
Technical Support and E-Warranty Certificate www.vevor.com/support
SUCTION POOL CLEANERS
USER MANUAL
We continue to be committed to provide you tools with competitive price.
"Save Half", "Half Price" or any other similar expressions used by us only represents an
estimate of savings you might benefit from buying certain tools with us compared to the major
top brands and doses not necessarily mean to cover all categories of tools offered by us. You
are kindly reminded to verify carefully when you are placing an order with us if you are
actually saving half in comparison with the top major brands.
- 1 -
MODEL:18151BX
Have product questions? Need technical support? Please feel free to
contact us:
CustomerService@vevor.com
NEED HELP? CONTACT US!
This is the original instruction, please read all manual instructions
carefully before operating. VEVOR reserves a clear interpretation of our
user manual. The appearance of the product shall be subject to the
product you received. Please forgive us that we won't inform you again if
there are any technology or software updates on our product.
SUCTION POOL
CLEANERS

- 2 -
Safety Instructions
Thanks to its easy assembly, you’ll be able to use your automatic cleaner in a
few minutes. Follow the instructions carefully and SAVE THIS MANUAL
Assembly precautions
1.Assemble only according to these instructions. Improper assembly can
create hazards.
2.Wear ANSI-approved safety goggles and heavy-duty work gloves during
assembly.
3.Keep assembly area clean and well lit.
4.Keep bystanders out of the area during assembly.
5.Do not assemble when tired or when under the influence of alcohol, drugs
or medication.
6.Product capabilities apply to properly and completely assembled product
only.
Use precautions
1.DO NOT SIT OR STAND ON THIS ITEM.
2.This product is not a toy. Do not allow children to play with or near this
item.
3.Use as intended only.
4.Inspect before every use; do not use if improper assembly.
- 3 -
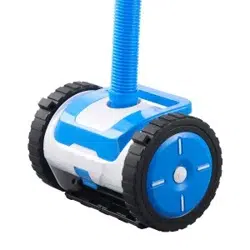
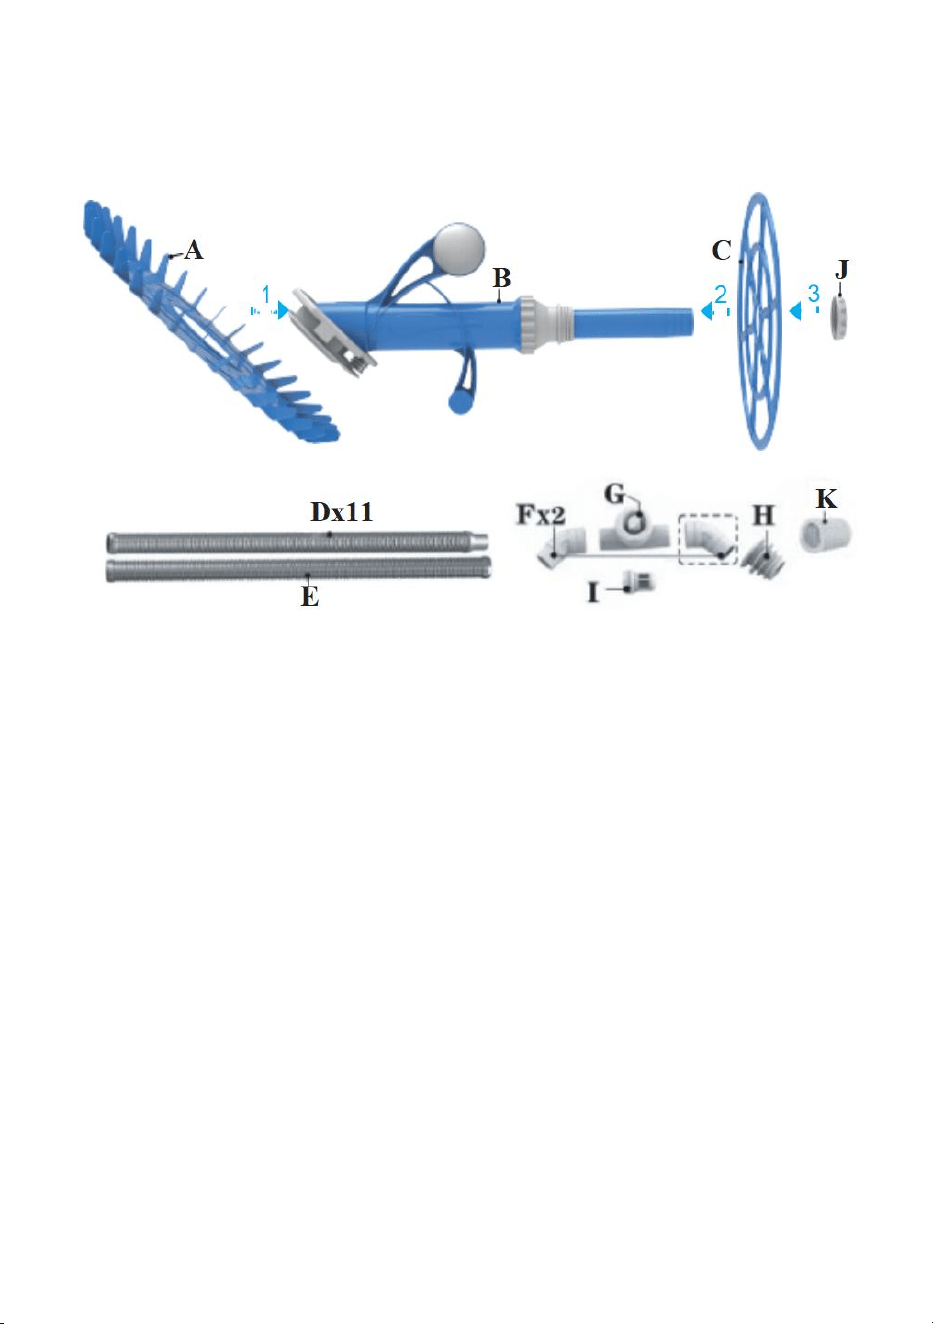
Components List
1.Install disk "A" onto the main body "B" and clip it into the groove of the foot pad.
2.Install the steering wheel "C" on to the main body "B".
3.Fix the steering wheel by screwing nut "J".
- 4 -
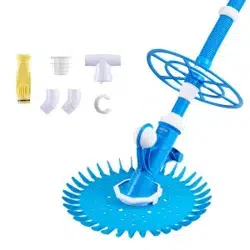
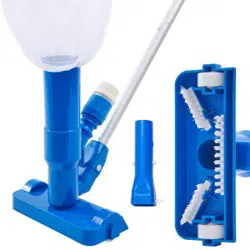
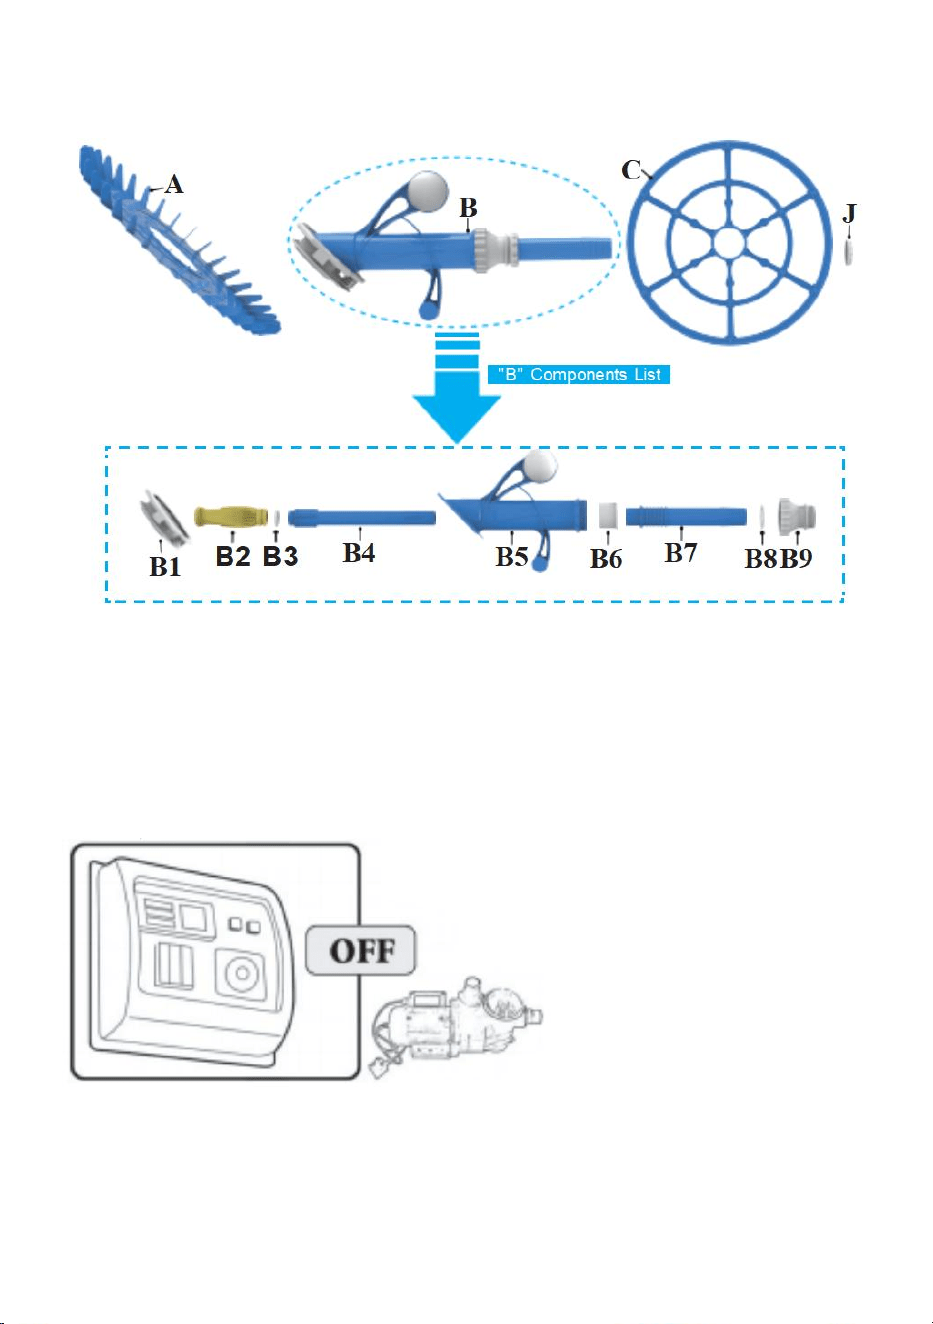
“B” Components List
Preparatory Work
1.Turn off the pump of your pool. The Pump for the cleaner should have a
minimum power of 0.5HP/1000gallons.
- 5 -
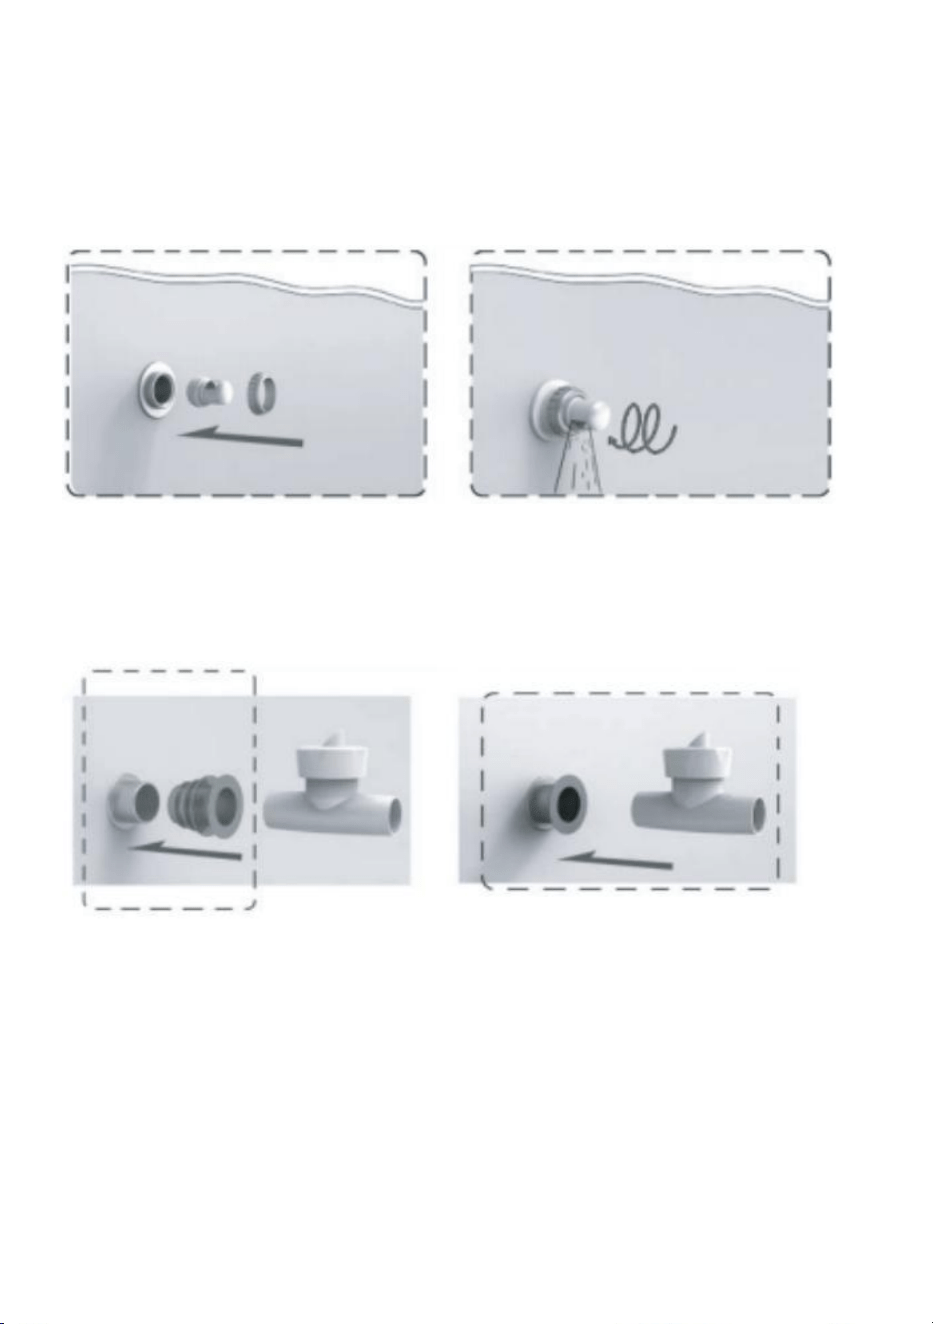
2.Replace the eyelet of your return inlet with part "l", ensuring that the opening faces
downward so as not to interfere with the operation of the cleaner. If your pool is
equipped with a vacuum plug, follow step #3. If not, go directly to step
#4.
3.Connect part "H" to your Vac plug. Connect the regulator "G" to part"H". Make
sure that the arrow under the regulator is pointed toward the Vac plug. Now go
directly to step #5.
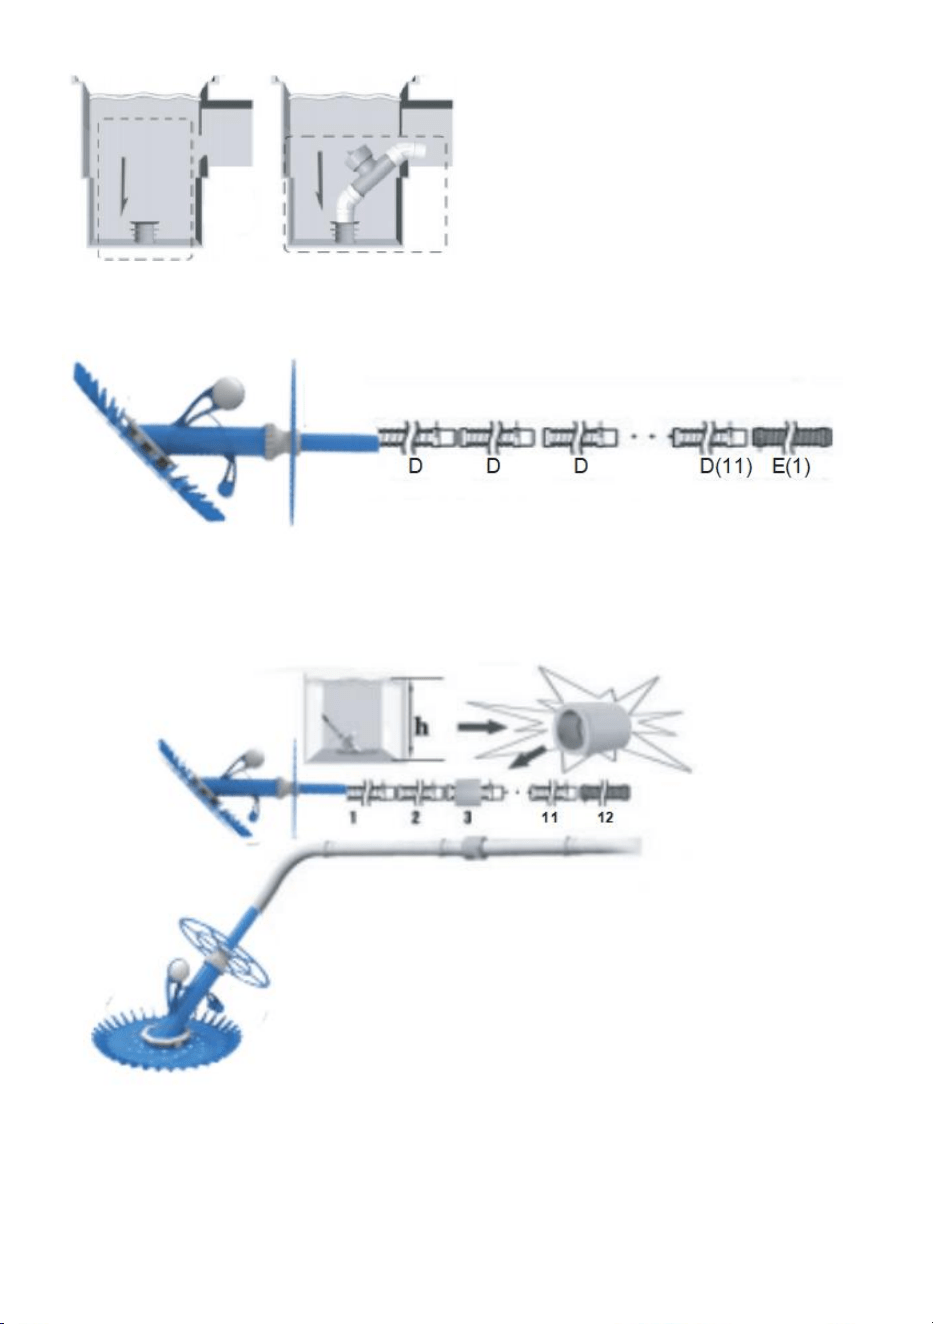
4.Assemble the two elbow connectors "F" to the regulator "G". lnsert the
attachment "H" facing downward and then the regulator. Take care the arrow under
the regulator is pointed towards the skimmer.
- 6 -
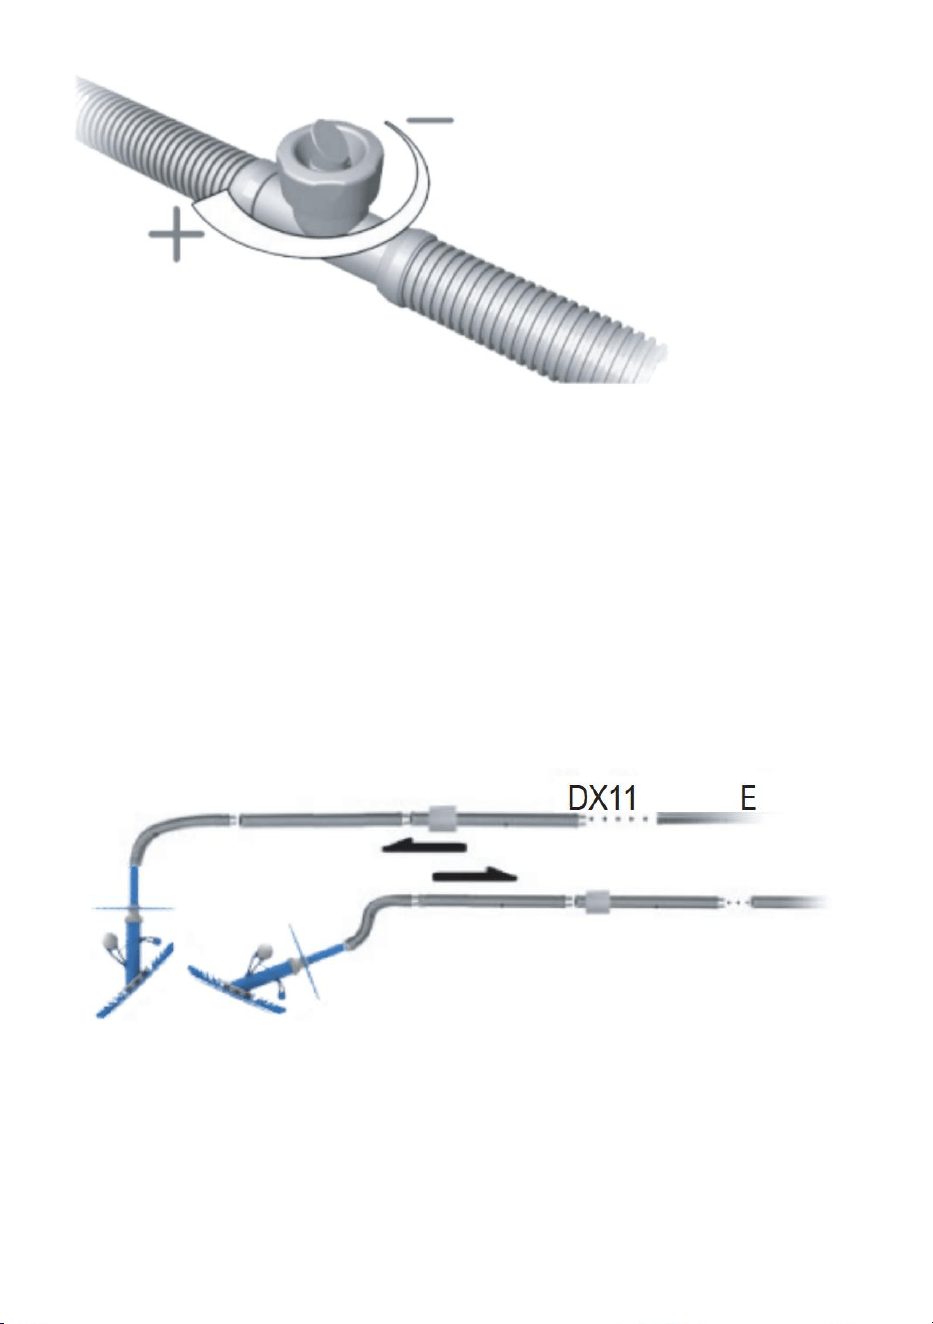
5.Connect the hose sections "D" and finish with section "E".
6.Place the weight "K" onto the third hose section and slide & click it backward or
forward to adjust the buoyancy of the hoses and angle of cleaner in use.
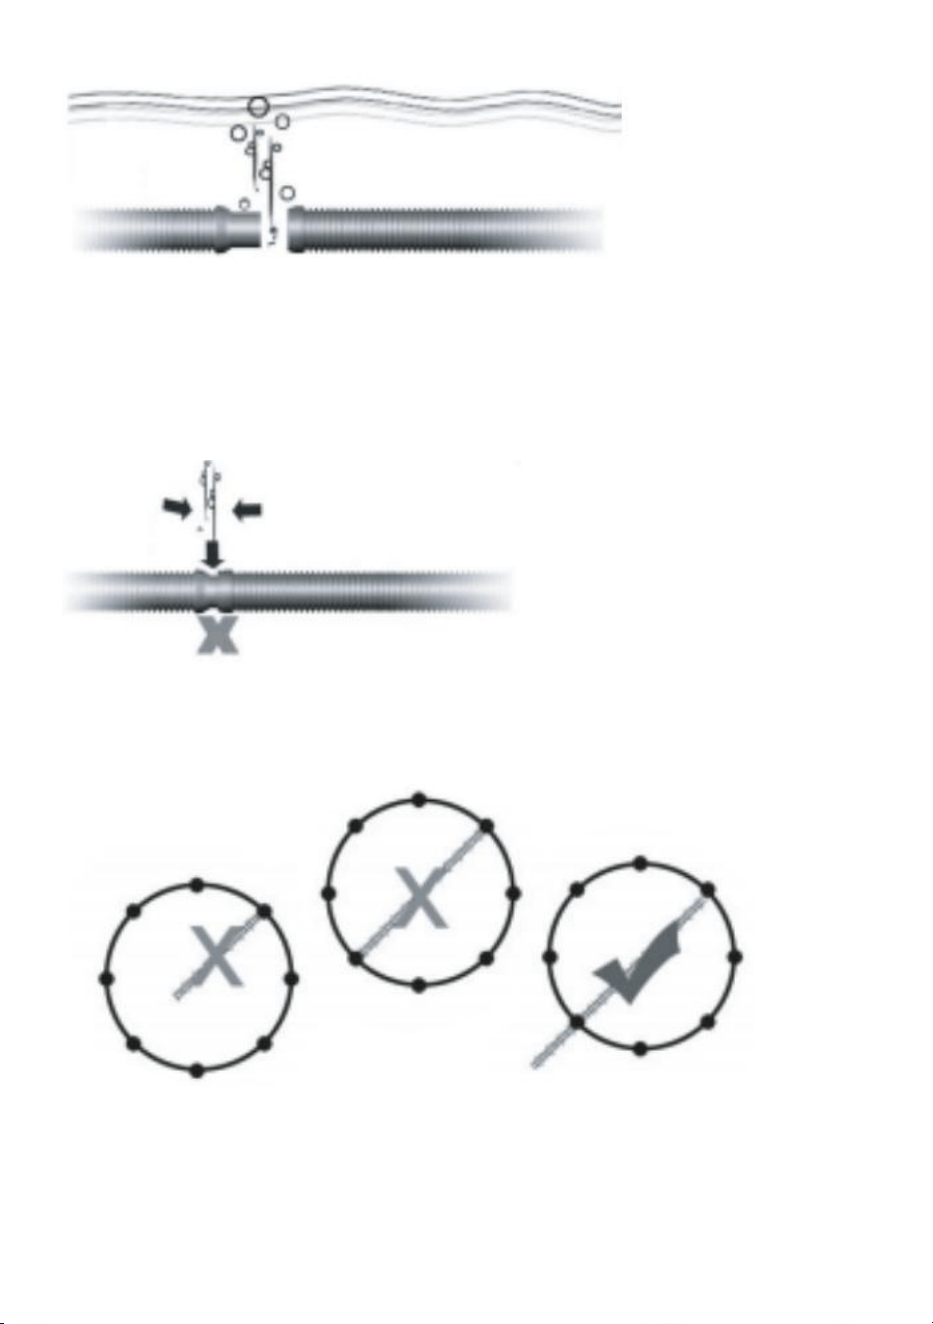
7.Fill the hoses with water to eliminate the air pockets.
- 7 -
No leak is allowed at the joint of the hoses.
8.Use enough hose sections to reach the farthest point in the pool.
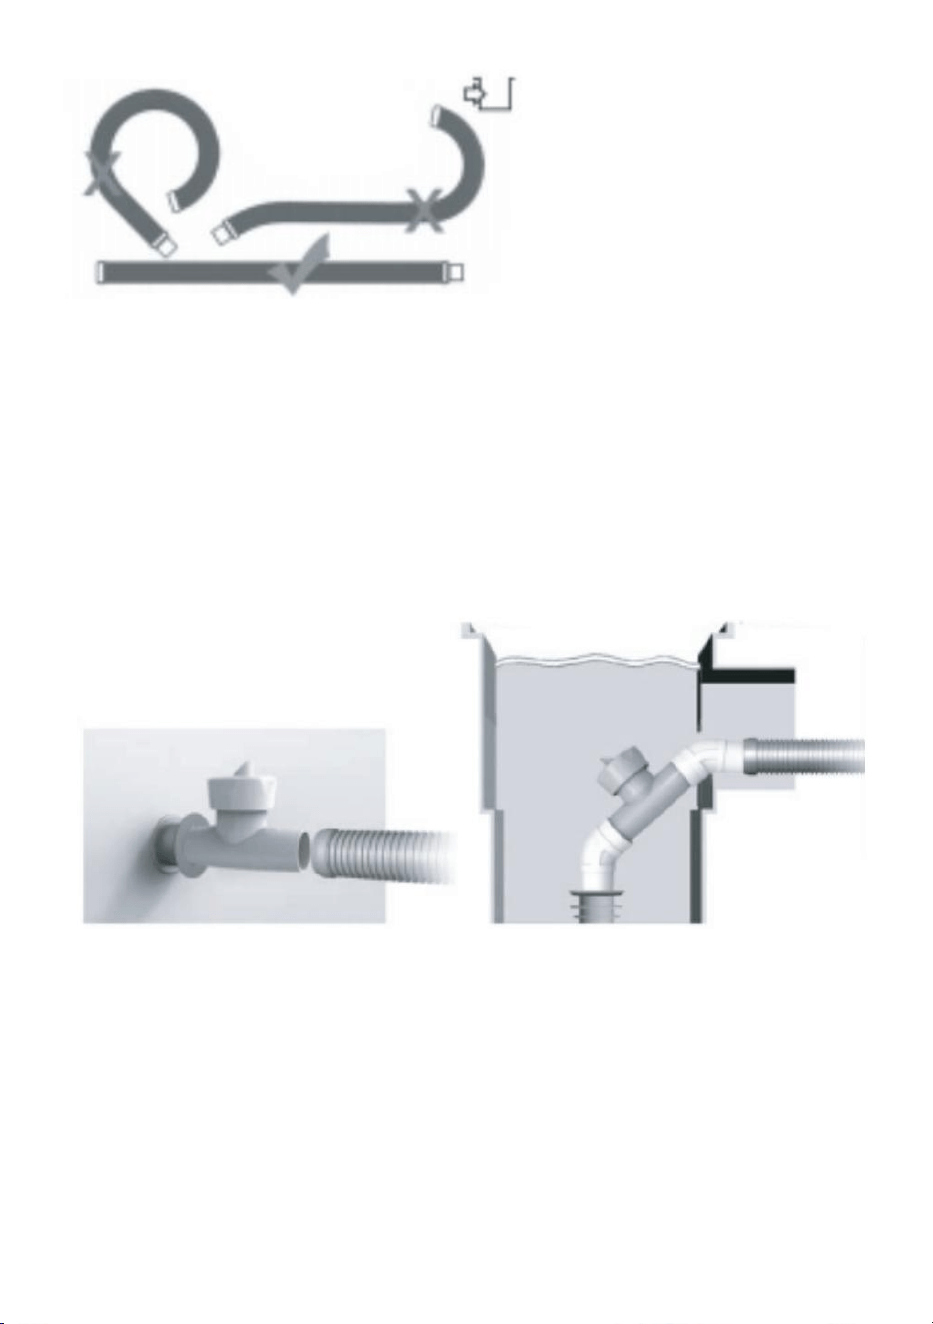
Always keep the hose lay straight when storage.
- 8 -
9.If your regulator is connected to a vacuum plug, then connect the hose "E"
directly to the regulator"G". If your regulator is connected to a wall skimmer, then
pass the hose through the skimmer mouth and connect it to the
regulator via the elbow "F".
10. Adjust your filtration system to the vacuum setting. A pump of at least 1/2
horsepower (1000ga/h) is required.

- 9 -
11.Turn on the pump and relax as your cleaner cleans your pool.
12.You can adjust the power of your cleaner by turning the knob of the regulator
"G" as shown.
- 10 -
13.If the cleaner leans too far forwards or backwards during operations, this can
be corrected by moving the weight "K" along the tube section as shown in the
drawing.
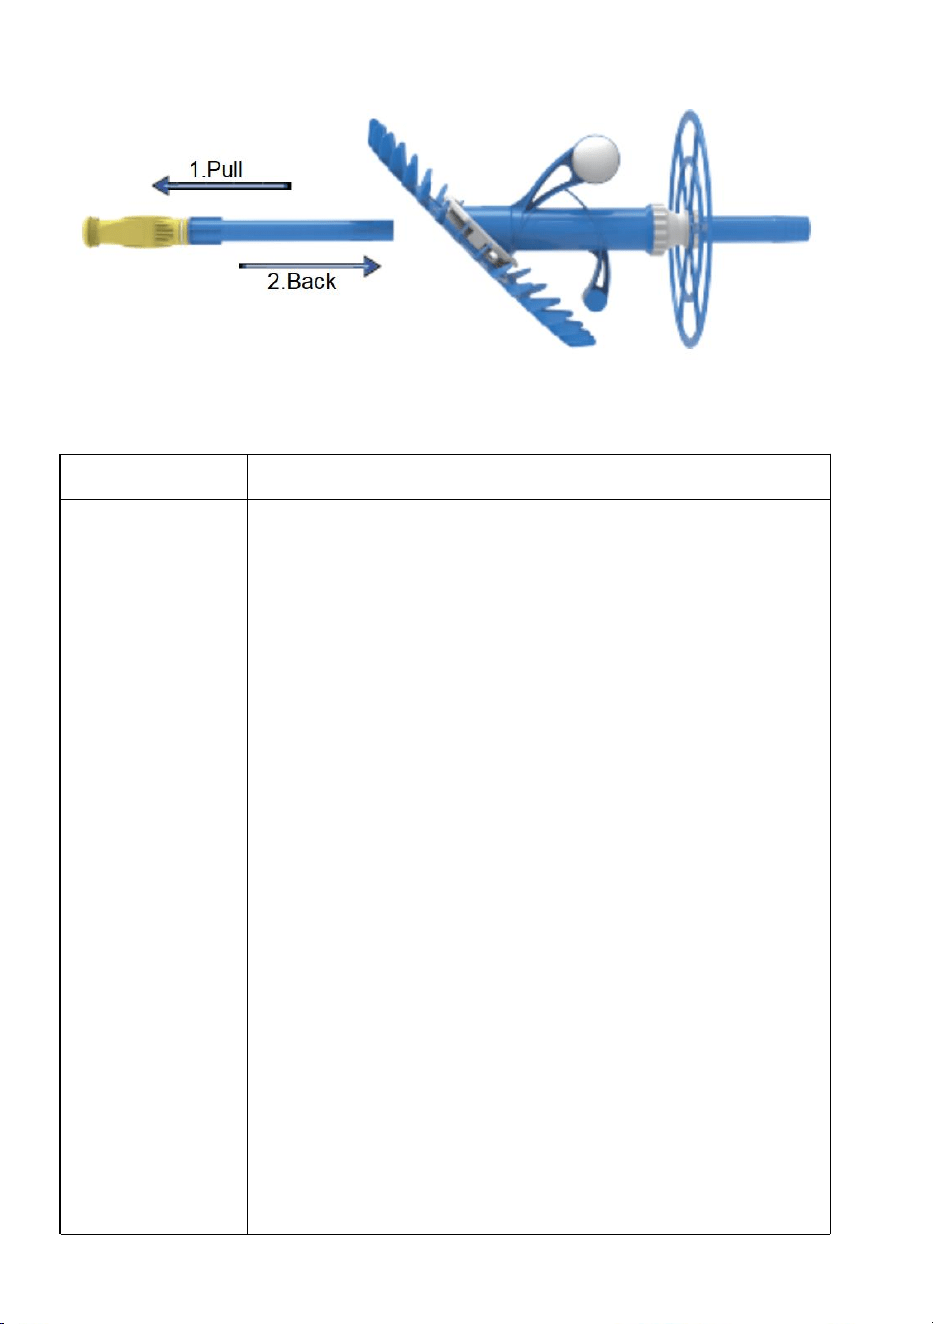
How to Change the Diaphragm
1.Pull out the diaphragm together with "B4" (Make sure the white small clip must
be set back on the new diaphragm).
- 11 -
2.Insert the assembled part back into the cleaner.
Trouble Shooting Guide
PROBLEM
POSSIBLE SOLUIONS
Cleaner is
sluggish
or has
stopped
operating.
● Check if the pump is ON or primed.
● Check t h e c leaner head for blockages.
● Clean and empty pump basket and empty
skimmer/ weir basket.
● Ensure the filtration system is thoroughly
cleaned. Clean sand/ cartridge filters on your
pool pump as per manufacturers’
specifications.
● Inspect the regulator valve and flush away any
debris build- up.
●Check the Mat for wear.
● Make sure the curved tips of the Mat are facing
upwards.
● Ensure that the skimmer/ weir vacuum lid is
fitted correctly and check for cracks.
- 12 -
● Check the hose for blockage.
● Check the hose for leaks by lifting each section
above water while pump is running.
●Check the diaphragm for blockages, and clean
and empty it if blocked. Noted that if too many
chemical tablets are used, the service life of
diaphragm will be shorter.
Cleaner gets
stuck on
steps.
● Adjust the return jets toward the problem area
to guide the cleaner away from the steps.
● Verify proper hose length.
● Ensure cleaner sits flush with the pool floor.
Adjust the position of hose weight if
necessary. This should be done at the deepest
part of the pool.
●
Increase or decrease the flow to your cleaner
via the regulator.
●Check the Mat for wear.
Cleaner
travels in a
repetitive
pattern.
● Adjust return jets downwards.
●
Verify proper hose length.
●
Ensure cleaner sits flush with the pool floor.
Adjust the position of t h e hose weight if
necessary.
●
This should be done at the deepest part of the
pool.
●Remove or add one hose section.
●
Inspect the Regulator Valve and flush away any
debris build- up.
●
Check that the hose sections are straight; if
not, lay hose in a straight line in the sun to
relax the memory.
- 13 -
●
Twist each hose section a half- turn at each
connection point.
●
Ensure the wheel at the top of the Cleaner head
is rotating freely.
Cleaner
climbs out
of pool and
draws in air.
●Ensure there is a valve installed in the
skimmer/ weir.
●
Inspect the Regulator Valve and flush away any
debris build- up.
●
Verify proper hose length.
●
Ensure cleaner sits flush with the pool floor.
Adjust the position of hose weight if necessary.
This should be done at the deepest part of the
pool.
Cleaner hose
is tangling.
●
Ensure the wheel on top of the Cleaner body
is rotating freely and is screwed on securely.
●
Check that the hose sections are straight; if
not, lay t h e hose in a straight line in the sun.
●
There may be too many hose sections for
your pool. Try removing a section.
●
Inspect the Regulator Valve and flush away any
debris build- up.
●
For pools where the skimmer is located at one
end, the performance of the cleaner can be
greatly improved by tying the hose off in the
middle of the long side of your pool. This will
allow the cleaner to move about the entire pool
and eliminate the cleaner hose from tangling.
Cleaner
won't leave
edge or rim
●
Utilize return jets to move cleaner.
●
Adjust hose weight.
●
Try decreasing the flow to your cleaner via the
regulator. Less suction will allow the cleaner to
- 14 -
of the pool.
move more freely.
Cleaner
leaves
patches.
●
Ensure the wheel on top of the Cleaner body
is rotating freely and is screwed on securely.
●
Adjust return jets downwards.
●
Verify proper hose length.
●
Ensure cleaner sits flush with the pool floor.
Adjust the position of hose weight if
necessary. This should be done at the deepest
part of the pool.
●
Check that the hose sections are straight; if
not, lay t h e hose in a straight line in the sun.
Cleaner
sticks on
walls and
floors.
● Ensure there is a valve installed in the skimmer
/
weir.
●
Inspect the Regulator Valve and flush away any
debris build- up.
● Check the Mat for wear.
●
Try increasing or decreasing the flow to your
cleaner via the regulator.
Cleaner not
sitting flat on
bottom.
●Ensure there is a valve installed in the skimmer
/
weir.
●
Inspect the Regulator Valve and flush away any
debris build- up.
●
Ensure the wheel on top of the Cleaner body
is rotating freely and is screwed on securely.
●
Adjust return jets downwards.
●
Verify proper hose length.
●
Ensure cleaner sits flush with the pool floor.
Adjust the position of hose weight if necessary.
This should be done at the deepest part of the
pool.

- 15 -
1. After using the cleaner, don't forget to pick it up from the pool water and put it in
a cool, dry place to keep it. Can not be exposed to strong sunlight. Or it is easy to
become brittle and cause a fracture.
2.Diaphragm is a quick-wear part. It is not included in the one-year warranty period.
Additional purchase are required after damage.
Air bubbles
are
noticeable in
the return
jets.
●
Ensure the cleaner hose is assembled tightly.
●
Ensure cleaner head is not removed from the
water while pump is running.
●
Ensure the hoses are not damaged.
●
Ensure the regulator valve is underwater.
- 16 -
Address:Baoshanqu Shuangchenglu 803long 11hao 1602A-1609shi Shanghai
Imported to AUS: SIHAO PTY LTD, 1 ROKEVA STREETEASTWOOD NSW 2122 Australia
Imported to USA: VEVOR STORE INC, 9448 RINCHMOND PL #E RANCHO CUCAMONGA,
California, 91730 United States of America
REP
UK
Pooledas Group Ltd
Unit 5 Albert Edward House, The Pavilions
Preston, United Kingdom
REP
EC
SHUNSHUN GmbH
Römeräcker 9 Z2021, 76351
Linkenheim-Hochstetten, Germany
Made In China