
AXISCameraStationS22ApplianceSeries
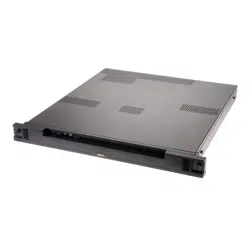
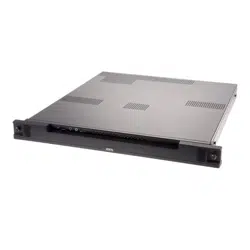
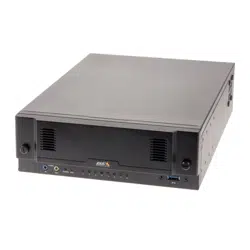
AXISCameraStationS2208Appliance
AXISCameraStationS2212Appliance
AXISCameraStationS2216Appliance
AXISCameraStationS2224Appliance
UserManual

AXISCameraStationS22ApplianceSeries
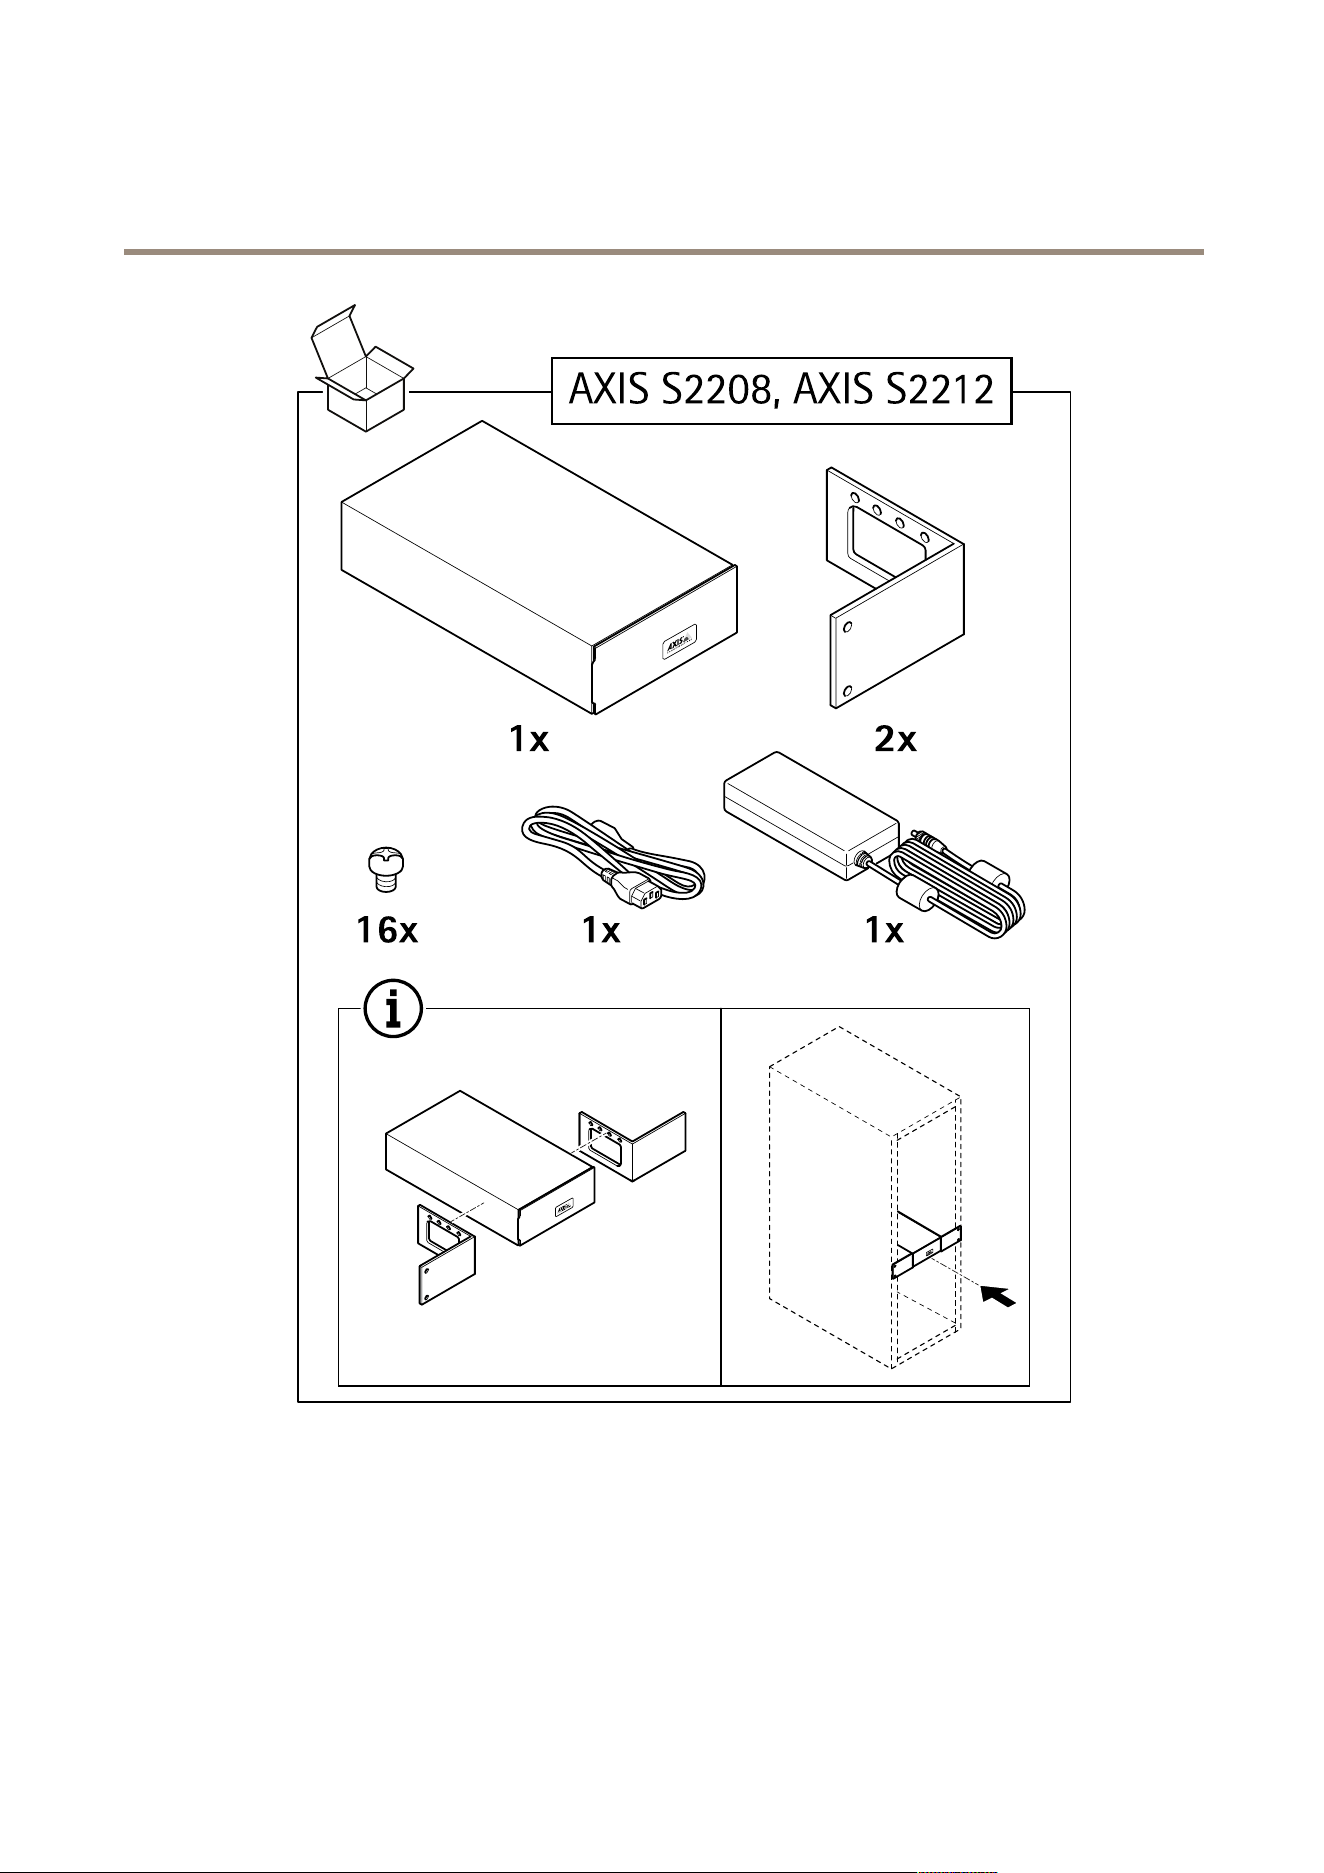
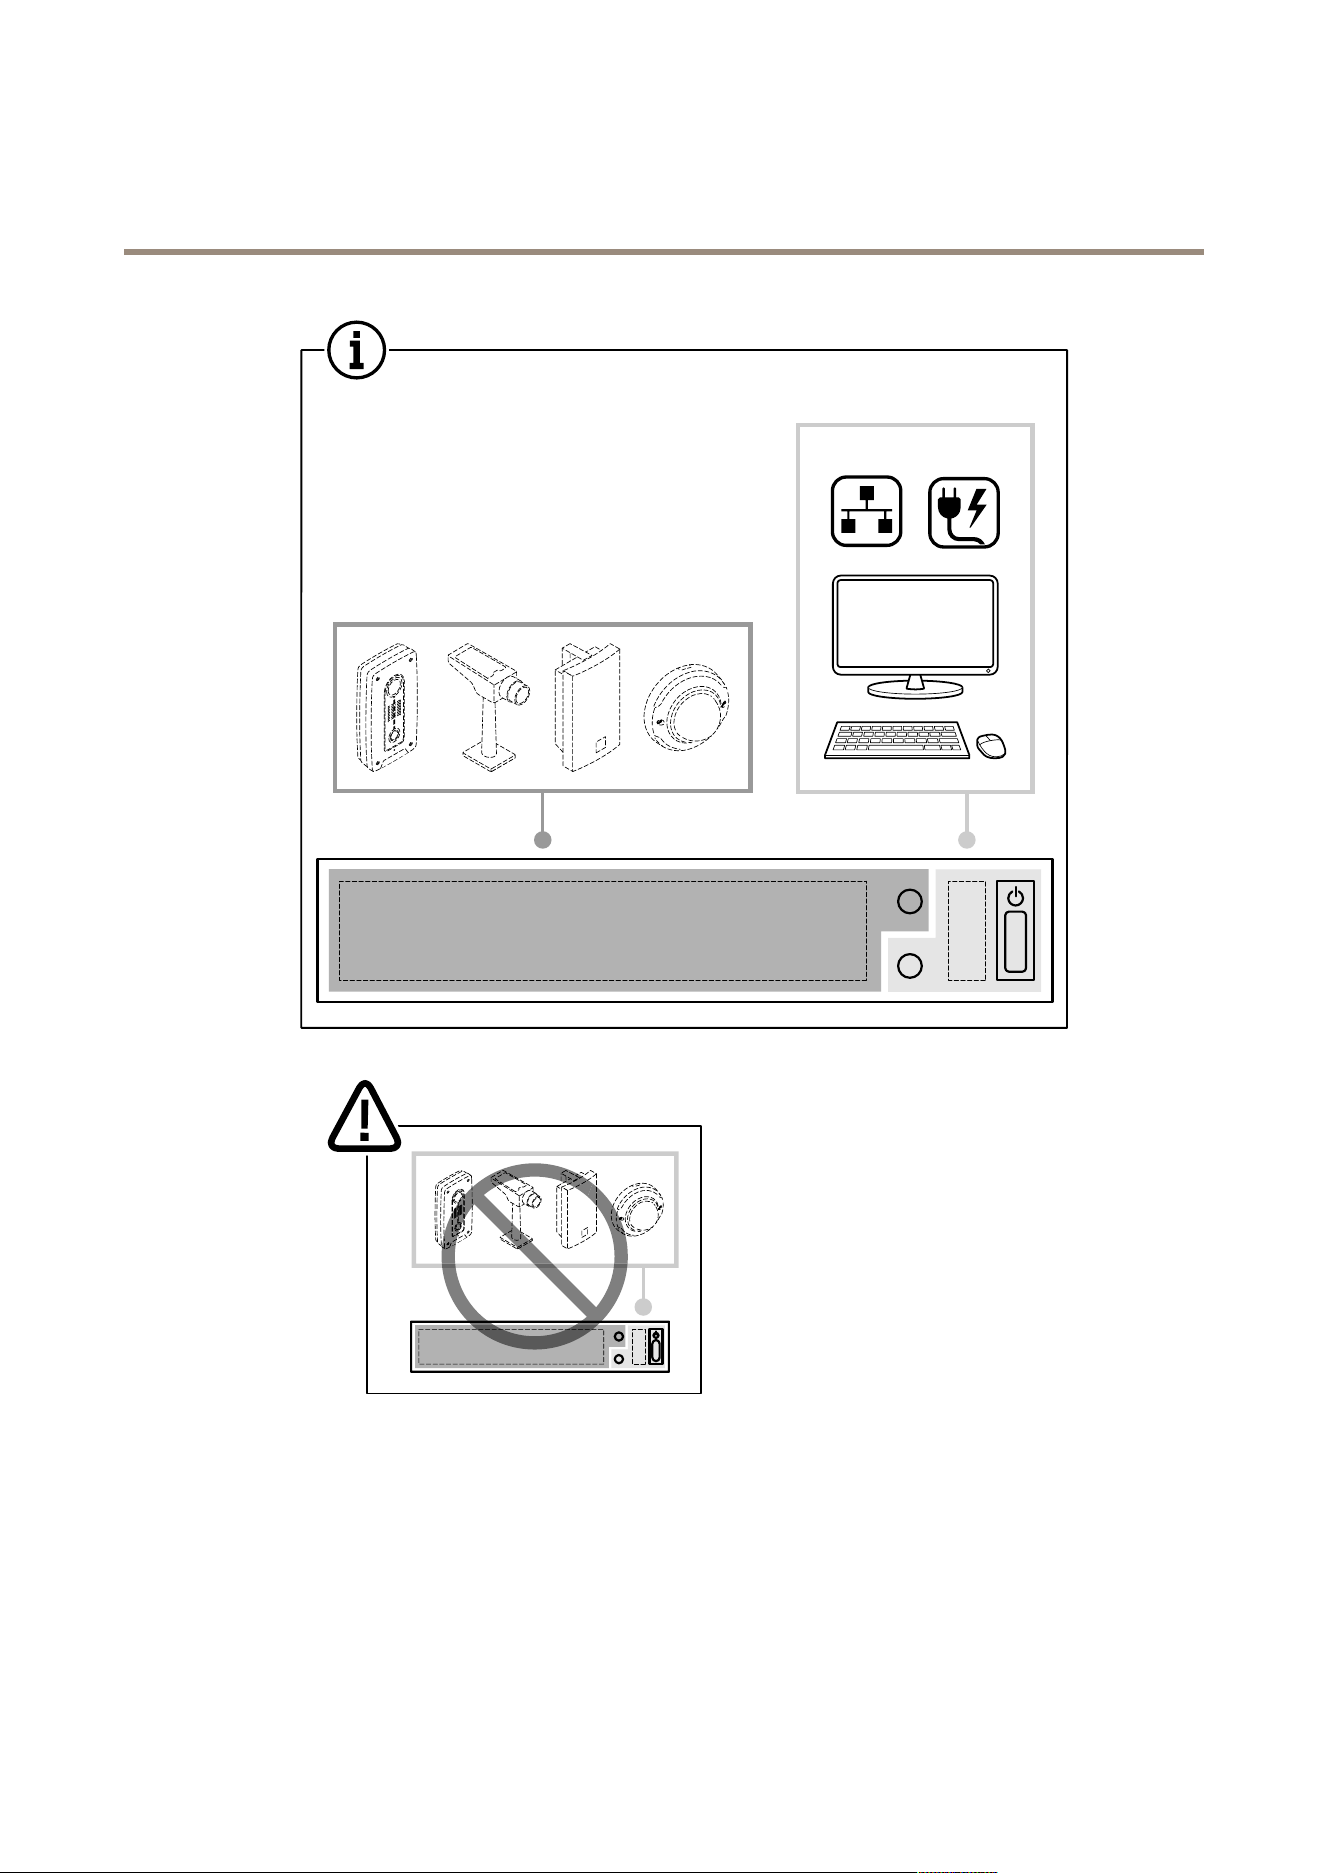
Aboutyourdevice
Aboutyourdevice
AXISCameraStationS22Applianceseriesisanall-in-onerecordingsolutionwithintegrated,manageablePoEswitchdesigned
todeliverreliablehigh-denitionsurveillancewithupto4Kresolution.Forquickandeasyinstallation,theapplianceseriesis
preconguredandpreloadedwithAXISCameraStationvideomanagementsoftwareincludinglicensesplusallnecessarysystem
software.AXISCameraStationoffersanintuitiveuserinterfacethatallowsuserstotakefulladvantageofAxiswiderangeofvideo
surveillancecamerasandotherIPproducts.Withtheoperatingsystemstoredonasolid-statedrive(SSD)and3-yearhardware
warranty,theapplianceseriesprovidesareliablesurveillancesolution.
2
AXISCameraStationS22ApplianceSeries
Setupexamples
Setupexamples
Setupinanindependentsurveillancenetwork
Youcancreateanindependentsurveillancenetworkwhichhasnointerconnectivitytoanotherexternalnetwork.Thissetupisabasic
plugandplayinstallation.Thebuilt-inswitch’sDHCPserverisenabledbydefault.AssoonasyouplugthecamerasintothePoE
ports,thecameraswillpoweronandobtainanIPaddressandbeaccessibleviaAXISCameraStation.
Difcultylevel
Basic
Benets
Dedicatedsurveillancenetworkwithnointerconnectivityto
anotherexternalnetwork
Plugandplayinstallation
LimitationsBandwidth
PoEbudget
Noremoteaccess
Actionsneeded
Changethedefaultpasswordforthebuilt-inswitch
RegistertheAXISCameraStationlicense
3
AXISCameraStationS22ApplianceSeries
Setupexamples
Connectorsused
PoEenablednetworkconnectors,port1-12
USB2.0connectorx2(forkeyboardandmouse)
Displayport
TM
orHDMIconnector
ConnectorsNOTused
RJ45switchuplink
SFPswitchuplink
RJ45servernetwork
USB3.0connector(frontside)
Audiolinein(frontside)
Audiolineout(frontside)
Setupinanexistingnetwork
Youcancreateasurveillancenetworkwithinanexistingnetwork.Thismeansthatthesurveillancenetworkisseparatedfrom
theexistingnetwork.
Difcultylevel
Advanced
BenetsAbilitytouseanAXISCameraStationclienttoconnecttoS22
seriesoverthenetwork.
Networksegregation
LimitationsMayrequireyoutofollowcorporatenetworkpolices
4

AXISCameraStationS22ApplianceSeries
Setupexamples
Actionsneeded
Changethedefaultpasswordforthebuilt-inswitch
RegistertheAXISCameraStationlicense
Connectorsused
PoEenablednetworkconnectors,port1-12
RJ45servernetwork(forconnectiontonetwork)
(Optional)USB2.0connectorx2(forkeyboardandmouse)
(Optional)Displayport
TM
orHDMIconnector
ConnectorsNOTused
RJ45switchuplink
SFPswitchuplink
USB3.0connector(frontside)
Audiolinein(frontside)
Audiolineout(frontside)
5

AXISCameraStationS22ApplianceSeries
Getstarted
Getstarted
ThestandardworkowtocongureanAXISCameraStationrecorderis:
1.Installyourdevice
2.UpdateAXISCameraStationtothelatestversion.
-Ifyoursystemisonline:opentheAXISRecorderToolboxappandclickUpdateAXISCameraStation.
-Ifyoursystemisofine:gotoaxis.comanddownloadthelatestversion.
3.CongureWindows®.Werecommendto:
-UpdateWindows®tothelatestversion.SeeUpdateWindows®onpage29
-Createastandarduseraccount.SeeCreateauseraccountonpage24
4.CongureAXISCameraStation
5.RegisteryouAXISCameraStationlicenses.
-LicenseasystemwithInternetconnectiononpage22
-LicenseasystemwithoutInternetconnectiononpage22
6.ConnectyoursystemtotheAXISCameraStationmobileviewingapp.SeeCongureAXISSecureRemoteAccess
6
AXISCameraStationS22ApplianceSeries
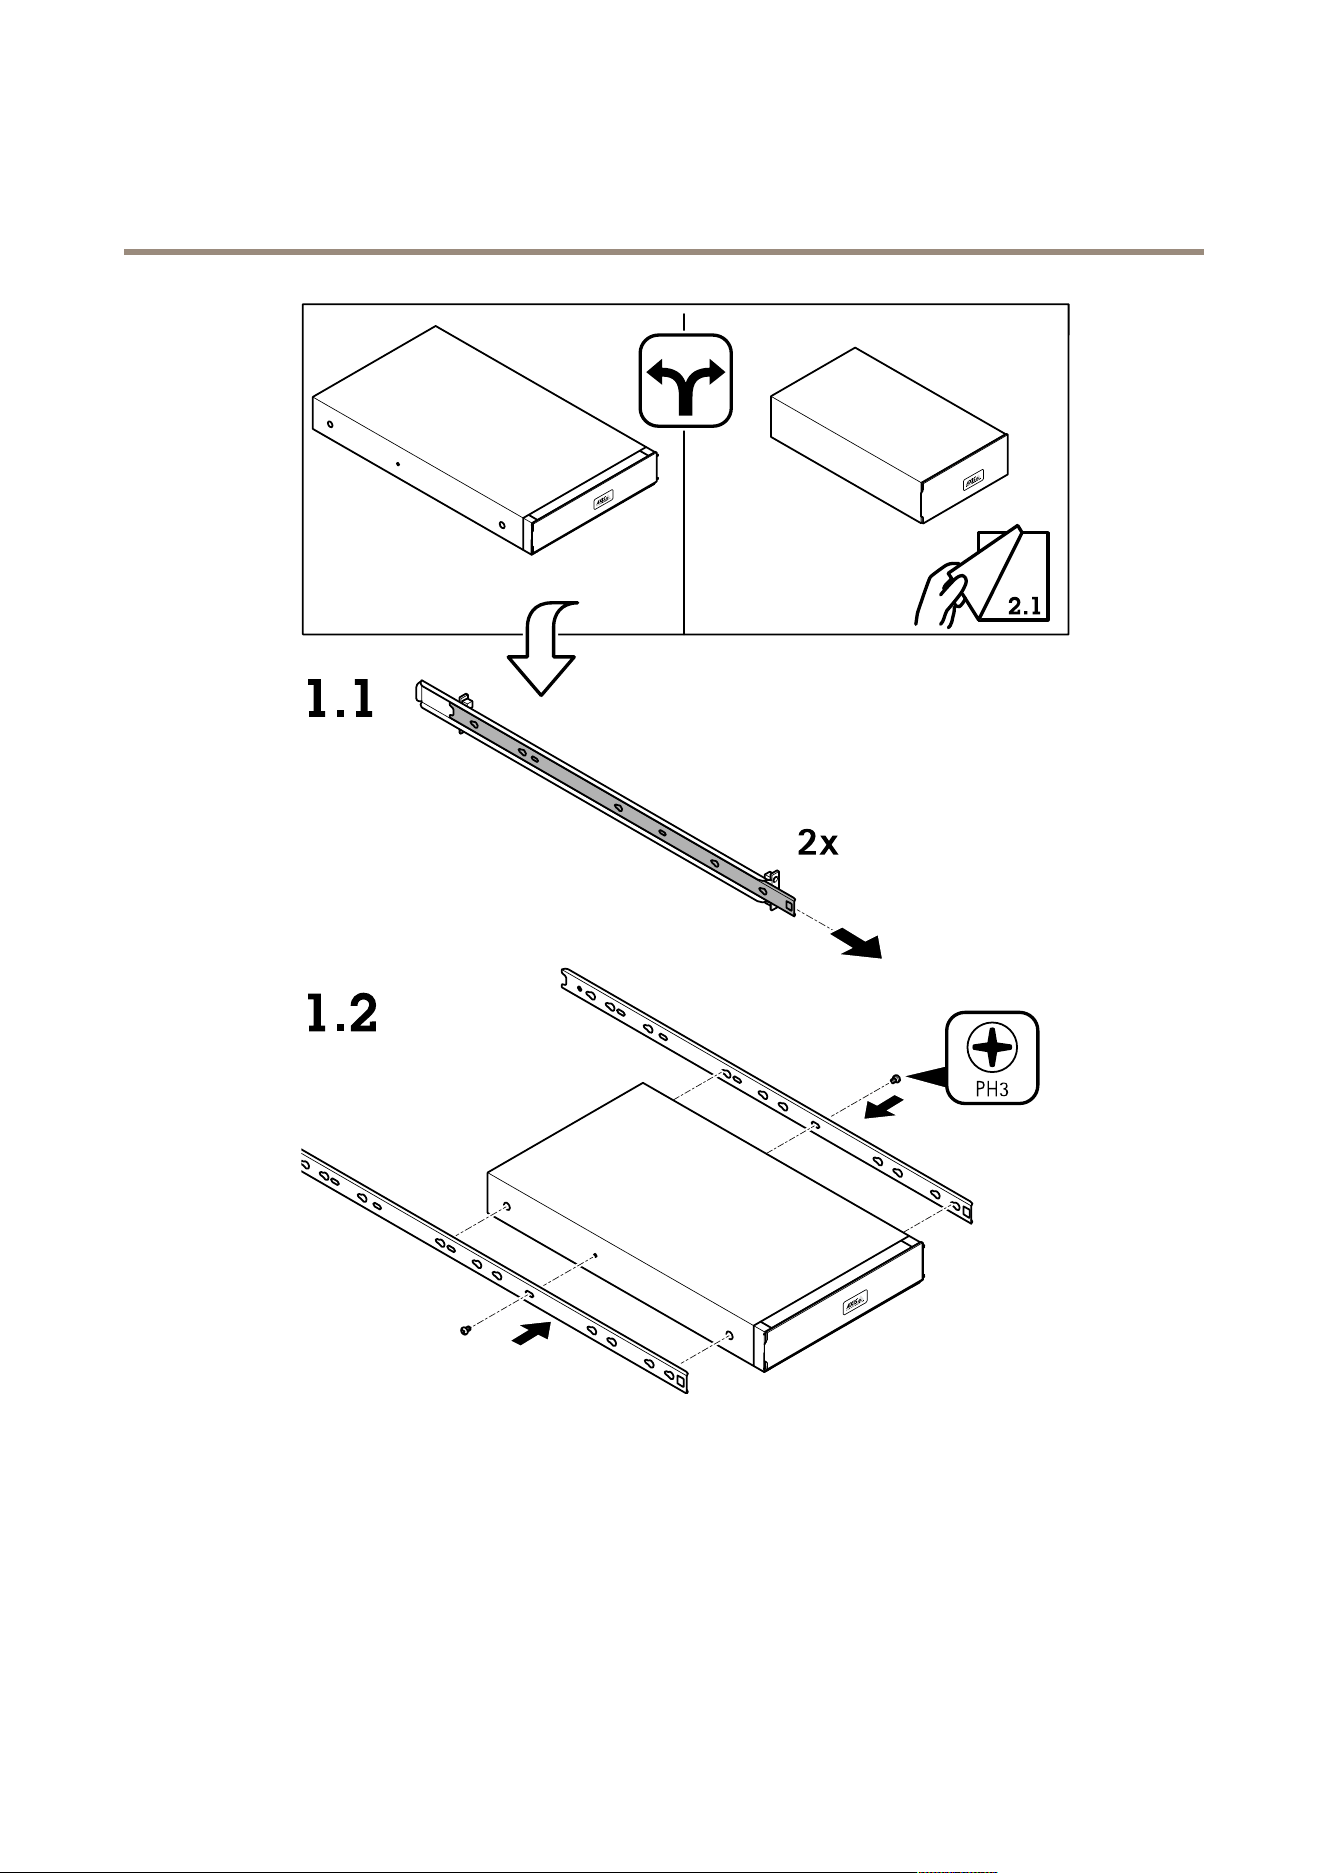
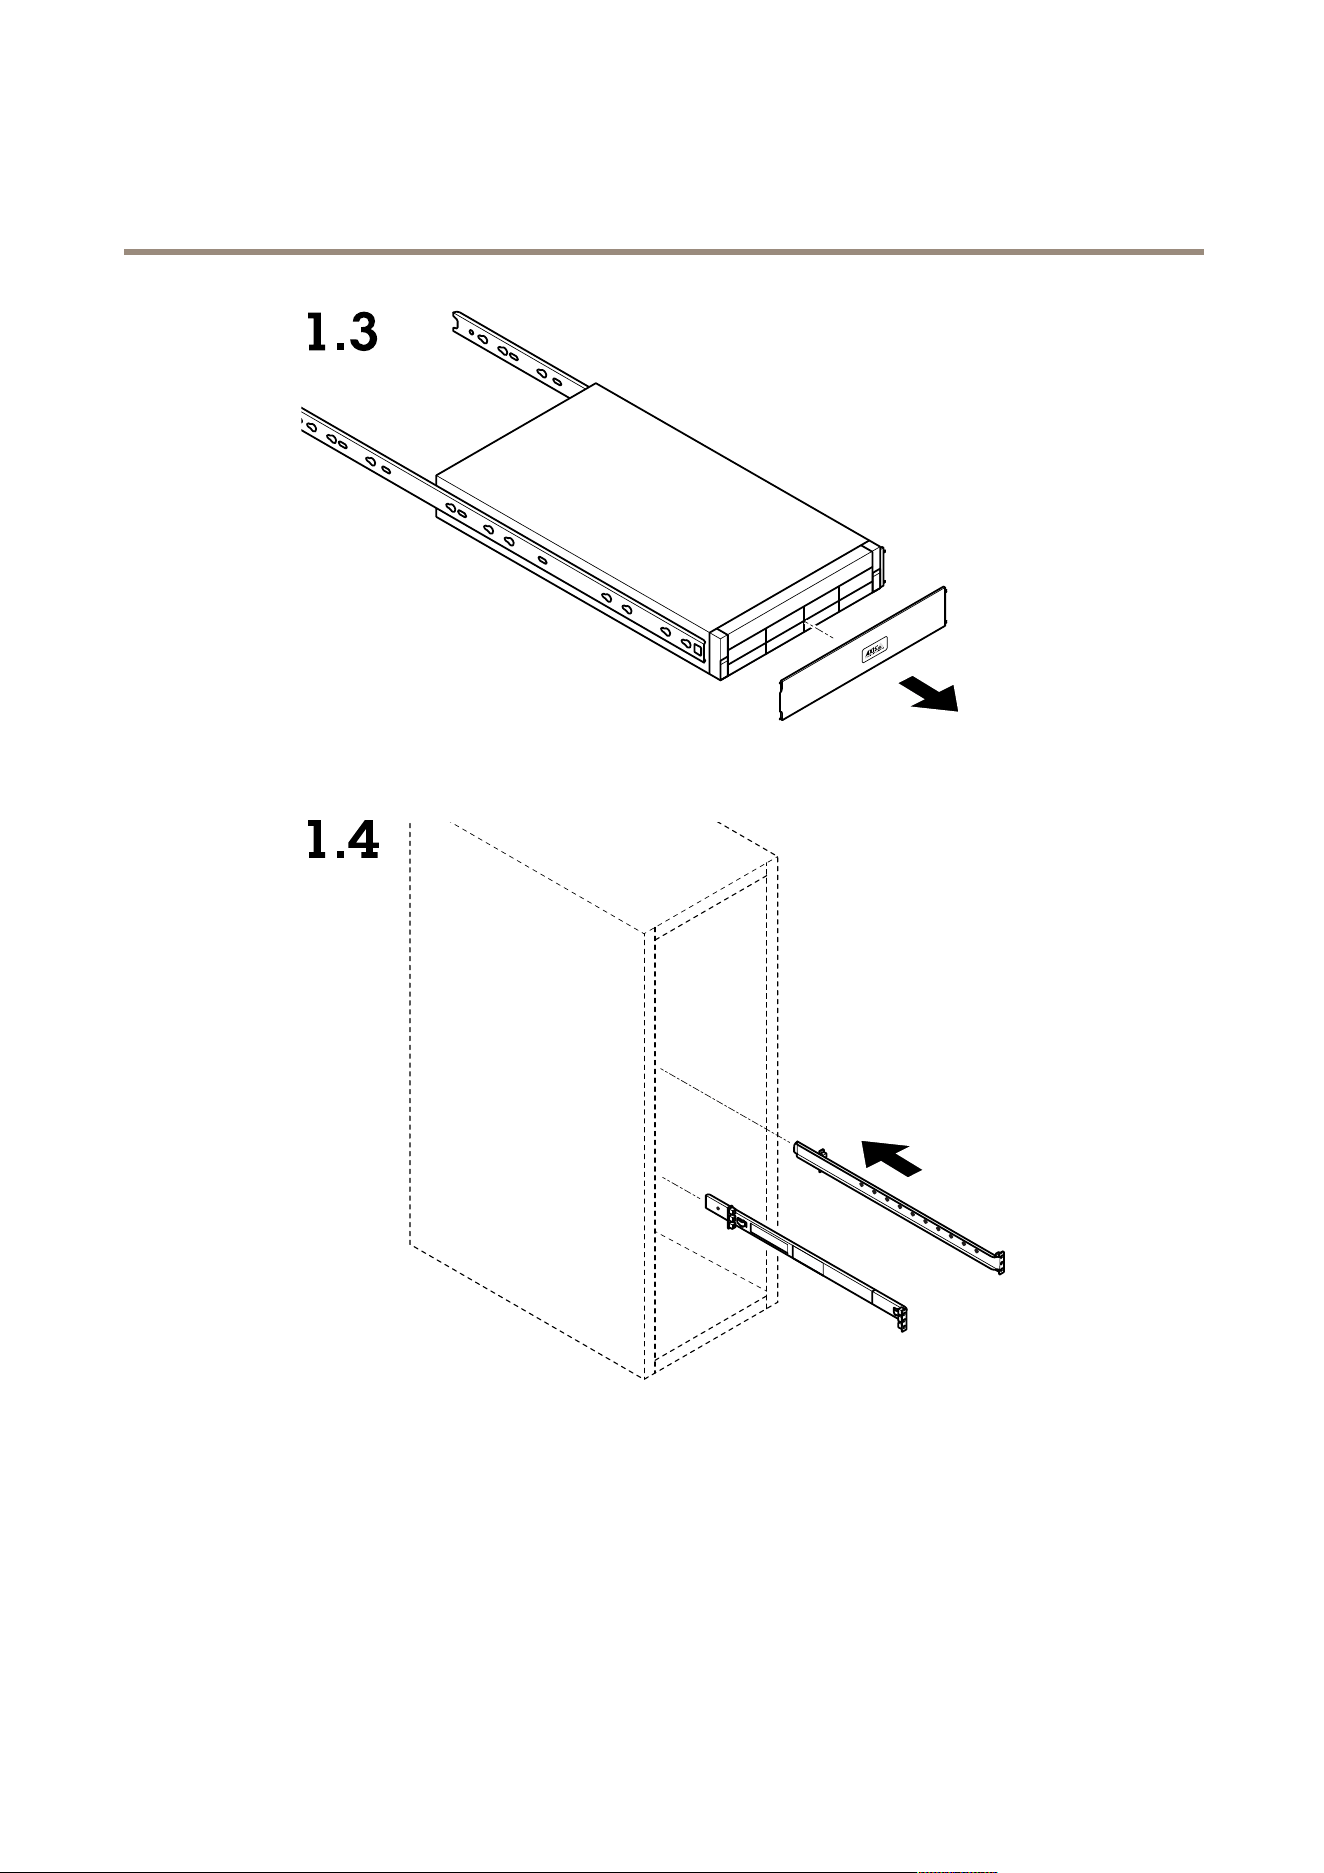
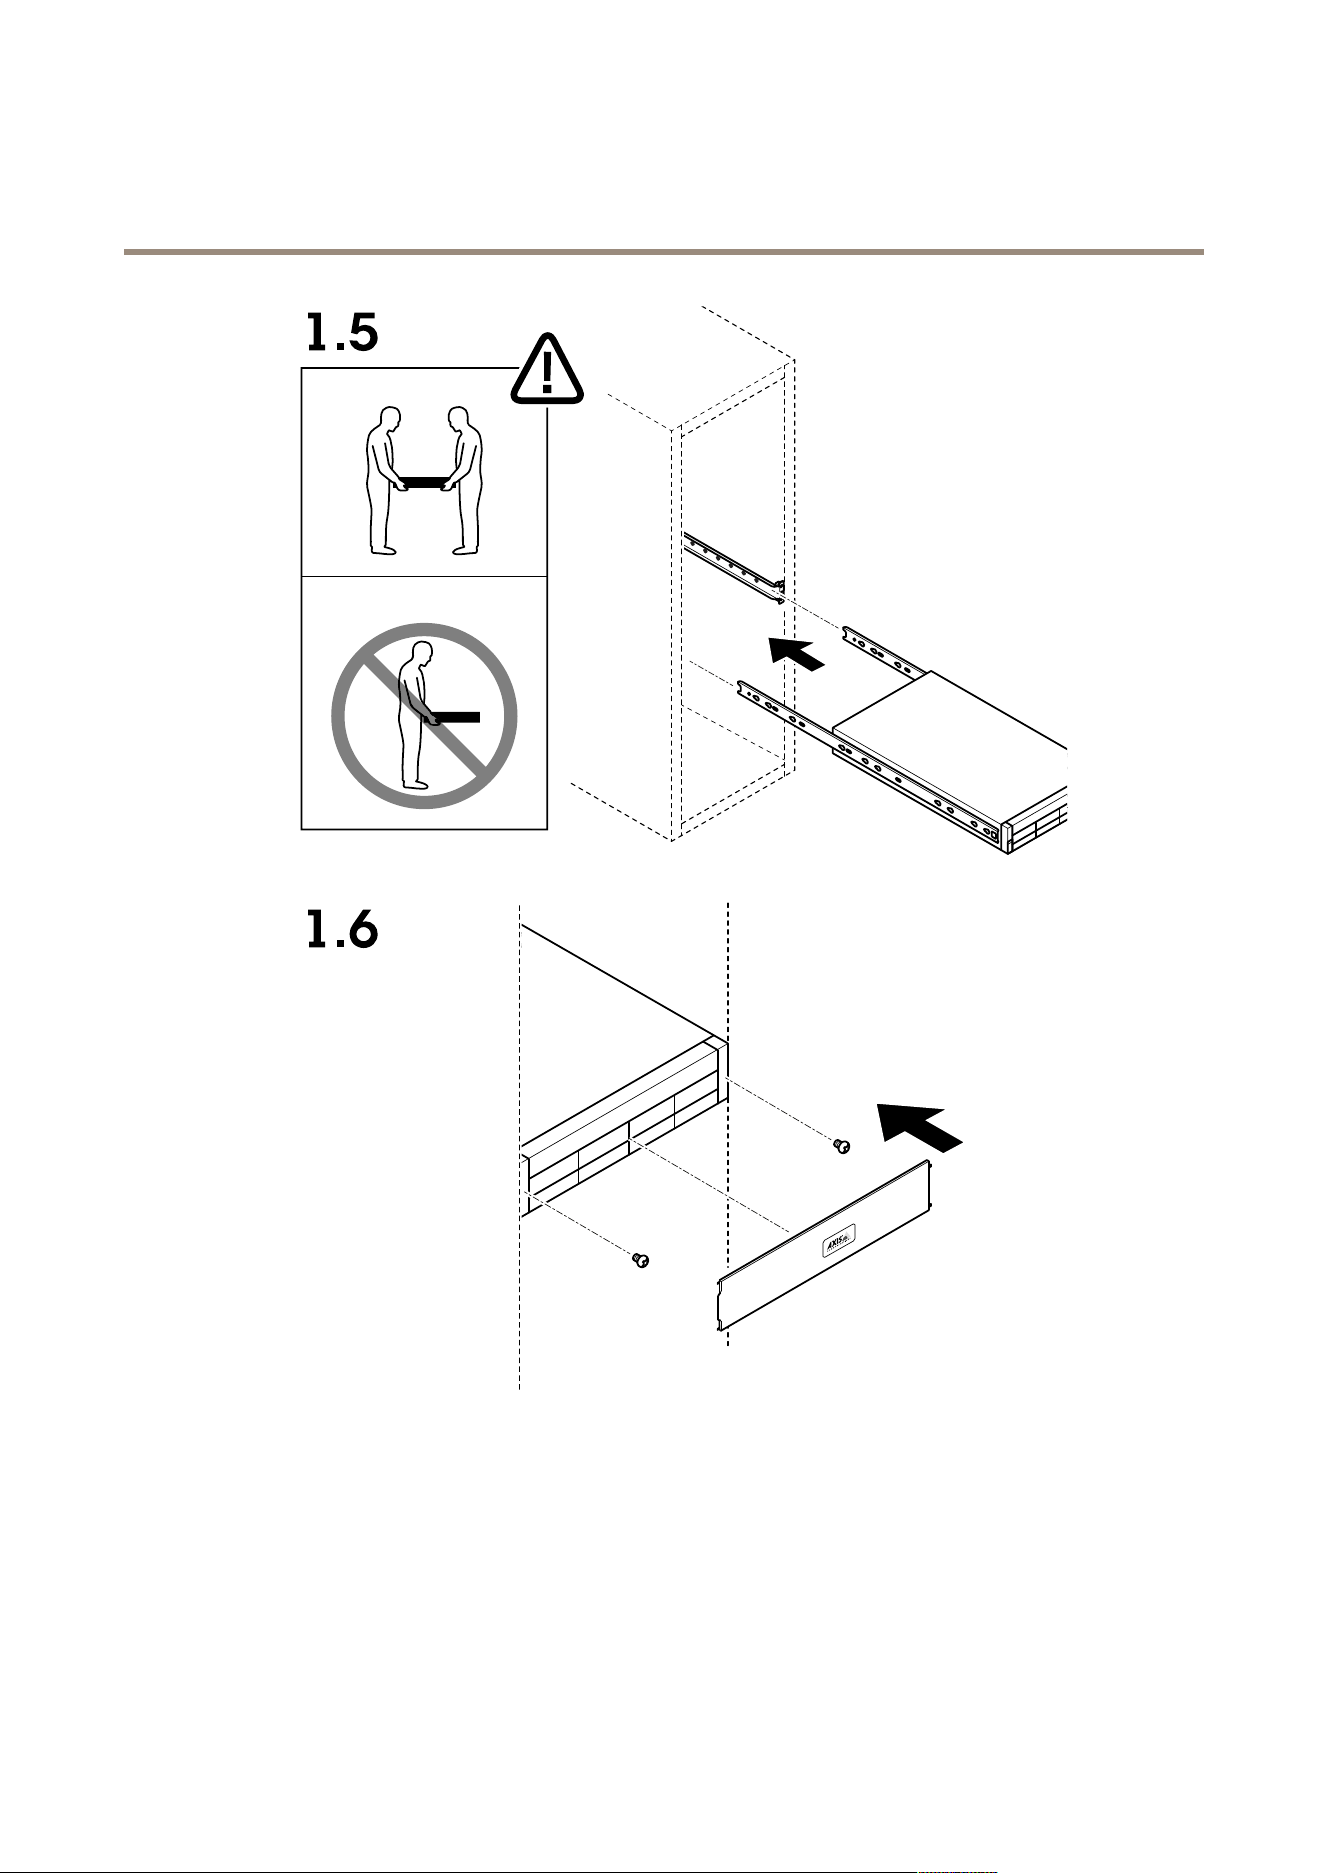
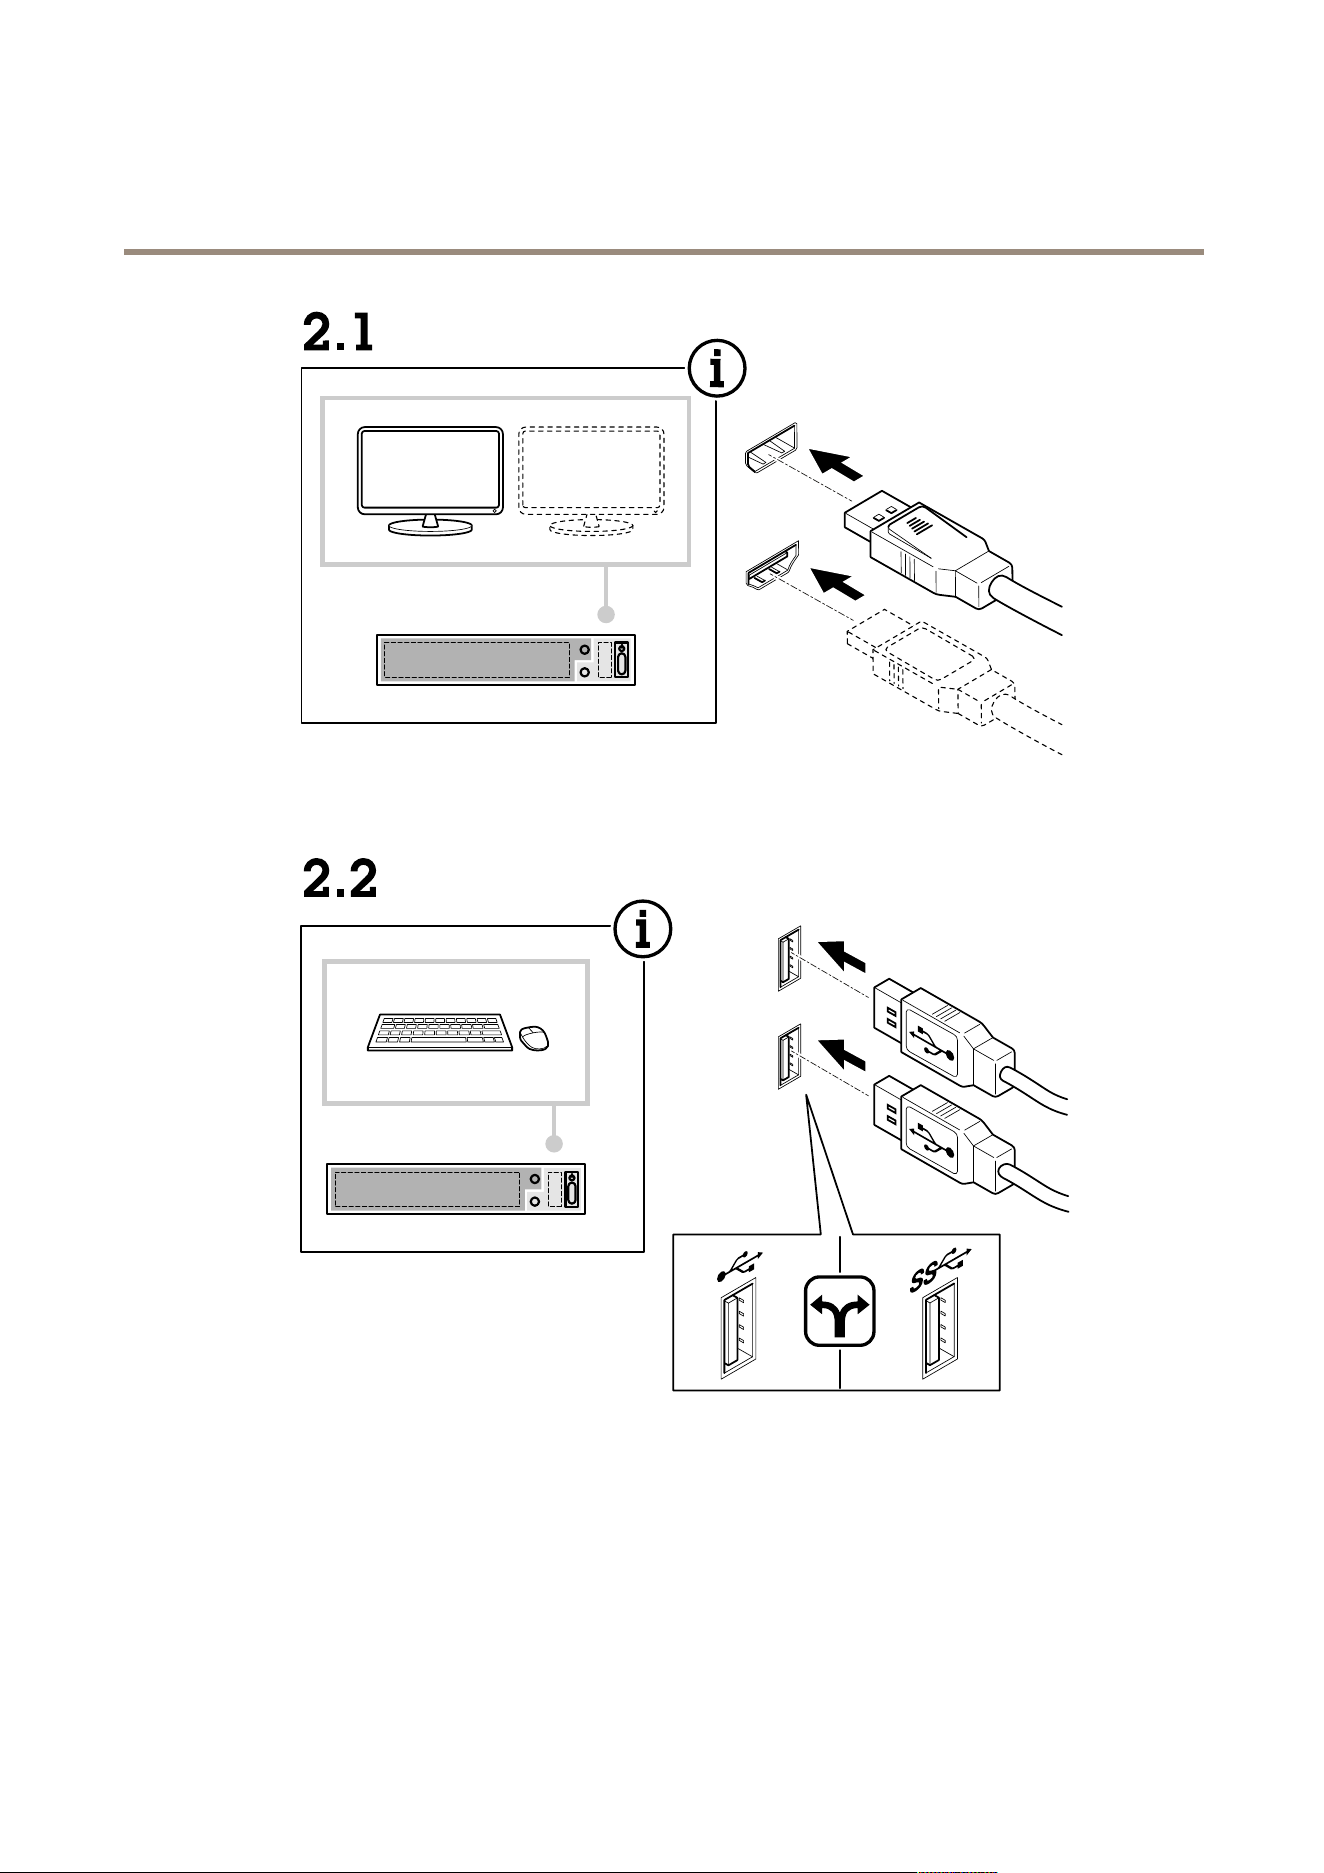
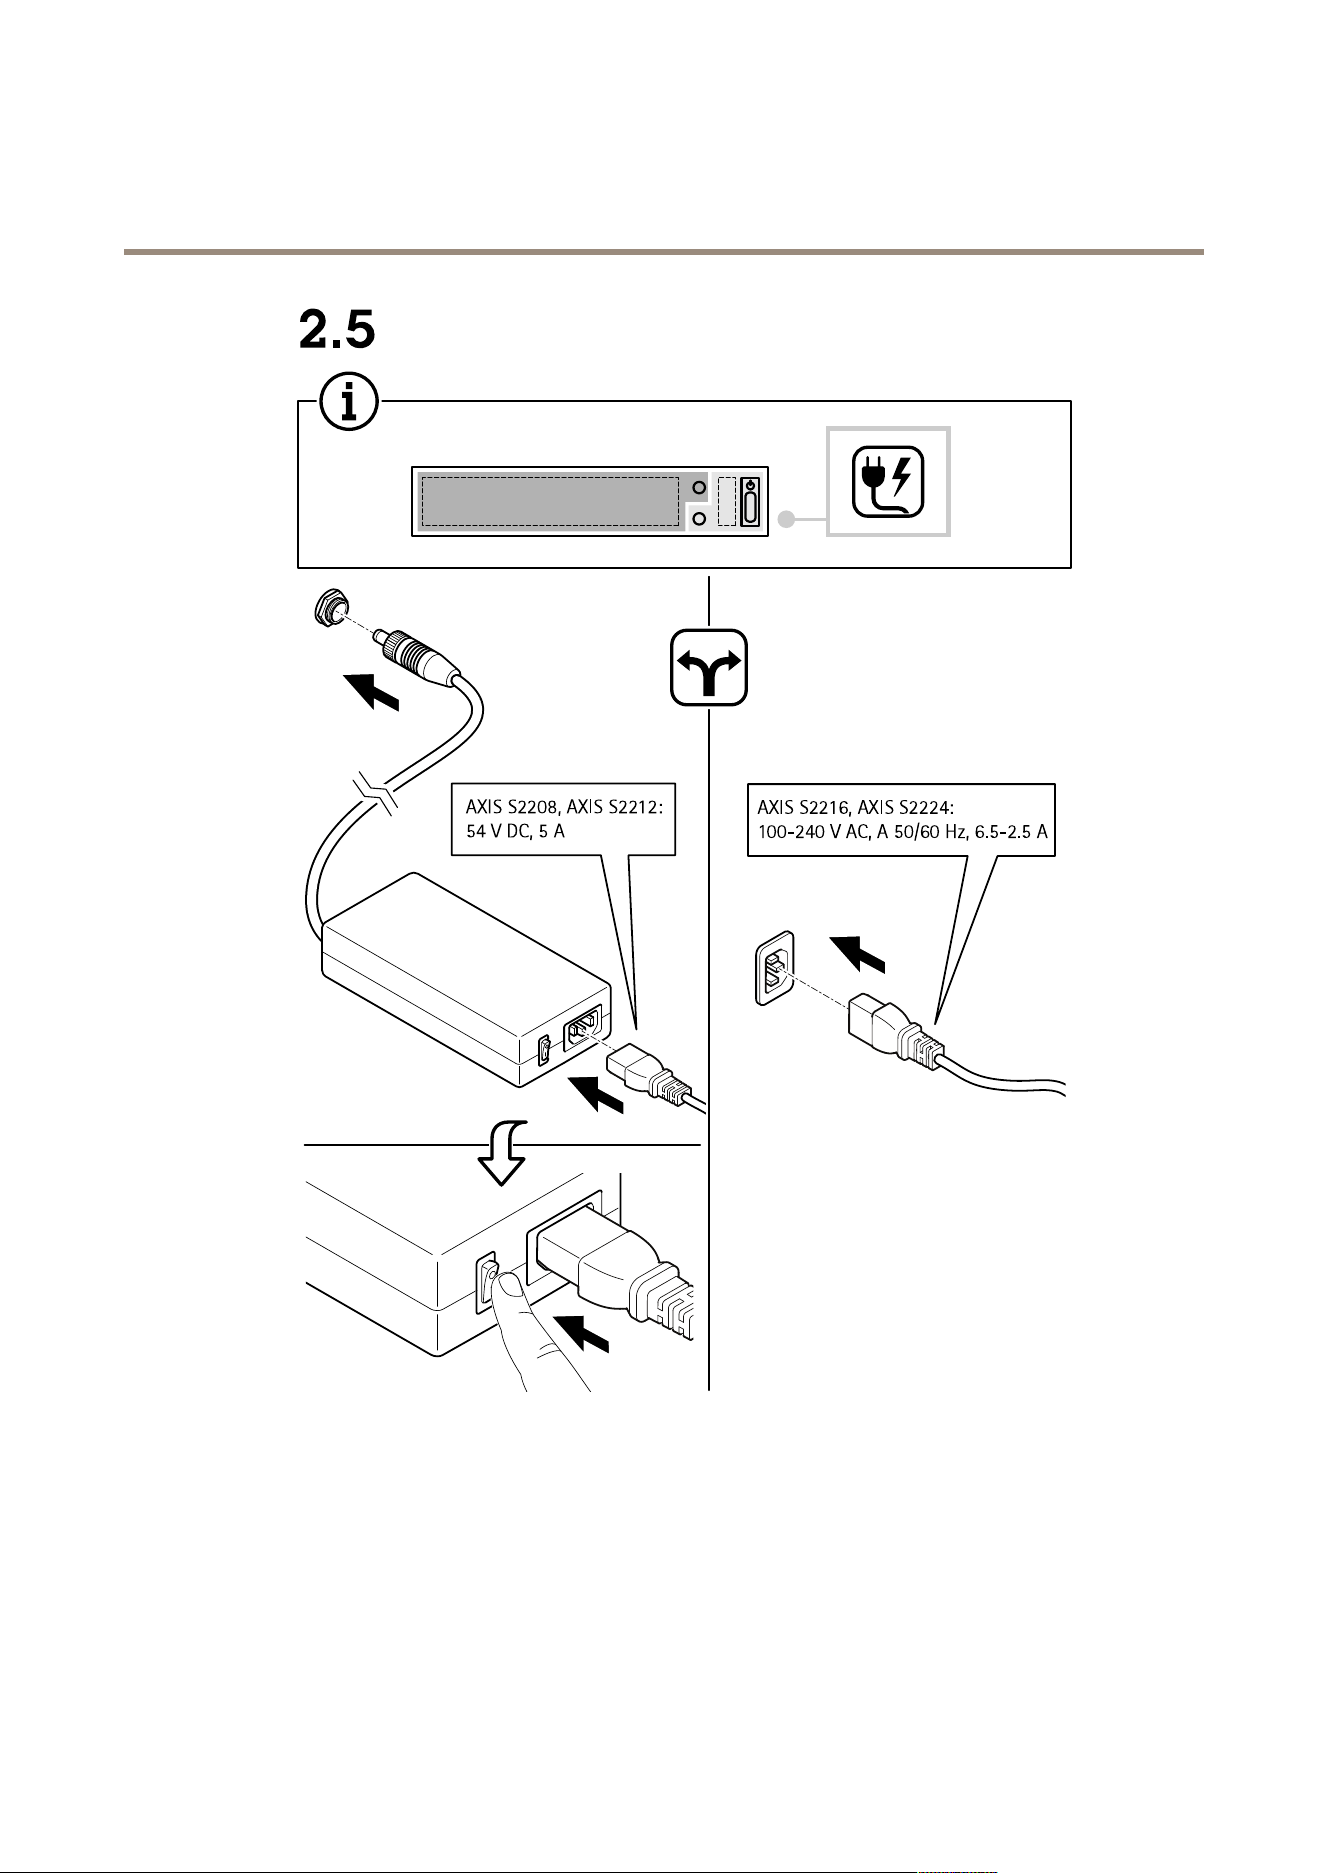
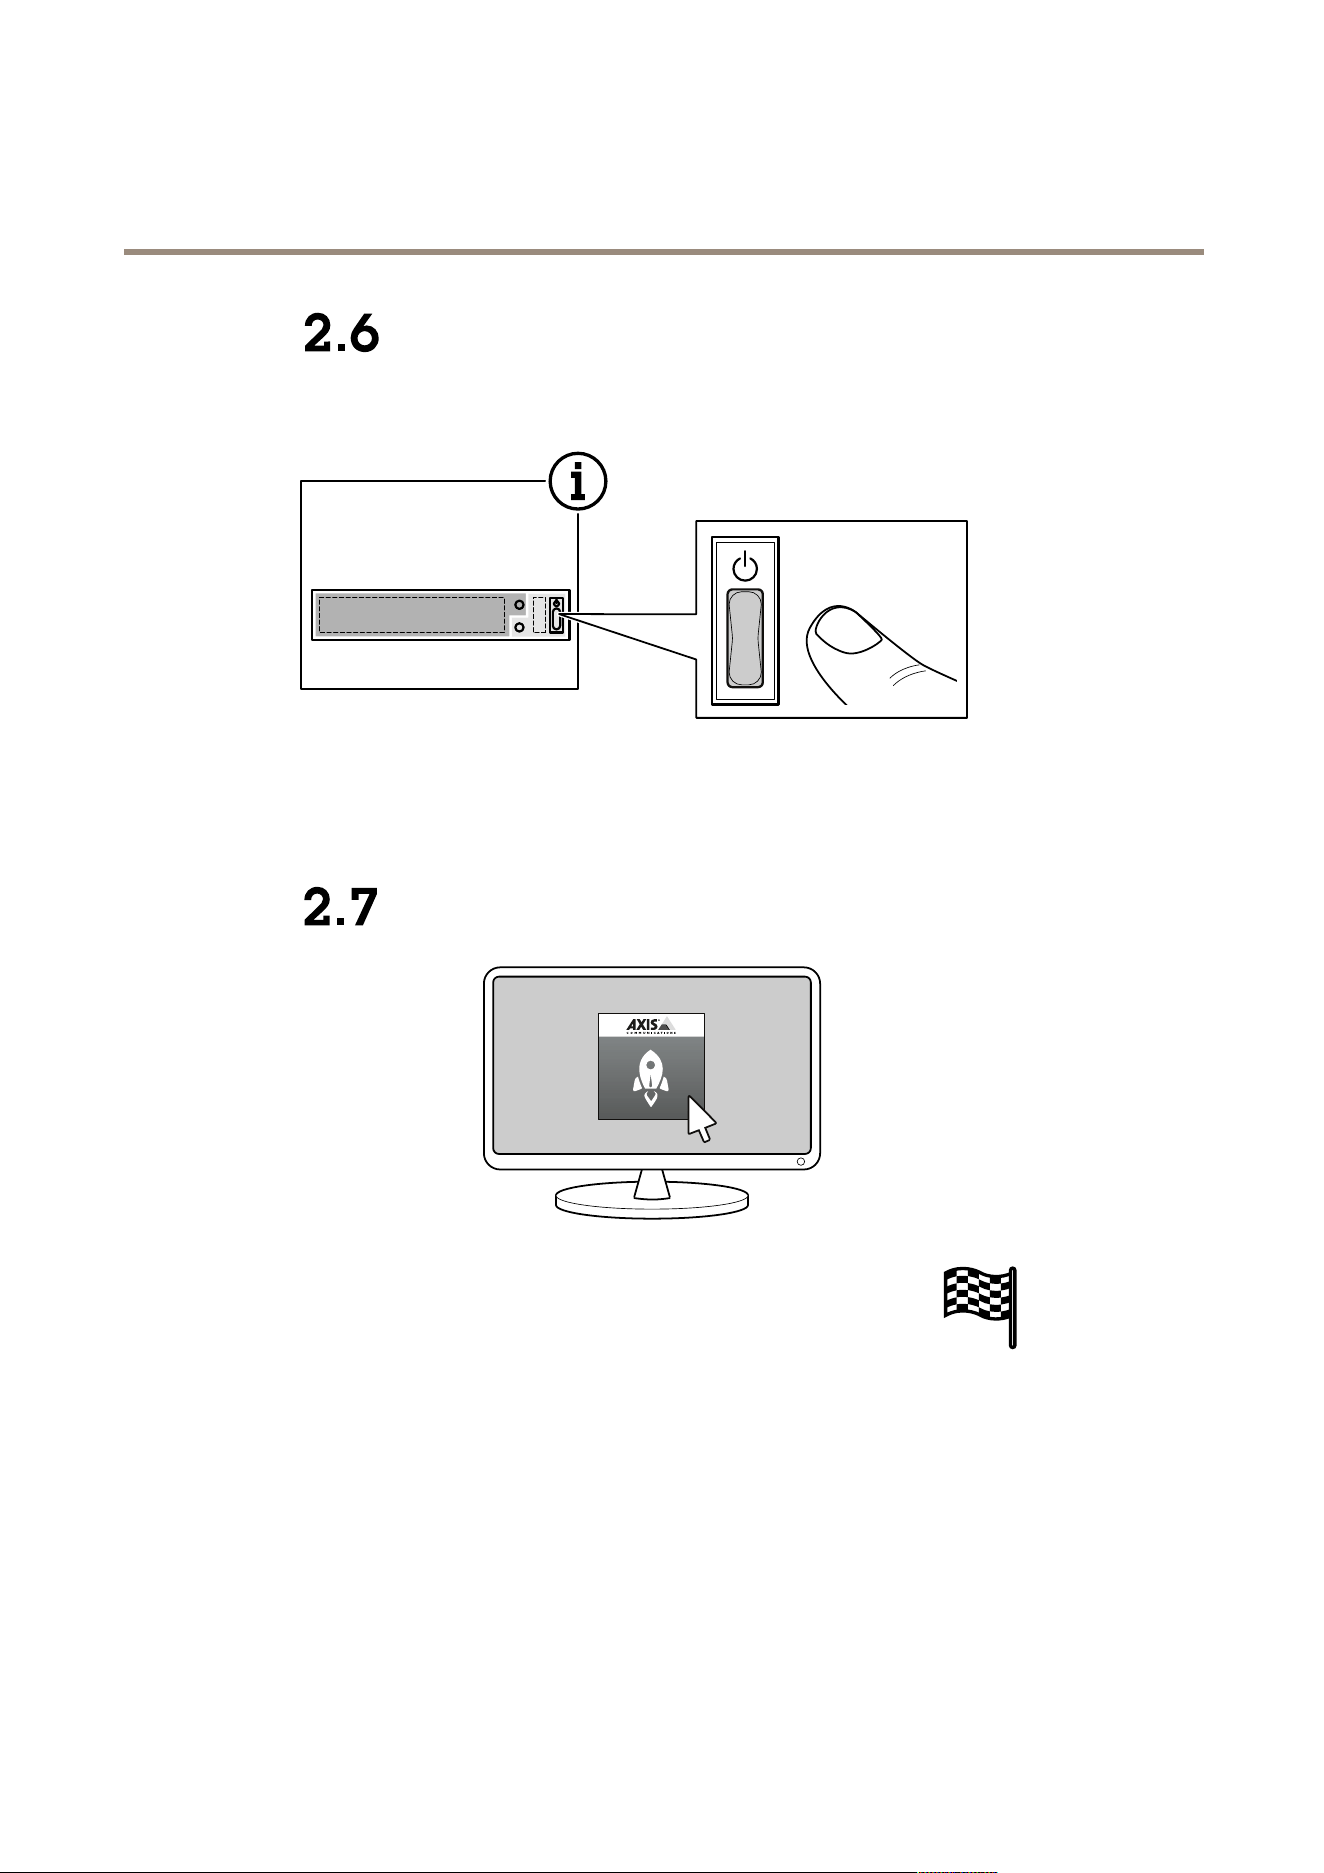
Installyourdevice
Installyourdevice
7
AXISCameraStationS22ApplianceSeries
Installyourdevice
8
AXISCameraStationS22ApplianceSeries
Installyourdevice
9
AXISCameraStationS22ApplianceSeries
Installyourdevice
10
AXISCameraStationS22ApplianceSeries
Installyourdevice
11
AXISCameraStationS22ApplianceSeries
Installyourdevice
12
AXISCameraStationS22ApplianceSeries
Installyourdevice
13

AXISCameraStationS22ApplianceSeries
Installyourdevice
14
AXISCameraStationS22ApplianceSeries
Installyourdevice
15
AXISCameraStationS22ApplianceSeries
Installyourdevice
16

AXISCameraStationS22ApplianceSeries
Configureyourdevice
Configureyourdevice
LogontoAXISCameraStationserver
ThroughtheAXISCameraStationclient,youcanconnecttoasingleserverinstalledonthelocalcomputerorelsewhereonthe
network,ortomultipleservers.
Double-clicktheAXISCameraStationicontostarttheAXISCameraStationclient.YoucanconnecttoAXISCameraStation
serversinthefollowingways:
Toconnecttotheserversusedintheprevioussession,selectLastusedservers.
Toconnecttotheserverinstalledonthesamecomputerastheclient,selectThiscomputer.
•SelectLogonascurrentusertologonasthecurrentWindowsuser.
•ClearLogonascurrentuserandclickLogon.SelectOtheruserandprovideanotherusernameandpasswordtolog
onwithadifferentusernameandpassword.
•SelectLogonas<username>ifyouhaveyourusernameandpasswordremembered.
Toconnecttoaremoteserver:
1.SelectRemoteserver.
2.SelectaserverfromtheRemoteserverdrop-downlistorentertheIPorDNSaddressintheeld.Iftheserverisnot
listed,click
toreloadalltheavailableremoteservers.
Iftheserverisconguredtoacceptclientsonadifferentportthanthedefaultportnumber55752,entertheIPaddress
followedbytheportnumber,forexample,192.168.0.5:46001
3.Youcan:
-SelectLogonascurrentusertologonasthecurrentWindowsuser.
-ClearLogonascurrentuserandclickLogon.SelectOtheruserandprovideanotherusernameandpassword
tologonwithadifferentusernameandpassword.
-SelectLogonas<username>ifyouhaveyourusernameandpasswordremembered.
TosignintoAXISSecureRemoteAccess:
1.ClicktheSignintoAXISSecureRemoteAccesslink.
2.EnteryourMyAxisaccountcredentials.
3.ClickSigninandGranttograntaccess.
Toconnecttotheserversfromaserverlist,selectaserverlistfromthedrop-downlistoftheServerlisteld.Click
to
createoredittheserverlists.
ToimportaserverlistlethathasbeenexportedfromAXISCameraStation,clickImportserverlistatthebottomrightand
browsetoa.mslle.
Todeletetheusernamesandpasswordsthathavesavedforalltheconnectedservers,clickDeletesavedpasswordsatthe
bottomright.
Toconnecttoaserver,itmaybenecessarytochangetheclientproxysettings,clickChangeclientproxysettingsatthebottomright.
17

AXISCameraStationS22ApplianceSeries
Configureyourdevice
CongureAXISCameraStation
ThisGetstartedtutorialwillwalkyouthroughthebasicstepstomakeyoursystemupandrunning.
Beforeyoustart,youmayneedto:
•Congureyournetworkdependingonyourinstallation.SeeNetworkconguration.
•Congureyourserverportsifneeded.SeeServerportconguration.
•Considersecurityissues.SeeSecurityconsiderations.
Afternecessarycongurations,youcanstarttoworkwithAXISCameraStation:
1.StartAXISCameraStation
2.Adddevices
3.Congurerecordingmethodonpage18
4.Liveviewcamerasonpage19
5.Replayrecordingsonpage19
6.Addbookmarksonpage19
7.Exportrecordingsonpage19
8.PlayandverifyrecordingsinAXISFilePlayeronpage20
StartAXISCameraStation
AXISCameraStationServiceControlautomaticallystartsaftertheinstallationiscomplete.
Double-clicktheAXISCameraStationClienticontostarttheAXISCameraStationclient.Whenstartingtheclientforthersttime,
itautomaticallyattemptstologontotheAXISCameraStationserverinstalledonthesamecomputerastheclient.
YoucanconnecttomultipleAXISCameraStationserversindifferentways.
Adddevices
ThersttimeyoustartyourAXISCameraStation,youarenavigatedtotheAdddevicespage.AXISCameraStationautomatically
searchesthenetworkforconnecteddevicesanddisplaysalistofdevicesfound.
1.Selectthecamerastoaddfromthelist.
Ifyourcameraisnotlisted,clickFindbyaddress,enterthecameraaddressandclickOK.
2.ClickAdd.
3.SelectQuickcongurationorSiteDesignerconguration.ClickNext.
4.UsethedefaultsettingsandensuretherecordingmethodissettoNone.ClickInstall.
Congurerecordingmethod
1.GotoConguration>Recordingandevents>Recordingmethod.
2.Ifyouwanttoenablemotiondetectionrecording:
2.1Selectacamera.
2.2TurnonMotiondetection.
2.3ClickApply.
18

AXISCameraStationS22ApplianceSeries
Configureyourdevice
3.Ifyouwanttoenablecontinuousrecording:
3.1Selectacamera.
3.2TurnonContinuous.
3.3ClickApply.
Liveviewcameras
1.ClicktheLiveviewtabtonavigatetothecameraliveview.
2.Clickacameratonavigatetotheliveviewofthatcamera.
Abluedotafterthecameranameshowsthatcontinuousrecordingisinprogress.Areddotafterthecameranameshows
thatmotiondetectionrecordingisinprogress.
3.Click
tonavigatefromLiveviewtoRecordings.
Aredlineinthetimelineshowsthatmotiondetectionrecordinghasbeentakenforthatperiod.Abluelineinthe
timelineshowsthatcontinuousrecordingisinprogress.
Replayrecordings
1.GototheRecordingtab.
2.Inthetimelineofthecamera,usethemousewheeltozoominandoutanddragthetimelinetomakethemarker
pointingatyourdesiredposition.
3.Tostartplayingtherecordingfromthedesiredposition,click
.
Addbookmarks
1.GototheRecordingtab.
2.Inthetimelineofthecamera,usethemousewheeltozoominandoutanddragthetimelinetomakethemarker
pointingatyourdesiredposition.
3.Click
.
4.Enterthebookmarknameanddescription.Usekeywordsinthedescriptiontomakethebookmarkeasytondand
recognized.
5.SelectPreventrecordingdeletiontolocktherecording.Alockedrecordingcannotbedeletedunlessactivelyunlocked.
6.ClickOK.Abookmarkiconisdisplayedatyourdesiredpositioninthetimeline.
Exportrecordings
1.GototheRecordingtab.
2.Inthetimelineofthecamera,usethemousewheeltozoominandout.
3.Click
todisplaytheselectionmarkers.
4.Dragthemarkerstoincludetherecordingsthatyouwanttoexport.
5.Click
toopentheExporttab.
6.IntheExporttab,youcandothefollowingifdesired.
19

AXISCameraStationS22ApplianceSeries
Configureyourdevice
-Clicktoaddanotefortherecording.
-ClickBrowsetoselectthelocationtoexporttherecordings.
-SelectIncludeAxisFilePlayer,Includenotes,andAdddigitalsignature.
7.ClickExport.
8.SelectUsepasswordandenteryourpasswordforthedigitalsignature.ClickOK.
PlayandverifyrecordingsinAXISFilePlayer
1.Gotothefolderthatyouhavespeciedfortheexportedrecordings.
20

AXISCameraStationS22ApplianceSeries
Configureyourdevice
Inthisexample,theexportedlesincludetherecordingsinthe.asfformat,thenotesinthe.txtformat,andAXISFilePlayer.
2.Double-clickAXISFilePlayer.Theexportedrecordingswillbeautomaticallyplayed.
3.Click
toshowthenotesaddedtotherecordings.
4.Toverifythedigitalsignature:
4.1GotoTools>Verifydigitalsignature.
4.2SelectValidatewithpasswordandenteryourpassword.
4.3ClickVerify.Thevericationresultpageisdisplayed.
Networkconguration
WhenAXISCameraStationClient,AXISCameraStationServer,andtheconnectednetworkdevicesareinstalledondifferent
networks,youmightneedtocongureproxyorrewallsettingsbeforeusingAXISCameraStation.
Clientproxysettings
Whentheclientandtheserverareseparatedbyaproxyserver,conguretheclientproxysettings.
1.Double-clicktheAXISCameraStationClienticon.
2.OntheLogonpage,clickChangeclientproxysettings.
3.Changetheclientproxysettings.
4.ClickOK.
Serverproxysettings
Whennetworkdevicesandtheserverareseparatedbyaproxyserver,conguretheserverproxysettings.
1.Double-clicktheAXISServiceControliconinWindowsnoticationarea.
2.SelectModifysettings.
3.IntheProxysettingssection,usethedefaultSystemaccountinternetoptionorselectUsemanualproxysettings.
4.ClickSave.
NATandFirewall
WhentheclientandtheserverareseparatedbyaNAT,rewallorsimilar,conguretheNATorrewalltoensurethattheHTTPport,
TCPport,andstreamingportspeciedinAXISCameraStationServiceControlareallowedtopassthroughtherewalland/orNAT.
ForinstructionshowtoconguretheNATorrewall,contactthenetworkadministrator.
Serverportconguration
Theports55752(HTTP),55754(TCP),55756(mobilecommunication),and55757(mobilestreaming)areusedonAXISCamera
StationServerforcommunicationbetweentheserverandtheclient.Ifrequired,theportscanbechangedfromAXISCamera
StationServiceControl.
Securityconsiderations
Topreventunauthorizedaccesstocamerasandrecordings,keepthefollowinginmind:
•Usestrongpasswordsforallnetworkdevices(cameras,videoencodersandauxiliarydevices).
21

AXISCameraStationS22ApplianceSeries
Configureyourdevice
•InstallAXISCameraStationServer,cameras,videoencoders,andauxiliarydevicesonasecurenetworkseparatedfrom
theofcenetwork.AXISCameraStationClientcanbeinstalledonacomputeronanothernetwork,forexample
anetworkwithInternetaccess.
•Ensureallusershavestrongpasswords.UsingWindowsActiveDirectoryahighlevelofsecuritycanbeimplemented.
LicenseasystemwithInternetconnection
BoththeAXISCameraStationclientandtheservermustbeconnectedtotheinternet.
1.IntheAXISCameraStationclient,gotoConguration>Licenses>ManagementandclickGotoAXISCameraStation
LicensePortal.
2.IntheAXISCameraStationlicenseportal,signinwithyourMyAxisaccount.
3.Enteryourlicensekey,andclickAddlicenses.
Note
ForAXISNetworkVideoRecorders,yourlicensedetailsaregeneratedautomaticallyandcanbefoundundertheLicense
keyssection.Werecommendthatyouwritethemdown,orsavetheminadigitalformatonaUSBashdriveforfuture
reference.Lostlicensekeyscannotberetrieved.
4.IntheAXISCameraStationclient,checkthatyourlicensekeysareshowninConguration>Licenses>Keys.
Towatchthisvideo,gotothewebversionofthisdocument.
www.axis.com/products/online-manual/
AXISCameraStationonlinelicenseregistration
LicenseasystemwithoutInternetconnection
TolicenseasystemwithoutInternetconnection:
1.IntheAXISCameraStationclient,exportthesystemle.
1.1GotoConguration>Licenses>Management.
1.2ClickExportsystemle.
1.3SaveyoursystemleonaUSBashdrive.
2.GototheAXISCameraStationlicenseportalwww.axis.com/licenses,signinwithyourMyAxisaccountanduploadyour
systemle.
3.Enteryourlicensekey,andclickAddlicenses.
22

AXISCameraStationS22ApplianceSeries
Configureyourdevice
Note
ForAXISNetworkVideoRecorders,yourlicensedetailsaregeneratedautomaticallyandcanbefoundundertheLicense
keyssection.Werecommendthatyouwritethemdown,orsavetheminadigitalformatonaUSBashdriveforfuture
reference.Lostlicensekeyscannotberetrieved.
4.ClickDownloadlicenseleandsavetheletoaUSBashdrive.
5.IntheAXISCameraStationclient,importthelicensele.
5.1GotoConguration>Licenses>Management.
5.2ClickImportlicensele,andselectthelicenseleonyourUSBashdrive.
5.3CheckthatyourlicensekeysareshowninConguration>Licenses>Keys.
Towatchthisvideo,gotothewebversionofthisdocument.
www.axis.com/products/online-manual/
AXISCameraStationofinelicenseregistration
23

AXISCameraStationS22ApplianceSeries
ManageWindows®useraccounts
ManageWindows®useraccounts
Createauseraccount
Tohelpkeepyourpersonaldataandinformationmoresecure,werecommendthatyouaddapasswordforeachlocalaccount.
Important
Onceyoucreateapasswordforalocalaccount,don'tforgetit.There’snowaytorecoveralostpasswordforlocalaccounts.
1.GotoSettings>Accounts>Otherpeople>AddsomeoneelsetothisPC.
2.ClickIdon’thavethisperson’ssign-ininformation.
3.ClickAddauserwithoutaMicrosoftaccount.
4.Enterausername,passwordandpasswordhint.
5.ClickNextandfollowtheinstructions.
Createanadministratoraccount
1.GotoSettings>Accounts>Otherpeople.
2.GototheaccountyouwanttochangeandclickChangeaccounttype.
3.GotoAccounttypeandselectAdministrator.
4.ClickOK.
5.Restartyourdeviceandsigninwiththenewadministratoraccount.
Createalocalusergroup
1.GotoComputerManagement.
2.GotoLocalUsersandGroups>Group.
3.Right-clickGroupandselectNewGroup.
4.Enteragroupnameandadescription.
5.Addgroupmembers:
5.1ClickAdd.
5.2ClickAdvanced.
5.3Findtheuseraccount(s)youwanttoaddtothegroupandclickOK.
5.4ClickOKagain.
6.ClickCreate.
Deleteauseraccount
Important
Whenyoudeleteanaccountyouremovetheuseraccountfromtheloginscreen.Youalsoremoveallles,settingsand
programdatastoredontheuseraccount.
24

AXISCameraStationS22ApplianceSeries
ManageWindows®useraccounts
1.GotoSettings>Accounts>Otherpeople.
2.GototheaccountyouwanttoremoveandclickRemove.
Changeauseraccount'spassword
1.Loginwithanadministratoraccount.
2.GotoUserAccounts>UserAccounts>Manageanotheraccountinsequence.
You’llseealistwithalluseraccountsonthedevice.
3.Selecttheuseraccountwhosepasswordyouwouldliketochange.
4.ClickChangethepassword.
5.EnterthenewpasswordandclickChangepassword.
Createapasswordresetdiskforauseraccount
WerecommendtocreateapasswordresetdiskusingaUSBashdrive.Then,ifyouforgetyourpassword,youcanresetthe
password.WithoutaUSBresetdisk,youcan’tresetthepassword.
Ifyou’reusingWindows10,version1803youcanaddsecurityquestionstoyourlocalaccountincaseyouforgetyourpassword,
soyoudon'tneedtocreateapasswordresetdisk.Todothis,gottoStartandclickSettings>Sign-inoptions>Updateyour
securityquestions.
1.Signintoyourdevicewithalocaluseraccount.Youcan’tcreateapasswordresetdiskforaconnectedaccount.
2.PlugaUSBashdriveintoyourdevice.
3.Ifthere’sanydataontheUSBashdrive,backitup.
4.FromtheWindows®searcheld,gotoCreateapasswordresetdisk.
5.IntheForgottenPasswordwizard,clickNext.
6.SelectyourUSBashdriveandclickNext.
7.TypeyourcurrentpasswordandclickNext.
8.Followtheonscreeninstructions.
9.RemovetheUSBashdriveandkeepitinasafeplacewhereyou'llrememberit.Youdon'thavetocreateanewdiskwhen
youchangeyourpasswordevenifyouchangeitseveraltimes.
25

AXISCameraStationS22ApplianceSeries
ManageAXISCameraStationuseraccounts
ManageAXISCameraStationuseraccounts
Congureuserpermissions
GotoConguration>Security>UserpermissionstoviewalistoftheusersandgroupsthathavebeenaddedtoAXISCamera
Station.
Note
•WhenconnectingtomultipleAXISCameraStationservers,youcanaddandmanageuserpermissionsonanyconnected
serverbyselectingtheserverfromtheSelectedserverdrop-downlist.
•AdministratorsofthecomputeronwhichtheAXISCameraStationserverisinstalledareautomaticallygivenadministrator
privilegestoAXISCameraStation.Youcannotchangeorremovetheadministratorsgroup'sprivileges.
Beforeauserorgroupcanbeadded,theuserorgroupmustberegisteredonthelocalcomputerorhaveanWindowsActiveDirectory
useraccount.UsingWindowsActiveDirectory,ahighlevelofsecuritycanbeimplemented.
Whenauserispartofagroup,theusergetsthehighestrolepermissionthatisassignedtotheindividualandthegroup.
Whenauserispartofagroup,theusergetstheaccessgrantedasanindividualandalsoreceivetherightsaspartofagroup.For
example,auserisgivenaccesstocameraXasanindividual.Theuserisalsoamemberofagroup.Thegroupisgivenaccessto
camerasYandZ.TheuserthenhasaccesstocamerasX,YandZ.
IftherearesecurityconcernsregardingtheaccesstothecomputerbyadesignatedAXISCameraStationuser,createastandarduser
accountthatyouthenuseforaccesstoAxisCameraStation.YoucanthenelevatetheaccounttoadministratorinConguration>
Security>Userpermissions.
Thelistconsistsofthefollowinginformation:
ItemDescription
NameUsernameasitappearsinthelocalcomputerorActiveDirectory.
TypeIndicatestheentryisagrouporasingleuser.
DetailsDetaileduserinformationasitappearsinthelocalcomputerorActiveDirectory.
DomainDomainnamewheretheuserisregistered.
RoleTheaccessrolegiventotheuserorgroup.
Possiblevalues:
•Administrator:Fullaccesstoallfunctionalityandallcamerasanddevices.
•Operator:FullaccesstoallfunctionalityexceptCongurationtab,Device
managementpage,andAuditlog.FullaccesstocamerasandI/Oports.Access
toplaybackandrecordingexportcanberestricted.
•Viewer:AccesstolivevideofromcamerasandaccesstoI/Oports.
Toaddauserorgroup,seeAddusersorgroups.
Tochangeuseraccessrightsforauserorgroup,selecttheuserorgroupandclickEdit.Youcaneditmultipleusersorgroupsatthe
sametimewhentheyhavethesameroleasOperatororViewer.
Toremoveauserorgroup,selecttheuserorgroupandclickRemove.Inthepop-updialog,clickOKtoremovetheuserorgroup.
Addusersorgroups
UseraccountsinMicrosoftWindowsandActiveDirectoryusersandgroupscanaccessAXISCameraStation.ToaddausertoAXIS
CameraStation,youhavetoaddusersoragrouptoWindows.
26

AXISCameraStationS22ApplianceSeries
ManageAXISCameraStationuseraccounts
ToaddauserorgroupinMicrosoftWindows:AddingauserinWindowsmayvarydependingonwhichversionofWindowsyou
arerunning.FollowtheinstructionsonMicrosoft'ssite.IfyouareconnectedtoanActiveDirectorydomainnetwork,consult
yournetworkadministrator.
ToaddauseroragroupinAXISCameraStation:
1.GotoConguration>Security>UserpermissionsandclickAdd.
2.SelectServertosearchforusersorgroupsonthelocalcomputer,orselectDomaintosearchforActiveDirectoryusersor
groups.
3.SelectUsersorGroupstosearchforonlyusersorgroups.
4.Thelistofusersorgroupsisdisplayed.UsersandgroupsthathavealreadybeenaddedtoAXISCameraStationarenotlisted.
-Iftherearetoomanyusersorgroups,thesearchresultisnotdisplayed.UsetheTypetosearcheldtorene
thesearchandndaspecicuserorgroup.
-Ifthedomainusersearchfails,theServicelogonaccountmustbechanged.
5.SelecttheusersorgroupsandclickAdd.
6.SettheusersorgroupsroletoAdministrator,Operator,orViewer.
7.IfyouhaveselectedtheOperatororViewerrole,selectthecameras,I/Os,orviewstograntaccessto.ClickAdvancedto
viewalloptionsforcamerasandI/Os.SeeUserorgroupprivileges.
8.IfyouhaveselectedOperatorrole,clickPlaybacktorestrictplaybackorrecordingexportaccess.SeeUserorgroup
privileges.
9.ClickOK.
Userorgroupprivileges
UsersandgroupswiththeAdministratorrolehavefullaccesstotheentiresystem.
ForusersandgroupswiththeOperatororViewerrole,youcangrantdifferentaccessprivilegestothespeciccameras,I/Oports,
views,playbackofrecordings,andsnapshots.Forhowtodeneaccessprivilegesforauserorgroup,seeAddusersorgroups.
Cameras
ThefollowingaccessprivilegesareavailableforusersorgroupswiththeOperatororViewerrole.
•InthedefaultSimplemode:
-Access:Allowaccesstothecameraandallcamerafeatures.
•IntheAdvancedmode:
-Access:Allowaccesstothecameraandallcamerafeatures.
-Video:Allowaccesstolivevideofromthecamera.
-Audio:Allowaccesstoaudiofromthecamera.
-MechanicalPTZ:AllowaccesstomechanicalPTZcontrols.
-ManualRecording:Allowtostartandstoprecordingsmanually.
I/O
ThefollowingaccessprivilegesareavailableforusersorgroupswiththeOperatororViewerrole.
•InthedefaultSimplemode:
27

AXISCameraStationS22ApplianceSeries
ManageAXISCameraStationuseraccounts
-Access:AllowfullaccesstotheI/Oport.
•IntheAdvancedmode:
-Access:AllowfullaccesstotheI/Oport.
-Read:AllowtoviewthestateoftheI/Oport.Theuserisnotabletochangetheportstate.
-Write:AllowtochangethestateoftheI/Oport.
Views
ThefollowingaccessprivilegesareavailableforusersorgroupswiththeOperatororViewerrole.
•Access:AllowaccesstotheviewsinAXISCameraStation.
•Edit:AllowtoedittheviewsinAXISCameraStation.
Playback
ThefollowingaccessprivilegesareavailableforusersorgroupswiththeOperatorrole.
•Exportrecordings:Allowexportingrecordings.
•Generateincidentreport:Allowgeneratingincidentreports.
•Preventaccesstorecordingsolderthan:Preventaccessingrecordingsolderthanthespeciednumberofminutes.When
usingsearch,theuserwillnotndrecordingsolderthanthespeciedtime.Recordingsandbookmarksolderthanthe
speciedtimecannotbeplayed.
Snapshots
ThefollowingaccessprivilegeisavailableforusersorgroupswiththeOperatororViewerrole.
•Takesnapshots:Allowtakingsnapshotsintheliveviewandrecordingsmodes.
28

AXISCameraStationS22ApplianceSeries
Manageyourdevice
Manageyourdevice
UpdateWindows®
Windows®10periodicallychecksforupdates.Whenanupdateisavailable,yourdeviceautomaticallydownloadstheupdatebut
you'vetoinstallitmanually.
Note
Recordingwillbeinterruptedduringascheduledsystemrestart.
Tomanuallycheckforupdates:
1.GotoSettings>Update&Security>WindowsUpdate.
2.ClickCheckforupdates.
CongureWindowsupdatesettings
SometimesyoumightwanttochangehowandwhenWindows
®
updates.
Note
Allongoingrecordingsstopduringascheduledsystemrestart.
1.OpentheRunapp.
-GotoWindowsSystem>Run,or
-pressWINandR.
2.Typegpedit.mscandclickOK.TheLocalGroupPolicyEditoropens.
3.GotoComputerConguration>AdministrativeTemplates>WindowsComponents>WindowsUpdate.
4.Congurethesettingsasrequired,seeexample.
Example
Toautomaticallydownloadandinstallupdateswithoutanyuserinteractionandhavethedevicerestartifnecessaryoutofofce
hoursusethefollowingconguration:
1.OpenAlwaysautomaticallyrestartatthescheduledtimeandselect:
1.1Enabled
1.2Therestarttimerwillgiveusersthismuchtimetosavetheirwork(minutes):15.
1.3ClickOK.
2.OpenCongureAutomaticUpdatesandselect:
2.1Enabled
2.2CongureAutomaticupdates:Autodownloadandscheduletheinstall
2.3ScheduleInstallday:EverySunday
2.4ScheduleInstalltime:00:00
2.5ClickOK.
3.OpenAllowAutomaticUpdatesimmediateinstallationandselect:
29

AXISCameraStationS22ApplianceSeries
Manageyourdevice
3.1Enabled
3.2ClickOK.
Resetyourserver
Youcanusetheserverresetbuttontoresetyourserver.Itwilltakemorethanonehourtoresetyourserver.
1.Poweroffyourdevice.
2.Pressandholdtheserverresetbuttonfor5seconds.WindowsREwillbestarted.
3.SelectTroubleshoot.
4.SelectResetyourPC.
5.SelectKeepmylesorRemoveeverything.IfyouselectKeepmyles,youneedtoprovidetheadministratorcredentials.
6.Followtheinstructionsonthescreen.
7.TheserverrebootsandstartstheproceduretorestoreWindowstofactorydefaultsettings.
Towatchthisvideo,gotothewebversionofthisdocument.
www.axis.com/products/online-manual/
Resetyourservertofactorydefaultsettings
Resetyourswitch
Youcanresetyourswitchtofactorydefaultsettingsbyusingoneofthefollowingways:
•Theswitchresetbutton.Beforeyoustart,ensurethattheswitchison.Pressandholdtheswitchresetbuttonforabout5
secondsuntilthepowerbuttonLEDattherearsideofthedeviceturnsblue.Itwilltakeabout6minutes.
•Theswitch’smanagementpage.SeeResettofactorydefaultsettingsonpage38.
30

AXISCameraStationS22ApplianceSeries
Managethebuilt-inswitch
Managethebuilt-inswitch
Aboutthebuilt-inswitch
TheAXISCameraStationS22ApplianceSeriescomeswithanintegratedPoweroverEthernet(PoE)switch.Youcancongureand
managethebuilt-inswitch.
Thepurposeoftheswitchistosegregatetrafconthenetworksothatsecuritycamerasandrelatedtrafcmanagedbytheswitch
(PoEportsandU1networkconnections)arenotsharedwithothernetworks.
Theswitch’spowermanagementfollowtheserules:
•Eachportcanreservepoweraccordingtotheconnectedpowereddevice’sPoEclass.Powercanalsobeallocatedmanually.
•Iftheactualpowerconsumptionforagivenportexceedsthereservedpowerforthatport,itwillshutdown.
•Portswillshutdownwhentheactualpowerconsumptionforallportsexceedsthetotalamountofpowerthatthe
powersupplycandeliver.Theportsarethenshutdownaccordingtotheportsprioritywherealowerportnumber
meanshigherpriority.
Logintotheswitch'smanagementpage
1.Gototheswitch’smanagementpage.
-Fromthewebbrowser,entertheswitch’sIPaddress.Bydefault:192.168.0.1
-FromAXISRecorderToolbox,gotoSwitch>Opentheswitchconguration.
-FromAXISCameraStationClient,gotoConguration>Switch>Management.SeeCongureswitch.
2.Loginwithyourcredentials.
-username:admin
-password:youcanndtherandomlygeneratedpasswordonastickerunderneaththeproductoraself-adhesive
stickerintheboxcontent.
Tologouttheswitch'smanagementpage,goto>Logout.
Overview
Intheswitch’smanagementpage,clickOverview.
Generalinformation
Category
ItemDescription
ActiveportsThenumberofportsthatareinuse.
PortsusingPoEThenumberofportswithPoEenabledthatareinuse.
Portssummary
LockedportsThenumberofportsthatarelocked.
CurrentPoEusage
ThetotalpowerinwattsandpercentageconsumedbythePoEdevices.
Clicktheporttoseethedetailsabouttheport.
ActiveTheportisinuse.
InactiveTheportisreadytobeused.
Portstatus
BlockedTheportisblocked.
31

AXISCameraStationS22ApplianceSeries
Managethebuilt-inswitch
Portlist
ItemDescription
PortTheportnumberthatthedeviceisconnectedto.
DeviceThenameofthedeviceconnectedtotheport.
IPaddressTheIPaddressofthedeviceconnectedtotheport.
PoEDisplaysthePoEstatus.YoucanclicktheicontoturnonorturnoffPoEontheport.
Powerconsumption(W)
Thepowerinwattsconsumedbythedeviceconnectedtotheport.
Upstream(Mbit/s)
Theaveragedatarateinmegabitspersecondforoutbounddataontheport.
Downstream(Mbit/s)
Theaveragedatarateinmegabitspersecondforinbounddataontheport.
MACaddressTheMACaddressofthedeviceconnectedtotheport.
LockDisplayswhethertheportislocked.Youcanclicktheicontolockorunlocktheport.
TurnonandturnoffPoE
TurnonPoEonaport
1.Intheswitch’smanagementpage,clickOverview.
2.InthePoEcolumn,click
toturnonPoEonthespecicport.
TurnonPoEonallports
1.Intheswitch’smanagementpage,clickOverview.
2.Click
andselectTurnonPoEonallports.
TurnoffPoEonaport
1.Intheswitch’smanagementpage,clickOverview.
2.InthePoEcolumn,click
toturnoffPoEonthespecicport.
TurnoffPoEonallports
1.Intheswitch’smanagementpage,clickOverview.
2.Click
andselectTurnoffPoEonallports.
Note
YoucanalsoturnonandturnoffPoEinthePowermanagementpage.
Lockandunlockports
YoucanlockaMACaddresstoaportsothatonlytrafccomingfromthatMACaddresswillpass.Thisimprovessecurityandprevents
unauthorizedusersfromconnectingalaptoporotherdevicestothesecuritynetwork.
Lockaport
1.Intheswitch’smanagementpage,clickOverview.
2.IntheLockcolumn,click
tolocktheport.
32

AXISCameraStationS22ApplianceSeries
Managethebuilt-inswitch
Lockallports
1.Intheswitch’smanagementpage,clickOverview.
2.Click
andselectLockallports.
Unlockaport
1.Intheswitch’smanagementpage,clickOverview.
2.IntheLockcolumn,click
tounlocktheport.
Unlockallports
1.Intheswitch’smanagementpage,clickOverview.
2.Click
andselectUnlockallports.
Powermanagement
Intheswitch’smanagementpage,clickPowermanagement.
Generalinformation
•PortsusingPoE:thenumberofportswithPoEenabledthatareinuse.
•CurrentPoEusage:thePoEpowerinwattsconsumedbydevicesandthepercentageofusedPoEpoweroutofthe
totaldedicatedPoEpower.
•Powerrequested:thetotalpowerinwattsandpercentageallocatedtodevices.
Portlist
ItemDescription
PortTheportnumberthatthedeviceisconnectedto.
PoEDisplaysthePoEstatus.YoucanclicktheicontoturnonorturnoffPoEontheport.
PoEclassThePoEclassoftheport.
PriorityThepriorityofpowerallocationoftheport.
Powerconsumption(W)
Thepowerinwattsconsumedbythedeviceconnectedtotheport.
Powerrequested(W)
Thepowerinwattsrequestedbythedeviceconnectedtotheport.
Powerallocated(W)
Manuallyadjustthepowerallocatedtotheport.
OnlyavailablewhenyouselectManualasthepowerallocationmethod.
Allocatepower
PoEpowercanbeallocatedtotheconnecteddevicesinthefollowingways:
•PoEclass:TheswitchallocatesPoEpowerbasedonthePoEclassoftheconnecteddevice.
•Manual:YoucanmanuallyadjustPoEpowerallocatedtotheconnecteddevice.
•LLDP-MED:TheswitchcommunicateswiththeconnecteddeviceanddynamicallyallocatesPoEpowerasneeded.
Note
ThepowerallocationmethodLLDP-MEDworksonlyforcameraswithrmware9.20orlater.
33
AXISCameraStationS22ApplianceSeries
Managethebuilt-inswitch
Tochangethepowerallocationmethod:
1.Intheswitch’spowermanagementpage,gotoPowermanagement.
2.SelectPoEClass,Manual,orLLDP-MEDunderAllocatepower.
3.IfyouhaveselectedManual,gotothePowerallocatedcolumnandchangethepowerallocatedtotheconnecteddevice.
4.Ifyouwanttochangethepriorityoftheconnecteddevice,selectapriorityforthatdevice.Thepriorityofotherdevices
willchangeautomatically.
5.ClickRefresh.
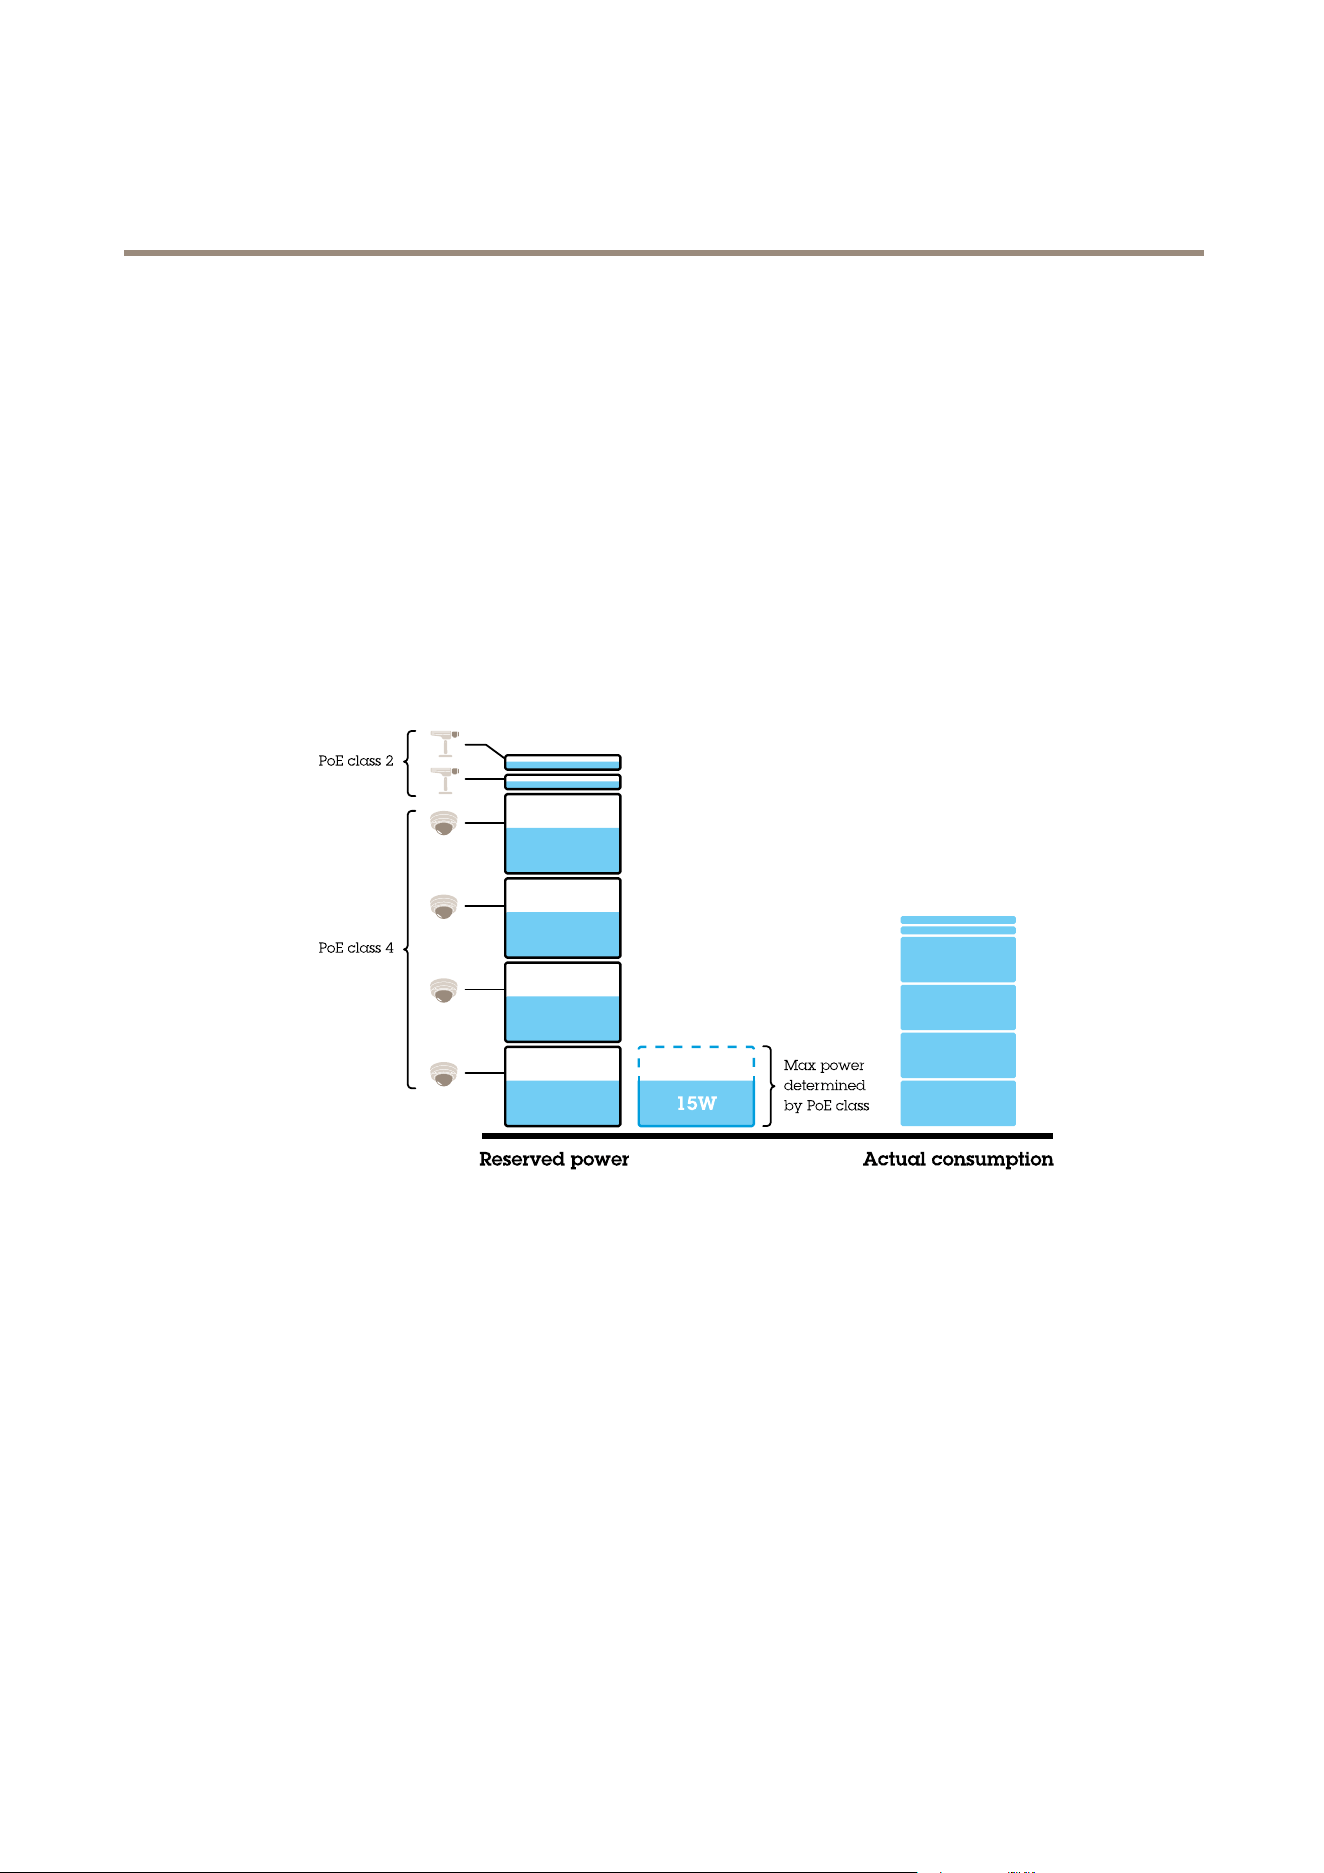
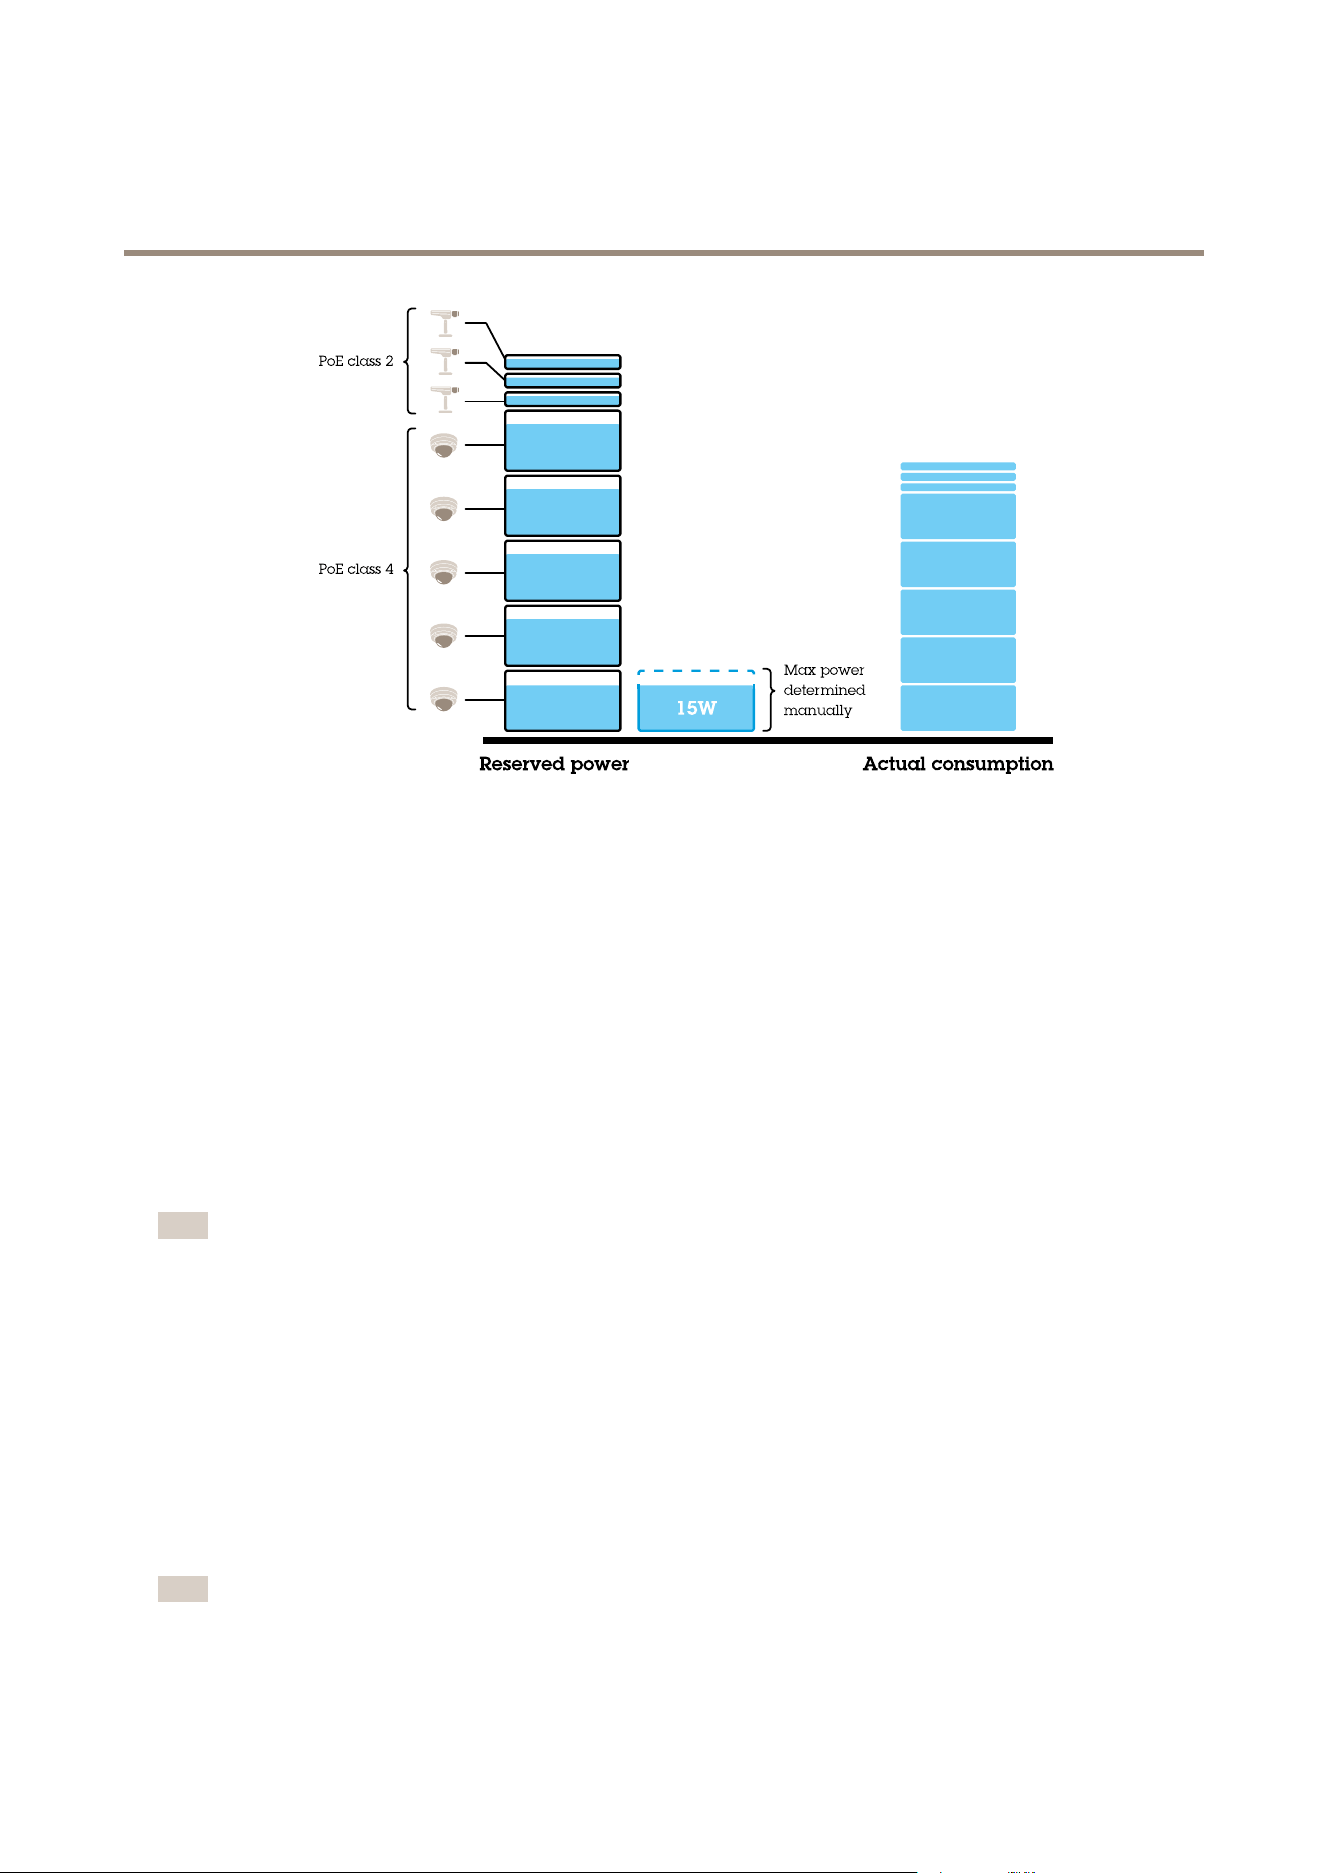
Example
Inthisexample,theswitchhasatotalpowerbudgetof135W.APoEclass4devicerequests30Wpowerandactuallyconsumes15
Wpower.APoEclass2devicerequests7Wpowerandactuallyconsumes5Wpower.
AllocatepowerbyPoEclass
ThepowerrequestedbyeachdeviceisdeterminedbythePoEclass.Theswitchcanpower4PoEclass4devicesand2PoEclass2
devices.Thetotalpowerrequestedis(4x30)+(2x7)=134W.Theactualpowerconsumedis(4x15)+(2x5)=70W.Inthisway,
allconnecteddevicesareguaranteedenoughpowerandthepriorityislessimportant.
Allocatepowermanually
34
AXISCameraStationS22ApplianceSeries
Managethebuilt-inswitch
Thepowerrequestedismanuallyadjustedto20WforPoEclass4devices.Theswitchcanpower5PoEclass4devicesand3PoEclass
2devices.Thetotalpowerrequestedis(5x20)+(3x7)=121W.Theactualpowerconsumedis(5x15)+(3x5)=90W.Inthis
way,allconnecteddevicesareguaranteedenoughpowerandthepriorityislessimportant.
Settings
Congurenetworksettings
Youcanchangetheswitch’sIPaddress.Butformostcamerainstallations,werecommendusingthedefaultsettings.Thereasonfor
thisisthatasurveillancenetworkisnormallyisolatedfromothernetworks,forexampleacorporateLAN.Inthiscase,youwould
onlyusethesurveillancenetworktomanageandcollectsurveillancedevicesanddatafromthevideomanagementsoftware
installedontheserver.
1.Intheswitch’smanagementpage,gotoSettings>Networksettings.
2.Entertheconnectiontype,IPaddress,subnetmask,gateway,DNS1,DNS2,andhostname.
Note
Thefactorydefaultsettingsare:astaticIPconnectionwithaddress192.168.0.1andasubnetmaskwithaddress
255.255.255.0.
3.ClickSave.
Conguredateandtime
1.Intheswitch’smanagementpage,gotoSettings>Dateandtime.
2.Selectthecountryandtimezone.
3.Tosetthetimemanually,selectManualandmanuallyadjustthetime.
4.TosetupanNTPserver,selectNTPserverandentertheNTPserveraddress.
Note
NTPonlyworkswhentheswitchisconnectedtoanetworkandconguredwithInternetaccess.
35

AXISCameraStationS22ApplianceSeries
Managethebuilt-inswitch
5.ClickSave.
CongureDHCPserver
Important
Iftheswitch’sDHCPserverisenabledandyourAXISCameraStationS22Applianceisconnectedtoanexternalnetworkwith
itsownDHCPserver,youwillhaveIPaddressconicts.Thismightresultinthecorporatenetworknotworking.
YoucanconguretheswitchtouseitsinternalDHCPserverforassigningIPaddressestoconnecteddevices.Whenyouusethe
switchuplinkconnectiontoallowdevicestoaccessorbeingaccessedbyexternalapplication,youmustspecifythegateway
andDNSaddresses.
1.Intheswitch’smanagementpage,gotoSettings>DHCPserver.
2.SelectUseDHCPserver.
3.EnterthestartIPaddress,endIPaddress,subnetmask,gateway,DNS1,DNS2,leaselength,anddomainname.
4.ClickSave.
CongureSNMP
1.Intheswitch’smanagementpage,gotoSettings>SNMP.
2.Entertheservername,contact,andlocationusedfortheSNMPconnection.
3.IfyouwanttouseSNMPV1orSNMPV2c,selectSNMPV1/SNMPV2candenterthereadcommunity.
4.IfyouwanttouseSNMPV3,selectSNMPV3(MD5)andentertheusernameandpassword.
Note
CurrentlyweonlysupportMD5authenticationusedforSNMP.
5.ClickSave.
Congurewebsettings
1.Intheswitch’smanagementpage,gotoSettings>Websettings.
2.Entertheportnumber.
3.Formoresecureconnection,selectSecureconnection(HTTPS)andentertheportnumberusedforHTTPSconnection.
4.ClickSave.
Important
Ifyouhavechangedtheportnumber,ensureyourecordthenewportnumber.Ifyou’veforgottenthenewportnumber,
contactAxissupport.
Maintenance
Updatermware
1.Intheswitch’smanagementpage,gotoMaintenance>Updatermware.
2.DraganddropthermwareleorclickBrowseandnavigatetothermwarele.
3.ClickUpload.
4.Afterthermwareupdatingisdone,reboottheswitch.
36

AXISCameraStationS22ApplianceSeries
Managethebuilt-inswitch
Reboottheswitch
Important
Whiletheswitchreboots,allconnecteddeviceswilltemporarilyloseconnectionwiththeswitchincludingPoE.
1.Intheswitch’smanagementpage,gotoMaintenance>Rebootswitch.
2.ClickRebootandYes.
3.Whentheswitchrebootsafterafewminutes,enteryourusernameandpasswordtologin.
Backuptheswitch'ssettings
Note
Theusernameandpasswordareincludedinthebackuple.
1.Intheswitch’smanagementpage,gotoMaintenance>Backupandrestore.
2.ClickCreateabackuple.Thebackupleinthe.binformatiscreatedintheDownloadsfolder.
Restoretheswitch'ssettings
Note
Torestoretheswitch’ssettings,youmustpreviouslyhavecreatedabackuple.
1.Intheswitch’smanagementpage,gotoMaintenance>Backupandrestore.
2.DraganddropthebackupleorclickBrowseandnavigatetothebackuple.
3.ClickUpload.
Itcouldtakeafewminutestorestoretheswitchfromthebackuple.Oncethesettingsarerestored,theswitchwillautomatically
rebootandyouneedtologinagain.
Managecerticates
1.Intheswitch’smanagementpage,gotoMaintenance>Managecerticates.
2.Clickandnavigatetoyourprivatekeyle.
3.Click
andnavigatetoyourcerticatele.
4.Click
andnavigatetoyourCAbundlele.
5.ClickSave.
6.Reboottheswitch.
Changepassword
Youcanchangetheswitch'sdefaultpasswordtoapasswordyouchooseyourself.
Important
Ensureyouselectapasswordyouremember.Ifyouhaveforgottenthenewpassword,contactAxissupport.
1.Intheswitch’smanagementpage,gotoMaintenance>Changepassword.
37

AXISCameraStationS22ApplianceSeries
Managethebuilt-inswitch
2.Enterthecurrentpasswordandyournewpasswordasrequired.
3.ClickSave.
Resettofactorydefaultsettings
1.Intheswitch’smanagementpage,gotoMaintenance>Resettofactorydefaultsettings.
2.ClickResetandYes.
Aftertheresetisdone,theswitchwillrebootautomatically.
Log
Intheswitch’smanagementpage,clickLogtoseealistoflogs.ClickRefreshtorefreshthelist.Clickthecolumntitletosort
inalphabeticalorder.
ItemDescription
TimeThedateandtimewhenthelogeventhappened.
LevelTheseriouslevelshownaswarningicons.
UserTheuserthatinitiatesthelogevent.
IPaddressTheIPaddressoftheuserthatinitiatesthelogevent.
Service
Theservicethatthelogeventisrelatedto.Possiblevaluesaredesktop,network,system,ntpd,
storage,dhcp,etc.
EventThedescriptionaboutthelogevent.
Createswitchreports
1.Intheswitch’smanagementpage,clickLog.
2.ClickCreateswitchreport.
38
AXISCameraStationS22ApplianceSeries
Productoverview
Productoverview
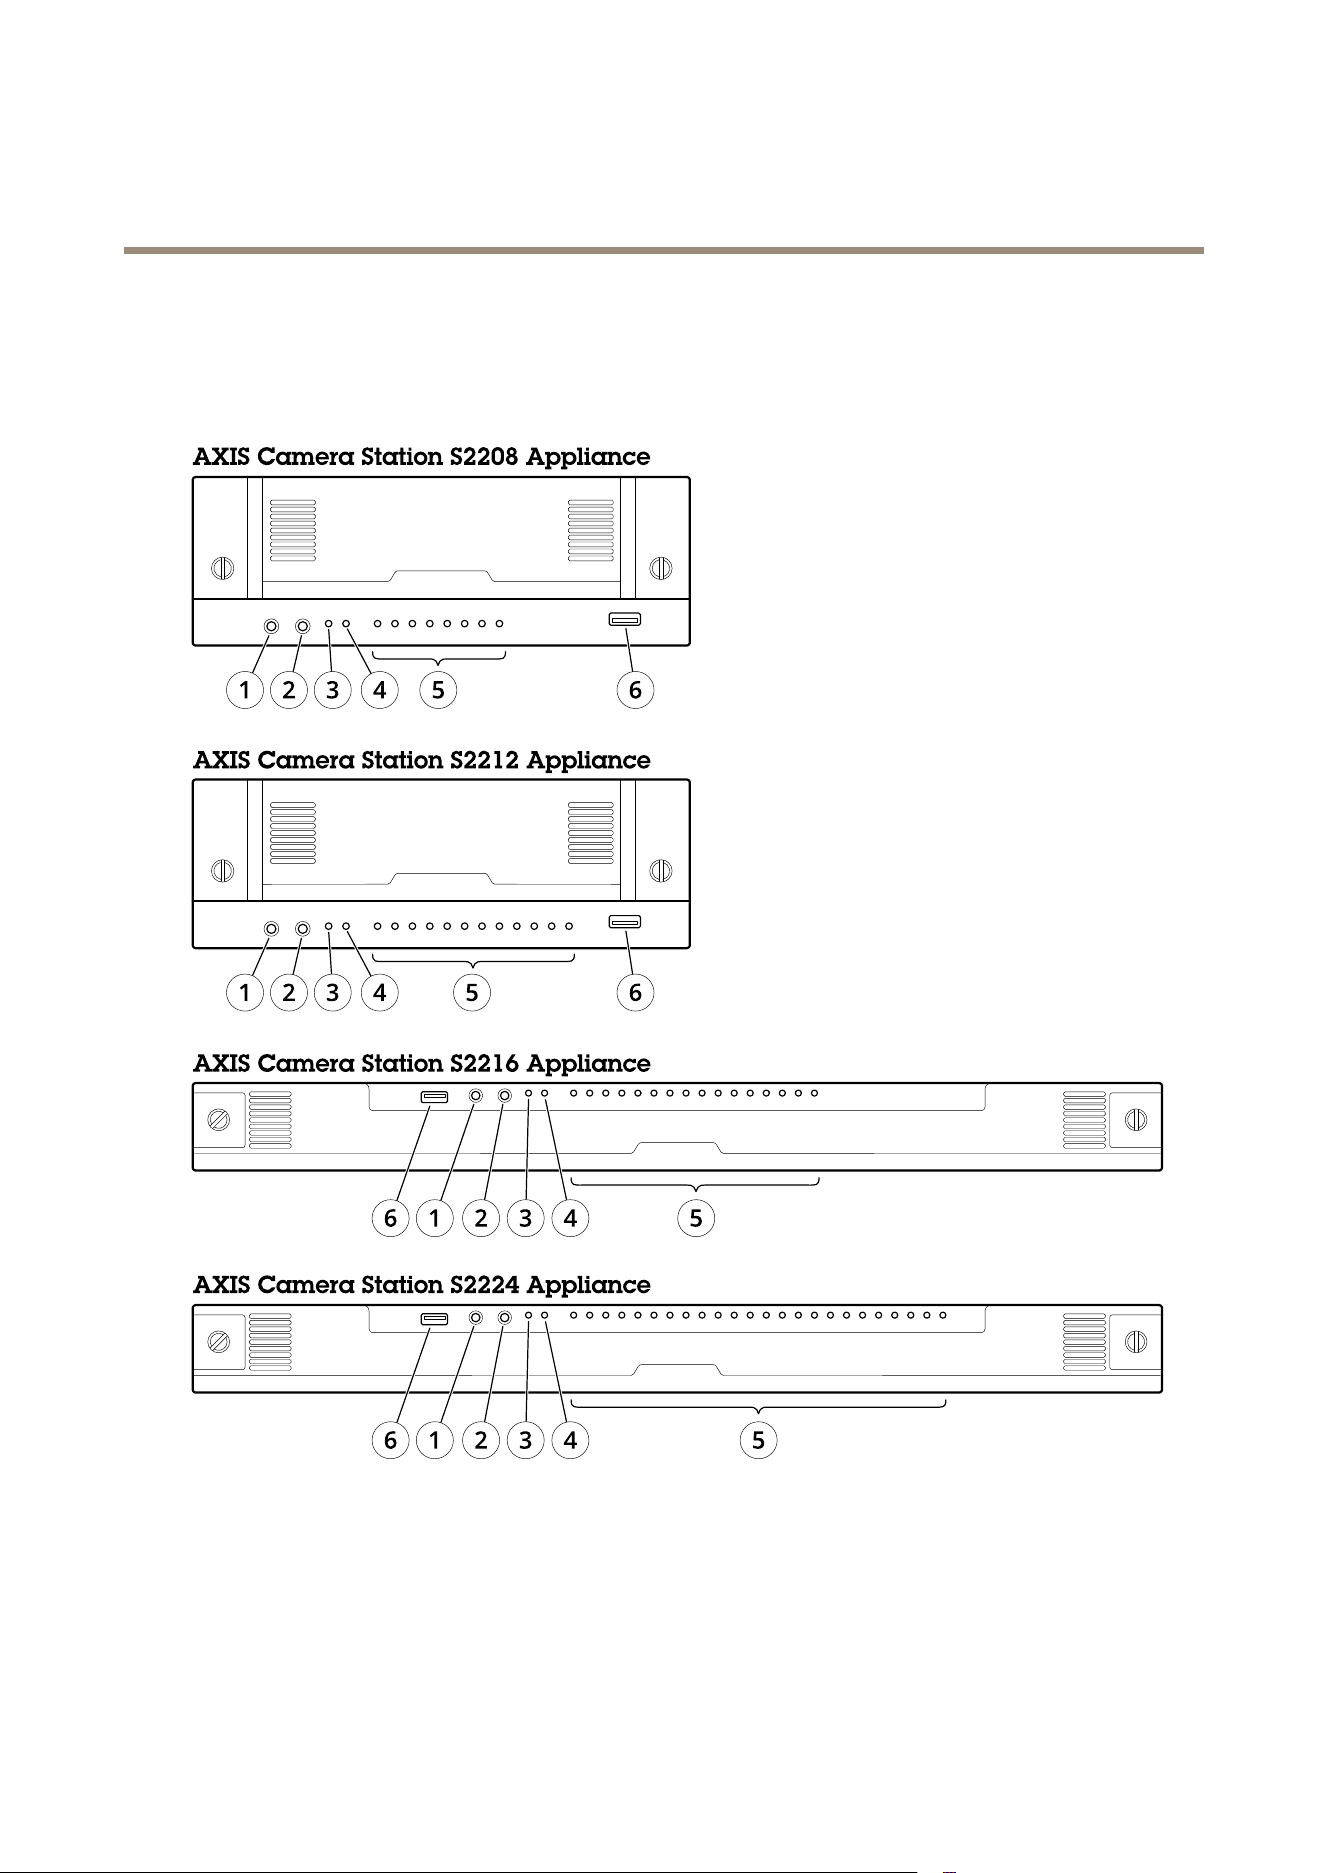
Frontside
1 2 3 4 5 6 7 8
1 2 3 4 5 6 7 8 9 10 11 12
1 2 3 4 5 6 7 8 9 10 13 14 15 1611 12
1 2 3 4 21 22 23 245 6 7 8 9 10 13 14 15 16 17 18 19 2011 12
1
Audioin
2
Audioout
3
SystempowerLED
4
DiskactivityLED
5
StatusLEDsofPoEports
6
USB3.0
39
AXISCameraStationS22ApplianceSeries
Productoverview
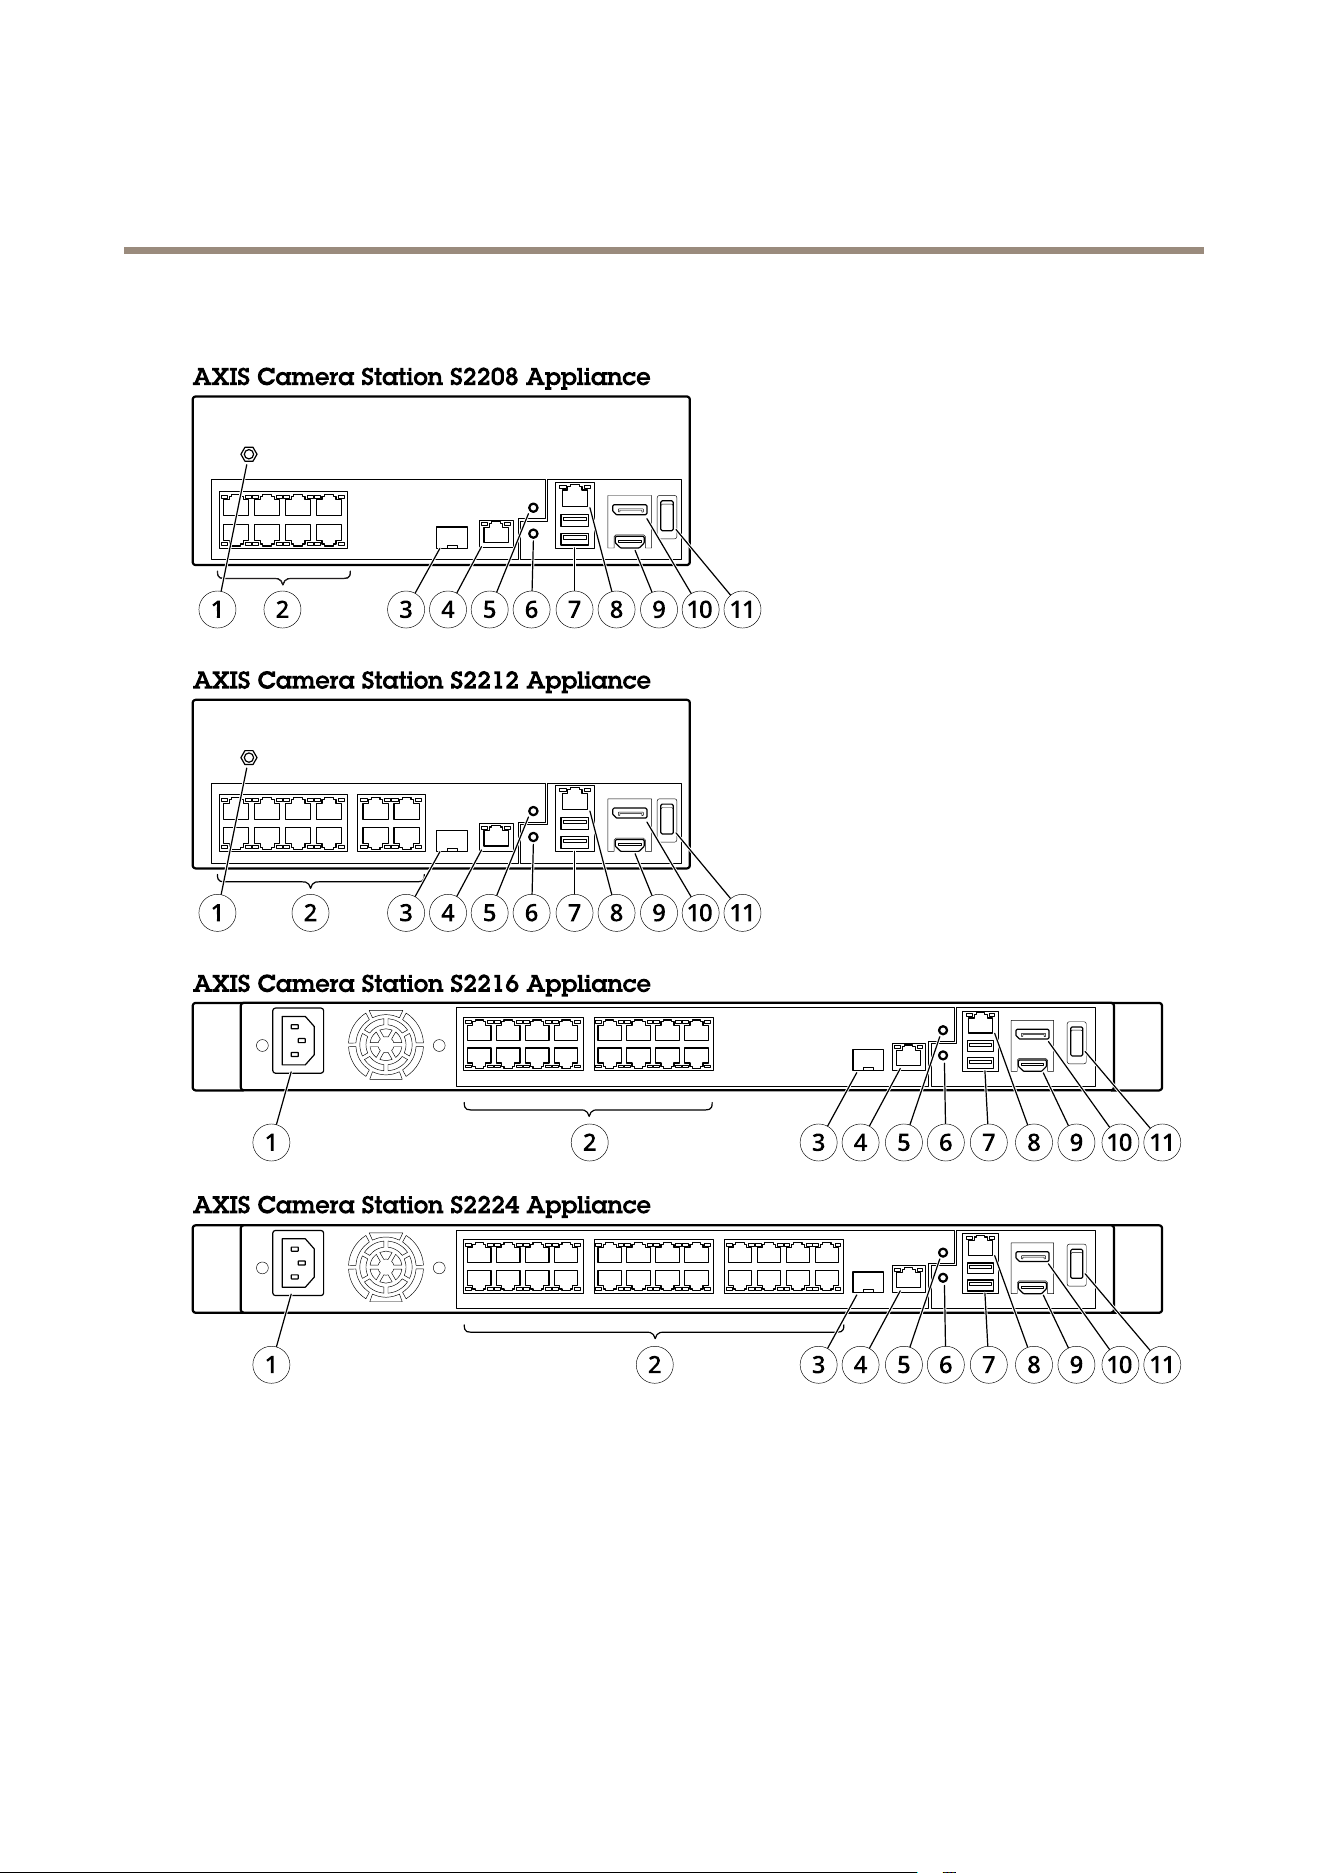
Rearside
1 3 5 7
2 4 6 8
1 3 5 7
2 4 6 8
9 11 13 15
10 12 14 16
1 3 5 7
2 4 6 8
9 11
10 12
1 3 5 7
2 4 6 8
9 11 13 15
10 12 14 16
17 19 21 23
18 20 22 24
1
Powerconnector
2
PoEports
3
Switchuplink,SFP
4
Switchuplink,RJ45
5
Switchresetbutton
6
Serverresetbutton
7
USB2.0x2
8
Servernetwork,RJ45
9
HDMIport
10
Displayport
11
Powerbutton
40

AXISCameraStationS22ApplianceSeries
Productoverview
Specications
FrontLEDs
LEDindicator
Color
Indication
Power
GreenServeron
Networkports
Green
Linkstate
BlinksamberHarddriveactivity Harddrive
BlinksredPossibleharddrivefailure
RearLEDs
Networkspeedandactivity
Color
Indication
Amber
10/100Mbit/s
RightLED
Green
1000Mbit/s
LeftLEDBlinksgreenNetworkactivity
Powerbutton
Color
Indication
OffSwitchandserveroff
BlueDuringswitchboot
Whenthepowerbuttonisnot
pressed
GreenSwitchbootcompleted
Red(ashesoncefor1s)
Poweron
>5sblinksgreenRestartingserver
>10ssteadybluePoweroffswitch
Whenthepowerbuttonispressed
>15sblinksbluePoweroffswitchandserver
41

AXISCameraStationS22ApplianceSeries
Troubleshooting
Troubleshooting
Ifyoucan’tndwhatyou’relookingforhere,trythetroubleshootingsectionataxis.com/support.
Performasystemrecovery
Ifthedevicehashadacompletesystemfailure,youmustusearecoveryimagetorecreatetheWindows®system.Todownloadthe
AXISRecoveryKit,contactAXISTechnicalSupportandsupplytheserialnumberofyourdevice.
1.DownloadtheAXISRecoveryKitandAXISISOtoUSBTool.
2.InsertaUSBdriveintoyourcomputer.
-UseaUSBdrivewithaminimumof16GBto32GB.
-TheUSBdrivewillbeformatted,andallexistingdatawillbeerased.
3.RuntheAXISISOtoUSBToolandfollowtheonscreeninstructions.
WritingdatatotheUSBdrivetakesapproximately10to15min.Don’tremovetheUSBdriveuntiltheprocessiscomplete.
4.AftertheISOtoUSBtooliscomplete,taketheUSBdriveandplugitintoyourdevice.
5.Startyourdevice.
6.WhenyouseetheAXISsplashscreen,pressF12.
7.ClickUEFI:USBDrive.
8.NavigatetoyourUSBdriveandpressENTER.ThesystembootsintotheAXISRecoveryKit.
9.ClickReinstallOperatingSystem.
Therecoverytakesroughly10to15mintocomplete.Younddetailedinstructionsinthedownloadfortherecoverykit.
TroubleshootAXISCameraStation
ForinformationabouthowtotroubleshootAXISCameraStation,gototheAXISCameraStationusermanual.
42


UserManualVer.M4.2
AXISCameraStationS22ApplianceSeries
Date:February2020
©AxisCommunicationsAB,2018-2020
PartNo.T10134965