USER GUIDE
SNAP G is a portable gimbal camera that combines ease of use and functionality.

2
Contents
1. Basicinformationoverview 3
1.1 Includeditems 3
1.1.1 Standarditems 3
1.1.2 Accessories(soldseparately) 3
1.2 Partnames 4
1.2.1 Mainunit(front/backview) 4
1.2.2Mainunit(sideview) 4
1.2.3Mainunit(top/bottomview) 5
1.3 Removingandinsertingthememorycard 5
1.4 Removingandinsertingthebattery 6
1.5 Chargingtheproduct 6
1.6 Turningtheproducton/off 7
1.7 Checkingthebatterylevel 7
1.8 Safetyinformationforproperuse 8
2. Usingtheproduct 9
2.1 OverviewoftheLCD 9
2.1.1 Mainmenutree 9
2.1.2UsingtheLCDfunction 10
2.1.3Screenlayout 10
2.2 Usingthebuttons 12
2.3 OverviewofLEDstatusandbeep 13
3. OverviewofSNAPGfeatures 14
3.1 UsingAItrackingmode 14
3.2 Facetrackingmode 15
3.3 UsingFACEID 16
3.4 Usingdynamicmotionrecordingmode 17
3.5 Updatingthefirmware 18
4. UsingtheSNAPGapp 19
4.1 DownloadingtheSNAPGapp 19
4.2 Usinglivestreaming 19
5. Usingrecordingmodes 22
5.1 Usingvideomodes 22
5.2 Usingphotomodes 24
5.3 Settingpresets 25
6. Settingthegimbal 26
6.1 Settingthegimbal 26
6.2 Usingthegimbalmode 26
7. Viewingalbum 27
7.1 OverviewoftheAlbumscreen 27
7.2 Deletingfilesinthealbum 27
8. Configuringthesystemsettings 28
8.1 Connectionsettings 28
8.2 Recordingsettings 28
8.3 Othersettings 29
8.4 Systeminformation 29
9. Specifications 30
3
1. Basic information overview
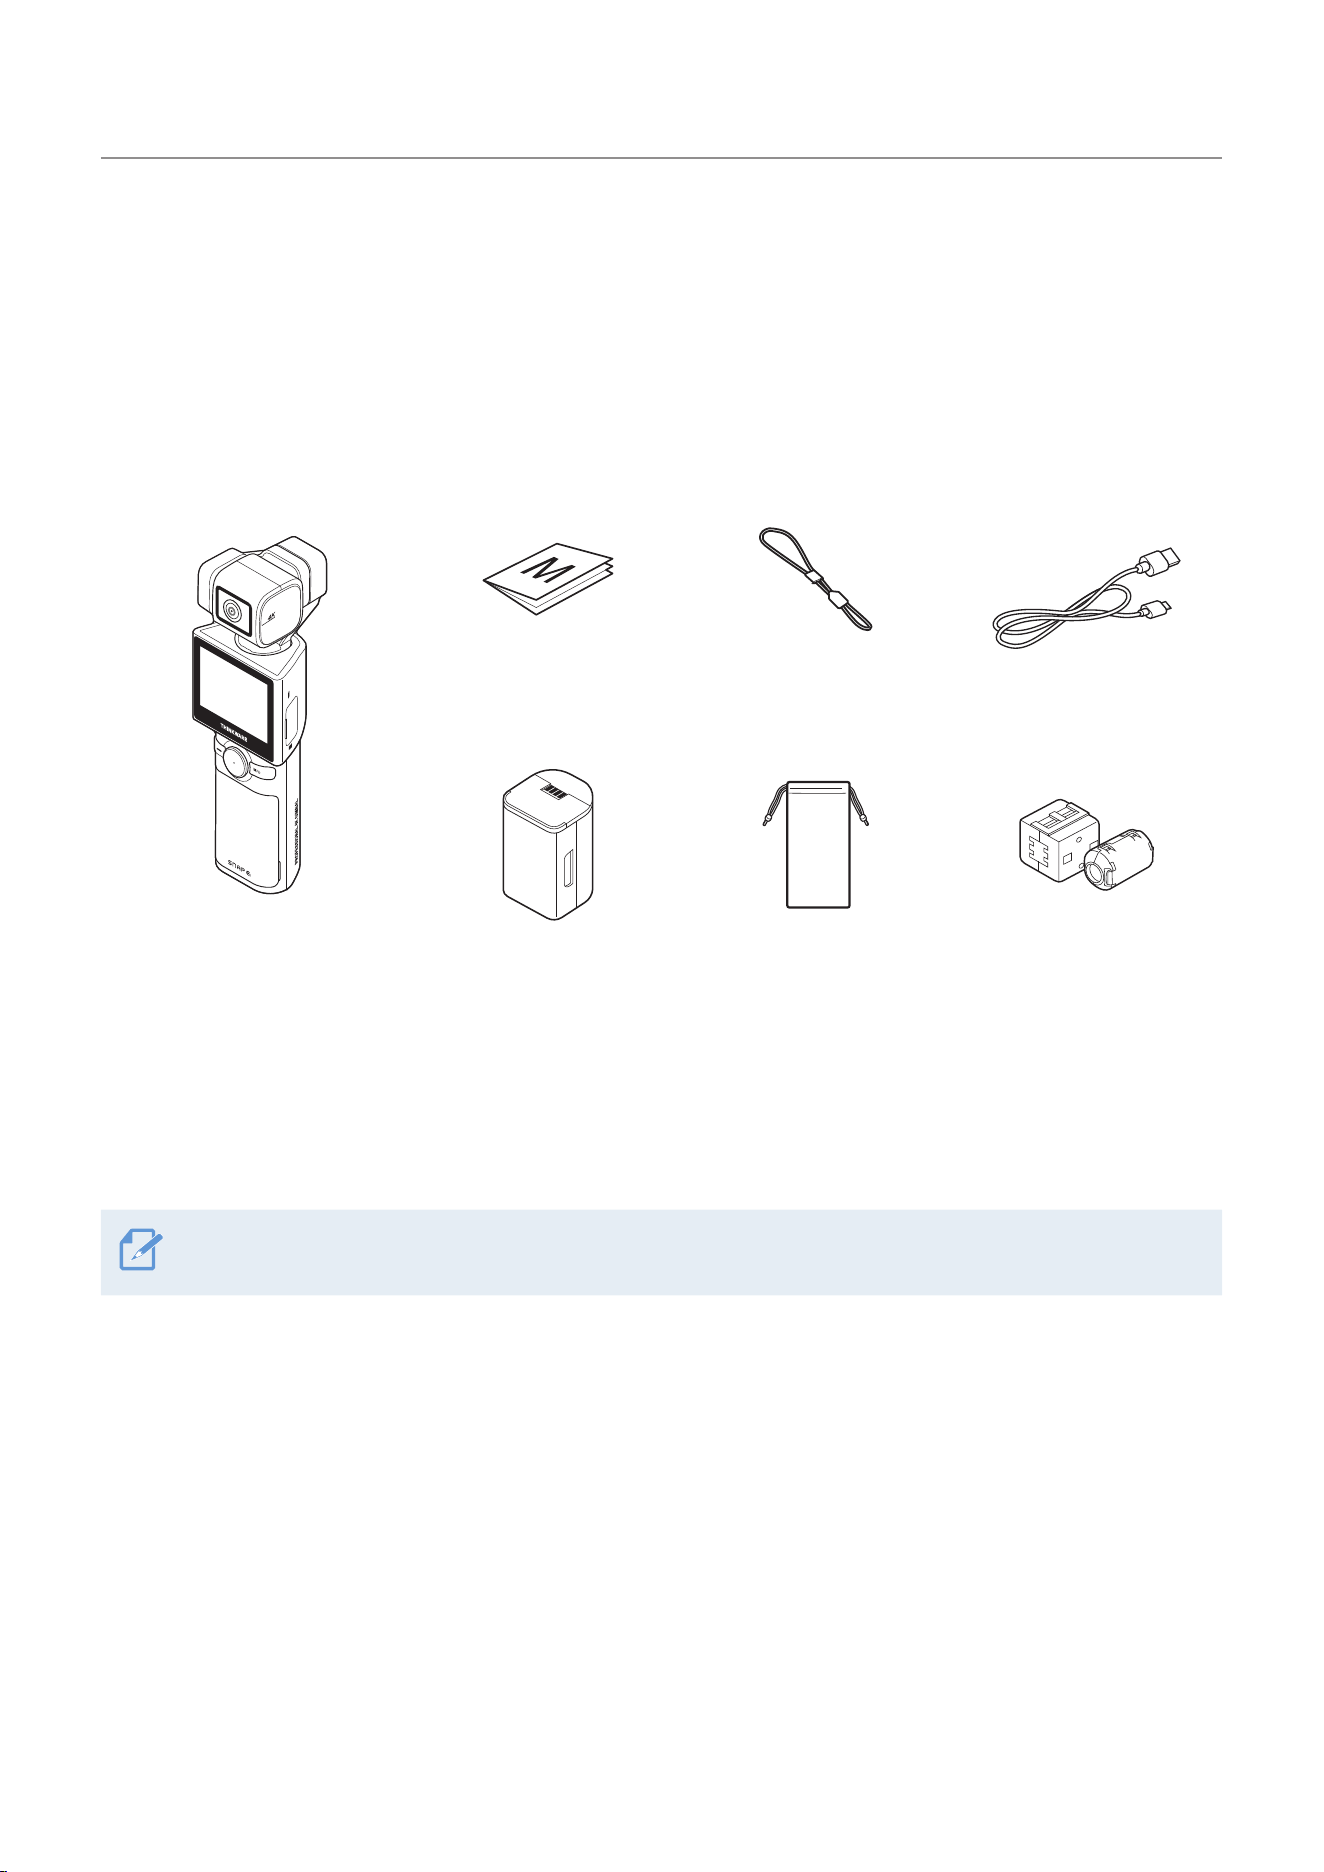
1.1 Included items
1.1.1 Standard items
Quick start guide Strap USB-C cable
Main unit Battery Pouch Ferrite core
1.1.2 Accessories (sold separately)
Mini tripod / Microphone / Backpack mount / Battery charger / ND filter / LCD protective film /
Hard protective case (small) / Hard protective case (large)
Visit the THINKWARE homepage (http://thinkware.com) to buy extra included items and accessories.
Basic information overview
4
1.2 Part names
1.2.1 Main unit (front/back view)
Camera
Pan motor
Speaker
Trigger
M4 mount
connector
Strap holder
LCD
LED status
Recording button
Joystick
Mode/Power button
Battery cover
1.2.2 Main unit (side view)
Roll motor
Microphone
USB port/SD card slot cover
USB-C port
Microphone
External microphone port
microSD card slot
Basic information overview
5
1.2.3 Main unit (top/bottom view)
Tilt motor
Battery cover
release button
1/4” mount connector
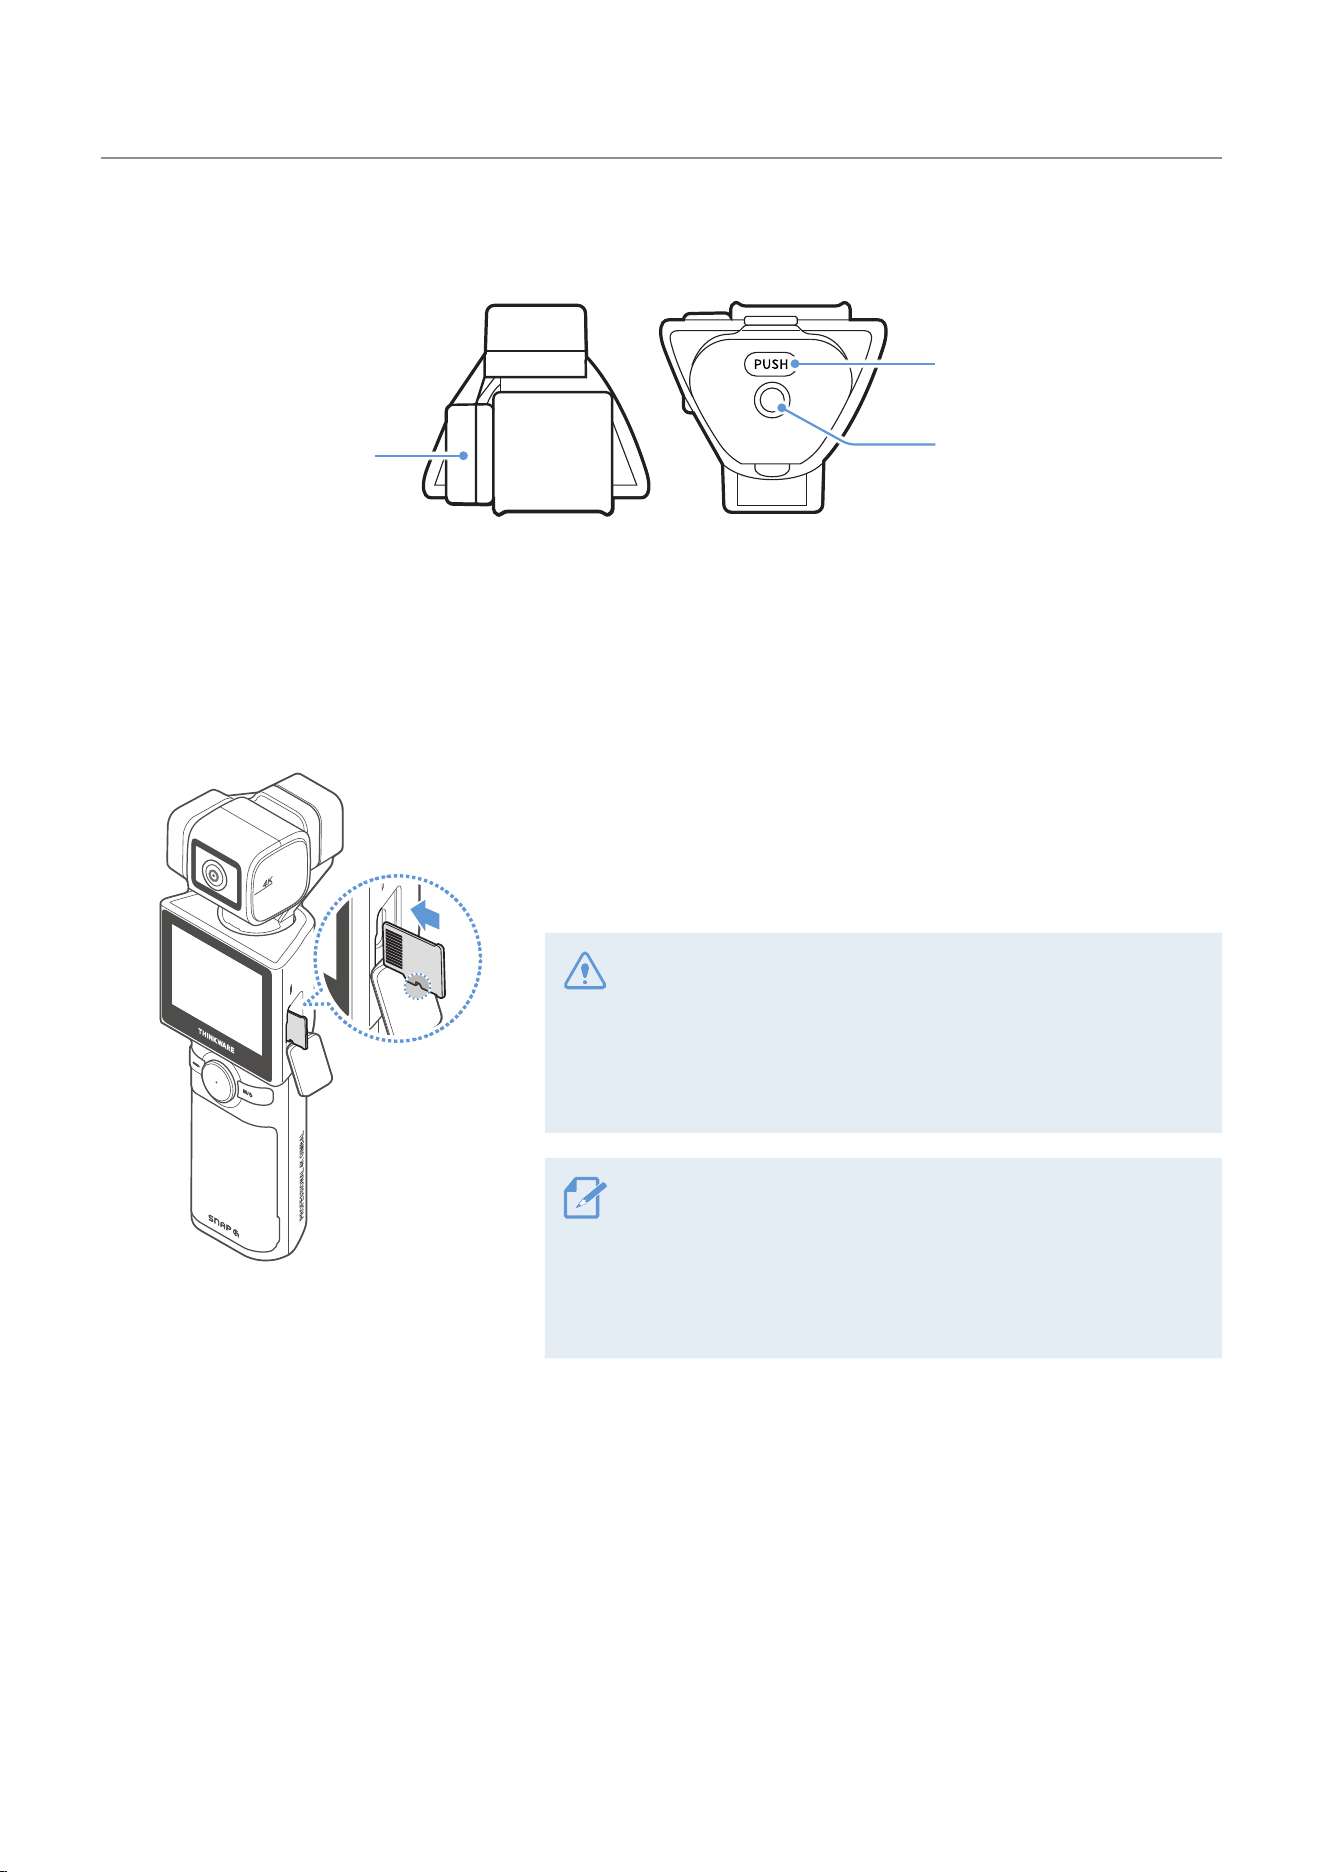
1.3 Removing and inserting the memory card
Before removing the memory card, ensure that the product is
turned off. Gently push the bottom of the memory card with your
fingernail to release it, and then remove it from the product.
To insert the memory card, open the USB/SD card slot cover,
ensure that the memory card is in the correct direction, and
insert it into the slot until you hear a click.
• Ensure that the memory card is in the correct direction
before inserting it into the product. The product slot or the
memory card may be damaged if it is inserted incorrectly.
• Format the memory card periodically to avoid memory card
fragmentation and storage errors.
• For more information about the recommended Micro SD
cards, visit http://www.thinkware.com/help.
• The recommended Micro SD cards are subject to change
and SD cards from manufacturers other than THINKWARE
are not guaranteed to operate properly.
Basic information overview
6
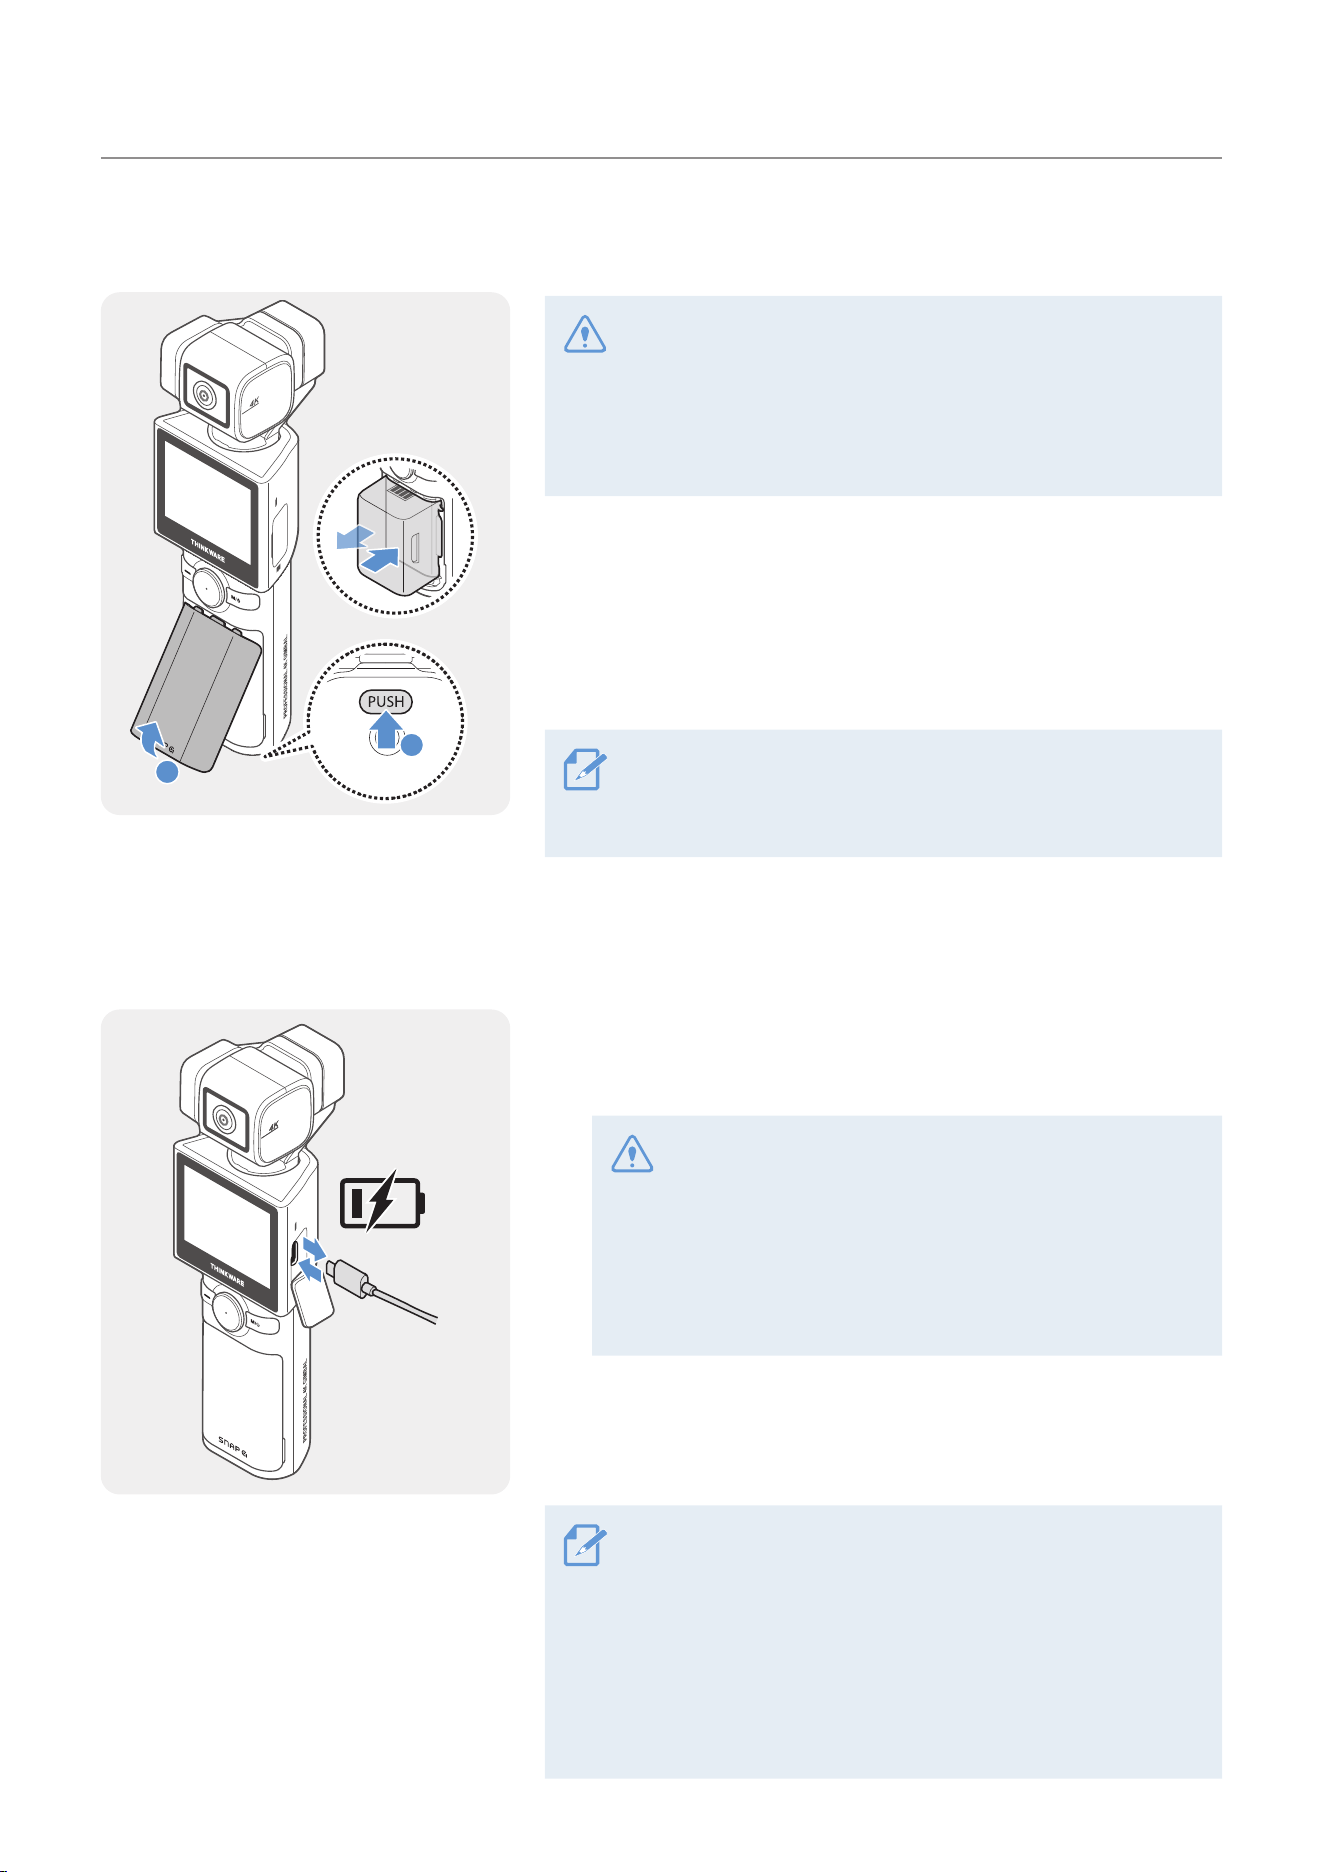
1.4 Removing and inserting the battery
2
1
➊➊
➋➋
➌➌
• For optimal performance, use a genuine SNAP G battery.
• The performance of the product may be limited and the
camera performance is not guaranteed if you do not use an
authentic SNAP G battery. For more information on battery
safety and use, refer to the Battery Information Guide.
1
Open the battery cover by pressing the battery cover
release button and take out the battery by holding the
grooves on both sides of the battery.
2
Insert the new battery in the correct direction.
The product uses a removable battery. Ensure that the
battery cover is tightly closed and sealed before using the
product.
1.5 Charging the product
1
Connect the product to a USB adapter or computer USB port
using the included USB cable.
• Fully charge the battery before using the product for
the first time.
• Use an adapter that supports 2A or higher. The product
may not charge when using certain adapters.
• If you use a cable other than the included authentic
cable, the product may not charge.
2
When charging is complete, the LED indicator of the product
will turn off.
• It takes 180 minutes to fully charge the battery. (You can
charge two batteries at the same time by using SNAP G
battery charger.)
• For the fastest charging of the product, use the SNAP G
charger (sold separately).
• Charging time may vary depending on the charging
environment.
Basic information overview
7
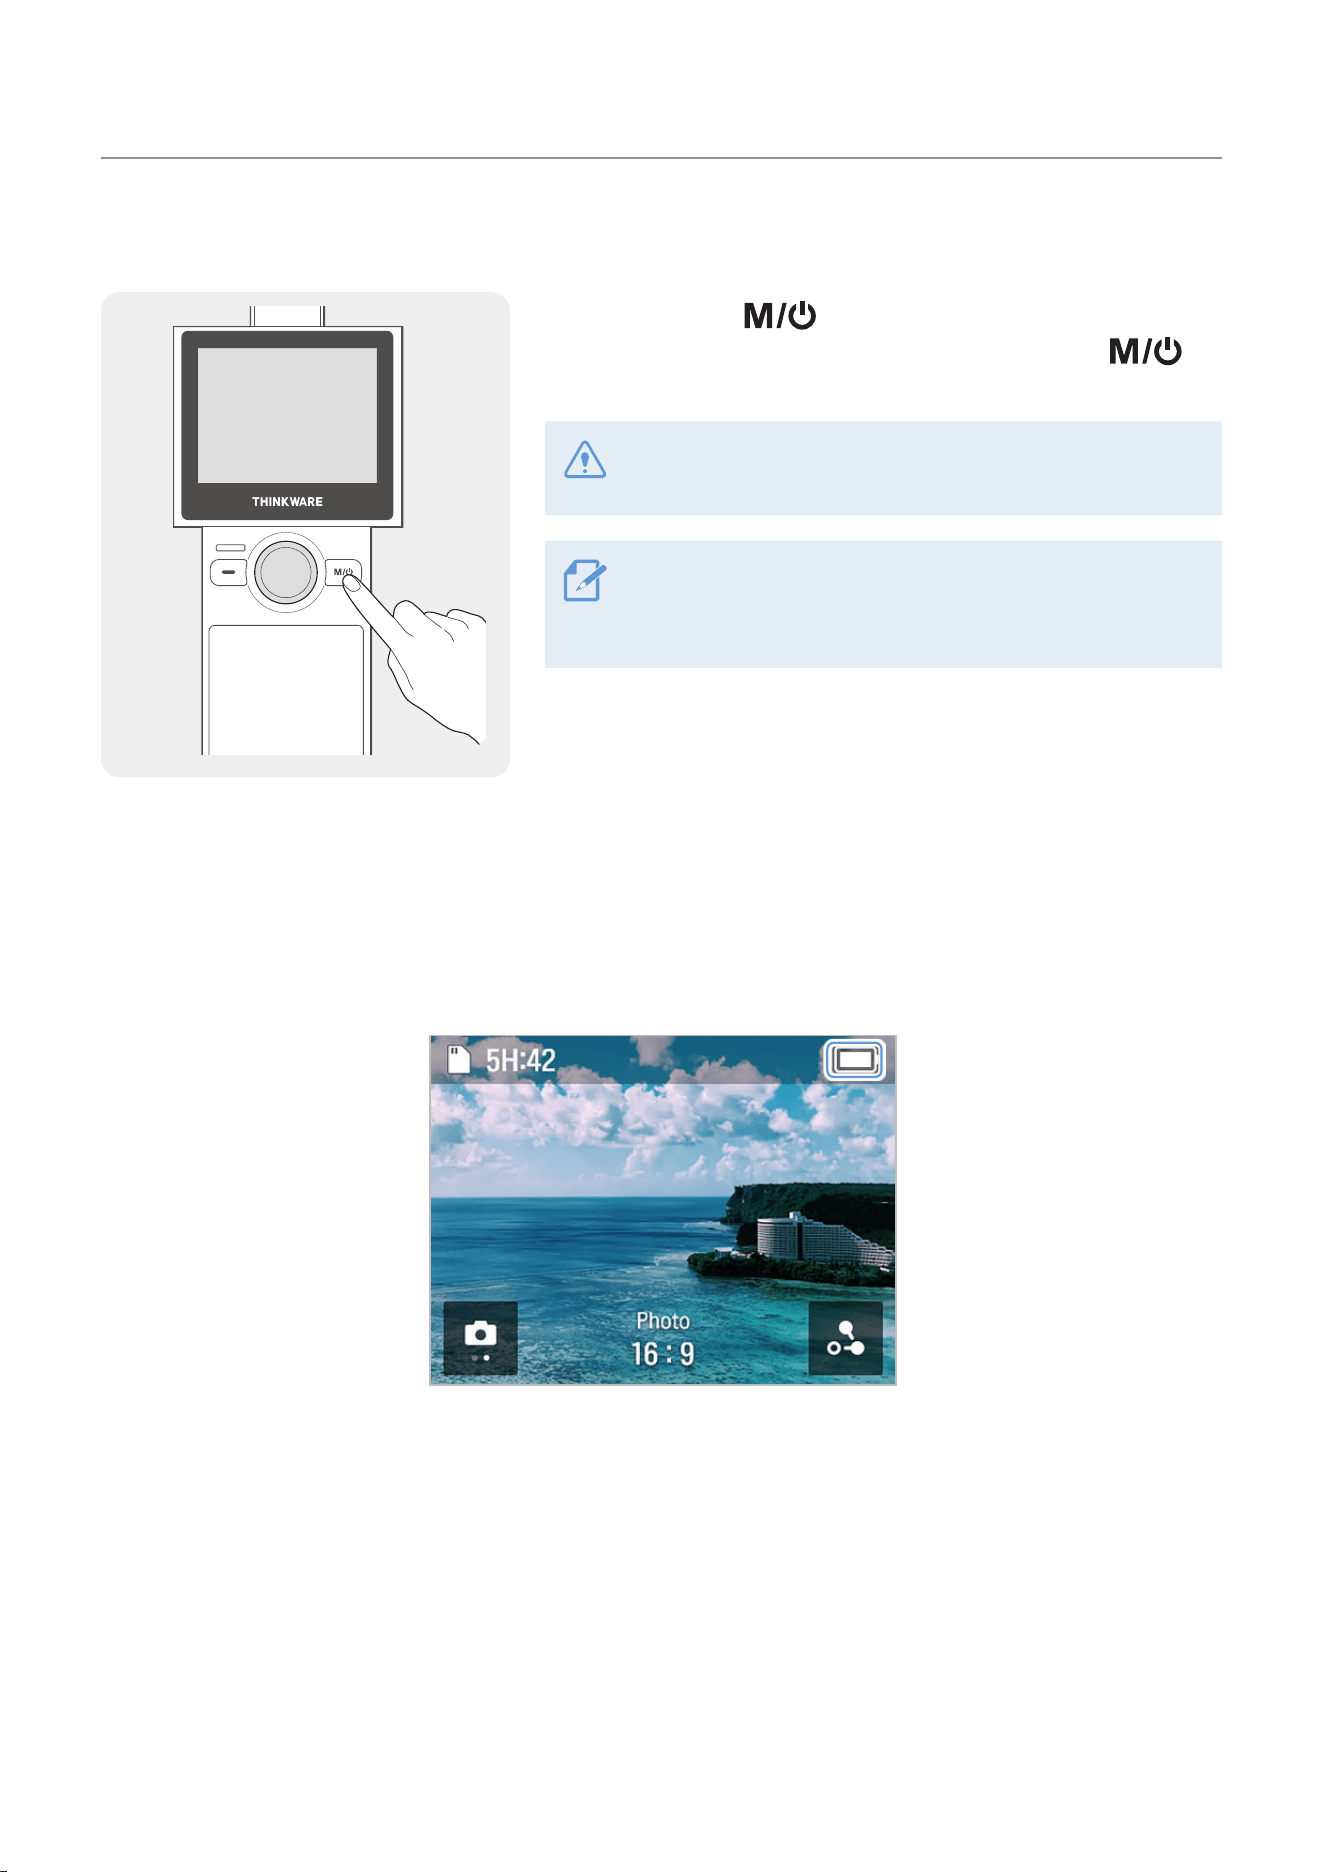
1.6 Turning the product on/off
Press and hold the button on the product to turn the
product on. To turn the product off, press and hold the
button again.
Be careful when storing or carrying the product as the power
may be turned on by pressing the power button.
The welcome mode is turned on when the product is turned
on. To turn welcome mode off, set it on the gimbal settings
menu.
1.7 Checking the battery level
The remaining battery level can be checked through the battery icon displayed at the top-right part of the
LCD screen.
Basic information overview
8
1.8 Safety information for proper use
Read the following safety information to properly use the product.
Product operation
• If the product is impacted, it may malfunction or break down.
• Avoid contact with sand and liquid to protect the gimbal motor and sensors, etc.
• To prevent damage from high temperatures during product use, it may enter overheat protection mode and
stop recording.
• Close the cover to prevent foreign objects from entering the memory slot and USB port before using the
product.
• Be careful not to get foreign objects inside the battery cover.
• The proper operating temperature for the product is 10 - 35 °C.
• The battery life may vary depending on the product usage environment and settings.
Product management
• This product is not waterproof. Clean the product with a soft cloth without using any liquid.
• Foreign objects on the camera lens may crack or break the lens. Clean with a soft cloth.
• Do not use a pointed object or compressed air when removing foreign objects from the microphone hole.
• Store the product in the enclosed soft pouch. Do not impact the gimbal motor when storing the product.
9
2. Using the product
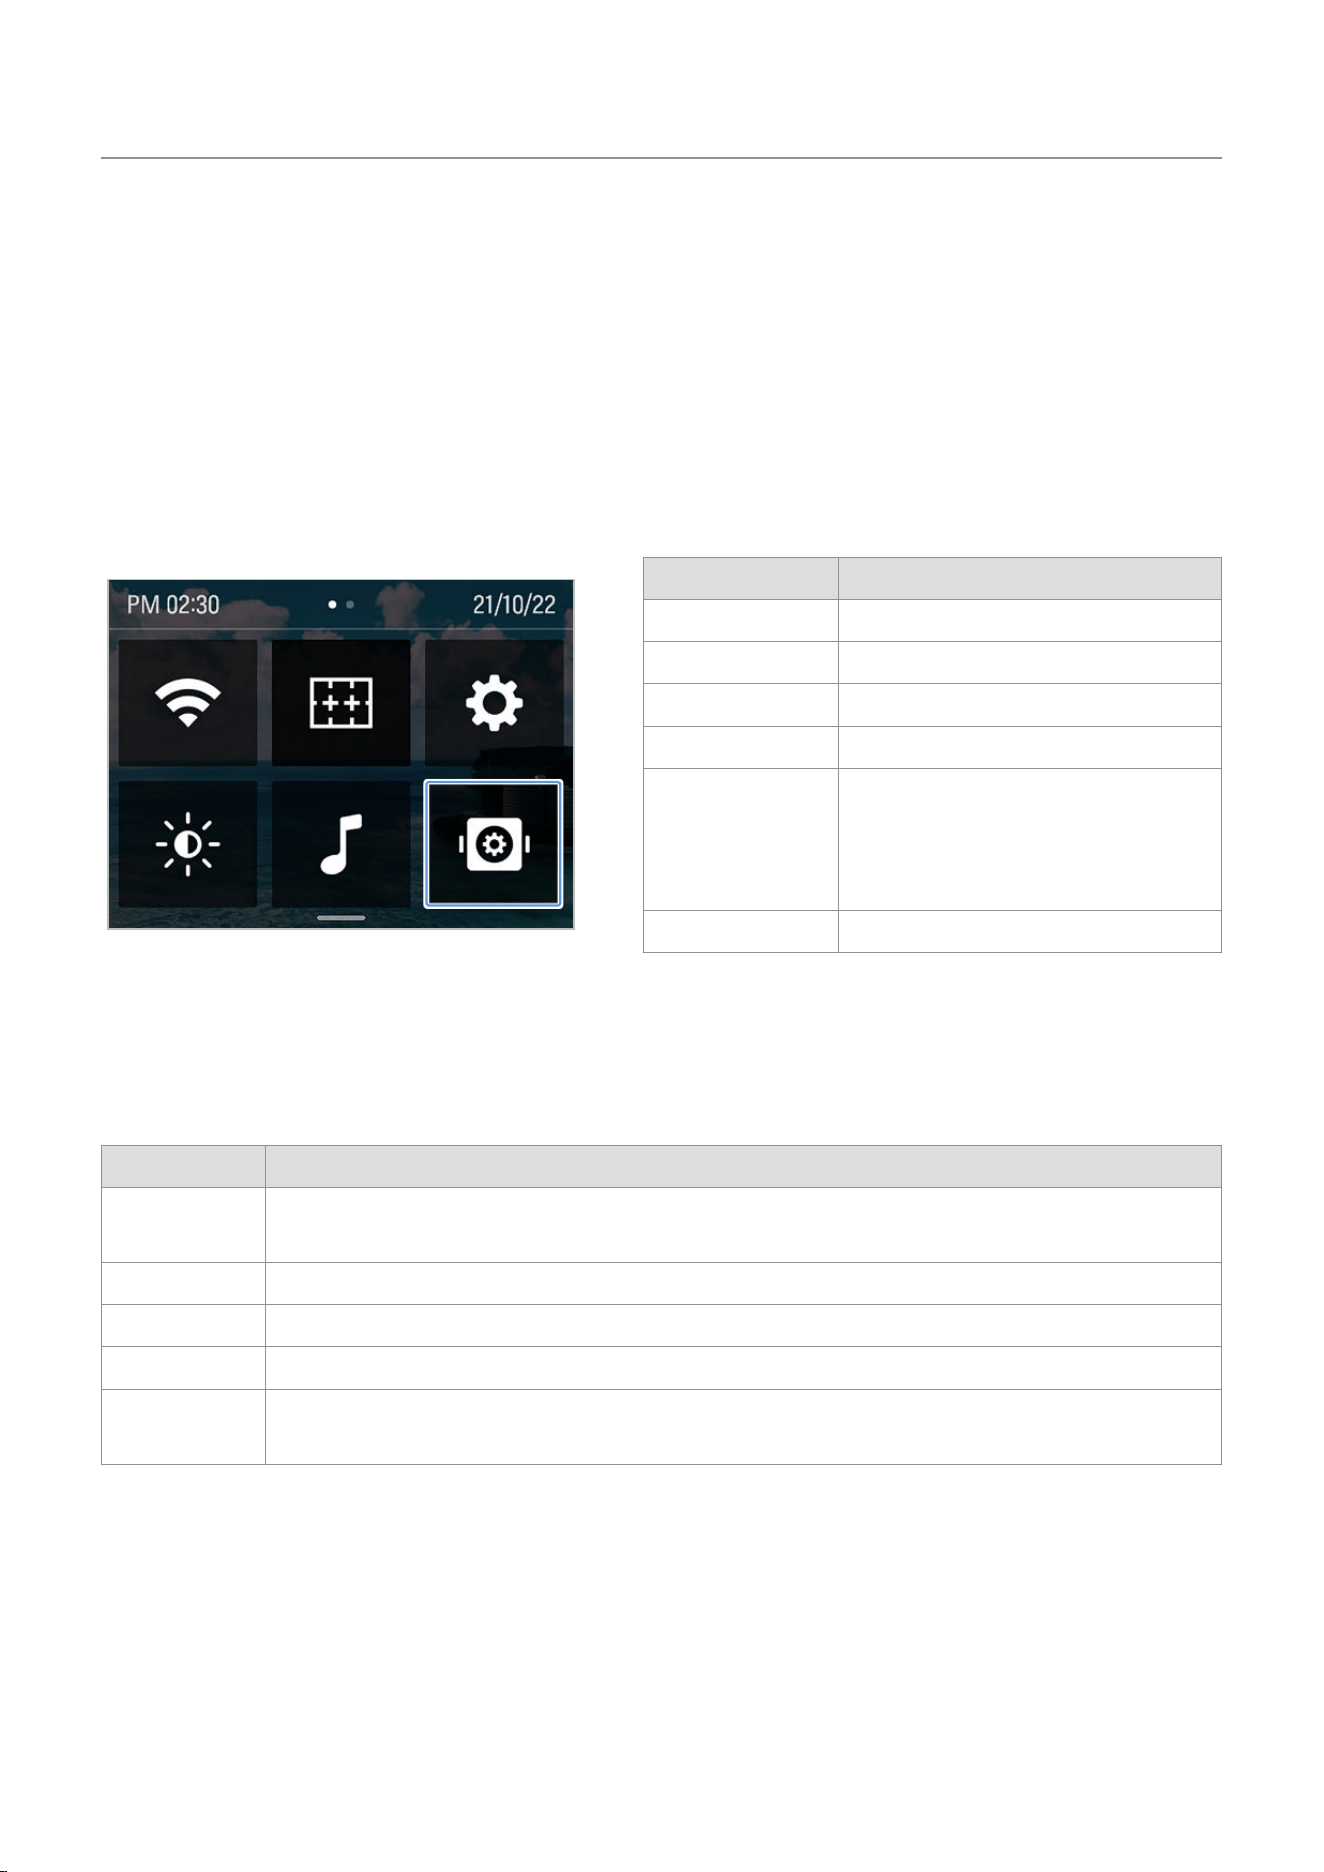
2.1 Overview of the LCD
2.1.1 Main menu tree
The main menu tree of the product is as follows.
Settings menu
Gimbal quick setting
Album
Preset
Using the product
10
2.1.2 Using the LCD function
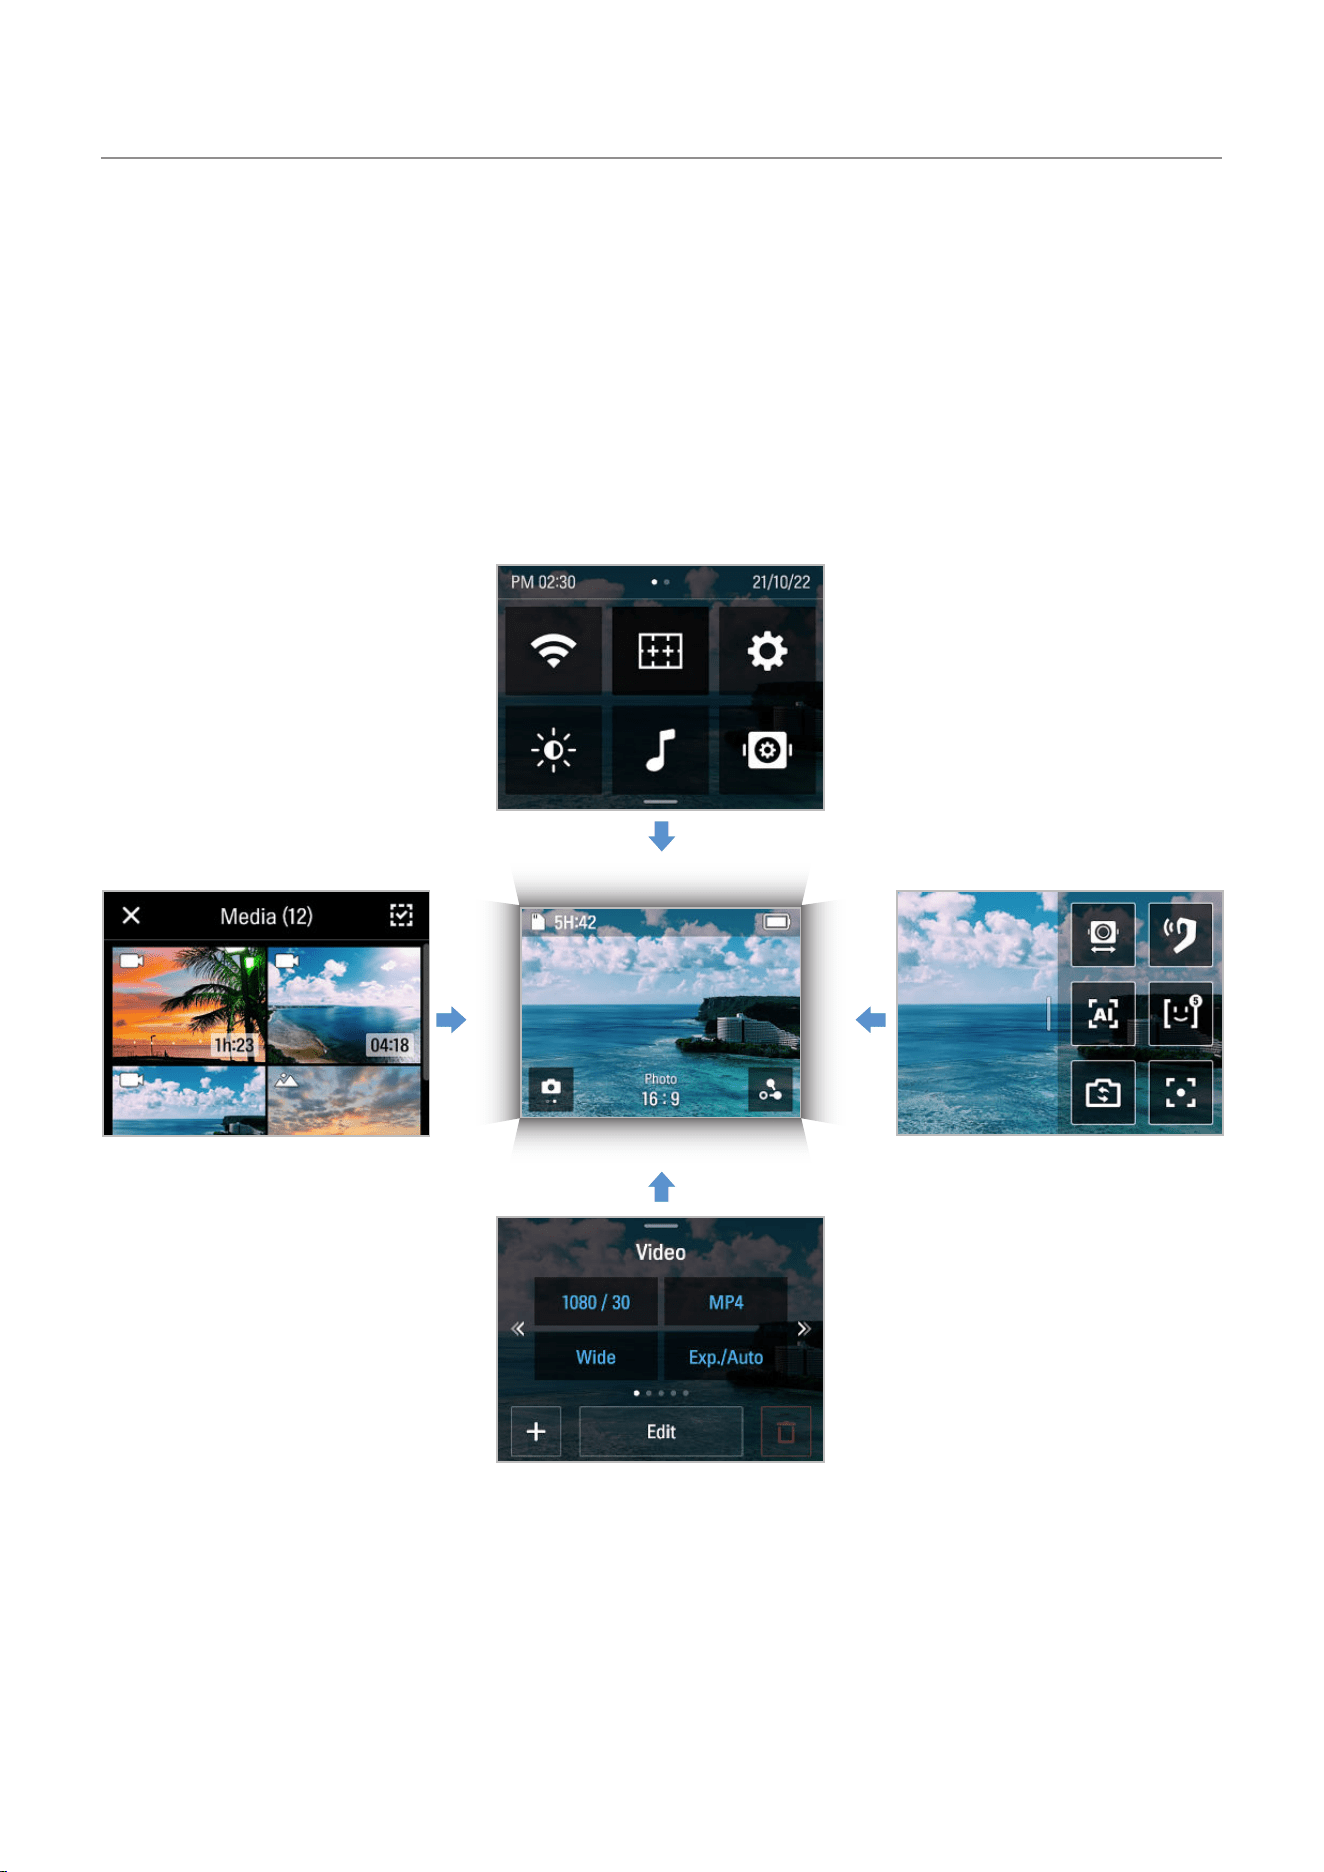
You can use the corresponding function by sliding the LCD in each direction.
• Swipe Up: Moves to the preset mode.
• Swipe Down: Moves to the settings.
• Swipe Left: Moves to the gimbal quick settings.
• Swipe Right: Moves to the album.
You can go back to the preview screen by swiping the LCD
in the opposite direction of each direction on each mode
screen.
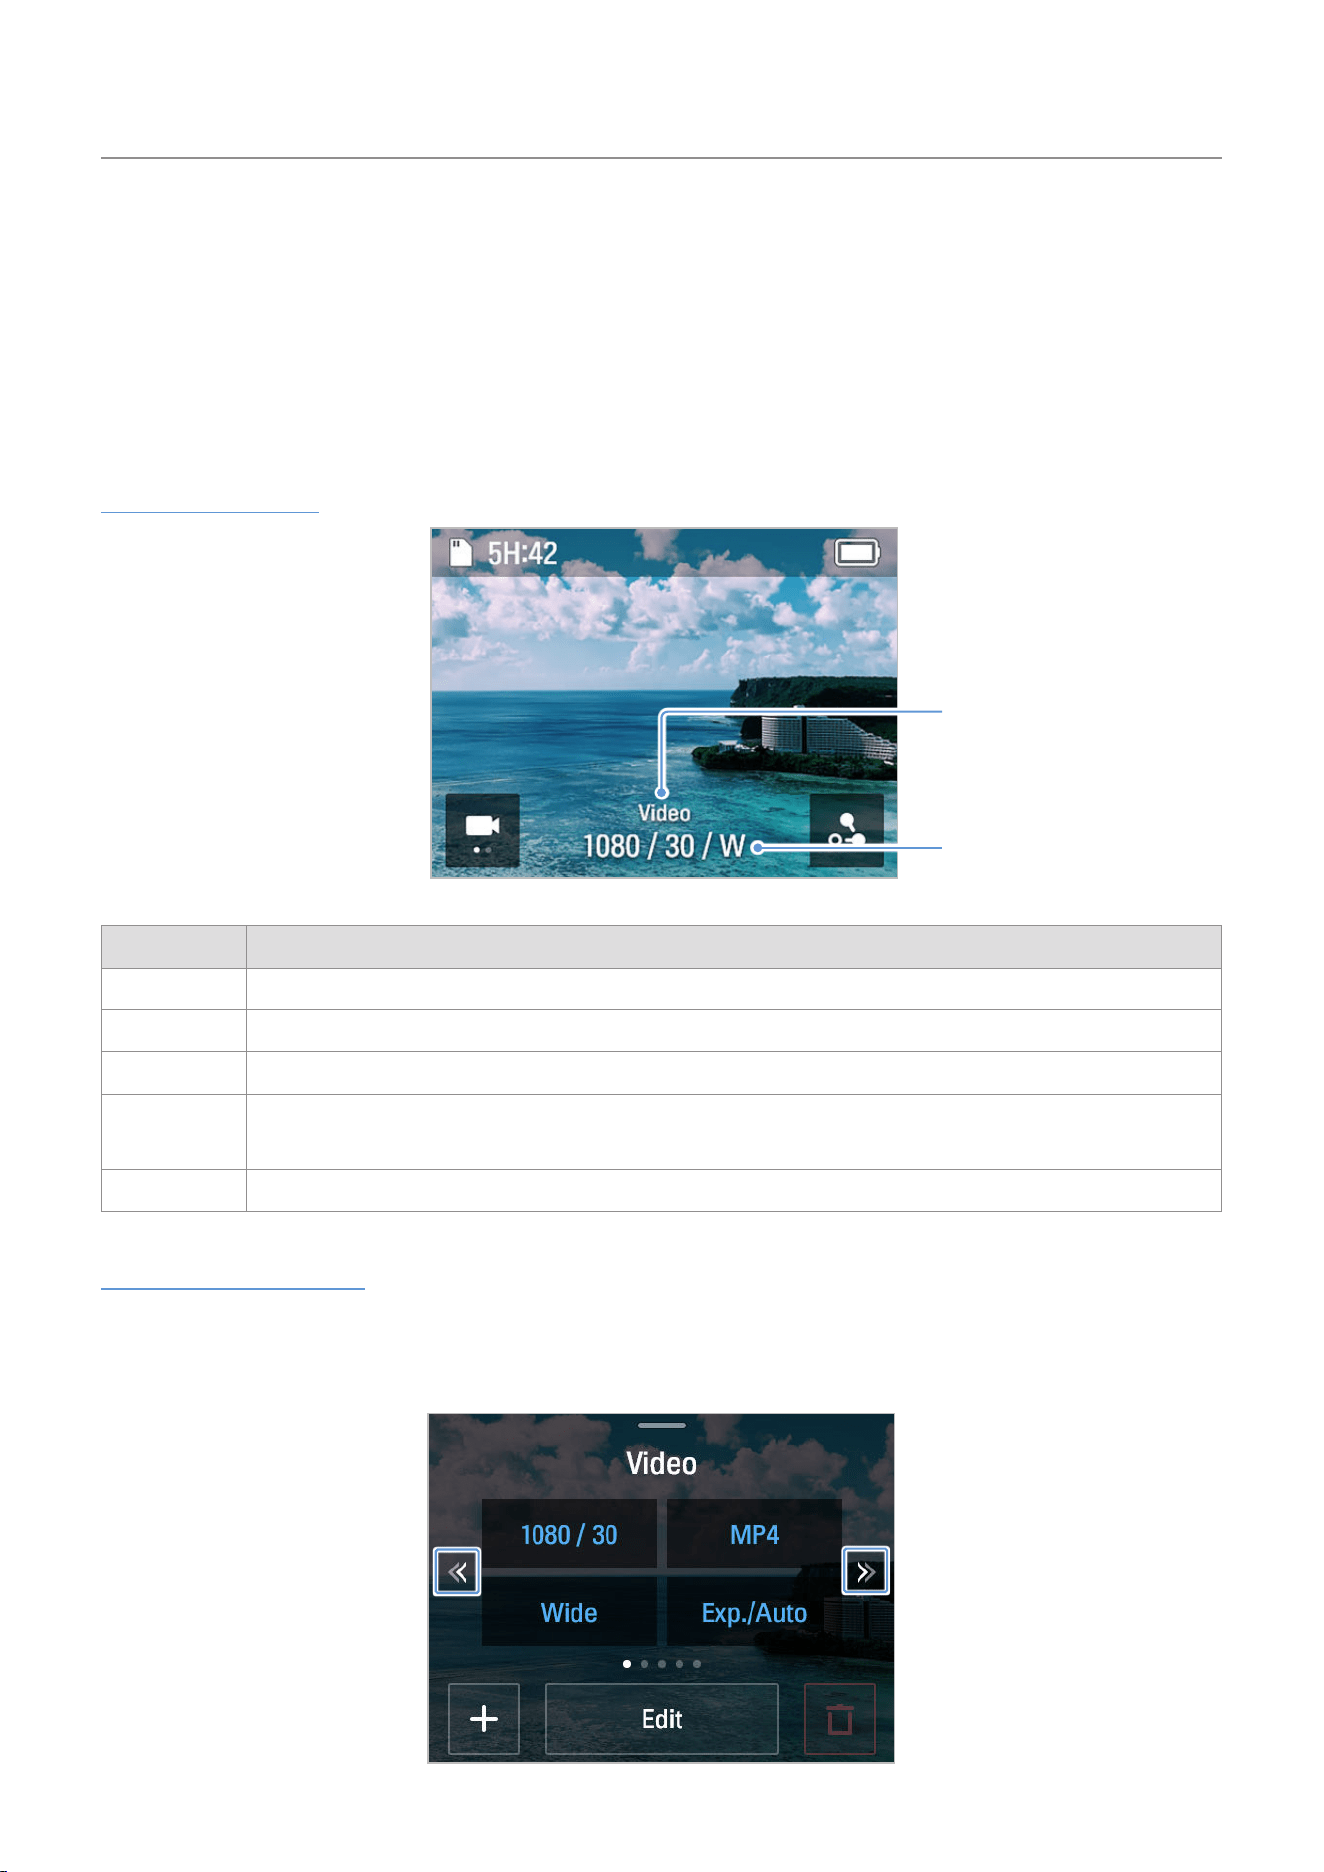
2.1.3 Screen layout
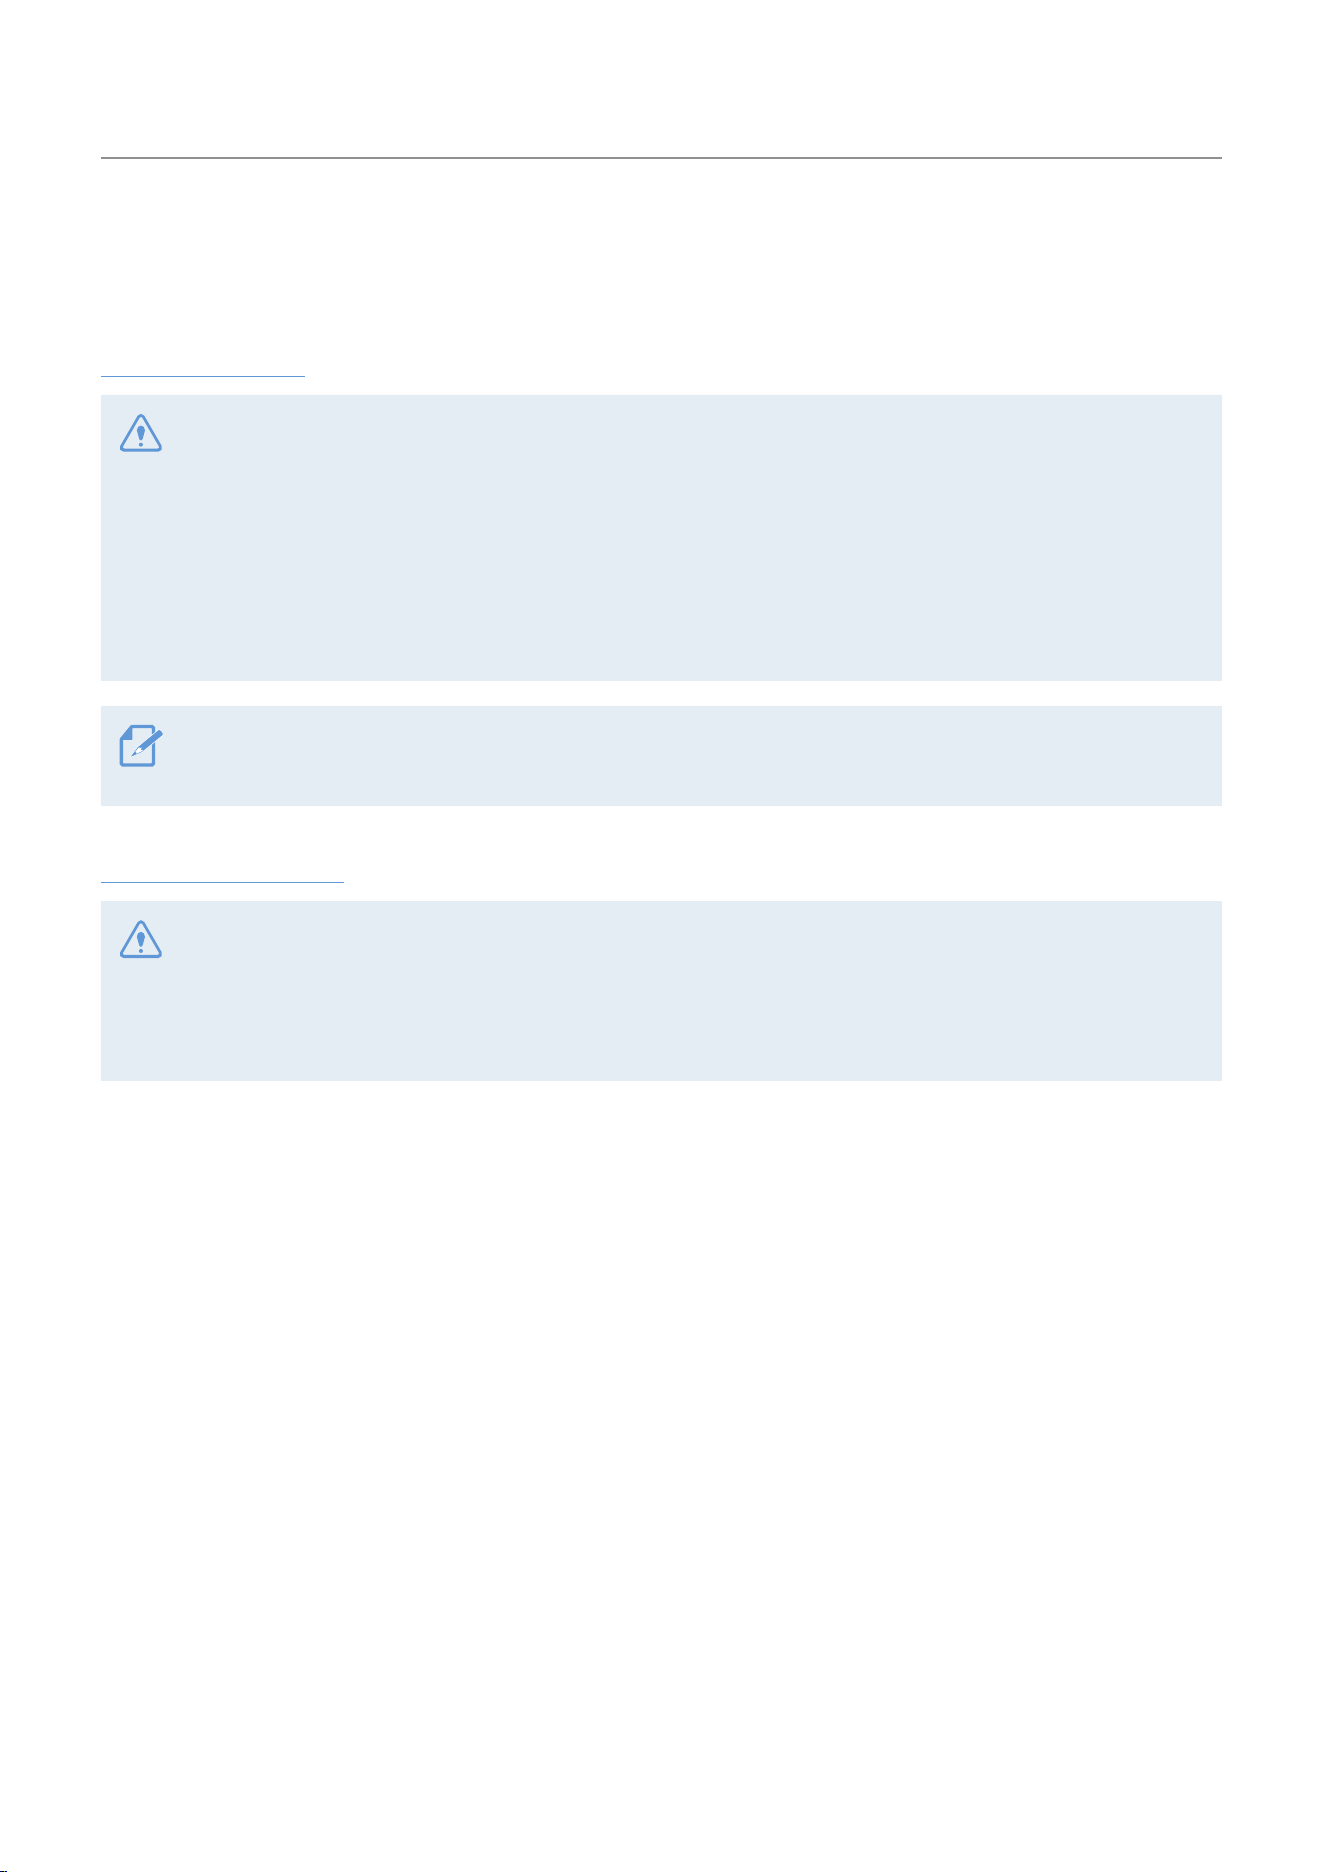
Preview screen layout
When the product is turned on, the camera preview, recording mode, battery level, and micro SD card
information are displayed on the LCD.
➊➊ ➋➋ ➌➌
➎➎ ➏➏ ➐➐
➍➍
Num Description
➊➊
Displays SD card information and status.
(Estimated recordable time/SD card not inserted/
Insufficient memory capacity/Error)
➋➋
Displays the Wi-Fi status.
➌➌
Displays the battery status.
➍➍
Tap on the preview screen to hide or show the
icons on the screen.
➎➎
• Displays the currently set mode.
• Touch to change video and photo modes.
➏➏
• Displays the recording settings of the currently
set mode.
• Swipe or touch the screen to move to the settings.
➐➐
In photo mode
• Touch to set the timer.
In video mode
• Touch to use dynamic motion recording mode.
Using the product
11
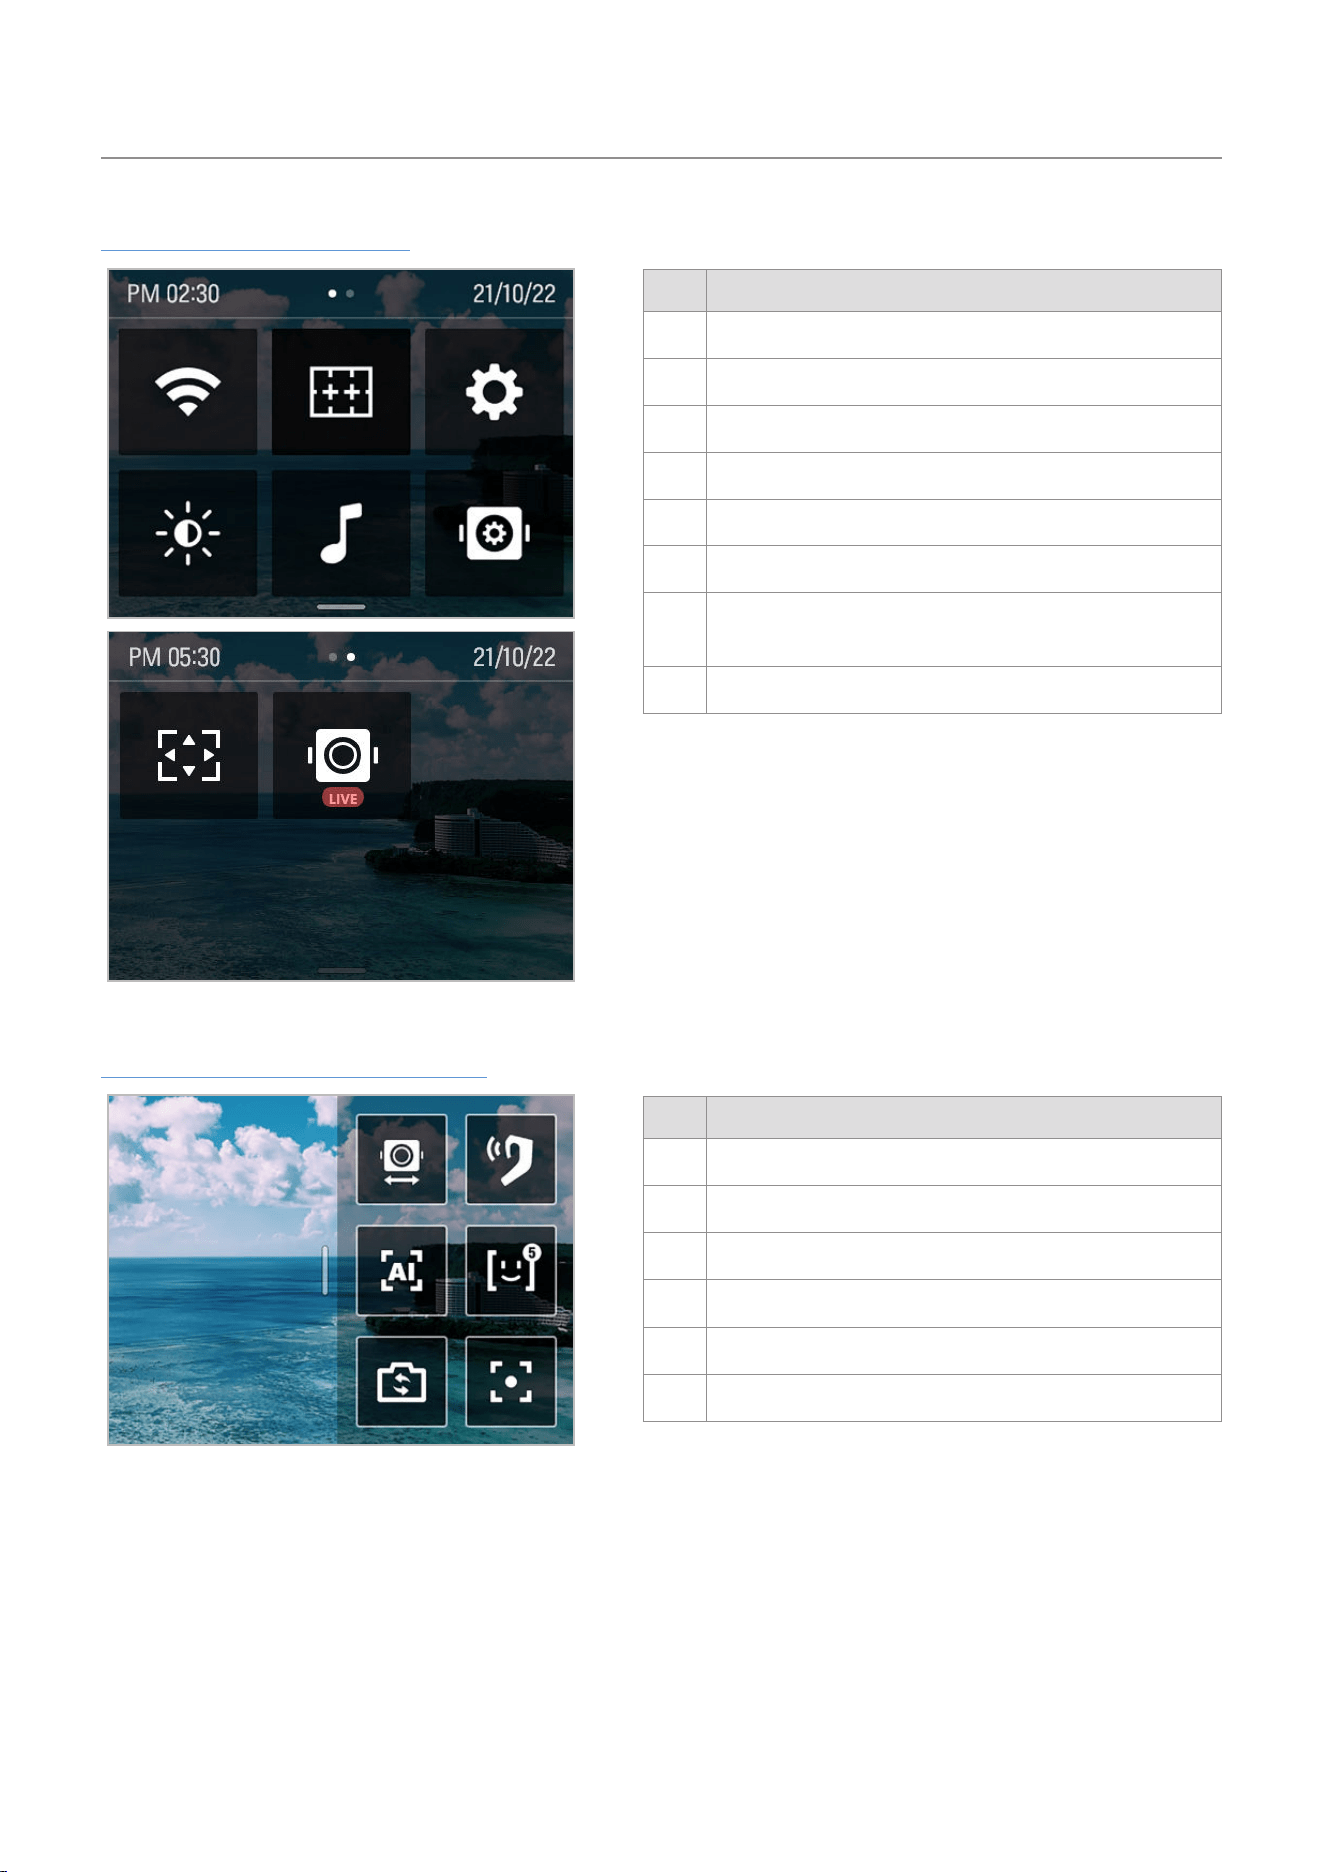
Quick Setting Menu Screen
➊➊ ➋➋ ➌➌
➎➎ ➏➏➍➍
➐➐➐➐ ➑➑
Num Description
➊➊
Turning Wi-Fi on/off
➋➋
Turn the grid on/off (display grid in preview screen)
➌➌
System settings
➍➍
LCD brightness
➎➎
Turn beep on/off
➏➏
Gimbal settings
➐➐
Switch to full screen
(Switch the preview screen from 16:9 to full screen)
➑➑
Turn live streaming on/off
Gimbal quick setting menu screen
➊➊
➋➋
➌➌
➎➎
➏➏
➍➍
Num Description
➊➊
Gimbal mode settings
➋➋
Switch tracking mode
➌➌
Switch front/selfie mode
➍➍
To be supported
➎➎
Turn FACE ID on/off
➏➏
Gimbal center alignment

Using the product
12
2.2 Using the buttons
Refer to the table below to use the product's buttons, trigger and joystick.
Press and hold the button to turn on the product.
M button
Joystick
Recording button
Trigger
Buttons
Sort
Preview screen Recording
Short press Long press Short press Long press
Start recording - Stop recording -
Photo/video mode
switching
Power off -
Stop recording and
power off
Joystick
Left Right Up Down
Move the camera to the left Move the camera to the right Move the camera upward Move the camera down
Trigger
Movement Preview screen layout Recording
Holding
Use the gimbal control mode set by the user
(chosen from among the 5 control modes in gimbal settings)
Press twice Gimbal center alignment
Press 3 times Switch front/selfie mode
Trigger + M button Changing the detailed shooting mode -
Trigger + Joystick up Zoom in
Trigger + Joystick down Zoom out
• You can change the default and the gimbal mode when holding the trigger on the settings.
• Some button functions are subject to change.
Using the product
13
2.3 Overview of LED status and beep
LED status
Sort Description
Turning on / Fully charged / Stop recording LED off
Recording video Red LED flickers slowly
Taking photo Red LED flickers once
Panorama Red LED flickers once per shoot
Firmware update / calibration Red LED flickers quickly
Charging Green LED on
Recording while charging
Light green and dark green LEDs
alternately flicker
Buzzer
Sort Description
Start recording video 1 single buzz
Stop recording video 2 single buzzes
Start taking photo 1 shutter sound
Calibration 3 consecutive buzzes
14
3. Overview of SNAP G features
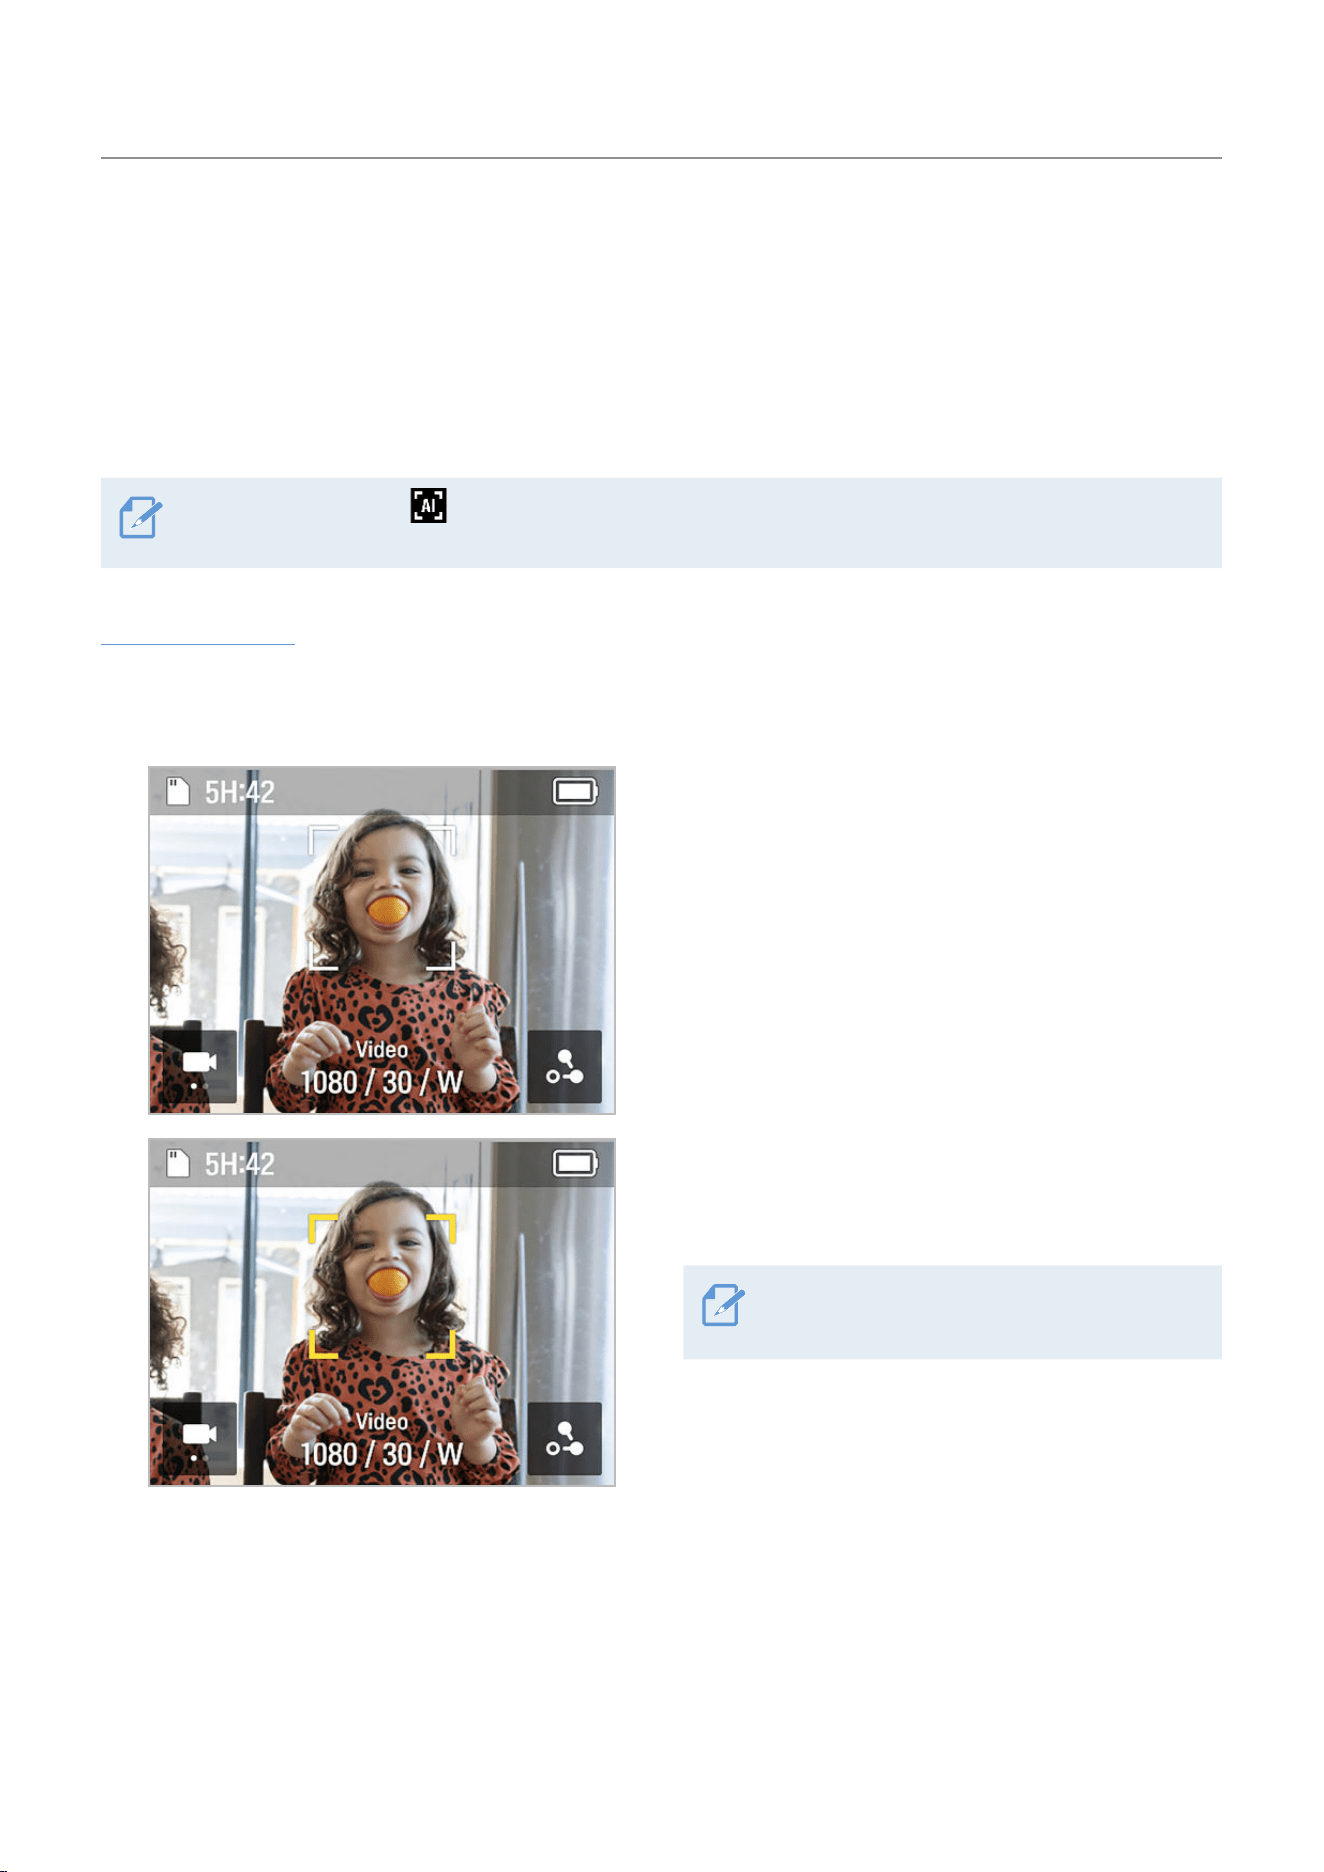
3.1 Using AI tracking mode
AI tracking mode recognizes additional areas around a person's face, providing smart recognition extended
tracking even for movements that change direction frequently and quickly.
Each time you press the button, it switches in the following order: AI tracking
>
Face tracking
>
Tracking mode off.
AI tracking mode
1
Swipe left on the Preview screen to open the Quick menu, then change the tracking mode to AI
tracking mode.
2
Face recognition mode will start in AI tracking
mode. When a subject's face is detected, a square,
white border is created around their face.
3
If you touch the inside of the square, white border,
it turns yellow and tracking starts. When tracking
starts, other people's faces will not be recognized.
To stop tracking, touch the square, yellow
border.
Overview of SNAP G features
15
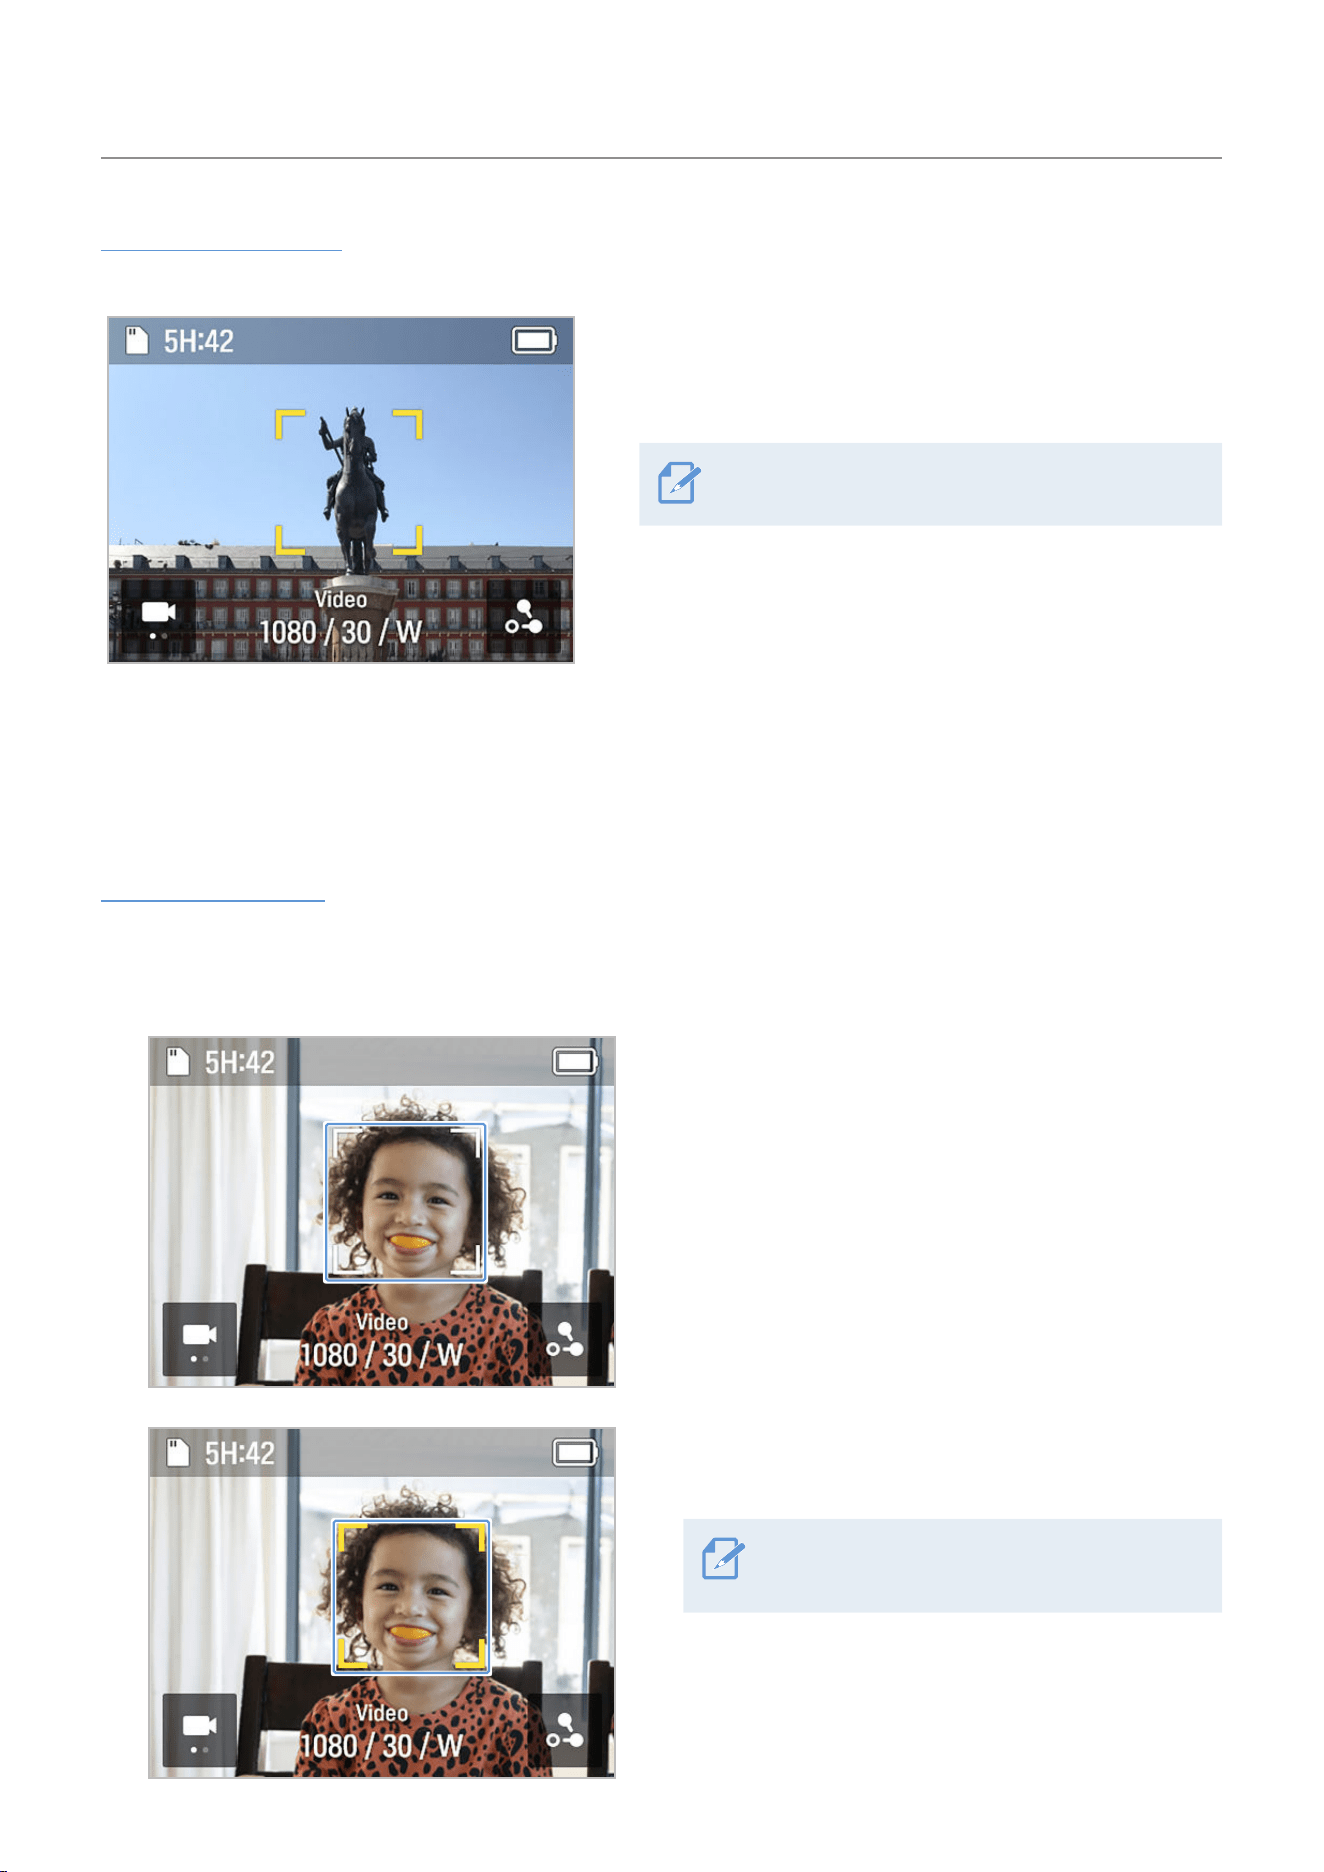
Active tracking mode
Use Active tracking mode to track moving or specific objects in AI tracking mode.
In AI tracking mode, touch a specific target you want
to record twice, then a square, yellow border will be
created and active tracking mode will start.
To end tracking, touch the square, yellow border.
3.2 Face tracking mode
Face tracking mode recognizes and tracks a person's face.
Face tracking mode
1
Swipe left on the Preview screen to open the Quick menu, then change the tracking mode to Face
tracking mode.
2
Face recognition mode will start in Face tracking
mode. When a subject's face is detected, a square,
white border is created around their face.
3
If you touch the inside of the square, white border,
it turns yellow and tracking starts.
To end tracking, touch the yellow square
border.
Overview of SNAP G features
16
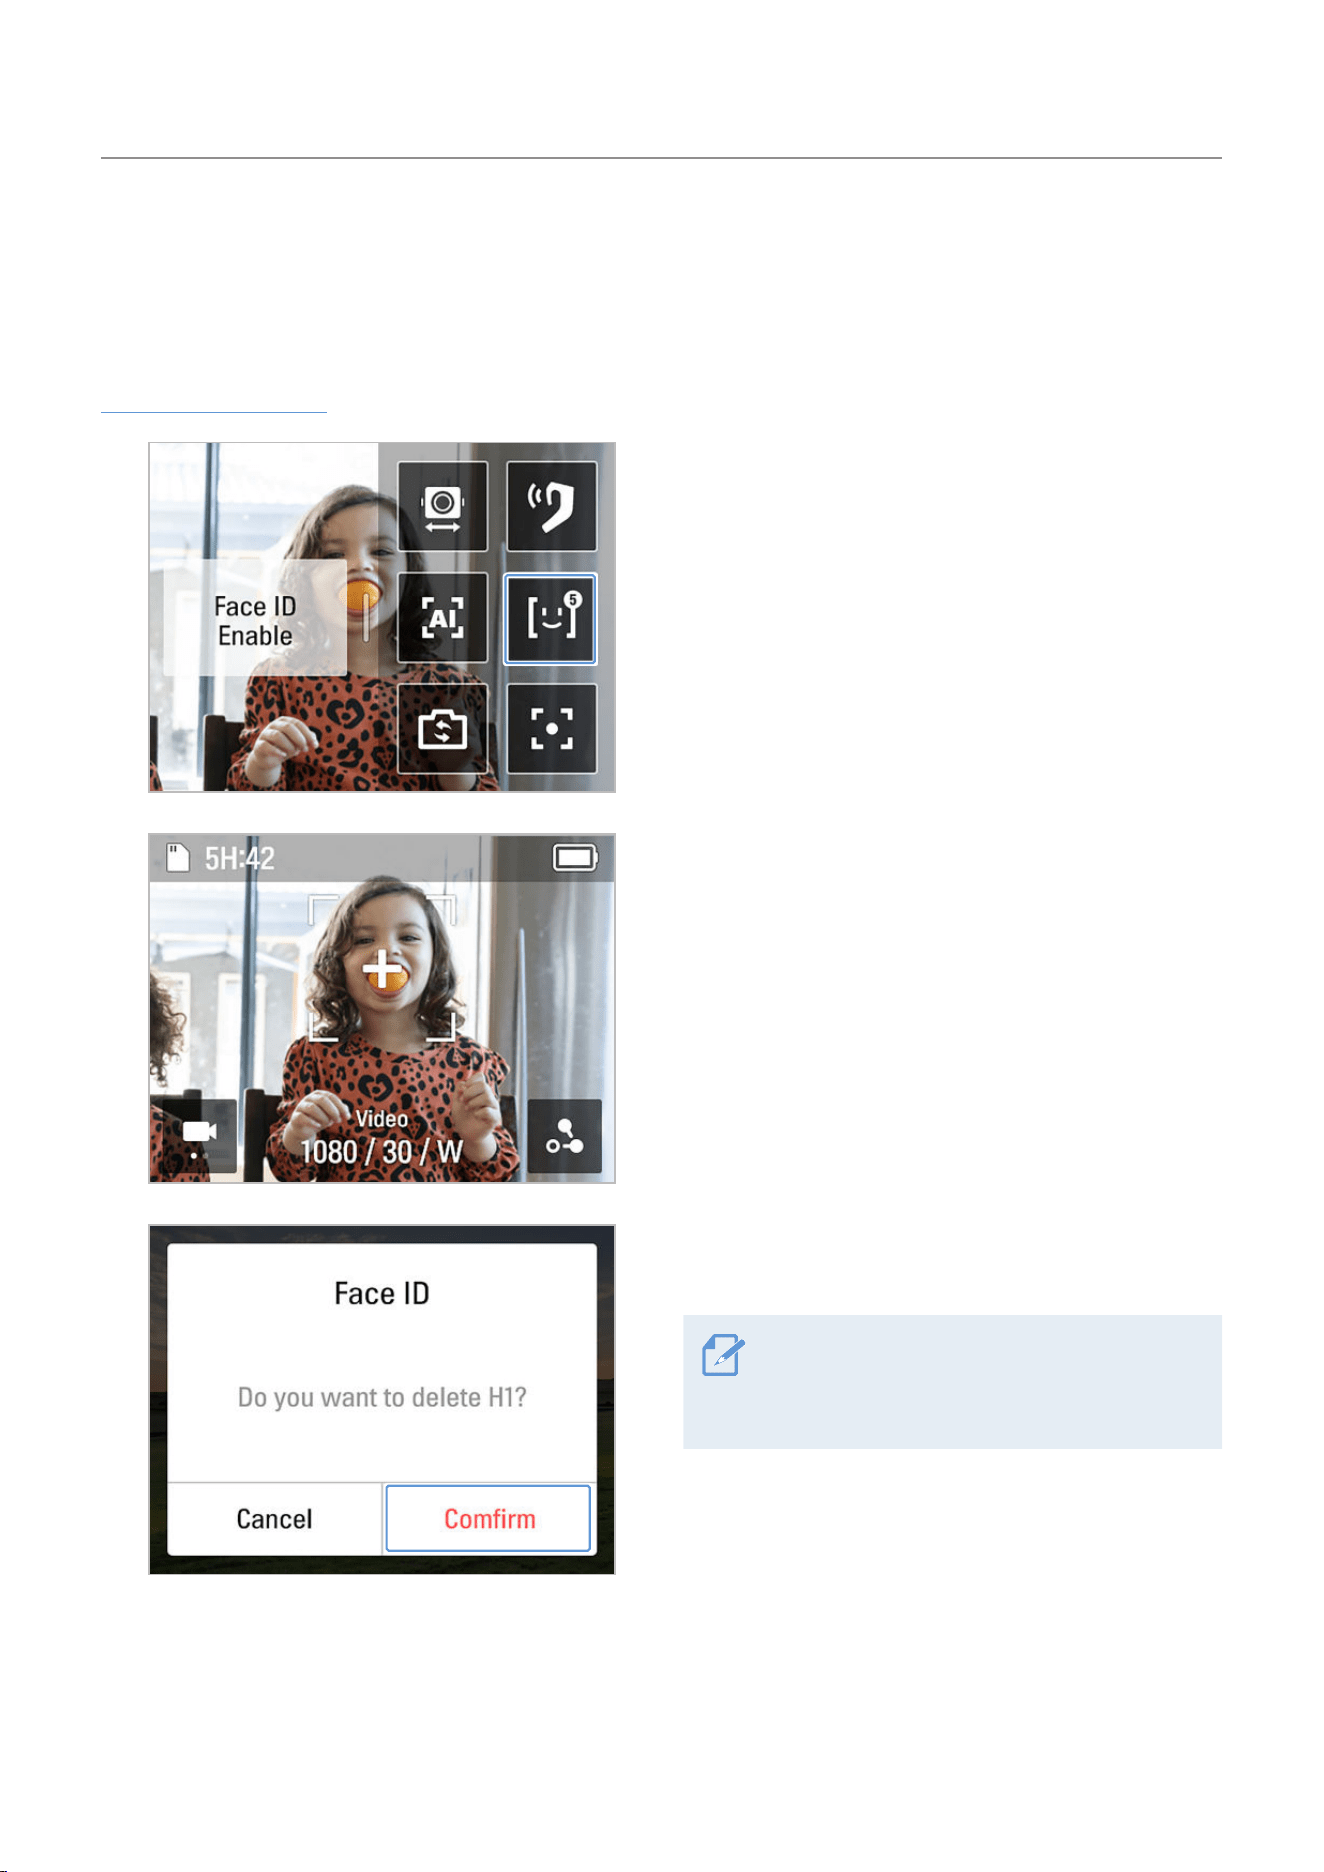
3.3 Using FACE ID
Once you register people's faces on FACE ID, the faces will be automatically recognized and tracked based
on the camera angle without requiring any actions.
FACE ID registration
1
Swipe left on the preview screen to open the
gimbal quick menu, then touch the FACE ID button
to activate the feature.
2
Start recording the person you want to register
for FACE ID. When the product recognizes a face,
a white square border will be created around the
face and the + button inside the box will become
activated.
3
Touch the + button
>
Confirm to complete FACE ID
registration.
• The product tracks who has the highest
registration priority.
• You can register up to five FACE IDs.
Overview of SNAP G features
17
Check/delete FACE ID
1
Touch System Settings
>
Recording Settings
>
FACE ID to check the registered people by registration
rank.
2
Touch the FACE ID you want to delete, then press on the top right to delete the FACE ID.
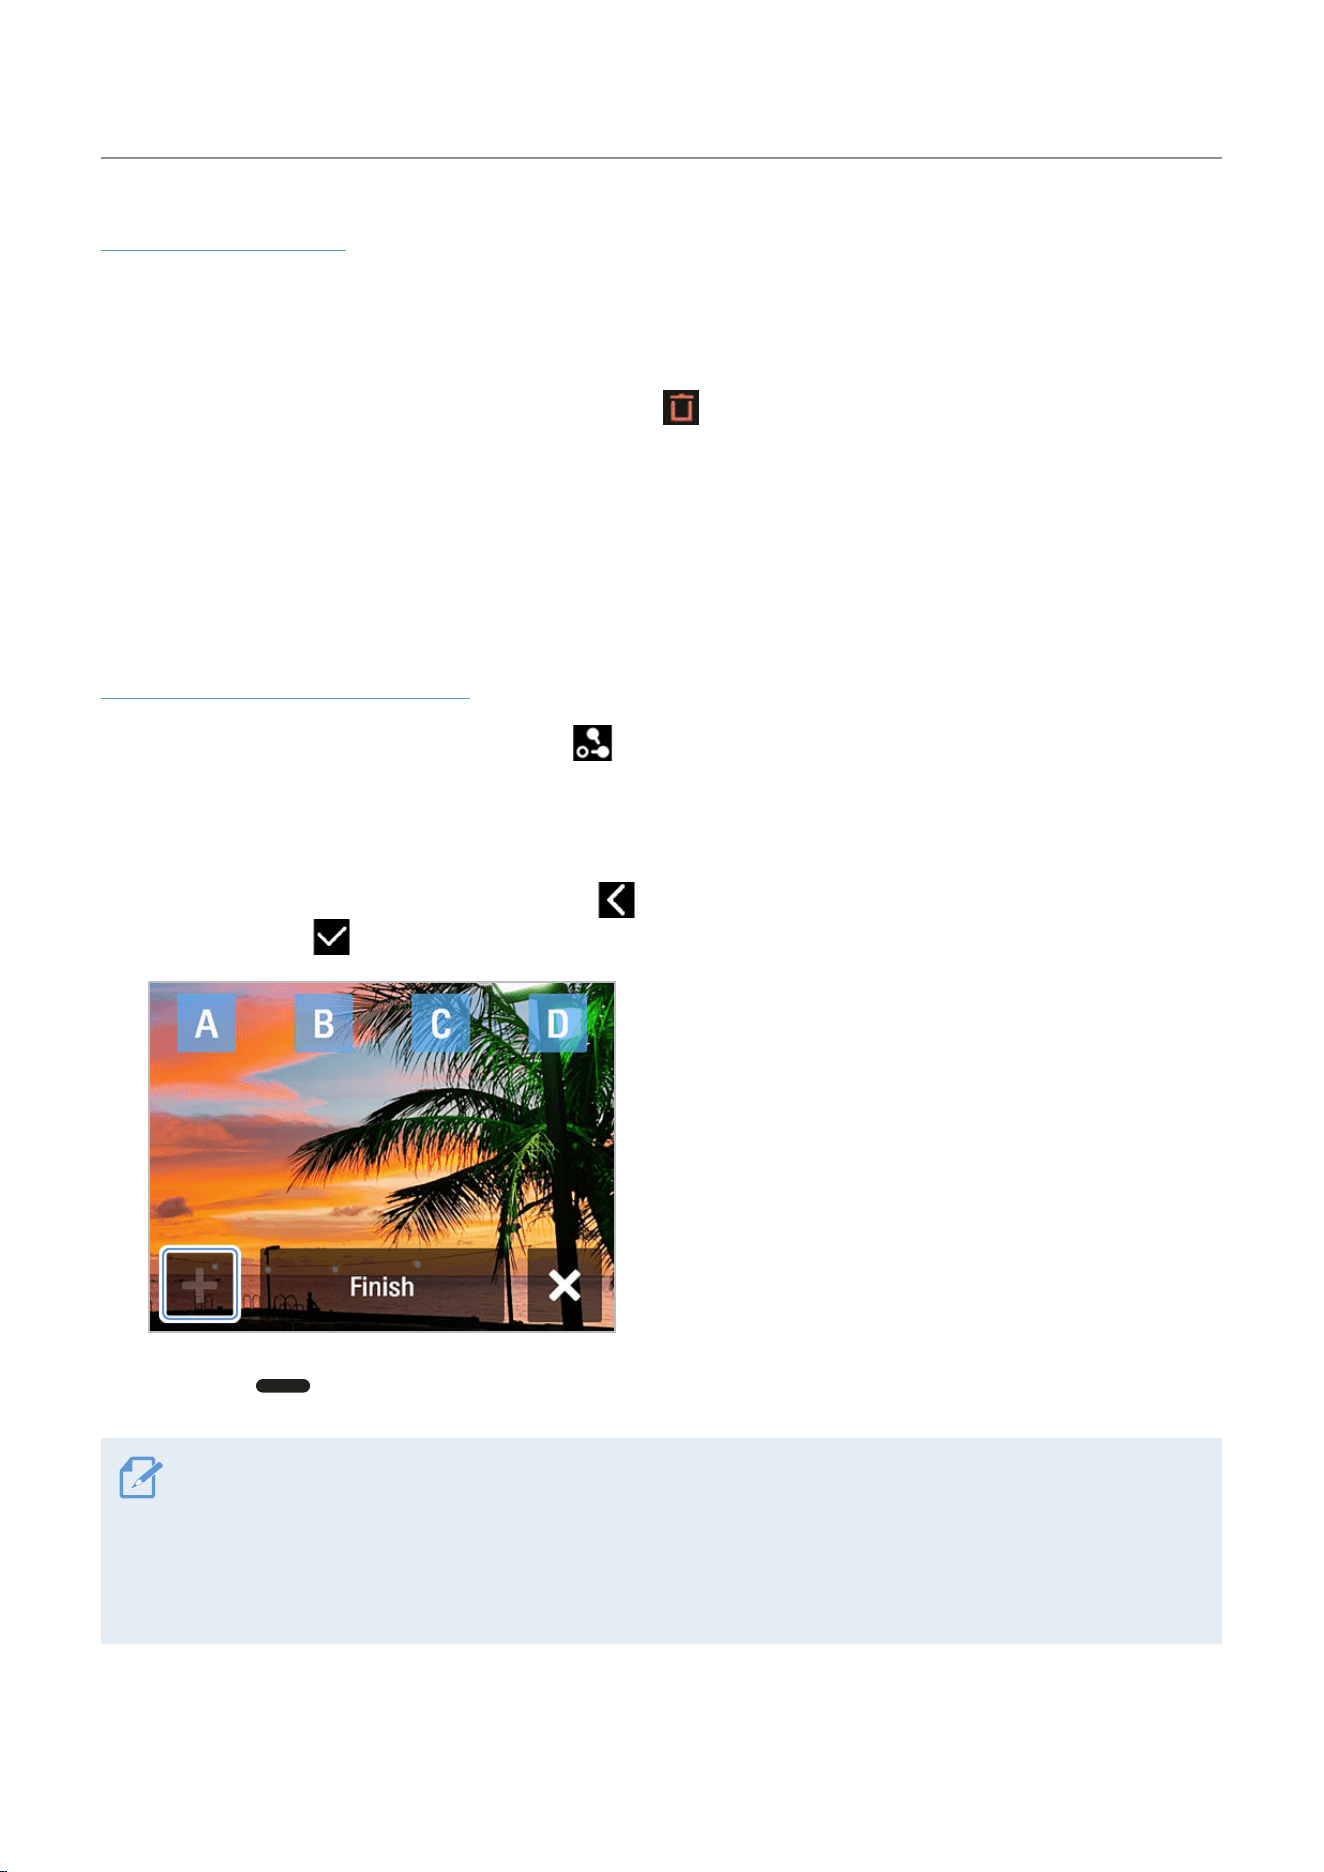
3.4 Using dynamic motion recording mode
Withthedynamicmotionfunction,youcanspecifyupto4recordingpoints,andsetthepathandtimeto
record before recording.
Dynamic motion recording mode
1
On the Video Preview screen, touch the ( ) button
>
motion settings.
2
Set the time to record. The video length is automatically calculated and displayed based on the video
settings value (speed, interval).
3
After setting the recording time, touch the ( ) button to return to the Motion Settings screen, and
then touch the ( ) button in the upper-right corner to move to the Route Settings screen.
4
Use the joystick to select four desired shooting
points (A-D) and press the + button to designate
each shooting point.
5
Press the button on the product. The product shoots the selected points.
• The route can be set up to 4 points (A/B/C/D).
• Touching the End button on the Settings screen moves to the End Selection screen, and at the end, deletes all
location information and moves to the Motion Settings screen.
• While recording, all locations set as routes are displayed on the Preview screen, and the route completed, the
route being recorded, and the route to be recorded are displayed as images to help you recognize the route.
Overview of SNAP G features
18
Recording in Repeat mode
You can set two shooting points and take continuous and repeating shots at set time intervals.
With the joystick, select two recording points by pressing the + button, press the Repeat mode (
) button,
and press the button on the product.
You cannot use the repeat mode if you set more paths than two recording points.
3.5 Updating the firmware
For optimal operation of the product, ensure that you keep the firmware up to date.
1
Visit www.thinkware.com/support.
2
Save the downloaded firmware file to the product's memory card.
3
Insert the memory card with the firmware to start updating the firmware.
• For more information on product updates, visit www.thinkware.com/support.
• If you save the firmware to the SD card and update the product at the same time, the update will proceed
in the order of system firmware and gimbal firmware.
19
4. Using the SNAP G app
You can use various functions of the product by connecting the product to the SNAP G app.
4.1 Downloading the SNAP G app
1
On your smartphone, search for the SNAP G app in the Google Play Store or Apple App Store, or scan
the QR code below to download and install the app.
2
Open the installed SNAP G app.
3
Press Connect Camera, find and connect to the Wi-Fi network that starts with SNAP G XXXXX (6 digit
number) on the Wi-Fi settings screen of your smartphone.
• The Wi-Fi password is 12345678.
• You can check the camera's Wi-Fi information on the connection settings menu.
4.2 Using live streaming
You can use the live streaming feature in the SNAP G app to stream stable and high-definition broadcasts.
Live streaming
1
Open the quick menu, then touch the Wi-Fi button
to turn on Wi-Fi and connect the product and the
SNAP G app.
Using the SNAP G app
20
2
Select the desired broadcasting platform from the
Live streaming menu in the app preview screen or
the app home screen’s setting menu, and then go
to the streaming settings.
Twitch live streaming will be supported.
3
Sign in to the registered or newly registered account for each broadcasting platform, set the
transmission resolution and network items, and touch the Streaming Settings Complete button.
To use mobile hotspot data, first enable hotspot data in your smartphone Wi-Fi settings, and then enter
the hotspot's AP information.
4
When streaming setup is complete, the setting information is delivered to the product and the
connection between the app and the product is disconnected.
5
When the connection between the app and the
product is disconnected, open the camera quick
menu and then touch the live streaming button to
start live streaming.
Quick live streaming
1
Swipe down on the preview screen to open the
quick menu, then touch the live streaming button to
start live streaming.
This feature is available only when there
is saved live streaming information. To
save streaming information, connect to live
streaming via the app.
Using the SNAP G app
21
2
The broadcasting platform icon is displayed in the
status bar if live streaming is proceeding normally.
The product connects with the AP set in the
app. It will not connect in places where the
corresponding AP is not present.
View live streaming information
1
Swipe down on the preview screen to launch the
quick menu, then touch
>
Connection settings
>
Live streaming.
2
Check the AP SSID and password stored in the product.
To change the broadcasting platform, connect to the new broadcasting platform in the app.
22
5. Using recording modes
You can check the screen of each recording mode and change the settings.
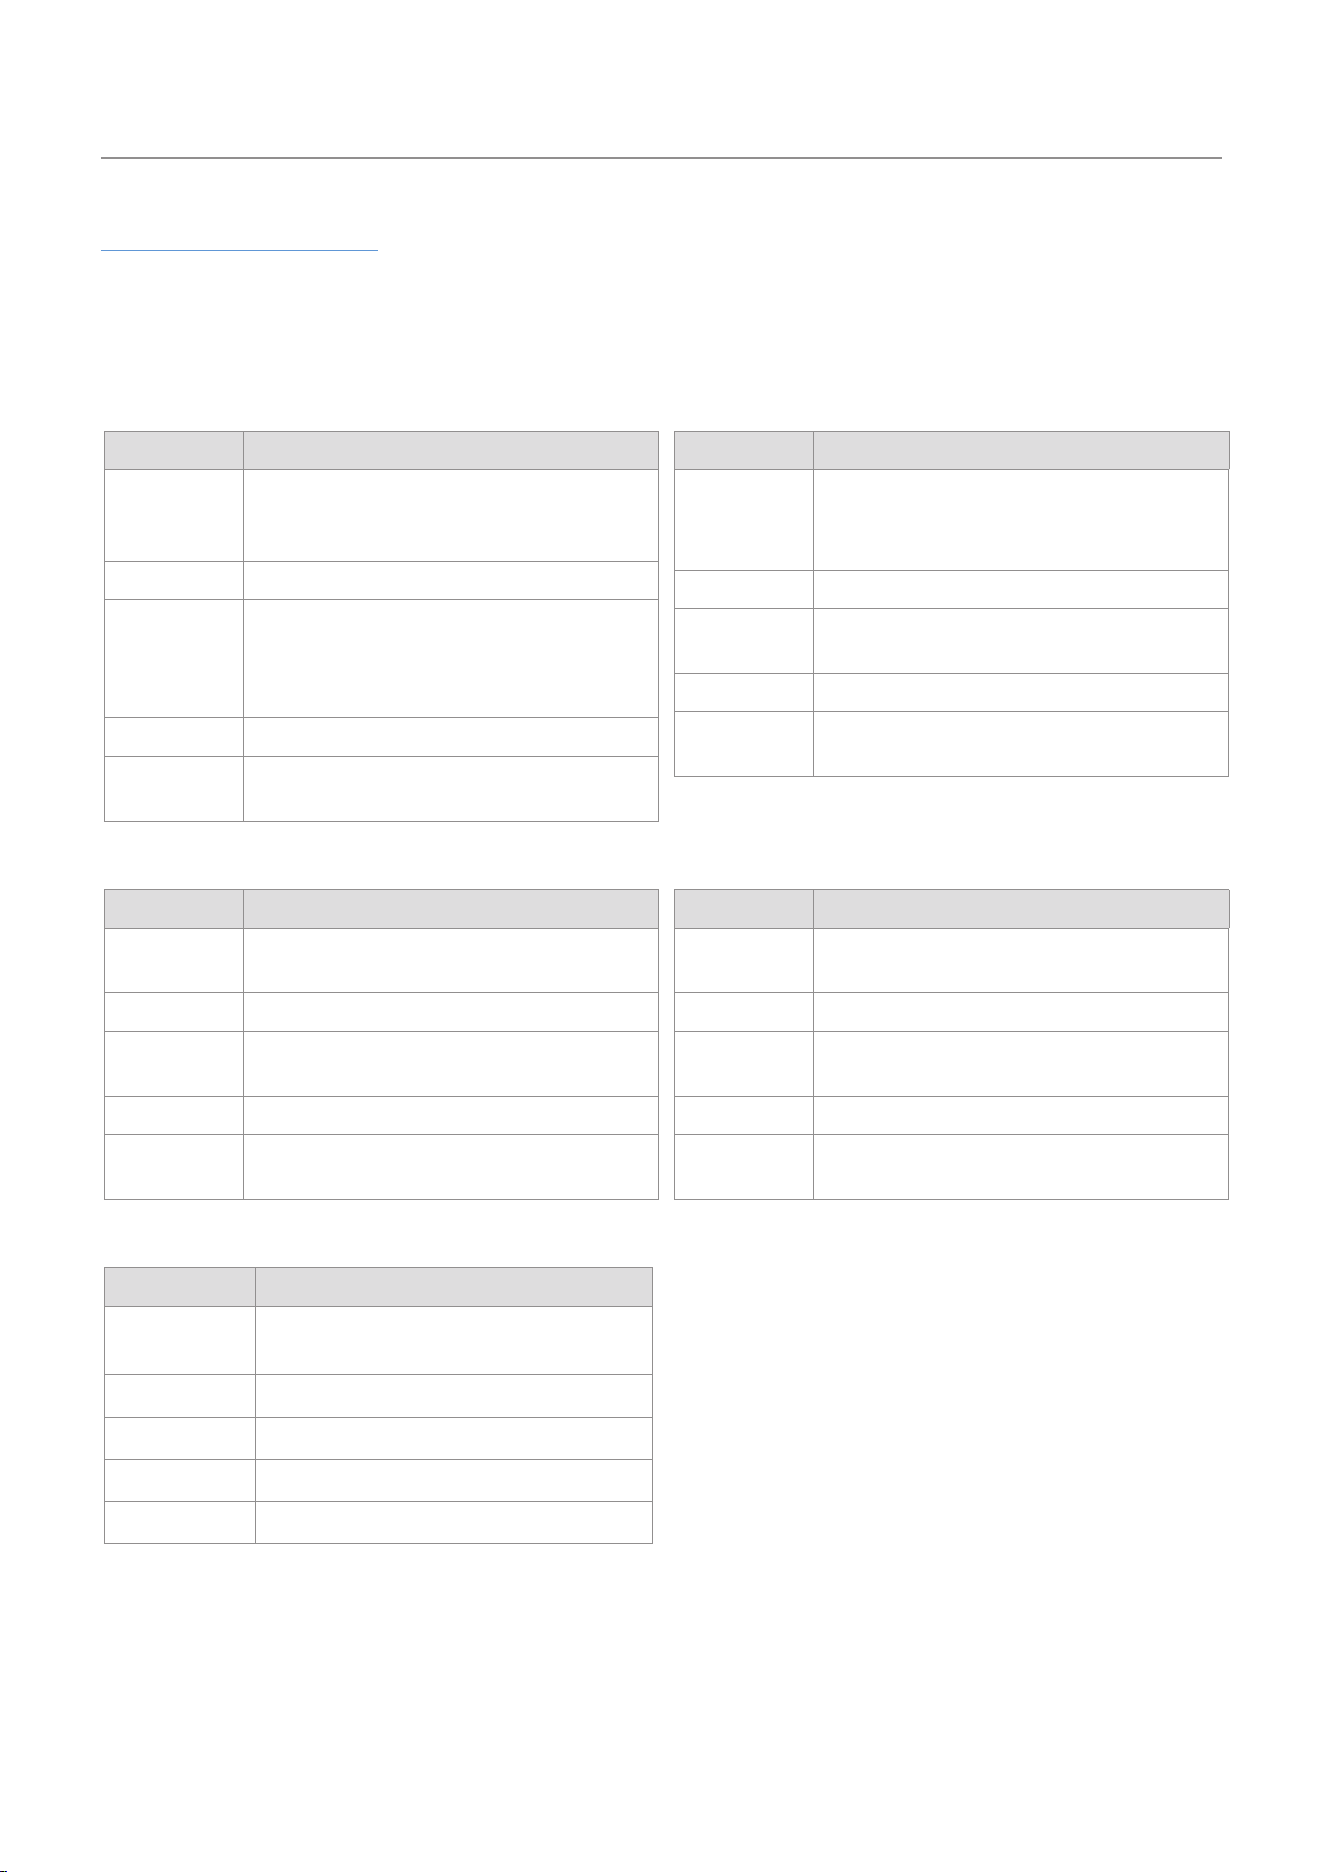
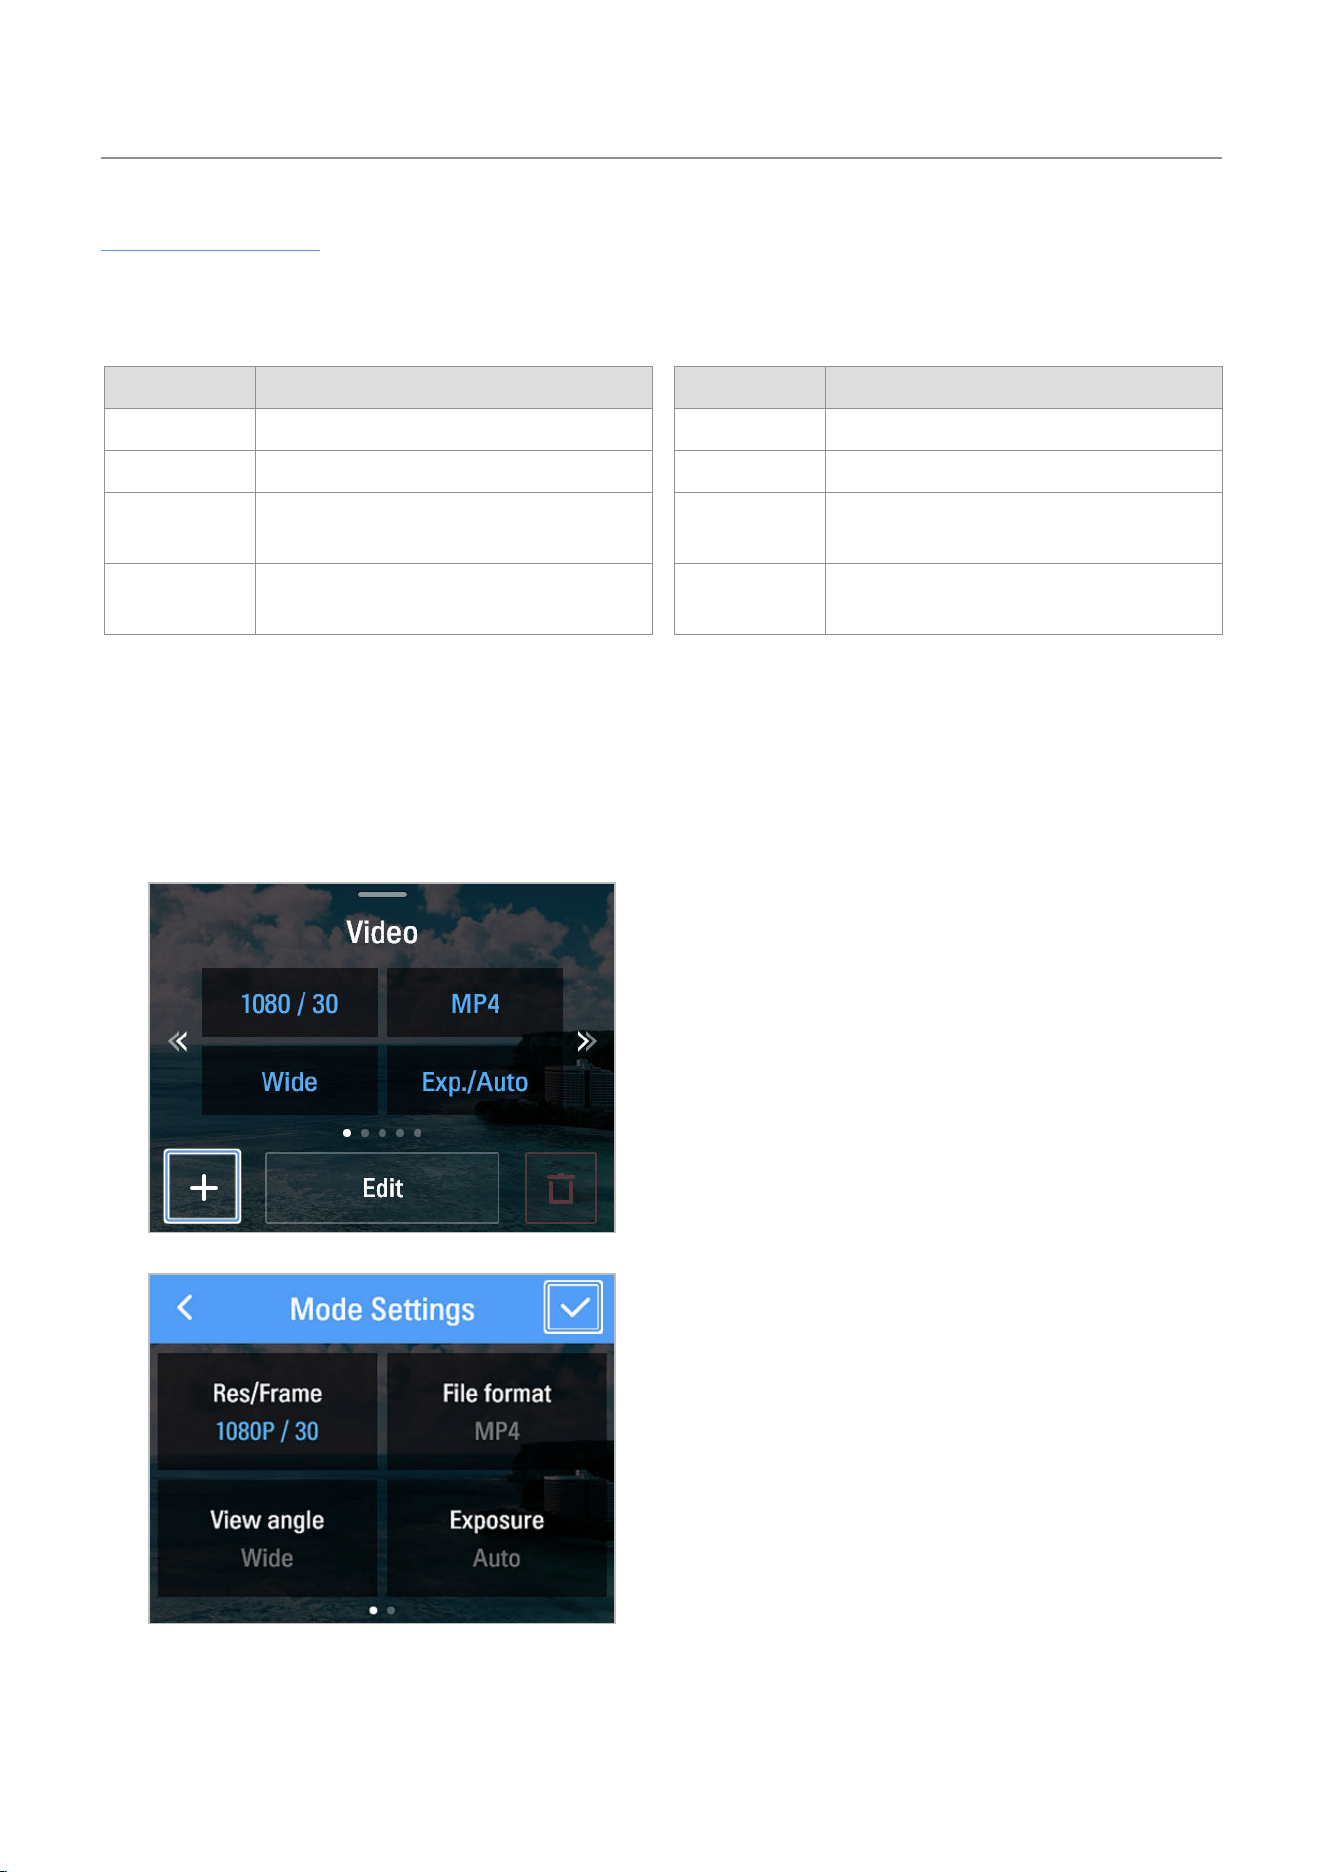
5.1 Using video modes
Video mode screen
Preset name
(Video, Slow motion,
Hyperlapse, Timelapse,
SNV)
Resolution · Frame/Speed/
Interval · angle of view
Mode Description
Video Records high-definition videos with up to 4K @60FPS resolution.
Slow motion Suitable for fast-moving subjects, records 4x slower at 120 FPS.
Timelapse Records a short video of a long-duration activity with video frames at set intervals.
Hyperlapse
You can record while moving with video frames at set intervals. Records long hours of activity in
short, dynamic videos.
SNV Records with optimal brightness at 4K @15FPS resolution in extremely low light conditions.
Switching video modes
On the Preset settings screen, swipe left or right on the screen or touch the arrow to change the video
mode.Youcanswitchto5differentvideomodes(Video,slowmotion,hyperlapse,timelapse,SNV).
Using recording modes
23
Video recording settings
Touch the Edit button to change the recording environment to the desired setting.
You can set the file format, the angle of view when recording, the color temperature, and the brightness of
the screen.
Video setting value
Settings Detailed setting value
Resolution/
Frame
1080p @24, 30, 60, 120fps
2.7K @24, 30, 60fps
4K @24, 30, 60fps
File format MP4/MOV
Angle of
view
Wide/Linear/Narrow angle (4K @60fps
linear/narrow angle not supported, 4K
@30fps not supported narrow angle 2.7K
@60fps linear/narrow angle not supported)
Exposure Auto/Manual
White
balance
Auto/Sunlight/Cloudy/Incandescent/
Fluorescent/Custom
Slow motion setting value
Settings Detailed setting value
Resolution/
Speed
Resolution: 1080p
Speed: 4x
File format MP4/MOV
Angle of
view
Wide/Linear/Narrow angle
(4K narrow angle not supported)
Exposure Auto/Manual
White
balance
Auto/Sunlight/Cloudy/Incandescent/
Fluorescent/Custom
Time lapse setting value
Settings Detailed setting value
Resolution/
Speed
Resolution: 1080p, 4K
Interval: 0.5, 1, 2, 3, 5, 10, 15, 30, 60
File format Video/Photo + Video
Angle of
view
Wide angle/linear/narrow angle (4K
linear/non-narrow angle not supported)
Exposure Auto/Manual
White
balance
Auto/Sunlight/Cloudy/Incandescent/
Fluorescent/Custom
Hyperlapse setting value
Settings Detailed setting value
Resolution/
Speed
Resolution: 1080p, 2.7K, 4K
Speed: 2x, 5x, 10x, 15x, 30x
File format MP4/MOV
Angle of
view
Wide angle/linear/narrow angle (4K
linear/narrow angle not supported)
Exposure Auto/Manual
White
balance
Auto/Sunlight/Cloudy/Incandescent/
Fluorescent/Custom
SNV setting value
Settings Detailed setting value
Resolution/
Frame
Speed: 4K @15fps
File format MP4/MOV
Angle of view Wide/Linear
Exposure Auto
White balance Auto
Using recording modes
24
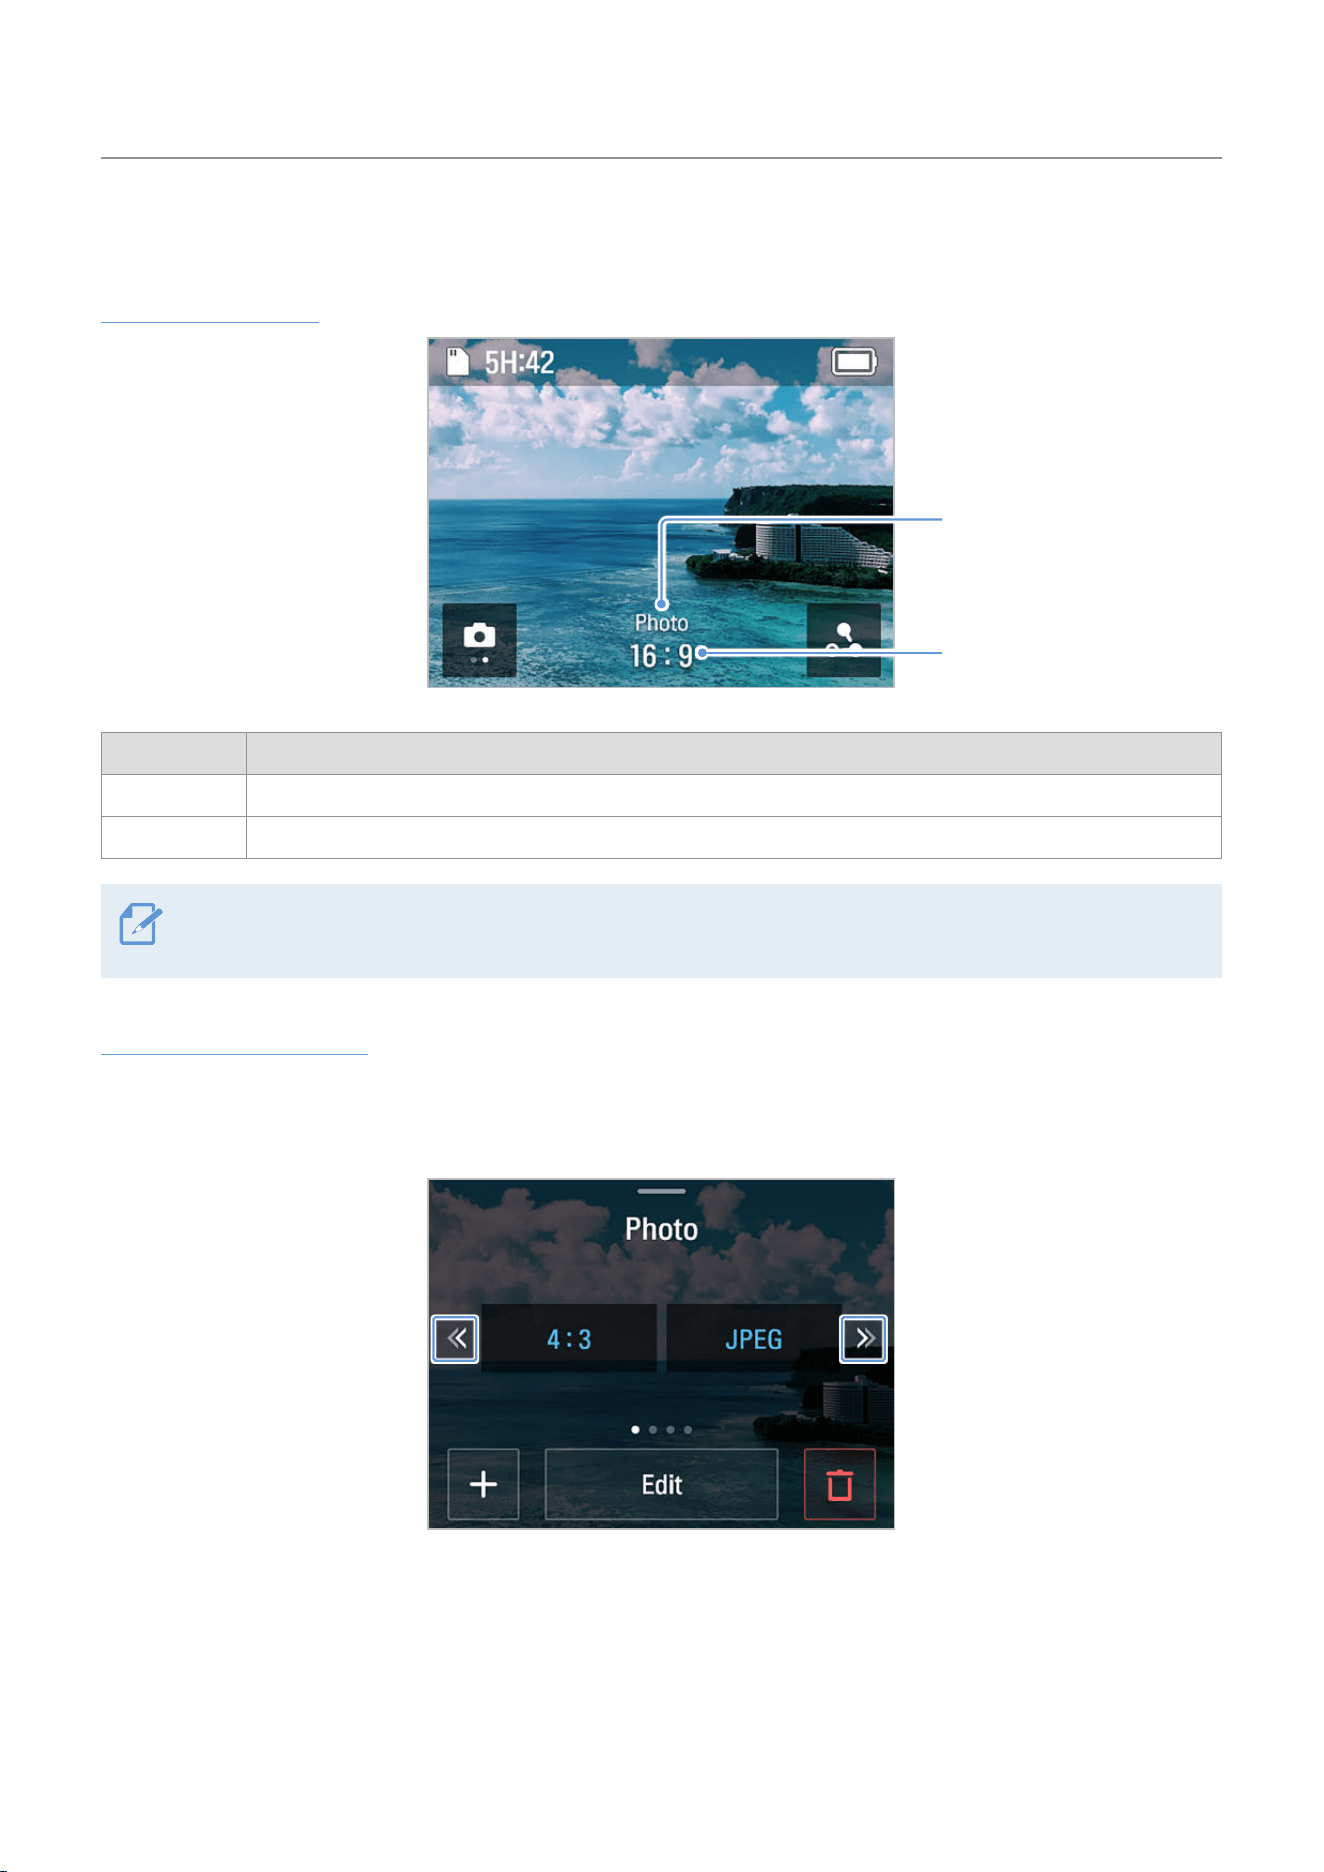
5.2 Using photo modes
Using photo modes
Preset name
(Photo, Panorama)
Screen ratio
Mode Description
Photo Takes a single 12-Megapixel picture.
Panorama Takes multiple photos with the set aspect ratio and saves them to be edited into a single photo.
When you enter the album after connecting the SNAP G app and the product, the panoramic photos are
edited into a single photo.
Switching photo modes
On the preset setting screen, swipe left or right or touch the arrow to change the photo mode. You can
switch to 2 different photo modes (Photo/Panorama).
Using recording modes
25
Photo mode setting
Touch the Edit button to change the recording environment to the desired setting.
Photo settings value
Settings Detailed settings value
Screen ratio 16:9, 4:3, 1:1
File format JPEG + RAW
Exposure
Auto
Manual
White balance
Auto, Sunlight, Cloudy, Incandescent,
Fluorescent, Custom
Panorama setting value
Settings Detailed setting value
Screen ratio 180°, 360°, 3x3
File format JPEG + RAW
Exposure
Auto
Manual
White balance
Auto, Sunlight, Cloudy, Incandescent,
Fluorescent, Custom
5.3 Setting presets
You can add presets with frequently used settings in photo or video mode.
1
Touch the + button on the photo or video preset
screen.
2
Select the desired mode for setting the preset, set
the detailed setting value, and touch the OK button
to create a customized preset.
26
6. Setting the gimbal
You can customize the product setting by using Gimbal settings menu.
6.1 Setting the gimbal
Swipe down on the Preview screen to open the quick menu, then touch the Gimbal settings button to set
the gimbal.
Setting menu Description
Gimbal speed Set gimbal speed.
Gimbal sensitivity Set gimbal sensitivity.
Welcome mode Turn Welcome mode on/off.
Calibration Start the gimbal calibration.
Gimbal mode
• Default: Select the desired mode
among Pan/Follow/FPV.
• Trigger: Select the desired mode
among Pan/Follow/FPV/Lock/None.
Reset Reset the gimbal settings.
6.2 Using the gimbal mode
You can set and use the various gimbal modes.
Mode Description
Pan mode
The roll and tilt directions are fixed and move according to the left and right movement of the
user's hand.
Follow mode The roll direction is fixed and move according to the left and right movement of the user's hand.
FPV mode Pan, roll, and tilt directions move based on the movement of the user's hand.
Lock mode Pan, roll, and tilt directions are fixed in one direction.
None mode
The product does not change any gimbal mode while holding down the trigger (keeps the default
gimbal mode).
27
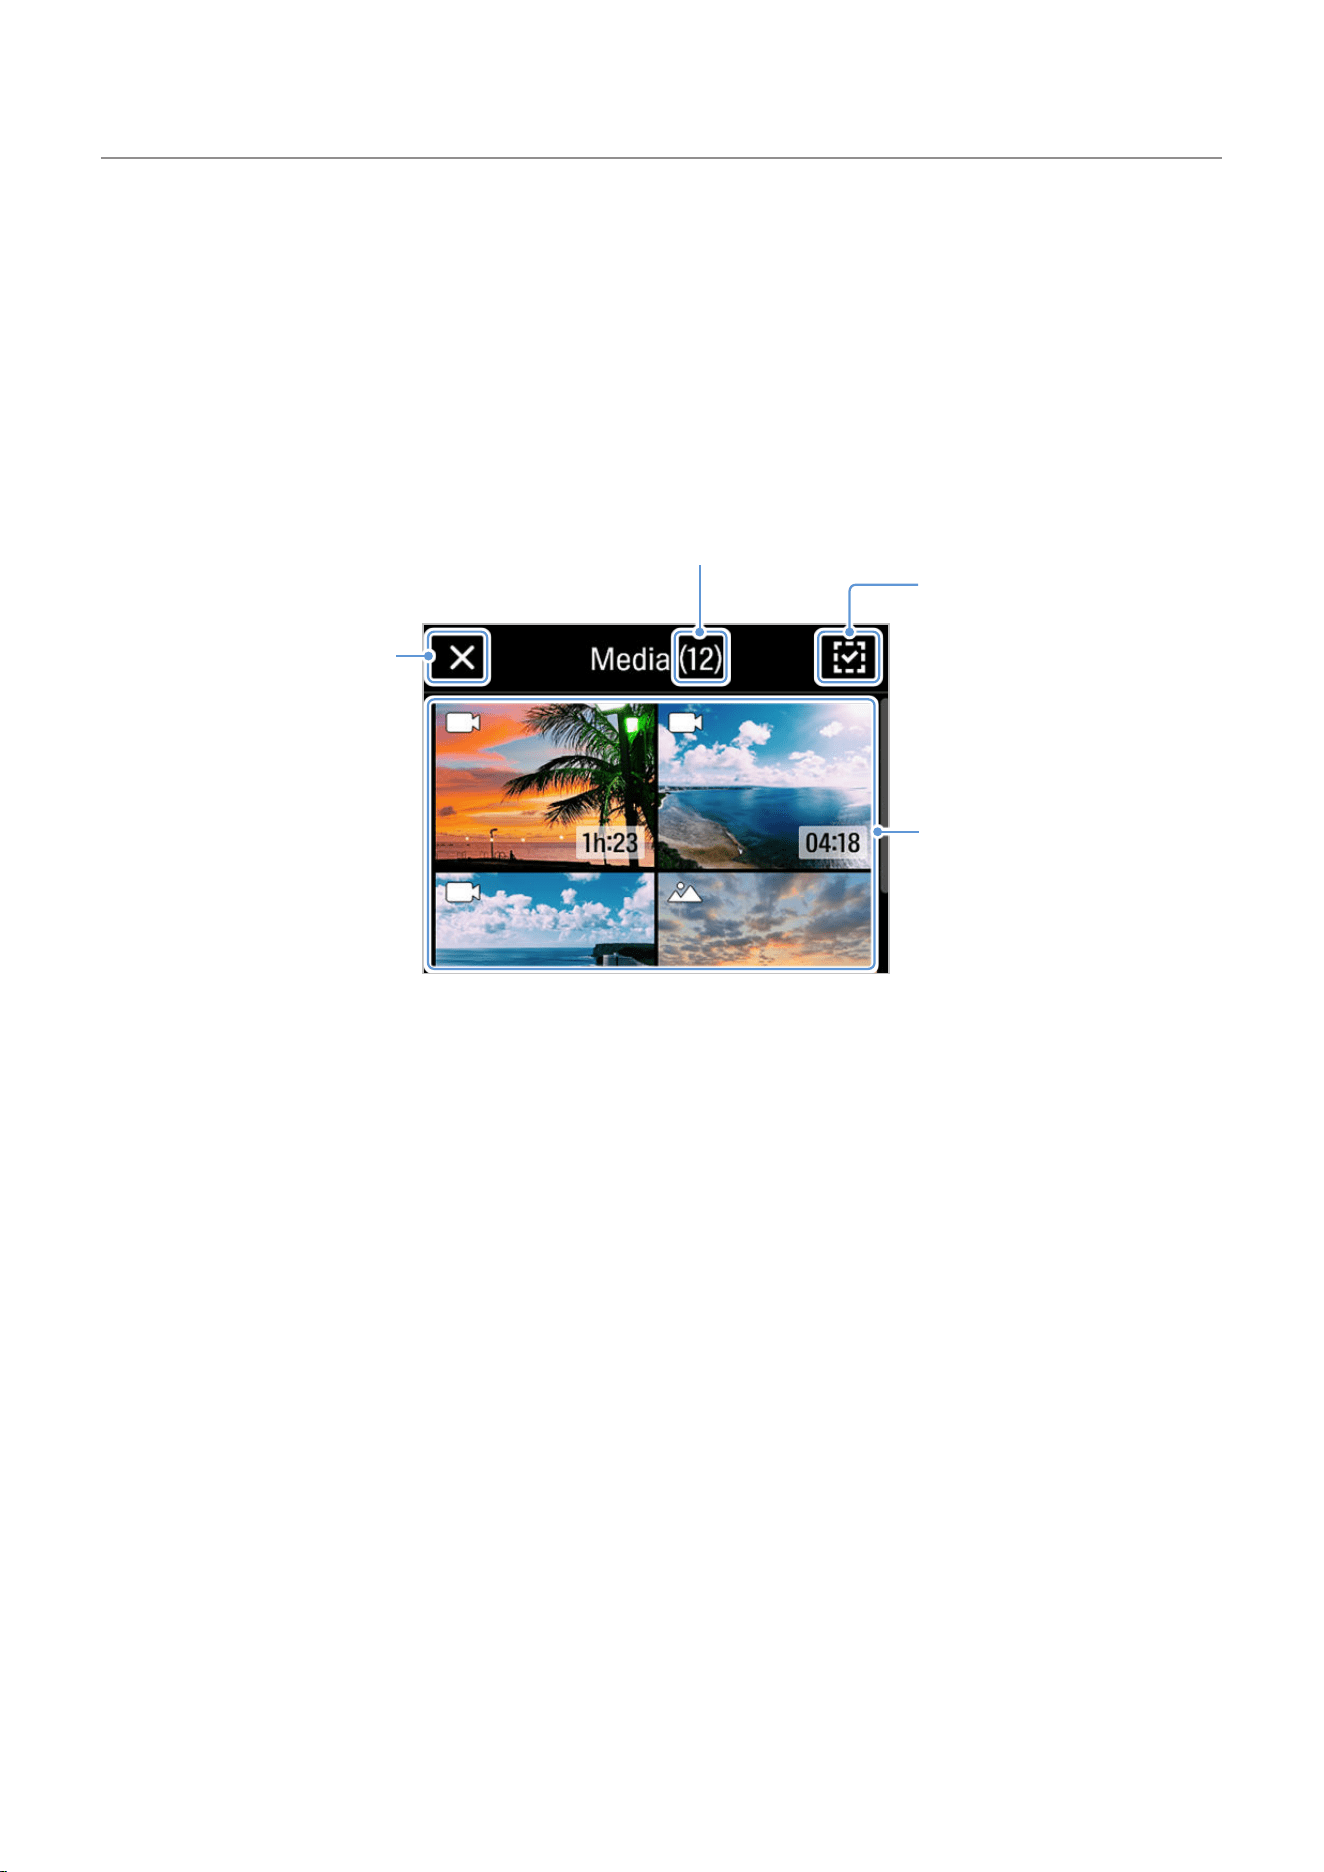
7. Viewing album
Swipe right on the preview screen to open the album and view the photos and videos.
7.1 Overview of the Album screen
Touch the thumbnails of each file to view them.
File selection button:
Select to delete the file.
Displays file thumbnails
and information.
Closes the album list
screen and moves to the
preview screen.
Displays the number of thumbnails (files).
7.2 Deleting files in the album
You can delete files individually/selectively or all files with the File selection button.
1
Touch the File selection button and touch the file you want to delete.
2
Touch the Delete button on the top-right part of the screen.
3
In the Delete file pop-up window, touch Delete to delete the selected file.
28
8. Configuring the system settings
Swipe down on the Preview screen to open the Quick menu, then touch
>
System Settings to set the
system.
8.1 Connection settings
Wi-Fi
Setting menu Description
Wi-Fi use Turn on/off Wi-Fi
Wi-Fi information Display the information of the currently connected Wi-Fi.
Wi-Fi initialize Initialize the currently connected Wi-Fi.
Live streaming
Turn live streaming on or off and view the information.
8.2 Recording settings
Setting menu Description
Quick shot Turn on/off the quick shot mode.
Upside down Flip the screen upside down.
Mic settings Set the built-in microphone quality.
Ext. mic volume Adjust external microphone volume.
Output type Select output type.
FACE ID Manage the registered FACE ID.

Configuring the system settings
29
8.3 Other settings
Setting menu Description
Auto power off Set the product to turn off automatically when the specified time is exceeded.
Auto LCD off Set the product’s LCD to turn off automatically when the specified time is exceeded.
Date & time Set the date and time.
Indicator Turn on/off the indicator.
8.4 System information
Setting menu Description
Language
Select the desired language among 한국어/English/中文/繁體中文/Español/Français/
Deutsch/日本語.
Format SD card Format SD card.
Firmware information Check the firmware information.
System initialization Initialize all the settings of the product.
Regulations Check the product’s certification status.

30
9. Specifications
To see the product specifications, refer to the following table.
Item Specifications
General
Size 53 x 161.4 x 49.8mm
Weight 234g (with battery)
Wi-Fi/Bluetooth Internal
Usage time About 2 hours (FHD 30fps / LCD off)
Buttons Recording / Power (M) / Joystick / Trigger
Mount 1/4 mount, M4 mount
Battery
Type Replaceable lithium-ion pack
Storage 2,000mAh
Voltage 3.7V
Charging time About 180 minutes
LCD Screen size 2”
Gimbal
Pan mode Software control angle -45° to 245°
Tilt Software control angle -42° to 122°
Roll Software control angle ±45°
Gimbal mode Pan, Follow, FPV, Lock, None
APP APP SNAP G - only app

Specifications
31
Item Specifications
Camera
Sensor 1/2.3” CMOS / 12.3MP
Lens FOV: 133.9° (diagonal) / F2.6
Maximum image
size
4,056 x 3,040
Photo mode Photo/Panorama
Video mode Video, Time lapse, Hyperlapse, Slow motion, Dynamic motion recording, SNV mode
Tracking mode FACE ID auto tracking, AI tracking, Face tracking, Active tracking
Video resolution
[PAL]
4K @50, 25, 24fps
2.7K @50, 25, 24fps
1920 x 1080p @100, 50, 25, 24fps
[NTSC]
4K @60, 30, 24fps
2.7K @60, 30, 24fps
1920 x 1080p @120, 60, 30, 24fps
Photo ratio 16:9 / 4:3 / 1:1
Photo file format JPEG, RAW
Video file format MOV, MP4
Memory card microSD card (up to 512 GB), Micro SDXC, UHC-I U3 class, Class10
Audio output 48 KHz AAC

