
FP10074US
THIS INSTRUCTION BOOKLET CONTAINS IMPORTANT SAFETY INFORMATION. PLEASE READ AND KEEP FOR FUTURE REFERENCE.
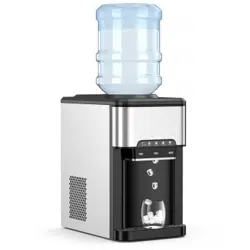
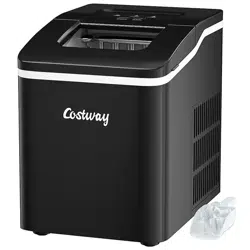
ICE MAKER
Machine à Glaçons

EN
Before You Start
Please read all instructions carefully.
Retain instructions for future reference.
Separate and count all parts and hardware.
Read through each step carefully and follow the proper order.
We recommend that, where possible, all items are assembled near to the area in
which they will be placed in use, to avoid moving the product unnecessarily once
assembled.
Always place the product on a flat, steady and stable surface.
Keep all small parts and packaging materials for this product away from babies
and children as they potentially pose a serious choking hazard.
FR
Veuillez lire attentivement toutes les instructions.
Conservez les instructions pour vous y référer ultérieurement.
Vérifiez toutes les pièces et les accessoires.
Lisez attentivement chaque étape et suivez l’ordre correct.
Nous recommandons que, dans la mesure du possible, tous les produits
soient assemblés à proximité de la zone où ils seront utilisés, afin d’éviter tout
déplacement inutile du produit une fois assemblé.
Placez toujours le produit sur une surface plane et stable.
Conservez toutes les petites pièces de ce produit et les matériaux d’emballage
hors de portée des bébés et des enfants, car ils pourraient présenter un risque
d’étouffement.
Avant de Commencer
02
IMPORTANT SAFETY INSTRUCTIONS
Your safety and the safety of others are very important.
We have provided many important safety messages manual and
your appliance.
Always read and obey all safety messages.
This is the safety alert symbol:
All safety messages will follow the safety alert symbol and the
word “DANGER” or “WARNING”.
These words mean:
You can be killed or seriously injured if you don’t immediately
follow instructions.
All safety messages will tell you what the potential hazard is, tell
you how to reduce the chance of injury, and tell you what can
happen if the instructions are not followed.
DANGER
WARNING
EN
03
EN

EN
When using electrical appliances, basic safety precautions should
be followed to reduce the risk of fire, electric shock, and injury to
persons or property. Read all instructions before using any
appliance.
Do not operate this,or any other appliance with a damaged
cord.
Connect to properly polarized outlets only. No other appliance
should be plugged into the same outlet. Be sure that the plug is
fully inserted into the receptacle.
Do not run the power cord over carpeting or other heat
insulators. Do not cover the cord. Keep cord away from traffic
areas, and do not submerge in water.
We do not recommend the use of an extension cord, as it may
overheat and become a risk of fire. If you must use an extension
cord, use No.14 AWG minimum size and rated no less than
1875 watts.
Unplug the ice maker before cleaning or making any repairs or
servicing.
IMPORTANT SAFETY TIPS
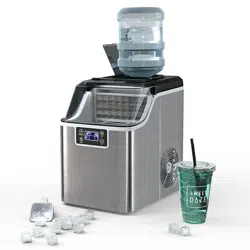
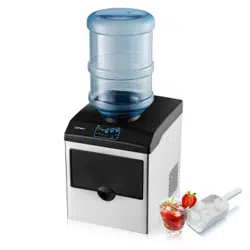
PREPARING YOUR ICE MAKER FOR USE
04

EN
Exercise caution and use reasonable supervision when appliance
is used near children.
Do not use your ice-maker outdoors. Place the ice-maker away
from direct sunlight and make sure that there is at least 4 inches
of space between the back of your unit and wall. Keep a minimum
distance of 4 inches on each side of your unit free.
Do not use other liquid to make the ice-cube other than water.
Do not clean your ice maker with flammable fluids. The fumes
can create a fire hazard or explosion.
Do not tip over.
If the ice maker is brought in from outside in wintertime, give it
a few hours to warm up to room temperature before plugging it
in.
If the supply cord is damaged, it must be replaced by the
qualified person in order to avoid a hazard.
This ice maker must be positioned so that the plug is accessible.
Disconnect the mains plug from the supply the supply socket
when not in use, where supply connection is via mains plug.
WARNING: This appliance must be earthed.
05
EN
EN
v
Warning:
W K v
W
W
v
WARNING:
T v
v
v
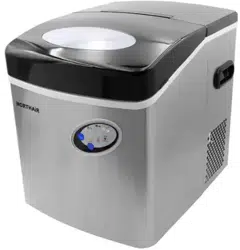
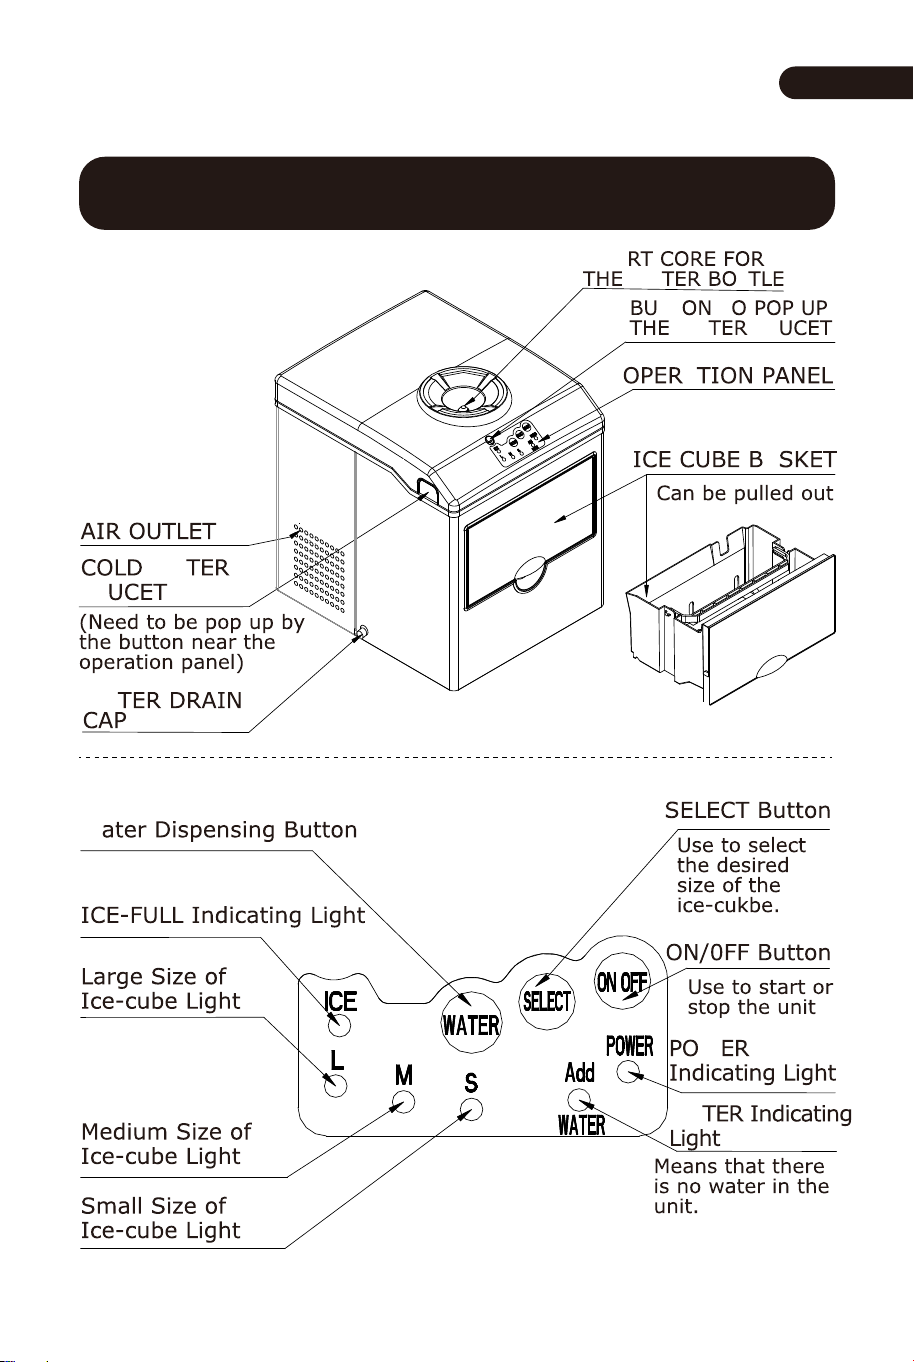
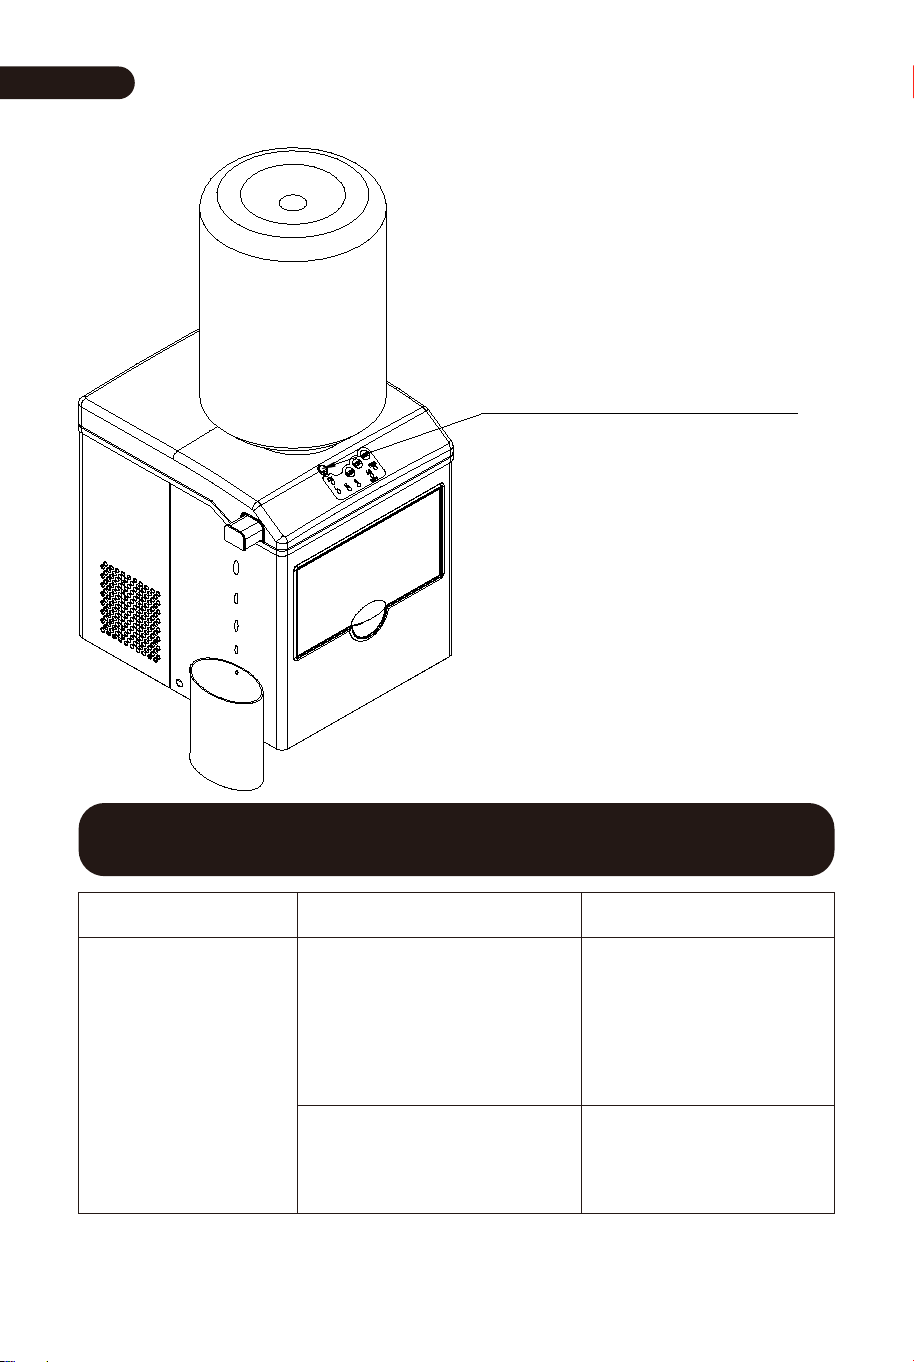
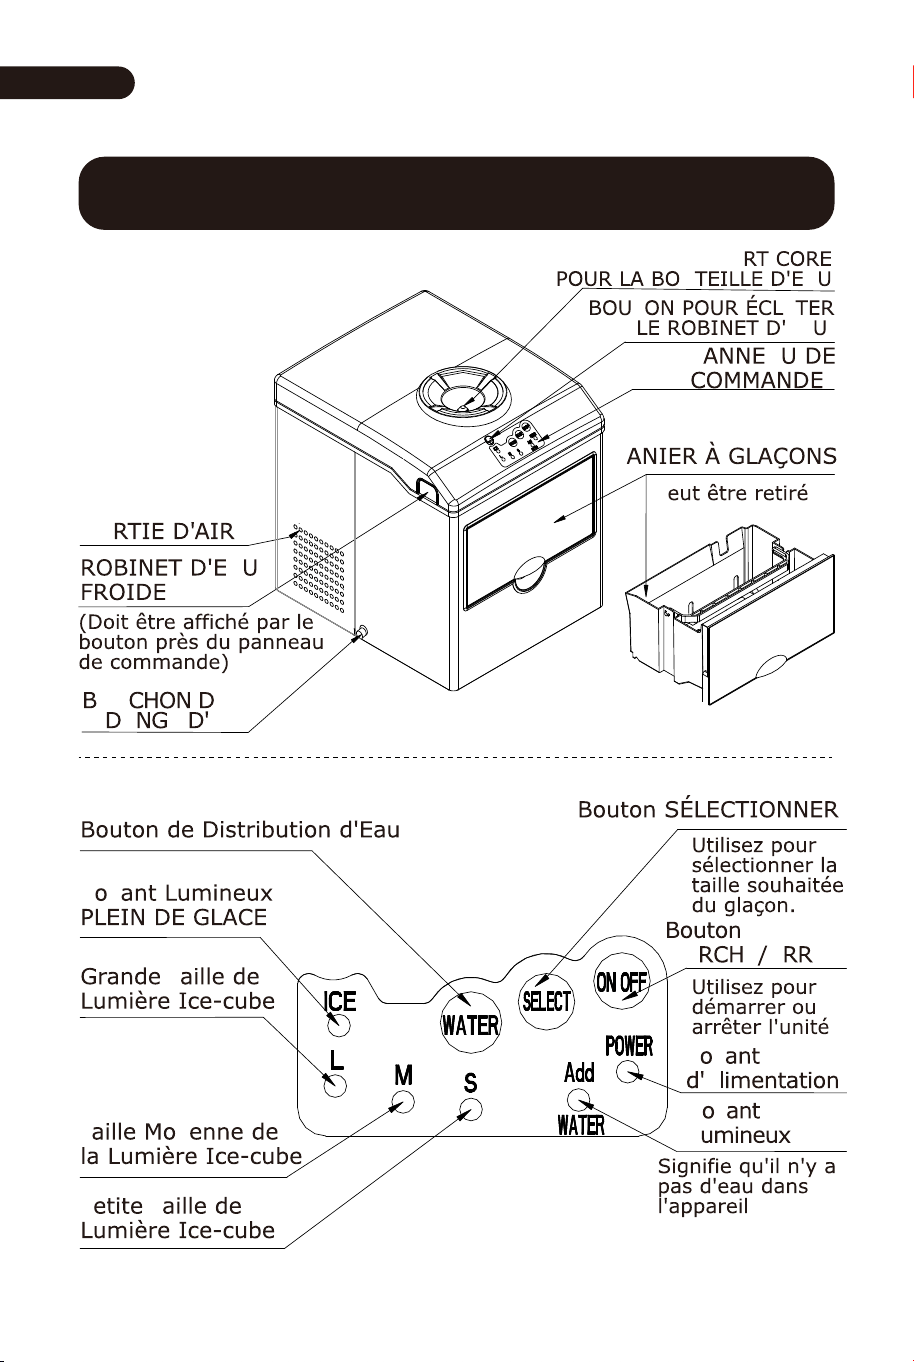
GETTING TO KNOW YOUR UNIT
IMPORTANT:
06
EN
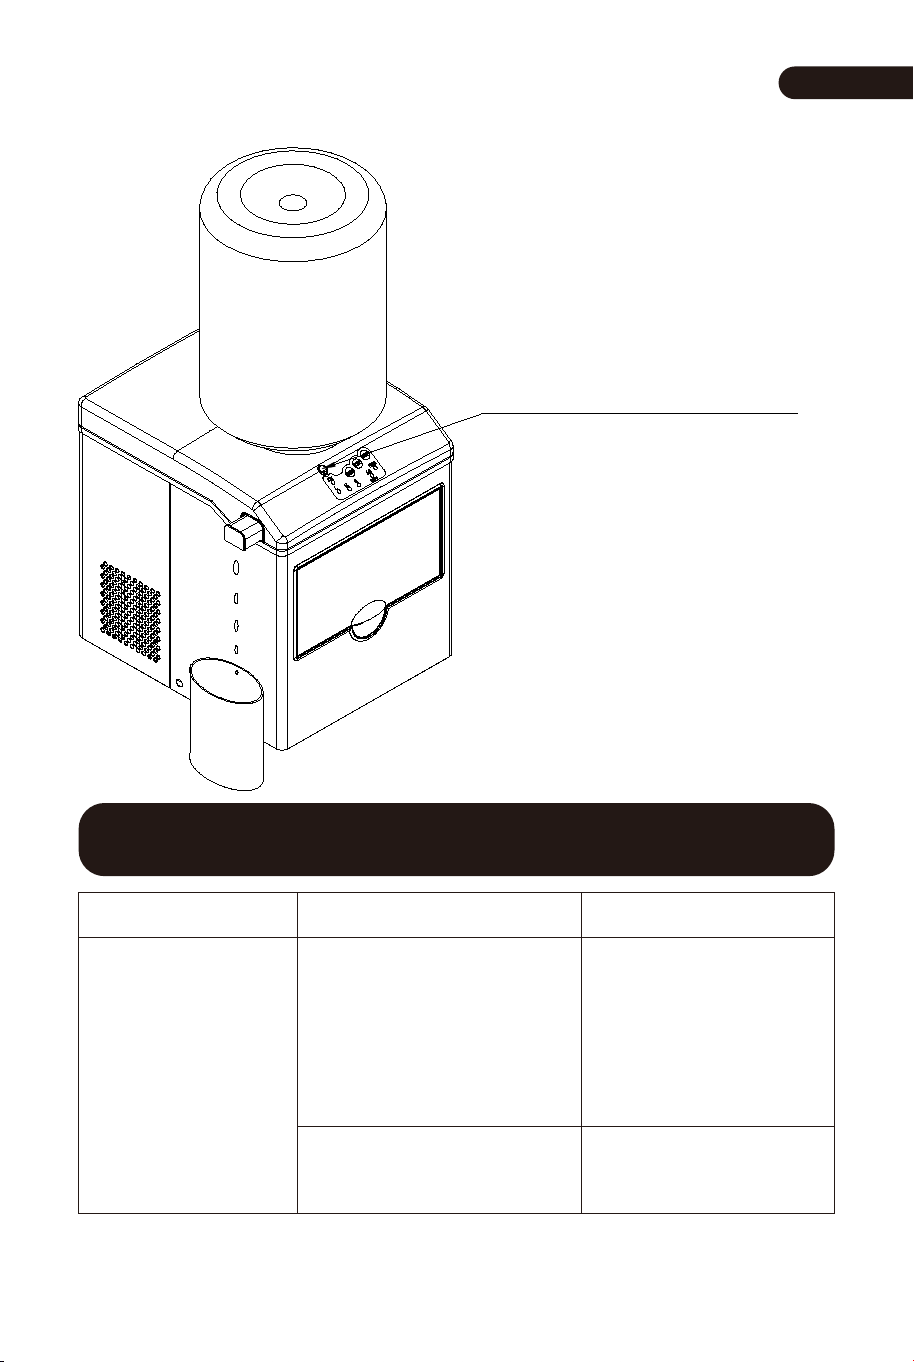
GETTING TO KNOW YOUR UNIT
UNIT
OPERATION PANEL
A
WA
WA
FA
SMA
WA T
TT T
WA FA
A
W
WA
W
07
EN
OPERATING PROCEDURES & MAINTENANCE
1.Remove the exterior and interior packaging. Check that ice
scoop is included. If you have any trouble, please ask qualified
technician for help.
2.Clean the interior with lukewarm water and a soft cloth. Take
out the ice basket and clean it.
3.Find a location for your ice maker that is protected from direct
sunlight and other sources of heat (i.e.: stove, furnace, radiator).
Place the ice maker on a level surface. Maker sure that there is at
least 4 inches of space between the back and sides of your ice
maker and the wall.
4.Allow one hour for the refrigerant fluid to settle before plugging
ice maker in.
5.The appliance must be positioned so that the plug is accessible.
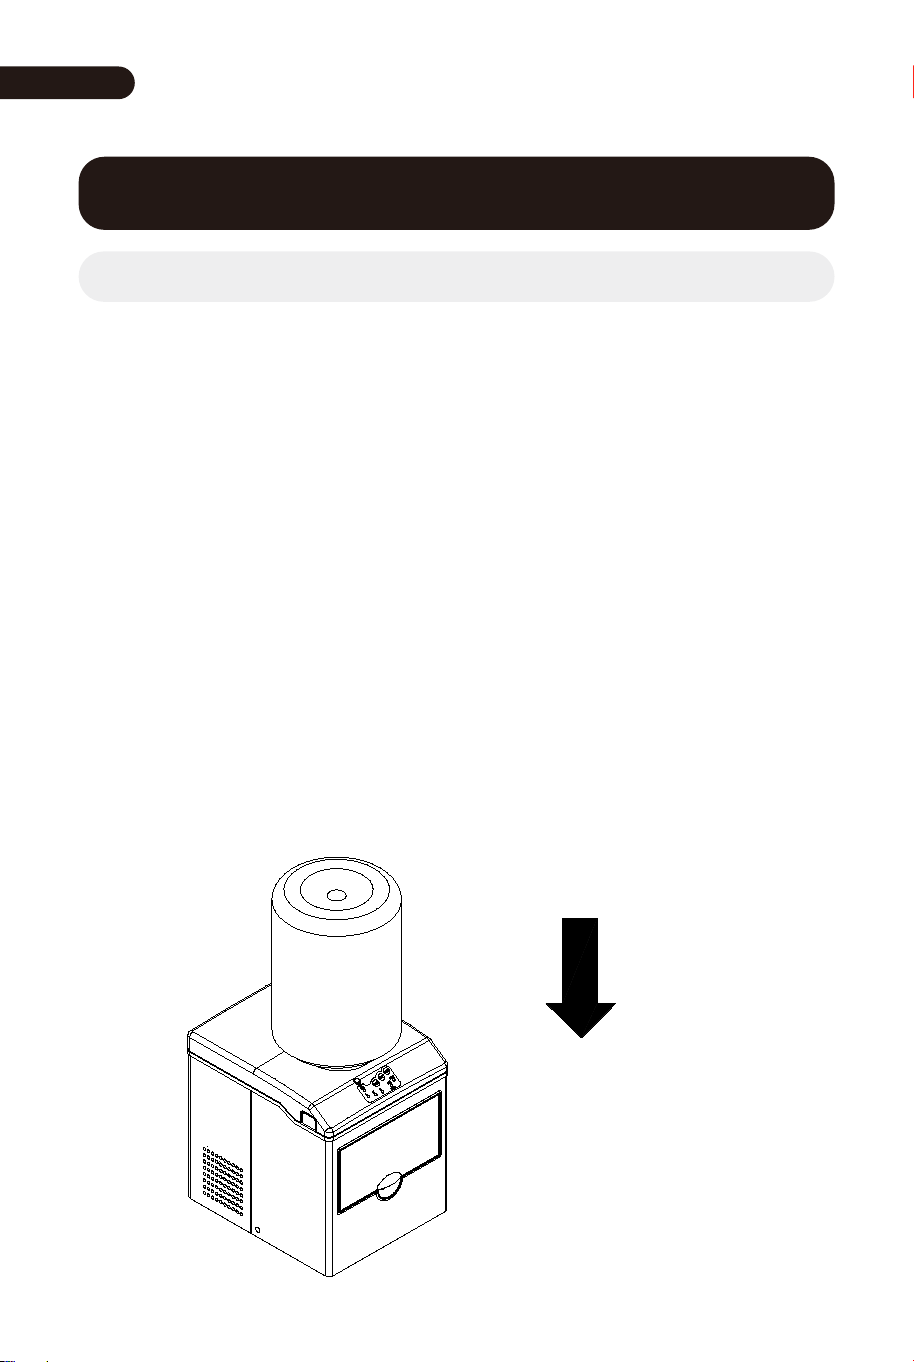
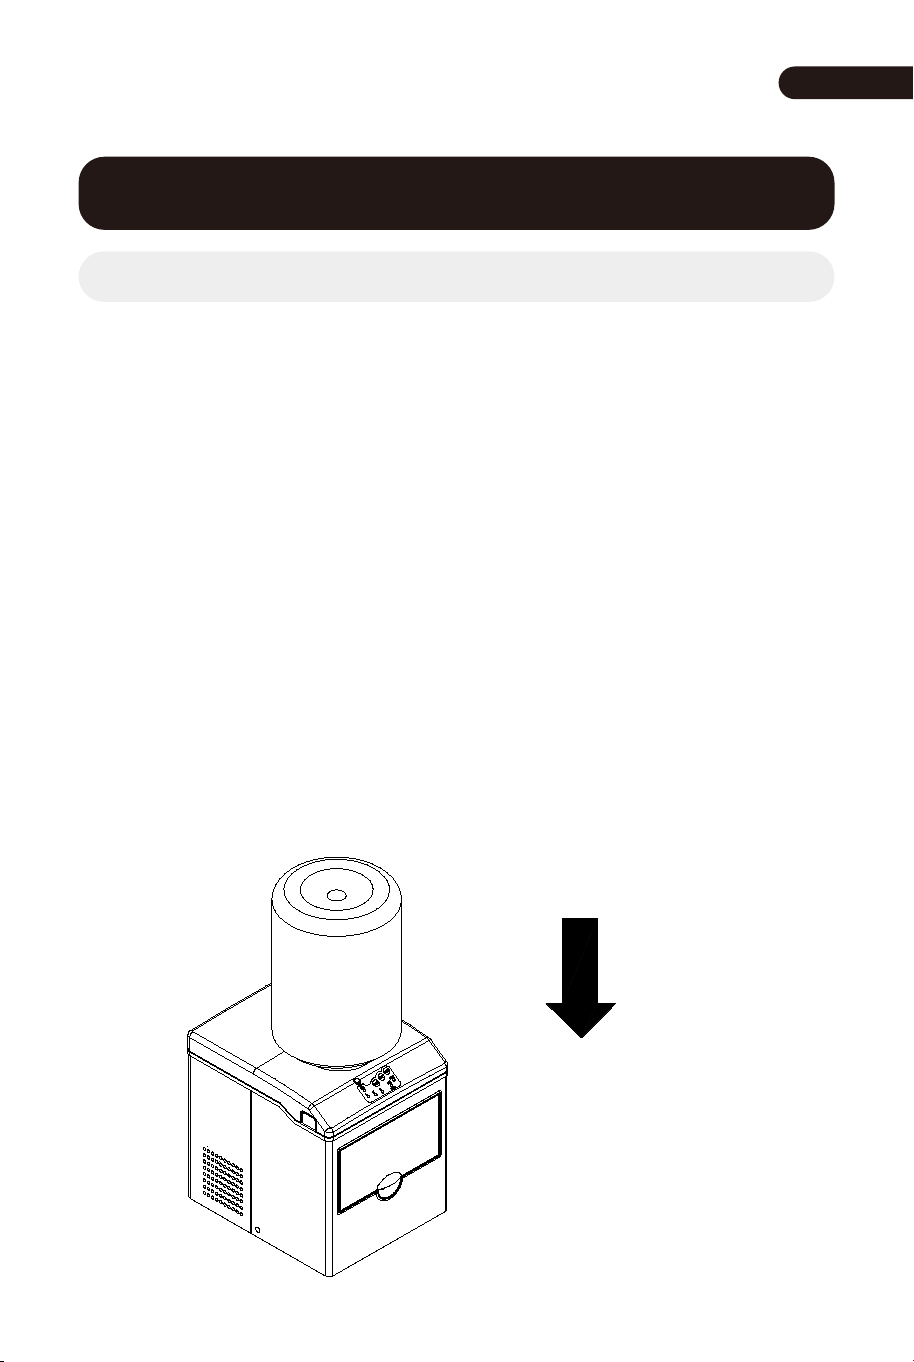
6.Before placing water bottle on the unit, be sure that the drain
plug on the back is tightly fastened.
7.Hold the water bottle vertically and upside down (over the unit)
and place the water bottle into the SMART CORE for the water
bottle. Apply slightly pressure in order to pierce the bottle cap
with the spigot. This unit accepts two, three or five gallon water
bottle with pierceable sealed caps.
UNPACKING YOUR ICE MAKER
PLACEBOTTLE
VERTICALLY
STRAIGHT DOWN
08

EN
* Improper use of the grounded plug can result in the risk of
electrical shock. If the power cord is damaged please ask qualified
technician for help.
1.This unit should be properly grounded for your safety. The
power cord of this appliance is equipped with a three-prong plug
which mates with standard three prong wall outlets to minimize
the possibility of electric shock.
2.Plug your appliance into an exclusive, properly installed,
grounded wall outlet. Do not under any circumstances, cut or
remove the third (ground) prong from the power cord. Any
questions concerning power and/or grounding should be directed
toward a certified electrician.
3.This appliance requires a standard 110-120V~ 60Hz, electrical
outlet with three-prong ground.
Before using your ice maker, it is strongly recommended to clean
it thoroughly.
1.Take out the ice basket.
2.Clean the interior with diluted detergent, warm water and a soft
cloth.
3.Then use the water to rinse the inside parts, and drain out the
water by unplugging the drain cap on the side.
4.The outside of the ice maker should be cleaned regularly with a
mild detergent solution and warm water.
5.Dry the interior and exterior with a soft cloth.
6.When the machine is not in use, open water drained cap to drain
water completely from water reservoir.
CONNECTING YOUR ICE MAKER
CLEANING AND MAINTAINING YOUR ICE MAKER
DANGER
09

EN
USING YOUR ICE MAKER
MAKING THE ICE -CUBE
1.Press “ON/OFF” on the control panel to begin the ice making
cycle.
2.Select the size of the ice cube by pressing the “Select” button.
3.The ice making cycle lasts 6 to 15 minutes, depending on the
size of the ice cube selection and the ambient temperature. And
during the extreme temperature, the lasting time maybe vary a
lot.
4.If water pump can’t inject water, the ice maker will stop
automatically, and the “ADD WATER” indicator will be on on the
operation panel. Please check the water bottle and replace a new
bottle full of water.
Press “ON/OFF” button again to start the unit again.
And if the new bottle full of water is replaced and the “ADD
WATER” indicator is still on because of water pump not working
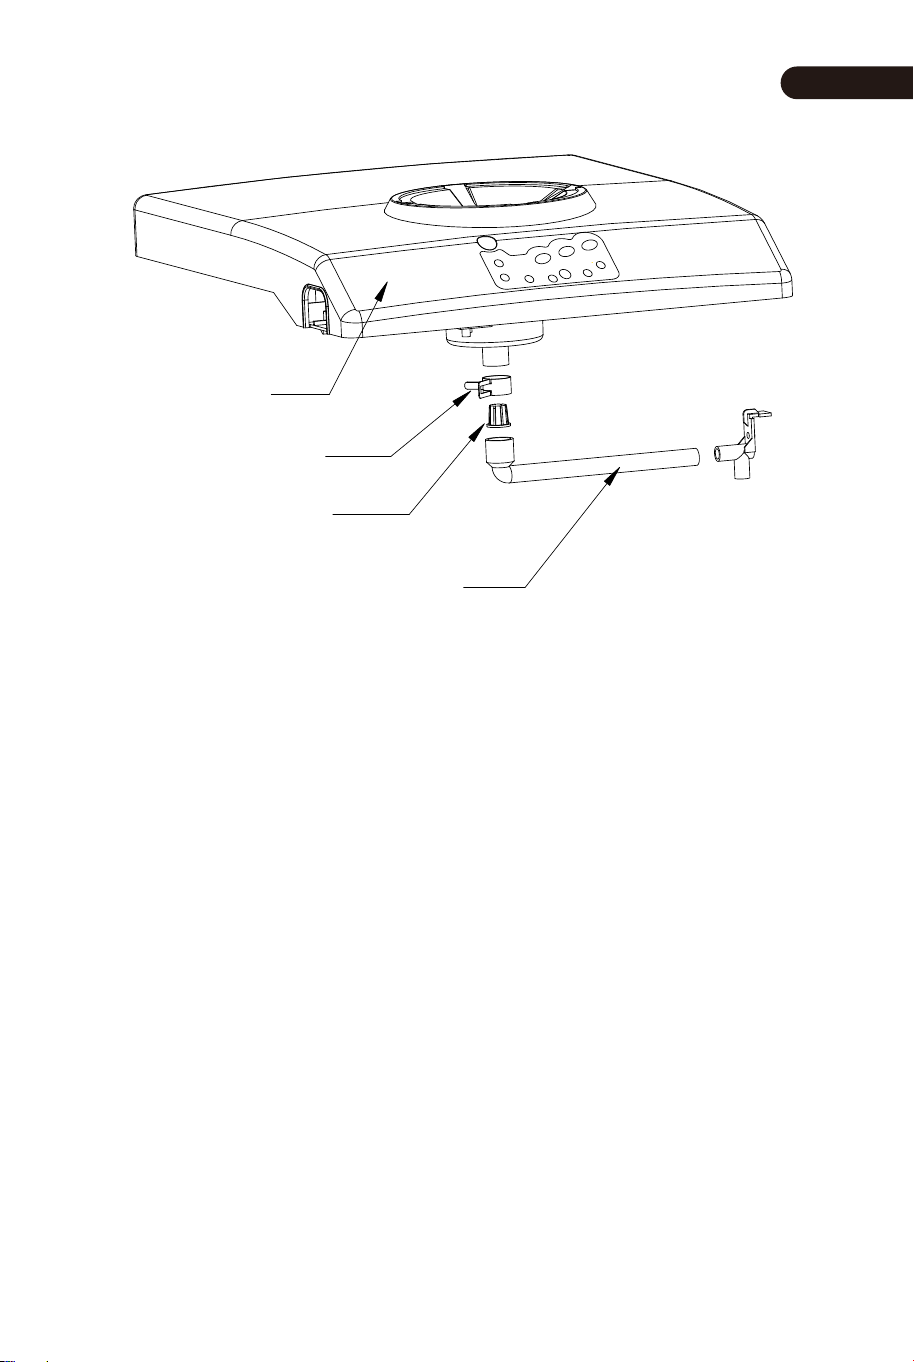
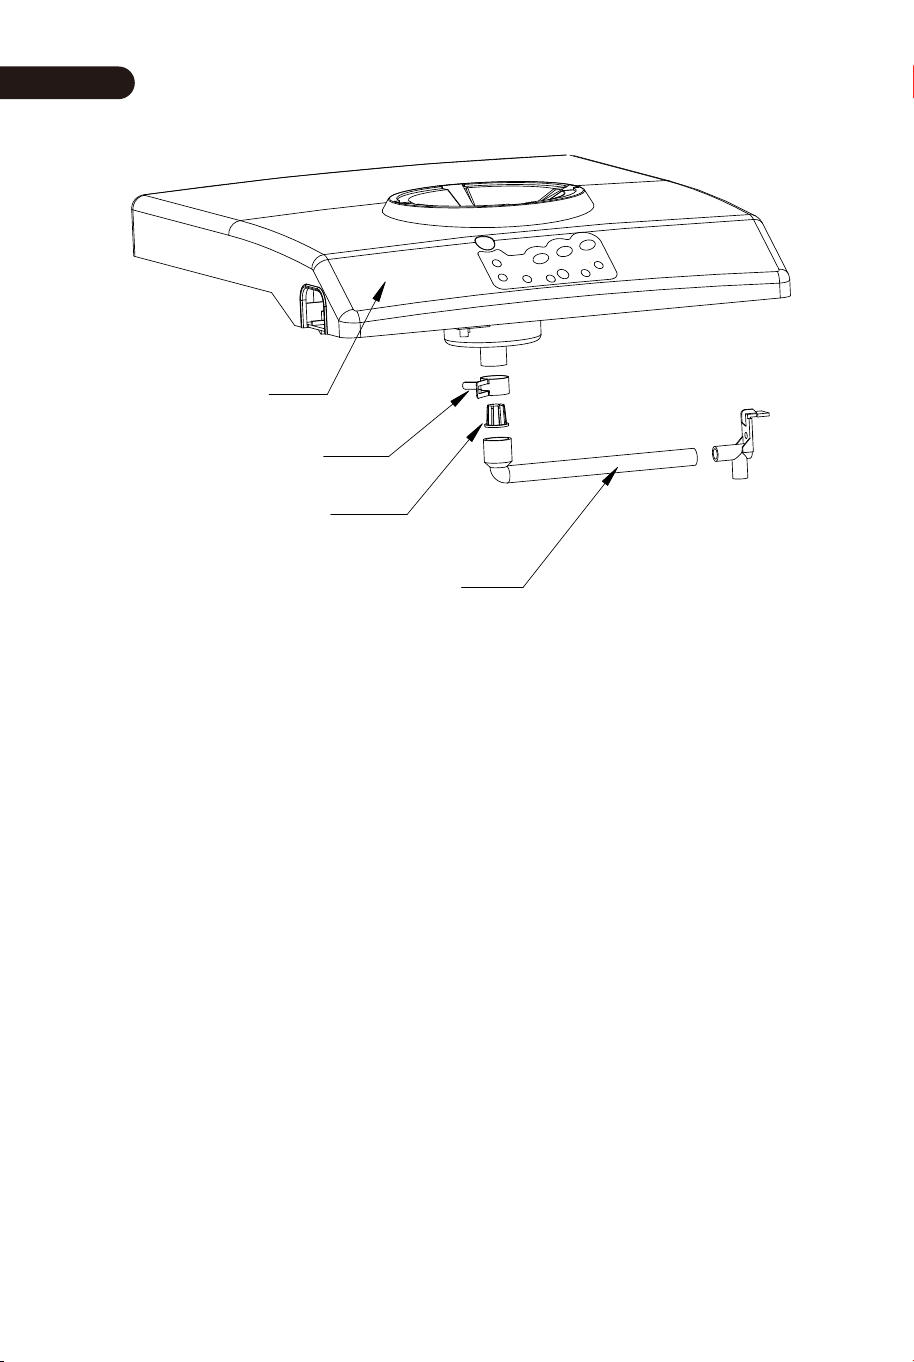
properly, please check the two water filter:
A.The water filter is located in the bottom of water tank, first
check it is blocked or not. Otherwise clean it.
B.The water filter is displayed in following figure. Release the
clipper and take down the water pipe, then take out the water
filter and clean it, then install back and use the clipper to fasten
the water pipe again.
10
EN
Allow the refrigerant liquid inside the compressor at least 3
minutes to settle before restarting.
5.The ice maker automatically stops working when the ICE light
on the operation panel is on means that ice basket is full.
ENJOY THE COLD WATER
The cold water can be enjoyed only after the ice-making have
worked for more than half hour.
1.Press the button to pop up the cold water faucet.
2.Press the “WATER” Water Dispensing Button on the operation
button to dispense the cold water to your cup. Release pressing till
your cup is full of the cold water.
TOP COVER
CLIPPER
WATER FILTER
WATER PIPE
11
EN
TROUBLESHOOTING
Push this button to let the
cold water faucet pop up.
PROBLEM POSSIBLE CAUSE SOLUTION
“WATER”
indicator is on.
Lack of Water.
One of two water
filter is blocked.
Stop the ice maker,
replace with a new
bottle full of water,
and then restart it.
Check both of water
filter and clean it.
12
EN
“ICE” indicator
is on.
Ice cubes stick
together.
The ice basket is full
of the ice-cube.
The ice cycle is too
long.
Pull the ice basket
and empty it.
Stop the ice maker,
and restart it when
the ice blocks melt.
Select the small ice
button.
Water temperature in
inner tank is too low.
Change the water in
the inner Tank.
Temperature of water
is better set between
8
O
C-32
O
C/46
O
F-90
O
F.
Ice making
cycle is normal
but no ice is
made.
Ambient
temperature or
water temperature
in inner tank is too
high.
Please run the ice
maker below
32
O
C/90
O
F and pour
colder water into
tank.
Refrigerant liquid
leakage.
Verify by a qualified
technician.
Pipe in the cooling
system is blocked.
Verify by a qualified
technician.
13

EN
USING YOUR ICE MAKER
TECHNICAL PARAMETERS
Model
Description
Protection Type
Climate Type
Power Rating
Ice-making Rated Current
Ice-harvest Rated Current
Refrigerant
Vesicant
Enclosure
Ice maker using bottled water,
with cold water dispensing function
I
SN/N/ST/T
110-120V/60Hz
2.0A
2.7A
R290 / 33g
C
5
H
10
Stainless steel
FP10074US
14
EN
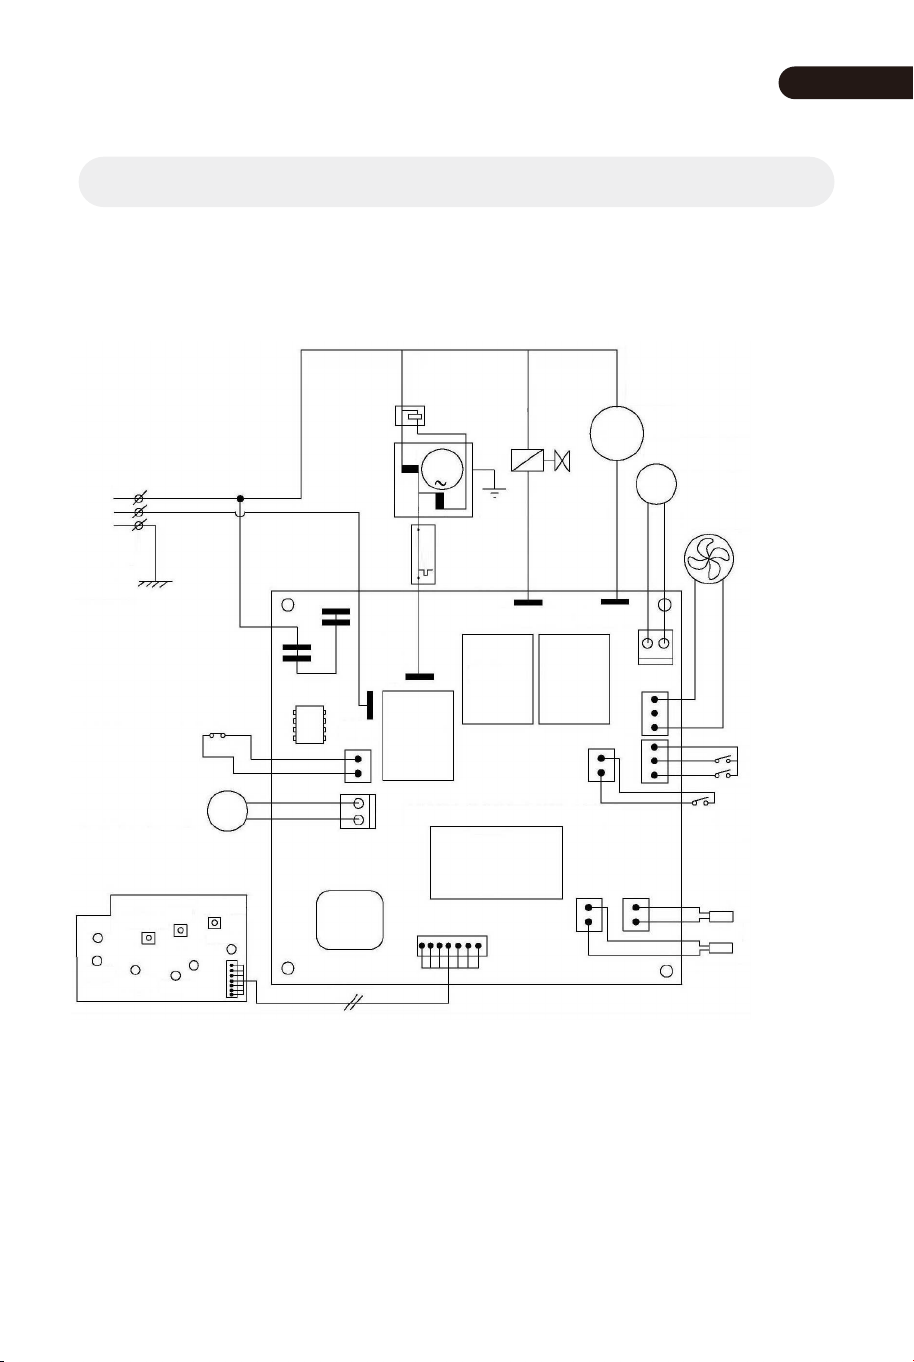
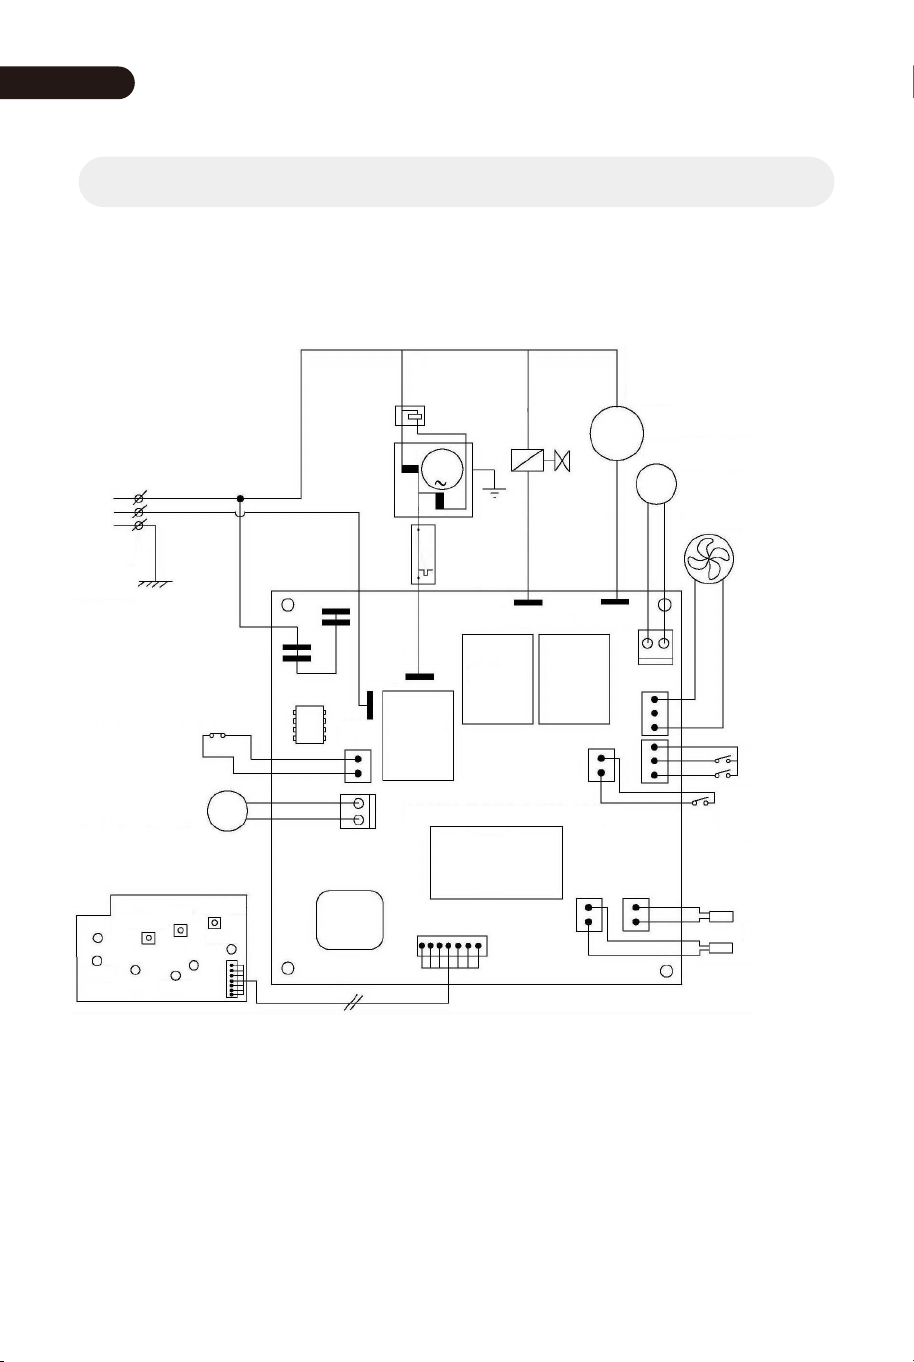
CIRCUIT DIAGRAM
ELECTRICAL
DIAGRAM FOR
ICE-MAKER
POWER
SUPPLY
MICRO SWITCH FOR
FAUCET DETECTING
DC Pump FOR
Water FAUCET
N
L
G
ICE
LED3
LED2
LED1
WATER
WATER
T1
T1
T2
MCU
SM
M
7C
SET
ON/OFF
ON/OFF
SENSOR FOR ICE
FULL DETECTING
SENSOR FOR
CONTROLING
FAN MOTOR
WATER DETECTING
SWITCH
MICRO SWITCH
MICR0 SWITCH
MAIN CONTROL PCB
COMP
-PUMP+
-PUMP+
+FAN-
DC Fan Motor
DC Water Pump
COMPRESSOR
MW
AC-N
AC-L
Relay
Relay Relay
AW
Motor For Ice shovel
Solenoid
Valve
Start Relay
Over 1oad
Protector
VALVE
OPERATION PCB
MOTOR
15
CONSIGNES DE SÉCURITÉ IMPORTANTES
Votre sécurité et celle des autres sont très importantes.
Nous avons fourni de nombreux manuels de messages de sécurité
importants et votre appareil.
Lisez et respectez toujours tous les messages de sécurité.
C'est le symbole d'alerte de sécurité:
Tous les messages de sécurité suivront le symbole d'alerte de
sécurité et le mot « DANGER » ou « AVERTISSEMENT ».
Ces mots signifient:
Vous pouvez être tué ou gravement blessé si vous ne suivez pas
immédiatement les instructions.
Tous les messages de sécurité vous indiqueront quel est le danger
potentiel, vous indiqueront comment réduire les risques de
blessure et vous indiqueront ce qui peut arriver si les instructions
ne sont pas suivies.
DANGER
ATTENTION
FR
16
v
v
v
-v
A
r -v
r
v v v
r
r v oy
r
CONSEILS DE SÉCURITÉ IMPORTANTS
PRÉPARATION DE VOTRE MACHINE À
GLAÇONS POUR L'UTILISATION
FR
17
F v v
r o
v r
-v
v r
v
oy v v
v
v r
r
v r r
r
r
r
AVERTISSEMENT :
FR
18
k v
v
v
Avertissement:
V v
AVE TIS v v
AVE TIS
AVE TIS
y
AVERTISSEMENT :
P
v
APPRENDRE À CONNAÎTRE VOTRE UNITÉ
IMPORTANT:
FR
19
APPRENDRE À CONNAÎTRE VOTRE UNITÉ
UNITÉ
PANNEAU DE COMMANDE
SO
P A
OU E
VI A E EAU
A
SMA
U A
T A
EA
P
P
MA E A ÊT
V
y
L EAU
V
y
A
V y
T
T y
P T
FR
20
PROCÉDURES D'EXPLOITATION ET ENTRETIEN
1.Retirez l'emballage extérieur et intérieur. Vérifiez que la cuillère à
glace est incluse. Si des pièces manquent, veuillez contacter notre
service client.
2.Nettoyez l'intérieur avec de l'eau tiède et un chiffon doux. Sortez le
panier à glace et nettoyez-le.
3.Trouvez un emplacement pour votre machine à glaçons à l'abri de
la lumière directe du soleil et d'autres sources de chaleur (c.-à-d. :
cuisinière, fournaise, radiateur). Placez la machine à glaçons sur une
surface plane. Assurez-vous qu'il y a au moins 4 pouces d'espace
entre l'arrière et les côtés de votre machine à glaçons et le mur.
4.Attendez une heure que le fluide frigorigène se dépose avant de
brancher la machine à glaçons.
5.L'appareil doit être positionné de manière à ce que la prise soit
accessible.
6.Avant de placer la bouteille d'eau sur l'appareil, assurez-vous que
le bouchon de vidange à l'arrière est bien fixé.
7. Tenez la bouteille d'eau verticalement et à l'envers (au-dessus de
l'appareil) et placez la bouteille d'eau dans le NOYAU INTELLIGENT
pour la bouteille d'eau. Appliquer une légère pression afin de percer
le bouchon de la bouteille avec le robinet. Cette unité accepte des
bouteilles d'eau de deux, trois ou cinq gallons avec des bouchons
scellés perçables.
DÉBALLAGE DE VOTRE MACHINE À GLAÇONS
PLACEZ LA
BOUTEILLE
VERTICALEMENT
DROITE VERS LE BAS
FR
21

* Une mauvaise utilisation de la fiche mise à la terre peut
entraîner un risque de choc électrique. Si le cordon d'alimentation
est endommagé, veuillez appeler notre service client.
1.Cet appareil doit être correctement mis à la terre pour votre
sécurité. Le cordon d'alimentation de cet appareil est équipé d'une
fiche à trois broches qui s'accouple avec les prises murales
standard à trois broches pour minimiser les risques de choc
électrique.
2.Branchez votre appareil dans une prise murale exclusive,
correctement installée et mise à la terre. Ne coupez ou ne retirez
en aucun cas la troisième broche (terre) du cordon d'alimentation.
Toute question concernant l'alimentation et/ou la mise à la terre
doit être adressée à un électricien certifié.
3.Cet appareil nécessite une prise électrique standard de
110-120V~ 60Hz, avec mise à la terre à trois broches.
Avant d'utiliser votre machine à glaçons, il est fortement
recommandé de la nettoyer soigneusement.
1.Sortez le panier à glace.
2.Nettoyez l'intérieur avec un détergent dilué, de l'eau tiède et un
chiffon doux.
3.Ensuite, utilisez l'eau pour rincer les pièces intérieures et vidangez
l'eau en débranchant le bouchon de vidange sur le côté.
4.L'extérieur de la machine à glaçons doit être nettoyé régulièrement
avec une solution détergente douce et de l'eau tiède.
5.Séchez l'intérieur et l'extérieur avec un chiffon doux.
6.Lorsque la machine n'est pas utilisée, ouvrez le bouchon de
vidange d'eau pour vidanger complètement l'eau du réservoir d'eau.
CONNEXION DE VOTRE MACHINE À GLAÇONS
NETTOYAGE ET ENTRETIEN DE VOTRE MACHINE À GLAÇONS
DANGER
FR
22

UTILISATION DE VOTRE MACHINE À GLAÇONS
FABRICATION DU GLACE-CUBE
1.Appuyez sur « MARCHE/ARRÊT » sur le panneau de commande
pour commencer le cycle de fabrication de glace.
2.Sélectionnez la taille du glaçon en appuyant sur le bouton «
Sélectionner ».
3.Le cycle de fabrication de glace dure de 6 à 15 minutes, selon la
taille de la sélection de glaçons et la température ambiante. Et
pendant la température extrême, la durée peut varier beaucoup.
4.Si la pompe à eau ne peut pas injecter de l'eau, la machine à
glaçons s'arrêtera automatiquement et l'indicateur « AJOUTER DE
L'EAU » s'allumera sur le panneau de commande. Veuillez vérifier
la bouteille d'eau et remplacer une nouvelle bouteille pleine d'eau.
Appuyez à nouveau sur le bouton « MARCHE/ARRÊT » pour
redémarrer l'appareil. Et si la nouvelle bouteille pleine d'eau est
remplacée et que le voyant « AJOUTER DE L'EAU » est toujours
allumé car la pompe à eau ne fonctionne pas correctement,
veuillez vérifier les deux filtres à eau :
A.Le filtre à eau est situé au fond du réservoir d'eau, vérifiez
d'abord qu'il est bloqué ou non. Sinon nettoyez-le.
B.Le filtre à eau est affiché dans la figure suivante. Relâchez la
tondeuse et démontez le tuyau d'eau, puis retirez le filtre à eau et
nettoyez-le, puis réinstallez-le et utilisez la tondeuse pour fixer à
nouveau le tuyau d'eau.
FR
23
Laissez le liquide réfrigérant à l'intérieur du compresseur reposer
pendant au moins 3 minutes avant de redémarrer.
5.La machine à glaçons s'arrête automatiquement lorsque le
voyant GLACE du panneau de commande est allumé, ce qui
signifie que le panier à glaçons est plein.
PROFITEZ DE L'EAU FROIDE
L'eau froide ne peut être appréciée qu'après que la fabrication de
glace ait fonctionné pendant plus d'une demi-heure.
1.Appuyez sur le bouton pour ouvrir le robinet d'eau froide.
2.Appuyez sur le bouton de distribution d'eau « EAU » sur le
bouton de fonctionnement pour distribuer l'eau froide dans votre
tasse. Relâchez la pression jusqu'à ce que votre tasse soit pleine
d'eau froide.
COUVERCLE
SUPÉRIEUR
TONDEUSE
FILTRE À EAU
CONDUITE D'EAU
FR
24
DÉPANNAGE
Appuyez sur ce bouton
pour ouvrir le robinet
d'eau froide.
PROBLÈME CAUSE POSSIBLE SOLUTION
L'indicateur «
EAU » est
allumé.
Manque d'eau.
Un des deux filtres à
eau est bouché.
Arrêtez la machine à
glaçons,
remplacez-la par une
nouvelle bouteille
remplie d'eau, puis
redémarrez-la.
Vérifiez les deux
filtres à eau et
nettoyez-les.
FR
25

L'indicateur
«GLACE » est
allumé.
Les glaçons
collent
ensemble.
Le panier à glace est
rempli de glaçons.
Le cycle de glace est
trop long.
Tirez le panier à glace
et videz-le.
Arrêtez la machine à
glaçons et
redémarrez-la lorsque
les blocs de glace
fondent. Sélectionnez
le petit bouton de
glace.
La température de
l'eau dans le réservoir
intérieur est trop
basse.
Changez l'eau dans le
réservoir intérieur. La
température de l'eau
est mieux réglée
entre 8
O
C-32
O
C/
46
O
F-90
O
F.
Le cycle de
fabrication de
glace est
normal mais
aucune glace
n'est
fabriquée.
La température
ambiante ou la
température de
l'eau dans le
réservoir interne est
trop élevée.
Veuillez faire
fonctionner la
machine à glaçons en
dessous de 32
O
C/
90
O
F et verser de
l'eau plus froide dans
le réservoir.
Fuite de liquide
réfrigérant.
Vérifiez par un
technicien qualifié.
Le tuyau du système
de refroidissement
est bouché.
Vérifiez par un
technicien qualifié.
FR
26

PARAMÈTRES TECHNIQUES &
SCHÉMA DE CIRCUIT
PARAMÈTRES TECHNIQUES
Modèle
Description
Type de Protection
Type de Climat
Puissance Nominale
Courant Nominal de Fabrication de Glace
Courant Nominal de Récolte de Glace
Réfrigérant
Vésicant
Enceinte
Machine à glaçons utilisant de l'eau en
bouteille, avec fonction de distribution
d'eau froide
I
SN/N/ST/T
110-120V/60Hz
2,0A
2,7A
R290 / 33g
C
5
H
10
Acier Inoxydable
FP10074US
FR
27
SCHÉMA
SCHÉMA ÉLECTRIQUE
POUR MACHINE À
GLAÇONS
SOURCE DE
COURANT
MICRO-INTERRUPTEUR DE
DETECTION DE ROBINET
Pompe à courant
ontinu POUR
ROBINET D'EAU
N
L
G
GLACE
LED3
LED2
LED1
EAU
EAU
T1
T1
T2
MCU
SM
M
7C
POSITIONNER
MARCHE/ARRÊT
MARCHE/ARRÊT
CAPTEUR DE
DETECTION DE
GLACE PLEINE
CAPTEUR DE
CONTRÔLE DU
MOTEUR DU
VENTILATEUR
INTERRUPTEUR
DE DÉTECTION D'EAU
MICRO-INTERRUPTEUR
MICRO-INTERRUPTEUR
CARTE DE COMMANDE PRINCIPALE
COMP
POMPE
POMPE
Ventilateur
Moteur de Ventilateur CC
Pompe à Eau CC
COMPRESSEUR
MW
AC-N
AC-L
Relais
Relais Relais
AW
Moteur Pour Pelle à Glace
Électrovanne
Démarrer
le relais
Protecteur de
Surcharge
SOUPAPE
OPÉRATION
PRINCIPALE
MOTEUR
c
FR
28
Instructions De Retour / Réclamation De Dommages
Dans le cas où un retour est requis, l'article doit être retourné dans sa boîte
d'origine. Sans cela, votre retour ne sera pas accepté.
NE PAS jeter la boîte/l'emballage d'origine.
Prenez une photo des marquages de la boîte.
Prenez une photo des dommages (le cas échéant).
Envoyez-nous un e-mail avec les images demandées.
Une photo des marquages (texte) sur le côté de la boîte est requise au cas où
une pièce serait nécessaire pour le remplacement. Cela aide notre personnel à
identifier votre numéro de produit pour s'assurer que vous recevez les bonnes
pièces.
Une photo des dommages est toujours requise pour déposer une réclamation et
obtenir rapidement votre remplacement ou votre remboursement. Assurez-vous
d'avoir la boîte même si elle est endommagée.
Envoyez-nous un e-mail directement depuis le marché où votre article a été
acheté avec les images ci-jointes et une description de votre réclamation.
FR
In case a return is required, the item must be returned in original box. Without this
your return will not be accepted.
DO NOT discard the box / original packaging.
Take a photo of the box markings.
Take a photo of the damaged part (if applicable).
Send us an email with the images requested.
A photo of the markings (text) on the side of the box is required in case a part is
needed for replacement. This helps our staff identify your product number to
ensure you receive the correct parts.
A photo of the damage is always required to file a claim and get your replacement
or refund processed quickly. Please make sure you have the box even if it is
damaged.
Email us directly from marketplace where your item was purchased with the
attached images and a description of your claim.
EN
Return / Damage Claim Instructions
Instructions De Retour / Réclamation De Dommages
29


If you're having difficulty, our friendly
customer team is always here to help.
USA office: Fontana AUS office: Truganina
GBR office: Ipswich FRA office: Saint Vigor d'Ymonville
AUS:cs.au@costway.com
FRA:cs.f r @costway.com
V3