
2
About this Document
Rev. 2.1: This document is written for iViewer revision 3.0.3 or later.
Rev. 2.2: Revised for 3.5.7.
1. The time displayed on the Playback tool follows that on the VAST server. The limitation on time
selection is lifted due to time zone selection concern.
2. iViewer will display the layout page where the newly-added cameras reside.
3. Added preset button, and preset position selection row.
4. Presets are only supported on cameras, VAST, and ND8x01 series.
5. Changed the location of the resolution change button.
6. Added a page for contacting technical support.
7. Supports SSL encrypted connection (for direct camera connection, NVR, or w/ VAST v1.12 or above).
8. Supports the display of snapshots instead of live streaming on the Live View page.
9. Supports display of camera name on screen.
10. Supports connection to VAST sub-stations.
11. Supports two way audio.
12. Added the Technical Support ll-in page.
Note on limitations:
* If the fisheye streaming mode is configured as a panoramic 1080P mode, the associated fisheye
dewarp control (PiP) will be disabled.
* Supports the connection to Linux-based NVRs, including ND8322P and ND8422P.
* Two way audio between iViewer and a VAST server is not supported.
Rev. 2.3: Revised for software rev. 3.6.2 and above.
1. Supports login to VAST using Windows AD user accounts (a VAST rev. 1.12 server installation is
required for iOS).
2. Supports DO control.
3. Supports hardware decoding for streaming H.264/H.265/MPEG4 video on Android 5.0 or Apple iOS 8.0
devices. (If no GPU, will automatically turn to software decode).
4. Changed the location of the resolution change button.
5. Timeline Playback (NVR, or VAST station).
6. Supports layout change.
7. Supports retaining a dewarped view on the live view window after a sheye's dewarp mode has been
congured.
3
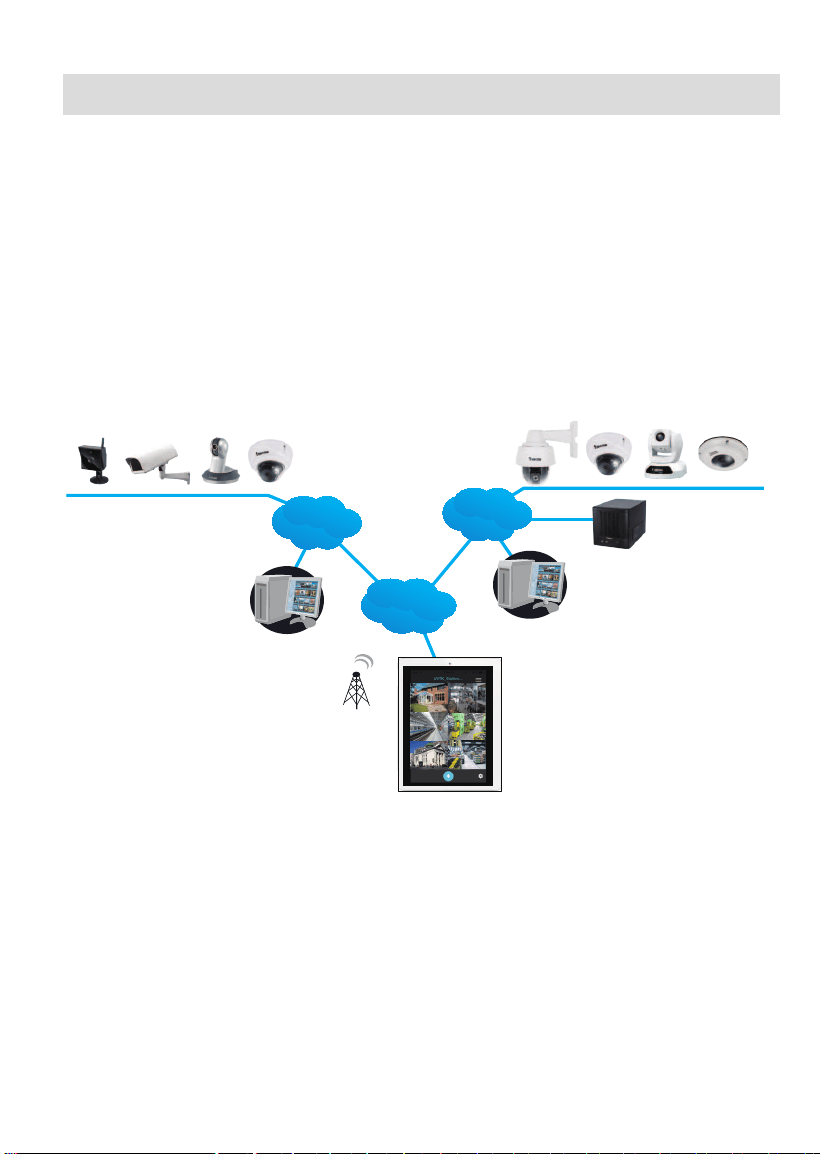
1-2. An established
VAST
,
ST7501
, or
VIVOTEK's NVR
deployment consisting of multiple
network cameras, where the VAST or ST7501 servers can be accessed via a public
IP or DNS service. The corresponding VAST and ST7501 software must be of a
revision number
1.7
or later.
I. Requirements
VAST
Server Station
VAST
Server Station
iViewer
Wi Fi
WAN
LAN
port: 3454
port: 3454
NVR
LAN
https port: 3443
https port: 3443
1-3. Network cameras have already been configured via VAST, ST7501 software, or
VIVOTEK's NVR station, namely, "inserted" into the managed list of cameras of the
above software.
1-1. iViewer rev. 3.0 supports iOS 8.0 and above. You should upgrade your operating
system on the following devices:
• iPhone 6 Series, iPhone 5 Series, and iPhone 4s
• iPad Air, iPad mini, iPad 2 and iPad (2nd generation or above)
• iPod touch (5th generation or above)
iViewer also supports mobile devices running Android 4.0 or later.
4
Wi-Fi Access Point
LAN
Network Cameras
iViewer
port: 80
port: 80
1-4. The iViewer rev. 1.3 and above supports direct connections with network cameras
when their IPs are known to the user.
If you connect via Internet to a VAST/ST server, NVR station, or cameras behind a
rewall or router,
• When connecting to a VAST/ST server or NVR station-
If a VAST/ST server or NVR station is located behind a firewall or router,
congure port forwarding or "bypass tunnel," by mapping TCP port "
3454
" (for
access to VAST) on the router to your VAST/ST server or NVR station. Enter
the server's public IP and port "
3454
" on the iViewer conguration pane.
• When connecting to individual cameras -
If an individual camera is located behind a firewall or router, configure port
forwarding or "bypass tunnel," by mapping TCP port "
80
" (camera's default for
HTTP). Enter the camera's public IP and port "
80
" on the iViewer conguration
pane.
Please consult your network administrator or the documentation that came with
your rewall or broadband router.
IMPORTANT:
5
• Below are the typical TCP ports for access to individual network cameras
Network General settings:
HTTPS = 443, (3443 for VAST server)
FTP = 21
Streaming:
HTTP = 80
Secondary HTTP = 8080
RTSP = 554 / 4543 (VAST v1.9 and later)
RTP for video = 5556
RTCP for video = 5557
RTP for audio = 5558
• By default, the smallest resolution stream will be selected for display. In most
cases, it is the #2 for 3 stream models, or #3 for 4 stream models.
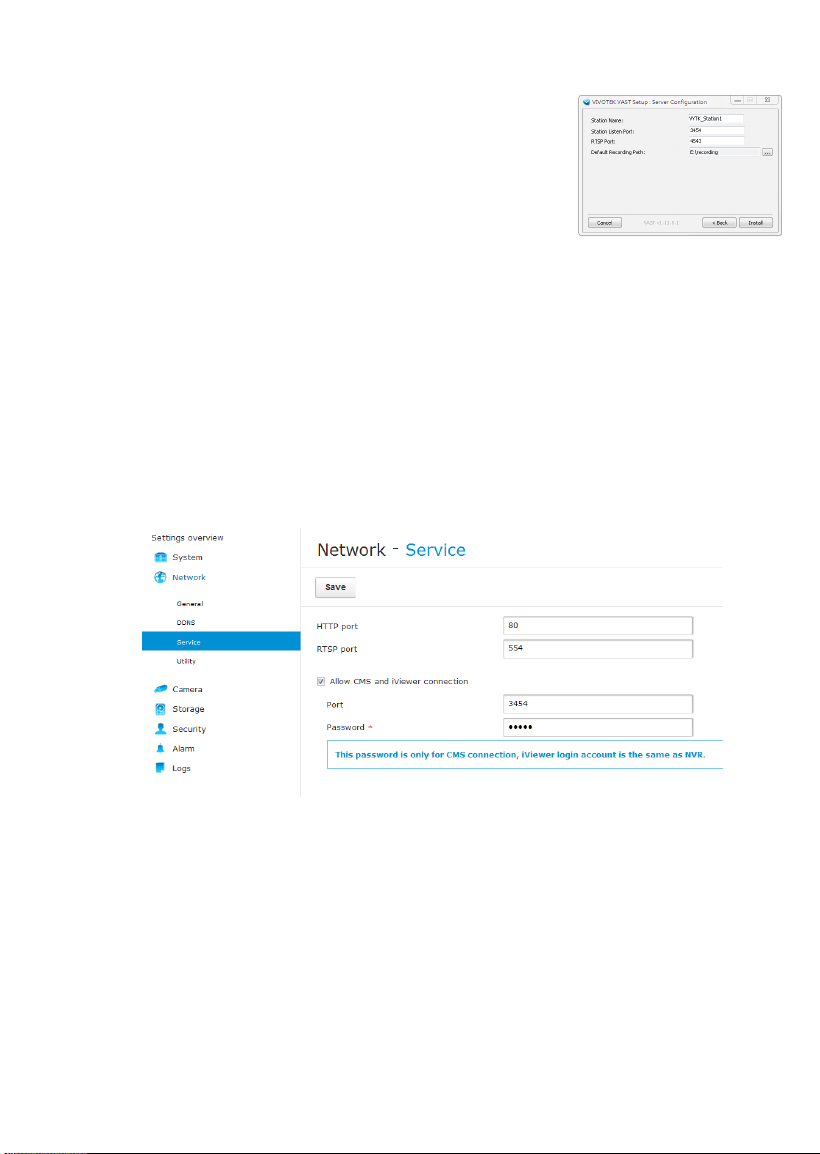
• To establish a connection with VIVOTEK's embedded Linux-based NVR, you
need to enable the connection on a web console via
Network
>
Service
.
Select the "Allow CMS and iViewer connection" checkbox, and enter the same
password as that you use for login to an NVR console.
6
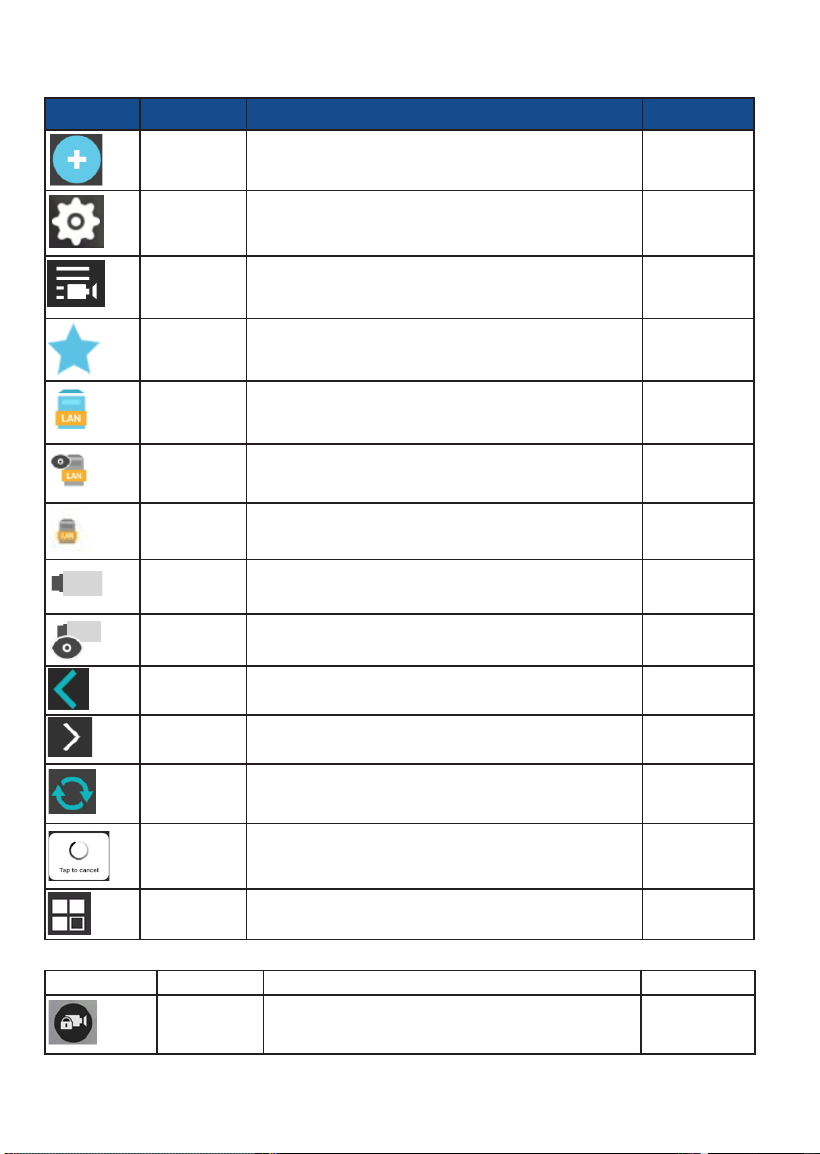
Knowing Buttons in iViewer
Icon Name Function Location
Add camera /
station
Tap to add cameras, VAST/ST7501 station, or NVR.
Live
Setting
Displays the Tutorial and Technical support pages.
Live
Device list
Tap to display the device list, as cameras in list, or
individual stations.
Live
My favorite
Displays the cameras enlisted in the My favorite group.
When a camera's view cell is selected (oating), drag the
view cell to this icon to join the camera to My Favorites.
Device list
VAST or
ST7501
station
Tap to display a connected VAST, ST7501 station, or
NAS.
Device list
VAST or
ST7501
station
A VAST sub-station that is currently selected.
Device list
VAST sub-
station
A VAST sub-station.
Device list
Cameras
Tap to display individual cameras in the Cameras group.
Device list
Cameras
A Cameras group is currently selected.
Device list
Back
Tap to return to the previous page (for iOS only).
Live or Add
devices
Page indicator
This indicator temporarily displays to show that there are
multiple pages on the live view.
Live
Snapshot
refresh
When using the snapshot mode, use this button to
manually refresh the current snapshots on live view,
instead of streaming video.
Device list
Tap to cancel
Allows you to stop a pending attempt to establish a
connection, and move to the next camera/server group.
Live
Layout
Tap to select a different layout Live
Indicators
Unauthorized
This appears on view cells when camera's password
has been changed, or when users do not have access
to a VAST server.
Live

7
Icon Name Function Location
PTZ
Tap to enter the PTZ mode.
Full view
PTZ
PTZ control is taking place. Tap again to disable PTZ
control.
Full viewl
Fisheye
Tap to enter the sheye dewarped mode (1O, 1P, and
1R).
Full view
Fisheye
The sheye dewarped mode is taking place. Tap again
to disable the dewarped mode.
Full view
Playback
Opens the Playback roller selector.
Full view
Playback
The video playback is taking place. Note that you can
enter the dewarped mode during a playback.
Full view
Playback Time
This icon is shown when playing the past recording.
Tap this to return to live view.
Full view
Snapshot
Tap to take a snapshot of the current screen.
Full view
Conguration
Tap to enter the camera conguration screen.
Full view
PTZ home
In the PTZ mode, tap to return to the home position. Full view
Two way audio
Tap to coomunicate via the two way audio Full view
Since wireless connection and video streaming consume considerable power, you should
leave the iViewer when you are not watching the live view. Press the Home button to leave
the iViewer.
IMPORTANT:
8
II. Getting Started and Basic Operation
Starting Up
2-1. iViewer is acquired through the App Store (for
Apple devices), and is started by a tap on
its icon.
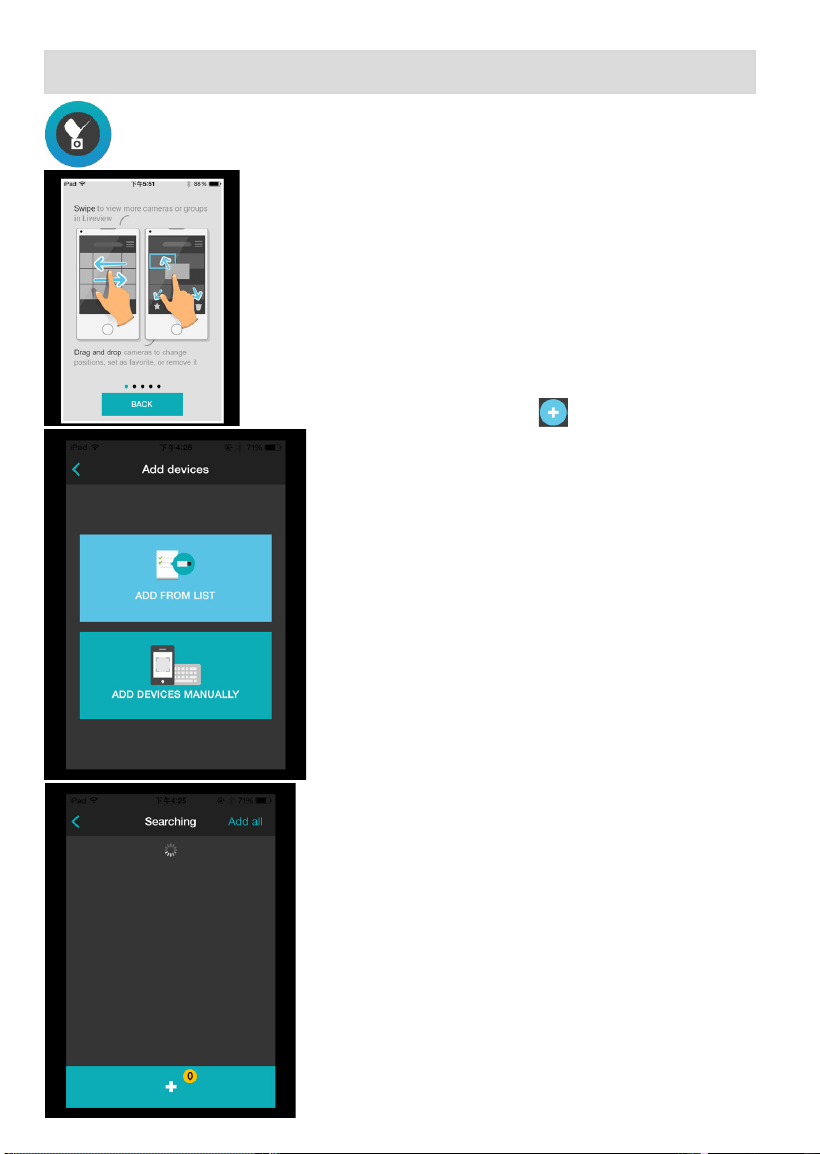
2-2. On the rst use, the Tutorial pages will start.
Swipe to the left to read through these pages.
The Tutorial pages will not start the next time
you use the iViewer.
2-3. Click on the Add button to enter the
Add
devices
page.
2-3-1.
Tap on
ADD FROM LIST
. The iViewer will
automatically scan the local network for all
servers and cameras.
By default, the video stream with the smallest
resolution on each camera is selected for its
lower resolution and frame rate, e.g., 176x144
and 5fps, and is recommended.
It will take several seconds to search for
devices in the local network.

9
After a short while, devices discovered on the local
network will be listed.
Single tap to select a device, and then tap on the
Add button below. You may also tap the
Add all
button on the upper right. Repeat the process to
add all devices your prefer.
1
2
If any of the devices come with a preset password,
enter its user name and password (64 digits max.).
You may then select to
Apply
(apply the credential to
a single camera),
Apply to All
(apply the credential
to all cameras), or
Skip All
(skip and abandon these
cameras). Multiple entry pages will appear if credential
is required for multiple devices.
Your devices should be enlisted in a short while.
When a server is enlisted to your conguration, cameras managed by the server will be
automatically placed into multiple layout pages.
With multiple pages, your current position and the total number of pages will be
indicated as follows:
5
current page
total no. of page
iViewer retries the connection to any camera it fails to connect.
10
2-3-2.
You can also tap on the
ADD DEVICES
MANUALLY
, especially if a device comes from
the outside of the local network.
Tap to select either a
SERVER
or an individual
CAMERA
.
Enter its IP address, communication port
[(1~65535), usually not necessary to change)],
and the credentials (RFC2396-compliant URL).
Tap on the Add button to proceed.
Your devices should be added in a short while.
When the device is successfully added, you can
go to the live view to check the live streaming or
tap
ADD MORE
to enlist other devices.
You can congure to access the camera or the
VAST server using the https encrypted session.
Slide the selector to enable secure connection.
Make sure your camera's Security > HTTPS
setting has been enabled. Sometimes a camera
reboot is necessary. The https encrypted
connection is available for a VAST server rev.
1.11 and later. The default https port on VAST is
3443
.
Since rev. 3.6, the iViewer supports log in
to a VAST server using a pre-congured
Windows AD account. Windows AD accounts
can be congured to allow access to a
VAST server in
Conguration
>
User
Management
>
Account Management
.
Make sure the users are members of the
same AD domain.
11
Cameras thus congured will be
automatically added to the view cells on the
Live view screen.
If you added a server, all cameras managed
by the server will be placed into the live view
cells. They can span across multiple layout
pages. You may manually change their
positions on the layout later.
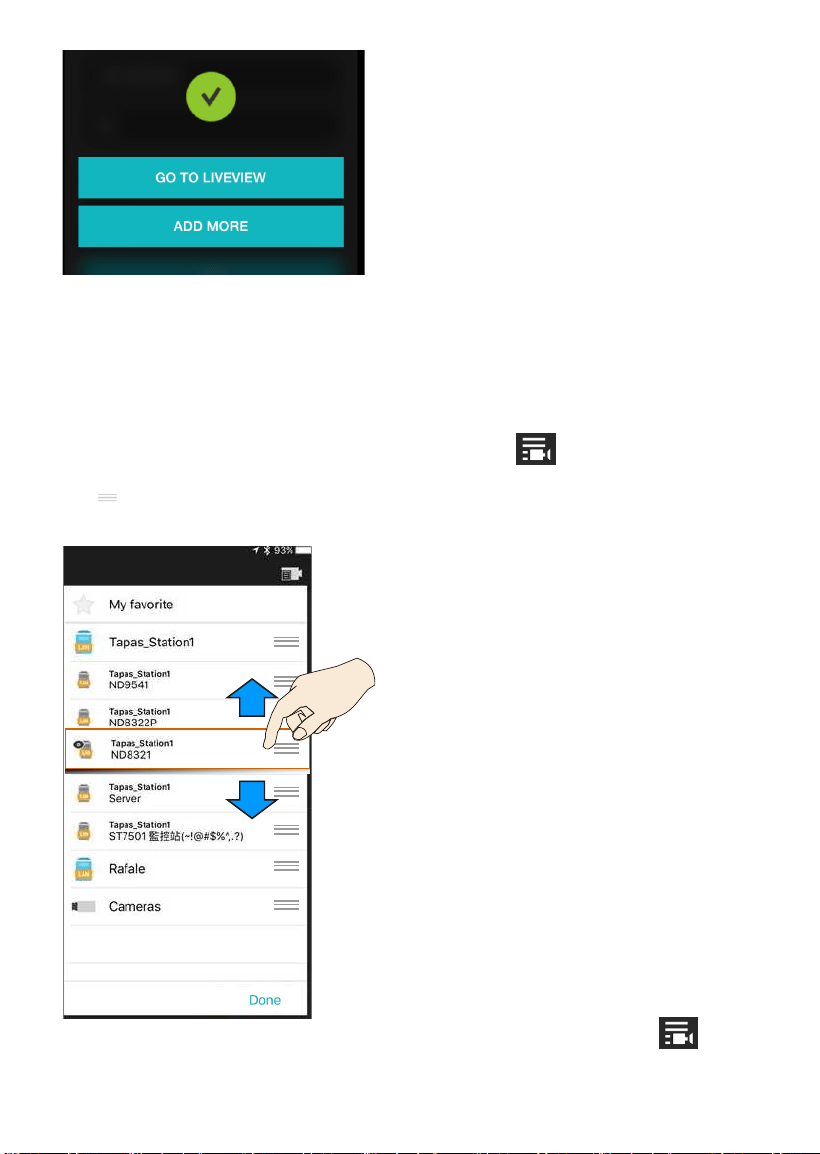
2-4-1. Change the display order of different device groups.
By default, the device group that most recently joined the iViewer is placed on top. The
top-down order corresponds to the display order on the live view (from left to right).
You can change the order on the Device list. Tap the
button to enter the Device
list. Tap
Switch Positions
(iOS only). Select a device group by tapping and holding the
icon. The device group will become aoat. Drag the device group to a different
place on the list. Tap on the
Done
button to complete the process.
2-4. If preferred, change the display and cameras' positions.
Note that you can only access the
My favorite
group via the
Device list
window.
The position of the
My favorite
group is always on top and can not be changed.

12
2-4-2. Change the cameras' positions on live view.
You can place your nger tip on one camera for
0.5 second
until it becomes aoat, and
then drag it to a view cell you prefer.
You can also move a view cell to another page by dragging it near and across the
border of the current layout. Note that you can only do so when you have a server with
multiple cameras placed on multiple layout pages.
If you move a camera view cell to a view
cell that is already populated, the two
cameras will swap their positions.
Note that you can not move a camera to
a different server/camera group.
2-4-3. Change the layout of view cells.
Tap the lower left layout icon to bring out the available layouts for the 1x2, 2x3, and 3x4
options.
13
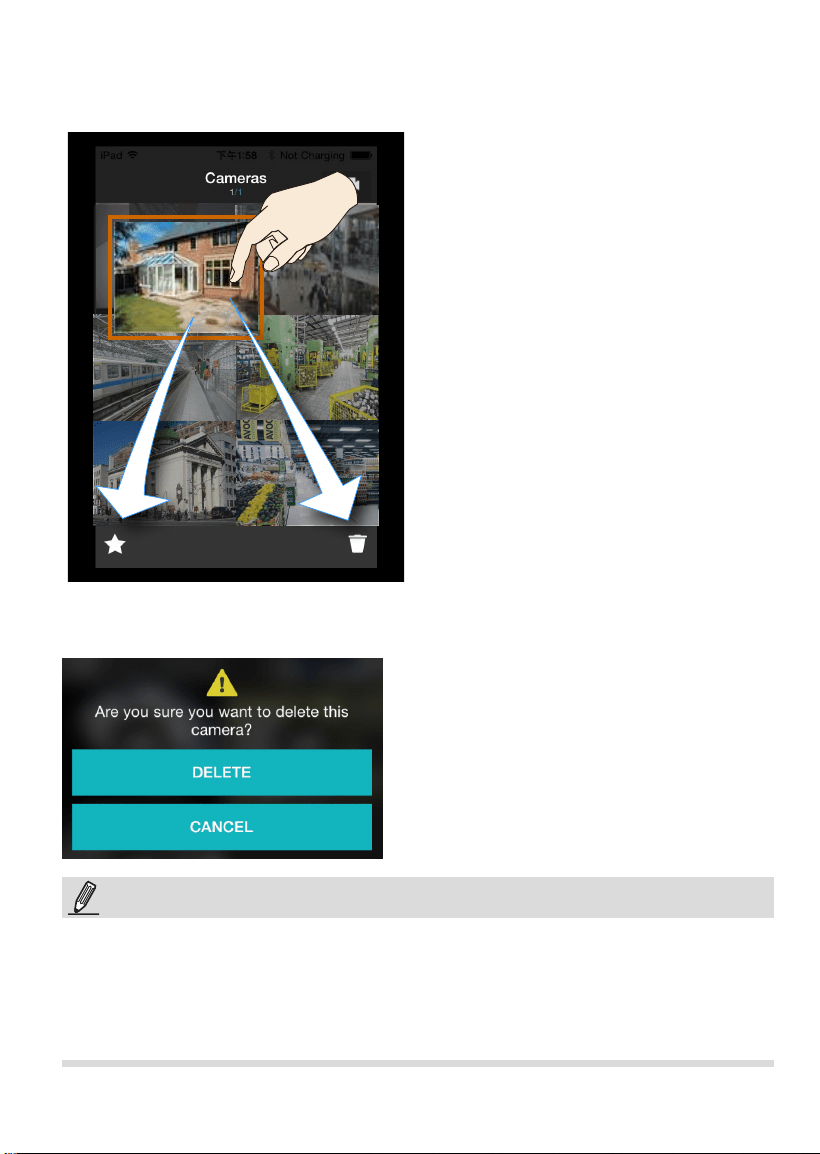
2-4-4. Add camera to the
My Favorite
group or delete the camera from list.
Place your nger tip on one camera for
0.5 second
until it becomes aoat, and then
drag it to the Favorite icon or to the trash can.
If you delete a camera from live view, a conrm message will prompt. Tap
DELETE
to
remove the camera.
Note the following with the functions:
1. You
can not delete
a camera
under the VAST server or NVR. The
privilege for managing the cameras
under VAST or NVR belongs to their
administrators, and should be made via
a console with those machines.
2. The
My favorite
and the trash can icons
only appear when you select a camera
and the camera's view cell becomes
aoat.
Move the camera to the top of My
favorite icon until it turns blue to join the
My favorite group.
3. Removing a single channel from under a
video server will also remove the rest of
the channels.
Cameras are added to view cells in the following order: upper left > upper right > middle
left > middle right, and so on. They automatically ll another page when the current layout
is full.
Once a camera/server is added, iViewer automatically displays the page where the most
recently added camera resides.
NOTE:

14
2-5. Double tap on a camera view cell opens a full view window. Tap on the Back button
on the upper left of screen to return to the Live view window.
Five functional buttons are available on the screen:
2-5-1.
PTZ
: provides zoom, pan and tilt control for cameras that come with PTZ
mechanisms, such as a speed dome camera.
Tap on the button to enable the PTZ functions. The button will turn blue.
Tap on the button again to diable the PTZ functions.
Zoom In
Pan or tilt
Model SD9361
PRESET
Use your ngers to exert PTZ control to move
to a different field of view, or zoom in/out on
a view. Swipe your finger to the opposite
direction of your target to move to it.
When in the full view and when the PTZ mode
is not activated, swipe left or right to access
other cameras in the same server/camera
group. To access other cameras in a different
group, you need to go back to the live view,
and then enter the display of a different group.
Tap on the
Home
button to return to a PTZ camera's home position.
1. Not all user accounts have the rights to perform PTZ control. Make sure the credentail
you used to enlist the camera comes with such rights.
2. The iOS device does not enter auto-lock when running the iViewer.
3. The onscreen functions will not be available until the connection is established. Before
the connection is made, the following indicator will display on the screen. The icon will
also display on a function button when it is initializing, such as the two way audio.
NOTE:
15
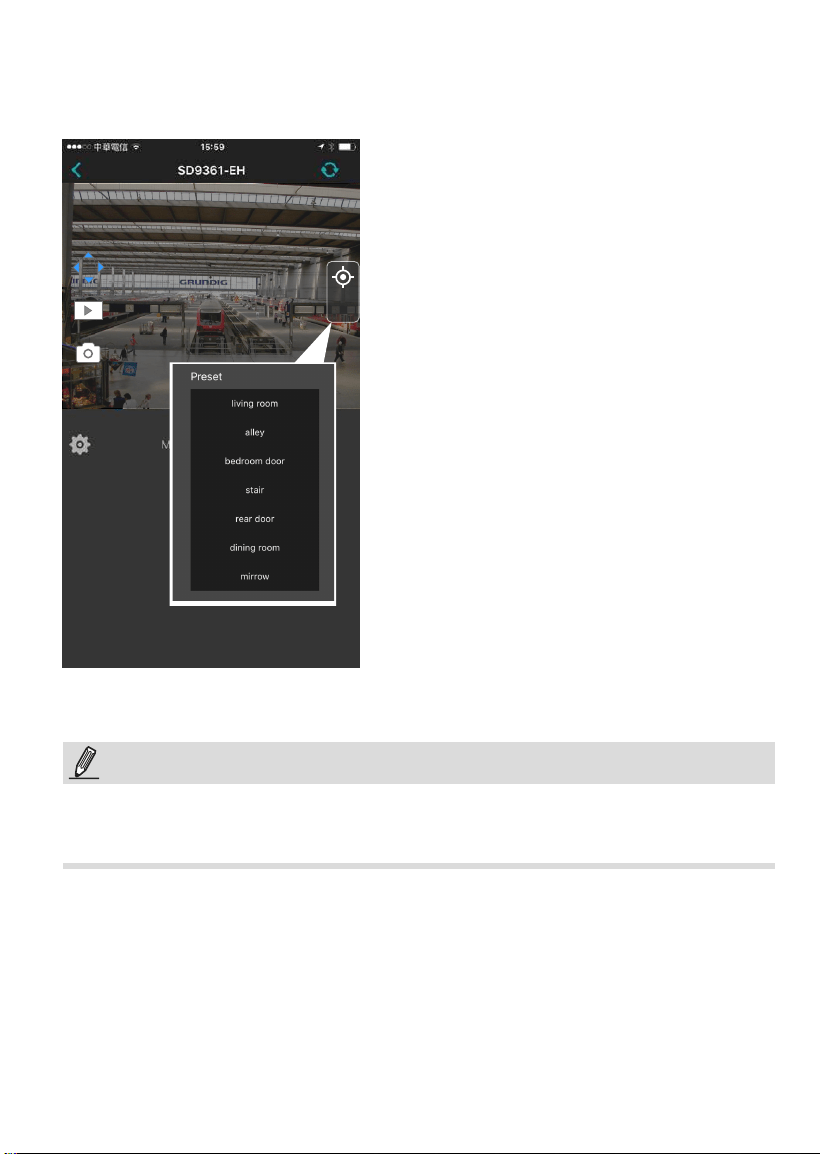
PRESET
Tap on Preset to reveal the preset positions for the camera. Tap to select a position, and
the camera lens will move to that position. Movement lags can occur depending on the
performance of network connection.
When in the Full camera view, you can swipe across the screen to move to the view of
another camera. However, you can only access other cameras within the same group.
NOTE:
16
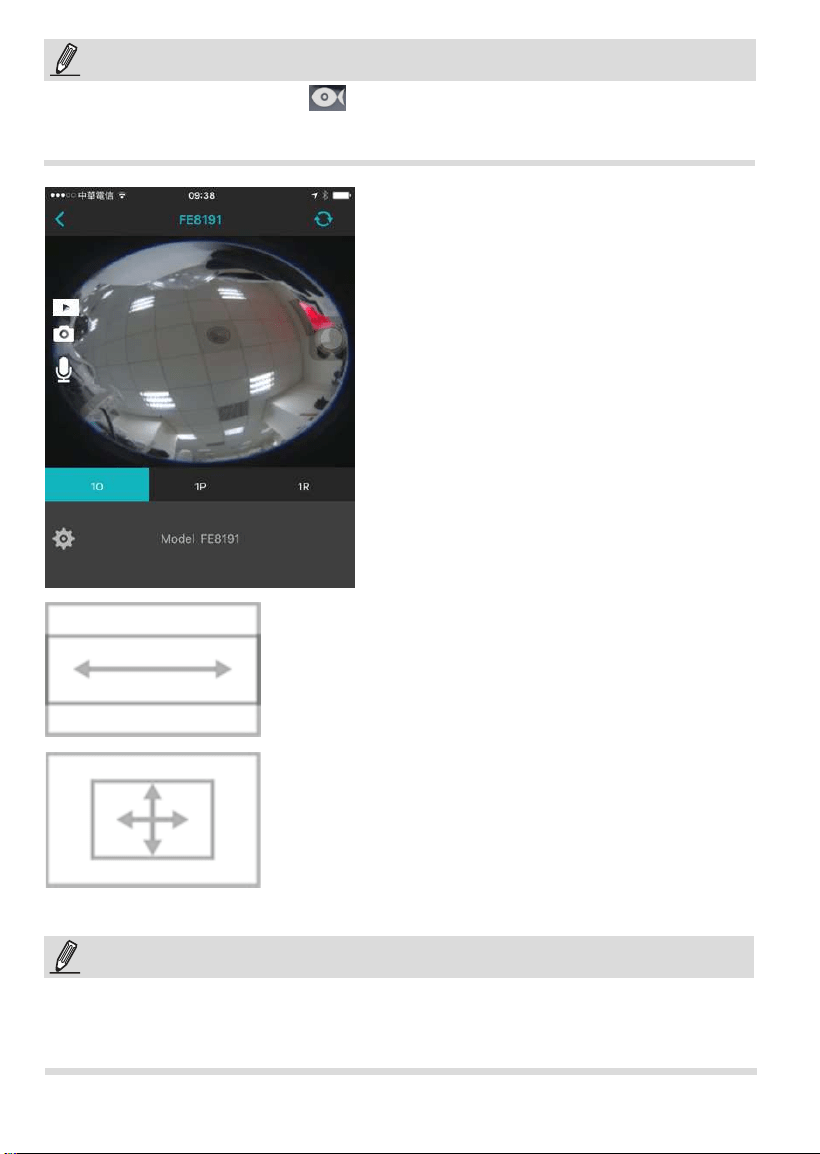
For fisheye cameras, use the
button to enable PTZ control in a Regional or
Panoramic view.
NOTE:
When in a sheye Panoramic view, swipe to the left
or to the right to change the eld of view.
When in a sheye Regional view, put your nger tip
on the screen for half a second, and then drag your
nger across the screen in any direction to change
the eld of view.
When in the full view, the 1O, 1P, and 1R modes
will be available at the lower screen.
View Type
:
1O
: The orignal circular view. Note that you
can
not
exert the PiP function in this mode.
1R
: The Regional view. You can perform PTZ
functions in this mode using nger moves
to move to a different view area, or zoom
in/out on a view area.
1P
: The Panoramic view displays a long stripe
of an all round view. You can rotate the
image horizontally using nger swipes.
If you already congured a sheye camera to be streaming in the FOV or Local Dewarp
mode, the sheye button will not be available. It is like exerting the dewarp task on the
camera itself, and therefore the dewarp-associated functions cannot be performed on the
iViewer.
NOTE:
17
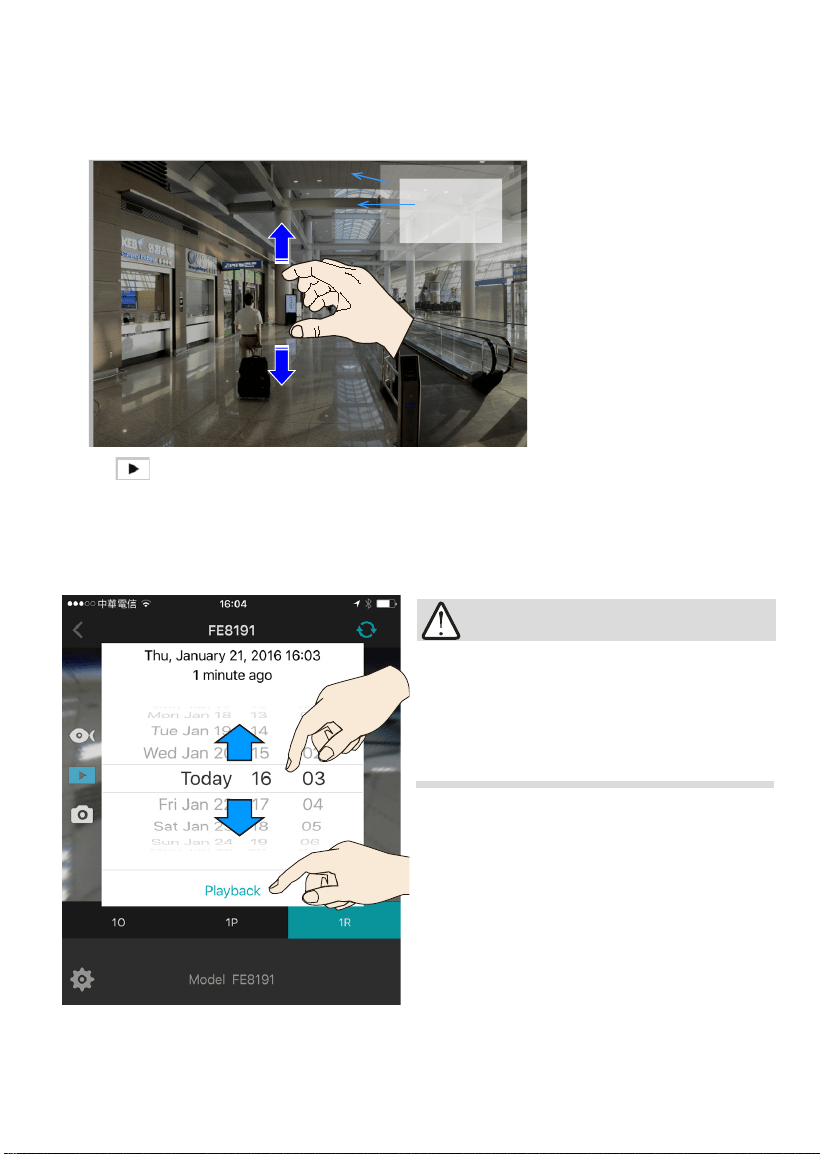
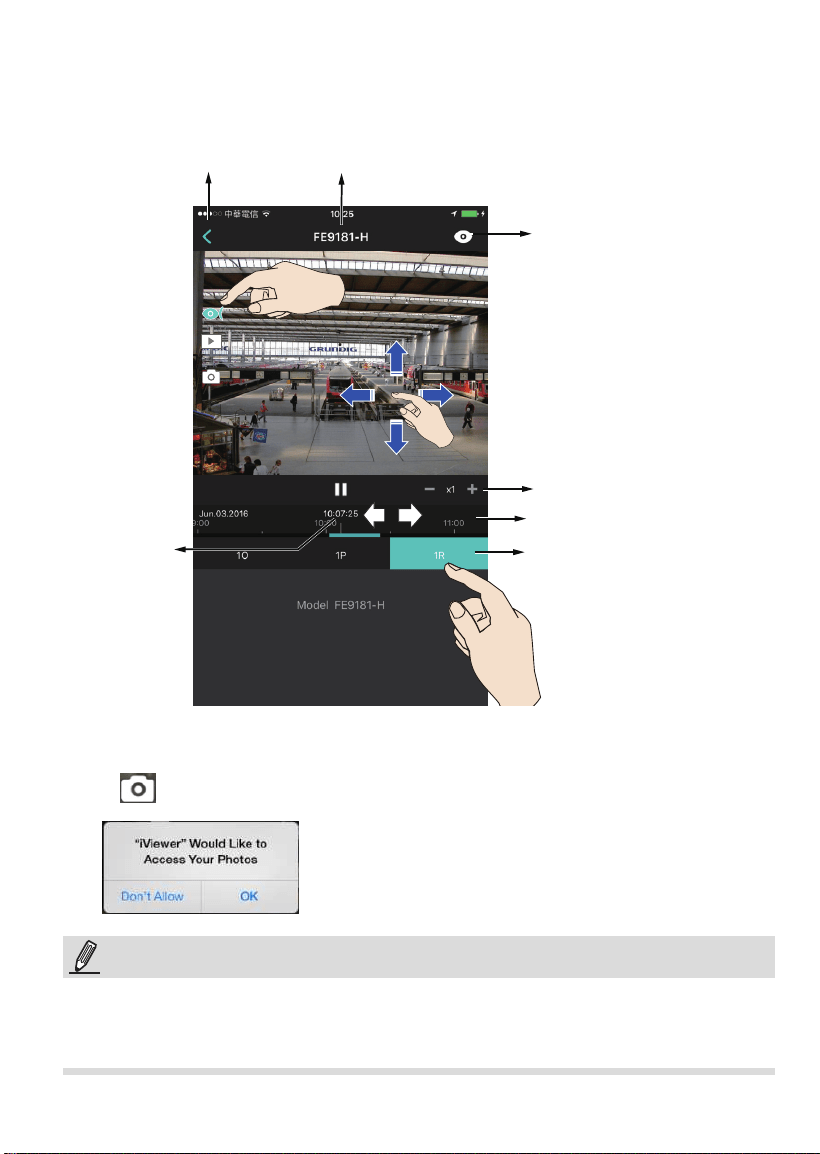
2-5-2.
Playback
: searches and plays recorded video footages on a
VAST
,
ST7501
server, or an
NVR
station. Use the time roller to select the time when the recording
took place. Click on the
Playback
button below to retrieve past videos.
The presumption is that you already know a
recorded video does exist for a specic point
in time, and by a specic camera.
The time roller selector is not available for
Android users. .
IMPORTANT:
PiP (Picture in Picture)
: provides PiP control for cameras that do not have the PTZ
mechanisms. (such as a eld of view from a xed lens camera). Once zoomed in,
you can move the focus by nger-swiping in all directions, zoom in/out to explore the
regions within a wide angle of view. You can zoom in on a view cell without using the
PTZ button.
Full view
Current field of view
You need to zoom out to the
full extent before you can
swipe the screen to move
to the live view of another
camera.
If no recording data exists by the designated
point in time, the iViewer will start to play
back the first available recording before
the designated point in time. If there is no
recording data at all, a disconnected icon is
displayed.
If different time zones were set for the
iViewer device and for a VAST server, the
recording data will be displayed using the
time zone setting on the server.
18
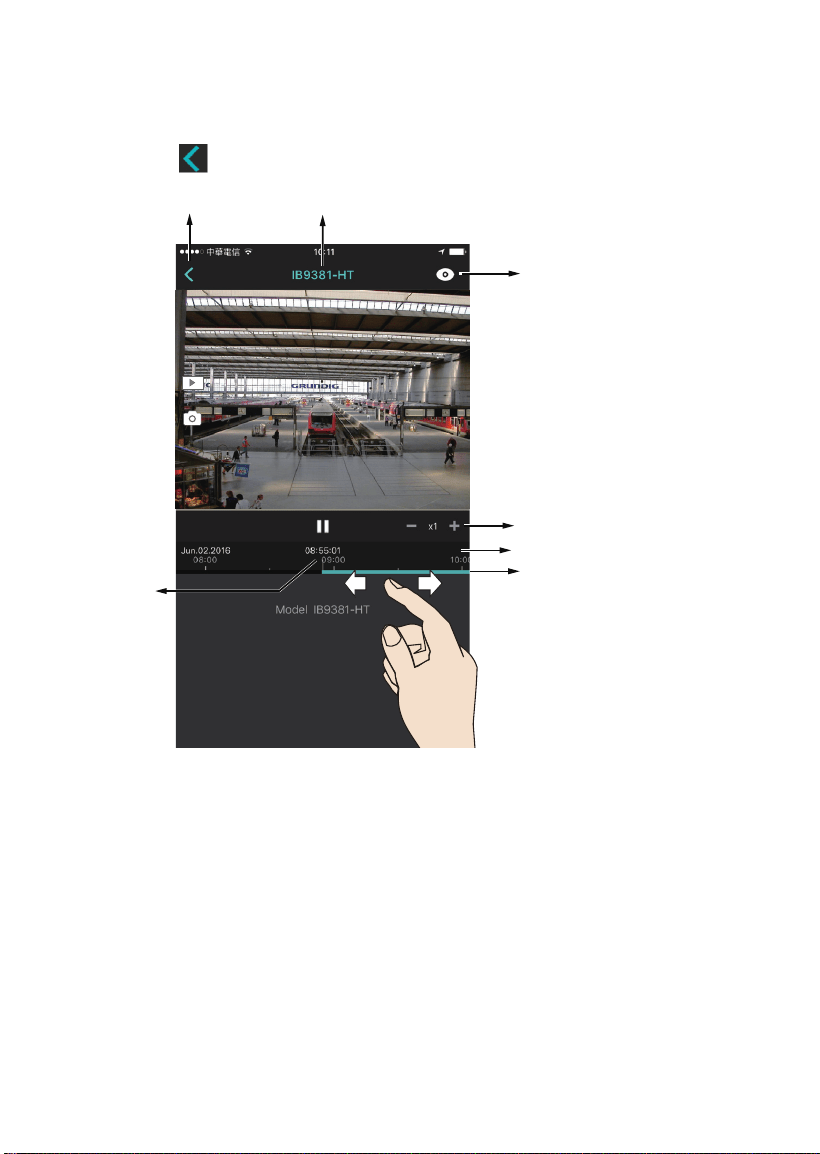
Recorded time of
current playback
Playback status
Control buttons
Camera name
Return to Live
Timeline
Color bar
indicates the time
span with existing
recording
The
Playback
window provides control over the selected video footage. You can tap on
the control buttons to increase or decrease the playback speed. Note that Playback only
retrieves recorded videos from VAST/ST7501 servers, or the ND series NVRs. The default
for the playback is 1 minute before the current time.
Tap on the
Back
button to return to the live view.
Note the following when using the Playback function:
1. You can also use your fingers to zoom in/out on the Playback screen. See the
description for PiP on the previous page.
2. For a sheye camera, you can select a dewarp display mode during the playback, such
as 1R or 1P.
3. The Snapshot function also applies in the Playback window. When playing back a video
in a Regional view, the snapshots taken will also be the regional views.
4. You can move through the timeline by tapping and scrolling along the timeline to a point
in time of your interest.
5. The playback speeds are congurable as 1X, 2X, 4X, 8X, 16X, 32X, or 64X.
19
Recorded time of
current playback
Playback status
Camera name
Return to Live
Control buttons
Timeline
Dewarp modes
Below is the Playback screen for a sheye camera. During the playback, you can select a
dewarp mode, click the sheye icon, and then tap and swipe the screen to move to move
the eld of view you prefer.
2-5-3.
Snapshot
: saves the current view as a jpeg. Tap OK to proceed.
If a camera does not comply with ONVIF Profile-G, the summary of recordings on the
timeline will not be available.
NOTE:
20
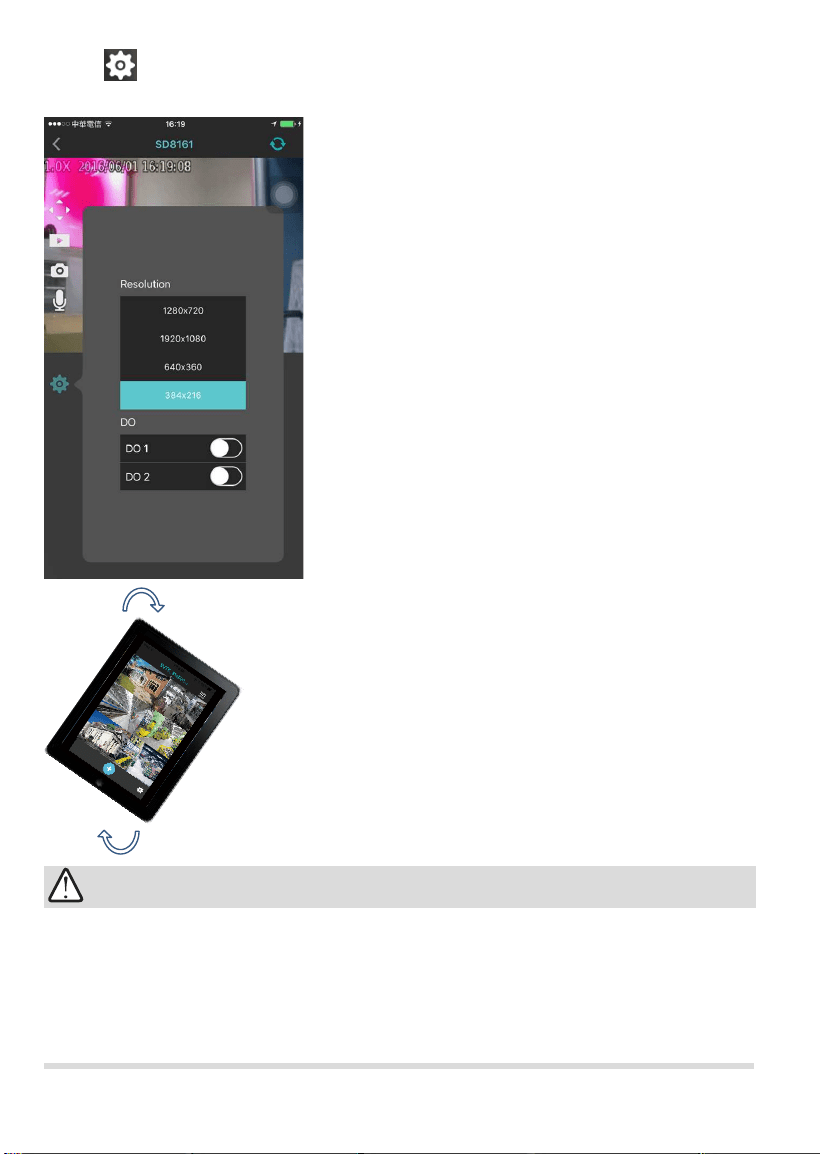
Rotate your iPad to view a live video in a portrait
or landscape orientation. The video rotates
accordingly for both multi- and single-cell
displays.
1. The PTZ, Playback, Snapshot, and Conguration options discussed above only appear
in a Full View window.
2. The PTZ function takes effect only if your cameras come with PTZ mechnical design,
such as a speed dome camera.
3. The PiP function allows users to zoom in on an existing video feed and move along to
different areas covered by the video feed.
IMPORTANT:
2-5-4.
Camera Conguration
: Click this button to change the resolutions of video
stream for the current view cell.
If you change the video stream for the full view
window here, the conguration will only take effect
for the full view window. The smaller view cells
on the Layout page will still display the smallest-
resolution streams.
Note that the default stream resolutions on each
camera can only be changed via a web console.
You can not change the camera stream resolution
in here. The configuration changes the current
view resolution.
If your camera is connected to external devices via
the DO lines, e.g., an alarm or lighting equipment,
you can toggle the Digital Output signals by
turning on the DO buttons. Please remember to
turn off the DO output once the intended action is
fulllled.
Some NVRs do not support the transfer of camera
DO. Cameras managed through the NVR will not
display the DO options.
21
III. Other Functions
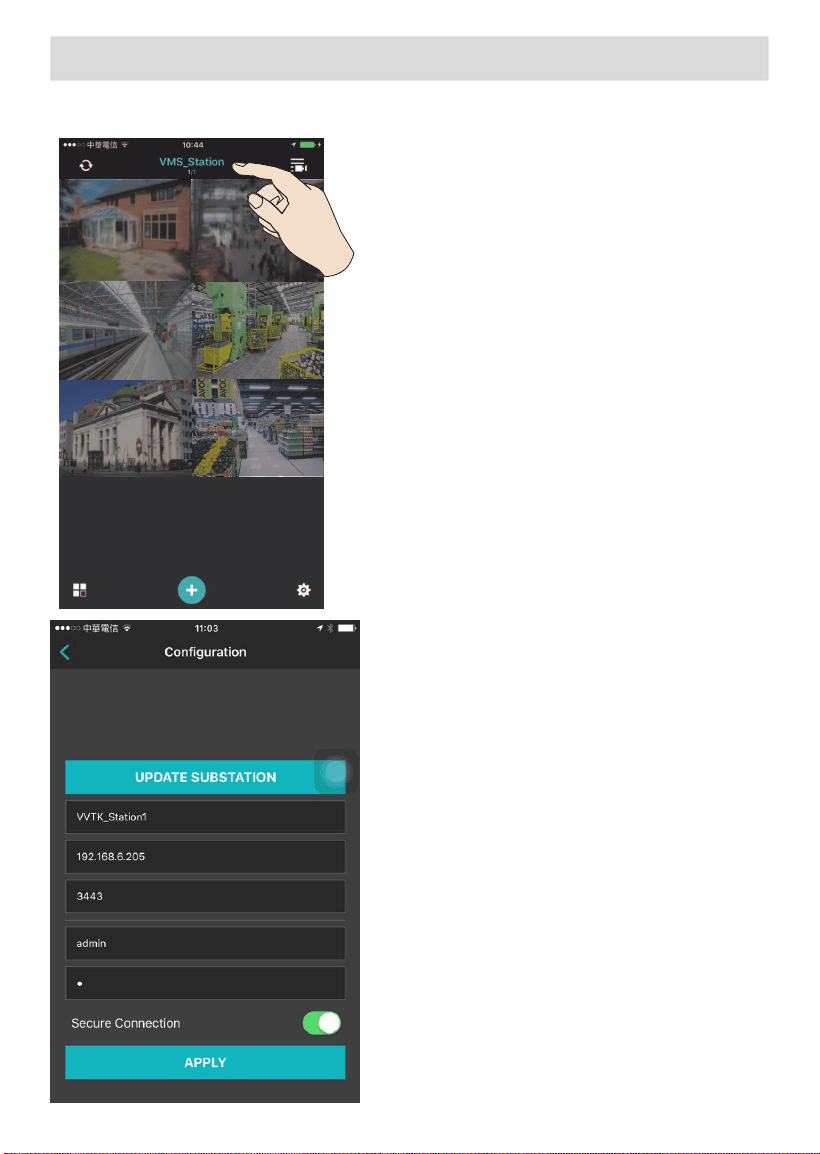
3-1. Editing an Existing Server or Camera
To access a server,
1. Enter the server group.
2. Tap on a server name on top to enter
the conguration page.
To access an individual camera,
1. Enter the Camera group,
2. Open a full view of the specic camera,
3. Double tap on the camera or server
name on top to enter the conguration
page.
If you have changes on the server, such
as that you added or removed cameras,
change of camera's IP addresses, use the
UPDATE SUBSTATION
button to refresh
the server status. The cameras managed
by the server will then be automatically
updated.
22
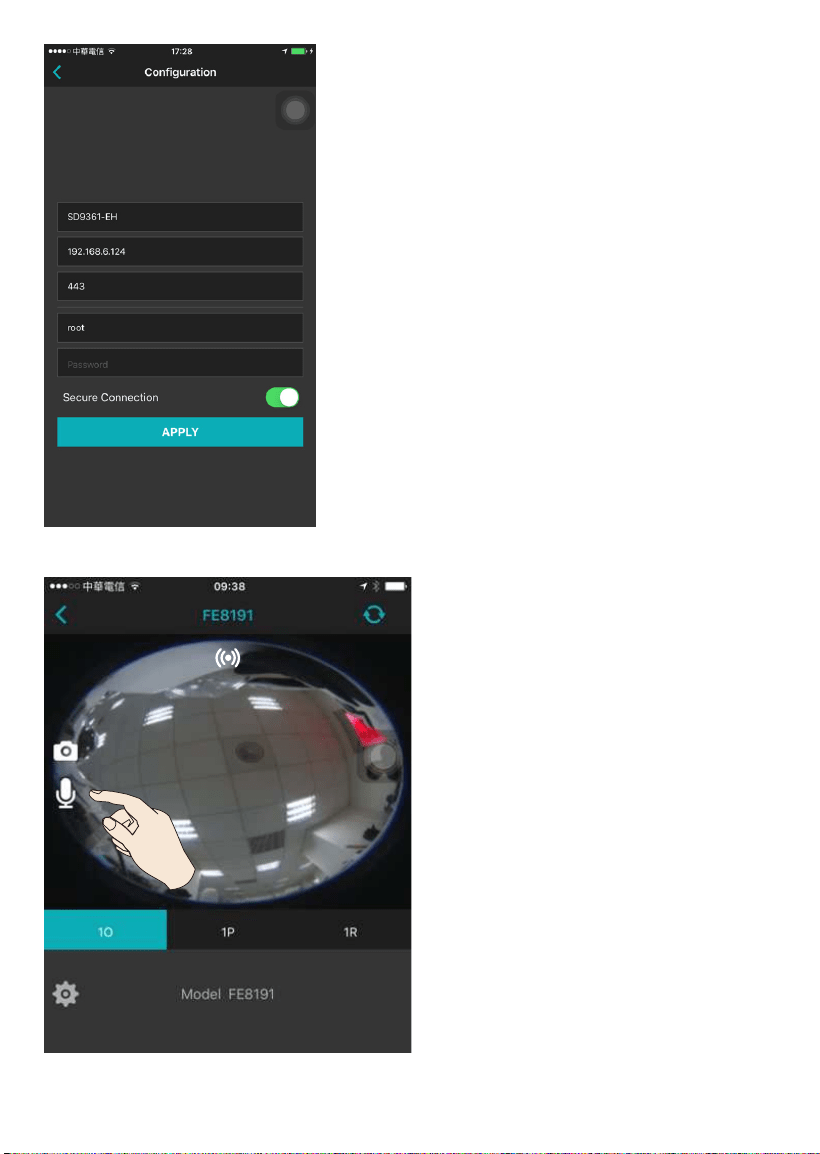
This is a camera configuration page.
Click on each entry to edit the camera's
conguration.
Enter RFC2396-compliant URL in the
address field, a port number ranging
from 1 to 65535 (usually not necessary
to change), and a max. of 64 ASCII
characters as User name and Password.
When done, tap the APPLY button for the
conguration change to take place.
If secure connection is preferred, make
sure the https configuration has been
properly congured on the camera.
3-2. Two Way Audio
If you have a camera that supports two
way audio, you can speak to the audience
near the camera from your iViewer device.
1. Make sure the camera audio setting is
not muted on the camera. Also, make
sure the camera audio output lines are
connected to an amplied speaker.
2. Tap on the speaker button. Speak when
the button turns blue. A speaker sign
will appear on screen. Tap again to end
the conversation.
Currently, the Two Way Audio function
does not apply to cameras managed by a
VAST server.
The microphone button does not appear
if your camera does not support Two Way
Audio.

23
In the Device list window, place your finger
tip on a server for half a second. Swipe to the
left, and the
Delete
button will appear. Tap the
Delete button to remove the server.
To leave the Device list window, tap on the
outside of the conguration window.
3-3. Removing a Server (NVR) or Camera Group
You can also swipe the My favorite group to the
left to reveal the
Clear All
button, and remove
all cameras placed under it. However, the My
favorite group will not be removed.
If the members (cameras) of a server have been
added to the My favorite group, you do not need
to remove them from the My favorite group.
When the server is removed, those members
will be removed from the My favorite group.
The
Switch Positions
button allows you to
change the display order of server and camera
groups (iOS only).
You can contact VIVOTEK's technical support
through the link at the bottom of the
Settings
page.
3-4. Technical Support
Enter your name (50 digits max.), Contact email,
consumer type, organization, country, select a
device, MAC, firmware version, etc. Enter the
description of your problem, and then tap
Send
.
You can skip the entries shown as N/A.
Note that if you select a server, no MAC address
will display here.
24
iPad
®
, iPod
®
, and iPhone
®
are trademarks of Apple Inc., registered in the U.S. and other
countries.
Credit Notice
Below are the limitations of the current release of software:
1. Notication directly from the cameras is not supported.
2. The iViewer does not run in the background when users leave the current session.
3. iViewer does not support login with a preset account and password.
4. iViewer does not support conguration backup and restore functions.
5. iViewer does not support video recording to an iPhone and iPad.
6. iViewer does not support two way audio from cameras managed by a VAST server.
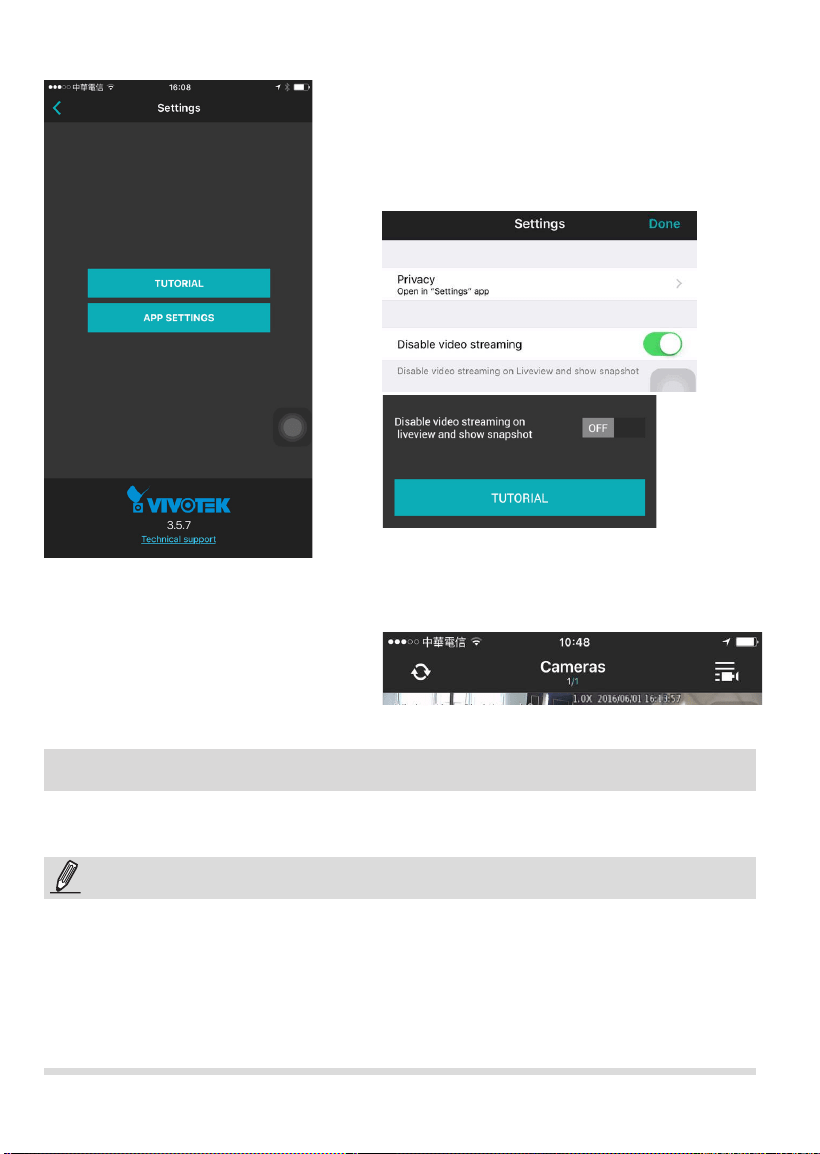
NOTE:
This option reduces the requirements for
networking bandwidth. The
APP SETTINGS
allows you to disable the live view streaming
and use snapshots instead on the live view. You
can still acquire a live view streaming when you
double-tap on a view cell for a full view.
3-5. APP SETTINGS
In this mode, use the refresh button at the top
of the screen to acquire instant snapshots from
your cameras. iViewer does not automatically
refresh the snapshots on screen.
iOS
Android