EN
USER AND SAFETY GUIDE
Wi-Fi Humidity and Temperature Sensor Gen3
Read before use
This document contains important technical and safety information about the
device, its safety use and installation.
⚠CAUTION! Before you start the installation, read carefully and entirely this guide
and any other documents accompanying the device. Failure to follow the installation
procedures can lead to malfunction, danger to your health and life, violation of law,
or refusal of legal and commercial guarantees (if any). Shelly Europe Ltd. is not
responsible for any loss or damage in case of incorrect installation or improper
operation of this device due to failure to follow the user and safety instructions in
this guide.
Product Description
Shelly H&T Gen3 (the Device) is a Wi-Fi smart humidity and temperature sensor.
The Device can be accessed, controlled, and monitored remotely from any place
where the User has internet connectivity, as long as the device is connected to a
Wi-Fi router and the Internet.
The Device has an embedded Web Interface that you can use to monitor, control,
and adjust its settings.
⚠NOTICE: The Device comes with factory-installed rmware. To keep it up-to-date
and secure, Shelly Europe Ltd. provides the latest rmware updates free of charge.
You can access the updates through either the embedded web interface or the
Shelly Smart Control mobile application, where you can nd details about the latest
rmware version. The choice to install or not the rmware updates is the user’s
sole responsibility. Shelly Europe Ltd. shall not be liable for any lack of conformity
of the Device caused by the failure of the user to install the available updates in a
timely manner.
Installation instruction
⚠CAUTION! Do not use the Device if it shows any sign of damage or defect.
⚠CAUTION! Do not attempt to service or repair the Device yourself.
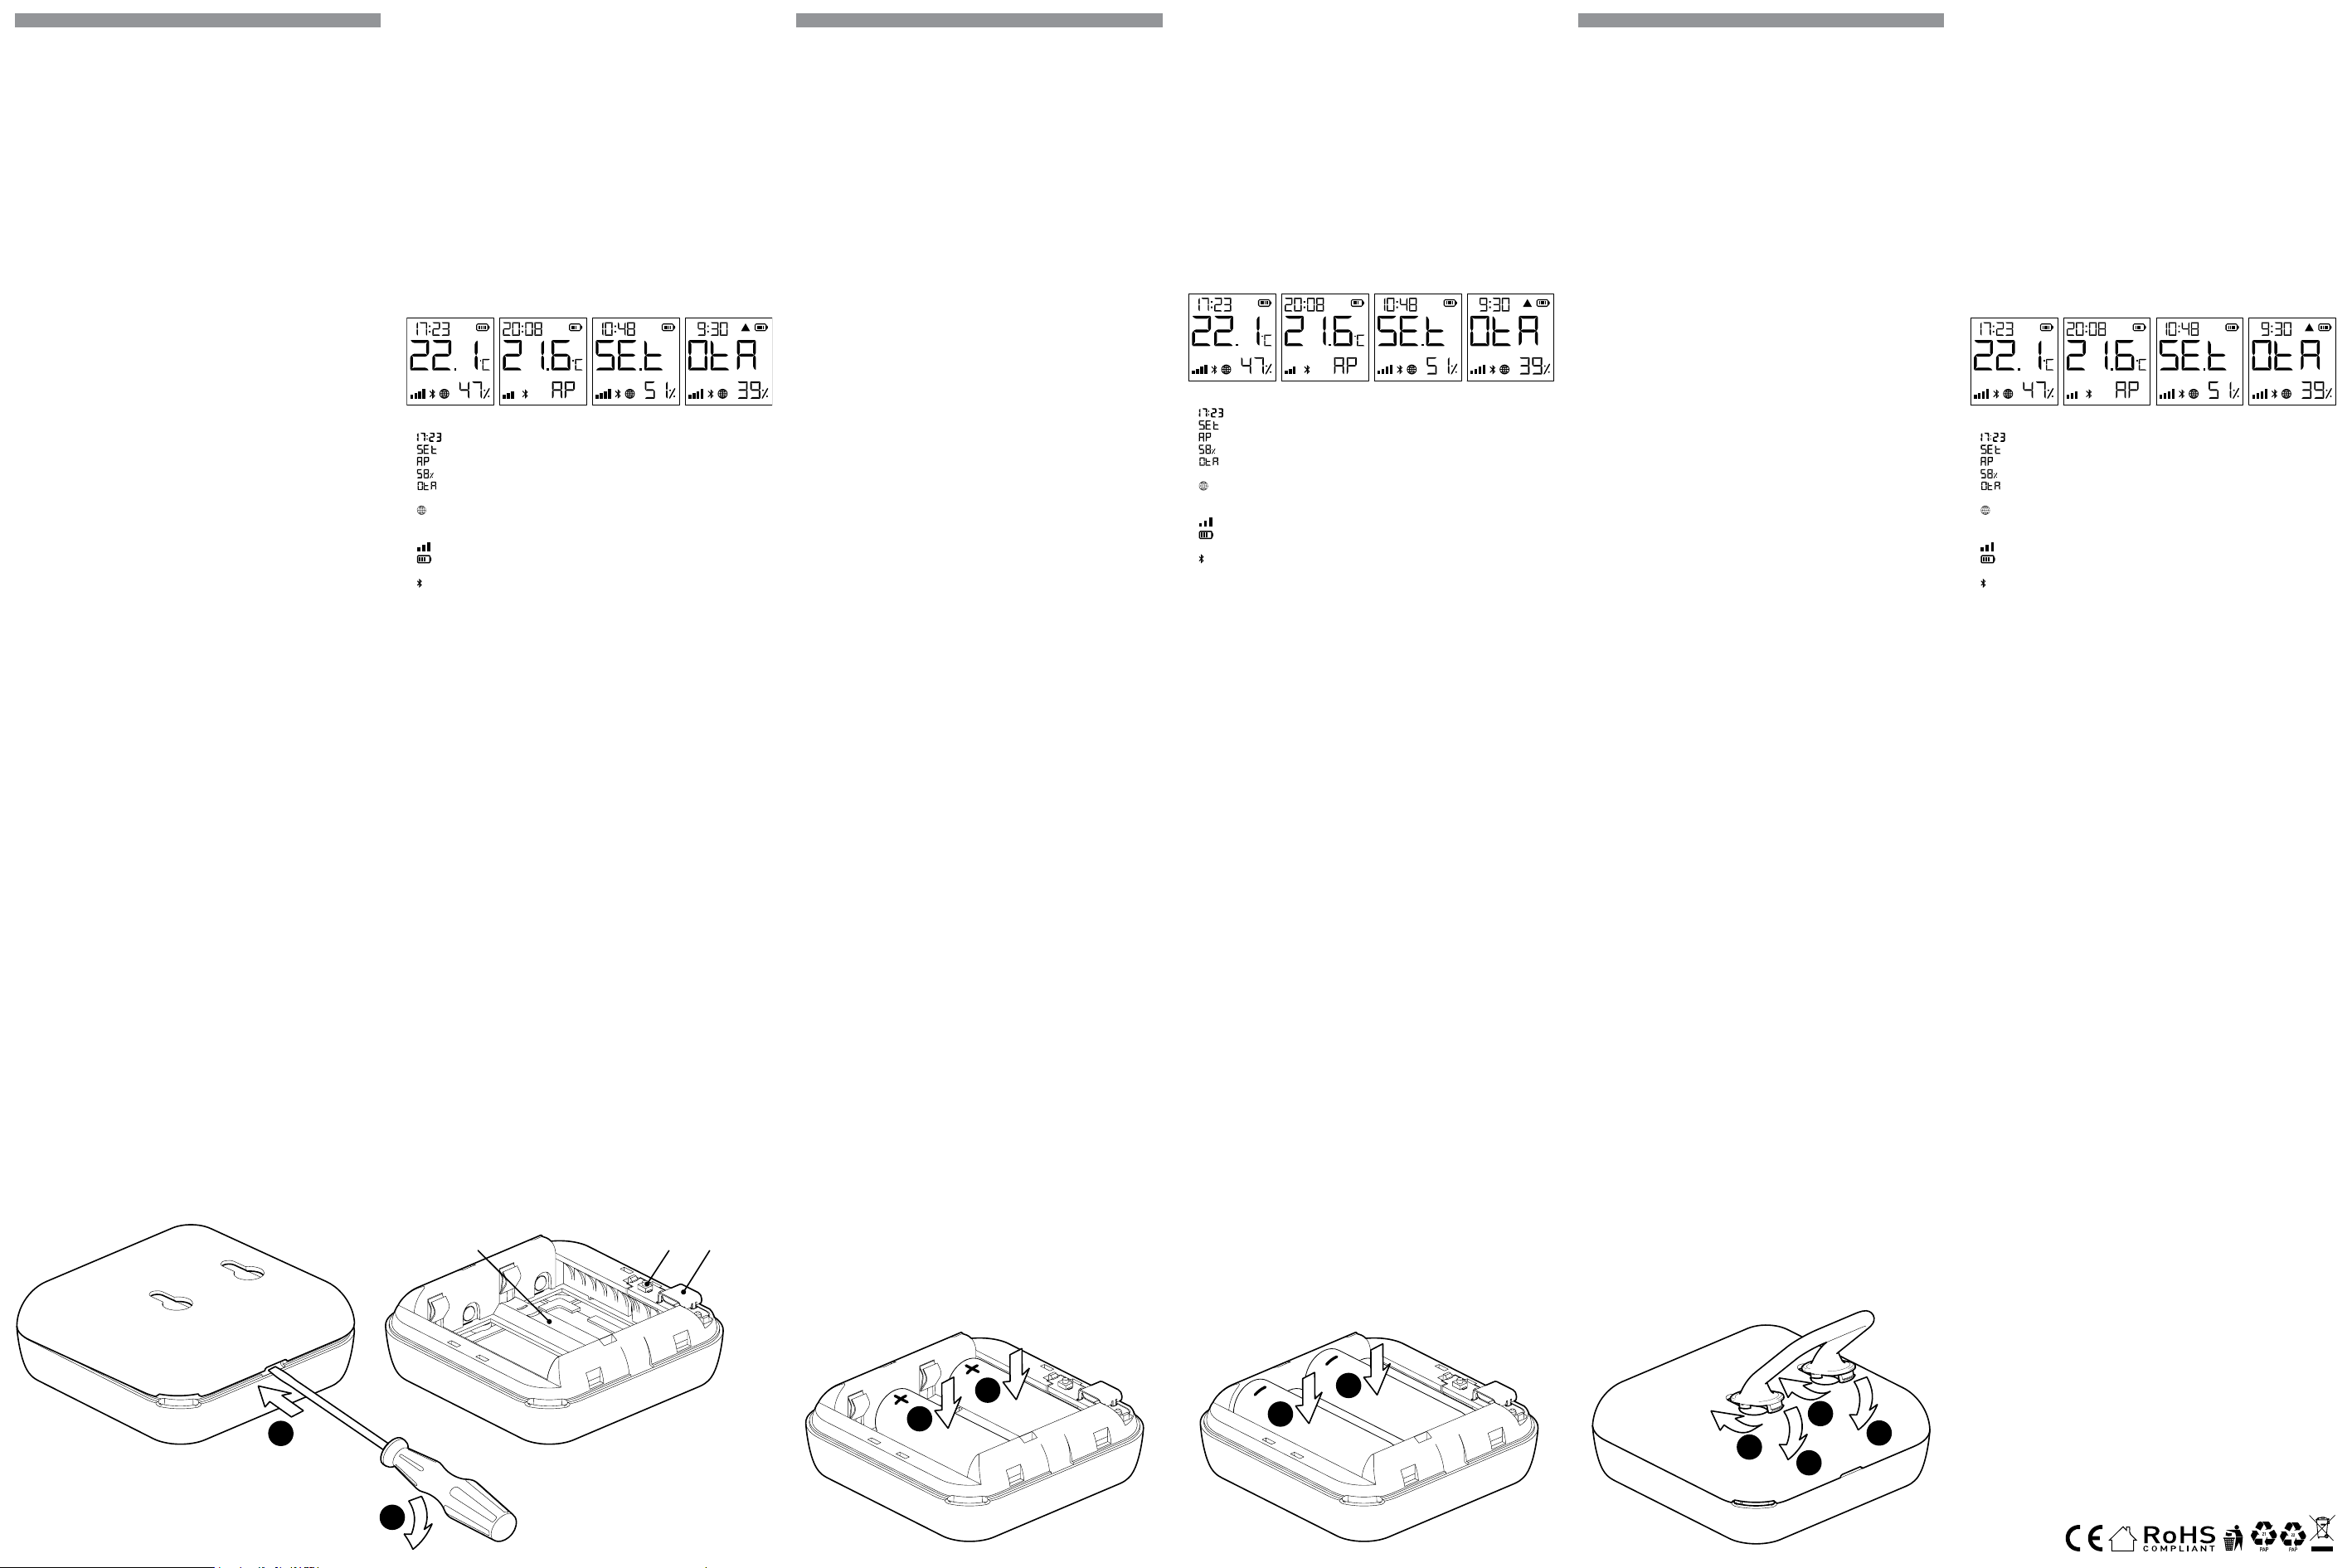
1. Power supply
Shelly H&T Gen3 can be powered by 4 AA (LR6) 1.5 V batteries or a USB Type-C
power supply adapter.
⚠CAUTION! Use the Device only with batteries or USB Type-C power supply adapt-
ers that comply with all applicable regulations. Inappropriate batteries or power
supply adapters may damage the Device and cause re.
A. Batteries
Remove the Device back cover using a at screwdriver as shown in Fig. 1, insert
the bottom row batteries as shown in Fig. 3 and the top row batteries as shown
in Fig. 4.
⚠CAUTION! Make sure the batteries + and - signs correspond to the marking on the
Device battery compartment (Fig. 2 A)
B. USB Type-C power supply adapter
Insert the USB Type-C power supply adapter cable into the Device USB Type-C
port (Fig. 2 C)
⚠CAUTION! Do not connect the adapter to the Device if the adapter or the cable
are damaged.
⚠CAUTION! Unplug the USB cable before removing or placing the back cover.
⚠IMPORTANT! The Device cannot be used to charge rechargeable batteries.
2. Starting
When initially powered the Device will be put in Setup mode and the display will
show SEt instead of the temperature. By default the Device access point is en-
abled, which is indicated by AP in the bottom right corner of the display. If it is
not enabled, press and hold the Reset button (Fig. 2 B) for 5 seconds to enable it.
⚠IMPORTANT! To save the batteries the Device stays in Setup mode for 3 minutes
and then goes to Sleep mode and the display will show the measured temperature.
Press briey the Reset button to bring it back to Setup mode. Pressing the Reset
button briey while the Device is in Setup mode will put the Device in Sleep mode.
3. Inclusion to Shelly Cloud
The Device can be monitored, controlled, and set up through our Shelly Cloud
home automation service. You can use the service though either an Android or iOS
mobile application or through any internet browser at https://control.shelly.cloud/.
The Shelly mobile application and Shelly Cloud service are not conditions for the
Device to function properly. This Device can be used standalone or with various
other home automation platforms and protocols.
If you choose to use the application and cloud service, you can nd instructions on
how to connect the Device in the mobile application guide:
https://shelly.link/app-guide
4. Manually connecting to a local Wi-Fi network
Shelly H&T Gen3 can be managed and controlled through its embedded web inter-
face. Make sure the Device is in Setup mode, its access point (AP) is enabled and
you are connected to it using a Wi-Fi-enabled device. From a web browser open
the Device Web Interface by navigating to 192.168.33.1. Select Settings from the
main menu and then Wi-Fi under Network settings.
Enable Wi-Fi 1 and/or Wi-Fi 2 (backup network) by checking the Enable Wi-Fi
network checkbox. Select the Wi-Fi network name (SSID) from the NETWORKS
dropdown. Enter the Wi-Fi network password(s) and select Save settings.
The URL appears in blue at the top of the Wi-Fi section, when the Device is suc-
cessfully connected to the Wi-Fi network.
⚠RECOMMENDATION! For security reasons, we recommend disabling the AP, after
the Device successful connection to the local Wi-Fi network. Select Settings from
the main menu and then Access Point under Network settings. Disable the AP by
unchecking Enable AP network checkbox.
When you complete the Device inclusion to the Shelly cloud or another service,
place the back cover.
⚠CAUTION! Unplug the USB cable before removing or placing the back cover.
5. Attaching the stand
If you want to place the Device on your desk, on a shelf or any other horizontal
surface, attach the stand as shown on Fig. 5.
6. Wall mounting
If you want to mount the Device on a wall or any other vertical surface, use the
back cover to mark the wall where you want to mount the Device.
⚠CAUTION! Do not drill through the back cover.
Use screws with head diameters between 5 and 7 mm and max 3 mm thread diam-
DE
BEDIENUNGS- UND SICHERHEITSHANDBUCH
Wi-Fi-Luftfeuchtigkeits- und Temperatursensor Gen3
Bitte vor Gebrauch durchlesen
Dieses Dokument enthält wichtige technische und sicherheitstechnische Infor-
mationen über das Gerät und seine sichere Verwendung und Installation.
⚠ACHTUNG! Bevor Sie mit der Installation beginnen, lesen Sie bitte die Begleitdo-
kumentation sorgfältig und vollständig durch. Die Nichtbeachtung der empfohlenen
Verfahren kann zu Fehlfunktionen, Lebensgefahr oder Gesetzesverstößen führen.
Shelly Europe Ltd. haftet nicht für Verluste oder Schäden im Falle einer falschen
Installation oder Bedienung dieses Geräts.
Produktvorstellung
Shelly H&T Gen3 (das Gerät) ist ein intelligenter Wi-Fi-Luftfeuchtigkeits- und Tem-
peratursensor.
Auf das Gerät kann von jedem Ort, an dem der Nutzer eine Internetverbindung hat,
zugegriffen werden, es kann gesteuert und überwacht werden, solange das Gerät
mit einem WLAN Router und dem Internet verbunden ist.
Das Gerät verfügt über eine integrierte Webschnittstelle, über die das Gerät über-
wacht und gesteuert sowie seine Einstellungen angepasst werden können.
⚠HINWEIS: Das Gerät wird mit einer werkseitig installierten Firmware geliefert. Um
es aktuell und sicher zu halten, stellt Shelly Europe Ltd. die neuesten Firmware-Up-
dates kostenlos zur Verfügung. Sie können auf die Updates entweder über das inte-
grierte Webinterface oder über die Shelly Smart Control Mobilanwendung zugreifen,
wo Sie Details über die neueste Firmware-Version nden können. Die Entscheidung,
die Firmware-Updates zu installieren oder nicht, liegt in der alleinigen Verantwortung
des Benutzers. Shelly Europe Ltd. haftet nicht für Konformitätsmängel des Geräts,
die darauf zurückzuführen sind, dass der Benutzer die verfügbaren Updates nicht
rechtzeitig installiert hat.
Installationsanleitung
⚠ACHTUNG! Verwenden Sie das Gerät nicht, wenn es Anzeichen von Beschädigun-
gen oder Defekten aufweist.
⚠VORSICHT! Versuchen Sie nicht, das Gerät selbst zu warten oder zu reparieren.
1. Stromzufuhr
Shelly H&T Gen3 kann mit 4 Batterien des Typs AA (LR6) 1,5 V oder einem USB-
Typ-C-Netzteil betrieben werden.
⚠VORSICHT! Verwenden Sie das Gerät nur mit Batterien oder USB-Typ-C-Netzteil-
adaptern, die allen geltenden Vorschriften entsprechen. Ungeeignete Batterien oder
Netzteile können das Gerät beschädigen und einen Brand verursachen.
A. Batterien
Entfernen Sie die Abdeckung der Geräterückseite mit einem achen Schrauben-
zieher (siehe Abb. 1), legen Sie die Batterien der unteren Reihe (siehe Abb. 3) und
die Batterien der oberen Reihe (siehe Abb. 4) ein.
⚠VORSICHT! Achten Sie darauf, dass die + und - Zeichen der Batterien mit den
Markierungen auf dem Batteriefach des Geräts übereinstimmen (Abb. 2 A).
B. USB-Typ-C-Netzteiladapter
Stecken Sie das Kabel des USB-Typ-C-Netzteiladapters in den USB-Typ-C-An-
schluss des Geräts (Abb. 2 C).
⚠VORSICHT! Schließen Sie den Adapter nicht an das Gerät an, wenn der Adapter
oder das Kabel beschädigt sind.
⚠VORSICHT! Ziehen Sie das USB-Kabel ab, bevor Sie die hintere Abdeckung ent-
fernen oder anbringen.
⚠WICHTIG! Das Gerät kann nicht zum Auaden von wiederauadbaren Batterien
verwendet werden.
2. Einschalten
Beim ersten Einschalten bendet sich das Gerät im Setup-Modus, und auf dem
Display wird SEt anstelle der Temperatur angezeigt. Standardmäßig ist der Zu-
gangspunkt des Geräts aktiviert, was durch AP in der unteren rechten Ecke des
Displays angezeigt wird. Wenn er nicht aktiviert ist, halten Sie die Reset-Taste
(Abb. 2 B) 5 Sekunden lang gedrückt, um ihn zu aktivieren.
⚠WICHTIG! Um die Batterien zu schonen, bleibt das Gerät 3 Minuten lang im Ein-
stellungsmodus und geht dann in den Ruhemodus über, wobei das Display die ge-
messene Temperatur anzeigt. Drücken Sie kurz die Reset-Taste, um das Gerät wie-
der in den Setup-Modus zu bringen. Durch kurzes Drücken der Reset-Taste, während
sich das Gerät im Setup-Modus bendet, wird das Gerät in den Ruhemodus versetzt.
3. Einbindung in Shelly Cloud
Das Gerät kann über unseren Shelly Cloud Hausautomatisierungsdienst über-
wacht, gesteuert und eingerichtet werden. Sie können den Dienst entweder über
eine mobile Android- oder iOS-Anwendung oder über einen beliebigen Internet-
browser unter https://control.shelly.cloud/ nutzen.
Die Shelly App und der Shelly Cloud Service sind keine Voraussetzung für die
ordnungsgemäße Funktion des Geräts! Dieses Gerät kann eigenständig oder mit
verschiedenen anderen Hausautomatisierungsplattformen und -protokollen ver-
wendet werden.
Wenn Sie das Gerät mit der Shelly Smart Control App und unserem Cloud-Dienst
nutzen und steuern möchten, nden Sie Anweisungen dazu in der Anleitung zur
Mobilanwendung: https://shelly.link/app-guide
4. Manuelle Verbindung mit einem lokalen WLAN Netzwerk
Der Shelly H&T Gen3 kann über seine integrierte Webschnittstelle verwaltet und
gesteuert werden. Vergewissern Sie sich, dass sich das Gerät im Einrichtungsmo-
dus bendet, sein Zugangspunkt (AP) aktiviert ist und Sie über ein Wi-Fi-fähiges
Gerät mit dem Gerät verbunden sind. Öffnen Sie in einem Webbrowser die Web-
schnittstelle des Geräts, indem Sie zu 192.168.33.1 navigieren. Wählen Sie im
Hauptmenü Settings und dann Wi-Fi unter Network settings.
Aktivieren Sie Wi-Fi 1 und/oder Wi-Fi 2 (Backup-Netzwerk), indem Sie das Kon-
trollkästchen Enable Wi-Fi network aktivieren. Wählen Sie den Namen des Wi-Fi-
Netzwerks (SSID) aus der Dropdown-Liste NETWORKS. Geben Sie das/die Pass-
wort(e) für das Wi-Fi-Netzwerk ein und wählen Sie Save settings.
Die Geräte-URL erscheint in blauer Farbe am oberen Rand des Wi-Bereichs, wenn
das Gerät erfolgreich mit dem Wi-Fi-Netzwerk verbunden ist.
⚠EMPFEHLUNG! Aus Sicherheitsgründen empfehlen wir, den AP zu deaktivieren,
nachdem das Gerät erfolgreich eine Verbindung mit dem lokalen Wi-Fi-Netzwerk
hergestellt hat. Wählen Sie im Hauptmenü Settings und dann Access Point unter
Network settings. Deaktivieren Sie den AP, indem Sie das Kontrollkästchen Enable
AP network deaktivieren.
Wenn Sie die Aufnahme des Geräts in die Shelly-Cloud oder einen anderen Dienst
abgeschlossen haben, setzen Sie die hintere Abdeckung auf.
⚠VORSICHT! Ziehen Sie das USB-Kabel ab, bevor Sie die hintere Abdeckung ent-
fernen oder anbringen.
5. Befestigen des Ständers
Wenn Sie das Gerät auf Ihrem Schreibtisch, in einem Regal oder auf einer anderen
IT
GUIDA ALL’USO E ALLA SICUREZZA
Sensore Di Umidità e Temperatura Wi-Fi Gen3
Leggere prima dell’uso
Questo documento contiene importanti informazioni tecniche e di sicurezza sul
dispositivo e sul suo uso e installazione in sicurezza.
⚠ATTENZIONE! Prima di iniziare l’installazione leggere attentamente e completa-
mente la documentazione allegata. La mancata osservanza delle procedure consi-
gliate potrebbe portare a malfunzionamenti, pericolo per la vita o violazione della
legge. Shelly Europe Ltd. non è responsabile per eventuali perdite o danni in caso di
installazione o funzionamento errati di questo dispositivo.
Introduzione al prodotto
Shelly H&T Gen3 (il Dispositivo) è un sensore di umidità e temperatura intelligente
Wi-Fi.
È possibile accedere al dispositivo, controllarlo e monitorarlo a distanza da qualsi-
asi luogo in cui l’utente disponga di una connessione Internet, purché il dispositivo
sia collegato a un router Wi-Fi e a Internet.
Il Dispositivo dispone di un’interfaccia web integrata che può essere utilizzata per
monitorare e controllare il dispositivo, nonché per regolarne le impostazioni.
⚠AVVISO: il dispositivo è dotato di un rmware installato in fabbrica. Per man-
tenerlo aggiornato e sicuro, Shelly Europe Ltd. fornisce gratuitamente gli ultimi
aggiornamenti del rmware. È possibile accedere agli aggiornamenti tramite l’in-
terfaccia web incorporata o l’applicazione mobile Shelly Smart Control, dove si pos-
sono trovare informazioni sull’ultima versione del rmware. La scelta di installare o
meno gli aggiornamenti del rmware è di esclusiva responsabilità dell’utente. Shelly
Europe Ltd. non sarà responsabile di eventuali difetti di conformità del Dispositivo
causati dalla mancata installazione tempestiva degli aggiornamenti disponibili da
parte dell’utente.
Istruzioni per l’installazione
⚠ATTENZIONE! Non utilizzare il dispositivo se presenta segni di danni o difetti.
⚠ATTENZIONE! Non tentare di riparare il Dispositivo da solo.
1. Alimentazione
Shelly H&T Gen3 può essere alimentato da 4 batterie AA (LR6) da 1,5 V o da un
adattatore di alimentazione USB Type-C.
⚠ATTENZIONE! Utilizza il dispositivo solo con batterie o adattatori di alimentazio-
ne USB Type-C conformi a tutte le normative vigenti. Batterie o adattatori di alimen-
tazione inadeguati possono danneggiare il Dispositivo e causare incendi.
A. Batterie
Rimuovi il coperchio posteriore del dispositivo con un cacciavite piatto come mo-
strato in gura 1, inserisci le batterie della la inferiore come mostrato in gura 3 e
le batterie della la superiore come mostrato in gura 4.
⚠ATTENZIONE! Assicurati che i segni + e - delle batterie corrispondano alla marca-
tura sul vano batterie del dispositivo (g. 2 A).
B. Adattatore di alimentazione USB Tipo-C
Inserisci il cavo dell’adattatore di alimentazione USB Type-C nella porta USB
Type-C del dispositivo (g. 2 C).
⚠ATTENZIONE! Non collegare l’adattatore al dispositivo se l’adattatore o il cavo
sono danneggiati.
⚠ATTENZIONE! Scollega il cavo USB prima di rimuovere o riporre il coperchio po-
steriore.
⚠IMPORTANTE! il Dispositivo non può essere utilizzato per caricare batterie rica-
ricabili.
2. Avvio
Quando viene alimentato inizialmente, il dispositivo entra in modalità Setup e il di-
splay mostra SEt al posto della temperatura. Per impostazione predenita, il punto
di accesso del dispositivo è abilitato, come indicato da AP nell’angolo in basso a
destra del display. Se non è abilitato, tieni premuto il pulsante Reset (g. 2 B) per
5 secondi per abilitarlo.
⚠IMPORTANTE! per risparmiare le batterie, il dispositivo rimane in modalità Setup
per 3 minuti e poi passa in modalità Sleep e il display mostra la temperatura misu-
rata. Premi brevemente il pulsante Reset per tornare in modalità Setup. Premendo
brevemente il pulsante Reset mentre il dispositivo è in modalità Setup, il dispositivo
passa in modalità Sleep.
3. Inclusione a Shelly Cloud
Il dispositivo può essere monitorato, controllato e impostato attraverso il nostro
servizio di automazione domestica Shelly Cloud. È possibile utilizzare il servizio
tramite un’applicazione mobile per Android o iOS o tramite un qualsiasi browser
internet all’indirizzo https://control.shelly.cloud/.
L’applicazione mobile Shelly e il servizio Shelly Cloud non sono condizioni per il
corretto funzionamento del Dispositivo. Questo Dispositivo può essere utilizzato
con vari altri servizi e applicazioni di automazione domestica.
Se scegli di utilizzare il Dispositivo con l’applicazione mobile Shelly Smart Control
e il servizio cloud, le istruzioni su come connettere il Dispositivo al Cloud e control-
larlo tramite l’app Shelly Smart Control sono disponibili nella guida dell’applicazio-
ne mobile: https://shelly.link/app-guide
4. Collegamento manuale a una rete Wi-Fi locale
Shelly H&T Gen3 può essere gestito e controllato attraverso l’interfaccia web in-
corporata. Assicuratevi che il dispositivo sia in modalità Setup, che il suo punto di
accesso (AP) sia abilitato e che siate collegati ad esso con un dispositivo abilita-
to al Wi-Fi. Da un browser web, aprire l’interfaccia web del dispositivo navigando
verso 192.168.33.1. Selezionare Settings dal menu principale e poi Wi-Fi sotto
Network settings.
Abilitare il Wi-Fi 1 e/o il Wi-Fi 2 (rete di backup) selezionando la casella di controllo
Enable Wi-Fi network. Selezionare il nome della rete Wi-Fi (SSID) dal menu a tendi-
na NETWORKS. Inserire le password della rete Wi-Fi e selezionare Save settings.
L’URL del dispositivo apparirà in blu nella parte superiore della sezione Wi, quan-
do il dispositivo si sarà connesso correttamente alla rete Wi-Fi.
⚠RACCOMANDAZIONE! Per motivi di sicurezza, si consiglia di disabilitare l’AP
dopo che il dispositivo si è connesso con successo alla rete Wi-Fi locale. Selezion-
are Settings dal menu principale e poi Access Point in Network Settings. Disattivare
l’AP deselezionando la casella di controllo Enable AP Network.
Una volta completata l’inclusione del dispositivo nel cloud Shelly o in un altro
servizio, riporre il coperchio posteriore.
⚠ATTENZIONE! Scollega il cavo USB prima di rimuovere o posizionare il coperchio
posteriore.
5. Fissare il supporto
Se vuoi posizionare il Dispositivo sulla scrivania, su una mensola o su qualsiasi
altra supercie orizzontale, ssa il supporto come mostrato nella gura 5.
6. Montaggio a parete
Se vuoi montare il dispositivo su una parete o su un’altra supercie verticale, usa
41/2023
Ver1
eter to x the Device to a wall or another vertical surface.
Another option to mount the Device is using a double sided foam sticker.
⚠CAUTION! The Device is intended for indoor use only.
⚠CAUTION! Protect the Device from dirt and moisture.
⚠CAUTION! Do not use the Device in a damp environment, and avoid water splash-
ing.
Reset button actions
The Reset button is shown on Fig.2 B.
• Press briey:
- If the Device is in Sleep mode, puts it in Setup mode.
- If the Device is in Setup mode, puts it in Sleep mode.
• Press and hold for 5 sec: If the Device is in Setup mode, enables its access
point.
• Press and hold for 10 sec: If the Device is in Setup mode, factory resets the
Device.
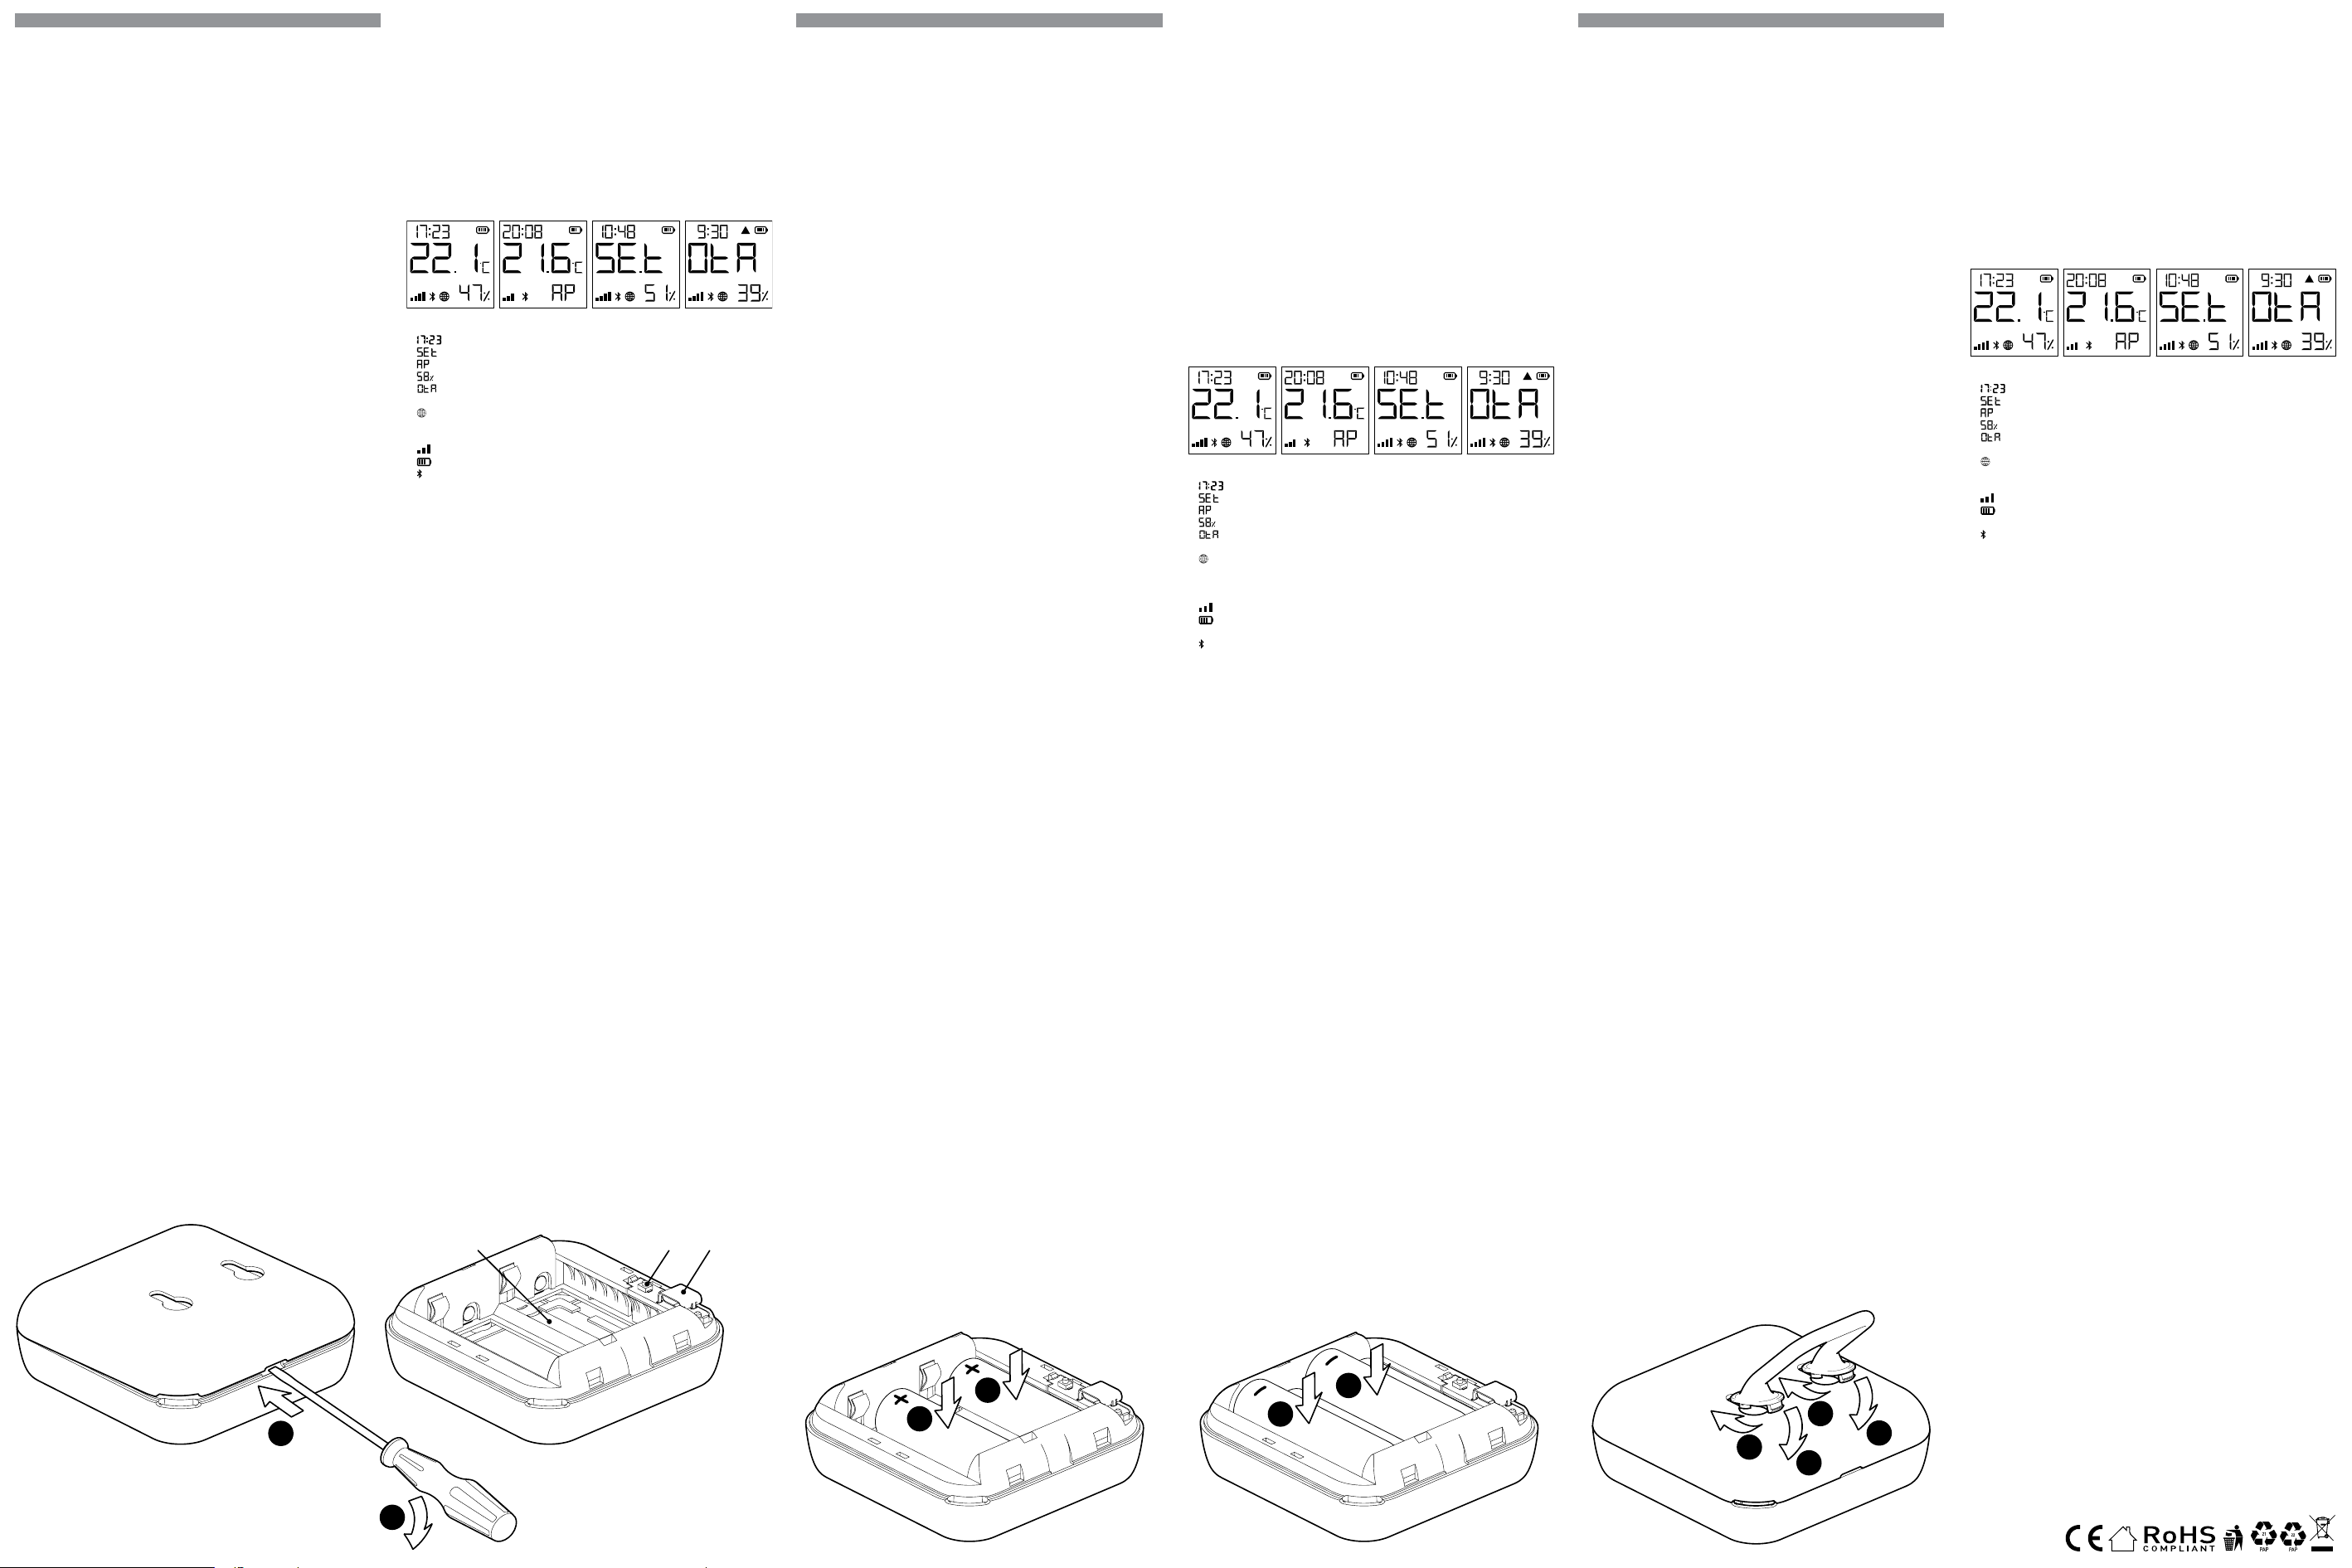
Display
⚠NOTICE: The quality of the internet connection may inuence the accuracy of the
displayed time.
• Current local time.
• The Device is in Setup mode.
• The Device access point is enabled
• Humidity
• The Device is receiving over-the-air updates. Shows the progress in per-
cents instead of the humidity.
• The Device has reported current readings to the Cloud. If missing, the cur-
rent readings on the display are not yet reported. In this case, the readings
on the display may differ from the ones in the Cloud.
• Wi-Fi signal strength indicator
• Indicates battery level. Shows an empty battery when USB- powered.
• Bluetooth connectivity is enabled. Bluetooth is used for inclusion. It can be
disabled from the Shelly app or the Device local web interface.
•
▲
Error while updating the Device rmware.
Specication
• Dimensions (HxWxD):
- without stand: 70x70x26 mm / 2.76x2.76x1.02 in
- with stand: 70x70x45 mm / 2.76x2.76x1.77 in
• Ambient temperature: 0 °C to 40 °C / 32 °F to 104 °F
• Humidity: 30 % to 70 % RH
• Power supply:
- Batteries: 4 AA (LR6) 1.5 V (batteries not included)
- USB power supply: Type-C (cable not included)
• Estimated battery life: Up to 12 months
• Electrical consumption:
- Sleep mode ≤32µA
- Setup mode ≤76mA
• RF band: 2400 - 2495 MHz
• Max. RF power: < 20 dBm
• Wi-Fi protocol: 802.11 b/g/n
• Wi-Fi operational range (depending on local conditions):
- up to 50 m / 160 ft outdoors
- up to 30 m / 100 ft indoors
• Bluetooth protocol: 4.2
• Bluetooth operational range (depending on local conditions):
- up to 30 m / 100 ft outdoors
- up to 10 m / 33 ft indoors
• CPU: ESP-Shelly-C38F
• Flash: 8MB
• Webhooks (URL actions): 10 with 2 URLs per hook
• MQTT: Yes
• REST API: Yes
Declaration of conformity
Hereby, Shelly Europe Ltd. declares that the radio equipment type for Shelly H&T
Gen3 is in compliance with Directive 2014/53/EU, 2014/35/EU, 2014/30/EU,
2011/65/EU. The full text of the EU declaration of conformity is available at the
following internet address:
https://shelly.link/HT-Gen3_DoC
Manufacturer: Shelly Europe Ltd.
Address: 103 Cherni vrah Blvd., 1407 Soa, Bulgaria
Tel.: +359 2 988 7435
E-mail: support@shelly.cloud
Ocial website: https://www.shelly.com
Changes in the contact information data are published by the Manufacturer on
the ocial website.
https://www.shelly.com
All rights to the trademark Shelly® and other intellectual rights associated with
this Device belong to Shelly Europe Ltd.
horizontalen Fläche aufstellen möchten, bringen Sie den Ständer wie in Abb. 5
gezeigt an.
6. Wandmontage
Wenn Sie das Gerät an einer Wand oder einer anderen vertikalen Fläche anbringen
möchten, markieren Sie die Wand, an der Sie das Gerät anbringen möchten, mit
der hinteren Abdeckung.
⚠VORSICHT! Bohren Sie nicht durch die hintere Abdeckung.
Verwenden Sie Schrauben mit einem Kopfdurchmesser zwischen 5 und 7 mm und
einem maximalen Gewindedurchmesser von 3 mm, um das Gerät an einer Wand
oder einer anderen vertikalen Fläche zu befestigen.
Eine weitere Möglichkeit zur Befestigung des Geräts ist die Verwendung eines
doppelseitigen Schaumstoffaufklebers.
⚠VORSICHT! Das Gerät ist nur für die Verwendung in Innenräumen vorgesehen.
⚠VORSICHT! Schützen Sie das Gerät vor Schmutz und Feuchtigkeit.
⚠VORSICHT! Verwenden Sie das Gerät nicht in einer feuchten Umgebung und ver-
meiden Sie Wasserspritzer.
Aktionen der Reset-Taste
Die Reset-Taste ist in Abb.2 B dargestellt.
• Drücken Sie sie kurz:
- Wenn sich das Gerät im Ruhemodus bendet, wird es in den Setup-Modus ver-
setzt.
- Wenn sich das Gerät im Setup-Modus bendet, wird es in den Ruhemodus ver-
setzt.
• 5 Sekunden lang drücken: Wenn sich das Gerät im Setup-Modus bendet, wird
sein Zugangspunkt aktiviert.
• 10 Sekunden lang gedrückt halten: Wenn sich das Gerät im Setup-Modus be-
ndet, wird das Gerät auf Werkseinstellungen zurückgesetzt.
Anzeige
⚠HINWEIS: Die Qualität der Internetverbindung kann die Genauigkeit der angezeig-
ten Zeit beeinussen.
• Aktuelle Ortszeit.
• Das Gerät bendet sich im Setup-Modus.
• Der Zugangspunkt des Geräts ist aktiviert.
• Luftfeuchtigkeit
• Das Gerät erhält ein Over-the-Air-Update. Zeigt den Fortschritt in Prozent
anstelle der Luftfeuchtigkeit an.
• Das Gerät hat aktuelle Messwerte an die Cloud gemeldet. Fehlt diese An-
gabe, werden die aktuellen Messwerte auf dem Display noch nicht gemel-
det. In diesem Fall können die Messwerte auf dem Display von denjenigen
in der Cloud abweichen.
• Anzeige der Wi-Fi-Signalstärke
• Zeigt den Batteriestand an. Zeigt eine leere Batterie an, wenn das Gerät
über USB mit Strom versorgt wird.
• Die Bluetooth-Verbindung ist aktiviert. Bluetooth wird für die Aufnahme
verwendet. Sie kann über die Shelly App oder die lokale Webschnittstelle
des Geräts deaktiviert werden.
•
▲
Fehler beim Aktualisieren der Gerätermware.
Technische Daten
• Abmessungen (HxBxT):
- ohne Ständer: 70x70x26 mm / 2.76x2.76x1.02 in
- mit Standfuß: 70x70x45 mm / 2.76x2.76x1.77 in
• Umgebungstemperatur: 0 °C bis 40 °C / 32 °F bis 104 °F
• Luftfeuchtigkeit: 30 % bis 70 % RH
• Stromversorgung:
- Batterien: 4 AA (LR6) 1,5 V (Batterien nicht enthalten)
- USB-Stromversorgung: Typ-C (Kabel nicht enthalten)
• Geschätzte Lebensdauer der Batterie: Bis zu 12 Monate
• Stromverbrauch:
- Stromverbrauch: Ruhemodus ≤32µA
- Einrichtungsmodus ≤76mA
• Frequenzband: 2400 - 2495 MHz
• Max. Sendeleistung in Frequenzband: <20 dBm
• WLAN-Protokoll: 802.11 b/g/n
• WLAN-Reichweite (abhängig von den örtlichen Gegebenheiten):
- bis zu 50 m / 160 ft im Freien
- bis zu 30 m / 100 ft in Innenräumen
• Bluetooth-Protokoll: 4.2
• Bluetooth-Reichweite (abhängig von den örtlichen Gegebenheiten):
- bis zu 30 m / 100 ft im Freien
- bis zu 10 m / 33 ft in Innenräumen
• CPU: ESP-Shelly-C38F
• Flash: 8MB
• Webhooks (URL-Aktionen): 10 mit 2 URLs pro Hook
• MQTT: Ja
• REST-API: Ja
Konformitätserklärung
Hiermit erklärt Shelly Europe Ltd., dass der Funkanlagentyp Shelly H&T Gen3 der
Richtlinie 2014/53/EU, 2014/35/EU, 2014/30/EU, 2011/65/EU entspricht. Den
vollständigen Text der EU-Konformitätserklärung nden Sie unter folgender Inter-
netadresse
https://shelly.link/HT-Gen3_DoC
Hersteller: Shelly Europe Ltd.
Adresse: 103 Cherni vrah Blvd., 1407 Soa, Bulgarien
Tel.: +359 2 988 7435
E-Mail: support@shelly.cloud
Ozielle Website: https://www.shelly.com
Änderungen der Kontaktdaten werden vom Hersteller auf dessen oziellen Web-
site veröffentlicht
https://www.shelly.com
Alle Rechte an der Marke Shelly® und anderen geistigen Eigentumsrechten im Zu-
sammenhang mit diesem Gerät gehören Shelly Europe Ltd.
il coperchio posteriore per segnare la parete su cui vuoi montare il dispositivo.
⚠ATTENZIONE! Non forare il coperchio posteriore.
Per ssare il dispositivo alla parete o a un’altra supercie verticale, utilizza viti con
diametro della testa compreso tra 5 e 7 mm e diametro massimo della lettatura
di 3 mm.
Un’altra opzione per montare il dispositivo è l’utilizzo di un adesivo biadesivo.
⚠ATTENZIONE! Il Dispositivo è destinato esclusivamente all’uso in ambienti interni.
⚠ATTENZIONE! Proteggi il Dispositivo da sporco e umidità.
⚠ATTENZIONE! Non utilizzare il dispositivo in un ambiente umido ed evita gli schiz-
zi d’acqua.
Azioni del pulsante di reset
Il pulsante di reset è mostrato nella g. 2 B.
• Premilo brevemente:
- Se il dispositivo è in modalità Sleep, passa alla modalità Setup.
- Se il dispositivo è in modalità Setup, passa in modalità Sleep.
• Tieni premuto per 5 secondi: se il dispositivo è in modalità Setup, attiva il suo
punto di accesso.
• Tieni premuto per 10 secondi: se il dispositivo è in modalità Impostazione, ese-
gue il reset di fabbrica del dispositivo.
Display
⚠AVVISO: la qualità della connessione a Internet può inuire sulla precisione dell’o-
ra visualizzata.
• Ora locale corrente.
• Il dispositivo è in modalità di congurazione.
• Il punto di accesso del dispositivo è abilitato.
• Umidità
• Il dispositivo sta ricevendo un aggiornamento via etere. Mostra l’anda-
mento in percentuale invece dell’umidità.
• Il dispositivo ha segnalato le letture correnti al Cloud. Se manca, i valori at-
tuali sul display non sono ancora stati segnalati. In questo caso, le letture
sul display possono differire da quelle nel Cloud.
• Indicatore della potenza del segnale Wi-Fi
• Indica il livello della batteria. Mostra una batteria scarica quando è alimen-
tato via USB.
• La connettività Bluetooth è abilitata. Il Bluetooth viene utilizzato per l’in-
clusione. Può essere disattivata dall’applicazione Shelly o dall’interfaccia
web locale del dispositivo.
•
▲
Errore durante l‘aggiornamento del rmware del dispositivo.
Speciche tecniche
• Dimensioni (HxLxP):
- senza supporto: 70x70x26 mm / 2.76x2.76x1.02 in
- con supporto: 70x70x45 mm / 2.76x2.76x1.77 in
• Temperatura ambiente: 0 °C a 40 °C / 32 °F a 104 °F
• Umidità: da 30 % a 70 % di umidità relativa
• Alimentazione:
- Batterie: 4 AA (LR6) 1,5 V (batterie non incluse)
- Alimentazione USB: Tipo-C (cavo non incluso)
• Durata stimata della batteria: Fino a 12 mesi
• Consumo elettrico:
- Consumo elettrico: Modalità Sleep ≤32µA
- Modalità Setup ≤76mA
• Bande di radiofrequenza: 2400 - 2495 MHz
• Massima potenza a radiofrequenza: <20 dBm
• Protocollo Wi-Fi: 802.11 b/g/n
• Intervallo operativo Wi-Fi (a seconda delle condizioni locali):
- no a 50 m / 160 ft all’aperto
- no a 30 m / 100 ft all’interno
• Protocollo Bluetooth: 4.2
• Intervallo operativo Bluetooth (a seconda delle condizioni locali):
- no a 30 m / 100 ft all’aperto
- no a 10 m / 33 ft all’interno
• CPU: ESP-Shelly-C38F
• Flash: 8MB
• Webhook (azioni URL): 10 con 2 URL per ogni hook
• MQTT: Sì
• API REST: Sì
Dichiarazione di conformità
Con la presente, Shelly Europe Ltd. dichiara che il tipo di apparecchiatura radio
Shelly H&T Gen3 è conforme alla Direttiva 2014/53/UE, 2014/35/UE, 2014/30/UE,
2011/65/UE. Il testo completo della dichiarazione di conformità UE è disponibile
al seguente indirizzo internet
https://shelly.link/HT-Gen3_DoC
Produttore: Shelly Europe Ltd.
Indirizzo: 103 Cherni vrah Blvd., 1407 Soa, Bulgarien
Tel.: +359 2 988 7435
E-mail: support@shelly.cloud
Sito web uciale: https://www.shelly.com
Le modiche ai dati di contatto sono pubblicate dal Produttore sul sito Web uf-
ciale.
https://www.shelly.com
Tutti i diritti sul marchio Shelly® e altri diritti intellettuali associati a questo dispo-
sitivo appartengono a Shelly Europe Ltd.
1
2
AB
C
2
2
1
1
1
1
2
2
g.1 g.2
g.5g.4g.3
41/2023
1
2
AB
C
2
2
1
1
1
1
2
2
g.1 g.2
g.5g.4g.3
Ver1
ES
GUÍA DE USO Y SEGURIDAD
Sensor Wi De Temperatura y Humedad Gen3
Leia antes de utilizar
Este documento contém importante informação técnica e de segurança relativa
ao dispositivo, sua utilização segura e instalação.
⚠¡ATENCIÓN! Antes de comenzar la instalación, lea atentamente y por completo
la documentación adjunta. El incumplimiento de los procedimientos recomendados
puede provocar un mal funcionamiento, un peligro para su vida o una violación de la
ley. Shelly Europe Ltd. no se hace responsable de cualquier pérdida o daño debido a
una instalación o uso inadecuado de este dispositivo.
Resumen del producto
Shelly H&T Gen3 (el Dispositivo) es un sensor inteligente de temperatura y hu-
medad por Wi-Fi.
Se puede acceder al dispositivo, controlarlo y supervisarlo a distancia desde cual-
quier lugar en el que el usuario disponga de conexión a Internet, siempre que el
dispositivo esté conectado a un router Wi-Fi y a Internet.
El Dispositivo tiene una interfaz web integrada que se puede utilizar para supervi-
sar y controlar el dispositivo, así como para ajustar su conguración.
⚠AVISO: El dispositivo viene con rmware instalado de fábrica. Para mantenerlo
actualizado y seguro, Shelly Europe Ltd. proporciona las últimas actualizaciones de
rmware de forma gratuita. Puede acceder a las actualizaciones a través de la inter-
faz web integrada o de la aplicación móvil Shelly Smart Control, donde encontrará
información detallada sobre la última versión del rmware. La elección de instalar o
no las actualizaciones del rmware es responsabilidad exclusiva del usuario. Shelly
Europe Ltd. no será responsable de ninguna falta de conformidad del Dispositivo
causada por el hecho de que el usuario no instale las actualizaciones disponibles
en el momento oportuno.
Instrucciones de instalación
⚠¡ATENCIÓN! No utilice el dispositivo si presenta algún signo de daño o defecto.
⚠¡ATENCIÓN! No intente arreglar o reparar el dispositivo usted mismo.
1. Alimentación
Shelly H&T Gen3 puede alimentarse con 4 pilas AA (LR6) de 1,5 V o con un adap-
tador de alimentación USB Tipo-C.
⚠¡ATENCIÓN! Utilice el dispositivo solo con pilas o adaptadores de alimentación
USB tipo C que cumplan con todas las normativas aplicables. Las baterías o los
adaptadores de alimentación inadecuados pueden dañar el dispositivo y provocar
un incendio.
A. Baterías
Retire la tapa trasera del dispositivo con un destornillador plano como se muestra
en la g. 1, introduzca las pilas de la la inferior como se muestra en la g. 3 y las
pilas de la la superior como se muestra en la g. cuatro
⚠¡ATENCIÓN! Asegúrese de que los signos + y - de las pilas se corresponden con
la marca del compartimento de las pilas del aparato (g. 2 A)
B. Adaptador de la fuente de alimentación USB Tipo-C
Inserte el cable del adaptador de alimentación USB Tipo-C en el puerto USB Tipo-C
del dispositivo (g. 2 C)
⚠¡ATENCIÓN! No conecte el adaptador al dispositivo si el adaptador o el cable
están dañados.
⚠¡ATENCIÓN! Desconecte el cable USB antes de quitar o poner la tapa trasera.
⚠¡IMPORTANTE! El dispositivo no puede utilizarse para cargar baterías recarga-
bles.
2. Primeros pasos
Cuando se enciende por primera vez, el dispositivo entrará en el modo de con-
guración y la pantalla mostrará SEt en lugar de la temperatura. Por defecto, el
hotspot del dispositivo está habilitado, lo que se indica con AP en la esquina in-
ferior derecha de la pantalla. Si no está habilitado, mantenga pulsado el botón de
reinicio (g. 2 B) durante 5 segundos para habilitarlo.
⚠¡IMPORTANTE! Para ahorrar energía de la batería, el dispositivo permanece en
modo de conguración durante 3 minutos y luego pasa a modo de reposo y la pan-
talla mostrará la temperatura medida. Pulse brevemente el botón Reset para volver
al modo Conguración. Pulsar brevemente el botón Reset mientras el dispositivo
está en modo de conguración pondrá el dispositivo en modo de reposo.
3. Inclusión a Shelly Cloud
El dispositivo se puede supervisar, controlar y congurar a través de nuestro ser-
vicio de domótica Shelly Cloud. Puede utilizar el servicio a través de una aplica-
ción móvil para Android o iOS o a través de cualquier navegador de Internet en
https://control.shelly.cloud/.
La aplicación móvil Shelly y el servicio Shelly Cloud no son condiciones para el
buen funcionamiento del Dispositivo. Este dispositivo puede utilizarse con otros
servicios y aplicaciones de domótica.
Si decides utilizar la aplicación y el servicio en la nube, encontrarás instrucciones
sobre cómo conectar el Dispositivo en la guía de la aplicación móvil
https://shelly.link/app-guide
4. Conexión manual a una red Wi-Fi local
Shelly H&T Gen3 puede gestionarse y controlarse a través de su interfaz web in-
tegrada. Asegúrese de que el dispositivo está en modo de conguración, que su
punto de acceso (AP) está activado y que está conectado a él mediante un dis-
positivo con Wi-Fi. Desde un navegador web, abra la interfaz web del dispositivo
accediendo a 192.168.33.1. Seleccione Settings en el menú principal y, a continu-
ación, Wi-Fi en Network settings.
Active Wi-Fi 1 y/o Wi-Fi 2 (red de reserva) marcando la casilla Enable Wi-Fi net-
work. Seleccione el nombre de la red Wi-Fi (SSID) en el menú desplegable NET-
WORKS. Introduzca la(s) contraseña(s) de la red Wi-Fi y seleccione Save settings.
La URL del dispositivo aparecerá en azul en la parte superior de la sección Wi-Fi,
cuando el dispositivo se haya conectado con éxito a la red Wi-Fi.
⚠¡RECOMENDACIÓN! Por razones de seguridad, recomendamos desactivar el AP,
después de que el Dispositivo se conecte con éxito a la red Wi-Fi local. Seleccione
Settings en el menú principal y luego Access Point en Network Settings. Desactive
el punto de acceso desmarcando la casilla Enable AP Network.
Cuando haya completado la inclusión del dispositivo en la nube de Shelly o en otro
servicio, coloque la cubierta posterior.
⚠¡ATENCIÓN! Desconecte el cable USB antes de quitar o poner la tapa trasera.
5. Colocación del soporte
Si desea colocar el Dispositivo en su escritorio, estantería o cualquier otra super-
PT
MANUAL DO UTILIZADOR E DE SEGURANÇA
Sensor Wi-Fi De Humidade e Temperatura Gen3
Leia antes de utilizar
Ce document contient des informations techniques et de sécurité importantes
concernant l’appareil, son utilisation et son installation en toute sécurité.
⚠ATENÇÃO! Antes de iniciar a instalação, por favor leia atentamente e na íntegra
a documentação incluída. O incumprimento dos procedimentos recomendados po-
derão dar origem a avarias, perigo à sua vida ou violação da lei. A Shelly Europe Ltd.
não se responsabiliza por quaisquer perdas ou danos em caso de uma incorreta
instalação ou incorreta utilização deste dispositivo.
Apresentação do Produto
Shelly H&T Gen3 (o Dispositivo) é um sensor Wi-Fi inteligente de humidade e tem-
peratura.
Dispositivo pode ser acedido, controlado e monitorizado remotamente a partir de
qualquer local onde o utilizador tenha ligação à Internet, desde que o dispositivo
esteja ligado a um router Wi-Fi e à Internet.
O Dispositivo tem uma interface Web incorporada que pode ser utilizada para mo-
nitorizar e controlar o dispositivo, bem como ajustar as suas denições.
⚠AVISO: O dispositivo vem com rmware instalado de fábrica. Para o manter atua-
lizado e seguro, a Shelly Europe Ltd. fornece gratuitamente as últimas actualizações
de rmware. Pode aceder às actualizações através da interface web incorporada ou
da aplicação móvel Shelly Smart Control, onde pode encontrar detalhes sobre a
versão mais recente do rmware. A escolha de instalar ou não as actualizações
de rmware é da exclusiva responsabilidade do utilizador. A Shelly Europe Ltd. não
será responsável por qualquer falta de conformidade do Dispositivo causada pela
falha do utilizador em instalar as actualizações disponíveis de forma atempada.
Instruções para instalação
⚠CUIDADO! Não utilize o aparelho se este apresentar qualquer sinal de dano ou
defeito.
⚠ATENÇÃO! Não tente reparar você mesmo o Dispositivo.
1. Fonte de alimentação
Shelly H&T Gen3 pode ser alimentado por 4 baterias AA (LR6) 1.5 V ou por uma
outra fonte de alimentação com um adaptador USB-C.
⚠ATENÇÃO! Utilize o Dispositivo apenas com baterias ou fontes de alimentação
tipo USB-C que cumpram todos os regulamentos aplicáveis. O uso impróprio de
baterias ou outras fontes de alimentação poderão danicar o Dispositivo ou causar
incêndio.
A. Baterias
Remova a tampa traseira do Dispositivo utilizando uma chave de fendas, tal como
ilustrado na g. 1, insira a la inferior de baterias como na g. 3 e a la de topo
como na g. 4.
⚠ATENÇÃO! Certique-se de que os pólos + e - das baterias correspondem às mar-
cas no compartimento das baterias do Dispositivo.
B. Adaptador de fonte de alimentação USB-C
Insira o cabo do adaptador de fonte de alimentação USB-C na cha USB-C do
Dispositivo (g. 2 C)
⚠ATENÇÃO! Não conecte o adaptador ao Dispositivo se este ou o cabo se encon-
trarem danicados.
⚠ATENÇÃO! Desligue o cabo USB antes de remover ou recolocar a tampa traseira.
⚠IMPORTANTE! O Dispositivo não pode ser utilizado para carregar baterias recar-
regáveis.
2. Iniciando
Quando iniciada a alimentação de energia, o Dispositivo entrará em modo “Setup”
e o visor mostrará SEt em vez da temperatura. Por defeito, o ponto de acesso do
Dispositivo estará ativado, o que é indicado pelo AP no canto inferior direito do
visor. Se não estiver ativado, mantenha o botão de “Reiniciar” pressionado durante
5 segundos para o ativar.
⚠ATENÇÃO! Para poupar as baterias o Dispositivo mantém-se em modo “Setup”
durante 3 minutos e entra depois em modo “Sleep”, mostrando a temperatura
medida. Pressione brevemente o botão “Reiniciar” para retornar ao modo “Setup”.
Pressionando brevemente o botão “Reiniciar” enquanto o Dispositivo está em modo
“Setup” fará o dispositivo entrar em modo “Sleep”.
3. Inclusão de Shelly Cloud
O Dispositivo pode ser monitorizado, controlado e congurado através do nosso
serviço de automação doméstica Shelly Cloud. Pode utilizar o serviço através de
uma aplicação móvel Android ou iOS ou através de qualquer navegador de Inter-
net em https://control.shelly.cloud/.
O aplicativo móvel Shelly e o serviço Shelly Cloud não são condições para que
o Dispositivo funcione corretamente. Este dispositivo pode ser usado de forma
independente ou com várias outras plataformas e protocolos de automação re-
sidencial.
Se você optar por usar o dispositivo com o aplicativo móvel Shelly Smart Control
e o serviço de nuvem, as instruções sobre como conectar o dispositivo à nuvem e
controlá-lo por meio do aplicativo Shelly Smart Control podem ser encontradas no
guia do aplicativo móvel: https://shelly.link/app-guide.
4. Conectando manualmente a uma rede Wi-Fi local
O Shelly H&T Gen3 pode ser gerido e controlado através da sua interface Web
incorporada. Certique-se de que o dispositivo está no modo de conguração,
que o seu ponto de acesso (AP) está ativado e que está ligado a ele utilizando
um dispositivo com Wi-Fi. A partir de um navegador Web, abra a interface Web do
dispositivo navegando para 192.168.33.1. Seleccione Settings no menu principal
e, em seguida, Wi-Fi em Network settings.
Active o Wi-Fi 1 e/ou o Wi-Fi 2 (rede de reserva) marcando a caixa de vericação
Enable Wi-Fi network. Seleccione o nome da rede Wi-Fi (SSID) no menu penden-
te NETWORKS. Introduza a(s) palavra(s)-passe da rede Wi-Fi e seleccione Save
settings.
O endereço URL do Dispositivo irá aparecer em cor azul no topo da seção Wi,
quando o Dispositivo se encontrar devidamente conectado a uma rede Wi-Fi.
⚠RECOMENDAÇÃO! Por razões de segurança, recomendamos a desativação do
AP, após a ligação bem sucedida do Dispositivo à rede Wi-Fi local. Seleccione Set-
tings no menu principal e, em seguida, Access Point em Network Settings. Desac-
tive o AP desmarcando a caixa de vericação Enable AP Network.
Quando concluir a inclusão do dispositivo na nuvem da Shelly ou noutro serviço,
coloque a tampa traseira.
⚠ATENÇÃO! Desligue o cabo USB antes de remover ou recolocar a tampa traseira.
5. Colocando o suporte
Se desejar colocar o Dispositivo na sua secretária, numa prateleira ou qualquer
outra superfície horizontal, coloque o suporte como ilustrado na g. 5.
FR
GUIDE D’UTILISATION ET DE SÉCURITÉ
Capteur D’humidité et De Température Wi-Fi Gen3
A lire avant utilisation
Ce document contient des informations techniques et de sécurité importantes
concernant l’appareil, son utilisation et son installation en toute sécurité.
⚠ATTENTION ! Avant de commencer l’installation, veuillez lire attentivement et en-
tièrement cette notice d’utilisation. Le non-respect des procédures recommandées
peut entraîner un dysfonctionnement, représenter un danger ou être une violation de
la loi. Shelly Europe Ltd. n’est pas responsable des pertes ou des dommages causés
lors d’une installation ou utilisation inadéquate de ce dispositif.
Présentation du produit
Shelly H&T Gen3 (l’appareil) est un capteur d’humidité et de température intelligent
Wi-Fi.
Il est possible d’accéder au Dispositif, de le contrôler et de garder un oeil dessus,
d’où que vous soyez, à partir du moment où vous avez accès à Wi-Fi et à l’Internet.
L’appareil dispose d’une interface Web intégrée qui peut être utilisée pour surveiller
et contrôler le dispositif ainsi que pour régler ses paramètres.
⚠AVERTISSEMENT: Le Dispositif est livré avec un micrologiciel pré-installé. Pour
le maintenir à jour et sécurisé, Shelly Europe Ltd. fournit gratuitement les dernières
mises à jour disponibles du micrologiciel. Vous pouvez accéder aux mises à jour
depuis l’interface web intégrée ou l’application Shelly Smart Control, où vous trou-
verez des détails sur la dernière version du micrologiciel. Le choix d’installer ou non
les mises à jour du micrologiciel relève de la seule responsabilité de l’utilisateur.
Shelly Europe Ltd. n’est pas responsable de tout défaut de conformité du Dispositif
causé par le fait que l’utilisateur n’a pas installé les mises à jour disponibles en
temps voulu.
Instructions d’installation
⚠ATTENTION ! N’utilisez pas le Dispositif s’il présente des signes de dommages
ou de défaut.
⚠ATTENTION ! N’essayez pas d’entretenir ou de réparer l’appareil vous-même.
1. Alimentation électrique
Shelly H&T Gen3 peut être alimenté par 4 piles AA (LR6) de 1,5 V ou un adaptateur
d’alimentation USB Type-C.
⚠ATTENTION ! Utilisez l’appareil uniquement avec des piles ou des adaptateurs
d’alimentation USB Type-C conformes à toutes les réglementations applicables. Des
piles ou des adaptateurs d’alimentation inappropriés peuvent endommager l’appa-
reil et provoquer un incendie.
A. Piles
Retirez le capot arrière de l’appareil à l’aide d’un tournevis plat comme indiqué sur
la g. 1, insérez les piles de la rangée inférieure comme indiqué sur la g. 3 et les
piles de la rangée supérieure comme illustré à la g. 4.
⚠ATTENTION ! Assurez-vous que les panneaux piles + et - correspondent au mar-
quage sur le compartiment à piles de l’appareil (g. 2 A)
B. Adaptateur d’alimentation USB Type-C
Insérez le câble adaptateur d’alimentation USB Type-C dans le port USB Type-C
du périphérique (g. 2 C)
⚠ATTENTION ! Ne connectez pas l’adaptateur au périphérique si l’adaptateur ou le
câble sont endommagés.
⚠ATTENTION ! Débranchez le câble USB avant de retirer ou de placer le capot ar-
rière.
⚠IMPORTANT ! L’appareil ne peut pas être utilisé pour charger des piles rechar-
geables.
2. Démarrage
Lorsqu’il est initialement alimenté, l’appareil sera mis en mode Conguration et
l’écran achera SEt au lieu de la température. Par défaut, le point d’accès périphé-
rique est activé, ce qui est indiqué par AP dans le coin inférieur droit de l’écran. S’il
n’est pas activé, maintenez enfoncé le bouton Reset (g. 2 B) pendant 5 secondes
pour l’activer.
⚠IMPORTANT! Pour économiser les piles, l’appareil reste en mode Conguration
pendant 3 minutes, puis passe en mode veille et l’écran ache la température
mesurée. Appuyez brièvement sur le bouton Réinitialiser pour le ramener en mode
Conguration. Appuyez brièvement sur le bouton Réinitialiser pendant que l’appareil
est en mode Conguration pour mettre l’appareil en mode veille.
3. Inclusion dans Shelly Cloud
L’appareil peut être surveillé, contrôlé et conguré par le biais de notre service de
domotique Shelly Cloud. Vous pouvez utiliser le service par le biais d’une applica-
tion mobile Android ou iOS ou par le biais de n’importe quel navigateur Internet à
l’adresse https://control.shelly.cloud/.
L’application Shelly et le service Shelly Cloud ne sont pas indispensables au bon
fonctionnement du Dispositif. Ce Dispositif peut être utilisé avec d’autres services
et applications domotiques.
Si vous choisissez d’utiliser le Dispositif avec l’application Shelly Smart Control et
le service Shelly Cloud, les instructions pour connecter le Dispositif au Cloud et
le contrôler depuis l’application Shelly se trouvent dans le guide de l’application
mobile: https://shelly.link/app-guide.
4. Connexion manuelle à un réseau Wi-Fi local
Shelly H&T Gen3 peut être géré et contrôlé via son interface web intégrée. As-
surez-vous que l’appareil est en mode conguration, que son point d’accès (PA)
est activé et que vous êtes connecté à l’appareil à l’aide d’un dispositif compatible
Wi-Fi. À partir d’un navigateur Web, ouvrez l’interface Web de l’appareil en nav-
iguant jusqu’à 192.168.33.1. Sélectionnez Settings dans le menu principal, puis
Wi-Fi sous Network settings.
Activez le Wi-Fi 1 et/ou le Wi-Fi 2 (réseau de secours) en cochant la case Enable
Wi-Fi network. Sélectionnez le nom du réseau Wi-Fi (SSID) dans la liste déroulante
NETWORKS. Saisissez le(s) mot(s) de passe du réseau Wi-Fi et sélectionnez Save
settings.
L’URL de l’appareil apparaîtra en bleu en haut de la section Wi, lorsque l’appareil
est correctement connecté au réseau Wi-Fi.
⚠RECOMMANDATION ! Pour des raisons de sécurité, il est recommandé de désac-
tiver le point d’accès après la connexion réussie de l’appareil au réseau Wi-Fi local.
Sélectionnez Settings dans le menu principal, puis Access Point sous Network set-
tings. Désactivez le point d’accès en décochant la case Enable AP Network.
Lorsque vous avez terminé l’inclusion de l’appareil dans le nuage Shelly ou dans un
autre service, placez la couverture arrière.
⚠ATTENTION ! Débranchez le câble USB avant de retirer ou de placer le capot ar-
rière.
5. Fixation du support
Si vous souhaitez placer l’appareil sur votre bureau, sur une étagère ou sur toute
cie horizontal, je el soporte como se muestra en la g. 5.
6. Montaje en la pared
Si desea montar el Dispositivo en una pared o en cualquier otra supercie vertical,
utilice la tapa trasera para marcar la pared donde desea montar el Dispositivo.
⚠¡ATENCIÓN! No perfore la tapa trasera.
Utilice tornillos con un diámetro de cabeza entre 5 y 7 mm y un diámetro de rosca
máximo de 3 mm para jar el Dispositivo a una pared u otra supercie vertical.
Otra opción para montar el Dispositivo es utilizar un adhesivo de espuma de doble
cara.
⚠¡ATENCIÓN! El dispositivo está diseñado para su uso en interiores.
⚠¡ATENCIÓN! Proteja el dispositivo de la suciedad y la humedad.
⚠¡ATENCIÓN! No utilice el dispositivo en un entorno húmedo y evite las salpica-
duras de agua.
Acciones del botón de reinicio
El botón de reinicio se muestra en la g. 2b
• Pulsación corta:
- Si el dispositivo está en modo de reposo, pone el dispositivo en modo de con-
guración.
- Si el dispositivo está en modo de conguración, pone el dispositivo en modo
de reposo.
• Pulsación larga durante 5 segundos: Si el dispositivo está en modo de congu-
ración, habilita su punto de acceso.
• Mantenga pulsado durante 10 segundos
Mostrar
⚠AVISO: La calidad de la conexión a Internet puede inuir en la precisión de la
hora mostrada.
• Hora local actual.
• El dispositivo está en modo de conguración.
• La zona activa del dispositivo está activada.
• Humedad
• El dispositivo está recibiendo una actualización por aire. Muestra el pro-
greso en porcentajes en lugar de la humedad.
• El dispositivo ha informado de las lecturas actuales a la nube. Si falta, las
lecturas actuales en la pantalla siguen sin ser reportadas. En este caso,
las lecturas en la pantalla pueden diferir de las de la nube.
• Indicador de intensidad de la señal Wi-Fi
• Indica el nivel de batería. Muestra una batería vacía cuando se alimenta
por USB.
• La conectividad Bluetooth está activada. El Bluetooth se utiliza para la
inclusión. Se puede desactivar desde la aplicación Shelly o la interfaz web
local del dispositivo.
•
▲
Error al actualizar el rmware del dispositivo.
Especicaciones
• Dimensiones (HxAxP):
- sin soporte: 70x70x26 mm / 2.76x2.76x1.02 in
- con soporte: 70x70x45 mm / 2.76x2.76x1.77 in
• Temperatura ambiente: 0 °C a 40 °C / 32 °F a 104 °F
• Humedad: 30 % a 70 % RH
• Alimentación:
- Pilas: 4 AA (LR6) 1,5V (pilas no incluidas)
- Fuente de alimentación USB: Tipo-C (cable no incluido)
• Duración estimada de las pilas: hasta 12 meses
• Consumo de energía:
- Consumo de energía: Modo de reposo ≤32 µA
- Modo de conguración ≤76mA
• Banda de radiofrecuencia: 2400 - 2495 MHz
• Potencia máxima de radiofrecuencia: <20 dBm
• Protocolo Wi-Fi: 802.11 b/g/n
• Alcance operativo de Wi-Fi (dependiendo de las condiciones locales):
- hasta 50 m / 160 ft en exteriores
- hasta 30 m / 100 ft en interiores
• Protocolo Bluetooth: 4.2
• Alcance operativo de Bluetooth (dependiendo de las condiciones locales):
- hasta 30 m / 100 ft en exteriores
- hasta 10 m / 33 ft en interiores
• CPU: ESP-Shelly-C38F
• Flash: 8MB
• Webhooks (acciones de URL): 10 con 2 URLs por hook
• MQTT: Sí
• API REST: Sí
Declaración de conformidad
Shelly Europe Ltd. declara por la presente que el equipo de radio tipo Shelly H&T
Gen3 cumple con las directivas 2014/53/UE, 2014/35/UE, 2014/30/UE, 2011/65/
UE. El texto completo de la declaración de conformidad de la UE está disponible
en la siguiente dirección web
https://shelly.link/HT-Gen3_DoC
Fabricante: Shelly Europe Ltd.
Dirección: 103 Cherni vrah Blvd., 1407 Soa, Bulgarien
Tel: +359 2 988 7435
Correo electrónico: support@shelly.cloud
Sitio web ocial: https://www.shelly.com
Los cambios en la información de contacto son publicados por el fabricante en
el sitio web ocial.
https://www.shelly.com
Todos los derechos de las marcas Shelly®, y otros derechos de propiedad intelec-
tual asociados a este dispositivo pertenecen a Shelly Europe Ltd.
6. Suporte de parede
Se desejar montar o Dispositivo numa parede ou em qualquer outra superfície
vertical, utilize a tampa traseira para marcar na parede o local onde quer montar
o Dispositivo.
⚠ATENÇÃO! Não perfure através da tampa traseira.
Utilize parafusos com um diâmetro de cabeça entre 5 e 7 mm e um máximo de 3
mm de espessura para xar o Dispositivo a uma parede ou outra superfície ver-
tical.
Outra opção para montar o Dispositivo é utilizar película adesiva de dupla face.
⚠ATENÇÃO! O Dispositivo foi desenhado apenas para uso em interior.
⚠ATENÇÃO! Proteja o Dispositivo de poeiras e humidade.
⚠ATENÇÃO! Não utilize o Dispositivo em locais húmidos e evite salpicos de água.
Ações do botão “Reiniciar”
O botão “Reiniciar” é indicado na g.2 B.
• Pressione brevemente:
- Se o Dispositivo estiver em modo “Sleep”, entra em modo “Setup”.
- Se o Dispositivo estiver em modo “Setup”, entra em modo “Sleep”.
• Pressionando durante 5 seg: Se o Dispositivo estiver em modo “Setup”, ativará
o ponto de acesso.
• Pressionando durante 10 seg: Se o Dispositivo estiver em modo “Setup”, repõe
as congurações de fábrica.
Mostrador
⚠AVISO: A qualidade da ligação à Internet pode inuenciar a exatidão da hora
apresentada.
• Hora local atual.
• O Dispositivo está em modo “Setup”.
• O ponto de acesso do Dispositivo está ativo.
• Humidade
• O Dispositivo está a receber uma atualização sem os. Mostra o progres-
so em percentagem em lugar da humidade.
• O Dispositivo reportou as leituras à Cloud. Se omitidas, as leituras atuais
no mostrador ainda não foram reportadas. Nestes casos, as leituras no
mostrador podem ser diferentes das que estão na Cloud.
• Indicador de potência do sinal Wi-Fi
• Indica nível de bateria. Mostra uma bateria vazia quando alimentado por
USB.
• Conetividade Bluetooth está ativa. Bluetooth é usado para inclusão. Pode
ser desativado através da App Shelly ou do interface web local do Dispo-
sitivo.
•
▲
Erro ao atualizar o rmware do dispositivo.
Especicações
• Dimensões (AxLxP):
- sem suporte: 70x70x26 mm / 2.76x2.76x1.02 in
- com suporte: 70x70x45 mm / 2.76x2.76x1.77 in
• Temperatura ambiente: 0 °C a 40 °C / 32 °F a 104 °F
• Umidade: 30 % a 70 % RH
• Fonte de alimentação:
- Baterias: 4 AA (LR6) 1.5 V (baterias não incluídas)
- Fonte de alimentação USB: Tipo C (cabo não incluído)
• Tempo de vida da bateria: Até 12 meses
• Consumo elétrico:
- Consumo elétrico: Modo Sleep ≤32µA
- Modo Setup ≤76mA
• Banda de radiofrequências: 2400 - 2495 MHz
• Potência máxima de radiofrequências: <20 dBm
• Protocolo Wi-Fi: 802.11 b/g/n
• Alcance de operação de Wi-Fi (dependendo das condições locais):
- até 50 m / 160 ft no exterior
- até 30 m / 100 ft no interior
• Protocolo Bluetooth: 4.2
• Alcance de operação de Bluetooth (dependendo das condições locais):
- até 30 m / 100 ft no exterior
- até 10 m / 33 ft no interior
• CPU: ESP-Shelly-C38F
• Flash: 8MB
• Webhooks (ações URL): 10 com 2 URLs por cada hook
• MQTT: Sim
• REST API: Sim
Declaração de conformidade
A Shelly Europe Ltd. declara por este meio que o equipamento rádio tipo Shelly
H&T Gen3 opera conforme a Diretriz 2014/53/EU, 2014/35/EU, 2014/30/EU,
2011/65/EU. O texto completo da declaração da UE sobre a conformidade está
disponível no seguinte endereço de internet
https://shelly.link/HT-Gen3_DoC
Fabricante: Shelly Europe Ltd.
Endereço: 103 Cherni vrah Blvd., 1407 Soa, Bulgária
Tel.: +359 2 988 7435
E-mail: support@shelly.cloud
Site ocial: https://www.shelly.com
Alterações nos endereços de contato são publicados pelo Fabricante no website
ocial. https://www.shelly.com
Todos os direitos sobre a marca registada Shelly® e outros direitos de proprie-
dade intelectual associados a este Dispositivo pertencem a Shelly Europe Ltd.
autre surface horizontale, xez le support comme indiqué à la g. 5.
6. Montage mural
Si vous souhaitez monter l’appareil sur un mur ou toute autre surface verticale,
utilisez le capot arrière pour marquer le mur où vous souhaitez monter l’appareil.
⚠ATTENTION ! Ne percez pas à travers le capot arrière.
Utilisez des vis dont le diamètre de la tête est compris entre 5 et 7 mm et un
diamètre de letage maximal de 3 mm pour xer l’appareil à un mur ou à une autre
surface verticale.
Une autre option pour monter l’appareil consiste à utiliser un autocollant en
mousse double face.
⚠ATTENTION ! L’Appareil est destiné à un usage intérieur uniquement.
⚠ATTENTION ! Protégez l’appareil de la saleté et de l’humidité.
⚠ATTENTION ! N’utilisez pas l’appareil dans un environnement humide et évitez
les éclaboussures d’eau.
Actions du bouton de réinitialisation
Le bouton Réinitialiser est illustré sur la g.2 B.
• Appuyez brièvement :
-Si l’appareil est en mode veille, le met en mode Conguration.
-Si l’appareil est en mode Conguration, mettez-le en mode veille.
• Appuyez longuement pendant 5 secondes : si l’appareil est en mode Congura-
tion, active son point d’accès.
• Appuyez longuement pendant 10 secondes : si l’appareil est en mode d’installa-
tion, réinitialise l’appareil aux paramètres d’usine.
Montrer
⚠AVIS : La qualité de la connexion internet peut inuencer la précision de l’heure
achée.
• Heure locale actuelle.
• L’appareil est en mode d’installation.
• Le point d’accès périphérique est activé.
• Humidité
• L’appareil reçoit une mise à jour en direct. Ache la progression en pour-
centages au lieu de l’humidité.
• L’appareil a signalé les lectures actuelles au Cloud. S’il est manquant, les
lectures actuelles sur l’écran ne sont pas encore signalées. Dans ce cas,
les lectures sur l’écran peuvent différer de celles du Cloud.
• Indicateur de puissance du signal Wi-Fi
• Indique le niveau de la batterie. Ache une batterie vide lorsqu’elle est
alimentée par USB.
• La connectivité Bluetooth est activée. Bluetooth est utilisé pour l’inclusion.
Il peut être désactivé à partir de l’application Shelly ou de l’interface Web
locale de l’appareil.
•
▲
Erreur lors de la mise à jour du micrologiciel de l’appareil.
Spécication
• Dimensions (H x L x P) :
-sans support : 70 x 70 x 26 mm / 2.76 x 2.76 x 1.02 in
-avec support : 70 x 70 x 45 mm / 2.76 x 2.76 x 1.77 in
• Température ambiante : 0 °C à 40 °C / 32 °F à 104 °F
• Humidité : 30 % à 70 %
• Alimentation :
-Piles : 4 AA (LR6) 1,5 V (piles non incluses)
-Alimentation USB : Type-C (câble non inclus)
Consommation électrique :
-Mode veille ≤32μA
-Mode de conguration ≤76mA
• Bande de radiofréquences : 2400-2495 MHz
• Puissance de radiofréquence max. : < 20 dBm
• Wi-Fi : 802.11 b/g/n
• Portée du Wi-Fi (en fonction des collectivités locales) :
-jusqu’à 50 m / 164 ft à l’extérieur
-jusqu’à 30 m / 98 ft à l’intérieur
• Bluetooth : 4.2
• Portée du Bluetooth (en fonction des collectivités locales) :
-jusqu’à 30 m / 98 ft à l’extérieur
-jusqu’à 10 m / 33 ft à l’intérieur
• Processeur: ESP-Shelly-C38F
• Flash : 8 Mo
• Webhooks (actions d’URL) : 10 avec 2 URL par hook
• MQTT : Oui
• API REST: Oui
Déclaration de conformité
Par la présente, Shelly Europe Ltd. déclare que l’équipement radio de type Shel-
ly H&T Gen3 est conforme à la directive 2014/53/UE, 2014/35/UE, 2014/30/UE,
2011/65/UE. Le texte complet de la déclaration de conformité de l’UE est dispo-
nible à l’adresse internet suivante
https://shelly.link/HT-Gen3_DoC
Fabricant : Shelly Europe Ltd.
Adresse : 103, Boulevard Cherni vrah, 1407 Soa, Bulgarie
Tél : +359 2 988 7435
E-mail : support@shelly.cloud
Site ociel : https://www.shelly.com/fr
Les modications des coordonnées, faites par le fabricant, sont publiées sur le
site ociel.
https://www.shelly.com
Tous les droits de la marque Shelly® et autres droits de propriété intellectuelle
associés à ce Dispositif appartiennent à Shelly Europe Ltd.