OWNER'S MANUAL
AIR PURIFIER
Read this owner's manual thoroughly before operating the
appliance and keep it handy for reference at all times.
ENGLISH
U10CS1H
MFL71891976
Rev.00_051024
www.lg.com
Copyright © 2017-2024 LG Electronics Inc. All Rights Reserved.
Scan to see the online manual.

TABLE OF CONTENTS
2
4 IMPORTANT SAFETY
INSTRUCTIONS
4 READ AND SAVE THESE INSTRUCTIONS
4 Safety Messages
4 IMPORTANT INSTRUCTIONS
5 WARNING INSTRUCTIONS
5 Technical Safety
6 Installation
6 Operation
7 Maintenance
8 CAUTION INSTRUCTIONS
8 Installation
8 Operation
8 Maintenance
9 Battery/Remote Control
10 PRODUCT OVERVIEW
10 Product Features
10 Front
11 Back
12 Filter
12 Accessories
13 INSTALLATION
13 Before Installation
13 Unpacking the Appliance
13 Transportation Requirements
14 Installing the Unit
14 Installation Location Requirements
14 Installing the Safety Plate
15 Installing the Safety Guard
16 OPERATION
16 Features
16 Controlling the Air Purifier
18 Remote Control
20 Operating the Air Purifier
20 Start/Stop
20 Operating Mode
20 Wide Mode
20 Natural Wind Mode
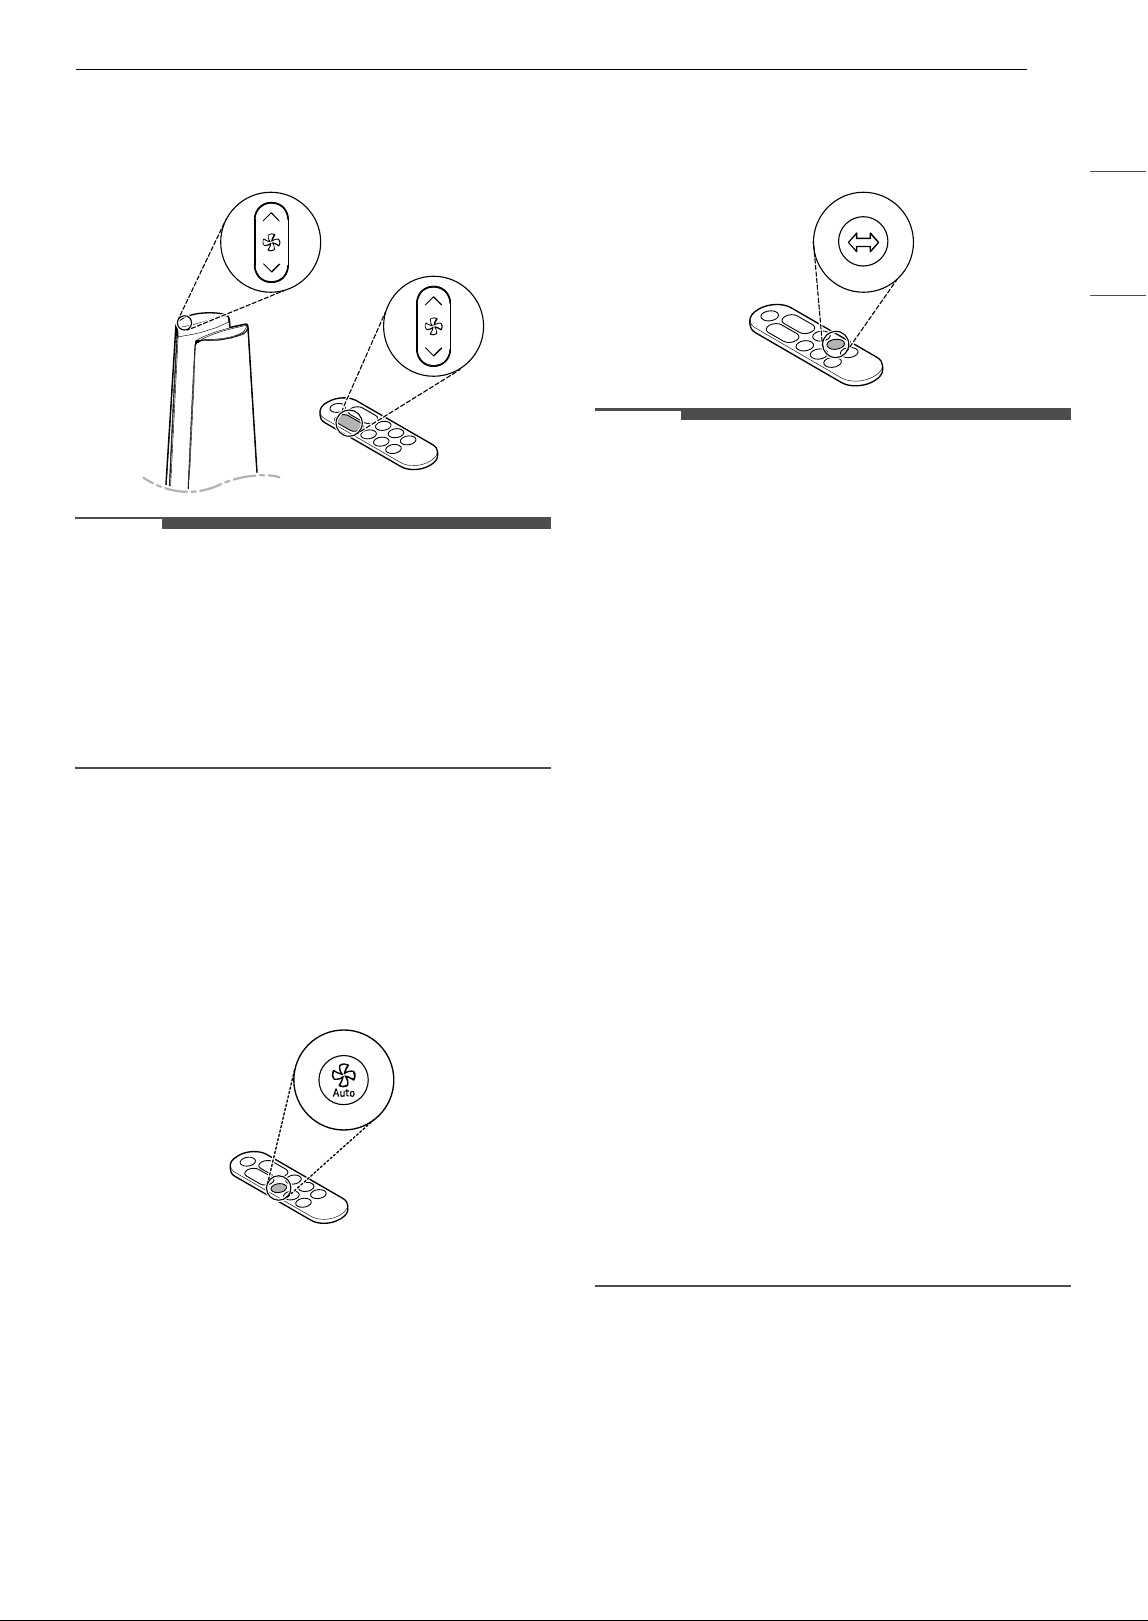
20 Adjusting the Fan Speed
21 Auto Fan
21 Rotation
21 Heating
22 Using the Extra Functions
22 Setting the Sleep Timer
23 Setting the Standby Screen
23 Setting Display Brightness
24 Setting Product Sound
25 Overall Air Quality
25 Understanding Overall Air Quality
26 SMART FUNCTIONS
26 LG ThinQ Application
26 LG ThinQ Application Features
26 Before Using LG ThinQ Application
26 Installing the LG ThinQ Application
27 RF Module Specifications
27 FCC Notice
27 FCC RF Radiation Exposure Statement
27 Open Source Software Notice Information
27 Smart Diagnosis
28 Using LG ThinQ to Diagnose Issues
28 Using Audible Diagnosis to Diagnose
Issues
29 MAINTENANCE
29 Maintaining the Product
29 Scheduled Maintenance
29 Alerts on the Status Display
29 Cleaning the Exterior
30 Cleaning the Particle Sensor
30 Cleaning the Filters
32 Replacing the Filters
32 Storage
34 TROUBLESHOOTING
34 Before Calling for Service
34 Operation
34 Status Display
35 Odor
35 LG ThinQ

4 IMPORTANT SAFETY INSTRUCTIONS
IMPORTANT SAFETY INSTRUCTIONS
READ AND SAVE THESE INSTRUCTIONS
The following safety guidelines are intended to prevent unforeseen risks or damage from unsafe or
incorrect operation of the appliance.
The guidelines are separated into ‘WARNING’ and ‘CAUTION’ as described below.
Safety Messages
Your safety and the safety of others are very important.
We have provided many important safety messages in this manual and on your appliance. Always read and
follow all safety messages.
All safety messages will tell you what the potential hazard is, tell you how to reduce the chance of injury,
and tell you what may happen if the instructions are not followed.
IMPORTANT INSTRUCTIONS
WARNING
• When using electrical appliances, basic precautions should always be followed to reduce the risk of fire,
electric shock, injury to persons, and hyperthermia, including the following:
• Read all instructions before using this heater.
• This heater is hot when in use. To avoid burns, do not let bare skin touch hot surfaces. If provided, use
handles when moving this heater. Keep combustible materials, such as furniture, pillows, bedding,
papers, clothes, and curtains at least 3 1/4 feet (1 m) from the front of the heater and keep them away
from the sides and rear.
• Extreme caution is necessary when any heater is used by or near children or invalids and whenever the
heater is left operating and unattended.
• Always unplug heater when not in use.
• Do not operate any heater with a damaged cord or plug or after the heater malfunctions, has been
dropped or damaged in any manner. Discard heater, or return to authorized service facility for
examination and/or repair.
• Do not use outdoors.
• This heater is not intended for use in bathrooms, laundry areas and similar indoor locations. Never
locate heater where it may fall into a bathtub or other water container.
• Do not run cord under carpeting. Do not cover cord with throw rugs, runners, or similar coverings. Do
not route cord under furniture or appliances. Arrange cord away from traffic area and where it will not
be tripped over.
• To disconnect heater, turn controls to off, then remove plug from outlet.
This is the safety alert symbol.
This symbol alerts you to potential hazards that can kill or injure you and others. All safety messages
will follow the safety alert symbol and either the word WARNING or CAUTION.
These words mean:
WARNING
You may be killed or seriously injured if you do not follow instructions.
CAUTION
You may be injured or cause damage to the product if you do not follow instructions.
5IMPORTANT SAFETY INSTRUCTIONS
ENGLISH
• Do not insert or allow foreign objects to enter any ventilation or exhaust opening as this may cause an
electric shock or fire, or damage the heater.
• To prevent a possible fire, do not block air intakes or exhaust in any manner. Do not use on soft surfaces,
like a bed, where openings may become blocked.
• A heater has hot and arcing or sparking parts inside. Do not use it in areas where gasoline, paint, or
flammable liquids are used or stored.
• Use this heater only as described in this manual. Any other use not recommended by the manufacturer
may cause fire, electric shock, or injury to persons.
• Always plug heaters directly into a wall outlet/receptacle. Never use with an extension cord or
relocatable power tap (outlet/power strip).
• This heater may include an audible (a visual) alarm to warn that parts of the heater are getting
excessively hot. If the alarm sounds (flashes), immediately turn the heater off and inspect for any objects
on or adjacent to the heater that may cause high temperatures. DO NOT OPERATE THE HEATER WITH
THE ALARM SOUNDING (FLASHING).
• Hyperthermia can result in death. Symptoms of hyperthermia include high body temperature,
headache, nausea, vomiting, tiredness, dizziness, fainting, and rapid pulse. If you begin to experience
symptoms related to hyperthermia, turn off the heater and seek medical attention.
• To avoid excessive room temperatures which can cause hyperthermia: DO NOT leave product running
unattended in a confined space around infants, or individuals with reduced physical, sensory, or mental
capabilities.
•
"SAVE THESE INSTRUCTIONS"
WARNING INSTRUCTIONS
WARNING
• To reduce the risk of explosion, fire, death, electric shock, injury or scalding to persons when using this
product, follow basic precautions, including the following:
Technical Safety
• This appliance is not intended for use by persons (including children) with reduced physical, sensory or
mental capabilities or lack of experience and knowledge, unless they have been given supervision or
instruction concerning use of the appliance by a person responsible for their safety.
Children should be supervised to ensure that they do not play with the appliance.
• The fan is not a toy. It should not be played with or placed where young children can reach it.
• If the supply cord is damaged, it must be replaced by the manufacturer, its service agent or similarly
qualified person in order to avoid a hazard.
• Only an authorized repair person should disassemble, repair, or modify the appliance.
• Do not touch the power plug with wet hands.
• Do not install and use broken parts.
• Do not use the product if it has been dropped on the floor.
• To reduce The Risk Of Fire, Electric Shock Or Injury To Persons, Do Not Use Replacement Parts That Have
Not Been Recommended By The Manufacturer (e.g. Parts Made At Home Using A 3D Printer).
• To Reduce The Risk Of Fire Or Electric Shock, Do Not Use This Fan With Any Solid-State Speed Control
Device.
• RISK OF ELECTRIC SHOCK - These servicing instructions are for use by qualified personnel only. To
reduce the risk of electric shock, do not perform any servicing other than that contained in the operating
instructions unless you are qualified to do so.

6 IMPORTANT SAFETY INSTRUCTIONS
• This manual is also available in a PDF format at https://www.lg.com and you can obtain a printed copy of
the manual from the PDF format.
• To avoid overheating, do not cover the product.
• Do not place this product directly under an electrical outlet.
• Do not use the product if the heater is damaged.
• Some parts of this product become very hot and may cause burns. Special care should be taken when
using this product in the presence of children and infirm people or animals.
• Do not use this heater in small rooms when they are occupied by persons not capable of leaving the
room on their own, unless constant supervision is provided.
Installation
• Do not install the appliance on an uneven or inclined surface.
• Do not install the appliance in an area exposed to direct sunlight or near heat-generating equipment.
• Do not install the product in a place where combustible gas may leak or industrial oil or metallic
particulates are present.
• Do not allow the appliance to push against the power cord or plug.
• Do not bend the power cable excessively or place a heavy object on top of it.
• Do not extend the length of the power cable or alter it.
• Do not use several devices on a multi-socket extension outlet.
• Make the connection securely so that screw-in terminals will not be loosened when the cable is pulled.
• Make sure that the power cable cannot be pulled out or damaged during operation.
• When unplugging the power cord, always pull it by the plug.
• Unplug the appliance during thunder or lightning storms or when not in use for a long time.
• This appliance has a polarized plug (one blade is wider than the other).
- To reduce the risk of electric shock, this plug is intended to fit in a polarized outlet only one way.
- If the plug does not fit fully in the outlet, reverse the plug. If it still does not fit, contact a qualified
electrician.
- Do not attempt to defeat this safety feature.
Operation
• If the appliance is immersed in water, stop using it and contact an LG Electronics Customer Information
Center.
• Do not operate any fan with a damaged cord or plug. Discard fan or return to an authorized service
facility for examination or repair.
• If there is a gas leakage (isobutane, propane, LNG, etc.), do not touch the appliance or power plug and
ventilate the area immediately.
• If you detect any abnormal noise, odor or smoke, unplug the appliance immediately and contact an LG
Electronics Customer Information Center.
• Do not use or store fire, combustibles (ether, benzene, alcohol, drugs, propane, butane, combustible
sprays, insecticide, air freshener, cosmetics, etc.) or flammable materials (candles, lamps, etc.) near the
product.
• Do not allow animals or pets to chew on the power cord.
• Do not move the appliance when it is in operation.
• Do not hit the appliance.
• Do not insert hands or metal objects into the air inlet or outlet.
• Do not put flammables into the appliance.

7IMPORTANT SAFETY INSTRUCTIONS
ENGLISH
• Do not move or operate the appliance while its cover is open.
• Do not allow children to climb on or play with the appliance.
• Do not place anything on top of the appliance.
• User Servicing Instructions.
- Only an authorized repair person from an LG Electronics service center should disassemble, repair, or
modify the product.
Maintenance
• Dispose of the packing materials (vinyl, styrofoam, etc.) to keep them out of the reach of children.
• Take care not to injure or pinch yourself when you detach and reattach parts of the appliance.
• Turn off and unplug the appliance before cleaning it or replacing the filter.
• Do not clean the appliance with brushes, cloths or sponges which are abrasive or made of metal.
• For inner cleaning, contact an Authorized Service Center or a dealer.
• Do not use harsh detergent that can cause corrosion or damage to the unit.
• Harsh detergent may also cause failure of product, fire, or electric shock.
8 IMPORTANT SAFETY INSTRUCTIONS
CAUTION INSTRUCTIONS
CAUTION
• To reduce the risk of minor injury to persons, malfunction, or damage to the product or property when
using this product, follow basic precautions, including the following:
Installation
• Do not tilt the appliance to pull or push it when transporting.
• Do not install the appliance in a vehicle, RV, or marine vessel.
• Do not place the appliance near a TV or stereo equipment.
• Do not place the appliance under bright light.
• The appliance must be installed in accordance with national wiring regulations.
• When moving or storing the appliance, wrap the power cord around the base of the appliance to prevent
personal injury, damage to the cord or damage to floors.
• Do not place the appliance near curtains.
Operation
• Do not use the product for removal of toxic gas such as carbon monoxide.
• Do not use the product for ventilation purposes.
• Do not use the appliance for a long time in a region with unstable voltage.
• Do not place obstacles around the air inlet or outlet.
• For safe use of the appliance, children or others with reduced mental capabilities need to be closely
monitored by a person who is responsible for their safety.
• Do not use the product for special purposes such as preserving plants, precision instruments, artworks,
etc.
• Do not operate the appliance with wet hands.
• Do not let the moisture from a humidifier directly touch the appliance.
• Do not use the appliance while it is not in an upright position.
• Do not use the appliance near objects vulnerable to heat.
• Do not use detergents, cosmetics, chemicals, air fresheners, or disinfectants in the appliance.
• Do not touch any internal parts while the unit is operating or immediately after operation.
• Use the filter only for its intended purpose.
• The Deodorization filter and Dust Collection filter are assembled together. Do not try to detach them
from each other.
• Do not insert any objects into the air outlet.
Maintenance
• Do not use strong detergents or solvents to clean the appliance. Use a soft cloth to clean.
• Do not clean the appliance with an alkaline detergent.
• Do not wipe the appliance surface using sulfuric acid, hydrochloric acid or organic solvents (thinner,
kerosene etc.) or attach a sticker on the appliance.
• Do not allow water inside the appliance.
• Do not wash the filter with water.

9IMPORTANT SAFETY INSTRUCTIONS
ENGLISH
SAVE THESE INSTRUCTIONS
• Be careful not to damage the ultra-fine filter when cleaning it with a vacuum cleaner.
Battery/Remote Control
• Do not modify the battery.
• An improperly installed battery may cause an explosion.
• Do not recharge or take apart the battery.
• Do not dispose of the battery by placing it in a fire, or expose it to high temperatures.
• Remove and store the battery in a safe location if you don’t intend to use the remote control for a long
time.
• Do not press multiple buttons at the same time on the remote control.
• Do not kick or step on the remote control.
• Do not use the remote control near water or in areas with high humidity.
• Do not expose the remote control to fire or high temperatures.
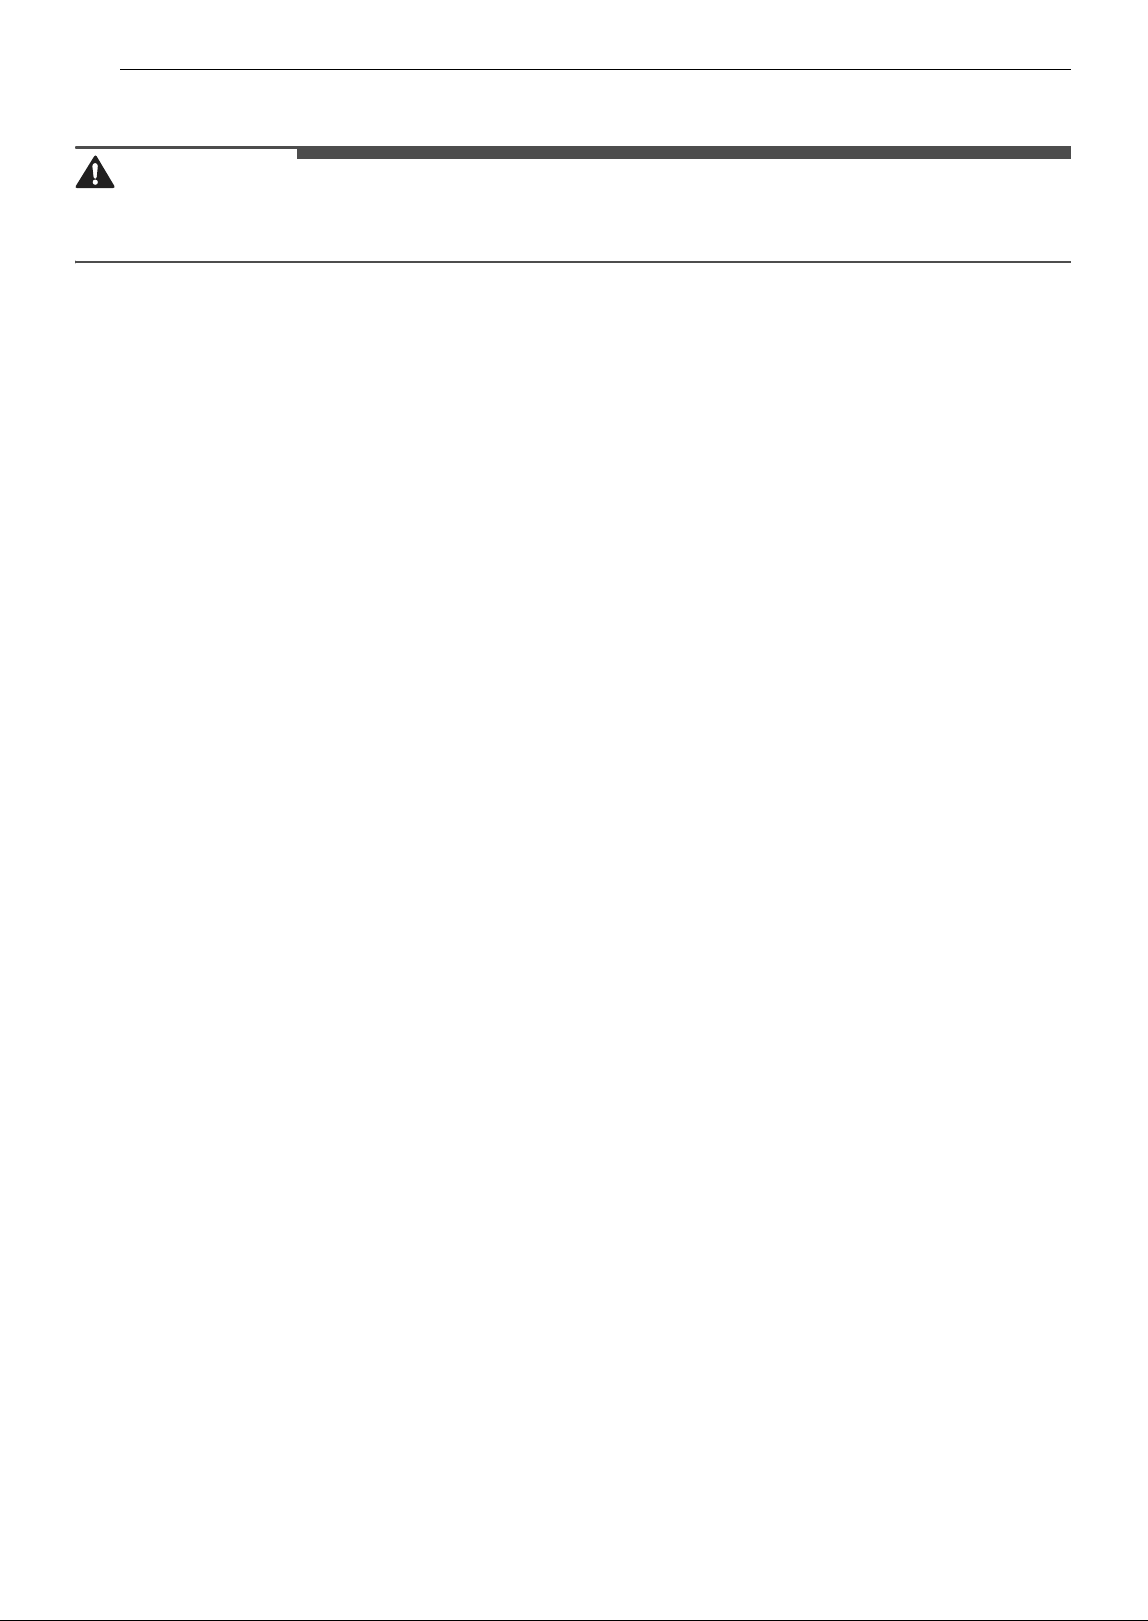
10 PRODUCT OVERVIEW
PRODUCT OVERVIEW
Product Features
The images in this guide may be different from the actual components and accessories, which are subject
to change by the manufacturer without prior notice for product improvement purposes.
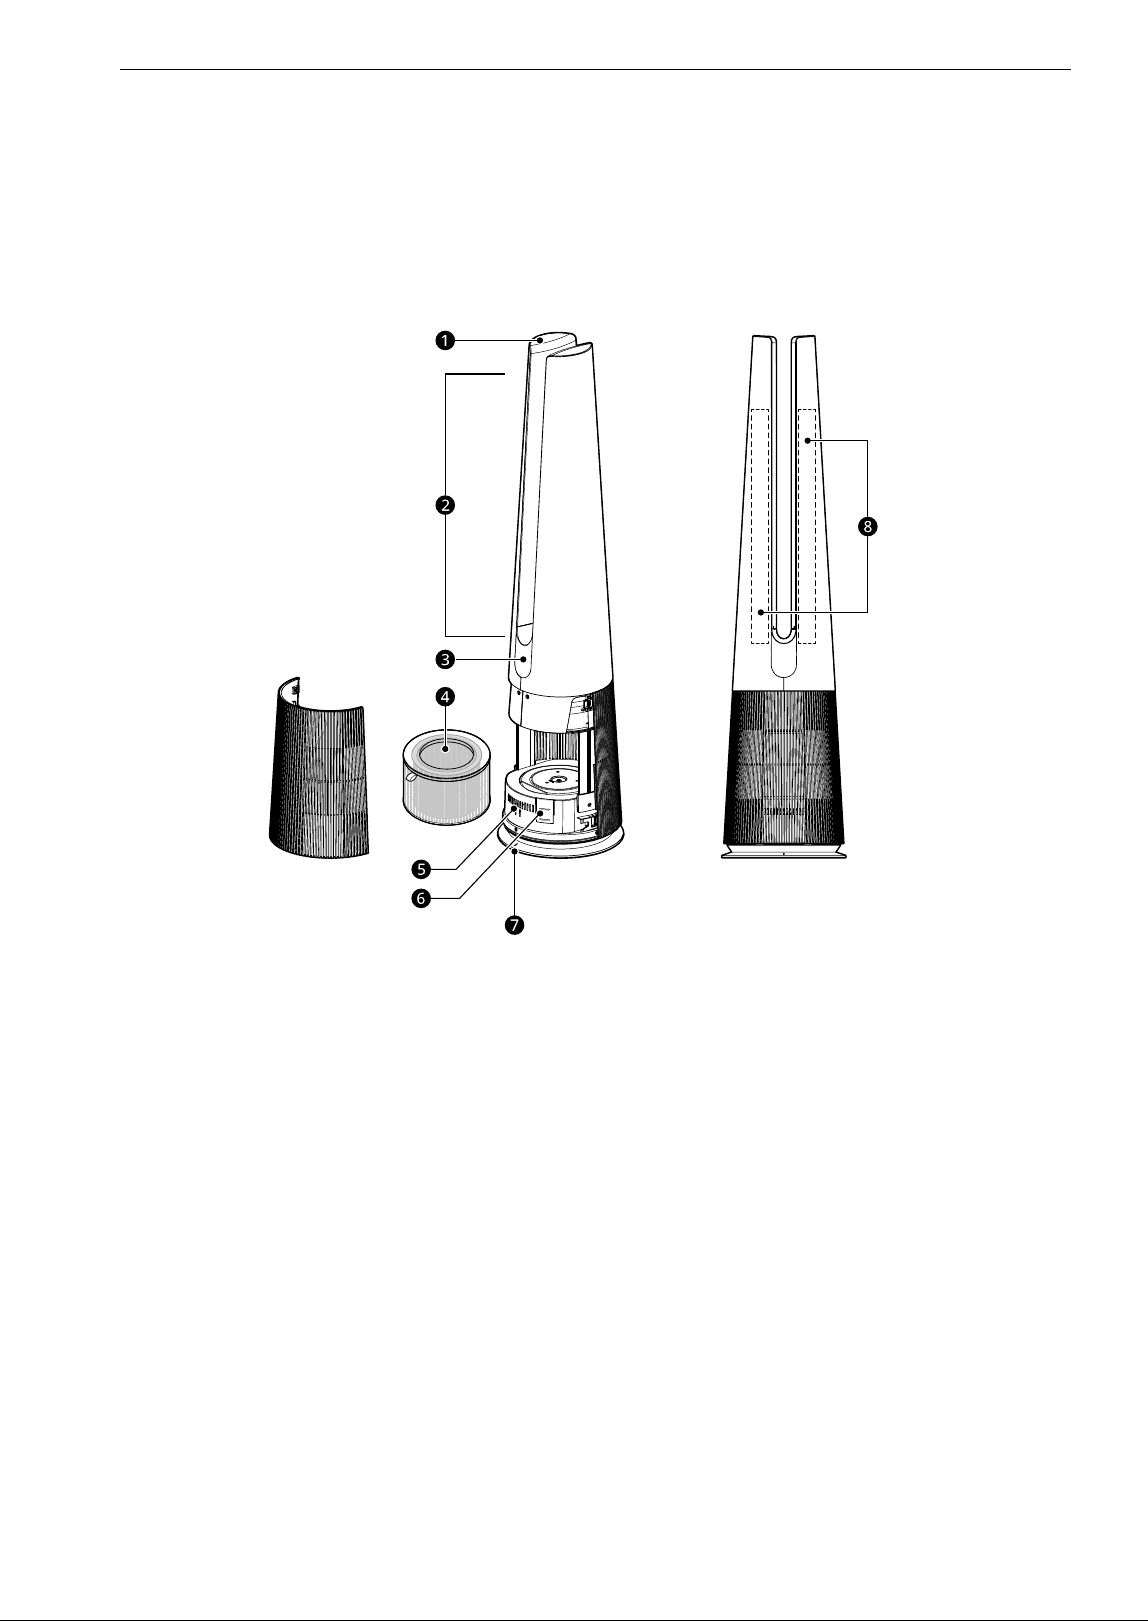
Front
a Control Panel
• Sets the appliance functions.
b Air Outlet
• Emits air purified by the filter.
c Display
(Status Display / Receiver for Remote
Control Signal)
• Displays the settings of the appliance and the
air quaility.
d Filter
• Minimizes fine particulates, possible sources
of smog, and other odors.
e Smart Diagnosis Sensor
• If the product malfunctions, use Smart
Diagnosis to check the product status. (See
Smart Diagnosis in Smart Functions)
f PM1.0 Sensor
• Detects the PM concentration levels.
g Product Center Line
• Indicates the center line of the product.
h Heater (inside the product)
• Warms the air drawn into the air purifier.
11PRODUCT OVERVIEW
ENGLISH
Back
a Remote Control Holder
• Use it to attach the remote control to the product for storage.
• Attach the front side of the remote control below the attachment label.
b Handle
• Use it to carry and move the product.
c Temperature/Humidity Sensor
• Detects the ambient temperature and humidity.
d Air Inlet (Cover)
• Air is sucked into the air purifier through the air inlet.
• The front and rear covers can be removed separately.
CAUTION
• The remote control holder uses a magnet, so do not allow other magnets or metal objects to stick to it.
- Doing so may cause product failure.
12 PRODUCT OVERVIEW
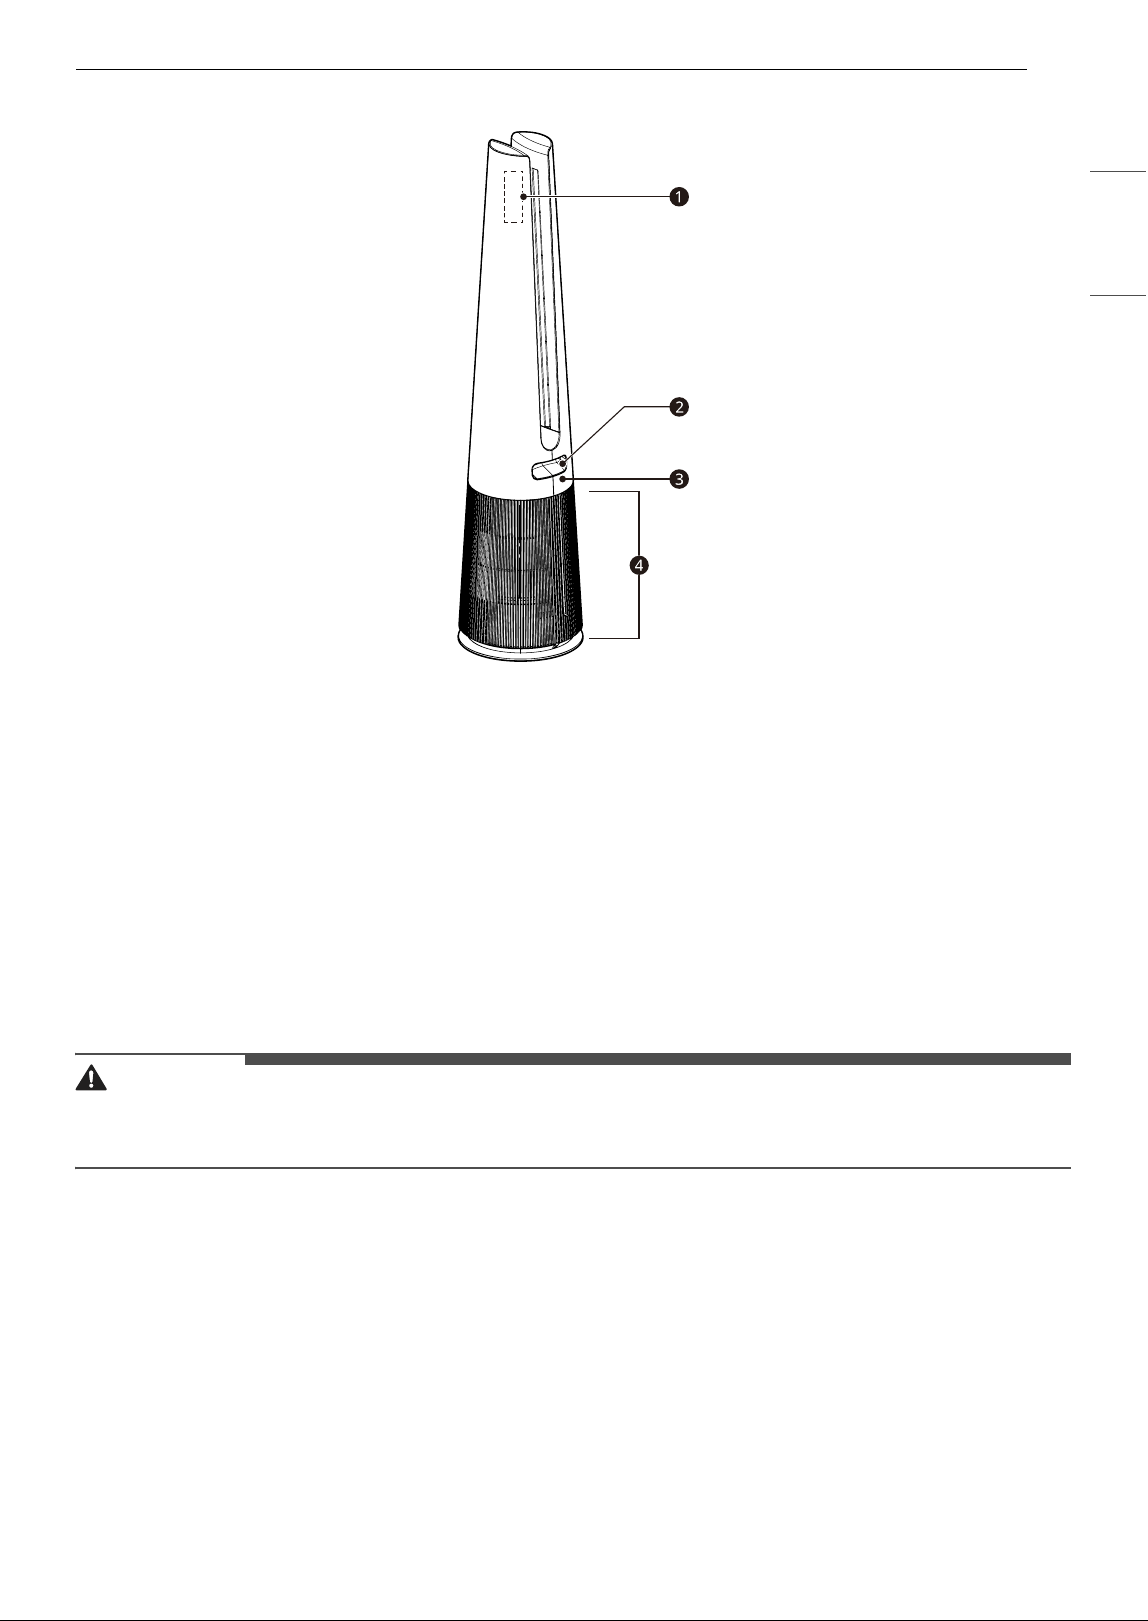
Filter
a Deodorization Filter
• This filter removes smog-causing substances (SO
2
, NO
2
) and household odors (ammonia, acetic acid,
acetaldehyde)
b Dust Collection Filter
• Minimizes PM1.0 and cigarette smoke from the air.
c Filter Handle
• Used to remove or install the filter.
• The side with the handle should face upwards.
d Ultra-Fine Filter
• The Ultra-Fine Filter is attached to the exterior of the filter and primarily removes household dust
with large particles from the air.
CAUTION
• Do not forcefully separate the filters, as the filters are attached.
• Do not throw the filters or use them for other purposes.
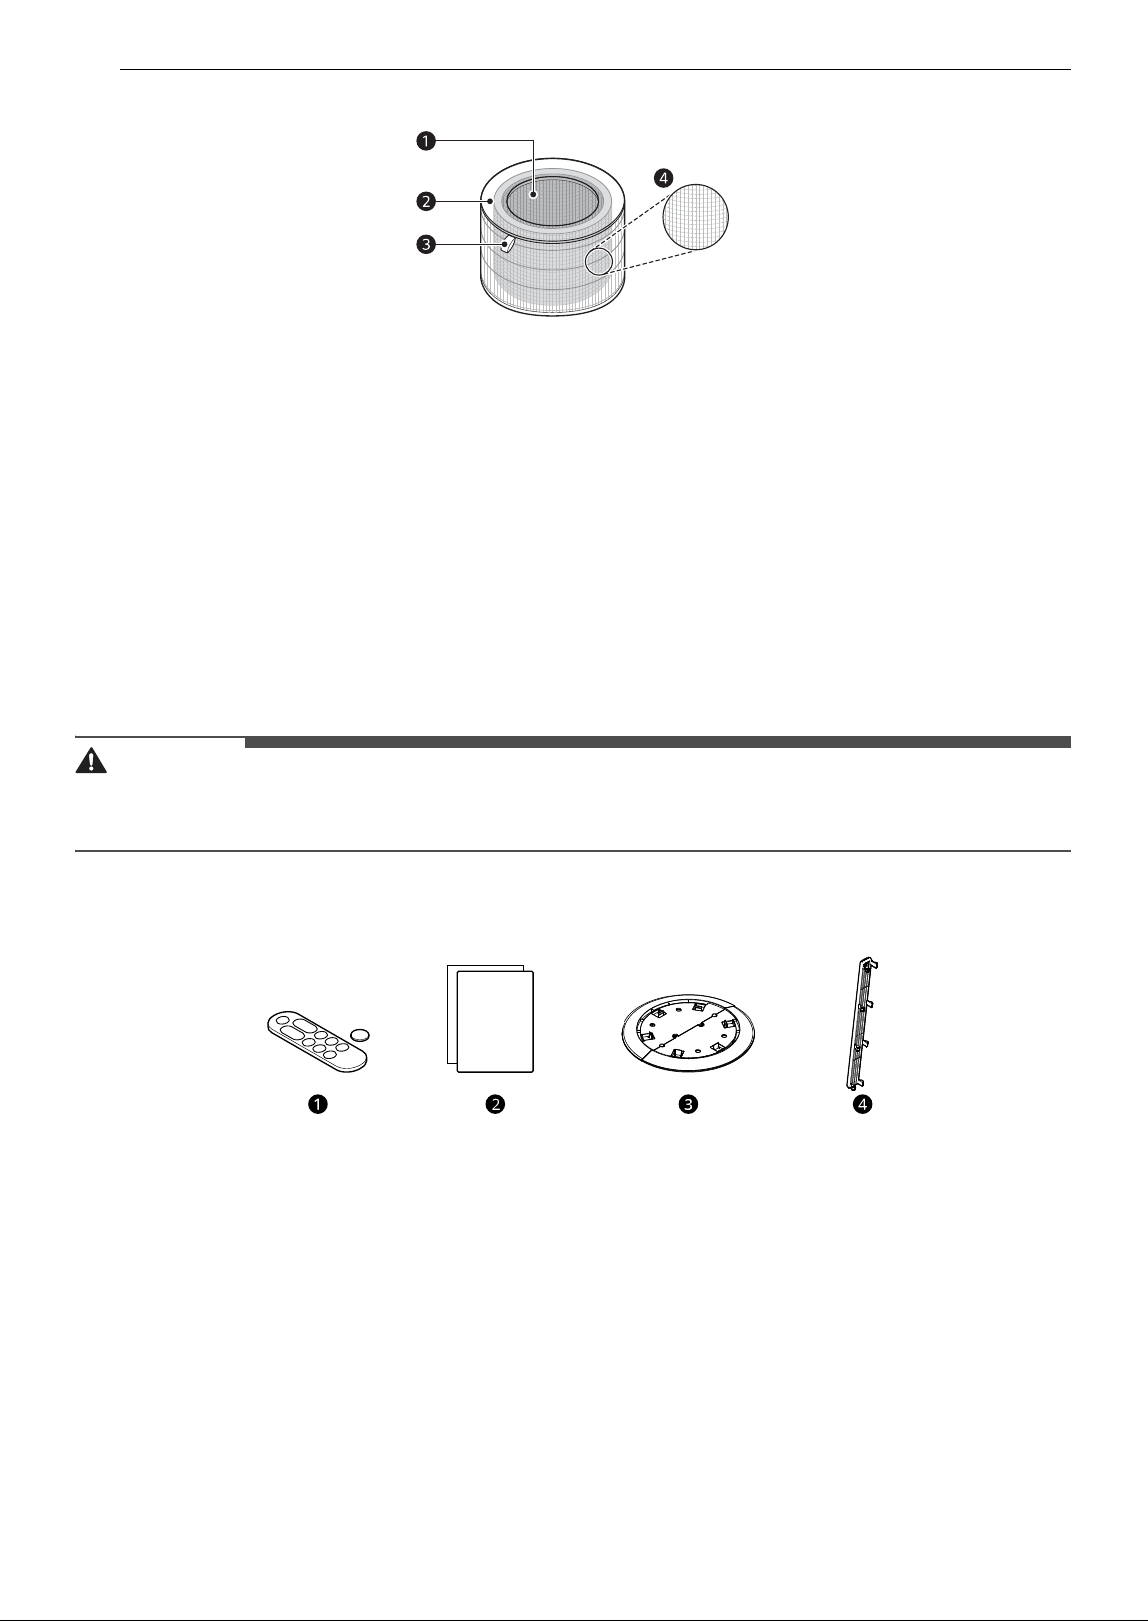
Accessories
a Remote Control/Battery (CR2025, 1EA)
b Owner's Manual
c Safety Plate
d Safety Guard
13INSTALLATION
ENGLISH
INSTALLATION
• The exterior or components of the product may vary depending on the model.
Before Installation
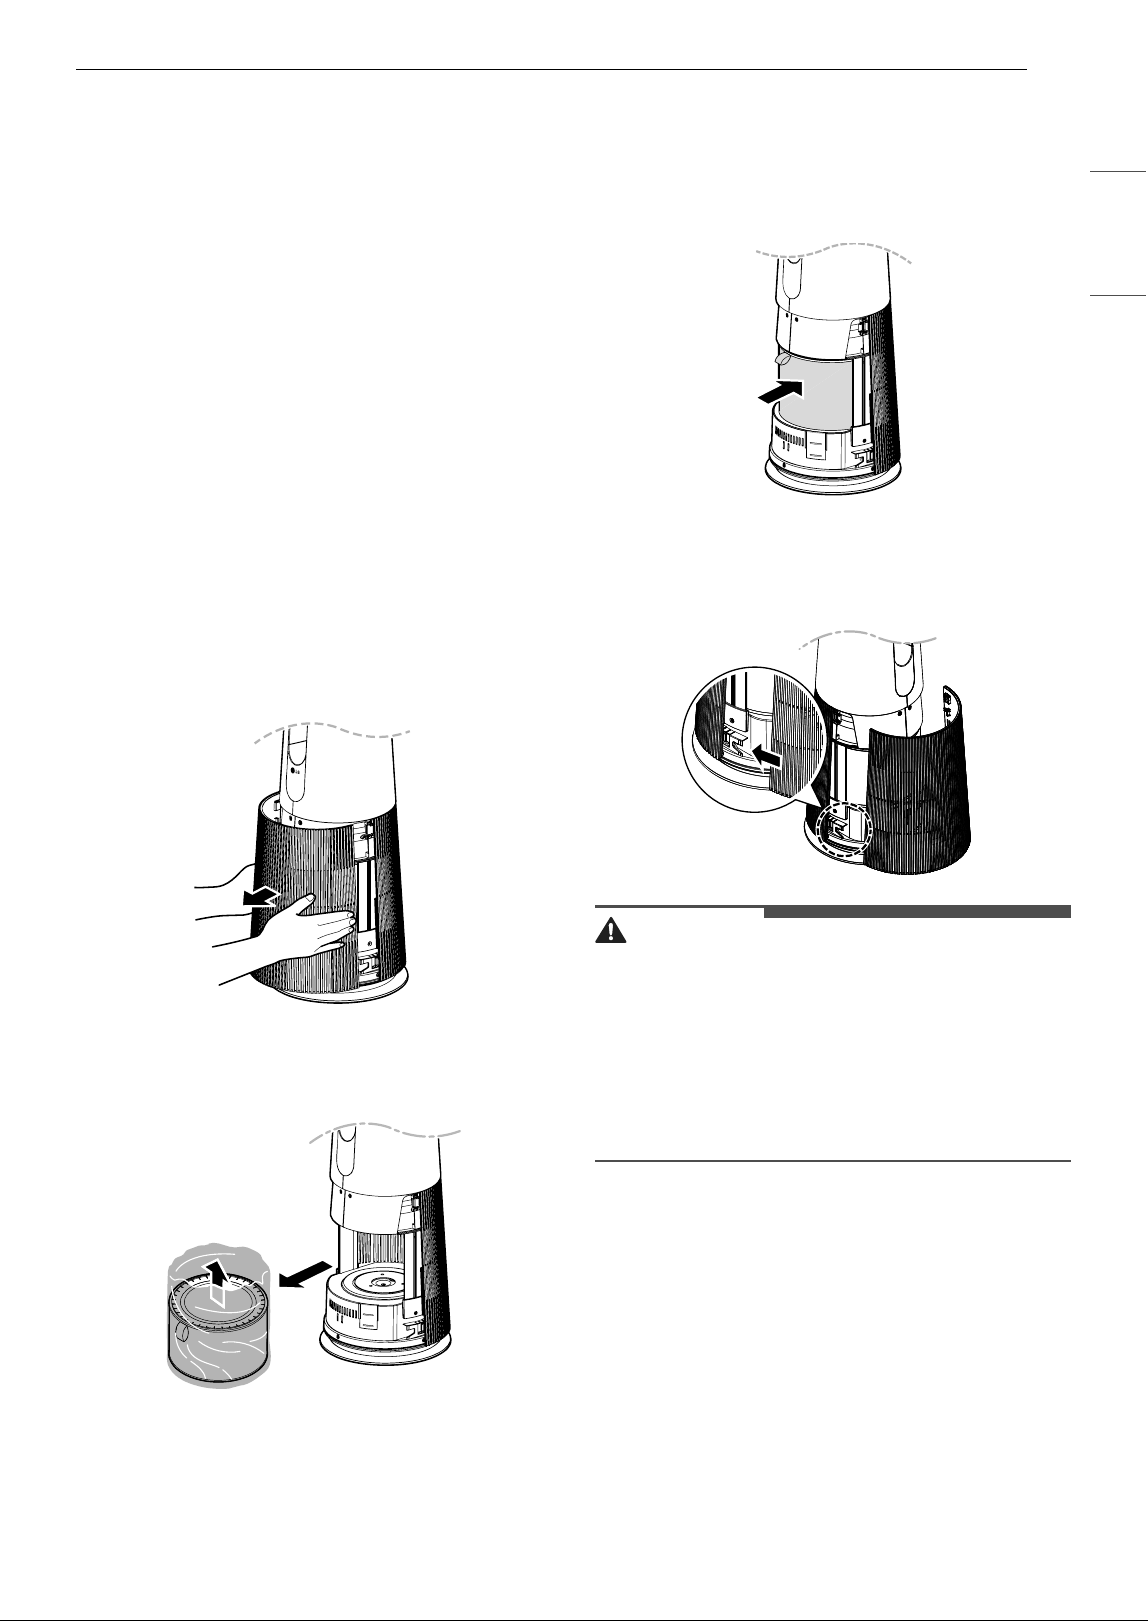
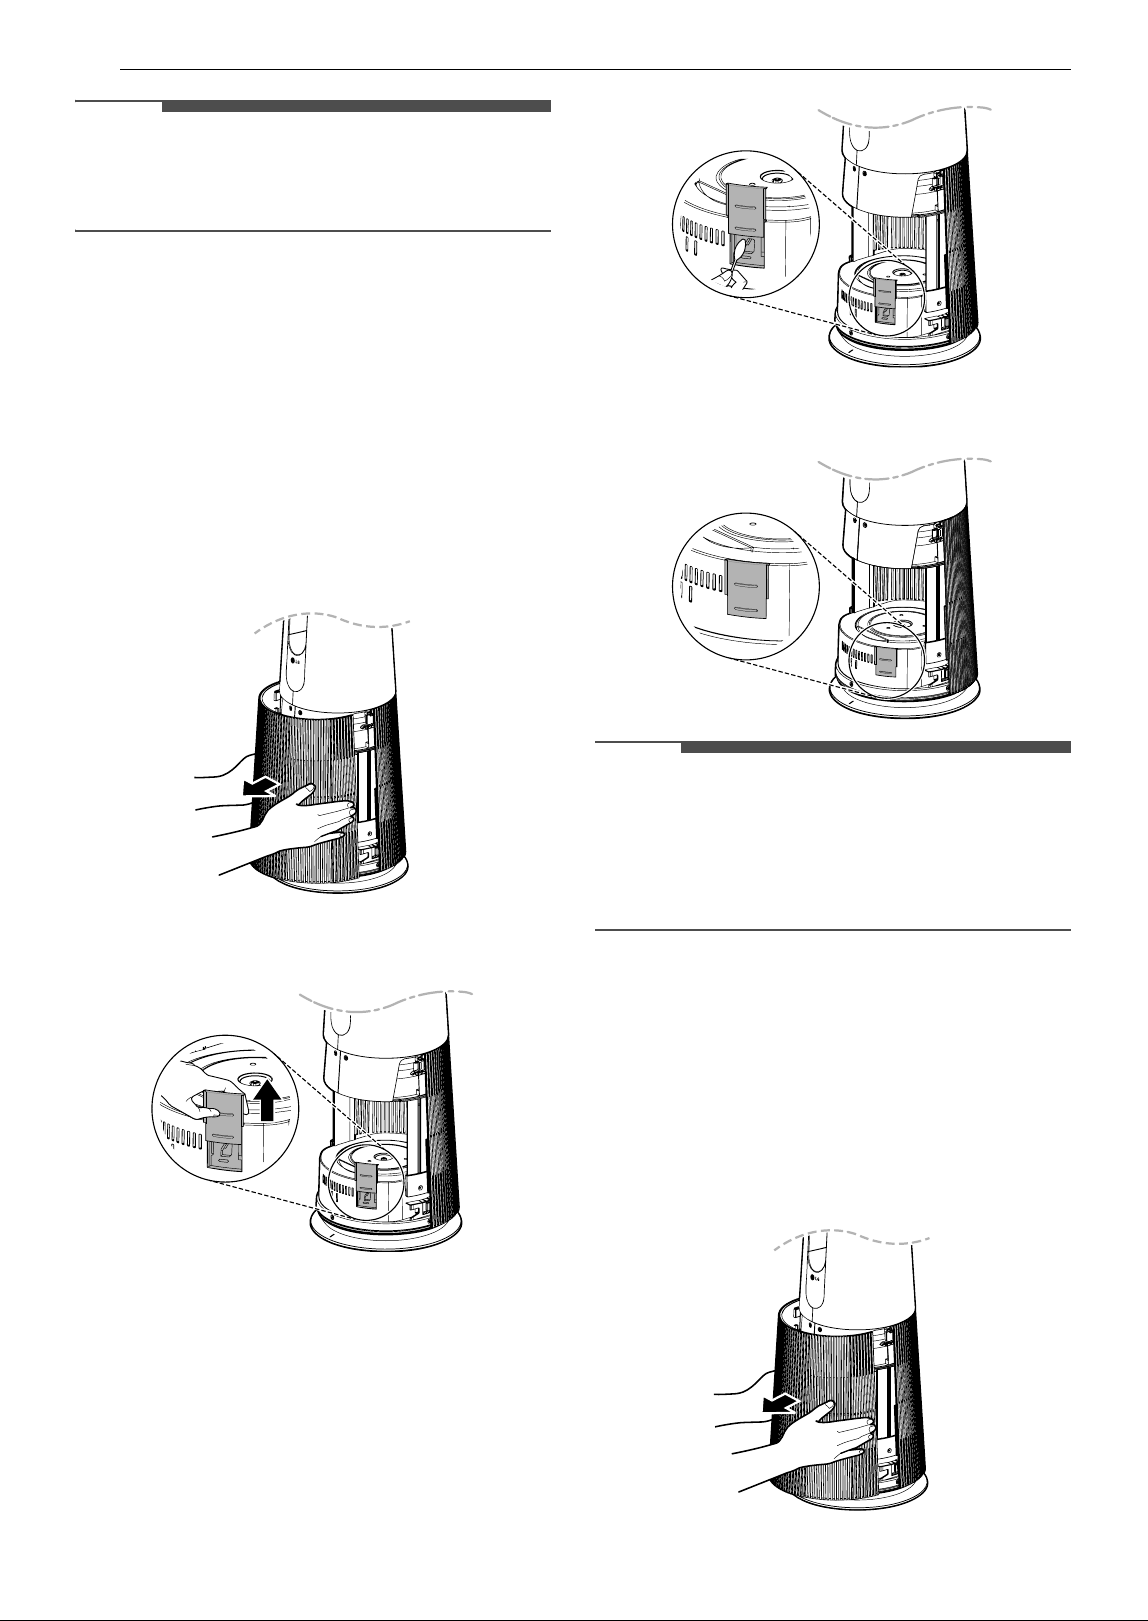
Unpacking the Appliance
Unpack the appliance and remove all packing tape
and the filter packaging before using the
appliance.
1 Take the product out of the box, and remove
the packaging and tape attached to the
product.
2 While facing the front of the product, hold
and gently pull both sides of the air inlet
(cover) to remove it.
• The side with the LG logo on the display is
the front of the product.
3 Remove the filter and dispose of the
packaging.
4 Install the filter into the product.
• Make sure that the side with the filter
handle is facing up.
5 To reinstall the cover, insert the tabs at the
bottom of the cover into the groove at the
bottom of the product and close the cover.
CAUTION
• Be sure to remove the protective packaging
from the filter before using the product.
• When installing the filter, pay attention to the
direction of the filter.
- Failure to do so may cause malfunction or
product failure.
- The side with the filter handle is the top.
Transportation Requirements
• Before moving or storing the product, wrap the
cord around the lower part of the product to
keep the power plug from touching the floor.
- Failure to do so may damage the power plug
or scratch the floor.
• Do not transport the product by holding its
exterior cover.
- The cover may open and cause the product to
drop. Dropping the product may cause injury
or product failure.
14 INSTALLATION
• Carry the product safely by using the handle at
the back of the product and placing your other
hand at the top front.
• If the heater was used, make sure the product is
cool before handling it.
Installing the Unit
Installation Location Requirements
Install the product at least 3 1/4 ft (1m) from walls.
• If there is not enough room for air suction, the
air purification performance may be affected.
• The performance of the product may differ
depending on the operating environment
(considering factors such as temperature and
humidity).
- At humidity levels of 40 % – 70 %, the product's
guaranteed performance standards can be
achieved.
• Do not install the product near direct sunlight or
bright lighting.
- Doing so may cause discoloration of the
product.
Installing the Safety Plate
1 Assemble the safety plate as shown.
2 Place the product so that the center line of the
product aligns with the center line on the
safety plate.
3 Assemble the product completely by pressing
it down until it clicks into place.
• If the product is tilted, reassemble it.
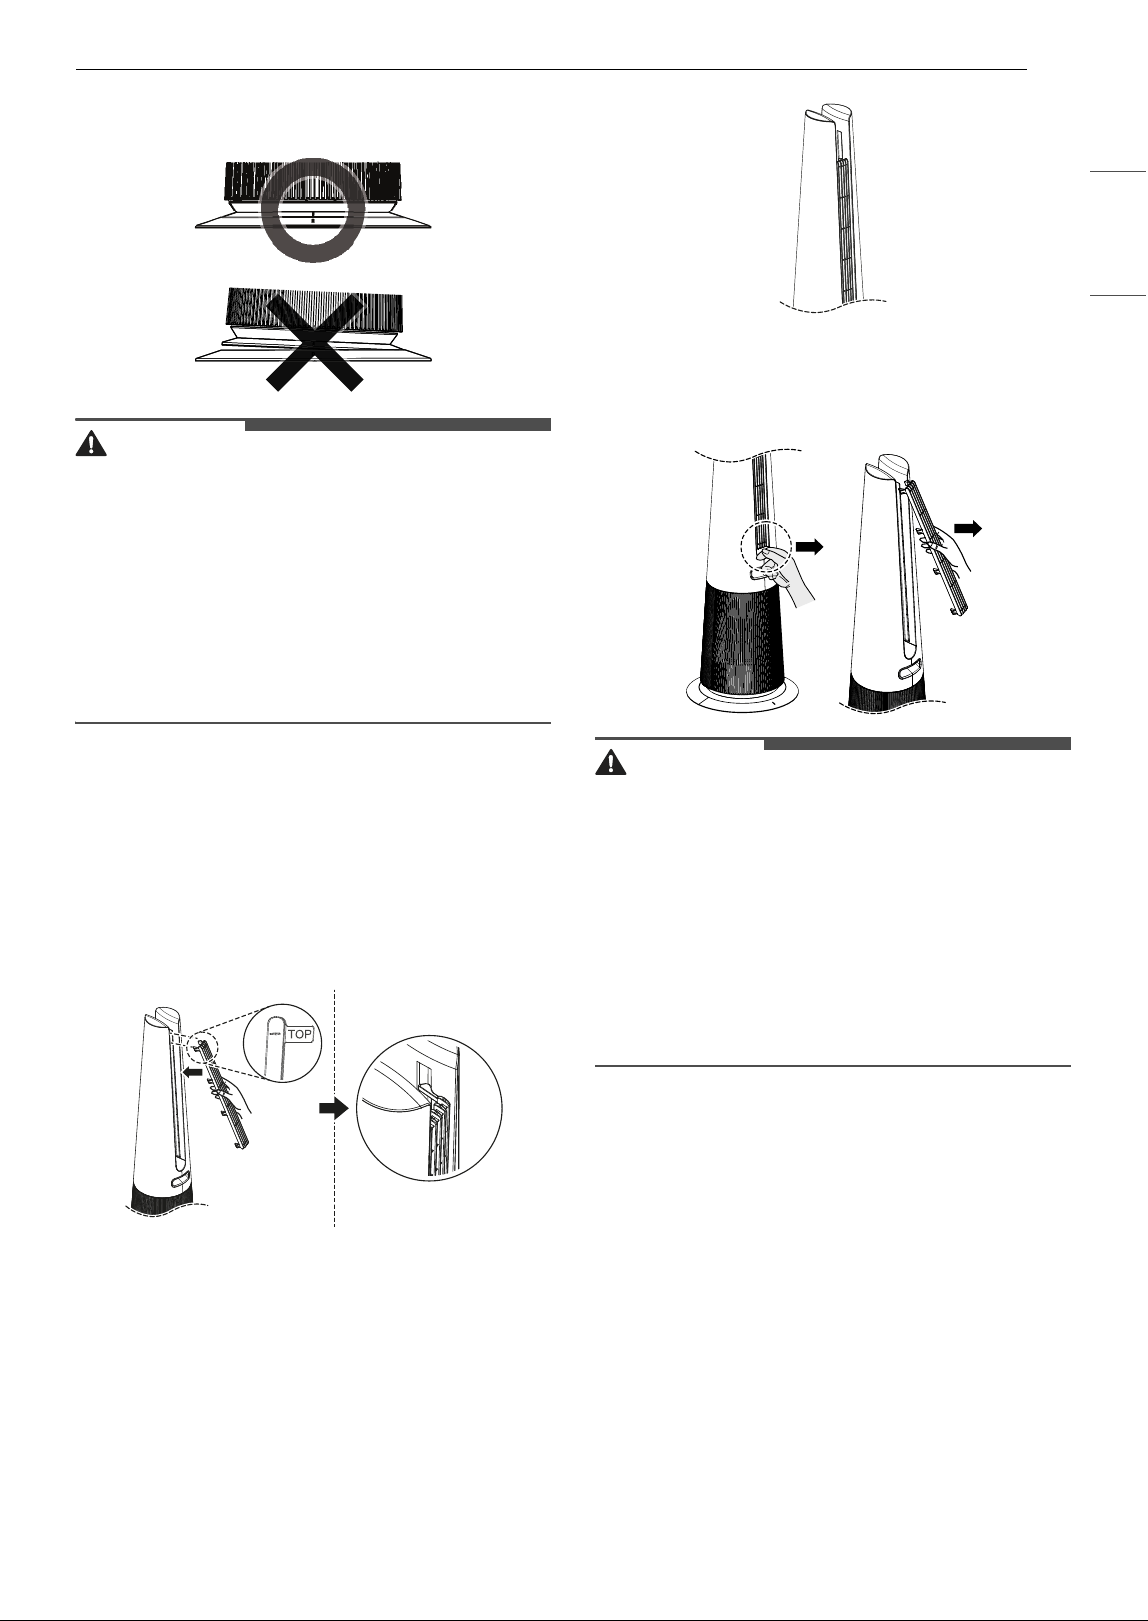
15INSTALLATION
ENGLISH
• To remove the safety plate, tilt the product
backward.
CAUTION
• Be sure to install the safety plate in order to use
the product safely.
• Do not use the product on uneven or inclined
floors.
• When assembling the safety plate, be careful to
avoid catching your hand between the product
and the plate.
• Do not use the safety plate for purposes other
than that for which it is designed.
Installing the Safety Guard
The safety guard prevents burns caused by the hot
air outlet.
1 Insert the top tabs of the safety guard into the
top of the outlet slots on the back of the
product.
2 Insert the tabs into the outlet slots along the
length of the safety guard, working from top
to bottom until the guard is completely
assembled.
3 To remove the safety guard, allow the product
to cool completely and then pull the guard out
from the bottom.
CAUTION
• If you have an infant, install the safety guard to
prevent accidental contact with the hot air
outlet.
• Do not push or pull the product while the safety
guard is installed on the product.
• Before assembling or disassembling the safety
guard, be sure to turn the heating function off
and check that the surface of the product is cool.
• Do not use the safety guard for purposes other
than that for which it is designed.
16 OPERATION
OPERATION
• The exterior or components of the product may vary depending on the model.
• The remote controller may not be included depending on the model.
Features
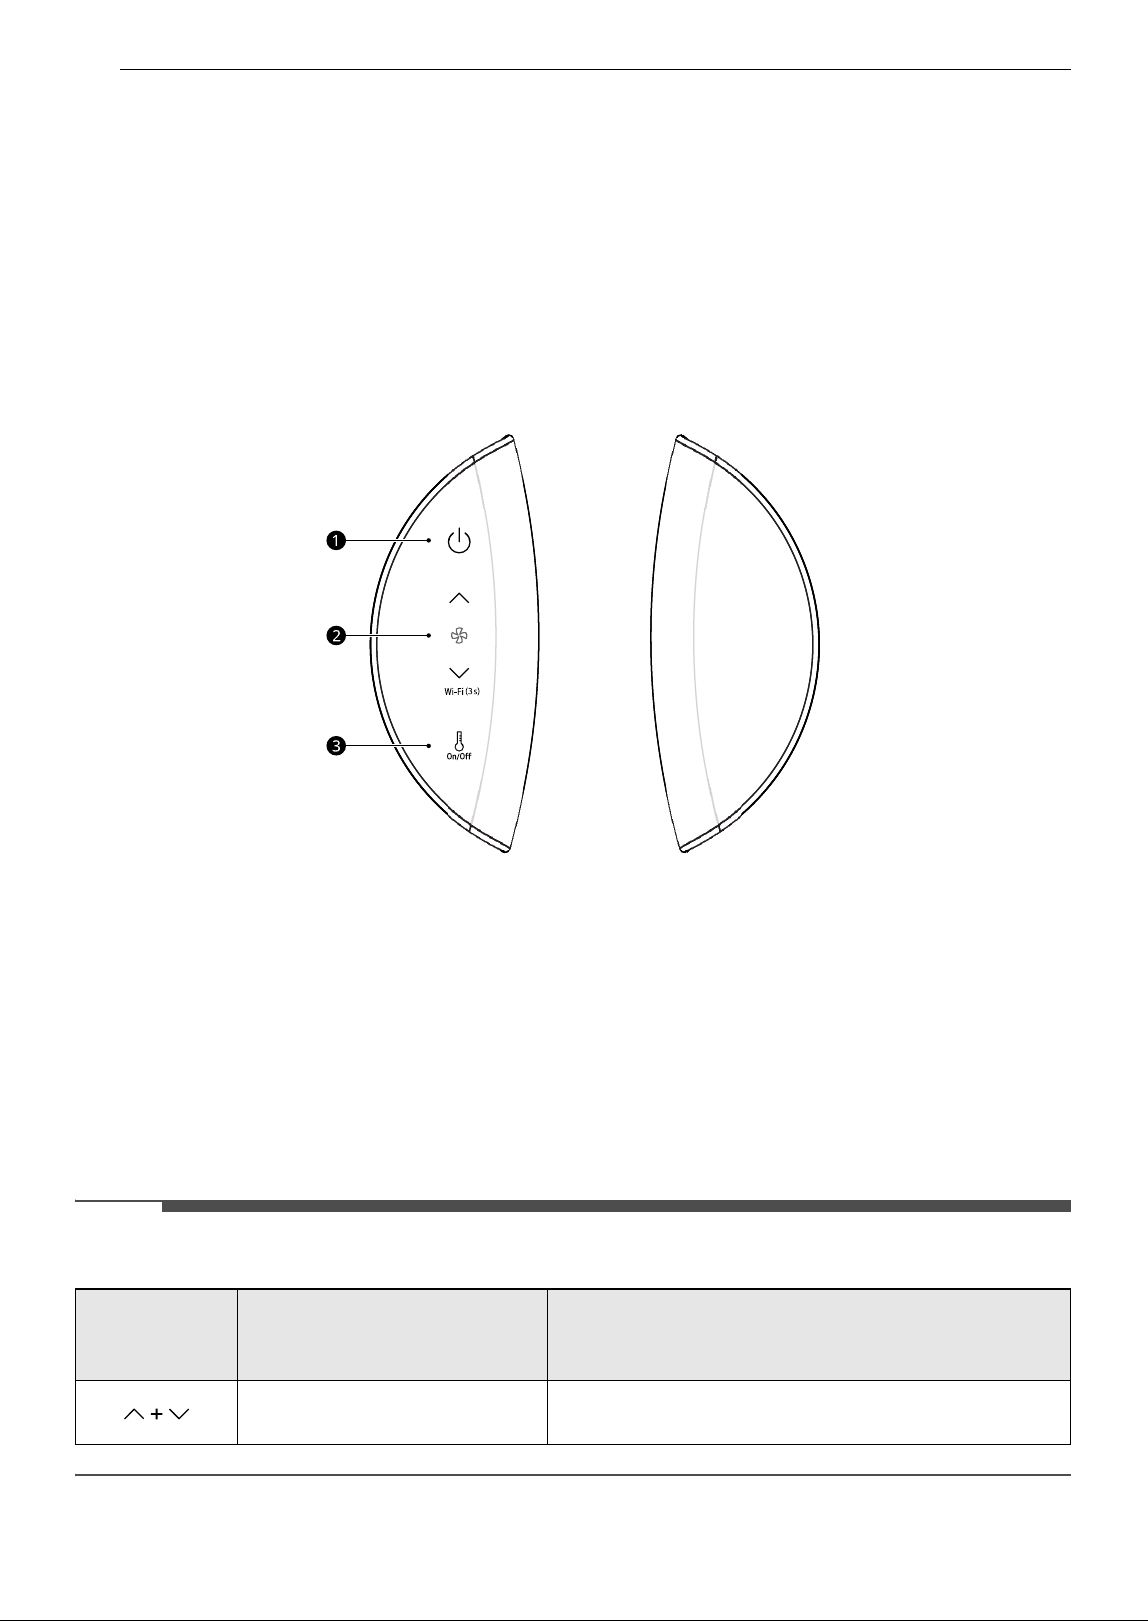
Controlling the Air Purifier
Control Panel
a Standby On/Off Button
• Turns the product on or off.
b Speed Button
• Sets the fan speed.
• Reset the filter replacement alert by pressing and holding down the J button for 3 seconds.
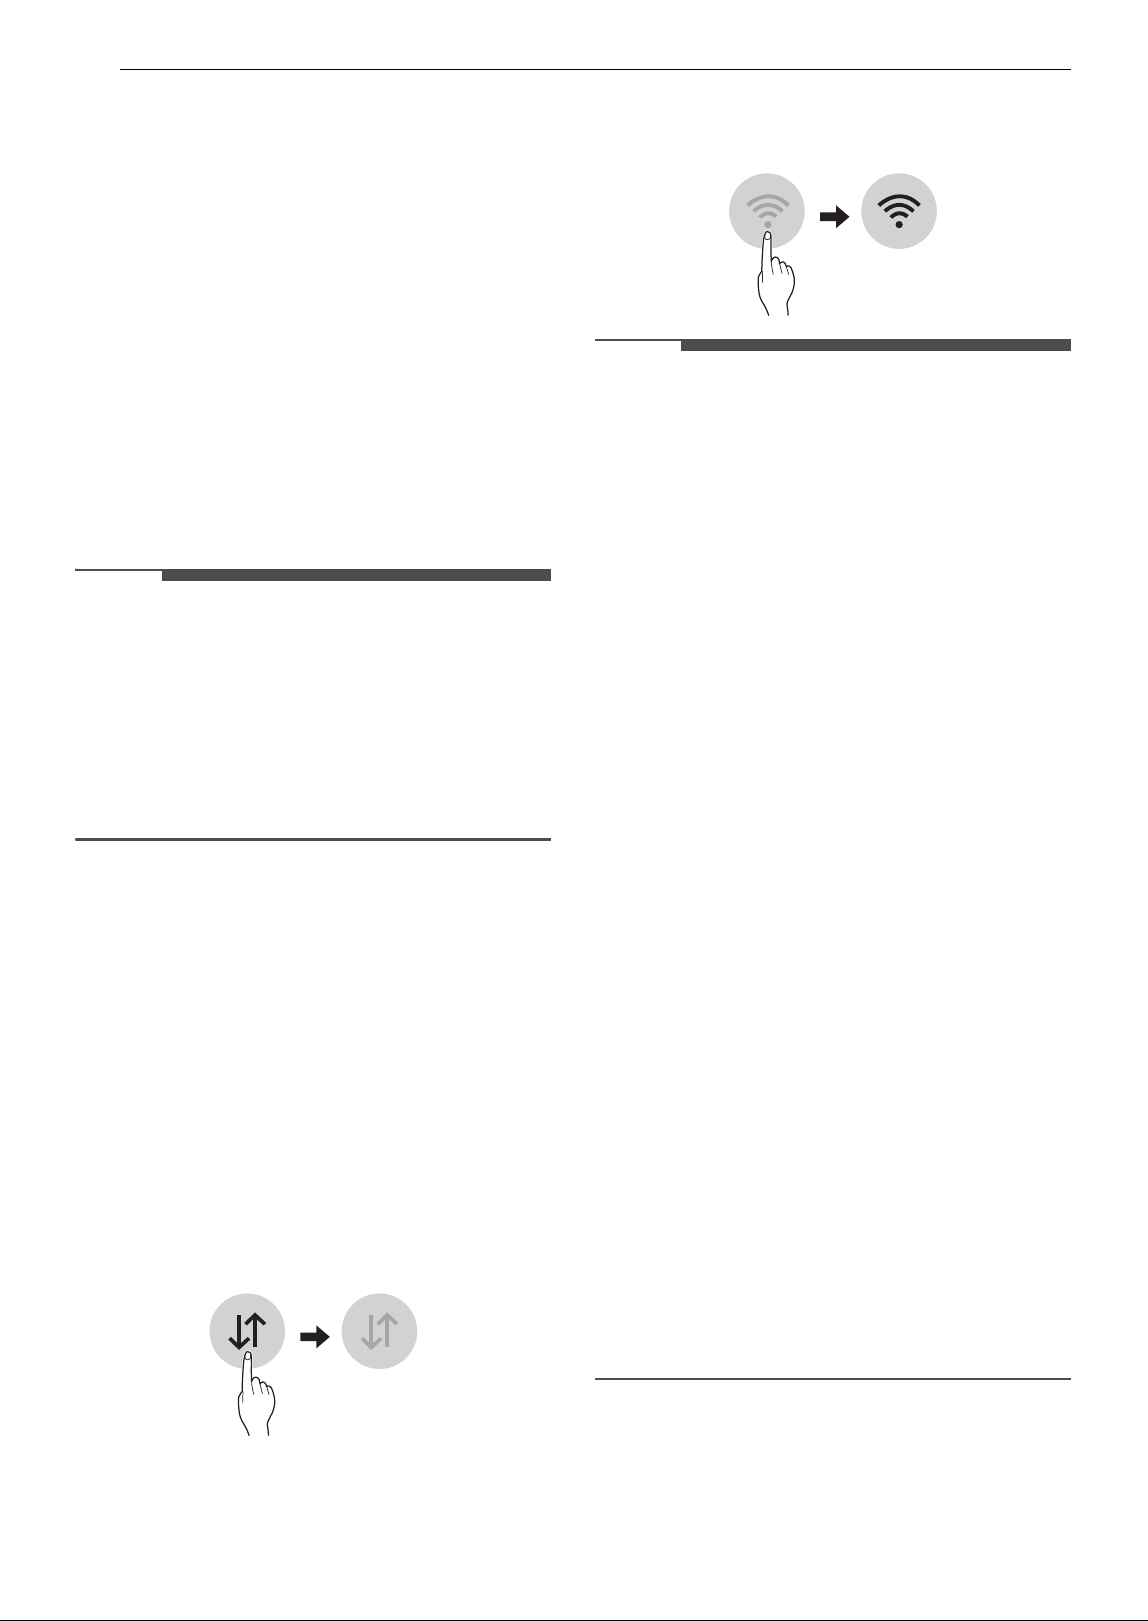
• To prepare the product to connect to Wi-Fi through the LG ThinQ application, press and hold the K
button for 3 seconds.
c Heating Button
• Starts or stops heating.
NOTE
• Press the two buttons on the control panel at the same time for 3 seconds to use the extra functions.
Long press
(more than 3
seconds)
Extra Functions Description
Smart Diagnosis
Determine the cause of a product failure through the LG
ThinQ application.
17OPERATION
ENGLISH
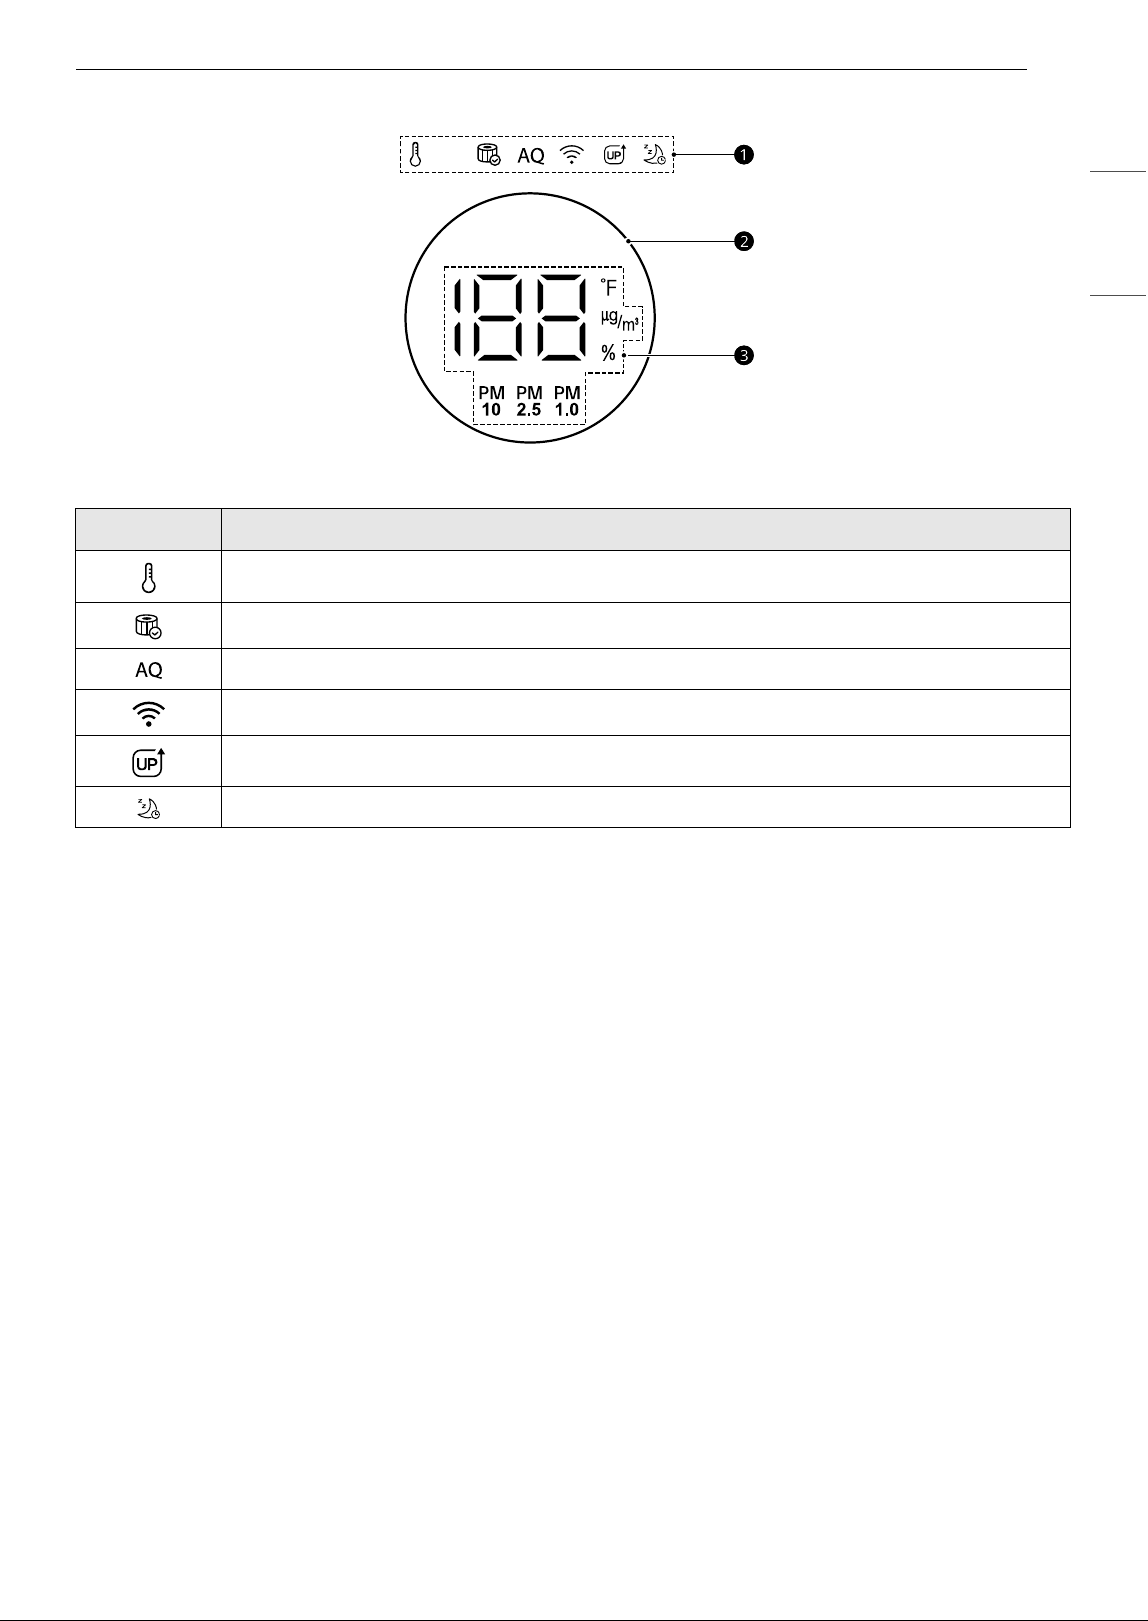
Status Display
a Add-On Display
b Air Quality Light
• Check the overall air quality through the air quality light.
c Status Display
• Display the air quality, PM10/PM2.5/PM1.0 concentration, temperature and humidity.
Icon Description
Displayed when operating in heating mode.
Displayed when it is time to replace the filter.
The color displayed indicates the overall air quality.
Displayed when a Wi-Fi connection is established.
Displayed when an upgraded function becomes available.
Displayed when the sleep timer is set.
18 OPERATION
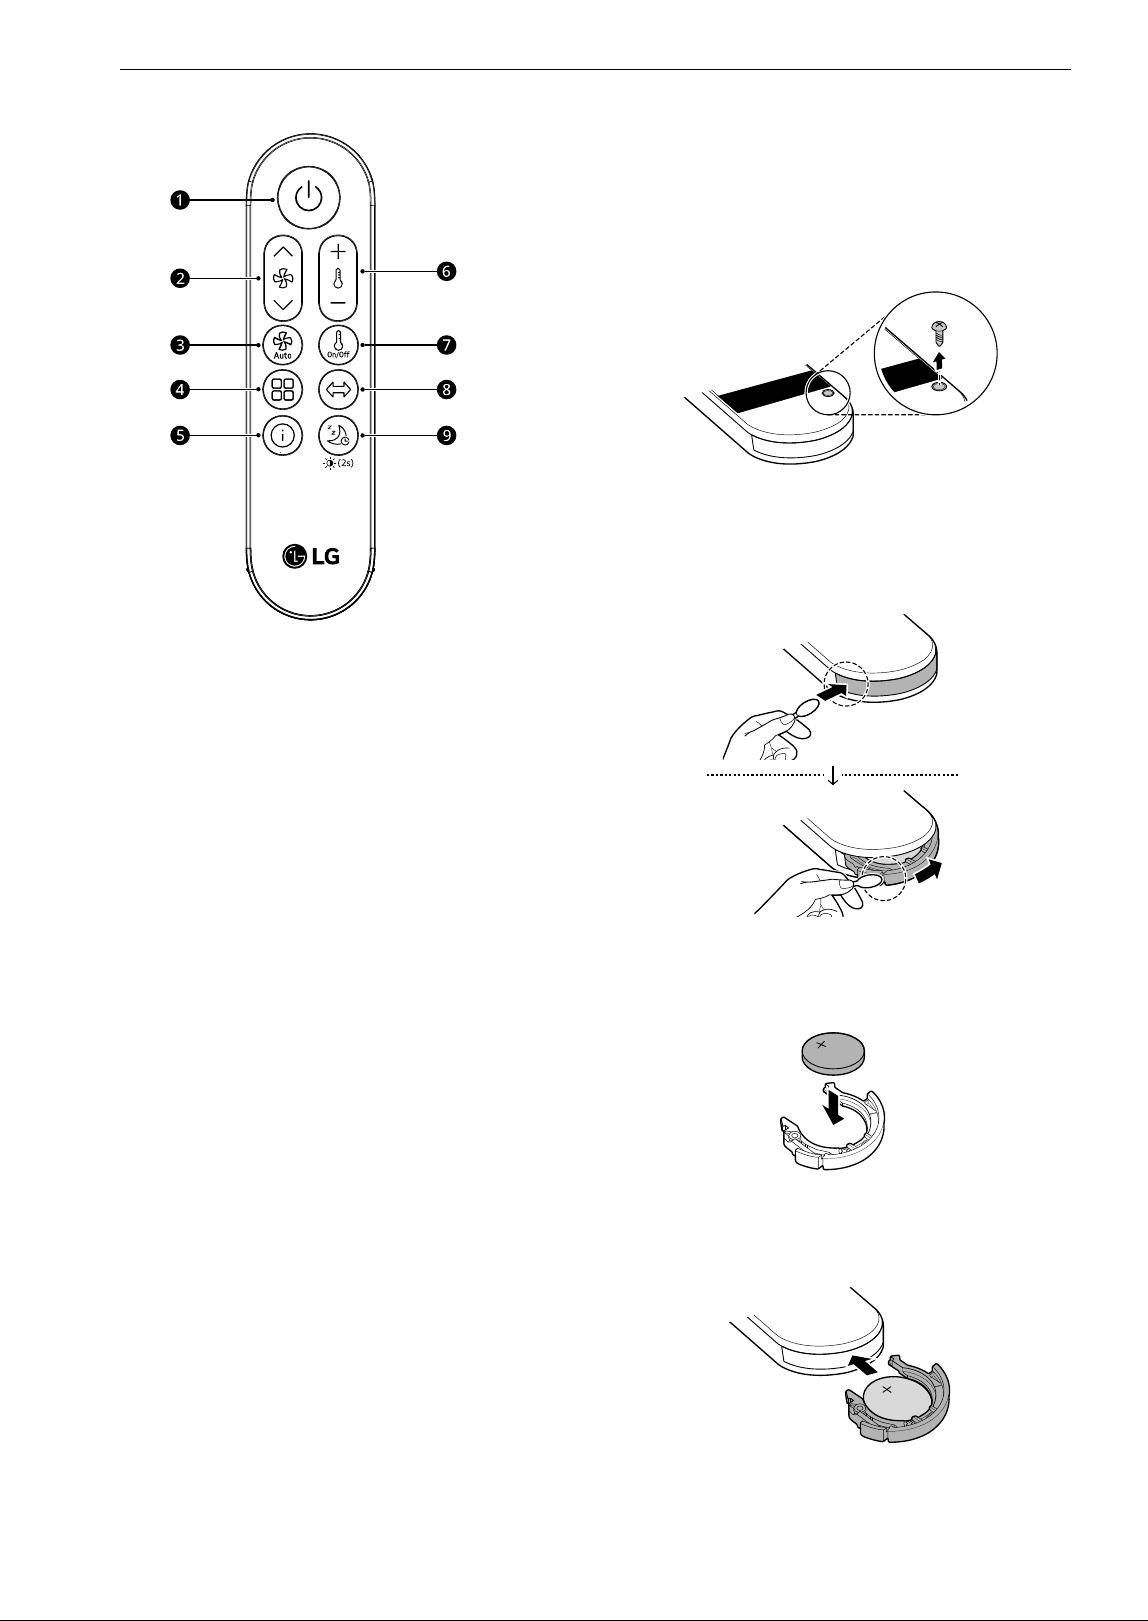
Remote Control
a Standby On/Off Button
Turns the air purifier on and off.
b Speed Button
Adjusts the fan speed on the air purifier.
• Press and hold the J button to increase the
fan speed continuously.
• Press and hold the K button to decrease the
fan speed continuously.
c Auto Fan Button
Sets the fan speed automatically.
d Mode Button
Sets the operating mode.
e Information Display Button
Sets the standby screen.
f Target Temperature Button
Changes the target temperature during
heating. (Temperature setting range: 60 8 to
86 8 (16 7 to 30 7))
g Heating Button
Starts or stops heating.
h Rotation Button
Sets the rotation.
• Press and hold the button for 2 seconds to
turn the product sound on or off.
i Sleep Timer Button
Schedules the time to turn off the product.
• Press and hold the button for 2 seconds to
set the display brightness.
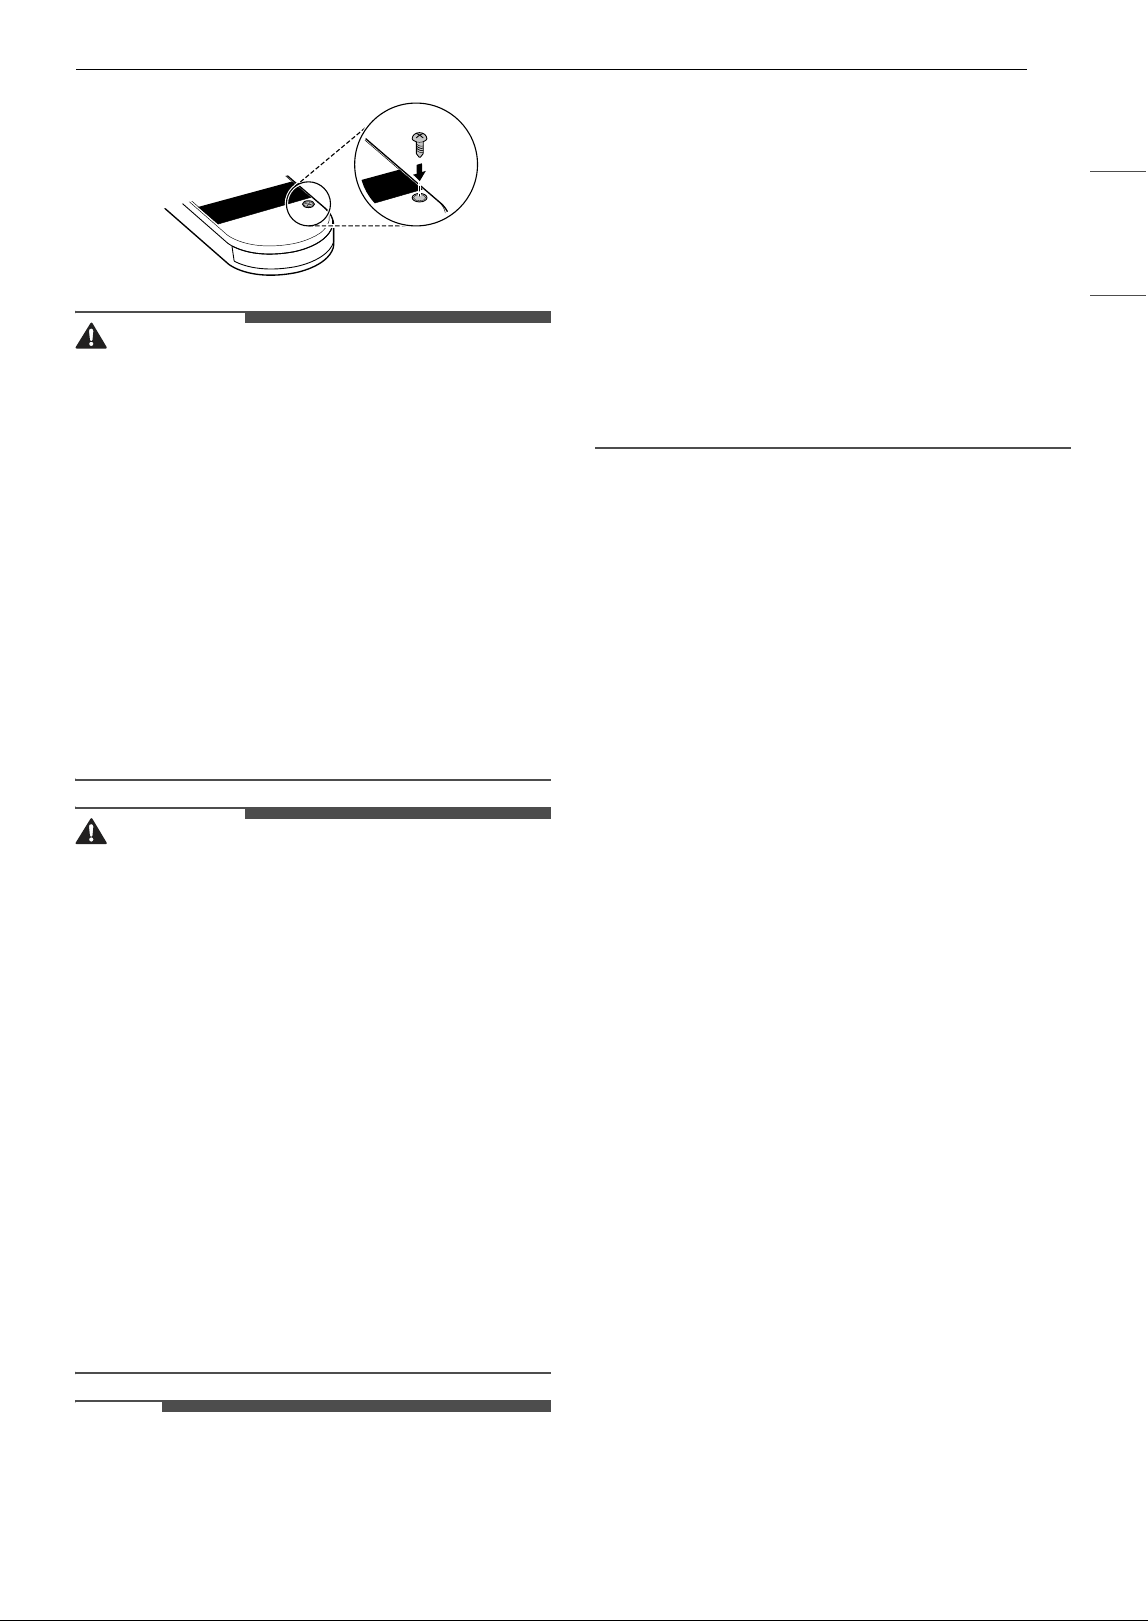
Inserting the Battery
1 Using a screwdriver, remove the screw on the
back of the remote control.
2 Using a cotton swab or other simple tool,
press in to release the tab on the battery tray.
Slide the tray sideways to remove it.
3 Insert the battery in the tray with the +
polarity facing up.
4 Push the battery tray in until it clicks into
place.
5 Reassemble the screw on the back of the
remote control.
19OPERATION
ENGLISH
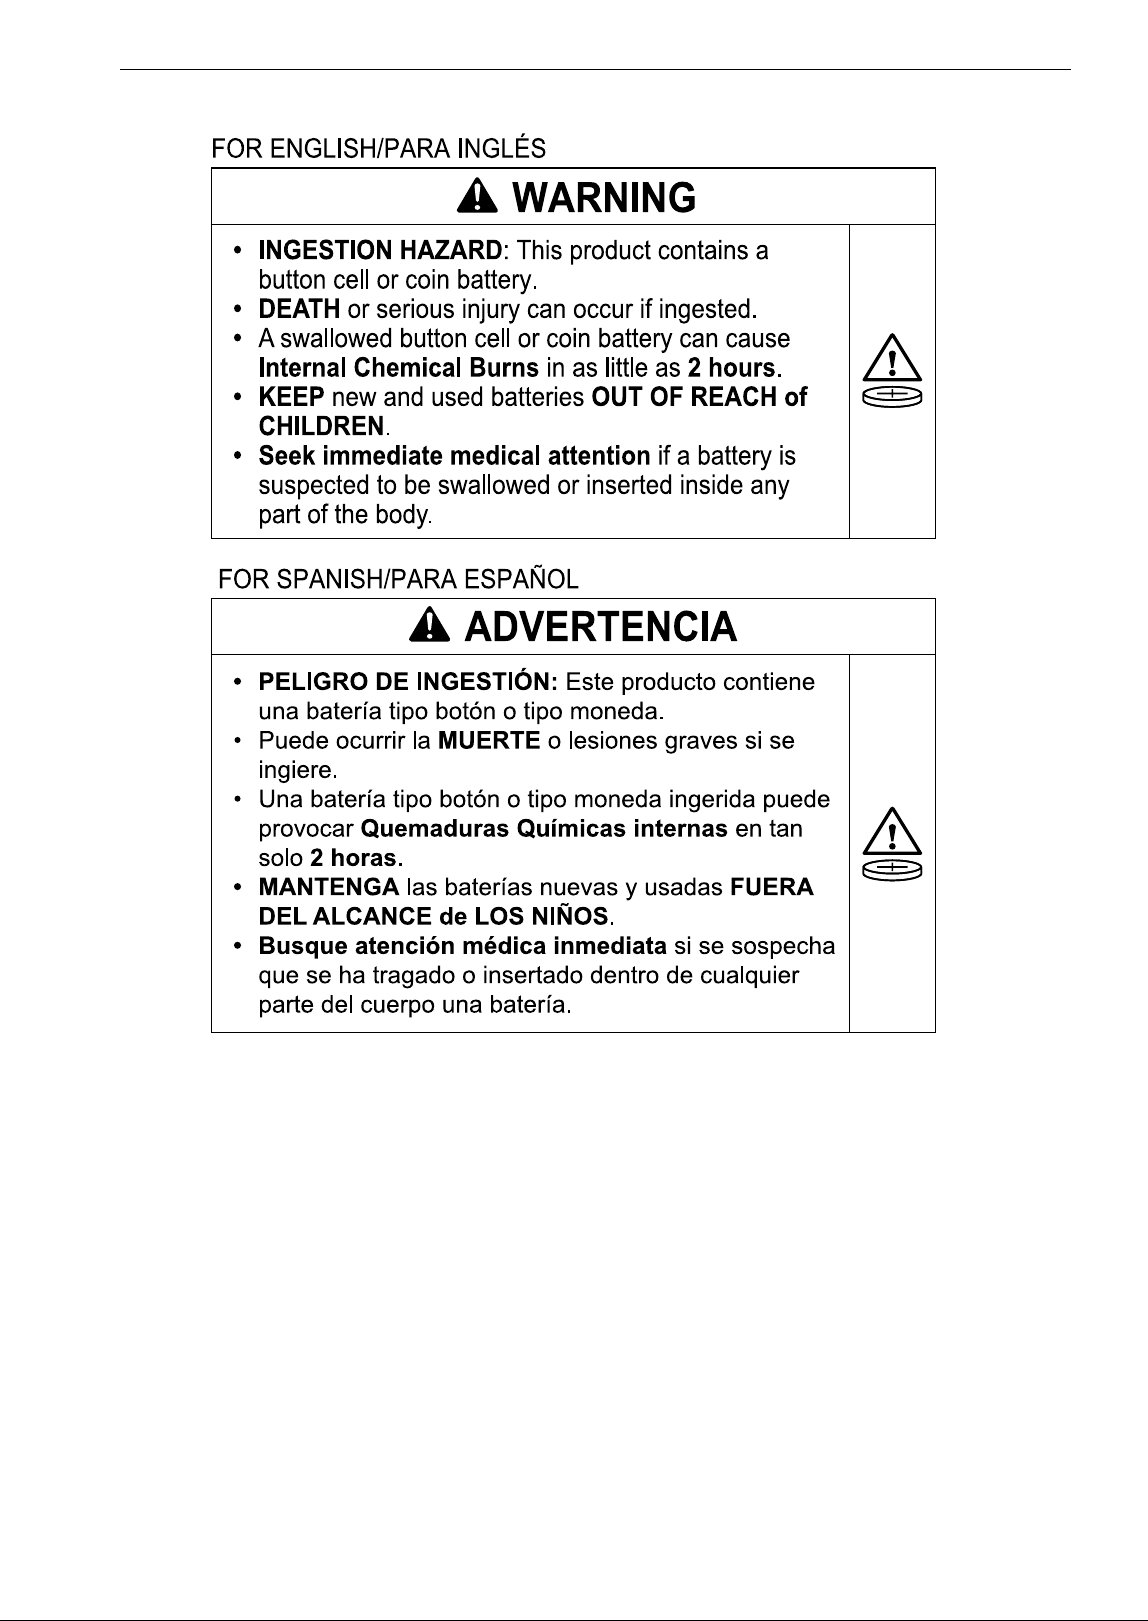
WARNING
• Warning: Contains Coin/Button Cell Battery
• Close the coin/button cell battery tray properly
to prevent it from being separated, and keep it
out of the reach of children.
• If the battery tray cannot be securely fixed, stop
using it immediately and keep it out of the reach
of children.
• Swallowing the battery may cause serious injury
or death. If it is swallowed, seek immediate
medical treatment.
• Do not attempt to modify the coin/button cell
battery. Doing so may cause a fire or product
failure.
• Do not dispose of batteries near a place with fire
or heat. Doing so may cause an explosion.
CAUTION
• Do not store the remote control near a heater,
candle or lit cigarette. Doing so may cause a fire
or product deformation.
• Do not store the remote control in a damp area,
and keep it away from splashing water.
Exposure to such moisture may lead to fire or
electric shock.
• Press only one button on the remote control at a
time. If you press a number of buttons at the
same time, the remote control or the product
may malfunction.
• Do not kick or step on the remote control. Doing
so may damage the remote control.
• Remove and store the battery if you don’t intend
to use the remote control for a long time. Failure
to do so may allow battery fluid to leak, leading
to product failure.
• Do not attempt to remove the label on the back
of the remote control.
NOTE
• For products which include a remote control, a
coin/button cell battery (CR2025) is provided.
• When a problem occurs with the remote control,
replace the coin/button cell battery or check the
polarity (+/-) of the battery first before
contacting an LG Electronics Customer
Information Center.
• When using the remote control, point it at the
remote control receiver on the product.
• If there is an obstacle between the remote
control and the product, or the distance between
the remote control and the product is too great,
the remote control may not operate effectively.
The recommended distance from which to use
the remote control is 23 ft (7 m) or less.
• Dispose of used batteries in a local waste battery
collection box.
20 OPERATION
Operating the Air Purifier
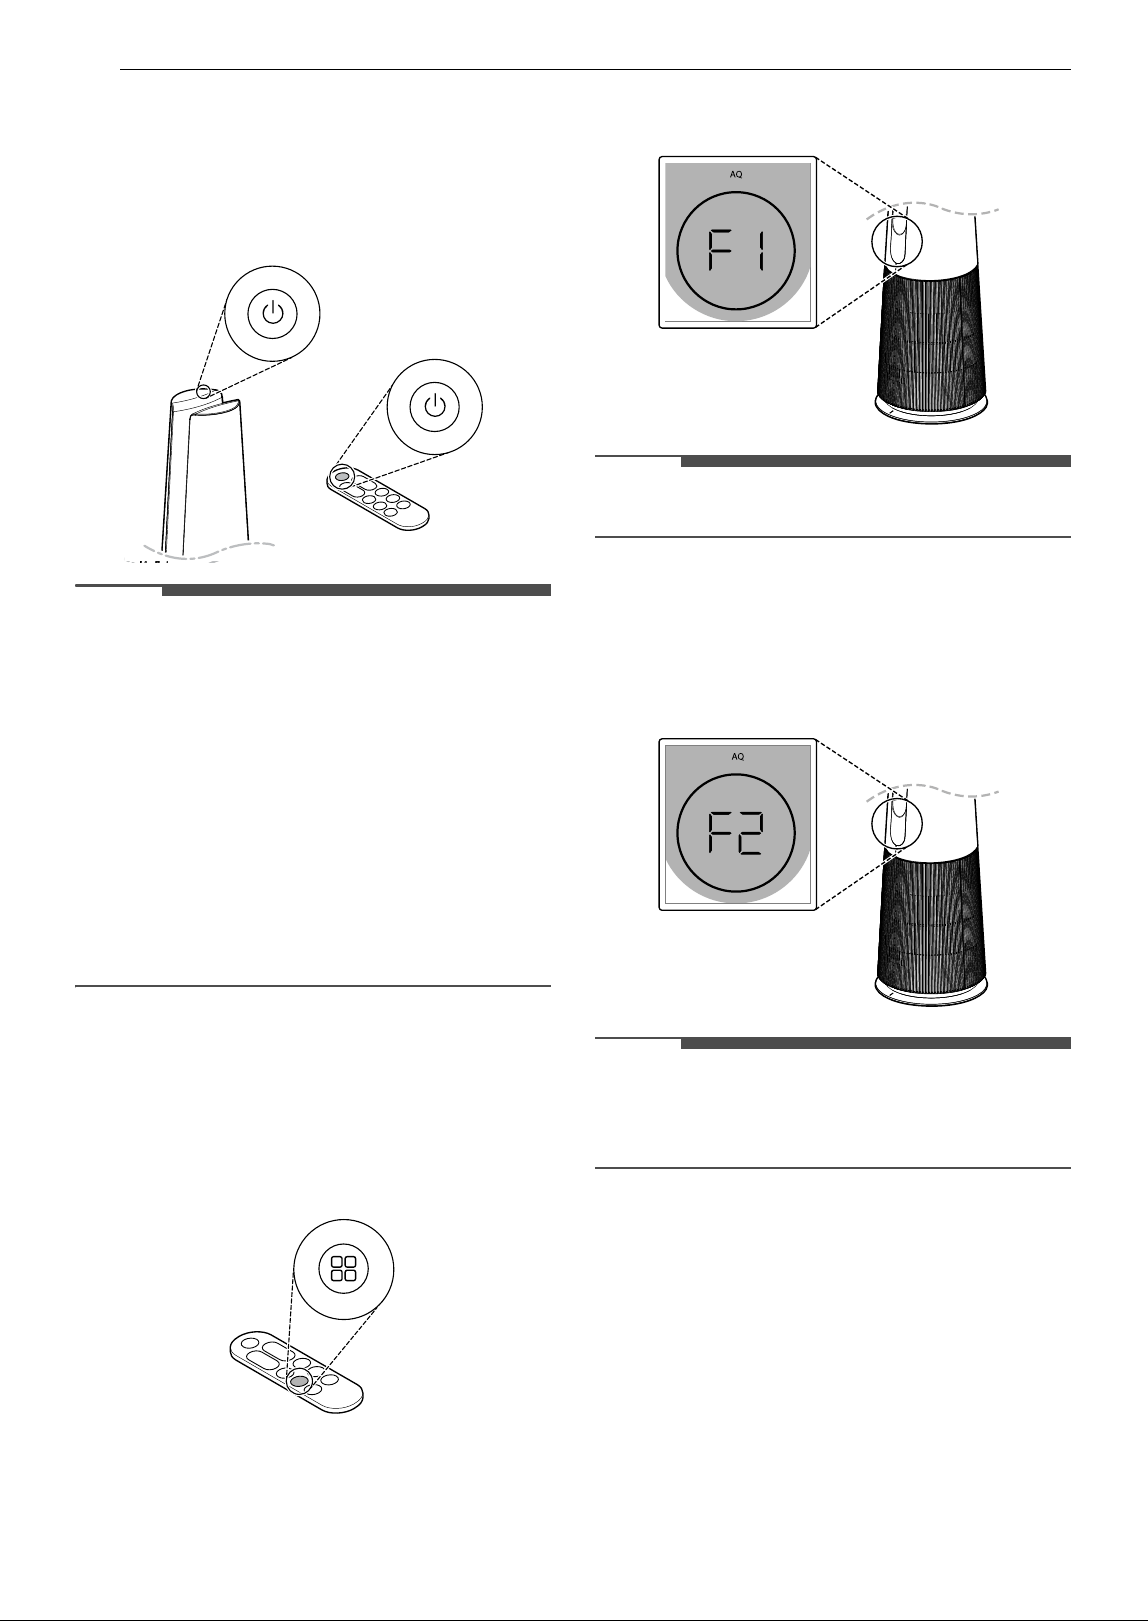
Start/Stop
Press the Standby On/Off button to turn the air
purifier on or off.
NOTE
• When you operate the product for the first time
after installing it, it will operate in Wide Mode
with Level 5 as the fan speed.
• If you stop product operation and then resume,
it will start in the mode you last selected.
• If the product is unplugged or a power failure
occurs during operation, the most recently used
mode (fan speed, operating mode, brightness) is
saved.
• When you start product operation, the room
temperature and indoor humidity are displayed
in that order, and the overall air quality is
displayed after the sensor has stabilized.
Operating Mode
Press the Mode button to select the mode.
• If you press the Mode button during operation,
the mode will change in the order of Wide Mode
& Natural Wind Mode.
Wide Mode
Clean air comes out from the front of the product,
keeping the room cool and pleasant.
• When the Wide Mode is selected, F1 is displayed
briefly on the status display.
NOTE
• Auto Fan can be used with the Wide Mode.
Natural Wind Mode
The fan speed changes to mimic a natural breeze.
• When the Natural Wind Mode is selected, F2 is
displayed briefly on the status display.
NOTE
• When you adjust the fan speed while operating
in Natural Wind Mode, the operating mode
changes to Wide Mode.
Adjusting the Fan Speed
Press the Speed button to control the fan speed of
the air purifier.
21OPERATION
ENGLISH
• Press the Speed button during operation to
change the speed in the order of Auto (Au) ~
Level 1 - Level 10 ~ Turbo (Po).
NOTE
• When you press the Speed button during
heating, the fan speed changes in the order of
Auto (Au) & Level 1 - Level 10.
• As the fan speed gets higher the air may become
cooler.
• The higher the fan speed, the higher the
purification rate in the operating space.
Auto Fan
The fan speed is adjusted automatically according
to the air quality level of the indoor air.
• Press the Auto Fan button during operation to
use the Auto Fan function.
• Au is displayed briefly on the status display.
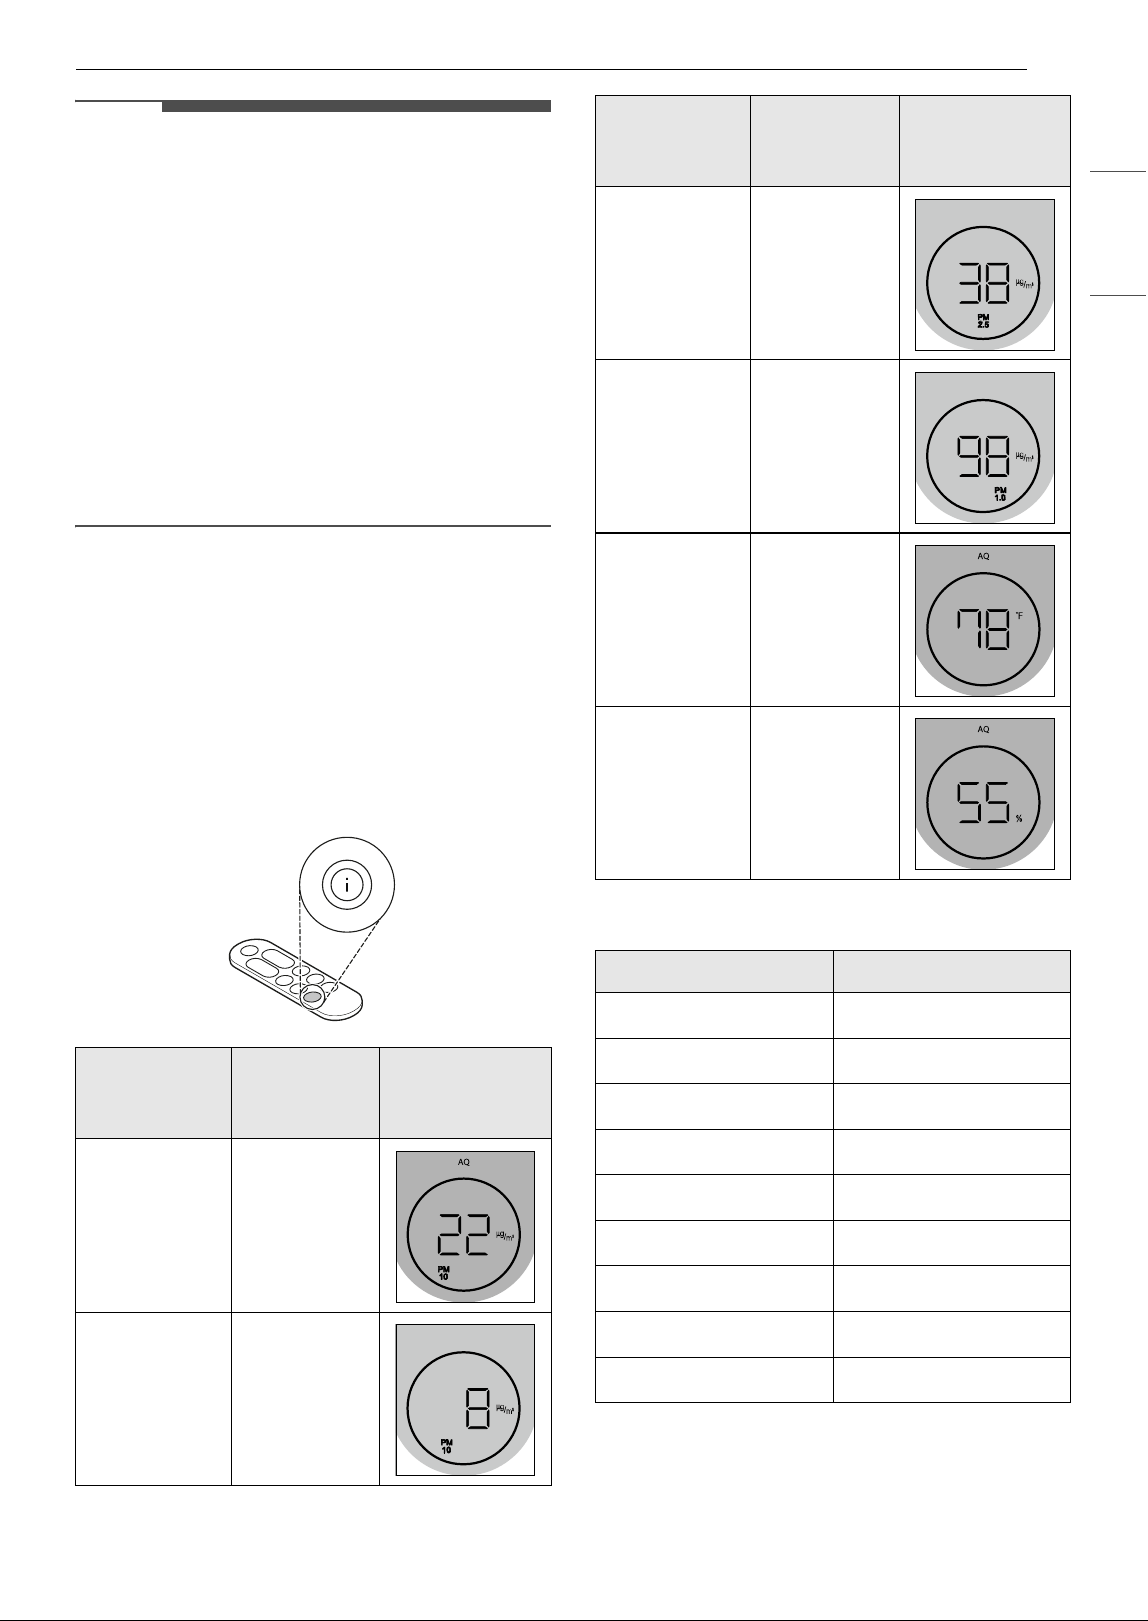
Rotation
Sets the rotation of the air purifier.
•Press the Rotation button during operation to
change the rotation in the order of 45° ~ 60°
~ 90° ~ 140° ~ Stop (OF).
NOTE
• The air purifier rotates at 140° during the initial
rotation and starts rotating from the center of
the product after position initialization.
• To turn off the rotation function, press the
Rotation button.
• If a function is changed while using rotation, the
rotation stops for a while so that you can check
the display status. The rotation starts again after
the setting is completed.
• While using rotation: If you turn off the product,
the product stops after rotating to its center.
• While not using rotation: When you turn off the
product, the product turns off in its stationary
position.
• The product rotates based on its center.
(For the center of the product, refer to Product
Overview and Front.)
• Do not hold the product and rotate it forcibly.
• If you have forcibly rotated the product, the
center of the product should be reset.
• To align its center, turn the product off, unplug
it, wait a few minutes, and plug it back in.
When you use rotation, the product's center is
then initialized automatically.
• If you rotate the product manually, a noise may
occur during initial rotation.
- After the product rotates once, it will operate
normally.
• Rotation works the same even during heating.
Heating
Sets the heating operation of the air purifier.
•Press the Heating button during operation to
set heating.

22 OPERATION
• During heating, only the Wide Mode can be
used.
WARNING
• Some parts of this product become very hot and
may cause burns.
CAUTION
• During heating, be careful not to use other
electric heating appliances. If other electric
heating appliances are used at the same time
during heating, the circuit breaker may trip.
NOTE
• Press the Target Temperature Setting button
on the remote control to select a temperature
from 60 8 to 86 8 (16 °C to 30 °C).
• When you start heating after installing the
product for the first time, it operates at 868 (30
°C) with the fan speed at level 5.
• If the current air temperature is higher than the
target temperature, the product operates as
follows:
- The heater inside the product stops working.
- The heating icon on the status display turns
white.
• If the target temperature is set lower than the
current air temperature when you start heating,
the heating will be carried out for a set period of
time. Then the product will operate at the target
temperature, so heating may not be supplied. If
heating is not supplied, set the target
temperature higher than the current ambient air
temperature.
• If the current ambient temperature is lower than
the target temperature, the product operates as
follows:
- The heater inside the product starts working.
- The heating icon on the status display turns
red.
• Excessive electricity bills may result if heating is
used for a long time. (Rated power consumption
during is 1500 W.)
• When you stop and restart heating, the product
starts at the last set temperature.
• Heating auto-block function: Heating can work
continuously for up to 8 hours, but it turns off
automatically after 8 hours of operation. To
restart it, press the Heating button.
• Residual heat removal function: When you turn
off the power during heating, the residual heat
removal works to get rid of the residual heat
inside the product.
- The heating icon on the status display turns
white.
- Time counts down from 60 seconds ( 60
~ 59
~ 58.......2 ~ 1 ~ 0)
- When the time reaches 0, the product turns
off.
• During heating, there may be an odor from the
heat generated in the air outlet. The odor will
naturally disperse over time.
• The following types of noise are normal and do
not indicate a malfunction:
- Ticking, clicking, or popping noises may be
generated from contraction and expansion
due to temperature differences in the plastic.
- Clanging or clanking noises may be generated
from contraction and expansion due to the
temperature differences in the heater.
- Clunking noises may be generated by the
heater switch operating during heating.
Using the Extra Functions
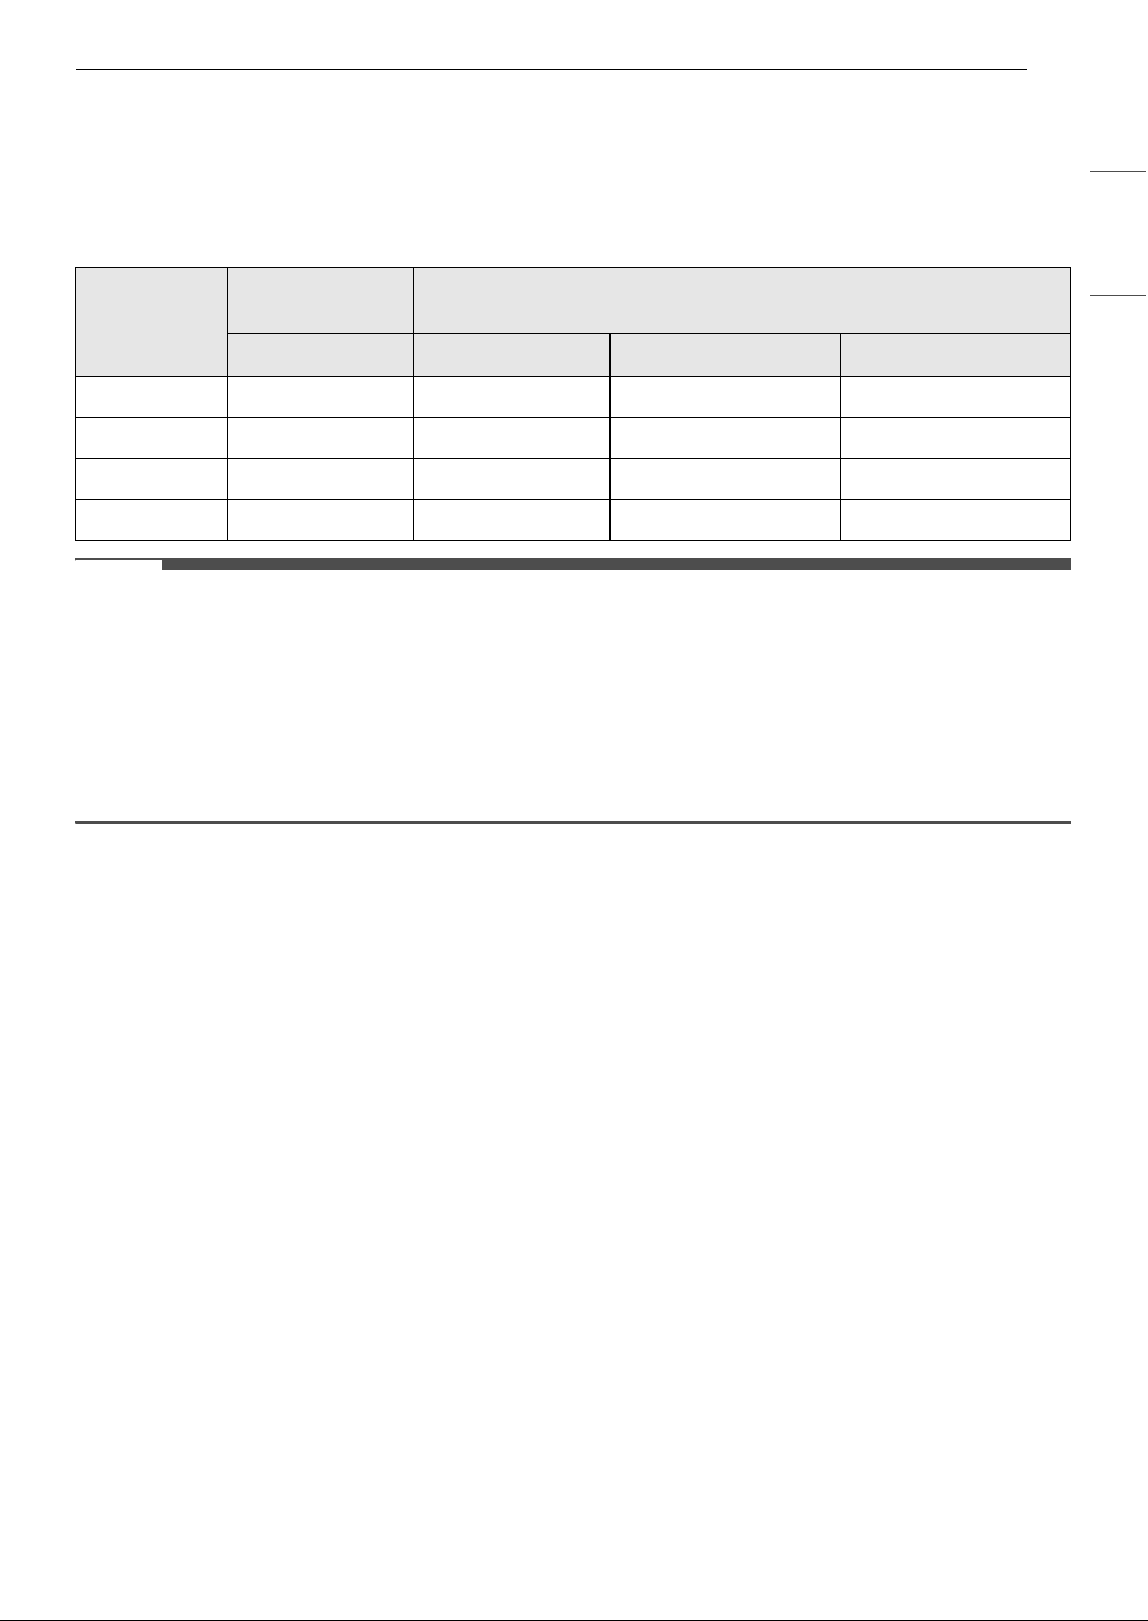
Setting the Sleep Timer
Set the timer to turn the product off automatically
after a specific time.
•Press the Sleep Timer button during operation
to set the sleep timer in the order of 1H (turn off
1 hour later) ~ 12H (turn off 12 hours later) ~
OF (cancel)
23OPERATION
ENGLISH
NOTE
• When the sleep timer is set, the product stops
rotating and the display brightness is set to level
1. (However, if the display brightness is set to Off
before the sleep timer is set, the screen
brightness will remain OFF.)
• When the sleep timer is set, the fan speed is
automatically adjusted to maintain quieter
operation and avoid disturbing your sleep.
• You can change the fan speed, display
brightness, and rotation even while the sleep
timer is set.
• To cancel the sleep timer once it's set, press the
Sleep Timer button on the remote control once
again.
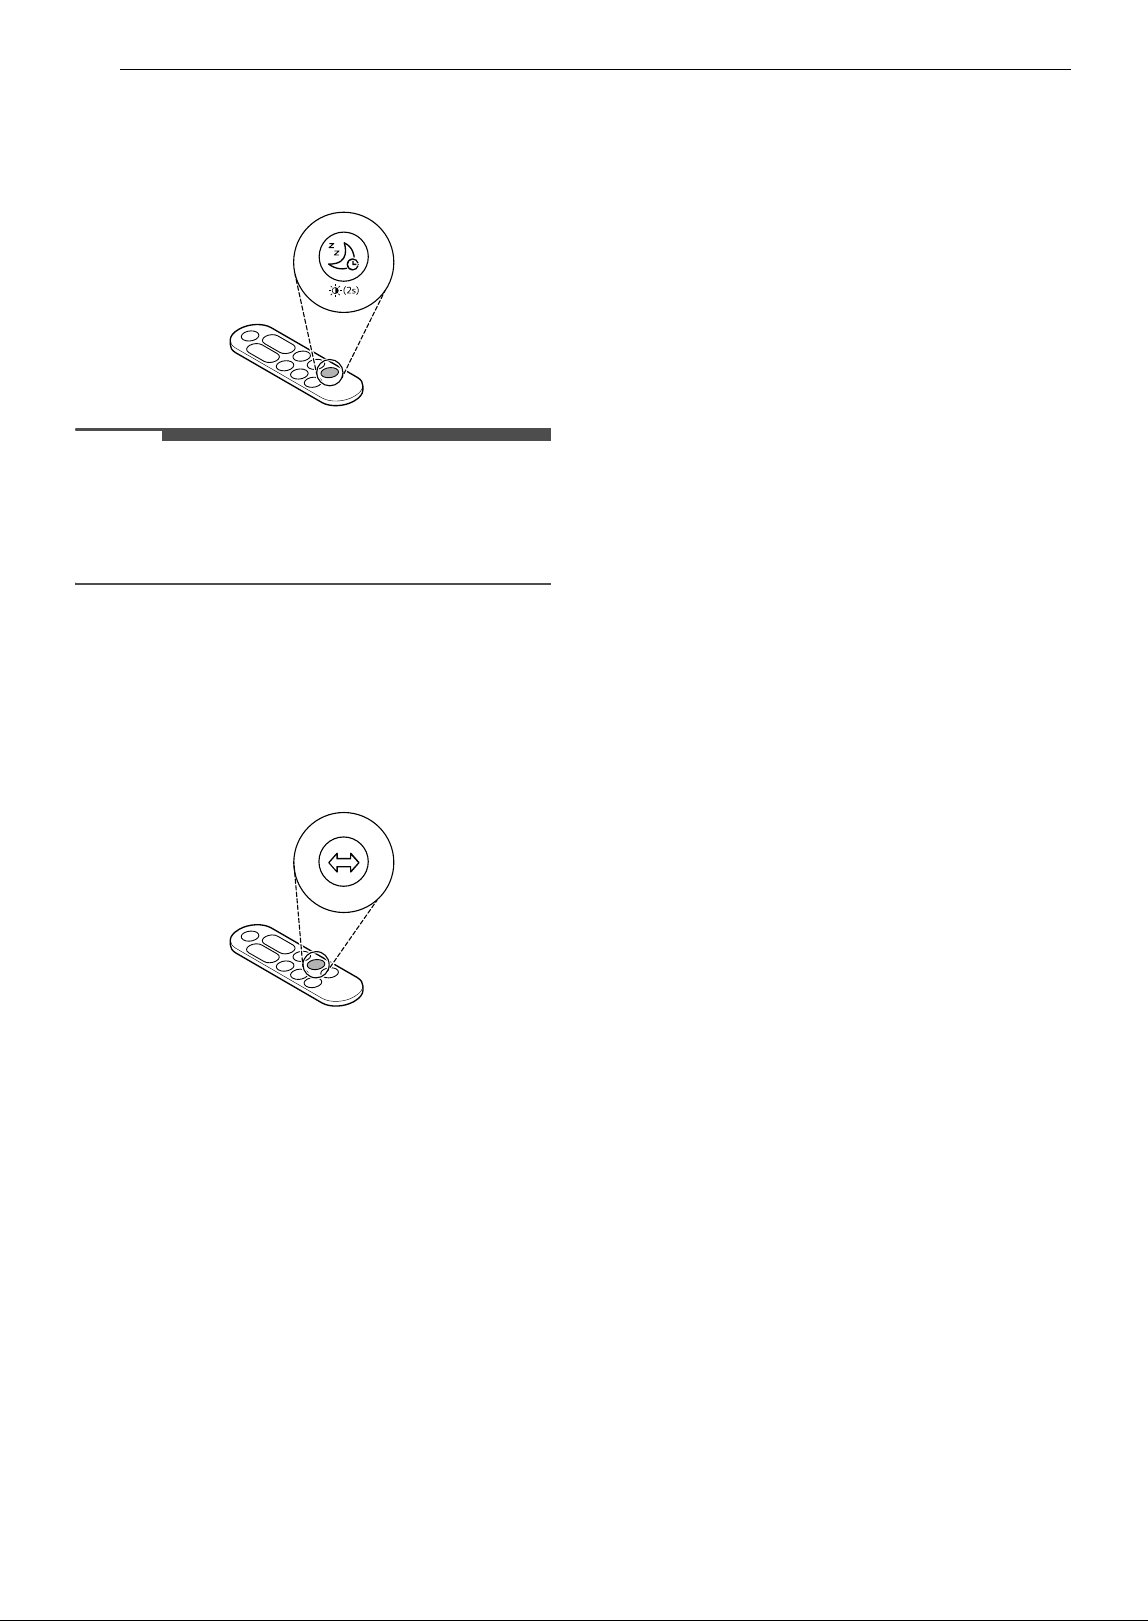
Setting the Standby Screen
The screen displays a variety of indoor air
information.
• Press the Information Display button on the
remote control to set the desired standby screen
in the order of Air Quality ~ PM10 ~ PM2.5
~ PM1.0 ~ Room Temperature ~ Room
Humidity.
Celsius to Fahrenheit Conversion Table
Setting Display Brightness
Adjusts the display brightness of the status
display.
Standby
Screen
Information
Contents Example
Air Quality
Displays the
status of
overall air
quality.
PM10
Displays
PM10 (fine
dust)
information.
PM2.5
Displays
PM2.5 (ultra-
fine dust)
information.
PM1.0
Displays
PM1.0 (super
ultra-fine
dust)
information.
Room
Temperature
Displays
indoor
temperature
information.
Room
Humidity
Displays
indoor
humidity
information.
Celsius Fahrenheit
40 7 104 8
35 7 95 8
30 7 86 8
25 7 77 8
20 7 68 8
15 7 59 8
10 7 50 8
5 7 41 8
0 7 32 8
Standby
Screen
Information
Contents Example
24 OPERATION
• Press the Sleep Timer button on the remote
control for 2 seconds during operation to
change the display brightness in the order of 3
(bright) ~ 2 (medium) ~ 1 (dim) ~ OF (Off).
NOTE
• If you press the button while the display
brightness is set to Off, the screen brightness is
set to 1 (dim) for a moment and then the screen
turns off.
Setting Product Sound
Turns the product's button sounds and notification
sounds on or off.
•Press the Rotation button on the remote control
for 2 seconds to set the product sound.
25OPERATION
ENGLISH
Overall Air Quality
Understanding Overall Air Quality
The overall air quality is calculated based on the concentration of particulates and is categorized in 4 levels
based on the level of pollution in the air. (Green, Yellow, Orange, and Red)
NOTE
• Overall air quality is determined based on the concentration of particulate matter (PM).
• PM concentration values are based on the data sheet provided by the sensor manufacturer.
• The PM concentration measurement was tested using LG Electronics’ standard test materials.
• Differences in PM concentration values may be the result of different methods of measuring or
differences in the actual PM concentration levels.
- If the PM concentration is high, there may be a larger difference between the displayed concentration
and the actual concentration.
Color
Overall air
quality
Concentration of PM (μg/m
3
)
Status PM10 PM2.5 PM1.0
Red Poor 255 or more 56 or more 56 or more
Orange Unhealthy 155 ~ 254 36 ~ 55 36 ~ 55
Yellow Moderate 55 ~ 154 13 ~ 35 13 ~ 35
Green Good 54 or less 12 or less 12 or less
26 SMART FUNCTIONS
SMART FUNCTIONS
LG ThinQ Application
The LG ThinQ application allows you to
communicate with the appliance using a
smartphone.
LG ThinQ Application Features
Smart Diagnosis
If you experience a problem while using the
appliance, this Smart Diagnosis feature will help
you diagnose the problem.
Settings
Allows you to set various options on the appliance
and in the application.
NOTE
• If you change your wireless router, internet
service provider, or password, delete the
connected appliance from the LG ThinQ
application and connect it again.
• The application is subject to change for
appliance improvement purposes without notice
to users.
• Functions may vary by model.
Before Using LG ThinQ Application
This feature is only available on models with Wi-Fi
function.
1 Check the distance between the appliance
and the wireless router (Wi-Fi network).
• If the distance between the appliance and
the wireless router is too far, the signal
strength becomes weak. It may take a long
time to connect or installation may fail.
2 Turn off the Mobile data or Cellular Data on
your smartphone.
3 Connect your smartphone to the wireless
router.
NOTE
• To verify the Wi-Fi connection, check that the Wi-
Fi f icon on the status display is lit.
• The appliance supports 2.4 GHz Wi-Fi
networks only. To check your network
frequency, contact your Internet service
provider or refer to your wireless router manual.
• LG ThinQ is not responsible for any network
connection problems or any faults, malfunctions,
or errors caused by network connection.
• If the appliance is having trouble connecting to
the Wi-Fi network, it may be too far from the
router. Purchase a Wi-Fi repeater (range
extender) to improve the Wi-Fi signal strength.
• The Wi-Fi connection may not connect or may be
interrupted because of the home network
environment.
• The network connection may not work properly
depending on the Internet service provider.
• The surrounding wireless environment can
make the wireless network service run slowly.
• If the appliance cannot be connected due to
problems with the wireless signal transmission,
unplug the appliance and wait about a minute
before trying it again.
• If the firewall on your wireless router is enabled,
disable the firewall or add an exception to it.
• The wireless network name (SSID) should be a
combination of English letters and numbers. (Do
not use special characters.)
• Smartphone user interface (UI) may vary
depending on the mobile operating system (OS)
and the manufacturer.
• If the security protocol of the router is set to
WEP, the network setup may fail. Change the
security protocol (WPA2 is recommended) and
connect the product again.
Installing the LG ThinQ Application
Search for the LG ThinQ application from the
Google Play Store or Apple App Store on a
27SMART FUNCTIONS
ENGLISH
smartphone. Follow instructions to download and
install the application.
RF Module Specifications
FCC Notice
The following notice covers the transmitter
module contained in this product.
This equipment has been tested and found to
comply with the limits for a Class B digital device,
pursuant to Part 15 of the FCC Rules. These limits
are designed to provide reasonable protection
against harmful interference in a residential
installation. This equipment generates, uses, and
can radiate radio frequency energy and, if not
installed and used in accordance with the
instructions, may cause harmful interference to
radio communications. However, there is no
guarantee that interference will not occur in a
particular installation. If this equipment does
cause harmful interference to radio or television
reception, which can be determined by turning the
equipment off and on, the user is encouraged to
try to correct the interference by one or more of
the following measures:
• Reorient or relocate the receiving antenna.
• Increase the separation between the equipment
and the receiver.
• Connect the equipment into an outlet on a
circuit different from that to which the receiver is
connected.
• Consult the dealer or an experienced radio/TV
technician for help.
This device complies with part 15 of the FCC Rules.
Operation is subject to the following two
conditions:
(1) This device may not cause harmful interference
and
(2) This device must accept any interference
received, including interference that may cause
undesired operation.
Any changes or modifications in construction of
this device which are not expressly approved by
the party responsible for compliance could void
the user’s authority to operate the equipment.
FCC RF Radiation Exposure
Statement
This equipment complies with FCC radiation
exposure limits set forth for an uncontrolled
environment. This transmitter must not be co-
located or operating in conjunction with any other
antenna or transmitter.
This equipment should be installed and operated
with a minimum distance of 20 cm (7.8 inches)
between the antenna and your body. Users must
follow the specific operating instructions for
satisfying RF exposure compliance.
Open Source Software Notice
Information
To obtain the source code that is contained in this
product, under GPL, LGPL, MPL, and other open
source licenses that have the obligation to disclose
source code, and to access all referred license
terms, copyright notices and other relevant
documents, please visit https://
opensource.lge.com.
LG Electronics will also provide open source code
to you on CD-ROM for a charge covering the cost
of performing such distribution (such as the cost of
media, shipping, and handling) upon email
request to opensource@lge.com
.
This offer is valid to anyone in receipt of this
information for a period of three years after our
last shipment of this product.
Smart Diagnosis
Use this feature to help you diagnose and solve
problems with your appliance.
NOTE
• For reasons not attributable to LGE’s negligence,
the service may not operate due to external
factors such as, but not limited to, Wi-Fi
unavailability, Wi-Fi disconnection, local app
store policy, or app unavailability.
• The feature may be subject to change without
prior notice and may have a different form
depending on where you are located.
Wi-Fi module Specifications
Frequency Range 2412 MHz - 2462 MHz
Output power (Max) < 30 dBm
Bluetooth module Specifications
Frequency Range 2402 MHz - 2480 MHz
Output power (Max) < 30 dBm
28 SMART FUNCTIONS
Using LG ThinQ to Diagnose Issues
If you experience a problem with your Wi-Fi
equipped appliance, it can transmit
troubleshooting data to a smartphone using the
LG ThinQ application.
• Launch the LG ThinQ application and select the
Smart Diagnosis feature in the menu. Follow
the instructions provided in the LG ThinQ
application.
Using Audible Diagnosis to
Diagnose Issues
Follow the instructions below to use the audible
diagnosis method.
• Launch the LG ThinQ application and select the
Smart Diagnosis feature in the menu. Follow
the instructions for audible diagnosis provided
in the LG ThinQ application.
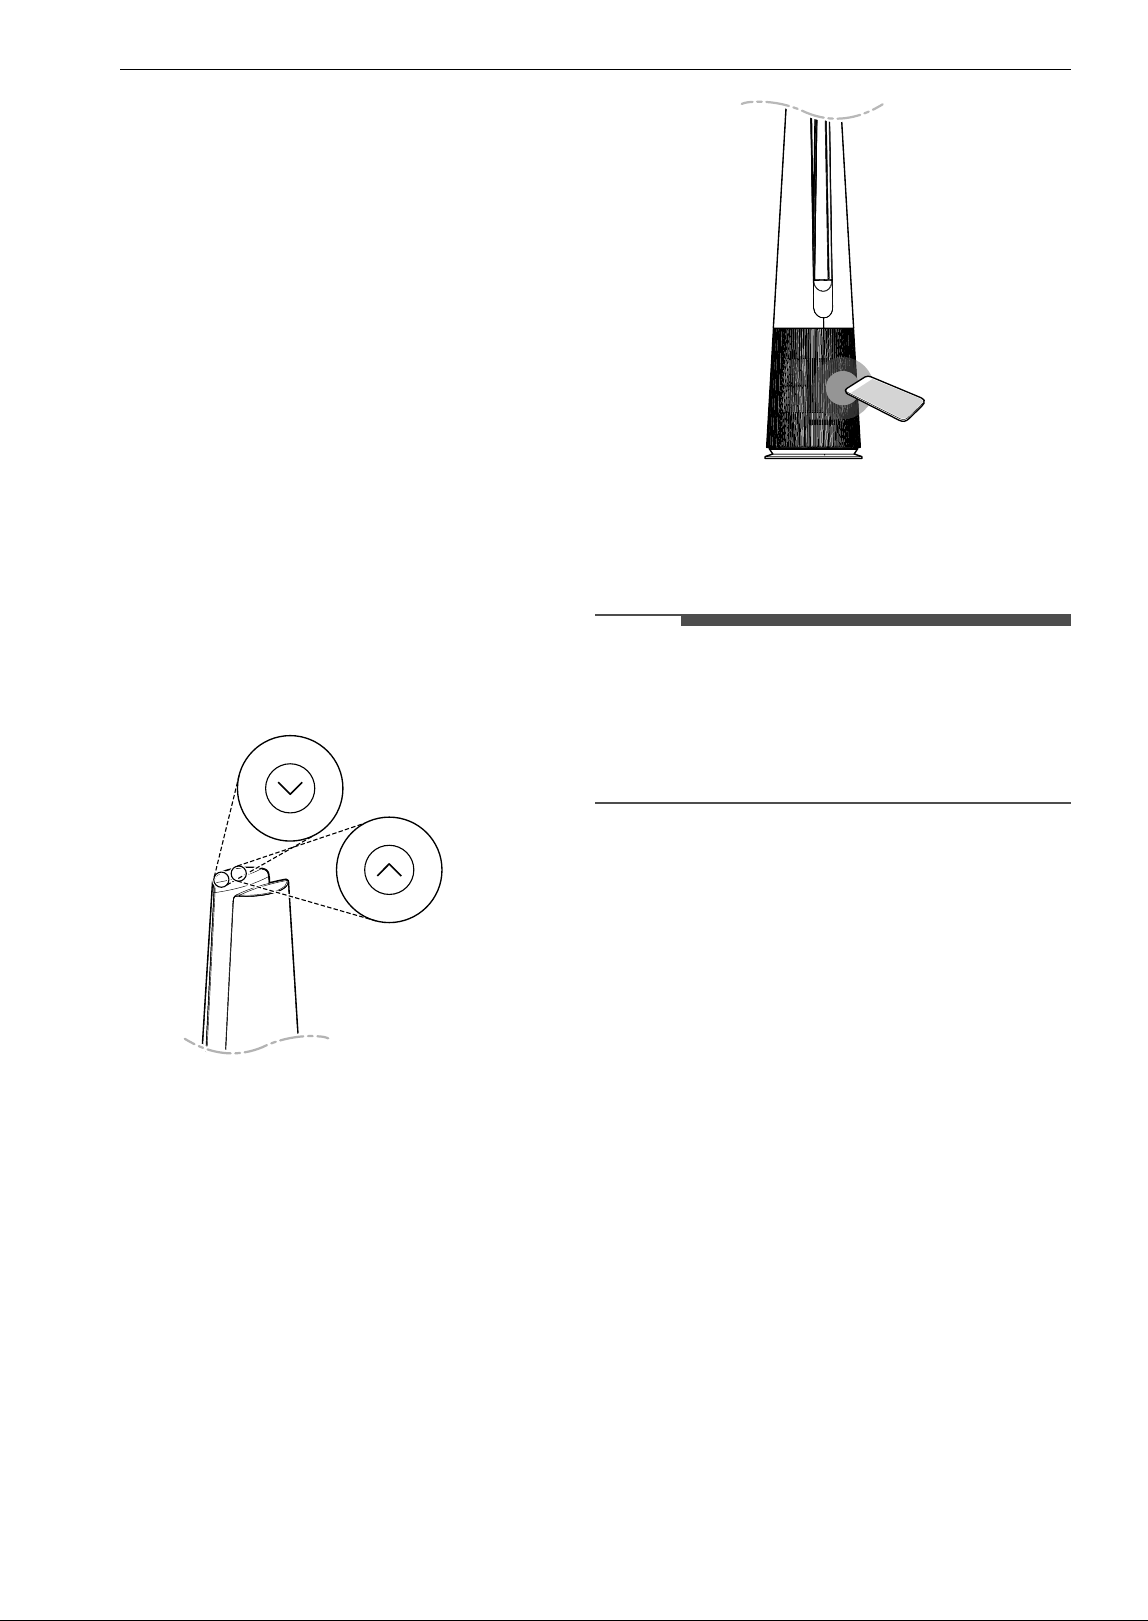
1 Press and hold the Speed Up and Speed
Down buttons for 3 seconds to execute the
Smart Diagnosis function.
2 Place your smartphone near the product.
• Make sure the microphone of the
smartphone faces the front of the product.
3 When data transmission is complete, the
smart diagnosis result will be displayed on the
LG ThinQ Application.
NOTE
• For accurate diagnosis, do not move the
smartphone away from the product until the
beeping stops.
• Keep quiet around the product during Smart
Diagnosis.
29MAINTENANCE
ENGLISH
MAINTENANCE
Maintaining the Product
Scheduled Maintenance
WARNING
• Stop the appliance operation and unplug the
power cord before cleaning and replacing the
filter.
• Do not spray water directly on the appliance.
NOTE
• The color of the filter may vary depending on the
usage environment and color of dust.
• The cleaning frequency may vary depending on
the operating hours and environment of the
appliance.
• If you do not clean the product according to the
cleaning frequency, you may experience a bad
odor and poor performance.
• The filter must be replaced at the end of its
lifespan, and the cost of replacement filters is
not covered under the warranty. To purchase
new filters, contact an LG Electronics Customer
Information Center or visit the website at
www.lg.com
• The upper and lower parts of the filter are made
of paper instead of plastic. Repeated removal of
the filter may cause scratches on the top and
bottom of the filter.
• Scratches on the top and bottom of the filter will
not affect its performance.
Alerts on the Status Display
NOTE
• Filter replacement alerts appear based on the
maximum usage time, taking into account the
operating hours of the appliance. The
replacement frequency is determined by the
operating hours and environment.
Cleaning the Exterior
1 Remove dust from the air inlet using a
vacuum cleaner.
2 Wipe the air outlet and the exterior of the
product with a soft cloth.
CAUTION
• If the heater was used, make sure the product is
cool before handling it.
• Do not wipe the appliance with an alkaline
detergent.
• Never use sulphuric acid, hydrochloric acid or
organic solvent (e.g., thinner, kerosene and
acetone) to wipe the appliance exterior, or affix
labels on the exterior. Doing so may damage the
product surface.
• Care should be exercised to prevent water from
flowing into the product.
NOTE
• If dust on the front and rear covers cannot be
removed, disassemble the covers and clean
them with water. After cleaning, dry the covers
thoroughly in the shade.
Component
Cleaning
frequency
Replacement
frequency
Filter
Ultra-fine
filter
Clean filter as
needed
1 year
Alert Measures
Replace the filter.
30 MAINTENANCE
NOTE
• If fingerprints or dust on the front and back
covers are difficult to remove, wipe them off with
a microfiber cloth moistened with alcohol.
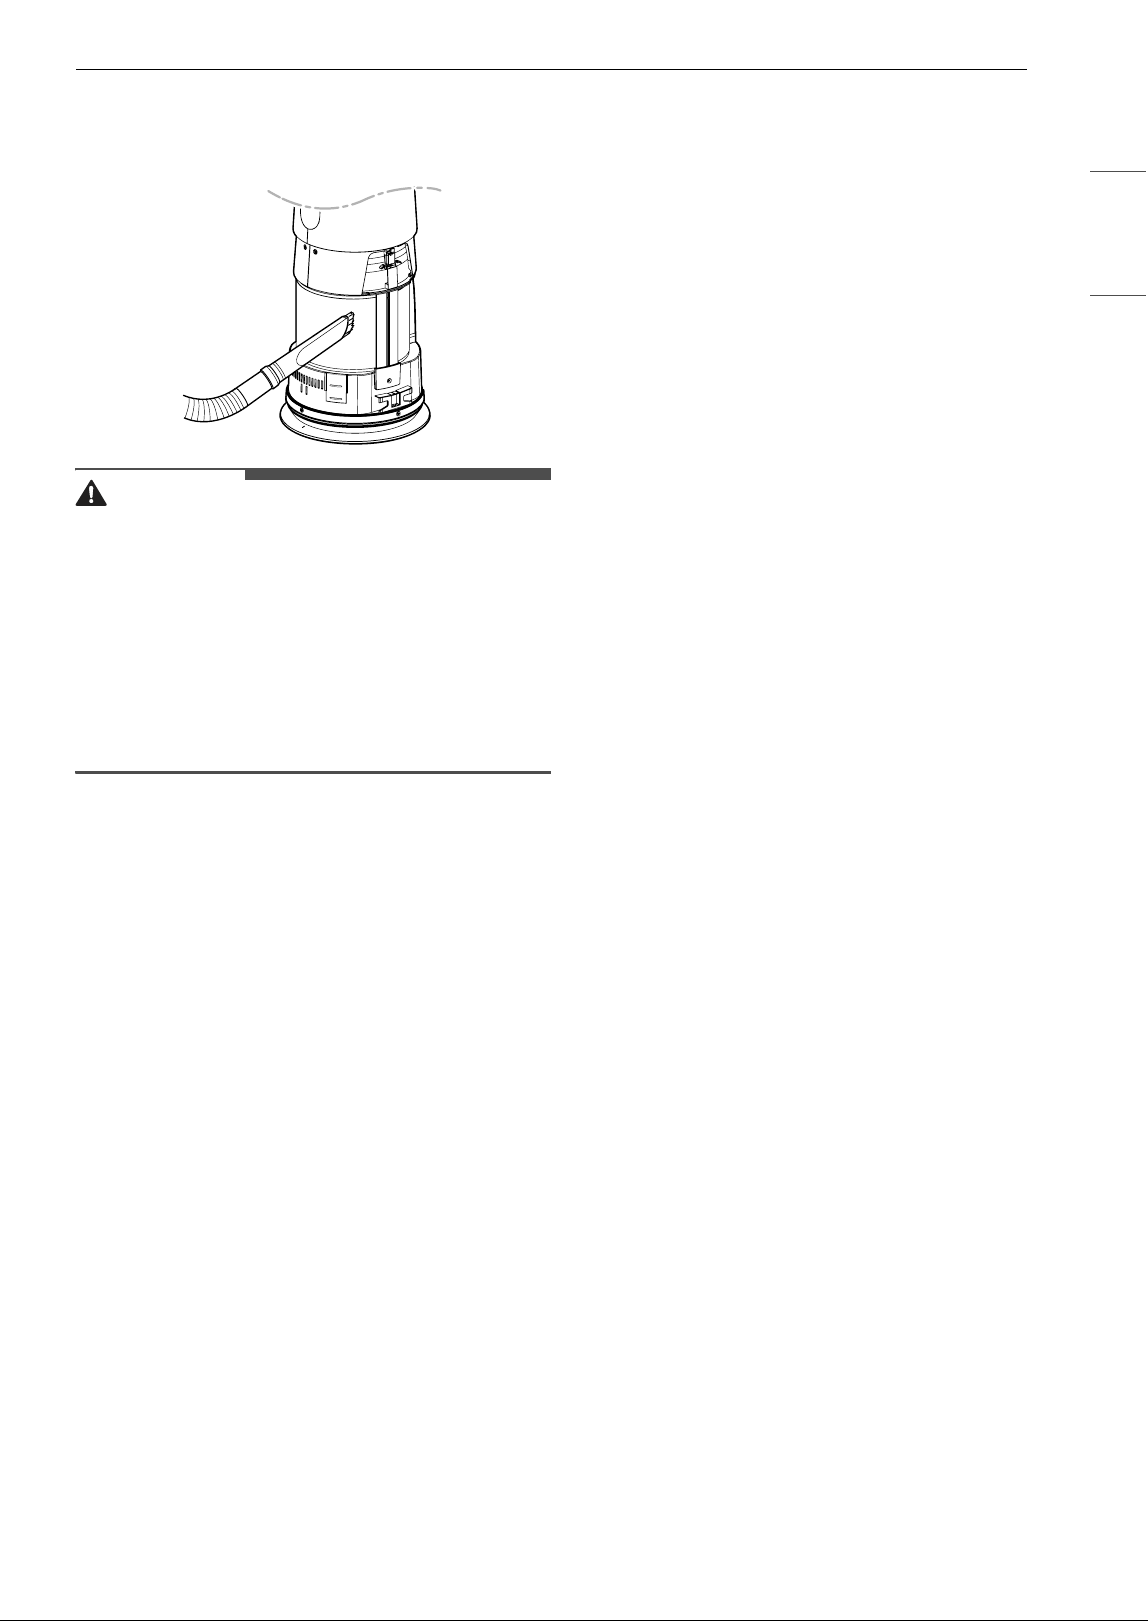
Cleaning the Particle Sensor
The PM1.0 (super ultra-fine dust) sensor detects
fine dust and large dust contamination levels. So
for best results clean the lens periodically, at least
once every 2 months.
1 Facing the front of the product, hold and
gently pull both sides of the air inlet (cover) to
remove it.
• The side with the LG logo on the display is
the front of the product.
2 Push the sensor cover up.
3 Clean the lens with a cotton swab soaked with
water and dry it off with a dry cotton swab.
4 Close the sensor cover.
NOTE
• Do not wipe the sensor with any substances
other than water. Doing so may cause the
appliance to malfunction.
• When opening or closing the sensor cover, a
sound caused by friction may be heard.
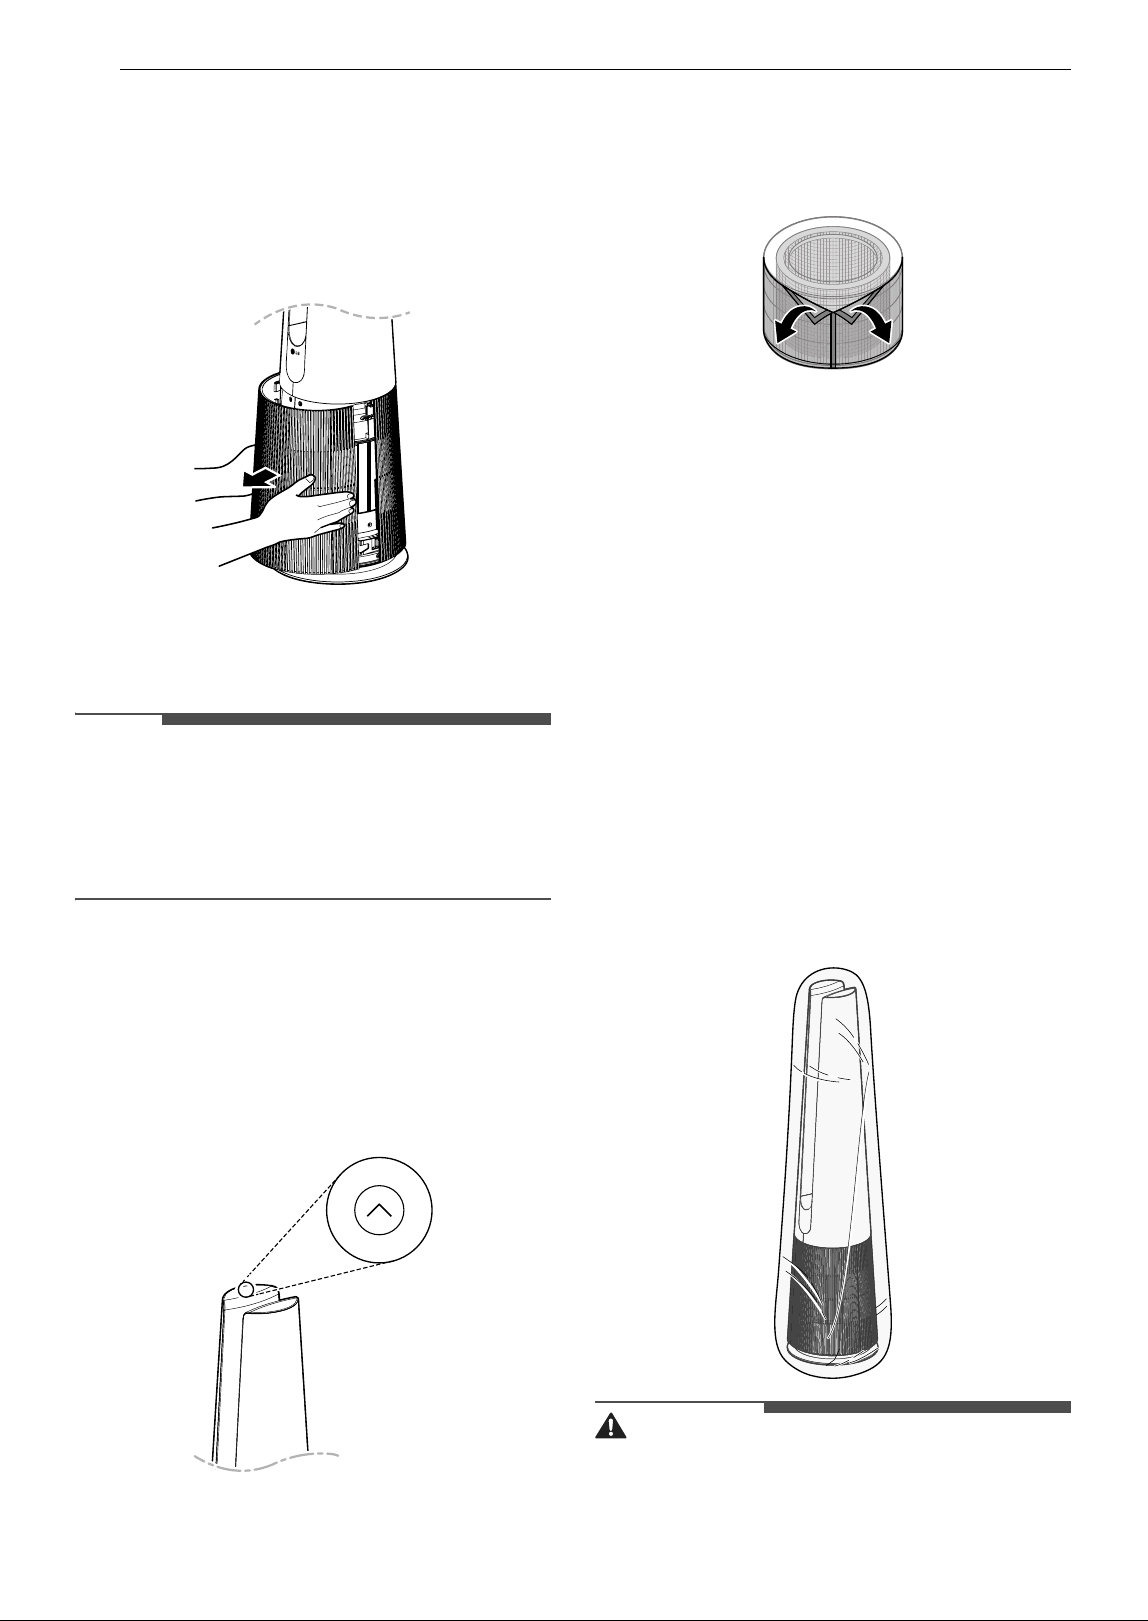
Cleaning the Filters
1 Remove the front and rear covers from the
product.
• Facing the front of the product with the LG
logo, hold and gently pull both sides of the
cover on top of the air inlet (cover) to
remove it. Repeat to remove the back cover.
31MAINTENANCE
ENGLISH
2 Using a vacuum cleaner or soft brush, remove
any dust from the ultra-fine filter surrounding
the filter.
CAUTION
• Do not clean the filter with water. The service life
of the filter may be reduced.
• Be careful not to damage the ultra-fine filter
when using a vacuum cleaner.
• Take caution because there is a risk of tearing or
loss when removing or assembling the ultra-fine
filter.
• Take care to avoid getting liquid on the filter, as
it may damage the filter.
32 MAINTENANCE
Replacing the Filters
1 Remove the cover of the product, and replace
the filter.
• To avoid spreading dust when replacing the
filter, place newspaper on the floor before
you remove the filter.
2 When you finish replacing the filter, turn off
the Filter Replacement Notification.
NOTE
• The Filter Replacement Notification is turned on
according to the maximum period of use,
considering the operating time of the product.
The replacement interval may vary depending
on the hours of use and the environment.
Turning off Filter Replacement
Notification
Press and hold the Speed Up button on the control
panel for 3 seconds.
g (Filter Replacement Notification) on the status
display is turned off and the time for the Filter
Replacement Notification is reset.
Replacing the Ultra-Fine Filter
To replace the ultra-fine filter, locate the Velcro
and separate it slowly and carefully to remove the
ultra-fine filter.
Storage
Storing the Product
If the product will not be used for a long period of
time, store it in a dry and shaded place.
1 Operate the product for one hour or more on
a fine day.
2 Turn off the power and unplug the product
from the electrical outlet.
• Wind the power cord around the bottom of
the appliance.
3 Pack the appliance to prevent dust or foreign
substances from entering the appliance.
Store the packed appliance out of direct
sunlight.
CAUTION
• Do not store the appliance in a humid location or
in an area exposed to direct sunlight.
33MAINTENANCE
ENGLISH
If you do so, the appliance may be deformed,
malfunction or generate odor.
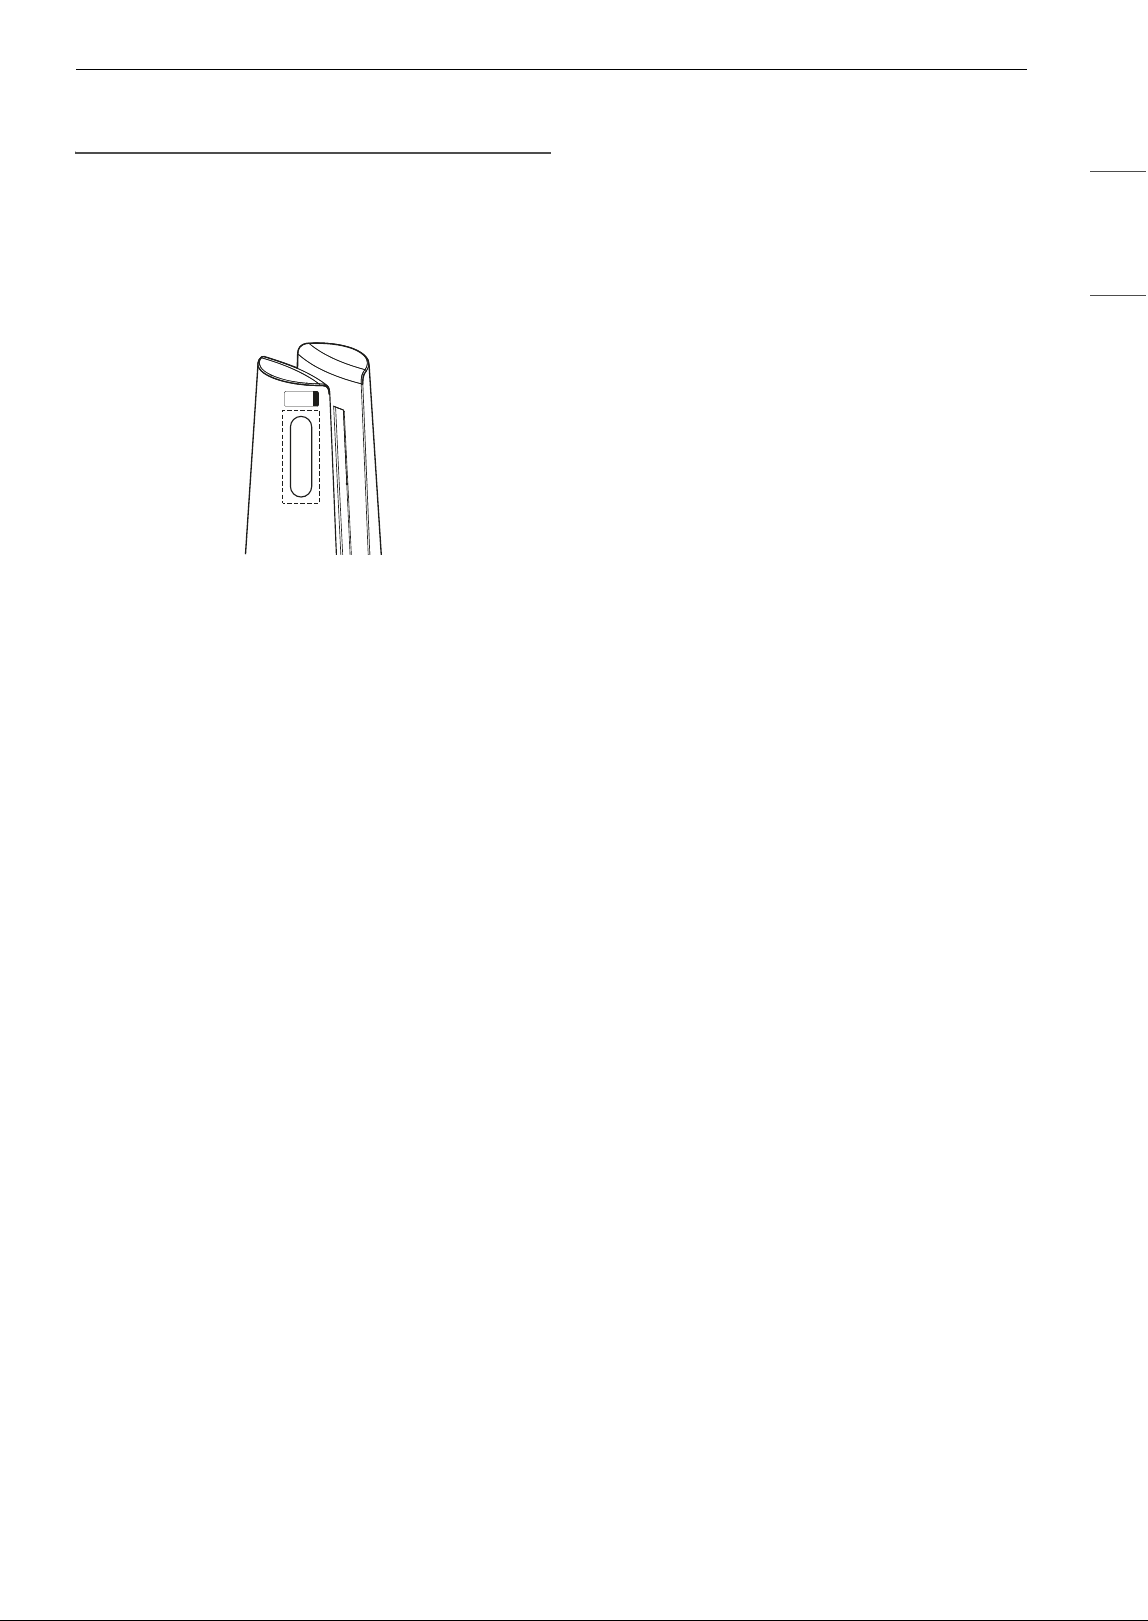
Storing the Remote Control
If you are not going to use the remote control for
an extended period of time, remove the battery
and store the remote control after attaching it to
the product.
• Attach the front part of the remote control under
the remote control attachment location label.
34 TROUBLESHOOTING
TROUBLESHOOTING
Before Calling for Service
Please check the following before calling for service. If the problem persists, contact your local service
center.
Operation
Status Display
Problem Possible Cause & Solution
The product does not
power on.
Is the power plug disconnected?
• Connect it to an outlet correctly.
Did the electricity get cut off?
• Check the power to other products in the house.
A noise occurs and
the fan speed is low.
Has dust accumulated in the ultra-fine filter?
• Clean the ultra-fine filter.
Has dust accumulated in the filter?
• Replace the filter.
Air purification is not
done properly.
Is the indoor pollution severe?
• Ventilate indoors before using the product.
Has dust accumulated in the ultra-fine filter?
• Clean the ultra-fine filter.
Has dust accumulated in the filter?
• Replace the filter.
Are you using it in a place that is too spacious or too open?
• Use a product that suits the size of the room.
• Avoid well-ventilated places such as doors, windows, etc.
Is there an obstacle nearby?
• Remove any nearby obstacles before operating the product.
Is the product installed in a corner?
• Move the product and reinstall it.
Problem Possible Cause & Solution
The color of the
overall air quality is
continuously red.
Does the color not change even if it is moved to a clean room?
• Remove the power plug from the outlet and reconnect after 1 minute.
Did you use a spray near the product?
• Do not use a spray near the product.
The concentration of
PM does not change.
Is the product used in a closed space?
• In a closed space, the displayed air quality level may continue unchanged.
The concentration of
PM continues to be
high.
Does the air continue to flow in from the outside to the location where the product is
installed?
• In an environment where air flows in from the outside, the concentration level may
continue to be high.
35TROUBLESHOOTING
ENGLISH
Odor
LG ThinQ
The level of the
concentration of PM
displayed on the
product is different
from that in the LG
ThinQ application.
Are you looking at the same type of dust particle?
• Check if the indication of PM1.0 (super ultra-fine dust), PM2.5 (ultra-fine dust) and PM10
(fine dust) matches between the LG ThinQ application and the product.
• Due to a difference in update time between the LG ThinQ application and the product, the
level displayed in real time may differ.
Nothing comes on
the screen.
Is the display brightness set to OFF?
• To change the display brightness, press and hold the Sleep Timer button on the remote
control for 2 seconds.
The temperature and
humidity displayed
are different from
those displayed by
other products.
Does the air continue to flow in from the outside to the location where the product is
installed?
• In an environment where air flows in from the outside, the temperature and humidity may
change continuously.
• The temperature and humidity may vary depending on the structure of the surrounding
environment, such as doors, windows, and ventilation ducts.
• The temperature and humidity may vary depending on air circulation even in the same
space. Also, the temperature and humidity may differ from the temperature and humidity
measured by other products and thermo-hygrometers.
Problem Possible Cause & Solution
A strange odor
comes out of the air
outlet as well as the
filter.
Was the product purchased recently?
• This is the odor of activated charcoal, and is not harmful. This is similar to the odor you
may experience in a brand new car. It will go away within a day following use.
Is the product used in a place where there is lots of smoke or odors?
• If the air purifier is operated after an air freshener, diffuser, or scented candle has been
used, or interior work or wallpaper replacement have occurred, the filter may absorb and
emit an odor. Ventilate the room first before using the product.
Does the filter have a bad smell?
• The filter replacement cycle may vary depending on the usage environment. If there is an
odor, replace the filter with a new one.
Is it in an environment in which food is prepared?
• If you use the product for a long period of time where you cook or broil fish/meat, the filter
lifespan may be significantly decreased.
• If possible, open a window for ventilation while cooking, and use the product to remove
any odors left following ventilation.
Is it a humid environment?
• The filter may emit an odor if used in a humid environment. Dry the filter in sunlight before
use.
Problem Possible Cause & Solution
The product and the
smartphone cannot
be connected
through Wi-Fi.
Is the Wi-Fi password used to connect to the smartphone correct?
• Press the Settings button on your smartphone, and then find your Wi-Fi in the network list.
Press and hold the button to select [Clear Network], and then proceed with product
registration again from the beginning.
Problem Possible Cause & Solution

36 TROUBLESHOOTING
The product and the
smartphone cannot
be connected
through Wi-Fi.
Is your smartphone using mobile data rather than Wi-Fi?
• In the smartphone's settings, turn off Mobile Data, turn on Wi-Fi, and then register the
product.
Does the name (ID) of the wireless router contain special characters?
• Set the name (ID) of the wireless router as a combination of numbers and English letters.
Wi-Fi connection may be difficult if you enter special characters.
Is the frequency of the wireless router not 2.4 GHz?
• When connecting the product via Wi-Fi, only a 2.4 GHz network can be used. Set the
wireless router to 2.4 GHz and then connect. To check the frequency of your wireless
router, contact your Internet carrier or router manufacturer.
Are the product and the wireless router too far apart?
• If the distance between the product and the wireless router is too great, the wireless signal
may be weak, and the connection may not be smooth. Move the wireless router closer to
the product.
Problem Possible Cause & Solution
37APPENDIX
ENGLISH
APPENDIX
Information
APPLIANCE SPECIFICATIONS
• Appearance and specifications may vary without notice to improve the quality of the appliance.
Name U10CS1H
Power AC 115 V~ 60 Hz
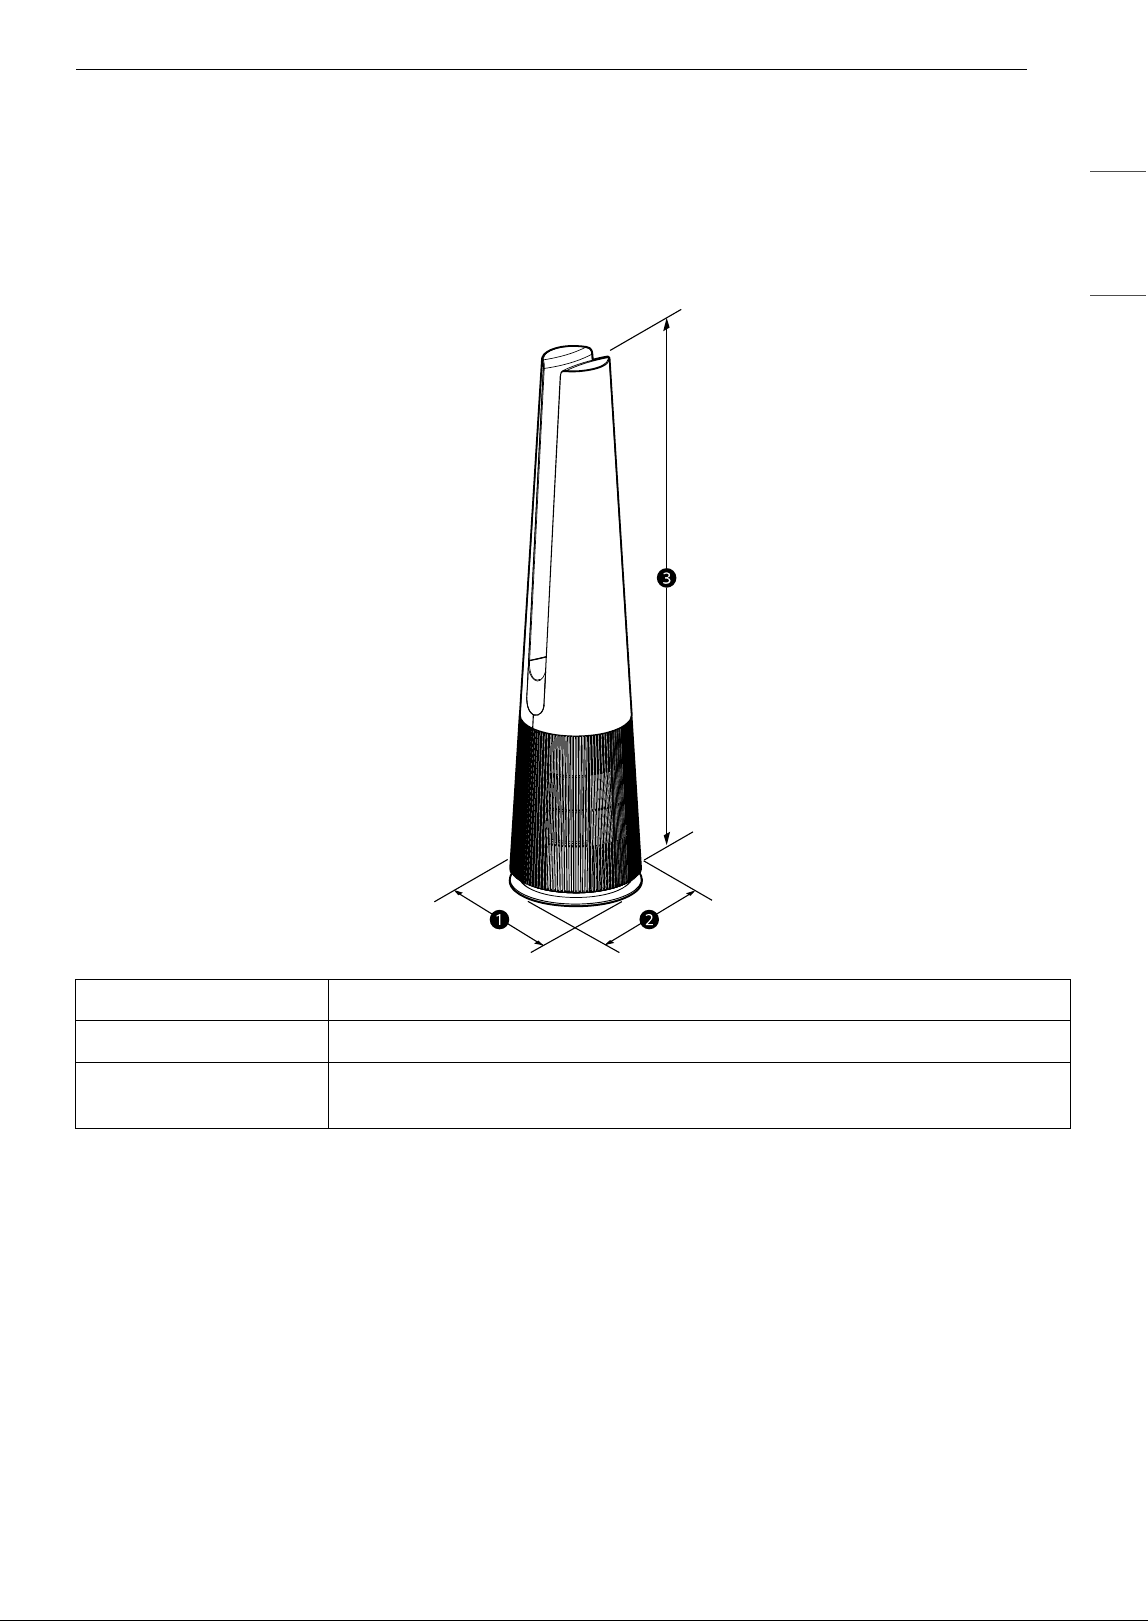
Exterior Dimensions
(a x b x c)
10.4" x 10.4" x 44.1" (265 mm x 265 mm x 1120 mm)
38 APPENDIX
Coin/Button Cell Battery
• Remove and immediately recycle or dispose of used batteries according to local regulations and keep
away from children. Do not dispose of batteries in household trash or incinerate.
• Even used batteries may cause severe injury or death.
• Call a local poison control center for treatment information.
• Compatible battery type (CR2025).
• Nominal battery voltage: 3 V
• Non-rechargeable batteries are not to be recharged.
• Do not force discharge, recharge, disassemble, heat above temperature rating 212 °F or incinerate.
Doing so may result in injury due to venting, leakage or explosion resulting in chemical burns.
• Ensure the batteries are installed correctly according to polarity (+ and -).
• Do not mix old and new batteries, different brands or types of batteries, such as alkaline, carbon-zinc, or
rechargeable batteries.
• Remove and immediately recycle or dispose of batteries from equipment not used for an extended
period of time according to local regulations.
• Always completely secure the battery compartment. If the battery compartment does not close securely,
stop using the product, remove the batteries, and keep them away from children.

39LIMITED WARRANTY
ENGLISH
LIMITED WARRANTY
USA
ARBITRATION NOTICE:
THIS LIMITED WARRANTY CONTAINS AN ARBITRATION PROVISION THAT REQUIRES YOU AND LG
ELECTRONICS (“LG”) TO RESOLVE DISPUTES BY BINDING ARBITRATION INSTEAD OF IN COURT, UNLESS
YOU CHOOSE TO OPT OUT. IN ARBITRATION, CLASS ACTIONS AND JURY TRIALS ARE NOT PERMITTED.
PLEASE SEE THE SECTION TITLED “PROCEDURE FOR RESOLVING DISPUTES” BELOW.
WHAT THIS WARRANTY COVERS:
Should your LG Air Purifier ("Product") fail due to a defect in materials or workmanship under normal and
proper use, during the warranty period set forth below, LG will, at its option, repair or replace the Product.
This limited warranty is valid only to the original retail purchaser of the Product ("You") and applies only
when purchased lawfully and used within the United States including U.S. Territories.
NOTE
• Replacement Products and parts are warranted for the remaining portion of the original warranty period
or ninety (90) days, whichever is greater.
• Replacement Products and parts may be new, reconditioned, refurbished, or otherwise factory
remanufactured.
• Replaced Product or part(s) will be the property of LG.
• Proof of original retail purchase specifying the Product model and date of purchase is required to obtain
warranty service under this limited warranty.
INFORMATION
WARRANTY PERIOD:
1 year from the Date of Purchase: Any internal/ functional Parts and Labor
HOW SERVICE IS HANDLED: In-Home Service
In-home service will be provided during the warranty period subject to availability within the United States.
In-home service may not be available in all areas. To receive in-home service, the product must be
unobstructed and accessible to service personnel. If during in-home service repair cannot be completed, it
may be necessary to remove, repair and return the product. If in-home service is unavailable, LG may elect,
at our option, to provide for transportation of our choice to and from an LG authorized service center.
EXCEPT TO THE EXTENT PROHIBITED BY APPLICABLE LAW, ANY IMPLIED
WARRANTY OF MERCHANTABILITY OR FITNESS FOR A PARTICULAR PURPOSE ON
THE PRODUCT IS LIMITED IN DURATION TO THE DURATION OF THE ABOVE LIMITED
WARRANTY. UNDER NO CIRCUMSTANCES SHALL LG OR ITS U.S. DISTRIBUTORS/
DEALERS BE LIABLE FOR ANY INDIRECT, INCIDENTAL, CONSEQUENTIAL, SPECIAL,
OR PUNITIVE DAMAGES, INCLUDING, WITHOUT LIMITATION, LOST GOODWILL,

40 LIMITED WARRANTY
LOST REVENUES OR PROFITS, WORK STOPPAGE, IMPAIRMENT OF OTHER GOODS,
COST OF REMOVAL AND REINSTALLATION OF THE PRODUCT, LOSS OF USE, OR ANY
OTHER DAMAGES WHETHER BASED IN CONTRACT, TORT, OR OTHERWISE. LG’S
TOTAL LIABILITY, IF ANY, SHALL NOT EXCEED THE PURCHASE PRICE PAID BY YOU
FOR THE PRODUCT.
SOME STATES DO NOT ALLOW THE EXCLUSION OR LIMITATION OF INCIDENTAL OR CONSEQUENTIAL
DAMAGES OR LIMITATIONS ON HOW LONG AN IMPLIED WARRANTY LASTS, SO THE ABOVE EXCLUSIONS
OR LIMITATIONS MAY NOT APPLY TO YOU. THIS LIMITED WARRANTY GIVES YOU SPECIFIC LEGAL RIGHTS
AND YOU MAY ALSO HAVE OTHER RIGHTS THAT VARY FROM STATE TO STATE.
THIS LIMITED WARRANTY DOES NOT COVER:
• Service trips to deliver, pick up, or install, educate how to operate, correct wiring, or correct
unauthorized repairs.
• Damage or failure of the Product to perform during power failures and interrupted or inadequate
electrical service.
• Damage or failure of the Product caused by leaky or broken water pipes, frozen water pipes, restricted
drain lines, inadequate or interrupted water supply or inadequate supply of air.
• Damage or failure of the Product resulting from operating the Product in a corrosive atmosphere or
contrary to the Product owner’s manual.
• Damage or failure of the Product caused by accidents, pests and vermin, lightning, wind, fire, floods, acts
of nature, or any other causes beyond the control of LG.
• Damage or failure of the Product caused by unauthorized modification or alteration, or if the Product is
used for other than the intended purpose, or any water leakage where the Product was not properly
installed.
• Damage or failure of the Product caused by incorrect electrical current, voltage, or plumbing codes.
• Damage or failure of the Product caused by transportation, storage, and/or handling, including
scratches, dents, chips, and/or other damage to the finish of the Product, unless such damage is
reported within one (1) week of delivery.
• Damage or failure of the Product resulting from misuse, abuse, improper installation, repair, or
maintenance. Improper repair includes the use of parts not authorized by LG. Improper installation or
maintenance includes installation or maintenance contrary to the Product owner’s manual.
• Damage or failure of the Product caused by the use of parts, components, accessories, consumable
cleaning products, or any other products or services that were not authorized by LG.
• Damage or missing items to any display or open box Product.
• Refurbished Product or any Product sold “As Is”, “Where Is”, “With all Faults”, or similar disclaimer.
• Products with original serial numbers that have been removed, altered, or cannot be readily determined.
• Increases in utility costs and additional utility expenses.
• Any noises associated with normal operation.
• Products used for other than normal and proper household use (e.g., commercial or industrial use) or
contrary to the Product owner’s manual.
• Costs associated with removal and reinstallation of the Product for repairs, or the removal and
reinstallation of the Product if it is installed in an inaccessible location or not installed in accordance with
the Product Owner's manual.
• Accessories, removable components, or consumable parts (e.g. Shelves, door bins, drawers, water/air
filters, racks, light bulbs, batteries, etc., as applicable), except for internal/functional parts covered under
this limited warranty.
• Replacing house fuses or resetting of circuit breakers, correction of house wiring or plumbing, or
correction of product installation.
41LIMITED WARRANTY
ENGLISH
The cost of repair or replacement under these excluded circumstances shall be
borne by You.
TO OBTAIN WARRANTY SERVICE AND ADDITIONAL INFORMATION
Call 1-800-243-0000 and select the appropriate option from the menu. Or visit our website at http://
www.lg.com
Or by mail: LG Customer Information Center (ATTN: CIC) 201 James Record Road, Huntsville, AL 35824
FOR YOUR RECORDS
Write the model and serial numbers here:
• This information is located on a label on the side of the unit.
• Staple your receipt to this page in the event you need it to prove date of purchase or for warranty issues.
Model No.
Serial No.
Dealer’s Name
Date Purchased

42 LIMITED WARRANTY
PROCEDURE FOR RESOLVING DISPUTES:
ALL DISPUTES BETWEEN YOU AND LG ARISING OUT OF OR RELATING IN ANY WAY TO THIS LIMITED
WARRANTY OR THE PRODUCT SHALL BE RESOLVED EXCLUSIVELY THROUGH BINDING ARBITRATION, AND
NOT IN A COURT OF GENERAL JURISDICTION. BINDING ARBITRATION MEANS THAT YOU AND LG ARE EACH
WAIVING THE RIGHT TO A JURY TRIAL AND TO BRING OR PARTICIPATE IN A CLASS ACTION.
Definitions. For the purposes of this section, references to “LG” mean LG Electronics U.S.A., Inc., its
parents, subsidiaries and affiliates, and each of their officers, directors, employees, agents, beneficiaries,
predecessors in interest, successors, assigns and suppliers; references to “dispute” or “claim” shall include
any dispute, claim or controversy of any kind whatsoever (whether based in contract, tort, statute,
regulation, ordinance, fraud, misrepresentation or any other legal or equitable theory) arising out of or
relating in any way to the sale, condition or performance of the product or this Limited Warranty.
Notice of Dispute. In the event you intend to commence an arbitration proceeding, you must first notify
LG in writing at least 30 days in advance of initiating the arbitration by sending a letter to LG at LG
Electronics, USA, Inc. Attn: Legal Department-Arbitration 111 Sylvan Avenue, Englewood Cliffs, NJ 07632.
You and LG agree to engage in good faith discussions in an attempt to amicably resolve your claim. The
notice must provide your name, address, and telephone number; identify the product that is the subject of
the claim; and describe the nature of the claim and the relief being sought. If you and LG are unable to
resolve the dispute within 30 days, either party may proceed to file a claim for arbitration.
Agreement to Binding Arbitration and Class Action Waiver. Upon failure to resolve the dispute during
the 30 day period after sending written notice to LG, you and LG agree to resolve any claims between us
only by binding arbitration on an individual basis, unless you opt out as provided below. Any dispute
between you and LG shall not be combined or consolidated with a dispute involving any other person’s or
entity’s product or claim. More specifically, without limitation of the foregoing, any dispute between you
and LG shall not under any circumstances proceed as part of a class or representative action. Instead of
arbitration, either party may bring an individual action in small claims court, but that small claims court
action may not be brought on a class or representative basis.
Arbitration Rules and Procedures. To begin arbitration of a claim, either you or LG must make a written
demand for arbitration. The arbitration will be administered by the American Arbitration Association
(“AAA”) and will be conducted before a single arbitrator under the AAA’s Consumer Arbitration Rules that
are in effect at the time the arbitration is initiated (referred to as the “AAA Rules”) and under the
procedures set forth in this section. The AAA Rules are available online at www.adr.org/consumer. Send a
copy of your written demand for arbitration, as well as a copy of this provision, to the AAA in the manner
described in the AAA Rules. You must also send a copy of your written demand to LG at LG Electronics,
USA, Inc. Attn: Legal Department-Arbitration 111 Sylvan Avenue, Englewood Cliffs, NJ 07632. If there is a
conflict between the AAA Rules and the rules set forth in this section, the rules set forth in this section will
govern. This arbitration provision is governed by the Federal Arbitration Act. Judgment may be entered on
the arbitrator’s award in any court of competent jurisdiction. All issues are for the arbitrator to decide,
except that issues relating to the scope and enforceability of the arbitration provision and to the
arbitrability of the dispute are for the court to decide. The arbitrator is bound by the terms of this
provision.
Governing Law. The law of the state of your residence shall govern this Limited Warranty and any
disputes between us except to the extent that such law is preempted by or inconsistent with applicable
federal law.
Fees/Costs. You do not need to pay any fee to begin an arbitration. Upon receipt of your written demand
for arbitration, LG will promptly pay all arbitration filing fees to the AAA unless you seek more than $25,000
in damages, in which case the payment of these fees will be governed by the AAA Rules. Except as
otherwise provided for herein, LG will pay all AAA filing, administration and arbitrator fees for any
arbitration initiated in accordance with the AAA Rules and this arbitration provision. If you prevail in the
arbitration, LG will pay your attorneys’ fees and expenses as long as they are reasonable, by considering
factors including, but not limited to, the purchase amount and claim amount. Notwithstanding the
foregoing, if applicable law allows for an award of reasonable attorneys’ fees and expenses, an arbitrator
can award them to the same extent that a court would. If the arbitrator finds either the substance of your
claim or the relief sought in the demand is frivolous or brought for an improper purpose (as measured by
the standards set forth in Federal Rule of Civil Procedure 11(b)), then the payment of all arbitration fees will
be governed by the AAA Rules. In such a situation, you agree to reimburse LG for all monies previously
disbursed by it that are otherwise your obligation to pay under the AAA Rules. Except as otherwise

43LIMITED WARRANTY
ENGLISH
provided for, LG waives any rights it may have to seek attorneys’ fees and expenses from you if LG prevails
in the arbitration.
Hearings and Location. If your claim is for $25,000 or less, you may choose to have the arbitration
conducted solely on the basis of (1) documents submitted to the arbitrator, (2) through a telephonic
hearing, or (3) by an in-person hearing as established by the AAA Rules. If your claim exceeds $25,000, the
right to a hearing will be determined by the AAA Rules. Any in-person arbitration hearings will be held at a
location within the federal judicial district in which you reside unless we both agree to another location or
we agree to a telephonic arbitration.
Opt Out. You may opt out of this dispute resolution procedure. If you opt out, neither you nor LG can
require the other to participate in an arbitration proceeding. To opt out, you must send notice to LG no
later than 30 calendar days from the date of the first consumer purchaser’s purchase of the product by
either: (i) sending an e-mail to opto[email protected], with the subject line: “Arbitration Opt Out” or (ii) calling 1-
800-980-2973. You must include in the opt out e-mail or provide by telephone: (a) your name and address;
(b) the date on which the product was purchased; (c) the product model name or model number; and (d)
the serial number (the serial number can be found (i) on the product; or (ii) online by accessing https://
www.lg.com/us/support/repair-service/schedule-repair-continued and clicking on “Find My Model & Serial
Number”).
You may only opt out of the dispute resolution procedure in the manner described above (that is, by e-mail
or telephone); no other form of notice will be effective to opt out of this dispute resolution procedure.
Opting out of this dispute resolution procedure will not affect the coverage of the Limited Warranty in any
way, and you will continue to enjoy the full benefits of the Limited Warranty. If you keep this product and
do not opt out, then you accept all terms and conditions of the arbitration provision described above.