
Read this owner’s manual thoroughly before operating the appliance and
keep it handy for reference at all times.
MFL71825202
OWNER’S MANUAL
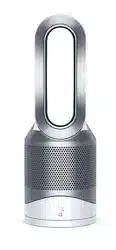
Air Purier
Rev.00_110921
Copyright © 2021 LG Electronics Inc. All Rights Reserved
www.lg.com
U9C Series
EN ENGLISH

EN
Index
This manual may contain images or content different from the model you purchased. This
manual is subject to revision by the manufacturer.
SAFETY INSTRUCTIONS
Installation
10 Parts Instruction
12 Unpacking the Appliance
13 Installation Location Requirements
13 Transportation Requirements
Operation
14 Status Display
15 Control Panel
17 Getting Started
20 Using Extra Functions
Smart functions
24 LG ThinQ Application
27 Smart Diagnosis
Maintenance
28 Maintaining the Appliance
29 Cleaning the Appliance
29 Maintaining the Filter
Troubleshooting
32 Before Calling for Service
36 Appliance Specifications
WARRANTY (USA)
03
EN
SAFETY INSTRUCTIONS
READ AND SAVE THESE INSTRUCTIONS
The following safety guidelines are intended to prevent unforeseen
risks or damage from unsafe or incorrect operation of the
appliance.
The guidelines are separated into ‘WARNING’ and ‘CAUTION’ as
described below.
This symbol is displayed to indicate matters and
operations that can cause risk. Read the text marked
with this symbol carefully and follow the instructions in
order to avoid risk.
WARNING
This indicates that failure to follow the instructions can
cause serious injury or death.
CAUTION
This indicates that failure to follow the instructions can
cause minor injury or damage to the product.
IMPORTANT SAFETY INSTRUCTIONS
WARNING
To reduce the risk of explosion, re, death, electric shock,
injury or scalding to persons when using this product, follow
basic precautions, including the following:
Children in the Household
•
This appliance is not intended for use by persons (including
children) with reduced physical, sensory or mental
capabilities, or lack of experience and knowledge, unless
they have been given supervision or instruction concerning
use of the appliance by a person responsible for their safety.
Children should be supervised to ensure that they do not play
with the appliance.

04
EN
Installation
•
Do not install the appliance on an uneven or inclined surface.
•
Do not install the appliance in an area exposed to direct
sunlight or near heat-generating equipment.
•
Do not install the product in a place where combustible gas
may leak or industrial oil or metallic particulates are present.
•
Do not allow the appliance to push against the power cord or
plug.
•
Do not touch the power plug with wet hands.
•
When unplugging the power cord, always pull it by the plug.
•
Unplug the appliance during thunder or lightning storms or
when not in use for a long time.
•
Do not bend the power cord excessively or place a heavy
object on top of it.
•
Do not extend the length of the power cord or alter it.
•
Do not use several devices on a multi-socket extension outlet.
•
Make the connection securely so that screw in terminals will
not be loosened when the power cord is pulled.
•
Make sure that the power cord cannot be be pulled out or
damaged during operation.
•
If the power cord is damaged, it must be replaced by the
manufacturer, its service agent or similarly qualied person in
order to avoid a hazard.
•
This appliance has a polarized plug (one blade is wider than
the other). To reduce the risk of electric shock, this plug is
intended to t in a polarized outlet only one way. If the plug
does not t fully in the outlet, reverse the plug. If it still does
not t, contact a qualied electrician. Do not attempt to defeat
this safety feature.

05
EN
Operation
•
If the appliance is immersed in water, stop using it and contact
an LG Electronics Customer Information Center.
•
If there is a gas leakage (isobutane, propane, LNG, etc.), do
not touch the product or power plug and ventilate the area
immediately.
•
Do not clean the appliance with brushes, cloths or sponges
which are abrasive or made of metal.
•
If you detect any abnormal noise, odor or smoke, unplug the
product immediately and contact an LG Electronics Customer
Information Center.
•
Only an authorized repair person should disassemble, repair,
or modify the appliance.
•
Do not use or store re, combustibles (ether, benzene,
alcohol, drugs, propane, butane, combustible spray,
insecticide, air freshener, cosmetics, etc.) or ammable
materials (candles, lamps, etc.) near the product.
•
Do not place the power cord under rugs, carpeting or mats.
•
Do not allow animals or pets to chew on the power cord.
•
Do not move the appliance when it is in operation.
•
Do not hit the appliance.
•
Do not insert hands or metal objects into the air inlet or outlet.
•
Do not install and use broken parts.
•
Do not put ammables into the appliance.
•
Do not allow children to climb on or play with the appliance.
•
Do not place anything on top of the appliance.

06
EN
•
The fan is not a toy. It should not be played with or placed
where young children can reach it.
•
Be careful that children do not get their hands caught in the
vanes by putting their hands during the vanes operation.
•
This product uses UVnano LED. Do not disconnect or replace
the UVnano LED arbitrarily. LEDs must be replaced only by
LG-approved service providers.
•
Harmful UVnano radiation may leak if the device is used in an
unintended way or if the wires are damaged. UVnano radiation,
even in very small amounts, can harm the eyes and skin.
•
Be careful not to let any part of your body put on between the
vanes during the vane operation.
•
Do not replace the UV Lamp while it is plugged in.
- Skin or eye damage may result from directly viewing the light
produced by the lamp in this apparatus. Always disconnect
power before relamping or servicing. Replace Lamp With
Lamp CUD7GF1B, Manufactured by Seoul Viosys Co.,
LTD.Replace Lamp With Lamp LTPL-G35U275GC-TWA,
Manufactured by Lite-On Technology Corporation.
Maintenance
•
Dispose of the packing materials (vinyl, styrofoam, etc.) to
keep them out of reach of children.
•
Take care not to injure or pinch yourself when you detach and
reattach parts of the appliance.
•
Turn off and unplug the appliance before cleaning it or
replacing the lter.
07
EN
CAUTION
To reduce the risk of minor injury to persons,
malfunction, or damage to the product or property
when using this product, follow basic precautions,
including the following:
Installation
•
Do not tilt the appliance to pull or push it when transporting.
•
Do not install the appliance in a vehicle, RV, or marine vessel.
•
Do not place the appliance near a TV or stereo equipment.
•
Do not place the appliance under bright light.
•
The appliance must be installed in accordance with national
wiring regulations.
•
When moving or storing the appliance, wrap the power cord
around the base of the appliance to prevent personal injury,
damage to the cord or damage to oors.
•
Do not place the appliance near curtains.

08
EN
Operation
•
Do not use the product for removal of toxic gas such as
carbon monoxide.
•
Do not use the product for ventilation purposes.
•
Do not use the appliance for a long time in a region with
unstable voltage.
•
Do not place obstacles around the air inlet or outlet.
•
For safe use of the appliance, children or others with reduced
mental capabilities need to be closely monitored by a person
who is responsible for their safety.
•
Do not use the product for special purposes such as
preserving plants, precision instruments, artworks, etc.
•
Do not operate the appliance with wet hands.
•
Do not let the moisture from a humidier directly touch the
appliance.
•
Do not use the appliance while it is not in an upright position.
•
Do not use the appliance near objects vulnerable to heat.
•
Do not use detergents, cosmetics, chemicals, air fresheners,
or disinfectants in the appliance.
•
Do not touch any internal parts while the unit is operating or
immediately after operation.
•
Use the lter only for its intended purpose.
•
The Deodorizing Care lter and True HEPA lter are
assembled together. Do not try to detach them from each
other.
•
Do not insert any objects into the Air outlet.

09
EN
Maintenance
•
Do not use strong detergents or solvents to clean the product.
Use a soft cloth to clean.
•
Do not clean the appliance with an alkaline detergent.
•
Do not wipe the appliance surface using sulfuric acid,
hydrochloric acid or organic solvents (thinner, kerosene etc.)
or attach a sticker on the appliance.
•
Do not allow water inside the appliance.
•
Do not wash the lter with water.
•
Be careful not to damage the ultra-ne lter when cleaning it
with a vacuum cleaner.

EN
10
EN
Installation
•
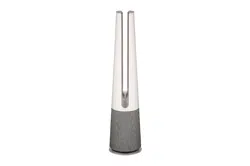
The appearance or functions of the appliance may differ depending on the model.
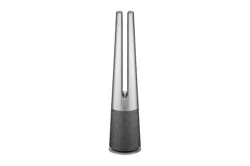
Parts Instruction
Front Rear
Controller
•
Sets the product functions.
Vane
•
Moves depending on the operating
mode(Wide / Direct / Diffusion).
Air Outlet
•
It discharges puried air through the lter.
Display
(Status Display / Remote Control Receiver)
•
Displays the settings of the product and the
air condition.
Filter
•
Minimizes allergens, ne particulates,
possible sources of sick house syndrome,
smog, and other odors.
Smart Diagnosis
•
If the product malfunctions, use Smart
Diagnosis to check the product status. (See
Smart Diagnosis in Smart Functions)
Sensor
•
PM1.0 (particles with a diameter between
1.0 and 2.5 micrometers) Sensor: Detects
the concentration levels of dust.(Y
ou do not
need to clean the sensor lens separately.)
Product Center Line
•
It is the center line of the product.
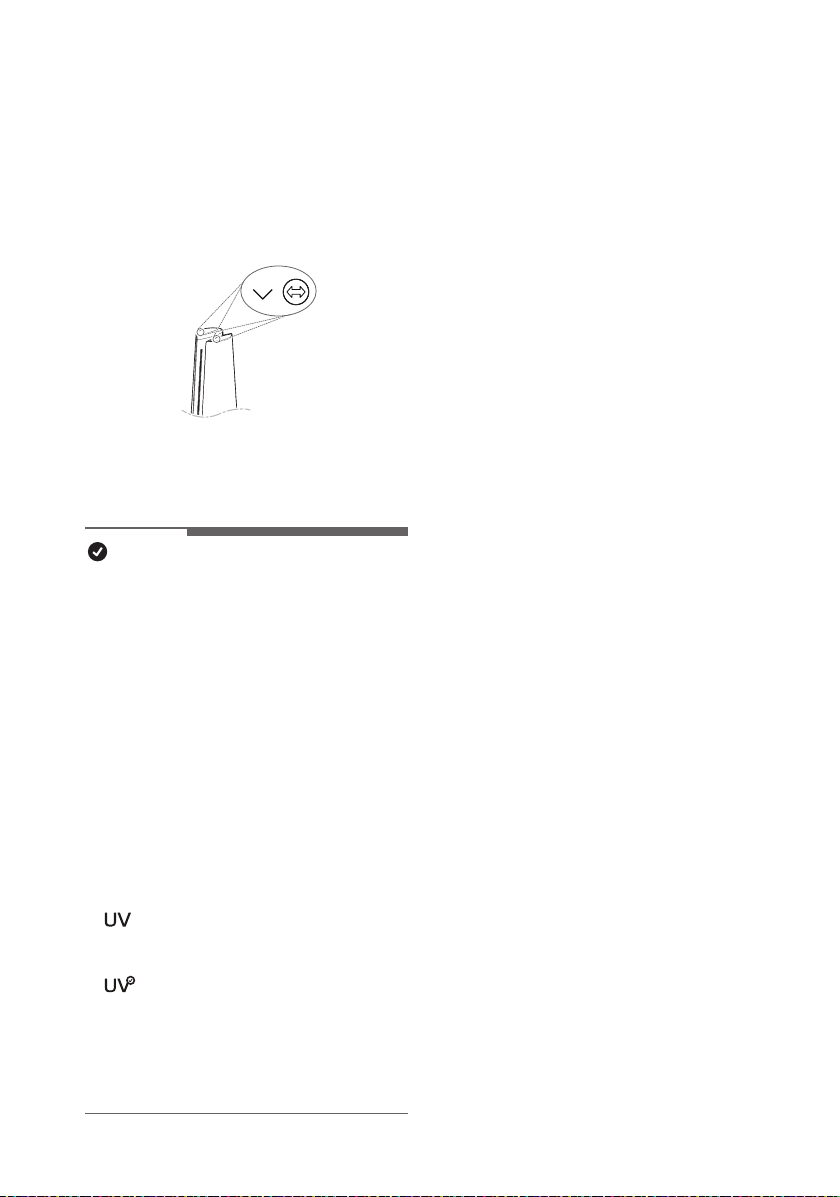
UVnano LED(Only models with UVnano
applied)
•
Remove the harmful bacteria at internal fan
of the air purier.
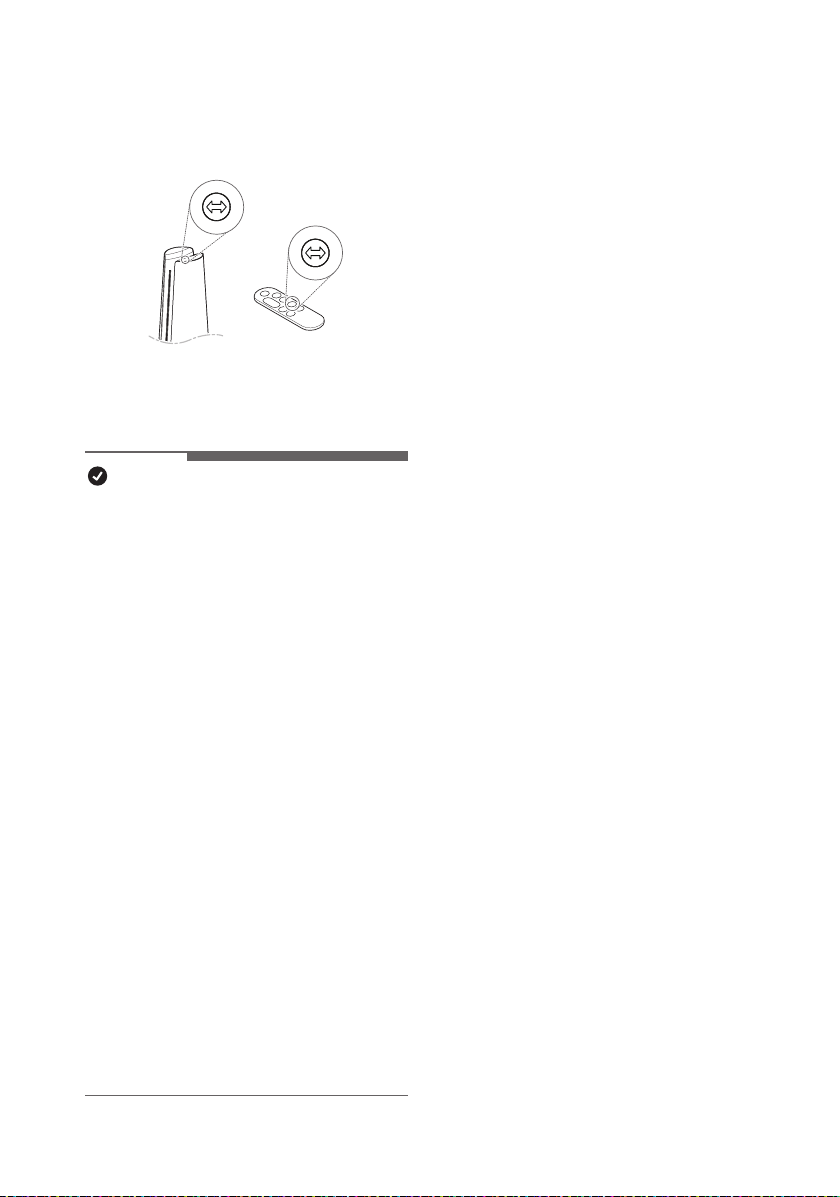
Remote Control Holder
•
Attach the remote controller to store it.
Handle
•
Use when carrying the product.
Temperature/Humidity Sensor
•
Detects temperature and humidity.
Air Inlet (Cover)
•
Air goes into the purier through the inlet.
•
The front and rear covers may be removed
separately.
CAUTION
•
Be careful not to stick magnets or metal objects to
the remote controller holder as it is attached with
magnets.
•
Be careful that children do not get caught by
putting their hands during the Vane operation.
11
ENEN
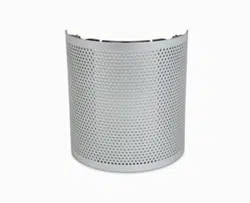
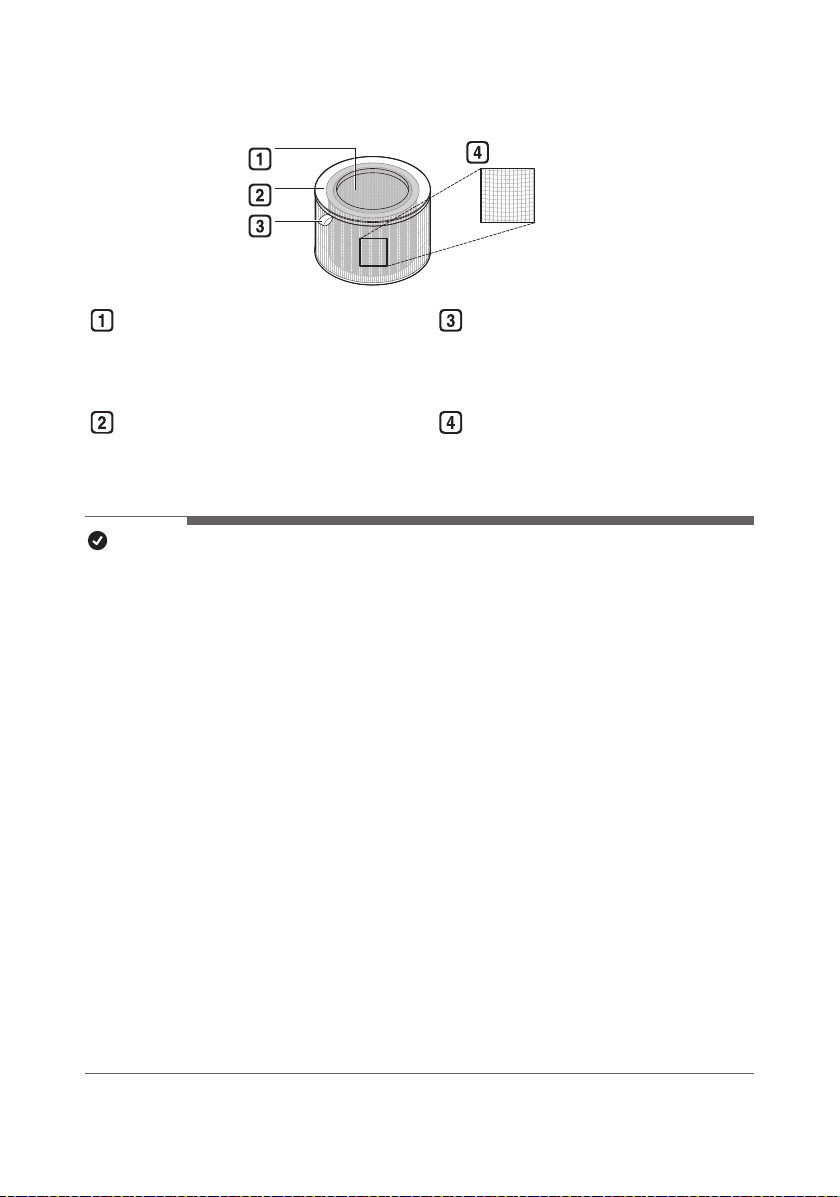
Filter System
Ultra Fine Filter
Deodorizing Care lter
Minimizes odors from the bathroom,
cigarettes, food and other common
sources.
True HEPA lter
Minimizes PM1.0 and cigarette smoke
from the air.
Filter Handle
Use it to remove the lter from the
product.
Ultra Fine Filter
Minimizes large particles oating in
the air.
Note
•
A slight odor may be emitted from the new lter at the beginning after purchase. The odor
will disappear after a day or so of using the product, so you can use it without worry.
•
The frequency of cleaning and lter replacement may vary depending on environment and
usage time.
•
Filters may be used for up to 1 year. The more polluted the indoor air, the shorter the life of
the lter.
•
If an excessive odor is present in the room, rst ventilate the air to remove the odor, and
then use the air purier to remove the remaining odor.
•
If the air purier is used after not having been used for a long time and there is an odor,
you can reduce the odor from the lter by operating it on fan speed 10 step in a ventilated
area.
•
The lter may emit an odor when used continuously in a humid environment or where
moisture from a humidier is absorbed into the lter. If odor is generated due to moisture,
dry the lter in sunlight before use.
•
Carbon monoxide (CO) is a harmful gas that is mainly introduced from the outside, and
cannot be removed with a lter.
•
Keep the windows or doors closed while using the product. However, if you operate the
product for a long time in a closed space, the carbon dioxide concentration may rise. So
be sure to ventilate the indoor regularly.
•
The deodorization function of the air purier operates by trapping the odor in the lter. If
you use the product for a long time in a room with excessive odor, the performance of the
lter may decrease signicantly.
12
EN
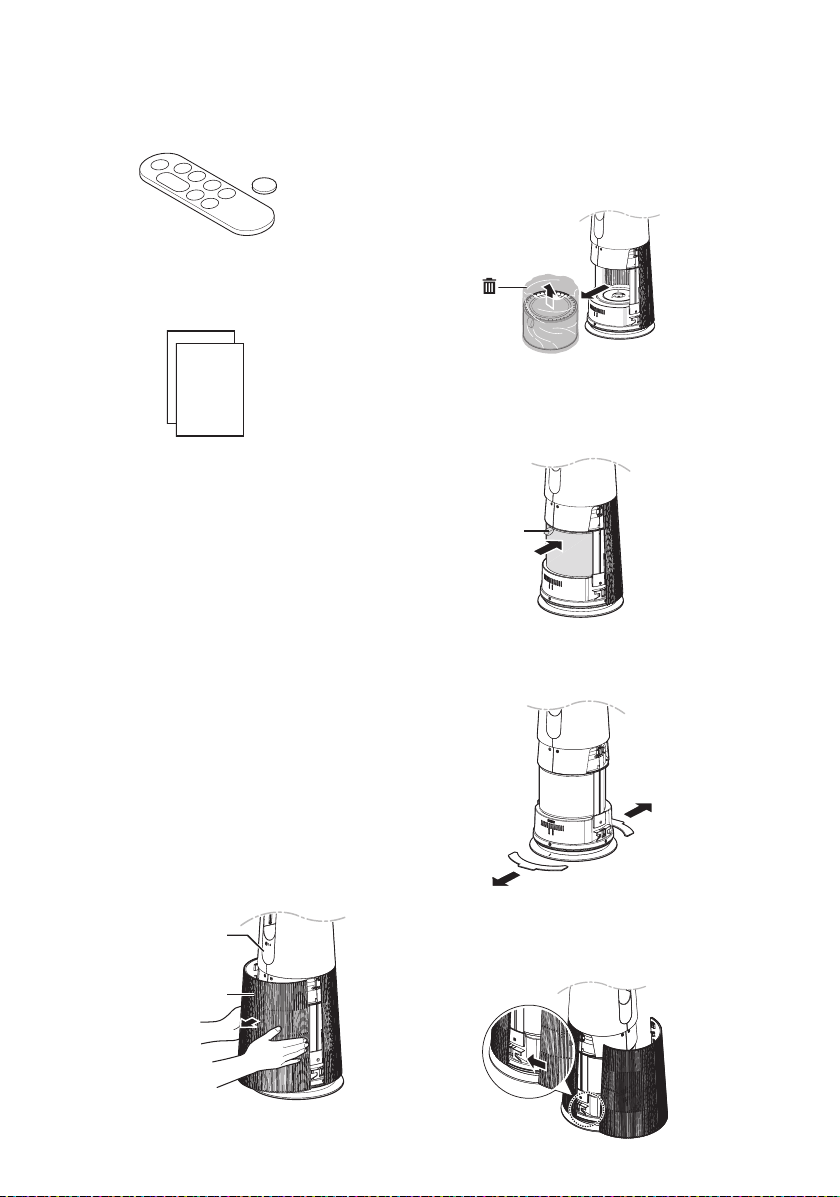
Accessories
Remote Control/Battery
(CR2025, 1 Unit)
Owner’s Manual / Quick Guide
Unpacking the Appliance
Remove the xing tape and protective vinyl,
packing material product and its lter before use.
Removing lter vinyl and
packing material
1
Remove the product from the
packaging and remove the xing tape
attached to the product.
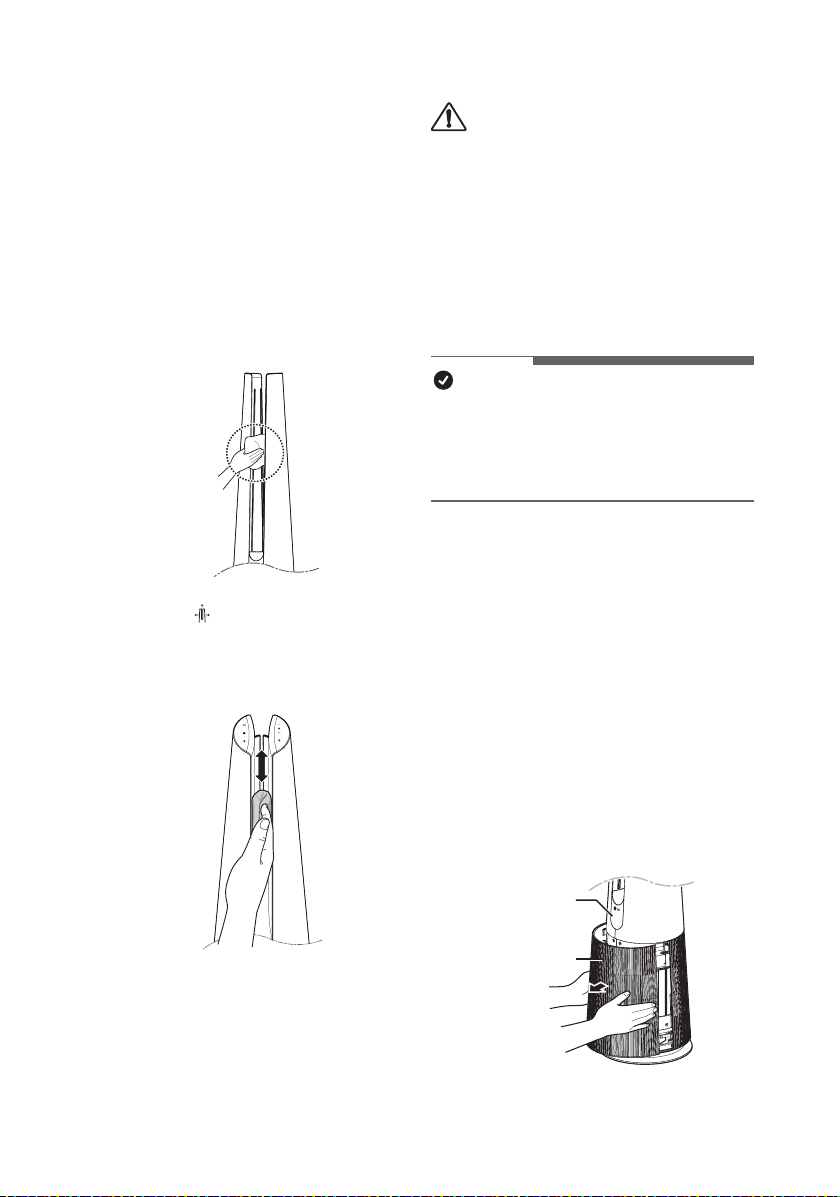
2
Grab the cover and gently pull to
separate it from the appliances.
•
The direction with the LG logo on
the product display is the front of the
product.
Display
Air inlet(cover)
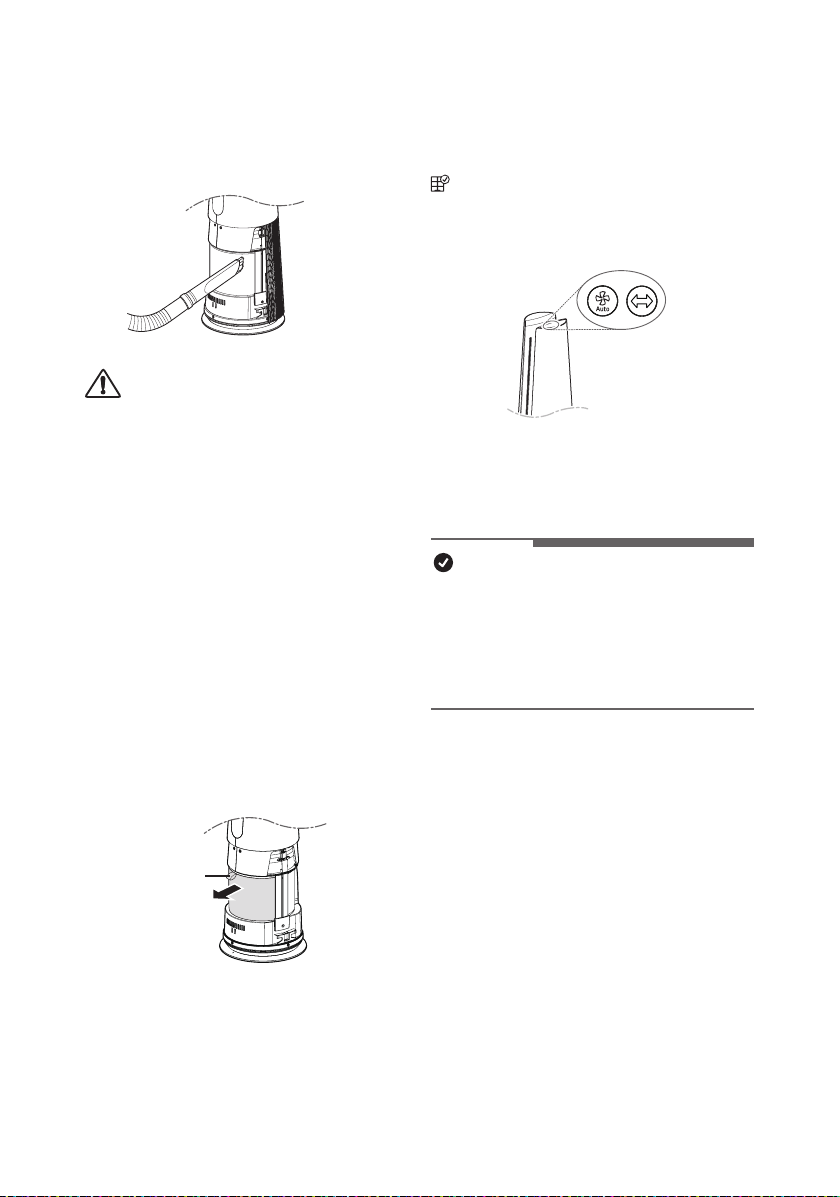
3
After separating the lter, remove its
protective vinyl.
•
When removing the packaged lter,
separate it from the protective vinyl.
4
Install the lter in the product.
•
Make sure that the handle is facing
upward.
Handle
5
Remove the packing material inserted
at the bottom of the product.
6
Insert the tabs at the bottom of the
cover into the slots in the base of the
appliance and close the cover.
13
EN
CAUTION
•
Be sure to remove the vinyl from the lter
before using the product.
•
Pay attention to the direction of the lter
when installing the lter.
•
Be sure to remove the cushioning material
before using the product.
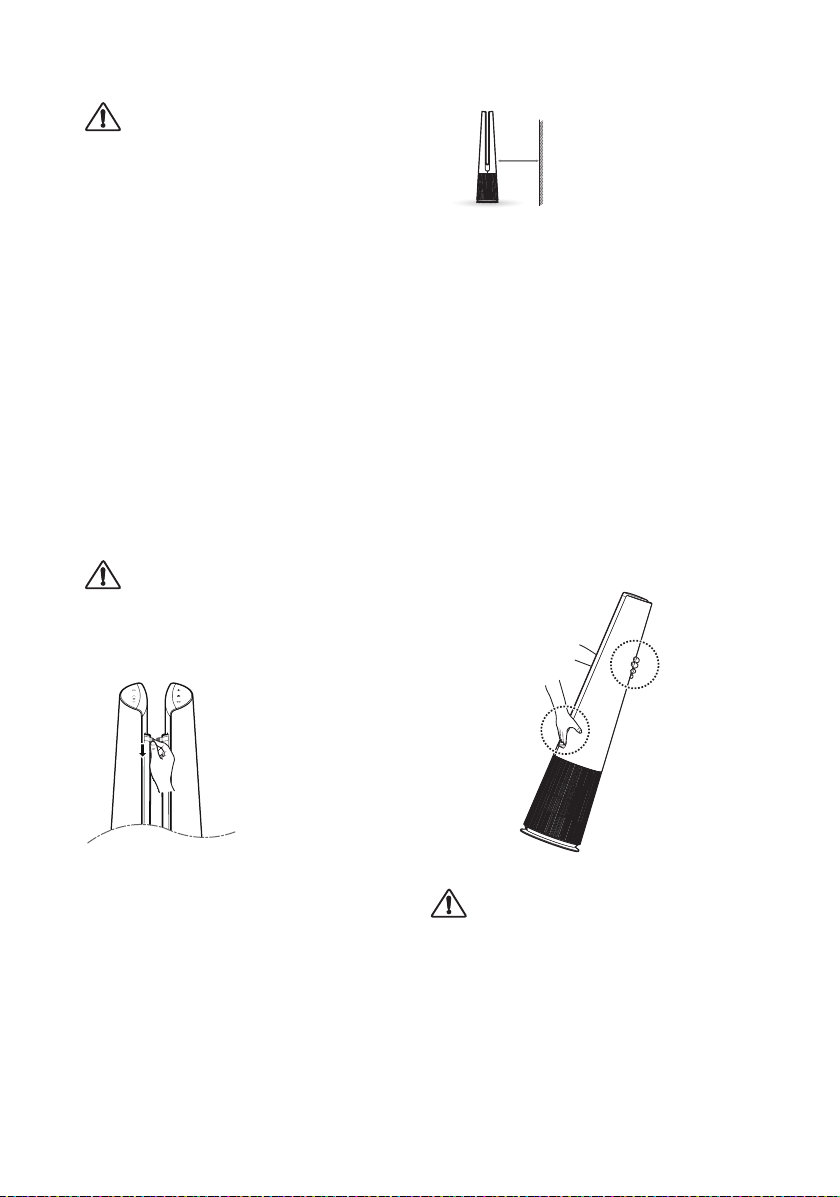
Removing vane vinyl
Use the product after removing the vane
vinyl.
1. Operating product.
2. Press Mode button and select Diffusion
Mode.
3. After vanes come out, grasp the vinyl
at the top and remove it slowly in the
downward direction.
CAUTION
•
If you do not remove the vane vinyl, be
aware that the vinyl may make noise while
operating the product.
Installation Location
Requirements
Install at a distance of at least 3 ¼ ft (1 m)
from a wall.
•
If there is not enough space for air to be
taken in, performance of the air purier
may be reduced.
1 m
The performance of the product may differ
depending on the operating environment
(such as temperature and humidity).
•
Product performance may be slightly
degraded when used outside of a humidity
range of 40% to 70%.
Transportation Requirements
Be careful not to drag the power cord on the
oor when moving or storing the product.
Transporting the Appliance
Carry the product safely by using the handles
at the top and back of the product.
CAUTION
•
Do not move the product by holding the
outer cover. The cover may open and the
product may fall.
EN
14
EN
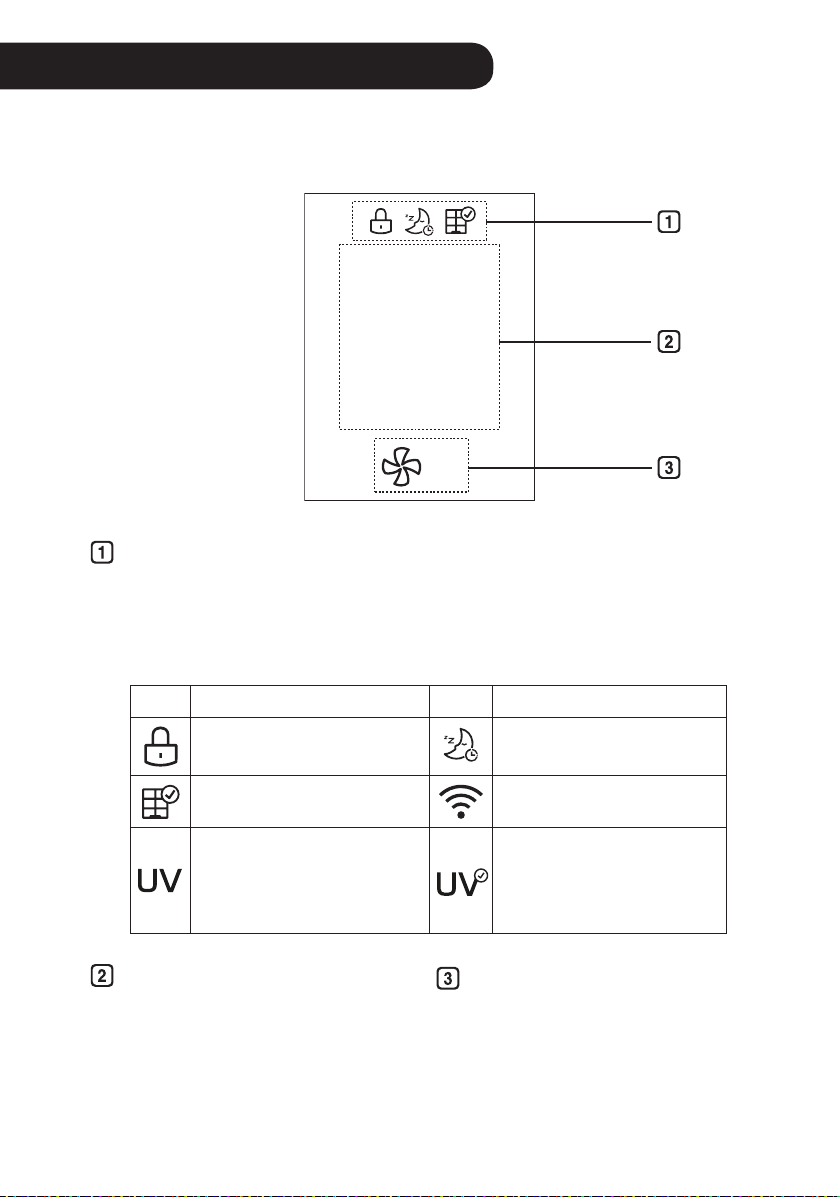
Add-on Display
•
Up to three icons are displayed
•
Icons are shown or displayed according to display priority.
–
Button Lock > Timer > Filter Replacement Notication > UVnano > Wi-Fi
Connection
Icon Description Icon Description
Displays when the control panel
is locked.
Displayed when the sleep timer
is set.
Displays when it is time to
replace the lter.
Displays when connected to
Wi-Fi.
Displayed when the UVnano
setting is enabled.
Displayed when the UVnano is
not working normally.
(Check if the lter and air
intake cover are properly
installed.)
Status display
•
Air quality, PM10/PM2.5/PM1.0 dust
concentration, temperature, humidity,
and operation status are displayed.
Fan Speed Display
•
Displays Fan speed from Auto,
Steps 1 to 10 and Turbo.
Operation
•
The appearance or accessories of the product may differ depending on the model.
Status Display
PM10
5
3
㎍/㎥
15
ENEN
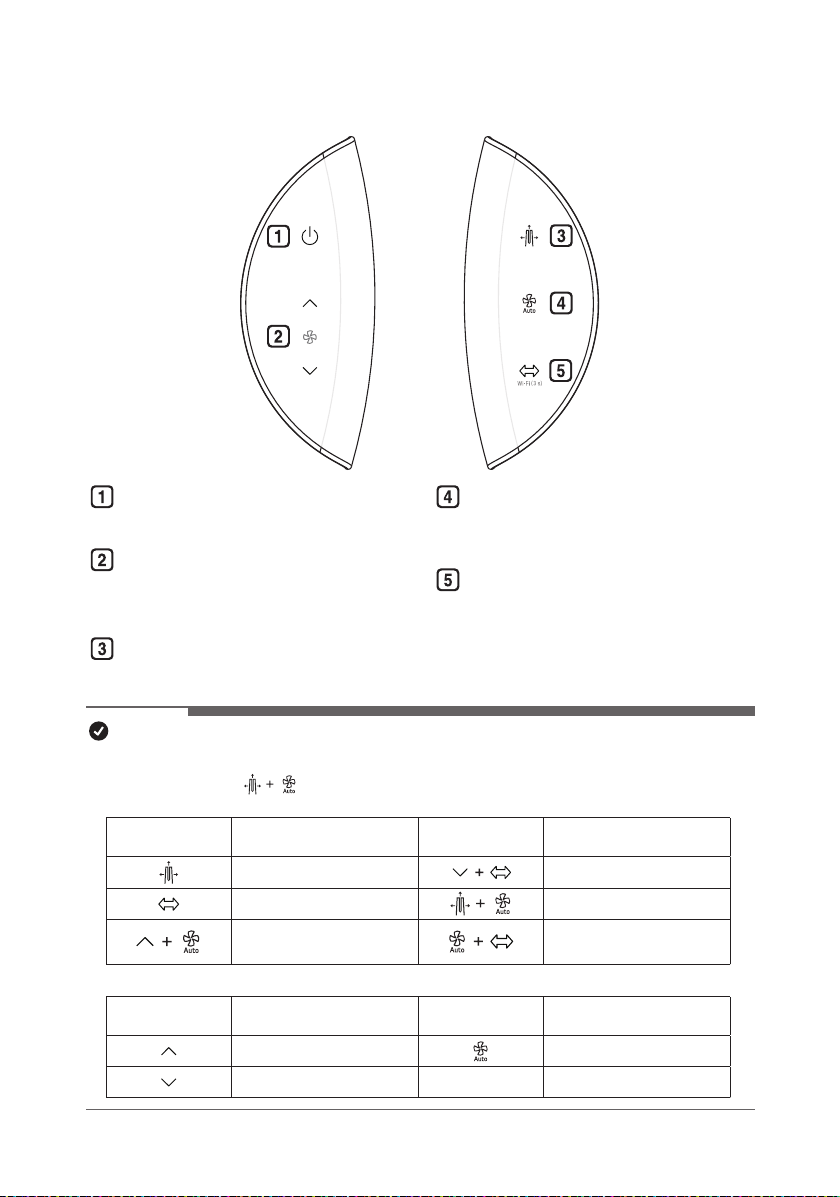
Control Panel
Standby On/Off Button
Can start or stop operation.
Speed Button
Allows you to adjust the fan speed
of the product.
Mode Button
Use it to set the operation mode of
the product.
Auto Fan Button
Sets the product’s wind strength
automatically.
Rotation Button
Sets the rotation of the product.
Note
•
You can use extra functions by pressing the button on the control panel for longer than 3 seconds.
(
Example : Press the
Mode button and the Auto Fan button at the same time for 3 seconds
or longer.)
Long press
(more than 3 seconds)
Function
Long press
(more than 3 seconds)
Function
Control Panel Lock/Unlock
UVnano On/Off
Connect Wi-Fi
Smart Diagnosis
Product sound On/Off
Filter Replacement
Notication Reset
•
Press and hold the button
Press and hold
the button
Function
Press and hold
the button
Function
Continuous change of Fan speed
Continuous change of standby screen
Continuous change of Fan speed
16
EN
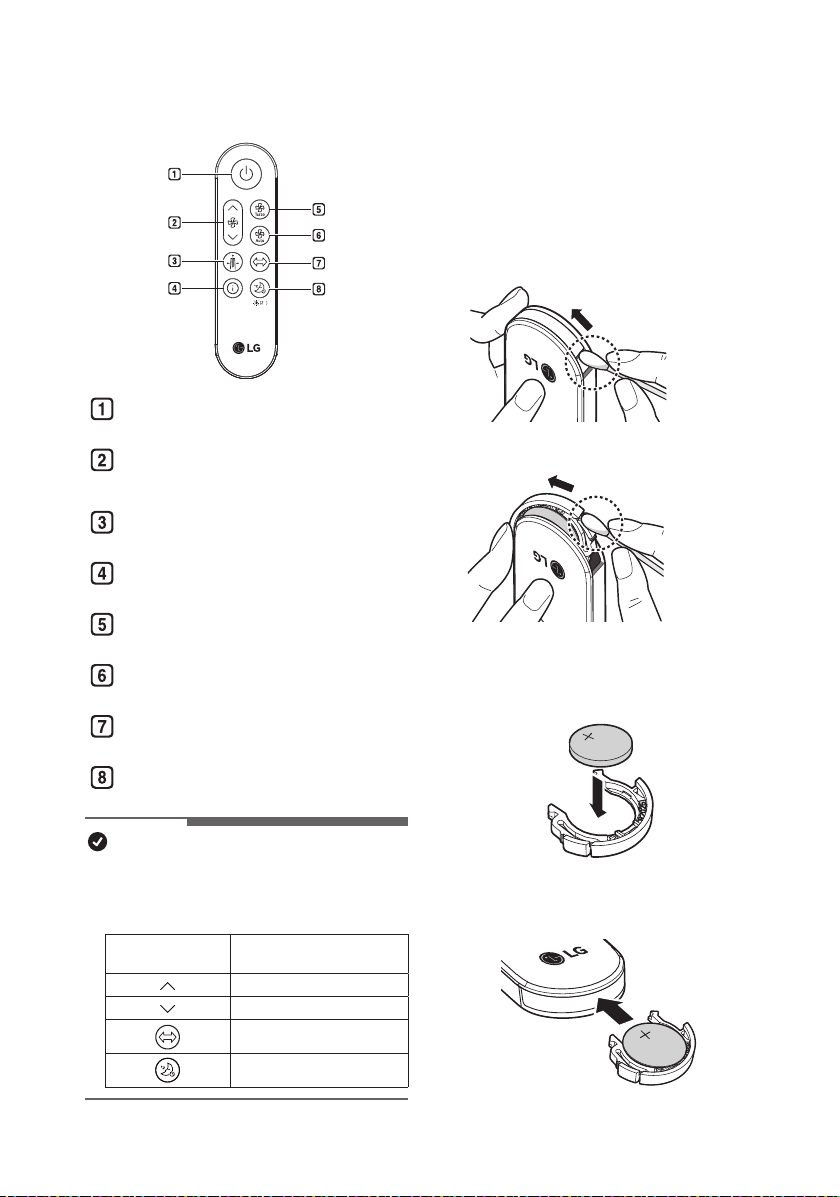
Remote Controller
s
Standby On/Off button
Can start or stop operation.
Speed button
Allows you to adjust the fan speed of
the product.
Mode button
Sets the operation mode.
Show Info button
Use to set the standby screen.
Turbo button
Sets fan speed to Turbo.
Auto Fan button
Sets the fan speed automatically.
Rotation button
Sets the rotation of the product.
Sleep Timer button
Sets the sleep schedule.
Note
•
You can use extra functions by pressing
the buttons on the remote controller for
longer than 2 seconds.
Long press (more
than 2 seconds)
Function
Continuous change of Fan speed
Continuous change of Fan speed
Product sound On/Off
Setting Display brightness
Preparing to Use the Remote
Controller
1
With the front side of the remote
controller facing up, remove the battery
tray by pushing in the direction of
number 2 while pressing part 1 with a
simple tool (cotton swab, etc.).
①
②
②
①
2
Insert the battery provided with the
appliance into the tray. Place it with the
+ mark facing up.
3
Insert the battery tray back into the
remote controller.
17
EN
•
The remote controller signal reception may
be interrupted when strong lights such as
uorescent lamps or neon signs are present.
In this case, use the remote controller in
front of the remote signal receiver of the
indoor unit.
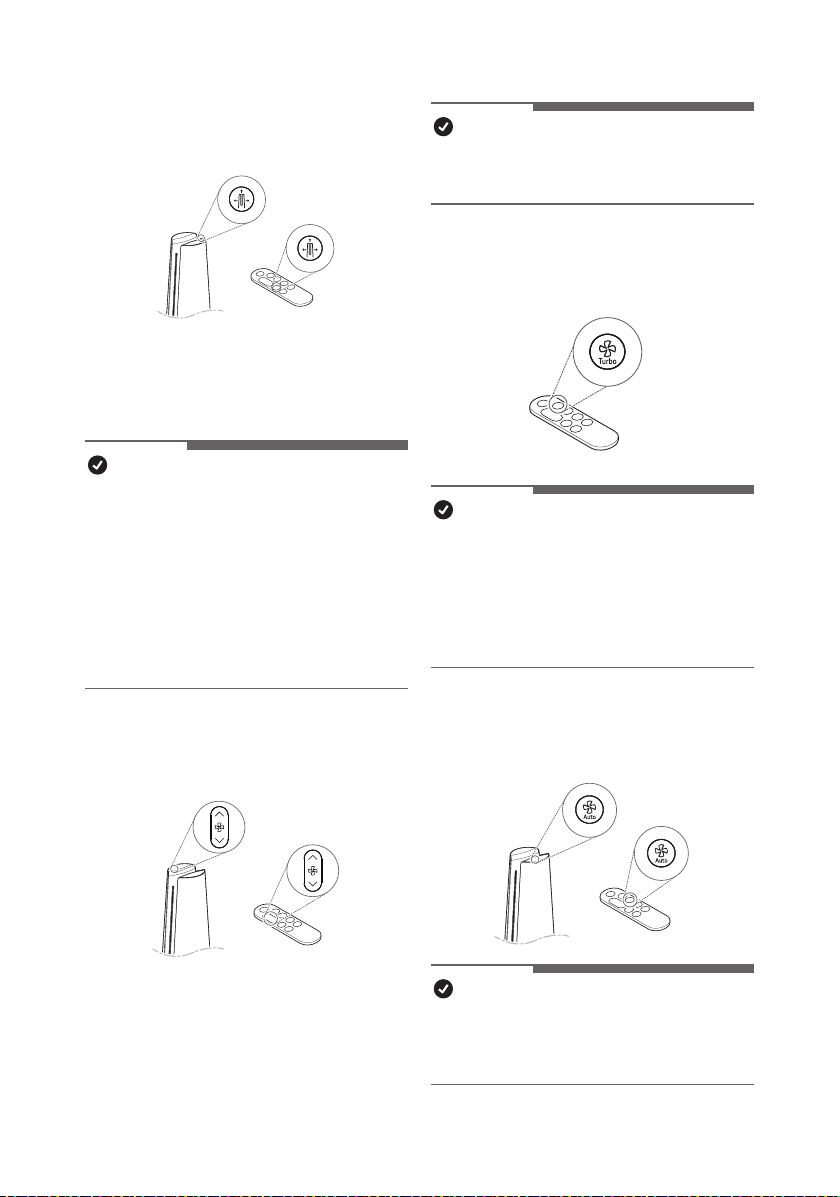
Getting Started
Press the Standby On/Off button to start
operation.
Note
•
When starting operation for the rst time
after installing the product, it will operate in
Wide mode and with step 5 of fan speed.
•
If you stop operation and resume it, it
will start cleaning with the mode you last
selected.
•
Even if power is lost due to a blackout, the
product will remember the mode(Fan speed,
Mode, Display brightness) you used last.
•
When you start driving, the dust
concentration is displayed after sensor
stabilization (about 15 seconds). While
sensor stabilization is in progress, the clean
stabilization screen (
) appears on the
status display.
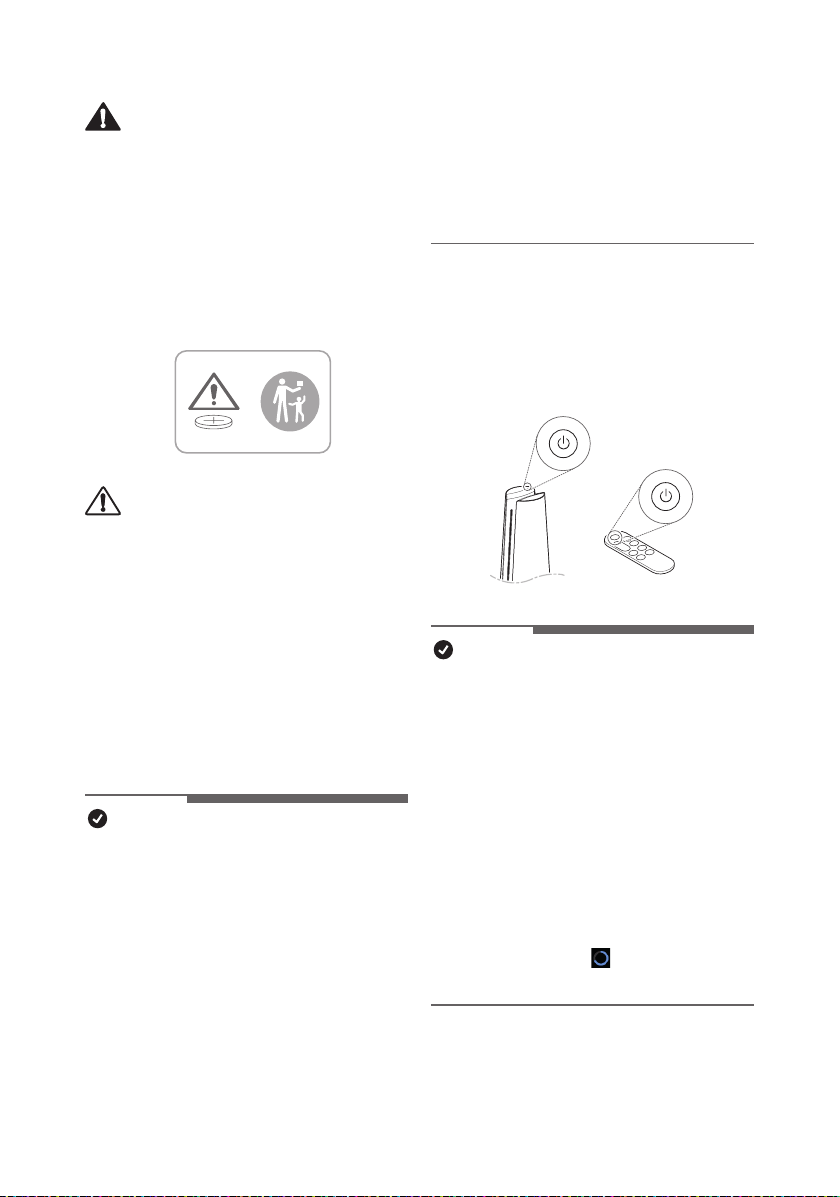
WARNING
•
The remote controller uses button/coin type
batteries (CR2025).
•
Swallowing batteries may cause serious
injury or death. Go to hospital emergency
room immediately to seek medical attention.
•
Keep the battery out of reach of children.
•
If the battery tray is not secured rmly, stop
using the appliance immediately and keep it
away from children.
CAUTION
•
Do not arbitrarily modify the battery.
•
Do not recharge or disassemble the battery.
•
Do not throw the battery into a re for
disposal or leave it near heat.
•
Do not press multiple buttons at the same
time.
•
Do not use it in a place with a lot of water or
moisture.
•
Do not use it in a place with ames or heat.
•
Remove and store the battery in a safe
location if you do not intend to use the
remote controller for a long time.
Note
•
If the remote controller is not operating
properly, check the polarity (+, -) of the
battery or replace the battery before
contacting the service center.
•
When using the remote controller, point the
remote controller transmitter toward the
receiver on the product.
•
The remote controller is not received
properly at a distance of more than 7 m from
the product.
18
EN
Using the Mode
Sets the operation mode of the air purier.
•
Each time the Mode button is pressed
during operation, the sequence of Wide
Mode – Direct Mode – Diffusion Mode is
repeated.
Note
•
Wide Mode - In operation mode, you can
feel cool and comfortable with clean wind
discharged to the front.
•
Direct mode - As the vane closes slightly, the
air is intensively discharged.
•
Diffusion Mode - Operation mode in which the
vane changes the direction of the wind to clean
the indoor space in various directions and to
use it without being cold even in winter.
Adjusting the Fan Speed
Adjusts the fan speed of the purier.
•
Each time the Speed button is pressed
during operation, it changes in the order of
steps 1 to 10.
•
Press and hold the Speed button to
change the fan speed in a row.
Note
•
The stronger the wind, the faster the
space is cleaned.
Using Turbo
Sets the fan speed to Turbo.
Note
•
After running on Turbo, if you turn "Turbo"
off before 30 minutes, it will switch to the
previous fan speed.
•
After 30 minutes of turbo operation, the
fan speed automatically changes to Auto
Fan.
Using Auto Fan
Sets the air purier’s fan speed automatically.
Note
•
When set to Auto Fan, the indoor ne dust
concentration, appropriate Fan speed are
set automatically.
19
EN
Using Rotation
Sets the rotation of the air purier.
•
Each time the Rotation button is pressed
during operation, the sequence of 45°-60°
-90°-140°-Stop is repeated.
Note
•
It rotates at 140° during the initial rotation
and starts rotating from the center of the
product after position initialization.
•
When the Rotation button is pressed
while the product is rotating, it will set to
‘Stop’.
•
When the function is changed while using
the rotation, the rotation stops for a while
so that the display status can be checked,
and then the rotation operates again after
the setting is completed.
•
When using rotation mode: When the
product is turned off, the product rotates
to the center and stops.
•
When the rotation mode is not in use:
When the product is turned off, the
product turns off at a stationary position.
•
Product rotation rotates around the center
of the product.
•
Do not forcefully rotate the product by
holding it.
•
If you hold the product and force it to
rotate, you will need to re-center the
product.
•
To center the product, turn off the product,
unplug the power cord, wait for a while,
and then plug in the power cord again.
After that, if you turn on the rotation, the
initialization proceeds automatically.
20
EN
Using Extra Functions
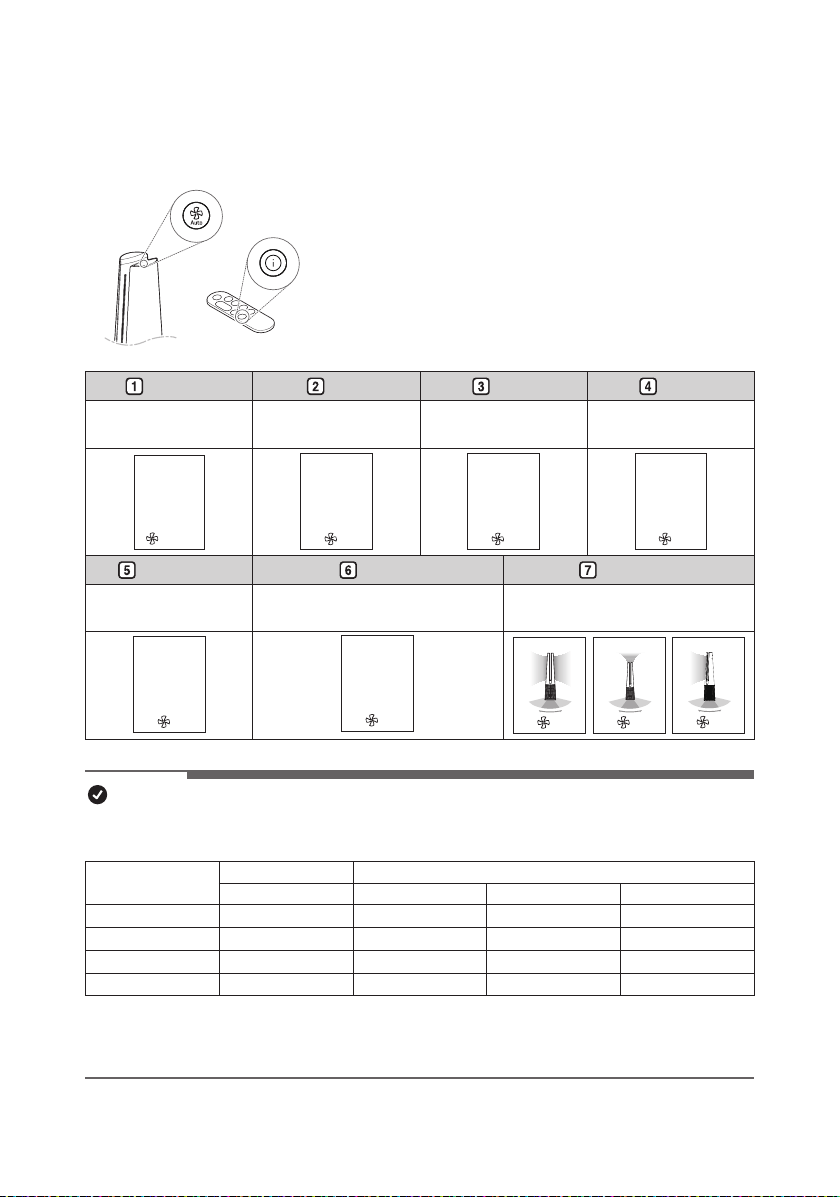
Setting standby display
Displays air quality, air quality circulation, temperature, and
operation information.
•
Press and hold the Auto Fan button in the control panel.
•
Press the show Show Info button on the remote
controller.
•
The order of Air Quality – PM10 – PM2.5 – PM1.0 –
Temperature – Humidity - Operating status is repeated.
Air Quality PM10 PM2.5 PM1.0
• Displays the overall air
quality status.
• Displays ne dust
information.
• Displays Ultra-ne dust
information.
• Displays Super ultra-
ne dust information.
Air Quality
Poor
Turbo
PM10
235
3
㎍/㎥
PM2.5
38
3
㎍/㎥
PM1.0
98
3
㎍/㎥
Temperature Humidity Mode status
•
Displays room
temperature information.
• Displays indoor humidity
information.
• Displays operation status
information.
Temperature
77°
3
Humidity
40
%
3
3
3
3
Note
•
Overall Air quality is calculated based on the concentrations of dust is categorized into 4 levels:
green, yellow, orange, and red, depending on the contamination of the air.
Color
Overall Air Quality Concentration of PM (μg/m
3
)
State PM10 PM2.5 PM1.0
Red Poor 255 or more 56 or more 56 or more
Orange Unhealthy 155 ~ 254 36 ~ 55 36 ~ 55
Yellow Moderate 55 ~ 154 13 ~ 35 13 ~ 35
Green Good 54 or less 12 or less 12 or less
•
Overall air quality can be seen by the color of the air quality indicator and the text
indicating the concentration of dust.
•
The color of overall air quality is determined based on the concentration of dust.
21
EN
•
If the product is used in the following
environments, the dust concentration may
be displayed differently from the actual
value.
–
Around fabric sofas and beds, around
hairy carpets, organizing blankets/
clothes, using a vacuum cleaner,
places with bugs and pets, places with
high humidity.
–
Places where outside air enters,
such as around construction sites,
roadsides, factories, doorways,
windows, and ventilation openings.
–
Places where products that generate
steam and ne particles (humidiers,
cooking utensils, sprays, etc.) are
used.
–
Even if dust is generated by activity
such as dusting or cleaning, the sensor
may not respond if large dust of PM10
or higher is generated, but the dust is
removed by the lter.
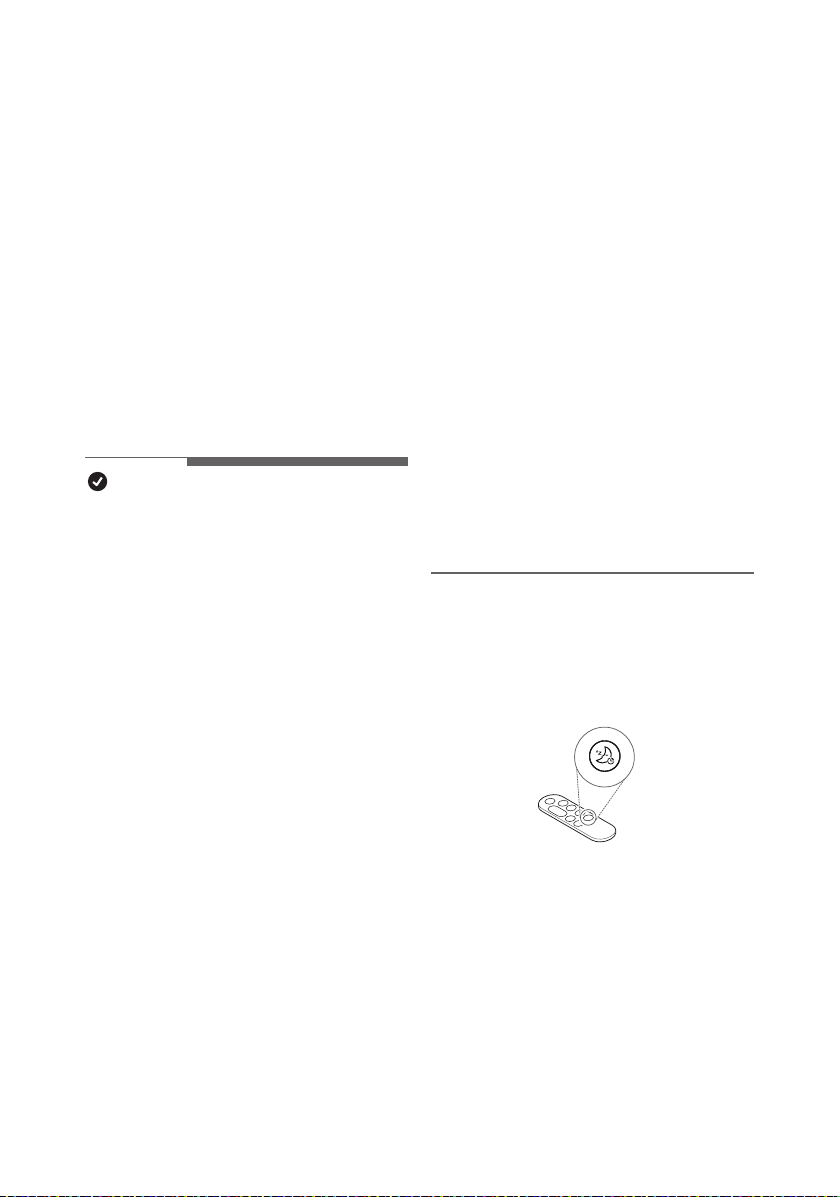
Setting a Sleep Timer
It is set to automatically stop operation after
operation for a set period of time.
•
Press the Sleep Timer button while the
appliance is operation.
–
Each time the sleep timer button is
pressed, it repeats in the order of 1~12-
Off.
•
If the sleep schedule is set, the display
brightness level 1 and rotation are
operated at stop. (However, if you set the
display brightness to off before setting the
sleep mode, the display brightness will
remain off.)
Checking air condition on the
Status Display
You can check the overall air quality and dust
concentration on the Status display of the
product.
•
Overall air quality : Overall air quality
can be seen by the color of the air quality
indicator and the text indicating the
concentration of dust.
•
Dust concentration: The dust
concentration is indicated with the color
displayed with specic gures, depending
on particle size. Displays the dust
concentration of PM10/PM2.5/PM1.0.
Note
•
Dust concentration is displayed in units of
1 from 4 to 999. For dust concentration,
refer to the sensor manufacturer's data
sheet.
•
The ne dust/ultra-ne dust concentration
displayed on the product may be different
from the measurement standards of other
instruments and other products.
–
If the dust concentration is high, the
difference between the displayed dust
concentration and the actual dust
concentration may be large.
•
Temperature and humidity may
vary depending on the surrounding
environment, such as doorways, windows,
and vents.
•
Temperature and humidity may appear
differently depending on air circulation
in the same room. Also, the temperature
and humidity may be different from other
products and thermo-hygrometers.
•
If different or identical products are
used in the same space, there may be
differences in the concentration readings
due to air circulation.
22
EN
Note
•
When you make a sleep reservation, the fan
speed is set to level 1, and after a certain
period of time, it is automatically adjusted
according to the air condition.
•
You can change the fan speed, display
brightness, and rotation even when the
sleep timer is set.
•
If you press the Sleep Timer button once
more while the sleep schedule is set, the
sleep schedule is canceled.
Setting Display Brightness
Adjusts display brightness.
•
Press the Sleep Timer button for more
than 2 seconds to enter the display
brightness setting screen.
–
Each time the button is pressed once
or for more than 2 seconds, it changes
in the order of Brightness 3 - Brightness
2 - Brightness 1 - Off.
–
Press any other key on the remote
control to exit the display brightness
setting screen.
Note
•
When setting the display brightness to
off, if you press the button, it turns on
at brightness 1 for a while, and then the
screen on the display turns off.
•
The default display brightness is set to
Brightness 2.
–
Brightness 3: 100%
–
Brightness 2: 60%
–
Brightness 1: 10%
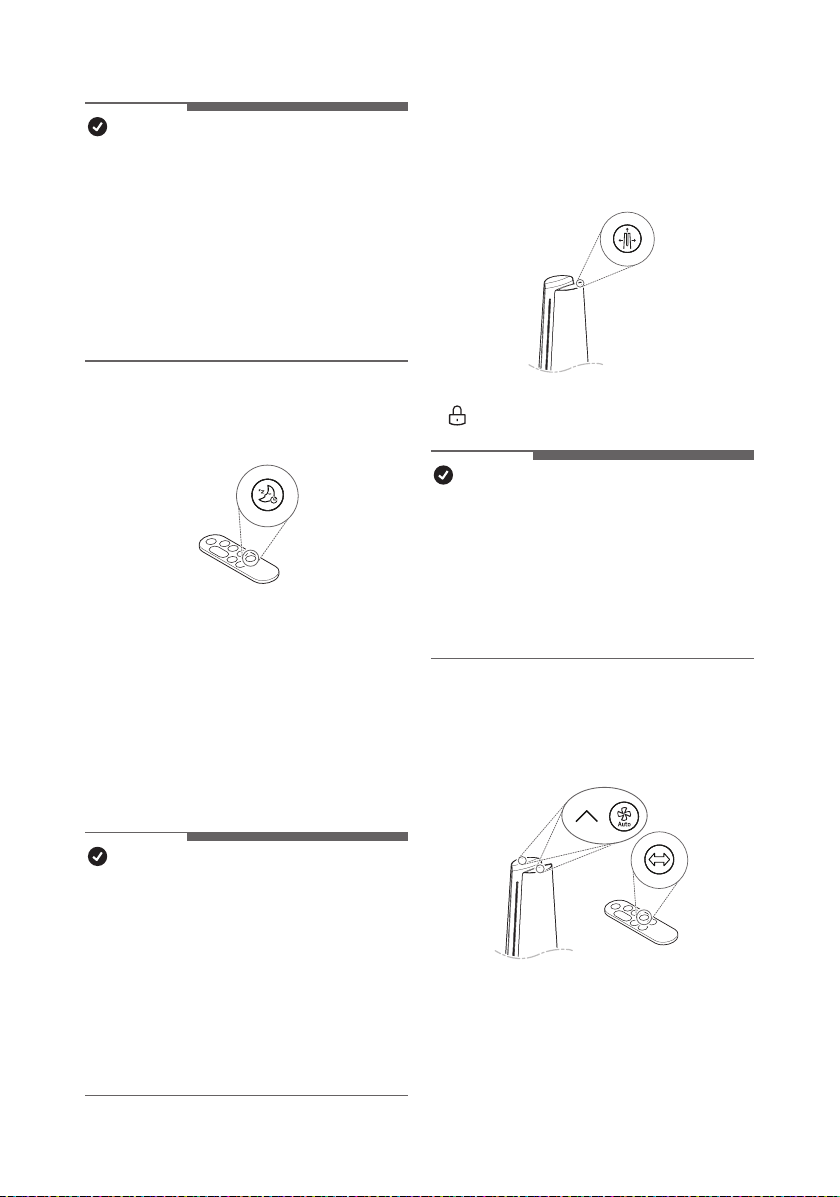
Using button lock
You can lock the buttons on the control panel
to prevent unwanted operation by children or
other factors.
•
Press the Mode button for 3 seconds.
•
is displayed on the status display.
Note
•
The remote controller can be used even
when locked.
•
You can use the LG ThinQ application to
change modes even when the device is
locked.
•
To unlock, press the Mode button again
for at least 3 seconds.
Setting the Product sound
Turns On/Off the sound of the air purier.
•
Press the Speed up and Auto Fan buttons
on the control panel at the same time for 3
seconds.
•
Press and hold the Rotation button on the
remote controller for 2 seconds.
23
EN
Using UVnano
(Only models with UVnano
applied)
Remove the harmful bacteria the fan inside
the air purier to circulate cleaner air.
•
Press the Speed down and Rotation
buttons on the control panel at the same
time for 3 seconds.
Note
•
To disable UVnano, press the Speed
down and Rotation buttons button on the
control panel again for at least 3 seconds.
•
UVnano is a compound of UV (ultraviolet
light) and nanometer (unit of length).
•
If there is dust of foreign matter inside the
UVnano LED, wipe with a soft cloth.
•
Do not operate the product if damage to
the UVnano LED is evident.
•
Be sure to turn off the product before
cleaning and performing other
maintenance.
•
If the product cover is opened or the lter
is removed, the UVnano operation status
may not be displayed normally.
•
icon on the status display is a display
that guides UVnano on/off, not a UVnano
on/off indicator.
•
Displayed when UVnano does not
operate normally. (Check that the lter
and air intake (cover) are installed in the
correct position.)
•
When using the product for the rst time,
the UVnano function is turned on.
EN
24
EN
LG ThinQ Application
The LG ThinQ application allows you to
communicate with the appliance using a
smartphone.
LG ThinQ Application Features
Smart Diagnosis
If you experience a problem while using the
appliance, this smart diagnosis feature will
help you diagnose the problem.
Settings
Allows you to set various options on the
appliance and in the application.
Note
•
If you change your wireless router,
Internet service provider, or password,
delete the connected appliance from
the LG ThinQ application and connect it
again.
•
The application is subject to change for
appliance improvement purposes without
notice to users.
•
Functions may vary by model.
Before using LG ThinQ
Application
This feature is only available on models with
Wi-Fi function.
1
Check the distance between the
appliance and the wireless router (Wi-Fi
network).
•
If the appliance is too far from the
wireless router, the signal strength
becomes weak. It may take a long
time to connect or installation may
fail.
2
Turn off the Mobile data or Cellular
Data on your smartphone.
3
Connect your smartphone to the
wireless router.
Smart functions
25
ENEN
Note
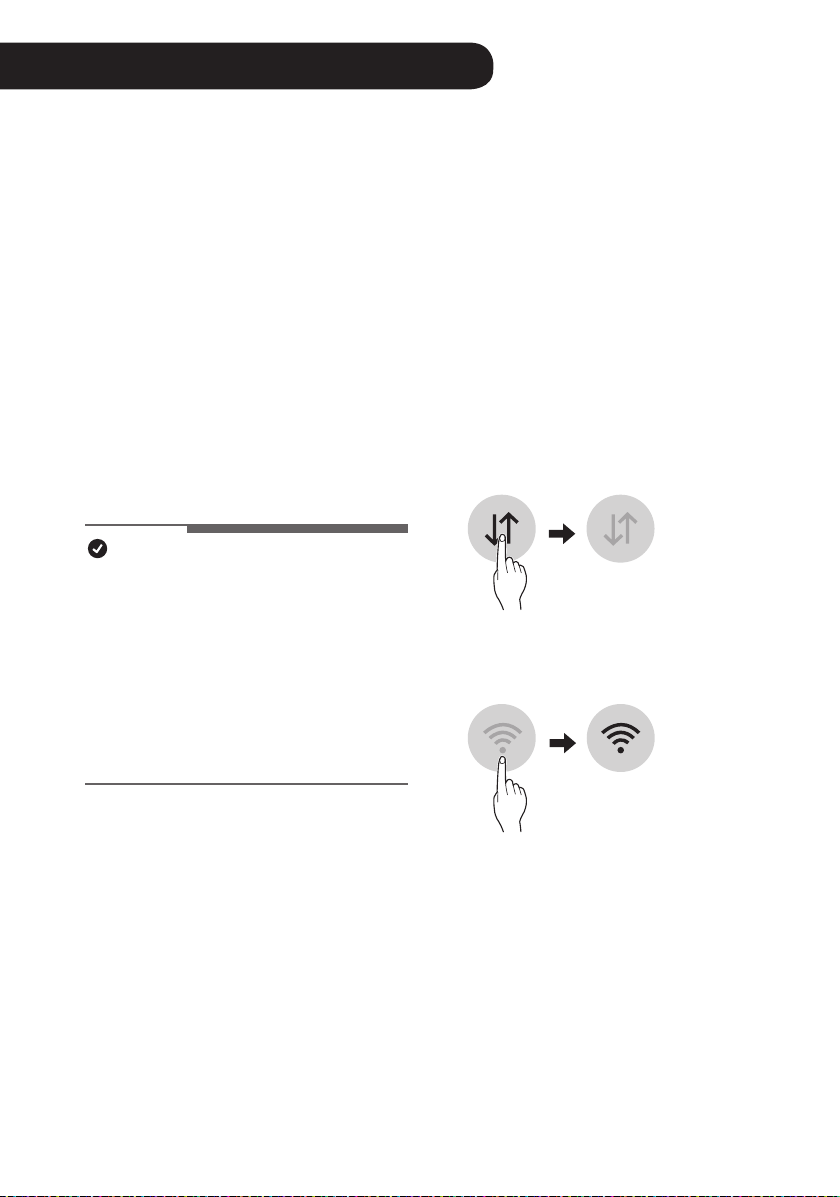
•
To verify the Wi-Fi connection, check that
the Wi-Fi
f
icon on the control panel is lit.
•
The appliance supports 2.4 GHz Wi-Fi
networks only. To check your network
frequency, contact your Internet service
provider or refer to your wireless router
manual.
•
LG ThinQ is not responsible for any
network connection problems or any
faults, malfunctions, or errors caused by
network connection.
•
If the appliance is having trouble
connecting to the Wi-Fi network, it may be
too far from the router. Purchase a Wi-Fi
repeater (range extender) to improve the
Wi-Fi signal strength.
•
The Wi-Fi connection may not connect or
may be interrupted because of the home
network environment.
•
The network connection may not work
properly depending on the Internet service
provider.
•
The surrounding wireless environment
can make the wireless network service
run slowly.
•
If the appliance cannot be connected
due to problems with the wireless signal
transmission, unplug the appliance and
wait about a minute before trying it again.
•
If the rewall on your wireless router is
enabled, disable the rewall or add an
exception to it.
•
The wireless network name (SSID) should
be a combination of English letters and
numbers. (Do not use special characters.)
•
Smartphone user interface (UI) may
vary depending on the mobile operating
system (OS) and the manufacturer.
•
If the security protocol of the router is
set to WEP, the network setup may fail.
Change the security protocol (WPA2 is
recommended) and connect the product
again.
Installing the LG ThinQ
Application
Search for the LG ThinQ application from the
Google Play Store or Apple App Store on a
smartphone. Follow instructions to download
and install the application.
Wireless LAN Module
Specications
Frequency
Range
Output Power
(Max.)
Wi-Fi
2412 MHz ~
2462 MHz
< 30 dBm
Bluetooth
2402 MHz ~
2480 MHz
< 30 dBm
FCC Notice
The following notice covers the transmitter
module contained in this product.
This equipment has been tested and found
to comply with the limits for a Class B digital
device, pursuant to Part 15 of the FCC
Rules. These limits are designed to provide
reasonable protection against harmful
interference in a residential installation.
This equipment generates, uses, and can
radiate radio frequency energy and, if not
installed and used in accordance with the
instructions, may cause harmful interference
to radio communications. However, there is
no guarantee that interference will not occur
in a particular installation. If this equipment
does cause harmful interference to radio or
television reception, which can be determined
by turning the equipment off and on, the user
is encouraged to try to correct the interference
by one or more of the following measures:
- Reorient or relocate the receiving antenna.
- Increase the separation between the
equipment and the receiver.
- Connect the equipment into an outlet on
a circuit different from that to which the
receiver is connected.

26
EN
- Consult the dealer or an experienced radio/
TV technician for help.
This device complies with part 15 of the FCC
Rules. Operation is subject to the following
two conditions:
(1)
This device may not cause harmful
interference and
(2) This device must accept any interference
received, including interference that may
cause undesired operation.
Any changes or modications in construction
of this device which are not expressly
approved by the party responsible for
compliance could void the user’s authority to
operate the equipment.
FCC RF Radiation Exposure
Statement
This equipment complies with FCC radiation
exposure limits set forth for an uncontrolled
environment. This transmitter must not be
co-located or operating in conjunction with
any other antenna or transmitter.
This equipment should be installed and
operated with a minimum distance of 20
cm (7.8 inches) between the antenna and
your body. Users must follow the specic
operating instructions for satisfying RF
exposure compliance.
Open Source Software Notice
Information
To obtain the source code under GPL, LGPL,
MPL, and other open source licenses, that
is contained in this product, please visit
https://opensource.lge.com. In addition to
the source code, all referred license terms,
warranty disclaimers and copyright notices
are available for download.
LG Electronics will also provide open
source code to you on CD-ROM for a
charge covering the cost of performing
such distribution (such as the cost of media,
shipping, and handling) upon email request
to [email protected]. This offer is valid
for a period of three years after our last
shipment of this product. This offer is valid to
anyone in receipt of this information.
27
EN
Smart Diagnosis
This is a function that can diagnose the
cause of product failure.
Note
•
Service may be suspended due to
external factors (such as unavailability of
Wi-Fi, disconnection of Wi-Fi, app store
policy, app unavailability, etc.) that are not
due to the negligence of LG Electronics.
•
This is subject to change without prior
notice, and the service method may vary
depending on local circumstances.
Using LG ThinQ to Diagnose
Issues
If a problem occurs with a Wi-Fi-equipped
product, you can diagnose the problem by
sending data to your smartphone using LG
ThinQ.
•
After launching LG ThinQ, select Smart
Diagnosis from the menu. Diagnose the
product according to procedure provided
by LG ThinQ.
Note
•
When diagnosing with Wi-Fi, you can
diagnose the product with a beep sound
when the Wi-Fi connection with the
product is disconnected.
Using Audible Diagnosis to
Diagnose Issues
If smart diagnosis using the app continues
to fail, click the Use Diagnosis with 'Go to
Audible Diagnosis' button of the ThinQ App
and follow the instructions that appear.
1
Press the Mode and Auto Fan buttons
on the control panel at the same time
for 3 seconds.
2
Place your phone near the product.
•
Make sure the phone’s microphone
is facing the front of the product.
3
The results of Smart Diagnosis will be
displayed in the LG ThinQ application.
Note
•
For accurate diagnosis, do not move the
smartphone away from the product until
the beep stops.
•
Please be quiet around the product during
Smart Diagnosis.

EN
28
EN
Maintenance
Maintaining the Appliance
Frequency of Cleaning and Filter
Replacement
Type
Cleaning
frequency
Replacement
cycle
Filter
Ultra Fine
Filter
If it is
contaminated,
use a vacuum
cleaner or a
soft brush to
clean it.
1 year
Note
•
The operating environment and operation
hours may affect the cleaning frequency.
Clean more often if operating in a dusty
environment.
•
Failure to clean the product following the
recommended schedule may result in it
smelling bad or not working properly.
•
The lter must be replaced at the end of
its lifespan, and the cost of replacement
lters is not covered under the warranty.
To purchase new lters, contact an LG
Electronics Customer Information Center
or visit the website at www.lg.com
•
If the PM concentration does not change
on the display for a long time, clean the
PM1.0 sensor even if it is not scheduled
for a cleaning.
•
You can also have the lter cleaned or
replaced by the Service Center. You
will be charged a nominal fee for lter
cleaning and replacement services.
•
The upper and lower parts of the lter
are made of paper instead of plastic.
Repeated removal of the lter may cause
scratches on the top and bottom of the
lter.
•
Even if there are scratches on the top and
bottom of the lter, there is no problem in
use.
Alerts on the Status Display
Notication Corrective action
Replace the lter.
Note
•
Filter replacement alerts appear based
on the maximum usage time, taking
into account the operating hours of the
product. The replacement frequency is
determined by the operating hours and
environment.
WARNING
•
Stop operation of the product and unplug the power plug or cord from the outlet before
cleaning and replacing the lter.
•
Do not spray water directly on the product.
29
ENEN
Cleaning the Appliance
Cleaning the Exterior of the
Product
1
Use a vacuum cleaner to remove dust
from the air inlet.
2
Wipe the air outlet and the exterior of
the product with a soft cloth.
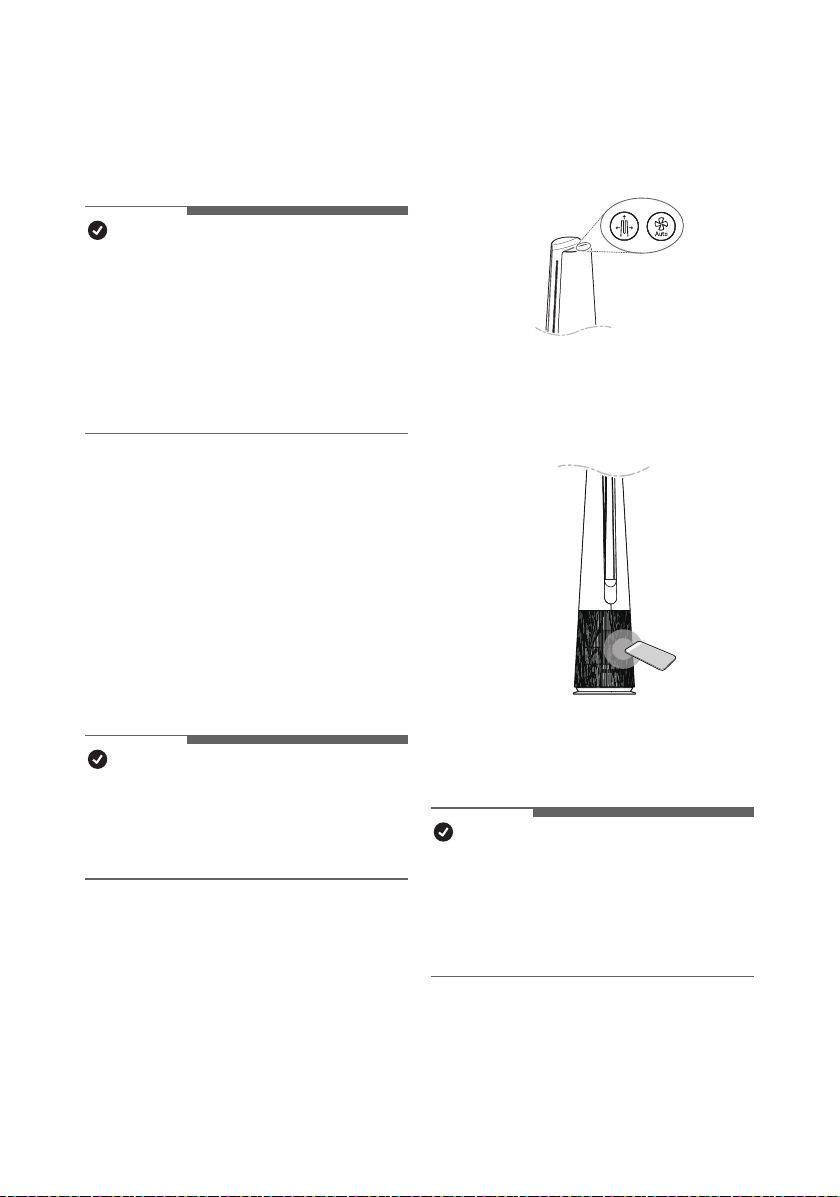
3
Press the
Mode
button to select
the diffusion mode. When the vane is
nished, wipe the front and back of the
vane with a soft cloth.
Back
CAUTION
•
Do not clean the product with alkaline
detergent.
•
Do not wipe the product surface using
sulfuric acid, hydrochloric acid, or an
organic solvent (thinner, kerosene,
acetone, etc.) or attach stickers to the
product. This may damage the product
surface.
•
Do not let water enter into the product.
Note
•
If you nd it difcult to remove dust from
the front and rear covers, remove the
lters and wash them with water. Then,
dry them completely in the shade.
Maintaining the Filter
Cleaning the Filters
1
Remove the front and rear covers of
the product.
Grab both sides of the top of the
air inlet (cover) from the front of the
product and pull gently to separate it.
•
The direction with the LG logo on
the product display is the front of the
product.
Display
Air inlet(Cover)
30
EN
2
Remove dust surrounding the Ultra-
ne lter with a vacuum cleaner or soft
brush.
CAUTION
•
Do not wash the Deodorizing Care lter or
True HEPA lter with water. This shortens
the lter’s life.
•
Be careful not to damage the ultra ne
lter when using a vacuum cleaner.
•
Be careful not to damage the lter if
liquid gets on the lter.
Replacing the Filter
1
Remove the front and rear covers of the
product and pull the handle to replace
the lter.
•
To avoid polluting the surroundings
when replacing the lter, place
newspaper on the oor before you
remove the lter.
Handle
2
Once you have replaced the lter, turn
off the lter replacement alert.
Reset lter replacement
notication
(Filter replacement notication) on
the status display is canceled and the
replacement notication time is reset
•
Press Auto Fan and Rotation buttons at
the same time for at least 3 seconds.
•
Use when replacing with a new lter.
Note
•
A notication is displayed when a lter
replacement is required.
•
When the lter is installed, scratches may
occur on the upper and lower surfaces,
but there is no problem in operation.

31
EN
Storing the Product
If the product will not be used for a long
period of time, store in a dry, shaded place
without moisture.
1
Operate the product for at least 1 hour
on a sunny day.
•
This removes moisture and prevents
mold from building up inside the
product.
2
Turn off the power and unplug it from
the electrical outlet.
3
Package the product to prevent dust or
foreign substances from entering the
product. Store the packaged product in
a shaded place.
CAUTION
Do not store the product in a humid place or
in a place exposed to the direct sunlight.
EN
32
EN
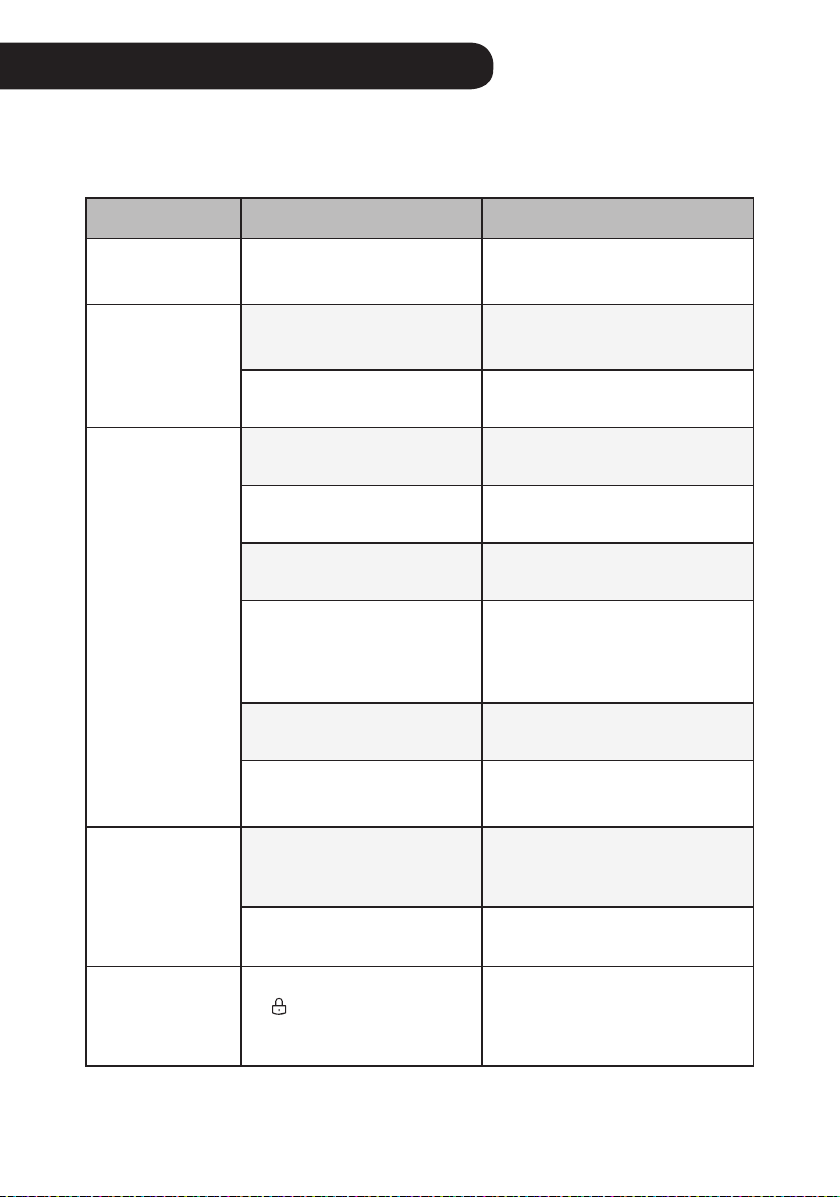
Troubleshooting
Before Calling for Service
Please check the following before you contact the service center. If the problem persists,
contact your local service centter.
Symptom Cause Remedy
It does not
operate at all.
Is the power cord
unplugged from the outlet?
•
Insert it into the socket correctly.
The amount of
wind is small
and there is a
noise.
Did dust accumulate in the
ultra ne lter?
•
Clean the ultra ne lter
thoroughly.
Did dust accumulate in the
True HEPA lter?
•
Replace the lter.
The air inside is
not puried well
enough.
Is the indoor pollution
severe?
•
Ventilate the indoors before
using the product.
Did dust accumulate in the
ultra ne lter?
•
Clean the ultra ne lter
thoroughly.
Did dust accumulate in the
True HEPA lter?
•
Replace the lter.
Are you using it in a place
that is too spacious or too
open?
•
Use a product that suits the size
of the room.
•
Avoid well-ventilated places
such as doors, windows, etc.
Is there any obstacle
nearby?
•
Remove the obstacle.
Is the product installed at
a corner?
•
Move the product and install it
again.
The overall
cleanness color
is still in red.
Does the color not change
even if it is moved to a
clean room?
•
Remove the power cord from
the outlet and reconnect after 1
minute.
Did you use a spray near
the product?
•
Do not use a spray near the
product.
The buttons
on the control
panel do not
work.
Is
displayed on the
status display?
•
To unlock, press the Mode
button on the control panel for 3
seconds.
33
ENEN
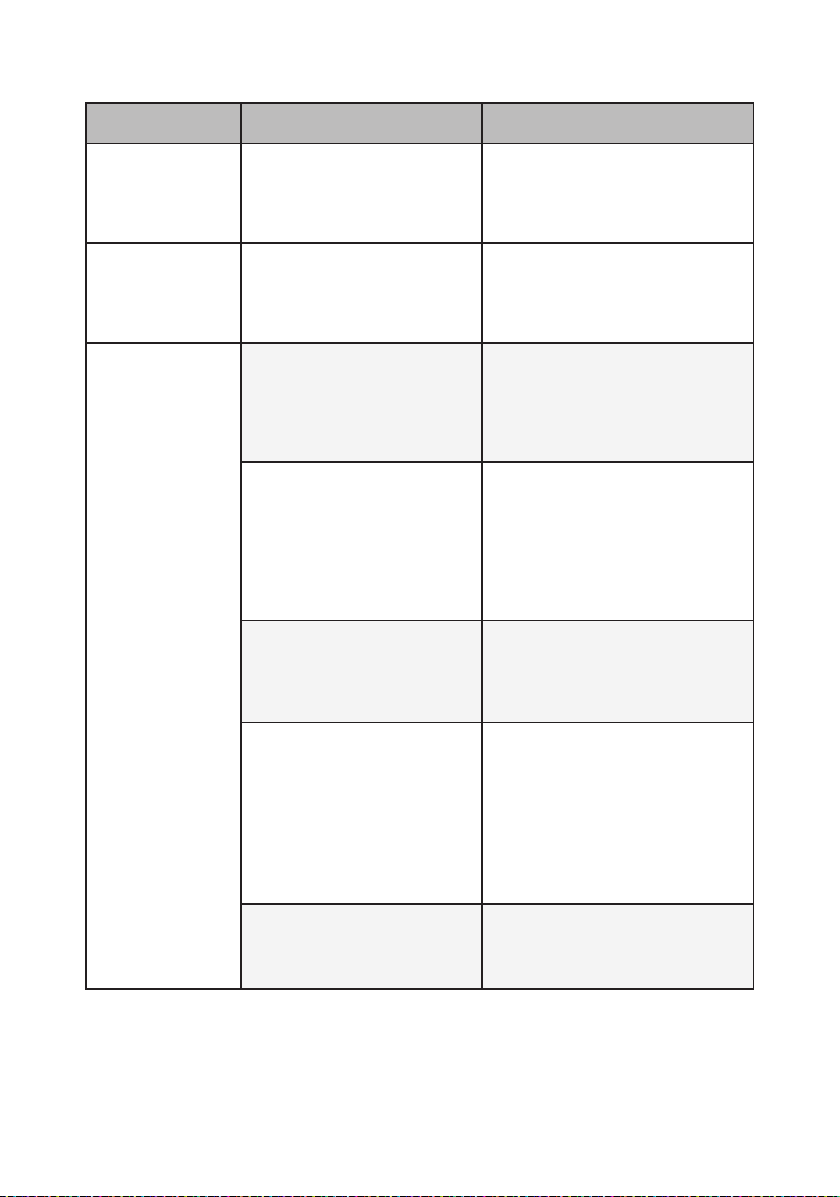
Symptom Cause Remedy
The
concentration
of the ne dust
does not change.
Is the product used in a
closed space?
•
In closed spaces, the Air Quality
level may continue to stay the
same without change.
The concentration
of ne dust
continues to
remain high.
Does the air continue to
ow in from the outside
to the location where the
product is installed?
•
In an environment where there
is an inow of outside air, the
concentration may continue to
remain high.
A strange odor
comes out from
the air outlet as
well as the lter.
Did you purchase the
product recently?
•
This is the odor of activated
charcoal, and is not harmful. This
is similar to the odor you may
experience in a brand new car. It
will go away within a day after use.
Is the product used in a
place with a lot of smoke
or odors?
•
If the air purier is operated after an
air freshener, diffuser, or scented
candle has been used, or interior
work or wallpaper replacement
have occurred, the lter may absorb
and emit the odor. Ventilate the
room rst before using the product.
Does the lter have a bad
smell?
•
The lter replacement frequency
may differ depending on the
usage environment. If there is an
odor, replace with a new lter.
Is it in an environment
where food is prepared?
•
If you use the product for a long
period of time where you cook or
broil sh/meat, the lter lifespan
may be signicantly decreased.
•
If possible, open a window for
ventilation while cooking, and use
the product to remove the odor left
after the ventilation.
Is it a humid environment?
•
The lter may emit an odor if used
in a humid environment. Dry the
lter in sunlight before use.
34
EN
Symptom Cause Remedy
The dust
concentration
levels are
different
between the
product and the
LG ThinQ app.
Are you looking at the
same type of dust particle?
•
Make sure that the levels of the
PM1.0/PM2.5/PM10
dust are
displayed consistently between
the LG ThinQ app and your
product.
•
A difference in values could
be caused by the difference in
update time between the LG
ThinQ app and the product.
The appliance
and smartphone
cannot be
connected via
Wi-Fi.
The password for the Wi-
Fi that you are trying to
connect to is incorrect.
•
Find the Wi-Fi network
connected to your smartphone
and remove it, then connect
your appliance in LG ThinQ.
Mobile data for your
smartphone is turned on.
•
Turn off the Mobile data of
your smartphone and connect
the appliance using the Wi-Fi
network.
The wireless network name
(SSID) I set incorrectly.
•
The wireless network name
(SSID) should be a combination
of English letters and numbers.
(Do not use special characters.)
The router frequency is
not 2.4 GHz.
•
Only a 2.4 Ghz router frequency
is supported. Set the wireless
router to 2.4 GHz and connect
the appliance to the wireless
router. To check the router
frequency, check with your
Internet service provider or the
router manufacturer.
The appliance is too far
from the router.
•
If the appliance is too far from
the router, the signal may be
weak and the connection may
not be congured correctly.
Move the router closer to the
appliance.
35
EN
Symptom Cause Remedy
The display
does not
appear.
Is the display brightness
set to off?
•
To change the diplay brightness,
press the
Sleep Timer button
on the remote controller for more
than 2 seconds.
I set UVnano,
but the UV icon
is not displayed
on the status
display.
Is there no indication of
/
on the status
display?
•
Only 3 icons are displayed
according to priority.
•
Reset the UVnano by pressing
the Speed down and Rotation
buttons on the control panel at the
same time for 3 seconds.
Is on the status
indicator?
•
Displayed when UV does not
operate normally. (Check if the
lter and air intake (cover) are
installed in the correct position.)
The
temperature/
humidity is
displayed
differently from
other products.
Is outside air continuously
coming into the place
where the product is
installed?
•
Temperature and humidity values
may uctuate continuously in an
environment where outside air is
introduced.
•
Temperature and humidity
may vary depending on the
surrounding environment such
as doorways, windows, and
ventilation holes.
•
Temperature and humidity may
appear differently depending
on air circulation in the same
room. Also, the temperature
and humidity may be different
from other products and thermo-
hygrometers.
EN
36
EN
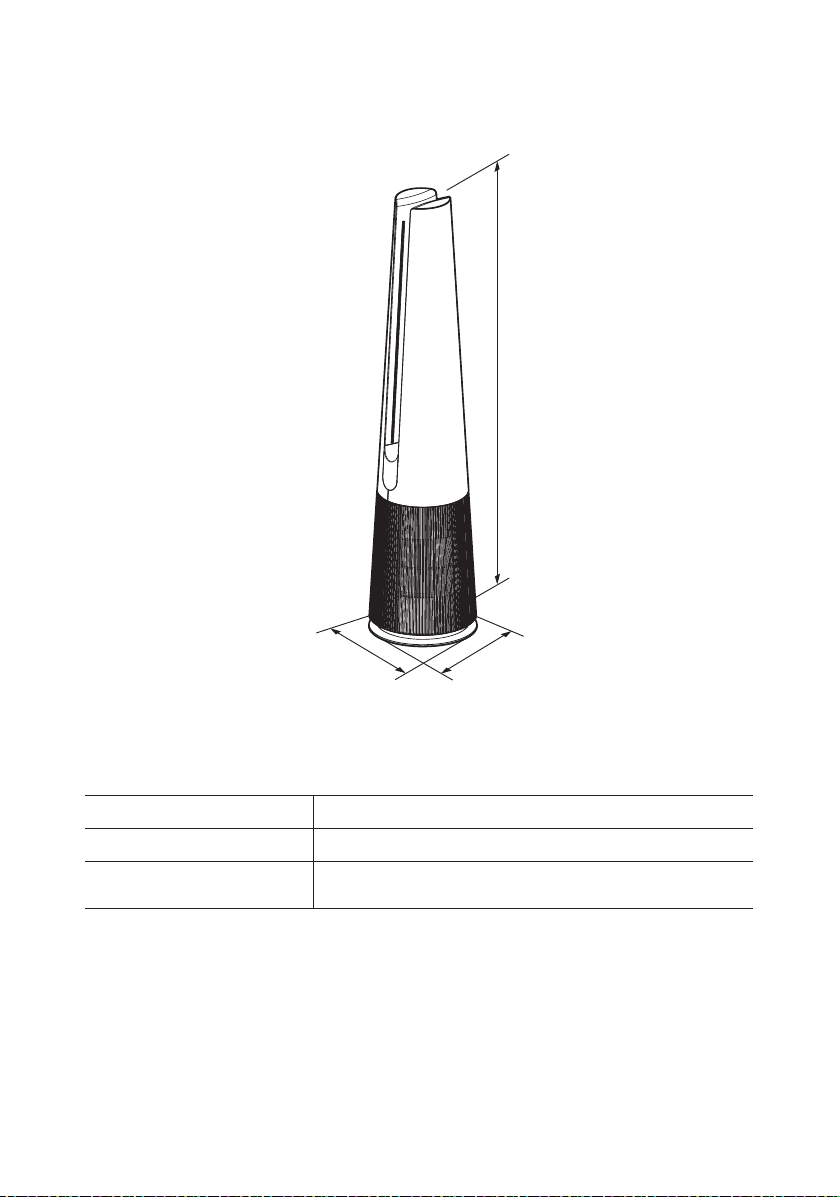
The external appearance and dimensions of the product are subject to change without prior
notice.
Model Name
U9C Series
Power
AC 115V~ 60Hz
Exterior dimensions
(width x depth x height)
265 mm x 265 mm x 1,120 mm
Height
Depth
Width
Appliance Specications

37
ENEN
ARBITRATION NOTICE: THIS LIMITED WARRANTY CONTAINS AN ARBITRATION
PROVISION THAT REQUIRES YOU AND LG TO RESOLVE DISPUTES BY BINDING
ARBITRATION INSTEAD OF IN COURT, UNLESS YOU CHOOSE TO OPT OUT. IN
ARBITRATION, CLASS ACTIONS AND JURY TRIALS ARE NOT PERMITTED. PLEASE
SEE THE SECTION TITLED “PROCEDURE FOR RESOLVING DISPUTES” BELOW.
Should the LG Air Purier fail due to a defect in materials or workmanship under normal home
use, during the warranty period set forth below, LG will at its option repair or replace the
product. This limited warranty is valid only to the original retail purchaser of the product and
applies only when purchased and used within the United States, including U.S. Territories.
Proof of original retail purchase is required to obtain warranty service under this limited
warranty.
Warranty Period Scope of Warranty Remark
One (1) year from date of
original retail purchase
Any internal / functional
parts and labor
LG will provide parts and
labor to repair or replace
defective parts.
Ten (10) years from date of
original retail purchase
Smart Inverter Motor
Parts Only. Customer will
be responsible for any
labor or in-home service to
replace defective parts.
•
Replacement products and parts are warranted for the remaining portion of the original
warranty period or ninety (90) days, whichever is greater.
•
Replacement products and parts may be new or remanufactured.
THIS WARRANTY IS IN LIEU OF ANY OTHER WARRANTY, EXPRESS OR IMPLIED,
INCLUDING WITHOUT LIMITATION, ANY WARRANTY OF MERCHANTABILITY OR
FITNESS FOR A PARTICULAR PURPOSE. TO THE EXTENT ANY IMPLIED WARRANTY
IS REQUIRED BY LAW, IT IS LIMITED IN DURATION TO THE EXPRESS WARRANTY
PERIOD ABOVE. NEITHER THE MANUFACTURER NOR ITS U.S. DISTRIBUTOR
SHALL BE LIABLE FOR ANY INCIDENTAL, CONSEQUENTIAL, INDIRECT, SPECIAL,
OR PUNITIVE DAMAGES OF ANY NATURE, INCLUDING WITHOUT LIMITATION, LOST
REVENUES OR PROFITS, OR ANY OTHER DAMAGE WHETHER BASED IN CONTRACT,
TORT, OR OTHERWISE.
Some states do not allow the exclusion or limitation of incidental or consequential damages or
limitations on how long an implied warranty lasts, so the above exclusion or limitation may not
apply to you. This warranty gives you specic legal rights and you may also have other rights
that vary from state to state.
THIS LIMITED WARRANTY DOES NOT COVER:
•
Service trips to deliver, pick up, or install or repair the product; instruction to the customer on
operation of the product; repair or replacement of fuses or correction of wiring or plumbing,
or correction of unauthorized repairs/installation.
WARRANTY (USA)

38
EN
•
Failure of the product to perform during power failures and interrupted or inadequate
electrical service.
•
Damage caused by leaky or broken water pipes, frozen water pipes, restricted drain
lines, inadequate or interrupted water supply or inadequate supply of air.
•
Damage resulting from operating the product in a corrosive atmosphere or contrary to
the instructions outlined in the product’s owner’s manual.
•
Damage to the product caused by accidents, pests and vermin, lightning, wind, re,
oods, or acts of God.
•
Damage or failure caused by unauthorized modication or alteration, or if it is used for
other than the intended purpose, or any water leakage where the unit was not properly
installed.
•
Damage or failure caused by incorrect electrical current, voltage, or plumbing codes,
commercial or industrial use, or use of accessories, components, or consumable
cleaning products that are not approved by LG.
•
Damage caused by transportation and handling, including scratches, dents, chips, and/
or other damage to the nish of your product, unless such damage results from defects
in materials or workmanship and is reported within one (1) week of delivery.
•
Damage or missing items to any display, open box, discounted, or refurbished product.
•
Products with original serial numbers that have been removed, altered, or cannot be
readily determined. Model and serial numbers, along with original retail sales receipts,
are required for warranty validation.
•
Increases in utility costs and additional utility expenses.
•
Repairs when the product is used for other than normal and usual household use (e.g.
commercial use, in ofces and recreational facilities) or contrary to the instructions
outlined in the product’s owner’s manual.
•
Costs associated with removal of the product from your home for repairs.
•
The removal and reinstallation of the product if it is installed in an inaccessible location
or is not installed in accordance with published installation instructions, including LG’s
owner’s and installation manuals.
•
Damage resulting from misuse, abuse, improper installation, repair, or maintenance.
Improper repair includes use of parts not approved or specied by LG.
The cost of repair or replacement under these excluded circumstances shall be borne
by the consumer.
TO OBTAIN WARRANTY SERVICE AND ADDITIONAL INFORMATION
For additional product information, visit the LG website at http://www.lg.com
For assistance using this product or to schedule service, contact LG Electronics at 1-800-243-
0000 (US).
For further assistance, write: LG Electronics, 201 James Record Road, Huntsville, Alabama
35813

39
EN
PROCEDURE FOR RESOLVING DISPUTES:
ALL DISPUTES BETWEEN YOU AND LG ARISING OUT OF OR RELATING IN ANY WAY
TO THIS LIMITED WARRANTY OR THE PRODUCT SHALL BE RESOLVED EXCLUSIVELY
THROUGH BINDING ARBITRATION, AND NOT IN A COURT OF GENERAL JURISDICTION.
BINDING ARBITRATION MEANS THAT YOU AND LG ARE EACH WAIVING THE RIGHT TO
A JURY TRIAL AND TO BRING OR PARTICIPATE IN A CLASS ACTION.
Denitions. For the purposes of this section, references to “LG” mean LG Electronics U.S.A.,
Inc., its parents, subsidiaries and afliates, and each of their ofcers, directors, employees,
agents, beneciaries, predecessors in interest, successors, assigns and suppliers; references
to “dispute” or “claim” shall include any dispute, claim or controversy of any kind whatsoever
(whether based in contract, tort, statute, regulation, ordinance, fraud, misrepresentation or
any other legal or equitable theory) arising out of or relating in any way to the sale, condition
or performance of the product or this Limited Warranty.
Notice of Dispute. In the event you intend to commence an arbitration proceeding, you must
rst notify LG in writing at least 30 days in advance of initiating the arbitration by sending
a letter to LG at LG Electronics, USA, Inc. Attn: Legal Department- Arbitration 111 Sylvan
Avenue, Englewood Cliffs, NJ 07632. You and LG agree to engage in good faith discussions
in an attempt to amicably resolve your claim. The notice must provide your name, address,
and telephone number; identify the product that is the subject of the claim; and describe
the nature of the claim and the relief being sought. If you and LG are unable to resolve the
dispute within 30 days, either party may proceed to le a claim for arbitration.
Agreement to Binding Arbitration and Class Action Waiver. Upon failure to resolve the
dispute during the 30 day period after sending written notice to LG, you and LG agree to
resolve any claims between us only by binding arbitration on an individual basis, unless
you opt out as provided below. Any dispute between you and LG shall not be combined or
consolidated with a dispute involving any other person’s or entity’s product or claim. More
specically, without limitation of the foregoing, any dispute between you and LG shall not
under any circumstances proceed as part of a class or representative action. Instead of
arbitration, either party may bring an individual action in small claims court, but that small
claims court action may not be brought on a class or representative basis.
Arbitration Rules and Procedures. To begin arbitration of a claim, either you or LG must
make a written demand for arbitration. The arbitration will be administered by the American
Arbitration Association (“AAA”) and will be conducted before a single arbitrator under the
AAA’s Consumer Arbitration Rules that are in effect at the time the arbitration is initiated
(referred to as the “AAA Rules”) and under the procedures set forth in this section. The AAA
Rules are available online at www.adr.org/consumer. Send a copy of your written demand for
arbitration, as well as a copy of this provision, to the AAA in the manner described in the AAA
Rules. You must also send a copy of your written demand to LG at LG Electronics, USA, Inc.
Attn: Legal Department- Arbitration 111 Sylvan Avenue, Englewood Cliffs, NJ 07632. If there
is a conict between the AAA Rules and the rules set forth in this section, the rules set forth in
this section will govern. This arbitration provision is governed by the Federal Arbitration Act.
Judgment may be entered on the arbitrator’s award in any court of competent jurisdiction.
All issues are for the arbitrator to decide, except that issues relating to the scope and
enforceability of the arbitration provision and to the arbitrability of the dispute are for the court
to decide. The arbitrator is bound by the terms of this provision.

40
EN
Governing Law. The law of the state of your residence shall govern this Limited Warranty and
any disputes between us except to the extent that such law is preempted by or inconsistent
with applicable federal law.
Fees/Costs. You do not need to pay any fee to begin an arbitration. Upon receipt of your
written demand for arbitration, LG will promptly pay all arbitration ling fees to the AAA unless
you seek more than $25,000 in damages, in which case the payment of these fees will be
governed by the AAA Rules. Except as otherwise provided for herein, LG will pay all AAA
ling, administration and arbitrator fees for any arbitration initiated in accordance with the AAA
Rules and this arbitration provision. If you prevail in the arbitration, LG will pay your attorneys’
fees and expenses as long as they are reasonable, by considering factors including, but
not limited to, the purchase amount and claim amount. Notwithstanding the foregoing, if
applicable law allows for an award of reasonable attorneys’ fees and expenses, an arbitrator
can award them to the same extent that a court would. If the arbitrator nds either the
substance of your claim or the relief sought in the demand is frivolous or brought for an
improper purpose (as measured by the standards set forth in Federal Rule of Civil Procedure
11(b)), then the payment of all arbitration fees will be governed by the AAA Rules. In such
a situation, you agree to reimburse LG for all monies previously disbursed by it that are
otherwise your obligation to pay under the AAA Rules. Except as otherwise provided for, LG
waives any rights it may have to seek attorneys’ fees and expenses from you if LG prevails in
the arbitration.
Hearings and Location. If your claim is for $25,000 or less, you may choose to have the
arbitration conducted solely on the basis of (1) documents submitted to the arbitrator, (2)
through a telephonic hearing, or (3) by an in-person hearing as established by the AAA Rules.
If your claim exceeds $25,000, the right to a hearing will be determined by the AAA Rules.
Any in-person arbitration hearings will be held at a location within the federal judicial district
in which you reside unless we both agree to another location or we agree to a telephonic
arbitration.
Opt Out. You may opt out of this dispute resolution procedure. If you opt out, neither you nor
LG can require the other to participate in an arbitration proceeding. To opt out, you must send
notice to LG no later than 30 calendar days from the date of the rst consumer purchaser’s
purchase of the product by either: (i) sending an e-mail to [email protected], with the subject
line: “Arbitration Opt Out” or (ii) calling 1-800-980-2973. You must include in the opt out e-mail
or provide by telephone: (a) your name and address; (b) the date on which the product was
purchased; (c) the product model name or model number; and (d) the serial number (the
serial number can be found (i) on the product; or (ii) online by accessing https://www.lg.com/
us/support/repair-service/schedule-repair-continued and clicking on “Find My Model & Serial
Number”).
You may only opt out of the dispute resolution procedure in the manner described above
(that is, by e-mail or telephone); no other form of notice will be effective to opt out of this
dispute resolution procedure. Opting out of this dispute resolution procedure will not affect the
coverage of the Limited Warranty in any way, and you will continue to enjoy the full benets
of the Limited Warranty. If you keep this product and do not opt out, then you accept all terms
and conditions of the arbitration provision described above.
Memo
EN

Memo
Lea este manual del propietario en detalle antes de operar el aparato y
manténgalo a mano para referencia en todo momento.
MANUAL DEL PROPIETARIO
Puricador de aire
Copyright © 2021 LG Electronics Inc. Todos los Derechos Reservados
www.lg.com
U9C Series
ES ESPAÑOL

ES
Índice
Este manual puede contener imágenes o contenido diferente al modelo que compró. Este
manual está sujeto a revisión por parte del fabricante.
INSTRUCCIONES DE
SEGURIDAD
Instalación
10 Instrucción de piezas
12 Desempaque del aparato
13 Requisitos de ubicación de la
instalación
13 Requisitos de transporte
Funcionamiento
14 Pantalla de visualización de estado
15 Panel de Control
17 Primeros pasos
20 Uso las funciones extra
Funciones inteligentes
24 Aplicación LG ThinQ
27 Smart Diagnosis
Mantenimiento
28 Mantenimiento del aparato
29 Limpieza del producto
29 Mantenimiento del filtro
Resolución de
Problemas
32 Antes de llamar al servicio
36 Especificaciones del aparato
GARANTÍA (EE. UU.)
03
ES
INSTRUCCIONES DE SEGURIDAD
LEA Y GUARDE ESTAS INSTRUCCIONES
Las siguientes pautas de seguridad tienen como objetivo prevenir
riesgos o daños imprevistos a causa de un funcionamiento
imprudente o incorrecto del aparato.
Las pautas se dividen en "ADVERTENCIA" y "PRECAUCIÓN"
como se describe a continuación.
Este símbolo se muestra para indicar problemas y
funcionamientos que pueden provocar riesgos. Lea
atentamente el texto marcado con este símbolo y siga
las instrucciones para evitar riesgos.
ADVERTENCIA
Esto indica que el incumplimiento de las instrucciones puede
provocar lesiones graves o la muerte.
PRECAUCIÓN
Esto indica que el incumplimiento de las instrucciones puede
provocar lesiones menores o daños en el producto.
INSTRUCCIONES IMPORTANTES DE SEGURIDAD
ADVERTENCIA
Para reducir el riesgo de explosión, incendio, muerte,
descargas eléctricas, lesiones o quemaduras en las personas
cuando utilizan este producto, siga las precauciones básicas,
incluido lo siguiente:
Niños en el hogar
•
Este aparato no está destinado para que lo utilicen personas (incluidos
niños) con capacidades físicas, sensoriales ni mentales reducidas,
que carezcan de experiencia y conocimiento, a menos que una
persona responsable de la seguridad le haya ofrecido supervisión o
indicaciones sobre el uso del aparato. Se debe supervisar a los niños
para garantizar que no jueguen con el aparato.

04
ES
Instalación
•
No instale el aparato sobre una supercie desnivelada ni
inclinada.
•
No instale el aparato en un área expuesta a la luz solar
directa o cerca de equipos que generen calor.
•
No instale el producto en un lugar donde pudiera haber fugas
de gas combustible o donde haya presente aceite industrial o
partículas metálicas.
•
No permita que el aparato empuje el cable de alimentación o
enchufe.
•
No toque el enchufe de alimentación con las manos
húmedas.
•
Cuando desenchufe el cable de alimentación, tómelo siempre
desde el enchufe.
•
Desenchufe el aparato durante tormentas eléctricas o cuando
no se utilice durante mucho tiempo.
•
No doble excesivamente el cable de alimentación ni coloque
objetos pesados sobre él.
•
No extienda la longitud del cable de alimentación ni la altere.
•
No utilice varios dispositivos en un adaptador con extensiones
para múltiples enchufes.
•
Conecte de manera segura para que los tornillos de los
terminales no queden ojos cuando tire del cable.
•
Asegúrese de que no se pueda tirar del cable de alimentación
ni dañarlo durante el funcionamiento.
•
Si el cable de suministro está dañado, el fabricante, su
agente de servicio o una persona con calicaciones similares
debe reemplazarlo para evitar peligros.

05
ES
•
Este aparato tiene un enchufe polarizado (una clavija es
más ancha que la otra). Para reducir el riesgo de descarga
eléctrica, este enchufe está diseñado para que quepa en
un tomacorriente polarizado de una sola manera. Si el
enchufe no cabe por completo en el tomacorriente, invierta el
enchufe. Si aun así no cabe, comuníquese con un electricista
calicado. No intente anular esta característica de seguridad.
Funcionamiento
•
Si el aparato se sumerge en agua, deje de utilizarlo y
comuníquese con el centro de información al cliente de LG
Electronics.
•
Si hay una fuga de gas (isobutano, propano, GNL, etc.), no
toque el producto ni el cable de alimentación y ventile el área
de inmediato.
•
No limpie el aparato con cepillos, paños ni esponjas que sean
abrasivas o metálicas.
•
Si detecta ruido, olor o humo inusuales, desenchufe el
producto de inmediato y comuníquese con el centro de
información al cliente de LG Electronics.
•
Solo una persona de reparación autorizada deberá desarmar,
reparar o modicar el aparato.
•
No utilice ni guarde fuego, combustibles (éter, benceno,
alcohol, drogas, propano, butano, aerosol combustible,
insecticida, ambientador, cosméticos, etc.) ni materiales
inamables (velas, lámparas, etc.) cerca del producto.
•
No coloque el cable de alimentación cerca de alfombras o
tapetes.
•
No permita que animales o mascotas mastiquen el cable de
alimentación.
•
No mueva el aparato mientras está funcionando.
•
No golpee el aparato.

06
ES
•
No inserte las manos ni objetos metálicos en la entrada o
salida de aire.
•
No instale ni utilice piezas dañadas.
•
No coloque productos inamables en el aparato.
•
No permita que los niños suban al aparato ni que jueguen
con él.
•
No coloque ningún objeto sobre el aparato.
•
El ventilador no es un juguete. No debe colocarse donde los
niños puedan alcanzarlo ni deben jugar con él.
•
Tenga cuidado de que los niños no se queden atrapados en
las paletas al poner sus manos durante la operación de las
paletas.
•
Este producto utiliza LED UVnano. No desconecte ni
reemplace el LED UVnano de forma arbitraria. Los LED
deben ser reemplazados únicamente por proveedores de
servicios aprobados por LG.
•
Es posible que se produzcan fugas de radiación UVnano
dañina si el dispositivo se utiliza de forma no intencionada o
si los cables están dañados. La radiación ultravioleta nano,
incluso en cantidades muy pequeñas, puede dañar los ojos y
la piel.
•
Tenga cuidado de no dejar que ninguna parte de su cuerpo se
coloque entre las paletas durante la operación de las mismas.
•
No reemplace la lámpara UV mientras está enchufada.
- Pueden producirse daños en la piel o los ojos al ver
directamente la luz producida por la lámpara en este
aparato. Desconecte siempre la energía antes de cambiar
la lámpara o repararla. Reemplace la lámpara con la
lámpara CUD7GF1B, fabricada por Seoul Viosys Co., LTD.
Reemplace la lámpara con lámpara LTPL-G35U275GC-
TWA, fabricada por Lite-On Technology Corporation.
07
ES
Mantenimiento
•
Elimine los elementos del empaquetado (vinilo, poliestireno,
etc.) para mantenerlos lejos del alcance de los niños.
•
Tenga cuidado de no lesionarse ni pellizcarse cuando
desconecte o vuelva a conectar partes del aparato.
•
Apague o desenchufe el aparato antes de limpiarlo o de
reemplazar el ltro.
PRECAUCIÓN
Para reducir el riesgo de lesiones menores en las
personas, mal funcionamiento o daños al producto o a
la propiedad cuando se utiliza este producto, siga las
precauciones básicas, incluido lo siguiente:
Instalación
•
No incline el aparato para tirar o empujar de él cuando lo
transporte.
•
No instale el aparato en un vehículo, coche caravana o
embarcación marítima.
•
No coloque el aparato cerca de un equipo de televisor o estéreo.
•
No coloque el aparato donde haya luz brillante.
•
El aparato debe instalarse de acuerdo con las reglamentaciones
nacionales de cableado.
•
Cuando mueva o almacene el aparato, enrosque el cable
de alimentación alrededor de la base del aparato para evitar
lesiones personales, daños al cable o daños a los pisos.
•
No coloque el aparato cerca de cortinas.

08
ES
Funcionamiento
•
No utilice el producto para eliminar gases tóxicos como
monóxido de carbono.
•
No utilice el producto para nes de ventilación.
•
No utilice el aparato durante mucho tiempo en una región con
tensión inestable.
•
No coloque obstáculos alrededor de la entrada o salida de
aire.
•
Para el uso seguro del aparato, una persona responsable de
su seguridad debe controlar de cerca a los niños o a otras
personas con capacidades mentales reducidas.
•
No utilice el producto para nes especiales como preservar
plantas, instrumentos de precisión, obras de arte, etc.
•
No encienda el aparato con las manos húmedas.
•
No permita que la humedad del humidicador tenga contacto
directo con el aparato.
•
No utilice el aparato mientras si no está en posición recta.
•
No utilice el aparato cerca de objetos vulnerables al calor.
•
No utilice detergentes, cosméticos, químicos, ambientadores
ni desinfectantes en el aparato.
•
No toque ninguna pieza interna mientras la unidad esté
funcionando o inmediatamente después del funcionamiento.
•
Utilice el ltro solo para su objetivo destinado.
•
El ltro de protección desodorizante y el ltro True HEPA
están ensamblados juntos. No intente separar uno del otro.
•
No inserte ningún objeto en la salida de aire.

09
ES
Mantenimiento
•
No utilice detergentes o solventes fuertes para limpiar el
producto. Utilice un paño suave para limpiar.
•
No limpie el aparato con un detergente alcalino.
•
No limpie la supercie del aparato con ácido sulfúrico, ácido
hidroclórico ni solventes orgánicos (diluyente, querosén, etc.), ni
coloque pegatinas en el aparato.
•
No permita que haya agua dentro del aparato.
•
No lave el ltro con agua.
•
Tenga cuidado de no dañar el ltro ultrano si usa una aspiradora
para limpiarlo.
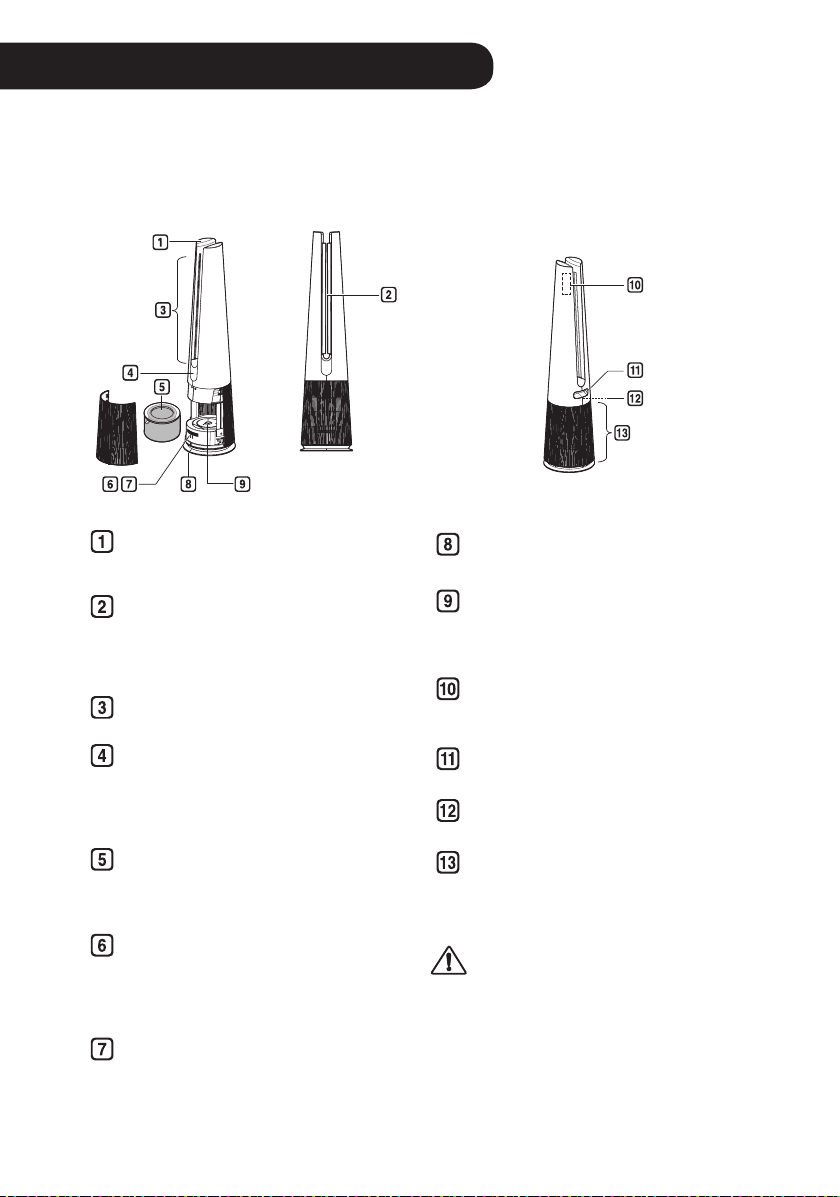
ES
10
ES
Instalación
•
El aspecto o funciones del aparato pueden variar dependiendo del modelo.
Instrucción de piezas
Vista frontal Vista trasera
Controlador
•
Utilícelo para ajustar las funciones del
producto.
Paleta
•
La paleta funciona según el modo de
funcionamiento (Modo ancho(Wide Mode)
/ Modo directo(Direct Mode) / Modo
difuión(Diffusion Mode)).
Salida de aire
•
Descarga el aire puricado a través del ltro.
Pantalla
(Pantalla de estado / Receptor del mando a
distancia)
•
Utilícelo para comprobar los ajustes del
producto y el estado del aire.
Filtro
•
Minimiza alérgenos, partículas nas, fuentes
posibles de síndrome de vivienda enferma,
smog y otros olores.
Smart Diagnosis
•
Si el producto funciona mal o funciona mal,
puede comprobar el estado del producto a
través de Smart Diagnosis. (Consulte Smart
Diagnosis de Funciones intelignetes)
Sensor
•
PM1.0 (particles with a diameter between 1.0
and 2.5 micrometers) Sensor :
Detecta los
niveles de concentración de polvo.
Línea central de producto
•
Es el central del producto.
UVnano LED(Solo modelos con UVnano
aplicado)
•
Elimine las bacterias dañinas en el ventilador
interno del producto.
Soporte para el mando a distancia
•
Conecte el mando a distancia para
almacenarlo.
Asa
•
Úsela al transportar el producto.
Sensor de temperatura / humedad
•
Detecta temperatura y humedad.
Entrada de aire (Tapa)
•
El aire entra en el puricador a través de la entrada.
•
Se pueden quitar la tapa frontal y trasera por
separado.
PRECAUCIÓN
•
Tenga cuidado de no pegar imanes u objetos
metálicos en la parte de almacenamiento del
controller remoto, ya que está unida con imanes.
•
Tenga cuidado de que los niños no queden
atrapados al poner sus manos durante la
operación de la paleta.
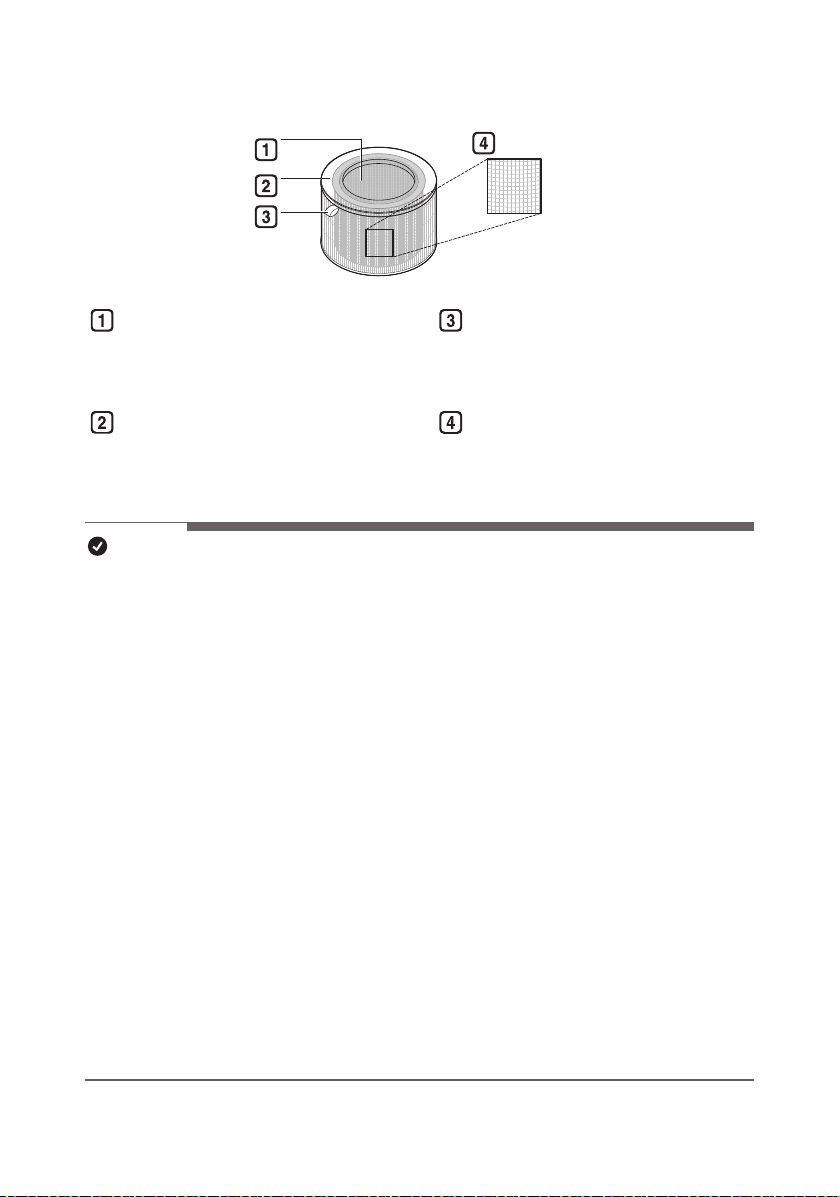
11
ESES
Sistema de ltro
Filtro ultrano
Filtro de protección desodorizante
Minimiza los olores del baño,
cigarrillo, alimentos y otras fuentes
comunes.
Filtro True HEPA
Minimiza el PM1.0 y el humo del
cigarrillo del aire.
Mango del ltro
Utilícela para quitar el ltro del
producto.
Filtro ultrano
Minimiza las partículas grandes que
otan en el aire.
NOTA
•
Es posible que al principio se emita un ligero olor por el ltro nuevo luego de la compra. El
olor desaparecerá después de un día más o menos de usar el producto, por lo que puede
usarlo sin preocupaciones.
•
La frecuencia de limpieza y reemplazo del ltro puede variar según el entorno y el tiempo
de uso.
•
Los ltros pueden utilizarse hasta por 1 año. Cuanto más contaminado esté el aire interior,
más corta será la vida útil del ltro.
•
Si hay un olor excesivo en la habitación, primero ventile el aire para eliminar el olor y
luego use el Puricador de aire para eliminar el olor restante.
•
Si el Puricador de aire se utiliza después de no haber sido usado por un tiempo
prolongado y hay olor, puede reducir el olor del ltro usándolo en fan speed 10 step in a
ventilated area.
•
El ltro puede emitir un olor cuando se usa continuamente en un ambiente húmedo o
donde se absorbe la humedad desde un humidicador hacia el ltro. Si se genera olor
debido a la humedad, seque el ltro a la luz del sol antes del uso.
•
El monóxido de carbono (CO) es un gas nocivo que se introduce principalmente desde el
exterior, y no se puede eliminar con un ltro.
•
Mantenga las ventanas o las puertas cerradas cuando utilice el producto. No obstante,
si utiliza el producto por un largo tiempo en un espacio cerrado, se puede aumentar
la concentración de dióxido de carbono. Por ello, asegúrese de ventilar el interior con
regularidad.
•
La función de desodorización del producto opera atrapando los olores en el ltro. Si
utiliza el producto durante mucho tiempo en una habitación con demasiados olores, el
rendimiento del ltro puede disminuir signicativamente.
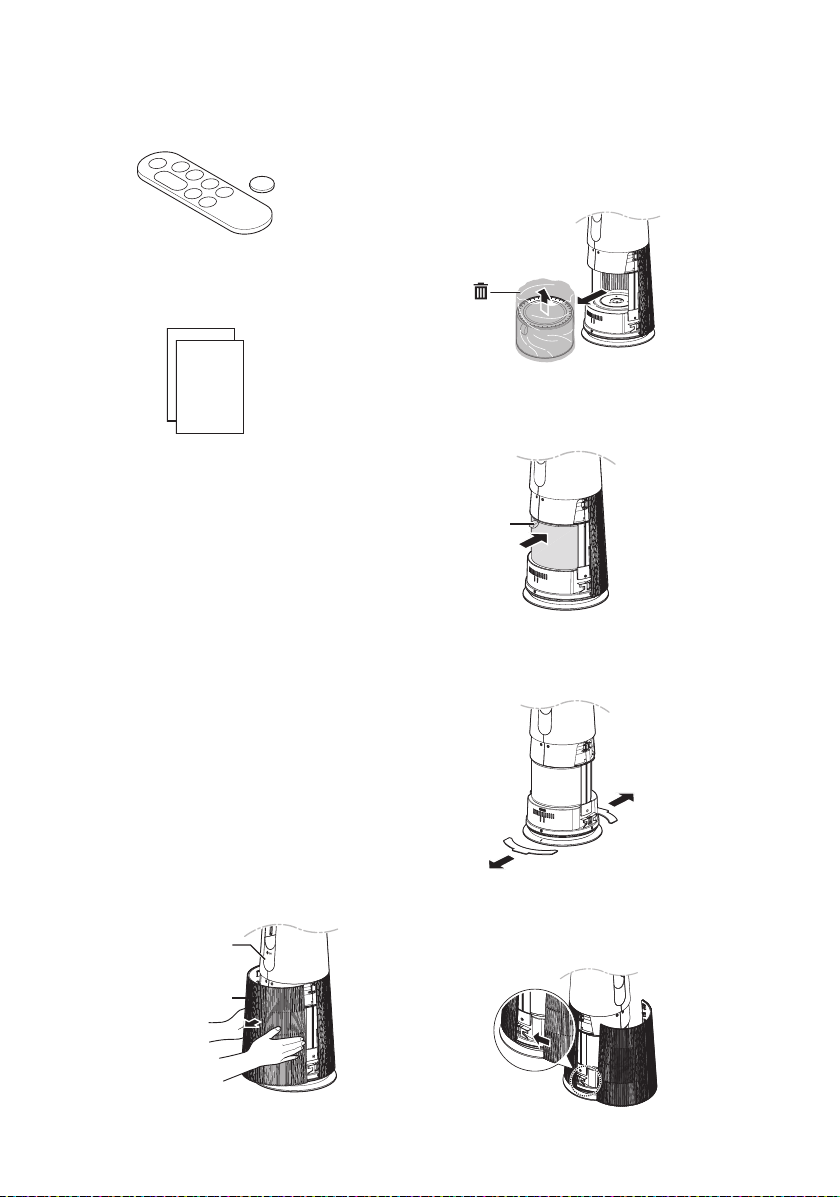
12
ES
Accesorios
Mando a distancia/batería
(CR2025, 1 unidad)
Manual del propietario/Guía rápida
Desempaque del aparato
Retire la cinta de jación y el vinilo protector,
el producto de material de embalaje y su
ltro antes de su uso.
Retirar el ltro de vinilo y el
material de embalaje
1
Quite el producto del embalaje y
retire la cinta de jación adhesiva del
producto.
2
Agarre la tapa y tire suavemente para
separarla de los electrodomésticos.
•
La dirección con el logotipo de LG
en la pantalla del producto es la
parte frontal del producto.
Pantalla
Entrada de aire
(Tapa)
3
Después de separar el ltro, retire su
vinilo protector.
•
Al retirar el ltro empaquetado,
sepárelo del vinilo protector.
4
Instale el ltro en el producto.
•
Asegúrese de que el asa mire hacia arriba.
Asa
5
Retire el material de embalaje insertado
en la parte inferior del producto.
6
Inserte las pestañas en la parte inferior
de la cubierta en las ranuras de la base
del aparato y cierre la cubierta.
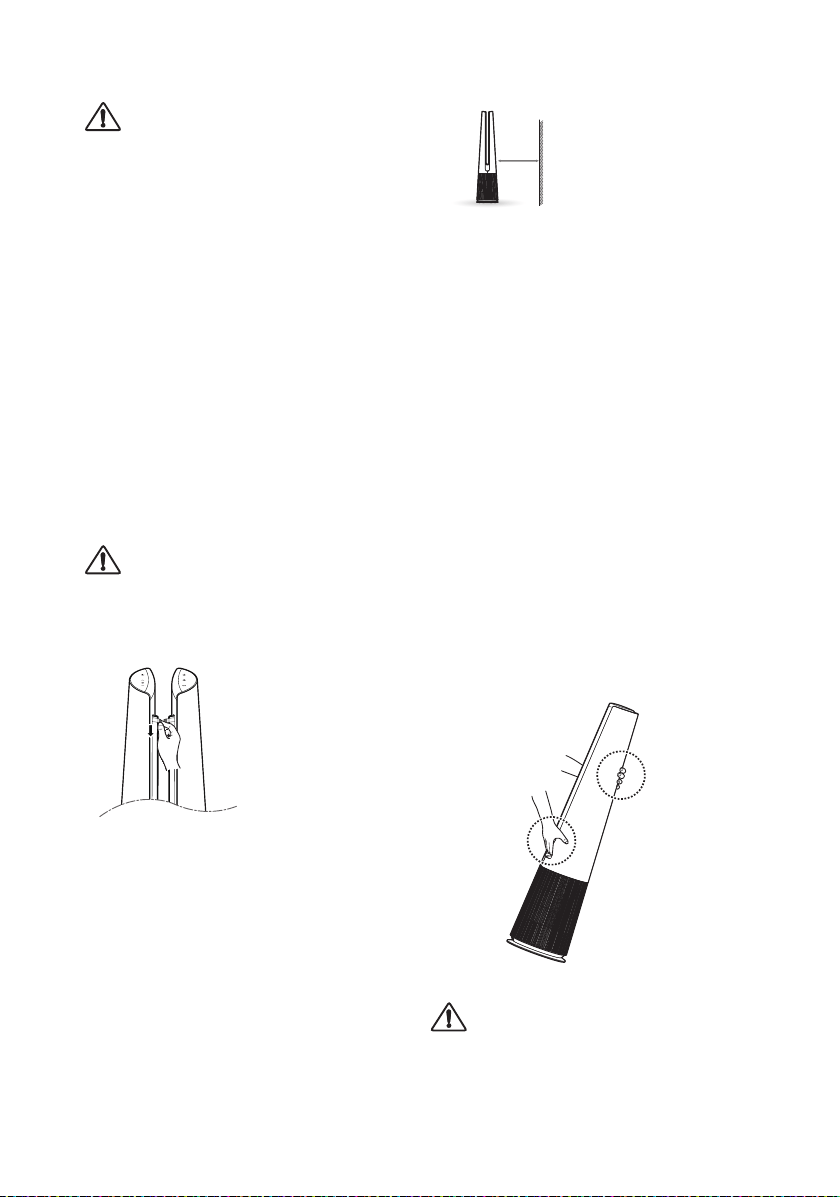
13
ES
PRECAUCIÓN
•
Asegúrese de quitar el vinilo del ltro antes
de usar el producto.
•
Preste atención a la dirección del ltro
cuando esté instalando el ltro.
•
Asegúrese de quitar el material acolchado antes
de usar el producto.
Retirar el vinilo de la paleta
Utilice el producto después de quitar el vinilo
de la paleta.
1. Producto operativo.
2. Presione el botón Mode y seleccione el
modo de difusión.
3. Después de que salgan las paletas, agarre
el vinilo por la parte superior y retírelo
lentamente hacia abajo.
PRECAUCIÓN
•
Si no retira el vinilo de paleta, tenga en
cuenta que el vinilo puede hacer ruido
mientras utiliza el producto.
Requisitos de ubicación de
la instalación
Instale a una distancia de al menos 3 ¼ ft (1
m) de la pared.
•
Si no hay suciente espacio para que
haya tomada de aire, podría reducirse el
rendimiento del producto.
1 m
El rendimiento del producto puede diferir
según el entorno de funcionamiento (por
ejemplo, la temperatura y la humedad).
•
El rendimiento del producto puede verse
ligeramente degradado cuando se utiliza
fuera de un rango de humedad del 40% al
70%.
Requisitos de transporte
Cuando mueva o almacene el producto,
asegúrese de que el cable de alimentación
no toque el suelo envolviéndolo alrededor de
la parte inferior del producto.
Requisitos de transporte
Transporte el producto de forma segura
utilizando las asas en la parte superior y
trasera del producto.
PRECAUCIÓN
•
No mueva el producto sujetándolo por la
cubierta exterior. La tapa puede abrirse y
el producto puede caer.
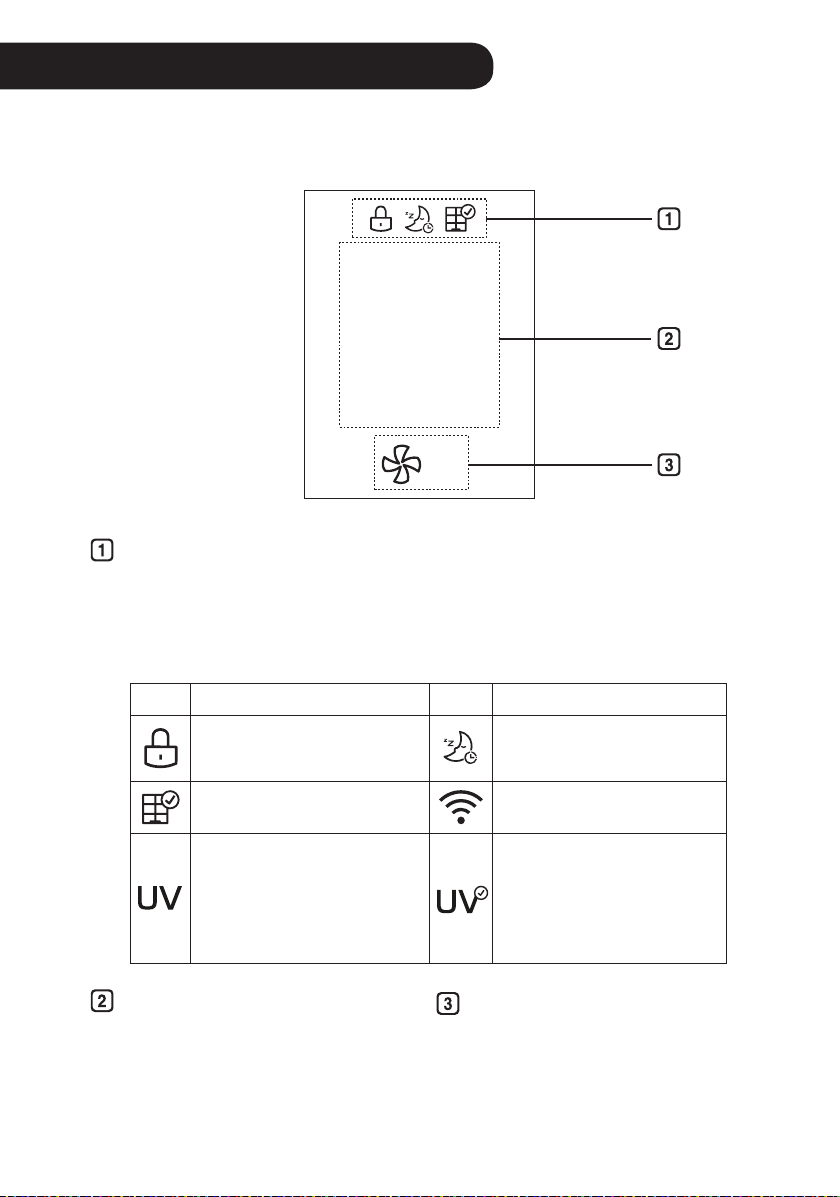
ES
14
ES
Pantalla de add-ons
•
Se muestran hasta tres iconos
•
Los iconos se muestran o se muestran según la prioridad de visualización.
–
Bloqueo de botones > Temporizador > Noticación de reemplazo de ltro > UV
nano > Conexión Wi-Fi
Icono Descripción Icono Descripción
Muestra cuando el panel de
control está bloqueado.
Se muestra cuando se
congura el temporizador de
apagado.
Muestra cuando es el momento
de reemplazar el ltro.
Muestra cuando esté
conectado al Wi-Fi.
Se muestra cuando la
conguración de UVnano está
habilitada.
Se muestra cuando UVnano
no está funcionando
normalmente.
(Compruebe si el ltro y la
tapa de entrada de aire están
instalados correctamente.)
Indicación de estado
•
Se muestran la calidad del aire, la
concentración de polvo PM10 / PM2.5
/ PM1.0, la temperatura, la humedad y
el estado de funcionamiento.
Pantalla de velocidad del
ventilador
•
Muestra velocidad del ventilador
en Auto, Pasos 1 a 10 y Turbo.
Funcionamiento
•
La apariencia o los accesorios del producto pueden variar según el modelo.
Pantalla de visualización de estado
PM10
5
3
㎍/㎥

15
ESES
Panel de Control
Botón de Espera encendido / apagado
Puede iniciar o detener la operación.
Botón de Velocidad
Le permite ajustar la intensidad del
viento en el producto.
Botón de Modo
Utilícelo para congurar el modo de
operación del producto.
Botón de Viento automático
Establece automáticamente la fuerza
del viento del producto.
Botón de Rotación
Establece la rotación del producto.
NOTA
•
Puede utilizar funciones extra pulsando el botón del panel de control durante más de 3 segundos.
(
Ejemplo presione el
botón de Modo de funcionamiento y el botón de Viento automático al
mismo tiempo durante 3 segundos o más.
)
Pulsación prolongada
(más que 3 segundos)
Función
Pulsación prolongada
(más que 3 segundos)
Función
Bloqueo / desbloqueo del panel de control
UVnano encendido / apagado
Conectar Wi-Fi
Smart Diagnosis
Sonido del producto
encendido / apagado
Reinicio de noticación
de sustitución de ltro
•
Mantenga pulsado el botón
Mantenga
pulsado el botón
Función
Mantenga
pulsado el botón
Función
Cambio continuo de velocidad del ventilador
Cambio continuo de la pantalla de espera
Cambio continuo de velocidad del ventilador
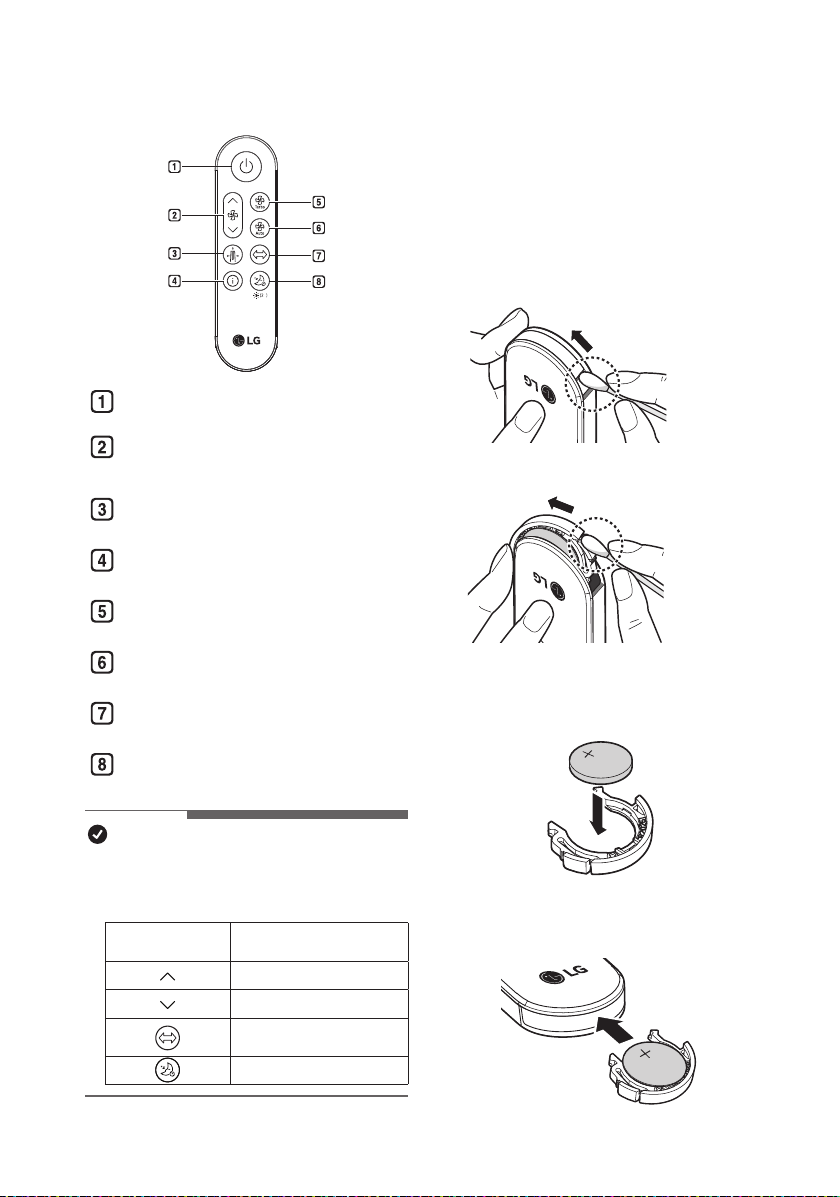
16
ES
Mando a distancia
s
Botón de Espera encendido / apagado
Puede iniciar o detener la operación.
Botón de Velocidad
Le permite ajustar la intensidad del viento en
el producto.
Botón de Modo
Congura el modo de operación.
Botón de Mostrar información
Utilícelo para establecer la pantalla de espera.
Botón de Turbo
Establece la velocidad del ventilador en Turbo.
Botón de Ventilador automático
Ajusta la velocidad del ventilador automático.
Botón de Rotación
Establece la rotación del Producto.
Botón de Temporizador de desconexión
Establece el horario de sueño.
NOTA
•
Puede utilizar funciones extra pulsando los
botones del mando a distancia durante más de
2 segundos.
Pulsación prolongada
(más que 2 segundos)
Función
Cambio continuo de velocidad del ventilador
Cambio continuo de velocidad del ventilador
Sonido del producto encendido / apagado
Conguración del brillo de la pantalla
Preparación para uso del mando
a distancia
1
Con la parte frontal del controller
remoto hacia arriba, retire la bandeja de
la batería presionando en la dirección
del número 2 mientras presiona la parte
1 con una herramienta simple (hisopo
de algodón, etc.).
①
②
②
①
2
Inserte la batería suministrada con el
aparato en la bandeja. Colóquela con
la marca + hacia arriba.
3
Vuelve a insertar la bandeja de la
batería en el mando a distancia.

17
ES
•
La recepción de la señal del mando a
distancia puede interrumpirse cuando hay
luces fuertes como lámparas uorescentes
o letreros luminosos. En este caso, utilice
el mando a distancia frente al receptor de
señal remota de la unidad interior.
Primeros pasos
Pulse el botón de Espera encendido /
apagado para iniciar la operación.
NOTA
•
Al iniciar la operación por primera vez
después de instalar el producto, éste
funcionará en modo Modo ancho(Wide
Mode) y con 5 niveles de velocidad del
ventilador.
•
Si detiene la operación y la reanuda,
comenzará a limpiar con el último modo que
seleccionó.
•
Incluso si se pierde energía debido a un
apagón, el producto recordará el modo
(velocidad del ventilador, modo, brillo de la
pantalla) que utilizó por última vez.
•
Cuando comienza a conducir, la
concentración de polvo se muestra
después de la estabilización del sensor
(aproximadamente 15 segundos).
Mientras la estabilización del sensor
está en progreso, aparece la pantalla de
estabilización limpia (
) en la pantalla de
estado.
ADVERTENCIA
•
El mando a distancia utiliza baterías tipo
botón/ moneda (CR2025).
•
La ingestión de baterías puede causar
lesiones graves o la muerte. Busque a una
emergencia de inmediato para obtención de
atención médica.
•
Mantenga la batería fuera del alcance de los
niños.
•
Si la bandeja de la batería no se cierra bien,
deje de utilizar el aparato de inmediato y
manténgalo alejado de los niños.
PRECAUCIÓN
•
No modique la batería arbitrariamente.
•
No recargue ni desmonte las baterías.
•
No arroje la batería al fuego para desecharla
ni la deje cerca del calor.
•
No pulse varios botones a la vez.
•
No lo utilice en un lugar con mucha agua o
humedad.
•
No lo utilice en un lugar con llamas o calor.
•
Quite y almacene la batería en un lugar
seguro si no tiene la intención de utilizar el
mando a distancia en mucho tiempo.
NOTA
•
Si el mando a distancia no funciona
correctamente, verique la polaridad (+, -)
de la batería o sustitúyala antes de ponerse
en contacto con el centro de servicio.
•
Elimine las baterías de acuerdo con la
normativa medioambiental.
•
Cuando utilice el controller remoto, apunte
el transmisor del controller remoto hacia el
receptor del producto.
•
El mando a distancia no se recibe
correctamente a una distancia de más de 7
m del producto.
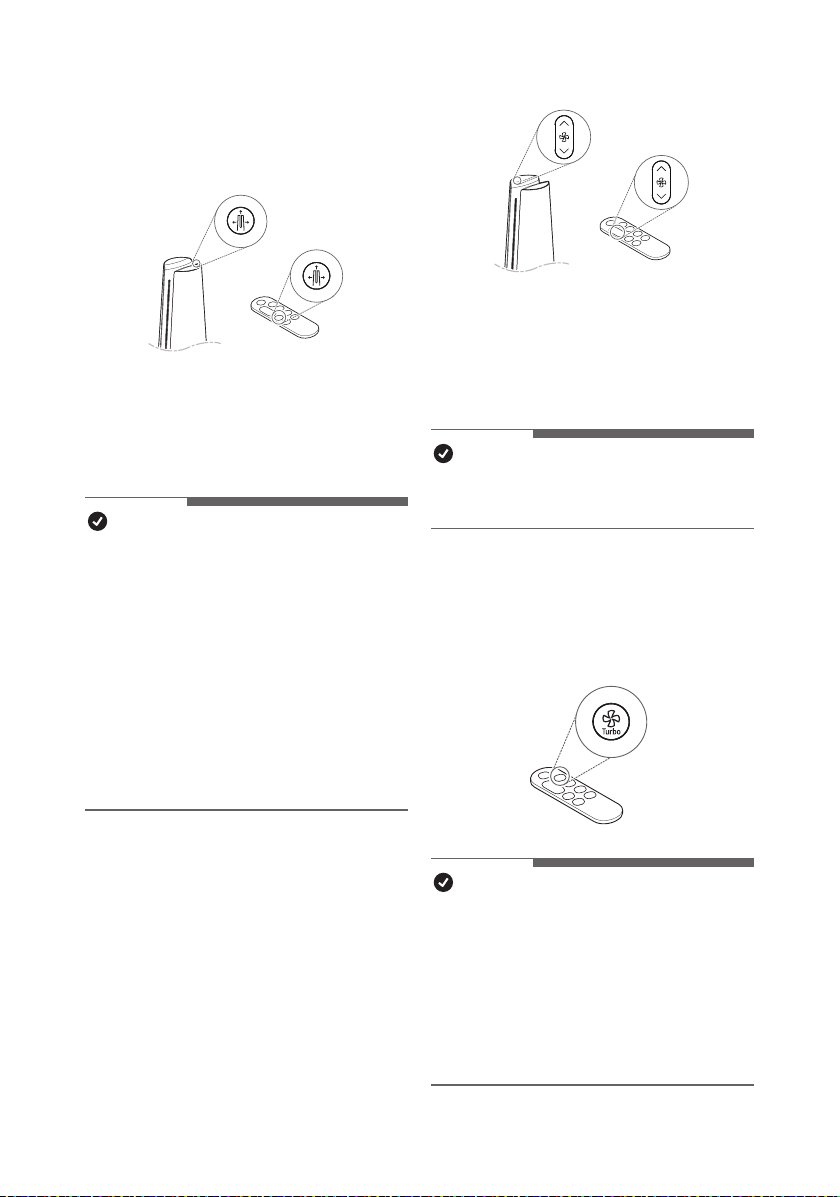
18
ES
Uso de Modo
Establece el modo de operación del
producto.
•
Cada vez que se pulsa el botón de Modo
durante su funcionamiento, se repite la
secuencia de limpieza Modo ancho(Wide
Mode) – Modo directo(Direct Mode) –
Modo difuión(Diffusion Mode)
NOTA
•
Modo ancho(Wide Mode) : En el modo
de funcionamiento, puede sentirse fresco
y cómodo con el viento limpio descargado
hacia el frente.
•
Modo directo(Direct Mode) - A medida
que la paleta se cierra ligeramente, el aire
se descarga intensamente.
•
Modo difuión(Diffusion Mode) : Modo
de funcionamiento en el que la paleta
cambia la dirección del viento para limpiar
el espacio interior en varias direcciones y
utilizarlo sin hacer frío incluso en invierno.
Ajuste de las velocidades del
ventilador
Ajusta la potencia del viento del producto.
•
Cada vez que se pulsa el botón de
Velocidad durante el funcionamiento, ésta
cambia en el orden de los pasos 1 a 10.
•
Mantenga pulsado el botón de Velocidad
para cambiar la velocidad del Ventilator.
NOTA
•
Cuanto más fuerte es el viento, más
rápido se limpia el espacio.
Uso de Turbo
Establece la velocidad del ventilador en
Turbo.
NOTA
•
Después de ejecutar Turbo, si apaga
"Turbo" antes de 30 minutos, cambiará a
la velocidad anterior del ventilador.
•
Después de 30 minutos de
funcionamiento turbo, la velocidad del
viento cambia automáticamente a viento
automático.
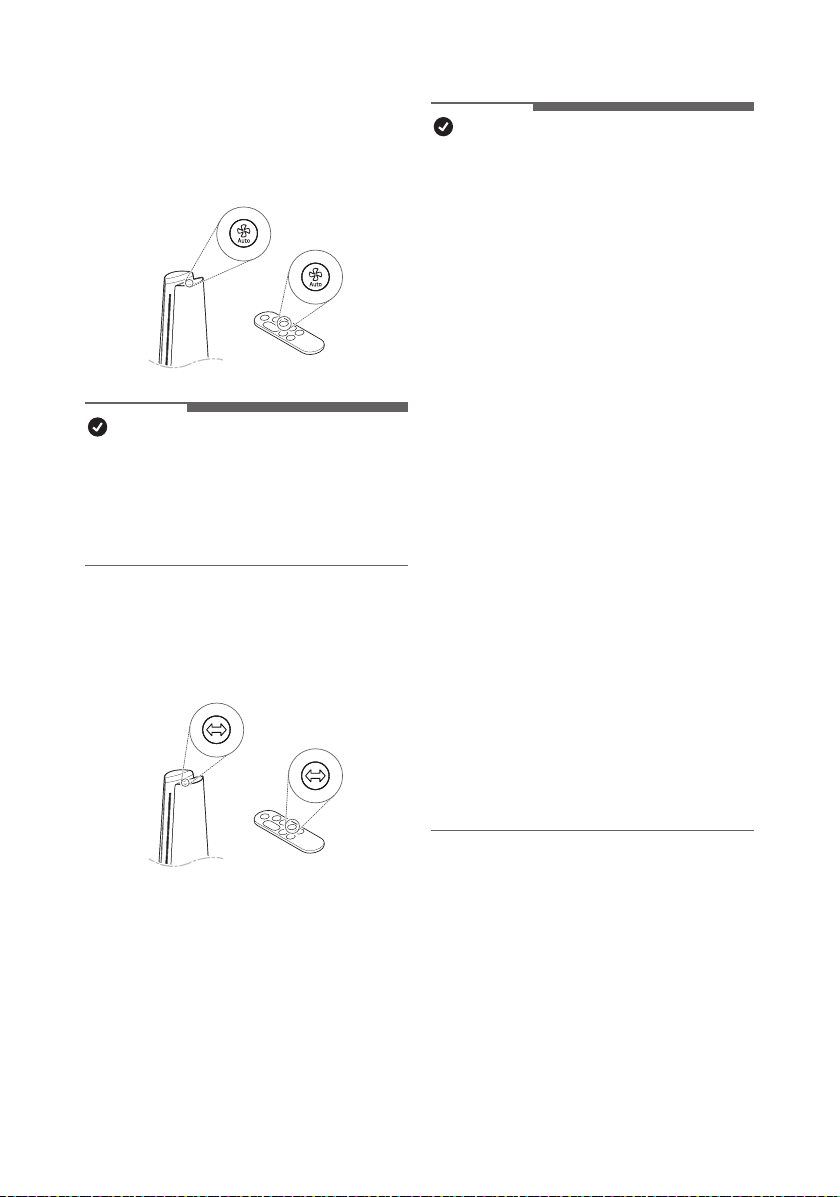
19
ES
Uso de Viento automático
Establece automáticamente la fuerza del
viento del producto.
NOTA
•
Cuando se establece en funcionamiento
viento automático, el volumen de aire
apropiado se ajusta automáticamente de
acuerdo con la concentración de polvo
no en el interior.
Uso de rotación
Establece la rotación del producto.
•
Cada vez que se pulsa el botón de
Rotación durante la operación, se repite
la secuencia de 45°-60°-90°-140°-Parada.
NOTA
•
Gira a 140° durante la rotación inicial y
empieza la rotación desde el centro del
producto después de la inicialización de
la posición.
•
Cuando se pulsa el botón de Rotación
mientras el producto esté en rotación, se
ajustará en "Detener".
•
When the function is changed while using
the rotation, the rotation stops for a while
so that the display status can be checked,
and then the rotation operates again after
the setting is completed.
•
Cuando se usa el modo de rotación:
cuando el producto está apagado, el
producto gira hacia el centro y se detiene.
•
Cuando el modo de rotación no está en
uso: cuando el producto está apagado,
el producto se apaga en una posición
estacionaria.
•
La rotación del producto gira alrededor
del centro del producto.
•
No gire con fuerza el producto
sujetándolo.
•
Si sujeta el producto y lo fuerza a girar,
deberá volver a centrarlo.
•
Para centrar el producto, apáguelo,
desenchufe el cable de alimentación,
espere un momento y vuelva a
enchufarlo. Después de eso, si enciende
la rotación, la inicialización procede
automáticamente.
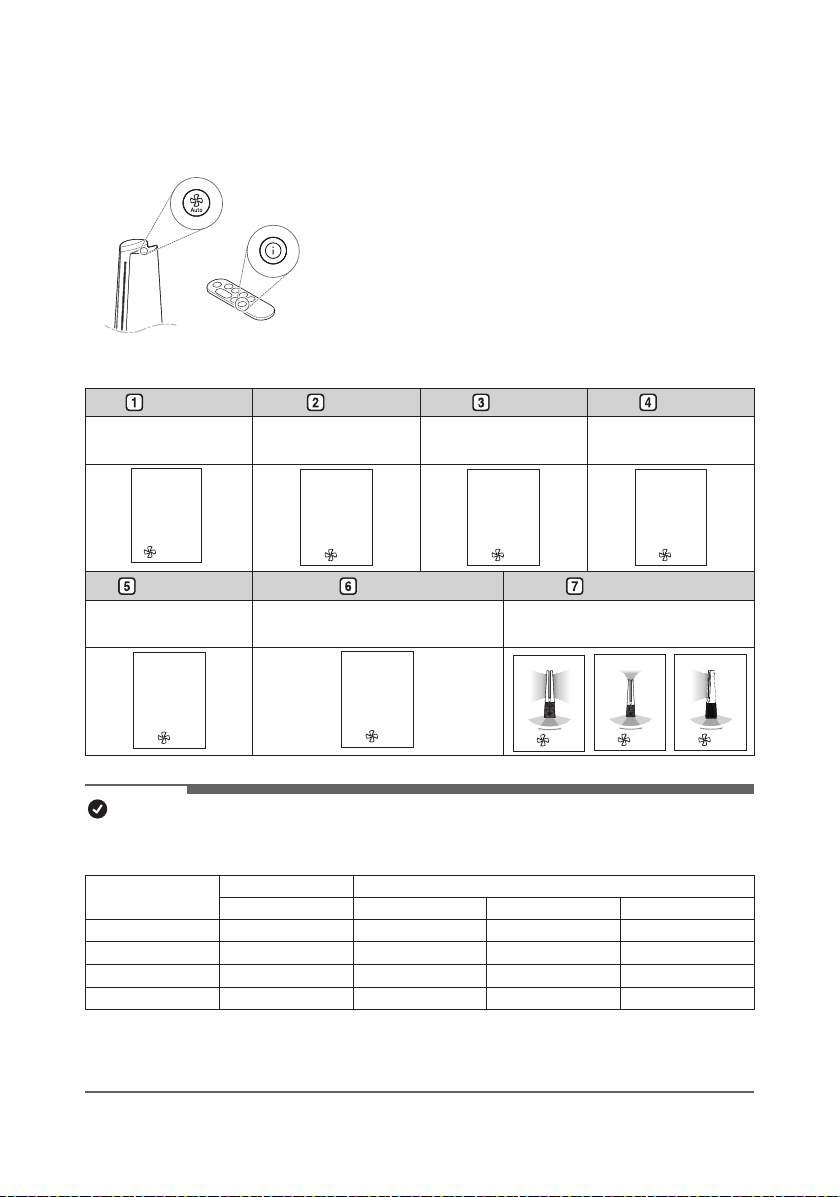
20
ES
Uso las funciones extra
Conguración de pantalla de espera
Muestra información sobre la calidad del aire, la circulación de
la calidad del aire, la temperatura y el funcionamiento.
•
Mantenga pulsado el botón Viento automático en los
controle panel.
•
Pulse el botón de Mostrar información en el mando a
distancia.
•
La información mostrada cambia en el orden de Air Quality
– PM10 – PM2.5 – PM1.0 – Temperatura(Temperature) –
Humedad(Humidity) - Estado de modo
Air Quality PM10 PM2.5 PM1.0
•
Muestra el estado general
de la calidad del aire.
• Muestra información
sobre polvo no.
• Muestra información
sobre polvo ultra no.
•
Muestra información sobre
polvo súper ultra no.
Air Quality
Poor
Turbo
PM10
235
3
㎍/㎥
PM2.5
38
3
㎍/㎥
PM1.0
98
3
㎍/㎥
Temperature Humidity Estado de modo
•
Muestra información sobre
la temperatura ambiente.
• Muestra información sobre la
humedad interior.
• Muestra información sobre el
estado de la operación.
Temperature
77°
3
Humidity
40
%
3
3
3 3
NOTA
•
La calidad general del aire se calcula en función de las concentraciones de polvo y se clasica
en 4 niveles: verde, amarillo, naranja y rojo, según la contaminación del aire.
Color
Calidad del aire general
Concentración de PM (μg/m
3
)
Estado PM10
PM2.5 PM1.0
Rojo Baja(Poor) 255 o más 56 o más 56 o más
Naranja
Insalubre(Unhealthy)
155 ~ 254 36 ~ 55 36 ~ 55
Amarillo
Moderado(Moderate)
55 ~ 154 13 ~ 35 13 ~ 35
Verde Buena(Good) 54 o menos 12 o menos 12 o menos
•
La calidad general del aire se puede ver por el color del indicador de limpieza y el texto
que indica la concentración de polvo.
•
El color de la calidad general del aire se determina en función de la concentración de polvo.
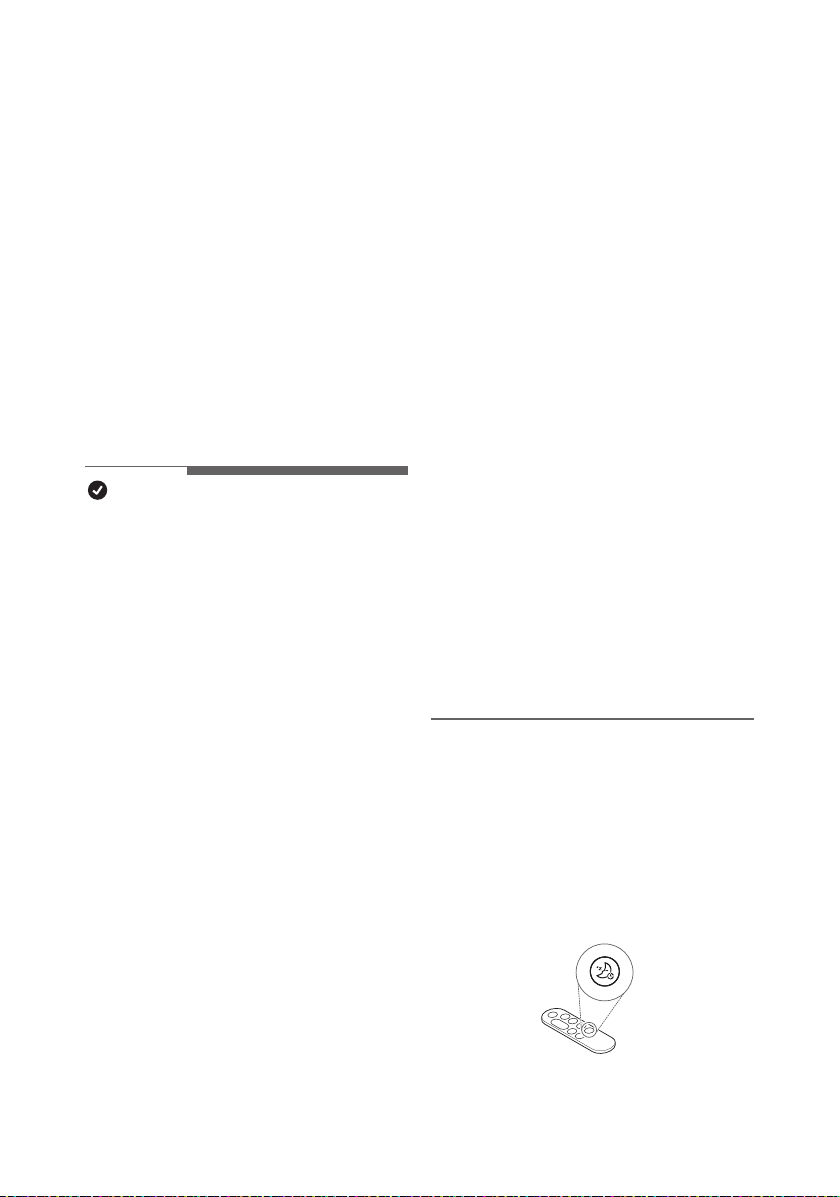
21
ES
•
Si se utilizan productos diferentes o
idénticos en el mismo espacio, puede
haber diferencias en las lecturas de
concentración debido a la circulación del
aire.
•
Si el producto se utiliza en los siguientes
entornos, la concentración de polvo
puede mostrarse de forma diferente al
valor real.
–
Alrededor de sofás y camas de tela,
alrededor de alfombras peludas,
organización de mantas / ropa, uso
de aspiradora, lugares con insectos y
mascotas, lugares con alta humedad.
–
Lugares por donde entra el aire
exterior, como alrededor de sitios de
construcción, bordes de carreteras,
fábricas, puertas, ventanas y aberturas
de ventilación.
–
Lugares donde se utilizan productos
que generan vapor y partículas nas
(humidicadores, utensilios de cocina,
aerosoles, etc.)
–
Incluso si el polvo se genera por
actividades como quitar el polvo o
limpiar, es posible que el sensor
no responda si se genera una gran
cantidad de polvo de PM10 o superior,
pero el ltro elimina el polvo.
Conguración de Temporizador
de desconexión
Está congurado para detener
automáticamente la operación después de
la operación durante un período de tiempo
establecido.
Comprobación del estado del
aire en el pantalla de estado
Puede comprobar la calidad general del aire
y la concentración de polvo en el pantalla de
estado del producto.
•
Calidad general del aire: la calidad
general del aire se puede ver por el color
del indicador de calidad del aire y el texto
que indica la concentración de polvo.
•
Concentración de polvo: La
concentración de polvo se indica con el
color mostrado con cifras especícas,
dependiendo del tamaño de partícula.
Muestra la concentración de PM10/PM2.5/
PM1.0.
NOTA
•
La concentración de polvo se muestra
en unidades de 1 de 4 a 999. Para la
concentración de polvo, consulte la hoja
de datos del fabricante del sensor.
•
La concentración de polvo no / polvo
ultrano que se muestra en el producto
puede ser diferente de los estándares de
medición de otros instrumentos y otros
productos.
–
Si la concentración de polvo es alta,
la diferencia entre la concentración de
polvo mostrada y la concentración de
polvo real puede ser grande.
•
La temperatura y la humedad pueden
variar según el entorno circundante,
como puertas, ventanas y conductos de
ventilación.
•
La temperatura y la humedad pueden
aparecer de manera diferente
dependiendo de la circulación de aire
en la misma habitación. Además, la
temperatura y la humedad pueden ser
diferentes a las de otros productos y
termohigrómetros.
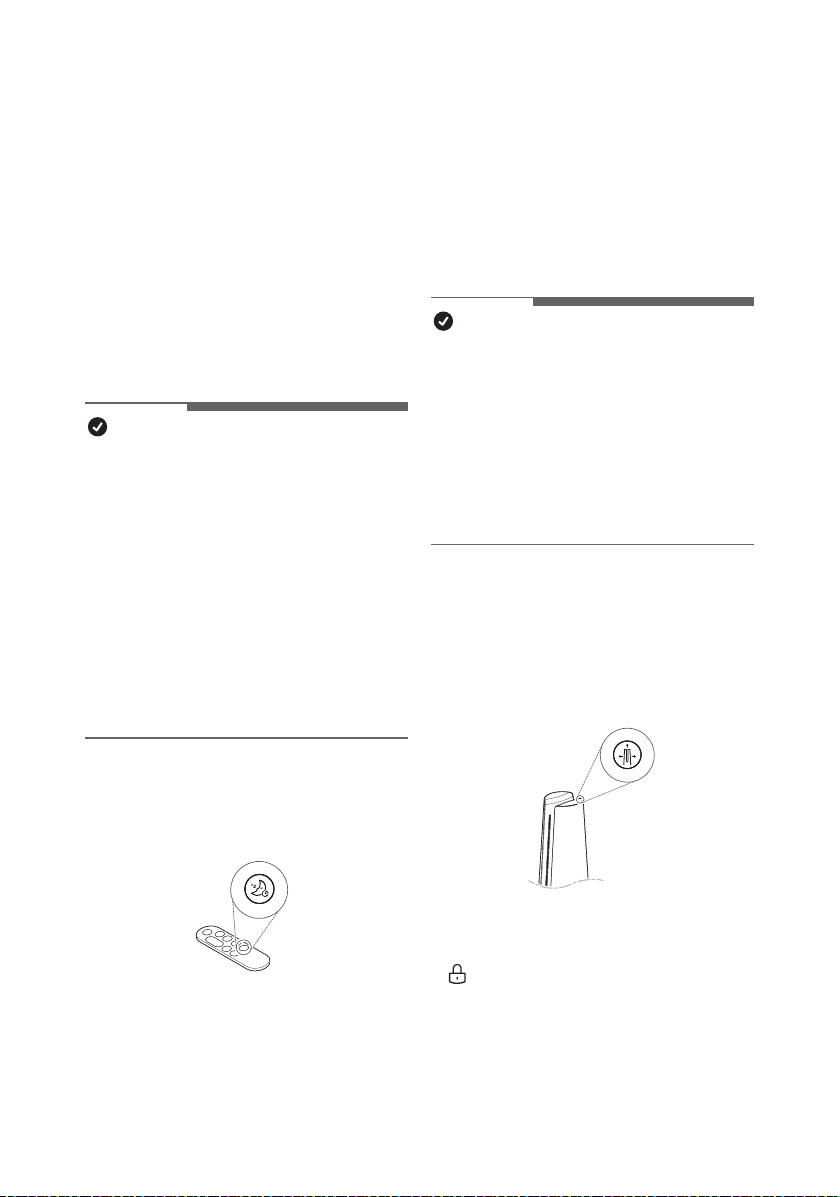
22
ES
•
Presione el botón del Temporizador de
Desconexión mientras el aparato está en
funcionamiento.
–
Cada vez que se presiona el botón del
temporizador de apagado, se repite en
el orden de 1~12-Apagado.
•
Si se congura el horario de suspensión, el
nivel de brillo de la pantalla 1 y la rotación
se operan en la parada. (Sin embargo,
si congura el brillo de la pantalla en
apagado antes de congurar el modo
de suspensión, el brillo de la pantalla
permanecerá apagado).
NOTA
•
Cuando hace una reserva para dormir, la
velocidad del viento se establece en el
nivel 1 y, después de un cierto período de
tiempo, se ajusta automáticamente según
la condición del aire.
•
Puede cambiar la velocidad del viento, el
brillo de la pantalla y el rotación incluso
cuando el temporizador de apagado está
congurado.
•
Si presiona el botón de Temporizador
de Desconexión una vez más mientras
el horario de sueño está congurado, el
horario de sueño se cancela.
Ajuste de brillo de la pantalla
Ajusta el brillo de la pantalla.
•
Presione el botón del Temporizador
de desconexión durante más de 2
segundos para ingresar a la pantalla de
conguración del brillo de la pantalla.
–
Cada vez que se presiona el botón
una vez o durante más de 2 segundos,
cambia en el orden de Brillo 3 - Brillo 2
- Brillo 1 - Apagado.
–
Presione cualquier otra tecla del
controller remoto para salir de la
pantalla de ajuste de brillo de la
pantalla.
NOTA
•
Cuando se apaga el brillo de la pantalla,
si presiona el botón, se enciende con
el brillo 1 durante un tiempo y luego se
apaga la pantalla.
•
El brillo de la pantalla predeterminado se
establece en Brillo 2.
–
Brillo 3: 100%
–
Brillo 2: 60%
–
Brillo 1: 10%
Uso del botón de bloqueo
Puede bloquear los botones del panel de
control para evitar operaciones no deseadas
por niños u otros factores.
•
Pulse el botón de Modo durante 3
segundos.
•
se muestra en el pantalla de estado.
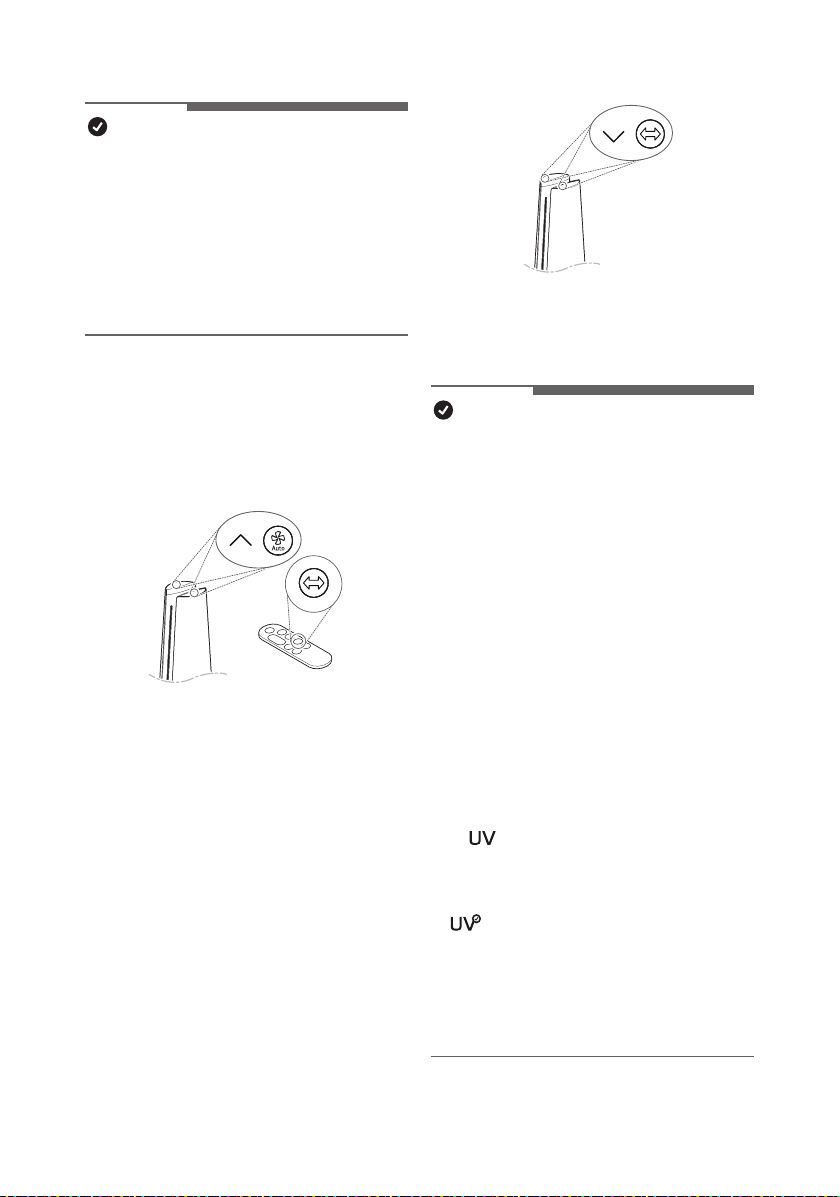
23
ES
•
Presione los botones de Velocidad y
Rotación en el panel de control al mismo
tiempo durante 3 segundos.
NOTA
•
Para deshabilitar UVnano, vuelva a
presionar el botón de Velocidad para
abajo y Rotación en el panel de control
durante al menos 3 segundos.
•
UVnano es un compuesto de UV (luz
ultravioleta) y nanómetro (unidad de
longitud).
•
Si hay polvo de materias extrañas dentro
del UVnano LED, límpielo con un paño
suave.
•
No opere el producto si el daño al LED
UVnano es evidente.
•
Asegúrese de apagar el producto antes
de limpiarlo y realizar otro mantenimiento.
•
Si se abre la tapa del producto o se
quita el ltro, es posible que el estado de
funcionamiento de UVnano no se muestre
normalmente.
•
El
icono en la pantalla de estado
es una pantalla que guía el encendido /
apagado de UVnano, no un indicador de
encendido / apagado de UVnano.
•
: Aparece cuando UVnano no
funciona normalmente. (Verique que el
ltro y la entrada de aire (cubierta) estén
instalados en la posición correcta).
•
Cuando se utiliza el producto por primera
vez, la función UVnano está activada.
NOTA
•
Se puede utilizar el mando a distancia
incluso cuando esté bloqueado.
•
Puede usar la LG ThinQ application
para cambiar de modo incluso cuando el
dispositivo esté bloqueado.
•
Para desbloquear, pulse el botón de
Modo nuevamente durante al menos 3
segundos.
Conguraciones de sonido del
producto
Enciende/apaga el sonido del producto.
•
Presione los botones de aumento
de Velocidad para arriba y Viento
automático en el panel de control al
mismo tiempo durante 3 segundos.
•
Presione y mantenga presionado el botón
de Rotación en el mando a distancia
durante 2 segundos.
Uso de UVnano
(Solo modelos con UVnano aplicado)
Elimina las bacterias dañinas el ventilador
dentro del producto para hacer circular aire
más limpio.
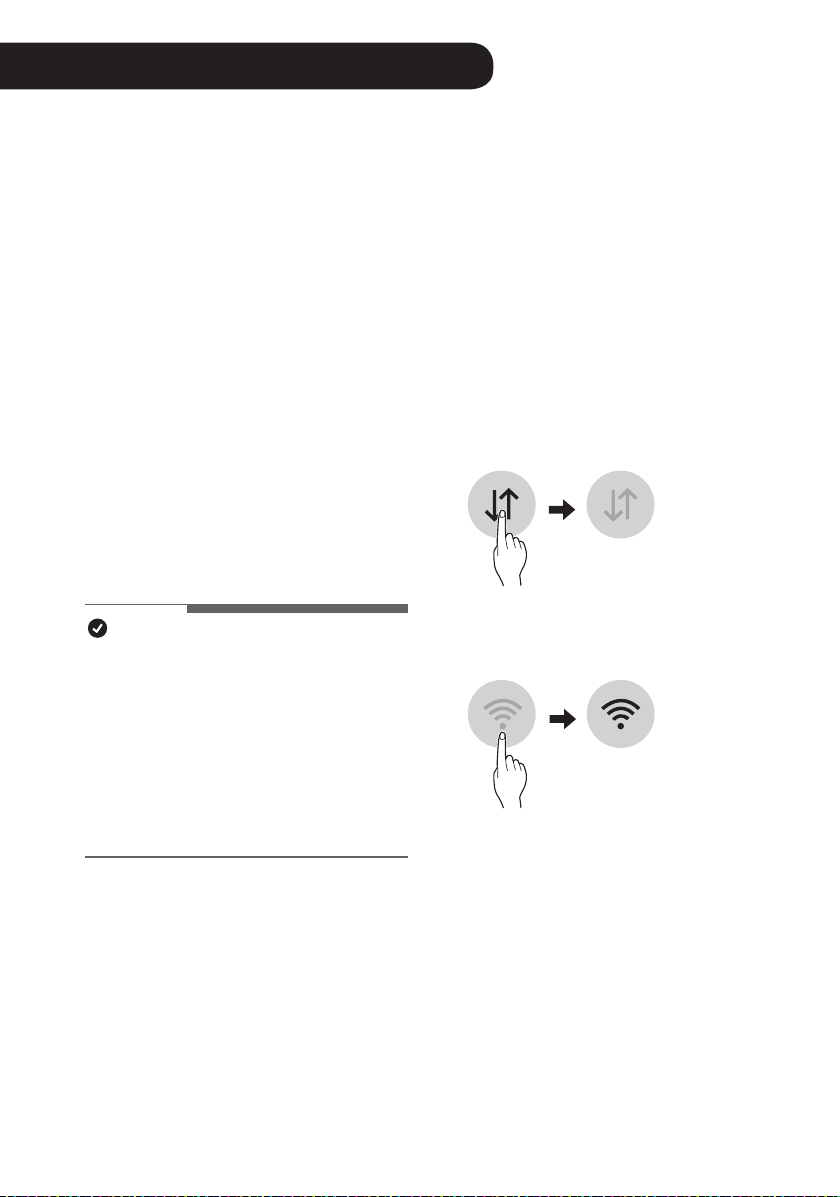
ES
24
ES
Aplicación LG ThinQ
La aplicación LG ThinQ le permite
comunicarse con el aparato mediante un
teléfono inteligente.
Funciones de la aplicación LG
ThinQ
Smart Diagnosis
Si experimenta un problema a utilizar el
electrodoméstico, la función de diagnóstico
inteligente lo ayudará a diagnosticar el
inconveniente.
Conguración
Le permite ajustar varias opciones en el
aparato y en la aplicación.
NOTA
•
Si cambia de enrutador inalámbrico,
proveedor de Internet o contraseña, borre
el aparato conectado en la aplicación LG
ThinQ y proceda a conectarlo de nuevo.
•
La aplicación está sujeta a cambios para
la mejora del aparato sin previo aviso a
los usuarios.
•
Las funciones pueden variar según el
modelo.
Antes de usar la aplicación LG
ThinQ
Esta característica solo está disponible en
modelos con la función Wi-Fi.
1
Verique la distancia entre el aparato y
el enrutador inalámbrico (red Wi-Fi).
•
Si la distancia entre el aparato y
el enrutador inalámbrico es muy
grande, la señal será débil. Puede
que le tome más tiempo conectarse
o que falle la instalación.
2
Desactive los datos móviles o datos
celulares en su teléfono inteligente.
3
Conecte su teléfono inteligente al
enrutador inalámbrico.
Funciones inteligentes
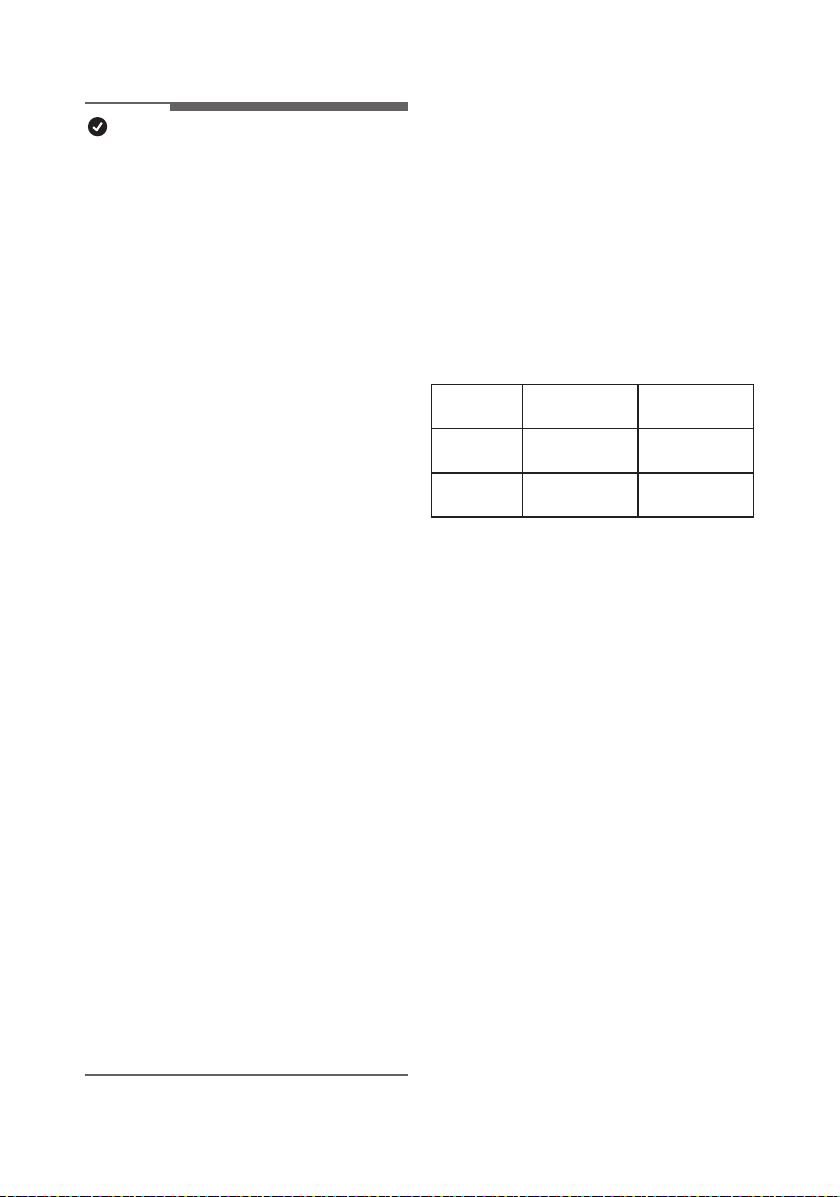
25
ESES
NOTA
•
Para vericar la conexión Wi-Fi, revise
que el ícono Wi-Fi
f
en el panel de
control esté encendido.
•
El aparato admite redes Wi-Fi de 2.4 GHz
solamente. Para vericar la frecuencia
de red, contáctese con el proveedor de
servicio de Internet o consulte el manual
del enrutador inalámbrico.
•
LG ThinQ no es responsable por ningún
problema de conexión de red, falla, mal
funcionamiento o error causado por la
conexión de red.
•
Si el aparato no se conecta bien a la red
Wi-Fi, es posible que esté demasiado
lejos del enrutador. Compre un repetidor
de Wi-Fi (extensor de señal) para mejorar
la fuerza de la señal Wi-Fi.
•
Es posible que la conexión Wi-Fi no se
efectúe o se interrumpa debido al entorno
de la red doméstica.
•
Es posible que la conexión de red no
funcione bien por cuestiones relacionadas
con su proveedor de servicios de Internet.
•
El entorno inalámbrico circundante puede
hacer que el servicio de red inalámbrica
funcione lentamente.
•
Si el aparato no puede conectarse debido
a problemas con la transmisión de la
señal inalámbrica, desenchúfelo y espere
alrededor de un minuto previo a intentarlo
de nuevo.
•
Si el cortafuegos de su enrutador
inalámbrico está activado, desactívelo o
añada una excepción a este.
•
El nombre de la red inalámbrica (SSID)
debe ser una combinación de letras y
números. (No utilice símbolos especiales).
•
La interfaz de usuario (UI) del teléfono
inteligente puede variar dependiendo del
sistema operativo (OS) del móvil y del
fabricante.
•
Es posible que falle la conguración
de red, si el protocolo de seguridad del
router está en WEP. Cambie el protocolo
de seguridad por otro (se recomienda
el WPA2) y conecte el producto
nuevamente.
Instalación de la aplicación LG
ThinQ
Busque la aplicación LG ThinQ en la tienda
Google Play o en la App Store de Apple
desde su teléfono inteligente. Siga las
instrucciones para descargar e instalar la
aplicación.
Especicaciones módulo LAN
inalámbrico
Rango de
frecuencia
Potencia de
salida (Max.)
Wi-Fi
2412 MHz ~
2462 MHz
< 30 dBm
Bluetooth
2402 MHz ~
2480 MHz
< 30 dBm
Aviso de la FCC
El siguiente aviso cubre el módulo transmisor
contenido en este producto.
Este equipo fue probado y se determinó que
cumple con los límites para los dispositivos
digitales de Clase B, en conformidad con
la parte 15 de las normas de la FCC. Estos
límites están diseñados para ofrecer una
protección razonable contra interferencias
dañinas en una instalación residencial. Este
equipo genera, usa y puede emitir energía
de radiofrecuencia y, si no se instala y
utiliza de acuerdo con las instrucciones,
podría causar interferencias dañinas a las
comunicaciones por radio. Sin embargo,
no se garantiza que dicha interferencia no
pueda ocurrir en instalaciones particulares.
Si este equipo causa interferencia dañina
a la recepción de radio o televisión, que se
puede determinar encendiendo y apagando
el equipo, se aconseja al usuario intentar
corregir la interferencia realizando alguna de
las siguientes acciones:

26
ES
Información de anuncio de
programas de código abierto
Para obtener el código fuente bajo GPL,
LGPL, MPL y otras licencias de código
abierto que contiene este producto, visite
https://opensource.lge.com. Además del
código fuente, se pueden descargar los
términos de la licencia, las anulaciones de la
garantía y los avisos de derechos de autor.
LG Electronics también le proporcionará
el código abierto en un CD-ROM por
un costo que cubra los gastos de dicha
distribución (como el costo del medio,
del envío y de la manipulación) una vez
realizado el pedido por correo electrónico
a la dirección [email protected]. Esta
oferta es válida solo durante un período de
tres años después de que se envíe el último
cargamento de este producto. Esta oferta
es válida para todo aquel que reciba esta
información.
- Reorientar o reubicar la antena receptora.
- Aumentar la separación entre el equipo y el
receptor.
- Conecte el equipo a una toma de corriente
en un circuito diferente al que está
conectado el receptor.
- Consultar al vendedor o a un técnico de
radio/TV con experiencia para solicitar
ayuda.
El dispositivo cumple con la parte 15 de las
Reglas FCC. La operación está sujeta a las
siguientes dos condiciones:
(1) Este dispositivo no debe causar
interferencia dañina, y
(2) Este dispositivo debe aceptar cualquier
interferencia que reciba, incluida la
interferencia que pueda causar un
funcionamiento no deseado.
Cualquier cambio o modicación en la
construcción de este dispositivo, que no
cuente con la aprobación expresa de la parte
responsable del cumplimiento, puede anular
la autorización del usuario para operarlo.
Declaración de exposición a
radiaciones de RF de la FCC
Este equipo cumple con los límites de
exposición a la radiación de la FCC
establecidos para un entorno no controlado.
Este transmisor no se debe ubicar ni utilizar
junto con ninguna otra antena o transmisor.
Este equipo solo se debe instalar y utilizar
a una distancia mínima, entre la antena y
el cuerpo, de 20 cm (7,8 pulgadas). Los
usuarios deben seguir las instrucciones
especícas de funcionamiento para asegurar
el cumplimiento de las disposiciones sobre la
exposición a la radiación de RF.
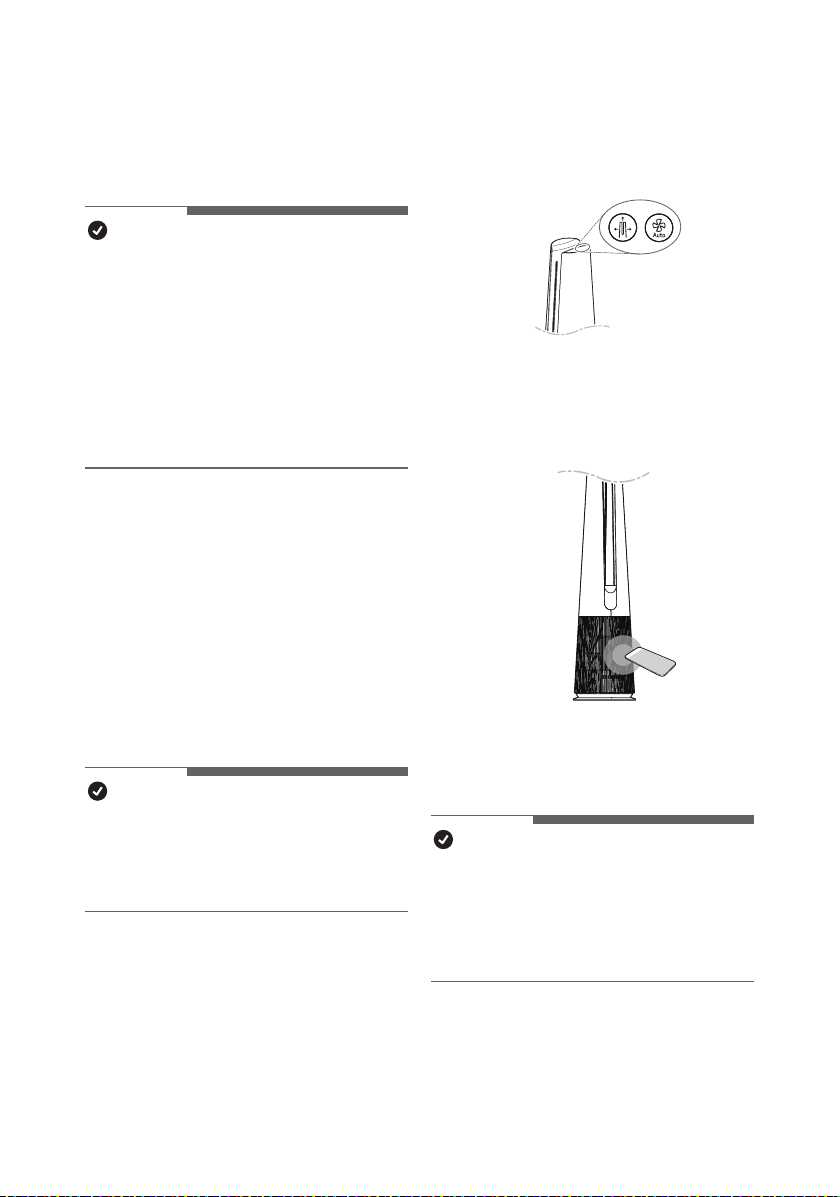
27
ES
Smart Diagnosis
Esta es una función que puede diagnosticar
la causa de la falla del producto.
NOTA
•
El servicio puede suspenderse debido
a factores externos (como falta de
disponibilidad de Wi-Fi, desconexión
de Wi-Fi, política de la tienda de
aplicaciones, indisponibilidad de
aplicaciones, etc.) que no se deben a la
negligencia de LG Electronics.
•
Esto está sujeto a cambios sin previo
aviso y el método de servicio puede variar
según las circunstancias locales.
Uso de LG ThinQ para
diagnosticar problemas
Si ocurre un problema con un producto
equipado con Wi-Fi, puede diagnosticar
el problema enviando datos a su teléfono
inteligente usando LG ThinQ.
•
Después de iniciar LG ThinQ,
seleccione Smart Diagnosis en el menú.
Diagnostique el producto de acuerdo con
el procedimiento proporcionado por LG
ThinQ.
NOTA
•
Al diagnosticar con Wi-Fi, puede
diagnosticar el producto con un pitido
cuando se desconecta la conexión Wi-Fi
con el producto.
Uso del diagnóstico audible
para diagnosticar problemas
Si el diagnóstico inteligente con la aplicación
sigue fallando, haga clic en el botón 'Go to
Audible Diagnosis' de la aplicación y siga las
instrucciones que aparecen.
1
Pulse los botones de Modo y Viento
automático en el panel de control al
mismo tiempo durante 3 segundos.
2
Acerque su teléfono al producto.
•
Asegúrese de que el micrófono del
teléfono esté orientado hacia la parte
frontal del producto.
3
Los resultados del Diagnostico
Inteligente se mostrarán en la aplicación
LG ThinQ.
NOTA
•
Para un diagnóstico preciso, no aleje el
teléfono inteligente del producto hasta
que se detenga el pitido.
•
Esté en silencio alrededor del producto
durante el Diagnóstico Inteligente.
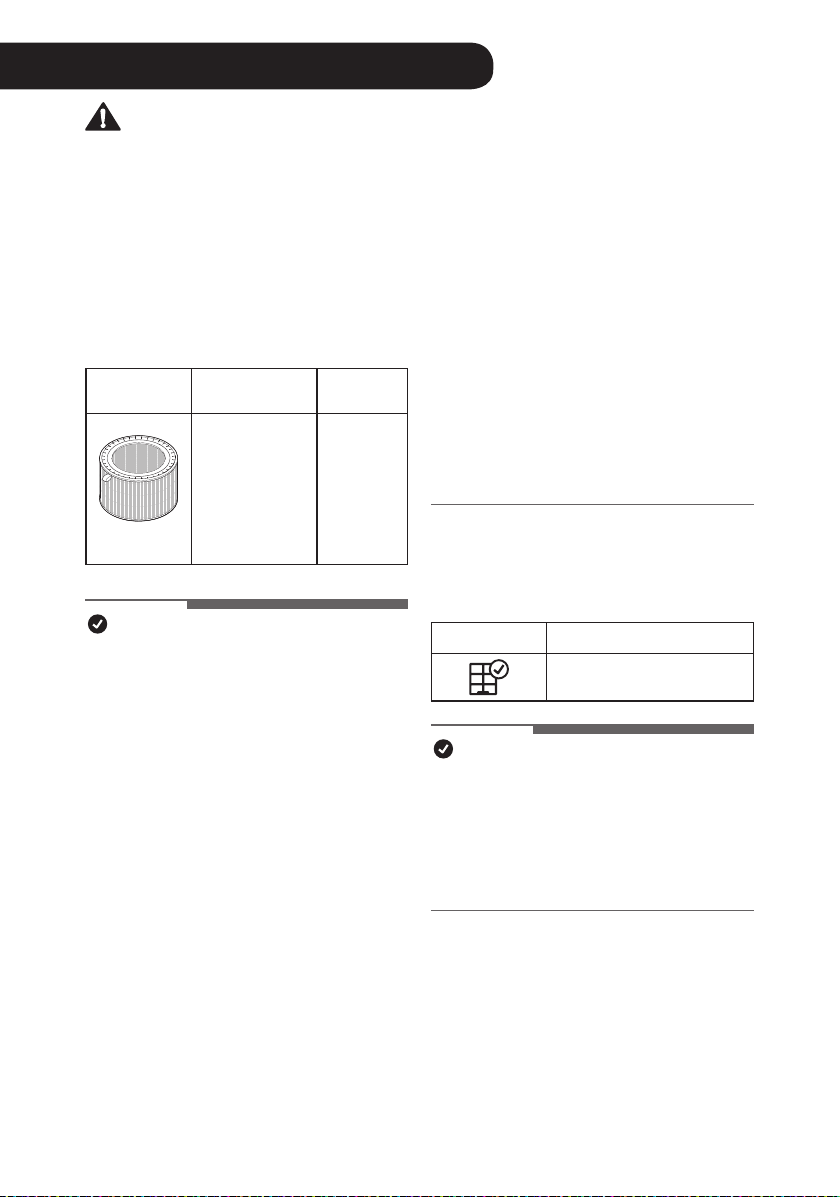
ES
28
ES
Mantenimiento
Mantenimiento del aparato
Frecuencia de limpieza y
sustitución del ltro
Tipo
Solo ltro
ultrano
Ciclo de
sustitución
Filtro
Polvo ultrano
Si estuviera
contaminado,
use una
aspiradora o un
cepillo suave
para limpiarlo.
1 año
NOTA
•
El entorno operativo y los horarios de
funcionamiento podrían afectar la frecuencia
de limpieza. Limpie con más frecuencia,
si el aparato funciona en un entorno
polvoriento.
•
Si no se limpia el aparato según el
cronograma recomendado, el producto
podría oler mal o no funcionar de manera
adecuada.
•
Debe reemplazar el ltro al nal de su vida
útil y el costo de los ltros de reemplazo no
está cubierto por la garantía. Para comprar
ltros nuevos, comuníquese con un centro
de información al cliente de LG Electronics
o visite el sitio web en www.lg.com
•
Si la concentración de MP no cambia en
la pantalla durante mucho tiempo, limpie
el sensor de PM1.0 incluso si no está
programada una limpieza.
•
También puede hacer que el centro de
servicio limpie o sustituya el ltro. Se le
cobrará una tarifa nominal por los servicios
de limpieza y sustitución del ltro.
•
Las partes superior e inferior del ltro están
hechas de papel en lugar de plástico. La
extracción repetida del ltro puede causar
rayones en la parte superior e inferior del
ltro.
•
Incluso si hay rayones en la parte superior
e inferior del ltro, no hay ningún problema
con el uso.
Noticaciones del pantalla de
estado
Noticación Medidas correctivas
Sustituya el ltro.
NOTA
•
Los avisos de alerta de reemplazo
del ltro aparecen en el tiempo de
uso máximo, al considerar las horas
de funcionamiento del producto. La
frecuencia de reemplazo se determina
según las horas de uso y el entorno.
ADVERTENCIA
•
Detenga la operación del producto y desenchufe el cable de alimentación de la toma
eléctrica antes de limpiar y reemplazar el ltro.
•
No pulverice agua directamente sobre el producto.
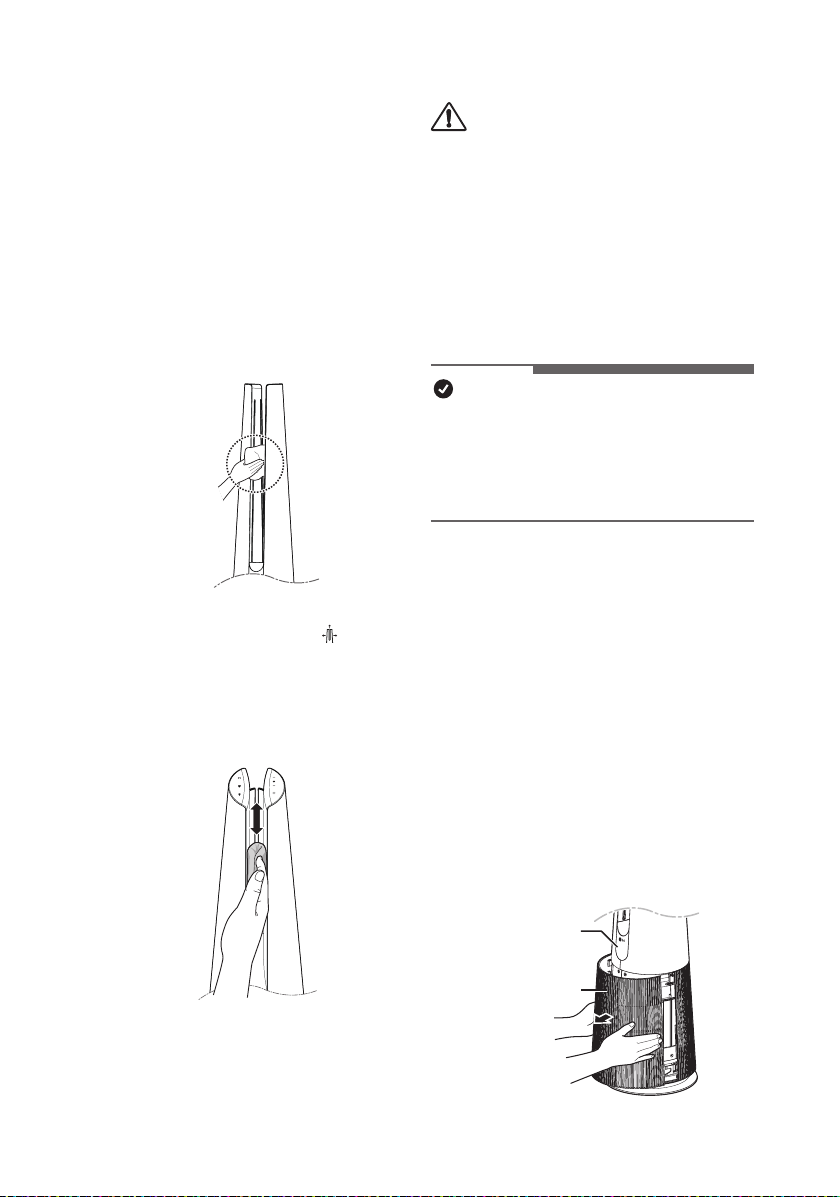
29
ESES
Limpieza del producto
Limpieza del exterior del
producto
1
Utilice una aspiradora para eliminar el
polvo de la entrada de aire.
2
Limpie la salida de aire y el exterior del
producto con un paño suave.
3
Presione el botón de Modo
para
seleccionar el modo difuión(Diffusion
Mode) del espacio. Cuando la paleta
esté terminada, limpie la parte
delantera y trasera de la paleta con un
paño suave.
La parte de atrás
PRECAUCIÓN
•
No limpie el producto con detergentes
alcalinos.
•
No limpie la supercie del producto
con ácido sulfúrico, ácido clorhídrico
ni disolventes orgánicos (diluyente,
queroseno, acetona, etc.) ni pegue
etiquetas en el producto. Esto puede
dañar la supercie del producto.
•
No deje que entre agua en el producto.
Note
•
Si le resulta difícil quitar el polvo de
las tapas delantera y trasera, retire los
ltros y lávelos con agua. A continuación,
deje que se sequen completamente a la
sombra.
Mantenimiento del ltro
Limpieza de los ltros
1
Retire las tapas delantera y trasera del
producto.
Agarre ambos lados de la parte
superior de la entrada de aire (cubierta)
desde la parte frontal del producto y tire
suavemente para separarlo.
•
La dirección con el logotipo de LG
en la pantalla del producto es la
parte frontal del producto.
Pantalla
Entrada de aire
(Tapa)
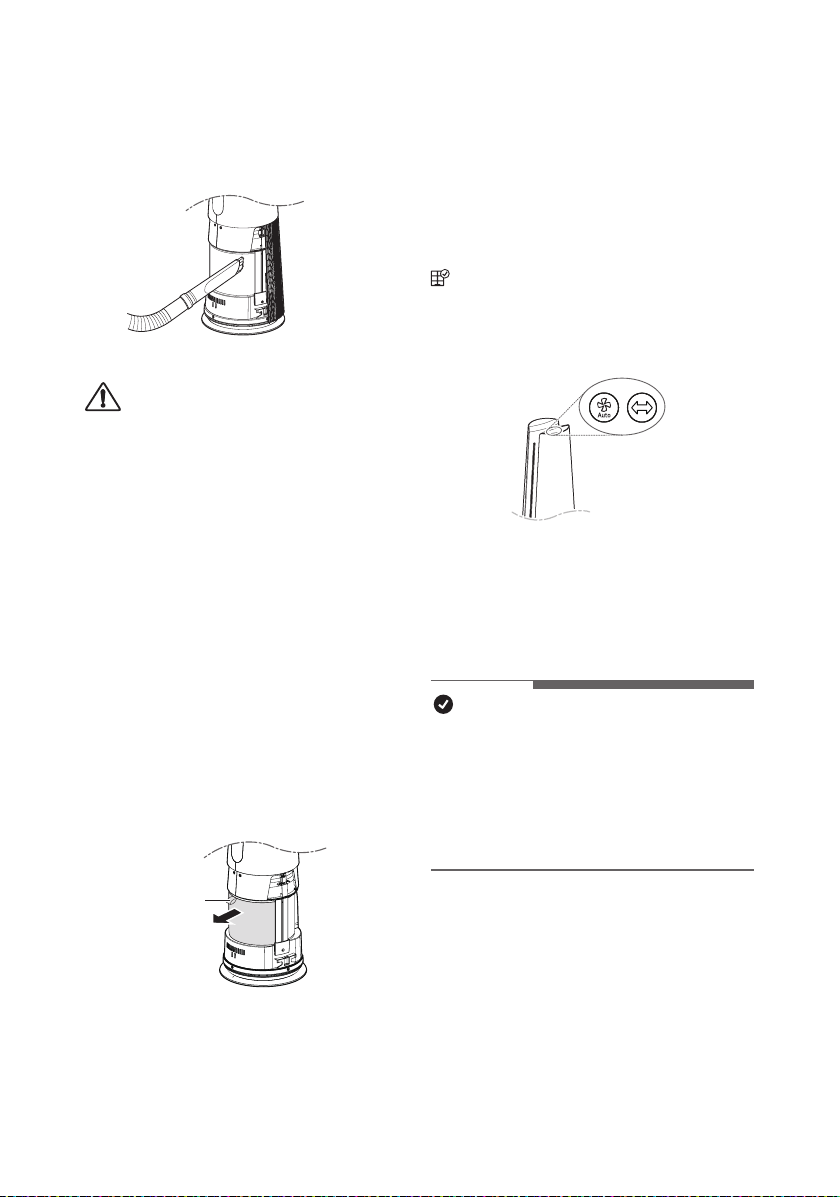
30
ES
2
Elimine el polvo alrededor del ltro
Filtro ultrano con un aspirador o un
cepillo suave.
PRECAUCIÓN
•
No lave el ltro protección desodorizante
ni el ltro True HEPA con agua. Esto
acorta la vida útil del ltro.
•
Tenga cuidado para no dañar el ltro ultra
no al utilizar una aspiradora.
•
Tenga cuidado de no dañar el ltro si
entra líquido en el ltro.
Sustitución del ltro
1
Retire las cubiertas delantera y trasera
del producto y tire de la manija para
reemplazar el ltro.
•
Para no contaminar la zona
circundante al sustituir el ltro,
coloque un periódico en el suelo
antes de quitar el ltro.
Asa
2
Tras cambiar el ltro, desactive la alerta
de sustitución del ltro.
Restablecer noticación de
reemplazo de ltro
(Noticación de reemplazo de ltro)
en la pantalla de estado se cancela y se
restablece el tiempo de noticación de
reemplazo.
•
Presione los botones de Viento
automático y Rotación al mismo tiempo
durante al menos 3 segundos.
•
Úselo cuando lo reemplace por un ltro
nuevo.
Note
•
Se muestra una noticación cuando se
requiere un reemplazo de ltro.
•
Cuando se instala el ltro, pueden
producirse arañazos en las supercies
superior e inferior, pero no hay ningún
problema de funcionamiento.
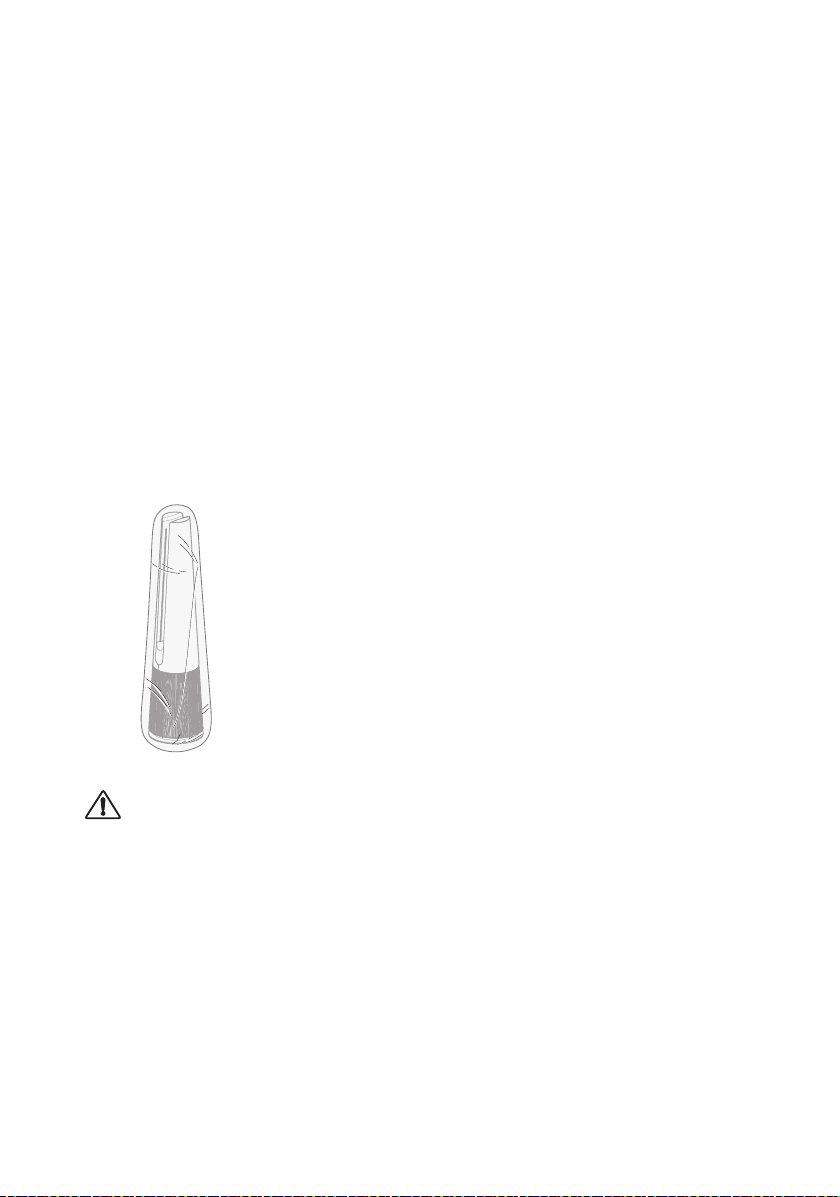
31
ES
Almacenamiento del producto
Si no se utilizará el producto durante un largo
período de tiempo, guárdelo en un lugar
seco, sombreado y sin humedad.
1
Opere el producto durante al menos 1
hora en un día soleado.
•
Eso eliminará la humedad y evitará
que se forme moho dentro del
producto.
2
Apague el producto y desenchúfelo de
la toma eléctrica.
3
Embale el producto para que no entren
en él polvo ni sustancias extrañas.
Guarde el producto embalado en un
lugar sombreado.
PRECAUCIÓN
No guarde el producto en lugares húmedos
o en un lugar expuesto a la luz solar directa.
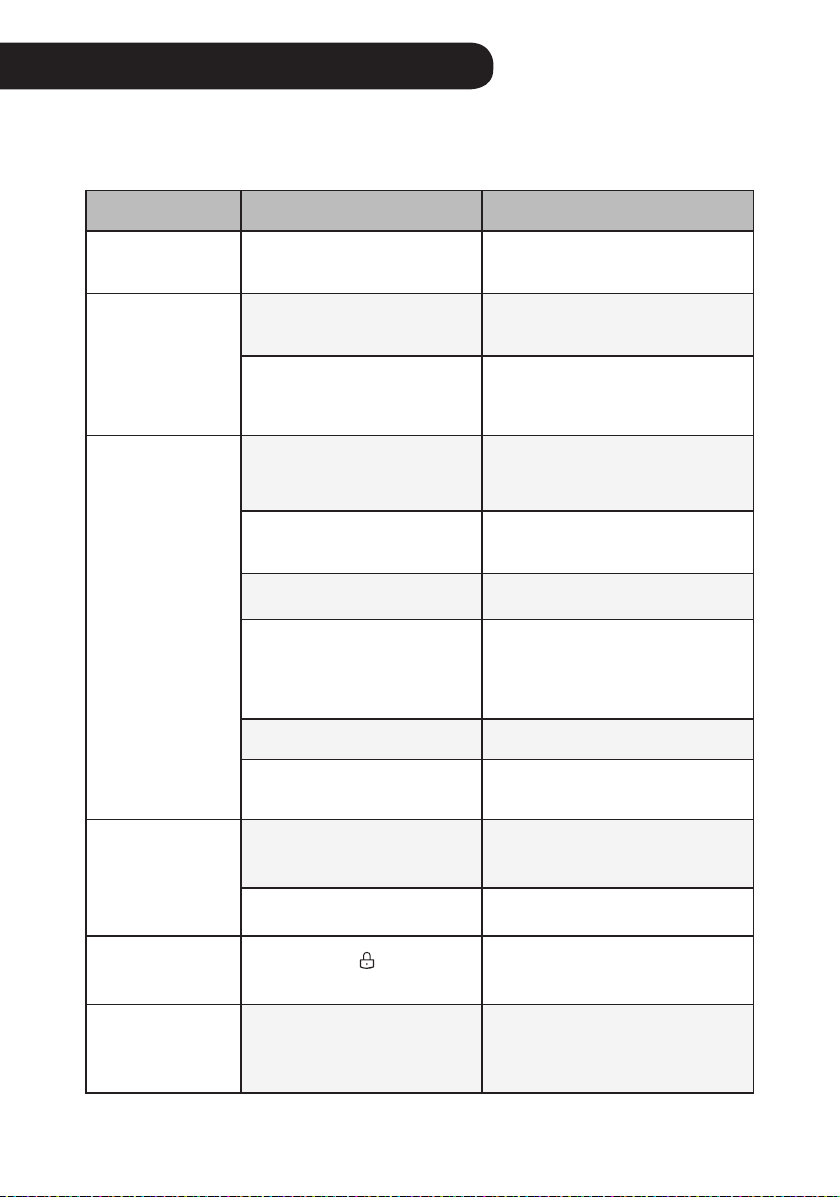
ES
32
ES
Antes de llamar al servicio
Compruebe lo siguiente antes de ponerse en contacto con el centro de servicio. Si el
problema persiste, comuníquese con su centro de servicio local.
Síntoma Causa Solución
No funciona en
absoluto.
¿El enchufe está
desconectado de la toma?
•
Enchúfelo en la toma
correctamente.
El ujo de aire
es pequeño y
hay un ruido.
¿Se ha acumulado polvo
en el ltro ultra no?
•
Haga limpieza profunda del ltro
ultra no.
¿Se ha acumulado
polvo en el ltro total de
alérgenos?
•
Sustituya el ltro.
El aire del
interior no
se purica lo
suciente.
¿Hay mucha
contaminación en el
interior?
•
Ventile el interior antes de usar
el producto.
¿Se ha acumulado polvo
en el ltro ultra no?
•
Haga limpieza profunda del ltro
ultra no.
¿Se ha acumulado polvo
en el ltro True HEPA?
•
Sustituya el ltro.
¿Utiliza el producto en
un lugar demasiado
espacioso o demasiado
abierto?
•
Utilice un producto adecuado
para el tamaño de la habitación.
•
Evite lugares bien ventilados
como puertas, ventanas, etc.
¿Hay algún obstáculo cerca?
•
Retire el obstáculo.
¿El producto está
instalado en una esquina?
•
Mueva el producto e instálelo de
nuevo.
El color de
limpieza general
sigue en rojo.
¿No cambia el color,
incluso cuando se mueve
a una habitación limpia?
•
Desconecte el enchufe de la
toma y vuelva a conectarlo 1
minuto después.
¿Ha utilizado aerosol cerca
del producto?
•
No utilice aerosol cerca del
producto.
Los botones del
panel de control
no funcionan.
¿Se muestra
en el
pantalla de estado?
•
Para desbloquear, pulse el
botón de Modo en el panel de
control durante 3 segundos.
La
concentración
de polvo no no
cambia.
¿Se utiliza el producto en
un espacio cerrado?
•
En un espacio cerrado, es
posible que el nivel de limpieza
permanezca lo mismo sin
cambios.
Resolución de Problemas
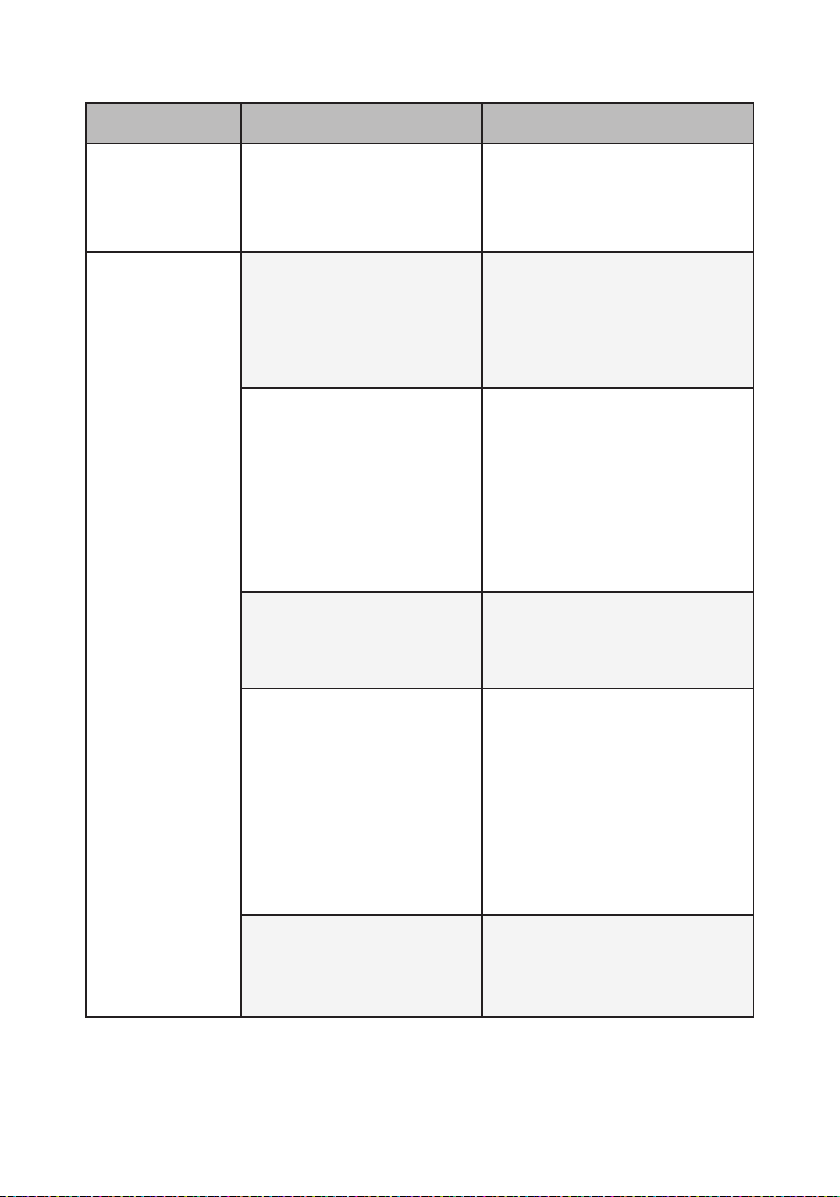
33
ESES
Síntoma Causa Solución
La
concentración
de polvo no
continúa siendo
alta.
En el lugar en el que está
instalado el producto,
¿entra aire del exterior
continuamente?
•
En un entorno donde hay una
entrada de aire exterior, la
concentración puede seguir
siendo alta.
Sale un olor
extraño de la
salida de aire y
el ltro.
¿Hace poco tiempo que
adquirió el producto?
•
Este es el olor del carbón
activado que no es nocivo.
Es similar al olor que puede
percibir en un coche nuevo.
Desaparecerá un día después
de su uso.
¿Se utiliza el producto en
un lugar con mucho humo
o muchos olores?
•
Si el producto se opera después
de haber usado un ambientador,
difusor o vela perfumada, o se
han realizado trabajos en el
interior o se ha reemplazado el
papel de tapizar, el ltro puede
absorber y emitir el olor. Ventile la
habitación primero antes de usar
el producto.
¿El ltro huele mal?
•
La frecuencia de sustitución del
ltro puede variar dependiendo
del entorno de uso. Si hay olor,
sustitúyalo por un ltro nuevo.
¿Es en un ambiente donde
se preparan los alimentos?
•
Si utiliza el producto durante
mucho tiempo mientras cocina
pescado o carne, puede resultar
una reducción signicativa de la
vida útil del ltro.
•
Si es posible, abra la ventana
para ventilar mientras cocine y
utilice el producto para eliminar
los olores que queden tras la
ventilación.
¿Es un ambiente húmedo?
•
El ltro puede emitir un olor si
se usa en un ambiente húmedo.
Seque el ltro a la luz del sol
antes de usarlo.
34
ES
Síntoma Causa Solución
Los niveles de
concentración
de polvo son
diferentes en el
producto y en
la aplicación LG
ThinQ.
¿Está mirando el mismo
tipo de partícula de polvo?
•
Asegúrese de que los niveles
de PM1.0/PM2.5/PM10
mostrados sean los mismos en
la aplicación LG ThinQ y en el
producto.
•
La diferencia de los valores
puede deberse a que la
aplicación LG ThinQ y el
producto se hayan actualizado
en momentos diferentes.
El dispositivo
y el teléfono
inteligente
no se pueden
conectar a
través de Wi-Fi.
La contraseña de la red Wi-
Fi a la que está intentando
conectarse es incorrecta.
•
Busque la red Wi-Fi conectada a
su teléfono inteligente y retírela,
luego conecte su dispositivo en
LG ThinQ.
Los datos móviles de su
teléfono inteligente están
activados.
•
Apague los datos móviles de su
teléfono inteligente y conecte el
dispositivo mediante la red Wi-
Fi.
El nombre de la red
inalámbrica (SSID) lo
conguré incorrectamente.
•
El nombre de la red
inalámbrica (SSID) debe ser
una combinación de letras y
números en inglés. (No utilice
caracteres especiales.)
La frecuencia del
enrutador no es de 2,4
GHz.
•
Solo se admite una frecuencia
de enrutador de 2,4 Ghz.
Congure el enrutador
inalámbrico a 2,4 GHz y conecte
el dispositivo al enrutador
inalámbrico. Para comprobar
la frecuencia del enrutador,
consulte con su proveedor de
servicios de Internet o con el
fabricante del enrutador.
El dispositivo está
demasiado lejos del
enrutador.
•
Si el aparato está demasiado
lejos del enrutador, la señal
puede ser débil y la conexión
puede no estar congurada
correctamente. Acerque el
enrutador al dispositivo.
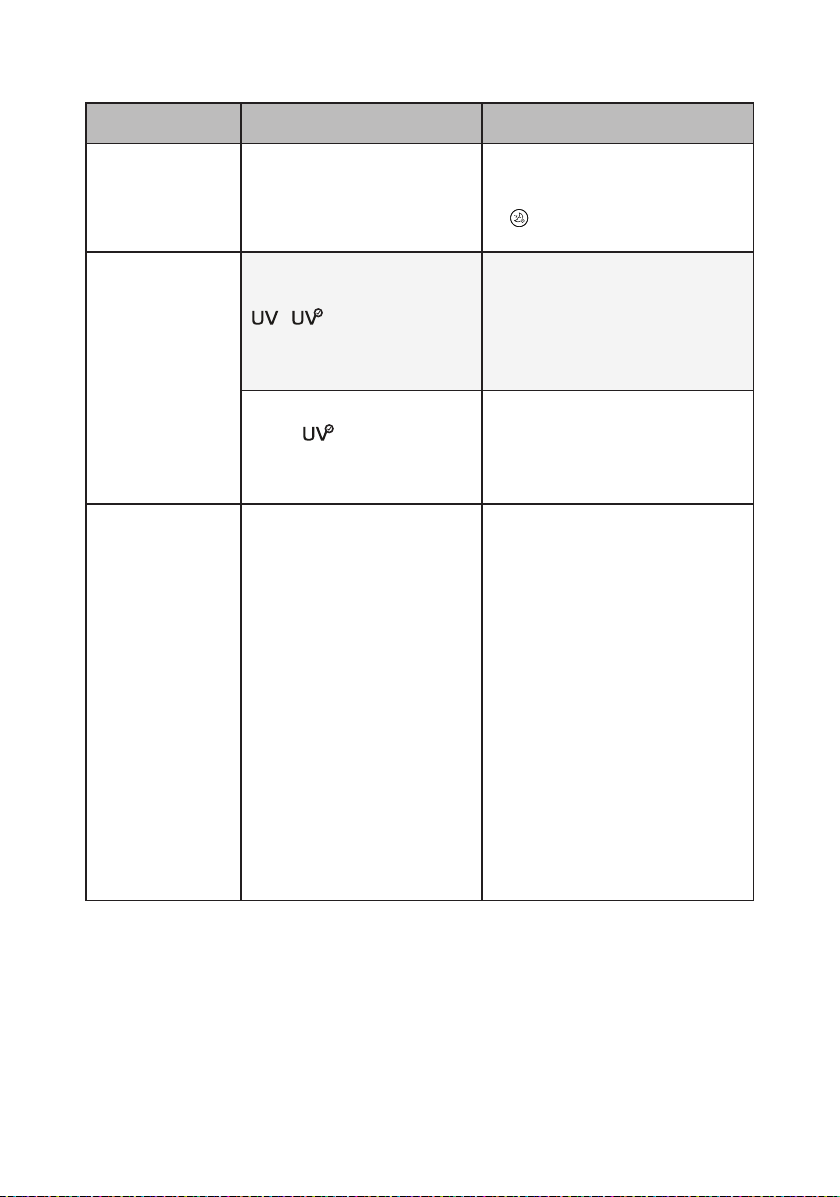
35
ES
Síntoma Causa Solución
La pantalla no
aparece.
¿Está desactivado el brillo
de la pantalla?
•
Para cambiar el brillo de la
pantalla, presione el botón de
Temporizador de desconexión
en el controller remoto más
de 2 segundos.
Conguré
UVnano, pero
el icono de UV
no se muestra
en la pantalla de
estado.
¿No hay indicación de
/
en la pantalla de
estado?
•
Solo se muestran 3 iconos
según la prioridad.
•
Botones de Velocidad para
abajo y Rotación en el panel
de control al mismo tiempo
durante 3 segundos.
¿Está en el indicador
de estado?
•
Aparece cuando UVnano
no funciona normalmente.
(Compruebe si el ltro y la
entrada de aire (cubierta) están
instalados en la posición inicial).
La temperatura
/ humedad
se muestra
de forma
diferente a otros
productos.
¿Entra continuamente
aire exterior en el lugar
donde está instalado el
producto?
•
Los valores de temperatura
y humedad pueden uctuar
continuamente en un entorno
donde se introduce aire exterior.
•
La temperatura y la humedad
pueden variar según el
entorno circundante, como
puertas, ventanas y oricios de
ventilación.
•
La temperatura y la humedad
pueden aparecer de manera
diferente dependiendo de
la circulación de aire en la
misma habitación. Además,
la temperatura y la humedad
pueden ser diferentes a
las de otros productos y
termohigrómetros.
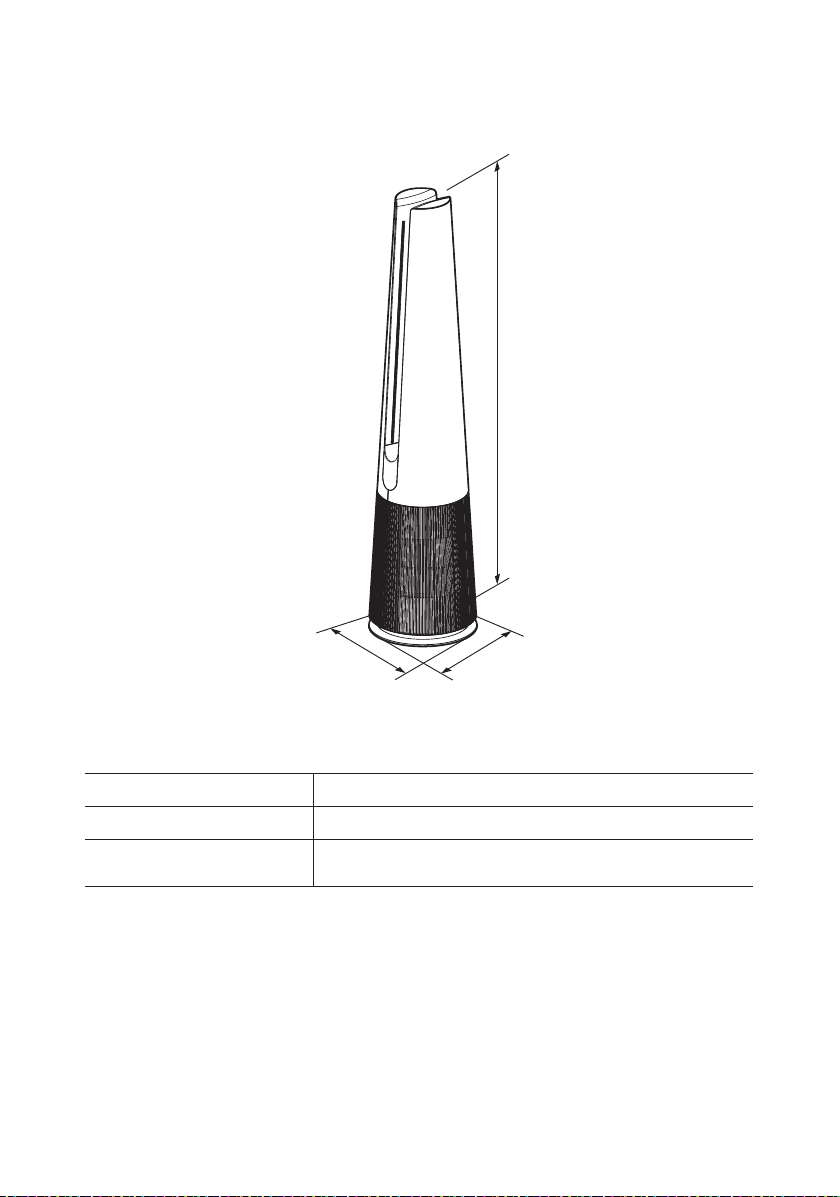
ES
36
ES
El aspecto externo y las dimensiones del producto pueden cambiar sin previo aviso.
Nombre del modelo
U9C Series
Suministro eléctrico
AC 115V~ 60Hz
Dimensiones externas (anchura
x profundidad x altura)
265 mm x 265 mm x 1,120 mm
Altura
Profundidad
Anchura
Especicaciones del aparato
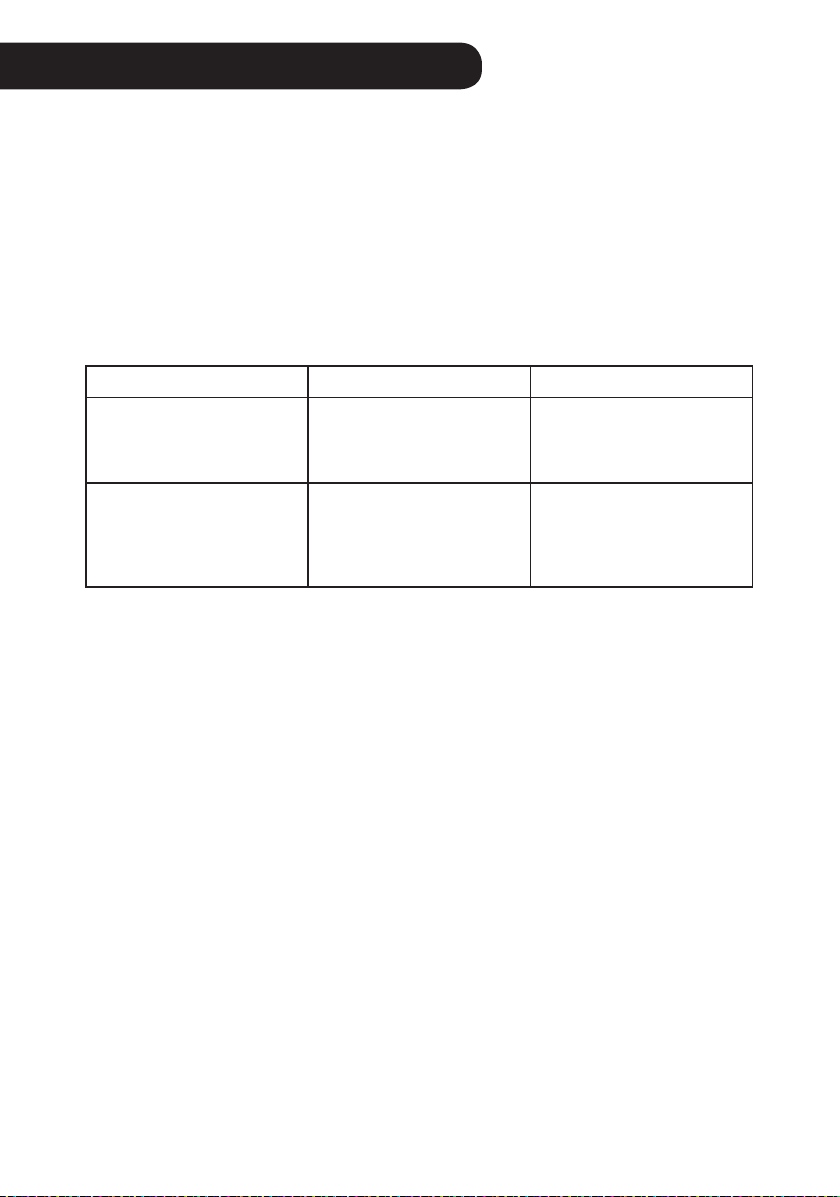
37
ESES
NOTIFICACIÓN DE ARBITRAJE: ESTA GARANTÍA LIMITADA CONTIENE UNA DISPOSICIÓN
DE ARBITRAJE QUE REQUIERE QUE USTED Y LG RESUELVAN DISPUTAS A TRAVÉS DE
ARBITRAJE VINCULANTE EN LUGAR DE HACERLO EN LOS TRIBUNALES, EN CASO DE QUE
DECIDA RENUNCIAR A ESTA OPCIÓN. NO SE PERMITEN LAS DEMANDAS COLECTIVAS Y
LOS JUICIOS POR JURADO. CONSULTE LA SECCIÓN TITULADA “PROCEDIMIENTO PARA
CONTROVERSIAS NO RESUELTAS” A CONTINUACIÓN.
En caso de que el producto LG falle debido a un defecto en los materiales o en la mano de obra en
condiciones de uso hogareño normal, durante el período de garantía establecido en el presente,
LG reparará o reemplazará el producto según su criterio. Esta garantía limitada solo es válida para
el comprador original del producto y solo se aplica si el producto se compró y usó dentro de los
Estados Unidos, incluidos los territorios de los EE. UU. Se requiere el comprobante de la compra
minorista original para recibir el servicio cubierto por esta garantía.
Período de garantía Alcance de la garantía Comentarios
Un (1) año desde la fecha
de compra minorista
original
Cualquier pieza interna/
funcional y mano de obra
LG entregará piezas y
mano de obra para reparar
o reemplazar las piezas
defectuosas.
Diez (10) años desde la
fecha de compra minorista
original
Motor inversor inteligente
Solo piezas. El cliente será
responsable de cualquier
servicio de mano de obra o en
el hogar para reemplazar las
piezas defectuosas.
•
Los productos y piezas de reemplazo tienen garantía durante el resto del período de garantía
original o noventa (90) días, lo que sea mayor.
•
Los productos y piezas de reemplazo pueden ser nuevos o reconstruidos.
ESTA GARANTÍA SUSTITUYE A CUALQUIER OTRA GARANTÍA EXPRESA O IMPLÍCITA,
INCLUIDA ENTRE OTRAS, CUALQUIER GARANTÍA DE COMERCIABILIDAD O IDONEIDAD
PARA UN PROPÓSITO PARTICULAR. CUALQUIER GARANTÍA IMPLÍCITA REQUERIDA
POR LA LEY ESTARÁ LIMITADA EN CUANTO A SU DURACIÓN SEGÚN EL PERÍODO DE
GARANTÍA EXPLÍCITAS QUE SE MENCIONA ANTERIORMENTE. NI EL FABRICANTE NI EL
DISTRIBUIDOR EN EE. UU. SERÁN RESPONSABLES DE CUALQUIER DAÑO FORTUITO,
RESULTANTE, INDIRECTO, ESPECIAL O PUNITIVO DE CUALQUIER NATURALEZA,
INCLUIDAS ENTRE OTRAS, LAS PÉRDIDAS DE INGRESOS O DE GANANCIAS,
O CUALQUIER OTRO DAÑO YA SEA EN VIRTUD DE UN CONTRATO, ACUERDO
EXTRACONTRACTUAL U OTROS.
Algunos estados no permiten la exclusión o limitación de daños incidentales o resultantes, o
limitaciones sobre la duración de una garantía, de modo que es posible que no se le aplique la
exclusión o limitación anterior. Esta garantía le otorga derechos legales especícos y tal vez tenga
otros derechos que varíen de un estado a otro.
ESTA GARANTÍA LIMITADA NO CUBRE:
•
Viajes de servicio para entregar, retirar o instalar o reparar el producto; instrucciones para el
cliente sobre el funcionamiento del producto; reparación o reemplazo de fusibles o corrección de
cableado o conductos, o corrección de reparaciones/instalación no autorizadas.
•
Si el producto no funciona durante cortes o interrupciones del suministro eléctrico o con el
servicio eléctrico inadecuado.
GARANTÍA (EE. UU.)

38
ES
•
Daños causados por tuberías de agua con ltraciones o dañadas, tuberías de agua congeladas,
tuberías de drenaje restringidas, suministro de agua inadecuado o interrumpido o suministro de
aire inadecuado.
•
Daños provocados por hacer funcionar el producto en una atmósfera corrosiva o contraria a las
instrucciones establecidas en el manual del propietario del producto.
•
Daños en el producto causados por accidentes, plagas y parásitos, iluminación, viento, fuego,
inundaciones o desastres naturales.
•
Daños o fallas causados por modicaciones o alteraciones no autorizadas o si el producto se usa
para otro n que no sea el del diseño original, o cualquier fuga de agua si la unidad se instaló en
un lugar inadecuado.
•
Daños o fallas causados por corriente eléctrica, tensión o códigos de plomería incorrectos,
uso comercial o industrial, o el uso de taccesorios, componentes o productos de limpieza
consumibles que no están aprobados por LG.
•
Daños causados por el transporte y manejo del producto, incluidos rayones, abolladuras, pintura
saltada u otros daños al acabado del producto, a menos que dichos daños sean el resultado
de defectos en los materiales o en la mano de obra y se informen dentro de una (1) semana
después de la entrega.
•
Daños o artículos faltantes en cualquier pantalla, caja abierta, productos con descuento o
restaurado.
•
Los productos cuyos números de serie originales se hayan eliminado, alterado o que no puedan
determinarse. Para la validación de la garantía se requieren los números de modelo y serie,
junto con recibos de venta minorista originales.
•
Aumentos en los costos de los servicios públicos y gastos adicionales en los servicios públicos.
•
Reparaciones cuando el producto se utiliza para otro uso que no sea el normal y habitual en el
hogar (por ejemplo, uso comercial, en ocinas e instalaciones recreativas) o uso contrario a las
instrucciones delineadas en el manual del propietario del producto.
•
Costos asociados con la extracción del producto de su hogar para reparaciones.
•
La extracción y reinstalación del producto, si se instala en un lugar inaccesible o si no se
instala de acuerdo con las instrucciones de instalación publicadas, incluidos los manuales del
propietario y de instalación de LG.
•
Daños resultantes del uso indebido, abuso, instalación inadecuada, reparaciones o
mantenimiento. Las reparaciones inadecuadas incluyen el uso de piezas no aprobadas ni
especicadas por LG.
El costo de la reparación o el reemplazo bajo estas circunstancias excluidas estará a cargo
del consumidor.
PARA OBTENER SERVICIO DE GARANTÍA E INFORMACIÓN ADICIONAL
Para obtener información adicional del producto, visite el sitio web de LG en http://www.lg.com
Para recibir asistencia sobre el uso de este producto o para programar tareas de servicio,
comuníquese con LG Electronics al 1-800-243-0000 (US).
Para obtener más asistencia, escriba a LG Electronics, 201 James Record Road, Huntsville,
Alabama 35813

39
ES
PROCEDIMIENTO PARA RESOLVER DISPUTAS:
TODAS LAS DISPUTAS ENTRE USTED Y LG QUE SURJAN O SE RELACIONEN DE
CUALQUIER MANERA CON ESTA GARANTÍA LIMITADA O CON EL PRODUCTO DEBERÁN
RESOLVERSE EXCLUSIVAMENTE A TRAVÉS DEL ARBITRAJE VINCULANTE Y NO EN UN
TRIBUNAL DE JURISDICCIÓN GENERAL. ARBITRAJE VINCULANTE SIGNIFICA QUE USTED
Y LG RENUNCIAN AL DERECHO DE JUICIO POR JURADO Y A PRESENTAR O A PARTICIPAR
EN UNA DEMANDA COLECTIVA.
Deniciones. Para nes de esta sección, las referencias a “LG” signican LG Electronics U.S.A.,
Inc., su casa matriz, subsidiarias y aliadas, y cada uno de sus ejecutivos, directores, empleados,
agentes, beneciarias, predecesores en interés, sucesores, asignatarios y proveedores; las
referencias a “disputa” o “reclamo” incluirán todas las disputas, reclamos o controversias de
cualquier clase (ya sea que estén basadas en acciones civiles, estatutos, reglamentaciones,
ordenanzas, fraude, interpretación errónea o cualquier otra teoría legal o equitativa) que surja de
la venta, condición o desempeño del producto de esta Garantía Limitada o se relacione de alguna
manera con dichas situaciones.
Noticación de disputa. En caso de que tenga la intención de iniciar un procedimiento de
arbitraje, debe noticar por escrito en primer lugar a LG con 30 días de anticipación como
mínimo, antes de iniciar el arbitraje mediante una carta dirigida a LG en LG Electronics, USA,
Inc. Atención: Legal Department- Arbitration 111 Sylvan Avenue, Englewood Cliffs, NJ 07632.
Usted y LG acuerdan participar de buena fe en debates como intento por resolver su reclamo de
manera amigable. La noticación debe incluir su nombre, dirección y teléfono; debe identicar el
producto sujeto del reclamo y describir la naturaleza del reclamo, y la solución buscada. Si usted
y LG no pueden resolver la disputa dentro de un plazo de 30 días, cualquiera de las partes puede
presentar un reclamo de arbitraje.
Acuerdo de arbitraje vinculante y renuncia a demanda colectiva. Ante la imposibilidad de
resolver la disputa durante el período de 30 días posterior al envío de la noticación escrita a LG,
usted y LG acuerdan resolver cualquier reclamo entre nosotros solo mediante arbitraje vinculante
individual, a menos que renuncie a esta opción según se dispone a continuación. Cualquier
disputa entre usted y LG no se combinará ni consolidará con una disputa que involucre el producto
o reclamo de cualquier otra persona o entidad. Más especícamente, sin limitación de lo anterior,
cualquier disputa entre usted y LG no se procesará, bajo ninguna circunstancia, como parte de una
demanda colectiva o una demanda representativa. En lugar del arbitraje, cualquiera de las partes
podría presentar una demanda individual en el tribunal de reclamos menores, pero la demanda de
esos reclamos menores no podrá presentarse como demanda colectiva ni representativa.
Normas y procedimientos del arbitraje. Para comenzar el arbitraje de un reclamo, usted o LG
deben presentar una demanda escrita de arbitraje. La Asociación Estadounidense de Arbitraje
(“AAA”) administrará el arbitraje que se llevará a cabo ante un único árbitro según las Reglas de
Arbitraje del Consumidor de la AAA que estén vigentes cuando se inicie el proceso (denominadas
“Reglas de la AAA”) y según los procedimientos establecidos en esta sección. Las Reglas de
la AAA están disponibles en línea en www.adr.org/consumer. Envíe una copia de su demanda
de arbitraje escrita, además de una copia de esta disposición a la AAA de la manera descrita
en las Reglas de la AAA. Asimismo, debe enviar una copia de su demanda escrita a LG en LG
Electronics, USA, Inc. Atención: Legal Department- Arbitration 111 Sylvan Avenue, Englewood
Cliffs, NJ 07632. Si existe un conicto entre las Reglas de la AAA y las reglas establecidas en esta
sección, se aplicarán las reglas establecidas en el presente. Esta disposición de arbitraje se rige
según la Ley Federal de Arbitraje. A discreción del árbitro podría iniciarse un juicio en cualquier
tribunal de jurisdicción competente. Todos los temas quedan a decisión del árbitro, excepto los
relacionados con el alcance y la aplicabilidad de la disposición de arbitraje y el carácter de la
disputa para ser resuelta con arbitraje, que son decisión del tribunal. El árbitro se rige según los
términos de esta disposición.

40
ES
Ley vigente. La ley del estado de su residencia será la ley vigente para esta Garantía limitada
y cualquier disputa entre nosotros, excepto en la medida en que la ley federal prevalezca sobre
dicha ley o esta resulte inconsistente.
Horarios/costos. Usted no debe pagar honorarios para iniciar un procedimiento de arbitraje.
Al recibir su demanda escrita de arbitraje, LG pagará todos los cargos de presentación de
arbitraje a la AAA a menos que intente cobrar más de $25,000 por daños, en cuyo caso el pago
de estos cargos se regirán según las Reglas de la AAA. Excepto que se establezca lo contrario
a lo establecido en el presente, LG pagará todos los cargos de presentación ante la AAA, de
administración y honorarios del árbitro, según las Reglas de la AAA y esta disposición de arbitraje.
Si usted gana el arbitraje, LG pagará los honorarios de su abogado y las costas, dentro de lo
razonable, al considerar factores que incluyen, pero no están limitados al monto de la compra y el
monto del reclamo. Sin perjuicio de lo anterior, si la ley aplicable permite una bonicación de los
honorarios y costas de los abogados, el árbitro puede bonicarlos de la misma medida que lo haría
un tribunal. Si el árbitro determina que la sustancia de su reclamo o la resolución que se busca
en la demanda es frívola o se presenta para nes inadecuados (según lo indican los estándares
establecidos en la Ley Federal de Procedimiento Civil 11(b)), entonces el pago de todos los gastos
del arbitraje se regirá según las Reglas de la AAA. En tal situación, usted acepta reembolsar a LG
todos los importes pagados anteriormente por la empresa que deba pagar según las Reglas de la
AAA. Excepto que se establezca una disposición en contrario, LG renuncia a cualquier derecho
que pudiera tener de reclamarle a usted el pago de honorarios abogados y costas, si LG gana el
arbitraje.
Audiencias y ubicación. Si su reclamo es por $25,000 o menos, puede elegir que el arbitraje se
lleve a cabo solo sobre la base de (1) documentos presentados ante el árbitro, (2) a través de una
audiencia telefónica, o (3) mediante una audiencia en persona según lo establecen las Reglas de
la AAA. Si su reclamo supera los $25,000, las Reglas de la AAA determinarán el derecho a una
audiencia. Todas las audiencias de arbitraje presenciales se llevarán a cabo en una ubicación
dentro del distrito federal judicial donde usted resida, a menos que ambas partes acuerden
celebrarlas en otro lugar o que aceptemos un arbitraje telefónico.
Opción de renuncia. Puede optar por renunciar a este procedimiento de resolución de disputas.
Si renuncia a él, ni usted ni LG pueden solicitar que la otra parte participe en un procedimiento de
arbitraje. Para optar por la renuncia, debe noticar a LG antes de los 30 días calendario desde
la fecha de la compra del primer consumidor de una de estas maneras: (i) enviar un mensaje de
correo electrónico a [email protected], con el asunto: “Opción de renuncia a arbitraje” o (ii) llamar al
1-800-980-2973. En el mensaje de correo electrónico o en la llamada telefónica debe incluir: (a) su
nombre y dirección; (b) la fecha de compra del producto; (c) el nombre o número del modelo del
producto; y (d) el número de serie (encontrará el número de serie (i) en el producto; o (ii) en línea
al acceder a https://www.lg.com/us/support/repair-service/schedule-repair-continued y al hacer clic
en “Buscar mi número de modelo y número de serie”).
Solo puede optar por renunciar al procedimiento de disputa de la manera descrita anteriormente (es
decir, por correo electrónico o teléfono); ninguna otra forma de noticación será ecaz para optar
por renunciar a este procedimiento de resolución de disputas. La renuncia a este procedimiento
de resolución de disputas no afectará la cobertura de esta Garantía limitada de ninguna manera, y
usted seguirá disfrutando de todos los benecios de la Garantía limitada. Si conserva el producto
y no renuncia al procedimiento, acepta todos los términos y condiciones de la disposición de
arbitraje descritos anteriormente.

Memorándum
ES

Memorándum
Memorándum

Memorándum

Memorándum
This product earned the ENERGY
STAR label by meeting strict energy ef-
ciency guidelines set by the U.S. EPA.
Room air cleaners have demonstrated
the potential for improving air quality
and providing health benets. EPA
does not endorse manufacturer claims
regarding the degree to which a specic
product will produce healthier indoor air.
The energy efciency of this ENERGY STAR certied model is measured
based on a ratio between the model’s CADR for Smoke and the electrical
energy it consumes, or CADR/Watt.