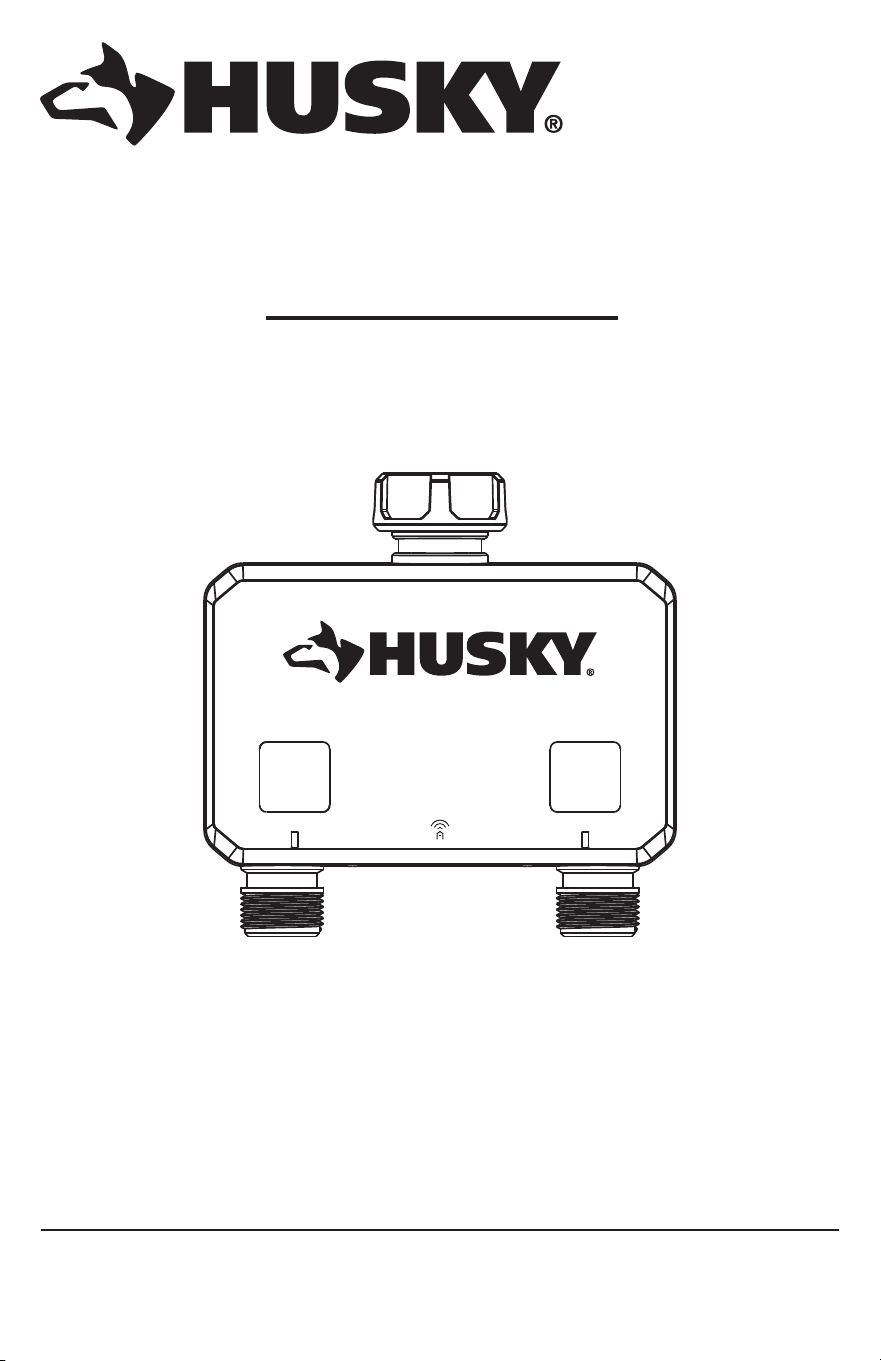
USE AND CARE GUIDE
SMART WATERING TIMER
Questions, problems, missing parts?
Before returning to the store, call Hubspace Customer Service
8 a.m. - 7 p.m., EST, Monday - Friday, 9 a.m. - 6 p.m., EST, Saturday
1-877-592-5233
HOMEDEPOT.COM/HUBSPACE
Item #1010 461 413
Model #867006-1004
THANK YOU
We appreciate the trust and condence you have placed in Hubspace through the purchase of this smart watering
timer. We strive to continually create quality products designed to enhance your home. Visit us online to see our full
line of products available for your home improvement needs. Thank you for choosing Hubspace!

2
Table of Contents
Safety Information .......................................................2
Installation Notice ....................................................2
Product Use Notice ..................................................2
Service & Maintenance Notice ................................. 2
Gateway Notice .......................................................3
Warranty.......................................................................3
Limited 4 Year Warranty ...........................................3
Gateway Warranty .................................................... 3
Information Statements ..............................................4
Wireless Protocol .....................................................4
Bluetooth
®
...............................................................4
Federal Communications Commission Statement
....4
Ised Statement .........................................................4
Suppliers Declaration Of Conformity ........................ 4
Pre-Installation ............................................................5
Description ...............................................................5
Package Contents ....................................................5
Product Description .................................................5
Installation ...................................................................6
Operation......................................................................9
Features ...................................................................9
Power Consumption Requirements..........................9
Manual Operation .....................................................9
Led Operation .........................................................10
Power Loss & Return Operation .............................10
Low Battery Operation ...........................................10
App Operation ........................................................10
Auto-Off Timer ........................................................11
No Event History ....................................................11
Scheduling ............................................................11
What Can Be Scheduled? .......................................11
Number Of Schedules ............................................12
Rain Delay .............................................................12
Onboarding And Removal ....................................... 12
Qr Code Or Manual Entry Onboarding ...................12
Qr Codeless Setup Mode Onboarding ...................12
Setup Mode Identicaton ......................................12
Device Removal ....................................................12
Troubleshooting .........................................................13
Timer ......................................................................13
Smart Plug ............................................................13
Safety Information
PLEASE READ THIS NOTICE BEFORE INSTALLING, USING
AND SERVICING THIS PRODUCT.
This product is designed and manufactured for providing
lawn and garden watering. Please read carefully and
follow the instructions given below. Lack of proper
working knowledge or improper use could cause
unexpected damage or loss of personal or commercial
belongings.
□ For non-commercial use only – commercial use
will void the warranty.
□ For watering use with outdoor home water faucet
only.
□ Not for indoor or appliance use. Use only with
pressures of 60 PSI (4 BAR) max.
□ Do not use with water exceeding 100°F (38°C).
□ Not for use on outlet end of ‘Y’ connectors or
other hose accessories. Detach and drain before
freezing weather.
□ Replace battery every year, when low battery icon
ashes or before long unattended use.
□ For best practice, use one port at a time. Water
ow will decrease when both sides are used at
the same time because of xed water pressure.
INSTALLATION NOTICE
Any removal or replacement of parts in installation is
NOT recommended and may invalidate the warranty of
the product.
PRODUCT USE NOTICE
Always use new alkaline batteries. It is the user’s
responsibility for damage caused by using unauthentic
batteries. This product is made of mechanical and
electronic components, which may be sensitive towards
physical impact, and electronic shock. Using the
product with care prevents unexpected malfunction and
optimizes the product’s life span. Do not disassemble
the product. Unauthorized disassembly will void the
product warranty. Please refer to the troubleshooting
page if any problem occurs or contact customer service
TOLL FREE HELP LINE 1-877-592-5233 HOMEDEPOT.
COM/Hubspace. When the timer is not being used for an
extended period remove all batteries from the timer at
the same time and replace them with new batteries of
the same size and type when placed back in service.
SERVICE & MAINTENANCE NOTICE
Always seek advice from HOMEDEPOT.COM/Hubspace
on cleaning, moving, or maintaining the product.
The information in this notice is subject to change
without notice.

3 HOMEDEPOT.COM/HUBSPACE
Please contact 1-877-592-5233 for further assistance.
Safety Information (continued)
GATEWAY NOTICE
Make sure to use this product together with a minimum
10A circuit breaker in the upstream. For indoor use
only. Do not use it in wet locations. The total current
limit of the device is 10amps. To avoid damage, do not
exceed the 10 Amp limit. If a direct short is created on
the output, the gateway will be damaged and no longer
function. Do not disassemble the product or make
repairs yourself. You run the risk of electric shock and
voiding the limited warranty. If you need service, please
contact customer support TOLL FREE HELP LINE
1-877-592-5233 HOMEDEPOT.COM/Hubspace.
Warranty
LIMITED 4 YEAR WARRANTY
The retailer of this product, hereby warrants, subject to the conditions set forth below, that it will either repair or,
at its option, this product if it proves to be defective by reason of improper workmanship or materials within the
original purchaser’s limited time. To obtain repairs or replacement under this limited warranty you must bring this
product to the retailer’s store in which you bought it.
Original purchaser: This limited warranty is limited to the original purchaser at retail of this product from retailer.
Except to the extent prohibited by applicable law, no other warranties, whether express or implied, including the
warranties of merchantability and tness for a particular purpose, shall apply to this product. Under no circumstances
shall the retailer be liable for consequential or incidental damages in connection with this product. To the extent
retailer is prohibited by applicable law from excluding implied warranties, the duration of such implied warranties
which are not excludable shall be the original purchaser’s lifetime. Some states do not allow the limitation on how
long an implied warranty lasts, so the above limitation on the duration of implied warranties which are not excludable,
if any, may not apply to you. Some states do not allow the exclusion or limitation of incidental or consequential
damages, so the above limitation or exclusion of incidental or consequential damages may not apply to you.
The retailer neither assumes nor authorizes any representative or other person to assume for it any obligation or
liability other than such as is expressly set forth herein. This limited warranty gives you specic legal rights, and
you may also have other rights which vary from state to state.
Contact the Customer Service Team at 1-877-592-5233 or visit HOMEDEPOT.COM/Hubspace.
RESPONSIBLE PARTY: Lawn and Garden LLC, 7501 Esters Boulevard, Suite 140, Irving, Texas 75063
GATEWAY WARRANTY
1 YEAR LIMITED WARRANTY
This product is guaranteed to be free of defects in materials and workmanship for 1 year from the date of purchase.
The guarantee does not include normal wear and tear.
4
Information Statements
WIRELESS PROTOCOL
The Wi-Fi CERTIFIED
™
Logo is a certication mark of Wi-Fi Alliance
®
. Apple and the Apple logos
are trademarks of Apple Inc., registered in the U.S., and other countries. App store is a service
mark of Apple Inc. Google, Google Play and the Google Play logo are trademarks of Google LLC.
BLUETOOTH
®
The Bluetooth
®
word mark and logos are registered trademarks owned by Bluetooth SIG,Inc.
and any use of such marks by The Home Depot, Inc., is under license. Other trademarks and
trade names are those of their respective owners.
Smart Plug QDID 153778 and 141499
Timer QDID 175971
FEDERAL COMMUNICATIONS COMMISSION STATEMENT
This device complies with Part 15 of the FCC Rules, Operation is subject to the following two conditions:
1. This device may not cause harmful interference.
2. This device must accept any interference received, including interference that may cause undesired
operation.
Changes or modications not expressly approved by the party responsible for compliance could void the user’s
authority to operate the equipment.
NOTE: This equipment has been tested and found to comply with the limits for a class B digital device, pursuant to part 15 of the FCC
Rules. These limits are designed to provide reasonable protection against harmful interference in a residential installation. This equipment
generates uses and can radiate radio frequency energy and, if not installed and used in accordance with the instructions, may cause harmful
interference to radio communications. However, there is no guarantee that interference will not occur in a particular installation. If this
equipment does cause harmful interference to radio or television reception, which can be determined by turning the equipment off and on,
the user is encouraged to try to correct the interference by one or more of the following measures:
□ Re-orient or relocate the receiving antenna.
□ Increase the separation between the equipment and receiver.
□ Connect the equipment into an outlet on a circuit different from that to which the receiver is connected.
□ Consult the dealer or an experienced radio/TV technician for help.
ISED STATEMENT
This equipment complies with IC RSS-102 radiation exposure limits set forth for an uncontrolled environment.
This equipment should be installed and operated with a minimum distance of 20cm between the radiator and
any part of your body.
Contains FCC ID: 2AB2Q-LA02303B
IC ID: 10256A-LA02303B
HVIN: LA02303B
SUPPLIERS DECLARATION OF CONFORMITY
47 CFR § 2.1077 Compliance Information.
5 HOMEDEPOT.COM/HUBSPACE
Please contact 1-877-592-5233 for further assistance.
Pre-Installation
DESCRIPTION
This dual-spigot Watering Timer is a battery-operated BLE (Bluetooth) intelligent irrigation timer device that opens
and closes two water valves to regulate the ow of water from one tap into 2 distinct hosepipes. It is controlled
through an app on a mobile phone. The intention is that each hosepipe feeds an irrigation zone of some kind.
The watering timer can be turned on or off and schedules set up using the mobile app for each individual spigot.
When used with a gateway device, for example, a nearby smart plug, the timer can be controlled remotely. For best
practice, use one port at a time. Water ow will decrease when both sides are used at the same time.
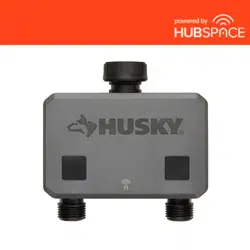
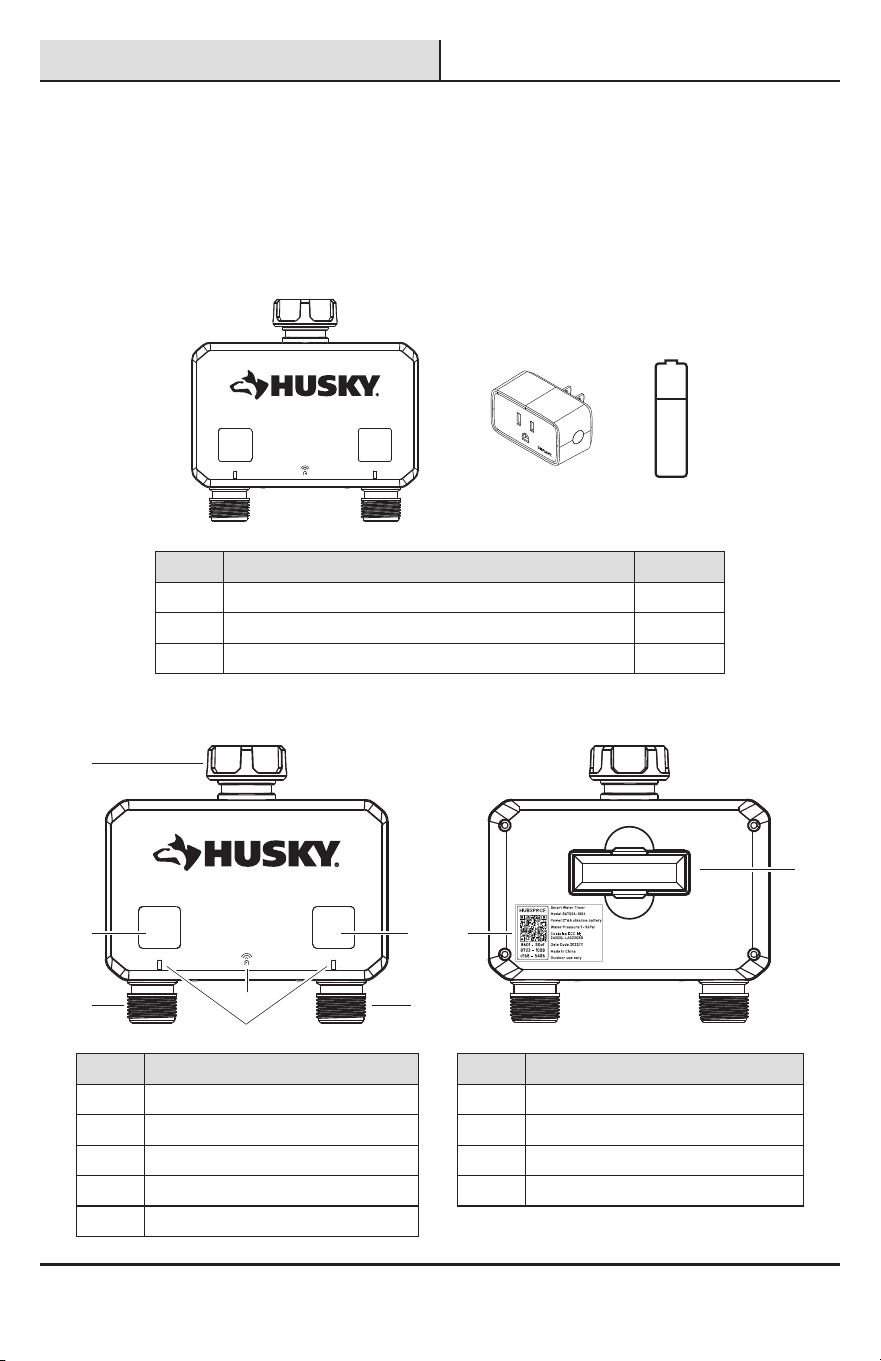
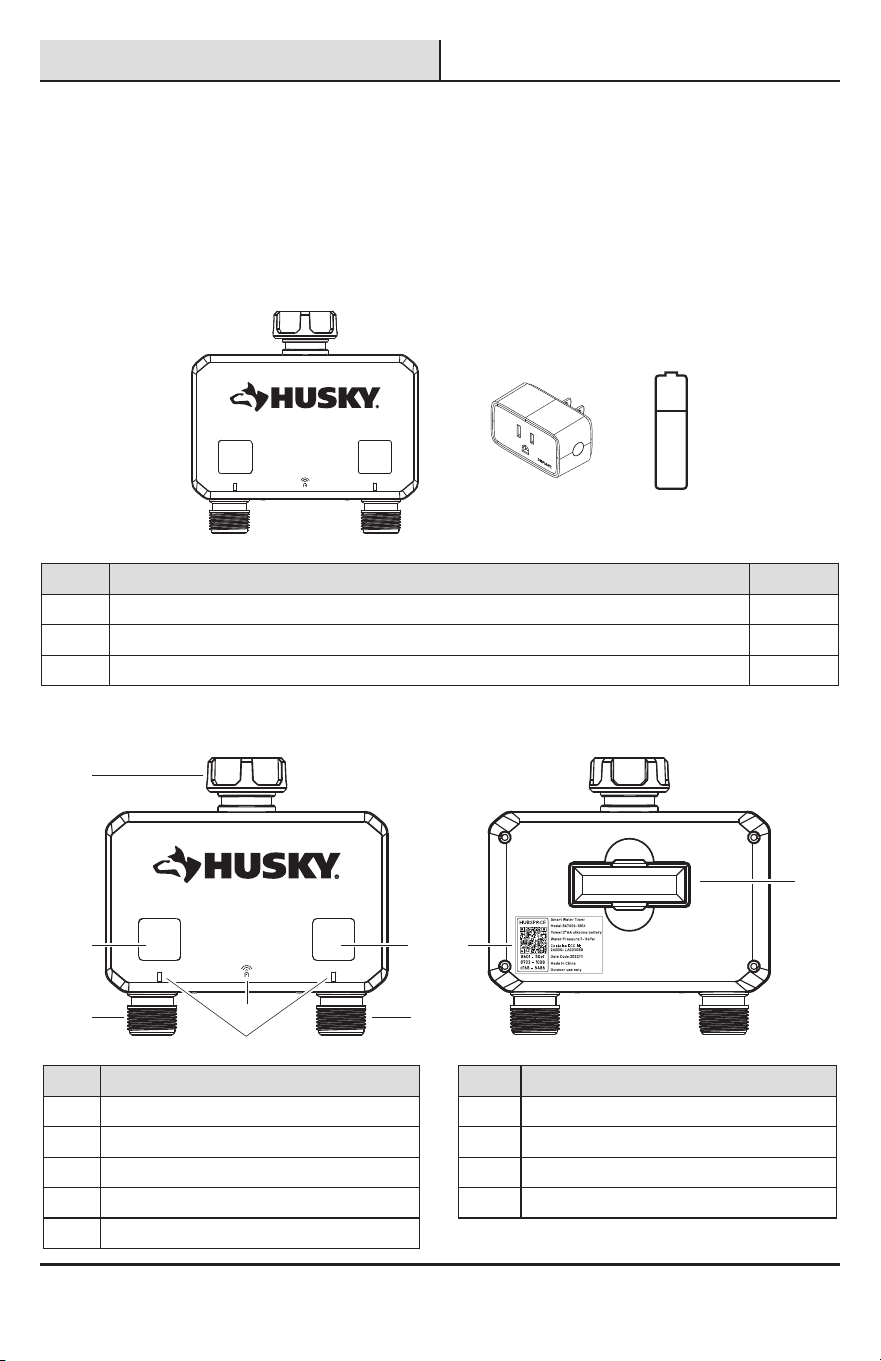
PACKAGE CONTENTS
AA
A B C
Part Description Quantity
A Smart Watering Timer 1
B Wi-Fi CERTIFIED
™
Hubspace Smart Plug Gateway 1
C AA Battery 2
PRODUCT DESCRIPTION
A
B
E
C
F
I
H
G
D
FRONT BACK
Part Description Part Description
A Easy swivel coupling F Right button manual mode operation
B Left button manual mode operation G Zone 2 Outlet
C Zone 1 Outlet H QR Code
D Wi-Fi Symbol I Battery Tray
E LED Lights
6
Installation
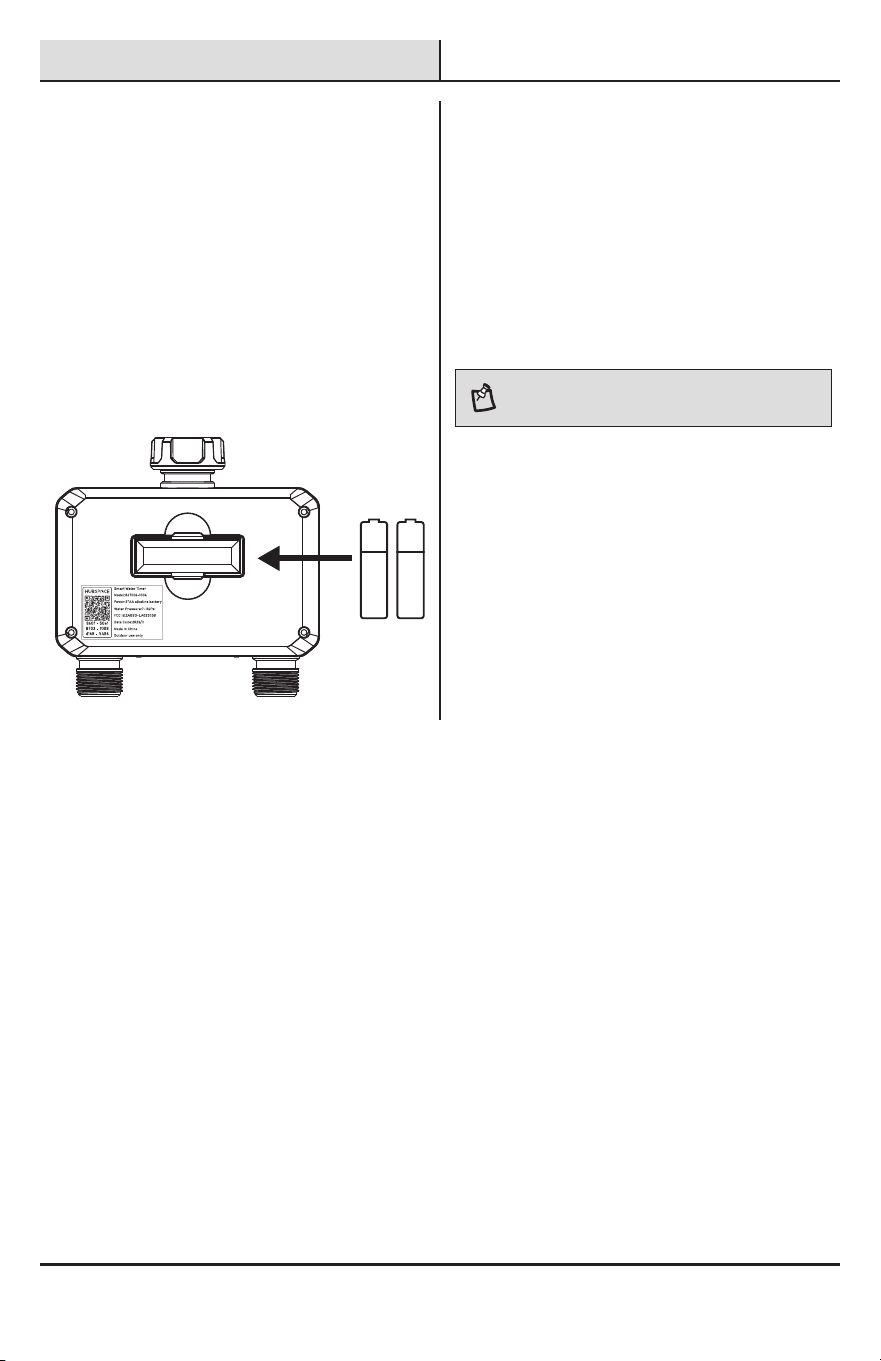
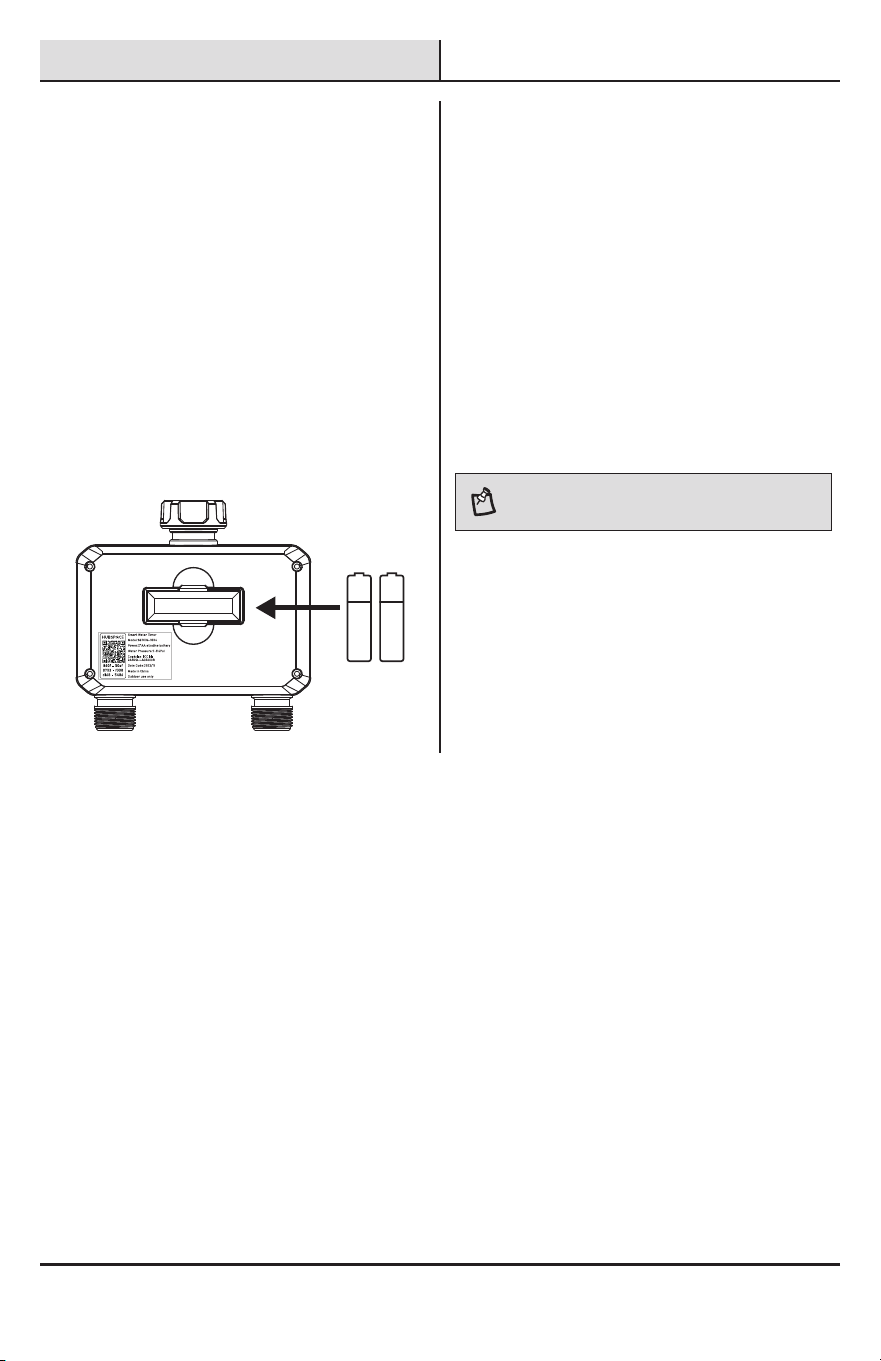
1
Install the batteries
□ Remove the tray from the back of the Timer by
sliding it out.
□ Insert two AA (1.5V) alkaline batteries
(included) and replace the tray. (Be sure
battery is completely secured)
□ Replace battery every year, when low battery
icon ashes or before long unattended use.
□ If batteries are removed for extended periods
of time, the timer will need to resync with
the cloud via the app to resume the previous
watering schedules and date/time
AA AA
2
Attach timer to faucet
□ Attach Timer to an outdoor hose faucet and
turn faucet on after programming.
□ Not for use on outlet end of ‘Y’ connectors or
other hose accessories.
□ Press left and right buttons for manual
operation of the unit on each spigot.
□ Left and right outlets can function at the same
time.
NOTE: For best practice, use one port at a time.
Water ow will decrease when both sides are used at the
same time.
7 HOMEDEPOT.COM/HUBSPACE
Please contact 1-877-592-5233 for further assistance.
Installation (continued)
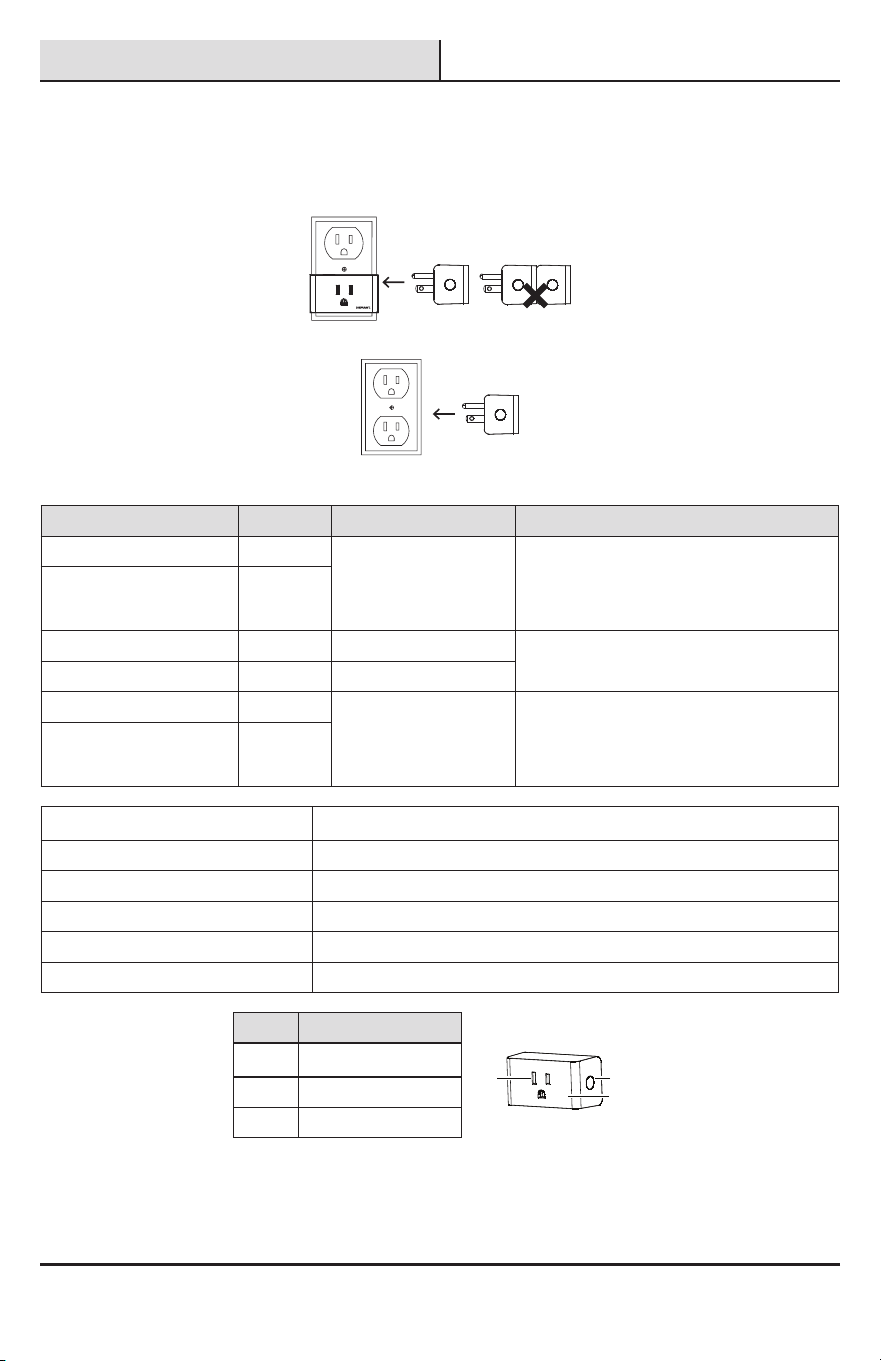
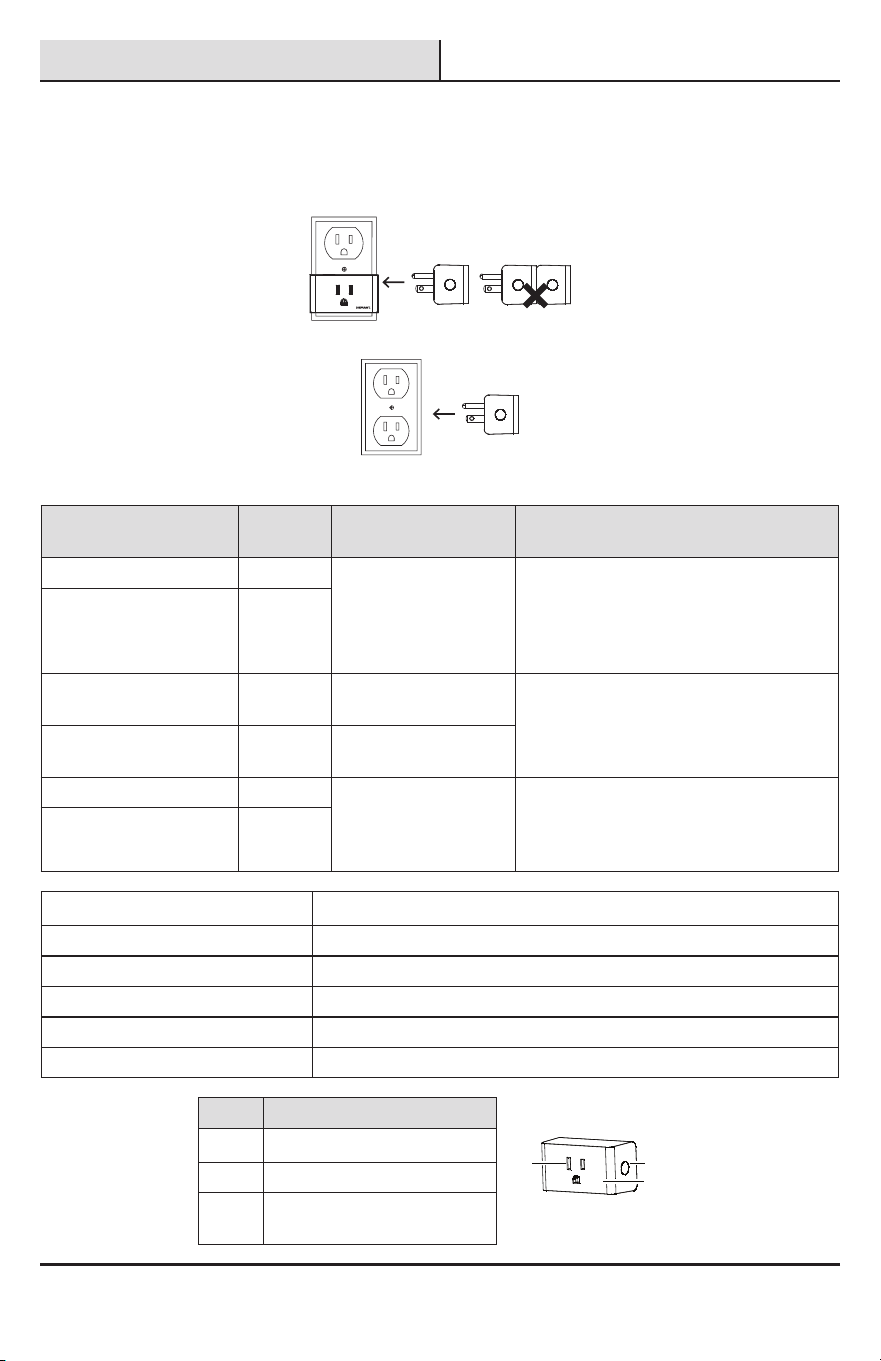
3
Smart Plug
□ Insert the Smart Plug into a wall socket.
□ Do not insert plugs in a row.
□ Insert the plug into the socket. The plug is now ready to use.
Smart Plug
LED State Plug State Meaning Action To Take
Orange Quick Blink Off Wi-Fi is not connected. Set up Wi-Fi for the product. If you have
already set up Wi-Fi for this product, wait for
it to connect. Check the Hubspace app for
connectivity status.
Orange/Green Quick Blink On
Off Off The plug is off. No action required.
Green On The plug is on.
Red Off There is a Wi-Fi error. Go to the device settings in the app and
set up Wi-Fi again. Check that your WiFi
Access Point is allowing the device to join
the network.
Orange On
Input 120VAC, 60Hz
Output 120VAC, 60Hz,10A Maximum load, Resistive
Network Wireless Type 2.4GHz, IEEE 802.11b/g/n
Operating Temperature 32°–104° F
Operating Humidity 5-85% RH, Non-condensing
Certication FCC, IC, ETL
Part Description
A Power Socket
b
ca
B Indicator Light
C Power Button
8
Installation (continued)
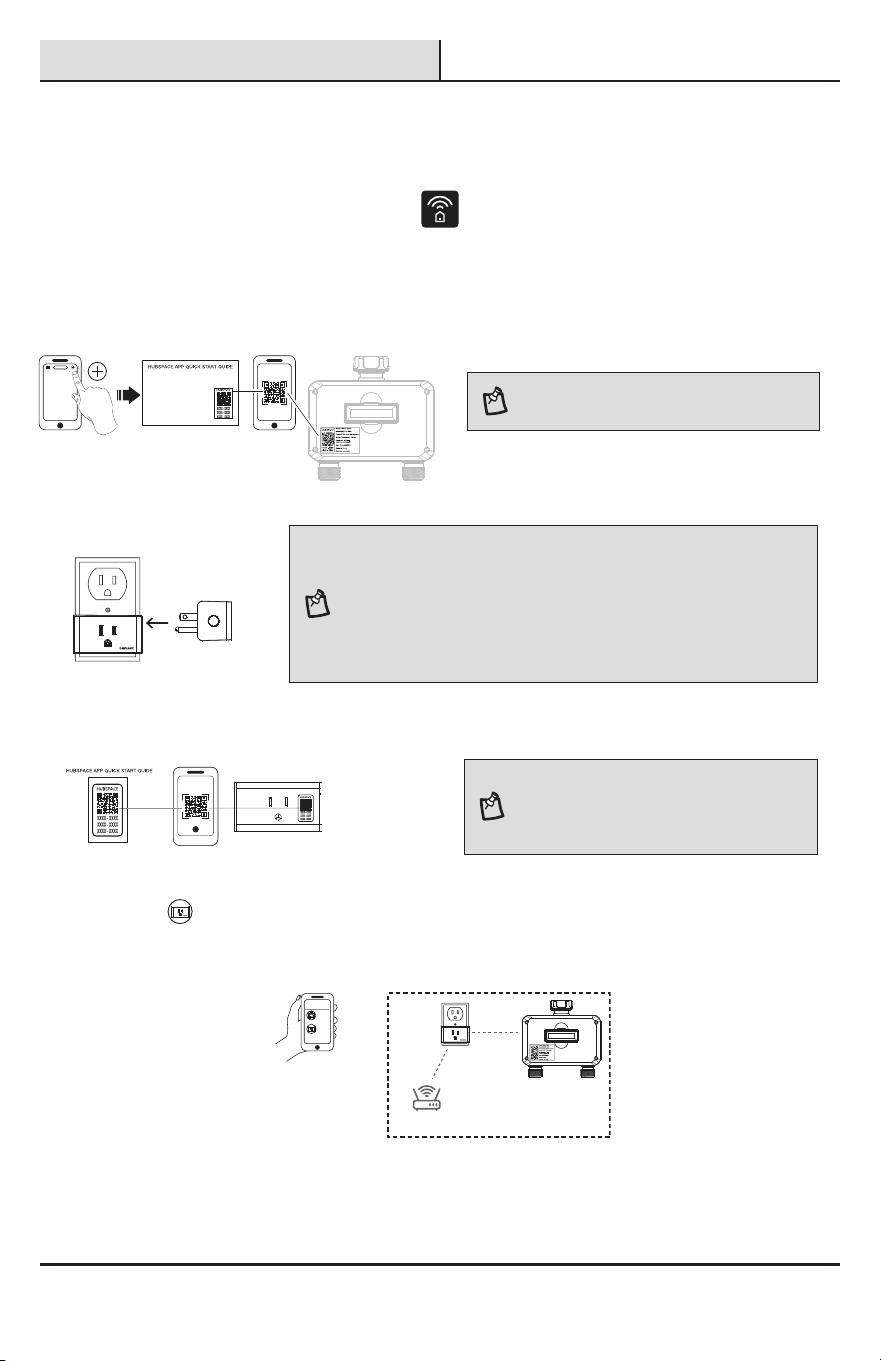
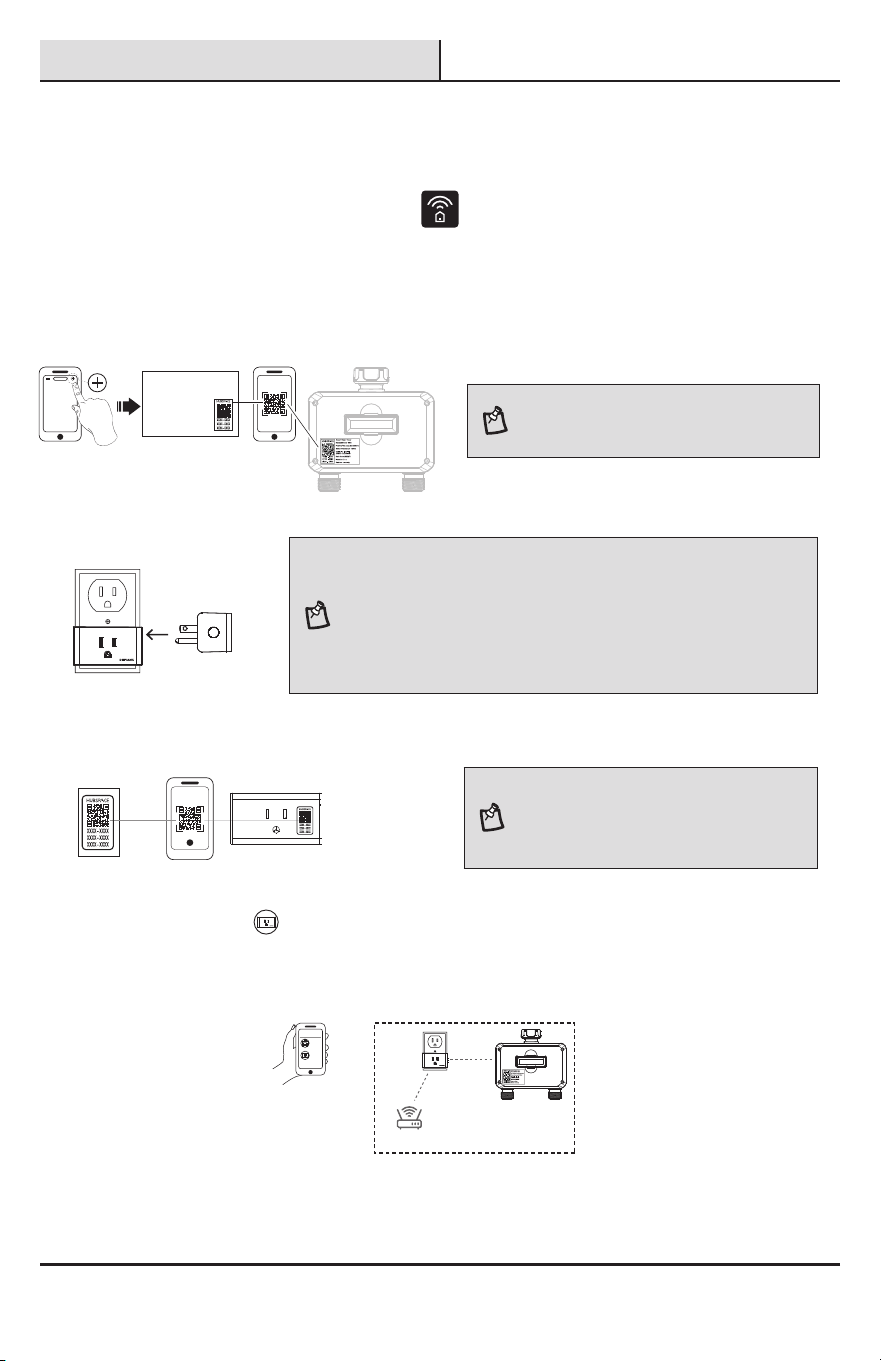
4
Program timer
1. Download the Hubspace app from the App Store or the Google Play Store.
2. Create an account, or if you already have an account, sign in.
3. Follow the instructions on the Hubspace app screen.
4. Tap “+” button in the upper right corner to add your timer by scanning QR code on the back or in Timer Quick
Start Guide, and it will perform timer direction check automatically.
NOTE: If the QR code is missing or unable to scan,
follow the app instructions. Press and hold both
buttons for 5 seconds to discover your timer.
5. Connect your plug to power and follow the instructions on the Hubspace app screen.
NOTE:
□ The range of the Bluetooth® connection is approximately 30 feet (10 meters).
However, maximum communication range will vary depending on obstacles (person,
metal, wall, etc.). For best connectivity, we recommend plugging Smart Plug in a
power outlet near your timer.
□ The device only connects to 2.4GHz networks and does NOT support 5GHz bandwidth.
Hubspace only shows Wi-Fi networks that your device can use.
□ If you do not see your Wi-Fi network name when you attempt to connect your devices,
please check your router settings or move your product closer to your Wi-Fi router.
6. Tap “+” button in the upper right corner to add your plug by scanning QR code on plug or in Smart Plug Quick
Start Guide.
NOTE: If the QR code cannot be scanned, you can
enter the code manually. Tap Enter Code and follow
the instructions.
7. Set up Smart Plug as Wi-Fi Gateway for remote control.
Tap Smart Plug from the homepage in Hubspace app, and nd “Wi-Fi gateway support to another device”
to setyour Smart Plug as a Wi-Fi Gateway. This allows you to connect your timer remotely with internet access
from your phone.
Hubspace app
Remote Control
Wi-Fi Router
Wi-Fi Gateway Setup
8. Set up your Voice Assistant
You can connect your smart plug to Google Home and Alexa from the Hubspace app. Or, you can sign in to Alexa
app or Google Home and connect to your Hubspace devices from there.
9 HOMEDEPOT.COM/HUBSPACE
Please contact 1-877-592-5233 for further assistance.
Operation
FEATURES
□ PHYSICAL BUTTONS – a left and right button on the center front of the timer that controls the open/close of
each spigot. These buttons are used for manual operation.
□ 2 LED indicators to indicate active watering (green) and low battery (red) of each spigot.
□ Up to 35 watering schedules per spigot to determine when watering should be done.
□ Spigot management.
□ Ability to name each spigot.
□ Set schedules for each spigot (2 zones).
□ Ability to set the timer from 1-360 minutes.
□ App control to open and close the spigots after a specied duration.
□ Product can connect to another Hubspace product that can function as a Wi-Fi Gateway (microhub).
With micro hub gateway, support for one timer can be provided remotely:
□ Operation and conguration
□ Status Reporting
□ Alexa / Google Home integration
POWER CONSUMPTION REQUIREMENTS
The product is AA-battery operated (2 batteries) and the target battery life is 1800 operations (open or close)
between replacement. Battery life should be about 1 year depending on battery quality and environmental
conditions. Seek advice from your local service provider on cleaning, moving, or maintaining the product.
MANUAL OPERATION
Manual mode: There are two ways to enter manual mode: one is to directly press the manual button of the timer to
enter manual mode, and the other is to enter manual mode through the operation settings on the APP panel.
Button Operation -The following actions will be available with the physical buttons on the water timer:
Button Button Press Action
Left Button Short press will open or close the left water valve (zone 1).
Right Button Short press will open or close the right water valve (zone 2).
Spigots will stay open for a set period of time. The default is 60 minutes, and the minimum is 1 minute and
maximum 360 minutes. Note that this occurs when the buttons are pressed manually or when the spigots are
opened via the mobile app. This duration is not used when the scheduling system is used.

10
Operation (continued)
LED OPERATION
Note: there are 2 LED banks total (1 per spigot)
LED TRIGGER COLOR DESCRIPTION:
Trigger Color Description
Button push (Open) Green light, slow blink Indicates active watering
Low battery Red light, slow blink Indicates low battery
Button push (Closed) Off Not watering
Button push (Low battery) Red light, quick blink, 5 seconds If the spigot is open, try to close it. If
closed, do nothing.
Long push of both buttons
to go into setup mode
Green light, blink, 10 seconds. Indicates the device is in setup mode.
Canceled when added to an account or
timeout after 5 minutes.
POWER LOSS & RETURN OPERATION
If there is loss of power (crash or battery removal), upon resumption the valves will close if they were previously
open (no timer running). This prevents over watering and is a safety feature. When power resumes, the default state
of the timer is to close the spigots. If there is a timer running while there is a crash or reboot, then the user will
need to manually close the valves for safety. If batteries are removed for extended periods of time, then reinstalled
at a later date, the timer will resync with the cloud via the app to resume previous watering schedules and to
update the date/time functions within the timer.
LOW BATTERY OPERATION
If the battery is low, the valve(s) must return to the closed position to prevent overwatering. The user should be
alerted in the app, for example - the battery icon should change color (red). When in a low-power situation, the
open/close function must be disabled in the app.
□ If a spigot is reported as open, then the timer will close automatically due to low battery triggering.
□ If a spigot is reported as open, the button on the device should allow an attempt to close it, but not open it.
□ When in low battery mode, buttons should not open valves. When pushed, the LED should blink rapidly for
5 seconds to indicate that the operation is not allowed. See chart above.
APP OPERATION
The watering timer shall have the following operations available via the app:
□ Product name (parent)
□ Open/Close status and button to open/close both spigots.
□ When opening the spigots, a duration will be implemented (Default Time On is 60 minutes). When closing
the spigots through the app, this duration will be overridden. If the battery is low, then this should be
shown on the main screen and open/close control disabled.
□ Battery Level -The battery level will be displayed as an icon in the app.
□ Spigot 1 Name
□ Spigot 2 Name
□ Create a Schedule Button
11 HOMEDEPOT.COM/HUBSPACE
Please contact 1-877-592-5233 for further assistance.
Operation (continued)
□ The current countdown timer status for both Spigots.
NOTE: The spigots are always on a timer if used, default
60 minutes. This is shown when the spigot has been
opened via the mobile app or manually. It is not shown
when the spigot is open due to a scheduled event.
□ Rain Delay button - goes to option to delay for between 1 day and 15 days, with 1 day as the default.
□ Icons for: Schedules, Settings
□ Default Time Open
□ The default time that the valve will be open. Default is 60 minutes with a range of 1 to 360 minutes. This is
the time that is used when the spigot is turned on manually via the button or the mobile app. A countdown
will be shown in the UI when this is done.
□ General Settings: Product name, Room, Location, Time Zone
□ Connectivity
□ Wi-Fi Gateway selection
□ Info: Product Type, Firmware version, Product feedback, Device
AUTO-OFF TIMER
The watering timer spigots always operate with a timer set. The default is 60 minutes and the range is 1 minute to
360 minutes. The app will represent this in hh:mm format and show a countdown for each spigot.
NO EVENT HISTORY
Event History will not be supported for this product.
SCHEDULING
Users can set schedules according to the timezone they are in, and the standard scheduling system will apply. The
user may apply schedules to the timer if 1) the app is within BLE range of the timer OR 2) the timer is within BLE
range of the associated gateway. The device will sync its time when it can connect to the Internet, but it will also
utilize a Real Time Clock (RTC) chip to keep track of time.
WHAT CAN BE SCHEDULED?
The user can schedule the spigots to come on and off at different times or based on sunrise or sunset. The watering
timer can calculate sunrise and sunset times based on the location, time zone, and date. The location is provided by
the app when the device is added to the account.
The following items can be scheduled:
□ Per Spigot
□ Start time
□ End time
□ Days of the week
Every X number of days (60 day period) with a start day of the week, example - start on Monday and water every 2
days.
NOTE: When using schedules, the watering timer can be
set to run longer than the default on time that would be
used if the spigot is turned on manually via the button or
by the mobile app.

12
Operation (continued)
NUMBER OF SCHEDULES
Up to 35 watering schedules per spigot can be programmed for complete watering customization.
RAIN DELAY
The user will be able to set a rain delay setting in the app that will tell the timer to pause all scheduled operations
for a period of time (for both spigots). The default will be 1 day (24 hours), and the user will have the ability to set
it for between 1 to 15 days. After the time runs out, the timer will resume scheduled operations.
□ The app must show clearly that the timer is in rain delay or not and allow the user to start or end Rain Pause.
□ If either spigot is opened due to button, mobile app, or voice control, the rain delay must be canceled.
□ When the Rain Pause starts, all valves must be closed.
□ The timer starts from when the user starts the rain delay.
□ The user can cancel the rain delay at any time.
ONBOARDING AND REMOVAL
Onboarding is done via QR code scanning, manual code entry, or QR-codeless capability. The QR code is placed
on the unit’s label on the device or on the device itself, for example - via laser etching or printing. QR codes
are unique for each device. Scanning the QR code of a device already on another account will transfer it to the
scanner’s account.
NOTE: If a user does not connect a gateway or if the
watering timer is out of range of the gateway, they will
only be able to operate and congure the watering timer
through the Hubspace app when it is within BLE range.
QR CODE OR MANUAL ENTRY ONBOARDING
The user scans the QR code or enters the code manually into the app.
QR CODELESS SETUP MODE ONBOARDING
To enable onboarding without the QR code, users can place the device into setup mode by pressing and holding
both buttons for 5 seconds. The LED’s will then blink green to indicate this mode is active. The device will stay in
this mode for 5 minutes or until it is added to an account by the mobile app.
SETUP MODE IDENTIFICATON
When instructed to identify the device by the app in setup mode, the device will blink the LED.
DEVICE REMOVAL
When the device is removed from an account, or reset by the service, it may close the valve if it is open. Note that
this is done on a “best effort” basis and may not be possible or performed depending on the connectivity and
timing. However, the valve will be closed once the timer has completed. Devices do not know whether they are on
an account or not and it is entirely possible for a user to remove the device from their account remotely.
13 HOMEDEPOT.COM/HUBSPACE
Please contact 1-877-592-5233 for further assistance.
Troubleshooting
TIMER
Problem Solution
Timer does not water or does not
come on at desired time.
□ Faucet is on.
□ Clock is set to correct time including AM and PM.
□ Batteries are low.
□ Desired outlet (Left or Right) is programmed.
□ Rain delay is on.
□ Start time is set to desired time including AM and PM.
Water won’t turn off.
□ Watering duration is set to desired time.
□ The Manual mode is on.
Low water Pressure
□ Faucet is open completely
□ Use one port at a time
SMART PLUG
Problem Solution
What devices can be controlled with
the Smart Plug?
□ You can control any small appliances (less than max load 1800W) in
accordance with the Smart Plug’s specications.
My Hubspace device is not connecting
to Wi-Fi.
□ Make sure your device is connected to a power source. Your
Internet connection or Wi-Fi network may be down.
My device cannot nd any Wi-Fi
networks.
□ Make sure you have a 2.4GHz capable Wi-Fi networ1< within range
of the device you are trying to add.
My device is in a location that does not
have Wi-Fi. Can I still use it with the
Hubspace app?
□ Yes. Use the app on a phone with an Internet connection like LTE.
The phone must be within Bluetooth range of your Hubspace device
and have Bluetoolh enabled.
I cannot nd the QR code.
□ It is on the plug housing. A copy of the QR code is also included in
your device’s documentation.
The QR code has become damaged.
How do I add the device?
□ Under the QR code are numbers. You can enter those in manually
instead of scanning the code.
A device is on another account. How
do I transfer it?
□ Scan the QR code and It will transfer to your account.
My device is ofine for long periods
of time.
□ Make sure your Wi-Fi signal strength is sufcient. You may need to
move your router, use mesh Wi-Fi, or Wi-Fi extenders .
The device is on and I scanned the QR
code, but the app cannot connect to it.
□ Tum off Bluetooth on your phone and tum n back on. Then, scan the
QA code. If the problem persists, turn your phone off and on, then
try again.
Can I scan the same QR code to add
multiple products?
□ No. Each product has a unique QA code.

Questions, problems, missing parts? Before returning to the store,
call Hubspace Customer Service
8 a.m. - 7 p.m., EST, Monday-Friday, 9 a.m. - 6 p.m., EST, Saturday
1-877-592-5233
HOMEDEPOT.COM/HUBSPACE
Retain this manual for future use.

GUÍA DE USO Y MANTENIMIENTO
TEMPORIZADOR INTELIGENTE DE RIEGO
¿Preguntas, problemas o piezas faltantes? Antes de volver a la tienda, llama al Servicio
al Cliente de Hubspace de lunes a viernes de 8 a.m. a 7 p.m. (hora del este)
y los sábados de 9 a.m. a 6 p.m. (hora del Este).
1-877-592-5233
HOMEDEPOT.COM/HUBSPACE
Artículo #1010 461 413
Modelo #867006-1004
GRACIAS
Apreciamos la conanza que has depositado en Hubspace con la compra de este temporizador inteligente
de riego. Nos esforzamos en crear continuamente productos de calidad diseñados para mejorar tu hogar.
Visítanos por Internet para ver nuestra línea completa de productos disponibles a n de satisfacer tus
necesidades de mejoras del hogar. ¡Gracias por elegir Hubspace!

16
Tabla de contenido
Información De Seguridad ........................................16
Aviso De Instalación ...............................................16
Aviso De Uso Del Producto .....................................16
Aviso De Servicio Y Mantenimiento .......................17
Aviso De La Puerta De Enlace ...............................17
Garantía......................................................................17
4 Años De Garantía Limitada .................................. 17
Garantía De Puerta De Enlace ................................17
Declaraciones Informativas ......................................18
Protocolo Inalámbrico ............................................18
Bluetooth
®
.............................................................18
Declaración De La Comisión Federal De
Comunicaciones ....................................................18
Declaración De Ised ...............................................18
Declaración De Conformidad De Los Proveedores
..18
Preinstalación ............................................................19
Descripción ............................................................19
Contenido Del Paquete ...........................................19
Descripción Del Producto .......................................19
Instalación .................................................................20
Uso .............................................................................23
Características .......................................................23
Requisitos De Consumo De Energía .......................23
Uso Manual ............................................................23
Uso De Las Luces Led ............................................24
Pérdida De Potencia Y Uso De Retorno ..................24
Uso Con Batería Baja .............................................24
Uso De La App ........................................................ 24
Temporizador De Apagado Automático ..................25
Sin Historial De Eventos .........................................25
Programación ........................................................25
¿Qué Se Puede Programar? ...................................25
Número De Horarios ...............................................26
Retraso Por Lluvia .................................................26
Vinculación Y Desvinculación.................................26
Vinculación Por Código Qr O Ingreso Manual
De Código ..............................................................26
Vinculción Del Modo De Conguración Sin
Código Qr ..............................................................26
Identicacion Del Modo De Conguracion ............26
Desvinculación De Dispositivos ............................26
Solución De Problemas .............................................27
Temporizador .........................................................27
Enchufe Inteligente ...............................................27
Información de seguridad
LEE ESTE AVISO ANTES DE INSTALAR, UTILIZAR Y
REALIZAR MANTENIMIENTO A ESTE PRODUCTO.
Este producto está diseñado y fabricado para el riego
de céspedes y jardines. Lee atentamente y sigue las
instrucciones que se dan a continuación. La falta de
conocimientos sobre el uso o el uso inadecuado podrían
causar daños inesperados o la pérdida de pertenencias
personales o comerciales.
□ Sólo para uso no comercial; el uso comercial
anulará la garantía.
□ Sólo para regar con agua del grifo exterior de la casa.
□ No usar en interiores o con electrodomésticos.
Usar sólo con presiones de 60 PSI (4 bar) máx.
□ No usar con agua cuya temperatura supere los
100 °F (38 °C).
□ No debe utilizarse en el extremo de salida de
conectores en "Y" u otros accesorios para
mangueras. Desconectar y drenar antes de que
lleguen las heladas.
□ Reemplaza las baterías todos los años, cuando el
ícono de batería baja parpadee o antes de usarla
mucho tiempo sin supervisión.
□ Como práctica recomendada, utiliza un puerto a la
vez. El ujo de agua disminuirá cuando se utilicen
ambos lados al mismo tiempo, debido a la presión
ja del agua.
AVISO DE INSTALACIÓN
NO se recomienda retirar ni sustituir piezas durante la
instalación, ya que ello puede invalidar la garantía del
producto.
AVISO DE USO DEL PRODUCTO
Usa siempre baterías alcalinas. El usuario es
responsable de los daños causados por el uso de
baterías no auténticas. Este producto está formado por
componentes mecánicos y electrónicos, que pueden
ser sensibles a los impactos físicos y a los choques
electrónicos. Utilizar el producto con cuidado evita
averías inesperadas y optimiza su vida útil. No desarmes
el producto. El desarmado no autorizado anulará la
garantía del producto. Consulta la página de solución
de problemas si se produce algún problema o ponte en
contacto con el servicio al cliente: LÍNEA DE AYUDA SIN
COSTO 1-877-592-5233 HOMEDEPOT.COM/Hubspace.
Cuando el temporizador no se utilice durante un periodo
prolongado, retira todas las pilas del temporizador al
mismo tiempo y sustitúyelas por pilas nuevas del mismo
tamaño y tipo cuando vuelvas a ponerlo en servicio.

17 HOMEDEPOT.COM/HUBSPACE
Para obtener asistencia, llama al 1-877-592-5233.
Información de seguridad (continuación)
AVISO DE SERVICIO Y MANTENIMIENTO
Solicita ayuda siempre en HOMEDEPOT.COM/Hubspace
sobre la limpieza, el traslado o el mantenimiento del
producto. La información en este aviso está sujeta a
cambios sin previo aviso.
AVISO DE LA PUERTA DE ENLACE
Asegúrate de utilizar este producto junto con un
cortacircuitos de 10 A como mínimo en la corriente
ascendente. Sólo para usar en interiores. No lo utilices
en lugares húmedos. El límite de corriente total del
aparato es de 10 A. Para evitar daños, no superes el
límite de 10 A. Si se crea un cortocircuito directo en
la salida, la puerta de enlace quedará dañada y dejará
de funcionar. No desarmes el producto ni lo repares
tú mismo. Corres el riesgo de sufrir una descarga
eléctrica y de anular la garantía limitada. Si necesitas
asistencia, comunícate con el servicio al cliente: LÍNEA
DE AYUDA SIN COSTO 1-877-592-5233 HOMEDEPOT.
COM/Hubspace.
Garantía
4 AÑOS DE GARANTÍA LIMITADA
Por este medio, el vendedor de este producto garantiza, sujeto a las condiciones establecidas a continuación, que
reparará o, a su elección, reemplazará este producto si resulta defectuoso debido a mano de obra o materiales
inadecuados dentro del plazo limitado del comprador original. Para obtener reparaciones o sustituciones en virtud
de esta garantía limitada, debes llevar este producto a la tienda en la que lo compraste.
Comprador original: Esta garantía limitada sólo cubre al comprador original del producto, comprado al detalle en
una tienda minorista.
Este producto no está cubierto, excepto hasta dónde sea prohibido por la ley pertinente, por ninguna otra garantía,
implícita o explícita, incluyendo las garantías de comerciabilidad o idoneidad para un propósito particular. Bajo
ninguna circunstancia, el minorista será responsable de daños consecuenciales o incidentales relacionados con este
producto. En la medida que la ley pertinente prohíba al minorista la exclusión de garantías implícitas, el periodo de
cobertura de dichas garantías implícitas que no puedan ser excluidas será igual al periodo de por vida del comprador
original. Algunos estados no permiten la limitación temporal de garantías implícitas, por lo tanto, la limitación anterior
de las garantías implícitas no excluibles, de haber alguna, puede no aplicarse a su caso. Algunos estados no permiten
la exclusión o limitación de daños directos o indirectos, por lo que las limitaciones o exclusiones anteriores de los
daños directos e indirectos podrían no aplicarse a su caso.
El minorista no asume ni autoriza a ningún representante u otra persona a que asuma en su nombre ninguna
obligación o responsabilidad distinta de las que se establecen expresamente en el presente documento. Esta
garantía limitada le otorga derechos legales especícos, y puedes también tener otros derechos, que varían según
el estado.
Comuníquese con el Equipo de Servicio al Cliente al teléfono 1-877-592-5233 o visite HOMEDEPOT.COM/HUBSPACE.
PARTE RESPONSABLE: Lawn and Garden LLC, 7501 Esters Boulevard, Suite 140, Irving, Texas 75063
GARANTÍA DE PUERTA DE ENLACE
GARANTÍA LIMITADA DE 1 AÑO
Este producto está garantizado contra defectos materiales o de fabricación por un período de 1 año a partir de la
fecha de compra. La garantía no cubre el desgaste y deterioro normal.
18
Declaraciones informativas
PROTOCOLO INALÁMBRICO
El logotipo de Wi-Fi CERTIFIED
™
es una marca de certicación de Wi-Fi Alliance
®
. Apple y los
logotipos de Apple son marcas comerciales de Apple Inc. registradas en EE.UU. y otros países.
App Store es una marca de servicio de Apple Inc. Google, Google Play y el logotipo de Google
Play son marcas registradas de Google LLC.
BLUETOOTH
®
La marca y los logotipos Bluetooth
®
son marcas registradas propiedad de Bluetooth SIG,Inc.
y cualquier uso de dichas marcas por parte de The Home Depot, Inc. se realiza bajo licencia.
Otras marcas registradas y nombres comerciales pertenecen a sus respectivos titulares.
Enchufe Inteligente QDID 153778 and 141499
Temporizador QDID 175971
DECLARACIÓN DE LA COMISIÓN FEDERAL DE COMUNICACIONES
Este dispositivo cumple con la parte 15 de las Normas de la FCC. Su operación está sujeta a las dos condiciones
siguientes:
1. Este dispositivo no debe causar interferencia dañina
2. tiene que aceptar cualquier interferencia recibida, incluso aquella que pudiera causar uso no deseado.
Los cambios o modicaciones sin previa aprobación expresa de parte responsable de su cumplimiento podrían
anular el derecho del usuario a operar el equipo.
NOTA: Este equipo ha sido probado y se determinó que cumple con los límites para un dispositivo digital Clase B, de acuerdo con la Parte
15 de las Normas FCC Estos límites fueron establecidos para dar protección razonable contra la interferencia dañina en uso residencial. Este
equipo genera, usa y puede irradiar energía en radiofrecuencias; de no ser instalado y utilizado de acuerdo con las instrucciones, pudiera
causar interferencia dañina a comunicaciones por radio. Sin embargo, no hay garantía de que no ocurrirá interferencia en cierta instalación
particular. Si este equipo causa interferencia perjudicial a la recepción de radio o televisión, que puede determinarse encendiendo y
apagando el equipo, se recomienda al usuario tratar de corregir la interferencia con una o más de las siguientes medidas:
□ Reorientar o reubicar la antena receptora.
□ Incrementar la distancia entre el equipo y el receptor.
□ Conectar el equipo a un tomacorriente de circuito distinto al que el receptor esté conectado.
□ Para obtener ayuda, consulta al distribuidor o algún técnico de radio/TV con experiencia.
DECLARACIÓN DE ISED
Este equipo cumple con los límites de exposición a radiación para un ambiente no controlado establecidos por la
RSS-102 de IC. Este equipo debe ser instalado y operado con una distancia mínima de 20 cm entre el radiador y
cualquier parte de tu cuerpo.
Contiene el ID de FCC: 2AB2Q-LA02303B
ID de IC: 10256A-LA02303B
HVIN: LA02303B
DECLARACIÓN DE CONFORMIDAD DE LOS PROVEEDORES
Información de cumplimiento 47 CFR § 2.1077.
19 HOMEDEPOT.COM/HUBSPACE
Para obtener asistencia, llama al 1-877-592-5233.
Preinstalación
DESCRIPCIÓN
Este temporizador de riego de doble grifo es un dispositivo temporizador inteligente de riesgo BLE (Bluetooth) que
funciona con baterías y abre y cierra dos válvulas de agua para regular el ujo de agua de un grifo a 2 mangueras
distintas. Se controla mediante una app en el teléfono móvil La intención es que cada manguera alimente una zona
de riego de algún tipo. El temporizador de riego puede activarse o desactivarse y pueden establecerse horarios
mediante la app móvil para cada llave individual. Cuando se utiliza con un dispositivo de puerta de entrada, por
ejemplo, un enchufe inteligente cercano, el temporizador se puede controlar de forma remota. Como práctica
recomendada, utiliza un puerto a la vez. El ujo de agua disminuirá cuando se utilicen ambos lados al mismo tiempo.
CONTENIDO DEL PAQUETE
AA
A B C
Pieza Descripción Cantidad
A Temporizador inteligente de riego 1
B Puerta de enlance con enchufe inteligente habilitado por Hubspace y Wi-Fi CERTIFIED
™
1
C Batería AA 2
DESCRIPCIÓN DEL PRODUCTO
A
B
E
C
F
I
H
G
D
PARTE FRONTAL PARTE POSTERIOR
Pieza Descripción Pieza Descripción
A Acoplamiento giratorio fácil F Uso del modo manual con el botón derecho
B
Uso del modo manual con el botón izquierdo
G Salida Zona 2
C Salida Zona 1 H Código QR
D Símbolo Wi-Fi I Bandeja de baterías
E Luces LED
20
Instalación
1
Cómo instalar las baterías
□ Retira la bandeja de la parte posterior del
temporizador deslizándola hacia fuera.
□ Coloca dos baterías alcalinas AA (1.5 V)
(incluidas) y vuelve a colocar la bandeja.
(Asegúrate de que las baterías estén
aseguradas)
□ Reemplaza las baterías todos los años, cuando
el ícono de batería baja parpadee o antes de
usarla mucho tiempo sin supervisión.
□ Si se quitan las baterías durante largos
periodos de tiempo, el temporizador tendrá
que volver a sincronizarse con la nube a través
de la app para reanudar los programas de
riego y la fecha/hora anteriores
AA AA
2
Cómo jar el temporizador al
grifo
□ Fija el temporizador a un grifo de manguera
exterior y abre el grifo después de
programarlo.
□ No debe utilizarse en el extremo de salida de
conectores en "Y" u otros accesorios para
mangueras.
□ Presiona los botones izquierdo y derecho para
el uso manual de la unidad en cada uno de
los grifos.
□ Las salidas izquierda y derecha pueden
funcionar al mismo tiempo.
NOTA: Como práctica recomendada, utiliza un puerto
cada vez. El ujo de agua disminuirá cuando se utilicen
ambos lados al mismo tiempo.
21 HOMEDEPOT.COM/HUBSPACE
Para obtener asistencia, llama al 1-877-592-5233.
Instalación (continuación)
3
Enchufe Inteligente
□ Conecte el producto a la toma de corriente.
□ No conecte varios enchufes entre sí.
□ Conecte el producto a la toma de corriente. El dispositivo está listo para ser utilizado.
Enchufe Inteligente
Señales LED Estado del
enchufe
Signicado Acciones A Tomar
Parpadeo naranja Apagado No conectado a la Wi-Fi Congure su Wi-Fi para el producto. Si
ya conguró su Wi-Fi para este producto,
espere a que se conecte. Verique el estado
de su conexión desde la aplicación de
Hubspace.
Parpadeo naranja/verde Encendido
Apagado Apagado El enchufe está
apagado.
Ninguna acción requerida.
Verde Encendido El enchufe está
encendido.
Rojo Apagado Hay un error con la
conexión Wi-Fi.
Vaya a la conguración del dispositivo en la
aplicación y congure nuevamente su Wi-Fi.
Verique que su punto de acceso Wi-Fi
permita que el dispositivo se una a la red.
Naranja Encendido
Entrada 127V ~, 60 Hz
Salida 127V ~, 60 Hz,10 A carga máxima
Tipo de red inalámbrica 2.4 GHz, IEEE 802.11b/g/n
Temperatura operativa 0°C ~ 40°C
Humedad operativa 5-85 % HR, sin condensación
Certicación FCC, IC, ETL
Part Descripción
A Toma de corriente
b
ca
B Luz indicadora
C Botón de encendido/botón de
restablecimiento
22
Instalación (continuación)
4
Temporizador de programa
1. Descargue la aplicación Hubspace de App Store o de Google Play.
2. Cree una cuenta o inicie sesión si ya tiene una.
3. Siga las instrucciones en la pantalla de la apliccación de Hubspace.
4. Pulse el botón «+» en la esquina superior derecha para añadir su temporizador escaneando el código QR en
la parte posterior o en la Guía de inicio rápido del temporizador, y realizará la vericación de la dirección del
temporizador automáticamente.
HUBSPACE APP GUÍA DE
INICIO RÁPIDO
NOTA: Si falta el código QR o no se puede escanear,
sigue las instrucciones de la aplicación. Mantén
presionado el botón de encendido durante 5 segundos
para activar el temporizador.
5. Conecte su enchufe a la corriente y siga las instrucciones en la pantalla de la aplicación Hubspace.
NOTA:
□ El alcance de la conexión Bluetooth® es de aproximadamente 30 pies (10 metros).
Sin embargo, el rango máximo de comunicación variará dependiendo de los
obstáculos (persona, metal, pared, etc.). Para una mejor conectividad, recomendamos
enchufar el Enchufe inteligente en una toma de corriente cerca de su temporizador.
□ El dispositivo solo se conecta a redes de 2,4 GHz y NO admite un ancho de banda de
5 GHz. Hubspace solo muestra las redes Wi-Fi que su dispositivo puede usar.
□ Si no ves el nombre de tu red Wi-Fi cuando intentes conectar tus dispositivos, verica
la conguración de tu enrutador o acerca tu producto a tu enrutador Wi-Fi.
6. Pulse el botón «+» en la esquina superior derecha para añadir su enchufe escaneando el código QR en el
enchufe o en la Guía de inicio rápido del Enchufe inteligente.
HUBSPACE APP GUÍA DE
INICIO RÁPIDO
NOTA: Si el código QR no pudiese ser escaneado,
puede introducir el código manualmente. Seleccione
Introducir Código y siga las instrucciones.
7. Congure el Enchufe inteligente como puerta de enlace Wi-Fi para el control remoto.
Pulse el Enchufe inteligente en la página de inicio de la aplicación Hubspace y busque «Compatibilidad
con la puerta de enlace Wi-Fi en otro dispositivo» para congurar su el Enchufe inteligente como una puerta de
enlace Wi-Fi. Esto le permite conectar su temporizador de forma remota con desde su teléfono con acceso a
Internet.
Control remoto
de la aplicación
Hubspace
Router Wi-Fi
Configuración de la puerta de enlace Wi-Fi
8. Conguración con asistente de voz
Puede conectar su enchufe inteligente con Google Home y con Alexa desde la aplicación de Hubspace, o puede
directamente iniciar sesión desde la aplicación de Alexa o de Google Home y conectar desde ahí sus dispositivos.
23 HOMEDEPOT.COM/HUBSPACE
Para obtener asistencia, llama al 1-877-592-5233.
Uso
CARACTERÍSTICAS
□ BOTONES FÍSICOS: un botón izquierdo y otro derecho en la parte central frontal del temporizador que
controlan la apertura/cierre de cada grifo. Estos botones se utilizan para el uso manual.
□ 2 indicadores LED para indicar el riego activo (verde) y la batería baja (rojo) de cada grifo.
□ Hasta 35 programas de riego por grifo para determinar cuándo se debe regar.
□ Administración de los grifos.
□ Posibilidad de nombrar cada grifo.
□ Establece horarios para cada grifo (2 zonas).
□ Posibilidad de programar el temporizador de 1 a 360 minutos.
□ La app controla la apertura y el cierre de los grifos tras una duración determinada.
□ El producto puede conectarse a otro producto de Hubspace que pueda funcionar como una puerta de
enlace con Wi-Fi (microhub). Con la puerta de enlace de micro hub, se puede proporcionar soporte para un
temporizador de forma remota:
□ Uso y conguración
□ Informes de situación
□ Integración con Alexa / Google Home
REQUISITOS DE CONSUMO DE ENERGÍA
El producto funciona con baterías AA (2) y la duración prevista de las baterías es de 1,800 usos (abrir o cerrar) entre
reemplazos. La duración de las baterías debería ser de aproximadamente 1 año, dependiendo de la calidad de las
baterías y de las condiciones ambientales. Solicita ayuda a tu proveedor de servicios local sobre la limpieza, el
traslado o el mantenimiento del producto.
USO MANUAL
Modo manual: Hay dos formas de acceder al modo manual: una es presionar directamente el botón manual del
temporizador para entrar en modo manual, y la otra es entrar en modo manual a través de los ajustes de uso del
panel de la APP.
Uso de los botones: Con los botones físicos del temporizador de riego podrás realizar las siguientes acciones:
Botón Acción de presionar el botón
Botón izquierdo Presionar brevemente abrirá o cerrará la válvula de agua izquierda (zona 1).
Botón derecho Presionar brevemente abrirá o cerrará la válvula de agua derecha (zona 2).
Los grifos permanecerán abiertos durante un tiempo determinado. El valor por defecto es 60 minutos, siendo
el mínimo de 1 minuto y el máximo 360 minutos. Recuerda que esto sucede cuando se presionan los botones
manualmente o cuando se abren los grifos a través de la app móvil. Esta duración no se utiliza cuando se utiliza el
sistema de programación.

24
Uso (continuación)
USO DE LAS LUCES LED
Nota: hay 2 LEDs en total (1 por grifo)
DESCRIPCIÓN DEL COLOR DEL GATILLO LED:
Gatillo Color Descripción
Presionar el botón (Abrir) Luz verde, parpadeo lento Indica riego activo
Batería baja Luz roja, parpadeo lento Indica batería baja
Presionar el botón (Cerrado) Off Sin riego
Presionar el botón (Batería
baja)
Luz roja, parpadeo rápido, 5
segundos
Si el grifo está abierto, intenta cerrarlo. Si
está cerrado, no hagas nada.
Presión prolongada de
ambos botones para pasar
al modo de conguración
Luz verde, parpadea, 10 segundos. Indica que el aparato está en modo
conguración. Se cancela cuando se
añade a una cuenta o se agota el tiempo
tras 5 minutos.
PÉRDIDA DE POTENCIA Y USO DE RETORNO
Si se produce una pérdida de alimentación (caída o retiro de la batería), al reiniciar, las válvulas se cerrarán
si antes estaban abiertas (sin el temporizador en operación). Esto evita el riego excesivo y es un elemento de
seguridad. Cuando se reanuda la alimentación, el estado por defecto del temporizador es cerrar los grifos. Si hay un
temporizador en operación mientras se produce un fallo o un reinicio, el usuario tendrá que cerrar manualmente las
válvulas por seguridad. Si se quitan las baterías durante un periodo prolongado de tiempo y se vuelven a instalar
más adelante, el temporizador se resincronizará con la nube a través de la app para reanudar los programas de
riego anteriores y actualizar las funciones de fecha/hora dentro del temporizador.
USO CON BATERÍA BAJA
Si la batería está baja, la(s) válvula(s) debe(n) volver a la posición cerrada para evitar el riego excesivo. El usuario
debe recibir una alerta en la app, por ejemplo: el ícono de la batería debe cambiar de color (rojo). En situaciones de
bajo consumo, la función abrir/cerrar debe desactivarse en la app.
□ Si se informa de que un grifo está abierto, el temporizador se cerrará automáticamente debido a la activación
por batería baja.
□ Si se informa de que un grifo está abierto, el botón del dispositivo debe permitir intentar cerrarlo, pero no abrirlo.
□ En el modo de batería baja, los botones no deben abrir las válvulas. Al presionar, el LED debe parpadear
rápidamente durante 5 segundos para indicar que la operación no está permitida. Ver gráco anterior.
USO DE LA APP
El temporizador de riego dispondrá de las siguientes operaciones a través de la app:
□ Nombre del producto (principal)
□ Estado de apertura/cierre y botón para abrir/cerrar ambos grifos.
□ Cuando se abran los grifos, se aplicará una duración (el tiempo de encendido por defecto es de 60
minutos). Al cerrar los grifos a través de la app, se anulará esta duración. Si la batería está baja, debe
mostrarse en la pantalla principal y desactivarse el control de apertura/cierre.
□ Nivel de batería: El nivel de batería se exhibirá como un icono en la app.
□ Nombre de grifo 1
□ Nombre de grifo 2
□ Botón Create a Schedule (Crear un horario)
25 HOMEDEPOT.COM/HUBSPACE
Para obtener asistencia, llama al 1-877-592-5233.
Uso (continuación)
□ El estado actual del temporizador en cuenta regresiva para ambos grifos.
NOTA: Los grifos están siempre como temporizador si se
utilizan, por defecto a 60 minutos. Se muestra cuando el
grifo se ha abierto a través de la app móvil o manualmente.
No se muestra cuando el grifo está abierto debido a un
evento programado.
□ Botón Rain Delay (Retraso por lluvia): va a la opción de retrasar entre 1 día y 15 días, con 1 día por defecto.
□ Iconos para: Horarios, Ajustes
□ Hora de apertura por defecto
□ El tiempo por defecto que la válvula estará abierta. Por defecto es 60 minutos con un rango de 1 a 360
minutos. Es el tiempo que se utiliza cuando el grifo se abre manualmente mediante el botón o la app
móvil. Se mostrará una cuenta atrás en la interfaz de usuario cuando esto se haga.
□ Ajustes generales: Nombre del producto, habitación, ubicación, zona horaria
□ Conectividad
□ Selección de puerta de enlace con Wi-Fi
□ Información: Tipo de producto, versión de rmware, comentarios sobre el producto, dispositivo
TEMPORIZADOR DE APAGADO AUTOMÁTICO
Los grifos con temporizador de riego siempre funcionan con un temporizador programado. El valor por defecto es
60 minutos y el rango es de 1 minuto a 360 minutos. La app lo representará en formato hh:mm y mostrará una
cuenta atrás para cada grifo.
SIN HISTORIAL DE EVENTOS
El historial de eventos no será compatible con este producto.
PROGRAMACIÓN
Los usuarios pueden establecer horarios según la zona horaria en la que se encuentren, y se aplicará el sistema de
programación estándar. El usuario puede aplicar horarios al temporizador si 1) la app está dentro del alcance BLE
del temporizador O 2) el temporizador está dentro del alcance BLE de la puerta de enlace asociada. El dispositivo
sincronizará su hora cuando pueda conectarse a Internet, pero también utilizará un chip de reloj en tiempo real
(RTC) para controlar la hora.
¿QUÉ SE PUEDE PROGRAMAR?
El usuario puede programar los grifos para que se enciendan y apaguen a horas diferentes o en función del
amanecer o el atardecer. El temporizador de riego puede calcular las horas de salida y puesta del sol en función de
la ubicación, la zona horaria y la fecha. La app proporciona la ubicación cuando se añade el dispositivo a la cuenta.
Se pueden programar los siguientes elementos:
□ Por grifo
□ Hora de inicio
□ Hora nal
□ Días de la semana
Cada X número de días (periodo de 60 días) con un día de la semana de inicio, ejemplo: empieza el lunes y riega
cada 2 días.
NOTA: Cuando se utilizan programas, el temporizador
de riego puede ajustarse para que funcione durante más
tiempo que el tiempo de encendido predeterminado que se
utilizaría si el grifo se encendiera manualmente mediante
el botón o mediante la app del teléfono móvil.
26
Uso (continuación)
NÚMERO DE HORARIOS
Se pueden programar hasta 35 horarios de riego por grifo para una personalización completa del riego.
RETRASO POR LLUVIA
El usuario podrá establecer un ajuste de retraso por lluvia en la app que indicará al temporizador que detenga todas
las operaciones programadas durante un periodo de tiempo (para ambos grifos). El valor por defecto será de 1 día
(24 horas), y el usuario tendrá la posibilidad de jarlo de 1 a 15 días. Cuando se agote el tiempo, el temporizador
reanudará las operaciones programadas.
□ La app debe mostrar claramente que el temporizador está en retraso por lluvia o no y permitir al usuario
iniciar o nalizar la pausa por lluvia.
□ Si se abre cualquiera de los grifos mediante un botón, app del teléfono móvil o control por voz, debe
cancelarse el retraso por lluvia.
□ Cuando se inicia la pausa de lluvia, todas las válvulas deben estar cerradas.
□ El temporizador se inicia cuando el usuario inicia el retraso por lluvia.
□ El usuario puede cancelar el retraso por lluvia en cualquier momento.
VINCULACIÓN Y DESVINCULACIÓN
La vinculación se realiza mediante el escaneado del código QR, la introducción manual del código o la capacidad
sin código QR. El código QR se coloca en la etiqueta de la unidad en el dispositivo o en el propio dispositivo, por
ejemplo, mediante grabado láser o impresión. Los códigos QR son únicos para cada dispositivo. Al escanear el
código QR de un dispositivo que ya está en otra cuenta, se transferirá a la cuenta del escáner.
NOTA: Si un usuario no conecta una puerta de enlace
o si el temporizador de riego está fuera del alcance de
la puerta de enlace, sólo podrá manejar y congurar el
temporizador de riego a través de la app Hubspace cuando
esté dentro del alcance BLE.
VINCULACIÓN POR CÓDIGO QR O INGRESO MANUAL DE CÓDIGO
El usuario escanea el código QR o lo introduce manualmente en la app.
VINCULCIÓN DEL MODO DE CONFIGURACIÓN SIN CÓDIGO QR
Para activar la vinculación sin el código QR, los usuarios pueden poner el dispositivo en modo conguración
manteniendo presionados ambos botones durante 5 segundos. A continuación, los LED parpadearán en verde para
indicar que este modo está activo. El dispositivo permanecerá en este modo durante 5 minutos o hasta que la app
móvil lo añada a una cuenta.
IDENTIFICACION DEL MODO DE CONFIGURACION
Cuando la app te indique que identiques el dispositivo en el modo de conguración, el dispositivo hará parpadear
el LED.
DESVINCULACIÓN DE DISPOSITIVOS
Cuando el dispositivo se desvincula de una cuenta, o es restablecido por el servicio, puede cerrar la válvula
si está abierta. Ten en cuenta que esto se hace sobre la base del "mejor esfuerzo" y puede no ser posible o
realizarse dependiendo de la conectividad y el momento. Sin embargo, la válvula se cerrará una vez nalizado el
temporizador. Los dispositivos no saben si están en una cuenta o no y es totalmente posible que un usuario elimine
el dispositivo de su cuenta a distancia.

27 HOMEDEPOT.COM/HUBSPACE
Para obtener asistencia, llama al 1-877-592-5233.
Solución de problemas
TEMPORIZADOR
Problema Solución
El temporizador no riega o no se
enciende a la hora deseada.
□ El grifo está abierto.
□ El reloj está ajustado a la hora correcta, incluyendo AM y PM.
□ Las baterías tienen poca carga.
□ El grifo deseado (izquierdo o derecho) está programado.
□ El retraso por lluvia está activado.
□ La hora de inicio se ajusta a la hora deseada, incluyendo AM y PM.
El agua no se cierra. □ La duración del riego se ajusta al tiempo deseado.
□ El modo manual está activado.
Baja presión de agua □ El grifo está completamente abierto
□ Utiliza un puerto a la vez
ENCHUFE INTELIGENTE
Problema Solución
¿Qué dispositivos se pueden controlar
con el enchufe inteligente?
□ Puedes controlar cualquier electrodoméstico pequeño (menos que
la carga máxima de 1,800 W) de acuerdo con las especicaciones
del enchufe inteligente.
Mi dispositivo Hubspace no se conecta
a Wi-Fi.
□ Asegúrate de que tu dispositivo esté conectado a la corriente. Tu
conexión a Internet o red Wi-Fi puede estar inactiva.
Mi dispositivo no puede encontrar
ninguna red Wi-Fi.
□ Asegúrate de tener una red Wi-Fi con capacidad de 2.4 GHz dentro
del alcance del dispositivo que estás intentando agregar.
Mi dispositivo está en una ubicación
que no tiene Wi-Fi. ¿Puedo seguir
usándolo con la app Hubspace?
□ Sí. Usa la app en un teléfono con conexión a Internet como LTE.
El teléfono debe estar dentro del alcance de Bluetooth de tu
dispositivo Hubspace y tener Bluetooth habilitado.
No encuentro el código QR.
□ Está en la carcasa del enchufe. También se incluye una copia del
código QR en la documentación de tu dispositivo.
El código QR se ha dañado.
¿Cómo agrego el dispositivo?
□ Debajo del código QR hay números. Puedes ingresarlos
manualmente en lugar de escanear el código.
Un dispositivo está en otra cuenta.
¿Cómo lo transero?
□ Escanea el código QR y se transferirá a tu cuenta.
Mi dispositivo está desconectado
durante largos períodos de tiempo.
□ Asegúrate de que la intensidad de la señal de tu Wi-Fi sea
suciente. Es posible que debas mover tu router, usar Wi-Fi de red
o extensores de Wi-Fi.
El dispositivo está encendido y
escaneé el código QR, pero la app no
se puede conectar.
□ Apaga el Bluetooth en tu teléfono y vuelve a encenderlo. Luego,
escanea el código QR . Si el problema persiste, apaga y enciende tu
teléfono y vuelve a intentarlo.
¿Puedo escanear el mismo código QR
para agregar varios productos?
□ No. Cada producto tiene un código QR único.

¿Preguntas, problemas o piezas faltantes? Antes de regresar a la tienda, llama al Servicio
al Cliente de Hubspace de lunes a viernes de 8:00 a.m. a 7:00 p.m. (hora del Este)
y los sábados de 9:00 a.m. a 6:00 p.m. (hora del Este).
1-877-592-5233
HOMEDEPOT.COM/HUBSPACE
Conserva este manual para referencias futuras.