TTP-244CE
Desktop Barcode Printers
User Manual
◼ Thermal Transfer
◼ Direct Thermal

I
Copyright information
©2021 TSC Auto ID Technology Co., Ltd.
The copyright in this manual, the software and firmware in the printer described are owned by TSC Auto ID Technology Co., Ltd.
All rights reserved.
CG Triumvirate is a trademark of Agfa Corporation. CG Triumvirate Bold Condensed font is under license from the Monotype
Corporation. Windows is a registered trademark of Microsoft Corporation.
All other trademarks are the property of their respective owners. Information in this document is subject to change without
notice and does not represent a commitment on the part of TSC Auto ID Technology Co. No part of this manual may be
reproduced or transmitted in any form or by any means, for any purpose other than the purchaser’s personal use, without the
expressed written permission of TSC Auto ID Technology Co.

II
Table of Contents
1. Introduction .......................................................................................................................................................................................................1
2. Operation Overview ...........................................................................................................................................................................................2
2.1 Unpacking and Inspection ............................................................................................................................................................................2
2.2 Printer Overview ..........................................................................................................................................................................................3
2.2.1 Front View .............................................................................................................................................................................................3
2.2.2 Interior View ..........................................................................................................................................................................................4
2.2.3 Rear View ..............................................................................................................................................................................................5
3. Setup .................................................................................................................................................................................................................6
3.1 Setting up the Printer ...................................................................................................................................................................................6
3.2 Instructions to Top Cover Operation.............................................................................................................................................................7
3.3 Loading the Ribbon ......................................................................................................................................................................................8
3.4 Loading the Media ..................................................................................................................................................................................... 10
3.5 External Label Roll Mount Installation (Option) .......................................................................................................................................... 11
3.6 Loading Fan-fold Media ............................................................................................................................................................................. 12
3.7 Loading Label in Peel-Off Mode (Option) ................................................................................................................................................... 13
3.8 Loading Label in Cutter Mode (Option) ...................................................................................................................................................... 14
4. LED and Button Functions ............................................................................................................................................................................... 15
4.1 LED Indicator ............................................................................................................................................................................................. 15

III
4.2 Regular Button Function ............................................................................................................................................................................ 15
4.3 Power-on Utilities ....................................................................................................................................................................................... 16
5. TSC Console ................................................................................................................................................................................................... 17
5.1 Start TSC Console ..................................................................................................................................................................................... 17
5.2 Setup Ethernet Interface ............................................................................................................................................................................ 19
5.3 Printer Function ......................................................................................................................................................................................... 21
5.4 Setting Post-Print Action ............................................................................................................................................................................ 22
6. Troubleshooting ............................................................................................................................................................................................... 23
7. Maintenance .................................................................................................................................................................................................... 26
8. Agency Compliance and Approvals ................................................................................................................................................................. 28
9. Revision History .............................................................................................................................................................................................. 31

1
1. Introduction
Thank you very much for purchasing TSC bar code printer.
This printer provides both thermal transfer and direct thermal printing at user selectable speed of: 2.0, 3.0, 4.0 or 5.0 ips, for TTP-
245C series; 2.0 or 3.0 ips for TTP-343C series. It accepts roll feed, die-cut, and fan-fold labels for both thermal transfer and direct
thermal printing. All common bar codes formats are available. Fonts and bar codes can be printed in 4 directions, 8 different
alphanumeric bitmap fonts and a build-in true type font capability. You will enjoy high throughput for printing labels with this printer.
This document provides an easy reference for operating this printer. For system integration, the TSPL/TSPL2 printer programming
manual or SDKs can be found on TSC website at: https://www.tscprinters.com.
2
2. Operation Overview
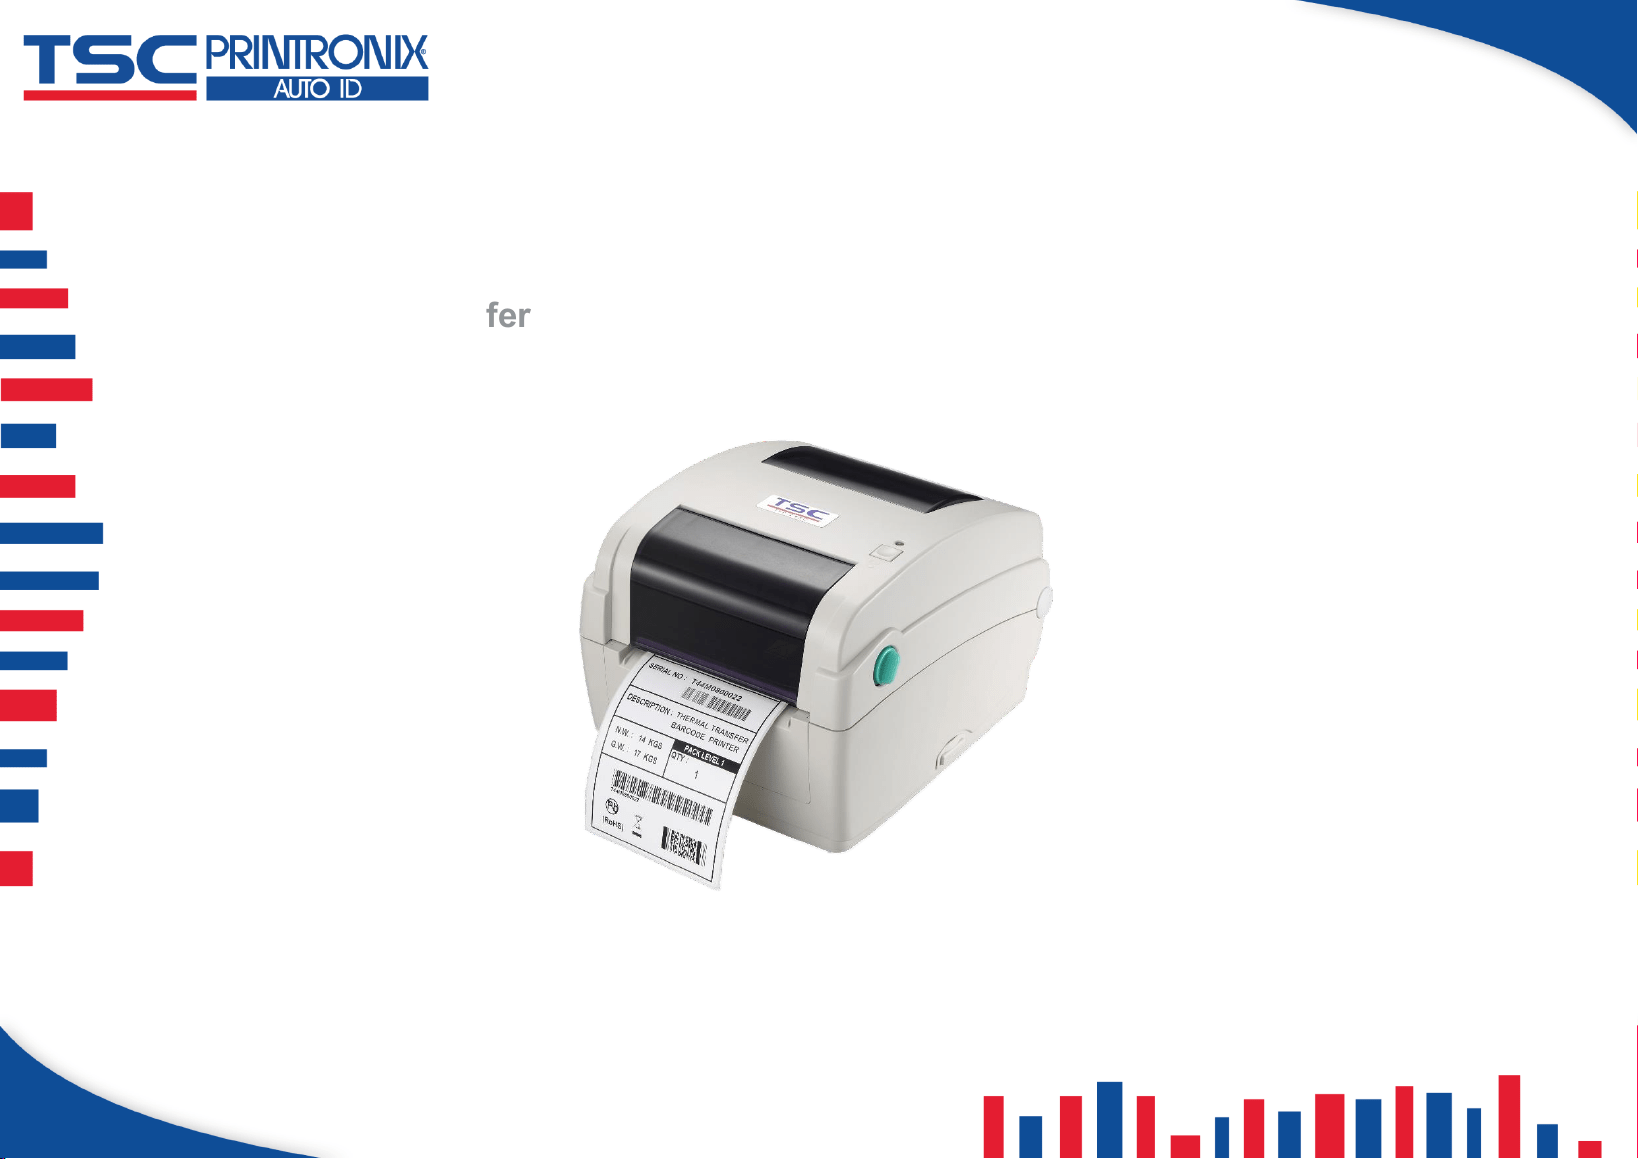
2.1 Unpacking and Inspection
This printer has been specially packaged to withstand damage during shipping. Please carefully inspect the packaging and printer
upon receiving the bar code printer. Please retain the packaging materials in case you need to reship the printer.
◼ One printer unit
◼ One quick installation guide
◼ One power cord
◼ One auto switching power supply
◼ One USB interface cable
If any parts are missing, please contact the Customer Service Department of your purchased reseller or distributor.
3
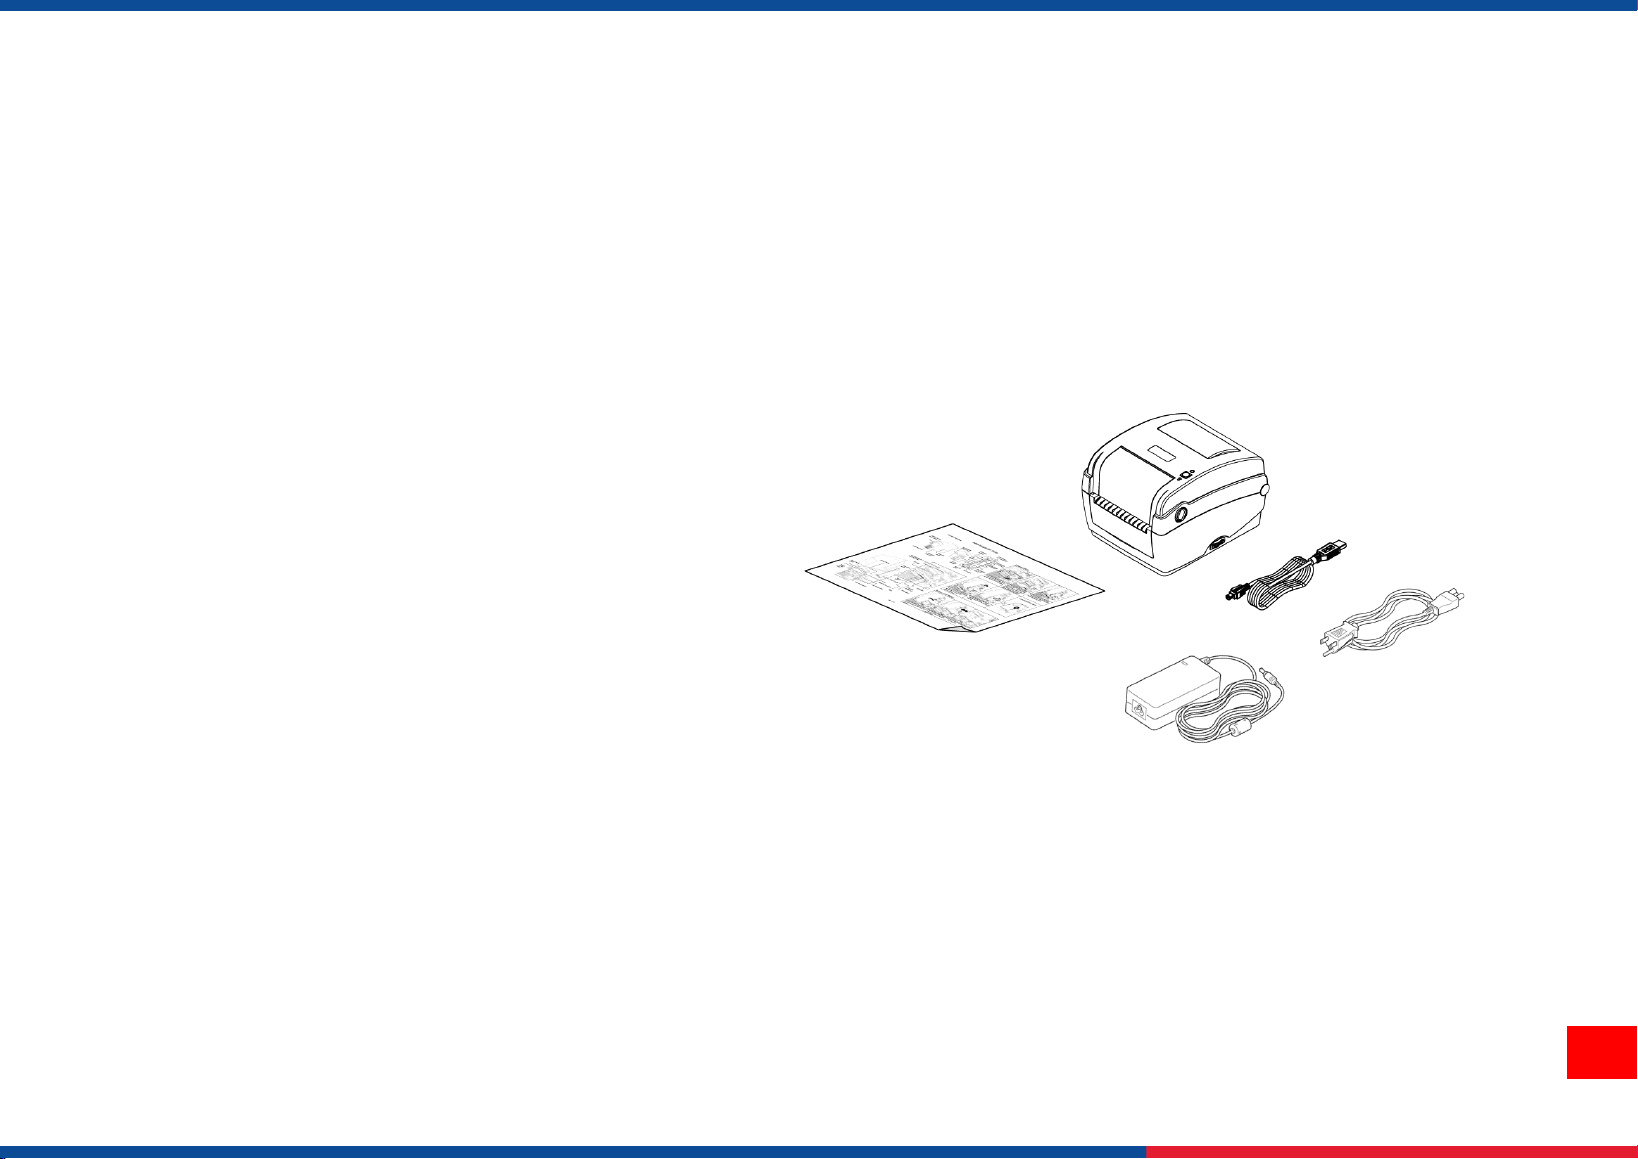
1. Ribbon access cover
2. Media view window
3. LED indicator
4. Feed button
5. Top cover open lever
6. SD card socket
2.2 Printer Overview
2.2.1 Front View
1
2
4
5
3
6
4
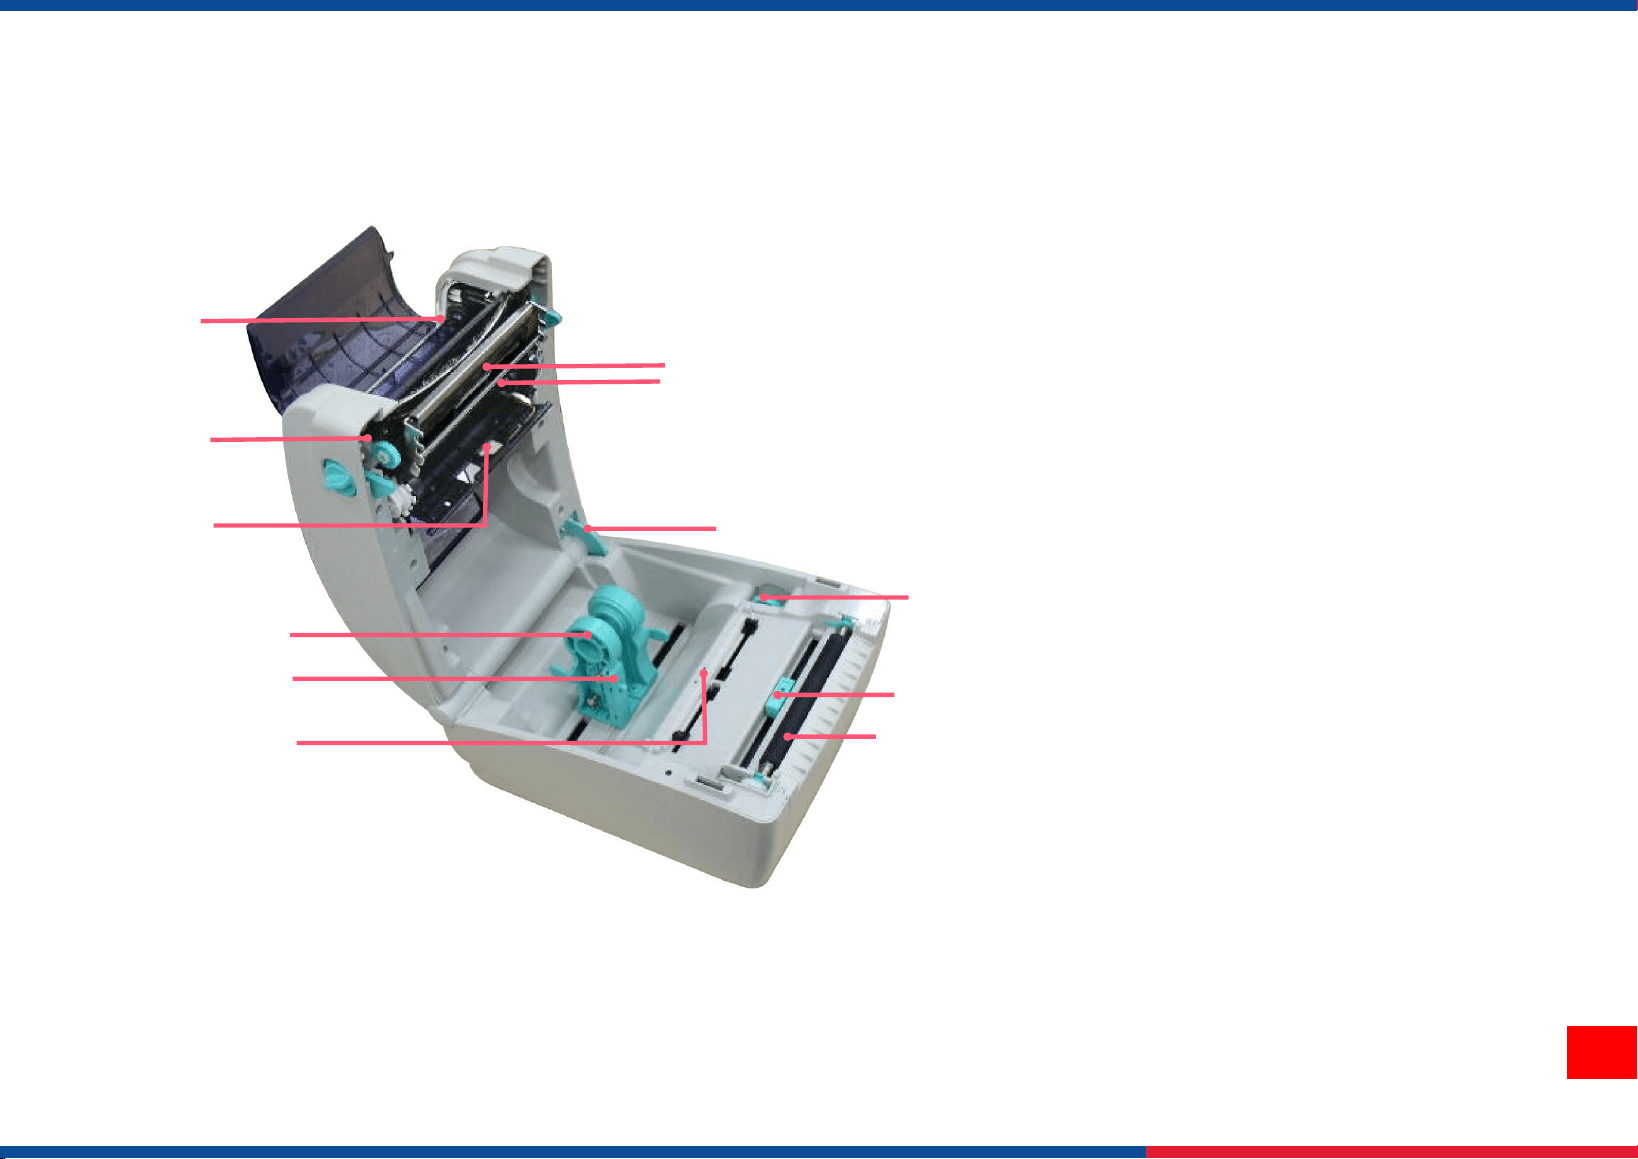
1. Ribbon rewind hub
2. Ribbon rewind gear
3. Gap sensor (receiver)
4. Media holder
5. Media holder lock switch
6. Gap sensor (transmitter)
7. Printhead
8. Ribbon supply hub
9. Top cover support
10. Media guide adjustment knob
11. Black mark sensor
12. Platen roller
2.2.2 Interior View
6
1
2
4
5
3
7
8
9
10
11
12
5
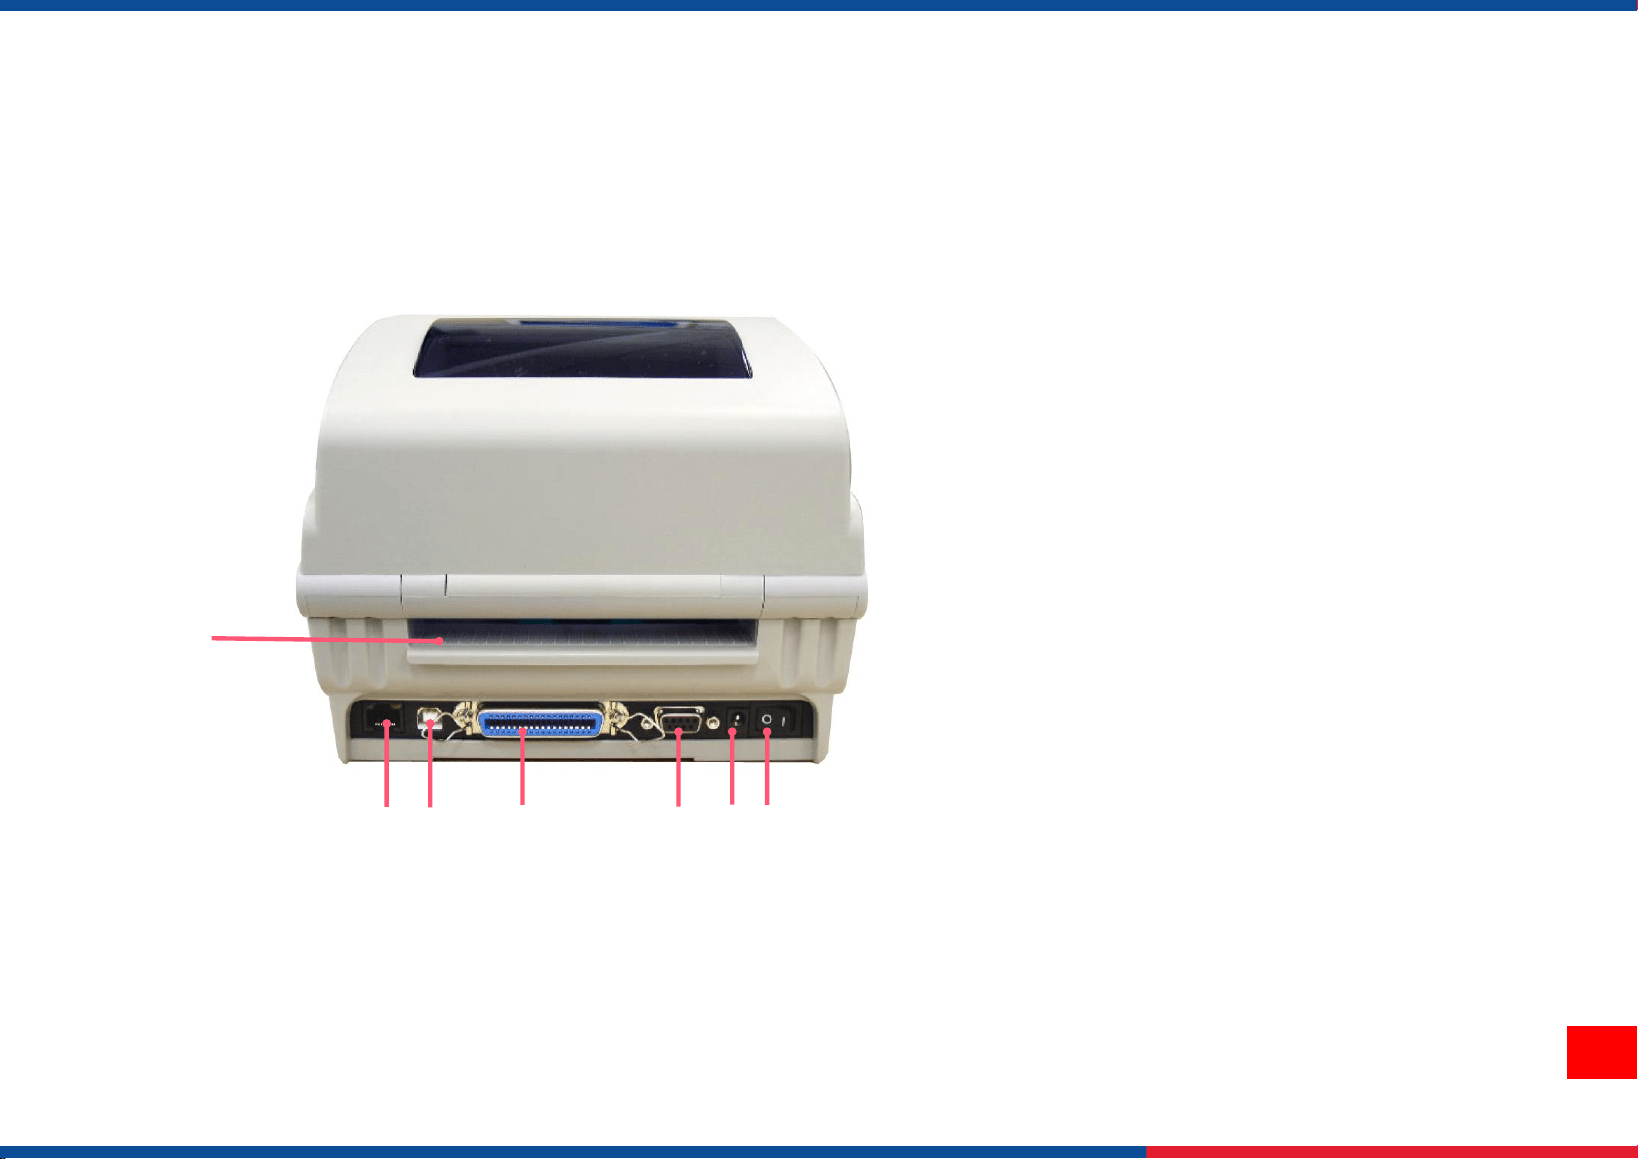
2.2.3 Rear View
1. Fan-fold paper entrance chute
2. Ethernet interface
3. USB interface
4. Centronics interface
5. RS-232C interface
6. Power jack socket
7. Power switch
5
2
3
6
4
7
1
6
3. Setup
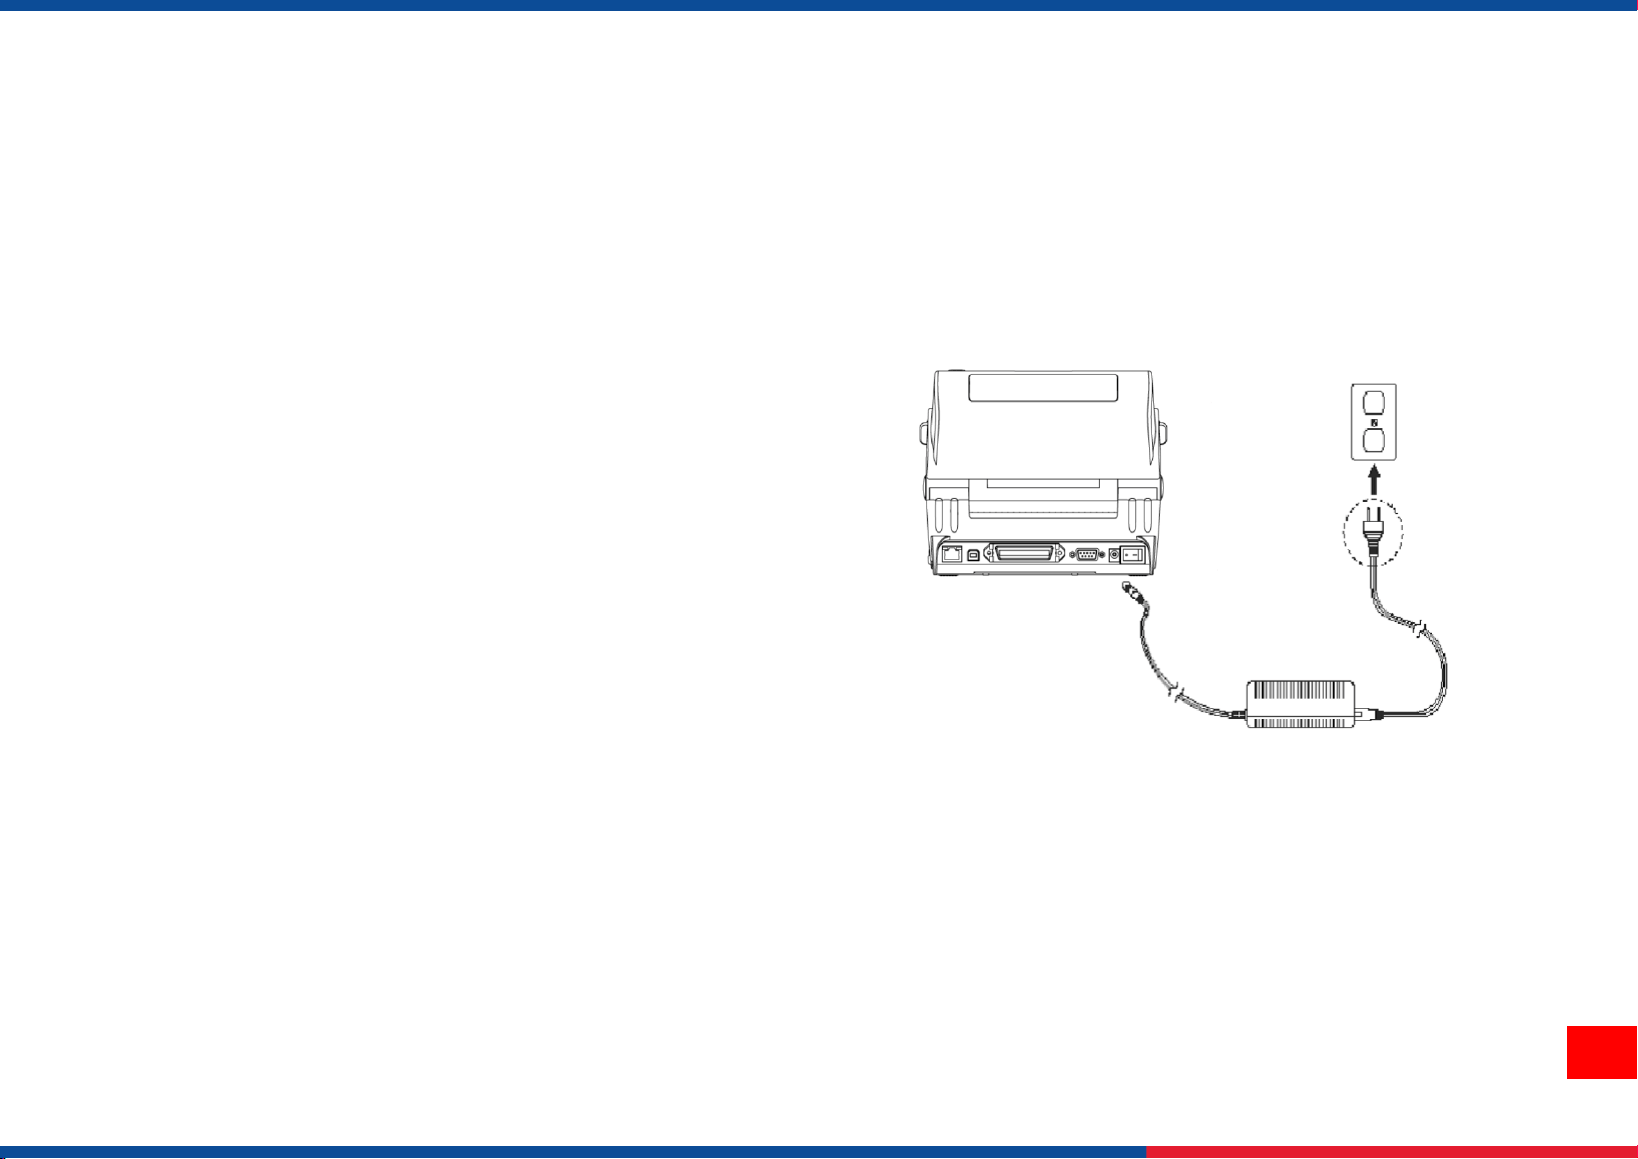
3.1 Setting up the Printer
1. Place the printer on flat surface.
2. Make sure the printer is power off.
3. Connect the printer to the computer with the provided USB cable.
4. Plug in the power cord.
◆ Note: Please switch OFF the printer before plugging in the power cord to printer power jack.
7
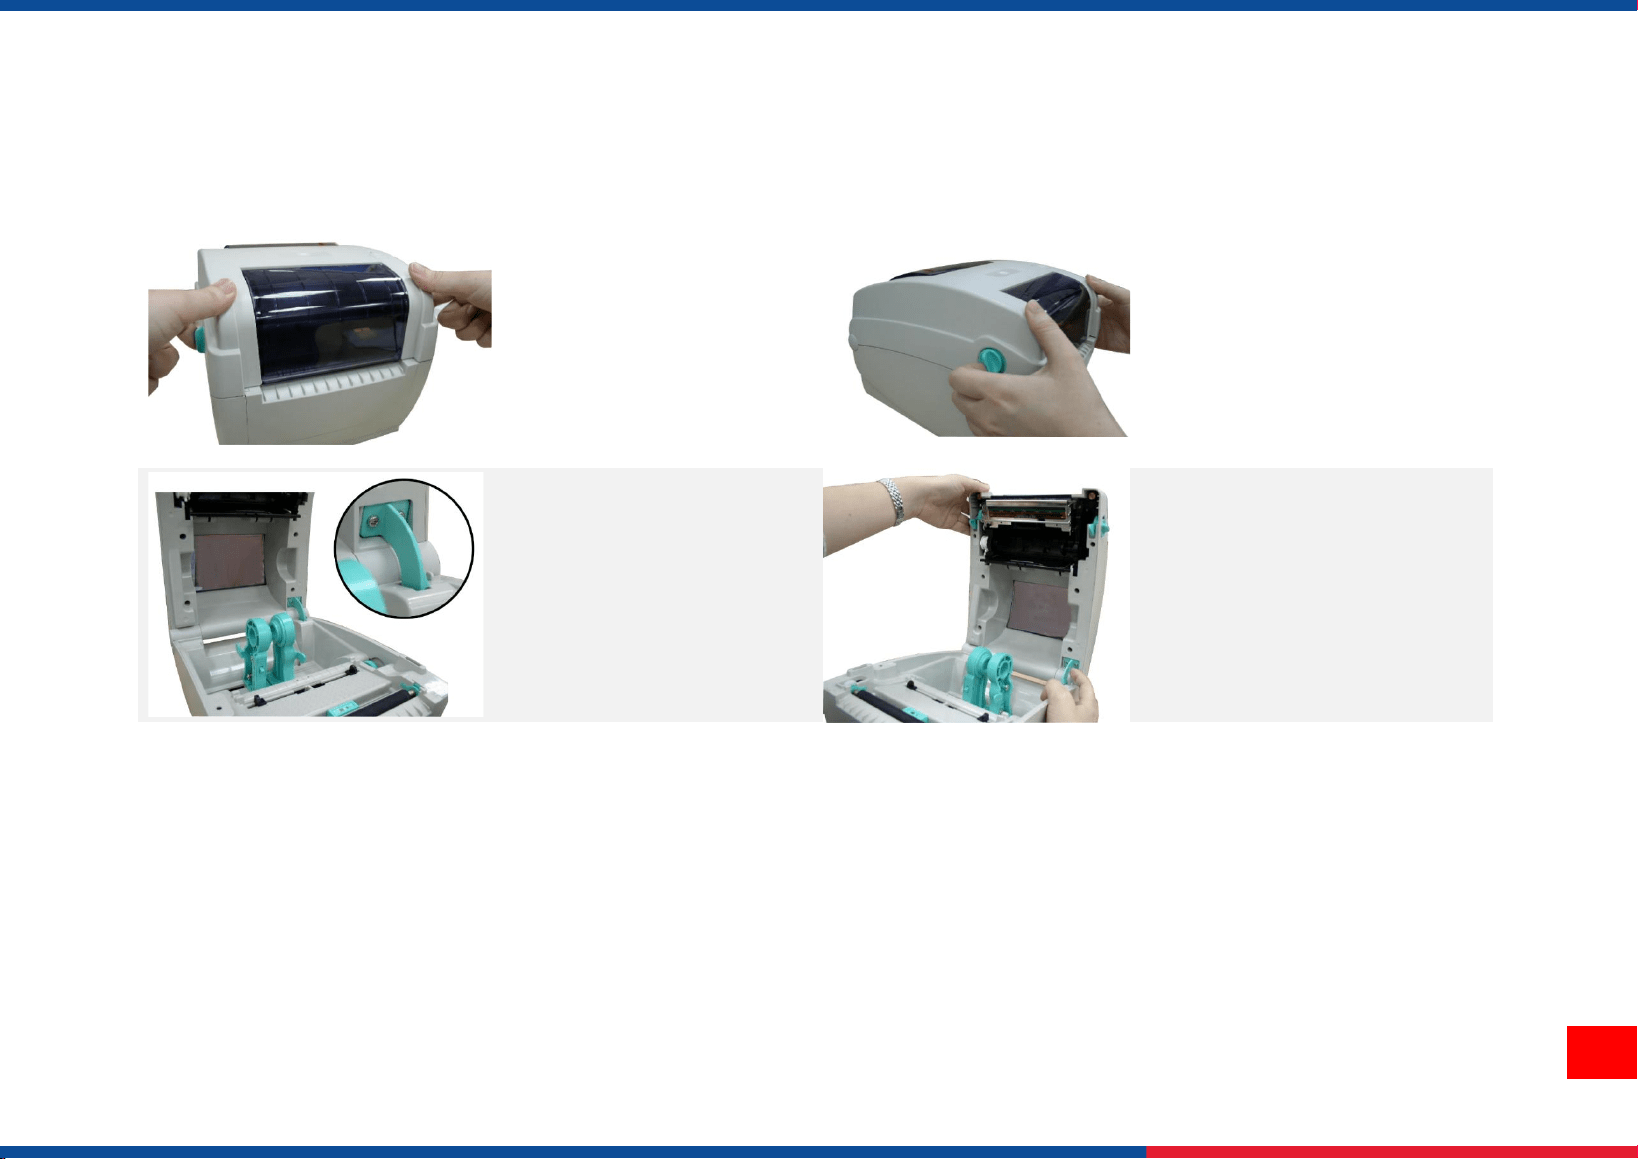
3.2 Instructions to Top Cover Operation
1. Open the printer top
cover.
2. Pull the tabs located on
each side towards the front
of the printer, then lift the
top cover to the maximum
open angle.
3. A top cover support at
the rear of the printer
will engage with lower
inner cover to hold the
printer top cover open.
4. Hold the top cover and
press the top cover support
to disengage the top cover
support with lower inner
cover. Gently close the top
cover.
8
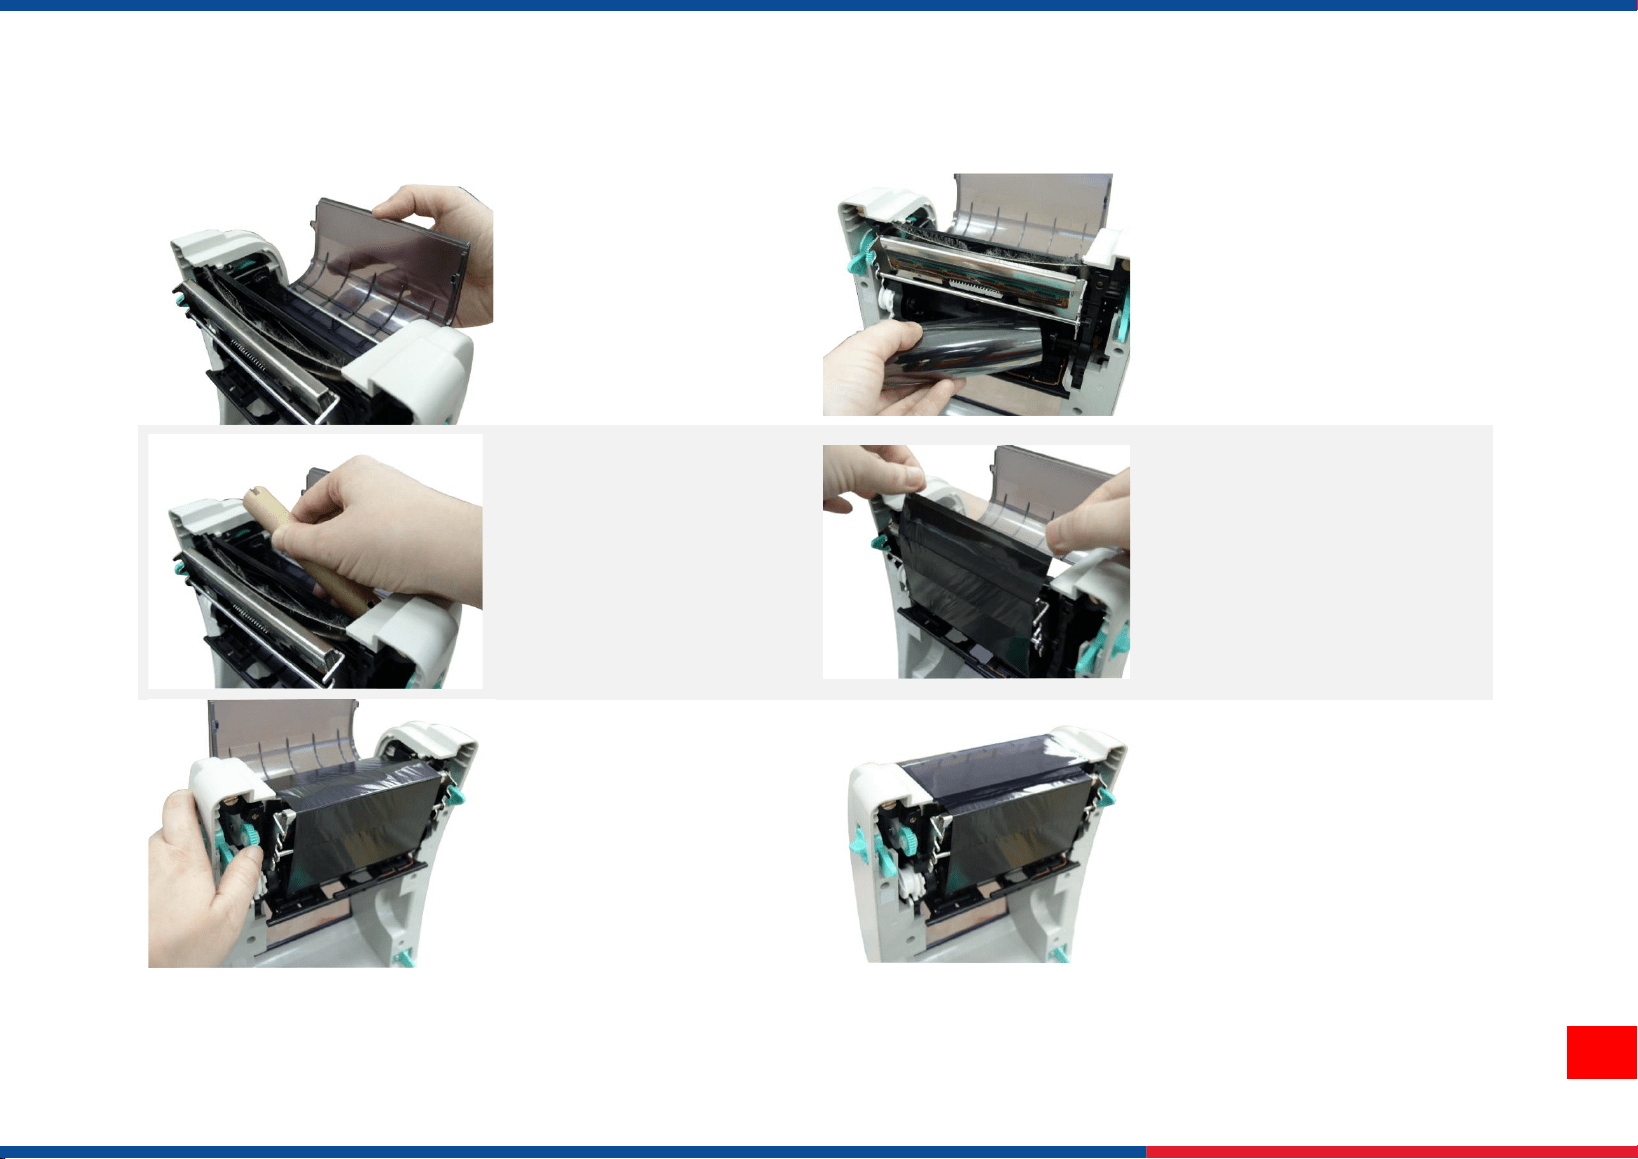
3.3 Loading the Ribbon
1. Open the printer top
cover and the ribbon
access cover.
2. Insert the ribbon right side
onto the supply hub. Align
the notches on the left side
and mount onto the spokes.
3. Insert the paper core
right side onto the
rewind hub. Align the
notches on the left side
and mount onto the
spokes.
4. Stick the ribbon onto the
ribbon rewind paper core.
5. Turn the ribbon rewind
gear until the ribbon
plastic leader is
thoroughly wound and
the black section of the
ribbon covers the print
head.
6. Close the ribbon access
cover and the top cover.
9
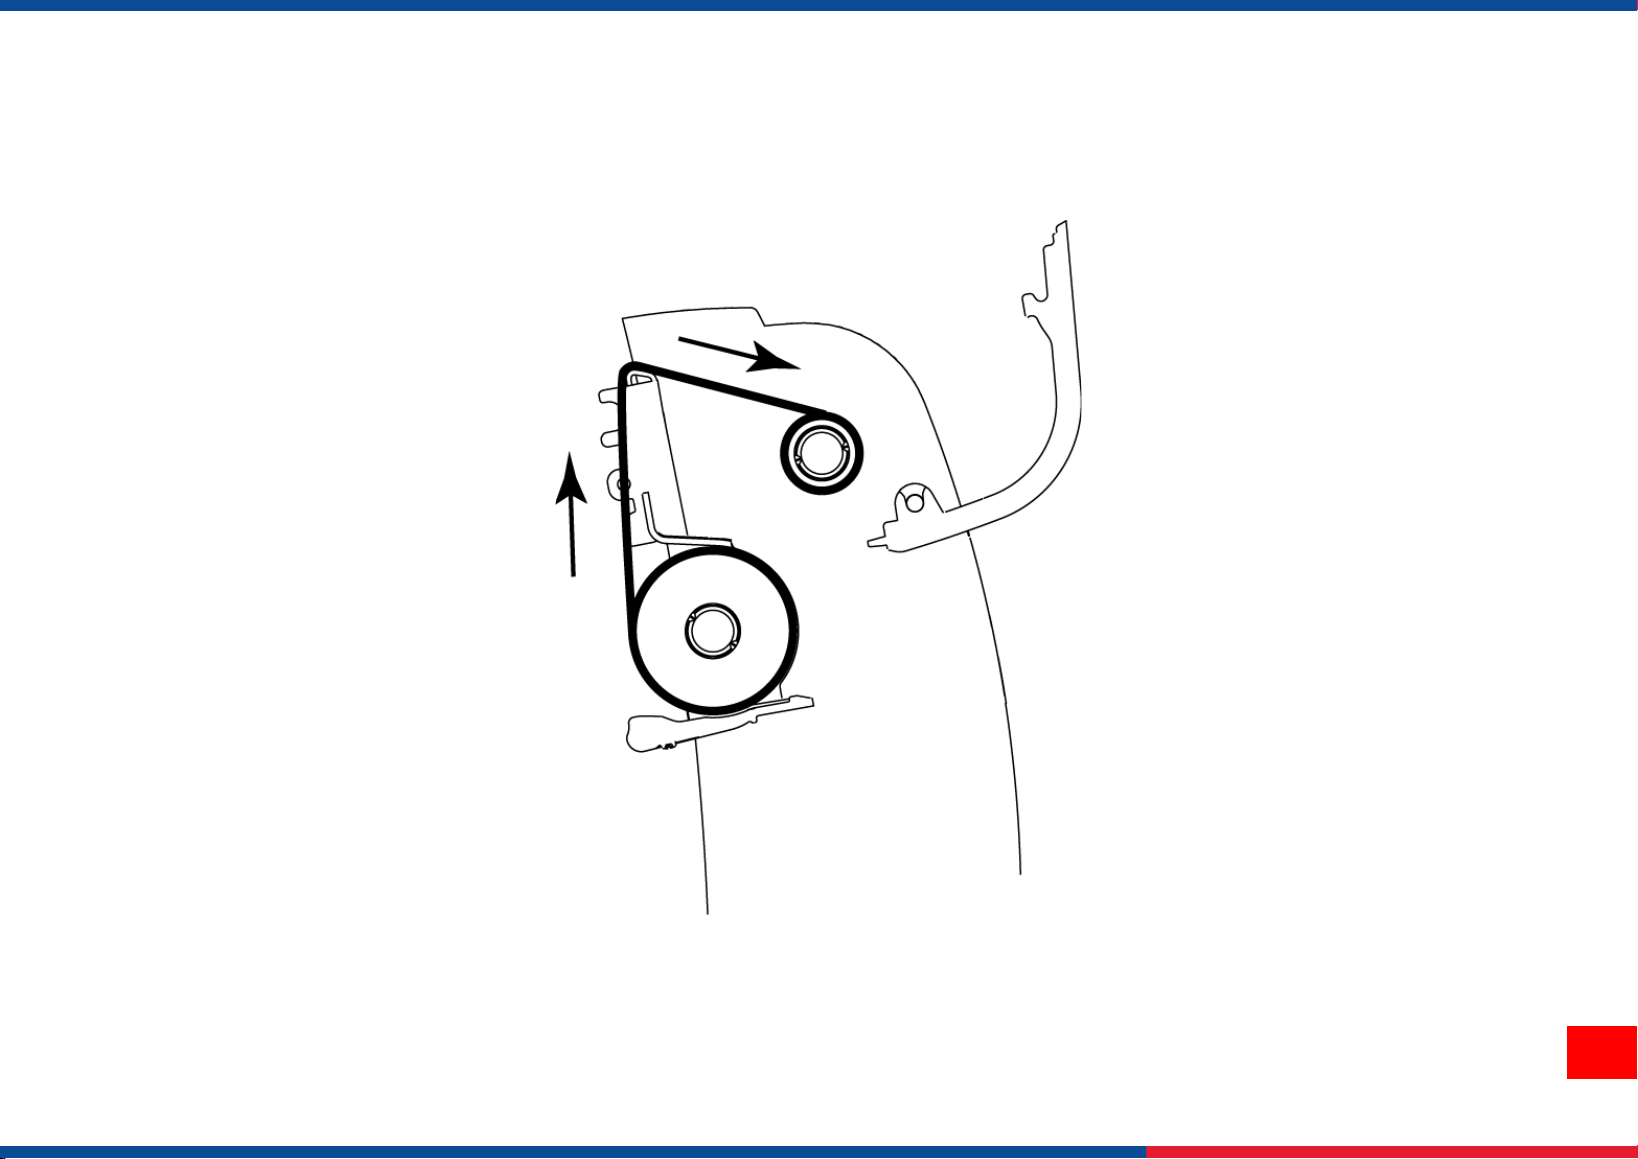
Loading Path for Ribbon
10
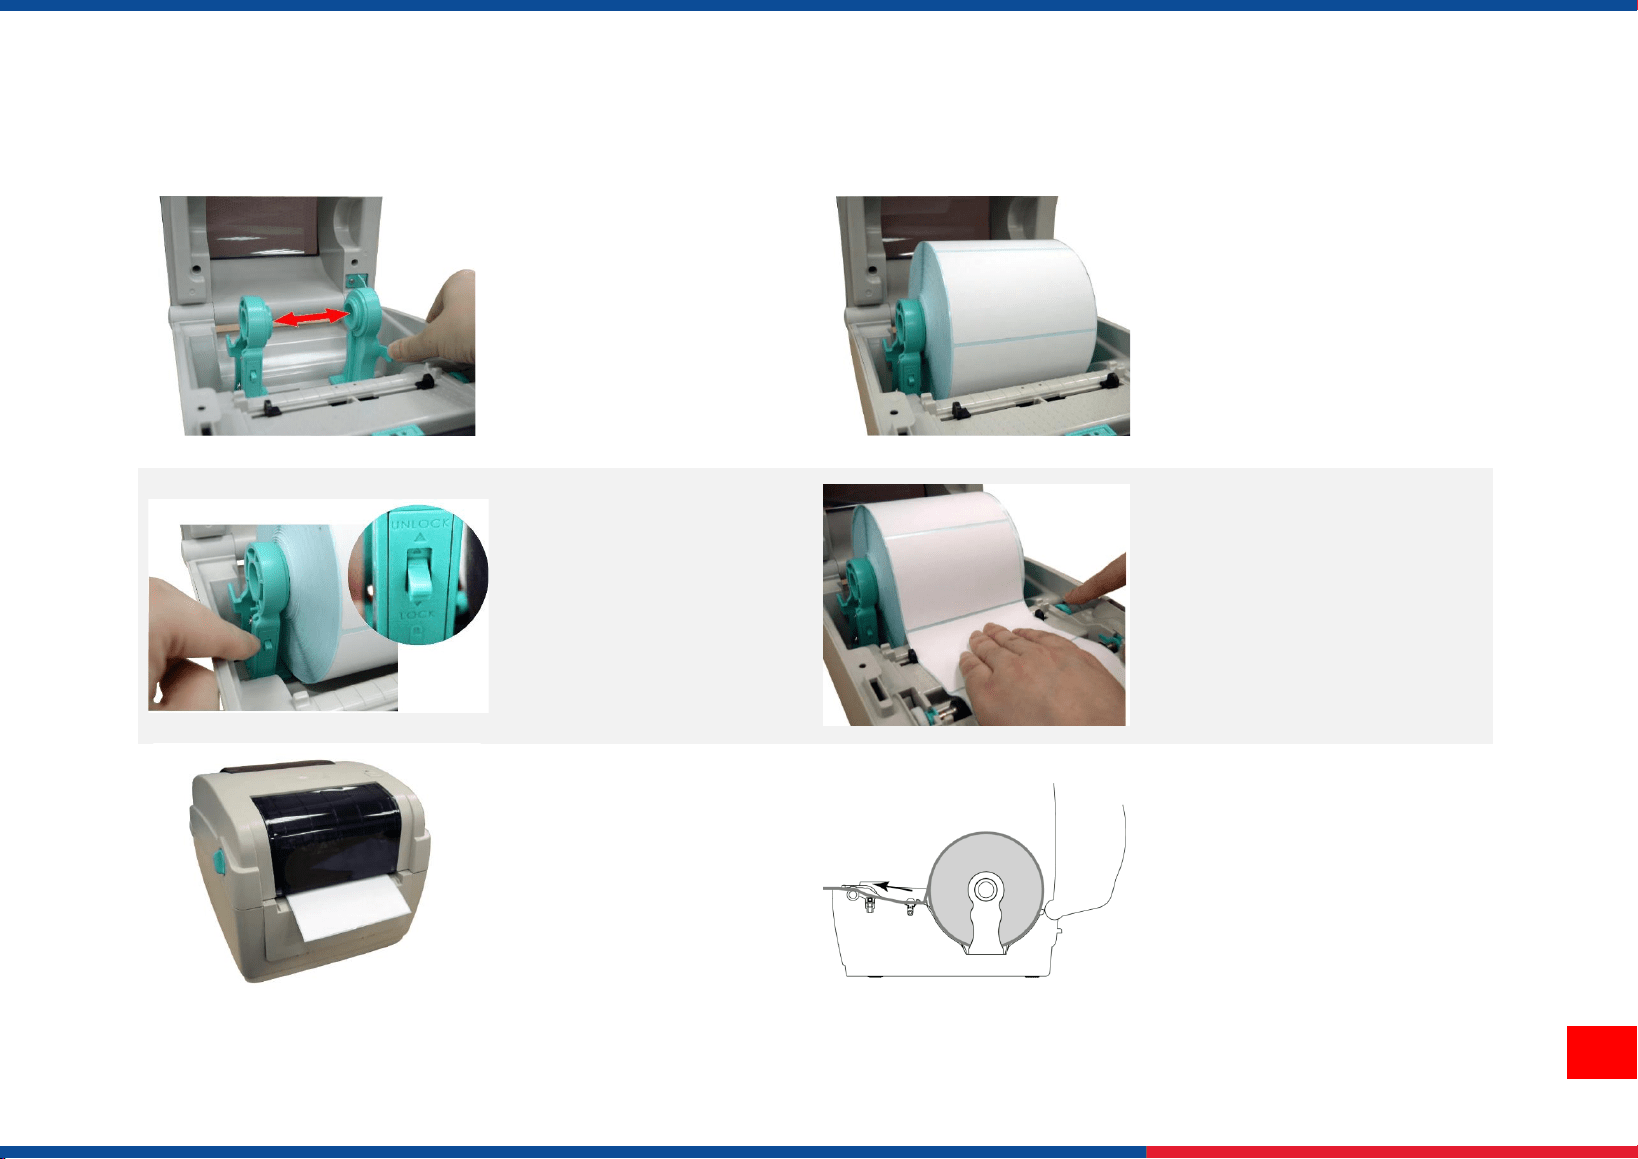
3.4 Loading the Media
1. Open the printer top
cover and separate the
media holders.
2. Place the roll between the
holders then put it onto the
core.
3. Press down the media
holder lock switch to
hold the label roll firmly.
4. Place the paper and make
sure the printing side is
facing up. Move the media
guides to fit the label width.
5. Disengage the top
cover support and close
the top cover gently.
Use software or
hardware to make the
calibration. (Please
refer to chapter 4&5)
6. Loading path for roll label.
11
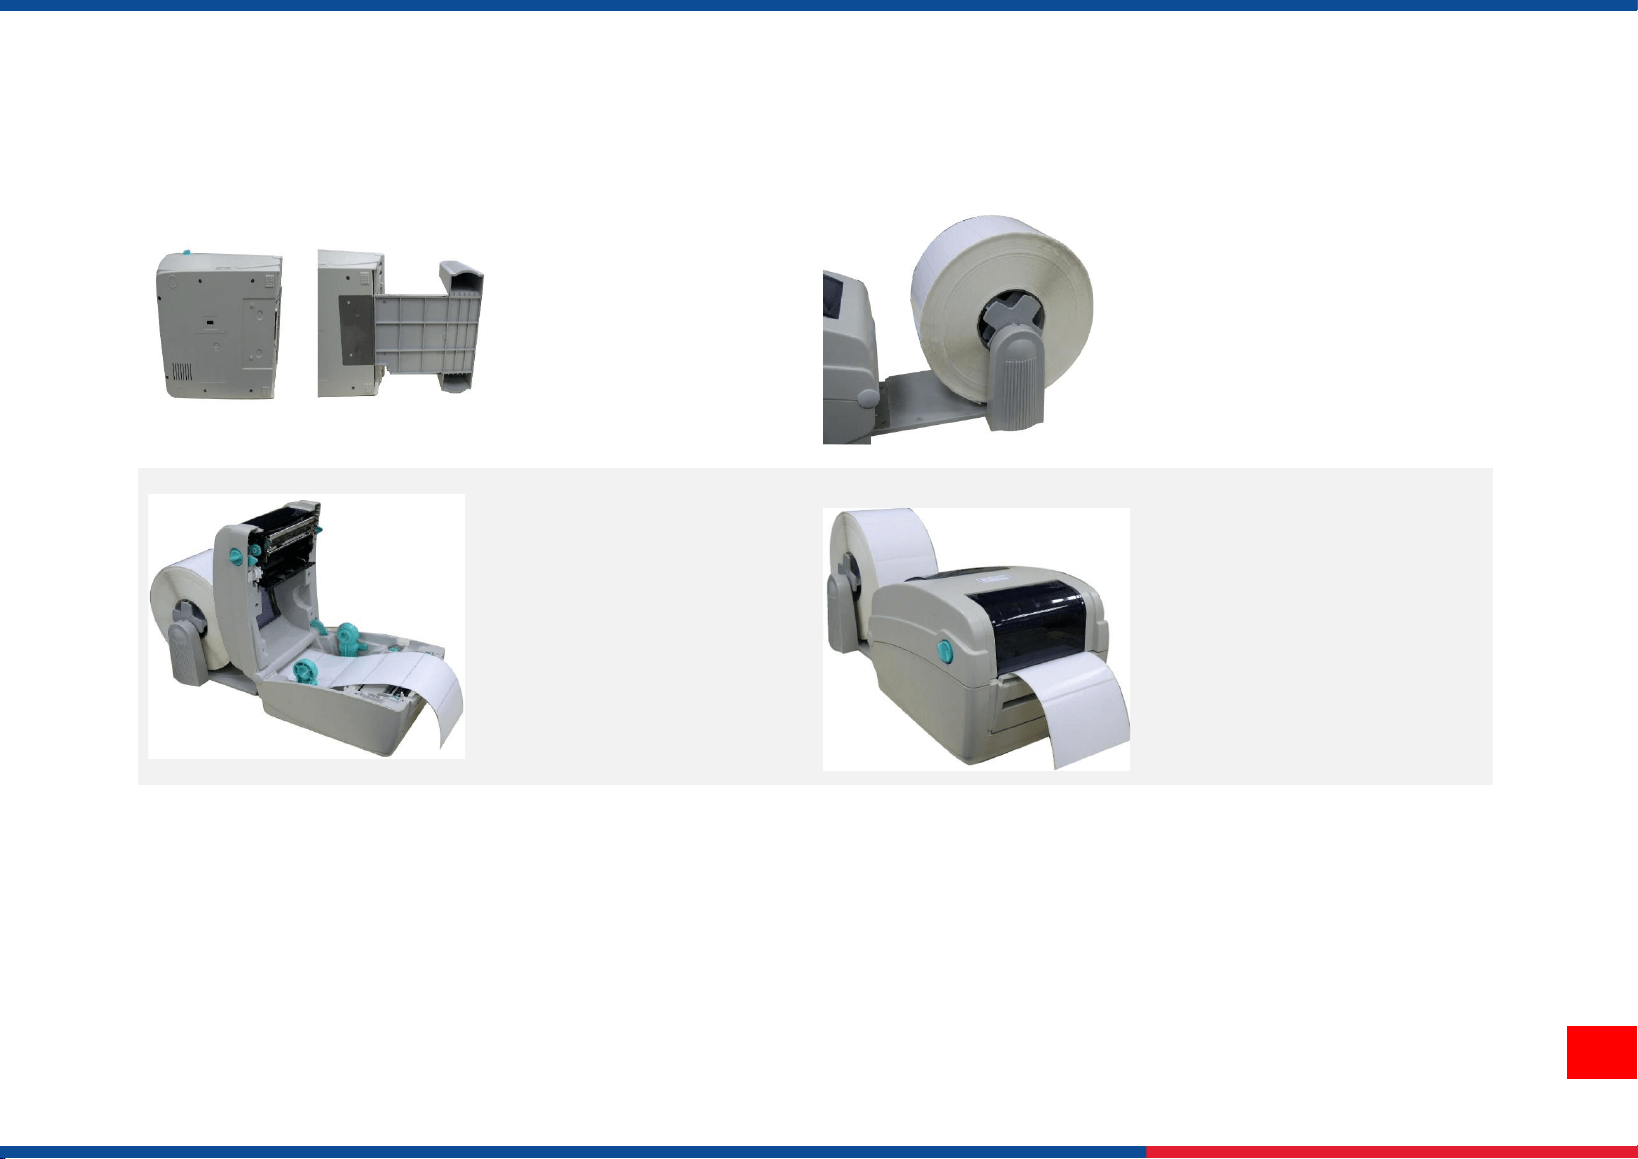
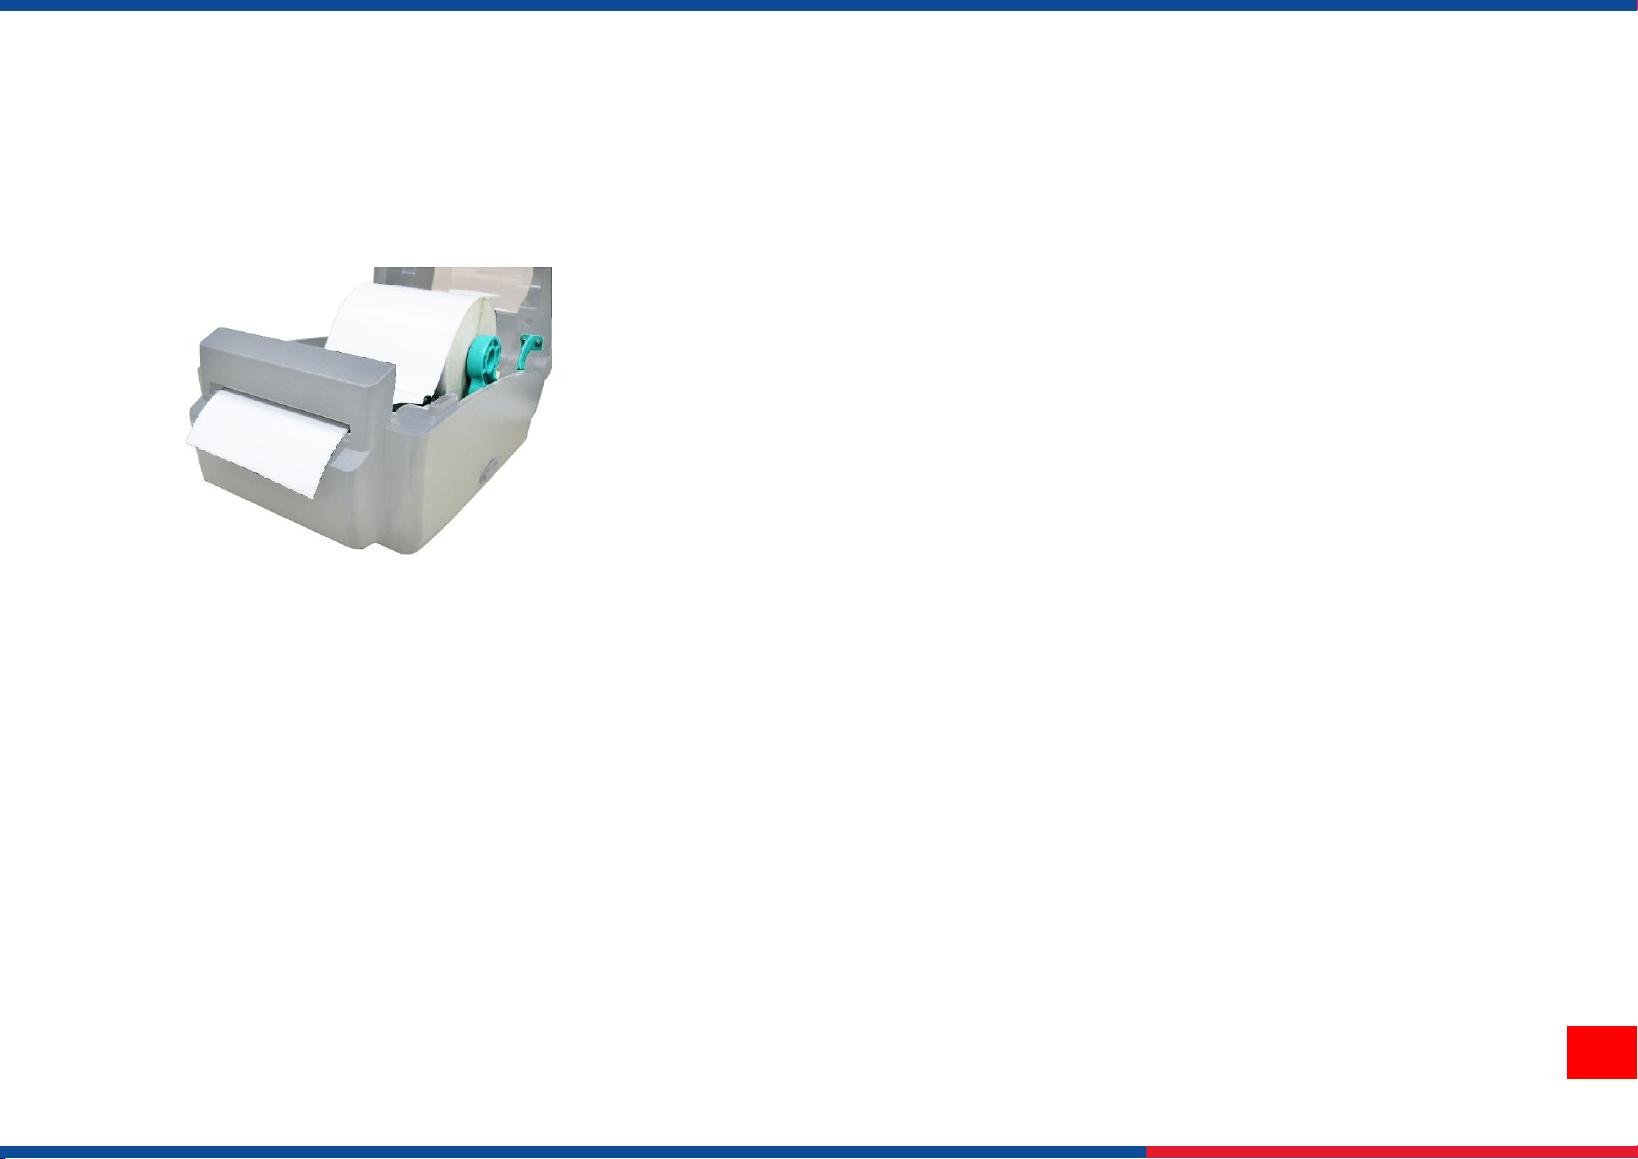
3.5 External Label Roll Mount Installation (Option)
1. Attach an external
paper roll mount on the
bottom of the printer.
2. Insert a 3” label spindle into
a paper roll. And install it on
the external paper roll
mount.
3. Open the printer’s top
cover and separate the
media holders. Then
feeds the media from
the rear external label
entrance chute.
4. Disengage the top cover
support and close the top
cover gently. Use software
to make calibration (Please
refer to chapter 4 and 5.)
12
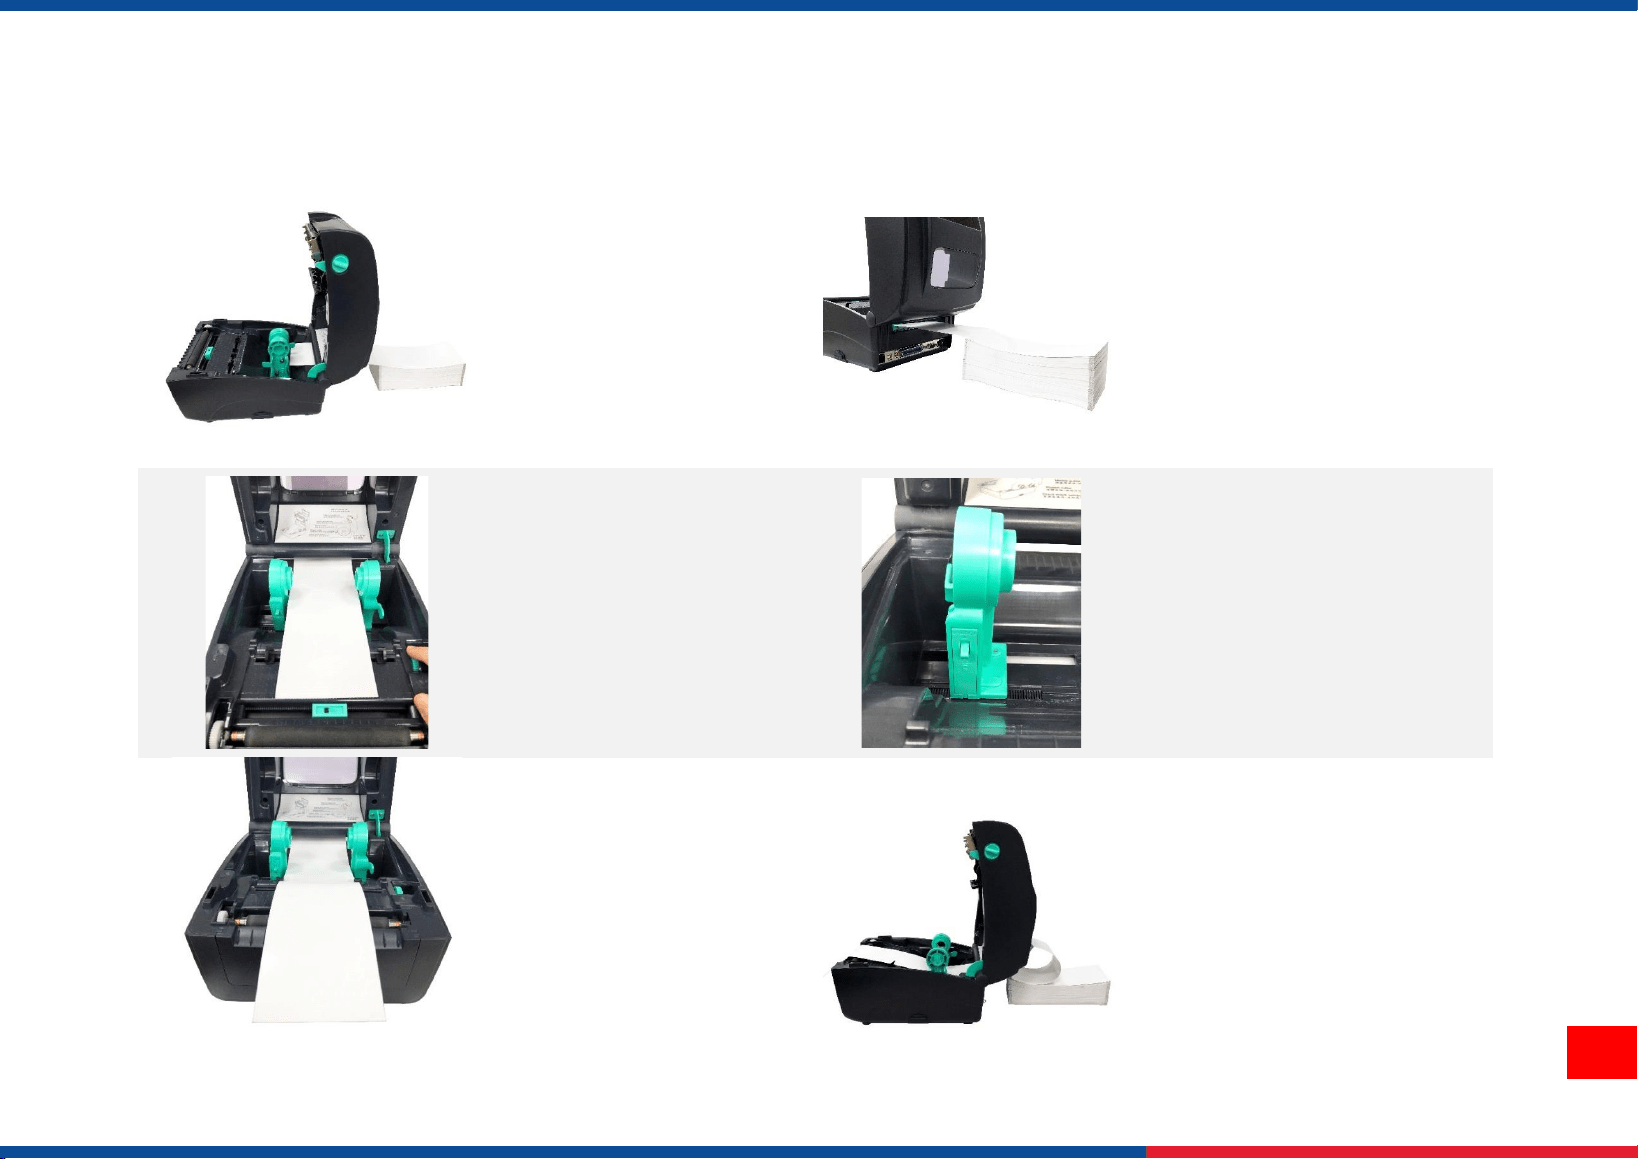
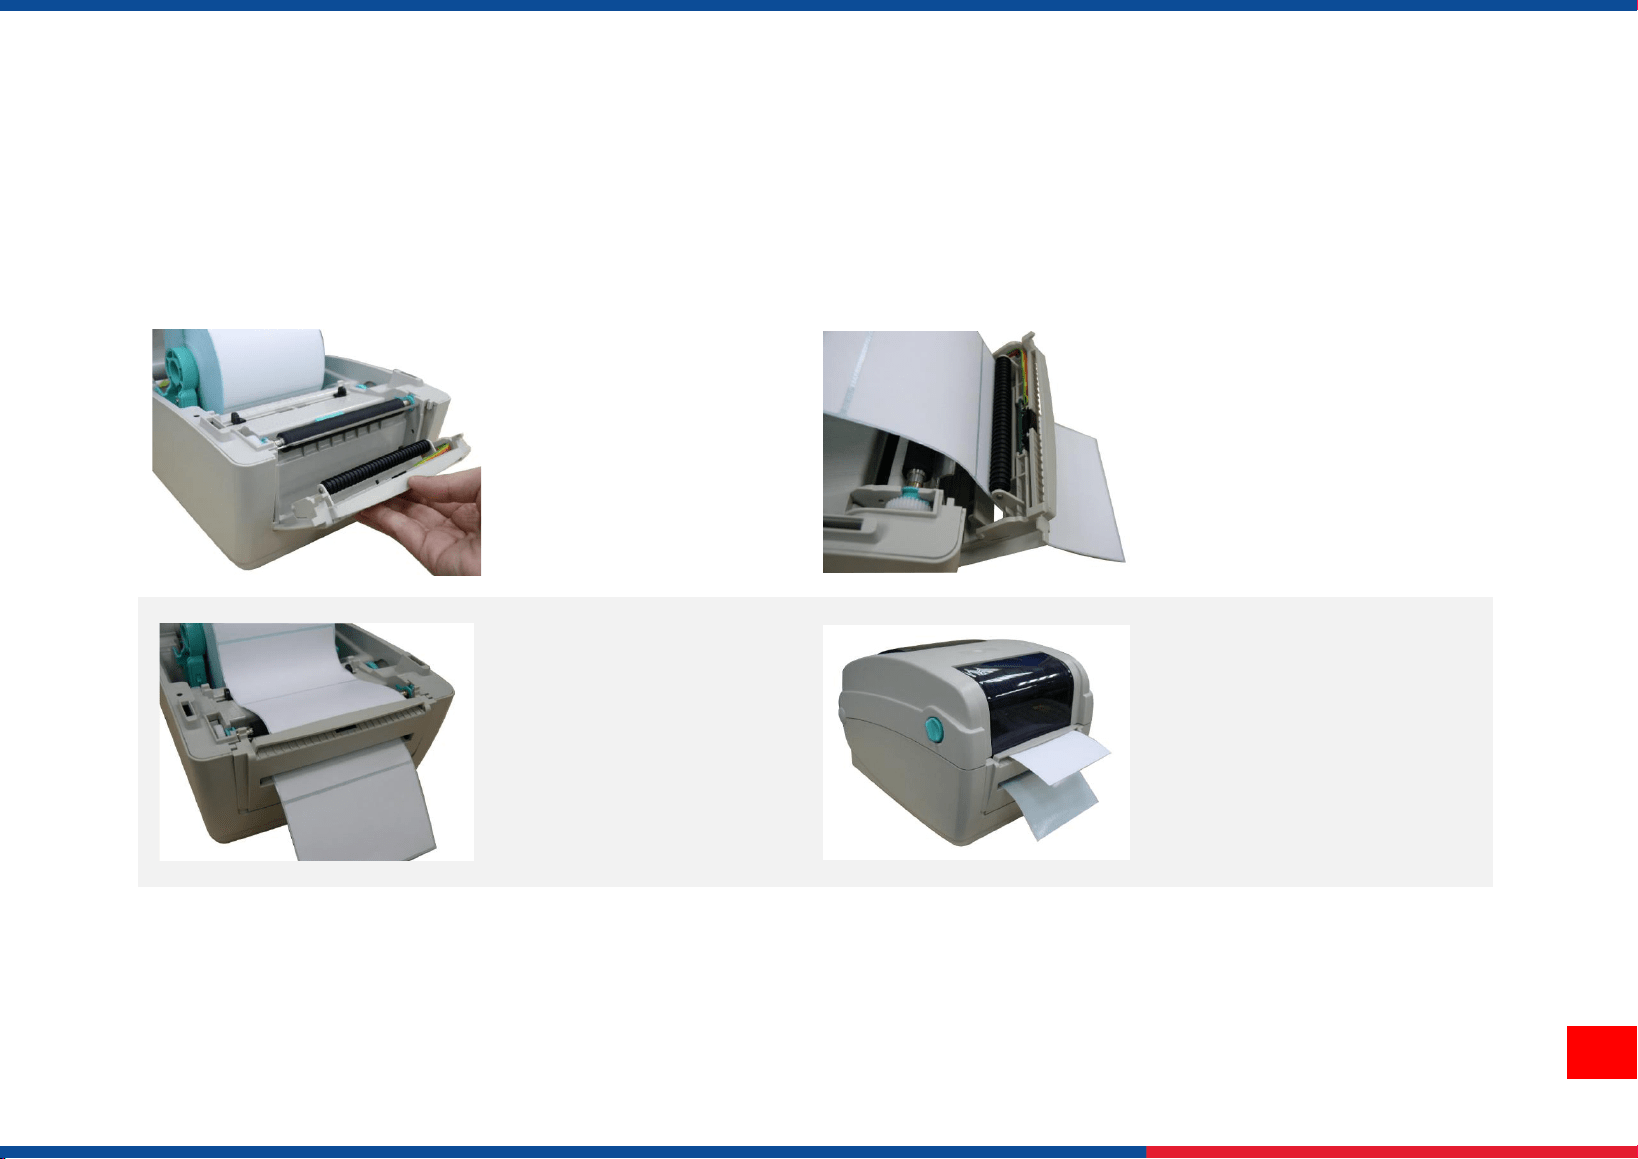
3.6 Loading Fan-fold Media
1. Open the printer top
cover.
2. Insert the fan-fold media
through the external label
entrance chute.
3. Separate and hold
open the media
holders.
4. Press down the media
holder lock switch to hold
the media firmly.
5. Place the paper,
printing side face up.
Move the media guides
to fit the media width by
turning the guide
adjuster knob.
6. Complete the installation of
fan-fold media..
13
3.7 Loading Label in Peel-Off Mode (Option)
1. Open the printer top cover. Refer to section 3.4. to load the media then feed the paper.
2. Use software to set the media sensor type and calibrate the selected sensor.( Please refer to chapter 4 and 5)
3. Open the peel-off panel
by pulling it out.
4. Lead the media through the
backing paper opening and
beneath the peel-off roller.
5. Push the peel-off panel
back to the printer
6. Disengage the top cover
support and close the top
cover gently. Press the
FEED button to test.
14
3.8 Loading Label in Cutter Mode (Option)
1. Open the printer top cover. Refer to section 3.4. to load the media then feed the paper.
2. Lead the media through the cutter paper opening.
3. Move the media guides to fit the label width by turning the guide adjuster knob.
4. Disengage the top cover support and close the top cover gently.
5. Use software to set the media sensor type and calibrate the selected sensor.( Please refer to chapter 4 and 5)
Note:
Please calibrate the gap/black mark sensor when changing media.
Regular cutter specification:
Full cut: Media thickness: 0.06~ 0.19mm
Media type: receipt and label liner w/o glue
Partial cut: Media thickness: 0.06~0.12mm
Media type: receipt and label liner w/o glue
Label length: 25.4 mm ~ max. print length
*Except for the linerless cutter, all regular/heavy duty/care label cutters DO NOT cut on media with glue.

15
4. LED and Button Functions
4.1 LED Indicator
Color
Meaning
(Green)
Solid: Power is on and ready to be used.
Flash :System is downloading data or printer is paused.
(Amber)
System is clearing data.
(Red)
Solid - Printer head open, cutter error.
Flash - Printing error, such as paper empty, paper jam, ribbon empty, or memory error etc.
4.2 Regular Button Function
1. Feed labels
When the printer is ready, press the button to feed one label to the beginning of next label.
2. Pause the printing job
When the printer is printing, press the button to pause a printing job. When the printer is paused, the LED will be green blinking.
Press the button again to continue the printing job.

16
4.3 Power-on Utilities
Power-on Utilities provides the basic functions and can be activated by below procedures:
Turn off the power > Hold the Feed button > Open the power > Release the button depending on the color of the LED.
Sequences of the settings:
LED Colors
Functions
Amber
Red
(5 blinks)
Amber
(5 blinks)
Green
(5 blinks)
Green /
Amber
(5 blinks)
Red / Amber
(5 blinks)
Solid green
1. Sensor Calibration
(Gap / black mark sensor)
Release
2. Self-Test
(And enter dump mode)
Release
3. Factory Default
Release
4. Bline Calibration
Release
5. Gap Calibration
Release
6. READY
(Skip AUTO.BAS)
Release
17
5. TSC Console
TSC Console is a management tool combining the Printer Management, Diagnostic Tool, CommTool and Printer Webpage settings,
which enables you to adjust printer’s settings/status; change printers’ settings; download graphics, deploy fonts, graphics, label
templates or upgrade the firmware to the group of printers, and send additional commands to printers at the same time.
※ Printer firmware version before A2.12 will only use 9100 Port as command port; Printer firmware after A2.12 will use
6101 Port as command port.
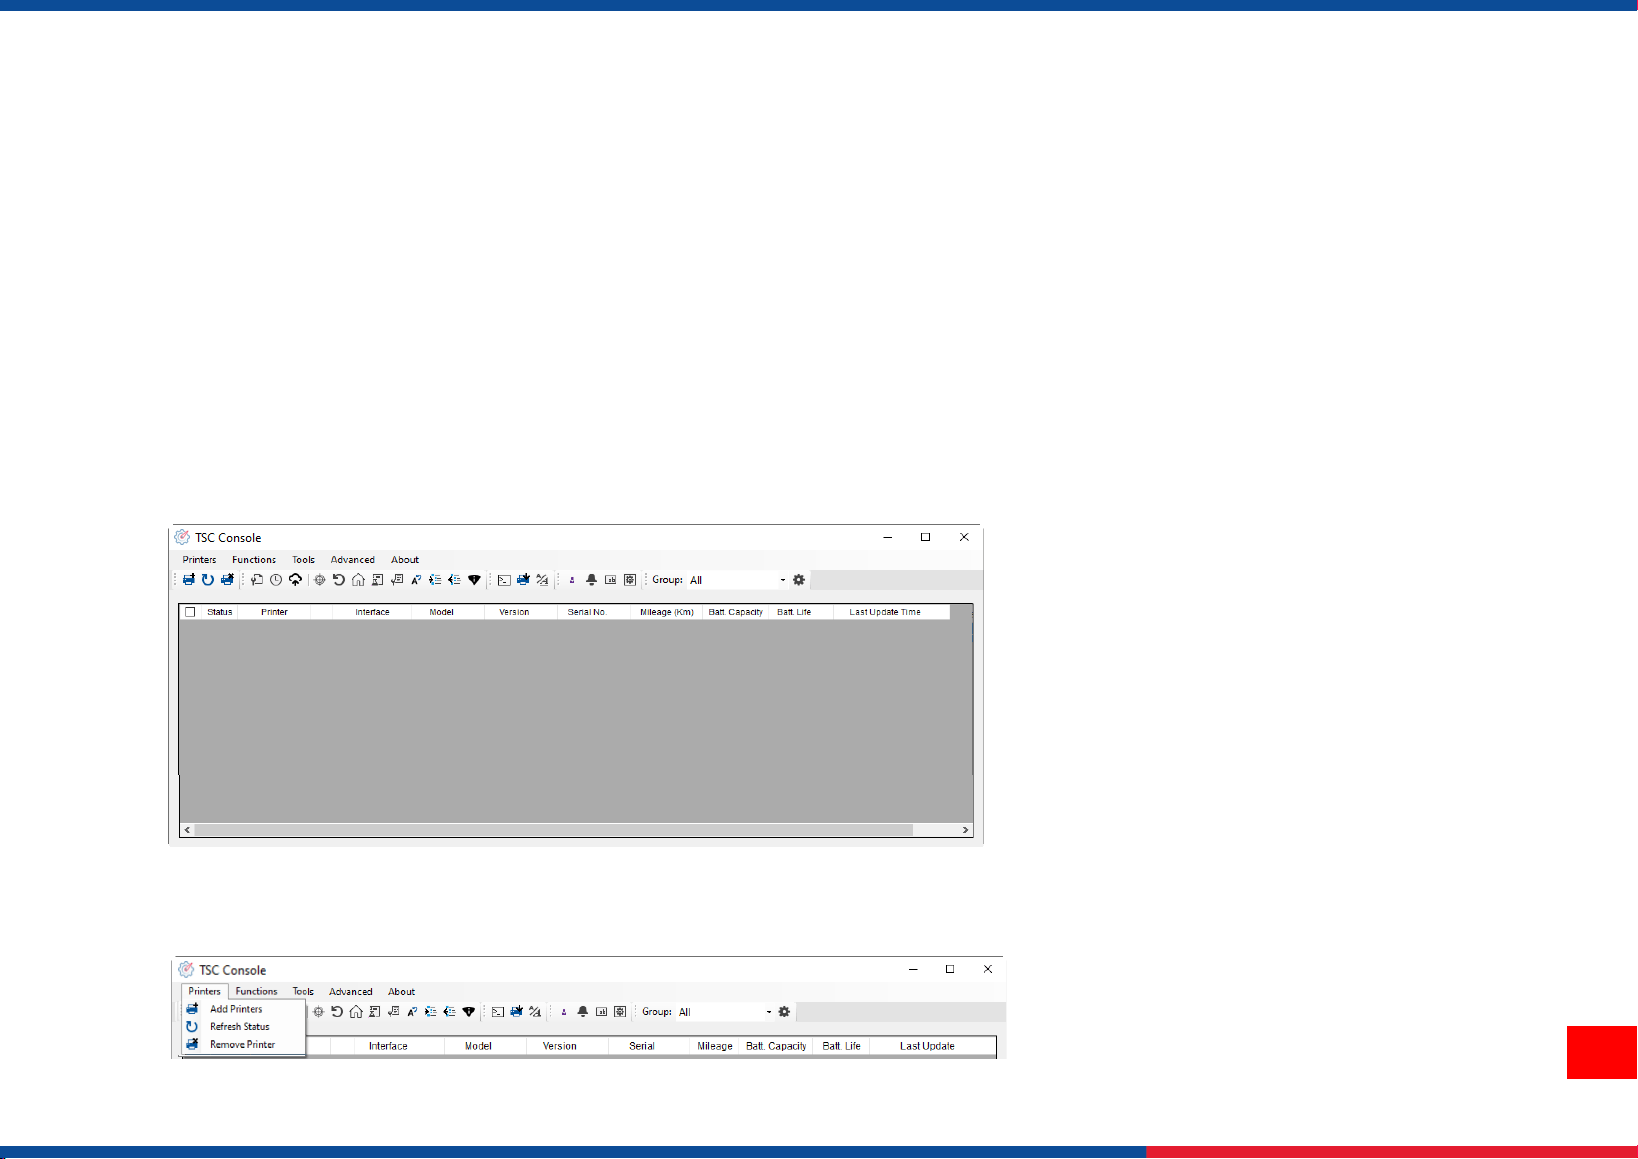
5.1 Start TSC Console
1. Double click TSC Console icon to start the software.
2. Manually add the devices by clicking Printer > Add Printers.
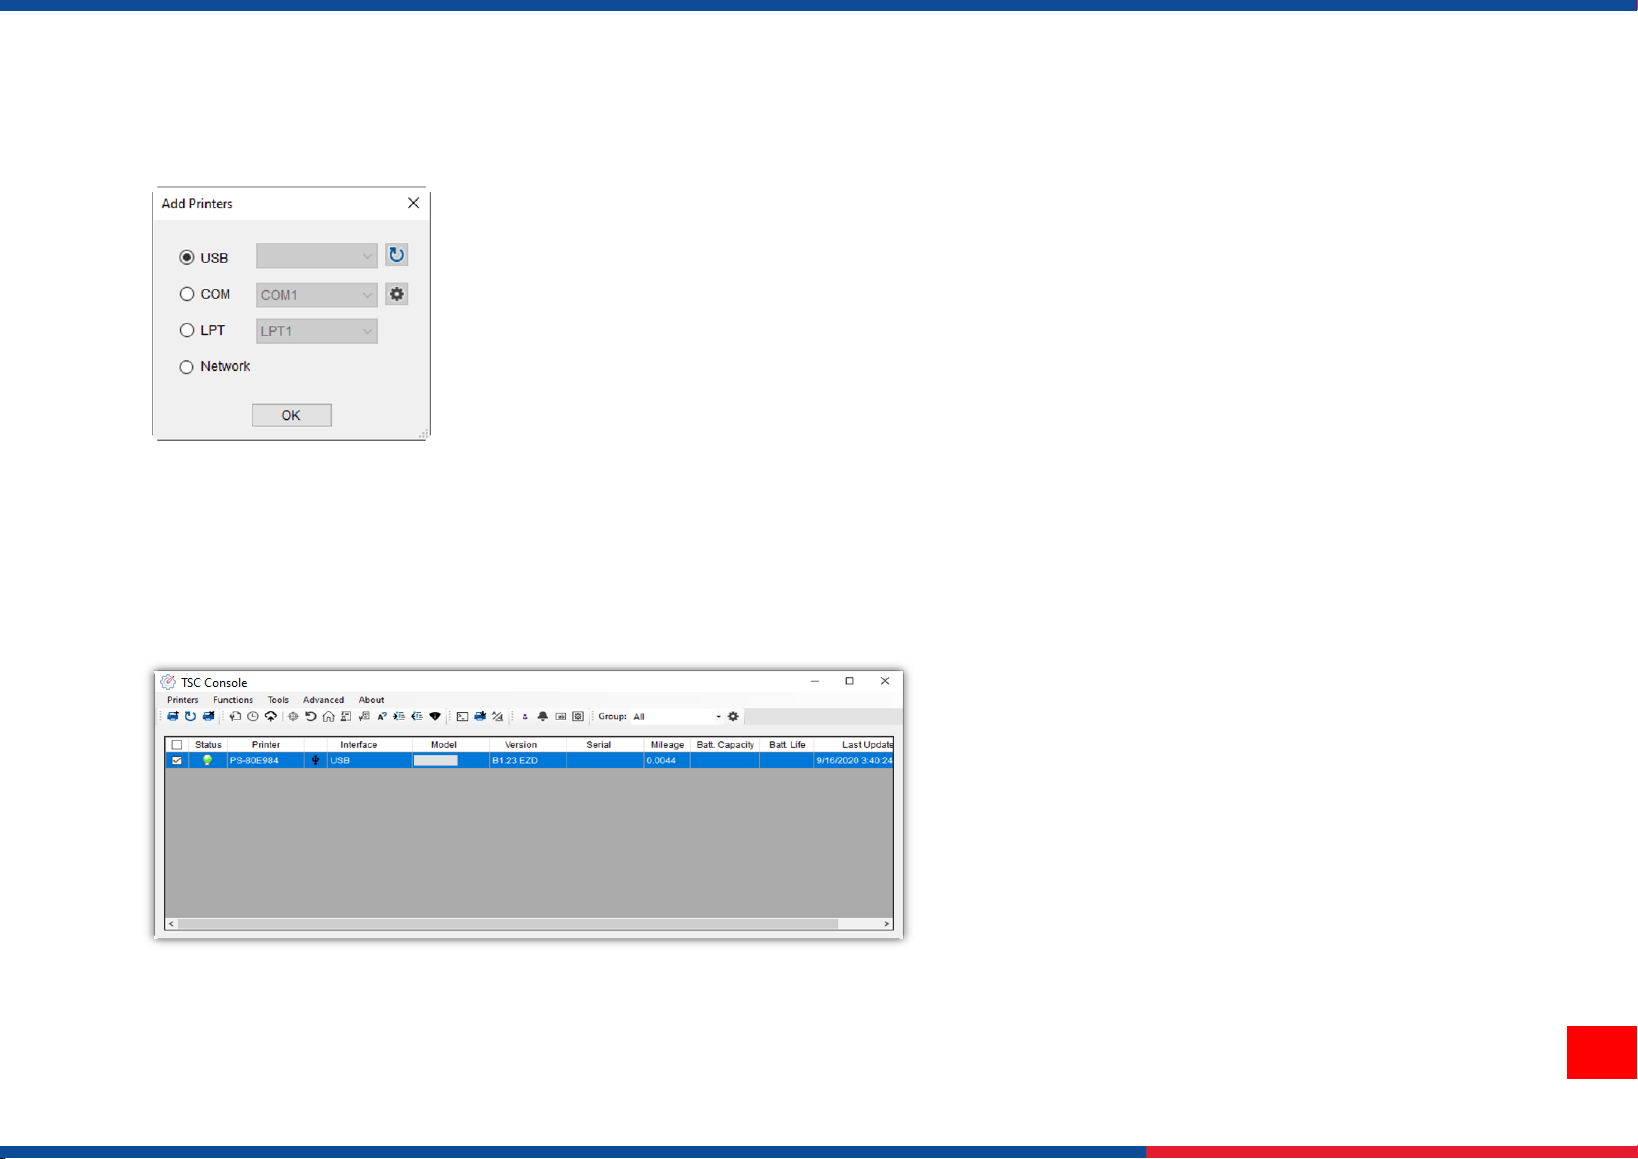
18
3. Select the current interface of the printer.
4. The printer will be added to TSC Console’s interface.
5. Select the printer and set the settings.
◼ For more information, please refer to TSC Console User Manual.
19
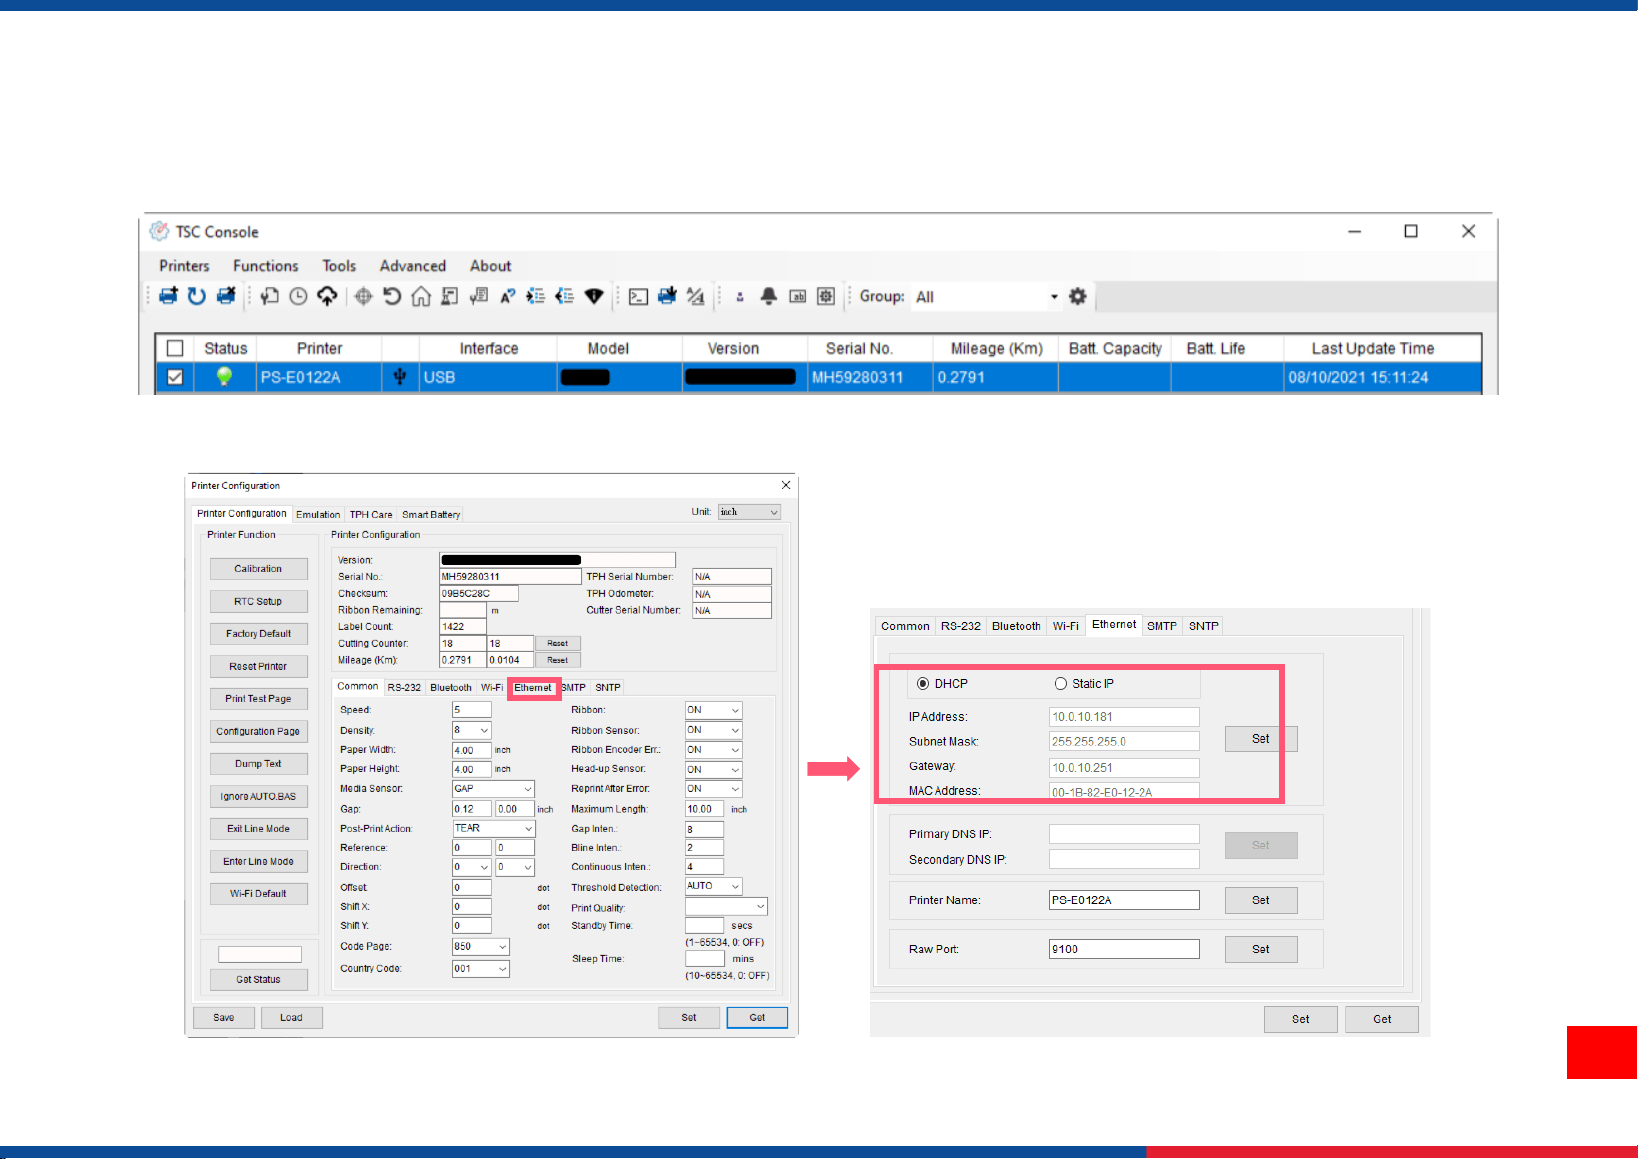
5.2 Setup Ethernet Interface
◼ Use USB or COM to establish the interface on TSC Console.
◼ Double click to enter the Printer Configuration Page > Click Ethernet tab > Check the IP Address.

20
◼ Return to TSC Console main page > Click Add Printer on the top left of the window.
◼ Choose Network > Key in the IP Address > Click Discover to establish the Ethernet interface.
◼ The notification will pop up > Click OK to close the window > The Ethernet interface will be shown on TSC Console.

21
5.3 Printer Function
Printer Function could be found in Printer Configuration. “Printer Function” will be shown on the left side of the window.
Functions
Description
Calibrate Sensor
Detect media types and the size of the label
RTC Setup
Synchronize printer with Real Time Clock on PC
Factory Default
Initialize the printer to default settings
Reset Printer
Reboot printer
Print Test Page
Print test page according to the specified label size and sensor type.
Configuration Page
Print printer configurations
Dump Text
Activate the printer to dump mode
Ignore AUTO.BAS
Ignore AUTO.BAS file when printer boot up.
Exit Line Mode
Exit the line mode to page mode
Enter Line Mode
Leave page mode and enter line mode
Reset WiFi
Restore the WiFi settings to defaults.
22
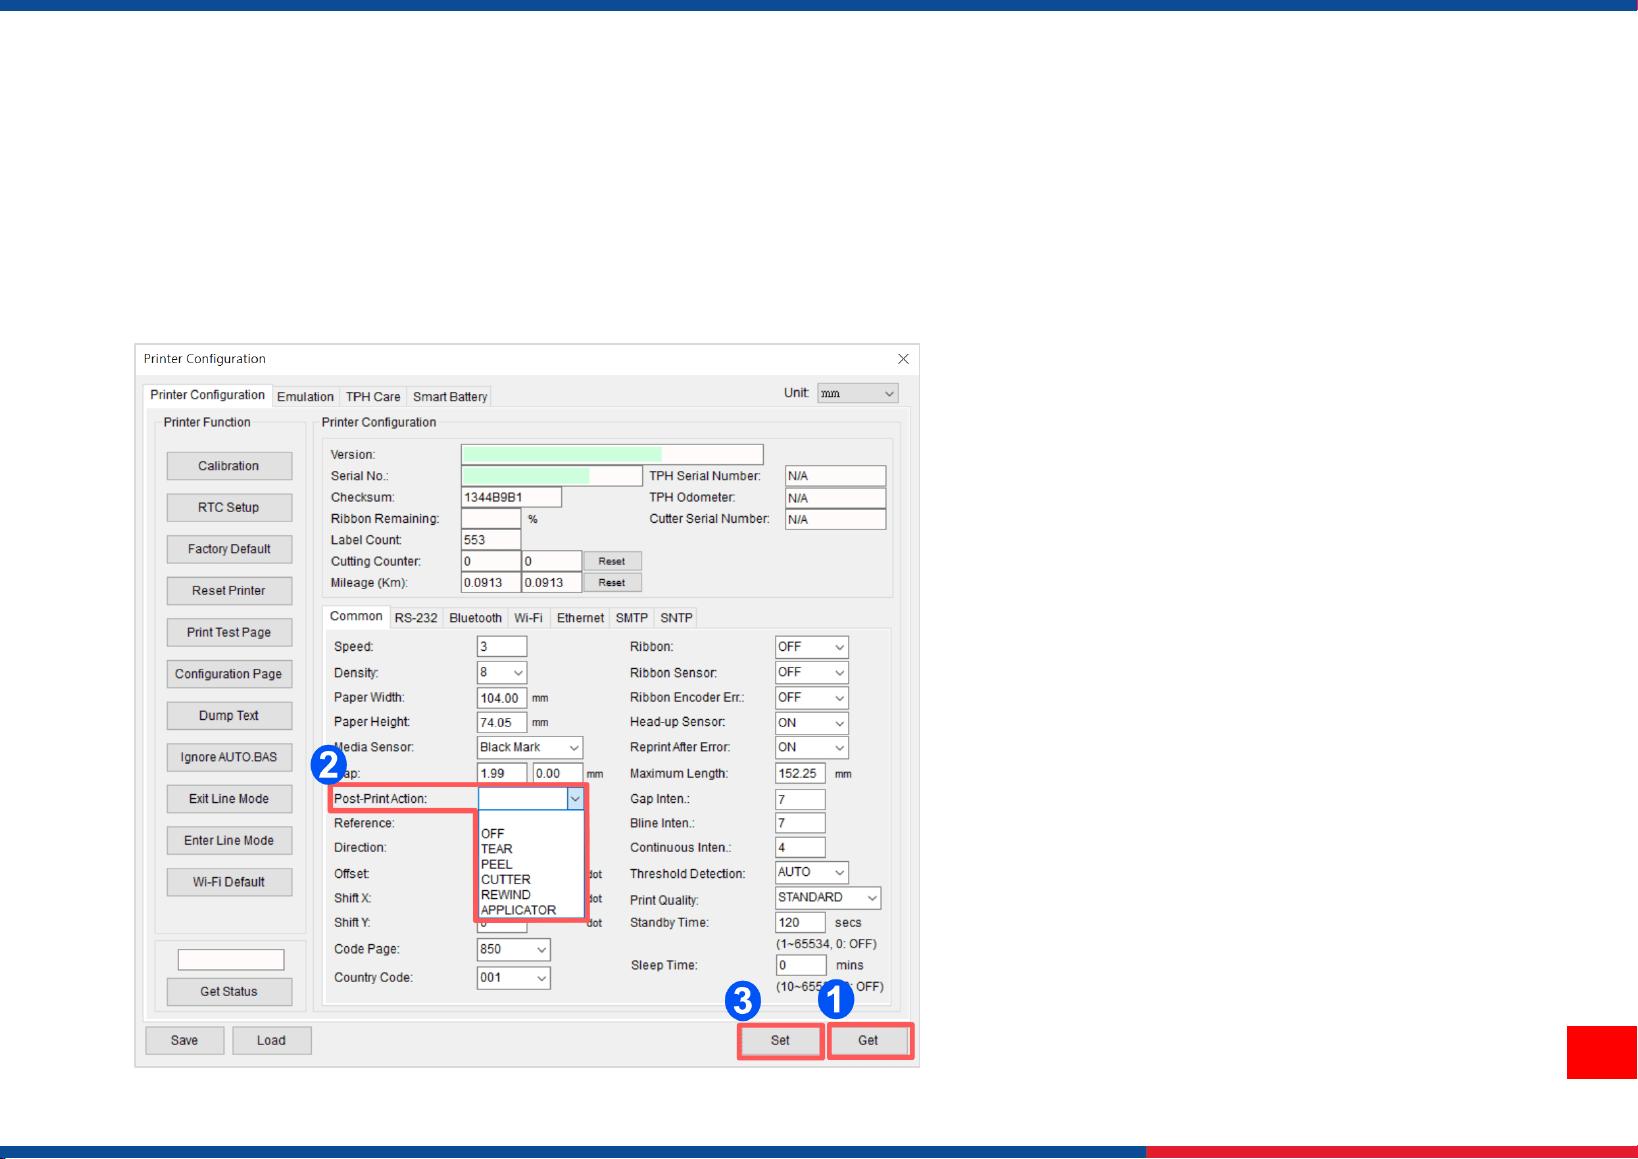
5.4 Setting Post-Print Action
When the printer is equipped with other option kits, ex: cutter, peeler, rewinder, please select the mode after finishing the calibration.
Follow below procedure to set the post action for the printing:
Refer Ch. 5.1 to Connect the printer with TSC Console > Double click the printer > The Printer Configuration Page will pop up > Click
Get to load information > Go to Common Tab > Find Post-Print Action > Select the mode depending on users’ application > Click Set.

23
6. Troubleshooting
This section lists the common problems that according to the LED status and other problems you may encounter when operating
the printer. Also, it provides solutions.
LED Status
LED Status / Color
Printer Status
Possible Cause
Recovery Procedure
OFF
No response
No power
* Turn on the power switch.
* Check if the green LED is lit on power supply. If it is not lit on,
power supply is broken.
* Check both power connections from the power cord to the power
supply and from the power supply to the printer power jack if
they are connected securely.
Solid Green
ON
The printer is ready to use
* No action necessary.
Green with blinking
Pause
The printer is paused
* Press the FEED button to resume for printing.
Red with blinking
Error
The out of label or the
printer setting is not
correct
1. Out of label
* Load a roll of label and follow the instructions in loading the
media then press the FEED button to resume for printing.
2. Printer setting is not correct
* Initialize the printer

24
Print Problem
Problem
Possible Cause
Recovery Procedure
Not Printing
Check if interface cable is well connected to the
interface connector.
Re-connect cable to interface.
The serial port cable pin configuration is not pin to pin
connected.
Please replace the cable with pin to pin connected.
The serial port setting is not consistent between host
and printer.
Please reset the serial port setting.
The port specified in the Windows driver is not correct.
Select the correct printer port in the driver.
The Ethernet IP, subnet mask, gateway is not
configured properly.
Configure the IP, subnet mask and gateway.
No print on the label
Label loaded not correctly.
Follow the instructions in loading the media.
Continuous feeding labels
The printer setting may go wrong.
Please do the initialization and gap/black mark
calibration.
Paper Jam
Gap/black mark sensor sensitivity is not set properly
(sensor sensitivity is not enough)
Calibrate the gap/black mark sensor.
Make sure label size is set properly.
Set label size exactly as installed paper in the
labeling software or program.
Labels may be stuck inside the printer mechanism near
the sensor area.
Remove the stuck label.
Poor Print Quality
Top cover is not closed properly.
Close the top cover completely and make sure the
right side and left side levers are latched properly.
Wrong power supply is connected with printer.
Check if 24V DC output is supplied by the power
supply.
Check if supply is loaded correctly.
Reload the supply.
Check if dust or adhesives are accumulated on the
print head.
Clean the print head.

25
Check if print density is set properly.
Adjust the print density and print speed.
Check print head test pattern if head element is
damaged.
Run printer self-test and check the print head test
pattern if there is dot missing in the pattern.

26
7. Maintenance
This session presents the clean tools and methods to maintain the printer.
◼ For Cleaning
Depending on the media used, the printer may accumulate residues (media
dust, adhesives, etc.) as a by-product of normal
printing. To maintain the best printing quality, you should remove these residues by cleaning the printer
periodically. Regularly
clean the print head and supply sensors once change a new media to keep the printer at the optimized performance and extend
printer life.
◼ For Disinfecting
Sanitize your printer to protect yourself and others and can help prevent the spread of viruses.
◼ Important
- Set the printer power switch to O (Off) prior to performing any cleaning or disinfecting tasks. Leave the power cord
connected to keep the printer grounded and to reduce the risk of electrostatic damage.
- Do not wear rings or other metallic objects while cleaning any interior area of the printer.
- Use only the cleaning agents recommended in this document. Use of other agents may damage the printer and void its
warranty.
- Do not spray or drip liquid cleaning solutions directly into the printer. Apply the solution on a clean lint-free cloth and then
apply the dampened cloth to the printer.
- Do not use canned air in the interior of the printer as it can blow dust and debris onto sensors and other critical
components.
- Only use a vacuum cleaner with a nozzle and hose that are conductive and grounded to drain off static build up.
- All reference in these procedures for use of isopropyl alcohol requires that a 99% or greater isopropyl alcohol content be
used to reduce the risk of moisture corrosion to the printhead.
- Do not touch printhead by hand. If you touch it careless, please use 99% Isopropyl alcohol to clean it.
- Always taking personal precaution when using any cleaning agent.

27
Cleaning Tools
◼ Cotton swab
◼ Lint-free cloth
◼ Brush with soft non-metallic bristles
◼ Vacuum cleaner
◼ 75% Ethanol (for disinfecting)
◼ 99% Isopropyl alcohol (for printhead and platen roller cleaning)
◼ Genuine printhead cleaning pen
◼ Mild detergent (without chlorine)
Cleaning Process:
Printer Part
Method
Interval
Print Head
I. Always turn off the printer before cleaning the printhead.
II. Allow the printhead to cool for at least one minute.
III. Use a cotton swab and 99% Isopropyl Alcohol or genuine print head cleaning pen to
clean the print head surface.
Clean the print head when
changing a new label roll.
Platen Roller
I. Turn off the printer.
II. Rotate the platen roller and wipe it thoroughly with the lint-free 99% Isopropyl Alcohol.
Clean the platen roller
when changing a new
label roll
Peel Bar
Use the lint-free cloth with 99% Isopropyl Alcohol to wipe it.
As needed
Sensor
Use brush with soft non-metallic bristles or a vacuum cleaner, to remove paper dust.
Clean upper and lower media sensors to ensure reliable Top of Form and Paper Out sensing.
Monthly
Exterior
Clean the exterior surfaces with a clean, lint-free cloth (water-dampened cloth). If necessary,
use a mild detergent or desktop cleaning solution then use the 75% Ethanol to wipe it.
As needed
Interior
Clean the interior of the printer by removing any dirt and lint with a vacuum cleaner, as
described above, or use a brush with soft non-metallic bristles then use the 75% Ethanol to
wipe it.
As needed

28
8. Agency Compliance and Approvals
EN 55032, Class B
EN 55024
EN 60950-1; EN 61000-3-2; EN 61000-3-3
FCC part 15B, Class B
ICES-003, Class B
This equipment has been tested and found to comply with the limits for a Class B digital device, pursuant to
part 15 of the FCC Rules. These limits are designed to provide reasonable protection against harmful
interference in a residential installation. This equipment generates, uses and can radiate radio frequency
energy and, if not installed and used in accordance with the instructions, may cause harmful interference to
radio communications. However, there is no guarantee that interference will not occur in a particular
installation. If this equipment does cause harmful interference to radio or television reception, which can be
determined by turning the equipment off and on, the user is encouraged to try to correct the interference by
one or more of the following measures:
-Reorient or relocate the receiving antenna.
-Increase the separation between the equipment and receiver.
-Connect the equipment into an outlet on a circuit different from that to which the receiver is connected.
-Consult the dealer or an experienced radio/ TV technician for help.
This device complies with Part 15 of the FCC Rules. Operation is subject to the following two conditions:
(1) This device may cause harmful interference, and (2) this device must accept any interference received,
including interference that may cause undesired operation.
This Class B digital apparatus complies with Canadian ICES-003.
Cet appareil numérique de la classe B est conform à la norme NMB-003 du Canada.
AS/NZS CISPR 32, Class B

29
UL 60950-1(2nd Edition)
CSA C22.2 No. 60950-1-07(2nd Edition)
EN 60950-1
GB 4943.1
GB 9254, Class B
GB 17625.1
Energy Star for Imaging Equipment Version 2.0
TP TC 004/2011
TP TC 020/2011
IS 13252(Part 1)/
IEC 60950-1
KN 22
KN 24
Note: There may have certification differences in the series models, please refer to product label for accuracy.
Important safety instructions:
1. Read all of these instructions and keep them for later use.
2. Follow all warnings and instructions on the product.
3. Disconnect the power plug from the AC outlet before cleaning or if fault happened.
Do not use liquid or aerosol cleaners. Using a damp cloth is suitable for cleaning.
4. The mains socket shall be installed near the equipment and easily accessible.
5. The unit must be protected against moisture.
6. Ensure the stability when installing the device, Tipping or dropping could cause damage.

30
7. Make sure to follow the correct power rating and power type indicated on marking label
provided by manufacture.
8. Please refer to user manual for maximum operation ambient temperature.
WARNING:
Hazardous moving parts, keep fingers and other body parts away.
CAUTION:
(For equipment with RTC (CR2032) battery or rechargeable battery pack)
Risk of explosion if battery is replaced by an incorrect type.
Dispose of used batteries according to the Instructions as below.
1. DO NOT throw the battery in fire.
2. DO NOT short circuit the contacts.
3. DO NOT disassemble the battery.
4. DO NOT throw the battery in municipal waste.
5. The symbol of the crossed out wheeled bin indicates that the battery should not be placed in municipal waste.
Caution: The printhead may be hot and could cause severe burns. Allow the printhead to cool.
CAUTION:
Any changes or modifications not expressly approved by the grantee of this device could void the user's authority to operate the equipment.

31
9. Revision History
Date
Content
Editor
2023/8/10
Modify 2.1 Unpacking and Inspection section
Camille