
1
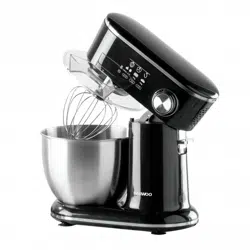
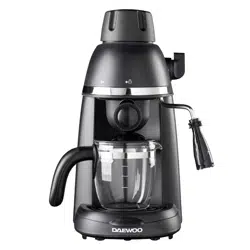
Espresso Maker
Model No. SDA2698
User Manual
IMPORTANT – RETAIN THESE INSTRUCTIONS FOR FUTURE REFERENCE

2
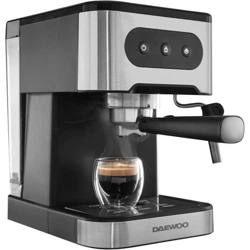
Espresso Maker
Model No. SDA2698
User Manual
IMPORTANT – RETAIN THESE INSTRUCTIONS FOR FUTURE REFERENCE
Contents
Page No.
2 Contents
3 Reading and Storing the User Manual
3 Important Safety Instructions for Proper Use
6 Additional Safety Information
7 Explanation of Symbols
8 Description of Parts
10 Before First Use of Your Espresso Maker
10 Instructions for Use - Pre-Heating Your Espresso Maker
12 Instructions for Use - Making an Espresso Coffee
14 Instructions for Use - Making a Cappuccino
15 Notes on Coffee
15 Making Hot Water
15 If the Steam Nozzle is Blocked
15 Cleaning the Steam Nozzle After Frothing
16 Using the Warming Plate
16 Automatic Power Off
16 Descaling Your Espresso Maker
16 How to Descale
17 Cleaning and Maintenance
17 Technical Specification
18 Plug Wiring Information
18 Troubleshooting Guide
19 Recycling Information
19 Customer Support
Back Page Warranty Information

3
Espresso Maker
Model No. SDA2698
User Manual
IMPORTANT – RETAIN THESE INSTRUCTIONS FOR FUTURE REFERENCE
READING AND STORING THE USER MANUAL
Before using this product, please read through this manual
carefully paying particular attention to the safety instructions.
Failure to do so may result in personal injury or damage to the
product.
Carefully save this instruction manual for future reference. Ensure the
user manual is included when passing the product on to any third parties.
IMPORTANT SAFETY INSTRUCTIONS FOR PROPER USE
When using electrical appliances, basic safety precautions should always
be followed.
Only use the product as described in this user manual. Any other use is
considered improper and may result in damage to property or persons.
The manufacturer or vendor cannot be held liable for damages or injury
incurred through improper or incorrect use.
• Read and familiarise yourself with all operating
instructions before using this Coffee Maker.
• Before plugging your coffee maker into the mains, visually
check that it is intact and has not suffered any transit
damage.
• Check that the voltage indicated on the data plate
corresponds with that of the local network before
connecting the appliance to the mains power supply.
• Close supervision is required when using this appliance near
children.
• Never leave this appliance within reach of children.
• This appliance can be used by children aged from 8 years
and above if they have been given supervision or instruction
concerning use if the appliance in a safe way and if they
understand the hazards involved. Cleaning and user
maintenance shall not be made by children unless they are
older than 8 and supervised. Keep the appliance and its
cord out of reach of children aged less than 8 years. This
appliance can be used by persons with reduced physical,
sensory or mental capabilities or lack of experience and

4
Espresso Maker
Model No. SDA2698
User Manual
IMPORTANT – RETAIN THESE INSTRUCTIONS FOR FUTURE REFERENCE
knowledge if they have been given supervision or
instruction concerning use of the appliance in a safe way
and understand the hazards involved. Children shall not
play with the appliance.
• DO NOT leave the appliance unattended during use.
• DO NOT leave the appliance unattended whilst connected
to the mains supply.
• Always use this appliance on a solid, level, non-flammable
surface.
• DO NOT use this appliance outdoors.
• It is imperative to unplug the power cord after the
appliance has been used, before it is cleaned and whilst
being repaired.
• If the supply cord is damaged, it must be replaced by the
manufacturer, service agent or similarly qualified person in
order to avoid hazard.
• Repairs to electrical appliances should only be performed by
qualified personnel. Improper repairs may place user at
serious risk.
• DO NOT operate this appliance with a damaged plug or
cord, after a malfunction or after being dropped or
damaged in any way.
• Regular, periodic checks should be carried out on the mains
cable to ensure no damage is evident. Should there be any
signs of damage the appliance should not be used.
• DO NOT allow the mains cable to hang over sharp edges or
come in contact with hot surfaces.
• DO NOT run the mains cable under carpets, rugs, etc.
• Allow the unit to cool before storage.
• Never place the appliance near to flammable material or
high-pressure containers.
• This appliance is intended for household use only and
should not be used for industrial purposes.

5
Espresso Maker
Model No. SDA2698
User Manual
IMPORTANT – RETAIN THESE INSTRUCTIONS FOR FUTURE REFERENCE
• DO NOT use any accessories or attachments with this
appliance other than those supplied or recommended by
supplier.
• DO NOT immerse the appliance, base or its cord in water or
any other liquids.
• DO NOT use this appliance for anything other than its
intended use.
• DO NOT push objects into any openings as damage to the
appliance and/or electric shock may occur.
• Ensure appliance is situated in an open area, do not allow it
to come in contact with cupboards, curtains, wall coverings,
clothing or other flammable materials.
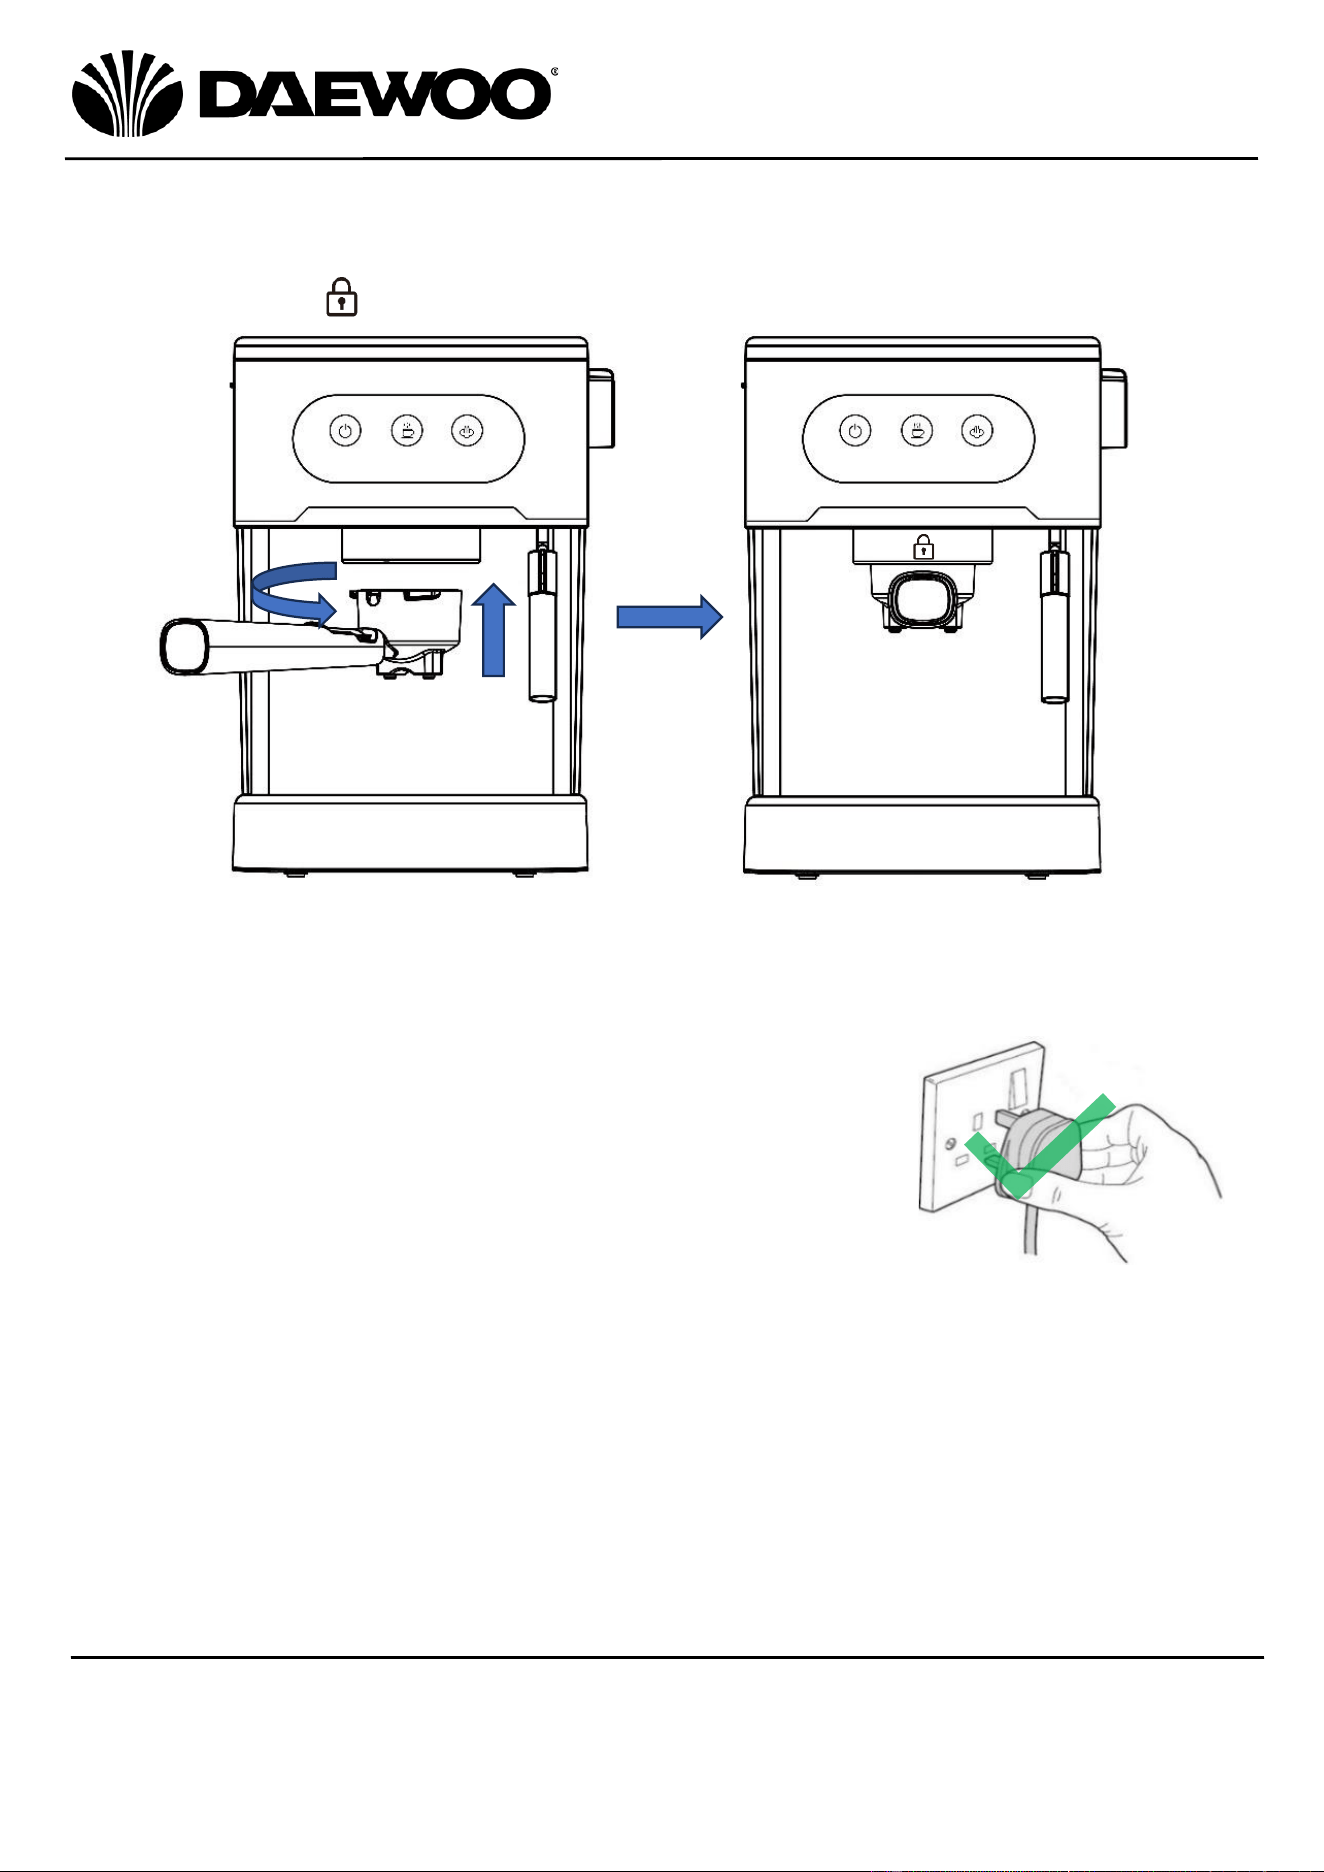
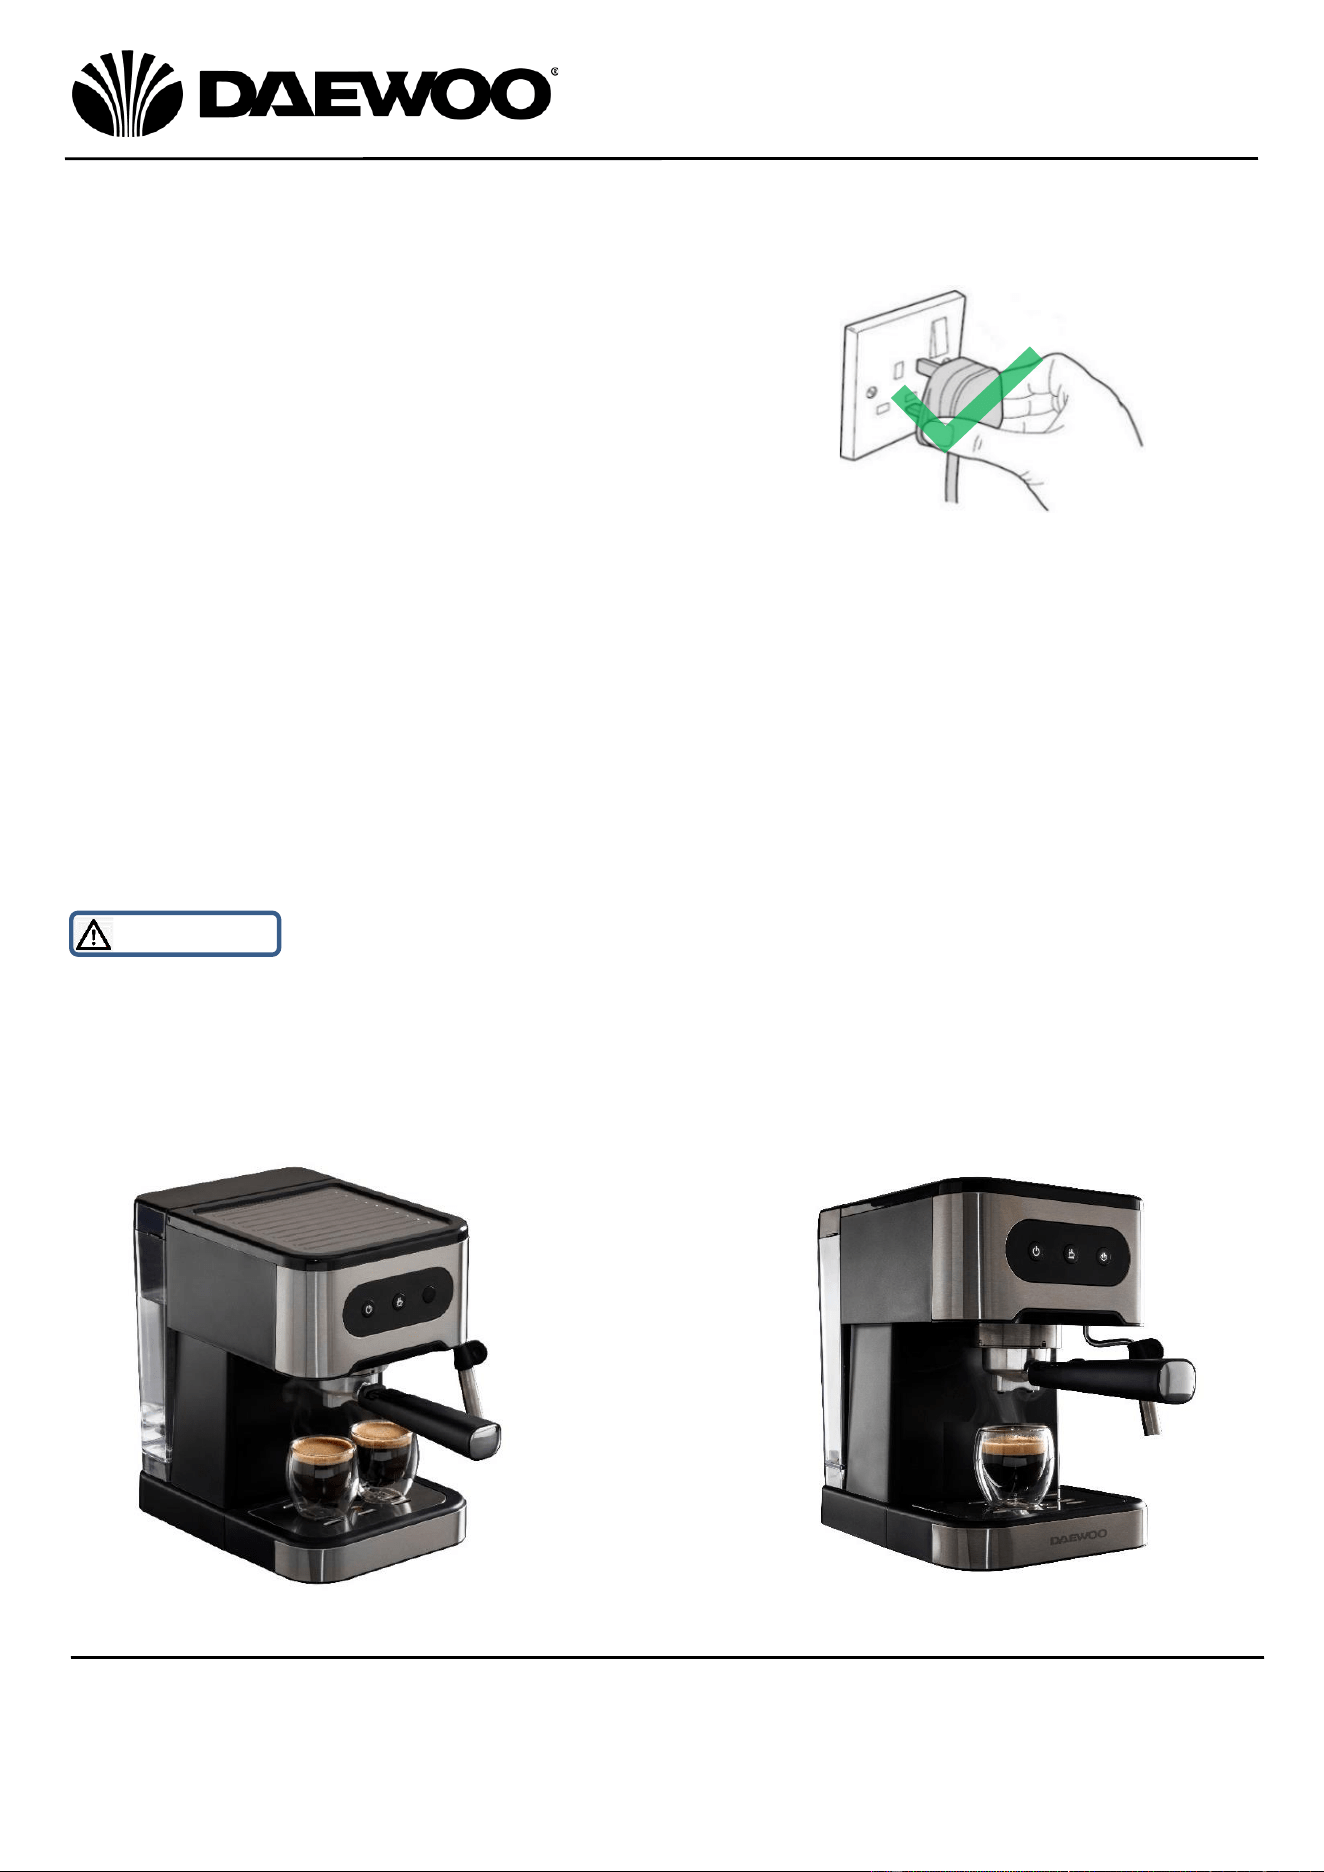
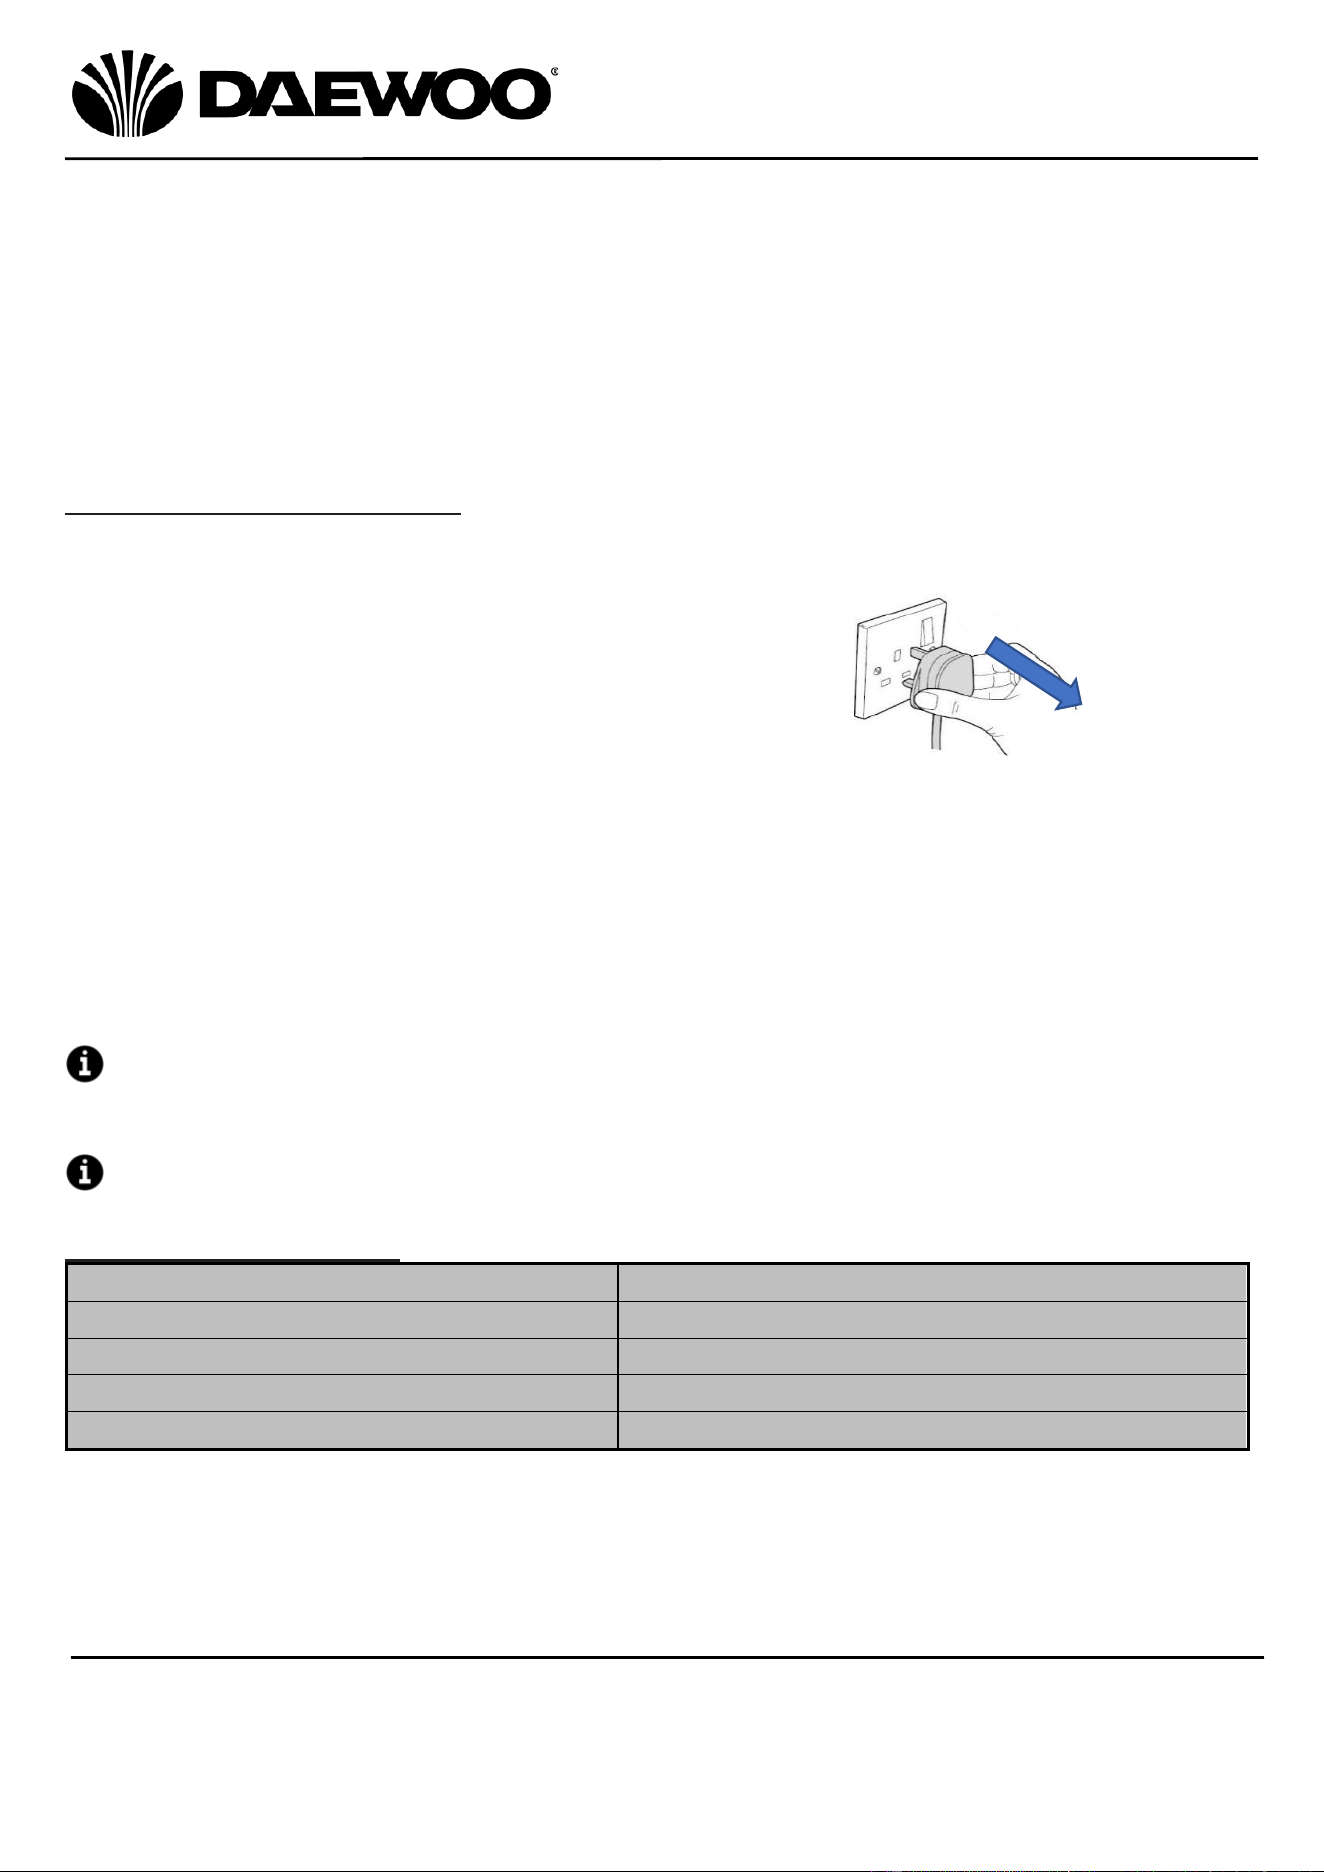
• Unplug after each use. Grasp the plug, not the cord.
• DO NOT cover this appliance.
• Never place this appliance on an electric, gas, or any other
type of hob.
• WARNING: DO NOT remove the filter holder whilst the
water is boiling.
• Never fill the coffee maker more than its capacity – ensure
the water level is between the min and max marks on the
water tank. If the coffee maker is overfilled, boiling water
may be ejected.
• Always close the tank lid during use and do not open the lid
or remove the filter holder whilst the water is boiling.
• CAUTION: The outside surface of the coffee maker will get
hot during use.
THIS APPLIANCE MUST BE EARTHED

6
Espresso Maker
Model No. SDA2698
User Manual
IMPORTANT – RETAIN THESE INSTRUCTIONS FOR FUTURE REFERENCE
ADDITIONAL SAFETY INFORMATION
• This appliance is intended for use in domestic households only, it
must not be used for commercial use.
• Hot liquid or steam is emitted from the brewing head and steam
nozzle during operation.
• Do not cover the espresso maker.
• Allow to the espresso maker to cool fully before storing.
• The surfaces of the filter holder and steam nozzle will become
hot during use. Do not touch – always use the handle.
• Ensure that the espresso machine is used in an open, well-
ventilated area well away from other appliances and not near or
under surfaces that are heat sensitive or those that may be
damaged by steam.
• Only use this espresso maker with the accessories provided. This
appliance can cause personal injury if misused.
• DO NOT place anything on top of the appliance.
• Ensure that the water level in the water tank does not exceed
the MAX mark whilst filling and that it does not drop below the
MIN mark during use.
7
Espresso Maker
Model No. SDA2698
User Manual
IMPORTANT – RETAIN THESE INSTRUCTIONS FOR FUTURE REFERENCE
Explanation of Symbols
The following warning symbols or words are used in this instruction manual:
Products labelled with UK Conformity Assessment identifies
products conforming to UK statutory requirements.
Products labelled with this symbol conform to applicable
provisions of the European Economic Area.
You should now recycle your waste electrical goods and in doing
so help the environment. This symbol means waste electrical
products at the end of their useful life should not be disposed of
with normal household waste and not sent to landfill. Please
ensure it is taken to a suitable facility for disposal. Check with
your Local Authority or retailer for recycling advice or visit
www.recycle-more.co.uk, enter your postcode to find out your
nearest recycling site.
WARNING!
This symbol provides useful additional information on the use
of this product.
This symbol indicates that the supply uses an alternating current
mains supply.
This designates a hazard with moderate risk, which may result
in severe injury if not adhered to.
8
Espresso Maker
Model No. SDA2698
User Manual
IMPORTANT – RETAIN THESE INSTRUCTIONS FOR FUTURE REFERENCE
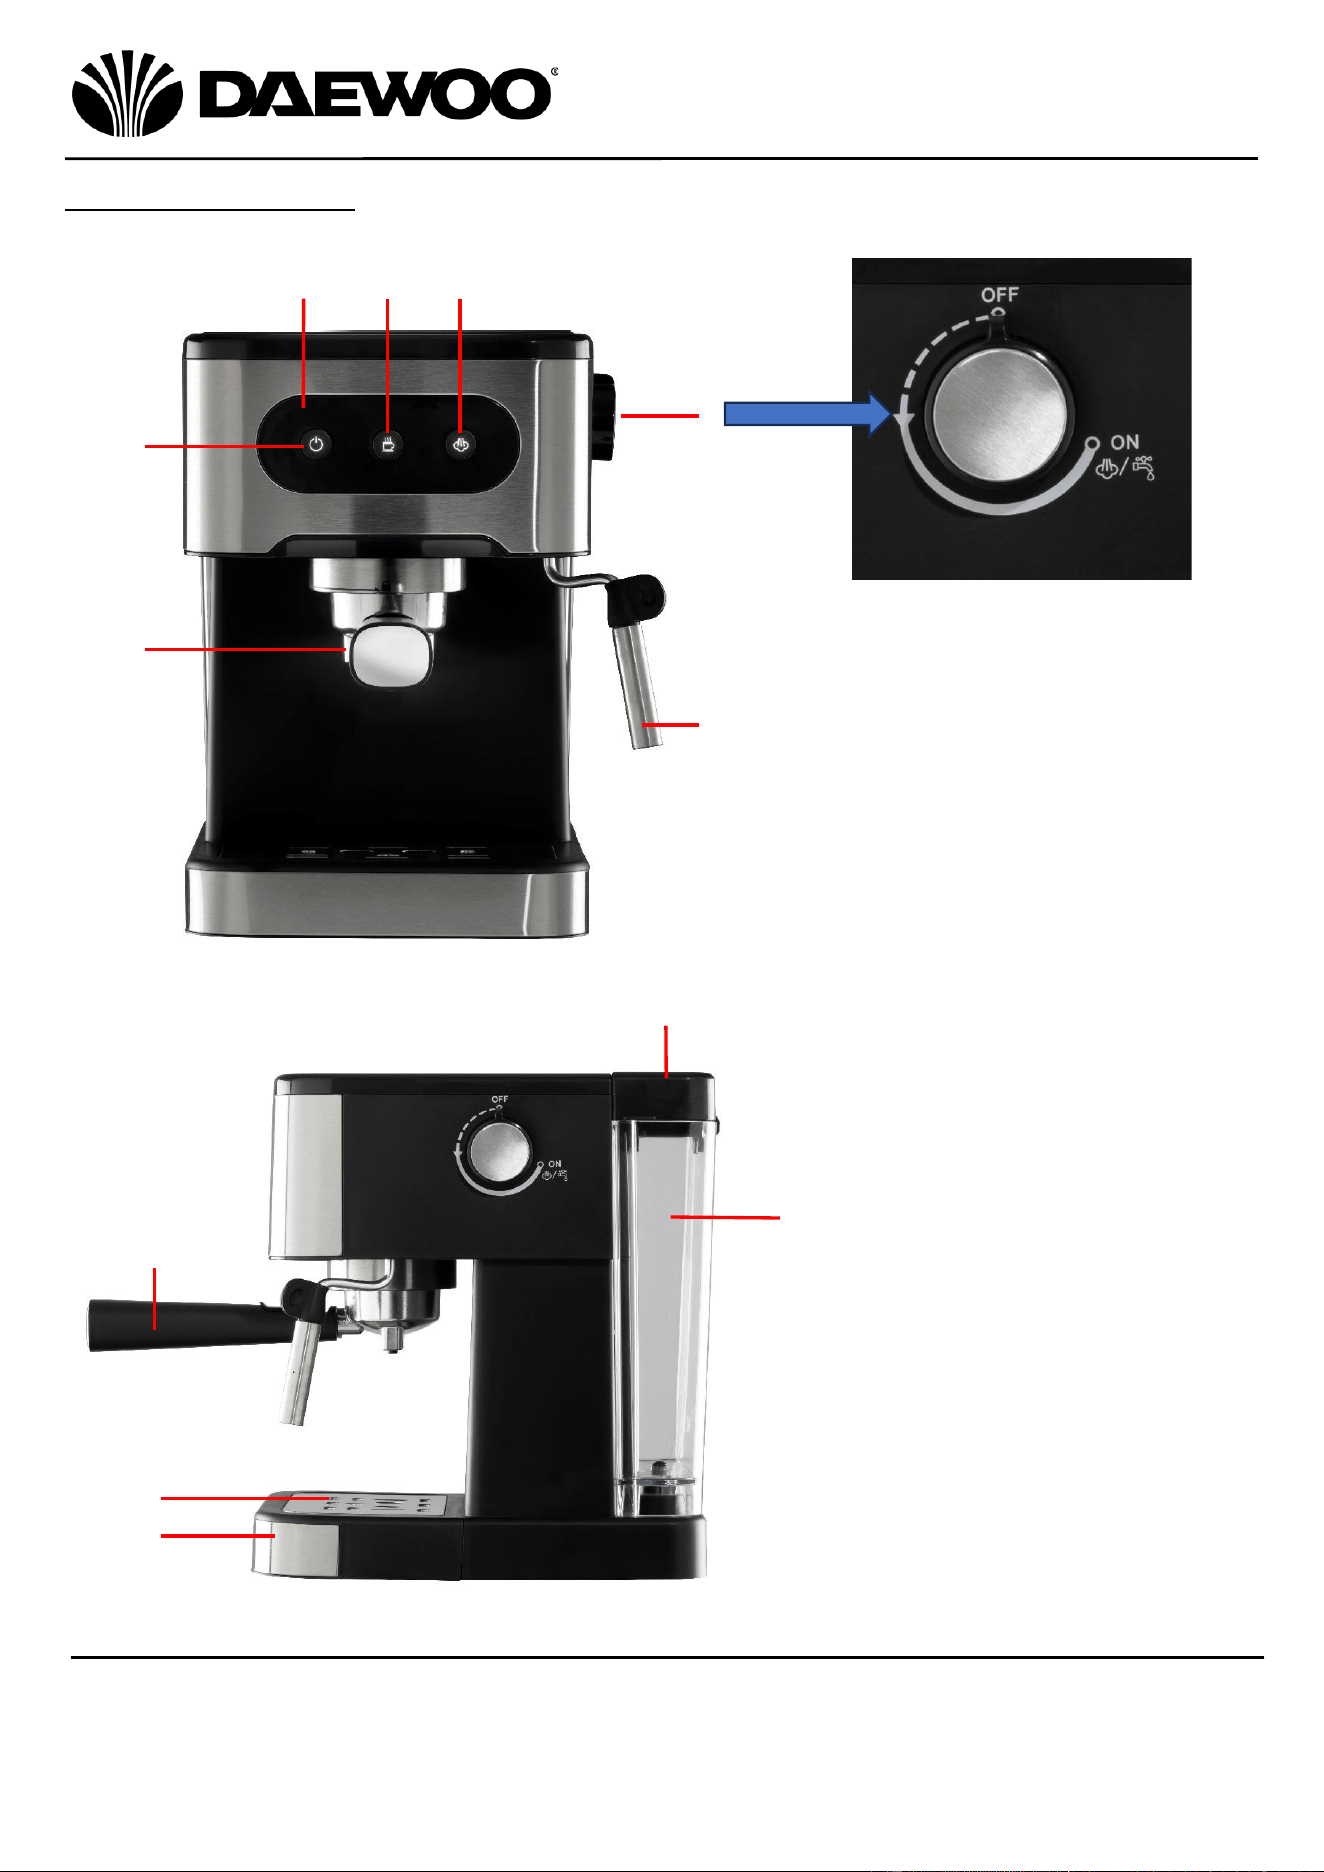
Description of Parts
1. Coffee Nozzles
2. Power Button
3. Control Panel
4. Brewing Button
5. Steam Button
6. Steam Control
7. Steam Nozzle
8. Water Tank Lid
9. Water Tank
10. Filter Holder Handle
11. Drip Tray Plate
12. Drip Tray
2
3
6
9
11
10
7
4
5
8
1
12
9
Espresso Maker
Model No. SDA2698
User Manual
IMPORTANT – RETAIN THESE INSTRUCTIONS FOR FUTURE REFERENCE
13
14
15
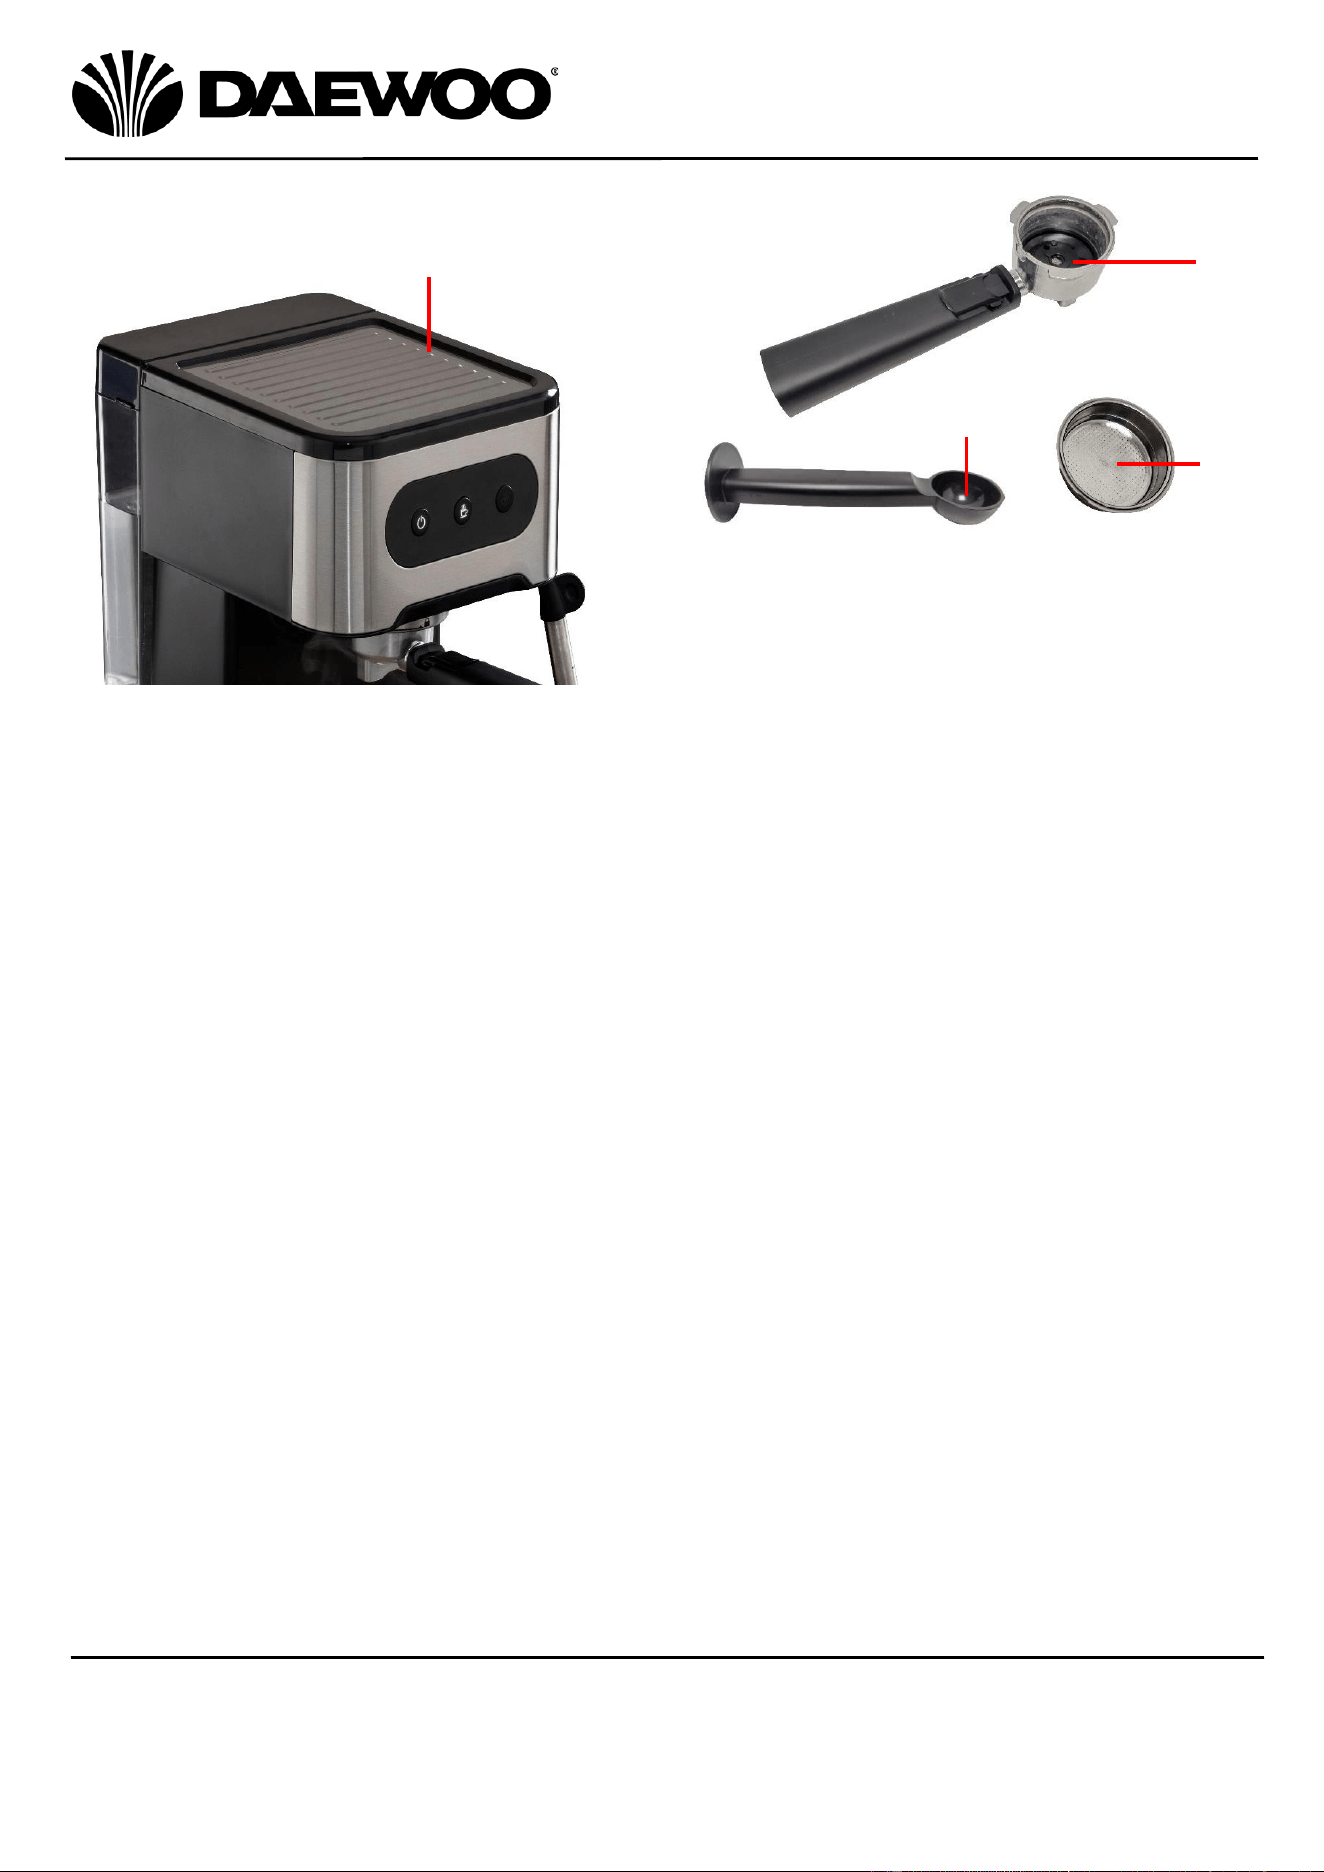
13. Warming Plate
14. Coffee Filter holder
15. Coffee filter
16. Measuring Spoon/ Tamper
16
10
Espresso Maker
Model No. SDA2698
User Manual
IMPORTANT – RETAIN THESE INSTRUCTIONS FOR FUTURE REFERENCE
Before first Use of Your Espresso maker
• Remove all packing materials and discard responsibly.
• Ensure all parts are present - see Description of Parts above.
• Check that there is no transit damage to the mains cable or product.
• Place the appliance on a solid, level, heat resistant surface clear of all
obstructions as described above.
• Wash all the accessories (14, 15 & 16) in warm soapy then rinse and dry
thoroughly.
• Preheat the Espresso Maker before first use – see Preheating Your Espresso
Maker before First Use below.
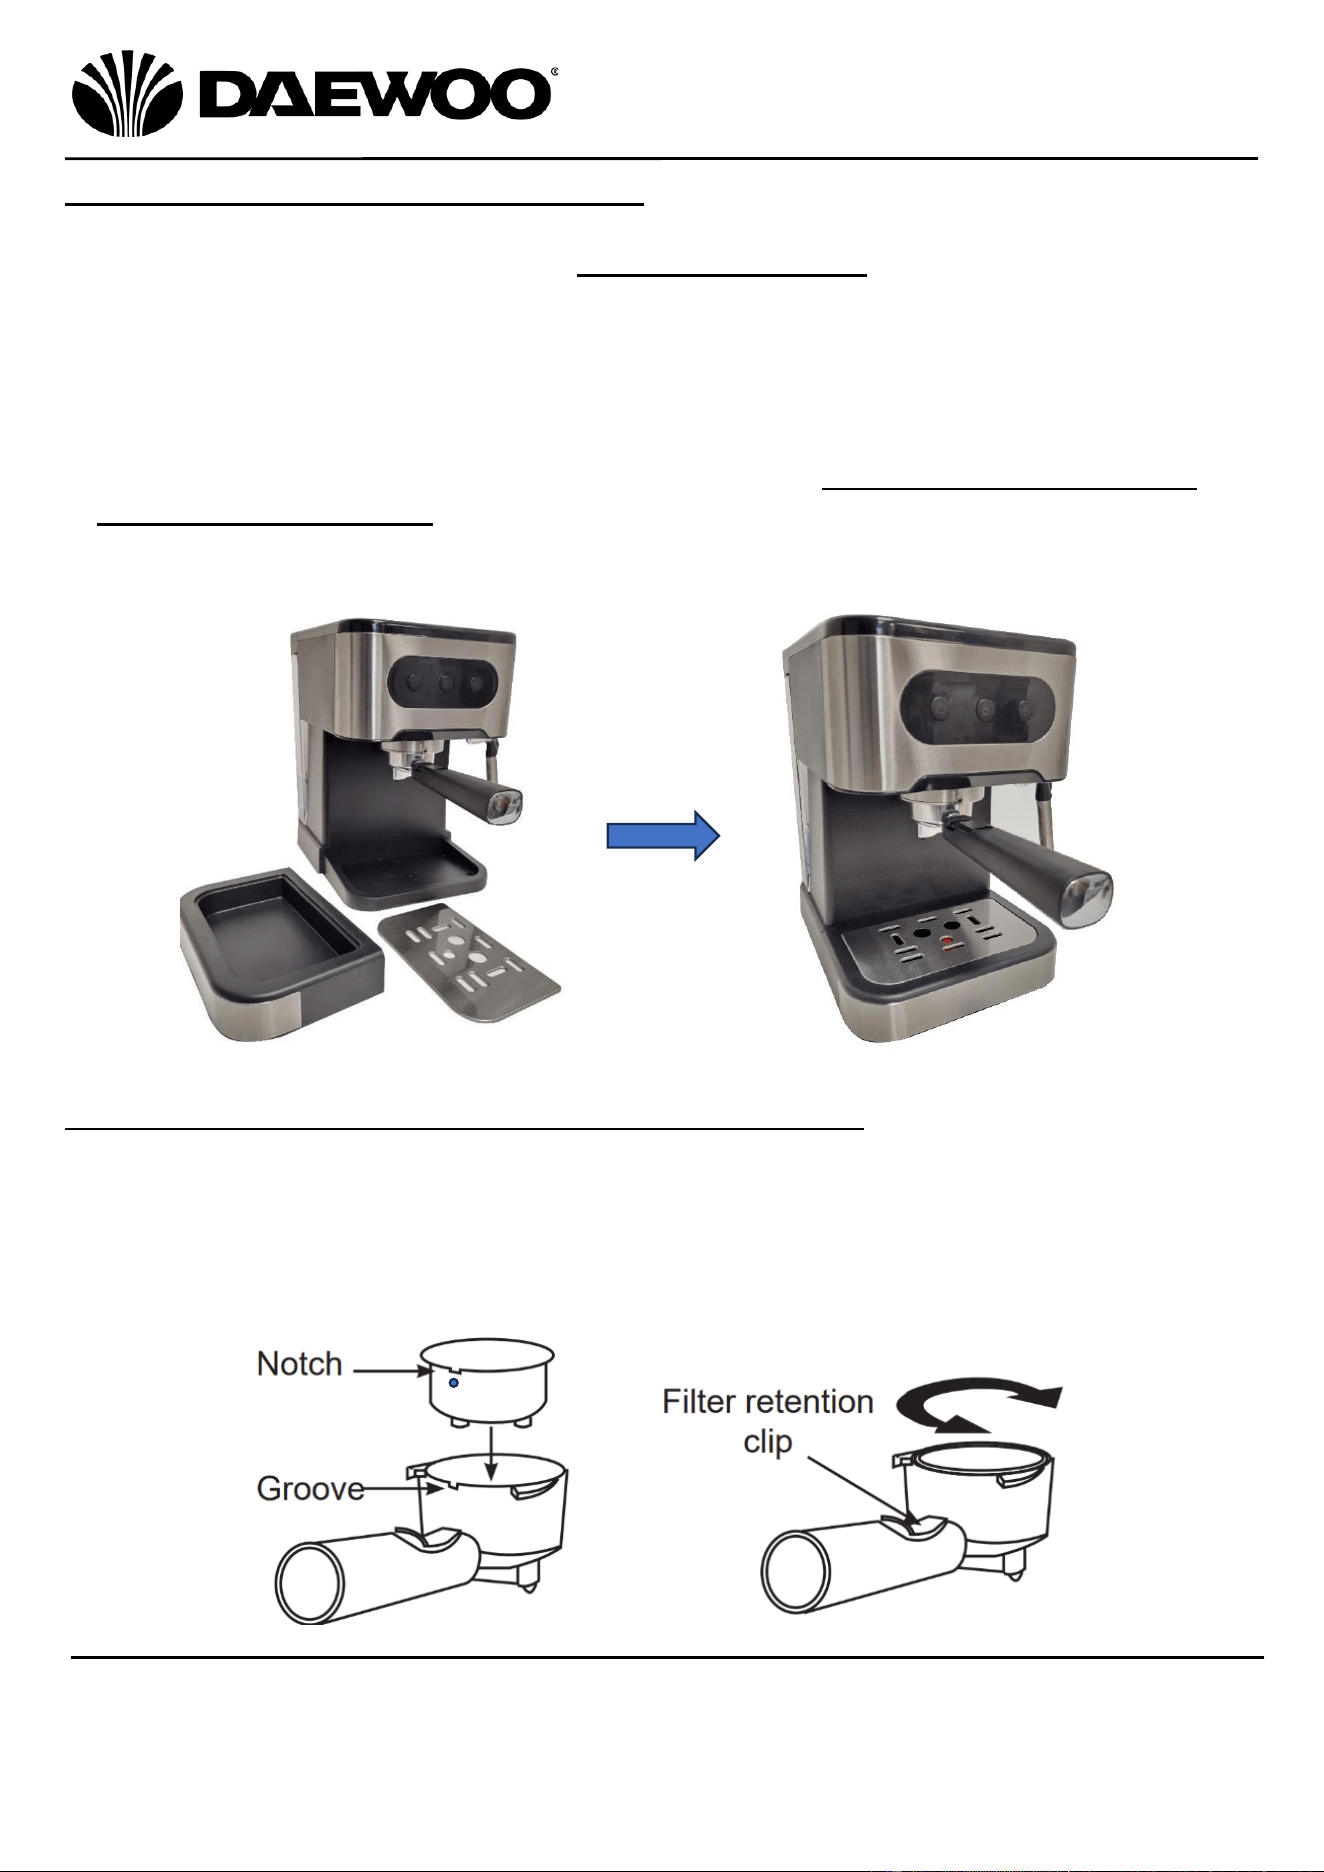
• Place the Drip Tray (12) into the coffee maker and place the Drip Tray Plate (11)
on top of the Drip Tray (12). See Fig. 1 & 2 below:
Instructions for Use – Preheating Your Espresso Maker
1. Lift the Water Tank Lid (8) and fill the Water Tank (9) with water up to the MAX
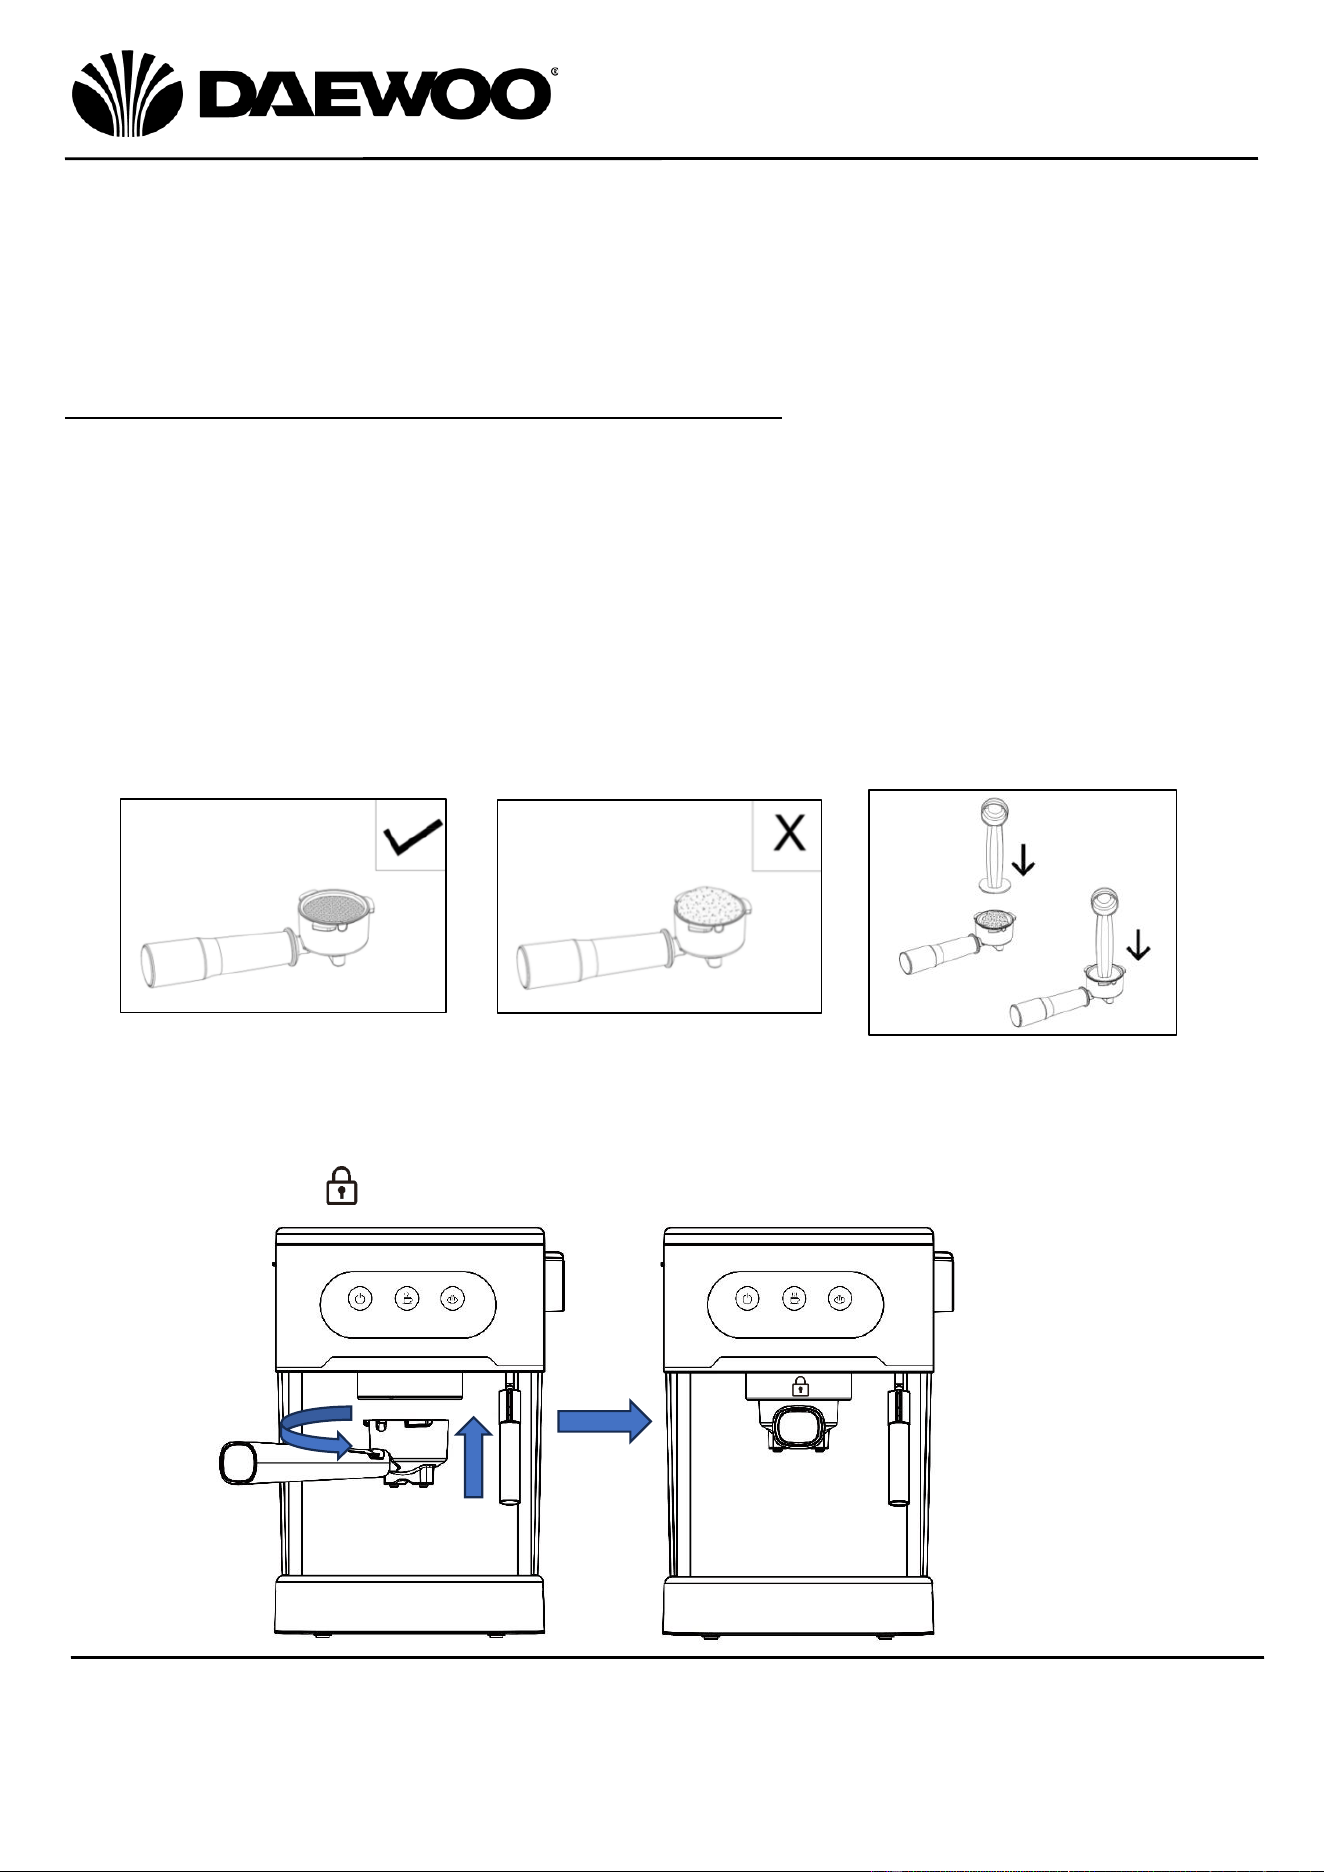
line, install the Coffee Filter (15) into the Coffee Filter Holder (14) by aligning the
notch on the Coffee Filter (15) with the groove on the Coffee Filter Holder (14).
NB Do not put any coffee in the coffee filter at this stage.
2. Rotate the Coffee Filter (15) to the left or right to lock it in place:
Fig. 1
Fig. 2
11
Espresso Maker
Model No. SDA2698
User Manual
IMPORTANT – RETAIN THESE INSTRUCTIONS FOR FUTURE REFERENCE
3. Place one hand on the top of the espresso maker to support the unit and attach
the Coffee Filter Holder (14) using the Filter Holder Handle (10) by holding the
handle and placing it in the coffee maker as in fig.3 then rotate right to the
locked position as shown below in fig.4:
4. Ensure that the Steam Control (6) is set to the ‘OFF’ position. Place a cup onto
the Drip Tray Plate (11).
5. Insert the mains plug into the nearest socket.
6. Press the Power Button (2), the power button will flash whilst the unit is
warming up.
7. Once the button has stopped flashing, the Power Button (2) and the Brewing
Button (4) will both illuminate to show the espresso maker has warmed up.
8. Press the Brewing Button (4) which will start the brewing process and hot
water will be dispensed into the cup. Be careful not to overfill the cup.
9. Press the Brewing Button (4) to stop brewing once the cup is full.
10. Carefully empty the cup once full.
NB the Brewing Button (4) will flash during the brewing process.
Fig. 3
Fig. 4
12
Espresso Maker
Model No. SDA2698
User Manual
IMPORTANT – RETAIN THESE INSTRUCTIONS FOR FUTURE REFERENCE
To make a good espresso coffee it is recommended to preheat the coffee maker
before making the coffee. Pre-heating includes the coffee filter holder and the
cup(s) so that the flavour of the coffee is not influenced by a cold machine.
Use the above steps 1 – 10 to preheat your Espresso Maker before making cups
of coffee.
Instructions for Use – Making an Espresso Coffee
1. Preheat the Espresso Maker as described above.
2. Remove the Coffee Filter Holder (14), then remove the Coffee Filter (15) and
wipe dry using a clean dry cloth.
3. Using the Measuring Spoon/Tamper (16), add ground coffee to the Coffee
Filter (15), fill halfway for one small cup of coffee, fill it for two cups.
4. Press the coffee powder tightly using the Tamper at the end of the Measuring
Spoon/Tamper (16), (see Fig. 5 below)
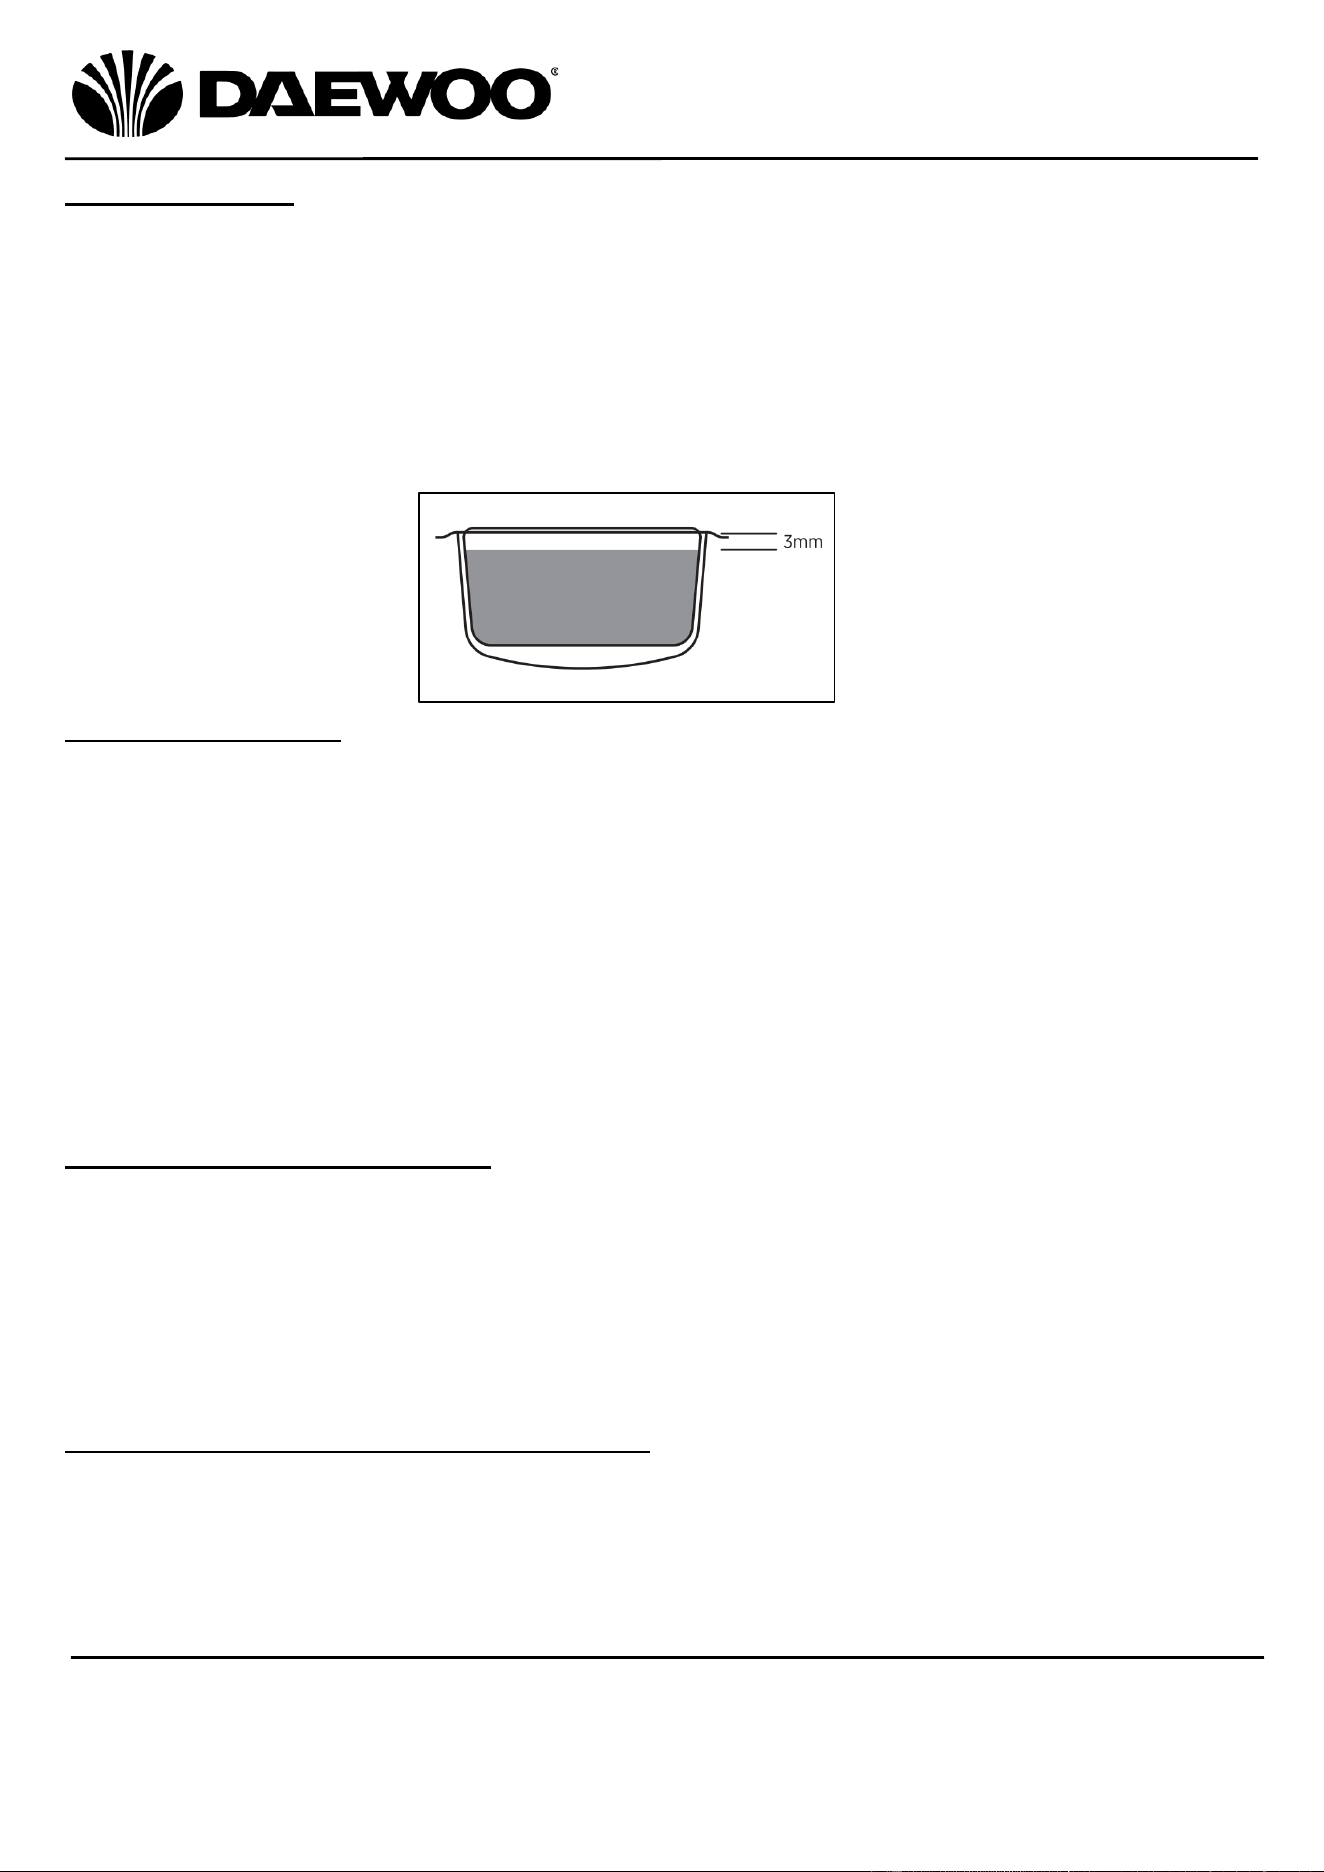
5. Remove any excess coffee powder from the edge of the filter so the coffee sits
about 3mm from the top edge of the filter.
NB Too much coffee in the filter will result in a poor seal and leakage.
6. Place one hand on the top of the espresso maker to support the unit and attach
the Coffee Filter Holder (14) using the Filter Holder Handle (10) by holding the
handle and placing it in the coffee maker as in fig.6 then rotate right to the
locked position as shown below in fig.7:
Fig. 5
Fig. 6
Fig. 7
13
Espresso Maker
Model No. SDA2698
User Manual
IMPORTANT – RETAIN THESE INSTRUCTIONS FOR FUTURE REFERENCE
7. Pour out the hot water in the cup(s) from the pre-heating and place your
warmed cups on the Drip Tray Plate (11).
8. Ensure that the Steam Control (6) is set to the ‘OFF’ position.
9. Insert the mains plug into the nearest socket.
10. Press the Power Button (2), the power button will flash whilst the unit is
warming up.
11. Once the button has stopped flashing, the Power Button (2) and the Brewing
Button (4) will both illuminate to show the espresso maker has warmed up.
12. Press the Brewing Button (4) which will start the brewing process and hot
coffee will be dispensed into the cup(s). Be careful not to overfill the cup(s).
NB the Brewing Button (4) will flash whilst the coffee is being dispensed.
13. Press the Brewing Button (4) to stop brewing once the cup is full.
WARNING! Do not leave the Espresso Maker unattended whilst the coffee is
being dispensed as the Brewing Button (4) must be pressed to stop the unit
dispensing coffee.
14. Remove the Coffee Filter Holder (14) and the Coffee Filter (15) once cool and
rinse clean in running water.
Left: To make two
cups of coffee,
position the cups
centrally side by
side on the Drip
Tray Plate (11).
Right: if one cup of
coffee is required,
place the cup
centrally on the Drip
Tray Plate (11).
14
Espresso Maker
Model No. SDA2698
User Manual
IMPORTANT – RETAIN THESE INSTRUCTIONS FOR FUTURE REFERENCE
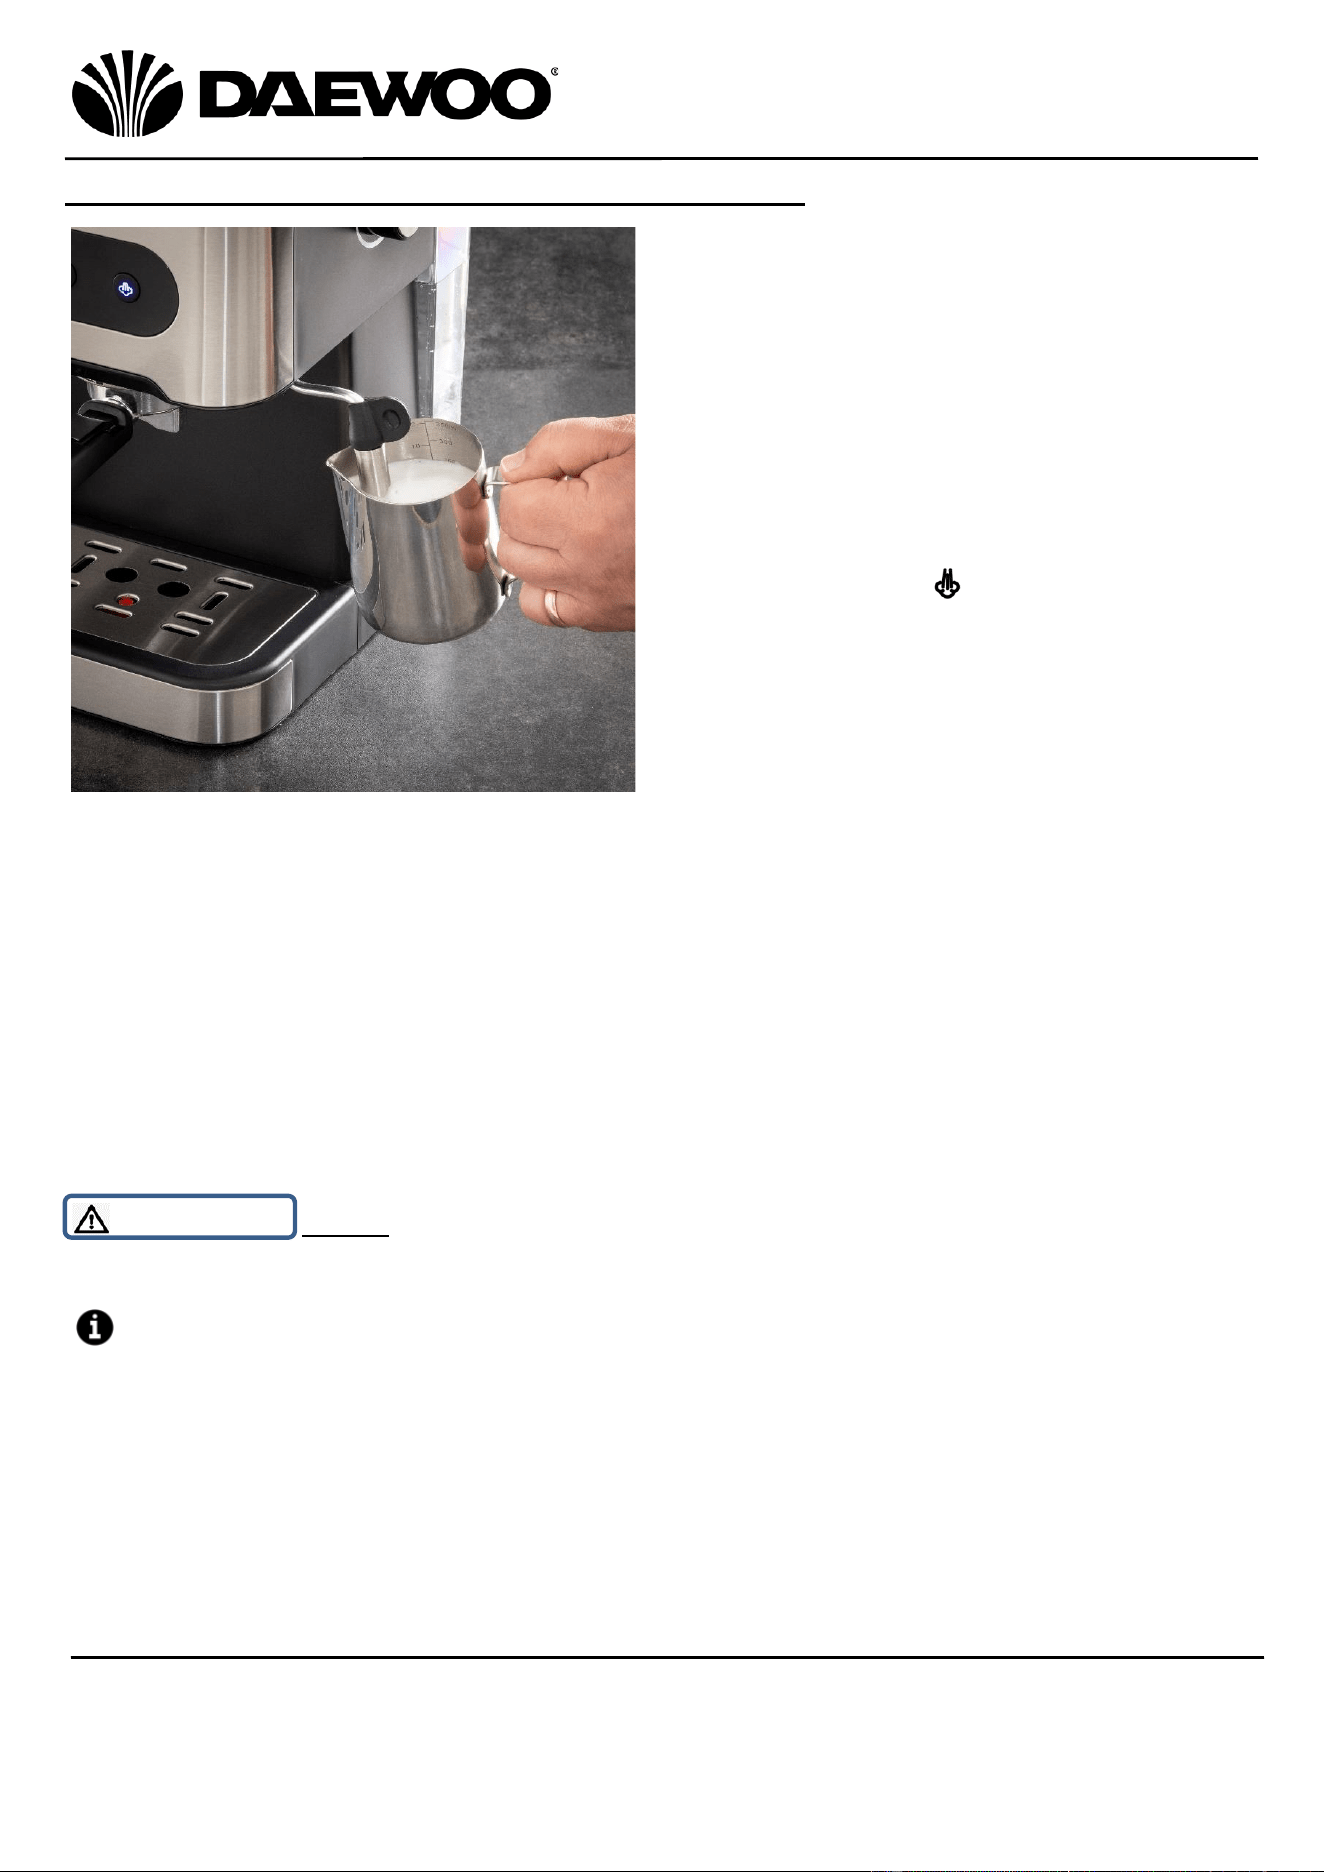
Instructions for Use – Making a Cappuccino Coffee
1. First, prepare an espresso coffee as the
detailed above in ‘Making an Espresso
Coffee’ above, making sure that the cup
is big enough accommodate the coffee
and the frothed milk.
2. Make sure that the Steam Control (6) is
in the ‘OFF’ position.
3. Press the Power Button (2) and the
Steam Button (5) . Both buttons will
illuminate.
4. Fill a jug with 100ml of milk for each
prepared Cappuccino, it is
recommended to use whole milk at
refrigerator temperature (not hot).
5. To maximise milk foam performance, rotate the Steam Control (6) for
approximately 10 seconds without putting it in the milk in the jug. This will clear
out any cold water in the system. Rotate the Steam Control (6) back to the ‘OFF’
position and conduct the next step.
6. Insert the Steam Nozzle (7) into the milk to about two centimetres deep, then
rotate the Steam Control (6) slowly anti-clockwise. Steam will come out from
the Steam Nozzle (7)
7. Frothed milk is made by moving the vessel round whilst the nozzle is submerged
in the milk.
WARNING! Never touch the Steam Nozzle (7) whilst steam is emitted to avoid
scalding.
Always turn the Steam Control (6) slowly to release the steam in a controlled
manner.
8. After frothing the milk, rotate the Steam Control (6) to the ‘OFF’ position. The
best temperature for frothed milk is 70°C.
9. Pour the frothed milk into the espresso coffee prepared earlier. The Cappuccino
is ready to serve.
10. Sweeten if desired and sprinkle the froth with a little cocoa powder.
15
Espresso Maker
Model No. SDA2698
User Manual
IMPORTANT – RETAIN THESE INSTRUCTIONS FOR FUTURE REFERENCE
Notes on Coffee
This Espresso Maker uses ground powdered coffee which is available from most
good supermarkets and coffee retailers.
Do not use instant coffee or similar with this Espresso Maker.
Distance to the surface of pressed coffee powder should be about 3mm away from
the edge of the filter cup (important indicator). Too high or too low will affect the
extraction pressure and effect of coffee. Reduce or increase the amount of coffee
powder accordingly:
Making Hot Water
The Espresso Maker can produce hot water rather than steam from the Steam
Nozzle (7):
1. Place a cup under the Steam Nozzle (7).
2. Press the Power Button (2), the power button will flash whilst the unit is
warming up.
3. Once the Power (2) and Brewing (4) buttons are illuminated, Rotate the Steam
Control (6) to ‘ON’ position and hot water will be dispensed.
4. Rotate the Steam Control (2) to ‘OFF’ position when the desired amount of hot
water has been dispensed.
5. Press the Power Button (2) to switch the machine off.
If the Steam Nozzle is blocked
1. Turn the Steam Control (6) to the ‘OFF’ position and allow the espresso maker
cool down for about half an hour, then poke the steam outlet several times with
a needle about 1 mm in diameter until it clears.
2. Finally, press the Steam Button (5) and turn the Steam Control (6) to the ‘ON’
position, to ensure the appliance can produce steam.
3. Press the Power Button (2) to switch the machine off.
Cleaning the Steam Nozzle after frothing
1. After frothing the milk, put an empty jug under the Steam Nozzle (7).
2. Press the Steam Button (5) and rotate the Steam Control (6) to ‘ON’ for steam
release for 20 seconds, then rotate the Steam Control (6) to ‘OFF’ and press the
Steam Button (5) off to clean out the Steam Nozzle (7).
3. Press the Power Button (2) to switch the machine off.

16
Espresso Maker
Model No. SDA2698
User Manual
IMPORTANT – RETAIN THESE INSTRUCTIONS FOR FUTURE REFERENCE
Using the Warming Plate
Place the coffee cup(s) onto the Warming Plate (13) on top of the machine to
keep them warm prior to making coffee.
Automatic power ‘off’
The coffee maker will turn itself off automatically 25 minutes after pressing the
Power Button (2).
De-scaling Your Espresso Maker
Once tap water is heated, calcium and other mineral deposits attach themselves
to the inside of your espresso maker. Excessive limescale build up will damage the
machine, the Steam Nozzle is particularly vulnerable to blockage and should be
cleaned regularly. We recommend using bottled water or filtered water. If you
cannot do this and use water straight from the tap, then it is necessary to de-scale
the coffee machine regularly. Do not use vinegar but a commercially available
decalcification agent, carefully follow the quantities recommended in the
instructions of the agent.
How to De-Scale:
It is recommended that the espresso maker is descaled every 4 weeks - if you live
in a hard water area every 2 weeks is recommended. Better still, use
bottled/Distilled water.
Fill the Water Tank (9) with water and de-scaler to the MAX level.
Follow the steps as detailed in ‘Preheating Your Espresso Maker before First Use
above.
For the Brewing section:
1. Remove the Coffee Filter Holder (14) from the unit.
2. Place a container onto the Drip Tray Plate (11).
3. Press the Power Button (2) to turn the unit on, the Power indicator and Brewing
indicators will illuminate.
4. Press the Brewing Button (4), once water has been flowing for 20 seconds
(approximately 100ml), press the Brewing Button (4), then wait for 5 minutes
for the first de-scaling cycle.
5. Empty the container and replace onto the Drip Tray Plate (11).
6. Repeat the above steps 1 - 5 to conduct the second and third cycles for de-
scaling immediately, (it is not necessary to wait for 5 minutes on the second and
third cycle).
For the Steaming section:
1. Place a container under the Steam Nozzle (7).
2. Press the Power Button (2) to turn the unit on, the Power indicator and Brewing
indicators will illuminate.
17
Espresso Maker
Model No. SDA2698
User Manual
IMPORTANT – RETAIN THESE INSTRUCTIONS FOR FUTURE REFERENCE
3. Press the Steam Button (5), rotate the Steam Control (6) to the ‘ON’ position,
the maximum level, and make steam for 2 minutes.
4. Rotate the Steam Control (6) to the ‘OFF’ position, then press the Steam Button
(5) off to stop making steam.
5. Press the Power Button (2) to turn the unit off, leave the de-scaler
in the unit for at least 15 minutes.
6. After 15 minutes empty the water tank and refill with clean water.
7. Restart the unit and repeat the above steps - with clean water
Cleaning and Maintenance
• Expel any water that may be inside the coffee machine by turning on the
steam function for approximately 2-3 minutes, or until steam no longer comes
from the steam nozzle.
• Unplug from the mains and allow coffee
maker cool down completely before cleaning.
• Clean the outside of the espresso maker with clean damp cloth.
• Rinse the water tank out and allow to dry.
• Wash the drip tray plate and drip tray regularly and dry thoroughly.
• Never immerse the unit in water or any other liquids.
• Immediately after use pull the metal tube and rubber handle off the steam
nozzle and wash both in warm soapy water and dry thoroughly.
• Wash the measuring spoon in warm soapy water and dry thoroughly.
Clean the appliance after every use in order to keep it in good working
order.
Do not allow water to sit in the tank, empty the tank after every use.
Technical Specification
Rated Voltage
220-240V~ 50/60Hz
Rated Power
1350W
Model Number
SDA2698
Protection Class
I (This Appliance Must Be Earthed)
Water tank capacity (maximum)
1.5 Litres
18
Espresso Maker
Model No. SDA2698
User Manual
IMPORTANT – RETAIN THESE INSTRUCTIONS FOR FUTURE REFERENCE
Non-Rewireable Mains Plug
If your appliance is supplied with a non-rewireable plug fitted to the mains lead
and should the fuse need replacing, you must use an ASTA approved one
(conforming to BS 1362 of the same rating). If in doubt, consult a qualified
electrician. Never use a plug with the fuse cover missing.
If you need to remove the plug – DISCONNECT FROM THE MAINS – and then cut
it off the mains lead and immediately dispose of it safely. Never attempt to reuse
the plug or insert it into a socket outlet as there is a danger of electric shock.
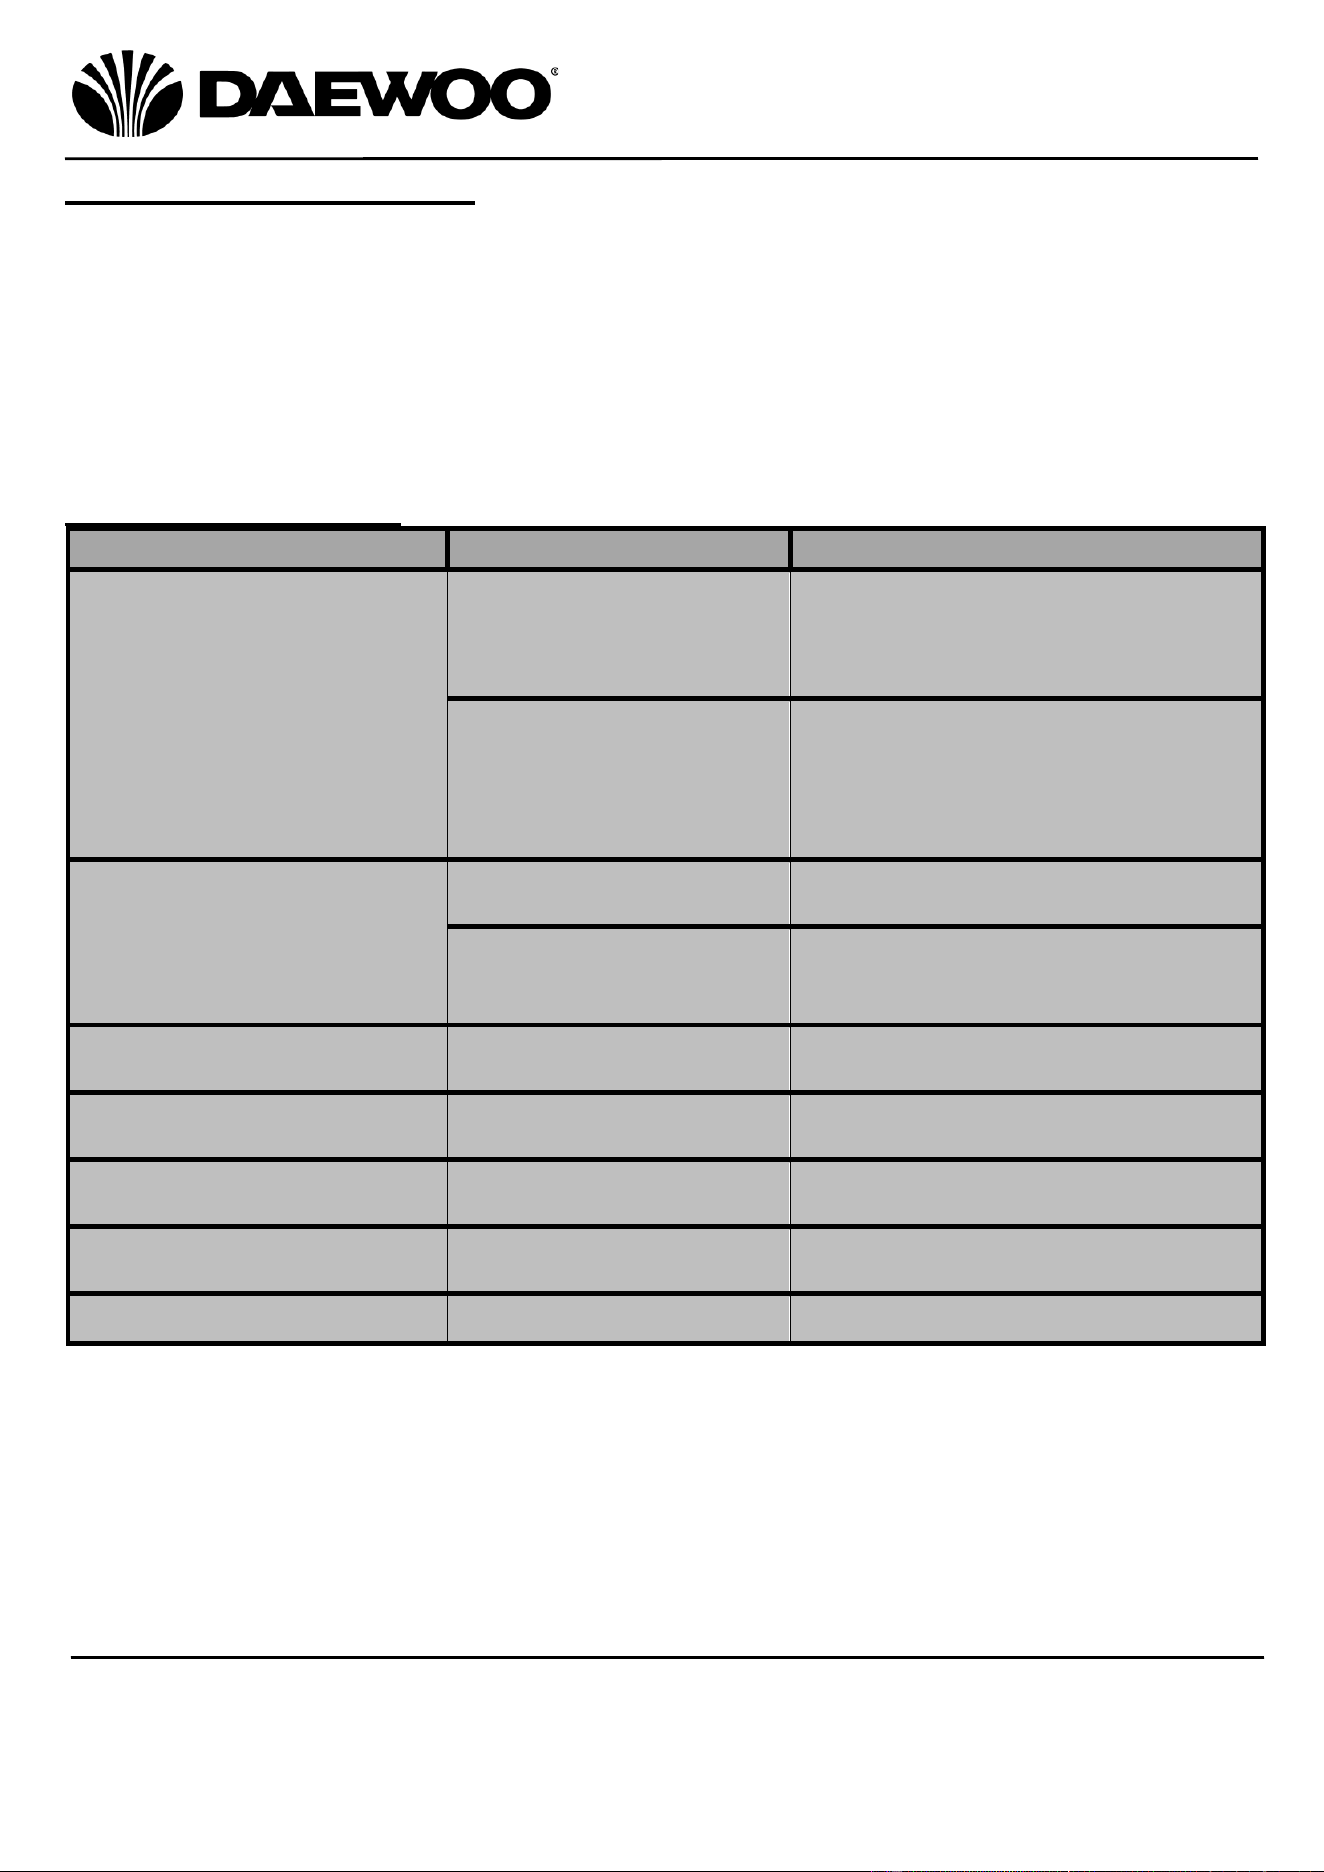
Troubleshooting Guide
Problem
Possible Cause
Possible Fix
No coffee pours
No water in the water
tank
Fill the tank with water, run
through the appliance without a
coffee filter to ensure it is fully
primed
The coffee grounds are
too fine or tamped down
too hard
Empty the filter and rinse under
water to clean, Wipe the filter with
a cloth.
Refill the filter with grinds and
tamp
No steam from the Steam
wand
Steam Nozzle tube is
blocked
See page 15, “If the steam outlet
becomes blocked”
No water in the water
tank
Fill the tank with water, run hot
water through the Steam Nozzle to
ensure water flows
Water is leaking from the
bottom of the machine
Too much water in the
drip tray
Clean out the drip tray
Water is leaking from the
outer side of the filter
There is some ground
coffee on edge of filter
Clean it off
Tainted taste to the coffee
Allowing water to sit too
long, improper cleaning
Clean and de-scale
Low or no steam from the
steam wand
Steam Nozzle is clogged
up
Clean and de-scale
Poor milk frothing
Using skimmed milk
Full fat milk is best
19
Espresso Maker
Model No. SDA2698
User Manual
IMPORTANT – RETAIN THESE INSTRUCTIONS FOR FUTURE REFERENCE
Recycling Information
Disposal of the Packaging
Dispose of paper and cardboard in appropriate paper re-cycling facilities.
Dispose of recyclable plastics in appropriate plastic re-cycling facilities.
Dispose of non-recyclable plastics in the appropriate plastics collection service.
Disposal of the Product
You should now recycle your waste electrical goods and in doing so
help the environment. This symbol means waste electrical products
at the end of their useful life should not be disposed of with normal
household waste and not sent to landfill. Please ensure it is taken
to a suitable facility for disposal. Check with your Local Authority or
retailer for recycling advice or visit www.recycle-more.co.uk enter
your postcode to find out your nearest recycling site.

20
Espresso Maker
Model No. SDA2698
User Manual
IMPORTANT – RETAIN THESE INSTRUCTIONS FOR FUTURE REFERENCE
WARRANTY
Thank you for purchasing your Daewoo product.
As part of our commitment to quality, we are offering you an extra 2 years warranty in
addition to your 1 year guarantee
Your Daewoo product is guaranteed for 1 year from the date of original purchase, with proof
of purchase or receipt. If any defect should occur due to faulty workmanship or material, your
faulty product should be returned to the place of purchase, replacement or refund is at the
discretion of the retailer.
The guarantee is subject to the following provisions:
•
The product must be correctly installed and operated in accordance with the
requirements contained in the instruction manual.
•
The product must be used solely for domestic purposes.
•
It does not cover general wear and tear, damage, misuse or any consumable parts.
•
The guarantee will be rendered invalid if the product is re-sold or has been damaged through
inexpert repair.
•
The guarantee is only valid within the UK and Eire.
Your standard 1 year guarantee will only be extended to the maximum available for your
individual product upon registration. (Note: products must be registered individually and
covers the main body and housing). If you do not register your product within 28 days of the
original purchase date, your product will only be guaranteed for 1 year.
To validate your extended 2 year warranty*please register your purchase online within 28
days of the original purchase date by registering at:
https://help.daewooelectricals.com
or
Contact Us (daewooelectricals.com)
*Your extended warranty is only valid with proof of purchase receipt and subject to the
conditions outlined above.
Daewoo is a registered trademark.
Produced and imported under licence by
Eurosonic Group Limited
Brightgate House
1 Brightgate Way
Manchester M32 0TB UK
EU Rep: EuroSonic Magppie (ESM) Ltd. Ireland D05 X006
www.esgltd.com