
Loading ...
Loading ...
Loading ...
7weber.com
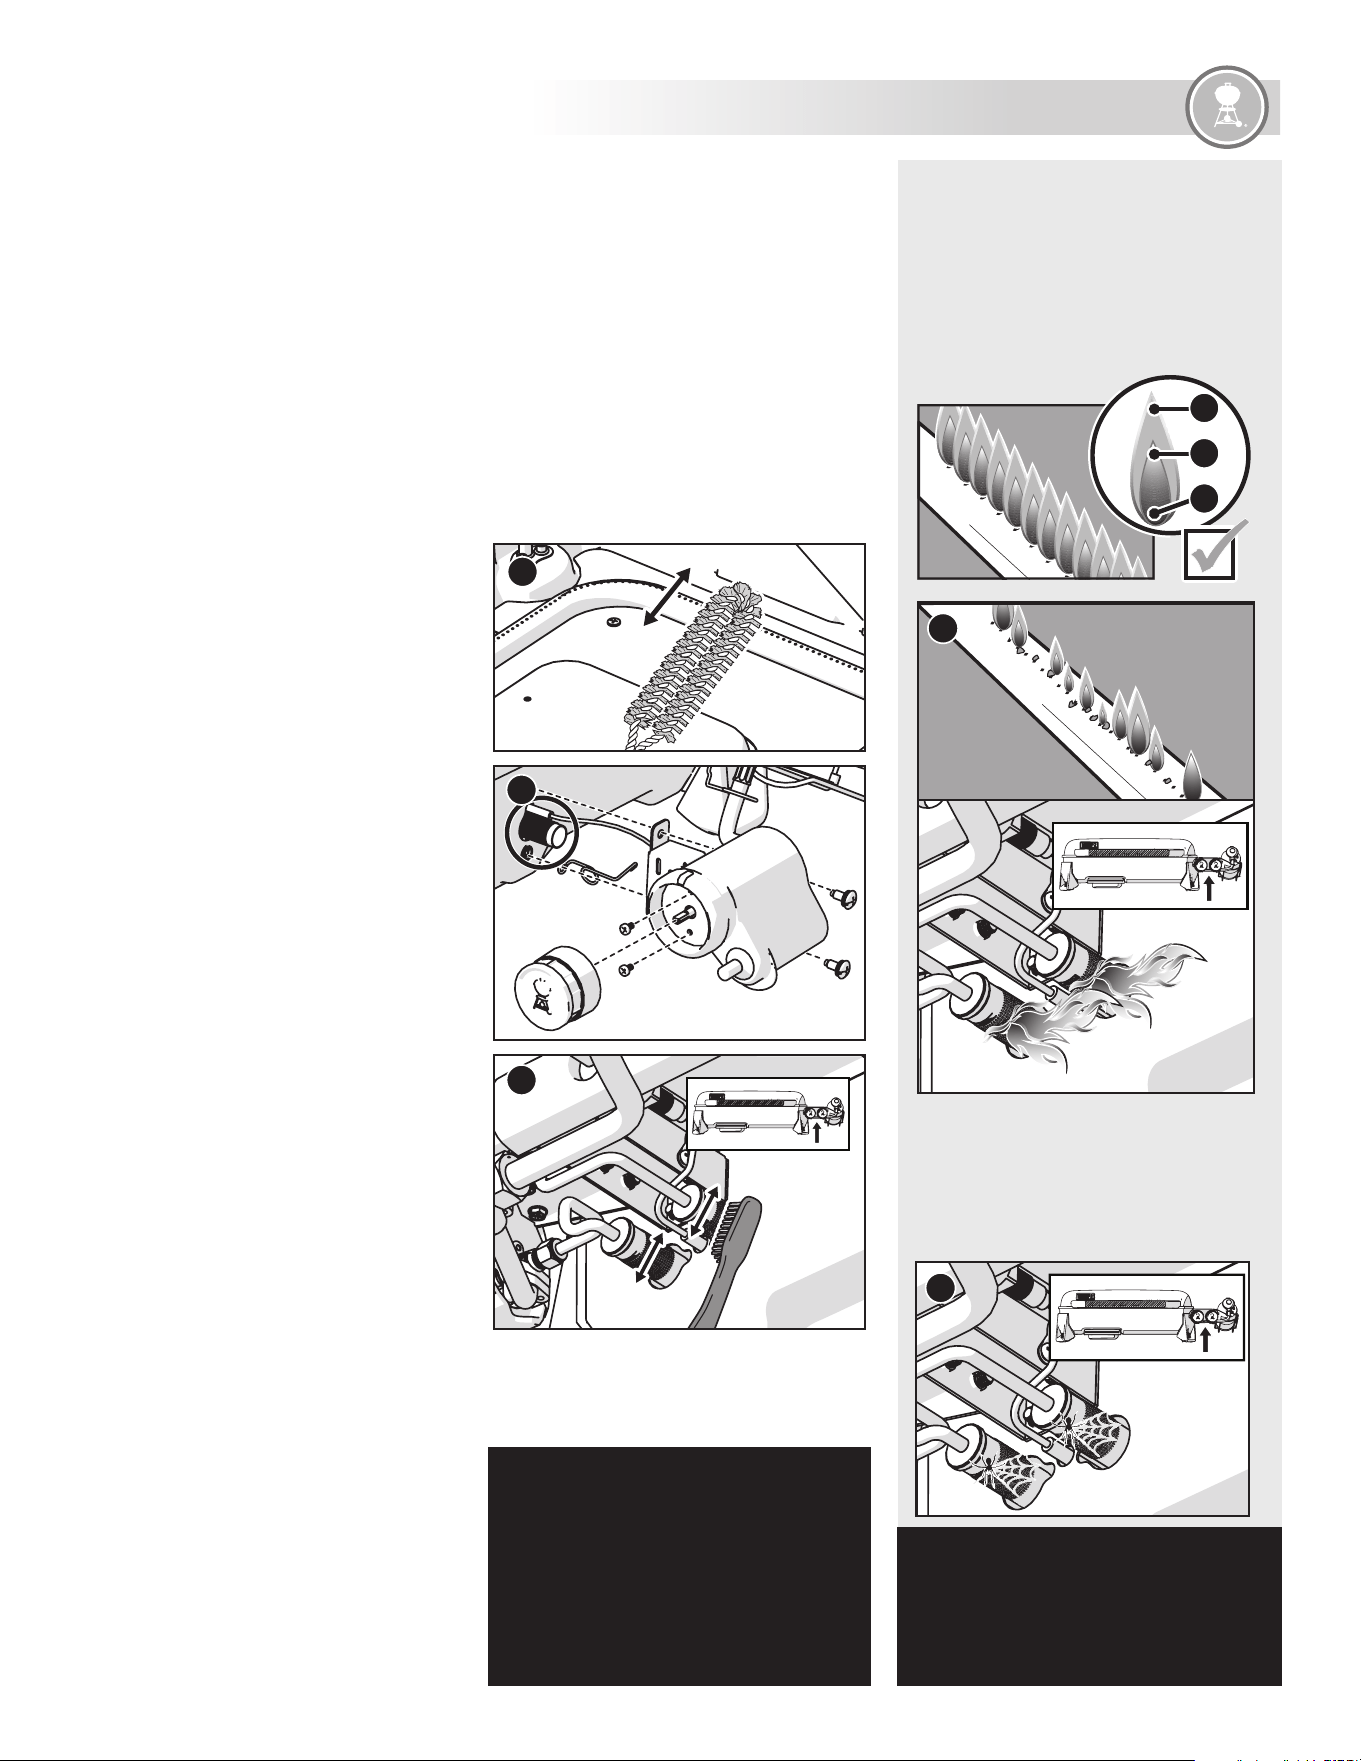
Proper Burner Flame Pattern
The burner in your grill is factory set for the correct
air and gas mixture. When the burner is performing
correctly, you will see a specific flame pattern.
The tips may occasionally flicker yellow (A), with a
descending light blue (B) to dark blue flame (C).
m WARNING: Blocked and dirty ports can restrict full
gas flow, resulting in a fire (D) in and around the gas
valves, causing serious damage to your grill.
Spider Screens
The combustion air openings of the burners(E) are
fitted with stainless steel screens to prevent spiders
and other insects from spinning webs and building
nests inside the burners. Additionally, dust and
debris can accumulate on the outside of the spider/
insect screen and obstruct the oxygen flow to the
burners.
PRODUCT CARE
m WARNING: Do not attempt to make any repair to
gas carrying, gas burning, ignition components
or structural components without contacting
Weber-Stephen Products LLC, Customer Service
Department.
m CAUTION: The burner tube openings must be
positioned properly over the valve orifices.
B
A
C
E
D
m WARNING: Turn your grill o and wait for it to cool
before thoroughly cleaning.
m WARNING: When cleaning the burners, never use
a brush that has already been used to clean the
cooking grates. Never put sharp objects into the
burner port holes.
m CAUTION: Do not use any of the following to clean
your grill: abrasive stainless steel polishes or
paints, cleaners that contain acid, mineral spirits or
xylene, oven cleaner, abrasive cleansers (kitchen
cleansers), or abrasive cleaning pads.
Cleaning and Maintenance
Cleaning the Griddle
The griddle surface should be cleaned after each use to
preserve it and continue to ensure a non-stick cooking
surface. Follow these steps for a proper cleaning:
1. After the grill is o and cooled for 5 minutes, use a
metal scraper or spatula to scrape excess grease, oil,
and food debris into the hole in the griddle.
NOTE: For stubborn, stuck on food debris, a small amount
of room temperature water can be used during the scraping
process. DO NOT USE LARGE AMOUNTS COLD WATER WHILE
CLEANING THE GRIDDLE.
2. Using several paper towels, wipe and dry the griddle's
surface, directing any excess grease, oil, and food
debris into the hole in the griddle.
3. Apply small amounts of a neutral cooking oil such as
vegetable or canola across the griddle's surface.
4. Using paper towels, rub the oil evenly around the en-
tire cooking surface. Use more paper towels if needed
to wipe up any excess pools of oil.
Cleaning the Burners
Two areas on the burners that are key to optimum
performance are the ports (small openings running along
the length of the burners) and the spider/insect screens on
the front ends of the burners. Keeping these areas clean is
essential for safe operation.
Cleaning the Burner Ports
1) Once the grill has been turned o and cooled, and the
LP cylinder has been disconnected, using BBQ mitts or
gloves remove the griddle and set aside.
2) Use a clean stainless steel bristle grill brush to clean the
outside of the burners by brushing across the burner
ports (A).
Cleaning the Spider Screens
1) Locate the ends of the burners on the underside of the
control panel where they meet the valves. On 17” (43 cm)
models it is necessary to remove the bezel bracket to
access the spider screen. Follow these insctructions to
access the spider screen (B):
1. Remove the control knob by pulling it out away from the
control assembly.
2. Remove the two screws from the control knob bezel.
3. Remove the two screws from the bezel bracket.
4. Clean the spider/insect screens on the burner tube using a
soft bristle brush.
5. Once the spider screen is cleaned, reassemble the control
knob assembly in the reverse order.
NOTE: Make sure the grounding wire and ignition wire are
connected to the control assembly before reassembling.
2) Clean the spider/insect screens on the burner tube(s)
using a soft bristle brush (C).
Cleaning the Grease ManagementSystem
The grease management system consists of a slide-out
grease tray and a catch pan. These components were
designed to be easily removed, cleaned, and replaced; an
essential step every time you prepare to grill. Instructions
on inspecting the grease management system can be found
in the "Every Time You Cook" section of this manual.
NOTE: If any grease sticks to the grease chute, a small
amount of water may help flush it into grease tray.
NOTE: In the event of severe weather, water may enter the
grease tray and disposable drip pan. Check the disposable
drip pan and grease tray for water and empty when
necessary.
Cleaning the Grill Frame
The outside of your grill may include stainless steel,
porcelain-enameled, and plastic surfaces. WEBER
recommends the following methods based on the
surfacetype:
Cleaning Stainless Steel Surfaces
Clean stainless steel using a non-toxic, non-abrasive
stainless steel cleaner or polish designed for use on outdoor
products and grills. Use a microfiber cloth to clean in the
direction of the grain of the stainless steel. Donot use paper
towels.
A
B
NOTE: Do not risk scratching your stainless steel with
abrasive pastes. Pastes do not clean or polish. They
will change the color of the metal by removing the top
chromium oxide film coating.
Cleaning Painted, Porcelain-Enameled Surfaces and
PlasticComponents
Clean painted, porcelain-enameled and plastic components
with warm soapy water, and paper towels or cloth. After
wiping down the surfaces, rinse and dry thoroughly.
Cleaning the Outside of Grills that are in Unique
Environments
If your grill is subject to a particularly harsh environment,
you will want to clean the outside more often. Acid rain,
pool chemicals, and salt water can cause surface rusting
to appear. Wipe down the outside of your grill with warm
soapy water. Follow up with a rinse and thorough drying.
Additionally, you may want to apply a stainless steel cleaner
weekly to prevent surface rust.
C
Loading ...