Instruction Manual
DancingWaterLightTowerSpeakerSystemwithBluetooth
MODEL:
E
HS-200
1

Caution:
Changesormodificationsnotexpresslyapprovedbythepartyresponsiblefor
compliancecouldvoidtheuser'sauthoritytooperatetheequipment.
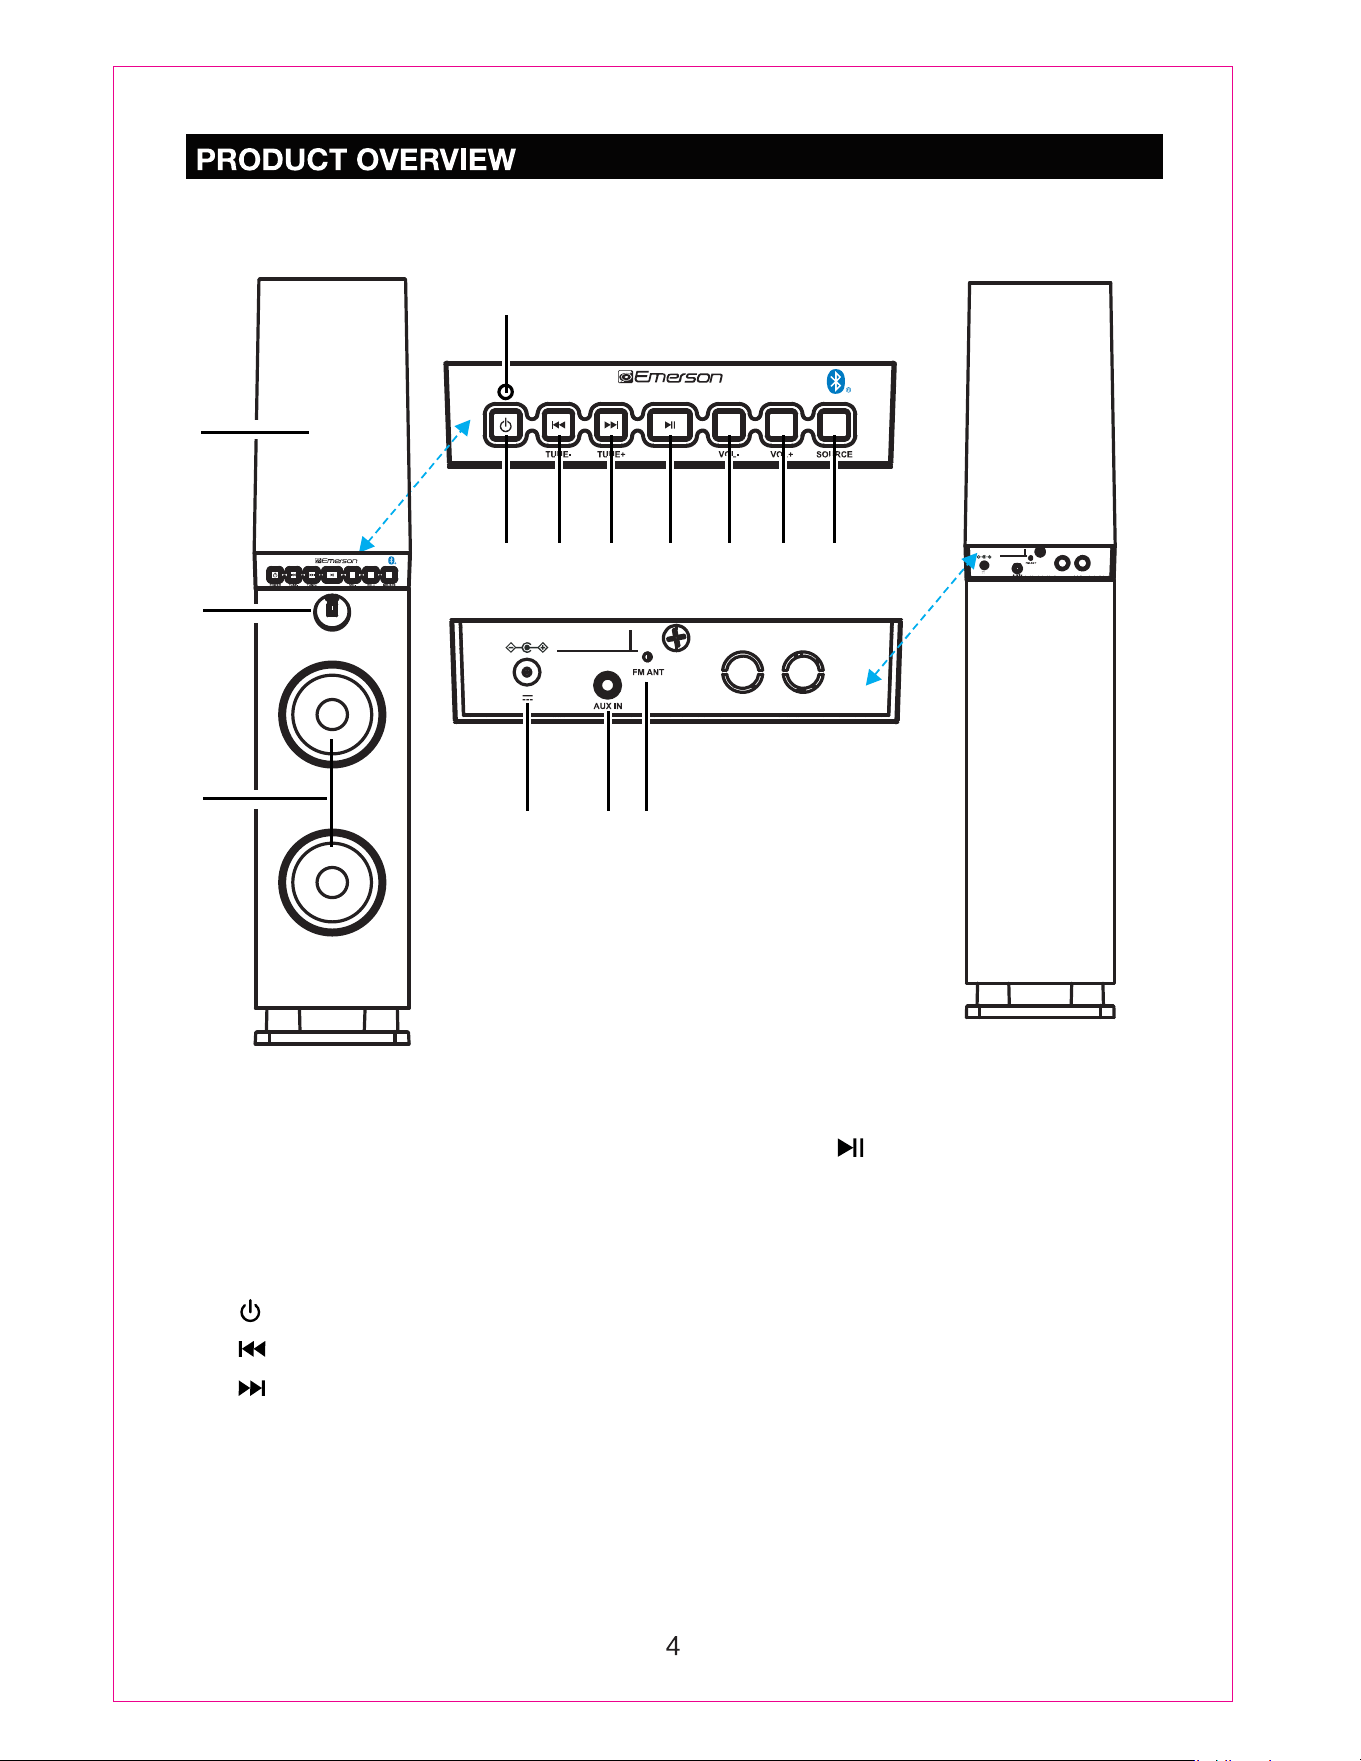
Front View
Rear View
3
4
4. Indicator
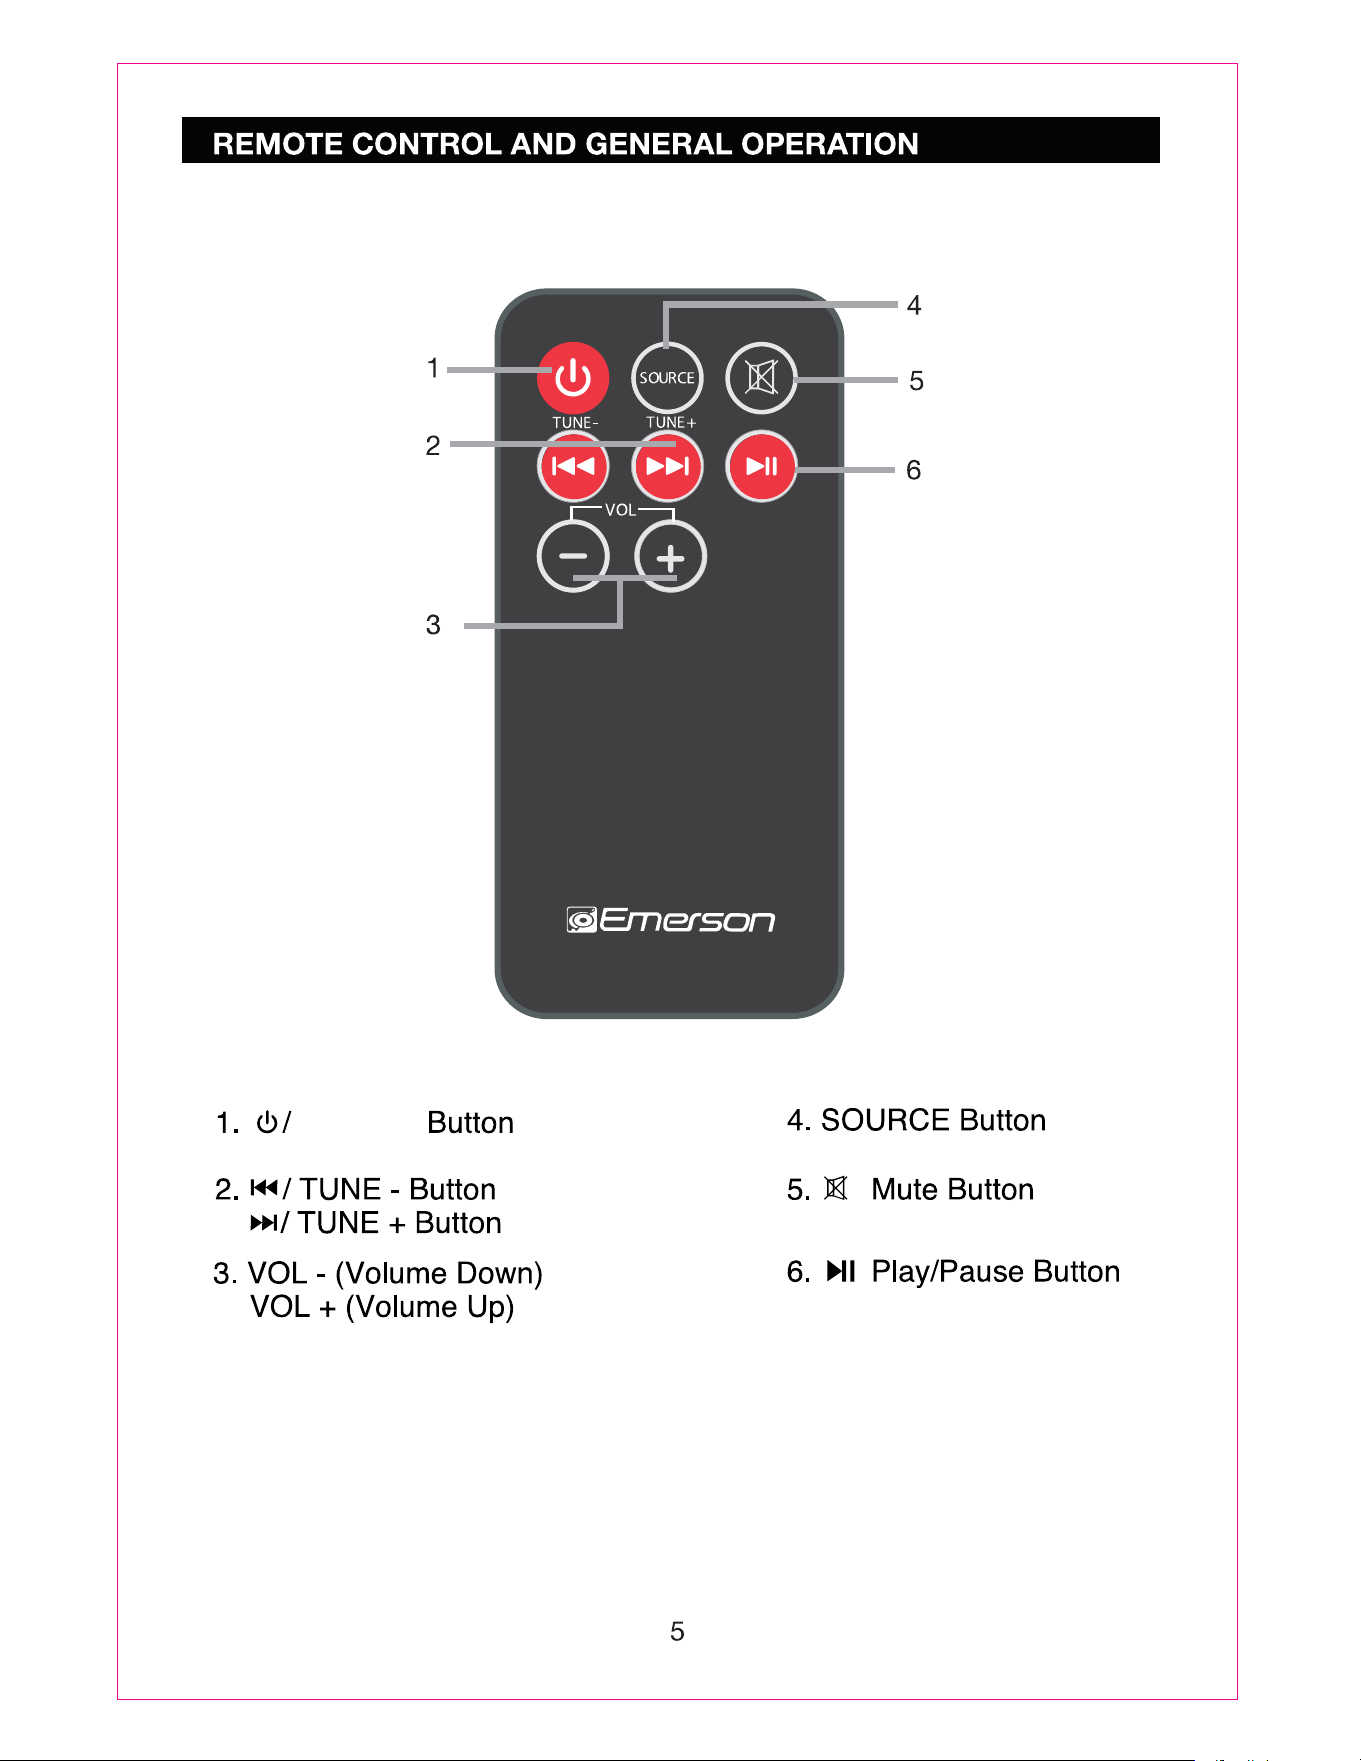
6. / TUNE - Button
7. / TUNE + Button
5. (Power) Button
9. VOL - (Volume Down)
10. VOL + (Volume Up)
13. AUX IN Jack
11. SOURCE Button
12. DC IN Jack
10
14
5 6 7 8 9
12 13
8. (Play/Pause) Button
14. FM ANT
(Antenna)
2. Remote Sensor
1
1. Water Dancing Cover
POWER
5.8V
2A
DC IN
DC 5.8V,2A
DC IN
11
2
3. Speakers
POWER
POWER
EHS-2001

BATTERY PRECAUTIONS
Follow these precautions when using a battery in this device:
1. Use only the size and type of battery specified.
2. Be sure to follow the correct polarity when installing the battery as indicated in the
battery compartment, a reserved battery may cause damage to the device.
3. Do not mix different types of batteries together ( e.g: Alkaline and Carbon-zinc ) or old
batteries with fresh ones.
4. If the batteries in the device are consumed or the device is not to be used for a long
period of time, remove the batteries to prevent damage or injury from possible leakage.
5. Do not try to recharge the battery not intended to be recharged; it can overheat and
rupture. ( Follow battery manufacturer’s instructions.)
6. The batteries shall not be exposed to excessive heat such as sunshine, fire or the like.
7. Clean the battery contacts and also those of the device prior to battery installation.
8. The Remote Control supplied with a coin/button cell battery. If the coin button cell
battery is swallowed, it can cause severe internal burns in just 2 hours and can lead
to death.Keep new and used battery away from children. If the battery compartment
does not close securely, stop using the product and keep it away from children.
If you think batteries might have been swallowed or placed inside any part of the
body, seek immediate medical attention.
CAUTION
Dangerofexplosionifthebatteryisincorrectlyreplaced.Replaceonlywiththesameor
equivalenttype.
EFFECTIVE DISTANCE OF REMOTE TRANSMITTER
NOTES:
----when there is an obstacle between the unit and the transmitter may not operate.
----when direct sunlight, an incandescent lamp, fluorescent lamp or any other strong light
shines on the REMOTE SENSOR of the unit, the remote operation may be unstable.
, the LED light will light in the water cover
andwaterwill
Press the Power Button
dance.
Press the Power Button , the LED light will turn off in the water cover
and
water will
stop dancing.
Press the SOURCE Button repeatedly until the indicator turns GREEN.
/ TUNE -
/ TUNE +
/ TUNE -
/ TUNE +
During playback:
Water dancing up and down will be controlled by the volume level.
8
9
Selecting Bluetooth Mode
Your Tower Speaker also includes Bluetooth connectivity. You can connect Bluetooth
equipped mobile phones, tablets and laptop computers to play through your audio
system.
- Please note, only one Bluetooth device can be connected to the unit at one time.
Press the SOURCE button until
theblueindicatorflashes.
- The system will start searching for the device last connected, if the device is
found the system will reconnect the device automatically.
Activate Bluetooth on your device
(smartphone, tablet, computer,etc.).
In the Bluetooth menu of your device, there should be an option to search for
Bluetooth devices. Select this option.
- Your device will now scan for other Bluetooth devices and should find the
unit, identified as
''EMERSONEHS-2001"
".
Choose to pair with
“EMERSONEHS-2001”
-
If asked for a password, please enter "
Your Bluetooth device will now be connected. Once a connection has been
established, the indicator will stay lit.
After pairing for the first time, the audio system will appear on the connection
menu of your Bluetooth device.
If you want to connect another Bluetooth device to the unit, deactivate the current
connection. Follow the steps above to connect the new device.
During playing:
Press button to change between Play and Pause mode at any time.
Press or button to select the next or previous track.
PressVOL-orVOL+buttontodecreaseorincreasethevolume.
- These functions may not be available for all Bluetooth sources.
Press button on the remote control to turn off sound, press again to resume.
Water dancing up and down will be controlled by the volume level.
theBluetoothTowerSpeaker.
PresstheSOURCEbuttonrepeatedlyuntiltheindicatorturnsORANGE.
Waterdancingupanddownwillbecontrolledbythevolumelevel.
10
Press
buttononremotecontroltoturnoffsound,pressagaintoresume.
Setthesourcetoplay.
PressVOL-/+toadjustvolume.
11
Accessories
12
Instruction Manual
AUX IN Cable
Remote Control with Battery
AC Adapter
WarrantyCard
Power Source...........................................................................5.8V 2A
Power Consumption............................................................................................11.6W
Bluetooth Working Range......................................................................up to 33ft(10m)
FM Coverage.........................................................................................87.5-108.0MHz
Support
Ifyouhaveproblemswithyourdevice,pleaseconsult
theinstructionsinthismanual,aswellasthelatest
news,alerts,anddocumentationwhichcanbefound
byvisitingusonthewebatwww.emersonaudio.com.
Ifyouneedfurtherassistance,pleasecontactNaxa
TechnicalSupport.
NAXATechnicalSupport
2320East49thSt.
Vernon,CA90058
www.emersonaudio.com
MODEL:EHS2001
SistemadealtavocesdeFarodeagua
debaileconBluetooth
Elsímbolodelrelámpagocon
puntadeflechadentrodeun
triángulo,esdiseñadopara
advertiralusuariodevoltajes
peligrososnoaisladosdentrodel
productoquepuedenserde
magnitudsuficientepara
constituirriesgodefuegoo
choqueeléctricoparalas
persona.
PRECAUCIÓN: PARA REDUCIR EL
RIESGO DE CHOQUE ELECTRICO
NOREMOVERLACUBIERTA(O
TAPA),DENTRODEESTE
APARATONOHAYPARTESQUEEL
USUARIOPUEDADARLESERVICIO,
ACUDIRAUNCENTRODE
SERVICIOAUTORIZADOOCON
PERSONALCALIFICADO.
Elsímbolodeexclamacióndentro
deuntriángulo,esparaalertaral
usuariodelapresenciade
instruccionesimportantesde
operación,mantenimientoy
servicioqueseencuentrandentro
deesteinstructivo
DECLARACION FCC
EsteproductohasidoprobadoycumpleconlaslimitacionesdeunproductodigitalClase
B,deacuerdoconlaParte15delasNormasFCC.Estoslímitesestándiseñadospara
permitirunaprotecciónrazonablecontrainterferenciadañinaenunainstalación
residencial.Esteproductogenera,usaypuedeemitirenergíadefrecuenciaradialy,deno
serinstaladoyutilizadodeacuerdoconlasinstrucciones,puedecausarinterferencia
dañinaalascomunicacionesradiales.Sinembargo,noexistegarantíadequela
interferencianopuedaocurrirenunainstalaciónparticular.Siesteproductocausauna
interferenciadañinaalarecepcióndelaradioolatelevisión,locualsepuededeterminar
encendiendoyapagandoelproducto,serecomiendaalusuariotratardecorregirla
interferenciamedianteunaomásdelassiguientesmedidas:
• Orientarnuevamenteoreubicarlaantenareceptora.
• Aumentarlaseparaciónentreelproductoyelreceptor.
• Conectarelproductoaunasalidadeuncircuitodiferentealreceptor.
• Consultarasuproveedoroauntécnicoderadioytelevisión.
Esteproductocumpleconlaparte15delasreglasFCC.Laoperacióndelaparatoestá
sujetaalasdossiguientescondiciones:
(1) Esteproductonopuedecausarinterferenciaperjudicialy(2)esteproductodebe
aceptarcualquierinterferenciarecibida,incluyendointerferenciasquepuedancausarun
funcionamientonodeseado.
Laantenausadaparatransmisióndebeestarinstaladaporelproveedoraunadistancia
dealmenos20cmdelaspersonasynodebesercolocadauoperadaenconjuntocon
cualquierotraantenaotransmisor.
Precauciones sobre modificaciones
Cualquiercambioomodificaciónnoexpresamenteaprobadaporlaparteresponsabledel
cumplimientopuedeanularlaautoridaddelusuarioparaoperaresteproducto.
2

IMPORTANTES INSTRUCIONES DE SEGURIDAD
1. Leerl
asinstrucciones.
2. Conservarlasinstrucciones.
3. Poneratenciónalasadvertencias.
4. Seguirlasinstrucciones.
5. No usar este producto cerca del agua por ejemplo cerca de una bañera, lavabo,
fregadero de cocina o de lavar, sótanos húmedos o cerca de una piscina. Este
productonodebeserexpuestoalgoteoosalpicaduradeagua,alalluviaohumedad.
Nocolocarobjetosllenosconlíquidosencimadelproducto,comovasosconagua.
6. Limpiar solo con una tela, suave, limpia y seca, No usar limpiadores líquidos o en
aerosol.
7. Nobloquearlasranurasdeventilaciónparaasegurarlabuenaoperacióndelproducto
y protegerlo del sobrecalentamiento. Instalar de acuerdo con las instrucciones del
fabricante. No colocar el producto sobre una cama, sofá, alfombra u otra superfici
e
similar que bloquee las aberturas. El producto no debe colocarse en un librero o
estantequeimpidaelflujodelaireatravésdelasranuras.Laventilaciónnodebeser
bloqueadacubriendolasranurasconobjetoscomoperiódicos,cortinas,franelas,etc.
8. Elproductonodebecolocarsecercaosobreunradiadorofuentesdecalor,registros
de calor, estufas u otros productos que producen calor (incluso amplificadores). La
exposicióncontinuaatemperaturasde75°Comayores,porejemploenelinteriorde
unautomóvilduranteelverano,puederesultarendañosalproducto.
9. No colocar sobre el producto fuentes generadoras de flama como velas, veladoras,
etc.
10. No eliminar la característica de seguridad de una clavija polarizada o clavija con
terminalatierra,estaesunamedidadeseguridad.Unaclavijapolarizadacuantacon
dos terminales con una terminal más ancha que la otra. Una clavija con terminal
a
tierracuentacondosterminalesconunaterceraterminalconconexiónatierra.Sila
clavija no entra completamente en el tomacorriente, intentar meterla nuevamente
volteándola; si tampoco entra completamente consultar a un electricista o personal
calificadoparareemplazareltomacorrienteobsoleto.
11. Proteccióndelcordóndealimentación.Elcordóndealimentacióndebecolocarsede
forma tal que no exista probabilidad de pisarlo o apretarlo sobre los lugares donde
serácolocadoocontraelproductomismo.Poneratenciónparticularenelcordón,la
clavija,eltomacorrienteyenlospuntosendondeestossalendelproducto.
12. No instalar en un área que impida el fácil acceso al tomacorriente. Desconectar el
cordónode alimentacióneslaúnicaformaderemover completamentelafuentede
alimentacióndelproductoydebeserfácilmenteaccesibleentodomomento.
13. Fuentes de alimentación – Este producto debe ser operado solo con los tipos de
fuentes de alimentación indicados en la etiqueta de marcado, si no está seguro del
tipodelafuentedepoderdesucasa,consultarconsuproveedoroconlacompañía
de electricidad local. Para producto diseñados para operar con baterías u otras
fuentes,referirsealmanualdeoperación.
14. Desconectar este productodeltomacorriente durante tormentas eléctricas o cuando
3

novaserusadoporunperiodolargodetiempoparaprotegerlodedañosdebidoalos
rayososobrelíneasdepoder.
15. Sielproductonovaserusadoporunperiodolargodetiempo,favorderemoverlas
bateríasparaprevenirdañosporfugadeácido.
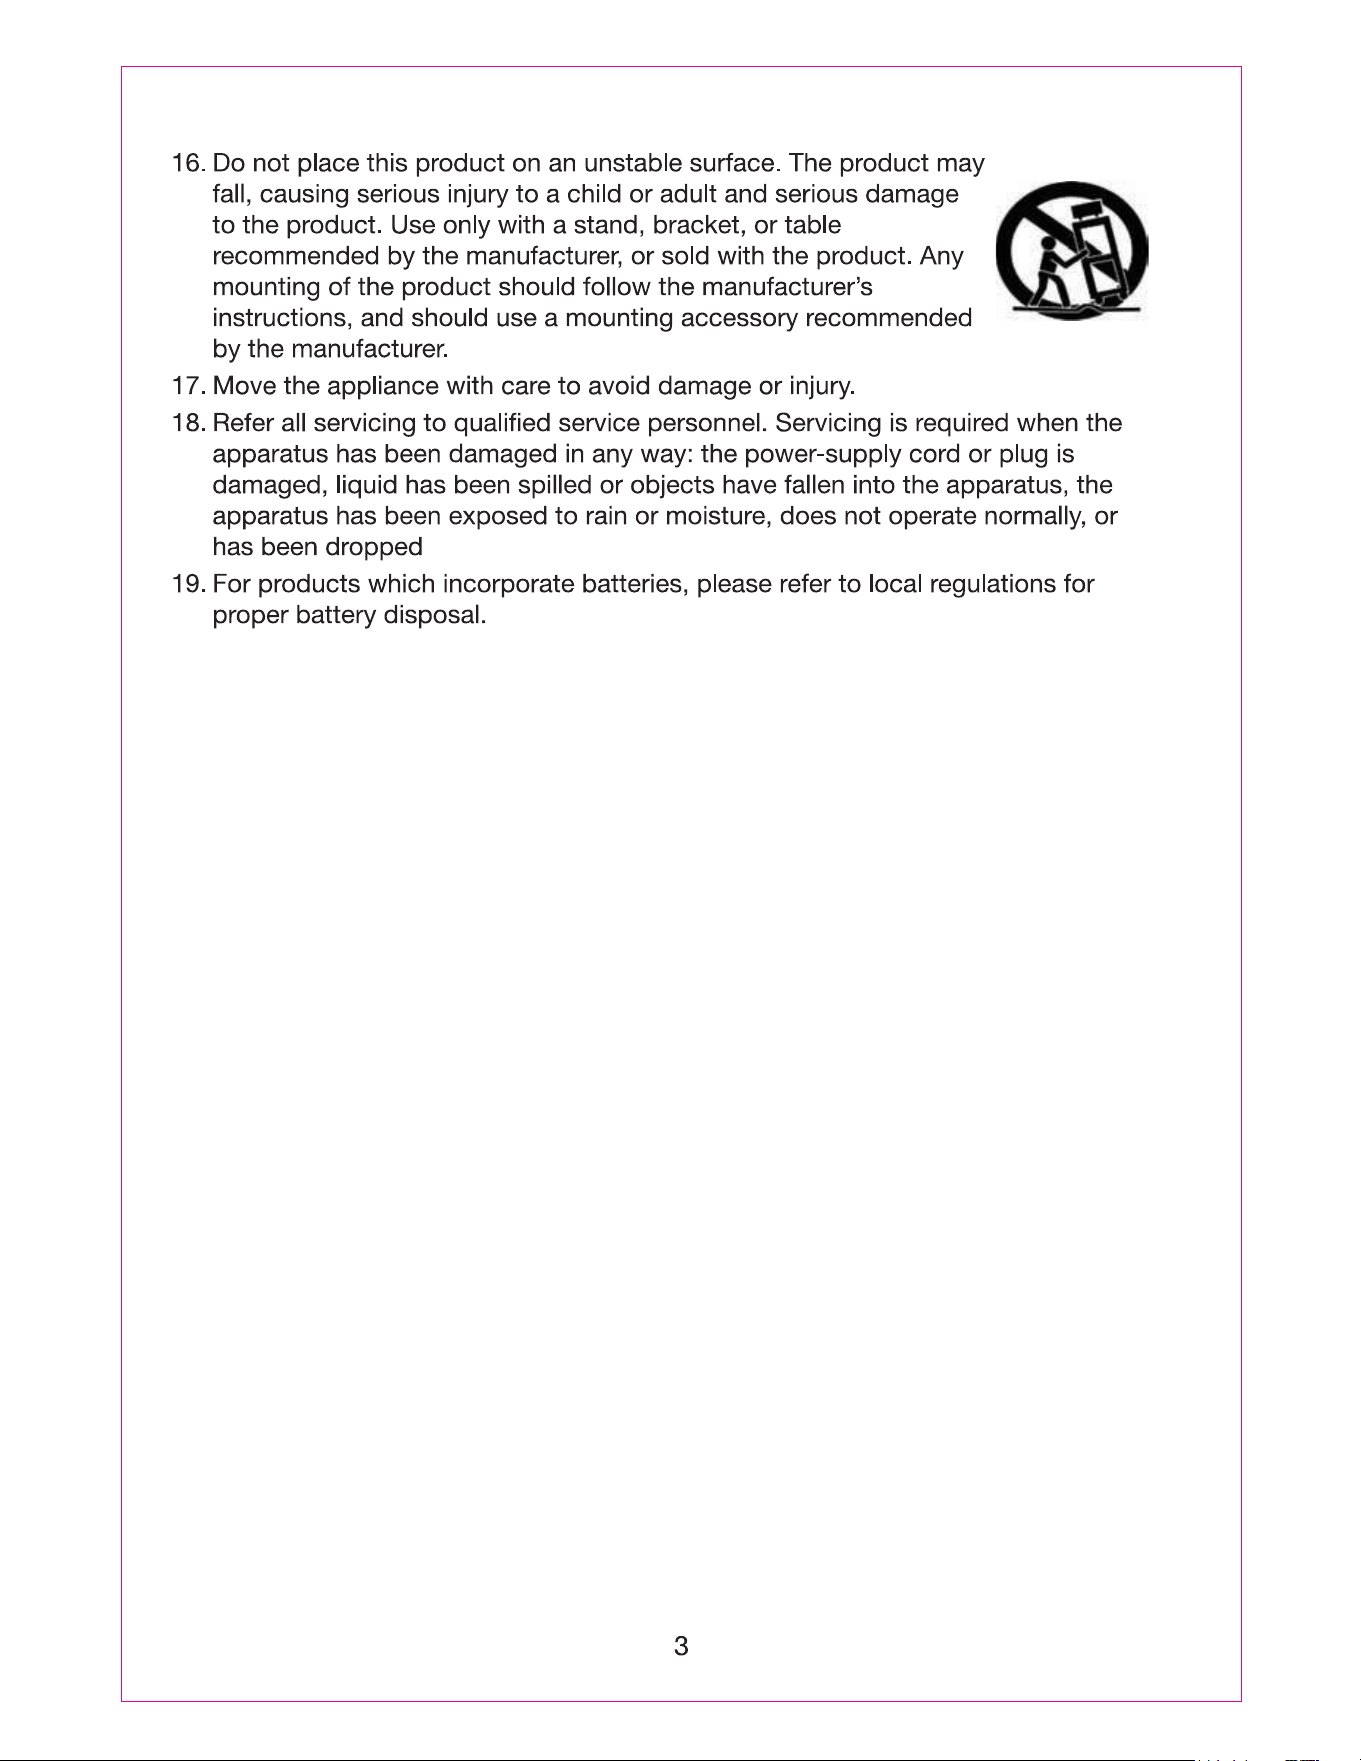
16. No colocar este producto en un carrito, plataforma, repisa o mesa
inestables, el producto puede caerse generando serias lesiones y
dañosalaspersonasy/oalproducto.Usaresteproductosolocon
elcarrito,plataforma,repisaomesarecomendadoporelfabricante
o vendido con el producto. Cualquier montaje del producto debe
seguir las instrucciones del fabricante y usar accesorios de montaje recomendados
porelfabricante.
17. Lacombinacióndelproductoydeuncarritodebemoverseconcuidado.Lasparadas
repentinas, fuerza excesiva y las superficies desniveladas pueden generar que el
productoyelcarritosevuelquen,generandoriesgodeseriaslesionesy/odañosalas
personasy/oalproducto.
18. No intentar dar servicio usted mismo a este producto, abriendo o removiendo las
cubiertas,puedeexponerseavoltajespeligrososuotrosriesgos.
19. Referirtodo servicio al centro deservicio autorizado.Servicio se requierecuandoel
producto ha sido dañado en cualquier forma; la clavija o el cordón de alimentación
estén dañados; ha sido derramado liquido o han caído objetos en el interior del
producto;elproductohasidoexpuestoalaalgoteoosalpicaduradeagua,alalluvia
o humedad; el producto no opera adecuadamente siguiendo las instrucciones
de
operación; el producto se ha caído o golpeado o si la cubierta está dañada; el
productoexhibecambiosensufuncionamientonormal.
20.
Paraproductoqueincorporanbaterías,referirsealorganismodedesechossólidosde
sulocalidadparadesecharlosdeformasegurayevitardañosalmedioambiente.
4
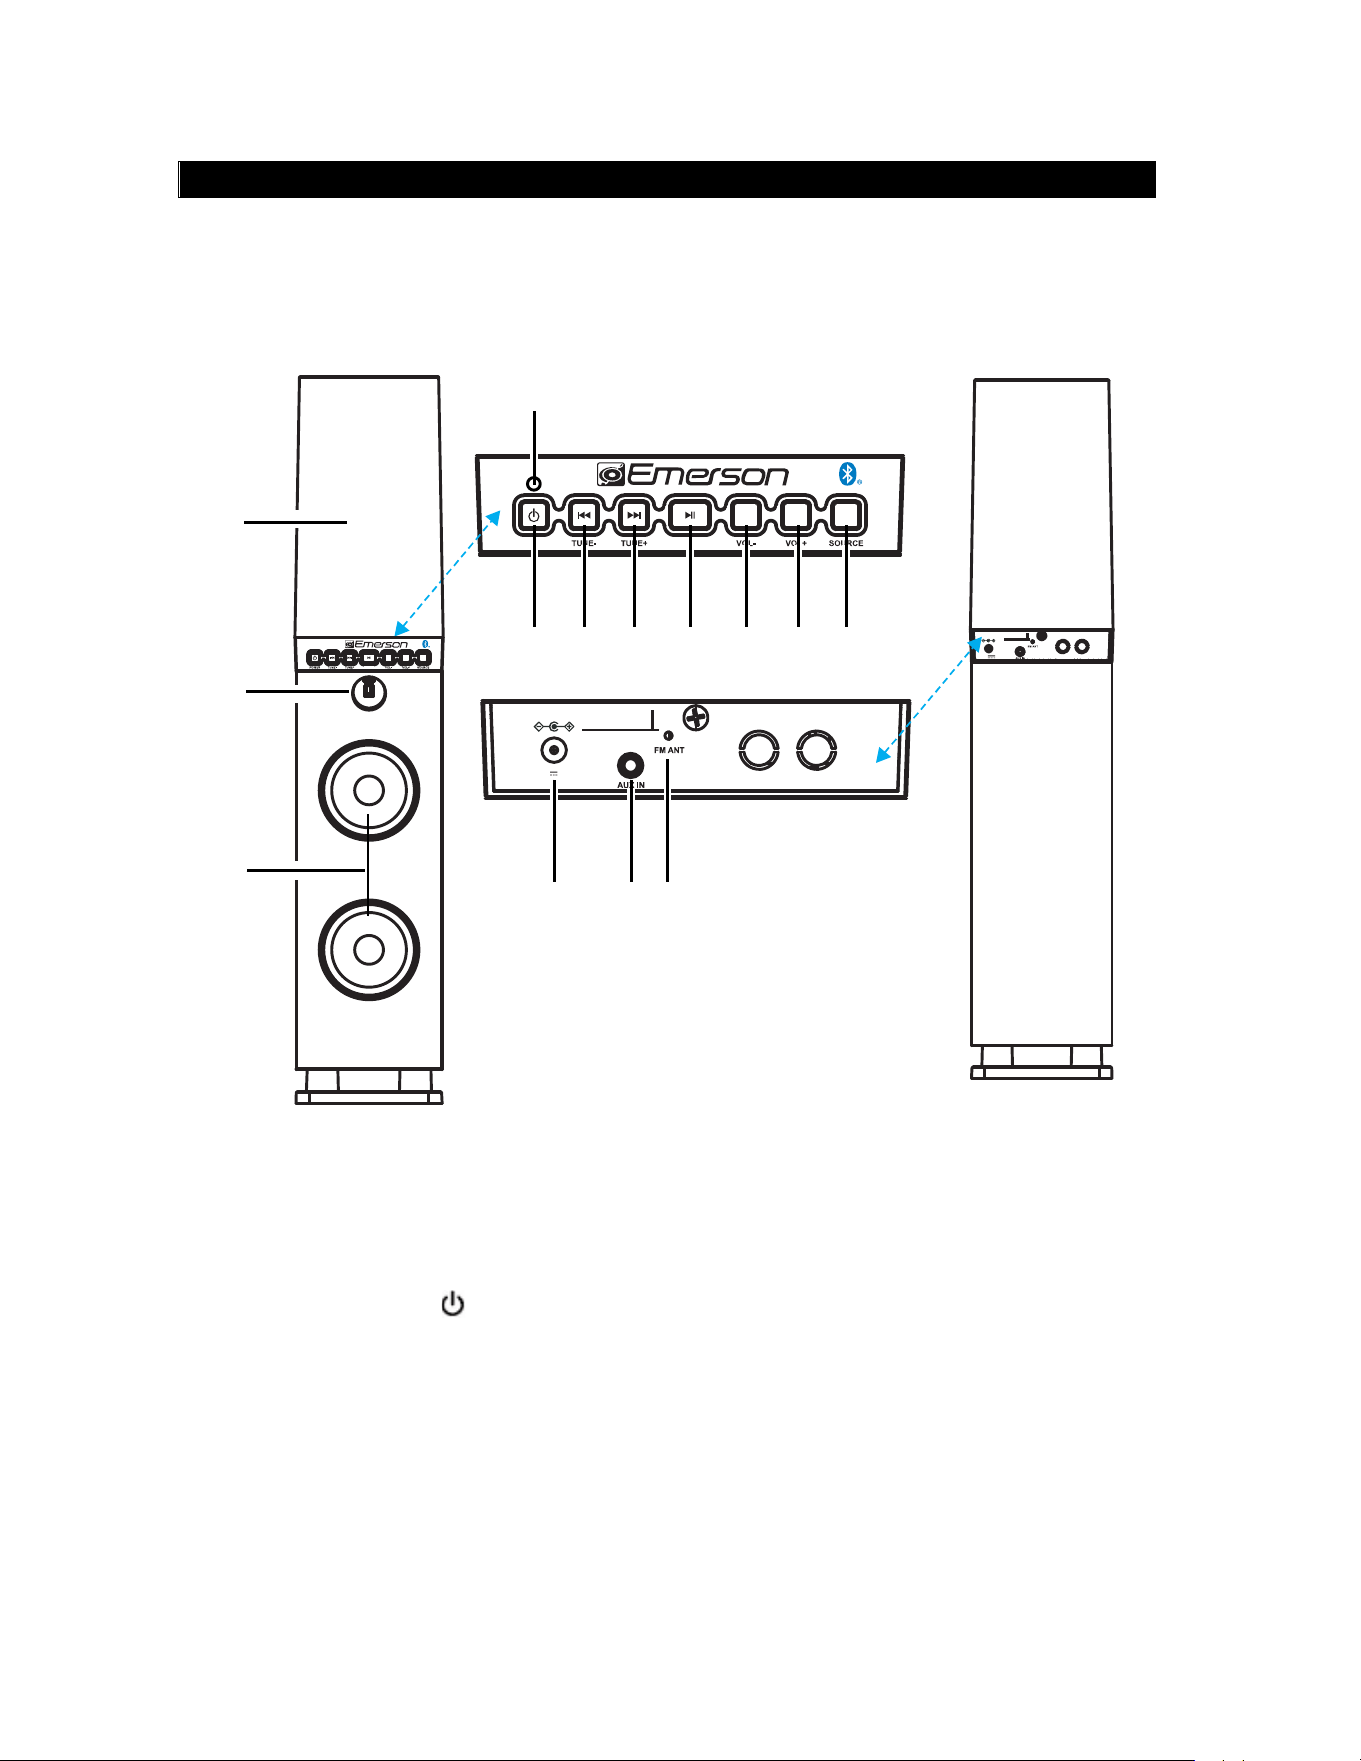
DESCRIPCION DE PARTES – UNIDAD PRINCIPAL
1. Cubiertaconaguadanzante
2. SensorInfrarrojo
3. Bocinas
4. Ledindicador
5. BotóndePoder“ ”“POWER”
6. BotóndeAnterior/Sintonía-
“!/TUNE-“
7. BotóndeSiguiente/Sintonía+
“"/TUNE+”
8. BotóndeReproducir/Pausar“#$”
9. Botónparaaumentarvolumen
“VOL+”
10. Botónparadisminuirvolumen
“VOL-“
11. BotóndeFuente“SOURCE”
12. ConectordeentradadeVcc“DC
IN”
13. Conectordeentradaauxiliar“AUX
IN”
14. AntenadeFM
5
VISTA
FRONTAL
VISTA
POSTERIOR
3
4
10
14
5 6 7 8 9
12 13
1
POWER
11
2
5.8V
2A
DC IN
5.8V
DC IN
2A
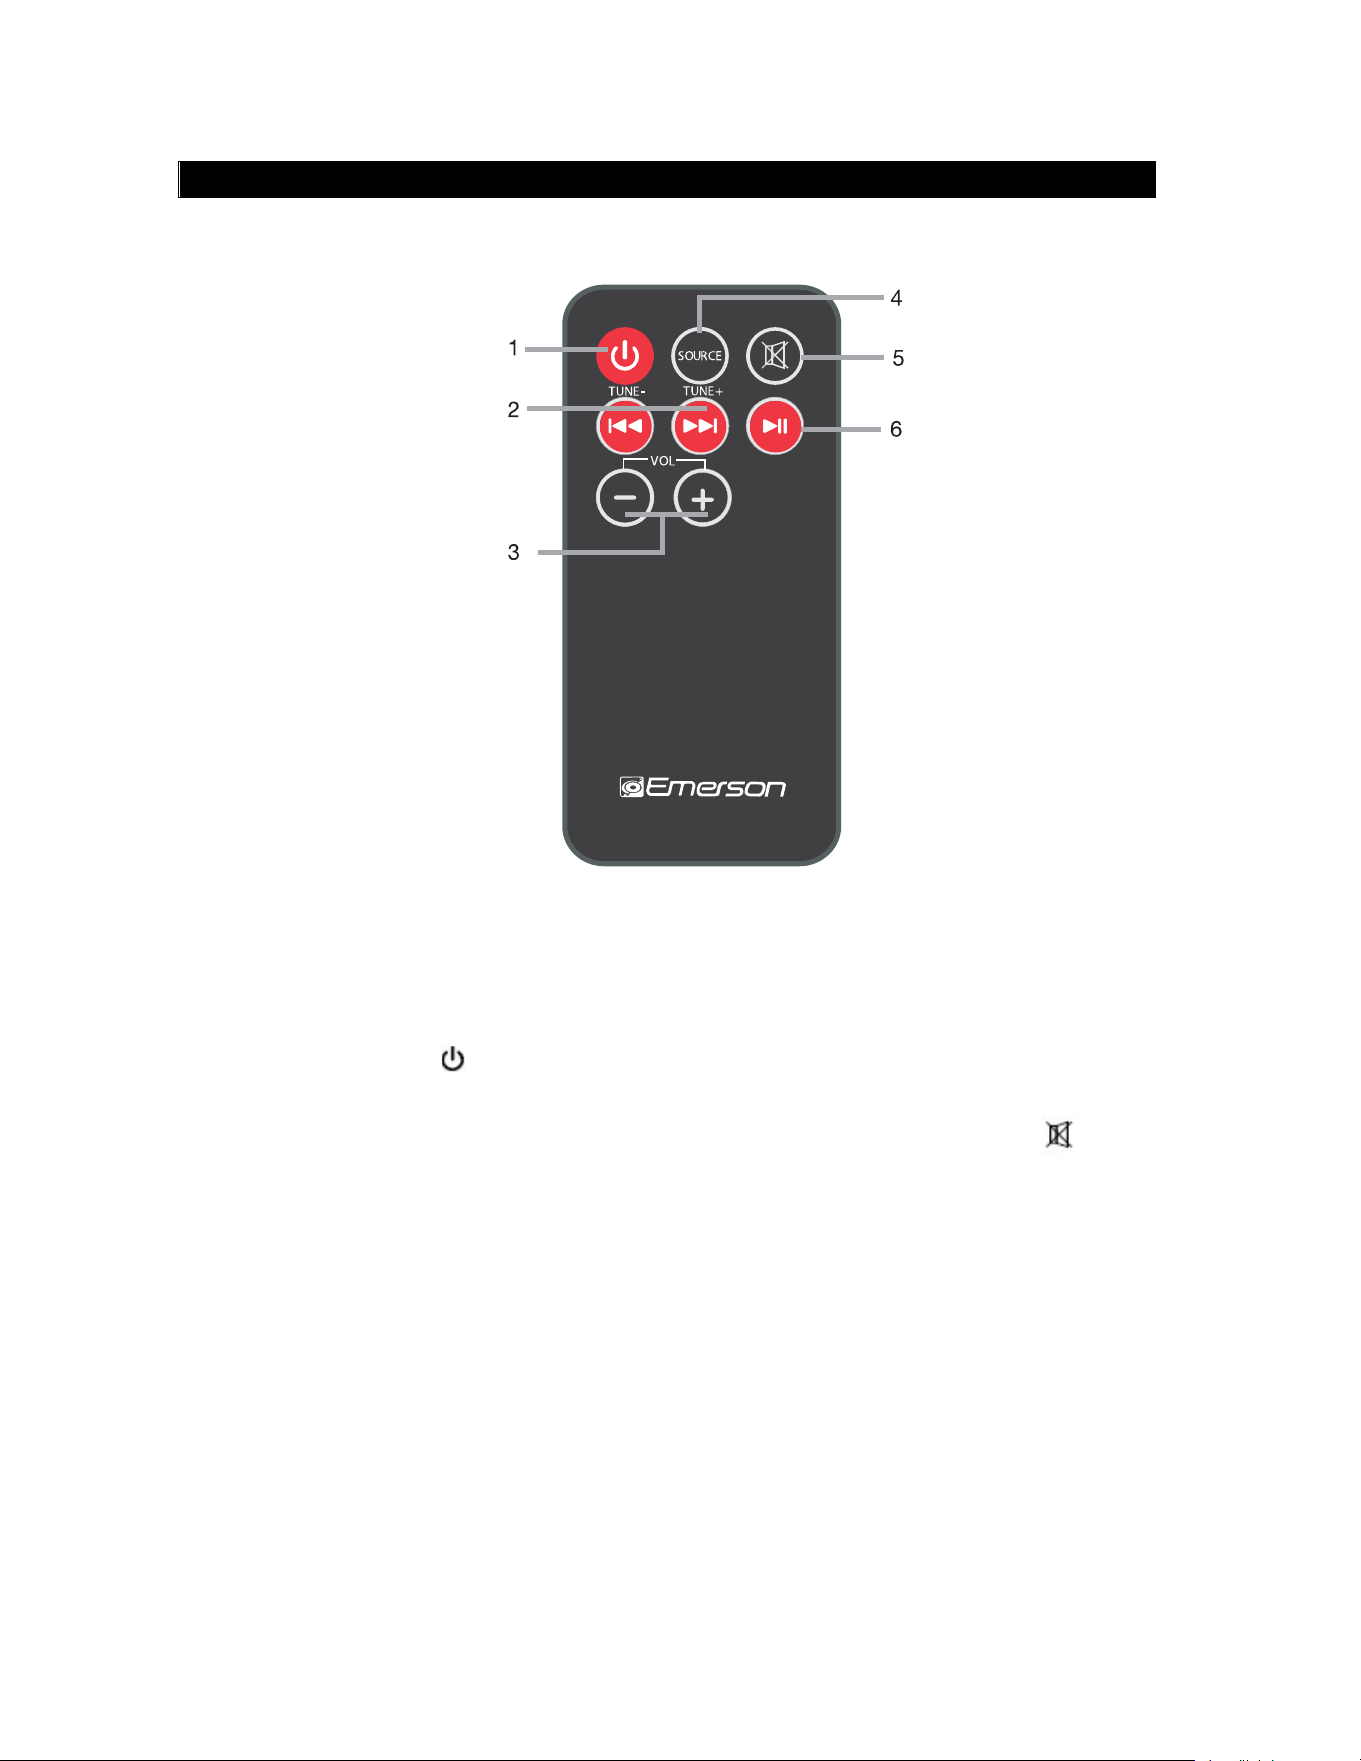
DESCRIPCION DE PARTES – CONTROL REMOTO
1. BotóndePoder“ ”“POWER”
2. BotóndeAnterior/Sintonía-“!/TUNE-“
BotóndeSiguiente/Sintonía+
“"/TUNE+”
3. Botónparaaumentarvolumen“VOL+”
Botónparadisminuirvolumen“VOL-“
4. BotóndeFuente
“SOURCE”
5. BotóndeSilencio“ ”
6. BotóndeReproducir/
Pausar“#$”
6
POWER
EHS-2001
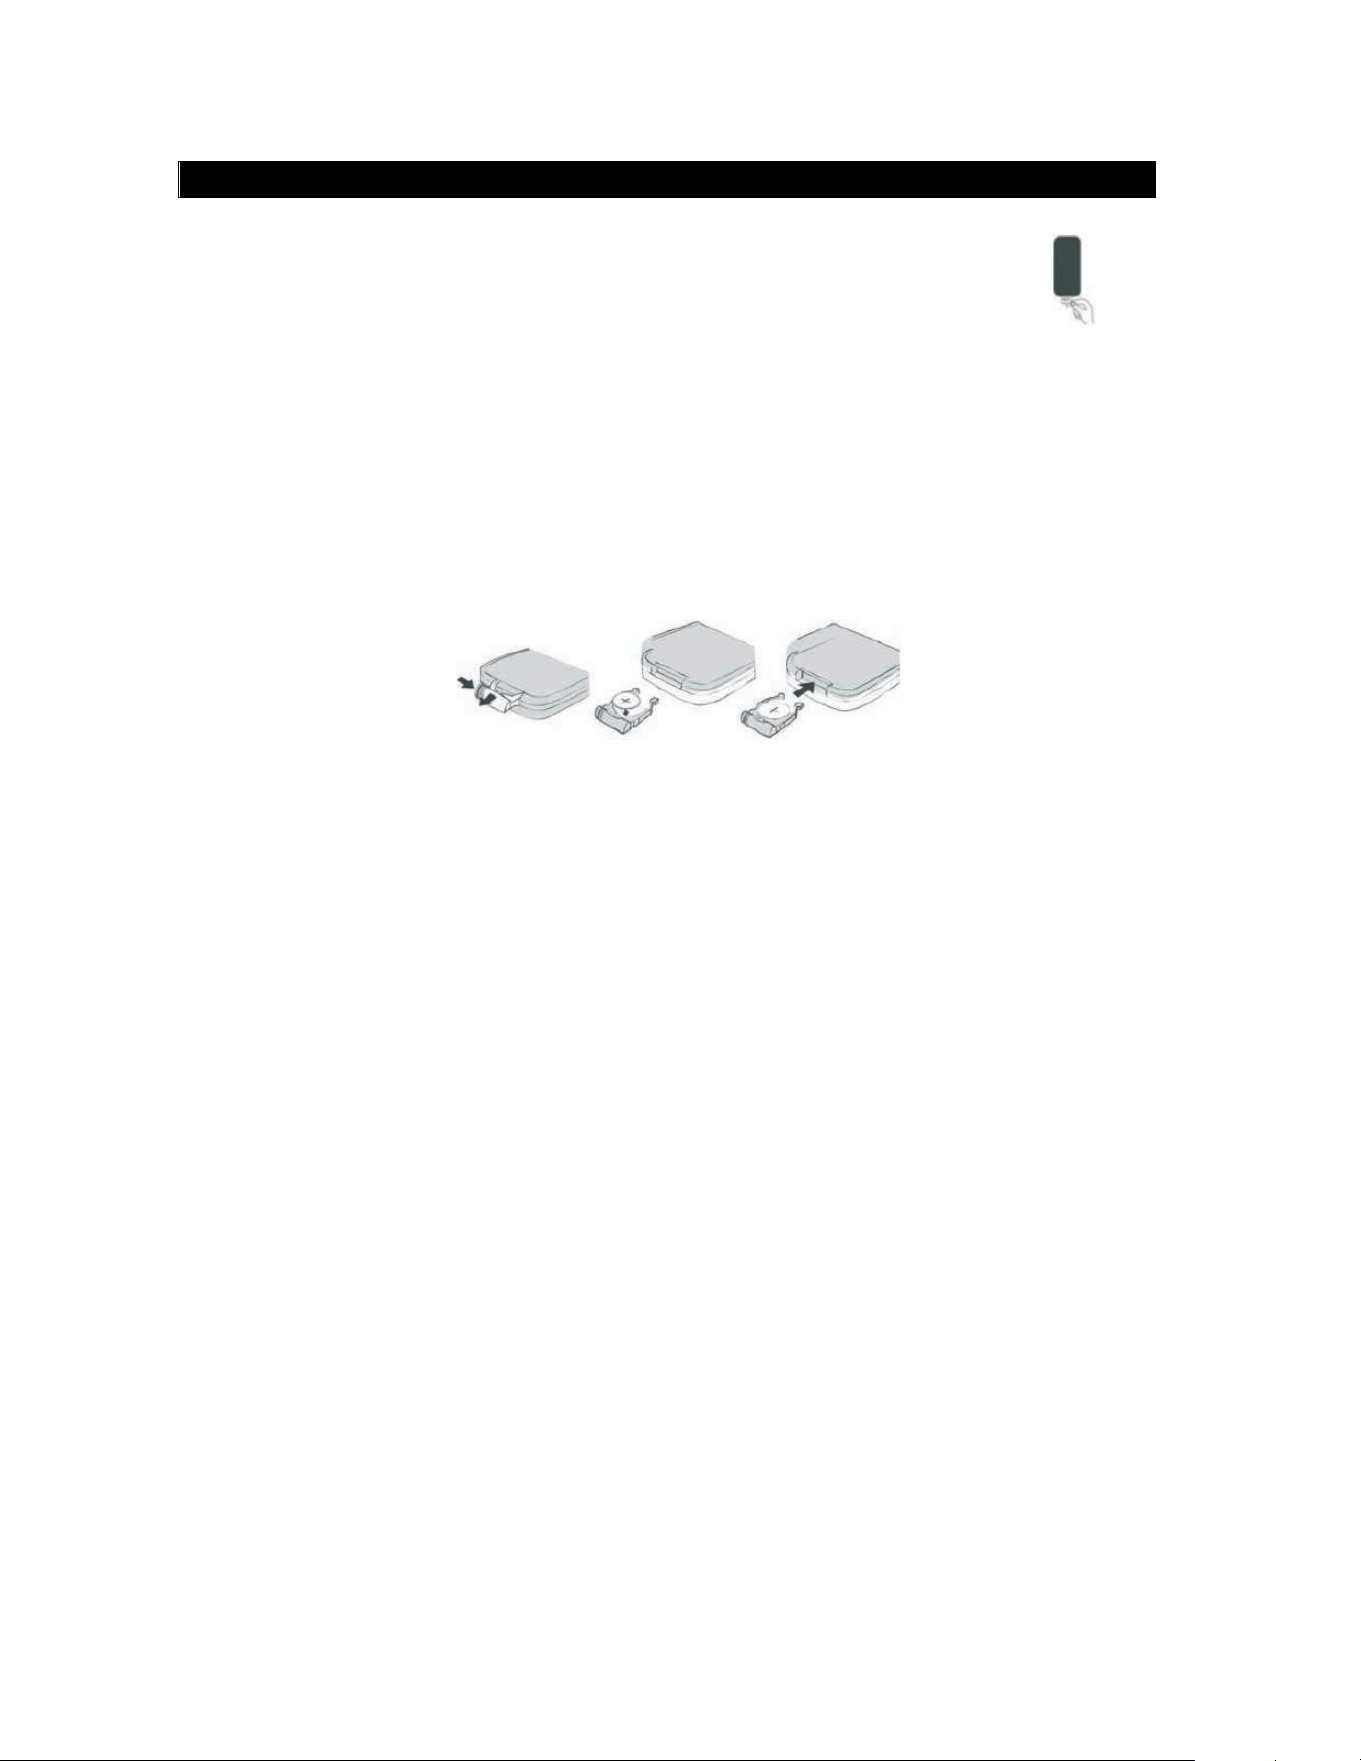
INSTALACION DE LA BATERIA – CONTROL REMOTO
Antes de usar por primera vez el control remoto: Remover el
protector de plástico del compartimiento de la batería como se
observaenlafigura
Reemplazando la batería
Elcontrolremotooperaconunabateríade3Vcctipobotón“CR2025”.
1. Presionarhacialaderechasobreelsegurodelabandejadelabateríayjalar
labandejahaciafuera.
2. Removerlabateríagastadaeinstalarunabateríanuevadelitio(CR2025)en
labandeja,verificandoqueelladopositivodelabateríaquedehaciaarriba.
3. Introducirlabandejaenelcompartimientohastaescucharunclic.
PRECAUCIONES SOBRE LAS BATERIAS
Seguirlasprecaucionessiguientesalusarbaterías
1. Usarsoloeltipoytamañodebateríaespecificada.
2. Asegurasedecolocarconlacorrectapolaridadalinstalarlabateríacomose
indicaenelinteriordelcompartimiento,unapolaridadincorrectapuedecausar
dañosalproducto.
3. Nomezclarbateríasdediferentetipo(porejemplo,alcalinasconzinc-carbón)
o bateríanuevasconusadas.
4. Sielproductonovaserusadoporunperiodolargodetiempo,favorde
removerlasbateríasparaevitardañosolesionesdebidoalafugadeácidode
lasmismas.
5. Nointentarrecargarbateríasquenoestándiseñadasparaestepropósito,esto
puedesobrecalentarlasyprovocarunaexplosión(seguirlasinstruccionesdel
fabricantedelasbaterías).
6. Noexponerlasbateríasalcalorexcesivocomobajolosrayosdirectosdelsol,
fuegoosimilares.
7. Limpiarloscantosdelproductoydelasbateríasantesdeinstalarlas.
8. Elcontrolremotovieneconunabateríatipobotón,mantenerlabateríalejos
delosmenoresdeedadymascotas.Silabateríaestragada,estopuede
generarriesgodeasfixiayseverasquemadurasinternasquepuedeserde
consecuenciasfatales.Sielcompartimientodelabateríanosecierra
adecuadamente,detenersuusoymantenerelproductolejosdelalcancede
7

losniños.Sipiensaquelabateríahasidotragadaocolocadaenelinteriorde
cualquierpartedelcuerpo,acudiralmedicoinmediatamente.
PRECAUCION
• Peligrodeexplosiónsilasbateríassoncolocadasconlapolaridadincorrecta.
• Reemplazarsoloconbateríasdelmismotipooequivalentes.
RANGO DE OPERACIÓN DEL CONTROL REMOTO
• Apuntarconeltransmisorinfrarrojodelcontrolremotodirectamentealsensor
infrarrojodelproductoypresionarelbotóndeseado.
• Elcontrolremotooperaenunadistanciade6metrosaproximadamenteyuna
ángulode30ºrespectoaloscostadosdelsensorinfrarrojodelproducto.
Notas:
• Obstáculosentreelsensorremotoyeltransmisorinfrarrojopuedenprovocar
queelcontrolremotonoopereadecuadamente.
• Losrayosdelsol,lámparasincandescentesyfluorescentesocualquierotra
fuenteluminosafuertesobreelsensorremotodelaunidadpuedenprovocar
queelcontrolremotonoopereadecuadamente.
INICIANDO
ANTENA DEL RADIO FM
AntesdeusarlafuncióndeRadioFM,desenrollaryextenderlaantenaalámbrica
completamente.Ajustarladireccióndelaantenaparalograrlamáximafuerzade
laseñaldesintoníadelasestacionesderadioFM.
CONECTANDO LA FUENTE DE ALIMENTACIÓN
Antesdeconectarelproductoalafuentedealimentación,verificarqueelvoltaje
deltomacorrientedesulocalidadcorrespondaconelvoltajeespecificadoenla
etiquetademarcadodelproducto.
• Conectareladaptadorca/ccaltomacorriente.
ENCENDER LA BOCINA
• Presionar“ ”paraencenderlabocina,losledsseenciendeniluminandoel
aguayelaguaempiezaadanzar.
APAGAR LA BOCINA
• Presionar“ ”nuevamenteparaapagarlabocina,losledsseapaganyel
aguadejadedanzar.
8

OPERACIÓN DEL RADIO FM
SELECCIONANDO EL MODO DE RADIO FM
• Presionar“SOURCE”repetidamentehastaqueelledindicadorseiluminaen
verde.
SINTONÍA AUTOMÁTICA DE LAS ESTACIONES
• Presionarysostener“"/TUNE+”o“!/TUNE-“parasintonizar
automáticamentelaestaciónsiguienteoanteriorrespectivamente.
• Lasintoníasedetieneautomáticamentealsintonizarunaestaciónconseñal
fuerte.
SINTONÍA MANUAL DE LAS ESTACIONES
• Presionar“"/TUNE+”o“!/TUNE-“pasoapasoparasintonizarmanualmente
laestaciónsiguienteoanteriorrespectivamente.
• Lasintoníamanualdelasestacioneshacequeestasepuedanescucharmás
claramente.
• Si escucha ruido de fondo al sintonizar la estación, la fuerza de la señal
puede estar débil. Puede mejorar la fuerza de la señal ajustando la
dirección de la antena o moviendo la bocina a una posición diferente.
• DurantelasintoníadelasestacionesderadioFM,ladanzadelaguaes
controladaporelniveldevolumen.
9

REPRODUCCION DE UN DISPOSITIVO EXTERNO BLUETOOTH®
LabocinacuentaconlafuncióndeconectividadBluetooth®.Puedeconectar
dispositivodeaudioexternoBluetooth®comoteléfonoscelulares,tabletas,
computadoras,etc.parareproduciratravésdelabocina
SELECCIONANDO EL MODO BLUETOOTH®
•
Pulseelbotón“SOURCE”hastaqueelindicadorAzulparpadee.
• La bocina inicia la búsqueda del ultimo dispositivo Bluetooth® conectado, si
detecta el dispositivo Bluetooth® este se conecta automáticamente.
• Solo un dispositivo Bluetooth® puede conectarse a la bocina a la vez.
Sieldispositivonoestásincronizadoalabocina
• ActivarlafunciónBluetooth®eneldispositivoexterno(teléfonoscelulares,
tabletas,computadoras,etc.)
• EnelmenúBluetooth®deldispositivo,seleccionarlaopciónparabuscar
dispositivosBluetooth®.
• El dispositivo inicia el escaneo de los dispositivos Bluetooth® cercanos e
identificarlos, la bocina se despliega en la lista de dispositivos encontrados
como “EMERSONEHS-2001”
• Seleccionar“EMERSONEHS-2001”enlalistaparasincronizareldispositivo
externoconlabocina.
• En caso de requerir una contraseña, ingresar “0000”
• AhoraeldispositivoBluetooth®externoylabocinaestánconectados.Unavez
quelaconexiónsehaestablecido,elledindicadorpermaneceencendido.
Despuésdefinalizarelprocesodesincroníaporprimeravez,labocina
apareceenelmenúdeconexióndeldispositivoBluetooth®externo.
• SideseaconectarotrodispositivoBluetooth®alabocina,desactivarla
conexióndeldispositivoactual.Seguirlospasosarribaindicadosparaconectar
elnuevodispositivo.
10

DURANTE LA REPRODUCCIÓN
• Presionar“#$ ”parapausaroreanudarlareproducción.
• Presionar“"/TUNE+”o“!/TUNE-“paraseleccionarlapistasiguienteo
anteriorrespectivamente.
• Esta función no está disponible para todos los dispositivos Bluetooth®
• Presionar“ ”enelcontrolremotoparadesactivarlasalidadeaudio
(silencio),presionarnuevamenteparavolveraactivarlasalidadeaudio.
• DurantelareproduccióndeundispositivoexternoBluetooth®,ladanzadel
aguaescontroladaporelniveldevolumen.
REPRODUCCION DE UNA FUENTE DE AUDIO EXTERNA SIN
BLUETOOTH®
CONEXIÓN DE LA ENTRADA AUXILIAR
• ConectarunextremodelcabledeaudioconconectoresestéreodeØ3.5mm
alconectordesalidadeldispositivodeaudioexterno(porejemplo,teléfonos
celular,reproductorMP3,Tableta,computadora,etc.)
• ConectarelotroextremodelcabledeaudioconconectoresestéreodeØ3.5
mmalconectordeentradaauxiliar“AUXIN”debocinalocalizadoenlaparte
posteriordelabocina.
REPRODUCCION DE LA FUENTE AUXILIAR
• Presionar“SOURCE”repetidamentehastaqueelledindicadorseiluminaen
anaranjado.
• Ajustarlareproducciónatravésdelafuentedeaudioauxiliar.
• Presionar“VOL+“o“VOL-“paraajustarelvolumenalniveldeseado.
• Durantelareproduccióndeunfuentedeaudioexterna,ladanzadelaguaes
controladaporelniveldevolumen
11
•
PulseVOL-oVOL+paradisminuiroaumentarelvolumen.
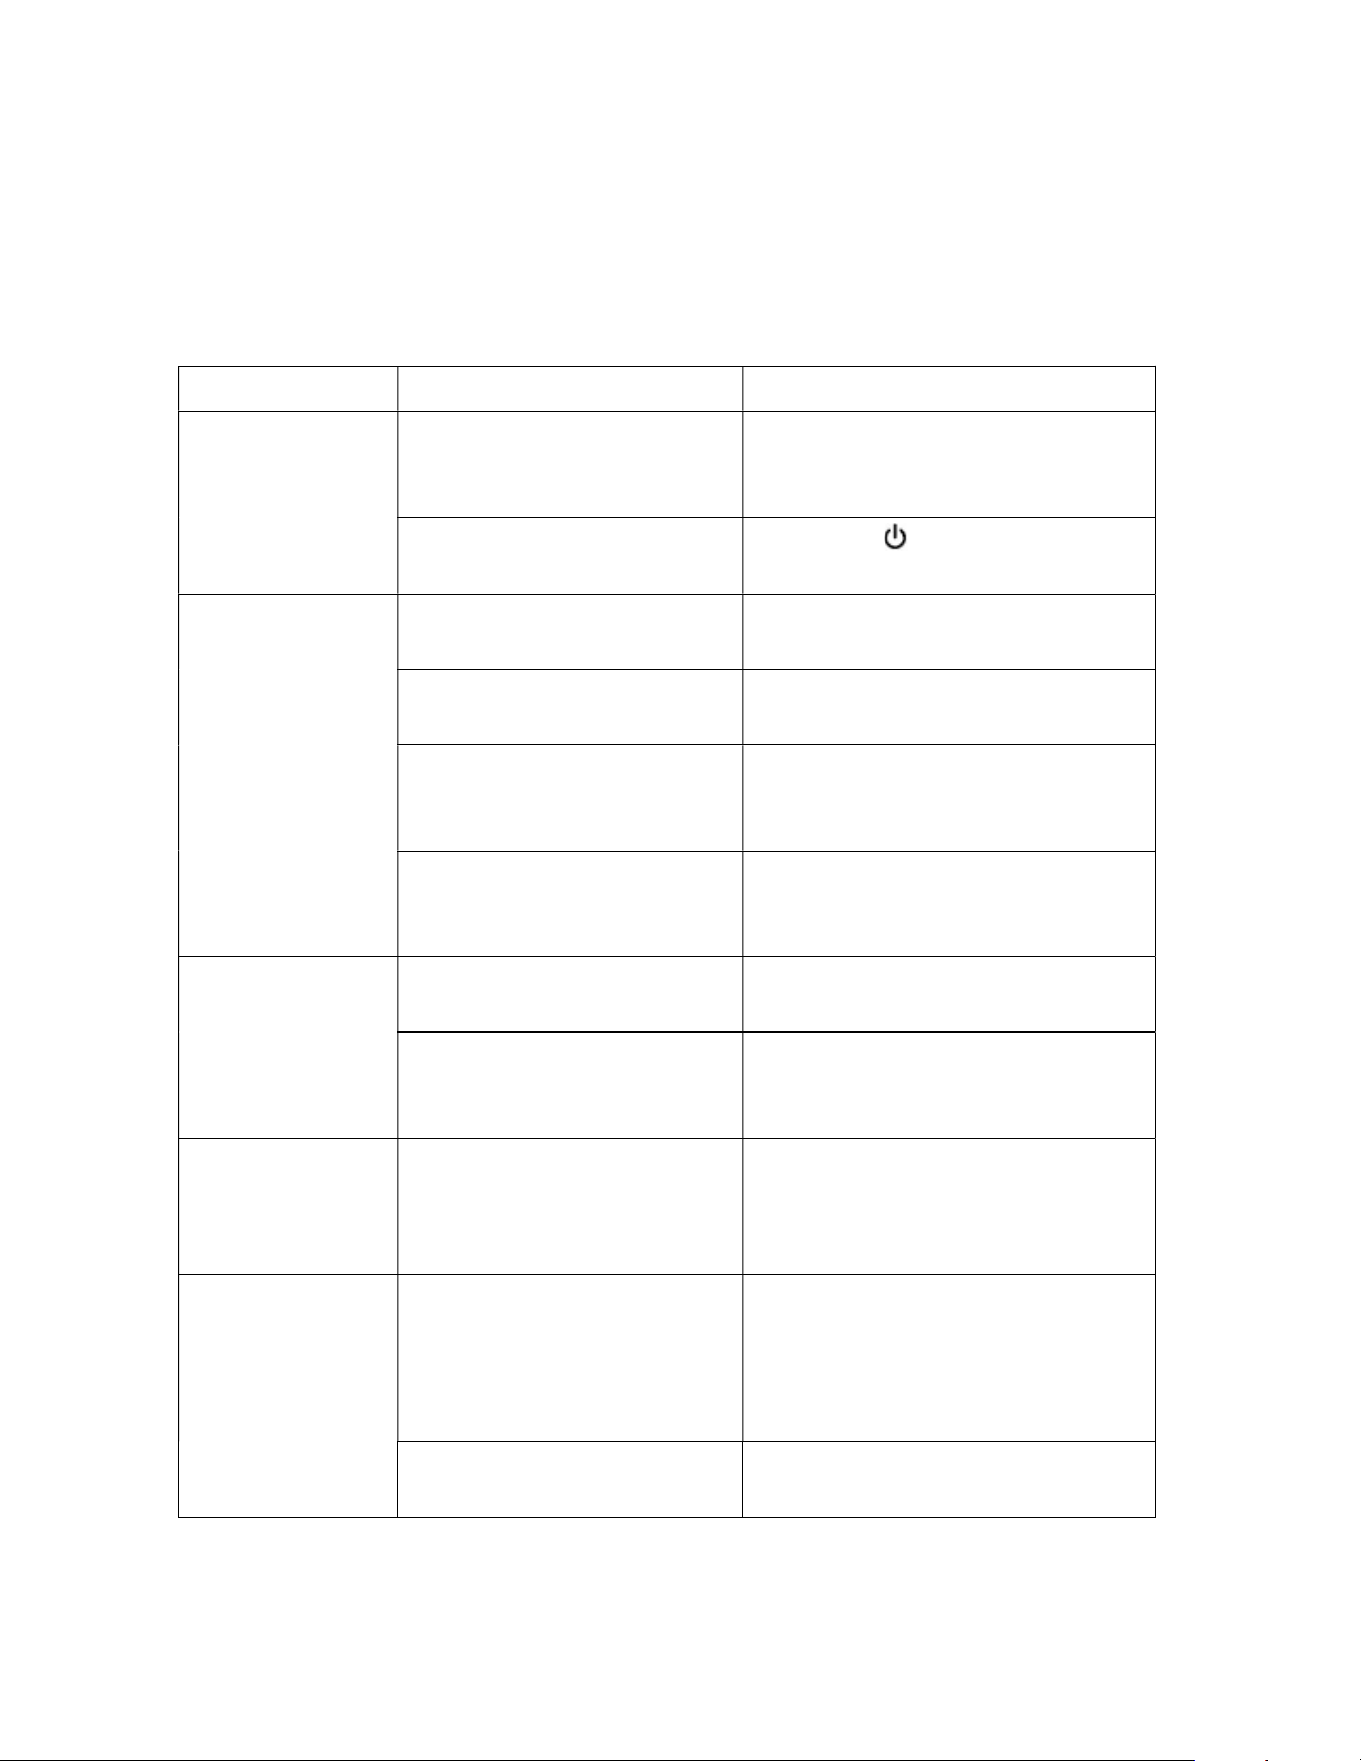
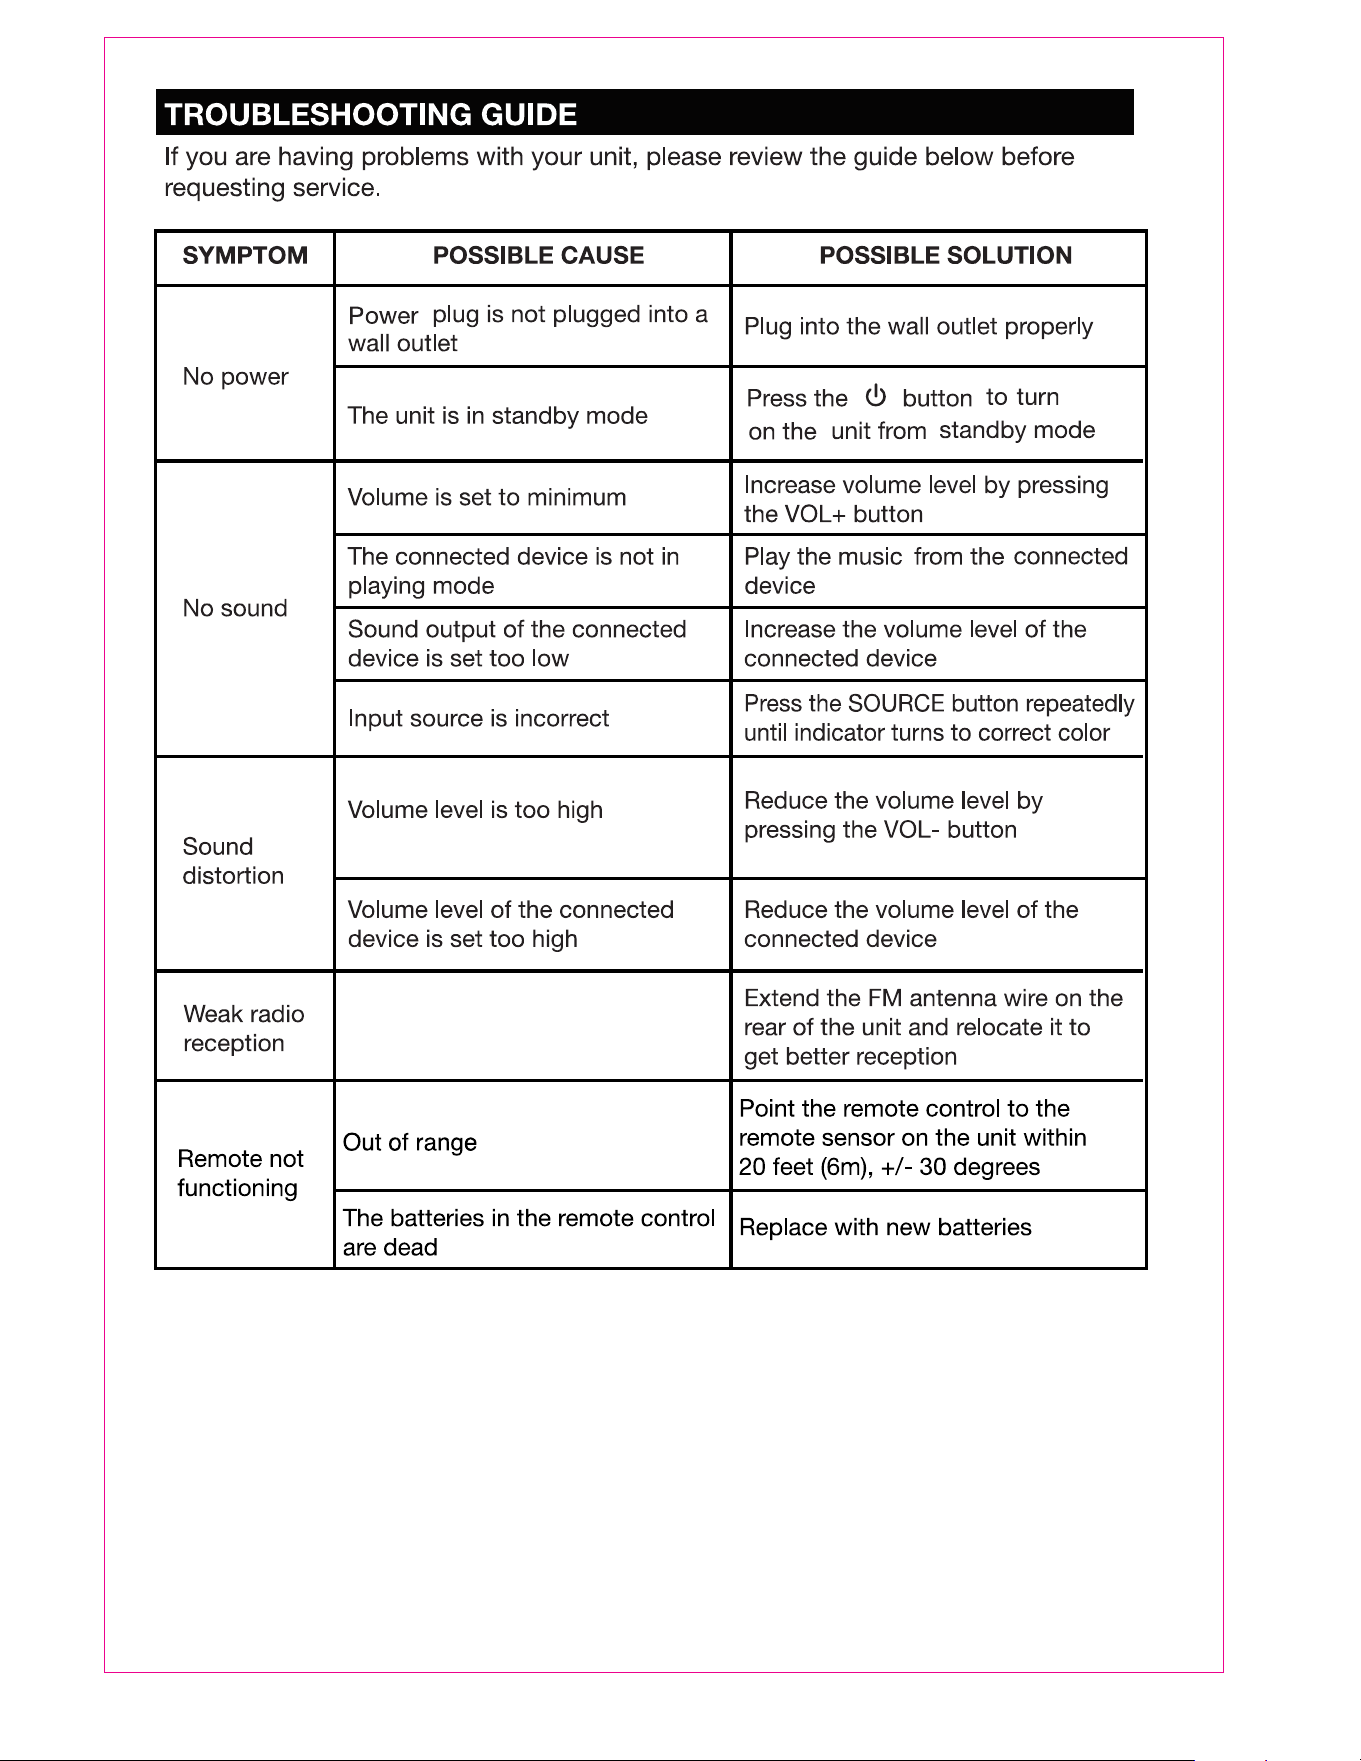
Guía rápida para la solución de problemas
Estaguíapresentalosproblemasmáscomunesylaposiblesolución.Favor
dereferirsealaguíaantesdeacudiralcentrodeservicioautorizado.
Problema Posible causa Posible solución
Noenciende Noestáconectadoelel
adaptadorca/ccal
tomacorriente
Conectareladaptadorca/ccal
tomacorriente
Labocinaestáenmodode
espera
Presionar“ ”paraencenderla
bocina
Nohaysalida
deaudio
Volumenajustadoal
mínimo
Presionar“VOL+”paraaumentar
elvolumen
Eldispositivoconectado
noestáenreproducción
Iniciarlareproduccióndel
dispositivoconectado
Elvolumendeldispositivo
conectadoesdemasiado
bajo
Aumentarelvolumendel
dispositivoconectado
Lafuentedeentradaes
incorrecta
Presionar“SOURCE”hastaque
elledindicadorseiluminaconel
colordelafuentecorrecta
Salidadeaudio
distorsionada
Volumendemasiadoalto Presionar“VOL-”paradisminuir
elvolumen
Elvolumendeldispositivo
conectadoesdemasiado
alto
Disminuirelvolumendel
dispositivoconectado
Recepciónde
radiodébil
Antenanoextendiday
maladirección
Extenderlaantenaalámbricade
FMcompletamentey
direccionarlaoreubicarla
bocina
Elcontrol
remotonoopera
Fueradelrangode
operación
Apuntaralsensorinfrarrojo
directamenteconunadistancia
de6metrosmáximoyunángulo
de30°alosladosconrespecto
alsensorinfrarrojodelabocina
Lasbateríasenelcontrol
estánagotadas
Reemplazarlasbateríaspor
unasnuevas
12

ESPECIFICACIONES
Fuente de alimentación: 5.8Vcc2A
Potencia de entrada: 11.6W
Rango de operación Bluetooth®: Hasta10metros
Frecuencia FM: 87.5MHz–108.0MHZ
Accesorios
• Manualdeoperación
• CableAuxiliar
• Controlremotoconbatería
• Adaptadorca/cc
Nota: Las especificaciones y diseño de este producto están sujetos a cambios sin previo
aviso para mejoras de los mismos.
13
•
TarjetadeGarantia
Soporte
Sitieneproblemasconlaoperacióndelreproductor,favordeconsultarlasinstruccioneseneste
manual,asicomolasultimasnoticias,recomendacionesydocumentaciónquepuedeencontrar
ennuestrapaginawebwww.emersonaudio.com.
Sinecesitaasistenciafutura,favordecontactaralcentrodeservicioautorizado.
NAXATechnicalSupport
2320East49thSt.
Vernon,CA90058
www.emersonaudio.com

