
Loading ...
Loading ...
Loading ...
4
GETTING STARTED
Conducting a Leak Check
Once the LP tank is properly installed, it is necessary to
perform a leak check. A leak check is a reliable way to verify
that gas is not escaping after you connect the LP tank.
Weber recommends performing a thorough leak check after
assembly, as well as annually. The following fittings should
be tested:
• Where the LP tank connects to the regulator.
• Where the regulator connects to the gas hose.
• Where the gas hose connects to the burner valve.
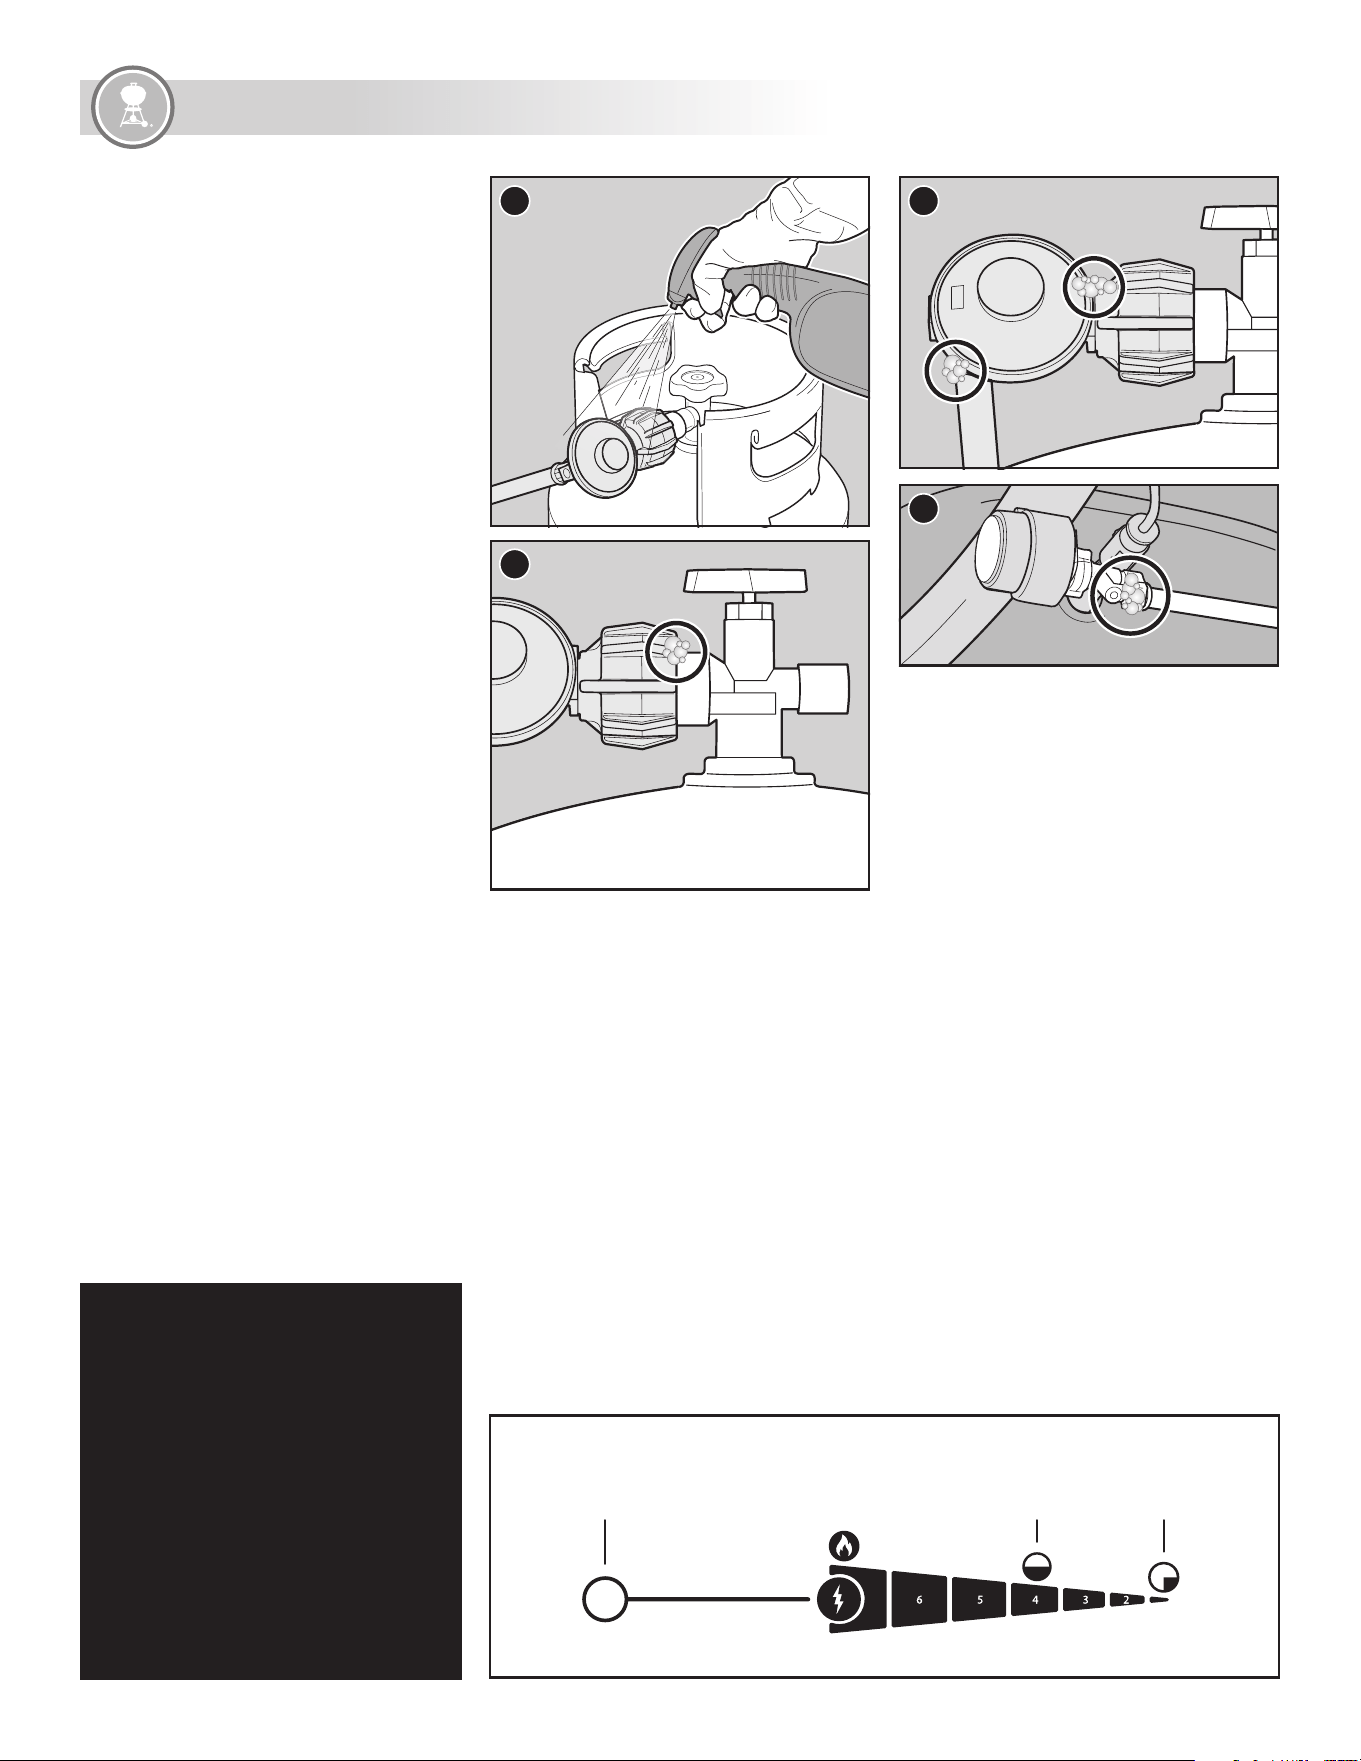
Checking for Gas Leaks
If there is a leak from your appliance (smell of gas)
immediately attempt to turn o the tank valve. Remove
the appliance to a well-ventilated location away from any
ignition source. Check for leaks using soapy water. Do not
try to detect leaks using a flame.
1) Wet fittings (A) with a soap and water solution, using a
spray bottle, brush, or rag. You can make your own soap
and water solution by mixing 20% liquid soap with 80%
water; or, you can purchase leak check solution in the
plumbing section of any hardware store.
2) Slowly open gas supply by turning tank valve counter-
clockwise while checking for bubbles.
3) If bubbles appear there is a leak:
a) If the leak is at the LP tank (B), turn o the gas.
Disconnect the regulator, then reconnect and test.
If the leak persists DONOT OPERATE THE GRILL.
Disconnect the LP tank. Contact the Customer
Service Representative in your area using the contact
information on our website.
b) If the leak is at regulator (C), or at the fitting indicated
in illustration (D), DO NOT OPERATE THE GRILL.
Contact the Customer Service Representative in your
area using the contact information on our website.
If a leak is present, contact the Customer Service
Representative in your area using the contact
information on our website.
4) If bubbles do not appear, leak checking is complete:
a) Turn gas supply o at the LP tankand rinse
connections with water.
NOTE: Since some leak test solutions, including soap and water,
may be slightly corrosive, all connections should be rinsed with
water after checking for leaks.
Refilling or Replacing an LP Tank
Removing the LP Tank
Every time your LP tank needs to be refilled or replaced,
follow these instructions to remove it.
1) Confirm that the tank valve is fully closed. Close by
turning valve clockwise.
2) Unscrew gas hose coupling from the tank.
Additional Leak Check Precautions
The following fittings should be tested for gas leaks each
time an LP tank is refilled and reinstalled:
• Where the regulator connects to the LP tank (B) and at the
regulator (C).
Follow the instructions for "Checking for Gas Leaks".
A
D
B
C
OFF START/HIGH MEDIUM LOW
Burner Control Knob Settings
m DANGER: Do not use a flame to check for gas leaks.
Besure there are no sparks or open flames in the
area while you check for leaks.
m DANGER: Leaking gas may cause a fire or
explosion.
m DANGER: Do not operate the grill if there is a gas
leak present.
m DANGER: If you see, smell, or hear the hiss of gas
escaping from the liquid propane tank:
1) Move away from liquid propane tank.
2) Do not attempt to correct the problem
yourself.
3) Call your fire department.
m DANGER: Always close the tank valve before
disconnecting the regulator. Do not attempt to
disconnect the gas regulator and hose assembly or
any gas fitting while this grill is in operation.
m DANGER: Do not store a spare LP tank under or
near this grill. Never fill the tank beyond 80% full.
Failure to follow these statements exactly may
result in a fire causing death or serious injury.
Loading ...
Loading ...
Loading ...