TECO
Eeered To Perfo
HEAT PUMP DRYER
User's Manual
Model:
TC
D80
A
SH
AG
IMPORTANT NOTE:
Thank you for selecting a TECO quality Dryer.Read this manual
carefully before installing or operating your new unit.
Make sure to save this manual for future reference.
The design and specifications are subject to change without prior
notice for product improvement. Consult with the sales agency
or manufacturer for details.
w

PREFACE
Thank you for choosing our dryers.Please
read this manual carefully. It provides instruc
tion, use, and maintenance. Retain it for future
reference. Record the model and serial numbers
of your machine. Quote this information to your
dealer if you require service.
The following symbols are used in this manual:
A
Important information concerning your personal safety
and information on how to avoid damaging the appliance
H General information and tips
� Environmental information
A
Possible Electric Shock
• Disassembly, repair or modification can't be carried out by people other than professional
maintenance staff.
• The household electrical supply system {the current, the voltage, the cable) such as a fuse
with the specifications and safety details pvided refer to "normal load" operation.
• The power plug must be connected to a three-core socket with an earth wire and is grounded properly and
reliably.
• If the supply cord is damaged, it must be replaced by the manufacturer, its service agent or similarly qualified
persons in order to avoid a hazard.
• Don't disconnect the power plug by pulling the supply cord. Hold the power plug with your hand.
• Don't use the supply cord when connection of the power plug and the supply cord is loose.
• Don't touch the power plug with wet hands. Wipe dust or water drops over the power plug of
• Don't over-bend the supply cord or put it under heavy weight.
• Don't use the supply cord /socket /power plug if it is damaged or bken.
A Possible Explosions
• Don't put combustible liquid such as gasoline, petrol and alcohol into the
appliance or nearby. Don't put clothes with these liquids into the appliance.
• Don't connect I disconnect the power plug when leakage of gas or other
combustible gas o
ccurs.
A Fire Accidents/Short Circuit Or Electric Leakage May Occur
f with a dry cloth.
• Do not install the appliance close to fire sources or heat sources.
• Do not rest any burning candles or cigarettes on the appliance.
• Do not install the appliance in areas prone to dampness or rainll as water on the elerical
mponents can damage the appliance and/or cause accidents.
• Do not install the dryer in places in direct sunlight, the plastic and rubber components
become brittle and aged.
• Do not use water jets on the appliance when cleaning ii.
• In order to avoid danger of fires caused by excessive drying, do not use the appliance to dry the llowing
items: Cushions, quilts and the like (these items accumulate heat).
• When using stain remover on your laund, ensure you run an era rinse cycle prior to loading into the
tumble der.
• Ensure all pockets are empty prior to loading laundry into the tumble dryer.
• Items that have been soiled with substances such as cooking oil, acetone, alcohol, petrol, kerosene, spot
removers, turpentine, waxes and wax removers should be washed in hot water with an extra amount of
detergent before being dried in the tumble dryer.
• Ensure the openings in the base are not obstructed by carpets.
• The hot air discharge from the dryer cannot be shared with other exhaust passages from devices that
burn gases or other fuels.
Read and understand thoroughly these safety instructions before use. The items indicated here
are very important safety precautions, which must be followed. We cannot be held liable for
damage caused by non-compliance with the warning and safety instructions resulting from
incorrect use or operation.
This appliance is not intended for use by persons (including children) with reduced physical,
sensory or mental capabilities or lack of experience and knowledge unless they have been given
supervision or instruction concerning use of the appliance by a person responsible for their
safety.
Children should be supervised to ensure that they do not play with the appliance.
Packaging (e.g. wraps, polystyrene, etc.) can be dangerous for children. There is a risk of
suffocation. Keep packaging materials away from children.
1
A
Warning
• In the appliance enclosure or in the built-in structure, keep ventilation openings clear
of obstruction.
• Do not damage the refrigerant circuit.
• Never stop a tumble dry before the end of the drying cycle unless all items are quickly
removed and spread out so that the heat is dissipated.
•
The appliance must not be supplied through an external switching device, such as
a timer, or connected to a circuit that is ragularly switched on and o by a utility
A
Personal Injury May Occur
�
• This machine is not intended for use by persons (including children} with reduced physical,
sensory or mental capabilities, or lack of experience and knowledge, unless they have been
�
\
)
given supervision or instruction concerning use of the appliance by a person responsible f
o
r
�
}
their safety.
·
c'
•
•
• To avoid danger to children, ensure all packaging is disposed of safely.
�
• Ensure children under 3 years of age are supervised.
•
Wait until the drum has stopped completely prior to removing laundry from the dryer.
• Children and pets should be kept away when the dryer is working to ensure they do not become trapped.
Always
check the drum carefully before closing the door .
A
Other Instructions
•This appliance is designed for domestic use. It must not be used for purposes other than those for which it was
designed.
•Only wash fabrics which are designed to be machine dried. Follow the instructions on each garment label.
•Any electrical work required to install this appliance should be carried out by a qualified electrician.
•If the machine is situated on a carpeted floor, please adjust the feet in order to allow air to circulate freely under
the appliance.
•Do not climb onto the dryer or rest heavy objects I heating devices or items with water or anything that could
leak on the dryer, deformation of the face panel and the plastic component could occur.
•Any objects such as coins, safety pins, nails, screws, stones or any other hard, sharp material can cause
extensive damage and must not be placed into the machine.
•Aer having installed the appliance, check that it is not pressing or standing on its electrical supply cable, or
vent hose.
•Items such as am rubber {latex foam}, shower caps, waterproof textiles, rubber backed articles and clothes or
pillows fitted with am rubber pads should not be dried in the tumble dryer.
•Always unplug the appliance after use, clean and perform regular maintenance.
•Do not overload the appliance. See the relevant section in the user manual.
•Clothes which are dripping wet should not be places in the dryer.
•Garments which have been in contact with volatile petroleum products should not be machine dried. If volatile
cleaning fluids are used, care should be taken to ensure that the fluid is removed from the garment bere
placing in the machine.
•Never use the tumble dryer if the power supply cable, the control panel, the working surface or the base are
damaged so that the inside of the tumble dryer is accessible.
•The tumble dryer is not to be used if industrial chemicals have been used for cleaning.
•The lint must not to be allowed to accumulate around the tumble dryer.
•Do not dry unwashed items in the tumble dryer.
•Fabric soeners or similar products should be used as specified by the fabric soener instructions.
• The final pat of a tumble dryer cycle occurs without heat (cool down cycle} to ensure that the items are left at a
temperature that ensures that the items will not be damaged.
• The exhaust air must not be discharged into a flue
or
duct which is used for exhausting fumes from appliances
burning gas or other fuels.
•That the appliance must not be installed behind a lockable door, a sliding door or a door with a hinge on the
opposite side to that of the tumble dryer, in such a way that a full opening of the tumble dryer door is restricted.
• The machine must be placed in a clean place with no water, ice and combustible materials. To keep vibration
and noise to a minimum when the dryer is in use, it should be placed on a firm and level surface.
• If the tumble dryer is not completely leveled, adjust the front feet up. To lower the dryer, turn anti-clockwise
and to raise it, turn clockwise until the appliance is level preventing it from shaking.
• Adequate ventilation has to be provided to avoid the back flow of gases into the room from appliances
burning other fuels, including open fires.
2
• Items that have been soiled with substances such as cooking oil, acetone, alcohol, petrol, kerosene, spot
removers, turpentine, waxes and wax removers should be washed in hot water with an extra amount of
detergent before being dried in the tumble dryer.
• Remove all objects from pockets such as lighters and matches.
• Oil-aected items can ignite spontaneously, especially when exposed to heat sources such as in a
tumble dryer. The items become warm, causing an oxidation reaction in the oil.
• Oxidation creates heal. If the heat cannot escape, the items can become hot enough to catch fire. Piling,
tacking or storing oil affected items can prevent heat from escaping and so create a fire hazard.
• If it is unavoidable that fabrics that contain vegetable or cooking oil or have been contaminated by hair
care products be placed in a tumble dryer they should first be washed in hot water with extra detergent
- this will reduce, but not eliminate the hazard.
• This dryer has an hermetically sealed system.
• Do not vent gases into the atmosphere.
• Refrigerant(pe):R134A (GWP=1430).
• If the supply cord is damaged, it must be replaced by T
E
CO service agent or similarly qualified persons
in order to avoid damage to the appliance or hazards.
• The appliance must not be installed behind a lockable door, a sliding door or a door with a hinge on the
opposite side to that of the tumble dryer, in such a way that a full opening of the tumble dryer door is
restricted.
Product description
Control panel
S
�
p
_
o
_
w
_
e
_
a,
__
_
_
O
�
F
1.Control Panel
2.Water Tank
3.Flu filter
4.Door
5.Condenser cover
6.Adjustment leg
Standard
Shis
,-,
Cotton
Denim
I
, '\ � Synthetic
����� I (-; I ······�·���.����
Time
\
� _/
/
wel
Refresh
'
,
,
0Wool
Warm Air / , Duvet
1. Programme selection knob 2. Time 3. Child Lock
6. Buzzer
7. Delay start 8. Start/Pause
Heat Pump
e.o ••
4. Dry level 5. Anti-crease
9. Indicator Lights:
Drainage container
Flu filter
3
H
First Use
• Ensure that the electrical connections comply with
the installation instructions.
• Remove the polystrene block and any material
from the drum.
• Before using your tumble der for the first time, we
recommend that you place a few damp cloths inside
the appliance and d for 30 minutes. There may be
dust inside a brand new tumble der.
Select The Required Program
H
Daily Use I
Connect the appliance
• Open the door
• Place the laundry in the drum, one
item at a time, shaking them out as
much as possible.
• Close the door. Please check the laundry does
not get caught between the door and filter.
• Turn the program selector dial to the required program. The StaPause light starts to flash.
The program will be switched o if you have not pressed any button for 10 minutes.
Attention:
• "Standad"is for the "standard cotton program". Standard program is suitable to dry normal wet cotton
laundry, and it is the most efficient program in terms of energy consumption for drying wet cotton laundry.
• Some thick clothes (jeans
&
towels). Because of the material characteristics, some items are difficult to
dry. If you find that they are not completely dry at the end of the program, it is recommended to use the
"Time" program to dry again.
Automatic Controlled Drying
• You can choose a dierent program based on your clothes materials. The dryer has the function that
can sense the moisture in order to automatically adjust the drying time r optimal drying.
• This automatic control system is fit r most programs except Warm Air, Refresh and Time.
Time Controlled Drying
• u can choose the time of drying according to the actual situation, the knob is turned to Time, and you
can also increase it to the desired time by pressing the Time button.
• To cancel a program which is nunning, turn the program selector dial to "o ". At the end of drying, turn the
selector dial to "o " to switch the machine o bere removing the laundry.
Programme Option Buttons
• Depending on the program, dierent functions can be combined. These must be selected aer
choosing the desired program and bere depressing the Start/Pause button. When these buttons
are pressed, the corresponding indicator lights comes on. When they are pressed again, the indicator
lights go off.
4
OFF
Standard
-------------
Sposwear
-----------
-
-
,
,
0
,
-
-
-------------·------
�
emm
�(�-------------,, - '
I
Co��-Q
\ __ � Synthetic
Time
Undeear
____
_
_
,
0
I
_____ \ I
Bulky Item
Towel
Refresh
' ,
0 Wool
-----------------------
-
----------------------
Warm Air
Duvet
__________________ , , _____ _
� - �
I
Baby
Care

Select Buzzer
• The buzzer can be selected during normal use. Press the "Buzzer'' button to turn o the buzzer and
corresponding light. Press once again to activate the buzzer and corresponding light. A sound will be
emitted.
Anti Crease Delay Start
•
The "Buzzer'' key is pressing Anti Crease and Delay Start at the same lime for
3 second.
LPressr
3seconds
When the buzzer is on, if you press the "buzzer'' button once more, the buzzer will be switched o.
Select the D level
•
Before you start the machine, you can choose the dry level. The dry level is divided into three
grades. ( Heavy Strong � Normal )
• This option is only suitable to the five programs: Daily, Cotton, Synthetic, Bulky Item, Towel.
Select Anti Crease
Anti-crease is a default setting at the end of each program. Longer Anti-crease can be selected while
the program is in standby or running.
Select Delay start
This button allows you to delay the start of the program by up to 24 hours (each time the button is
pressed the lime is increased by 1 hour). This option must be selected aer setting the required
program and before pressing Start/Pause to commence drying. When Start /Pause is pressed, the
corresponding indicator lights start to flash and countdown begins.
"Delay cancelled 1 �233• • • • 23�24" --
The countdown begins aer you have pressed the Start/Pause button. The corresponding light illuminates
when you have pressed this button. All indicator lights go out except Delay Start pilot light.
Display
The display shows the following information
Aer you have selected the program, its duration (in hours and minutes) appears on the display. It is calculated
automatically on the basis of the maximum load accepted for each type of bric and of the required degree of
drying. When the program stas, the remaining time is displayed every 1 minute.
•
Delayed Sta.
If you have selected a delay time by means of the relevant button, the display shows it. The countdown is
displayed hour by hour. Once you press the "StarPause" button, the appliance will start the delayed
process. If you want to check the selected program, press the "Delay Start" button again. It shows the
duration of the previously selected program.
•
Incorrect option selection
If you select an option that is not compatible with the program you have selected, the display shows ErS (error) .
If you select other program because of incorrect operation while the program is running, the display shows ErS
(error).
Select StaPause
Select the required program options and press the Start/Pause button to commence drying. The
dryer will pause aer pressing the button again or opening the door while the program is running.
When the machine is suspended, Program Selection Dial and other keys are invalid except Start/
Pause. Anti Crease and Buzzer keys. To re-start the program, press the Sta/Pause button once
again.
5

Indicator lights
•These lights indicate the following functions:
•Drying light" ". This light indicates that the appliance is in the drying phase.
•Cooling light"M ". This light indicates that the appliance is in the cooling phase. At the end of
drying, there is a two minute cooling phase to cool the laundry.
•End of program lighf '@ ". This light is on at the end of the cooling phase.
•Anti-creasing light " ". This light indicates the appliance is in the anti-crease phase:
•If selected, the Anti-Crease program light will be on before Anti-Crease program the light will flash
while the program runs; If not selected, the Anti-Crease program light will flash during default anti-
crease cycle.
•Filter light " ". It comes on every cycle to remind you that the filter must be cleaned at the end of
the program.
•Child Lock light " 0". This light indicated the appliance is locked.
•Buzzer light"" ". This light is on when buzzer program is selected.
•Delay Start light"0 ". This light is on when delay start program is selected.
•Drying pe light"� " these lights will be on when Dry Level function is selected. When
you choose different drying intensities, the corresponding indicator light turns on.
•nk full light"�" It comes on aer each program and also when the water tank is full. which
remind you to empty the water container Note: Empty the water container aer each program to
avoid the alarm when use in next time.
At The End Of The Program
All drying programs will end with a 2-minute cooling phase.
If the laundry is not removed at the end of the cycle, the dryer will run an anti-crease phase (default:
10 minutes, select: 120 minutes). If you do not remove the laund, the der will stop automatically at
the end of the anti crease phase. The display shows "End" and the buzzer sounds r 15 seconds when
the buzzer function is on. finish.turn the programme selector dial to off.
Child Lock Function
When the machine is on, press "Time" and "D level" buttons r several seconds, the system will lock all
the buttons. Then all buons are invalid except "o". If you want to make the appliance to return to the
normal state, then press 'Time" and "D level" buttons for several seconds again.
The • functiOpen on wthe ill be door releasduring ed in thoperation e following cases:
• Open the door during operation.
• Take out filter drawer during operation
• Water tank full
Time
D Level
Child Lock
u can set again the "Child Lock" function when you restart the machine.
Aer Each Use
Impoant
:
If the ding pgram has to be stopped bere it reaches the end, we recommend that you turn
the program selector dial to position "Refresh" and wait until the end of this cooling phase bere removing
the laundry. This will avoid a build-up of heat inside the appliance.
To do this first tum the dial to "o" and then to "Refresh" and press the"Start" button.
Modiing the program
To change a program which is running, first cancel it by turning the program selector dial to "o". Select the
new program and press the "Start" button.
Attenon: The display will show "-" when in dormant state; - standby mode, 10 minutes later, without any
operation, enter a dormant state.
- controller shows "End", 10 minutes later, without any operation, enter a dormant state.
Before Loading Laundry
Never tumble dry the following: Particularly delicate items such as net curtains, woolen, silk, fabrics with metal trim,
nylon tights, bulky materials such as anoraks, blankets, eiderdowns, sleeping bags, feather quilts and any items
containing rubber foam or materials similar to rubber foam.
• Always follow the instructions on garment labels:
□ May be tumble died
6
□ Normal drying (high temperature)
□ Delicate drying (low temperature)
�
Do not tumble dry
-
• Close pillowcases and covers with fasteners to prevent small laundry items getting tangled inside them.
Close press studs, zips, hooks, tie belts and apron strings. Sort laundry according to type and degree of
drying required.
• Do not over-dry laundry, this avoids creasing and saves energy.
• Avoid drying dark clothes with light coloured fluf items such as towels as they could attract flu.
• The laundry must be thoroughly spun before tumble drying.
• Easy-care items, e. g. shirts, should be briefly pre-spun bere drying.
• Knitted textiles (knitted undeear) may shrink a little after drying. Please do not over-dry items of this
type. It is advisable to allow for shrinkage when choosing the size of new purchases.
• You can also put starched items into your dryer. However, to achieve the desired starched effect,
choose the program "Iron dry". To remove any starch residues, wipe out the internal drum aer drying
with a moist cloth and then rub dry.
• To avoid a static charge when drying is completed, use either a fabric soener when you are washing
the laundry or a fabric conditioner specifically r tumble dryers.
• Remove the laundry when the dryer has finished drying.
• If individual items are still damp aer drying, set a brief post-drying time, for at least 30 minutes, this will
be necessary particularly r multilayered items (e.g. collars, pockets, etc.)
Make sure that no metal objects are le in the laundry (e.g. hair clips, safety pins, pins, etc.)
Button up pillowcases, close zip fasteners, hooks and poppers. Tie any belts or long tapes. avoid
laundry becoming tangled:
Close zips, button up duvet covers and tie loose ties or ribbons (e.g. of aprons).
Turn items with double-layered fabrics inside out (e.g. with cottonlined anoraks, the cotton layer should
be outermost). These fabrics will improve the drying process.
Remove all objects from pockets such as lighters and matches .
Maximum Loads
Recommended loads are indicated in the program charts :
General rules: Cotton, linen : drum full but not too tightly packed ;
Synthetics : drum no more than half full;
Delicate fabrics and woollens : drum no more than quarter full.
T to load the maximum capacity of the machine as small loads are uneconomical.
Coue
Max
Description of programme
load
Standard
8kg Blend materials usual clothes and so on. It is possible to choose dierent ding strength.
Cotton
8kg
Synthetic
4kg
Bulky Item 8kg
Cotton clothes and so on. It is possible to choose dierent drying strength.
Chemical fiber products and so on. It is possible to choose dierent drying strength.
dry the larger clothes. (bedsheet, Quilt cover) It is possible to choose dierent
drying strength and so on.
wel
4kg
wel. It is possible to choose dierent ding strength.
Wool
2kg
Knitted sweater and so on.
Duvet
3kg
Down jacket.
Baby Care
3kg
Baby clothes.
Warm Air
4kg
Used for drying delicate material loads, such as silk, etc. The machine dries depend on the
display time, regardless of the drying level.
Refresh
4kg
The clothes are deodorizing and fresh, and the intensity of drying is weak. The machine
dries depend on the display time, regardless of the drying level.
Drying thick or multi-layered textiles,the machine dries depend on the display time,
Time
8kg
regardless of the drying level. e.g. terry towelling items.For drying individual items of
laundry or r small volumes.
Undeear
2kg
Undeear.
Denim
4kg
Denim.
Shirts
2kg
Shirts .
Sportswear
2kg
Sportswear.
Note: For drying bathrobes and towels, do not exceed the max load of 6kg.
Laund Weights
Th
e llowing weights
ar
e indicative:
Bathrobe
Napkin
Quilt Cover
Sheet
Pillow Case
Tablecloth
Towelling Towel
Tea Cloth
A Care and Cleaning I
1600g
Night Dress
265g
130g
Ladies' Brie
130g
930g
Men's Work Shi
800g
665g Men's Shi 265g
266g
Men's Pyjamas
130g
330g
Blouse
665g
265g
Men's Underpants
130g
130g
• You must DISCONNECT the appliance from the electricity supply bere you can carry out any cleaning
or maintenance work.
• Don't clean the dryer by directly spraying water onto the dryer. Don't clean the dryer with benzene,
thinner, alcohol or acetone. Otherwise, it may cause discoloration, dermation, damage. electric shock
or fire.
• When cleaning the product, be sure to unplug the power cord.
Durning the drying cycle, the control panel or the door may accumulate moisture.
Control Panel
• Clean with a so, damp cloth. Do not use abrasive substances.
• Don't spray cleaners directly on the panel.
• The control panel finish may be damaged by some laundry pre-treatment soil and stain remover products.
• Apply such products away from your dryer and wipe up any spills or overspray immediately.
Stainless Steel Tumbler
• clean the stainless steel tumbler, use a damp
cloth with a mild, non-abrasive cleaner suitable for
stainless steel surfaces.
• Remove the cleaner sidue and d with a clean cloth.
Cleaning The Filter
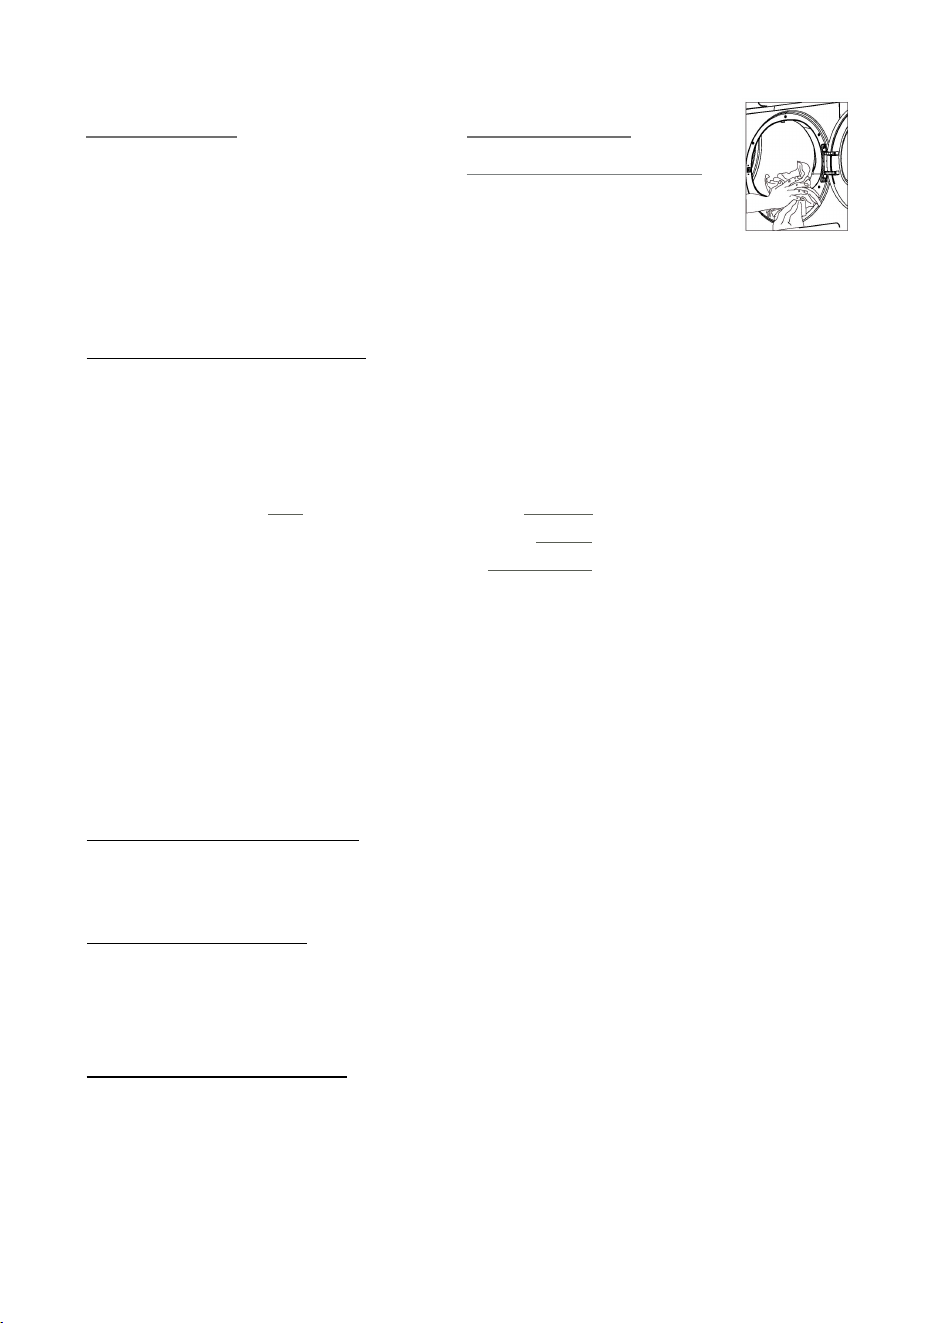
Cleaning the door
Clean periodically the interior part
of the door to remove any flu.
Accurate cleaning ensures correct
drying.
H
umidit
y
Sensor
This auto sensing dryer uses a humidity sensor that requires cleaning to function
efficiently as calcium oxide may build up on the sensor surface.
1.Remove and clean the filter.
2. Locate the humidity sensor in the filter compartment and gently
clean the humidity sensor with a dry cloth (refer to image on right).
8
Always clean the lint filter and the inner surfaces
of the loading door aer each drying process.
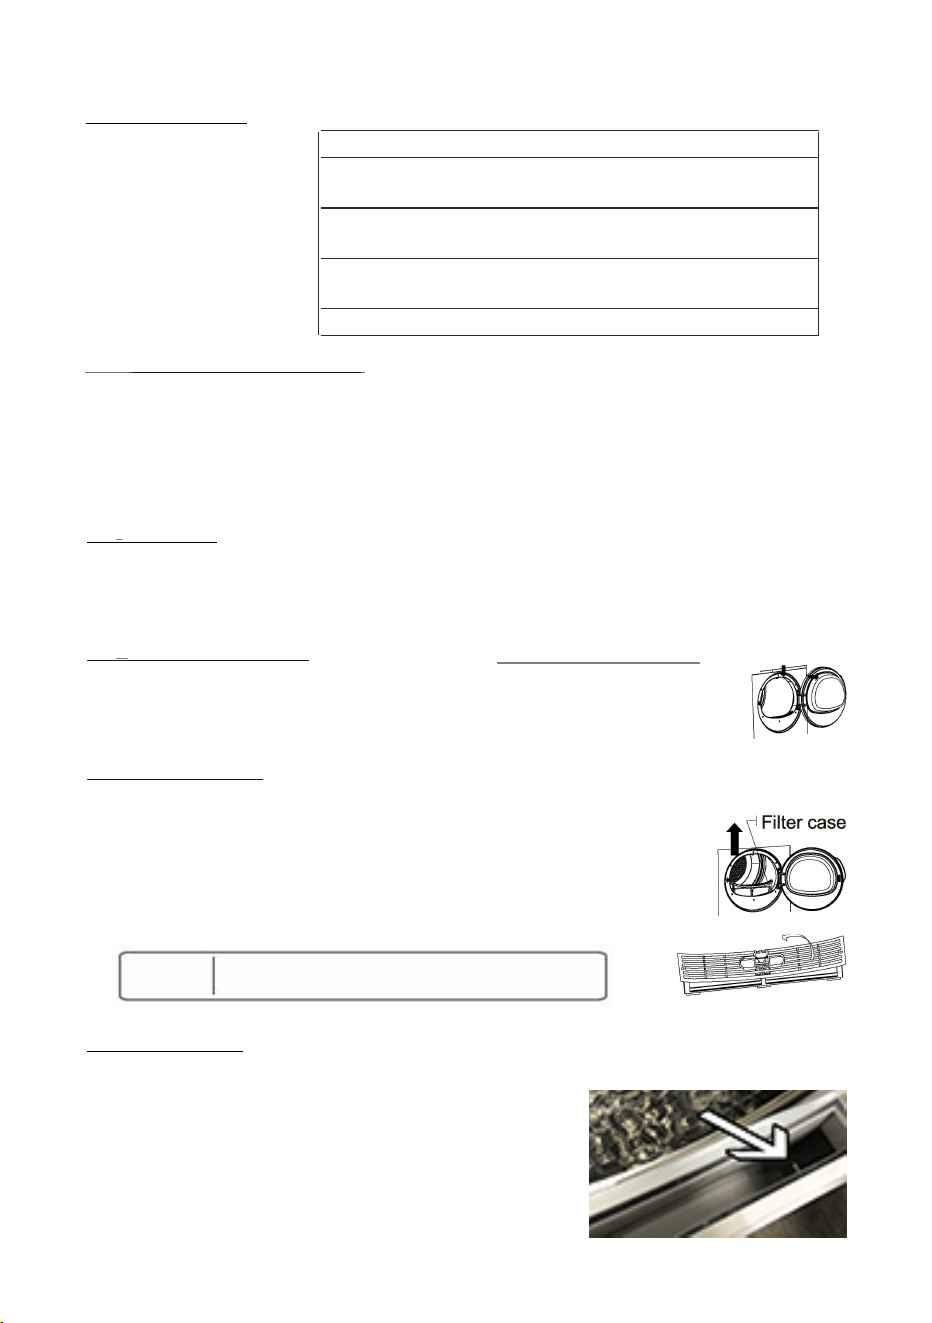
• Open the loading door.
• Remove the lint filter by putting it up and open the lint filter.
• Clean lint, fibre, and cotton raveling by hand or with a so piece of cloth.
• Close the lint filter and place it back into its housing.
• A layer can build up on the filter pores that can cause clogging of the filter aer using
the der r a while. Wash the lint filter with warm water to remove the layer that builds
up on the lint filter surface. Dry the lint filter completely bere reinstalling it.
• The lint trap has to be cleaned frequently.
rning
A
Water container emptied
1.Pull out water conta
i
ner
·;�'
buon
3. Pull the water contai ner
4.Press the Start/Pause
D
ryer
Ex
terior
�
• The whole dryer has a high-gloss finish. Clean with a soft, damp cloth. Don't use
abrasive substances.
• Protect the surface from sharp objects as they may scratch or damage the finish.
• Don't place any heavy or sharp objects or a detergent box on the dryer.
K
eep
them
on a pedestal or in a separate storage box.
�
�
Clean the evaporator
•
Clean the lint accumulated on the fins of the evaporator located behind the filter drawer with a vacuum
cleaner or a soft brush. u can also clean by hand provided that you wear protective gloves.
�
.
.
•
It is recommended to clean it at least twice every month.
�
A warning I Evaporator ns are sharp. Clean using a soft brush only.
IMPORNT : If you call a technician for a fault listed below or to repair a fault caused by incorrect use or
installation, a charge will be made even if the appliance is within the warranty period.
Technical data
Dryer Model
TCD80ASHA
G
Dryer Capacity(kg)
8.0
(ACV/Hz)
220-240/50
Rated power (W)
650
Weight(kg)
46
Power(le-on mode)(W)
0.36
Power(off mode)(W)
0.4
Energy consuplion at full load(kWh)
2.9
Programme time at full load(min)
290
Dimensions(H x W x D)(mm)
850 x 595 X 630
Ambient temperature range(
°
C)
5-35
NOTE
The above data in the table is based on using the “Standard” program which has
been tested according to AS/NZS 2442.2:2000 + A1: 2006 + A2: 2007 standards.
This data may vary based on different laundry types, residual moisture,
environmental conditions and voltage fluctuation.
9
Do Not Use The Appliance Without a Filter
rning
A
Water container collects all of the water from condenser.
The container needs to be emptied after every drying
cycle. If the water container is full, an active program
will stop automatically. The � light will come on
and the buer sounds. In order to continue the
program, the water container must be emptied
and dry.
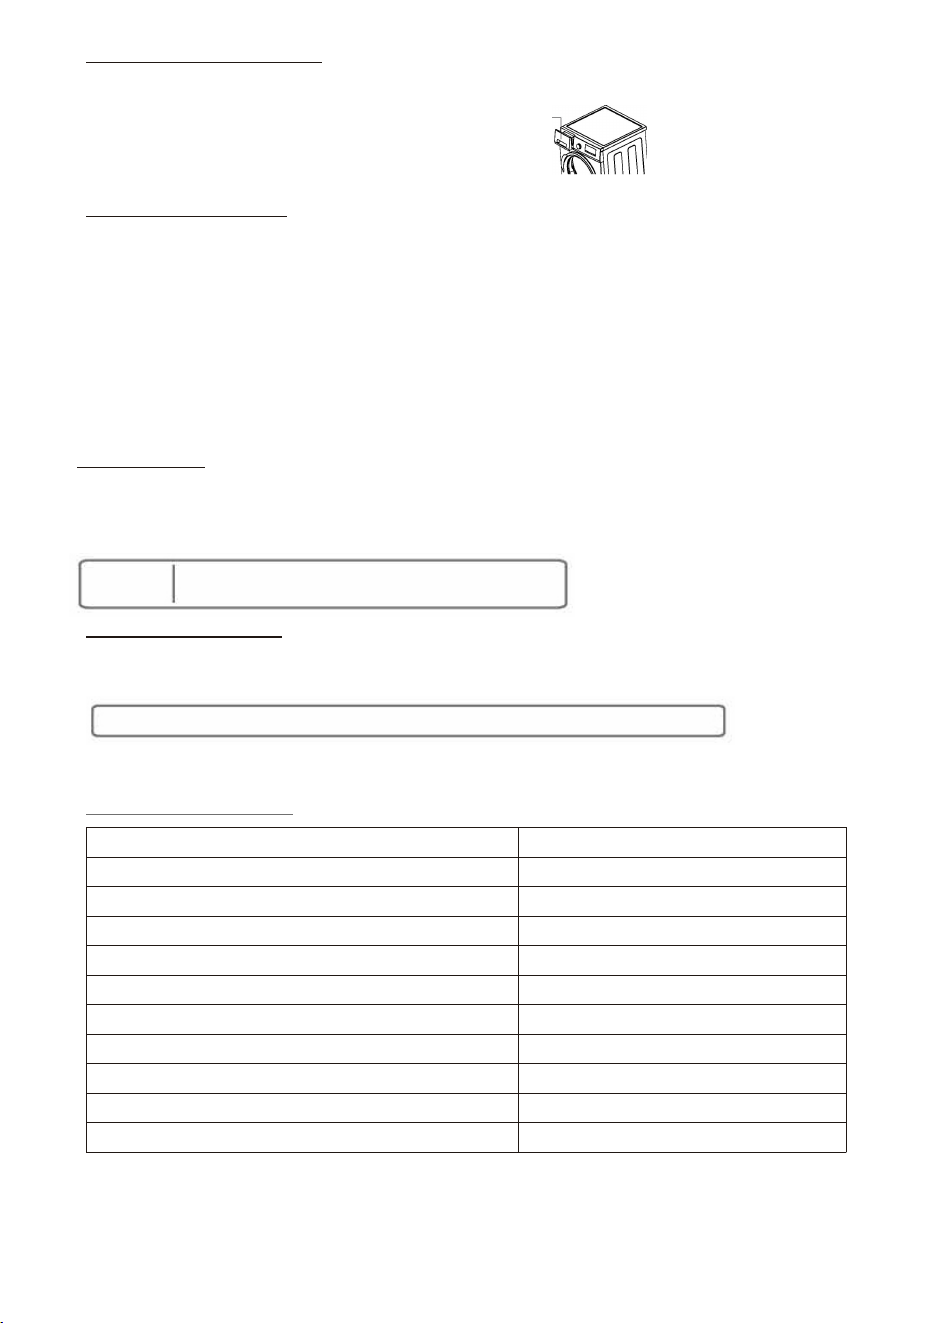
Clean the filter drawer
Lint and fibre that could not be captured by the lint lter are blocked in the filter drawer behind the cover. Clean
the filter drawer after each drying process. There is a two-level filter in the filter drawer. The first level is the
filter drawer sponge and the second level is the filter cloth.
• Press the button to open the cover.
• Unlock the fixer.
• Pull out the filter drawer.
• Clean lint, fiber and cotton collecting on the filter cloth by hand or with a soft piece of cloth.
• When you notice a layer that may cause clogging on the filter cloth, clean the layer by
washing with warm water. Leave to dry completely before installing the drawer.
Wash the filler drawer sponge by hand to remove the fiber and lint on the surface. After
washing the sponge, squeeze it and remove excess water. Dry the sponge before replacing.
wate r tank
• Check accessory: Open the accessory bag
and check the accessories.
Accessory Name Quantity
drainpipe
1
m
manual
1
Something not working
?
Malfunction Possible Cause Solution
Dryer does
•
Mains plug is not plugged in.
•
Plug in at main socket.
• Loading door is open.
•
Close loading door.
not work
• Have you pressed the►II button?
• Press the►II button again.
•
Wrong programme selected.
•
Select a different programme the next time
Drying results
• Filter clogged.
you dry(see "Drying Programme "section).
unsatisfactory
• Incorrect volume of laundry.
• Clean lint filter.
• The sediment on humidity sensor.
• Observe recommended loading volumes.
Drum light does
•
Light bulb is defective.
• Replace light bulb.
not work(option)
Drying cycle ends
• Not enough washing loaded or
• Select higher drying level(e. g. Heavy instead
shortly aer
programme starts.
washing load is too dry r selected
of Strong)
"END" light
programme.
illuminated.
Drying cycle lasts
• Load volume is too big.
•
Reduce load volume.
an unusually long
time
H If you a unable to identi or solve the pblem, nta our sei nter. Bre telephoning, make a
note the model, serial number and puhase date your machine: the Sei Center will requi this
inrmation.
Eah note
This appliance must be earthed. In case of failure or damage, eah can provide a minimum resistance to
reduce the possibility of electric shock. The power cord has grounding wire with device and power cord
with plug. Plug must be inserted into a properly installed and grounded socket(in accordance with all local
rules and standards).
er dischae
It's not necessary to discharge the condensed water to the tank, it can be drained out directly.
change drainpipe
Pull out the water pipe by means of the arrow direction, Then install the drainpipe.
A pair of pliers may be used if it is diicult to do.
ving tns cging
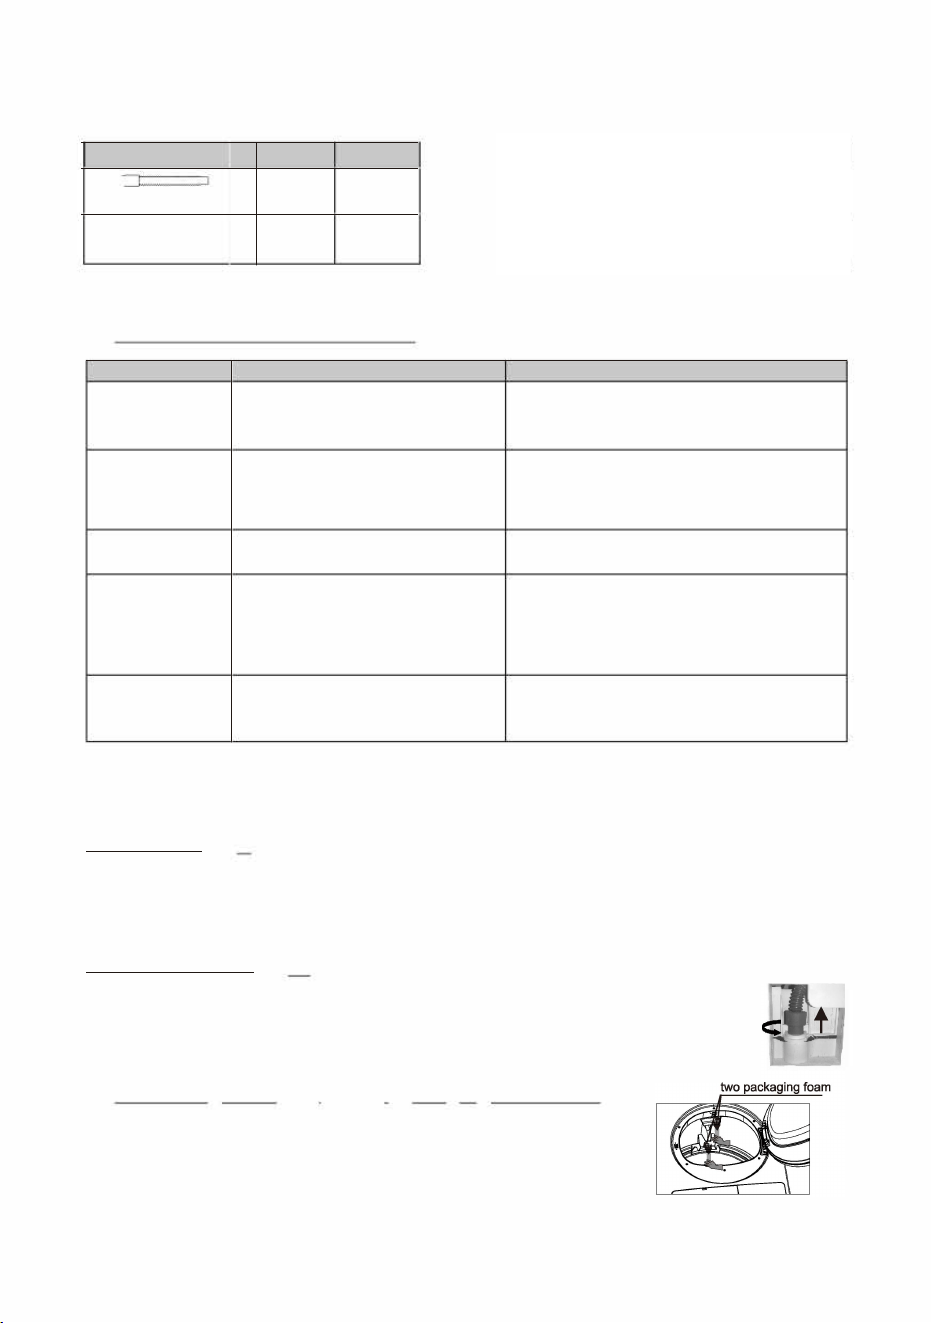
A Caution!
Bere use of the machine, the packaging foam must be removed from the
drum. 1.0pen the loading door.
2.Pull o adhesive strips from inside machine on top of drum.
3.Remove the two packaging foam from the machine.
10

�\
�
Check the dr
y
er
i
s le
v
el
Press on either front corner, the machine should not move up and down.(please check
both corners) when press on the top frame (both corners), if it moves, re-adjust the
adjustable feet.
Do not place stacks of blankets or a rope on the floor, which could generate some heat
and aect how the machine runs.
Adjustable screw
A IMPORNT: The hot air emitted by the tumble der can reach temperature of up to 60
°
C.The appliance
must therere not be installed on floors which are not resistant to high temperatures.
Electrical Connection
Any electrical work required to install this appliance should be carried out by a qualified electrician or competent person
.
A Warning I THIS APPLIANCE MUST BE EARTHED
A The manufacturer declines any liability should this saty measure not be obseed.
Be switching on, make su the elericity supply voltage is the same as that indicated on the appliance's
ting plate.
�� Packaging materials
• The materials marked with the symbol are recyclable.
>PE<=polyethylene
>PS<=polystyrene
>PP<=polypropylene
• This means that they can be recycled by disposing of them properly in appropriate collection containers.
•
Old machine
Use authorized disposal sites for your old appliance. Help to keep your country tidy!
•
The symbol on the product or on its packaging indicates that this product may not be treated as
household wastnstead it should be taken to the appropriate collection point r the recycling of electrical
and electronic equipment. By ensuring this produ is disposed of correly, you will help prevent potential
negative consequences r the environment and human health, which could otheise be caused by
inappropriate waste handling of this product. For more detailed inrmation about recycling of this product,
please contact your local council, your household waste disposal service or the shop where you purchased
the product.
• The Symbol � mean: caution, risk of fire Oil-aected items can ignite spontaneously, especially when
exposed to heat sources such as in a tumble dryer. The items become warm, causing an oxidation reaction
in the oil. Oxidation creates heat. If the heat cannot escape, the items can become hot enough to catch fire.
Piling, stacking or storing oilaected items can prevent heat from escaping and so create a fire hazard. If it
is unavoidable that fabrics that contain vegetable or cooking oil or have been contaminated by hair care
products be placed in a tumble dryer they should first be washed in hot water with extra detergent - this
will reduce, but not eliminate, the hazard.
11

��
Ecological hints
save energy and to help protect the enviromen!, we recommend that you llow these hints:
Try to load the maximum capacity of the machine as small loads are uneconomical.
• Do not over-dry laundry, this avoids creasing and saves energy.
• Select the drying program according to the type of laundry and the required degree of dryness.
• Clean the filters regularly to avoid excessive drying times and high electricity consumption.
• Ventilate the room well.
12

REPAIRS, SERVICE & WARRANTY
It is hazardous for anyone installing, removing, altering,
repairing, servicing or testing of this appliance.
Only an Authorised Service Person can carry out servicing or
repairs to this appliance.
IF SERVICE IS REQUIRED:
If you have a problem, and the problem persists after you have
made the checks mentioned in this manual, contact:
TECO Australia’s Service on 1300 660 037 (8:30am - 4pm
Mon~Fri AEST) For warranty details please visit
www.teco.com.au
Service Email : [email protected]
Spare Parts : [email protected]
13

TECO
RRANTY INFORMION
Teco's warranty information for the product purchased is available at www.teco.com.au.
A copy of the warranty may also be obtained by contacting Teco's rranty and Service Department on
1300 660 037 during business hours (Mon - Fri 8.30am -4pm AEST).
To arrange for servicing of a Teco product, please contact our Warranty and Service Department on
130066 0 037 during business hours (Mon- Fri 8.30am -4pm AEST).
To assist in processing any warranty claim that you may have Teco recommends that you:
I.
Complete the llowing inrmation in relation to your purchase:
Name of retailer:
______
______
________
_
Name of owner: _
______
______
________
_
Date of purchase: _
______
______
_______
_
Model No. :
Serial No. :
MFG code:
2.
Retain proof of your purchase r any warranty claim. Ideally this proof of purchase will be the tax
invoice issued r your purchase.
3.
Complete the llowing inrmation in relation to the person that installed your Teco appliance
(if applicable):
Installer's name:
_______
_____
________
_
Telephone No.:
Licence No.:
TECO
DC
B-V
5
.teco.com.au