
Loading ...
Loading ...
Loading ...
10
Leveling Accuracy for
Horizontal Orientation
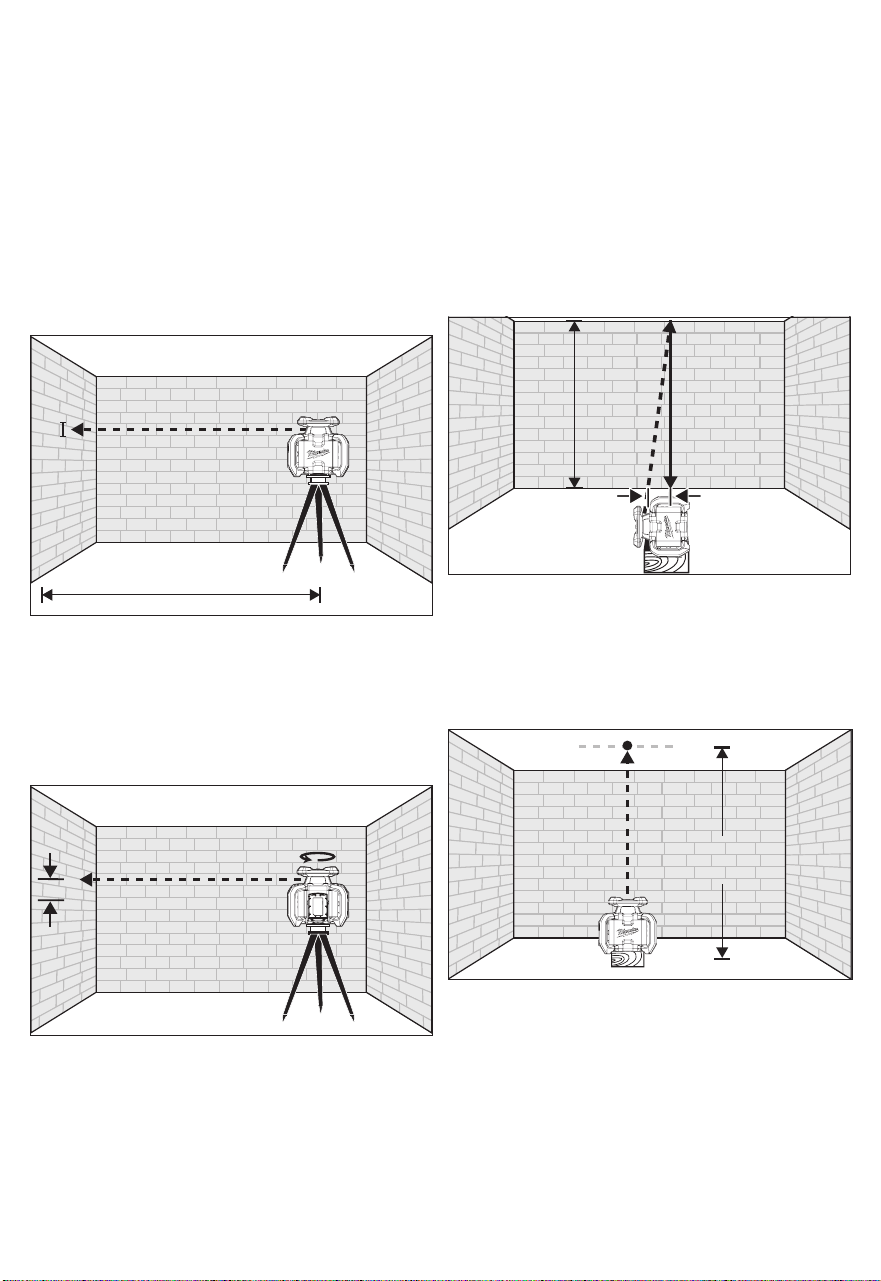
A tripod is suggested for this operation. Use a dis-
tance of 100' between the center of the laser and a
wall. Ensure the area is clear of objects before doing
this operation. This procedure must be performed
twice to check the plane accuracy for both the X
and Y axes.
1. Mount the laser on a tripod.
2. Turn on the laser by pressing the power button,
and wait for the self-leveling sequence to nish.
The leveling animation on the laser display will
complete, the laser diode will turn on and the laser
head will start to spin.
3. Mark the center of the beam on the wall point I. If
the laser is not visible, use a compatible remote/re-
ceiver to nd the plane and mark the center point.
100'
4. Rotate the laser 180
o
, and wait for the self-leveling
to nish. Mark the center of the beam on the wall
(point II). Ensure point II is as vertical as possible
above or below point I.
5. Measure the vertical distance, (d) between points
"I" and "II". This is the actual height deviation
of the laser in the axis checked over 200'. The
maximum deviation allowed should be 1/8" at 200'
(or 1/16" at 100').
180°180°
dd
IIII
II
6. Repeat the steps above in other axis.
Leveling Accuracy for
Vertical Orientation
Ensure the area is clear of obstructions before do-
ing this operation. Attach a plumb bob to the ceiling
near a wall. The plumb bob should be a minimum
of 30' in length.
1. Ensure the work area is on a at, clean surface.
2. Place the laser in the correct vertical orientation
with the keypad facing up and parallel to the
ground. If possible, elevate o the ground. Be
sure the setup is stable before proceeding to the
next step.
3. Turn on the laser by pressing the power button,
and wait for the self-leveling sequence to nish.
The leveling animation will complete, the diode
will become solid and will enter plumb dot mode.
4. Enter RPM mode by selecting the desired speed
from the RPM menu and press the "OK" button
to start the laser head rotation. Manually turn the
tool to align the laser, so it crosses the plumb bob
line at least 30' above the ground.
5. Measure the distance between the plumb bob
string and the laser at the base of the wall. This
distance represents the laser's actual deviation
from plumb. The maximum deviation allowed
should be 3/64" over 30' (or 1/8" at 100').
dd
30'30'
Plumb Dot Accuracy
A free measuring distance of approximately 15'
between the oor and ceiling on a rm surface is
required. It's suggested to elevate the tool o the
ground for this operation.
1. Place the tool within 1' of the oor.
2. Turn on the tool by pressing the power button, and
allow the laser to self-level.
15'15'
IIII
II
3. Mark the center of the plumb point on the ceiling
(point I).
4. Rotate the tool 180° being as careful as possible
to keep the center of the laser in the exact same
location.
Loading ...
Loading ...
Loading ...