
W ATCH KITS
W atchmaking Guide
Seiko NH36 Edition
The Marco
The Cabot
W ATCH KITS
Parts & Tools Checklist ......................................................................
About The Movement .......................................................................
A Brief History on W atchmaking ......................................................
W atchmaking Guide ..........................................................................
Final Checks .......................................................................................
W arranty......................................................................................................
Contact ................................................................................................
Contact ................................................................................................
3
5
6
8
20
21
23
23
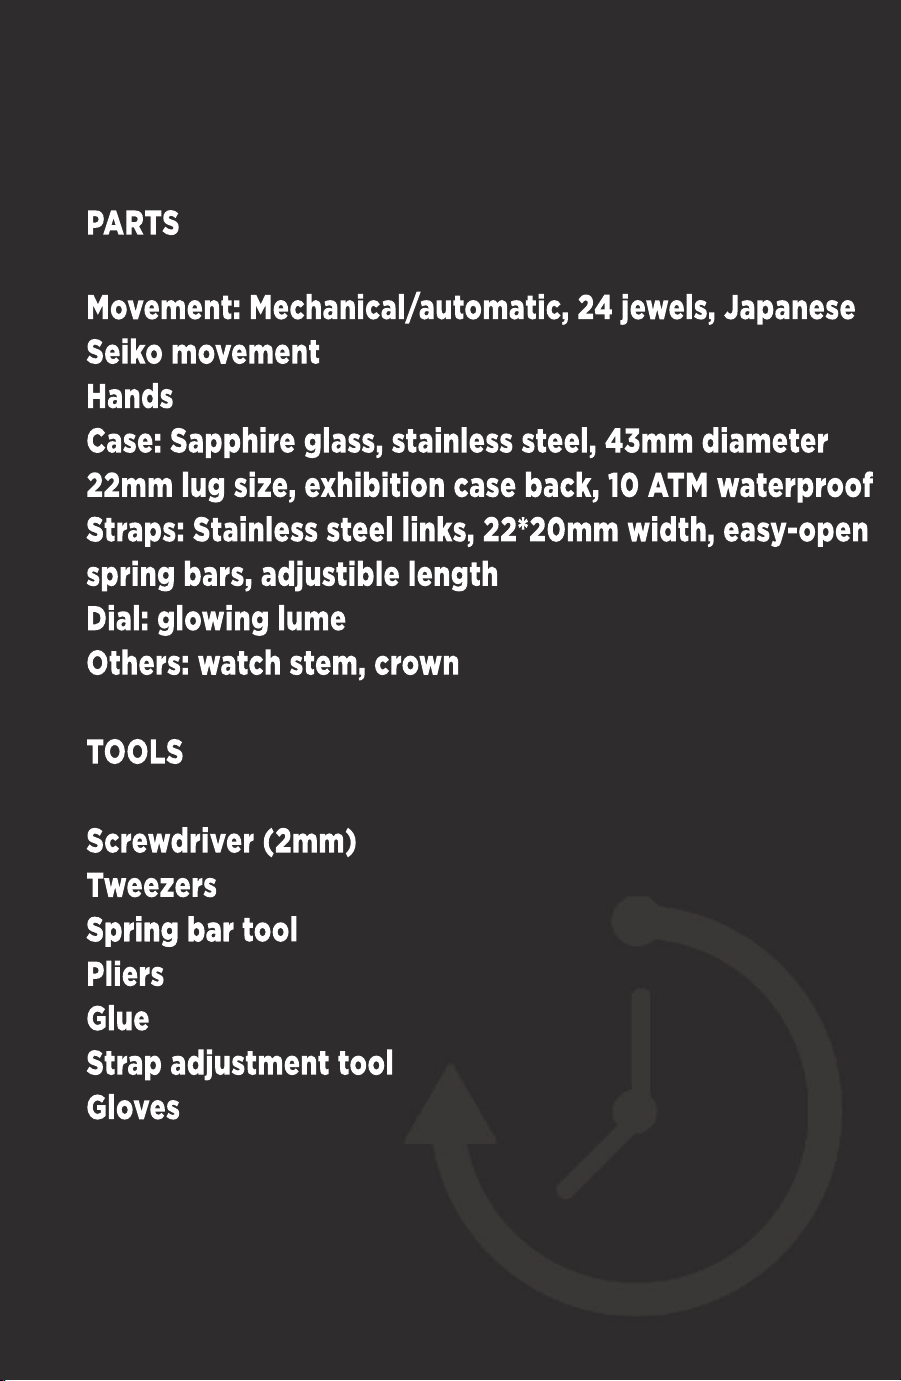
PARTS
Movement: Mechanical/automatic, 24 jewels, Japanese
Seiko movement
Hands
Case: Sapphire glass, stainless steel, 43mm diameter
22mm lug size, exhibition case back, 10 ATM waterproof
SStraps: Stainless steel links, 22*20mm width, easy-open
spring bars, adjustible length
Dial: glowing lume
Others: watch stem, crown
TOOLS
Screwdriver (2mm)
Tweezers
Spring bar
Spring bar tool
Pliers
Glue
Strap adjustment tool
Gloves
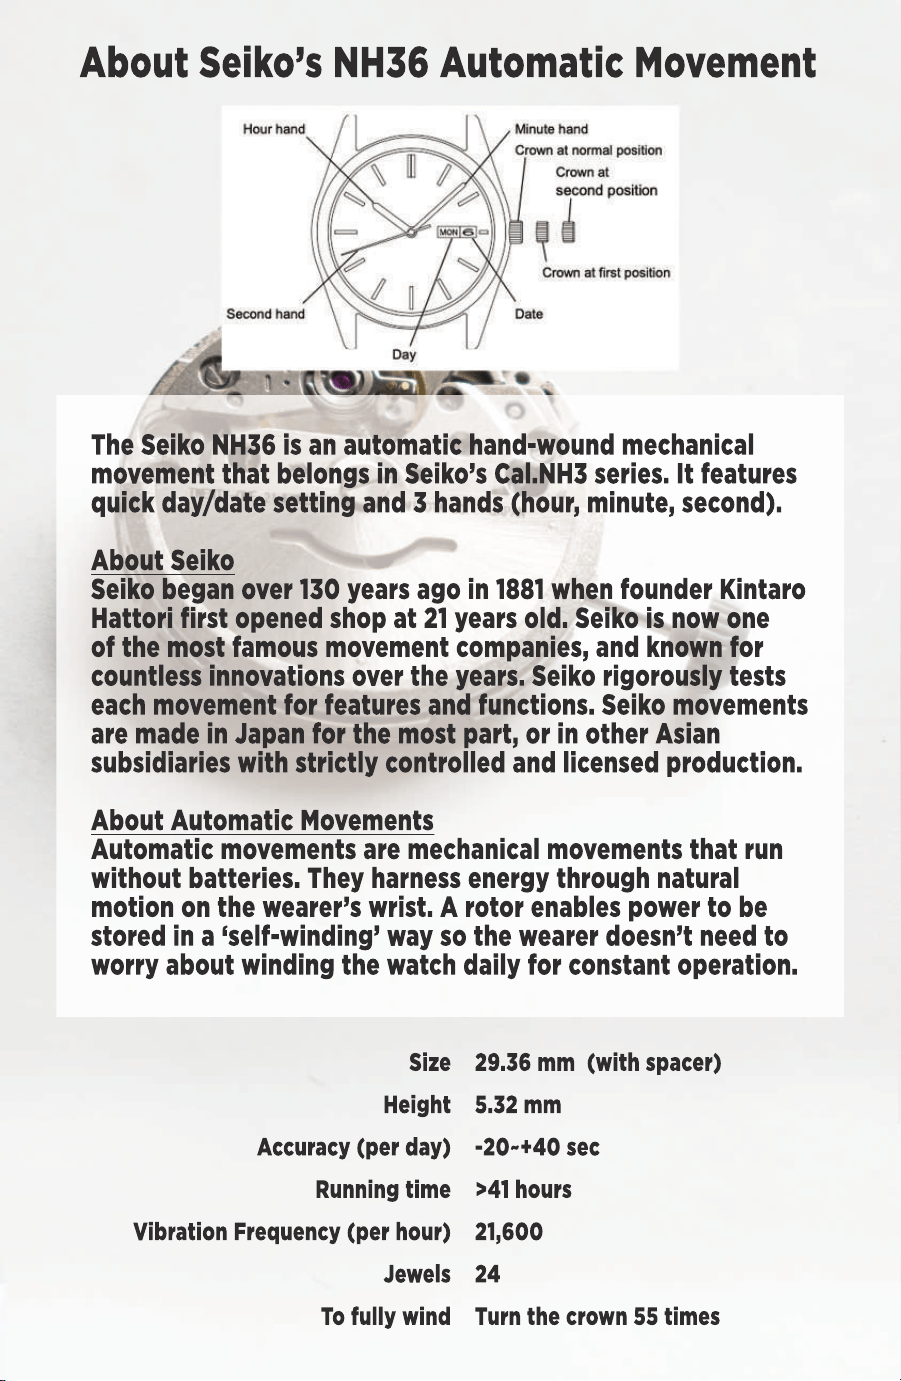
About Seiko’s NH36 Automatic Movement
Size
Height
Accuracy (per day)
Running time
Vibration Frequency (per hour)
Jewels
T
To fully wind
29.36 mm (with spacer)
5.32 mm
-20~+40 sec
>41 hours
21,600
24
T
Turn the crown 55 times
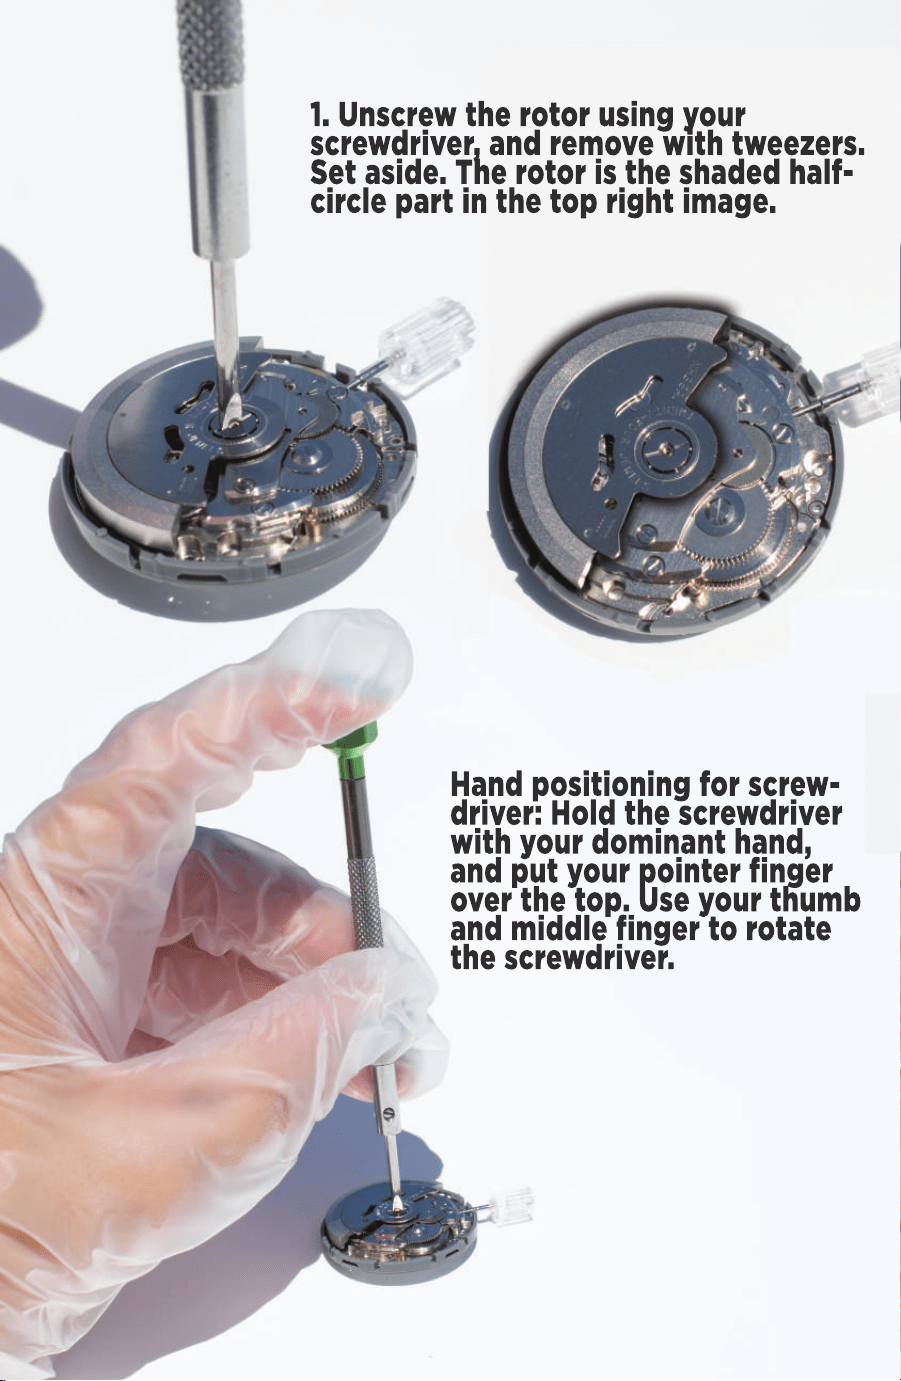
1. Unscrew the rotor using your
screwdriver, and remove with tweezers.
Set aside. The rotor is the shaded half-
circle part in the top right image.
Hand positioning for screw-
driver: Hold the screwdriver
with your dominant hand,
and put your pointer finger
over the top. Use your thumb
and middle finger to rotate
the screwdriver.

2. Fit the dial onto the top of the movement
(the day/date rectangle should align at 3:00
with the stem). The two dial feet on the
bottom (bue circles) will fit into the gray spacer
around the movement.
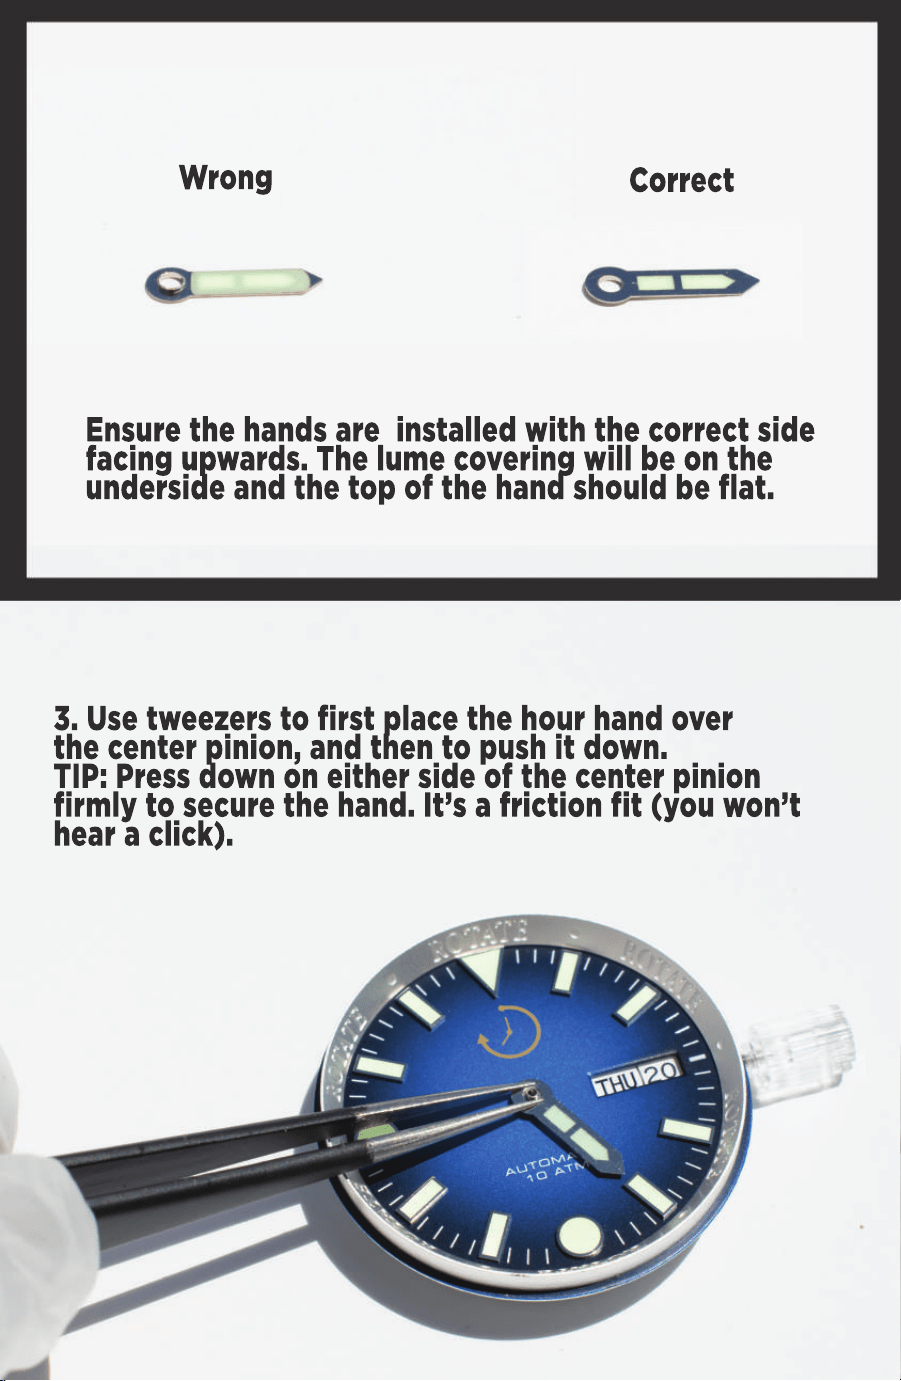
Wrong
Correct
Ensure the hands are installed with the correct side
facing upwards. The lume covering will be on the
underside and the top of the hand should be flat.
3. Use tweezers to first place the hour hand over
the center pinion, and then to push it down.
TIP: Press down on either side of the center pinion
firmly to secure the hand. It’s a friction fit (you won’t
hear a click).
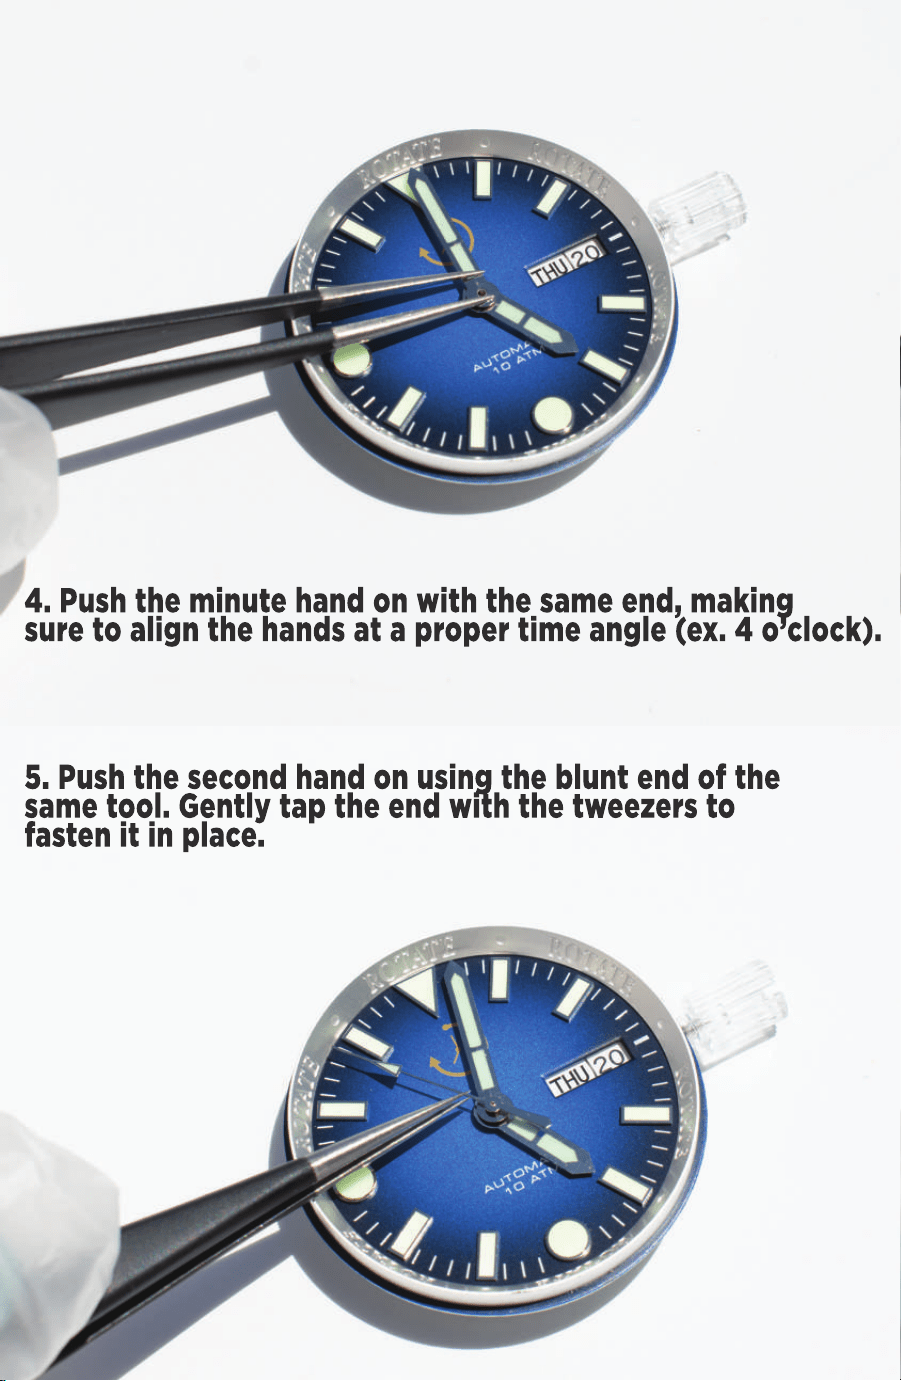
4. Push the minute hand on with the same end, making
sure to align the hands at a proper time angle (ex. 4 o’clock).
5. Push the second hand on using the blunt end of the
same tool. Gently tap the end with the tweezers to
fasten it in place.
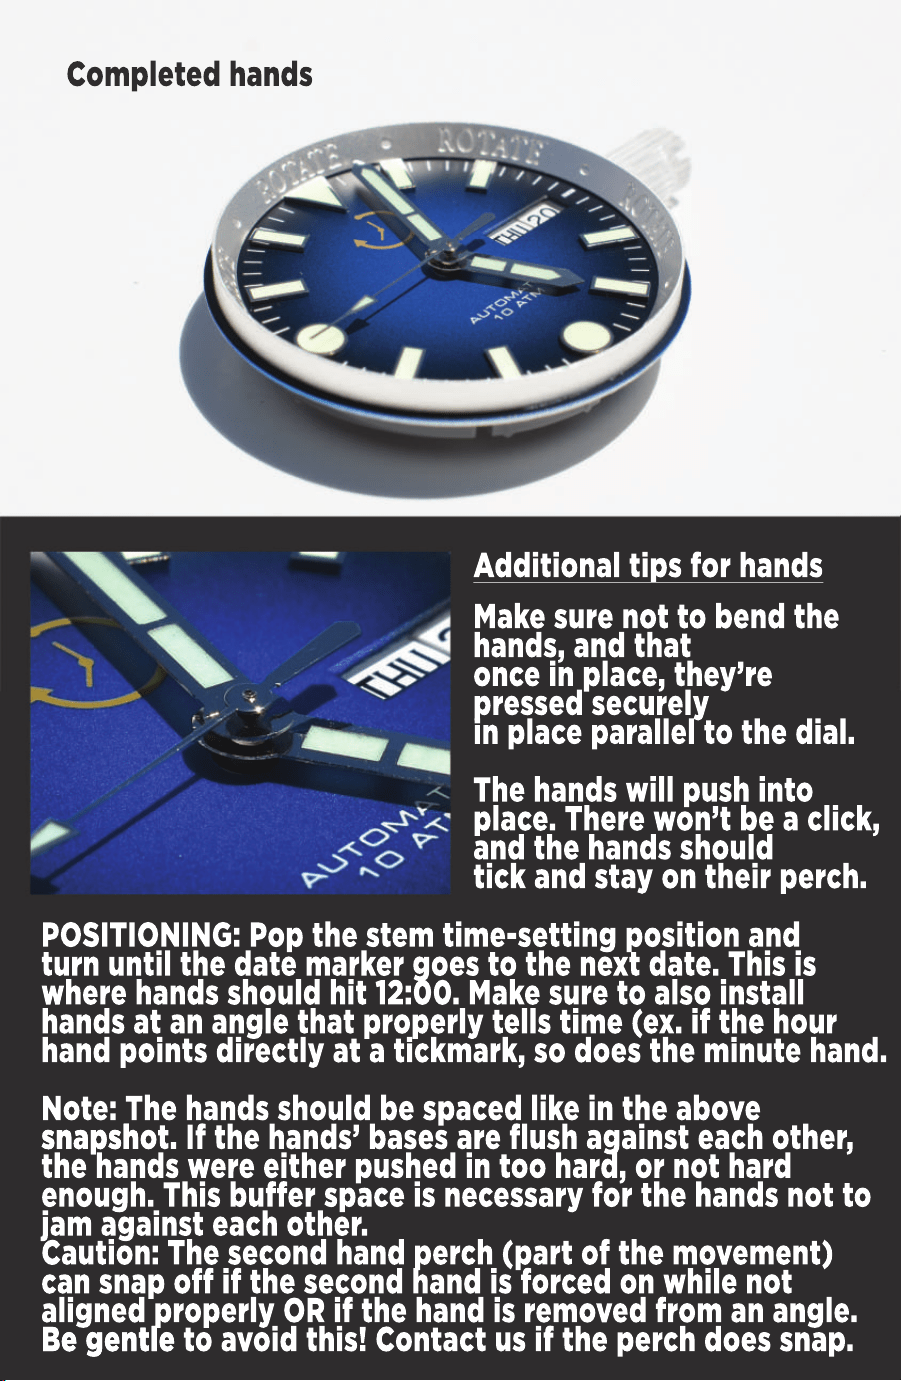
Completed hands
POSITIONING: Pop the stem time-setting position and
turn until the date marker goes to the next date. This is
where hands should hit 12:00. Make sure to also install
hands at an angle that properly tells time (ex. if the hour
hand points directly at a tickmark, so does the minute hand.
Note: The hands should be spaced like in the above
snapsh
snapshot. If the hands’ bases are flush against each other,
the hands were either pushed in too hard, or not hard
enough. This buffer space is necessary for the hands not to
jam against each other.
Caution: The second hand perch (part of the movement)
can snap off if the second hand is forced on while not
aligned properly OR if the hand is removed from an angle.
Be gentle
Be gentle to avoid this! Contact us if the perch does snap.
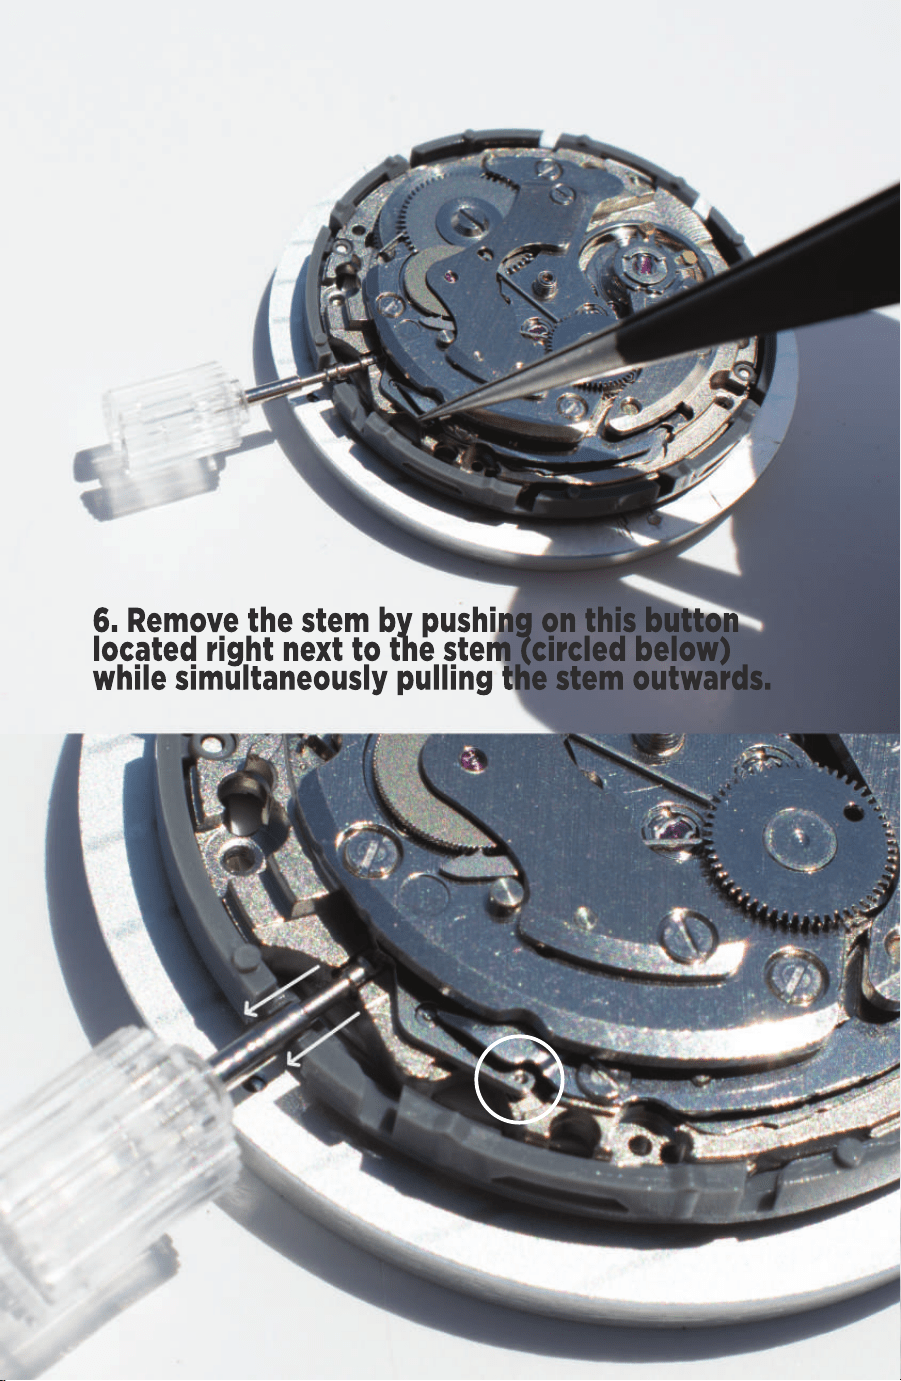
6. Remove the stem by pushing on this button
located right next to the stem (circled below)
while simultaneously pulling the stem outwards.
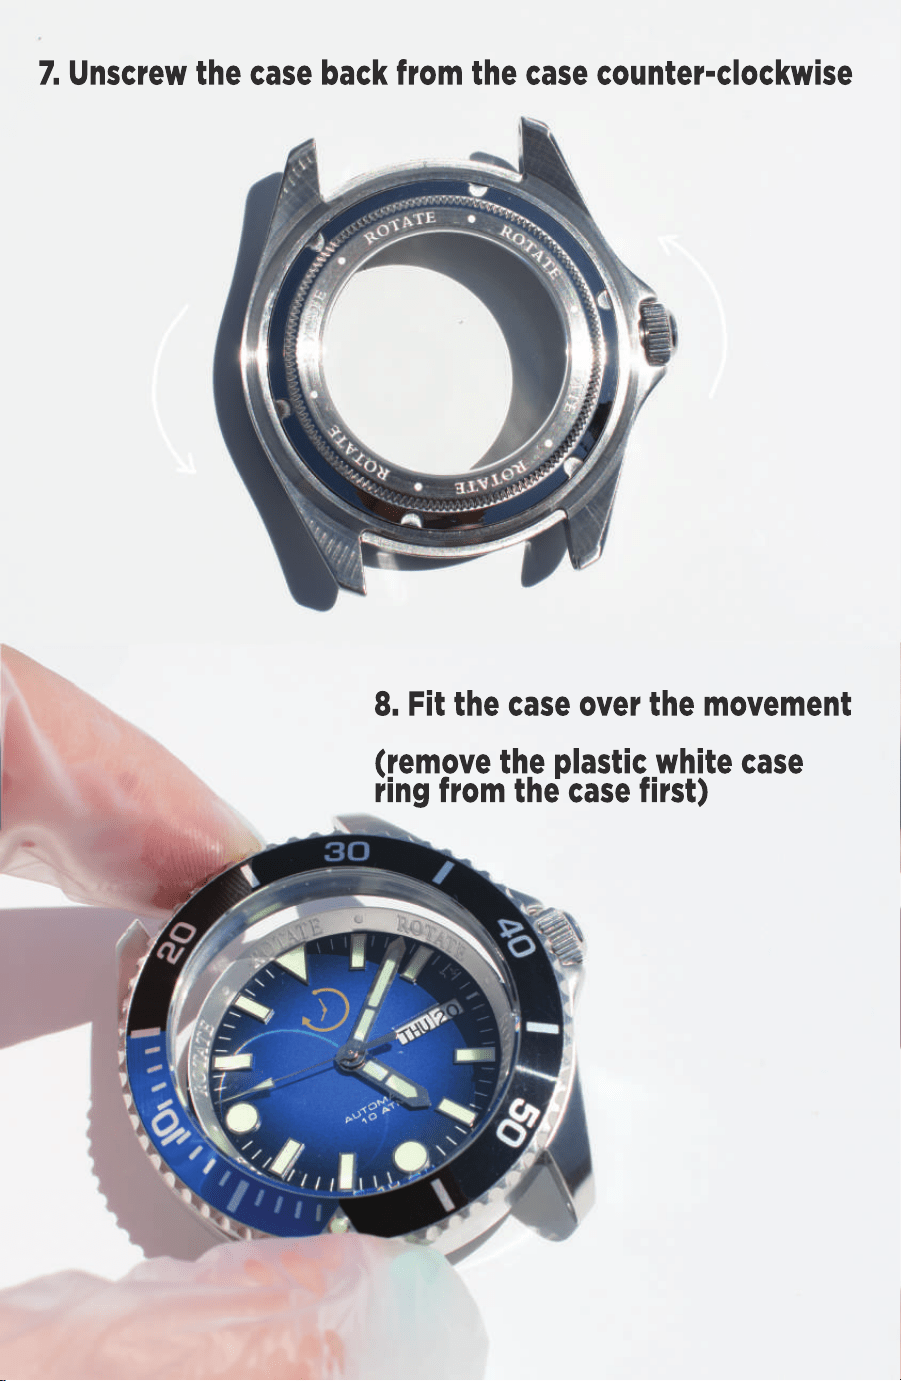
7. Unscrew the case back from the case counter-clockwise
8. Fit the case over the movement
(remove the plastic white case
ring from the case first)
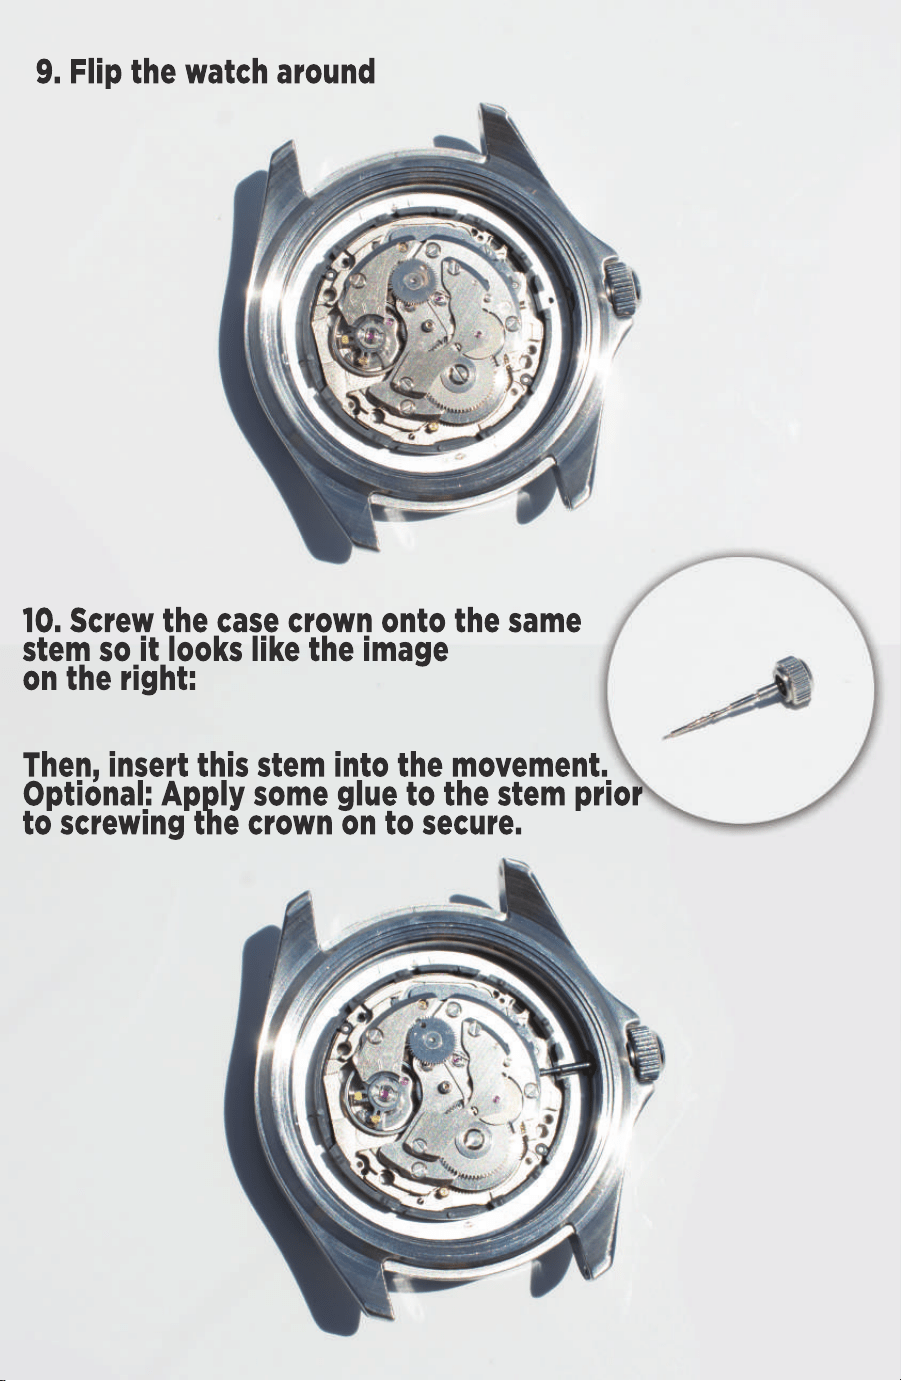
9. Flip the watch around
10. Screw the case crown onto the same
stem so it looks like the image
on the right:
Then, insert this stem into the movement.
Optional: Apply some glue to the stem prior
to screwing the crown on to secure.
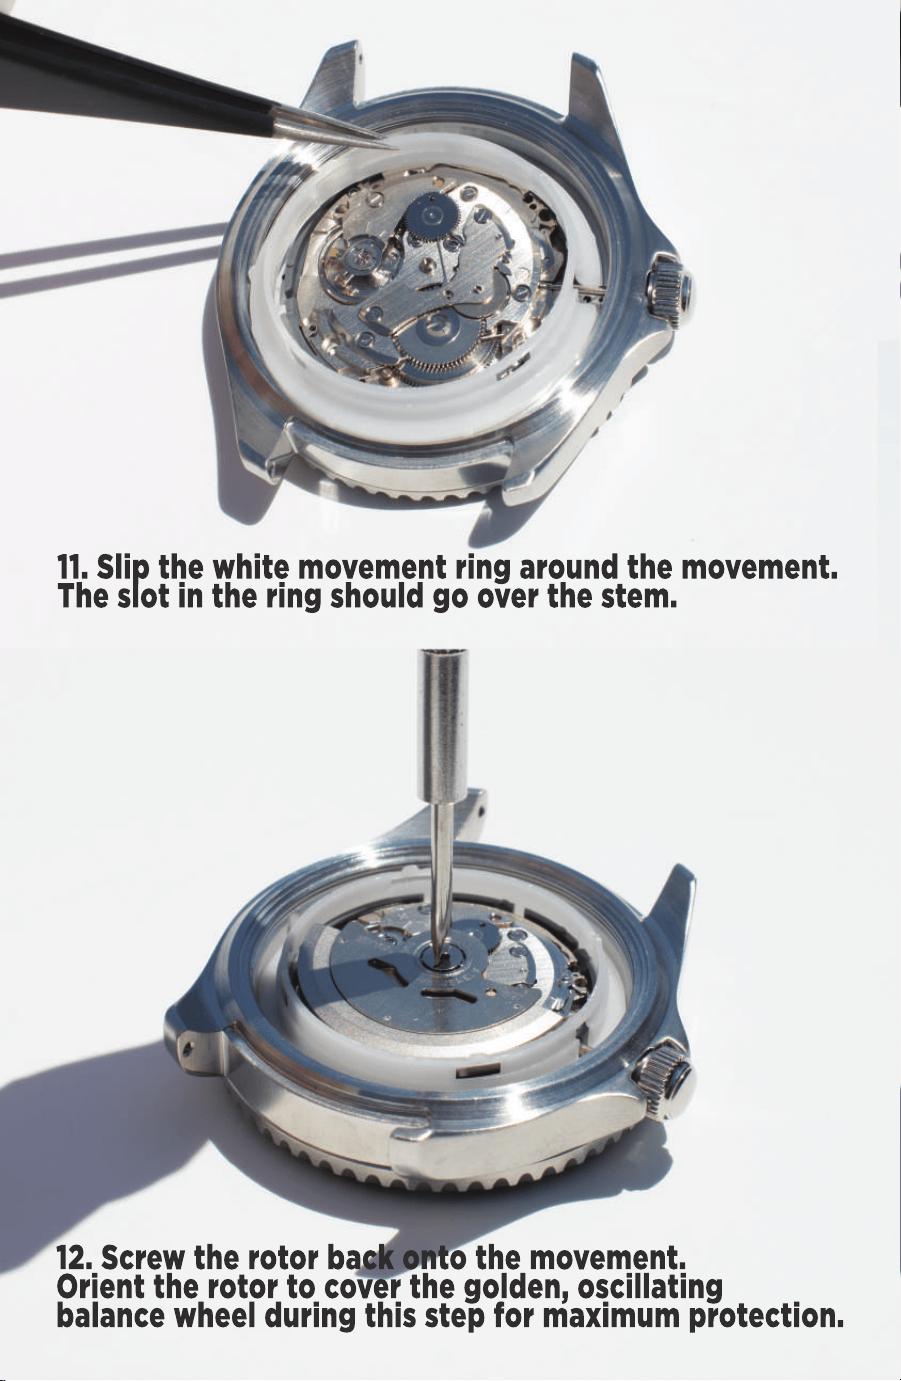
11. Slip the white movement ring around the movement.
The slot in the ring should go over the stem.
12. Screw the rotor back onto the movement.
Orient the rotor to cover the golden, oscillating
balance wheel during this step for maximum protection.
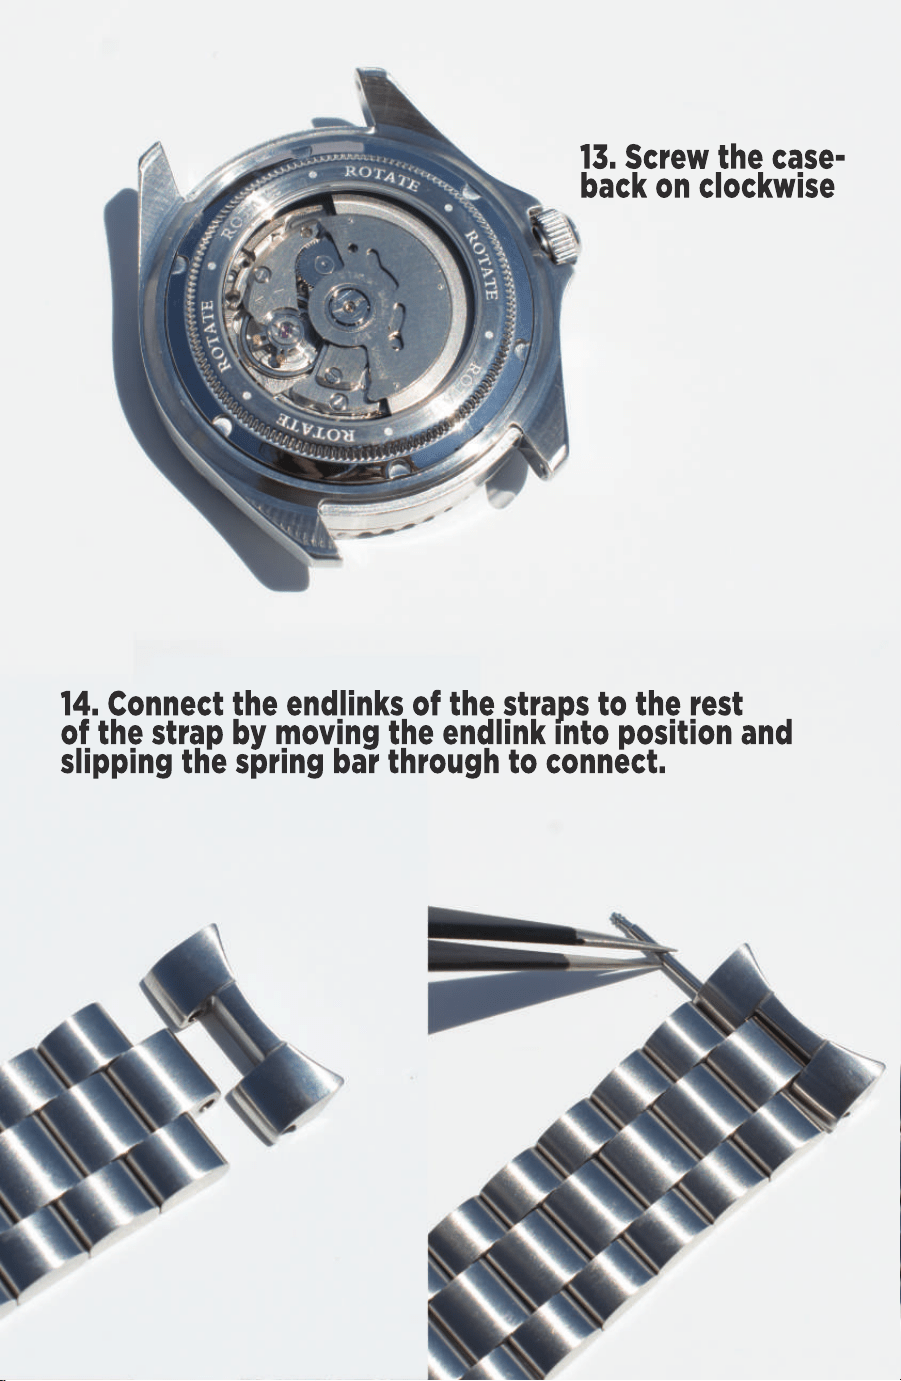
13. Screw the case-
back on clockwise
14. Connect the endlinks of the straps to the rest
of the strap by moving the endlink into position and
slipping the spring bar through to connect.
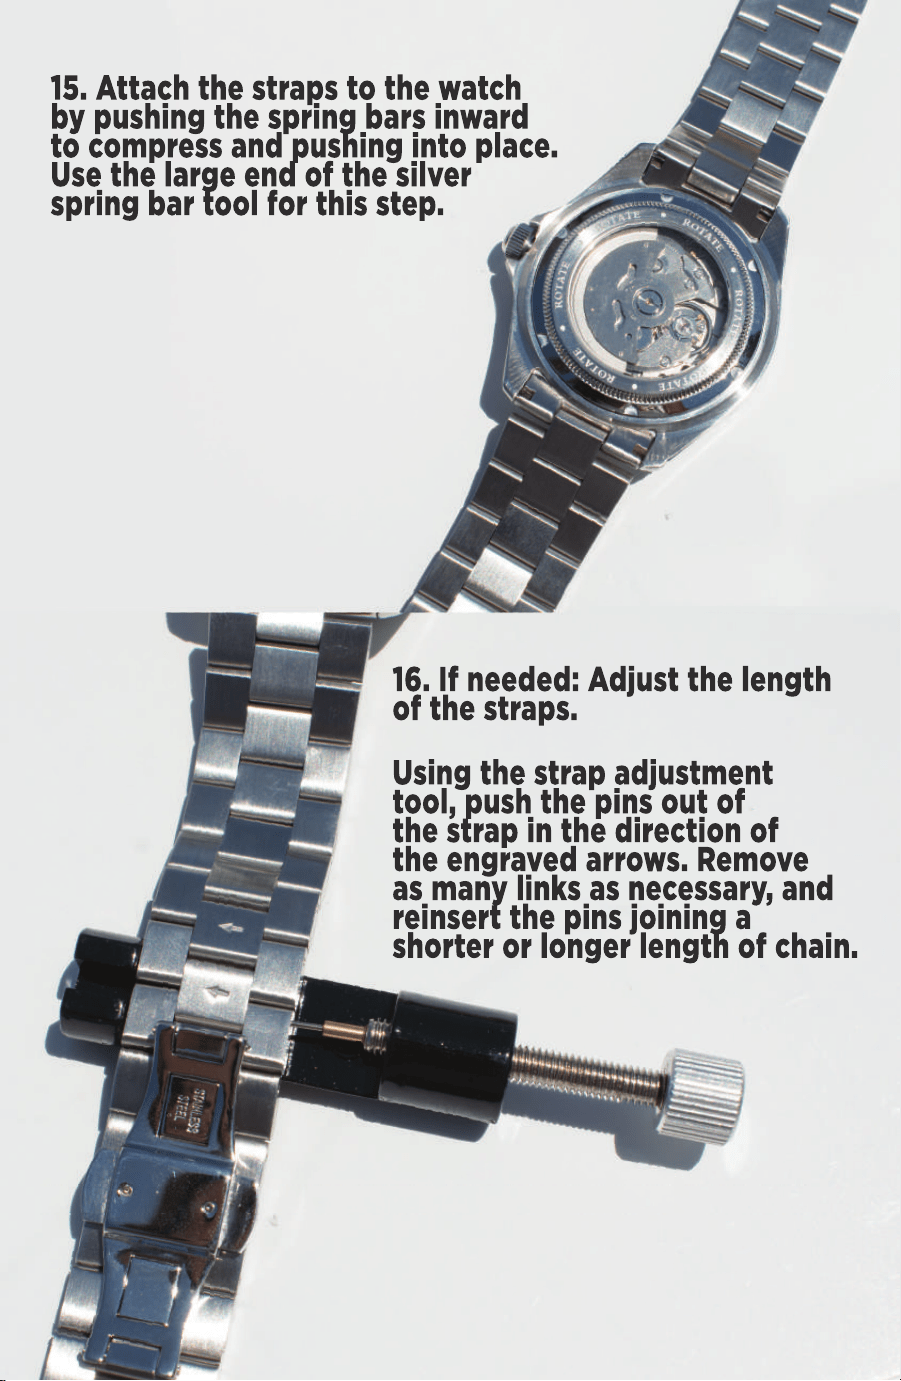
15. Attach the straps to the watch
by pushing the spring bars inward
to compress and pushing into place.
Use the large end of the silver
spring bar tool for this step.
16. If needed: Adjust the length
of the straps.
Using the strap adjustment
tool, push the pins out of
the strap in the direction of
the engraved arrows. Remove
as many links as necessary, and
reinsert the pins joining a
shor
shorter or longer length of chain.
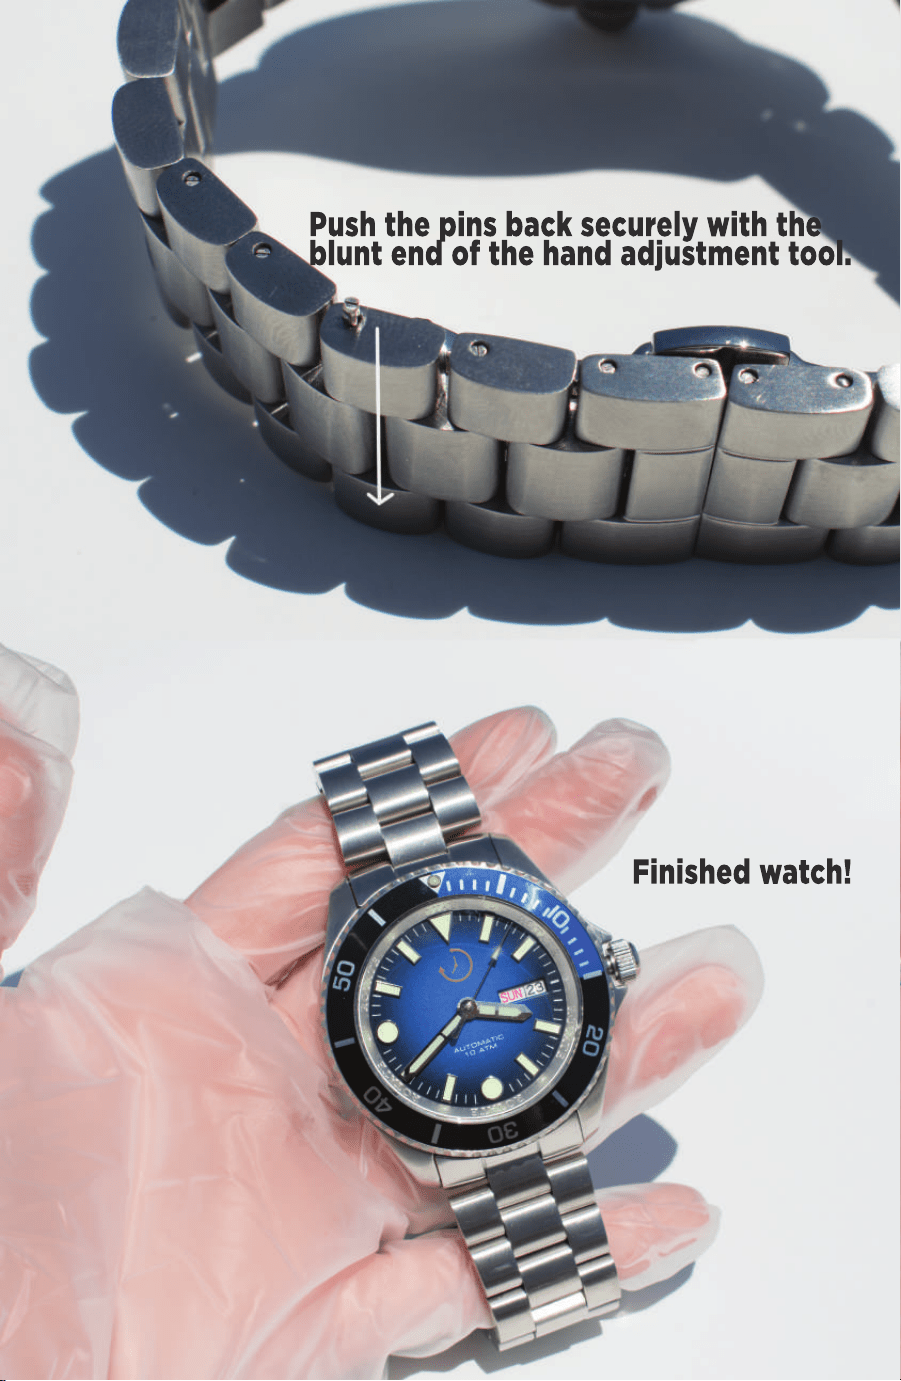
Push the pins back securely with the
blunt end of the hand adjustment tool.
Finished watch!

Thank you for your interest in Rotate Watches’ Watch
Kits! This warranty applies to all watch kits purchased
from Rotate Watches.
W hat does the warranty cover?
The warranty will replace all damaged parts
EXCLUDING the movement and case pieces
f
free-of-charge if proof of damage is received. Please
send photos/videos to hello@rotatewatches.com with
the part/tool name and color (if applicable).
The warranty also partially covers movements and
case pieces, including the movement, stem, case
front, case middle, case back, and crown. If
any component is damaged by the customer, we
can
can offer factory prices for those pieces.**
Please email us photos/videos of the damage to
hello@rotatewatches.com. We’ll attempt to help
repair the damage with you, but if unsuccessful,
we can supply a discount code for the factory price.
To obtain warranty service, you must first contact
us to determine the problem and the best solution
f
for you: hello@rotatewatches.com.


W ATCH KITS
We’re constantly seeking
feedback, testimonials, and pictures!
Please submit to us at:
rotatewatches.com/reviews
or email to hello@rotatewatches.com
Tag us on Instagram @rotatewatches!
