Model No. DG276
Thank you for purchasing a Dellonda product. Manufactured to a high standard, this product will,
if used according to these instructions, and properly maintained, give you years of trouble free performance.
www.dellonda.co.uk
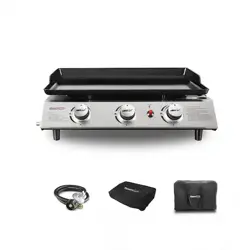
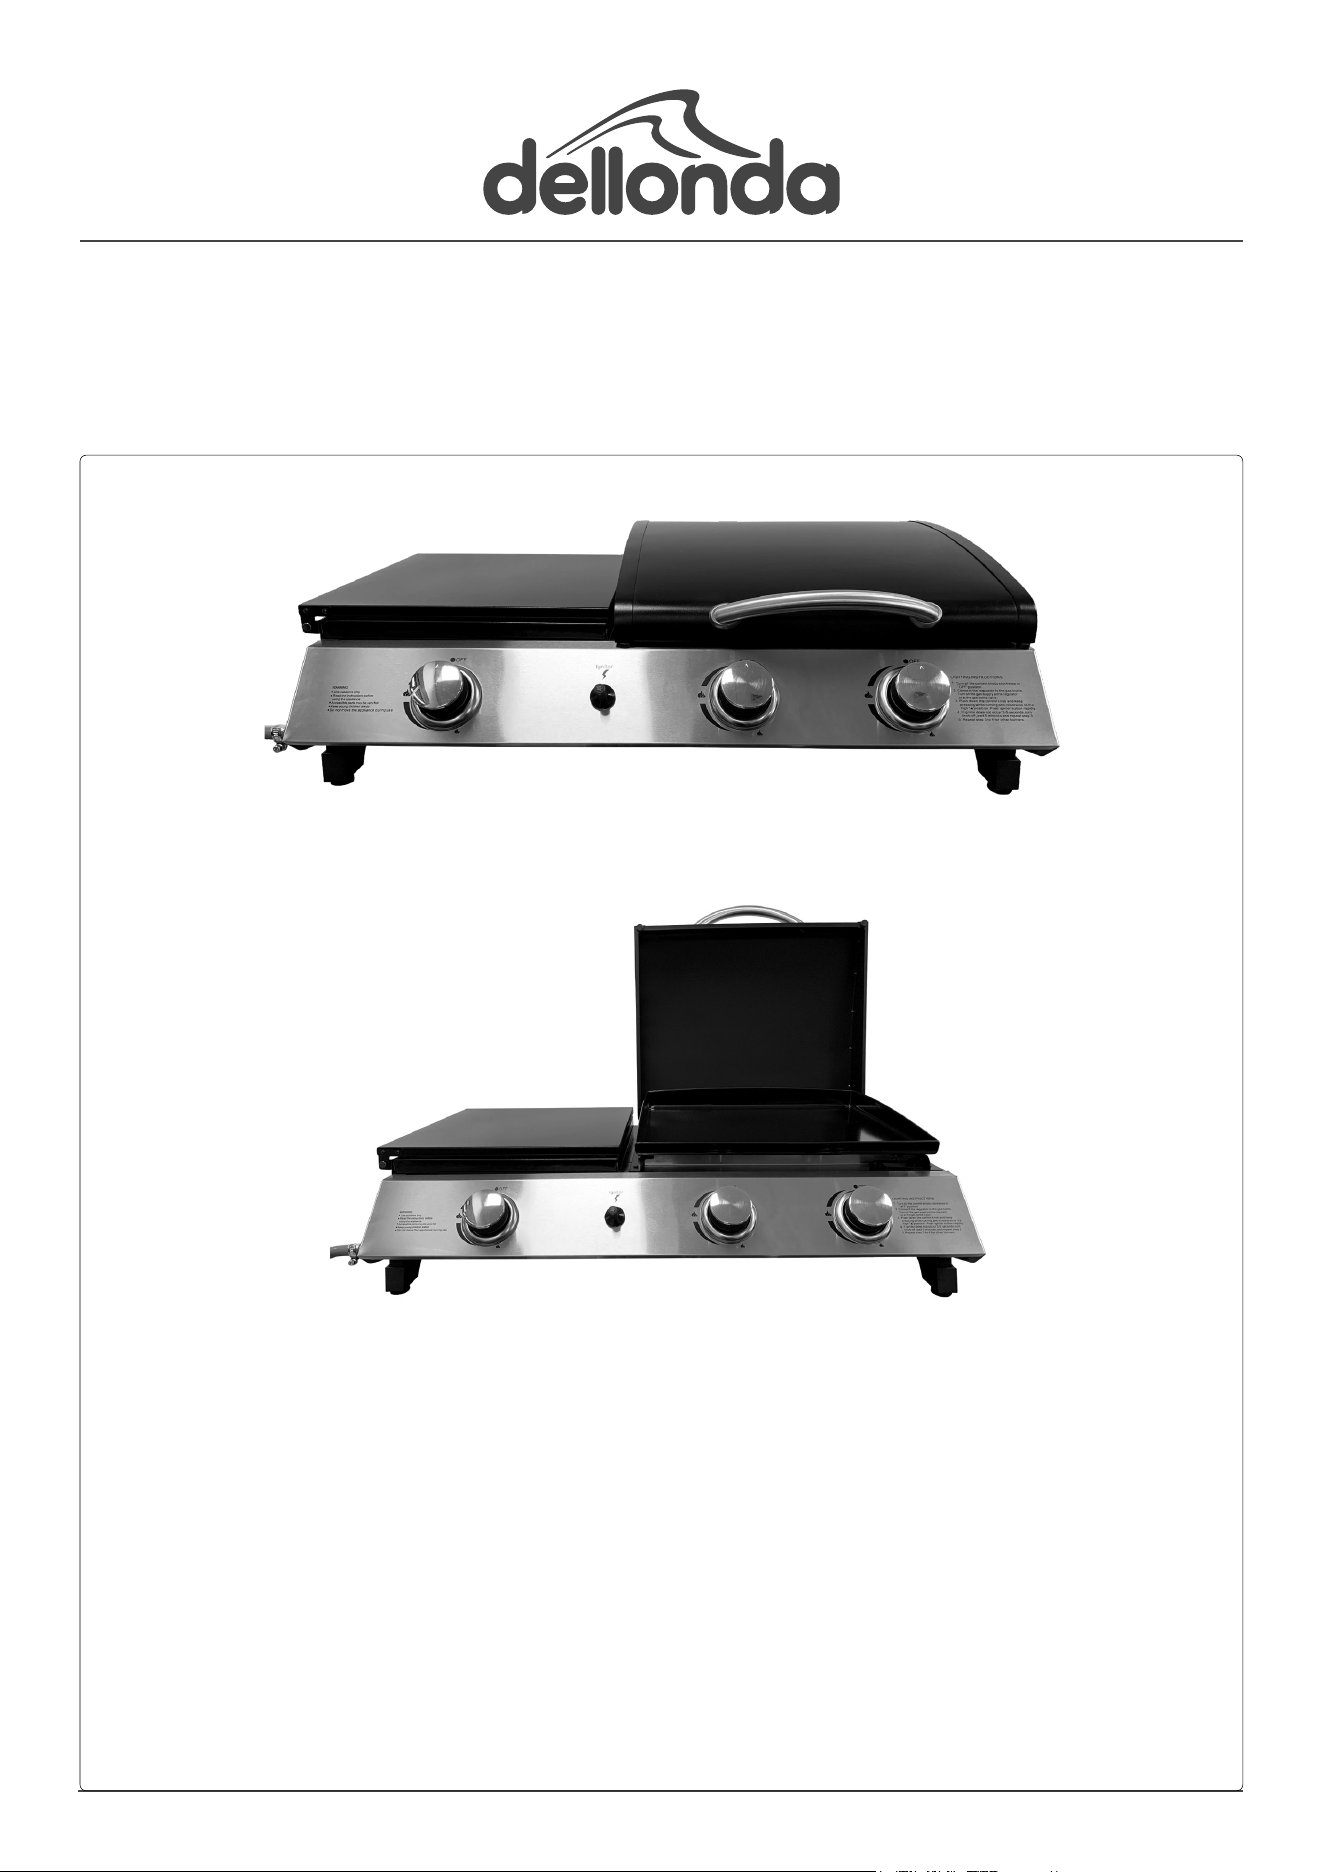
Dellonda 3 Burner Gas Plancha/Grill BBQ
Stainless Steel, 8.5kW
DG276 Issue:2 21/03/24
Important Information
Please read these instructions carefully. Note the safe operational requirements, warnings & cautions. Use the product correctly and with care
for the purpose for which it is intended. Failure to do so may cause damage and/or personal injury and will invalidate the warranty. Keep these
instructions safe for future use.
Refer to
instruction
manual
Wear
Gloves
Warning:
Hot
Surface
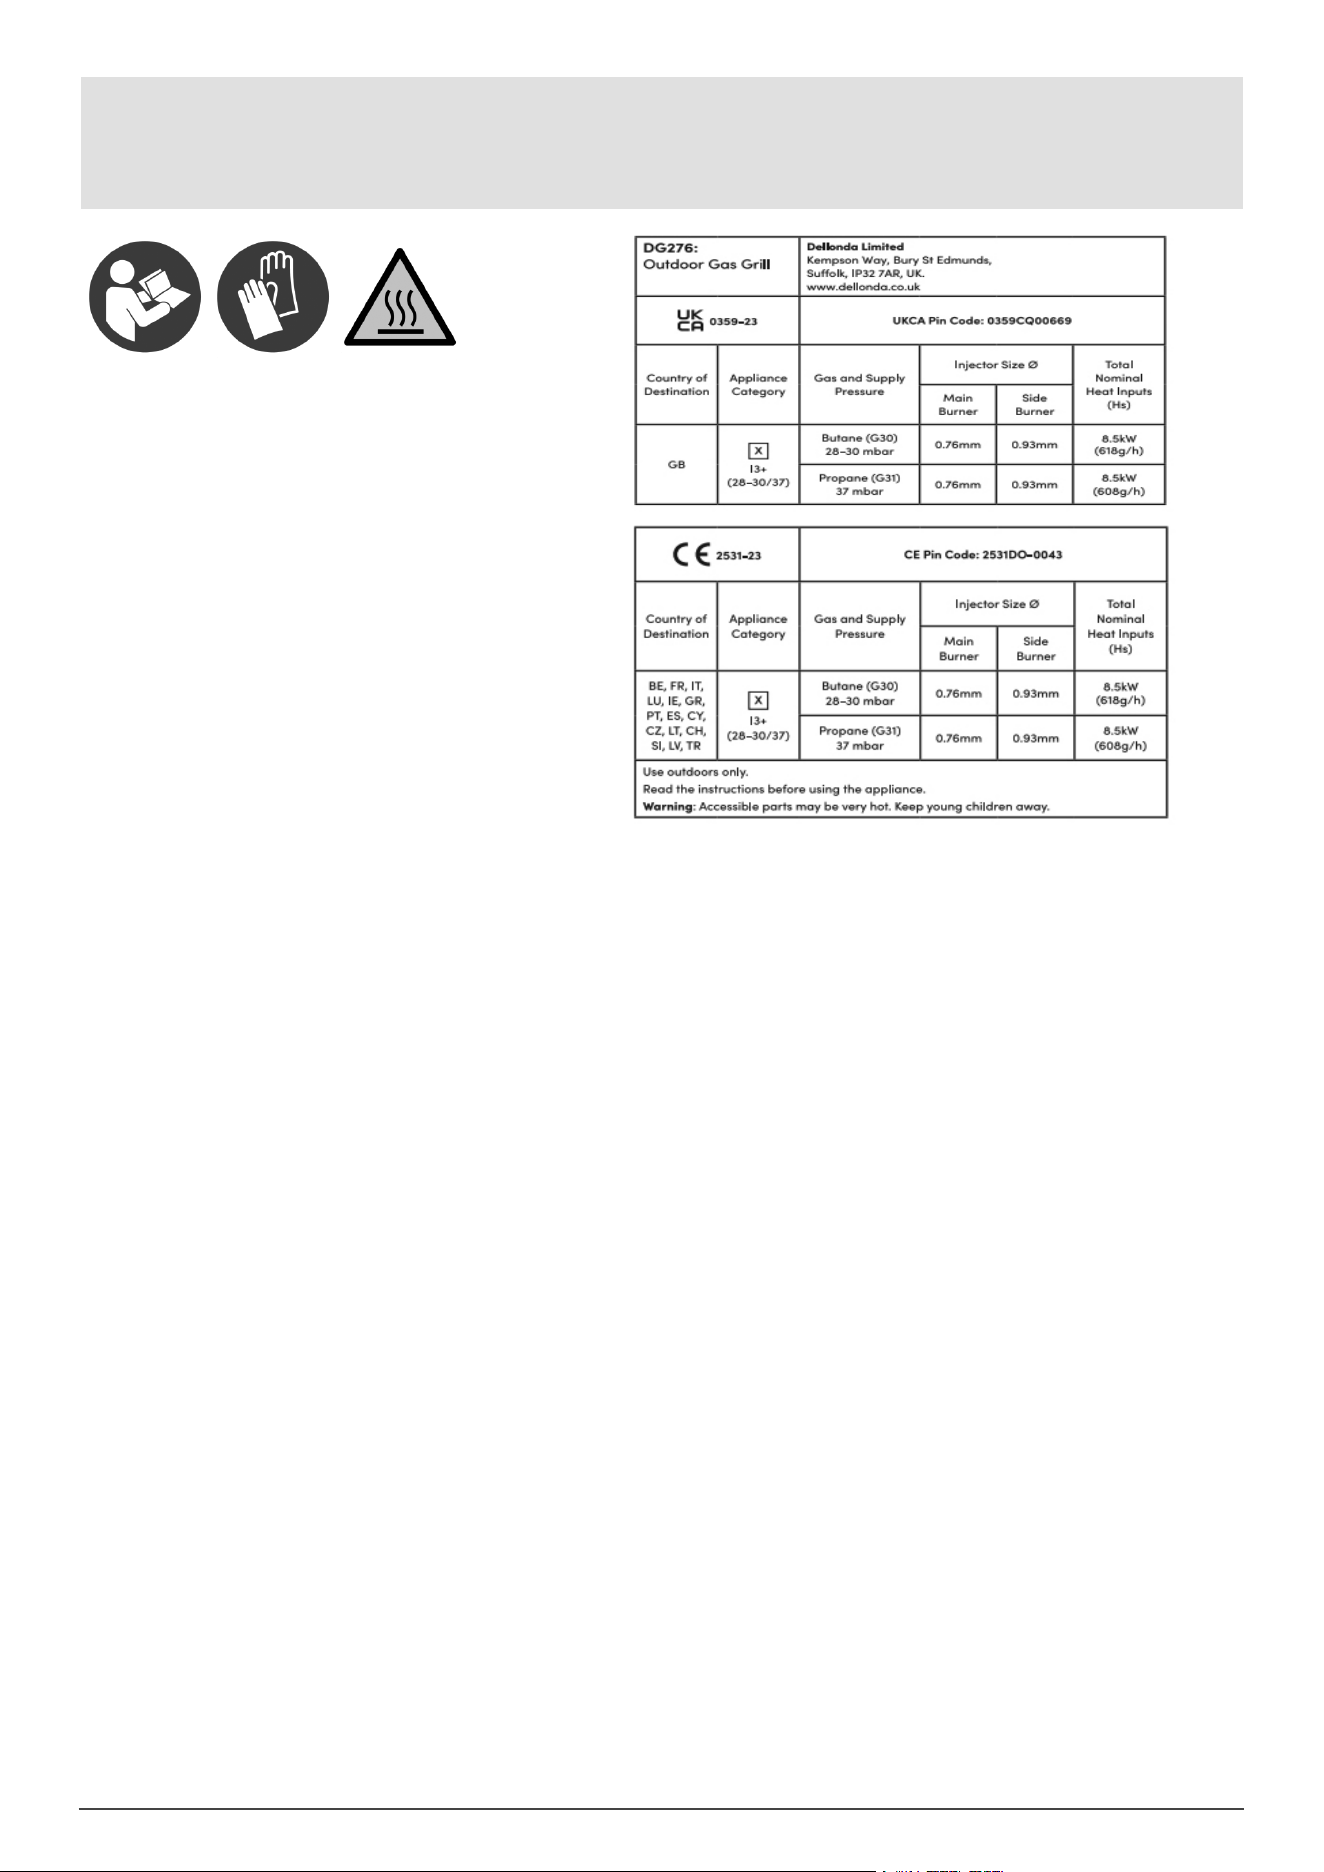
Specication
No. of burners: 3.
Cooking Area (W x D):Plancha 400 x 340mm.
Cooking grid 300 x280mm.
Product Dimensions (W x D x H): 795 x 475 x 215mm.
Ignition: Piezo.
Nett Weight 15kg.
Power: 8.5kW Plancha (2.5kW per burner Grill 3.5kW).
Product depth (front to back) 47.5cm.
Product dimensions 795 x 475 x 215mm.
Product hight (oor to top) 21.5cm.
Product width (side to side) 79.5cm.
Introduction
Plancha bbq grill with three stainless steel burners. Use in the garden, travel or camping trips. Plancha cooking uses low-fat, high-heating cooking
with no are-ups and is ideal for all kinds of food such as eggs, pancakes, sausages, salmon, steak, vegetables and so much more. Piezo ignition
ensures a safe and easy start-up every time, just press the button, no matches needed. Supplied with regulator and hose assembly for use with
propane patio gas bottles.
Safety Instructions
• GENERAL SAFETY
• Read the instructions before using the appliance.
• WARNING! The warnings, cautions and instructions in this manual cannot cover all possible conditions and situations that may occur. It must
be understood by the operator that common sense and caution are factors which cannot be built into this product, but must be applied by the
operator.
• WARNING! Hazardous re or explosion may result if instructions are ignored.
• WARNING! Never use a ame to do the leak test and ensure no naked ames are nearby when doing the leakage test.
• WARNING! Accessible parts may be very hot. Keep young children and pets away.
• WARNING! If you smell gas: turn off the gas supply at the cylinder, extinguish all naked ames, DO NOT operate any electrical appliances, check
for leaks as detailed in this manual. If odour persists, contact Dellonda.
• WARNING! Any modication to this appliance may be dangerous and is absolutely not permitted.
• WARNING! The hood must always be open when lighting the burner.
• Read the instructions carefully before assembly and retain this manual for future reference.
• Use outdoors only, stand on a level surface, remember hot fat may drip out of the drip tray.
• Handle the hot appliance with the help of oven gloves.
• The appliance should be cleaned on a regular basis. Take care not to enlarge burner ports of orice openings when cleaning the burner or valves.
• Connect the regulator and hose onto the gas cylinder, close all the valves by turning the control knobs to the “OFF” (fully clockwise) position.
• Always do the gas leak check before you use the barbecue and after a cylinder change. Test the leakage on all the connections where gas passes
by.
• Parts sealed by the manufacturer shall not be modied by the user.
• Use outdoors only.
• This appliance must be kept away from ammable materials during use.
• DO NOT modify the appliance.
• GAS LEAK CHECK Put soapy water on all the connections where the gas reaches. Open the gas cylinder valve and regulator. If bubbles are seen,
tighten the connection. If bubbles are still seen, close all valves, turn off the regulator and contact Dellonda for help.
• Never use the appliance with a leak.
• The gas cylinder can only be changed by a competent person.
• Use oven gloves and sturdy long handled barbecue tools when cooking on the appliance.
• Be prepared if an accident or re should occur. Know where your rst aid kit and re extinguishers are and how to use them correctly.
• Keep the gas supply hose away from any heated surfaces.
• Ensure the appliance has completely cooled before storing.
• Cylinders must be stored outdoors, upright and out of reach of children. Protect cylinder from high temperatures and replace the plastic port cap.
• This gas appliance is designed for outside use only.
• DO NOT use in high winds.
• When the regulator is to be used outdoors, it shall be positioned or protected against direct penetration by any trickling water.
• DO NOT move the appliance during use.
• Turn off the gas supply at the gas cylinder after use.
www.dellonda.co.uk
Regulator And Hose
• Only use regulators and hose approved for LPG at the above pressures. The life expectancy of the regulator is estimated as 10 years. It is
recommended that the regulator is changed within 10 years of the date of manufacture.
• The use of the wrong regulator or hose is unsafe; always check that you have the correct items before operating the appliance.
• The hose used must conform to the relevant standard for the country of use. The length of the hose must be 1.5 meters (maximum). Worn or
damaged hose must be replaced. Ensure that the hose is not obstructed, kinked, or in contact with any part of the appliance other than at its
connection. Change the hose when the national conditions require it.
• The hose should not be twisted or kinked when attached to the regulator and outdoor gas appliance.
• No part of the hose should touch any part of the appliance. Site the cylinder out to the left hand side of the appliance at the maximum distance
permitted by the hose length.
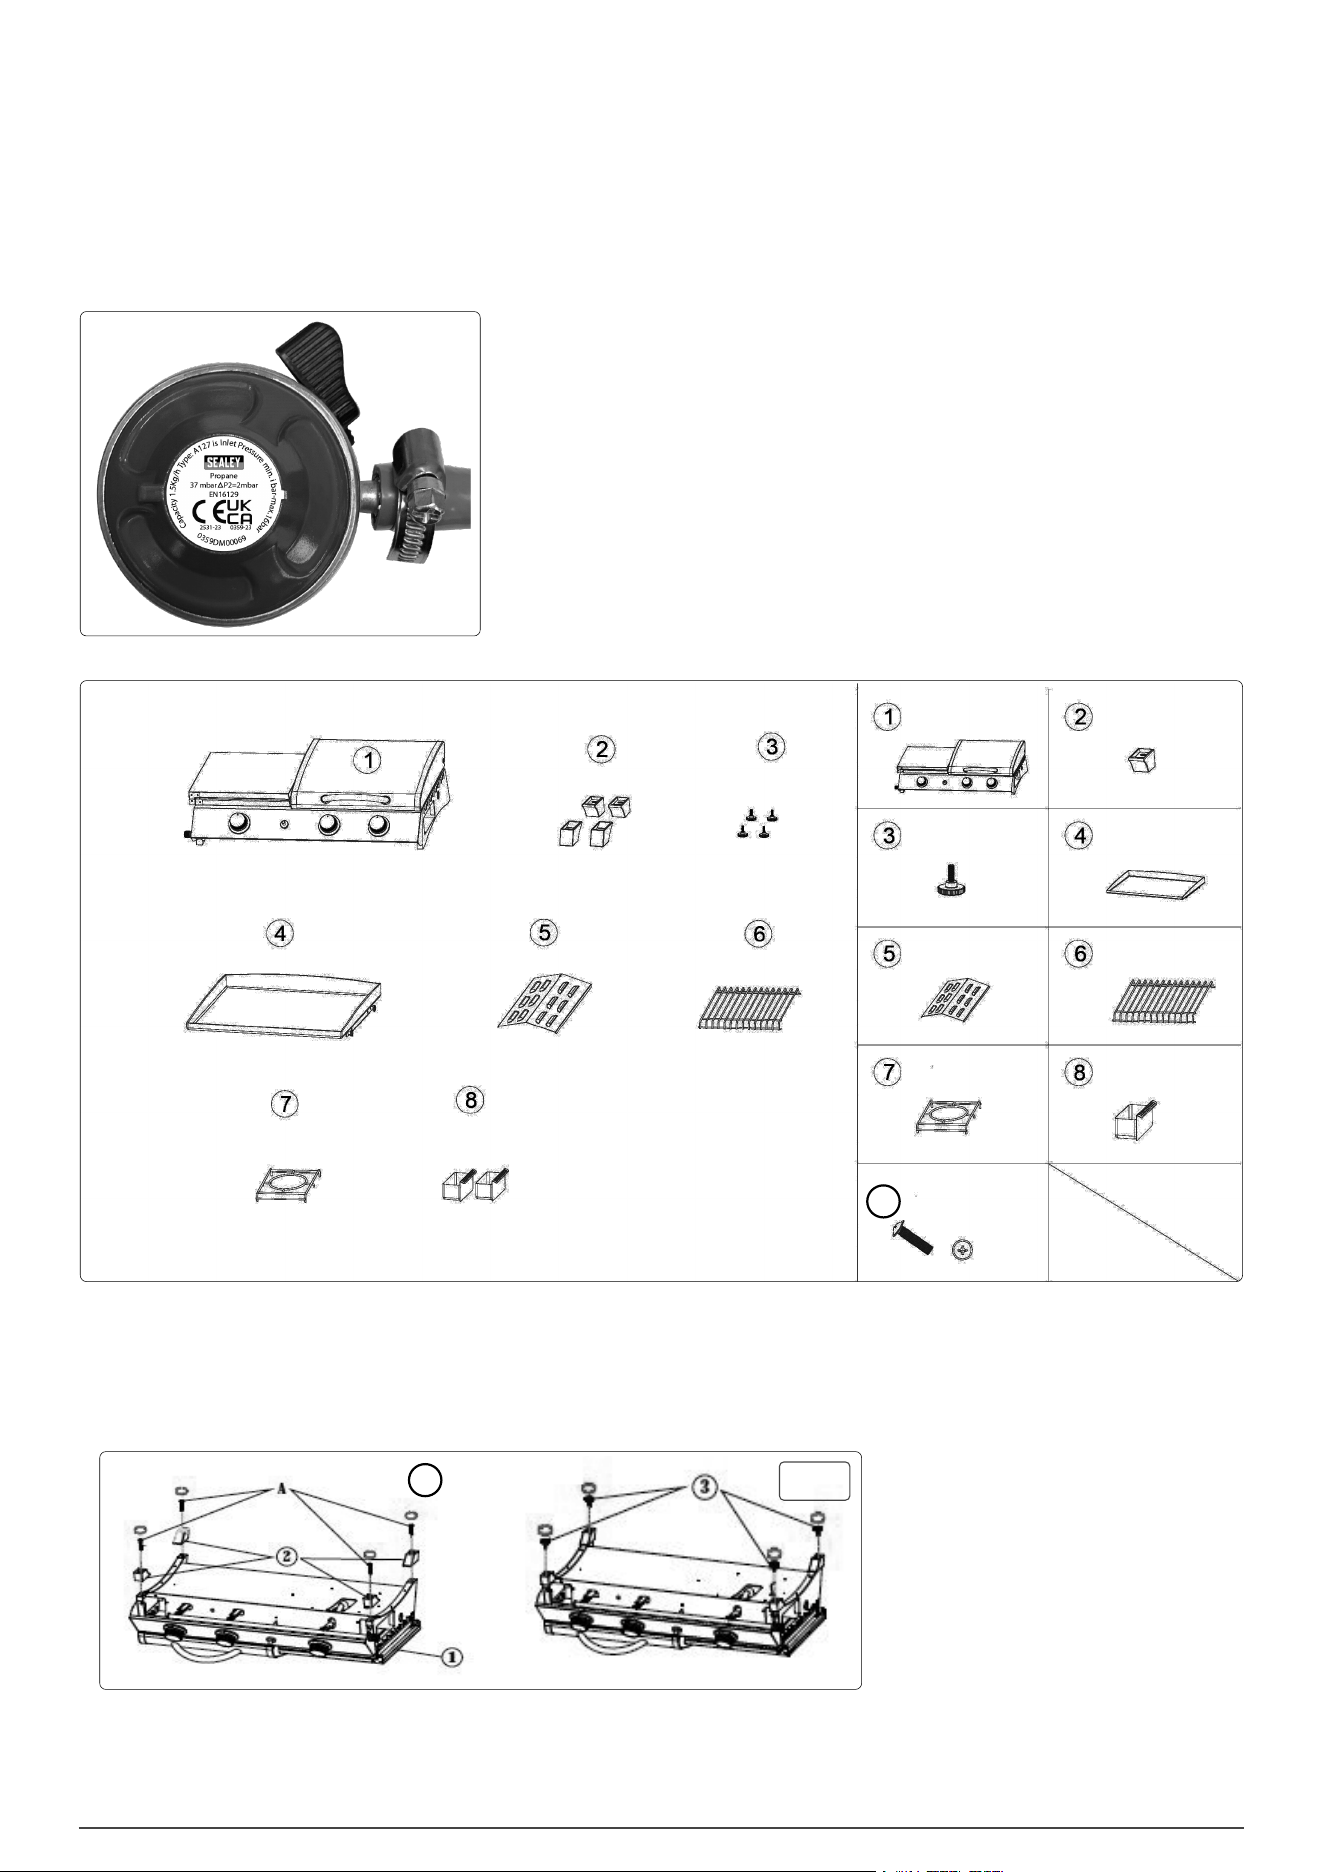
Contents
Assembly
• WARNING! Although we take every effort to ensure that the assembly process is as easy as possible, it is inherent with fabricated steel parts that
corners and edges can cause cuts if improperly handled during assembly procedures. Be careful while handling any parts during assembly. It is
strongly recommended that you protect hands with a pair of work gloves.
• Attach the feet to the burner unit (g.1). Use part 3 under the feet for adjustment if the appliance standing is not at.(g.1.3)
Gas Regulator IGT 27mm Push type
Regulator marked to BS EN 16129 standard
CE UK CA
Regulator cannot be tted unless in the off position.
Capacity 1.5kg/h Type.A127
Inlet pressure minimum 1 bar maximum.16 bar.
Propane 37mbar ∆ P2=2mbr.
ΔP (Delta P) is a mathematical term symbolizing a change (Δ) in pressure (P).
The downstream installation pressure shall not exceed the ΔP marked on the device.
www.dellonda.co.uk
A
*4
M15
g.1
A
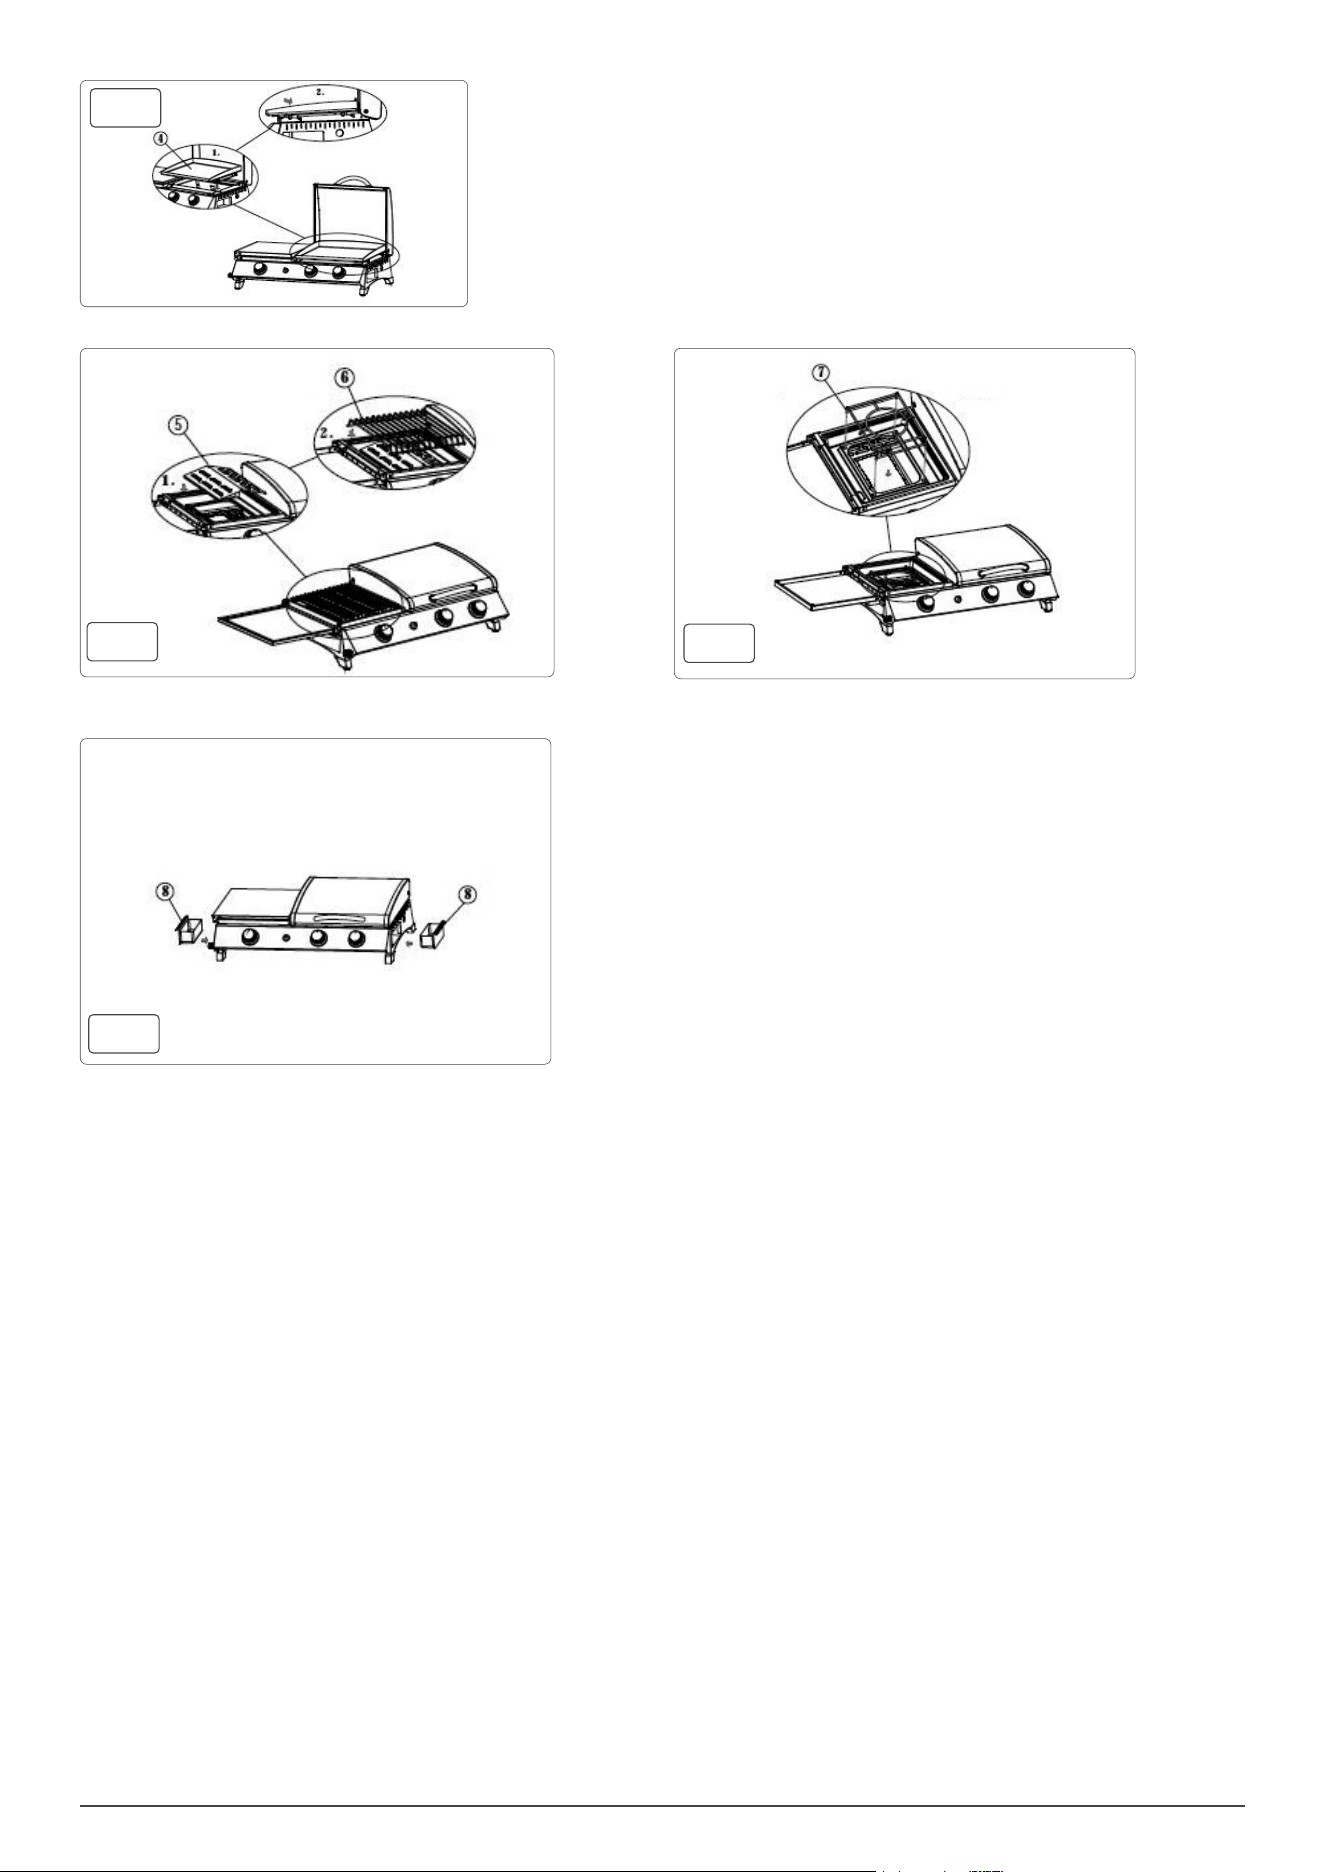
• Attach burner plate 5 and cooking rack 6 for grilling. (g.3). Use pot holder 7 when boiling water / soup (g.4).
• Attach grease tray 8 (g.5).
• Connect the gas hose to the appliance using the clips supplied. Connect the regulator to the hose.
• Connect the regulator to the cylinder valve following the regulator instructions supplied with the regulator.
• Turn all of the control knobs to the ‘OFF’ position before turning on the gas supply to the appliance.
• Operate the regulator in accordance with the instructions supplied with the regulator.
Positioning, Lighting, Usage & Care Information
• Ensure the appliance is positioned on a permanent, at, level, heat resistant non-ammable surface that is capable of safely carrying the weight
of the appliance.
• Position the appliance away from ammable items.
• Ensure the appliance has a minimum of 2m overhead clearance and has a minimum 2m clearance from other surrounding items.
• Follow these instructions carefully to avoid seriously damaging your appliance and causing injury to yourself and to property.
To Check For Leaks
• Never check for leaks with a naked ame, always use a soapy water solution
• Make 2-3 uid ounces of leak detecting solution by mixing one part washing up liquid with 3 parts water.
• Ensure the control valve is “OFF”.
• Connect the regulator to the cylinder and connect regulator with hose and outdoor gas grill, ensure the connections are secure then turn ON the
gas.
• Brush the soapy solution on to the hose and all joints. If bubbles appear you have a leak, which must be rectied before use. Turn off the gas
supply in the event of gas leak.
• Retest after xing the fault. Turn OFF the gas at the cylinder after testing.
• If detected leakage can not be rectied, do not attempt to cure leakage but consult Dellonda.
g.3
g.4
g.5
www.dellonda.co.uk
g.2
Locate tray on lugs into the slots being sure to have the oil drain on the bottom right g.2.

• Lighting The Burners
• 1. Connect the gas cylinder to the appliance following the instructions supplied with the regulator.
• 2. Turn all the control knobs to the ‘OFF’ position.
• 3. Turn ‘ON’ the gas supply at the cylinder or regulator switch following the regulator connection and operating instructions. Check with the use of
soapy water for any gas leakage between the bottle and the regulator and the gas valve. Any leakage will show as bubbles in the area of the leak.
If leak is found do not use the appliance. Consult your gas or appliance supplier for advice.
• 4. To light the left hand burner, push down the left hand control knob and keep pressing whilst turning anti-clockwise to the “Full rate” position
whilst press the ignition button sited between the two knobs up to four times in rapid succession. This will light the left hand burner. If not please
repeat this process.
• 5. If the burner has not lit after two attempts, turn ‘OFF’ the gas tap and wait 5 minutes before retrying the ignition sequence.
• 6. If the burner does not stay alight, please repeat step 4.
• 7. When the burner is lit, adjust the heat by turning the knob to the High/Low position.
• 8. To light the right hand burner, push down the right hand control knob and keep pressing whilst turning anti-clockwise to the “Full rate” position
whilst pressing the ignition button sited between the two knobs up to four times in rapid succession. This will light the right hand burner. If not
please repeat this process.
• 9. If the burner has not lit after two attempts, turn ‘OFF’ the gas tap and wait 5 minutes before retrying the ignition sequence.
• 10. If the burner does not stay alight, please repeat step 8.
• 11. When the burner is lit. Adjust the heat by turning the knob to the High/Low position (the operating temperature of this appliance is 0 - 370).
• 12. To turn ‘OFF’ the appliance, turn the cylinder valve or regulator switch to the ‘OFF’ position by following the regulator instructions, turn all of
the control knobs on the appliance clockwise to the “OFF” position when the ame have extinguished.
• WARNING: If any burner fails to ignite, turn the control knob off (clockwise) and also turn the cylinder valve off. Wait ve minutes before
attempting to relight with ignition sequence.
• After use, close the gas supply by either turning ‘OFF’ the switch on the regulator or turning ‘OFF’ the cylinder valve.
• In the event of ash back whilst the appliance is in use. Turn all the controls, cylinder valve and regulator switch to the ‘OFF’ position. Wait 5
minutes before attempting to relight the appliance.
• If the problem persists after relighting, consult Dellonda, or a qualied gas engineer for assistance or repair. Never try to rectify the problem
yourself as this could result in serious injury and/or property damage.
Using The Appliance
• Toss vegetables and rub meat with neutral oil. Never add oil directly to the surface of the appliance (it may ignite).
• When appliance is very hot (water dropped on appliance will bead), use tongs to add ingredients to appliance in a single layer.
Storage Of The Appliance
• Storage of an appliance indoors is only permissible if the cylinder is disconnected and removed from the appliance. When the appliance is not to
be used for a period of time it should be stored in its original packaging in a dry dust free environment.
• Clean the appliance of excess fat, before storage, with a damp cloth using a mild detergent solution as the cleaning agent.
• Store the appliance in a clean dry environment.
• DO NOT store your gas cylinder indoors.
• Store in a well ventilated area away from direct sunlight.
Gas Cylinder
• The appliance can be used with any gas cylinder of weights between 4.5KGS and 15KGS butane and 3.9KGS to 13KGS propane. The gas cylinder
should not be dropped or handled roughly. If the appliance is not in use, the cylinder must be disconnected. Replace the protective cap on the
cylinder after disconnecting the cylinder from the appliance.
• Cylinders must be stored outdoors in an upright position and out of the reach of children. The cylinder must never be stored where temperatures
can reach over 50° C. Do not store the cylinder near ames, pilot lights or other sources of ignition. DO NOT SMOKE.
• The cylinder should be changed away from any source of ignition.
Maintenance
• In normal conditions of use, in order to ensure correct operation of the installation it is recommended that this device is changed within 10 years
of the date of manufacture.
Cleaning And Care
• DO NOT open the grease tray during use.
• CAUTION: All cleaning and maintenance should be carried out when the barbecue is cool and with the fuel supply turned OFF at the gas cylinder.
We would recommend that this gas grill should be serviced by your localgas retail outlet at least once a year by a competent engineer. Do not
attempt to service this appliance yourself.
Cleaning
• COOKING SURFACE
• Clean the appliance while it is still hot. Soak several paper towels with water, and roll them up together like a cigar. Using a pair of tongs to hold
paper towels, rub surface of appliance to remove residue. Let appliance and grill cool before removing appliance.
• Use a mild soapy water solution. Non-abrasive scouring powder can be used on stubborn stains then rinse with water.
• OUTSIDE SURFACE
• Use mild detergent or baking soda and hot water solution. Non-abrasive scouring powder can be used on stubborn stains, then rinse with water.
• NEVER USE OVEN CLEANER
• PLASTIC SURFACES
• Wash with a soft cloth and hot soapy water solution. Rinse with water. DO NOT use abrasive cleaners, degreasers or a concentrated barbecue
cleaner on plastic parts.
• GREASE TRAY
• DO NOT open the grease tray during use.
• When clean the grease tray, take away the grease cup rst then pull out the grease tray.
• Please check the grease cup regularly and clear the grease when 1/3 full.
www.dellonda.co.uk

• To remove the grease tray carefully lift the tray straight up before pulling it sideways out of the appliance.
• Let the fat cool before attempting to clean the grease tray.
• CLEANING THE BURNER ASSEMBLY
• Turn the gas OFF at the control knob and disconnect the cylinder.
• Remove hot plate.
• Clean the burner with a soft brush or blow clean with compressed air and wipe with a cloth.
• Clean any clogged ports with a pipe cleaner or stiff wire (such as an opened paper clip).
• Inspect burner for any damage (cracks or holes). If damage is found, replace with a new burner.
• Reinstall the burner, check to ensure that the Gas valve orices are correctly positioned and secured inside the burner inlet (venturi).
• In some cases your barbeque will light back because of an insect crawling inside the burner venturi or a spider spinning its web inside the burner.
This can be rectied by using a bottle brush inserted through the burner venturi and pushing it into the burner over the burner length. If condition
persists consult Dellonda.
Servicing
• Your gas appliance should be serviced annually by a competent registered person.
Troubleshooting
g.6
Problem Possible cause Solution
Burners will not light using the
ignition system.
Gas cylinder empty.
Faulty regulator.
Obstructions in burner.
Obstructions in gas jet or gas hose.
Wire is loose or disconnected on
electrode or ignition unit.
Electrode or wire is damaged or faulty
push button igniter.
The distance between the burner and the
electrode pin is too large or too small.
Replace with full cylinder.
Have regulator checked or replace.
Cleans jets and gas hose.
Reconnect wire.
Change electrode wire or change igniter. Check and ensure the distance
between.
Low ame or ashback (ame
in burner tube, a hissing or
roaring noise may be heard).
Gas cylinder is too small.
Obstructions in burner.
Obstructions in gas jets or gas hose.
Windy conditions.
Use larger cylinder.
Clean burner.
Clean jets and gas hose.
Use barbecue in a more sheltered position.
Burner will not ignite. a. No gas ow.
b. Regulator not fully connected.
c. Obstruction of gas ow.
d. Burner ports clogged or blocked.
a. Check if LP gas cylinder is empty. If empty, replace.
b. Check to see if regulator is correctly tted to gas cylinder.
c. Clean burner tubes, check for bent or kinked hose.
d. Clean burner ports.
Sudden drop in gas ow or
reduced ame height.
a. Out of gas.
b. Block or kink in hose.
a. Replace gas cylinder.
b. Check gas hose. Straighten hose or replace if damaged. call Service
Centre or place of purchase to get it serviced.
Irregular ame pattern, ame
does not run the full length of
burner.
Burner ports are clogged or blocked. Clean burner ports.
Flame is yellow or orange. a. New burner may have residual
manufacturing oils.
b. Insect nest or spiders web in burner or
regulator.
c. Food residue, grease or seasoning
salt on burner.
a. Burn gas cooker for 15 minutes to clear it through.
b. Check for infestation, clean burner and regulator.
c. Clean gas appliance.
Flame blows out. a. High or gusting winds.
b. Low on LP gas.
a. Do Not use in high winds.
b. Replace LP gas cylinder.
www.dellonda.co.uk
• Ensure gas is turned off. Clean using mild soap and
warm water as indicated in (g.6).

Dellonda Limited
Kempson Way, Suffolk Business Park, Bury St Edmunds, Suffolk. IP32 7AR
01284 757575 [email protected] www.dellonda.co.uk
www.dellonda.co.uk
Environment Protection and Waste Protection and Electrical Equipment Regulations (WEEE)
Recycle unwanted packaging materials. When this product is no longer required, or has reached the end of it’s useful life, please
dispose of it in an environmentally friendly way. Drain any fluids (if applicable) into approved containers, in accordance with local
wast regulations. It is our policy to continually improve products and we reserve the right to alter data,
specifications and parts without prior notice. No liability is accepted for incorrect use of this product. Guarantee is 12 months from
purchase date, proof of which is required for any claim.