
DS-KH7300EY Series Indoor Staon
User Manual

Legal Informaon
About this Document
●
This Document includes instrucons for using and managing the Product. Pictures, charts,
images and all other
informaon hereinaer are for descripon and explanaon only.
●
The
informaon contained in the Document is subject to change, without noce, due to
rmware updates or other reasons. Please nd the latest version of the Document at the
Hikvision website ( hps://www.hikvision.com ). Unless otherwise agreed, Hangzhou Hikvision
Digital Technology Co., Ltd. or its aliates (hereinaer referred to as "Hikvision") makes no
warranes, express or implied.
●
Please use the Document with the guidance and assistance of professionals trained in
supporng the Product.
About this Product
This product can only enjoy the aer-sales service support in the country or region where the
purchase is made.
Acknowledgment of Intellectual Property Rights
●
Hikvision owns the copyrights and/or patents related to the technology embodied in the
Products described in this Document, which may include licenses obtained from third pares.
●
Any part of the Document, including text, pictures, graphics, etc., belongs to Hikvision. No part
of this Document may be excerpted, copied, translated, or modied in whole or in part by any
means without
wrien permission.
●
and other Hikvision's trademarks and logos are the properes of Hikvision in
various
jurisdicons.
●
Other trademarks and logos menoned are the properes of their respecve owners.
LEGAL DISCLAIMER
●
TO THE MAXIMUM EXTENT PERMITTED BY APPLICABLE LAW, THIS DOCUMENT AND THE
PRODUCT DESCRIBED, WITH ITS HARDWARE, SOFTWARE AND FIRMWARE, ARE PROVIDED "AS
IS" AND "WITH ALL FAULTS AND ERRORS". HIKVISION MAKES NO WARRANTIES, EXPRESS OR
IMPLIED, INCLUDING WITHOUT LIMITATION, MERCHANTABILITY, SATISFACTORY QUALITY, OR
FITNESS FOR A PARTICULAR PURPOSE. THE USE OF THE PRODUCT BY YOU IS AT YOUR OWN RISK.
IN NO EVENT WILL HIKVISION BE LIABLE TO YOU FOR ANY SPECIAL, CONSEQUENTIAL,
INCIDENTAL, OR INDIRECT DAMAGES, INCLUDING, AMONG OTHERS, DAMAGES FOR LOSS OF
BUSINESS PROFITS, BUSINESS INTERRUPTION, OR LOSS OF DATA, CORRUPTION OF SYSTEMS, OR
LOSS OF DOCUMENTATION, WHETHER BASED ON BREACH OF CONTRACT, TORT (INCLUDING
NEGLIGENCE), PRODUCT LIABILITY, OR OTHERWISE, IN CONNECTION WITH THE USE OF THE
DS-KH7300EY Series Indoor Staon User Manual
i

PRODUCT, EVEN IF HIKVISION HAS BEEN ADVISED OF THE POSSIBILITY OF SUCH DAMAGES OR
LOSS.
●
YOU ACKNOWLEDGE THAT THE NATURE OF THE INTERNET PROVIDES FOR INHERENT SECURITY
RISKS, AND HIKVISION SHALL NOT TAKE ANY RESPONSIBILITIES FOR ABNORMAL OPERATION,
PRIVACY LEAKAGE OR OTHER DAMAGES RESULTING FROM CYBER-ATTACK, HACKER ATTACK,
VIRUS INFECTION, OR OTHER INTERNET SECURITY RISKS; HOWEVER, HIKVISION WILL PROVIDE
TIMELY TECHNICAL SUPPORT IF REQUIRED.
●
YOU AGREE TO USE THIS PRODUCT IN COMPLIANCE WITH ALL APPLICABLE LAWS, AND YOU ARE
SOLELY RESPONSIBLE FOR ENSURING THAT YOUR USE CONFORMS TO THE APPLICABLE LAW.
ESPECIALLY, YOU ARE RESPONSIBLE, FOR USING THIS PRODUCT IN A MANNER THAT DOES NOT
INFRINGE ON THE RIGHTS OF THIRD PARTIES, INCLUDING WITHOUT LIMITATION, RIGHTS OF
PUBLICITY, INTELLECTUAL PROPERTY RIGHTS, OR DATA PROTECTION AND OTHER PRIVACY
RIGHTS. YOU SHALL NOT USE THIS PRODUCT FOR ANY PROHIBITED END-USES, INCLUDING THE
DEVELOPMENT OR PRODUCTION OF WEAPONS OF MASS DESTRUCTION, THE DEVELOPMENT OR
PRODUCTION OF CHEMICAL OR BIOLOGICAL WEAPONS, ANY ACTIVITIES IN THE CONTEXT
RELATED TO ANY NUCLEAR EXPLOSIVE OR UNSAFE NUCLEAR FUEL-CYCLE, OR IN SUPPORT OF
HUMAN RIGHTS ABUSES.
●
IN THE EVENT OF ANY CONFLICTS BETWEEN THIS DOCUMENT AND THE APPLICABLE LAW, THE
LATTER PREVAILS.
© Hangzhou Hikvision Digital Technology Co., Ltd. All rights reserved.
DS-KH7300EY Series Indoor Staon User Manual
ii
Symbol Convenons
The symbols that may be found in this document are dened as follows.
Symbol Descripon
Danger
Indicates a hazardous situaon which, if not avoided, will or could
result in death or serious injury.
Cauon
Indicates a potenally hazardous situaon which, if not avoided, could
result in equipment damage, data loss, performance degradaon, or
unexpected results.
Note
Provides addional informaon to emphasize or supplement
important points of the main text.
DS-KH7300EY Series Indoor Staon User Manual
iii
Regulatory Informaon
EU Conformity Statement
This product and - if applicable - the supplied accessories too are marked with "CE"
and comply therefore with the applicable harmonized European standards listed
under the EMC Direcve 2014/30/EU, RE Direcve 2014/53/EU,the RoHS Direcve
2011/65/EU
2012/19/EU (WEEE direcve): Products marked with this symbol cannot be disposed
of as unsorted municipal waste in the European Union. For proper recycling, return
this product to your local supplier upon the purchase of equivalent new equipment,
or dispose of it at designated
collecon points. For more informaon see:
www.recyclethis.info
2006/66/EC (baery direcve): This product contains a baery that cannot be
disposed of as unsorted municipal waste in the European Union. See the product
documentaon for specic baery informaon. The baery is marked with this
symbol, which may include
leering to indicate cadmium (Cd), lead (Pb), or mercury
(Hg). For proper recycling, return the
baery to your supplier or to a designated
collecon point. For more informaon see:www.recyclethis.info
Industry Canada ICES-003 Compliance
This device meets the CAN ICES-3 (B)/NMB-3(B) standards requirements.
This device complies with Industry Canada licence-exempt RSS standard(s). Operaon is subject to
the following two
condions:
1. this device may not cause interference, and
2. this device must accept any interference, including interference that may cause undesired
operaon of the device.
Le présent appareil est conforme aux CNR d'Industrie Canada applicables aux appareils
radioexempts de licence.
L'exploitaon est autorisée aux deux condions suivantes :
1. l'appareil ne doit pas produire de brouillage, et
2.
l'ulisateur de l'appareil doit accepter tout brouillage radioélectrique subi, même si le brouillage
est suscepble d'en compromere le fonconnement.
Under Industry Canada regulaons, this radio transmier may only operate using an antenna of a
type and maximum (or lesser) gain approved for the transmier by Industry Canada. To reduce
potenal radio interference to other users, the antenna type and its gain should be so chosen that
the equivalent isotropically radiated power (e.i.r.p.) is not more than that necessary for successful
communicaon.
DS-KH7300EY Series Indoor Staon User Manual
iv

Conformément à la réglementaon d'Industrie Canada, le présent émeeur radio peut fonconner
avec une antenne d'un type et d'un gain maximal (ou inférieur) approuvé pour l'émeeur par
Industrie Canada. Dans le but de réduire les risques de brouillage radioélectrique à l'intenon des
autres
ulisateurs, il faut choisir le type d'antenne et son gain de sorte que la puissance isotrope
rayonnée équivalente (p.i.r.e.) ne dépasse pas l'intensité nécessaire à l'établissement d'une
communicaon sasfaisante.
This equipment should be installed and operated with a minimum distance 20cm between the
radiator and your body.
Cet équipement doit être installé et
ulisé à une distance minimale de 20 cm entre le radiateur et
votre corps.
If a power adapter is provided in the device package, use the provided adapter only. If no power
adapter is provided, ensure the power adapter or other power supply complies with Limited Power
Source. Refer to the product label for the power supply output parameters.
DS-KH7300EY Series Indoor Staon User Manual
v
About this Manual
Get the manual and related soware from or the ocial website (hp://www.hikvision.com).
Product Model
Network Indoor Staon DS-KH7300EY-WTE2
DS-KH7300EY-TE2
DS-KH7300EY Series Indoor Staon User Manual
vi

Contents
Chapter 1 Topology .................................................................................................................... 1
Chapter 2 Cable and Transmission Distance ................................................................................ 6
Chapter 3 Typical Applicaon and Flow ...................................................................................... 7
Chapter 4 Set Device Rotary DIP Switch ...................................................................................... 8
Chapter 5 Menu ....................................................................................................................... 11
Chapter 6 Call Indoor Staon from Door Staon ....................................................................... 13
Chapter 7 Other Operaons on Device ..................................................................................... 14
7.1 Receive Call .......................................................................................................................... 14
7.2 View Call Logs ...................................................................................................................... 14
7.3 View Capture Logs ............................................................................................................... 14
Chapter 8
Conguraon on Device ........................................................................................... 15
8.1 Call
Sengs .......................................................................................................................... 15
8.2 Shortcut Sengs .................................................................................................................. 16
8.3 Set Live View ........................................................................................................................ 17
8.4 Volume
Sengs ................................................................................................................... 18
8.5 App Sengs ......................................................................................................................... 19
8.5.1 Connect to Wi-Fi ......................................................................................................... 19
8.5.2 Connect to Hik-Connect Service .................................................................................. 20
8.5.3 Unlink App Account .................................................................................................... 21
8.6 Add Outer Door
Staon ....................................................................................................... 22
8.7 Number
Sengs .................................................................................................................. 22
8.8 View Indoor Staon Type ..................................................................................................... 23
8.9 Preference ............................................................................................................................ 23
8.10 Set Time ............................................................................................................................. 25
8.11 Change System Language ................................................................................................... 26
8.12 Adjust Brightness ............................................................................................................... 27
DS-KH7300EY Series Indoor Staon User Manual
vii

8.13 Format TF Card ................................................................................................................... 28
8.14 Test Network ...................................................................................................................... 29
8.15 Restore Device ................................................................................................................... 30
8.16 View Device
Informaon .................................................................................................... 31
Chapter 9 FAQ .......................................................................................................................... 33
DS-KH7300EY Series Indoor Staon User Manual
viii
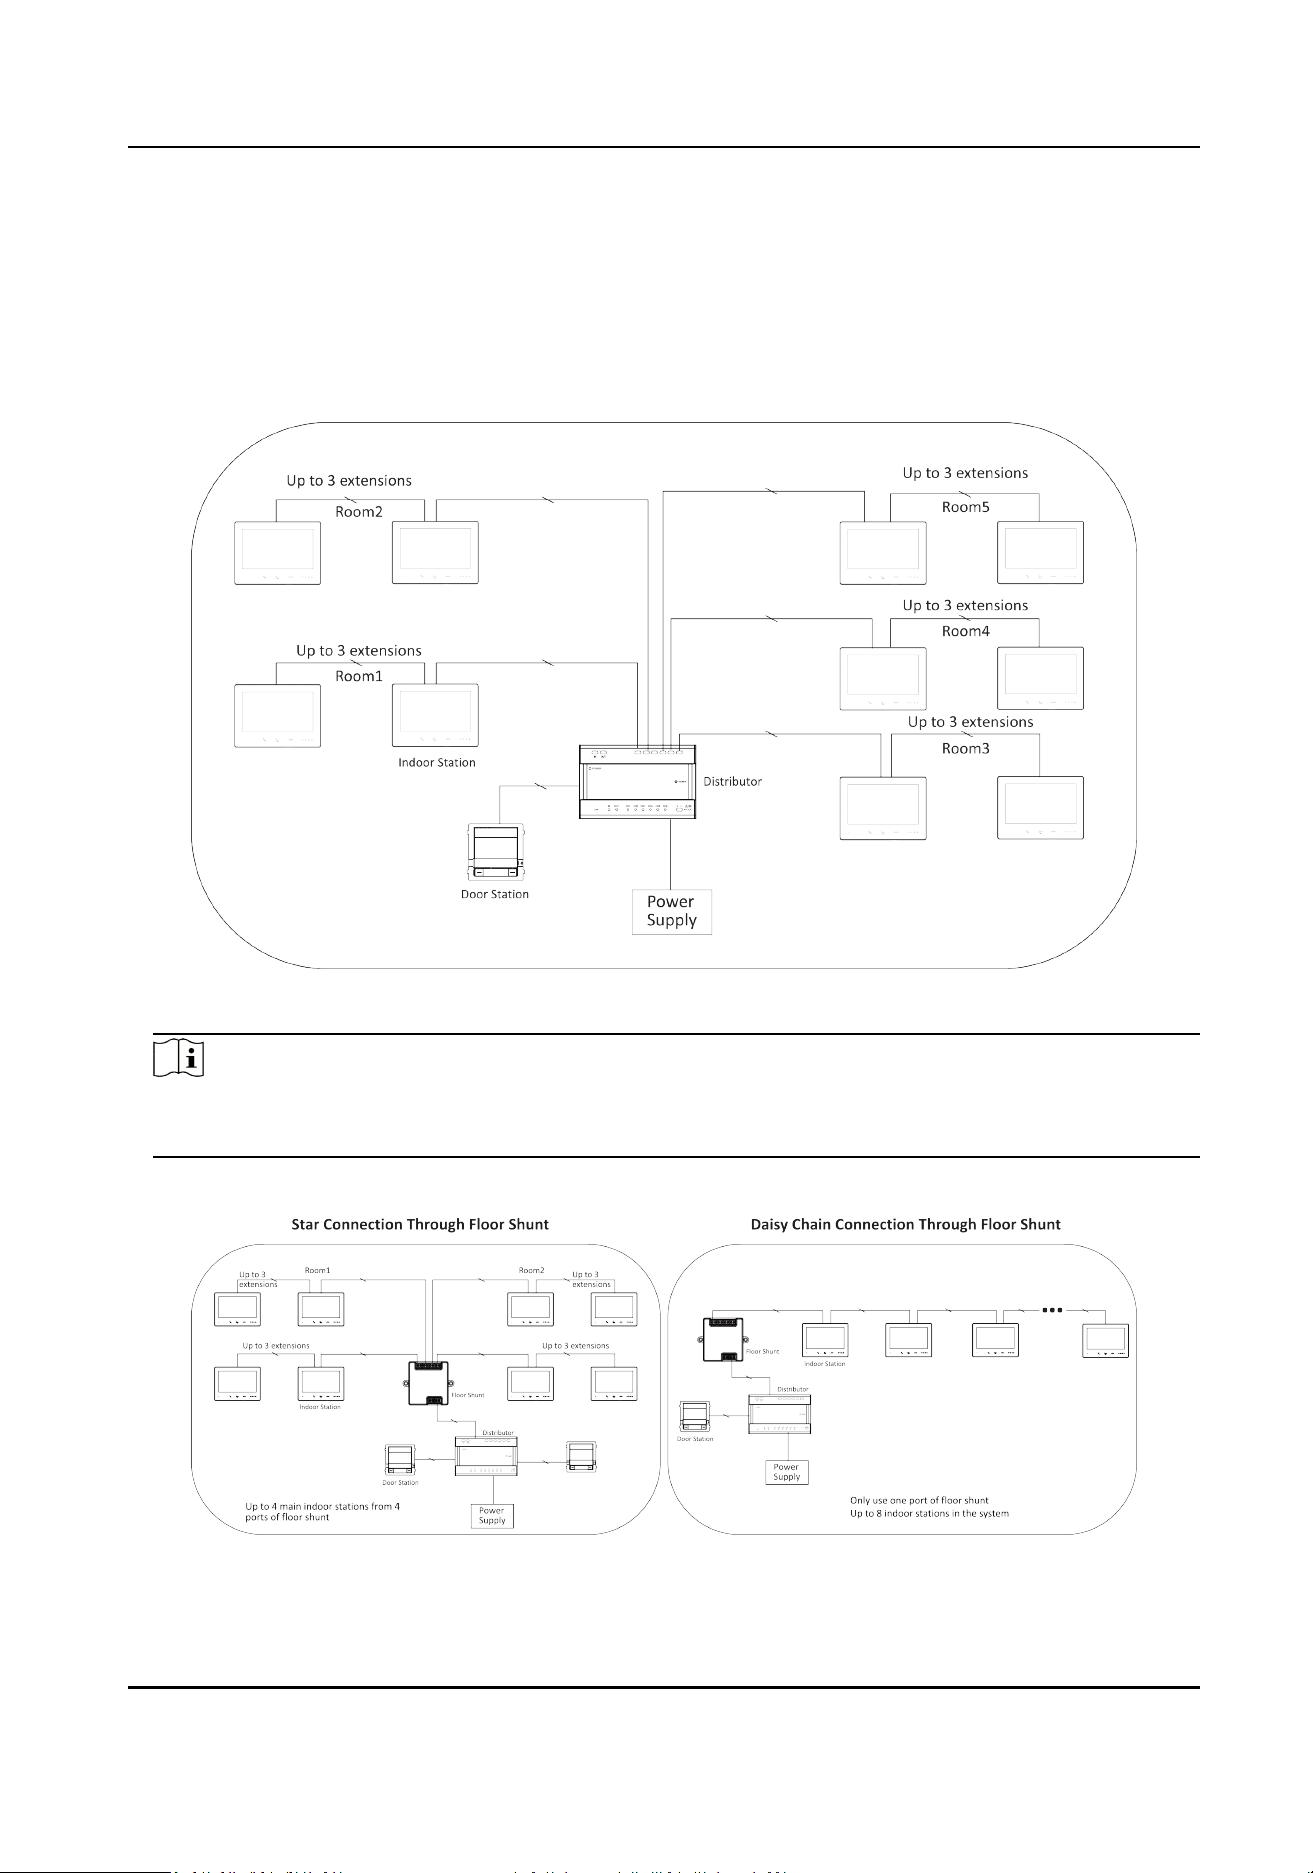
Chapter 1 Topology
The 2-Wire HD devices can be used in dierent situaons.
●
Mul-Family Topology
Figure 1-1 Mul-Family Topology
Note
Each channel of the distributor can be connected to 1 door staon / 1 main and 3 sub indoor
staons / 8 main indoor staons.
●
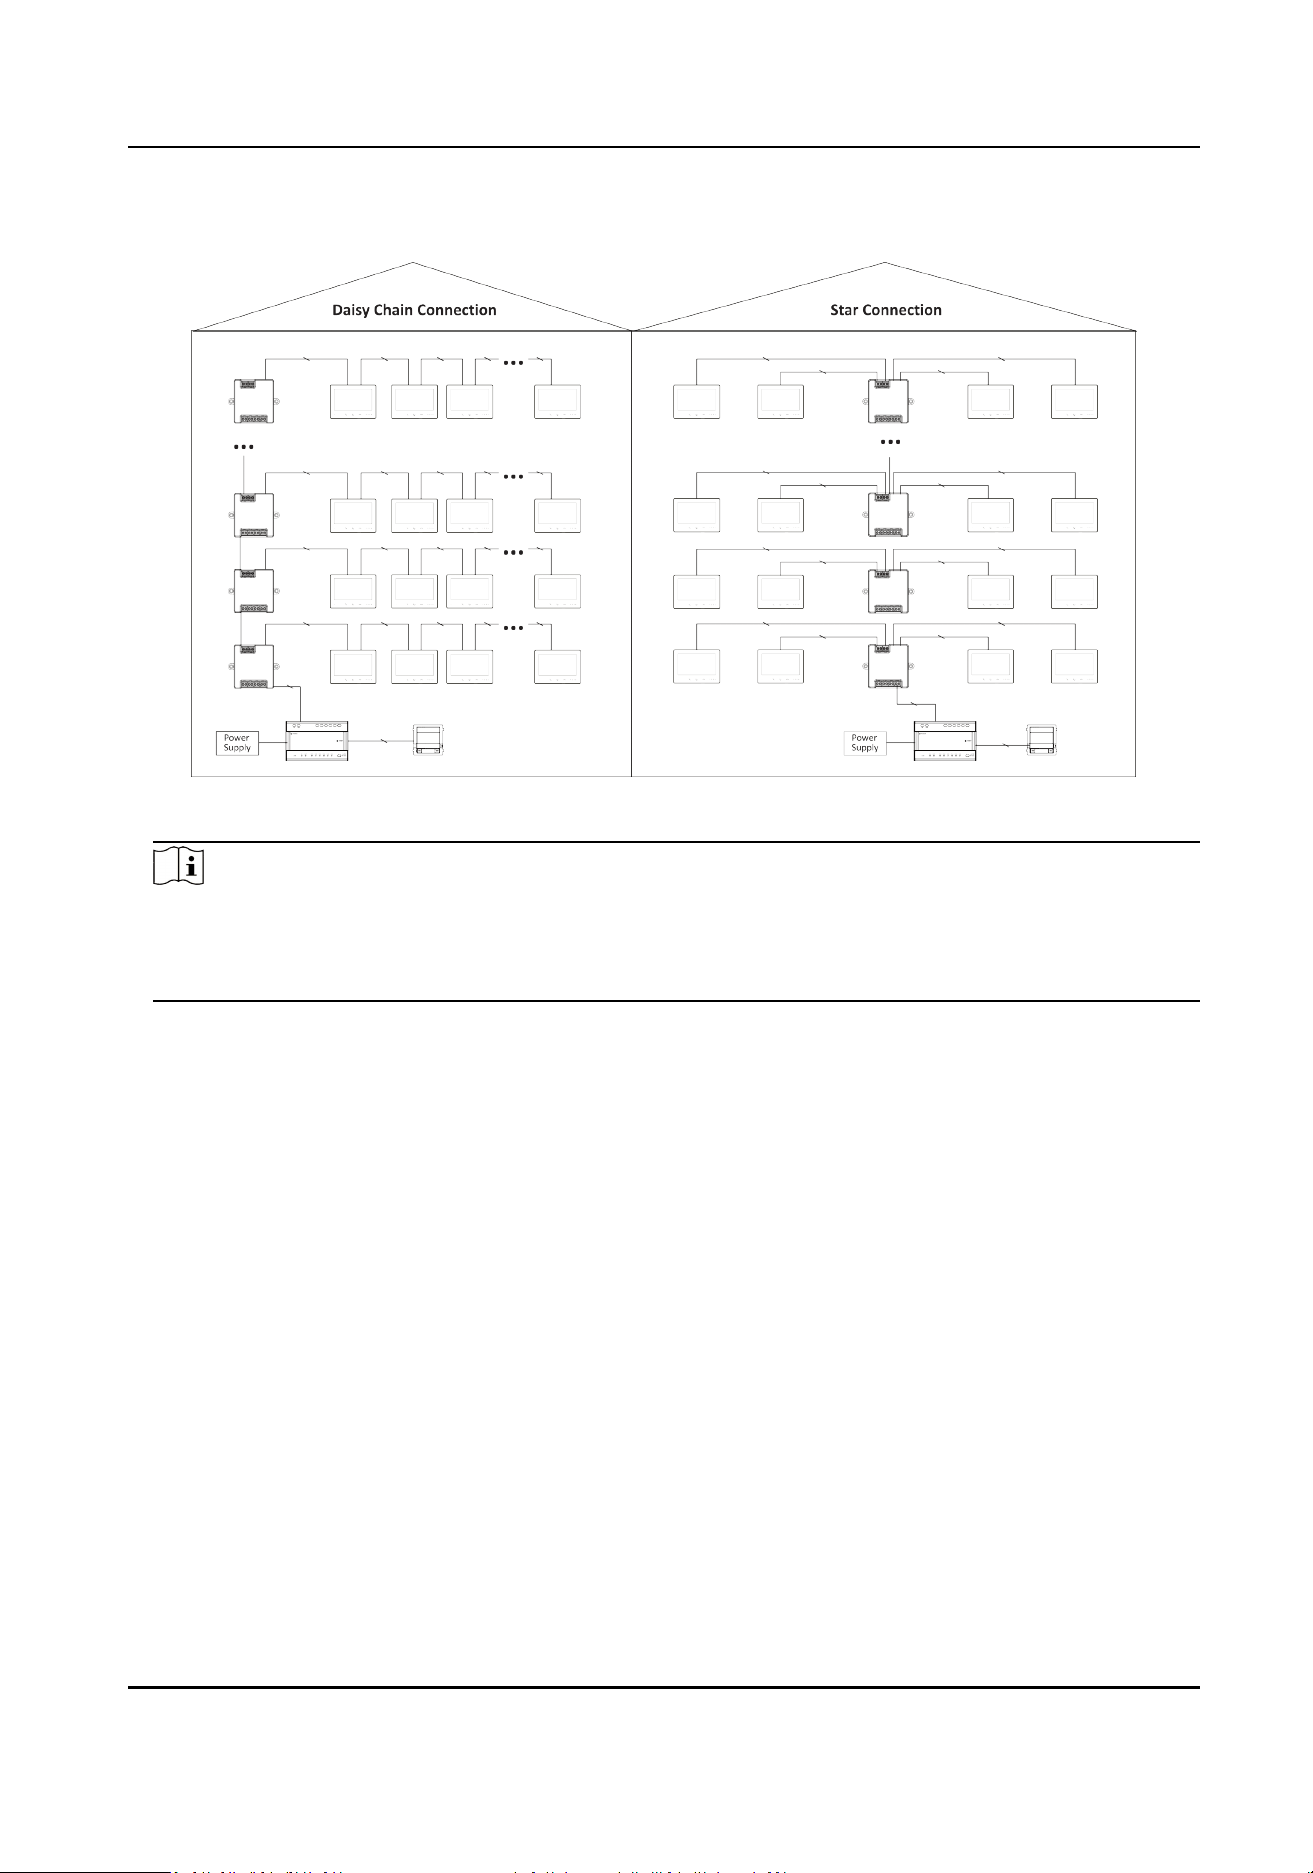
Single Floor Topology
Figure 1-2 Single Floor Topology
DS-KH7300EY Series Indoor Staon User Manual
1
●
Single Building Topology
Figure 1-3 Single Building Topology
Note
○
Up to 22 indoor staons with Wi-Fi or 64 without Wi-Fi can be used in one building. (The cable
needs to be beer than AWG20)
○
Up to 16 oor shunts can be cascaded.
●
Single Building (Combined)
DS-KH7300EY Series Indoor Staon User Manual
2
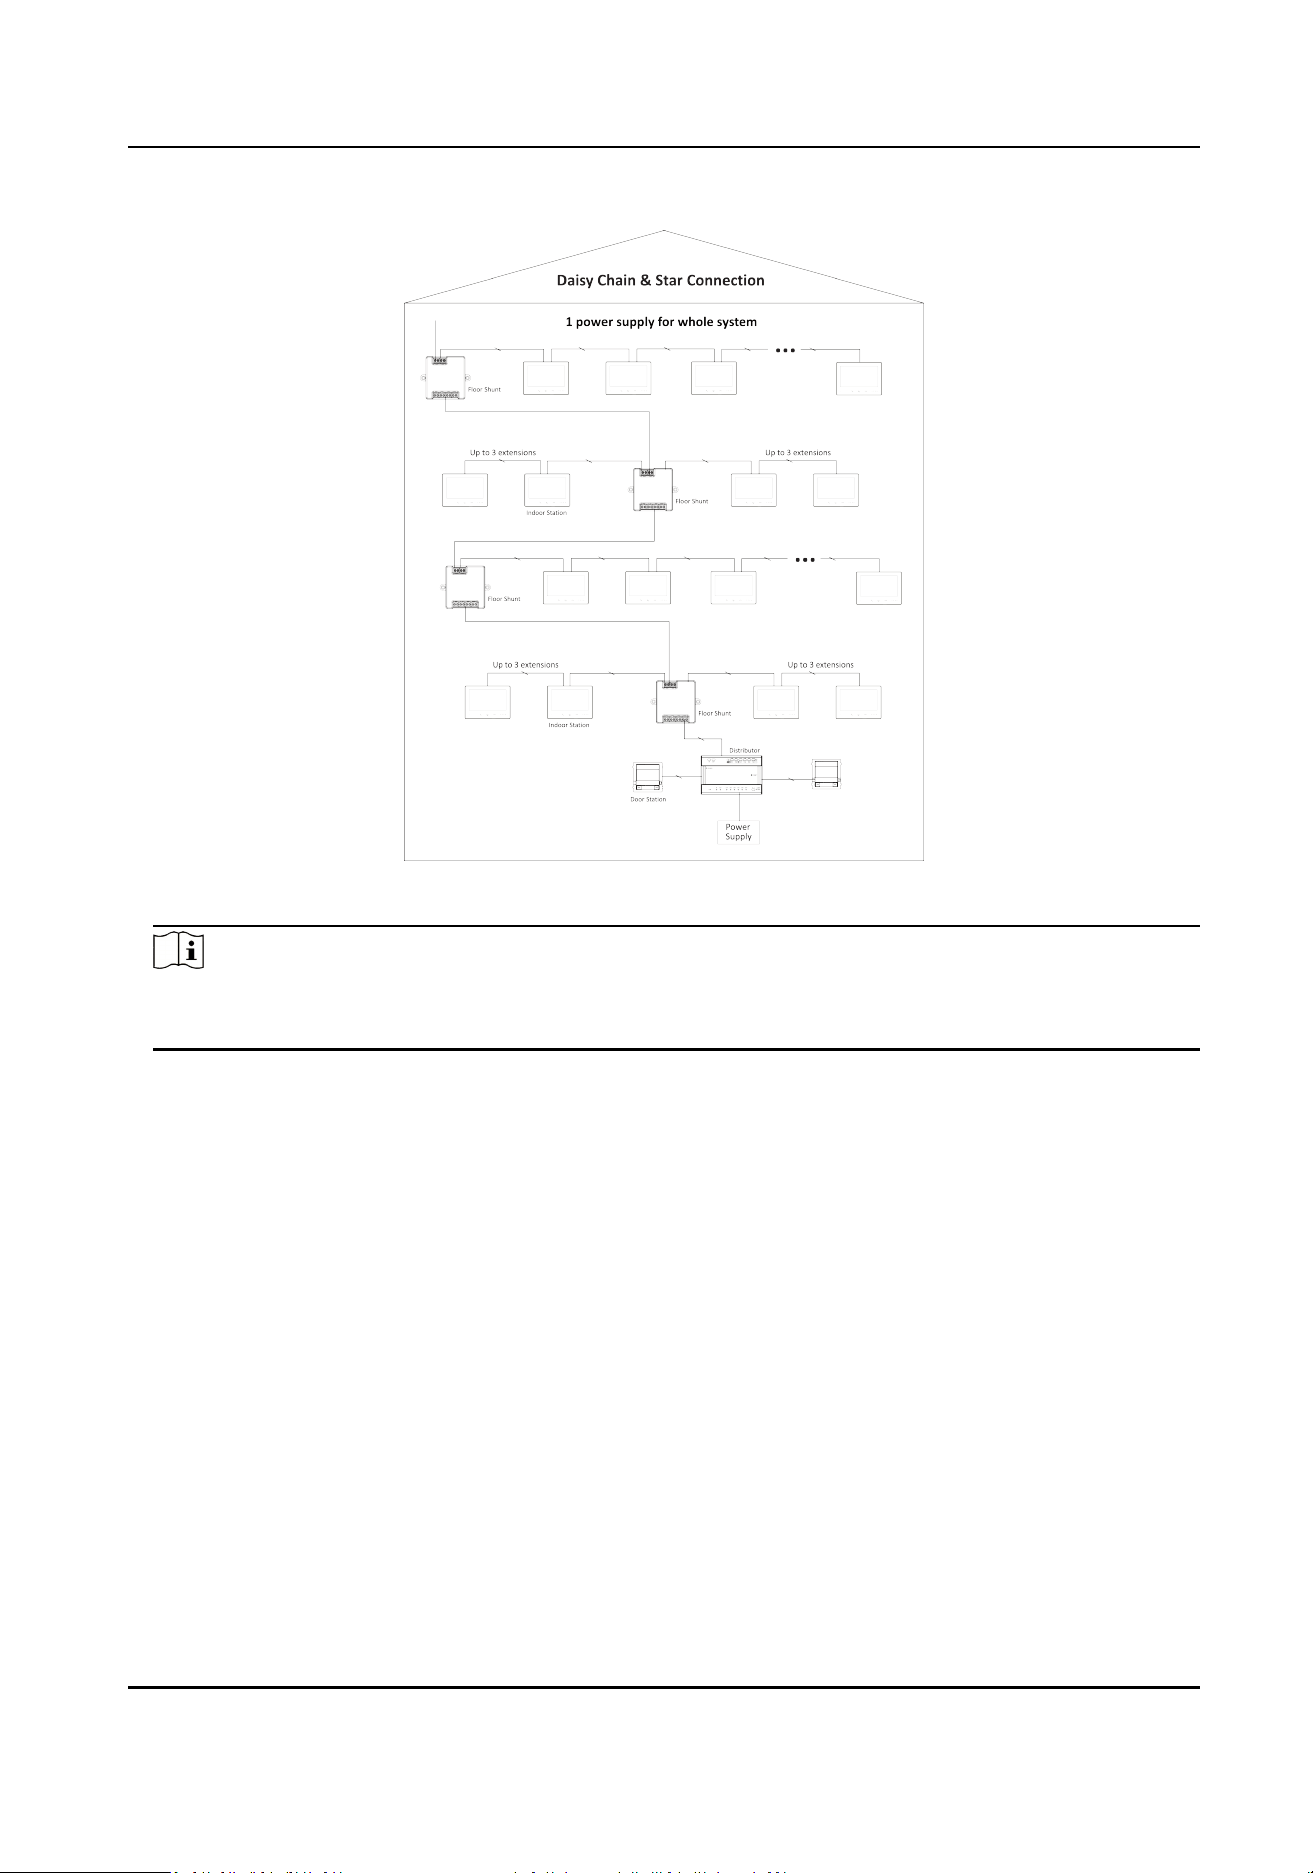
Figure 1-4 Single Building (Combined)
Note
Due to system power consumpon limitaons, device needs to be powered separately aer 64
or 22 indoor staons are exceeded.
●
System Extension in one building
DS-KH7300EY Series Indoor Staon User Manual
3
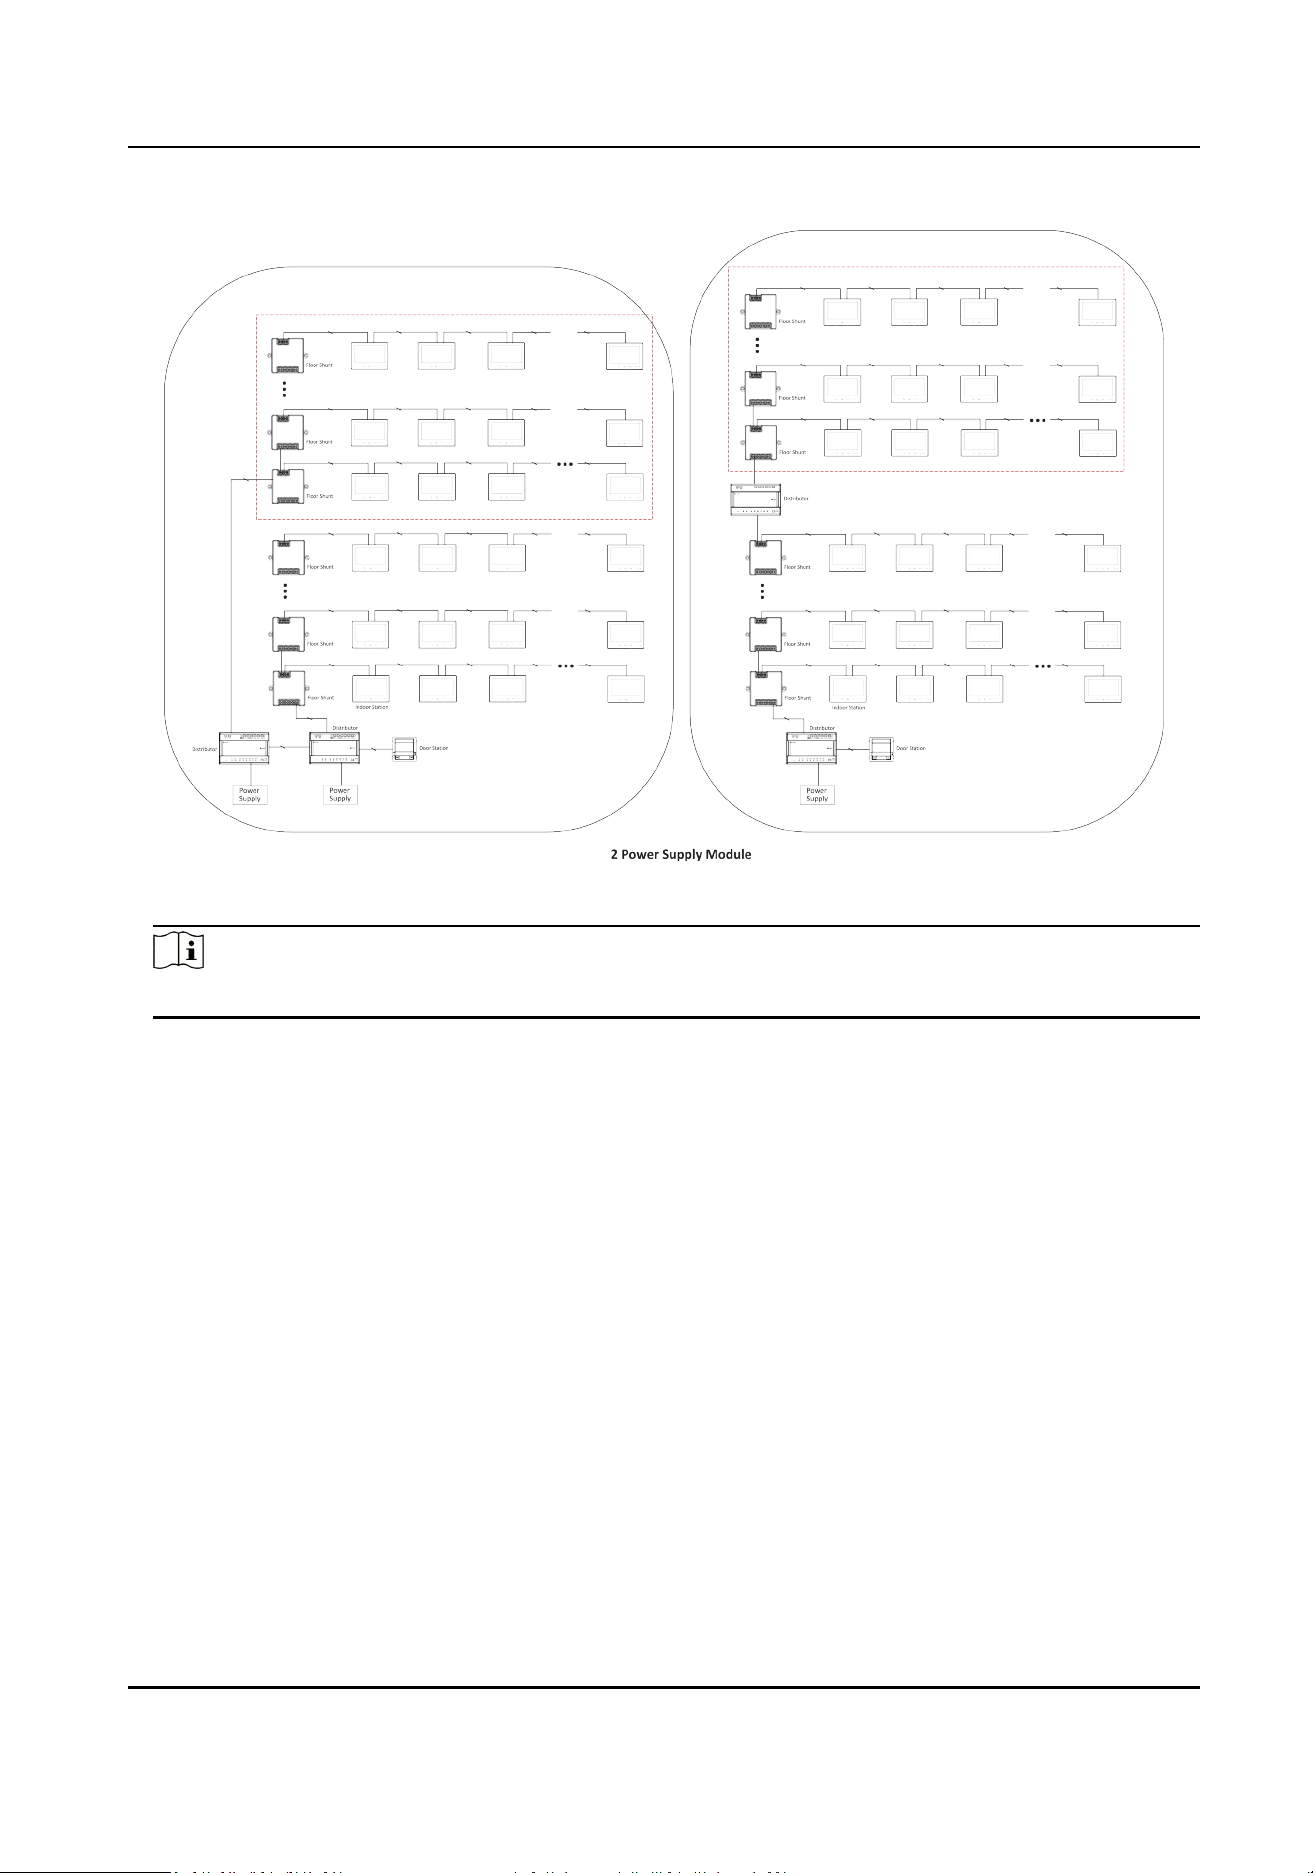
Figure 1-5 System Extension in one building
Note
Up to 99 indoor staons without Wi-Fi, 44 with Wi-Fi.
●
Mulple Building Topology
DS-KH7300EY Series Indoor Staon User Manual
4
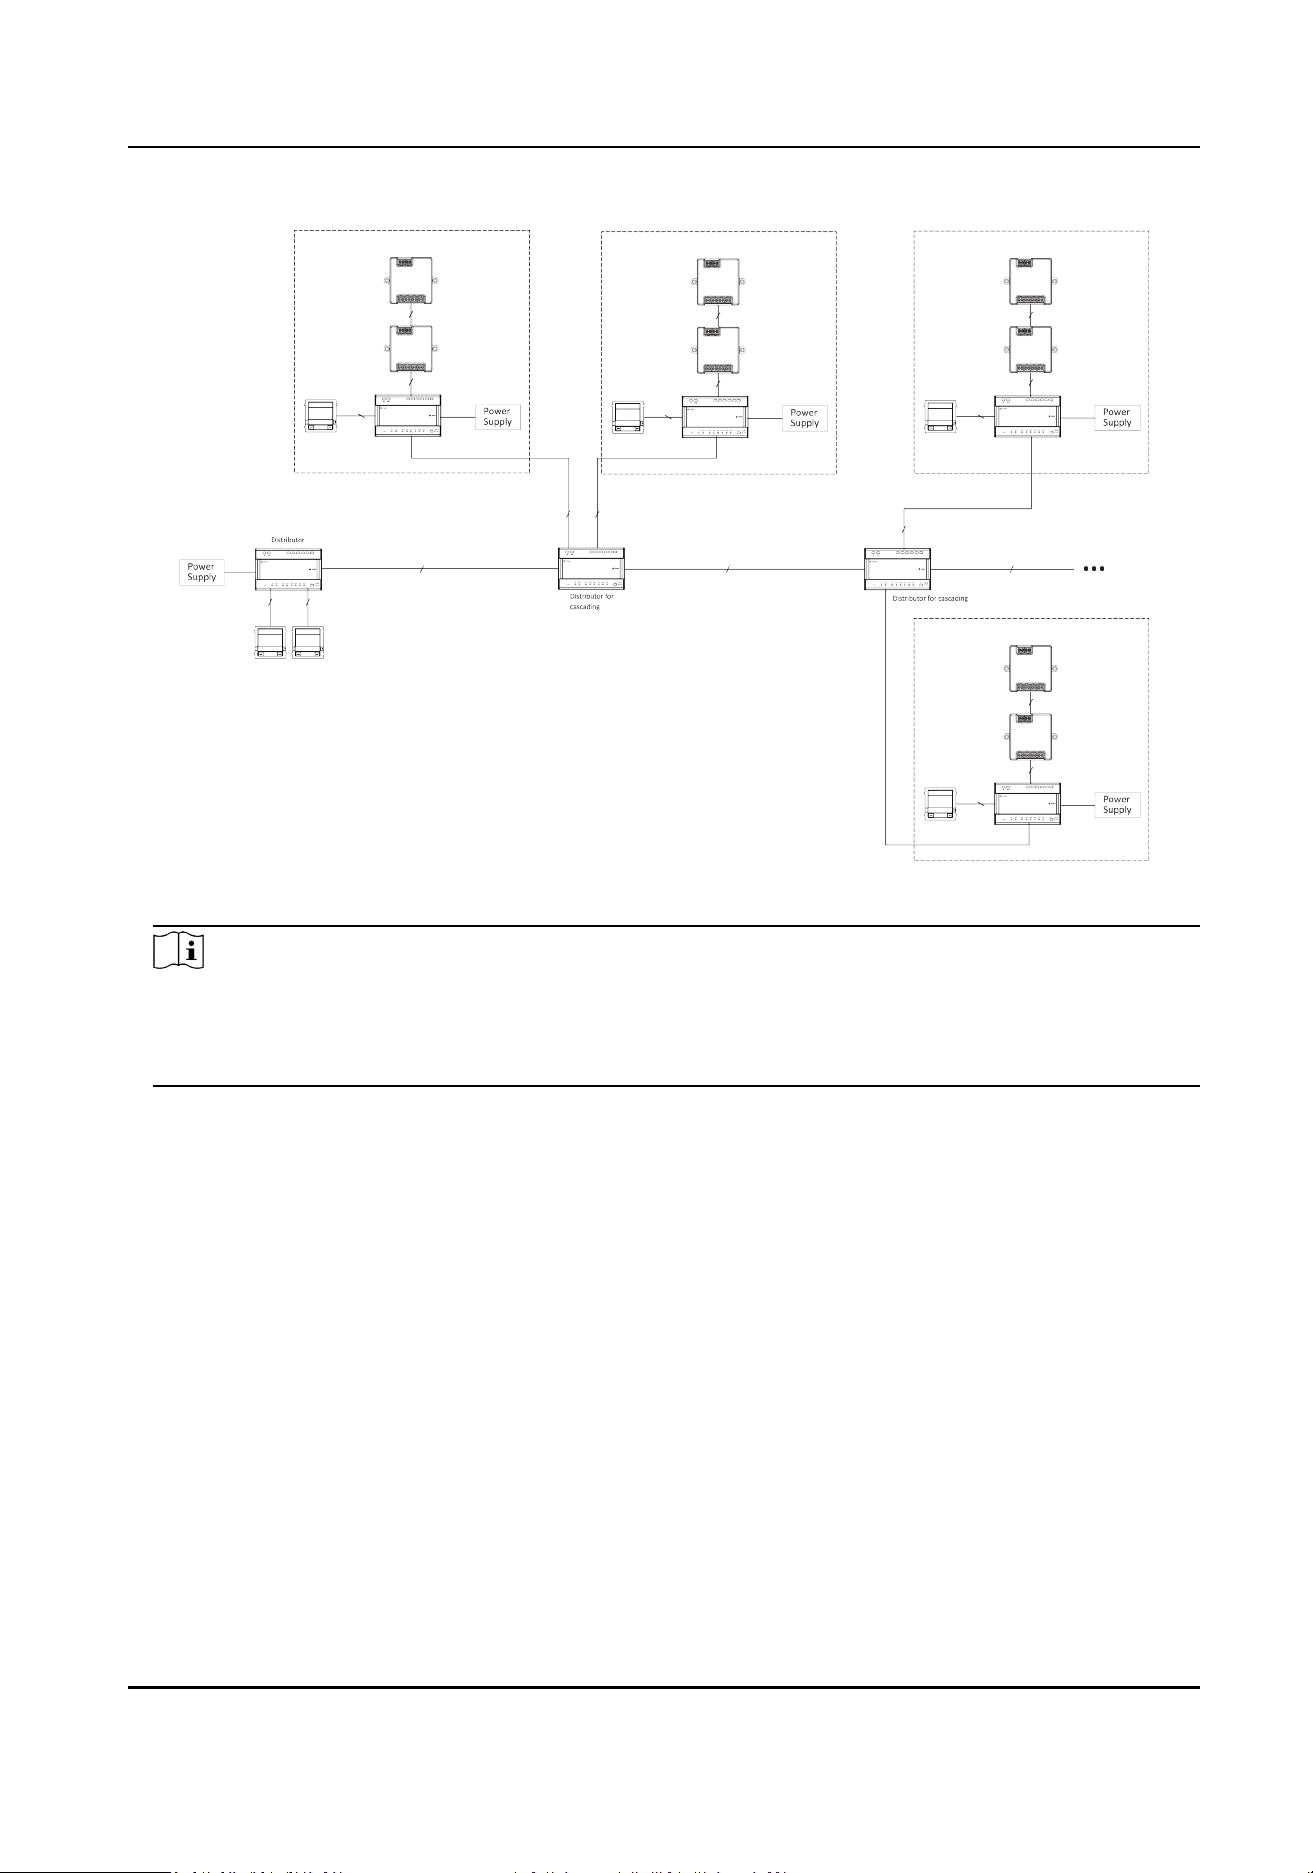
Figure 1-6 Mulple Building Topology
Note
○
Up to 16 buildings can be connected in the system via the distributor for cascading.
○
Up to 10 outer door staons can be connected.
○
Up to 16 sub door staons can be connected.
DS-KH7300EY Series Indoor Staon User Manual
5
Chapter 2 Cable and Transmission Distance
Cable and transmission distance between devices should follow rules below.
Table 2-1 Cable and Transmission Distance
Cable
Type
DS-
KAD7061
to DS-
KAD7061
DS-
KAD7061
to Main
Indoor
Staon
Indoor
Staon to
Indoor
Staon
DS-
KAD7061
to DS-
KAD7060
DS-
KAD7060
to Power
Module/
KAD-7060-
S
DS-
KAD7060
to Door
Staon
Door
Staon to
Lock
(Power
Supply)
UTP 5 0.2
mm
2
(Cat.
5) AWG24
60 m 60 m 60 m 60 m 100 m 60 m NA
0.28 mm
2
(TP)
AWG23
60 m 40 m 40 m 40 m 80 m 40 m 30 m
0.5 mm
2
(Parallel)
AWG20
60 m 60 m 60 m 60 m 100 m 60 m 50 m
1 mm
2
(Parallel)
AWG17
60 m 60 m 60 m 60 m 100 m 60 m 50 m
1 mm
2
(TP)
AWG17
60 m 40 m 40 m 40 m 80 m 40 m 100 m
1 mm
2
(Parallel)
AWG15
60 m 40 m 60 m 60 m 100 m 60 m 100 m
Note
Distance from power supply to the furthest indoor staon is 200 m.
DS-KH7300EY Series Indoor Staon User Manual
6
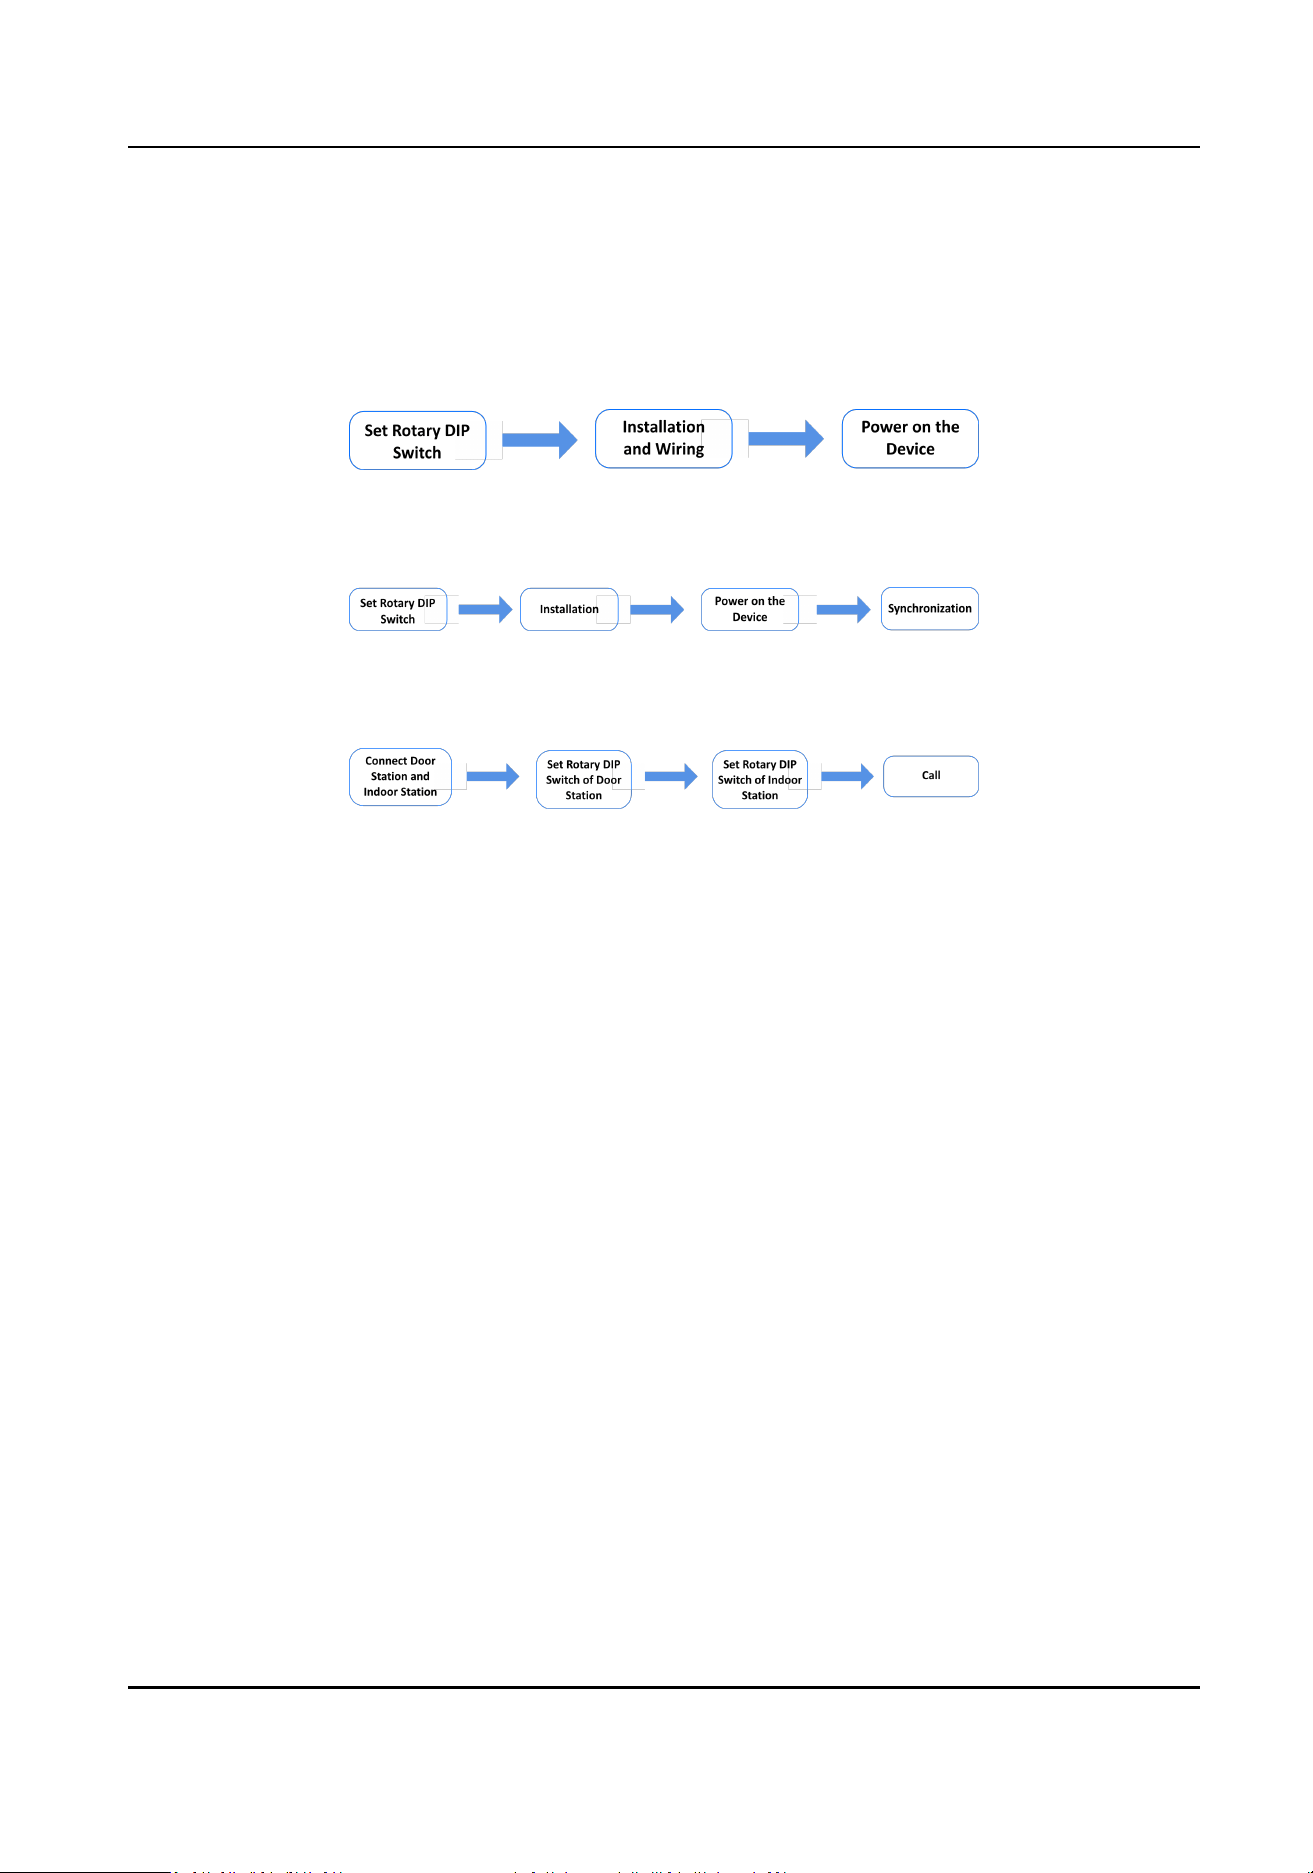
Chapter 3 Typical Applicaon and Flow
1. Device Deployment:
Basic Deployment
Figure 3-1 Basic Deployment
Advanced Deployment: Set DIP Switch→Installaon→Power on the device→Synchronizaon
Figure 3-2 Advanced Deployment
2. Call
Figure 3-3 Advanced Deployment
DS-KH7300EY Series Indoor Staon User Manual
7
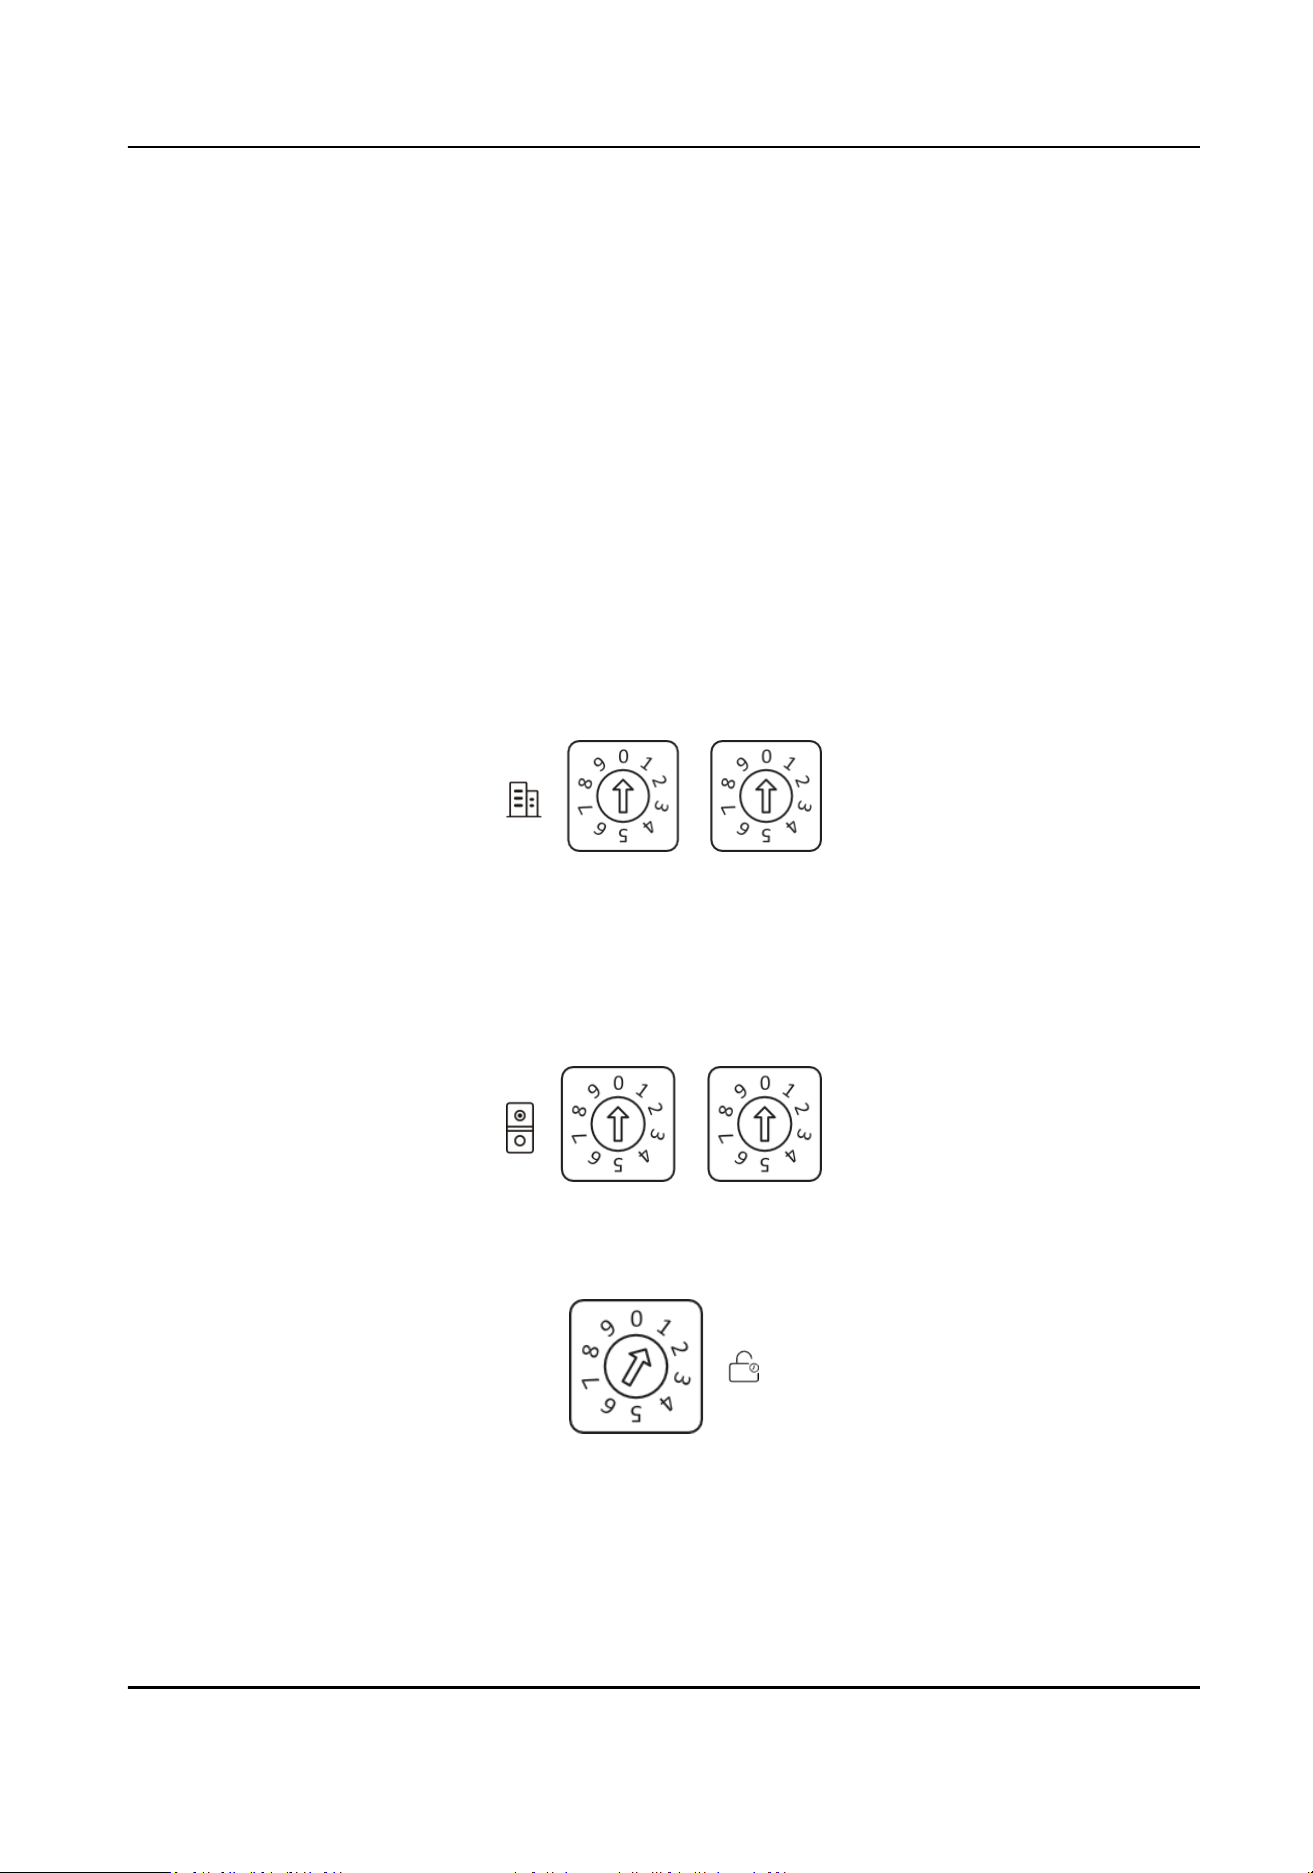
Chapter 4 Set Device Rotary DIP Switch
Aer door staons have been connected to indoor staons, you can set rotary DIP switch of these
devices.
DIP Switch of Door Staon
Use the rotary switch to set the building No., door staon No., sub door staon, outer door staon
No. and door open duraon. The Tens column refers to the number in Tens, and the Units column
refers to the number in Units. On each rotary DIP switch, 0 to 9 refers to No. 0 to 9. In total, you
can use 1 to 99 to number the building. If the door
staon is main door staon, the Door Staon
No. should be set as 0; If it is sub door staon, set Door Staon No. as 1~16; If it is outer door
staon, set Door Staon No. as 90~99. Use the screwdriver to adjust the number. The arrow
indicates the number.
Building No. (1~99)
Figure 4-1 Building No.
Door Staon No.
Main Door
Staon: 0
Sub Door Staon: 1~16
Outer Door
Staon : 90~99
Figure 4-2 DIP Switch of Door
Staon No.
Door Open Duraon
Figure 4-3 DIP Switch of Door Open
Duraon
DS-KH7300EY Series Indoor Staon User Manual
8
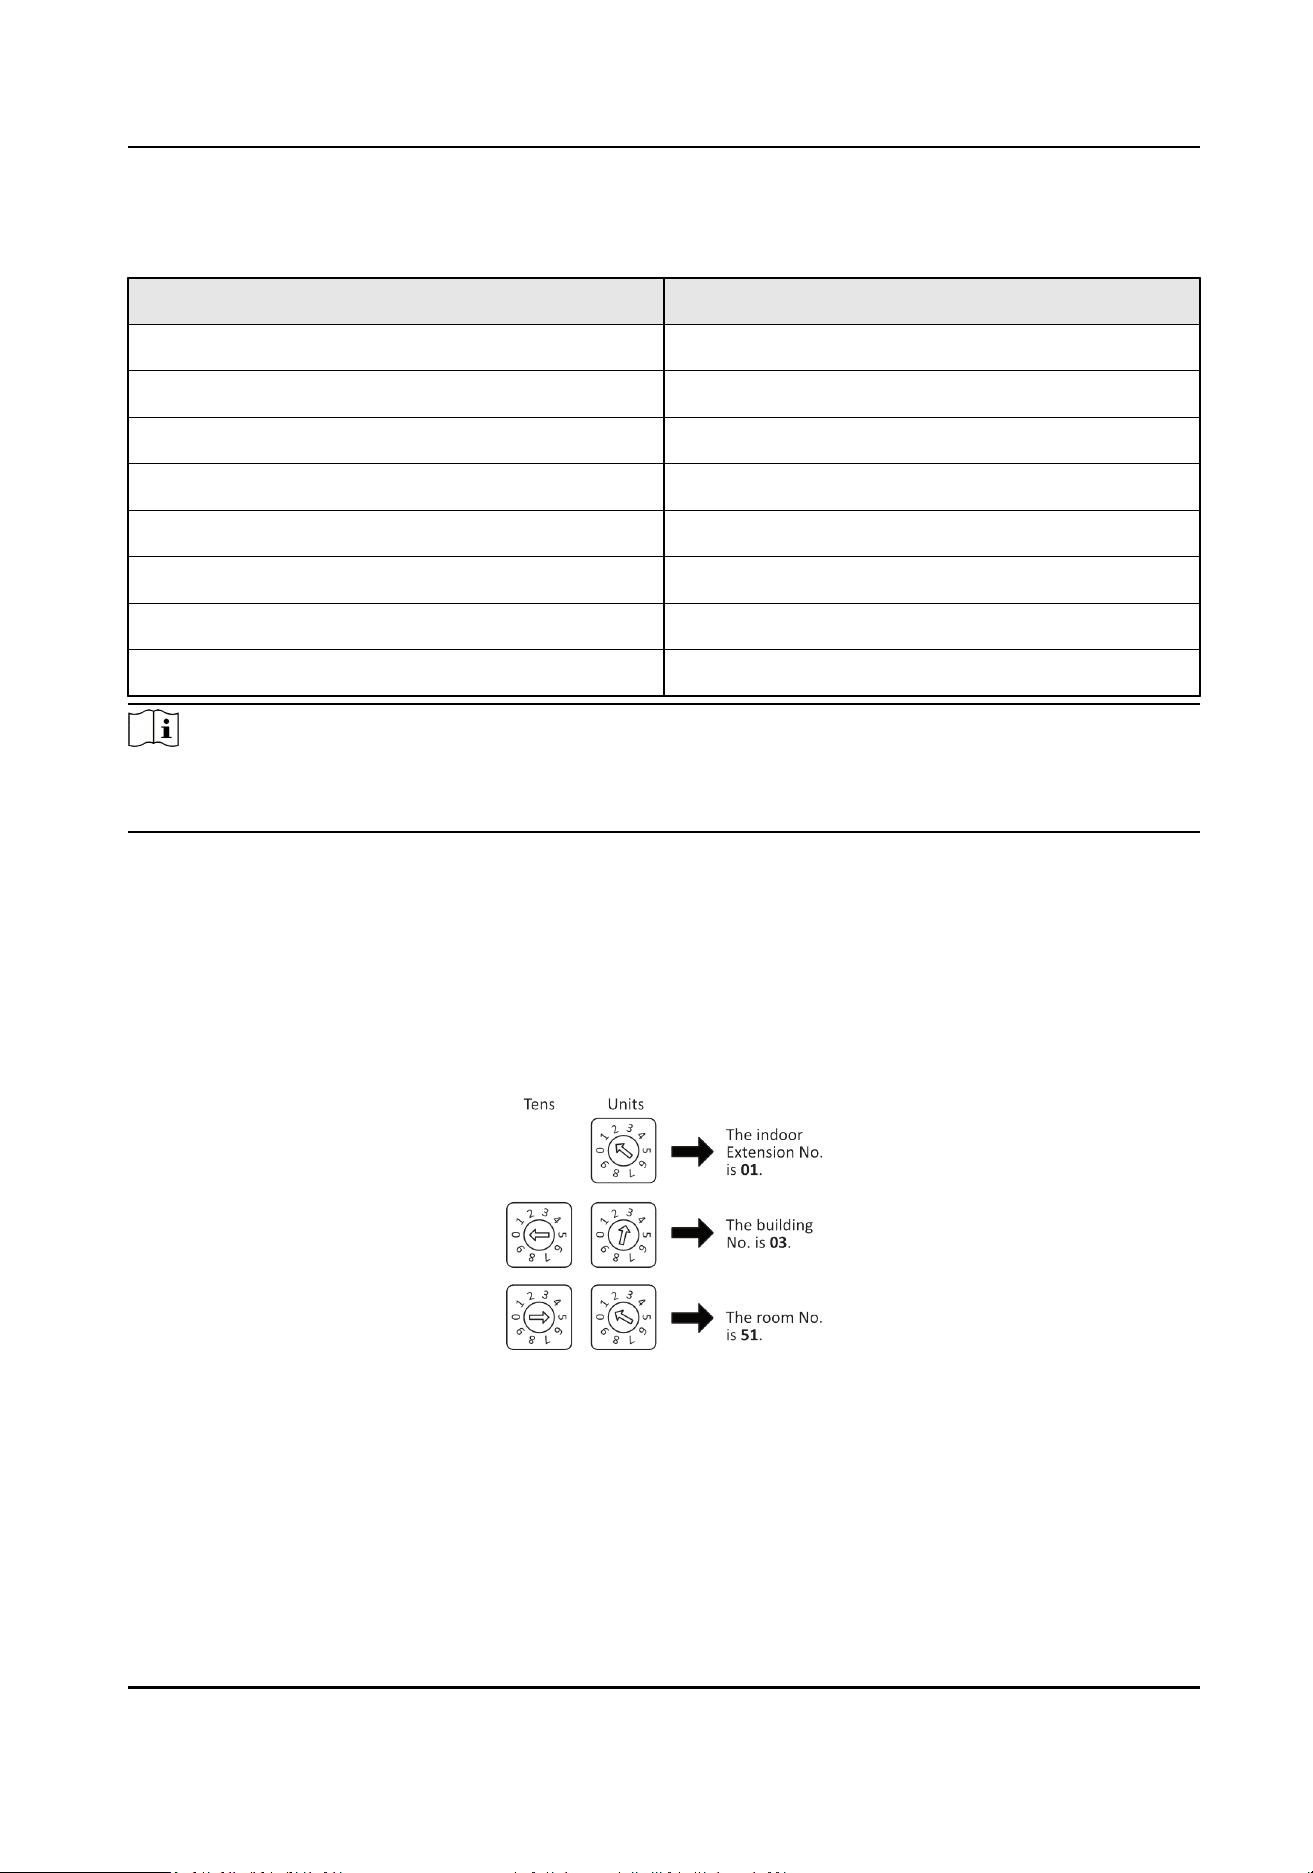
Table 4-1 Door Open Duraon
Rotary DIP Switch Door Open Duraon(s)
0 2
1 1
2 3
3 4
4 5
5 8
6 10
7/8/9 Reserved
Note
●
It is recommended to sck the supplied number remark on the back of the device to indicate the
device's No.
DIP Switch of Indoor Staon
Use the rotary DIP switch to set the indoor extension No., the building No., and the room No. The
Tens column refers to the number in Tens, and the Units column refers to the number in Units. On
each rotary DIP switch, 0 to 9 refers to No. 0 to 9. In total, you can use 1 to 3 to number the indoor
extension No., and use 1 to 99 to number the building or the room. Use the screwdriver to adjust
the number. The arrow indicates the number. An example is shown below.
Figure 4-4 Example: DIP Switch of Indoor Staon
DS-KH7300EY Series Indoor Staon User Manual
9
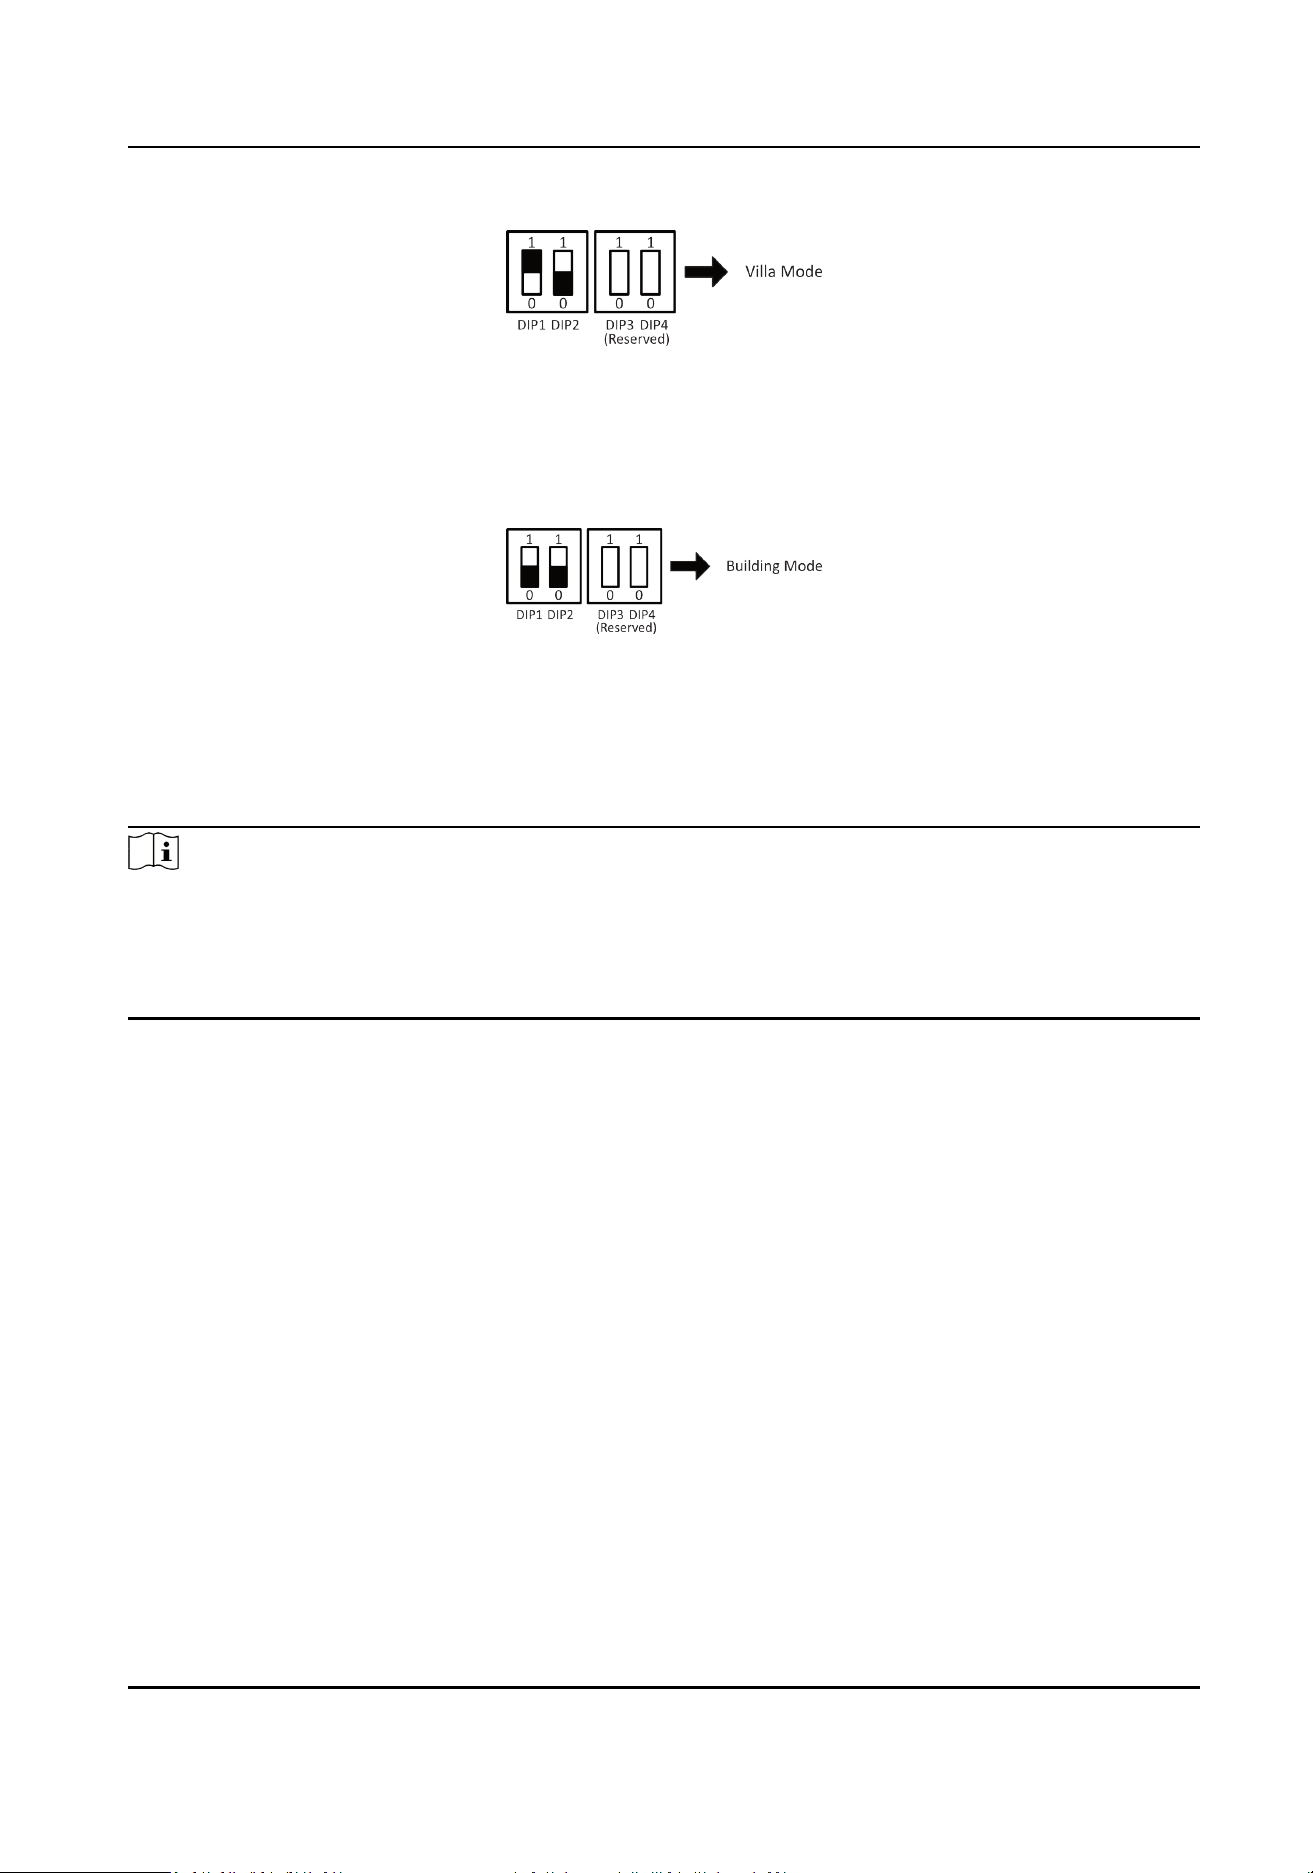
Figure 4-5 Villa Mode
Villa Mode: The device can be powered by separate power supply. Under the villa mode, more
than one device can be lightened up; when the extension is called, it can be lightened up and
intercom via videos.
Figure 4-6 Building Mode
Building Mode: In one power supply system, up to 4 indoor staons can be wired and up to 1
indoor staon can be normally used at the same me. When other devices are lightened up, the IN
USE indicator will also be lightened up. Separate power supply is not supported. When the
extension is called, the screen cannot be lightened up.
Note
●
DIP 1 and DIP 2 are for mode sengs, and DIP 3 and DIP 4 are reserved.
●
If DIP 2 is set as 1, the funcon of Professional Studio will be enabled.
●
The device is on debugging mode when the extension No. is 9. You can operate the indoor
staon on debugging mode without connecng to the door staon.
DS-KH7300EY Series Indoor Staon User Manual
10
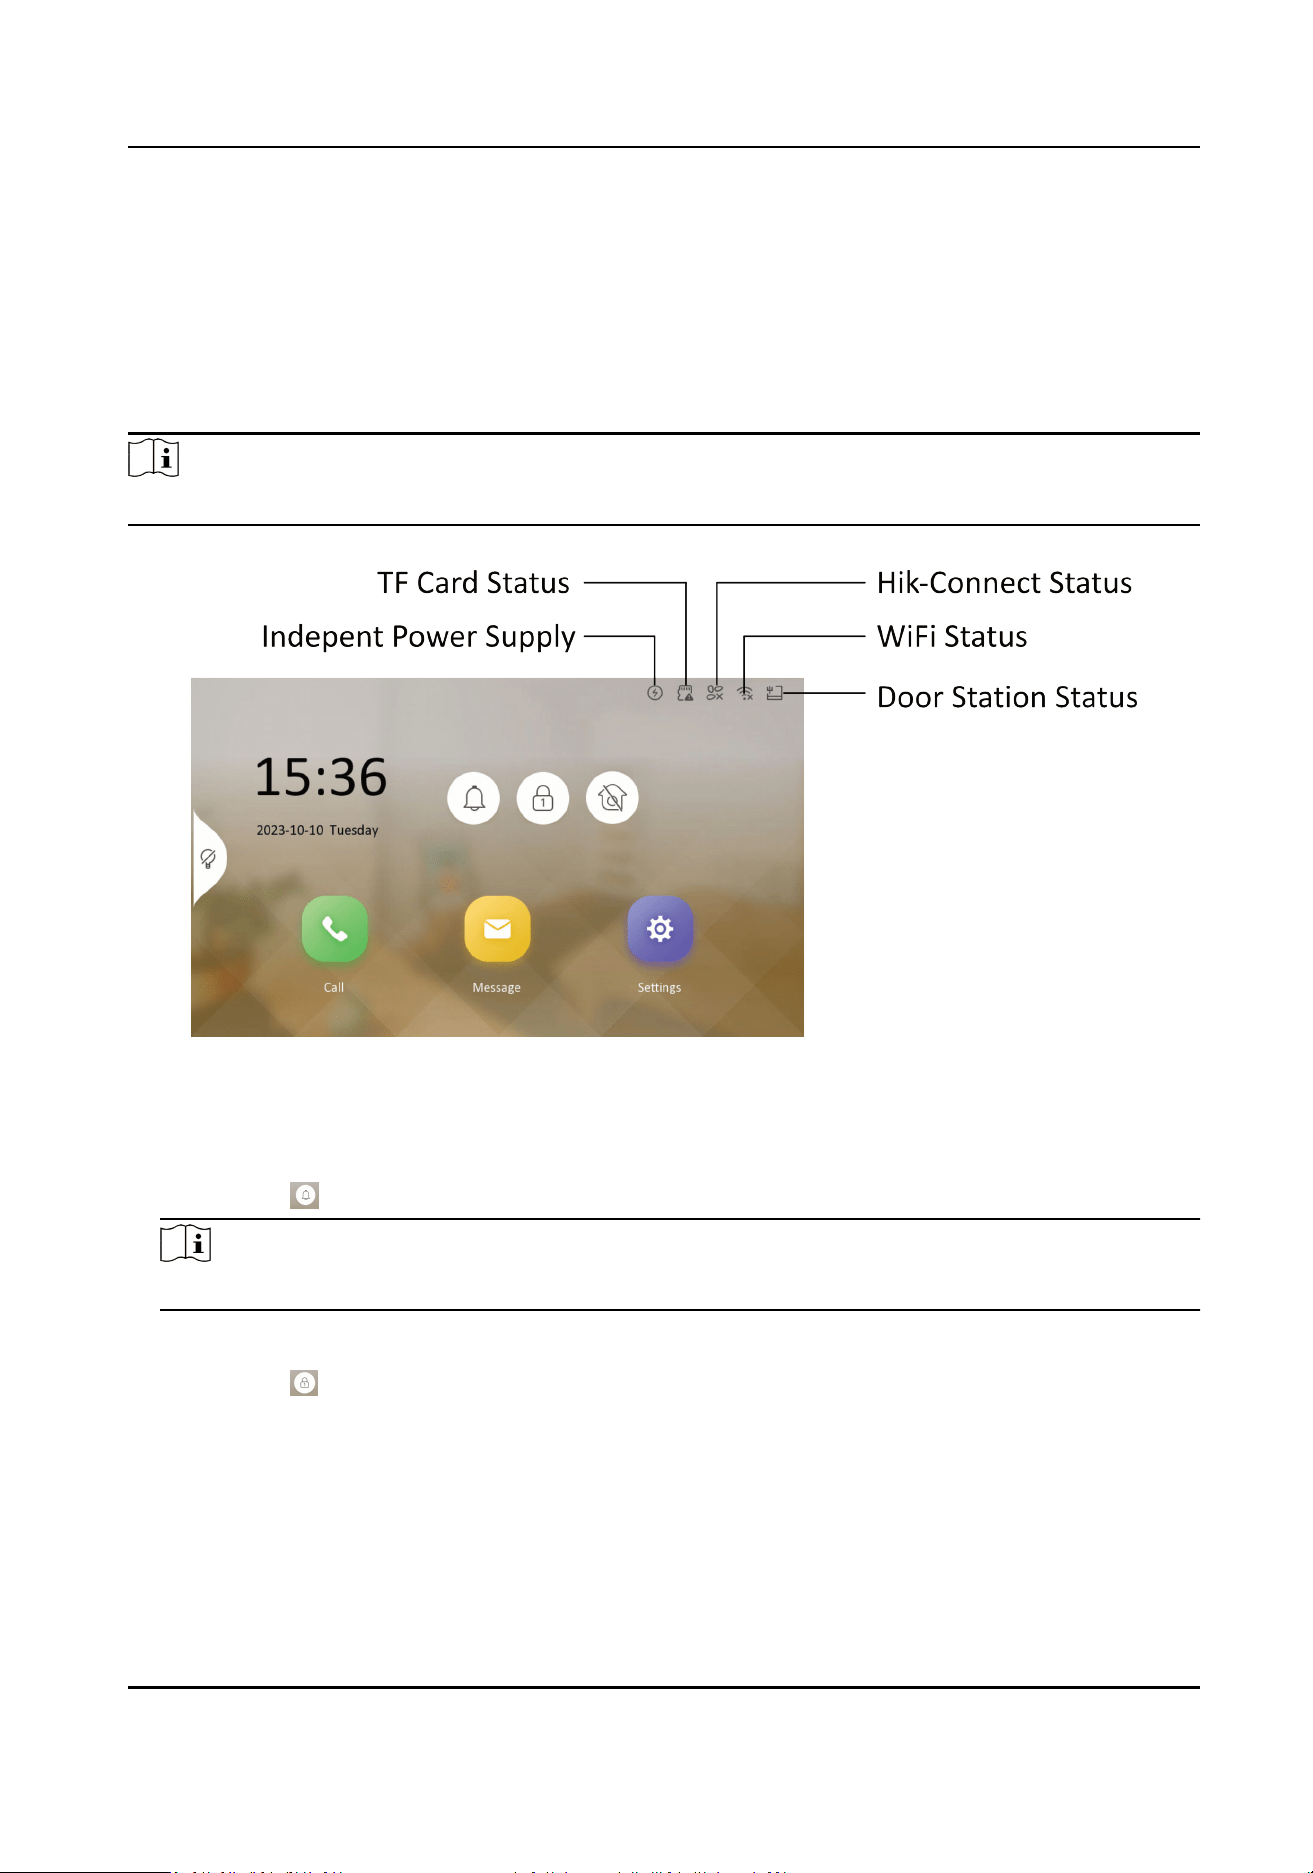
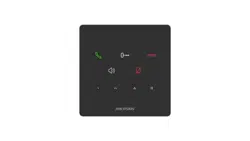
Chapter 5 Menu
You can mute the device, unlock and live view the linked device on the menu page. You can also
check the status of on the menu page.
You can view the status of the Hik-Connect, Wi-Fi, door
staon and the TF Card on the menu page.
Note
The Live View icon can be disabled
Figure 5-1 View Status
Icons on the page.
Mute
You can tap on the menu page to mute the indoor staon.
Note
Aer mung, there will be no ringtone when receiving a call.
Unlock
You can tap on the menu page to unlock linked device. You can set this key on the Shortcut
Key Sengs page.
DS-KH7300EY Series Indoor Staon User Manual
11
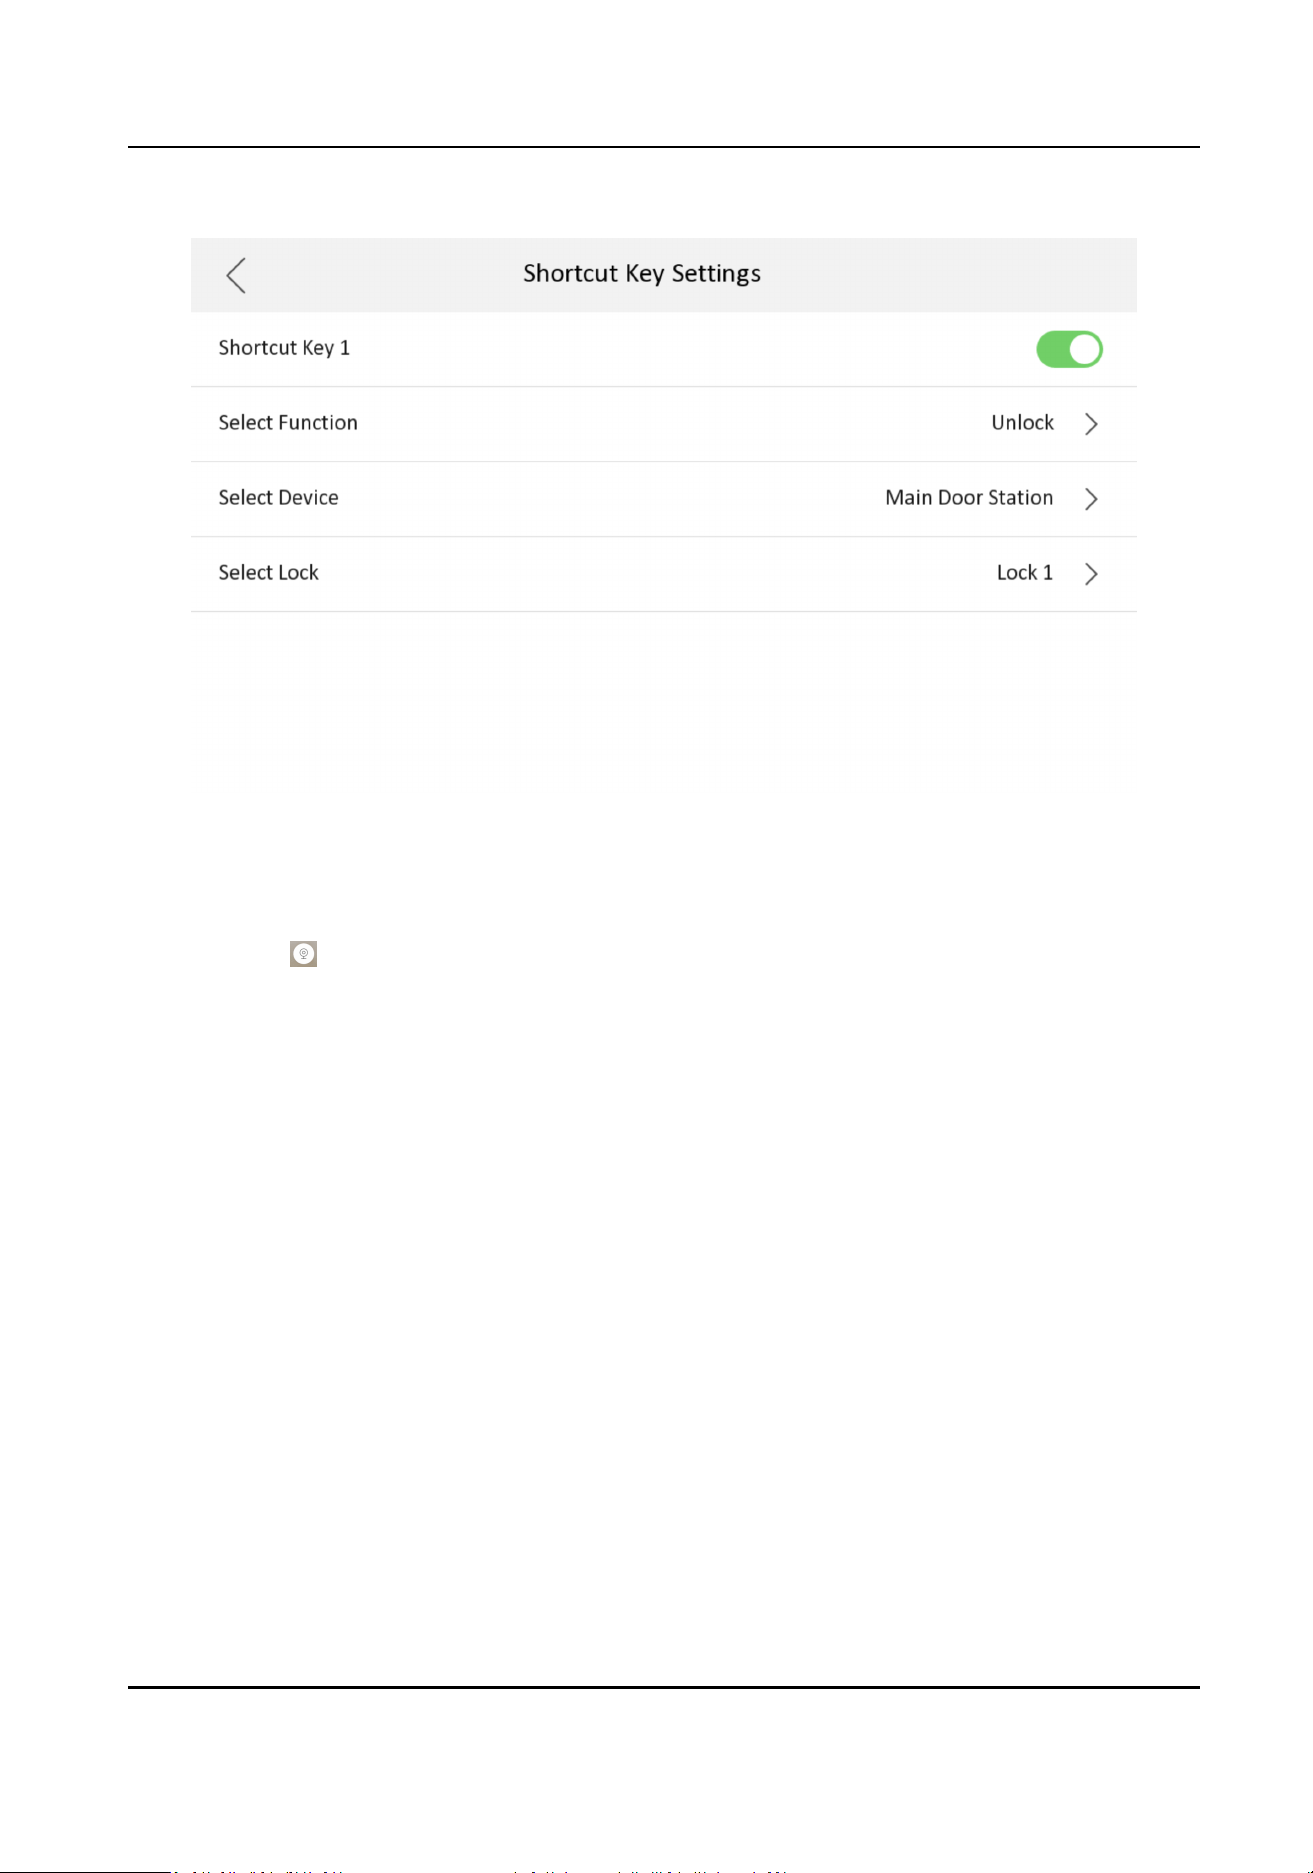
Figure 5-2 Shortcut Key Sengs
By default, you can tap this icon to unlock lock 1 of the main door staon.
Live View
You can tap to live view door staon.
By default, you can tap this icon to live view the main door staon.
DS-KH7300EY Series Indoor Staon User Manual
12

Chapter 6 Call Indoor Staon from Door Staon
Aer powering on the device, the door staon and door staon can conduct the following
operaon.
Before You Start
The indoor staon and door staon should connect rst and nish the sengs of DIP switch.
Steps
1.
The door
staon call indoor staon directly.
2.
The indoor staon views the live video of the door staon.
DS-KH7300EY Series Indoor Staon User Manual
13
Chapter 7 Other Operaons on Device
7.1 Receive Call
The indoor staon and indoor extension can receive calls from door staon, outer door staon and
sub door staon.
On the call from door staon page, there are 2 unlock buons: Unlock 1, and Unlock 2. When you
tap Unlock 1, the building gate will open by default, and when you tap Unlock 2, the door
connected to the door
staon with the secure control door unit will open.
Tap the capture buon to capture and save the live view picture when speaking with the door
staon.
Note
The indoor extension can connect to indoor staon with network cables. Aer connecng, the
indoor extension can receive calls from devices that linked to the indoor staon.
7.2 View Call Logs
Steps
1.
Tap Call →
to enter the call log page.
2.
Tap a piece of call logs in the list to call back.
Note
●
The indoor staon saves call logs from door staons, outer door staons, and sub door
staons.
●
Hold a piece of call logs to open the call logs handling menu. Tap Delete to delete the piece of
call logs. Tap Clear to delete all pieces of call logs.
7.3 View Capture Logs
Before You Start
You need to enable the
funcon of snapshot before you can receive capture logs. For more details,
please refer to Preference
Steps
1.
Tap Message → to enter the capture log page.
2.
You can view all capture logs on this page.
DS-KH7300EY Series Indoor Staon User Manual
14
Chapter 8 Conguraon on Device
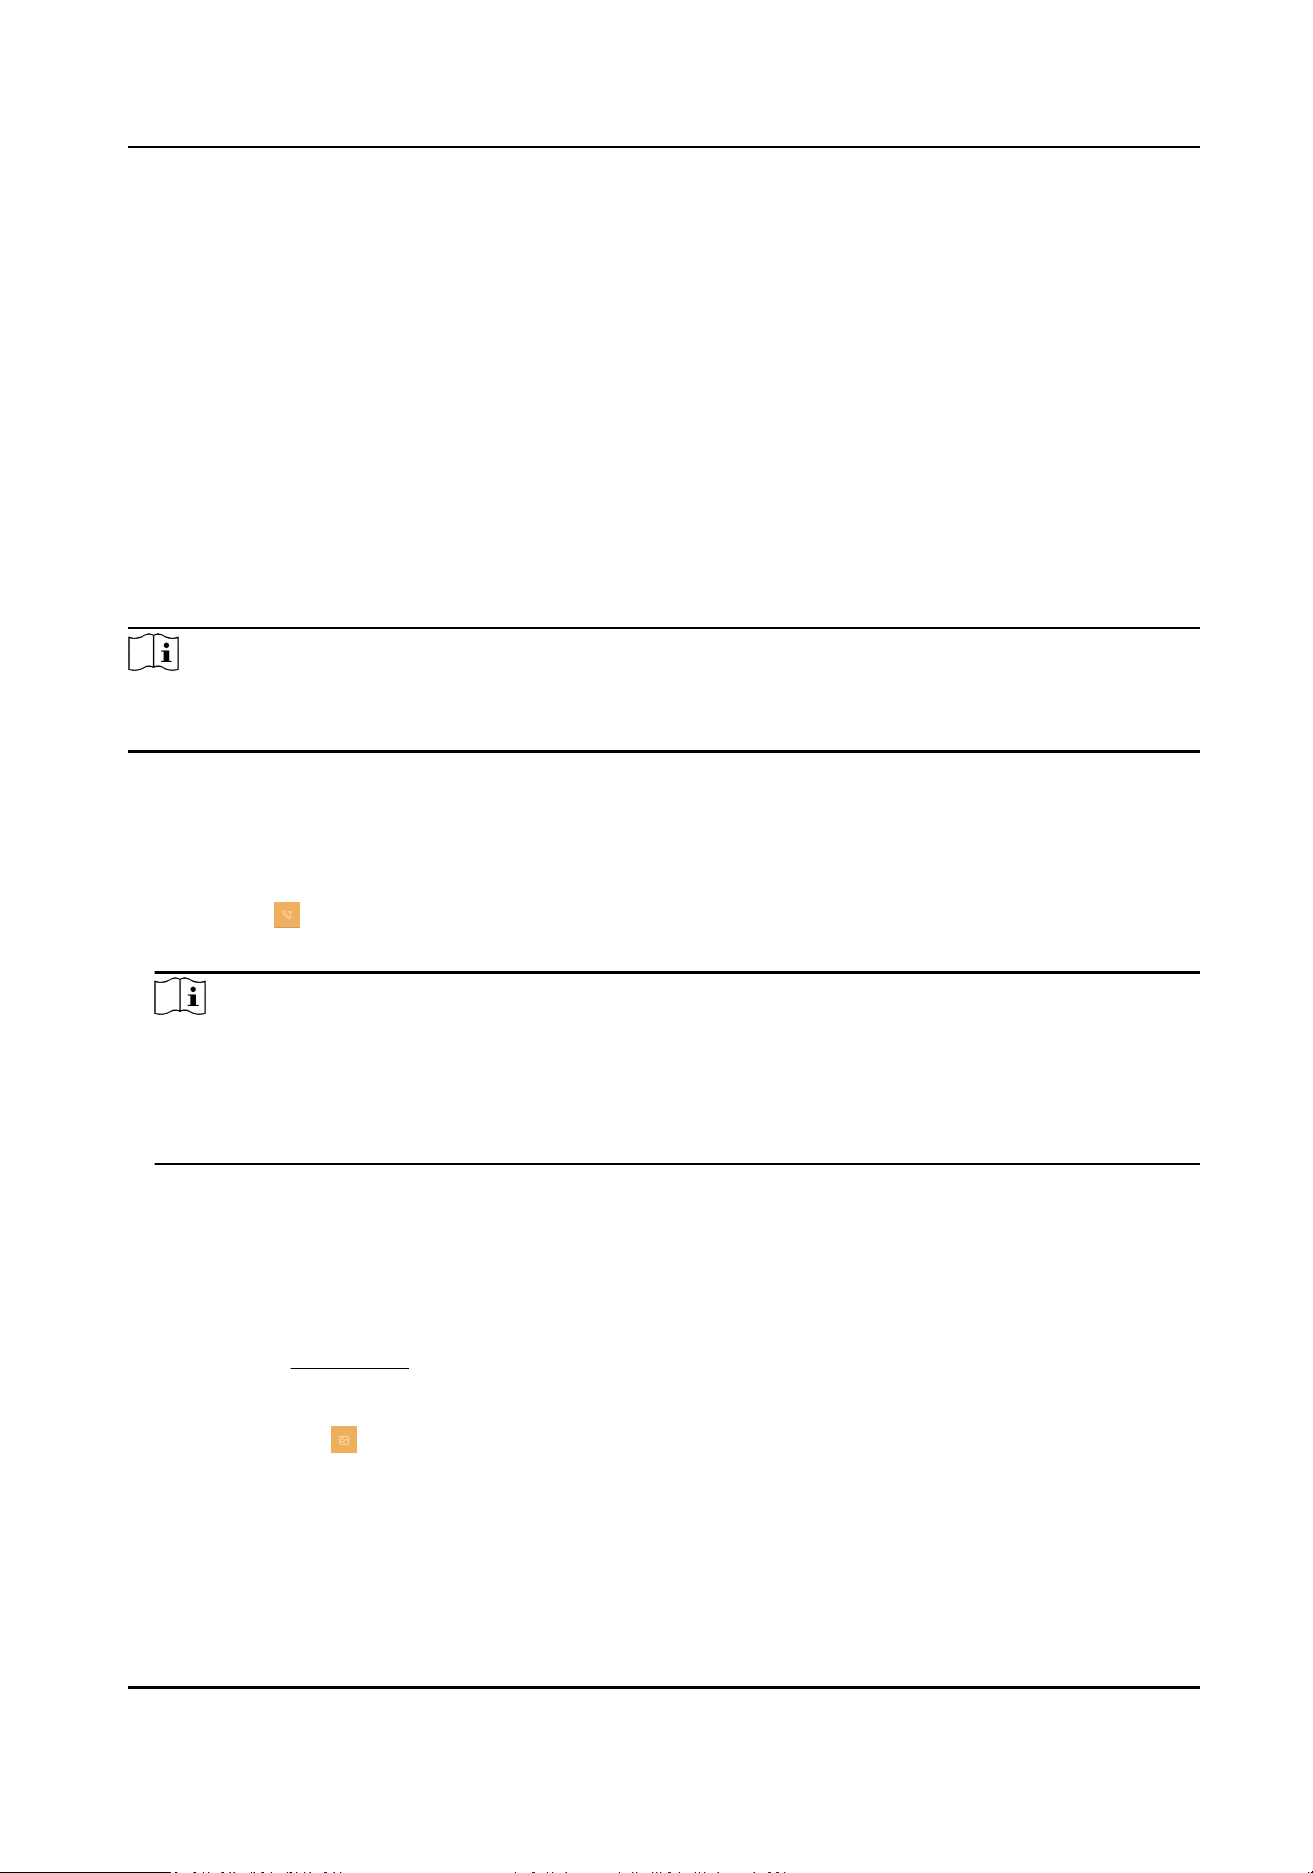
8.1 Call Sengs
You can set the ringtone, ring duraon, call forwarding me on call sengs page.
Steps
1.
Tap Sengs → to enter the call sengs page.
Figure 8-1 Call Sengs
2.
Set corresponding parameters.
Ringtone
There are 3 ringtones by default, and you can custom and import at most 4 ringtones via
Batch
Conguraon Tool or iVMS-4200 Client Soware.
Ringtone Duraon: The maximum duraon of indoor staon when it is called without being
accepted. Ringtone duraon ranges from 10 s to 30 s.
Calling Duraon
The call will end automacally when the actual calling duraon is longer than the congured
one. Calling duraon ranges from 30 s to 60 s.
Call Forwarding Duraon
The ring duraon limit beyond which the call is automacally forwarded to the mobile phone
designated by the resident. Call forwarding ranges from 0 s to 20 s.
DS-KH7300EY Series Indoor Staon User Manual
15
Other Sengs
You can enable professional studio funcon, set unlock and unlock duraon.
Professional Studio
You can enable the funcon of Professional Studio according to your actual needs.
Note
●
The funcon is disabled by default. When it is enabled, the door will be opened
automacally when the outer staon or door staon calls the indoor staon.
●
If the second rotary DIP Switch of the indoor staon turns 1, the shortcut key buon of
professional studio will be displayed on the menu. By default, the
buon will not be
displayed.
Unlock Sengs
Select the lock for unlocking.
Note
By default, professional studio funcon congures lock 1.
Unlock Duraon
You can set the duraon for unlocking.
Note
Indoor extension does not support the ring duraon sengs and call forwarding sengs.
8.2 Shortcut Sengs
You can congure shortcut keys on the shortcut sengs page.
Unlock Keys
Tap Sengs → → Shortcut Sengs to enter the Shortcut Sengs page.
Unlock Key
You can select device and lock for sengs.
Shortcut Keys
You can set dierent funcons to dierent shortcut keys.
Tap to enable the shortcut key. Set the
funcon, device and lock for the key.
Live View
Tap Sengs → → Conguraon → .
Enable Live View, and the icon of live view will be shown on the main page.
DS-KH7300EY Series Indoor Staon User Manual
16
Professional Studio
Tap Sengs → → Other Sengs . Enable Professional Studio, and the icon will be shown on
the main page.
8.3 Set Live View
On the live view page, you can view the live video of linked door staon, outer door staon and
sub door
staon.
Steps
Note
●
Make sure the door staon is well-connected.
●
Make sure the indoor extension and the indoor staon are well-connected.
1.
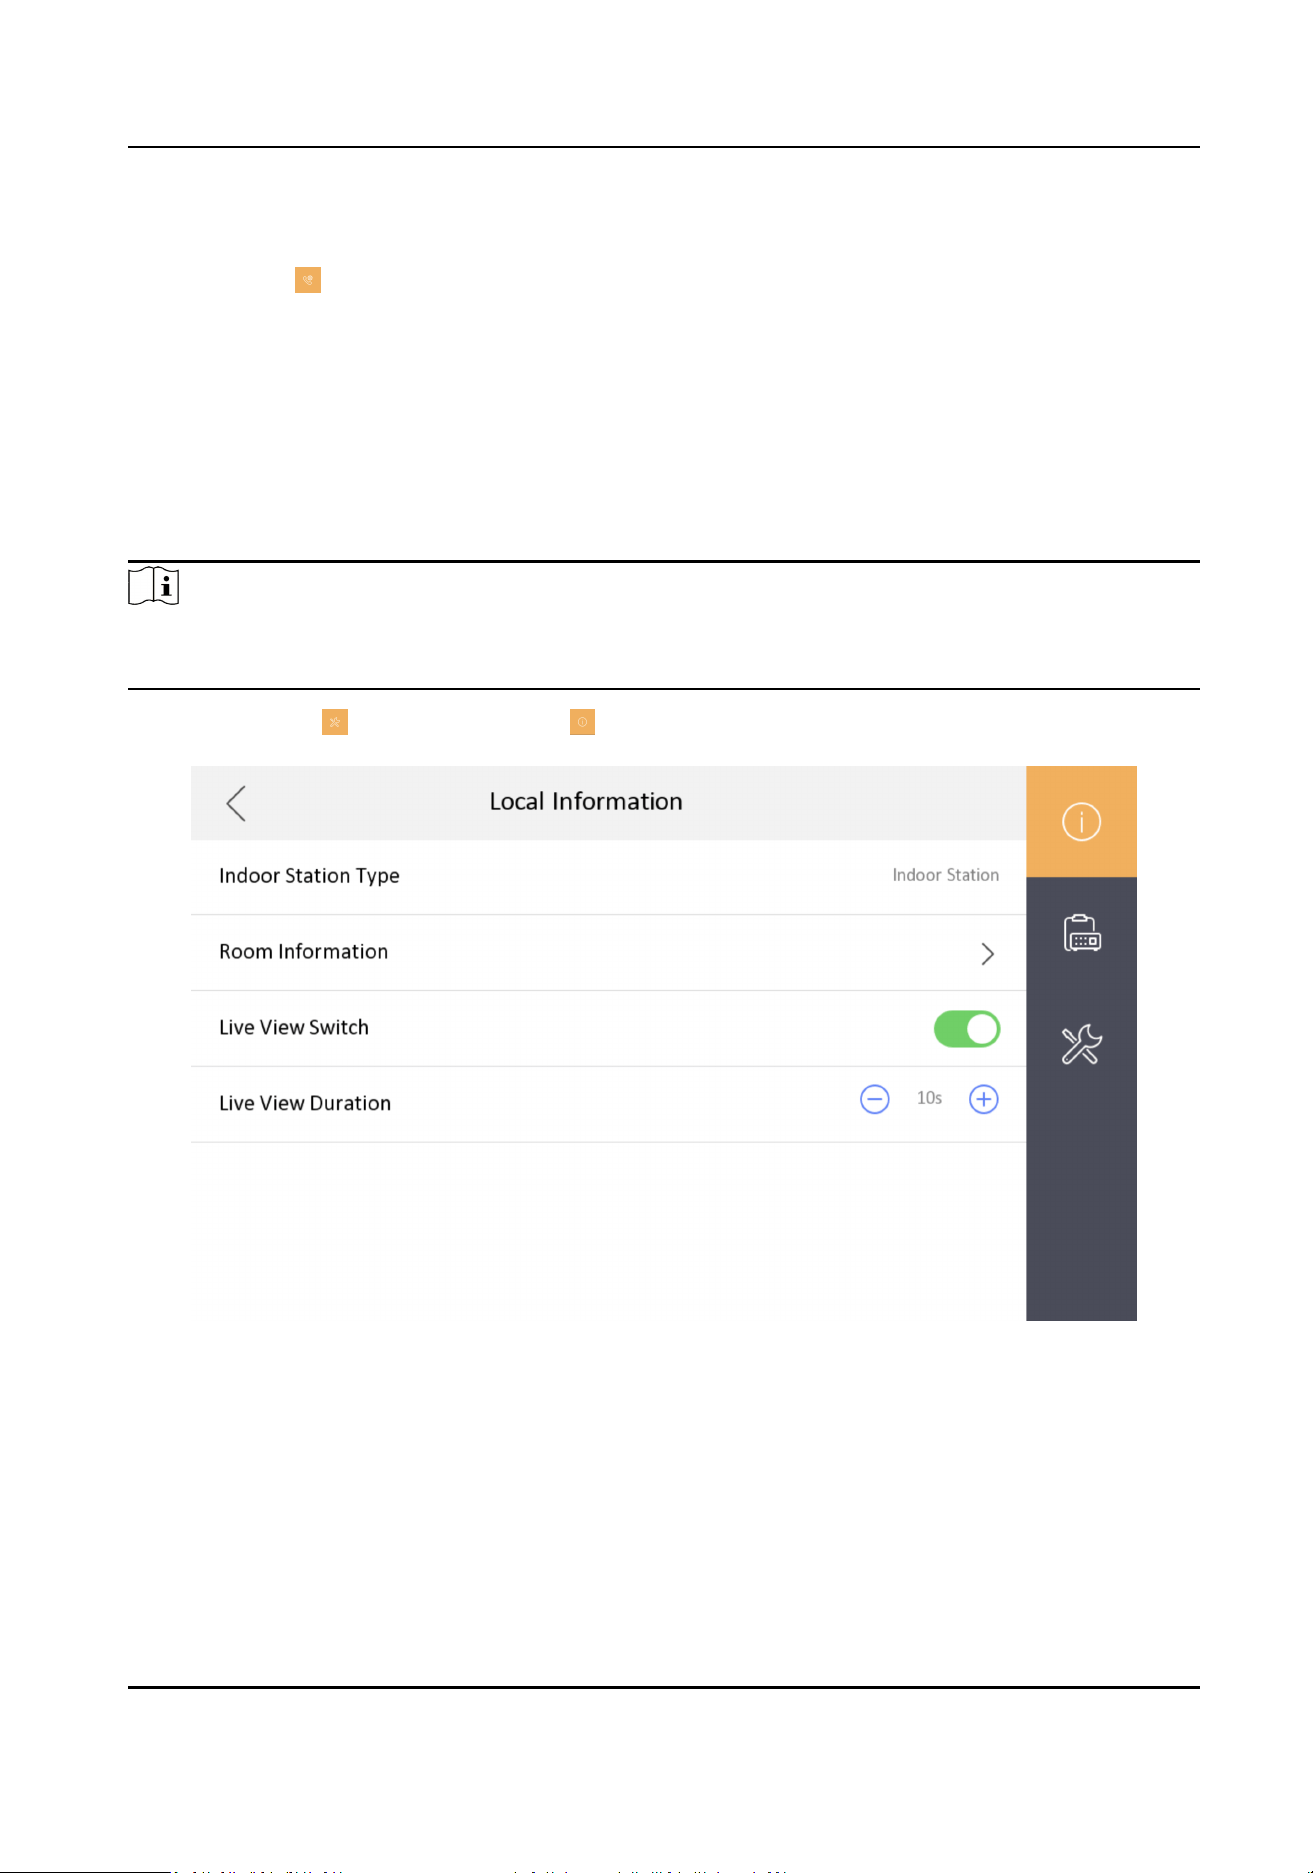
Tap Sengs → → Conguraon → to enter the page of Local Informaon.
Figure 8-2 Local Informaon
2.
Enable Live View and the device can start view live videos of linked devices. You can also set the
duraon for live view.
3.
Aer enable the funcon, the live view icon will be shown on the main page. Tap Live View on
the main page.
DS-KH7300EY Series Indoor Staon User Manual
17

Figure 8-3 Live View
4.
Tap to enter the live view page of door staon.
Note
●
On the Call from Door Staon page, there are 2 unlock buons: Unlock 1, and Unlock 2. When
you tap Unlock 1, the building gate will open by default. When you tap Unlock 2, the door
staon connected door will open.
●
On the Call from Door
Staon page, there are 1 capture buon. You can tap the buon to
capture the picture via door
staon.
●
The indoor staon can view live videos of at most 1 main door staon + 16 sub door staon
+10 outer door staon.
8.4 Volume Sengs
Set the microphone volume, prompt sound volume and call volume.
Steps
1.
Tap
Sengs → → Volume Sengs to enter the volume sengs page.
DS-KH7300EY Series Indoor Staon User Manual
18
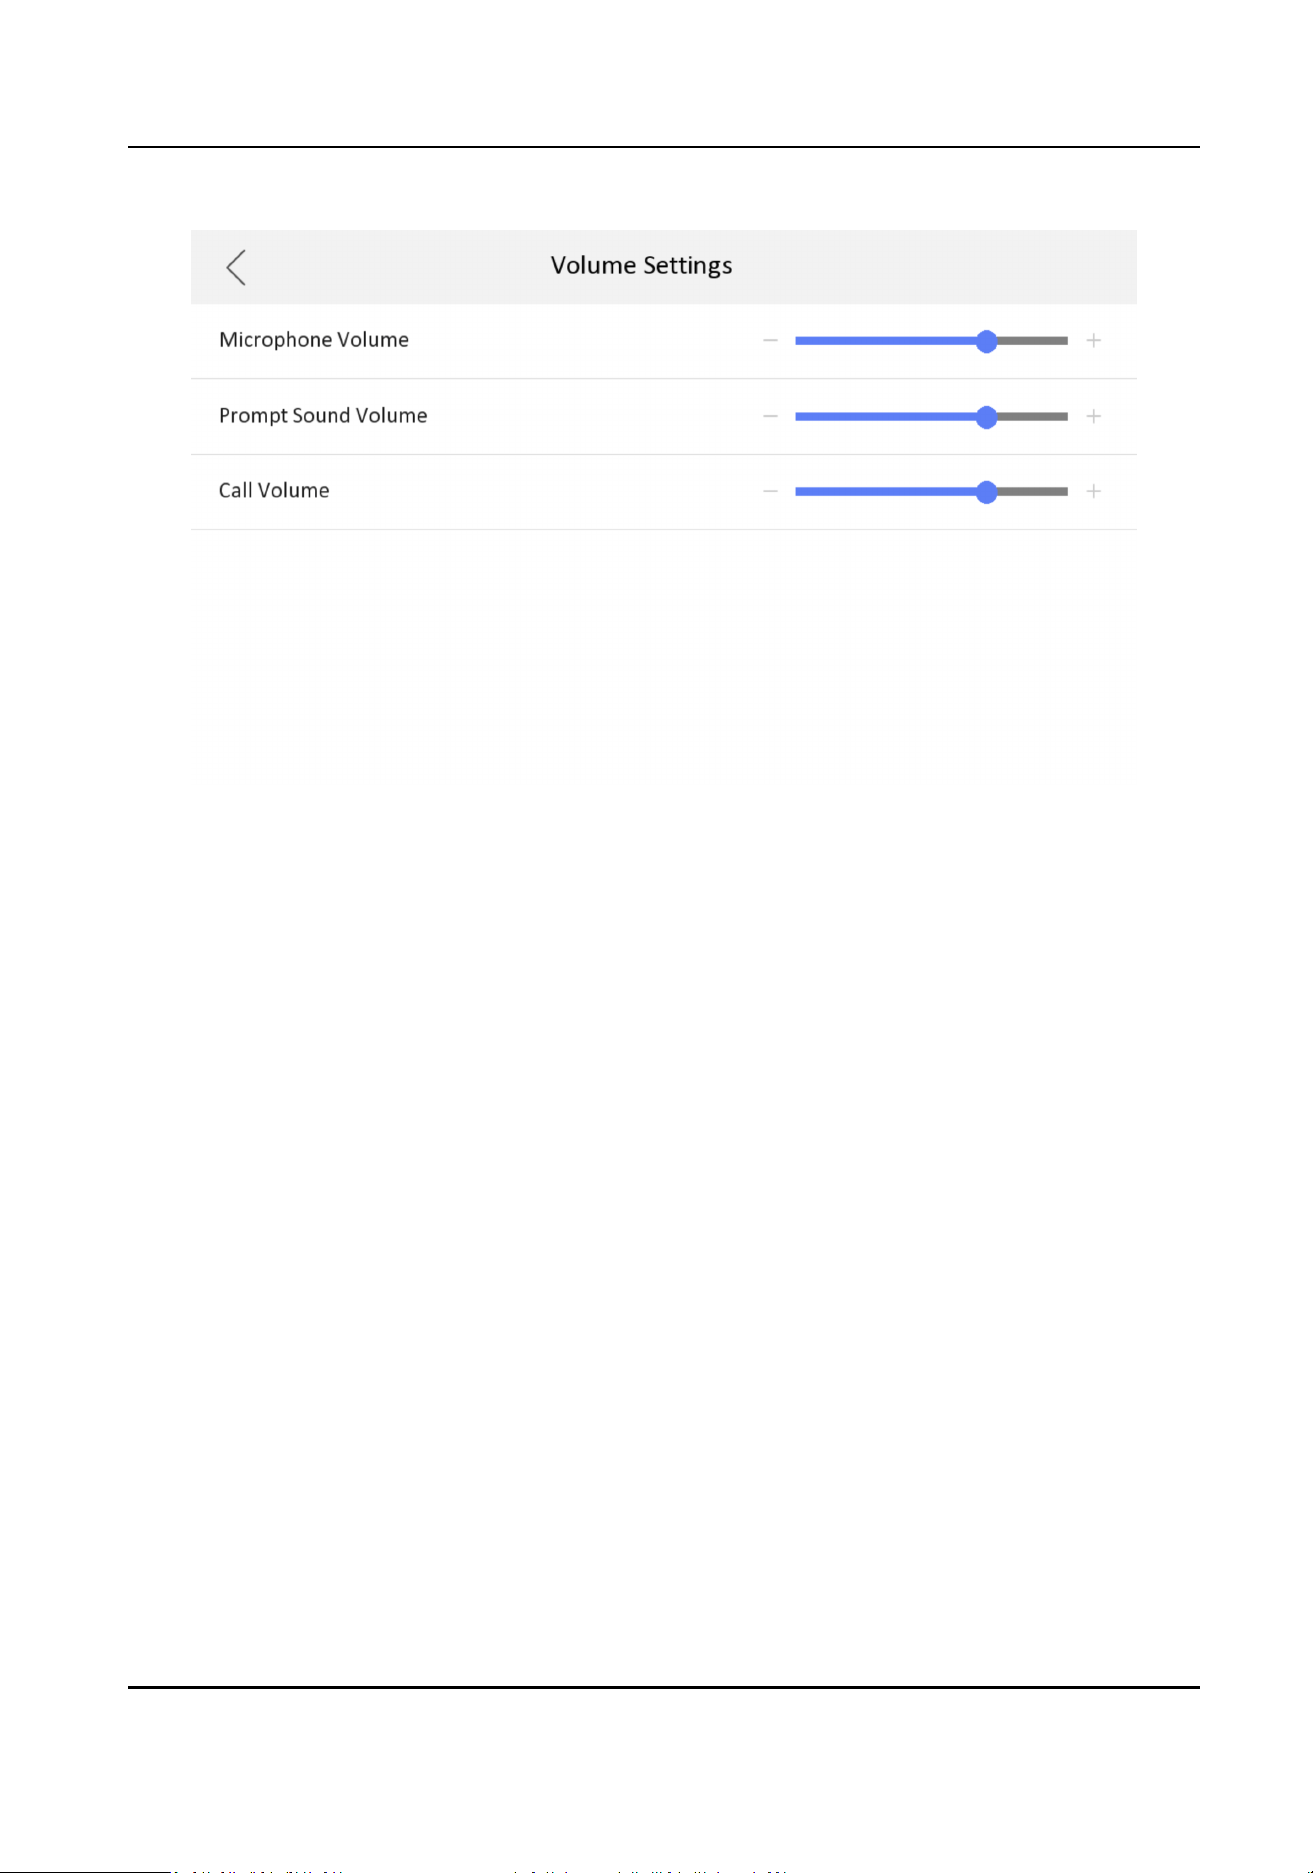
Figure 8-4 Volume Sengs Page
2.
Set the microphone volume, prompt sound volume, and the call volume of the indoor staon.
8.5 App
Sengs
The device support adding to Hik-Connect and conguraon remotely via the client.
8.5.1 Connect to Wi-Fi
Aer connecng to Wi-Fi, you can view live videos and unlock the door via mobile App. Only some
indoor staons support Wi-Fi.
Tap
Sengs → Wi-Fi Sengs . Enable Wi-Fi, and the indoor staon can search the Wi-Fi.
DS-KH7300EY Series Indoor Staon User Manual
19
Figure 8-5 Wi-Fi Sengs
Aer connecng to the Wi-Fi, you can operate remotely via the mobile App. The App supports
displaying the list of linked door
staons. You can unlock the door, receive calls from door staons.
8.5.2 Connect to Hik-Connect Service
Before You Start
Note
The funcon of the device varies according to different models. Refers to the actual device for
detailed informaon.
Steps
1.
Tap
Sengs → → Conguraon → → Hik-Connect Service Sengs to enter the sengs
page.
2.
Enable Enable Hik-Connect Service.
DS-KH7300EY Series Indoor Staon User Manual
20
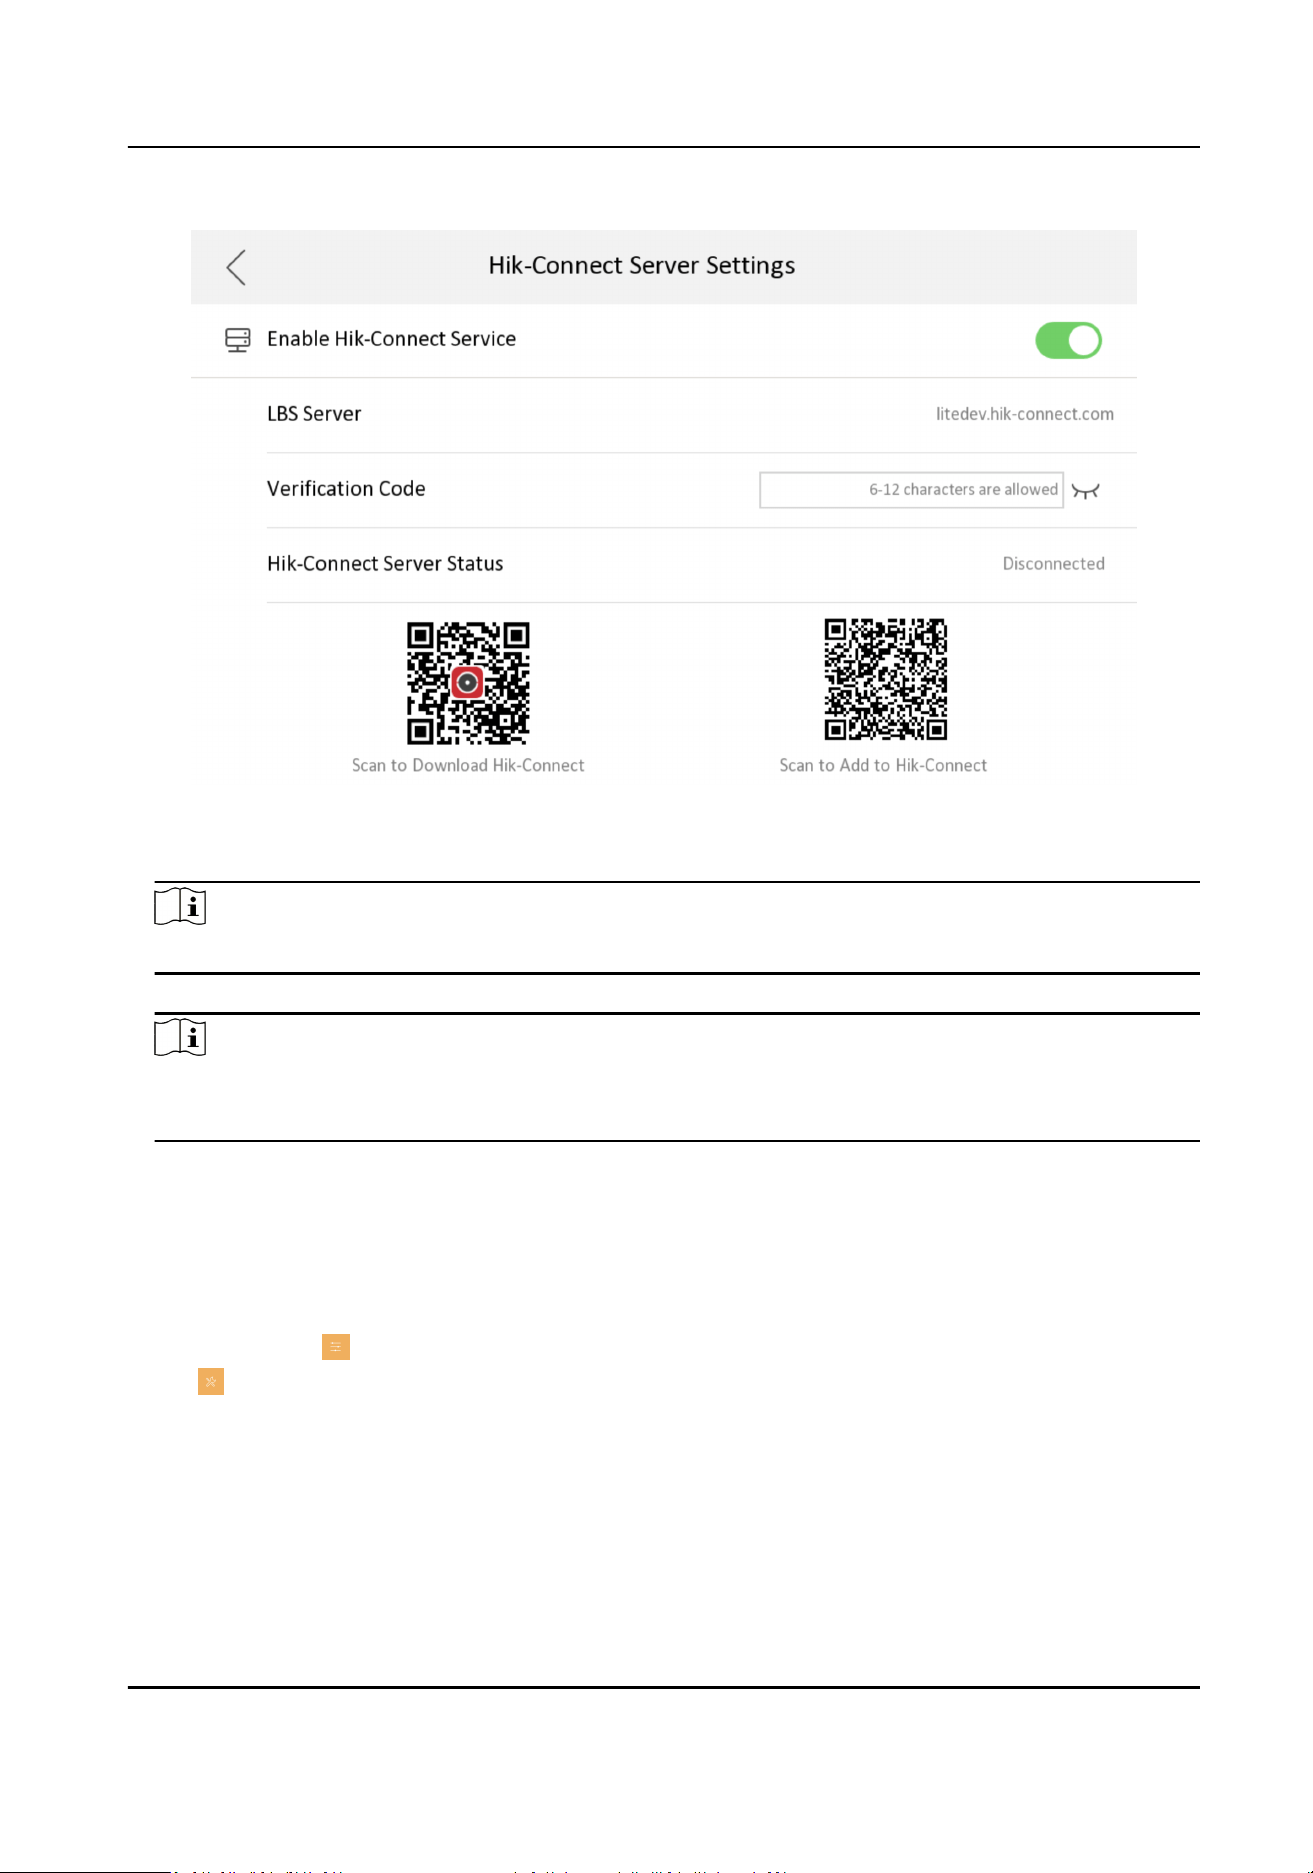
Figure 8-6 Enable Hik-Connect Service
3.
Edit LBS server and Vericaon Code.
Note
Vericaon code is used to add the device to mobile client.
4.
Oponal: Scan the QR code on the screen.
Note
●
Scan the le QR code on the screen to access Hik-Connect.
●
Scan the right QR code on the screen to add the device to the mobile client.
8.5.3 Unlink App Account
Remove the account from the mobile client.
Steps
1.
Tap Sengs → → Conguraon .
2.
Tap
to enter the system maintenance page.
DS-KH7300EY Series Indoor Staon User Manual
21
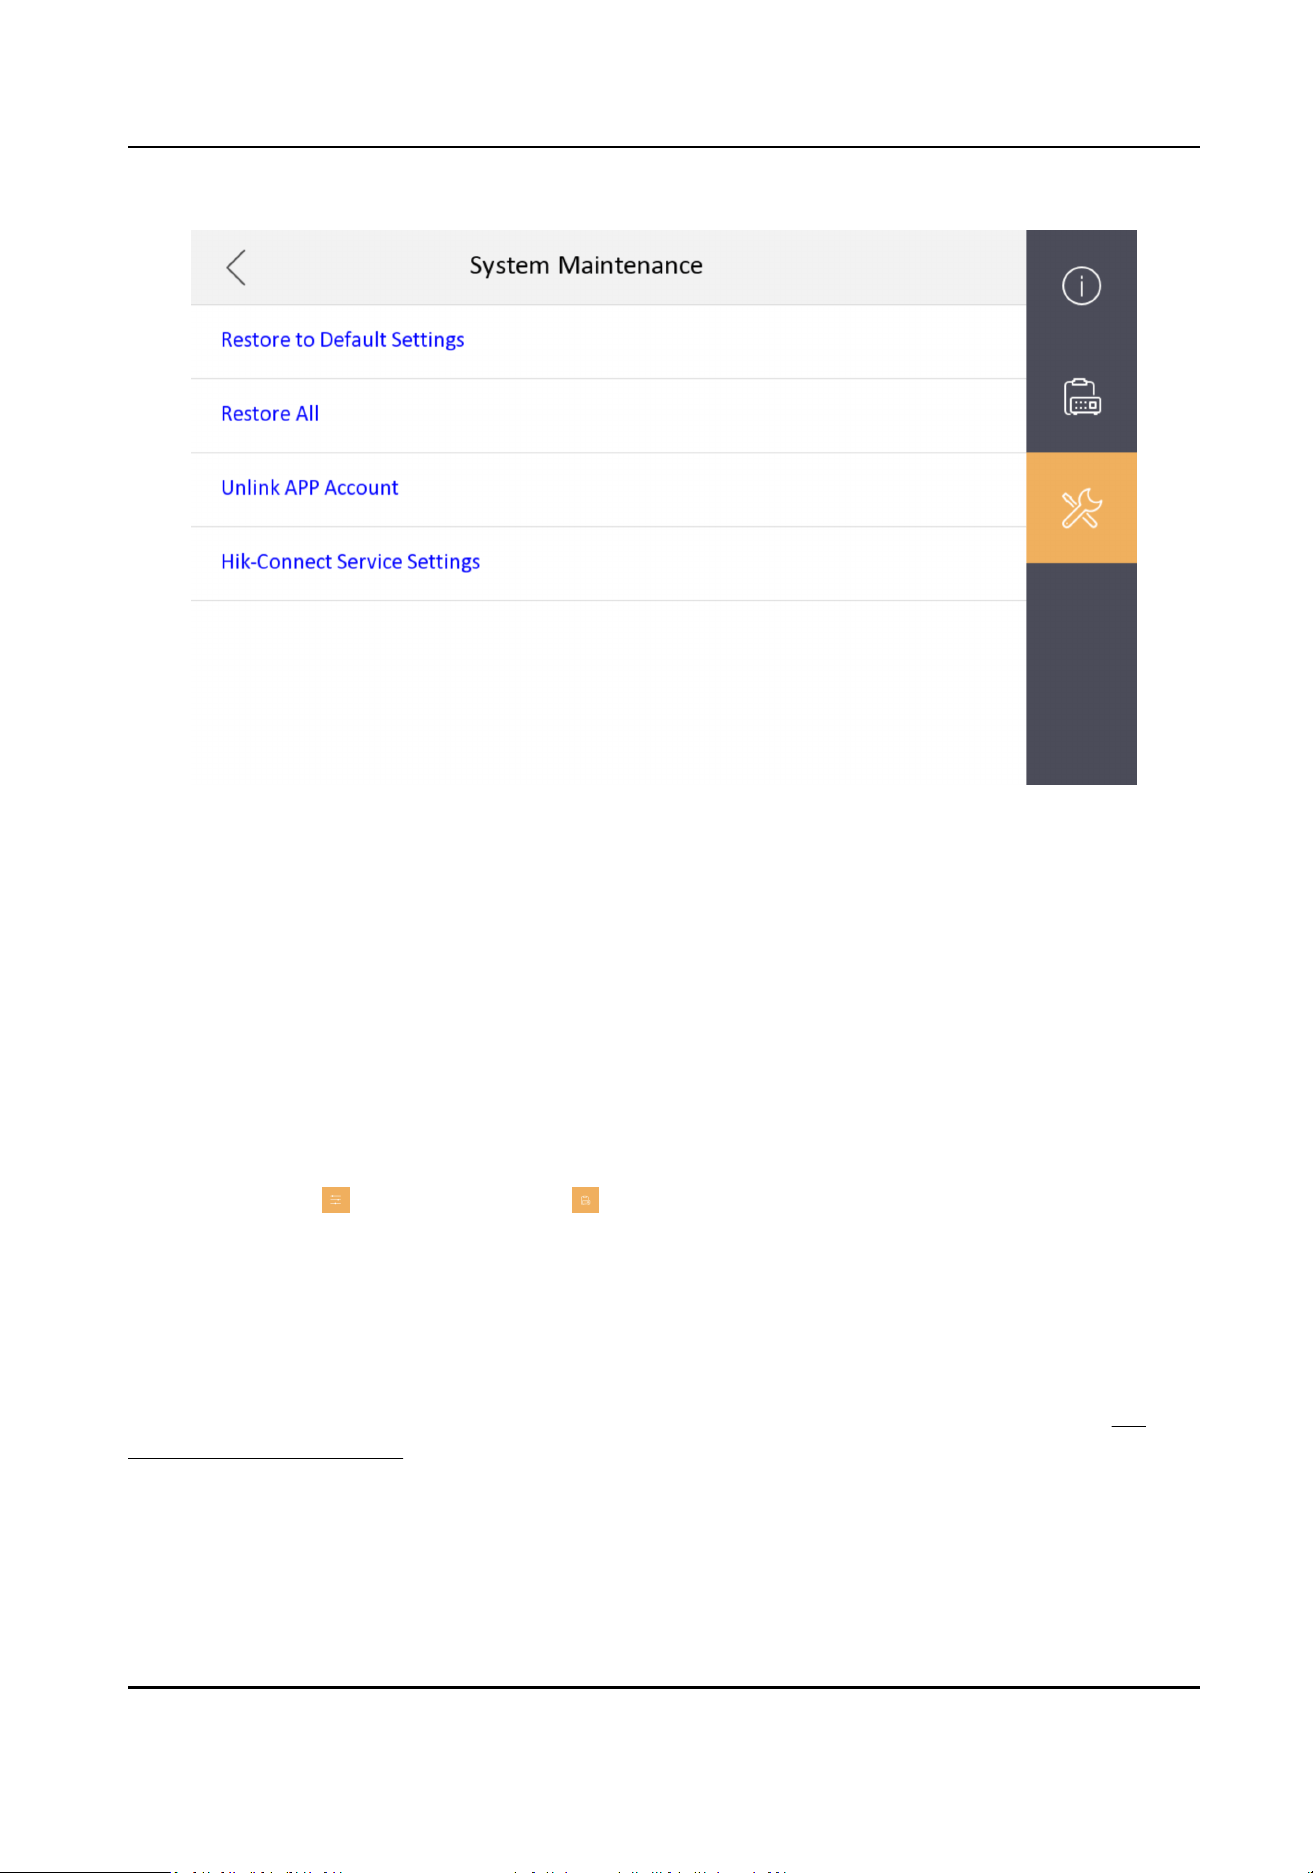
Figure 8-7 System Maintenance
3.
Tap Unlink App Account, and follow the steps on the page.
8.6 Add Outer Door
Staon
The indoor staon can connect to the outer door staon. Aer connecng, the outer staon can
call indoor
staon.
Before You Start
You need to set the No. of the outer door
staon via the DIP switch.
Steps
1.
Tap Sengs → → Conguraon → to enter the device management page.
2.
Tap + to add a outer door staon.
3.
Enter the No. and tap OK.
8.7 Number
Sengs
You can set building No. and room No. via the rotary DIP switch. For details, please refer to Set
Device Rotary DIP Switch .
DS-KH7300EY Series Indoor Staon User Manual
22
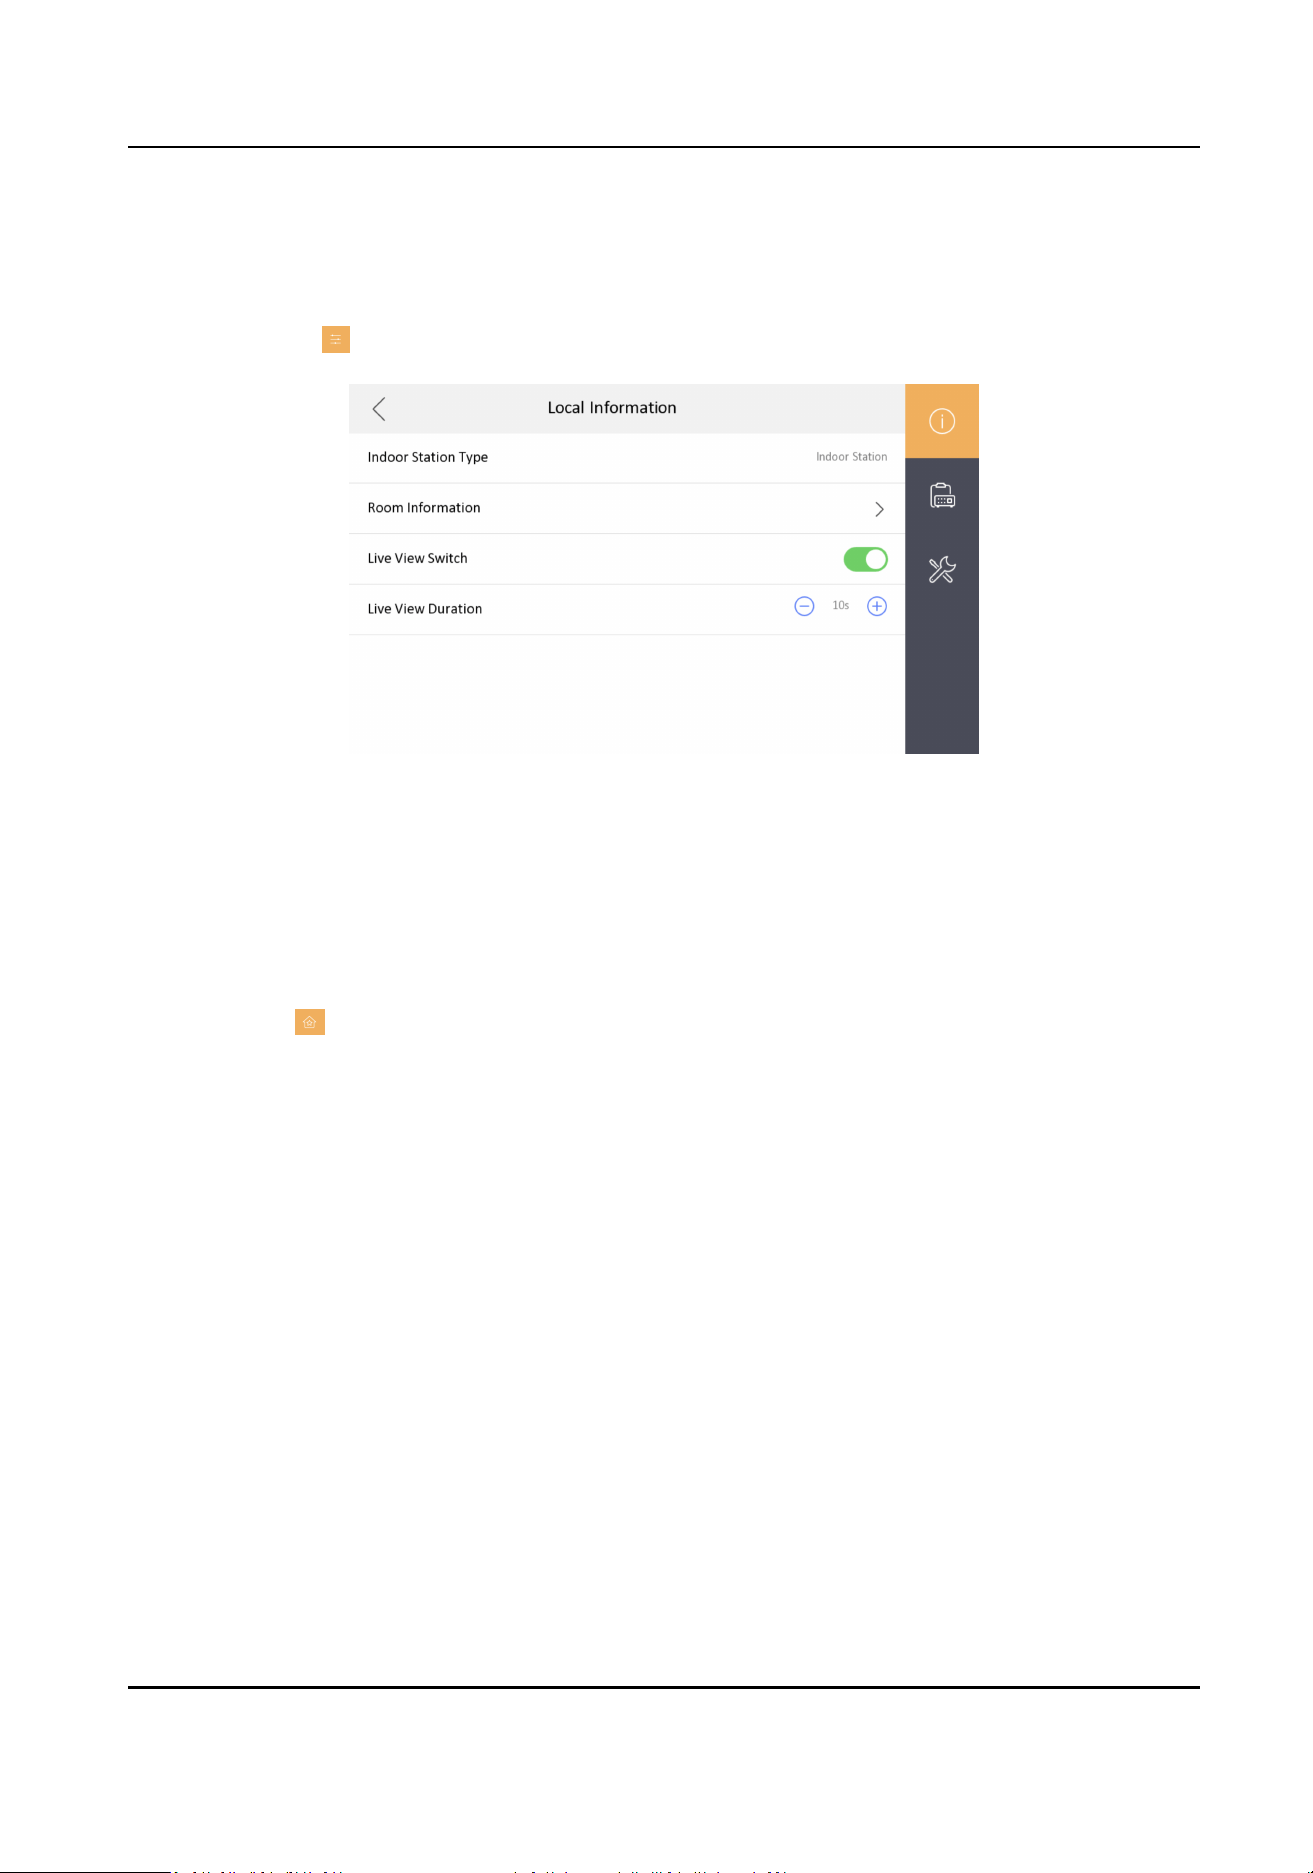
8.8 View Indoor Staon Type
Steps
1.
Tap Sengs → → Conguraon → Local Infomaon to enter the Local Infomaon page.
Figure 8-8 Local Informaon
2.
View the Indoor Staon Type.
8.9 Preference
You can set capture sengs on the preference page.
Tap
Sengs → to enter the preference page.
DS-KH7300EY Series Indoor Staon User Manual
23
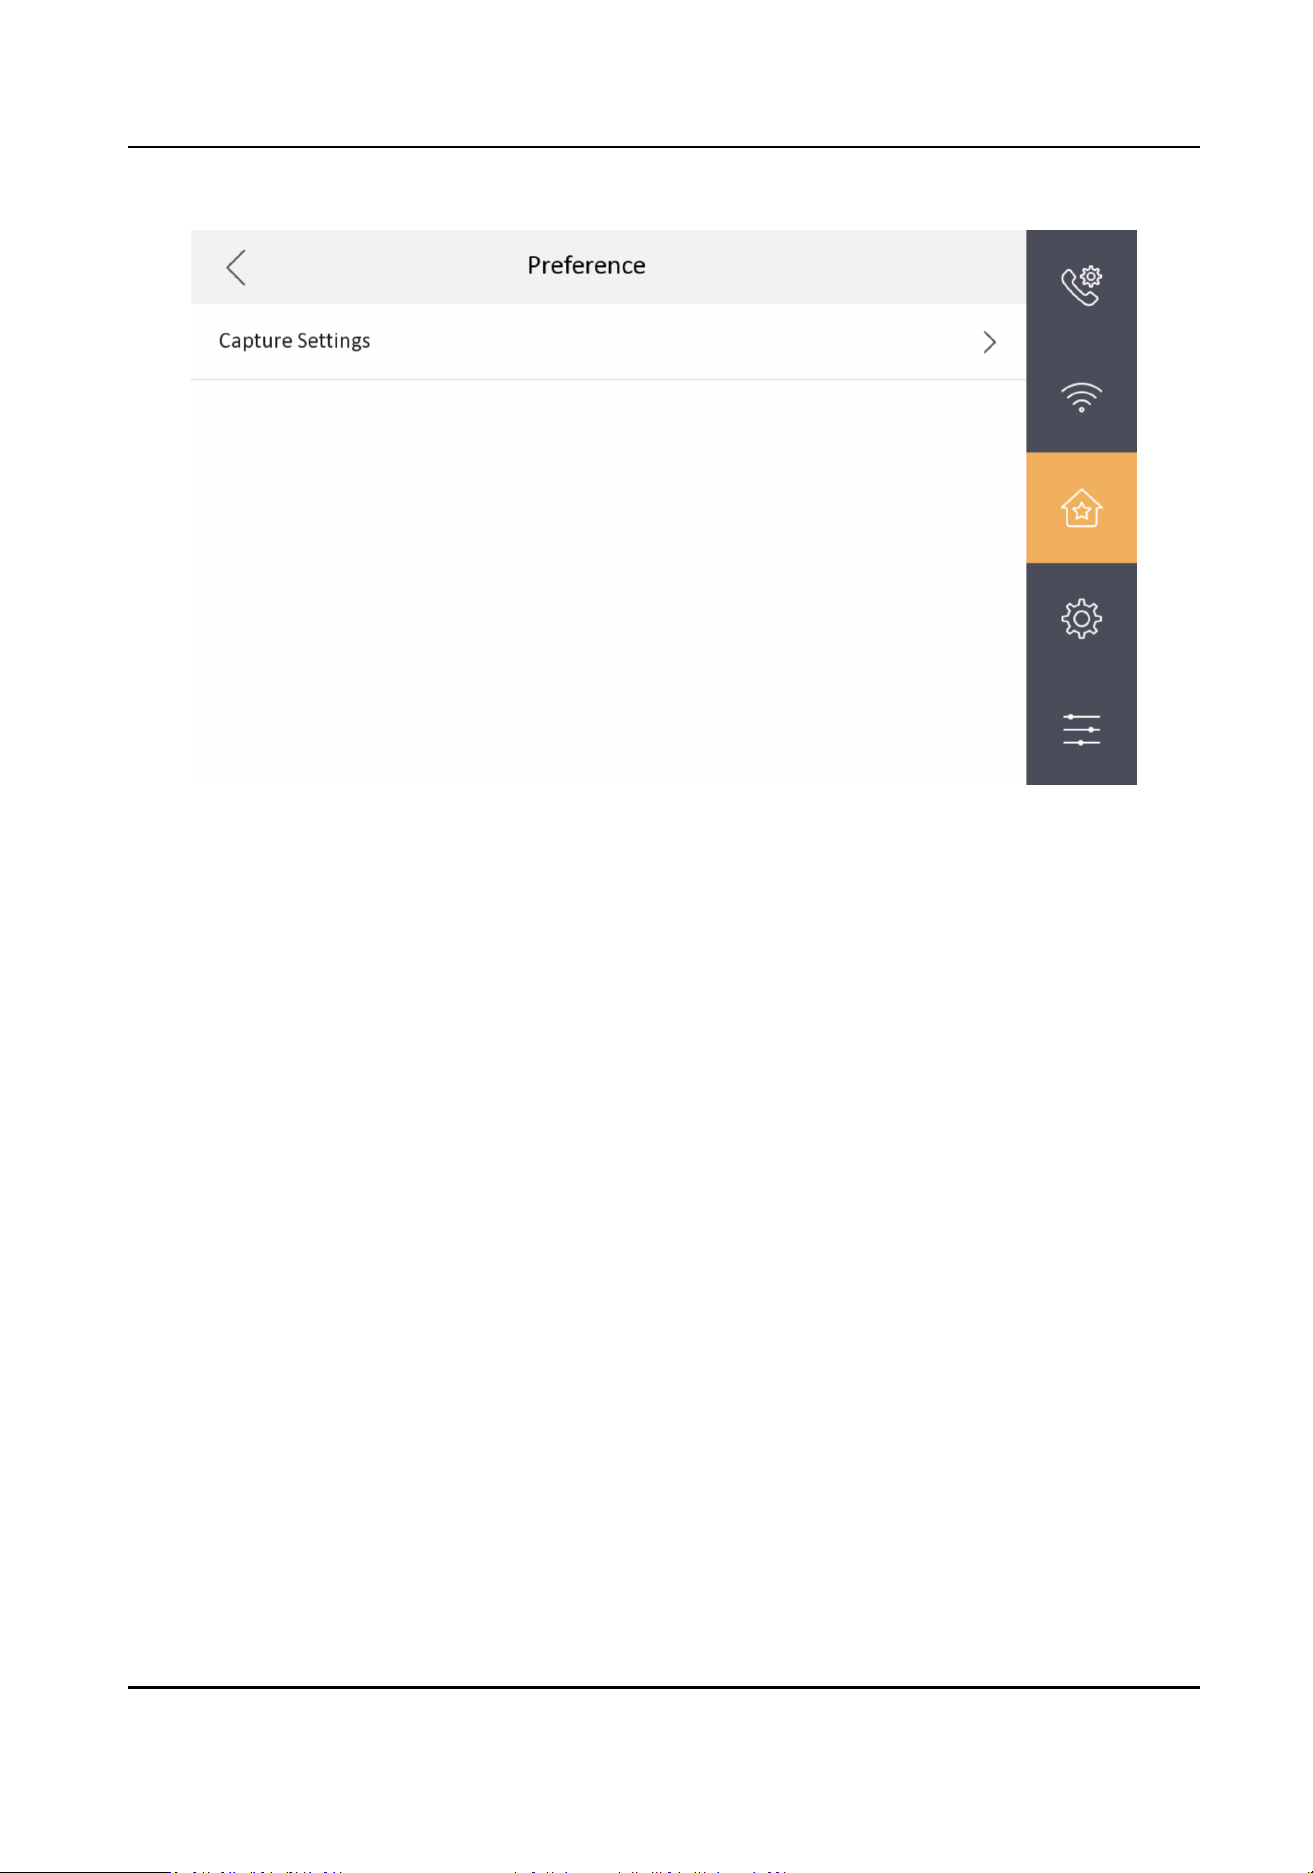
Figure 8-9 Preference
Capture Sengs
Aer enable Snapshot, you can capture pictures when receiving the call and viewing the live
videos. You can set the Snapshot Time which is the
duraon for the captured picture saved in
the device.
DS-KH7300EY Series Indoor Staon User Manual
24
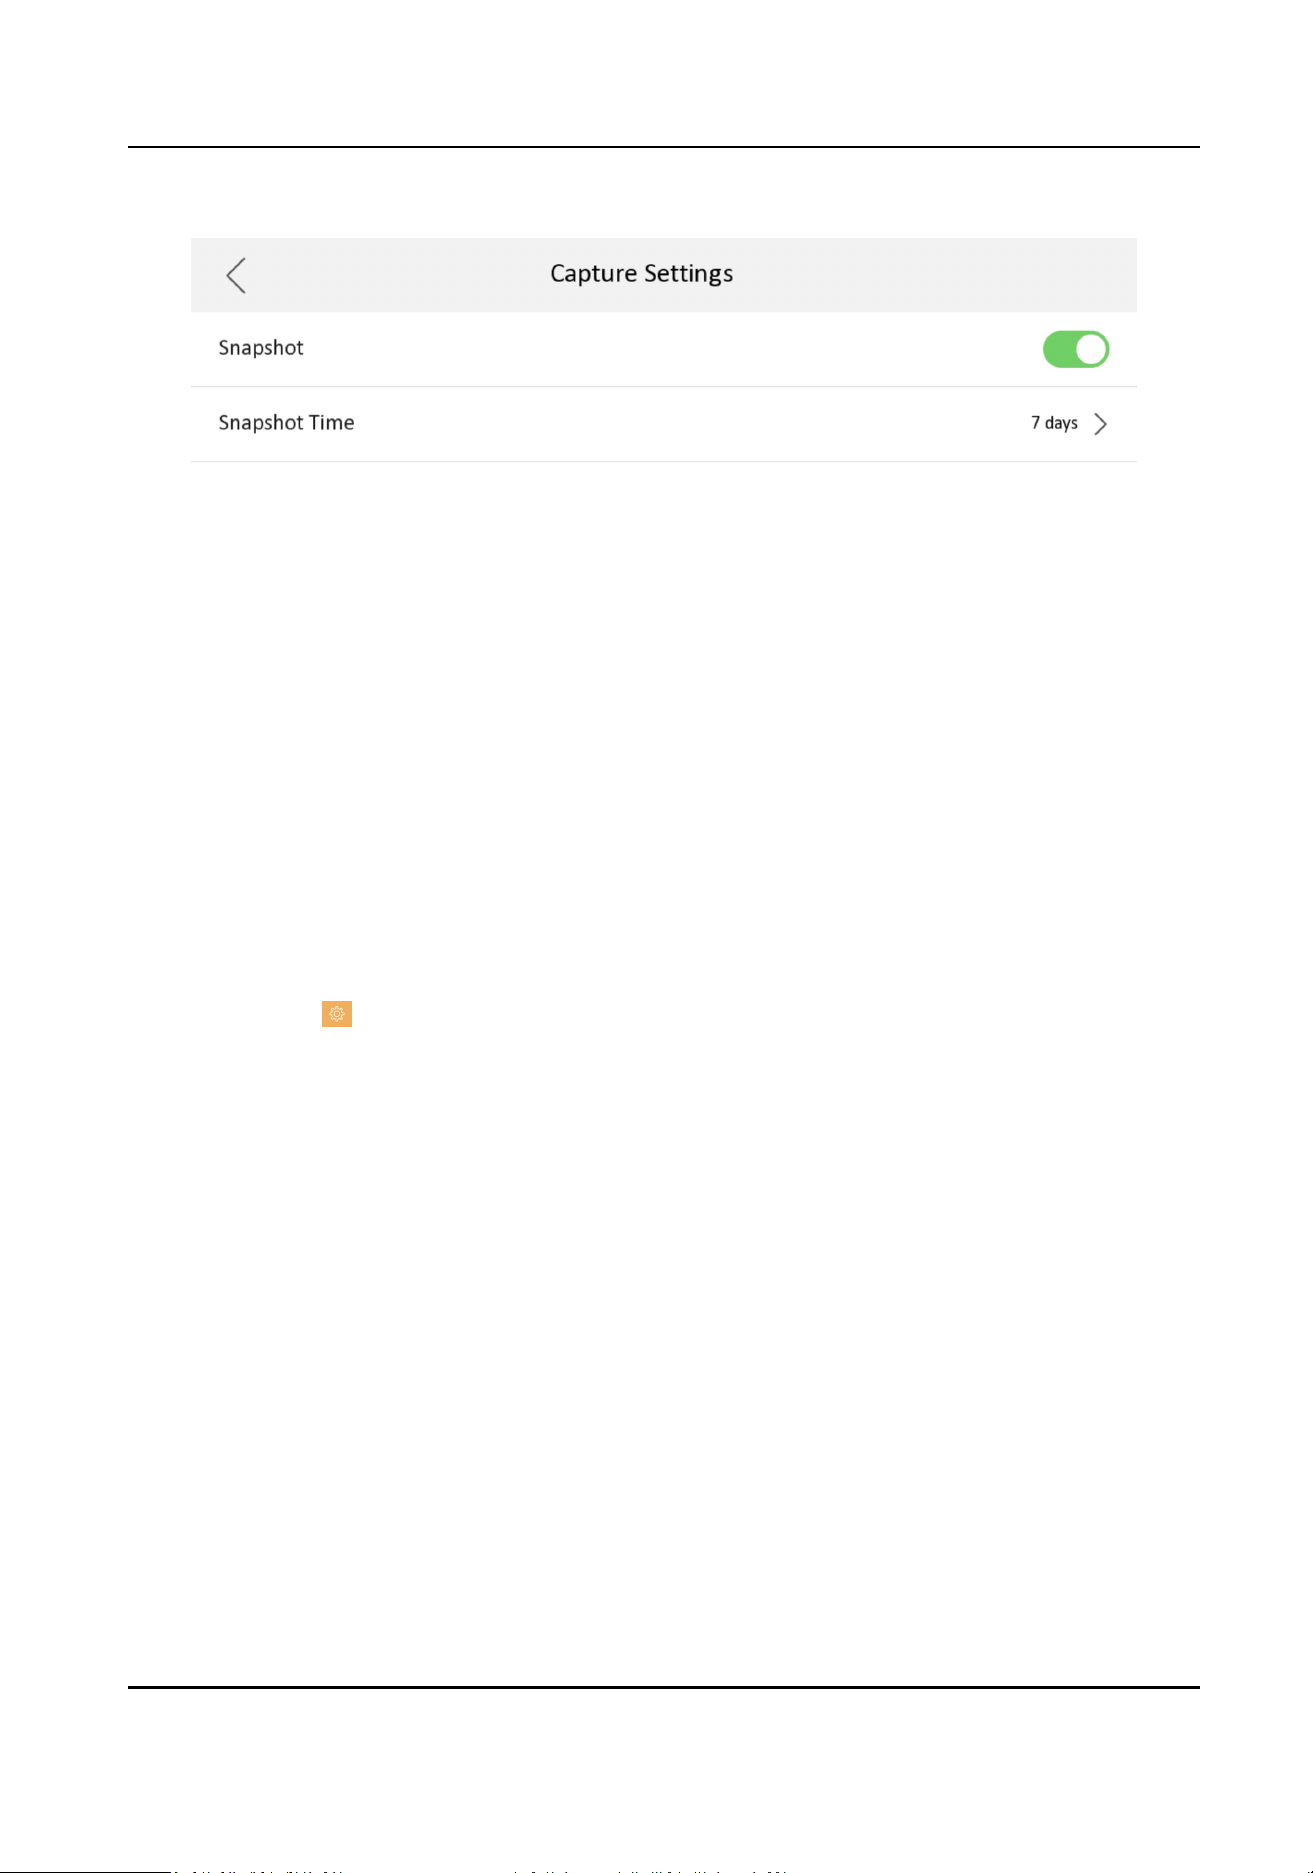
Figure 8-10 Capture Sengs
8.10 Set Time
Steps
1.
Tap
Sengs → → Time and Date to enter the me synchronizaon page.
2.
Tap Date Format and Time Format to set the me format.
3.
Oponal: Tap Time to set me manually.
4.
Tap Sync Time.
DS-KH7300EY Series Indoor Staon User Manual
25
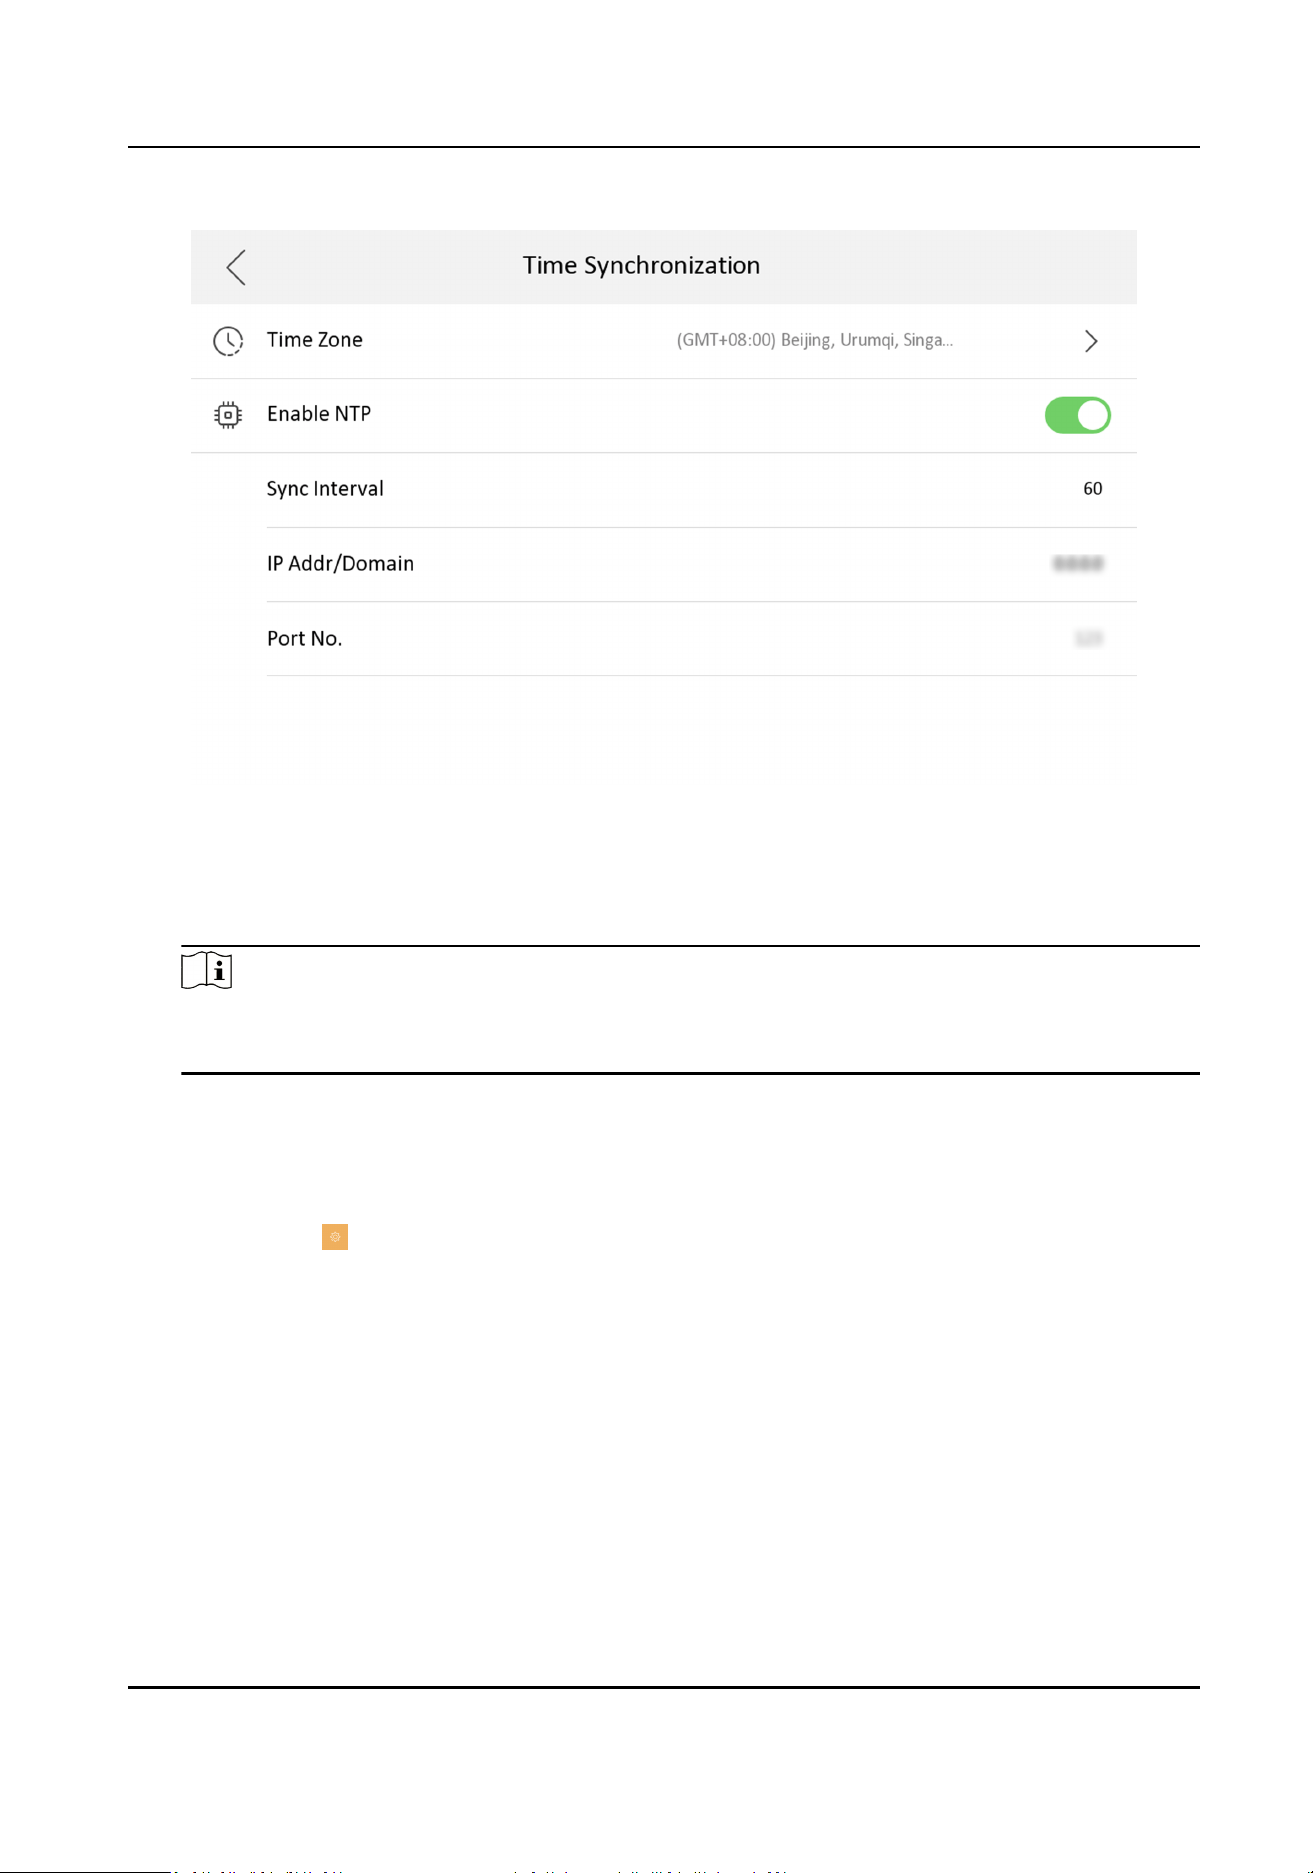
Figure 8-11 Time Synchronizaon
1) Select the Time Zone.
2) Enable Enable NTP.
3) Set the synchronizing interval, enter the IP address/domain of NTP server and port No.
Note
●
The default unit of synchronizing interval is minute.
●
The me zone can be congured as well if the NTP is not enabled.
8.11 Change System Language
Steps
1.
Tap
Sengs → to enter the General Sengs page.
DS-KH7300EY Series Indoor Staon User Manual
26

Figure 8-12 General Sengs
2.
Tap System Language to change the system language.
8.12 Adjust Brightness
Steps
1.
Tap
Sengs → to enter the General Sengs page.
DS-KH7300EY Series Indoor Staon User Manual
27

Figure 8-13 General Sengs
2.
Tap + or - to adjust the screen brightness.
8.13 Format TF Card
Steps
1.
Tap
Sengs → to enter the General Sengs page.
DS-KH7300EY Series Indoor Staon User Manual
28
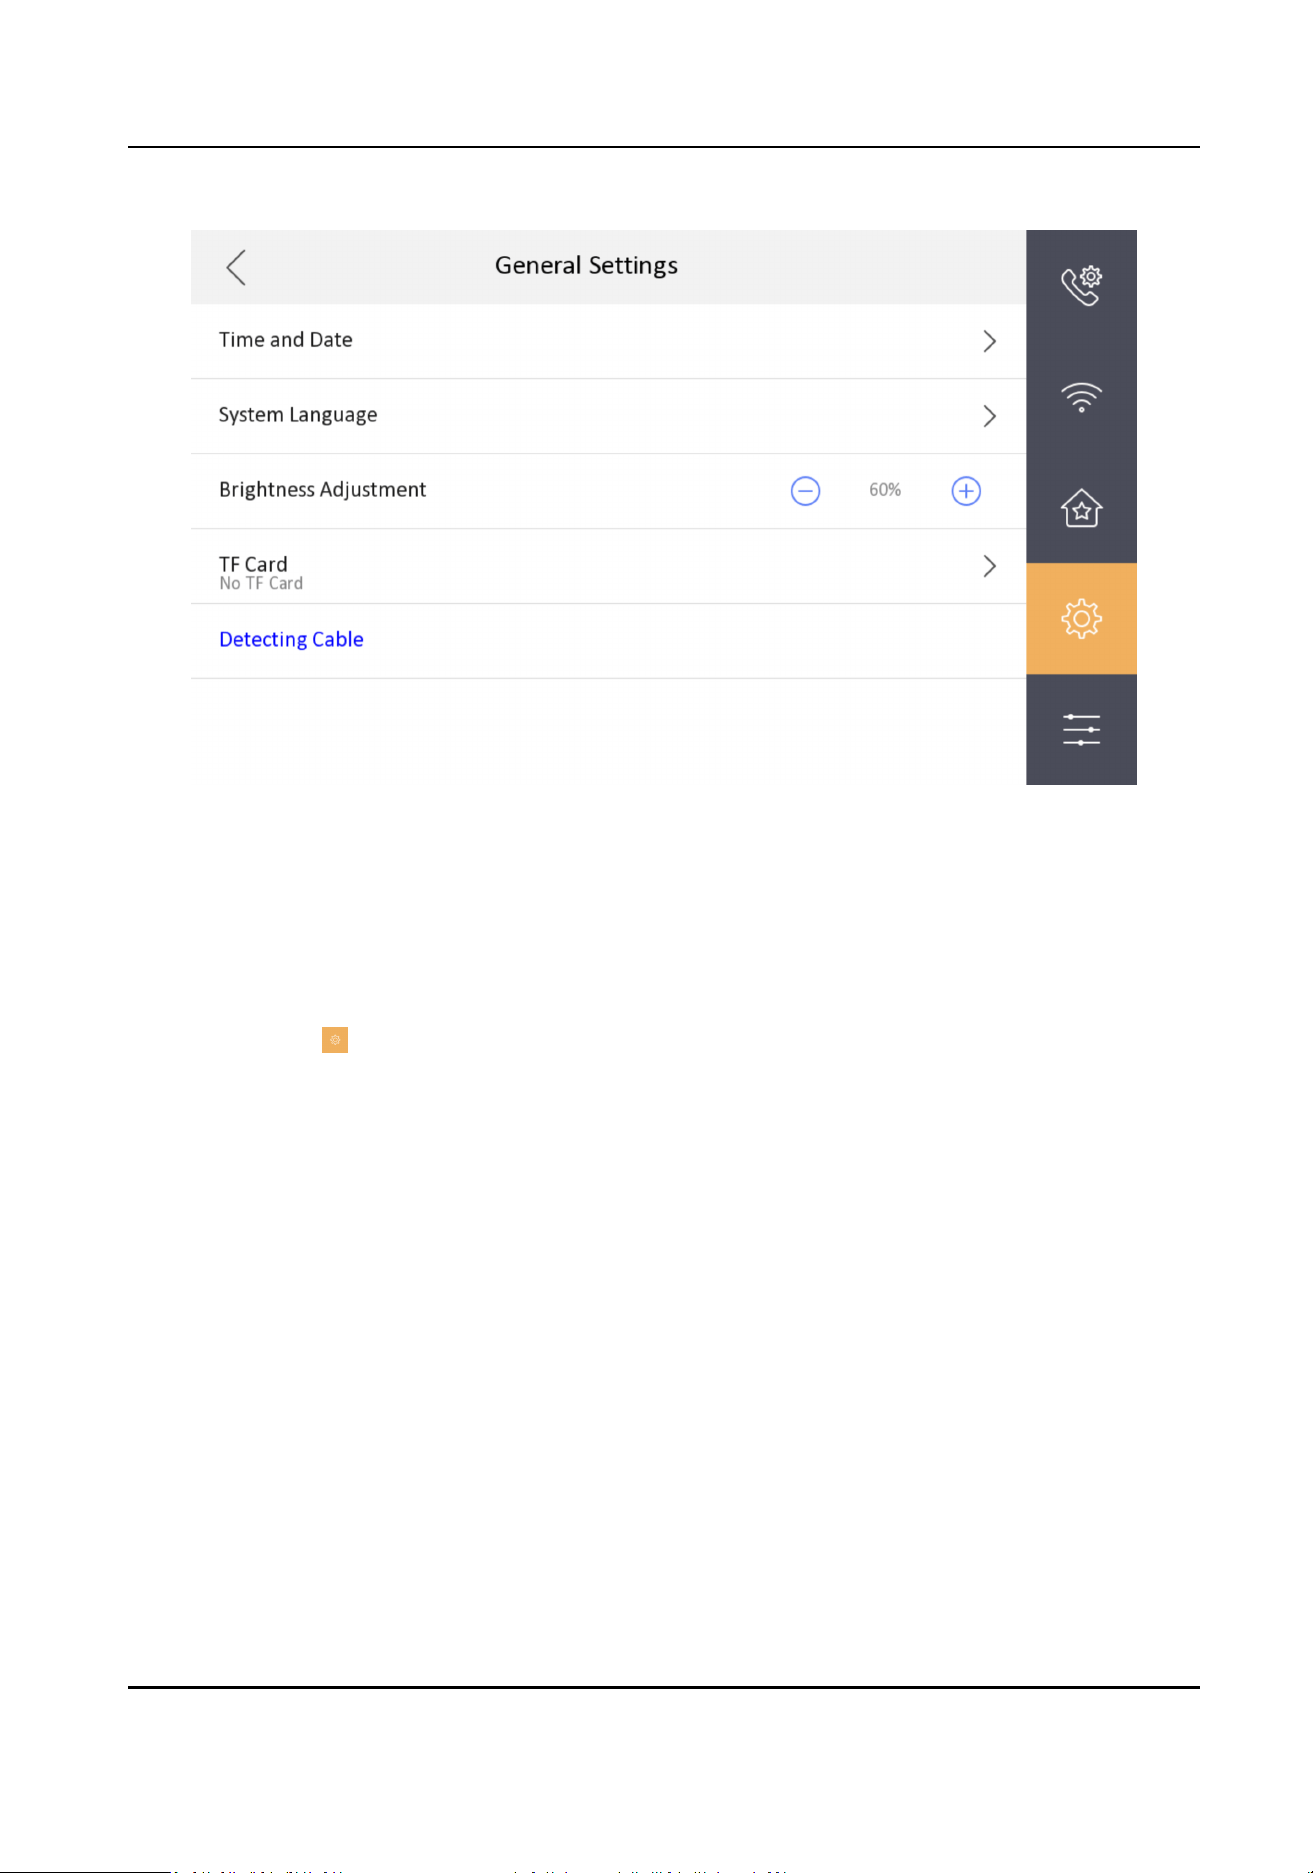
Figure 8-14 General Sengs
2.
Tap TF Card to view the TF card or format the TF card.
8.14 Test Network
Steps
1.
Tap
Sengs → to enter the General Sengs page.
DS-KH7300EY Series Indoor Staon User Manual
29
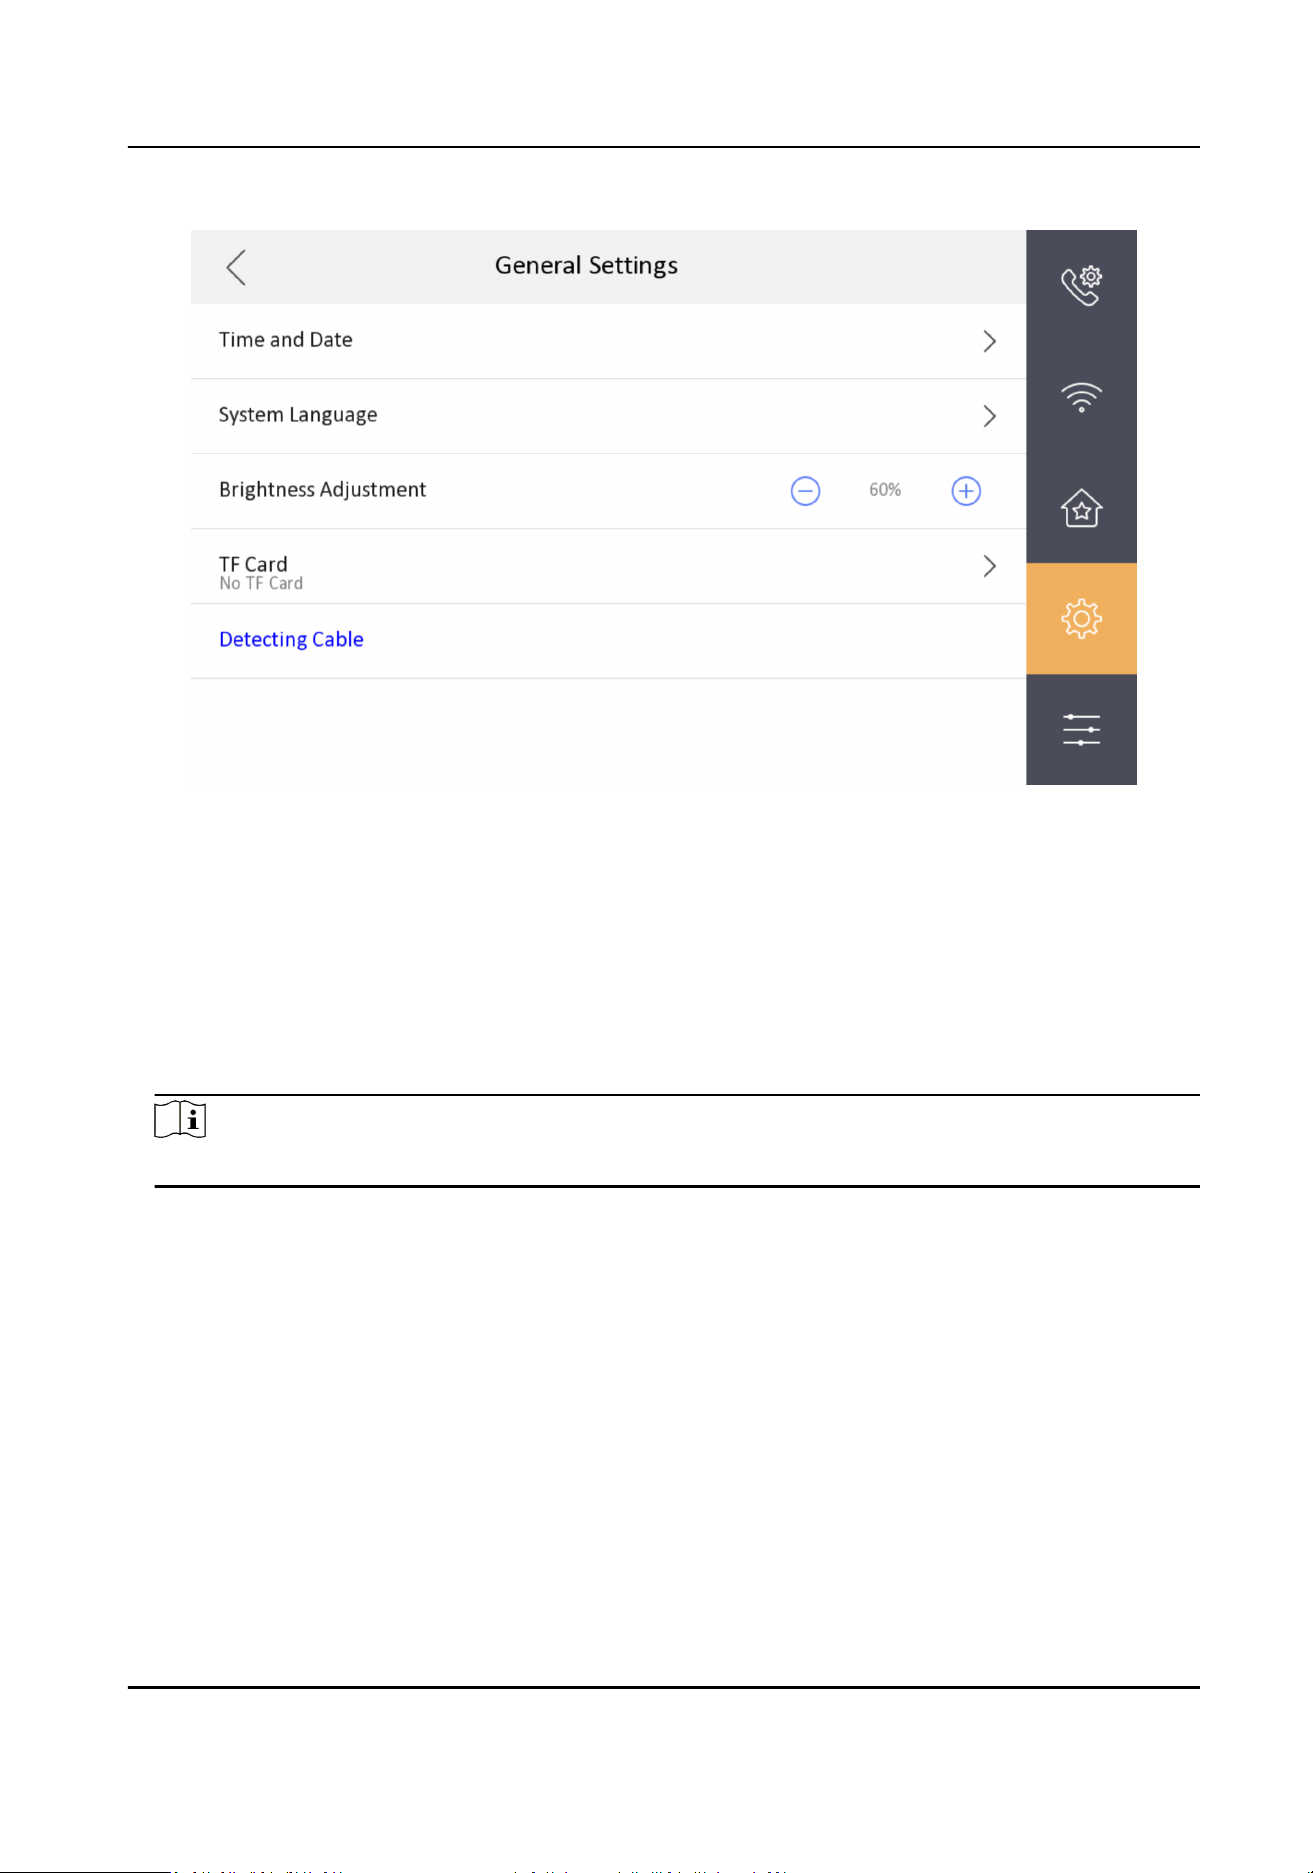
Figure 8-15 General Sengs
2.
Tap Detecng Cable to test whether the network can meet the requirement of the device using.
8.15 Restore Device
Steps
1.
On the main page of the device, tap
Sengs → Advanced Sengs → System Maintenance to
enter the restore default sengs page.
Note
Admin password is required to enter the advanced sengs page.
DS-KH7300EY Series Indoor Staon User Manual
30
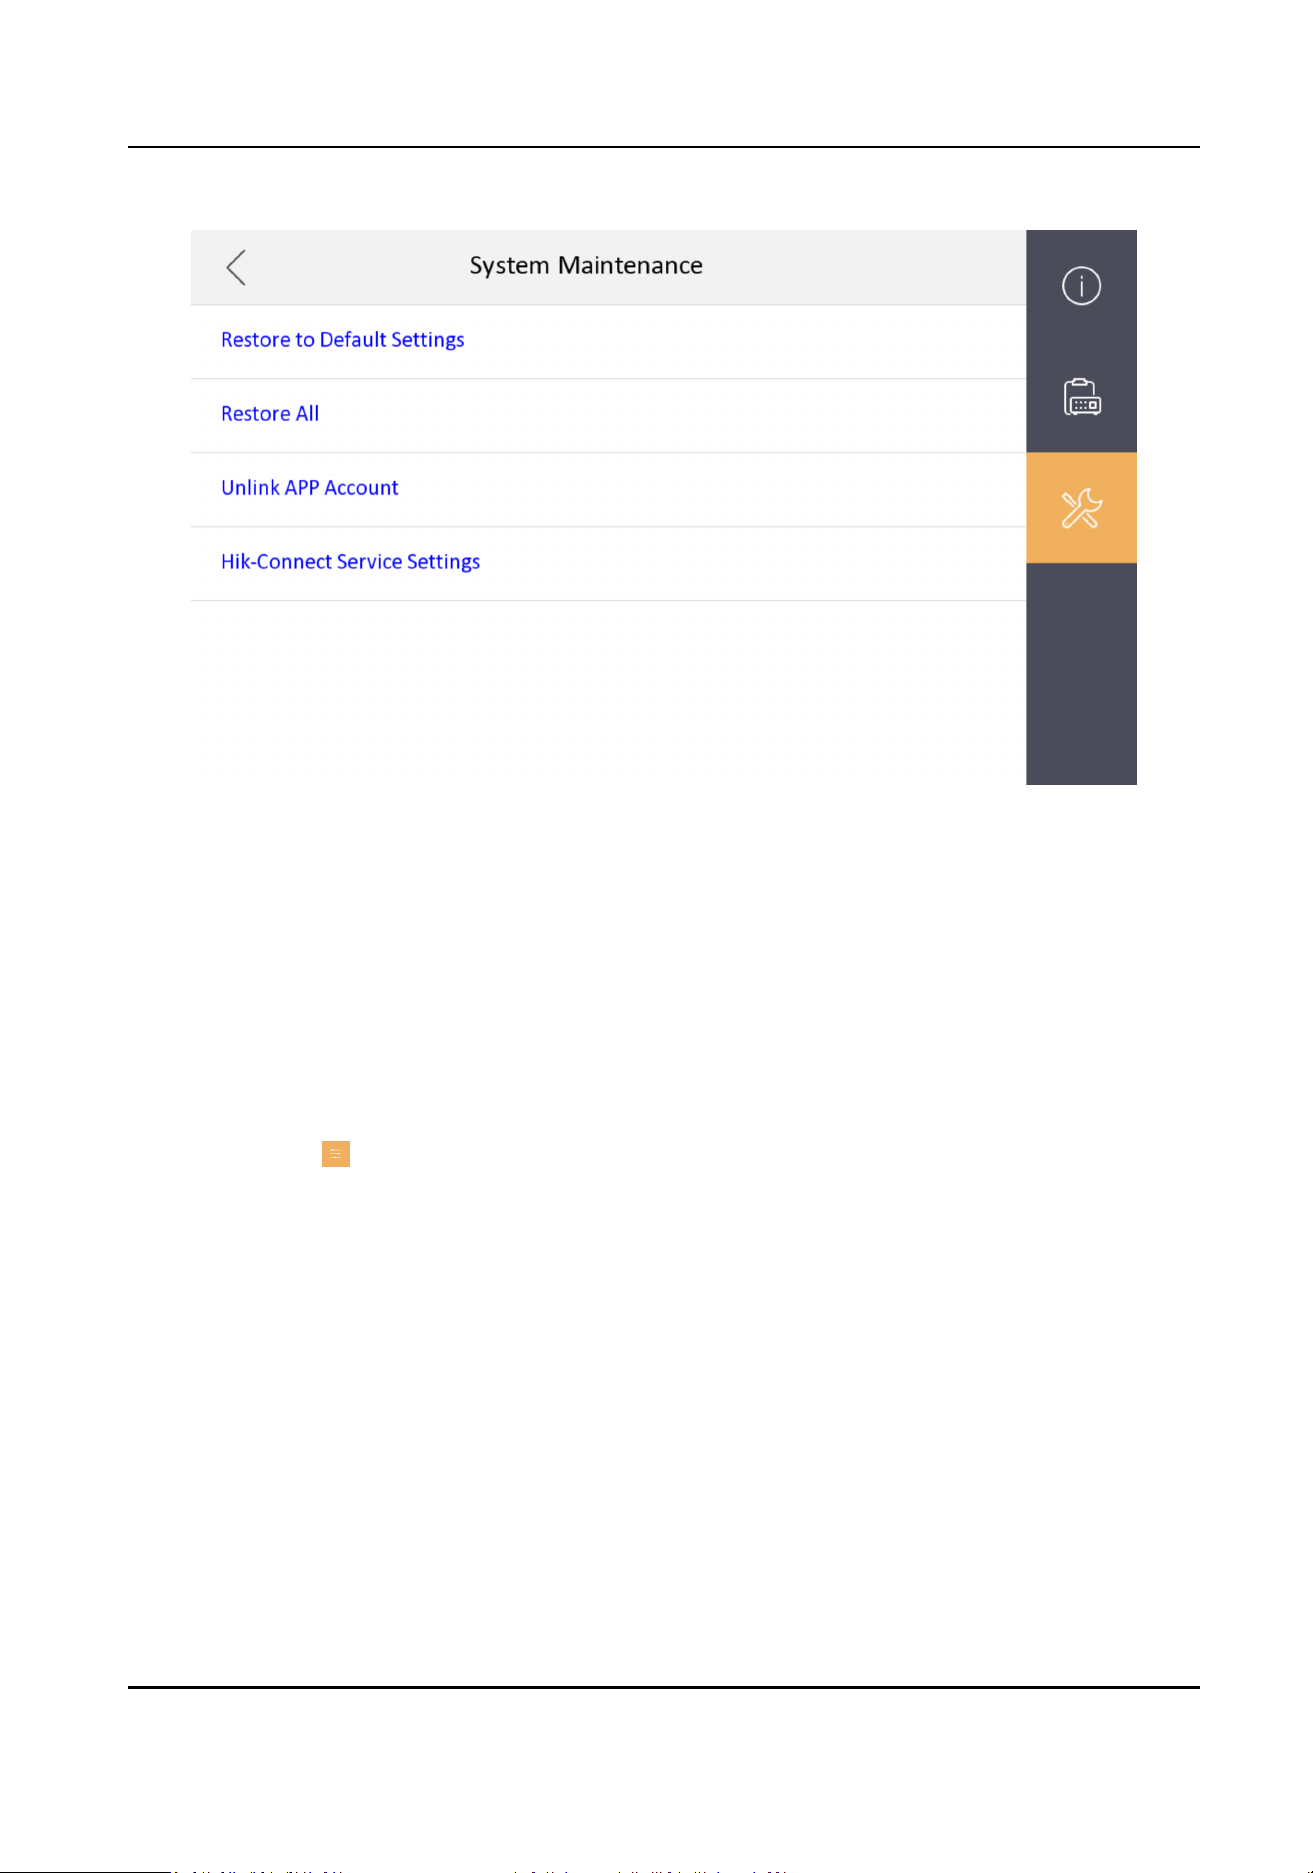
Figure 8-16 Restore Default Sengs
2.
Tap Restore Default Sengs to restore the default sengs and reboot the system.
3.
Tap Restore All to restore all parameters and reboot the system.
8.16 View Device
Informaon
View the device informaon, including the version, model, serial No. rmware version and open
source disclaimer.
Steps
1.
Tap Sengs → → Device Informaon to enter the Device Informaon page.
DS-KH7300EY Series Indoor Staon User Manual
31
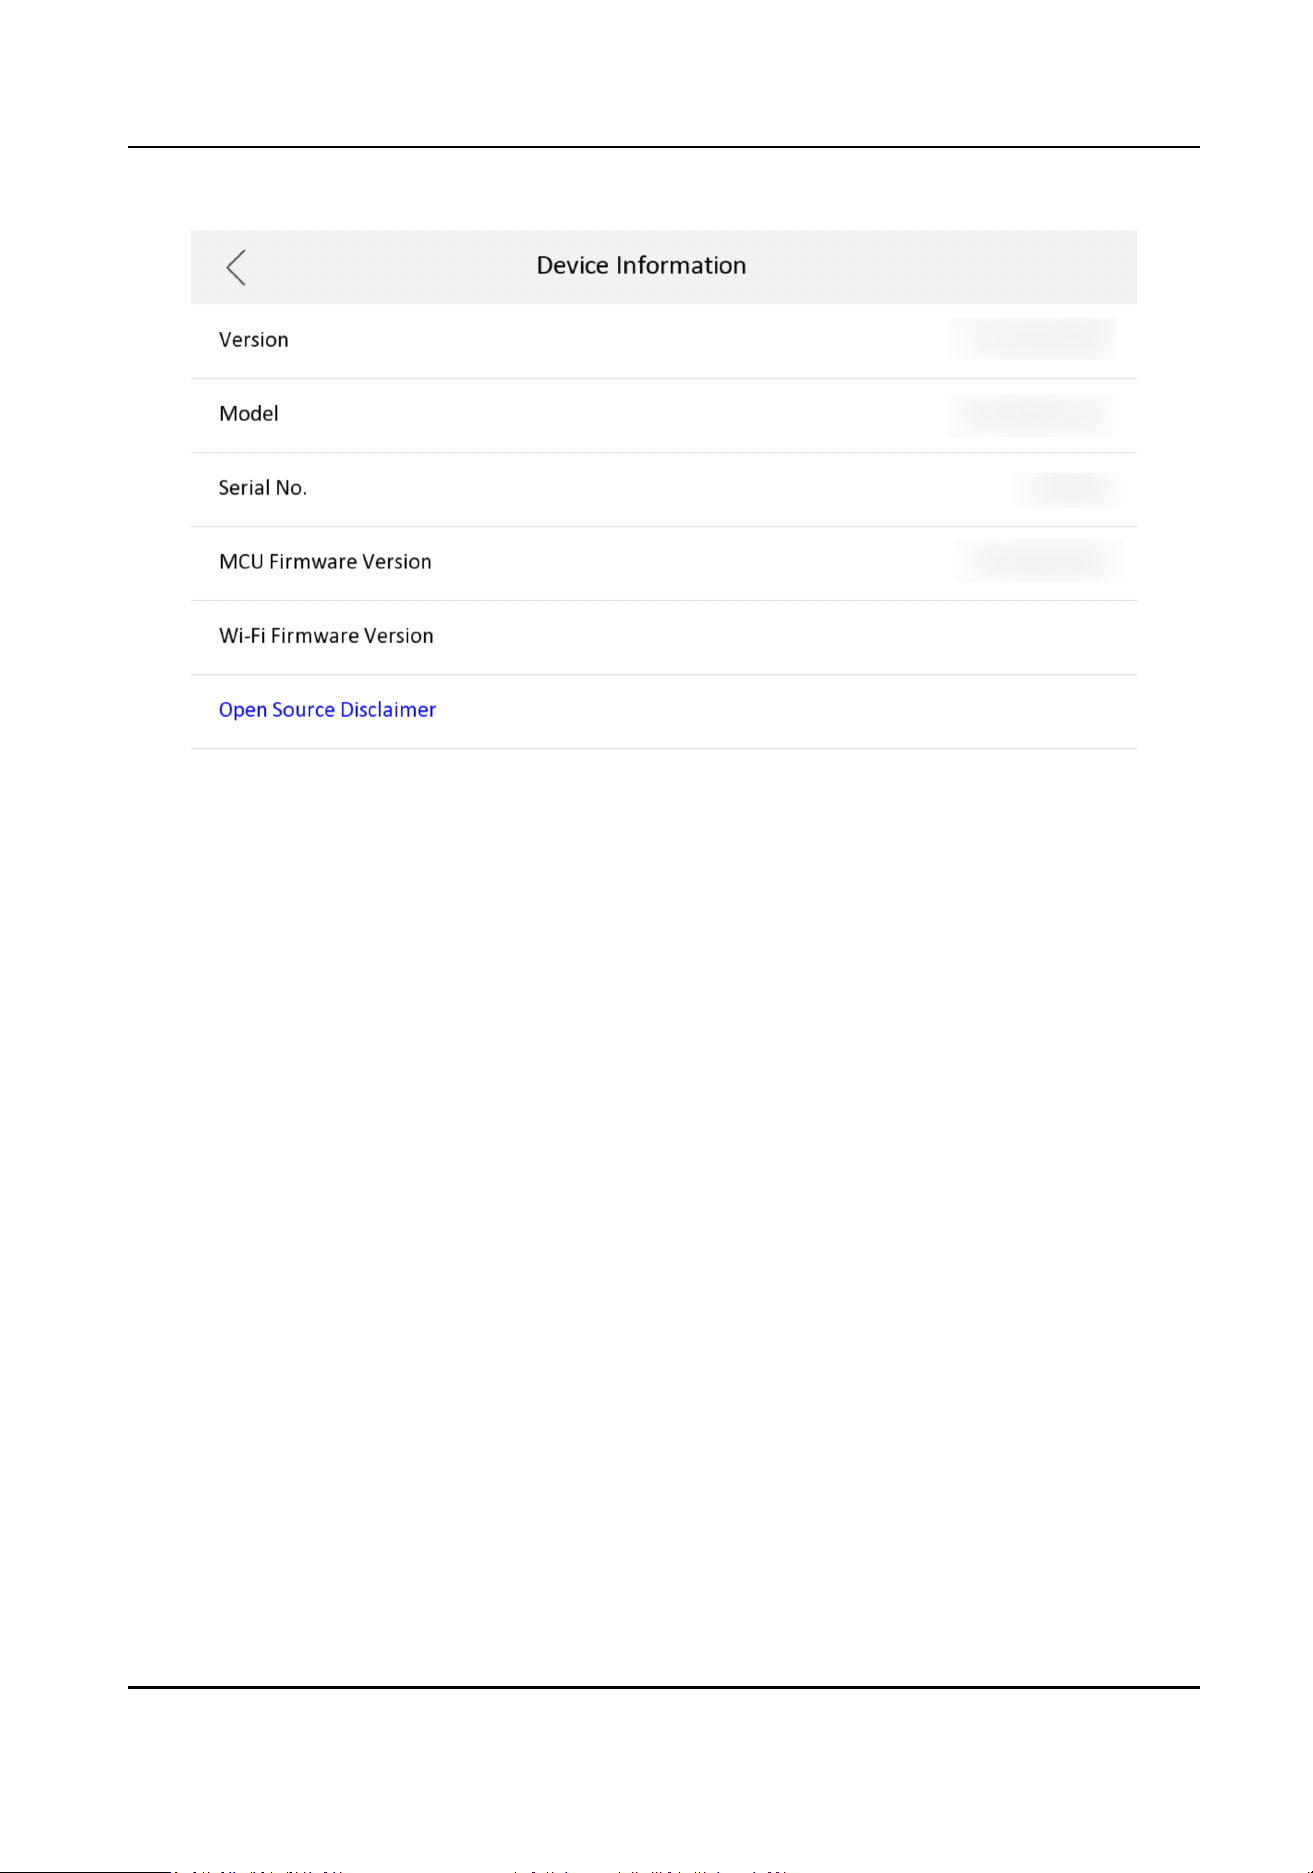
Figure 8-17 Device Informaon
2.
View the device version, model, rmware version and serial No.
3.
Oponal: Tap Open Source Disclaimer to view the OSS statement.
DS-KH7300EY Series Indoor Staon User Manual
32
Chapter 9 FAQ
The FAQ for indoor staon is listed as follows.
1. Q: How to light up the screen? Why it doesn't work when I press the screen?
A: You can only press the unlock key to light up the screen.
2. Q: I connected
mulple indoor staon, but why only one indoor staon screen can be light up?
A: Because all devices in same building use one power supply to save power. Therefore, only
one indoor
staon is allowed to operate at the same me. If you would like to operate another
indoor
staon, please wait for the rst indoor staon to screen o.
3. Q: Is there any way to light up more than one indoor staon screen at the same me?
A: If you power the indoor staon with separate 12 V 1 A power adapter, then set the 1st DIP
switch as on, then it can be operated any
me. No maer other indoor staon screen is ON or
OFF.
Note
Seng the DIP 1 as ON without powering the indoor staon with separate power adapter may
lead to insucient power to the whole system and other unpredictable problems.
4. Q: I congured indoor staon and several indoor staon, when calling from door staon, only
the main indoor
staon screen show the image, the extensions only give the ring sound but no
image is shown on the screen, why?
A: All devices in same building use one same power supply in order to save power. Only main
indoor
staon will show the image, but if you answer from indoor extension, the screen will
light up and main indoor staon screen will become o.
5. Q: There are some LED lights ashing on the right side of screen, what's the meaning of that?
A: Please check the table below rst.
Type
Power In Use Mute (Do
Not
Disturb)
Wi-Fi Reason Soluon
Rotary
Switch
Flashing Flashing OFF OFF Rotary
Switch is
wrong/
conict
Check
indoor
staon
rotary
switch
Door
Staon
Flashing OFF Flashing OFF Door
staon is
oine
Check
wiring or
rotary
switch,
whether
have same
DS-KH7300EY Series Indoor Staon User Manual
33
Type Power In Use Mute (Do
Not
Disturb)
Wi-Fi Reason Soluon
building
number as
door staon
Distributor Flashing OFF OFF OFF Wiring
abnormal
Check the
wiring
between
distributor
and indoor
staon
6. Q: How long will the indoor staon screen keep ON? Can I change the duraon?
A: The screen will be o aer 5 s if no operaon (including press the buon, touch the screen,
call from door
staon, remote unlock/Live view/Enable two-way audio from Hik-Connect APP.
upgrade indoor staon rmware from door staon), considering the power saving we can't
modify or extend the
me duraon.
7. Q: Why it prompts the live view failed when I click the camera icon?
A: The live view door staon funcon is disabled by default, you can enable it from
menu→advanced
funcon→conguraon→live view switch.
DS-KH7300EY Series Indoor Staon User Manual
34

UD32950B-A