
12V 3/8”SQ DRIVE CORDLESS RATCHET WRENCH
45NM - BODY ONLY
MODEL NO: CP1202
Thank you for purchasing a Sealey product. Manufactured to a high standard, this product will, if used according to these
instructions, and properly maintained, give you years of trouble free performance.
IMPORTANT: PLEASE READ THESE INSTRUCTIONS CAREFULLY. NOTE THE SAFE OPERATIONAL REQUIREMENTS, WARNINGS & CAUTIONS. USE
THE PRODUCT CORRECTLY AND WITH CARE FOR THE PURPOSE FOR WHICH IT IS INTENDED. FAILURE TO DO SO MAY CAUSE DAMAGE AND/OR
PERSONAL INJURY AND WILL INVALIDATE THE WARRANTY. KEEP THESE INSTRUCTIONS SAFE FOR FUTURE USE.
1. SAFETY
1.1. ELECTRICAL SAFETY
WARNING! It is the user’s responsibility to check the following:
Check all electrical equipment and appliances to ensure that they are safe before using. Inspect power supply leads, plugs and all
electrical connections for wear and damage. Sealey recommend that an RCD (Residual Current Device) is used with all electrical
products. You may obtain an RCD by contacting your local Sealey stockist.
If the product is used in the course of business duties, it must be maintained in a safe condition and routinely PAT (Portable
Appliance Test) tested.
Electrical safety information, it is important that the following information is read and understood.
1.1.1. Ensure that the insulation on all cables and on the appliance is safe before connecting it to the power supply.
1.1.2. Regularly inspect power supply cables and plugs for wear or damage and check all connections to ensure that they are secure.
1.1.3. Important: Ensure that the voltage rating on the appliance suits the power supply to be used and that the plug is tted with the
correct fuse - see fuse rating in these instructions.
8 DO NOT pull or carry the appliance by the power cable.
8 DO NOT pull the plug from the socket by the cable. Remove the plug from the socket by
maintaining a rm grip on the plug.
8 DO NOT use worn or damaged cables, plugs or connectors. Ensure that any faulty item is
repaired or replaced immediately by a qualied electrician.
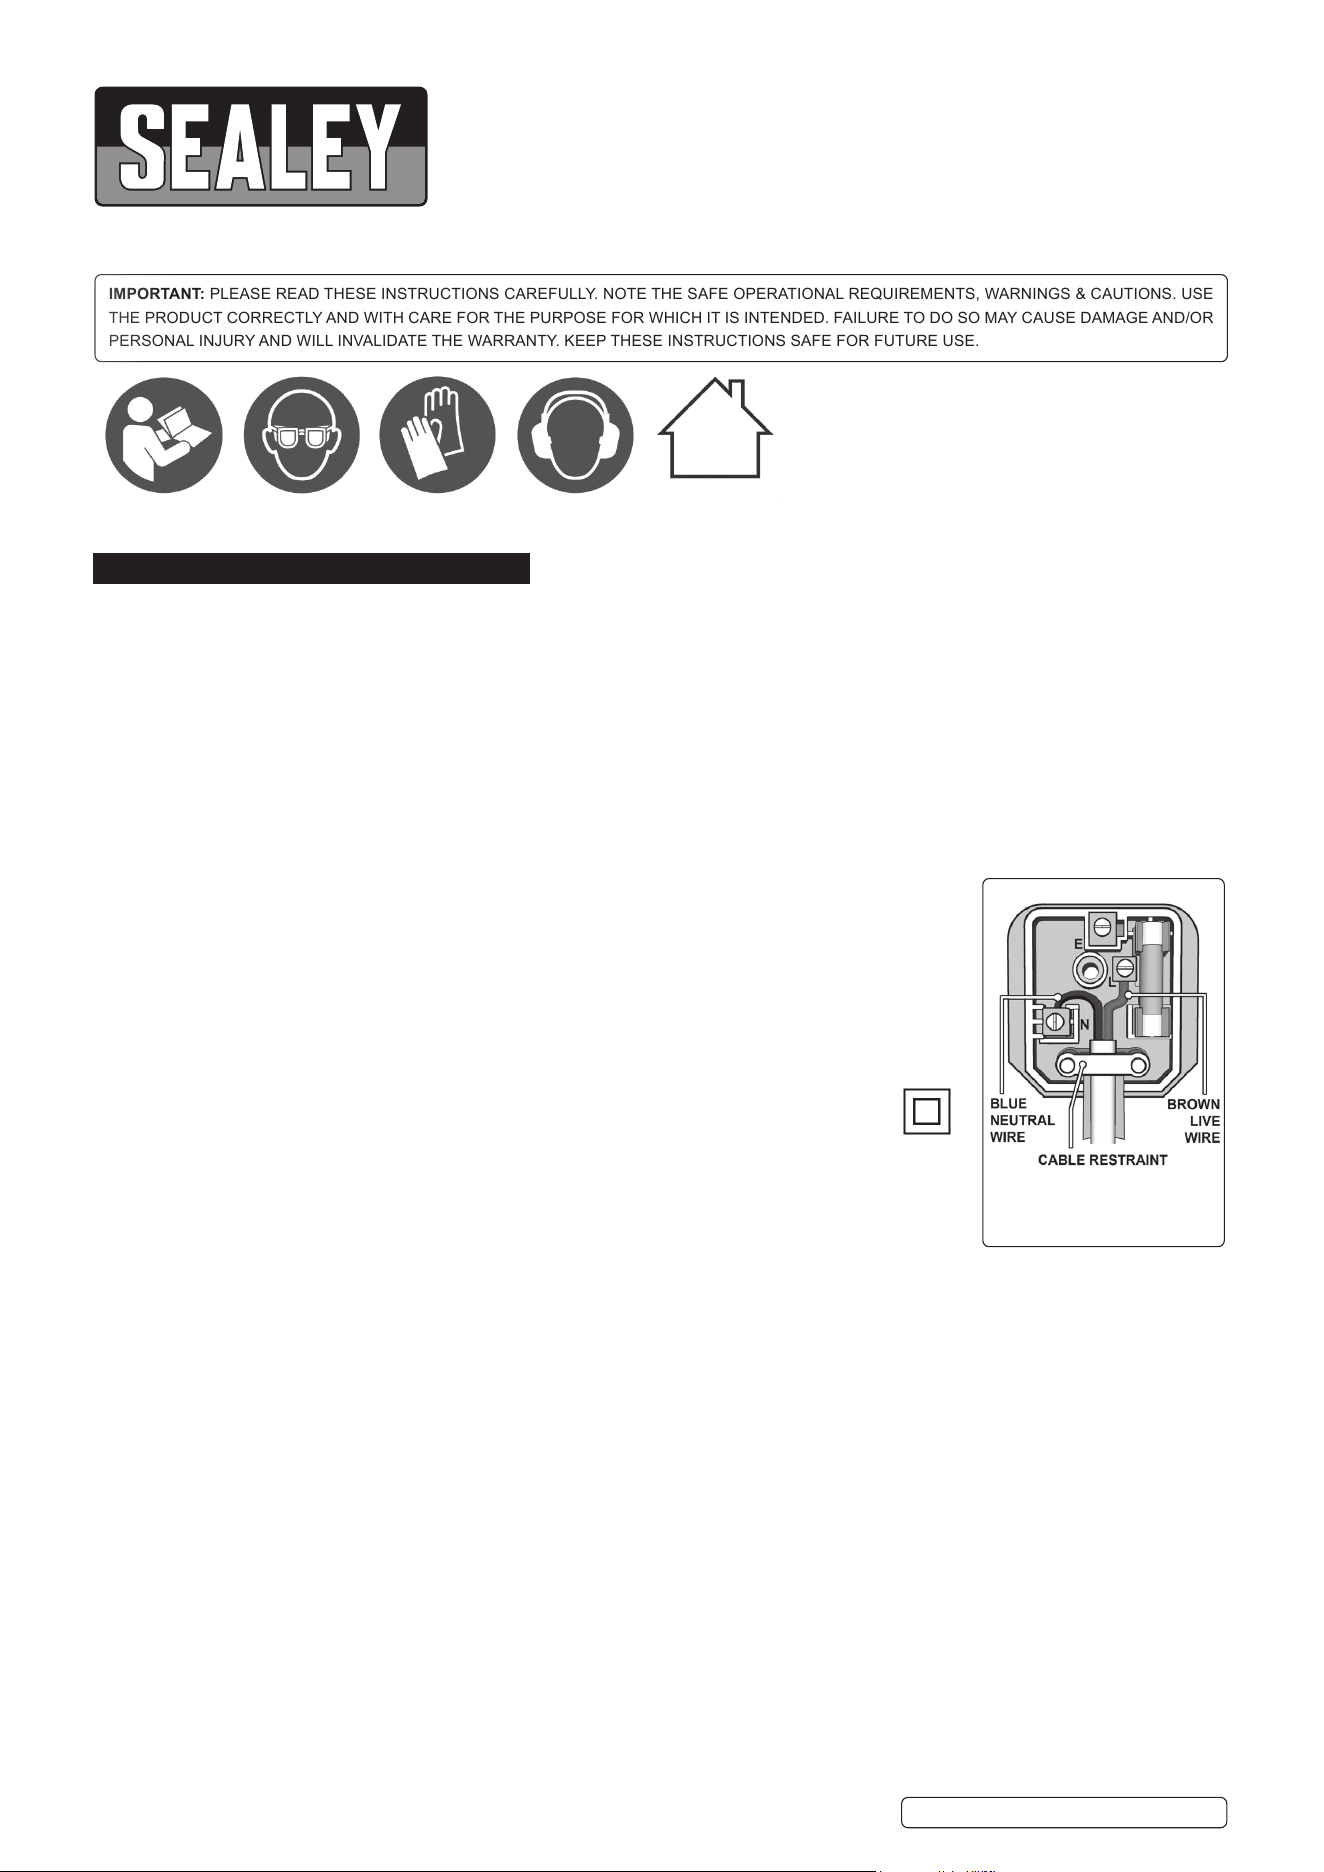
1.1.4. This product is tted with a BS1363/A 13 Amp 3 pin plug.
If the cable or plug is damaged during use, switch the electricity supply and remove from use.
Replace a damaged plug with a BS1363/A 13 Amp 3 pin plug. If in doubt contact a qualied
electrician.
Class II products are wired with live (brown) and neutral (blue) only are marked with the
Class II symbol;
A) Connect the BROWN live wire to the live terminal ‘L’.
B) Connect the BLUE neutral wire to the neutral terminal ‘N’.
C) After wiring, check that there are no bare wires and ensure that all wires have been correctly
connected.
Ensure that the cable outer sheath extends inside the cable restraint and that the restraint is tight.
8 DO NOT connect either wire to the earth terminal.
Sealey recommend that repairs are carried out by a qualied electrician.
1.2. BATTERY SAFETY (Battery CP1200BP / Charger CP1200MC not supplied)
9 Charge battery prior to rst use. The battery pack will have been shipped in a low charge state.
9 Use only the charger provided to charge the Ratchet Wrench battery.
8 DO NOT charge battery when room temperature is below 50°F (10°C) or above 104°F (40°C).
8 DO NOT attempt recharging the battery by means of a generator or a DC power source.
8 DO NOT short-circuit the battery by linking both terminals with conductive materials.
8 DO NOT store the battery (or Ratchet Wrench) in locations where the temperature may exceed 104°F (40°C).
▲ DANGER! DO NOT attempt to dismantle the battery pack. For safety and environmental reasons DO NOT discard in domestic
waste or by burning. ONLY discard or recycle according to local authority regulations.
WARNING! DO NOT allow a leaking battery to contact your person. If you come into contact with battery liquid take the following
immediate action:
a) Skin contact: Wash immediately with soap and water, then wash flesh in either lemon juice or vinegar.
b) Eye contact: Wash with a strong solution of boric acid, and seek immediate medical attention.
1.3. BATTERY CHARGER SAFETY INSTRUCTIONS. (Battery CP1200BP / Charger CP1200MC not supplied)
WARNING: DO NOT use the charger to charge any battery other than that supplied for the Ratchet Wrench. Other types of batteries
may explode.
9 All mains electrical supply safety features must be followed as described in 1.1. above.
9 Disconnect the charger from the mains power supply when not in use.
9 Important: Check that the voltage marked on the charger is the same as the power supply to be used.
8 DO NOT pull or carry the charger by the power lead, or pull the plug from the mains socket by the power lead.
8 DO NOT use any other type of charger.
CP1202 | Issue 2 (1F) 05/03/20
Original Language Version
© Jack Sealey Limited
Refer to
instructions
Wear eye
protection
Wear protective
gloves
Wear ear
protection
Charger: Indoor
Use Only
Recommended Fuse
Rating: 3A
8 DO NOT try to open or dismantle the charger.
8 DO NOT get the charger wet, or use in wet, damp conditions (for indoor use only).
8 DO NOT operate the charger if it or the battery is damaged.
8 DO NOT insert foreign objects or material into the hole reserved for the battery.
8 DO NOT force the battery into the charger. The battery will only fit one way to ensure correct polarity alignment.
8 DO NOT charge a second battery immediately. Consecutive charging will overheat the charger. Allow the unit to cool for 15 minutes
before
charging the next battery.
9 Store the charger in the same manner as the battery, see section 1.2.
1.4. GENERAL SAFETY.
9 Maintain the Ratchet Wrench and battery in good condition. Check moving parts alignment on a regular basis.
9 Replace or repair damaged parts. Use an authorised service agent and recommended parts only. Unauthorised parts may be
dangerous and will invalidate the warranty.
9 Ensure the Ratchet Wrench is switched off before installing the battery pack.
9 Keep the Ratchet Wrench and charger clean for best and safest performance.
9 Remove ill tting clothing. Remove ties, watches, rings and other loose jewellery and contain long hair.
9 Evaluate your working area before using the Ratchet Wrench; e.g. ceilings, oors and enclosures may contain electrical items or
water piping
9 Ensure battery pack is correctly inserted into the Ratchet Wrench handle and latched in place before attempting to switch on
Ratchet Wrench.
9 Secure loose work pieces with a clamp, vice or other adequate holding device.
9 Avoid unintentional starting.
9 Wear approved safety eye protection (standard spectacles are not adequate).
9 Maintain correct balance and footing. Ensure the floor is not slippery and wear non-skid shoes.
9 Be aware that this Ratchet Wrench does not need to be plugged into the mains power.
9 Keep children and unauthorised persons away from the working area.
8 DO NOT use the Ratchet Wrench where there are ammable liquids, solids or gases, such as paint solvents, etc.
8 DO NOT allow children to operate the Ratchet Wrench.
8 DO NOT operate the Ratchet Wrench if any parts are missing as this may cause failure and/or personal injury.
8 DO NOT hold unsecured work piece in your hand.
8 DO NOT leave the Ratchet Wrench operating unattended.
8 DO NOT carry the Ratchet Wrench with your finger on the power switch. Keep chuck direction switch in the locked position.
8 DO NOT use the Ratchet Wrench for a task it is not designed to perform.
8 DO NOT operate the Ratchet Wrench when you are tired or under the influence of alcohol, drugs or intoxicating medication.
8 DO NOT get the Ratchet Wrench or battery charger wet or use in damp or wet locations.
2. INTRODUCTION
Compact, lightweight cordless ratchet wrench, allows access to tight spaces. Variable speed control trigger with lock function gives more
control during application. Heavy-duty mechanical steel ratchet head with forward and reverse control. Robust composite housing with soft,
comfortable grip. Integrated LED battery level indicator and LED work light. Requires Model No CP1200BP 12V 1.5Ah Lithium-ion battery and
Model No CP1200MC battery charger.
3. SPECIFICATION
Model No.. ................................................................. CP1202
Battery options (not included)
12V 1.5Ah Li, 12V 3Ah Li, 12V 4Ah Li
Consumable parts:
CP1200BP ................................................ Battery 12V 1.5Ah
CP1200BP3 ................................................. Battery 12V 3Ah
CP1200BP4 ................................................. Battery 12V 4Ah
Replacement parts ..................... CP1200MC - mains charger
Drive ............................................................................ 3/8”sq
Max. torque ...................................................... 45Nm(33lb.ft)
No load speed ......................................................... 0-250rpm
Noise power/pressure ........................................ 100/88dB(A)
Vibration/uncertainty ........................................ 2.898/1.5m/s²
4. CHARGING
4.1. BATTERY PACK REMOVAL AND REPLACEMENT
4.1.1. Switch the machine off before removing the battery pack.
4.1.2. Press the battery latches in (located either side of grip
and withdraw the battery pack (g.1).
4.1.3. To replace the battery pack, push the stem into the drill
until the latches engage. The battery pack can only be
inserted in the correct orientation.
4.2. BATTERY CHARGING
4.2.1. Batteries that have been out of use for some time or are new
may not accept a full charge. This is not a battery fault; the
battery may need to be discharged and charged a couple of
times to restore full capacity.
4.2.2. Connect the charger to the electric power supply. A ashing
green LED will show.
4.2.3. Insert the battery into the charger. A steady red light
will show.
g.1
Original Language Version
© Jack Sealey Limited
CP1202 | Issue 2 (1F) 05/03/20
Original Language Version
© Jack Sealey Limited
4.2.4. When fully charged, a steady green LED will show.
4.2.5. The battery is ready for use.
5. OPERATION
5.1. USING THE WRENCH
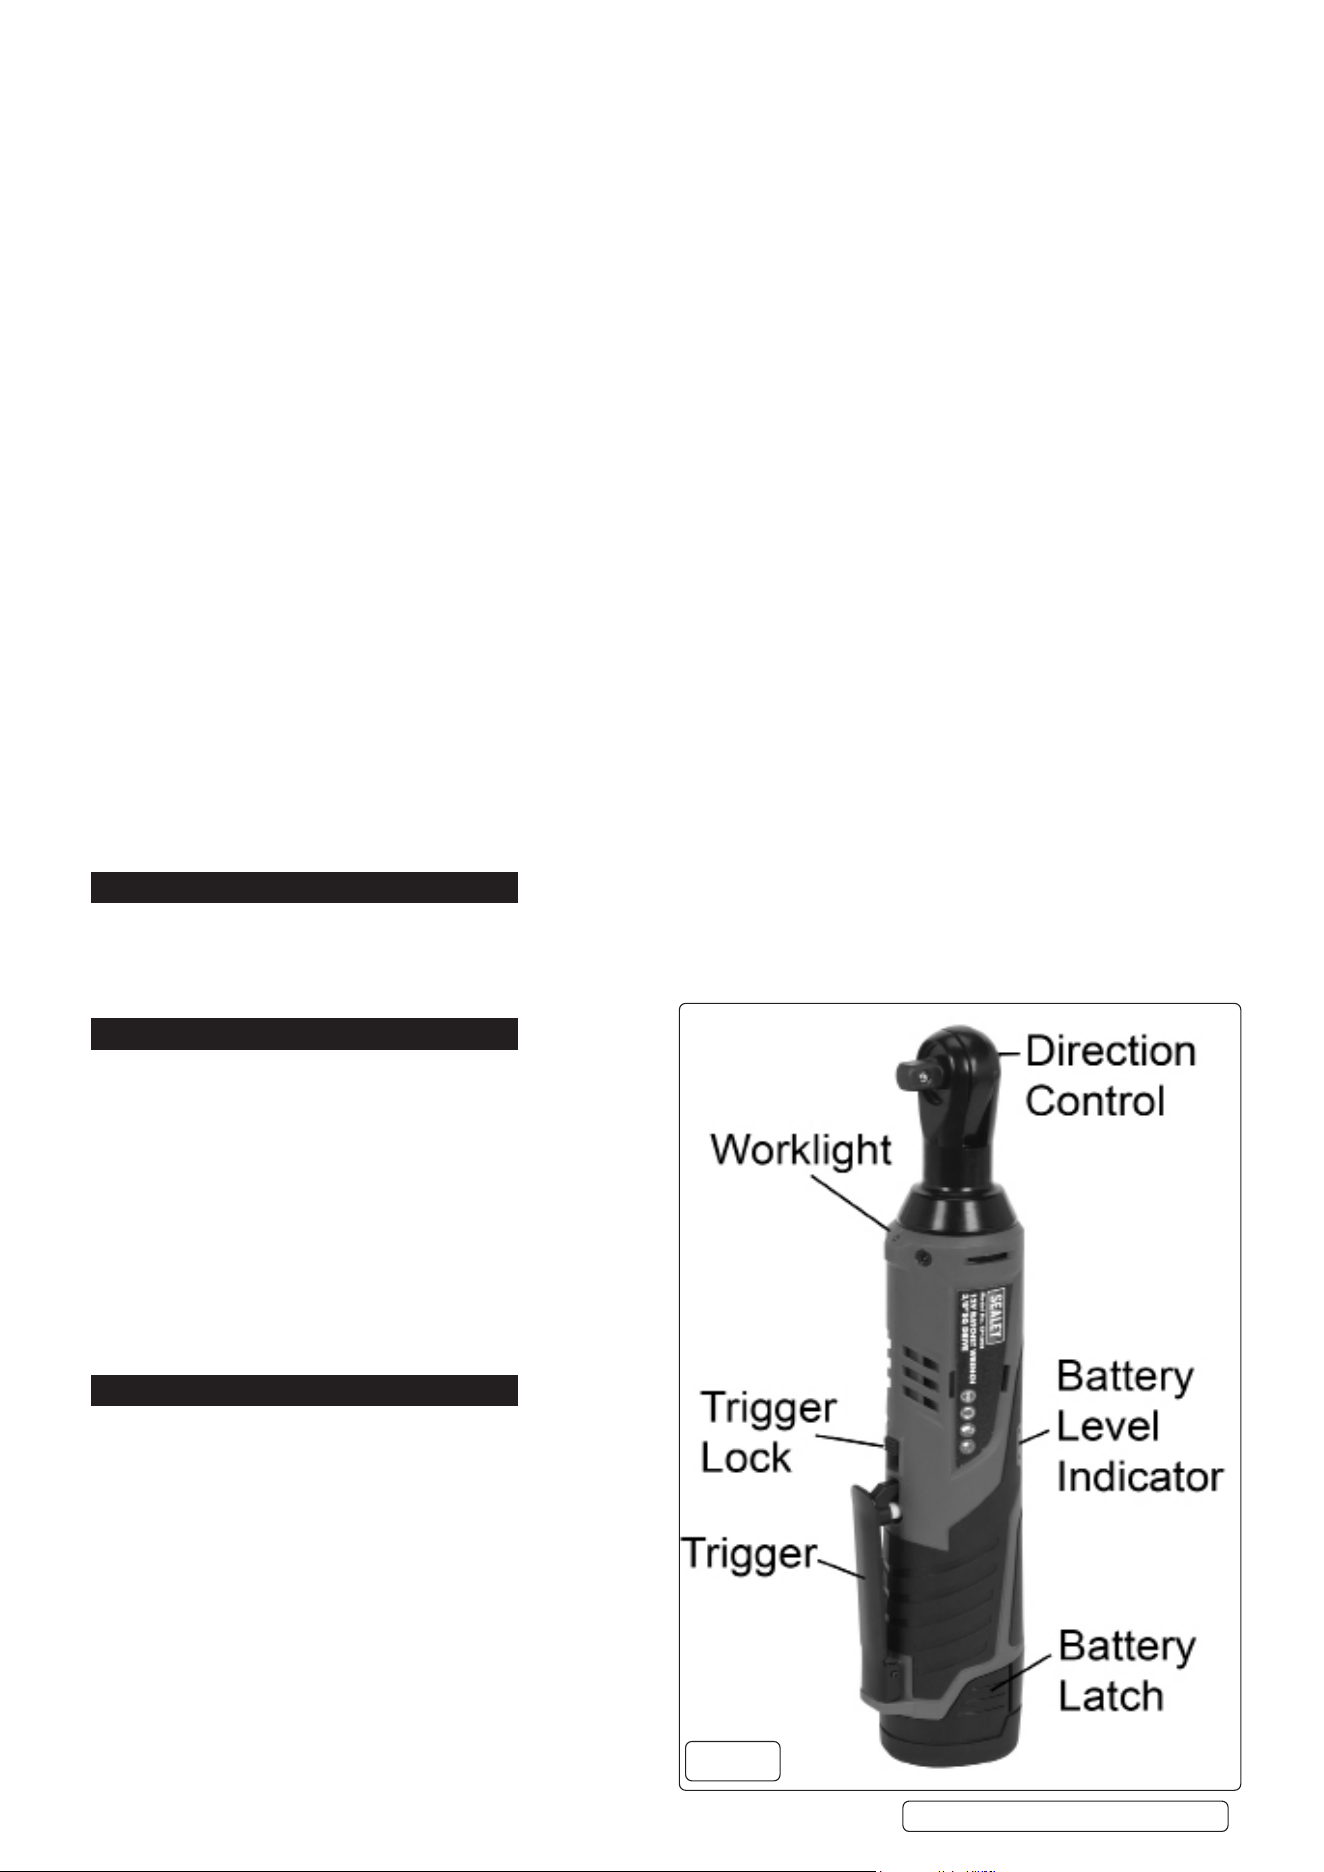
5.1.1. Fit the socket to the wrench by snapping it onto the square drive.
5.1.2. Select the required direction of rotation. To change direction, turn the direction selector (g.1) to the left or right. change direction, turn the direction selector (g.1) to the left or right. DO NOTDO NOT attempt to attempt to
change the direction of rotation whilst trigger is depressed. change the direction of rotation whilst trigger is depressed.
5.1.3. 5.1.3. Speed can be controlled by varying the nger pressure on the trigger. Initial pressure will switch on the worklight.
5.1.4. The trigger can be locked in the off position when required to prevent accidental use.
5.1.5. When tightening, take care not to over-torque small xiWhen tightening, take care not to over-torque small xings.
Note: On critical fixings always check the torque with a torque wrench according to the product or vehicle manufacturer’s guidelines.
WARNING! – Risk of Hand Arm Vibration Injury.
This tool may cause Hand Arm Vibration Syndrome if its use is not managed adequately.
This tool is subject to the vibration testing section of the Machinery Directive 2006/42/EC.
This tool is to be operated in accordance with these instructions.
Measured vibration emission value (a): .............2.9 m/s²
Uncertainty value (k): ............................1.5 m/s²
Please note that the application of the tool to a sole specialist task may produce a different average vibration emission. We recommend that a
specific evaluation of the vibration emission is conducted prior to commencing with a specialist task.
A health and safety assessment by the user (or employer) will need to be carried out to determine the suitable duration of use for each tool.
NB: Stated Vibration Emission values are type-test values and are intended to be typical.
Whilst in use, the actual value will vary considerably from and depend on many factors.
Such factors include; the operator, the task and the inserted tool or consumable.
NB: ensure that the length of leader hoses is sufficient to allow unrestricted use, as this also helps to reduce vibration.
The state of maintenance of the tool itself is also an important factor, a poorly maintained tool will also increase the risk of Hand Arm Vibration
Syndrome.
Health surveillance.
We recommend a programme of health surveillance to detect early symptoms of vibration injury so that management procedures can be modified
accordingly.
Personal protective equipment.
We are not aware of any personal protective equipment (PPE) that provides protection against vibration injury that may result from the
uncontrolled use of this tool. We recommend a sufficient supply of clothing (including gloves) to enable the operator to remain warm and dry and
maintain good blood circulation in fingers etc. Please note that the most effective protection is prevention, please refer to the Correct Use and
Maintenance section in these instructions. Guidance relating to the management of hand arm vibration can be found on the HSC website
www.hse.gov.uk - Hand-Arm Vibration at Work.
CP1202 | Issue 2 (1F) 05/03/20
Sealey Group, Kempson Way, Suffolk Business Park, Bury St Edmunds, Suffolk. IP32 7AR
01284 757500 01284 703534 sales@sealey.co.uk www.sealey.co.uk
Note: It is our policy to continually improve products and as such we reserve the right to alter data, specifications and component parts without prior
notice.
Important: No Liability is accepted for incorrect use of this product.
Warranty: Guarantee is 12 months from purchase date, proof of which is required for any claim.
BATTERY REMOVAL
Under the Waste Batteries and Accumulators Regulations 2009, Jack Sealey Ltd are required to inform potential purchasers of products
containing batteries (as defined within these regulations), that they are registered with Valpak’s registered compliance scheme. Jack
Sealey Ltd’s Batteries Producer Registration Number (BPRN) is BPRN00705.
ENVIRONMENT PROTECTION
Recycle unwanted materials instead of disposing of them as waste. All tools, accessories and packaging should be sorted, taken to
a recycling centre and disposed of in a manner which is compatible with the environment. When the product becomes completely
unserviceable and requires disposal, drain any fluids (if applicable) into approved containers and dispose of the product and fluids
according to local regulations.
WEEE REGULATIONS
Dispose of this product at the end of its working life in compliance with the EU Directive on Waste Electrical and Electronic Equipment
(WEEE). When the product is no longer required, it must be disposed of in an environmentally protective way. Contact your local solid
waste authority for recycling information.