Loading ...
Loading ...
Loading ...
4
Then, aach the regulator to the CO2 tank, using an adjustable wrench
to avoid leakage. Place a metal fastener around the neck of the red hose,
and aach the hose to the nozzle of the regulator. Tighten the fastener
using a flathead screwdriver. Place another metal fastener around the
other end of the red hose, and aach to the nozzle on the Keg Coupler.
Tighten the metal fastener. Twist counterclockwise to open the CO2
tank. Unscrew the pressure valve until loose, and then re-screw until the
pressure gauge reads “12”
Locate the translucent hose connected to the Keg Tower, and aach it to
the Keg Coupler. Then, connect the Keg Coupler to your keg by pushing
down and twisting clockwise to lock it in.
Then, guide the translucent hose through the kegerator opening, or
if you have an island, as shown, guide it through both openings. If
mounting to a counter-top, secure your tower using the four long bolts
& nuts, and 2 rubber washers. If mounting directly onto your kegerator,
use the 4 short bolts and metal washers.
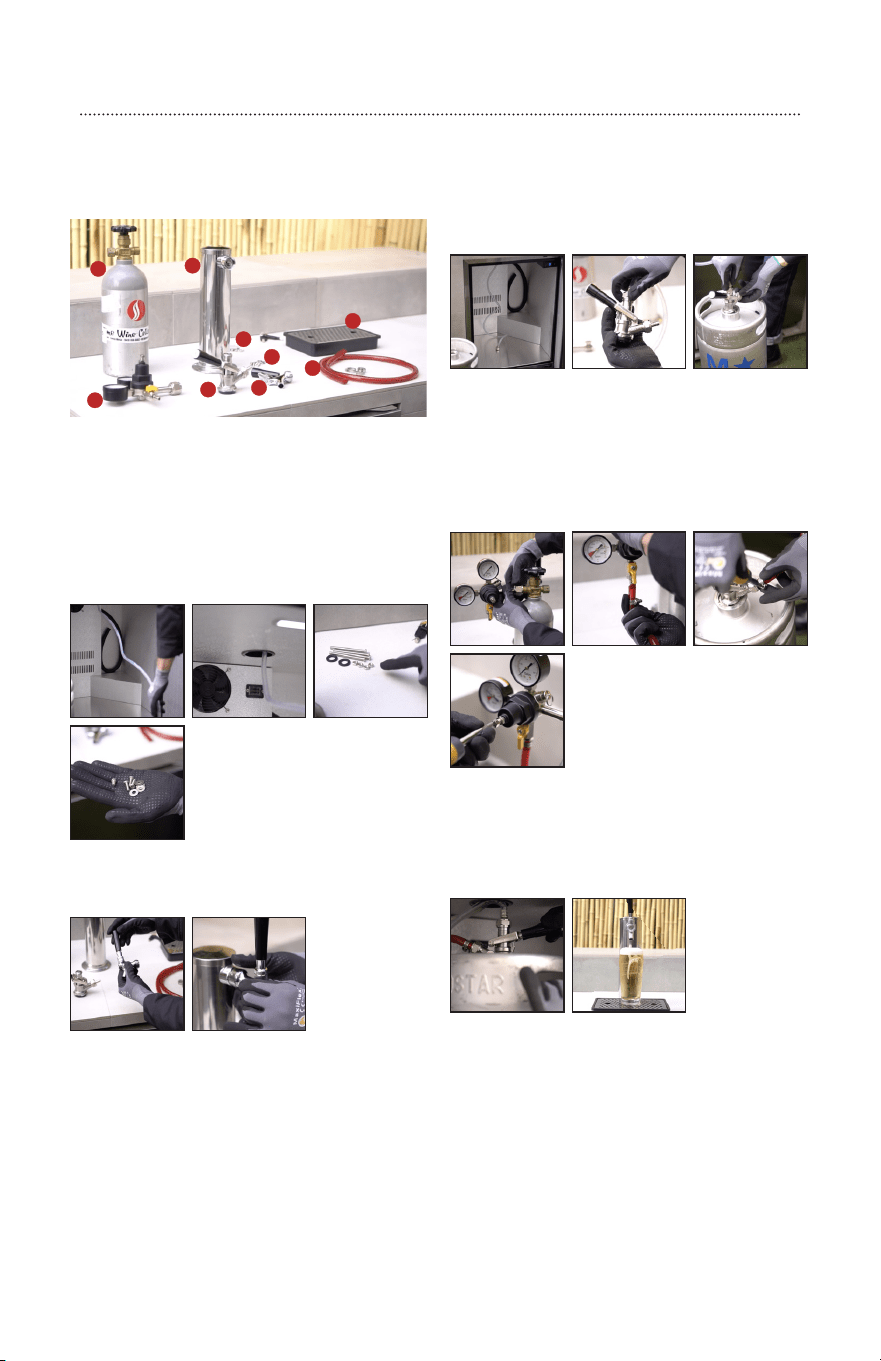
INSTALLATION
Unpackage your kegerator and lay out the kegerator parts on a flat
surface, ensuring you have the following:
STEP 1
STEP 2
5. Keg Tower w/Hose
6. Red Hose w/ 2 Fasteners
7. 4 Short Bolts & 4 Metal
Washers
1. CO2 Regulator
2. Keg Coupler
3. Keg Tap & Handle
4. CO2 Tank
8. 4 Long Bolts, 4 nuts &
2 Rubber Washers
9. Tap Tray
10. Keys
1
3
4
6
5
7
8
9
2
Now, screw the tap handle onto the keg tap, and fasten the keg tap to
the tower by rotating counterclockwise.
STEP 3
Place your CO2 tank onto the shelf, and then lift the keg into
the kegerator. Tap your keg by pulling out the black lever of your
keg coupler, pushing down, and releasing. Make sure your keg
completely cools before use. Place the Tap Tray below the tap.
POUR AND ENJOY!
STEP 6
DO NOT PUSH DOWN THE BLACK LEVER ON KEG COUPLER
STEP 4
STEP 5
Loading ...
Loading ...
Loading ...