
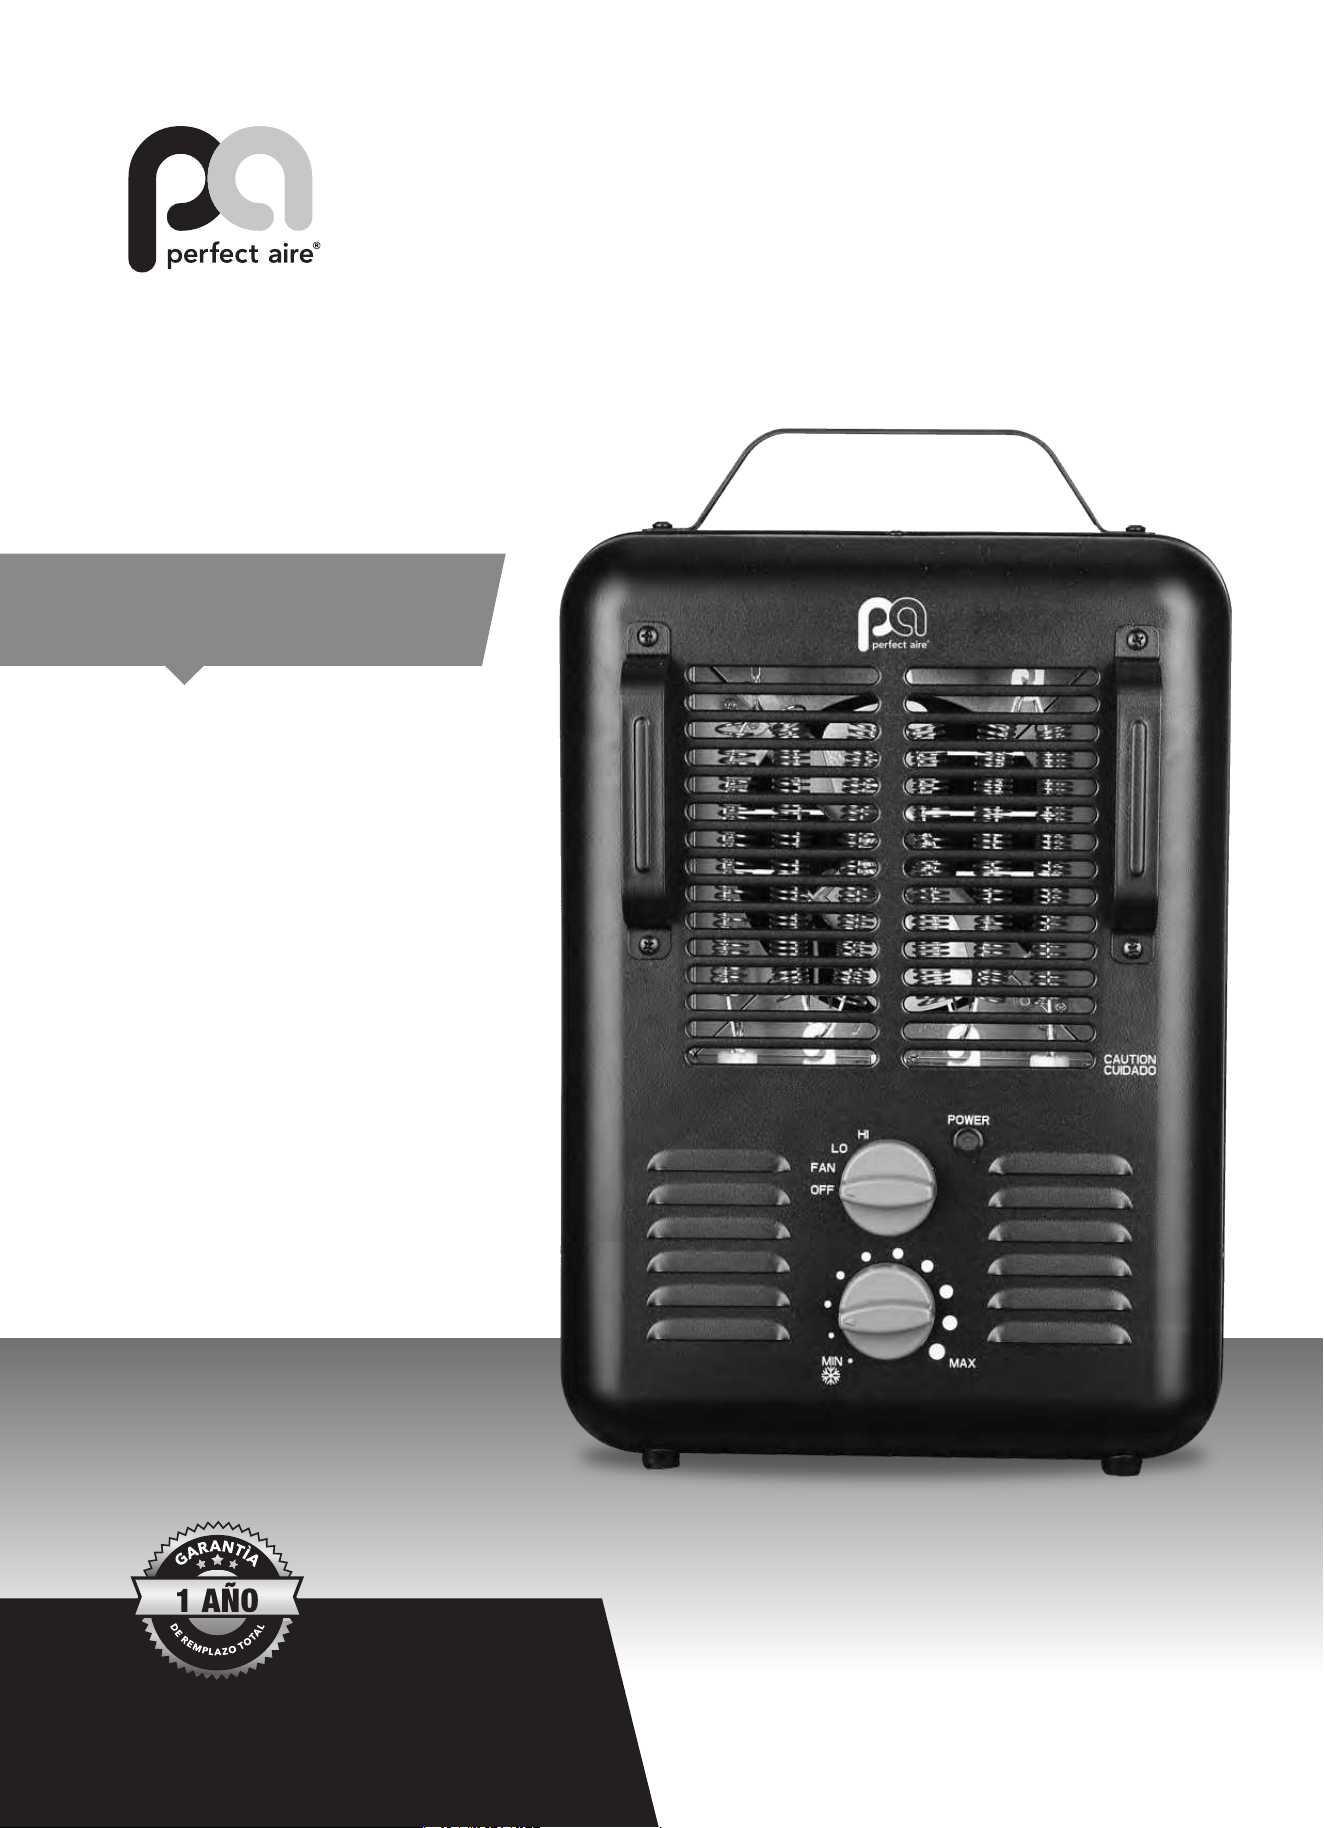
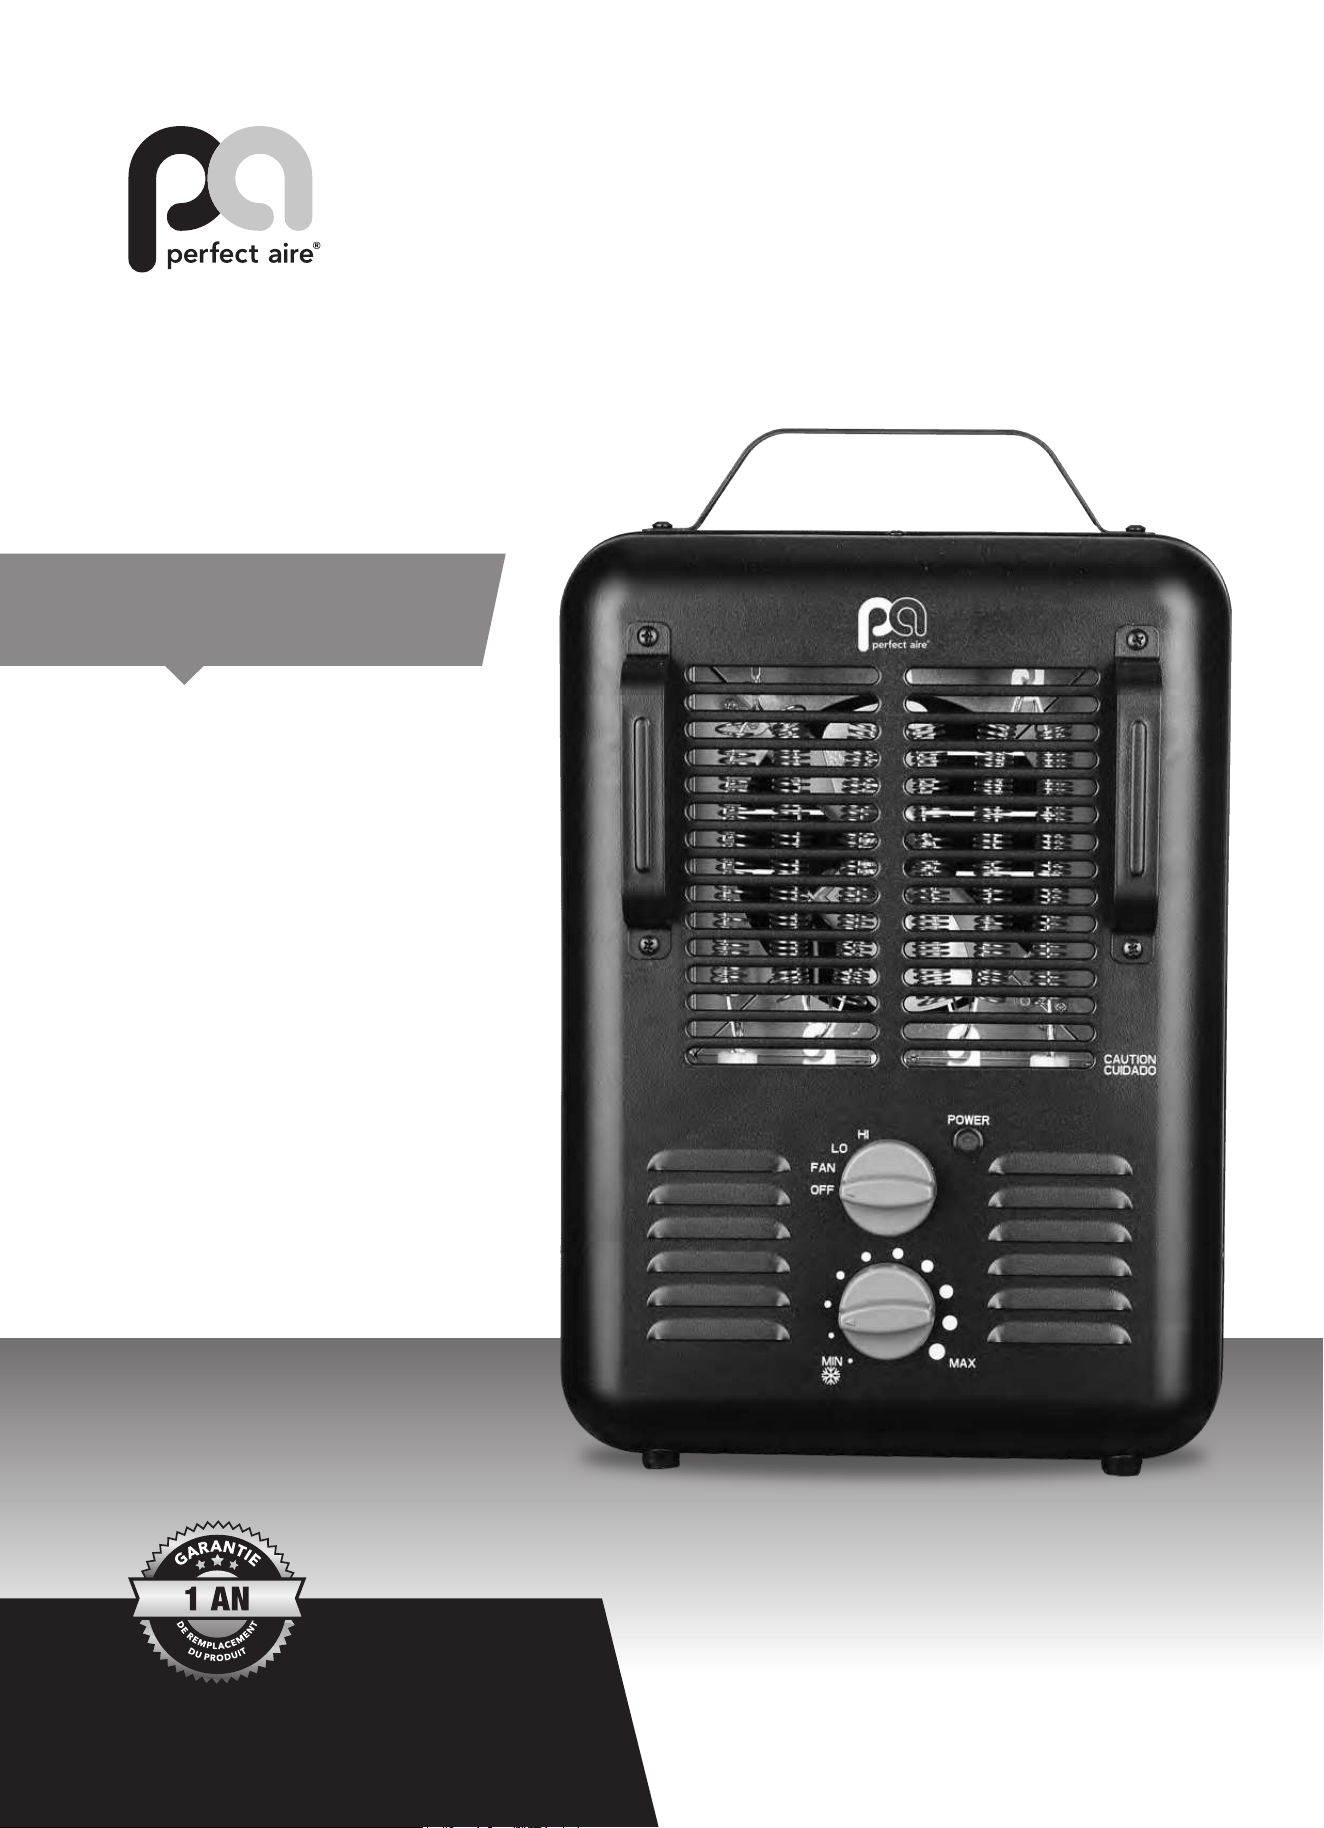
HEAVY DUTY ELECTRIC
UTILITY HEATER
FOR MODEL:
1PHF3P14
Before using your oscillating parabolic heater
please read this manual carefully and keep
it for future reference, along with your receipt.
USER MANUAL
PLEASE READ AND SAVE THESE
IMPORTANT SAFETY INSTRUCTI O N S
•
•
•
•
•
•
•
When using electrical appliances, basic safety precautions
should always be followed to reduce the risk of fire, electric
shock, and personal injury, including the following:
1. Read all instructions before using this heater.
2. This heater is hot when in use. To avoid burns, do not let bare
skin touch hot surfaces. If provided, use handles when moving this
heater. Keep combustible materials, such as furniture, pillows,
bedding, papers, clothes, and curtains at least 3 feet (0.9 m) from
the front of the heater and keep them away from the sides and
rear.
3. Extreme caution is needed when any heater is used by or near,
children or individuals with reduced physical, sensory, or mental
capabilities or when the heater is left operating unattended.
4. Always unplug heater when not in use.
5. Do not operate any heater with a damaged cord or plug or after
the heater malfunctions, has been dropped or damaged in any
manner. Discard the heater, or call customer service before
return
ing it for examination and/or repair.
6. Do not use outdoors.
7.
8.
9.
This heater is not intended for use in bathrooms, laundry areas
and similar indoor locations. Never locate the heater where it may
fall into a bathtub or other water container.
Do not run the cord under carpeting. Do not cover cord with throw
rugs, runners, or similar coverings. Do not run the cord under
furniture or appliances. Arrange the cord away from high traffic
areas and where it will not be tripped over.
To disconnect the heater, turn controls to the off position, then
remove plug from outlet.
Do not insert or allow foreign objects to enter any ventilation or
exhaust opening as this may cause an electric shock or fire, or
damage the heater.
11. To prevent a possible fire, do not block air intakes or exhaust in
any manner. Do not use on soft surfaces, like a bed, where
openings may become blocked.
12. A heater has hot and arcing or sparking parts inside. Do not use
it in areas where gasoline, paint, or flammable liquids are used or
stored.
13. Use this heater only as described in this manual. Any other use
not recommended by the manufacturer may cause fire, electric
shock, or personal injury.
14. Always plug heaters directly into a wall outlet/receptacle. Never
use with an extension cord, plug adapter or relocatable power tap
(outlet/power strip).
15. When unplugging, be sure to pull by the plug and not the cord.
16. If the heater will not operate, see specific instructions on Auto
Safety Shut-off.
17. DO NOT attempt to repair or adjust any electrical or mechanical
functions on this unit. Doing so will void your warranty. The inside
of the unit contains no user serviceable parts. All servicing should
be performed by qualified personnel only.
18. Discontinue use if the plug or outlet is hot. It is recommended to
check the power cord, plug and outlet if the plug or outlet become
hot to the touch.
19. Do not use this heater in the immediate area of a bath, a shower
or a swimming pool.
20. Do not use with a wireless plug adapter or outlet that allows the
unit to be controlled remotely.
21.
SAVE THESE INSTRUCTIONS
FOR FUTURE REFERENCE
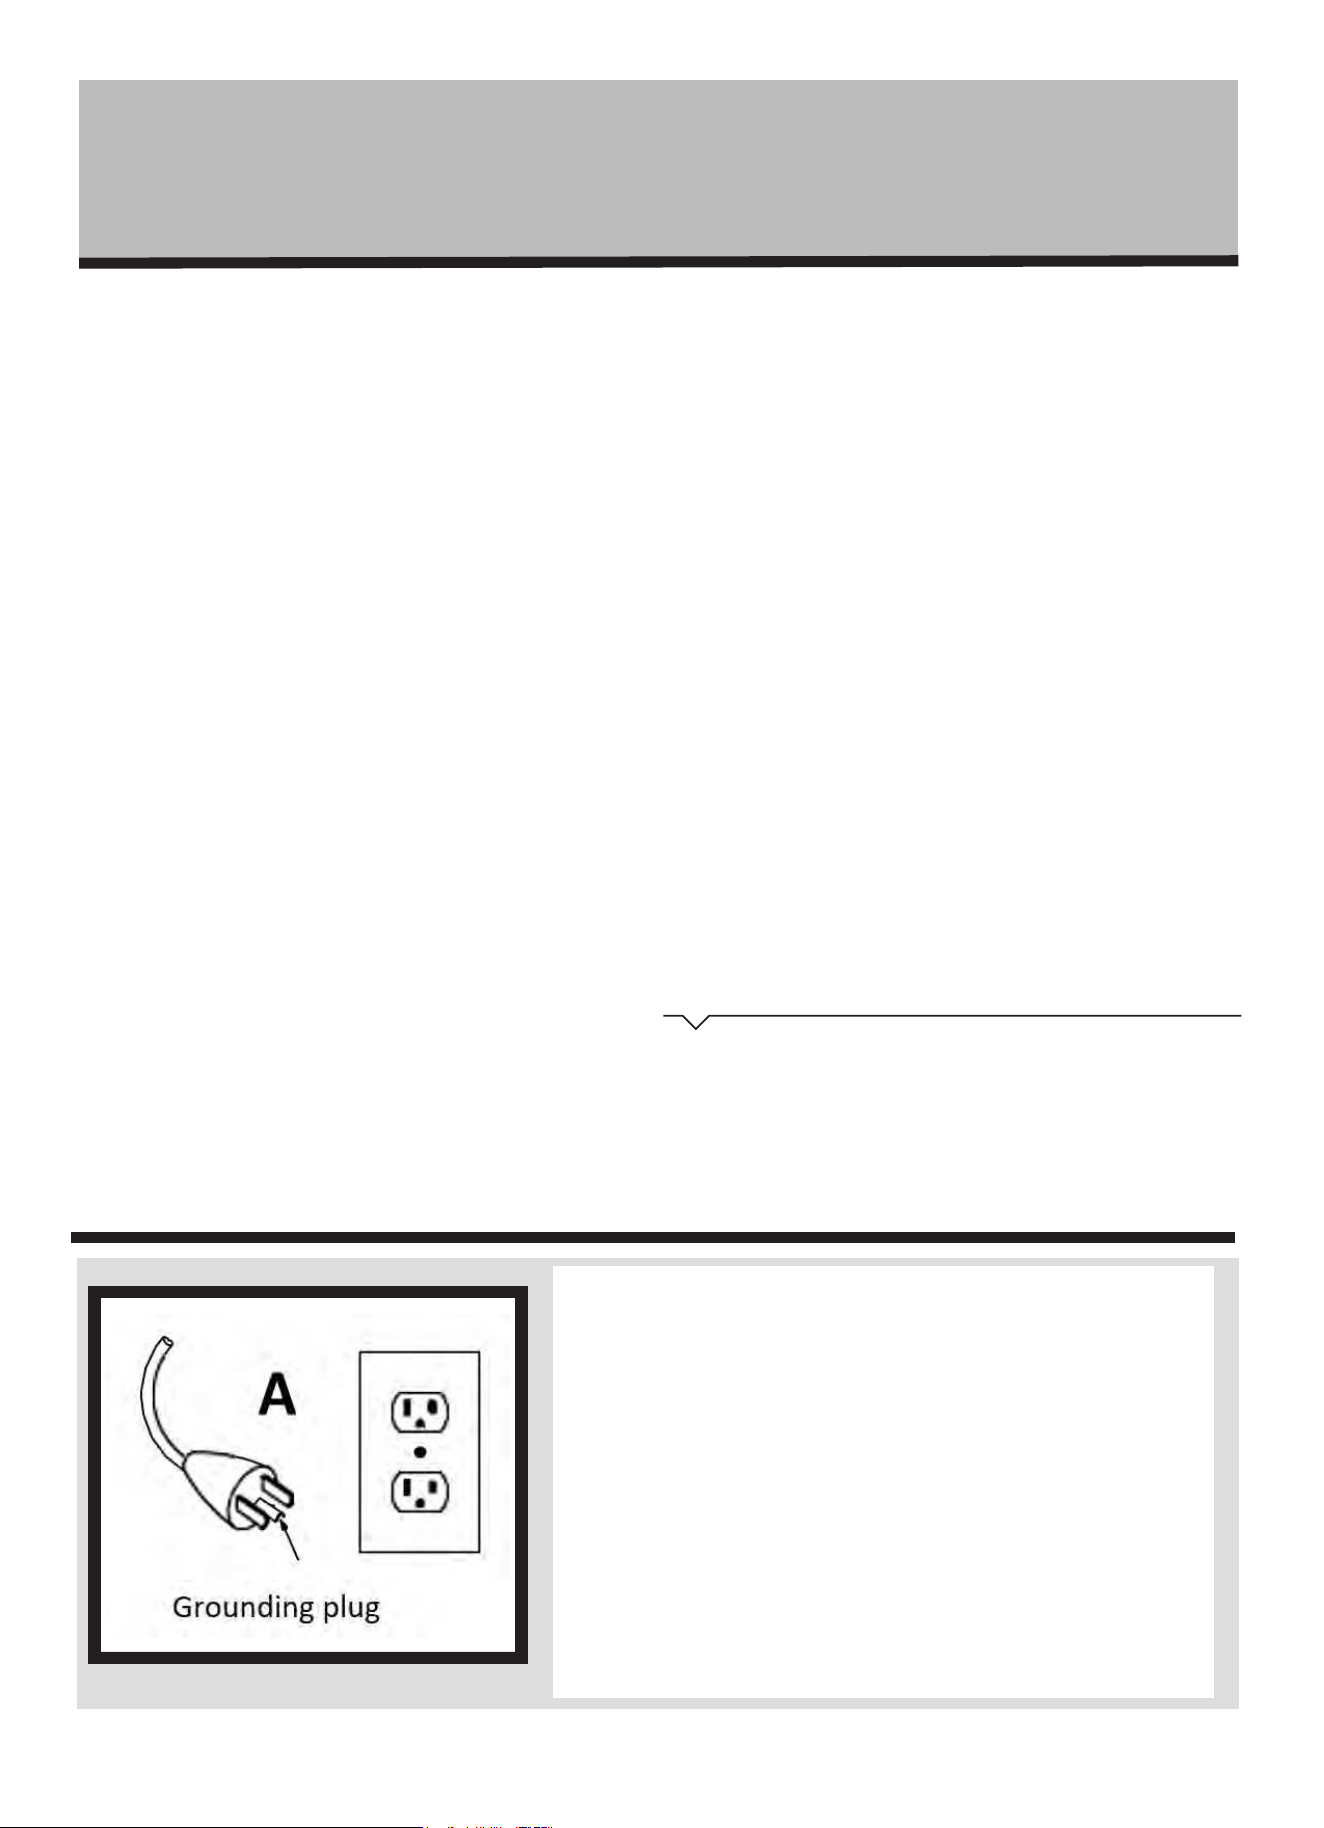
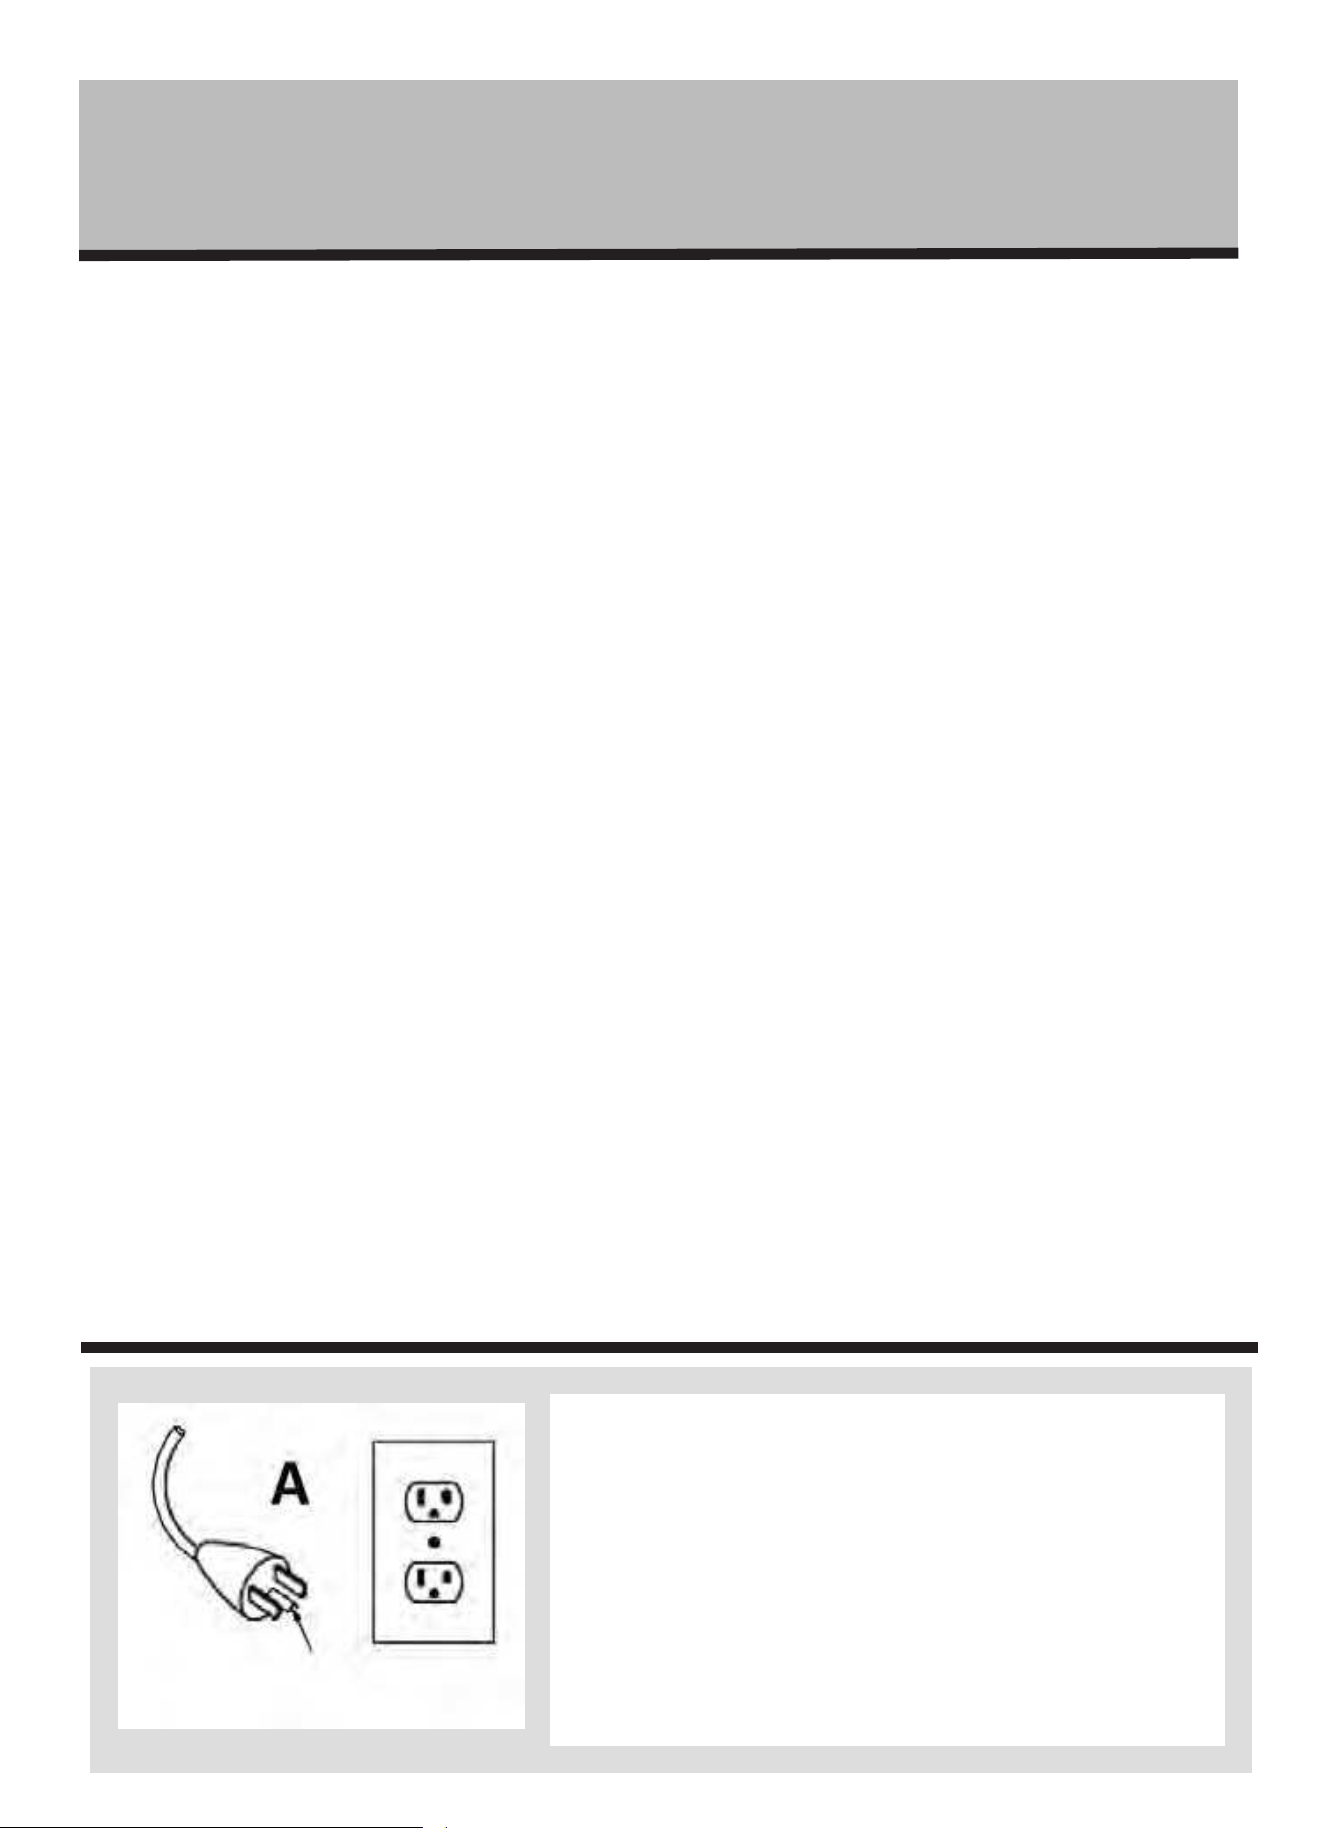
WARNING
This heater has a voltage rating of 120 volts. The cord has a
plug as shown in Fig. A. The grounding prong extending from
the plug must be connected to a permanent ground such as a
properly grounded outlet box. NEVER use an adapter,
extension cord or power strip with this unit.
DO NOT bypass the safety features of the grounding-type
plug. DO NOT use the heater if the power cord or plug are
damaged.
DO NOT ATTEMPT TO MODIFY THIS PLUG OR DEFEAT THIS
SAFETY FEATURE IN ANY WAY.
•
•
•
•
•
•
•
The heater must not be located immediately below a socket-outlet.
Due to oscillating parts and to avoid overstraining the product,
please discard this product after a maximum of 3 years of use
from date of purchase.
22.
10.
CONSUMER PRODUCT INFORMATION
For your own records, please attach a copy of your sales receipt to this
manual. Also, write the store name/location and date purchased below:
Store Name: _____________________________________________________
Location: ________________________________________________________
Date Purchased: _________________________________________________
FEATURES - OPERATION S
•
•
•
•
TECHNICAL DATA
•Amps: 12.5
•Wattage: L
ow 1300W, High 1500W (+5% -10%)
•Working voltage: 120V AC/60Hz
ASSEMBLY INSTRUCTIONS
Carefully remove the heater and all parts from the box. We
recommended you save the carton for off-season storage.
Package includes:
1 - Heater
1 - Carry Handle
2 - Screws
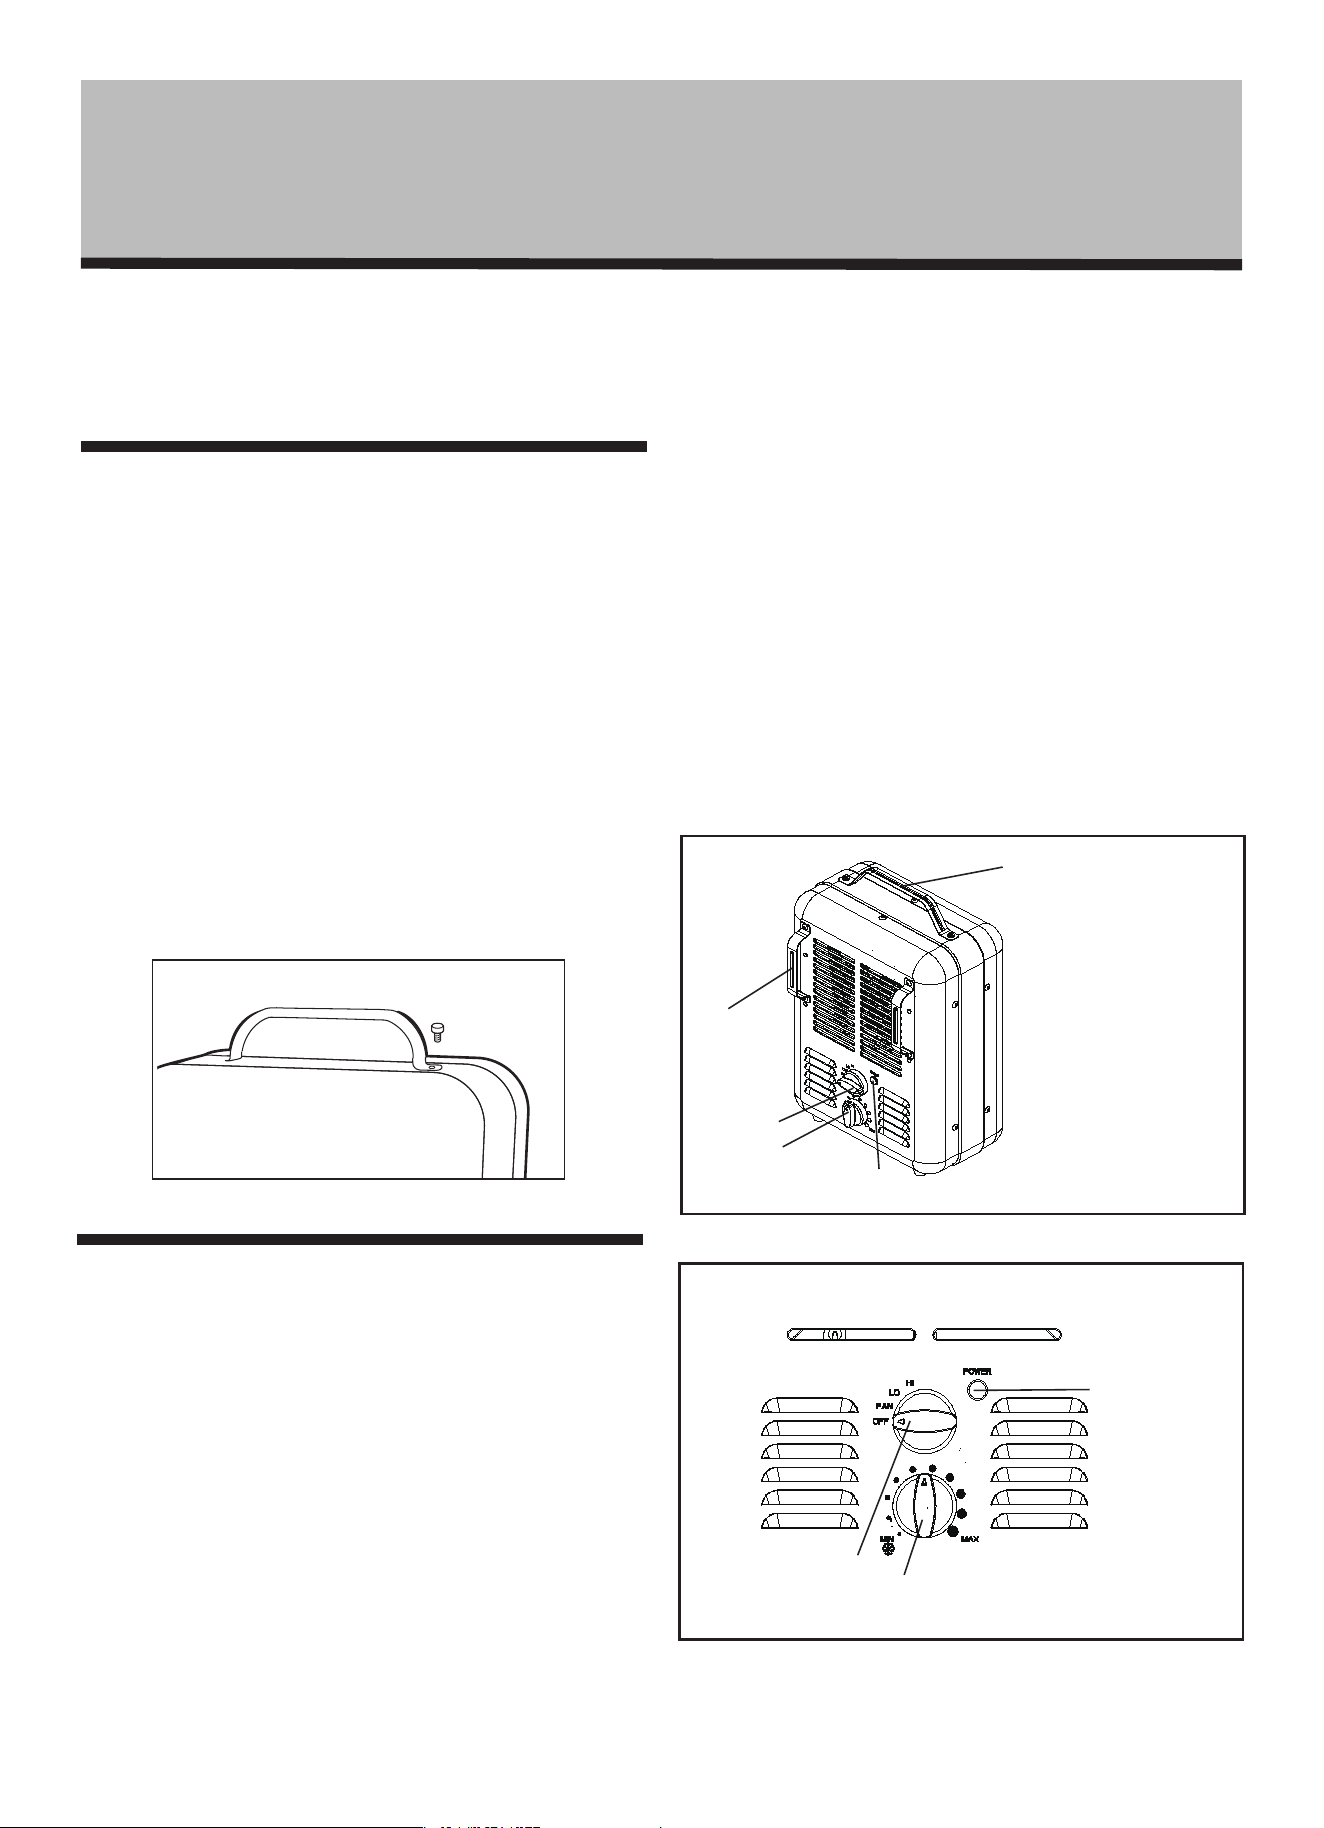
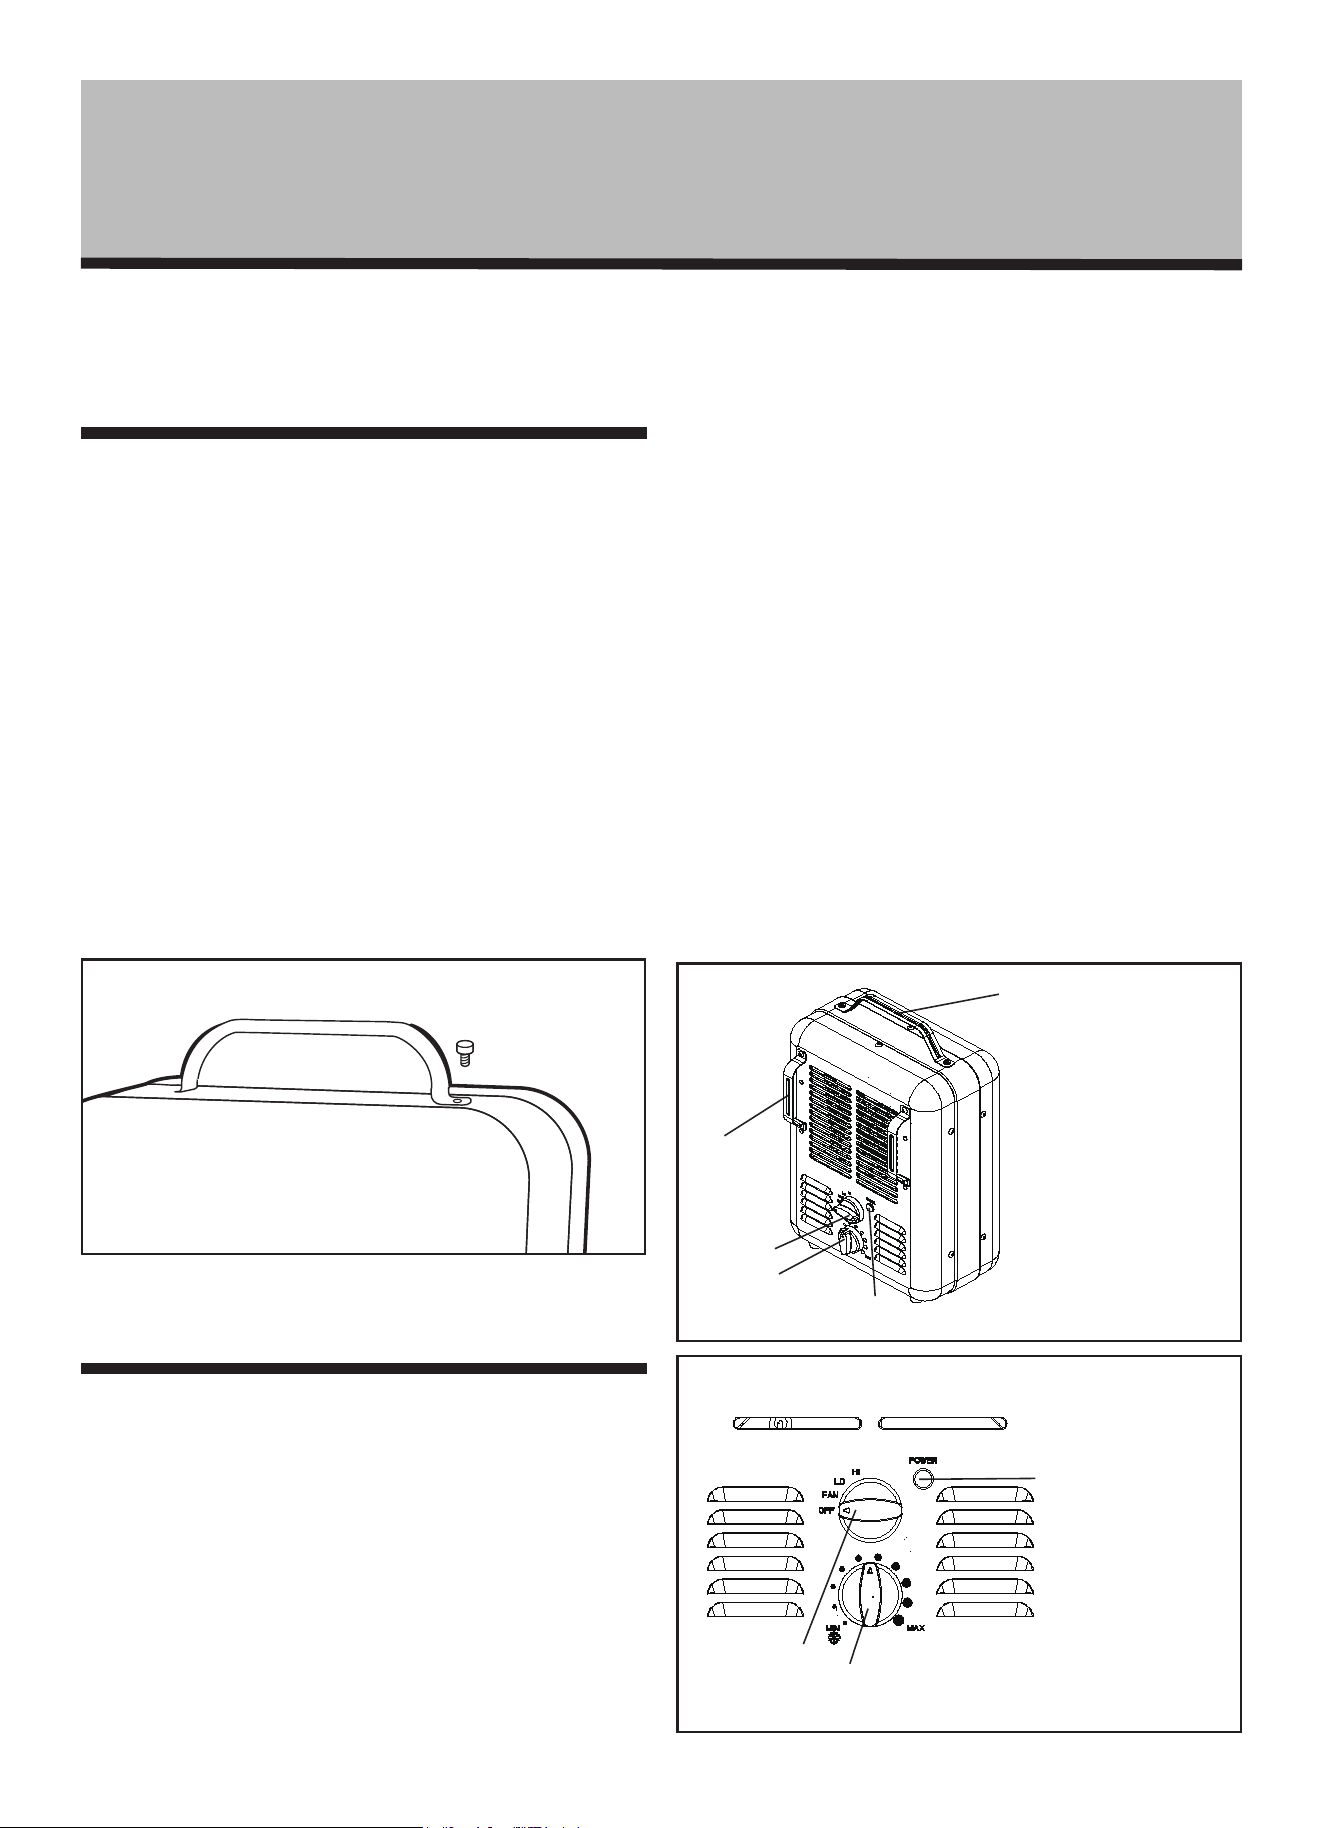
Handle Assembly:
1. Place the heater in an upright position.
2. Use the provided screws to attach the carry handle on
top of the heater housing (See Figure 1, below).
3. Use a phillips screwdriver to tighten the screws firmly.
Please ensure that screws are not overtightened.
NOTE: THIS UNIT IS FOR FLOOR USE ONLY.
OPERATING INSTRUCTIONS
1. Place
the heater on a firm level
surface.
2. Avoid overloading your circuit
by not using other
high
wattage appliances in the same outlet. At
1500
Watts,
this unit draws 12.5
Amps.
Mode Settings
1. To start heater operation, turn Thermostat control
clockwise to the highest setting.
2. Switch the control knob to your desired heat setting:
3. The Power Light will remain on during operation.
1.
2.
Turn the Thermostat Control knob clockwise (to
the right) to start the heater.
When the desired temperature/comfort level is
reached, lower the temperature setting by turning
the Thermostat Control knob counter-clockwise (to
the left)
.
3.
The thermostat will now automatically maintain the
pre-set temperature level by turning the heater ON
and OFF.
NOTE: It is normal for the heater to cycle ON and OFF as
it maintains the preset temperature. To prevent the unit
from cycling, raise the temperature setting.
Figure 1
Figure 2
B
A
D
E
Figure 3
CONTROL PANEL
B
A
•
•
•
•
•
•
•
A. Power Indicator
B. Thermostat Control
Knob
C. Mode Knob
D. Protective Guard
Rails
E. Carry Handle
C
A. Power Light
B. Control Knob
C. Thermostat Control
C
OFF - No Function
FAN - Fan Only
LO - Low Heat
HI - High Heat
Thermostat Control

CLEANING/MAINTENANCE
Always unplug the heater before cleaning and allow the
heater to cool down completely.
1.Clean the unit using a soft cloth moistened with a
mild soap and water solution.
2.NEVER use abrasive or flammable solvents to clean
the unit.
3.After cleaning, be sure to completely dry the unit
with a cloth or towel.
AUTO SAFETY SHUT-OFF WITH INSTANT
OVERHEAT PROTECTION
This heater is equipped with a Total Safety System with
overheat protection that will shut-off the heater in an
overheat situation.
Tip-Over Shut-off:
If the unit is tipped over forward or backward,
where the air intake or exhaust is blocked the unit
will shut off. To reset, simply place the heater in an
upright position on a level surface.
Overheat Shut-off:
When a potential overheat temperature is reached, the
system will automatically shut the heater off. Make sure
the heater is clear of all obstructions. It can only resume
operation when the user resets the unit.
RESET INSTRUCTIONS:
If your heater shuts down:
TROUBLESHOOTING
If your heater fails to operate:
•The thermostat might be set too low. Turn the
Thermostat Control clockwise until the heater restarts.
•Make sure the control knob is in either
the Low or High setting.
•Make sure the electrical outlet and circuit breaker
are working.
•Check for obstructions. If you find an obstruction turn
the heater OFF, and UNPLUG THE UNIT. Carefully
remove the obstruction and follow the reset
instructions.
Please DO NOT attempt to open or repair the
heater.
HEATER STORAGE
1.Store the heater with cord in a cool, dry location.
2.We recommend storing the unit and cord its original
packaging.
•
•
•
CLEANING / MAINTENANCE
TROUBLESHOO T I NG
•
•
•
•
•
•
•
1)Turn the Control to the OFF position.
2)Unplug the unit and wait 30 minutes.
3)Plug in and operate
as you normally would.
This unit comes with an anti-freeze function
built into the thermostat control knob, to
prevent freezing temperatures in rooms
such as a basements.
If you have any questions, concern of for
further assistance, please contact
Consumer Services at 844-472-2473,
Mon-Thurs. 7AM-7PM, Friday
7AM-5:30PM Central Standard Time.
For inquiries regarding
recycling and proper disposal
of this product, please contact your local waste
management facility.
ANTI-FREEZE FUNCTION

Distributed by:
Perfect Aire, LLC
5401 Dansher Rd.
Countryside, IL 60525
844-4PA-AIRE | 844-472-2473
www.perfectaire.us
Specification and performance data is subject to change without notice.
PA/User_1PHF3P14/04272020
CALENTON ELÉCTRICO
DE SERVICIO PESADO
PARA MODELOS:
1PHF3P14
Antes de usar su refrigerador, lea est manual
cuidadosamente y guárdelo para referencia
en el future, junto con su recibo.
USER MANUAL
•
•
•
•
•
•
•
LEA Y CONSERVE ESTAS INSTRUCCIONES
IMPORTANTES DE SEGURIDAD
•
•
•
•
•
•
•
Para reducir el riesgo de incendios, descargas eléctricas y lesiones
personales al utilizar electrodomésticos, siga siempre las precauciones
básicas de seguridad, incluyendo las que se mencionan a continuación:
1.
Lea todas las instrucciones antes de usar este
calentador.
2. El calentador se calienta al usarlo. Para evitar
quemaduras, NO toque las superficies calientes con
la piel. Si existen, utilice las manijas para mover la
unidad. Mantenga los materiales combustibles, como
muebles, almohadones, sábanas, papeles, ropa y
cortinas a por lo menos 3 pies (0,9m) de la parte
delantera del calentador y manténgalos alejados de
los costados y de la parte de atrás.
3. Debe tener mucho cuidado cuando el calentador es
utilizado por, o cerca de niños o inválidos, y siempre
que se deje el calentador prendido y desatendido.
4. Siempre desenchufe el calentador cuando no lo
utilice.
5. NO utilice el calentador si el cable o el enchufe están
dañados o luego de una falla, se haya caído o haya
sufrido cualquier tipo de daño. Deseche el calentador
o devuélvalo al centro de servicio autorizado para su
revisión y/o reparación.
6. NO utilizar en el exterior.
7. Este calentador no está diseñado para ser utilizado
en baños, lavaderos y zonas similares de interiores.
NUNCA coloque el calentador donde pueda caerse
dentro de una bañera u otro recipiente con agua.
8. No coloque el cable debajo de la alfombra. No
cubra el cable con alfombras, tapetes o artículos
similares. No pase el cable por debajo de muebles o
electrodomésticos. Coloque el cable lejos del área de
tráfico y donde no se tropiece con él.
9. Para desconectarlo, gire el control a la posición OFF,
luego quite el enchufe del tomacorriente.
10. No inserte ni permita que objetos extraños
penetren en la ventilación o salida de aire ya que
esto puede causar un choque eléctrico o incendio, o
dañar el calentador.
11. Para evitar un posible incendio, no bloquee las
entradas de aire
o escape de ninguna manera. No lo use en superficies
blandas, como una cama, donde las aberturas se
pueden bloquear.
12. Un calentador tiene partes calientes y que pueden
producir chispas en su interior. NO lo utilice en áreas
donde se utiliza o se guarda gasolina, pintura o
líquidos inflamables.
13. Utilice este calentador sólo como se describe en este
manual. Cualquier otro uso no recomendado por el
fabricante puede provocar incendios, descargas
eléctricas o lesiones a personas.
14. Siempre conecte el calentador directamente a un
tomacorriente de pared. Nunca lo use con un cable
de extensión o con un tomacorriente múltiple.
15. Al desenchufarlo, asegúrese de tirar del enchufe y no
del cable.
16. Si el calentador no funciona, vea las instrucciones
específicas del apagado automático de seguridad.
17. NO intente reparar o ajustar ninguna función
eléctrica
o mecánica de esta unidad. El hacerlo invalidará la
garantía. La unidad no contiene partes reparables
por el usuario. Toda reparación debe ser realizada
únicamente por personal calificado.
18. Deje de usarlo si el cable o el enchufe se calienta. Se
recomienda que reemplace el tomacorriente si el
enchufe o el tomacorriente se calienta.
19. El calentador no se debe localizar inmediatamente
debajo de un tomacorriente. No use este calentador
en áreas cercanas a un baño, una ducha o una
piscina.
20. No utilizar con adaptadores de conexión inalámbrica
o tomacorrientes con función de control remoto.
21. El calentador no debe ser ubicado inmediatamente
debajo de una toma de corriente.
22. Debido a las partes oscilantes y para evitar
sobrecargar el producto, deseche este producto
después de un máximo de 3 años de uso de la fecha
de compra.
GUARDE ESTAS
INSTRUCCIONES PARA
FUTURAS REFERENCIAS
INFORMACIÓN DEL PRODUCTO PARA EL CONSUMIDOR
For your own records, please attach a copy of your sales receipt to
this manual. Also, write the store name/location and date purchased
below:
Este calentador tiene una tensión nominal de 120 voltios. El cable tiene un
enchufe como se muestra en la Fig. A. La punta de conexión a tierra que se
extiende desde el enchufe debe conectarse a una conexión a tierra
permanente, como una caja de salida con conexión a tierra. NUNCA use
un adaptador, cable de extensión o regleta con esta unidad.
NO omita las características de seguridad del enchufe de conexión a tierra.
NO use el calentador si el cable de alimentación o el enchufe están
dañados.
Enchufe a tierra
Advertencia
NO INTENTE MODIFICAR ESTE ENCHUFE NI DERROTAR ESTA
FUNCIÓN DE SEGURIDAD DE NINGUNA MANERA.
Nombre de Tienda:________________________________________________________
Direccion de Tienda:______________________________________________________
Fecha de Compra: _______________________________________________________
•
•
•
•
•
•
•
C
A
RACTERISTICAS Y FUNCIONAMIENTO
•
•
•
•
ESPECIFICACIONES TECNICAS
•Amperes: 12,5
•Potencia: 1500 W (+5% -10%)
•Voltaje de funcionamiento: 120v CA/60Hz
INSTRUCCIONES DE ARMADO
Saque cuidadosamente el calentador y todas las piezas de
la caja. Se recomienda conservar la caja de cartón para
guardar el calentador cuando se esté fuera de temporada.
Este paquete incluye:
1 - Calentador
1 - Manija de Transporte
2 - Tornillos
Ensamblaje de la manija:
1. Coloque el calentador en posición vertical.
2. Utilice los tornillos proporcionados para
colocar la manija de transporte sobre la
carcasa del calentador (vea la Figura 1).
3. Utilice el destornillador para ajustar los
tornillos con firmeza. Asegúrese de que los
tornillos no estén demasiado ajustados.
NOTA: ESTA UNIDAD ES SÓLO PARA USAR EN EL PISO.
INSTRUCCIONES PARA OPERAR
1.Colocar la estufa sobre una superficie firme y nivelada.
2.Para evitar sobrecargar el circuito, no
operar otro artefacto eléctrico de alto
voltaje en el mismo circuito. A 1500 wats,
esta unidad consume 12,5 amperios.
Configuración de modo
Control del termostato
1. Para encender el calentador, se debe girar el control
del termostato en el sentido de las agujas del reloj
hasta alcanzar la posición más alta. Permitir que la
estufa caliente la habitación.
2. Cuando se alcance la temperatura ambiental
deseada, baje la configuración de la temperatura
girando el control del termostato en el sentido
contrario al de las agujas del reloj hasta que el
calentador deje de funcionar.
3. Para que el control mantenga automáticamente la
temperatura así programada, girar el control a ON y
OFF.
Figura 1
Figura 2
C
A
D
E
Figura 3
VISTA DE CERCA DEL PANEL DE CONTROL
C
A
1. Para que el calentador funcione, para
encender la estufa colocar el control de
termostato en alta.
2. Girar el selector de temperatura al nivel
deseado:
OFF - Apagado
FAN - Sólo ajuste del ventilador
LO - Ajuste de calefacción baja
HI - Ajuste de calefacción alta
3. La luz indicadora permanecerá encendida
durante
A. Encendido
B. Control de Termostato
C. Luz de Selector
D. Cubierta protectora
E. Manija de Transporte
frontal
B
A. Encendido
B. Luz Indicadora
de Selector
C. Control de
Termostato
B
NOTA: Es normal que la estufa se encienda y se apague automáticamente
para mantener la temperatura programada. Para evitarlo, programar a una
temperatura más alta.
•
•
•
•
•
•
•
LIMPIEZA / MANTENIMIENTO
Siempre desenchufe el calentador y deje que se enfríe
antes de limpiarlo.
1. Limpie la unidad con un paño suave humedecido en
una solución suave de agua y jabón.
2. NUNCA usar solventes abrasivos o inflamables para
limpiar la unidad.
3. Después de limpiarla, cerciorarse de secarla
completamente con un paño o toalla.
AUTOAPAGADO DE SEGURIDAD CON
PROTECCIÓN INSTANTÁNEA CONTRA
VOLCADURAS
Esta estufa está equipada con un sistema Total de
Seguridad que apaga la estufa cuando se vuelca o cuando
se presentan situaciones de recalentamiento.
Autoapagado por volcadura:
Esta estufa se apagará si se vuelca accidentalmente. Para
reactivar la estufa, simplemente colocarla de pie en una
superficie nivelada.
Autoapagado por recalentamiento:
Si el calentador se recalienta, el sistema lo apagará
automáticamente. Asegurarse que la estufa no tenga
obstrucciones. Sólo puede reanudar el funcionamiento
cuando el usuario reinicia la unidad.
INSTRUCCIONES VOLVER A ENCENDER
Si la unidad se apaga:
1) GIRE el Control a APAGADO.
2) Desenchufe la unidad y espere 30 minutos.
3) Enchufela y vuélvala a operar normalmente.
DIAGNOSTICO DE PROBLEMAS
Si su calentador no funciona:
•El termostato puede estar ajustado demasiado bajo.
Gire la perilla del termostato en sentido de las agujas
del reloj hasta que comience a calentar nuevamente.
•Asegúrese de que el Selector se encuentre en la
configuración Low (Baja) o High (Alta).
•
Asegúrese de que el tomacorriente o llave térmica
funcionen correctamente.
•
Verifique que no haya ninguna obstrucción. Si
encuentra una obstrucción, apague el calentador, y
DESENCHUFELO. Quite cuidadosamente la
obstrucción y siga el procedimiento para reiniciar la
unidad.
NO intente abrir o reparar el calentador.
PARA ALMACENAR EL CALENTADOR
1. Guarde el calentador y el cable en un lugar fresco y
seco.
2. Recomendamos guardar la unidad y el cable enr la
caja original de compra.
•
•
•
L I M P I E Z A / M A N T E N I M I E N T O Y
D I A G N Ó S T I C O D E P R O B L E M A S
FUNCIÓN ANTICONGELANTE:
El calefactor está provisto con el ajuste ANTICONGELANTE
en el control del termostato para ayudar a proteger el
sótano y también otras áreas de su casa.
Si tiene alguna pregunta o inquietud para
obtener más ayuda, comuníquese con Servicios
al Consumidor al 844-472-2473, de lunes a
jueves. 7 AM-7PM, viernes 7 AM-5:30PM Hora
estándar central.
For inquiries regarding recycling and proper
disposal of this product, please contact your
local waste management facility.

Distribuido por:
Perfect Aire, LLC
5401 Dansher Rd.
Countryside, IL 60525
844-4PA-AIRE | 844-472-2473
www.perfectaire.us
Las especificaciones y datos de rendimiento están sujetos a cambios sin previo aviso.
PA/User_1PHF3P14/04272020
Pour le Modèle :
1PHF3P14
Avant d’utiliser votre réfrigérateur, veuillez lire
attentivement ce manuel et le conserver pour
référence ultérieure, avec votre reçu.
MANUEL DE
L’UTILISATEUR
RADIATEUR ÉLECTRIQUE
UTILITAIRE ROBUSTE
VEUILLEZ LIRE ET CONSERVER CES
INSTRUCTIONS DE SÉCURITÉ
IMPORTANTES
•
•
•
•
•
•
•
Pour réduire les risques d'incendie, de choc électrique et de blessures
corporelles des précautions de sécurité de base doivent toujours être
suivies lorsque vous utilisez un appareil électrique, notamment :
11.
Pour prévenir un risque dʼincendie, ne bloquez pas les prises dʼair
ou dʼévacuation de quelque manière que ce soit. N'utilisez pas sur
des surfaces souples, comme un lit, où les entrées et sorties d'air
peuvent se bloquer.
12.
Tout radiateur a des pièces intérieures qui deviennent très chaudes et
qui produisent des arcs ou des étincelles.
Nʼutilisez pas dans un endroit qui pourrait être exposé à de
lʼessence, de la peinture ou dʼautres liquides inflammables.
13.
Utilisez ce radiateur uniquement tel que décrit dans ce manuel. Toute
autre utilisation non recommandée par le fabricant peut causer un
incendie, un choc électrique ou des blessures corporelles.
14.
Branchez toujours le radiateur directement dans une prise murale.
Ne jamais utiliser une rallonge ou prise de courant amovible (c.-à-d.
bande multiprise).
15.
Lors du débranchement, assurez-vous de tirer en tenant la fiche et
non pas le cordon.
16.
Si le radiateur ne fonctionne pas, voir les instructions détaillées de la
protection Arrêt de sécurité Automatique.
17.
NE PAS tenter de réparer ou dʼajuster aucune des fonctions
électriques ou mécaniques de cette unité. Cela annulera votre
garantie. Lʼintérieur de lʼappareil ne contient aucune pièce réparable
par lʼutilisateur. Toute réparation devrait être effectuée par une
personne qualifiée.
18.
Cesser d'utiliser le radiateur si la fiche ou la prise est trop chaude. Il
est recommandé de vérifier le cordon, la fiche et la prise si la fiche
ou la prise sont trop chaudes au toucher.
19.
N'utilisez pas ce radiateur à proximité immédiate d'un bain, d'une
douche ou d'une piscine.
20.
Ne pas utiliser avec un adaptateur de prise sans fil ou une prise
équipée dʼun contrôle à distance.
21.
Ce radiateur ne doit pas être placé directement sous une prise de
courant.
22.
En raison des pièces oscillantes et pour éviter lʼanéantissement du
produit, sʼil vous plaît jeter ce produit après un maximum de 3 ans
dʼutilisation à partir de la date dʼachat.
CONSERVEZ CES
INSTRUCTIONS POUR
RÉFÉRENCE FUTURE.
Avertissement
Ce radiateur a une tension nominale de 120 volts. Le cordon a une fiche comme illustré sur la Fig. A.
La broche de mise à la terre qui est la plus longue doit être connectée à une mise à la terre
permanente telle qu'une prise correctement mise à la terre. N'utilisez JAMAIS d'adaptateur, de
rallonge ou de bande multiprise avec cet appareil.
NE PAS contourner lʼélément de sécurité de la fiche avec mise à la terre. NE PAS utiliser le radiateur
si la fiche ou le cordon dʼalimentation sont endommagés.
N'ESSAYEZ PAS DE MODIFIER CETTE FICHE OU DE CONTOURNER CET ÉLÉMENT DE SÉCURITÉ
DE QUELQUE MANIÈRE QUE CE SOIT.
•
•
•
•
•
•
•
1.
Lisez toutes les instructions avant d'utiliser ce radiateur.
2.
Ce radiateur est chaud lorsqu'il est utilisé, pour éviter les brûlures, ne
laissez pas la peau nue toucher les surfaces chaudes. Si elle est
incluse, utilisez la poignée pour déplacer le radiateur. Gardez les
matériaux combustibles tels que les meubles, les oreillers, la literie, les
papiers, les vêtements et les rideaux à au moins 3 pieds (0.9 m) de
l'avant, et éloignez-les des côtés ou de l'arrière du radiateur.
3.
Une grande prudence est nécessaire lorsquʼun appareil de chauffage
est utilisé en présence dʼenfants ou de personnes handicapées et que
le radiateur est utilisé et laissé sans surveillance.
4.
Débranchez toujours le radiateur lorsquʼil nʼest pas utilisé.
5.
N'utilisez pas un radiateur avec une fiche ou un cordon endommagé,
après un fonctionnement erratique, a été échappé ou endommagé de
quelque manière que ce soit. Jetez-le ou appelez le service à la
clientèle avant de le retourner pour vérification et/ou réparation.
6.
Nʼutilisez pas à lʼextérieur.
7.
Ce radiateur nʼest pas conçu pour être utilisé dans les salles de bains,
les buanderies et autres pièces intérieures semblables. Ne jamais
placer le radiateur là où il pourrait tomber dans une baignoire ou
dans un autre contenant d'eau.
8.
Ne passez pas le cordon sous un tapis. Ne couvrez pas le cordon
avec une moquette, un tapis long ou dʼautres revêtements de sol. Ne
faites pas passer le cordon sous des meubles ou dʼautres appareils.
Installez le cordon à lʼécart des zones de circulation de manière à
éviter tout risque de trébuchement.
9.
Avant de débrancher le radiateur, tournez tous les contrôles à la
position d'arrêt, puis retirez la fiche de la prise de courant.
10.
N'insérez pas ou ne permettez pas à des objets étrangers de pénétrer
les ouvertures de ventilation et dʼévacuation, car cela peut causer un
choc électrique, un incendie ou endommager le radiateur.
RENSEIGNEMENTS SUR LE PRODUIT DESTINÉS AU CONSOMMATEUR
Pour vos propres archives, veuillez joindre une copie de votre reçu de
vente à ce manuel et compléter les informations suivantes :
Magasin de l'achat:
Location: ______________________________________________________________
Date d'achat:
___________________________________________________________________
Fiche avec mise à la terre
CARACTÉRISTIQUES – FONCTIONNEMENT
•
•
•
•
SPÉCIFICATIONS TECHNIQUES
•
Ampères: 12,5 A
•
Puissance: Faible 1300W, Élevé 1500W (+5% -10%)
•
Tension de Fonctionnement: 120V CA/60Hz
INSTRUCTIONS DE MONTAGE
Retirez soigneusement votre radiateur et toutes les pièces de la
boîte. Il est recommandé de conserver le carton pour
ʼentreposage hors saison.
Cette boîte contient :
1 -
Radiateur
1 -
Poignée de transport
2 -
Vis
Assemblage de la Poignée :
1.
Placer le radiateur en position verticale.
2.
Utilisez les vis incluses pour fixer la poignée de
transport à la partie supérieure du boîtier du radiateur
(Voir fig. 1).
3.
Utiliser un tournevis cruciforme (phillips) pour serrer les
vis fermement mais pas sur-serrer.
REMARQUE: CET APPAREIL EST POUR USAGE
AU SOL SEULEMENT.
INSTRUCTIONS D'UTILISATION
1. Installez le radiateur sur une surface plane et solide.
2. Évitez de surcharger votre circuit en nʼutilisant pas
dʼautres appareils de haute puissance dans la même
prise. À 1,500 Watts, cette unité consomme 12,5
ampères.
Réglage des Commandes
1.
Pour mettre le radiateur en marche, tournez la commande
du thermostat dans le sens horaire au réglage le plus
élevé.
1.
Tournez le bouton du thermostat dans le sens horaire (à droite)
pour mettre le radiateur en marche.
2.
Lorsque le niveau de température/confort souhaité est atteint,
abaisser le réglage de la température en tournant le contrôle du
thermostat dans le sens antihoraire jusquʼà ce que le radiateur
cesse de fonctionner.
3.
Le thermostat maintiendra désormais automatiquement le niveau
de température souhaité en alternant le mode du radiateur entre
marche et arrêt.
REMARQUE :
Il est normal que le radiateur alterne entre
MARCHE et ARRÊT pour maintenir la température préréglée.
Pour empêcher lʼarrêt de lʼappareil augmenter le réglage de
la température.
Figure 2
B
A
D
E
Figure 3
B
A
•
•
•
•
•
•
•
Commande du Thermostat
A.
Voyant Dʼalimentation
B.
Commande du thermostat
C.
Sélecteur de mode
D.
Gardes Frontaux
Protecteurs
E.
Poignée de Transport
C
A.
Voyant dʼalimentation
B.
Sélecteur
C.
Commande du Thermostat
C
PLAN RAPPROCHÉ DU PANNEAU DE COMMANDE
2.
Tournez le sélecteur sur le réglage de chaleur souhaitée :
OFF (Arrêt) - Pas de Fonction
FAN (Ventilation) - Ventilation Seulement
LO (Faible) - Chauffage Faible
HI (Élevé) - Chauffage Élevé
Le voyant d'alimentation restera allumé pendant le
fonctionnement.
3.
Figure 1
NETTOYAGE/ENTRETIEN
Débranchez toujours le radiateur avant le nettoyage et
laissez-le refroidir.
1.
Nettoyez l'appareil avec un chiffon doux imbibé d'une
solution d'eau et de savon doux
.
2.
Nʼutilisez JAMAIS de solvants abrasifs ou inflammables
pour nettoyer lʼappareil.
3.
Après le nettoyage, assurez-vous de sécher complètement
lʼappareil avec un chiffon ou une serviette.
ARRÊT DE SÉCURITÉ AUTOMATIQUE
AVEC PROTECTION INSTANTANÉE
CONTRE LA SURCHAUFFE
Ce radiateur est équipé d'un système de sécurité totale avec
protection de surchauffe qui éteindra le radiateur dans une
situation de surchauffe.
Arrêt en cas de Basculement :
Si l'appareil est basculée vers l'avant ou vers l'arrière, là où
l'entrée ou la sortie d'air est bloquée, l'appareil s'arrête Pour
réinitialiser, il suffit de placer le radiateur en position verticale
sur une surface plane.
Arrêt de surchauffe :
Lorsquʼune température de surchauffe potentielle est atteinte, le
système arrête automatiquement le radiateur. Assurez-vous que
le radiateur est libre de tout obstacle. Pour remettre le
radiateur en marche vous devez le réinitialisé.
DÉPANNAGE
Si votre radiateur ne fonctionne pas :
•
Le thermostat est peut-être réglé trop bas. Tournez la
commande du thermostat dans le sens horaire jusqu'à ce
que le radiateur redémarre.
•
Assurez-vous que le sélecteur est en réglage LOW (Faible)
ou HIGH (Élevé).
•
Assurez-vous que la prise électrique ou le disjoncteur
fonctionne.
•
Vérifiez sʼil y a des obstructions. Si vous trouvez une
obstruction tourner le radiateur à OFF (Arrêt), et
DÉBRANCHEZ LʼAPPAREIL. Retirez soigneusement
ʼobstruction et suivez les instructions de réinitialisation.
Sʼil vous plaît NE PAS ESSAYER dʼouvrir ou
de réparer le radiateur.
REMISAGE DU RADIATEUR
1.
Remiser le radiateur avec le cordon dans un endroit
frais et sec.
2.
Nous recommandons de remiser lʼappareil et le
cordon dans lʼemballage original.
•
•
•
NETTOYAGE / ENTRETIEN
DÉPANNAGE
•
•
•
•
•
•
•
Si vous avez des questions ou si vous avez
besoin d'aide, veuillez appeler le Service aux
consommateurs au 844-472-2473, du lundi au
jeudi. 7 h à 19 h, vendredi 7 h à 17 h 30, heure
normale du Centre. Pour toute question
concernant le recyclage et l'élimination
appropriée de ce produit, veuillez contacter
votre organisme public local de gestion des
déchets.
INSTRUCTIONS DE RÉINITIALISATION :
Si votre radiateur sʼarrête :
1)
Tournez le contrôle à la position OFF (Arrêt).
2)
Débranchez lʼappareil et attendez 30 minutes.
3)
Branchez et utilisez normalement.
FONCTION ANTI-GEL :
Votre radiateur à un réglage Anti-Gel (Anti-Freeze) sur
la commande du thermostat pour aider à protéger les
sous-sols et autres pièces de la maison

DISTRIBUÉ PAR :
Perfect Aire, LLC
5401 Dansher Rd.
Countryside, IL 60525
844-4PA-AIRE | 844-472-2473
www.perfectaire.us
Les données relatives aux caractéristiques et à la performance peuvent faire l’objet
de modifications sans préavis.
PA/User_1PHF3P14/04272020