
2
TABLE OF CONTENTS
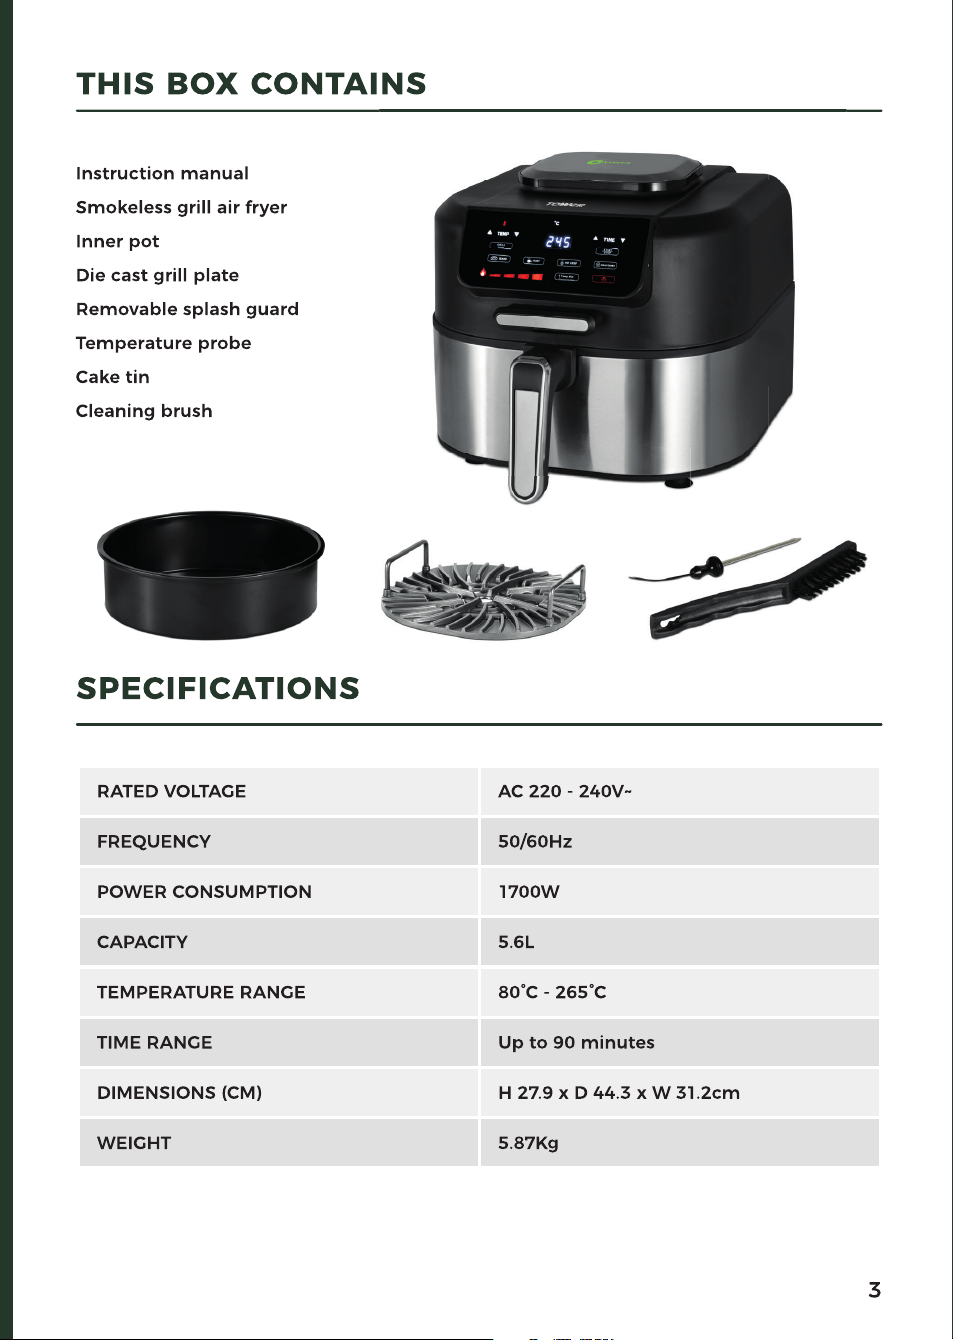
THIS BOX CONTAINS 3
SPECIFICATIONS 3
IMPORTANT SAFETY INFORMATION 4
• Key Safety Points 4
• General Safety 4
• Whilst Air Frying 5
• Plug And Cord 5
• Wiring Safety 6
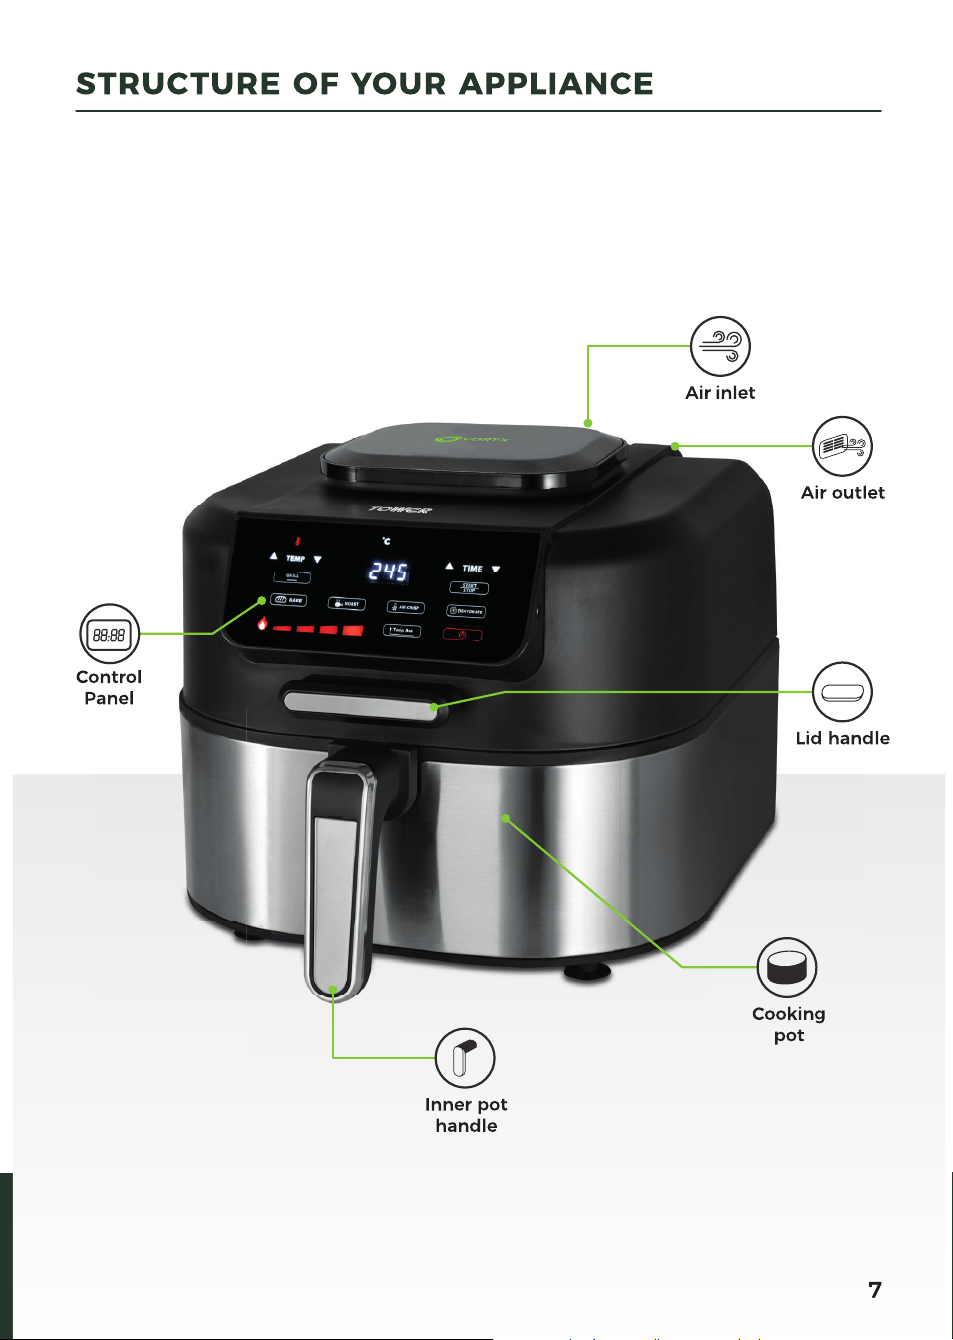
STRUCTURE OF YOUR APPLIANCE 7
CONTROL PANEL 8
BEFORE FIRST USE 9
• Preparing For Use 9
• Automatic Switch Off 9
• Air Fryer Inner Pot Safety Switch 9
• Removing The Inner Pot 9
USING YOUR AIR FRYER 10
• Installing And Removing The Splash Guard 10
• Installing The Inner Pot 10
• Turning The Appliance On And Off 10
• Starting The Cooking Process 10
• Mode Selection 11
• Grill Mode 11
• Selecting The Grilling Temperature 11
• Grilling Tips 12
• Bake Mode 12
• Roast Mode 13
• Air-Fry Mode 13
• Air-Frying Tips 14
• Dehydrate Mode 14
• The Temp Ace Functionality 15
• Weights And Measures 16
• Settings Table 17
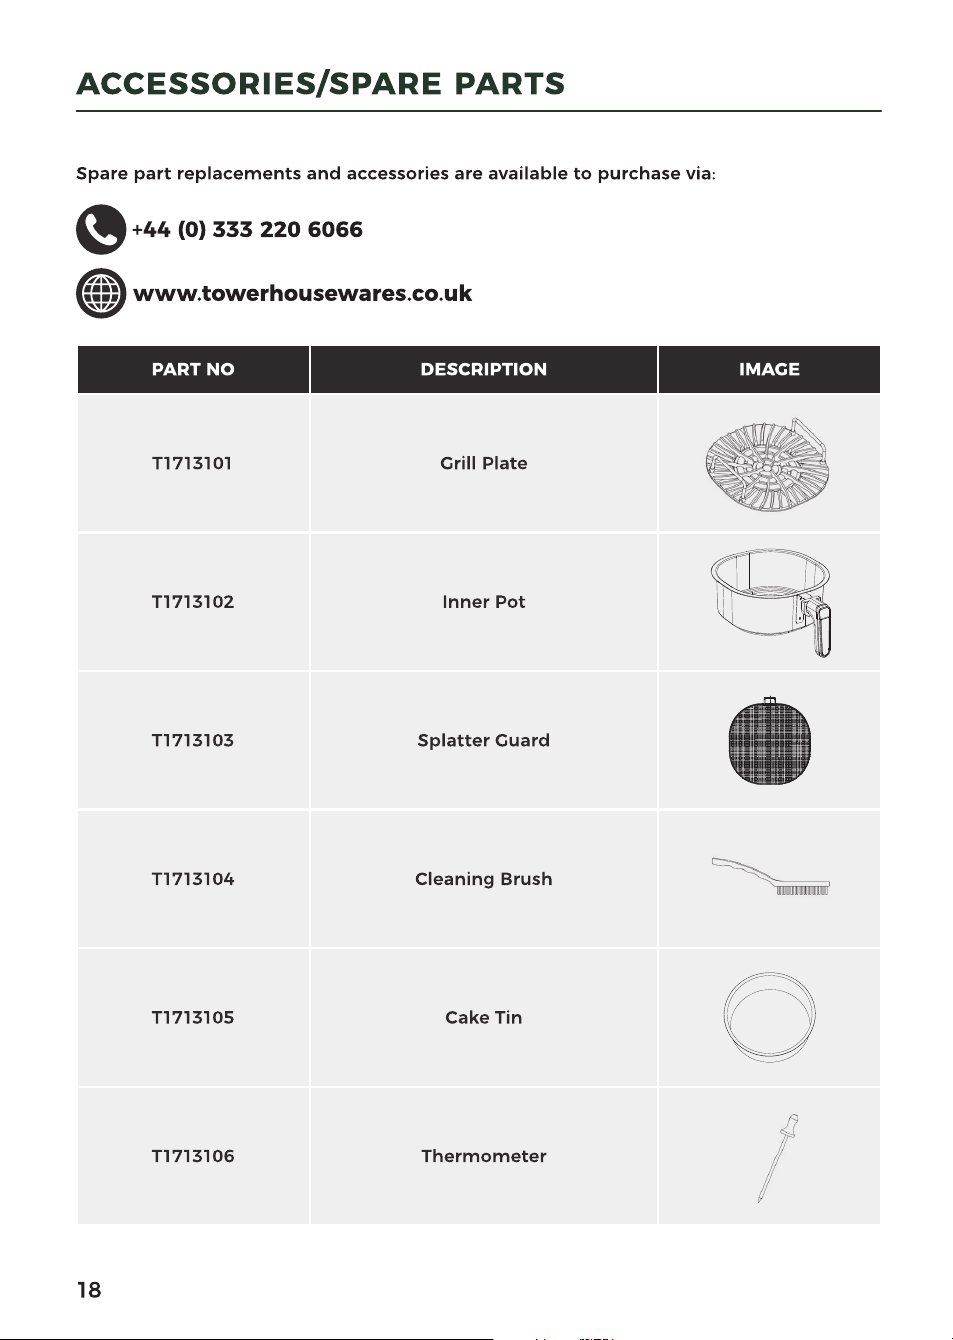
ACCESSORIES / SPARE PARTS 18
CLEANING AND CARE 19
TROUBLESHOOTING 20-21
DISPOSAL OF THE UNIT 22
CUSTOMER SUPPORT 22
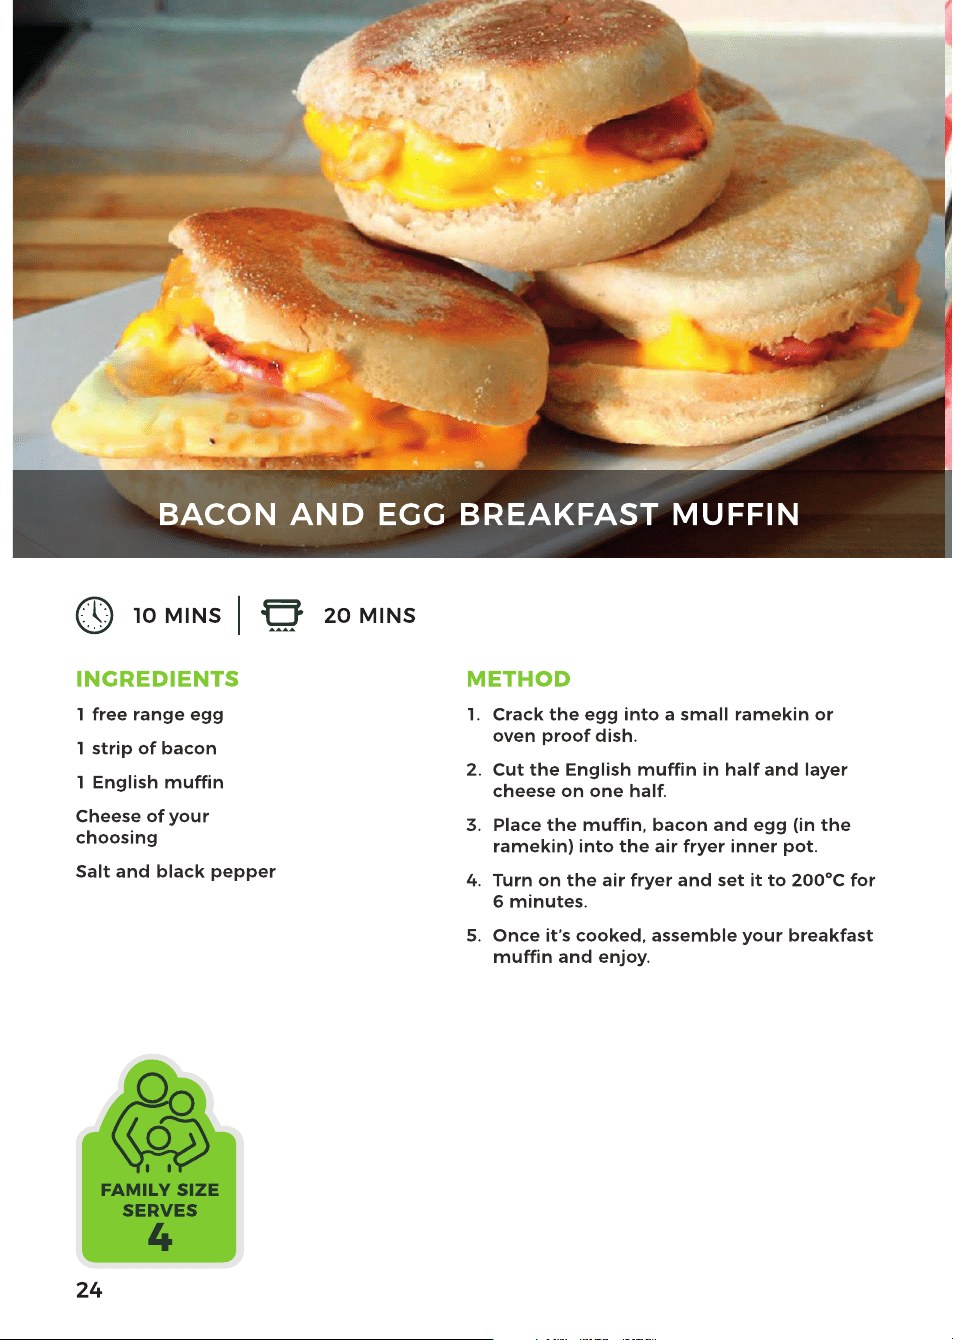
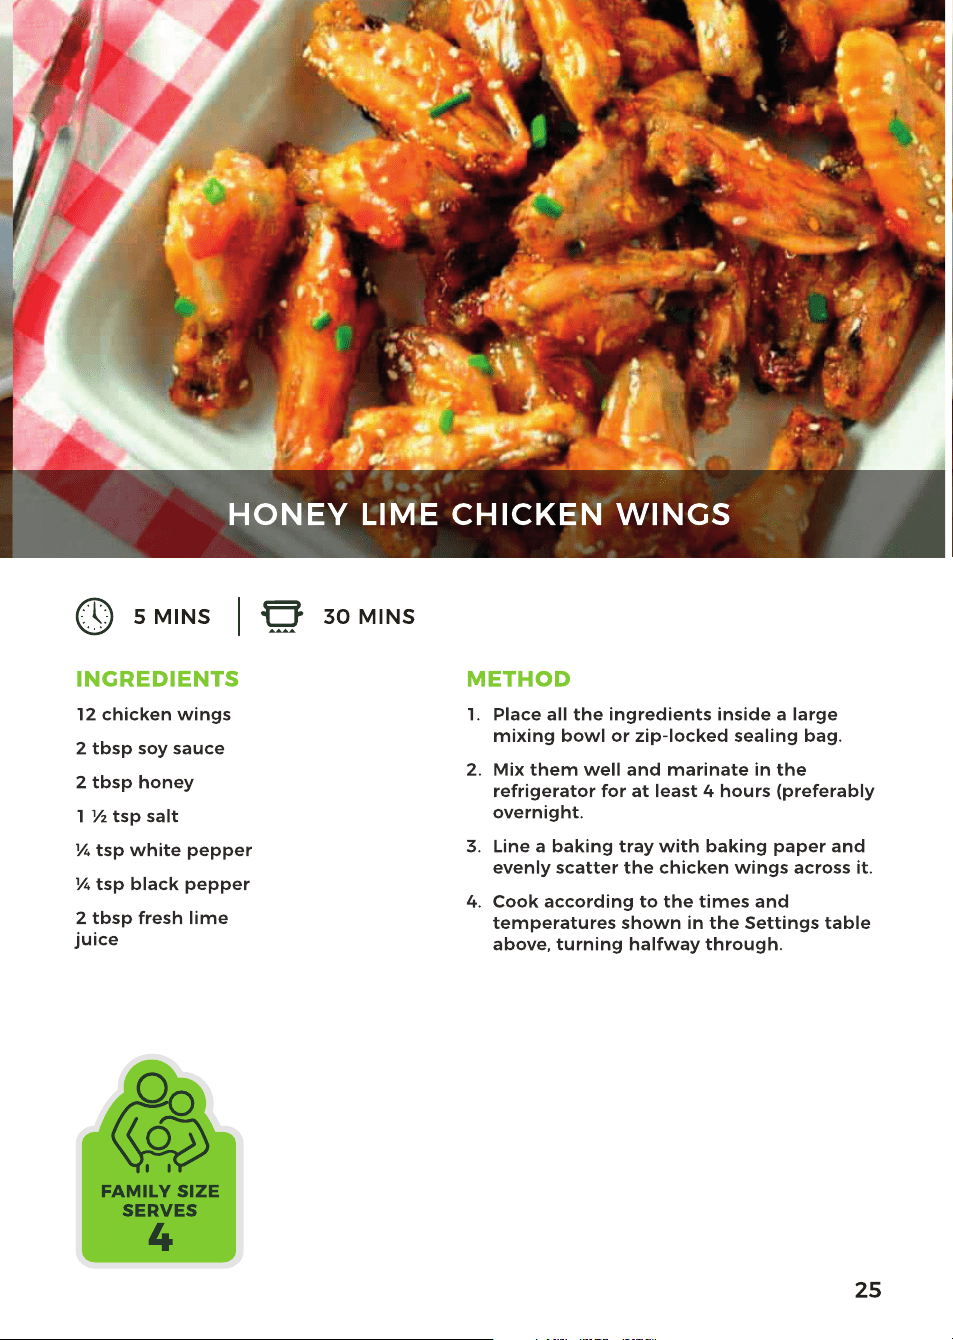
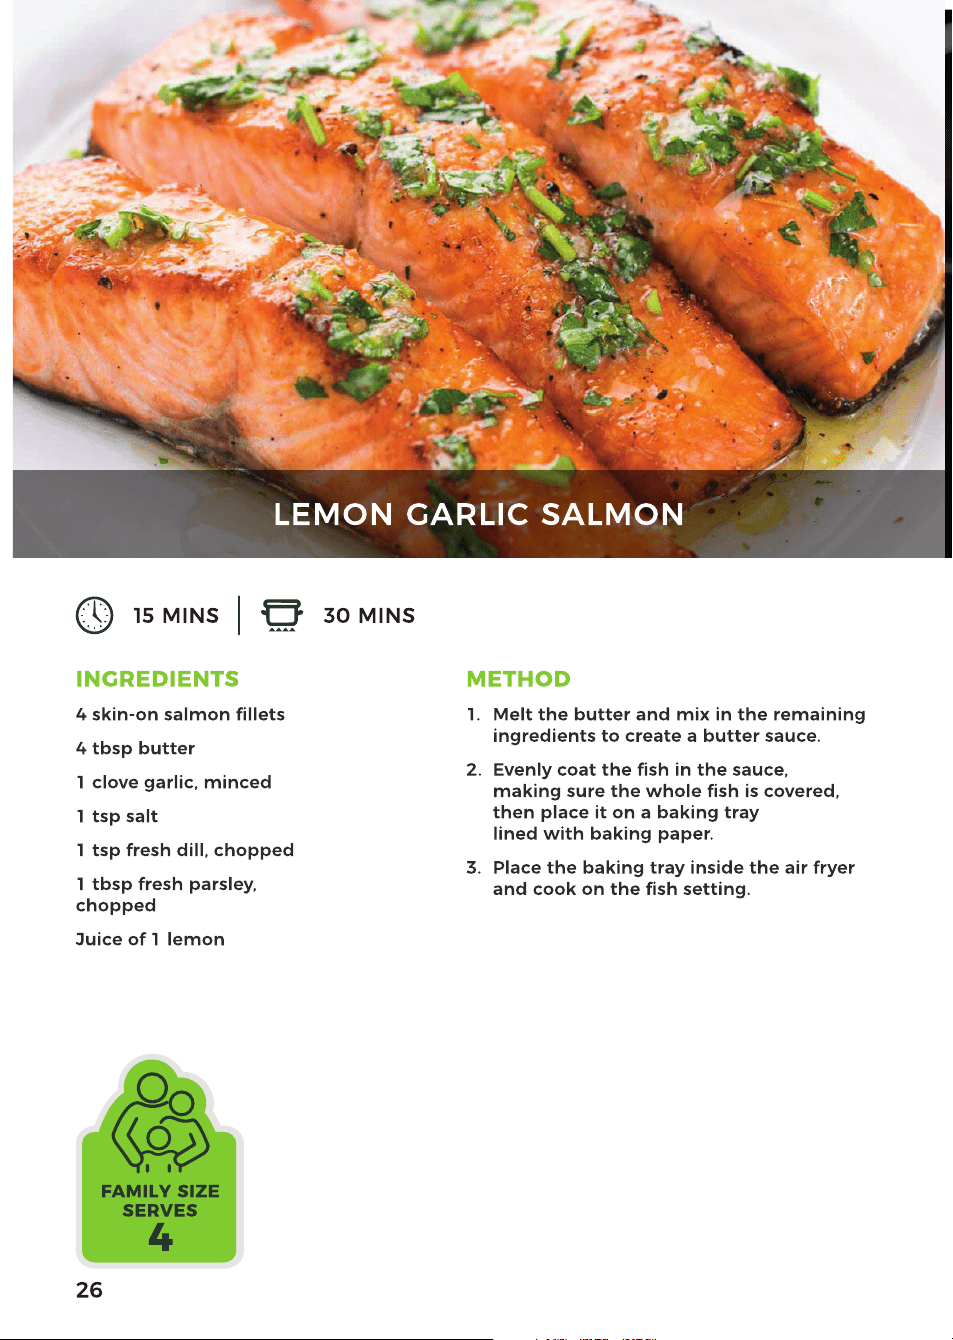
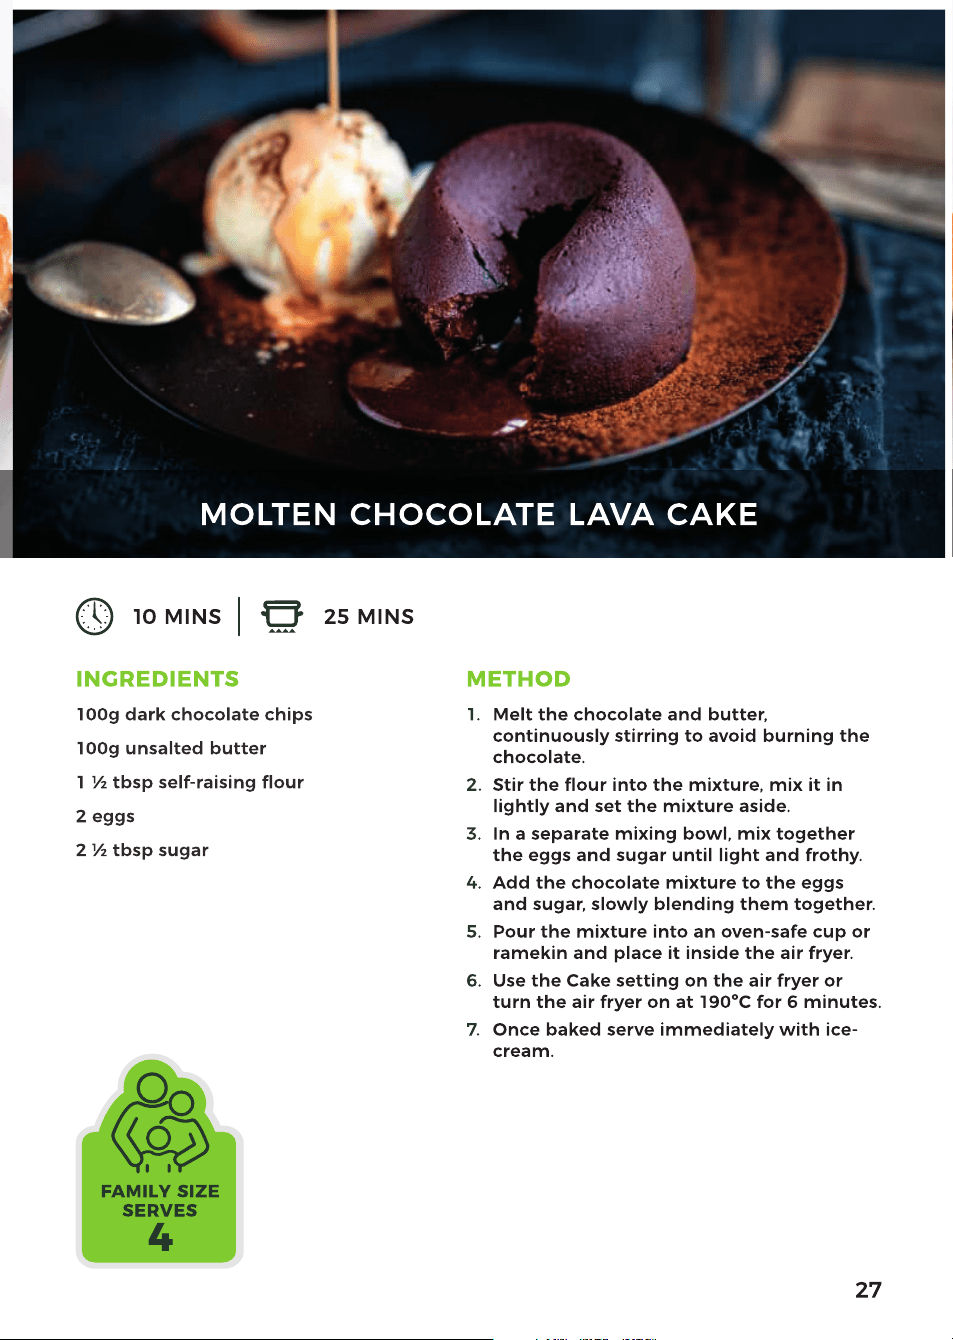
RECIPES 23-27

4
Please read these safety NOTES carefully
BEFORE using your Tower appliance.
These warnings have been provided in the
interest of safety. Basic safety precautions
should always be followed including the
following:
KEY SAFETY POINTS
CAUTION: During operation:
• Surfaces are hot. DO NOT touch the hot
surfaces.
• Hot steam is released through the air
outlet openings. Keep your hands and
face at a safe distance from the steam
and from the air outlet openings.
• Hot steam and air may escape when the
appliance is opened.
GENERAL SAFETY
• DO NOT immerse cords, plugs or any
part of the appliance in water or any
other liquid.
• Close supervision is necessary when any
appliance is used by or near children.
• Children should not play with the
appliance.
• This appliance can be used by children
aged from 8 years and above and
persons with reduced physical, sensory
or mental capabilities or lack of
experience and knowledge if they have
been given supervision or instruction
concerning use of the appliance in a
safe way and understand the hazards
involved.
• Cleaning and user maintenance should
not be undertaken by children without
supervision.
• Take care when any appliance is used
near pets.
• Switch off and unplug before fitting
or removing accessories, after use and
before cleaning.
• Allow the appliance to cool down for
approximately 30 minutes before fitting
or removing accessories or cleaning.
• If the supply cord or appliance is
damaged, stop using the appliance
immediately and seek advice from the
manufacturer, its service agent or a
similarly qualified person.
• The use of accessory attachments is
not recommended by the appliance
manufacturer, apart from those supplied
with this product.
• DO NOT use the appliance outdoors.
• DO NOT place the appliance on or near a
hot stove top or heated oven.
• Take care when moving the appliance, or
removing accessories and food as hot oil
or other hot liquids may be present.
• DO NOT clean the appliance with
metal kitchen utensils, caustic
or abrasive cleaning agents or scouring
sponges.
• DO NOT place anything on top
of the appliance.
• DO NOT use this appliance for anything
other than its intended use.
• This appliance is for household
use only.
It is important that this instruction
manual is retained for future
reference.
If the appliance is given to someone
else, it should always be accompanied
by these operating instructions, as
they form an integral part of the
appliance.
IMPORTANT SAFETY INFORMATION

5
WHILST AIR FRYING
• Please ensure that the appliance is used
on a stable, level, and heat resistant
surface.
• DO NOT place the appliance
on or near combustible materials
such as a tablecloth or curtain.
• DO NOT place the appliance against
a wall or against other appliances.
Leave at least 10cm free space
on the back and sides and 10cm free
space above the appliance.
• DO NOT place the appliance in
the presence of explosive
and/or flammable fumes.
• DO NOT cover the air inlet and outlet
during operation.
• Any accessories, baking trays or oven
dishes used in the appliance
will become hot. Always use oven gloves
when handling or removing anything
from the appliance.
• DO NOT place food that is still packed in
plastic wrap or plastic bags
in the appliance.
• DO NOT allow food to come into contact
with the heating element of
the appliance.
• If the appliance begins to emit smoke,
unplug it immediately.
Only open the door once the smoke has
cleared. Remove burnt remnants.
• DO NOT leave this appliance unattended
whilst operating.
PLUG AND CORD
• Check that the voltage of the main
circuit corresponds with the rating of the
appliance before operating.
• WARNING: DO NOT let the cord hang
over the edge of a table or counter,
serious burns may result from the air
fryer being pulled off the counter
where it may be grabbed by children
or become entangled with the user.
• DO NOT let the supply cord touch
hot surfaces.
• DO NOT carry the appliance by the
power cord.
• DO NOT use any extension cord
with this appliance.
• The appliance is not intended to be
operated by means of an external timer
or separate remote-control system.
• DO NOT pull the plug out by the cord
as this may damage the plug and/or
the cable.
• DO NOT plug and unplug with
wet hands.

6
IMPORTANT: As the colours in the mains
lead of this appliance may not correspond
with the coloured markings identifying
the terminals in your plug, please proceed
as follows:
The wires in the mains lead are labelled
in accordance with the following code:
Blue neutral [N] Brown live [L] Green/
Yellow [EARTH]
PLUG FITTING DETAILS
(WHERE APPLICABLE)
• The wire labelled blue is the neutral
and must be connected to the terminal
marked [N].
• The wire labelled brown is the live wire
and must be connected to the terminal
marked [L].
• The wire labelled green/yellow must be
connected to the terminal marked with
the letter [E].
• On no account must either the brown
or the blue wire be connected to the
[EARTH] terminal.
• Always ensure that the cord grip is
fastened correctly.
• The plug must be fitted with a fuse
of the same rating already fitted and
conforming to BS 1362 and be ASTA
approved.
• If in doubt consult a qualified electrician
who will be pleased to do this for you.
NON-REWIREABLE MAINS
PLUG
If your appliance is supplied with a
non-rewireable plug fitted to the mains
lead and should the fuse need replacing,
you must use an ASTA approved one
(conforming to BS 1362 of the same
rating).
If in doubt, consult a qualified electrician
who will be pleased to do this for you.
If you need to remove the plug -
disconnect it from the mains - then cut
it off of the mains lead and immediately
dispose of it
in a safe manner. Never attempt to reuse
the plug or insert it into a socket outlet as
there is a danger of an electric shock.
In the unlikely event the appliance develops a fault, stop using it immediately
and seek advice from the Customer Support Team. +44 (0) 333 220 6066
WARNING:
This appliance MUST be earthed!
FUSE
Earth
(G
reen/Yellow)
Fuse
Neutral
(Blue)
Live
(Bro
wn)
WIRING SAFETY FOR UK USE ONLY

8
1. Temperature selection panel
2. Roasting mode selection key
3. Temperature indicator
4. Air Frying mode selection key
5. Time selection panel
6. Start/Stop key
7. Dehydrate mode selection key
8. Power ON/OFF key
9. Temp Ace function key
10. LED Display
11. Grill temperature display
12. Baking mode selection key
13. Grill mode selection key
NOTE: The Temp ACE function
automatically detects the ideal cooking
temperature for each ingredient with the
help of a temperature probe.
CONTROL PANEL
1 32 4
91011
5
6
712
13
8

9
PREPARING FOR USE
1. Remove your appliance from the
packaging.
2. Check that there is no damage to the
cord or any visible damage to the body.
3. Check that all listed parts are present.
4. Remove any stickers or labels from the
appliance. DO NOT remove the rating
plate or any warnings.
5. Dispose of the packaging in a
responsible manner.
6. Locate the appliance on a stable,
horizontal, even and heat-resistant
surface in accordance with the
Important safety information section.
7. Thoroughly clean the inner pot and grill
plate with hot water, some washing up
liquid and a non-abrasive sponge.
8. Wipe the inside and outside of the
appliance with a moist cloth.
9. DO NOT fill the inner pot with oil,
frying fat or any other liquid. This is an
oil-free fryer that works on hot air.
10. Place the grill plate in the inner pot.
11. DO NOT put anything on top of the
appliance, as this will disrupt the airflow
and the hot air frying will be affected as
a result.
AUTOMATIC SWITCH OFF:
The Tower Air Fryer has a built-in timer,
which will automatically shut down the Air
Fryer when timer reaches zero.
You can manually switch off the Air Fryer
by holding down the Power ON/OFF key
until the unit stops working.
AIR FRYER INNER POT
SAFETY SWITCH:
For your safety, this air fryer contains
a safety switch in the inner pot designed
to keep if from accidentally turning on
when the inner pot is not properly situated
inside the appliance and the timer is
not set. Before using the air fryer, please
ensure that the inner pot is fitted, the lid
is closed and the cooking timer has been
set.
REMOVING THE INNER POT
The inner pot can be removed fully from
the air fryer. Press the button on the back
of the handle to release the pot from the
air fryer, then pull the pot up and away
from the main body of the unit until it
detaches.
BEFORE FIRST USE
10
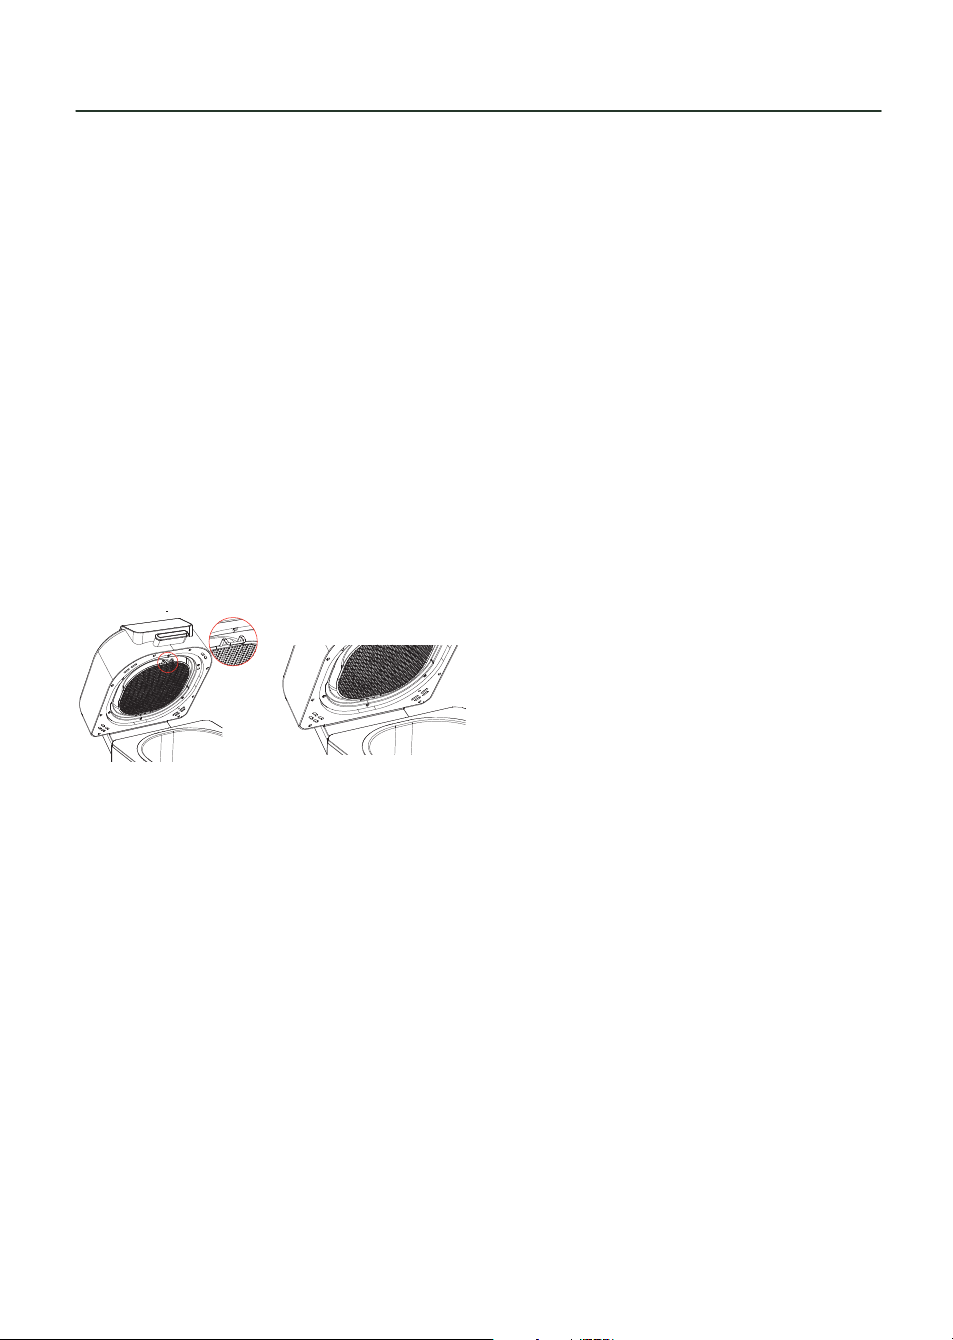
INSTALLING AND REMOVING
THE SPLASH GUARD
This unit comes complete with a splash
guard, to help protect the top of the
appliance while cooking.
To install the splash guard, slide it gently
into its corresponding slot underneath
the unit’s lid, then fasten the rear tab to
the clip at the back of the lid and push it
upwards until it clicks into place.
To remove the splash guard, use a finger
to lift the clip at the front of the lid, then,
with the clip still pushed up, pull one of
the other tabs towards you to release
the splash guard, as shown in the figure
below. Once the splash guard has been
released, carefully pull it out of its slot
in the body of the unit until it is fully
detached.
CAUTION! Always allow the splash guard
to cool down fully before attempting to
remove it.
NOTE: Remove the splash guard from the
unit after every use.
INSTALLING THE INNER POT
NOTE: Always ensure the inner pot is
installed and firmly secured into place
before using the unit.
To install the inner pot, simply place
it inside the appliance, ensuring the
indent on the pot is aligned with the
corresponding notch on the body of the
unit, then push it down until it clicks into
place.
NOTE: When using the unit in Grilling
mode, take care to place the grill plate
inside the inner pot before starting the
cooking process.
TURNING THE APPLIANCE ON
AND OFF
Once the splash guard and inner pot
have been correctly installed, plug the
unit into the mains. There will be a sound
prompt, the control panel will light up fully
for a few seconds and the Power On/Off
indicator will illuminate.
Press the Power On/Off button at any
time while the unit is in operation to turn
it off. The unit will stop working, and the
LED screen and all indicators will go out,
but the Power On/Off button will remain
illuminated.
STARTING THE COOKING
PROCESS
Once the unit has been turned on, press
any of the Mode buttons on the control
panel to select the corresponding
function: Grill, Bake, Roast, Air Fry or
Dehydrate. The LED screen will display
the default time and temperature for each
mode alternately.
Once the desired mode has been selected,
press the Start/Stop button to start the
cooking process. The unit will begin to
pre-heat, and the LED screen will display
‘Pre’ to show this process is under way,
then change to displaying vertical bars
while the process is unfolding.
NOTE: The unit will automatically pre-heat
for 3-4 minutes when using Grill, Bake,
Roast or Air Fry mode.
NOTE: Though highly recommended for
ideal results, the pre-heating process can
be manually skipped when in Bake, Roast
or Air Fry mode. To skip the pre-heating
process when cooking in these modes,
press the corresponding key on the unit’s
control panel while the unit is pre-heating.
The unit’s LED display will show the ‘Add
Food’ prompt to indicate pre-heating has
been skipped.
NOTE: In Dehydrate mode, the unit will
not need to pre-heat, and the cooking
process will begin directly after the mode
is selected.
USING YOUR AIR FRYER

11
USING YOUR AIR FRYER
When the unit has finished pre-heating,
the LED screen will display ‘Add Food’, to
indicate the unit is ready to cook. Lift the
lid, add food to the pot and close the lid.
The cooking process will automatically
begin and the cooking time will begin
counting down on the unit’s LED display,
to show the cooking process has been
started.
Press the Start/Stop key again while the
cooking process is under way to pause
it, and again when cooking is paused to
resume it.
MODE SELECTION
This unit is equipped with a choice of five
functionalities:
•
Air frying: Crisp, delicious, healthy
food without the need to deep fry.
•
Roasting: Super succulent roast
chicken, pork, beef and lamb.
•
Crisper grill: Add flavour to steak,
chicken, fish or vegetables.
•
Baking: Great for baking breads, tarts,
pies and more.
•
Dehydrate: Dehydrate slices of fruit
and vegetables to make low fat, low
sugar snacks.
Press the corresponding key on the unit’s
control panel to select each cooking
mode. The corresponding indicator will
light up and the unit’s LED display will
show the default time and temperature
for that mode.
NOTE: To select a new mode when one
mode is in operation, press the Start/
Pause button to pause the cooking
process, press the button for the new
mode to switch over to it and press the
Start/Pause button again to resume the
process.
GRILL MODE
Press the Grill key on the unit’s control
panel to use the unit’s grilling function.
The corresponding indicator and the Grill
Temperature display will begin to flash to
show this mode has been selected.
SELECTING THE GRILLING
TEMPERATURE
Once grilling mode has been selected,
repeatedly press the Grill key to
cycle between the four available
temperatures: Low, Medium, High and
Max. The corresponding bars on the grill
temperature display will begin to flash
to show each temperature has been
selected.
Refer to the table below for guidance on
when to select each grilling temperature.
LOW:
205º
MEDIUM
215º
HIGH
245º
MAX UP
TO 265º
Bacon
Frozen
meats
Steak Veggies
Sausage
Marinated
/sauced
meats
Chicken Fruit
Calzones Burgers Pizza
When
using
thick BBQ
sauce
Hotdogs
Fresh/
Frozen
seafood
Kebabs
The temperature can also be selected
manually, if required. Press the
Temperature
Selection keys on the unit’s control
panel to adjust the cooking temperature
by increments of 5. Press the
key to
increase the temperature, or the key to
decrease it. The new temperature will be
displayed on the unit’s LED screen to show
this setting has been adjusted.
NOTE: The grilling temperature for specific
items can also be set automatically, using
the Temp ACE function and the unit’s
temperature probe. Refer to pages 15/16
for more information on how to use the
Temp ACE function.
Once the correct temperature has been
set, press the Time Selection keys on the
unit’s control panel to adjust the cooking
time, from 1 to 30 minutes, by increments
of 1. Press the
key to increase the time,
or the
key to decrease it.

12
The new cooking time will be displayed on
the unit’s LED screen to show this setting
has been adjusted
Once all the correct settings have been
selected, press the Start/Stop key to start
the cooking process.
When the cooking process is done, the
unit will give off a sound prompt and the
LED display will show ‘End’ to indicate
cooking has ended. When this occurs,
open the unit’s lid, remove your food and
allow it to stand for about a minute before
enjoying.
WARNING! The inner pot will be VERY hot
after cooking. Take extreme caution when
removing it from the unit. DO NOT set the
inner pot directly on the countertop or any
similar surface when it is hot, as it might
damage them.
GRILLING TIPS:
There is an art to determining when your
steak, lamb chop or cutlet is cooked to
the correct degree of doneness - rare,
medium rare, medium, medium well or
well done - but it is easily mastered with
these handy hints and tips.
Rare: Cook for a few minutes per side,
depending on thickness. Turn once
only. Cook until the steak feels very
soft with the back of the tongs. A meat
thermometer will show the internal
temperature of a rare steak as 55-60°C /
130-140°F.
Medium rare: Cook on one side until
moisture is just visible on top surface. Turn
once only. Cook on the other side until
the surface moisture is visible. The steak
will be cooked to medium rare when it
feels soft with the back of the tongs. A
meat thermometer will show the internal
temperature of a medium rare steak as
60-65°C / 140-150°F.
Medium: Cook on one side until moisture
is pooling on the top surface. Turn once
only. Cook on the second side until
moisture is visible. The steak will be
cooked to medium when it feels springy
with the back of the tongs.
A meat thermometer will show the
internal temperature of a medium steak as
65-70°C / 150-160°F.
Medium well: Cook on one side until
moisture is pooling on top surface.
Turn and cook on the second side until
moisture is pooling on top. Reduce heat
slightly and continue to cook until the
steak feels firm with the back of the
tongs. A meat thermometer will show the
internal temperature of a medium well
steak as 70-75°C / 160-170°F.
Well done: Cook on one side until
moisture is pooling on top surface.
Turn and cook on the second side until
moisture is pooling on top. Reduce heat
slightly and continue to cook until the
steak feels very firm with the back of the
tongs. A meat thermometer will show the
internal temperature of a well done steak
as 75°C / 170°F.
BAKE MODE
Press the Bake key on the unit’s control
panel to use the unit’s baking function.
The corresponding indicator will light up
and the unit’s LED display will show the
default time and temperature for this
mode to show it has been selected.
If required, press the Temperature
Selection keys on the unit’s control
panel to adjust the cooking temperature
by increments of 5. Press the
key to
increase the temperature, or the key
to decrease it. The new temperature will
be displayed on the unit’s LED screen to
show this setting has been adjusted.
NOTE: The baking temperature for specific
items can also be set automatically, using
the Temp ACE function and the unit’s
temperature probe. Refer to pages 15/16
for more information on how to use the
Temp ACE function.
Once the correct temperature has been
set, press the Time Selection keys on the
unit’s control panel to adjust the cooking
time, from 1 to 90 minutes, by increments
of 1. Press the
key to increase the time,
or the
key to decrease it.
USING YOUR AIR FRYER

13
The new cooking time will be displayed on
the unit’s LED screen to show this setting
has been adjusted.
TIP: Adjust baking times on conventional
recipes by about 10 minutes, to
account for the unit’s powerful cooking
performance.
Once all the correct settings have been
selected, press the Start/Stop key to
start the cooking process. When the
pre-heating stage ends and the LED
display shows the ‘Add Food’ prompt,
place the baking pan or tray containing
the ingredients inside the unit’s inner pot
and close the lid. The cooking process will
resume as normal.
When the cooking process is done, the
unit will give off a sound prompt and the
LED display will show ‘End’ to indicate
cooking has ended. When this occurs,
open the unit’s lid, remove your food and
allow it to stand for about a minute before
enjoying.
WARNING! The inner pot will be VERY hot
after cooking. Take extreme caution when
removing the inner pot and the cake tin
from the unit. We recommend using an
oven glove. DO NOT set the inner pot
directly on the countertop or any similar
surface when it is hot, as it might damage
them.
ROAST MODE
Press the Roast key on the unit’s control
panel to use the unit’s roasting function.
The corresponding indicator will light up
and the unit’s LED display will show the
default time and temperature for this
mode to show it has been selected.
If required, press the Temperature
Selection keys on the unit’s control
panel to adjust the cooking temperature
by increments of 5. Press the
key to
increase the temperature, or the
key
to decrease it. The new temperature will
be displayed on the unit’s LED screen to
show this setting has been adjusted.
NOTE: The roasting temperature
for specific items can also be set
automatically, using the Temp ACE
function and the unit’s temperature
probe. Refer to page 15/16 for instructions
on how to carry out this measurement.
Once the correct temperature has been
set, press the Time Selection keys on the
unit’s control panel to adjust the cooking
time, from 1 to 90 minutes, by increments
of 1. Press the
key to increase the time,
or the key to decrease it. The new
cooking time will be displayed on the
unit’s LED screen to show this setting has
been adjusted.
TIP: Adjust roasting times on conventional
recipes by about 10 minutes, to
account for the unit’s powerful cooking
performance.
Once all the correct settings have been
selected, press the Start/Stop key to start
the cooking process.
When the cooking process is done, the
unit will give off a sound prompt and the
LED display will show ‘End’ to indicate
cooking has ended. When this occurs,
open the unit’s lid, remove your food and
allow it to stand for about a minute before
enjoying.
WARNING! The inner pot will be VERY hot
after cooking. Take extreme caution when
removing it from the unit. DO NOT set the
inner pot directly on the countertop or any
similar surface when it is hot, as it might
damage them.
AIR-FRY MODE
Press the Air-Fry key on the unit’s control
panel to use the unit’s air frying function.
The corresponding indicator will light up
and the unit’s LED display will show the
default time and temperature for this
mode to show it has been selected.
If required, press the Temperature
Selection keys on the unit’s control
panel to adjust the cooking temperature
by increments of 5. Press the
key to
increase the temperature, or the key
to decrease it. The new temperature will
be displayed on the unit’s LED screen to
show this setting has been adjusted.
USING YOUR AIR FRYER

14
NOTE: The crisping temperature
for specific items can also be set
automatically, using the Temp ACE
function and the unit’s temperature
probe. Refer to pages 15/16 for more
information on how to use the Temp ACE
function.
Once the correct temperature has been
set, press the Time Selection keys on the
unit’s control panel to adjust the cooking
time, from 1 to 30 minutes, by increments
of 1. Press the
key to increase the time,
or the key to decrease it. The new
cooking time will be displayed on the
unit’s LED screen to show this setting has
been adjusted.
TIP: Adjust frying times on conventional
recipes by about 10 minutes, to
account for the unit’s powerful cooking
performance.
Once all the correct settings have been
selected, press the Start/Stop key to start
the cooking process.
When the cooking process is done, the
unit will give off a sound prompt and the
LED display will show ‘End’ to indicate
cooking has ended. When this occurs,
open the unit’s lid, remove your food and
allow it to stand for about a minute before
enjoying.
WARNING! The inner pot will be VERY hot
after cooking. Take extreme caution when
removing it from the unit. DO NOT set the
inner pot directly on the countertop or any
similar surface when it is hot, as it might
damage them.
AIR-FRYING TIPS:
• If the food is cold, increase the
cooking time by a few extra minutes.
• To remove large or fragile ingredients,
lift the ingredients out of the inner
pot with a pair of tongs.
• The cooking time will depend on the
size of your ingredients. Smaller sizes
may require a shorter cooking time.
• Shaking smaller ingredients and
turning food halfway during the
cooking time optimises the end result
and can help prevent unevenly fried
ingredients.
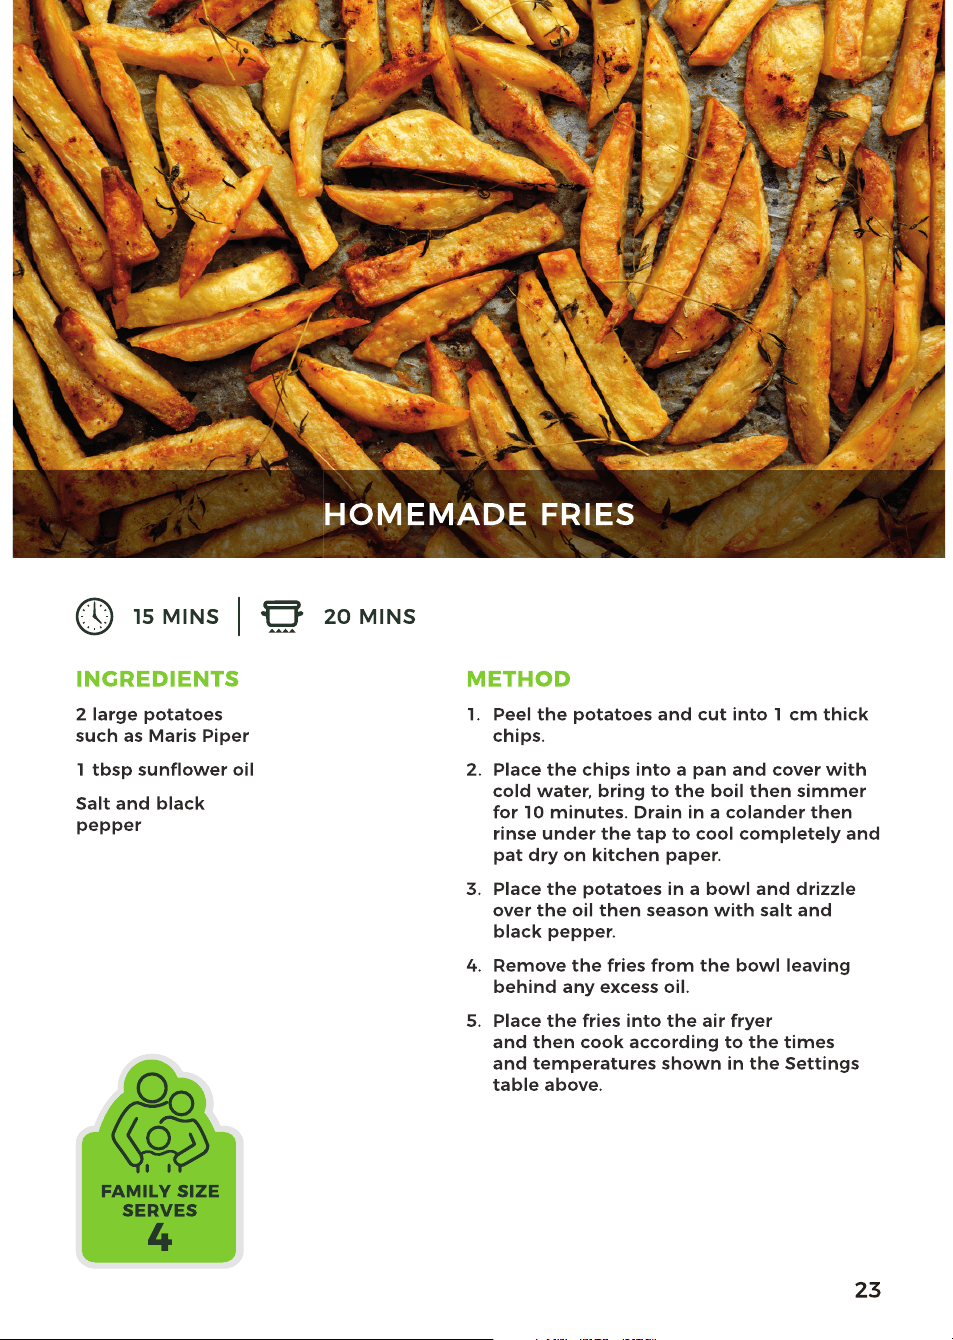
• For perfectly fluffy fries, it is
recommended that potatoes be
parboiled before frying.
• Add some oil to fresh potatoes for a
crispy result. Fry your ingredients in
the air fryer within a few minutes after
you added the oil.
• Be cautious of using extremely greasy
foods.
• Snacks that can be prepared in an
oven can also be prepared in the unit.
• Use pre-made dough to prepare filled
snacks quickly and easily. Pre-made
dough also requires a shorter cooking
time than home-made dough.
• When battering items, ensure they
are battered in the correct order,
so that they do not fall apart while
crisping or frying. Items should be
first be coated in flour, then butter or
egg, and finally breadcrumbs.
• The table on page 17 offers reference
times and quantities for frying a
variety of popular ingredients:
DEHYDRATE MODE
Press the Dehydrate key on the unit’s
control panel to use the unit’s dehydrating
function. The corresponding indicator will
light up and the unit’s LED display will
show the default time and temperature
for this mode to show it has been
selected.
If required, press the Temperature
Selection keys on the unit’s control
panel to adjust the cooking temperature
by increments of 5. Press the
key to
increase the temperature, or the key
to decrease it. The new temperature will
be displayed on the unit’s LED screen to
show this setting has been adjusted.
Once the correct temperature has been
set, press the Time Selection keys on
the unit’s control panel to adjust the
cooking time, from 1 minute to 9 hours,
by increments of one minute. Press the
USING YOUR AIR FRYER

15
key to increase the time, or the key
to decrease it. The new cooking time will
be displayed on the unit’s LED screen to
show this setting has been adjusted.
WARNING! The inner pot will be VERY hot
after cooking. Take extreme caution when
removing it from the unit. DO NOT set the
inner pot directly on the countertop or any
similar surface when it is hot, as it might
damage them.
Once all the correct settings have been
selected, press the Start/Stop key to start
the cooking process.
NOTE: Food should be checked regularly
throughout the dehydration process, to
prevent it from losing too much moisture
and becoming inedible.
When the cooking process is done, the
unit will give off a sound prompt and the
LED display will show ‘End’ to indicate
cooking has ended. When this occurs,
open the unit’s lid, remove your food and
allow it to stand for a few moments before
enjoying.
THE TEMP ACE FUNCTIONALITY
This unit is equipped with a smart Temp
ACE function, which automatically detects
the ideal cooking temperature for each
ingredient with the help of a temperature
probe.
To use the Temp ACE function, begin
choosing the desired cooking mode. To do
this, press the corresponding key on the
unit’s control panel.
Once the correct settings have been
programmed, plug the temperature probe
into the corresponding socket on the
right-hand side of the control panel, taking
care to ensure the cord is not kinked, as
shown in the illustration below.
NOTE: Take care to ensure the
temperature probe is correctly installed,
as detailed in the section above and
diagram opposite, before selecting the
Temp ACE function. If the probe is not in
place, the unit will display the text ‘Plug
In’ on the LED screen until the plug is
connected to the unit.
Once the temperature probe is connected
to the unit, press the Temp ACE key, then
use the Temperature selection panel to
select the desired cooking temperature.
FOOD
SET TEMP
ACE TO
RESTED FOOD
TEMPERATURE
Fish 60ºC 65ºC
Poultry 75ºC 75ºC or higher
Pork 60ºC 65ºC
Beef
Rare 50ºC 52ºC
Medium
Rare
55ºC 58ºC
Medium 60ºC 65ºC
Medium
Well
65ºC 66ºC
Well Done 70ºC 72ºC
Ground
Pork
70ºC 72ºC
Ground
Turkey
70ºC 74ºC
NOTE: When using the Temp ACE setting
and temperature probe to select cooking
temperatures, food should be allowed to
rest inside the unit for approximately five
minutes once the cooking time elapses.
This is because, in this cooking mode, the
inner temperature of food steadily rises as
it is left to stand, ensuring the ingredients
are fully cooked throughout. The table
above shows the recommended Temp
ACE and carry-over temperatures for a
variety of common ingredients.
USING YOUR AIR FRYER
16
NOTE: The probe can also be used
to measure the inner temperature of
ingredients, even if no cooking program
has been selected. To do this, insert the
probe into the food, as detailed below,
then press the Temp ACE button for
approximately two seconds. The inner
temperature of the food will be displayed
on-screen for about five seconds.
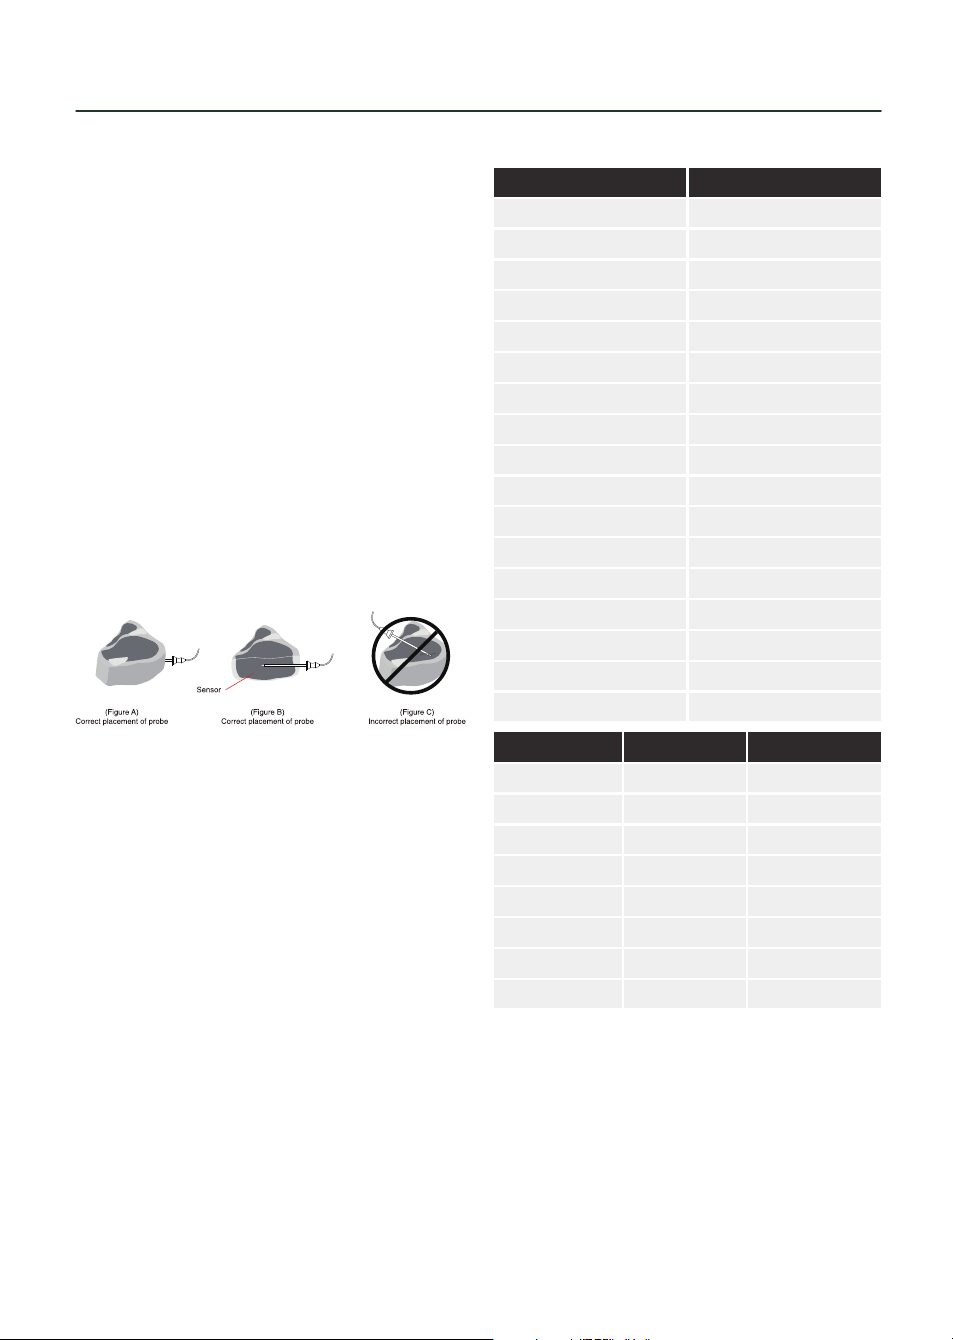
Insert the temperature probe into the
thickest part of the largest protein item,
in a horizontal position, as shown in the
figure below.
After pre-heating, and with the probe
in place, open the lid and place the food
inside, ready for cooking.
Once the ingredients are in place, press
the Start/Stop key to begin the cooking
process.
NOTE: The probe will not provide accurate
readings unless placed into the item
correctly. DO NOT insert the probe into
the item vertically or at an angle.
NOTE: When measuring the temperature
of meat or fish, the probe should be
placed close to, but not touching the
bone.
NOTE: The TEMP ACE function may be
accidentally activated if the key is pressed
while the unit is paused or held down for
about 3 seconds. The text ‘Plug In’ will
be displayed on the unit’s LED screen to
indicate the button has accidentally been
pressed. When this occurs, press the Temp
ACE button again. The unit will resume
regular operation.
WEIGHTS AND MEASURES
Check these charts for basic imperial
to metric conversions of weights.
IMPERIAL Metric
1/2 oz 15g
1 oz 30g
2 oz 60g
3 oz 90g
4 oz 110 g
5 oz 140g
6 oz 170g
7 oz 200g
8 oz 225g
9 oz 255g
10 oz 280g
11 oz 310g
12 oz 340g
13 oz 370g
14 oz 400g
16 oz 425g
1 lb oz 450g
METRIC IMPERIAL US CUPS
250ml 8 fl oz 1 cup
180ml 6 fl oz 3/4 cup
150ml 5 fl oz 2/3 cup
120ml 4 fl oz 1/2 cup
75ml 2 ½ fl oz 1/3 cup
60ml 2 fl oz 1/4 cup
30ml 1 fl oz 1/8 cup
15ml 1/2 fl oz 1 tablespoon
FOOD ALLERGIES
IMPORTANT: Some of the recipes
contained in this document may contain
nuts and/or other allergens. Please be
careful when making any of our sample
recipes that you ARE NOT allergic to any of
the ingredients. For more information on
allergies, please visit the Food Standards
Agency’s website at: www.food.gov.uk
USING YOUR AIR FRYER

17
Min- Max
Weight (g)
Time
(mins)
Temp (°C) Extra information Shake
POTATO & FRIES
Thin Frozen Fries 400-500 18-20 200 Yes
Thick Frozen Fries 400-500 20-25 200 Yes
Potato Gratin 600 20-25 200 Yes
MEAT & POULTRY
Steak 100-600 10-15 180
Pork Chops 100-600 10-15 180
Hamburger 100-600 10-15 180
Sausage Roll 100-600 13-15 200
Drumsticks 100-600 25-30 180
Chicken Breast 100-600 15-20 180
SNACKS
Spring Rolls 100-500 8-10 200 Use Oven Ready Yes
Frozen Chicken Nuggets 100-600 6-10 200 Use Oven Ready Yes
Frozen Fish Fingers 100-500 6-10 200 Use Oven Ready
Frozen Bread Crumbed
Cheese Snacks
100-500 8-10 180 Use Oven Ready
Stuffed Vegetables 100-500 10 160
BAKING
Cake 400 20-25 160 Use Baking Tin
Quiche 500 20-22 180 Use Baking Tin /
Oven Dish
Muns 400 15-18 200 Use Baking Tin
Sweet Snacks 500 20 160 Use Baking Tin /
Oven Dish
SETTINGS

19
WARNING! Do not immerse the appliance
in water or any other liquid.
NOTE: Clean the appliance after every use.
1. DO NOT use metal kitchen utensils or
abrasive cleaning materials to clean
them, as this may damage
the non-stick coating.
2. Remove the mains plug from the wall
socket and let the appliance cool down.
NOTE: Remove the inner pot to let the
air fryer cool down more quickly.
3. Wipe the outside of the appliance with
a moist cloth.
4. Clean the inner pot and grill plate with
hot water, some washing-up liquid and
a non-abrasive sponge.
5. You can use degreasing liquid to
remove any remaining dirt.
NOTE: The inner pot is NOT dishwasher-
proof. NEVER place the inner pot in the
dishwasher.
CLEANING AND CARE
TIP: If dirt is stuck to the bottom of the
inner pot, fill the inner pot with hot
water with some washing-up liquid. Let
the inner pot soak for approximately 10
minutes.
6. Clean the inside of the appliance with
hot water and a non-abrasive sponge.
7. Clean the heating element with the
cleaning brush to remove any food
residues.
STORAGE
• Ensure that the air fryer is cool, clean
and dry before you store it.
• Store the appliance in a cool and dry
place.

20
PROBLEM POSSIBLE CAUSE POSSIBLE SOLUTION
The air fryer does not
work.
The appliance is not
plugged in.
Plug the appliance into an
earthed wall socket.
The timer has not been
set.
Set the time required.
The Power ON/OFF key
has not been pressed.
Press the Power ON/OFF key.
The inner pot is not
correctly inserted into
the unit
Ensure the inner pot
is correctly inserted. If
necessary, refer to the
corresponding section of this
instruction manual.
The ingredients are not
done. Too much food has been
added to the unit.
Put smaller batches of
ingredients in the air fryer.
Smaller batches are fried
more evenly.
The set temperature is
too low.
Set to an appropriate
temperature, re-fry food.
The cooking time is too
short.
Set an appropriate cooking
time and re-fry the food.
Fresh fries are fried
unevenly in the air fryer.
Wrong type of potatoes
used.
Use fresh potatoes and make
sure they stay firm during
frying.
The potato sticks were
not rinsed adequately
before frying
Rinse the potato sticks
properly to remove starch
from the outside.
Fried snacks are not
crispy when they come
out of the unit.
Some food materials
have to be fried with oil.
Coat the surface of the food
with a thin layer of oil on first,
then start to fry them.
Wrong type of snacks
used.
Use oven snacks or lightly
brush some oil onto the
snacks for a crispier result.
Fresh fries are not
crispy when they come
out of the air fryer.
The crispiness of the fries
depends on the amount
of oil and water in the
fries.
Make sure you dry the potato
sticks properly before you
add the oil.
Cut the potato sticks smaller
for a crispier result.
Add slightly more oil for a
crispier result.
TROUBLESHOOTING

21
PROBLEM POSSIBLE CAUSE POSSIBLE SOLUTION
The appliance is
smoking
The ingredients have a
high oil content.
Smoking will be normal.
The unit contains grease
from previous use.
White smoke is caused by
grease heating up inside the
fryer. Clean the unit properly
after each use.
The splatter guard is not
correctly installed.
Install the splatter guard
as detailed in the relevant
section of this instruction
manual.
The cooking settings
have not been correctly
programmed.
Adjust the cooking settings
as required.
The unit is showing an
unexpected message.
Shut Lid
The unit’s lid is not properly
closed. Close the unit’s lid
properly.
Add Pot
The pot is not installed.
Install the pot into the unit,
as detailed in the relevant
section of this instruction
manual.
Plug In
The probe is not connected to
the unit. Connect the probe
to the unit, as detailed in
the relevant section of this
instruction manual.
E
The unit has encountered
an error or is not functioning
properly. Stop using it
immediately and contact the
Customer Support Team.
TROUBLESHOOTING

22
Appliances bearing the symbol shown
here may not be disposed of in domestic
rubbish. You are required to dispose of old
electrical and electronic appliances like
this separately.
Please visit www.recycle-more.co.uk
or www.recyclenow.co.uk for access
to information about the recycling of
electrical items.
Please visit www.weeeireland.ie for
access to information about the recycling
of electrical items purchased in Ireland.
If you have any questions or concerns about your new product,
please contact our helpful Customer Support Team:
+44 (0) 333 220 6066
www.towerhousewares.co.uk
Please have your Model No. available. This can be found on the front
cover of this instruction manual and on the appliance’s rating label.
The WEEE directive, introduced in August
2006, states that all electrical items must
be recycled, rather than taken to landfill.
Please arrange to take this appliance to
your local Civic Amenity site for recycling,
once it has reached the end of its life.
DISPOSAL OF THE UNIT
CUSTOMER SUPPORT

28
This product is guaranteed for 12 months
from the date of original purchase.
If any defect arises due to faulty
materials of workmanship, the faulty
products must be returned to the place
of purchase.
Refund or replacement is at the
discretion of the retailer.
THE FOLLOWING CONDITIONS APPLY:
The product must be returned to the
retailer with proof of purchase or a
receipt.
The product must be installed and used
in accordance with the instructions
contained in this instruction guide.
It must be used only for domestic
purposes.
It does not cover wear and tear, damage,
misuse or consumable parts.
Tower has limited liability for incidental
or consequential loss or damage.
This guarantee is valid in the UK and
Eire only.
The standard one year guarantee is only
extended to the maximum available
for each particular product upon
registration of the product within 28
days of purchase. If you do not register
the product with us within the 28 day
period, your product is guaranteed for
1 year only.
To validate your extended warranty,
please visit www.towerhousewares.
co.uk and register with us online.
Please note that length of extended
warranty offered is dependent on
product type and that each qualifying
product needs to be registered
individually in order to extend its
warranty past the standard 1 year.
Extended warranty is only valid with
proof of purchase or receipt.
Your warranty becomes void should you
decide to use non Tower spare parts.
Spare parts can be purchased from
www.towerhousewares.co.uk
Or call our Customer Support Team on:
+44 (0) 333 220 6066
We hope you enjoy your appliance for many years...
YEAR
GUARANTEE
3
0223V1
