
Please give us a chance to make it right and do better !
Contact our friendly customer service department for help first.
Replacements for missing or damaged parts will be shipped ASAP !
Contact Us !
Do NOT return this item.
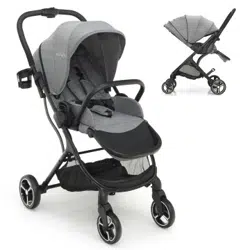
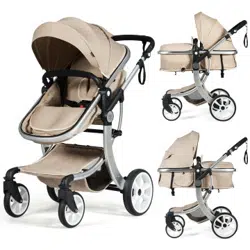
BABY STROLLER
BC10054
USER’S MANUAL
THIS INSTRUCTION BOOKLET CONTAINS IMPORTANT SAFETY INFORMATION. PLEASE READ AND KEEP FOR FUTURE REFERENCE.
US:cs.us@costway.com
UK:cs.uk@costway.com
US office: Fontana UK office: Ipswich AU office: Truganina
EN FR

Please give us a chance to make it right and do better !
Contact our friendly customer service department for help first.
Replacements for missing or damaged parts will be shipped ASAP !
Contact Us !
Do NOT return this item.
BABY STROLLER
BC10054
USER’S MANUAL
THIS INSTRUCTION BOOKLET CONTAINS IMPORTANT SAFETY INFORMATION. PLEASE READ AND KEEP FOR FUTURE REFERENCE.
US:cs.us@costway.com
UK:cs.uk@costway.com
US office: Fontana UK office: Ipswich AU office: Truganina
EN FR
02 03
Before You Start
General Warnings:
Danger! Keep all small parts and packaging materials for this product away from
babies and children, otherwise they may pose a choking hazard.
The product must be installed and used under the supervision of an adult.
Read through each step carefully and follow the proper order.
Remove all Packaging, separate and count all parts and hardware before
installation.
Please ensure that all parts are correctly installed, incorrect installation can lead to
a danger.
We recommend that, where possible, all items are assembled near the area in
which they will be placed in use, to avoid moving the product unnecessarily once
assembled.
Ensure a secure surface during installation, and place the product always on a flat,
steady and stable surface.
Please read all instructions carefully and keep it for future reference.
Thank you for purchasing our Baby stroller!
• Please read Operating Instructions before using the stroller
• It maybe affect use if you don’t follow the Operating Instructions
WARNING: USE THIS HARNESS AT ALL TIMES.
• USE THIS STRAP TO STOP THE PRAM/STROLLER* ROLLING AWAY.
• The pram/stroller* must not be used near an open fire or exposed
flame.
• Care be taken if the pram/stroller* is used on stairs or escalators.
• The brakes must always be applied when the pram/stroller is not
moving.
• Accessories packed separately shall have their own instruction
sheet or book.
• It is unsafe to use accessories other than those approved by
the vehicle manufacturer.
• For accessories, advice shall be provided as to ITEM 608 vehicles
the accessory may be used with.
WARNING
TO AVOID INJURY OR DEATH:
ALWAYS APPLY THE BRAKES WHENEVER THE PRAM/STROLLER
IS STATIONARY.
• DO NOT LEAVE CHIL DREN UNATTENDED.
• SECURE THE CHILD IN THE HARNESSAT ALL T IMES.
• DO NOT CARRY EXTRA CHILDREN OR BAGS ON THIS
PRAM/STROLLER*.
• MAKE SURE KIS CAN’T MOVE ANY PART.
• NOT RECOMMENDED FOR A CHILD UNDER 6 MONTHS OLD
WHEN STROLLER MODE;

04 05
• Instructions and reasons for use if there is a manual or automatic
device provided to close the foot opening area.
• Never leave the harness buckled when not fitted to a child in the
pram/stroller* because the harness can form loops which may pose
a strangulation hazard
• Instructions for regular inspection and maintenance, e. g.
lubrication, freedom of movement of locking devices, and security
of essential components.
• Instructions for erecting and folding, with particular reference to
all locking devices and storage latch, highlighting the danger of
being injured in moving parts; and advice on safe carrying of the
folded vehicle; and instructions for applying or engaging the
storage latch if the storage latch does not engage automatically.
• The weight capacity of the storage basket is 6.6 lbs (3 kg), the
weight capacity of whole stroller is 33 lbs (15 kg). Excessive weight
may cause a hazardous unstable condition to exist.
WARNING: Never leave child unattended.
WARNING: Avoid serious injury from falling or sliding out.
Always use seat belt.
WARNING: Parcels or accessory items, or both, placed on the
unit may cause the unit to become unstable.
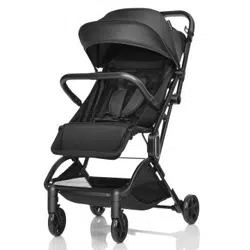
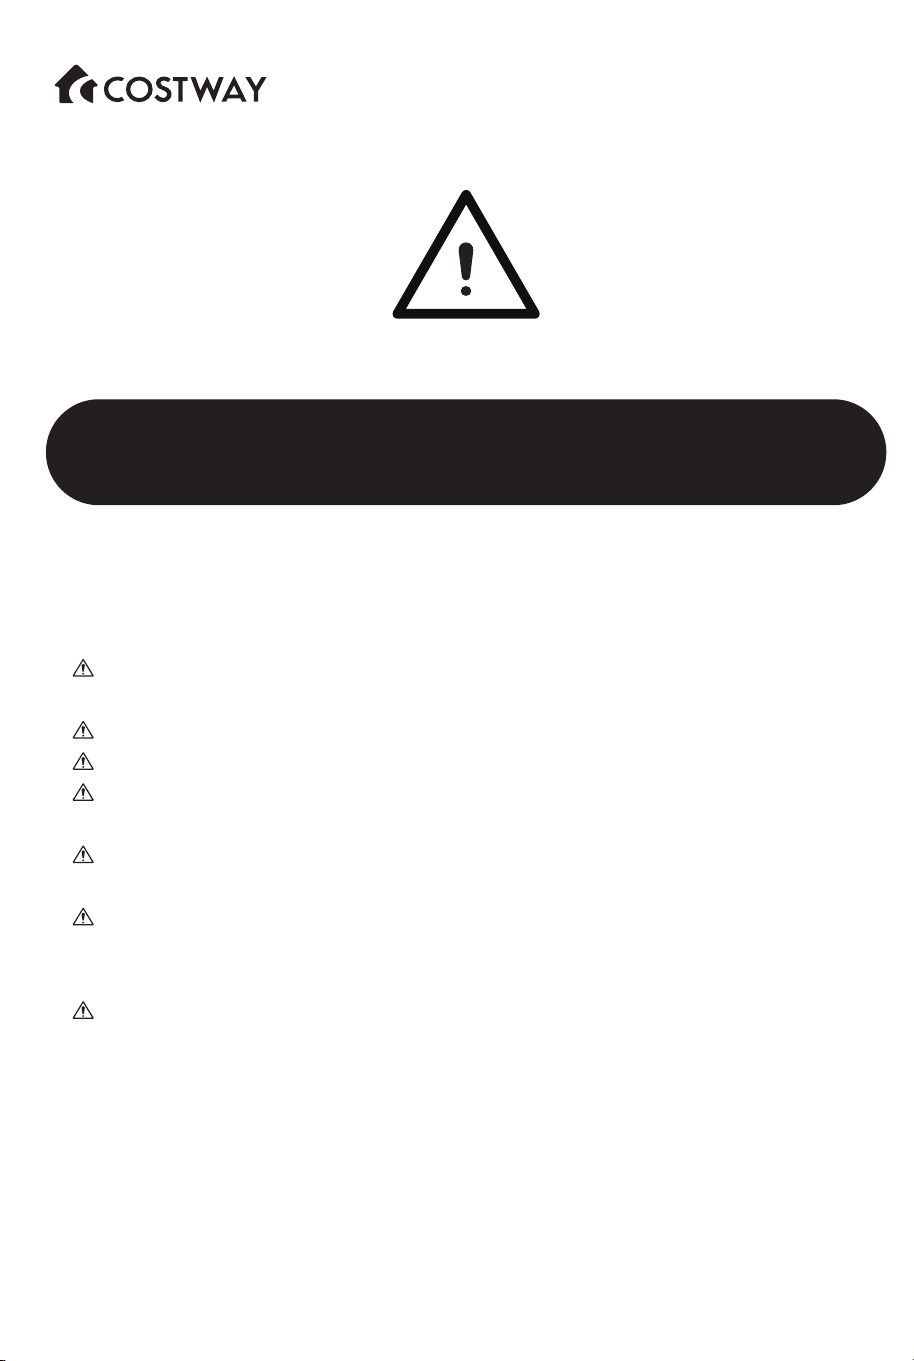
Parts schematic
Removable independent components
Handle
Handle height adjustment button
Close the stroller button
Armrest
removal button
Seat/Sleeping part removal button
Seat/
Sleeping part
Seat/Sleeping part adjustment button
Front wheel
orieritation
Front wheel
removal
button
Basket for storage
Rear wheel removal button
Rear wheel
Rear brake pedal
lock for closing
Front wheel
canopy
armrest
Frame
Amrest
Cotton pad
wheels
Basket for storage
Foot cover
Seat/Sleeping part
Dust cover of the basket
Handle belt
04 05
• Instructions and reasons for use if there is a manual or automatic
device provided to close the foot opening area.
• Never leave the harness buckled when not fitted to a child in the
pram/stroller* because the harness can form loops which may pose
a strangulation hazard
• Instructions for regular inspection and maintenance, e. g.
lubrication, freedom of movement of locking devices, and security
of essential components.
• Instructions for erecting and folding, with particular reference to
all locking devices and storage latch, highlighting the danger of
being injured in moving parts; and advice on safe carrying of the
folded vehicle; and instructions for applying or engaging the
storage latch if the storage latch does not engage automatically.
• The weight capacity of the storage basket is 6.6 lbs (3 kg), the
weight capacity of whole stroller is 33 lbs (15 kg). Excessive weight
may cause a hazardous unstable condition to exist.
WARNING: Never leave child unattended.
WARNING: Avoid serious injury from falling or sliding out.
Always use seat belt.
WARNING: Parcels or accessory items, or both, placed on the
unit may cause the unit to become unstable.
Parts schematic
Removable independent components
Handle
Handle height adjustment button
Close the stroller button
Armrest
removal button
Seat/Sleeping part removal button
Seat/
Sleeping part
Seat/Sleeping part adjustment button
Front wheel
orieritation
Front wheel
removal
button
Basket for storage
Rear wheel removal button
Rear wheel
Rear brake pedal
lock for closing
Front wheel
canopy
armrest
Frame
Amrest
Cotton pad
wheels
Basket for storage
Foot cover
Seat/Sleeping part
Dust cover of the basket
Handle belt
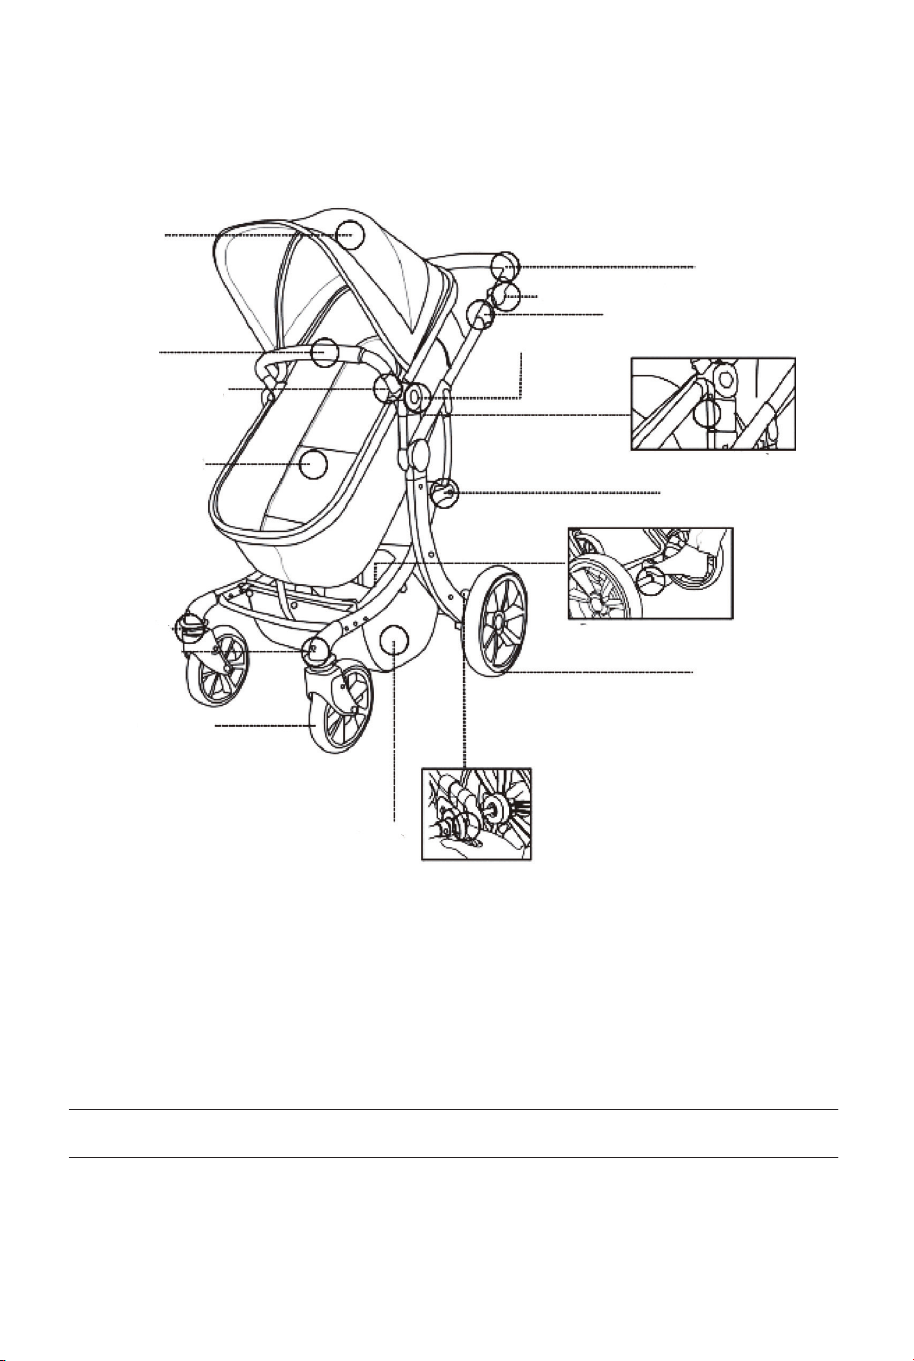
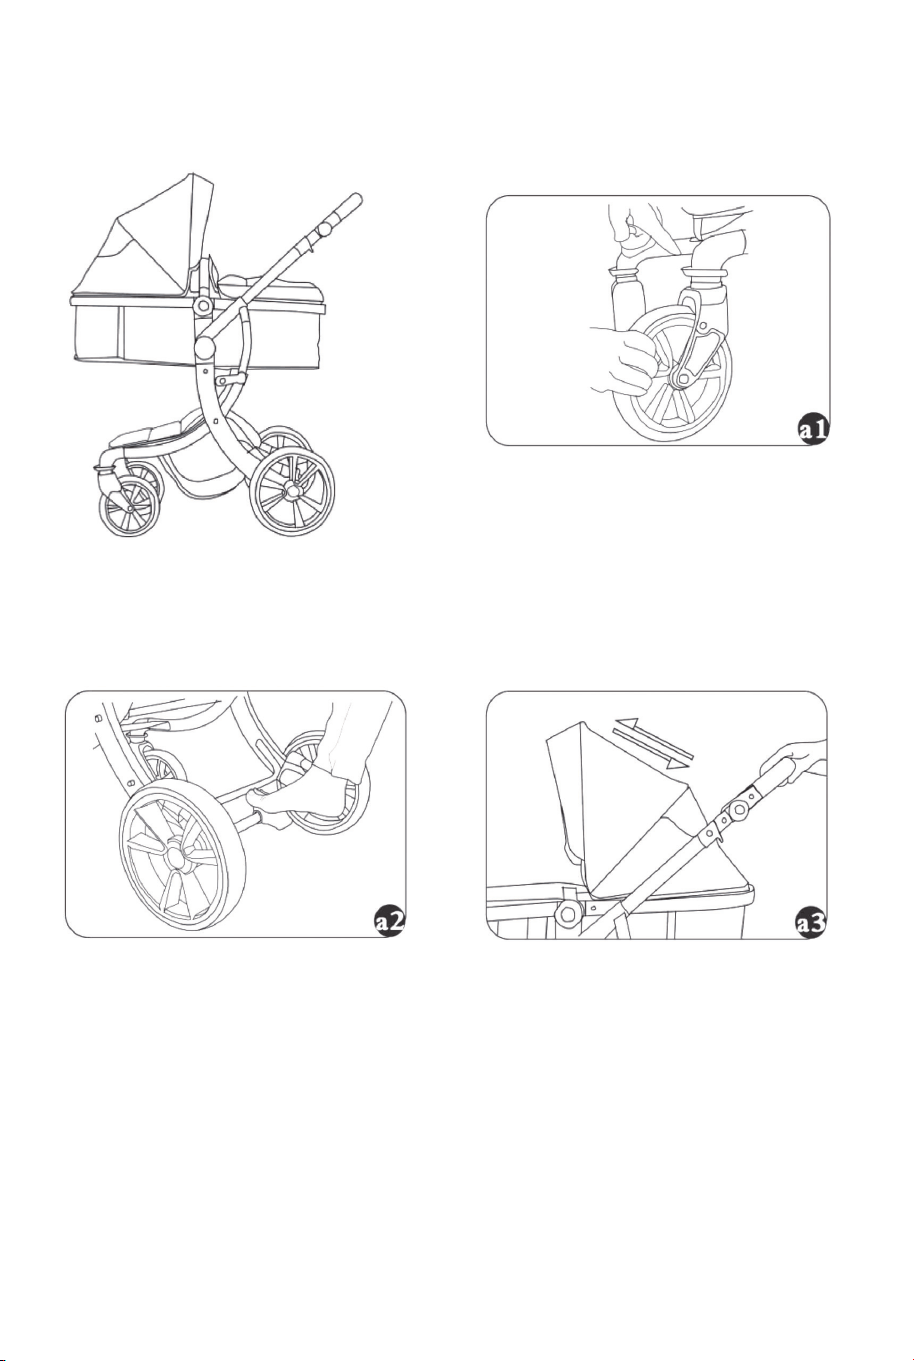
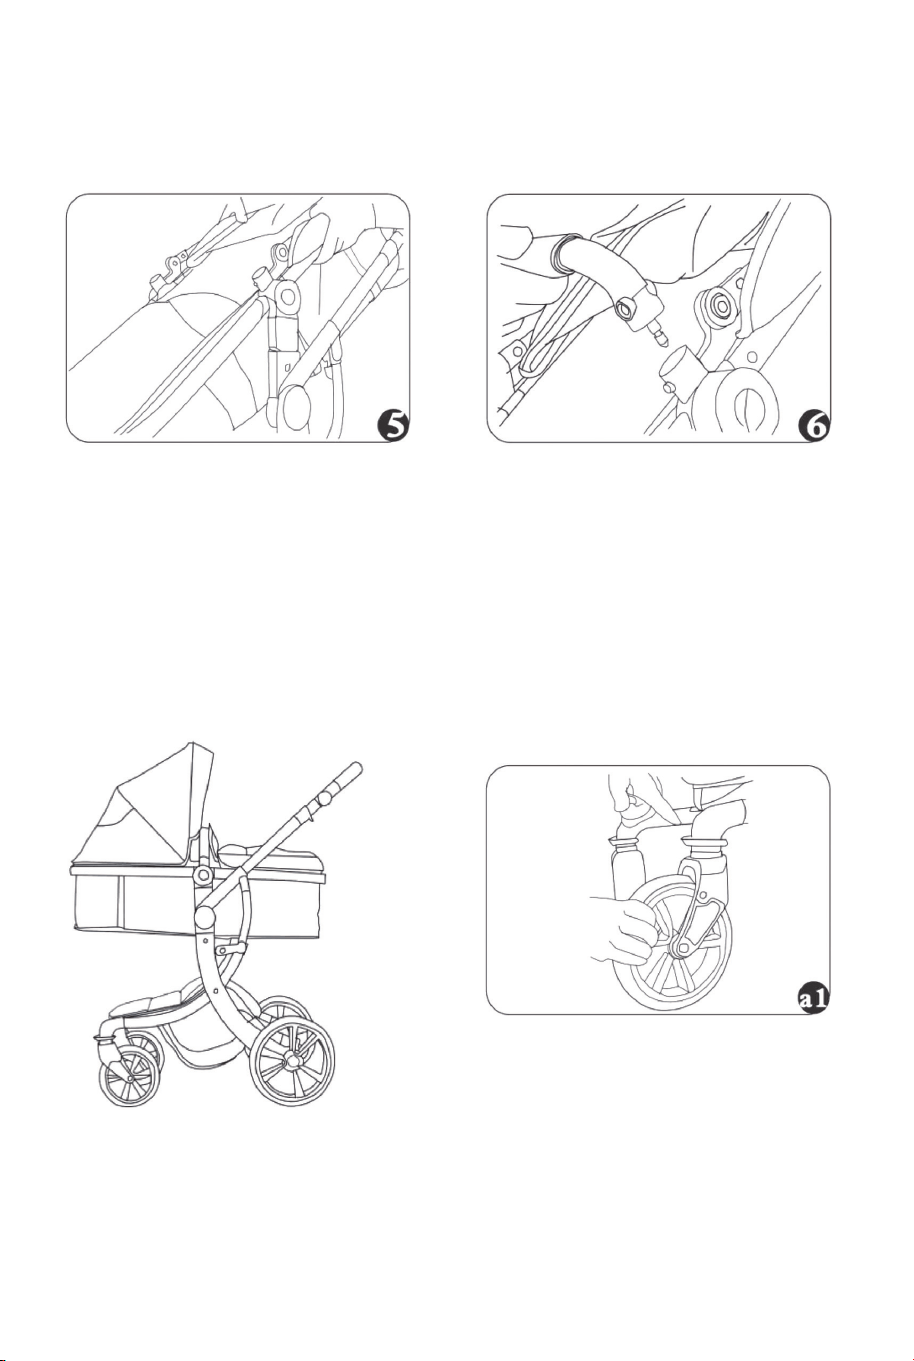
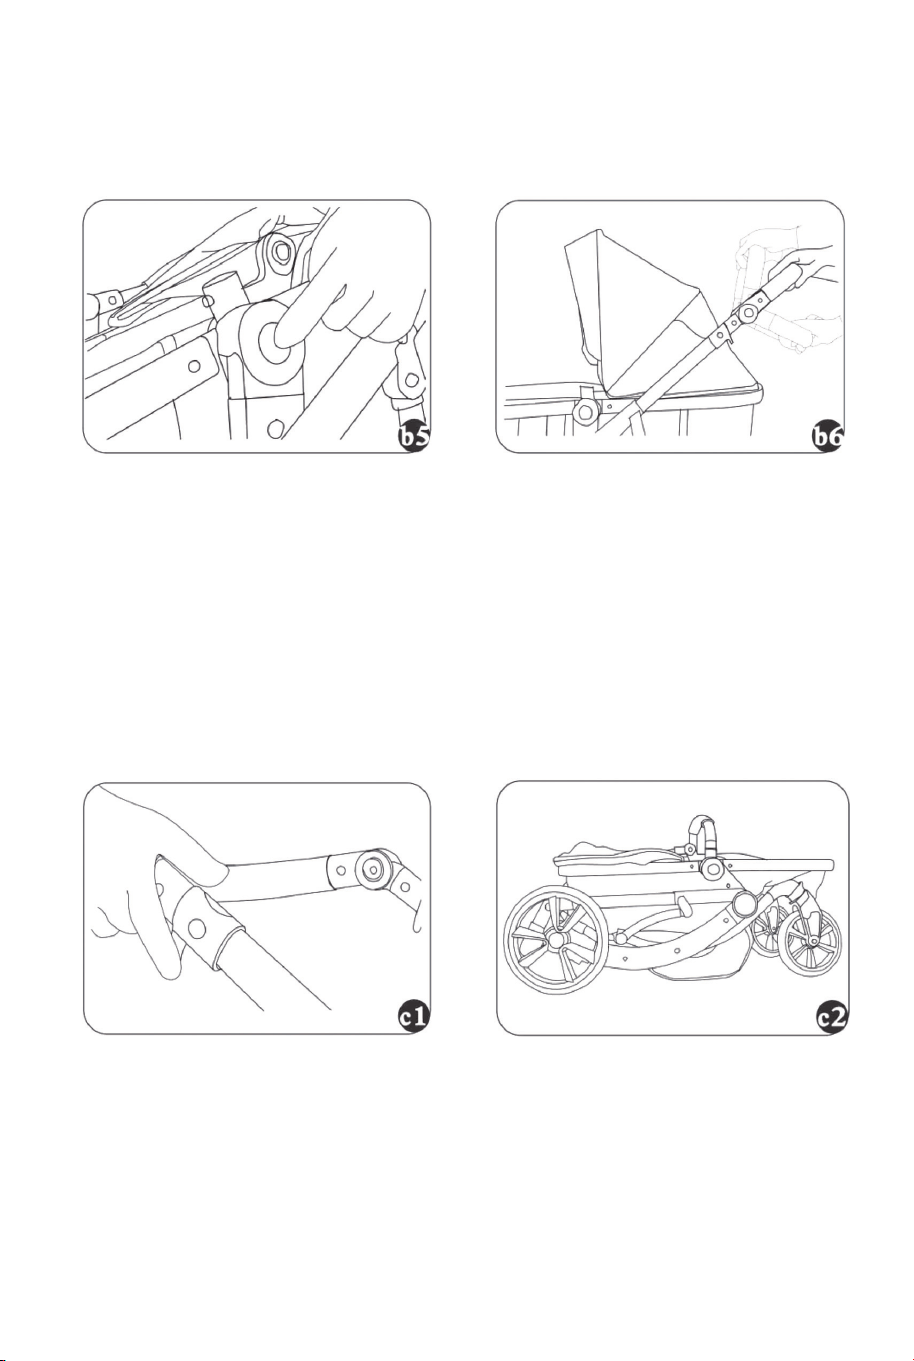
Open the frame I
Open the frame lock button.
Front wheel installation
See the picture.
Sleeping part installation
Grasp the part then insert to
the frame connector.
Open the frame II
Lift up the push handle and
push back.
Rear wheel installation
See the picture.
Handle installation
Insert the handle to handle
holder.
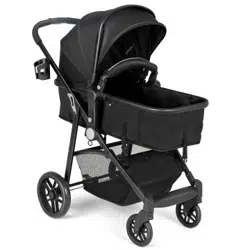
Renderings of the vehicle
How to use rear wheel brake
Press the brake pedal towards
your direction to lock the wheel,
press again to the opposite
direction to unlock the wheel.
How to adjust Front wheel
Orientation
Press down the Orientation
Button to lock the front wheel,
lift up the button to unlock.
How to use canopy
As shown in the figure.
06 07
Open the frame I
Open the frame lock button.
Front wheel installation
See the picture.
Sleeping part installation
Grasp the part then insert to
the frame connector.
Open the frame II
Lift up the push handle and
push back.
Rear wheel installation
See the picture.
Handle installation
Insert the handle to handle
holder.
Renderings of the vehicle
How to use rear wheel brake
Press the brake pedal towards
your direction to lock the wheel,
press again to the opposite
direction to unlock the wheel.
How to adjust Front wheel
Orientation
Press down the Orientation
Button to lock the front wheel,
lift up the button to unlock.
How to use canopy
As shown in the figure.
06 07
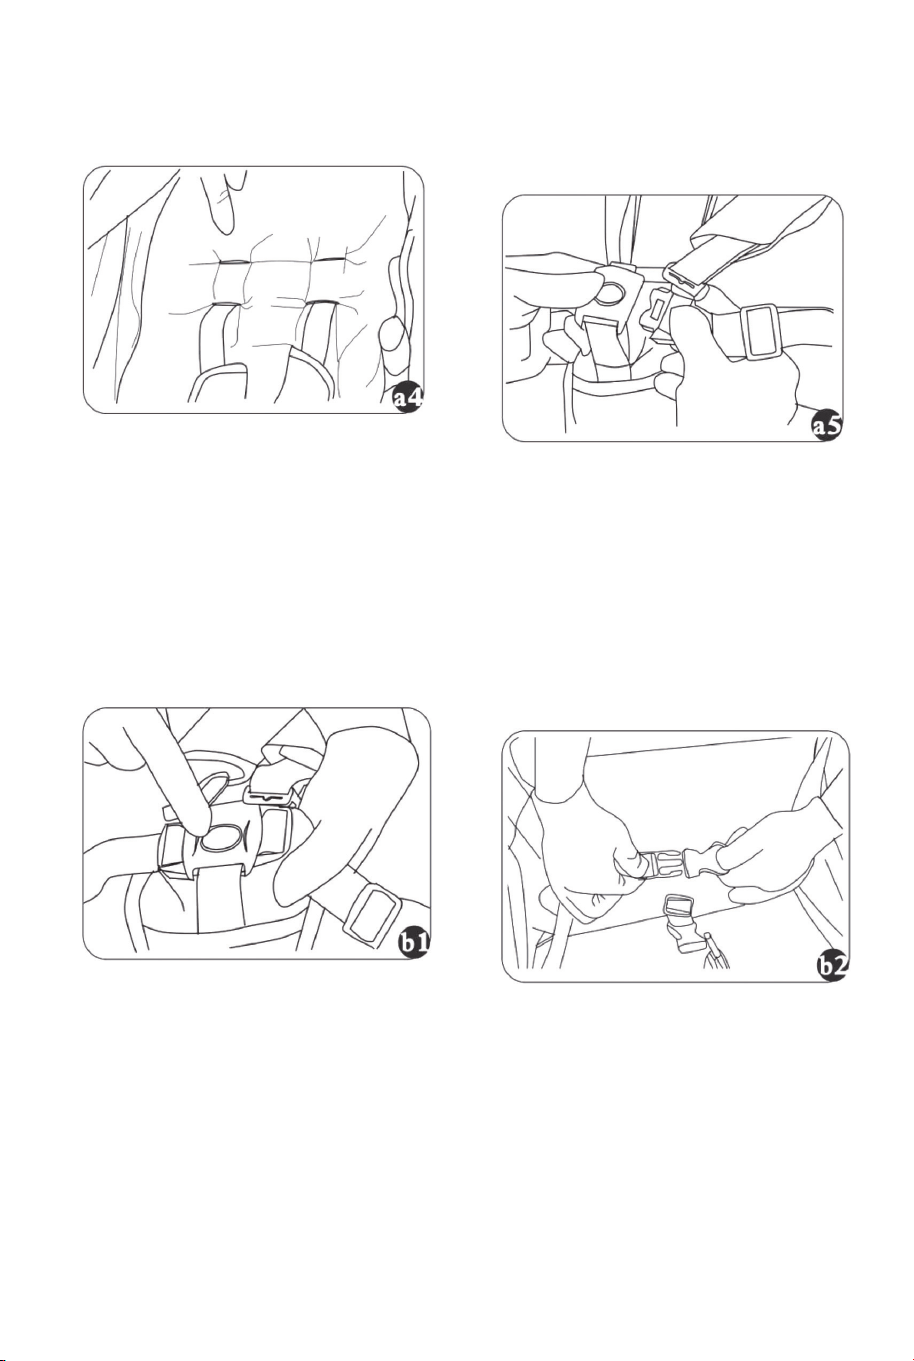
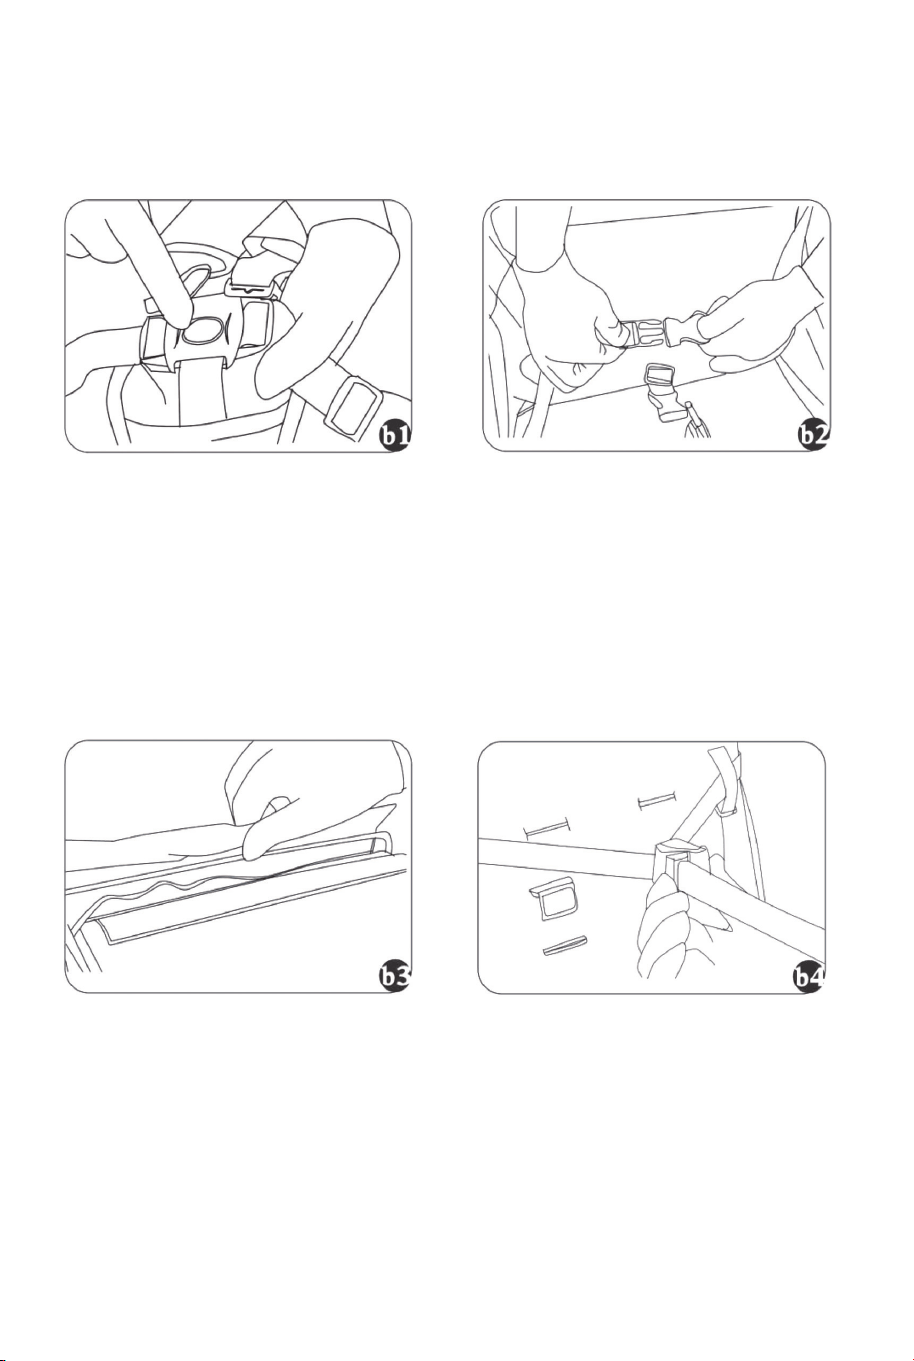
How to use safety belt
According to the baby's height
to choose the right connector.
Safety belt unlock
Press the button to unlock the
belt.
How to connect belt and
shoulder harness
Insert the safety shoulder
harness to the belt connector,
then insert the belt connector
to the safety belt connector.
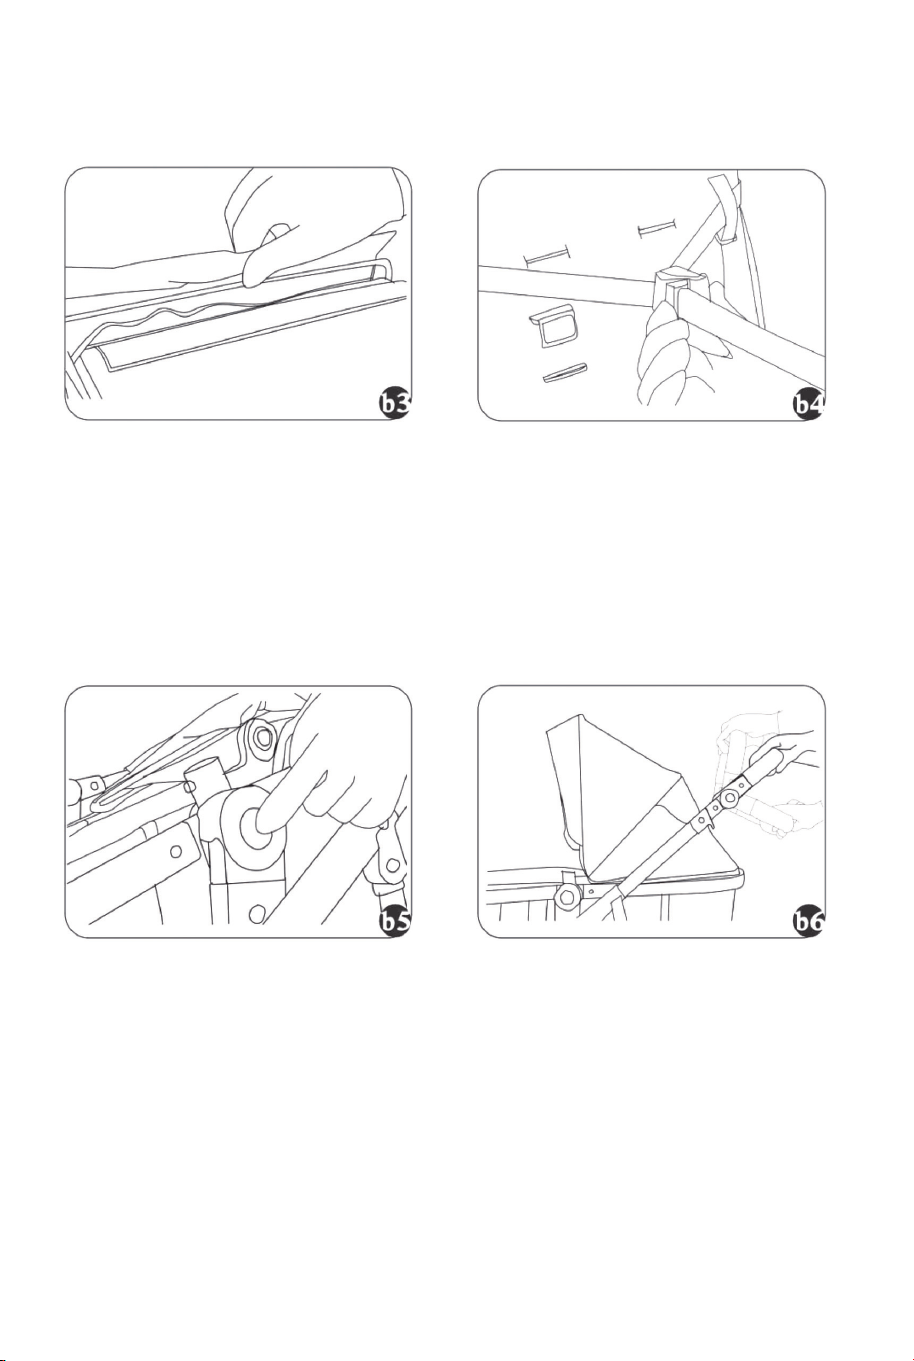
How to fix the backrest I
See the picture.
How to fix the backrest II
Press the button to unlock the
belt.
How to adjust the sleeping
part
Press the button as the picture
then you can adjust the part
to the position you want.
How to fix the backrest III
Use one hand to press the
button and use another hand
to pull the strap.
How to adjust the push
handle height
Use both hands to press the
two button beside the handle,
then you can adjust the height
you want.
08 09
How to use safety belt
According to the baby's height
to choose the right connector.
Safety belt unlock
Press the button to unlock the
belt.
How to connect belt and
shoulder harness
Insert the safety shoulder
harness to the belt connector,
then insert the belt connector
to the safety belt connector.
How to fix the backrest I
See the picture.
How to fix the backrest II
Press the button to unlock the
belt.
How to adjust the sleeping
part
Press the button as the picture
then you can adjust the part
to the position you want.
How to fix the backrest III
Use one hand to press the
button and use another hand
to pull the strap.
How to adjust the push
handle height
Use both hands to press the
two button beside the handle,
then you can adjust the height
you want.
08 09
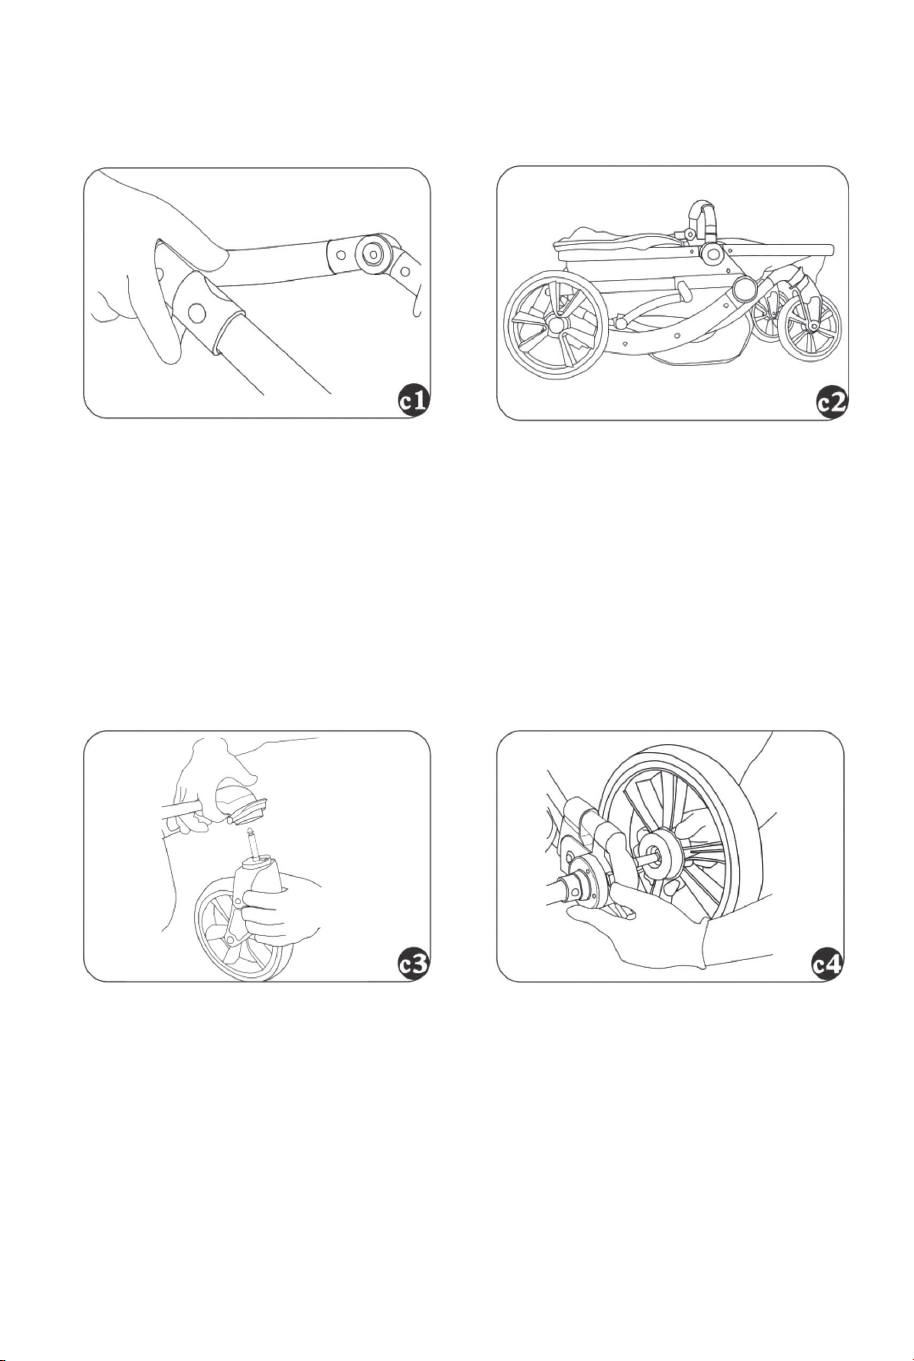
Folding Stroller I
Press the lock button to close
the Stroller at the same time
pull up the stroller drag hook,
press the frame to fold the
stroller.
Front wheel disassembly
Press the lock button,then pull
down the front wheel.
Folding Stroller II
The effect of the stroller after
folding.
Rear wheel disassembly
Press the lock button,then Pull
out the Rear wheel.
Handle disassembly
Press the lock button, thenPull
out the handle.
How to use strap
The strap must be wrapped
around your hand when you
push the stroller.
10 11

VEUILLEZ NOUS DONNER L’OCCASION DE L’AMÉLIORER !
Contactez notre service à la clientèle pour obtenir de l’aide.
Les remplacements de pièces manquantes ou endommagées seront
expédiés dès que possible !
Contactez-nous !
Ne retournez pas cet article.
FR : [email protected]
POUSSETTE POUR BÉBÉ
BC10054
MANUEL DE L’UTILISATEUR
Contactez notre service à la clientèle pour obtenir de l’aide.
EN FR
CE MANUEL CONTIENT DES INFORMATIONS IMPORTANTES SUR LA SÉCURITÉ. VEUILLEZ LE LIRE ET LE CONSERVER POUR TOUTE RÉFÉRENCE FUTURE.
FR office: Saint Vigor d'Ymonville

Avant de Commencer
Avertissements Généraux :
Danger ! Éloignez toutes les petites pièces et le matériel d’emballage des bébés et
des enfants pour éviter un risque d’étouffement.
Le produit doit être installé et utilisé sous la surveillance d’un adulte.
Lisez attentivement chaque étape et suivez le bon ordre.
Retirez tous les emballages, séparez et comptez toutes les pièces et le matériel
avant l’installation.
Assurez-vous que toutes les pièces soient correctement installées. Une installation
incorrecte peut entraîner un danger.
Assurez une surface sûre pendant l’assemblage et placez le produit toujours sur
une surface plane et stable.
Veuillez lire attentivement toutes les instructions et les conserver pour la référence
ultérieure.
02 03
Merci d'avoir acheté notre poussette bébé!
• Veuillez lire le mode d'emploi avant d'utiliser la poussette.
• Cela peut affecter l'utilisation si vous ne suivez pas les instructions
d'utilisation.
AVERTISSEMENT: UTILISEZ CE HARNAIS EN TOUT TEMPS.
• UTILISEZ CETTE SANGLE POUR EMPÊCHER LE
LANDAU/POUSSEUSE DE ROULER.
• Le landau/poussette ne doit pas être utilisé à proximité d'un feu
ouvert ou d'une flamme nue.
• Soyez prudent si le landau/poussette est utilisé dans des escaliers
ou des escalators.
• Les freins doivent toujours être appliqués lorsque le
landau/poussette ne bouge pas.
• Les accessoires emballés séparément doivent avoir leur propre
feuille d'instructions ou livret.
AVERTISSEMENT
POUR ÉVITER DES BLESSURES OU LA MORT :
APPLIQUEZ TOUJOURS LES FREINS LORSQUE LA POUSSETTE
EST À L'ARRÊT.
• NE LAISSEZ PAS LES ENFANTS SANS SURVEILLANCE.
• ASSUREZ-VOUS QUE VOTRE ENFANT PORTE TOUJOURS UNE
CEINTURE DE SÉCURITÉ.
• NE TRANSPORTEZ PAS D'ENFANTS OU DE SACS
SUPPLÉMENTAIRES SUR CETTE POUSSEUSE.
• ASSUREZ-VOUS QUE LES ENFANTS NE PEUVENT PAS
DÉPLACER AUCUNE PIÈCE.
• NON RECOMMANDÉ POUR UN ENFANT DE MOINS DE 6 MOIS
EN MODE POUSSETTE ;

04
• Il n'est pas sûr d'utiliser des accessoires non approuvés par le
constructeur du véhicule.
• Pour les accessoires, des conseils doivent être fournis quant aux
véhicules de l'ARTICLE 608 avec lesquels l'accessoire peut être
utilisé.
• Instructions et raisons d'utilisation si un dispositif manuel ou
automatique est prévu pour fermer la zone d'ouverture des pieds.
• Ne laissez jamais le harnais bouclé lorsqu'il n'est pas fixé à un
enfant dans le landau/poussette car le harnais peut former des
boucles qui peuvent présenter un risque d'étranglement.
• Instructions pour l'inspection et l'entretien réguliers, par ex. g.
lubrification, liberté de mouvement des dispositifs de verrouillage et
sécurité des composants essentiels.
• Instructions pour le montage et le pliage, avec une référence
particulière à tous les dispositifs de verrouillage et au verrou de
stockage, mettant en évidence le danger de blessure dans les
pièces mobiles ; et des conseils pour transporter en toute sécurité
le véhicule plié ; et des instructions pour appliquer ou engager le
verrou de stockage si le verrou de stockage ne s'engage pas
automatiquement.
• La capacité de charge du panier de rangement est de 6,6 lb (3
kg), la capacité de charge de la poussette entière est de 33 lb (15
kg). Un poids excessif peut entraîner une condition instable
dangereuse.
AVERTISSEMENT: Ne jamais laisser l'enfant sans surveillance.
AVERTISSEMENT: Évitez les blessures graves en tombant ou
en glissant. Utilisez toujours la ceinture de sécurité.
AVERTISSEMENT: Des colis ou des accessoires, ou les deux,
placés sur l'appareil peuvent rendre l'appareil instable.
05
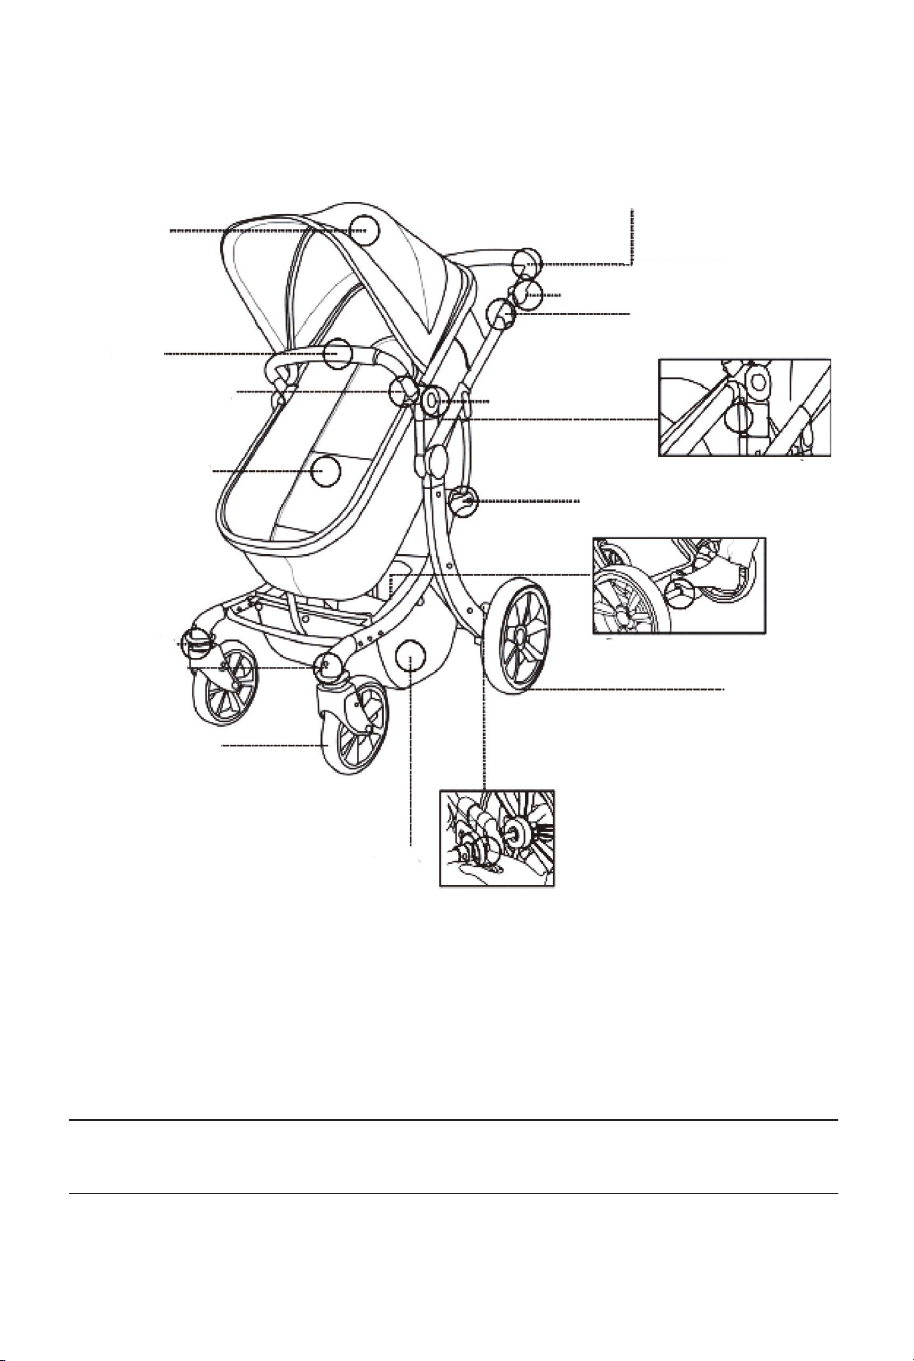
Schéma des Pièces
Poignée
Bouton de réglage de
la hauteur de la poignée
Bouton de fermeture
de la poussette
Bouton de
retrait de
l'accoudoir
Siège/Bouton de
retrait de la
partie de coucher
Siège
/Partie de
coucher
Orientation
de la roue
Bouton de
retrait de la
roue avant
Panier de rangement
Bouton de retrait de la roue arrière
Roue arrière
Pédale de frein arrière
Roue avant
Canopée
Accoudoir
Verrou pour la fermeture
Siège/Bouton de
réglage de la
partie de coucher
Composants indépendants amovibles
Cadre
Accoudoir
Tampon de coton
Roues
Panier de rangement
Couvercle de pied
Siège/Partie de coucher
Housse anti-poussière
du panier
Ceinture de la poignée
04
• Il n'est pas sûr d'utiliser des accessoires non approuvés par le
constructeur du véhicule.
• Pour les accessoires, des conseils doivent être fournis quant aux
véhicules de l'ARTICLE 608 avec lesquels l'accessoire peut être
utilisé.
• Instructions et raisons d'utilisation si un dispositif manuel ou
automatique est prévu pour fermer la zone d'ouverture des pieds.
• Ne laissez jamais le harnais bouclé lorsqu'il n'est pas fixé à un
enfant dans le landau/poussette car le harnais peut former des
boucles qui peuvent présenter un risque d'étranglement.
• Instructions pour l'inspection et l'entretien réguliers, par ex. g.
lubrification, liberté de mouvement des dispositifs de verrouillage et
sécurité des composants essentiels.
• Instructions pour le montage et le pliage, avec une référence
particulière à tous les dispositifs de verrouillage et au verrou de
stockage, mettant en évidence le danger de blessure dans les
pièces mobiles ; et des conseils pour transporter en toute sécurité
le véhicule plié ; et des instructions pour appliquer ou engager le
verrou de stockage si le verrou de stockage ne s'engage pas
automatiquement.
• La capacité de charge du panier de rangement est de 6,6 lb (3
kg), la capacité de charge de la poussette entière est de 33 lb (15
kg). Un poids excessif peut entraîner une condition instable
dangereuse.
AVERTISSEMENT: Ne jamais laisser l'enfant sans surveillance.
AVERTISSEMENT: Évitez les blessures graves en tombant ou
en glissant. Utilisez toujours la ceinture de sécurité.
AVERTISSEMENT: Des colis ou des accessoires, ou les deux,
placés sur l'appareil peuvent rendre l'appareil instable.
05
Schéma des Pièces
Poignée
Bouton de réglage de
la hauteur de la poignée
Bouton de fermeture
de la poussette
Bouton de
retrait de
l'accoudoir
Siège/Bouton de
retrait de la
partie de coucher
Siège
/Partie de
coucher
Orientation
de la roue
Bouton de
retrait de la
roue avant
Panier de rangement
Bouton de retrait de la roue arrière
Roue arrière
Pédale de frein arrière
Roue avant
Canopée
Accoudoir
Verrou pour la fermeture
Siège/Bouton de
réglage de la
partie de coucher
Composants indépendants amovibles
Cadre
Accoudoir
Tampon de coton
Roues
Panier de rangement
Couvercle de pied
Siège/Partie de coucher
Housse anti-poussière
du panier
Ceinture de la poignée
Vue du véhicule Comment ajuster
l'orientation de la roue
avant
Appuyez sur le bouton
d'orientation pour verrouiller
la roue avant, soulevez le
bouton pour déverrouiller.
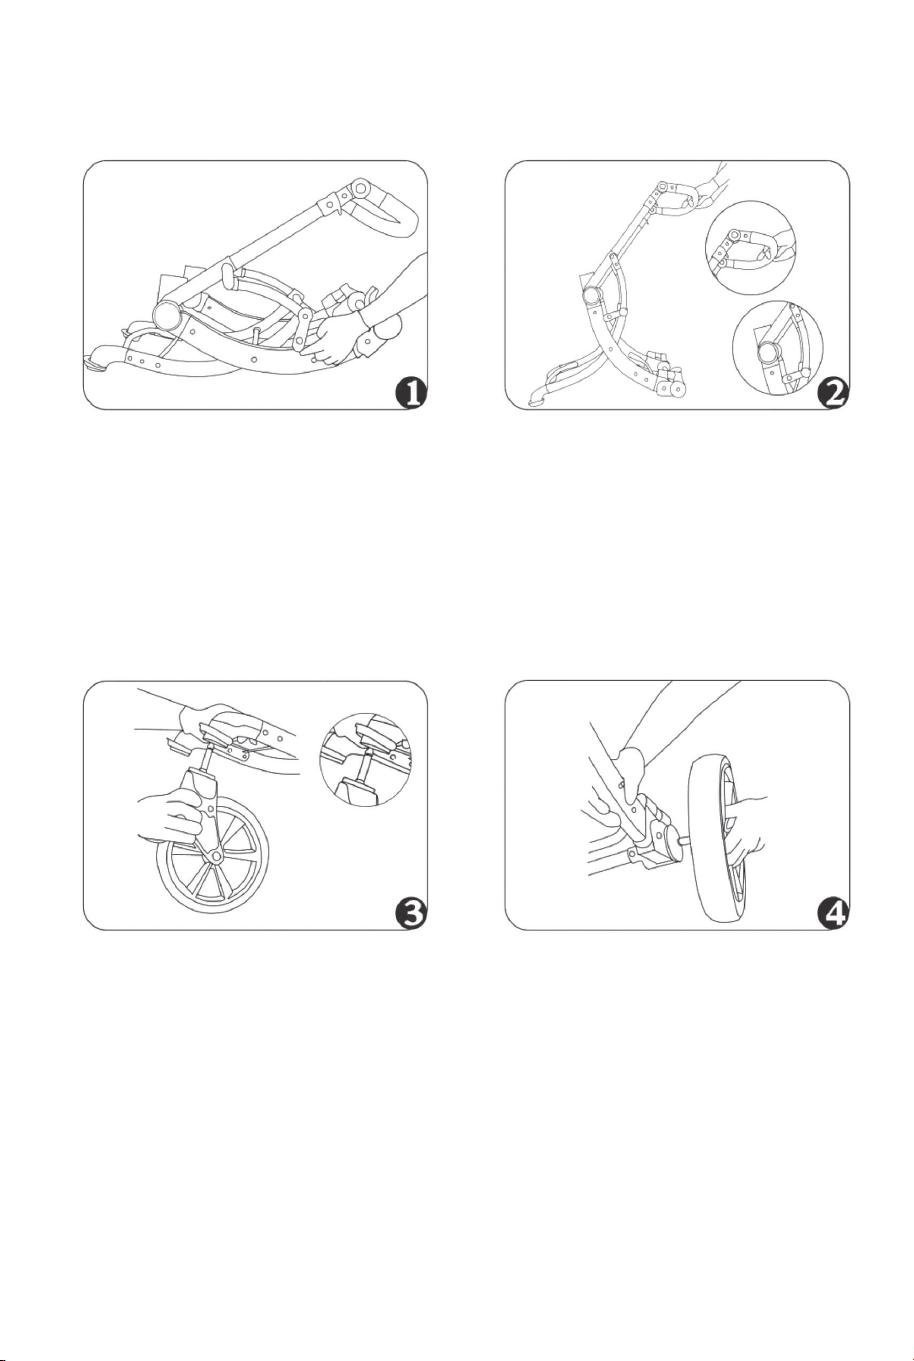
Ouvrir le cadre I
Ouvrez le bouton de
verrouillage du cadre.
Installation de la roue
avant
Regarder la photo.
Ouvrir le cadre II
Soulevez la poignée de
poussée et repoussez.
Installation de la roue
arrière
Regarder la photo.
Installation de la partie de
coucher
Saisissez la pièce puis
insérez-la dans le connecteur
du cadre.
Installation de la poignée
Insérez la poignée dans le
support de poignée.
06 07
Vue du véhicule Comment ajuster
l'orientation de la roue
avant
Appuyez sur le bouton
d'orientation pour verrouiller
la roue avant, soulevez le
bouton pour déverrouiller.
Ouvrir le cadre I
Ouvrez le bouton de
verrouillage du cadre.
Installation de la roue
avant
Regarder la photo.
Ouvrir le cadre II
Soulevez la poignée de
poussée et repoussez.
Installation de la roue
arrière
Regarder la photo.
Installation de la partie de
coucher
Saisissez la pièce puis
insérez-la dans le connecteur
du cadre.
Installation de la poignée
Insérez la poignée dans le
support de poignée.
06 07

Comment utiliser la
ceinture de sécurité
Selon la taille du bébé pour
choisir le bon connecteur.
Comment connecter la
ceinture et le harnais
d'épaule
Insérez le harnais d'épaule de
sécurité dans le connecteur de
ceinture, puis insérez le
connecteur de ceinture dans le
connecteur de ceinture de
sécurité.
Comment fixer le dossier II
Appuyez sur le bouton pour
déverrouiller la ceinture.
Comment fixer le dossier
III
Utilisez une main pour
appuyer sur le bouton et
utilisez une autre main pour
tirer la sangle.
Comment utiliser le frein de
roue arrière
Appuyez sur la pédale de frein
dans votre direction pour
bloquer la roue, appuyez à
nouveau dans la direction
opposée pour déverrouiller la
roue.
Comment utiliser la
canopée
Comme le montre la figure.
Déverrouillage de la
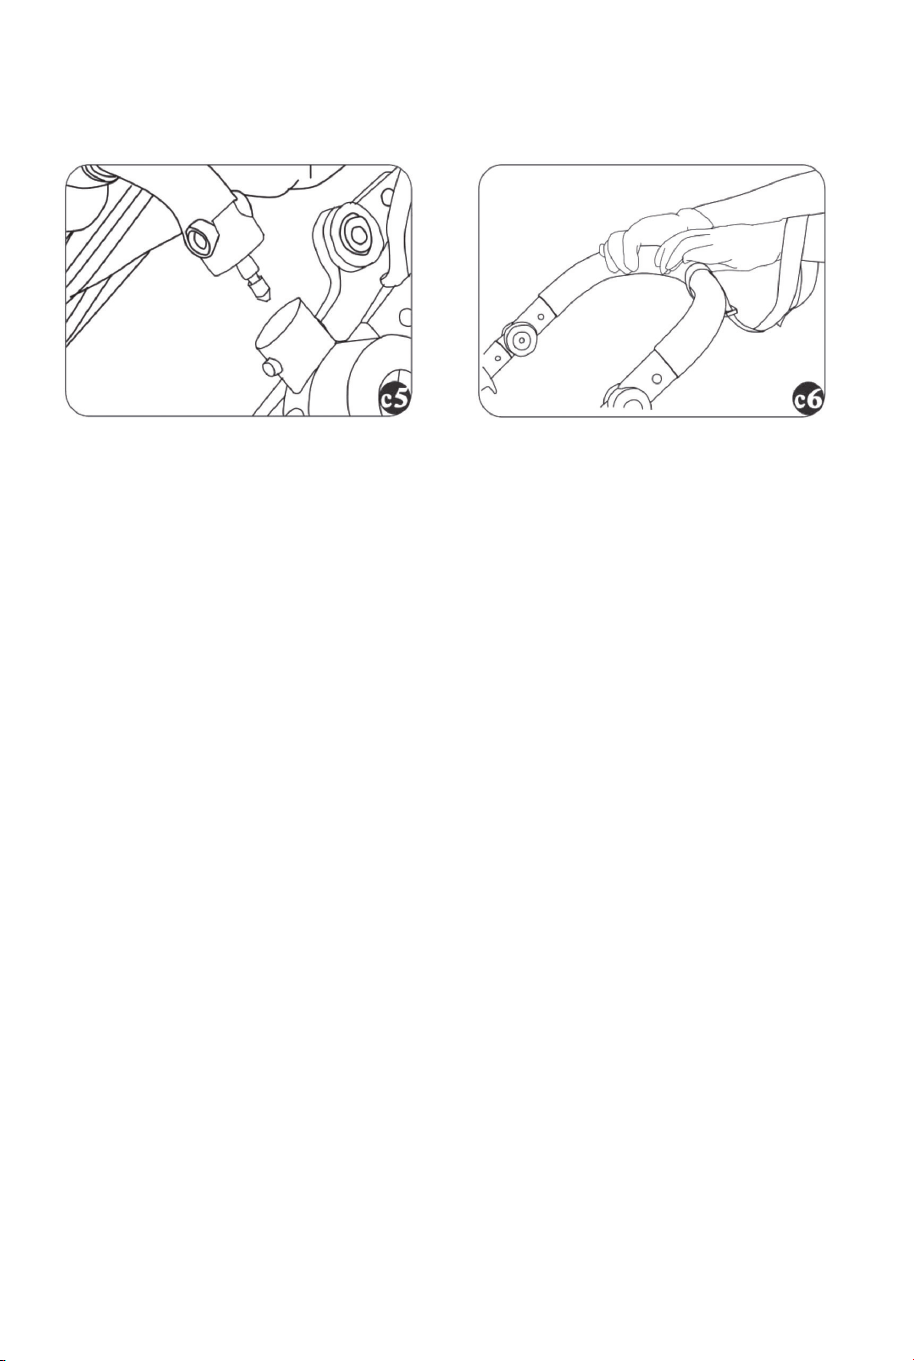
ceinture de sécurité
Appuyez sur le bouton pour
déverrouiller la ceinture.
Comment fixer le dossier I
Regarder la photo.
08 09
Comment utiliser la
ceinture de sécurité
Selon la taille du bébé pour
choisir le bon connecteur.
Comment connecter la
ceinture et le harnais
d'épaule
Insérez le harnais d'épaule de
sécurité dans le connecteur de
ceinture, puis insérez le
connecteur de ceinture dans le
connecteur de ceinture de
sécurité.
Comment fixer le dossier II
Appuyez sur le bouton pour
déverrouiller la ceinture.
Comment fixer le dossier
III
Utilisez une main pour
appuyer sur le bouton et
utilisez une autre main pour
tirer la sangle.
Comment utiliser le frein de
roue arrière
Appuyez sur la pédale de frein
dans votre direction pour
bloquer la roue, appuyez à
nouveau dans la direction
opposée pour déverrouiller la
roue.
Comment utiliser la
canopée
Comme le montre la figure.
Déverrouillage de la
ceinture de sécurité
Appuyez sur le bouton pour
déverrouiller la ceinture.
Comment fixer le dossier I
Regarder la photo.
08 09
Poussette pliable I
Appuyez sur le bouton de
verrouillage pour fermer la
poussette en même temps,
tirez sur le crochet de la
poussette, appuyez sur le
cadre pour plier la poussette.
Poussette pliable II
L'effet de la poussette après le
pliage.
Démontage de la poignée
Appuyez sur le bouton de
verrouillage, puis tirez la
poignée.
Comment utiliser la sangle
La sangle doit être enroulée
autour de votre main lorsque
vous poussez la poussette.
Comment régler la partie
de coucher
Appuyez sur le bouton comme
sur l'image, puis vous pouvez
ajuster la pièce à la position
souhaitée.
Comment régler la hauteur
de la poignée de poussée
Utilisez les deux mains pour
appuyer sur les deux boutons
à côté de la poignée, puis vous
pouvez régler la hauteur
souhaitée.
Démontage de la roue avant
Appuyez sur le bouton de
verrouillage, puis abaissez la
roue avant.
Démontage de la roue
arrière
Appuyez sur le bouton de
verrouillage, puis retirez la
roue arrière.
10 11