Installation Manual
SIR600
SMART IR AC CONTROLLER

TABLE OF CONTENTS
Important Safety Information 4
Poduct Compliance 5
Box Content 5
Introduction 6
Key Features and Benefits 7
Product Specification 7
Overall Dimensions 9
Button Functions 9
LED Status & Colours 10
Setting up the Device 10
Choosing the Right Location 12
Mounting Procedure 14
App Setting Up and Operation 16
Setting Up the IR Remote From the App 17
Setting Up the Network Connection 30
Operating in Online Mode via the App 32
Factory Reset 34
Technical Data 35
Table of Contents 3

• The product must be installed in compliance with any of
the EU’s regulations.
• The product must be stored in a safe dry area.
• Use the product the way it was destined to be used.
• The product was destined for indoor usage.
• To install and use the device correctly, please read all the
instructions in this manual.
• Do not attempt to disassemble, repair, tamper with, or
modify the product
• Disconnect your device before cleaning it with a dry cloth.
Important Safety Information
4 Important Safety Information
Important Safety Information
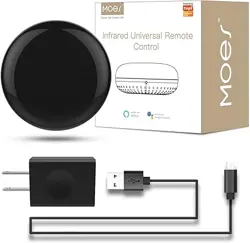
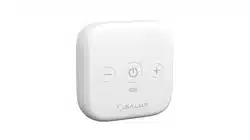
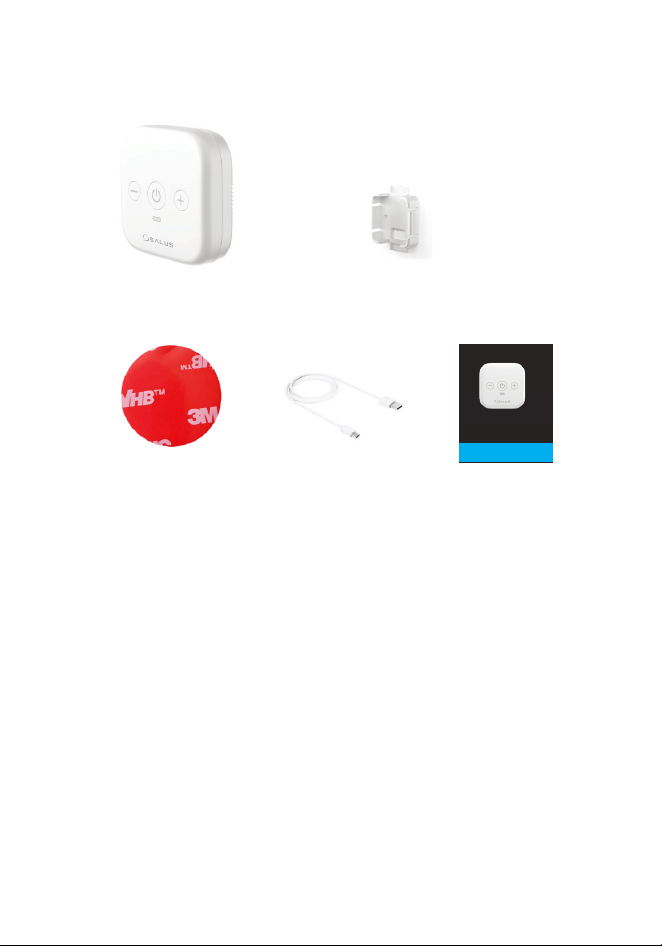
Box Content
SIR600
USB Cable3M Tape
SIR600
User Manual
Wall Mounting Bracket
Product Compliance
This product complies with the essential requirements and
other relevant provisions of Directives 2014/53/EU and 2011/65/
EU. The full text of the EU Declaration of Conformity is available
at the following internet address: www.saluslegal.com.
Box Content & Product Compliance 5

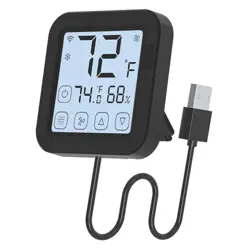
Introduction
Welcome to the user manual for the SIR600 (Smart IR AC Remote
Controller) by Salus. This innovative remote controller is designed
to enhance your home comfort by allowing you to easily adjust the
temperature of the air conditioning unit.
Whether you’re seeking a cooler environment in the summer
or a warmer atmosphere in the winter, the Smart IR AC Remote
Controller provides a seamless and ecient solution. Aimed at
providing a more comfortable and convenient living experience.
This device integrates cutting-edge technology with user-friendly
features, ensuring that you can enjoy the perfect indoor climate
eortlessly.
This manual will guide you through a safe and easy installation
of the device. It also includes instructions on how to operate and
connect it to the App.
6 Introduction

Key Features and Benefits
• WiFi connectivity with the Salus Smart Home Gateway.
This advanced controller supports hundreds of AC brands with
infrared remotes, ensuring wide compatibility and eortless
installation. With the SIR600, you can adjust your home’s tem-
perature remotely and synchronize heating and cooling for
optimal comfort. Embrace the convenience and eciency of
modern smart home technology with the SIR600 Smart IR AC
Controller, making your air conditioning system more intelli-
gent and user-friendly.
Product Specification
Welcome to the user manual for the SIR600 (Smart IR AC Remote
Controller) by Salus. This innovative remote controller is designed
to enhance your home comfort by allowing you to easily adjust the
temperature of the air conditioning unit.
Whether you’re seeking a cooler environment in the summer
or a warmer atmosphere in the winter, the Smart IR AC Remote
Controller provides a seamless and ecient solution. Aimed at
providing a more comfortable and convenient living experience.
This device integrates cutting-edge technology with user-friendly
features, ensuring that you can enjoy the perfect indoor climate
eortlessly.
This manual will guide you through a safe and easy installation
of the device. It also includes instructions on how to operate and
connect it to the App.
• Supports AC control functions (depends on AC model)
with user interface on the mobile app, including op-
erating modes, heat/cool temperature setpoint, fan
speed and swing.
Key Features and Benets & Product Specication 7
• The SIR600 has access to an online AC IR database, al-
lowing for quick and easy identification and matching
with your AC unit model.
Button Functions
8 Product Specication

Overall Dimensions
68mm 24mm
27mm
Button Functions
Power Toggle
Temperature DOWN
Temperature UP
Overall Dimensions & Button Functions 9
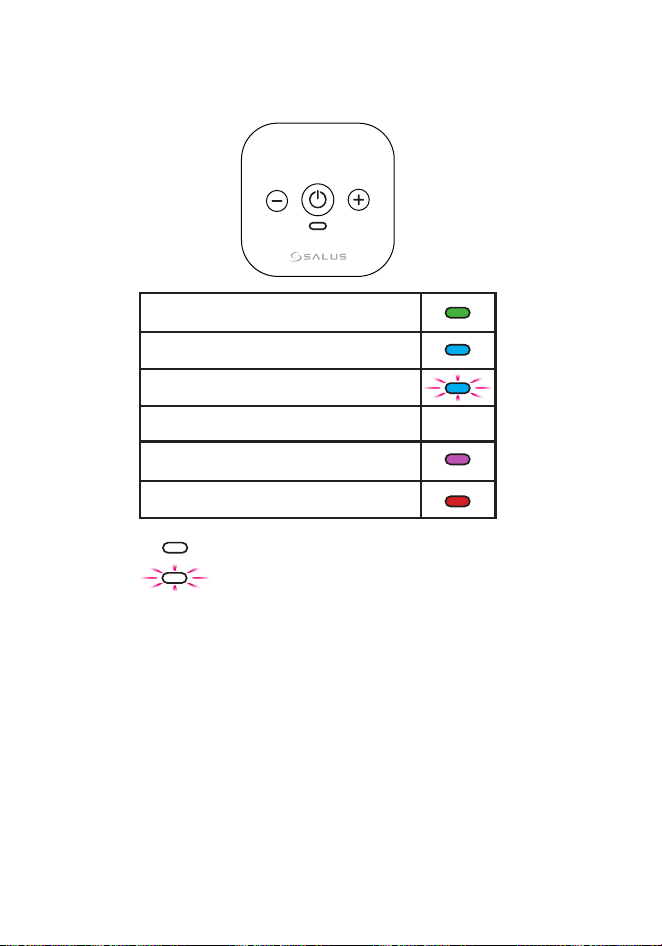
LED Status & Colours
- Solid LED light
- Blinking LED light
In this chapter, you will learn how to power up and position your Smart
IR AC Remote Controller for optimal performance. Proper setup is crucial
for ensuring that the device communicates effectively with your air con-
ditioner and integrates seamlessly into your home environment. Follow
these instructions to get your device up and running quickly, allowing you
to take advantage of all its smart features.
Setting up the Device
10 LED Status and Colours & Setting Up the Device
Factory reset
Standby mode (before pairing)
Pairing (add SIR600 to the App)
Pairing completion LED OFF
IR Learning
Change setpoint temperature or mode
LED Status & Colours
In this chapter, you will learn how to power up and position your Smart
IR AC Remote Controller for optimal performance. Proper setup is crucial
for ensuring that the device communicates effectively with your air con-
ditioner and integrates seamlessly into your home environment. Follow
these instructions to get your device up and running quickly, allowing you
to take advantage of all its smart features.
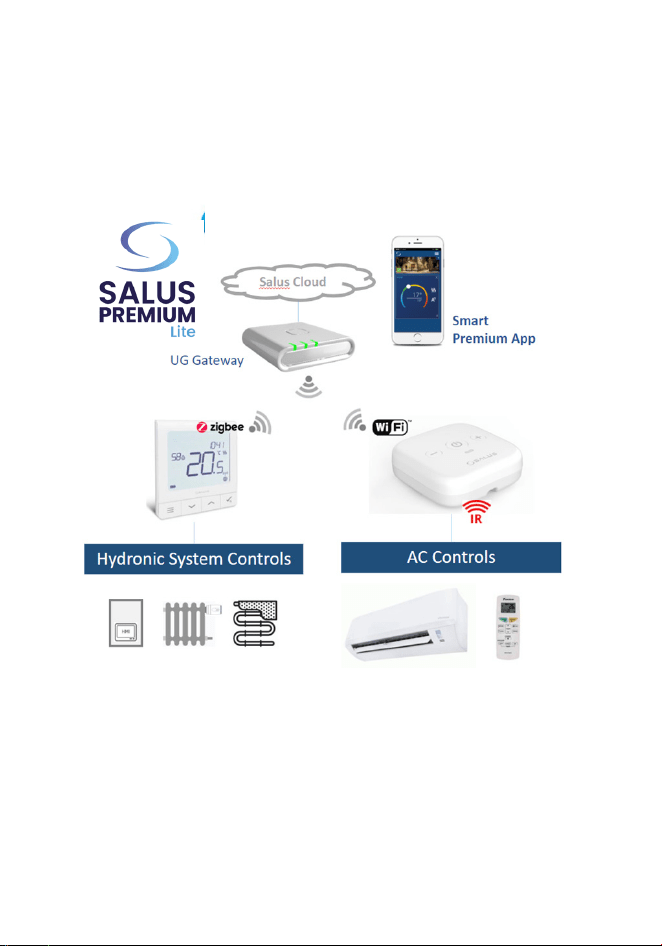
The device shall be added
into the Salus Smart Home
system with the connection
to the Salus UG gateway via
the local WiFi network.
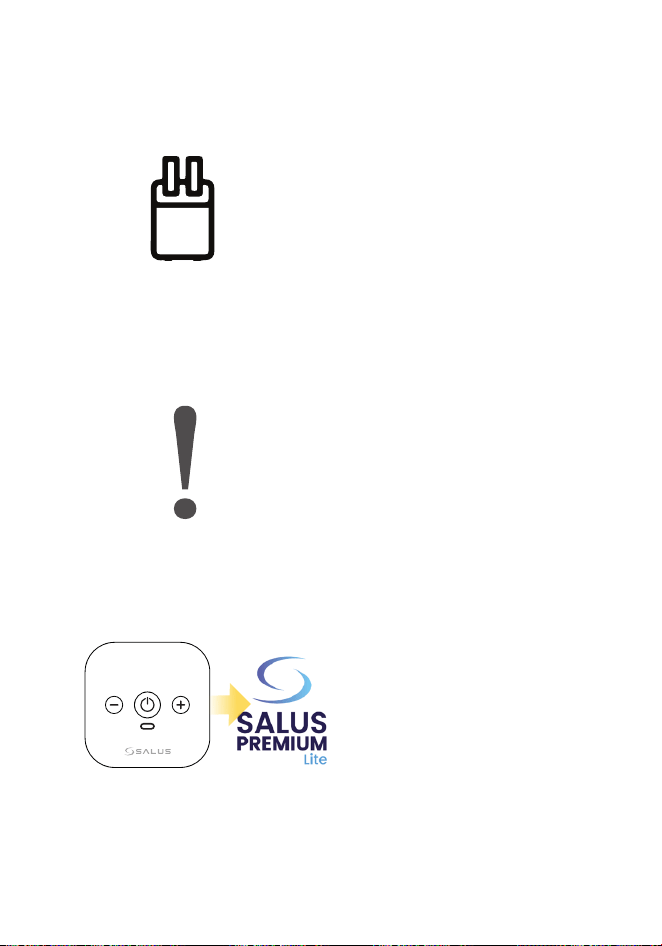
An USB power adapter for the
power supply will be required.
Retrieve the AC unit’s IR
code from the database.
Setting Up the Device 11

When installing your Smart IR AC Remote Controller, it’s essen-
tial to position the device in a location that ensures eective
communication with your air conditioner. Here are some key
considerations to keep in mind:
• Start by placing the controller where it has a direct line of
sight to your AC unit. This is important because IR signals
require an unobstructed path to function correctly. Make
sure there are no obstructions, such as furniture or walls,
that could block the IR signals.
• Distance is also an important factor. Position the device
within up to10 meters of the AC unit for optimal perfor-
mance. If the device is too far away, the IR signals may
become weak and unreliable.
• To avoid interference, keep the controller away from re-
flective surfaces, which can scatter IR signals. Additional-
ly, it’s best to place it away from sources of electromagnetic
interference, such as microwaves and routers, which
could disrupt the device’s performance. Direct sunlight
can also affect the device, so try to position it away from
windows where it might be exposed to harsh sunlight.
Choosing the right location
12 Choosing the Right Locaton
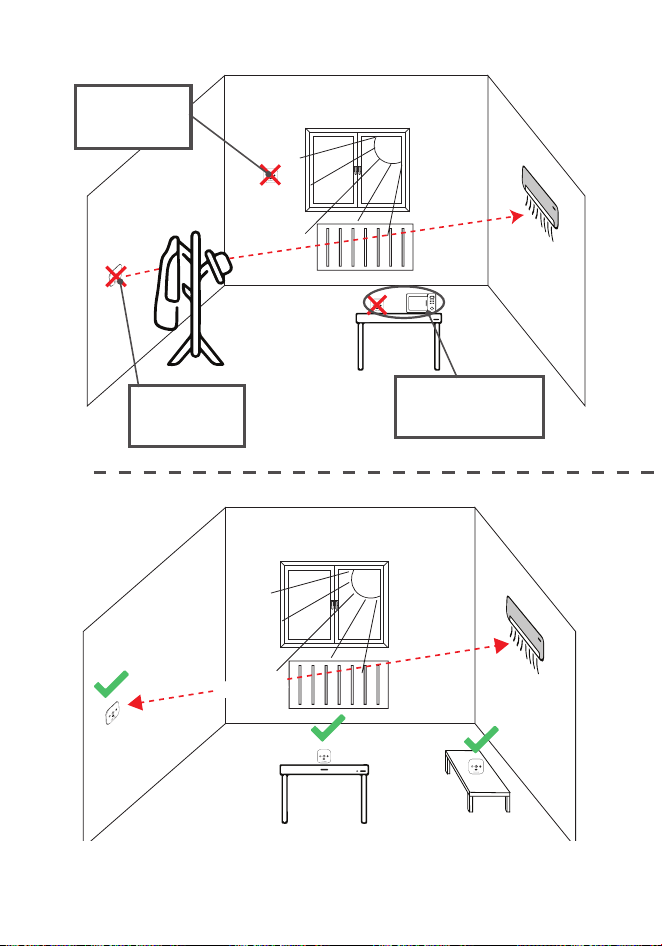
Under direct
sunlight
10m max.
Electromagnetic
interference
Obstructured
IR path
Choosing the Right Location 13

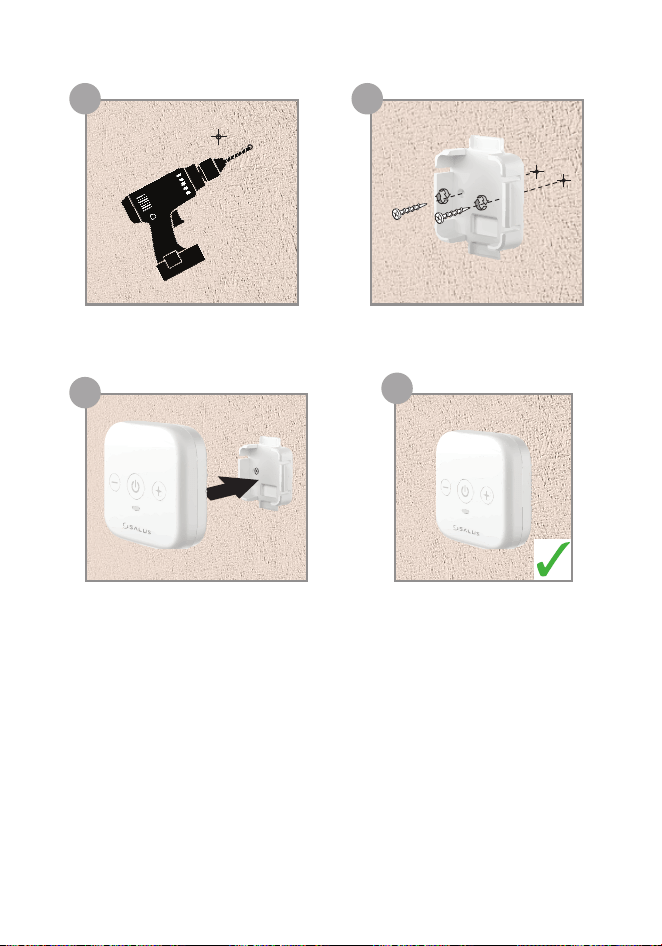
Mounting Procedure
Decide whether you want to mount the Smart IR AC Remote
Controller on a wall or place it on a stable surface.
1
Finally, insert the screws through the mounting holes on the
device and tighten them into the wall anchors until the de-
vice is secure.
4
If you prefer not to mount the device on a wall, simply place
it on a at, stable surface that provides a clear line of sight
to your AC unit.
5
If it is opted for wall mounting, use the included mounting
bracket to securely attach the device.
2
Start by marking the location where you want to install the
device. Next, drill holes at the marked points, ensuring they
are the correct size for the screws and wall anchors.
3
14 Mounting Procedure
Decide whether you want to mount the Smart IR AC Remote
Controller on a wall or place it on a stable surface.
Finally, insert the screws through the mounting holes on the
device and tighten them into the wall anchors until the de-
vice is secure.
If you prefer not to mount the device on a wall, simply place
it on a at, stable surface that provides a clear line of sight
to your AC unit.
If it is opted for wall mounting, use the included mounting
bracket to securely attach the device.
Start by marking the location where you want to install the
device. Next, drill holes at the marked points, ensuring they
are the correct size for the screws and wall anchors.
a b
c
d
Mounting Procedure 15
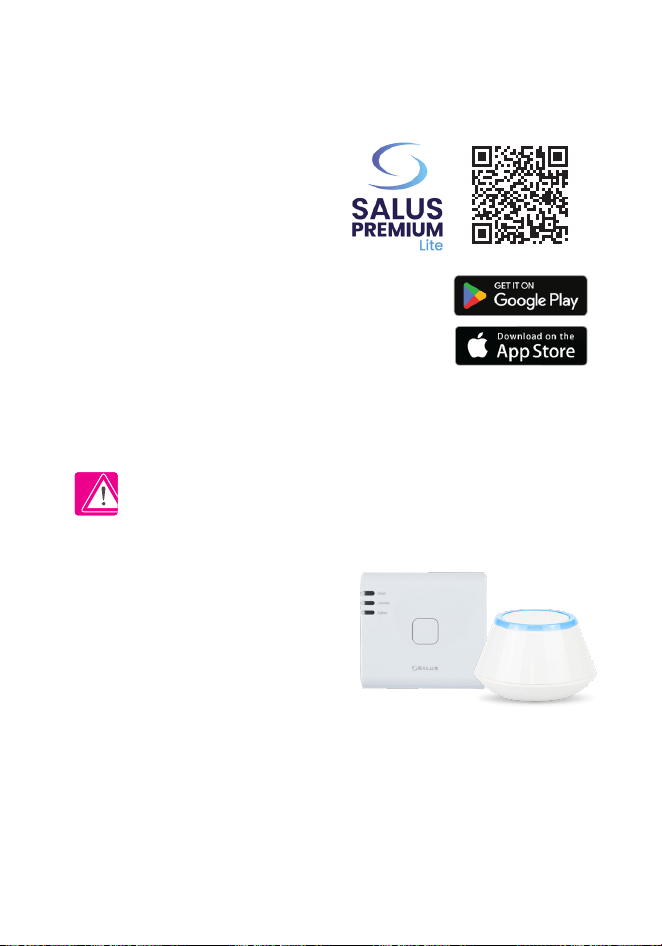
App Setting Up and Operation
First make sure that you have
downloaded the SALUS Premium
Lite App from the Google Play or
App Store.
You will need to follow a few
easy steps to create an account.
Salus Smart Home
Gateway is required
for the installation of
SIR600.
Please update the gate-
way to the latest
software version before
installing SIR600.
16 Mounting Procedure
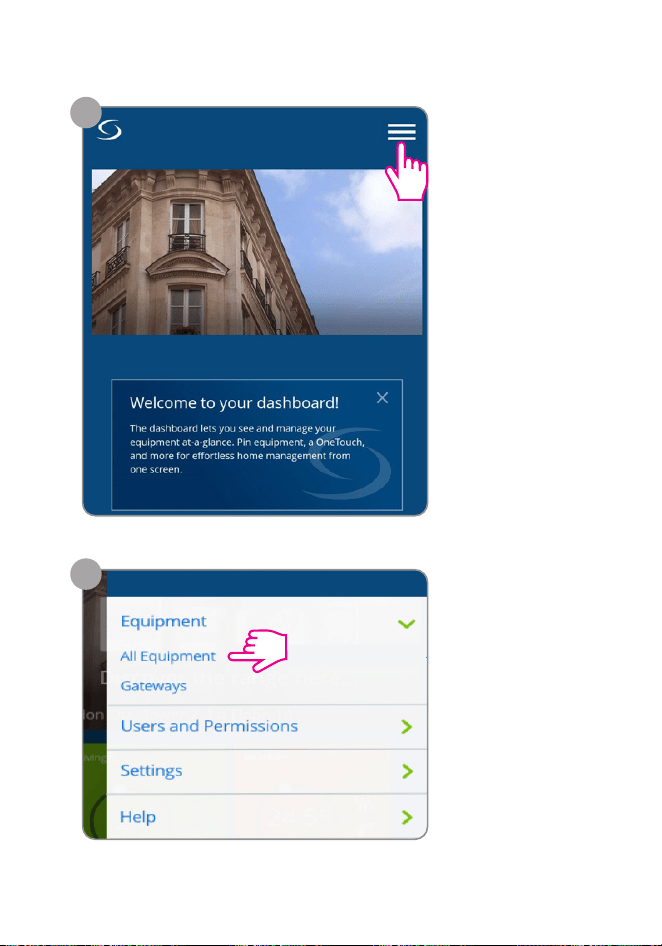
Setting Up the IR remote from the App
1
Select the Menu
command from
top-right
corner to open
the menu.
2
From Equipment
category we select
All Equipment.
Setting Up the IR Remote from the App 17
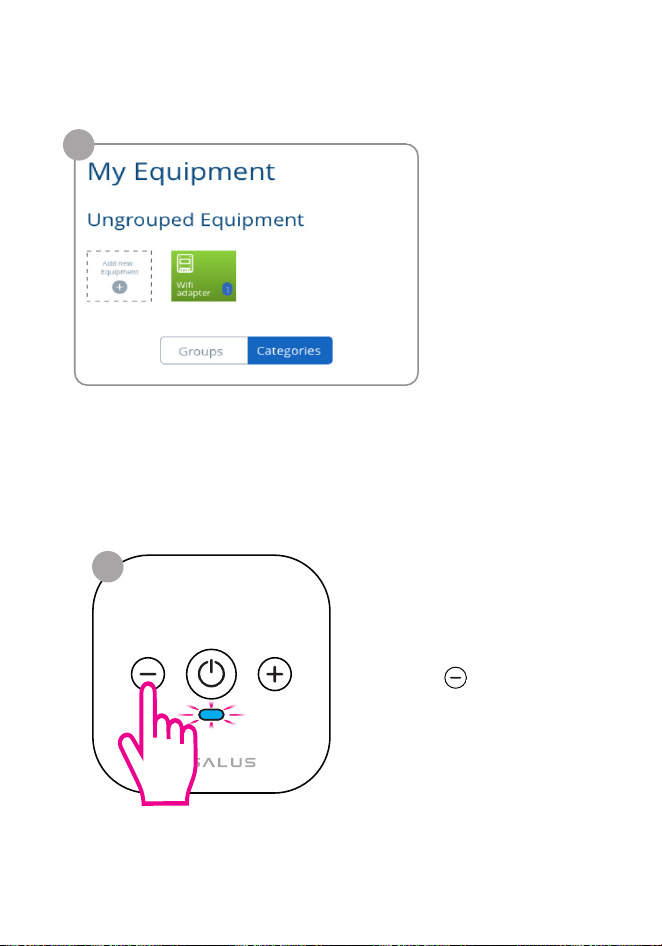
3
Here we select
Add new
Equipment.
In order to prepare the
SIR600 for connection,
hold the button for 5
seconds.
*The blue LED will blink
5 sec
4
18 Setting Up the IR Remote from the App
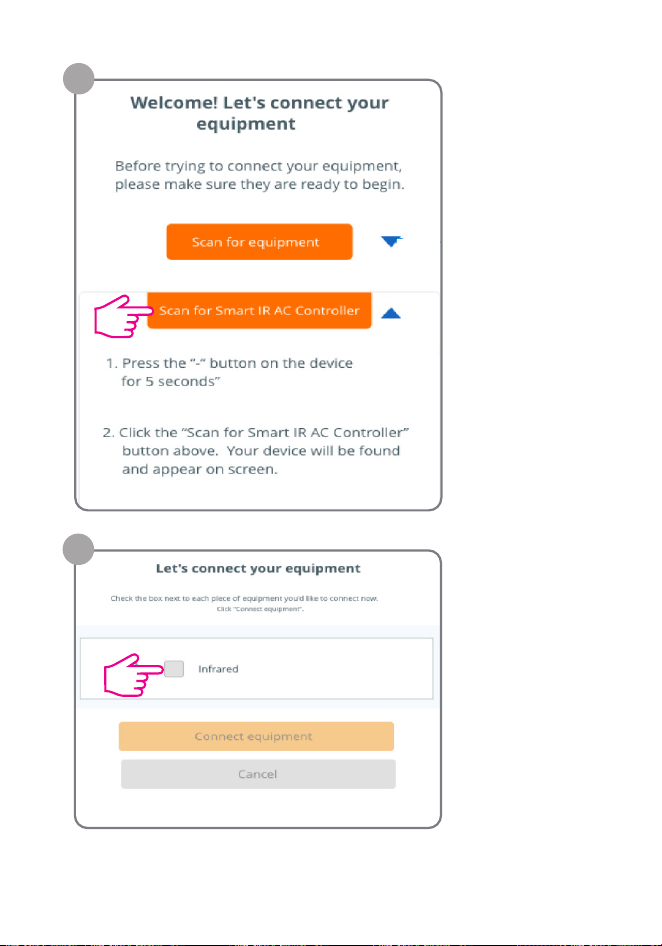
If the scanning
was
successfull the
infrared
device will be
shown and we
must select it.
6
5
Select Scan for
Smart IR AC
Controller as
the connection
mode.
Setting Up the IR Remote from the App 19
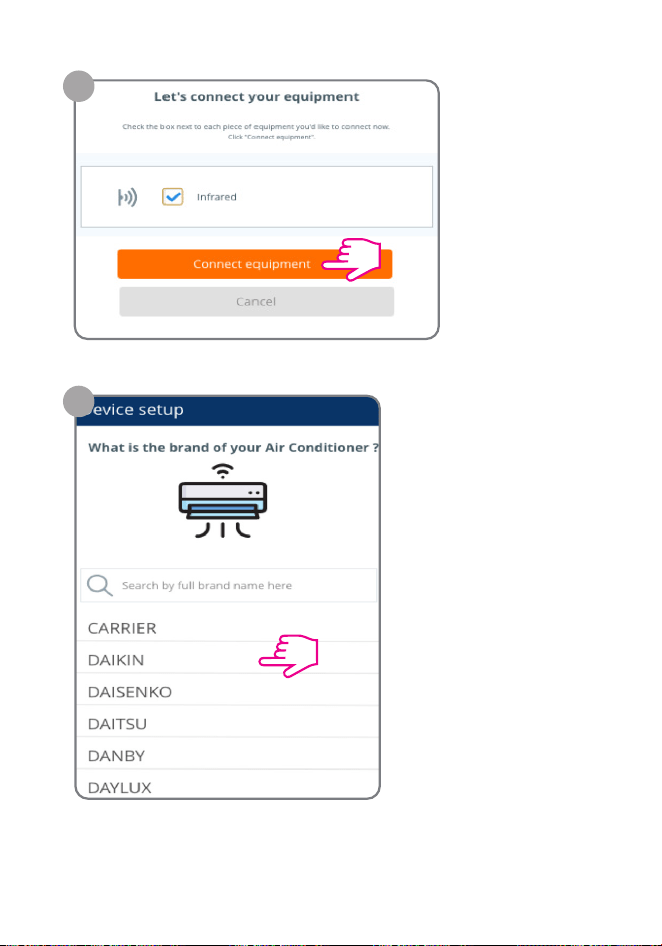
After selecting,
we will conrm
by choosing
Connect
equipment.
Search and select the
brand of the AC device.
7
8
20 Setting Up the IR Remote from the App
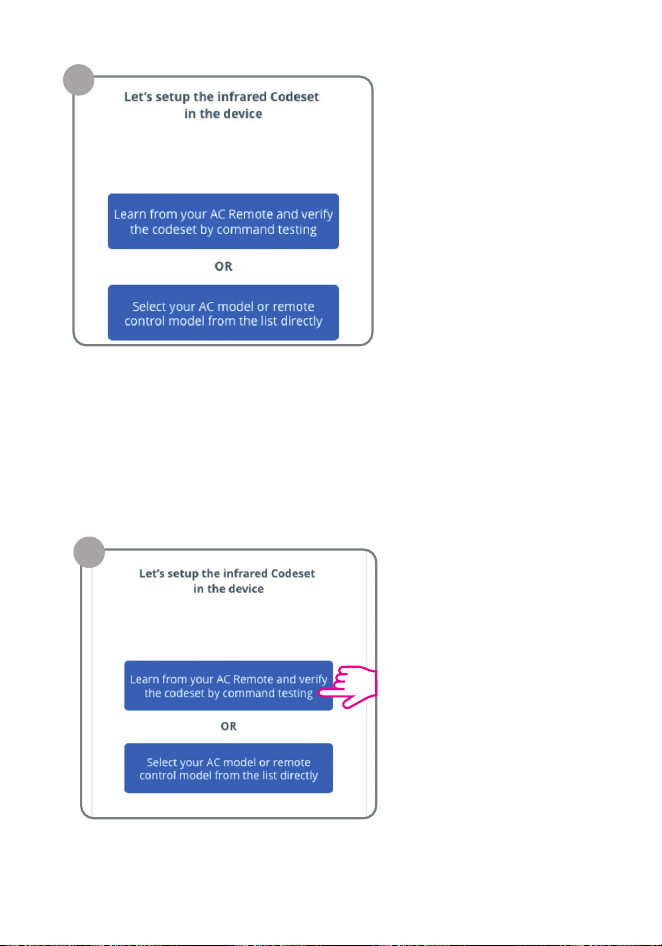
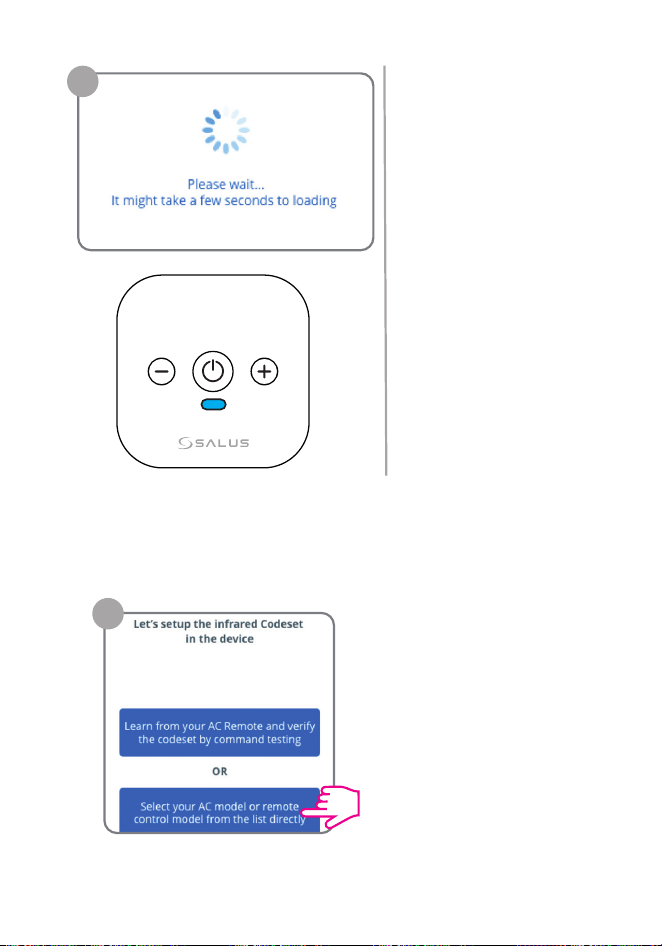
Once we selected the AC
brand we have two
options
(see the following pages):
9
OPTION A
Program the device by capturing commands from your
physical AC remote controller and test the commands to ensure
they work correctly.
We select rst option.
10A1
Setting Up the IR Remote from the App 21

The indications presented
on the screen must be
properly followed.
If the IR signal was detected,
the following notice will
be recieved. Press OK.
10A3
10A2
22 Setting Up the IR Remote from the App
The indications presented
on the screen must be
properly followed.
If the IR signal was detected,
the following notice will
be recieved. Press OK.
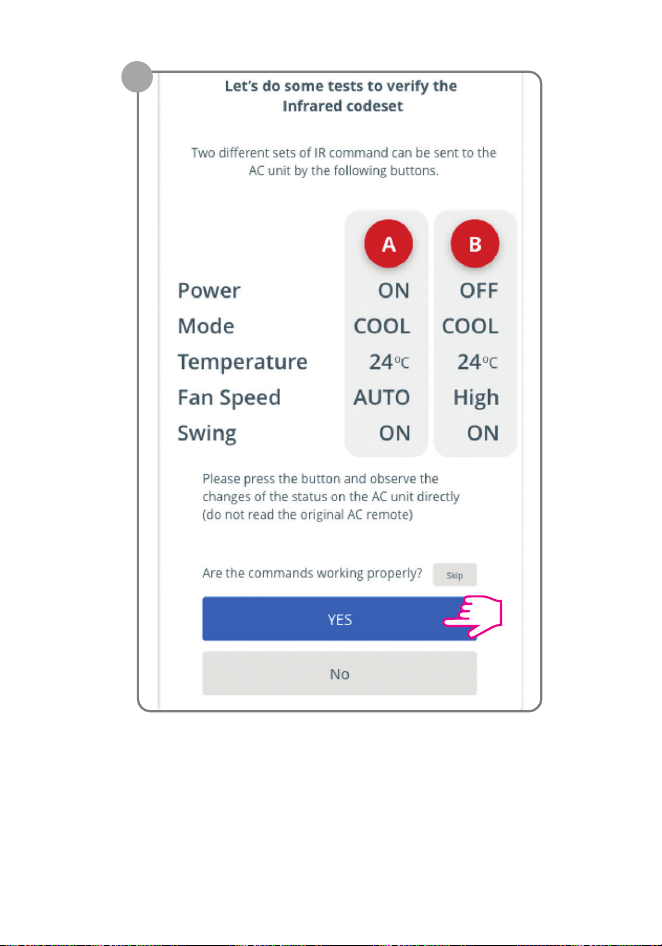
FIRST CODESET
Check if the commands work as shown. If they do,
then select YES.
10A4
Setting Up the IR Remote from the App 23
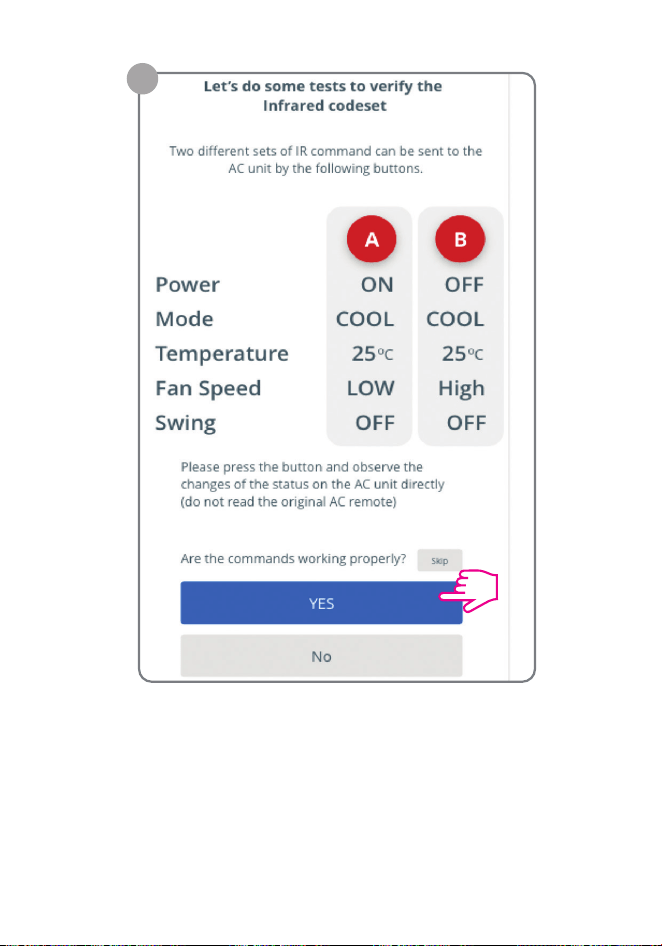
SECOND CODESET
Check if the commands work as shown. If they do,
select YES.
10A5
24 Setting Up the IR Remote from the App
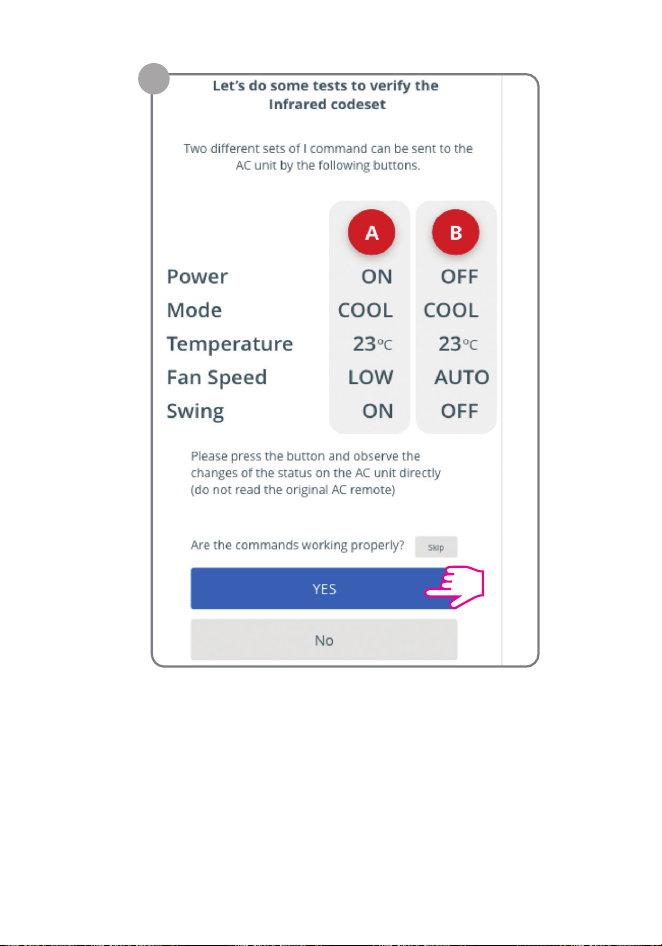
THIRD CODESET
Check if the commands work as shown. If they
do, select YES.
10A6
Setting Up the IR Remote from the App 25
10A7
If everything went
accordingly, the following
message should appear.
*SIR’s blue LED light will
be ON
OPTION B
Program the device by selecting your AC model or remote control
model from the list directly.
We select the second
option.
10B1
26 Setting Up the IR Remote from the App
If everything went
accordingly, the following
message should appear.
*SIR’s blue LED light will
be ON
OPTION B
Program the device by selecting your AC model or remote control
model from the list directly.
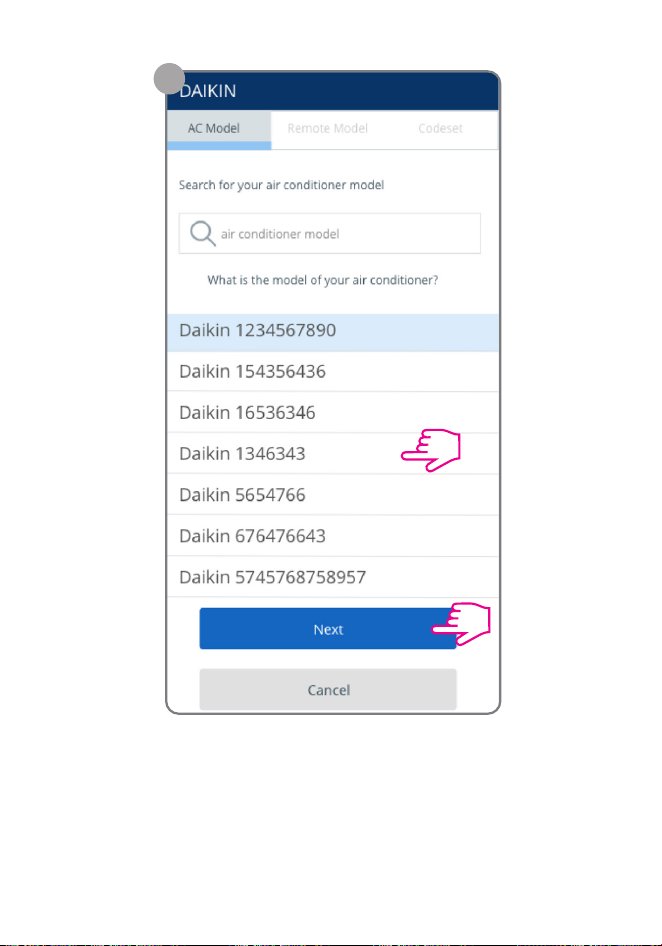
From the AC Model list,
select the model of AC device.
10B2
Setting Up the IR Remote from the App 27
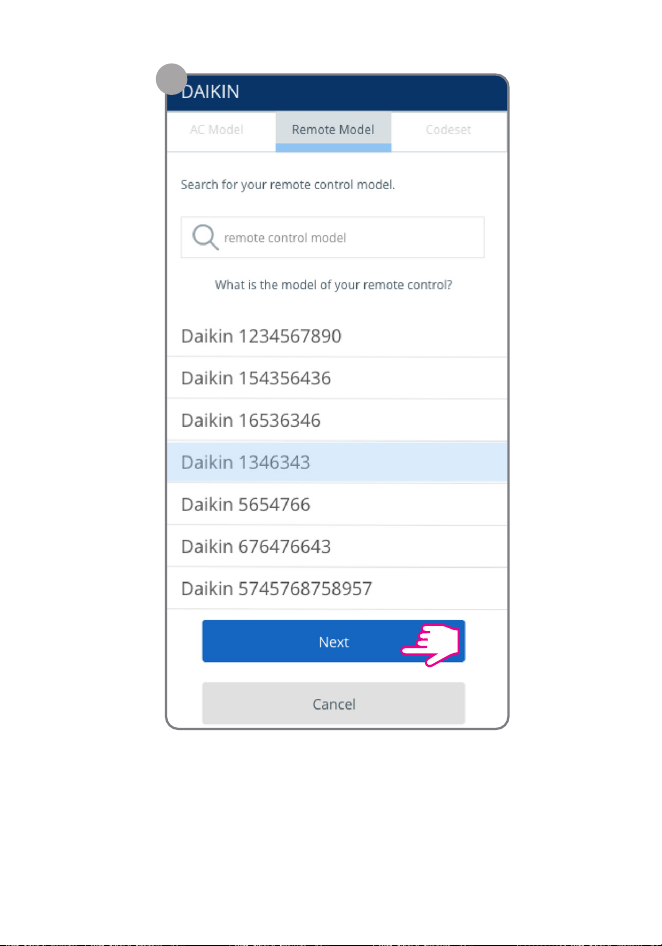
Then select the Remote Model list and select
the model of AC remote.
After selection, select Next.
10B3
10B4
28 Setting Up the IR Remote from the App
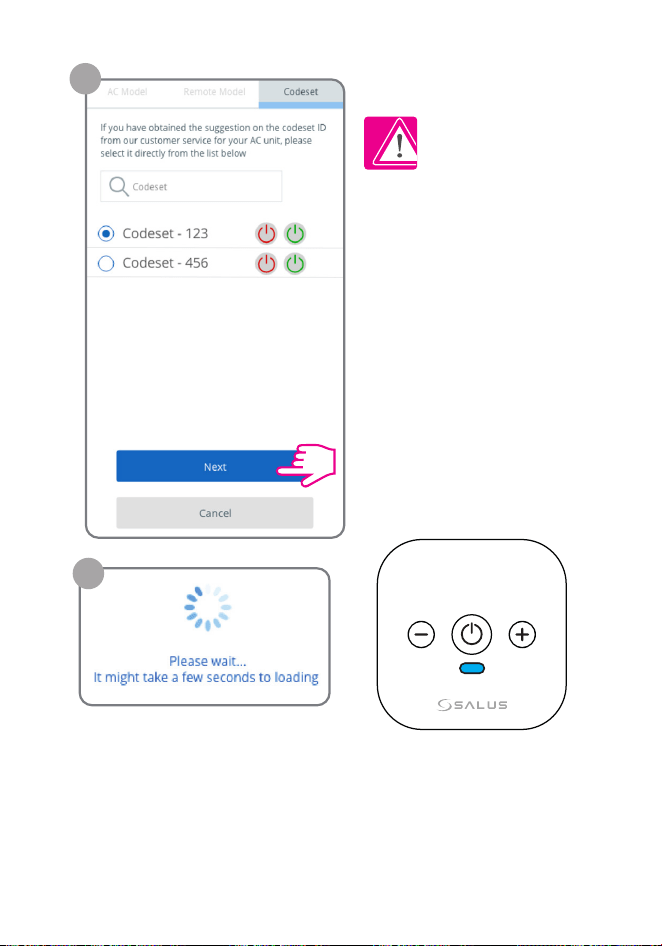
Please note !
If you have obtained the
suggestion on the codeset
ID from our customer service
for your AC unit, you can se-
lect it from the table shown
in the list Codeset as shown.
If no Codeset ID suggestion
has been provided, this step
can be ignored.
10B4
10A7
If everything went accord-
ingly, the following mes-
sage should appear.
*Blue LED light will be ON
Setting Up the IR Remote from the App 29
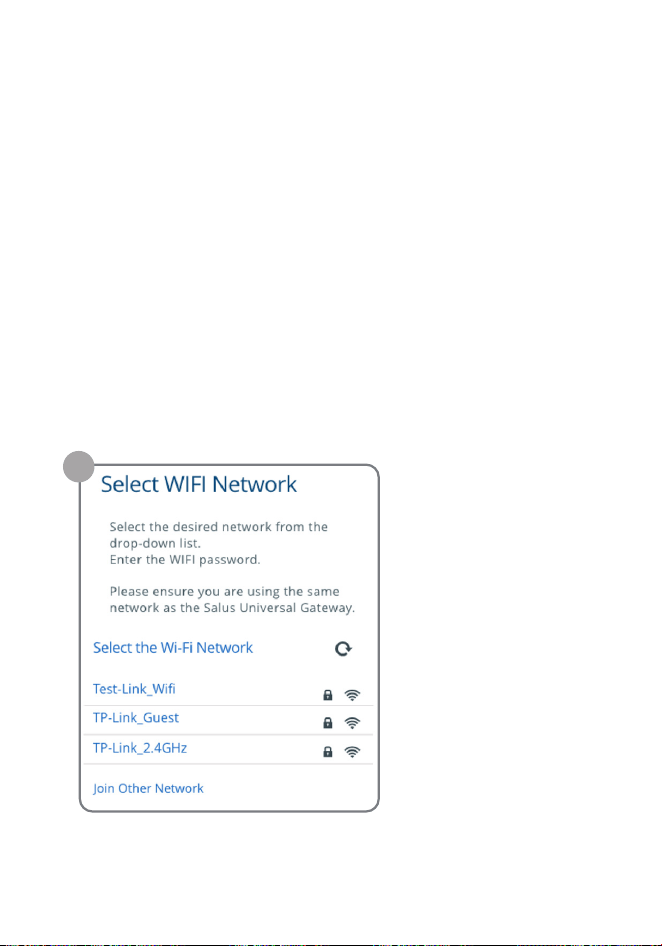
In order for the IR and gateway to communicate, the WiFi Net
work must be configured.
Please note that if the mobile phone and the gateway are not
in the same WiFi network, the application cannot access
the properties of the device.
After following the previous steps it will require for the selec-
tion of the WiFi Network.
Setting up the network connection
Select the desired
network from the list.
1
30 Setting Up the Network Connection
In order for the IR and gateway to communicate, the WiFi Net
work must be configured.
Please note that if the mobile phone and the gateway are not
in the same WiFi network, the application cannot access
the properties of the device.
After following the previous steps it will require for the selec-
tion of the WiFi Network.
Select the desired
network from the list.
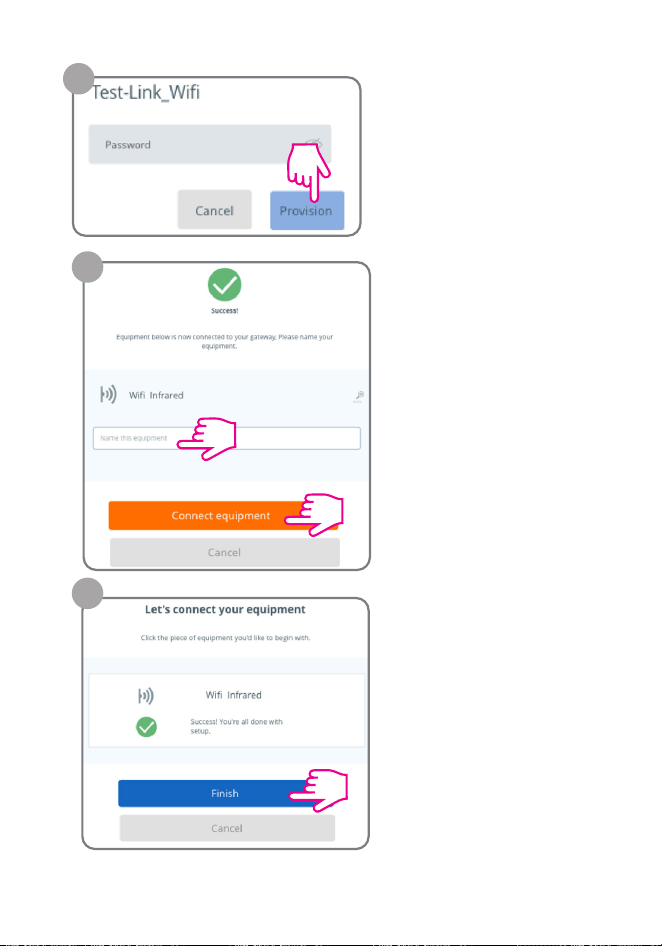
Provide the password
for the selected network
and select Provision.
2
Name the new
equipment and select
Connect Equipment
to conrm.
3
Select Finish to
conrm.
4
Setting Up the IR Remote from the App 31

Device has been added
and will be shown.
5
Operating in Online Mode via the App
This section will provide more info regarding all the features and
setups that can be done in the operation of the SIR600.
Once the IR device has been connected via the Salus Premium
Lite App, we can now work on congurations and settings re-
garding the operation and functionality.
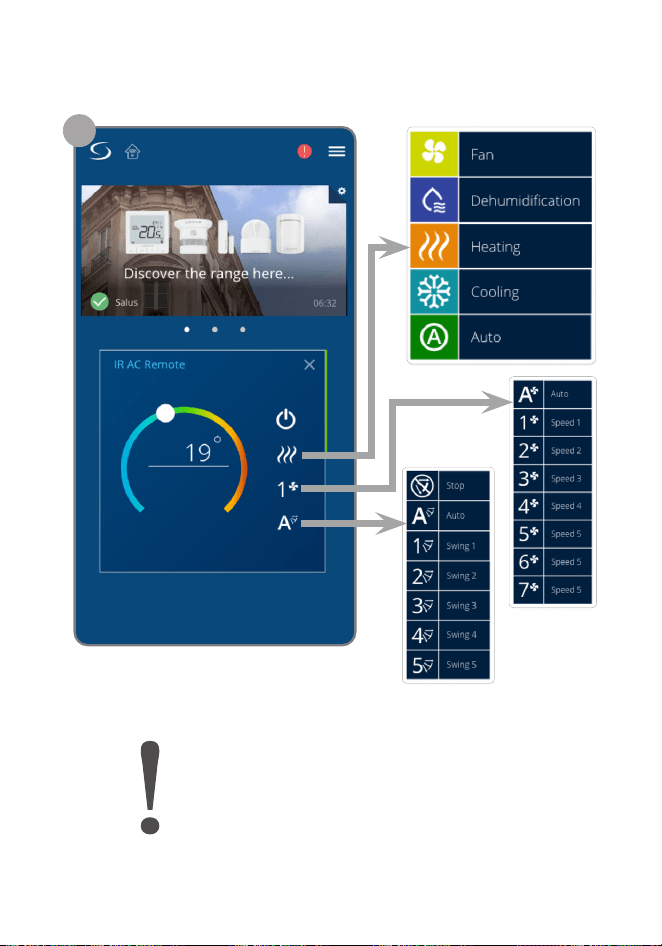
From the front page of the
App we select the
IR AC Remote icon.
From there we can turn on
the AC while also setting the
features.
1
32 Operating in Online Mode via the App
Device has been added
and will be shown.
Once the IR device has been connected via the Salus Premium
Lite App, we can now work on congurations and settings re-
garding the operation and functionality.
2
Disclaimer: App features are dependant
on the AC unit’s features and options.
Operating in Online Mode via the App 33
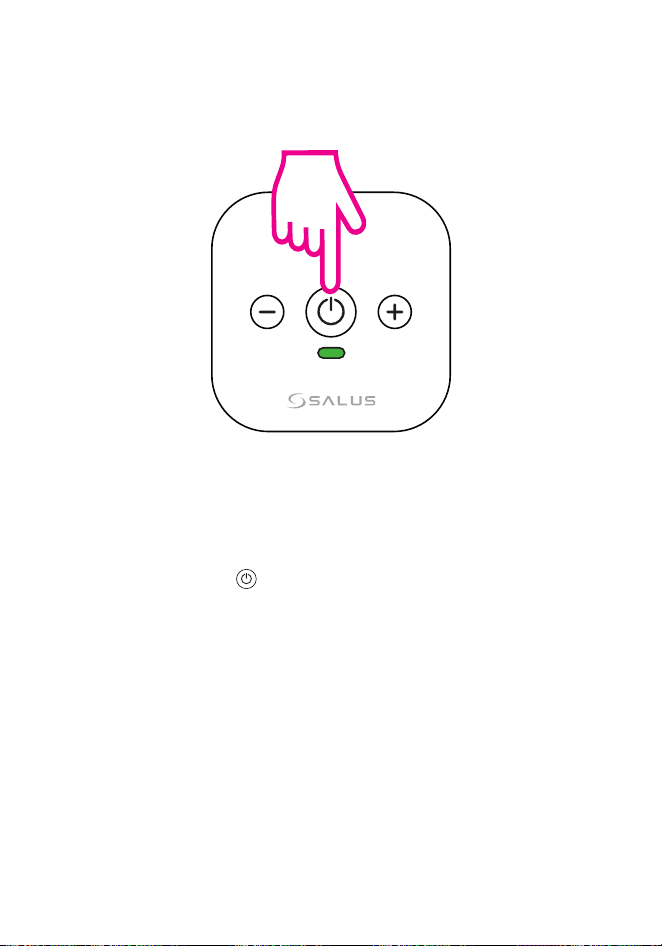
Factory reset
In order to realize a factory
reset on your device you must
press and hold the power but-
ton for 5 seconds.
*Green LED light will stay ON for
5 seconds.
Technical Data
Input 5Vdc 1A by USB-C
Connectivity WiFi 2.4GHz
AC modes
Auto, Cool, Dry, Fan and Heat
(Depending on the AC model)
Swing
Supports only vertical swing and up to
7 positions
Fan Speed
Auto and 1 - 7
(Depending on the AC model)
Storage temperature -10°C to 50°C, <90% RH
Operating temperature -0°C to 40°C, 5-90% RH, non-condensing
Dimensions (H x W x D) 68mm x 68mm x 27mm
5 sec
34 Factory Reset

Factory reset
Technical Data
Input 5Vdc 1A by USB-C
Connectivity WiFi 2.4GHz
AC modes
Auto, Cool, Dry, Fan and Heat
(Depending on the AC model)
Swing
Supports only vertical swing and up to
7 positions
Fan Speed
Auto and 1 - 7
(Depending on the AC model)
Storage temperature -10°C to 50°C, <90% RH
Operating temperature -0°C to 40°C, 5-90% RH, non-condensing
Dimensions (H x W x D) 68mm x 68mm x 27mm
Technical Data 35
HEAD OFFICE
SALUS Controls
Units 8-10, Northeld Business
Park, Forge Way,
Parkgate, Rotherham,
S60 1SD, United Kingdom
SALUS Controls GmbH,
Dieselstrasse 34,
63165 Mühlheim am Main,
Germany
Email: [email protected]
www.saluscontrols.com
SALUS Controls is a member of the Computime Group
Maintaining a policy of continuous product development SALUS Controls plc
reserve the right to change specition, design and materials of products listed in
this brochure without prior notice
V01
08/2024