Loading ...
Loading ...
Loading ...
8 Section 2 — ASSembly & Set-Up
Tire Pressure
WARNING
Equal tire pressure should be maintained at all times. Refer to
the tire sidewall for proper pressure.
The recommended operating tire pressure is:
• Approximately 10 psi for the rear tires
• Approximately 14 psi for the front tires
Important: Refer to the tire sidewall for exact tire
manufacturer’s recommended or maximum psi. Do
not overinflate. Uneven tire pressure could cause the
cutting deck to mow unevenly.
Gas & Oil Fill-up
Oil
Important: Your tractor is shipped with motor oil in
the engine. However, you MUST check the oil level
before operating. Be careful not to overfill.
Service and check the engine oil as instructed in the
Engine Operator’s Manual. Read the instructions
carefully.
Gasoline
The gasoline tank is located under the hood. Do not
overfill.
WARNING
Use extreme care when handling gasoline. Gasoline is extremely
flammable and the vapors are explosive. Never fuel machine indoors
or while the engine is hot or running. Extinguish cigarettes, cigars,
pipes, and other sources of ignition.
Note : Purchase gasoline in small quantities. Do not use
gasoline left over from the previous season, to minimize
gum deposits in the fuel system.
• This engine is certified to operate on unleaded
gasoline. For best results, fill the fuel tank with
only clean, fresh, unleaded gasoline with a
pump sticker octane rating of 87 or higher.
• Gasohol (up to 10% ethyl alcohol, 90%
unleaded gasoline by volume) is an approved
fuel. Other gasoline/alcohol blends, such as E85,
are not approved.
• Methyl Tertiary Butyl Ether (MTBE) and
unleaded gasoline blends (up to a maximum of
15% MTBE by volume) are approved fuels. Other
gasoline/ether blends are not approved.
• Fill fuel tank outdoors or in well-ventilated area.
• Never remove gas cap or add fuel while the
engine is hot or running. Allow engine to cool
at least two minutes before refueling.
• If gasoline is spilled, wipe it off the engine and
equipment. Move machine to another area. Wait
five minutes before starting the engine.
To Add Gasoline
Refer to Figure 2-1 and proceed to your applicable
model for your gas tank.
Hydrostatic Models
1. Turn the engine OFF and let the engine cool at
least two minutes before removing the fuel cap.
The gasoline tank is located under the hood.
Remove the fuel cap by turning it counter-
clockwise.
2. Fill the fuel tank with gasoline. Use only clean,
fresh (no more than 30 days old), unleaded
gasoline. Fill tank to the base of the filler neck
to allow space for fuel expansion. DO NOT TOP
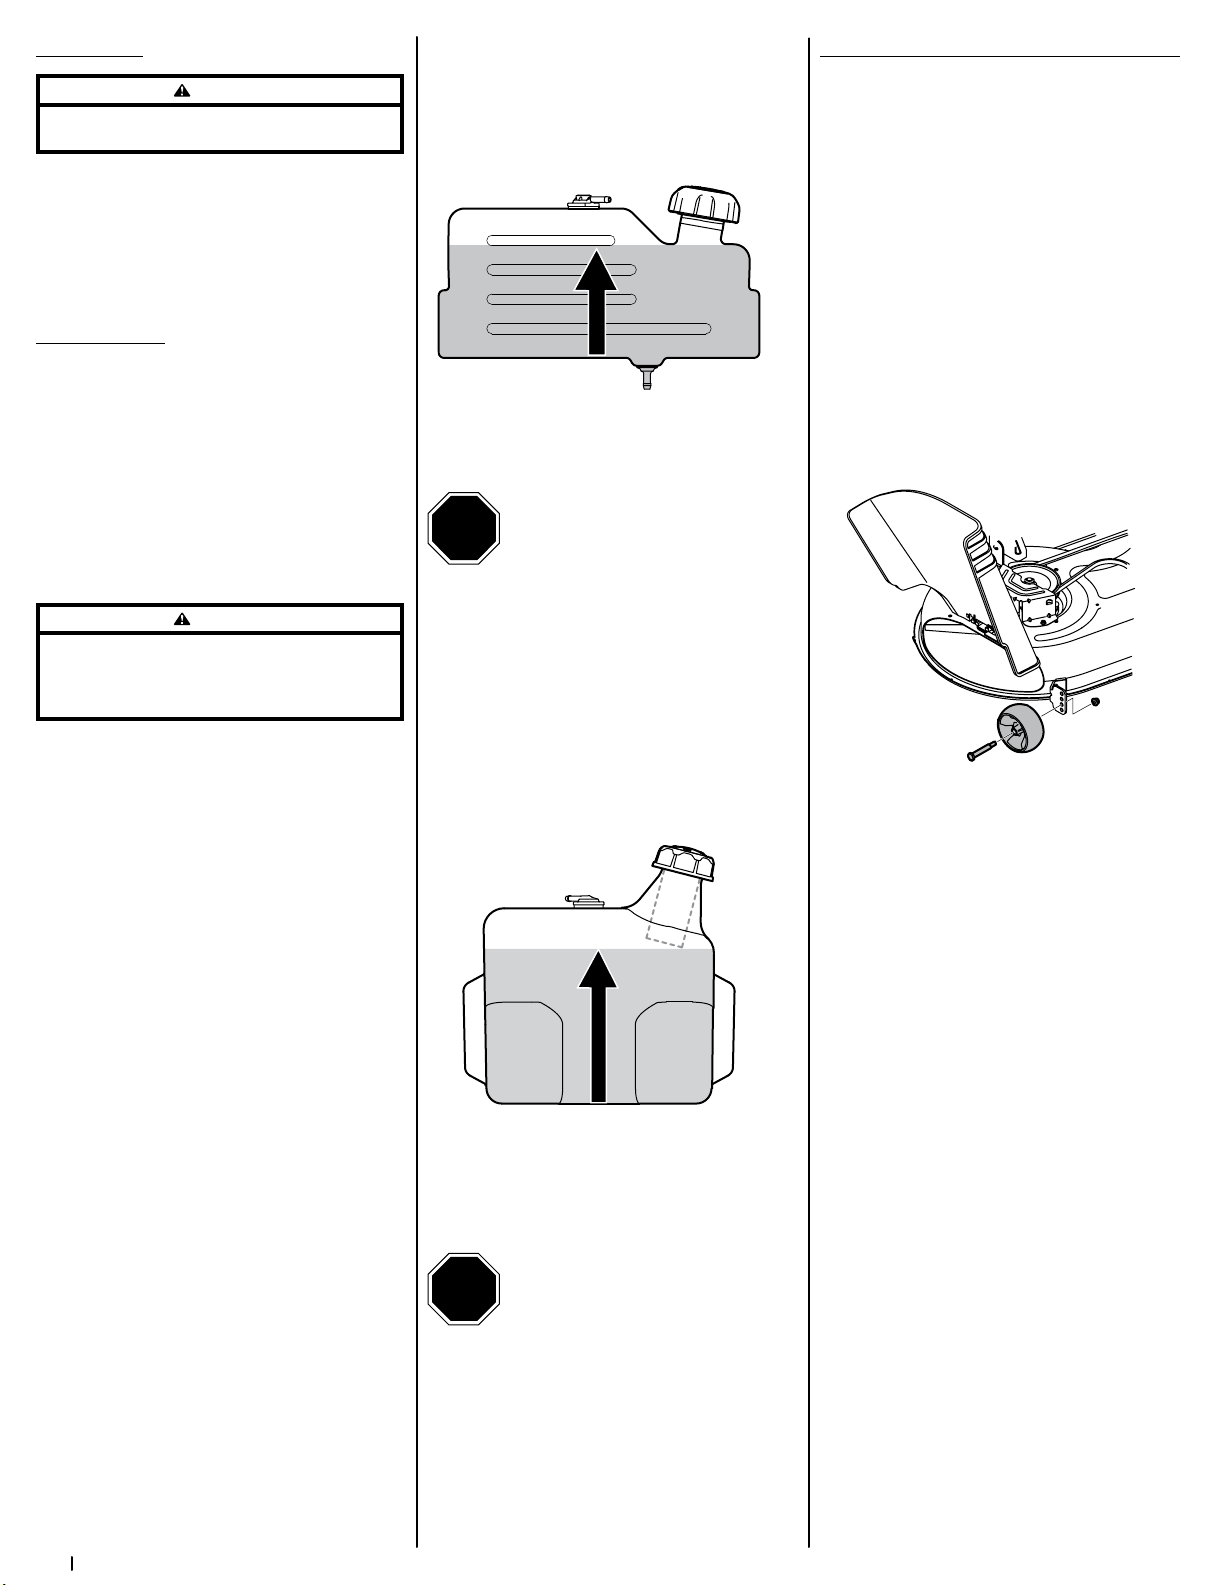
OFF THE TANK WITH FUEL. See Figure 2-9.
Figure 2-9
3. Reinstall the fuel cap.
STOP
STOP! Continue to Setting the Deck
Gauge Wheels (If Equipped) on page 9.
Foot Control CVT Models & CVT Models
1. Turn the engine OFF and let engine cool at least
two minutes before removing the fuel cap.
The gasoline tank is located under the hood.
Remove the fuel cap by turning it counter-
clockwise.
2. Fill the fuel tank with gasoline. Use only clean,
fresh (no more than 30 days old), unleaded
gasoline. Fill tank to no more than ⁄” below
bottom of filler neck to allow space for fuel
expansion. See Figure 2-10.
Figure 2-10
3. Reinstall the fuel cap.
Important: Do not overfill the tank. Fill tank to
no more than ⁄” below bottom of filler neck to
allow space for fuel expansion. See Figure 2-10.
STOP
STOP! Continue to Setting the Deck
Gauge Wheels (If Equipped) on page
10.
Setting the Deck Gauge Wheels (If Equipped)
Move the tractor to a firm and level surface, preferably
pavement, and proceed as follows:
1. Select the height position of the cutting deck
by placing the deck lift lever in the normally
desired mowing height setting (there are six
different cutting height notches on the right
fender).
2. Check the deck gauge wheels for contact or
excessive clearance with the surface below. The
deck gauge wheels should have between ¼”
and ½” clearance above the ground.
If the gauge wheels have excessive clearance or
contact with the surface, adjust as follows:
a. Raise the deck lift handle to its highest
setting.
b. Remove the front and rear deck gauge
wheels (a) by removing the lock nuts (b)
and shoulder screws (c) which secure
them to the deck. See Figure 2-11.
(b)
(a)
(c)
Figure 2-11
c. Place the deck lift lever in the desired
mowing height setting.
d. Reinsert the shoulder screws (c) into the
index hole that leaves approximately ½”
between the bottom of the deck gauge
wheel (a)and the pavement. Secure in
place with the lock nuts (c).
Refer to Leveling the Deck in the Service section on
page 10 of this manual for more detailed instructions
regarding various deck adjustments.
Loading ...
Loading ...
Loading ...