
DG630 DG630.9 DG631 DG631.9
CORDLESS CHAINSAW EN P02
TRONÇONNEUSE SANS FIL FR P21
MOTOSIERRA SIN CABLE ES P38
60V

2
EN
TABLE OF CONTENTS
IMPORTANT SAFETY INSTRUCTIONS.................................................................................2
SYMBOLS...................................................................................................................................8
SPECIFICATIONS......................................................................................................................9
COMPONENT LIST.................................................................................................................11
ASSEMBLY................................................................................................................................16
OPERATION..............................................................................................................................17
MAINTENANCE.......................................................................................................................18
TROUBLESHOOTING..............................................................................................................20
3
EN
PRODUCT SAFETY
WARNING: Some dust created by power
sanding, sawing, grinding, drilling and other
construction activities contains chemicals known to
the State of California to cause cancer, birth defects
or other reproductive harm. Some examples of these
chemicals are:
• Lead from lead-based paints;
• Crystalline silica from bricks and cement and
other masonry products;
• Arsenic and chromium from chemically-treated
lumber.
Your risk from these exposures varies, depending on
how often you do this type of work. To reduce your
exposure to these chemicals: work in a well ventilated
area, and work with approved safety equipment, such
as those dust masks that are specially designed to
WARNING: This product can expose you to
chemicals including lead and Di(2-ethylhexyl)
phthalate (DEHP) which are known to the State of
California to cause cancer and birth defects or other
reproductive harm. For more information go to www.
P65Warnings.ca.gov.
GENERAL POWER TOOL SAFETY
WARNINGS
WARNING Read all safety warnings,
provided with this power tool.
Failure to follow all
instructions listed below may result in electric shock,
Save all warnings and instructions for future
reference.
The term “power tool” in the warnings refers to your
mains-operated (corded) power tool or battery-
1. WORK AREA SAFETY
a) Keep work area clean and well lit.
Cluttered or
b)
Do not operate power tools in explosive
liquids, gases or dust.
Power tools create sparks
c) Keep children and bystanders away while
operating a power tool.
Distractions can cause
2. ELECTRICAL SAFETY
a)
Power tool plugs must match the outlet. Never
modify the plug in any way. Do not use any adapter
plugs with earthed (grounded) power tools.
b) Avoid body contact with earthed or grounded
surfaces, such as pipes, radiators, ranges and
refrigerators.
There is an increased risk of electric
c) Do not expose power tools to rain or wet condi-
tions.
Water entering a power tool will increase the
d)
Do not abuse the cord. Never use the cord for car-
rying, pulling or unplugging the power tool. Keep
cord away from heat, oil, sharp edges or moving
parts.
Damaged or entangled cords increase the
e) When operating a power tool outdoors, use an
extension cord suitable for outdoor use.
Use of a
cord suitable for outdoor use reduces the risk of
f) If operating a power tool in a damp location is
unavoidable, use a residual current device (RCD)
protected supply
.
Use of an RCD reduces the risk
3. PERSONAL SAFETY
a) Stay alert, watch what you are doing and use
common sense when operating a power tool. Do
not use a power tool while you are tired or under
A
moment of inattention while operating power tools
b)
Use personal protective equipment. Always wear
eye protection. Protective equipment such as dust
mask, non-skid safety shoes, hard hat, or hearing
protection used for appropriate conditions will
c) Prevent unintentional starting. Ensure the switch
is in the off-position before connecting to power
source and/or battery pack, picking up or carrying
the tool.
the switch or energising power tools that have the
d) Remove any adjusting key or wrench before
turning the power tool on.
A wrench or a key left
attached to a rotating part of the power tool may
e)
Do not overreach. Keep proper footing and
balance at all times.
This enables better control of
f) Dress properly. Do not wear loose clothing or
jewellery. Keep your hair, clothing and gloves
away from moving parts.

4
EN
g) If devices are provided for the connection of dust
extraction and collection facilities, ensure these
are connected and properly used.
Use of dust
h) Do not let familiarity gained from frequent use of
tools allow you to become complacent and ignore
tool safety principles.
A careless action can cause
4. POWER TOOL USE AND CARE
a) Do not force the power tool. Use the correct
power tool for your application.
The correct
b) Do not use the power tool if the switch does not
turn it on and off.
Any power tool that cannot be
controlled with the switch is dangerous and must
c) Disconnect the plug from the power source and/
or the battery pack from the power tool before
making any adjustments, changing accessories,
or storing power tools.
Such preventive safety
measures reduce the risk of starting the power tool
d) Store idle power tools out of the reach of children
and do not allow persons unfamiliar with the
power tool or these instructions to operate the
power tool.
Power tools are dangerous in the
e) Maintain power tools. Check for misalignment
or binding of moving parts, breakage of parts and
any other condition that may affect the power
tool’s operation. If damaged, have the power tool
repaired before use.
Many accidents are caused
f) Keep cutting tools sharp and clean.
Properly
maintained cutting tools with sharp cutting edges
g) Use the power tool, accessories and tool bits etc.
in accordance with these instructions, taking into
account the working conditions and the work to
be performed.
Use of the power tool for operations
different from those intended could result in a
h) Keep handles and grasping surfaces dry, clean
and free from oil and grease.
Slippery handles and
grasping surfaces do not allow for safe handling
5. BATTERY TOOL USE AND CARE
manufacturer
.
A charger that is suitable for one
battery packs.
Use of any other battery packs may
c) When battery pack is not in use, keep it away
from other metal objects, like paper clips, coins,
keys, nails, screws or other small metal objects,
that can make a connection from one terminal to
another.
Shorting the battery terminals together
d) Under abusive conditions, liquid may be ejected
from the battery; avoid contact. If contact
contacts eyes, additionally seek medical help.
e) Do not use a battery pack or tool that is damaged
or excessive temperature.
g) Follow all charging instructions and do not
charge the battery pack or tool outside the
Charging improperly or at temperatures outside
6. SERVICE
repair person using only identical replacement
parts.
This will ensure that the safety of the power
b) Never service damaged battery packs.
Service
of battery packs should only be performed by the
1) GENERAL CHAIN SAW
SAFETY WARNINGS:
a) Keep all parts of the body away from the saw
chain when the chain saw is operating. Before
you start the chain saw, make sure the saw
chain is not contacting anything.
A moment of
inattention while operating chain saws may cause
entanglement of your clothing or body with the saw
b) Always hold the chain saw with your right hand
on the rear handle and your left hand on the front
handle.
Holding the chain saw with a reversed

5
EN
c) Hold the chain saw by insulated gripping surfaces
only, because the saw chain may contact hidden
wiring
.
Saw chains contacting a “live”wire may
make exposed metal parts of the chain saw
“live”and could give the operator an electric
d) Wear safety glasses protection. Further protective
equipment for hearing, head, hands, legs and feet
is recommended.
Adequate protective clothing
e) Do not operate a chain saw, on a ladder, from a
rooftop, or any unstable support.
Operation of a
chain saw in this manner could result in serious
f) Always keep proper footing and operate the chain
level surface.
Slippery or unstable surfaces may
g) When cutting a limb that is under tension , be
alert for spring back.
When the tension in the
h) Use extreme caution when cutting brush and
saplings.
The slender material may catch the saw
chain and be whipped toward you or pull you off
i) Carry the chain saw by the front handle with
the chain saw switched off and away from your
body. When transporting or storing the chain saw
Proper handling
of the chain saw will reduce the likelihood of
j) Follow instructions for lubricating, chain
tensioning and changing the bar and chain.
Improperly tensioned or lubricated chain may
k) Cut wood only. Do not use chain saw for purposes
not intended. For example: do not use chain saw
for cutting metal, plastic, masonry or non-wood
building materials
.
Use of the chain saw for
operations different than intended could result in a
l) Do not attempt to fell a tree until you have an
understanding of the risks and how to avoid
them.
m) Do not operate a chain saw in a tree unless you
of a chain saw in a tree without proper training
could increase the risk of serious personal injury.
n) Follow all instructions when clearing jammed
material, storing or servicing the chain saw.
Make sure the switch is off and the battery pack
is removed.
Unexpected actuation of the chain
as a minimum, practice cutting logs on a saw-
horse or cradle.
p) Recommendation to have sharpening and
maintenance of the saw chain performed by
authorised service centers.
2) CAUSES AND OPERATOR
PREVENTION OF KICKBACK:
Kickback may occur when the nose or tip of the guide
bar touches an object, or when the wood closes in and
pinches the saw chain in the cut.
Tip contact in some cases may cause a sudden reverse
reaction, kicking the guide bar up and back
towards the operator. Pinching the saw chain along the
top of the guide bar may push the guide bar rapidly back
towards the operator.
Either of these reactions may cause you to lose control
of the saw which could result in serious personal injury.
Do not rely exclusively upon the safety devices built into
your saw. As a chain saw user, you should take several
steps to keep your cutting jobs free from accident or
injury.
Kickback is the result of chain saw misuse and/or
incorrect operating procedures or conditions and can
be avoided by taking proper precautions as given
below:
encircling the chain saw handles, with both
hands on the saw and position your body and arm
to allow you to resist kickback forces.
Kickback
forces can be controlled by the operator, if proper
b) Do not overreach and do not cut above shoulder
height.
This helps prevent unintended tip contact
and enables better control of the chain saw in
by the manufacturer.
Incorrect replacement guide
bars and saw chains may cause chain breakage
d) Follow the manufacturer’s sharpening and
maintenance instructions for the saw chain.

6
EN
Decreasing the depth gauge height can lead to
SAFETY WARNINGS FOR BAT-
TERY PACK
a) Do not dismantle, open or shred battery pack.
storage in direct sunlight.
c) Do not short-circuit a battery pack. Do not store
battery packs haphazardly in a box or drawer
where they may short-circuit each other or be
short-circuited by other metal objects. When
battery pack is not in use, keep it away from other
the battery terminals together may cause burns or
d) Do not subject battery pack to mechanical shock.
e) In the event of battery leaking, do not allow the
liquid to come in contact with the skin or eyes. If
contact has been made, wash the affected area
with copious amounts of water and seek medical
advice.
f) Do not use any battery pack which is not designed
for use with the equipment.
g) Keep battery pack out of the reach of children.
h) Always purchase the battery pack recommended
by the device manufacturer for the equipment.
i) Keep battery pack clean and dry.
j) Wipe the battery pack terminals with a clean dry
cloth if they become dirty.
k) Battery pack needs to be charged before use.
Always use the correct charger and refer to the
manufacturer’s instructions or equipment manual
for proper charging instructions.
l) Do not leave battery pack on prolonged charge
when not in use.
m) After extended periods of storage, it may be
necessary to charge and discharge the battery pack
several times to obtain maximum performance.
®
.
provided for use with the equipment.
o) Retain the original product literature for future
reference.
p) Use only the battery pack in the application for
which it was intended.
q) Remove the battery pack from the equipment when
not in use.
r) Dispose of properly.
s) Do not mix cells of different manufacture, capacity,
size or type within a device.
t) Keep the battery away from microwaves and high
pressure.
SAVE THESE INSTRUCTIONS
Instructions concerning the proper techniques for
basic felling, limbing, and cross-cutting
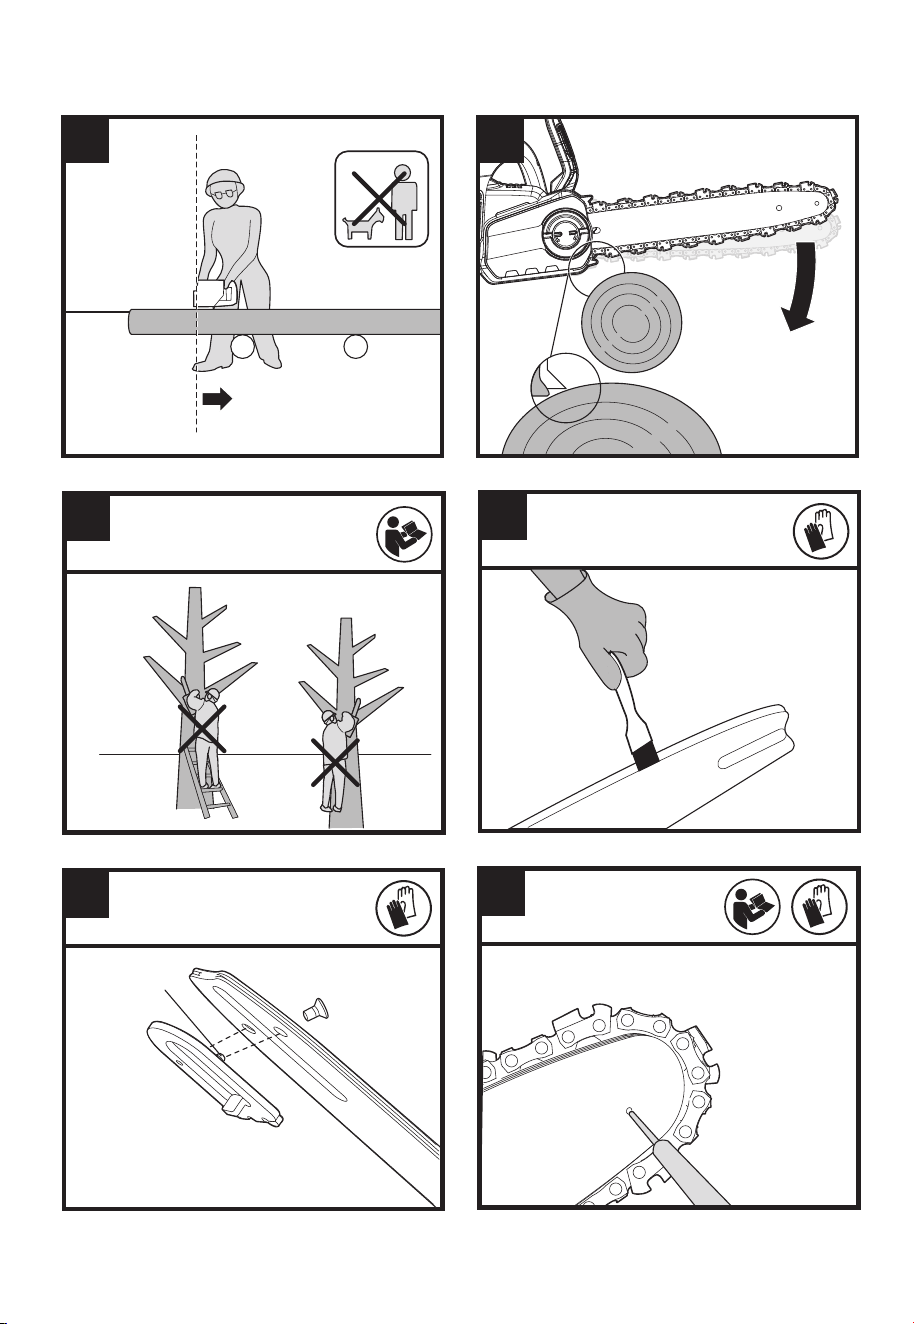
1. Felling a tree
When bucking and felling operations are being
performed by two or more persons at the same time,
the felling operations should be separated from the
bucking operation by a distance of at least twice the
height of the tree being felled. Trees should not be felled
in a manner that would endanger any person, strike any
utility line or cause any property damage. If the tree
does make contact with any utility line, the company
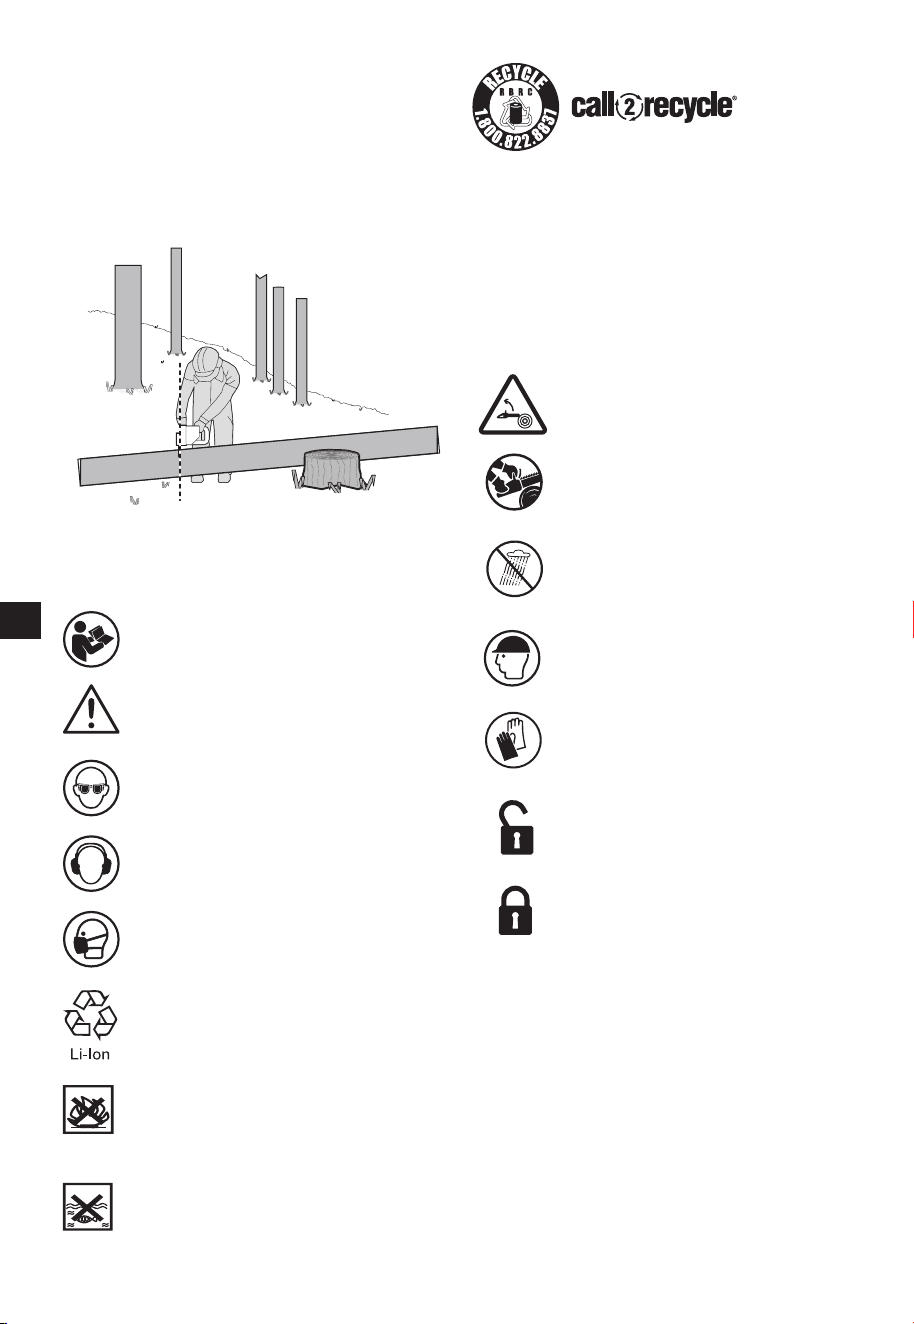
The Chainsaw operator should keep on the uphill side
of the terrain as the tree is likely to roll or slide downhill
after it is felled.
An escape path should be planned and cleared as
necessary before cuts are started. The escape path
should extend back and diagonally to the rear of the
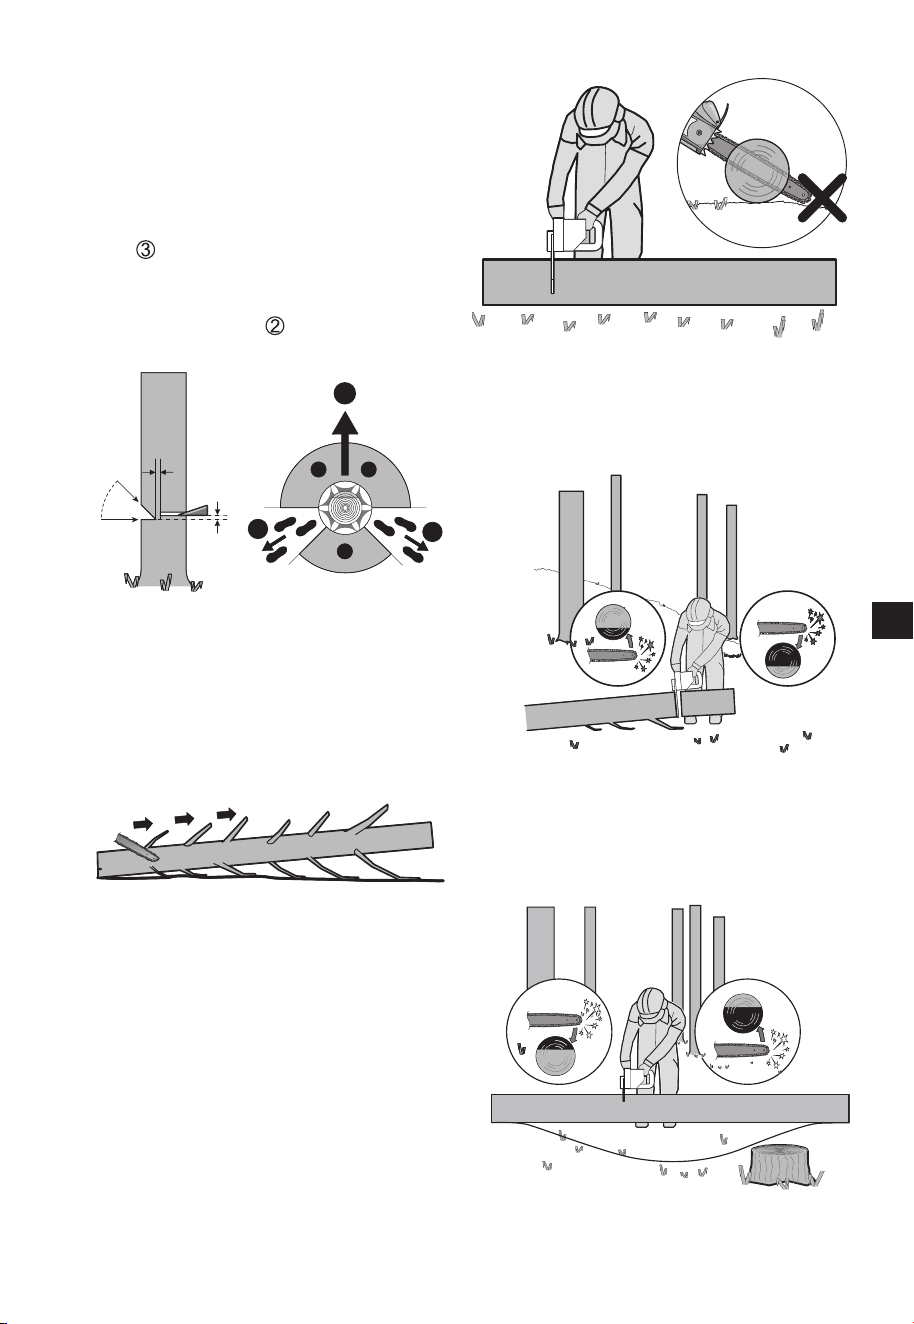
expected line of fall as illustrated in Figure 1.
Before felling is started, consider the natural lean of the
tree, the location of larger branches and the wind
direction to judge which way the tree will fall.
Remove dirt, stones, loose bark, nails, staples and wire
from the tree.
2. Notching undercut
Make the notch 1/3 the diameter of the tree,
perpendicular to the direction of falls as illustrated in
Figure 1. Make the lower horizontal notching cut (W)
chain or the guide bar when the second notch (X) is
being made.
3. Felling back cut
Make the felling back cut (Y) at least 50 mm higher than
the horizontal notching cut as illustrated in Figure 1.
Keep the felling back cut parallel to the horizontal
notching cut.
Make the felling back cut so enough wood is left to act
as a hinge. The hinge wood keeps the tree from twisting
and falling in the wrong direction. Do not cut through
7
EN
the hinge.
As the felling gets close to the hinge, the tree should
begin to fall. If there is any chance that the tree may not
fall in desired direction or it may rock back and bind the
saw chain, stop cutting before the felling back cut is
complete and use wedges of wood, plastic or aluminium
(Z) to open the cut and drop the tree along the desired
line of fall ( ).
When the tree begins to fall remove the Chainsaw from
the cut, stop the motor, put the Chainsaw down, then
use the retreat path planned ( ). Be alert for overhead
limbs falling and watch your footing. (See Figure 1)
3
2
2
W
Y
Z
X
50mm
50mm
1
1
1
2
2/3
1
1/3
1
2
2/3
1/3
Fig.1
Fig.2
Fig.3
Fig.4
Fig.5
Fig.6
4. Limbing a tree
Limbing is removing the branches from a fallen tree.
When limbing leave larger lower limbs to support the
log off the ground. Remove the small limbs in one cut as
illustrated in Figure 2. Branches under tension should
be cut from the bottom up to avoid binding the
Chainsaw.
3
2
2
W
Y
Z
X
50mm
50mm
1
1
1
2
2/3
1
1/3
1
2
2/3
1/3
Fig.1
Fig.2
Fig.3
Fig.4
Fig.5
Fig.6
5. Bucking a log
Bucking is cutting a log into lengths. It is important to
distributed on both feet. When possible, the log should
be raised and supported by the use of limbs, logs or
chocks. Follow the simple directions for easy cutting.
When the log is supported along its entire length as
illustrated in Figure 3, it is cut from the top (overbuck),
avoid contacting ground as this will greatly reduce the
chain sharpness.
3
2
2
W
Y
Z
X
50mm
50mm
1
1
1
2
2/3
1
1/3
1
2
2/3
1/3
Fig.1
Fig.2
Fig.3
Fig.4
Fig.5
Fig.6
When the log is supported on one end, as illustrated in
Figure 4, cut 1/3 the diameter from the underside
3
2
2
W
Y
Z
X
50mm
50mm
1
1
1
2
2/3
1
1/3
1
2
2/3
1/3
Fig.1
Fig.2
Fig.3
Fig.4
Fig.5
Fig.6
When the log is supported on both ends, as illustrated
in Figure 5, cut 1/3 the diameter from the top (overbuck)
3
2
2
W
Y
Z
X
50mm
50mm
1
1
1
2
2/3
1
1/3
1
2
2/3
1/3
Fig.1
Fig.2
Fig.3
Fig.4
Fig.5
Fig.6
When bucking on a slope always stand on the uphill
side of the log, as illustrated in Figure 6. When “cutting
8
EN
through”, to maintain complete control release the
cutting pressure near the end of the cut without relaxing
your grip on the Chainsaw handles. Don’t let the chain
contact the ground. After completing the cut, wait for
the saw chain to stop before you move the Chainsaw.
Always stop the motor before moving from tree to tree.
3
2
2
W
Y
Z
X
50mm
50mm
1
1
1
2
2/3
1
1/3
1
2
2/3
1/3
Fig.1
Fig.2
Fig.3
Fig.4
Fig.5
Fig.6
SYMBOLS
To reduce the risk of injury, user must read
instruction manual
Warning
Wear eye protection
Wear ear protection
Wear dust mask
Li-Ion battery, battery must be recycled
Do not burn
Batteries may enter water cycle if disposed
improperly, which can be hazardous
for ecosystem. Do not dispose of waste
batteries as unsorted municipal waste.
POSITEC
Inc. has established a partnership
with the RBRC Corporation to recycle
any
Positec
batteries with the RBRC-
call2recycle seal. For environmental
protection, please do not discard batteries
in the trash.
After the batteries' life cycle is ended,
then please call 1-800-822-8837 for a free
service that will properly dispose of the
battery.
Beware of chain saw kickback and avoid
contact with bar tip
Always use chain saw two-handed
Do not expose to rain
Wear head protection
Wear protective gloves
Unlock
Lock

9
EN
TECHNICAL DATA
Type Designation DG630 DG630.9 DG631 DG631.9 (3 - designation of machinery, representative of Chainsaw)
DG630 DG630.9 DG631 DG631.9
Rated voltage 60 V Max. **
Bar length 16'' (40 cm) 18'' (45 cm)
Chain speed 72 ft/s (22 m/s) 79 ft/s (24 m/s)
Oil tank capacity 6.7 oz. (190 ml)
Chain pitch 3/8'' LP (0.95 cm)
Chain gauge 0.043'' (1.1 mm)
Charging time 50 mins / 100 mins /
Machine weight
13 lbs
(5.9 kg)
9.6 lbs
(4.3 kg)
16.3 lbs
(7.4 kg)
10.2 lbs
(4.6 kg)
** Voltage measured without workload. Initial battery voltage reaches maximum of 60 volts. Nominal voltage is 54
volts.
ACCESSORIES
DG630 DG630.9 DG631 DG631.9
Chain
1 1 1 1
Bar
1 1 1 1
Tra nsportati on Cove r
1 1 1 1
Battery Pack (DG6B25)
1 / / /
Battery Pack (DG6B5)
/ / 1 /
Charger (DG6C3)
1 / 1 /
We recommend that you purchase your accessories listed in the above list from the same store that sold you the
tool. Refer to the accessory packaging for further details. Store personnel can assist you and offer advice.
14
15
17
19
18
20
21
1
2
3
4
5
6
7
8
9
13
10
11
12
16

11
EN
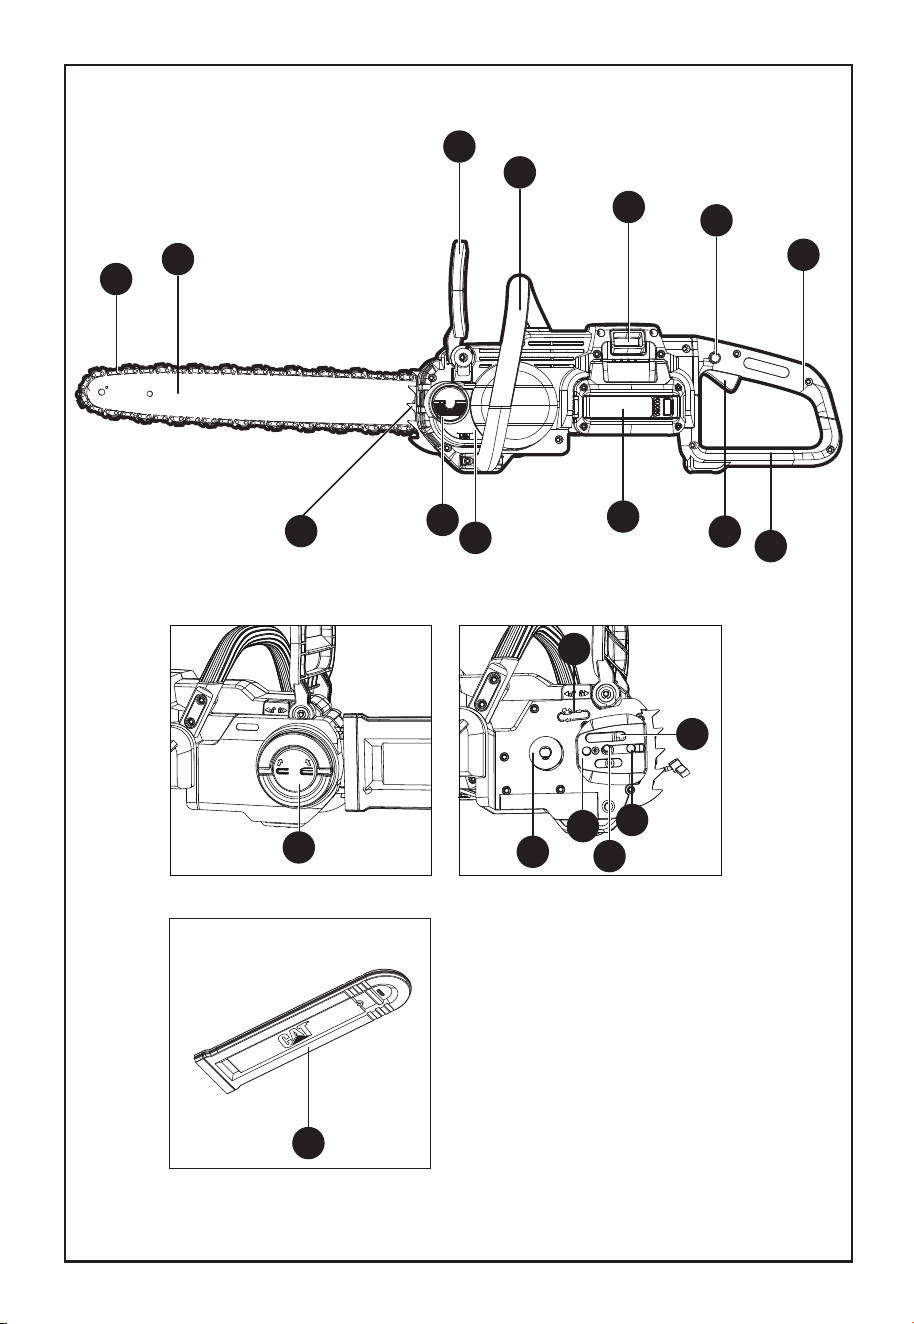
COMPONENT LIST
1. CHAIN
2. GUIDE BAR
3. CHAIN BRAKE LEVER (HAND GUARD)
4.
FRONT HANDLE
5. BATTERY PACK RELEASE BUTTON
6. LOCK-OUT BUTTON
7. REAR HANDLE
8. REAR HAND GUARD
9. ON/OFF SWITCH
10. BATTERY PACK *
11. OIL LEVEL WINDOW
12. OIL FILLER CAP
13. BUMPER SPIKE
14. CHAIN TENSIONING KNOB
15. CHAIN DIRECTION SYMBOL
16. OIL OUTLET
17. BAR LOCATING TABS
18. FASTENING BAR BOLT
19. BAR PAD
20. DRIVE SPROCKET
21. BAR AND CHAIN STORAGE/ TRANSPORTATION COVER (SHEATH)
22. BAR TENSIONING PLATE (SEE FIG. A2)
* Not all the accessories illustrated or described are included in standard delivery.
22
1
2
Kink/Plis/Torcimiento
1
2
C2C1
B2B1
A2A1
G
E
1
3-5mm
F
D
2
EN: Bar / F: Bar
ES: Barra de guía
H1
H2
100%
0%
1
2
Click/
Cliquez/Clic
Click/
Cliquez/Clic
1
2
NM
L
K
1
2
JI
R
Q
S
a
EN: Injecting grease to lubricate
ES: Inyectando grasa para lubricar
F: Injectez la graisse pour lubrifier
T
PO

16
EN
INTENDED USE
The Chainsaw is intended for sawing of trees, tree
trunks, branches, wooden beams, planks, etc. Cuts can
be sawed with or across the grain. This product is not
suitable for sawing mineral materials.
ASSEMBLY
WARNING! Do not install the battery pack before
it has been completely assembled.
Always use gloves when handling the chain.
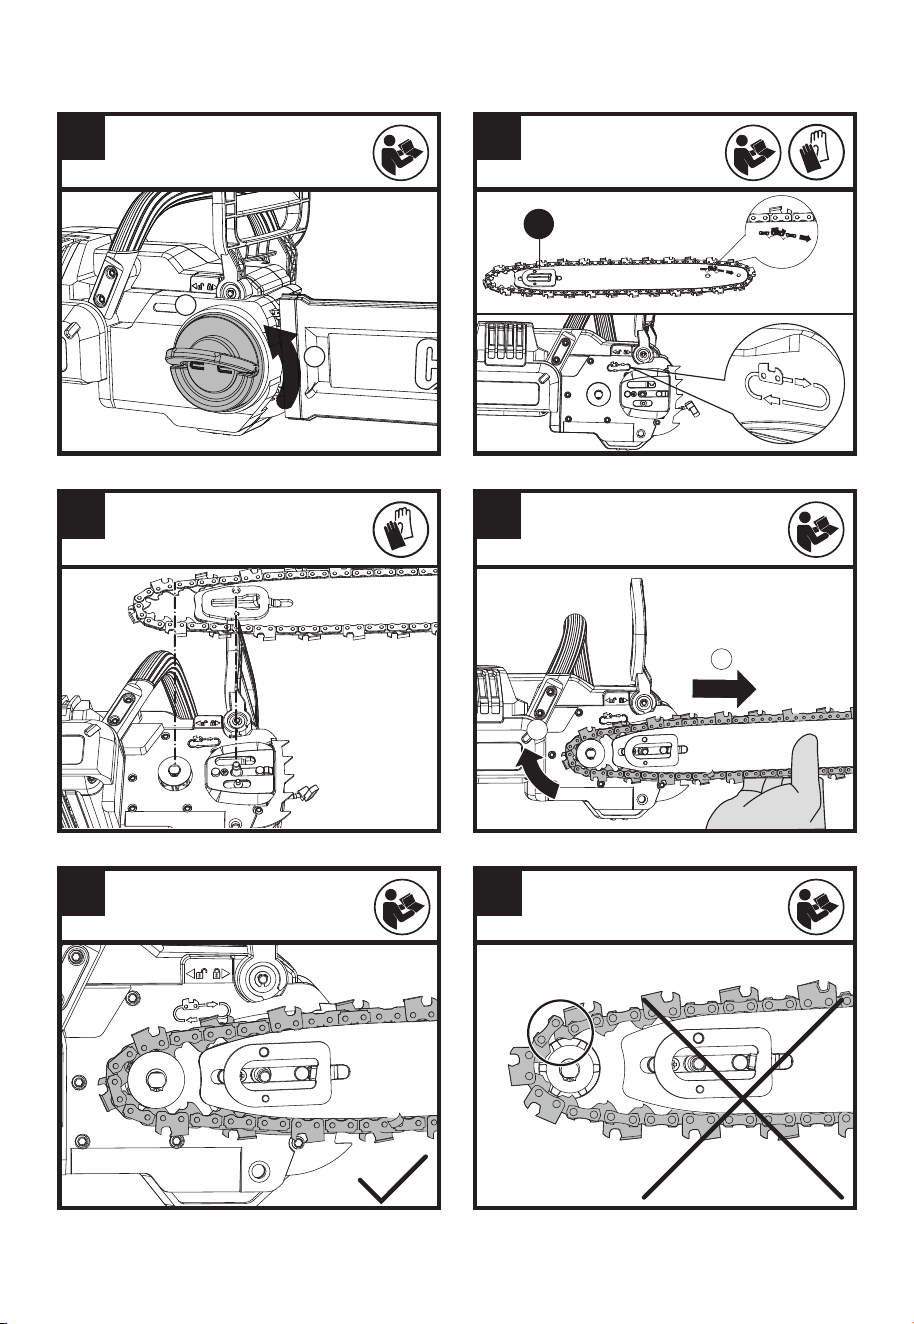
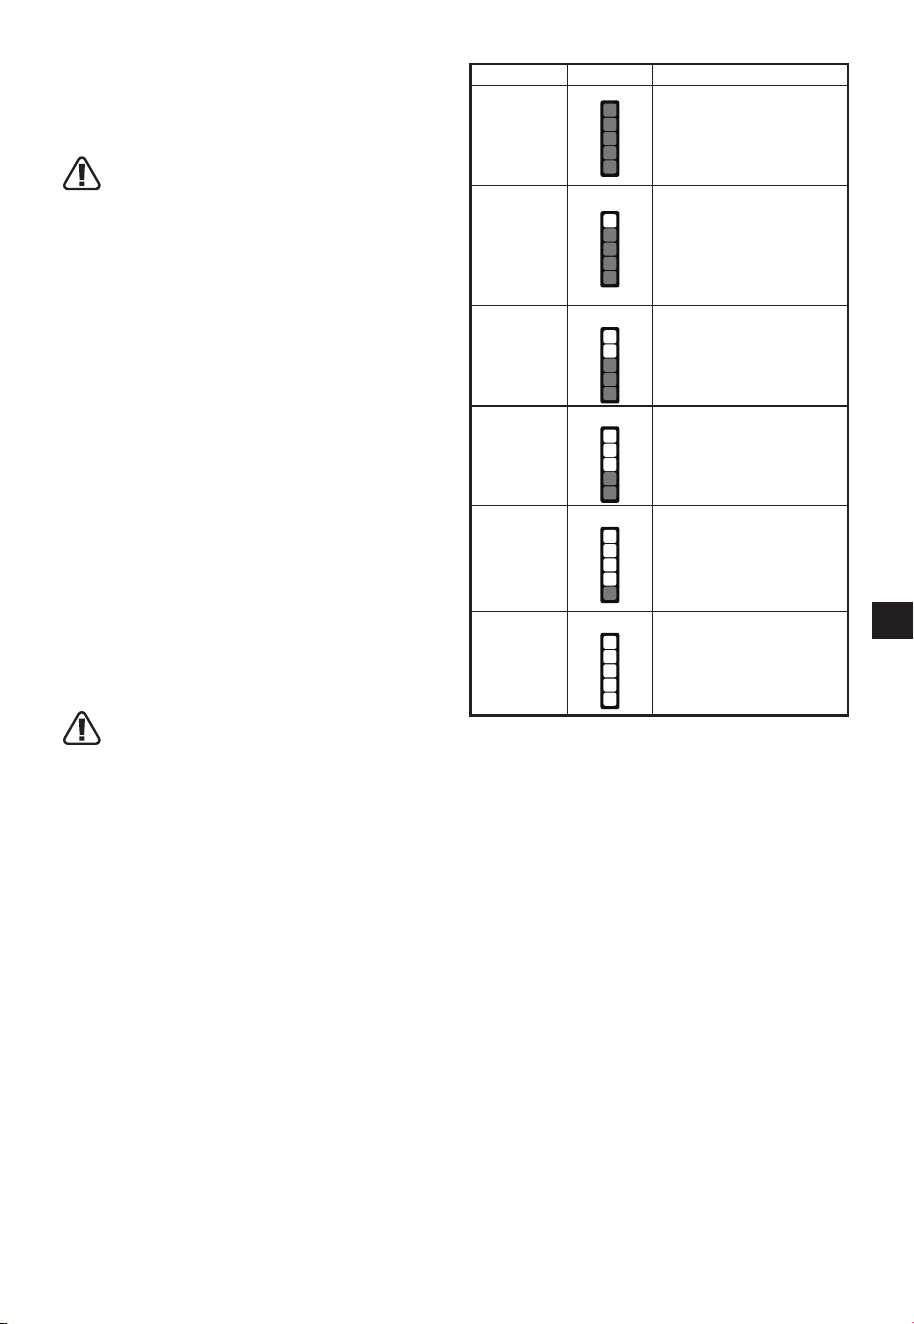
CHAIN AND GUIDE BAR ASSEMBLY
1. Unpack all parts carefully. Remove the chain cover
by turning the chain tensioning knob in a counter-
clockwise direction. (See Fig. A1)
2. Place the Chainsaw on a solid, level surface.
3. Use only genuine
Cat
®
chains or those
recommended for Guide Bar.
4. Slide the chain in the slot around the guide bar.
Ensure the chain is in correct running direction by
comparing it to the chain icon on the guide bar, or
referring to the chain direction symbol found on the
saw body. Ensure the bar tensioning plate is facing
outward. (See Fig. A2)
5. Fit the chain onto the drive sprocket, so that the
fastening bar bolt and the two bar locating tabs on
guide bar. (See Fig. B1, B2)
6. Assure all parts are seated properly and hold chain
and guide bar in a level position. Make sure the
drive links are fully seated in the drive sprocket (See
Fig. C1), avoiding a kink as shown in Fig. C2. If kink
occurs, pick up on the chain at the guide bar just
ahead of the kink and then pull the kink out.
NOTE: Chain should rotate freely and be free of kinks.
7. Fit the chain cover and tighten the chain cover by
turning the chain tensioning knob clockwise until it
is slightly tight. (See Fig. D)
WARNING: The chain is not yet tensioned.
Tensioning the chain is described in the
section“TENSIONING CHAIN”. The chain now needs to
be inspected to make sure it is properly tensioned.
TENSIONING CHAIN (See Fig. E, F)
NOTE: New saw chains will stretch. Check the chain
chain becomes loose around the guide bar.
WARNING:
Removing the battery pack before adjusting saw
chain tension.
Cutting edges on chain are sharp. Use protective
gloves when handling chain.
Maintain proper chain tension always. A loose
chain will increase the risk of kickback. A loose
chain may jump out of guide bar groove. This may
injure operator and damage chain. A loose chain
will cause chain, bar, and sprocket to wear rapidly.
2. Turn the chain tensioning knob clockwise until it is
hand tight.
NOTE: The tension is automatically increased
while the chain tensioning knob is being turned in a
clockwise direction. The built-in ratchet mechanism
prevents the chain tension from loosening.
3. Tilt the saw forward (See Fig. E) where the guide
bar tip is pushed in a downward direction. This will
remove slack from the chain.
4. Fully tighten the chain tensioning knob by turning it
clockwise.
5. Double check the tension set by the automatic
chain tensioning knob. The correct chain tension is
reached when the chain can be raised approx. Half
the drivelink depth from the guide bar in the center.
This should be done by using one hand to raise the
chain against the weight of the machine. (See Fig. F)
NOTE: The chain is properly tensioned when it can
be lifted off of the Guide Bar and the drivelink is
within the rail of the Guide Bar.
NOTE: The chain will stretch while cutting and lose
proper tension. When the chain becomes loose,
completely unscrew the chain tensioning knob or
turn the knob around three full turns in a counter-
clockwise direction, then retighten the chain
tensioning knob to properly reset the chain tension
by repeating Steps 1-5 listed above.
LUBRICATION (See Fig. G)
IMPORTANT:
operate the Chainsaw without chain oil or at an empty
oil tank level, as this will result in extensive damage
to the product.
NOTE: Chain life and cutting capacity depend
on optimum lubrication. Therefore, the chain is
automatically oiled during operation.
FILLING OIL TANK:
WARNING: Removing the battery pack before
cap facing upward.
17
EN
unscrew the cap by turning it counter clockwise.
3. Add bar and chain oil until tank is full.
and tighten by turning clockwise until hand tight.
IMPORTANT: To allow venting of the oil tank,
small breather channels are provided between the
ensure machine is left in a horizontal position when not
in use.
It is important to use bar and chain lubricant that is
formulated to perform over a wide temperature range
with no dilution required. This can be found at the
location where you purchased this saw or your local
hardware store. Do not use dirty, used or otherwise
contaminated oils. Damage may occur to the bar or
chain.Use of non approved oil will void the warranty.
Do not swallow. If swallowed, call a physician
immediately. Keep out of reach of children. Store away
CHECKING THE AUTOMATIC OILER
Proper functioning of the automatic oiler can be
checked by running the Chainsaw and pointing the tip
of the guide chain bar towards a piece of cardboard
or paper on the ground. If an increasing oil pattern
develops on the cardboard, the automatic oiler is
reservoir, contact
Cat
®
customer service agent or
Cat
®
approved service agent.
CAUTION: Do not touch the ground with the chain.
Ensure safety clearance of 12’’ (30 cm).
OPERATION
BEFORE USING YOUR CORDLESS TOOL
WARNING! The charger and battery pack are specially
designed to work together so do not attempt to use any
other devices. Never insert or allow metallic objects
into your charger or battery pack connections because
of an electrical failure and hazard will occur.
NOTE: Your battery pack is UNCHARGED and you must
charge once before use.
The battery charger supplied is matched to the Li-ion
battery installed in the machine. Do not use another
battery charger.
CHECKING THE BATTERY CHARGE CONDITION (See
Fig. H1)
Before starting or after use, press the button beside the
power indicator light on the battery pack to check the
battery capacity.
NOTE: Fig. H1 only applies for the battery pack with
battery indicator light.
Remarks
LED-light
Battery condition
Five green
lights are
illuminated.
70% ≤ Power level≤100%
Four green
lights are
illuminated.
50% ≤ Power level < 69%
Three green
lights are
illuminated.
35% ≤ Power level < 49%
Two green
lights are
illuminated.
20% ≤ Power level < 34%
One green
light are
illuminated.
10% ≤ Power level < 19%
No light is
illuminated.
Power level < 10%
CHARGING YOUR BATTERY PACK (See Fig. H2)
The Li-ion battery is protected against deep
discharging. When the battery is empty, the machine
is switched off by means of a protective circuit. Each
In a warm environment or after heavy use, the battery
pack may become too hot to permit charging. Allow
time for the battery to cool down before recharging.
TO REMOVE OR INSTALL BATTERY PACK (See Fig. I, J)
Depress the battery pack release button to remove the
battery pack from your tool. After recharging, insert the
battery pack into the battery port. A simple push and
Check to see if the battery is fully secured.
NOTE:
avoid dropping and injury.
SWITCHING ON AND OFF (See Fig. K)
ATTENTION: Check the battery packs before using your
cordless tool. Only use the battery pack listed in the
accessories section.
For switching on the tool, press the lock-out button,

18
EN
then fully press the on/off switch and hold in this
position. The lock-out button can now be released.
For switching off, release the on/off switch.
NOTE: The chain brake must be activated in order for
the saw to be switched on.
CHAIN BRAKE LEVER (See Fig. L)
The chain brake lever is a safety mechanism activated
through the front hand guard, when kickback occurs.
Chain stops immediately.
The following function check should be carried out at
regular intervals. Pull the front hand guard towards
the operator (position ) to deactivate chain brake.
To activate the chain brake, push front hand guard
forwards (position ).
NOTE: If the saw is unable to start, even though it is
assembled properly and working with fully charged
battery packs, then you should check if the chain brake
lever is in the correct position (position ).
CUTTING
IMPORTANT:
Level Window prior to starting and regularly
is low. A full oil tank will last approx. 12 minutes of
cutting depending on sawing intensity and stops.
Check recent replaced chain tension about every 10
minutes during operation.
(1) Installing the battery pack into the machine.
(2) Make sure section of log to be cut is not laying on
the ground. This will keep the chain from touching
the ground as it cuts through the log.
Touching the ground while the chain is moving is
dangerous and will dull the chain.
(3) Use both hands to grip saw. Always use left hand to
grip front handle and right hand to grip rear handle.
around saw handles. (See Fig. N)
width apart. Distribute your weight evenly on both
feet.
(5) When ready to make a cut, push the lock-out button
completely in with the right thumb and squeeze the
trigger. This will turn saw on. Releasing the trigger
will turn the saw off. Make sure the saw is running
at full speed before starting a cut.
(6) When starting a cut, slowly place moving chain
against the wood. The wood should be as close to
to avoid possible bouncing or skating (sideways
movement) of saw.
(7) Guide the saw using light pressure and do not put
excessive force on the saw, letting the saw do its
work. The motor will overload and can burn out. It
will do the job better and safer at the rate for which
it was intended.
(8) Remove the saw from a cut with the saw running
at full speed. Stop the saw by releasing the on/off
switch. Make sure the chain has stopped before
setting the saw down.
(9) Keep practicing on scrap logs in a secure working
and a steady cutting rate.
Kickback Safety Devices On This Saw
This saw has a low-kickback chain and reduced
kickback Guide Bar. Both items reduce the chance of
kickback. However, kickback can still occur with this
saw.
The following steps will reduce the risk of kickback.
• Use both hands to grip saw while saw is running.
around saw handles.
• Keep all safety items in place on saw. Make sure
they work properly.
• Do not overreach or cut above shoulder height.
• Keep solid footing and balance at all times.
• Stand slightly to the left side of saw. This keeps
your body from being in direct line with chain.
• Do not let Guide Bar nose touch anything when
chain is moving.
• Never try cutting through two logs at same time.
Only cut one log at a time.
• Do not bury the Guide Bar nose or try plunge cut
(boring into wood using guide bar nose).
• Watch for shifting of wood or other forces that may
pinch chain.
• Use extreme caution when reentering a previous
cut.
• Use only the low-kickback chain and guide bar that
were supplied with this Chainsaw or recommended.
• Never use a dull or loose chain. Keep chain sharp
with proper tension.
How to use Saw Safely
1. Use the Chainsaw only with secure footing.
2. Hold the Chainsaw at the right-hand side of your
body (See Fig. O).
3. The chain must be running at full speed before it
makes contact with the wood.
4. Use the bumper spikes to secure the saw onto the
wood before starting to cut.
5. Use the Bumper Spikes as a leverage point while
cutting. (See Fig. P)
6. Do not operate the Chainsaw with arms fully
to reach, or stand on a ladder while sawing (See
Fig. Q).
19
EN
Never use the Chainsaw above shoulder height.
MAINTENANCE AND STORAGE
OF CHAINSAW
1. Remove the battery pack
• When not in use
• Before moving from one place to another
• Before servicing
• Before changing accessories or attachments, such
as saw chain and guard
2. Inspect Chainsaw before and after each use.
Check saw closely if guard or other part has been
damaged. Check for any damage that may affect
operator safety or operation of saw. Check for
alignment or binding of moving parts. Check for
broken or damaged parts. Do not use Chainsaw if
damage affects safety or operation. Have damage
repaired by authorized service center.
3. Maintain Chainsaw with care.
• Never expose saw to rain or direct moisture.
• Keep chain sharp, clean, and lubricated for better
and safer performance.
• Follow steps outlined in this manual to sharpen
chain.
• Keep handles dry, clean, and free of oil and grease.
• Keep all screws and nuts tight.
4. When servicing, use only identical replacement
parts.
5. When not in use, always store Chainsaw
• in a high or locked place, out of children’s reach
• in a dry place
• with bar and chain cover in place
Bar Maintenance
To maximize bar life, the following bar maintenance is
recommended.
The bar rails that carry the chain should be cleaned
before storing the tool or if the bar or chain appear to
be dirty.
The rails should be cleaned every time the chain is
removed.
To clean the Bar rails:
1. Remove chain cover and bar and chain. (see
section ASSEMBLY)
2. Using a wire brush, screwdriver or similar tool,
clear the residue from the inner groove of the bar.
(See Fig. R)
3. Make sure to clean oil passages thoroughly
Conditions which require chain and guide bar
maintenance:
• Saw cuts to one side or at an angle.
• Saw has to be forced through the cut.
• Inadequate supply of oil to the bar and chain.
Check the condition of the guide bar each time the
chain is sharpened. A worn guide bar will damage the
After each use, remove the battery pack, clean all
sawdust from the guide bar and sprocket hole.
edges and sides.
File Rail Edges and
Sides
Square
Worn Groove Correct Groove
Replace the guide bar when the groove is worn, the
guide bar is bent or cracked, or when excess heating or
burring of the rails occurs. If replacement is necessary,
repair parts list or on the decal located on the Chainsaw.
Replacing Bar & Chain
Replace chain when cutters are too worn to sharpen or
when chain stops. Only use replacement chain noted
in this manual.
Inspect guide bar before sharpening chain. A worn
or damaged guide bar is unsafe. A worn or damaged
guide bar will damage chain. It will also make cutting
harder.
Fit the bar tensioning plate tab into the new bar by
tightening the screw clockwise. The tab protrusion (a)
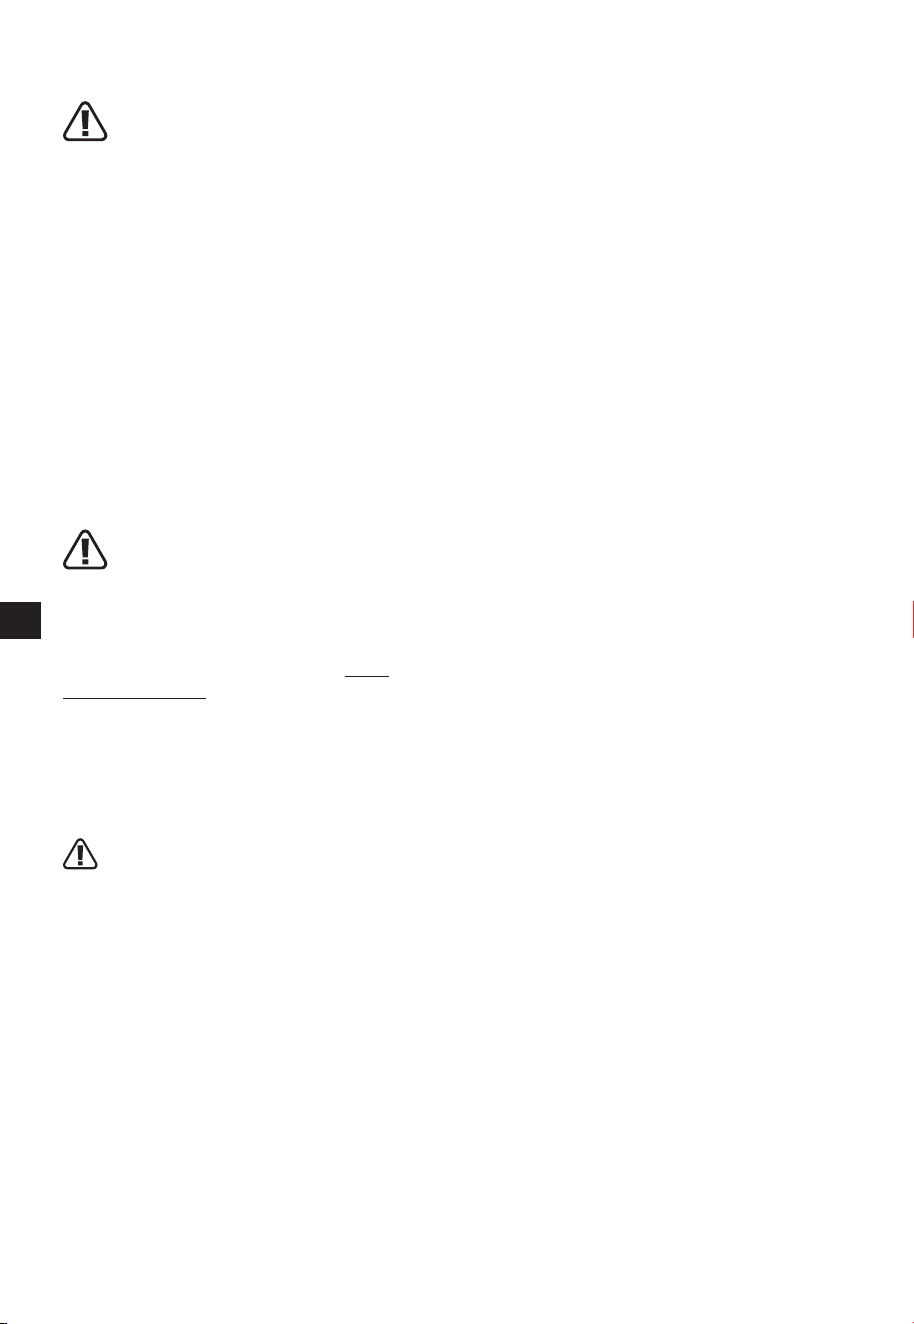
SHARPENING SAW CHAIN
WARNING: Remove the battery pack before
servicing. Severe injury or death could occur
from electrical shock or body contact with moving
chain.
Cutting edges on chain are sharp. Use protective
gloves when handling chain.
Keep chain sharp. Your saw will cut faster and more
safely. A dull chain will cause undue sprocket, Guide
Bar, chain, and motor wear. If you must force chain into
wood and cutting creates only sawdust with few large
chips, chain is dull.
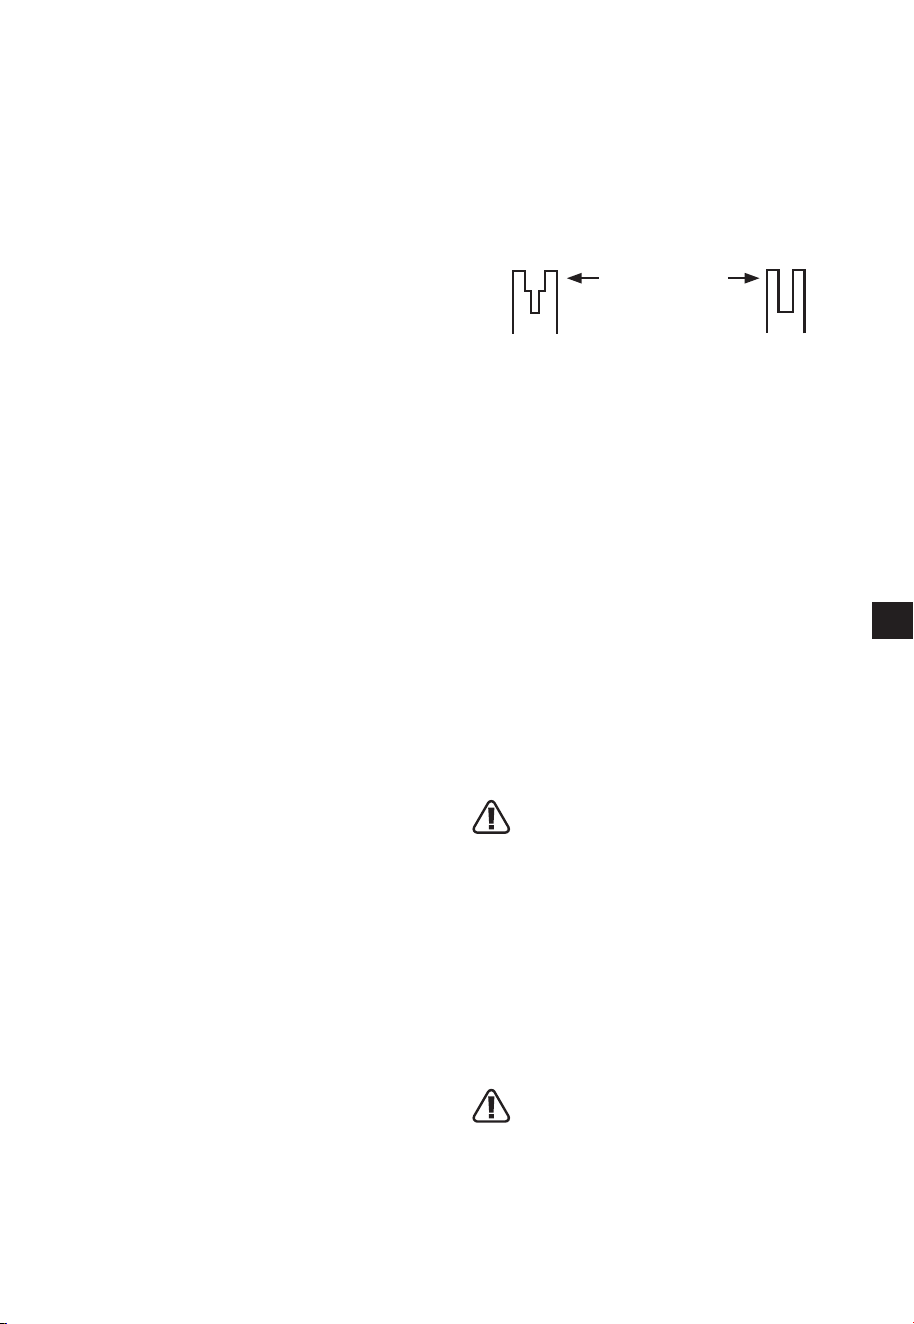
LUBRICATE SPROCKET
WARNING: Wear heavy duty gloves when
performing any maintenance or service to
this tool. Always remove the battery pack before
performing any service or maintenance on this tool.
NOTE: It is not necessary to remove the chain or bar
when lubricating the guide bar sprocket.
1. Clean the bar and sprocket
2. Using a grease gun, insert the tip of the gun into the

20
EN
lubrication hole and inject grease until it appears at
the outside edge of the sprocket tip. (See Fig. T)
3. To rotate the sprocket pull the chain by hand until
the ungreased side of the sprocket is in line with
the grease hole. Repeat the lubrication procedure.
FOR BATTERY TOOLS
The ambient temperature range for the use and
storage of tool and battery is 32-113
o
F (0°C-45°C).
The recommended ambient temperature range for
the charging system during charging is 32 -104
o
F
(0°C-40°C).
SAW MAINTENANCE
Follow maintenance instructions in this manual. Proper
cleaning of saw and chain and Guide Bar maintenance
can reduce chances of kickback. Inspect and maintain
saw after each use. This will increase the service life
of your saw.
NOTE: Even with proper sharpening, risk of kickback
can increase with each sharpening.
TROUBLESHOOTING TABLE
The following table gives checks and actions that you can perform if your machine does not operate correctly. If
these do not identify/remedy the problem, contact your service agent.
WARNING: Switch off and remove the battery pack before investigating fault.
Symptom Possible Cause Remedy
Chainsaw fails to
operate
Low battery charge.
Chain brake not in the proper position.
Charge both the battery packs.
Check to see if the chain brake is in
position . Refer to CHAIN BRAKE for
details.
Chainsaw
operates
intermittently
Over heating
Applying too much pressure while
cutting.
Loose connection.
Internal wiring defective.
On/Off switch defective.
Place the machine in a cool, ventilated
place to cool it down.
Applying relatively less pressure while
cutting.
Contact service agent.
Contact service agent.
Contact service agent.
Dry chain No oil in reservoir.
Oil passage clogged.
Clean cap.
Clean oil passage outlet.
Kickback Brake/Run
Down Brake
Brake does not stop chain Contact service agent.
Chain/chain bar
over-heats.
No oil in reservoir.
Oil passage clogged.
Chain is over tensioned.
Dull chain.
Clean cap.
Clean oil passage outlet.
Adjust chain tension.
Sharpen chain or replace.
Chainsaw rips,
vibrates, does not
saw properly.
Chain tension too loose.
Dull chain.
Chain worn out.
Chain teeth are facing in the wrong
direction.
Adjust chain tension.
Sharpen chain or replace.
Replace chain.
Reassemble with chain in correct
direction.

21
FR
TABLE DES MATIÈRES
INSTRUCTIONS DE SÉCURITÉ IMPORTANTES ..............................................................21
SYMBOLES...............................................................................................................................28
SPÉCIFICATIONS.....................................................................................................................29
LISTE DES COMPOSANTS....................................................................................................31
ASSEMBLAGE .......................................................................................................................32
OPÉRATION..............................................................................................................................33
ENTRETIEN .............................................................................................................................34
TABLEAU DE DÉPANNAGE...................................................................................................37
22
FR
SÉCURITÉ DU PRODUIT
AVERTISSEMENT! Certaines des poussières
produites en utilisant des outils électriques
sont considérées par l’État de Californie comme
susceptibles de provoquer le cancer, des anomalies
congénitales et d’autres problèmes de reproduction.
Voici des exemples de ces produits chimiques:
• plomb issu de peinture à base de plomb
• silice crystalline issue de briques et du ciment et
autres produits de maçonnerie
• arsenic et chrome issus de bois traité
chimiquement
Votre risque de ces expositions varie en fonction de
la fréquence à laquelle vous effectuez ce travail. Pour
réduire votre exposition à ces produits chimiques
: travaillez dans une zone bien ventilée; portez
un équipement de sécurité approuvé, tel que des
masques antipoussières spécialement conçus pour
AVERTISSEMENT : Ce dispositif peut vous
exposer aux produits chimiques notamment
le plomb et le di-phtalate (de 2-éthylhexyle) (DEHP)
qui sont reconnus dans l’État de Californie comme
causant des cancers et des anomalies congénitales
ou d’autres anomalies de la reproduction. Pour
en savoir plus, veuillez consulter le site www.
P65Warnings.ca.gov.
AVERTISSEMENTS GENERAUX
CONCERNANT LA SECURITE DES
OUTILS ELECTRIQUES
AVERTISSEMENT! Lisez et assimilez toutes les
instructions. Le non-respect des instructions
ci-après peut entraîner un risque de choc électrique,
d’incendie et/ou de blessures graves.
Conservez tous les avertissements et instructions
pour pouvoir les consulter ultérieurement.
L’expression « outil électrique » dans tous les
avertissements énumérés ci-dessous se réfère
à votre outil électrique fonctionnant sur secteur
1. AIRE DE TRAVAIL
a) Veillez à ce que l’aire de travail soit propre
et bien éclairée. Le désordre et le manque de
b) N’utilisez pas d’outils électriques dans un milieu
présentant un risque d’explosion, par exemple
en présence de liquides, de gaz ou de poussières
Les outils électriques créent des
ou les vapeurs.
c) Gardez à distance les curieux, les enfants et les
visiteurs lorsque vous travaillez avec un outil
électrique.
Ils pourraient vous distraire et vous
2. SÉCURITÉ ÉLECTRIQUE
correspondre aux prises murales. Ne jamais
outils électriques mis à la terre (mis à la masse).
correspondent réduiront le risque de choc
b) Évitez tout contact corporel avec des surfaces
mises à la terre (tuyauterie, radiateurs,
cuisinières, réfrigérateurs, etc.). Le risque de
choc électrique est plus grand si votre corps est
c) N’exposez pas les outils électriques à la pluie ou
à l’eau. La présence d’eau dans un outil électrique
d) Ne maltraitez pas le cordon. Ne transportez
jamais l’outil par son cordon et ne débranchez
pas le cordon à la chaleur, à des huiles, à des
arrêtes vives ou à des pièces en mouvement. Un
cordon endommagé augmente le risque de choc
e) Lorsque vous utilisez un outil électrique à
l’extérieur, utilisez un prolongateur adapté à une
utilisation en extérieur. L’utilisation d’un cordon
adapté à une utilisation extérieure réduit le risque
f) Si vous devez utiliser un outil électrique dans
un endroit humide, utilisez un dispositif de
courant résiduel (RCD) d’alimentation protégée.
L’utilisation d’un RCD réduit le risque de choc
3. SÉCURITÉ DES PERSONNES
a) Restez alerte, concentrez-vous sur votre travail et
faites preuve de bon sens. N’utilisez pas un outil
de drogues, d’alcool ou de médicaments.
Un
instant d’inattention lors de l’utilisation d’outils
b) Utilisez des accessoires de sécurité. Portez
toujours une protection oculaire. De l’équipement
de sécurité tel que le masque antipoussière,
les chaussures de sécurité antidérapantes, des

23
FR
casques durs ou des protections antibruit utilisés
dans des conditions appropriées réduiront les
c) Évitez les démarrages accidentels. Avant d’insérer
la batterie dans l’outil, assurez-vous que son
interrupteur est en position « OFF » (Arrêt) ou
verrouillée. Le fait de transporter un outil avec
la batterie dans un outil dont la détente est en
d) Retirer les clés de réglage avant de mettre l’outil
sous tension.
Une clé restée attachée à une partie
mobile de l’outil pourrait entraîner des blessures
e) Ne vous penchez pas trop en avant. Maintenez un
bon appui et restez en équilibre en tout temps.
Une bonne stabilité vous permet de mieux réagir à
f) Habillez-vous convenablement. Ne portez ni
les vêtements et les gants éloignés des pièces en
mouvement.
les cheveux longs risquent d’être happés par des
g) Si un sac de récupération de la poussière est
fourni avec un connecteur pour aspirateur,
assurez vous qu’il est correctement relié et utilisé
de façon appropriée. L’utilisation de ce système
réduit les dangers physiques et physiologiques liés
h) Ne laissez pas les habitudes acquises par une
utilisation fréquente d’outils relâcher notre
vigilance et ignorer les principes de sécurité des
outils. Une utilisation négligente peut causer des
4. UTILISATION ET ENTRETIEN DE L’OUTIL
a) Ne forcez pas l’outil. Utilisez l’outil approprié à
la tâche. L’outil approprié fonctionne mieux et de
façon plus sécuritaire. Respectez aussi la vitesse
b) N’utilisez pas un outil si l’interrupteur ne le met
pas en marche ou ne peut l’arrêter. Un outil qui ne
peut être contrôlé par l’interrupteur est dangereux
c) Débranchez la batterie de l’outil ou mettez
son interrupteur en position « OFF » (Arrêt) ou
« LOCKED » (Verrouillé) avant d’effectuer un
réglage, de changer d’accessoire ou de ranger
l’outil. De telles mesures de sécurité préventive
réduisent le risque de démarrage accidentel de
d) Rangez les outils hors de portée des enfants et
d’autres personnes inexpérimentées. Les outils
sont dangereux dans les mains d’utilisateurs
e) Prenez soin de bien entretenir les outils. Soyez
attentif à tout désalignement ou coincement des
pièces en mouvement, à tout bris ou à toute autre
condition préjudiciable au bon fonctionnement
de l’outil. Si vous constatez qu’un outil est
endommagé, faites-le réparer avant de vous en
servir.
De nombreux accidents sont causés par
f) Les outils de coupe doivent être toujours bien
affûtés et propres. Des outils bien entretenus,
dont les arêtes sont bien tranchantes, sont moins
susceptibles de se coincer et plus faciles à
g) Utilisez l’outil électrique, les accessoires et les
forets etc., en conformité avec ces instructions
et de la manière conçue pour le type particulier
d’outil électrique, prend en compte les conditions
de travail et le travail qui doit être accompli.
L’emploi de l’outil électrique pour des opérations
différentes de celles pour lesquelles il a été conçu
h) Maintenez les poignées et les surfaces de
prise sèches, propres et exemptes d’huile et
de graisse. Des poignées et surfaces de prise
glissantes ne permettent pas une manipulation et
un contrôle sécurisés de l’outil dans des situations
5. UTILISATION DE LA BATTERIE ET ENTRETIEN
a) Un outil à batterie avec batteries incorporées
ou une batterie séparée doit être rechargé
uniquement avec le chargeur indiqué pour la
batterie. Un chargeur qui peut être adéquat pour
un type de batterie peut créer un risque d’incendie
b) Utiliser un outil à batterie uniquement avec la
batterie désignée. L’emploi de toute autre batterie
c) Lorsque la batterie n’est pas utilisée, tenez-la
à l’écart d’autres objets métalliques tels que
trombones, pièces de monnaie, clés, clous, vis
ou autres petits objets métalliques susceptibles
d’établir une connexion d’une borne à une autre.
Le court-circuitage des bornes de batterie peut
causer des étincelles, des brûlures, une explosion
être éjecté de la batterie, évitez tout contact. Si
un contact se produisait accidentellement, rincez
abondamment avec de l’eau.
yeux, cherchez en plus de la mesure précédente

24
FR
e) N’utilisez pas une batterie ou un outil endommagé
Les batteries endommagées ou
imprévisible entraînant un incendie, une explosion
ou un risque de blessure
f) N’exposez pas une batterie ou un outil au feu ou à
une température excessive.
Une exposition au feu
ou à une température supérieure à 130 °C (266 °F)
g) Respectez toutes les instructions de chargement
et ne chargez pas la batterie ou l’outil en dehors
instructions. Un chargement incorrect ou à des
endommager la batterie et augmenter le risque
6. ENTRETIEN
a) Ayez votre outil électrique entretenu par un
réparateur agréé n’utilisant que des pièces
de rechange identiques
Cela assurera que la
b) Ne jamais tenter de réparer des batteries
endommagées. L’entretien et la réparation des
batteries doit uniquement être effectué par le
1) CONSIGNES DE SÉCURITÉ
POUR LA SCIE À CHAÎNE
a) Tenez la scie à chaîne bien éloignée des parties
de votre corps lorsque celle-ci est en marche.
Avant de mettre en marche la scie à chaîne,
veillez à ce qu’elle ne soit en contact avec
aucun objet. Vos vêtements peuvent s’accrocher
à la scie à chaîne ou alors votre corps peut s’y
coller pendant un moment d’inattention lors du
b) Toujours tenir la poignée arrière de la scie à
chaîne avec votre main droite et la poignée
avant avec votre main gauche.
Évitez d’inverser
la position des mains, car ceci pourrait augmenter
c) Tenez l’outil électrique par ses surfaces de
prise isolées uniquement, car la chaîne de la
scie peut entrer en contact avec un câblage
dissimulé ou son propre câble. Les chaînes
de la scie qui entrent en contact avec un câble
conducteur peuvent rendre conducteurs les
pièces en métal de l’outil électrique et causer ainsi
d) Portez des lunettes de sécurité et des protège-
oreilles. Des équipements de protection
supplémentaires pour la tête, les mains, les
jambes et les pieds sont recommandés.
P
ortez
réduire les risques de blessure par des débris
volants ou d’éviter un contact accidentel avec la
e) Ne pas utiliser la scie d’élagage sur une
échelle, d’un toit, ou tout support instable
Faire
fonctionner une scie à chaîne tout en haut d’un
f) Gardez toujours une bonne assise et ne faites
fonctionner la scie à chaîne que lorsque vous
plane. Les surfaces glissantes ou instables telles
que les échelles peuvent entraîner une perte
g) Lors de la coupe d’une branche sous tension,
faites attention au retour de celle-ci. Lorsque la
ou rendre la scie à chaîne incontrôlable
h) Soyez extrêmement prudent lors de la coupe de
la broussaille et des jeunes arbres. Le matériau
i) Portez la scie à chaîne par la poignée avant
lorsqu’elle est en arrêt, et éloignez-la de votre
corps. Lors du transport ou du stockage de la
scie à chaîne, toujours rabattre le protecteur
de guide-chaîne. Une manipulation appropriée
de la scie à chaîne permettra de réduire la
probabilité de contact accidentel avec la chaîne
j) Respectez les instructions relatives à la
remplacement des accessoires. Une chaîne
k) Uniquement destinée à la coupe de bois. Évitez
celles prévues. Par exemple : évitez d’utiliser
une scie à chaîne pour couper des matières
plastiques, du matériau de maçonnerie ou des
matériaux de construction autre que le bois.
que celle prévue pourrait entraîner une situation
l) N’essayez pas d’abattre un arbre tant que vous
n’avez pas compris les risques et la façon de les
éviter. Il y a un risque de blessures graves pour
l’opérateur ou les passants pendant l’abattage
m) N’utilisez de tronçonneuse sur un arbre à moins

25
FR
d’avoir été spécialement formé pour le faire.
L’utilisation d’une tronçonneuse sur un arbre sans
formation appropriée pourrait augmenter le risque
n) Suivez toutes les instructions pour nettoyer
les matériaux coincés, ranger ou entretenir la
scie d’élagage. Assurez-vous que la machine
est désactivée et que la batterie est retirée. Le
démarrage inattendu de la scie d’élagage pendant
le nettoyage du matériau coincé ou l’entretien
o) En cas de première utilisation, il est
recommandé d’apprendre à utiliser la scie
pour couper des bûches sur un chevalet ou un
support de sciage.
l’entretien de la chaîne de scie à des ateliers
d’entretien agréés.
2) CAUSES ET PRÉVENTION DU
RECUL DE L’OPÉRATEUR :
Un recul peut se produire lorsque le nez ou le bout de
la guide-chaîne touche un objet ou lorsque le bois se
resserre et pince la chaîne de la tronçonneuse dans
la coupe.
Dans certains cas, un contact du bout peut provoquer
une réaction inverse extrêmement rapide, propulsant
direction de l’opérateur. Un pincement de la chaîne
de la tronçonneuse le long de la partie supérieure
de la guidechaîne peut repousser rapidement la
guide-chaîne vers l’opérateur. Ces réactions peuvent
toutes deux provoquer une perte de contrôle de la
tronçonneuse pouvant entraîner des blessures graves
pour l’utilisateur.
Ne pas compter exclusivement sur les dispositifs de
sécurité de la scie. En tant qu’utilisateur d’une scie à
chaîne, vous devez prendre des mesures nécessaires
pour effectuer vos travaux de coupe sans accident ou
blessure.
Le recul est le résultat d’une mauvaise utilisation
de l’outil et/ou du non-respect des procédures ou
conditions d’utilisation, il peut être évité en respectant
les précautions indiquées ci-dessous :
a) Tenez fermement l’équipement, les pouces et
les doigts refermés sur les deux poignées ; vous
devez tenir la scie à chaîne avec vos deux mains
et votre corps et vos bras doivent être placés
dans une position qui vous permet de résister
aux forces de recul. Les forces de recul peuvent
être contrôlées par l’opérateur, si les précautions
b) Évitez de trop vous pencher en avant et de
couper à une hauteur au-dessus du niveau
des épaules. Cela permet d’éviter tout contact
involontaire avec l’embout et permet un meilleur
contrôle de la scie à chaîne en cas de situation
c) Utilisez uniquement des barres et chaînes de
Les barres
et chaînes de rechange inadaptées peuvent
d) Respectez les instructions relatives à l’affûtage
et à l’entretien de la chaîne de la scie fournies
par le fabricant. Diminuer la hauteur du limiteur
de profondeur peut entraîner une augmentation de
CONSIGNES GÉNÉRALES DE
SÉCURITÉ CONCERNANT LA
BATTERIE
a) Ne pas démonter, ouvrir ou déchiqueter le bloc
batterie.
b) Ne pas exposer le bloc batterie à la chaleur ou au
feu. Evitez de ranger la batterie dans un endroit
exposé à la lumière directe du soleil.
c) Ne pas court-circuiter une batterie. Ne stockez
pas les blocs batterie en vrac dans une boîte ou
un tiroir où ils peuvent se court-circuiter ou être
court-circuités par d’autres objets métalliques.
Lorsque le bloc batterie n’est pas utilisé,
tels que des trombones, des pièces de monnaie,
métalliques de petite taille, qui pourraient établir
de créer un court-circuit entre les bornes de
la batterie peut causer des brûlures ou des
d) Ne pas soumettre la batterie à des chocs
mécaniques.
e) En cas de fuite de la batterie, ne pas laisser le
liquide entrer en contact avec la peau ou les
yeux. Si un contact a été effectué, laver la zone
touchée avec beaucoup d’eau et consulter un
médecin.
f) Ne pas utiliser de batterie qui n’a pas été conçue
pour être utilisée avec cet appareil.
g) Maintenez la batterie hors de portée des enfants.
h) Achetez toujours une batterie recommandée par
le fabricant de l’appareil.
i) Conservez le bloc batterie propre et sec.
j) Essuyez les bornes de la batterie avec un chiffon

©2021 Caterpillar. CAT, CATERPILLAR, their respective logos, "Caterpillar Yellow," the "Power Edge" trade dress
as well as corporate and product identity used herein, are trademarks of Caterpillar and may not be used without
permission. Positec Group Limited,a licensee of Caterpillar Inc
www.catpowertools.com
AR01569402