Loading ...
Loading ...
Loading ...
21
5.2 Select the coee aroma or pre-ground coee
Once the milk container has been prepared, before selecting
the desired milk beverage, you can customise the coee aroma
as described in paragraph “4.3 Varying the coee aroma”. Al-
ternatively, you can select pre-ground coee and then add one
measure of coee as indicated in the Quick Guide (
).
5.3 At the end of preparation
•
To prepare a number of cappuccinos and milk
based coees, only clean the milk container
after you have prepared the last beverage.
• If there is some milk left, place the
container in the refrigerator immediately after cleaning.
• For optimum results over time, clean the Lattecrema sys-
tem thoroughly as described in chapter “12. Cleaning the
milk container”.
5.4 Customising the quantity in the cup
1. Press and hold the button corresponding to the milk bev-
erage to programme for a few seconds. The light ashes
quickly to indicate you are in the settings menu. Delivery
begins;
2. Once the cup is lled to the desired level, press the bever-
age button again. Delivery of the rst ingredient stops and
delivery of the second ingredient begins;
3. Once the cup is lled to the desired level, press the bev-
erage button again. Delivery stops and the quantity is
memorised.
Please note!
• To cancel the current programme, press a button correspond
-
ing to another beverage
• For the My Latte beverage, only the quantity of coee can be
programmed, while all the milk will be used as in the recipe.
6. CUSTOMISING THE HOT WATER QUANTITY
1. Press and hold the Hot water button for a few seconds.
The light ashes quickly to indicate you are in the settings
menu. Delivery begins;
2. Once the cup is lled to the desired level, press the bev-
erage button again. Delivery stops and the quantity is
memorised.
Default
(ml)
Programmable (ml)
Hot water 250
from ≃ 20 to ≃ 420
Please note!
To cancel the current programme, press a button corresponding to
another beverage
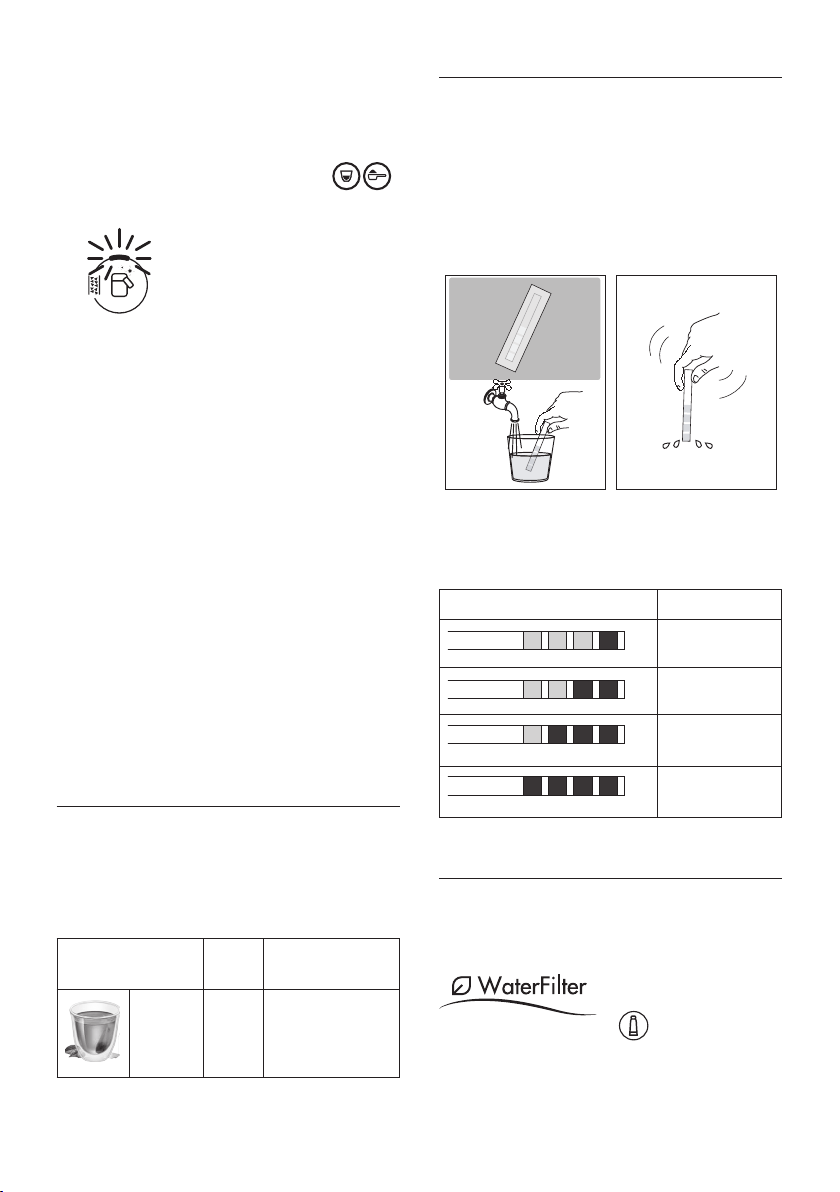
7. MEASURING WATER HARDNESS
The descaling alarm is displayed after a period of time es-
tablished according to water hardness. The machine is set by
default for a hardness value of “4”. The machine can also be
programmed according to the hardness of the water supply
in the various regions, so that descaling is required less often.
1. Remove the indicator paper from its packaging. If provided
with your model, you will nd it attached to the Quick Guide.
2. Immerse the paper completely in a glass of water for
about one second.
3. Remove the strip from the water and shake lightly. After
about a minute, 1, 2, 3, or 4 red squares appear, depend-
ing on the hardness of the water. Each square corresponds
to one level.
Total Hardness Test Hardness
1
Low
2
Medium
3
Medium/High
4
High
See instructions in section “10. Settings menu” to set the machine.
8. WATER SOFTENER FILTER
To ensure the performance of the machine remains constant
over time, we recommend using a De’Longhi water softener
lter and replacing it regularly. To purchase the lter, consult
the www.delonghi.com website.
EAN: 8004399327252
8.1 Replacing the lter
Please note!
After two months (see date indicator) or when the appliance
has not been used for 3 weeks, the lter should be replaced
even if the message has not yet appeared.
Loading ...
Loading ...
Loading ...