Loading ...
Loading ...
Loading ...

15
SETUP INSTRUCTIONS
ELECTRIC SHOCK can be fatal
Have a qualified electrician install and service this equipment.
Turn the input power OFF and unplug the machine from the receptacle before working
on this equipment.
Allow machine to sit for 5 minutes minimum to allow the power capacitors to discharge
before working inside this equipment.
Do not touch electrically hot parts.
Machine must be plugged into a receptacle that is grounded according to the National
Electrical Code and local codes.
Do not remove or defeat the purpose of the power cord ground pin.
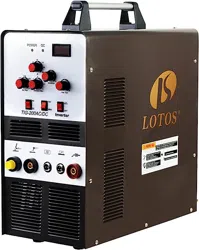
1. The machine will automatically detect the power of 110VAC to 220VAC. For 110VAC,
please attach the 220VAC to the 110VAC adapter cord.
2. Connect your Argon Tank to Argon Regulator and connect your Argon Regulator to the gas
inlet on the back of the machine (rear panel). Set the gas flow from 12 to 21 scfh.
3. For Tig welding, set Switch 8 to “TIG” mode, connect your Tig torch to Connectors 10 and
12.
4. If you are using the foot pedal, then connect your pedal to Connector 13 and set Switch 4 to
“Pedal” mode. If you are not using the foot pedal, then set Switch 4 to “OFF” mode.
5. Connect your Ground Cable to Connector 14 and attach your Ground Clamp to your work
piece.
6. For non-aluminum welding, please set Knob 9 to the “DC” mode. For aluminum welding, set
Knob 9 to the “AC” mode.
7. For Stick/MMA welding, you do NOT need gas supply. Just hook your Stick Electrode
Holder cable to Connector 11 and hook the Ground Cable to connector 14 and attach your
Ground Clamp to the work piece. Set Switch 8 to “MMA” mode, Set the machine to “AC”
mode for aluminum stick welding and “DC” for non-aluminum stick welding.
Note: For output amperage, “more is not always better” as too high of a current
setting will burn the tungsten electrodes and welded material.
8. For Clearance Effect Knob 6, it is for shifting the heat either to the work piece or to the
Tungsten Electrode. Turning the knob toward “-“ will induce more heat to the material you
are welding. While turning the knob toward “+” will induce more heat to the torch and gives
less penetration to the work piece. So turn the knob towards “-“ if the welding voltage is more
than 150A and turn the knob towards “+” if the welding voltage is less than 100A.
9. For Tungsten Electrodes, please refer to www.uwelding.com for proper equipment for
different types of welding.
10. For non-aluminum Tig welding, please sharpen the tungsten tip. For aluminum Tig welding,
please hold the torch 1/8” from the aluminum surface. Depress and hold foot pedal at the ½
position for 4 seconds then go to ¾ to full as required to form a ball on the tungsten. This is
necessary to achieve a smoother and higher quality aluminum Tig welding.
Loading ...
Loading ...
Loading ...