
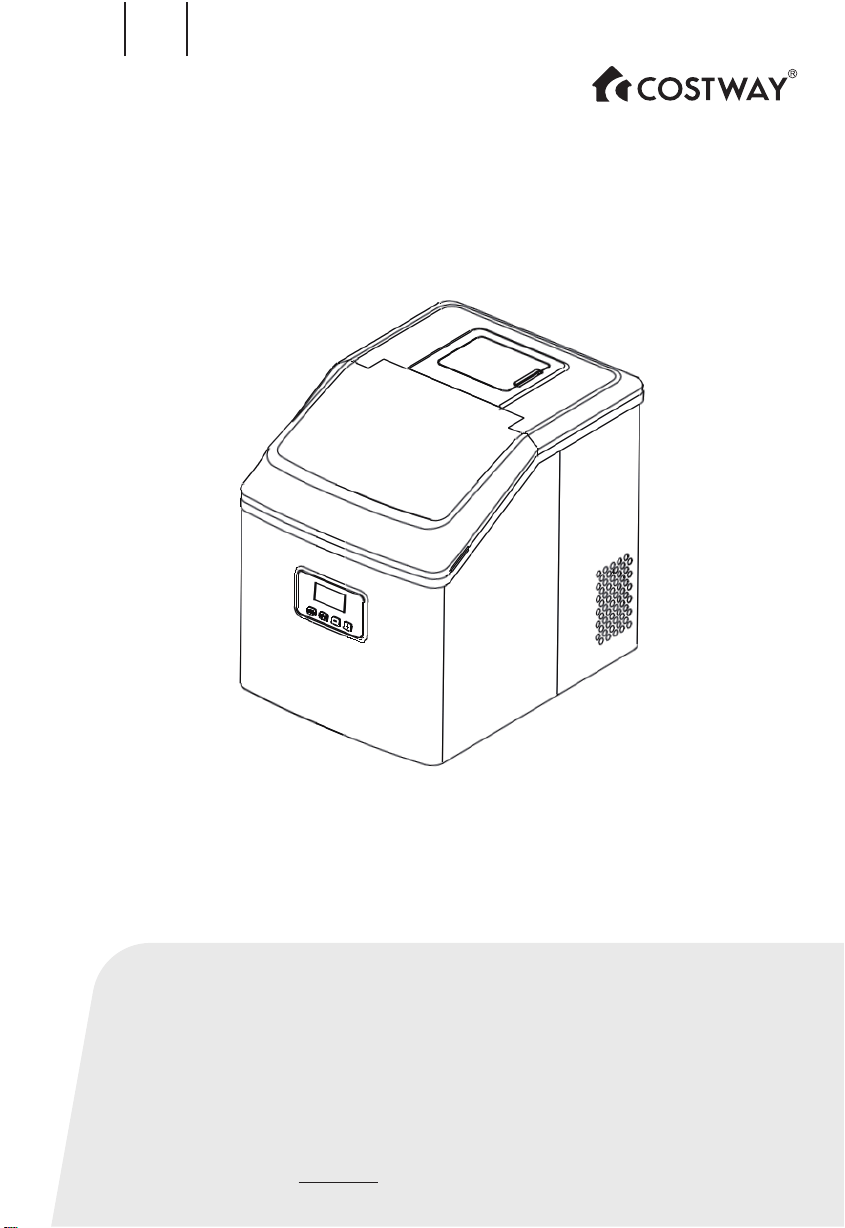
ICE MAKER
EP24525US
USER’S MANUAL
THIS INSTRUCTION BOOKLET CONTAINS IMPORTANT SAFETY INFORMATION. PLEASE READ AND KEEP FOR FUTURE REFERENCE.
EN FR
Before You Start
Please read all instructions carefully.
Retain instructions for future reference.
Separate and count all parts and hardware.
Read through each step carefully and follow the proper order.
We recommend that, where possible, all items are assembled
near to the area in which they will be placed in use, to avoid
moving the product unnecessarily once assembled.
Always place the product on a flat, steady and stable surface.
Keep all small parts and packaging materials for this product
away from babies and children as they potentially pose a serious
choking hazard.
02

IMPORTANT SAFETY INSTRUCTIONS
IMPORTANT SAFETY TIPS
Your safety and the safety of others are very important.
This is the safety alert symbol:
You can be killed or seriously injured if you don’t immediately
follow instructions.
These words mean:
We have provided many important safety messages in the manual for
your appliance. Always read and obey all safety messages.
All safety messages will tell you what the potential hazard is, tell you
how to reduce the chance of injury, and tell you what can happen if the
instructions are not followed.
When using electrical appliances, basic safety precautions should be
followed to reduce the risk of fire, electric shock, and injury to persons
or property. Read all instructions before using any appliance.
• Do not operate this, or any other appliance with a damaged cord.
Connect to properly polarized outlets only. No other appliance should be
plugged into the same outlet. Be sure that the plug is fully inserted into
the receptacle.
• Do not run the power cord over carpeting or other heat insulators. Do
not cover the cord. Keep cord away from traffic areas, and do not
submerge in water.
• We do not recommend the use of an extension cord, as it may
overheat and become a risk of fire. If you must use an extension cord,
use No.14 AWG minimum size and rated no less than 1875 watts.
All safety messages will follow the safety alert symbol and the
word “DANGER” or “WARNING”.
DANGER
WARNING
03
EN
WARNING: This appliance must be earthed.
• Unplug the ice maker before cleaning or making any repairs or
servicing.
• Exercise caution and use reasonable supervision when appliance is
used near children.
• Do not use your ice maker outdoors. Place the ice-maker away from
direct sunlight and make sure that there is at least 6 inches of space
between the back of your unit and wall. Keep a minimum distance of 6
inches on each side of your unit free.
• Do not use other liquids to make the ice-cube other than water.
• Do not clean your ice maker with flammable fluids. The fumes can
create a fire hazard or explosion.
• Do not tip over.
• If the ice maker is brought in from outside in winter time, give it a few
hours to warm up to room temperature before plugging it in.
• DANGER – Risk Of Fire or Explosion. Flammable Refrigerant Used. Do
Not Use Mechanical Devices To Defrost Ice Maker. Do Not Puncture
Refrigerant Tubing.
• DANGER – Risk Of Fire Or Explosion. Flammable Refrigerant
Used. To Be Repaired Only By Trained Service Personnel. Do Not
Puncture Refrigerant Tubing.
• CAUTION – Risk Of Fire Or Explosion. Flammable Refrigerant Used.
Consult Repair Manual/Owner’s Guide Before Attempting To Install or
Service This Product. All Safety Precautions Must be Followed.
• CAUTION – Risk Of Fire Or Explosion. Dispose Of Property In
Accordance With Federal Or Local Regulations. Flammable Refrigerant
Used .
• CAUTION-Risk Of Fire Or Explosion. Due To Puncture Of Refrigerant
Tubing; Follow Handling Instructions Carefully. Flammable Refrigerant
Used.
• The ice maker should be installed in accordance with the safety
standard for Refrigeration Systems, ASHRAE15. The ice maker shall not
be installed in corridors or hallways of public buildings.
04
EN

IMPORTANT:
• If the unit is with problems needed to be maintained, that replacing
with like components and that servicing shall be done by a qualificated
service personnel, so as to minimize the risk of possible ignition due to
incorrect parts or improper service.
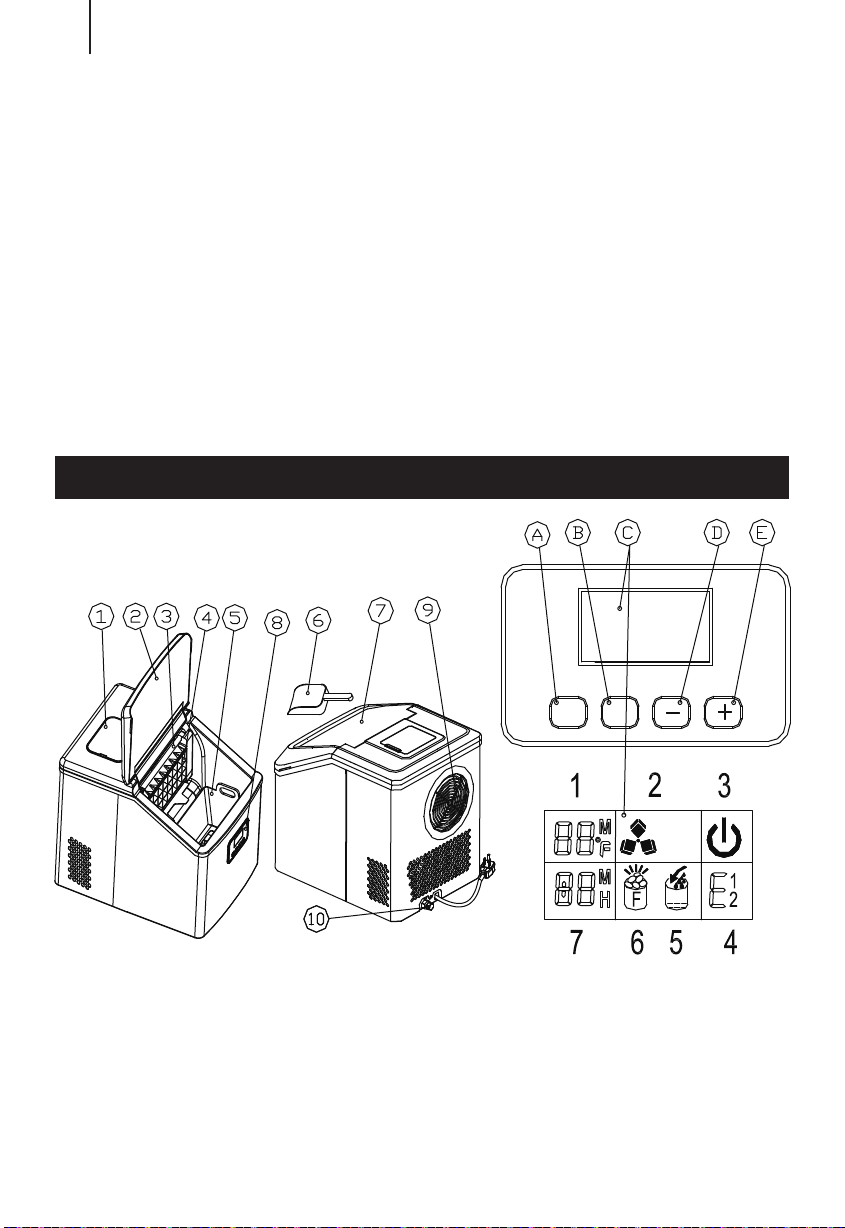
1.Water reservoir
cover
2.Unit top cover
3.Water separator
pipe
4.Evaporator
5.Ice basket
A.Timer
B.ON/OFF
C. LCD Display area
D. Ice making and
timer reduce.
E. Ice making and timer
increase.
The wires in this mains lead are colored in accordance with the following
code: Green or Green with a stripped yellow: Grounding
White: Neutral
Black: Live
To avoid a hazard due to instability of the appliance, it must be placed
at an even or flat surface.
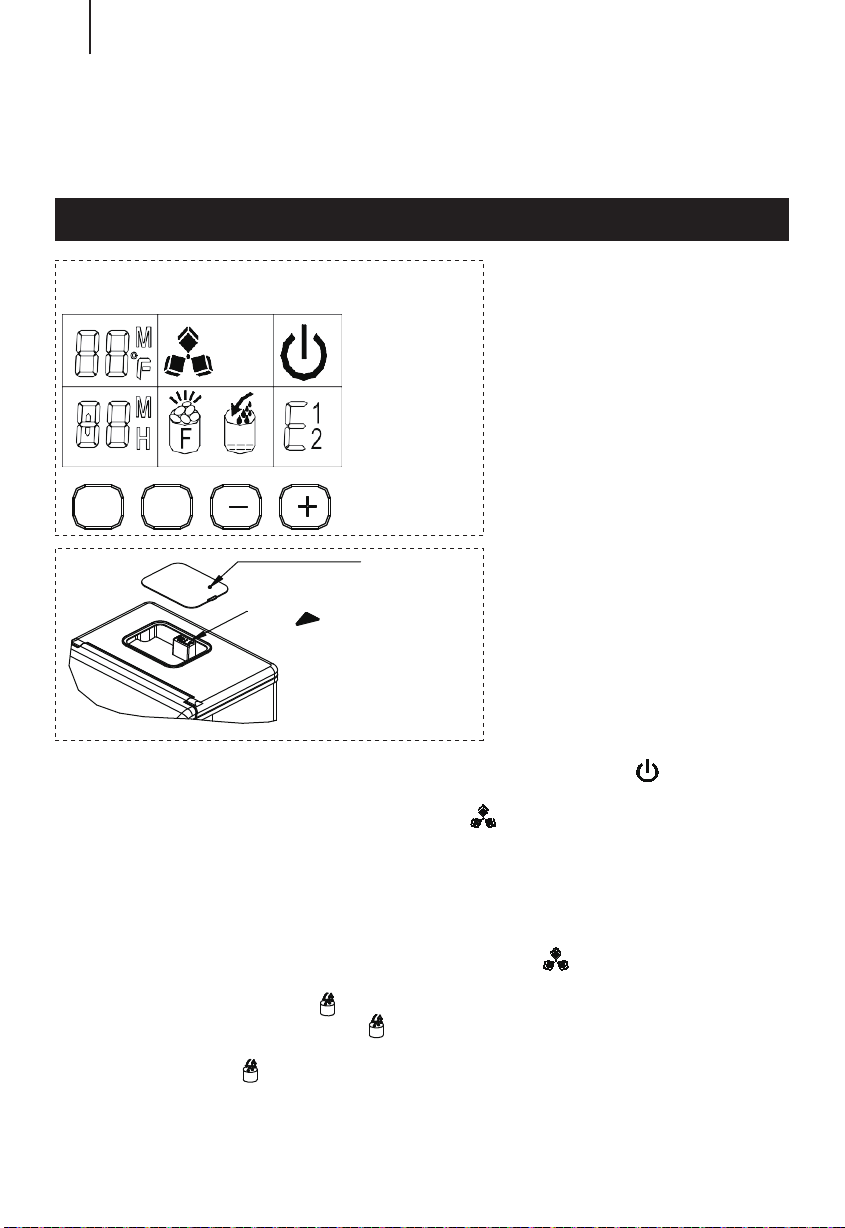
GETTING TO KNOW YOUR UNIT
TIMER ON/OFF -+
6.Ice scoop
7.Transparent window
8.Control Panel
9.Hot Air Outlet
10.Water draining
port: To draining out
the water from unit.
05
EN

UNPACKING YOUR ICE MAKER
CONNECTING YOUR ICE MAKER
WARNING: fill with potable water only.
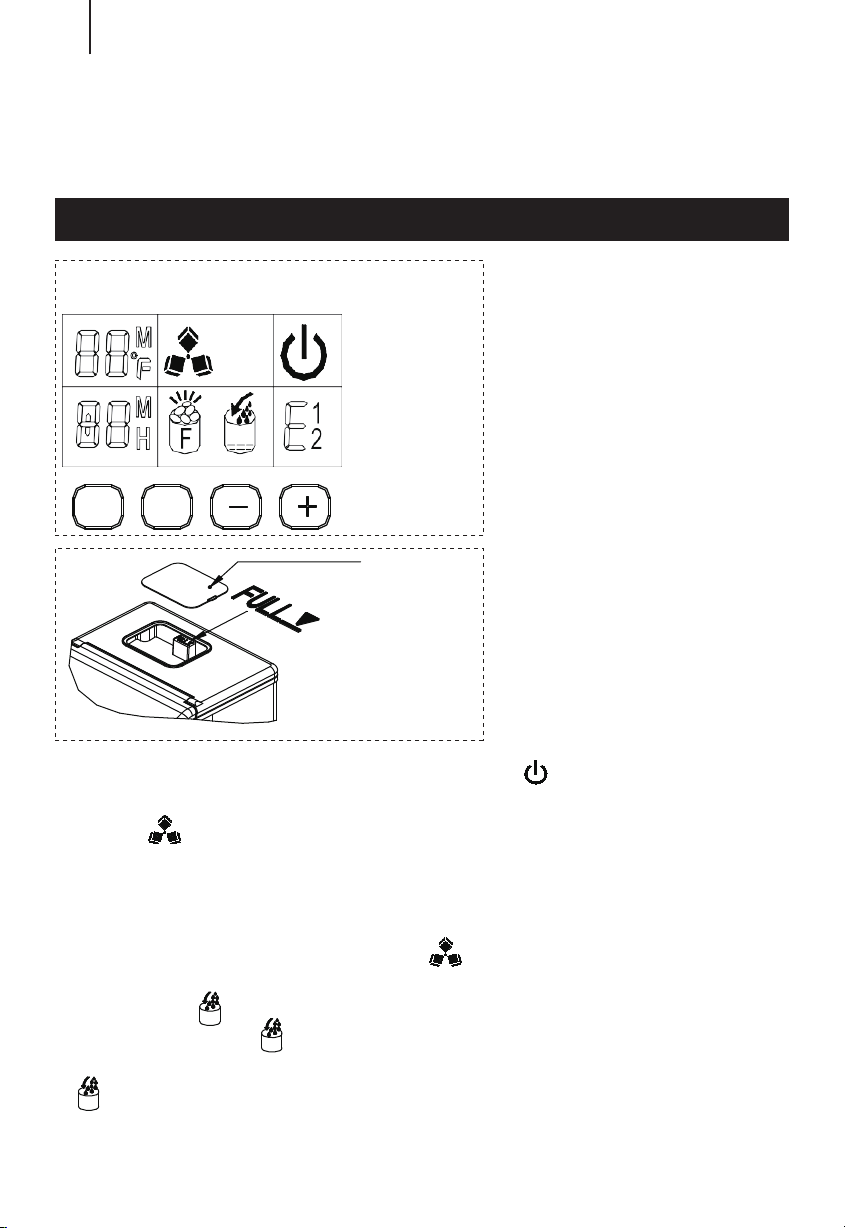
1.Ambient temp and ice making countdown symbol: when display show
<M>, ice making countdown,when display show <℉>,means ambient
temp.
2.Ice making and Ice harvest symbol: when the symbol is running, the
unit is making ice cube, when the symbol flash, the unit is ice harvest.
3.ON/OFF symbol.
4.Error code E1-Ambient temp senor breakdown.E2-refrigerating tube
sensor breakdown
5.Lack water warning symbol.
6.Ice full warning symbol.
7.Time setting display area. When show <H>, timer unit ON/OFF, when
show <M>,setting ice making time.
1.Remove the exterior and interior packaging. Check that ice basket and
ice scoop are included. If any parts are missing, please contact our
customer service.
2.Clean the interior with lukewarm water and a soft cloth. Take out the
ice basket and clean it
3.Find a location for your ice maker that is protected from direct
sunlight and other sources of heat (i.e.: stove, furnace, radiator). Place
the ice maker on a level surface. Make sure that there is at least 6
inches of space between the back and sides of your ice maker and the
wall.
4.Allow one hour for the refrigerant fluid to settle before plugging ice
maker in.
5.The appliance must be positioned so that the plug is accessible.
OPERATING PROCEDURES & MAINTENANCE
06
EN
1.This unit should be properly grounded for your safety. The power cord
of this appliance is equipped with a three-prong plug which mates with
standard three prong wall outlets to minimize the possibility of electric
shock.
2.Plug your appliance into an exclusive, properly installed, grounded
wall outlet. Do not under any circumstances, cut or remove the third
(ground) prong from the power cord. Any questions concerning power
and/or grounding should be directed toward a certified electrician.
3.This appliance requires a standard 110-120volt, 60Hz electrical outlet
with three-prong ground.
CLEANING AND MAINTAINING YOUR ICE MAKER
* Improper use of the grounded plug can result in the risk of
electrical shock. If the power cord is damaged please call our
customer service.
Before using your ice maker, it is strongly recommended to
clean it thoroughly.
DANGER
1.Take out the ice basket.
2.Clean the interior with diluted detergent, warm water and a soft cloth.
3.Then use the water to rinse the inside parts, and drain out the water
from the draining port by unplugging the drain cap on the back.
4.The outside of the ice maker should be cleaned regularly with a mild
detergent solution and warm water.
5.Dry the interior and exterior with a soft cloth.
6.When the machine is not in use for a long time, open the water drain
cap to drain water completely out from the water reservoir.
After using your ice maker for a long time, we also suggest you
should clean your unit. Especially to the water separator pipe
and the water filters, you must clean them periodically.
07
EN

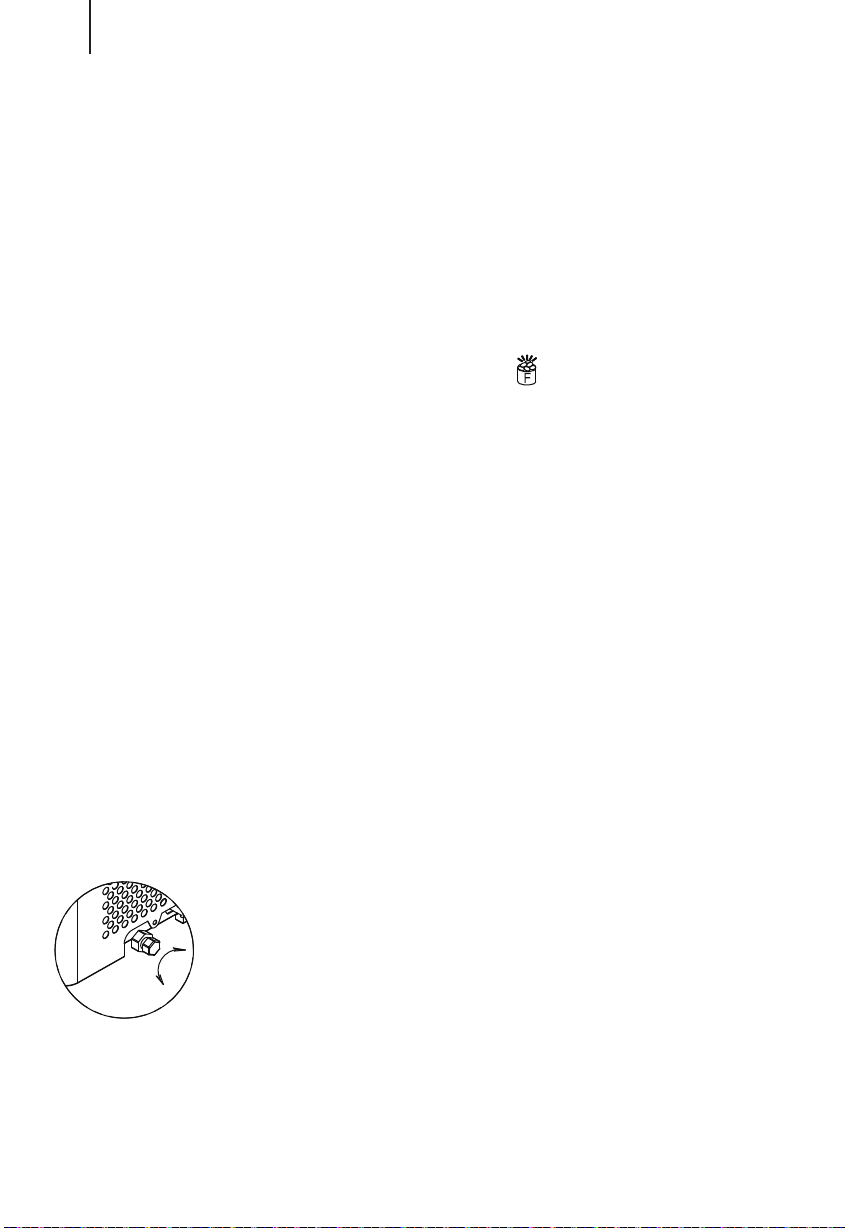
Evaporator
How to drain out the water from the internal tank and big water
reservoir completely
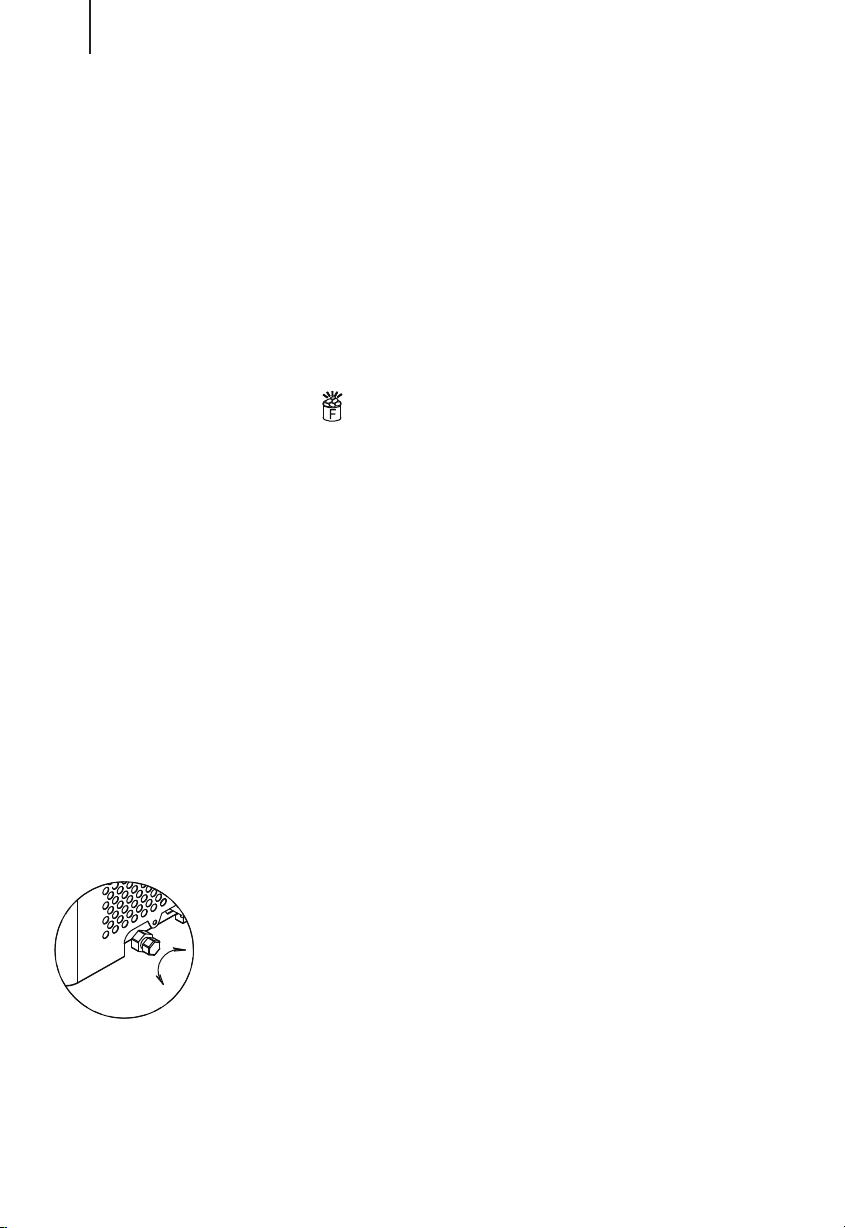
1.If the water separator pipe is blocked and there is no water flowing
down when you listen the compressor and the water pump inside are
still working, please turn off the unit first and disassemble this pipe
down, and clean it. Clean each hole on the pipe wall displayed in
following picture. After cleaning, install back the water separator pipe
and be sure the right terminal of the pipe connecting to the silicone pipe
well and as original.
2.For both of the water tank and the big water reservoir, clean them
with diluted detergent, warm water and a soft cloth. Then use the water
to rinse the inside, and drain out the water from the draining port by
unplugging the drain cap on the back. It will help you keep the unit and
ice-cube hygienic, and also make the unit work normally.
3.When cleaning, if find that the ice cube left on the evaporator and can
not be taken out easily, you can turn on the unit to let the unit enter the
ice making process, then press “ON/OFF” button for more than 5
seconds to let the unit start ice harvest process to melt the ice cube.It
will help you remove the hard ice cube.
Water Separator
Hole
08
EN
USING YOUR ICE MAKER
Because the water in the big water reservoir is stopped to drain port by
the water valave, if you want to drain away all the water, please plug on
the unit and but don’t start the unit, then remove the drain port cap at
the back. Wait some minutes, and all of the water will flow out.
2.When you plug the unit, the power symbol< > will flash. Press the
<ON/OFF> button, the unit will start making ice cube, ice making
symbol< > will keep running. The left up corner of display area will
show the ambient temp, i.e: 80℉ means the ambient temp is 80℉.
After several mins, this area will show flash number, the ice making will
countdown, i.e: 10M means the ice making will finish 10 mins later.
3.When ice maker harvest, symbol< > flash, the water will flow
from top water reservoir to bottom water tank through solenoid valve,
the symbol < > will be on, when the water in the bottom water tank
is full,the symbol < > will be off, then the next ice making cycle
start again. When there is no water in the water reservoir, the symbol
< > will keep on. Turn off the unit and fill water again, then restart
the unit to make ice cube. Or fill water directly and wait 20mins, the
unit will restart.
1.Remove the cover of the
water reservoir and pour
potable water into water
reservoir.
And be sure to keep water
level below the max. level
with FULL mark displayed in
following picture. Then
move back the cover at once
to avoid foreign matter
enter.
Warning: Do not pour the
water into the internal water
tank located underneath the
ice basket. This tank is not
big enough and will effect
the ice making performance.
Operation panel and display area
DISPLAY AREA
Cover for the
water reservoir
OPERATION AREA
TIMER ON/OFF -+
09
EN
Warning
A. Make sure the water tank ,water filter and the
water separator pipe are not blocked, then clean
them
B. The water temp will effect the ice making
capacity. The lower the temp is, the more ice cube
produces.
C. The cooler ambient temp is, the more ice cube
produces.
D. Always use good quality water to make sure the
pump work well. Bad quality water will cause pump
noise, but doesn’t effect the unit working.
E. The compressor restarts 3mins later if you turn
off the unit.
Remark: The ice making cycle lasts about 13 to 25 minutes, depending
on the ambient temperature. And for the first time, according to the
initial water temperature, ice-making last time will be a little longer. In
the extremely hot room temperature, ice-making time may vary a lot,
but it will not exceed 35 minutes.
If you think the ice cube is not thick enough, during ice making,press
the<+>and<->to set the ice making lead time. Press one time and the
ice making cycle will in crease or reduce one min, 6min most. This can
only start from the new cycle.
4.Press the button <time> more than 5s, the machine will enter
“CLEAN” model.
5.When Ice Full symbol < > is on, the unit will stop, take out the ice
cube inside, the unit will start working again.
If press the button <ON/OFF> more than 5s,when the ice maker is
working, the unit will start harvest. Press button <ON/OFF>, the unit
will turn off.
Timer setting. The timer setting is related to the thickness of the ice
cubes. When the unit is just turned on, the timer can be set according
to the system or by yourself to decide the ice thickness. When the unit
is working, it cannot be adjusted again.
Press the <TIMER> button, the display will show <1H>, and then press
<+> and <-> to set the time. During the setting, the H is flash, after
5s, the H will keep on and the unit will in your Timer setting.
6.Water Drain: take off the drain plug capon the back of unit, take out
the silicon plug, then drain the water inside. It is better to exchange
water every 24 hours and clean the unit every 3 days.
CLOSE
OPEN
10
EN
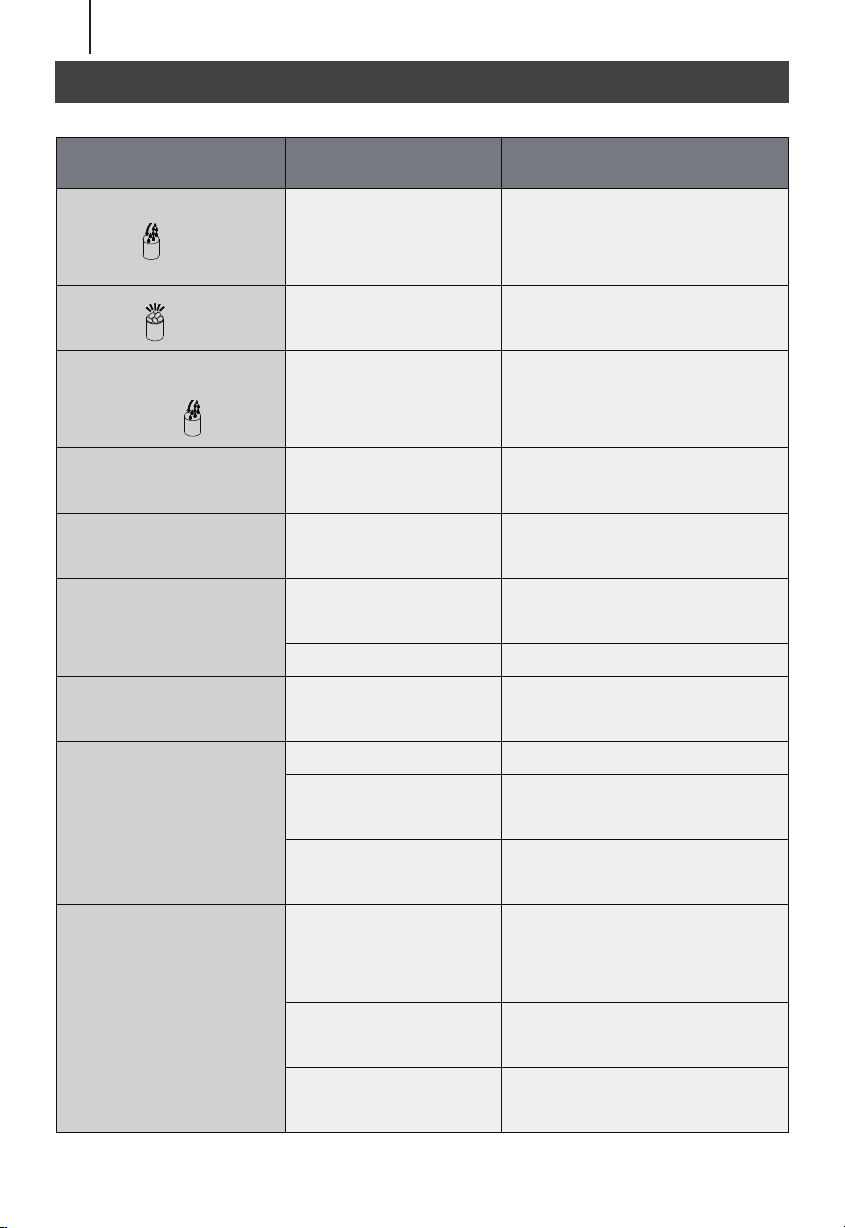
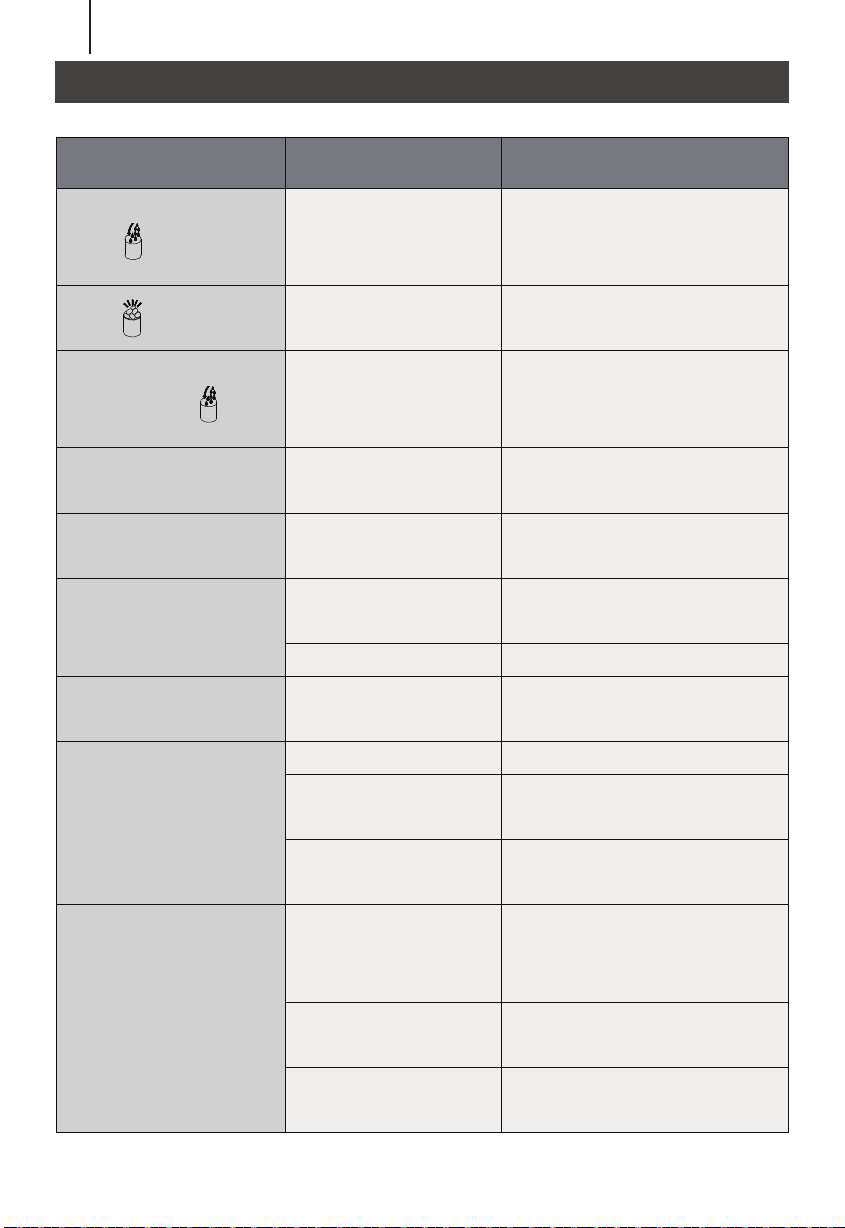
TROUBLESHOOTING
PROBLEM
< > is on
Lack of water
< > is on
The water reservoir has
water, but< > is on
<E1> is on
<E2> is on
No water in the water
Separator pipe
Too much ice cube in
the basket
The inlet solenoid
valve breakdown
Ambient temp sensor
breakdown
Refrigerating tube
sensor breakdown
The holes are blocked
Ice making cycle too
long
Water temp too high
Refrigerant system
leakage
Refrigerant system
block
Ice making short
Ambient temp is high
or the water temp is
high
Water filter block
Ambient temp too high
Remove the ice cube in the
basket
Remove the ice cube in the
basket
Need the technical service
person to maintain
The unit can still work, change a
new sensor
The unit can still work, change a
new sensor
Use slim wire to prick each hole,
till The water can flow out easily.
Press <->to reduce the ice
making time.
The water temp should be no
more morethan25℃(77℉).
Need the technical service
person to maintain
Need the technical service
person to maintain
Press<+>to increase the ice
making Time.
Move the unit to somewhere
ambient Temp lower than30 ℃
(86 ℉ ), fill cool water.
Clean the water filter
Move the unit to cool place
Ice cube thick and
can not drop down
Ice cube thin
Unit work but no ice
cube
POSSIBLE CAUSE SOLUTION
11
EN
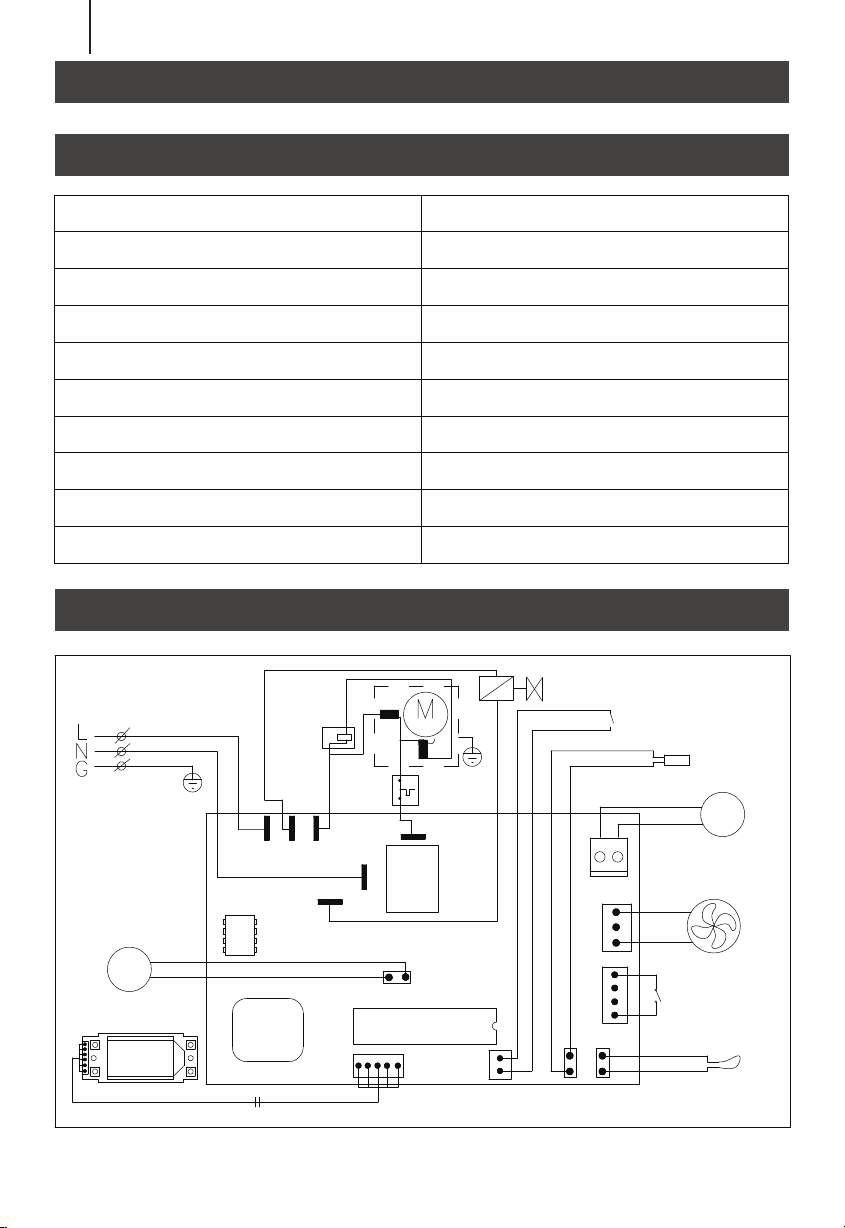
TECHNICAL PARAMETERS
CIRCUIT DIAGRAM
TECHNICAL PARAMETERS & CIRCUIT DIAGRAM
Model
Protection Type
Power
Ice Making Current
Ice Harvest Current
Refrigerant
High Side
Low Side
Net Weight
Enclosure
ELECTRICAL DIAGRAM
FOR ICE-MAKER
Start
Relay
COMPRESSOR
POWER SUPPLY
Overload
Protector
Relay
VALVE
AC-L
MW Solenoid Valve
magnetic control
switch
sensor for suction pipe
DC Water Pump
DC Fan Motor
T1
T2
-PUMP+
CKKG
CN6
6C
MCU
WATERV
COMP
T1
LCD
LNSR ROOM
FAN
+
1
water
Liquid Level
Switch
sensor for
room temp.
AW
AC-N 1 2
DC Water valve
control panel
EP24525US
I
115V/60Hz
1.6A
2.6A
R600a 1.13Oz/32g
260Psig
88Psig
24 lbs
Stainless
12
EN
Please give us a chance to make it right and do better !
Contact our friendly customer service department for help first.
Replacements for missing or damaged parts will be shipped ASAP !
Contact Us !
Do NOT return this item. US:cs.us@costway.com
UK:cs.uk@costway.com
US office: Fontana UK office: Ipswich AU office: Truganina
Machine à Glaçons
EP24525US
MANUEL DE L’UTILISATEUR
EN FR
CE MANUEL CONTIENT DES INFORMATIONS IMPORTANTES SUR LA SÉCURITÉ. VEUILLEZ LE LIRE ET LE CONSERVER POUR TOUTE RÉFÉRENCE FUTURE.
Avant de Commencer
Veuillez lire attentivement toutes les instructions.
Conservez les instructions pour vous y référer ultérieurement.
Vérifiez toutes les pièces et les accessoires.
Lisez attentivement chaque étape et suivez l’ordre correct.
Nous recommandons que, dans la mesure du possible, tous les
produits soient assemblés à proximité de la zone où ils seront
utilisés, afin d’éviter tout déplacement inutile du produit une fois
assemblé.
Placez toujours le produit sur une surface plane et stable.
Conservez toutes les petites pièces de ce produit et les matériaux
d’emballage hors de portée des bébés et des enfants, car ils
pourraient présenter un risque d’étouffement.
02
CONSIGNES DE SÉCURITÉ IMPORTANTES
CONSEILS DE SÉCURITÉ IMPORTANTS
Votre sécurité et celle des autres sont très importantes.
C'est le symbole d'alerte de sécurité:
Vous pouvez être tué ou gravement blessé si vous ne suivez pas
immédiatement les instructions.
Ces mots signifient :
Nous avons fourni de nombreux manuels de messages de sécurité
importants et votre appareil. Lisez et respectez toujours tous les
messages de sécurité.
Tous les messages de sécurité vous indiqueront quel est le danger
potentiel, vous indiqueront comment réduire les risques de blessure et
vous indiqueront ce qui peut arriver si les instructions ne sont pas
suivies.
Lors de l'utilisation d'appareils électriques, des précautions de sécurité
de base doivent être suivies pour réduire le risque d'incendie, de choc
électrique et de blessures aux personnes ou aux biens. Lisez toutes les
instructions avant d'utiliser un appareil.
• Ne faites pas fonctionner cet appareil ou tout autre appareil avec un
cordon endommagé.
Connectez-vous uniquement à des prises correctement polarisées.
Aucun autre appareil ne doit être branché sur la même prise.
Assurez-vous que la fiche est complètement insérée dans la prise.
• Ne faites pas passer le cordon d'alimentation sur de la moquette ou
d'autres isolants thermiques. Ne couvrez pas le cordon. Gardez le
cordon à l'écart des zones de circulation et ne l'immergez pas dans
l'eau.
• Nous ne recommandons pas l'utilisation d'une rallonge, car elle peut
surchauffer et devenir un risque d'incendie. Si vous devez utiliser une
rallonge, utilisez la taille minimale No.14AWG et une puissance nominale
d'au moins 1875 watts.
Tous les messages de sécurité suivront le symbole d'alerte de
sécurité et le mot « DANGER » ou « AVERTISSEMENT ».
DANGER
AVERTISSEMENT
03
FR
AVERTISSEMENT : Cet appareil doit être mis à la terre.
• Débranchez la machine à glaçons avant de la nettoyer ou d'effectuer
toute réparation ou entretien.
• Faites preuve de prudence et faites preuve d'une surveillance
raisonnable lorsque l'appareil est utilisé à proximité d'enfants.
• N'utilisez pas votre machine à glaçons à l'extérieur. Placez la machine
à glaçons à l'abri de la lumière directe du soleil et assurez-vous qu'il y a
au moins 6 pouces/15 cm d'espace entre l'arrière de votre appareil et le
mur. Gardez une distance minimale de 6 pouces/15 cm de chaque côté
de votre appareil libre.
• N'utilisez pas d'autre liquide pour fabriquer le glaçon que de l'eau.
• Ne nettoyez pas votre machine à glaçons avec des liquides
inflammables. Les fumées peuvent créer un risque d'incendie ou
d'explosion.
• Ne basculez pas.
• Si la machine à glaçons est amenée de l'extérieur en hiver, laissez-la
se réchauffer quelques heures à température ambiante avant de la
brancher.
• DANGER - Risque d'incendie ou d'explosion. Réfrigérant inflammable
utilisé. N'utilisez pas d'appareils mécaniques pour dégivrer la machine à
glaçons. Ne percez pas le tube de réfrigérant.
• DANGER – Risque d'incendie ou d'explosion. Réfrigérant
inflammable utilisé. À réparer uniquement par un personnel de service
qualifié. Ne percez pas le tube de réfrigérant.
• ATTENTION - Risque d'incendie ou d'explosion. Réfrigérant
inflammable utilisé. Consultez le manuel de réparation/guide du
propriétaire avant d'essayer d'installer ou de réparer ce produit. Toutes
les précautions de sécurité doivent être suivies.
• ATTENTION - Risque d'incendie ou d'explosion. Éliminer la propriété
conformément aux réglementations fédérales ou locales. Réfrigérant
inflammable utilisé.
• ATTENTION-Risque d'incendie ou d'explosion. En raison de la
perforation du tube de réfrigérant ; Suivez attentivement les
instructions de manipulation. Réfrigérant inflammable utilisé.
• La machine à glaçons doit être installée conformément à la norme de
sécurité pour les systèmes de réfrigération, ASHRAE15. La machine à
glaçons ne doit pas être installée dans les couloirs ou les couloirs des
bâtiments publics.
04
FR
IMPORTANT:
• Si l'appareil présente des problèmes devant être entretenus, le
remplacement par des composants similaires et l'entretien doivent être
effectués par un personnel d'entretien qualifié, afin de minimiser le
risque d'inflammation possible en raison de pièces incorrectes ou d'un
entretien inapproprié.
1. Couvercle du
réservoir d'eau
2. Couvercle
supérieur de l'unité
3. Tuyau séparateur
d'eau
4. Évaporateur
5. Panier à glace
A.Minuterie
B.ON/OFF (Marche/Arrêt)
C. Zone d'affichage LCD
D. Fabrication de glace et
réduction de la minuterie
E. Fabrication de glace et
augmentation de la
minuterie\
Les fils de ce câble d'alimentation sont colorés conformément au code
suivant :
Vert ou Vert avec une bande jaune : Mise à la terre
Blanc : Neutre
Noir : en direct
Pour éviter tout danger dû à l'instabilité de l'appareil, celui-ci doit être
placé sur une surface plane ou plane.
APPRENDRE À CONNAÎTRE VOTRE UNITÉ
TIMER ON/OFF -+
6. Pelle à glace
7. Fenêtre transparente
8. Panneau de
commande
9. Sortie d'air chaud
10. Orifice de vidange
d'eau : pour vidanger
l'eau de l'unité.
05
FR

DÉBALLAGE DE VOTRE MACHINE À GLAÇONS
CONNEXION DE VOTRE MACHINE À GLAÇONS
AVERTISSEMENT : remplir avec de l'eau potable uniquement.
1. Symbole de température ambiante et de compte à rebours de
fabrication de glace : lorsque l'écran affiche <M>, le compte à rebours
de fabrication de glace, lorsque l'écran affiche <℉>, signifie la
température ambiante.
2. Symbole de fabrication de glace et de récolte de glace : lorsque le
symbole est allumé, l'appareil fabrique des glaçons, lorsque le symbole
clignote, l'appareil est en train de récolter de la glace.
3. Symbole marche/arrêt.
4. Code d'erreur E1-Panne du capteur de température ambiante.
E2-Panne du capteur du tube réfrigérant
5. Symbole d'avertissement de manque d'eau.
6. Symbole d'avertissement de glace pleine.
7. Zone d'affichage du réglage de l'heure. Lorsqu'il est affiché <H>,
l'unité de minuterie est activée/désactivée, lorsqu'il est affiché <M>, le
réglage du temps de fabrication de glace.
1.Retirez l'emballage extérieur et intérieur, puis vérifiez que tous les
accessoires sont inclus. Si des pièces manquent, veuillez contacter notre
service client.
2.Nettoyez l'intérieur avec de l'eau tiède et un chiffon doux. Sortez le
panier à glace et nettoyez-le.
3.Placez votre machine à glaçons sur une table éloignée de la lumière
directe du soleil et d'autres sources de chaleur (c'est-à-dire : cuisinière,
fournaise et radiateur). Assurez-vous qu'il y a au moins 15 cm entre
l'arrière et les côtés de votre machine à glaçons et le mur.
4.Attendez une heure que le fluide frigorigène se stabilise avant de
brancher votre machine à glaçons.
5.L'appareil doit être positionné de manière à ce que la prise soit
accessible.
PROCÉDURES D'OPÉRARION ET ENTRETIEN
06
FR

NETTOYAGE ET ENTRETIEN DE VOTRE MACHINE À GLAÇONS
* Une mauvaise utilisation de la fiche mise à la terre peut entraîner un
risque de choc électrique. Si le cordon d'alimentation est endommagé,
veuillez appeler un technicien qualifié.
Avant d'utiliser votre machine à glaçons, il est fortement recom-
mandé de la nettoyer soigneusement.
1.Cet appareil doit être correctement mis à la terre pour votre sécurité.
Le cordon d'alimentation de cet appareil est équipé d'une fiche de mise
à la terre qui s'accouple avec les prises murales de mise à la terre
standard afin de minimiser les risques d'électrocution.
2.Branchez votre appareil dans une prise murale dédiée, correctement
installée et mise à la terre. N'endommagez en aucun cas le dispositif de
mise à la terre de la fiche. Toute question concernant l'alimentation
et/ou la mise à la terre doit être consultée avec un électricien certifié.
3.Cet appareil nécessite une prise électrique standard de 110-120 volts,
60 Hz avec une bonne mise à la terre.
1. Sortez le panier à glace.
2. Nettoyez l'intérieur avec un détergent dilué, de l'eau tiède et un
chiffon doux.
3. Utilisez ensuite l'eau pour rincer les pièces intérieures et vidangez
l'eau du port de vidange en débranchant le bouchon de vidange à
l'arrière.
4. L'extérieur de la machine à glaçons doit être nettoyé régulièrement
avec une solution détergente douce et de l'eau tiède.
5. Séchez l'intérieur et l'extérieur avec un chiffon doux.
6. Lorsque l'appareil n'est pas utilisé pendant une longue période,
ouvrez le bouchon de vidange d'eau pour vider complètement l'eau du
réservoir d'eau.
Après avoir utilisé votre machine à glaçons pendant une longue
période, nous vous suggérons également de nettoyer votre
appareil. Surtout pour le tuyau séparateur d'eau et les filtres à
eau, vous devez les nettoyer périodiquement.
DANGER
07
FR

Évaporateur
Comment vider complètement l'eau du réservoir interne et du
grand réservoir d'eau
1. Si le tuyau du séparateur d'eau est bloqué et qu'il n'y a pas d'eau qui
coule lorsque vous écoutez le compresseur et que la pompe à eau à
l'intérieur fonctionne toujours, veuillez d'abord éteindre l'appareil,
démonter ce tuyau et le nettoyer. Nettoyez chaque trou sur la paroi du
tuyau affiché dans l'image suivante. Après le nettoyage, réinstallez le
tuyau du séparateur d'eau et assurez-vous que la borne droite du tuyau
se connecte au puits de tuyau en silicone et comme l'original.
2.Pour le réservoir d'eau et le grand réservoir d'eau, nettoyez-les avec
un détergent dilué, de l'eau tiède et un chiffon doux. Ensuite, utilisez
l'eau pour rincer l'intérieur et vidangez l'eau du port de vidange en
débranchant le bouchon de vidange à l'arrière. Cela vous aidera à
garder l'appareil et le glaçon hygiéniques et à faire fonctionner l'appareil
normalement.
3.Lors du nettoyage, si vous constatez que le glaçon est laissé sur
l'évaporateur et ne peut pas être retiré facilement, vous pouvez allumer
l'appareil pour le laisser entrer dans le processus de fabrication de
glace, puis appuyer sur le bouton ON/OF pendant plus de 5 secondes
pour laisser l'appareil démarrer le processus de collecte de glace pour
faire fondre le glaçon. Cela vous aidera à retirer le glaçon dur.
Tuyau séparateur d'eau
Trou
08
FR
UTILISATION DE VOTRE MACHINE À GLAÇONS
Parce que l'eau dans le grand réservoir d'eau est arrêtée pour vidanger
le port par la vanne d'eau, si vous voulez vidanger toute l'eau, veuillez
brancher l'appareil et mais ne démarrez pas l'appareil, puis retirez le
bouchon du port de vidange à la retour. Attendez quelques minutes et
toute l'eau s'écoulera.
2.Lorsque vous branchez l'appareil, le symbole d'alimentation < > clignote.
Appuyez sur le bouton <ON/OFF>, l'appareil commencera à fabriquer des
glaçons, le symbole de fabrication de glace < > continuera à fonctionner. Le
coin supérieur gauche de la zone d'affichage affichera la température ambiante,
c'est-à-dire : 80℉ signifie que la température ambiante est de 80℉. Après
plusieurs minutes, cette zone affichera un numéro clignotant, la fabrication de
glace comptera à rebours, c'est-à-dire : 10M signifie que la fabrication de glace
se terminera 10 minutes plus tard.
3.Lorsque la machine à glaçons récolte, le symbole < > clignote, l'eau
s'écoule du réservoir d'eau supérieur vers le réservoir d'eau inférieur à travers
l'électrovanne, le symbole < > s'allume lorsque l'eau du réservoir d'eau
inférieur est pleine , le symbole < > s'éteindra, puis le prochain cycle de
fabrication de glace recommencera. Lorsqu'il n'y a pas d'eau dans le réservoir
d'eau, le symbole < > reste allumé. Éteignez l'appareil et remplissez à
nouveau d'eau, puis redémarrez l'appareil pour faire un glaçon. Ou remplissez
l'eau directement et attendez 20 minutes, et l'unité redémarrera.
1. Retirez le couvercle du
réservoir d'eau et versez de
l'eau potable dans le réservoir
d'eau.
Et assurez-vous de maintenir le
niveau d'eau en dessous du
niveau maximal avec la marque
FULL (PLEIN) affichée dans
l'image suivante. Ensuite,
remettez immédiatement le
couvercle en place pour éviter
que des corps étrangers ne
pénètrent à l'intérieur.
Avertissement : Ne versez pas
d'eau dans le réservoir d'eau
interne situé sous le panier à
glaçons. Ce réservoir n'est pas
assez grand et affectera les
performances de fabrication de
glace.
Panneau de commande et zone d'affichage
ZONE
D'AFFICHAGE
Couvercle pour le
réservoir d'eau
ZONE
D'OPÉRATION
TIMER ON/OFF -+
PLEIN
09
FR
Avertissement
A、Assurez-vous que le réservoir d'eau, le filtre à eau et
le tuyau du séparateur d'eau ne sont pas bloqués, puis
nettoyez-les.
B、La température de l'eau affectera la capacité de
fabrication de glace. Plus la température est basse, plus
le glaçon produit.
C、Plus la température ambiante est froide, plus le glaçon
produit.
D、Utilisez toujours de l'eau de bonne qualité pour vous
assurer que la pompe fonctionne bien. Une eau de
mauvaise qualité causera un bruit de pompe mais
n'affectera pas le fonctionnement de l'unité.
E、Le compresseur redémarre 3 minutes plus tard si vous
éteignez l'appareil.
Remarque : Le cycle de fabrication de glace dure environ 13 à 25
minutes, selon la température ambiante. Et pour la première fois, selon
la température initiale de l'eau, la fabrication de glace la dernière fois
sera un peu plus longue. Dans la température ambiante extrêmement
chaude, le temps de fabrication de glace peut varier considérablement,
mais il ne dépassera pas 35 minutes.
Si vous pensez que le glaçon n'est pas assez épais, pendant la
fabrication de glace, appuyez sur <+>et<->pour régler le délai de
fabrication de glace. Appuyez une fois et le cycle de fabrication de glace
augmentera ou diminuera d'une minute, 6 minutes maximum. Cela ne
peut commencer qu'à partir du nouveau cycle.
4. Appuyez sur le bouton <time> plus de 5 s, et la machine entrera
dans le mode «CLEAN».
5. Lorsque le symbole Ice Full (glace plein) < > est allumé, l'appareil
s'arrêtera, retirera le glaçon à l'intérieur et l'appareil recommencera à
fonctionner.
Si vous appuyez sur le bouton <ON/OFF> plus de 5 s, lorsque la
machine à glaçons fonctionne, l'unité commencera à récolter. Appuyez
sur le bouton <ON/OFF> et l'appareil s'éteindra.
Réglage de la minuterie. Le réglage de la minuterie est lié à l'épaisseur
des glaçons. Lorsque l'appareil vient d'être allumé, la minuterie peut
être réglée en fonction du système ou par vous-même pour décider de
l'épaisseur de la glace. Lorsque l'appareil fonctionne, il ne peut plus être
réglé.
Appuyez sur le bouton <TIMER>, l'écran affichera <1H> puis appuyez
sur <+> et <-> pour régler l'heure. Pendant le réglage, le H clignote,
après 5s, le H restera allumé et l'appareil sera dans votre réglage de
minuterie.
6. Vidange de l'eau : retirez le bouchon de vidange à l'arrière de
l'appareil, retirez le bouchon en silicone, puis vidangez l'eau à l'intérieur.
Il est préférable de changer l'eau toutes les 24 heures et de nettoyer
l'appareil tous les 3 jours.
FERMER
OUVRIR
10
FR
DÉPANNAGE
PROBLÈME
< > est allumé
< > est allumé
Manque d'eau
Le réservoir d'eau contient
de l'eau, mais< > est
allumé
<E1> est activé
<E2> est activé
Pas d'eau dans le
tuyau du séparateur
d'eau
Trop de glaçons dans
le panier
L'électrovanne
d'admission est en
panne
Panne du capteur de
température ambiante
Panne du capteur du
tube frigorifique
Les trous sont bouchés
Cycle de fabrication de
glace trop long
Température de l'eau
trop élevée
Fuite du système de
réfrigérant
Le système de
réfrigérant est bloqué
Fabrication de glace
courte
La température
ambiante est élevée ou
la température de l'eau
est élevée
Filtre à eau est bouché
Température ambiante trop élevée
Éteignez l'appareil et ajoutez de
l'eau jusqu'au niveau <FULL>,
puis redémarrez l'appareil.
Retirer le glaçon du panier
Besoin de la personne du
service technique pour
entretenir
L'appareil peut toujours
fonctionner, changez pour un
nouveau capteur
L'appareil peut toujours
fonctionner, changez pour un
nouveau capteur
Utilisez un fil mince pour piquer
chaque trou, jusqu'à ce que l'eau
puisse s'écouler facilement.
Appuyez sur <-> pour réduire
le temps de fabrication de
glace.
La température de l'eau ne doit
pas dépasser 25 ℃ (77 ℉).
Besoin de la personne du
service technique pour
entretenir
Besoin de la personne du
service technique pour
entretenir
Appuyez sur <+> pour
augmenter le temps de
fabrication de glace.
Déplacez l'appareil à une
température ambiante
inférieure à 30 ℃ (86 ℉) et
remplissez d'eau froide.
Nettoyer le filtre à eau
Déplacez l'appareil dans un endroit frais
Les glaçons sont épais
et ne peuvent pas
tomber
Glaçon mince
l'unité fonctionne
mais pas de glaçon
CAUSE POSSIBLE SOLUTION
11
FR

PARAMÈTRES TECHNIQUES
SCHÉMA DE CIRCUIT
PARAMÈTRES TECHNIQUES & SCHÉMA DE CIRCUIT
Modèle
Type de protection
Puissance
Courant de fabrication de glace
Courant de récolte de glace
Réfrigérant
Côté haut
Côté bas
Poids net
Boîtier
SCHÉMA ÉLECTRIQUE DE
LA MACHINE À GLAÇONS Relais de
démarrage
COMPRESSEUR
ALIMENTATION
Protecteur
de surcharge
Relais
VALVE
AC-L
MW Électrovanne
Interrupteur de
commande magnétique
Capteur pour tuyau d'aspiration
DC Pompe à eau
DC Moteur de ventilateur
T1
T2
-Pompe+
CKKG
CN6
6C
MCU
EAUV
COMP
T1
LCD
LNSR Chambre
Ventilateur
+
1
Commutateur de
niveau de liquide
Capteur de
température
ambiante
AW
AC-N 1 2
DC Valve d'eau
Panneau de
commande
EP24525US
I
115V/60Hz
1.6A
2.6A
R600a 1.13Oz/32g
260Psig
88Psig
11kg
Inoxydable
12
FR

VEUILLEZ NOUS DONNER L’OCCASION DE L’AMÉLIORER !
Contactez d’abord notre service à la clientèle amical pour l’aide.
Les replacements pour les pièces manquantes ou endommagées seront envoyés
le plus vite possible!
FR office: Saint Vigor d'Ymonville
Contactez-nous !
Ne retournez pas cet article. FR : [email protected]
Contactez notre service à la clientèle pour obtenir de l’aide.