Loading ...
[4]
PREPARE
THE
RANGE
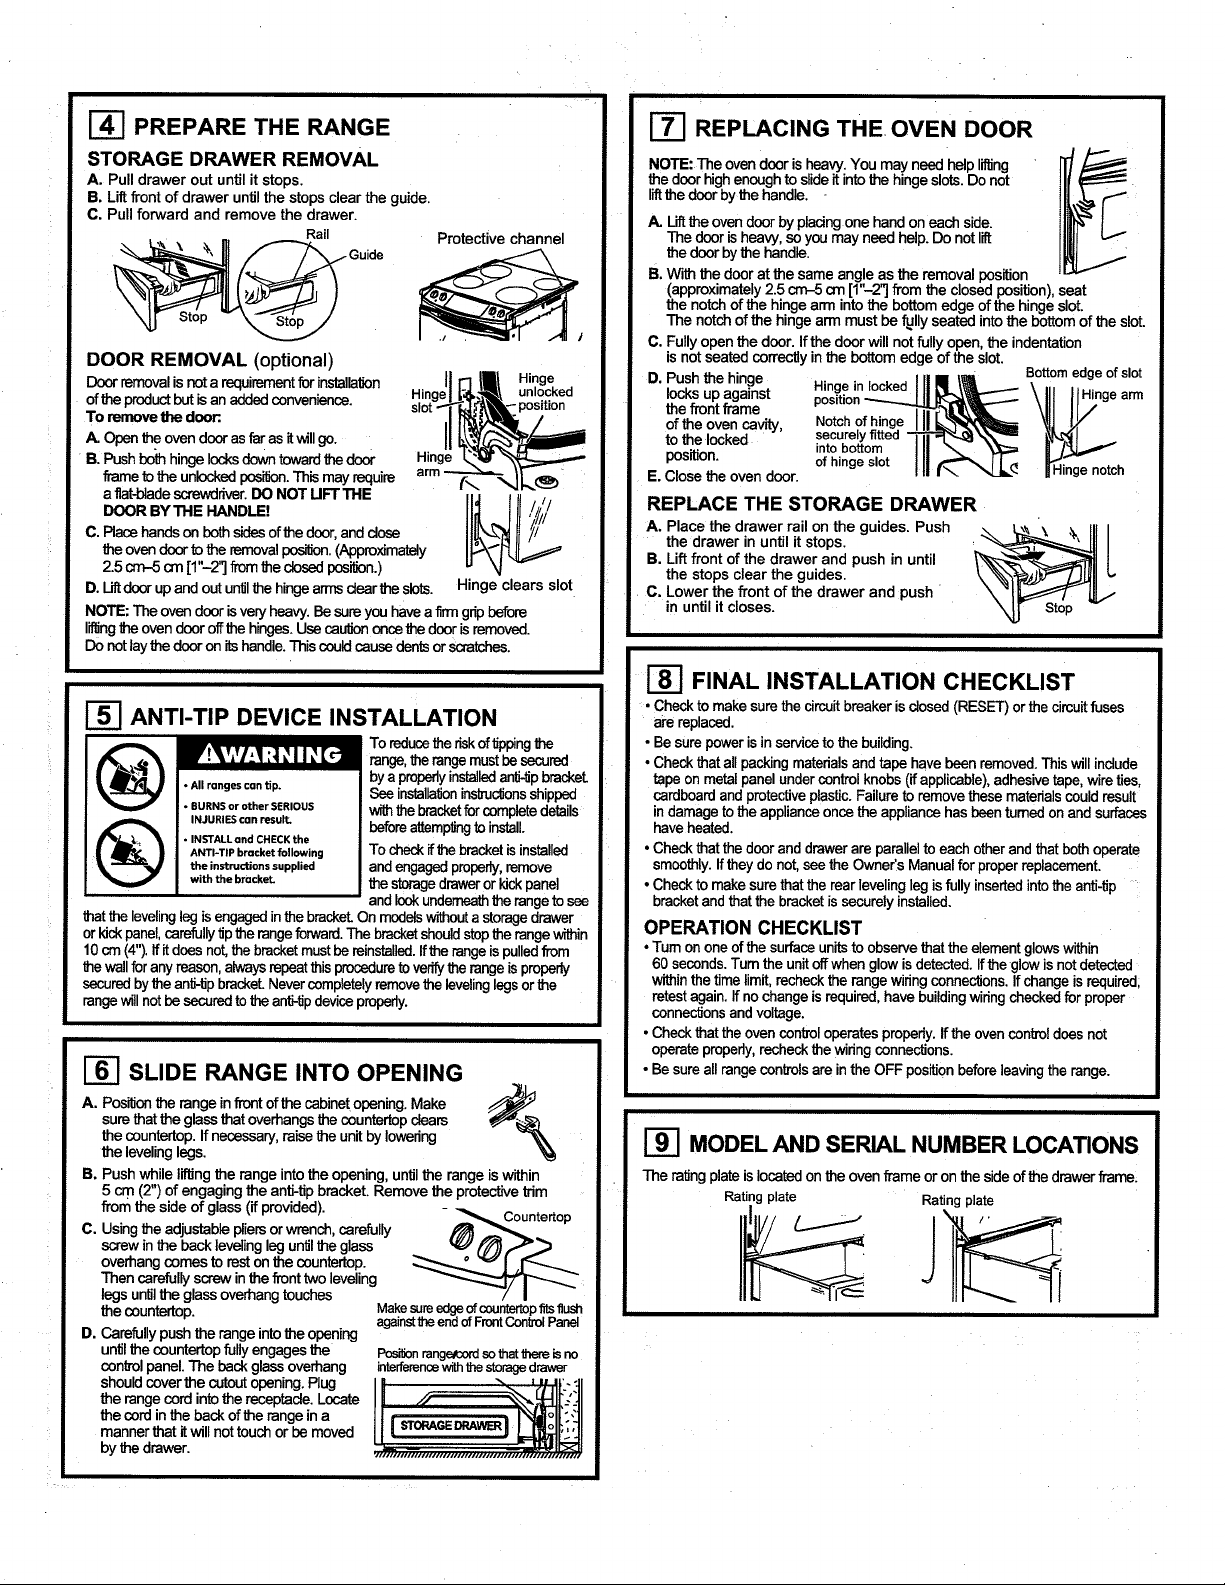
STORAGE
DRAWER
REMOVAL
A.
Pull
drawer
out
until
it
stops.
B.
Lift
front
of
drawer
until
the
stops
clear
the
guide.
C.
Pull
forward
and
remove
the
drawer.
Protective
channel
DOOR
REMOVAL
(optional)
Door
removal
is
not
a
requirement
for
installation
|
Hinge
of
the
product
but
is
an
added
convenience.
Hinge
|
q
_
poson’
To
remove
the
door:
.
A.
Open
the
oven door
as
far
as
it
will
go.
’
B.
Push
both
hinge
locks
down
toward
the
door
Hinge
frame
to
the
unlocked
position.
This
may
require =
47
a
flat-blade
screwdriver.
DO
NOT
LIFT
THE
i
DOOR
BY
THE
HANDLE!
ty}
C.
Place
hands
on both
sides
of
the
door,
and
close
the
oven
door
fo
the
removal
position.
(Approximately
2.5
om-5
cm
[1"-2"]
from
the
closed
position.)
D.
Lift
door
up
and
out
until
the
hinge
arms
clear
the
slots.
NOTE:
The
oven
door
is
very
heavy.
Be
sure
you
have
a
firm
grip
before
lifting
the
oven
door
off
the
hinges.
Use
caution
once
the
door
is
removed.
Do
not
lay
the
door
on
its
handle.
This
could
cause
dents
or
scratches.
Hinge
clears
slot
REPLACING
THE.
OVEN
DOOR
NOTE:
The
oven
door
is
heavy.
You
may
need
help
lifting
the
door
high
enough
to
slide
it
into
the
hinge
slots.
Do
not
lift
the
door
by
the
handle.
-
[
A.
Lift
the
oven
door
by
placing-one
hand
on
each
side.
The
door
is
heavy,
So
you
may
need
help.
Do
not
lift
the
door
by
the
handle.
B.
With
the
door
at
the
same
angle
as
the
removal
position
(approximately
2.5
cm-5
cm
[1"-2"]
from
the
closed
position),
seat
the
notch
of
the
hinge
arm
into
the
bottom
edge
of
the
hinge
slot.
The
notch
of
the
hinge
arm
must
be
fully
seated
into
the
bottom
of
the
slot.
C.
Fully.open
the
door.
if
the
door
will
not
fully
open,
the
indentation
is
not
seated
correctly
in
the
bottom
edge
of
the
slot.
D.
Push
the
hinge
Bottom
edge
of
slot
Hinge
in
locked
locks
up
against
a
Hinge
arm
the
front
frame
Position
.
of
the
oven
cavity,
Notch
of
hinge
|
]
to
the
locked
securely
fitted
position.
into
bottom
|
of
hinge
slot
Hinge
notch
_
E.
Close
the
oven
door.
REPLACE
THE
STORAGE
DRAWER
A.
Place
the
drawer
rail
on
the
guides.
Push
the
drawer
in
until
it
stops.
B.
Lift
front
of
the
drawer
and
push
in
until
the
stops
clear
the
guides.
.
C,
Lower
the
front
of
the
drawer
and
push
in
until
it
closes.
[5]
ANTI-TIP
DEVICE
INSTALLATION
AWARNING
To
reduce
the risk
of
tipping
the
‘range,
the
range
must
be
secured
.
by
a
properly
installed
anti-tip
bracket.
~All
ranges
can
tip.
See
installation
instructions
shipped
+
BURNS
or
other
SERIOUS
with
the
bracket
for
complete
details
INJURIES
can
result.
before
attempting
to
install.
ANTLTPbracketfollowing
|
To
check
ifthe
bracket
is
installed
the
instructions
supplied
and
engaged
properly,
remove
with
the
bracket.
the
storage
drawer
or
kick
panel
and
look
underneath
the
range
to
see
that
the
leveling
leg
is
engaged
in
the
bracket.
On
models
without
a
storage
drawer
or
kick
panel,
carefully
tip
the
range
forward.
The
bracket
should
stop
the
range
within
10
cm
(4").
If
it
does
not,
the
bracket
must
be
reinstalled.
If
the
range
is
pulled
from
the
wall
for
any
reason,
always
repeat
this
procedure
to
verify
the
range
is
properly
secured
by
the
anti-tip
bracket.
Never
completely
remove
the
leveling
legs
or
the
range
will
not
be
secured
fo
the
anti-ip
device
properly.
[6]
SLIDE
RANGE
INTO
OPENING
A.
Position
the
range
in
front
of
the
cabinet
opening.
Make
Ee
sure
that
the
glass
that
overhangs
the
countertop
clears
eS
the
countertop.
If
necessary,
raise
the
unit
by
lowering
\
the
leveling
legs.
B.
Push
while
lifting
the
range
into
the
opening,
until
the
range
is
within
5
cm
(2")
of
engaging
the
anti-tip
bracket.
Remove
the
protective
trim
from
the
side
of
glass
(if
provided).
-
Countertop
C.
Using
the
adjustable
pliers
or
wrench,
carefully
@
screw
in
the
back
leveling
leg
until
the
glass
Q
overhang
comes
to
rest
on
the
countertop.
°
Then
carefully
screw
in
the
front
two
leveling
legs
until
the
glass
overhang
touches
Make
sure
of
countertop
fits
flush
the
countertop.
Ging
the
ore
of
vont
Contol
Bans
D.
Carefully
push
the
range
into
the
opening
until
the
countertop
fully
engages
the
Position
rangescord
so
that
there
is
no
control
panel.
The
back
glass
overhang
interference
with
the
storage
drawer
should
cover
the
cutout
opening.
Plug
the
range
cord
into
the
receptacle.
Locate
the
cord
in
the
back
of
the
range
in
a
manner
that
it
will
not
touch
or
be
moved
by
the
drawer.
FINAL
INSTALLATION
CHECKLIST
+
Check
to
make
sure
the
circuit
breaker
is
closed
(RESET)
or
the
circuit
fuses
are
replaced.
*
Be
sure
power
is
in
service
to
the
building.
*
Check
that
all
packing
materials
and
tape
have
been
removed.
This
will
include
tape
on
metal
panel
under
control
knobs
(if
applicable),
adhesive
tape,
wire
ties,
cardboard
and
protective
plastic.
Failure
to
remove
these
materials
could
result
in
damage
to
the
appliance
once
the
appliance
has
been
tumed
on
and
surfaces
have.
heated.
*
Check
that
the
door
and
drawer
are
paraliel
to
each
other
and
that
both
operate
smoothly.
If
they
do
not,
see
the
Owner's
Manual
for
proper
replacement.
*
Check
to
make
sure
that
the
rear
leveling
leg
is
fully
inserted
into
the
anti-tip
bracket
and
that
the
bracket
is
securely
installed.
OPERATION
CHECKLIST
*
Tum
on
one
of
the
surface
units
to
observe
that
the
element
glows
within
60
seconds.
Turn
the
unit
off
when
glow
is
detected.
If
the
glow
is
not
detected
within
the
time
limit,
recheck
the
range
wiring
connections.
if
change
is
required,
retest
again.
If
no
change
is
required,
have
building
wiring
checked
for
proper
connections
and
voitage.
*
Check
that
the
oven
control
operates
properly.
if
the
oven
contro!
does
not
operate
properly,
recheck
the
wiring
connections.
*
Be
sure
all
range
controls
are
in
the
OFF
position
before
leaving
the
range.
[9]
MODEL
AND
SERIAL
NUMBER
LOCATIONS
The
rating
plate
is
located
on
the
oven
frame
or
on
the
side
of
the
drawer
frame:
Rating
plate
Rating
plate
Loading ...
Loading ...