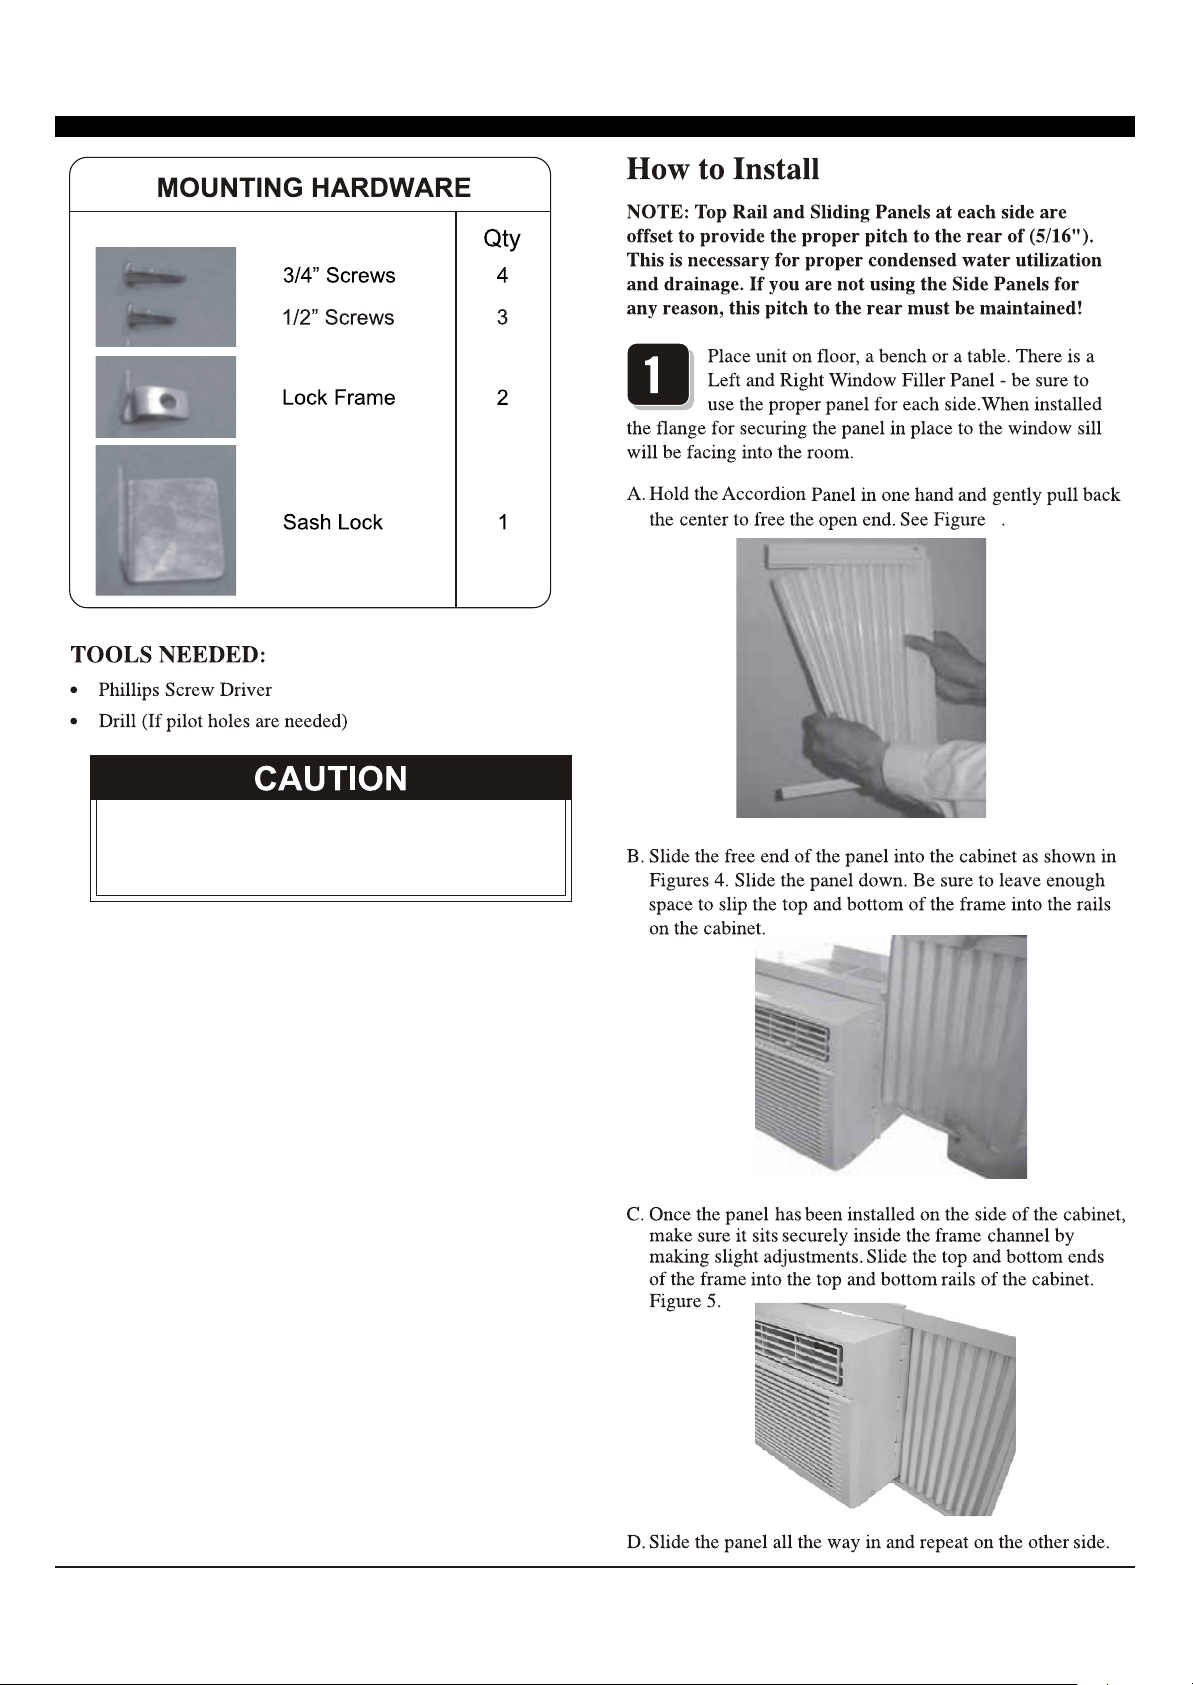
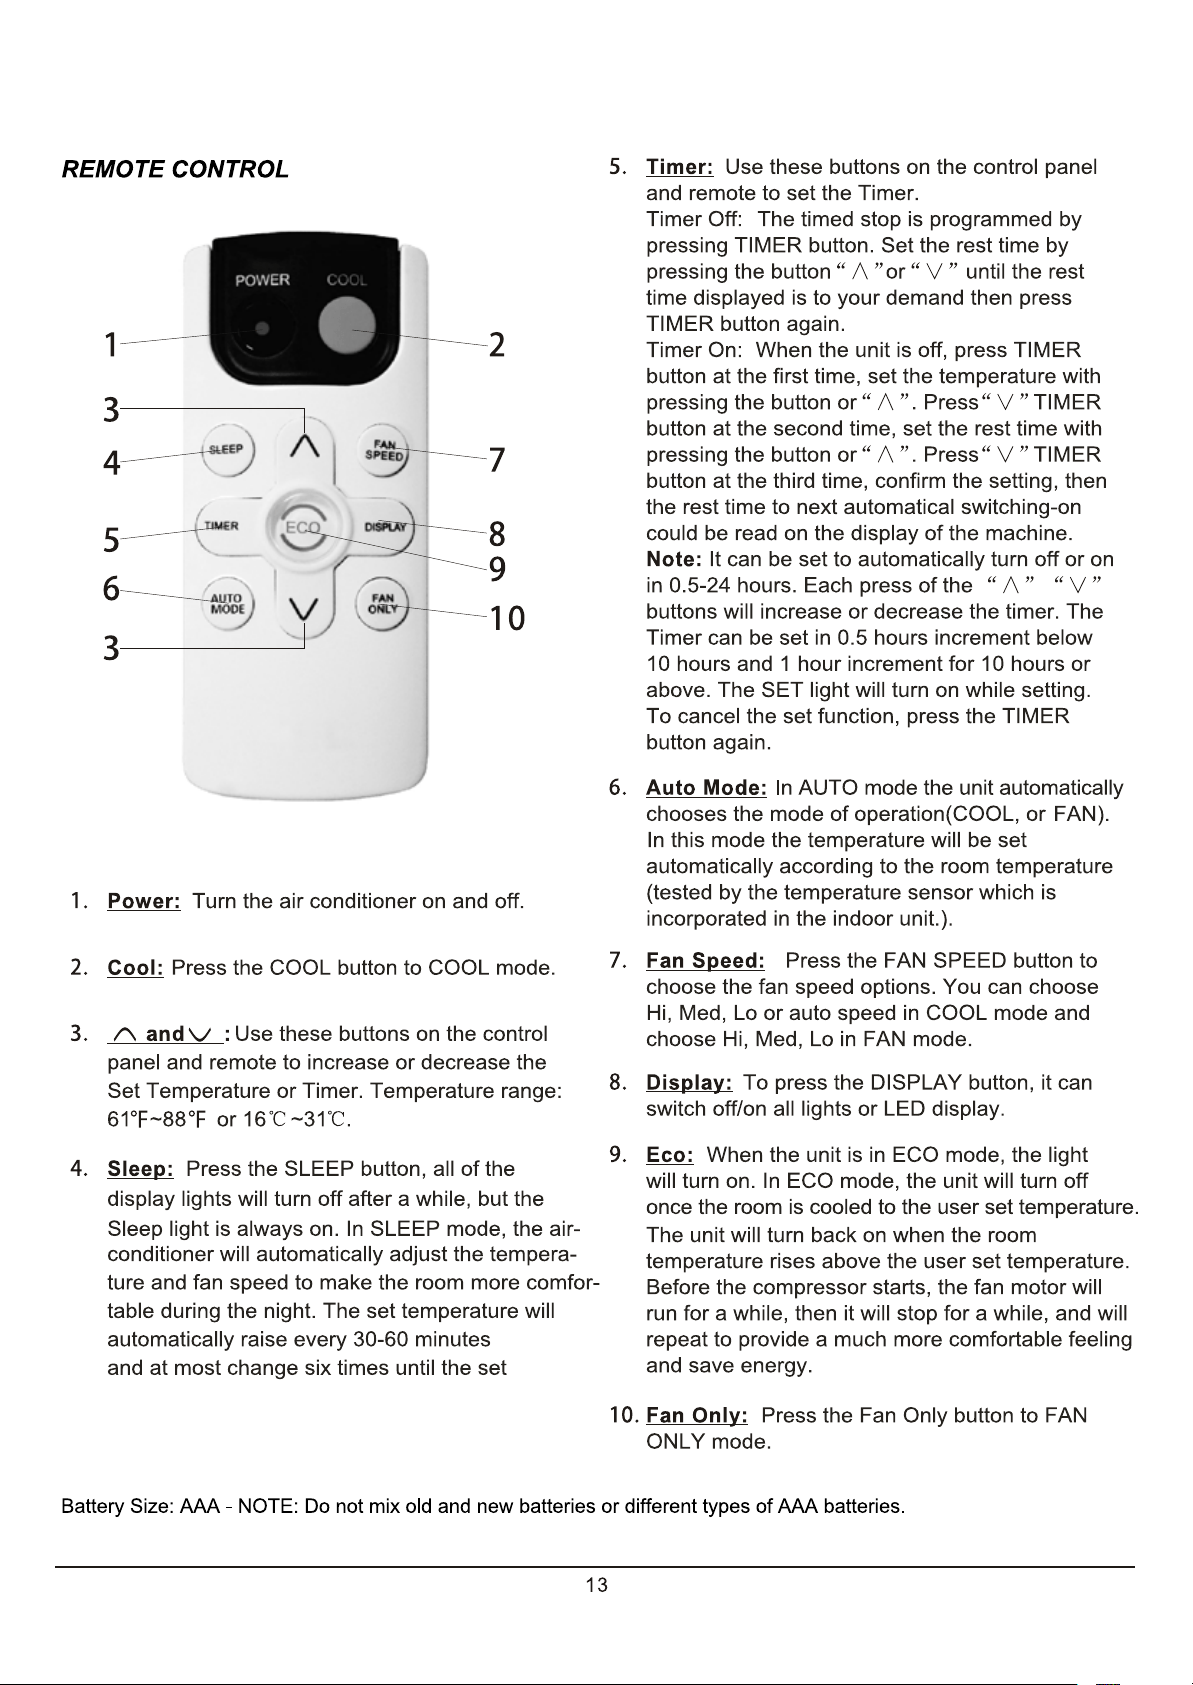
Model# / /
Read all instructions before use this device.
Product appearance and color may vary from pictures.
Keep the manual properly for future reference.
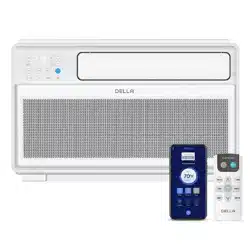
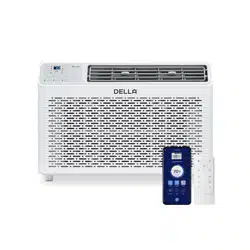
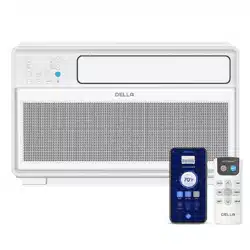
Recommended Room Size: 300-350 sp.ft / 28-33m (048-TL-W8KW)
400-450 sq.ft / 37-42 m (048-TL-W10KW /
(048-TL-W12KW)
) 450-550 sq.ft / 42-51 m

INTRODUCTION
IMPORTANT SAFETY INSTRUCTION ...........................................................................
...................................................................................
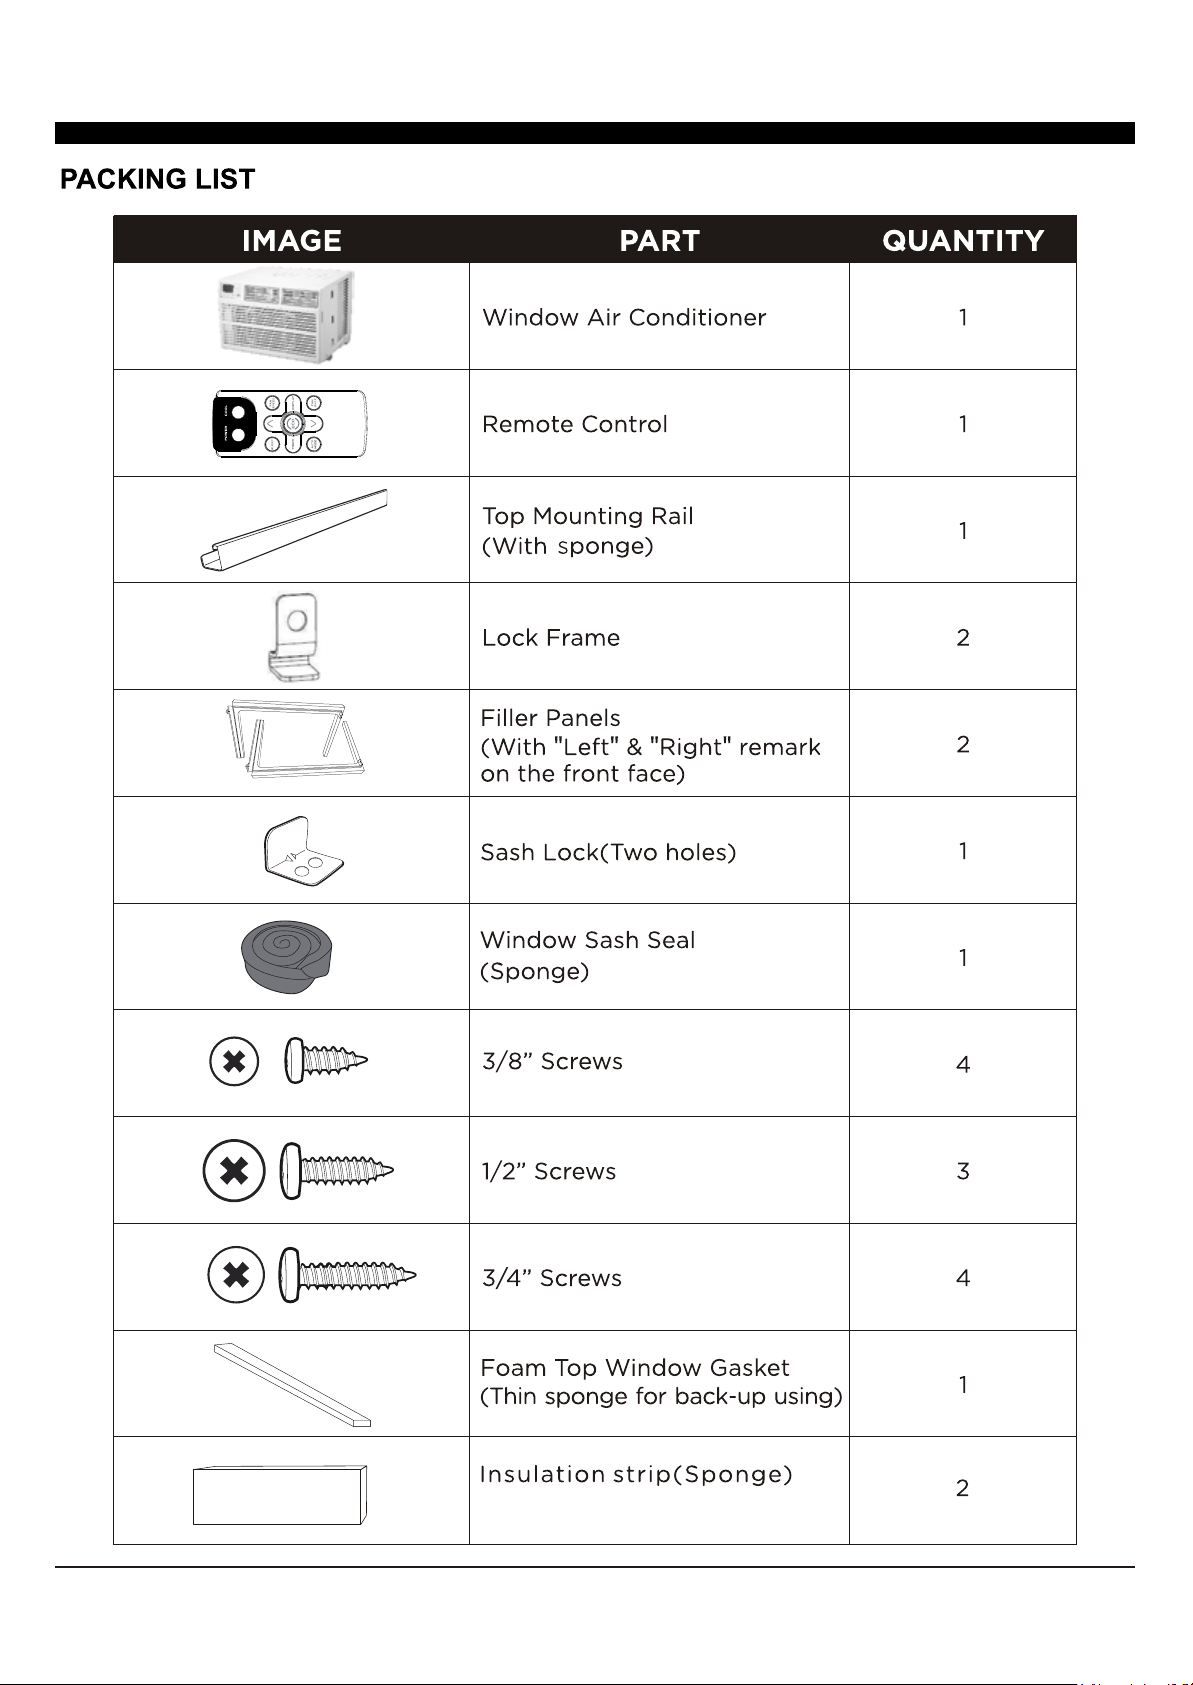
PACKING LIST ............................................................................................................
INSTALLATION&ASSEMBLY INSTRUCTIONS ..............................................................
USING YOUR AIR CONDITIONER ................................................................................
........................................................................
CARE AND CLEANING ................................................................................................
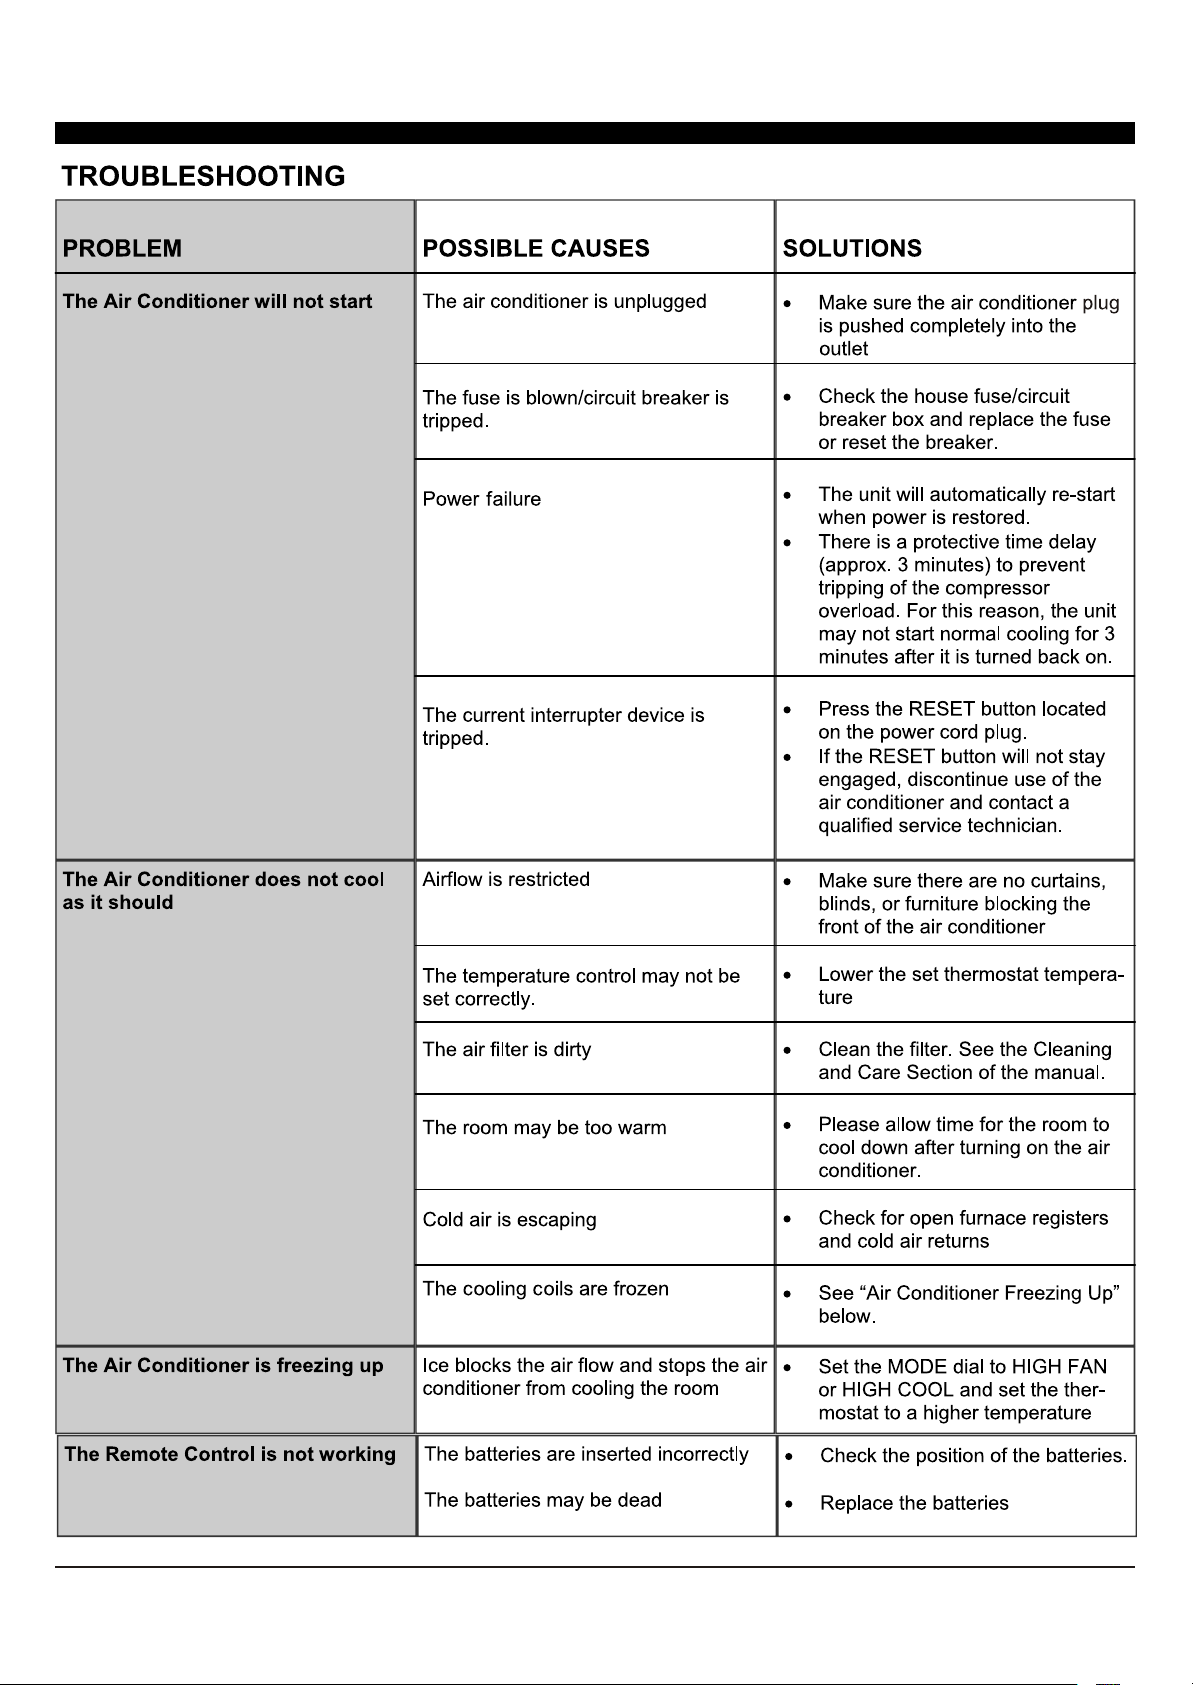
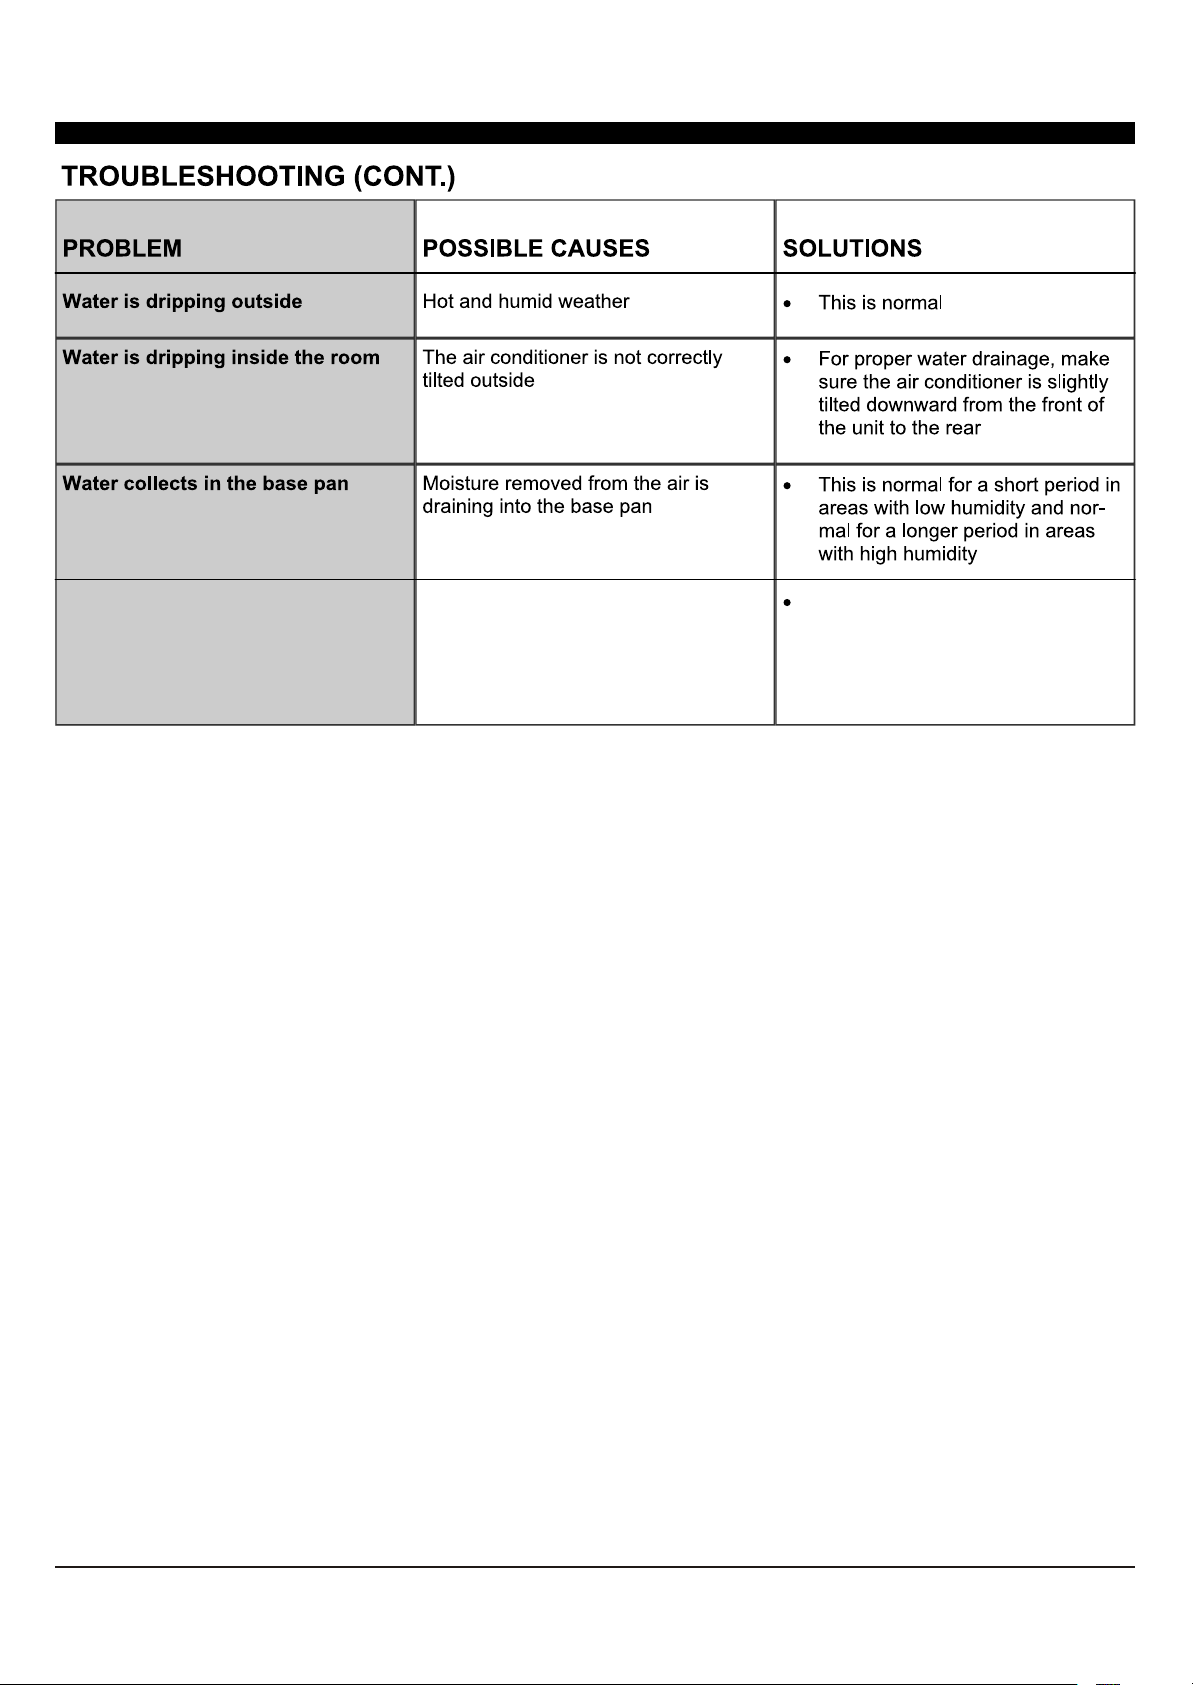
TROUBLESHOOTING .................................................................................................
ELECTRICAL REQUIREMENTS
OPERATING YOUR AIR CONDITIONER
1
1
1
1
1
Plug into a grounded 3 prong outlet.
Do not remove the ground prong.
Do not use a plug adapter.
Do not use an extension cord.
Use two or more people to move and install
the air conditioner.
Unplug the air conditioner before servicing.
048-TL-W8KW 048-TL-W10KW 048-TL-W12KWModel Number:
Power supply(Ph-V-Hz)
RATED Capacity(Btu/h)
RATED Input(W)
RATED Current(A)
Moisture Removal(L/h)
Refrigerant type (R32)(g)
Refrigerant type (R32)(ozs)
Indoor noise level (Hi/Med/Lo)(dBA)
Outdoor noise level (Hi/Med/Lo) (dBA)
Application area( Cooling Standard) (m2)
Application area (Cooling EPA) (sp.ft)
Dimension(W*D*H)(mm/in)
Net weight (kg/lbs)
1Ph, 115V~, 60Hz 1Ph, 115V~, 60Hz 1Ph, 115V~, 60Hz
8000 10000 12000
690 870 1040
6.7 9.5 11
1.0 1.2 1.5
290 290 380
R32/10.23 R32/10.23 R32/13.4
58/56/53 59/56/54 59/57/55
64/62/58 63/60/58 65/62/60
28-33 37-42-
300-350 400-450 450-550
472×433×338 /
18.58x17.05x13.31
472×478×338 /
18.58x18.82x13.31
502×582×385 /
19.76x22.91x15.16
21.1/46.5 23.3/51.4 29.9/65.9
Please read the manual before installation, using, maintenance.
Please contact the nearest after-sale service center when maintenance is necessary. At the time of
maintenance, the maintenance personnel must strictly comply with the Operation Manual provided
by the corresponding manufacturer and any non-professional is prohibited to maintain the air
conditioner.
The handling, installation, storage, servicing and disposal must comply with the provisions of
gas-related national laws and regulations, and also national wiring regulation.
It is necessary to clear away the refrigerant in the system when maintaining or scrapping an air
conditioner. Be aware that refrigerants may not contain an odour.
This appliance is not intended for use by persons (including children) with reduced physical, sensory
or mental capabilities, or supervision or instruction concerning use of the appliance by a person
responsible for their safety.
Children should be supervised to ensure that they do not play with the appliance.
Unit operation limits: Outdoor side 61~110 F, 80%RH; indoor side 61~90 F, 80%RH.
The appliance shall be stored in a room without continuously operating sources (for example: open
flames, an operating ignition gas appliance or an operating electric heater.)
Do not use means to accelerate the defrosting process or to clean, other than those recommended
by the manufacturer.
Do not pierce or burn the appliance.
O O

3
(8K) 0-8 amps
(10K-14K) 0-12 amps
(8K) 10-amp
(10K-14K) 15-amp
Plug into a grounded 3 prong outlet.
Do not remove the ground prong.
Do not use an adapter
Do not use an extension cord.
Failure to follow these instructions can
result in death, fire, or electrical shock
Electrical Shock Hazard
(Only for E-star model)
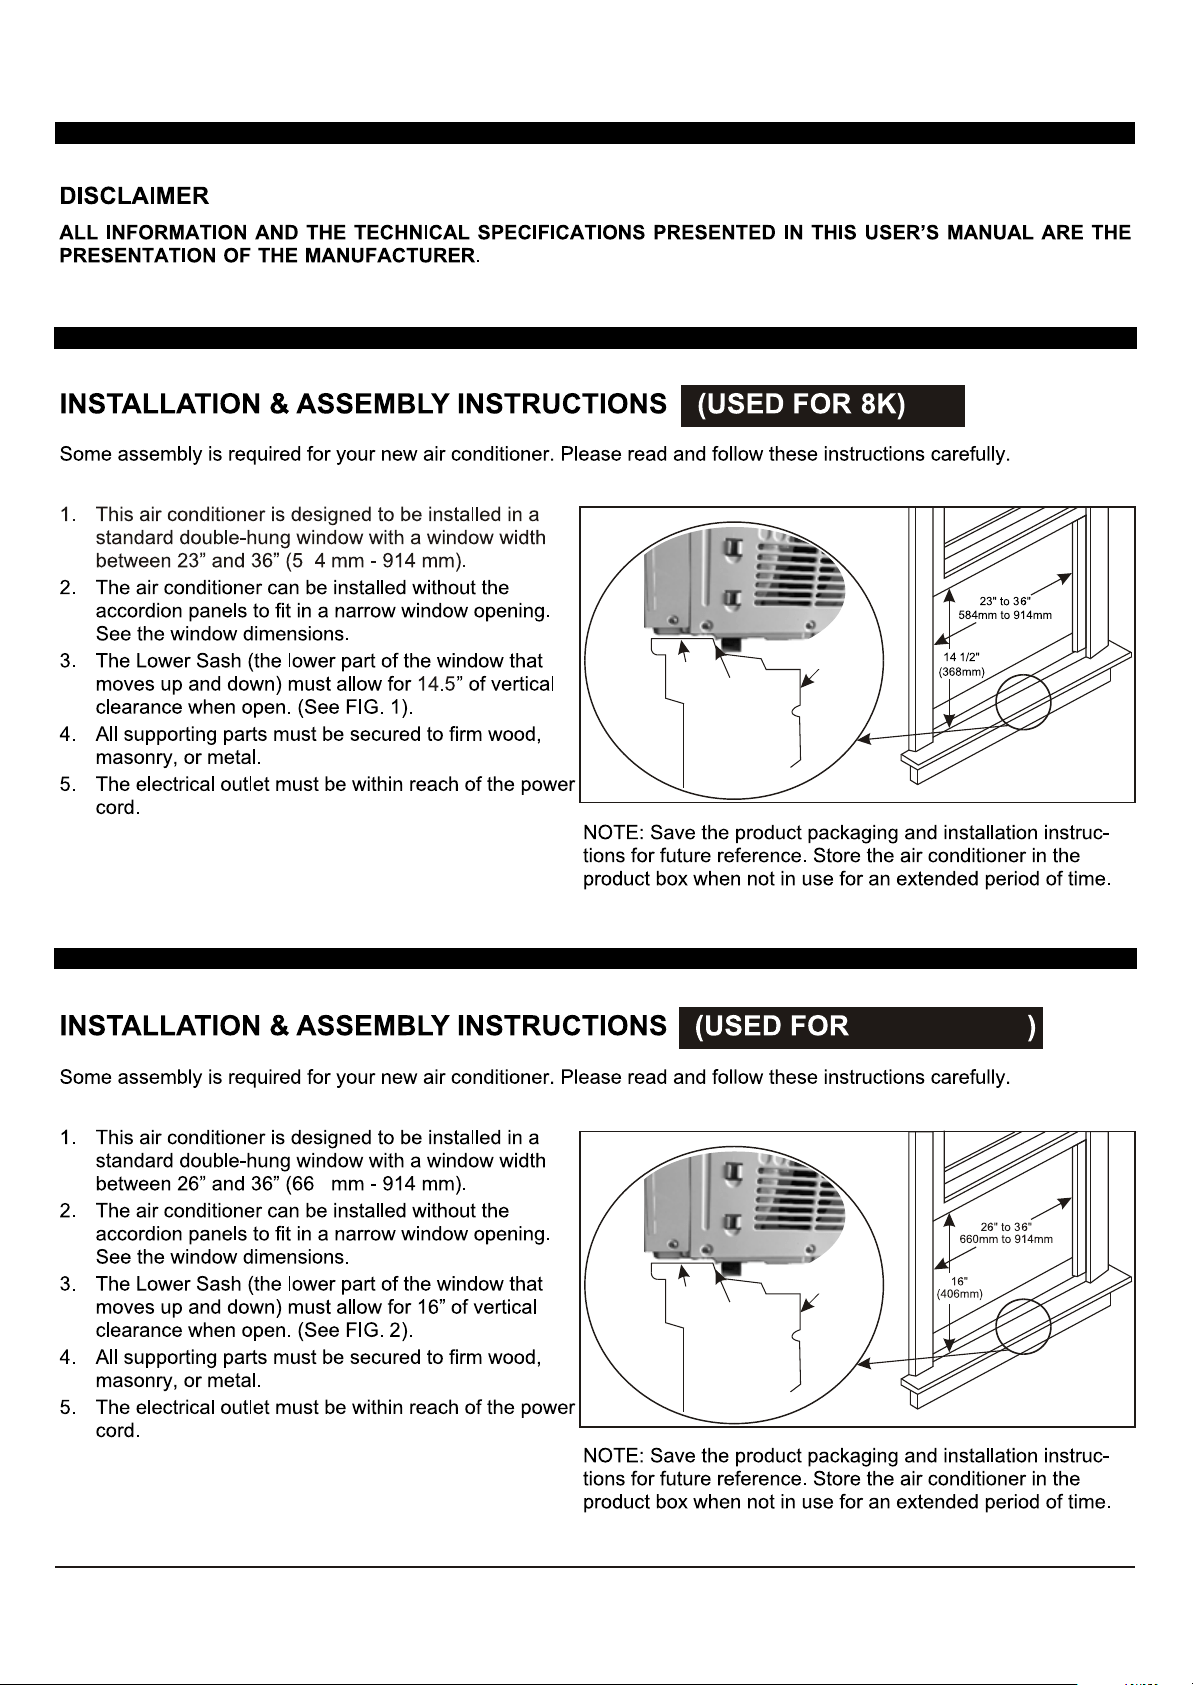
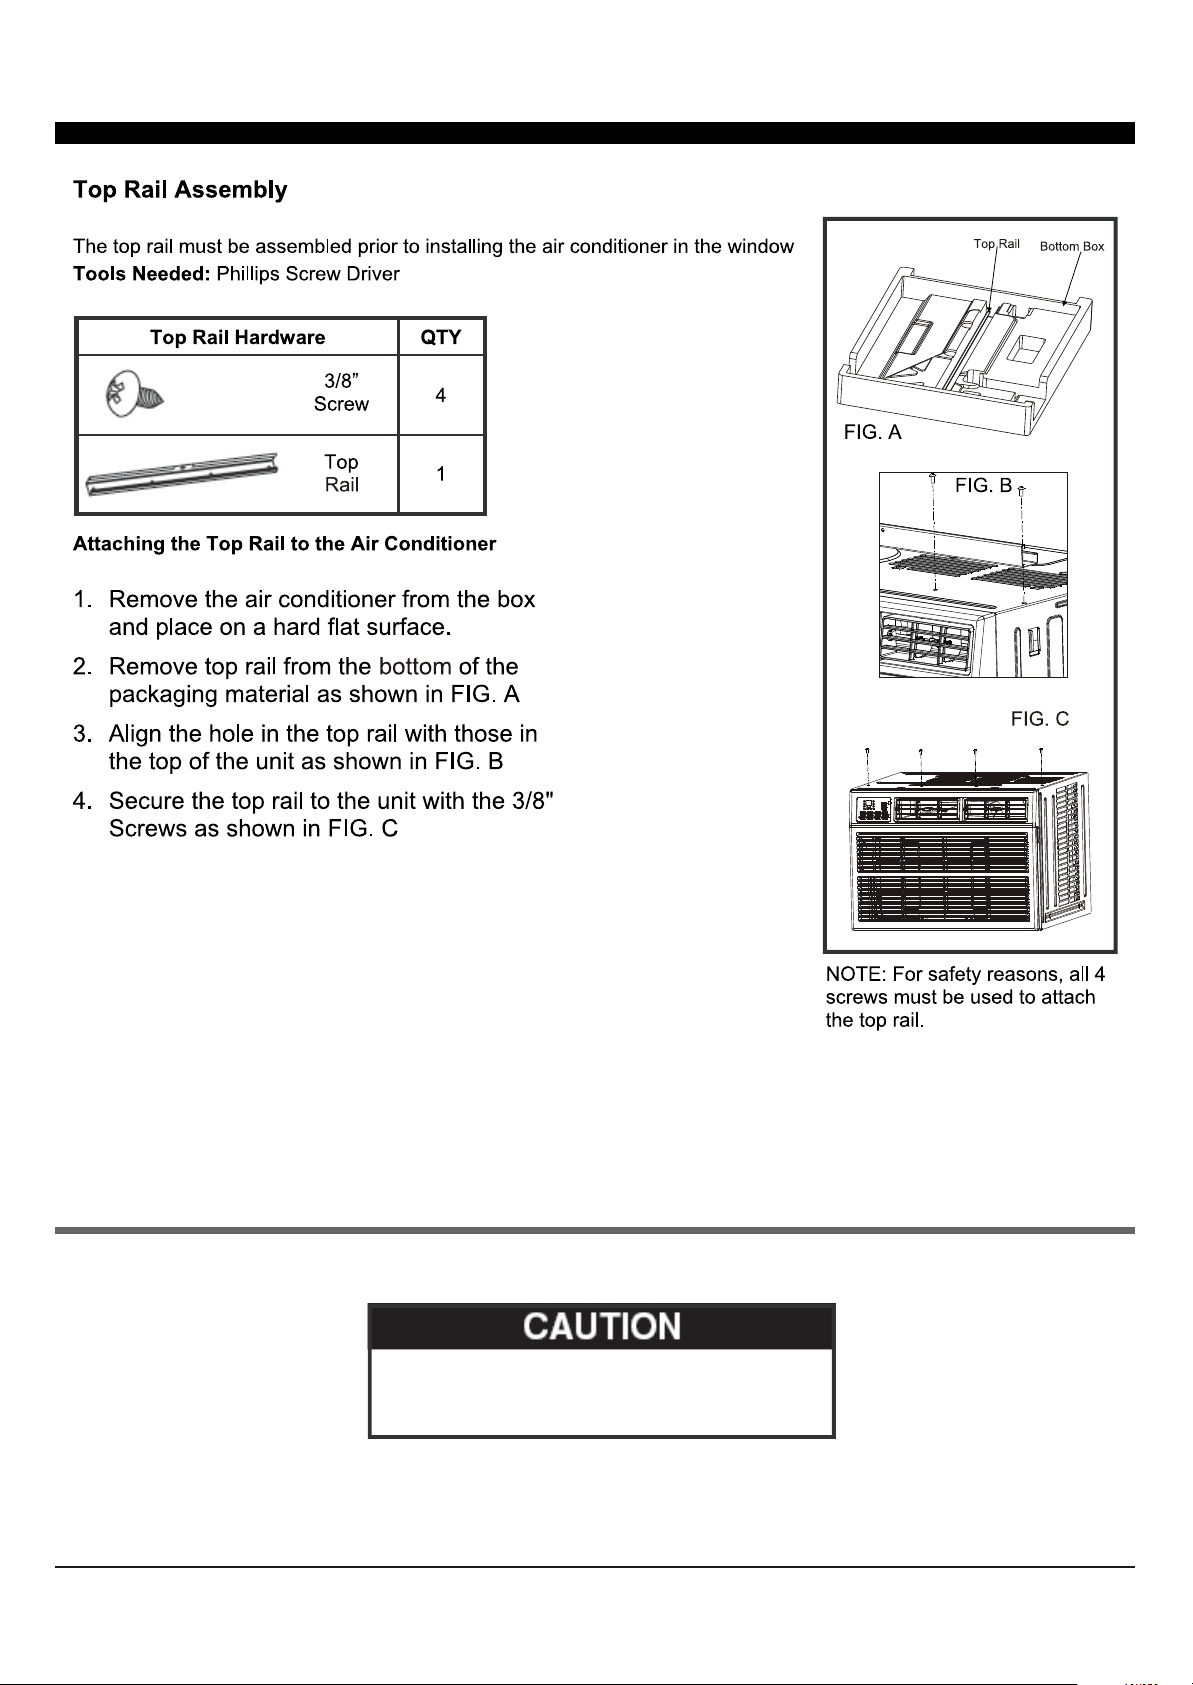
FIG. 1
FIG. 2
0
8
OFFSET
STOOL
SILL
INTERIOR
WALL
EXTERIOR
WALL
OFFSET
STOOL
SILL
INTERIOR
WALL
EXTERIOR
WALL
10K/12K/14K
6. The air conditioner should be tilted about 3° for
better drainage of condensate and rainwater.
6. The air conditioner should be tilted about 3° for
better drainage of condensate and rainwater.
6
(Only used for 6K/8K)
When handling the unit, be careful to avoid
cuts from the sharp metal edges and aluminum
fins on the front and rear coils.
7
FIG. 3
3
FIG. 4
FIG. 5
When handling the unit, be careful to avoid
cuts from the sharp metal edges and aluminum
fins on the front and rear coils.
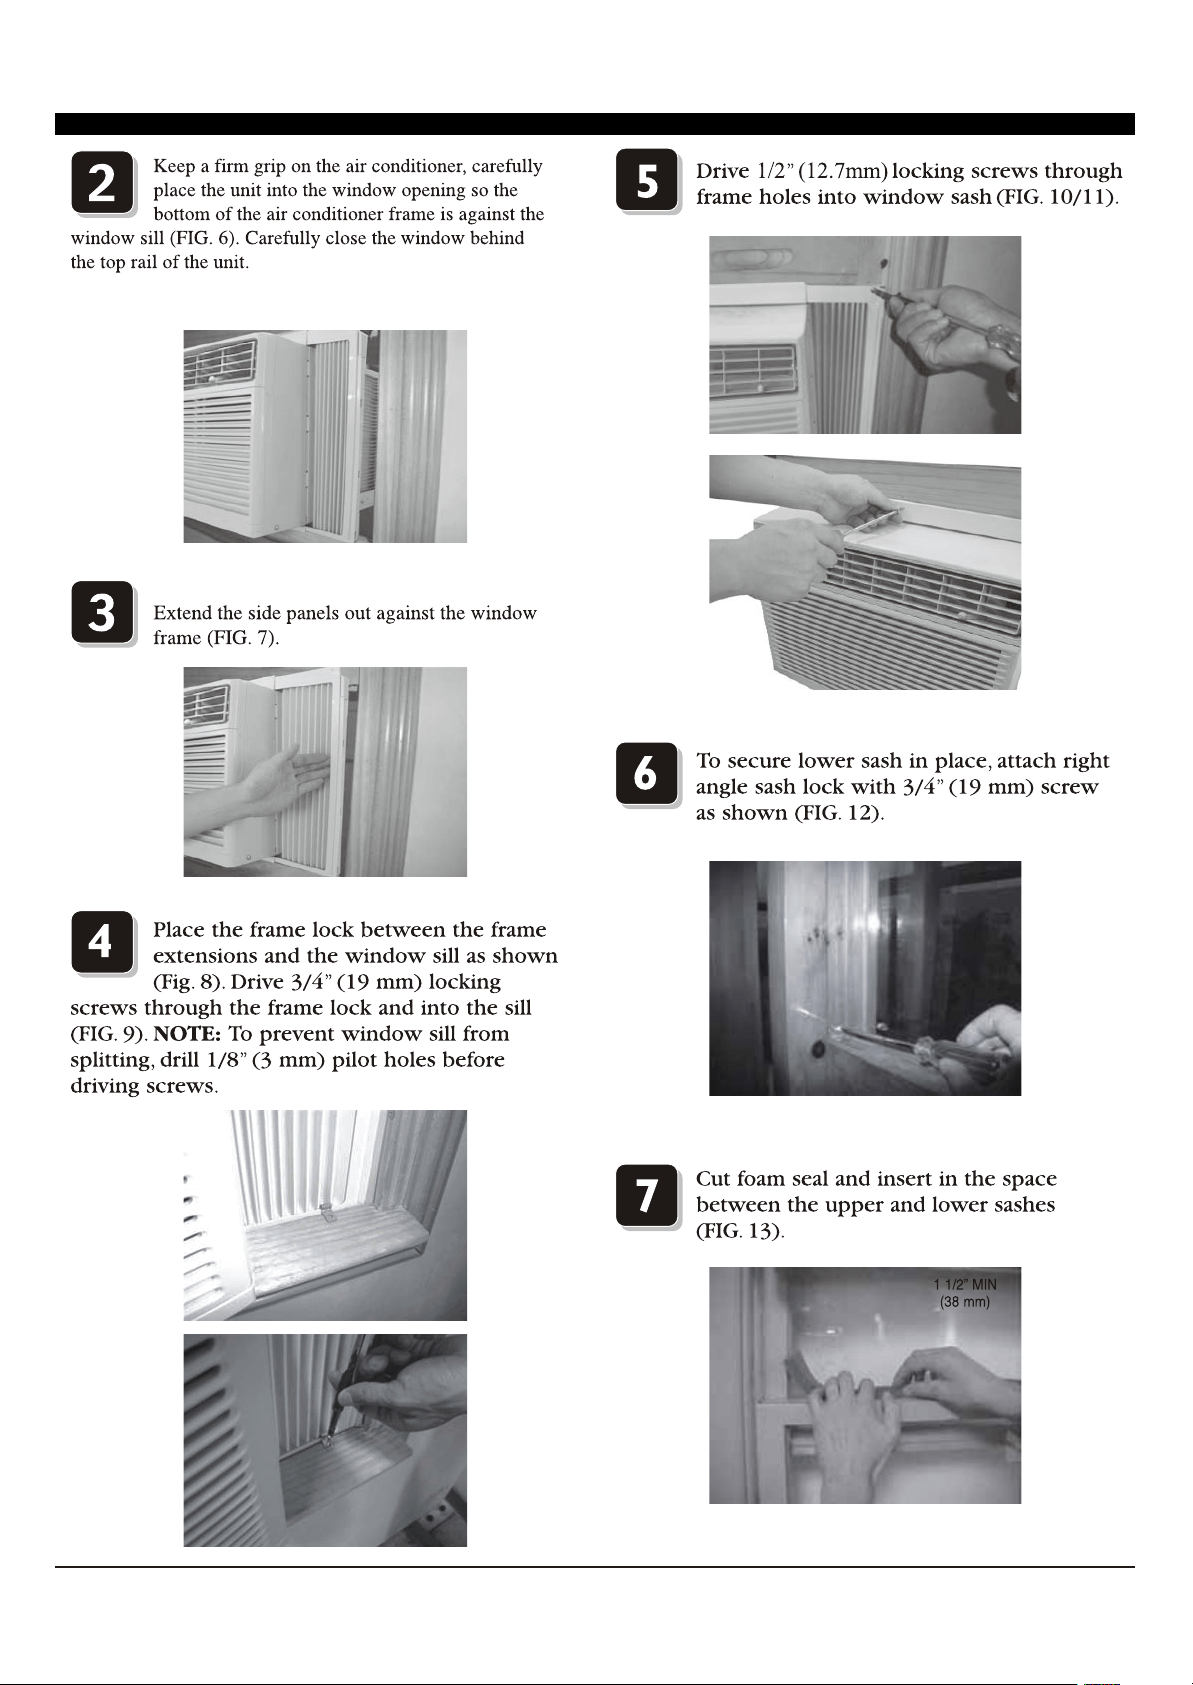
(Suggest to keep a downward
oblique, to let accumulated rain water to drain out,
from back side of the unit bottom.)
FIG. 6
FIG. 7
FIG. 8
FIG. 9
FIG. 10
FIG. 11
FIG. 12
FIG. 13
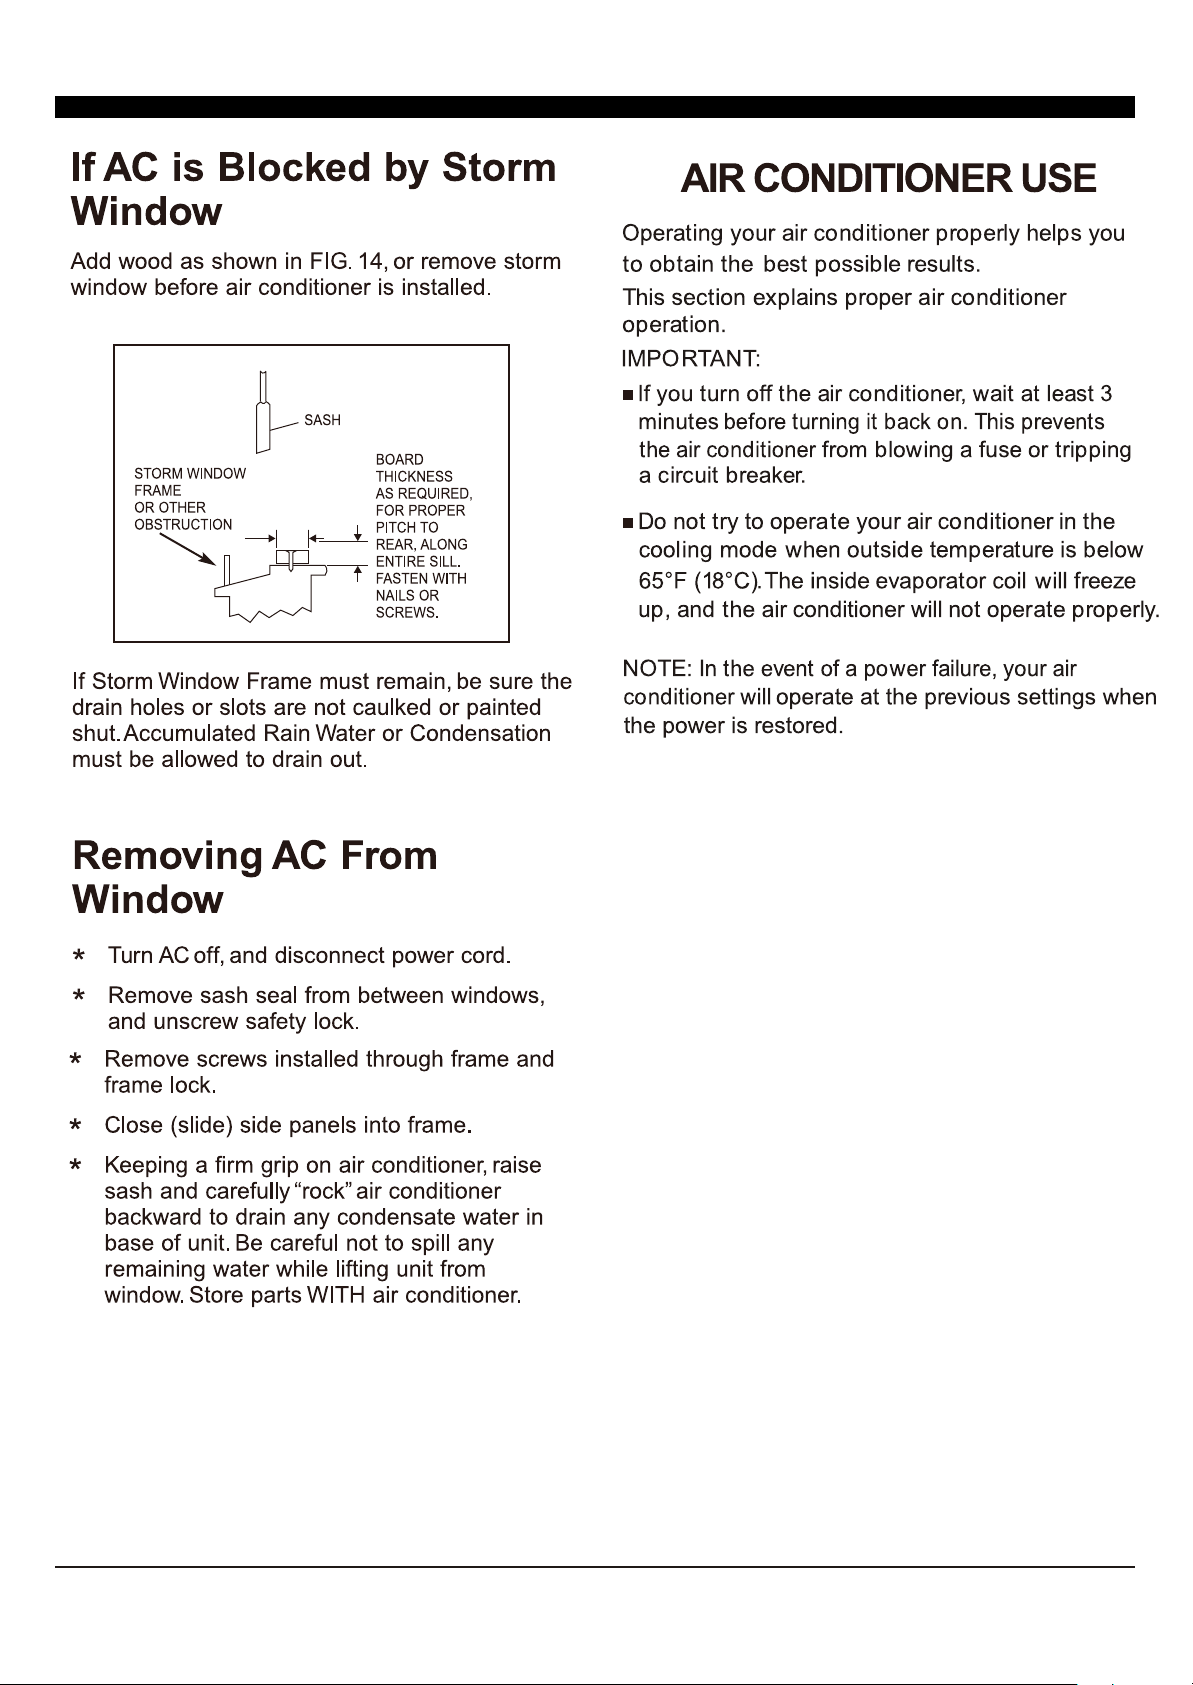
FIG. 14
INSTALLATION & ASSEMBLY INSTRUCTIONS
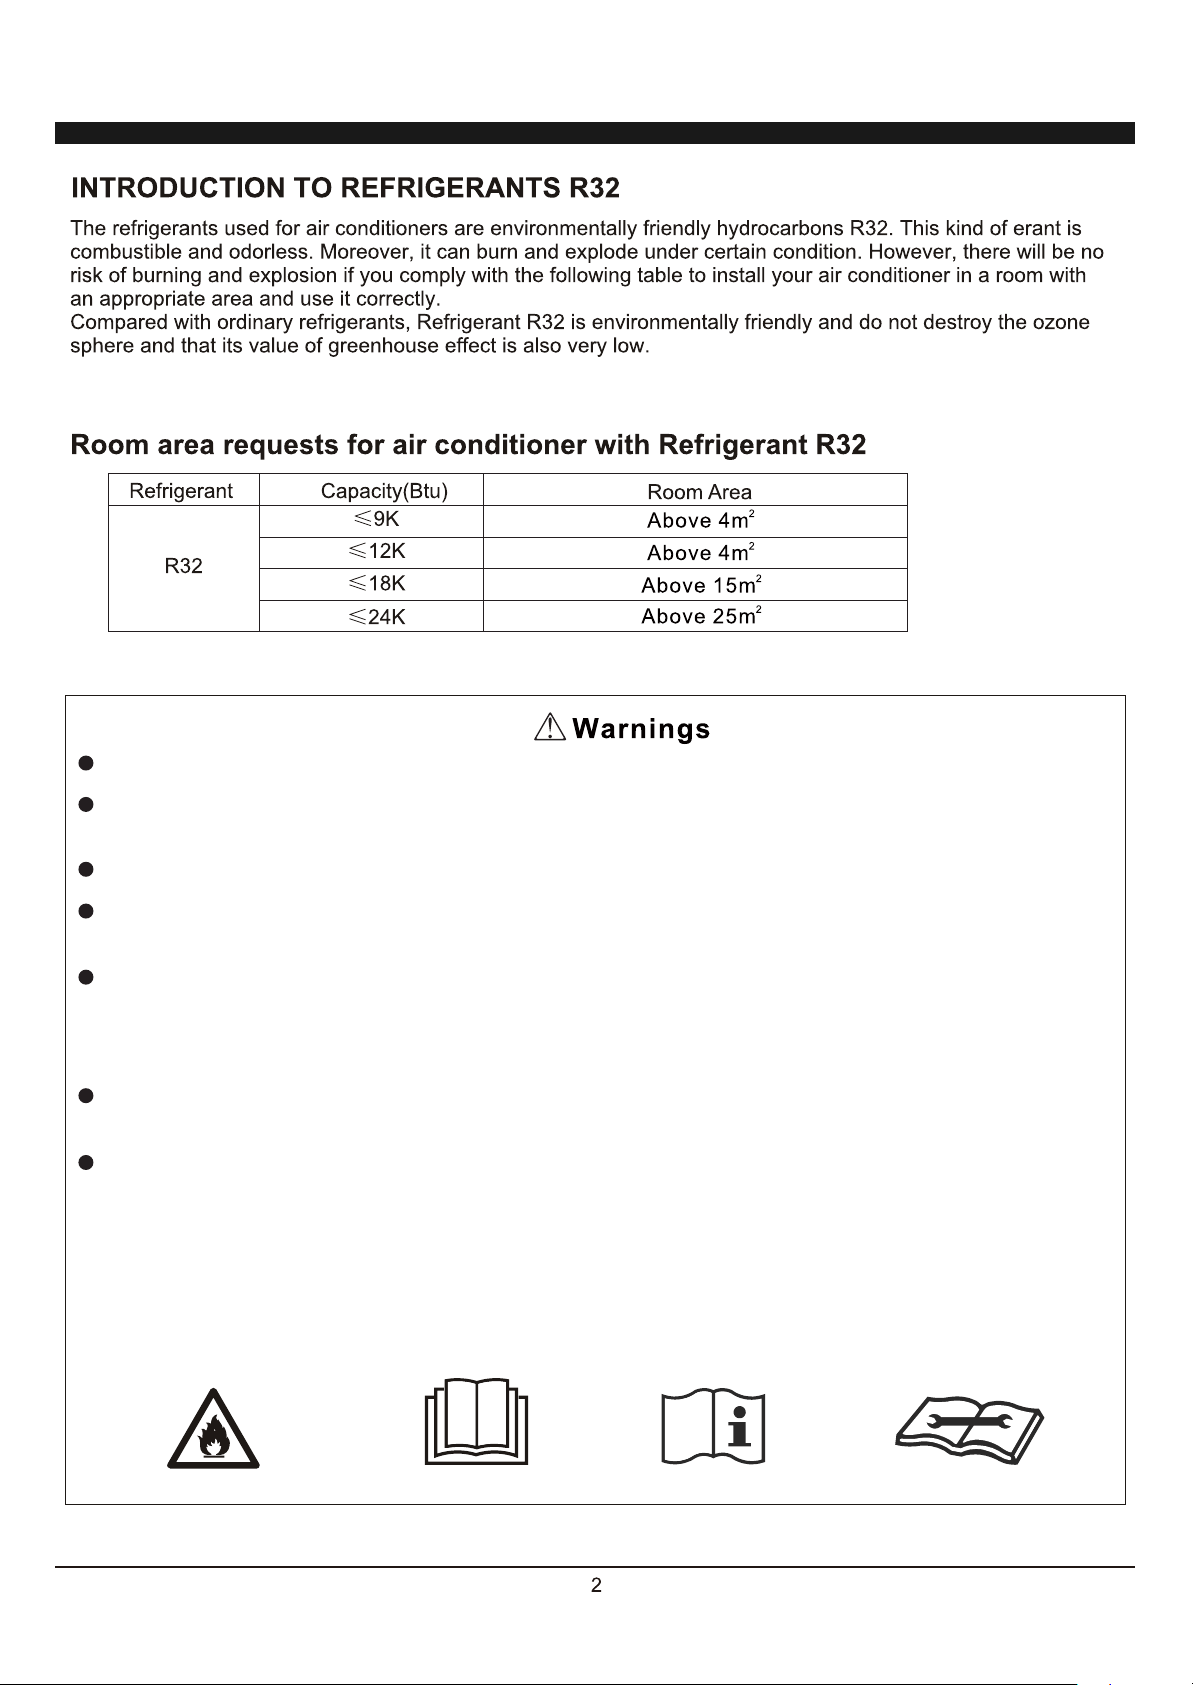
Introduction to Refrigerants R32
Before installing the appliance, you must read the manual carefully to get the safety
information and notes.
When filling the combustible refrigerant, any of your rude operations may cause serious
injury or injuries to human body or bodies and object or objects.
A leak test must be done after the installation is completed.
It is a must to do the safety inspection before maintaining or repairing an air conditioner
using combustible refrigerant in order to ensure that the fire risk is reduced to minimum.
It is necessary to operate the machine under a controlled procedure in order to ensure
that any risk arising from the combustible gas or vapor during the operation is reduced to
minimum.
Requirements for the total weight of filled refrigerant and the area of a room to be equipped
with an air conditioner
1. Site Safety
2. Operation Safety
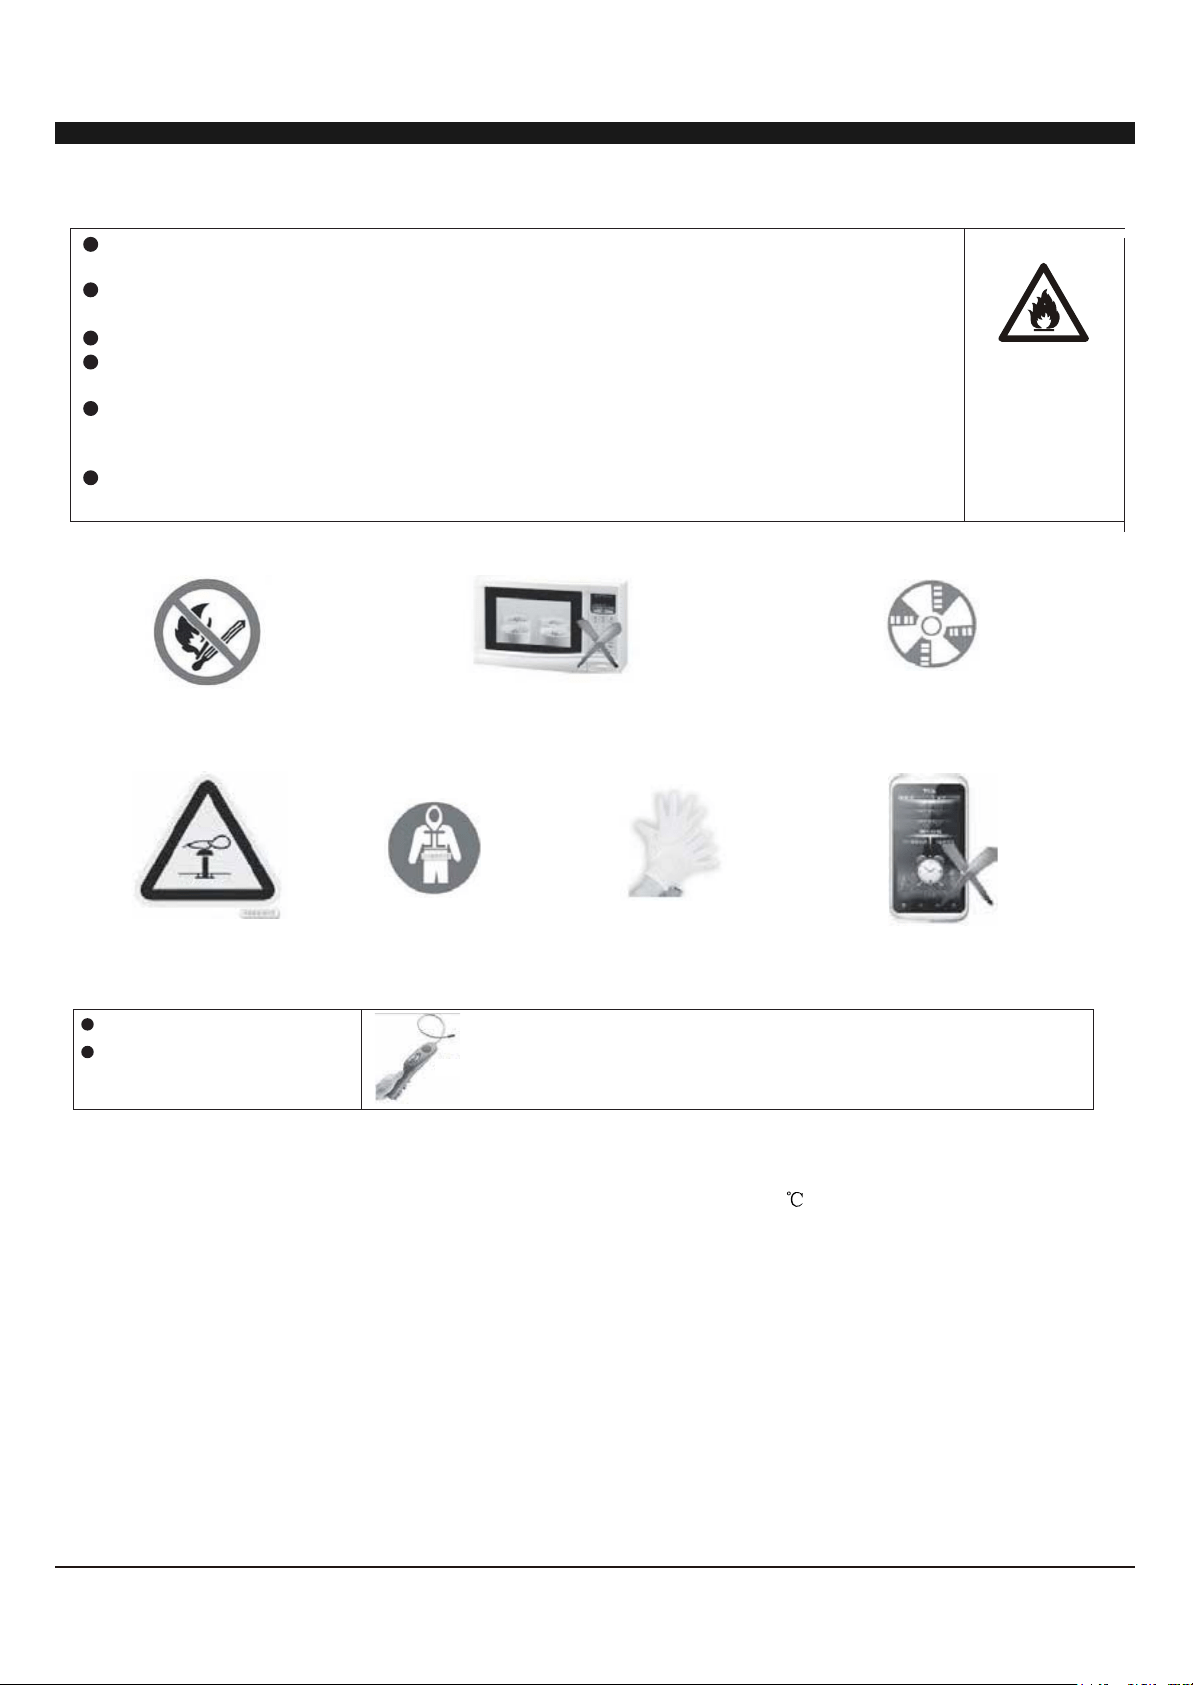
Open Flames Prohibited Ventilation Necessary
Open Flames Prohibited
Mind Static Electricity Must Wear Protective Clothing and anti-static gloves
Don't use mobile phone
3. Installation Safety
Refrigerant Leak Detector
Appropriate Installation Location
The left picture is the schematic diagram of a refrigerant leak detector.
Please note that:
1. The installation site should be in a well-ventilated condition.
2. The sites for installing and maintaining an air conditioner using Refrigerant R32 should be free from open fire
or welding, smoking, drying oven or any other heat source higher than 548 which easily produces open fire.
3. When installing an air conditioner, it is necessary to take appropriate anti-static measures such as wear anti-
static clothing and/or gloves.
4. It is necessary to choose the site convenient for installation or maintenance wherein the air inlets and outlets of
the indoor and outdoor units should be not surrounded by obstacles or close to any heat source or combustible
and/or explosive environment.
5. If the indoor unit suffers refrigerant leak during the installation, all the personnel should go out till the refrigerant
leaks completely for 15 minutes. If the product is damaged, it is a must to carry such damaged product back to
the maintenance station and it is prohibited to weld the refrigerant pipe or conduct other operations on the user's
site.
6. It is necessary to choose the place where the inlet and outlet air of the indoor unit is even.
7. It is necessary to avoid the places where there are other electrical products, power switch plugs and sockets,
kitchen cabinet, bed, sofa and other valuables right under the lines on two sides of the indoor unit, and also
prevent mechanical damage from occurring.
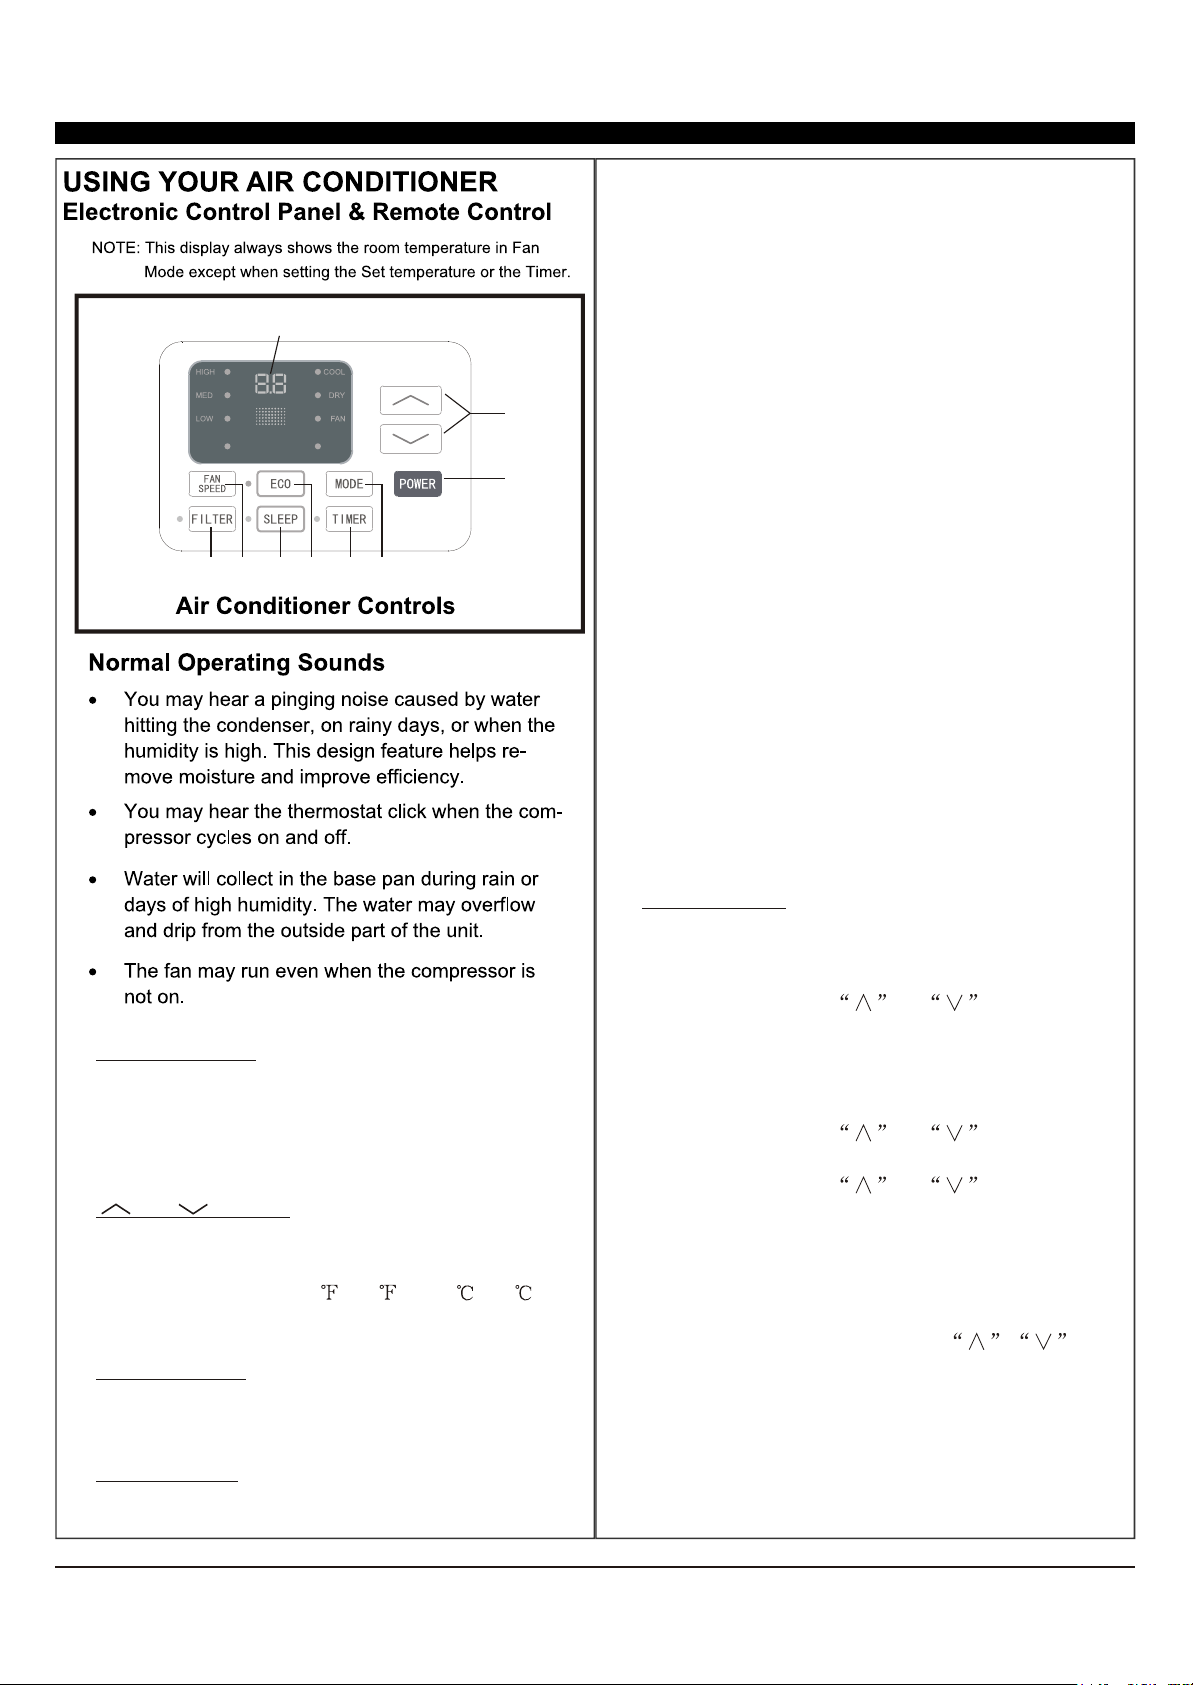
1. Without timer setting,the
operation mode is Cooling,Dry, Fan and Auto,and
the set temperature will be displayed.
Time will be displayed under timer setting.
Digital Display:
and Button:2. Use these buttons on the
control panel and remote to increase or decrease
the Set Temperature or Timer.
Temperature range: 61 ~88 or 16 ~31 .
3. Turn the air conditioner on and
off.
Power Button:
Press the mode button to cycle
through the various modes: Cool, Dry, Fan and
Auto.
4. Mode Button:
Use these buttons on the control
panel and remote to set the Timer.
Timer Off: The timed stop is programmed by
pressing TIMER button. Set the rest time by
pressing the button or until the rest
time displayed is to your demand then press
TIMER button again.
Timer On: When the unit is off, press TIMER
button at the first time, set the temperature with
pressing the button or . Press TIMER
button at the second time, set the rest time with
pressing the button or . Press TIMER
button at the third time, confirm the setting, then
the rest time to next automatical switching-on
could be read on the display of the machine.
Note: It can be set to automatically turn off or on in
0.5-24 hours. Each press of the
buttons will increase or decrease the timer. The
Timer can be set in 0.5 hours increment below 10
hours and 1 hour increment for 10 hours or above.
The SET light will turn on while setting.
To cancel the setted function, press the TIMER
button again.
5. Timer Button:
Cool Mode: The cooling function allows the air
conditioner to cool the room and at the same time
reduces Air humidify. Press the MODE button to
activate the cooling function. To optimize the
function of the air conditioner, adjust the
temperature and the speed by pressing the button
indicated.
Dry Mode: This function reduces the humidity of
the air to make the room more comfortable. Press
MODE button to set the DRY mode. An automatic
function of alternating cooling cycles and air fan
is activated.
Fan Mode: The conditioner works in only
ventilation. Press MODE button to set the FAN
mode. With pressing FAN SPEED button the
speed changes in the following sequence: Hi, Med
and Lo in FAN mode. The remote control also
stories the speed that was set in the previous
mode of operation.
Auto Mode: In AUTO mode the unit automatically
chooses the fan speed and the mode of operation
(COOL,or FAN).In this mode the fan speed
and the temperature are set automatically
according to the room temperature (tested by
the temperature sensor which is incorporated
in the indoor unit.).
1
2
3
456789
AUTO
SPEED
AUTO
MODE
7. Sleep Button:
Press the FAN SPEED button
to choose the fan speed options. You can choose
Hi, Med, Lo or auto speed in COOL mode and
choose Hi, Med, Lo in FAN mode.
8. Fan Speed Button:
9.
When the Filter Check light is off,
it is not necessary t o press the Filter Check button.
When the Filter Check light is on, you can turn off
the light by pressing the Filter Check button. After
the fan motor works for 500 total hours, the Filter
Check light will turn on to remind the user to clean
the filter.
Filter Button:
Press the SLEEP button, all of the
display lights will turn off after a while, but the
Sleep light is always on. In SLEEP mode, the air
conditioner will automatically adjust the
temperature and fan speed to make the room
more comfortable during the night. The set
temperature will automatically raise every 30-60
minutes, and at most change six times until the
set temperature will automatically raise or
decrease based on the room temperature and the
duration of sleep.
When the unit is in ECO mode, the
light will turn on. In ECO mode, the unit will
turn off once the room is cooled to the userset
temperature.
The unit will turn back on when the room
temperature rises above the userset temperature.
Before the compressor starts, the fan motor will
run for a while, then it will stop for a while, and will
repeat to provide a much more comfortable feeling
and save energy.
6. Eco Button:
10.
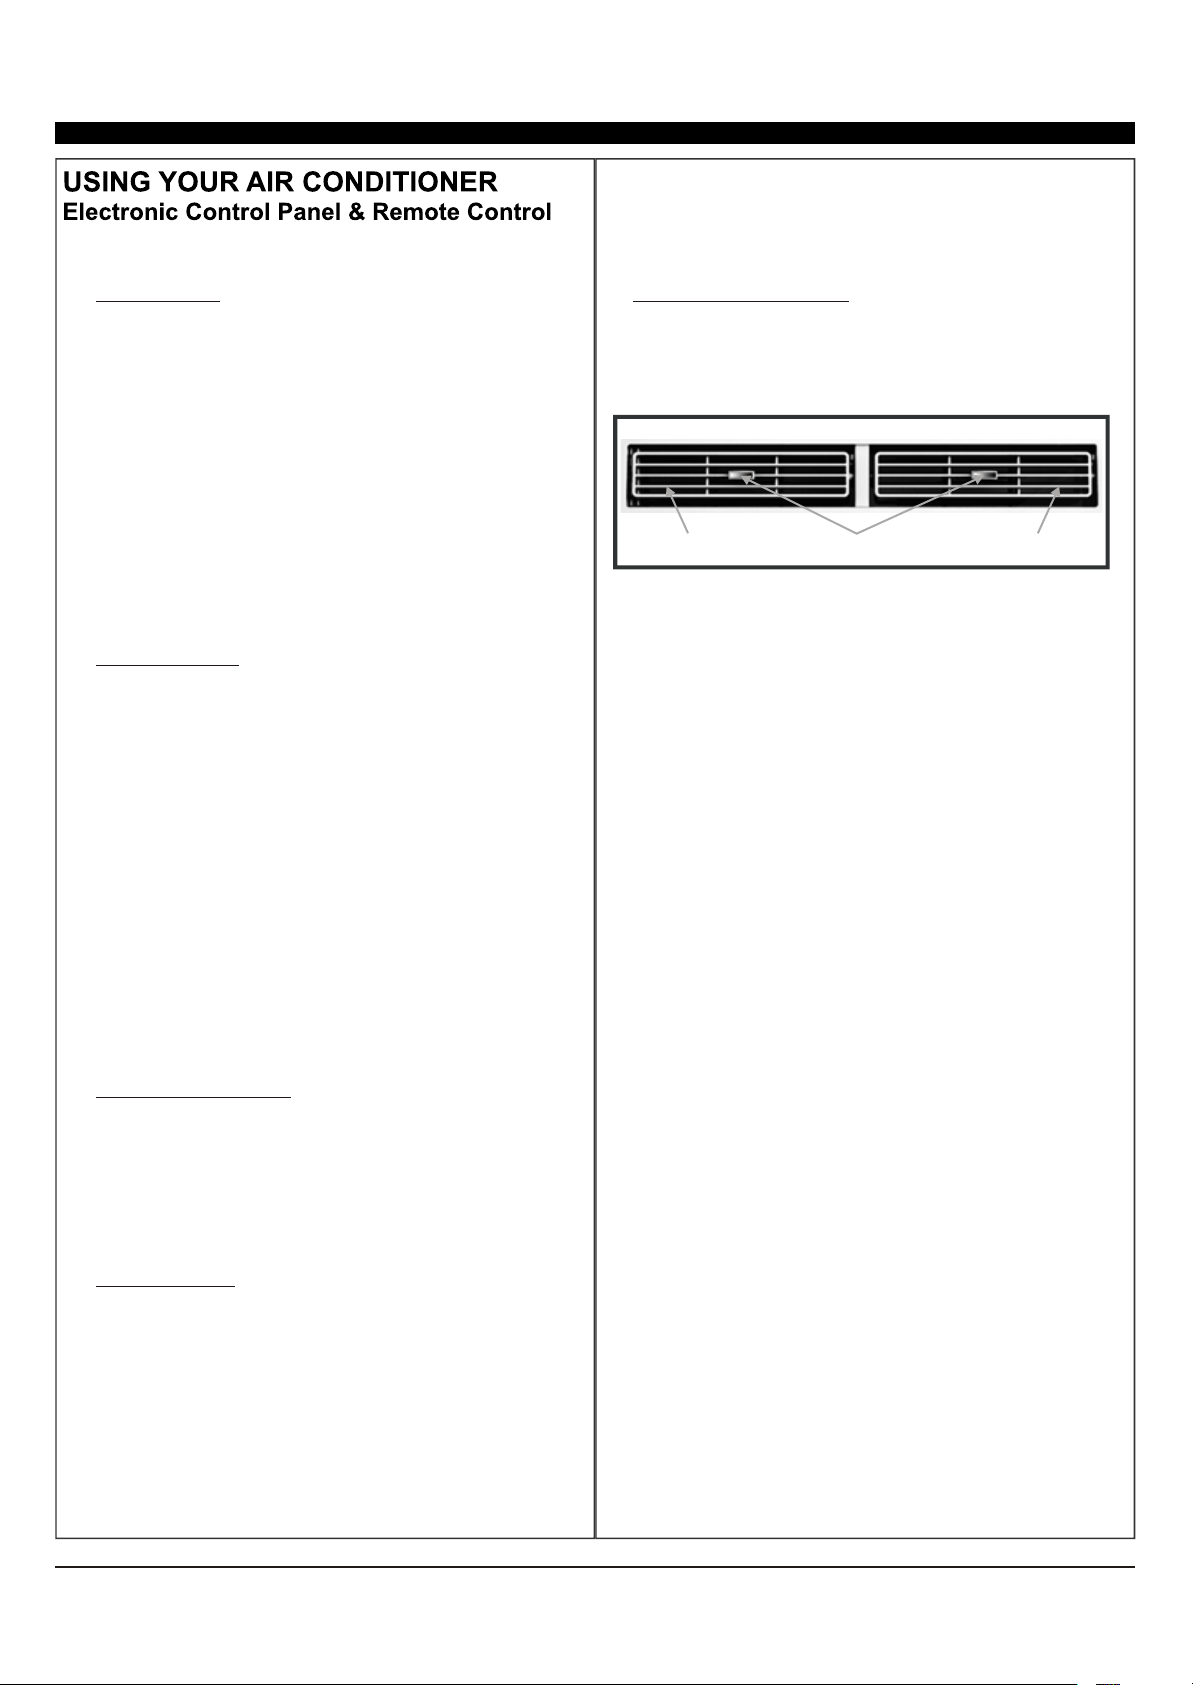
To direct the airflow,
horizontal wheel to control the horizontal
direction, control the
vertical direction.
use the
and use the air deflectors to
Directional Louvers:
horizontal wheelair deflector air deflector
Do not mix alkaline, standard (carbon-zinc), or rechargeable batteries.
temperature will automatically raise or decrease
based on the room temperature and the duration
of sleep.
1
FIG. 15
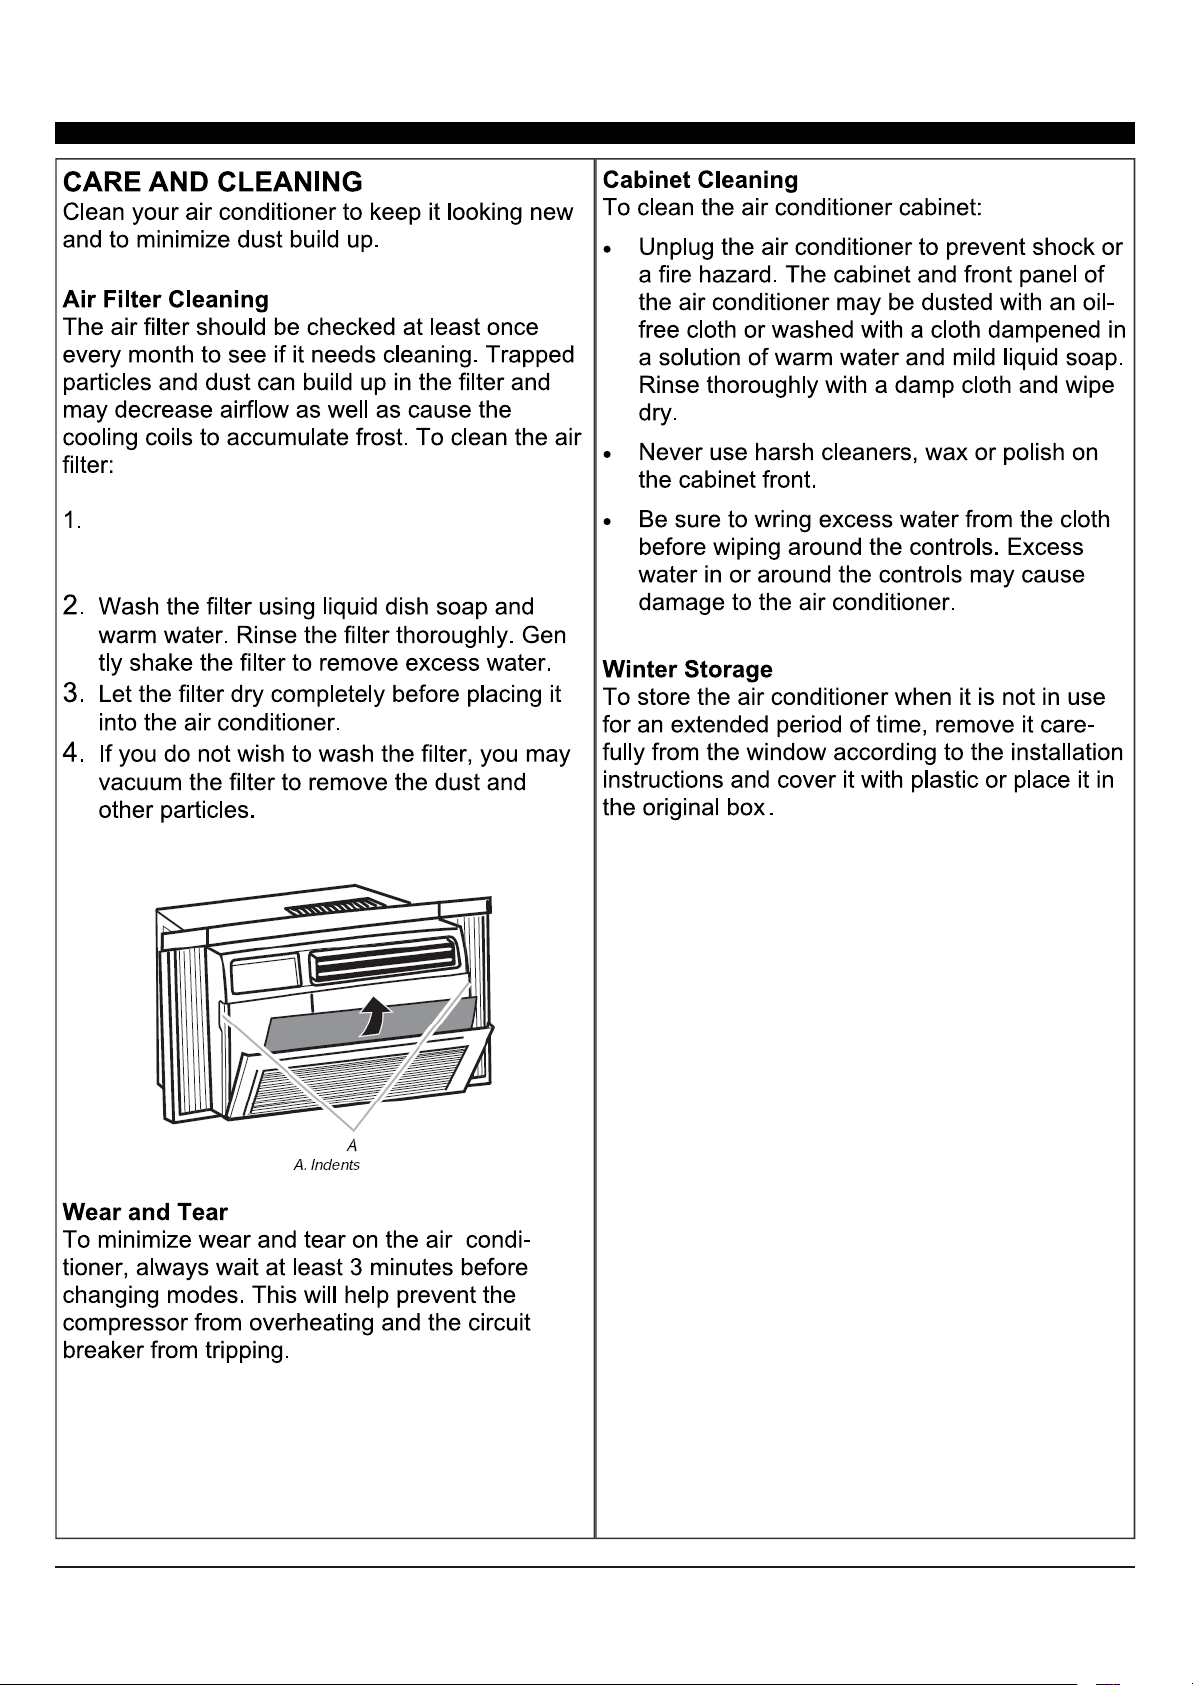
Take off the power plug, then remove the
filter by sliding it out from the front right
side of the air conditioner. (See Fig .15)
1
1
Display dr and unit
without control
The air conditioner is under demand
response, only turn ON/OFF can be
actived, and the set temperature may
raise, and the compressor may stop
It is the demand response
condition, you can wait for the
Delay time or override it by long
press down button for 3s on the
control panel.