VE-DWVFI
Dishwasher / User Manual
EN

CONTENTS
1.
IMPORTANT SAFETY INSTRUCTIONS ..........................................................................3
2.RECYCLING......................................................................................................................6
3. INSTALLATION ....................................................................................... .........................8
4.1.General Appearance......................................................................................................9
4.2.Technical Specifications ................................................................................................9
4.TECHNICAL SPECIFICATIONS .......................................................................................9
5.1. Preparing your Dishwasher for first use ......................................................................10
5.4. Salt refill indicator......................................................................................................14
5.3.Filling the Dishwasher Salt Dispenser ..........................................................................13
5.6. Filling the Detergent ............................................................................................14
5.7. Using combined detergents ........................................................................................15
5.8. Rinse-aid usage .................................................................................................... .......6
5.9. Filling the rinse-aid and setting ....................................................................................16
6.LOADING YOUR DISHWASHER ................................................................................... .17
6.1. Lower rack ..............................................................................................................19
7.PROGRAM TABLE .................................................................................................... .......27
8.THE CONTROL PANEL .................................................................................................. .29
8.1. KEYS ............................................................................................................................30
8.2. PREPARING THE MACHINE .......................................................................................30
8.3. SELECTION..........................................................................................30
5.5. Detergent usage ..................................................................................................4
5.BEFORE USING THE APPLIANCE .......................................................................... .....10
5.2.Setting the Water softener ............................................................................................11
6.2. Incorrect Loads................................................................................................21

9.CLEANING AND MAINTENANCE .................................................................................35
9.1. Cleaning the Machine and Filters ................................................................................36
9.2. Spray Arms ..................................................................................................................36
10. TROUBLESHOOTING .................................................................................................39
11.PRACTICAL INFORMATION ........................................................................................ 41

Thank you for choosing this product.
This User Manual contains important information on safety and
instructions intended to assist you in the operation and
maintenance of your appliance.
Please take the time to read this User Manual before using
your appliance and keep this book for future reference.
Icon Type Meaning
WARNING
RISK OF ELECTRIC SHOCK
FIRE
CAUTION
IMPORTANT / NOTE

INTRODUCTION
WARNING:
CAUTION:
NOTICE:

1. IMPORTANT SAFETY INSTRUCTIONS
WARNING:
The manufacturer disclaims responsibility for
damage or injury caused by improper use of this appliance.
1) L
2) L
3

•
•
WARNING:
program
program
4

WARNING:
RISK OF INJURY:
5

2.
RECYCLING
6

SAVE THESE INSTRUCTIONS
7
WARNING!:
Risk of injury or suocation!

3. INSTALLATION
WARNING:
WARNING:
8
4. TECHNICAL SPECIFICATIONS
13
4.2 Technical specifications
Load
capacity
oad
14 place
settings
Permissible
water
pressure
43.5-145psi
(0.3 - 10
bars)
Electrical
connection
120 V
(volts), 12
A (amps),
60Hz
(hertz)
Total power 1400(W)
Heater
power
1100 W
(watts)
NOTICE: Because we continually strive to
improve our products, we may change our
specifications and design without prior
notice. This device corresponds to the
following directives:
UL 749 Household Dishwasher directive.
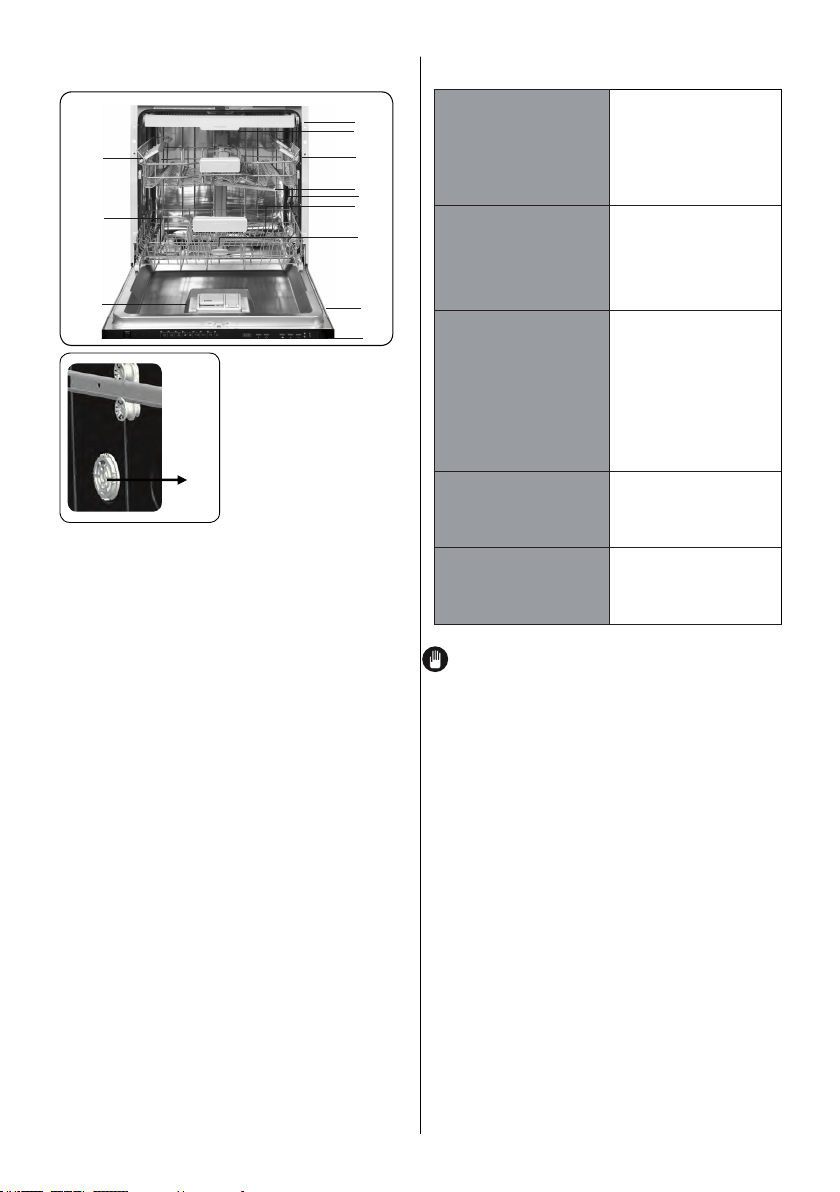
4.1. General appearance
9
1.
2.
3.
Upper basket with racks
Upper spray arm
Lower basket
5.
6. Top nozzle( Model Depending)
4.
7. Filters
8. Rating plate
9. Control panel
10. Detergent and rinse-aid dispenser
11. Salt dispenser( Model Depending)
12.
13.
Upper basket track latch
Drying Unit: This system provides
better
drying performance for your dishes.
Lower spray arm
3 basket( Model Depending)
rd
10
12
11
1
2
3
4
5
7
6
8
9

10
5.BEFORE USING THE APPLIANCE
5.1 Preparing your Dishwasher for first use
.
See chapter of setting the water softener)
Set the rinse aid dosage ( See chapter of filling the rinse-aid and setting)
filling the dishwasher salt dispenser
See chapter of filling the rinse aid and setting
Place the dishes in accordance with the instructions in the user manual.
Sof
fillingd)
program
CAUTION:
WARNING:
CAUTION:
5.2. Setting the Water Softener ( Model Depending)
°f
9 °f
inactive)
WARNING:
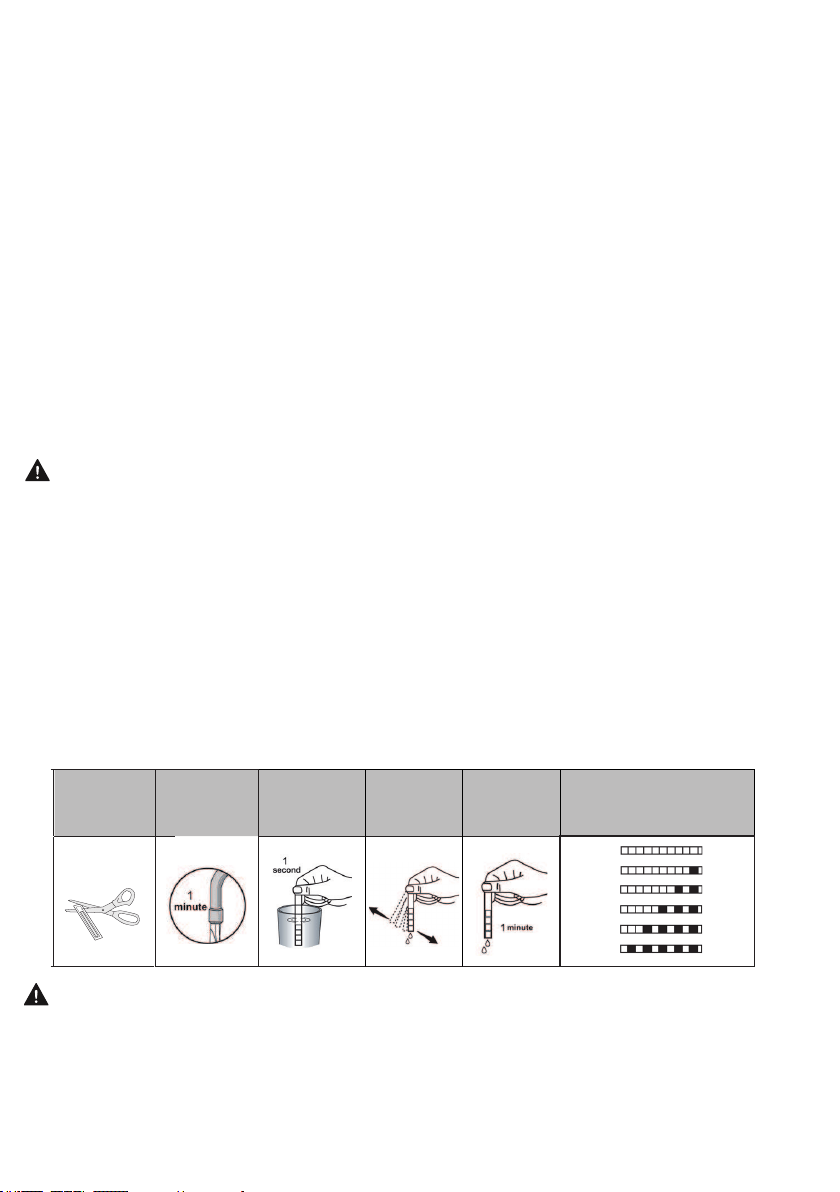
Test Strip(If available)
WARNING:9 °f
11
Run water
through tap
(1min.)
Keep the
strip in
water (1sec)
Shake the
strip.
Wait
(1min.)
Set the hardness level of
your machine.
1
2
3
4
5
6

Water Hardness Table
Level German °dH
French
°f
British
°E
Indicator
1
NOTE:
NOTE:
SALT INDICATOR
Please check the salt indicator on the control panel to see whether there is
adequate amount of softening salt in the dishwasher or not. You need to refill the salt
reservoir with salt whenever salt warning indicator appears on the control panel of your
machine.
In order to add salt to the machine,
1. Open the door of the machine,
2. Press and hold Start/Pause + On/Off key for 3 seconds,
3. The machine gives an audible warning when it is ON,
4. Then, press and program Selection + Cancel key until “SL” is represented on
the display,
5. The amount of Salt is adjusted by pressing program Selection + Cancel key,
6. After the adjustment,
turn off (by pressing Start/Pause + On/Off key) the
machine to save the selected salt amount.
1
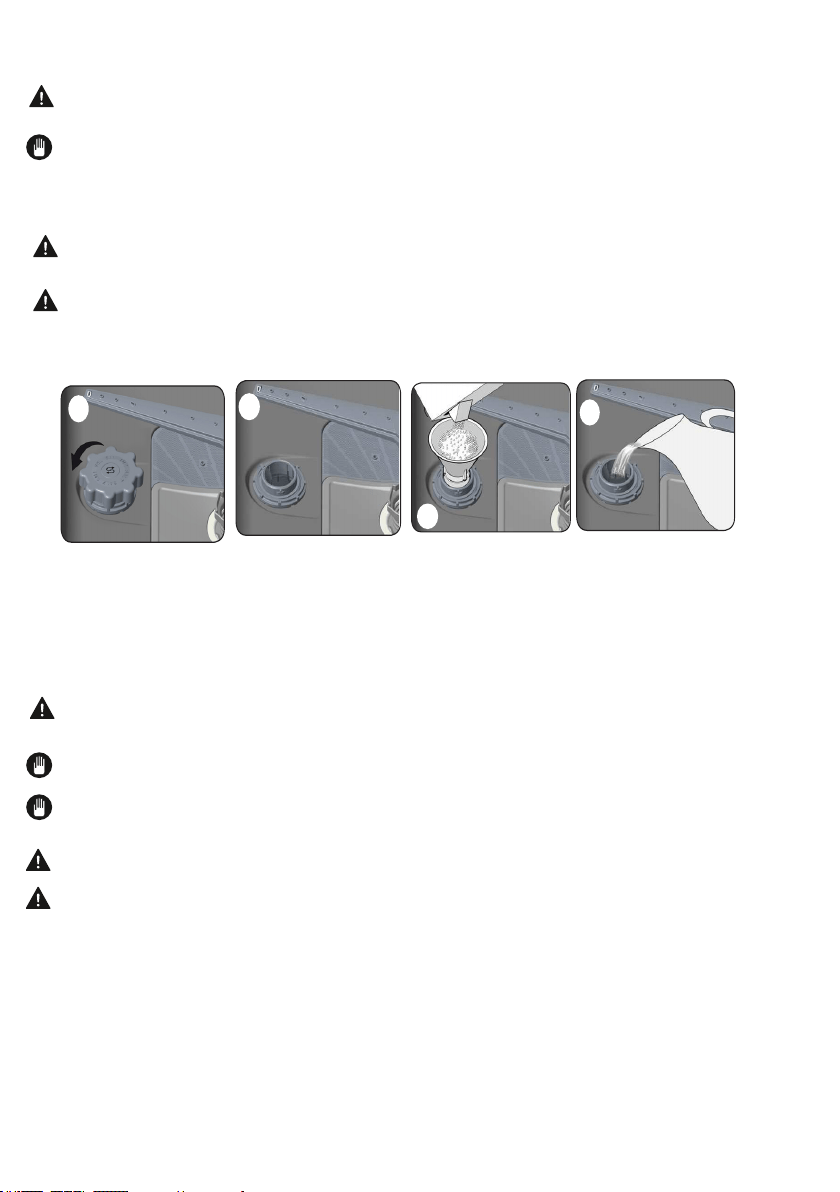
5.3 Filling the Dishwasher Salt Dispenser ( Model Depending)
WARNING:
e.
NOTE
e
WARNING:
WARNING:°f
1.
2. dd
3.
1
2
SALT
4
3
WARNING:program
NOTE:
NOTE:illuminates
WARNING
WARNING:
13

5.4. Salt Refill Indicator (Model Depending)
WARNING:program
program
NOTE:
°f
5.5. Detergent usage
WARNING:
program
NOTE:
does not
WARNING:
WARNING:
WARNING:
tablets
.
WARNING
program
5.6. Filling the Detergent
NOTE:program
14
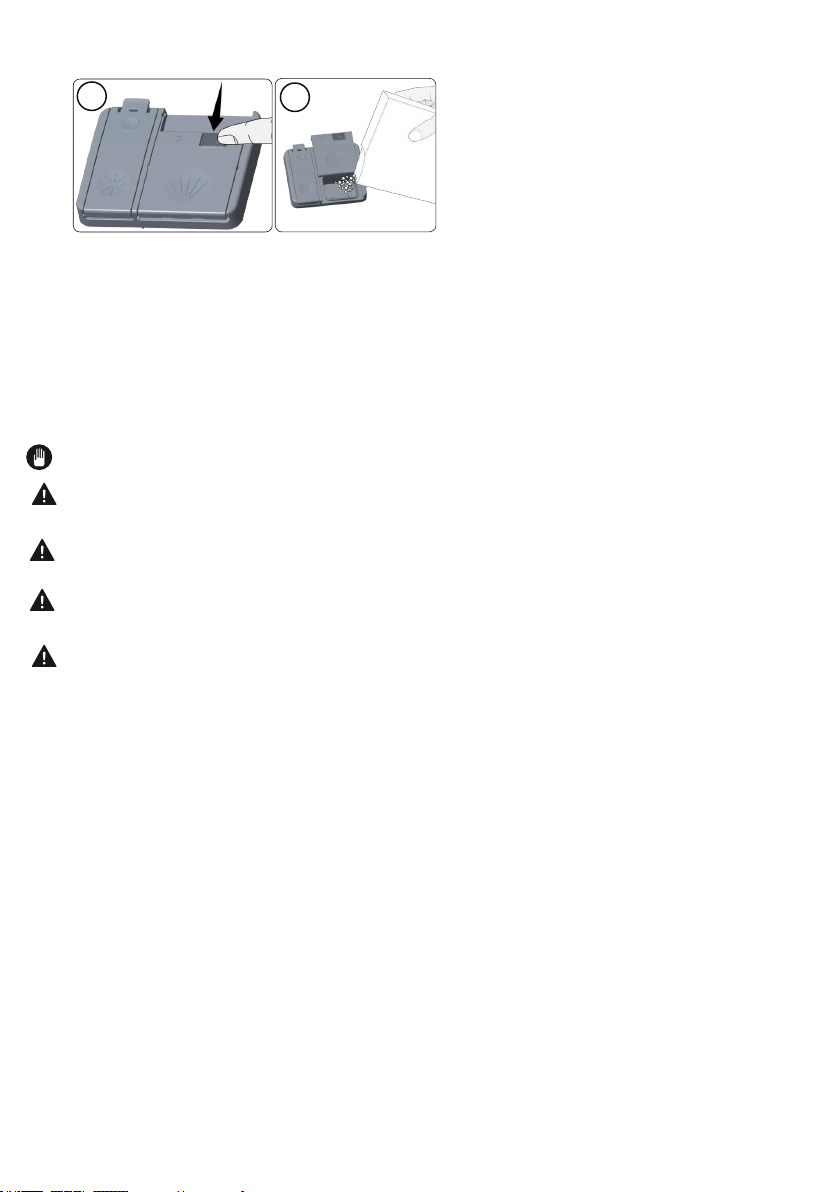
2.
3.
cm
cm
cm
4. e
NOTE: .
WARNING:
WARNING:
WARNING:
WARNING:
5.7. Using combined detergents
Points to consider when using this type of products:
DETERGENT
1
2
15
3
3
3

Recommended usage:
rinse aid
CAUTION:
Warning:
When you give up using combined detergents
•
•
•
•
5.8.Rinse-aid usage
NOTE:
5.9 Filling the rinse-aid and setting
16
NOTE:
6. LOADING YOUR DISHWASHER
WARNING:
NOTE:
WARNING:
NOTE:
Level Brightener Dose Indicator
1
1) p
2)
3)
program
In order to change the rinse aid level, follow the below steps before turning on the
machine
In order to add rinse aid to the machine,
1. Open the door of the machine,
2. Press and hold Start/Pause + On/Off key for 3 seconds,
3. The machine gives an audible warning when it is ON,
4. Then, press and hold program Selection + Cancel key until “rA” is represented on
the display,
5. The amount of rinse aid is adjusted by pressing program Selection + Cancel key,
6. After the adjustment, turn off (by pressing Start/Pause + On/Off key) the machine
to save the selected rinse aid amount
17
18
NOTE: Dishes and cutlery should not be placed above each other.
NOTE: Do not overload your dishwasher and pay attention to manufacturer instructions
regarding dishes which are appropriate for use in a dishwasher. Only with suitable dishes
(mentioned in section 5) will you obtain optimal washing results with a sensible use of
energy
High temperature water and dishwasher detergent may form a chemical synthesis that can
damage certain items.
WARNING: Be careful when loading and unloading sharp items. Load sharp knives with
the handles up to reduce the risk of personal injury.
Follow the below steps before loading dishwasher.
1. Open the door
2. Remove coarse food leftovers from tableware.
3. Load the dishwasher.
NOTE: While the appliance is running if you open the door all functions are automatically
interrupted. Once the door is closed functions will continue to work.
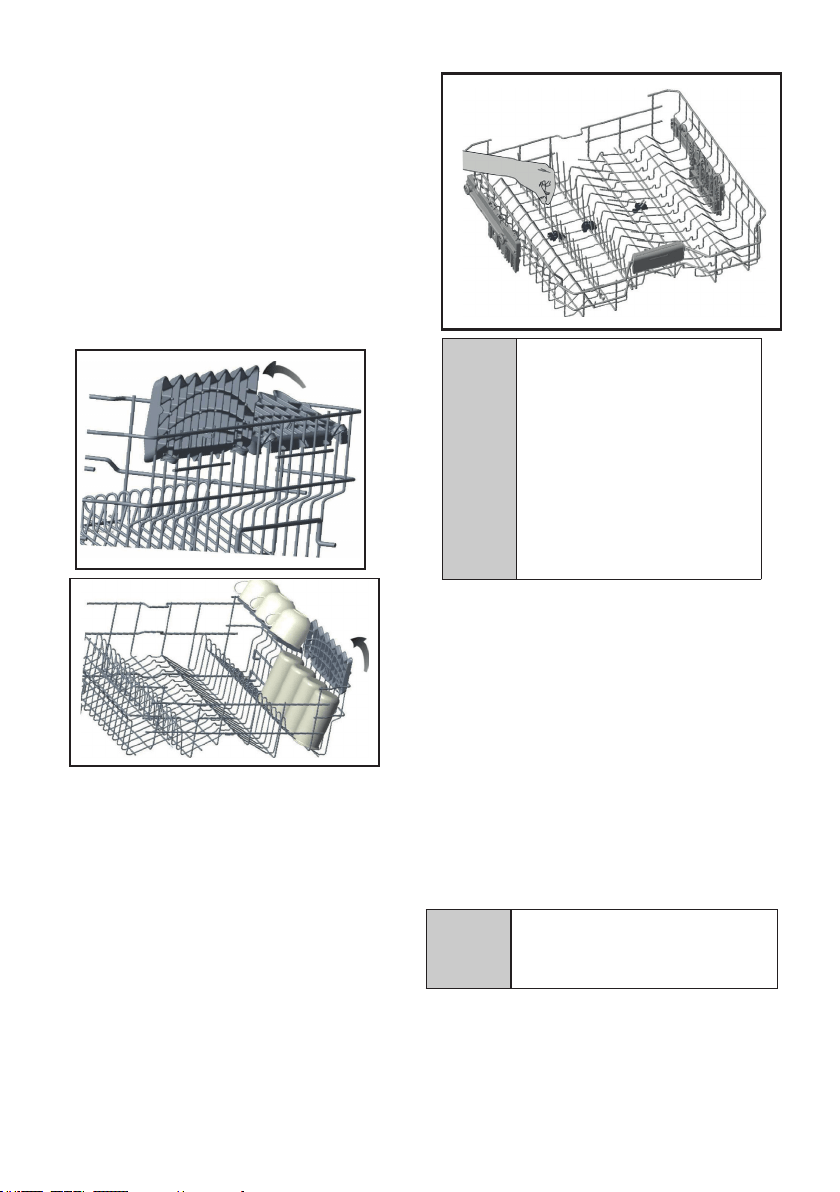
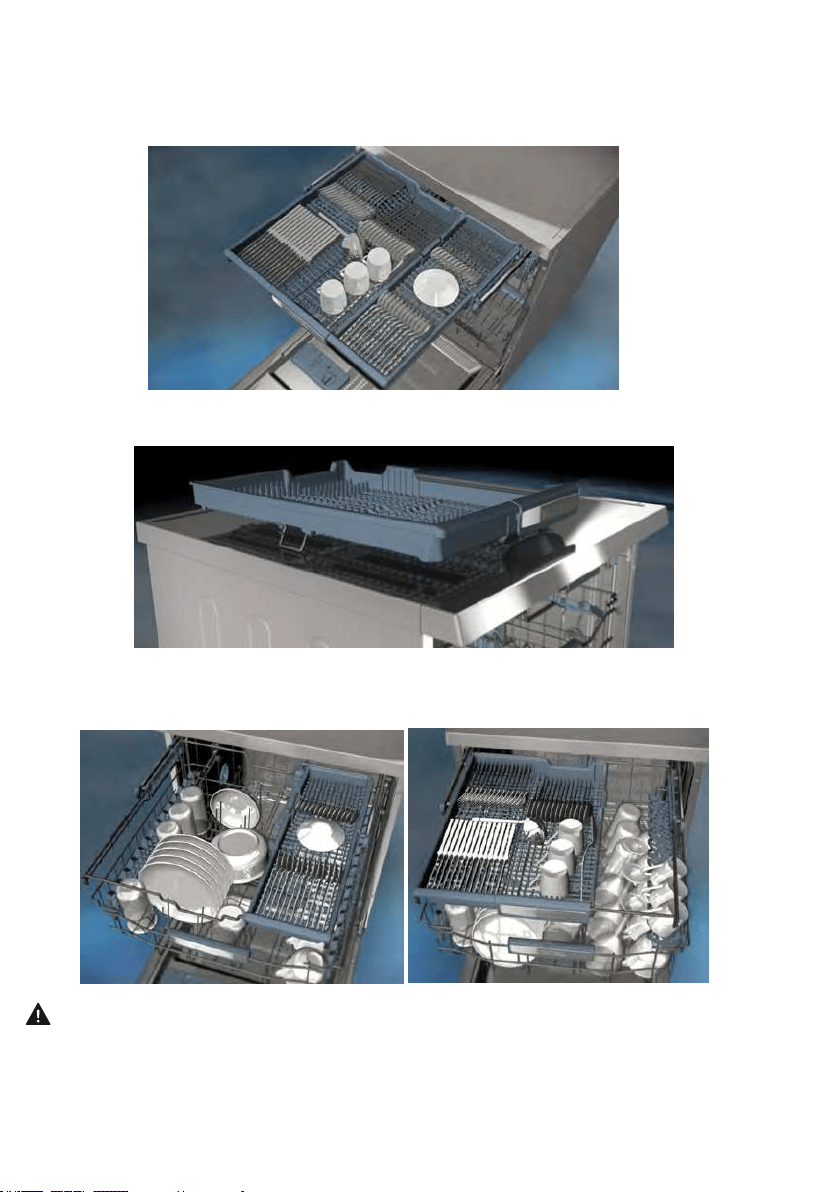
Upper rack ( Model Depending)
Load the upper rack with dessert plates, cups, glasses etc.
Top rack load pattern for 10 place settings.
Additional Loading Pattern 12 place settings

19
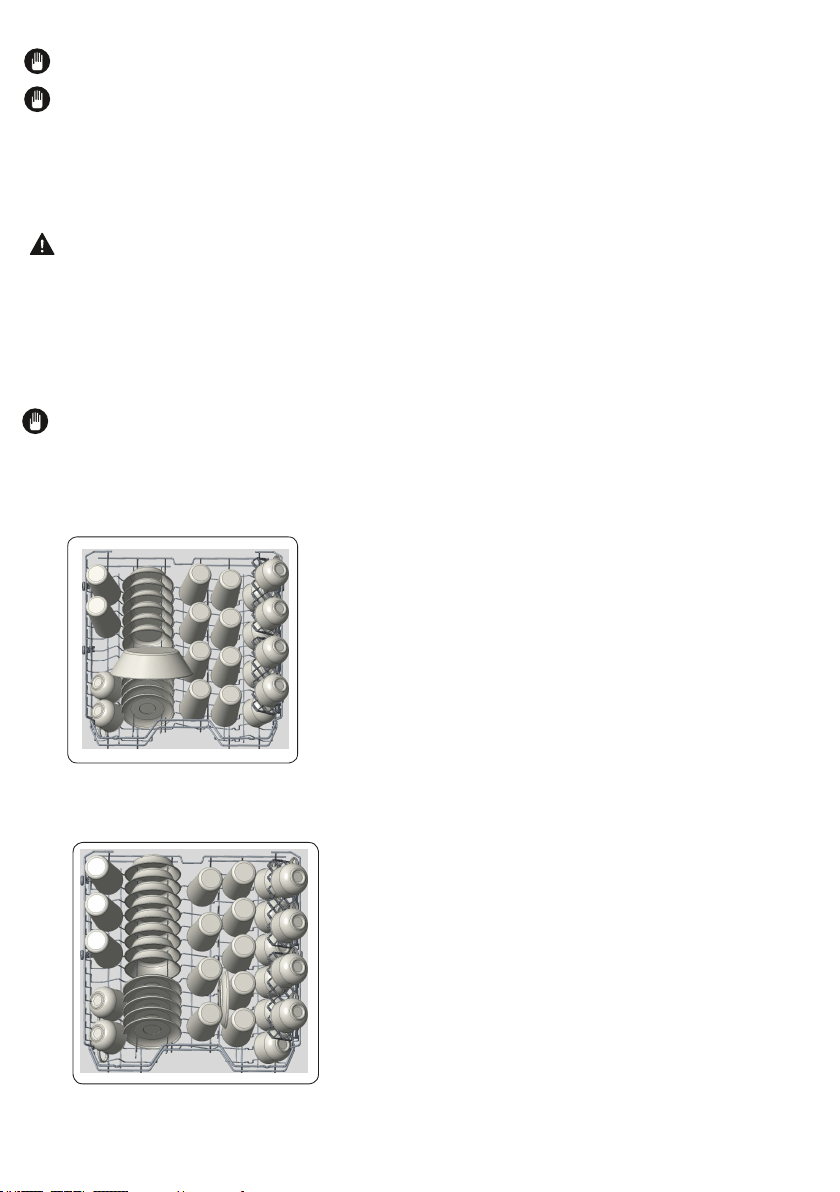
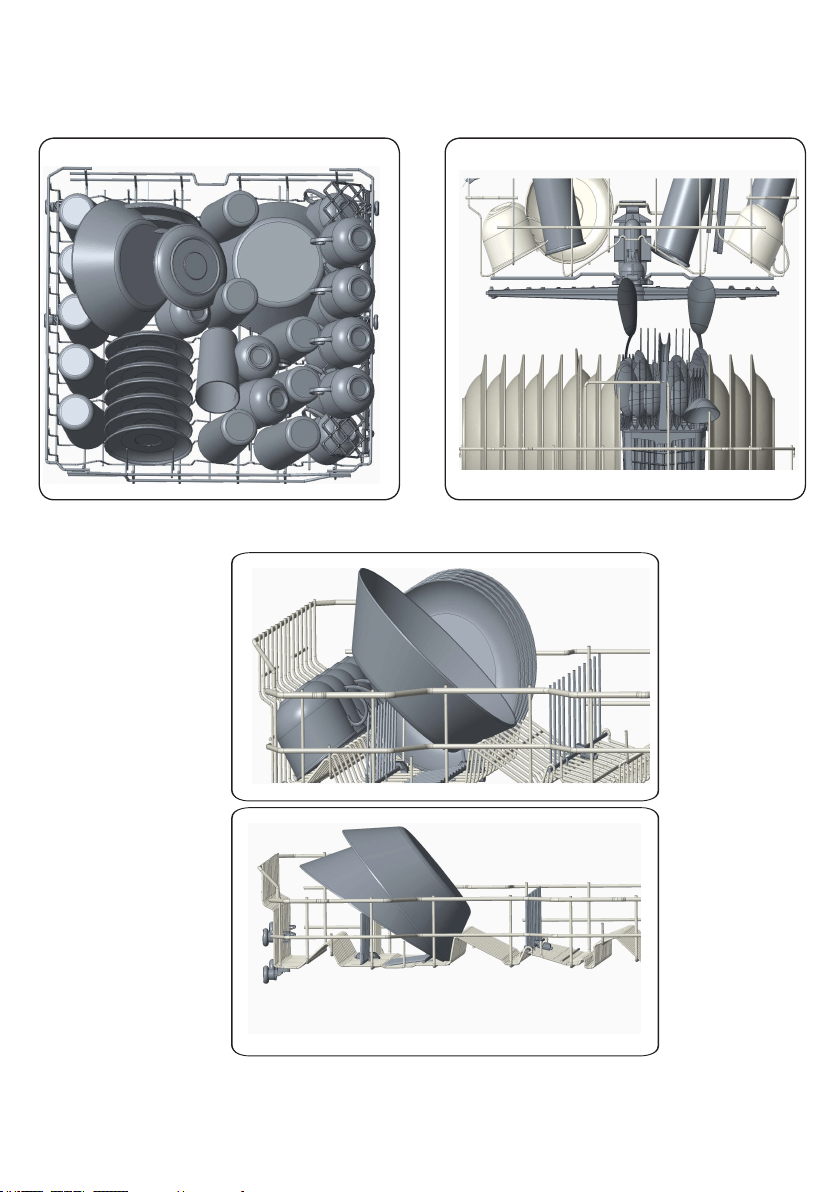
6.1. Lower rack ( Model Depending)
You can load into the lower basket such round and deep items as pots with long handles,
pot lids, plates, salad plates, cutlery sets. The lower rack should not be used for small
items such as cups, wine glasses, or small plates.
Bottom rack load patterns for 10 place settings.
Additional Loading patterns12 place settings
NOTE: Place all large and very dirty items in the lower rack .
WARNING : Large knives and other utensils with sharp tips and edges must be placed
horizontally into the upper rack due to risk of injury. Other smaller knives and sharp utensils
should be placed with sharp side down in the cutlery basket.
NOTE:
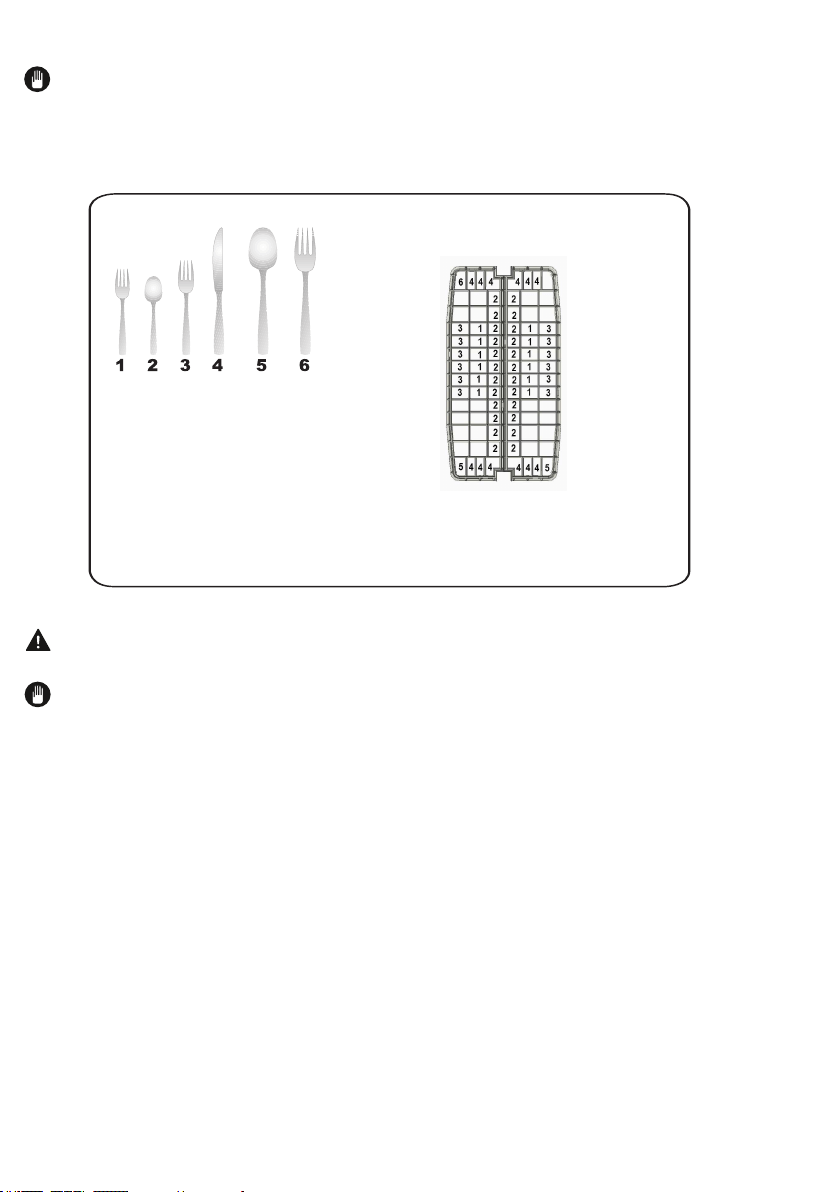
Loading cutlery basket (Model Depending)
WARNING:
NOTE:
0
Cutlery Basket load pattern for 12 place
settings .
1: Salad Fork
2: Teaspoon
3: Dinner fork
4: Knife-solid handle
5: Serving spoon
6: Serving fork
6.2. Incorrect Loads
USA/CAN - 21
Top Basket
Rack with height adjustment
re
.
C
NOTICE: Bringing the wires
to the horizontal position by
holding them from the tips
may cause them to bend.
Therefore, it will be
appropriate to bring the
wires in the middle to
horizontal or vertical position
by holding them from their
stems and pushing.
NOTICE: Make sure that both
levers catch in the same height
position.
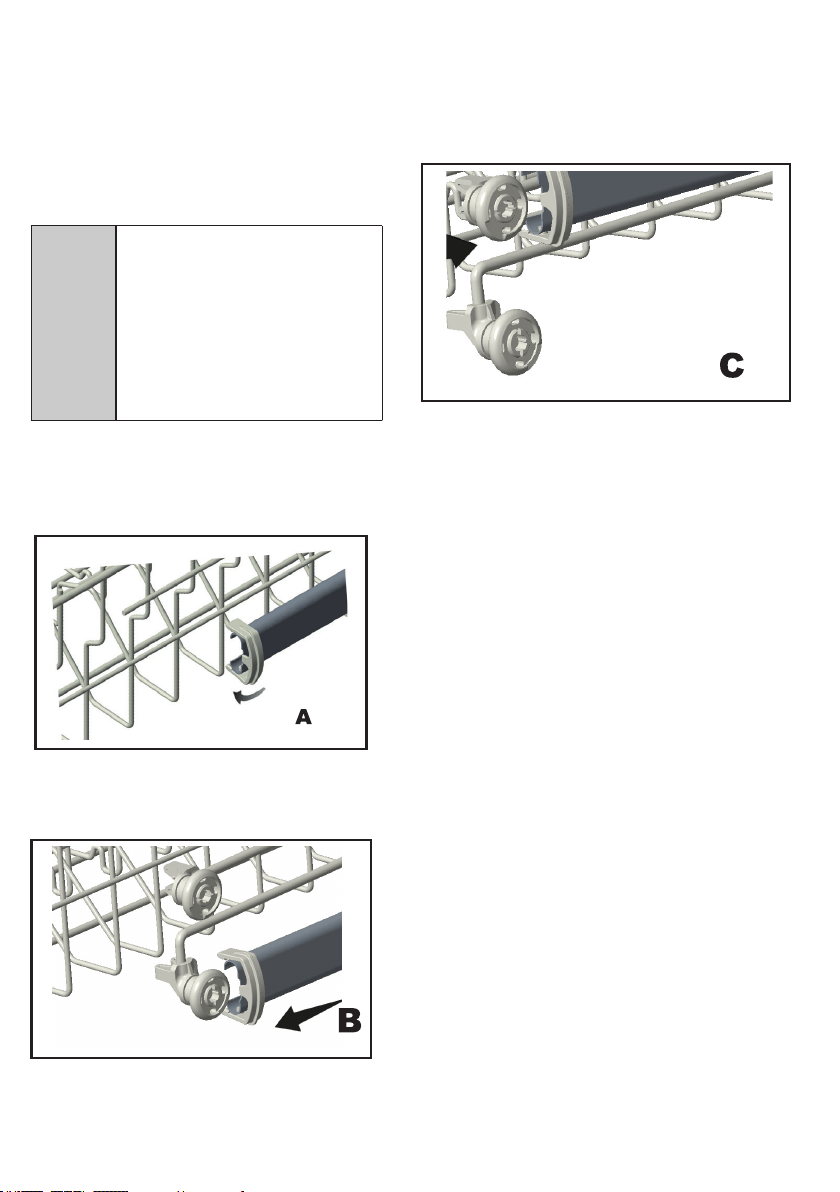
Height Setting (Model Depending)
1) Height Setting - when basket is
empty (model depending)
A
CAUTION:Make sure that
the rack is empty. Changing
the height setting while the
rack contains tableware
could cause the contents to
dislodge, causing personal
injury or damage to the
tableware.

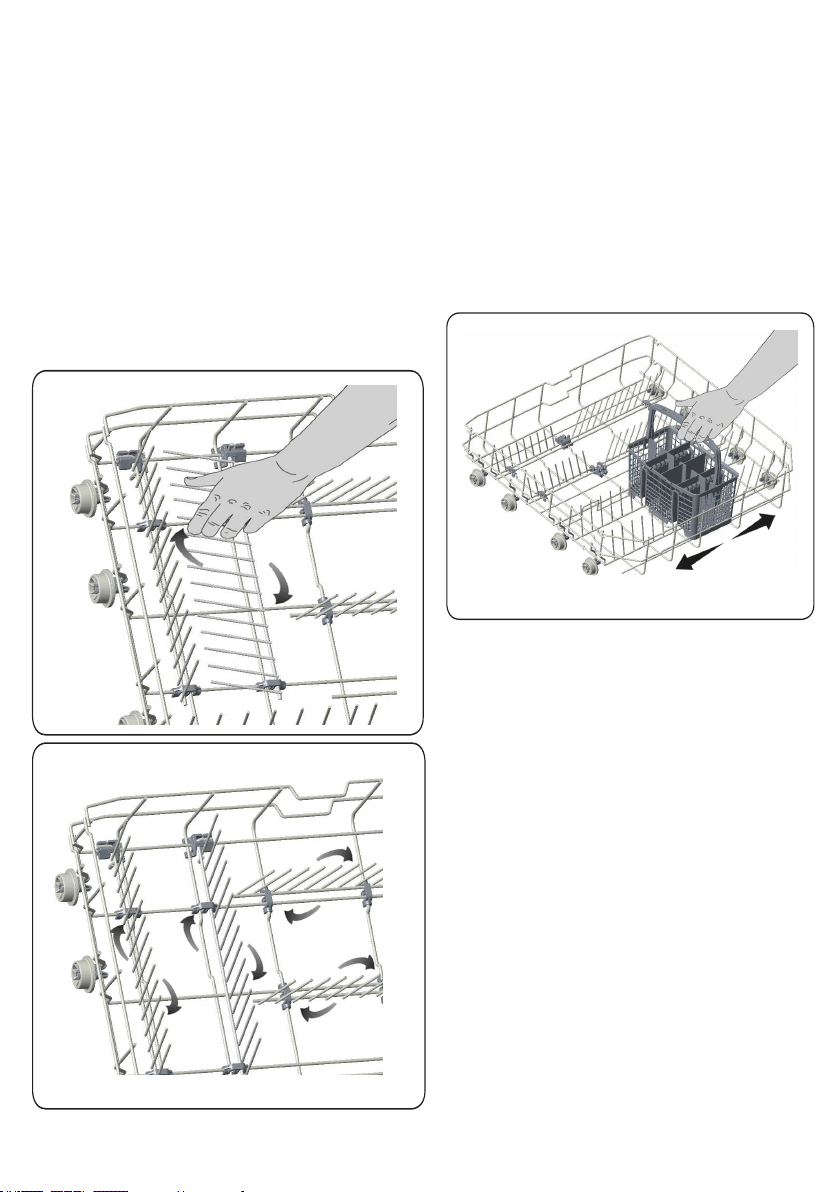
2) Height Setting - when basket is
filled (model depending)
The upper basket includes a mechanism
which enables the height of the basket
to be adjusted up (1) or down (2) without
having to remove the basket. Hold the
basket on both sides and pull it up or
push it down, ensuring both sides of the
upper basket are in the same position.
1
2
Lower Basket
Folding Racks
Folding racks consisting of four parts
that are located on the lower basket of your
machine are designed in order to let you
place big items easier such as pots,
pans, etc. If requested, each part can be
folded separately, or all of them can be
folded and larger spaces can be
obtained. You can use folding racks by
raising them upwards, or by folding.
Silverware Basket ( (Model
Depending)
Silverware basket is designed to wash
your dishes such as knife, fork, spoon, etc.
in a cleaner manner.
Since the cutlery basket can be moved ,
you can create a wider space while placing
your dishes to the lower basket and free
up space for your dishes in different sizes.
The upper cutlery basket is designed for you to place forks, spoons and knives, long dippers and small
items.
Because it can easily be taken out of the machine, it allows your dishes to be taken out of the machine
along with the basket after washing.
The Upper Cutlery Basket is composed of two pieces; if you need to make space for the dishes in the
upper basket, you can take out the left or right part of the upper cutlery basket in order to obtain more
space.
.
Warning: Knives and other sharp objects must be placed horizontally in the cutlery basket.
Upper Cutlery Basket (Model Depending)
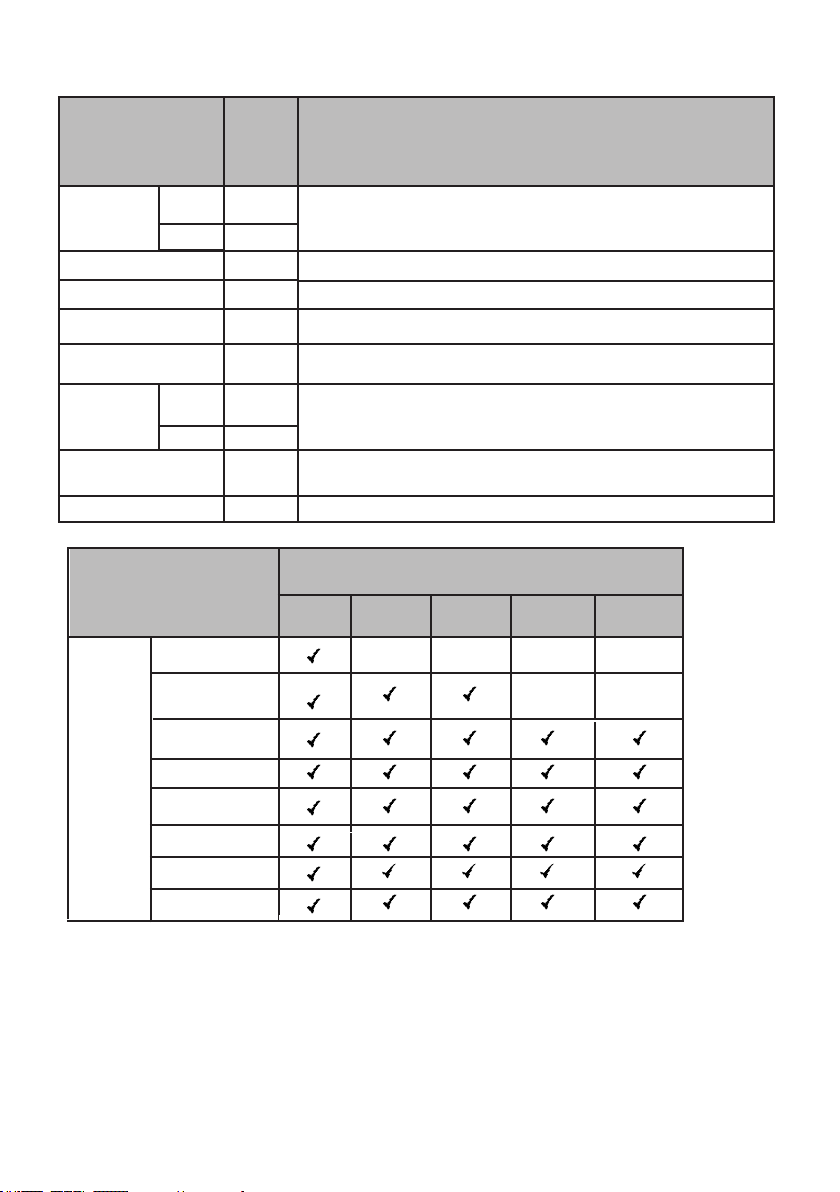
7. PROGRAMS and OPTIONS TABLE
Programs
Durations
(min)
Descriptions
program
Intensive
Intensive plus
Auto
DIRTY
program
program
CLEAN
DIRTY
CLEA
Rinse
165
130
50
117
145
122
90
15
program
155
110
Options
Regular
Programs
Delicate
Rinse
Daily
Super
Intensive
Intensive Plus
Auto
Half Load
Extra Rinse Extra Dry
Hi-TempHi-Temp
Sanitize
x
x x x
x
x

• Only use powder detergent for short programmes.
• Short programmes do not include drying.
• To assist drying, we recommend slightly opening the door after a cycle is complete.
• Only use powder detergent for short programmes.
• Short programmes do not include drying.
• To assist drying, we recommend slightly opening the door after a cycle is complete
Water Temperature
Hot water is needed for best dishwashing and drying results. Water entering
dishwasher should be at least 120°F (49°C) to give satisfactory results.
To check water temperature entering dishwasher:
• Turn on hot water faucet nearest dishwasher for several minutes to clear cool water
from pipes.
• Hold a candy or meat thermometer in stream of water to check the temperature.
• If temperature is below 120°F (49°C), have a qualified person raise the hot water
heater thermostat setting.
NOTE: The program duration may change according to the amount of dishes,
the ater temperature, the ambient temperature and selected additional functions.
NOTE: The energy-usage label is based on the "Regular" program. This program
is the most efficient in terms of its combined energy and water consumption at cleaning
normally soiled dishes.

1
2 3 i ii 4 iii 5 6 b
a
7
8
9
1.Display
2.On/Off Key + Start/Pause Key
3.rogram Selection Key + Cance
Key
4.Extra Function Key
i. Sanitize Function
ii. Extra Rinse Function
iii. Extra Dry Function
5.Delay Timer Key
6.Options Key
a. Hi-Temp Function
b. Half Load Function
7.Power On Indicator
8.Rinse Aid Indicator
9.End of program Indicator
8. OPERATING THE PRODUCT

8.3. Program Selection
1. key
2. "Programs Table"program
3. programsprogram
program key
key
In this case; to start
the selected program, the door must key
key
key
key
3
8.1. KEYS
On/O Key
This key is used as On/Off key if the corresponding button is held down for 3 seconds.
Otherwise, it can be used as Start/Pause key. It is used to turn on or turn off the machine.
Machine will turn on with Regular program in On mode and the number and the dura-tion
of the regular program will appear on the display. Each of program number and the
duration will sequentially represent for 2 seconds. In Off position, the display will turn off.
Start/Pause Key
program
Program Selection/Cancel Key
program programs table
Program Selection/Cancel Key
.
Delay Timer Key
.
8.2. Preparing the machine

8.4. Auxiliary functions
s
i. program
ii.
program
To add auxiliary function to the program:
1. programprogram
2. program
key
3.
six times.
Sanitize Function
.
i.
program
ii. "Available programs and options are indicated on program Table and Options
Table charts
Extra Rinse Function
Extra Dry Function
program
Half Load Function
.
1.
2.
3. program
4. program
5.
and/or

NOTE : The use of Delay Timer has a special case.
a. Assume that you have selected a program with delay and pressed Start/Pause
key. After a length of time, you have opened the door of the machine. If
the door of the machine is closed within 4 seconds, the machine resumes on for
the duration of delay timer. This is also valid if the door of the machine is not
closed within 4 seconds.
Changing the settings while Delay Timer is enabled
program
Programprogram
To cancel the Delay Timer function
1.
2. program
3. programe
i. program
ii. program
Hi-Temp Function
8.5. Programming the washing time
Delay Timer
programprogram starts.
1. program
2.
programprogram
3.
4. In order to start the selected program with delay, Start/Pause key should
be pressed and the door of the dishwasher must be closed within 4 seconds.
3

8.6.Starting the Program
program
programprogram
i. softening depends on model hardness level of the supply
water (Model depending).
program
ii.
program
iii.
program
3

8.7. Child (key) Lock
Ni
8.8. Cancelling the program
1. program
2.
program
program
8.9. Salt Indicator(Model Depending)
8.10. Rinse aid indicator
8.11. End of program
program
2. key
3.
4.
8.12. Water cut-off warn
L
ng
program
program
8.13. Overflowıng warn
L
ng
3
a.
b.
c.
4
2
b
a
2
b
a
3
c
1
3
9.MAINTENANCE AND CLEANING
WARNING :
WARNING
WARNING:
program
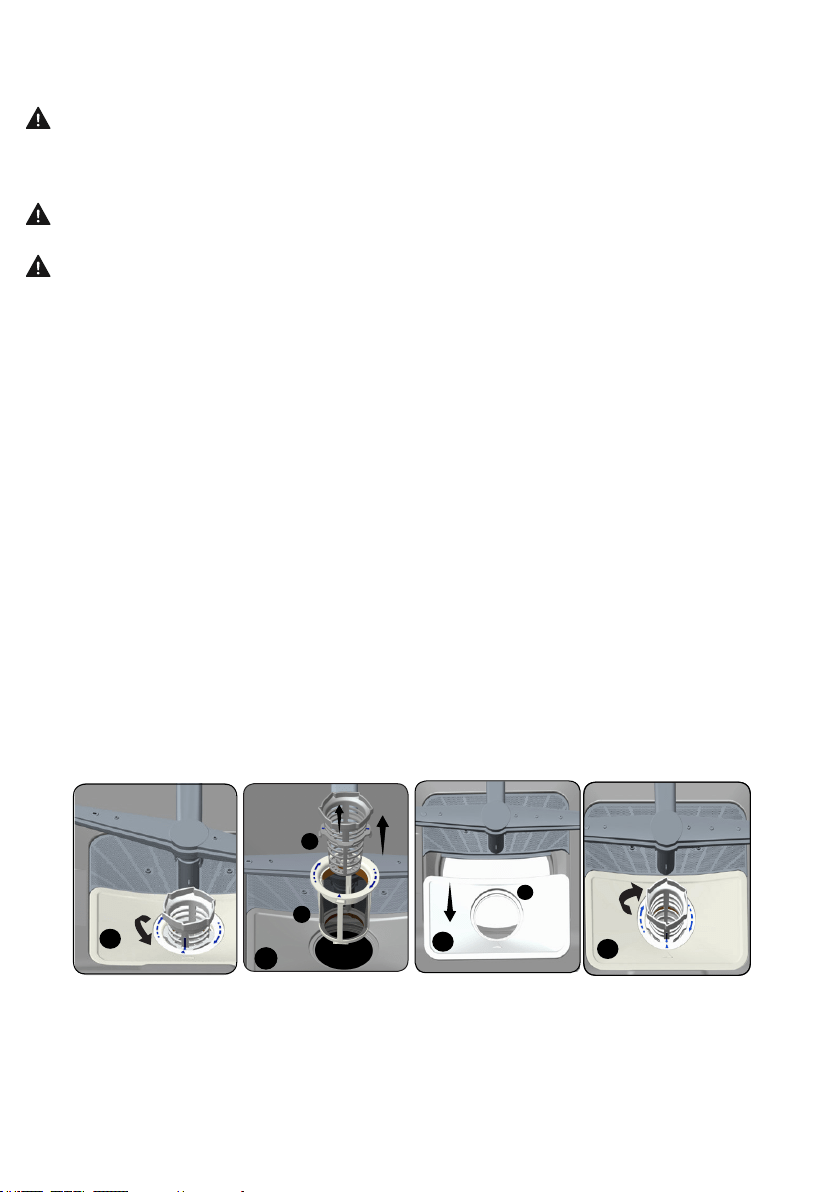
Filter
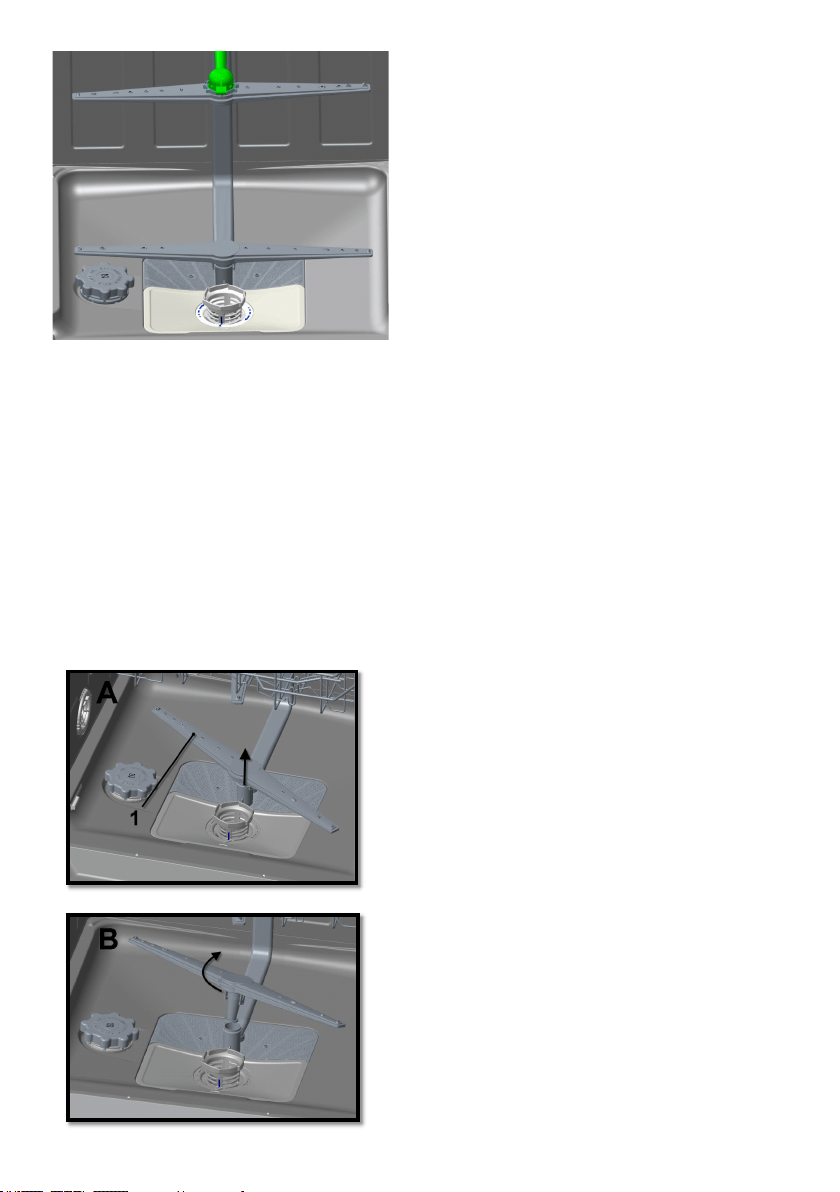
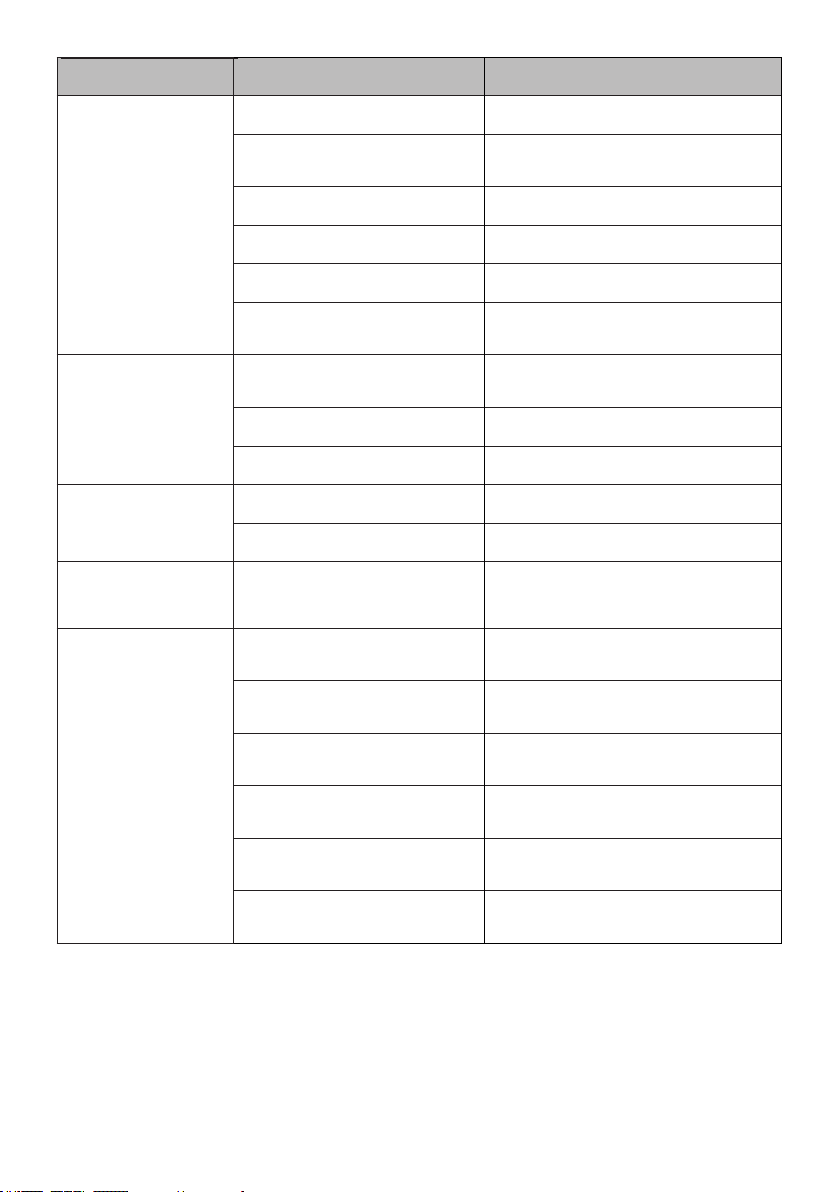
9.2. Cleaning the impellers
3
9.1. Spray arms
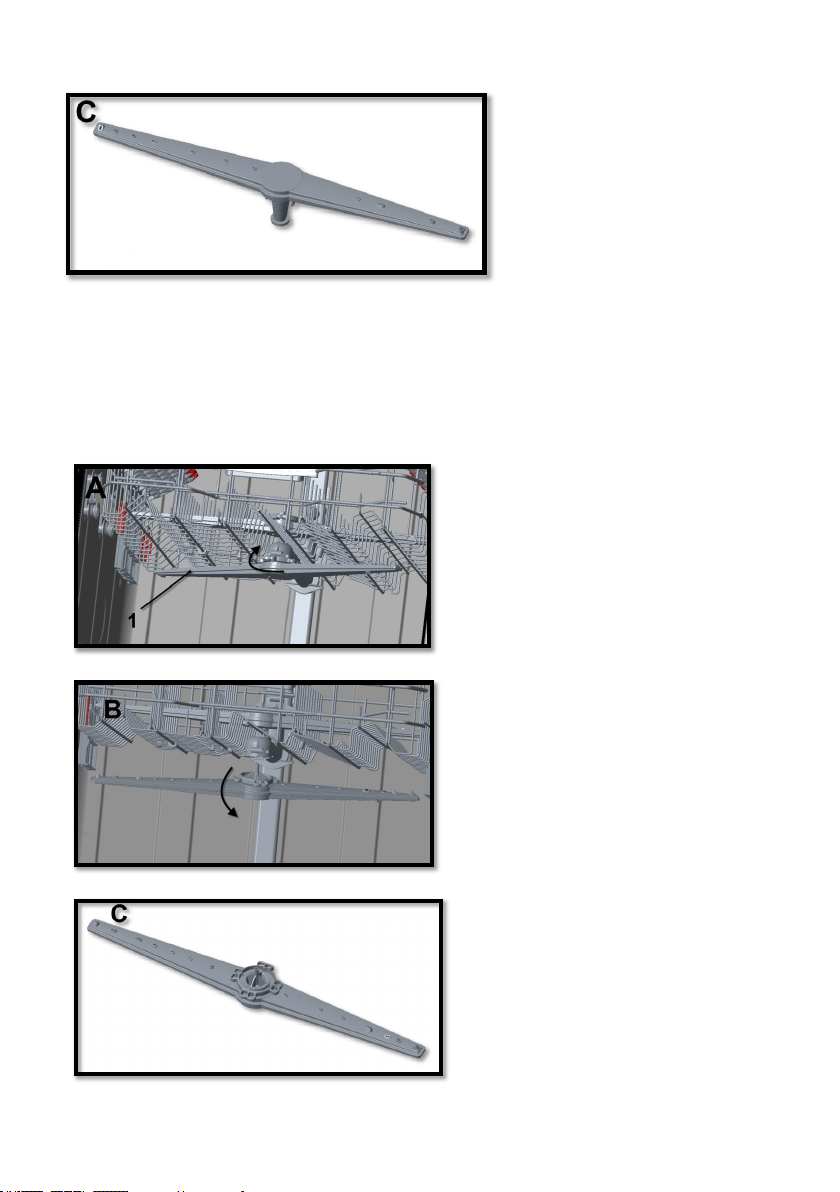
UPPER IMPELLER
3

WARNING:
WARNING:
WARNING:
SHOULD NOT BE WASHED IN YOUR DISHWASHER
program
3
program
key
program program
program
program
program
program
10. TROUBLESHOOTING

program
program
program
11. PRACTICAL INFORMATION
1.
2.
3.
program
4.
5. Rinseprogram
6.
7.
AUTOMATIC FAULT WARNINGS AND WHAT TO DO
4

Warranty
Porter&Charles products are designed and built to the highest standards.
We expect your appliances to provide many years of trouble free enjoyment.
In the event of an appliance requiring attention, each appliance is covered by a 2
year warranty from the date of purchase.
Refer to warranty policy for complete terms and conditions.
Coverage is for costs of parts and labour for appliances in capital cities &
metropolitan areas. We reserve the right to charge directly for handling
expenses outside the metropolitan region.
Porter&Charles products are supported by a national service support system.
Call our customer service department for attention.
Please retain your invoice
to quote should you require service assistance.
This will identify your product for our priority service back-up. Please
attach your invoice to this manual for easy future reference. To register
your purchase, you can either complete the section below to mail or fax, or
register online at www.porterandcharles.ca/warranty-information.
Porter&Charles
871 Cranberry Court
Oakville, ON L6L 6J7
Canada
Toll: 1-866-699-4973
Tel: 905-829-8389
Fax: 905-829-8409
Email:
For Service & Parts:
EURO-PARTS
1-866-722-2262
Important: Please record details of your purchase below and mail or e-mail to
Porter&Charles
-----------------------------------------------------------------------------------------cut along line ------------------------------------------------------------------------------------
Name: ________________________________ Tel No _________________________________
Address: ______________________________________________________________________
City : _________________________ Prov/State:___________ Postal Code/ZIP: ____________
Where purchased: ____________________________Purchase date: _____________________
Items purchased:________________________________________________________________
Serial No’s: :___________________________________________________________________
52300757 R35