User Manual
v1.
0
2022.
11

© 2022 DJI All Rights Reserved
2
Contents
Using this Manual
4
Product Overview
7
Introduction
8
Overview
8
Getting Started
12
Preparing the Goggles
13
Power Supply
14
Preparing the Motion Controller
16
Activation
17
Linking
18
Getting a Clear Vision
19
Using the Eyeglass Frames
21
DJI Goggles 2
24
Using the Touch Panel
25
Goggles Home Screen and Menu
27
Switching Aircraft
36
Using the Head Tracking Function
36
Using the Wireless Streaming Function
36
DJI Motion Controller
37
Controlling the Aircraft
38
Controlling the Gimbal and Camera
41
Motion Controller Alert
42
Motion Controller Calibration
42
Firmware Update
43

DJI Goggles 2 User Manual
v1.0
Contents
© 2022 DJI All Rights Reserved
4
Legend
Warning Important
Hints and Tips Reference
Navigating to a Topic
View a complete list of topics in the table of
contents. Click on a topic to navigate to that
section.
Searching for Keywords
Search for keywords such as “battery” and
“install” to find a topic. If you are using Adobe
Acrobat Reader to read this document, press
Ctrl+F on Windows or Command+F on Mac to
begin a search.
Printing this Document
This document supports high resolution
printing.
Using this Manual
DJI Goggles 2 User Manual
v1.0
Contents
© 2022 DJI All Rights Reserved
5
Read Before First Use
DJI™ provides users with extensive tutorial materials
ontheDJIocialwebsiteandDJIFlyApp.Watchall
tutorialvideosontheDJIocialwebsite,readthein-
box Safety Guidelines, then read this user manual
carefully to ensure correct and safe usage of this
product.
5.8 GHz is not supported in some regions.
This frequency band will automatically
be disabled when the aircraft is activated
or connected to DJI Fly in these regions.
Observe local laws and regulations.
Using the goggles does not satisfy the
requirement of visual line of sight (VLOS).
Some countries or regions require a visual
observertoassistbyobservingtheight.
Make sure to comply with local regulations
when using the goggles.
Watch Tutorial Videos
https://www.dji.com/goggles-2/video
Download the DJI Fly App
https://www.dji.com/goggles-2/
downloads

DJI Goggles 2 User Manual
v1.0
Contents
© 2022 DJI All Rights Reserved
6
Download DJI ASSISTANT
TM
2
(Consumer Drones Series)
https://www.dji.com/goggles-2/downloads
* This user manual covers both DJI Goggles 2 and DJI
Goggles 2 Motion Combo. The DJI Motion Controller
mentioned in this manual is a product of the DJI
Goggles 2 Motion Combo.

© 2022 DJI All Rights Reserved
7
Product Overview
DJI Goggles 2 User Manual
v1.0
Contents
© 2022 DJI All Rights Reserved
8
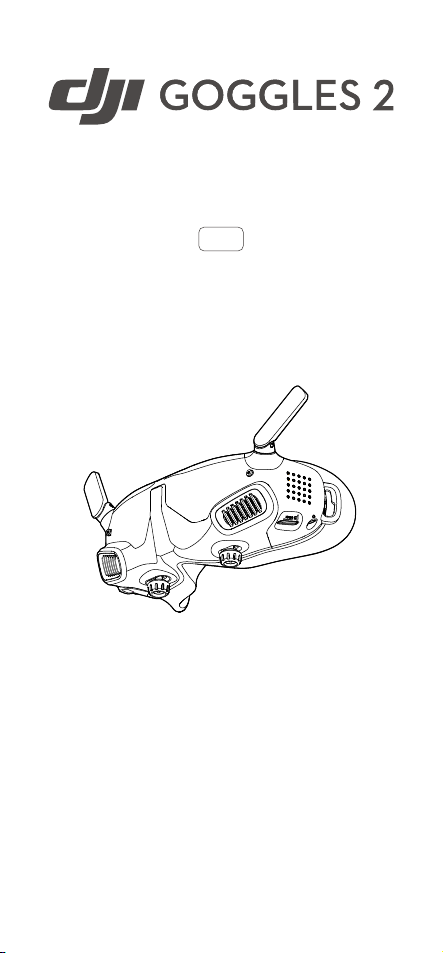
Introduction
DJI Goggles 2 is equipped with high-performance dual
displays and ultra-low-latency image transmission for
use with DJI aircraft, giving you a real-time aerial FPV
(First Person View) experience. The Wireless Streaming
function enables you to project the live-feed from your
mobile phone or computer to the goggles screen,
bringing you an immersive viewing experience. DJI
Goggles 2 supports the Head Tracking function. With
this function, the aircraft and gimbal can be controlled
through head movements. When used with the DJI
Motion Controller, you can control the aircraft and the
gimbal camera freely to meet your shooting needs in
various scenarios. The touch panel enables you to
easily complete operations using only one hand while
watching the screen. To provide a more comfortable
experience, the goggles support diopter adjustment so
that glasses are not required during use.
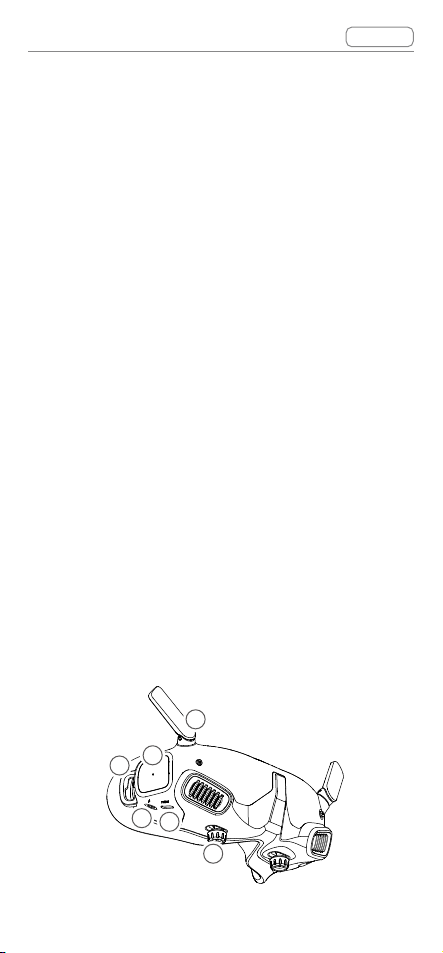
Overview
DJI Goggles
2
1
2
3
4
5
6
DJI Goggles 2 User Manual
v1.0
Contents
© 2022 DJI All Rights Reserved
9
1. Antennas
2. Touch Panel
3. Headband Attachment
4. Power Port
Use the power cable (USB-C) provided to connect
the power port of the goggles to the goggles
battery.
5. USB-C Port
6. IPD (Interpupillary Distance) Slider / Diopter
Adjustment Knob (hereinafter referred to as
"knob")
Toggle left and right to adjust the distance between
the lenses until the images are properly aligned.
Rotate the knobs to adjust the diopter in the range
of -8.0 D to +2.0 D.
9
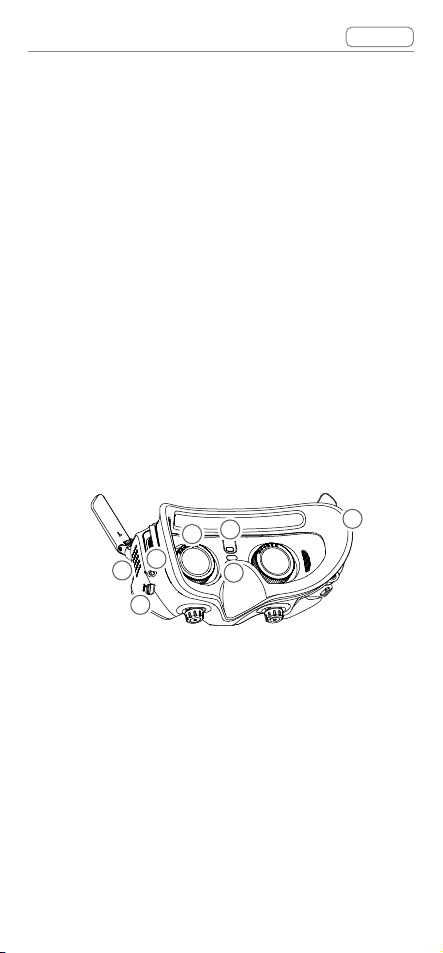
7
12
13
8
10
11
7. microSD Card Slot
8. 3.5mm Audio Port
9. LED Dot Matrix Display
10. Lens
11. Proximity Sensor
Detects whether the user is wearing the goggles
andautomaticallyturnsthescreenonoro.
12. Link Button
13. Foam Padding
DJI Goggles 2 User Manual
v1.0
Contents
© 2022 DJI All Rights Reserved
10
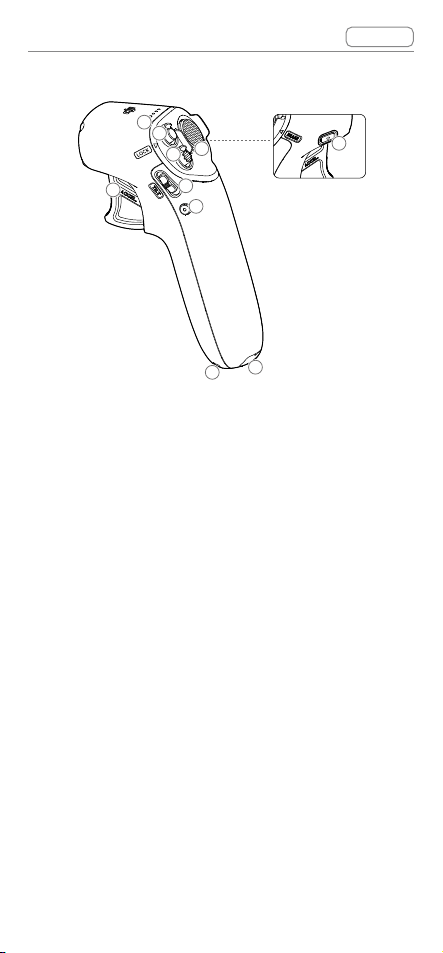
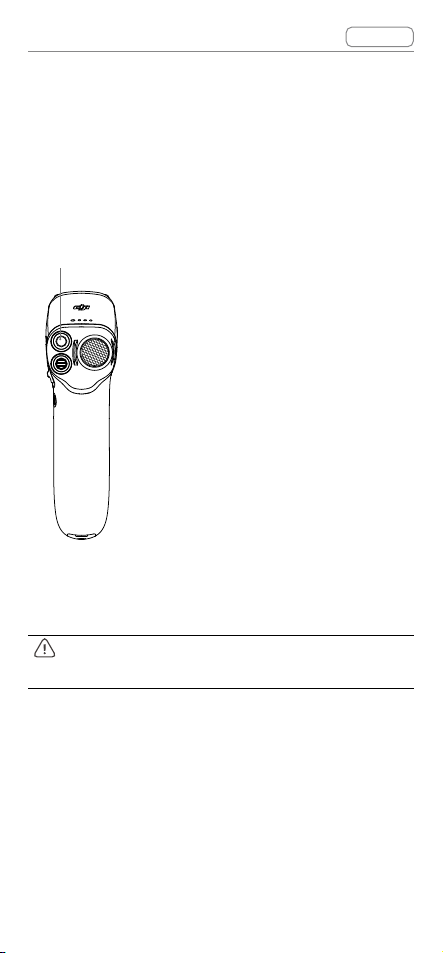
DJI Motion Controller
1
2
3
4
5
6
7
8
9
10
1. Battery Level LEDs
2. Lock Button
Press twice to start the motors of the aircraft. Press
andholdtomaketheaircrafttakeoautomatically,
ascend to approximately 1.2 m, and hover.
Press and hold while the aircraft is hovering to
make it land automatically and stop the motors.
3. Mode Button
Press once to switch between Normal mode and
Sport mode.
4. Brake Button
Press once to make the aircraft brake and hover in
place (only when GPS or Downward Vision System
is available). Press again to unlock the attitude.
Press and hold to initiate RTH. Press again to
cancel RTH.
5. Gimbal Tilt Slider
Push up and down to adjust the tilt of the gimbal.

DJI Goggles 2 User Manual
v1.0
Contents
© 2022 DJI All Rights Reserved
11
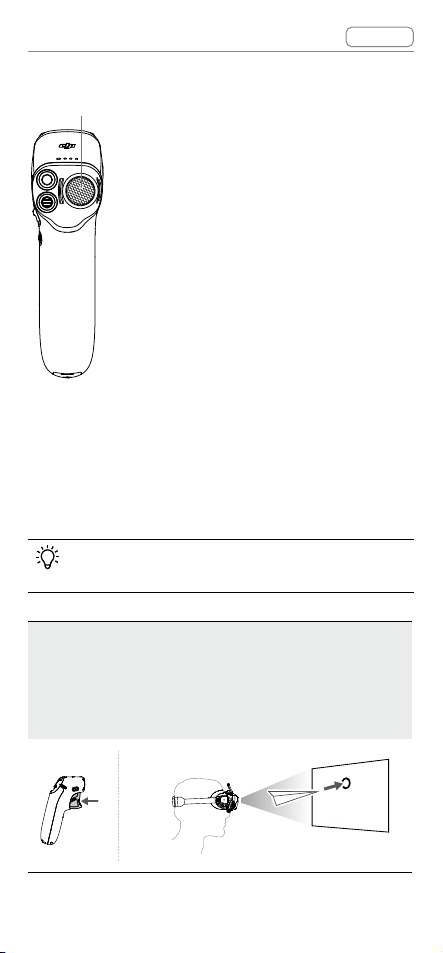
6. Shutter/Record Button
Press once to take photos or start or stop
recording. Press and hold to switch between photo
and video mode.
7. Accelerator
Presstoytheaircraftinthedirectionofthecircle
in the goggles. Apply more pressure to accelerate.
Release to stop and hover.
8. Lanyard Hole
9. USB-C Port
10. Power Button
Press once to check the current battery level.
Press once then press again and hold for two
secondstopowerthemotioncontrolleronoro.

© 2022 DJI All Rights Reserved
12
Getting Started
DJI Goggles 2 User Manual
v1.0
Contents
© 2022 DJI All Rights Reserved
13
Preparing the Goggles
Installation
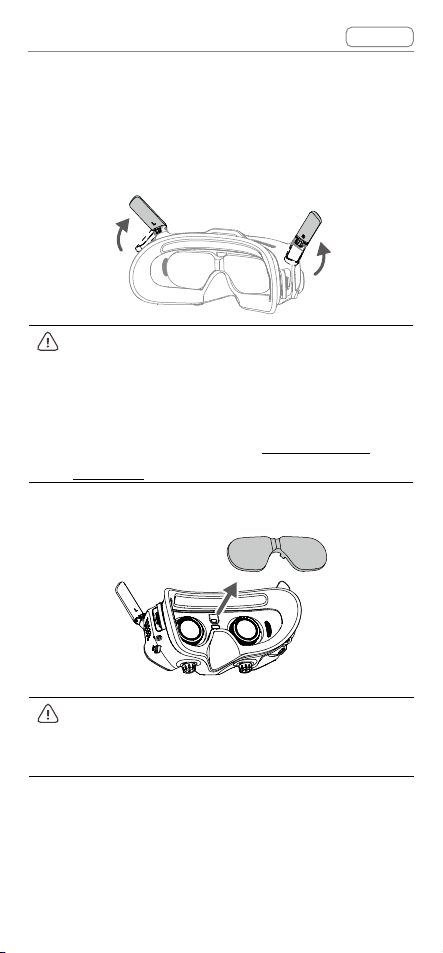
1. Unfold the antennas.
Fold the antennas to avoid damage when
the goggles are not in use. If the antenna
is accidentally damaged, you can contact
DJI after-sales to purchase a new one
for replacement. Refer to "
Replacing the
Antennas
" for the replacement procedure.
2. Remove the screen protector.
Re-attach the screen protector after use to
protect the lens and prevent damage caused
by direct sunlight.
DJI Goggles 2 User Manual
v1.0
Contents
© 2022 DJI All Rights Reserved
14
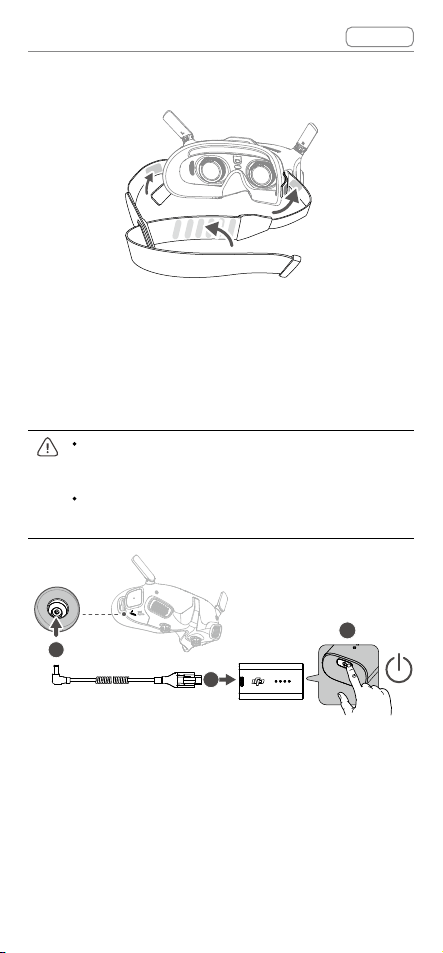
3. Attach the headband to the goggles.
Power Supply
Use the power cable provided to connect the power
port of the goggles to the goggles battery.
Only use the DJI goggles battery provided.
DO NOT use non-DJI batteries.
DO NOT use the goggles battery to power
other mobile devices.
1
3
2
Press the power button once to check the current
battery level.
Press once, then press again and hold for two
secondstopowerthegogglesonoro.
DJI Goggles 2 User Manual
v1.0
Contents
© 2022 DJI All Rights Reserved
15
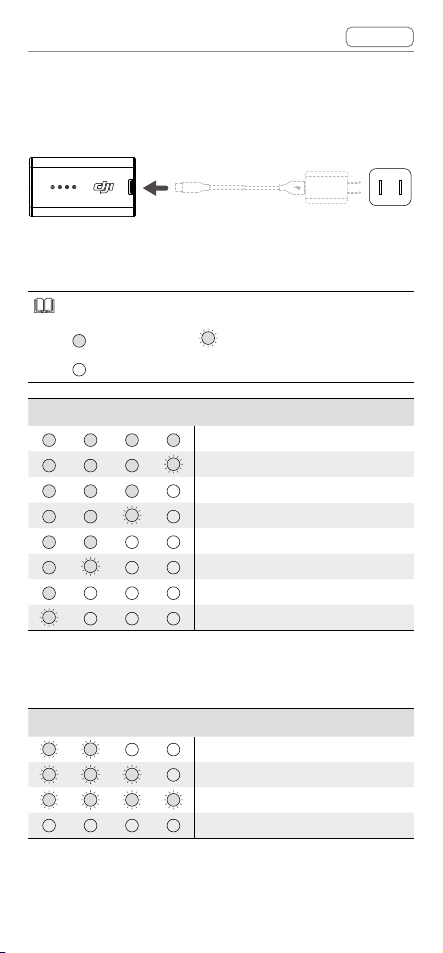
It is recommended to use a USB Power Delivery
charger to charge the goggles battery if the power
level is too low.
The battery level LEDs display the power level during
charging and when in use.
ThestatusesoftheLEDsaredenedbelow:
LED is on LEDisashing
LEDiso
Battery Level LEDs Battery Level
Battery Level
>
8
8%
75% < Battery Level≤8
8%
63% < Battery Level≤7
5%
50% < Battery Level≤6
3%
38% < Battery Level≤5
0%
25% < Battery Level≤3
8%
13% < Battery Level≤2
5%
0% < Battery Level≤1
3%
The table below shows the battery level during
charging.
Battery Level LEDs Battery Level
0% < Battery Level ≤5
0%
50% < Battery Level ≤7
5%
75% < Battery Level < 10
0%
Fully Charged

DJI Goggles 2 User Manual
v1.0
Contents
© 2022 DJI All Rights Reserved
16
Preparing the Motion Controller
Press the power button once to check the current
battery level.
Charge before using if the battery level is too low.
USB Power Delivery chargers are not supported.
Press once then press again and hold for two
secondstopowerthemotioncontrolleronoro.
The battery level LEDs display the power level of
the battery during charging and when in use. The
statusesoftheLEDsaredenedbelow:
LED is on.
LEDisashing.
LEDiso.
DJI Goggles 2 User Manual
v1.0
Contents
© 2022 DJI All Rights Reserved
17
Battery Level LEDs Battery Level
Battery Level > 8
0%
75%<BatteryLevel≤8
0%
63%<BatteryLevel≤7
5%
50%<BatteryLevel≤6
3%
38%<BatteryLevel≤5
0%
15%<BatteryLevel≤3
8%
8%<BatteryLevel≤1
5%
0%<BatteryLevel≤
8%
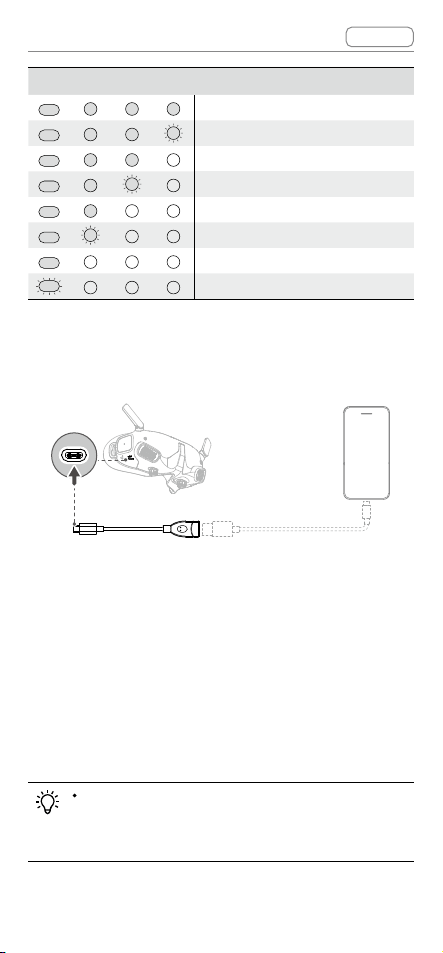
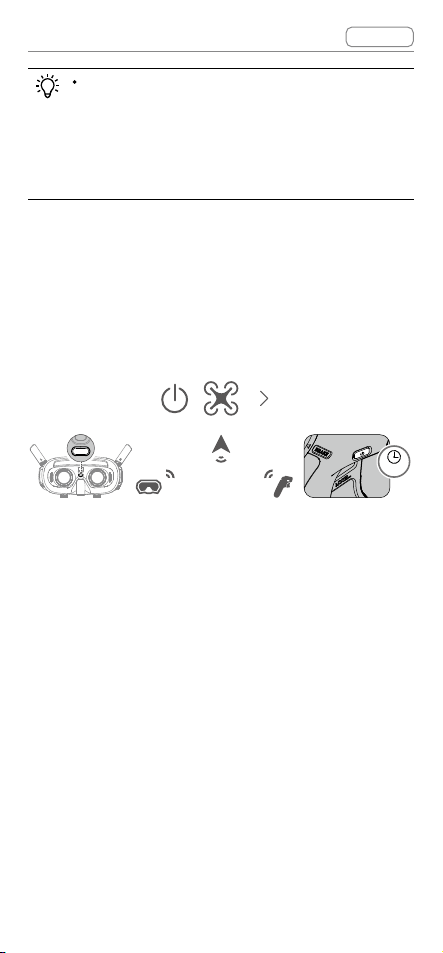
Activation
DJI Fly
App
Activatethedeviceandupdatethermwarebefore
usingforthersttime.Powerontheaircraft,goggles,
and motion controller. Make sure all the devices are
linked. Connect the USB-C port of the goggles to
your mobile device, run the DJI Fly App, and follow
the prompted instructions to activate. Make sure the
mobile device is connected to the internet during
activation.
Use the USB-C OTG Cable provided to
connect if you are using a USB-A to USB-C
cable.
DJI Goggles 2 User Manual
v1.0
Contents
© 2022 DJI All Rights Reserved
18
The goggles only support standard USB-C
protocols and MFI-certified Lightning cables.
Non-standard cables are not supported. If the
devices do not respond after connecting, use
a different data cable and try again.
Linking
Theaircraftmustbelinkedwiththegogglesrst,
followed by the motion controller.
2s
1. Power on the aircraft, goggles, and motion
controller.
2. Press the link button on the goggles. The goggles
will start to beep continually.
3. Press and hold the power button on the aircraft
until the battery level LEDs start to blink in
sequence.
4. Once linking is completed, the battery level LEDs of
the aircraft turn solid and display the battery level,
the goggles stop beeping, and image transmission
can be displayed normally.
DJI Goggles 2 User Manual
v1.0
Contents
© 2022 DJI All Rights Reserved
19
Press the link button on the goggles again to
stop the process if the goggles fail to connect
to the aircraft. Connect the goggles to your
mobile device and run the DJI Fly App, select
Connection Guide and then follow the on-
screen instructions to link. Make sure the
correct aircraft is selected, otherwise the
linking will fail.
5. Press and hold the power button of the aircraft until
the battery level LEDs start to blink in sequence.
6. Press and hold the power button of the motion
controller until it beeps continually and the battery
level LEDs blink in sequence.
7. The motion controller stops beeping once linking is
successful and both the battery level LEDs of the
aircraft and motion controller turn solid and display
the battery level.
The aircraft can be controlled with only one
remotecontroldeviceduringight.Ifyour
aircraft has been linked with multiple remote
controldevices,turnoothercontroldevices
beforeight.
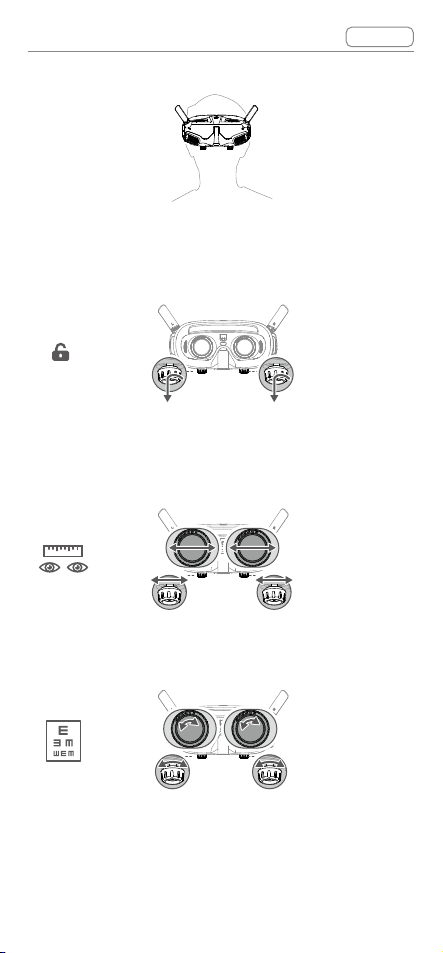
Getting a Clear Vision
After the devices are powered on and the image
transmission is displayed, wear the goggles and
adjusttheheadbanduntilthegogglestcomfortably.
Then use the knobs to adjust the distances between
DJI Goggles 2 User Manual
v1.0
Contents
© 2022 DJI All Rights Reserved
20
the lenses and the diopter to get a clear view.
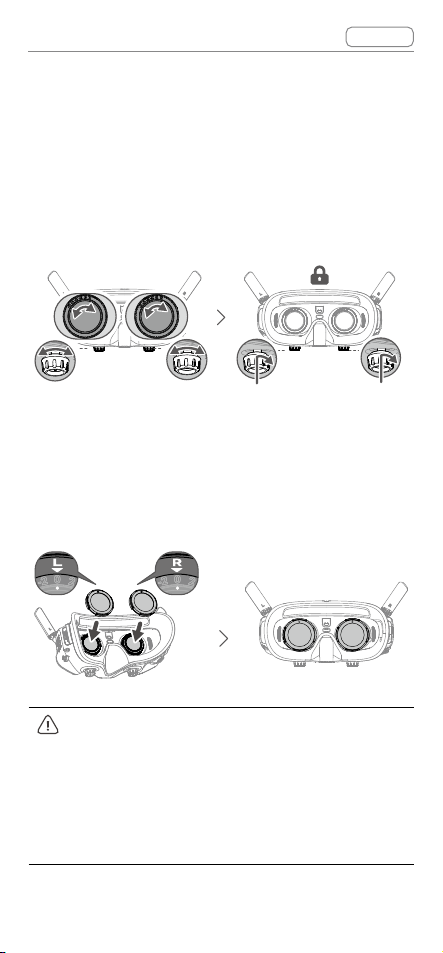
1. Rotate both the knobs in the direction as shown to
unlock them. Once unlocked, the knobs will pop
out.
2. Toggle the knobs left and right to adjust the
distance between the lenses until the images are
properly aligned.
56
-
72 mm
3. Slowly rotate the knobs to adjust the diopter. The
supported adjustment range is from -8.0 D to +2.0 D.
-8.0 D
-
+2.0D
DJI Goggles 2 User Manual
v1.0
Contents
© 2022 DJI All Rights Reserved
21
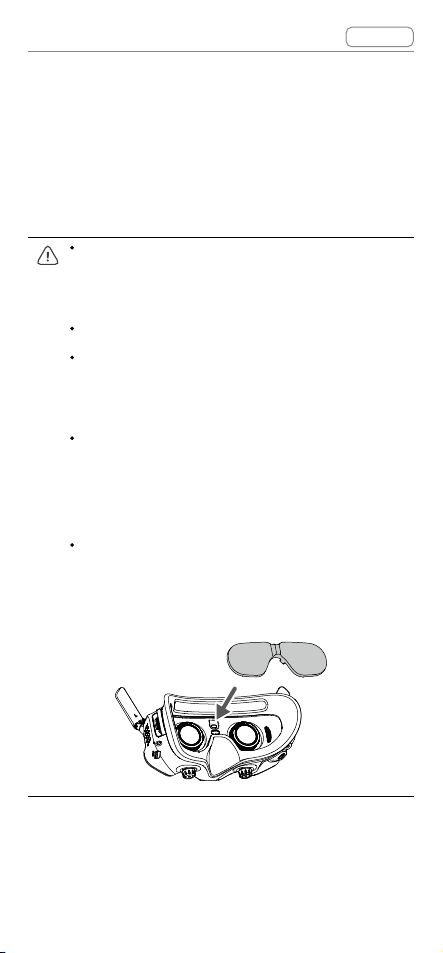
The diopter lenses do not support
astigmatism correction. If you require
astigmatism correction or if the goggles’
diopter is unsuitable, you can purchase
additional lenses and use the eyeglass frames
provided to install them on the goggles. Refer
to the next section “
Using the Eyeglass
Frames
” for more information.
When adjusting the diopter for the first time,
you are advised to adjust to a degree that is
slightly lower than the strength of your actual
eyeglasses. Give your eyes enough time to
adapt, then adjust the diopter again until you
get a clear view. Do not use a diopter higher
than your actual eyeglass power to avoid
eyestrain.
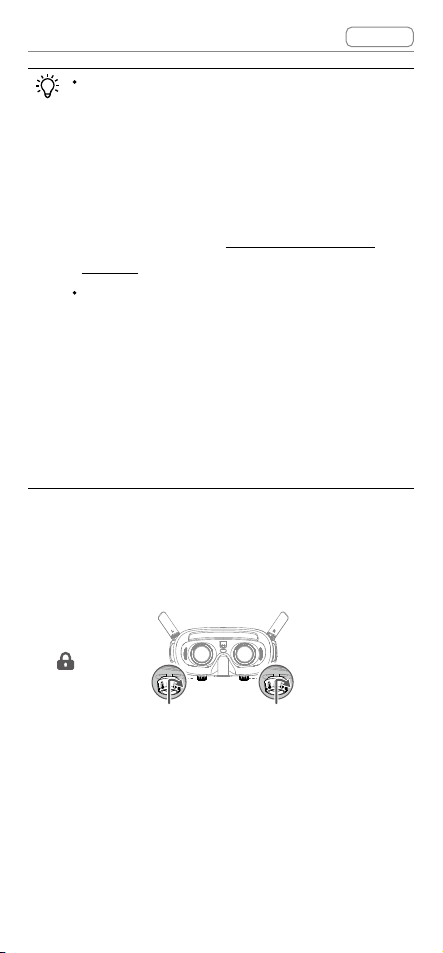
4. After you get a clear view, press the knobs in and
rotate them in the direction as shown to lock in the
lenses’ position and the diopter.
Using the Eyeglass Frames
The goggles support diopter adjustment in the range
of -8.0 D to +2.0 D without astigmatism correction. If
you require astigmatism correction or if the goggles’
DJI Goggles 2 User Manual
v1.0
Contents
© 2022 DJI All Rights Reserved
22
diopter is unsuitable, you can purchase additional
lenses and use the eyeglass frames to install them on
the goggles.
When purchasing lenses, bring the eyeglass
frames (a pair) to a professional optical shop
to ensure that the shape, size, astigmatism
axis, and edge thickness (< 2.8 mm) of the
lenses meet the installation requirements of
the eyeglass frames.
The overall diopter is the sum of the goggles’
diopter and the diopter of the additional
lenses. Make sure to adjust the diopter of
thegogglesrstandlocktheknobsbefore
installing the eyeglass frames.
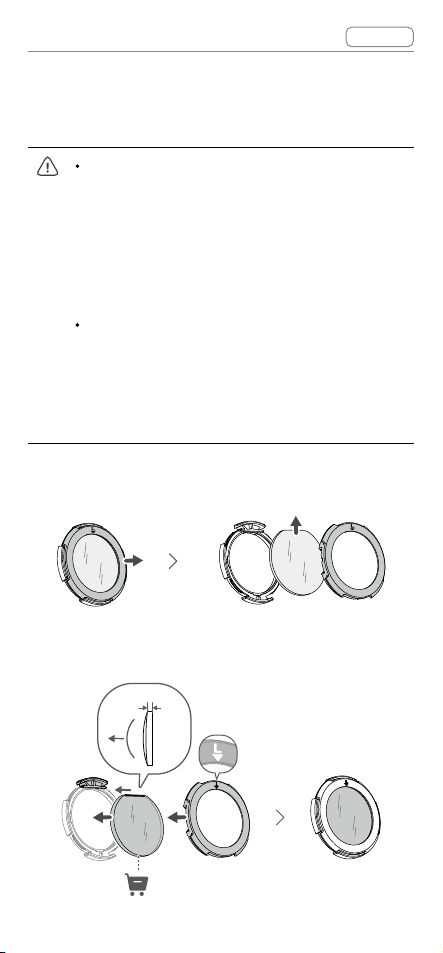
1. Detach the eyeglass frame and remove the original
dummy lens.
2. Install the prepared lens as shown. Make sure to
distinguish the left lens and the right one.
< 2.8 mm
DJI Goggles 2 User Manual
v1.0
Contents
© 2022 DJI All Rights Reserved
23
3. Adjust the diopter of the goggles according to your
needs and lock the knobs.
For example, if you usually wear -6.0 D glasses
and the self-prepared lens is -3.0 D, then you will
need to adjust the diopter of the goggles to -3.0 D
to ensure that the overall diopter is -6.0 D after the
eyeglass frame is installed on the goggles.
4. Install the left and right frames onto the goggles.
When installing, make sure that the mark on the top
of the frame is facing upwards, and the triangular
arrow is aligned with the white dot on the upper
edge of the goggle lens.
L
R
If the installed lens supports astigmatism
correction, do not rotate the knob after the
eyeglass frame is installed. Otherwise, the
astigmatism axis will shift resulting in blurred
vision. Make sure to adjust the diopter of the
goggles before installing the eyeglass frames.

© 2022 DJI All Rights Reserved
24
DJI Goggles 2
DJI Goggles 2 User Manual
v1.0
Contents
© 2022 DJI All Rights Reserved
25
Using the Touch Panel
DH
DH
Manual
Mode
300
ISO
1/200
Shuttle
5.5
Apeture
+3
M.M
Manual
WB
1200K
Status
Album
Transmission
Setting
More
The touch panel enables you to operate with only one
hand:
Toensureightsafetywhenusingthemotion
controller, press the brake button once to brake
and hover before operating the touch panel of
the goggles. Failure to do so is a safety risk and
may lead to the aircraft losing control or injury.
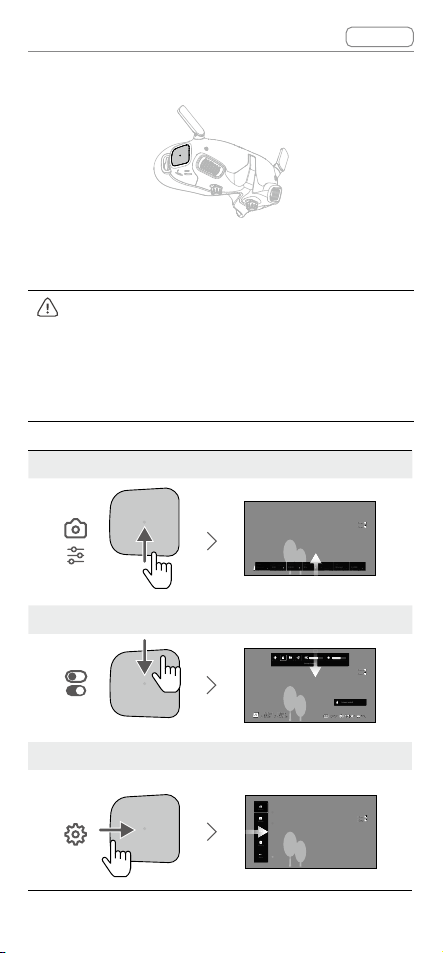
Swipe up from the bottom: enter Camera Settings
15min
10min
1.8km/h
1024.4m
D
500m
H
20.5km/h
80
20
75%
12'59''
Manual
Mode
300
ISO
1/200
Shuttle
5.5
Apeture
+3
M.M
Manual
WB
1200K
Status
Album
Transmission
Setting
More
Swipe down from the top: enter Shortcut Menu
15min
10min
1.8km/h
1024.4m
D
500m
H
20.5km/h
80
20
75%
12'59''
DH
Manual
Mode
300
ISO
1/200
Shuttle
5.5
Apeture
+3
M.M
Manual
WB
1200K
Status
Album
Transmission
Setting
More
Swipe right from the left: enter Menu
Manual
Mode
300
ISO
1/200
Shuttle
5.5
Apeture
+3
M.M
Manual
WB
1200K
15min
10min
Status
Album
Transmission
Setting
More
DJI Goggles 2 User Manual
v1.0
Contents
© 2022 DJI All Rights Reserved
26
You can change the settings to enter Menu by
swiping left from the right. To make the change,
select Settings from the menu and select
Control, then select Invert Horizontal Swipe.
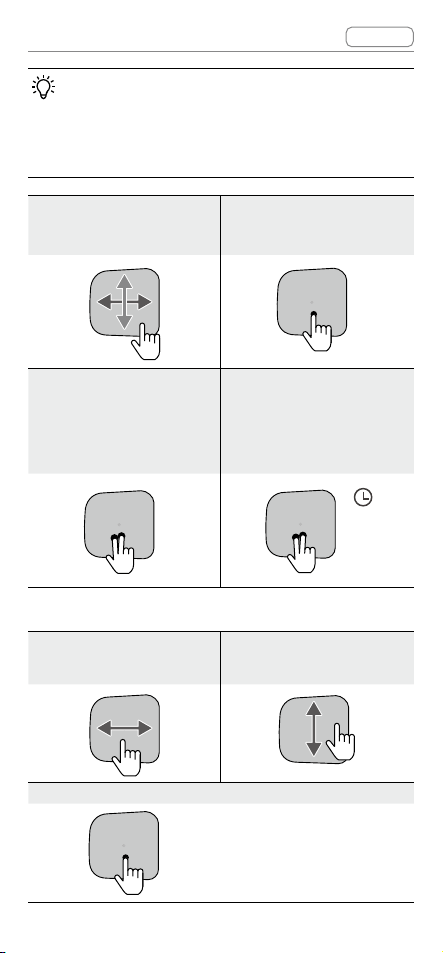
Swipe up/down/right/
left: navigate the menu
Single tap: conrm/
select
Manual
Mode
300
ISO
1/200
Shuttle
5.5
Apeture
+3
M.M
Manual
WB
1200K
Status
Album
Transmission
Setting
More
Tap with two ngers:
back
Press and hold with two
ngers on the Home
Screen: lock/unlock the
sceen
Manual
Mode
300
ISO
1/200
Shuttle
5.5
Apeture
+3
M.M
Manual
WB
1200K
Status
Album
Transmission
Setting
More
Manual
Mode
300
ISO
1/200
Shuttle
5.5
Apeture
+3
M.M
Manual
WB
1200K
Status
Album
Transmission
Setting
More
When playing video:
Swipe left/right: control
the progress bar
Swipe up/down: adjust
volume
Tap once: pause/play
DJI Goggles 2 User Manual
v1.0
Contents
© 2022 DJI All Rights Reserved
27
When operating the touch panel, use slow and
precise swipes to maximize function accuracy.
Goggles Home Screen and Menu
The actual screen interface and menu
options may differ from the descriptions
in this manual and vary depending on the
aircraft used, the available functions, and
the firmware version of the goggles.
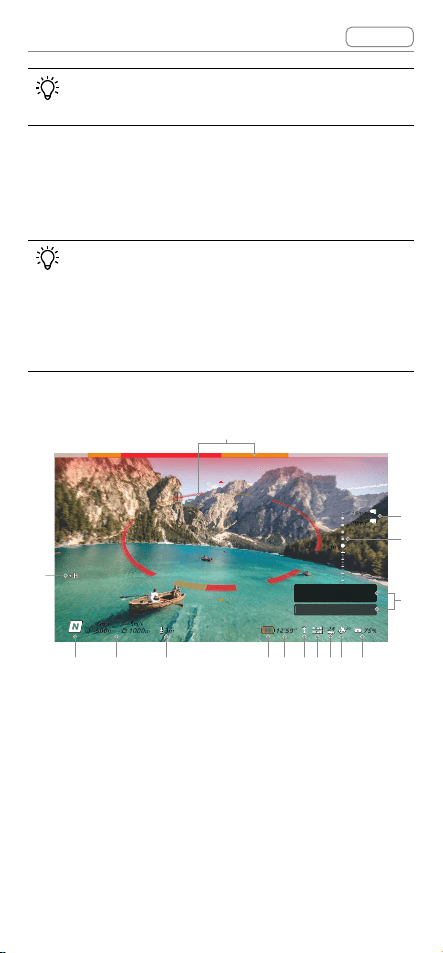
Home Screen
1
5m/s
1000m
D
500m
H
6m/s
3m
20
75%
12'59''
15
24
15min
10min
10°
Top
Top
2m
Bottom
Bottom 5m
567891011
2
3
4
121314
15
Press Brake button to cancel RTH
Low battery RTH
1. Obstacle Detection Status (only available for
aircrafts with the obstacle sensing function)
Indicates the distance between the aircraft and
obstacles as well as the general direction of the
obstacles. Red, orange, and gray bars indicate the
relative distance ranging from near to far. Red bars
are displayed when obstacles are close to the aircraft
and orange bars are displayed when obstacles are
DJI Goggles 2 User Manual
v1.0
Contents
© 2022 DJI All Rights Reserved
28
within the detection range. Gray bars indicate there
are no obstacles within the detection range.
The display of the obstacle detection status
interface varies by aircraft (as a bar on the
top or a ring at the center).
2. microSD Card Information
Displays the number of shots or recording time
remaining on the microSD card of the aircraft or
goggles.Aashingiconwillappearwhenrecording
that displays the recording time.
Do not insert or remove the microSD card
while recording, otherwise data or system
lesmaybelostordamaged.
3. Gimbal Slider
Displays the gimbal tilt angle when the gimbal dial
is toggled.
4. Prompts
Displaysnoticationsandinformationsuchas
when a new mode is applied or battery level is low.
5. Goggles Battery Level
Displays the battery level of the goggles.
6. GPS Signal Strength
Displays the current GPS signal strength of the
aircraft.
If the devices are not used for an extended period,
it may take longer than usual to search for GPS
signals. If the signals are unobstructed, it takes
approximately 20 seconds to search for the GPS
signalswhenthedevicesarepoweredonando
within a short period.

DJI Goggles 2 User Manual
v1.0
Contents
© 2022 DJI All Rights Reserved
29
7. Video Bitrate
Displays the current video bitrate of the live view.
8. Remote Controller and Video Downlink Signal
Strength
Displays the remote controller signal strength
between the aircraft and remote controller and the
video downlink signal strength between the aircraft
and the goggles.
9. Vision System Status (only available for aircrafts
with the obstacle sensing function)
DisplaysthestatusoftheVisionSystemindierent
directions. The icon is white when the Vision
System is working normally. Red indicates that the
Vision System is disabled or working abnormally
where the aircraft will not be able to avoid
obstacles automatically.
10. Remaining Flight Time
Displaystheremainingighttimeoftheaircraft
after starting the motors.
11. Aircraft Battery Level
12. Distance to the Ground
Displays the current altitude information of the
aircraft from the ground when the aircraft is less
than 10 m above the ground.
13. Flight Telemetry
Displays the horizontal distance (D) and speed as
well as vertical distance (H) and speed between
the aircraft and the Home Point.
14. Flight Modes
Displaysthecurrentightmode.
DJI Goggles 2 User Manual
v1.0
Contents
© 2022 DJI All Rights Reserved
30
15. Home Point
Indicates the location of the Home Point.
The goggles will display the screen saver if they are
disconnected from the aircraft and not used for an
extended period. Tap the touch panel to exit the
screen saver. Reconnect the goggles to the aircraft
and image transmission will be restored.
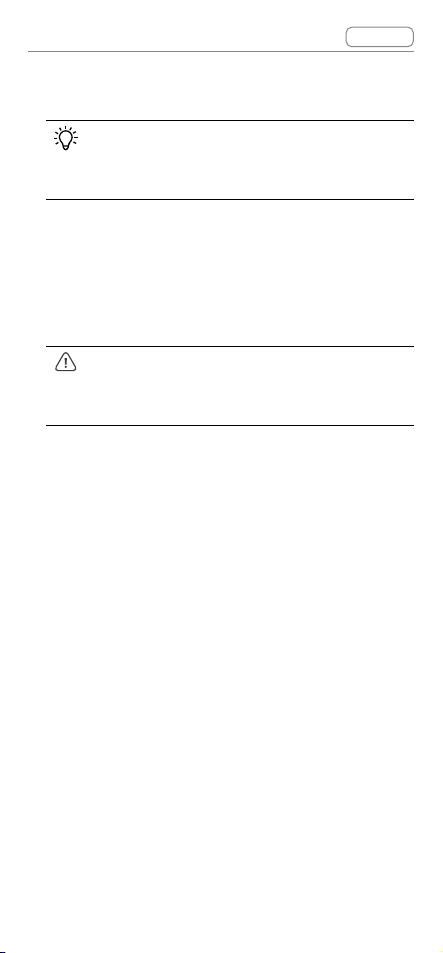
Shortcut Menu
15min
10min
1.8km/h
1024.4m
D
500m
H
20.5km/h
80
20
75%
12'59''
Swipe down from the top of the touch panel to
enter the Shortcut Menu and perform the following
functions:
Take a photo, or start/stop recording
Lock/unlock the screen
Enable/disable Enhanced Display
Enable/disable Head Tracking
Adjust brightness
Adjust volume
DJI Goggles 2 User Manual
v1.0
Contents
© 2022 DJI All Rights Reserved
31
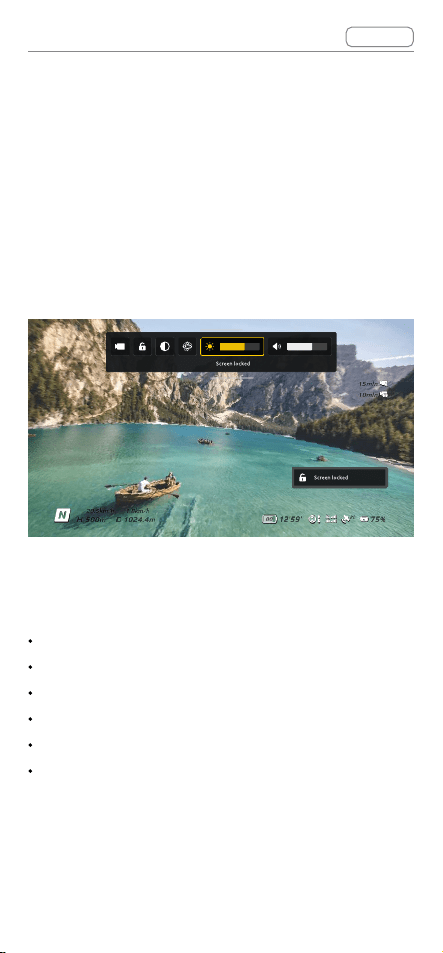
Camera Settings
15min
10min
锁屏
Mode
Manual
300
ISO
1/200
Shuttle
5.5
Apeture
+3
M.M
Manual
WB
1200K
Swipe up from the bottom of the touch panel to enter
the Camera Settings and to quickly change camera
parameters.
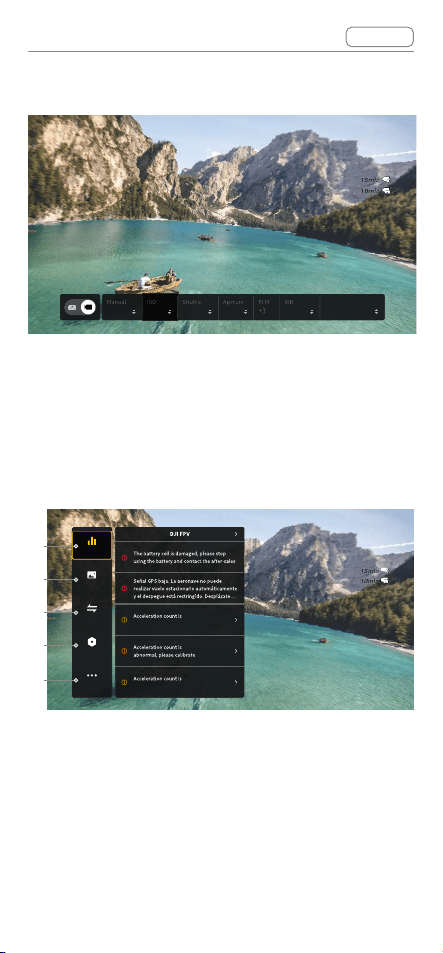
Menu
15min
10min
Status
Album
Transmission
Setting
More
Switch
abnormal
Calibration
abnormal
Calibration
Calibration
1
2
3
4
5
Swipe right from the left of the touch panel to open
the goggles menu.
1. Status
Displays the in-use aircraft model and detailed
information of prompt alerts. To change aircraft,
use the switch function in the upper right corner.

DJI Goggles 2 User Manual
v1.0
Contents
© 2022 DJI All Rights Reserved
32
2. Album
Shows the photos or videos stored on the microSD
ofthegoggles.Selectanyletopreview.
3. Transmission
The Transmission menu has a Pilot sub-menu and
Audience sub-menu.
The video transmission mode for the current
device can be set under the Pilot sub-menu,
including but not limited to:
a. Enable or disable Broadcast mode (only
supported by certain aircraft). The device
number will be displayed when Broadcast
modeisenabledsothatotherdevicescannd
the device and enter the channel to see the
camera view.
b. SettheFocusmodetoon,o,orauto.
c. Set the channel mode to auto or manual. It is
recommended to select auto so that the video
transmission will automatically switch between
the 2.4 and 5.8 GHz frequency bands and
select the channel with the best signal.
d. Set the frequency band. You can select either
2.4 or 5.8 GHz if the channel mode is manual.
e. Set the bandwidth of the video transmission.
The number of channels available varies
according to the bandwidth. The channel
with the best signal strength can be manually
selected.
The larger the bandwidth, the more spectrum
resources it occupies, which provides a higher

DJI Goggles 2 User Manual
v1.0
Contents
© 2022 DJI All Rights Reserved
33
video transmission rate and clearer image
quality. However, there will also be a higher
chance of wireless interference and the amount
of equipment that can be accommodated
will be more limited. To avoid interference in
a multiplayer competition, manually select a
xedbandwidthandchannel.
If any nearby video transmission device turns on
the Broadcast mode, the device and its signal
strength can be viewed in the Audience sub-
menu. Select a channel to see the camera view.
4. Settings
Safety
a.Setthesafetycongurationssuchasmaxight
altitude,maxightdistance,andRTHaltitude.
Users can also update the Home Point, set
Obstacle Avoidance behavior, and view the
IMU and compass status and calibrate them if
necessary.
b.FindMyDronehelpstondthelocationofthe
aircraft on the ground by using the cached
video in the goggles.
c. Advanced Safety Settings include aircraft
signal lost action, enabling/disabling AirSense,
and emergency propeller stop. The aircraft
can be set to hover, land, or RTH when it
loses the signal from the remote controller. If
the emergency propeller stop is enabled, the
motorscanbestoppedmid-ightanytimeby
pressing the lock button twice on the motion
controller or performing a combination stick
DJI Goggles 2 User Manual
v1.0
Contents
© 2022 DJI All Rights Reserved
34
command (CSC) on the remote controller. If
the emergency propeller stop is disabled, the
motorscanonlybestoppedmid-ightwith
the same control action in an emergency, such
as if a collision occurs, a motor stalls, the
aircraft rolls in the air, or is out of control and is
ascending or descending quickly.
Stoppingmotorsmid-ightwillcause
the aircraft to crash.
Control
a.Congureremotecontrollerrelatedfunctions,
such as setting the stick mode, customizing
functions of certain buttons, and calibrating the
IMU and compass.
b. Calibrate the motion controller, or view its tutorial.
c. Calibrate the gimbal or adjust the gimbal tilt
speed.
d. Invert horizontal swipe for the touch panel.
e. View the goggles tutorial.
Camera
a. Users can set the transmission video specs,
format and gridlines, enable or disable the
center point of the screen, and format the
microSD card.
Note that the data cannot be recovered
after formatting. Operate with caution.
b. In Advanced Camera Settings, users can set
the recording device, storage, color, and anti-
icker,aswellasenableordisabledistortion
correction.

DJI Goggles 2 User Manual
v1.0
Contents
© 2022 DJI All Rights Reserved
35
c. Select Reset Camera Parameters to restore all
camera settings to default.
Display
Adjust screen brightness, zoom, and display or
hide the Home Point.
About
a. View device information such as the serial
numberandthermwareofthegogglesand
linked devices.
b. Set the system language.
c. Select Reset All to reset the goggles and the
linked devices to their default settings.
5. More
Enable the wireless streaming function to cast the
video playing on the mobile device to the goggles
screen (the video player must support the wireless
streaming function).

DJI Goggles 2 User Manual
v1.0
Contents
© 2022 DJI All Rights Reserved
36
Switching Aircraft
To change aircraft, open the goggles menu and select
Status, then select Switch and choose the aircraft
you wish to use. Follow the on-screen instructions to
complete the change.
Using the Head Tracking Function
The head tracking function is only supported by
certain aircraft and can be enabled by clicking
in
the Shortcut Menu of the goggles.
After enabling the head tracking, the horizontal
orientation of the aircraft and the gimbal tilt can be
controlled through head movements. The remote
controldevicewillonlycontroltheightpathofthe
aircraft. The gimbal will not be able to be controlled
by the remote control device.
Using the Wireless Streaming
Function
The wireless streaming function enables you to
project the video playing on your mobile phone or
computer to the goggles display. For this to work, the
video player must support wireless streaming.
To use this function, open the goggles menu and
select More, then tap wireless streaming and follow
the on-screen instructions.

DJI Goggles 2 User Manual
v1.0
Contents
© 2022 DJI All Rights Reserved
38
Controlling the Aircraft
The motion controller has two modes: Normal mode and
Sport mode. Normal mode is selected by default.
Lock Button
Lock Button
Takeo:
Press twice to start the motors of
the aircraft. Press and hold to make
theaircraftautomaticallytakeo,
ascend to approximately 1,2 m, and
hover.
Landing:
Press and hold while the aircraft
is hovering to land it automatically
and stop the motors.
Press once to cancel Low Battery RTH when the
countdown appears in the goggles.
Critical Low Battery landing cannot be
canceled.
DJI Goggles 2 User Manual
v1.0
Contents
© 2022 DJI All Rights Reserved
39
Brake Button
Brake Button
Braking:
Press once for the aircraft to brake
and hover in place. Press again to
unlock the attitude.
RTH:
Press and hold the brake button
until the motion controller beeps
to indicate that RTH has started.
When the aircraft is performing
RTH or auto landing, you can press
the button once to cancel RTH or
landing.
Motion Control
Beforeusingforthersttime,practiceyingwith
the motion controller using DJI Virtual Flight.
Speed Control:
Presstheacceleratortoyinthe
direction of the circle in the goggles.
Apply more pressure to accelerate. Release to stop
and hover.
DJI Goggles 2 User Manual
v1.0
Contents
© 2022 DJI All Rights Reserved
40
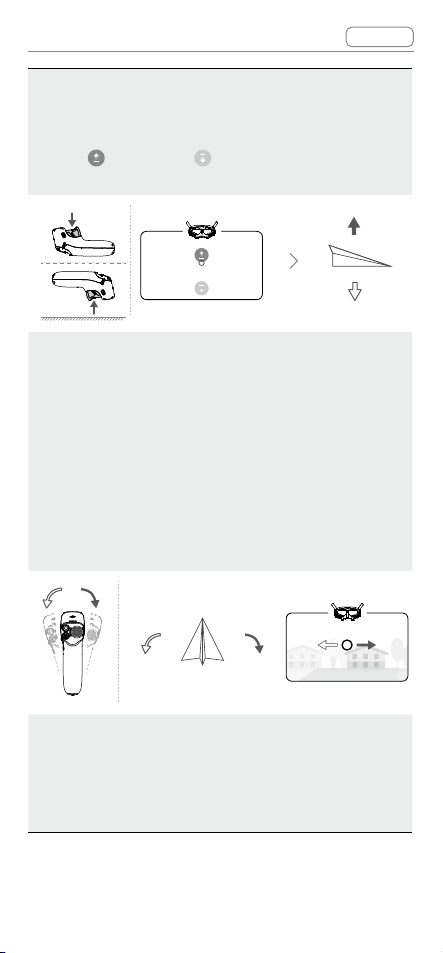
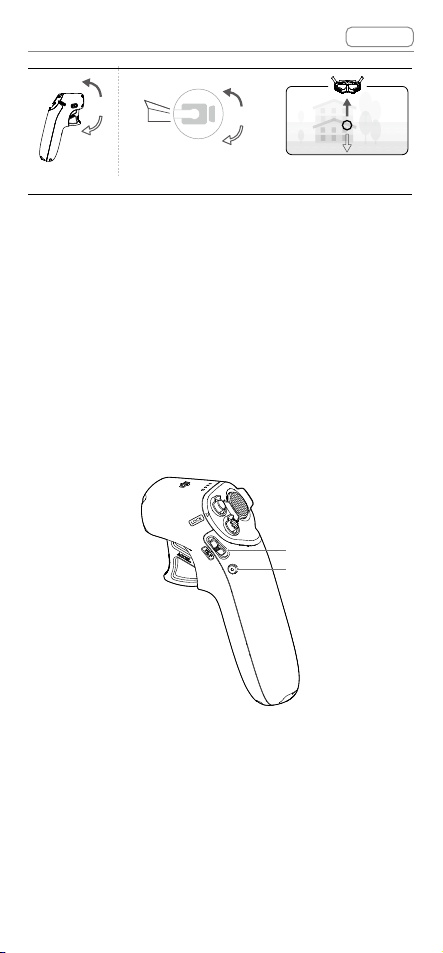
Ascent Descent:
To control the ascent or descent of
theaircraft,rsttiltthemotioncontroller90°upor
down. Once the circle in the goggles goes into the
ascend
or descend icon, press the accelerator
to make the aircraft ascend or descend.
Direction Control:
The orientation of the aircraft can
be controlled by tilting the motion controller left and
right. Tilt left to rotate the aircraft counterclockwise
and tilt right to rotate clockwise. The circle in the
goggles will move left and right and the video
transmission will change accordingly.
The greater the tilt angle of the motion controller, the
faster the aircraft will rotate.
Gimbal Control
:
Tilt the motion controller up and
down to control the tilt of the gimbal. The circle in
the goggles will move up and down and the video
transmission will change accordingly.
DJI Goggles 2 User Manual
v1.0
Contents
© 2022 DJI All Rights Reserved
41
Controlling the Gimbal and Camera
1. Gimbal Tilt Slider: push up and down to adjust the
tilt of the gimbal.
2. Shutter/Record Button: press once to take a photo
or to start or stop recording. Press and hold to
switch between photo and video mode.
1
2

DJI Goggles 2 User Manual
v1.0
Contents
© 2022 DJI All Rights Reserved
42
Motion Controller Alert
The motion controller sounds an alert during RTH.
The alert cannot be cancelled.
The motion controller sounds an alert when the battery
level is between 15% and 6%. A low battery level alert
can be cancelled by pressing the power button. A
critical battery level alert will sound when the battery
level is less than 5% and cannot be cancelled.
Motion Controller Calibration
The compass, IMU, and accelerator of the motion
controller can be calibrated. Immediately calibrate any
of the modules when prompted to do so.
On the goggles, go to Settings, Control, Motion
Controller, and then Motion Controller Calibration.
Select the module and follow the prompts to
complete calibration.
DO NOT calibrate the compass in locations
where magnetic interference may occur
such as close to magnetite deposits or large
metallic structures such as parking structures,
steel-reinforced basements, bridges, cars, or
scaolding.
DO NOT carry objects that contain
ferromagnetic materials such as mobile
phones near the aircraft during calibration.

DJI Goggles 2 User Manual
v1.0
Contents
© 2022 DJI All Rights Reserved
44
Use one of the following methods to update the
rmware:
1.UsetheDJIFlyApptoupdatethermwareforthe
entire set of devices including the aircraft, goggles,
and motion controller.
2. Use DJI Assistant 2 (Consumer Drones Series) to
updatethermwareforasingledevice.
Using DJI Fly
Power on the aircraft, goggles, and motion controller.
Make sure all the devices are linked. Connect the
USB-C port of the goggles to your mobile device,
run DJI Fly, and follow the prompted instructions to
update. Make sure your mobile device is connected
to the internet during the update.
Use the USB-C OTG cable provided to
connect if you are using a UBS-A to USB-C.
The goggles only support standard USB-C
protocolsandMFI-certiedLightningcables.
Non-standard cables are not supported. If the
devices do not respond after connecting, use
adierentdatacableandtryagain.
Using DJI Assistant 2 (Consumer Drones Series)
1. Connect the USB-C port of the goggles to the
computer using a USB-C to USB-A cable.
DJI Goggles 2 does not support computer
connection using a USB-C to USB-C cable.
DJI Goggles 2 User Manual
v1.0
Contents
© 2022 DJI All Rights Reserved
45
2. Launch DJI Assistant 2 and log in with a DJI
account.
3. Select the device and click Firmware Update on
the left side of the screen.
4.Selectthermwareversion.
5.Thermwarewillbedownloadedandupdated
automatically.
6. The device will restart automatically after the
rmwareupdateiscomplete.
Make sure to follow all the steps to update
thermware,otherwisetheupdatemayfail.
Thermwareupdatewilltakeseveral
minutes.Itisnormalifthescreenturnsoor
the goggles restart automatically during the
update.Pleasewaitpatientlyforthermware
upgrade to complete.
Make sure the computer is connected to the
internet during the update.
Makesurethatthedevicehassucient
powerbeforeupdatingthermware.
Do not unplug the USB-C cable during the
update.
Note that the update may reset the
parameters. Before updating, take note of
yourpreferredsettingsandrecongurethem
after the update.

© 2022 DJI All Rights Reserved
46
Maintenance
DJI Goggles 2 User Manual
v1.0
Contents
© 2022 DJI All Rights Reserved
47
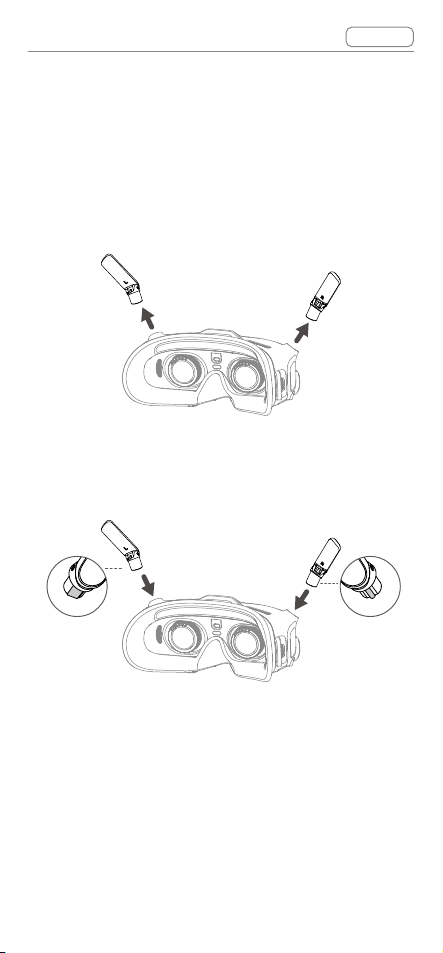
Replacing the Antennas
If an antenna is damaged, you can contact DJI after-
sales to purchase a new one for replacement.
To remove the antenna, hold the bottom of the
antenna and pull it upwards.
When installing, distinguish the left and right antennas
and make sure the antenna is properly aligned with
the port.

DJI Goggles 2 User Manual
v1.0
Contents
© 2022 DJI All Rights Reserved
48
Replacing the Foam Padding
1. Hold the bottom of the foam padding and remove it
gently as shown below.
DO NOT pull the sides when removing the
foam padding. Otherwise, the padding may be
damaged.
2. Align the positioning columns of the new foam
padding with the positioning holes on the goggles,
install it and press the left and right sides. After
hearing a "click", check and make sure that there is
no gap between the foam padding and the goggles.
DJI Goggles 2 User Manual
v1.0
Contents
© 2022 DJI All Rights Reserved
49
Cleaning and Maintenance of the
Lenses
Use a piece of soft, dry, and clean cloth to wipe in a
circular motion from the center to the outer edges of
each lens.
Make sure to disconnect the goggles from the
power outlet before cleaning and make sure
that no cables are connected.
DO NOT clean the lenses with alcohol.
The lenses are delicate. Clean them gently. DO
NOTscratchthemasthiswillaectviewing
quality.
Store the goggles in a dry place at room
temperature to avoid damage to the lenses
and other optical components from high
temperatures and humid environments.
Keep the lenses away from direct sunlight to
avoid screen damage. Re-attach the screen
protector to protect the lens when the goggles
are not in use.

© 2022 DJI All Rights Reserved
50
Appendix
DJI Goggles 2 User Manual
v1.0
Contents
© 2022 DJI All Rights Reserved
51
Specifications
VisittheDJIocialwebsiteforthelatest
specications:
https://www.dji.com/goggles-2/specs
DJI Goggles 2
Model Number RCDS
18
Weight Approx.290g(withheadband)
Dimensions
167.40×103.90×81.31mm(antennafolded)
196.69×103.90×104.61mm(antennaunfolded)
Screen Size
(single screen)
0.49in
Resolution
(single screen)
1920×1080p
Screen Refresh
Rate
Max. 100 Hz
IPD Range 56-72 mm
Diopter Range +2.0 D to -8.0 D
FOV 5
1°
Transmission
Whenusedwithdierentaircraft,thegoggles
will automatically select the corresponding
rmwaretomatchthetransmission
specicationoftheaircraft.
Operating
Frequency
2.4000-2.4835 GHz
5.725-5.850 GHz (not available in some countries/
regions)
Transmitter
Power (EIRP)
2.4 GHz: <30 dBm (FCC),
<20 dBm (CE/SRRC/MIC/KC)
5.8 GHz: <30 dBm (FCC),
<23 dBm (SRRC),
<14 dBm (CE/KC)
Latency *
1080p@100fps: 30 ms
1080p@60fps: 40 ms
Max Video
Bitrate
50 Mbps
DJI Goggles 2 User Manual
v1.0
Contents
© 2022 DJI All Rights Reserved
52
Wi-Fi
Protocol Wi-Fi 802.11b/a/g/n/ac
Operating
Frequency
2.4000-2.4835 GHz
5.150-5.250 GHz (in-door use only, not available
in some countries/regions)
5.725-5.850 GHz (not available in some countries/
regions)
Transmitter
Power (EIRP)
2.4 GHz: <20 dBm (FCC/CE/SRRC/MIC/KC)
5.1 GHz: <20 dBm (FCC/CE/MIC/KC)
5.8 GHz: <20 dBm (FCC/SRRC/KC), <14 dBm (CE)
Bluetooth
Protocol Bluetooth 5.
2
Operating
Frequency
2.4000-2.4835 GHz
Transmitter
Power (EIRP)
<8 dBm
Supported
Video Recording
Format
MOV
Supported
Video Playback
Format
MP4, MOV (Video format: H.264, H.265; Audio
format: ACC, PCM)
Wireless
Streaming
DLNA
Operating
Temperature
-10°to40°C(14°to104°F)
Power Input DJI Goggles 2 Battery
Supported SD
Cards
microSD Card, max 256 GB
Recommended
microSD Cards
SanDisk Extreme U3 V30 A1 32 GB microSDXC
SanDisk Extreme Pro U3 V30 A1 32 GB
microSDXC
Kingston Canvas Go!Plus U3 V30 A2 64 GB
microSDXC
KingstonCanvasReactPlusU3V90A164GB
microSDXC
KingstonCanvasReactPlusU3V90A1128
GB microSDXC
KingstonCanvasReactPlusU3V90A1256
GB microSDXC
Samsung PRO Plus V30 U3 V30 A2 256 GB
microSDXC
DJI Goggles 2 User Manual
v1.0
Contents
© 2022 DJI All Rights Reserved
53
DJI Goggles 2 Battery
Weight Approx. 122 g
Dimension 73.04×40.96×26mm
Capacity
1800 mAh
Voltage 7V-9V
1.
5A
Type Li-ion
Chemical
System
LiNiMnCoO
2
Energy 18 Wh
Charging
Temperature
0°to45°C(32°to113°F)
Max Charging
Power
12.6 W (5 V
2A/9V
1.4 A)
Operating Time Around2hours(wheninight)
DJI Motion Controller
Model Number FC7BMC
Weight Approx. 167 g
Operating
Frequency
2.4000-2.4835 GHz;
5.725-5.850 GHz (not available in some countries/
regions)
Transmitter
Power (EIRP)
2.4GHz:≤28.5dBm(FCC),
≤20dBm(CE/SRRC/MIC)
5.8GHz:≤31.5dBm(FCC),≤19dBm(SRRC)
,≤14dBm(CE)
Operating
Temperature
-10°to40°C(14°to104°F)
Operating Time Around 5 hours
* Measured in a wide-open area without interference. The actual latency
differsbyaircraft.

DJI Goggles 2 User Manual
v1.0
Contents
© 2022 DJI All Rights Reserved
54
Low Blue Light Statement
Light from displays can cause eyestrain and retina
damagewhichcanaectvisionovertime.DJI
Goggles 2 adopts an OLED eye-protection screen,
whichcaneectivelyreducethehigh-energyshort-
wave blue light and its emission range. The screen
supports all-mode low blue light, protecting users
from exposure to harmful blue light. DJI Goggles 2
hasobtainedtheLowBlueLightcertication.
It is highly recommended to follow the steps below to
protect your eyes against prolonged display use:
Look away from the screen and then at a distant place
for 20 seconds every 20 minutes.
Rest your eyes for 10 minutes after 2 hours of
continuous use.
Roll your eyes upward and then in a large circle every
few hours.
When your eyes get tired, try to blink at a normal rate,
then close your eyes and rest for a minute.


This content is subject to change without notice.
Download the latest version from
https://www.dji.com/goggles-2
Trademarks
is a trademark of SZ DJI TECHNOLOGY CO., LTD. (abbreviated
as“DJI”)anditsaliatedcompanies.
Names of products, brands, etc., appearing in this document are
trademarks or registered trademarks of their respective owner
companies.