Loading ...

PAC
®
| Ph. 866-931-8021 | [email protected]
www.pac-audio.com
Rev. 090916
Page 2
Pacific Accessory Corporation
Radio Replacement & Steering Wheel Control Interface
for 2014 - 2016 Mercedes Sprinter Vehicles
Equipped with a Factory Radio
RP4.2-MB11
VIDEO OUTPUT
REVERSE CAMERA INPUT
FRONT CAMERA
LEFT CAMERA
RIGHT CAMERA
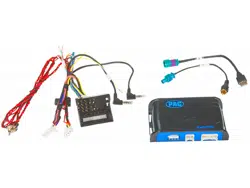
RP4.2-MB11-HAR
RP4.2-MB11 VS41
(when used)
To Radio
To Vehicle
Harness
Module Wiring Overview
Installation Steps
DIP
123 4
ON
Alpine JVC Kenwood Clarion Pioneer / Other Sony Fusion
None 1 2 1 & 2 3 1 & 3 2 & 3
Other = Advent, BOYO, Dual, Lightning Audio, Rockford Fosgate, Visteon
SET RADIO DIPSWITCHES (ON = DOWN)
1. The radio select DIP switches on the side of the interface must be adjusted to the proper radio
setting before plugging the interface into the vehicle.
2. Make all connections as described in the connection chart on the previous page.
3. Connect the SWC wire or 3.5mm jack to the aftermarket radio (aftermarket radio must support a wired remote input).
4. If using the VS41, connect the 10-pin connector from the VS41-HAR to the RP4.2-MB11’s expansion port.
5. If using the VS41, connect the cameras to the proper inputs on the VS41-HAR.
6. Mount the supplied 3-way switch, which will force both the front camera (when using the VS41) and rear camera, where it is
easily accessible.
7. The blind spot cameras will be activated with the use of the turn signal stalk. The passenger side camera will be active when
the right turn signal is active. The driver side camera will be active when the left turn signal is active. If more control is needed
signal within 2 seconds to activate either the right or left camera. The turn signal will need to remain in the on position for the
camera to remain active.
8. Once the DIP Switches have been set and all connections have been made, plug the interface into the vehicle.
9. If you wish to reassign functions to the SWC, or utilize short press long press dual command functionality follow the optional
programming instructions on the next page.
3-Way Switch
(Front / Rear Camera)
Loading ...
Loading ...