Loading ...
Loading ...
Loading ...

8
Installation
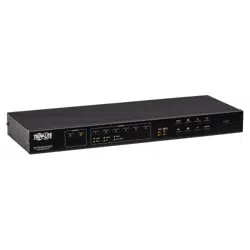
1
Ground the unit. Using a grounding wire, connect one end of the grounding wire to the unit’s grounding terminal and the
other end to a suitable earth-grounded object.
2
Connect your source devices to the Source device ports.
Note: Source 1, 2 and 3 allow users to connect up to two different sources with varying interfaces and select one from each set when
needed. For details on how to switch the source of each of these combo ports, refer to Switching the Display Source.
3
Using HDMI cables (not included), connect your HDMI-compliant displays to the HDMI Out ports.
Note: If you are only using one display, make sure to connect it to Display A where the OSD menu displays.
4
Connect your audio devices to the Analog or Digital Audio Out ports. By default, the connected speakers will output the
source audio of Display A.
5
Attach a keyboard and mouse to the USB Type-A ports to control the computers (connected as Source 1 and Source 2).
6
Connect USB peripherals to the USB Type-A ports.
7
To use the IR Remote Control, connect the included IR Receiver Cable to the IR Receiver port.
8
(Optional) To configure the unit’s settings via RS-232 port, connect the unit to a hardware or software controller.
9
Plug the power cord into the unit then to an available wall outlet.
10
Power on all connected devices.
POWER
HDM I IN
IR
HDM I IN HDM I IN HDM I IN HDM I IN HDM I IN
DisplayPort I N
Y
Pb/ Cb
Pr/ Cr
VIDEO
R L
RS-232
(IR)
1
2
3
4
5
6
8
9
10
7
Connecting the Switch
Loading ...
Loading ...
Loading ...