Loading ...
Loading ...
Loading ...
WIll IIIF-©LIAI ©W©ILI!
A CYCLE
1_ Remove the broil pan and grid, oven racks, all utensils
and any foil that may be In the oven. Do not try to
clean utensils or any other objects In the oven during
a self-clean cycle, if oven racks are le_ in the
range during a clean cycBe, they will darken_
lose their luster and become hard to slide, if
you choose to leave the racks In the oven, you can
polish the edges of the racks with steel wool and
apply a small amount of vegetable oii to the rack
edges after the self-clean cycle. This will make the
racks easier to slide.
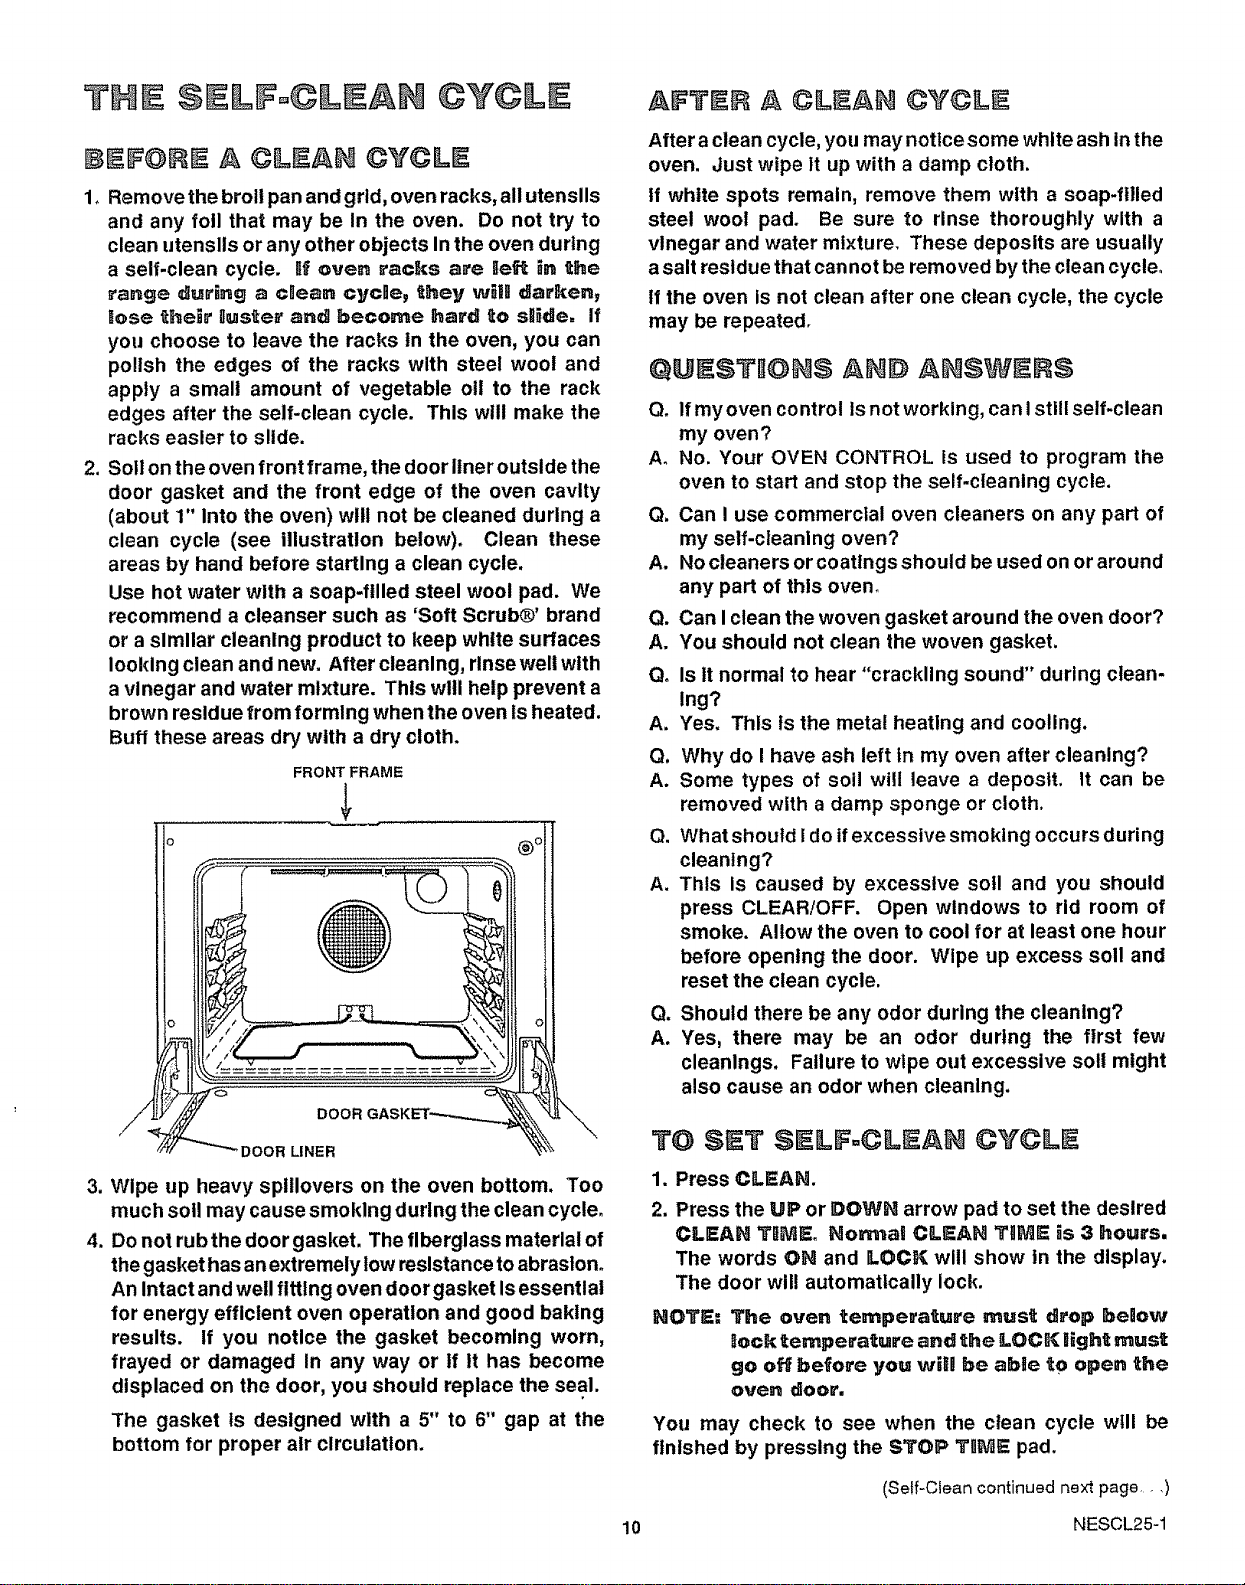
2. Soil on the oven front frame, the door liner outside the
door gasket and the front edge of the oven cavity
(about 1" Into the oven) will not be cleaned during a
clean cycle (see illustration below). Clean these
areas by hand before starting a clean cycle.
Use hot water with a soap-filled steel wool pad. We
recommend a cleanser such as 'Soft Scrub®' brand
or a slmllar cleaning product to keep white surfaces
looking clean and new. After cleaning, rlnsewell with
a vinegar and water mixture. This will help prevent a
brown residue from forming when the oven ts heated.
Buff these areas dry with a dry cloth.
FRONT FRAME
DOOR
DOORL|NER
3. Wipe t,p heavy splllovers on the oven bottom. Too
much soil may cause smoking during the clean cycle.
4. Do not rub the door gasket. The fiberglass material of
the gasket has an extremely low resistance to abrasion.
An Intact and well fitting oven doorgasket Is essential
for energy efficient oven operation and good baktng
results. If you notice the gasket becoming worn,
frayed or damaged In any way or If it has become
displaced on the door, you should replace the seal.
The gasket Is designed with a 5" to 6" gap at the
bottom for proper air circulation.
A CLEAH CYCLE
After a clean cycle, you may notice some white ash in the
oven. Just wipe tt up with a damp cloth.
tf white spots remain, remove them with a soap-filled
steel wool pad. Be sure to rinse thoroughly with a
vinegar and water mixture. These deposits are usually
a salt residue that can not be removed by the clean cycle.
if the oven is not clean after one clean cycle, the cycle
may be repeated.
QUI!SIFIO I$ AI'III) AI $WI!IIIS
Q. If my oven control Is not working, can Istill self-clean
my oven?
A. No. Your OVEN CONTROL is used to program the
oven to start and stop the self-cleaning cycle.
Q. Can I use commercial oven cleaners on any part of
my self-cleaning oven?
A. No cleaners or coatings should be used on or around
any part of this oven°
Q. Can I clean the woven gasket around the oven door?
A. You should not clean the woven gasket,
Qo Is it normal to hear "crackling sound" during clean-
Ing?
A. Yes. This ts the metal heating and cooling.
Q, Why do I have ash left in my oven after cleaning?
A. Some types of soil will leave a deposit. It can be
removed with a damp sponge or cloth.
Q. What should Ido ifexcessive smoking occurs during
cleaning?
A. This Is caused by excessive soil and you should
press CLEAR!OFF. Open windows to rid room of
smoke. Allow the oven to cool for at least one hour
before opening the door. Wipe up excess soil and
reset the clean cycle.
Q. Should there be any odor during the cleaning?
A. Yes, there may be an odor during the first few
cleanlngs. Failure to wlpe out excessive sol mlght
also cause an odor when cleaning.
TO SET SELF-CLeAN CYCLI
1. Press CLEAN.
2. Press the UP or DOWN arrow pad to set the desired
CLEAN TIIME° Normal CLEAN TIM_ is 3 hours,
The words OH and LOCK will show in the display.
The door will automatically lock.
NOTE_ The oven temperature must drop below
lock temperature and the LOCK light must
go off before you will be able tO open the
oven door.
You may check to see when the clean cycle will be
ftnlshed by pressing the STOP TItlE pad.
(Self-Clean continued next page .... )
10 NESCL25-1
Loading ...
Loading ...
Loading ...