Loading ...
Loading ...
Loading ...
2221
Recirculating
Recirculating
INSTALLATION
INSTALLATION OVERVIEW
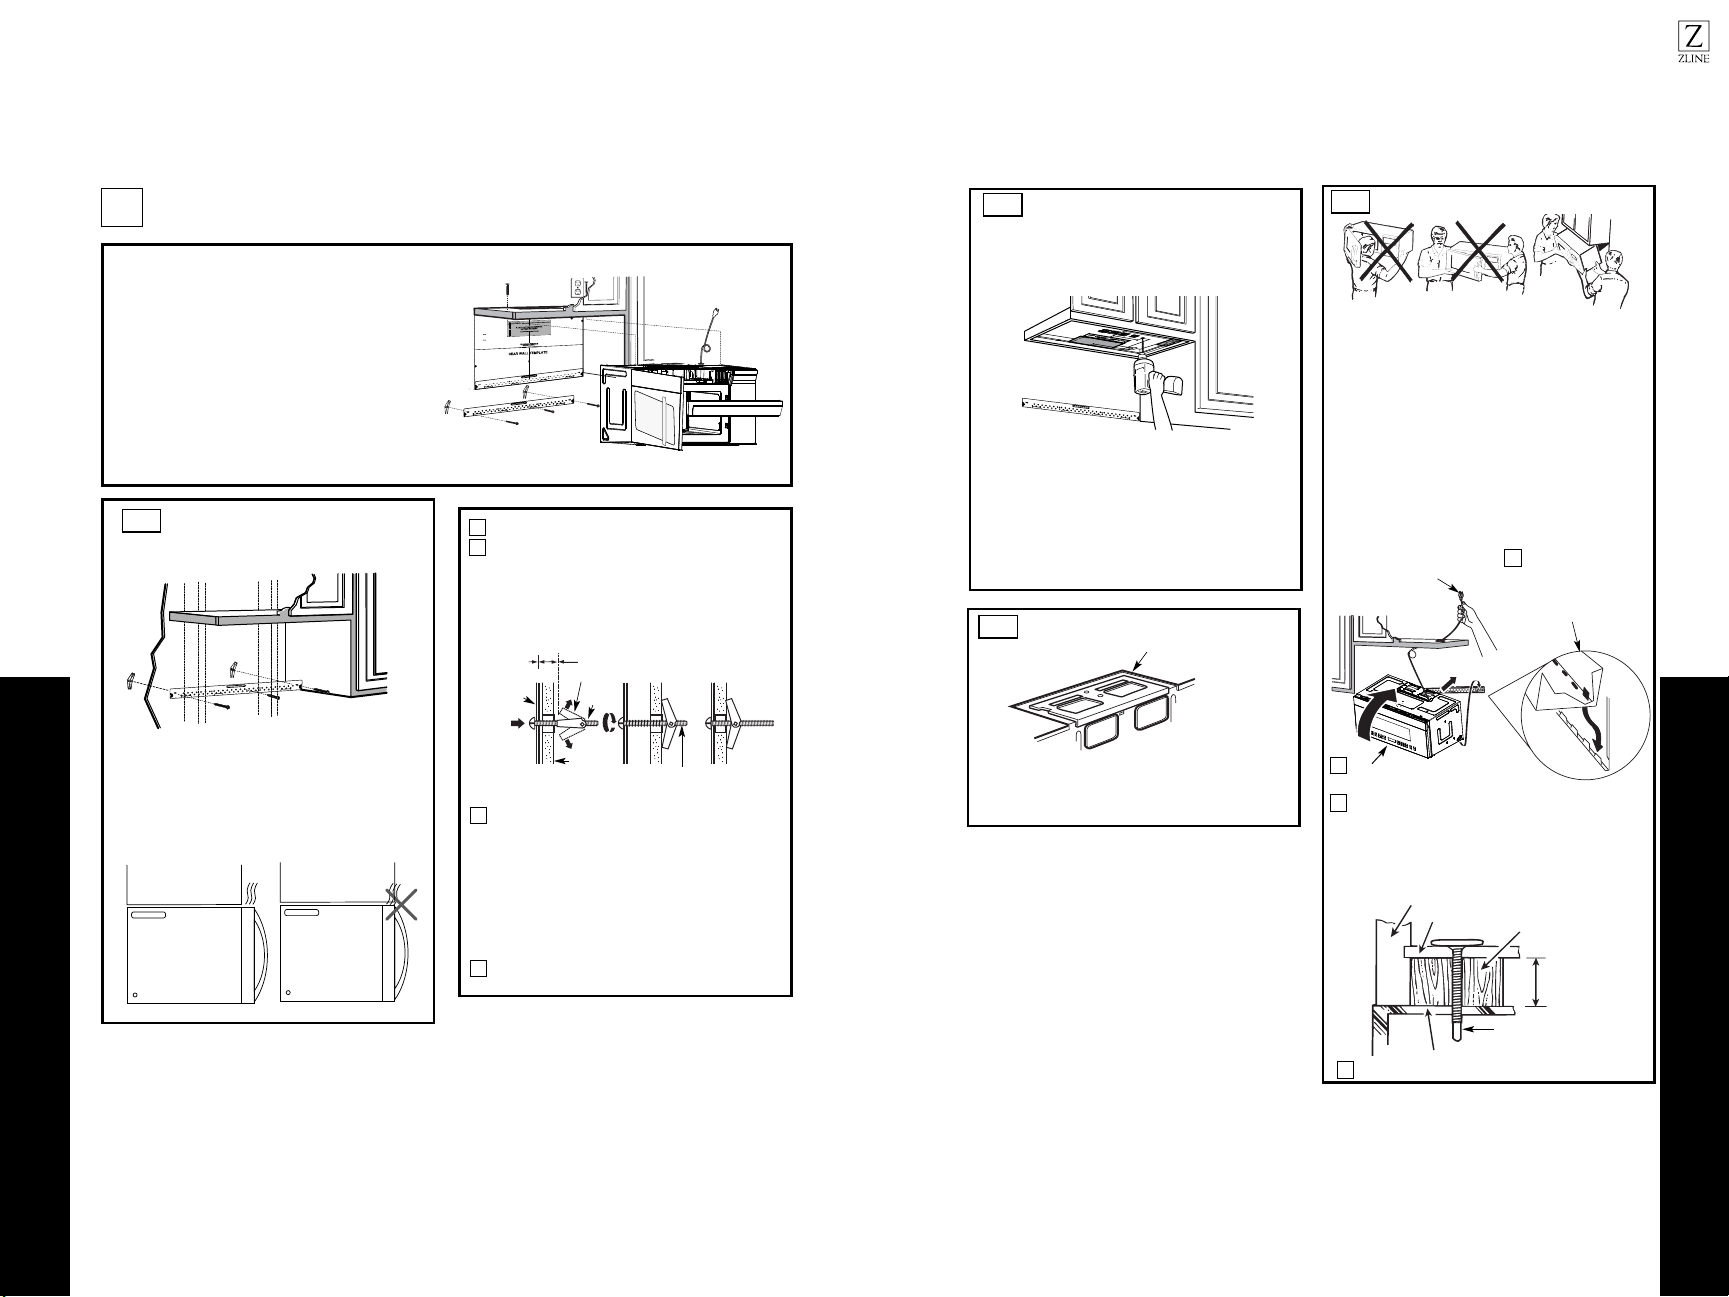
C1. Attach Mounting Plate to Wall
C2. Prepare Top Cabinet
C4.
C5.
Mount the Microwave Oven
IMPORTANT NOTES:
•Make sure the screws for the blower motor and blower
plate are securely tightened when they are reinstalled.
This will help to prevent excessive vibration.
•Make sure the motor wiring has been properly routed
and secured, and that the wires are not pinched.
Place the mounting plate against the wall and
insert the toggle wings into the holes in the wall
to mount the plate.
NOTE: Before tightening toggle bolts and wood
scr ew make sure the bottom of the mounting plate,
touch the bottom of the cabinet when pushed flush
against the wall and that the plate is properly
centered under the cabinet.
CAUTION: Be careful to avoid pinching fingers
between the back of the mounting plate and the wall.
Tighten all bolts. Pull the plate away from the wall
to help tighten the bolts.
4
3
ATTACH THE MOUNTING
PLATE TO THE WALL
C1.
Attach the plate to the wall using toggle bolts.
At least one wood screw must be used to attach
the plate to a wall stud.
Remove the toggle wings from the bolts.
Insert the bolts into the mounting plate through
the holes designated to go into drywall and
1
Wall
Mounting
Plate
Spacing for Toggles
More Than Wall
Thickness
Bolt End
Toggle
Bolt
Toggle Wings
To use toggle bolts:
2
RECIRCULATING (Non-Vented Ductless)
C
Install or change Charcoal Filter
C3. Check Blower Plate
NOTE:
CabinetCabinet
If the cabinet depth including the cabinet doors
out from wall using adequate materials supporting
150 Ibs to allow proper top vent air exhaust/intake.
12
"
4"
NO
T
E
:IT I
S VER Y I MP
ORTANT T
O
R
EAD AN
D F
O
LL
O
W
T
H
E
DIRE
CTIONS
I
N
T
H
E
INST
ALL
ATIO
N
INS
TR
U
CTIO
N
S
BEF
OR
E PR
O
C
EE
D
I
NG
W
IT
H
T
HIS
RE
AR W
A
LL TE
MPLAT
E
.
Th
is Re
arWallTe
mp
la
t
e
serv
es to
p
o
sition
t
he b
o
ttom
moun
ti
n
g pl
a
tean
d tolocate
t
h
e
ho
rizontal
e
xhaus
t
outle
t.
1
.
Usea
lev
eltoch eck tha t th
e
te
mpla
t
e
isp
o
siti
on
e
d
a
c
c
urately.
2
. L
o
ca
te an
d
ma
rk at
least o
ne
stu
d
o
n
th
e lef
t
or
r
igh
t side o
f
thec
en
te
rline.
I
t
isimpo
rt
a
nt
t
o
u
s
e
at
le
a
st
one
wo
od
screwmou nte
d
fi
r
m
ly
in astud tosu
p
p
o
rt
t
he weight
of
the
m
icrowav
e
.
Mark
t
wo
additional,e
ve
n
lysp
aced
locationsfor the s uppliedt
oggle b
ol
ts.
3. Drill h
oles i
n
th
e marked loca
t
io
n
s
.
Wh
e
re thereis
a stud
,
d
rill
a
3/16
"
h
o
l
efor
wood
sc
rews. F
o
rhole
s
th
a
t
do
not
lin
e u
p
with a
stud
, drill5
/8
"
h
o
le
s
for
to
g
gle bolts.
DO NO
T
I
N
S
TALL TH
E
M
OUNTINGPL ATE
A
T
THIS TIME.
4
. Re
m
o
ve
t
h
e
template from t he rea
r
w
a
l
l
.
5
. Review the
I
n
st
a
l
lat
i
on
In
structi
onbook for yo
u
r
installation situ a
tion.
Loc
a
teand
ma
rk holes to
a
lign with holes in the
mounting plate.
I
MPORT
ANT:
LOCA
TE AT L
E
AST ONE STUD
ON EI
T
H
ER SIDE
OF
THE
CE
N
TE
R
L
I
NE.
MARK T
HEL
O
CA
TION F
O
R2 ADDI TI ONAL, EV EN L Y
SPACED TO
GGLE BOLT S
IN TH
E
MOUN
TING
PLATE
A
REA
.
L
oc
at
e
a
nd
mark hole
s
t
o al
i
gn
wi
t
h hol
es
int
h
e
m
o
un
tin
g
p
lat
e.
IMP
O
RT
A
NT
:
LO
C
AT
E
AT LEA ST
O
NE
ST
UD
ON EITHER SIDE
O
F
T
H
E
CENT
E
RLINE.
MA
RK
T
H
E
LOCA
TION F
O
R
2
A
D
DIT
ION
AL
,
EVENLY
SPACED TO G
G
LE
BO
L
TS
IN
T
H
E
MOUNT
INGPLA T E
AREA.
T
r
im
th
e
re
ar
wa
ll t
e
m
plate
alon
g
the
d
o
t
ted
li
n
e.
Da
r
levuel ta alaho
ja
para
consul
t
arla
v
ers
ió
n
e
nEs
p
añol.
3
/8"
T
OEDG E
Trim t he rear wal l t
em
pla
t
e along
t
h
e dotted lin
e
.
reattach the toggle wings to 3/4” onto each bolt.
is more than 13”, then the unit must be spaced
INSTALLATION
Installation Instructions
Attach the microwave oven to the top cabinet.
Cabinet Front
Cabinet Bottom Shelf
Filler Block
Microwave Oven Top
Equivalent to Depth
of Cabinet Recess
3
MOUNT THE MICROWAVE OVEN
FOR EASIER INSTALLATION AND PERSONAL
SAFETY, WE RECOMMEND THAT TWO PEOPLE INSTALL
THIS MICROWAVE OVEN.
NOTE: If your cabinet is metal, use the nylon grommet around
the power cord hole to prevent cutting of the cord.
NOTE: We recommend using filler blocks if the cabinet
front hangs below the cabinet bottom shelf.
IMPORTANT: If filler blocks are not used, case damage may
occur from overtightening screws.
Insert a self-aligning screw through top center
cabinet hole. Temporarily secure the oven by turning the
screw at least two full turns after the threads have engaged.
(It will be completely tightened later.) Be sure to keep power
cord tight. Be careful not to pinch the cord, especially when
mounting flush to bottom of cabinet.
.
Self-Aligning Screw
4
2
Rotate front of oven up against
cabinet bottom.
Lift microwave, tilt
it forward, and hook
slots at back bottom
edge onto four lower
tabs of mounting
plate.
1
C3.
C4.
CHECK BLOWER PLATE
Blower Plate
•Place the microwave in its upright position, with the
top of the unit facing up.
•Check to see that the blower plate is correctly
installed on the unit.
USE TOP CABINET TEMPLATE
FOR PREPARATION OF TOP
CABINET
C2.
•Read the instructions on the TOP CABINET
TEMPLATE.
•Tape it underneath the top cabinet.
•Drill the holes, following the instructions on the
TOP CABINET TEMPLATE.
CAUTION: Wear safety goggles when drilling holes
in the cabinet bottom.
You need to drill holes for the top support screws and
a hole large enough for the power cord to fit through.
Adjust top template accordingly if the microwave
NOTE:
IMPORTANT: Do not grip or use the handle or heat shield
during installation. Do not remove the cardboard spacers
between the heat shield and door.
NOTE: When mounting the microwave oven, thread
power cord through hole in bottom of top cabinet. Keep
it tight throughout Steps 1–3. Do not pinch cord or lift oven
by pulling cord.
is being spaced out from the wall due to cabinet depth
(including cabinet doors) of more than 13”.
Loading ...
Loading ...
Loading ...