Loading ...
Loading ...
Loading ...
ENGLISH
8
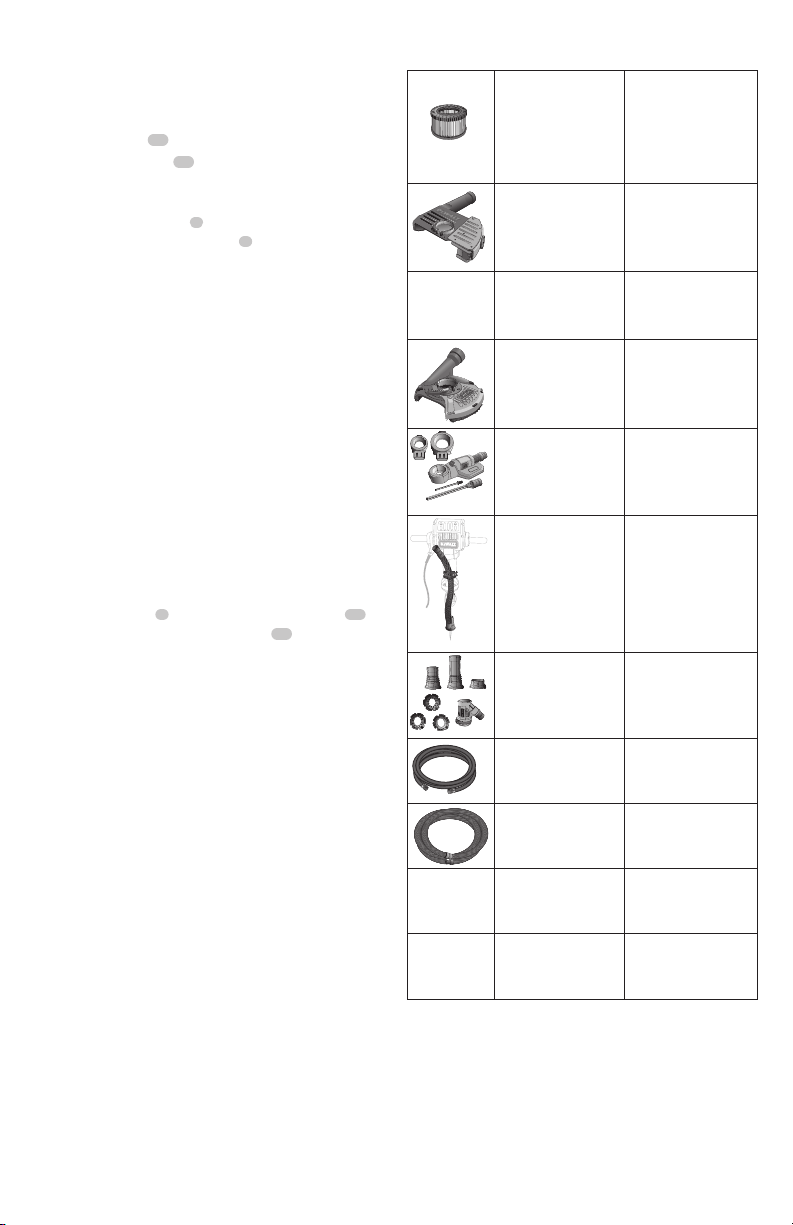
Optional Accessories
DWV9320 (some models)
DWV9330 (some models)
HEPA filter: Captures
99.97% of all particles
greater than or equal to
0.3 microns. Required
when picking up lead
paint debris.
DWE46100
5"–6" (127–152 mm)
Cutting/tuckpointing
shroud
D25301D Dust extraction adapter
DWE46152
5" (127 mm) Surfacing
shroud
DWH050K
DWH050 Universal drilling
dust extraction system
DWH052K
1-1/8" Hex hammer dust
collection
DWH053K
DWH053 SDS Max and
spline chipping dust
collection
DWV9316 Anti-static 14' (4.3 m) hose
DWV9315
Crush proof 14' (4.3 m)
hose
DWV9336 36 mm anti-static hose
DWV016TSRK Storage Rack Accessory
The filter bags provide a clean, easy and quick way to
dispose of the dustcollected.
If you remove the the rack DWV016TSRK from the Vac use
the screws supplied with the rack to close the screw holes
on top of the Vac Head
Accessories
WARNING: Since accessories, other than those offered
by DEWALT, have not been tested with this product, use
of such accessories with this tool could be hazardous.
To reduce the risk of injury, only DEWALT recommended
accessories should be used with thisproduct.
Recommended accessories for use with your tool are
available at extra cost from your local dealer or authorized
service center. If you need assistance in locating any
accessory, please contact DEWALT Industrial Tool Co., 701East
Joppa Road, Towson, MD 21286, call 1‑800‑4‑DEWALT (1‑800‑
433‑9258) or visit our website: www.dewalt.com.
Storage (Fig.K)
1. Empty the canister, refer to To Empty Canister
underOperation.
2. Clean the vacuum inside andoutside.
3. Clean or replace filters, refer toFilters.
4. Remove the hose
7
from the twist‑lock hose inlet
10
and close the inlet with the inlet plug
19
5. Put the ends of the suction hose together to prevent dirt
particles from escaping.
6. Store the suction hose and the power cord as shown in
the illustration. Place the unit in a dry room and secure it
from unauthorizeduse.
NOTE: Plug inlet plug into inlet to keep debris inside
canister when suction hose is removed. You can also
attach the ends of the hose together and lock together
with the twist‑lockend.
NOTE: After wet applications, the internal parts of the
liquid container must be dried before storage.
Cleaning
WARNING: Blow dirt and dust out of all air vents with
clean, dry air at least once a week. To minimize the risk
of eye injury, always wear ANSI Z87.1 approved eye
protection when performing thisprocedure.
WARNING: Never use solvents or other harsh
chemicals for cleaning the non‑metallic parts of the
tool. These chemicals may weaken the plastic materials
used in these parts. Use a cloth dampened only with
water and mild soap. Never let any liquid get inside the
tool; never immerse any part of the tool into aliquid.
visual damage to the filter membrane exists, replace
filters. Filters typically last between six and twelve
months, depending on use andcare.
To Install Filters (Fig. J)
1. Ensure filter seal
22
is in place and is secure
2. Line up filter threads
23
to vacuum head threads and
using moderate force, turn filter clockwise untiltight.
NOTE: Use care to not damage filtermaterial.
3. Place the vacuum head
3
onto the container and secure
it by closing the canister latches
4
.
Loading ...
Loading ...
Loading ...