Loading ...
Loading ...
Loading ...
6*'':6'40#.9#6'4(+.6'4-+6
An external water filter and connection kit has been supplied
for use with your Ice & Water refrigerator. The external filter design
allows more space within the refrigerator and provides double
the life of previous filters reducing the cost of replacement. The
filter is designed to significantly reduce chlorine, taste, odour,
heavy metals, turbidity ( cloudiness) and scale build up. The
INCLUDED¬PLASTIC¬,,$0%¬WATER¬TUBE¬ALLOWS¬QUICK¬CONNECTION¬TO¬
the filter and is designed for high durability and kink resistance.
This filter is designed only to be used with a potable water supply.
It should not be used on water that is micro biologically unsafe
or with water of unknown quality. The filter should be replaced
every 12 months. The service life of the filter may be reduced
in water supplies that contain an excess of particles or other
impurities. Reduced flow rate is an indication that a new filter
is required. Failure to replace the filter when required can
affect the function of the ice maker. Service calls caused by
a failure to replace the filter are not covered by warranty.
614'2.#%'6*'9#6'4(+.6'4
The water filter is fitted with Super Speed fit Fittings for
ease of installation and replacement. To replace the filter;
1. Turn off the water supply.
2. Release the pressure in the water lines by holding
a container against the water dispenser paddle on
the refrigerator until the pressure has been released.
3. Turn off the refrigerator at the power point and remove
the plug from the socket or turn off the icemaker.
4. Depress the collet (see diagram below) and pull the
tube out of each end of the filter.
5. Refit the tubes into the new filter to the stops (about 15mm).
Ensure that you observe the flow direction. Write the
fitment date in the space provided on the filter.
6. Gently pull back on the tube to ensure that it is secure.
7. Turn the water supply back on and check for leaks.
8. Plug the unit back in and turn the power supply back on to the
refrigerator and ensure that the icemaker is turned back on.
9. Purge and dispose of approximately 5 litres of water
through the water dispenser to condition the filter and
clear the water lines of air and impurities. It may take
up to a minute to get a full flow of water from the
dispenser. Do not be alarmed if there is an initial black
colour to the water. This is residual carbon dust from the
filter and is non-toxic.
10. Once the lines have been purged, dispose of the first
few batches of ice to ensure that impurities have been
flushed from this part of the system.
External water filter – installed between fridge and water supply.
(Usually situated within kitchen cupboard under sink or surrounds).
Tube supplied with filter installation kit.
Cut to fit as per your kitchen requirements.
From water supply
Flow direction
To fridge
Collet (blue ring).
There is a collet
at both ends.
Note: If the water is slow to shut off or the dispenser is dripping,
this indicates that there may still be air in the lines. Either purge
more water through the system to remove this air or allow some
time for the air to be removed over subsequent dispensing.
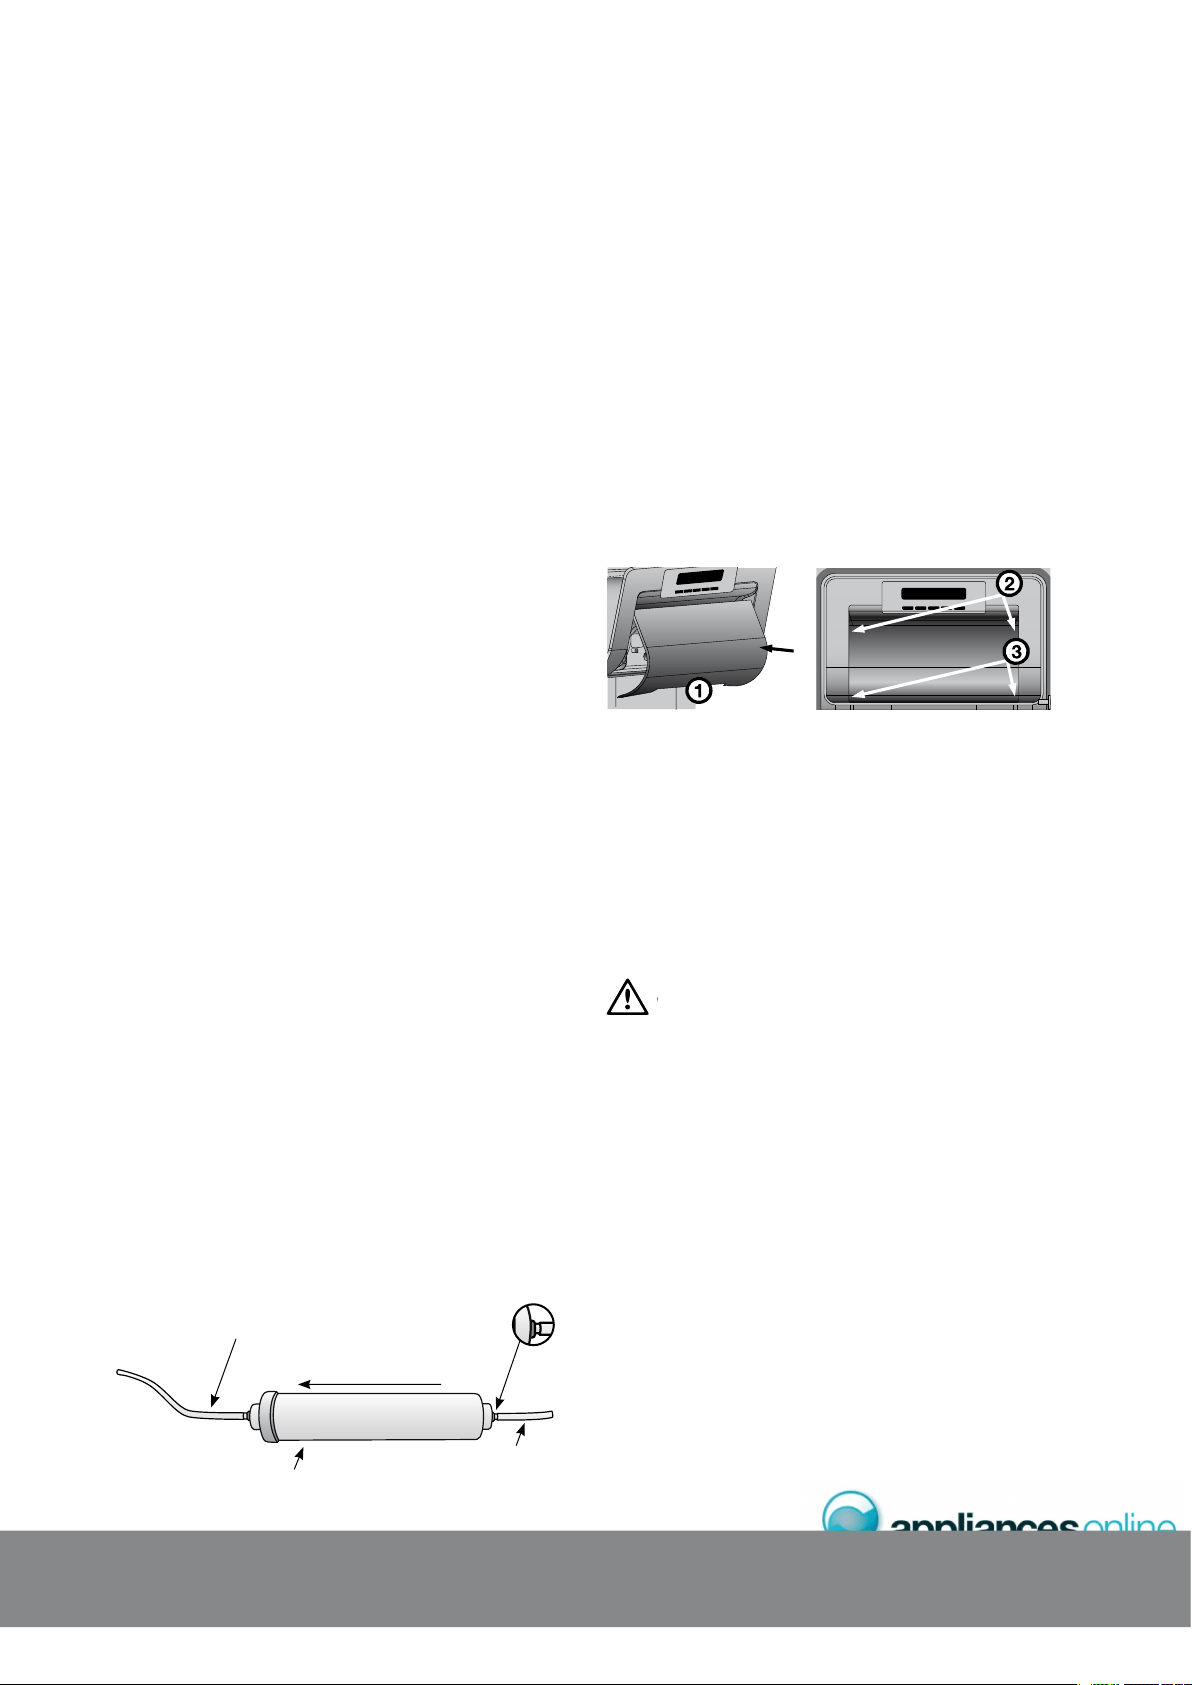
%*#0)+0)6*'.+)*6$7.$
4'(4+)'4#614.+)*6
1. Switch off the power at the power point and remove
the refrigerator’s power cord from the power point.
2. Check the temperature settings and write them down.
diagram A diagram B
3. Unclip the light lens by inserting your fingers at
point 1 in diagram A.
¬ ¬,IFT¬THE¬LIGHT¬LENS¬UNTIL¬IT¬IS¬CLEAR¬OF¬THE¬HOUSING¬AND¬
unscrew the light bulb.
5. Unscrew the light bulb and replace it with a bulb that is
the same as the original. If, when you remove the light
bulb the small rubber “O” ring comes out with the bulb,
fit the “O” ring over the new bulb and screw bulb into
the socket (see diagram on next page).
Never insert your finger into the light bulb socket to
check for the presence of the “O” ring.
6. Replace the light lens by inserting the tab on the lens
at point 2 and pushing in the lens with both hands at
point 3, see diagram B.
7. Turn the refrigerator back on and reset your temperature
to the previous settings.
%*#0)+0)6*'9#6'4(+.6'4
9
#6'4(+.6'4.+
)
*6$7.$
W
Loading ...
Loading ...
Loading ...