
AudioBox GO
Ultra-compact, mobile 2x2
USB audio interface
Owner’s Manual

Table of Contents
1. Overview 1
1.1 Thank you! 1
1.2 What's in the Box? 2
1.3 Companion PreSonus Products 4
2. Controls and Connections 5
2.1 Front-Panel Controls and Connections 5
2.2 Back Panel Connections 7
2.3 Connection Diagram 9
3. Connecting to a Computer 10
3.1 Installation for Windows 10
3.2 Universal Control (Windows) 10
3.3 Firmware update 11
3.4 Installation for macOS 11
3.5 Using the AudioBox GO with Popular Audio Applications 11
4. Studio One Prime Quick Start Guide 14
4.1 Installation and Authorization 14
4.2 Setting Up Studio One Prime 16
4.3 Configuring Audio Devices 16
4.4 Configuring MIDI Devices 17
4.5 Creating a New Song 21
5. Configuring Your I/O 23
6. Creating Audio and Instrument Tracks 25
6.1 Recording an Audio Track 26
6.2 Adding Virtual Instruments and Effects 26
7. Technical Information 29
8. Dinner is Served! 31
9. Legal 32
Table of Contents 2
1. Overview
1.1 Thank you!
Thank you for purchasing a PreSonus
®
AudioBox GO audio interface. PreSonus Audio Electronics, Inc.,
has designed the AudioBox GO utilizing high-grade components to ensure optimum performance that
will last a lifetime. Loaded with a high-headroom, a Class A microphone preamplifier, high-definition 24-
bit, 96 kHz conversion; and more, the AudioBox GO breaks new boundaries for portability in music per-
formance and production. All you need is a compatible computer or mobile device with a USB-C or USB-
A (2.0 or 3.0) connection, a microphone and cable, powered speakers, and your instruments, and you
are ready to record!
We suggest you read this manual in full to familiarize yourself with the features, applications, and correct
connection procedures for your AudioBox GO before trying to connect it to your computer. This will help
you avoid problems during installation and setup.
Throughout this manual you will find Power User Tips that can quickly make you an AudioBox GO
expert.
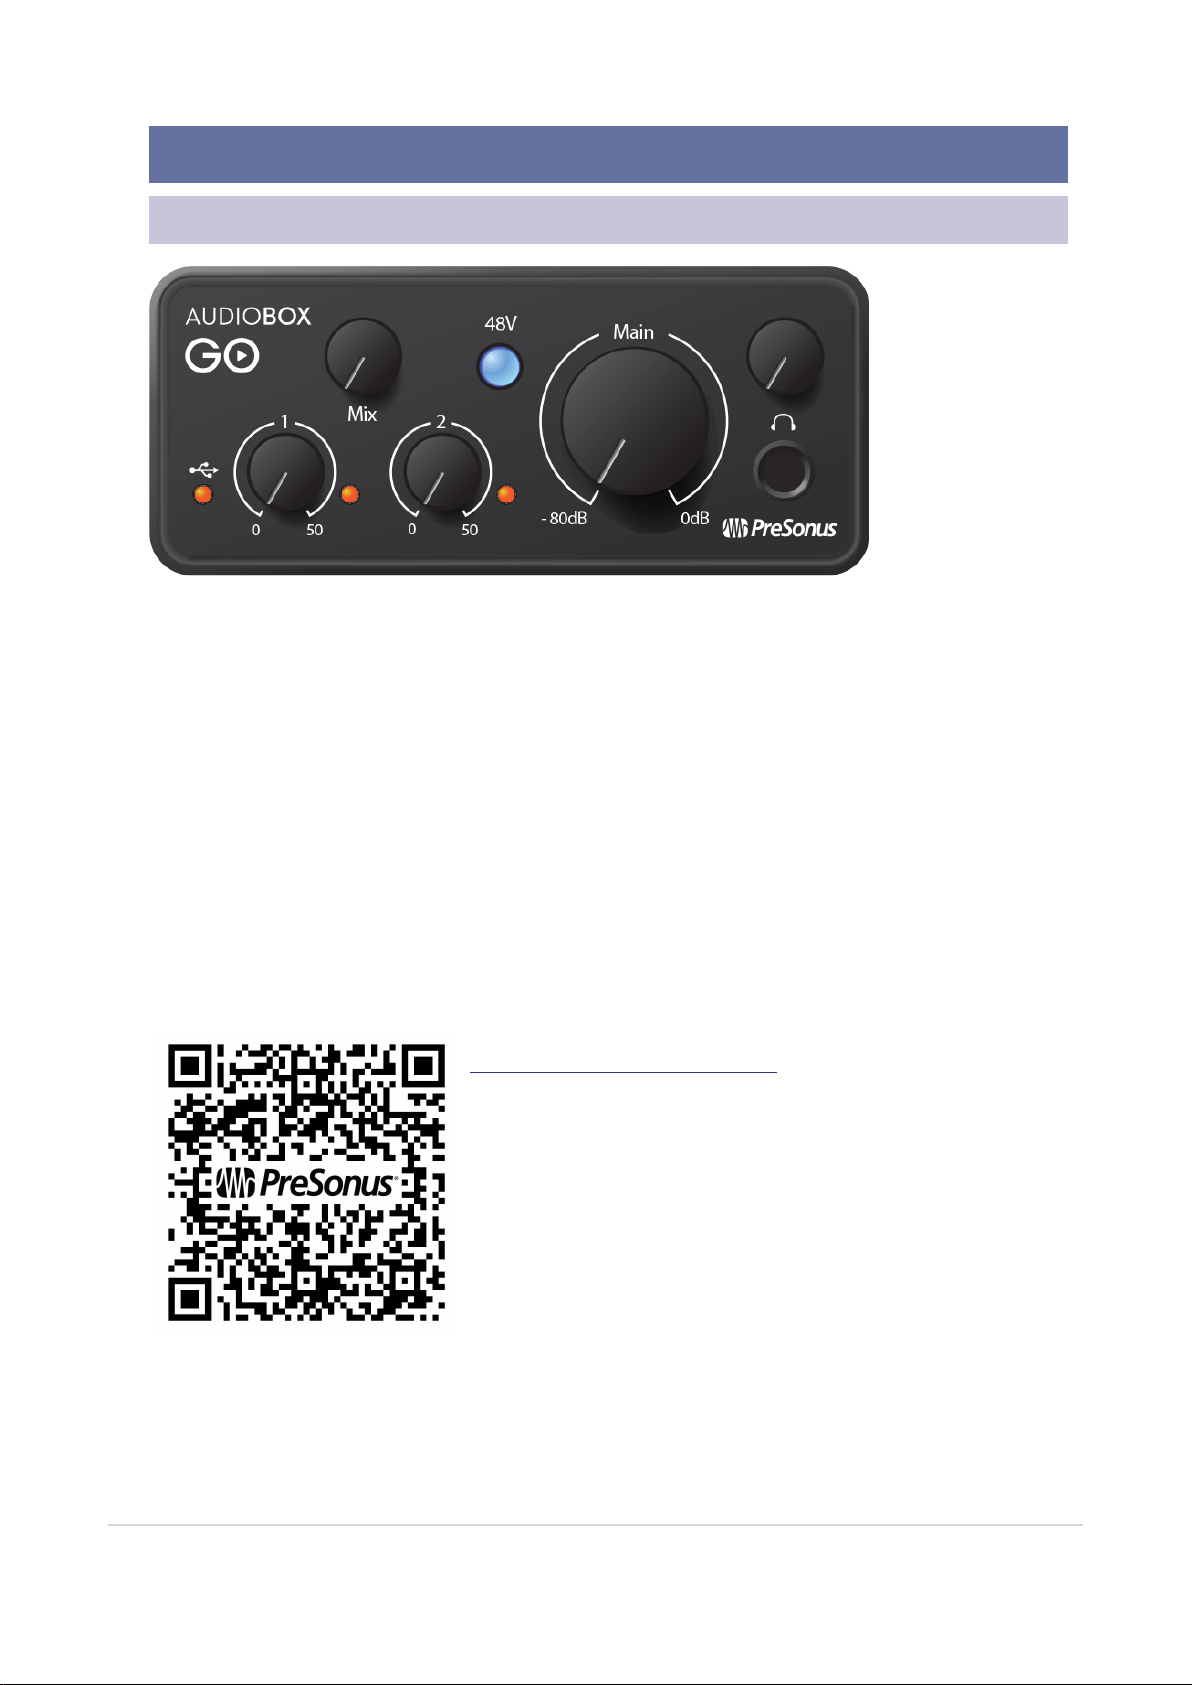
Just getting Started?
Visit our AudioBox GO online guide to check out online learning
resources for getting started with AudioBox GOand Studio One!
1. Overview 1

1.2 What's in the Box?
Your AudioBox GO package contains:
AudioBox GO 24-bit, 96 kHz audio interface.
Quick Start Guide. Use this as a handy reference guide to your hard-
ware features while you familiarize yourself with your new interface.
1M USB-C to A Cable. Use this to connect your AudioBox GO to a
USB port on your computer or a powered USB hub.
PreSonus Health Safety and Compliance Guide.
1.2 What's in the Box? 2

Rubber Feet.
Power User Tip: All companion software and drivers for your PreSonus AudioBox GO are available for
download from your My PreSonus user account. Please visit http://my.presonus.com and register
your AudioBox GO to receive downloads and licenses.
1.2 What's in the Box? 3
1.3 Companion PreSonus Products
Thanks for choosing PreSonus! As a solutions company, we believe the best way to take care of our cus-
tomers (that’s you) is to ensure that you have the best possible experience from the beginning of your sig-
nal chain to the end. To achieve this goal, we’ve prioritized seamless integration throughout every design
phase of these products from day one. The result is systems that communicate with each other as inten-
ded—straight out of the box—without excessive configuration hassles.
We’re here for you, wherever sound takes you.
Find out more at www.presonus.com.
1.3 Companion PreSonus Products 4
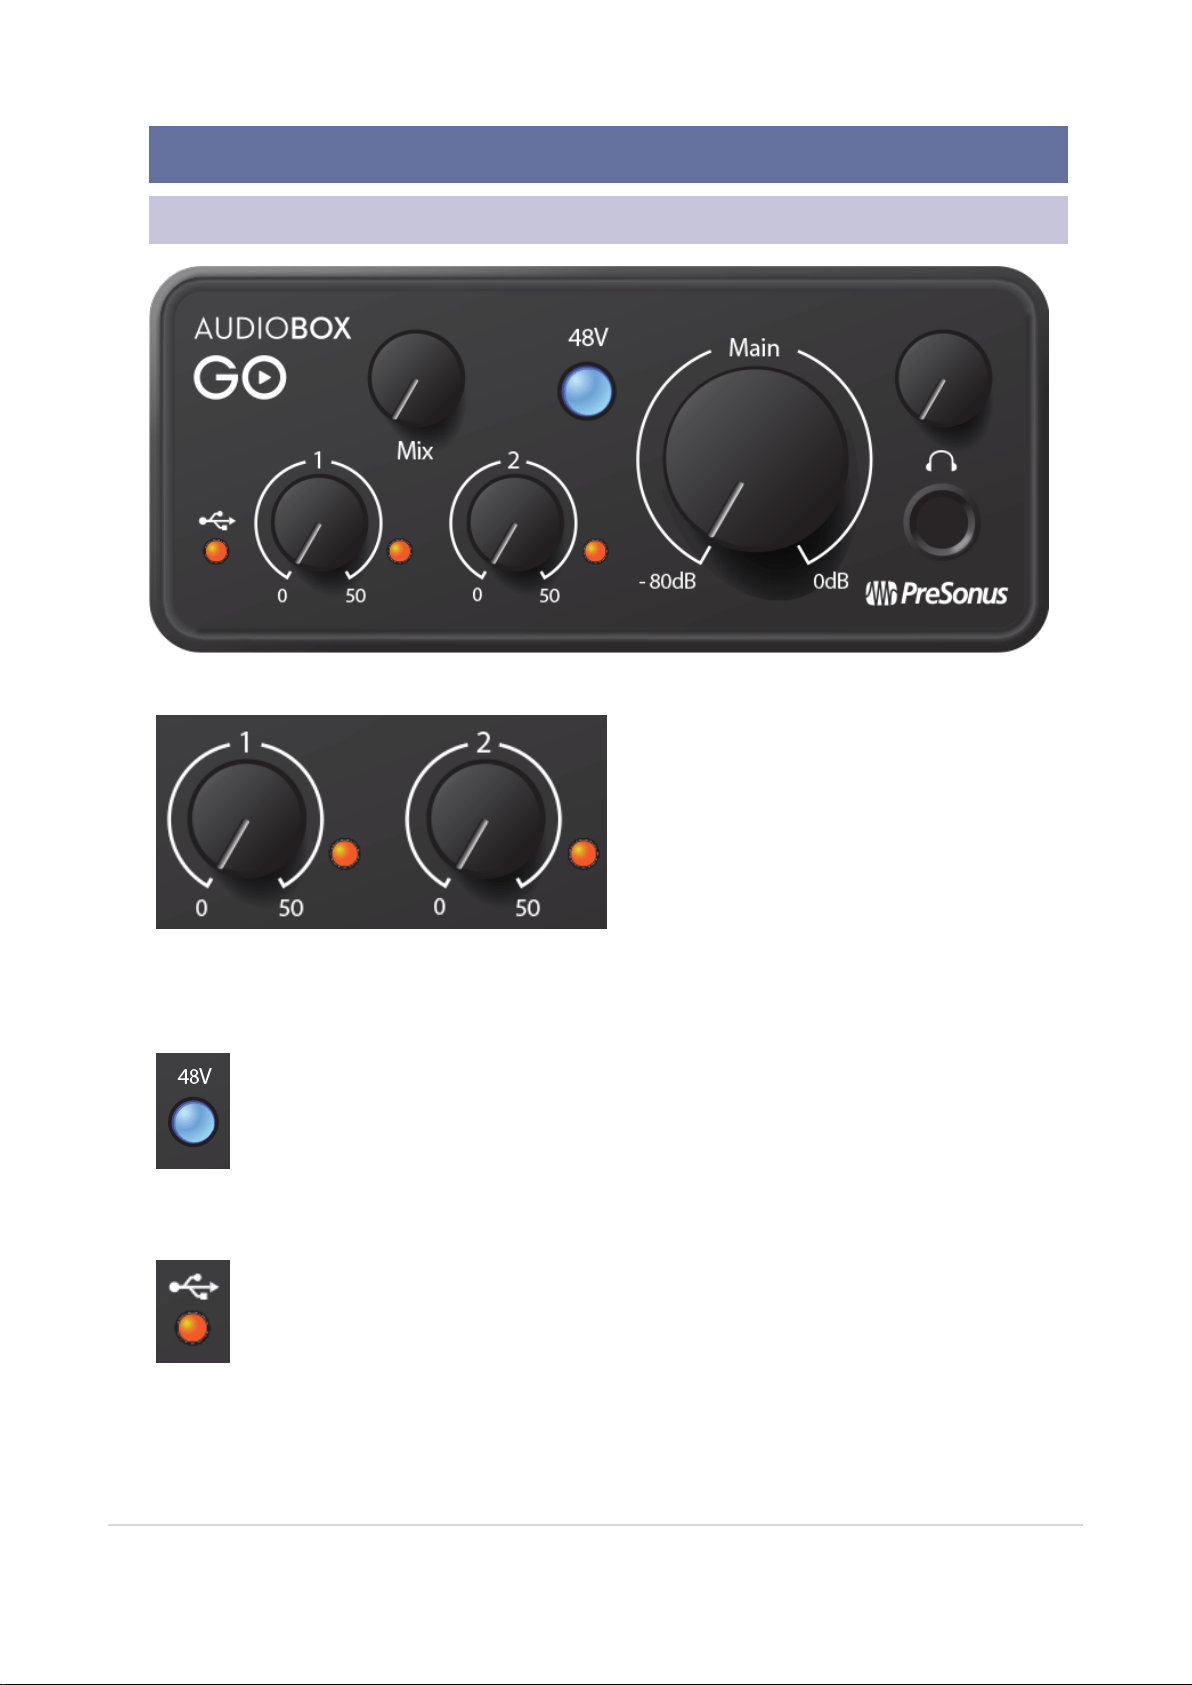
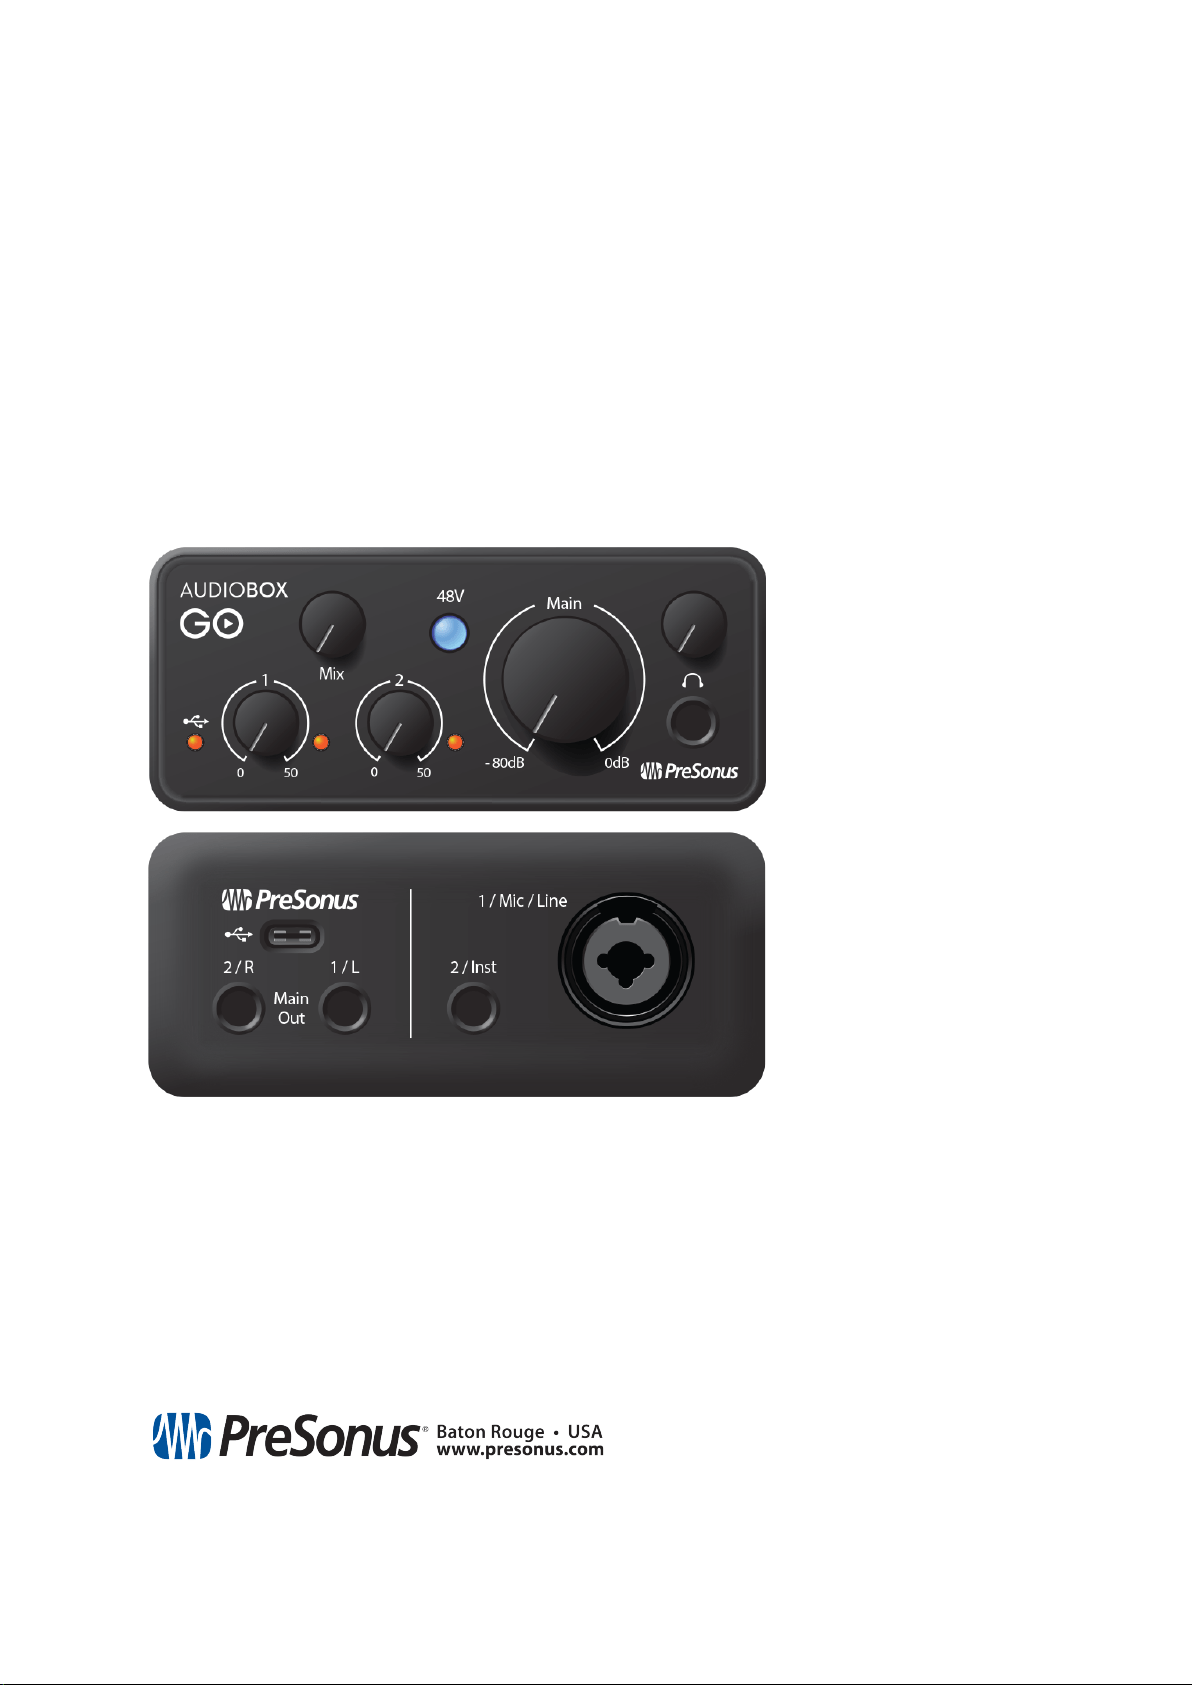
2. Controls and Connections
2.1 Front-Panel Controls and Connections
Gain Controls
These knobs provide 50 dB of variable gain (0 to
+50 dB for microphones, -15 to 35 dB for line/in-
strument).
Clip indicator. The small red to the right of the
Gain Controls will illuminate when your input signal
reaches -0.5 dBFS. At this level, the signal will
begin to overload the analog-to-digital converters
and exhibit signs of clipping. Use the gain controls
to keep the signal below this level.
48 Volt Phantom Power
The AudioBox GO provides 48V phantom power for the microphone inputs. Pressing the 48V
button switches phantom power on and off for all microphone inputs; the button will illuminate
in blue when phantom power is available on the microphone preamplifiers.
Power indicator
This light indicates if your AudioBox GO is powered on.
2. Controls and Connections 5
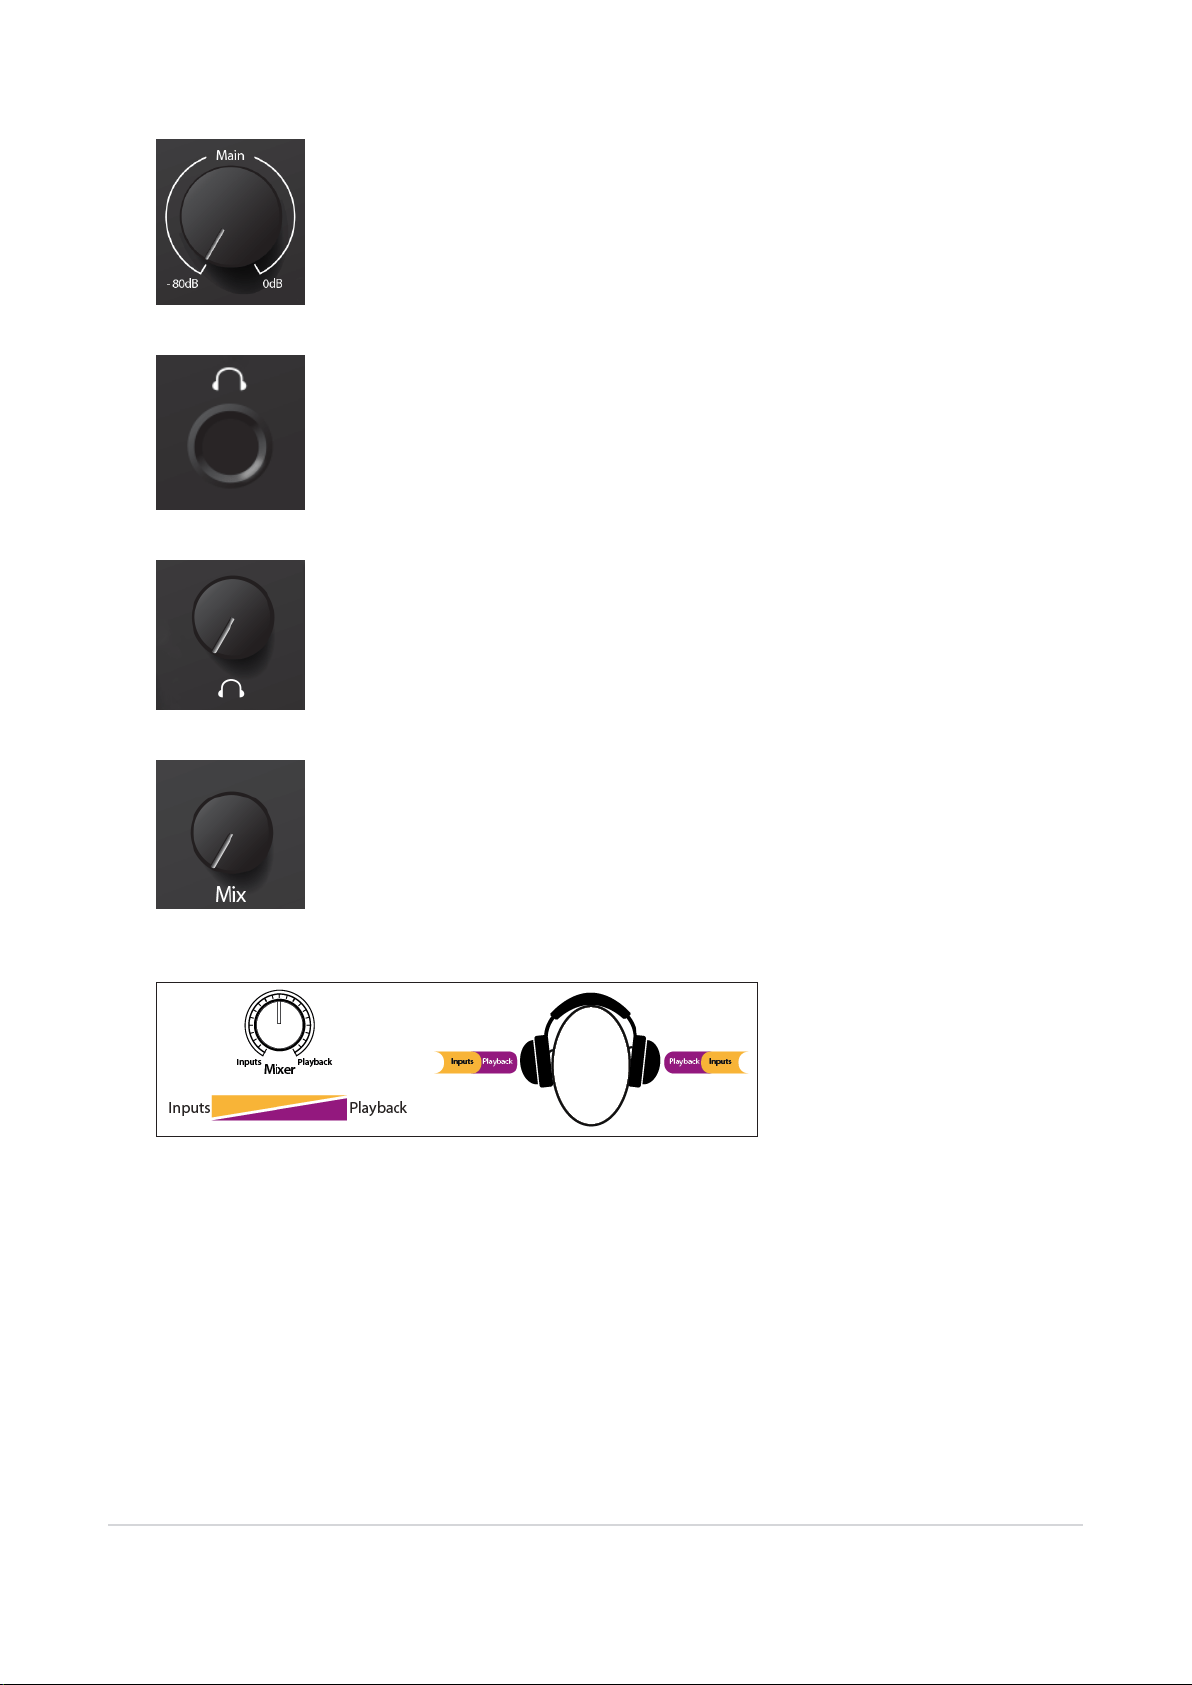
Main Volume
The Main knob controls the output level for the main left/right outputs on the back of
your AudioBox GO and has a range of -80 dB to 0 dB. This control provides atten-
uation only.
Headphone Output
The headphone output plays back the same sound as the Main left/right outputs.
Headphone Level
This knob controls the level of the headphone output.
Mixer
The Mixer knob allows you to blend your input signals with the playback streams from
your computer so that you can monitor your input signals without any latency (delay).
If the knob is positioned at 12 o’clock, the input signal and the playback stream will be
equally balanced. Turning the knob to the left will increase the level of the input signal
relative to the playback stream; turning to the right will increase the level of the play-
back stream relative to the input signal as illustrated below:
2.1 Front-Panel Controls and Connections 6
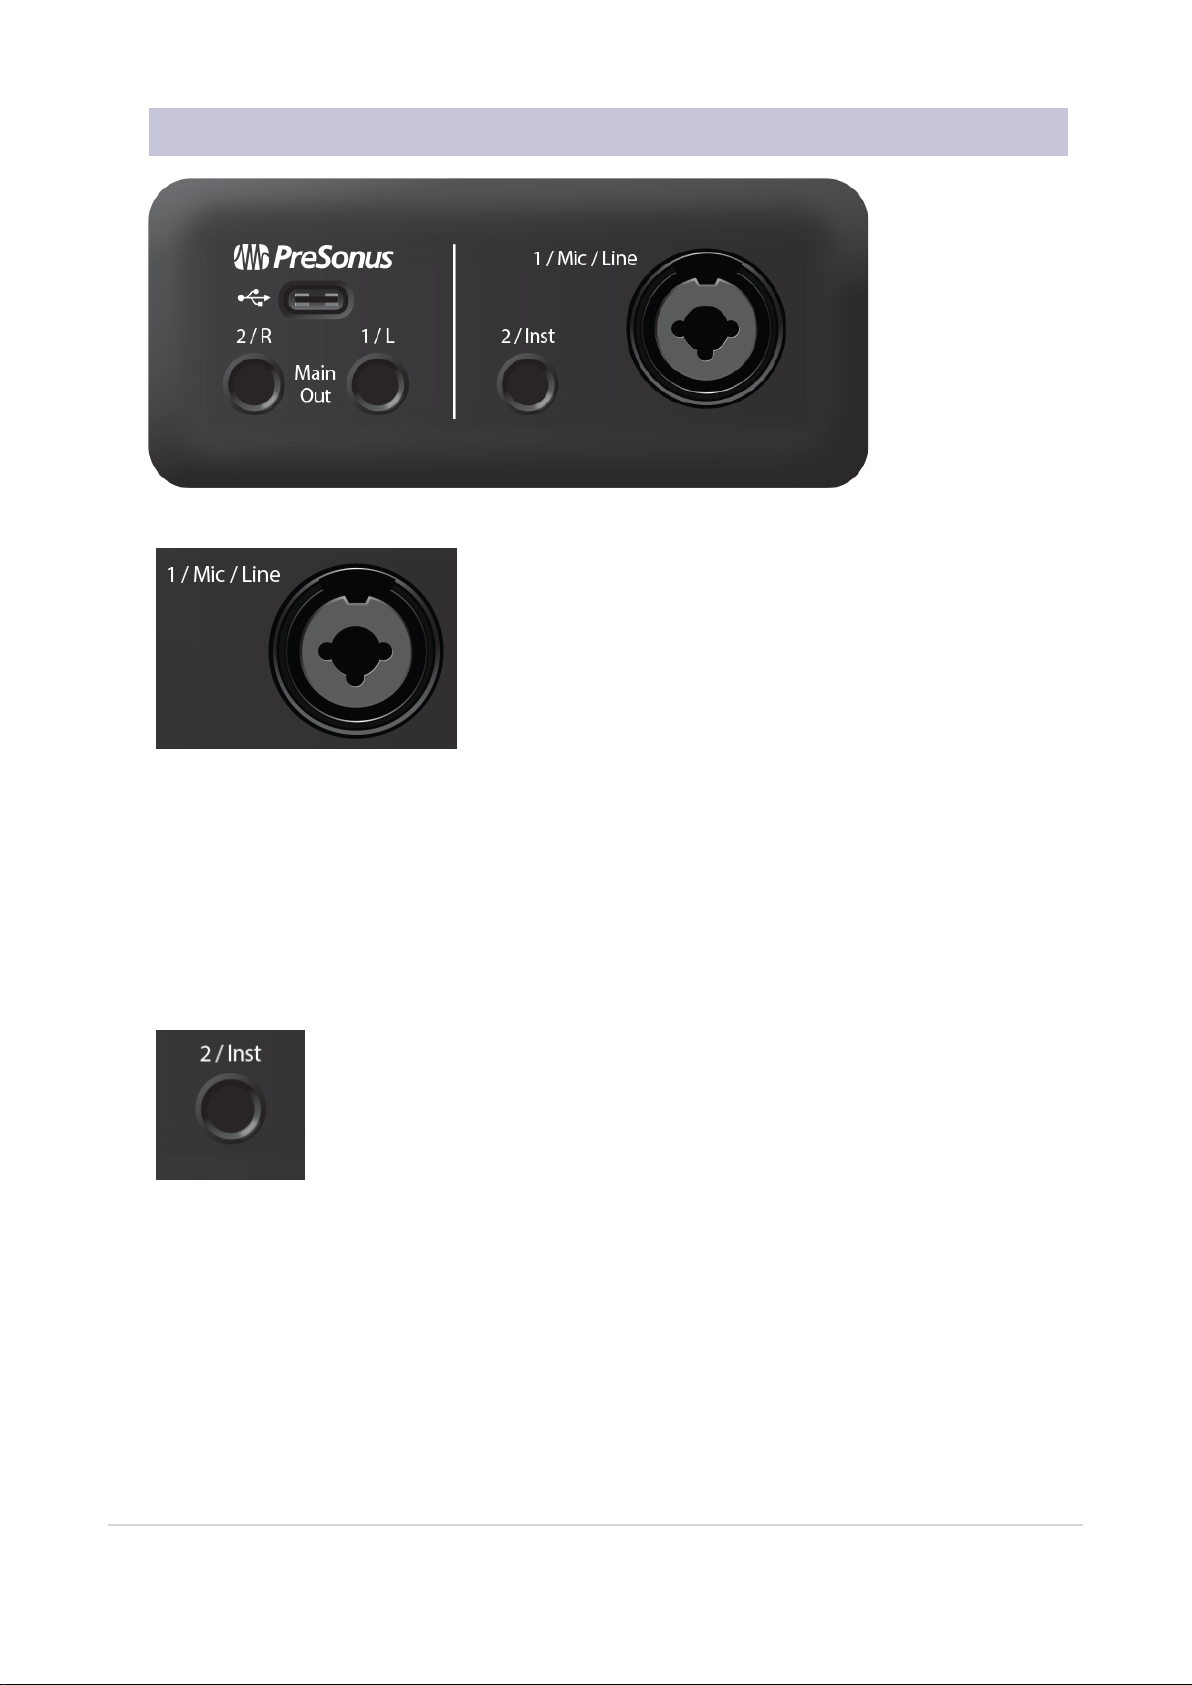
2.2 Back Panel Connections
Mic/Line combo Input
Your AudioBox GO interface is equipped with a combo jack that
works with both XLRmicrophones and Line-level sources. This con-
venient connector accepts either a ¼-inch or an XLR connector.
Microphones:The AudioBox Go combo jack is equipped with a
high-quality XMAX-L solid-state microphone preamp, optimized for
bus power. It's suitable for use with all types of microphones. You
may need to engage the +48v power switch for use with condenser
microphones.
Please note: As with any audio input device, plugging in a microphone or an instrument, or turning
phantom power on or off, will create a momentary spike in the audio output. Because of this, we highly
recommend that you turn down the channel trim before changing connections or turning phantom power
on or off. This simple step will add years to life of your audio equipment.
Line-level sources:The combo jack also supports the use of line-level devices like synthesizers, signal
processors, drum machines, etc.
Instrument Input
The ¼-inch connectors of Channel 2 can be used with passive instruments: guitar,
bass, etc.
2.2 Back Panel Connections 7
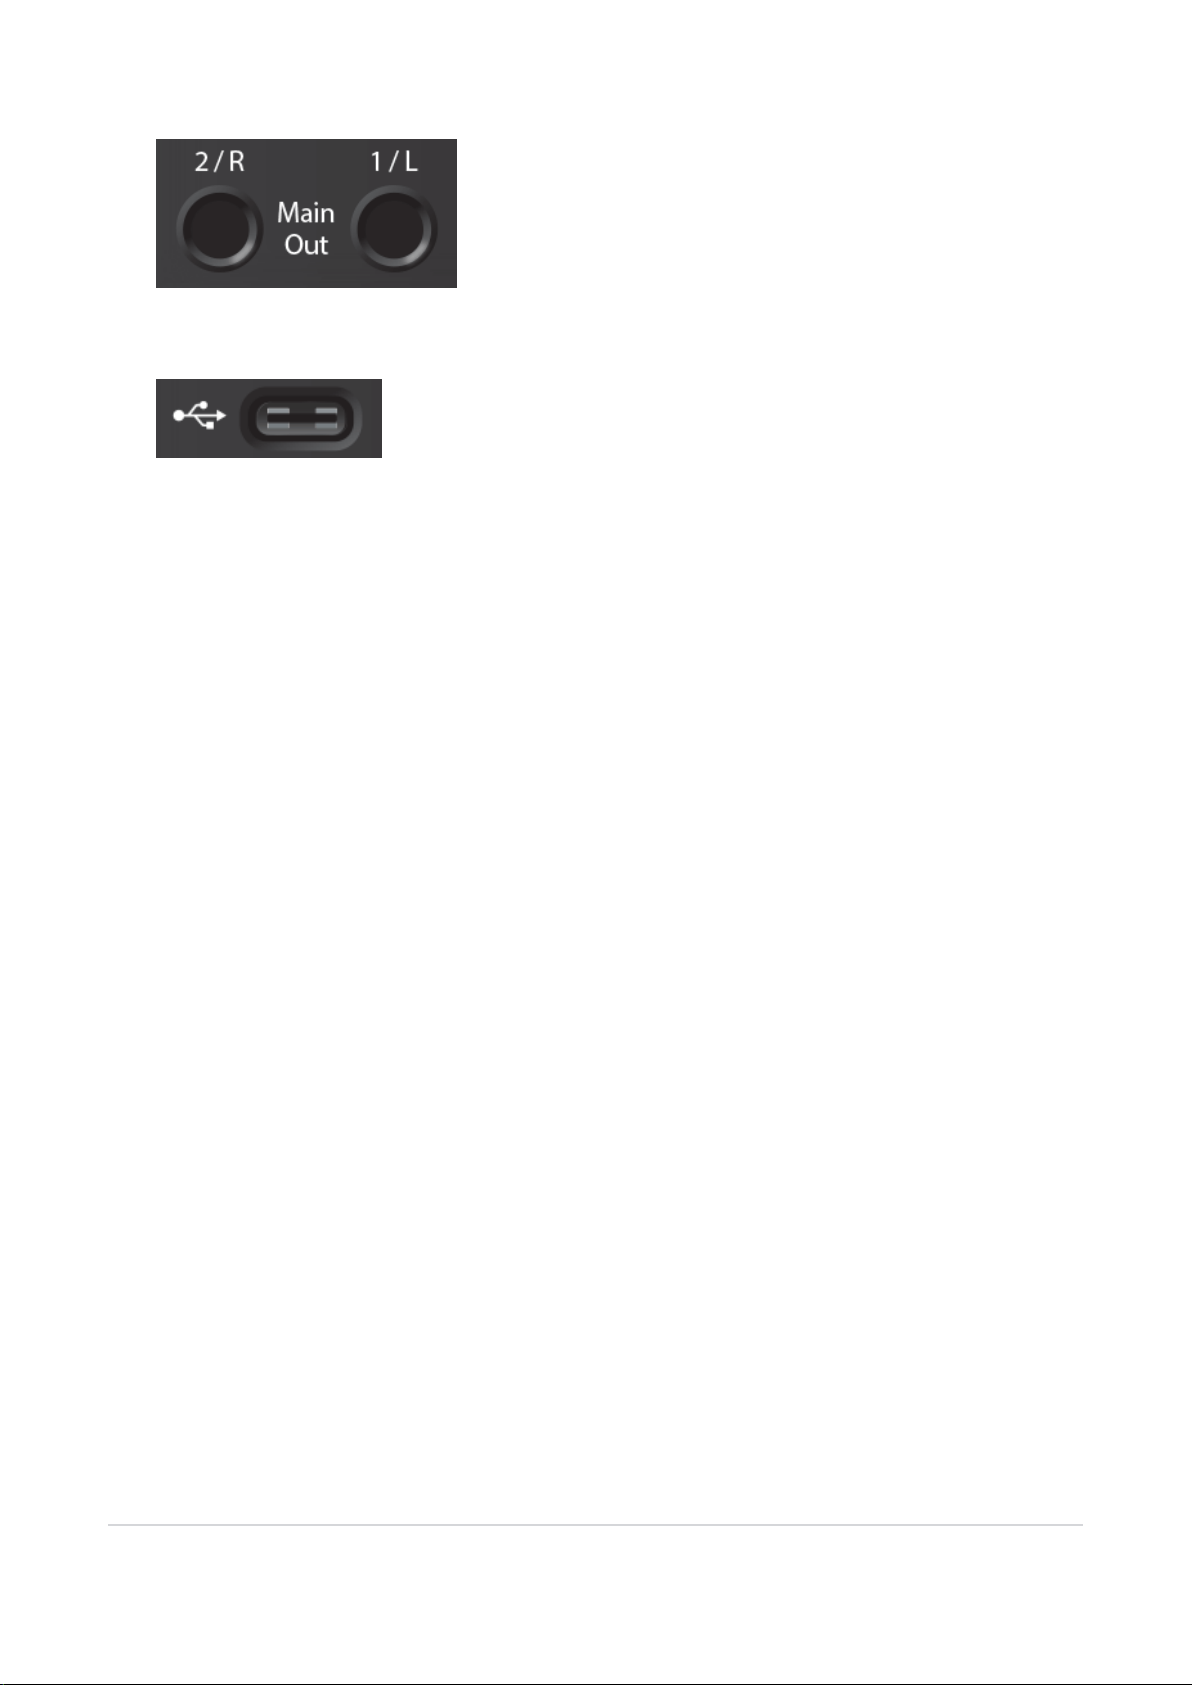
Main Outs
These are the Main outputs for the AudioBox GO. The output level of
the Main outputs is controlled by the Main level control on the front of
the unit. Playback streams 1 and 2 are routed to these outputs.
USB-C Port
Use this port to connect your AudioBox GO to your computer. While the Audi-
oBox GO connects using USB-C, it is fully compatible with USB 2.0 and 3.0
connections. Use the USB-C to A cable that came with your AudioBox GO if
your computer has a USB-A connection rather than a USB-C connection.
Please note: The AudioBox GO is backward compatible with USB 2.0 and USB 3.0 speed connections.
USB 1.1 is not supported.
2.2 Back Panel Connections 8
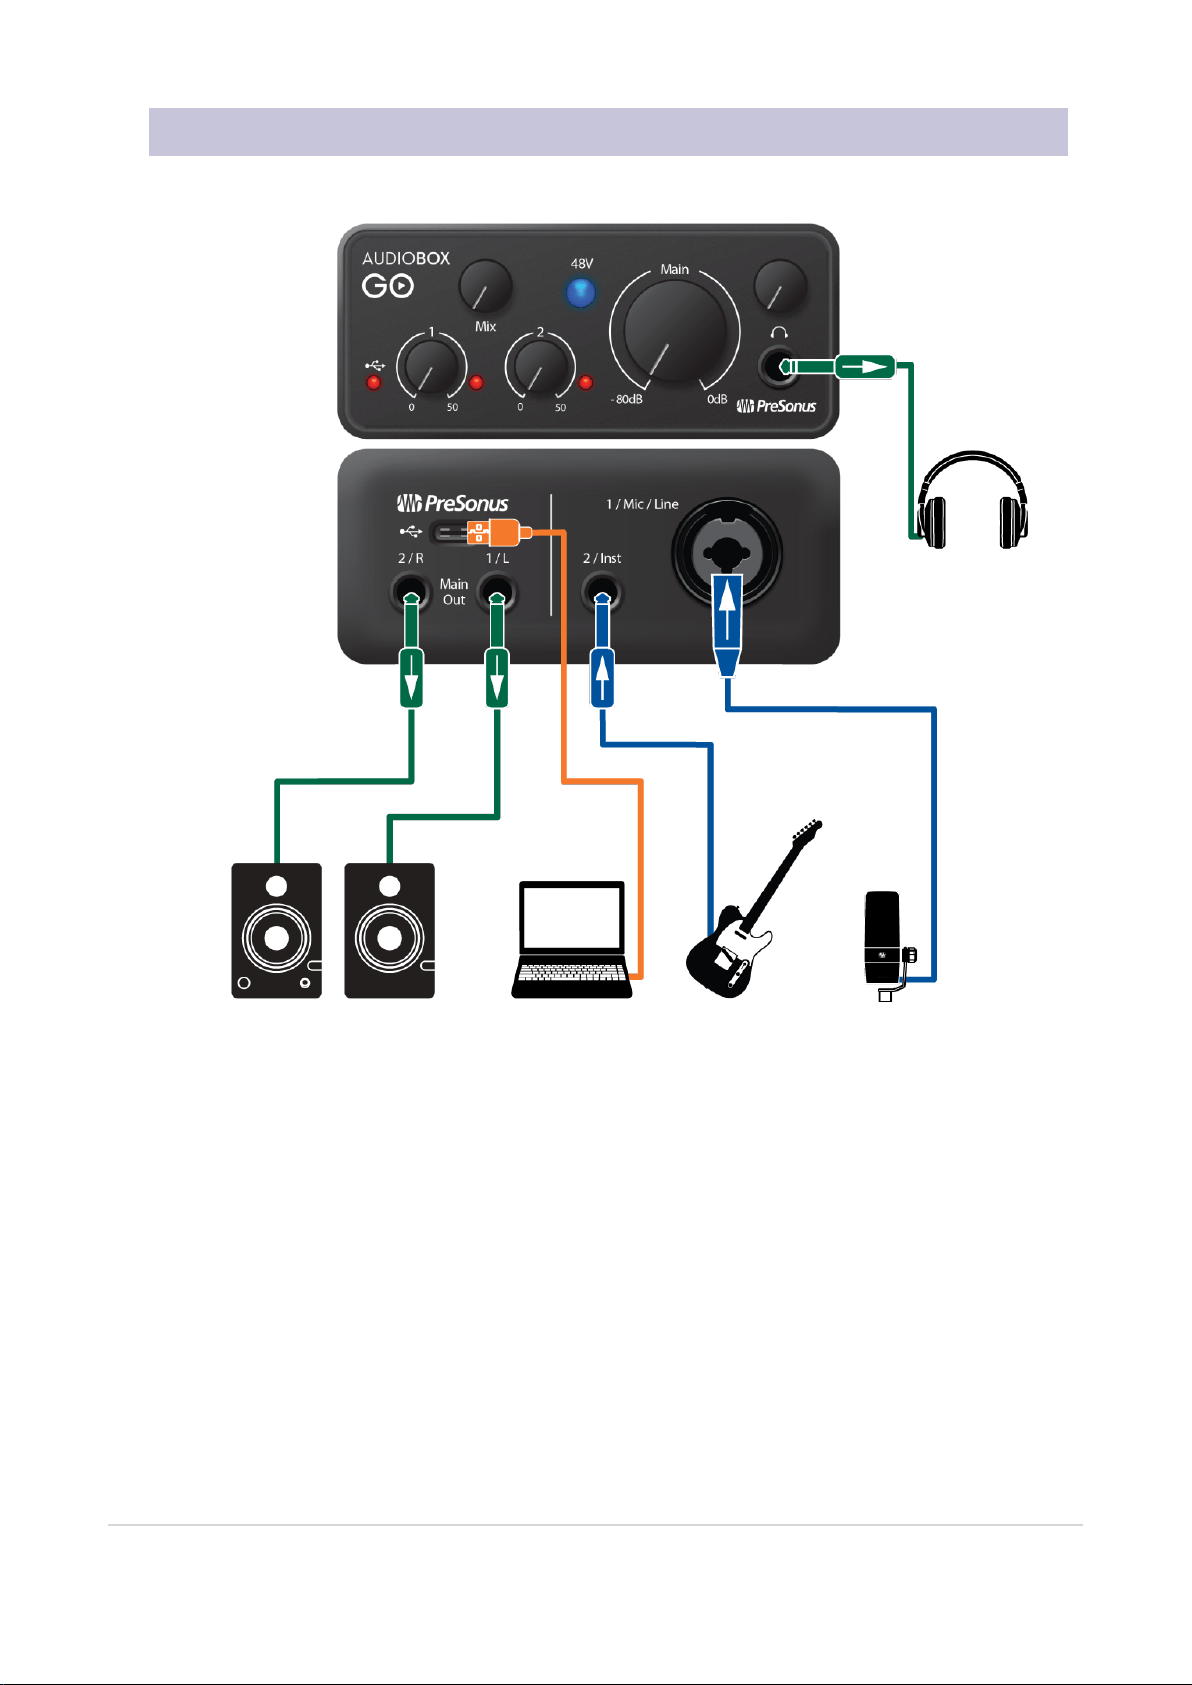
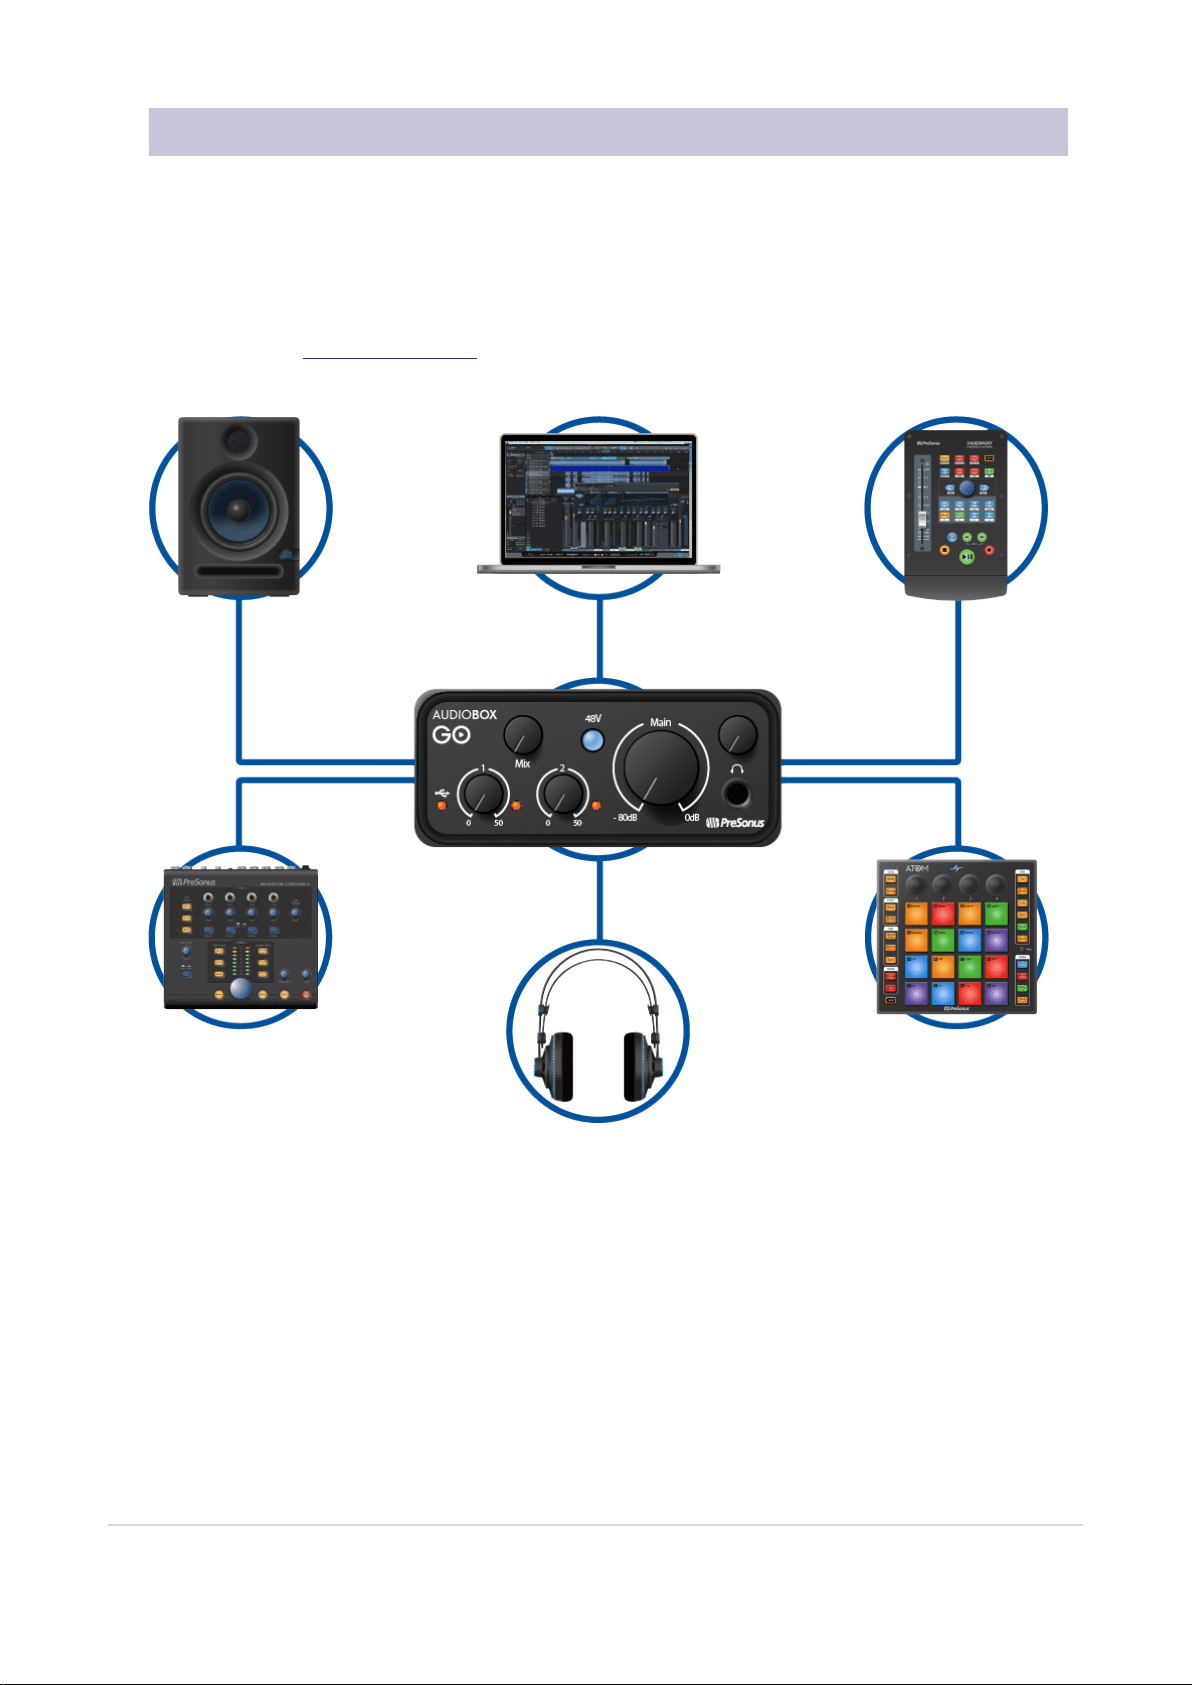
2.3 Connection Diagram
2.3 Connection Diagram 9

3. Connecting to a Computer
Before connecting your AudioBox GO to a computer, please visit www.presonus.com to verify the latest
system requirements.
Note: The speed of your processor, amount of RAM, and capacity, size, and speed of your hard drives
will greatly affect the overall performance of your recording system. A faster processor and more RAM
can reduce signal latency (delay) and improve overall performance.
The Universal Control installers for macOS and Windows are available from your My PreSonus user
account. The Windows installer also includes the Windows ASIO driver. No driver installation is neces-
sary for macOS. To begin, you must first visit http://my.presonus.com, create or log into your user
account, and register your AudioBox GO. Once registered, all software downloads will be available from
within your My PreSonus user account including Studio One Artist and the Studio Magic bundle.
3.1 Installation for Windows
Download the Universal Control installer from your My PreSonus account. Connect your AudioBox GO to
an available USB-C or USB-A (2.0 or 3.0) port and launch the installer. The installer will take you through
each step of the installation process. This application will install the ASIO and WDM drivers, as well as
Universal Control. Please read each message carefully.
It is recommended that you quit all applications before you start the installation.
The Universal Control installer will take you through each step of the installation process. Please read
each message carefully so that you do not connect your AudioBox GO too soon.
Power User Tip: It is recommended that you temporarily disable or turn off any anti-virus programs
you have running to prevent installation issues.
3.2 Universal Control (Windows)
Universal Control is a powerful hardware-management application for all PreSonus
interface products. It allows you to view any PreSonus interface product connected to
your computer or your computer’s network.
When Universal Control is launched, you will see the Launch window. From this win-
dow, you can manage all the ASIO driver settings.
3. Connecting to a Computer 10
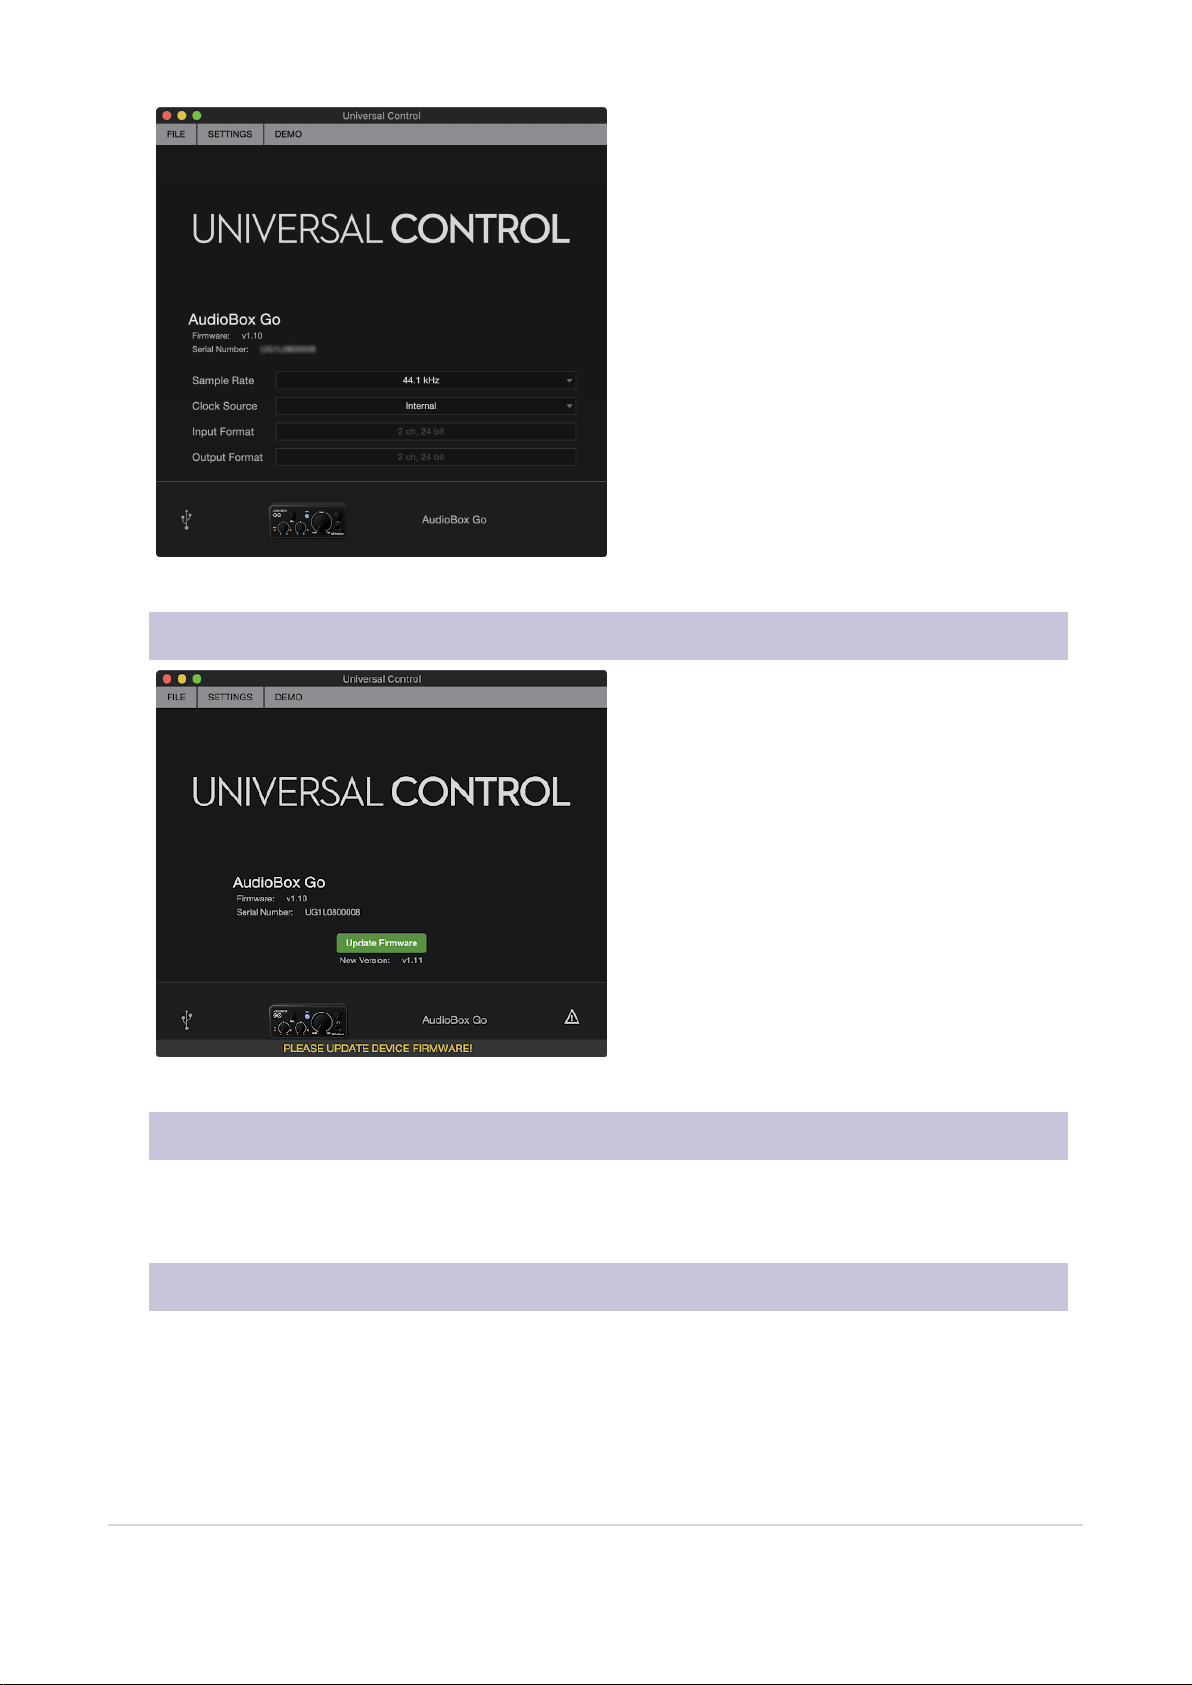
Sample Rate. Changes the sample rate
You can set the sample rate to 44.1, 48, 88.2, or 96
kHz. A higher sample rate will increase the fidelity
of the recording but will increase the file size and
the amount of system resources necessary to pro-
cess the audio.
Block Size. Sets the buffer size.
From this menu, you can set the buffer size. Lower-
ing the buffer size will lower latency; however, this
will also increase performance demands on your
computer. In general, you will want to set the buffer
size as low as your system can safely support. If
you begin to hear pops, clicks, or distortion in your
audio path, try raising the buffer size.
3.3 Firmware update
After you've installed Universal Control and con-
nected your AudioBox GO, you may be prompted
to update The AudioBox GO firmware. Updating
your firmware is a quick process, just click on the
green "Update Firmware" button and Universal
Control will do the rest.
Do not disconnect your AudioBox GO during the
firmware update process. Once the firmware is
updated, your AudioBox GO is ready to… GO!
3.4 Installation for macOS
Your AudioBox GO is a class-compliant Core Audio device in macOS. No driver installation is necessary.
Installing Universal Control for your AudioBox GO is optional, but we recommend installation to ensure
you'll always get the latest firmware updates.
3.5 Using the AudioBox GO with Popular Audio Applications
Complete setup instructions for Studio One Artist and a brief tutorial on its features can be found in Sec-
tion 4 of this manual. However, you can use your AudioBox GO with any audio-recording application that
supports Core Audio or ASIO. Please consult the documentation that came with your audio application
for specific instructions on how to select the AudioBox GO driver as the audio-device driver for your
3.3 Firmware update 11

software.
Below are basic driver-setup instructions for a few popular audio applic-
ations.
Steinberg Cubase 10+
l
Launch Cubase.
l
Create a new or open an existing project.
l
Go to Studio | Studio Setup.
l
Select “Audio System” from the Devices column on the left.
l
Click the ASIO Driver dropdown under Audio System.
l
Select “AudioBox ASIO Driver”.
l
Click “AudioBox ASIO Driver” under “Audio System” from the Devices column on the left.
l
Ensure that the input and output ports are correctly enabled and visible.
Ableton Live 10+
l
Launch Ableton Live.
l
Go to Options | Preferences | Audio.
l
Choose Driver Type: ASIO | Audio Device: ASIO AudioBox GO (Mac users will need to
select"Core Audio")
l
Choose Audio Input Device and select AudioBox GO
l
Choose Audio Output Device and select AudioBox GO
l
You may now select your AudioBox GO inputs and outputs for each track created in Live.
Apple Logic Pro X+:
l
Launch Logic Pro/Express.
l
Go to Logic | Preferences | Audio.
l
Click on the Devices Tab.
l
On the Core Audio tab, check Enabled.
l
Select your AudioBox GO from the device menu.
l
You will be asked if you’d like to relaunch Logic. Click “try (re)launch.”
l
Your AudioBox GO features custom I/O labels for faster work flow. To enable these labels for use
in Logic, go to Options | Audio | I/O Labels.
l
The second column in the pop-up window will be named “Provided by Driver.” Activate each of
these labels for your AudioBox GO. When you are done, close this window.
l
You are now ready to use your AudioBox GO.
Avid Pro Tools 2018+
l
Launch Pro Tools.
l
Go to Setup | Playback Engine and select your AudioBox GO from the menu at the top of the win-
dow. Click OK.
Cakewalk by Bandlab
l
Launch Cakewalk
l
Go to menu the menu and select Edit > Preferences
l
Select Audio > Playback and Recording
3.5 Using the AudioBox GO with Popular Audio Applications 12

l
Set the Driver Mode to ASIO
l
Restart Cakewalk if needed.
l
Return to Edit > Preferences > Audio > Devices Tab
l
Select all of the Input and Output Drivers for your AudioBox GO Device only
l
Cakewalk uses stereo-paired routing, so you should only see “AudioBox ASIO Driver Input 1” and
“AudioBox ASIO Driver Main Out Left” as options.
l
Navigate to “Drivers Settings” under same Audio Tab
l
Select “ABoxGo ASIO Output 1|2” for Playback Timing Master
l
Select “ABoxGo ASIO Input 1|2” for Record Timing Master
3.5 Using the AudioBox GO with Popular Audio Applications 13
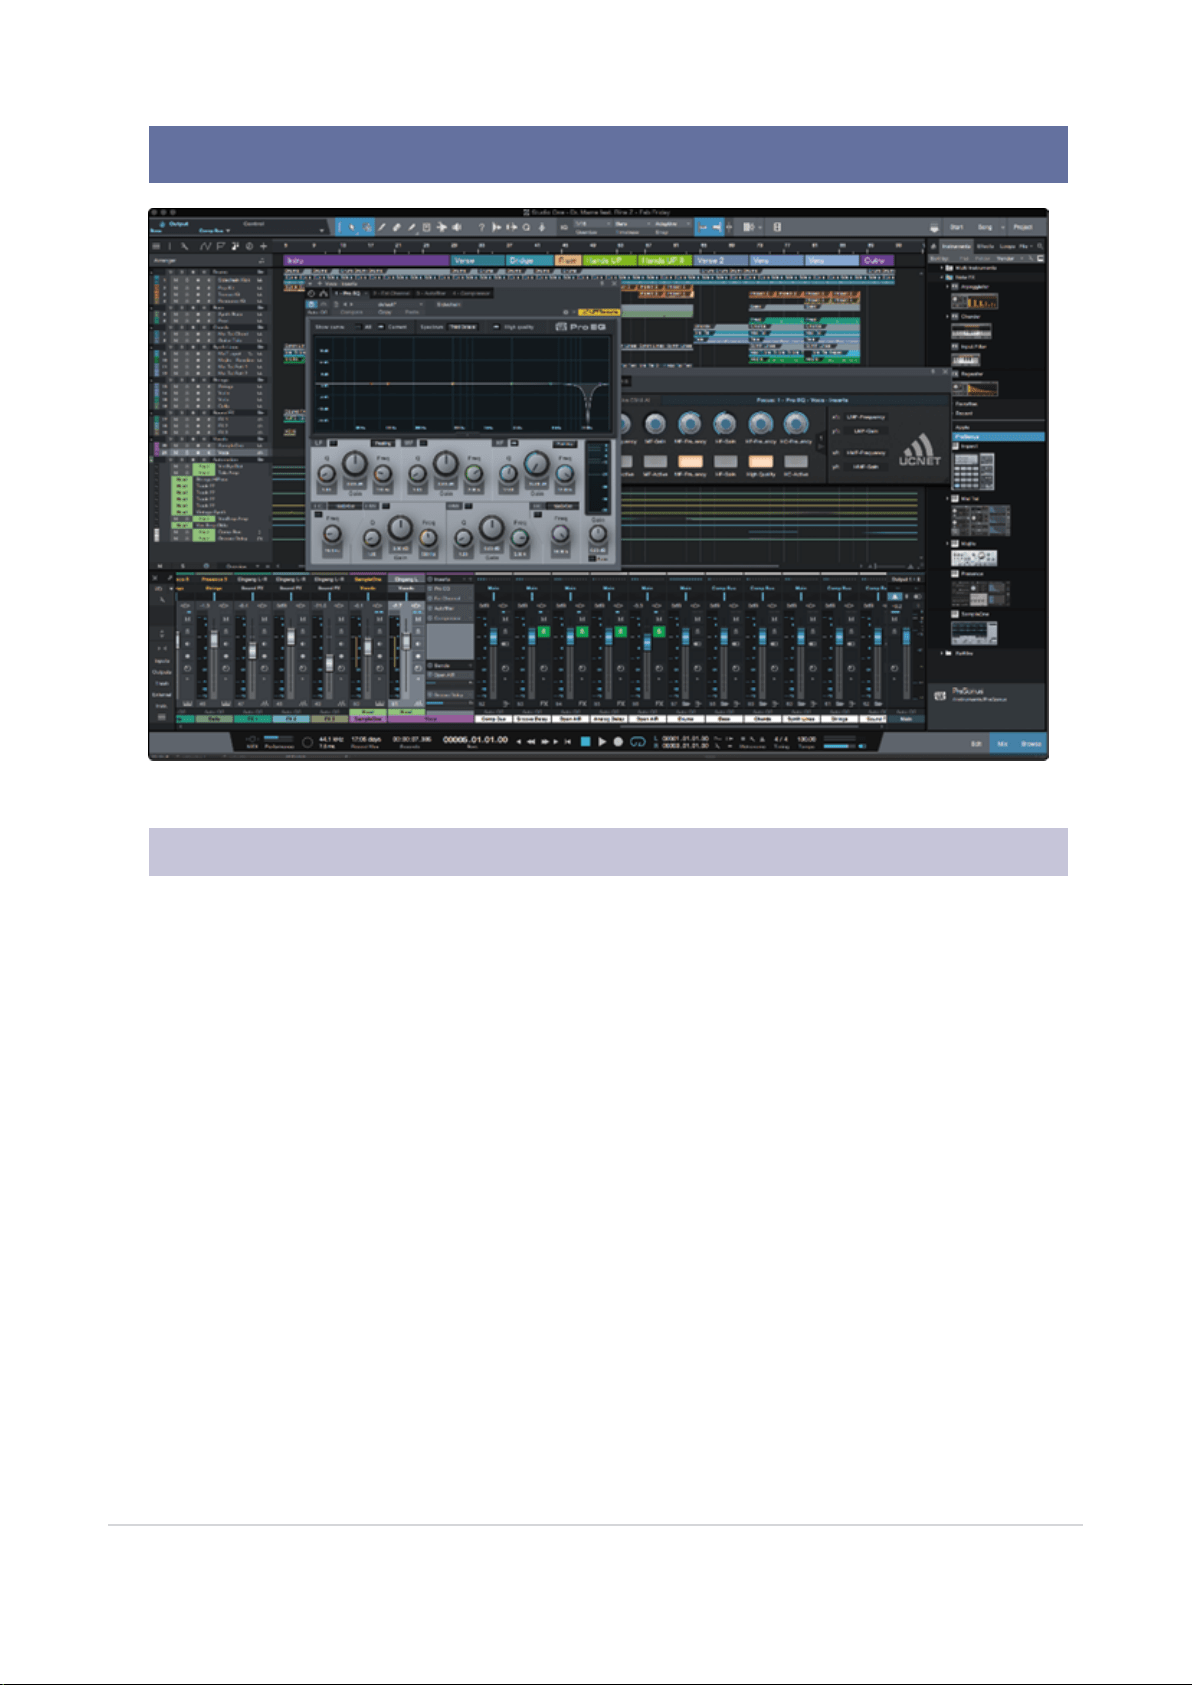
4. Studio One Prime Quick Start Guide
Studio One Prime provides you with all of the tools necessary to capture and mix a great performance.
4.1 Installation and Authorization
Once you have installed the drivers for your audio interface and connected it to your computer, you can
use the included PreSonus Studio One Prime music-production software to begin recording, mixing, and
producing your music. To install Studio One Prime, log into your My PreSonus account and register your
interface. Your product key for Studio One Prime will automatically be registered to your My PreSonus
account, along with your hardware registration.
4. Studio One Prime Quick Start Guide 14
Downloading and Running the Studio One Prime Installer
To install Studio One Prime, download the Studio One Prime installer from your My PreSonus account to
the computer on which you will use it.
l
Windows: Launch the Studio One Prime installer and follow the onscreen instructions.
l
Mac: Drag the Studio One Prime application into the Applications folder on your Mac hard drive.
Authorizing Studio One
When Studio One is launched for the first time on your computer, it will communicate with your My PreSo-
nus account and verify your registration. To ensure a seamless authorization process, make sure to
download your installer to the computer on which you will be using it, and be sure that your computer is
connected to the Internet when you launch the application for the first time.
Power User Tip: You may be prompted to enter your My PreSonus user account information. Clicking
“Remember Credentials” will allow you to have immediate access to any content you purchase from
the PreSonus Marketplace.
Installing Bundled Content for Studio One Prime
Studio One Prime comes bundled with an array of demo and tutorial materials, instruments, loops, and
samples. The Studio One Prime bundle includes all that you need to begin producing music.
4.1 Installation and Authorization 15
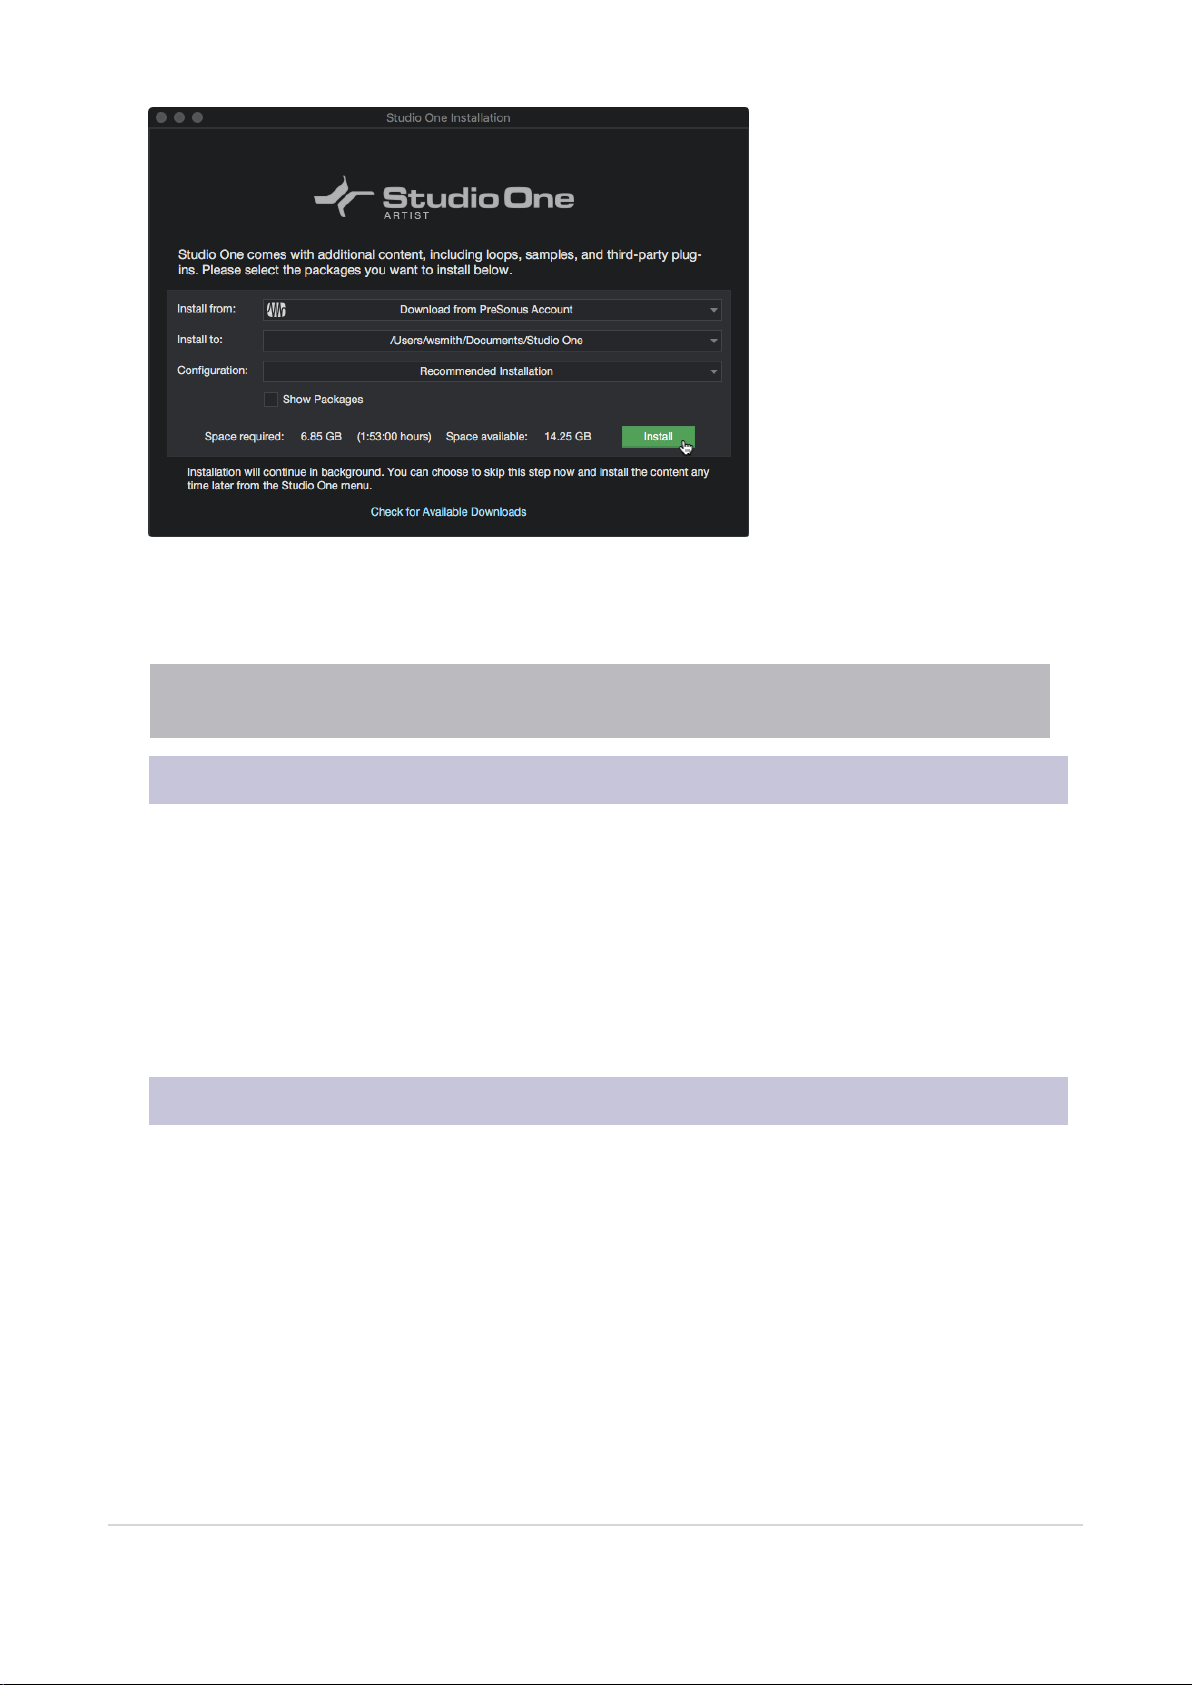
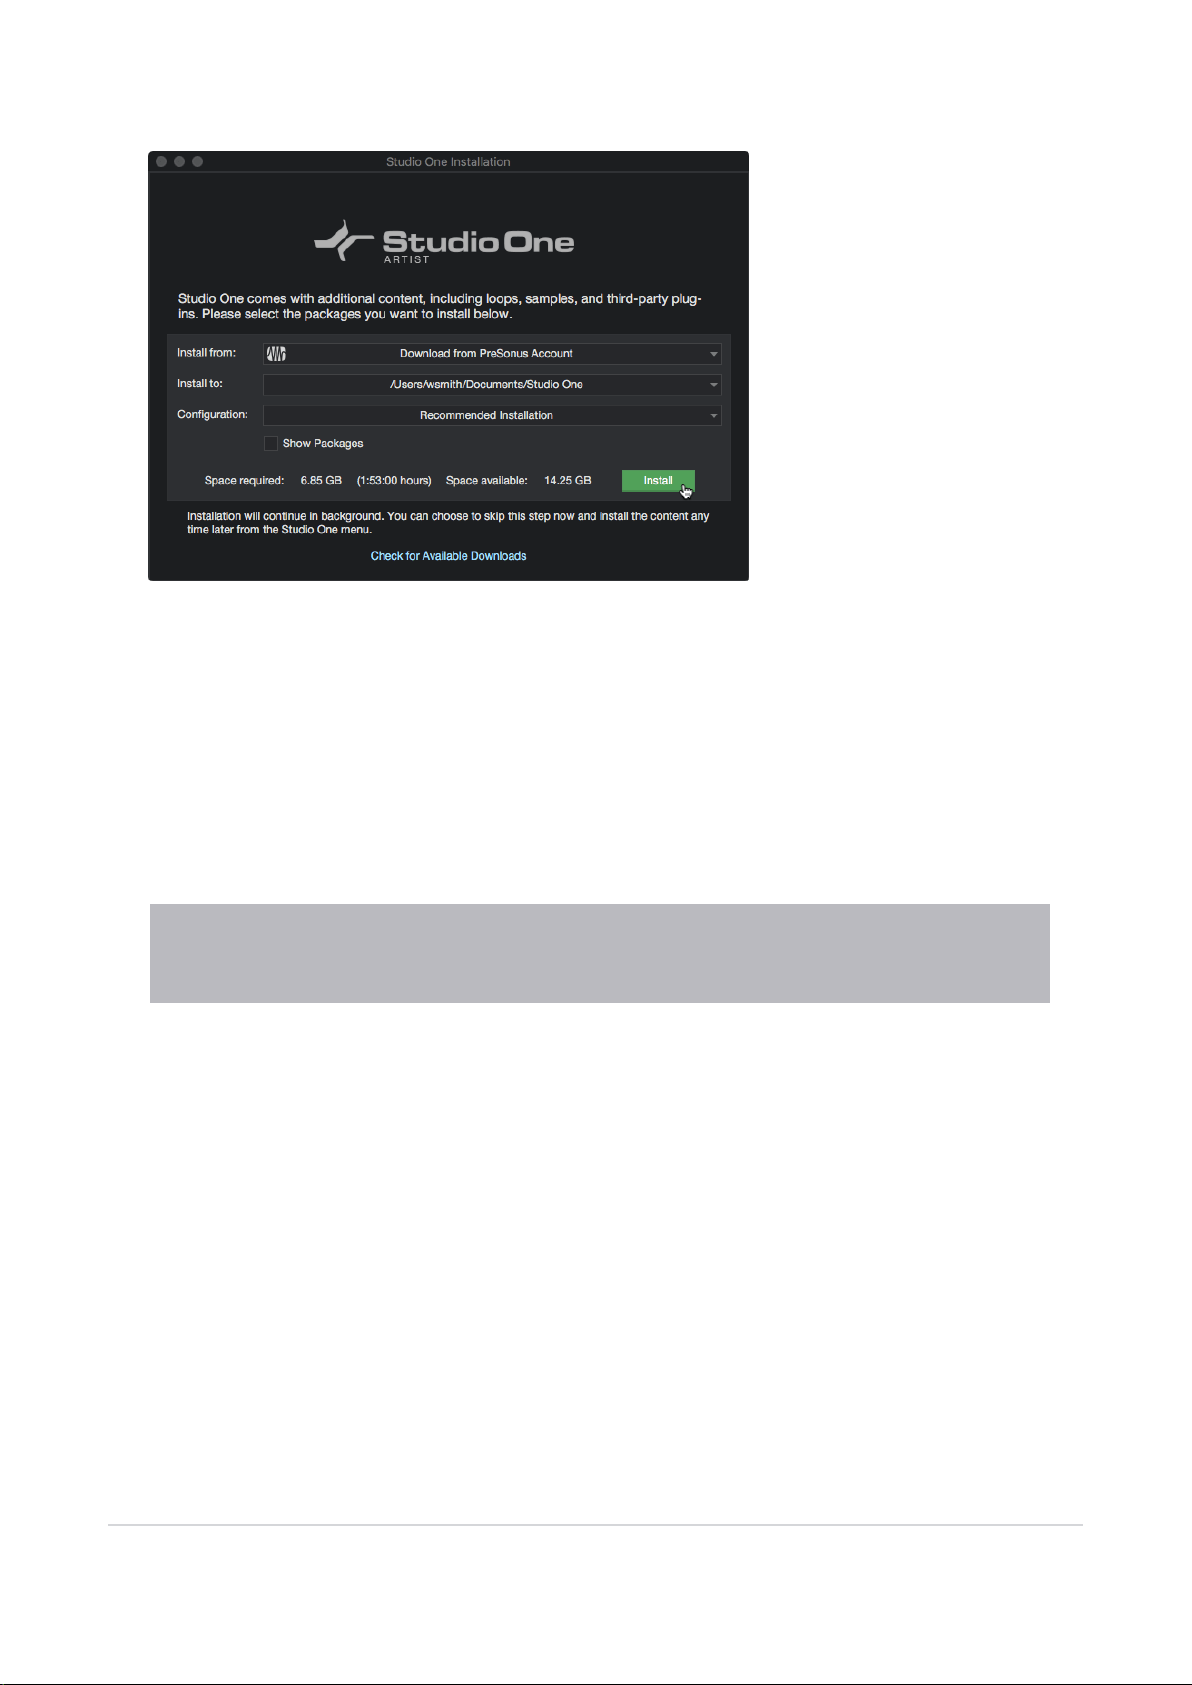
The first time you launch Studio One Prime, you will be prompted to install its companion content. Select
the content you wish to add and click “Install.” The content will automatically begin to download and
install from your My PreSonus user account.
Power User Tip: To select only a portion of the available content, click on “Show Packages”. From
here you can customize your content installation.
4.2 Setting Up Studio One Prime
Studio One Prime was designed to work with PreSonus interfaces and provides unique interoperability
and simplified setup. When Studio One Prime is launched, by default you will be taken to the Start page.
On this page, you will find document-management and device-configuration controls, as well as a cus-
tomizable artist profile, a news feed, and links to demos and tutorials from PreSonus. If your computer is
connected to the Internet, these links will be updated as new tutorials become available on the PreSonus
Web site.
Complete information on all aspects of Studio One Prime is available in the Reference Manual PDF loc-
ated within Studio One. The information in this tutorial covers only the basic aspects of Studio One Prime
and is intended to get you set up and recording as quickly as possible.
4.3 Configuring Audio Devices
In the middle of the Start page, you will see the Setup area. Studio One Prime automatically scans your
system for all available drivers and selects a driver. By default, it will choose a PreSonus driver if one is
available.
4.2 Setting Up Studio One Prime 16
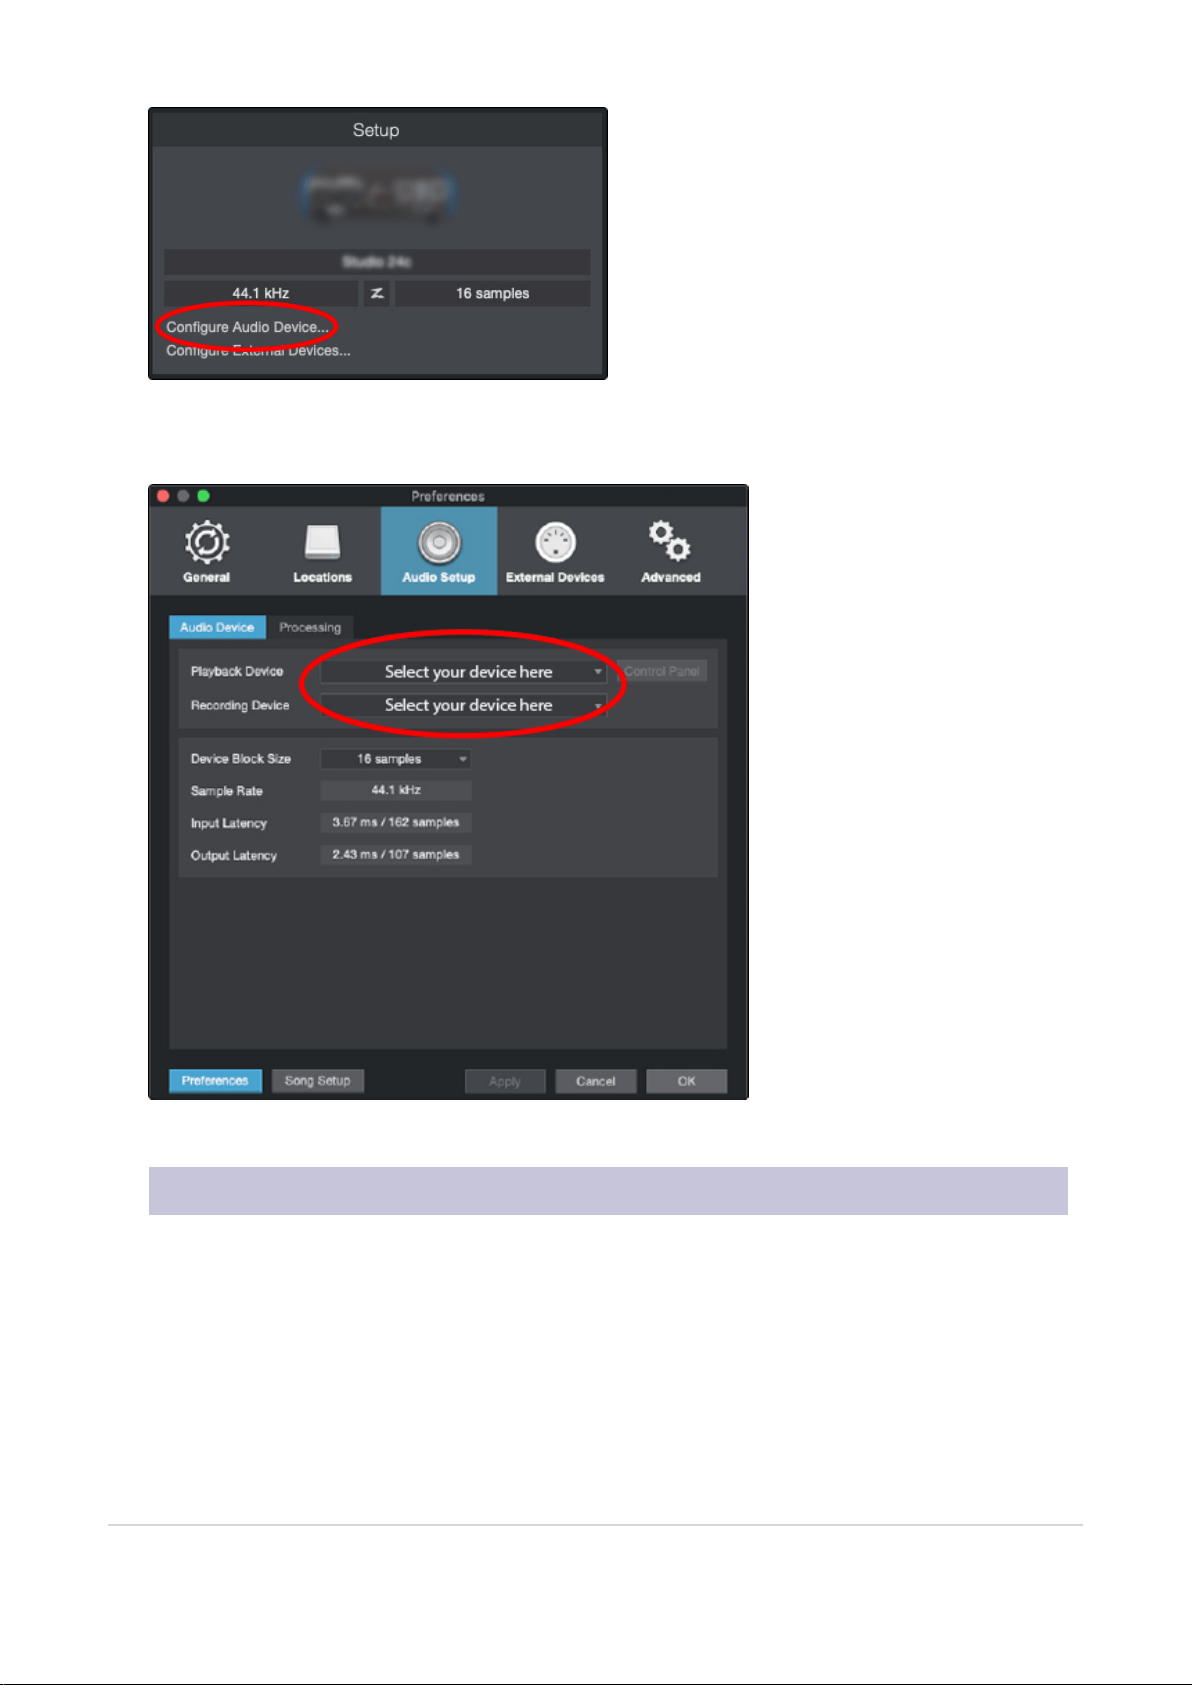
If you do not see your device listed on the Start page when you launch Studio One, click on the Configure
Audio Devices link in the Setup area to open the Options window.
In the Options window, click on the Audio Setup tab and select your device driver from the pull-down.
4.4 Configuring MIDI Devices
From the External Devices window in Studio One Prime, you can configure your MIDI keyboard con-
troller, sound modules, and control surfaces. This section will guide you through setting up your MIDI key-
board controller and sound modules. Please consult the Reference Manual located within Studio One for
complete setup instructions for other MIDI devices.
If you are using a third-party MIDI interface or USB MIDI-controller keyboard, you must install any
required drivers for these devices before beginning this section. Please consult the documentation that
came with your MIDI hardware for complete installation instructions.
4.4 Configuring MIDI Devices 17
If you do not have any MIDI devices, please skip to Section 4.3.
Setting up an External MIDI Keyboard Controller from the Start Page
A MIDI keyboard controller is a hardware device that is generally used for playing and controlling other
MIDI devices, virtual instruments, and software parameters. In Studio One Prime, these devices are
referred to as Keyboards, and they must be configured before they are available for use. In some cases,
your MIDI keyboard controller is also used as a tone generator. Studio One Prime views the controller
and tone-generation functions as two different devices: a MIDI keyboard controller and a sound module.
The MIDI controls (keyboard, knobs, faders, etc.) will be set up as a Keyboard. The sound modules will
be set up as an Instrument.
You can set up your external MIDI devices from the Setup area in the Start page. Before setting up a new
Song for recording, take a moment to configure external devices.
Make sure you have connected the MIDI Out of your external MIDI controller to a MIDI In on your PreSo-
nus audio interface (if available) or other MIDI interface. If you are using a USB MIDI controller, connect it
to your computer and power it on.
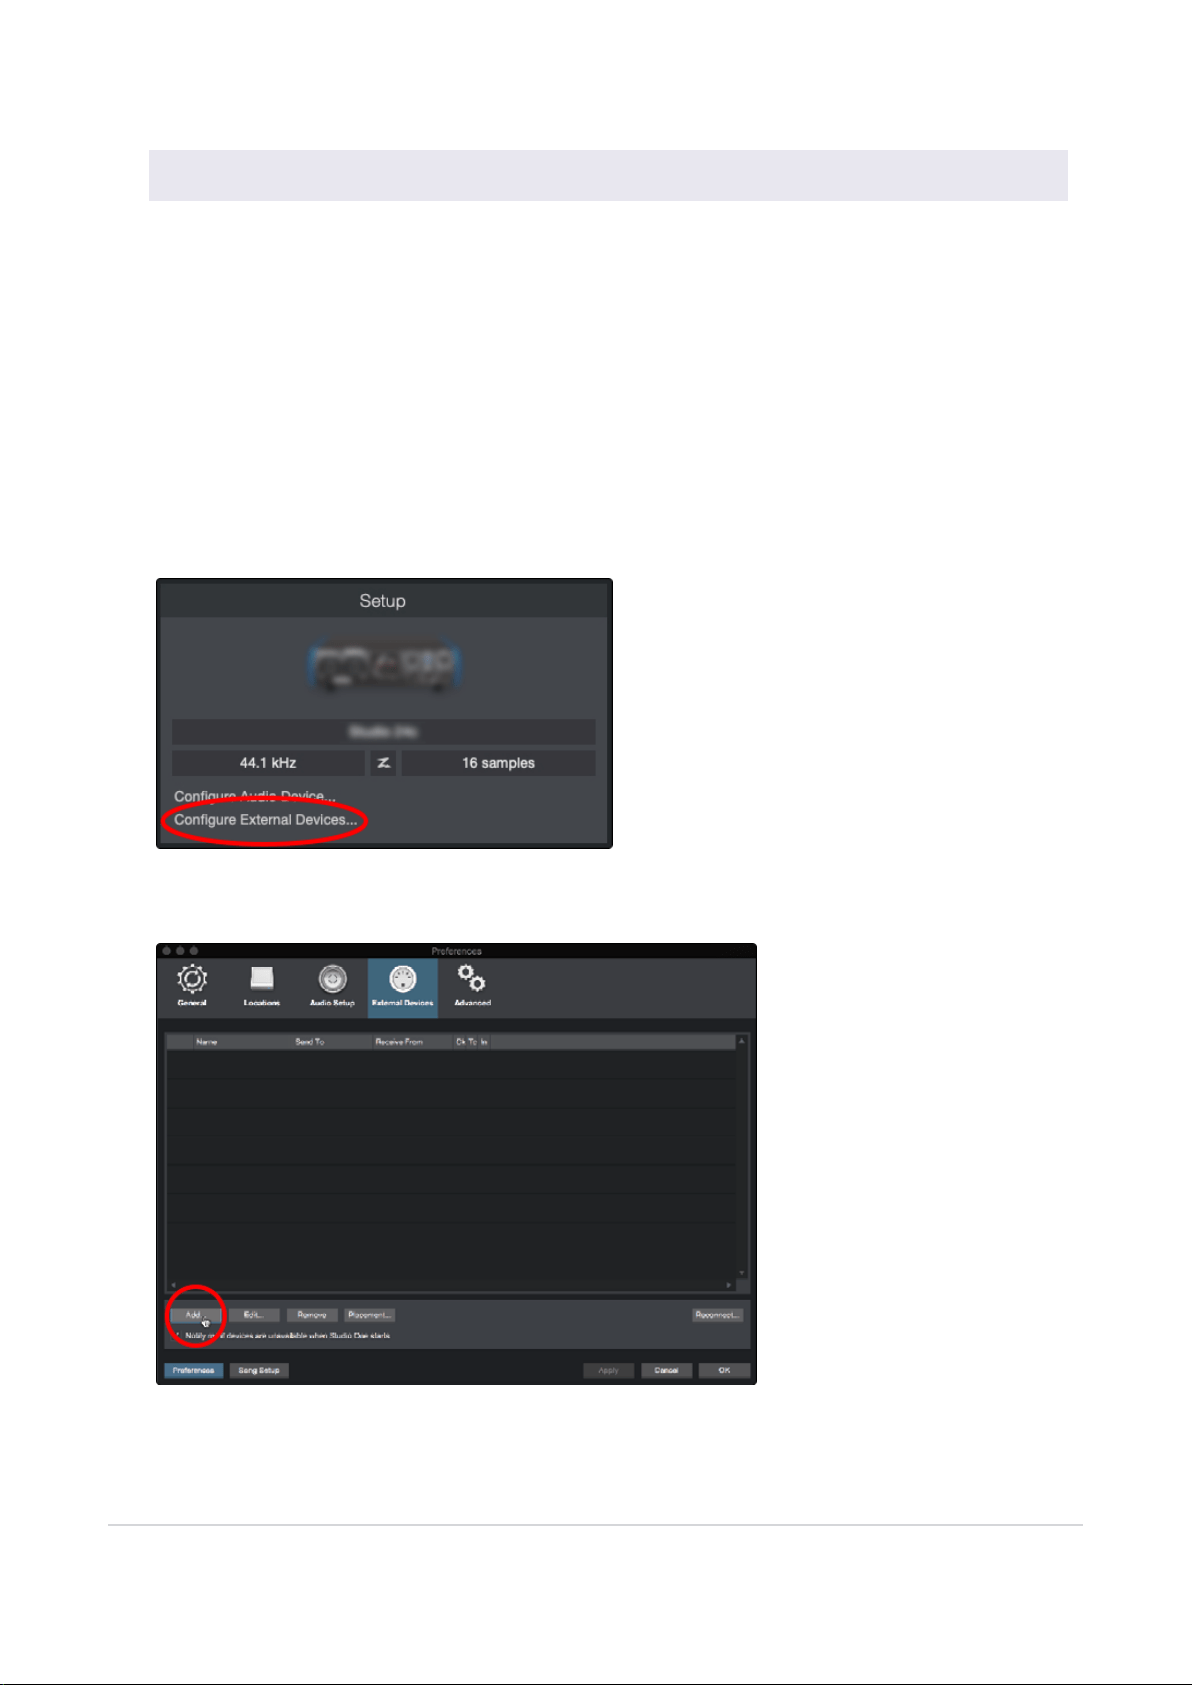
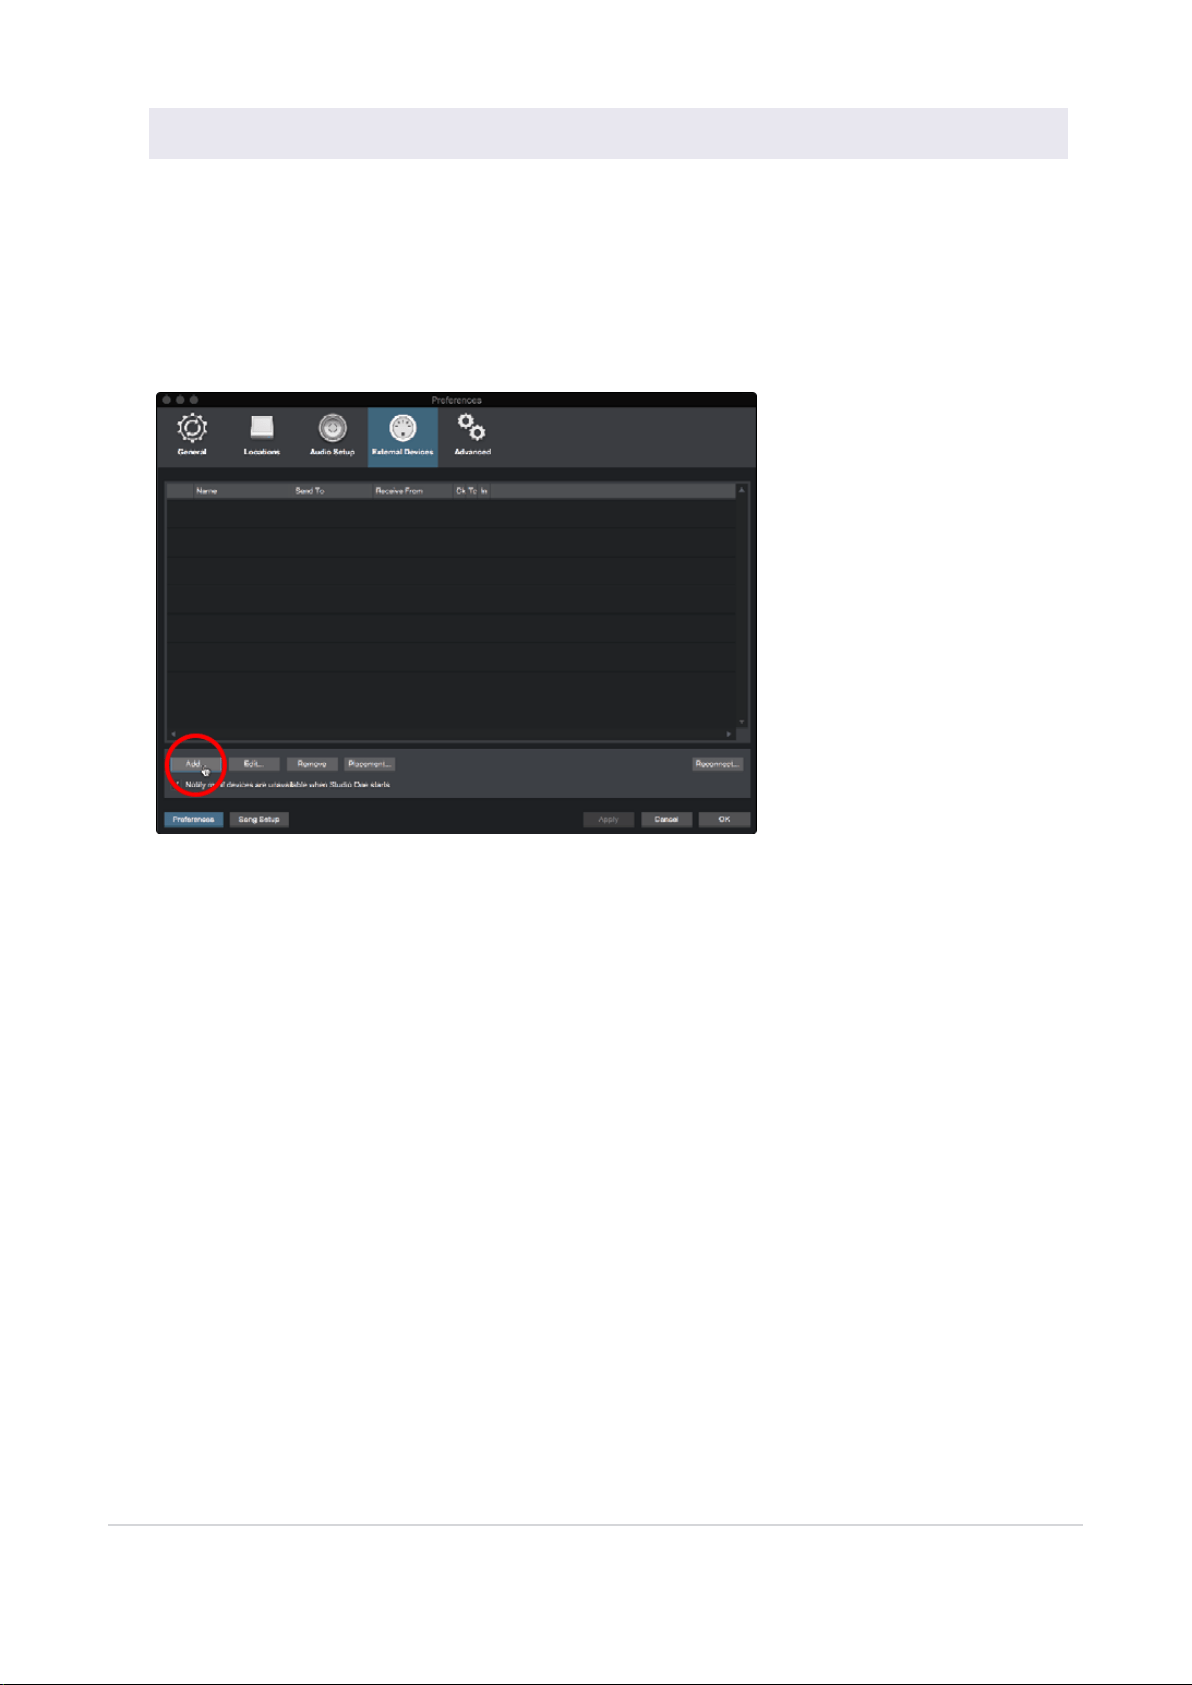
Click on the Configure External Devices link in the Setup area on the Start page to launch the External
Devices window.
Click the Add button. This will launch the Add Device window.
4.4 Configuring MIDI Devices 18
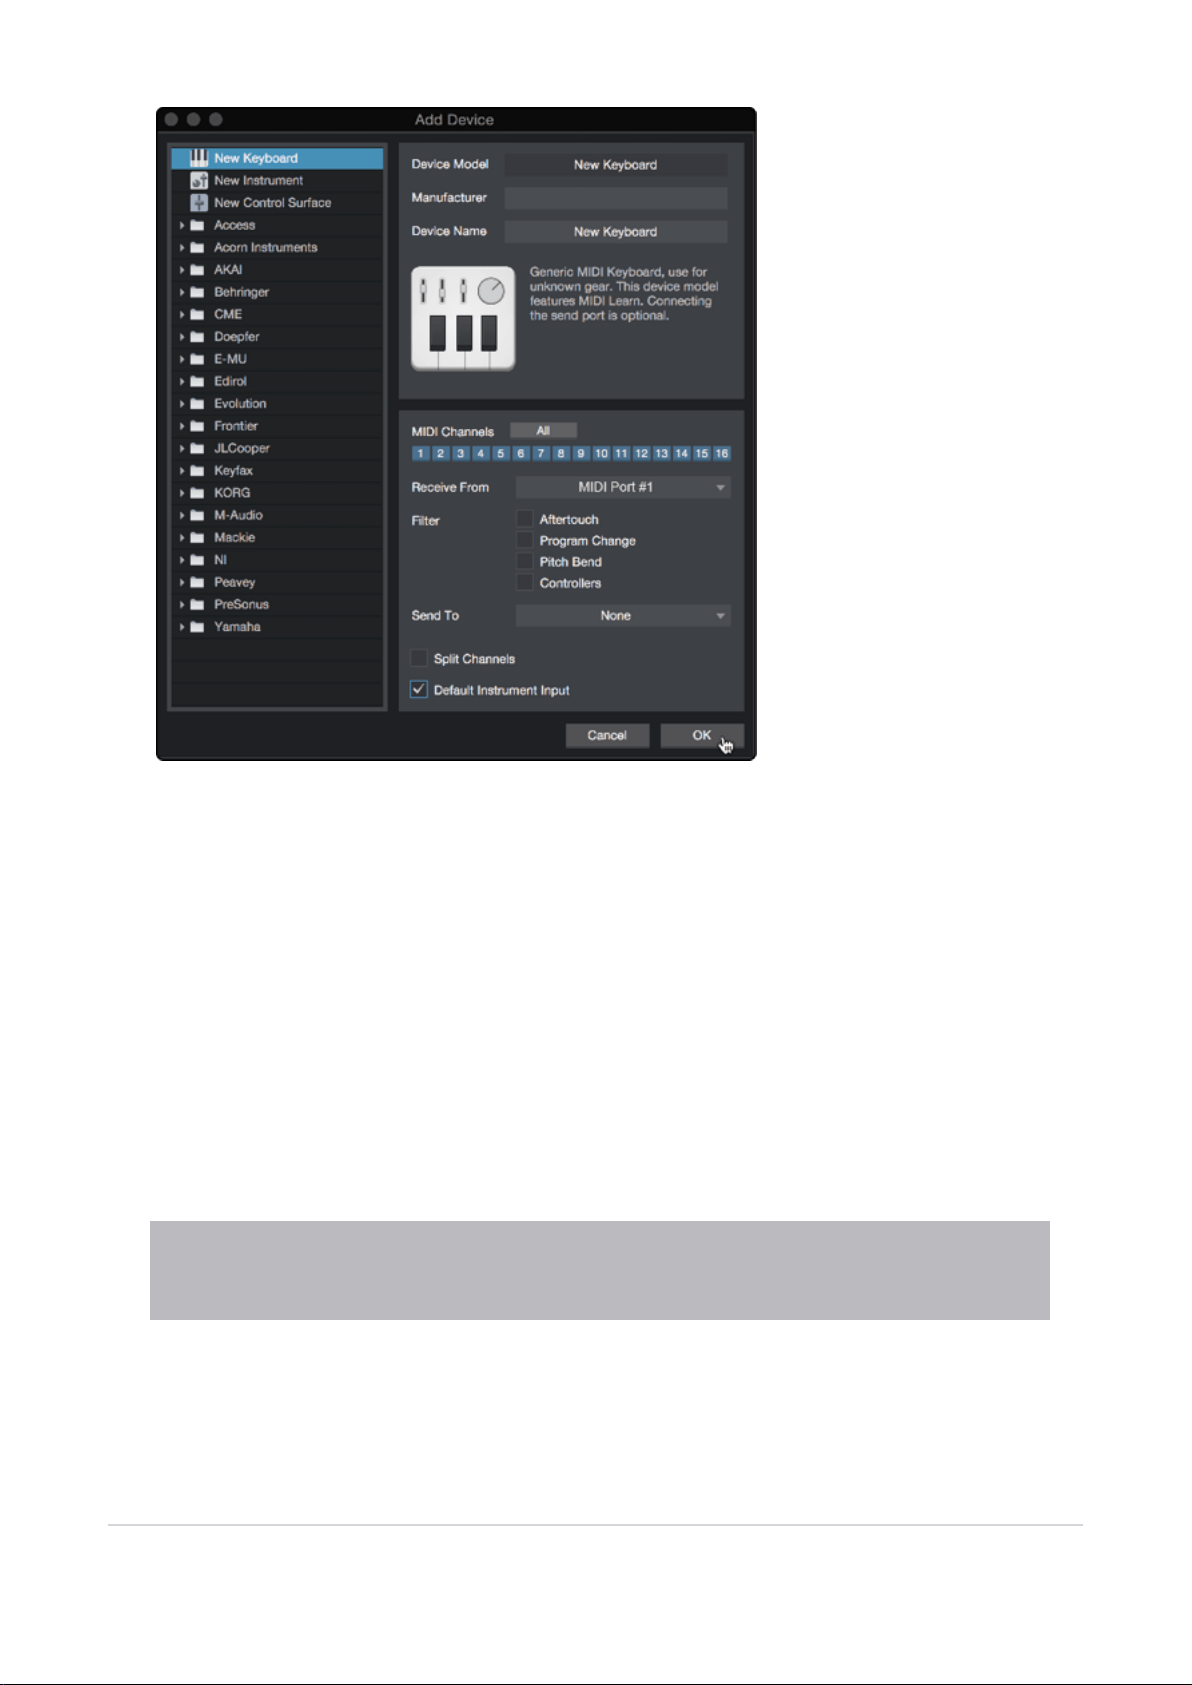
From the menu on the left, select your MIDI controller from the list of manufacturers and models. If you do
not see your MIDI controller listed, select New Keyboard. At this point, you can customize the name of
your keyboard by entering the manufacturer and device names.
l
You must specify which MIDI channels will be used to communicate with this keyboard. For most pur-
poses, you should select all MIDI channels. If you are unsure of which MIDI channels to choose,
select all 16.
l
Studio One allows you to filter out specific control functions. If you would like Studio One to ignore
Aftertouch, Pitch Bend, Program Change, or all CC messages, enable filtering for any or all of these
messages.
l
In the Receive From drop-down menu, select the MIDI interface input from which Studio One Prime
will receive MIDI data (that is, the MIDI port to which your keyboard is connected).
l
If this is the only keyboard that you will use to control your external synthesizers and virtual instru-
ments, you should check the box next to Default Instrument Input. This will automatically assign your
keyboard to control all MIDI devices in Studio One Prime.
l
Click “OK.” You're all set up!
Power User Tip: In the Send To drop-down menu, select the MIDI interface output from which your Stu-
dio One will send MIDI data to your keyboard. If your keyboard controller doesn’t need to receive MIDI
data from Studio One, you can leave this unselected.
If you have a sound module that you’d like to connect, leave the External Devices window open and pro-
ceed to the next part of this section. If not, you can close the window and skip to the next section.
4.4 Configuring MIDI Devices 19
Setting up an External MIDI Sound Module from the Start Page
MIDI instrument controllers (keyboards, MIDI guitars, etc.) send musical information, in the form of MIDI
data, to tone modules and virtual instruments, which respond by generating sound as instructed. Tone
modules can be standalone sound devices or can be integrated into a MIDI instrument, such as a key-
board synthesizer. Studio One Prime refers to all tone generators as Instruments. Once you have set up
your MIDI keyboard controller, take a moment to configure your sound module.
Make sure you have connected the MIDI In of your external sound module to the MIDIOut of your MIDI
interface.
In the External Devices window, click the Add button.
4.4 Configuring MIDI Devices 20
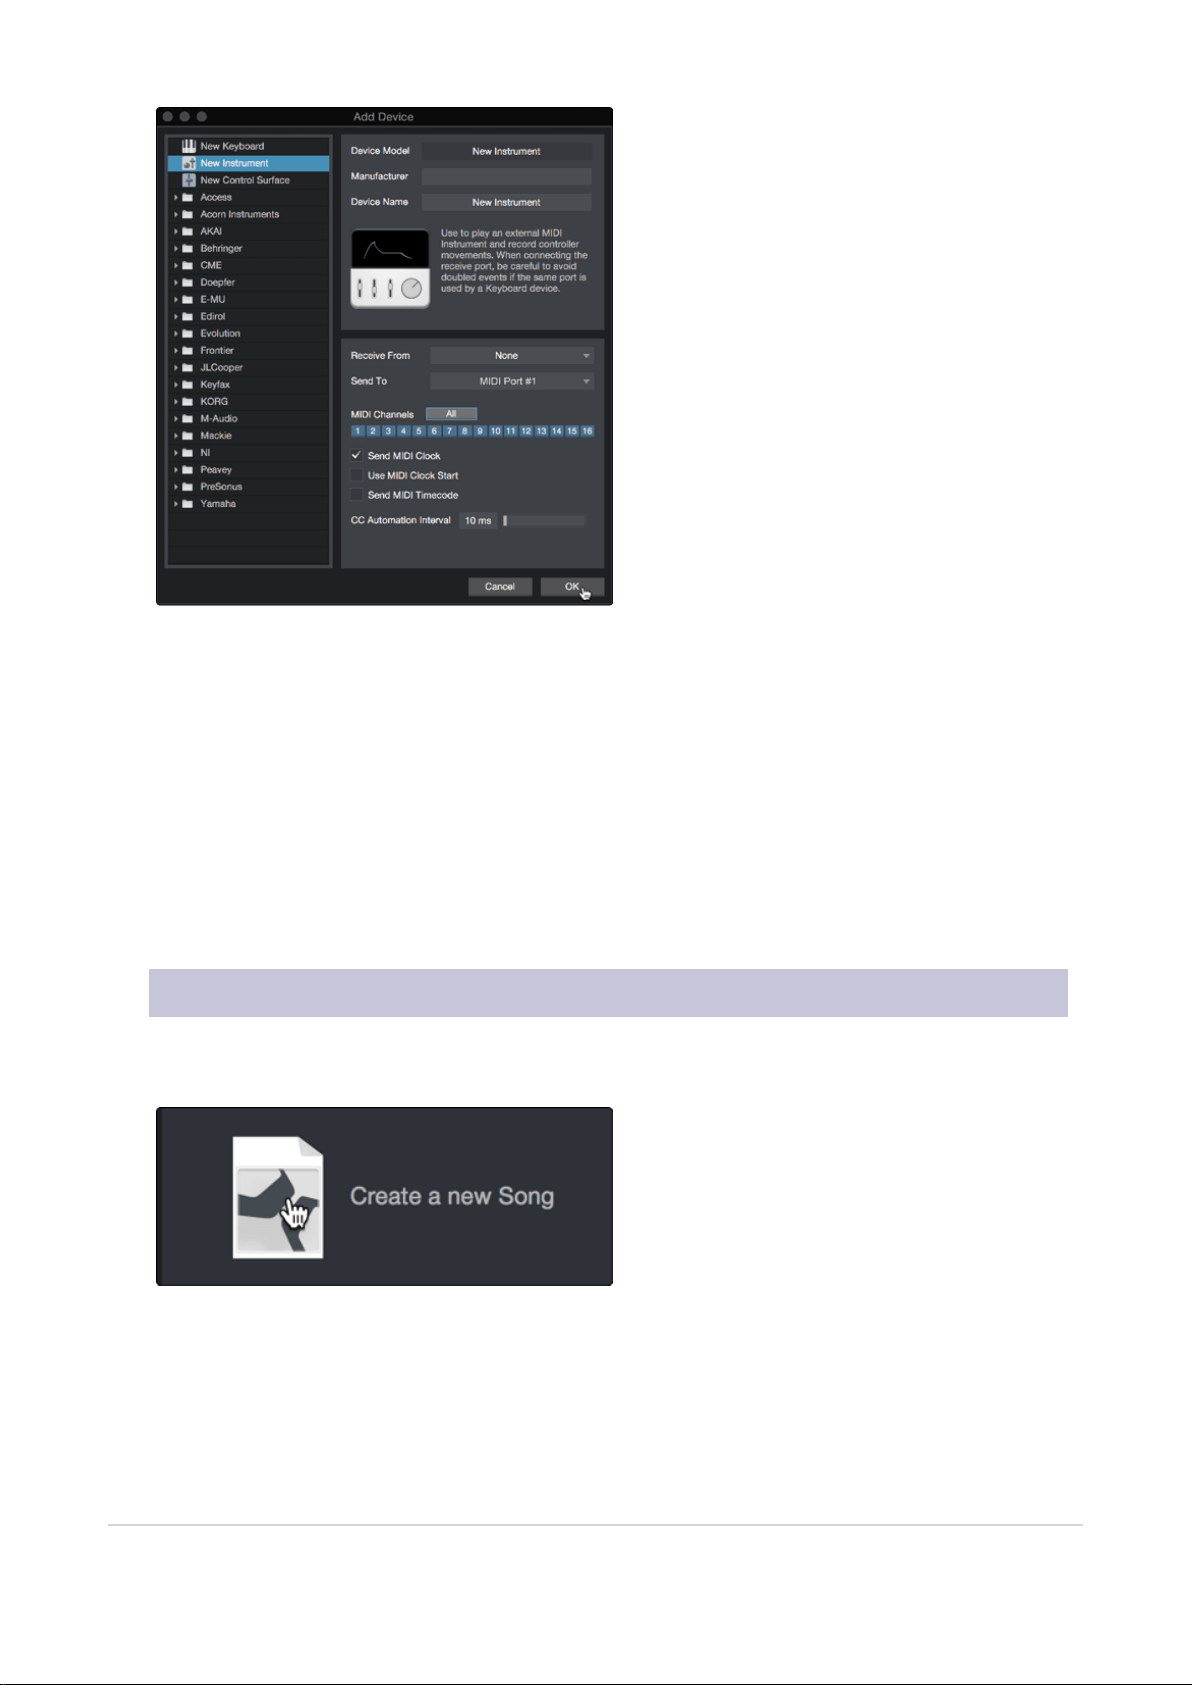
Select your device in the menu on the left. If your device is not listed, select New Instrument. At this point
you can customize the name of your keyboard by entering the manufacturer and device names.
l
Specify which MIDI channels will be used to communicate with this sound module. For most pur-
poses, you should select all MIDI channels. If you are unsure of which MIDI channels to select, we
suggest you select all 16.
l
In the Send To menu, select the MIDI interface output from which Studio One Prime will send MIDI
data to your sound module. Click “OK” and close the External Devices window. You are now ready to
start recording in Studio One Prime.
The rest of this Quick Start Guide will go over how to set up a Song and will discuss some general work-
flow tips for navigating through the Studio One Prime environment.
4.5 Creating a New Song
Now that you’ve configured your audio and MIDI devices, let’s create a new Song. We’ll start by setting
up your default audio I/O.
From the Start page, select “Create a New Song.”
4.5 Creating a New Song 21

In the New Song window, name your Song and choose the directory in which you’d like it saved. You’ll
notice a list of templates on the left. These templates provide quick setups for a variety of devices and
recording situations. The section will describe creating a Song from an empty session.
Power User Tip: If you plan to import loops into your Song, make sure that the Stretch Audio Files to
Song Tempo option is selected. This will automatically import loops at the correct tempo.
4.5 Creating a New Song 22
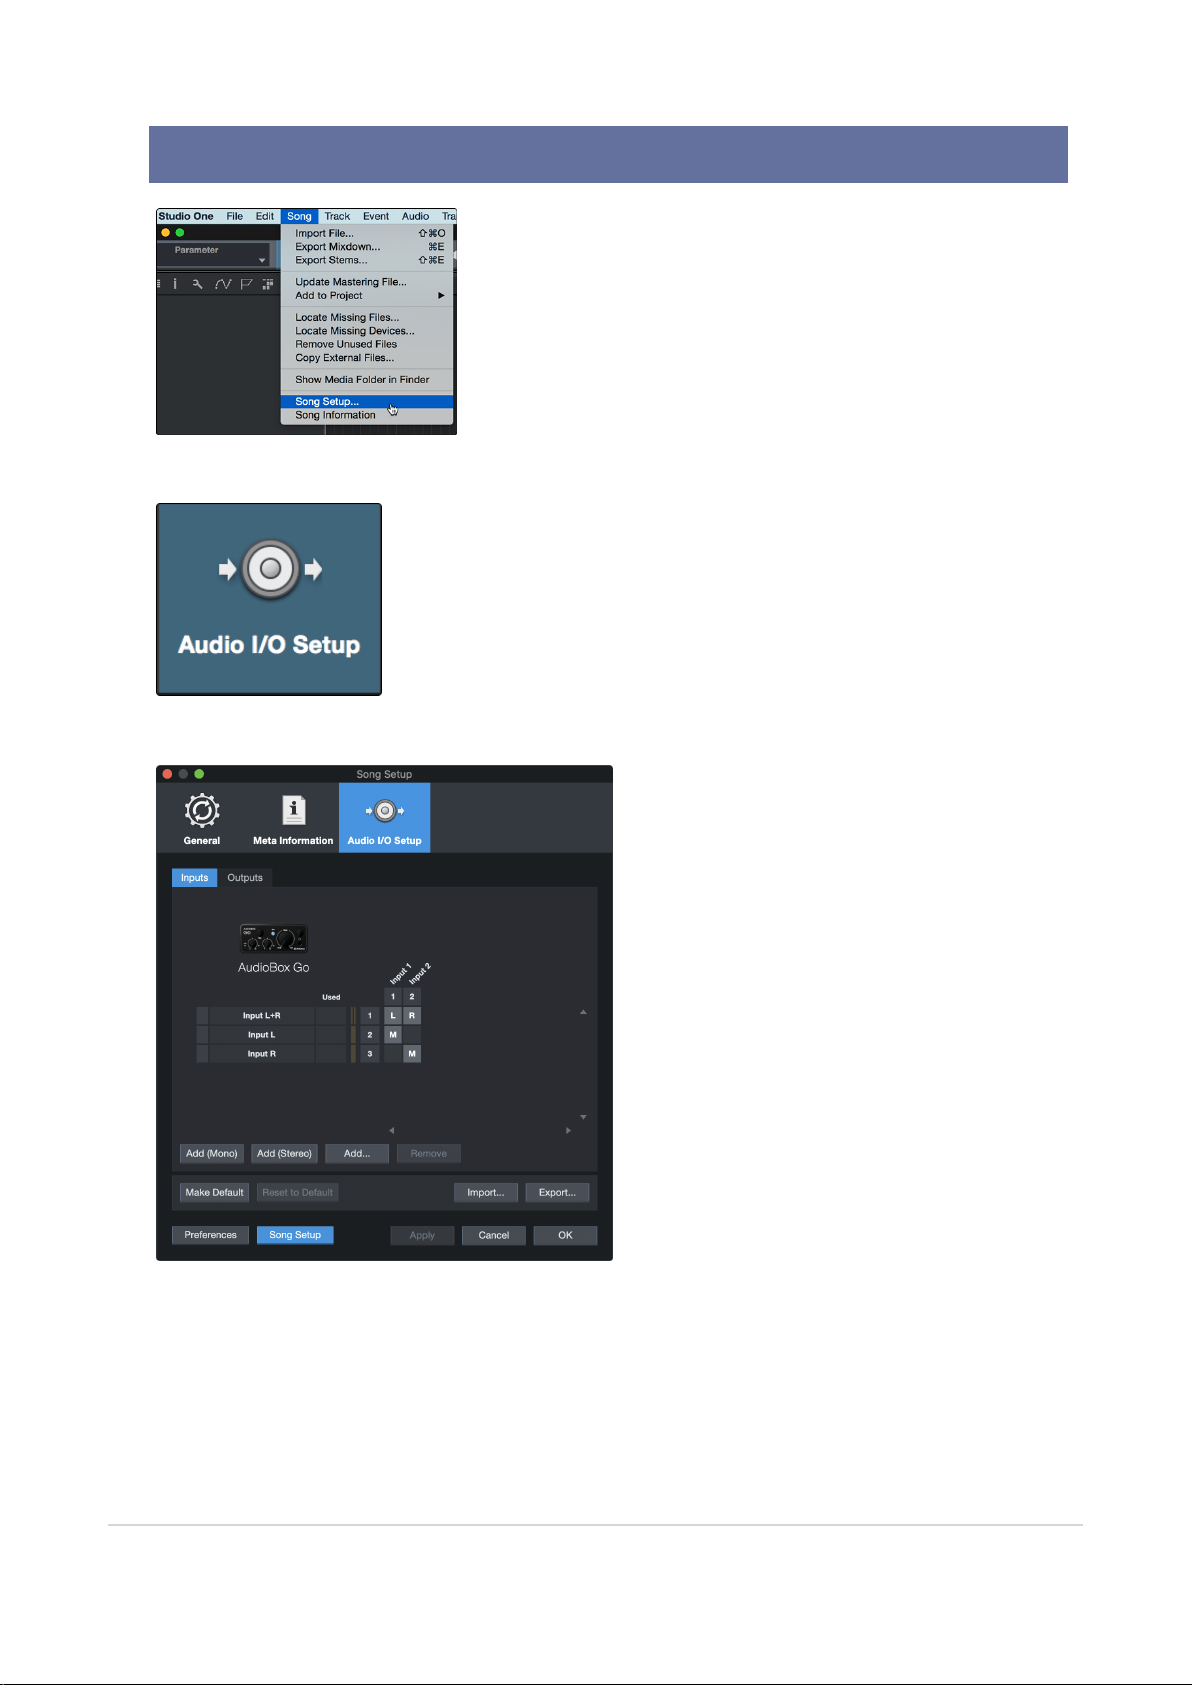
5. Configuring Your I/O
Click on Song | Song Setup to set your sample rate and resolution and configure your audio I/O.
Click on the Audio I/O Setup tab.
From the Inputs tab, you can enable any or all of the inputs on your AudioBox GOthat you’d like to have
available. We recommend that you create a mono input for each of the inputs on your interface. If you
plan on recording in stereo, you should also create a stereo input as well.
5. Configuring Your I/O 23
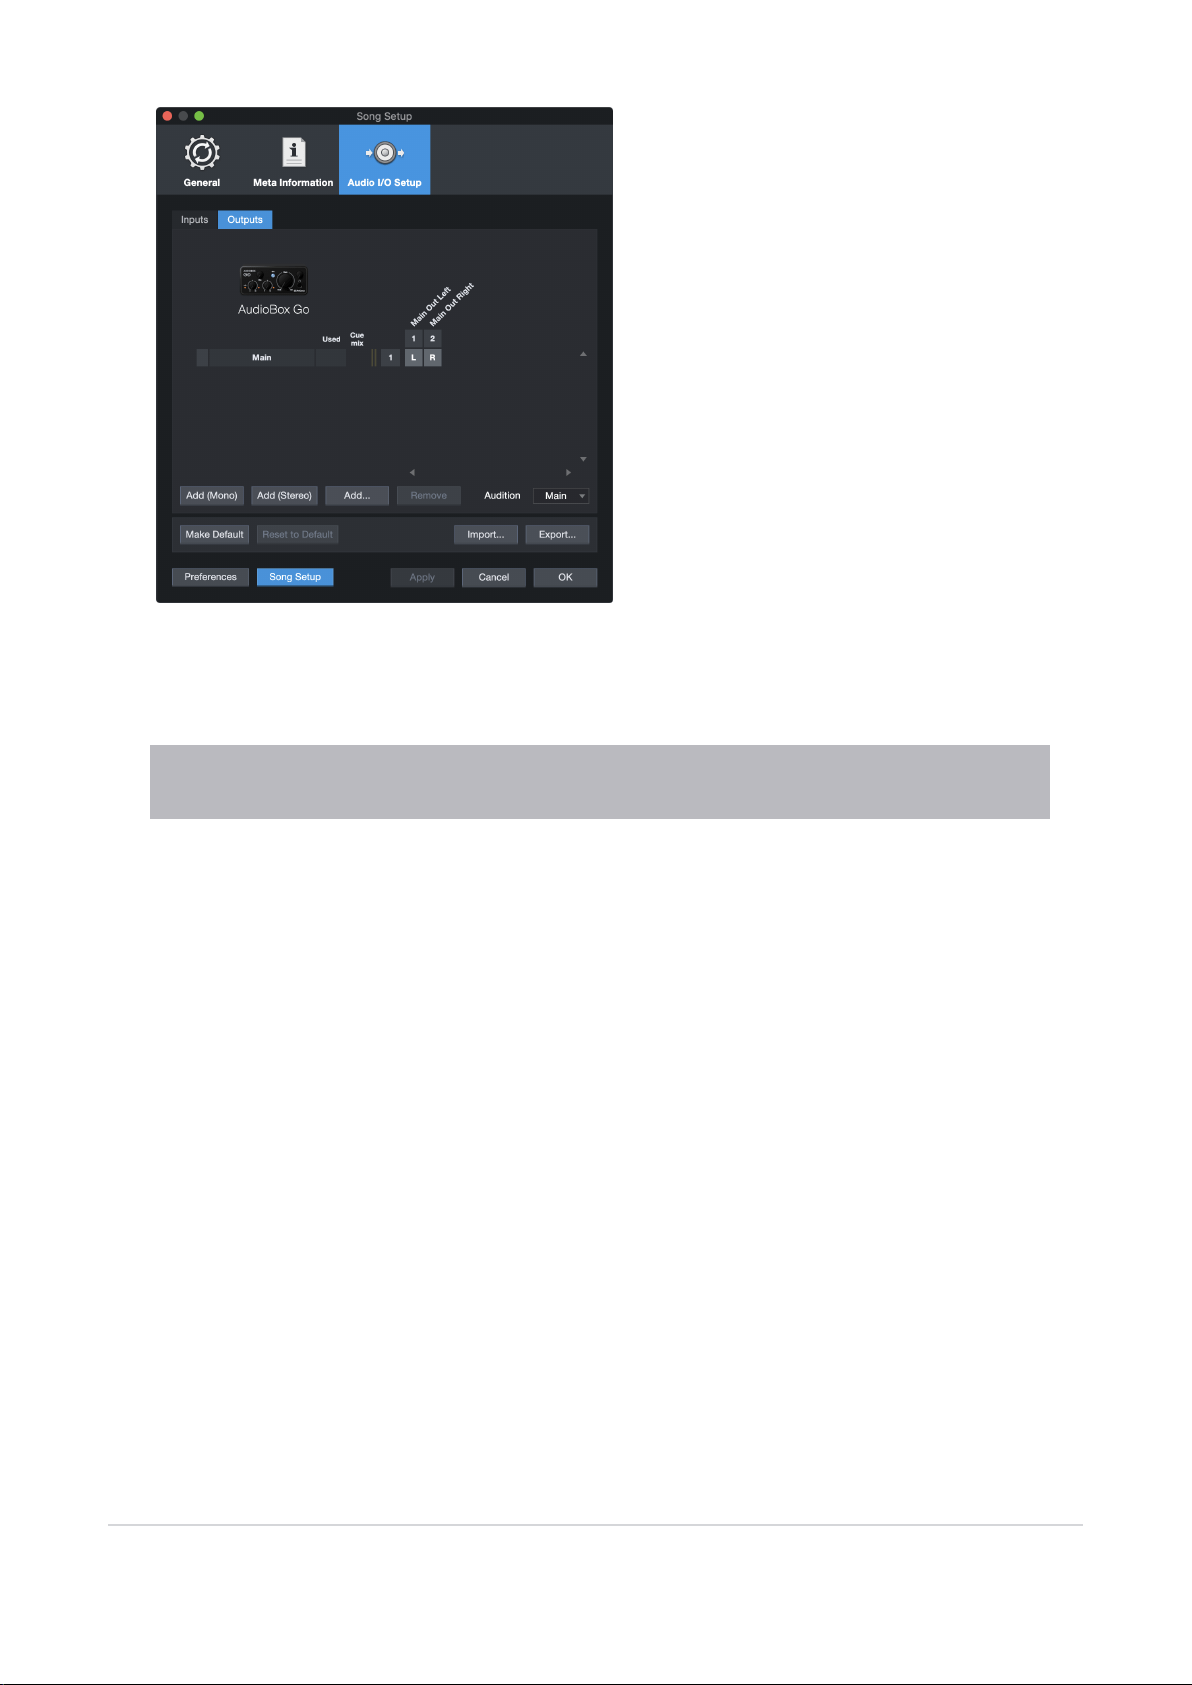
Click on the Outputs tabs to enable any or all of the outputs on yourAudioBox GO. In the lower right
corner, you will see the Audition Select menu. This allows you to choose the output from which you will
audition audio files prior to importing them into Studio One Artist. In general, you will want this to be the
main output bus.
Power User Tip:If you would like this I/O configuration to be the same every time you open Studio
One, click the Make Default button.
5. Configuring Your I/O 24
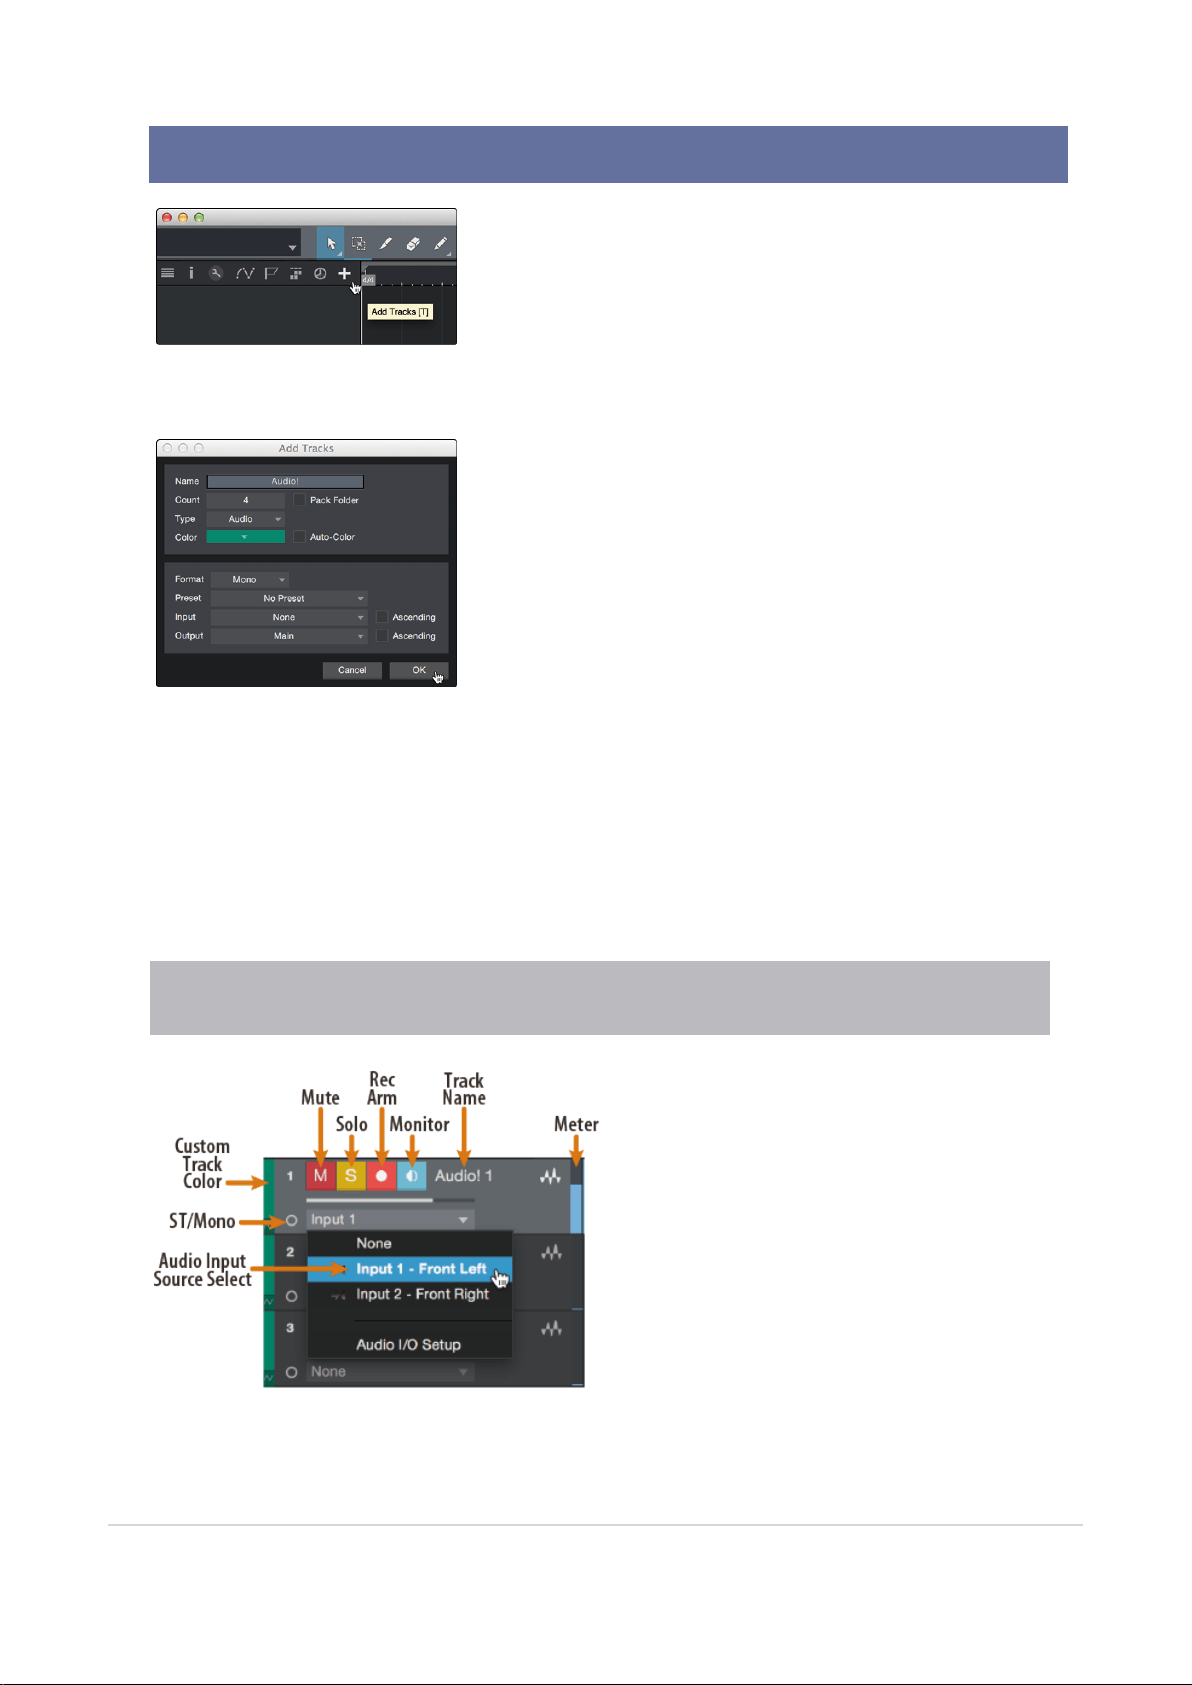
6. Creating Audio and Instrument Tracks
In the upper left corner of the Arrange window, you will notice several buttons. The button furthest to the
right is the Add Tracks button. Click on this button to open the Add Tracks window.
In the Add Tracks window, you can customize the track name and color, add a preset rack of effects, and
set the physical source for the input and output of your audio tracks. Most important, you can select the
number and type of tracks you’d like to create.
l
Audio. Use this track type to record and playback audio files.
l
Instrument. Use this track to record and playback MIDI data to control external MIDI devices or vir-
tual instrument plug-ins.
l
Automation. This track type lets you create automated parameter controls for your session.
l
Folder. This track helps you to manage your session as well as to quickly edit multiple tracks at once.
Power User Tip: If you would like to add an audio track for each of the available inputs, go to Track |
Add Tracks for All Inputs.
6. Creating Audio and Instrument Tracks 25
Note: Instrument tracks are nearly identical to audio tracks. The Input Source list for Instrument tracks
lists available external MIDI devices as well as any virtual instruments that have been added to the Song.
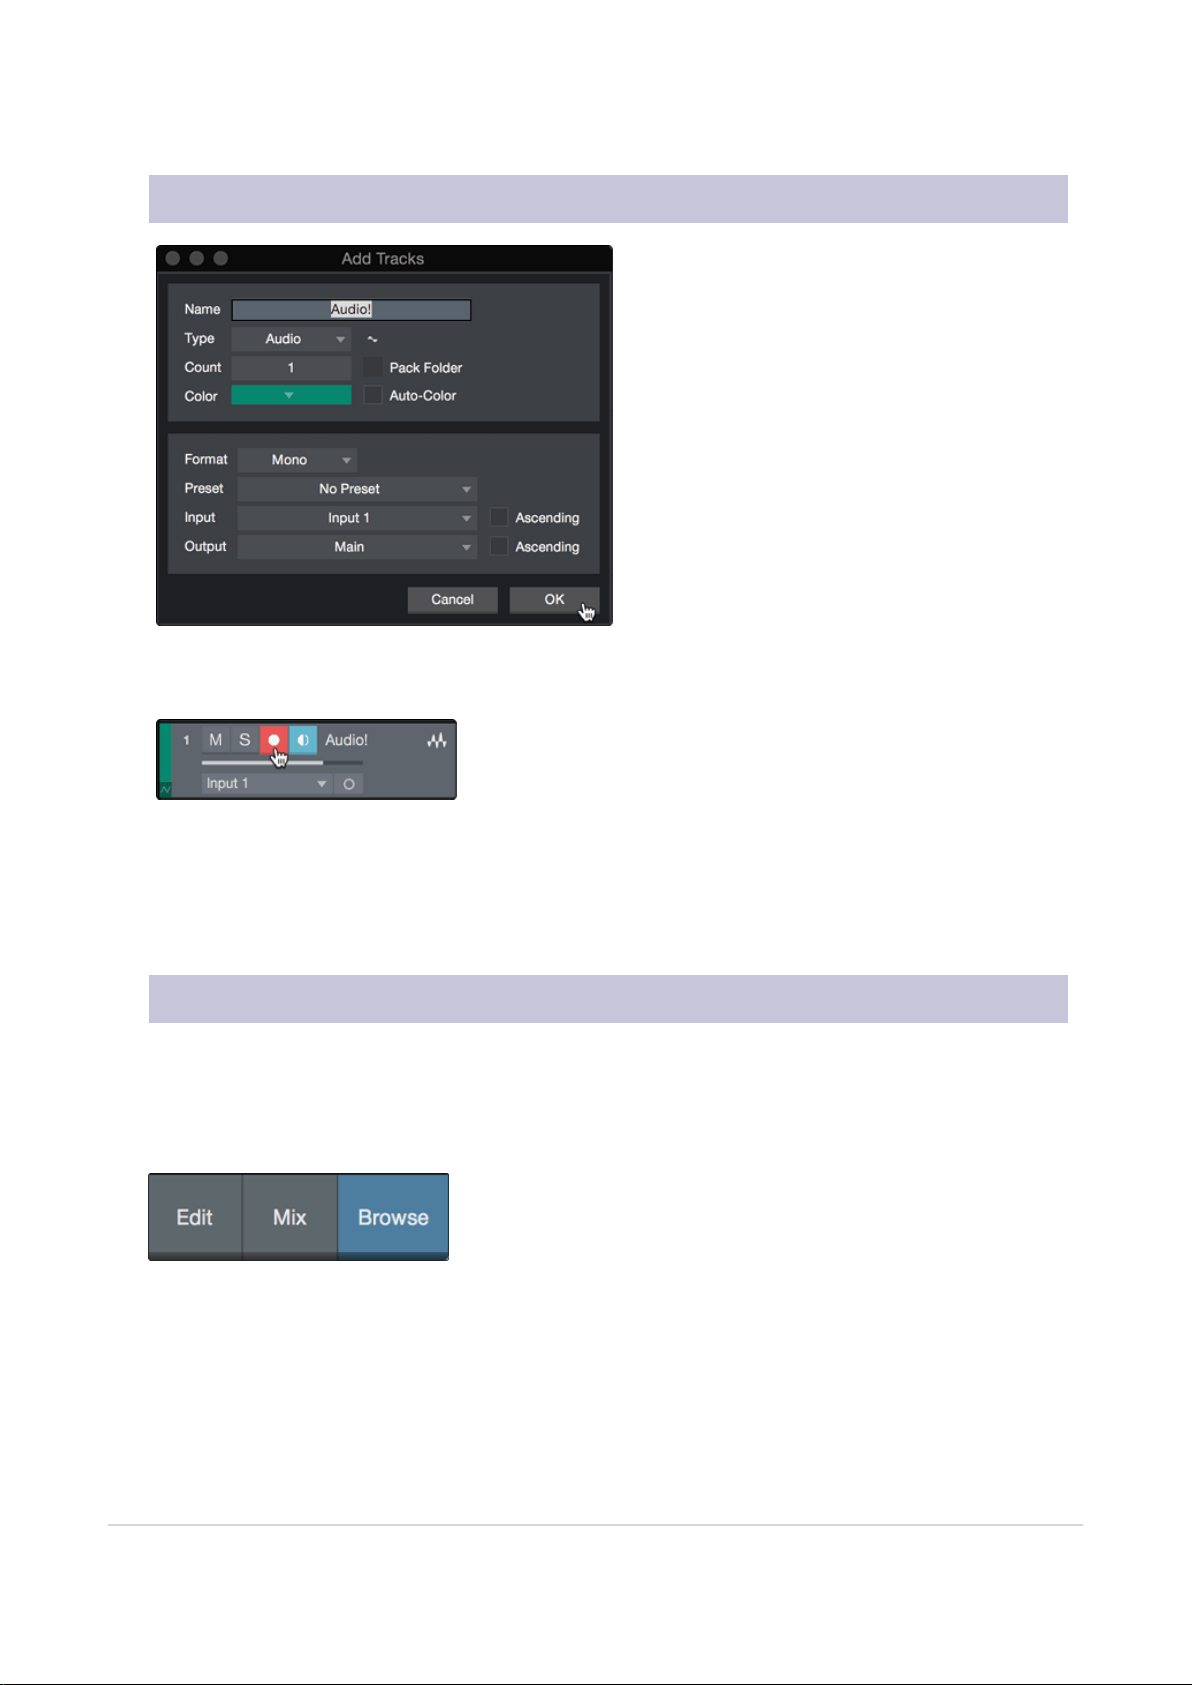
6.1 Recording an Audio Track
To begin recording, create an audio track from the Add Tracks window, set its input to Input 1 on your
interface, and connect a microphone to the same input.
Select Record Enable on the track. Turn up the Input 1 level on your audio interface while speak-
ing/singing into the microphone. You should see the input meter in Studio One Prime react to the input.
Adjust the gain so the input level is near its maximum without clipping (distorting).
You are now ready to start recording. For complete instructions, please consult the Studio One Refer-
ence manual located in Help | Studio One Reference Manual.
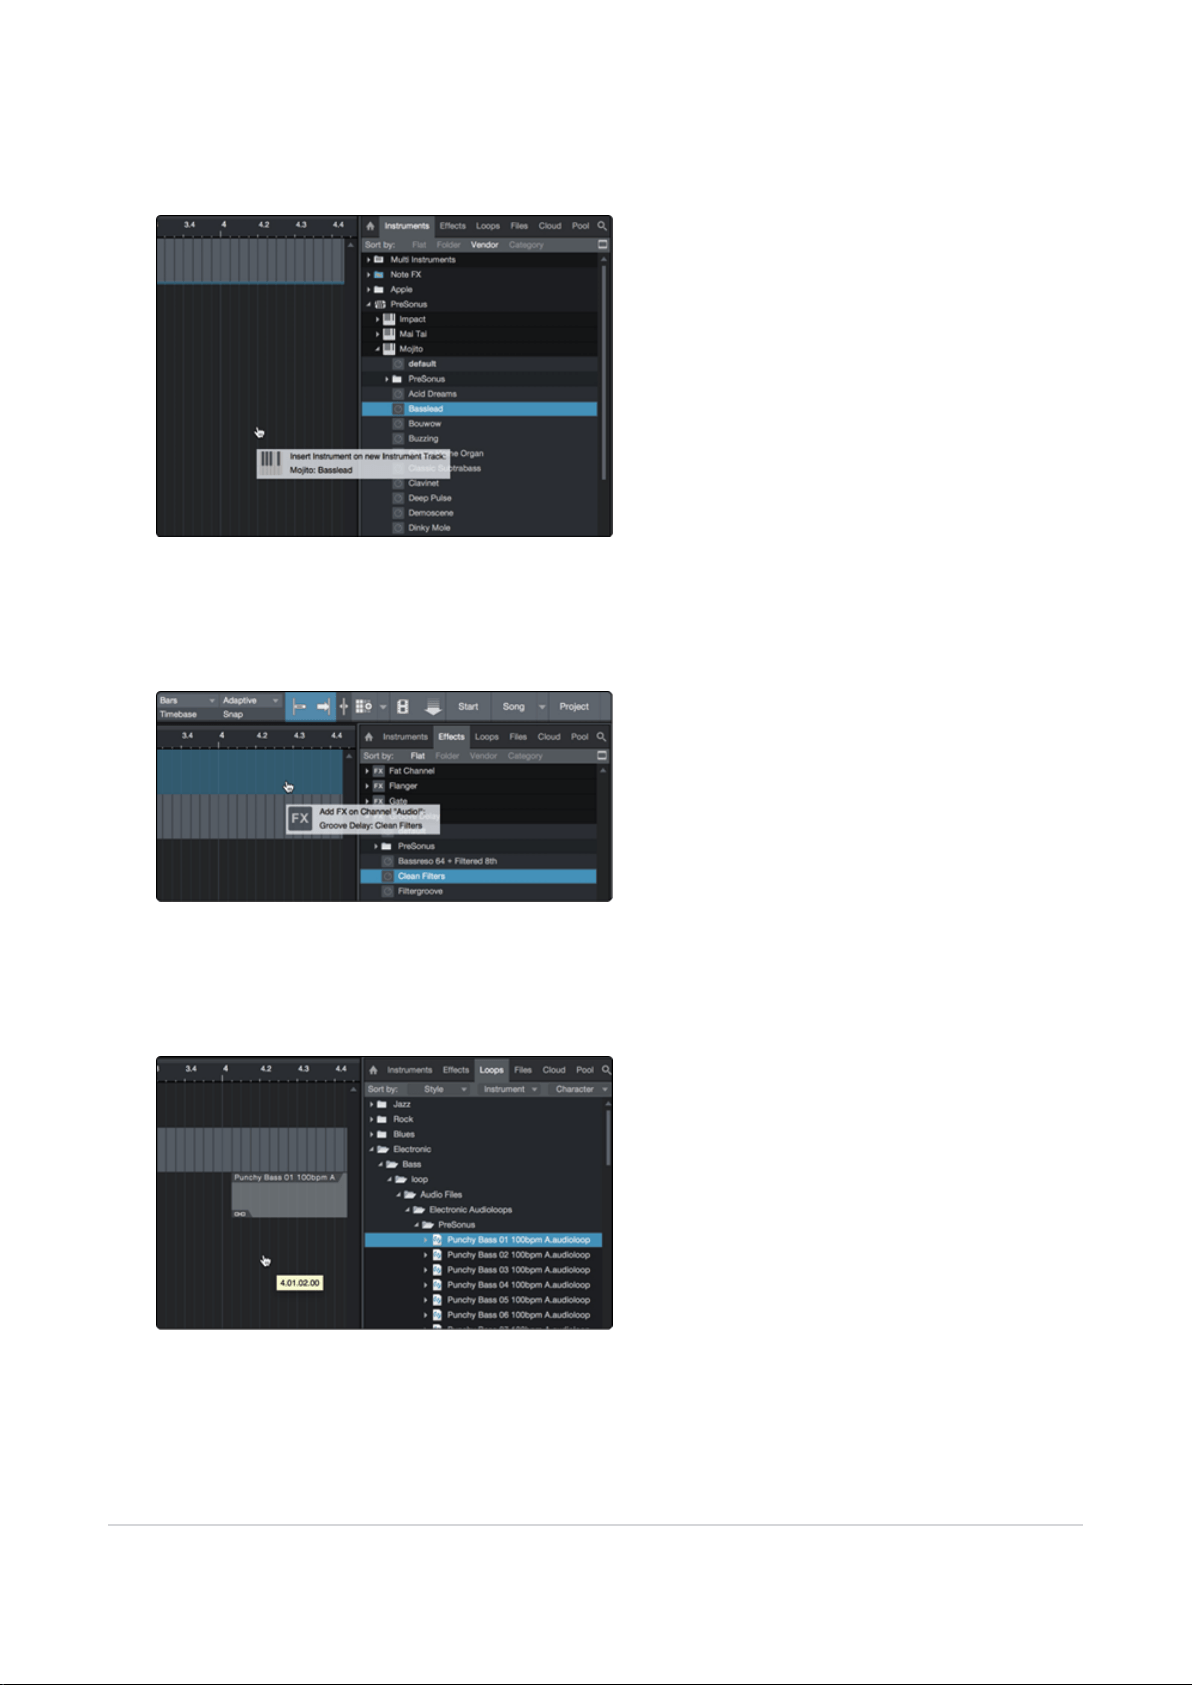
6.2 Adding Virtual Instruments and Effects
You can add plug-ins and instruments to your Song by dragging-and-dropping them from the browser.
You can also drag an effect or group of effects from one channel to another, drag in customized effects
chains, and instantly load your favorite virtual-instrument preset without ever scrolling through a menu.
Opening the browser.
In the lower right corner of the Arrange window are three buttons:
l
The Edit button opens and closes the audio and MIDI editors.
l
The Mix button opens and closes the Mixer window.
6.1 Recording an Audio Track 26
l
The Browse button opens the browser, which displays all of the available virtual instruments, plug-in
effects, audio files, and MIDI files, as well as the pool of audio files loaded into the current session.
Drag-and-Drop Virtual Instruments
To add a virtual instrument to your session, open the browser and click on the Instrument button. Select
the instrument or one of its patches from the Instrument browser and drag it into the Arrange view. Studio
One Prime will automatically create a new track and load the instrument as the input.
Drag-and-Drop Effects
To add a plug-in effect to a track, click the Effects button in the browser and select the plug-in or one of its
presets in the effects browser. Drag-and-drop the selection over the track to which you would like to add
the effect.
Drag-and-Drop Audio and MIDI Files
Audio and MIDI files can be quickly located, auditioned, and imported into your Song by dragging them
from the file browser into the Arrange view. If you drag the file to an empty space, a new track will be
6.2 Adding Virtual Instruments and Effects 27

created with that file placed at the position to which you dragged it. If you drag the file to an existing track,
the file will be placed as a new part of the track.
6.2 Adding Virtual Instruments and Effects 28

7. Technical Information
Specifications
General
Sample Rates 44.1, 48, 88.2, 96kHz
Converter Resolution 24 bit
ADCConverter Dynamic Range 90 dB, 48 kHz
DACConverter Dynamic Range 102 dB, 48 kHz
Microphone Preamp
Type XLR Female (via Combo), Balanced
Max Input Level (Unity Gain, 1 kHz @ 0.5% THD+N) +10 dBu (±0.5 dBu, min gain)
Gain Control Range 50 dB
Frequency Response 20 Hz - 20 kHz (±0.3 dBu, unity gain, unwtd)
THD+N (unwtd, 1 kHz @ +4 dBu Output, Unity Gain) 0.004% (1 kHz, -1 dBFS, min gain)
Input Impedance 1.4 kΩ
Phantom Power +48 V, +/- 2 VDC
Line Input
Type ¼” TS Female (via Combo), Unbalanced
Max Level +19 dB
Gain Control Range 50 dB,(-10 dB to +30 dB)
Input Impedance 750 KΩ
Instrument Input
Type ¼” TS Female (Input 2), Unbalanced
7. Technical Information 29

Max Level +13 dB
Gain Control Range 50 dB,(-10 dB to +30 dB)
Line Outputs
Type (Line Outputs) ¼” TRS, Impedance Balanced
Frequency Response 20 Hz to 20 kHz, +/-0.2 dB
Output Impedance 51 Ω
THD+N (1 kHz, 20 kHz BW, A-wtd) < 0.002%
Headphone Outputs
Type ¼” TRS Female, Stereo
Maximum Output Level 30 mW/channel @ 60 Ω
Frequency Response 20 Hz to 20 kHz, +/-0.5 dB
THD+N (1 kHz, max gain, 20 kHz BW, A-wtd) < 0.08%
S/N Ratio (1 kHz, max gain, 20 kHz BW, A-wtd) 90 dB
Power
Type Bus-powered
Digital Audio
Connection Type USB 2.0 on USB-C connector
ADC Dynamic Range (A-wtd) 90 dB, 48 kHz
DAC Dynamic Range (A-wtd) 102 dB, 48 kHz
Bit Depth 24 bits
Supported Sample Rates 44.1, 48, 88.2, 96kHz
7. Technical Information 30

8. Dinner is Served!
Added bonus: PreSonus’ previously Top Secret recipe for…
Red Beans and Rice!
Ingredients:
l
1 lb dried Red Kidney Beans
l
1 large onion (diced)
l
3 celery stalks (diced)
l
1 large green bell pepper (diced)
l
6-8 C vegetable stock
l
1 Tbsp. Tony Chachere seasoning (salt-free)
l
½ fresh parsley
l
2 tsp. kosher salt
l
2 Tbs. olive oil
l
1 smoked ham hock (optional)
Cooking instructions:
l
Rinse red beans in cold water.
l
In a pressure cooker, heat olive oil on medium high. Sauté onion, celery, bell pepper, beans, and ham
hock (if using) until onions are translucent.
l
Stir in Old Bay, parsley, and salt.
l
Add vegetable stock until beans and vegetables are covered.
l
Close pressure cooker and bring to full pressure on high heat.
l
Reduce heat to low while maintaining full pressure. Cook for 40 minutes.
l
Allow pressure to drop naturally (20-30 minutes).
l
Remove lid and crush with a potato masher until creamy.
l
Correct seasoning with salt and pepper if necessary.
l
Serve over rice with hot sauce and grilled Andouille sausage (optional).
8. Dinner is Served! 31

9. Legal
No part of this document may be reproduced or transmitted in any form or by any means and is protected
by U.S. and International copyright laws. Reproduction and distribution of this document without written
permission of PreSonus is prohibited.
Unless otherwise indicated below, the trademarks, service marks, and logos contained herein (the
“Marks”) are owned or controlled by PreSonus or licensed to PreSonus.
©2021-2021 PreSonus Audio Electronics, Inc. All Rights Reserved. AudioBox USB, Capture, CoActual,
EarMix, Eris, FaderPort, FireStudio, MixVerb, Notion, PreSonus, PreSonus AudioBox, QMix,
RedLightDist, SampleOne, Sceptre, StudioLive, Temblor, Tricomp, WorxAudio, and the Wave Logo are
registered trademarks of PreSonus Audio Electronics, Inc. Studio One is a registered trademark of
PreSonus Software Ltd.
ASIO is a trademark and software of Steinberg Media Technologies GmbH.
USB Type-C and USB-C are registered trademarks of USB Implementers Forum.
Mac, macOS, iOS, and iPadOS are registered trademarks of Apple, Inc., in the U.S. and other countries.
Windows is a registered trademark of Microsoft, Inc., in the U.S. and other countries.
Other product names mentioned herein may be trademarks of their respective companies.
All specifications subject to change without notice... except the recipe, which is a classic.
9. Legal 32
AudioBox GO
Ultra-compact, mobile 2x2
USB audio interface
Owner’s Manual
Part# 70-10000016-A