Projector
P502HL/P502WL
User’s Manual
Model No.
NP-P502HL, NP-P502WL

Ver. 1 6/15
•Apple,Mac,MacOS,MacBook,andiMacaretrademarksofAppleInc.registeredintheU.S.andothercountries.
•AppStoreisaservicemarkofAppleInc.
•IOSisatrademarkorregisteredtrademarkofCiscointheU.S.andothercountriesandisusedunderlicense.
•Microsoft,Windows,WindowsVista,InternetExplorer,.NETFrameworkandPowerPointareeitheraregistered
trademarkortrademarkofMicrosoftCorporationintheUnitedStatesand/orothercountries.
•MicroSaverisaregisteredtrademarkofKensingtonComputerProductsGroup,adivisionofACCOBrands.
•VirtualRemoteToolusesWinI2C/DDClibrary,©NicomsoftLtd.
•ThetermsHDMIandHDMIHigh-DenitionMultimediaInterface,andtheHDMILogoaretrademarksorregistered
trademarksofHDMILicensingLLCintheUnitedStatesandothercountries.
•HDBaseT™isatrademarkofHDBaseTAlliance.
•TrademarkPJLinkisatrademarkappliedfortrademarkrightsinJapan,theUnitedStatesofAmericaandother
countriesandareas.
•Wi-Fi
®
,Wi-FiAlliance
®
,Wi-FiProtectedAccess
®
,Wi-FiDirect
®
areregisteredtrademarksoftheWi-FiAlliance
®
.
WPA™,WPA2™,Wi-FiProtectedSetup™,Miracast™aretrademarksoftheWi-FiAlliance
®
.
•Blu-rayisatrademarkofBlu-rayDiscAssociation
•CRESTRONandROOMVIEWareregisteredtrademarksofCrestronElectronics,Inc.intheUnitedStatesandother
countries.
•EthernetiseitheraregisteredtrademarkortrademarkofFujiXeroxCo.,Ltd.
•GooglePlayandAndroidaretrademarksofGoogleInc.
•Otherproductnamesandcompanylogosmentionedinthisuser’smanualmaybethetrademarksorregistered
trademarksoftheirrespectiveholders.
•GPL/LGPLSoftwareLicenses
TheproductincludessoftwarelicensedunderGNUGeneralPublicLicense(GPL),GNULesserGeneralPublic
License(LGPL),andothers.
Formoreinformationoneachsoftware,see“readme.pdf”insidethe“aboutGPL&LGPL”folderonthesuppliedCD-
ROM.
NOTES
(1)Thecontentsofthisuser’smanualmaynotbereprintedinpartorwholewithoutpermission.
(2)Thecontentsofthisuser’smanualaresubjecttochangewithoutnotice.
(3)Greatcarehasbeentakeninthepreparationofthisuser’smanual;however,shouldyounoticeanyquestionable
points,errorsoromissions,pleasecontactus.
(4)Notwithstandingarticle(3),NECwillnotberesponsibleforanyclaimsonlossofprotorothermattersdeemed
toresultfromusingtheProjector.
i
Important Information
Safety Cautions
Precautions
PleasereadthismanualcarefullybeforeusingyourNECprojectorandkeepthemanualhandyforfuturereference.
CAUTION
Toturnoffmainpower,besuretoremovetheplugfrompoweroutlet.
Thepoweroutletsocketshouldbeinstalledasneartotheequipmentaspossible,andshouldbeeasily
accessible.
CAUTION
TOPREVENTSHOCK,DONOTOPENTHECABINET.
THEREAREHIGH-VOLTAGECOMPONENTSINSIDE.
REFERSERVICINGTOQUALIFIEDSERVICEPERSONNEL.
Thissymbolwarnstheuserthatuninsulatedvoltagewithintheunitmaybesufcienttocauseelectrical
shock.Therefore,itisdangeroustomakeanykindofcontactwithanypartinsideoftheunit.
Thissymbolalertstheuserthatimportantinformationconcerningtheoperationandmaintenanceofthis
unithasbeenprovided.
Theinformationshouldbereadcarefullytoavoidproblems.
WARNING:TOPREVENTFIREORSHOCK,DONOTEXPOSETHISUNITTORAINORMOISTURE.
DONOTUSETHISUNIT’SPLUGWITHANEXTENSIONCORDORINANOUTLETUNLESSALLTHEPRONGS
CANBEFULLYINSERTED.
DOC Compliance Notice (for Canada only)
ThisClassBdigitalapparatuscomplieswithCanadianICES-003.
Machine Noise Information Regulation - 3. GPSGV,
Thehighestsoundpressurelevelislessthan70dB(A)inaccordancewithENISO7779.
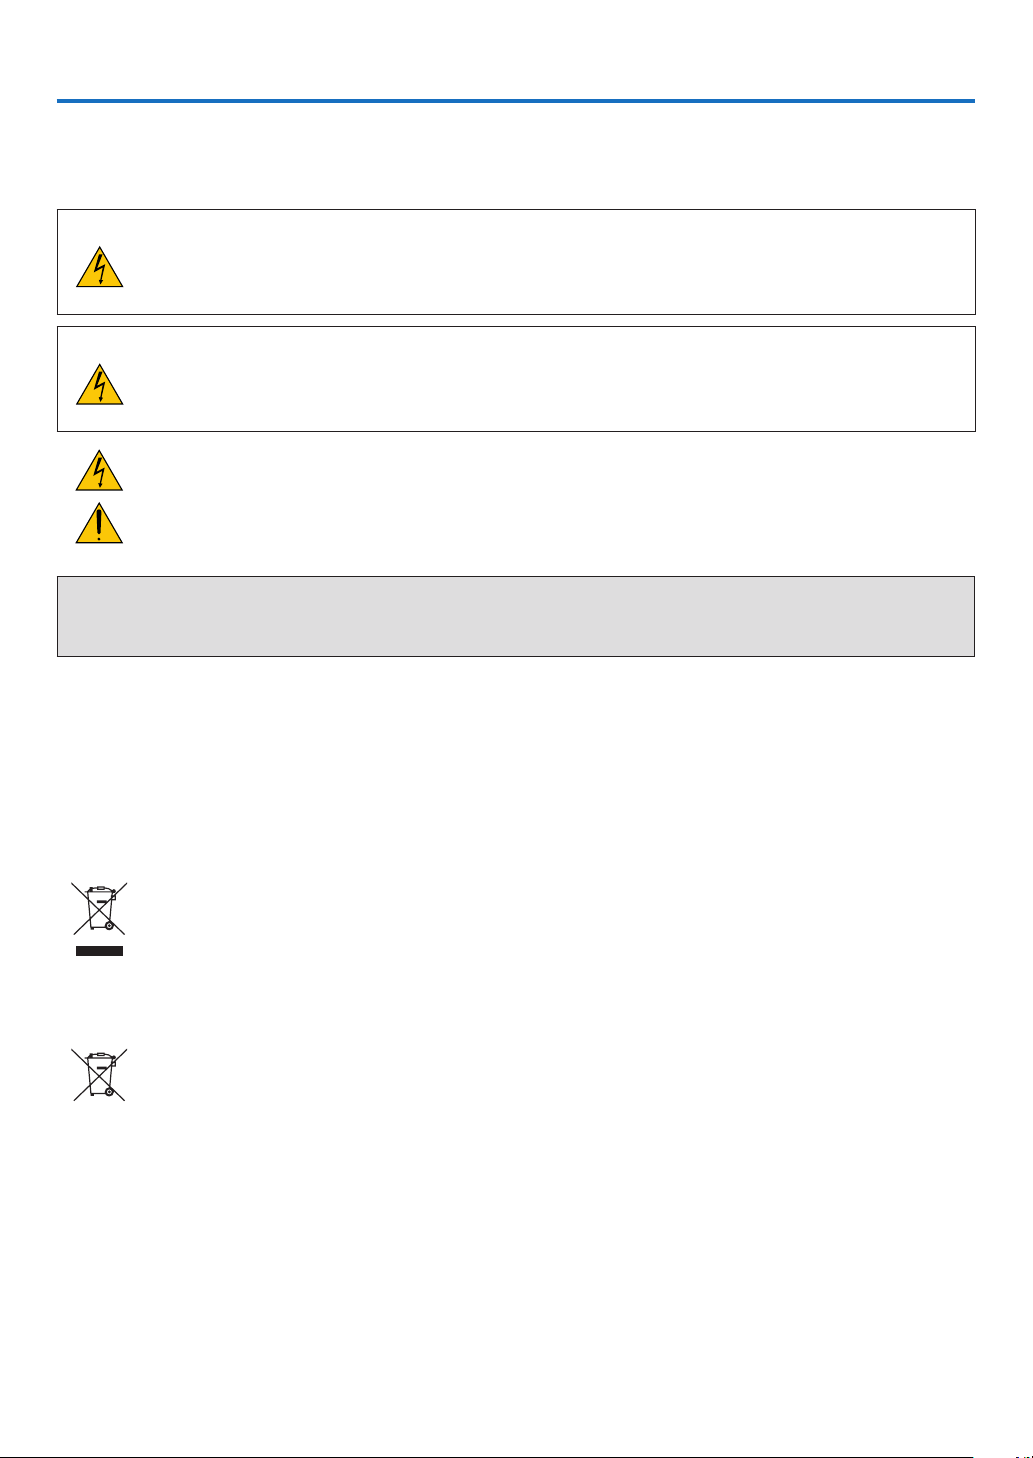
Disposing of your used product
EU-widelegislationasimplementedineachMemberStaterequiresthatusedelectricalandelectronicprod-
uctscarryingthemark(left)mustbedisposedofseparatelyfromnormalhouseholdwaste.Thisincludes
projectorsandtheirelectricalaccessories.Whenyoudisposeofsuchproducts,pleasefollowtheguidance
ofyourlocalauthorityand/orasktheshopwhereyoupurchasedtheproduct.
Aftercollectingtheusedproducts,theyarereusedandrecycledinaproperway.Thiseffortwillhelpusreduce
thewastesaswellasthenegativeimpacttothehumanhealthandtheenvironmentattheminimumlevel.
ThemarkontheelectricalandelectronicproductsonlyappliestothecurrentEuropeanUnionMemberStates.
For EU:Thecrossed-outwheeledbinimpliesthatusedbatteriesshouldnotbeputtothegeneralhousehold
waste!Thereisaseparatecollectionsystemforusedbatteries,toallowpropertreatmentandrecyclingin
accordancewithlegislation.
According the EU directive 2006/66/EC, the battery can’t be disposed improperly. The battery shall be sepa-
rated to collect by local service.

ii
Important Information
WARNING TO CALIFORNIA RESIDENTS:
Handlingthecablessuppliedwiththisproductwillexposeyoutolead,achemicalknowntotheStateofCalifornia
tocausebirthdefectsorotherreproductiveharm.WASHHANDSAFTERHANDLING.
RF Interference (for USA only)
WARNING
TheFederalCommunicationsCommissiondoesnotallowanymodicationsorchangestotheunitEXCEPTthose
speciedbyNECDisplaySolutionsofAmerica,Inc.inthismanual.Failuretocomplywiththisgovernmentregu-
lationcouldvoidyourrighttooperatethisequipment.Thisequipmenthasbeentestedandfoundtocomplywith
thelimitsforaClassBdigitaldevice,pursuanttoPart15oftheFCCRules.Theselimitsaredesignedtoprovide
reasonableprotectionagainstharmfulinterferenceinaresidentialinstallation.Thisequipmentgenerates,uses,and
canradiateradiofrequencyenergyand,ifnotinstalledandusedinaccordancewiththeinstructions,maycause
harmfulinterferencetoradiocommunications.However,thereisnoguaranteethatinterferencewillnotoccurina
particularinstallation.
Ifthisequipmentdoescauseharmfulinterferencetoradioortelevisionreception,whichcanbedeterminedby
turningtheequipmentoffandon,theuserisencouragedtotrytocorrecttheinterferencebyoneormoreofthe
followingmeasures:
•Reorientorrelocatethereceivingantenna.
•Increasetheseparationbetweentheequipmentandreceiver.
•Connecttheequipmentintoanoutletonacircuitdifferentfromthattowhichthereceiverisconnected.
•Consultthedealeroranexperiencedradio/TVtechnicianforhelp.
ForUKonly:InUK,aBSapprovedpowercordwithmouldedplughasaBlack(15Amps)fuseinstalledforusewith
thisequipment.Ifapowercordisnotsuppliedwiththisequipmentpleasecontactyoursupplier.
Important Safeguards
Thesesafetyinstructionsaretoensurethelonglifeofyourprojectorandtopreventreandshock.Pleasereadthem
carefullyandheedallwarnings.
Installation
•Donotplacetheprojectorinthefollowingconditions:
-Outdoors
-onanunstablecart,stand,ortable.
-nearwater,baths,ordamprooms.
-indirectsunlight,nearheaters,orheatradiatingappliances.
-inadusty,smokyorsteamyenvironment.
-onasheetofpaperorcloth,rugsorcarpets.
•Donotinstallandstoretheprojectorinthebelowcircumstances.Failuretodosomaycauseofmalfunction.
-Inpowerfulmagneticelds
-Incorrosivegasenvironment
•Ifyouwishtohavetheprojectorinstalledontheceiling:
-Donotattempttoinstalltheprojectoryourself.
-Theprojectormustbeinstalledbyqualiedtechniciansinordertoensureproperoperationandreducetherisk
ofbodilyinjury.
-Inaddition,theceilingmustbestrongenoughtosupporttheprojectorandtheinstallationmustbeinaccordance
withanylocalbuildingcodes.
-Pleaseconsultyourdealerformoreinformation.
iii
Important Information
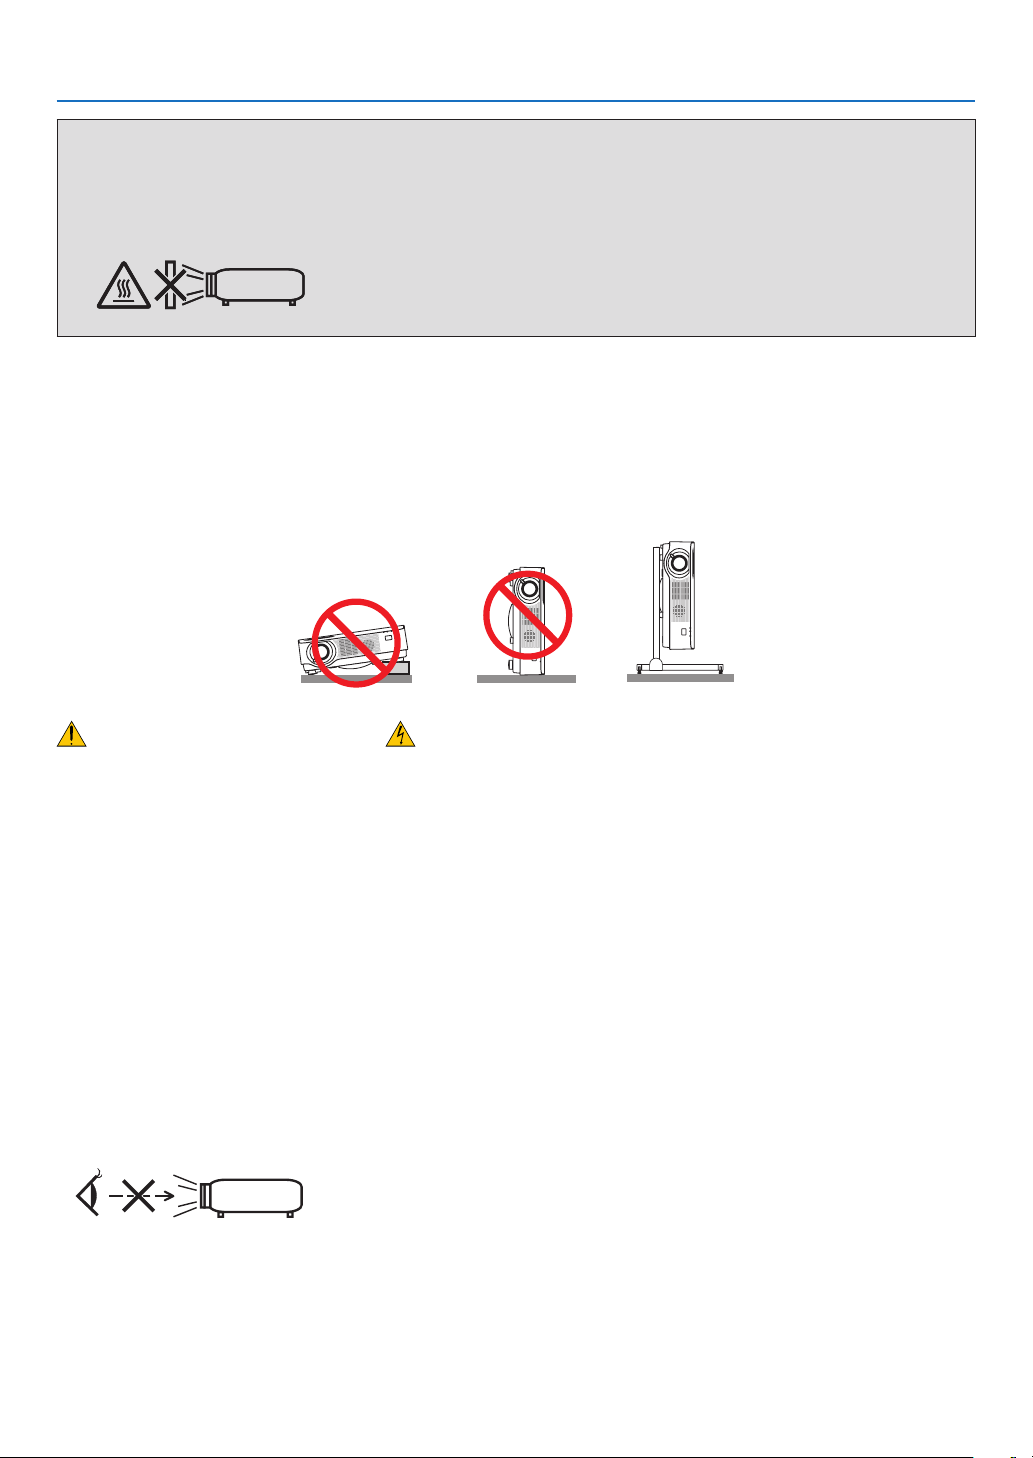
WARNING
•Donotcoverthelenswiththelenscaporequivalentwhiletheprojectorison.Doingsocanleadtomeltingof
thecapduetotheheatemittedfromthelightoutput.
•Donotplaceanyobjects,whichareeasilyaffectedbyheat,infrontoftheprojectorlens.Doingsocouldlead
totheobjectmeltingfromtheheatthatisemittedfromthelightoutput.
•Donotuseaspraycontainingammablegastogetridofaccumulateddustanddirtonthecabinetandthelens.It
maycauseofre.
Donotusetheprojectorwithitleaningtotheleftandright.Thismayresultinamalfunction,however,portraitinstal-
lation*ispossible.Forportraitinstallation,installtheprojectorwiththeintakeventatthebottom.Observeprecautions
forportraitinstallation.
*Acustomizedstandneedstobexedtogetherwiththeprojector.(→page86)
Fire and Shock Precautions
•Donotobstructtheprojector’sventilationholes.Also,donotplacepaper,clothorothersoftobjectsunderthe
projector.Doingsocouldcausere.Installtheprojectorinaplacewhereitwillhavesufcientspacearoundit(ap-
proximately100mmormorefortheventilationintake,200mmormorefortheexhaustvent).
•Donottrytotouchtheexhaustventasitcanbecomeheatedwhiletheprojectoristurnedonandimmediatelyafter
theprojectoristurnedoff.Partsoftheprojectormaybecometemporarilyheatediftheprojectoristurnedoffwith
thePOWERbutton.
Becarefulforhandlingtheprojector.
•Preventforeignobjectssuchaspaperclipsandbitsofpaperfromfallingintoyourprojector.Donotattempttoretrieve
anyobjectsthatmightfallintoyourprojector.Donotinsertanymetalobjectssuchasawireorscrewdriverintoyour
projector.Ifsomethingshouldfallintoyourprojector,disconnectitimmediatelyandhavetheobjectremovedbya
qualiedservicepersonnel.
•Donotplaceanyobjectsontopoftheprojector.
•Donottouchthepowerplugduringathunderstorm.Doingsocancauseelectricalshockorre.
•Theprojectorisdesignedtooperateonapowersupplyof100-240VAC50/60Hz.Ensurethatyourpowersupply
tsthisrequirementbeforeattemptingtouseyourprojector.
•Donotlookintothelenswhiletheprojectorison.Seriousdamagetoyoureyescouldresult.
•Donotlookintothelightsourceusingopticalinstruments(suchasmagnifyingglassesandmirrors).Visualimpair-
mentcouldresult.
•Whenturningontheprojector,makesurenoonewithinprojectionrangeislookingatthelens.
•Keepanyitems(magnifyingglassetc.)outofthelightpathoftheprojector.Thelightpathbeingprojectedfromthe
lensisextensive,thereforeanykindofabnormalobjectsthatcanredirectlightcomingoutofthelens,cancause
anunpredictableoutcomesuchasareorinjurytotheeyes.
•Donotplaceanyobjects,whichareeasilyaffectedbyheat,infrontofaprojectorexhaustvent.
Doingsocouldleadtotheobjectmeltingorgettingyourhandsburnedfromtheheatthatisemittedfromtheexhaust.
•Donotsplashwaterovertheprojector.Doingsocancauseelectricalshockorre.Iftheprojectorgetswet,turnoff
theprojector,unplugthepowercordandhavetheprojectorservicedbyaqualiedservicepersonnel.

iv
Important Information
•Handlethepowercordcarefully.Adamagedorfrayedpowercordcancauseelectricshockorre.
-Donotuseanypowercordotherthantheonesuppliedwiththeprojector.
-Donotbendortugthepowercordexcessively.
-Donotplacethepowercordundertheprojector,oranyheavyobject.
-Donotcoverthepowercordwithothersoftmaterialssuchasrugs.
-Donotheatthepowercord.
-Donothandlethepowerplugwithwethands.
•Turnofftheprojector,unplugthepowercordandhavetheprojectorservicedbyaqualiedservicepersonnelunder
thefollowingconditions:
-Whenthepowercordorplugisdamagedorfrayed.
-Ifliquidhasbeenspilledintotheprojector,orifithasbeenexposedtorainorwater.
-Iftheprojectordoesnotoperatenormallywhenyoufollowtheinstructionsdescribedinthisuser’smanual.
-Iftheprojectorhasbeendroppedorthecabinethasbeendamaged.
-Iftheprojectorexhibitsadistinctchangeinperformance,indicatinganeedforservice.
•Disconnectthepowercordandanyothercablesbeforecarryingtheprojector.
•Turnofftheprojectorandunplugthepowercordbeforecleaningthecabinet.
•Turnofftheprojectorandunplugthepowercordiftheprojectorisnottobeusedforanextendedperiodoftime.
•WhenusingaLANcable:
Forsafety,donotconnecttotheterminalforperipheraldevicewiringthatmighthaveexcessivevoltage.
CAUTION
•Besuretotightenthescrewsafterattachingthecablecover.Failuretodosomaycausethecablecovertocome
offandfall,resultingininjuryordamagetothecablecover.
•Donotputbundledcablesinthecablecover.Doingsomaydamagethepowercord,resultinginare.
•Donotholdthecablecoverwhilemovingtheprojectorordonotapplyexcessiveforcetothecablecover.Doing
somaydamagethecablecover,resultingininjury.
•Donotusethetilt-footforpurposesotherthanoriginallyintended.Misusessuchasgrippingthetilt-footorhang-
ingonthewallcancausedamagetotheprojector.
•Donotsendtheprojectorinthesoftcasebyparceldeliveryserviceorcargoshipment.Theprojectorinsidethe
softcasecouldbedamaged.
•Select[HIGH]inFanmodeifyoucontinuetousetheprojectorforconsecutivedays.(Fromthemenu,select
[SETUP]→[OPTIONS(1)]→[FANMODE]→[HIGH].)
Remote Control Precautions
•Handletheremotecontrolcarefully.
•Iftheremotecontrolgetswet,wipeitdryimmediately.
•Avoidexcessiveheatandhumidity.
•Donotshort,heat,ortakeapartbatteries.
•Donotthrowbatteriesintore.
•Ifyouwillnotbeusingtheremotecontrolforalongtime,removethebatteries.
•Ensurethatyouhavethebatteries’polarity(+/−)alignedcorrectly.
•Donotusenewandoldbatteriestogether,orusedifferenttypesofbatteriestogether.
•Disposeofusedbatteriesaccordingtoyourlocalregulations.

v
Important Information
Light Module
1. Alightmodulecontainingmultiplelaserdiodesisequippedintheproductasthelightsource.
2. Theselaserdiodesaresealedinthelightmodule.Nomaintenanceorserviceisrequiredfortheperformanceof
thelightmodule.
3. Enduserisnotallowedtoreplacethelightmodule.
4. Contactqualieddistributorforlightmodulereplacementandfurtherinformation.
Laser Safety Caution
•Thelasermoduleisequippedinthisproduct.
Useofcontrolsoradjustmentsofproceduresotherthanthosespeciedhereinmayresultinhazardousradiation
exposure.
•ThisproductisclassiedasClass1ofIEC60825-1Thirdedition2014-05.
ThisproductisclassiedasClass2ofIEC60825-1Secondedition2007-03.AlsocomplieswithFDAperformance
standards21CFR1040.10and1040.11forlaserproductsexceptfordeviationspursuanttoLaserNoticeNo.50,
datedJune24,2007.
Obeythelawsandregulationsofyourcountryinrelationtotheinstallationandmanagementofthedevice.
•Bluelaserdiodes:Wavelength455nm,Outputpower120W
•Donotlookintothelenswhiletheprojectorison.Seriousdamagetoyoureyescouldresult.Payenoughattention
tochildren.
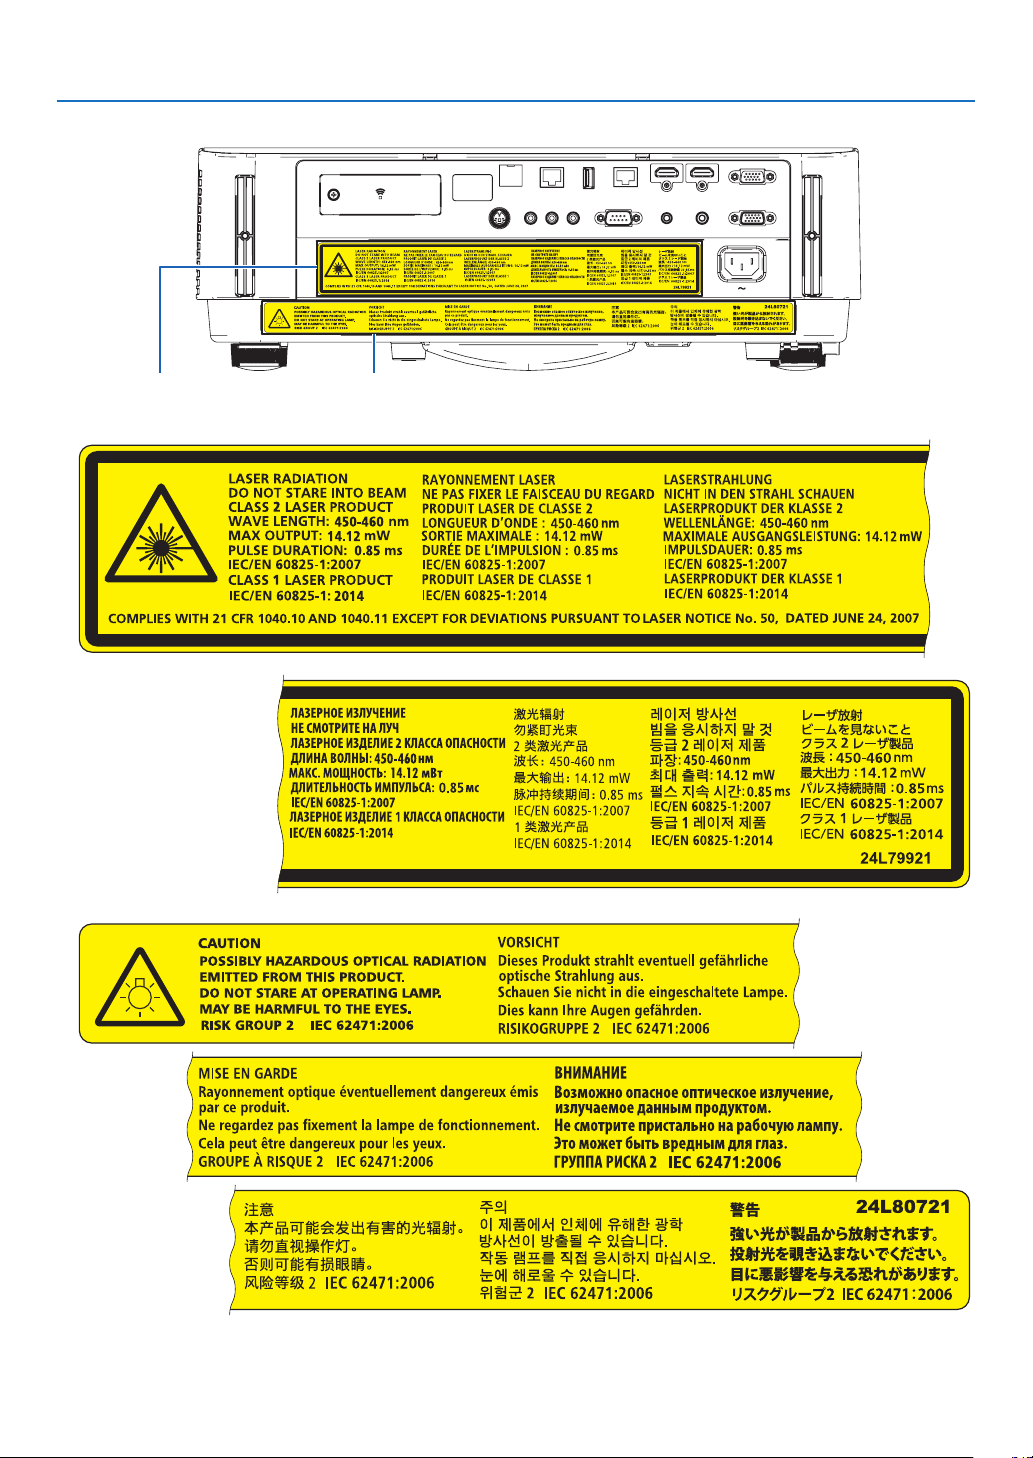
•Thebelowdiagramisindicatedontheprojector.
•Donotlookintothelightsourceusingopticalinstruments(suchasmagnifyingglassesandmirrors).Visualimpair-
mentcouldresult.
•Whenturningontheprojector,makesurenoonewithinprojectionrangeislookingatthelens.
DONOTSTAREINTOTHELENSWHILEINUSE.
vi
Important Information
•Thelabelsarestuckonthebelowindicatedposition.
Label 1 Label 2
Label1:
Label2:

vii
Important Information
About Copyright of original projected pictures:
Pleasenotethatusingthisprojectorforthepurposeofcommercialgainortheattractionofpublicattentioninavenue
suchasacoffeeshoporhotelandemployingcompressionorexpansionofthescreenimagewiththefollowingfunc-
tionsmayraiseconcernabouttheinfringementofcopyrightswhichareprotectedbycopyrightlaw.
[ASPECTRATIO],[KEYSTONE],Magnifyingfeatureandothersimilarfeatures.
Turkish RoHS information relevant for Turkish market
EEE Yonetmeliğine Uygundur.
Thisdeviceisnotintendedforuseinthedirecteldofviewatvisualdisplayworkplaces.Toavoidincommodingreec-
tionsatvisualdisplayworkplacesthisdevicemustnotbeplacedinthedirecteldofview.

viii
Important Information
Power management function
Theprojectorhaspowermanagementfunctions.Toreducepowerconsumption,thepowermanagementfunctions(1
and2)arefactorypresetasshownbelow.TocontroltheprojectorfromanexternaldeviceviaaLANorserialcable
connection,usetheon-screenmenutochangethesettingsfor1and2.
1. STANDBY MODE (Factory preset: NORMAL)
To control the projector from an external device, select [NETWORK STANDBY] for [STANDBY MODE].
NOTE:
•When[NORMAL]isselectedfor[STANDBYMODE],thefollowingterminalsandfunctionswillnotwork:
MONITOROUT(COMP.)terminal,AUDIOOUTterminal,LANfunctions,MailAlertfunction,DDC/CI(VirtualRemoteTool).Please
refertopage60aboutdetails.
2. AUTO POWER OFF (Factory preset: 1 hour)
To control the projector from an external device, select [OFF] for [AUTO POWER OFF].
NOTE:
•When[1:00]isselectedfor[AUTOPOWEROFF],youcanenabletheprojectortoautomaticallyturnoffin60minutesifthereis
nosignalreceivedbyanyinputorifnooperationisperformed.
Health precautions to users viewing 3D images
Beforeviewing,besuretoreadhealthcareprecautionsthatmaybefoundintheuser’smanualincludedwithyourLCD
shuttereyeglassesoryour3DcompatiblecontentsuchasDVDs,videogames,computer'svideolesandthelike.
Toavoidanyadversesymptoms,heedthefollowing:
•DonotuseLCDshuttereyeglassesforviewinganymaterialotherthan3Dimages.
•Allowadistanceof2m/7feetorgreaterbetweenthescreenandauser.Viewing3Dimagesfromtooclosea
distancecanstrainyoureyes.
•Avoidviewing3Dimagesforaprolongedperiodoftime.Takeabreakof15minutesorlongeraftereveryhour
ofviewing.
•Ifyouoranymemberofyourfamilyhasahistoryoflight-sensitiveseizures,consultadoctorbeforeviewing3D
images.
•Whileviewing3Dimages,ifyougetsicksuchasnausea,dizziness,queasiness,headache,eyestrain,blurry
vision,convulsions,andnumbness,stopviewingthem.Ifsymptomsstillpersist,consultadoctor.
•View3Dimagesfromthefrontofthescreen.Viewingfromananglemaycausefatigueoreyestrain.
Model Number of Wireless LAN unit
WirelessLANunitisanoptionalitem.
Tondtheappropriatemodeltoyourarea,pleasevisitthecompanywebsite:
URL:
http://www.nec-display.com/global/support/index.html

ix
Table of Contents
Important Information ............................................................................................i
1. Introduction ...........................................................................................................1
❶What’sintheBox? ..........................................................................................................1
❷IntroductiontotheProjector ...........................................................................................2
General .....................................................................................................................2
Lightsource·Brightness ..........................................................................................2
Installation ................................................................................................................. 2
Videos .......................................................................................................................2
Network ..................................................................................................................... 2
Energy-saving ...........................................................................................................3
Aboutthisuser’smanual ........................................................................................... 3
❸PartNamesoftheProjector ...........................................................................................4
Front .......................................................................................................................... 4
Mountingthelenscapstrap ...................................................................................... 4
Rear ..........................................................................................................................5
Controls/Indicators ....................................................................................................6
TerminalPanelFeatures ...........................................................................................7
❹PartNamesoftheRemoteControl ................................................................................8
BatteryInstallation ....................................................................................................9
RemoteControlPrecautions ..................................................................................... 9
OperatingRangeforWirelessRemoteControl ......................................................... 9
2. Projecting an Image (Basic Operation) ...............................................10
❶FlowofProjectinganImage .........................................................................................10
❷ConnectingYourComputer/ConnectingthePowerCord ..............................................11
❸TurningontheProjector ...............................................................................................12
NoteonStartupscreen(MenuLanguageSelectscreen) ....................................... 13
❹SelectingaSource .......................................................................................................14
Selectingthecomputerorvideosource..................................................................14
❺AdjustingthePictureSizeandPosition ........................................................................16
Adjustingtheverticalpositionofaprojectedimage(Lensshift) .............................17
Focus ......................................................................................................................19
Zoom ....................................................................................................................... 19
Adjustingthetilt(Tiltfoot) .......................................................................................20
❻CorrectingKeystoneDistortion[KEYSTONE] ..............................................................21
❼OptimizingComputerSignalAutomatically ..................................................................23
AdjustingtheImageUsingAutoAdjust ...................................................................23
❽TurningUporDownVolume .........................................................................................23
❾TurningofftheProjector ...............................................................................................24
❿WhenMovingtheProjector ..........................................................................................25
3. Convenient Features ......................................................................................26
❶TurningofftheImageandSound .................................................................................26
❷FreezingaPicture ........................................................................................................26
❸MagnifyingaPicture .....................................................................................................27
❹ChangingEcoMode/CheckingEnergy-SavingEffect .................................................28
UsingEcoMode[ECOMODE] ...............................................................................28

x
Table of Contents
CheckingEnergy-SavingEffect[CARBONMETER] ..............................................29
❺PreventingtheUnauthorizedUseoftheProjector[SECURITY] ..................................30
❻Viewing3DImages ....................................................................................................... 33
LCDshuttereyeglasses(recommended) ...............................................................33
Stepsforviewing3Dimagesontheprojector.........................................................33
Troubleshootingonviewing3Dimages...................................................................36
4. Using On-Screen Menu .................................................................................37
❶UsingtheMenus ...........................................................................................................37
MenuElements .......................................................................................................38
❷ListofMenuItems ........................................................................................................39
❸MenuDescriptions&Functions[SOURCE] .................................................................42
HDMI1andHDMI2..................................................................................................42
COMPUTER ...........................................................................................................42
VIDEO ..................................................................................................................... 42
HDBaseT ................................................................................................................42
APPS ......................................................................................................................42
❹MenuDescriptions&Functions[ADJUST] ................................................................... 43
[PICTURE] ..............................................................................................................43
[IMAGEOPTIONS] .................................................................................................46
❺MenuDescriptions&Functions[SETUP] ..................................................................... 50
[GENERAL] ............................................................................................................. 50
[MENU] ...................................................................................................................53
[INSTALLATION] .....................................................................................................54
[OPTIONS(1)] .........................................................................................................58
[OPTIONS(2)] .........................................................................................................60
[3D] .........................................................................................................................63
❻MenuDescriptions&Functions[INFO.] .......................................................................65
[USAGETIME] ........................................................................................................65
[SOURCE(1)] ..........................................................................................................65
[SOURCE(2)] ..........................................................................................................65
[HDBaseT] ..............................................................................................................65
[WIREDLAN] ..........................................................................................................65
[WIRELESSLAN] ...................................................................................................65
[VERSION(1)] .........................................................................................................65
[VERSION(2)] .........................................................................................................65
[OTHERS] ...............................................................................................................65
❼MenuDescriptions&Functions[RESET] ..................................................................... 66
ReturningtoFactoryDefault[RESET] ....................................................................66
5. Installation and Connections ....................................................................67
❶SettingUptheScreenandtheProjector ......................................................................67
Tablesofscreensizesanddimensions ..................................................................69
Exampleofinstallationonadesktop ......................................................................70
Lensshiftingrange ..................................................................................................71
❷MakingConnections .....................................................................................................73
ConnectingYourComputer .....................................................................................73
ConnectinganExternalMonitor .............................................................................75
ConnectingYourDVDPlayerorOtherAVEquipment ............................................. 76
ConnectingComponentInput .................................................................................77

xi
Table of Contents
ConnectingHDMIInput...........................................................................................78
Connectingyourdocumentcamera ........................................................................79
ConnectingtoaWiredLAN ....................................................................................80
ConnectingtoaWirelessLAN(Optional:NP05LMseries) .....................................81
ConnectingtoaHDBaseTtransmissiondevice(soldcommercially) ...................... 84
Portraitprojection(verticalorientation) ...................................................................86
6. APPS MENU .........................................................................................................88
❶WhatcanyoudowiththeAPPSMENU? .....................................................................88
7. User Supportware ............................................................................................92
❶SoftwareIncludedonCD-ROM ....................................................................................92
❷ProjectingYourComputer’sScreenImagefromtheProjectoroveraLAN(Image
ExpressUtilityLite) .................................................................................................93
StartingImageExpressUtilityLitefromaUSBMemoryorSDCard .....................96
❸ProjectinganImagefromanAngle(GeometricCorrectionToolinImageExpress
UtilityLite) ...............................................................................................................98
WhatyoucandowithGCT .....................................................................................98
ProjectinganImagefromanAngle(GCT) ..............................................................98
❹ControllingtheProjectoroveraLAN(PCControlUtilityPro4/Pro5) ........................101
❺UsingtheComputerCable(VGA)toOperatetheProjector(VirtualRemoteTool) ....106
❻ProjectingphotosordocumentssavedonthesmartphoneoverawirelessLAN
(WirelessImageUtility) .........................................................................................112
8. Maintenance .....................................................................................................113
❶CleaningtheLens.......................................................................................................113
❷CleaningtheCabinet ..................................................................................................114
9. Appendix ..............................................................................................................115
❶Troubleshooting ..........................................................................................................115
IndicatorMessages ............................................................................................... 115
CommonProblems&Solutions ............................................................................117
Ifthereisnopicture,orthepictureisnotdisplayedcorrectly. ............................... 118
❷Specications .............................................................................................................119
❸CabinetDimensions ...................................................................................................121
❹AttachingtheOptionalCableCover(NP08CV) ..........................................................122
Attachingthecablecover ...................................................................................... 122
Removingthecablecover ..................................................................................... 123
❺Pinassignmentsandsignalnamesofmainterminals ...............................................124
❻CompatibleInputSignalList .......................................................................................126
❼PCControlCodesandCableConnection ..................................................................127
❽UpdatetheSoftware ...................................................................................................128
❾TroubleshootingCheckList ......................................................................................... 130
❿TCOCertication ........................................................................................................132
⓫REGISTERYOURPROJECTOR!(forresidentsintheUnitedStates,Canada,and
Mexico) .................................................................................................................133
1
1. Introduction
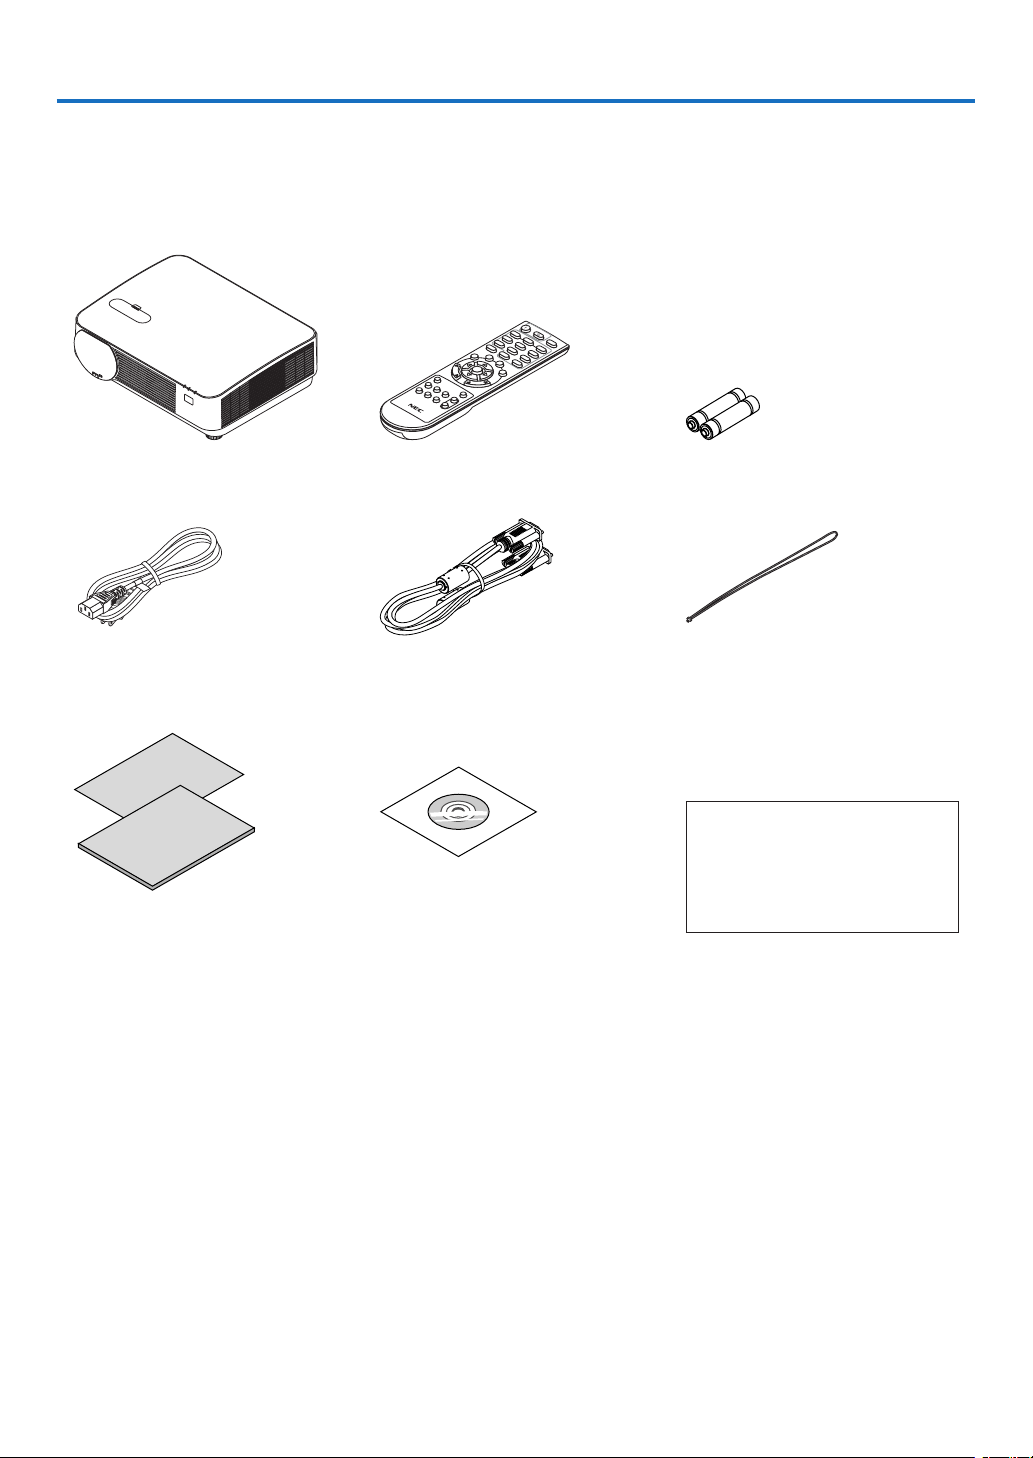
❶ What’s in the Box?
Makesureyourboxcontainseverythinglisted.Ifanypiecesaremissing,contactyourdealer.
Pleasesavetheoriginalboxandpackingmaterialsifyoueverneedtoshipyourprojector.
Projector
Remote control
(7N901121)
Batteries (AAA × 2)
Power cord
(US: 7N080240/7N080243)
(EU: 7N080027/7N080029)
Computer cable (VGA)
(7N520089)
Lens cap strap
For North America only
Limited warranty
For customers in Europe:
You will find our current valid Guar-
antee Policy on our Web Site:
www.nec-display-solutions.com
•ImportantInfomation(ForNorth
America: 7N8N6171) (For Other
countries than North America:
7N8N6171 and 7N8N6181)
•QuickSetupGuide(7N8N6191)/
(7N8N6201)
NEC Projector CD-ROM
User’s manual (PDF) and the utility
software
(7N952241)

2
1. Introduction
❷ Introduction to the Projector
Thissectionintroducesyoutoyournewprojectoranddescribesthefeaturesandcontrols.
General
•Single-chipDLPprojectorwithhighresolutionandhighbrightness
ModelnameDMDpanelResolutionAspectratio
P502HL 0.65type1920×1080pixels16:9
P502WL 0.65type1280×800pixels16:10
Light source · Brightness
•Along-lifelaserdiodeisequippedinthelightmodule
Theproductcanbeoperatedatlowcostbecausethelaserlightsourcecanbeusedforalongtimewithoutrequir-
ingreplacementormaintenance.
•Brightnesscanbeadjustedwithinawiderange
Unlikewithordinarylightsources,thebrightnesscanbeadjustedfrom16to100%in1%increments.
•[CONSTANTBRIGHTNESS]mode
Brightnessnormallydecreaseswithuse,butbyselecting[CONSTANTBRIGHTNESS]mode,theprojectorauto-
maticallycontrolstheoutputfromthelightmoduleaccordingtothelightmoduleusedtimeformaintainingconstant
brightness.
Installation
•Tilt-free,portraitprojection
Thisprojectorcanbesettoanyanglewithinavertical360°range.Itcanalsorotatethepicture90°intoportrait
orientation.Thisprojectorcannotbeinstalledwithrightorleftslantbesidestheportraitprojection.
•Lensshiftmechanismforadjustingthepositionoftheprojectedimageeasily
Thepositionoftheprojectedimageismovedbyturningthetwodialsontheprojectorcabinettop,oneforthe
verticaldirectionandanotherforthehorizontaldirection.
Videos
•Widerangeofinputterminals(HDMI×2,HDBaseT,etc.)
Theprojectorisequippedwithavarietyofinputterminals:HDMI(×2),Computer(analog),Video,HDBaseT,etc.
HDMIinputterminalonthisproductsupportsHDCP.HDBaseTisaconnectionstandardforhomeappliancesthat
isestablishedbytheHDBaseTAlliance.
•SupportsHDMI3Dformat
Thisprojectorcanbeusedtowatchvideosin3Dusingcommercially-availableactiveshutter-type3Deyewear
and3DemittersthatsupportXpand3D.
Network
•EquipsthefeatureofAPPSMENUthatcanutilizethenetwork.
TheAPPSMENUprovidesvariousfunctionsasVIEWER,REMOTEDESKTOPCONNECTION,IMAGEEXPRESS
UTILITY,Miracast,NETWORKSETTINGS(WiredLAN/WirelessLAN),andPROGRAMTIMER.
•Convenientutilitysoftware(UserSupportware)providedasstandard
TheveutilitysoftwarestoredintheenclosedNECProjectorCD-ROM(ImageExpressUtilityLite(ForWindows/
OSX),VirtualRemoteTool,PCControlUtilityPro4(forWindows)andPCControlUtilityPro5(forOSX))canbe
used.
•CRESTRONROOMVIEWcompatible
ThisprojectorsupportsCRESTRONROOMVIEW,allowingmultipledevicesconnectedtothenetworktobeman-
agedfromacomputerorcontroller.

3
1. Introduction
Energy-saving
•0.15W(100-130VAC)/0.36W(200-240VAC)instandbyconditionwithenergysavingtechnology
Selecting[NORMAL]for[STANDBYMODE]fromthemenucanputtheprojectorinpower-savingmode.
NORMAL:0.15W(100-130VAC)/0.36W(200-240VAC)
NETWORKSTANDBY:2.1W(100-130VAC)/2.3W(200-240VAC)
•“ECOMODE”forlowpowerconsumptionand“CARBONMETER”display
Theprojectorisequippedwitha“LIGHTMODE”forreducingpowerconsumptionduringuse.Furthermore,the
power-savingeffectwhenthe[ECOMODE]issetisconvertedintotheamountofreductionsofCO
2
emissions
andthisisindicatedontheconrmationmessagedisplayedwhenthepoweristurnedoffandat[INFO.]onthe
on-screenmenu(CARBONMETER).
About this user’s manual
Thefastestwaytogetstartedistotakeyourtimeanddoeverythingrightthersttime.Takeafewminutesnowto
reviewtheuser’smanual.Thismaysaveyoutimelateron.Atthebeginningofeachsectionofthemanualyou’llnd
anoverview.Ifthesectiondoesn’tapply,youcanskipit.
4
1. Introduction
❸ Part Names of the Projector
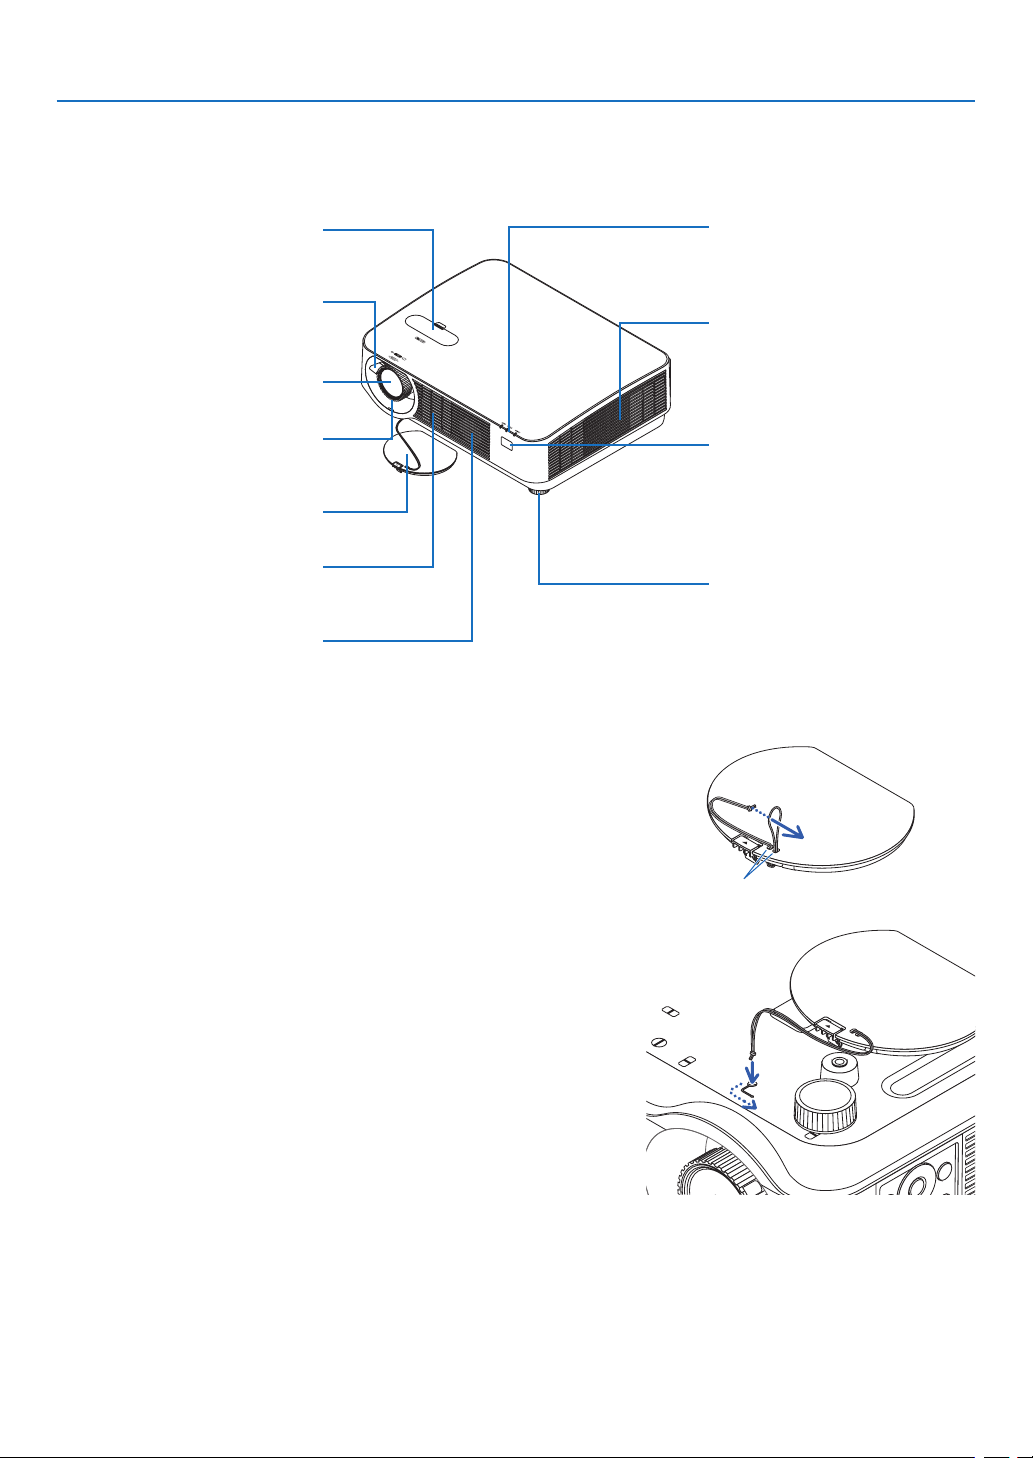
Front
IntakeVent
(→ page 113)
Lens shift cover
(→ page 17)
Lens Cap
Tilt Foot
(→ page 20)
IntakeVent
(→ page 113)
Remote Sensor
(
→ page 9)
Focus Ring
(→ page 19)
Indicators
(→ page 6)
Zoom Lever
(→ page 19)
Lens
MonauralSpeaker
Mounting the lens cap strap
1. Insert the tip of the strap into the lens cap mount hole and pass
the knot through.
Lens cap mount hole
2. Insert the knot into the strap mount hole (large) on the bottom of
the projector, then press it into the narrow (small) hole.
5
1. Introduction
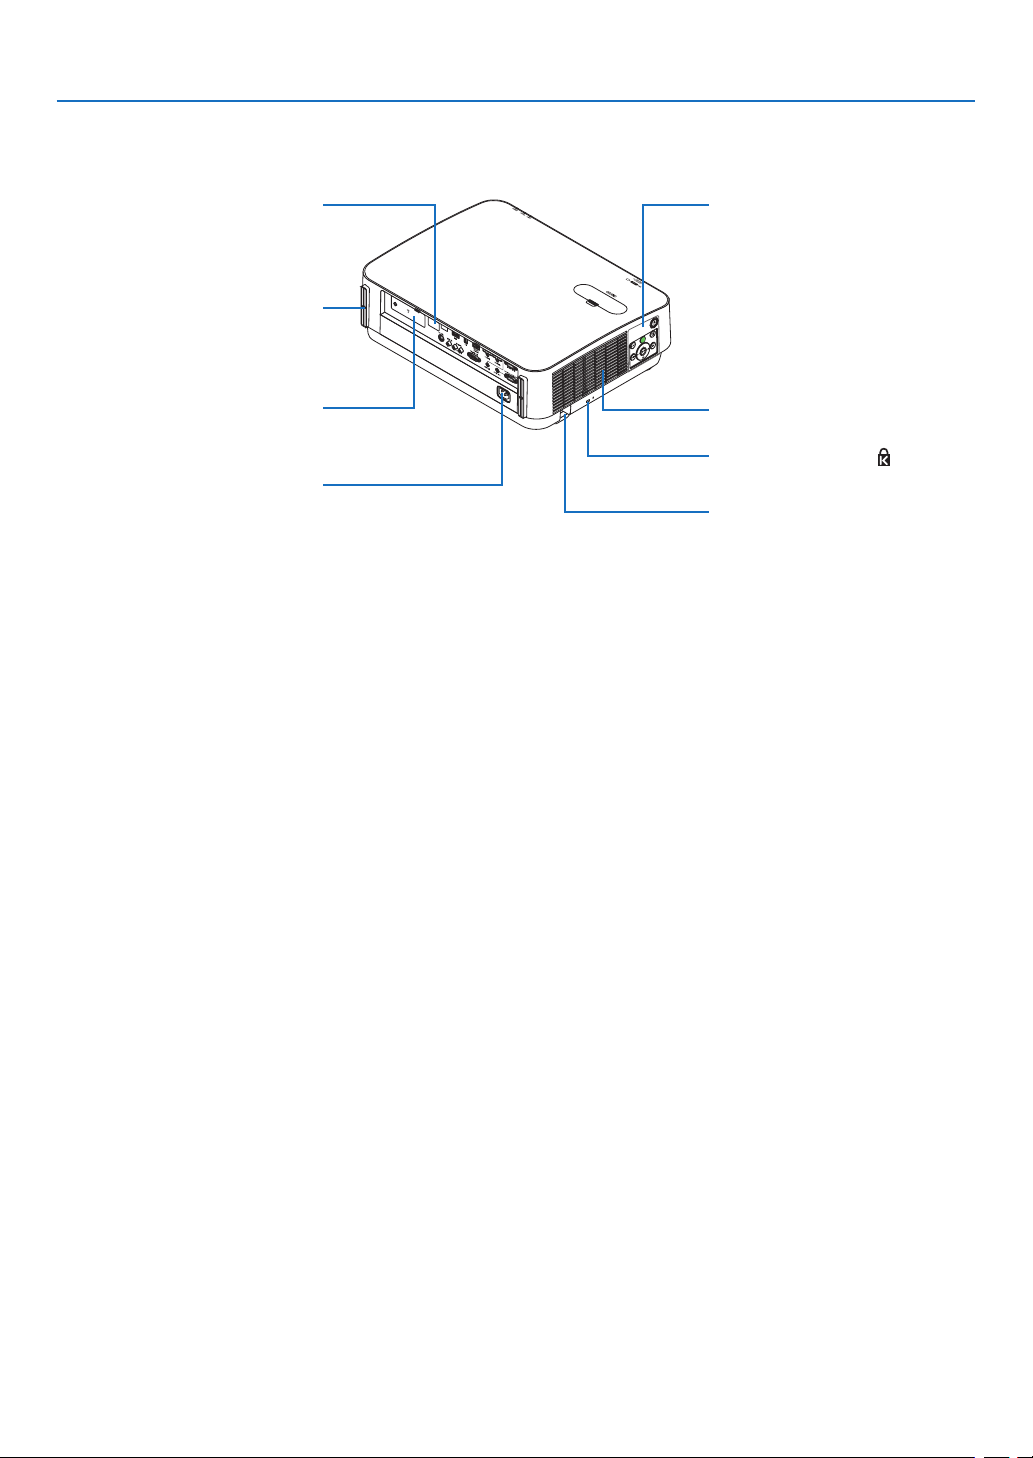
Controls
(→ page 6)
Remote Sensor
(→ page 9)
Built-in Security Slot (
)*
Wireless LAN cover
(
→ page 81)
ACInput
Connect the supplied power cord’s
three-pin plug here, and plug the
other end into an active wall outlet.
(→ page 11)
Exhaust Vent
Security chain opening
Attach an anti-theft device.
The security chain opening accepts
security wires or chains up to 0.18
inch/4.6 mm in diameter.
Rear
Connection for cable cover (Left/
Right) Screw holes
(→ page 122)
*Thissecurityslotsupportsthe
MicroSaver
®
SecuritySystem.

6
1. Introduction
Controls/Indicators
7
9
11
10
2 3 4
6
8
1
5
1. (POWER)Button
(→page12, 24)
2.POWERIndicator
(→page
11, 12, 24, 115)
3. STATUS Indicator
(→page
115)
4.LIGHTIndicator
(→page
115)
5.ECOButton
(→page
28)
6.SOURCEButton
(→page
14)
7.AUTOADJ.Button
(→page
23)
8.MENUButton
(→page
37)
9. ▲▼◀▶/VolumeButtons◀▶/KeystoneButtons
(→page
13, 21, 23, 37)
10.ENTERButton
(→page
37)
11.EXITButton
(→page
37)

7
1. Introduction
Terminal Panel Features
1.COMPUTERIN/ComponentInputTerminal(Mini
D-Sub15Pin)
(→page
73, 77, 79)
2.COMPUTERAUDIOINMiniJack(StereoMini)
(→page
73, 77)
3.HDMI1INTerminal(TypeA)
(→page
73, 74, 78)
4.HDMI2INTerminal(TypeA)
(→page
73, 74, 78)
5.MONITOROUT(COMP.)Terminal(MiniD-Sub15
Pin)
(→page
75)
6.AUDIOOUTMiniJack(StereoMini)
(→page
75)
7.VIDEOINTerminal(RCA)
(→page
76, 79)
8.VIDEO/S-VIDEOAUDIOINL/MONO,R(RCA)
(→page
76)
9.Ethernet/HDBaseTPort(RJ-45)
(→page
80, 84)
10.LANPort(RJ-45)
(→page
80, 85)
11.USB(WirelessLAN)Port
(→page
83)
12.USBPort(TypeA)
(→page
89)
13.3DSYNCTerminal(MiniDIN3Pin)
(→page
35)
14.PCCONTROL[PCCONTROL]Port(D-Sub9Pin)
(→page127)
UsethisporttoconnectaPCorcontrolsystem.
Thisenablesyoutocontroltheprojectorusingserial
communicationprotocol.Ifyouarewritingyourown
program,typicalPCcontrolcodesareonpage127.
15.SERVICEPort(USBTypeB)
(forservicepurposeonly)
14
2 6
39121011
8713 14 5
15
8
1. Introduction
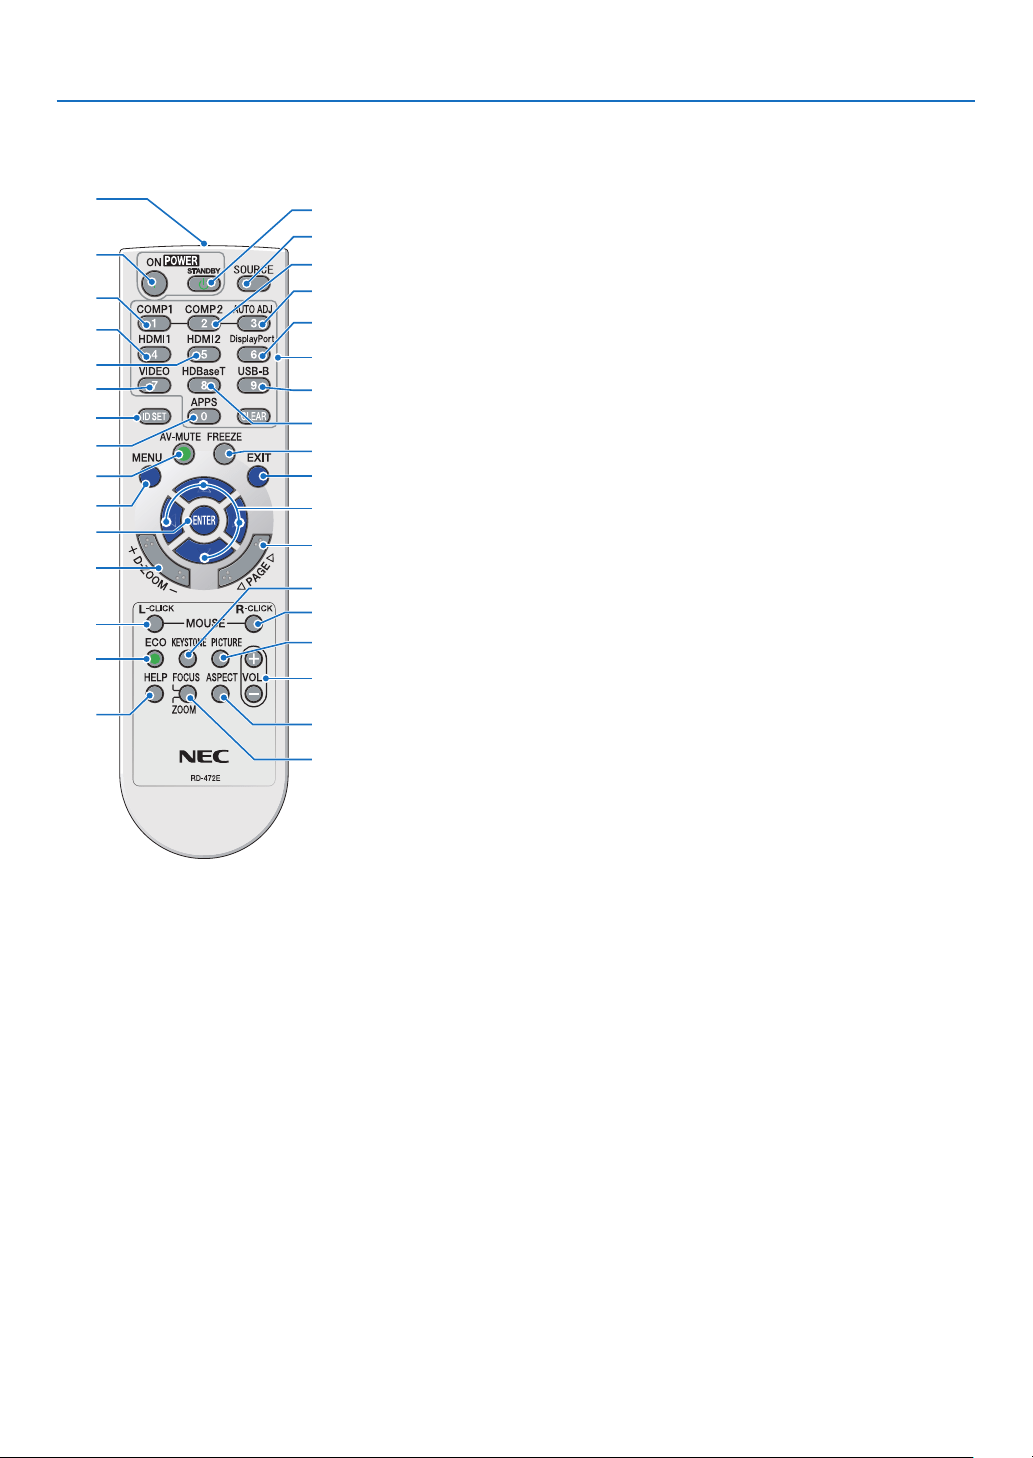
❹ Part Names of the Remote Control
+
3
4
6
7
1
2
10
16
17
15
14
9
5
8
13
30
31
32
20
21
26
28
29
25
24
23
22
27
33
19
18
12
11
1.InfraredTransmitter
(→page9)
2.POWERONButton
(→page
12)
3.POWERSTANDBYButton
(→page
24)
4.SOURCEButton
(→page
14)
5.COMPUTER1Button
(→page
14)
6.COMPUTER2Button
(Thisbuttondoesnotworkinthis
seriesofprojectors)
7.AUTOADJ.Button
(→page
23)
8.HDMI1Button
(→page
14)
9.HDMI2Button
(→page
14)
10.DisplayPortButton
(Thisbuttondoesnotworkinthis
seriesofprojectors)
11.VIDEOButton
(→page
14)
12.HDBaseTButton
(→page
14)
13.USB-BButton
(Thisbuttondoesnotworkinthis
seriesofprojectors)
14.APPSButton
(→page
14, 88)
15.IDSETButton
(→page
56)
16.NumericKeypadButton/
CLEARButton
(→page
56)
17.FREEZEButton
(→page
26)
18.AV-MUTEButton
(→page
26)
19.MENUButton
(→page
37)
20.EXITButton
(→page
37)
21. ▲▼◀▶Button
(→page
37)
22.ENTERButton
(→page
37)
23.D-ZOOM(+)(–)Button
(→page
27)
24.MOUSEL-CLICKButton*
(Thisbuttondoesnotworkinthis
seriesofprojectors)
25.MOUSER-CLICKButton*
(Thisbuttondoesnotworkinthis
seriesofprojectors)
26.PAGE▽/△Button
(→page89)
27.ECOButton
(→page
28)
28.KEYSTONEButton
(→page
21)
29.PICTUREButton
(→page
43, 45)
30.VOL.(+)(–)Button
(→page
23)
31.ASPECTButton
(→page
48)
32.FOCUS/ZOOMButton
(Thisbuttondoesnotworkinthis
seriesofprojectors)
33.HELPButton
(→page
65)
*TheMOUSEL-CLICKandMOUSER-CLICKbuttonsworkonlywhenaUSBcableisconnectedwithyourcomputer.
9
1. Introduction
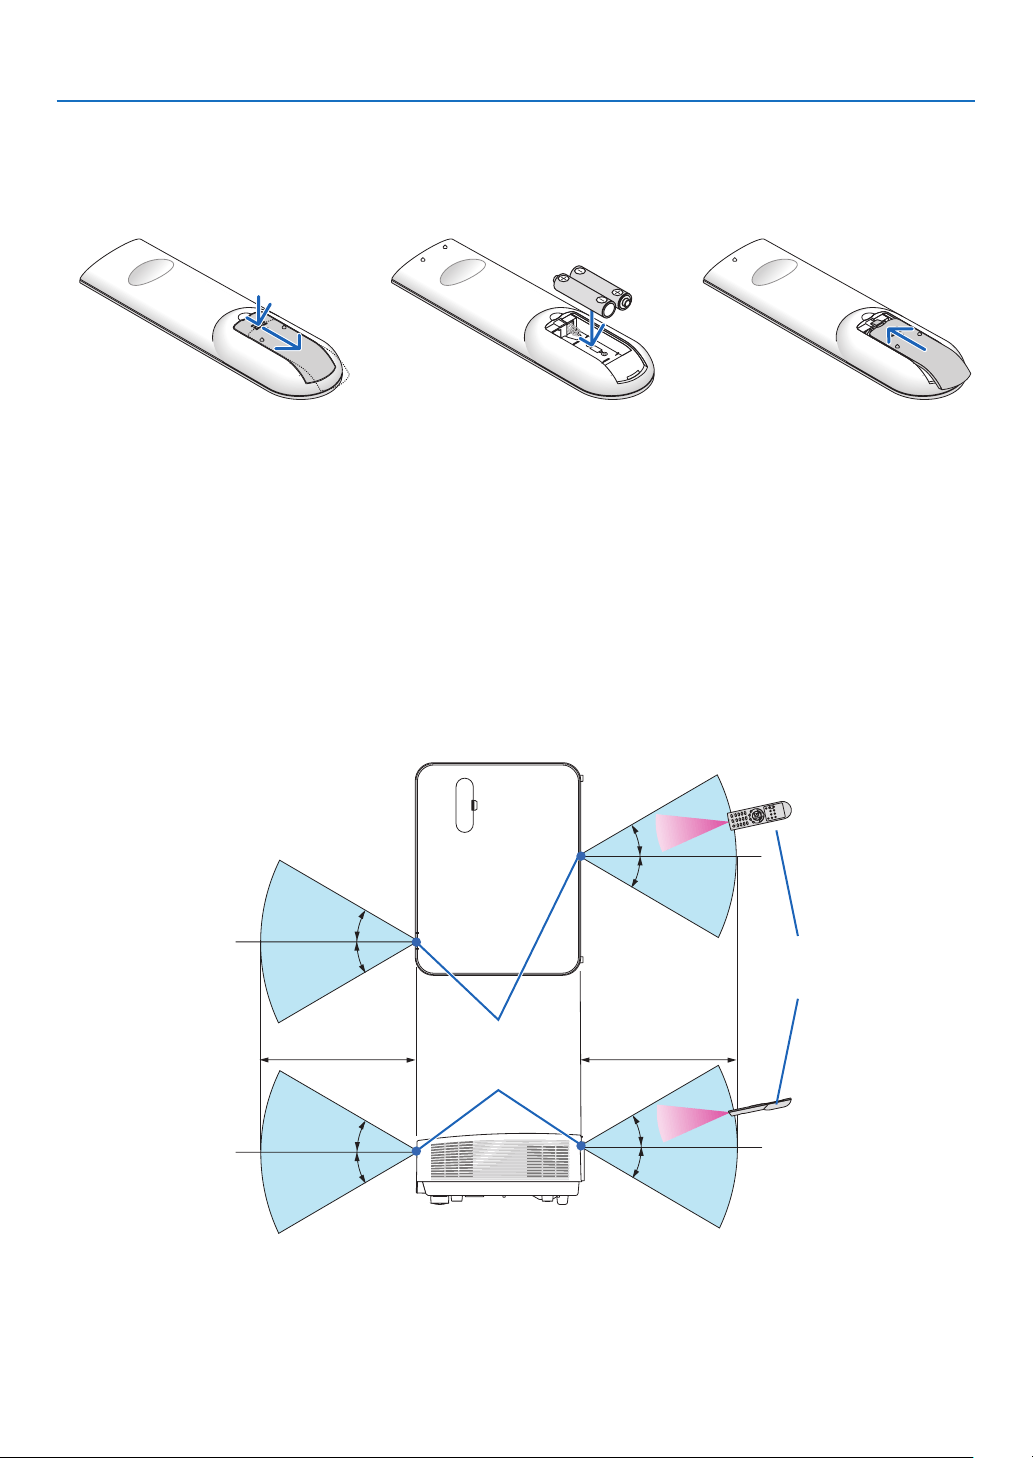
Battery Installation
1. Press firmly and slide the battery
cover off.
2. Install new batteries (AAA). En-
sure that you have the batteries’
polarity (+/−) aligned correctly.
3. Slip the cover back over the bat-
teries until it snaps into place. Do
not mix different types of batter-
ies or new and old batteries.
OPEN
OPEN
Remote Control Precautions
•Handletheremotecontrolcarefully.
•Iftheremotecontrolgetswet,wipeitdryimmediately.
•Avoidexcessiveheatandhumidity.
•Donotshort,heat,ortakeapartbatteries.
•Donotthrowbatteriesintore.
•Ifyouwillnotbeusingtheremotecontrolforalongtime,removethebatteries.
•Ensurethatyouhavethebatteries’polarity(+/−)alignedcorrectly.
•Donotusenewandoldbatteriestogether,orusedifferenttypesofbatteriestogether.
•Disposeofusedbatteriesaccordingtoyourlocalregulations.
•Theremotecontrolsensoronthebackoftheprojectorcannotbeusedwhentheseparatelysoldcablecoveris
mountedontheprojector.
Operating Range for Wireless Remote Control
30°
30°
30°
30°
30°
30°
30°
30°
23.0 feet/7 m23.0 feet/7 m
Remote sensor on
projector cabinet
Remote control
•Theinfraredsignaloperatesbyline-of-sightuptoadistanceofabout22feet/7mandwithina60-degreeangleof
theremotesensorontheprojectorcabinet.
•Theprojectorwillnotrespondifthereareobjectsbetweentheremotecontrolandthesensor,orifstronglightfalls
onthesensor.Weakbatterieswillalsopreventtheremotecontrolfromproperlyoperatingtheprojector.

10
Thissectiondescribeshowtoturnontheprojectorandtoprojectapictureontothescreen.
❶ Flow of Projecting an Image
Step 1
•Connectingyourcomputer/Connectingthepowercord(→ page 11)
Step 2
•Turningontheprojector(→ page 12)
Step 3
•Selectingasource(→ page 14)
Step 4
•Adjustingthepicturesizeandposition(→ page 16)
•Correctingkeystonedistortion[KEYSTONE](→ page 21)
Step 5
•Adjustingapictureandsound
- Optimizing a computer signal automatically (→ page 23)
- Turning up or down volume (
→ page 23)
Step 6
•Makingapresentation
Step 7
•Turningofftheprojector(→ page 24)
Step 8
•WhenMovingtheProjector(→ page 25)
2. Projecting an Image (Basic Operation)
11
2. Projecting an Image (Basic Operation)
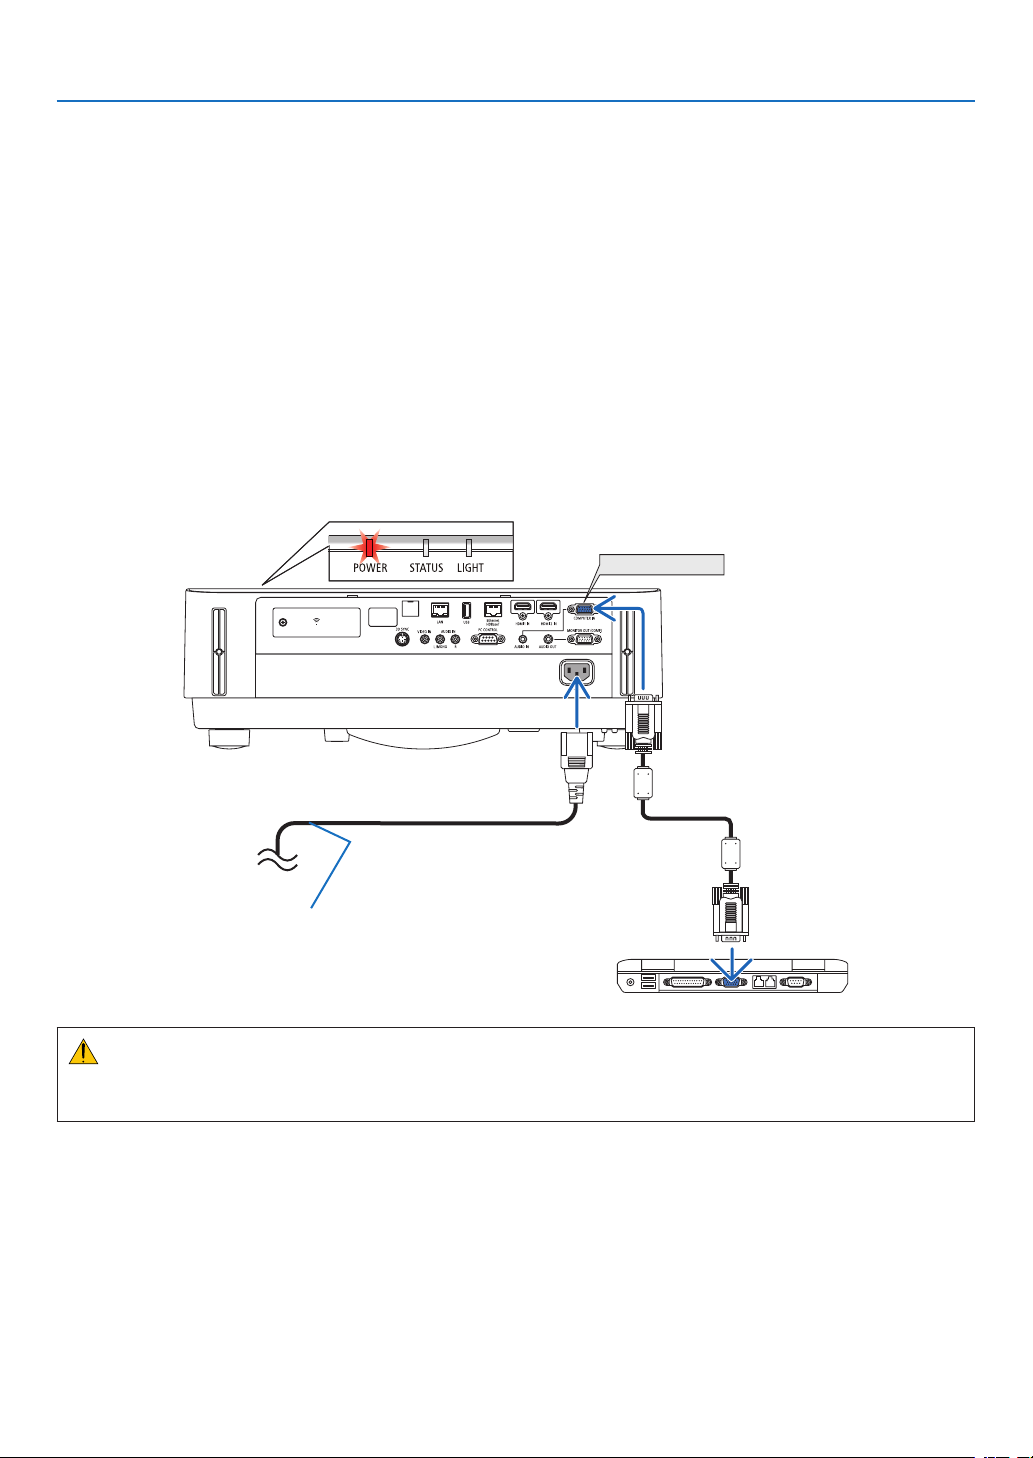
❷ Connecting Your Computer/Connecting the Power Cord
1.Connectyourcomputertotheprojector.
This section will show you a basic connection to a computer. For information about other connections, see “5.
InstallationandConnections”onpage73.
Connectthecomputercable(VGA)betweentheprojector’sCOMPUTERINterminalandthecomputer’sport(mini
D-Sub 15 Pin). Turn two thumb screws of both terminals to fix the computer cable (VGA).
2.Connectthesuppliedpowercordtotheprojector.
Firstconnectthesuppliedpowercord’sthree-pinplugtotheACINoftheprojector,andthenconnecttheother
plug of the supplied power cord in the wall outlet.
The projector’s power indicator will flash for a few seconds and then will light red* (standby mode).
*Thiswillapplyforbothindicatorswhen[NORMAL]isselectedfor[STANDBYMODE].SeethePowerIndicator
section.(→ page 115)
COMPUTER IN
Makesurethattheprongsarefullyinsertedinto
boththeACINandthewalloutlet.
To wall outlet ←
CAUTION:
PartsoftheprojectormaybecometemporarilyheatediftheprojectoristurnedoffwiththePOWERbutton.
Becarefultohandletheprojector.
12
2. Projecting an Image (Basic Operation)
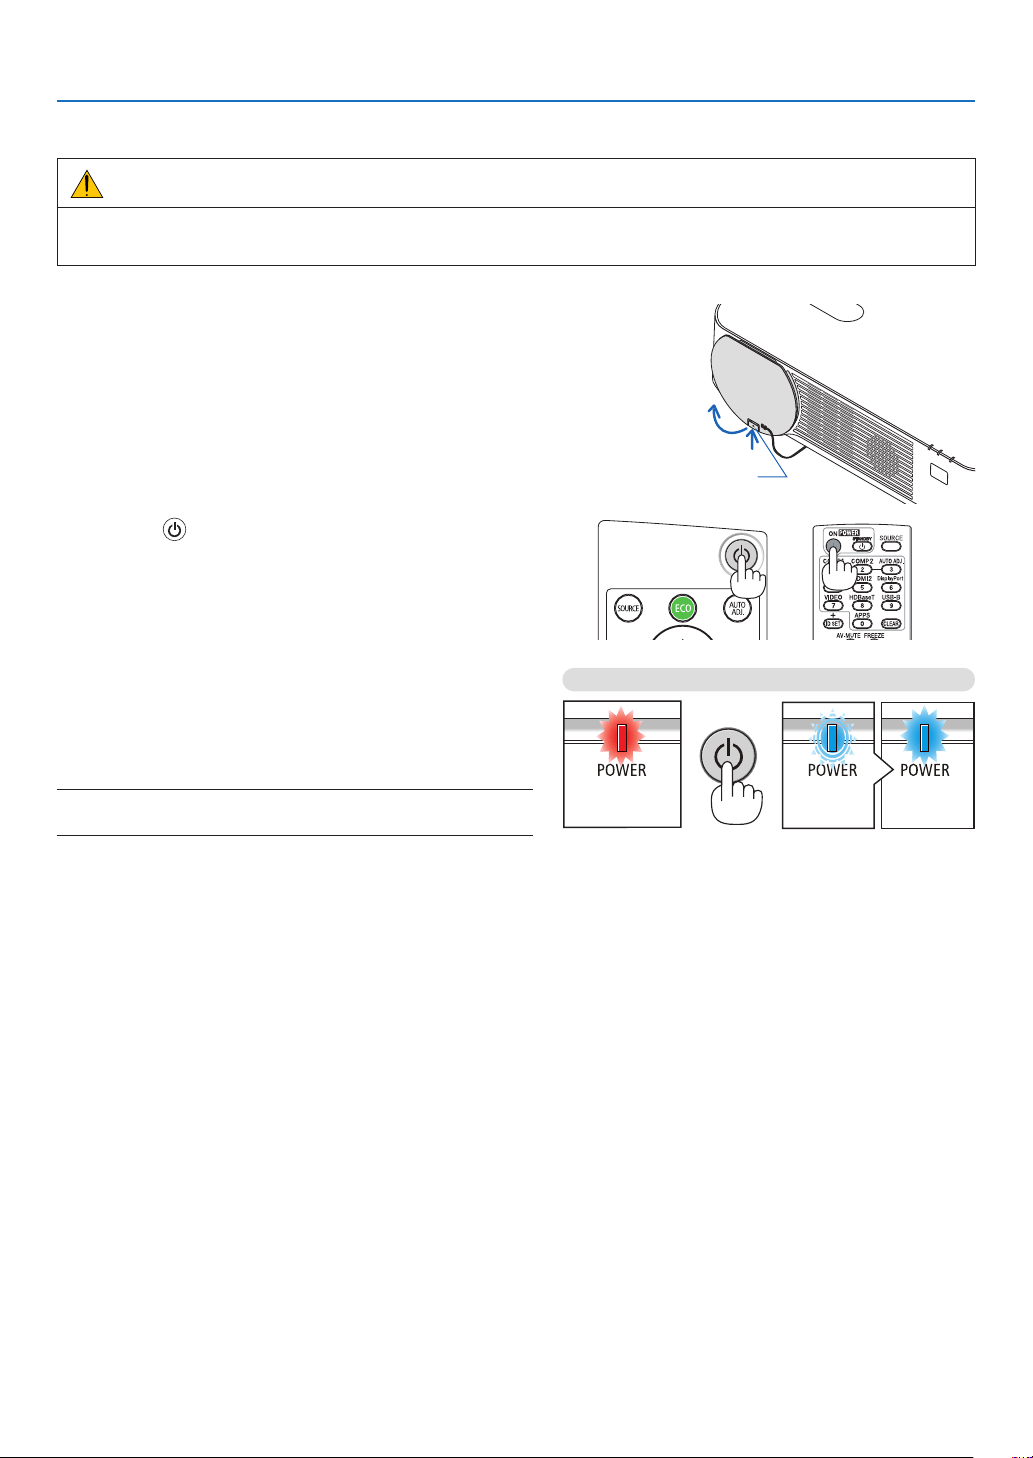
❸ Turning on the Projector
WARNING
Theprojectorproducesastronglight.Whenturningonthepower,makesurenoonewithinprojectionrangeis
lookingatthelens.
1. Remove the lens cap.
With the lens cap’s stopper pressed up, pull forward and
off.
Stopper
2. Press the
(POWER) button on the projector cabinet
or the POWER ON button on the remote control.
The POWER indicator lights blue and the image is projected
on the screen.
TIP:
•Whenthemessage“PROJECTORISLOCKED!ENTERYOUR
PASSWORD.”isdisplayed,itmeansthatthe[SECURITY]
featureisturnedon.(→page38)
After you turn on your projector, ensure that the computer
or video source is turned on.
NOTE:Whennoinputsignalispresent,theno-signalguidanceis
displayed(factorymenusetting).
Standby Blinking Power On
Steady red light Blinking blue
light
Steady blue
light
(→page
115)
13
2. Projecting an Image (Basic Operation)
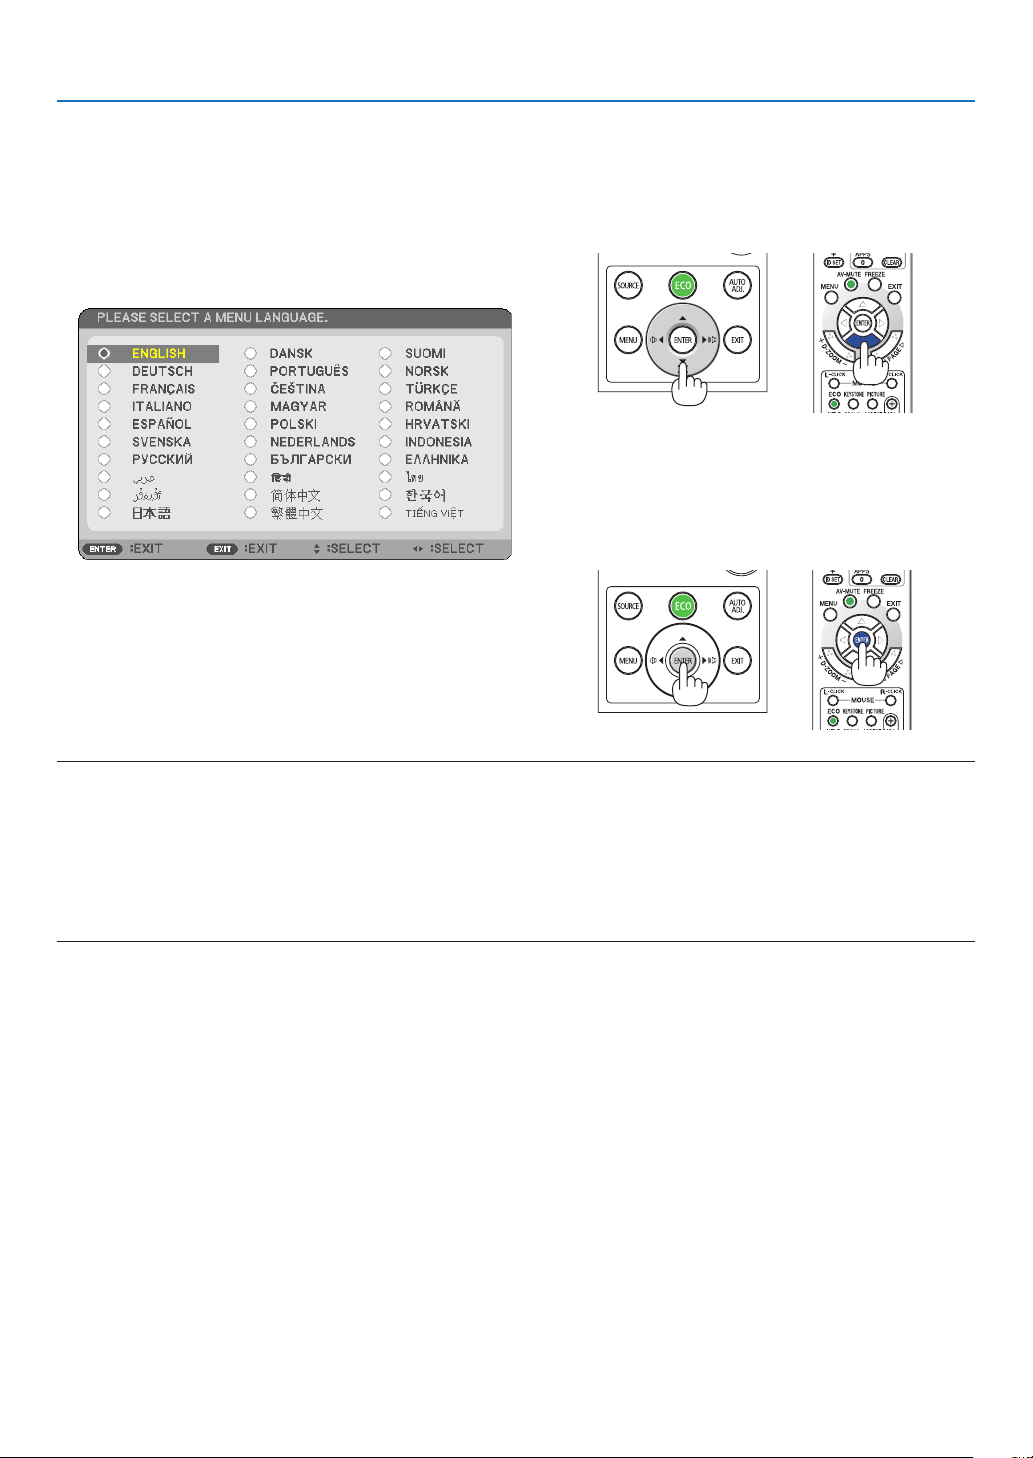
Note on Startup screen (Menu Language Select screen)
Whenyourstturnontheprojector,youwillgettheStartupmenu.Thismenugivesyoutheopportunitytoselectone
ofthe30menulanguages.
Toselectamenulanguage,followthesesteps:
1. Use the ▲, ▼, ◀ or ▶ button to select one of the 30
languages from the menu.
2. Press the ENTER button to execute the selection.
Afterthishasbeendone,youcanproceedtothemenu
operation.
Ifyouwant,youcanselectthemenulanguagelater.
(→[LANGUAGE]onpage39and52)
NOTE:
•Ifoneofthefollowingthingshappens,theprojectorwillnotturnon.
-Iftheinternaltemperatureoftheprojectoristoohigh,theprojectordetectsabnormalhightemperature.Inthisconditionthe
projectorwillnotturnontoprotecttheinternalsystem.Ifthishappens,waitfortheprojector’sinternalcomponentstocool
down.
-IftheSTATUSindicatorlightsorangewiththepowerbuttonpressed,itmeansthatthe[CONTROLPANELLOCK]isturnedon.
Cancelthelockbyturningitoff.(→page54)
•WhilethePOWERindicatorisblinkingblueinshortcycles,thepowercannotbeturnedoffbyusingthepowerbutton.
14
2. Projecting an Image (Basic Operation)
❹ Selecting a Source
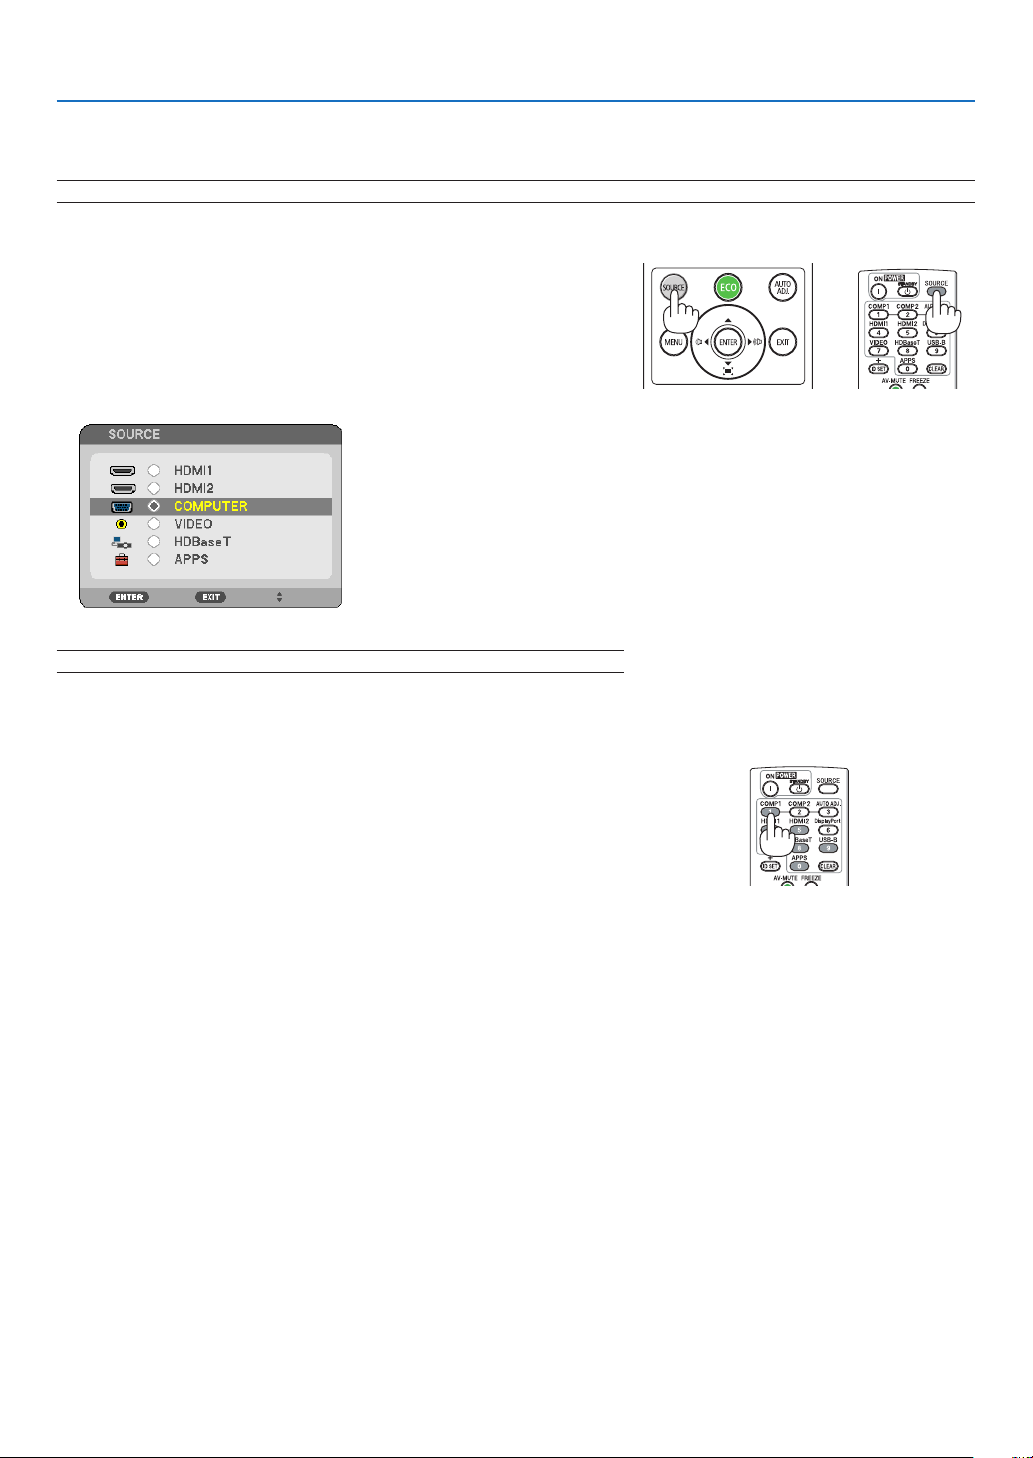
Selecting the computer or video source
NOTE:Turnonthecomputerorvideosourceequipmentconnectedtotheprojector.
Detecting the Signal Automatically
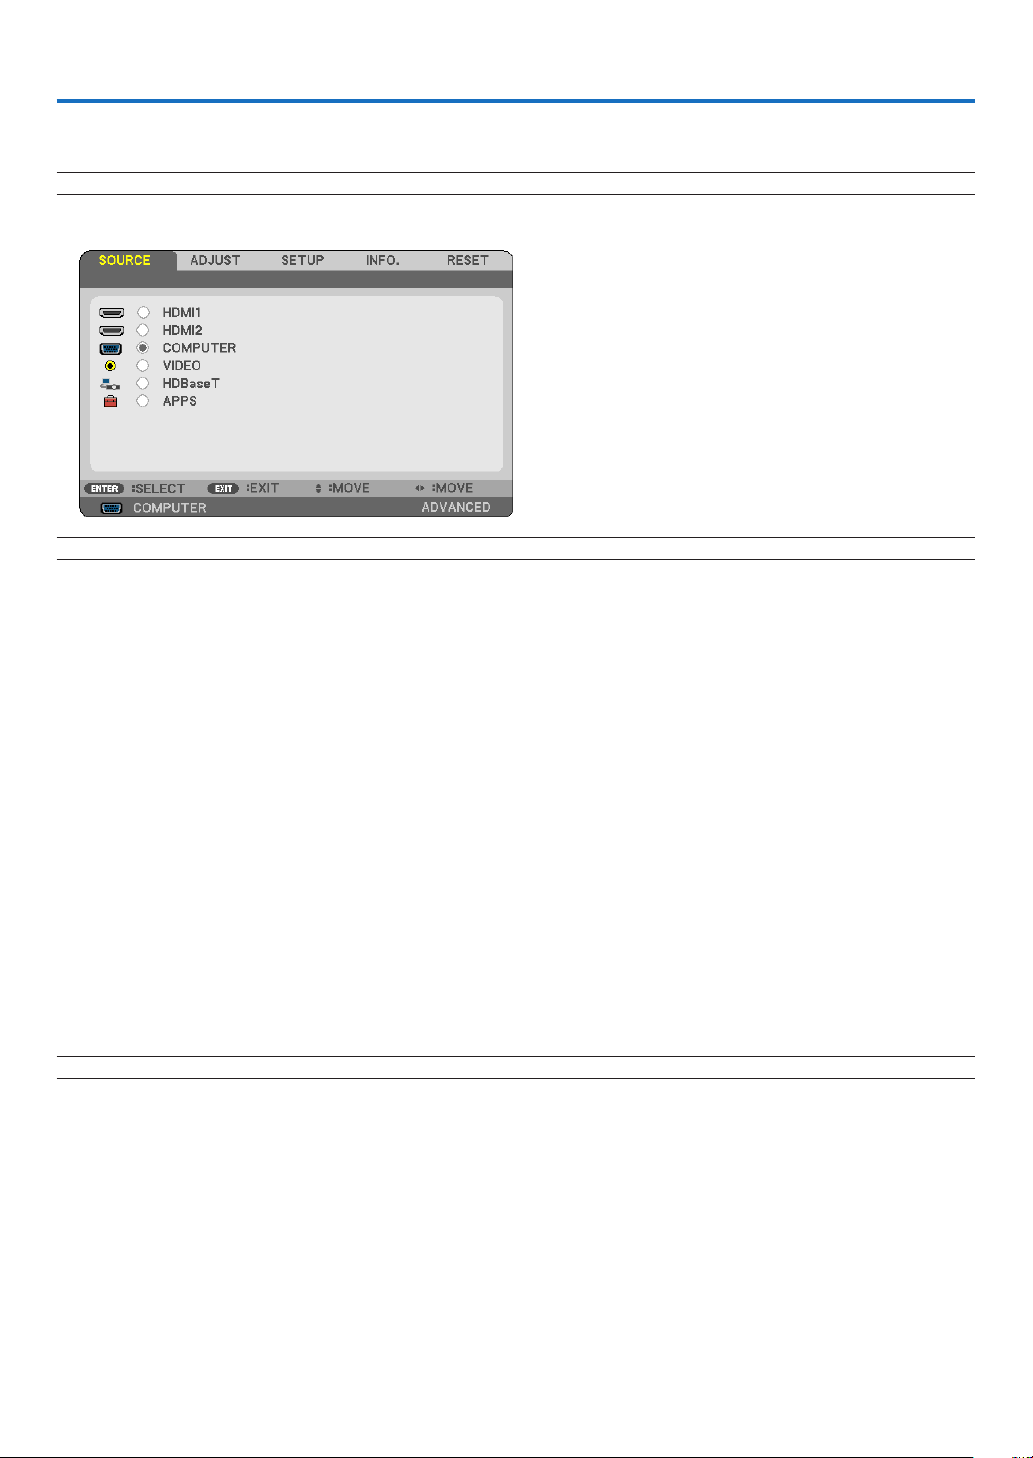
PresstheSOURCEbuttononce.Theprojectorwillsearchfortheavail-
ableinputsourceanddisplayit.Theinputsourcewillchangeasfollows:
[HDMI1]→[HDMI2]→[COMPUTER]→[VIDEO]→[HDBaseT]→[APPS]
•WiththeSOURCEscreendisplayed,youcanpresstheSOURCE
buttonafewtimestoselecttheinputsource.
TIP:Ifnoinputsignalispresent,theinputwillbeskipped.
Using the Remote Control
PressanyoneoftheCOMPUTER1,HDMI1,HDMI2,VIDEO,HDBaseT,
orAPPSbuttons.
15
2. Projecting an Image (Basic Operation)
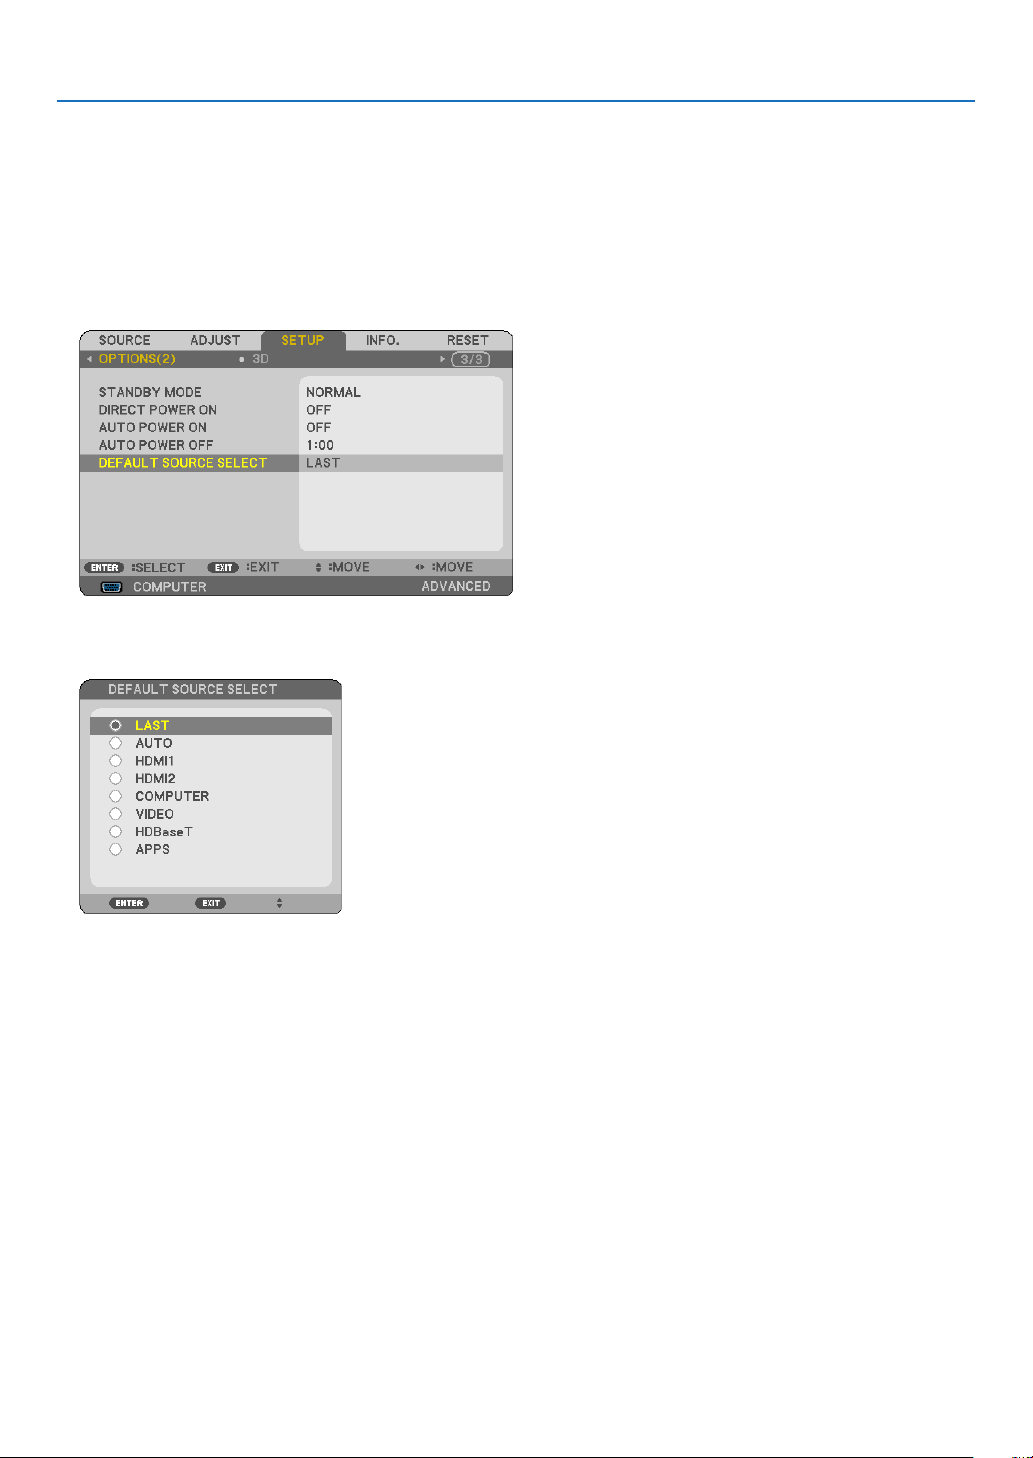
SelectingDefaultSource
Youcansothatitwillbedisplayedeachtimetheprojectoristurnedon.
1. Press the MENU button.
The menu will be displayed.
2. Press the
▶buttontwicetoselect[SETUP]andthe▼buttonortheENTERbuttontoselect[GENERAL].
3.
Press the
▶
buttonfourtimestoselect[OPTIONS(2)].
4. Press the ▼buttonvetimestoselect[DEFAULTSOURCESELECT]andpresstheENTERbutton.
The [DEFAULT SOURCE SELECT] screen will be displayed.
(
→ page 62)
5.
Select a source as the default source, and press the ENTER button.
6. Press the EXIT button a few times to close the menu.
7. Restart the projector.
The source you selected in step 5 will be projected.
TIP:
•Whentheprojectorandcomputerareconnectedandtheprojectorisinstandby,itispossibletoturnontheprojector’spower
andprojectthecomputer’sscreenautomaticallybydetectingthecomputersignalsorHDMIsignalsissuedfromthecomputer.
([AUTOPOWERON]→page61)
•OnWindows7,acombinationoftheWindowsandPkeysallowsyoutosetupexternaldisplayeasilyandquickly.
16
2. Projecting an Image (Basic Operation)
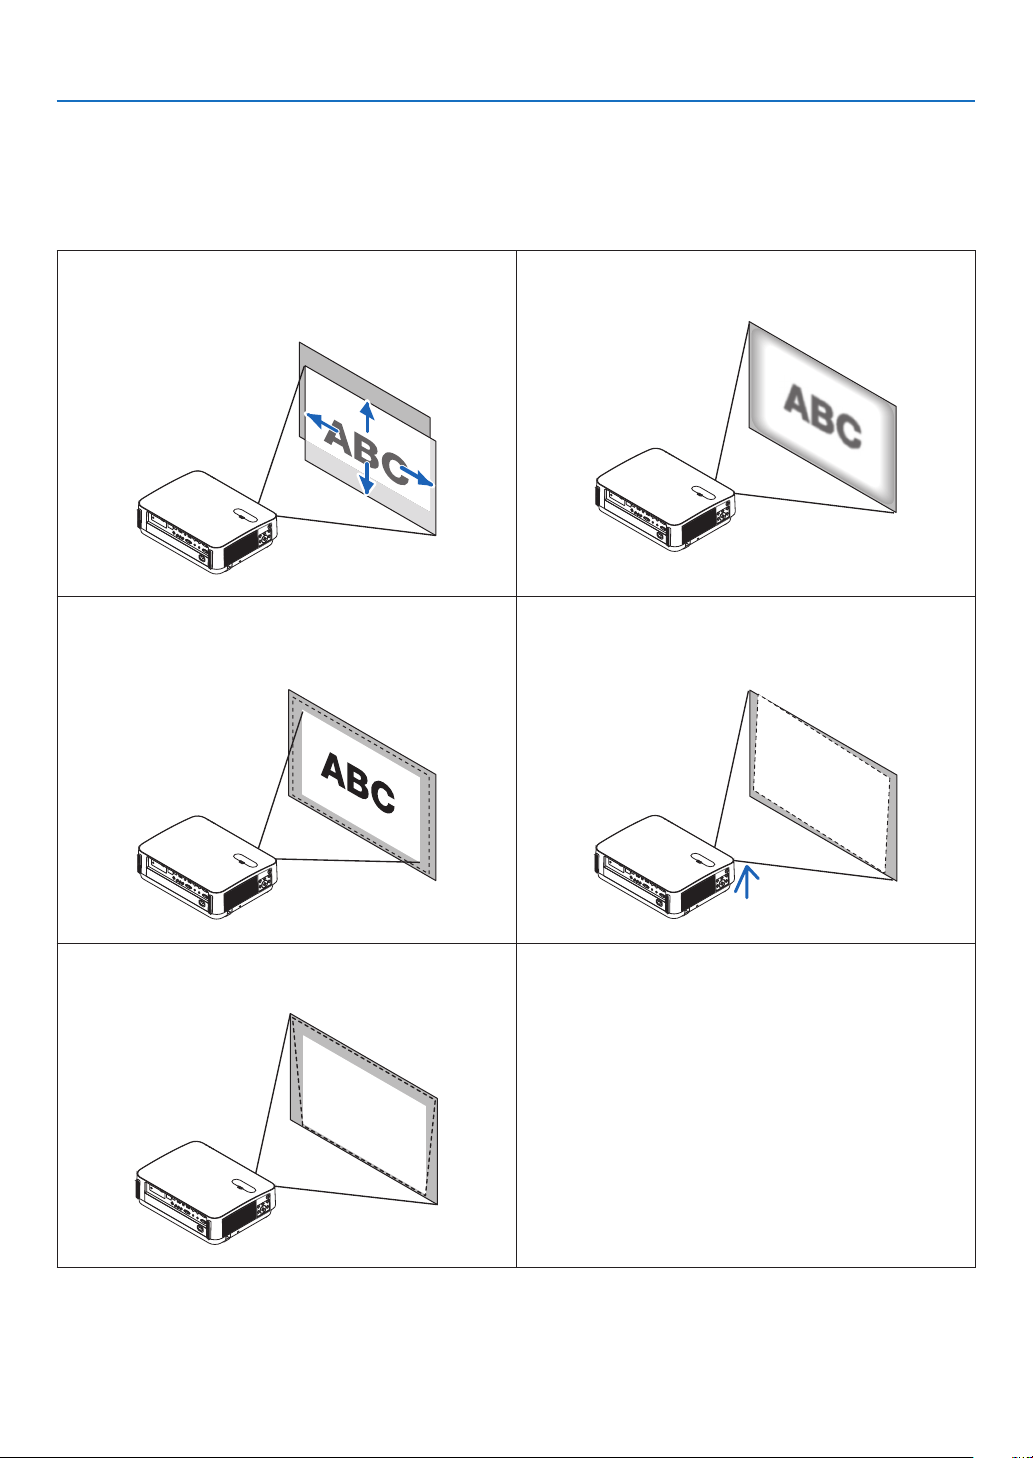
❺ Adjusting the Picture Size and Position
Usethelensshiftdial,theadjustabletiltfootlever,thezoomlever/zoomringandthefocusringtoadjustthepicture
sizeandposition.
Inthischapterdrawingsandcablesareomittedforclarity.
Adjustingtheprojectedimage’sverticalandhorizontal
position[Lensshift]
(→page17)
Adjustingthefocus[Focusring]
(→page19)
Finelyadjustingthesizeofanimage
[Zoomlever]
(→page19)
Adjustingtheprojectedimage’sheightandhorizontaltilt
[Tiltfoot]
(→page20)
Correctingthekeystonedistortion[Keystone]*
(→page21)
*Toperformkeystonecorrectionmanually,see“6.CorrectingKeystoneDistortion[KEYSTONE]”onpage21.
17
2. Projecting an Image (Basic Operation)
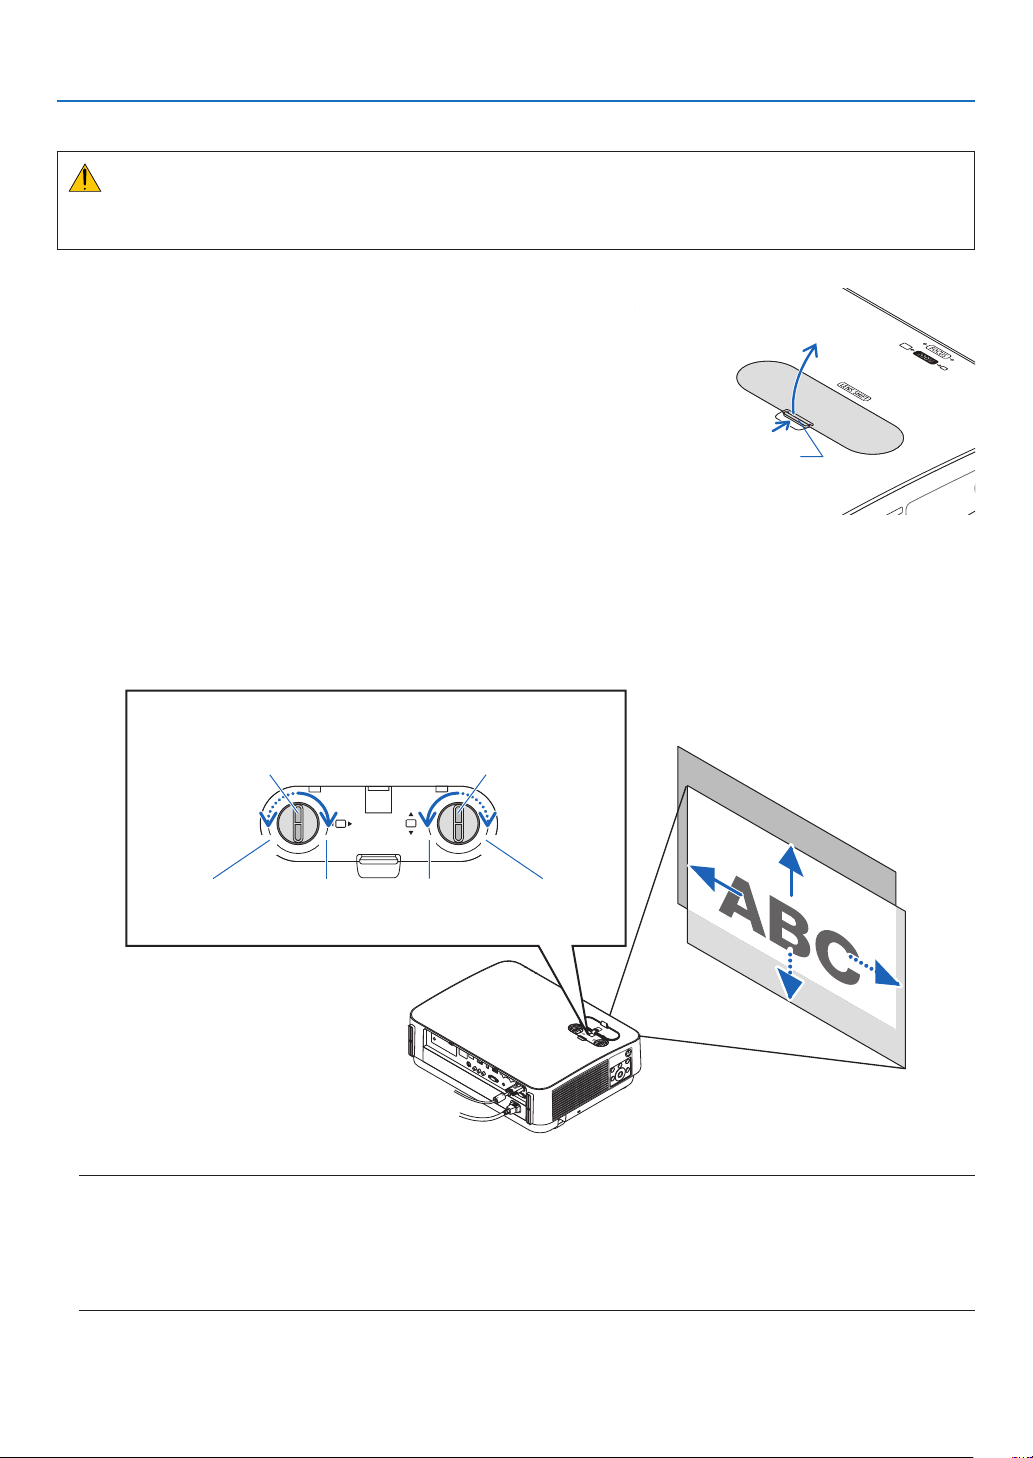
Adjusting the vertical position of a projected image (Lens shift)
CAUTION
Performtheadjustmentfrombehindorfromthesideoftheprojector.Adjustingfromthefrontcouldexposeyour
eyestostronglightwhichcouldinjurethem.
1. Open the lens shift cover.
Open with the cover’s stopper pushed forward.
•Thelensshiftcovercannotberemoved.
Stopper
2. Turn the lens shift dials clockwise or counterclockwise.
Vertical dial
Turnthisclockwiseorcounterclockwisetoadjusttheprojectionpositionintheverticaldirection.
Horizontal dial
Turnthisclockwiseorcounterclockwisetoadjusttheprojectionpositioninthehorizontaldirection.
Lens shift dial
(Horizontal)
Lens shift dial
(Vertical)
DownwardLeftward UpwardRightward
NOTE:
•Thedialscanbeturnedmorethanonefullturn,buttheprojectionpositioncannotbemovedmorethantherangeindicated
onthefollowingpage.Donotforcetoturnthedials.Doingsomaydamagethedials.
•Ifthelensisshiftedtothemaximuminthediagonaldirection,theedgesofthescreenwillbedarkorshaded.
•Theverticalshiftadjustmentmustbenishedwithanimageshiftedupward.Ifyounishtheverticalshiftadjustmentwithan
imageshifteddown,thezoom/focusadjustmentsorstrongshakingmaycauseaprojectedimagetoslightlyshiftdown.
18
2. Projecting an Image (Basic Operation)
3.Closethelensshiftcover.
Insertthecover’s2(two)hooksintothegroovesintheprojector,then
close the cover.
Hook
Groove
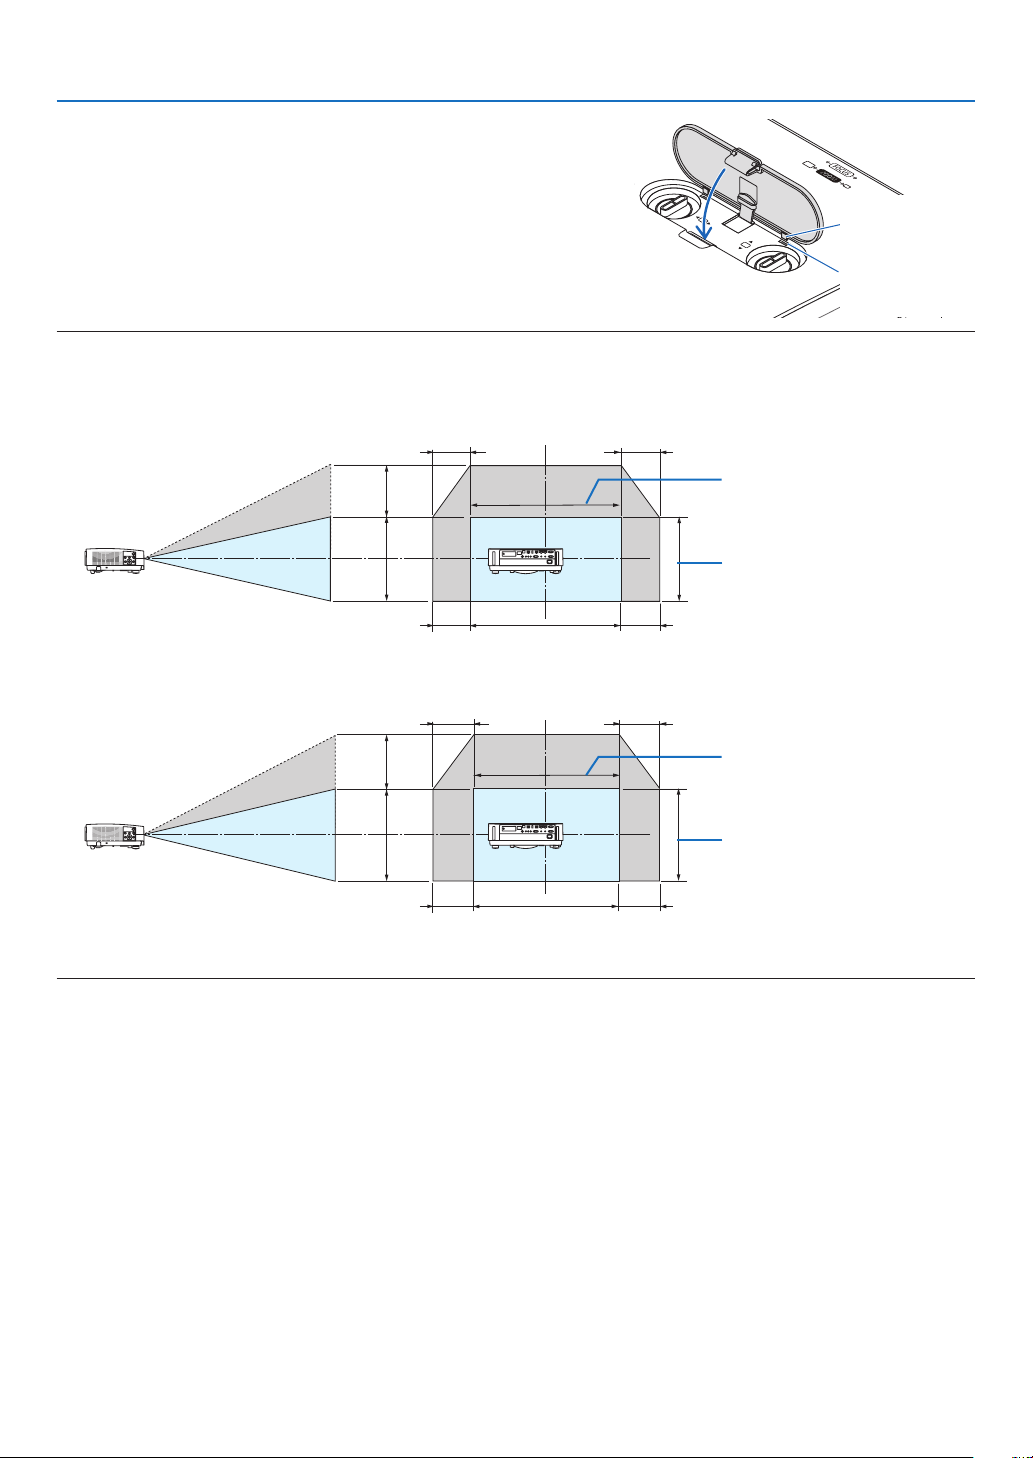
TIP:
•Thediagrambelowshowsthelensshiftadjustmentrange([ORIENTATION]:[DESKTOPFRONT]).
•Forthelensshiftadjustmentrangeregardingthe[CEILINGFRONT]projection,seepage71.
[P502HL]
100%V
62%V
100%H
25%H
25%H
25%H
25%H
Height of projected image
Width of projected image
[P502WL]
100%V
59%V
100%H
28%H
28%H
28%H
28%H
Height of projected image
Width of projected image
Descriptionofsymbols:Vindicatesvertical(heightoftheprojectedimage),Hindicateshorizontal(widthoftheprojectedimage).
19
2. Projecting an Image (Basic Operation)
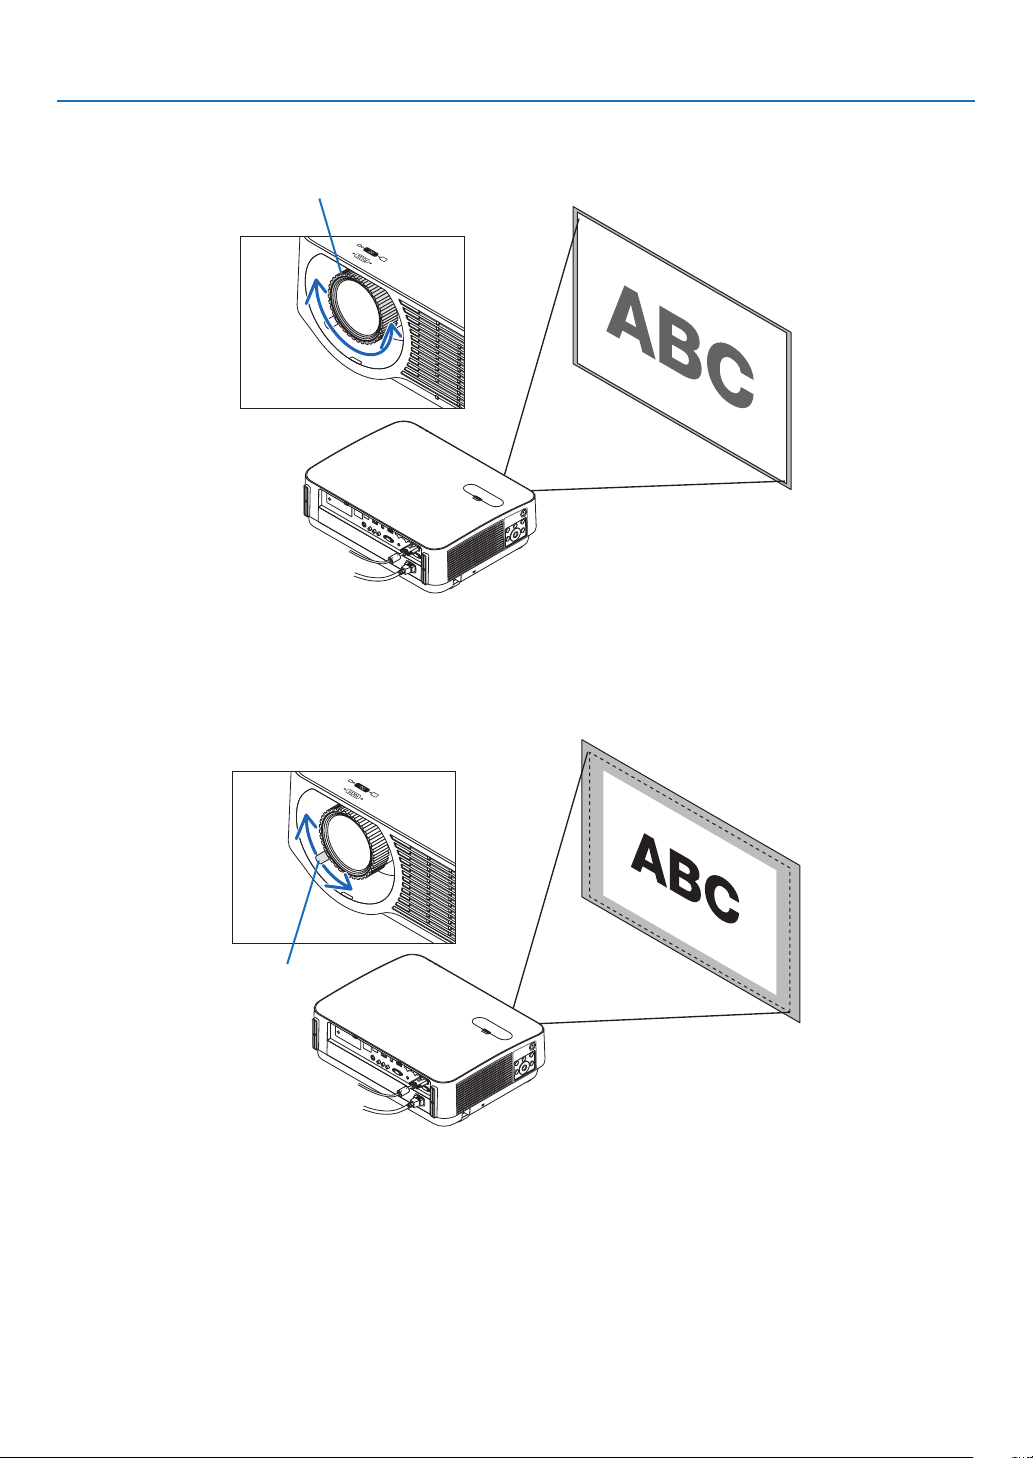
Focus
UsetheFOCUSringtoobtainthebestfocus.
Focus ring
Zoom
Turnthezoomleverclockwiseandcounterclockwise.
Zoom lever
20
2. Projecting an Image (Basic Operation)
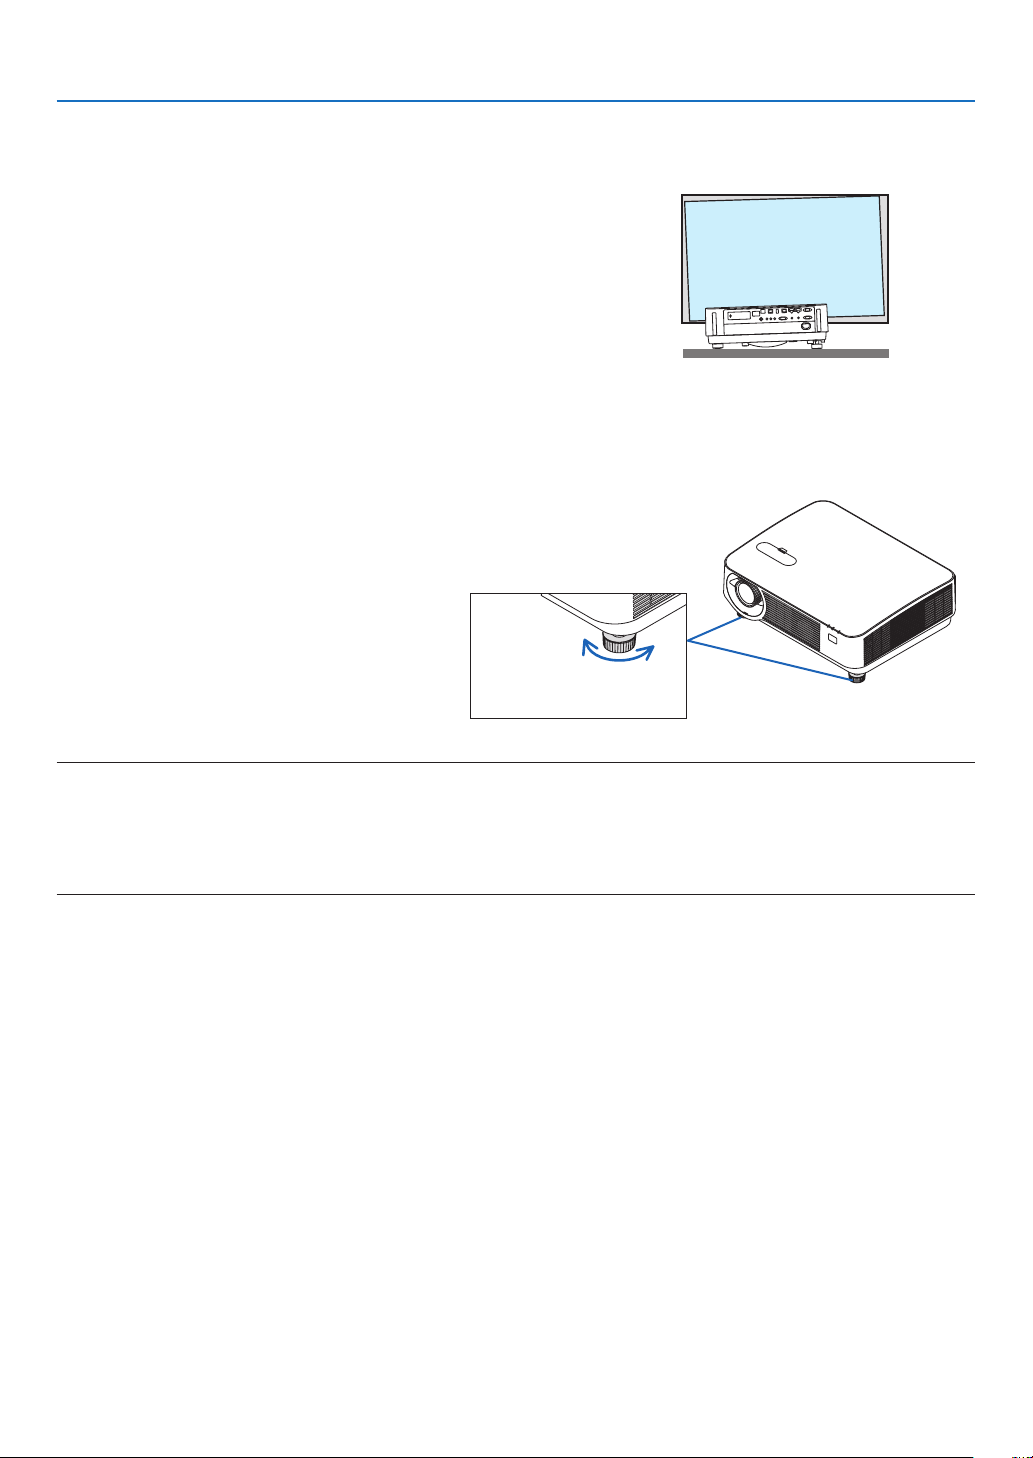
Adjusting the tilt (Tilt foot)
Adjustingtheleftandrighttilt.
1. Turn the left and right tilt feet to adjust.
The tilt feet lengthen and shorten when turned.
The height of the projected image is adjusted by turning the left
and right tilt feet.
Iftheprojectedimageistilted,turnoneofthetiltfeettoadjustthe
image so that it is level.
•Iftheprojectedimageisdistorted,see“6CorrectingKeystone
Distortion[KEYSTONE]”(→ page 21).
•Thetiltfeetcanbelengthenedbyamaximumof20mm.
•Thetiltfeetcanbeusedtotilttheprojectorbyamaximumof
4°.
Up
Down
Tilt foot
NOTE:
•Donotlengthenthetiltfeetanymorethan20mm/0.8".Doingsowillmakethetiltfeet’smountsectionunstableandcouldcause
thetiltfeettocomeofftheprojector.
•Donotusethetiltfeetforanypurposeotherthanadjustingtheprojector’sprojectionangle.
Handlingthetiltfeetimproperly,suchascarryingtheprojectorbygraspingthetiltfeetorhookingitontoawallusingthetiltfeet,
coulddamagetheprojector.
21
2. Projecting an Image (Basic Operation)
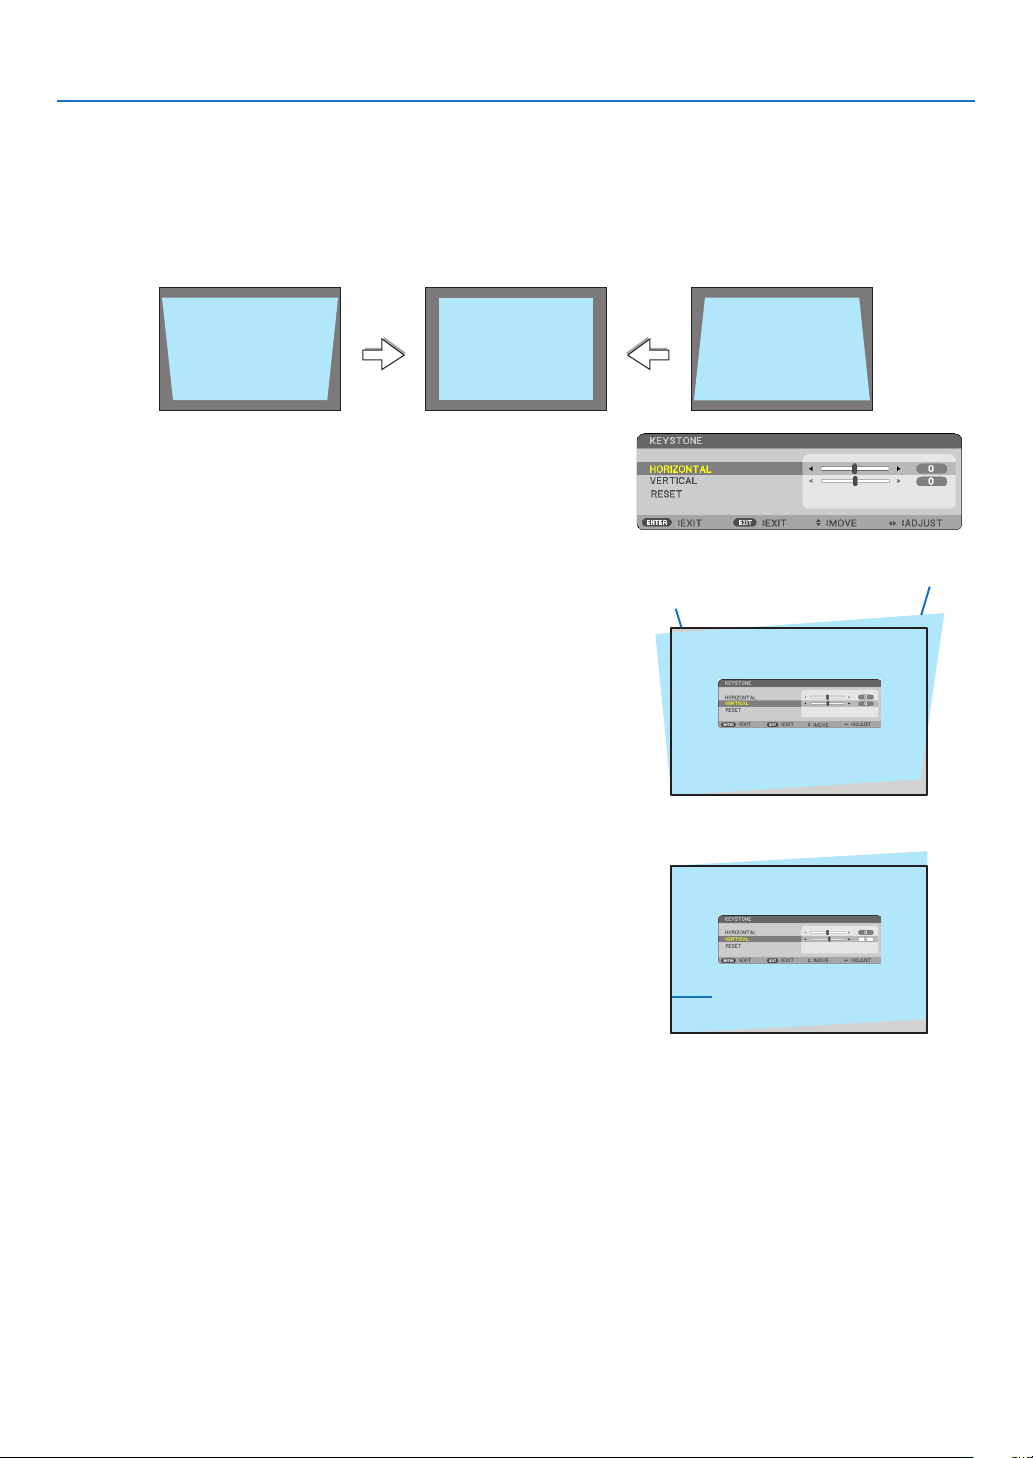
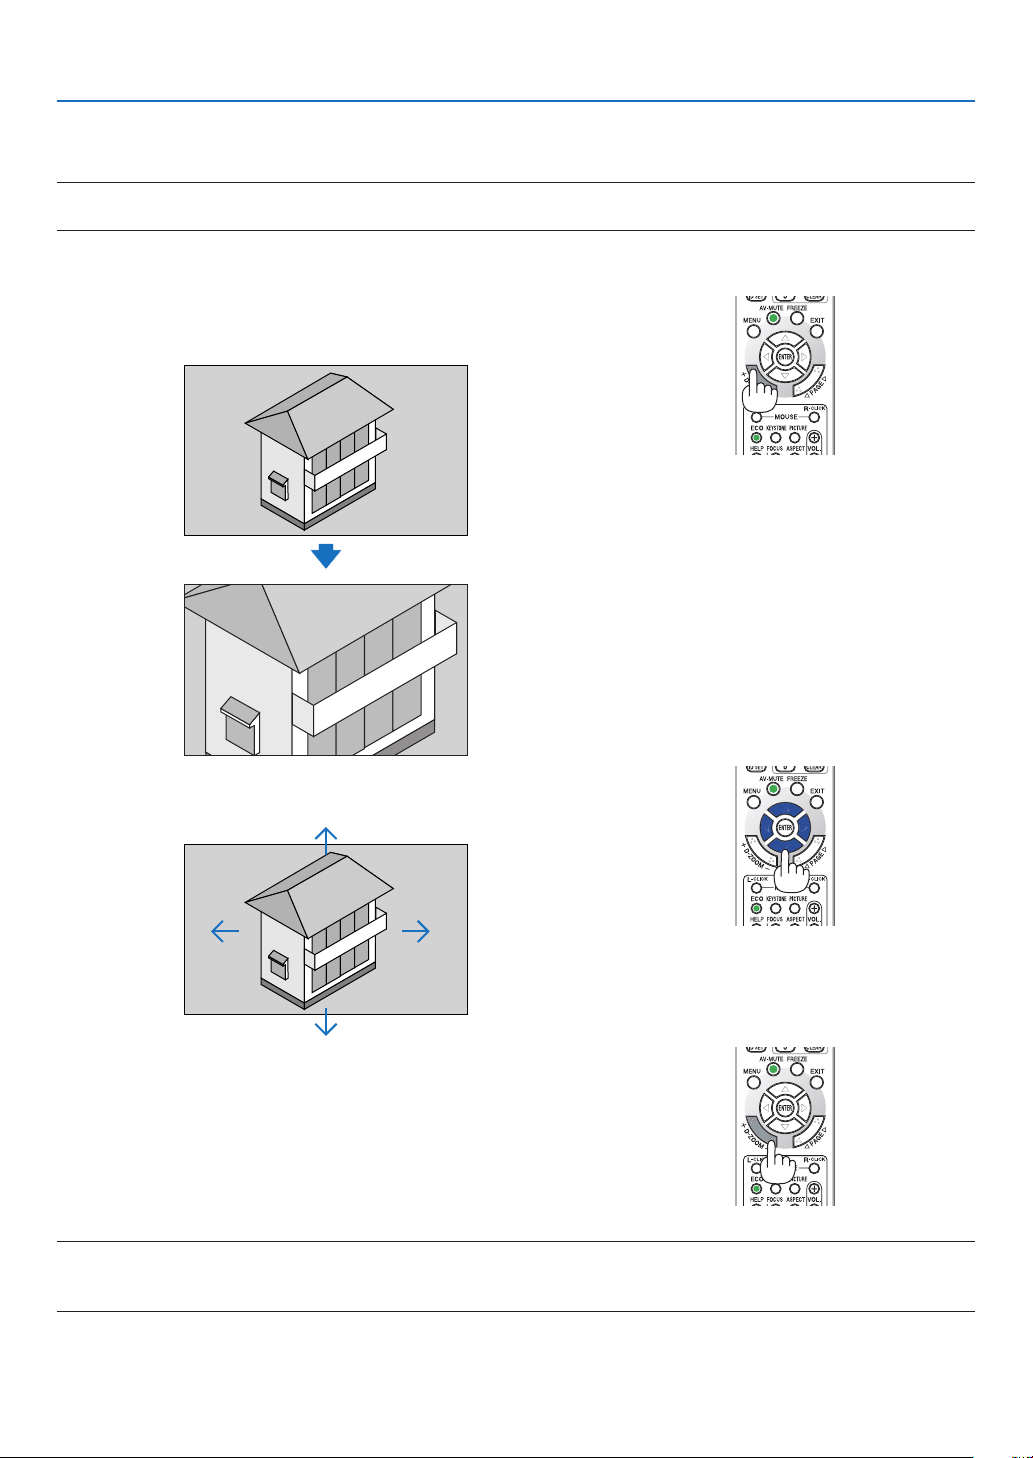
❻ Correcting Keystone Distortion [KEYSTONE]
Whentheprojectorisnotexactlyperpendiculartothescreen,keystonedistortionoccurs.Toovercomeit,youcanusethe
“Keystone”function,adigitaltechnologythatcanadjustforkeystone-typedistortion,resultinginacrisp,squareimage.
Thefollowingprocedureexplainshowtousethe[KEYSTONE]screenfromthemenutocorrecttrapezoidaldistortions.
Whentheprojectorisplaceddiagonallytothescreen,
Whentheprojectorissetupatanangleinrelationtothescreen,adjusttheHorizontaloptionoftheKeystonemenu
sothatthetopandbottomofsidesoftheprojectedimageareparallel.
1. When APPS is not selected as source and the menu is not dis-
played on, press the ▼ button on the projector cabinet.
The Keystone screen will be displayed on the screen.
•PresstheKEYSTONEbuttonwhenusingtheremotecontrol.
•Seepage
22 for [RESET].
2. Press the ▼buttontoselect[VERTICAL]andthenusethe◀ or ▶
so that the left and right sides of the projected image are parallel.
*Adjusttheverticalkeystonedistortion.
Projected area
Screen frame
3. Align the left (or right) side of the screen with the left (or right)
side of the projected image.
•Usetheshortersideoftheprojectedimageasthebase.
•Intherightexample,usetheleftsideasthebase.
Align left side
22
2. Projecting an Image (Basic Operation)
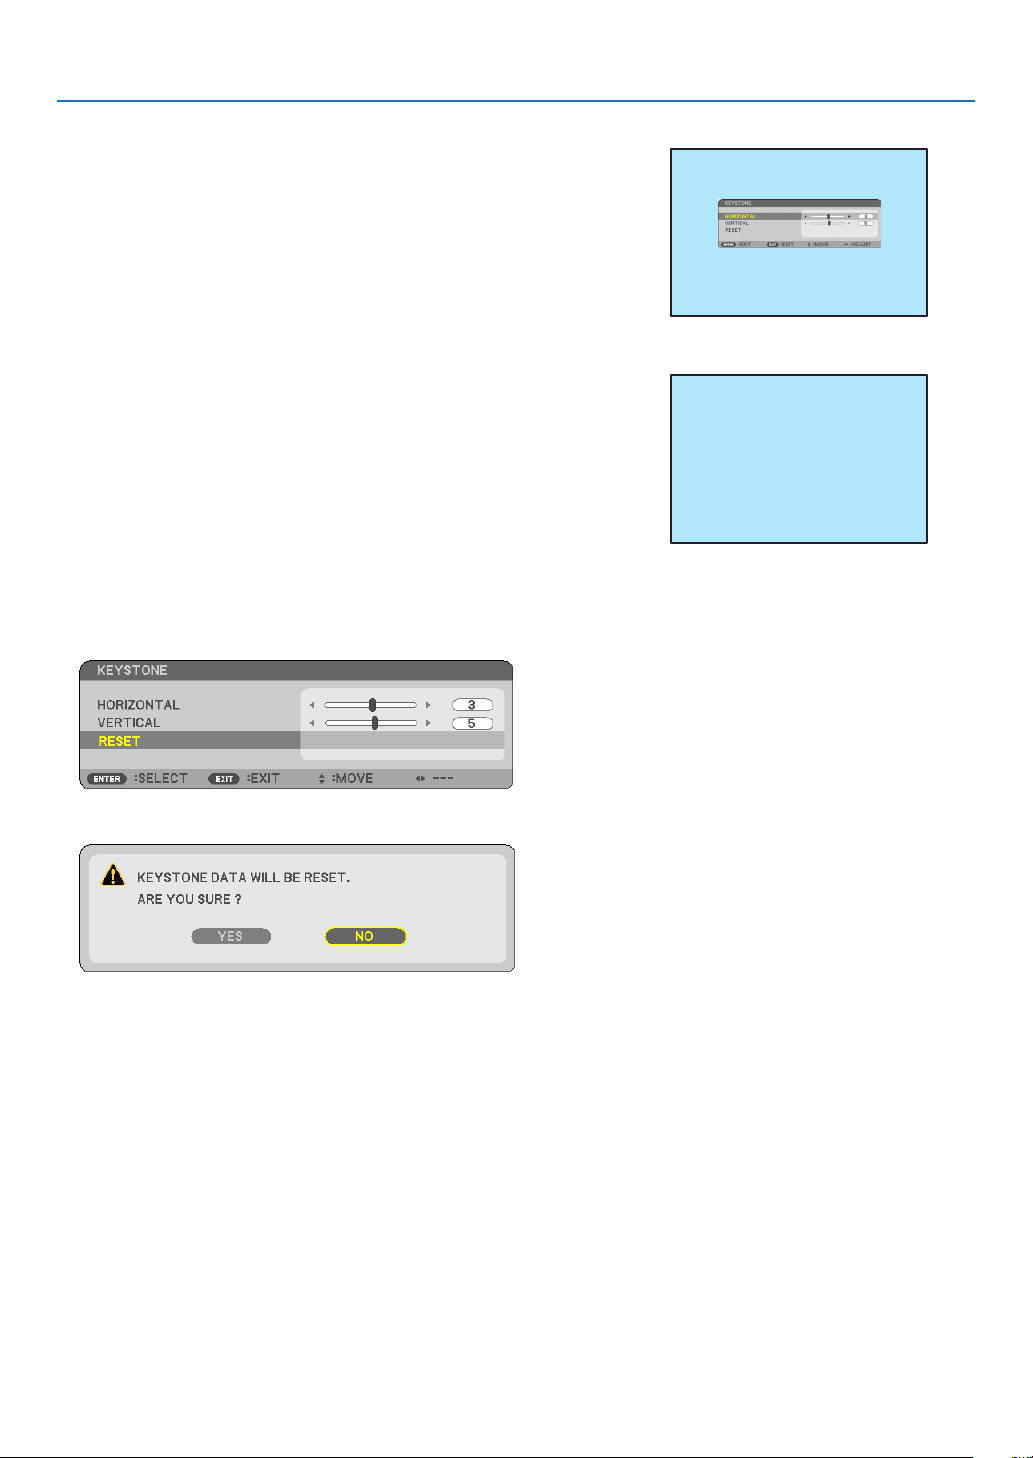
4. Press the ▲buttontoselect[HORIZONTAL]andthenusethe◀
or ▶ so that the top and bottom sides of the projected image are
parallel.
•Adjustthehorizontalkeystonedistortion.
5. Repeat steps 2 and 4 to correct keystone distortion.
6.AftercompletingKeystonecorrection,presstheEXITbutton.
The Keystone screen will disappear.
•ToperformKeystonecorrectionagain,pressthe▼ button to display
the Keystone screen and repeat above steps 1 to 6.
Toreturnthekeystoneadjustmentstodefault:
1. Press the ▼buttontoselect[RESET]andpresstheENTERbutton.
2. Press the ◀ or ▶buttontoselect[YES]andpresstheENTERbutton.
The adjustments will be reset.
•Whenresetting,the[HORIZONTAL]and[VERTICAL]adjustmentvaluesarealsoreset.
•TheKEYSTONEfeaturecancauseanimagetobeslightlyblurredbecausethecorrectionismadeelectronically.
23
2. Projecting an Image (Basic Operation)
❼ Optimizing Computer Signal Automatically
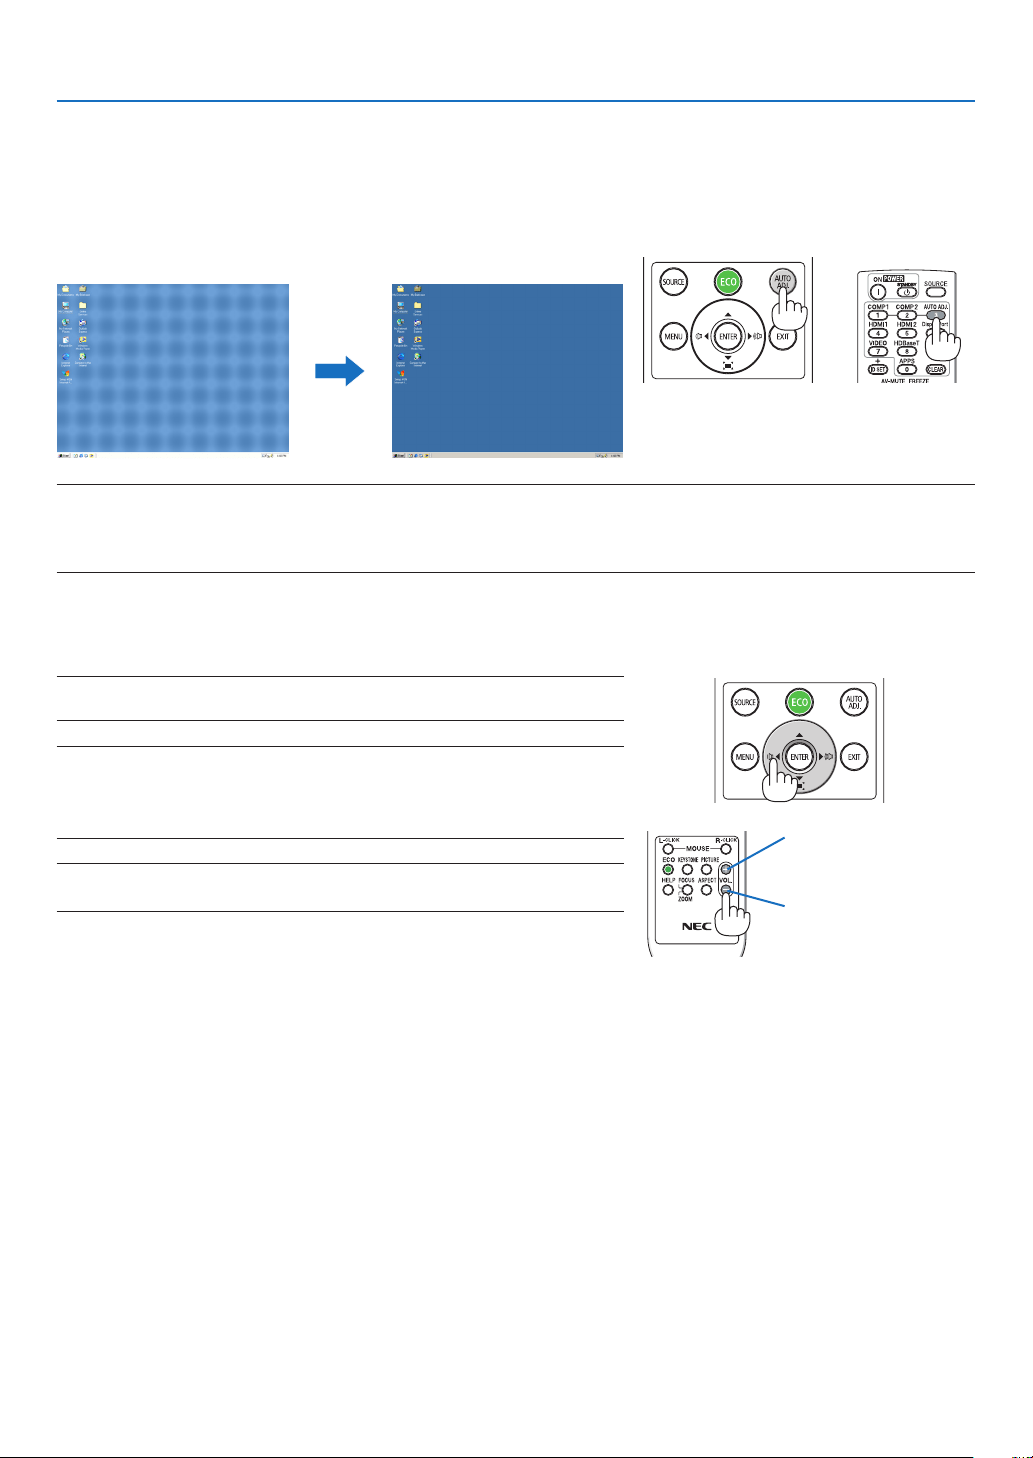
Adjusting the Image Using Auto Adjust
Optimizingacomputerimageautomatically.(COMPUTER)
PresstheAUTOADJ.buttontooptimizeacomputerimageautomatically.
Thisadjustmentmaybenecessarywhenyouconnectyourcomputerforthersttime.
[Poor picture] [Normal picture]
NOTE:
Somesignalsmaytaketimetodisplayormaynotbedisplayedcorrectly.
•IftheAutoAdjustoperationcannotoptimizethecomputersignal,trytoadjust[HORIZONTAL],[VERTICAL],[CLOCK],and[PHASE]
manually.(→page46,47)
❽ Turning Up or Down Volume
Soundlevelfromthespeakeroraudiooutputcanbeadjusted.
TIP:Whennomenusappear,the◀and▶buttonsontheprojectorcabinetwork
asavolumecontrol.
NOTE:
•Volumecontrolisnotavailablewiththe◀or▶buttonwhenanimageismagni-
edbyusingtheD-ZOOM(+)button,whenthemenuisdisplayed,orwhenthe
APPSisdisplayed.
TIP:The[BEEP]soundvolumecannotbeadjusted.Toturnoffthe[BEEP]sound,
fromthemenu,select[SETUP]→[OPTIONS(1)]→[BEEP]→[OFF].
Increasevolume
Decrease volume
24
2. Projecting an Image (Basic Operation)
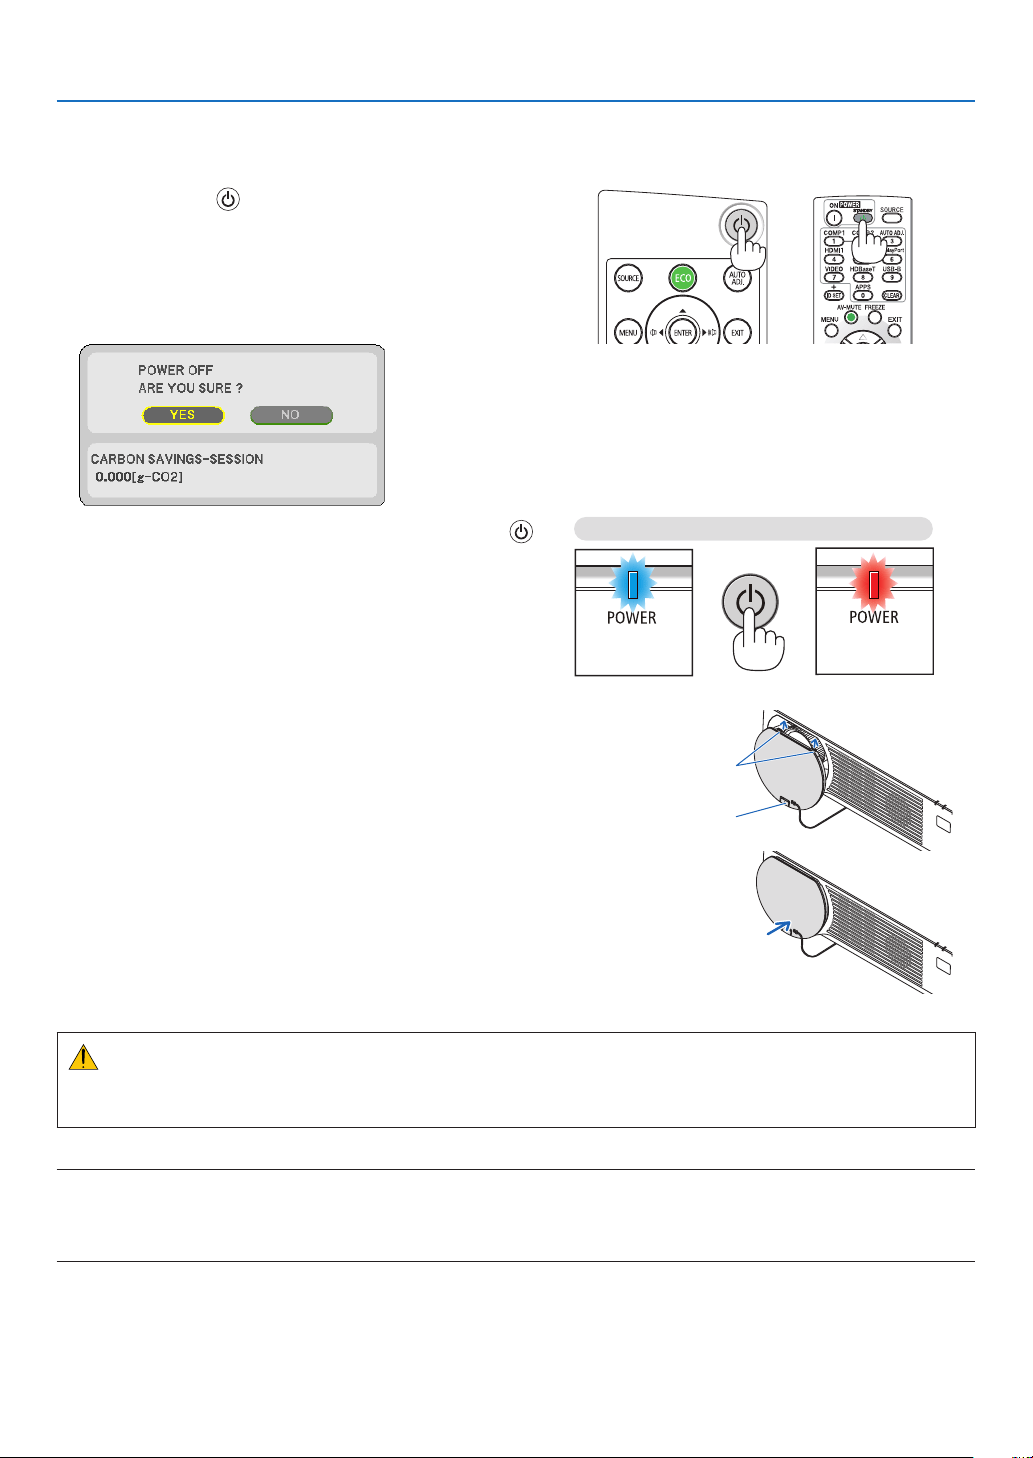
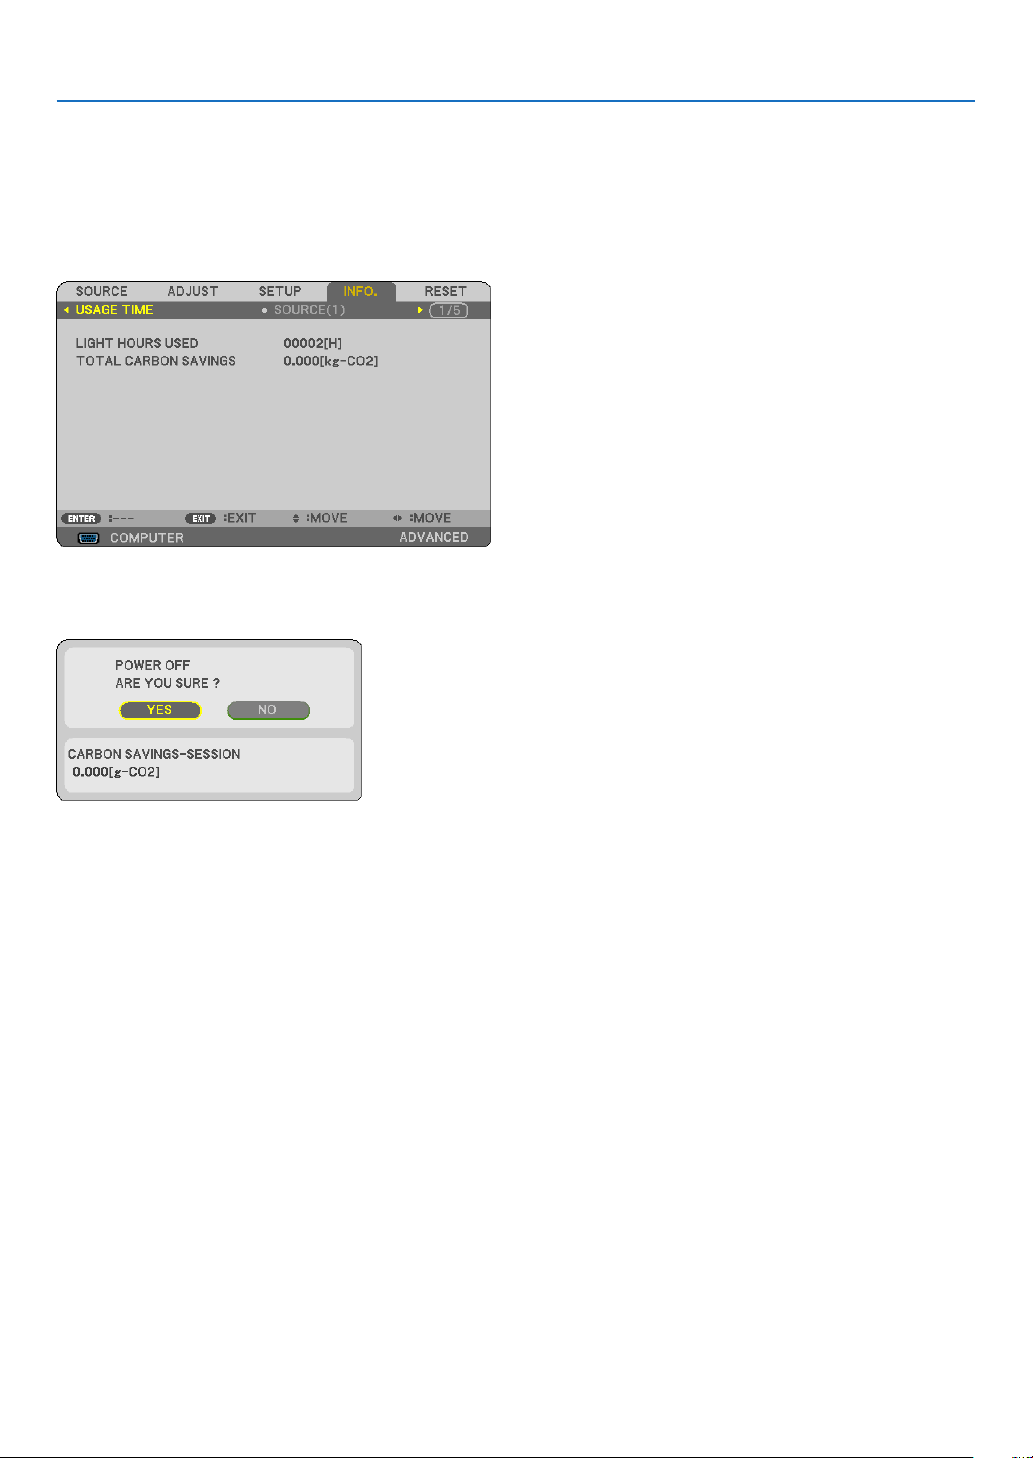
❾ Turning off the Projector
Toturnofftheprojector:
1. First, press the (POWER) button on the projector
cabinet or the STANDBY button on the remote control.
The confirmation message will be displayed.
•Theconrmationmessagedisplayedwhenthepower
is turned off indicates the amount of CO2 reduction this
session (
→ page 29).
2. Secondly, press the ENTER button or press the
(POWER) or the STANDBY button again.
When the light source turns off, the power turns off too. The
cooling fan remains to run for a while. When the cooling fan
stops to run, the projector will go into the STANDBY mode.
When in standby mode, the POWER indicator will light red
and the STATUS indicator will turn off when [NORMAL] is
selected for [STANDBY MODE].
Power On
Steady blue light
Standby
Steady red light
3. Mount the lens cap.
Insertthecap’s2(two)hooksintothegroovesoftheprojec-
tor, then press at the bottom of the lens cap. The stopper
is secured to the projector.
Hook
Stopper
CAUTION:
PartsoftheprojectormaybecometemporarilyheatediftheprojectoristurnedoffwiththePOWERbutton.
Becarefultohandletheprojector.
NOTE:
•Donotunplugthepowercordfromtheprojectororfromthepoweroutletwhileanimageisbeingprojectedandthecoolingfan
isrotating.Doingsocoulddeterioratetheprojector’sACINterminalorthepowerplug’scontact.DonotshutofftheACpower
supplywhileanimageisbeingprojected.DonotdisconnecttheACpowercorduntilthePOWERindicatorturnsONinred.

25
2. Projecting an Image (Basic Operation)
❿ When Moving the Projector
Preparation:Makesurethattheprojectoristurnedoff.
1. If the separately sold cable cover is mounted, remove it.
(
→ page 122)
2. Unplug the power cord.
3. Disconnect any other cables.
•RemovetheUSBmemoryifitisinsertedintotheprojector.

26
❶ Turning off the Image and Sound
PresstheAV-MUTEbuttontoturnofftheimageandsoundforashort
periodoftime.Pressagaintorestoretheimageandsound.
NOTE:
•Eventhoughtheimageisturnedoff,themenustillremainsonthescreen.
❷ Freezing a Picture
PresstheFREEZEbutton.IftheimageofaDVDplayer,etc.,isbe-
ingprojected,thevideoswitchestoastillimage.PresstheFREEZE
buttonagaintoresumethevideo.
NOTE:Theimageisfrozenbuttheoriginalvideoisstillplayingback.
3. Convenient Features
27
3. Convenient Features
❸ Magnifying a Picture
Youcanenlargethepictureuptofourtimes.
NOTE:
•Themaximummagnicationmaybelessthanfourtimesdependingonthesignal.
Todoso:
1.PresstheD-ZOOM(+)buttontomagnifythepicture.
To move the magnified image, use the ▲,▼,◀ or ▶ button.
2. Press the ▲▼◀▶ button.
The area of the magnified image will be moved
3.PresstheD-ZOOM(−)button.
Each time the D-ZOOM (−) button is pressed, the image is reduced.
NOTE:
•Theimagewillbemagniedordemagniedatthecenterofthescreen.
•Displayingthemenuwillcancelthecurrentmagnication.

28
3. Convenient Features
❹ Changing Eco Mode/Checking Energy-Saving Effect
Using Eco Mode [ECO MODE]
Whenthe[LIGHTMODE]’s[ECOMODE]issetto[ECO1]or[ECO2],thebrightnessandtheoperatingsoundare
reduced.Furthermore,thepowerconsumptionisdecreasedandtheprojector’sCO
2
emissionsarereduced.
[ECOMODE]Iconatthebot-
tomofthemenu
DescriptionStatusofLIGHTindicator
[OFF]100%brightness
Thescreenwillbebrightlylit.
Off
[ECO1]
Brightnesswillbeatabout80%.
Thecoolingfanwillalsoslowdownac-
cordingly.
Lowerpowerconsumption
SteadyGreen
light
[ECO2]
Brightnesswillbeatabout50%.
Thecoolingfanwillalsoslowdownac-
cordingly.
Lowerpowerconsumptionconsiderably
Toturnonthe[ECOMODE],dothefollowing:
1.PresstheECOButtonontheremotecontroltodisplay[ECOMODE]screen.
2. Use the ▼▲ buttons to select, then press the ENTER button.
The [ECO MODE] selection screen turns off and the projector switches to the selected mode.
•Wheninthe[ECOMODE],theLIGHTindicatorlightsgreen.
NOTE:
•The[ECOMODE]canbechangedbyusingthemenu.
Select[SETUP]→[GENERAL]→[LIGHTMODE]→[ECOMODE].
•The[LIGHTHOURSUSED]canbecheckedin[USAGETIME].Select[INFO.]→[USAGETIME].
•Afteralapseof1minutefromwhentheprojectordisplaysno-signalguidance,ablue,blackorlogoscreen,theprojectorgoes
into[ECO2]automatically.Theprojectorwillreturntoitsoriginalsettingonceasignalisaccepted.
•Iftheprojectorinsidetemperaturebecomeshighcausedonthehighroomtemperature,theprojectormaydecreasethebrightness
temporarilyforprotectingitself.Thisisaprotectivefunctioncalled[FORCEDECOMODE].Whentheprojectorisinthe[FORCED
ECOMODE],thethermometersymbol[
]isindicatedattherightbottomofthescreen.Whentheprojectorinsidetemperature
goesdownbycoolingtheroomorsettingthefanmodeto[HIGH],the[FORCEDECOMODE]willbereleasedandtheprojector
willbebacktotheoriginalsettingstate.Duringthe[FORCEDECOMODE],itdisablestochangethestatebychangingthesetting
ofthe[ECOMODE].
29
3. Convenient Features
Checking Energy-Saving Effect [CARBON METER]
Thisfeaturewillshowenergy-savingeffectintermsofCO
2
emissionreduction(kg)whentheprojector’s[ECOMODE]
issetto[ECO1]or[ECO2].Thisfeatureiscalledas[CARBONMETER].
Therearetwomessages:[TOTALCARBONSAVINGS]and[CARBONSAVINGS-SESSION].The[TOTALCARBON
SAVINGS]messageshowsthetotalamountofCO
2
emissionreductionfromthetimeofshipmentuptonow.Youcan
checktheinformationon[USAGETIME]from[INFO.]ofthemenu.(→page
65)
The[CARBONSAVINGS-SESSION]messageshowstheamountofCO
2
emissionreductionbetweenthetimeof
changingtoECOMODEimmediatelyafterthetimeofpower-onandthetimeofpower-off.The[CARBONSAVINGS-
SESSION]messagewillbedisplayedinthe[POWEROFF/AREYOUSURE?]messageatthetimeofpower-off.
TIP:
•TheformulaasshownbelowisusedtocalculatetheamountofCO
2
emissionreduction.
AmountofCO
2
emissionreduction=(Powerconsumptionin[OFF]for[ECOMODE]−Powerconsumptionin[ECO1]/[ECO2]for
[ECOMODE])×CO
2
conversionfactor.*WhentheimageisturnedoffwiththeAV-MUTEbutton,theamountofCO
2
emmission
reductionwillalsoincrease.
*CalculationforamountofCO
2
emissionreductionisbasedonanOECDpublication“CO
2
EmissionsfromFuelCombustion,
2008Edition”.
•The[TOTALCARBONSAVINGS]iscalculatedbasedonsavingsrecordedin15minutesintervals.
•Thisformulawillnotapplytothepowerconsumptionwhichisnotaffectedbywhether[ECOMODE]isturnedonoroff.
30
3. Convenient Features
❺
Preventing the Unauthorized Use of the Projector [SECURITY]
AkeywordcanbesetforyourprojectorusingtheMenutoavoidoperationbyanunauthorizeduser.Whenakeyword
isset,turningontheprojectorwilldisplaytheKeywordinputscreen.Unlessthecorrectkeywordisentered,thepro-
jectorcannotprojectanimage.
•The[SECURITY]settingcannotbecancelledbyusingthe[RESET]ofthemenu.
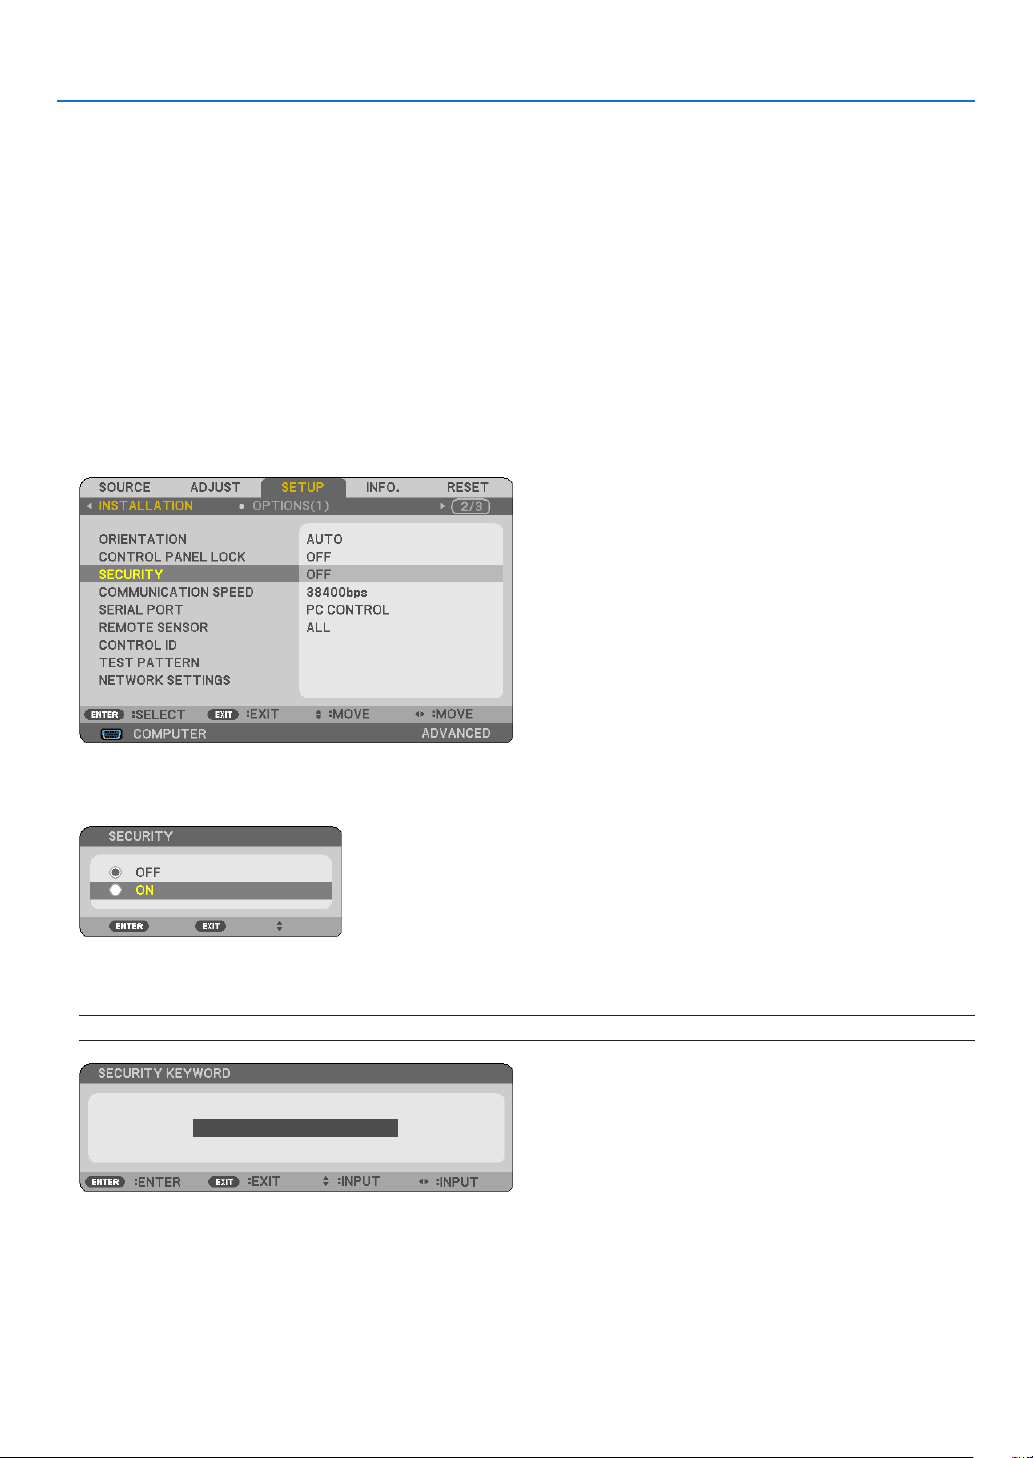
ToenabletheSecurityfunction:
1. Press the MENU button.
The menu will be displayed.
2. Press the
▶buttontwicetoselect[SETUP]andpressthe▼buttonortheENTERbuttontoselect[GEN-
ERAL].
3. Press the ▶buttontoselect[INSTALLATION].
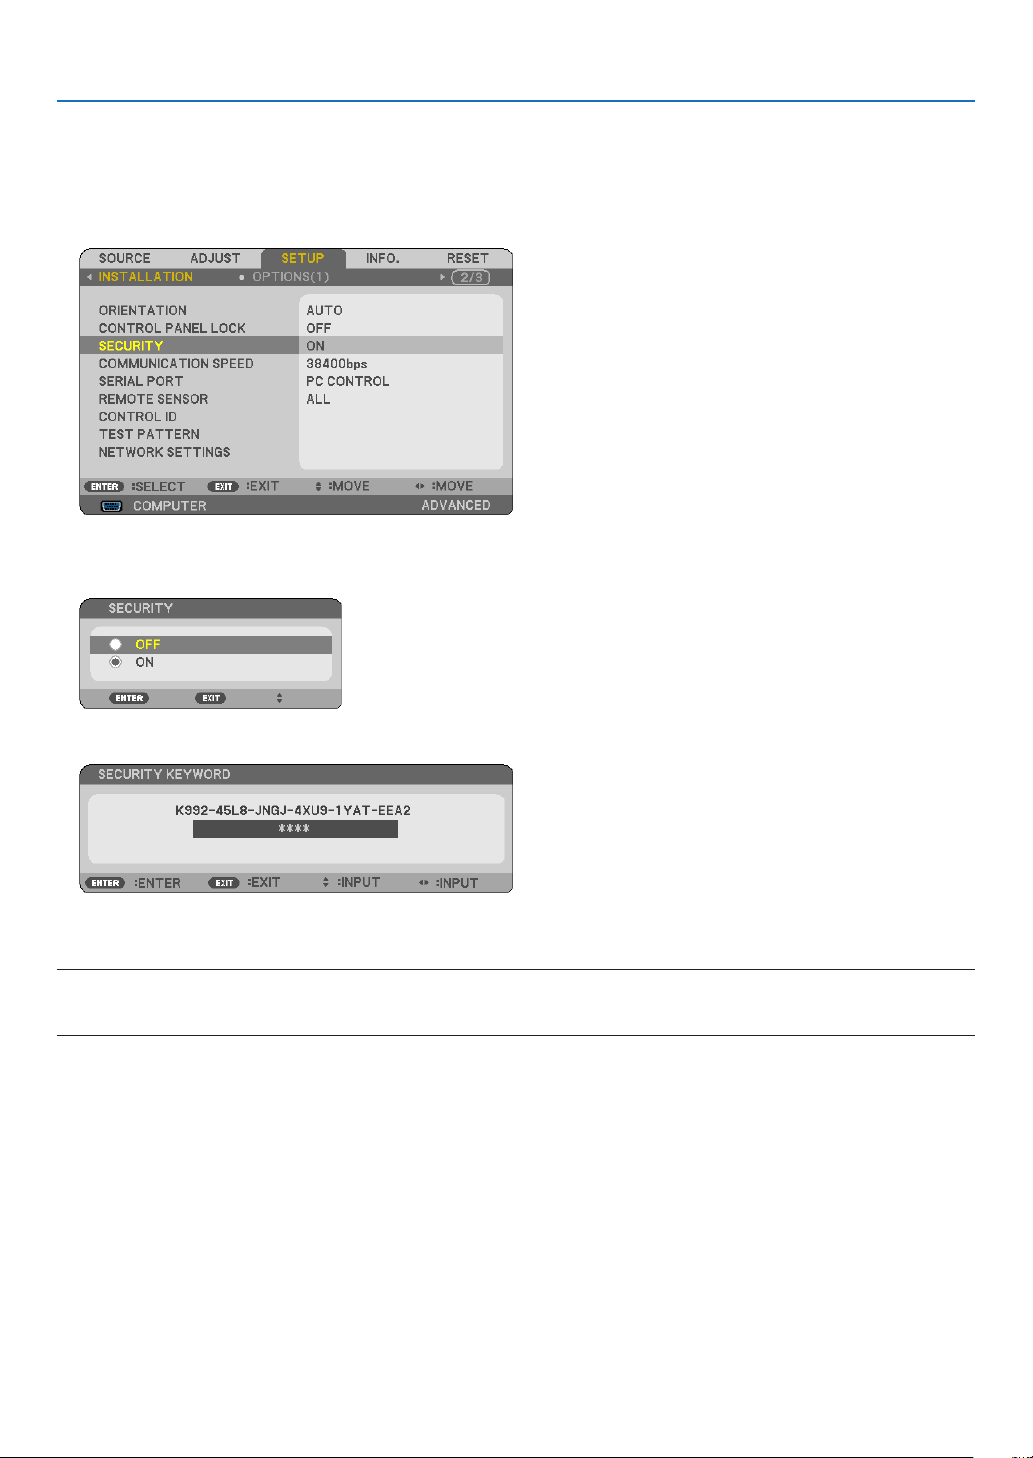
4. Press the ▼buttonthreetimestoselect[SECURITY]andpresstheENTERbutton.
The OFF/ON menu will be displayed.
5. Press the
▼buttontoselect[ON]andpresstheENTERbutton.
The[SECURITYKEYWORD]screenwillbedisplayed.
6. Type in a combination of the four ▲▼◀▶ buttons and press the ENTER button.
NOTE:Akeywordmustbe4to10digitsinlength.
The[CONFIRMKEYWORD]screenwillbedisplayed.
31
3. Convenient Features
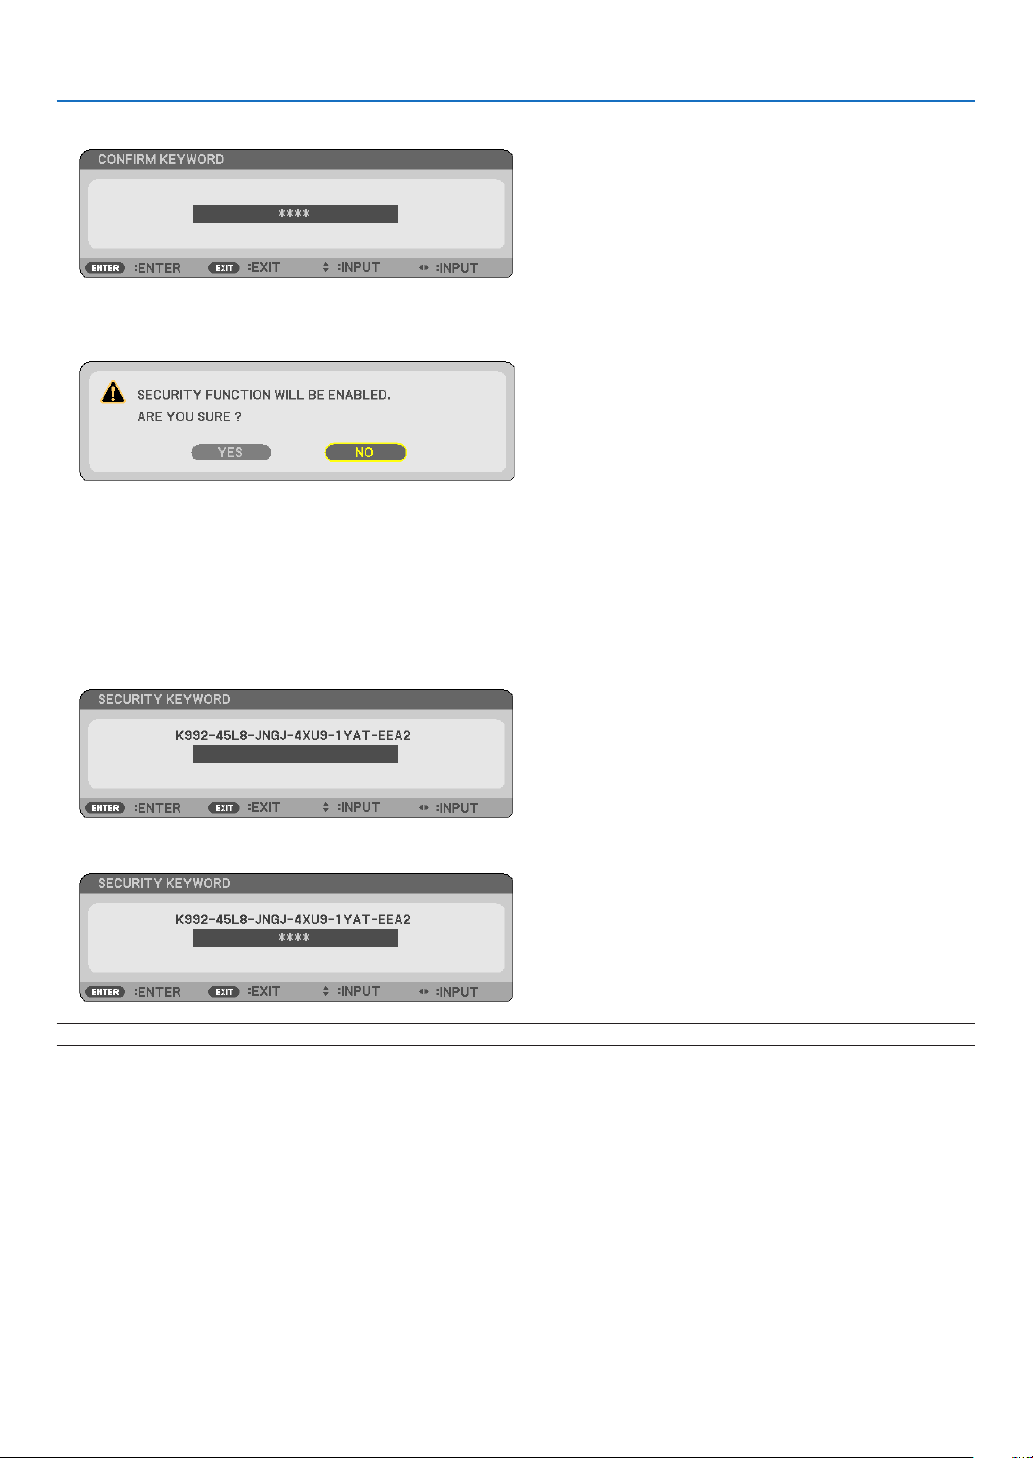
7. Type in the same combination of ▲▼◀▶ buttons and press the ENTER button.
The confirmation screen will be displayed.
8.Select[YES]andpresstheENTERbutton.
TheSECURITYfunctionhasbeenenabled.
Toturnontheprojectorwhen[SECURITY]isenabled:
1. Press the POWER button.
Theprojectorwillbeturnedonanddisplayamessagetotheeffectthattheprojectorislocked.
2. Press the MENU button.
3. Type in the correct keyword and press the ENTER button. The projector will display an image.
NOTE:Thesecuritydisablemodeismaintaineduntilthemainpoweristurnedofforunpluggingthepowercord.
32
3. Convenient Features
TodisabletheSECURITYfunction:
1. Press the MENU button.
The menu will be displayed.
2.Select[SETUP]→[INSTALLATION]→[SECURITY]andpresstheENTERbutton.
The OFF/ON menu will be displayed.
3.Select[OFF]andpresstheENTERbutton.
TheSECURITYKEYWORDscreenwillbedisplayed.
4. Type in your keyword and press the ENTER button.
Whenthecorrectkeywordisentered,theSECURITYfunctionwillbedisabled.
NOTE:Ifyouforgetyourkeyword,contactyourdealer.Yourdealerwillprovideyouwithyourkeywordinexchangeforyourrequest
code.YourrequestcodeisdisplayedintheKeywordConrmationscreen.Inthisexample[K992-45L8-JNGJ-4XU9-1YAT-EEA2]is
arequestcode.

33
3. Convenient Features
❻ Viewing 3D Images
Theprojectorprovides3DimagestoauserwearingcommerciallyavailableLCDshuttereyeglasses.
CAUTION
Health precautions
Beforeviewing,besuretoreadhealthcareprecautionsthatmaybefoundintheuser’smanualincludedwithyourLCD
shuttereyeglassesoryour3DcompatiblecontentsuchasDVDs,videogames,computer’svideolesandthelike.
Toavoidanyadversesymptoms,heedthefollowing:
•DonotuseLCDshuttereyeglassesforviewinganymaterialotherthan3Dimages.
•Allowadistanceof2m/7feetorgreaterbetweenthescreenandauser.Viewing3Dimagesfromtooclosea
distancecanstrainyoureyes.
•Avoidviewing3Dimagesforaprolongedperiodoftime.Takeabreakof15minutesorlongeraftereveryhour
ofviewing.
•Ifyouoranymemberofyourfamilyhasahistoryoflight-sensitiveseizures,consultadoctorbeforeviewing3D
images.
•Whileviewing3Dimages,ifyougetsicksuchasnausea,dizziness,queasiness,headache,eyestrain,blurry
vision,convulsions,andnumbness,stopviewingthem.Ifsymptomsstillpersist,consultadoctor.
•View3Dimagesfromthefrontofthescreen.Viewingfromananglemaycausefatigueoreyestrain.
LCD shutter eyeglasses (recommended)
•UsecommerciallyavailableDLP
®
LinkorothermethodcompatibleLCDshuttereyeglasses.
Steps for viewing 3D images on the projector
1.Connecttheprojectortoyourvideoequipment.
2.Turnontheprojector,displaytheon-screenmenu,andthenselect[ON]forthe3Dmode.
Fortheoperatingproceduretoturnonthe3Dmode,referto“On-screenmenufor3Dimages”onthefollowing
page.
3. Play your 3D compatible content and use the projector to display the image.
4.PutonyourLCDshuttereyeglassestoview3Dimages.
Also refer to the user’s manual accompanied with your LCD shutter eyeglasses for more information.
On-screenmenufor3Dimages
Followthestepstodisplaythe3Dmenu.
1. Press the MENU button.
The on-screen menu will be displayed.
2. Press the
▷ button twice.
The [SETUP] menu will be displayed.
3. Press the ▽ button once, and then press the ▷ button five times.
34
3. Convenient Features
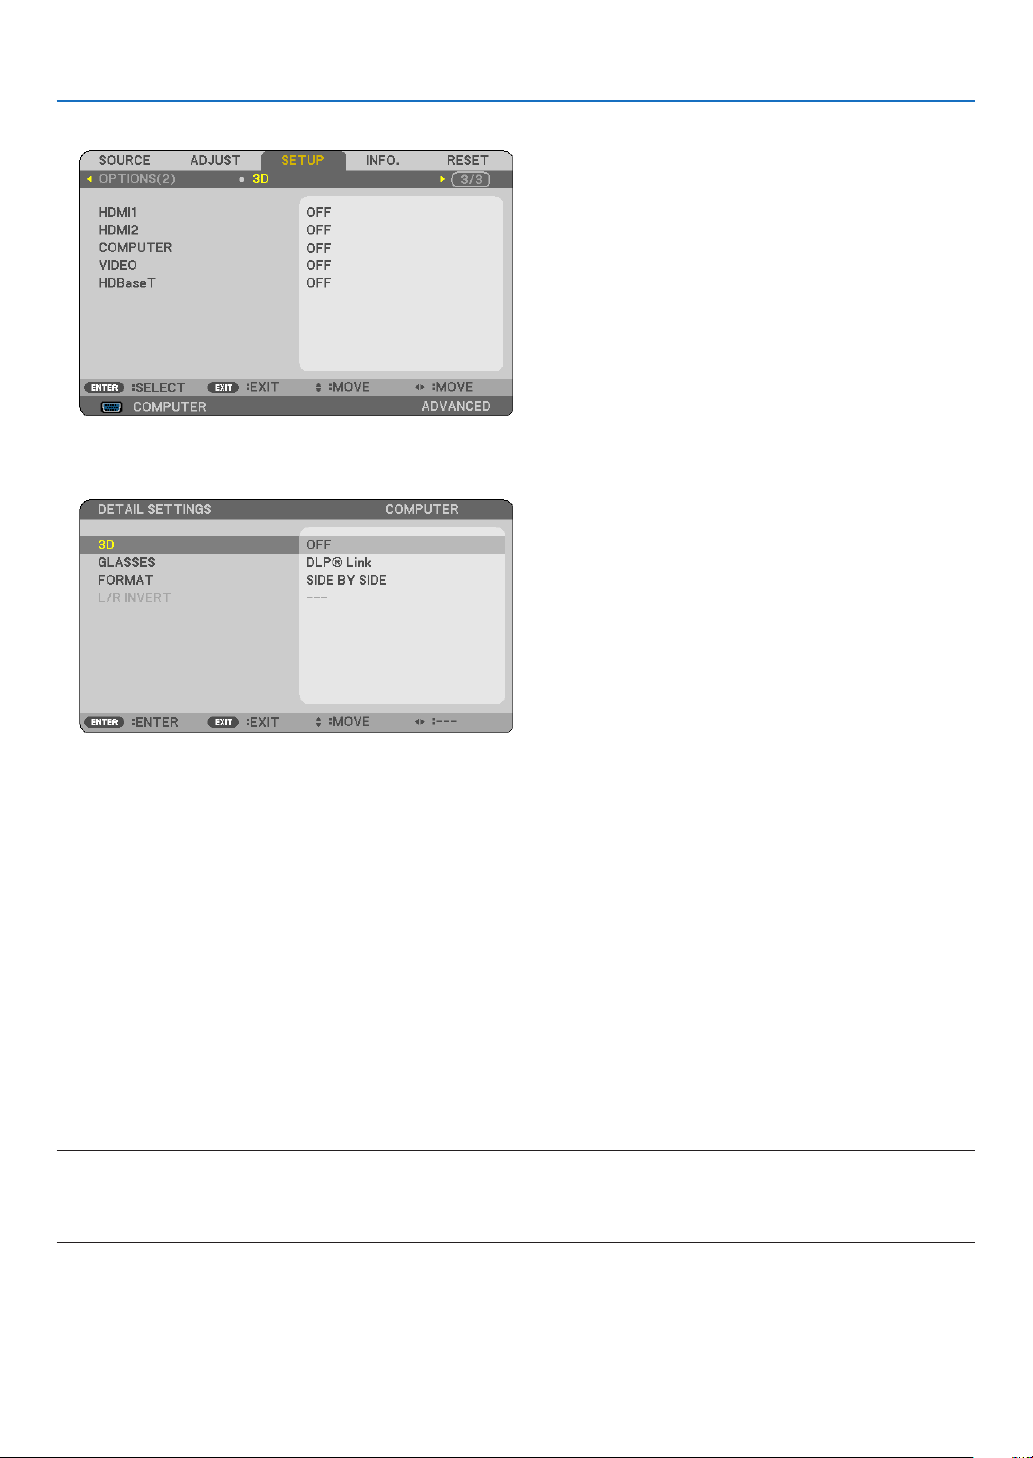
The [3D] menu will be displayed
4. Press the ▽ button to select a signal and press the ENTER button.
The3D(DETAILSETTINGS)screenwillbedisplayed.
5. Press the ▽buttonto[GLASSES]andpresstheENTERbutton.
The [GLASSES] setting screen will be displayed.
6. Press the
▽ button to select a compatible eyeglass method and press the ENTER button.
Setother3D-relatedmenuoptionssuchas[FORMAT]and[L/RINVERT]asnecessary.
When switched to a 3D image, the 3D viewing cautions message screen appears (by factory default). For details,
see page 53.
7. Press either
△ or ▽buttontoselect[3D]andpresstheENTERbutton.
The setting screen for 3D mode will be displayed on.
8. Press the
▽buttontoselect[ON]andpresstheENTERbutton.
The selected signal will be changed in 3D mode.
Selectinginputconnectedtoasourceof3Dimages[HDMI1/HDMI2/COMPUTER/VIDEO/
HDBaseT]
Thisfunctionswitchesthe3DmodebetweenONandOFFforeachinput.
NOTE:
Toconrmthatthesupported3Dsignalisaccepted,useeitherwayofthefollowing:
•Makesurethat[3D]isdisplayedinthetoprightofthescreenafterthesourceisselected.
•Display[INFO.]→[SOURCE(2)]→[3DSIGNAL]andmakesurethat“SUPPORTED”isdisplayed.

35
3. Convenient Features
Toview3Dimages,seepage33.
Select[HDMI1],[HDMI2],[COMPUTER],[VIDEO],or[HDBaseT].
NOTE:
•Themaximumdistanceforviewing3Dimagesis10m/394inchesfromthescreensurfaceunderthefollowingrestrictions:
-Brightnessontheprojector:2000lumensorgreater
-Screengain:1
-Viewingposition:Facingstraighttowardsthescreencenter
-Outsidelight:None
-LCDshuttereyeglasses:DLP®Linkcompatible3Deyeglasses
•If3DcontentisplayedbackonyourcomputerandtheperformanceispooritmaybecausedbytheCPUorgraphicschip.Inthis
caseyoumayhavedifcultyseeingthe3Dimagesastheywereintended.Checktoseeifyourcomputermeetstherequirements
providedinyouruser’smanualincludedwithyour3Dcontent.
•TheDLP
®
LinkcompatibleLCDshuttereyeglassesallowyoutoview3Dimagesbyreceivingsynchsignals,whichareincluded
inlefteyeandrighteyeimages,reectedfromthescreen.Dependingonenvironmentsorconditionssuchastheambientbright-
ness,screensizeorviewingdistance,theLCDshuttereyeglassesmayfailtoreceivesynchsignals,causingpoor3Dimages.
•Whenthe3Dmodeisenabled,theKeystonecorrectionrangewillbenarrower.
•Whenthe3Dmodeisenabled,thefollowingsettingsareinvalid.
[WALLCOLOR],[PRESET],[REFERENCE],[COLORTEMPERATURE]
•Refertothe[SOURCE(2)]screenunderthe[INFO.]menuforinformationonwhethertheinputsignalis3Dcompatible.
•Signalsotherthanthoselistedin“CompatibleInputSignalList”onpage126willbeoutofrangeorwillbedisplayedin2D.
Using a 3D emitter
Thisprojectorcanbeusedtowatchvideosin3Dusingcommercially-availableactiveshutter-type3Deyewear.In
ordertosynchronizethe3Dvideoandeyewear,acommercially-available3Demitterneedstobeconnectedtothe
projector(ontheprojectorside).
The3Deyewearreceivesinformationfromthe3Demitterandperformsopeningandclosingontheleftandright.
3D eyewear and 3D emitter preparations
Pleaseuseanactiveshutter-type3DeyewearthatconformswiththeVESAstandard.
Acommercially-availableRFtypemadebyXpandisrecommended.
3D eyewear ............ Xpand X105-RF-X2
3D emitter .............. Xpand AD025-RF-X1
Connectyour3Demittertothe3DSYNCterminaloftheprojector.
NOTE:
•Useanactiveshutter3Deyewear(compliancewithVESA)
•ChecktheoperatingconditionsdescribedintheusermanualoftheBlu-rayplayer.
•PleaseconnecttheDINterminalofthe3Demittertothe3DSYNCoftheprojector.
•The3Deyewearallowsvideostobeviewedin3Dbyreceivingsynchronizedopticalsignalsoutputfromthe3Demitter.Asaresult,
the3Dimagequalitymaybeaffectedbyconditionssuchasthebrightnessofthesurroundings,screensize,viewingdistance,
etc.
•Whenplayinga3Dvideosoftwareonacomputer,the3DimagequalitymaybeaffectedifthecomputerCPUandgraphicschip
performancearelow.Pleasechecktherequiredoperatingenvironmentofthecomputerthatisstatedintheoperatingmanual
attachedtothe3Dvideosoftware.

36
3. Convenient Features
Troubleshooting on viewing 3D images
Ifimageswillnotbedisplayedin3Dor3Dimagesappearas2D,checkthefollowingtable.Alsorefertotheuser’s
manualaccompaniedwithyour3DcontentorLCDshuttereyeglasses.
PossiblecausesSolutions
•Thecontentyouareplayingbackisnotcompatiblewith3D.•Playbackacontentcompatiblewith3D.
•The3Dmodewasturnedofffortheselectedsource.•Usetheprojector’smenutoturnon3Dmodefortheselected
source.(→page
63)
•YouarenotusingourrecommendedLCDshuttereyeglasses.•UseourrecommendedLCDshuttereyeglasses.(→page
33)
•IftheshutterofyourLCDshuttereyeglassescannotsyn-
chronizewiththecurrentlyprojectedsource,thefollowingare
possiblecauses:
-YourLCDshuttereyeglassesarenotswitchedon.•SwitchonyourLCDshuttereyeglasses.
Forusinga3Demitter:
•Useanactiveshutter-type3Deyewearand3Demitterrecom-
mended.
-ThebatteryintheLCDshuttereyeglassesrandown.•Rechargethebatteryorreplaceit.
-Thecorrecteyeglassmethodisnotselected.•Changetheeyeglassmethodfor3Dbyusingthemenu..(→
page
63)
-Theviewingdistancebetweentheviewerandthescreen
istoofar.
•Moveclosertothescreenuntiltheviewergets3Dimages.
•Orusetheprojector’smenutoselect[NON-INVERT]for[L/R
INVERT].
-Therearebrightlightsourcesorotherprojectorsnearthe
viewer.
•Keeplightsourcesorotherprojectorsawayfromtheviewer.
•Donotlooktowardabrightlightsource.
•Orusetheprojector’smenutoselect[NON-INVERT]for[L/R
INVERT].
•Ifyourcomputerisnotsetfor3Dviewing,thefollowingare
possiblecauses:
-Yourcomputerdoesnotmeettherequirementsfor3Dview-
ing.
•Checktoseeifyourcomputermeetstherequirementspro-
videdinyouruser’smanualincludedwithyour3Dcontent.
-Yourcomputerisnotsetfor3Doutput.•Setyourcomputerfor3Doutput.
Forusinga3Demitter:
-Thereisanobstaclebetweentheopticalreceiverofthe3D
eyewearandthe3Demitter.
•Pleaseremovetheobstacle.
-The3Dformatofthe3Dvideocontentsisnotsupported.•Pleasecheckwiththecompanysellingthe3Dvideocontents.
37
4. Using On-Screen Menu
❶ Using the Menus
NOTE:Theon-screenmenumaynotbedisplayedcorrectlywhileinterlacedmotionvideoimageisprojected.
1. Press the MENU button on the remote control or the projector cabinet to display the menu.
NOTE:ThecommandssuchasENTER,EXIT,▲▼,◀▶inthebottomshowavailablebuttonsforyouroperation.
2. Press the ◀▶ buttons on the remote control or the projector cabinet to display the submenu.
3. Press the ENTER button on the remote control or the projector cabinet to highlight the top item or the first
tab.
4. Use the
▲▼ buttons on the remote control or the projector cabinet to select the item you want to adjust or
set.
You can use the
◀▶ buttons on the remote control or the projector cabinet to select the tab you want.
5. Press the ENTER button on the remote control or the projector cabinet to display the submenu window.
6. Adjust the level or turn the selected item on or off by using the
▲▼◀▶ buttons on the remote control or
the projector cabinet.
Changesarestoreduntiladjustedagain.
7. Repeat steps 2 -6 to adjust an additional item, or press the EXIT button on the remote control or the projec-
torcabinettoquitthemenudisplay.
NOTE:Whenamenuormessageisdisplayed,severallinesofinformationmaybelost,dependingonthesignalorsettings.
8. Press the MENU button to close the menu.
To return to the previous menu, press the EXIT button.
38
4. Using On-Screen Menu
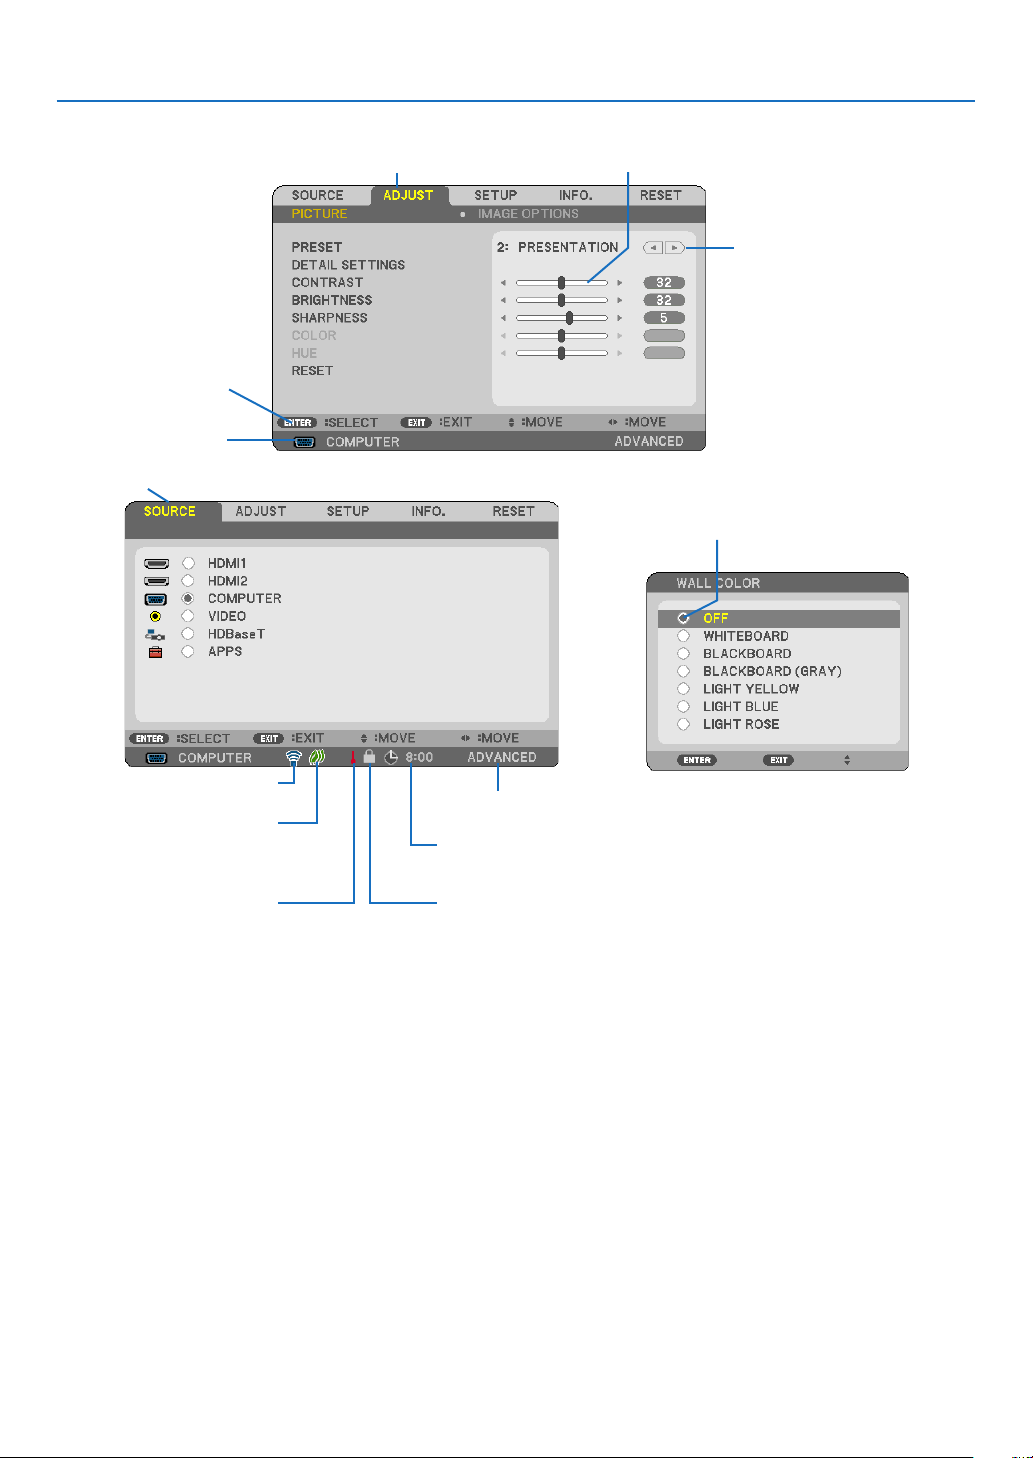
Menu Elements
Slide bar
Solid triangle
Ta b
Radio button
ECO mode symbol
Wireless symbol
Menuwindowsordialogboxestypicallyhavethefollowingelements:
Highlight ............................. Indicates the selected menu or item.
Solid triangle ......................Indicates further choices are available. A highlighted triangle indicates the item is active.
Tab ......................................Indicates a group of features in a dialog box. Selecting on any tab brings its page to the front.
Radio button ....................... Use this round button to select an option in a dialog box.
Source ................................Indicates the currently selected source.
Off Timer remaining time .... Indicates the remaining countdown time when the [OFF TIMER] is preset.
Slide bar .............................Indicates settings or the direction of adjustment.
ECO mode symbol ..............Indicates ECO MODE is set.
Key Lock symbol ................Indicates the [CONTROL PANEL LOCK] is enabled.
Thermometer symbol .........Indicates the projector is in the state of the [FORCED ECO MODE].
Wireless symbol .................Indicate the wireless LAN connection is enabled.
Menu mode ........................Indicate the [ADVANCED] menu or [BASIC] menu.
Source
Available buttons
Thermometer symbol KeyLocksymbol
Off Timer remaining time
Menu mode
Highlight
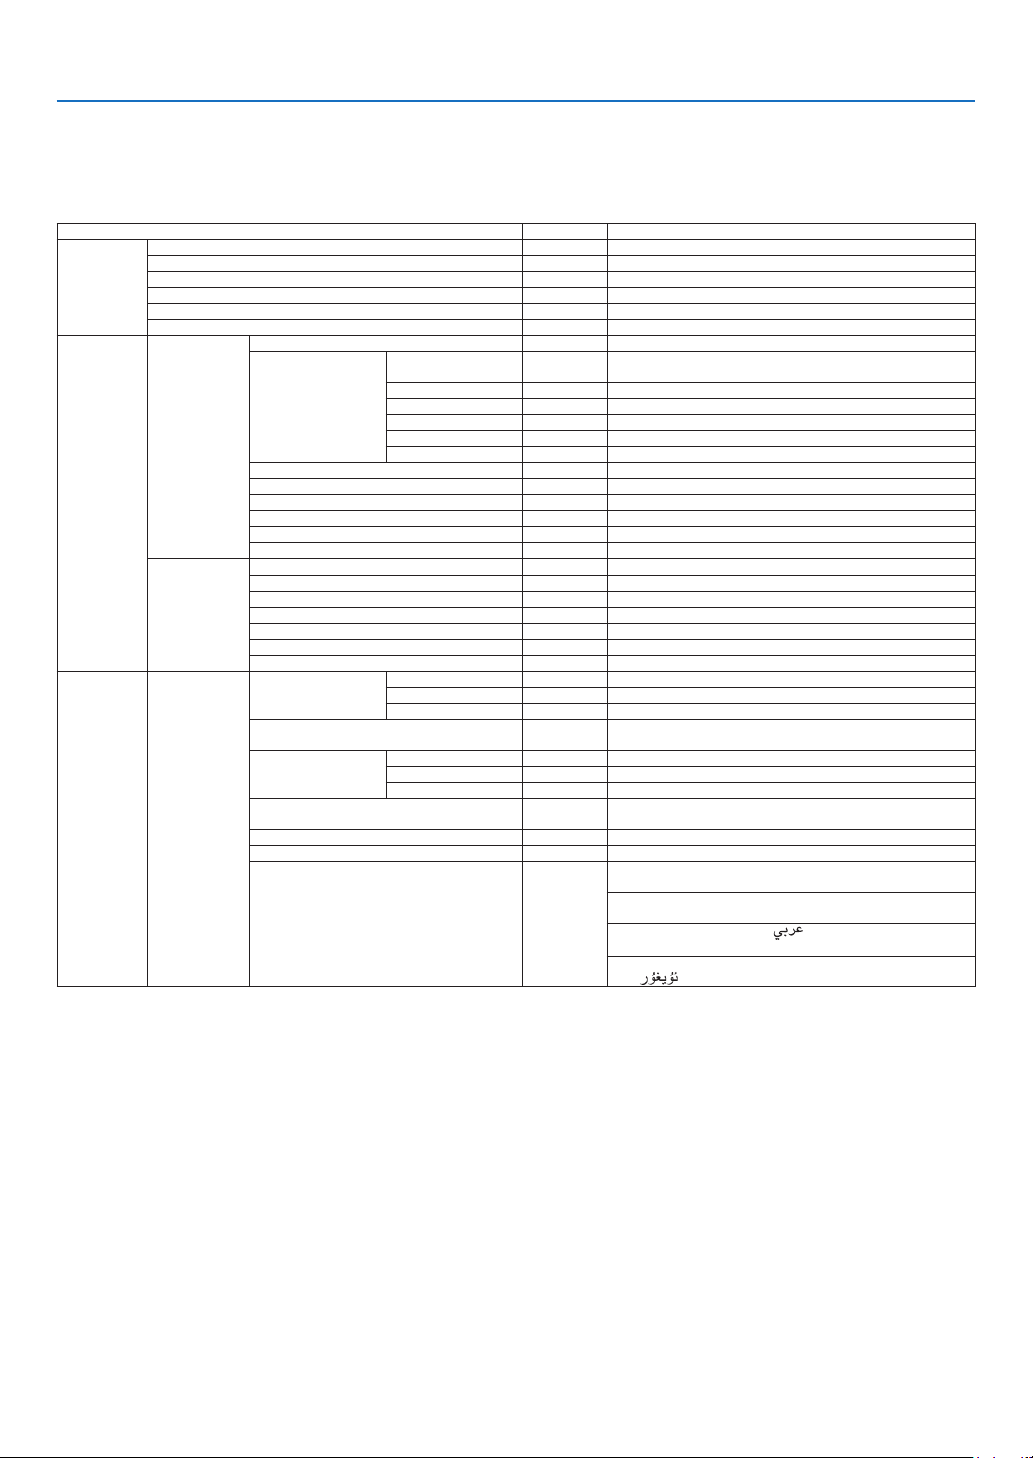
39
4. Using On-Screen Menu
❷ List of Menu Items
Somemenuitemsarenotavailabledependingontheinputsource.Thebelowlistedmenuitemsareontheadvanced
menu.Themark(B)isaddedtotheitemsonthebasicmenu.
Referto
88pagesabouttheAPPSMENU.
Menu Item Default Options
SOURCE HDMI1 (B) *
HDMI2 (B) *
COMPUTER (B) *
VIDEO (B) *
HDBaseT (B) *
APPS (B) *
ADJUST PICTURE PRESET * 1–7
DETAIL SETTINGS REFERENCE * HIGH-BRIGHT, PRESENTATION, VIDEO, MOVIE, GRAPHIC, sRGB,
DICOM SIM.
GAMMA CORRECTION*
1
DYNAMIC, NATURAL, BLACK DETAIL
SCREEN SIZE*
2
* LARGE, MEDIUM, SMALL
COLOR TEMPERATURE * 5000, 6500, 7800, 8500, 9300, 10500
COLOR ENHANCEMENT * OFF, LOW, MIDDLE, HIGH
DYNAMIC CONTRAST * OFF, ON
CONTRAST (B) 63
BRIGHTNESS (B) 63
SHARPNESS (B) 7
COLOR (B) 31
HUE (B) 31
RESET (B)
IMAGE OPTIONS CLOCK *
PHASE *
HORIZONTAL *
VERTICAL *
OVERSCAN AUTO AUTO, 0[%], 5[%], 10[%]
ASPECT RATIO * AUTO, 4:3, 16:9, 15:9, 16:10, LETTERBOX, NATIVE
NOISE REDUCTION OFF OFF, LOW, MEDIMU, HIGH
SETUP GENERAL KEYSTONE (B) HORIZONTAL 0
VERTICAL 0
RESET
WALL COLOR (B) OFF OFF, WHITEBOARD, BLACKBOARD, BLACKBOARD (GRAY), LIGHT
YELLOW, LIGHT BLUE, LIGHT ROSE
LIGHT MODE (B) ECO MODE OFF OFF, ECO1, ECO2
ADJUST 100 16–100
CONSTANT BRIGHTNESS OFF OFF, ON
CLOSED CAPTION OFF OFF, CAPTION1, CAPTION2, CAPTION3, CAPTION4, TEXT1, TEXT2,
TEXT3, TEXT4
OFF TIMER (B) OFF OFF, 0:30, 1:00, 2:00, 4:00, 8:00, 12:00, 16:00
TOOLS (B) to APPS MENU
LANGUAGE (B) ENGLISH ENGLISH, DEUTSCH, FRANÇAIS, ITALIANO, ESPAÑOL, SVENSKA, 日
本語
DANSK, PORTUGUÊS, ČEŠTINA, MAGYAR, POLSKI, NEDERLANDS,
SUOMI
NORSK, TÜRKÇE, РУССКИЙ,
, Ελληνικά, 简体中文, 한국어,
TIẾNG ViỆT
ROMÂNĂ, HRVATSKI, БЪЛГАРСКИ, INDONESIA, ,
ไทย,
, 繁體中文
*Theasterisk(*)indicatesthatthedefaultsettingvariesdependingonthesignal.
*1The[GAMMACORRECTION]itemisavailablewhenanitemotherthan[DICOMSIM.]isselectedfor[REFERENCE].
*2The[SCREENSIZE]itemisavailablewhen[DICOMSIM.]isselectedfor[REFERENCE].

40
4. Using On-Screen Menu
Menu Item Default Options
SETUP MENU COLOR SELECT COLOR COLOR, MONOCHROME
SOURCE DISPLAY ON OFF, ON
ID DISPLAY ON OFF, ON
DISPLAY TIME AUTO 45 SEC MANUAL, AUTO 5 SEC, AUTO 15 SEC, AUTO 45 SEC
BACKGROUND BLUE BLUE, BLACK, LOGO
3D CAUTION MESSAGE ON OFF, ON
INSTALLATION ORIENTATION AUTO AUTO, DESKTOP FRONT, CEILING REAR, DESKTOP REAR, CEILING
FRONT
CONTROL PANEL LOCK OFF OFF, ON
SECURITY OFF OFF, ON
COMMUNICATION SPEED 38400bps 4800bps, 9600bps, 19200bps, 38400bps
SERIAL PORT PC CONTROL PC CONTROL, HDBaseT
REMOTE SENSOR ALL ALL, FRONT/BACK, FRONT, BACK, HDBaseT
CONTROL ID CONTROL ID NUMBER 1 1–254
CONTROL ID OFF OFF, ON
TEST PATTERN
NETWORK SETTINGS to APPS MENU
OPTIONS(1) FAN MODE AUTO AUTO, HIGH
WXGA MODE ON OFF, ON
IMAGE MODE AUTO, STILL, MOVIE
HDMI
SETTINGS
HDMI1 VIDEO LEVEL AUTO AUTO, NORMAL, ENHANCED
HDMI2 VIDEO LEVEL AUTO AUTO, NORMAL, ENHANCED
HDBaseT VIDEO LEVEL AUTO AUTO, NORMAL, ENHANCED
AUDIO
SELECT
HDMI1 HDMI1 HDMI1, COMPUTER
HDMI2 HDMI2 HDMI2, COMPUTER
HDBaseT HDBaseT HDBaseT, COMPUTER
BEEP ON OFF, ON
OPTIONS(2) STANDBY MODE NORMAL NORMAL, NETWORK STANDBY
DIRECT POWER ON OFF OFF, ON
AUTO POWER ON OFF OFF, ON
AUTO POWER OFF 1:00 OFF, 0:05, 0:10, 0:20, 0:30, 1:00
DEFAULT SOURCE SELECT LAST LAST, AUTO, HDMI1, HDMI2, COMPUTER, VIDEO, HDBaseT, APPS
3D HDMI1 3D OFF OFF, ON
GLASSES DLP® Link DLP® Link, OTHERS
FORMAT AUTO AUTO, FRAME PACKING, SIDE BY SIDE, TOP AND BOTTOM, FRAME
SEQUENTIAL
L/R INVERT NON-INVERT NON-INVERT, INVERT
HDMI2 3D OFF OFF, ON
GLASSES DLP® Link DLP® Link, OTHERS
FORMAT AUTO AUTO, FRAME PACKING, SIDE BY SIDE, TOP AND BOTTOM, FRAME
SEQUENTIAL
L/R INVERT NON-INVERT
NON-INVERT, INVERT
COMPUTER 3D OFF OFF, ON
GLASSES DLP® Link DLP® Link, OTHERS
FORMAT SIDE BY SIDE SIDE BY SIDE, TOP AND BOTTOM, FRAME SEQUENTIAL
L/R INVERT NON-INVERT NON-INVERT, INVERT
VIDEO 3D OFF OFF, ON
L/R INVERT NON-INVERT NON-INVERT, INVERT
HDBaseT 3D OFF OFF, ON
GLASSES DLP® Link DLP® Link, OTHERS
FORMAT AUTO AUTO, FRAME PACKING, SIDE BY SIDE, TOP AND BOTTOM, FRAME
SEQUENTIAL
L/R INVERT NON-INVERT NON-INVERT, INVERT
*Theasterisk(*)indicatesthatthedefaultsettingvariesdependingonthesignal.

41
4. Using On-Screen Menu
Menu Item Default Options
INFO. USAGE TIME (B) LIGHT HOURS USED
TOTAL CARBON SAVINGS
SOURCE(1) (B) RESOLUTION
HORIZONTAL FREQUENCY
VERTICAL FREQUENCY
SYNC TYPE SEPARATE SYNC, COMPOSITE SYNC, SYNC ON GREEN, SYNC ON
VIDEO
SYNC POLARITY
SCAN TYPE INTERLACE, NON-INTERLACE
SOURCE(2) (B) SIGNAL TYPE RGB, VIDEO, YCbCr
VIDEO TYPE
NTSC, NTSC3.58, NTSC4.43, PAL, PAL-M, PAL-N, PAL60, SECAM
BIT DEPTH 8[bits], 10[bits], 12[bits]
VIDEO LEVEL FULL, ENHANCED, DEFAULT
3D SIGNAL SUPPORTED, NOT SUPPORTED
HDBaseT SIGNAL QUALITY NORMAL, WARNING, ABNORMAL
OPERATION MODE HDBaseT, ETHERNET, LOW POWER, DISCONNECT
LINK STATUS NO LINK, HDBaseT, LOW POWER, ETHERNET
HDMI STATUS NO HDMI, HDMI ON, HDCP ON
WIRED LAN IP ADDRESS
SUBNET MASK
GATEWAY
MAC ADDRESS
WIRELESS LAN IP ADDRESS
SUBNET MASK
GATEWAY
MAC ADDRESS
SSID
NETWORK TYPE
SECURITY
CHANNEL
SIGNAL LEVEL
VERSION(1) (B) FIRMWARE
DATA
VERSION(2) (B) FIRMWARE2
OTHERS (B) PROJECTOR NAME (B)
HOST NAME (B)
MODEL NO. (B)
SERIAL NUMBER (B)
LAN UNIT TYPE
CONTROL ID (when [CONTROL ID] is set) (B)
RESET CURRENT SIGNAL
ALL DATA
*Theasterisk(*)indicatesthatthedefaultsettingvariesdependingonthesignal.

42
4. Using On-Screen Menu
❸ Menu Descriptions & Functions [SOURCE]
HDMI1 and HDMI2
SelectstheHDMIcompatibleequipmentconnectedtoyourHDMI1INorHDMI2INterminal.
COMPUTER
SelectsthecomputerconnectedtoyourCOMPUTERinputterminalsignal.
NOTE:WhenthecomponentinputsignalisconnectedtotheCOMPUTERINterminal,select[COMPUTER].
VIDEO
SelectswhatisconnectedtoyourVIDEOinput-VCR,DVDplayerordocumentcamera.
HDBaseT
ProjectsthesignaltransmittedfromtheterminalssupportedHDBaseT.(→page
80, 81)
APPS
DisplaytheAPPSMENUorthefunctionintheAPPSMENUthatwasusedlasttime.

43
4. Using On-Screen Menu
❹ Menu Descriptions & Functions [ADJUST]
[PICTURE]
[PRESET]
Thisfunctionallowsyoutoselectoptimizedsettingsforyourprojectedimage.
Youcanadjustneutraltintforyellow,cyanormagenta.
Therearesevenfactorypresetsoptimizedforvarioustypesofimages.Youcanalsouse[DETAILSETTINGS]toset
useradjustablesettingstocustomizeeachgammaorcolor.
Yoursettingscanbestoredin[PRESET1]to[PRESET7].
HIGH-BRIGHT ........ Recommended for use in a brightly lit room.
PRESENTATION ..... Recommended for making a presentation using a PowerPoint file.
VIDEO .................... Recommended for typical TV program viewing.
MOVIE ................... Recommended for movies.
GRAPHIC ............... Recommended for graphics.
sRGB ..................... Standard color values
DICOM SIM. .......... Recommended for DICOM simulation format.
NOTE:
•The[DICOMSIM.]optionisfortraining/referenceonlyandshouldnotbeusedforactualdiagnosis.
•DICOMstandsforDigitalImagingandCommunicationsinMedicine.ItisastandarddevelopedbytheAmericanCollegeofRadiol-
ogy(ACR)andtheNationalElectricalManufacturersAssociation(NEMA).
Thestandardspecieshowdigitalimagedatacanbemovedfromsystemtosystem.

44
4. Using On-Screen Menu
[DETAILSETTINGS]
StoringYourCustomizedSettings[REFERENCE]
Thisfunctionallowsyoutostoreyourcustomizedsettingsin[PRESET1]to[PRESET7].
First,selectabasepresetmodefrom[REFERENCE],thenset[GAMMACORRECTION]and[COLORTEMPERATURE].
HIGH-BRIGHT ........ Recommended for use in a brightly lit room.
PRESENTATION ..... Recommended for making a presentation using a PowerPoint file.
VIDEO .................... Recommended for typical TV program viewing.
MOVIE ................... Recommended for movies.
GRAPHIC ............... Recommended for graphics.
sRGB ..................... Standard color values.
DICOM SIM. .......... Recommended for DICOM simulation format.
SelectingGammaCorrectionMode[GAMMACORRECTION]
Eachmodeisrecommendedfor:
DYNAMIC .............. Creates a high-contrast picture.
NATURAL ............... Natural reproduction of the picture.
BLACK DETAIL ....... Emphasizes detail in dark areas of the picture.
NOTE:Thisfunctionisnotavailablewhen[DICOMSIM.]isselectedfor[DETAILSETTINGS].
SelectingScreenSizeforDICOMSIM[SCREENSIZE]
Thisfunctionwillperformgammacorrectionappropriateforthescreensize.
LARGE ................... For screen size of 110"
MEDIUM ................ For screen size of 90"
SMALL ................... For screen size of 70"
NOTE:Thisfunctionisavailableonlywhen[DICOMSIM.]isselectedfor[DETAILSETTINGS].
AdjustingColorTemperature[COLORTEMPERATURE]
Thisoptionallowsyoutoselectthecolortemperatureofyourchoice.
NOTE:When[PRESENTATION]or[HIGH-BRIGHT]isselectedin[REFERENCE],thisfunctionisnotavailable.
EnhancingtheColor[COLORENHANCEMENT]
Thisallowsyoutoadjustthecolordensityoftheimage.
Thecoloroftheimagewillbecomedeeperintheorderof"LOW","MEDIUM",AND"HIGH"asthedisplayedimage
willbecomedarker.
With"OFF"selected,theCOLORENHANCEMENTfunctionwillnotwork.
NOTE:Thisfunctionisavailableonlywhen[PRESENTATION]isselected[REFERENCE].
AdjustingBrightnessandContrast[DYNAMICCONTRAST]
Thisfunctionallowsyoutoadjustthecontrastratioopticallyusingthebuilt-iniris.
Toincreasethecontrastratio,select[ON].
NOTE:
•The[DYNMICCONTRAST]itemcannotbeselectedinthefollowingeithercase:
-When[ECO1]or[ECO2]isselectedfor[ECOMODE].
-When[CONSTANTBRIGHTNESS]isenabled.

45
4. Using On-Screen Menu
[CONTRAST]
Adjuststheintensityoftheimageaccordingtotheincomingsignal.
[BRIGHTNESS]
Adjuststhebrightnesslevelorthebackrasterintensity.
[SHARPNESS]
Controlsthedetailoftheimage.
[COLOR]
Increasesordecreasesthecolorsaturationlevel.
[HUE]
Variesthecolorlevelfrom+/−greento+/−blue.Theredlevelisusedasreference.
InputsignalCONTRASTBRIGHTNESSSHARPNESSCOLORHUE
COMPUTER/HDMI/HDBaseT(RGB)YesYesYesNo No
COMPUTER/HDMI/HDBaseT
(COMPONENT)
YesYesYesYesYes
VIDEOYesYesYesYesYes
APPS,LANYesYesYesNo No
Yes=Adjustable,No=Notadjustable
[RESET]
Thesettingsandadjustmentsfor[PICTURE]willbereturnedtothefactorysettingswiththeexceptionofthefollowing;
Presetnumbersand[REFERENCE]withinthe[PRESET]screen.
Thesettingsandadjustmentsunder[DETAILSETTINGS]withinthe[PRESET]screenthatarenotcurrentlyselected
willnotbereset.
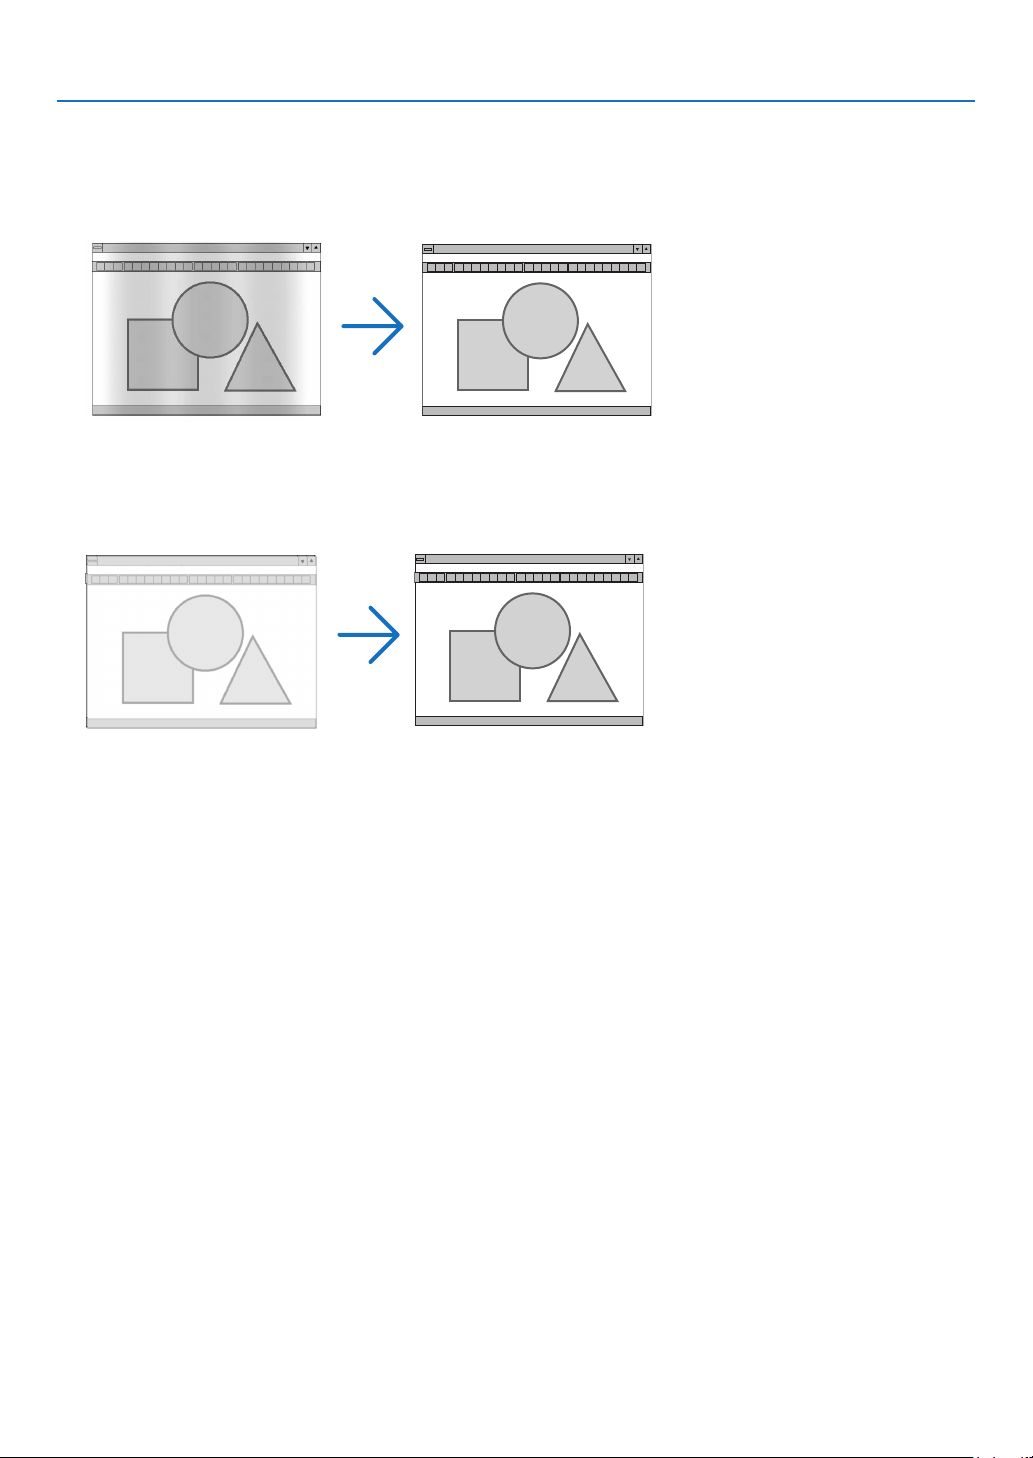
46
4. Using On-Screen Menu
[IMAGE OPTIONS]
AdjustingClockandPhase[CLOCK/PHASE]
ThisallowsyoutomanuallyadjustCLOCKandPHASE.
CLOCK ................... Use this item to fine tune the computer image or to remove any vertical banding that might appear. This
function adjusts the clock frequencies that eliminate the horizontal banding in the image.
This adjustment may be necessary when you connect your computer for the first time.
PHASE ................... Use this item to adjust the clock phase or to reduce video noise, dot interference or cross talk. (This is
evident when part of your image appears to be shimmering.)
Use [PHASE] only after the [CLOCK] is complete.
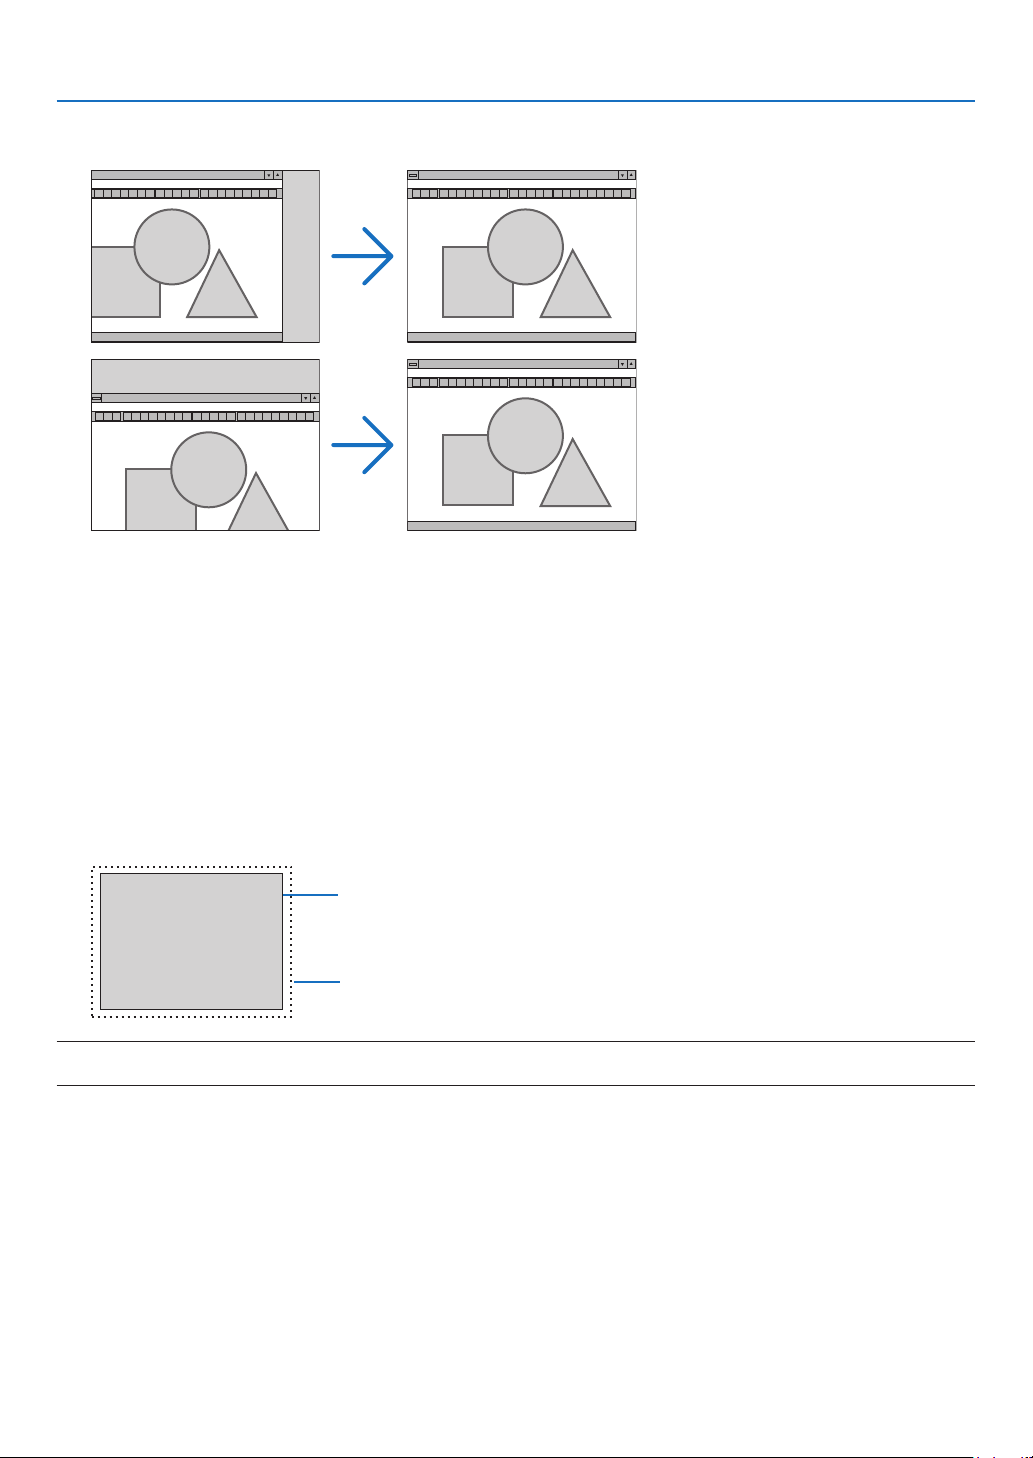
47
4. Using On-Screen Menu
AdjustingHorizontal/VerticalPosition[HORIZONTAL/VERTICAL]
Adjuststheimagelocationhorizontallyandvertically.
-Animagecanbedistortedduringtheadjustmentof[CLOCK]and[PHASE].Thisisnotmalfunction.
-Theadjustmentsfor[CLOCK],[PHASE],[HORIZONTAL],and[VERTICAL]willbestoredinmemoryforthe
currentsignal.Thenexttimeyouprojectthesignalwiththesameresolution,horizontalandverticalfrequency,
itsadjustmentswillbecalledupandapplied.
Todeleteadjustmentsstoredinmemory,fromthemenu,youselect[RESET]→[CURRENTSIGNAL]or[ALL
DATA]andresettheadjustments.
SelectingOverscanPercentage[OVERSCAN]
Thisallowsyoutosettheappropriateoverscanforanincomingsignal.
AUTO ..................... Display an appropriately overscanned image (factory setting).
OFF ........................ Does not overscan the image.
ON ......................... Overscans the image.
Projected image
Overscaned by 10%
NOTE:
•The[OVERSCAN]itemcannotbeselectedwhenVIDEOsignalsareusedorwhen[NATIVE]isselectedfor[ASPECTRATIO].
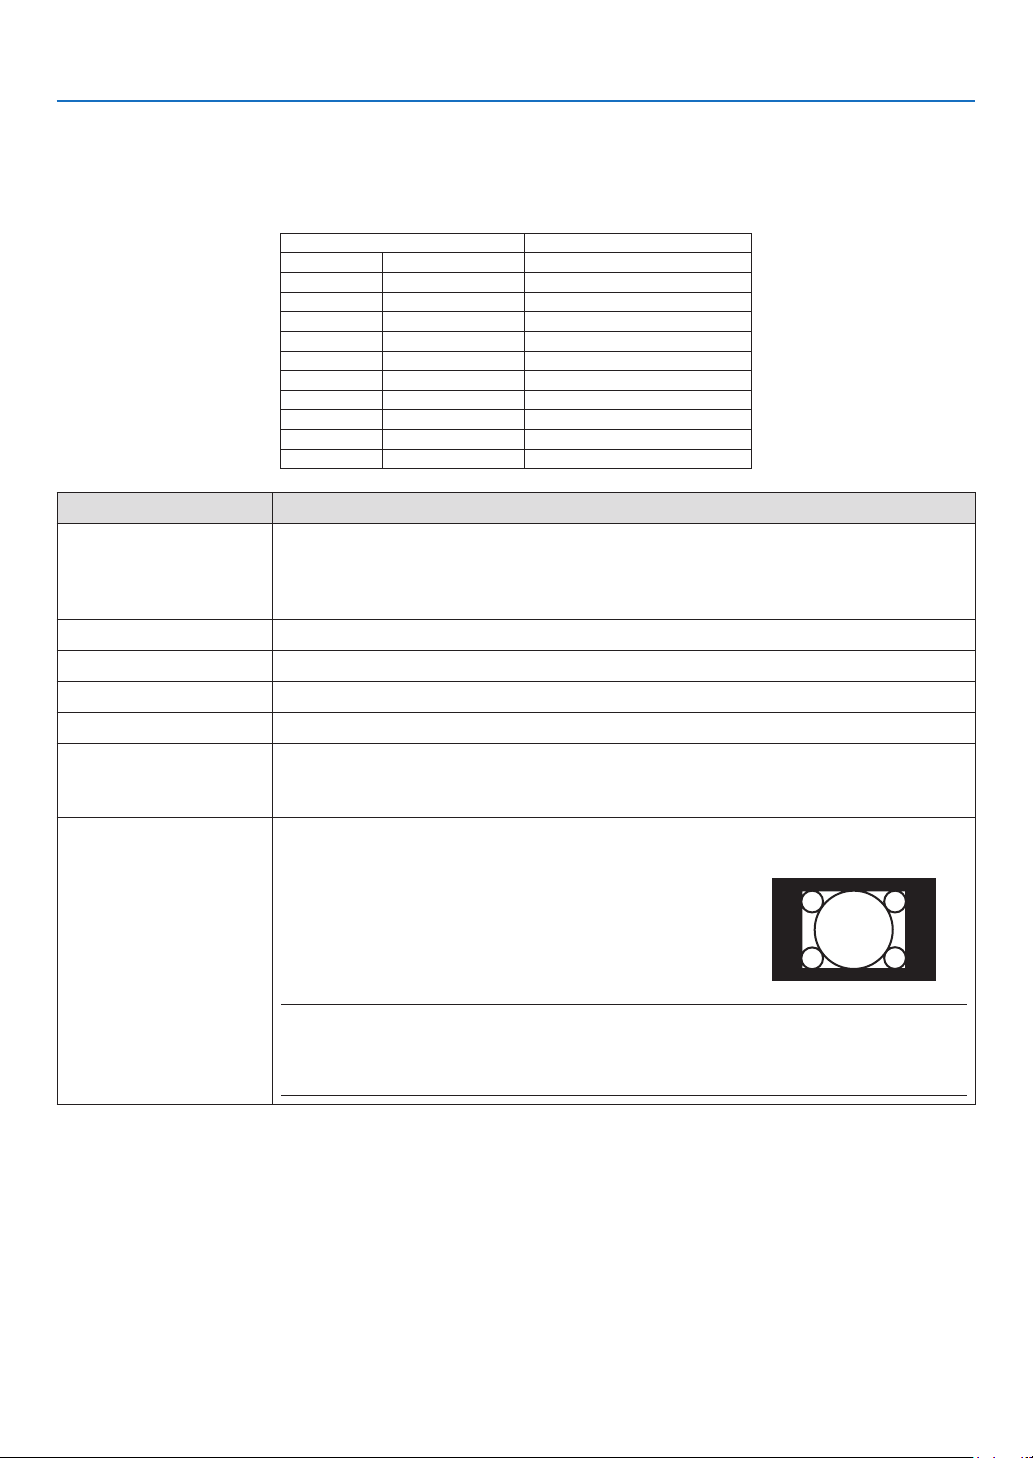
48
4. Using On-Screen Menu
SelectingAspectRatio[ASPECTRATIO]
Theterm“aspectratio”referstotheratioofwidthtoheightofaprojectedimage.
Theprojectorautomaticallydeterminestheincomingsignalanddisplaysitinitsappropriateaspectratio.
•Thistableshowstypicalresolutionsandaspectratiosthatmostcomputerssupport.
ResolutionAspectRatio
VGA640×4804:3
SVGA800×6004:3
XGA1024×7684:3
WXGA1280×76815:9
WXGA1280×80016:10
WXGA+
1440×90016:10
SXGA1280×10245:4
SXGA+1400×10504:3
UXGA1600×12004:3
FullHD1920×108016:9
WUXGA1920×120016:10
OptionsFunction
AUTO
Theprojectorwillautomaticallydeterminetheincomingsignalanddisplayitinitsaspect
ratio.(→
nextpage)
Theprojectormayerroneouslydeterminetheaspectratiodependingonitssignal.Ifthis
occurs,selecttheappropriateaspectratiofromthefollowing.
4:3Theimageisdisplayedin4:3aspectratio.
16:9Theimageisdisplayedin16:9aspectratio.
15:9Theimageisdisplayedin15:9aspectratio.
16:10Theimageisdisplayedin16:10aspectratio.
LETTERBOXTheimageofaletterboxsignalisstretchedequallyinthehorizontalandverticaldirec-
tionstotthescreen.Partsofthedisplayedimagearecroppedatthetopandbottom
edgesandthereforenotvisible.
NATIVETheprojectordisplaysthecurrentimageinitstrueresolutionwhentheincomingcomputer
signalhasalowerresolutionthantheprojector’snativeresolution.
[Example]Whentheincomingsignalwiththeresolutionof
800×600isdisplayed:
NOTE:
•Whenanon-computersignalisdisplayed,the[NATIVE]isnotavailable.
•Whenasignalwithahigherresolutionthantheprojector’snativeresolutionisdisplayed,[NA-
TIVE]isnotavailable.
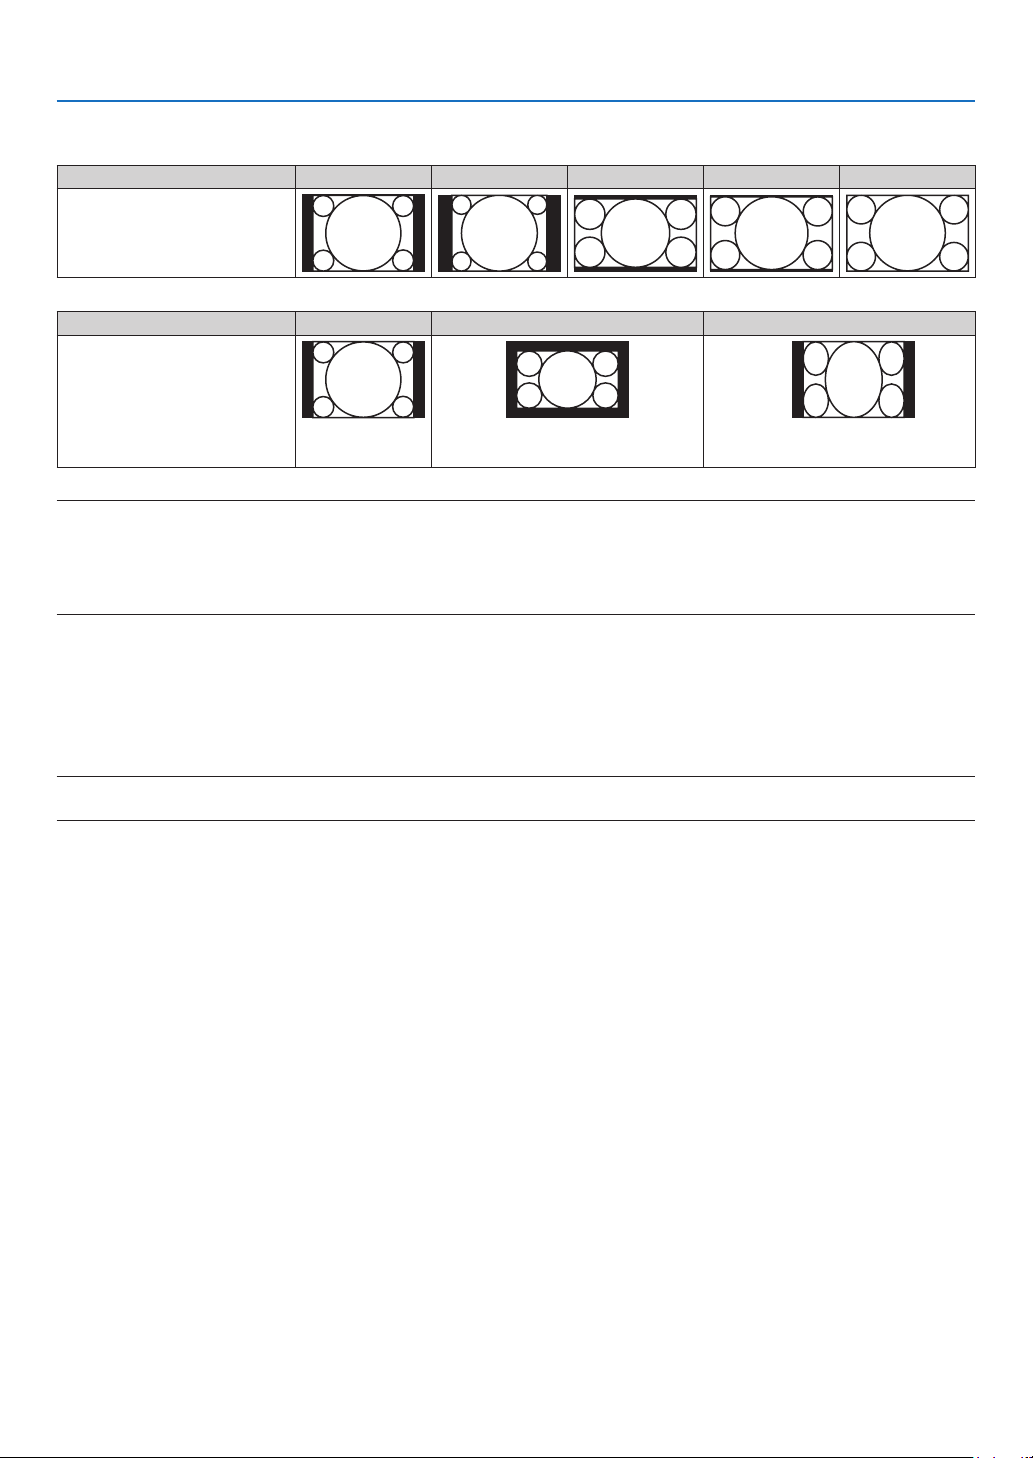
49
4. Using On-Screen Menu
Sample image when the appropriate aspect ratio is automatically determined
[Computersignal]
Aspectratioofincomingsignal4:35:416:915:916:10
Sampleimagewhentheappro-
priateaspectratioisautomati-
callydetermined
[Videosignal]
Aspectratioofincomingsignal4:3LetterboxSqueeze
Sampleimagewhentheaspect
ratioisautomaticallydetermined
NOTE:Todisplayaletterboxsignalprop-
erly,select[LETTERBOX].
NOTE:Todisplayasqueezedsignalprop-
erly,select[16:9].
TIP:
•Theterm“letterbox”referstoamorelandscape-orientedimagewhencomparedtoa4:3image,whichisthestandardaspect
ratioforavideosource.
Theletterboxsignalhasaspectratioswiththevistasize“1.85:1”orcinemascopesize“2.35:1”formovielm.
•Theterm“squeeze”referstothecompressedimageofwhichaspectratioisconvertedfrom16:9to4:3.
TurningonNoiseReduction[NOISEREDUCTION]
Thisfunctionallowsyoutoselectthelevelofnoisereduction.
Theprojectorissettotheoptimizedlevelforeachsignalatthefactory.
Selectyourpreferenceitemforyoursignalwhenvideonoiseisnoticeable.
Theoptionsare[OFF],[LOW],[MEDIUM],and[HIGH].
NOTE:ThisfeatureisnotavailablefortheRGBsignal.Noisereductionsettooffgivesbestimagequalitybywayofhigherbandwidth.
Noisereductionsettoonsoftenstheimage.

50
4. Using On-Screen Menu
❺ Menu Descriptions & Functions [SETUP]
[GENERAL]
CorrectingKeystoneDistortionManually[KEYSTONE]
Youcancorrecthorizontalorverticalkeystonemanually.[HORIZONTAL]and[VERTICAL](simultaneouslyadjustable)
correctioncanbeselected.
NOTE:
•Someitemsarenotavailablewhenoneitemisactivated.Unavailableitemsareshowningrey.
•Tochangefromoneitemtoanotheritem,resettherstitem.
•Adjustmentvalueswillbeoverwritten.Theywillnotbedeletedevenwhentheprojectoristurnedoff.
•Using[KEYSTONE]correctioncancausetheimagetobeslightlyblurredbecausethecorrectionismadeelectronically.
HORIZONTAL ......... Corrects horizontal keystone distortion. (→ page 21)
VERTICAL .............. Corrects vertical keystone distortion. (→ page
21)
RESET .................... Returns all the above items to the factory preset values.
TIP:
•Themaximumadjustmentrangewith[KEYSTONE]correctionis±25°inthehorizontaldirection,±30°intheverticaldirection.
-Dependingoninputsignal,theadjustablerangemaybenarrower.

51
4. Using On-Screen Menu
UsingtheWallColorCorrection[WALLCOLOR]
Thisfunctionallowsforquickadaptivecolorcorrectioninapplicationswherethescreenmaterialisnotwhite.
[LIGHTMODE]
Adjustingtheenergysavingssettingsandthebrightnessofeachprojectorinmulti-screenprojection.Forenergysav-
ingssettings,seepage28“4ChangingEcoMode/CheckingEnergy-SavingEffect”.
ECOMODEOFFThelightmoduleluminance(brightness)willbeatthesetupbrightnessfor[ADJUST].
ECO1Bycontrollingthebrightnessandfanspeedaccordingtotheselectedsetting,energycan
besavedandmotionnoiseandthepowerconsumptioncanbelowered.
Canbeselectedwhen[CONSTANTBRIGHTNESS]modeissetto[OFF].
ECO2
ADJUSTBrightnesscanbeadjustedin1%incrementsfrom16to100%.
Whenseveralprojectorsareusedformulti-screenprojection,thebrightnesscanbead-
justedindividuallyoneachprojector.
Theadjustmentisvalidwhen[ECOMODE]issetto[OFF]and[CONSTANTBRIGHT-
NESS]issetto[OFF].
CONSTANT
BRIGHTNESS
OFF[CONSTANTBRIGHTNESS]modewillbecanceled.
ONMaintains50%brightnessofthefactorydefaultsetting.
NOTE:
•[CONSTANTBRIGHTNESS]modeisafunctionusedtomaintainthebrightnessataconstant
level.Colorwillnotbexed.
TIP:
•Brightnessnormallydecreaseswithuse,butbyselecting[CONSTANTBRIGHTNESS]mode,theprojectorautomaticallyadjust
theoutputbasedontheprojectorusedtime,therebymaintainingaconstantbrightnessthroughoutthelifeofthelightmodule.
However,ifoutputisalreadyatitsmaximum,brightnesswilldecreasewithuse.

52
4. Using On-Screen Menu
SettingClosedCaption[CLOSEDCAPTION]
ThisoptionsetsseveralclosedcaptionmodesthatallowtexttobesuperimposedontheprojectedimageofVideo
orS-Video.
OFF ........................ This exits the closed caption mode.
CAPTION 1-4 ......... Text is superimposed.
TEXT 1-4 ................ Text is displayed.
NOTE:
•Theclosedcaptionisnotavailableunderthefollowingconditions:
-whenmessagesormenusaredisplayed.
-whenanimageismagnied,frozen,ormuted.
•Portionsofsuperimposedtextorclosedcaptionmaybetruncated.Ifthathappens,trytoplacethesuperimposedtextorclosed
captionwithinthescreen.
•Theprojectordoesnotsupportoptionalextendedcharactersforclosedcaptioning.
UsingOffTimer[OFFTIMER]
1. Select your desired time between 30 minutes and 16 hours: OFF, 0:30, 1:00, 2:00, 4:00, 8:00, 12:00, 16:00.
2. Press the ENTER button on the remote control.
3. The remaining time starts counting down.
4. The projector will turn off after the countdown is complete.
NOTE:
•Tocancelthepresettime,set[OFF]forthepresettimeorturnoffthepower.
•Whentheremainingtimereaches3minutesbeforetheprojectoristurnedoff,the[THEPROJECTORWILLTURNOFFWITHIN3
MINUTES]messagewillbedisplayedonthebottomofthescreen.
Displaythetoolsmenu[TOOLS]
Thisfunctiondisplaythetoolsmenu.(→page91)
SelectingMenuLanguage[LANGUAGE]
Youcanchooseoneof30languagesforon-screeninstructions.
NOTE:Yoursettingwillnotbeaffectedevenwhen[RESET]isdonefromthemenu.

53
4. Using On-Screen Menu
[MENU]
SelectingMenuColor[COLORSELECT]
Youcanchoosebetweentwooptionsformenucolor:COLORandMONOCHROME.
TurningOn/OffSourceDisplay[SOURCEDISPLAY]
ThisoptionturnsonoroffinputnamedisplaysuchasHDMI1,HDMI2,COMPUTER,VIDEO,HDBaseT,APPS,tobe
displayedonthetoprightofthescreen.
Whennoinputsignalispresent,theno-signalguidancepromptingyoutocheckforanavailableinputwillbedisplayedat
thecenterofthescreen.Whenthe[APPS]itemisselectedfor[SOURCE],theno-signalguidancewillnotbedisplayed.
TurningON/OFFControlID[IDDISPLAY]
ID DISPLAY ........... This option turns on or off the ID number which is displayed when the ID SET button on the remote control
is pressed.
SelectingMenuDisplayTime[DISPLAYTIME]
Thisoptionallowsyoutoselecthowlongtheprojectorwaitsafterthelasttouchofabuttontoturnoffthemenu.The
presetchoicesare[MANUAL],[AUTO5SEC],[AUTO15SEC],and[AUTO45SEC].The[AUTO45SEC]isthefac-
torypreset.
SelectingaColororLogoforBackground[BACKGROUND]
Usethisfeaturetodisplayablue/blackscreenorlogowhennosignalisavailable.Thedefaultbackgroundis[BLUE].
NOTE:
•Ifthe[LOGO]itemisselectedfor[BACKGROUND]withthe[HDBaseT]sourceselected,the[BLUE]itemwillbeselectedregard-
lessofitsselection.
•When[SOURCEDISPLAY]isturnedon,theno-signalguidancepromptingyoutocheckforanavailableinputwillbedisplayed
atthecenterofthescreenregardlessofitsselection.
•Yoursettingwillnotbeaffectedevenwhen[RESET]isdonefromthemenu.
[3DCAUTIONMESSAGE]
Thisselectswhethertodisplayacautionmessageornotwhenswitchingtoa3Dvideo.
ThedefaultconditionwhenshippedfromthefactoryisON.
OFF ........................ The 3D caution message screen will not be displayed.
ON ......................... The 3D caution message screen will be displayed when switching to a 3D video.Press the ENTER button to
cancel the message.
•Themessagewilldisappearautomaticallyafter60secondsorwhenotherbuttonsarepressed.Ifitdisappears
automatically,the3Dcautionmessagewillbedisplayedagainwhenswitchingtoa3Dvideo.
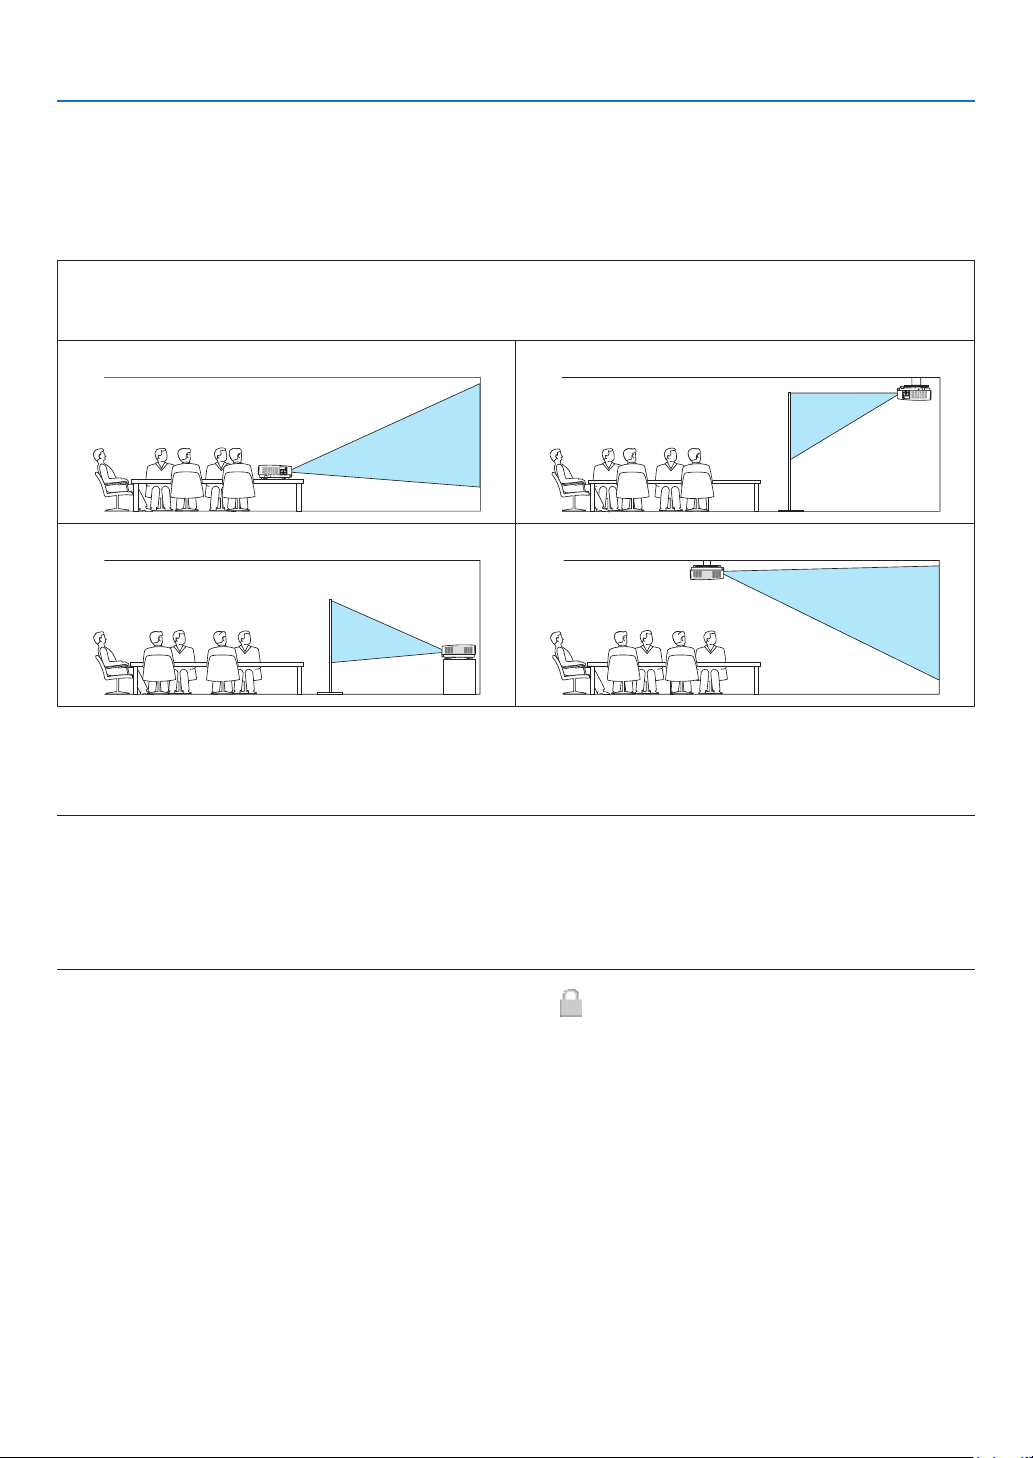
54
4. Using On-Screen Menu
[INSTALLATION]
SelectingProjectorOrientation[ORIENTATION]
Thisreorientsyourimageforyourtypeofprojection.Theoptionsare:desktopfrontprojection,ceilingrearprojection,
desktoprearprojection,andceilingfrontprojection.
AUTO
WhenthelightmoduleisturnedON,theinnersensoroftheprojectordetectsitsinstallationstateeitherDESK
FRONTorCEILINGFRONTandthenswitchitsprojectionmethod
DESKTOPFRONT
CEILINGREAR
DESKTOPREARCEILINGFRONT
DisablingtheCabinetButtons[CONTROLPANELLOCK]
ThisoptionturnsonorofftheCONTROLPANELLOCKfunction.
NOTE:
•ThisCONTROLPANELLOCKdoesnotaffecttheremotecontrolfunctions.
•HowtoreleasetheCONTROLPANELLOCK
1.Whentheprojectorisprojectingimageorinthesleepmode,pressandholdtheSOURCEbuttonontheprojectorcabinetfor
about10seconds.TheCONTROLPANELLOCKwillbereleased.
2.Whentheprojectorisinthestandbymode,pressandholdthePOWERbuttonontheprojectorcabinet.Itenablestopoweron
theprojector.Aftercheckingtheprojectorisprojectingimage,performthepreviousstep1.
TIP:Whenthe[CONTROLPANELLOCK]isturnedon,akeylockicon[]willbedisplayedatthebottomrightofthemenu.

55
4. Using On-Screen Menu
EnablingSecurity[SECURITY]
ThisfeatureturnsonorofftheSECURITYfunction.
Unlessthecorrectkeywordisentered,theprojectorcannotprojectanimage.(→page
30)
NOTE:Yoursettingwillnotbeaffectedevenwhen[RESET]isdonefromthemenu.
SelectingCommunicationSpeed[COMMUNICATIONSPEED]
ThisfeaturesetsthebaudrateofthePCControlport(D-Sub9P).Itsupportsdataratesfrom4800to38400bps.The
defaultis38400bps.Selecttheappropriatebaudrateforyourequipmenttobeconnected(dependingontheequip-
ment,alowerbaudratemayberecommendedforlongcableruns).
NOTE:Yourselectedcommunicationspeedwillnotbeaffectedevenwhen[RESET]isdonefromthemenu.
Selectingtheserialport[SERIALPORT]
Thissetswhichterminalontheprojectorwillreceivetheserialcontrolsignalswhenoperatingtheprojectorbyremote
controlfromacommerciallyavailableHDBaseTtransmitter(controlsignalsforturningthepoweronandoff,etc.).
Thereisnoneedtomakethissettingifnotoperatingtheprojectorbyremotecontrol(onlysendingvideoandaudio).
PC CONTROL ......... Control signals (RS232C serial communications) are received at the PC CONTROL terminal.
HDBaseT ................ The video/audio and control signals (RS232C serial communications) are received at the Ethernet/HDBaseT
port.
NOTE:
•When[HDBaseT]isset,itwillnotworkwhentheprojectorisinthestandbymode,regardlessofwhether[STANDBYMODE](→
page
60)issetto[NORMAL]or[NETWORKSTANDBY](thepowercannotbeturnedon).
Themethodsbelowcanbeusedtoturnontheprojector’spowerwhenitisinthestandbymode.
•TheprojectorcanbeoperatedbyconnectingthecomputerandprojectorbyRS232Cserialcommunications(ontheprojector,
usingthePCCONTROLterminalandthePCControlUtilityapplication,with[STANDBYMODE]setto[NETWORKSTANDBY]).
•Theprojectorcanbeoperatedbyconnectingthecomputerandprojectoroverthenetwork(ontheprojector,usingtheLAN
portandPCControlUtilityapplication,with[STANDBYMODE]setto[NETWORKSTANDBY]).
TIP:
•WhencontrollingtheprojectorusingtheLANport,thisworkswitheithersetting.
TurningOnorOffRemoteSensor[REMOTESENSOR]
Settheremotecontrolsensorsontheprojector’sfrontandrearpanelsandtheHDBaseTremotecontrolsensor.
Theoptionsare:ALL,FRONT/BACK,FRONT,BACK,andHDBaseT.
NOTE:
•When[HDBaseT]isset,itwillnotworkwhentheprojectorisinthestandbymode,regardlessofwhether[STANDBYMODE](→
page60)issetto[NORMAL]or[NETWORKSTANDBY](thepowercannotbeturnedon).
TIP:
•Iftheremotecontrolsystemdoesnotfunctionwhendirectsunlightorstrongilluminationstrikestheremotecontrolsensorof
theprojector,changeanotheroption.
•Theremotecontrolsensoronthebackoftheprojectorcannotbeusedwhentheseparatelysoldcablecoverismountedonthe
projector.
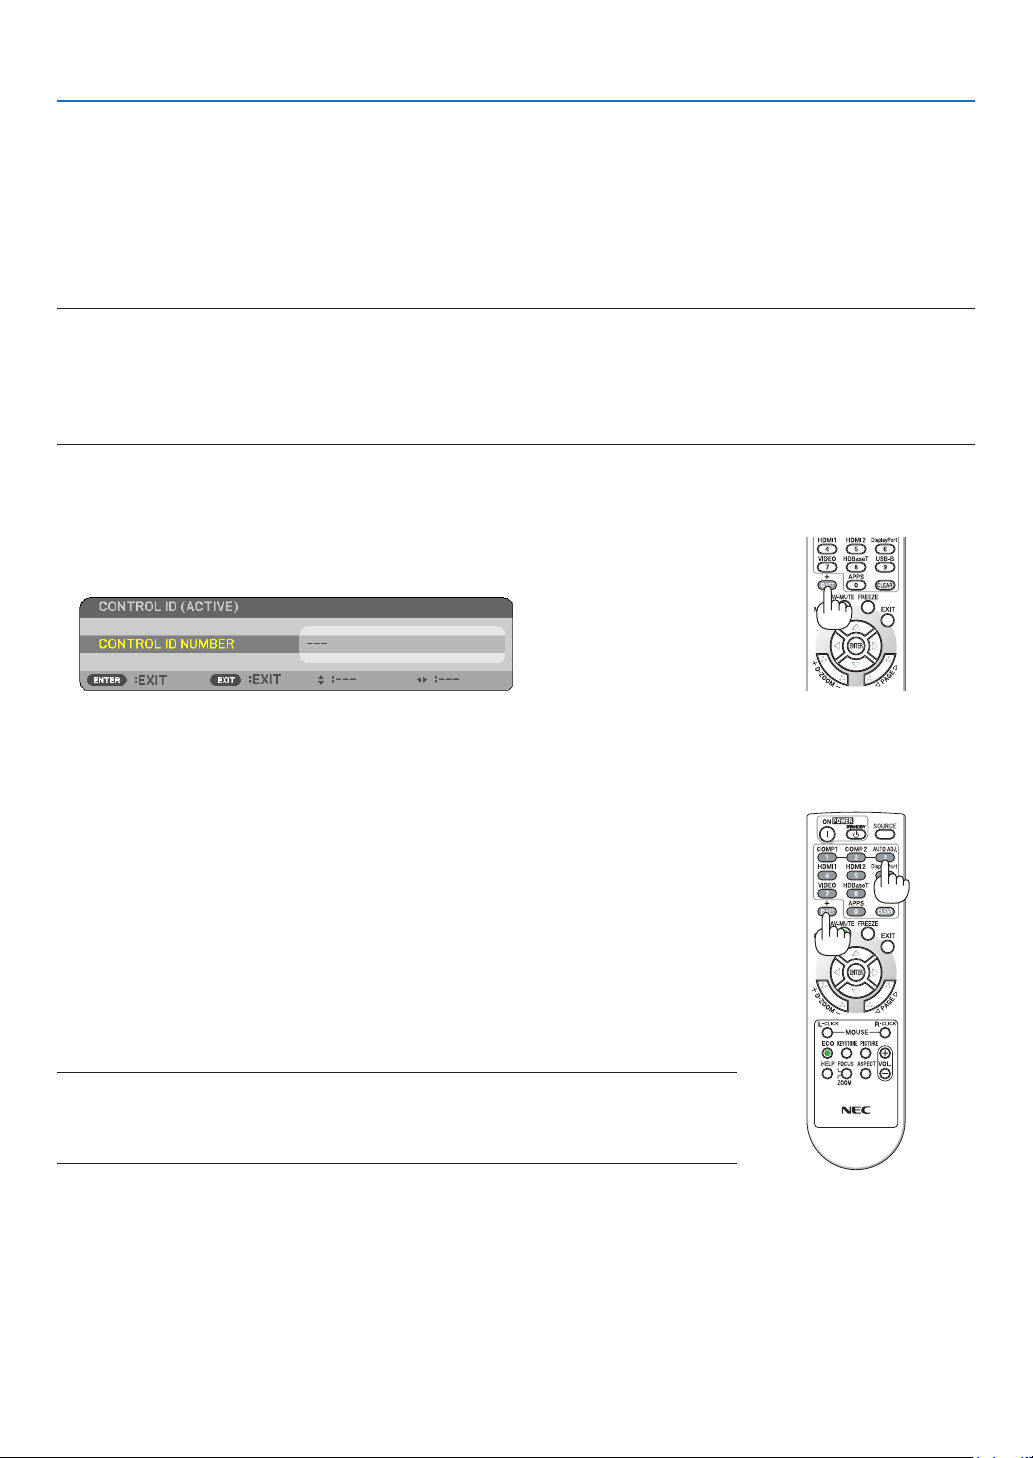
56
4. Using On-Screen Menu
SettingIDtotheProjector[CONTROLID]
YoucanoperatemultipleprojectorsseparatelyandindependentlywiththesingleremotecontrolthathastheCONTROL
IDfunction.IfyouassignthesameIDtoalltheprojectors,youcanconvenientlyoperatealltheprojectorstogether
usingthesingleremotecontrol.Todoso,youhavetoassignanIDnumbertoeachprojector.
CONTROL ID NUMBER ....... Select a number from 1 to 254 you wish to assign to your projector.
CONTROL ID .......................Select [OFF] to turn off the CONTROL ID setting and select [ON] to turn on the CONTROL ID setting.
NOTE:
•When[ON]isselectedfor[CONTROLID],theprojectorcannotbeoperatedbyusingtheremotecontrolthatdoesnotsupport
theCONTROLIDfunction.(Inthiscasethebuttonsontheprojectorcabinetcanbeused.)
•Yoursettingwillnotbeaffectedevenwhen[RESET]isdonefromthemenu.
•PressingandholdingtheENTERbuttonontheprojectorcabinetfor10secondswilldisplaythemenuforcancelingtheControl
ID.
Assigning or Changing the Control ID
1. Turn on the projector.
2. Press the ID SET button on the remote control.
TheCONTROLIDscreenwillbedisplayed.
IftheprojectorcanbeoperatedwiththecurrentremotecontrolID,the[ACTIVE]will
bedisplayed.IftheprojectorcannotbeoperatedwiththecurrentremotecontrolID,
the[INACTIVE]willbedisplayed.Tooperatetheinactiveprojector,assignthecontrol
IDusedfortheprojectorbyusingthefollowingprocedure(Step3).
+
3. Press one of numeric keypad buttons while pressing and holding the ID SET
button on the remote control.
Example:
Toassign“3”,pressthe“3”buttonontheremotecontrol.
NoIDmeansthatalltheprojectorscanbeoperatedtogetherwithasingleremote
control.Toset“NoID”,enter“000”orpresstheCLEARbutton.
TIP:TherangeofIDsisfrom1to254.
4. Release the ID SET button.
TheupdatedCONTROLIDscreenwillbedisplayed.
NOTE:
•TheIDscanbeclearedinafewdaysafterthebatteriesarerundownorremoved.
•Accidentallypressinganyoneofthebuttonsoftheremotecontrolwillclearcurrentlyspecied
IDwithbatteriesremoved.

57
4. Using On-Screen Menu
UsingTestPattern[TESTPATTERN]
Displaysthetestpatternforadjustingdistortiononthescreenandthefocusatthetimeoftheprojectorsetup.Once
the[TESTPATTERN]ontheonscreenmenuisselected,thepatternforadjustmentwillbedisplayedon.Ifyound
distortiononthepattern,adjusttheprojectorinstallationangleorcorrectdistortionbypressingtheKEYSTONEbutton
ontheremote.Ifthefocusadjustmentisrequired,controlthefocuslever.PressEXITbuttontoclosethetestpattern
andreturntothemenu.
Settingthenetwork[NETWORKSETTINGS]
Thisfunctiondisplaythenetworksettingsmenu.(→page90)

58
4. Using On-Screen Menu
[OPTIONS(1)]
SelectingFanMode[FANMODE]
FanModeisusedtosetthespeedoftheinternalcoolingfan.
AUTO ..................... The built-in fans automatically run at a variable speed according to the internal temperature.
HIGH ...................... The built-in fans run at a high speed. Select this option when using the projector at altitudes approximately
5500 feet/1700 meters or higher.
NOTE:
•ItisrecommendedthatyouselectHighspeedmodeifyouusetheprojectornon-stopforconsecutivedays.
•Set[FANMODE]to[HIGH]whenusingtheprojectorataltitudesapproximately5500feet/1700metersorhigher.
•Usingtheprojectorataltitudesapproximately5500feet/1700metersorhigherwithoutsettingto[HIGH]cancausetheprojector
tooverheatandtheprotectorcouldshutdown.Ifthishappens,waitacoupleminutesandturnontheprojector.
•Usingtheprojectorataltitudesapproximately5500feet/1700metersorhighercanshortenthelifeofopticalcomponentssuch
asthelightmodule.
•Yoursettingwillnotbeaffectedevenwhen[RESET]isdonefromthemenu.
EnablingorDisablingWXGAMode[WXGAMODE]
Selecting[ON]willgiveprioritytoWXGA(1280×768)/WUXGA(1920×1200)signalsinrecognizinganinputsignal.
When[WXGAMODE]issetto[ON],XGA(1024×768)/UXGA(1600×1200)signalsmaynotberecognized.Inthis
case,select[OFF].
NOTE:
•The[ON]isselectedatthetimeofshipment.
SelectingStillImageModeorMovieMode[IMAGEMODE]
Thisfunctionallowsyoutoselectthestillimagemodeorthemoviemode.
NOTE:
•Thismodemaynotbeavailabledependingoninputsignal.

59
4. Using On-Screen Menu
SettingHDMI1,HDMI2,orHDBaseT[HDMISETTINGS]
MakethesettingsforeachvideolevelwhenconnectingHDMIequipmentandEthernet/HDBaseTterminal.
VIDEO LEVEL ......... Select [AUTO] to automatically detect video level. If automatic detection may not work well, select [NOR-
MAL] to disable the [ENHANCED] feature of your HDMI equipment or select [ENHANCED] to improve image
contrast and increase detail in the dark areas.
SettingAudio[AUDIOSELECT]
MakethesettingsforeachaudiolevelwhenconnectingHDMIequipmentandEthernet/HDBaseTterminal.Select
betweeneachequipmentandcomputer.
HDMI1, HDMI2
........... Select [HDMI1] or [HDMI2] to switch the HDMI 1 IN or HDMI 2 IN digital audio signal or select [COMPUTER]
to switch the COMPUTER input audio signal.
HDBaseT ................ Select [HDBaseT] or [COMPUTER] to switch the source connected to the network.
EnablingKeySoundandErrorSound[BEEP]
Thisfeatureturnsonoroffthebuttonsoundoralarmwhenanerroroccursorthefollowingoperationsareperformed.
-Displayingthemainmenu
-Switchingsources
-Resettingdatabyusing[RESET]
-PressingPOWERONorSTANDBYbutton

60
4. Using On-Screen Menu
[OPTIONS(2)]
SelectingPower-savingin[STANDBYMODE]
Theprojectorhastwostandbymodes:[NORMAL]and[NETWORKSTANDBY].
TheNORMALmodeisthemodethatallowsyoutoputtheprojectorinthepower-savingconditionwhichconsumes
lesspowerthantheNETWORKSTANDBYmode.
NORMAL .......................POWER indicator: Red light/STATUS indicator: Off
When [NORMAL] is selected, only the following buttons and feature will work:
POWER button on the projector cabinet and the remote control, powering on from PC Control com-
mand, and AUTO POWER ON.
NETWORK STANDBY ....POWER indicator: Orange light/STATUS indicator: Off
When [NETWORK STANDBY] is selected, the projector can be turned on over a wired LAN/wireless LAN
connection and only the following buttons, terminals, and features will work:
POWER button on the projector cabinet and the remote control, powering on from PC Control command,
AUTO POWER ON, Operation by User Supportware, Network service, Program Timer.
Important:
•When[NETWORKSTANDBY]isselected,[AUTOPOWEROFF]willturningreyandbedisabledand[0:10]willbeselectedauto-
maticallyfor[AUTOPOWEROFF].
•Inthebelowconditions,settingofthe[STANDBYMODE]isdisabledandtheprojectorwillgointotheSLEEPmode*.
*Sleepmoderefersthemodewithoutfunctionalrestrictionsbythe[STANDBYMODE].PowerconsumptionintheSLEEPmode
isrelativelyhigherthanthe[NETWORKSTANDBY]mode.TheStatusindicatorturnsoninGreen.
When[STANDBYMODE]→[NETWORKSTANDBY]isselected
-When[NETWORKSERVICE]→[AMXSETTINGS]→[ENABLE]isselected
-When[NETWORKSERVICE]→[CRESTRONSETTINGS]→[CRESTRONCONTROL]→[ENABLE]isselected
-When[NETWORKSETTINGS]→[WIRELESSLAN]→Exceptfor[DISABLE]andmountingthewirelessLANunittotheprojector
-Whenthesignalisinputtothecomputer,HDMI1INorHDMI2INterminals
NOTE:
•WhenanHDBaseTtransmitterisconnectedtotheEthernet/HDBaseTport,iftheprojectorisinthestandbymode,theprojector
cannotbecontrolled(thepowercannotbeturnedon),regardlessofthe[STANDBYMODE]setting.
TIP:
•Evenwhen[NORMAL]isselectedfor[STANDBYMODE],poweronoroffcanbedonebyusingthePCCONTROLport.
•ThepowerconsumptioninthestandbymodewillnotbeincludedincalculatingCO
2
emissionreduction.
•Yoursettingwillnotbeaffectedevenwhen[RESET]isdonefromthemenu.
EnablingDirectPowerOn[DIRECTPOWERON]
Turnstheprojectoronautomaticallywhenthepowercordisinsertedintoanactivepoweroutlet.Thiseliminatesthe
needtoalwaysusethePOWERbuttonontheremotecontrolorprojectorcabinet.

61
4. Using On-Screen Menu
TurningOntheProjectorByApplyingComputerSignal[AUTOPOWERON]
WhentheprojectorisinStandbymode,applyingacomputerorHDMIsignalfromacomputerconnectedtotheCOM-
PUTERINinput,HDMI1,orHDMI2inputwillpowerontheprojectorandsimultaneouslyprojecttheimage.
ThisfunctionalityeliminatestheneedtoalwaysusethePOWERbuttonontheremotecontrolortheprojectorcabinet
topowerontheprojector.
Tousethisfunction,rstconnectacomputertotheprojectorandtheprojectortoanactiveACinput.
NOTE:
•Disconnectingacomputersignalfromthecomputerwillnotpowerofftheprojector.Werecommendusingthisfunctionincom-
binationoftheAUTOPOWEROFFfunction.
•Thisfunctionwillnotbeavailableunderthefollowingconditions:
-whenacomponentsignalisappliedtotheCOMPUTERINterminal
-whenaSynconGreenRGBsignalorcompositesyncsignalisapplied
•ToenabletheAUTOPOWERONafterchangingtothesleepmodeturningofftheprojector,wait5secondsandinputacomputer
orHDMIsignal.
IfacomputerorHDMIsignalisstillpresentwhentheprojectoristurnedoff,theAUTOPOWERONwillnotworkandtheprojector
remainsinstandbymode.
EnablingPowerManagement[AUTOPOWEROFF]
Theprojectorhaspowermanagementfunctions.Toreducepowerconsumption,thepowermanagementfunctions(1
and2)arefactorypresetasshownbelow.TocontroltheprojectorfromanexternaldeviceviaaLANorserialcable
connection,usetheon-screenmenutochangethesettingsfor1and2.
1. STANDBY MODE (Factory preset: NORMAL)
To control the projector from an external device, select [NETWORK STANDBY] for [STANDBY MODE].
NOTE:
•When[NORMAL]isselectedfor[STANDBYMODE],thefollowingterminalsandfunctionswillnotwork:
MONITOROUT(COMP.)terminal,AUDIOOUTterminal,LANfunctions,MailAlertfunction,DDC/CI(VirtualRemoteTool)
2. AUTO POWER OFF (Factory preset: 1 hour)
To control the projector from an external device, select [OFF] for [AUTO POWER OFF].
NOTE:
•When[1:00]isselectedfor[AUTOPOWEROFF],youcanenabletheprojectortoautomaticallyturnoffin60minutesifthereis
nosignalreceivedbyanyinputorifnooperationisperformed.

62
4. Using On-Screen Menu
SelectingDefaultSource[DEFAULTSOURCESELECT]
Youcansettheprojectortodefaulttoanyoneofitsinputseachtimetheprojectoristurnedon.
LAST ...................... Sets the projector to default to the previous or last active input each time the projector is turned on.
AUTO ..................... Searches for an active source in order of [HDMI1] → [HDMI2] → [COMPUTER] → [VIDEO] → [HDBaseT]
→ [APPS] and displays the first found source.
HDMI1 ................... Displays the digital source from the HDMI 1 IN terminal every time the projector is turned on.
HDMI2 ................... Displays the digital source from the HDMI 2 IN terminal every time the projector is turned on.
COMPUTER ........... Displays the computer signal from the COMPUTER IN terminal every time the projector is turned on.
VIDEO .................... Displays the Video source from the VIDEO IN terminal every time the projector is turned on.
HDBaseT ................ Projects the signal transmitted from the terminals supported HDBaseT.
APPS ..................... Display the APPS MENU.
NOTE:
•[APPS]cannotbedetectedwhen[AUTO]isselected.ForprojectingimagefromAPPS,select[APPS]or[LAST].

63
4. Using On-Screen Menu
[3D]
Selectinginputconnectedtoasourceof3Dimages[HDMI1/HDMI2/COMPUTER/VIDEO/HDBaseT]
[3D]
Thisfunctionswitchesthe3DmodebetweenONandOFFforeachinput.
ON ......................... Turns on the 3D mode for the selected input.
NOTE:
Toconrmthatthesupported3Dsignalisaccepted,useeitherwayofthefollowing:
•Makesurethat[3D]isdisplayedinthetoprightofthescreenafterthesourceisselected.
•Display[INFO.]→[SOURCE(2)]→[3DSIGNAL]andmakesurethat“SUPPORTED”isdisplayed.
OFF ........................ Turns off the 3D mode for the selected input.
[GLASSES]
Select3Dglassesmethod.
DLP
®
Link .............. For 3D eyeglasses (ones manufactured by XPAND are recommended) or DLP
®
Link compatible LCD shutter
eyeglasses.
Others .................... For other LCD shutter eyeglasses such as IR or wired LCD shutter types.
NOTE:
•WhenusingcrystalshutterglassesotherthanthoseusingtheDLP®Linkmethod,itmaynotbepossibletosynchronize,depend-
ingontheglasses.
•ThisfunctionwillnotworkforVIDEOsource.
[FORMAT]
Sets3Dformat.
AUTO ............................Automatically selects the appropriate format. The supported format is HDMI 3D only.
FRAME PACKING ..........Selects this format for the FRAME PACKING 3D image. FRAM PACKING is a format that stores the left
and right eye images without compression.
SIDE BY SIDE ...............Selects this format for the SIDE BY SIDE 3D image. SIDE BY SIDE is a format that stores the left and
right eye images displayed horizontally. Only the half of the horizontal resolution is supported
TOP AND BOTTOM .......Selects this format for the TOP AND BOTTOM 3D image. TOP AND BOTTOM is a format that stores the
left and right eye images displayed vertically. Only the half of the vertical resolution is supported.
FRAME SEQUENTIAL ....Selects this format for the FRAME SEQUENTIAL 3D image. FRAME SEQUENTIAL is a format that displays
the left and right eye images alternately.
NOTE:
•ThisfunctionwillnotworkforVIDEOsource.
•When3Dsignalsareinput,operationisonlypossiblewhen[GLASSES]issetto“DLP®Link”.

64
4. Using On-Screen Menu
[L/RINVERT]
Changethesettingifyouhavedifcultyseeing3Dimages.
NON-INVERT ......... Normal setting.
INVERT .................. Changes the order of displaying the images for left eye and right eye.
NOTE:
•When[L/RINVERT]cannotbeoperated,the[L/RINVERT]screenwillnotbedisplayedevenwhentheremotecontrol’svideo
buttonispressed.

65
4. Using On-Screen Menu
❻ Menu Descriptions & Functions [INFO.]
Displaysthestatusofthecurrentsignalandlightmoduleusage.Thisitemhasninepages.Theinformationincluded
isasfollows:
TIP:PressingtheHELPbuttonontheremotecontrolwillshowthe[INFO.]menuitems.
[USAGE TIME]
[LIGHTHOURSUSED](H)
[TOTALCARBONSAVINGS](kg-CO2)
•[TOTALCARBONSAVINGS]
Thisdisplaystheestimatedcarbonsavinginformationinkg.Thecarbonfootprintfactorinthecarbonsavingcal-
culationisbasedontheOECD(2008Edition).(→page
29)
[SOURCE(1)]
[RESOLUTION][HORIZONTALFREQUENCY]
[VERTICALFREQUENCY][SYNCTYPE]
[SYNCPOLARITY][SCANTYPE]
[SOURCE(2)]
[SIGNALTYPE][VIDEOTYPE]
[BITDEPTH][VIDEOLEVEL]
[3DSIGNAL]
[HDBaseT]
[SIGNALQUALITY][OPERATIONMODE]
[LINKSTATUS][HDMISTATUS]
[WIRED LAN]
[IPADDRESS][SUBNETMASK]
[GATEWAY][MACADDRESS]
[WIRELESS LAN]
[IPADDRESS][SUBNETMASK]
[GATEWAY][MACADDRESS]
[SSID][NETWORKTYPE]
[SECURITY][CHANNEL]
[SIGNALLEVEL]
[VERSION(1)]
[FIRMWARE]Version[DATA]Version
[VERSION(2)]
[FIRMWARE2]Version
[OTHERS]
[PROJECTORNAME][HOSTNAME]
[MODELNO.][SERIALNUMBER]
[LANUNITTYPE][CONTROLID](when[CONTROLID]isset)

66
4. Using On-Screen Menu
❼ Menu Descriptions & Functions [RESET]
Returning to Factory Default [RESET]
TheRESETfeatureallowsyoutochangeadjustmentsandsettingstothefactorypresetfora(all)source(s)except
thefollowing:
[CURRENTSIGNAL]
Resetstheadjustmentsforthecurrentsignaltothefactorypresetlevels.
Theitemsthatcanberesetare:[PRESET],[CONTRAST],[BRIGHTNESS],[COLOR],[HUE],[SHARPNESS],[AS-
PECTRATIO],[HORIZONTAL],[VERTICAL],[CLOCK],[PHASE],and[OVERSCAN].
[ALLDATA]
Resetalltheadjustmentsandsettingsforallthesignalstothefactorypreset.
AllitemscanberesetEXCEPT[LANGUAGE],[BACKGROUND],[ORIENTATION],[SERIALPORT],[SECURITY],
[COMMUNICATIONSPEED],[CONTROLID],[STANDBYMODE],[FANMODE],[LIGHTHOURSUSED],[TOTAL
CARBONSAVINGS],[PROJECTORNAME],[WIREDLAN],[WIRELESSLAN],[IMAGEEXPRESSUTILITYLITE],
[NETWORKSERVICE],[DATE&TIME],[ADMINISTRATORMODE],and[REMOTEDESKTOPCONNECTION].
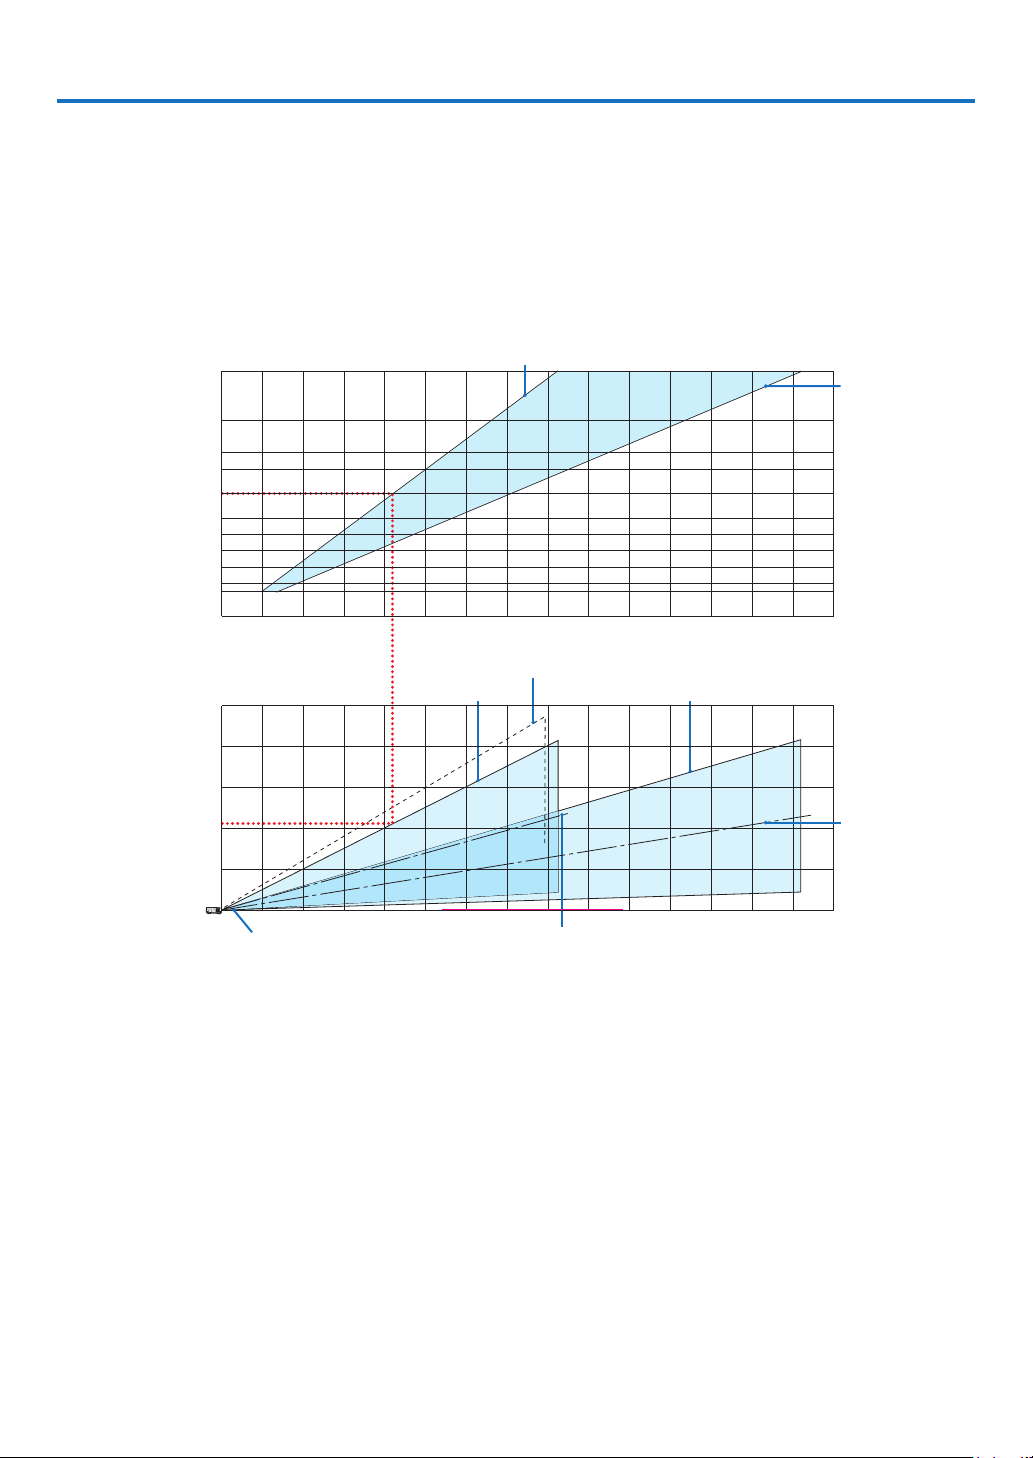
67
❶ Setting Up the Screen and the Projector
Usethistogetageneralideaofwhatthescreensizewillbewhensetinacertainposition,whatsizescreenyouwill
need,andwhatdistanceyouwillneedtoprojectimagesofthedesiredsize.
Theprojectiondistancerangeatwhichfocusingispossibleis0.79m(fora30model)to14.19m(fora300model).
Installwithinthisrange.
[P502HL]
0123456789101112 13 14 15
12 13 14 15
0
1
2
3
4
5
1234567891011
40
30
60
80
100
120
150
180
200
240
300
(inch)
(m)
Screen size
Screen height from the center of the
projector lens
[Projection distance]
When zoom lever turned to wide
With tilt feet tilted 4° when set to wide
When zoom lever turned to telescopic
When zoom lever
turned to telescopic
Screen center line
(telescopic)
When zoom lever
turned to wide
Projector lens center Screen center line (wide)
(m)
(m)
*Theguresindicatedfor“heightofscreenfromprojectorlenscenter”ontheprojectiondistancetableareforalensshiftof62%
V.
[ReadingtheTable]
Fromtheuppertableonthispage,toprojectwideimagesona150screen,installatabout4.1mfromthefront.
Also,fromthelowertablewecanseethatabout2.1marerequiredfromtheprojector’slenscentertotheupperedge
ofthescreen.Usethistoseewhetherornotenoughheightcanbeprovidedfromtheprojectortotheceilingand
forinstallingthescreen.Thediagramshowstheprojectiondistancewhentheprojectorisinstalledhorizontally.The
projectedimagecanbemovedupanddown,leftandrightusingthelensshiftfunction.(→page
17)
5. Installation and Connections
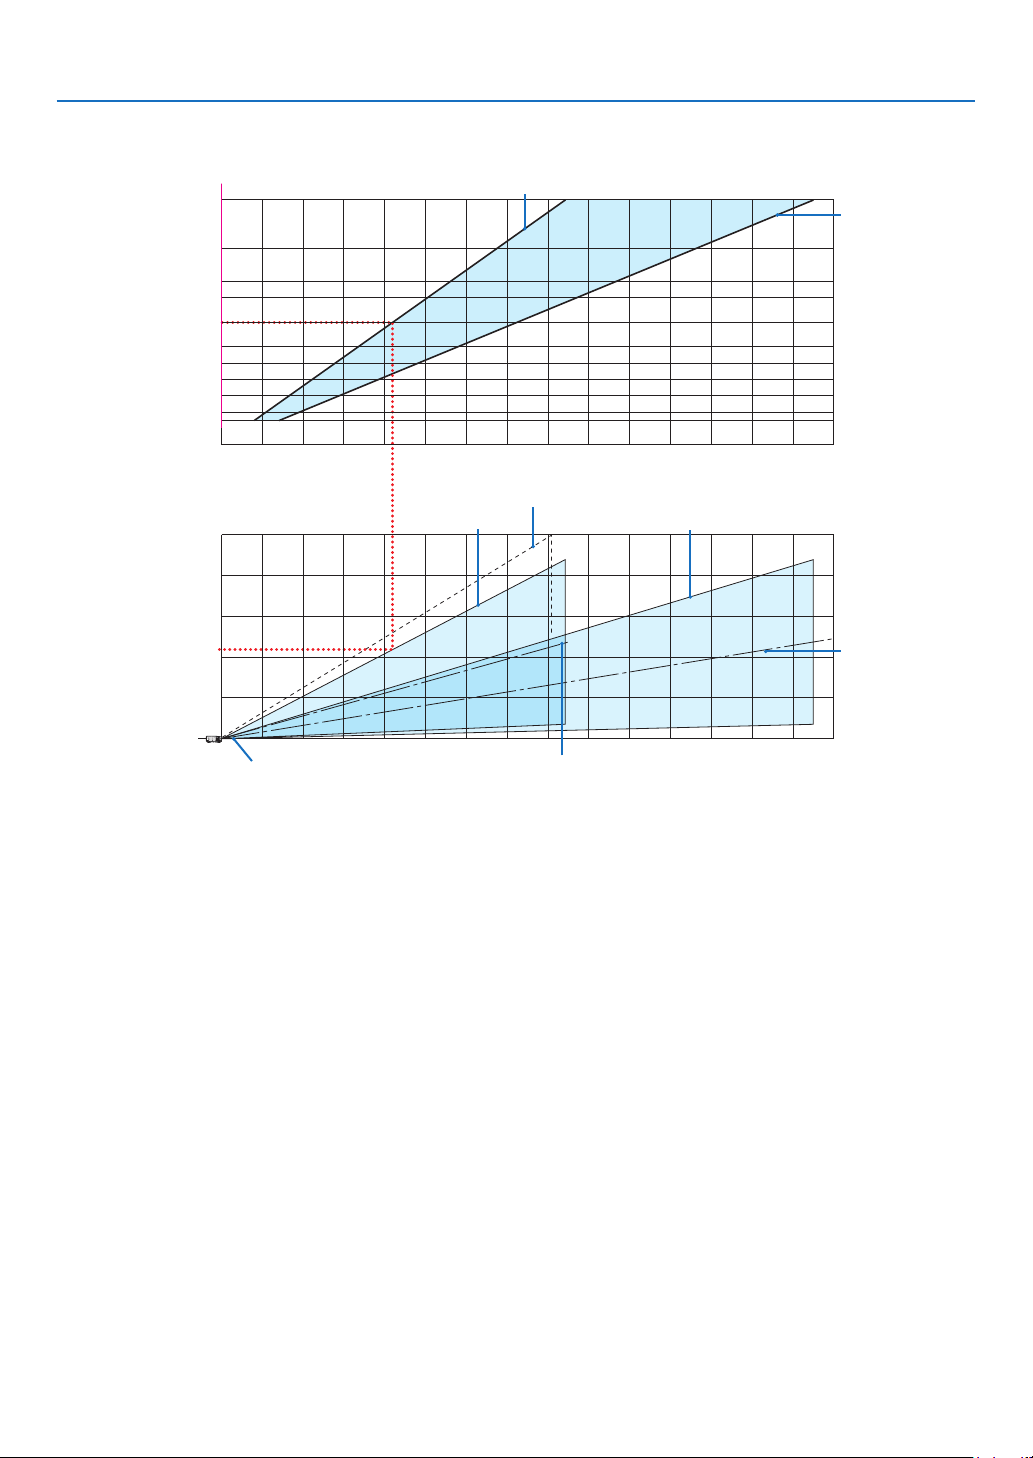
68
5. Installation and Connections
[P502WL]
012345678910 11 12 13 14 15
12 13 14 15
0
1
2
3
4
5
12345678910 11
40
30
60
80
100
120
150
180
200
240
300
(inch)
(m)
Screen size
Screen height from the center of the
projector lens
[Projection distance]
When zoom lever turned to wide
With tilt feet tilted 4° when set to wide
When zoom lever turned to telescopic
When zoom lever
turned to telescopic
Screen center line
(telescopic)
When zoom lever
turned to wide
Projector lens center Screen center line (wide)
(m)
(m)
*Theguresindicatedfor“heightofscreenfromprojectorlenscenter”ontheprojectiondistancetableareforalensshiftof59%
V.
[ReadingtheTable]
Fromtheuppertableonthispage,toprojectwideimagesona150screen,installatabout4.1mfromthefront.
Also,fromthelowertablewecanseethatabout2.1marerequiredfromtheprojector’slenscentertotheupperedge
ofthescreen.Usethistoseewhetherornotenoughheightcanbeprovidedfromtheprojectortotheceilingand
forinstallingthescreen.Thediagramshowstheprojectiondistancewhentheprojectorisinstalledhorizontally.The
projectedimagecanbemovedupanddown,leftandrightusingthelensshiftfunction.(→page
17)
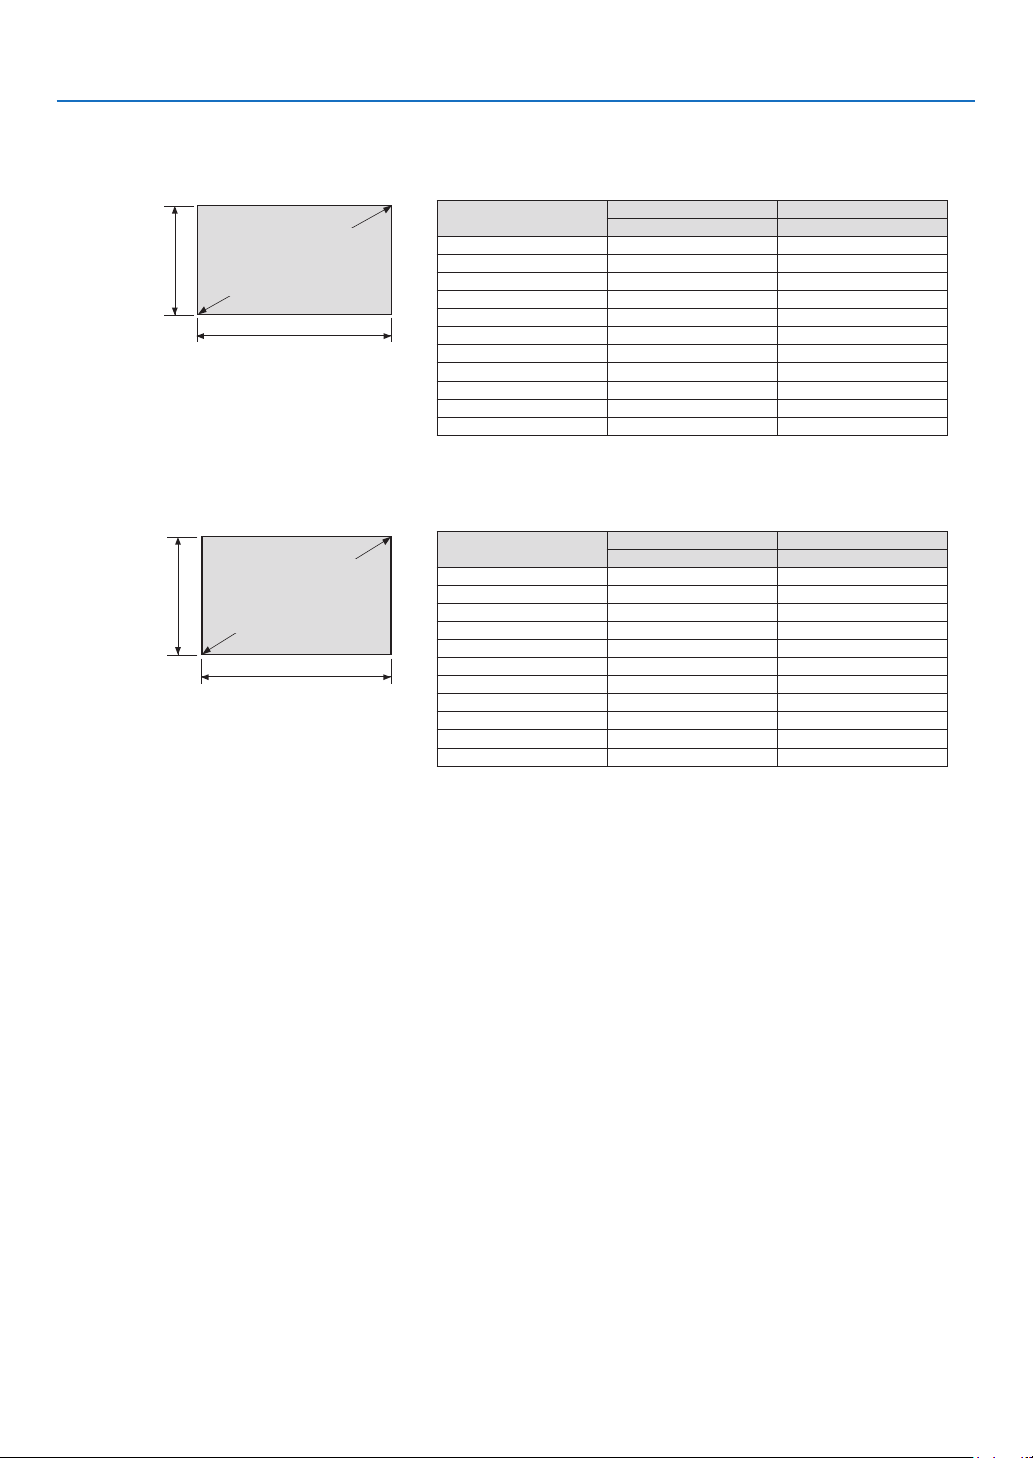
69
5. Installation and Connections
Tables of screen sizes and dimensions
[P502HL]
Screen height
Screen width
Screen size
(diagonal)
Size(inches)ScreenwidthScreenheight
(cm)(cm)
3066.437.4
4088.6 49.8
50 110.762.3
60 132.874.7
80 177.199.6
100 221.4124.5
120 265.7149.4
150 332.1186.8
200 442.8249.1
250 553.4311.3
300664.1373.6
[P502WL]
Screen height
Screen width
Screen size
(diagonal)
Size(inches)ScreenwidthScreenheight
(cm)(cm)
3064.640.4
4086.2 53.8
50 107.767.3
60 129.280.8
80 172.3107.7
100 215.4134.6
120 258.5 161.5
150 323.1201.9
200 430.8269.2
250 538.5336.5
300646.2403.9
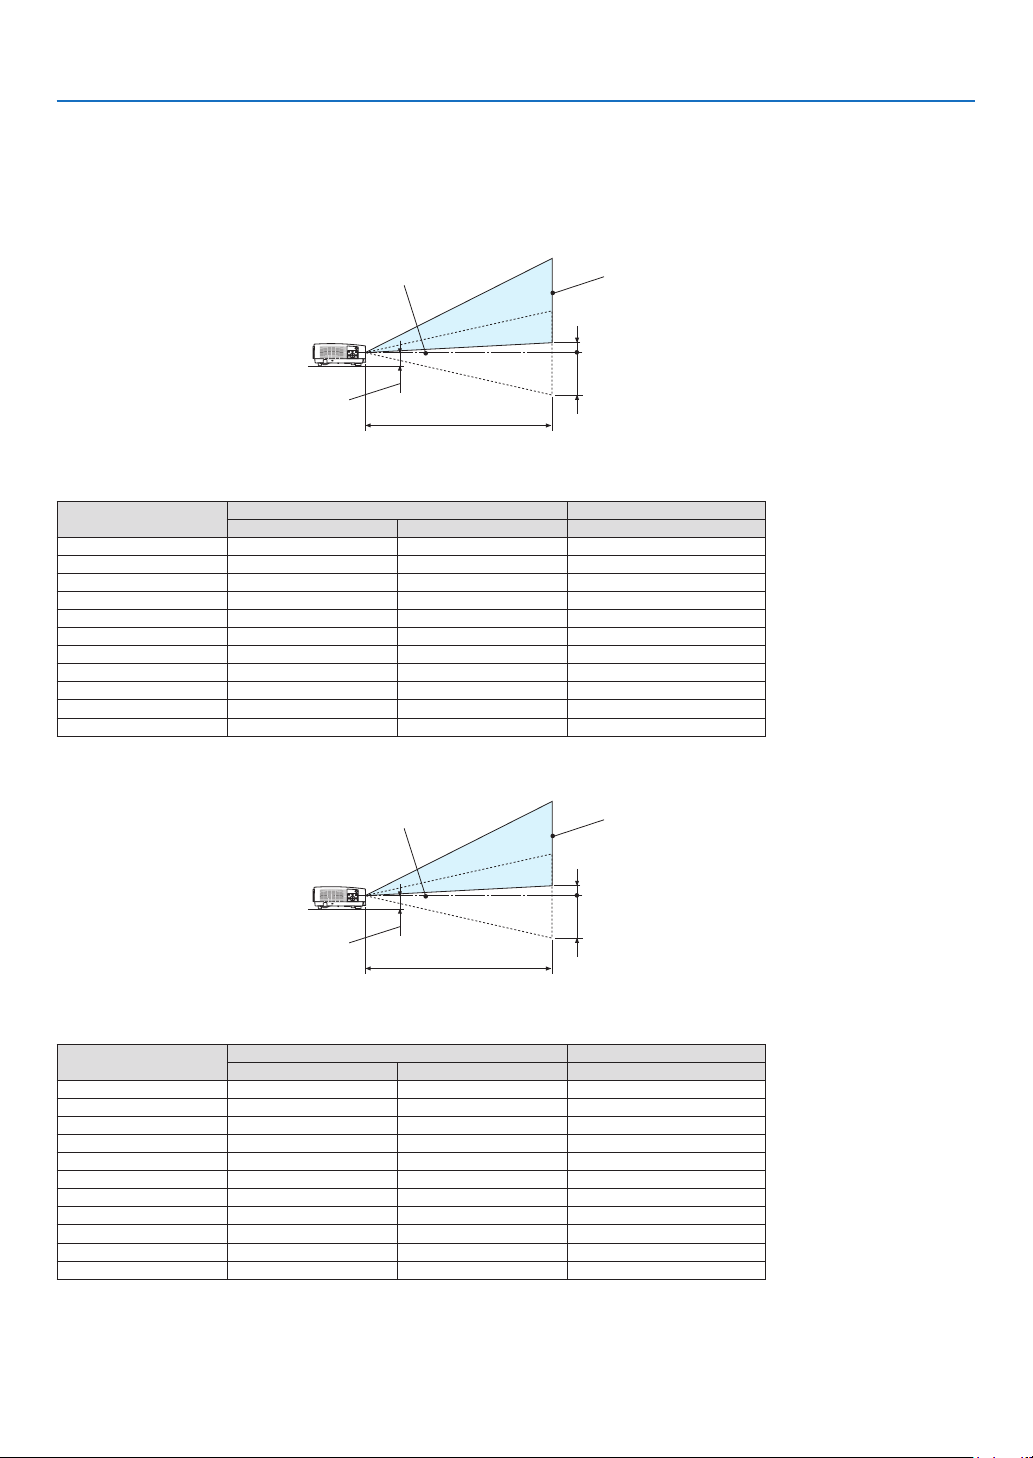
70
5. Installation and Connections
Example of installation on a desktop
Thediagrambelowshowsanexampleofwhentheprojectorisusedonadesktop.
Horizontalprojectionposition:Equaldistancetotheleftandrightfromthecenterofthelens
Verticalprojectionposition:(seetablebelow)
[P502HL]
Screen surface
Lower edge of screen with 61.6% V
Measurement +H
Measurement -H
Lower edge of screen with 0% V
Lens center
Approximately 92 to 97 mm
Projection distance L
(Note)Heightfromlenscentertoloweredgeofscreen(withtiltfeetscrewedin)
Screensize(inches)ThrowdistanceL(m)HeightH(cm)
WideTele0%V–62%V
300.791.39−18.7–+4.3
401.071.86 −24.9–+5.8
50 1.342.34−31.1–+7.2
60 1.62 2.81 −37.4–+8.7
80 2.173.76−49.8–+11.6
100 2.724.71−62.3–+14.5
120 3.285.66 −74.7–+17.4
150 4.117.08−93.4–+21.7
200 5.499.45−124.5–+28.9
250 6.8711.82 −155.7–+36.2
3008.25 14.19−186.8–+43.4
[P502WL]
Screen surface
Lower edge of screen with 59.0% V
Measurement +H
Measurement -H
Lower edge of screen with 0% V
Lens center
Approximately 92 to 97 mm
Projection distance L
(Note)Heightfromlenscentertoloweredgeofscreen(withtiltfeetscrewedin)
Screensize(inches)ThrowdistanceL(m)HeightH(cm)
WideTele0%V–59%V
300.81 1.42−20.2–+3.4
401.091.90−26.9–+4.6
50 1.372.39−33.7–+5.7
60 1.66 2.87−40.4–+6.9
80 2.22 3.84−53.8–+9.2
100 2.784.81−67.3–+11.5
120 3.355.78−80.8–+13.8
150 4.197.23−101.0–+17.2
200 5.60 9.65−134.6–+23.0
250 7.0112.08 −168.3–+28.7
3008.4314.50−201.9–+34.5

71
5. Installation and Connections
Lens shifting range
Thisprojectorisequippedwithalensshiftfunction(→page
17)foradjustingtheimagepositionusingdials.Lens
shiftingispossiblewithintherangeshownbelow.
NOTE:
•Incaselensshiftedvolumeexceedsthebelowillustratedrange,blurandshademayappeararoundendsofprojectedimage.
Legend:V“Vertical”referstothescreenheightandH“Horizontal”referstothescreenwidth.Thelensshiftrangeis
expressedasaratioofheightandwidth,respectively.
[P502HL]
Lensshiftingrange:
Verticaldirection:+62%,−0%
Horizontaldirection:±25%
100%V
62%V
100%H
25%H
25%H
25%H
25%H
Height of projected image
Width of projected image
[P502WL]
Lensshiftingrange:
Verticaldirection:+59%,−0%
Horizontaldirection:±28%
100%V
59%V
100%H
28%H
28%H
28%H
28%H
Height of projected image
Width of projected image
*Thelensshiftrangeisthesameforceilinginstallation.

72
5. Installation and Connections
(Example)Whenusingtoprojectona150"screen
[P502HL]
Accordingtothe“Tableofscreensizesanddimensions”(→page
70),H=130.8"/332.1cm,V=73.6"/186.8cm.
Adjustmentrangeintheverticaldirection:theprojectedimagecanbemovedupwards0.62×73.6"/186.8cm≈
45.3"/115cm(whenthelensisatthecenterposition).
Adjustmentrangeinthehorizontaldirection:theprojectedimagecanbemovedtotheleft0.25×130.8"/332.1cm≈
32.7"/83cm,totherightapproximately32.7"/83cm.
[P502WL]
Accordingtothe“Tableofscreensizesanddimensions”(→page70),H=127.3"/323.1cm,V=79.5"/201.9cm.
Adjustmentrangeintheverticaldirection:theprojectedimagecanbemovedupwards0.59×79.5"/201.9cm≈
46.9"/119cm(whenthelensisatthecenterposition).
Adjustmentrangeinthehorizontaldirection:theprojectedimagecanbemovedtotheleft0.28×127.3"/323.1cm≈
35.4"/90cm,totherightapproximately35.4"/90cm.
*Figuresdifferbyseveral%becausethecalculationisapproximate.
WARNING
*Installingyourprojectorontheceilingmustbedonebyaqualiedtechnician.ContactyourNECdealerformore
information.
*Donotattempttoinstalltheprojectoryourself.
•Onlyuseyourprojectoronasolid,levelsurface.Iftheprojectorfallstotheground,youcanbeinjuredandthe
projectorseverelydamaged.
•Donotusetheprojectorwheretemperaturesvarygreatly.Theprojectormustbeusedattemperaturesbetween
41°F(5°C)and104°F(40°C)(Ecomodeselectedautomaticallyat95°Fto104°F/35°Cto40°C).
•Donotexposetheprojectortomoisture,dust,orsmoke.Thiswillharmthescreenimage.
•Ensurethatyouhaveadequateventilationaroundyourprojectorsoheatcandissipate.Donotcovertheventson
thesideorthefrontoftheprojector.
Reflecting the Image
Usingamirrortoreectyourprojector’simageenablesyoutoenjoyamuchlargerimagewhenasmallerspaceis
required.ContactyourNECdealerifyouneedamirrorsystem.Ifyou’reusingamirrorsystemandyourimageis
inverted,usetheMENUand▲▼◀▶buttonsonyourprojectorcabinetoryourremotecontroltocorrecttheorienta-
tion.(→page54)
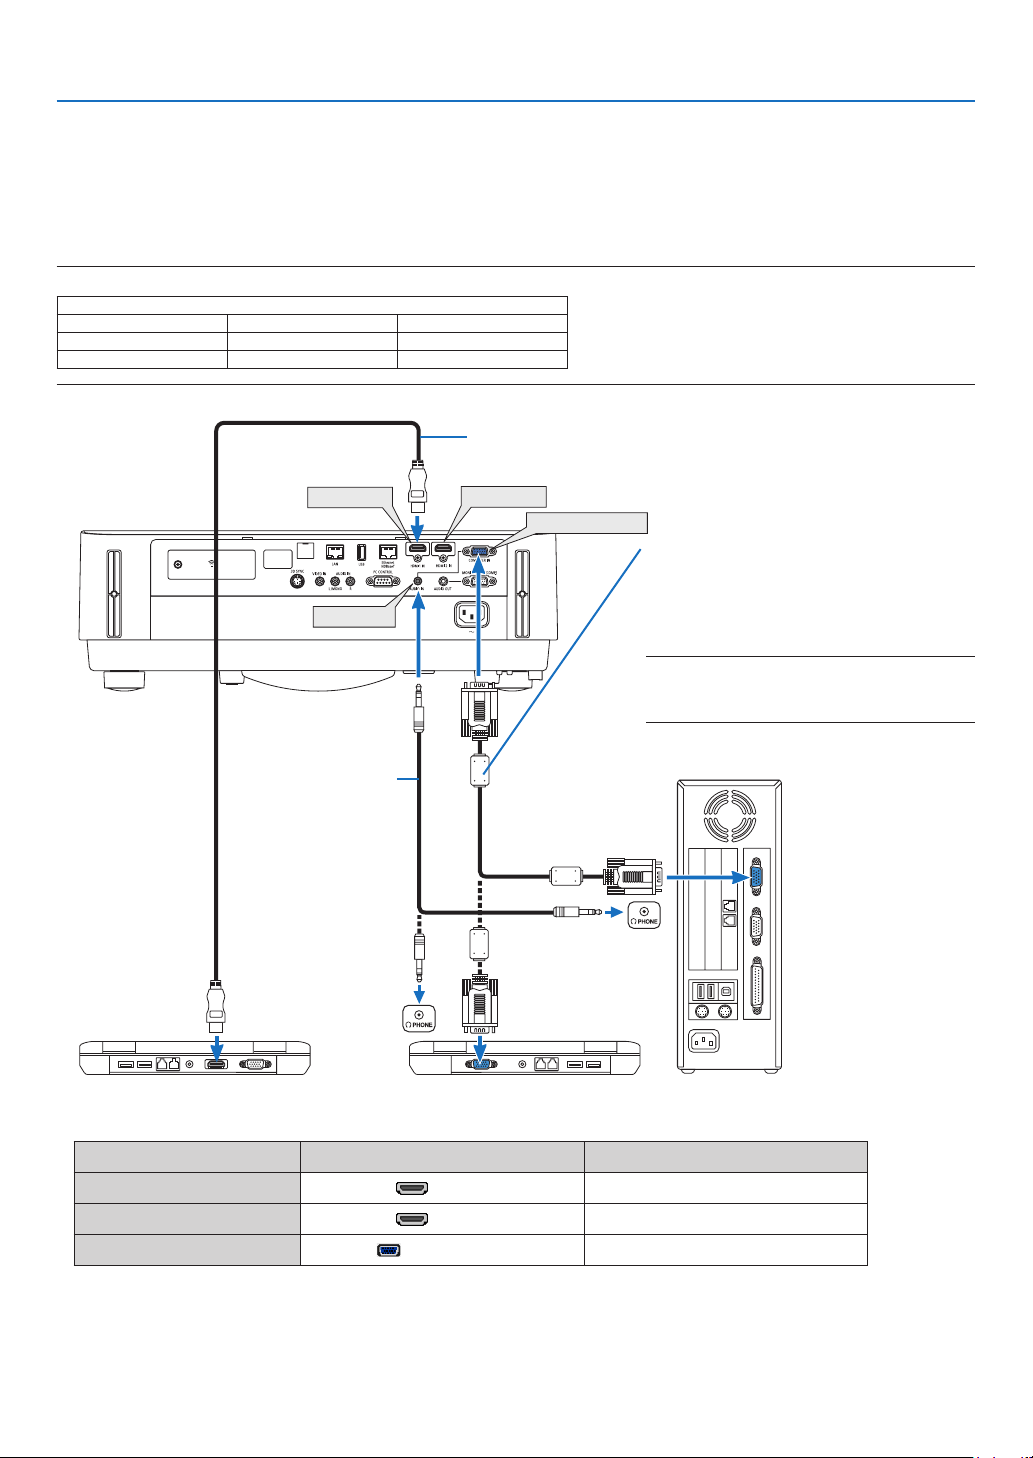
73
5. Installation and Connections
❷ Making Connections
Connecting Your Computer
ComputercablesandHDMIcanbeusedtoconnecttoacomputer.TheHDMIcableisnotenclosedwiththeprojector.
Pleasegetreadyasuitablecablefortheconnection.
NOTE:SignalssupportedbyPlug&Play(DDC2)
INPUT
COMPUTERINHDMI1INHDMI2IN
analogdigitaldigital
YesYesYes
HDMI 1 IN
HDMI 2 IN
COMPUTER IN
AUDIO IN
Computer cable (VGA) (supplied)
To mini D-Sub 15-pin terminal on the projector.
Itisrecommendedthatyouuseacommercial-
ly available distribution amplifier if connecting
a signal cable longer than the cable supplied.
NOTE:ForMac,useacommerciallyavailable
pinadapter(notsupplied)toconnecttoyour
Mac’svideoport.
Stereo mini-plug audio
cable (not supplied)
HDMIcable(notsupplied)
UseHighSpeedHDMI
®
Cable.
•Selectthesourcenameforitsappropriateinputterminalafterturningontheprojector.
Inputterminal
SOURCEbuttonontheprojectorcabinet
Buttonontheremotecontrol
HDMI1IN
HDMI1(HDMI1*)
HDMI2IN
HDMI2(HDMI2*)
COMPUTERIN
COMPUTER(COMPUTER1)
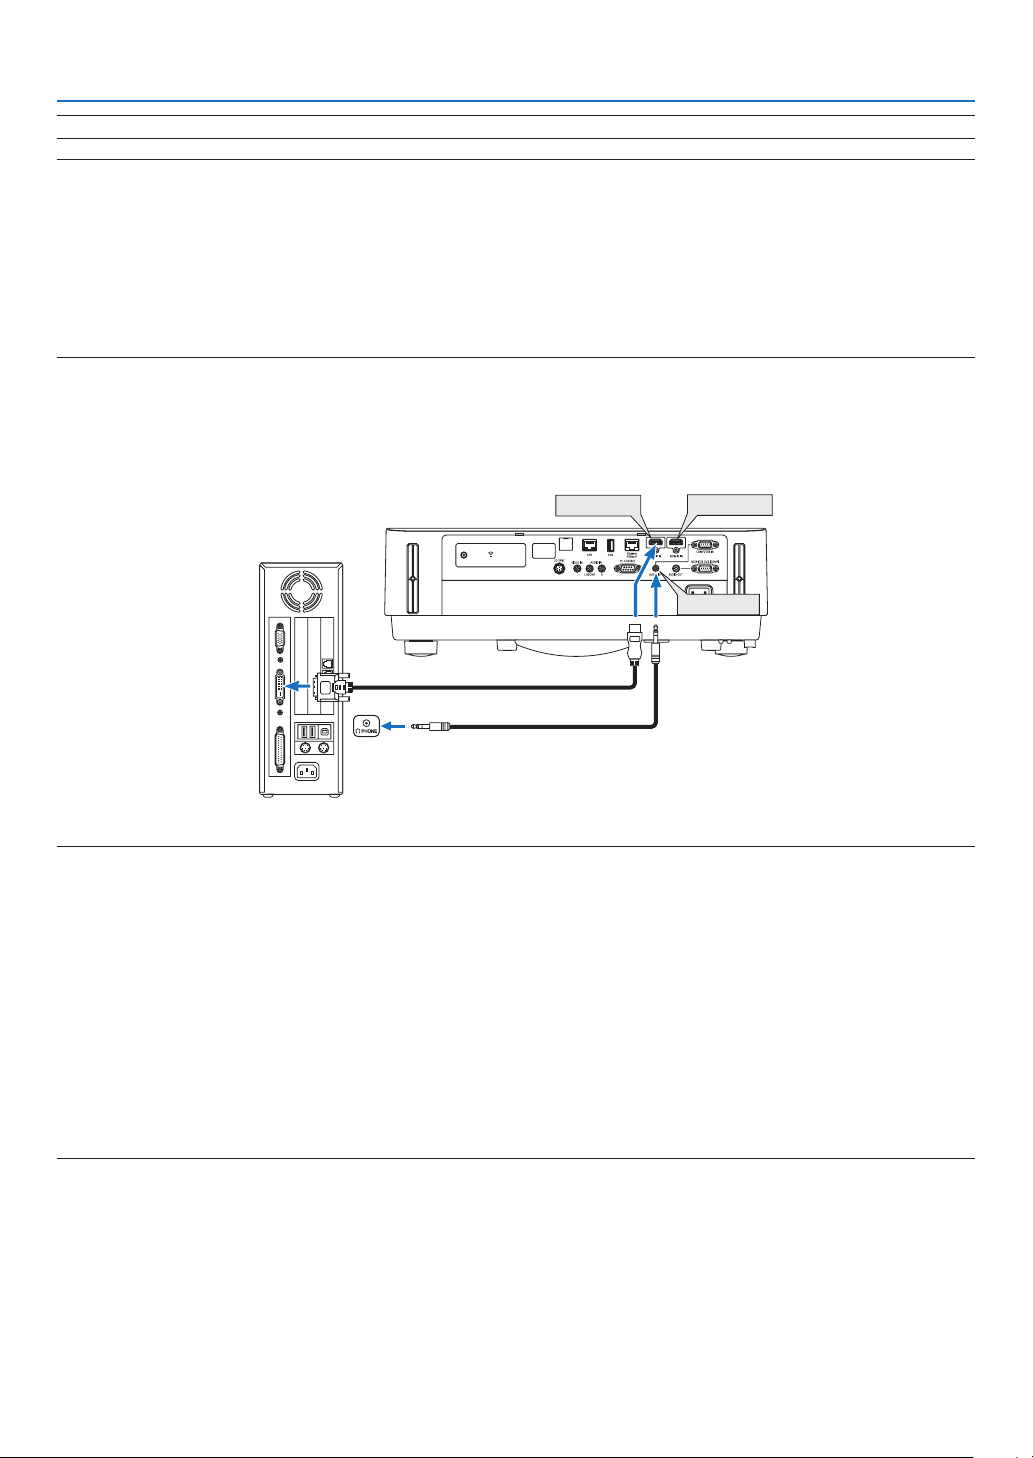
74
5. Installation and Connections
NOTE:TheprojectorisnotcompatiblewithvideodecodedoutputsoftheNECISS-6020switcher.
NOTE:AnimagemaynotbedisplayedcorrectlywhenaVideosourceisplayedbackviaacommerciallyavailablescanconverter.
Thisisbecausetheprojectorwillprocessavideosignalasacomputersignalatthedefaultsetting.Inthatcase,dothefollowing.
*Whenanimageisdisplayedwiththelowerandupperblackportionofthescreenoradarkimageisnotdisplayedcorrectly:
ProjectanimagetollthescreenandthenpresstheAUTOADJ.buttonontheremotecontrolortheprojectorcabinet.
Enabling the computer’s external display
DisplayinganimageonthenotebookPC’sscreendoesnotnecessarilymeanitoutputsasignaltotheprojector.
WhenusingaPCcompatiblelaptop,acombinationoffunctionkeyswillenable/disabletheexternaldisplay.
Usually,thecombinationofthe“Fn”keyalongwithoneofthe12functionkeysgetstheexternaldisplaytocomeonoroff.For
example,NEClaptopsuseFn+F3,whileDelllaptopsuseFn+F8keycombinationstotogglethroughexternaldisplayselections.
CautionswhenusingaDVIsignal
•WhenthecomputerhasaDVIoutputterminal,useacommerciallyavailableconvertercabletoconnectthecomputer
totheprojector’sHDMI1INorHDMI2INterminal(onlydigitalvideosignalscanbeinput).
HDMI 1 IN
HDMI 2 IN
AUDIO IN
NOTE:WhenViewingaDVIDigitalSignal
•Turnoffthepowerofthecomputerandprojectorbeforeconnecting.
•Whenavideodeckisconnectedviaascanconverter,etc.,thedisplaymaynotbecorrectduringfast-forwardingandrewinding.
•UseaDVI-to-HDMIcablecompliantwithDDWG(DigitalDisplayWorkingGroup)DVI(DigitalVisualInterface)revision1.0stan-
dard.
Thecableshouldbewithin197"/5mlong.
•TurnofftheprojectorandthePCbeforeconnectingtheDVI-to-HDMIcable.
•ToprojectaDVIdigitalsignal:Connectthecables,turntheprojectoron,thenselecttheHDMIinput.Finally,turnonyourPC.
Failuretodosomaynotactivatethedigitaloutputofthegraphicscardresultinginnopicturebeingdisplayed.Shouldthishappen,
restartyourPC.
•DonotdisconnecttheDVI-to-HDMIcablewhiletheprojectorisrunning.Ifthesignalcablehasbeendisconnectedandthen
reconnected,animagemaynotbecorrectlydisplayed.Shouldthishappen,restartyourPC.
•TheCOMPUTERvideoinputterminalssupportWindowsPlugandPlay.
•AMacsignaladapter(commerciallyavailable)mayberequiredtoconnectaMaccomputer.
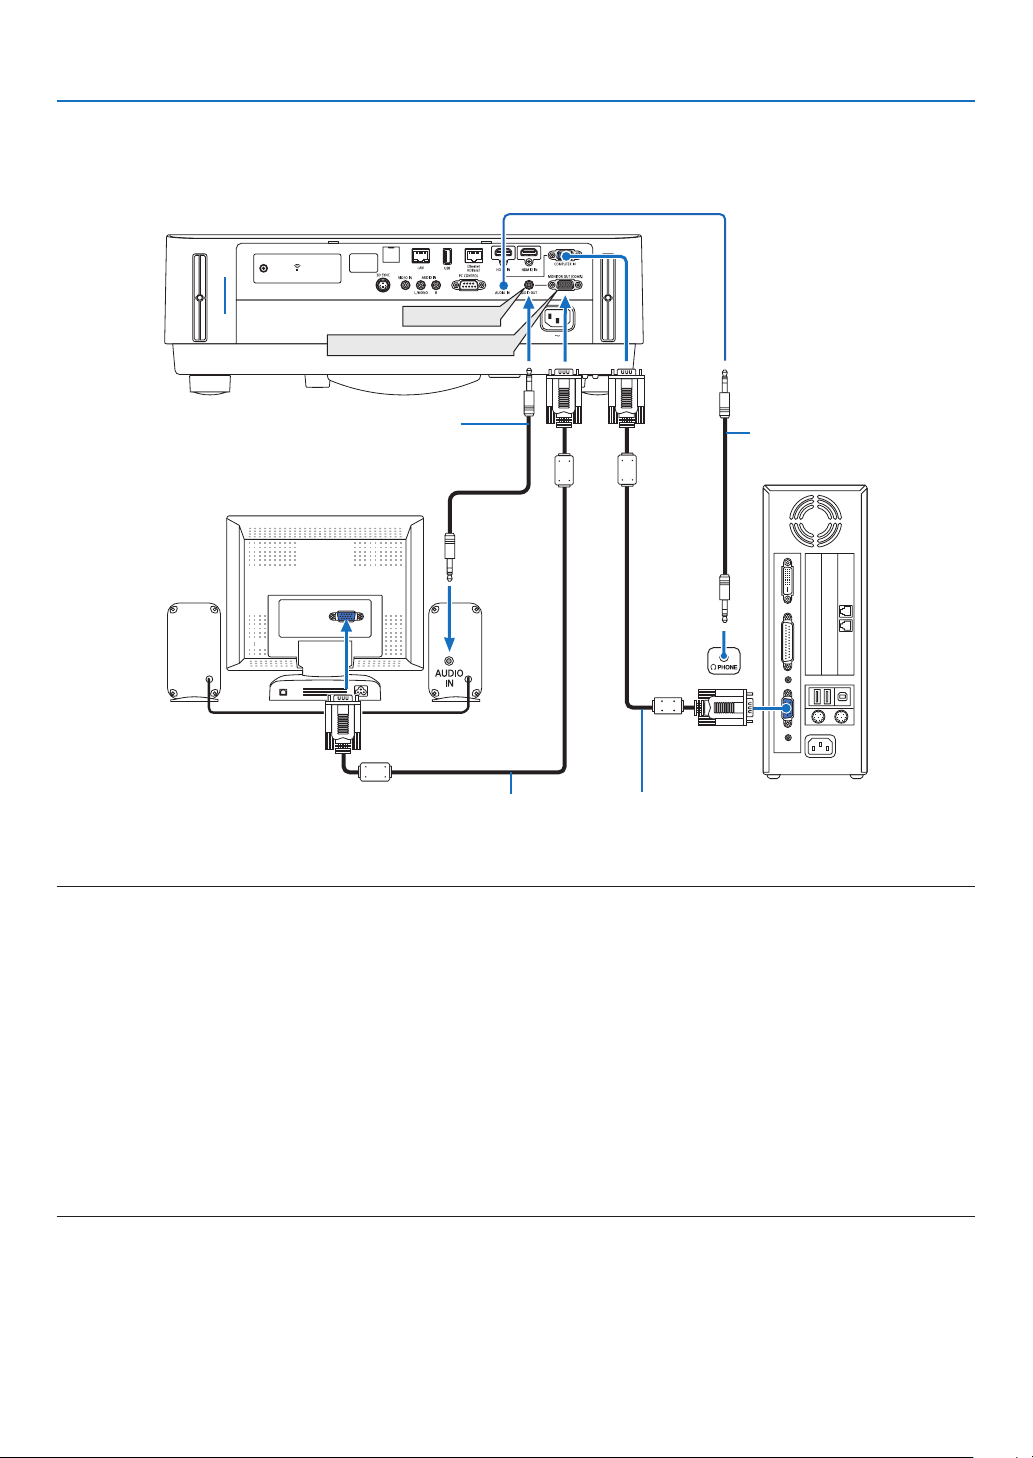
75
5. Installation and Connections
Connecting an External Monitor
Youcanconnectaseparate,externalmonitortoyourprojectortosimultaneouslyviewonamonitorthecomputer
analogimageyou’reprojecting.
AUDIO OUT
MONITOR OUT (COMP.)
Computer cable (VGA) (supplied)
Stereo mini-plug audio cable (not supplied)
Stereo mini-plug audio cable
(not supplied)
Computer cable (VGA) (not supplied)
NOTE:
•TheAUDIOOUTminijackdoesnotsupportHeadphoneterminal.
•Whenaudioequipmentisconnected,theprojectorspeakerisdisabled.
•ThesignaloutputfromtheMONITOROUT(COMP.)ofthisprojectorisforprojectingimageonexclusiveonedisplay.
•Whennosignalisappliedover3minutesintheconditionofprojectorstandbywhenNETWORKSTANDBYissetintheStandby
mode,outputfromtheMONITOROUT(COMP.)orAUDIOOUTterminalwillbestopped.Inthiscasepulloutthecomputercable
andsetitbackafterinputtingvideosignal
Monitoroutandsleepmode:
•TheMONITOROUT(COMP.)terminalwillnotworkwhen[NORMAL]isselectedfor[STANDBYMODE].
TheMONITOROUT(COMP.)terminalwillworkonlyinthesleepmode.
ApplyingasignalfromtheCOMPUTERINterminalwillputtheprojectorinthesleepmode,whichallowsyoutousetheMONITOR
OUT(COMP.)terminalandtheAUDIOOUTminijack.
Thesleepmodeisoneofthestandbymodes.Thesleepmodecannotbeselectedfromthemenu.
•Inthenetworkstandbymode,soundforthelastviewedcomputerorvideosourcewillbeheard.
BNC-to-COMPUTERINterminalconvertedsignalwillnotbeoutputinthestandbymodeandsleepmode.
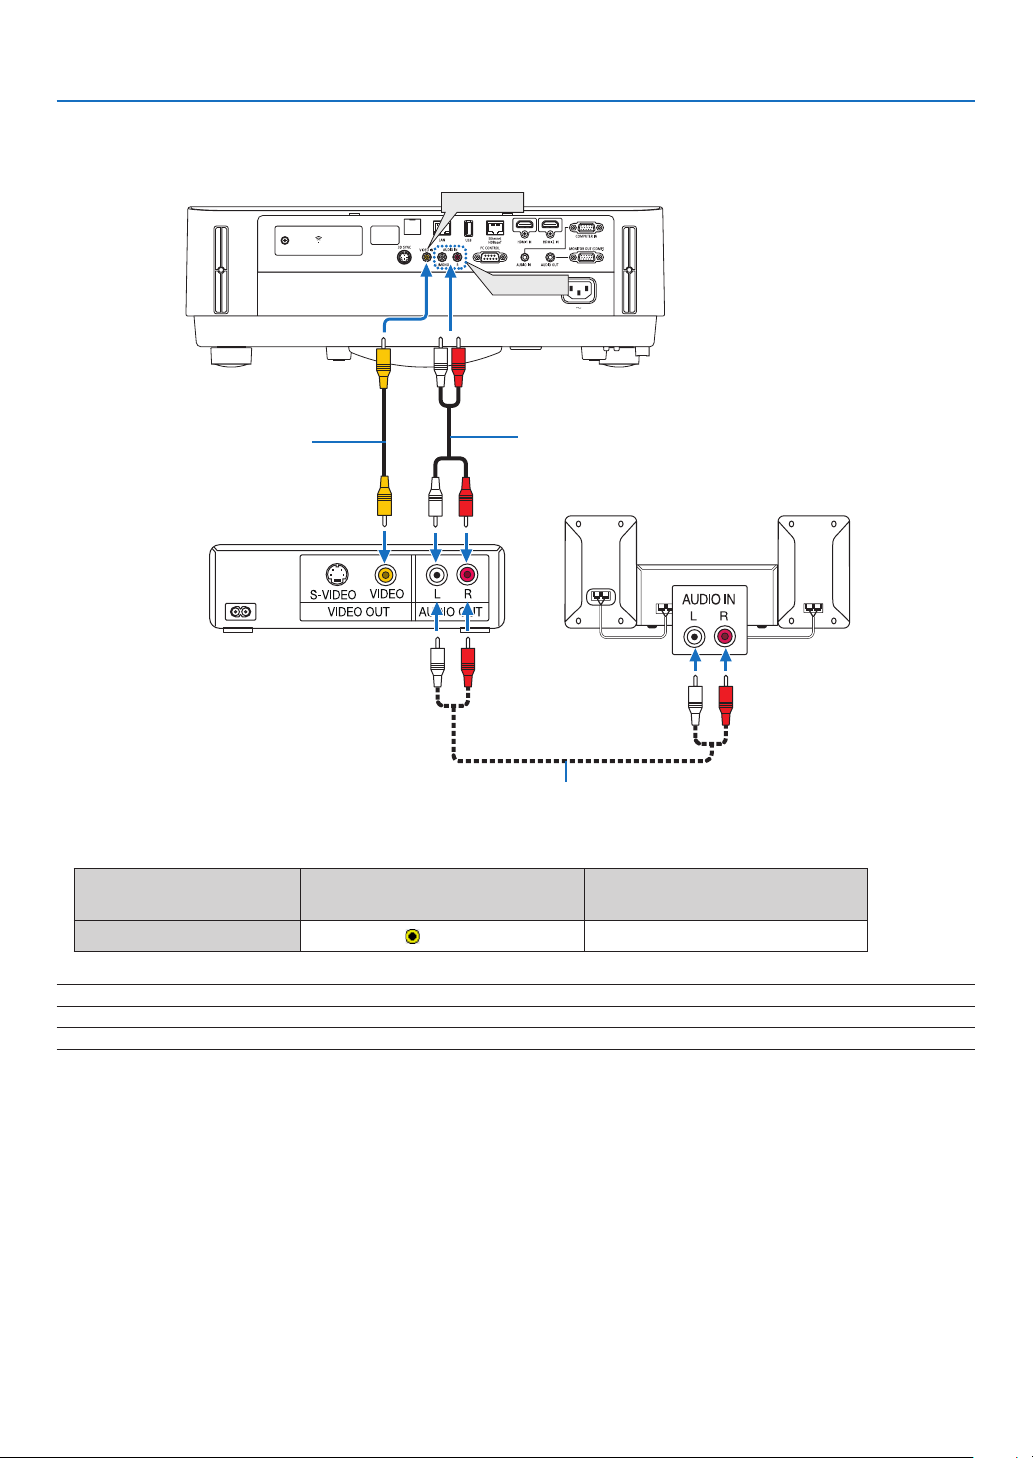
76
5. Installation and Connections
Connecting Your DVD Player or Other AV Equipment
ConnectingVideoInput
VIDEO IN
AUDIO IN
Audio cable (not supplied)
Video cable (not supplied)
Audio cable (not supplied)
Audio equipment
•Selectthesourcenameforitsappropriateinputterminalafterturningontheprojector.
Inputterminal
SOURCEbuttonontheprojector
cabinet
Buttonontheremotecontrol
VIDEOIN
VIDEO
(VIDEO)
NOTE:RefertoyourVCRowner’smanualformoreinformationaboutyourequipment’svideooutputrequirements.
NOTE:AnimagemaynotbedisplayedcorrectlywhenaVideosourceisplayedbackinfast-forwardorfast-rewindviaascanconverter.
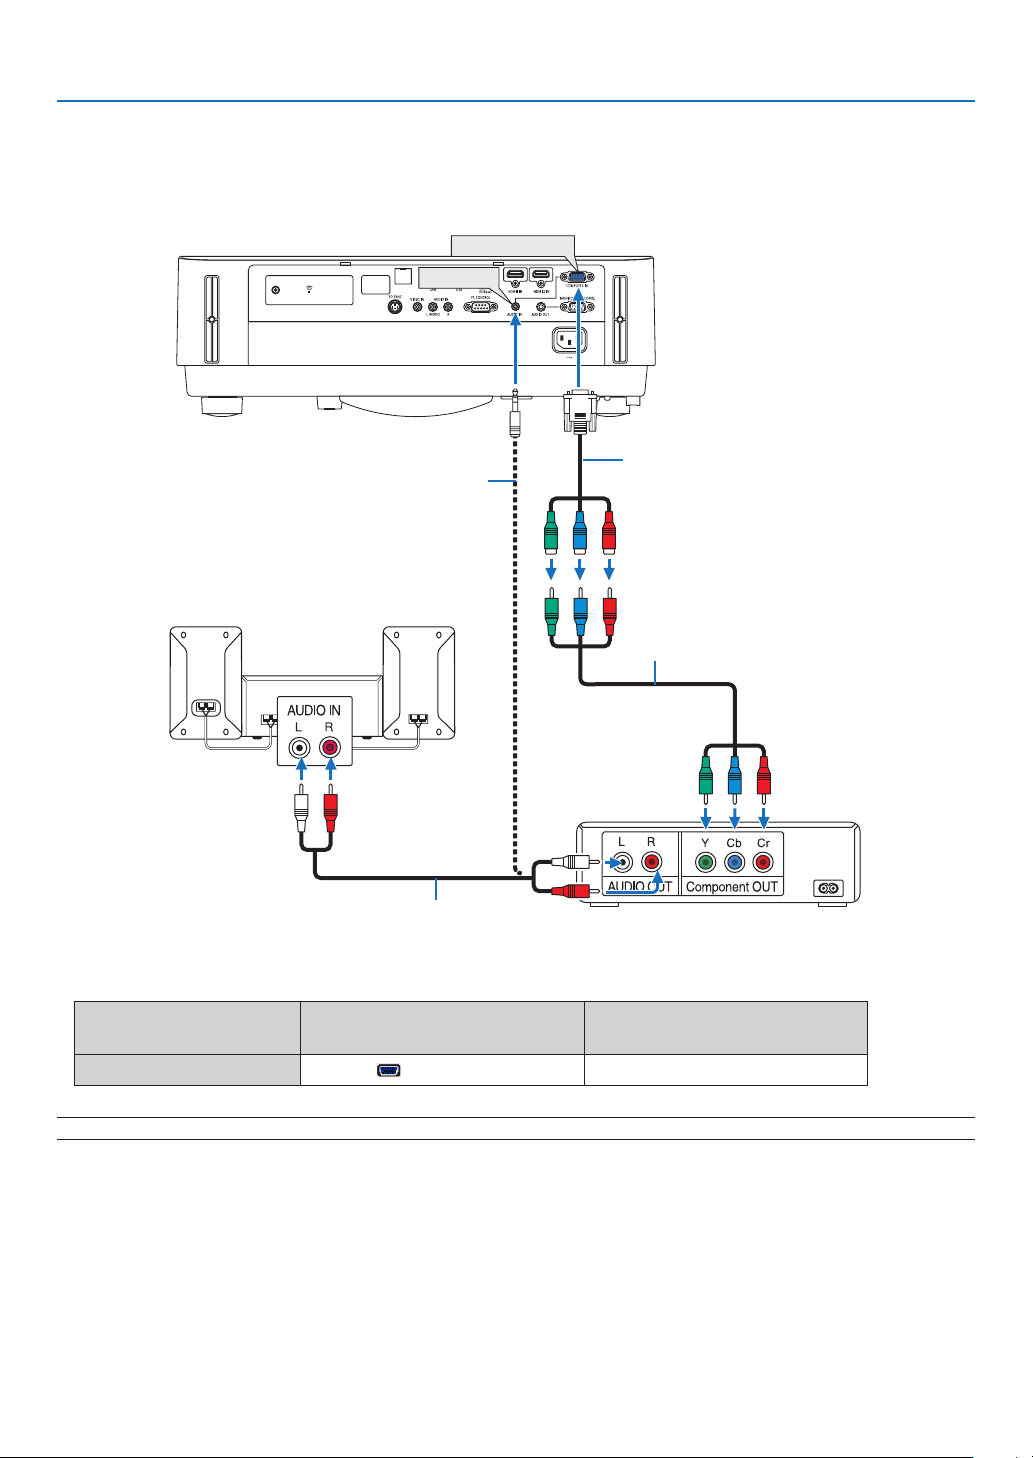
77
5. Installation and Connections
Connecting Component Input
Connectionforcomponentsignal.SignalfromthecolordifferencesignaloutputterminalonDVDplayers(DVDvideo
output)andtheYPbProutputterminalontheHi-visionvideocanbeprojected.Recommendtoconnecttheterminal
foraudiooutputontheDVDplayertotheaudiocomponents.
COMPUTER IN
AUDIO IN
15-pin - to - RCA (female) × 3 cable adapter
(ADP-CV1E)
Stereo mini plug - to - RCA audio cable (not supplied)
Component video RCA × 3 cable (not supplied)
Audio cable (not supplied)
DVD player
Audio Equipment
•Selectthesourcenameforitsappropriateinputterminalafterturningontheprojector.
Inputterminal
SOURCEbuttonontheprojector
cabinet
Buttonontheremotecontrol
COMPUTERIN
COMPUTER(COMPUTER1)
NOTE:RefertoyourDVDplayer’sowner’smanualformoreinformationaboutyourDVDplayer’svideooutputrequirements.
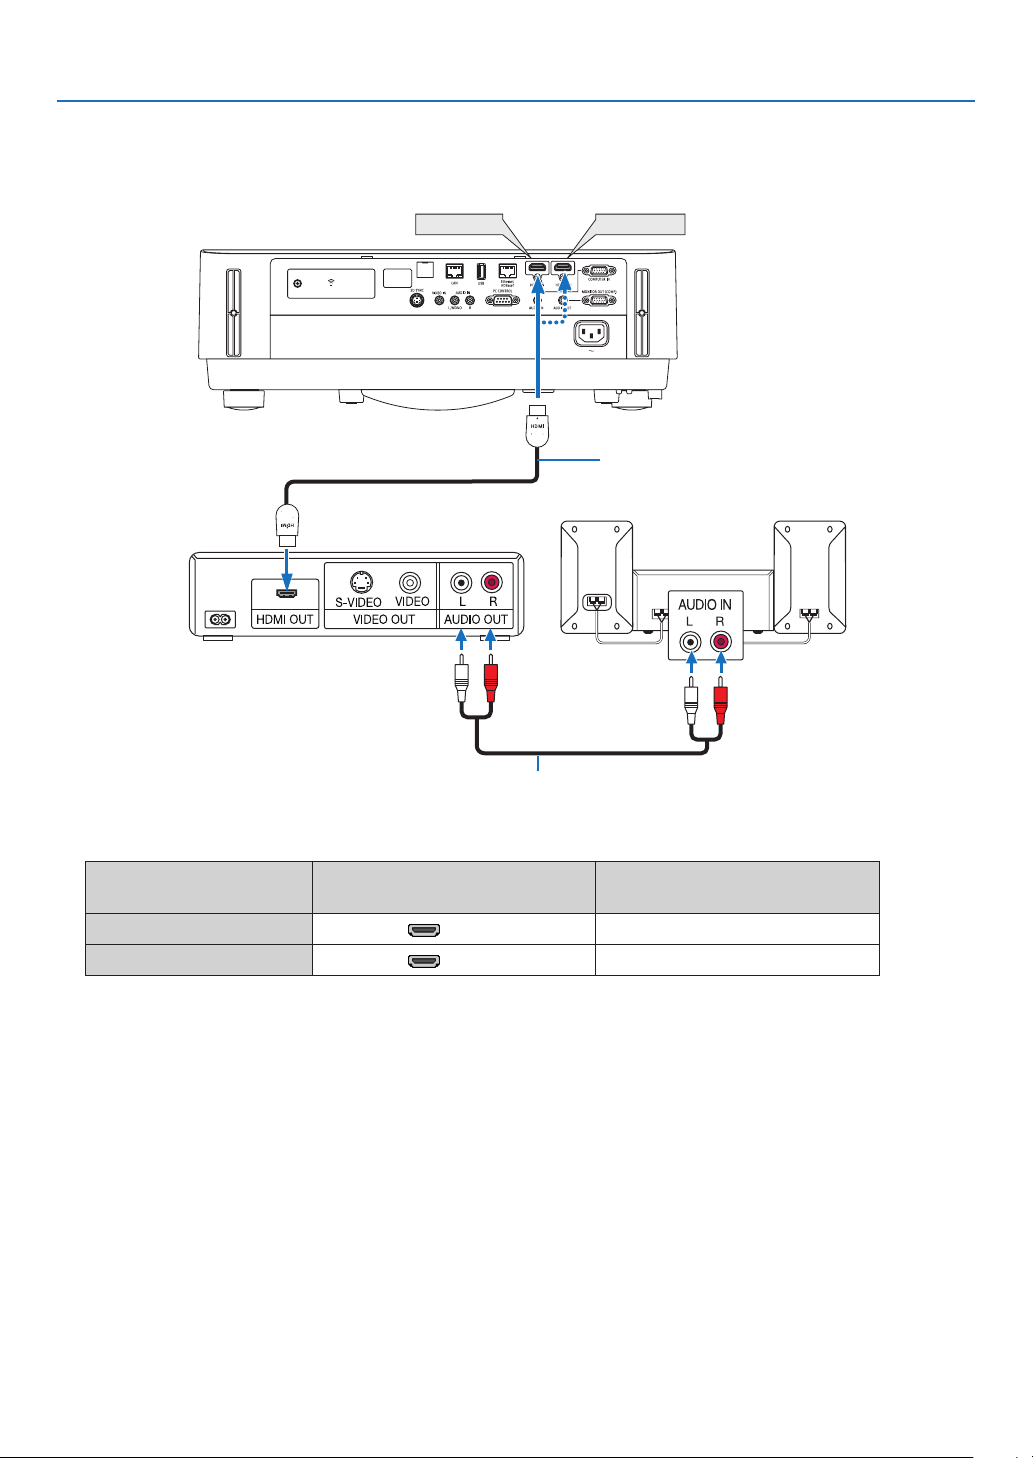
78
5. Installation and Connections
Connecting HDMI Input
YoucanconnecttheHDMIoutputofyourDVDplayer,harddiskplayer,Blu-rayplayer,ornotebooktypePCtothe
HDMIINterminalofyourprojector.
HDMI 1 IN
HDMI 2 IN
HDMIcable(notsupplied)
UseHighSpeedHDMI
®
Cable.
Audio cable (not supplied)
•Selectthesourcenameforitsappropriateinputterminalafterturningontheprojector.
Inputterminal
SOURCEbuttonontheprojector
cabinet
Buttonontheremotecontrol
HDMI1IN
HDMI1(HDMI1*)
HDMI2IN
HDMI2(HDMI2*)
•WhenconnectingtheHDMI1INterminal(orHDMI2INterminal)oftheprojectortotheDVDplayer,theprojec-
tor’svideolevelcanbemadesettingsinaccordancewiththeDVDplayer’svideolevel.Inthemenuselect[HDMI
SETTINGS]→[VIDEOLEVEL]andmakenecessarysettings.
•IftheHDMIinputsoundcannotbeheard,inthemenuselect[AUDIOSELECT]→[HDMI1]or[HDMI2].(→page
59)
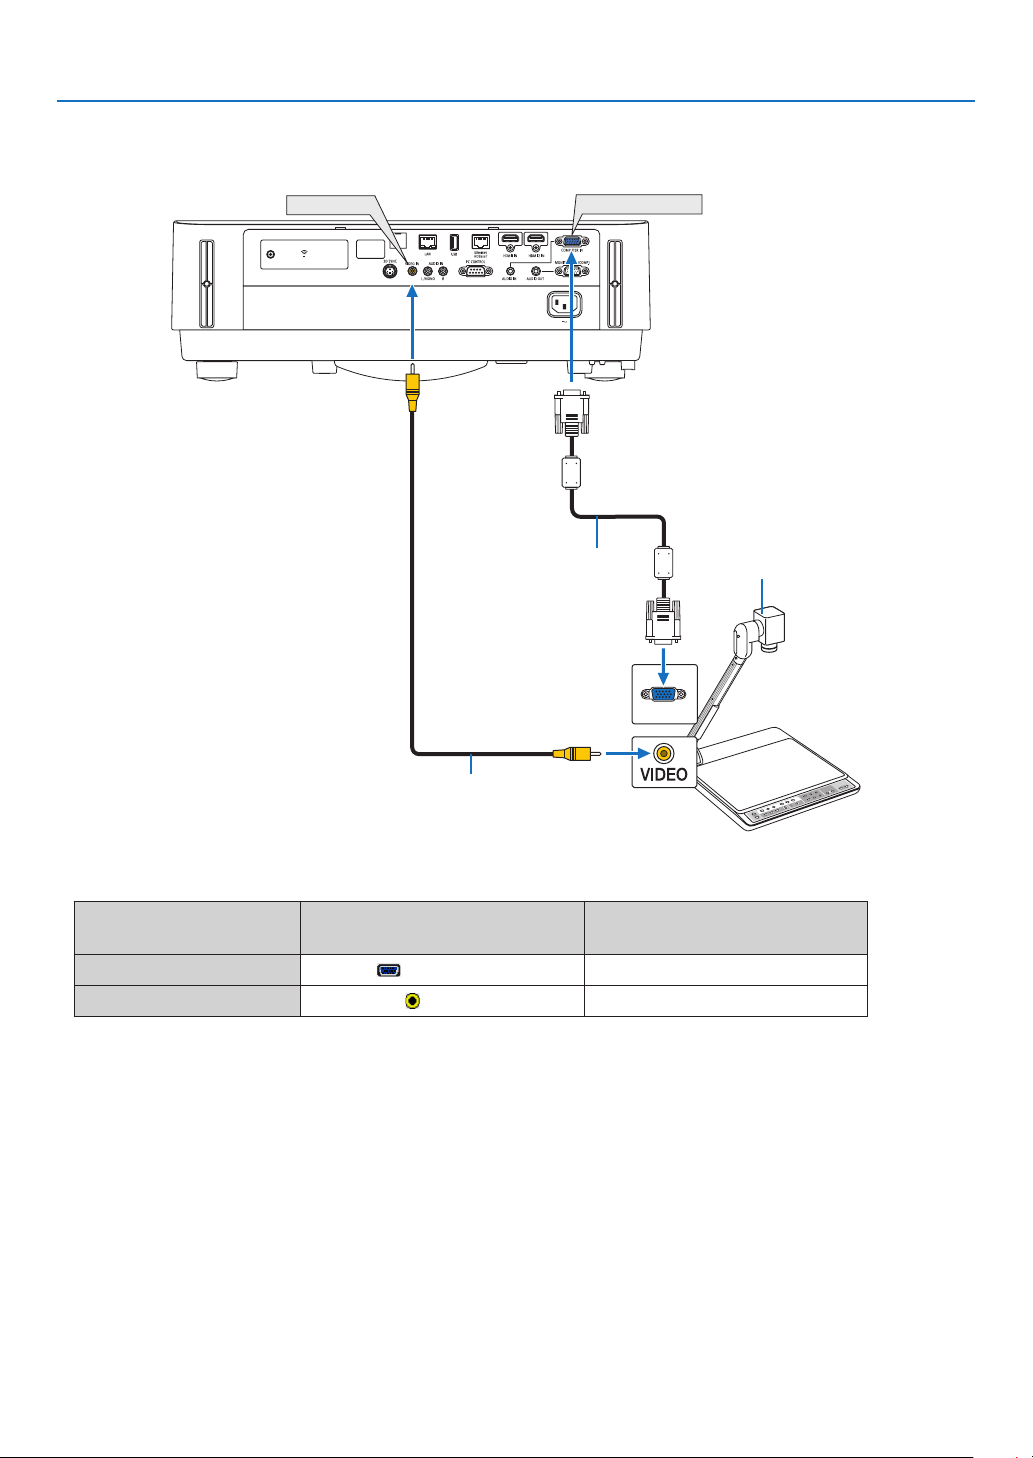
79
5. Installation and Connections
Connecting your document camera
Youcanconnectyourdocumentcameraandprojectprinteddocuments,etc.
COMPUTER IN
VIDEO IN
Name, position, and direction of
terminals are vary depending on
cameramodel.Pleasecheckuser's
manual of your camera for details.
Computer cable (VGA)
(supplied)
Video cable (not supplied)
•Selectthesourcenameforitsappropriateinputterminalafterturningontheprojector.
Inputterminal
SOURCEbuttonontheprojector
cabinet
Buttonontheremotecontrol
COMPUTERIN
COMPUTER(COMPUTER1)
VIDEOIN
VIDEO
(VIDEO)
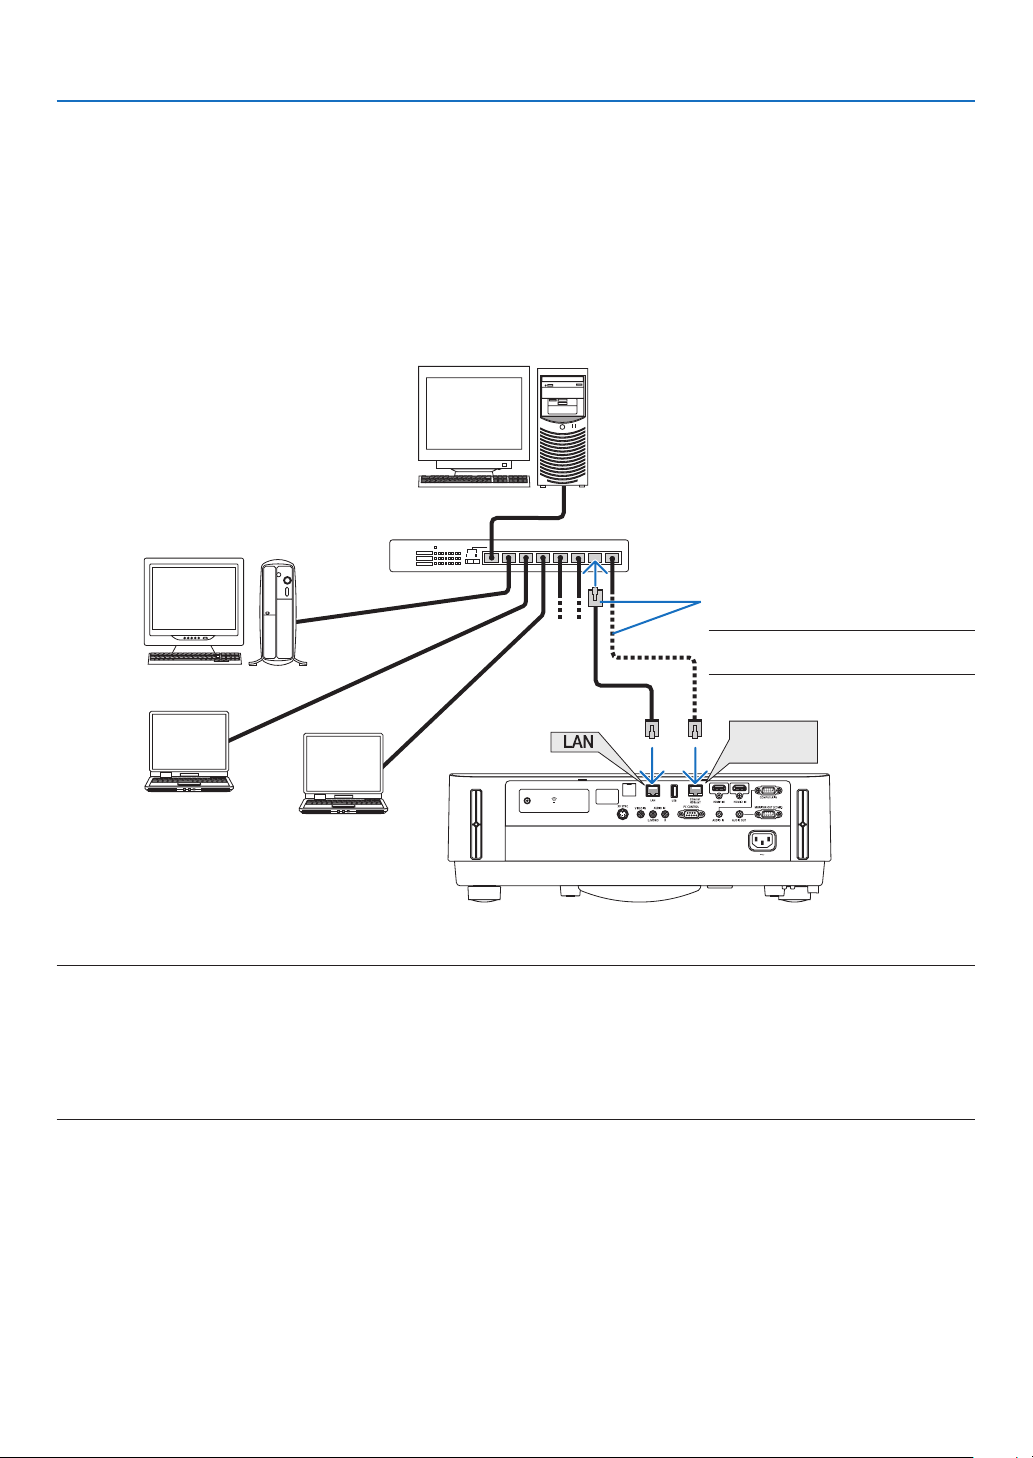
80
5. Installation and Connections
Connecting to a Wired LAN
TheprojectorcomesstandardwiththeEthernet/HDBaseTport(RJ-45)andtheLANportwhichprovideaLANcon-
nectionusingaLANcable.
TouseaLANconnection,youarerequiredtosetthewiredLANsettingsontheprojectormenu.Select[SETUP]→
[INSTALLATION]→[NETWORKSETTINGS].(→page
57).
ThenetworksettingscanalsobeselectedfromtheAPPSmenu.
ExampleofLANconnection
ExampleofwiredLANconnection
Ethernet
HDBaseT
Server
Hub
LAN cable (not supplied)
NOTE:UseaCategory5orhigher
LANcable.
NOTE:
•Abouttheprojector’sEthernet/HDBaseTandLANports
TheEthernet/HDBaseTandLANportsarethesame,asidefromtheHDBaseTfunction.ToconnecttotheLAN,useonly1ofthe
ports(itisnotpossibletoconnectbothportstotheLAN).
ForcontrollingtheprojectorbyaHDBaseTtransmitterwhosecontrolsignalisnotsupported(orwithwhichcannotconnectthe
projector)oroverthenetwork,connecttotheLANport.Atthesametime,forcontrollingtheprojectoroverthenetworkthatis
inthestateoftheNETWORKSTANDBYOn,connecttotheLANport.
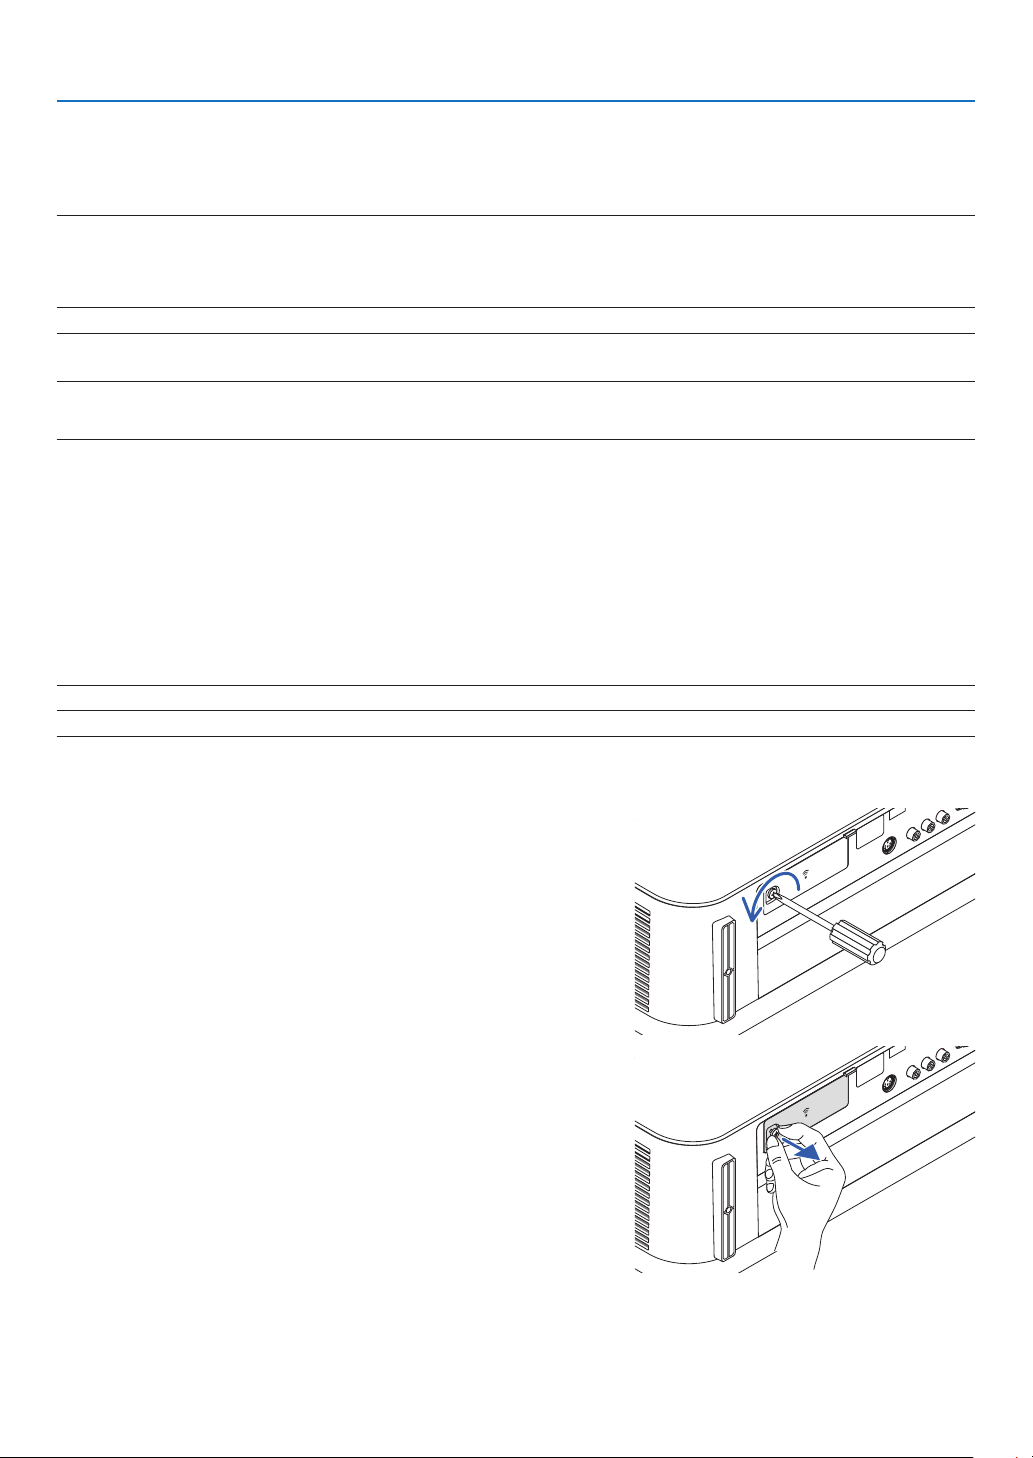
81
5. Installation and Connections
Connecting to a Wireless LAN (Optional: NP05LM series)
TheUSBWirelessLANUnitalsoprovidesawirelessLANconnection.TouseawirelessLANconnection,youare
requiredtoassignanIPaddresstotheprojector.
Important:
•IfyouusetheprojectorwiththeUSBWirelessLANUnitintheareawheretheuseofwirelessLANequipmentisprohibited,remove
theUSBWirelessLANUnitfromtheprojector.
•BuytheappropriateUSBWirelessLANUnitforyourcountryorarea.
NOTE:
•Yourcomputer’swirelessLANadapter(orunit)mustbecompliedwithWi-Fi(IEEE802.11a/b/g/n)standard.
AttachingtheUSBWirelessLANUnit
NOTE:
•TheUSBWirelessLANUnitmustbeinsertedintotheUSBWirelessLANUnitportinthecorrectdirection.Itcannotbeinserted
inthereversedirection.IftheUSBWirelessLANUnitisinsertedinthereversedirectionwithexcessiveforceapplied,theUSB
portmaybreak.
•BeforetouchingtheUSBWirelessLANUnit,touchametallicobject(suchasadoorknoboraluminumwindowframe)todischarge
thestaticelectricityfromyourbody.
•AlwaysinsertorremovetheUSBWirelessLANunitwhenthemainpoweristurnedoff.Failuretodosomaycauseprojector
malfunctionordamagetotheUSBwirelessLANunit.Iftheprojectorwillnotworkcorrectly,turnofftheprojector,disconnect
thepowercord,andthenconnectitagain.
•DonotinsertotherUSBdevicesintotheUSB(wirelessLAN)portinthewirelessLANcover.DonotinserttheUSBWirelessLAN
unitintotheUSBport.
NOTE:Whenthecablecoverisattached,removeitbeforeinsertingtheUSBWirelessLANUnit.
1. Press the POWER button to turn off the projector and set it
into standby condition, and disconnect the power cord.
2. Remove the wireless LAN cover.
(1)Turnthescrewcounterclockwiseuntilitturnsfreely.
(2) Hold the head of the screw and remove.
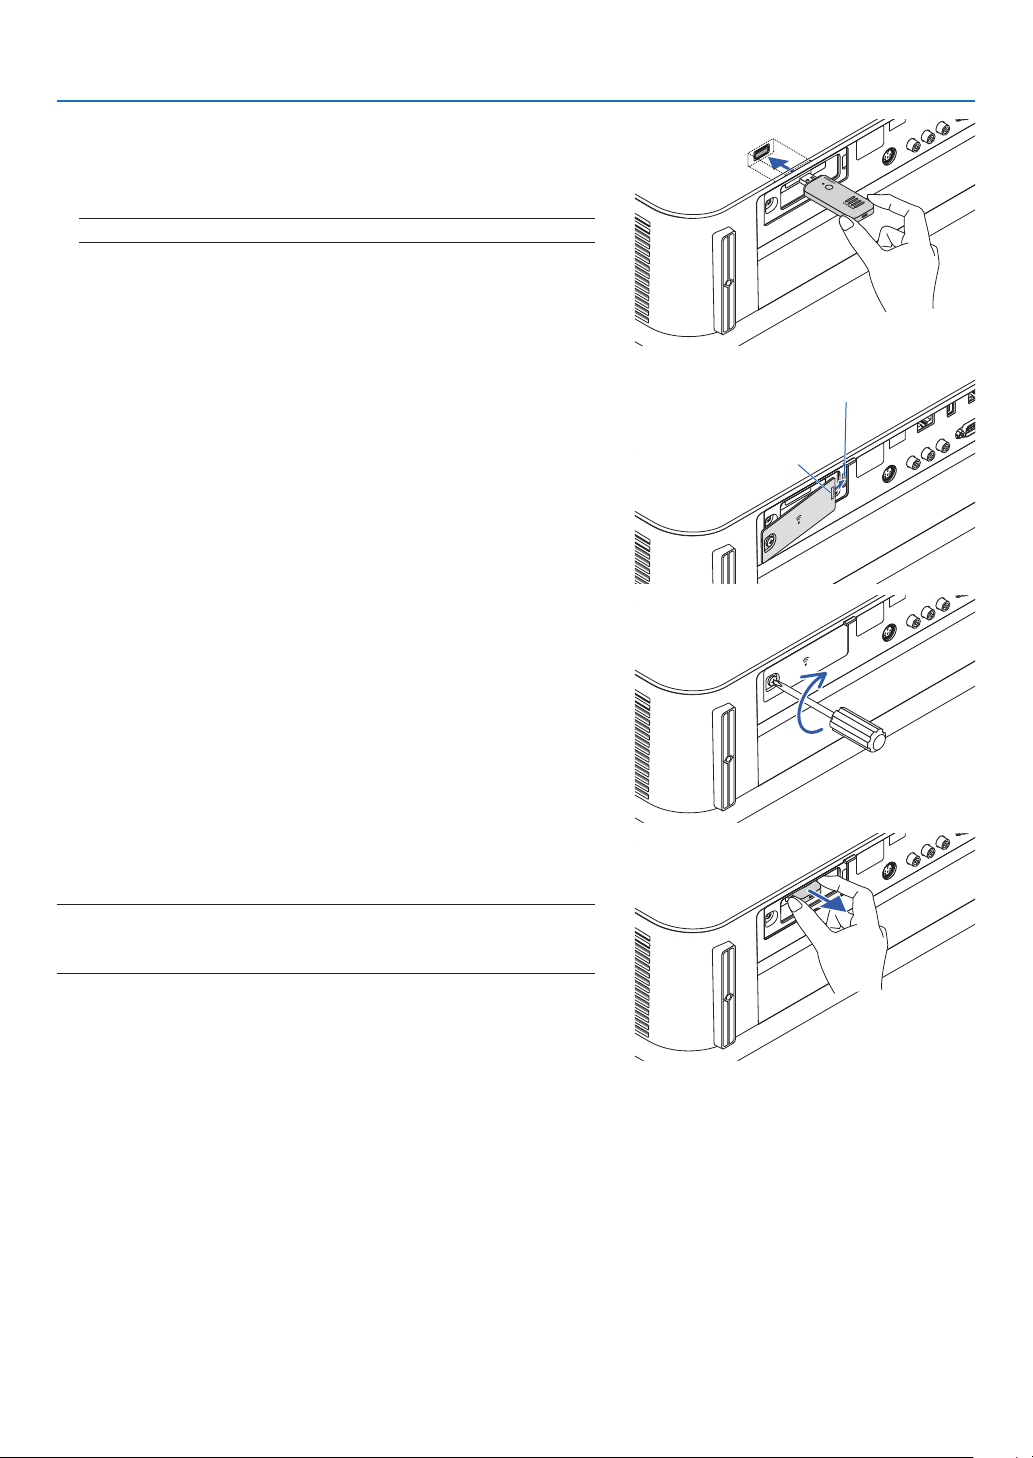
82
5. Installation and Connections
3. Insert the wireless LAN unit into the USB (wireless LAN) port
with the side containing the indicator facing up.
•SlowlyslidethewirelessLANunitleftandright,upanddown,
checkingtheinsertionslotasyoupushtheunitin.
NOTE:DonotforcetoinserttheUSBWirelessLANUnit.
4. Mount the wireless LAN cover.
(1)Insertthehookonthebackofthecoverintothegrooveinthe
projector and close the wireless LAN cover.
Groove
Hook
(2)Turnthescrewclockwisetotightenit.
* To remove the USB Wireless LAN Unit, disconnect the power
cord and use the above procedure.
NOTE:
•DonotpressthebuttonontheUSBWirelessLANUnit.Thebuttondoes
notworkwiththismodel.
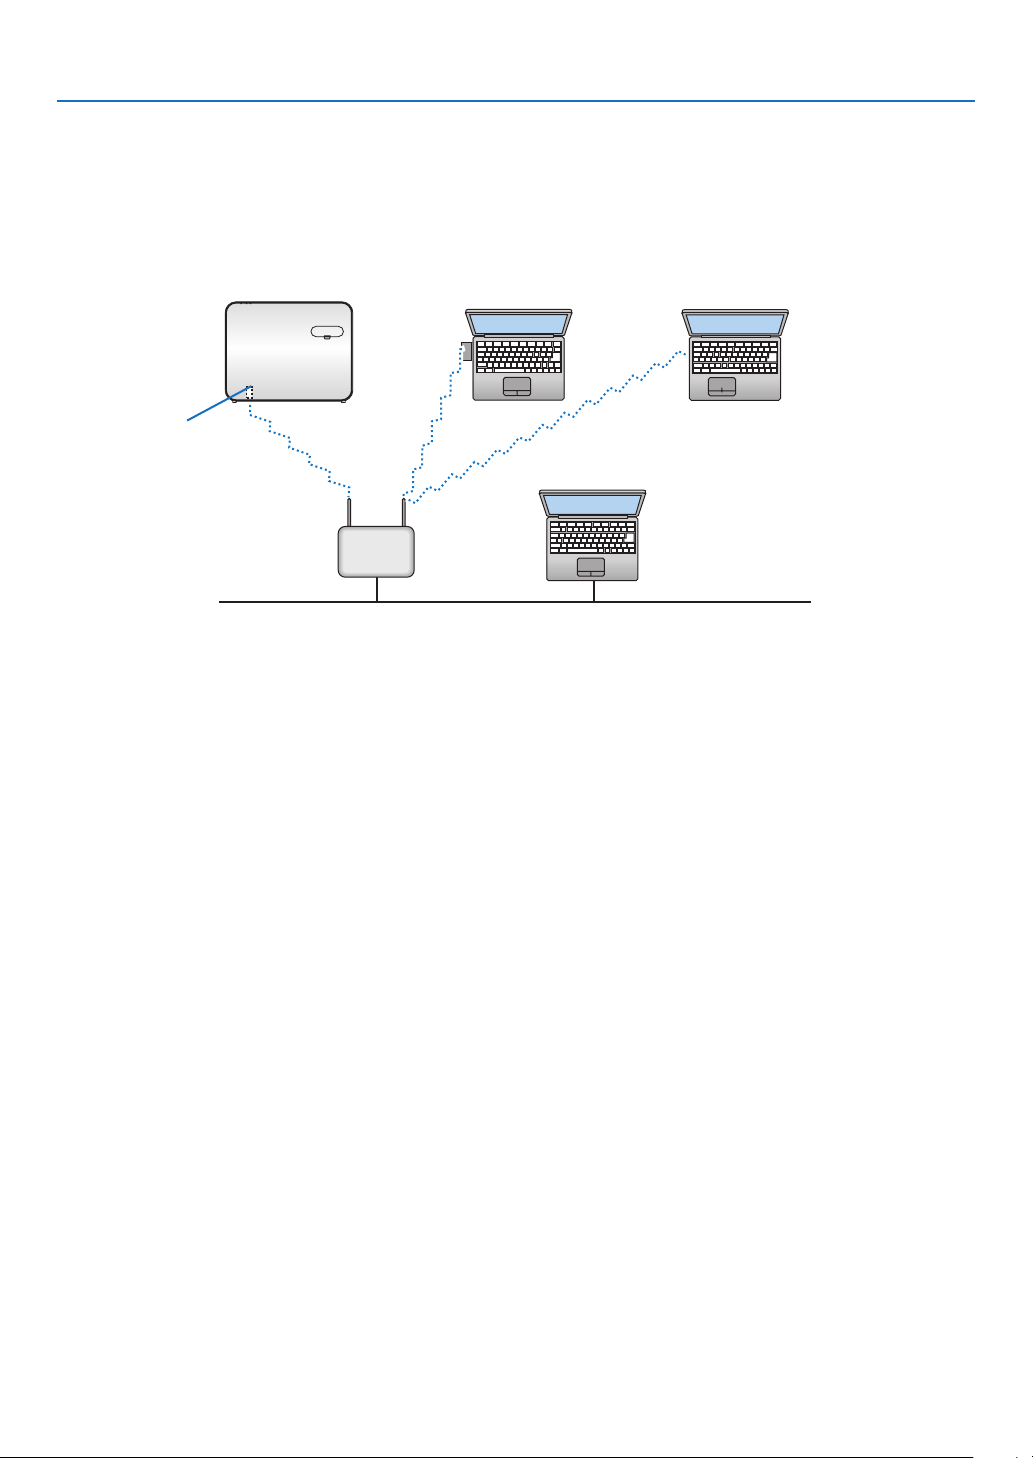
83
5. Installation and Connections
ExampleofwirelessLANconnection
TouseaLANconnection,youarerequiredtosettheWirelessLANsettingsontheprojectormenu.Select[SETUP]
→[INSTALLATION]→[NETWORKSETTINGS].(→page57).
ThenetworksettingscanalsobeselectedfromtheAPPSmenu.
PC with wireless LAN card
inserted
PC with built-in wireless
LAN function
Wired LAN
Wireless access point
USB Wireless LAN Unit
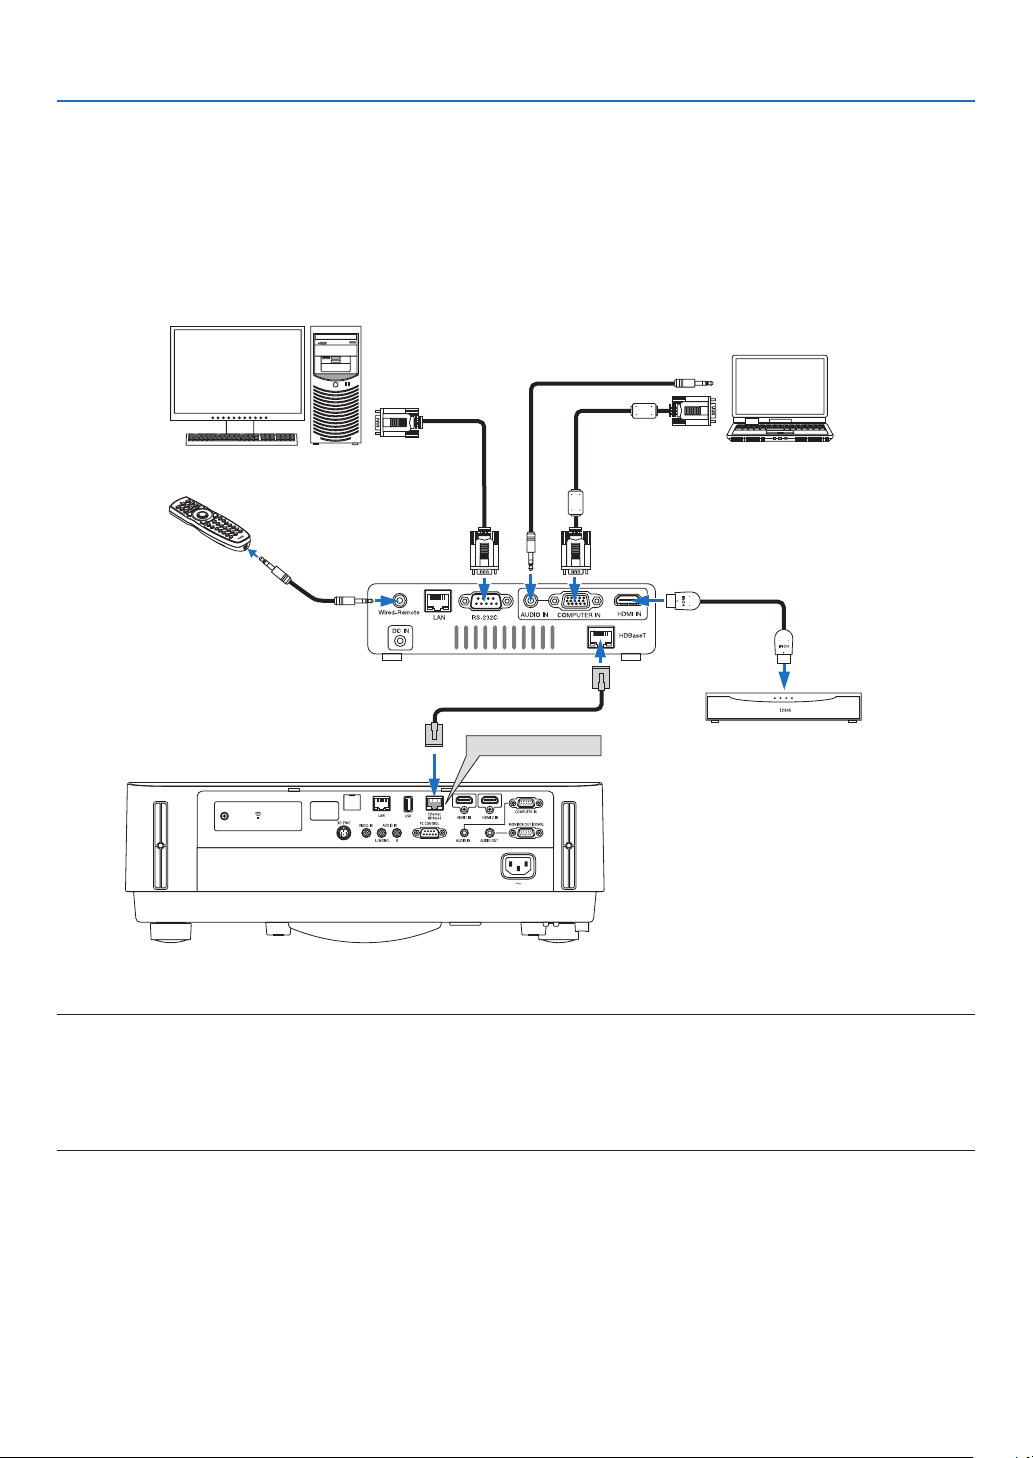
84
5. Installation and Connections
Connecting to a HDBaseT transmission device (sold commercially)
HDBaseTisaconnectionstandardforhomeappliancesthatisestablishedbytheHDBaseTAlliance.
UseaLANcablesoldcommerciallytoconnecttheEthernet/HDBaseTportoftheprojector(RJ-45)toaHDBaseT
transmissiondevicesoldcommercially.
Controlsignals(serialandLAN)andremotecontrolsignals(IRcommands)fromanexternaldeviceareonlysupported
whentheprojector’spoweristurnedon.
Connection example
Ethernet/HDBaseT
Computer (for control use) Computer (for output use)
Example of a transmission device
Remote control
HDMIoutputvideodevice
NOTE:
•Pleaseuseashieldedtwistedpair(STP)cableofCategory5eorhigherfortheLANcable(soldcommercially).
•ThemaximumtransmissiondistanceovertheLANcableis100m.
•Pleasedonotuseothertransmissionequipmentbetweentheprojectorandtransmissionequipment.Thepicturequalitymaybe
deterioratedasaresult.
•ThisprojectorisnotguaranteedtoworkwithallHDBaseTtransmissiondevicessoldcommercially.
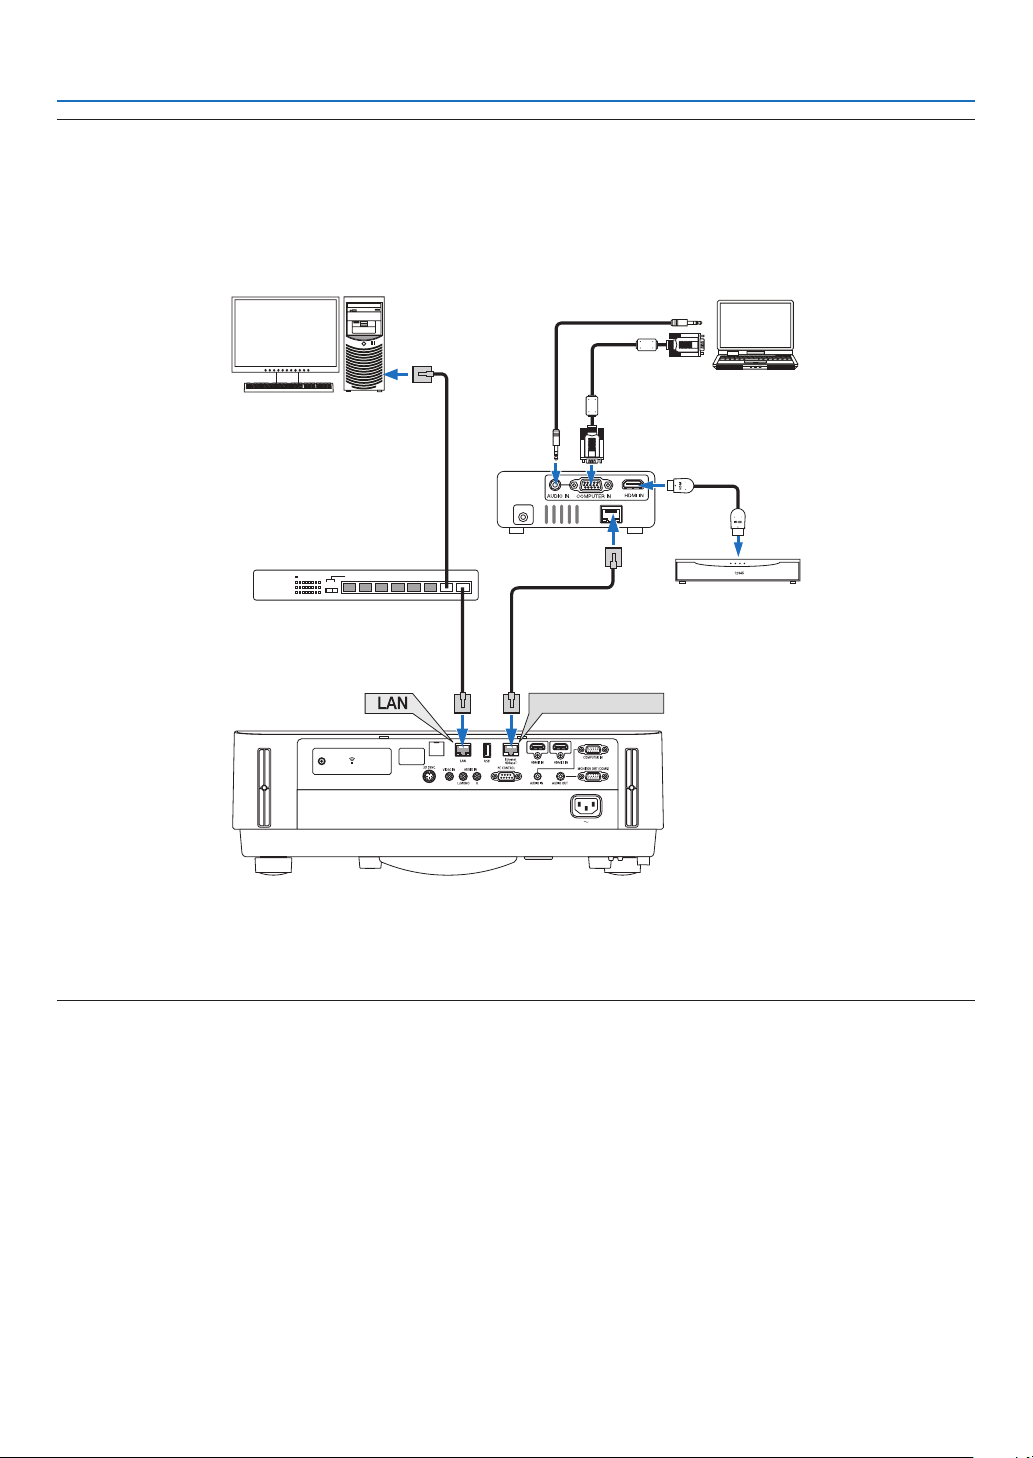
85
5. Installation and Connections
TIP:
•Withtheprojector’sEthernet/HDBaseTport,remotecontrolisnotavailablewhentheprojectorisinthestandbymode(serial
communicationsisnotavailable).(Remotecontrolbecomesavailablewhentheprojector’spowerison).The2(two)methods
belowcanbeusedtoturnontheprojector’spowerwhenitisinstandbymode.
1.Theprojectorcanbeoperatedbyconnectingthecomputerandprojectortothenetwork(ontheprojector,usingtheLANport
andPCControlUtilityapplicationwith[STANDBYMODE]setto[NETWORKSTANDBY](→page101).
DC IN
HDBaseT
Ethernet/HDBaseT
Computer (for projector control)
Computer (for output)
Example of a transmitter
Switching hub, etc.
VideodevicewithHDMIoutput
2.TheprojectorcanbeoperatedbyRS232Cserialcommunication(Onthisprojector,usethePCCONTROLterminalandthe
applicationsoftware,PCControlUtilityandselect[PCCONTROL]forthe[SERIALPORT])with[STANDBYMODE]setto[NET-
WORKSTANDBY].

86
5. Installation and Connections
Portrait projection (vertical orientation)
Portraitscreensfromacomputercanbeprojectedbyinstallingtheprojec-
torinaverticalorientation.Allthescreenssuchastheon-screenmenu
willberotatedinancounter-clockwisedirection.
Theprojectorisequippedwithasensortoautomaticallydetecttheinstal-
lationstate.
Precautionsduringinstallation
•Pleasedonotinstalltheprojectorinaverticalorientationontopoftheoorortableonitsown.Theintakevent
maybeobstructed,resultingintheprojectorgettingwarmandthepossibilityofreandmalfunctionoccurring.
•Forverticalinstallation,installtheprojectorwiththeintakeventfacingdownwards.Astandforsupportingthe
projectorneedstobemadeforthispurpose.Inthiscase,thestandmustbedesignedsuchthatthecenterof
gravityoftheprojectorislocatedwellwithinthelegsofthestand.Ifnot,theprojectormayfalloverandresult
ininjury,damageandmalfunction.
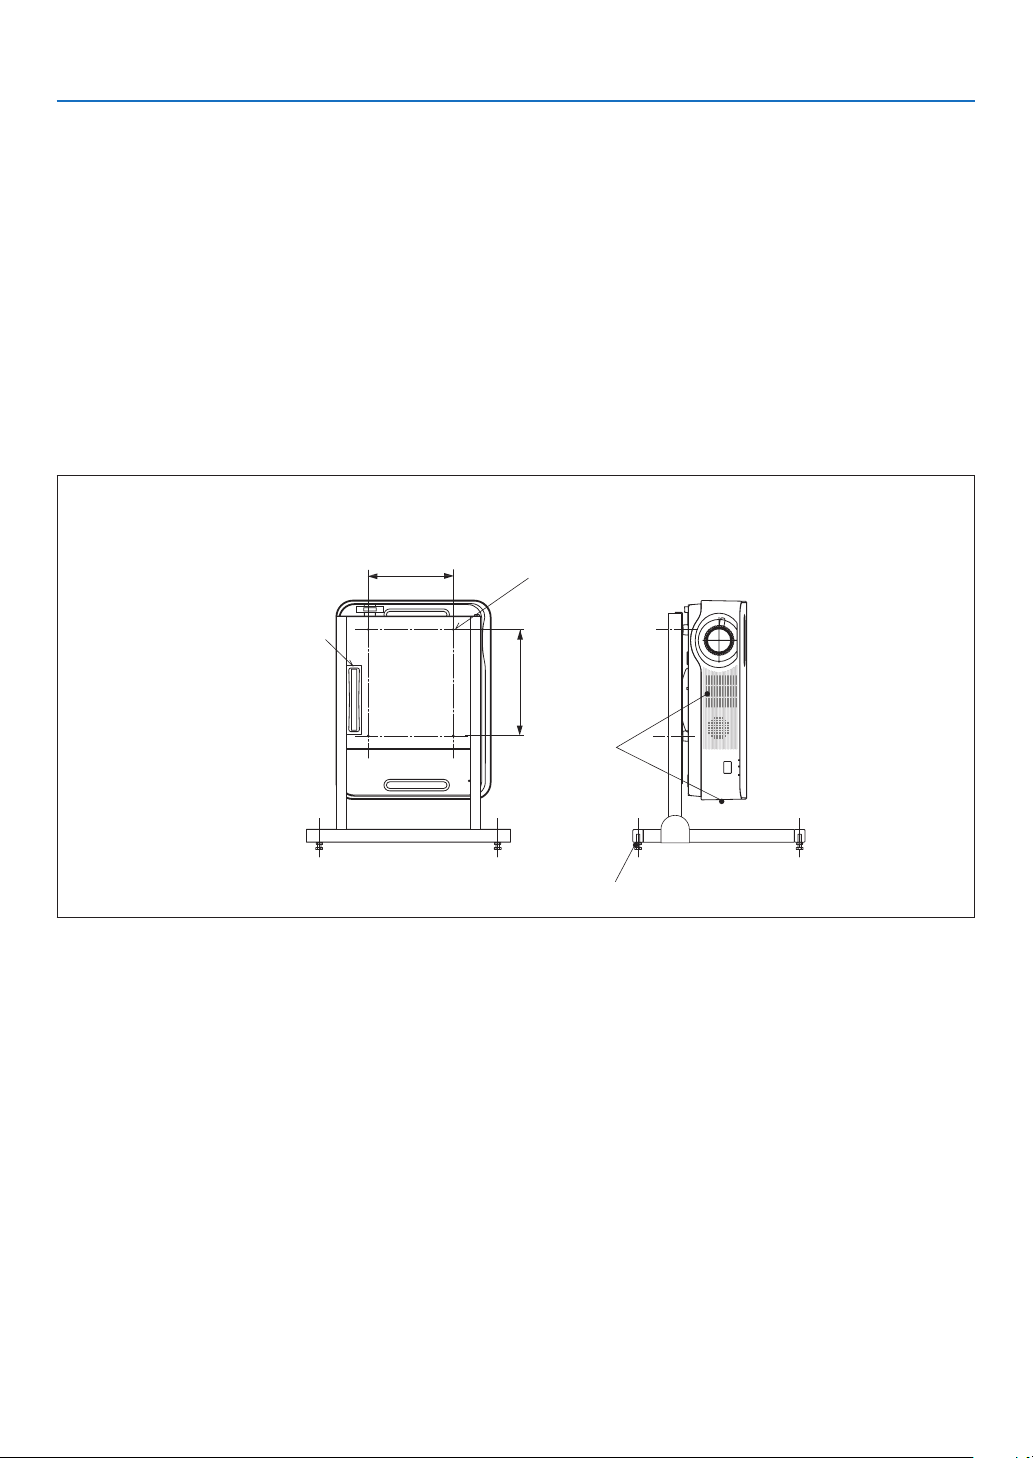
87
5. Installation and Connections
Designandmanufacturingconditionsforthestand
Pleaseengageaninstallationserviceproviderforthedesignandmanufactureofthecustomizedstandtobeusedfor
portraitprojection.Pleaseensurethatthefollowingarecompliedwithwhendesigningthestand.
1. Maintainadistanceofatleast100mmbetweentheprojectorintakeventandtheoor.
Donotobstructtheintakeventatthefrontoftheprojector.
2. Usethefourscrewholesonthebottomfaceoftheprojectortosecureittothestand.
Screwholecenterdimension:200×250mm
Screwholedimensionontheprojector:M4withamaximumdepthof8mm.
*Pleasedesignthestandsuchthattherearlegsonthebottomfaceoftheprojectordonotcontactthestand.
Thefrontlegscanbeturnedandremoved.
3. Horizontaladjustmentmechanism(forexample,boltsandnutsinfourlocations)
4. Pleasedesignthestandsuchthatitdoesnottoppleovereasily.
Referencedrawings
*Thedrawingshowingthedimensionalrequirementsisnotanactualstanddesigndrawing.
[Side View] [Front View]
Screw holes for 4 - M4 use
Notch
160 × 35 or greater
200
Horizontal adjuster
(Unit: mm)
250
Intake vent
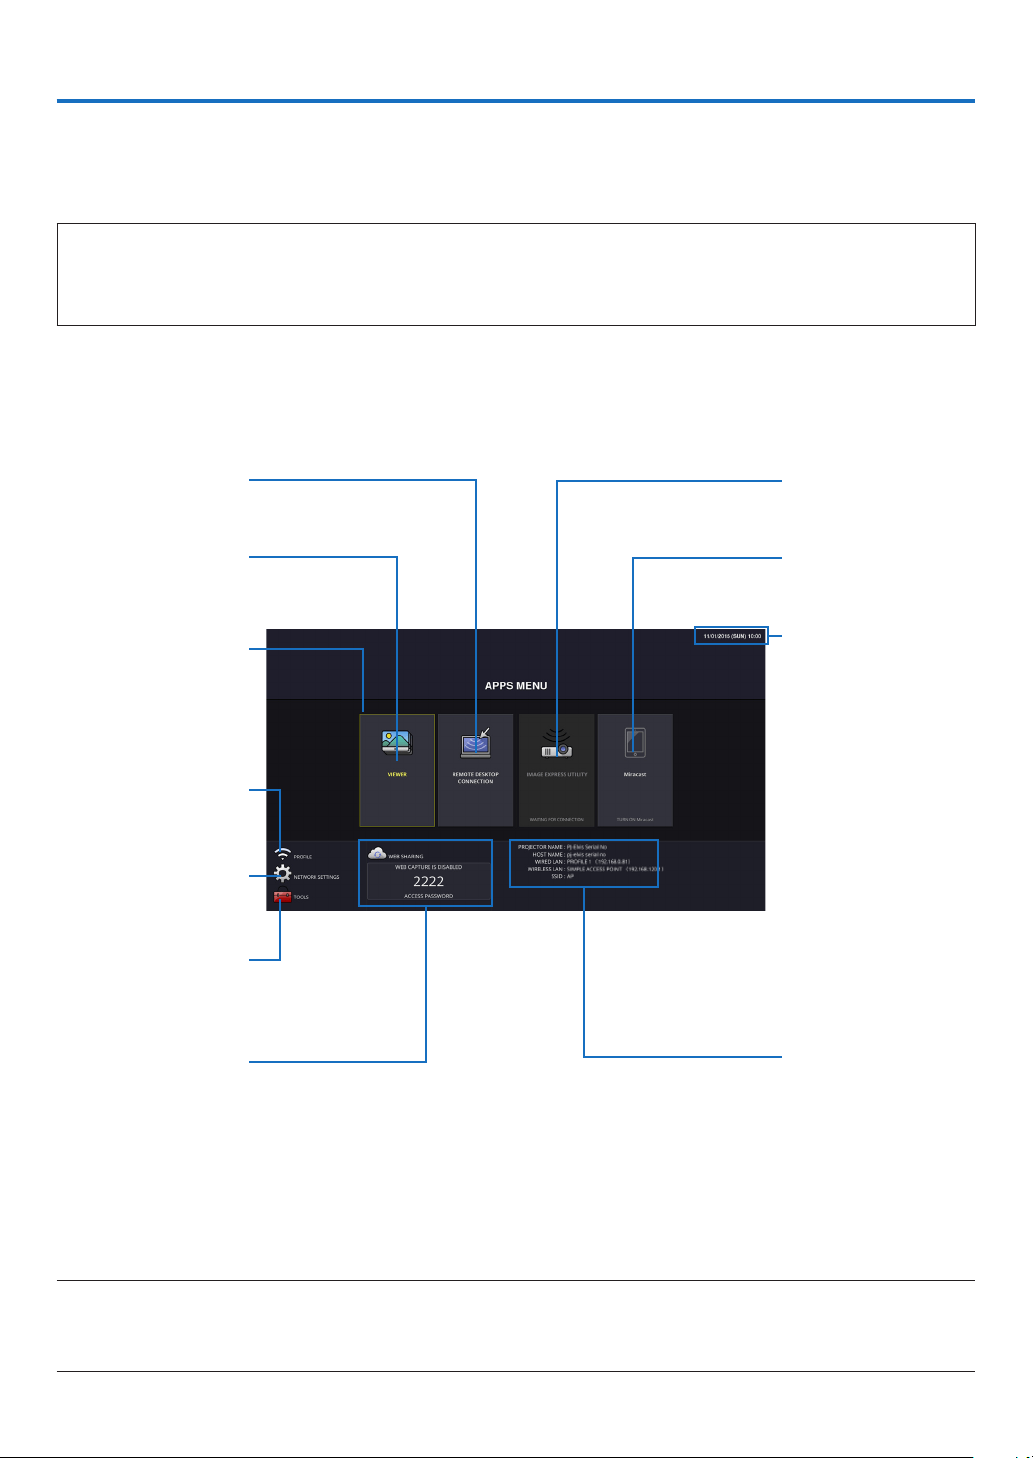
88
6. APPS MENU
❶ What can you do with the APPS MENU?
ItbecomesavailabletoselecttheexpansionfunctionsindicatedinbelowandvarioussettingwiththeAPPSMENU.
FordisplayingtheAPPSMENU,presstheAPPSbuttonontheremoteorselect[APPS]asthe[SOURCE]onthe
onscreenmenu.
INFORMATION
DetailedinformationabouteachfunctionontheAPPSMENUisexplainedonourwebsite.Pleasesearchitbythe
modelnameofyourprojector.
http://www.nec-display.com/dl/en/pj_manual/lineup.html
APPSMENUscreendisplay
Current date and time
Important:
Before utilizing the func-
tion of APPS MENU, set
day and time.
IMAGEEXPRESSUTIL-
ITY
Miracast
NETWORKINFORMA-
TION
REMOTE DESKTOP
CONNECTION
VIEWER
FOCUS
Indicatingtheselected
item.
Surrounded in a yellow
square.
Wireless LAN profile
selection
NETWORKSETTINGS
TOOLS
WEBSHARINGSET-
TING/DISPLAYINGAC-
CESS PASSWORD
NOTE:
•APPSMENUdoesnotsupportUighur.
•Whenthisprojectorisnotinanetwork,youcannotselect[REMOTEDESKTOPCONNECTION],[IMAGEEXPRESSUTILIITY],
[Miracast],and[WEBSHARING].
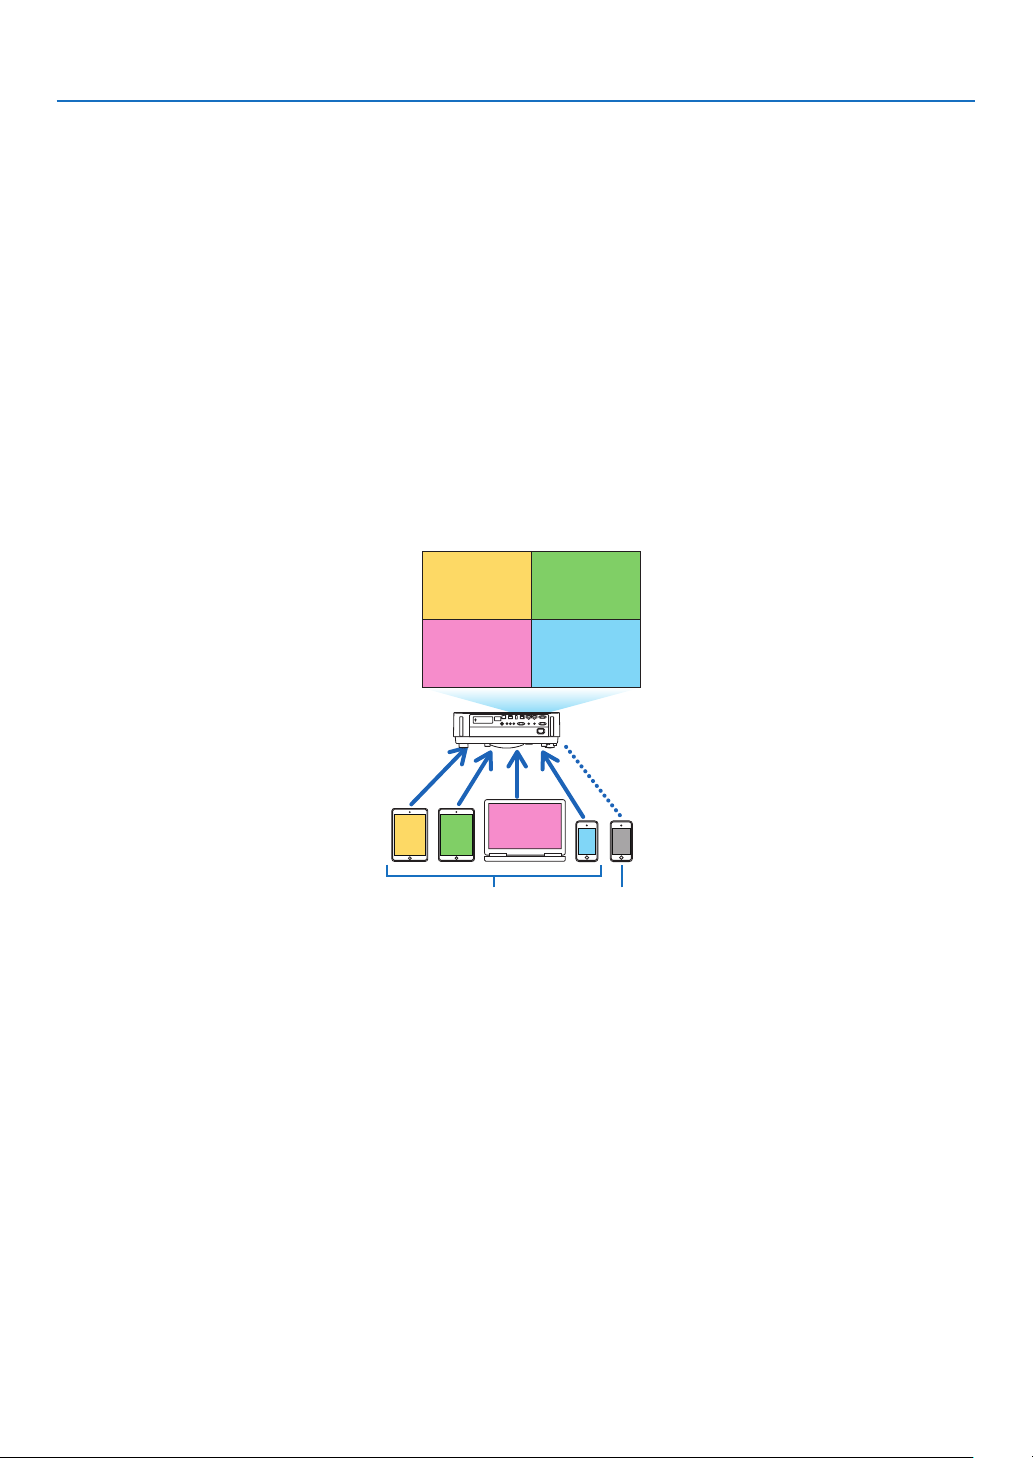
89
6. APPS MENU
VIEWER
Thisisusedtoselectasavedimageorvideoandprojectitfromtheprojector.Thethreetypesbelowcanbeused.
(1)ProjectorMemory:Imagesandvideostemporarilysavedintheprojector’sinternalmemory.
(2)USBMemory:ImagesandvideossavedintheUSBmemoryconnectedwiththeprojector.
(3)CommonFolder:Imagesandvideossavedinthecommonfolderinanetworkconnectedwiththeprojector.
REMOTE DESKTOP CONNECTION
•Selectthecomputerconnectedinthesamenetworkwiththeprojector,andtheprojectorprojectstheimageson
thecomputeroverthenetwork.
AcommerciallyavailableUSBkeyboardcanbeusedforcontrollingWindows8andWindows7computersconnected
inthenetworkwiththeprojector.
IMAGE EXPRESS UTILITY
•Ifvariousterminalunitssuchasacomputer,asmartphone,andatabletareconnectedwiththeprojectorinthe
network,itenablestotransferimagessavedoneachterminaltotheprojectorandtoprojectthem.
•YoucanconnectterminalunitsinmultipleOS(Windows,OSX,Android,andiOS)withtheprojectorsimultaneously.
•Theprojectorreceivesimagestransferredfrommultipleterminalunits(Max.50units)andprojectsthemonthe
screendividingit(Max.4×4)atthesametime.
BA
C
D
E
AB
CD
Transmit Stop
Simultaneous connection
Simultaneous display
•Installtheapplicationsoftware“ImageExpressUtilityLite”,includedintheCD-ROMsuppliedwiththeprojectoron
computers.(→page
94, 97)
•Forasmartphoneandatablet,downloadtheapplication“WirelessImageUtility”fromourwebsiteandinstalliton
these.(→page112)
Miracast
BywirelesslyconnectingtheterminalunitssupportingtheMiracastsuchastheAndroidwiththeprojector,itenables
theprojectortoprojectimagestransferredfromtheseterminals.
Beforeconnectingtheseterminalunits,set[Miracast]inthe[NETWORKSETTINGS]ontheprojector.
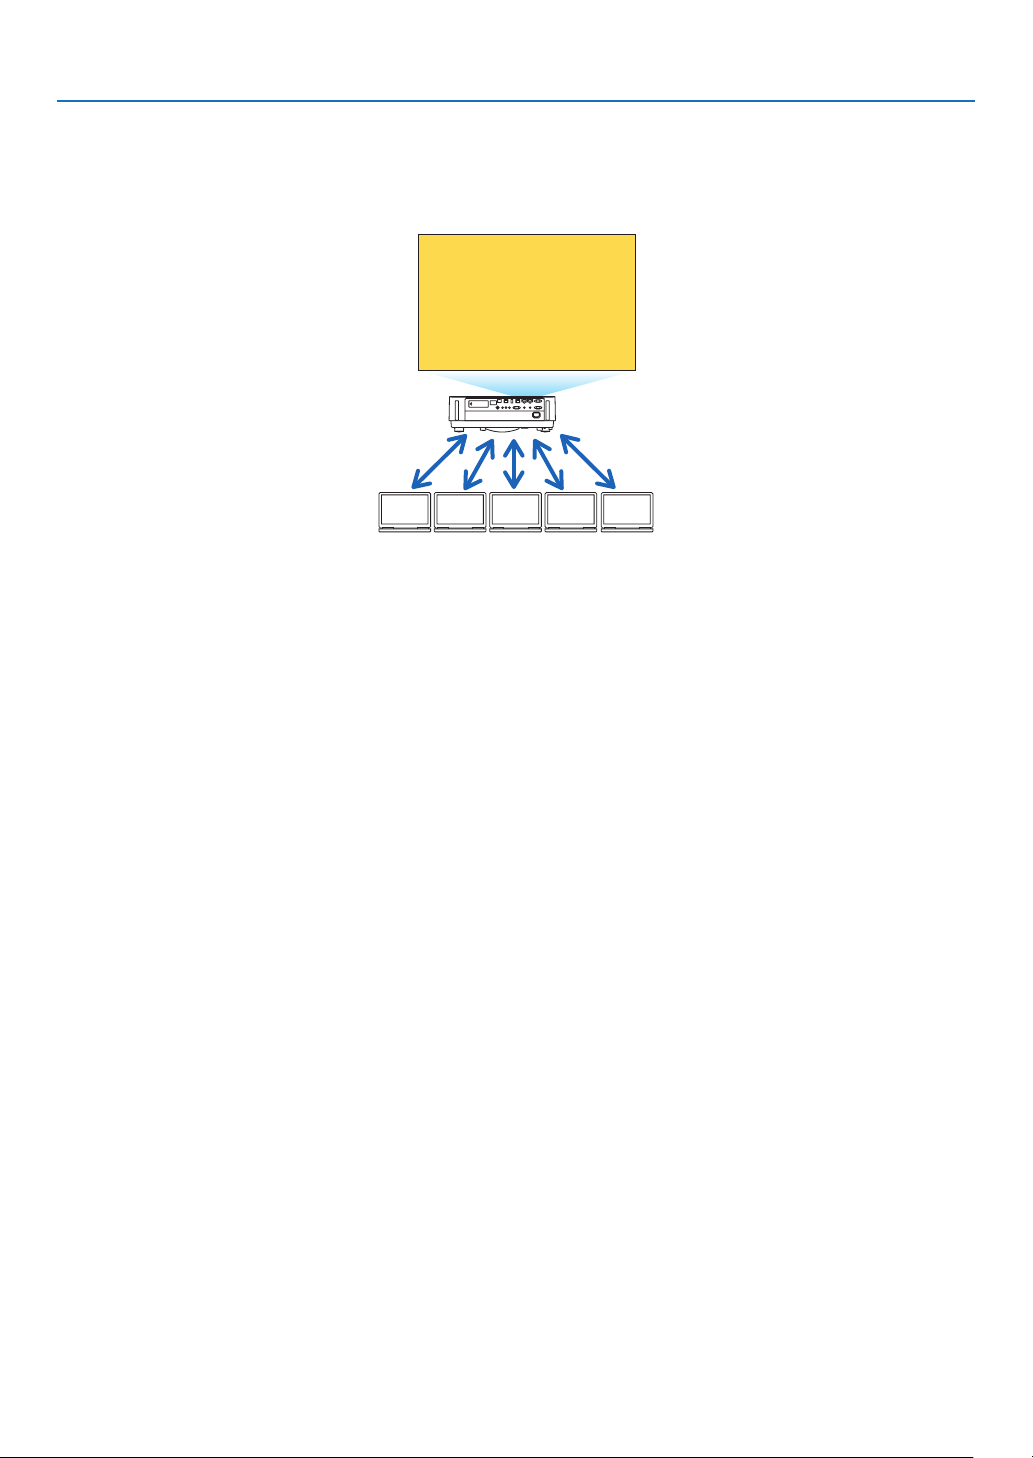
90
6. APPS MENU
WEB SERVER FUNCTION
WEBSHARING
Withoutusingtheexclusivesoftware,itenablestoshareimagesandlesamongtheprojectorandcomputersinthe
samenetworkbyaccessingthewebserveroftheprojectorutilizingthewebbrowser.
BACDE
Sharing files
IMAGEEXPRESSUTILITY
Itenablestocontroldisplayingpositionoftheimagesthataresimultaneouslytransferredfromeachterminalutilizing
theapplicationsoftware,ImageExpressUtilityLiteonthecomputerbrowserscreen.Precisecontrolsaschanging
numberofscreenportionsandpagestodisplayareavailable.
*Thisfunctionisavailablewhenthe“Managed”modeisselectedforthe[IMAGEEXPRESSUTILITY]inthe[NET-
WORKSETTINGS].Atthesametime,theprojectorshouldbereceivedandprojectimagesviatheImageExpress
UtilityLiteforutilizingthisfunction.
PROJECTORCONTROL
Itenablestocontroltheprojectoronthewebbrowserscreensonthecomputers.
HOWTOACCESSTHEWEBSERVER
ConnecttheprojectorandcomputersinanetworkandaccesstheURLinbelowbythewebbrowserofthecomputers.
URL:http://<IPaddressoftheprojector>
NETWORK SETTINGS
Setupbelowforconnectingtheprojectorwithawired/wirelessLAN.
PROJECTORNAME
Setuptheprojectornameandhostname.Serialnumberoftheprojectorissetasfactorydefault.
NETWORKINFORMATION
Indicateinformationwhentheprojectorhasconnectedinanetwork(byawired/wirelessLAN)
WIRED LAN
SetupforconnectingtheprojectorbyawiredLAN.
WIRELESS LAN
SetupforconnectingtheprojectorbyawirelessLAN.Atthesametime,setupfortheSIMPLEACCESSPOINT,
Wi-FiDirect,andMiracast.
IMAGEEXPRESSUTILITY
SetuptheMODE(FREE,MANAGED)fortheIMAGEEXPRESSUTILITY.
NETWORKSERVICE
SetupvarioussettingfortheAMX,HTTPserver,PJLink,AlertmailandCRESTRON.

91
6. APPS MENU
TOOLS
Setupforvariousfeaturesasthemouse,programtimer,dayandtime,administratormodeanddefaultAPP.
MOUSE
AcommerciallyavailableUSBmousecanbeusedforoperatingtheAPPSMENU.Performthesetupforusingit.
PROGRAMTIMER
Oncedayandtimeissetup,changingtheprojector’sconditioninpoweringON/standby,switchinginputsignals,and
switchingECOmodecanbeautomaticallyperformed.
DATEANDTIME
Determinetimezoneandsummertimeofyourareaandsetupcurrentdateandtime.
ADMINISTRATORMODE
Selectingthemenumodeoftheprojector,enable/disabletosaveallsetupvaluesoftheprojector,andsetupa
passwordfortheadministratormode.
DEFAULTAPP
Whenaterminalotherthanthe“APPS”terminalisselectedandyouswitchtothe“APPS”terminal,thefunctionse-
lectedasthedefaultapplicationislaunchedautomatically.
Whentheprojectoristurnedonintheconditionofbeingselectedthe“APPS”terminal,theapplicationselectedinthe
[DEFAULTAPP]willbestartedautomatically.

92
7. User Supportware
❶ Software Included on CD-ROM
NamesandFeaturesofBundledSoftwarePrograms
NameofsoftwareprogramFeatures
ImageExpressUtilityLite
ImageExpressUtilityLitefor
Mac
•Thisisasoftwareprogramusedtoprojectyourcomputer’sscreenoverthe
wired/wirelessnetwork.Thecomputercable(VGA)isnotrequired.(→page
93)
•ThissoftwareprogramcanbeusedtocontrolthepowerON/OFFandsource
selectionoftheprojectorfromyourcomputer.
•TheGeometricCorrectionTool(GCT)functionallowsyoutocorrectdistortion
ofimagesprojectedonacurvedwall.(→page98)
*“GCT”functionisnotsupportedbyMac.
NameofsoftwareprogramFeatures
PCControlUtilityPro4
PCControlUtilityPro5(forMac
OS)
Thisisasoftwareprogramusedtooperatetheprojectorfromthecomputerwhen
thecomputerandtheprojectorareconnectedwithLAN(wiredorwireless)or
aserialcable.(→page
101)
NameofsoftwareprogramFeatures
VirtualRemoteTool
(Windowsonly)
ThisisasoftwareprogramusedtocontrolthepowerON/OFFandsourceselec-
tionoftheprojectorfromyourcomputerbyusingthesuppliedcomputercable
(VGA)andothers.(→page
106)
Onlyviaserialconnectionitisalsousedtosendanimagetotheprojectorand
registeritasthelogodataoftheprojector.Afterregisteringit,youcanlockthe
logotopreventitfromchanging.
NOTE:
•ImageExpressUtilityLitedoesnotsupport“MeetingMode”inImageExpressUtility2.0suppliedwithourothermodels.
Download Service and Operating Environment
Pleasevisitourwebsiteaboutoperatingenvironmentanddownloadserviceforeachsoftware:
VisitURL:http://www.nec-display.com/dl/en/index.html
Download-Projector→Software&Driver
NameandFeaturesofanapplicationforAndroid/iOS.
Nameofapplication:
WirelessImageUtility(Android/iOS)
Features:
Byconnectingtheprojectorwithasmartphone,itenablestotransferphotosanddocumentssavedonthesmartphone
andprojecttheseontheprojector.(→page112)
*WirelessImageUtilityisnotcontainedinthesuppliedCD-ROM.

93
7. User Supportware
❷ Projecting Your Computer’s Screen Image from the
Projector over a LAN (Image Express Utility Lite)
UsingImageExpressUtilityLitecontainedonthesuppliedNECProjectorCD-ROMallowsyoutosendthecomputer’s
screenimagetotheprojectoroverawiredorwirelessLAN.
ImageExpressUtilityLiteisaprogramcompatiblewithWindows.
ImageExpressUtilityLiteforMacisaprogramcompatiblewithOSX.(→page
97)
ThissectionwillshowyouanoutlineabouthowtoconnecttheprojectortoaLANandtouseImageExpressUtility
Lite.FortheoperationofImageExpressUtilityLite,seethehelpofImageExpressUtilityLite.
Step1:installImageExpressUtilityLiteonthecomputer.
Step2:ConnecttheprojectortoaLAN.
Step3:StartImageExpressUtilityLite.
TIP:
•ImageExpressUtilityLite(forWindows)canbestartedfrommostcommerciallyavailableremovablemediasuchasUSBmemory
devicesorSDcardswithouttheneedtoinstallonyourcomputer.(→page
96)
What You can Do with Image Express Utility Lite
Imagetransmission(forWindowsandOSX)
•Thescreenofyourcomputercanbesenttotheprojectorviaawiredorwirelessnetworkwithoutacomputercable
(VGA).
Audiotransfercapability(forWindowsonly)
•ImageExpressUtilityLiteallowsyoutosendthecomputer'sscreenimageandaudiototheprojectoroverwired/
wirelessLANconnection.
•Audiotransfercapabilityisavailableonlywhenthecomputerconnectswiththeprojectorinpeer-to-peernetwork.
GeometricCorrectionTool[GCT](forWindowsonly)
See“❸ProjectinganImagefromanAngle(GeometricCorrectionToolinImageExpressUtilityLite)”.(→page
98)
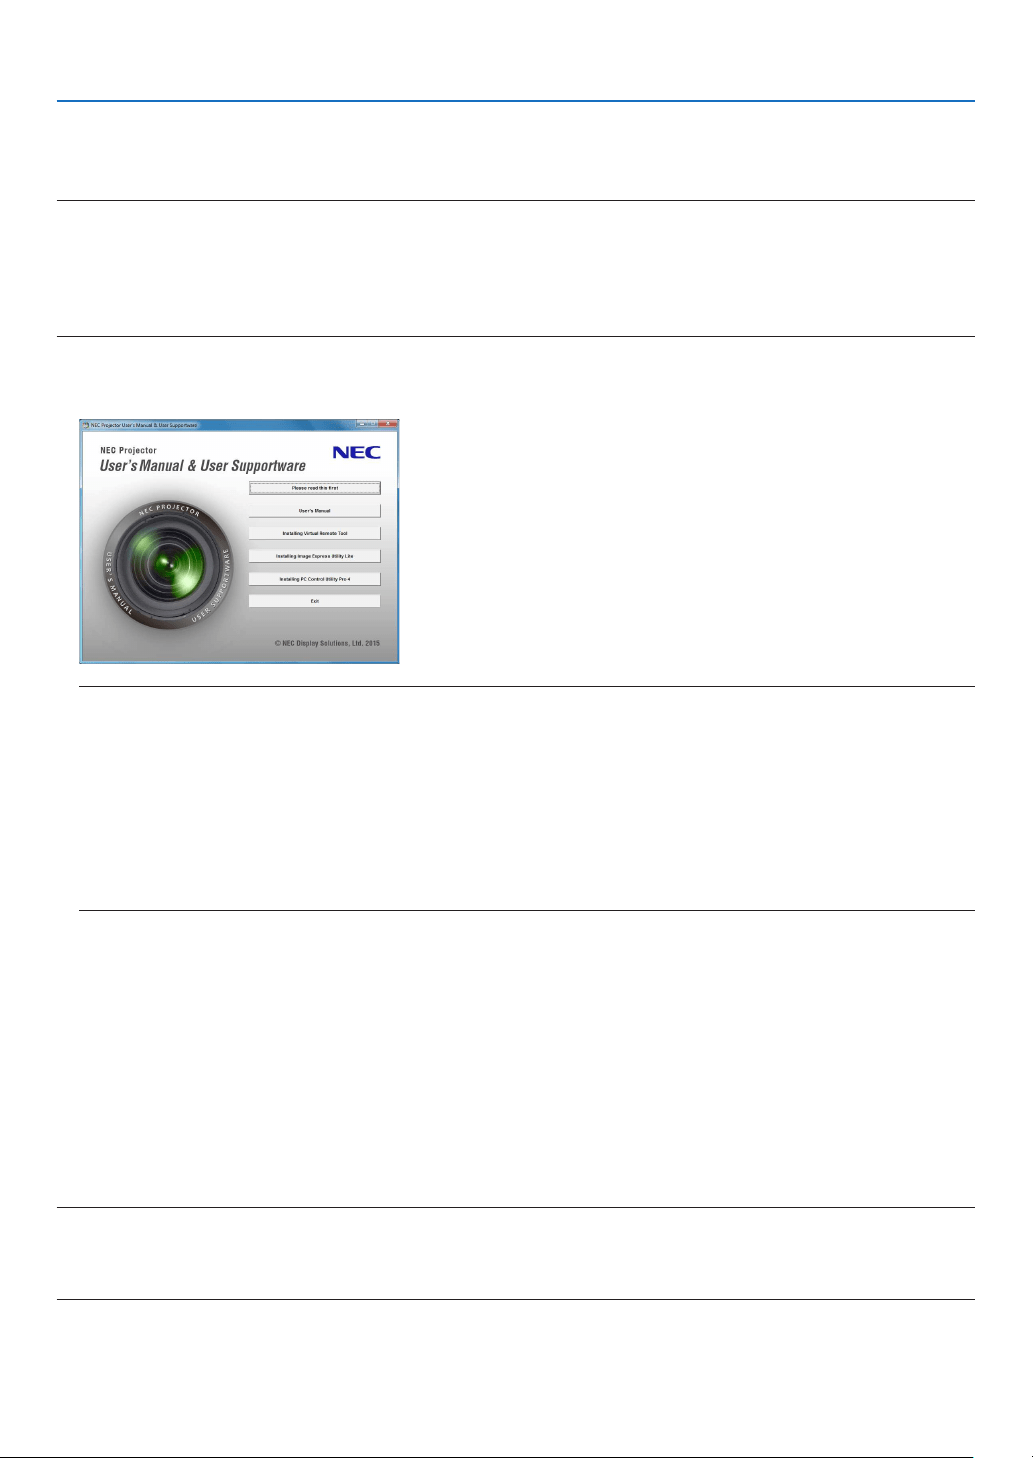
94
7. User Supportware
Using on Windows
Step 1: install Image Express Utility Lite on the computer.
NOTE:
•Toinstalloruninstalltheprogram,theWindowsuseraccountmusthave“Administrator”privilege.
•Exitallrunningprogramsbeforeinstallation.Ifanotherprogramisrunning,theinstallationmaynotbecompleted.
•ImageExpressUtilityLitewillbeinstalledtothesystemdriveofyourcomputer.
Ifthemessage“Thereisnotenoughfreespaceondestination”isdisplayed,freeupenoughspace(about100MB)toinstallthe
program.
1.InserttheaccompanyingNECProjectorCD-ROMintoyourCD-ROMdrive.
The menu window will be displayed.
TIP:
Ifthemenuwindowwillnotbedisplayed,trythefollowingprocedure.
ForWindows7:
1.Click“start”onWindows.
2.Click“AllPrograms”→“Accessories”→“Run”.
3.TypeyourCD-ROMdrivename(example:“Q:\”)and“LAUNCHER.EXE”in“Name”.(example:Q:\LAUNCH
-
ER.EXE)
4.Click“OK”.
The menu window will be displayed.
2.Click“InstallingImageExpressUtilityLite”onthemenuwindow.
The installation will start.
“ENDUSERLICENSEAGREEMENT”screenwillbedisplayed.
Read“ENDUSERLICENSEAGREEMENT”carefully
3.Ifyouagree,click“Iagree.”andthenclick“Next”.
•Followtheinstructionsontheinstallerscreenstocompletetheinstallation.
•Whentheinstallationiscomplete,youwillreturntothemenuwindow.
When the installation is complete, a completion message will be displayed.
4.Click“OK”.
This completes the installation.
TIP:
•UninstallingImageExpressUtilityLite
TouninstallImageExpressUtilityLite,dothesameproceduresstatedasin“UninstallingVirtualRemoteTool”.Read“VirtualRemote
Tool”as“ImageExpressUtilityLite”(→page
109)
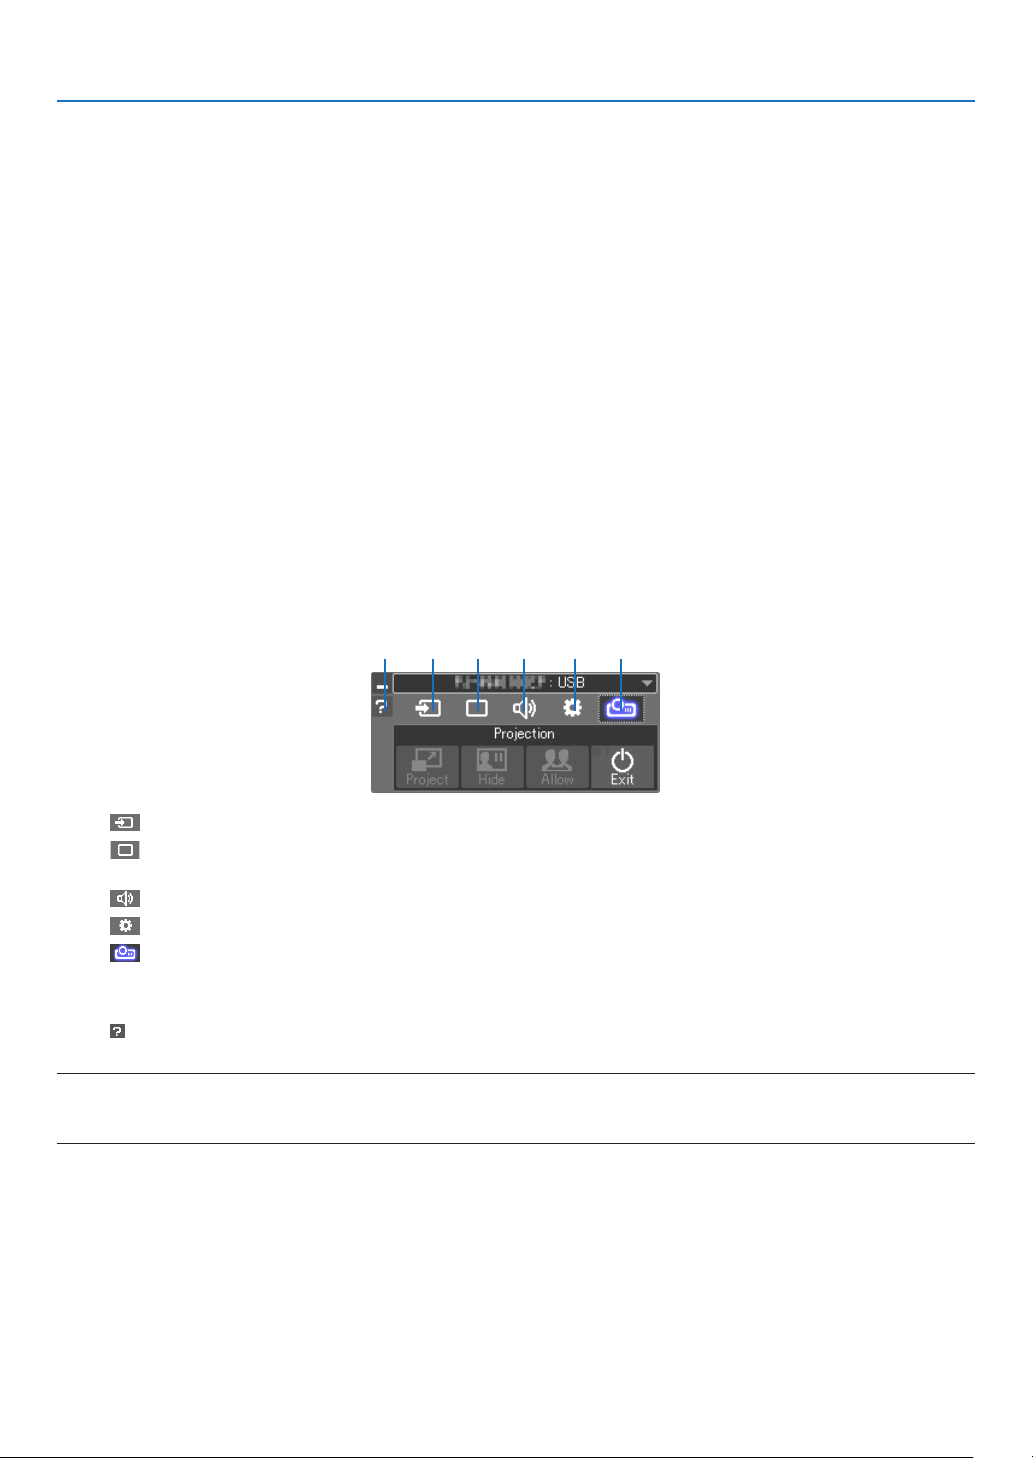
95
7. User Supportware
Step 2: Connect the projector to a LAN.
ConnecttheprojectortotheLANbyfollowingtheinstructionsin“ConnectingtoaWiredLAN”(→page
80)and“Con-
nectingtoaWirelessLAN(Optional:NP05LMseries)”(→page81).
Step 3: Start Image Express Utility Lite.
1.OnWindows,click“Start”→“Allprograms”→“NECProjectorUserSupportware”→“ImageExpressUtility
Lite”→“ImageExpressUtilityLite”.
ImageExpressUtilityLitewillstart.
Theselectwindowfornetworkconnectionwillbedisplayed
2.SelectNetworkandclick“OK”.
The select window for destination will show a list of connectable projectors.
•Whenconnectingthecomputerdirectlytotheprojectorbyone-to-one,“SimpleAccessPoint”isrecommended.
•Tocheckforthenetworkavailableforconnectedprojectors,fromthemenu,select[INFO.]→[WIRELESSLAN]
→[SSID].
3.Placeacheckmarkforprojectorstobeconnected,andthenclick“Connect”.
•Whenoneormoreprojectorsaredisplayed,fromthemenuontheprojector,select[INFO.]→[WIRELESSLAN]
→[IPADDRESS].
Whenconnectedtotheprojector,theImageExpressUtilityLitecontrolwindowappearsatthetopofthescreen.
The computer can be controlled by operating the control window.
4. Operate the control window.
(1) (2) (3) (4) (5)(6)
(1) (Source) ... Selects an input source of the projector.
(2)
(Picture) ... Turns on or off AV-MUTE (Picture mute), FREEZE (Freeze a picture), display, and GCT (geometric correction
tool). Refer to page
98 about GCT.
(3)
(Sound) .... Turns on or off AV-MUTE (Sound mute), play the sound and control the volume.
(4)
(Others) .... Uses for “Update”, “HTTP Server”, “Settings” and “Information”.
(5)
(Project) ... Enables to change screen size for presentation, menu indication (hide/indicate), interruption prohibition/
accept interruption.
It also enables to power off the projector.
(6)
(Help) ........... Displays the help of Image Express Utility Lite.
NOTE:
•When[NORMAL]isselectedfor[STANDBYMODE]fromthemenu,theprojectorthatisturnedoffwillnotbedisplayedinthe
selectwindowfordestination

96
7. User Supportware
TIP:
Viewingthe“Help”leofImageExpressUtilityLite
•DisplayingtheHelpleofImageExpressUtilityLitewhileitisrunning.
Clickthe[?](help)icononthecontrolwindow.
The Help screen will be displayed.
•DisplayingtheHelpleofGCTwhileitisrunning.
Click“Help”→“Help”ontheeditwindow.
The Help screen will be displayed.
•DisplayingthehelpleusingtheStartMenu.
Click“Start”→“Allprograms”or“Programs”→“NECProjectorUserSupportware”→“ImageExpressUtilityLite”
→“ImageExpressUtilityLiteHelp”.
The Help screen will be displayed.
Starting Image Express Utility Lite from a USB Memory or SD Card
ImageExpressUtilityLitecanbestartedfromcommerciallyavailableremovablemediasuchUSBmemoryorSD
cardsifitiscopiedbeforehand.ThiswilleliminatethetroubleofinstallingImageExpressUtilityLitetoyourcomputer.
1.CopyImageExpressUtilityLitetoremovablemedia.
Copyallthefoldersandles(totalsizeapprox.7MB)fromthe“IEU_Lite(removable-media)”folderinthesupplied
NEC Projector CD-ROM to the root directory of your removable media.
2. Insert your removable media into your computer.
The“AutoPlay”screenwillbedisplayedonyourcomputer.
TIP:
•Ifthe“AutoPlay”screenisnotdisplayed,openthefolderfrom“Computer”(“MyComputer”forWindowsXP).
3.Click“Openfoldertoviewles”
TheIEU_Lite.exe,otherfolder,andleswillbedisplayed.
4.Double-clickthe“IEU_Lite.exe”(
) icon.
ImageExpressUtilityLitewillstart.

97
7. User Supportware
Using on Mac
Step 1: Install Image Express Utility Lite for Mac on the computer
1.InserttheaccompanyingNECProjectorCD-ROMinyourMacCD-ROMdrive.
TheCD-ROMiconwillbedisplayedonthedesktop.
2.Double-clicktheCD-ROMicon.
The CD-ROM window will be displayed.
3.Double-clickthe“MacOSX”folder.
4.Double-click“ImageExpressUtilityLite.dmg”.
The“ImageExpressUtilityLite”windowwillbedisplayed.
5.Draganddropthe“ImageExpressUtilityLite”foldertoyourApplicationsfolderonOSX.
Step 2: Connect the projector to a LAN
ConnecttheprojectortotheLANbyfollowingtheinstructionsin“ConnectingtoaWiredLAN”(→page
80)and“Con-
nectingtoaWirelessLAN(Optional:NP05LMseries)”(→page81).
Step 3: Start Image Express Utility Lite for Mac
1. Open your Applications folder on OS X.
2.Double-clickthe“ImageExpressUtilityLite”folder.
3.Double-clickthe“ImageExpressUtilityLite”icon.
WhenImageExpressUtilityLiteforMacstarts,theselectwindowfordestinationwillbedisplayed.
•Atthersttimeofstartup,“ENDUSERLICENSEAGREEMENT”screenwillbedisplayedbeforetheselect
window for destination is displayed.
Read“ENDUSERLICENSEAGREEMENT”andselect“Iacceptthetermsinthelicenseagreement”,andclick
“OK”.
4.Selectaprojectortobeconnected,andthenclick“Connect”.
Yourdesktopscreenwillbedisplayedontheprojector.
TIP:
ViewingtheHelpofImageExpressUtilityLiteforMac
•Fromthemenubar,click“Help”→“ImageExpressUtilityLiteHelp”whileImageExpressUtilityforMacis
running.
The Help screen will be displayed
Uninstallingasoftwareprogram
1.Putthe“ImageExpressUtilityLite”foldertotheTrashicon.
2. Put the configuration file of Image Express Utility Lite for Mac to the Trash icon.
•ThecongurationleofImageExpressUtilityLiteforMacislocatedin“/Users/<yourusername>/Library/Prefer-
ences/jp.necds.Image_Express_Utility_Lite.plist”.
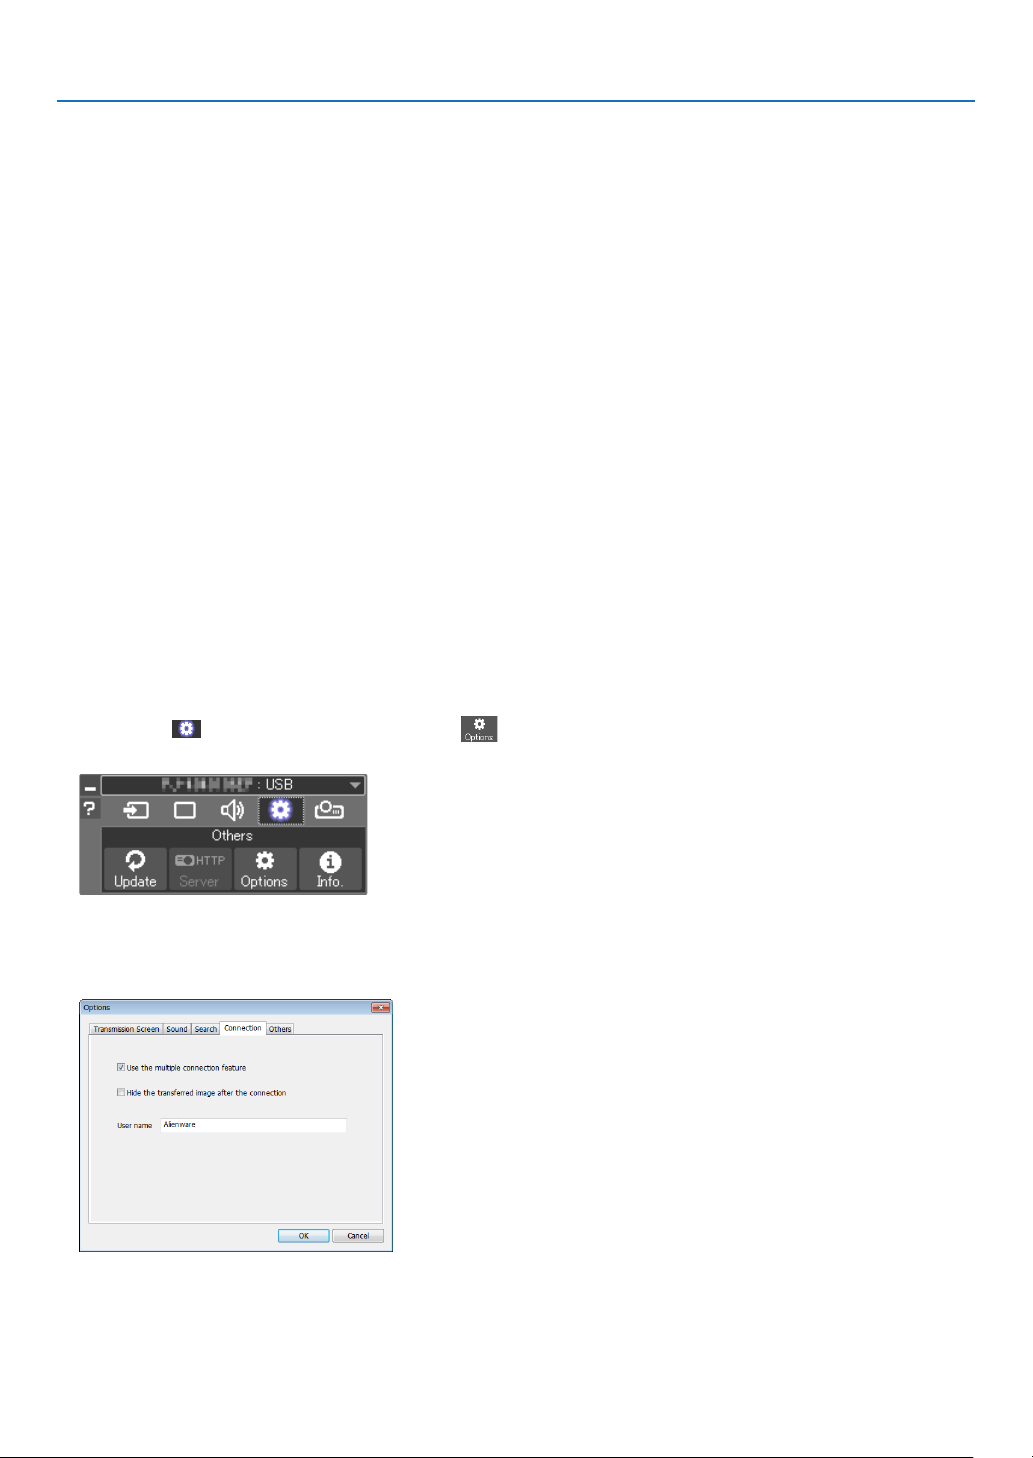
98
7. User Supportware
❸ Projecting an Image from an Angle (Geometric Correction
Tool in Image Express Utility Lite)
TheGeometricCorrectionTool(GCT)functionallowsyoutocorrectdistortionofimagesprojectedevenfromanangle.
What you can do with GCT
•TheGCTfeatureincludesthefollowingthreefunctions
•4-pointCorrection:Youcantaprojectedimagewithintheborderofthescreeneasilybyalignthefourcorners
ofanimagetotheonesofthescreen.
•Multi-pointCorrection:Youcancorrectadistortedimageonthecornerofawallorirregularshapedscreen
byusingmanyseparatedscreenstocorrecttheimageaswellas4-pointCorrection.
•ParametersCorrection:Youcancorrectadistortedimagebyusingacombinationoftransformationalrules
preparedinadvance.
Thissectionwillshowanexampleforusewith4-pointCorrection.
Forinformationabout“Multi-pointCorrection”and“ParametersCorrection”,seethehelpleofImageExpress
UtilityLite.(→page
96, 97)
•Yourcorrectiondatacanbestoredintheprojectororyourcomputerwhichcanberestoredwhennecessary.
•TheGCTfunctionisavailablewithawiredorwirelessLANconnection,andvideocable.
Projecting an Image from an Angle (GCT)
InstallImageExpressUtilityLiteonthecomputerandlaunchittodisplaythecontrolwindow.(→page95)
Preparation:Adjusttheprojectorpositionorthezoomsothattheprojectedimagecancoverthewholescreenarea.
1.Clickthe“
”(Others)iconandthenthe“”(Options)
button.
Options window will be displayed.
2.Clickthecheckbox“Usethemultipleconnectionfeature”and
then clear the check mark.
3.Clickthe“OK”button.
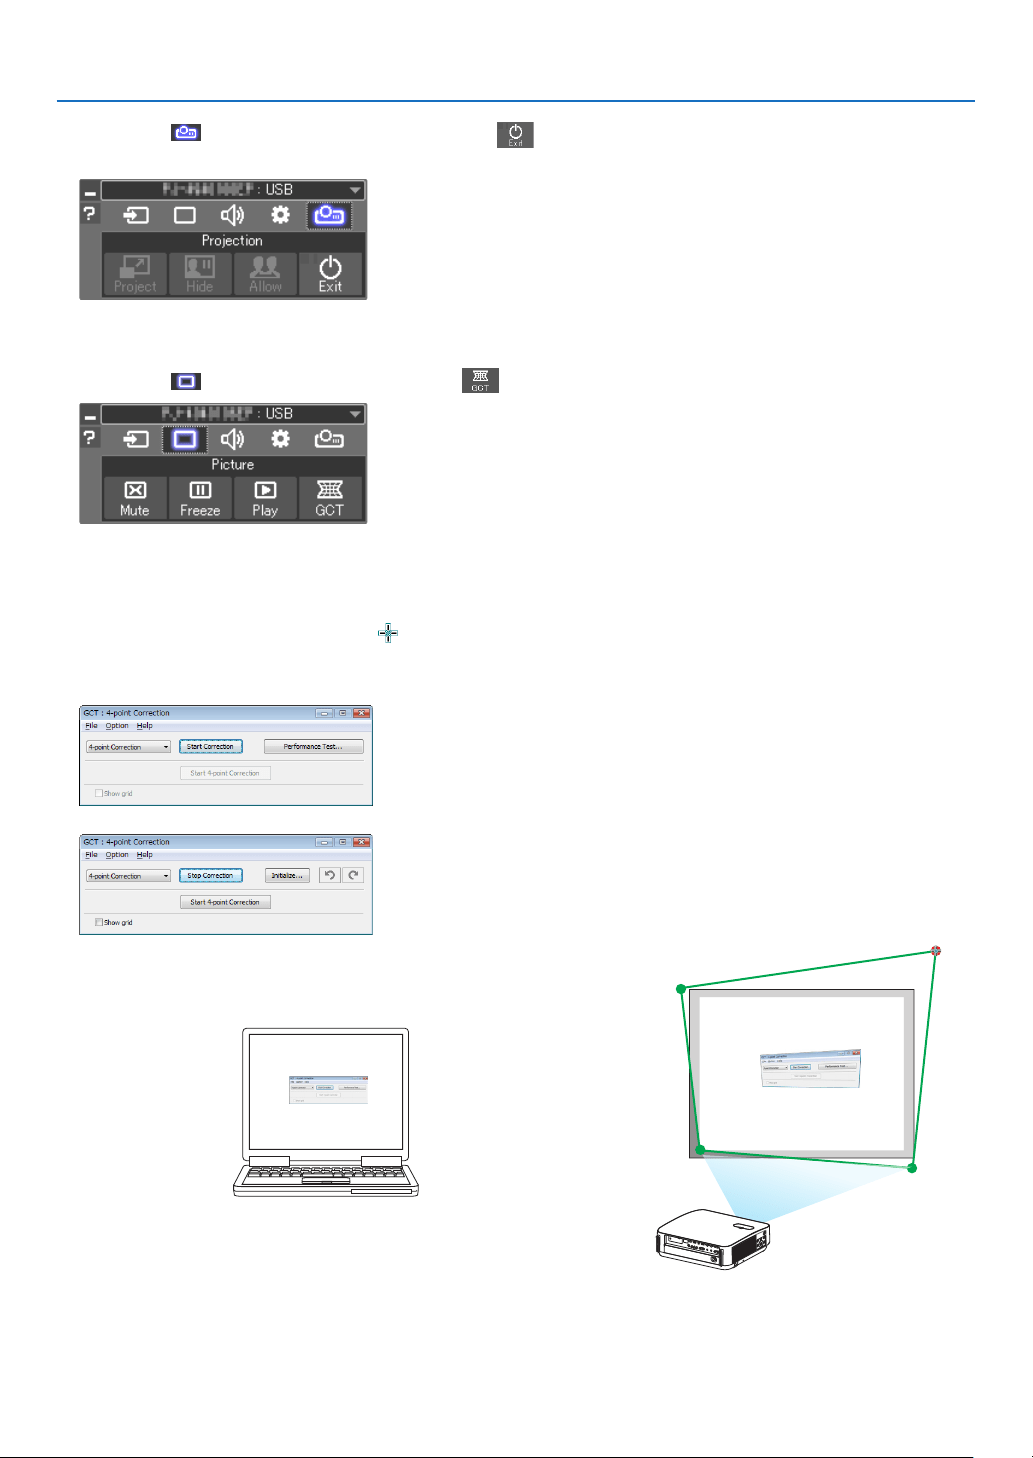
99
7. User Supportware
4.Clickthe“”(Projection)iconandthenthe“”(Exit)
button.
5.Click“Yes”.
6. Start the Image Express Utility Lite again.
7.Clickthe“”(Picture)iconandthenthe“”button.
The“4-pointCorrection”windowwillbedisplayed.
8.Clickthe“StartCorrection”buttonandthen“Start4-point
Correction”button.
A green frame and a mouse pointer ( ) will be displayed.
•Four[•]markswillbeappearedatfourcornersofthegreen
frame
9.Usethemousetoclickthe[•]markofwhichcorneryouwish
to move.
The currently selected [
•]markwillturnred.
(Intheaboveexample,Windowsscreensareomittedforclarication.)
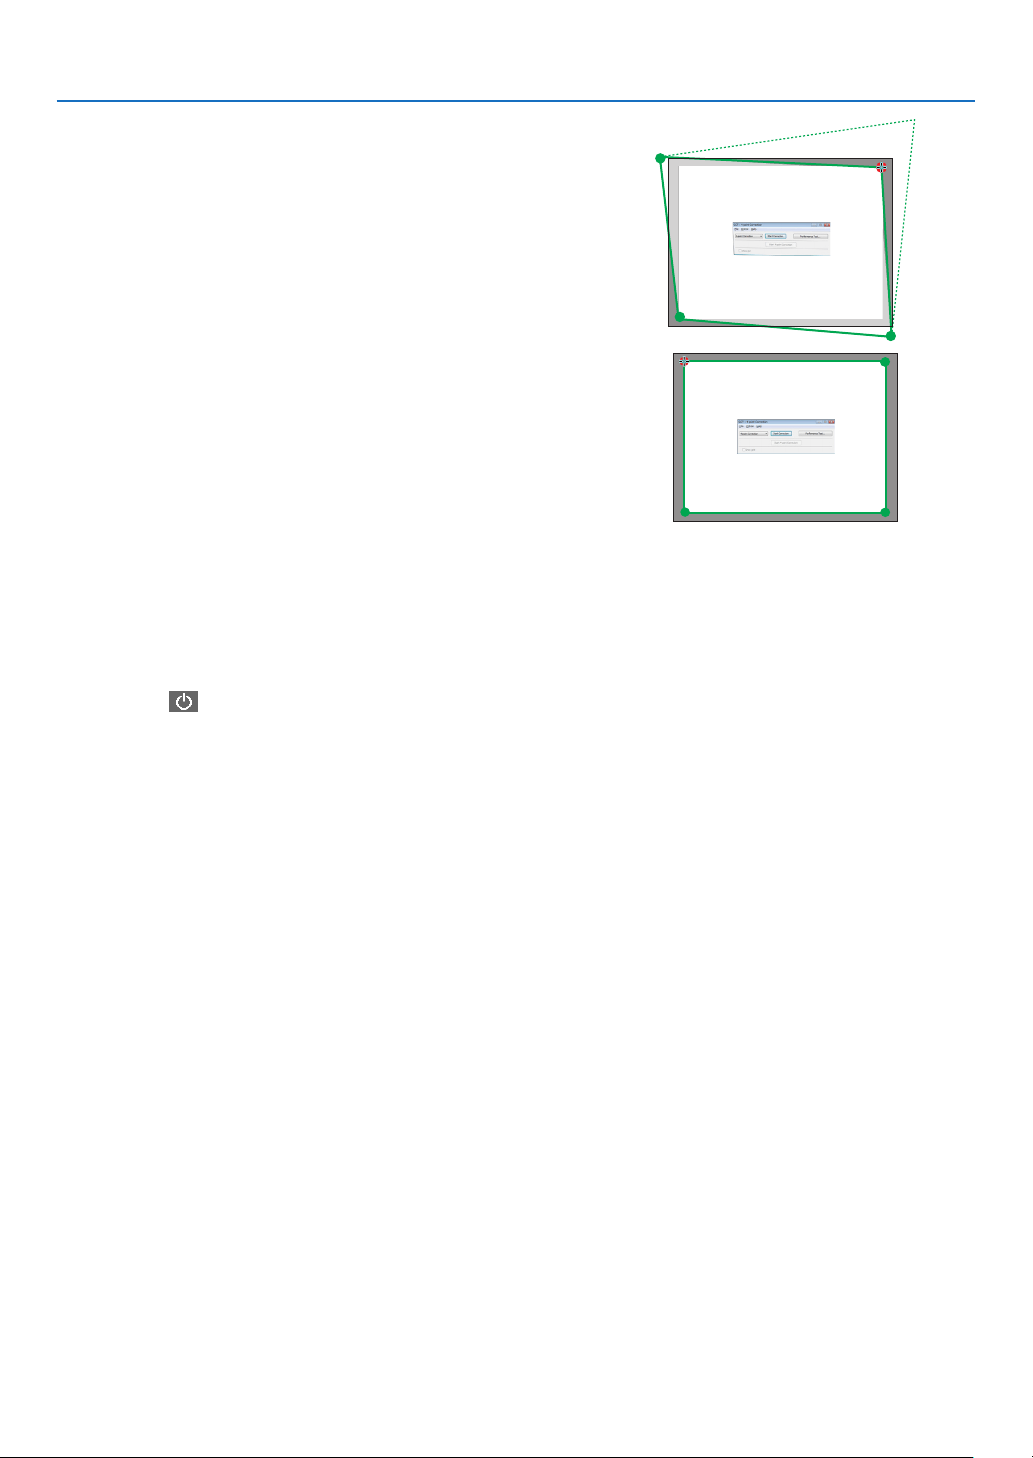
100
7. User Supportware
10
.Dragtheselected[•]marktothepointyouwishtocorrect
and drop it.
•Whenyouclicksomewherewithintheprojectimagearea,the
nearest [ •]markwillgotothepositionwherethemousecur-
sor is.
11
. Repeat Step 9 and 10 to correct the distortion of the projected
image.
12
. After completing, right-click the mouse.
The green frame and the mouse pointer will disappear from the
projected image area. This will complete the correction.
13
.Clickthe“X”(close)buttononthe“4-pointCorrection”window.
The“4-pointCorrection”windowwilldisappearandthe4-point
correctionwilltakeeffect.
14
.Clickthe“”buttononthecontrolwindowtoexittheGCT.
TIP:
•Afterperformingthe4-pointcorrection,youcansavethe4-pointcorrectiondatatotheprojectorbyclicking“File”→“Exportto
theprojector…”onthe“4-pointCorrection”window.
•SeetheHelpofImageExpressUtilityLiteforoperating“4-pointCorrection”windowandotherfunctionsthanGCT.(→page
96,
97)

101
7. User Supportware
❹
Controlling the Projector over a LAN (PC Control Utility Pro 4/
Pro 5)
Usingtheutilitysoftware“PCControlUtilityPro4”and“PCControlUtilityPro5”includedonthecompanionNEC
ProjectorCD-ROM,theprojectorcanbecontrolledfromacomputeroveraLAN.
PCControlUtilityPro4isaprogramcompatiblewithWindows.(→thispage)
PCControlUtilityPro5isaprogramcompatiblewithMacOS.(→page104)
Control Functions
PowerOn/Off,signalselection,picturefreeze,picturemute,audiomute,adjusting,errormessagenotication,
eventschedule.
ScreenofPCControlUtilityPro4
ThissectionprovidesanoutlineofpreparationforuseofPCControlUtilityPro4/Pro5.Forinformationonhowtouse
PCControlUtilityPro4/Pro5,seeHelpofPCControlUtilityPro4/Pro5.(→page
103, 105)
Step1:InstallPCControlUtilityPro4/Pro5onthecomputer.
Step2:ConnecttheprojectortoaLAN.
Step3:StartPCControlUtilityPro4/Pro5.
•TorunPCControlUtilityPro4onWindows8.1,Windows8andWindowsXP,“Microsoft.NETFrameworkVersion
2.0”isrequired.TheMicrosoft.NETFrameworkVersion2.0,3.0or3.5isavailablefromMicrosoft’swebpage.
Downloadandinstallitonyourcomputer.
TIP:
•WithPCControlUtilityPro4,controlisalsopossiblebyRS-232Cserialcommunicationsconnectedtotheprojector’sPCCONTROL
terminal.
Using on Windows
Step 1: Install PC Control Utility Pro 4 on the computer
NOTE:
•Toinstalloruninstalltheprogram,theWindowsuseraccountmusthave[Administrator]privilege.
•Exitallrunningprogramsbeforeinstallation.Ifanotherprogramisrunning,theinstallationmaynotbecompleted.
1InserttheaccompanyingNECProjectorCD-ROMintoyourCD-ROMdrive.
The menu window will be displayed.
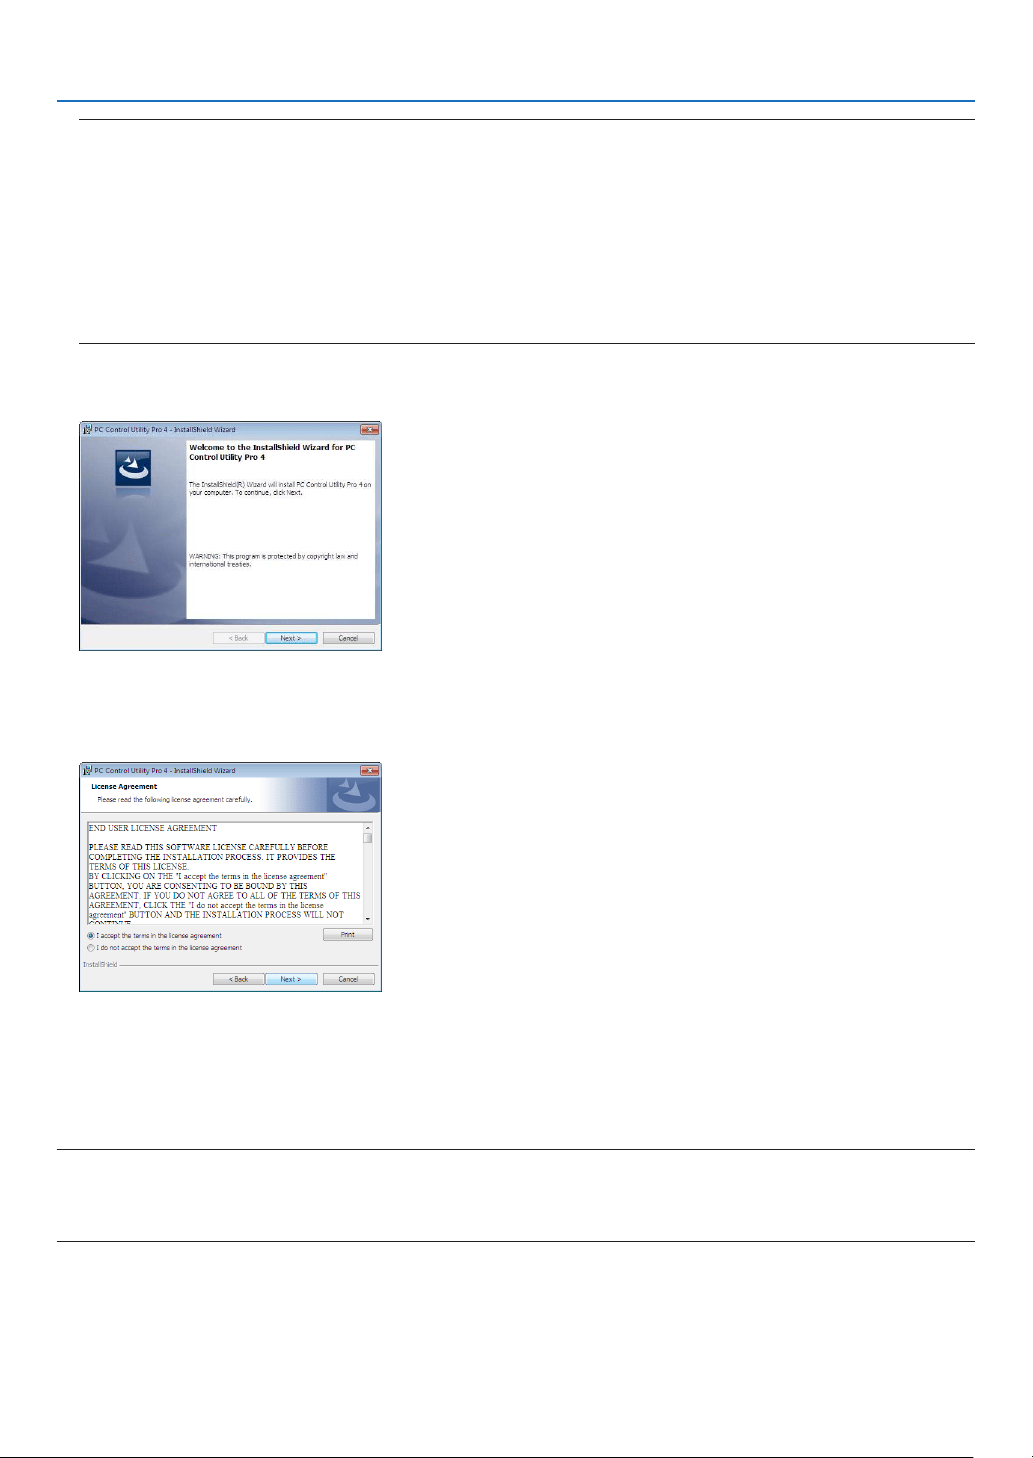
102
7. User Supportware
TIP:
Ifthemenuwindowwillnotbedisplayed,trythefollowingprocedure.
ForWindows7:
1.Click“start”onWindows.
2.Click“AllPrograms”→“Accessories”→“Run”.
3.TypeyourCD-ROMdrivename(example:“Q:\”)and“LAUNCHER.EXE”in“Name”.(example:Q:\
LAUNCHER.EXE)
4.Click“OK”.
The menu window will be displayed.
2Click“PCControlUtilityPro4”onthemenuwindow.
The installation will start.
When the installation is complete, the Welcome window will be displayed.
3Click“Next”.
“ENDUSERLICENSEAGREEMENT”screenwillbedisplayed.
Read“ENDUSERLICENSEAGREEMENT”carefully.
4Ifyouagree,click“Iacceptthetermsinthelicenseagreement”andthenclick“Next”.
•Followtheinstructionsontheinstallerscreenstocompletetheinstallation.
•Whentheinstallationiscomplete,youwillreturntothemenuwindow.
TIP:
•UninstallingPCControlUtilityPro4
TouninstallPCControlUtilityPro4,dothesameproceduresstatedasin“UninstallingVirtualRemoteTool”.Read“VirtualRemote
Tool”as“PCControlUtilityPro4”(→page
109)

103
7. User Supportware
Step 2: Connect the projector to a LAN.
ConnecttheprojectortotheLANbyfollowingtheinstructionsin“ConnectingtoaWiredLAN”(→page
80)and“Con-
nectingtoaWirelessLAN(Optional:NP05LMseries)”(→page81).
Step 3: Start PC Control Utility Pro 4
Click“Start”→“Allprograms”or“Programs”→“NECProjectorUserSupportware”→“PCControlUtilityPro4”→
“PCControlUtilityPro4”.
NOTE:
•FortheSchedulefunctionofthePCControlutilityPro4towork,youmusthaveyourcomputerrunningandnotinstandby/
sleepmode.Select“PowerOptions”fromthe“ControlPanel”inWindowsanddisableitsstandby/sleepmodebeforerunningthe
scheduler.
[Example]ForWindows7:
Select“ControlPanel”→“SystemandSecurity”→“PowerOptions”→“Changewhenthecomputersleeps”→“Putthecomputer
tosleep”→“Never”.
NOTE:
•When[NORMAL]isselectedfor[STANDBYMODE]fromthemenu,theprojectorcannotbeturnedonviathenetwork(wiredLAN/
wirelessLAN)connection.
TIP:
ViewingtheHelpofPCControlUtilityPro4
•DisplayingtheHelpleofPCControlUtilityPro4whileitisrunning.
Click“Help(H)”→“Help(H)…”ofwindowofPCControlUtilityPro4inthisorder.
The pop-up menu will be displayed.
•DisplayingthehelpleusingtheStartMenu.
Click“Start”→“Allprograms”or“Programs”→“NECProjectorUserSupportware”→“PCControlUtilityPro4”→
“PCControlUtilityPro4Help”.
The Help screen will be displayed.

104
7. User Supportware
Using on Mac
Step 1: Install PC Control Utility Pro 5 on the computer
1.InserttheaccompanyingNECProjectorCD-ROMinyourMacCD-ROMdrive.
TheCD-ROMiconwillbedisplayedonthedesktop.
2.Double-clicktheCD-ROMicon.
The CD-ROM window will be displayed.
3.Double-clickthe“MacOSX”folder.
4.Double-click“PCControlUtilityPro5.pkg”.
The installer will start.
5.Click“Next”.
“ENDUSERLICENSEAGREEMENT”screenwillbedisplayed.
6.Read“ENDUSERLICENSEAGREEMENT”andclick“Next”.
The confirmation window will be displayed
7.Click“Iacceptthetermsinthelicenseagreement”.
Follow the instructions on the installer screens to complete the installation.
Step 2: Connect the projector to a LAN
ConnecttheprojectortotheLANbyfollowingtheinstructionsin“ConnectingtoaWiredLAN”(→page
80)and“Con-
nectingtoaWirelessLAN(Optional:NP05LMseries)”(→page81).
Step 3: Start PC Control Utility Pro 5
1. Open your Applications folder in OS X.
2.Clickthe“PCControlUtilityPro5”folder.
3.Clickthe“PCControlUtilityPro5”icon.
PC Control Utility Pro 5 will start.
NOTE:
•FortheSchedulefunctionofthePCControlutilityPro5towork,youmusthaveyourcomputerrunningandnotinsleepmode.
Select“EnergySaver”fromthe“SystemPreferences”inMacanddisableitssleepmodebeforerunningthescheduler.
•When[NORMAL]isselectedfor[STANDBYMODE]fromthemenu,theprojectorcannotbeturnedonviathenetwork(wiredLAN/
wirelessLAN)connection.

105
7. User Supportware
TIP:
Uninstallingasoftwareprogram
1.Putthe“PCControlUtilityPro5”foldertotheTrashicon.
2.PutthecongurationleofPCControlUtilityPro5totheTrashicon.
•ThecongurationleofPCControlUtilityPro5islocatedin“/Users/<yourusername>/ApplicationData/NEC
ProjectorUserSupportware/PCControlUtilityPro5”.
ViewingtheHelpofPCControlUtilityPro5
•DisplayingtheHelpleofPCControlUtilityPro5whileitisrunning.
•Fromthemenubar,click“Help”→“Help”inthisorder.
The Help screen will be displayed.
•DisplayingtheHelpusingtheDock
1.Open“Application”folderinOSX.
2.Clickthe“PCControlUtilityPro5”folder.
3.Clickthe“PCControlUtilityPro5Help”icon.
The Help screen will be displayed.
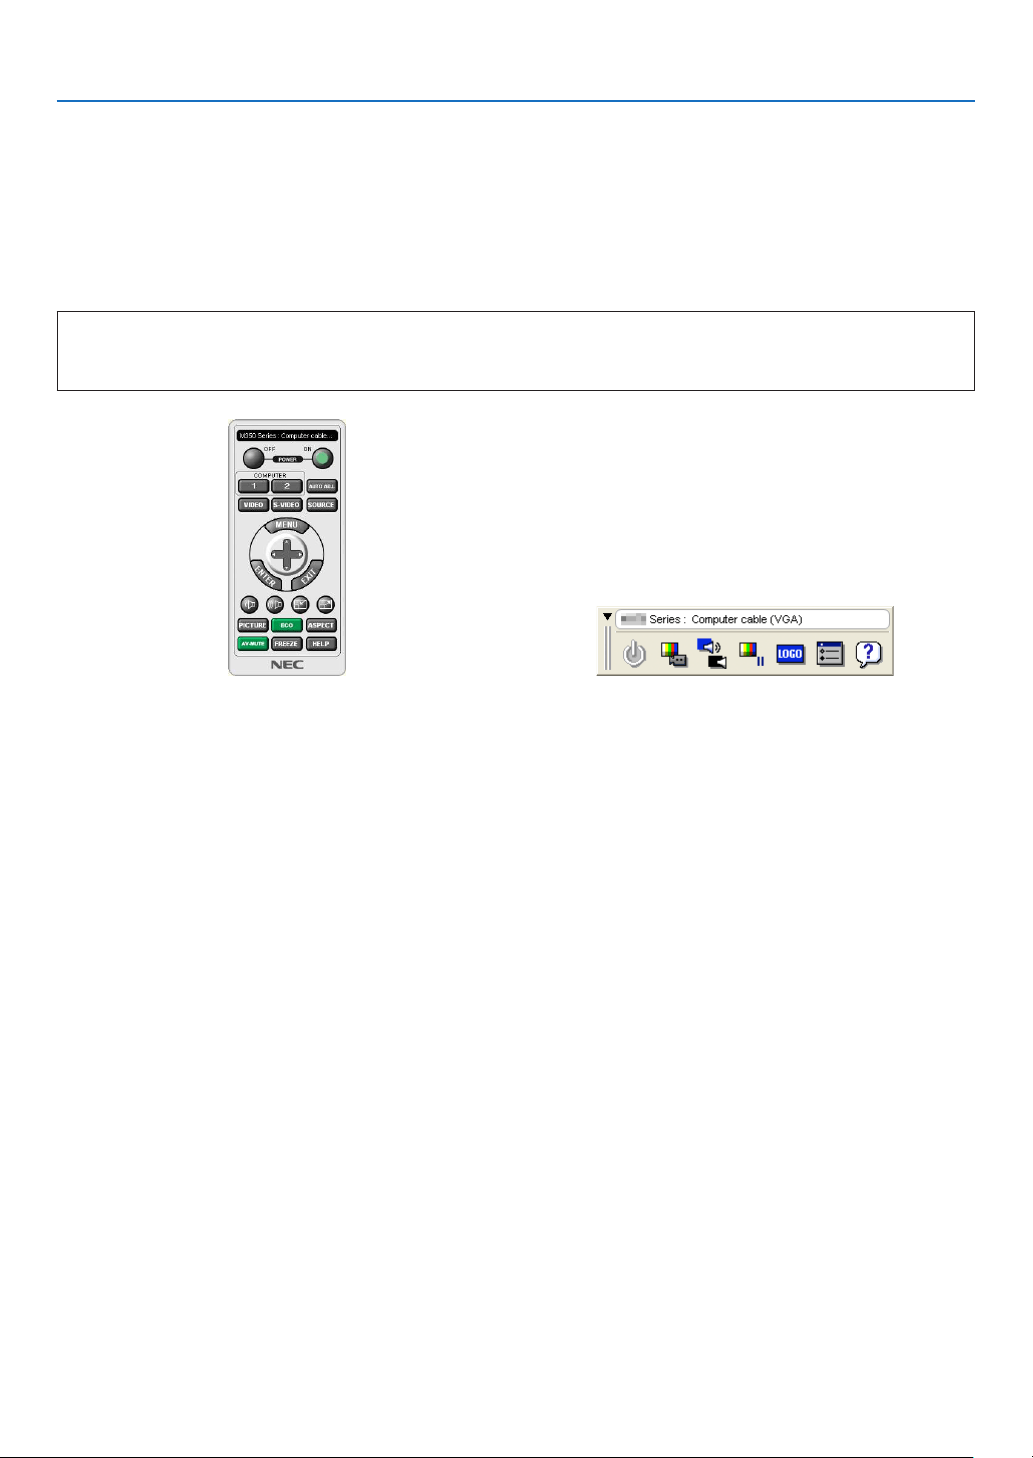
106
7. User Supportware
❺ Using the Computer Cable (VGA) to Operate the
Projector (Virtual Remote Tool)
Usingtheutilitysoftware“VirtualRemoteTool”includedonthecompanionNECProjectorCD-ROM,VirtualRemote
screen(ortoolbar)canbedisplayedonyourcomputerscreen.
Thiswillhelpyouperformoperationssuchasprojector’spoweronoroffandsignalselectionviathecomputercable
(VGA),serialcable,orLANconnection.Onlyviaserialconnectionitisalsousedtosendanimagetotheprojector
andregisteritasthelogodataoftheprojector.Afterregisteringit,youcanlockthelogotopreventitfromchanging.
Control Functions
PowerOn/Off,signalselection,picturefreeze,picturemute,audiomute,Logotransfertotheprojector,andremote
controloperationonyourPC.
VirtualRemotescreenToolbar
ThissectionprovidesanoutlineofpreparationforuseofVirtualRemoteTool.
ForinformationonhowtouseVirtualRemoteTool,seeHelpofVirtualRemoteTool.(→page
111)
Step1:InstallVirtualRemoteToolonthecomputer.(→page107)
Step2:Connecttheprojectortothecomputer.(→page109)
Step3:StartVirtualRemoteTool.(→page110)
TIP:
•VirtualRemoteToolcanbeusedwithaLANandaserialconnection.USBconnectionisnotsupportedbyVirtualRemoteTool.
•ForupdateinformationonVirtualRemoteTool,visitourwebsite:
http://www.nec-display.com/dl/en/index.html

107
7. User Supportware
NOTE:
•When[COMPUTER]isselectedfromyoursourceselection,theVirtualRemotescreenorthetoolbarwillbedisplayedaswellas
yourcomputerscreen.
•Usethesuppliedcomputercable(VGA)toconnecttheCOMPUTERINterminaldirectlywiththemonitoroutputterminalofthe
computertouseVirtualRemoteTool.
Usingaswitcherorothercablesthanthesuppliedcomputercable(VGA)maycausefailureinsignalcommunication.
VGAcableterminal:
PinNos.12and15arerequiredforDDC/CI.
•VirtualRemoteToolmaynotworkdependingonyourcomputer’sspecicationsandversionofgraphicadaptersordrivers.
•TorunVirtualRemoteToolonWindows8.1andWindows8,“Microsoft.NETFrameworkVersion2.0”isrequired.TheMicrosoft
.NETFrameworkVersion2.0,3.0or3.5isavailablefromMicrosoft’swebpage.Downloadandinstallitonyourcomputer.
•Logodata(graphics)thatcanbesenttotheprojectorwithVirtualRemoteToolhasthefollowingrestrictions:
(Onlyviaserialconnection)
-Filesize:Lessthan768KB
-Imagesize(resolution):
P502HL:Horizontal1920×vertical1080dotsorless
P502WL:Horizontal1280×vertical800dotsorless
•Toputthedefault“NEClogo”backinthebackgroundlogo,youneedtoregisteritasthebackgroundlogobyusingtheimage
le(P502HL:/Logo/NEC_logo2012_1920x1080.bmp,P502WL:/Logo/NEC_logo2011_1280x800.bmp)incluldedonthesupplied
NECProjectorCD-ROM.
TIP:
•Theprojector’sCOMPUTERINterminalsupportsDDC/CI(DisplayDataChannelCommandInterface).DDC/CIisastandard
interfaceforbidirectionalcommunicationbetweendisplay/projectorandcomputer.
•WiththeVirtualRemoteTool,controlispossiblewithbothnetwork(wired/wirelessLAN)andserialconnections.
Step 1: Install Virtual Remote Tool on the computer
NOTE:
•ToinstallVirtualRemoteTool,theWindowsuseraccountmusthave“Administrator”privilege.
•ExitallrunningprogramsbeforeinstallingVirtualRemoteTool.Ifanotherprogramisrunning,theinstallationmaynotbecom-
pleted.
1InserttheaccompanyingNECProjectorCD-ROMintoyourCD-ROMdrive.
The menu window will be displayed.
TIP:
Ifthemenuwindowwillnotbedisplayed,trythefollowingprocedure.
ForWindows7
1.Click“start”onWindows.
2.Click“AllPrograms”→“Accessories”→“Run”.
3.TypeyourCD-ROMdrivename(example:“Q:\”)and“LAUNCHER.EXE”in“Name”.(example:Q:\
LAUNCHER.EXE)
4.Click“OK”.
The menu window will be displayed.
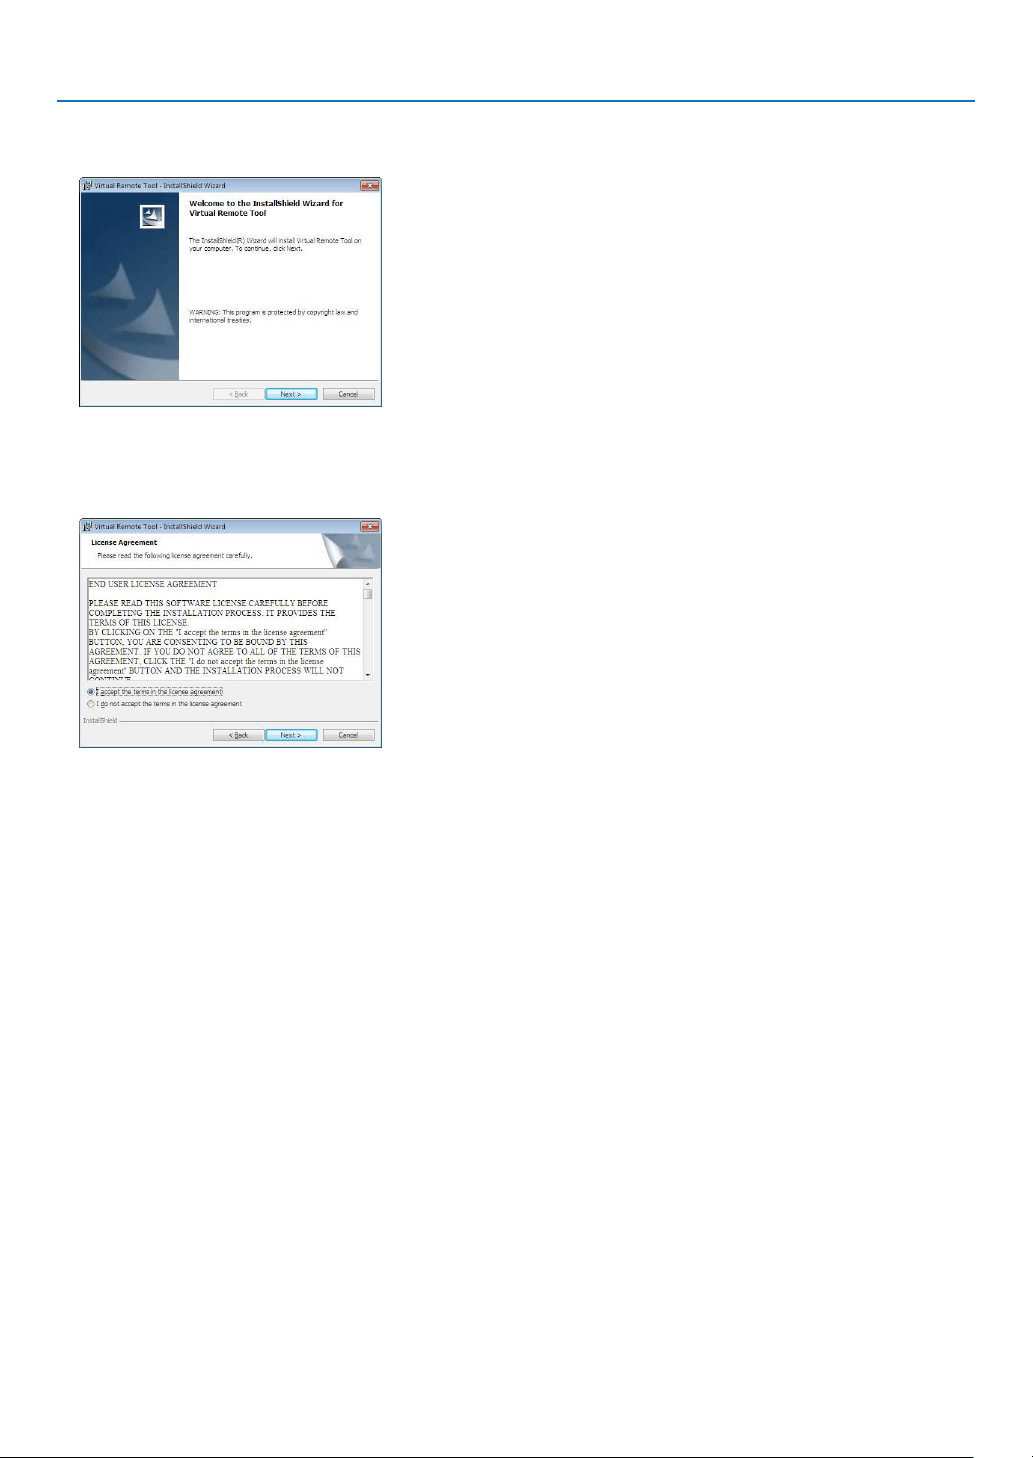
108
7. User Supportware
2Click“InstallVirtualRemoteTool”onthemenuwindow.
The installation will start.
When the installation is complete, the Welcome window will be displayed.
3Click“Next”.
“ENDUSERLICENSEAGREEMENT”screenwillbedisplayed.
Read“ENDUSERLICENSEAGREEMENT”carefully.
4Ifyouagree,click“Iacceptthetermsinthelicenseagreement”andthenclick“Next”.
•Followtheinstructionsontheinstallerscreenstocompletetheinstallation.
•Whentheinstallationiscomplete,youwillreturntothemenuwindow.
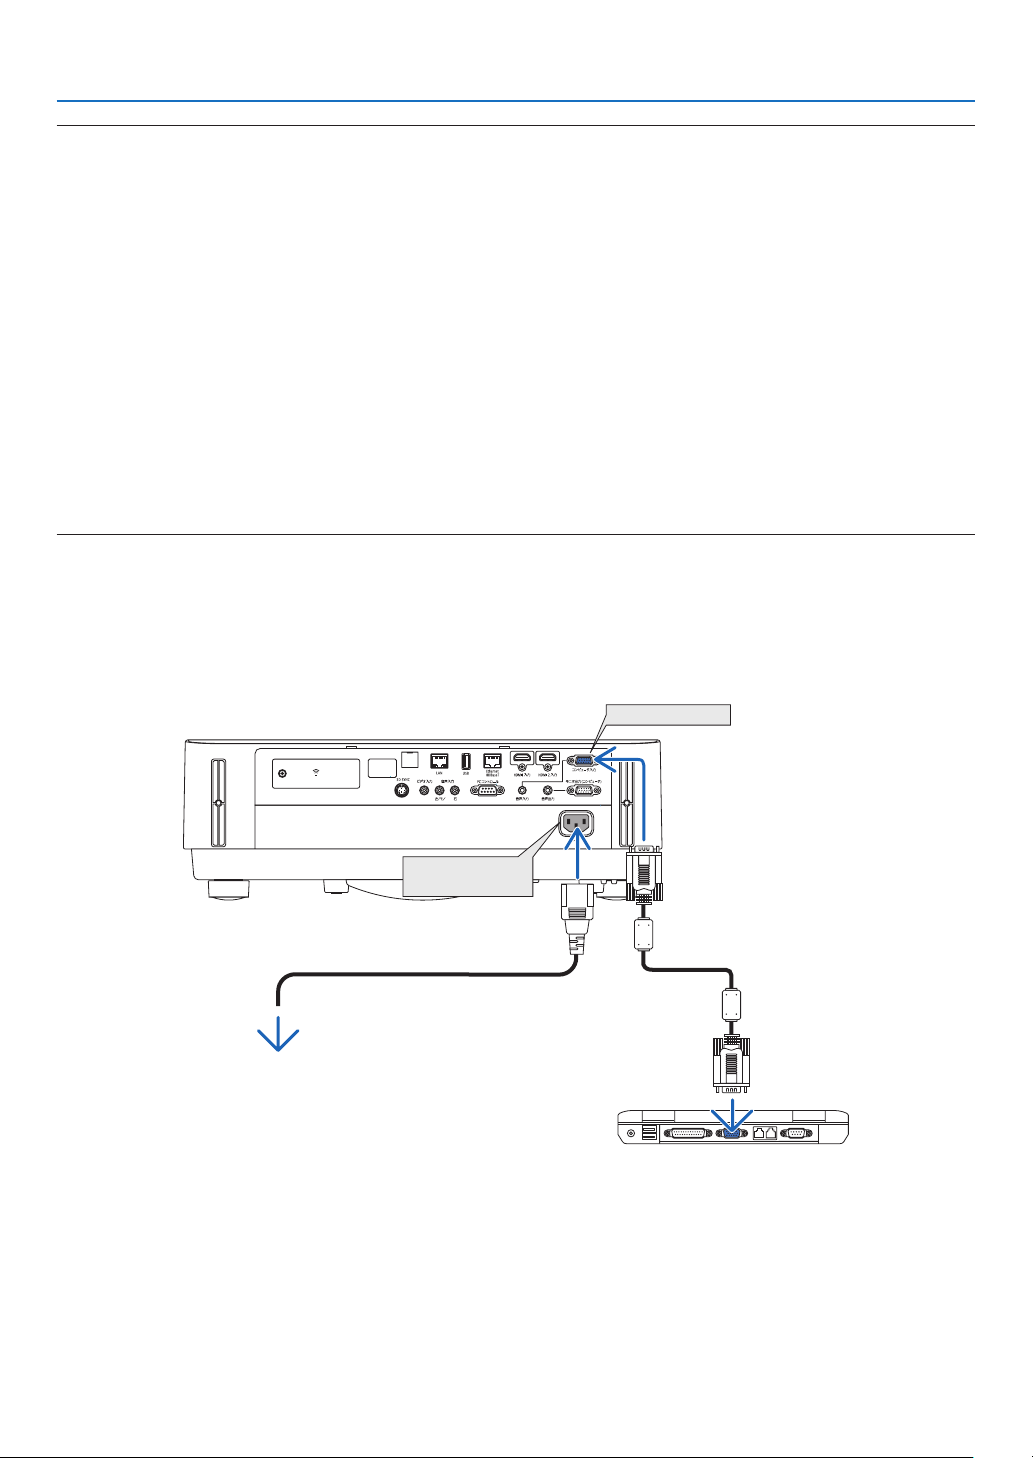
109
7. User Supportware
TIP:
UninstallingVirtualRemoteTool
Preparation:
ExitVirtualRemoteToolbeforeuninstalling.TouninstallVirtualRemoteTool,theWindowsuseraccountmusthave
“Administrator”privilege(Windows8.1,Windows8,Windows7andWindowsVista)or“ComputerAdministrator”
privilege(WindowsXP).
•ForWindows8.1,Windows8,Windows7andWindowsVista
1Click“Start”andthen“ControlPanel”.
The Control Panel window will be displayed.
2Click“Uninstallaprogram”under“Programs”
The“ProgramsandFeatures”windowwillbedisplayed.
3SelectVirtualRemoteToolandclickit.
4Click“Uninstall/Change”or“Uninstall”.
•Whenthe“UserAccountControl”windowsisdisplayed,click“Continue”.
Follow the instructions on the screens to complete the uninstallation.
Step 2: Connect the projector to the computer
1Usethesuppliedcomputercable(VGA)toconnecttheCOMPUTERINterminaloftheprojectordirectly
with the monitor output terminal of the computer.
2ConnectthesuppliedpowercordtotheACINoftheprojectorandthewalloutlet.
The projector is in the standby condition.
COMPUTER IN
ACInput
Supplied computer cable (VGA)
→ To wall outlet
Power cord (supplied)
TIP:
•WhenVirtualRemoteToolstartsforthersttime,“EasySetup”windowwillbedisplayedtonavigateyourconnections.
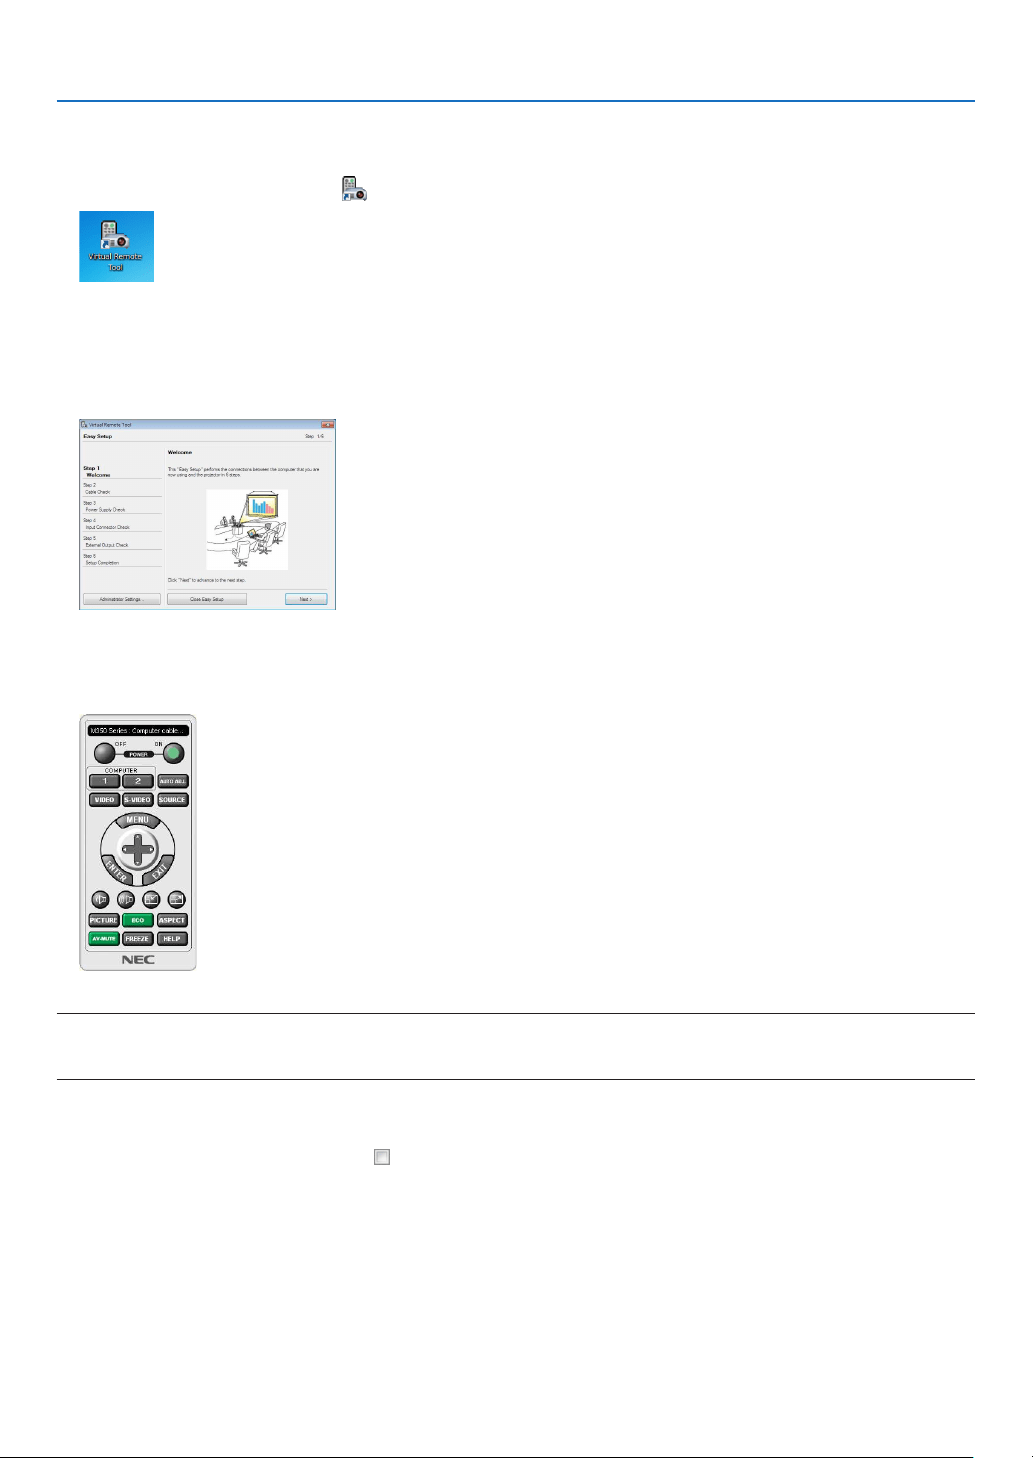
110
7. User Supportware
Step 3: Start Virtual Remote Tool
Start using the shortcut icon
•Double-clicktheshortcuticon
on the Windows Desktop.
StartfromtheStartmenu
•Click[Start]→[AllPrograms]or[Programs]→[NECProjectorUserSupportware]→[VirtualRemoteTool]
→[VirtualRemoteTool].
WhenVirtualRemoteToolstartsforthersttime,“EasySetup”windowwillbedisplayed.
Follow the instructions on the screens
When“EasySetup”iscompleted,theVirtualRemoteToolscreenwillbedisplayed.
NOTE:
•When[NORMAL]isselectedfor[STANDBYMODE]fromthemenu,theprojectorcannotbeturnedonviathecomputercable
(VGA)ornetwork(wiredLAN/wirelessLAN)connection.
TIP:
•TheVirtualRemoteToolscreen(orToolbar)canbedisplayedwithoutdisplaying“EasySetup”window.
Todoso,clicktoplaceacheckmarkfor“DonotuseEasySetupnexttime”onthescreenatStep6in“EasySetup”.
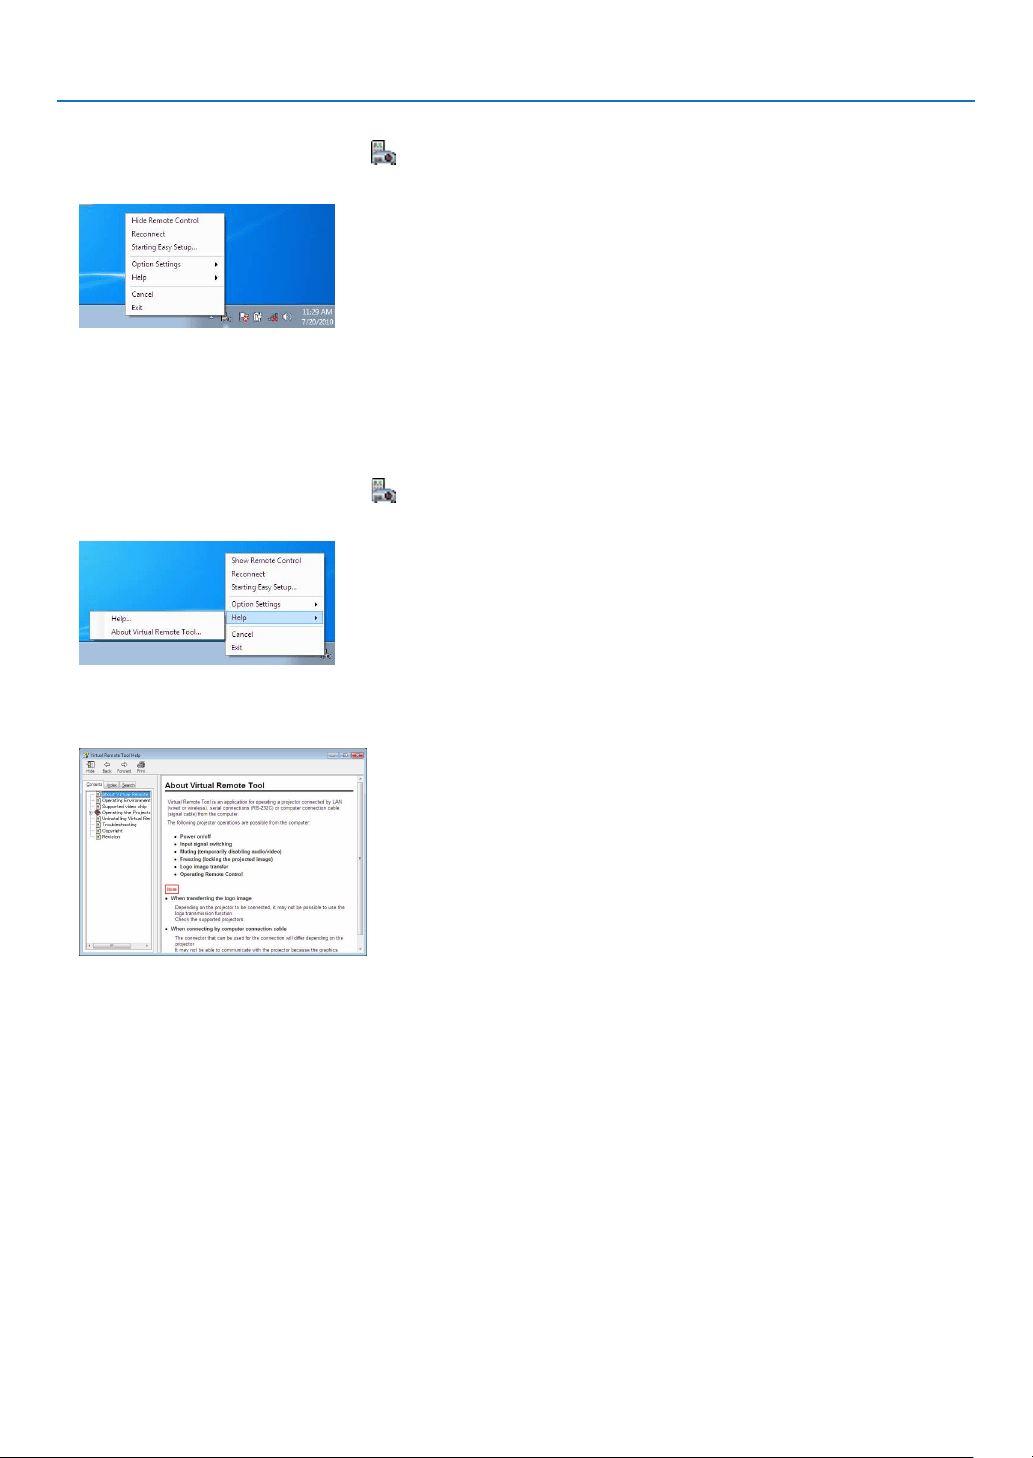
111
7. User Supportware
ExitingVirtualRemoteTool
1ClicktheVirtualRemoteToolicon on the Taskbar.
The pop-up menu will be displayed.
2Click“Exit”.
The Virtual Remote Tool will be closed.
ViewingthehelpleofVirtualRemoteTool
•Displayingthehelpleusingthetaskbar
1ClicktheVirtualRemoteToolicon
onthetaskbarwhenVirtualRemoteToolisrunning.
The pop-up menu will be displayed.
2.Click“Help”.
The Help screen will be displayed.
•DisplayingthehelpleusingtheStartMenu.
1.Click“Start”→“Allprograms”or“Programs”→“NECProjectorUserSupportware”→“VirtualRemote
Tool”→andthen“VirtualRemoteToolHelp”inthisorder.
The Help screen will be displayed.

112
7. User Supportware
❻ Projecting photos or documents saved on the smartphone
over a wireless LAN (Wireless Image Utility)
UtilizingtheWirelessImageUtility,itenablestotransferphotosanddocumentssavedonterminalsasasmartphone
oratablettotheprojectorviathewirelessLANandprojectthem.
TherearetwokindsofWirelessImageUtilitysoftwareoneforAndroidandanotherforiOSthatcanbedownloaded
fromGooglePlayorAppStore.
For Android
http://www.nec-display.com/dl/en/pj_android/wiu_for-android.html
For iOS
http://www.nec-display.com/dl/en/pj_ios/wiu_for-ios.html

113
8. Maintenance
❶ Cleaning the Lens
•Turnofftheprojectorbeforecleaning.
•Theprojectorhasaplasticlens.Useacommerciallyavailableplasticlenscleaner.
•Donotscratchormarthelenssurfaceasaplasticlensiseasilyscratched.
•Neverusealcoholorglasslenscleanerasdoingsowillcausedamagetotheplasticlenssurface.
WARNING
•Donotuseaspraycontainingammablegastoremovedustattachedtothelens,etc.Doingsomayresultin
re.
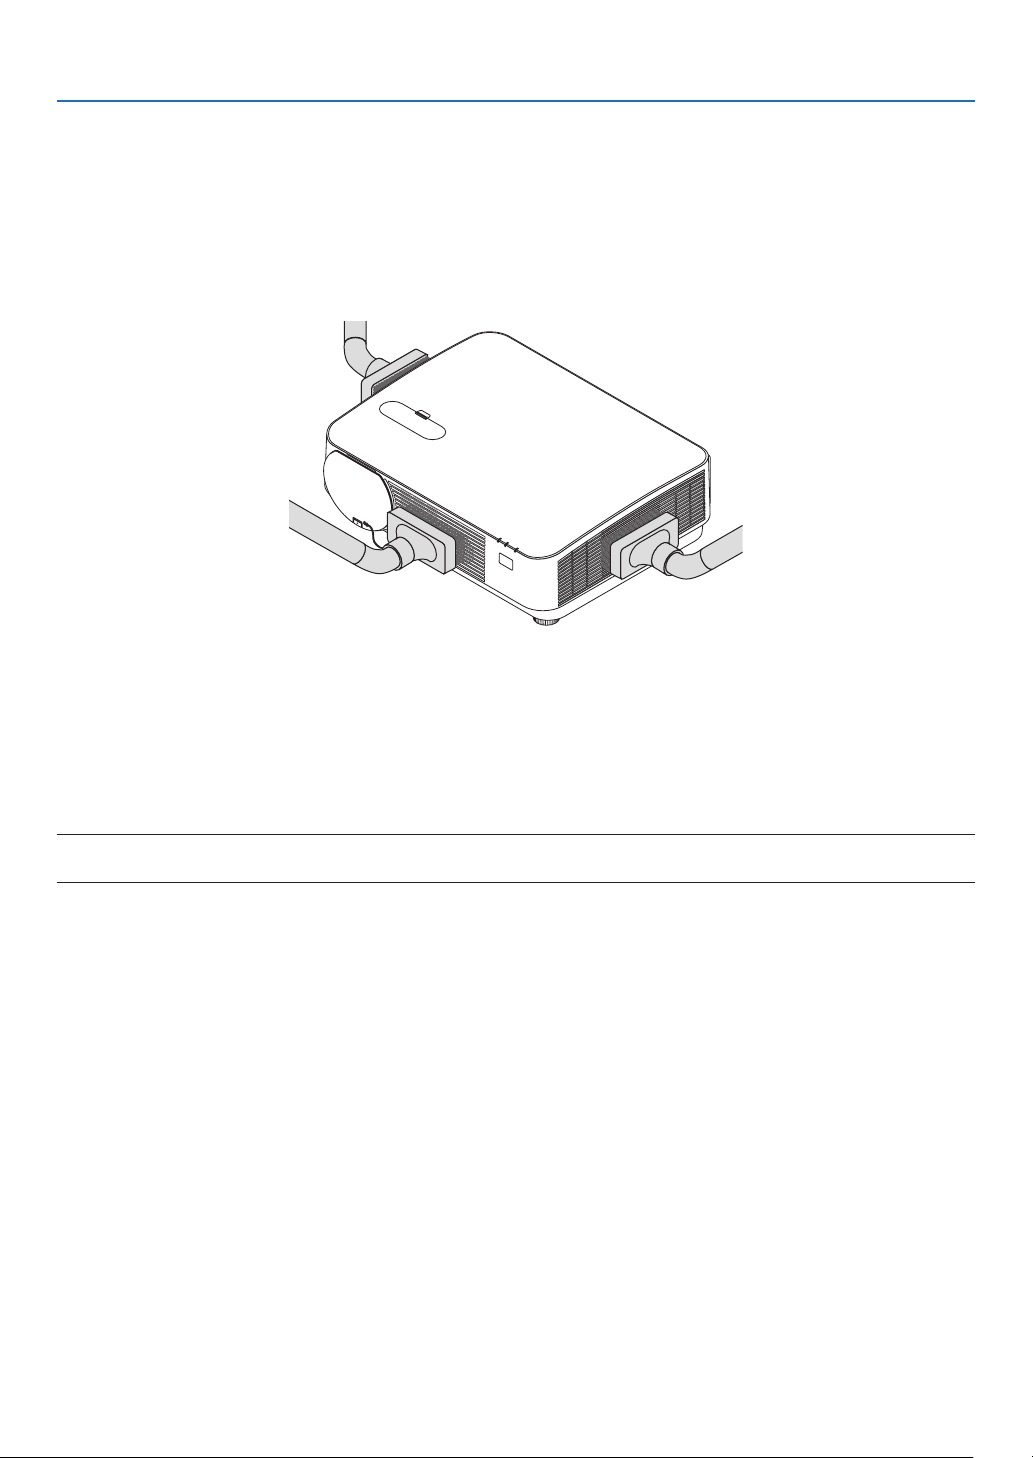
114
8. Maintenance
❷ Cleaning the Cabinet
Turnofftheprojector,andunplugtheprojectorbeforecleaning.
•Useadrysoftclothtowipedustoffthecabinet.
Ifheavilysoiled,useamilddetergent.
•Neverusestrongdetergentsorsolventssuchasalcoholorthinner.
•Whencleaningtheventilationslitsorthespeakerusingavacuumcleaner,donotforcethebrushofthevacuum
cleanerintotheslitsofthecabinet.
Vacuumthedustofftheventilationslitsorthespeaker.
•Poorventilationcausedbydustaccumulationinventilationopeningscanresultinoverheatingandmalfunction.
Theseareasshouldbecleanedregularly.
•Donotscratchorhitthecabinetwithyourngersoranyhardobjects
•Contactyourdealerforcleaningtheinsideoftheprojector.
NOTE:Donotapplyvolatileagentsuchasinsecticideonthecabinet,thelens,orthescreen.Donotleavearubberorvinylproduct
inprolongedcontactwithit.Otherwisethesurfacenishwillbedeterioratedorthecoatingmaybestrippedoff.
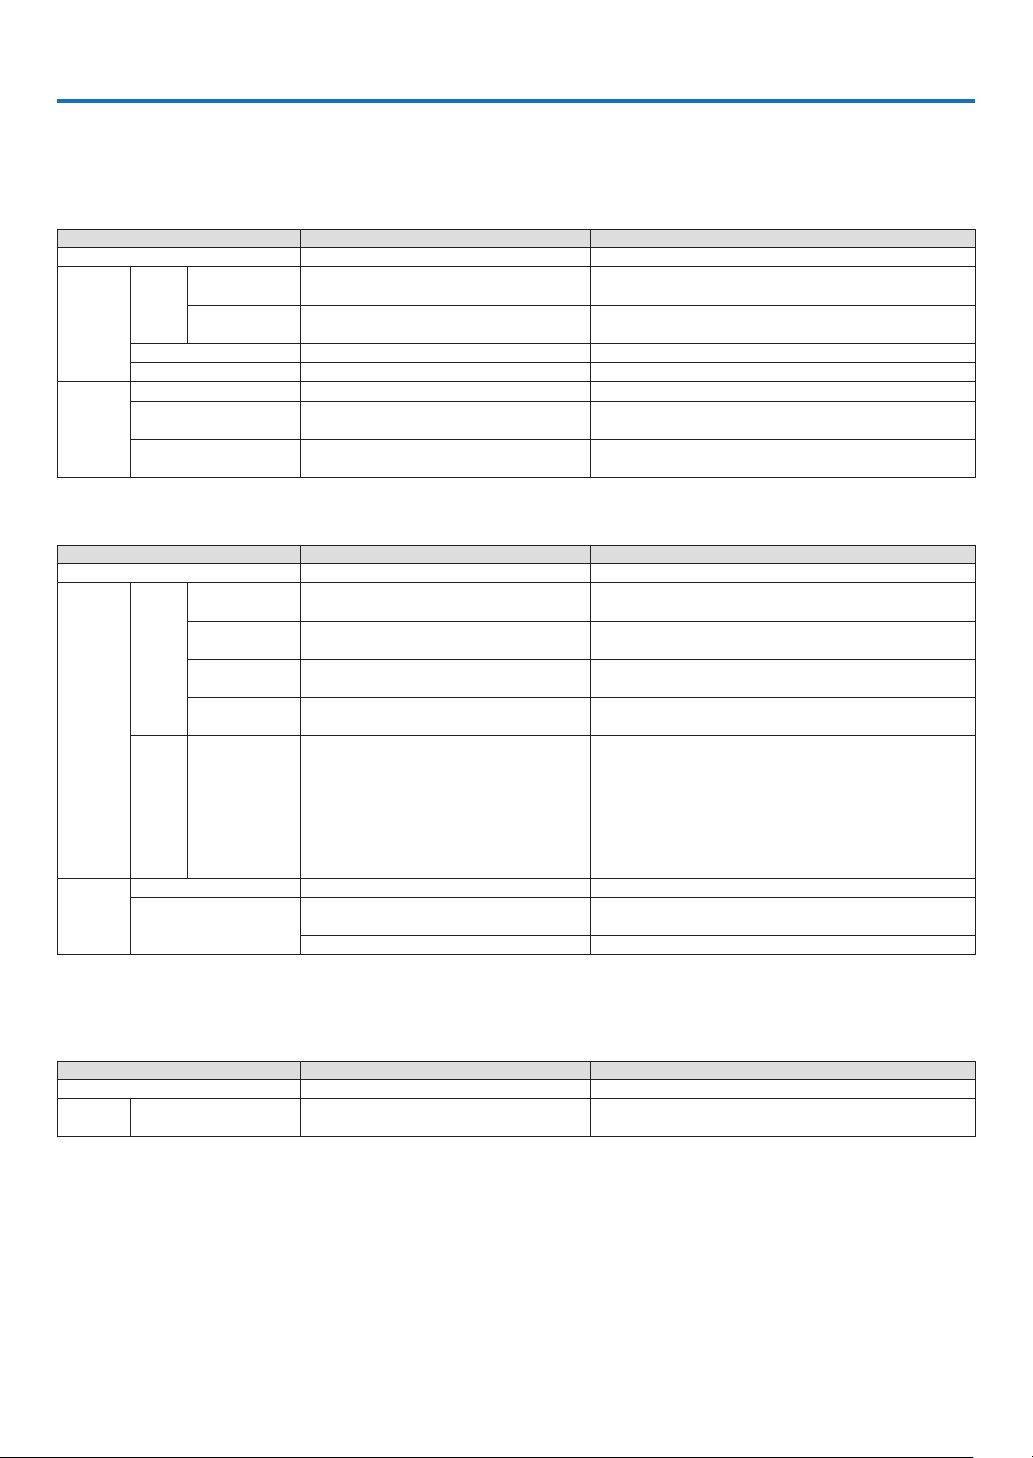
115
9. Appendix
❶ Troubleshooting
Thissectionhelpsyouresolveproblemsyoumayencounterwhilesettinguporusingtheprojector.
Indicator Messages
POWERIndicator
Indicator Condition ProjectorConditionNote
Off The main power is off –
Blinking
light
Blue
0.5 sec On,
0.5 sec Off
The projector is getting ready to turn on. Wait for a moment.
2.5 sec On,
0.5 sec Off
Off Timer is enabled.
Program timer (off time enabled)
–
Orange (short flashes) Cooling Wait for a moment
Orange (long flashes) Program timer (on time enabled)
Steady
light
Blue
The projector is turned on. –
Orange In Standby condition [NETWORK STAND-
BY] is selected for [STANDBY MODE]
–
Red In Standby condition [NORMAL] is
selected for [STANDBY MODE]
–
STATUS Indicator
Indicator Condition ProjectorConditionNote
Off Normal or Standby –
Blinking
light
Red
2 cycle (0.5 sec
On, 0.5 sec Off)
Temperature error The projector is overheated. Move the projector to a
cooler location.
3 cycle (0.5 sec
On, 0.5 sec Off)
Power error Power unit is not working properly. Contact your dealer.
4 cycle (0.5 sec
On, 0.5 sec Off)
Fan error Fans will not work correctly.
6 cycle (0.5 sec
On, 0.5 sec Off)
Light source error Ask your dealer or service personnel for repair.
Orange 1 cycle (0.5 sec
On, 2.5 sec Off)
Network conflict Both the built-in wired LAN and the wireless LAN cannot
be connected to the same network at the same time.
To use both built-in wired LAN and wireless LAN at the
same time, connect them to different networks.
NOTE:IntheStandbycondition,thestatusindicator
onthecabinetdoesnotblinkinorangeevenifthe
networkconicts
Steady
light
Green Sleep mode* –
Orange
CONTROL PANEL LOCK is on. You have pressed cabinet button when Control Panel
Lock is on.
CONTROL ID error Remote control ID and projector ID are not matched.
*Thesleepmodereferstothemodeinwhichtherestrictionstofunctionsduetothe[STANDBYMODE]settingshavebeenelimi-
nated.
LIGHT Indicator
Indicator Condition ProjectorConditionNote
Off No trouble or [ECO MODE] is set to [OFF]. –
Steady
light
Green [ECO MODE] is set to [ECO1] or [ECO2] –

116
9. Appendix
Over-TemperatureProtection
Iftheprojectorinsidetemperaturegetstoohigh,thelightmoduleswillbeturnedoffautomaticallyandthestatus
indicatorwillstarttoblink(2-cycleOnandOFF).
Shouldthishappen,dothefollowing:
•Unplugthepowercordafterthecoolingfansstop.
•Movetheprojectortoacoolerlocationiftheroomwhereyouarepresentingisparticularlytoowarm.
•Cleantheventsiftheyarecloggedwithdust.
•Waitabout60minutesuntiltheinsideoftheprojectorbecomescoolenough.

117
9. Appendix
Common Problems & Solutions
(→“POWER/STATUS/LIGHTIndicator”onpage
115.)
ProblemCheckTheseItems
Does not turn on
or shut down
•Checkthatthepowercordispluggedinandthatthepowerbuttonontheprojectorcabinetortheremote
control is on. (→ pages
11, 12)
•Checktoseeiftheprojectorhasoverheated.Ifthereisinsufcientventilationaroundtheprojectororifthe
room where you are presenting is particularly warm, move the projector to a cooler location.
•Thelightmodulemayfailtolight.Waitafullminuteandthenturnonthepoweragain.
•Set[FANMODE]to[HIGH]whenusingtheprojectorataltitudesapproximately5500feet/1700meters
or higher. Using the projector at altitudes approximately 5500 feet/1700 meters or higher without setting
to [HIGH] can cause the projector to overheat and the projector could shut down. If this happens, wait a
couple minutes and turn on the projector. (→ page 58)
If you turn on the projector immediately after the light module is turned off, the fans run without displaying
an image for some time and then the projector will display the image. Wait for a moment.
•Incaseit’shardtothinkthetroubleisnotcausedontheabovementionedconditions,unplugthepower
cord from the outlet. Then wait 5 minutes before plugging it in again. (→ page 24)
Will turn off
•Ensurethatthe[OFFTIMER]or[AUTOPOWEROFF]isoff.(→ page
52, 61)
No picture
•Checkiftheappropriateinputisselected.(→ page
14) If there is still no picture, press the SOURCE button
or one of the source buttons again.
•Ensureyourcablesareconnectedproperly.
•Usemenustoadjustthebrightnessandcontrast.(→ page 45)
•CheckthattheAVMUTE(imageoff)buttonsarenotpressed.
•Resetthesettingsoradjustmentstofactorypresetlevelsusingthe[RESET]intheMenu.(→ page 66)
•EnteryourregisteredkeywordiftheSecurityfunctionisenabled.(→ page 30)
•IftheHDMI1INortheHDMI2INsignalcannotbedisplayed,trythefollowing.
- Reinstall your driver for the graphics card built in your computer, or use the updated driver.
For reinstalling or updating your driver, refer to the user guide accompanied with your computer or
graphics card, or contact the support center for your computer manufacturer.
Install the updated driver or OS on your own responsibility.
We are not liable for any trouble and failure caused by this installation.
•SignalsmaynotbesupporteddependingontheHDBaseTtransmissiondevice.IRandRS232Ccannotbe
used in certain cases as well.
•BesuretoconnecttheprojectorandnotebookPCwhiletheprojectorisinstandbymodeandbeforeturning
on the power to the notebook PC.
In most cases the output signal from the notebook PC is not turned on unless connected to the projector
before being powered up.
*Ifthescreengoesblankwhileusingyourremotecontrol,itmaybetheresultofthecomputer’sscreen-
saver or power management software.
•Seealsothenext page.
Picture suddenly
becomes dark
•CheckiftheprojectorisintheForcedECOmodebecauseoftoohighambienttemperature.Ifthisisthe
case, lower the internal temperature of the projector by selecting [HIGH] for [FAN MODE]. (→ page
58)
Color tone or hue is
unusual
•Checkifanappropriatecolorisselectedin[WALLCOLOR].Ifso,selectanappropriateoption.(→ page
51)
•Adjust[HUE]in[PICTURE].(→ page
45)
Imageisn’tsquareto
the screen
•Repositiontheprojectortoimproveitsangletothescreen.(→ page
16)
•UsetheKeystonecorrectionfunctiontocorrectthetrapezoiddistortion.(→ page 21)
Picture is blurred
•Adjustthefocus.(→ page
19)
•Repositiontheprojectortoimproveitsangletothescreen.(→ page 16)
•Ensurethatthedistancebetweentheprojectorandscreeniswithintheadjustmentrangeofthelens.(→
page
67)
•Hasthelensbeenshiftedbyanamountexceedingtheguaranteedrange?(→ page
71)
•Condensationmayformonthelensiftheprojectoriscold,broughtintoawarmplaceandisthenturned
on. Should this happen, let the projector stand until there is no condensation on the lens.
Image is scrolling
vertically, horizontally
or both
•Checkthecomputer’sresolutionandfrequency.Makesurethattheresolutionyouaretryingtodisplayis
supported by the projector. (→ page
126)
•Adjustthecomputerimagemanuallywiththe[HORIZONTAL]/[VERTICAL]inthe[IMAGEOPTIONS].(→
page
47)

118
9. Appendix
ProblemCheckTheseItems
Remote control does
not work
•Installnewbatteries.(→ page
9)
•Makesuretherearenoobstaclesbetweenyouandtheprojector.
•Standwithin22feet(7m)oftheprojector.(→ page 9)
•Theremotecontrolsensoronthebackoftheprojectorcannotbeusedwhenthecablecoverismounted
on the projector.
Indicator is lit or
blinking
•SeethePOWER/STATUS/LIGHTIndicator.(→ page
115)
Cross color in RGB
mode
•PresstheAUTOADJ.buttonontheprojectorcabinetortheremotecontrol.(→ page
23)
•Adjustthecomputerimagemanuallywith[CLOCK]/[PHASE]in[IMAGEOPTIONS]inthemenu.(→ page
46)
Formoreinformationcontactyourdealer.
If there is no picture, or the picture is not displayed correctly.
•PoweronprocessfortheprojectorandthePC.
BesuretoconnecttheprojectorandnotebookPCwhiletheprojectorisinstandbymodeandbeforeturningonthe
powertothenotebookPC.
InmostcasestheoutputsignalfromthenotebookPCisnotturnedonunlessconnectedtotheprojectorbefore
beingpoweredup.
NOTE:Youcancheckthehorizontalfrequencyofthecurrentsignalintheprojector’smenuunderInformation.Ifitreads“0kHz”,
thismeansthereisnosignalbeingoutputfromthecomputer.(→page65orgotonextstep)
•Enablingthecomputer’sexternaldisplay.
DisplayinganimageonthenotebookPC’sscreendoesnotnecessarilymeanitoutputsasignaltotheprojector.
WhenusingaPCcompatiblelaptop,acombinationoffunctionkeyswillenable/disabletheexternaldisplay.Usually,
thecombinationofthe“Fn”keyalongwithoneofthe12functionkeysgetstheexternaldisplaytocomeonoroff.
Forexample,NEClaptopsuseFn+F3,whileDelllaptopsuseFn+F8keycombinationstotogglethroughexternal
displayselections.
•Non-standardsignaloutputfromthecomputer
IftheoutputsignalfromanotebookPCisnotanindustrystandard,theprojectedimagemaynotbedisplayed
correctly.Shouldthishappen,deactivatethenotebookPC’sLCDscreenwhentheprojectordisplayisinuse.Each
notebookPChasadifferentwayofdeactivate/reactivatethelocalLCDscreensasdescribedinthepreviousstep.
Refertoyourcomputer’sdocumentationfordetailedinformation.
•ImagedisplayedisincorrectwhenusingaMac
WhenusingaMacwiththeprojector,settheDIPswitchoftheMacadapter(notsuppliedwiththeprojector)accord-
ingtoyourresolution.Aftersetting,restartyourMacforthechangestotakeaffect.
ForsettingdisplaymodesotherthanthosesupportedbyyourMacandtheprojector,changingtheDIPswitchon
aMacadaptermaybounceanimageslightlyormaydisplaynothing.Shouldthishappen,settheDIPswitchto
the13"xedmodeandthenrestartyourMac.Afterthat,restoretheDIPswitchestoadisplayablemodeandthen
restarttheMacagain.
NOTE:AVideoAdaptercablemanufacturedbyAppleInc.isneededforaMacBookwhichdoesnothaveaminiD-Sub15-pinterminal.
•MirroringonaMacBook
*WhenusingtheprojectorwithaMacBook,outputmaynotbesetto1024×768unless“mirroring”isoffonyour
MacBook.Refertoowner’smanualsuppliedwithyourMaccomputerformirroring.
•FoldersoriconsarehiddenontheMacscreen
Foldersoriconsmaynotbeseenonthescreen.Shouldthishappen,select[View]→[Arrange]fromtheApple
menuandarrangeicons.

119
9. Appendix
❷ Specifications
Thissectionprovidestechnicalinformationaboutprojector’sperformance.
ModelnameNP-P502HLNP-P502WL
Method
1ChipDLPtype
Specicationsofmainparts
DMDpanelSize0.65"(aspectratio:16:9)0.65"(aspectratio:16:10)
Pixels
(*1)
2,073,600(1920dots×1080lines)1,024,000(1280dots×800lines)
ProjectionlensesF=2.0,f=18.2–31.1mm
ZoomManual(ZoomRatio=1.7)
FocusManual
LensshiftingH:±25%,V:+62%,−0%H:±28%,V:+59%,−0%
LightsourceBlueLaserDiode
OpticaldeviceOpticalisolationbydichroicmirror,combiningbydichroicprism
Lightoutput
(*2)
(*3)
5,000lm
Contrastratio
(*2)
(allwhite/allblack)15,000:1withdynamiccontrast
Screensize(throwdistance)30to300inches(0.8–14.2m)
ProjectionAngleFrom0to15.9degat80"From0to14.8degat80"
ProjectionDistance(FromProjection
Lens)
Wide:From0.8to8.2m
Tele:From1.4to14.2m
Wide:From0.8to8.4m
Tele:From1.4to14.5m
Colorreproducibility10-bitcolorprocessing(approx.1.07billioncolors)
ScanningfrequencyHorizontalAnalog:15kHz,24to100kHz(24kHzorgreaterforRGBinputs),conformingto
VESAstandards
Digital:15kHz,24to153kHz,conformingtoVESAstandards
VerticalAnalog:48Hz,50to85Hz,100,120HzconformingtoVESAstandards
Digital:24,25,30,48Hz,50to85Hz,100,120HzconformingtoVESAstandards
MainadjustmentfunctionsManualzoom,manualfocus,manuallensshift,inputsignalswitching(HDMI1/HDMI2/
COMPUTER/VIDEO/HDBaseT),autoimageadjustment,picturemaginication,mut-
ing(video),poweron/standby,on-screendisplay/selection,etc.
Max.displayresolution(horizontal×verti-
cal)
Analog:1920×1200(handledwithAdvancedAccuBlend)
Digital:1920×1080(handledwithAdvancedAccuBlend)
Inputsignals
R,G,B,H,VRGB:0.7Vp-p/75Ω
Y:1.0Vp-p/75Ω(withNegativePolaritySync)
Cb,Cr(Pb,Pr):0.7Vp-p/75Ω
H/VSync:4.0Vp-p/TTL
CompositeSync:4.0Vp-p/TTL
SynconG:1.0Vp-p/75Ω(withSync)
Compositevideo1.0Vp-p/75Ω
Component
Y:1.0Vp-p/75Ω(withSync)
Cb,Cr(Pb,Pr):0.7Vp-p/75Ω
DTV:480i,480p,720p,1080i,1080p(60Hz)
576i,576p,720p,1080i,1080p(50Hz)
DVD:Progressivesignal(50/60Hz)
AudioStereoL/R:0.5Vrms/22kΩorover
Input/outputterminals
Computer/Com-
ponent
VideoinputMiniD-Sub15-pin×1
VideooutputMiniD-Sub15-pin×1
AudioinputRCA×2(ForVideo),StereominiJack(ForComputer)
AudiooutputStereominiJack(Selectedfrom:Computer/Video/HDMI)
HDMIVideoinputHDMI
®
TerminaltypeA×2
DeepColor(colordepth):8-/10-/12-bitcompatible
Colorimetry:RGB,YcbCr444andYcbCr422compatible
LipSynccompatible,HDCPcompatible
(*4)
,Supports3D
AudioinputHDMI:Samplingfrequency–32/44.1/48kHz,Samplingbits–16/20/24bits
HDBaseTVideoinputDeepColor(colordepth):Support8/10/12bits
Colorimetry:SupportRGB,YCbCr444andYCbCr422
SupportLipSync,HDCP
(*4)
,3D
AudioinputSamplingfrequency:32/44.1/48kHz
Samplingbit:16/20/24bit
USBportUSBtypeA×1(ForUSBMemory)
Ethernet/HDBaseTportRJ-45×1,SupportsBASE-TX
3DSYNCoutputterminal5V/10mA,synchronizedsignaloutputfor3Duse
ControlTerminals
RS-232Cterminal(PCcontrol)D-Sub9-pin×1
Built-inSpeaker20W(monaural)

120
9. Appendix
ModelnameNP-P502HLNP-P502WL
UsageenvironmentOperatingtemperature:5to40°C
(*5)
Operatinghumidity:20to80%(withnocondensation)
Storagetemperature:−10to50°C
(*5)
Storagehumidity:20to80%(withnocondensation)
Operatingaltitude:0to2600m/8500feet
(Set[FANMODE]to[HIGH]whenusingtheprojectorataltitudesapproximately5500
feet/1700metersorhigher.)
Powersupply100–240VAC,50/60Hz
Powercon-
sumption
ECO
MODE
OFF464W(100-130V)
442W(200-240V)
ON362W(100-130V)
347W(200-240V)
STANDBY
MODE
NORMAL0.15W(100-130V)/0.36W(200-240V)
NETWORK
STANDBY
2.1W(100-130V)/2.3W(200-240V)
Ratedinputcurrent2.3A(240VAC)to5.7A(100VAC)
Externaldimensions18.46"(width)×5.39"(height)×14.37"(depth)/
469(width)×137(height)×365(depth)mm(notincludingprotrusions)
18.46"(width)×6.18"(height)×14.57"(depth)/
469(width)×157(height)×370(depth)mm(includingprotrusions)
Weight19.18lbs(8.7kg)
*1Effectivepixelsaremorethan99.99%.
*2CompliancewithISO21118-2012
*3Thisisthelightoutputvalue(lumens)whenthe[PRESET]modeissetto[HIGH-BRIGHT].Ifanyothermodeisselectedasthe
[PRESET]mode,thelightoutputvaluemaydropslightly.
*4HDMI
®
(DeepColor,LipSync)withHDCP
WhatisHDCP/HDCPtechnology?
HDCPisanacronymforHigh-bandwidthDigitalContentProtection.HighbandwidthDigitalContentProtection(HDCP)isasystem
forpreventingillegalcopyingofvideodatasentoveraHigh-DenitionMultimediaInterface(HDMI).
IfyouareunabletoviewmaterialviatheHDMIinput,thisdoesnotnecessarilymeantheprojectorisnotfunctioningproperly.With
theimplementationofHDCP,theremaybecasesinwhichcertaincontentisprotectedwithHDCPandmightnotbedisplayed
duetothedecision/intentionoftheHDCPcommunity(DigitalContentProtection,LLC).
Video:DeepColor;8/10/12-bit,LipSync
Audio:LPCM;upto2ch,samplerate32/44.1/48KHz,samplebit;16/20/24-bit
*535to40°C–“Forcedecomode”
•Thesespecicationsandtheproduct’sdesignaresubjecttochangewithoutnotice.
Foradditionalinformationvisit:
US:
http://www.necdisplay.com/
Europe:http://www.nec-display-solutions.com/
Global:http://www.nec-display.com/global/index.html
Forinformationonouroptionalaccessories,visitourwebsiteorseeourbrochure.
Thespecicationsaresubjecttochangewithoutnotice.
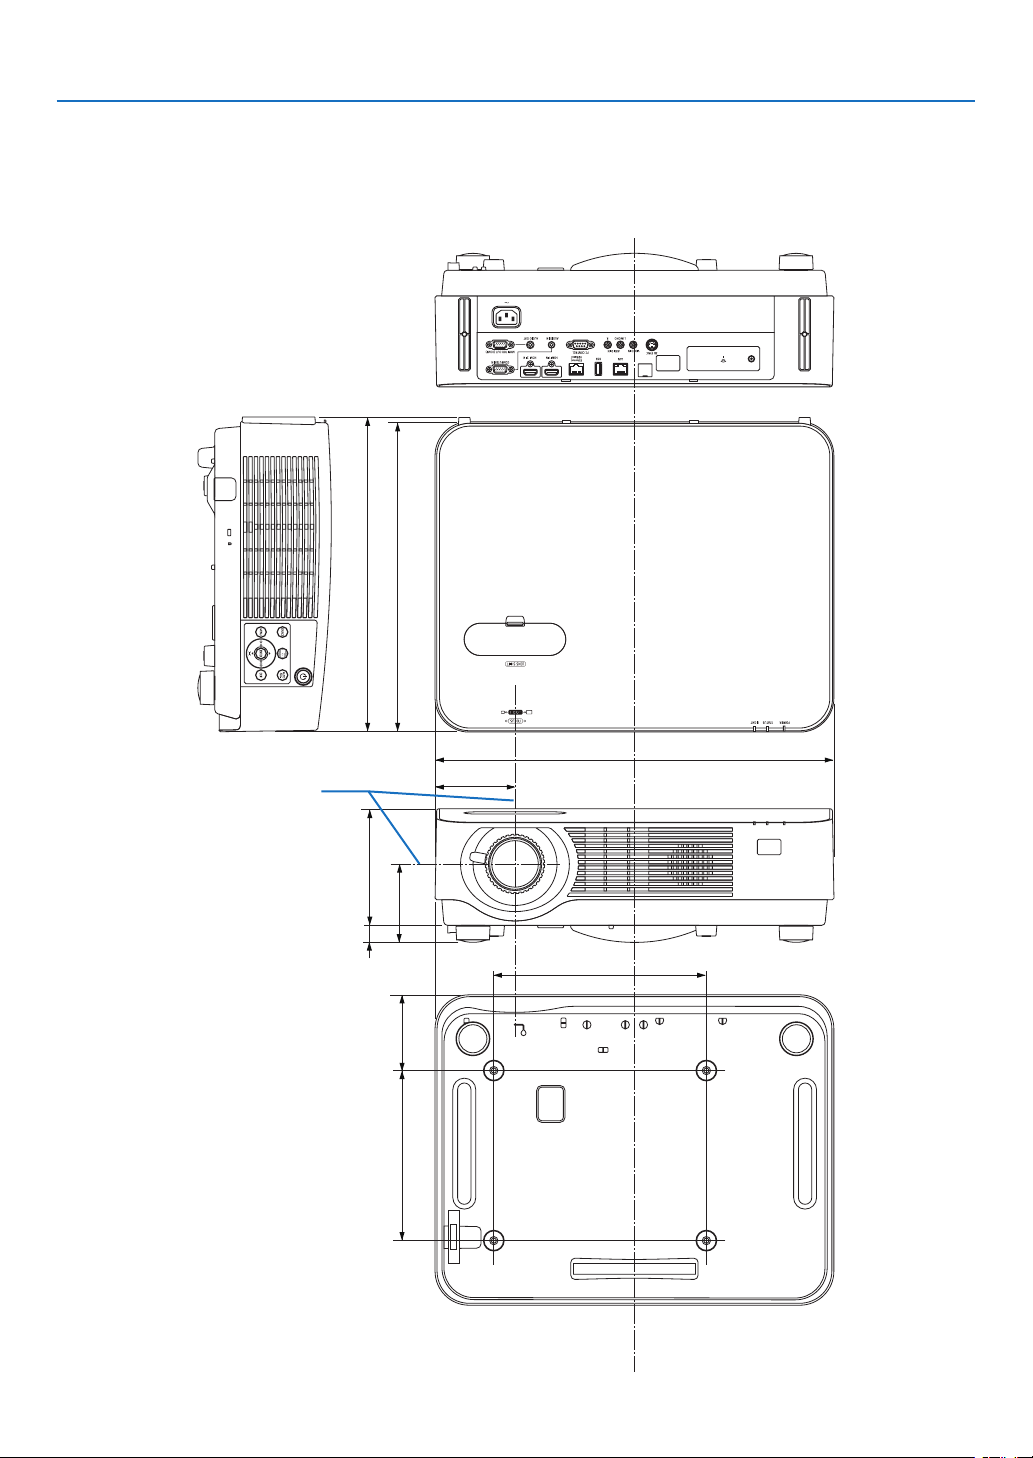
121
9. Appendix
469 (18.5)
94 (3.7)
250 (9.8)
365 (14.4)
200 (7.9)
89 (3.5)
92 (3.6)
20 (0.8)
137 (5.4)
370 (14.6)
❸ Cabinet Dimensions
Unit:mm(inch)
Lens center

122
9. Appendix
❹ Attaching the Optional Cable Cover (NP08CV)
Afternishingconnections,attachthesuppliedcablecovertoproperlyhidethecables.
CAUTION:
•Besuretotightenthescrewsafterattachingthecablecover.Failuretodosomaycausethecablecovertocome
offandfall,resultingininjuryordamagetothecablecover.
•Donotputbundledcablesinthecablecover.Doingsomaydamagethepowercord,resultinginare.
•Donotholdthecablecoverwhilemovingtheprojectorordonotapplyexcessiveforcetothecablecover.Doing
somaydamagethecablecover,resultingininjury.
Attaching the cable cover
Toolneeded:
•Phillipsscrewdriver(plus-head)about9cm/4inchesinlength
9 cm/4 inches
1. Align two claws on the cable cover edge with grooves of
the projector and push the top end.
•Theremainingclawonthecablecoveralsogoesinthe
projector’s groove.
NOTE:
•Becarefulnottogetcablescaughtinbetweenthecablecoverand
theprojector.
1
2
* As seen from below.
Claw on the cable cover
edge
Grooveinback
panel
Cable cover
claw
2. Tighten the cable cover screws.
•Besuretotightenthescrews.
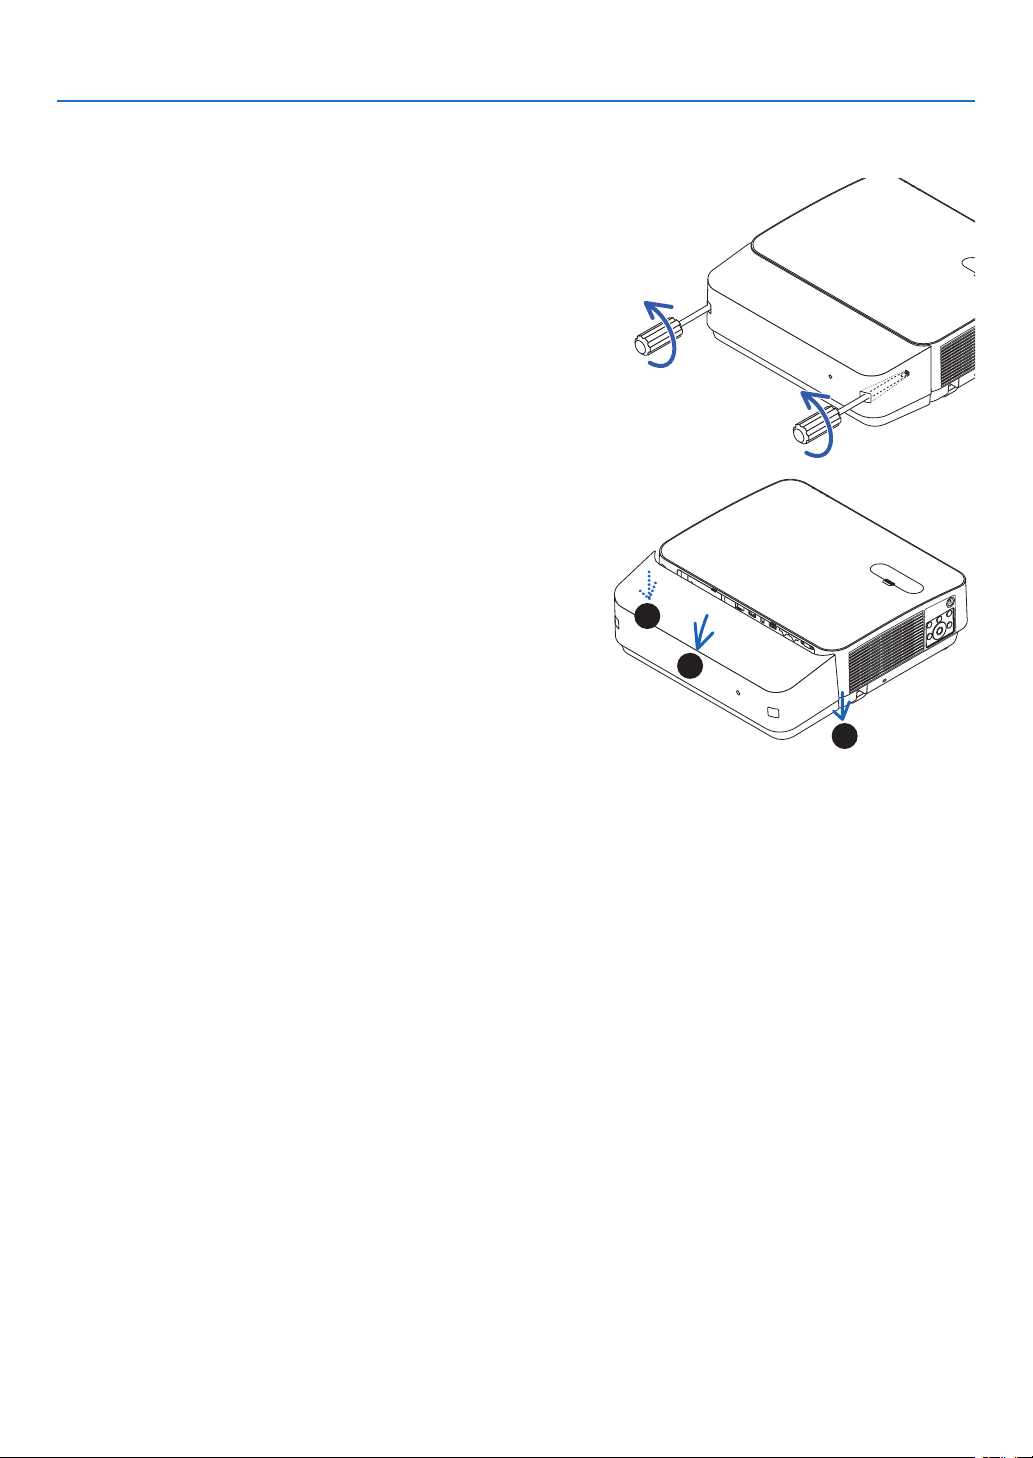
123
9. Appendix
Removing the cable cover
1. Loosen the cable cover screws until the Phillips screw-
driver goes into a freewheeling condition.
•Whensuspendedfromtheceiling,holdsothatthecable
cover does not drop.
•Thescrewscannotberemoved.
2. Remove the cable cover.
(1) Rotate a little downwards so that the claw comes out of the
projector’s groove.
(2) Slide downwards so that the claw on the cover edge comes
out of the projector’s groove.
2
1
2
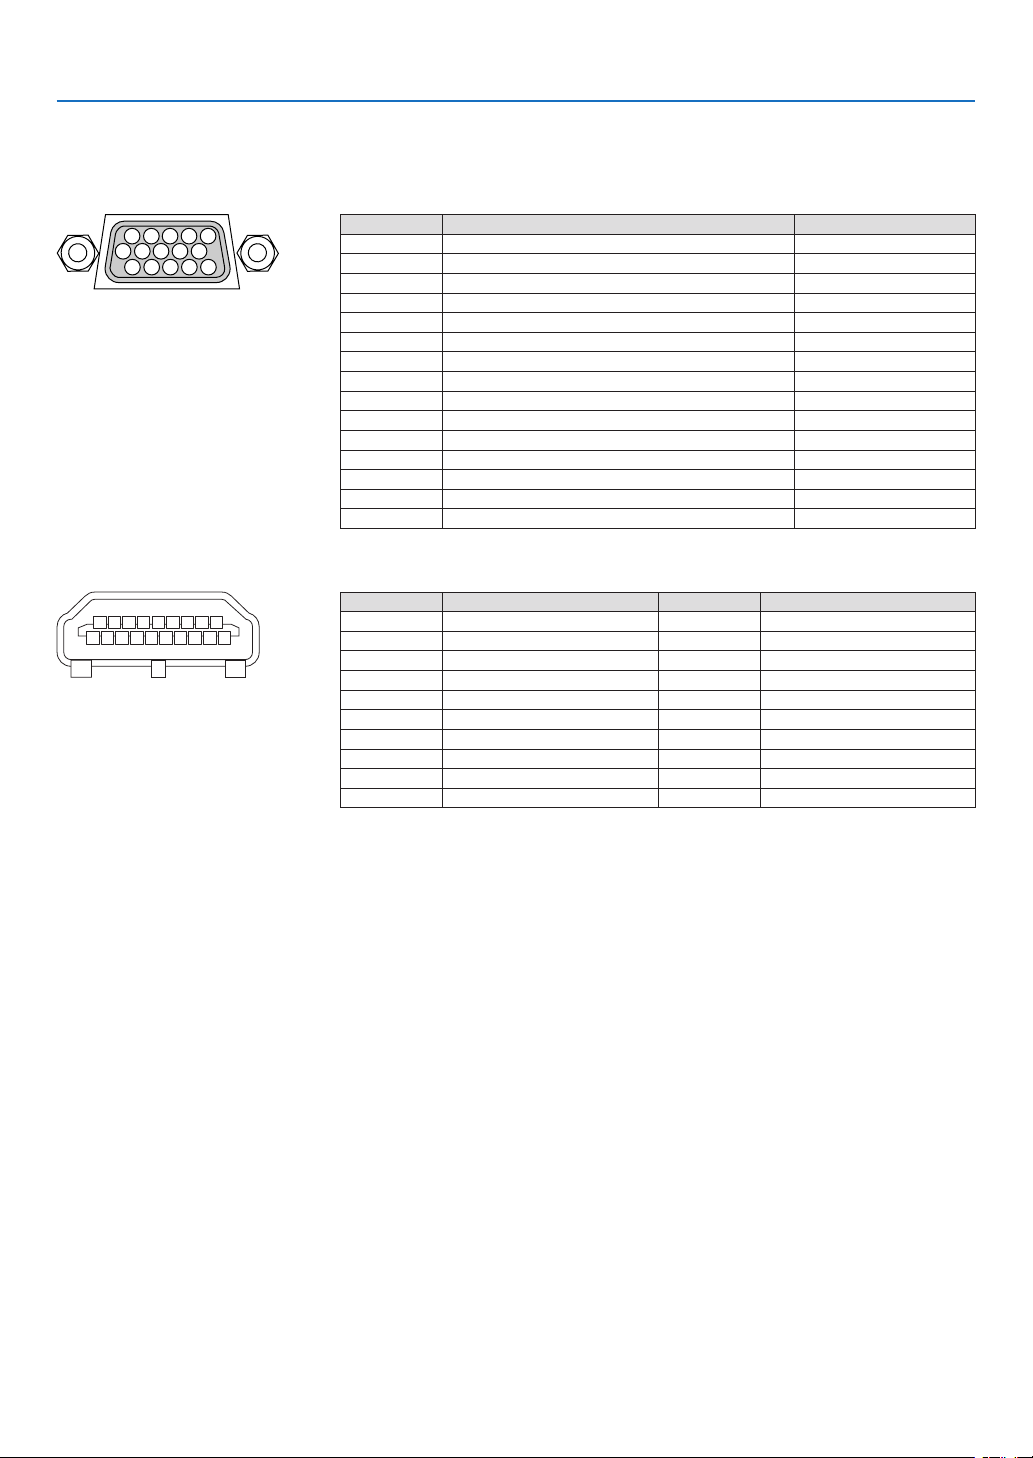
124
9. Appendix
❺ Pin assignments and signal names of main terminals
COMPUTER IN Terminal (Mini D-Sub 15 Pin)
Connectionandsignallevelofeachpin
51423
10
11 12 13 14 15
6978
Signal Level
Videosignal:0.7Vp-p(Analog)
Syncsignal:TTLlevel
PinNo.RGBSignal(Analog)YCbCr Signal
1 RedCr
2
GreenorSynconGreenY
3BlueCb
4Ground
5 Ground
6
RedGroundCrGround
7GreenGroundYGround
8 BlueGroundCbGround
9HotPlug
10 SyncSignalGround
11 NoConnection
12 Bi-directionalDATA(SDA)
13HorizontalSyncorCompositeSync
14VerticalSync
15 DataClock
HDMI 1 IN/HDMI 2 IN Terminal (Type A)
135791113151719
246810 12 14 16 18
PinNo.Signal PinNo.Signal
1 TMDSData2+11 TMDSClockShield
2 TMDSData2Shield12 TMDSClock−
3TMDSData2−13CEC
4TMDSData1+14Disconnection
5 TMDSData1Shield15 SCL
6 TMDSData1−16 SDA
7TMDSData0+17DDC/CECgrounding
8 TMDSData0Shield18 +5Vpowersupply
9TMDSData0−19Hotplugdetection
10 TMDSClock+
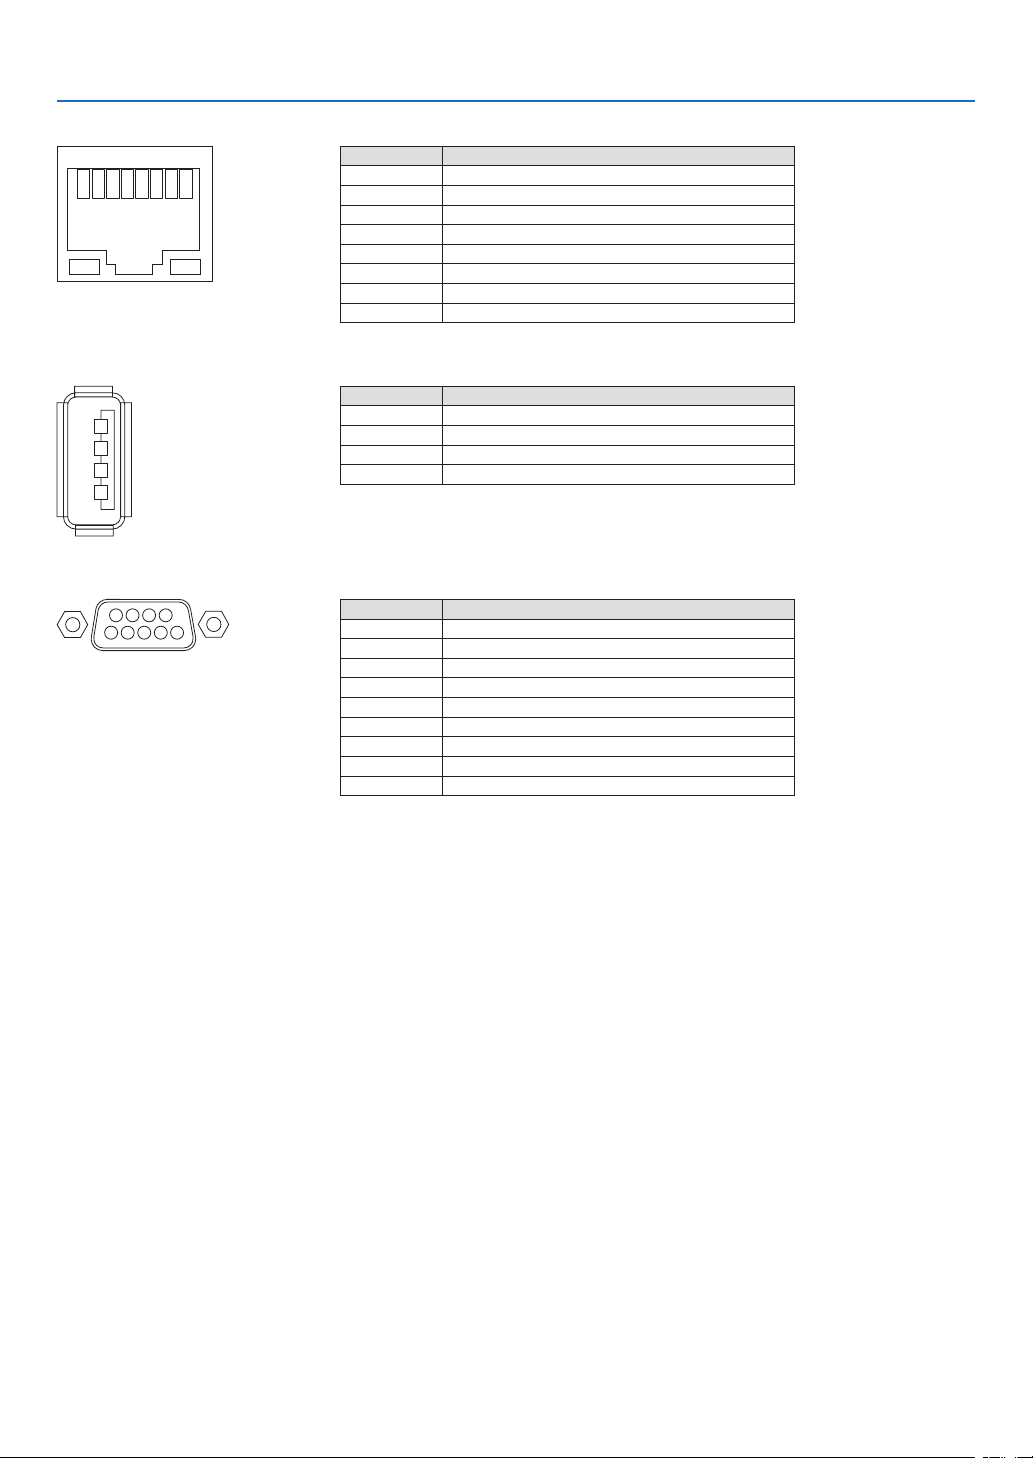
125
9. Appendix
Ethernet/HDBaseT/LAN Port (RJ-45)
12345678
PinNo.Signal
1 TxD+/HDBT0+
2 TxD−/HDBT0−
3RxD+/HDBT1+
4Disconnection/HDBT2+
5 Disconnection/HDBT2−
6 RxD−/HDBT1−
7Disconnection/HDBT3+
8 Disconnection/HDBT3−
USB Port (Type A)
1
3
2
4
PinNo.Signal
1 V
BUS
2 D−
3D+
4Grounding
PC CONTROL Port (D-Sub 9 Pin)
1234
5
6789
Communications protocol
PinNo.Signal
1 Unused
2
RxDreceptiondata
3TxDtransmissiondata
4Unused
5 Grounding
6 Unused
7
RTStransmissionrequest
8 CTStransmissionallowed
9Unused

126
9. Appendix
HDMI
Signal
Resolution
(dots)
AspectRatio
RefreshRate
(Hz)
VGA640×4804:360
SVGA800 ×600 4:360
XGA1024 ×7684:360
WXGA1280 ×768*
1
15:960
1280 ×800 *
1
16:1060
1366×76816:960
Quad-VGA1280 ×9604:360
SXGA1280 ×10245:460
SXGA+1400 ×1050 4:360
WXGA+1440 ×90016:1060
WXGA++1600 ×90016:960
WSXGA+1680 × 1050 16:1060
HDTV(1080p)1920 ×1080 16:950/60
HDTV(1080i)1920× 1080 16:950/60
HDTV(720p)1280 ×72016:950/60
SDTV(480p)720×4804:3/16:960
SDTV(576p)720×5764:3/16:950
SDTV(480i)720×4804:3/16:960
SDTV(576i)720×5764:3/16:950
3D
Signal
Resolution
(dots)
AspectRatio
RefreshRate
(Hz)
ForPCSignal
XGA1024 ×7684:360/120*
5
HD1280 ×72016:960/120*
5
WXGA1280 ×800 16:1060/120*
5
HDTV(1080p)1920 ×1080 16:960
ForVideoSignal
SDTV(480i)720×4804:3/16:960
HDMI3D
SignalResolution(dots)AspectRatioRefreshRate(Hz)
Structure:FramePacking
1080p1920×1080 16:923.98/24
720p1280 ×72016:950/59.94/60
Structure:SidebySide(Half)
1080i1920×1080 16:950/59.94/60
Structure:TopandBottom
1080p1920×1080 16:923.98/24
720p1280 ×72016:950/59.94/60
❻ Compatible Input Signal List
AnalogRGB
Signal
Resolution
(dots)
AspectRatio
RefreshRate
(Hz)
VGA640×4804:360/72/75/85/iMac
SVGA800 ×600 4:356/60/72/75/85/
iMac
XGA1024 ×7684:360/70/75/85/iMac
WXGA1280 ×768*
1
15:960
1280 ×800 *
1
16:1060
1360×768*
2
16:9*
3
60
1366×768*
2
16:960
Quad-VGA1280 ×9604:360/75
SXGA1280 ×10245:460/75
SXGA+1400 ×1050 4:360
WXGA+1440 ×90016:1060
WXGA++1600 ×900*
2
16:960
UXGA1600 × 1200 *
3
4:360
WSXGA+1680 × 1050 16:1060
HD1280 ×72016:960
FullHD1920 ×1080 16:960
WUXGA1920×1200 *
4
16:1060
MAC13"640 ×4804:367
MAC16"832 ×6244:375
MAC19"1024×7684:375
MAC21"1152 ×8704:375
MAC23"1280 × 10245:465
Component
SignalFormatAspectRatio
RefreshRate
(Hz)
HDTV(1080p)1920 ×1080 16:950/60
HDTV(1080i)1920× 1080 16:950/60
HDTV(720p)1280 ×72016:950/60
SDTV(480p)720×4804:3/16:960
SDTV(576p)720×5764:3/16:950
SDTV(480i)720×4804:3/16:960
SDTV(576i)720×5764:3/16:950
CompositeVideo
SignalAspectRatio
RefreshRate
(Hz)
NTSC4:360
PAL4:350
PAL604:360
SECAM4:350
*1Nativeresolution
*2Theprojectormayfailtodisplaythesesignalscorrectlywhen[AUTO]
isselectedfor[ASPECTRATIO]intheon-screenmenu.
Thefactorydefaultis[AUTO]for[ASPECTRATIO].Todisplaythese
signals,select[16:9]for[ASPECTRATIO].
*3WXGAMODE:OFF
*4WXGAMODE:ON
*5120HzsignalsaresupportedforFrameSequentialonly.
NOTE:
•Animagewithhigherorlowerresolutionthantheprojector’snativeresolution(1280×800)willbedisplayedwithAdvanced
AccuBlend.
•SynconGreenandCompositesyncsignalsarenotsupported.
•Signalsotherthanthosespeciedinthetableabovemaynotbedisplayedcorrectly.Ifthisshouldhappen,changetherefresh
rateorresolutiononyourPC.RefertoDisplayPropertieshelpsectionofyourPCforprocedures.
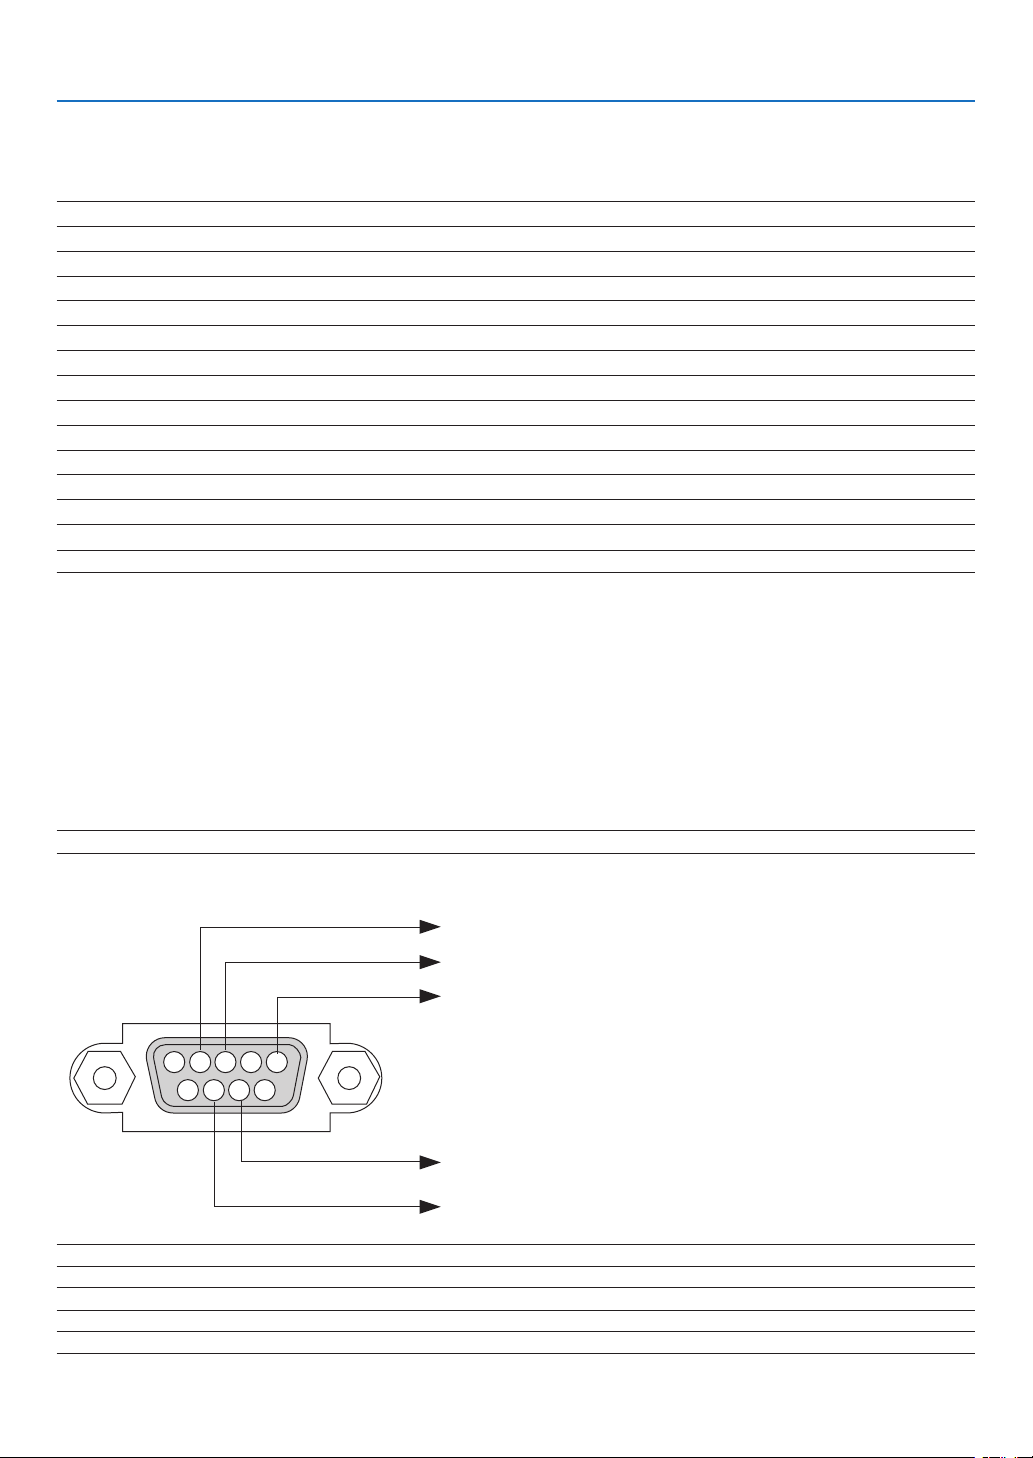
127
9. Appendix
❼ PC Control Codes and Cable Connection
PC Control Codes
Function Code Data
POWER ON 02H 00H 00H 00H 00H 02H
POWER OFF 02H 01H 00H 00H 00H 03H
INPUT SELECT COMPUTER 02H 03H 00H 00H 02H 01H 01H 09H
INPUT SELECT HDMI1 02H 03H 00H 00H 02H 01H 1AH 22H
INPUT SELECT HDMI2 02H 03H 00H 00H 02H 01H 1BH 23H
INPUT SELECT VIDEO 02H 03H 00H 00H 02H 01H 06H 0EH
INPUT SELECT APPS 02H 03H 00H 00H 02H 01H 20H 28H
INPUT SELECT HDBaseT 02H 03H 00H 00H 02H 01H 22H 2AH
PICTURE MUTE ON 02H 10H 00H 00H 00H 12H
PICTURE MUTE OFF 02H 11H 00H 00H 00H 13H
SOUND MUTE ON 02H 12H 00H 00H 00H 14H
SOUND MUTE OFF 02H 13H 00H 00H 00H 15H
NOTE:ContactyourlocaldealerforafulllistofthePCControlCodesifneeded.
Cable Connection
CommunicationProtocol
Baud rate .........................................38400 bps
Data length ......................................8 bits
Parity ...............................................No parity
Stop bit ............................................One bit
X on/off ............................................None
Communications procedure .............Full duplex
NOTE:Dependingontheequipment,alowerbaudratemayberecommendedforlongcableruns.
PC Control Terminal (D-SUB 9P)
15243
67 98
To GND of PC
To RxD of PC
To TxD of PC
To RTS of PC
To CTS of PC
NOTE1:Pins1,4,6and9arenoused.
NOTE2:Jumper“RequesttoSend”and“CleartoSend”togetheronbothendsofthecabletosimplifycableconnection.
NOTE3:Forlongcablerunsitisrecommendedtosetcommunicationspeedwithinprojectormenusto9600bps.
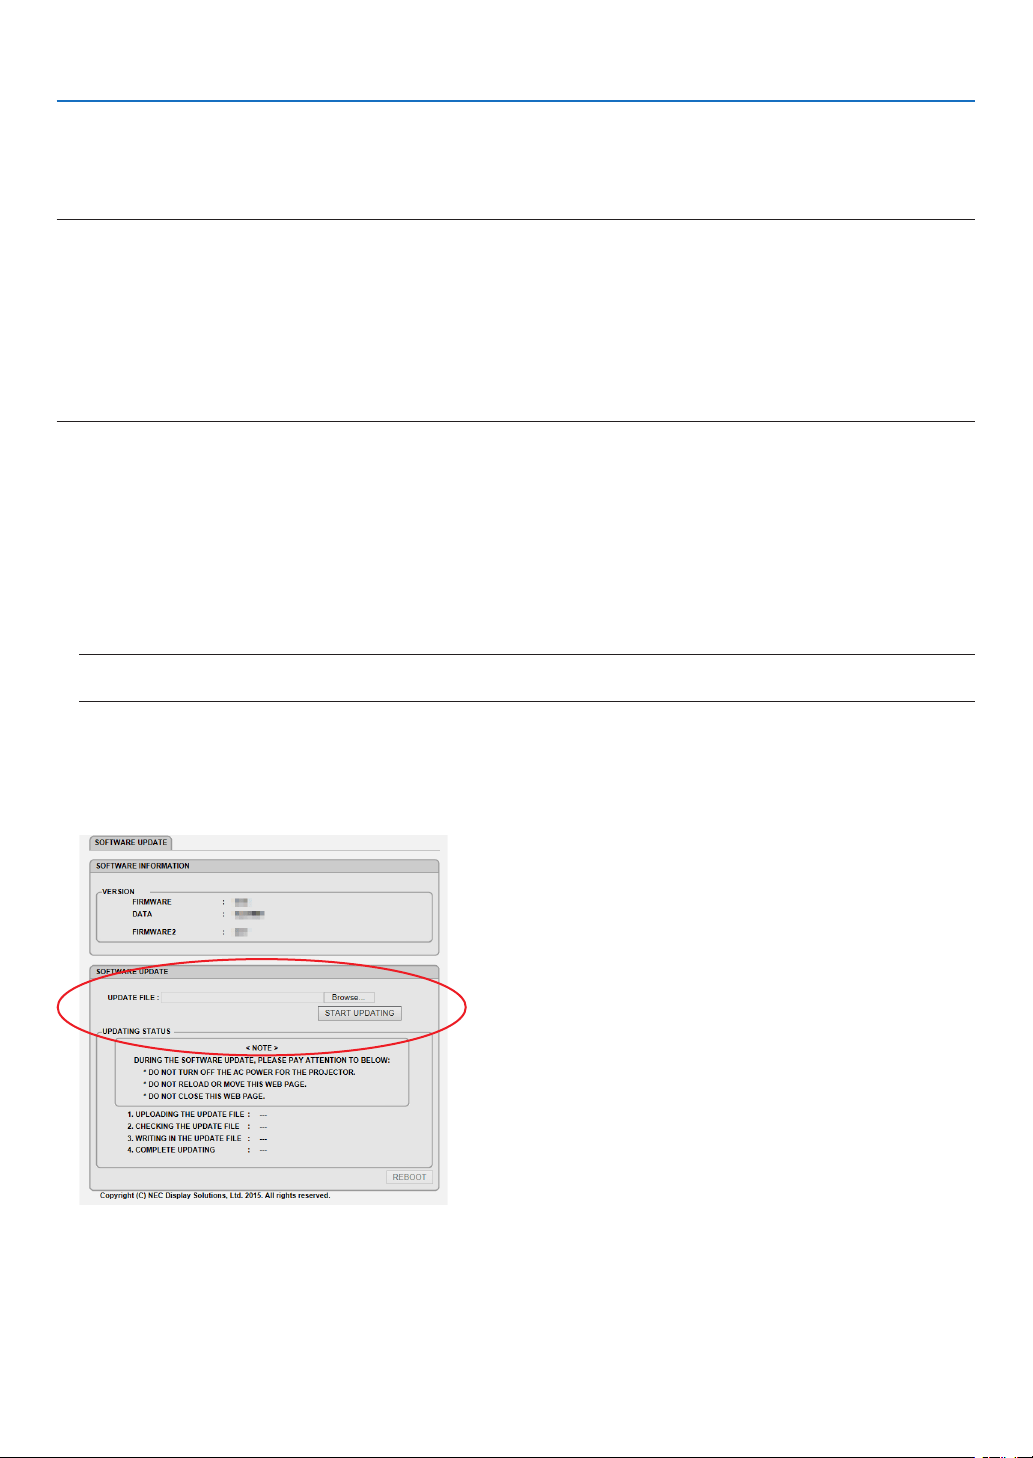
128
9. Appendix
❽ Update the Software
Usingthewebbrowseronacomputer,downloadtheupdatedsoftwarefortheprojectorfromourwebsiteandinstall
itontheprojectorbythewiredLANconnection.
NOTE:
•TheexclusivewebbrowserenablestoupdatethesoftwareisInternetExplorer11.
•Beforeperformingthesoftwareupdate,makesuretoconnectyourcomputerwiththeprojectorbytheLANcable.Itdoesnot
supportthewirelessLANconnection.
•Makesuretoset[NETWORKSTANDBY]asthestandbymodeoftheprojector.Factorydefaultsettingforthestandbymodeis
[NORMAL](→page60)
•Thesoftwareupdateisenabledonlywhentheprojectorisinstandbycondition.Whileperformingthesoftwareupdate,donot
powerontheprojector.Atthesametime,donotshutdowntheACpower.
•Neverupdatethebrowserpageduringthesoftwareupdate.Itdisablesthecomputerfordisplayingthewebpagecorrectly.
1. Access to the software download support page in our web site.
URL:
http://www.nec-display.com/dl/en/pj_soft/lineup.html
2.Checkifthesoftwareinstalledontheprojectorinuseisupdated.
•Youcancheckthesoftwareversionfromeither[VERSION(1)]or[VERSION(2)]intheonscreenmenu[INFOR
-
MATION].
3. If newer software version than one on the projector in use is uploaded on our website, download and save
it in an appropriate folder on your computer.
4. Turn off the power of the projector and set it in the standby condition.
Important:
•SoftwareupdatecannotbeperformedwhenthestandbymodeissetatNORMAL.
5.ConnecttheprojectorwithyourcomputerbytheLANcable.
6. Start up the web browser on your computer and then input the following web address:
URL(forthesoftwareupdate):http://<ProjectorIPaddress>/update.html
The software update screen will be displayed on.
7.Click[Browse….]atthecenterofthescreenandselectthesoftwareyousavedintheprocedure3.
•CheckthelenameindicatedontheUPDATEFILElist.
8.Click[STARTUPDATING]atthecenterofthescreen.
The screen display will change and your computer starts to update the software.

129
9. Appendix
NOTE:
•Duringthesoftwareupdate,payattentiontothefollows:
-DonotturnofftheACPowerfortheprojector.
-Donotreloadormovethewebpage.
-Donotclosethewebpage.
•Whensoftwareupdateiscompletedproperly,thebelowwillbedisplayedon:
1.UPLOADINGTHEUPDATEFILE:COMPLETED
2.CHECKINGTHEUPDATEFILE:COMPLETED
3.WRITINGINTHEUPDATEFILE:COMPLETED
4.COMPLETEUPDATING:PLEASEREBOOT.
9.Click[REBOOT]attherightbottomofthescreen.
The software update is completed and the projector will go into the standby mode.
NOTE:
•Ifanerroroccursduringthesoftwareupdate,anerrorcodeinbelowwillbedisplayedinthe“UPDATINGSTATUS”column.
2001:Failedtouploadthele.
2007:Theuploadedleistoolarge.
2011:Theuploadedleisbroken.
2012:Theuploadedleisbroken.
4001:ReceivednosignaloftheHTTPtransmission.
Theerrorcodesotherthanabovemaybedisplayed.
Ifanerrorisfoundduringthesoftwareupdate,turnontheprojectorandupdatetheleagain.
Whenthesoftwareupdateisnotcompletedproperlyevenifyoutriedtoupdateseveraltimes,pleaseconsultyourdealer.

130
9. Appendix
❾ Troubleshooting Check List
Beforecontactingyourdealerorservicepersonnel,checkthefollowinglisttobesurerepairsareneededalsoby
referringtothe“Troubleshooting”sectioninyouruser’smanual.Thischecklistbelowwillhelpussolveyourproblem
moreefciently.
*Printthispageandthenextpageforyourcheck.
Frequency of occurrence □ always □sometimes(Howoften?_____________________)□other(__________________)
Power
□
No power (POWER indicator does not light blue). See also “Status
Indicator (STATUS)”.
□
Powercord’splugisfullyinsertedintothewalloutlet.
□
Main power switch is pressed to the ON position.
□
No power even though you press and hold the POWER button.
□
Shut down during operation.
□
Powercord’splugisfullyinsertedintothewalloutlet.
□
[AUTO POWER OFF] is turned off (only models with the [AUTO
POWER OFF] function).
□
[OFF TIMER] is turned off (only models with the [OFF TIMER]
function).
Video and Audio
□
No image is displayed from your PC or video equipment to the
projector.
□
Still no image even though you connect the projector to the PC
first, then start the PC.
□
EnablingyournotebookPC’ssignaloutputtotheprojector.
• Acombinationoffunctionkeyswillenable/disabletheexter-
naldisplay.Usually,thecombinationofthe“Fn”keyalong
withoneofthe12functionkeysturnstheexternaldisplay
onoroff.
□
No image (blue or black background, no display).
□
Still no image even though you press the AUTO ADJUST button.
□
Still no image even though you carry out [RESET] in the
projector’smenu.
□
Signalcable’splugisfullyinsertedintotheinputterminal
□
A message appears on the screen.
(_____________________________________________)
□
The source connected to the projector is active and available.
□
Still no image even though you adjust the brightness and/or
the contrast.
□
Inputsource’sresolutionandfrequencyaresupportedbythe
projector.
□
Image is too dark.
□
Remains unchanged even though you adjust the brightness
and/or the contrast.
□
Image is distorted.
□
Image appears to be trapezoidal (unchanged even though you
carry out the [KEYSTONE] adjustment).
□
Parts of the image are lost.
□
Still unchanged even though you press the AUTO ADJUST
button.
□
Still unchanged even though you carry out [RESET] in the
projector’smenu.
□
Image is shifted in the vertical or horizontal direction.
□
Horizontal and vertical positions are correctly adjusted on a
computer signal.
□
Inputsource’sresolutionandfrequencyaresupportedbythe
projector.
□
Some pixels are lost.
□
Image is flickering.
□
Still unchanged even though you press the AUTO ADJUST
button.
□
Still unchanged even though you carry out [RESET] in the
projector’smenu.
□
Image shows flickering or color drift on a computer signal.
□
Still unchanged even though you change [FAN MODE] from
[HIGH] to [AUTO].
□
Image appears blurry or out of focus.
□
Stillunchangedeventhoughyoucheckedthesignal’sresolution
onPCandchangedittoprojector’snativeresolution.
□
Still unchanged even though you adjusted the focus.
□
No sound.
□
Audio cable is correctly connected to the audio input of the
projector.
□
Still unchanged even though you adjusted the volume level.
□
AUDIO OUT is connected to your audio equipment (only models
with the AUDIO OUT terminal).
Other
□
Remote control does not work.
□
No obstacles between the sensor of the projector and the
remote control.
□
Projector is placed near a fluorescent light that can disturb the
infrared remote controls.
□
ID for the projector and for the remote are same.
□
Buttons on the projector cabinet do not work (only models with the
[CONTROL PANEL LOCK] function)
□
[CONTROL PANEL LOCK] is not turned on or is disabled in
the menu.
□
Still unchanged even though you press and hold the SOURCE
button over 10 seconds.
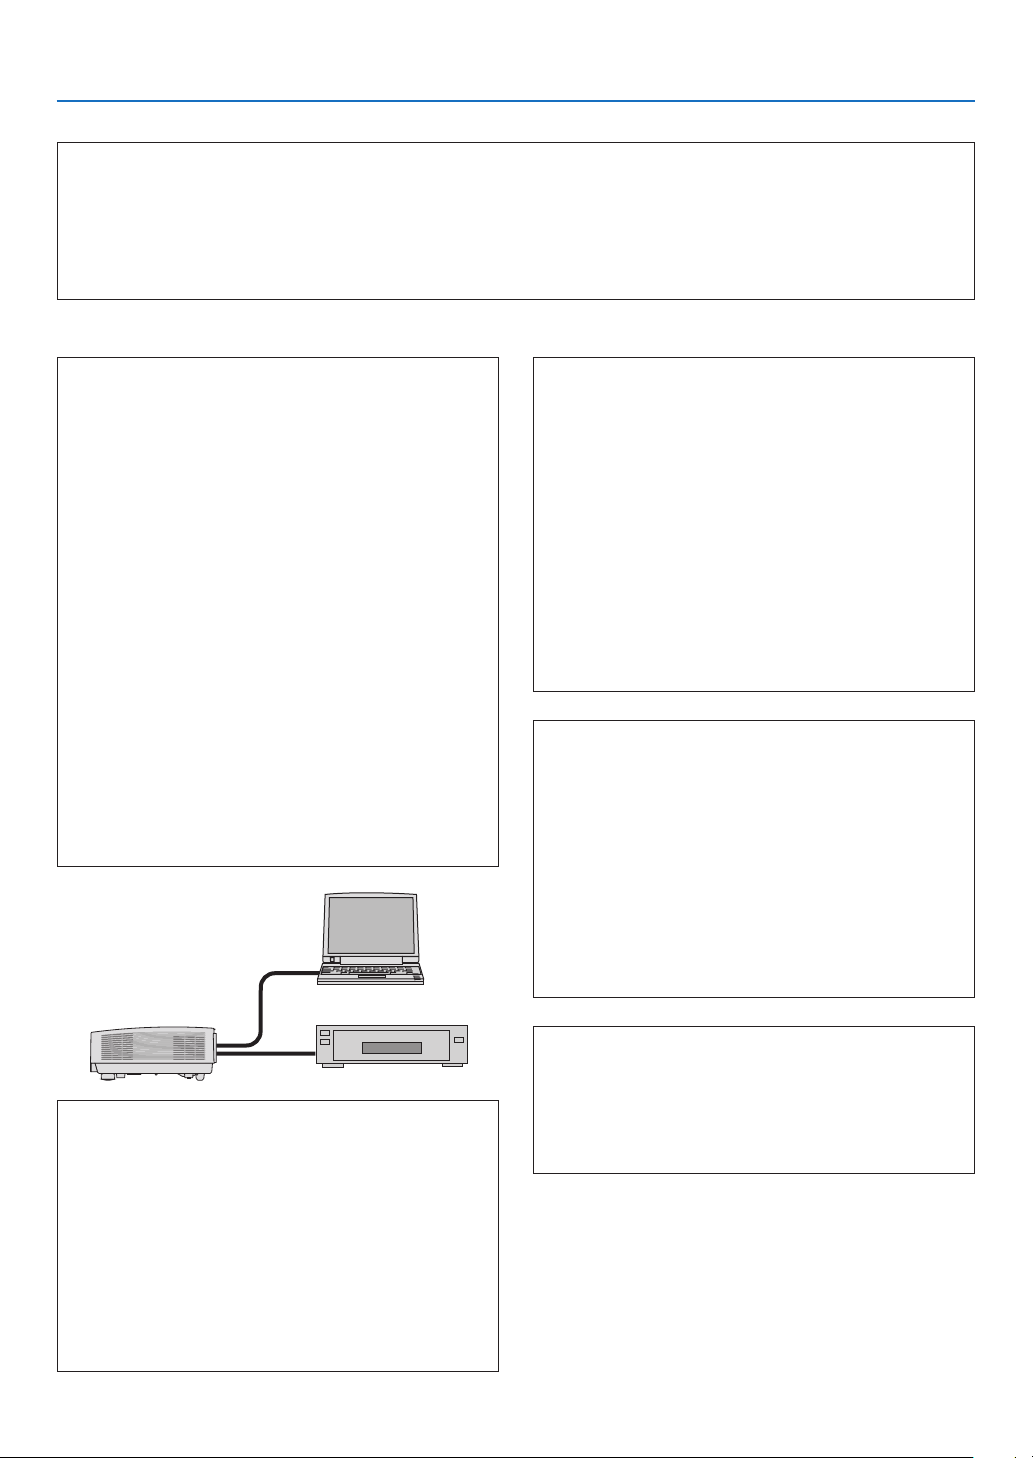
131
9. Appendix
In the space below please describe your problem in detail.
Information on application and environment where your projector is used
Installation environment
Screen size: inch
Screen type: □ White matte □ Beads □ Polarization
□ Wide angle □ High contrast
Throw distance: feet/inch/m
Orientation: □ Ceiling mount □ Desktop
Power outlet connection:
□
Connected directly to wall outlet
□ Connected to power cord extender or other (the
numberofconnectedequipment______________)
□ Connected to a power cord reel or other (the number
ofconnectedequipment______________)
Computer
Manufacturer:
Model number:
Notebook PC □ / Desktop □
Native resolution:
Refresh rate:
Video adapter:
Other:
Videoequipment
VCR, DVD player, Video camera, Video game or other
Manufacturer:
Model number:
Signal cable
NECstandardorothermanufacturer’scable?
Model number: Length: inch/m
Distribution amplifier
Model number:
Switcher
Model number:
Adapter
Model number:
Projector
PC
DVD player
Projector
Model number:
Serial No.:
Date of purchase:
Light module operating time (hours):
ECO MODE: □ OFF □ ECO1
□ ECO2
Information on input signal:
Horizontal synch frequency [ ] kHz
Vertical synch frequency [ ] Hz
Synch polarity H □ (+) □ (−)
V □ (+) □ (−)
Synch type □ Separate □ Composite
□ Sync on Green
STATUS Indicator:
Steady light □ Orange □ Green
Flashing light [ ] cycles
Remote control model number:

132
9. Appendix
❿ TCO Certification
SomemodelsinthisproductfamilyareTCOcertied.AllTCOcertiedmodelshavetheTCOmarkonthemarking
plate(onthebottomoftheproduct).ToseealistofourTCOcertiedprojectorsandtheirTCOCertication(inEnglish
only),visitourwebsiteat
http://www.nec-display.com/ap/en_projector/tco/index.html
TheTCOcertication,designedbyTCODevelopment,isaninternationalenvironmentalandergonomicsstandard
forITequipment.
InsomecaseswemaypostalistofTCOcertiedmodelsonourwebsitebeforetheTCOmarkisplacedontheproduct.
Thisdifferenceintimingisrelatedtothedatecerticationisreceivedcomparedwiththeprojectorsmanufacturingdate.

133
9. Appendix
⓫ REGISTER YOUR PROJECTOR! (for residents in the United
States, Canada, and Mexico)
Pleasetaketimetoregisteryournewprojector.ThiswillactivateyourlimitedpartsandlaborwarrantyandInstaCare
serviceprogram.
Visitourwebsiteatwww.necdisplay.com,clickonsupportcenter/registerproductandsubmityourcompletedformonline.
Uponreceipt,wewillsendaconrmationletterwithallthedetailsyouwillneedtotakeadvantageoffast,reliable
warrantyandserviceprogramsfromtheindustryleader,NECDisplaySolutionsofAmerica,Inc.

©NECDisplaySolutions,Ltd.20157N952241