

Projector
P 502HL/P 502WL
User's Manual for the APPS MENU
Contents
1. What can you do with the APPS MENU? ....................................................................2
2. VIEWER
..........................................................................................................................6
3. REMOTE DESKTOP CONNECTION
...........................................................................10
4. IMAGE EXPRESS UTILITY
..........................................................................................14
5. Miracast
.......................................................................................................................15
6. WEB SERVER FUNCTION...........................................................................................16
6-1. WEB SHARING ..................................................................................................................... 16
6-2. IMAGE EXPRESS UTILITY LITE
........................................................................................... 19
6-3. PROJECTOR CONTROL
...................................................................................................... 21
7. NETWORK SETTINGS .................................................................................................22
7-1. PROJECTOR NAME ............................................................................................................. 22
7-2. NETWORK INFORMATION
................................................................................................... 22
7-3. WIRED LAN
.......................................................................................................................... 22
7-4. Wireless LAN
........................................................................................................................ 22
7-5. IMAGE EXPRESS UTILITY
................................................................................................... 29
7-6. NETWORK SERVICE
............................................................................................................ 29
8. TOOLS ..........................................................................................................................31
8-1. MOUSE ................................................................................................................................. 31
8-2. PROGRAM TIMER
................................................................................................................ 31
8-3. DATE AND TIME
................................................................................................................... 34
8-4. ADMINISTRATOR MODE...................................................................................................... 34
8-5. DEFAULT APP
...................................................................................................................... 34
Trademarks ......................................................................................................................35
2
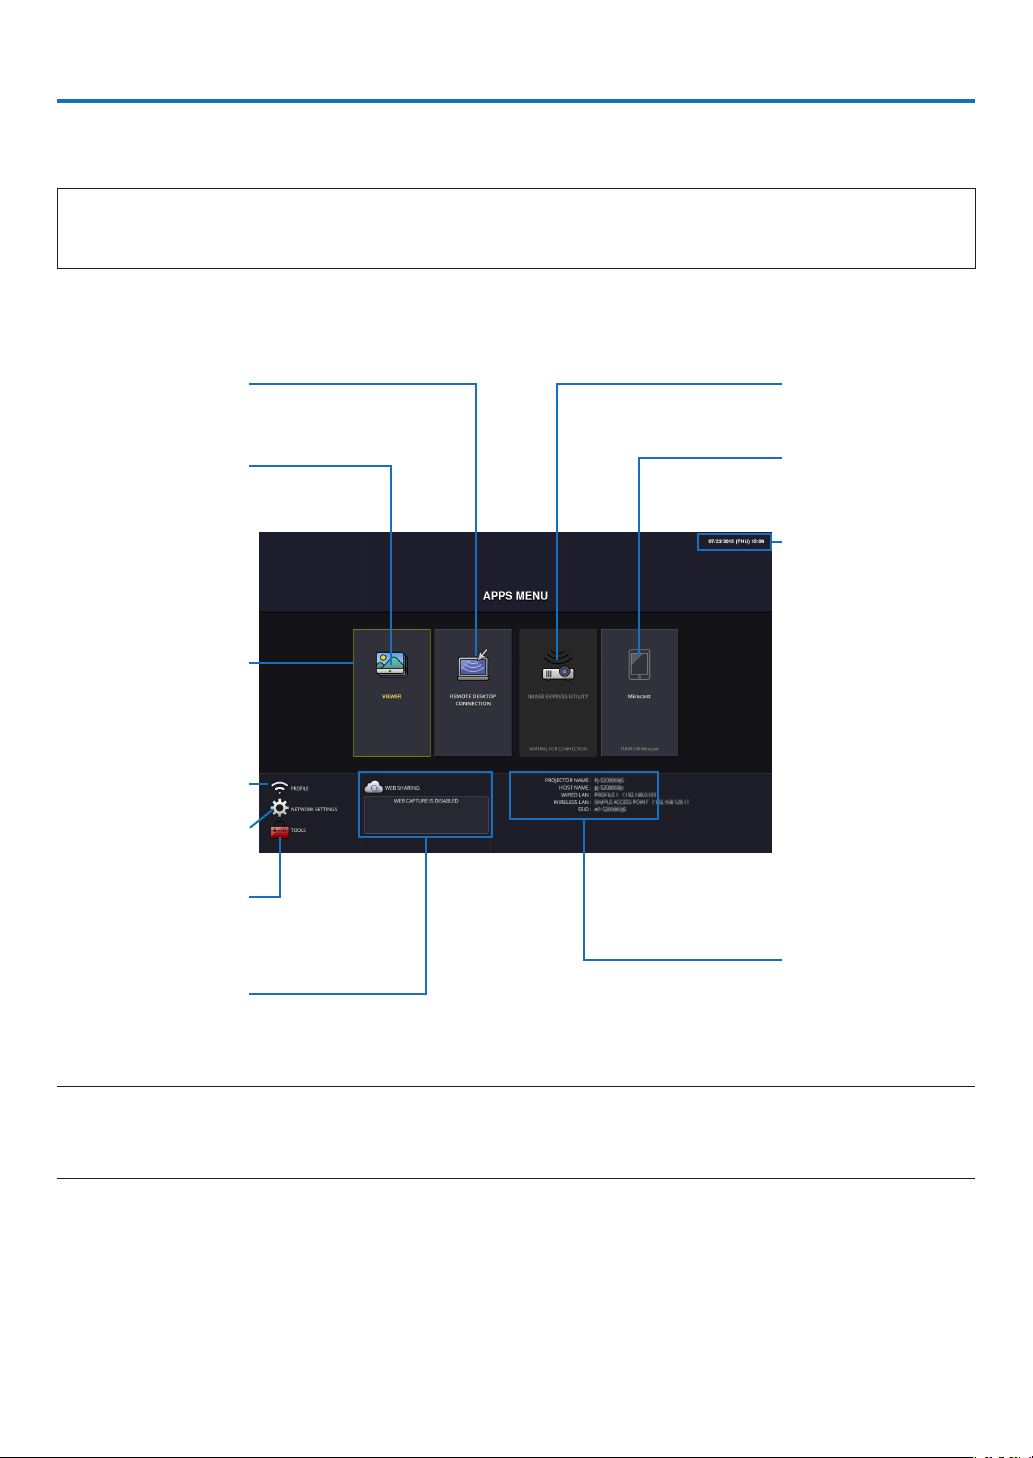
1. What can you do with the APPS MENU?
It becomes available to select the expansion functions indicated in below and various setting with the APPS MENU.
For displaying the APPS MENU, press the APPS button on the remote control or select [APPS] as the [SOURCE] on
the onscreen menu.
INFORMATION
For going back to the APPS MENU interrupting to use each application in the APPS MENU, press APPS button
on the remote control when the onscreen menu is not displayed on.
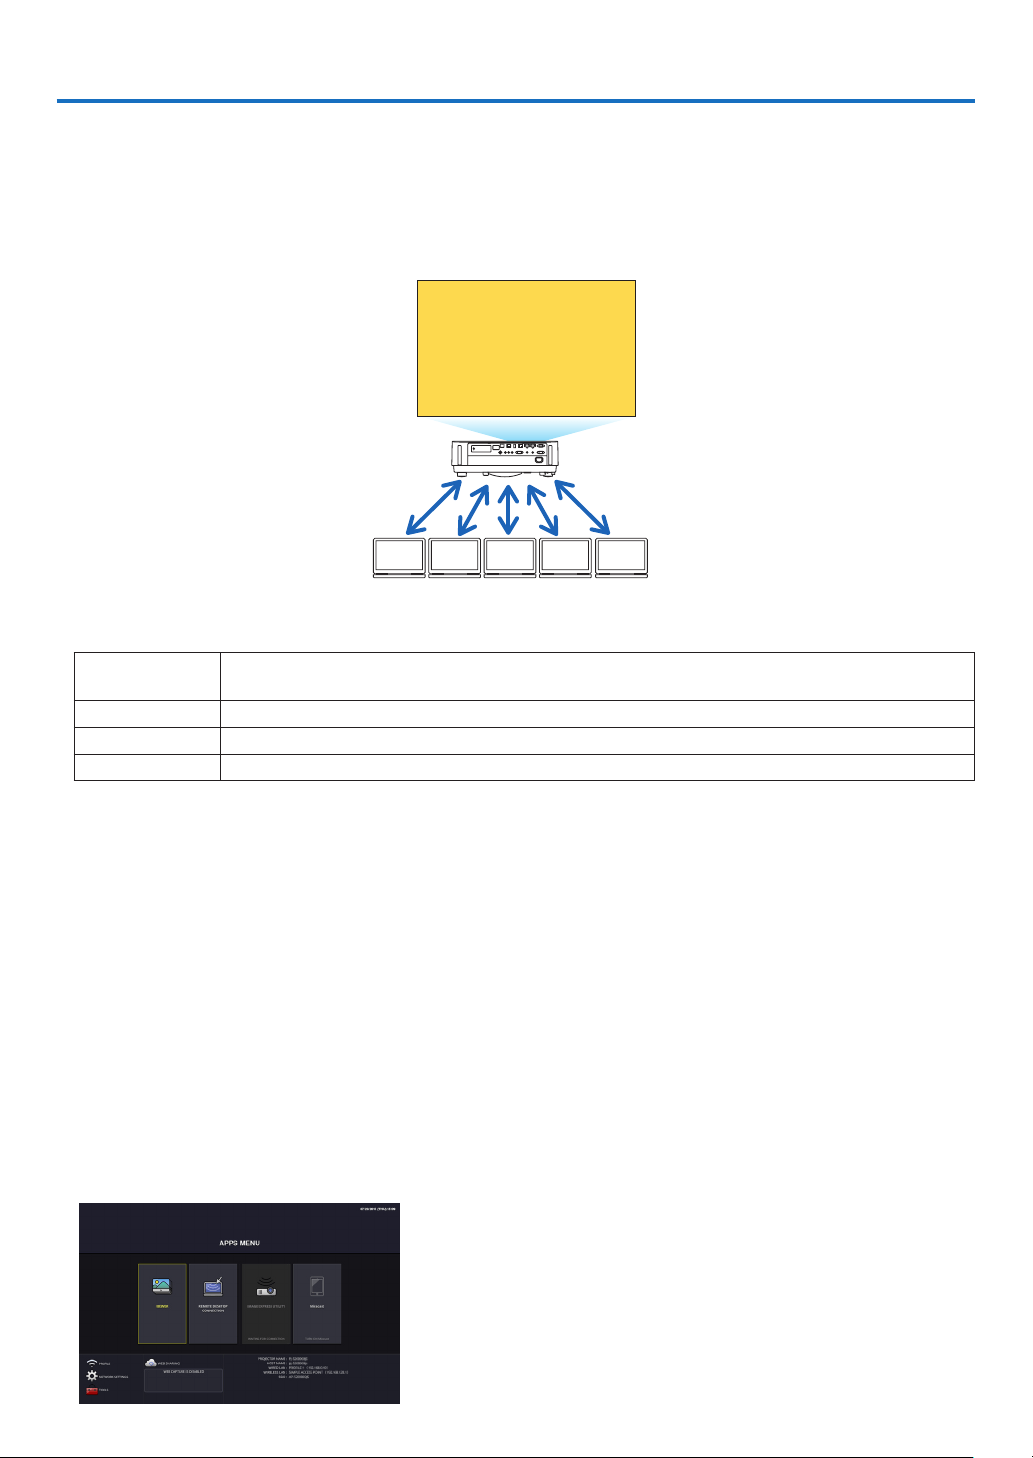
APPS MENU screen display
Current date and time
IMPORTANT:
Before utilizing the func-
tion of APPS MENU, set
day and time.
IMAGE EXPRESS UTIL-
ITY
Miracast
NETWORK INFORMA-
TION
FOCUS
Indicating the selected
item.
Surrounded in a yellow
square.
VIEWER
REMOTE DESKTOP
CONNECTION
WIRELESS LAN PRO-
FILE SELECTION
NETWORK SETTINGS
TOOLS
WEB SHARING
SETTING/ACCESS
PASSWORD DISPLAY
NOTE:
• APPSMENUdoesnotsupportUighur.
• Whenthisprojectorisnotinanetwork,youcannotselect[REMOTEDESKTOPCONNECTION],[IMAGEEXPRESSUTILITY],
[Miracast],and[WEBSHARING].
3
1. What can you do with the APPS MENU?
VIEWER
Select the saved images/movies and project them by the projector. This function is available for explained below:
(1) Projector Memory: Images and movies temporarily saved in the projector built-in memory utilizing the WEB SHAR-
ING.
(2) USB Memory: Images and movies saved in the USB memory connected with the projector.
(3) Shared Folder: Images and movies saved in the shared folder in a network connected with the projector.
REMOTE DESKTOP CONNECTION
• Selectthecomputerconnectedinthesamenetworkwiththeprojector,andtheprojectorprojectstheimageson
the computer over the network.
A commercially available USB keyboard can be used for controlling Windows 8 and Windows 7 computers in the
network connected with the projector.
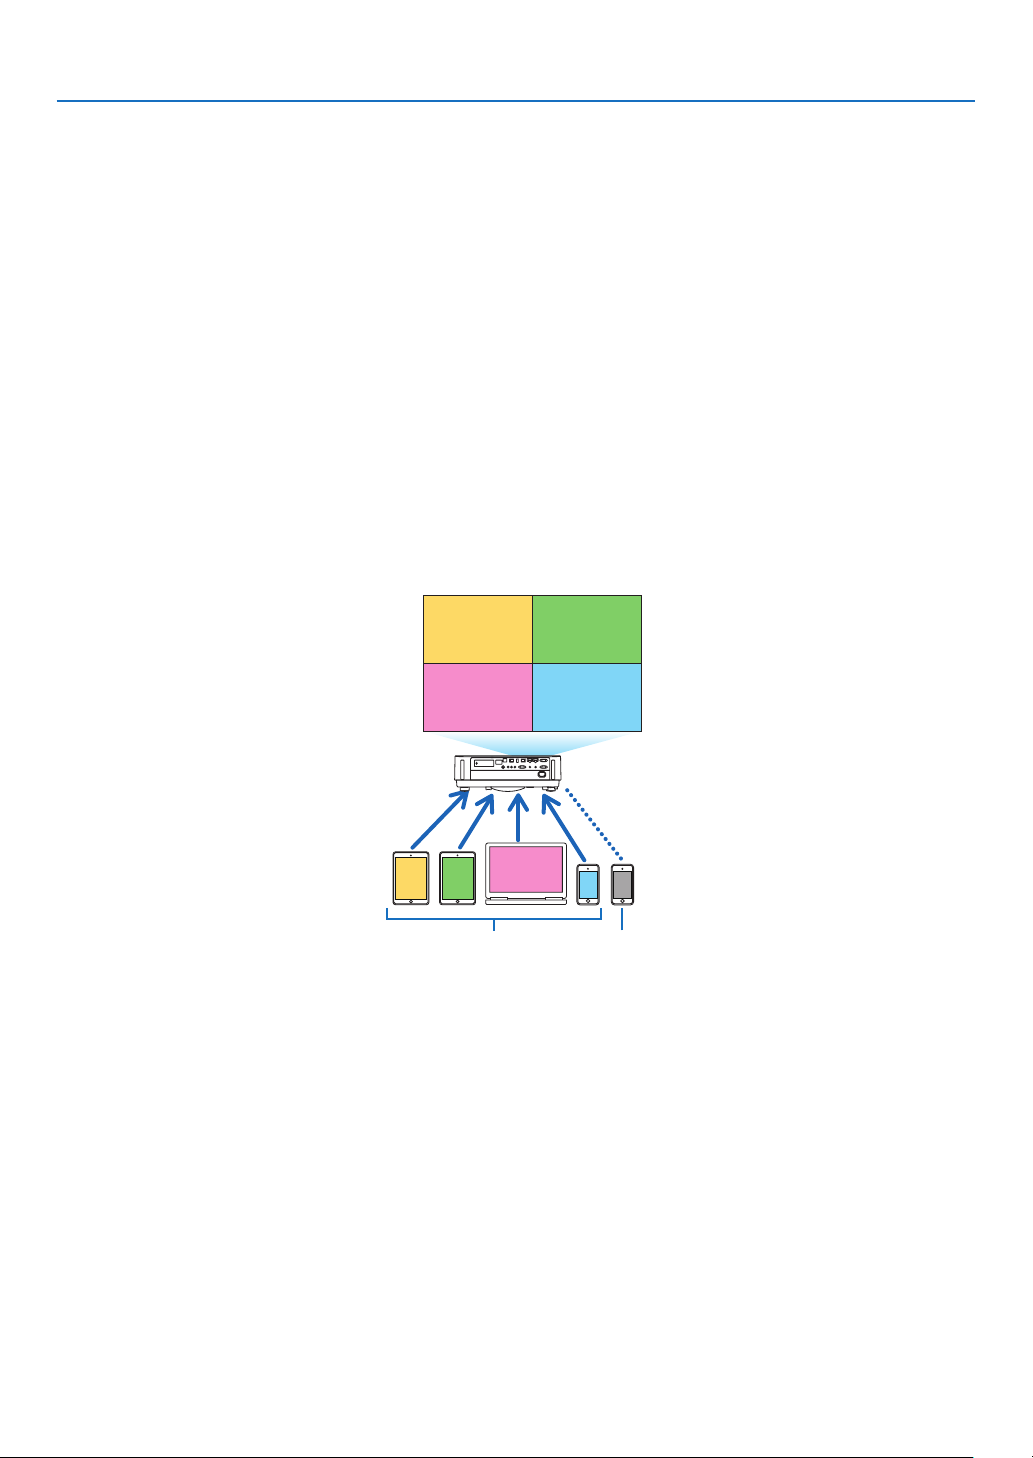
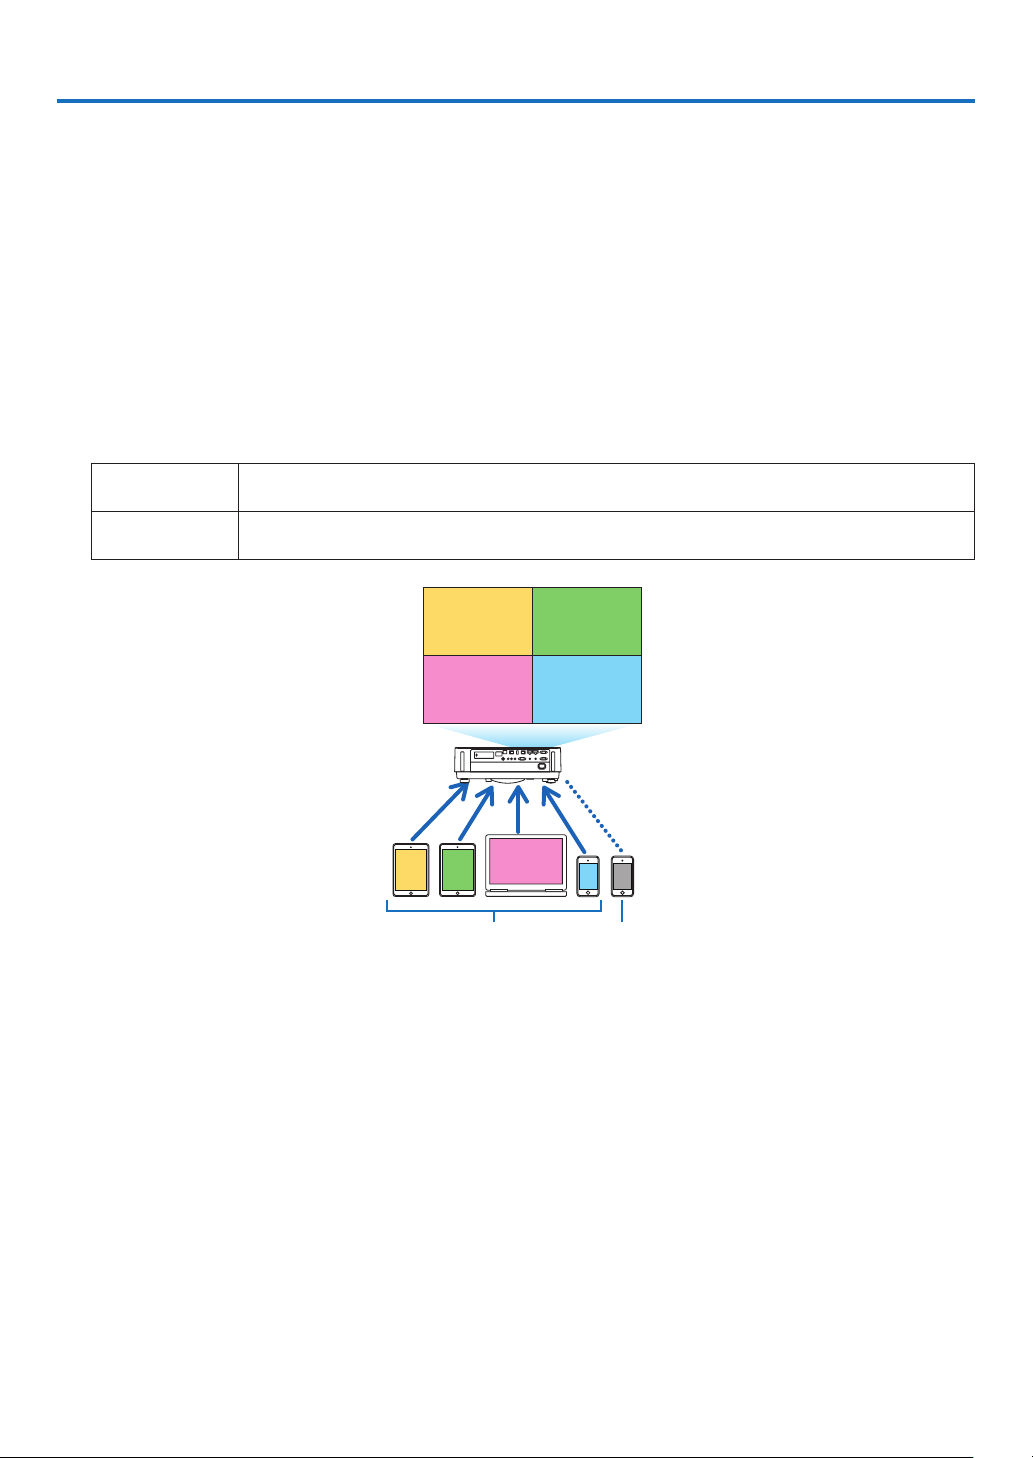
IMAGE EXPRESS UTILITY
• Ifvariousterminalunitssuchasacomputer,asmartphone,andatabletareconnectedwiththeprojectorinthe
network, it enables to transmit images saved on each terminal to the projector and to project them.
• YoucanconnectterminalunitsinmultipleOS(Windows,MacOSX,Android,andiOS)withtheprojectorsimultane-
ously.
• Theprojectorreceivesimagestransmittedfrommultipleterminalunits(Max.50units)andprojectsthemonthe
screen dividing it (Max. 4 × 4) at the same time.
BA
C
D
E
AB
CD
Transmit Stop
Simultaneous connection
Simultaneous display
• Installtheapplicationsoftware“ImageExpressUtilityLite”,includedintheCD-ROMsuppliedwiththeprojectoron
computers.
• Forasmartphoneandatablet,downloadtheapplication“WirelessImageUtility”fromourwebsiteandinstalliton
these.
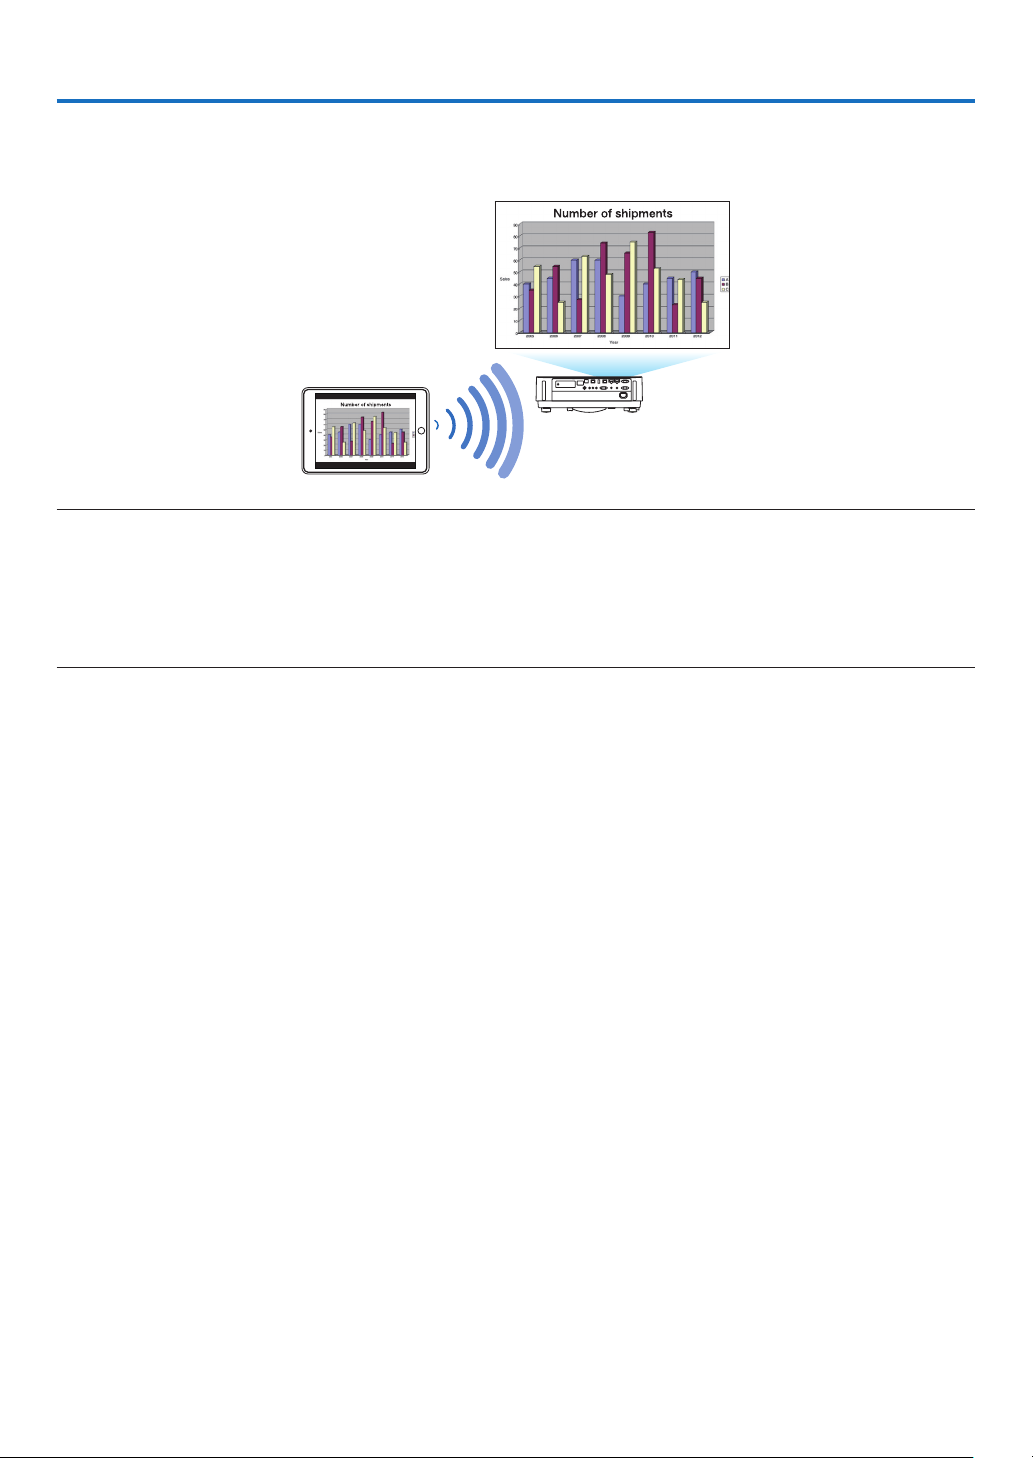
Miracast
By wirelessly connecting the terminal units supporting the Miracast such as the Android with the projector, it enables
the projector to project images transmitted from these terminals.
Before connecting these terminal units, set [Miracast] in the [NETWORK SETTINGS] on the projector.
4
1. What can you do with the APPS MENU?
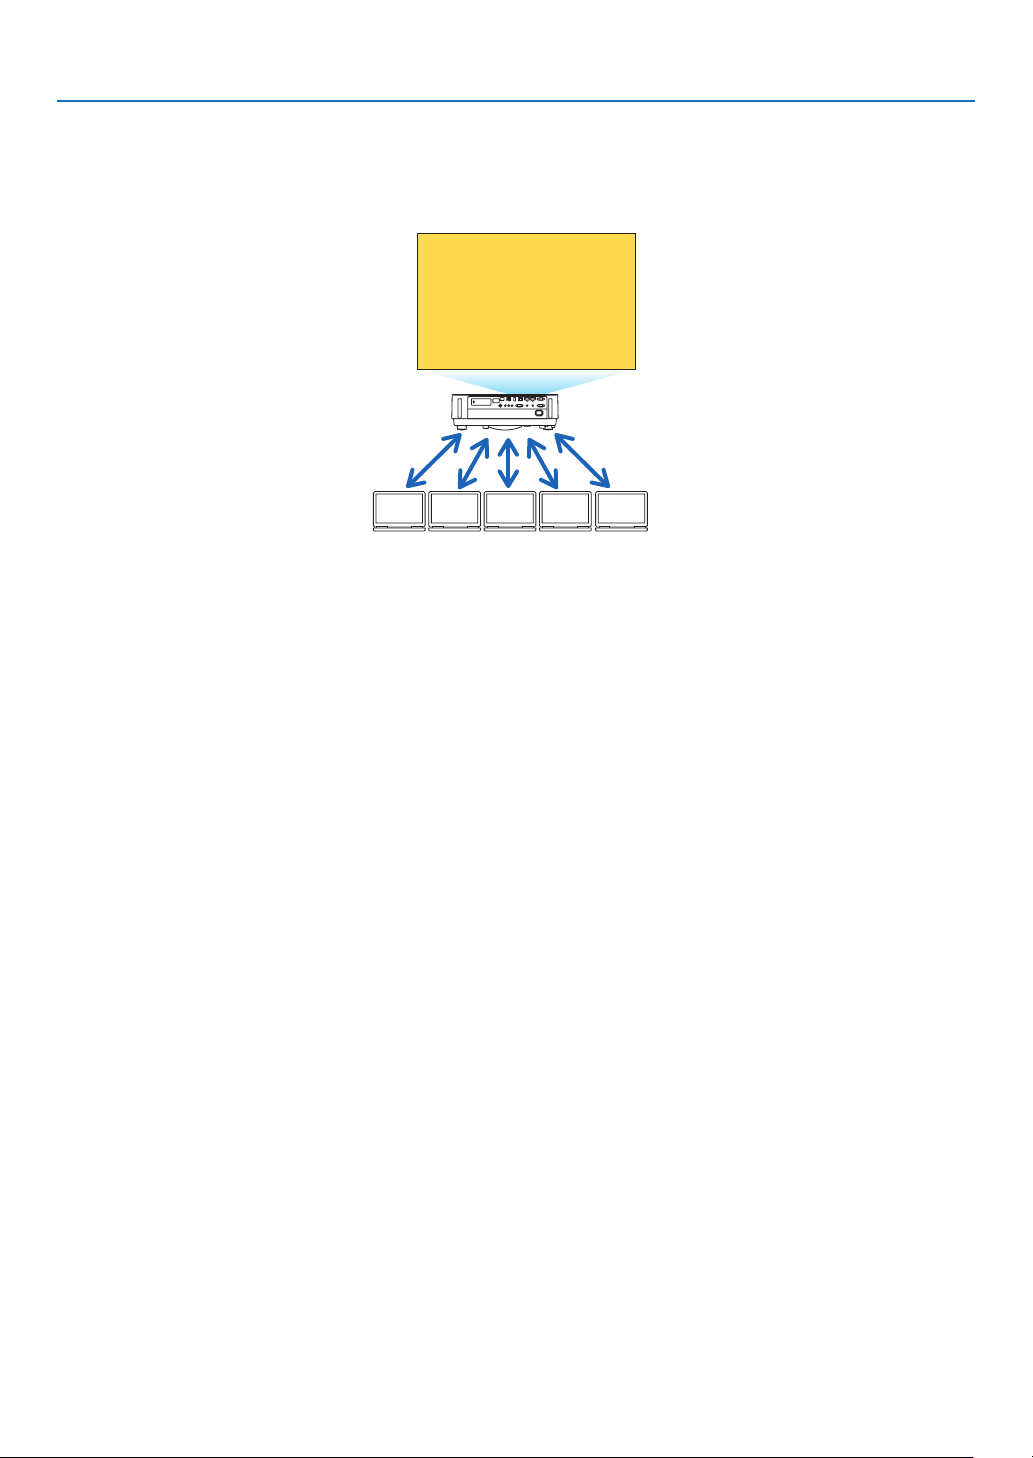
WEB SERVER FUNCTION
WEB SHARING
Without using the exclusive software, it enables to share images and files among the projector and computers in the
same network by accessing the web server of the projector utilizing the web browser.
BACDE
Sharing files
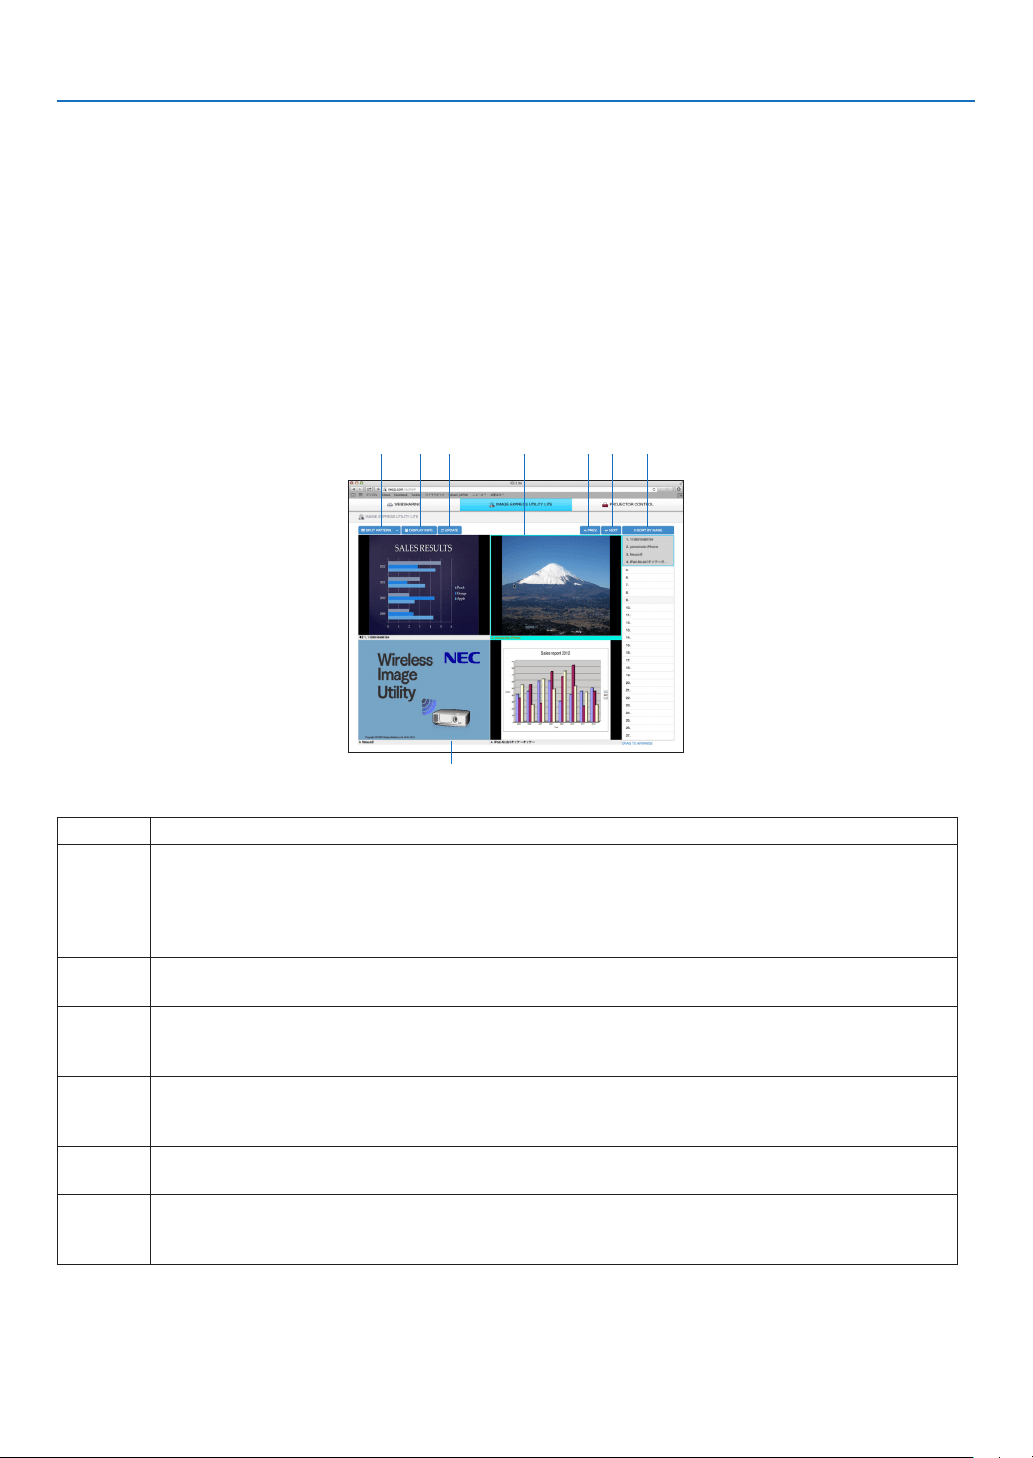
IMAGE EXPRESS UTILITY LITE
It enables to control screen splitting pattern and displaying position of the images that are simultaneously transmitted
fromeachterminalutilizingtheapplicationsoftware,ImageExpressUtilityLiteorWirelessImageUtility,onthecom-
puter browser screen. Precise controls as changing number of screen portions and pages to display are available.
PROJECTOR CONTROL
It enables to control the projector on the web browser screens on the computers.
HOW TO ACCESS THE WEB SERVER
ConnecttheprojectorandcomputersinanetworkandaccesstheURLinbelowbythewebbrowserofthecomput-
ers.
URL:http://<Projector’sIPaddress>
NETWORK SETTINGS
Setupbelowforconnectingtheprojectorwithawired/wirelessLAN.
PROJECTOR NAME
Set up the projector name and host name. Serial number of the projector is set as factory default.
NETWORK INFORMATION
Indicateinformationwhentheprojectorhasconnectedinanetwork(byawired/wirelessLAN)
WIRED LAN
SetupforconnectingtheprojectorbyawiredLAN.
WIRELESS LAN
SetupforconnectingtheprojectorbyawirelessLAN.Atthesametime,setupfortheSIMPLEACCESSPOINT,
Wi-FiDirect,andMiracast.
IMAGE EXPRESS UTILITY
SetuptheMODE(FREE,MANAGED)fortheIMAGEEXPRESSUTILITY.
NETWORK SERVICE
SetupvarioussettingfortheAMX,HTTPserver,PJLink,AlertmailandCRESTRON.
TOOLS
Set up for various features as the mouse, program timer, date and time, administrator mode and default APP.

5
1. What can you do with the APPS MENU?
MOUSE
A commercially available USB mouse can be used for operating the APPS MENU. Perform the set up for using it.
PROGRAM TIMER
Oncedayandtimeissetup,changingtheprojector’sconditioninpoweringON/standby,switchinginputsignals,and
switching ECO mode can be automatically performed.
DATE AND TIME
Set up current date and time to the projector.
ADMINISTRATOR MODE
Selecting the menu mode of the projector, enable/disable to save all set up values of the projector, and set up a
password for the administrator mode.
DEFAULT APP
Whentheprojectoristurnedonundertheconditionofbeingselectedthe“APPS”terminal,thefunctionsetupasthe
default APP will be started automatically.
In case a terminal besides the APPS terminal has been selected, the function set up as the default APP will be started
automatically when the APPS terminal is selected.
6
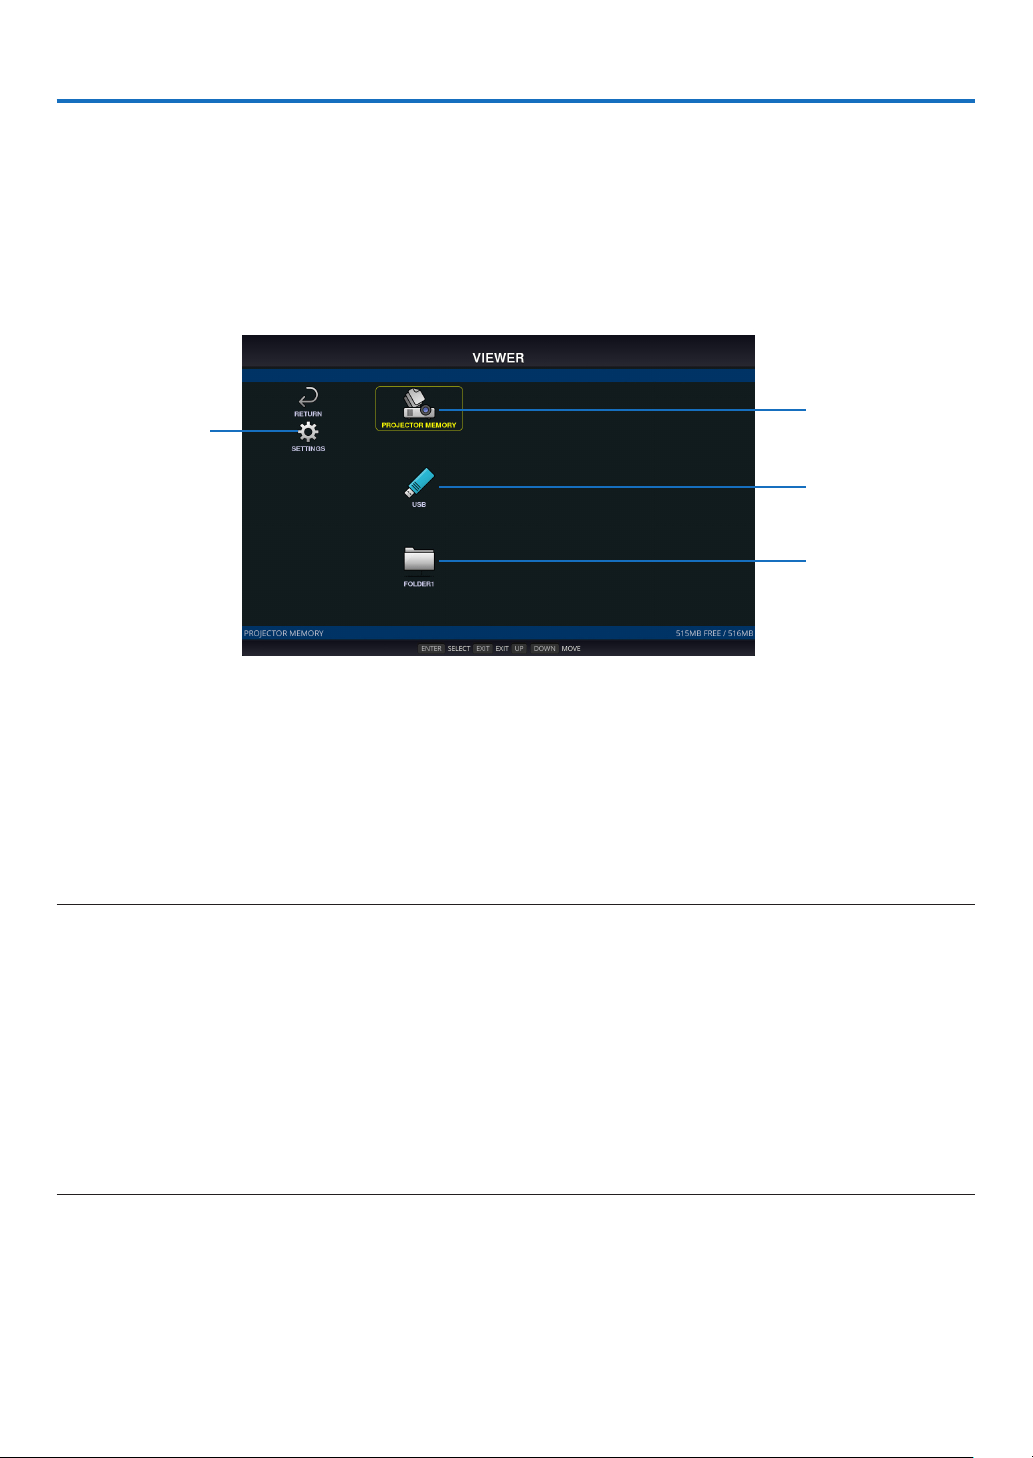
2. VIEWER
What you can do with the viewer
Select a saved image or movie and project it from this device. The following 3 destinations can be used.
(1) Projector memory: Images and movies temporarily saved in this device's built-in memory utilizing the WEB SHAR-
ING.
(2) USB memory: Images and movies saved in the USB memory connected to this device.
(3) Shared folder: Images and movies saved in the shared folder on the network connected to this device.
Top screen of the viewer
Projector memory
USB memory
Shared folder
Settings
• Select[SETTINGS]tochangethesettingsfortheslideshow,movies,sharedfoldersandsoon.
• While"Autoplay"hasbeenseteitherto"Still"of "Motionimage"intheSettings,the projectorstartsperforming
"Autoplay"bytheoperationinbelow:
- When the Viewer top screen is displayed on, a USB memory is connected in the projector.
- When the Viewer screen is displayed on first time after powering ON the projector in which a USB memory has
been connected.
Forstarting"Autoplay",thesystemwillautomaticallysearchboththerootdirectoryandthefoldersinthesubsequent
level in the USB memory and then display found still images or movies in order. The images and movies will be
displayedinthe"Sorted"order.
NOTE:
• Only1USBmemorycanberecognizedbytheviewer.DonotconnecttheUSBmemorytotheUSBportofthisdeviceusedfor
connectingtoawirelessLAN.
• 1to4sharedfolderscanbeset.
• Whentheconnectiontothesharedfolderfails,anerrormessageisdisplayedandan“x”isdisplayedinthefoldericon.Carryout
thefollowingchecksinthiscase.
• IstheLANcableconnectedcorrectly?
• Isthenameofthedestinationfoldercorrect?
• Isthedestinationfoldersetforsharing?
• Haveaccessrightsbeensetinthedestinationfolder?
• Arethereanydisplayablelessavedinthedestinationfolder?
• Isdateandtimesetcorrect?
• WhileutilizingthewirelessLAN,itdisablestoplaymovies.ChangetheproleofwirelessLANto[Disable].

7
2. VIEWER
Displayable/playable files
Still
Supported formats
File extension Supported
*.gif Interlace, transmission, animation
*.jpg/*.jpe/*.jpeg
Baseline,Progrressive,RGB,CMYK
*.png Interlace, α channel
*.bmp
*MS-OfcelesandPDFlescannotbedisplayedintheviewer.
Supported image resolution
File extension Resolution
JPEG
Upto5000x5000pixels
Gif
Upto1280×1280/lesizeupto5MB
Other images (.png, .bmp) Upto4000×4000pixels
Motion image
Supported formats
File extension Video codec Audio codec
*.mpg/*.mpeg MPEG2
MPEGAudioLayer2
MPEGAudioLayer3
(MP2/MP3 in abbreviation)
*.wmv WMV9 WMA 9 Standard
(WMA9 in abbreviation)
*.mp4 H.264/AVC AAC-LC
(AAC in abbreviation)
Detailed information
Item Conditions
Resolution
From320×240upto1920×1080
Video frame rate Upto30FPS
Video bit rate Upto30Mbps
Audio channel Up to 2-ch stereo
Audio sampling rate Up to 48 KHz
Audio bit rate MP2/MP3: Up to 448 kbps
WMA9: Up to 384Kbps
ACC:Upto256Kbps
Maximum file size Up to 2 gigabytes
Unsupported codec The WMV files containing sound data in the WMA Professional format can not be
played.
NOTE:
• Dependingonale,itmayoccuryoucannotplayitevenwhenitsatisesallabovementionedconditions.
• Dependingonnetworkenvironments,atypeoftheUSBmemory,andlebitrate,itmayoccuramoviecannotbeplayedprop-
erly.
• YoucannotplayDRMles(DigitalRightManagementles).
• Regardlessthesettingofleaspect,theMPEG2/WMVformattedmoviesareplayedat1:1
8
2. VIEWER
Compatible USB memory
This device cannot recognize USB memory formatted in the NTFS format. Check the format if this device cannot
recognize the connected USB memory.
FormataUSBmemoryintheFAT32formatorFAT16formatforusingitintheVIEWER,WHITEBOARD,andCOL-
LABORATION.RefertotheWindowsinstructionmanualorHelpleonhowtoformataUSBmemory.
NOTE:
• TheUSBportofthisdeviceisnotguaranteedtoworkwithallUSBmemoriessoldcommercially.
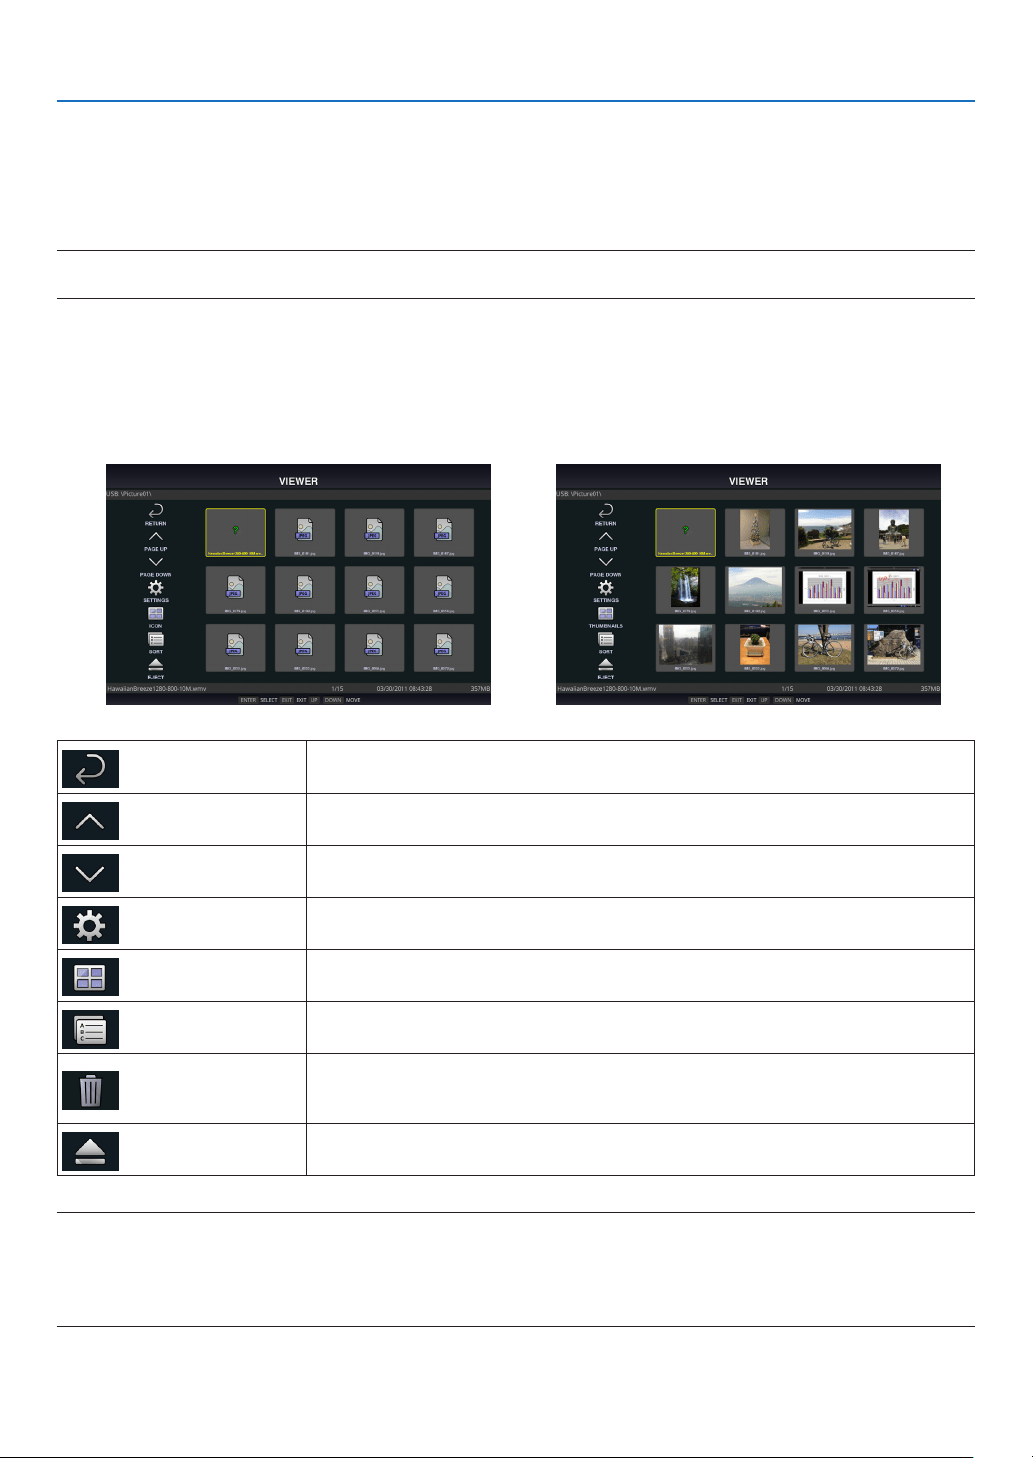
File display screen
• 12les(4lateral×3longitudinal)includingthefoldericonscanbedisplayedonasinglescreen.Usethe“PAGE
UP”or“PAGEDOWN”buttonontheleftofthescreentochangethelistoflesdisplayed.
• Thelescanbedisplayedusingeithericonsorthumbnailsintheviewer.
Icon display Thumbnail display
RETURN Go back one level higher.
PAGE UP Displayalistofthepreviousles.
PAGEDOWN Displayalistofthenextles.
SETTINGS Displaythesettingscreen.
THUMBNAILS/ICON Switch between thumbnail display and icon display.
SORT
Change the order to display files by name (filename), type (file extension), date (date
ofcreation),orsize(lecapacity).Thedefaultsortingorderisby“Name”.
DELETEALL
All the files in the memory can be deleted only when a list of the files in the projector
memoryisdisplayed.Becarefulwhenexecuting“DELETEALL”asdeletedleswill
not be recoverable.
EJECT
“Remove” the USB memory when a list of the les in the USB memory is dis-
played.
NOTE:
•Themaximumnumberoflescanbedisplayedinafolderincludingfoldericonsis300.
•Filenameswitha“.”atthebeginningofthelenamewillnotbedisplayed.
•Theiconofalewhosetypecannotbedeterminedisindicatedbya“?”.
•Ashortmovielemaybedisplayedwiththethumbnailinblack.

9
2. VIEWER
Slideshow display
• Focusonastillimageontheledisplayscreen(icondisplayorthumbnaildisplay)andpresstheENTERbuttonto
switch to the Slideshow display.
• Aslideshowmaybedisplayedusing“ManualPlayback”inwhichtheimagesareswitchedbyoperatingabuttonon
theremotecontrol,or“AutoPlayback”inwhichtheimagesareswitchedautomaticallyatasetinterval(playback
modeis“Auto”).
• Thedefaultfactorysettingis“ManualPlayback”.Toperform“AutoPlayback”,setthe“PlaybackMode”inthe“Set-
tings”to“Auto”.
• Theimageswillbedisplayedintheorderselectedunder“Sort”ontheledisplayscreen.
• WhenstillimagesinhighresolutionsareprojectedastheSlideshow,itmaybacktotheledisplayscreen.
Playback of a movie
• Focusonamotionimageintheledisplayscreen(icondisplayorthumbnaildisplay)andpressthe(ENTER)button
for playing back a movie.
Viewer settings
Select the icon in the file list screen or top screen of the viewer to display the configuration screen of the
viewer.
The following settings can be configured on the configuration screen.
Item 1 Item 2 Options (figures within the parenthe-
ses [ ] are default values)
Remarks
Slideshow Screen size [Best fit]/Actual size
Play Mode Automatic / [Manual]
Interval
[5]-300seconds Enabledwhen“Auto”isselected
Repeat [Disable]/Enable(defaultsettingis
unchecked)
Movie settings Screen size [Best fit]/Actual size
Repeat [OFF]/One File/All Files
Auto play AutoPlay [OFF]/Still/Motion image Enabled only when a USB memory
device is connected
Shared folder Folder 1/Folder 2/
Folder 3/Folder 4
[Disable]/Enable(defaultsettingis
unchecked)
Shared folder [¥¥] Up to 41 characters
User name Up to 64 characters
Password Up to 64 characters
10
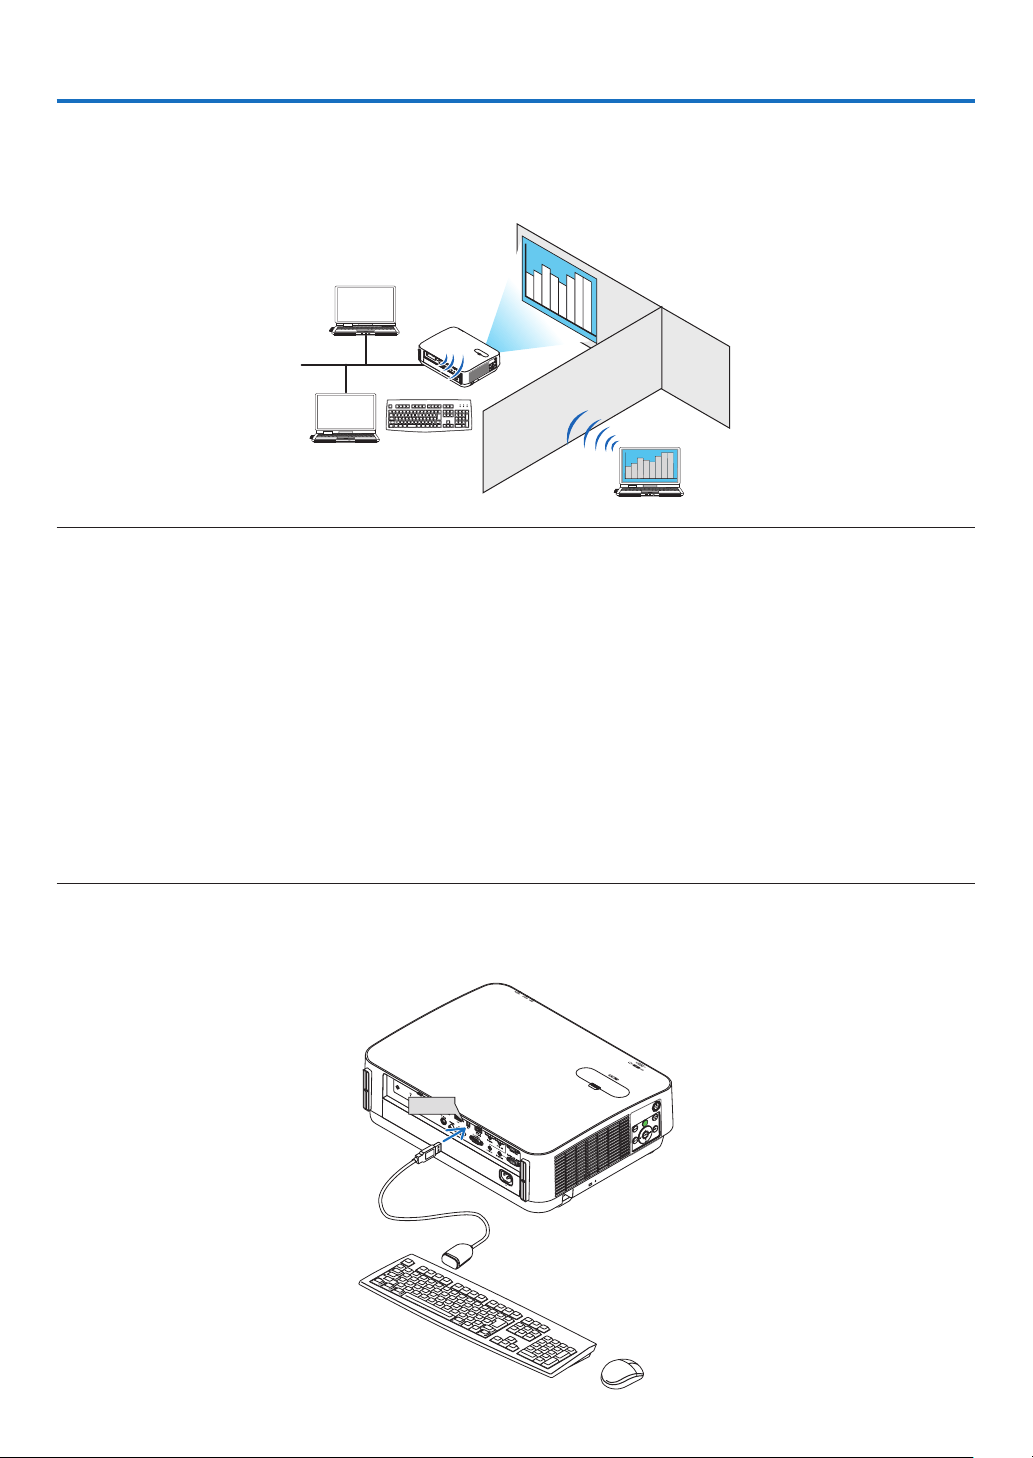
3. REMOTE DESKTOP CONNECTION
• ByselectingthePCconnectedinthesamenetworkwiththeprojector,theimageonthePCcanbeprojectedtothe
screen via network.
Then, by operating the keyboard, you can control Windows 8 or Windows 7 PC connected in the network.
• WiththeRemoteDesktopfunction,youcanremotelyoperatethePCplacedatadistancefromtheprojector.
Office
Meeting room
NOTE:
• The[REMOTEDESKTOP]functionwillworkonthefollowingWindowseditions.
Windows8Pro,Windows8Enterprise,
Windows7Professional,Windows7Ultimate,Windows7Enterprise,
• Inthisuser’smanual,thisfeatureisdescribedusingWindows7asanexample.
• AUSBkeyboardisrequiredtousetheRemoteDesktopconnection.
• TheRemoteDesktopconnectioncanbeoperatedwithakeyboard.Usingawirelessmousewithawirelesskeyboardismore
usefulforoperating.
Useacommerciallyavailablewirelesskeyboard,awirelessmouse,andaUSBwirelessreceiver.
UseacommerciallyavailableUSBkeyboardandUSBmouse.
• AUSBkeyboardwithabuilt-inUSBhubcannotbeusedwiththeprojector.
• AwirelesskeyboardormousethatsupportsBluetoothcannotbeusedwiththeprojector.
• WedonotwarrantthattheUSBportoftheprojectorwillsupportallUSBdevicesinthemarket.
• OntheloginscreenfortheREMOTEDESKTOPCONNECTION,makesuretousethestandardUSlayoutkeyboard(called101
keyboard).IfJapaneselayoutkeyboard(asJISlayoutkeyboard)isused,lettersdifferfromprintedlettersonthekeysmaybe
input.
Prepare a commercially available wireless keyboard (US layout version).
1. Connect the USB wireless receiver to the USB port (Type A) of the projector. Make all necessary settings
for your wireless keyboard and mouse.
USB
11
3. REMOTE DESKTOP CONNECTION
2. Press [APPS] on the remote to display the APPS MENU.
3. Focus on [TOOLS] and press [ENTER]
4. Focus on [MOUSE SETTING] and press [ENTER]
5. Focus on [MOUSE] and press [ENTER]
Check mark will be added.
6. Focus on [BACK] and press [ENTER]
7. Press [STANDBY] button on the remote twice.
The projector will be powered OFF.
8. Press [ON] button on the remote
The projector will be powered ON and the connected USB mouse will be available.
Setting the password to the user account of Windows 7
TIP:Ifapasswordhasbeensetforanaccount,thesteps1to8canbeskipped.
1. Click [Start] from the desktop of Windows 7.
2. Click [Control Panel].
3. Click [Add or remove user accounts] displayed under [User Accounts and Family Safety].
4. Click [Administrator].
5. Click [Create a password].
6. Input the password to the [New password] box.
7. Input the same password as that at Step 6 to the [Confirm new password] box.
8. Click [Create a password].
The Administrator is changed to [Password Protection].
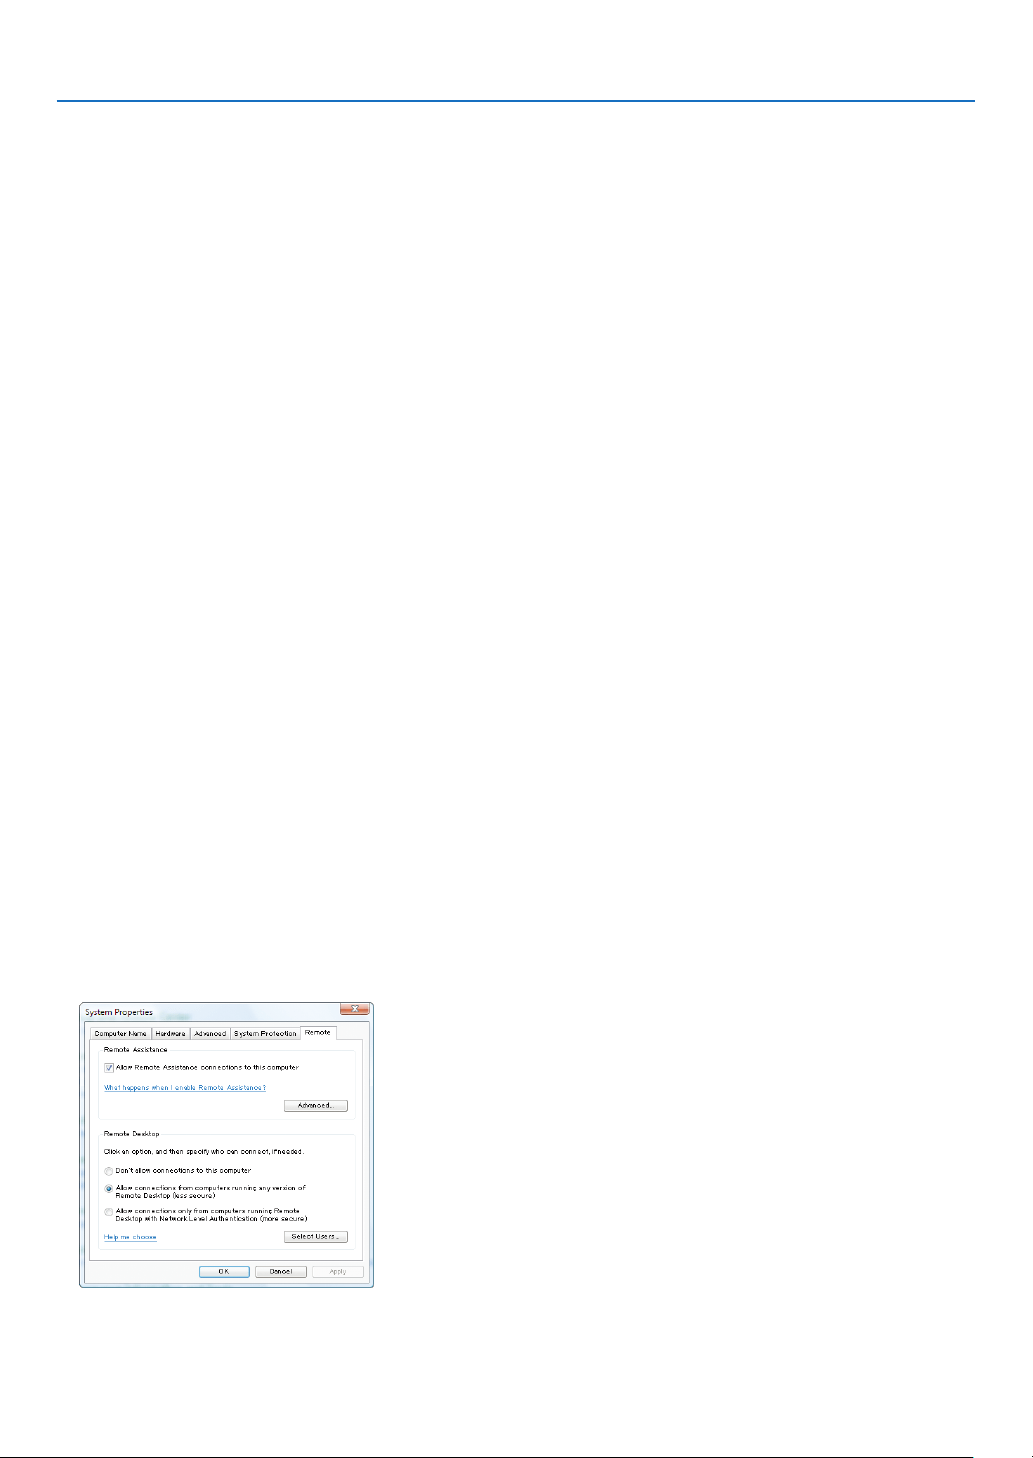
Setting the Remote Access
1. Click [Start] from the desktop of Windows 7.
2. Click [Control Panel].
3. Click [System and Security].
4. Click [Allow remote access] displayed under [System].
5. When the [User Account Control] confirmation window appears, click [Continue].
The [System Properties] window appears.
6. Click [Allow connections from computers running any version of Remote Desktop (less secure)] in the
Remote Desktop box and click [OK].
12
3. REMOTE DESKTOP CONNECTION
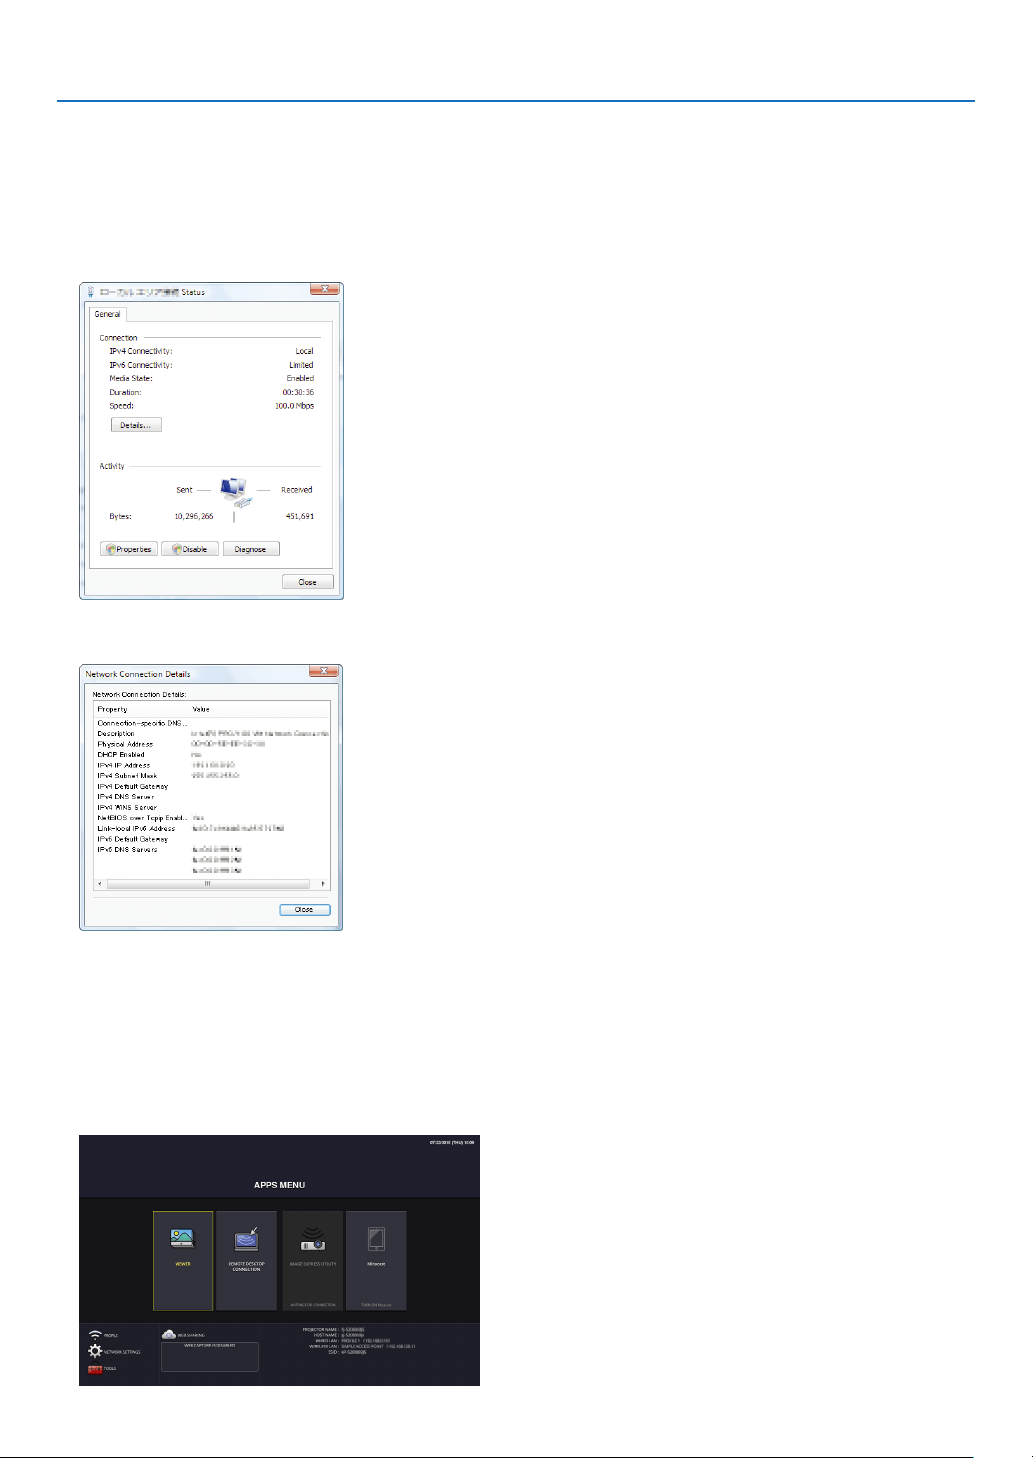
Checking the IP address on Windows 7
1. Click [Start] from the desktop of Windows 7.
2. Click [Control Panel].
3. Click [View network status and tasks] displayed under [Network and Internet].
4. Click [View status] displayed in blue on the right of [Local Area Connection] in the window.
The [Local Area Connection Status] window appears.
5. Click [Details...].
Write down the value for “IPv4 IP Address” (xxx.xxx.xxx.xxx) displayed.
6. Click [Close].
7. Click [X] at the upper right of the window.
The system goes back to the desktop.
Starting REMOTE DESKTOP CONNECTION
1. Press the APPS button on the remote control when the projector is in the state of powered ON.
The APPS MENU screen will be displayed.

13
3. REMOTE DESKTOP CONNECTION
2. Select [REMOTE DESKTOP CONNECTION] on the APPS MENU.
The [REMOTE DESKTOP CONNECTION] window appears.
3. Operate one among the wireless keyboard, wireless mouse and the remote control to input the IP address
of Windows 7 and click [CONNECTION].
The log-on screen of Windows 7 is displayed in the screen projected by the projector.
4. Operate the wireless keyboard to input the user’s password and press “Enter”.
The REMOTE DESKTOP CONNECTION is started.
Windows 7 desktop is displayed on the screen projected by the projector.
Log out the computer.
Use the wireless keyboard connected to the projector to operate Windows 7.
NOTE:
• IfyoucannotconnectwiththeREMOTEDESKTOPCONNECTIONproperlyandblackscreenremainstodisplay,oryoucannot
performtheREMOTEDESKTOPCONNECTIONcausedonunexpectedshutdown,etc.,press(APPS)buttonontheremotecon-
trolfordisplayingtheAPPSMENU,selecttheREMOTEDESKTOPCONNECTIONthenselectDISCONNECT.Trytoreconnectthe
REMOTEDESKTOPCONNECTION.
Exiting the REMOTE DESKTOP CONNECTION
1. Operate either the wireless keyboard or wireless mouse to click [Start] from the desktop screen projected
by the projector.
2. Click [LOG OFF] on the right of the start menu.
The remote desktop connection is stopped.
3. Press the button for an input terminal other than APPS on the remote control.
TIP:
Setting[DETAILSETTINGS]inREMOTEDESKTOPCONNECTION
[DETAIL SETTINGS]will allowyoutodisplaythedesktopbackground,ortoenablethe windowanimation functionduring the
RemoteDesktopoperation.
DESKTOPBACKGROUND:Clearthecheckmarktodisplaythedesktopbackgroundinasinglecolor.
THEMES: Clear the check mark not to use Themes.
MENUANDWINDOWANIMATION:Clearthecheckmarktodisablemenuandwindowanimation.
SHOWCONTENTSOFWINDOWWHILEDRAGGING:Clearthecheckmarktoshowonlythewindowpanewhile
dragging.
14
4. IMAGE EXPRESS UTILITY
• Whentheprojectorisconnectedwithvariousterminalunitsasacomputer,asmartphone,andatabletoveranet-
work, it enables to transmit and project images saved on each terminal using this Image Express Utility software
program.
• TerminalunitsinvariousOS(Windows,MacOSX,Android,andiOS)canbeconnectedtotheprojectorsimultane-
ously.
• Theprojectorenablestoreceiveimagestransmittedfrommultipleterminalunits(max.50units)atonceandproject
them splitting up its screen display into portions (max. 4 × 4).
• IMAGEEXPRESSUTILITYhastwoperformancemodes,theFREEmodeandMANAGEDmode.
EachmodecanbeselectedonthenetworksettingforIMAGEEXPRESSUTILITY(Seepage29)
- IntheFreemode,youcanfreelyconnecttotheprojectorviaImageExpressUtilityLiteinstalledonacomputer
or Wireless Image Utility installed on a smartphone, etc. The splitting pattern of the display screen is based on
the number of connected terminals. At the same time, you can select either splitting screen display or full screen
display from each terminal.
- In the Managed mode, same as in the Free mode in the state of the connection with several terminals, you can
switch the splitting/full screen display to the full/splitting screen display either by the remote or via the WEB
SERVER.
REMOTE
Once pressing the ENTER button during projecting the connected terminals' screen, the menu
for selecting display splitting pattern will be displayed on.
WEB SERVER
Precise setup is available as changing the screen splitting pattern and displaying position
(See page 20)
BA
C
D
E
AB
CD
Transmit Stop
Simultaneous connection
Simultaneous display
• Installtheapplicationsoftware,“ImageExpressUtility”thatiscontainedontheCD-ROMsuppliedwiththeprojector.
Please refer to the help file about detailed software information.
• Downloadandinstalltheapplicationsoftware,“WirelessImageUtility”ontoterminalunitsasasmartphoneanda
tablet. About detailed information of this application software, please refer to the Wireless Image Utility manual that
is uploaded on our web site.
• Ourapplicationsoftware,ImageExpressUtility2.0,isalsoavailable.Downloadfromourwebsiteandinstalliton
your computer. Please be reminded the simultaneous connection and simultaneous display are not functioned by
ImageExpressUtility2.0.
15
5. Miracast
This device can be connected wirelessly to a wireless terminal such as an Android terminal etc. that supports
the Miracast standard to project mirroring images transmitted from the terminal.
Setthenetworksettingofthisdeviceto“Miracast”beforeconnectingit.(→ page 24)
NOTE:
- DependingonthewirelessterminalsupportedtheMiracastinuseandtheenvironmentofradiowave,imagesandsoundmaybe
interrupted.
- TheproceduretoconnectwithMiracastisdifferedfromeachMiracastsupportedwirelessterminal.Fordetailedinformation,
pleaserefertotheuser’smanualofMiracastsupportedwirelessterminalortheHELPle.
- TheMiracastfunctionsontheprojectorarenotguaranteedforconnectingallMiracastsupportedwirelessterminalssoldcom-
mercially.
16
• Withoutusingtheexclusivesoftware,itenablestoshareimagesandlesamongtheprojectorandcomputersin
thenetworkbyaccessingtheprojector’swebserverutilizingthewebbrowser.(→ this page, WEB SHARING)
• Whileimagesonvariousterminalsaretransmittedandsimultaneouslyprojectedontheprojectorbyutilizingthe
IMAGEEXPRESSUTILITY,itenablestocontrolscreensplittingpatternandchangetheordertodisplaybyutilizing
the web browser on the computer. (See page 19,IMAGEEXPRESSUTILITYLITE)
• Itisabletocontroltheprojectorbythewebbrowserscreenonthecomputer.(→ page 21,PROJECTORCON-
TROL)
BACDE
Sharing files
• TheWEBServerFunctionsupportsthewebbrowsersinbelow:
Screen indication language is English only.
For Windows Internet Explorer 11
Chrome (latest version)
ForMacOSX Safari 6 or later
For iOS Safari (latest version)
For Android Chrome (latest version)
* Compared with the computer, some functions can be restricted for utilizing the WEB SHARING on smartphones or
tablets.
* ThePCCONTROLsupportsPCversiononly.
How to access the WEB SERVER
Connect the computer and the projector (this device) in a network.
BootupthewebbrowseronthecomputerandthenaccessthefollowingURL:
URL=http://(Projector’sIPaddress)
• Theprojector’sIPaddressisindicatedattherightbottomoftheAPPSmenu.
• IftheSIMPLEACCESSPOINTmodeforthewirelessLANissetontheprojector,itenablestoaccesstheWEB
SERVERbyinputtinganycharacterstothecolumnforinputtingURL.Inthiscase,youdonotneedtoinputthe
projector’sIPaddress,however,pleaseinputtheprojector’sIPaddressifitfailstoaccesstheWEBSERVER.
6-1. WEB SHARING
Setting for the WEB SHARING
1. Connect the projector with your computer over a network.
2. Display the projector APPS MENU
6. WEB SERVER FUNCTION
17
6. WEB SERVER
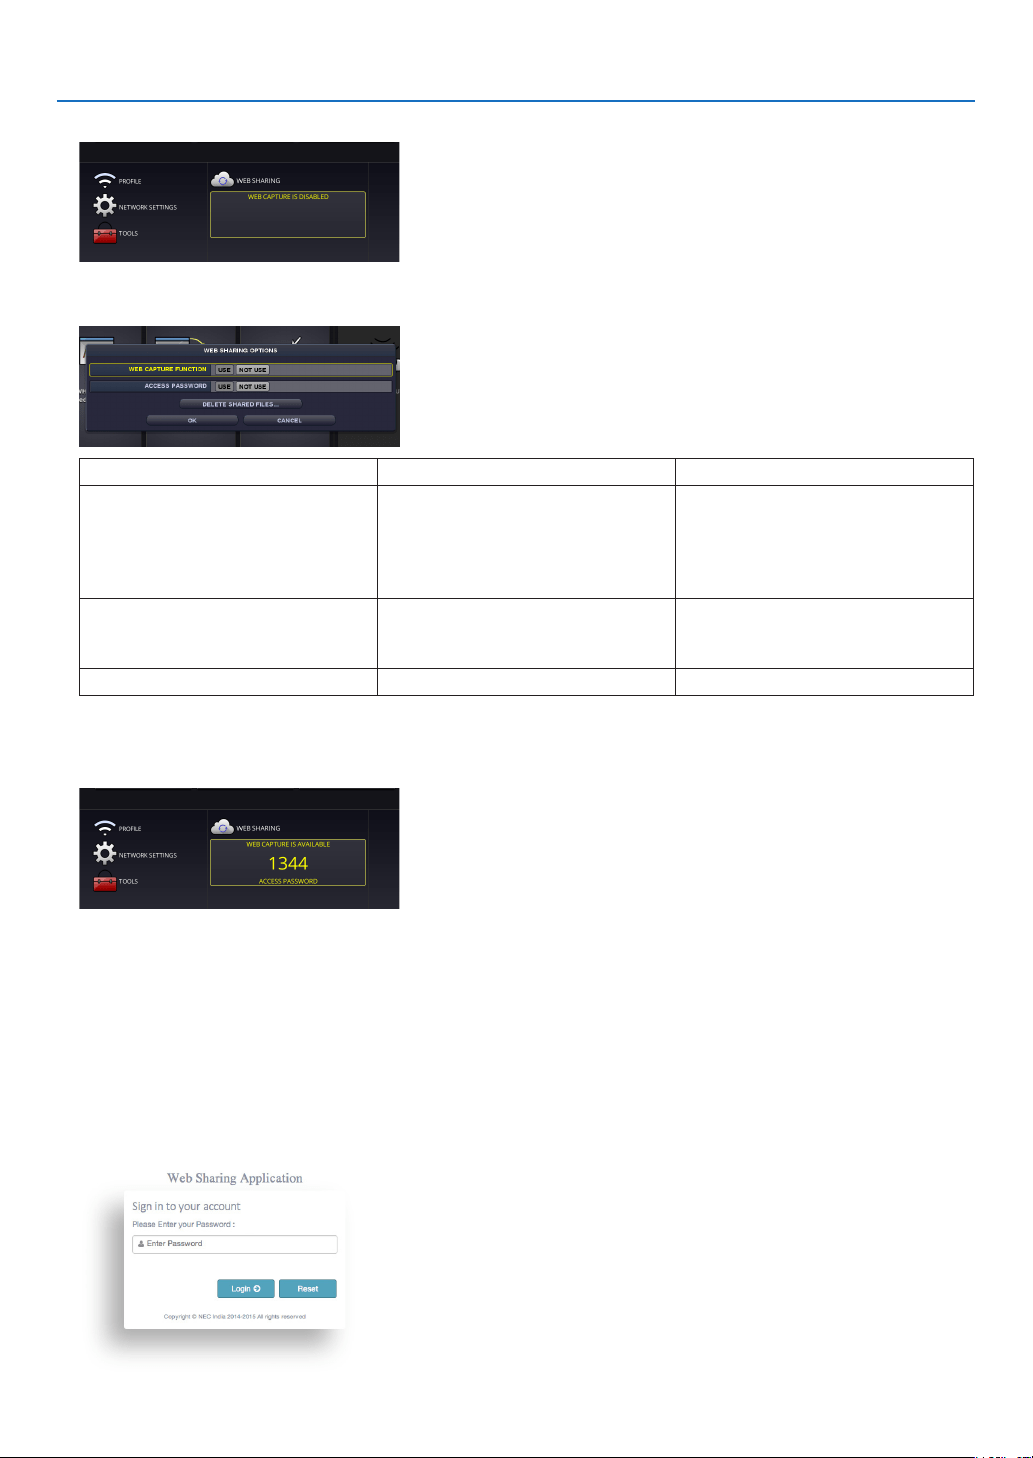
3. Move the focus to the box under the WEB SHARING in the APPS MENU.
4. Press ENTER button on the remote control.
Display the WEB SHARING options setting screen.
Item Explanation Remark
WEB CAPTURE Select USE/NOT USE capture from
the WEB browser. By setting this ON,
the projector screen will be displayed
onto the browser screen every 5
seconds.
Factory default setting is NOT USE
ACCESSPASSWORD Select whether to USE/NOT USE
the password for accessing the WEB
SHARING.
Factory default setting is NOT USE
DELETESHAREDFILES Deleteallsharedles
5. After setting up options, move the focus to OK and press the ENTER button.
If USE is selected both for WEB CAPTURE and ACCESS PASSWORD, the screen in below will displayed on. The
access password will be changed every time the password is reset or the projector is powered ON and OFF.
Starting the WEB SHARING
1. Start up the web browser on the computer and access the WEB SERVER.
• Pleaserefer"HowtoaccesstheWEBSERVER"onthepreviouspage
2. Input four digits number displayed on the APPS MENU and then click LOGIN.
• IfNOTUSEisselectedfortheaccesspasswordatthestep[5],theWEBSHARINGscreenwillbedisplayed.
• TheprojectorscreenwillbeswitchedtothePROJECTORCONTROLscreenonceyouclickthePROJECTOR
CONTROL tab, same as it, the projector screen will be switched to the IMAGE EXPRESS UTILITY LITE screen
once you click the IMAGE EXPRESS UTILITY LITE tab.

18
6. WEB SERVER
Operations on the WEB SHARING screen
• ByusingthisWEBSHARING,itenablestodisplayprojectedfunctionsoftheAPPSMENUasVIEWER,REMOTE
DESKTOPCONNECTION,IMAGEEXPRESSUTILITY,etcontothewebbrowserscreenevery5secondsandyou
can save them onto your computer. (WEB capture)
* Whentheprojectorisinoneofthebelowstate,capturedscreenswouldnotbeupdatedevery5seconds:
- Played back movie screen in the Viewer.
- When the Miracast has been selected for the APPS menu.
• Whenyouwillsavetheprojectedscreen,youcanaddtextontheprojectedscreen(memo)andsavetheseupto
10pagesandsaveitonthecomputerasoneimage.
• Itenablestouploadtheimagesavedonthecomputerandshareitamongthecomputersconnectedinthenet-
work.
NOTE:
• IfSafariisused,screendisplaysmaybedistorteddependingonthetimingofreloading.Inthiscase,tryagainbyrebootingthe
Safari.
• DatastoringfunctioninHTMLformat(explainedat③intheclauseofMemocreatingscreenonthenextpage)isnotavailable
onboththeIOSandOSXdevices.Onthesedevices,youneedtosavetextaddedscreenspagebypage.
• Ifyouusethebrowser,InternetExplorer,datasavingbyrightclickmaynotbeperformedcorrectlyinperformingthewebcapture.
Recommendtotrycapturingafterstoppingtheevery5secondsdisplaybypressing④freezebuttoninthebelowpicture.
• Upto20units(10unitsarerecommended)canbeconnectedsimultaneously.However,numberofunitsthatcanbeconnected
atthesametimeisvarydependingontheperformanceoftheprojectorandthenetworkenvironment.
④
⑤
⑥
②
①
③
Number Description
①
http://<Projector’sIPaddress>
②
Indicate the file names saved in the projector memory. The file can be downloaded by clicking the file
name.
NOTE:Forutilizingthedownloadedlesontheterminalsastablets,itmayberequiredtouseotherapplication.
③
Upload the file on the computer that will be shared. Name of the called out file is indicated as the
uploaded file.
④
Stoptoupdateevery5seconds.Clickagaintoresumeupdating.
⑤
DisplayprojectedfunctionsoftheAPPSMENU(VIEWER,REMOTEDESKTOP,IMAGEEXPRESS
UTILITY,etc)ontothescreenevery5seconds.
⑥
Create text added screen (memo) utilizing the screen displayed at the center.

19
6. WEB SERVER
Memo creating screen
①
③ ④ ⑤ ⑥
②
Number Explanation
①
Click to input text. After inputting, click [OK] at the right side.
②
Create a new page
③
Save all pages in 1 file.
NOTE:ThisisnotdisplayedontheiOSandOSXdevices.
④
Deletetheeditingpage
⑤
Back to the previous page
⑥
Move to the next page
6-2. IMAGE EXPRESS UTILITY LITE
Set the MODE to MANAGED for the IMAGE EXPRESS UTILITY
1. Focus on the NETWORK SETTING on the APPS MENU and press the ENTER button.
2. Focus on the IMAGE EXPRESS UTILITY and press the ENTER button.
The IMAGE EXPRESS UTILITY setting screen will be displayed on.
3. Focus on the MODE column and select MANAGED.
4. Focus on OK and press the ENTER button.
Reference:
• If[HTTPpassword]hasbeensetup,thepasswordinputwindowisdisplayedonbeforeswitchingtotheIMAGEEXPRESSUTILITY
LITEwindowbythewebbrowser.
Display images transmitted by various terminals as computers and tablets and
simultaneously project them on the projector
• TheImageExpressUtilityLiteiscontainedontheCD-ROMsuppliedwiththeprojector.Itisalsoavailabletodown-
load from our web site.
• TheWirelessImageUtilityisavailabletodownloadfromtheAppStoreandGooglePlay.
• Fordetailedinformationaboutinstallationandoperationofeachsoftware,pleaseseetheUser’sManualofthe
projectorandtheHELPcommandforeachsoftware.
20
6. WEB SERVER
Start the IMAGE EXPRESS UTILITY LITE
1. Connect the computer and the projector in a network.
2. Start the web browser on the computer and then access to the following URL:
URL=http://(Projector’s IP address)
• Projector’sIPaddressisindicatedattherightbottomoftheAPPSmenu.
The Web Sharing screen will be displayed on.
3. If [HTTP password] has been set for the IMAGE EXPRESS UTILITY LITE in NETWORK SETTING on the APPS
menu, input the password. The IMAGE EXPRESS UTILITY LITE screen will be displayed on after confirming
the password.
Control on the IMAGE EXPRESS UTILITY LITE screen
①
③ ④ ⑤ ② ⑥ ⑦ ⑧
Number Explanation
①
Thumbnail Gallery
• ThumbnailsthataretransmittedtotheprojectorviatheImageExpressUtilityLiteorWirelessImage
Utility.ThumbnailswillbedisplayedinblackwhennooneusesthescreensortheIMAGEEXPRESS
UTILITYhasnotselectedonAPPSMENU.
• Enablestoswitchthethumbnaildisplayedpositionbythedraganddrop
②
Focus
• Focusisdisplayedonwithalightblueframe.
③
Changing screen split pattern
• Oncethe“SPLITPATTERN”buttonisclicked,itenablestochangescreensplitpattern.
Based on meeting purposes, you can select one pattern among 2×1, 2×2, 3×3, 4×4, 1×12.
④
Selection to Indicate or Not to indicate terminal names on the projected screen.
• Enables to switch either to indicate or not to indicate terminals’ information on the projected
screen
⑤
Update the thumbnail gallery
• Oncethe“UPDATE”buttonispressed,itupdateanddisplaythelatestthumbnailgallery.
⑥ ⑦
Page change
• Changethepagetodisplaytothepreviouspagebypressingthe“PREV”buttonandtothenextpage
bypressingthe”NEXT”button.

21
6. WEB SERVER
⑧
Terminal list
• ListofterminalsthatareconnectingwiththeprojectorviaImageExpressUtilityLiteorWireless
Image Utility.
• Theterminalnamescurrentlyshownonthedisplayarelistedingray.
• Abletoswitchthepositiontodisplaybythedraganddropterminalnames.
• TerminalnamescanbesortedbyclickingtheSORTBYNAME.
NOTE:
• Forutilizingthisfunction,imagestransmittedfromthecomputerandotherterminalsmustbeprojectedon.Formoredetailed
informationforutilizingtheImageExpressUtilityLiteandtheWirelessImageUtility,pleaseseetheHELPforeachapplication.
• Thisisthefunctionforexclusiveoneperson.Youcannotsharetousethisfunctionwhileithasbeenutilizedonothercomput-
ers.
6-3. PROJECTOR CONTROL
Thereare2typesofscreenavailable,a“PROJECTORADJUSTMENTS”screentocontroltheprojectoranda“NET-
WORKSETTINGS”tocongurethenetworksettings.Youcanswitchbetweenthese2screensusingthetabs.
Start the PROJECTOR CONTROL
1. Connect the projector and the computer in a network.
2. Boot up a browser on the computer and access to the WEB SERVER.
• Pleasereferto"HowtoaccesstheWEBSERVER"onpage16.
The screen of the WEB SHARING will be displayed.
• Clickthe[PROJECTORCONTROL]tabforswitchingittothePROJECTORCONTROL.
Controlling the projector (PROJECTOR ADJUSTMENTS)
Enable to control image and volume and switch the input terminal. At the same time, it can be used for checking the
light hours used.
Configure network settings (NETWORK SETTINGS)
See“7.NETWORKSETTINGS”fordetailsonthewiredLANandwirelessLANsettings.(→ page 22)
• Setthealertmail(ALERTMAIL)
Refer to Page 29 for the functional description.
• NETWORKSERVICE
SeteachloginpasswordfortheHTTPserverandPJLink,andvalidityofAMXBEACON.
• CRESTRONsetting
Refer to Page 30 for the functional description.
• Networkinformation(INFORMATION)
Displaytheinformationofthenetworksetinthisdevice.

22
7. NETWORK SETTINGS
CongurationforconnectingthisdevicetoawiredLANorwirelessLAN.
7-1. PROJECTOR NAME
Set the projector name and host name. The default factory setting is the manufacturing number of this device.
Item Description Remarks
Projector name Set up the projector name A maximum of 16 alphanumeric
characters
Host name Set the host name of this device. A maximum of 16 alphanumeric
characters
7-2. NETWORK INFORMATION
Displaytheinformationwhenthisdeviceisconnectedtoanetwork(wiredLAN/wirelessLAN).
7-3. WIRED LAN
CongurethesettingsforconnectingthisdevicetoawiredLAN.
Item Description Remarks
Profile
ThesettingswhenconnectingthisdevicetoawiredLANcan
be registered in 2 ways (Profile 1 and Profile 2).
DHCP/IPADDRESS/
S U B N E T M A S K /
GATEWAY/AUTO-
MATICDNS
Performrequiredsettings
Reconnection Try connecting to the network again. Reconnect after chang-
ing the settings.
NOTE:
• IfyoucannotobtainIPaddressbydisconnecting/connectingtheLANcableunderthestatetheDHCPhasbeenset,poweroffthis
deviceonceandthenpoweritonagain.
7-4. Wireless LAN
CongurethesettingsforconnectingthisdevicetoawirelessLAN.
Item Description Remarks
Profile Select the configuration name when connecting this device
toawirelessLAN.
• Disable:Noradiowaveswillbetransmittedfromthewire-
lessLANunitconnectedtothisdevice.
• Simpleaccesspoint:Connecttoacomputerorsmartphone
by setting this device as a simple access point.
• Wi-Fi Direct: Connect to a device compatible withWi-Fi
Direct.
• Miracast:ConnecttoadevicecompatiblewithMiracast
• Prole1/Prole2:ThewirelessLANsettingscanbereg-
istered in 2 ways.
• Thedefaultfactorysetting
whenshippedis“Disable”.
• Ifasimpleaccesspoint
has been set up, the IP
address of this device
willbe“192.168.120.1”or
“192.168.130.1”.
NOTE:Whenasimpleaccess
pointissetup.Upto20unitscan
beconnectedsimultaneously.
Recommendtoconnectapprox.
10unitsfornormaloperation.
DHCP/IP address/
Subnet mask/Gate-
way/DNS
These can be set when Profile 1 or Profile 2 is selected.
Advanced settings The configuration items differ for each profile option. Refer
to the following table.
Reconnection Try connecting to the network again. Reconnect after chang-
ing the settings.

23
7. NETWORK SETTINGS
Advanced settings (simple access point)
Item Description Remarks
WPS settings Select the WPS push button method.
• Disable:DisabletheWPSfunction.
• Pushbutton:SelecttheWPSpushbuttonmethod.WPS
push button will be displayed in the application menu.
Security setting Select the security type (WPA2-PSK).
• The default factory setting
whenshippedis“Disable”.
• TheWPA2-PSKkeyconsists
of 8 - 63 half-byte alphanu-
meric characters.
SSID
SettheSSID. This consists of 1 - 32 half-byte
alphanumeric characters. The
default factory setting is the
manufacturing number of this
device.
LANmode Choose the wireless mode. The default factory setting when
shippedis“IEEE802.11b/g/n”.
Channel Choose the wireless channel. The default factory setting when
shippedis“6”.
Connection method with the push button method
1. Press the WPS push button under the application menu of the projector (AP).
A countdown of the WPS appears in the application menu.
2. Press the WPS push button on the WPS supported wireless terminal (Client side) during the countdown.
The WPS supported wireless terminal (Client side) will connect to the projector (AP).
Advanced Settings (Wi-Fi Direct)
Item Description Remarks
WPS settings Select the WPS push button method.
• Autopushbutton:Enabletoomittheproceduresearching
theterminalwhenreceivingconnectionrequestfromthe
Wi-FiDirectsupportedwirelessterminal.
• Push button: Perform the procedure for accepting the
connectionrequestreplyfromtheWi-FiDirectsupported
wireless terminal.
The default factory setting when
shippedis“AutoPushButton”.
How to connect with the auto push button method
1. Perform to search the Wi-Fi Direct supported device on the Wi-Fi Direct supported wireless terminal.
2. Select the projector name (this device) that is displayed in the search results.
The Wi-Fi Direct supported wireless terminal will connect to this device.
How to connect with the push button method
1. Display the APPS MENU screen on the projector.
2. Perform to search the Wi-Fi Direct supported device on the Wi-Fi Direct supported wireless terminal
3. Select the projector name (this device) that is displayed in the search results.
Countdown for connection request will appear on the APPS MENU of the projector
4. Press the accept button of the connection request reply dialog box during the countdown.
The Wi-Fi Direct supported wireless terminal will connect to this device.

24
7. NETWORK SETTINGS
Advanced settings (Miracast)
Item Description Remarks
WPS settings Select the WPS method.
• Autopushbutton:Enabletoomitthesearchingprocedure
whenreceivingtheconnectionrequestfromtheMiracast
supported wireless device.
• Pushbutton:Performthesearchingproceduretoaccept
theconnectionrequestreplyfromtheMiracastsupported
wireless device.
• PINcode:Inputthe PINcode indicatedontheprojector
onto the Miracast supported wireless device.
The default factory setting when
shippedis“AutoPushButton
HDCPsetting ChoosethefunctionofcontentsprotectionbyHDCP.
• Disable:DoesnotsupportHDCP
• Enable:SupportHDCP
The default factory setting when
shippedis“Enable”.
This projector supports
HDCP2.2.
How to connect with the auto push button method
1. Perform to search a Miracast supported device (receiver side) on the Miracast supported wireless terminal
(sender side)
2. Select the projector name (this device) that is displayed in the search result.
The connection between the projector and the Miracast supported wireless terminal (sender) will be established
and start the Miracast transmission.
How to connect with the push button method
1. Display the APPS MENU of this projector.
2. Perform to search a Miracast supported device (receiver side) on the Miracast supported wireless terminal
(sender side)
3. Select the projector name (this device) that is displayed in the search result.
Countdown for requesting the connection will appear on the APPS MENU of this device.
4. button during the countdown
The connection between the projector and the Miracast supported wireless terminal (sender) will be established
and start the Miracast transmission.
How to connect with the PIN code method
1. Display the APPS MENU of this projector.
2. Perform to search a Miracast supported device (receiver side) on the Miracast supported wireless terminal
(sender side)
3. Select the projector name (this device) that is displayed in the search result.
Countdown for requesting the connection will appear on the APPS MENU of this device.
4. button during the countdown
The connection between the projector and the Miracast supported wireless terminal (sender) will be established
and start the Miracast transmission.

25
7. NETWORK SETTINGS
Advanced Settings (Profile 1 / Profile 2)
Item Description Remarks
Site survey
• Run the site survey and display the detected access
points.
• Amaximumof64accesspointscanbedisplayed.
• Only1accesspointwiththesamenameasSSIDisdis-
played.
• The applicable access points are the security-disabled
WPA-PSK, WPA2- PSK, WPA-EAP and WPA2-EAP.
• A“Key”markisattachedwhenthesecuritysettingofthe
access point has been enabled.
Selection is not possible if this
device is not connected to a
wirelessLANunit.
NOTE: If any access point is not
searched, select the site survey
againafterselecting[RECONNECT]
onthewirelessLANscreen.
Security setting Select the type of security.
• Disable:Disablethesecuritysetting.
• WPA2-PSK:Inputcolumnofthekeyisdisplayed.
• WPA/WPA2-PSK:Inputcolumnofthekeyisdisplayed.
• WPA2-EAP:Authenticationsettingsaredisplayed.
• WPA/WPA2-EAP: Authentication settings items are dis-
played
• The default factory setting
whenshippedis“Disable”.
SSID SettheSSID. This consists of 1 - 32 half-byte
alphanumeric characters.
The default factory setting when
shippedis“NECPJ”.
[AUTHENTICATION]
SettingisrequiredforusingWPA2-EAPorWPA/WPA2-EAP.
Preparation before setting
SelectawirelessLANcompliantWPA-EAPorWPA2-EAPauthenticationandinstalladigitalcerticateontheprojec-
tor.
1. Set [DATE AND TIME] and [TIME ZONE] on the projector. (→ page 33)
2. Use a computer to save digital certificates (files) for WPA2-EAP setting to your USB memory device.
After completing saving the file, remove the USB memory device from the computer.
Important:
• Thesupportedleextensionsforclientcerticateare".pfx"and".p12",forrootcerticateare".cer"and".der".
• TheleformatsofdigitalcerticatethataresupportedbytheprojectorareDERandPKCS#12only.
• Theprojectorcannothandleanydigitalcerticatewhoselesizeexceeds8KB.
3. Plug the USB memory device into the USB port of the projector.
Setting Procedures
1. Select either [WPA2-EAP] or [WPA/WPA2-EAP] for the [SECURITY TYPE] on the [SECURITY] page
The pull-down list will be displayed.
2. Focus on the [AUTHENTICATION].
Select either [EAP-TLS] or [PEAP-MSCHAPV2] for [EAP TYPE]. The setting items vary depending on the EAP
type.

26
7. NETWORK SETTINGS
See the table below.
EAP Type Setting Item Note
EAP-TLS User Name 1 character or more and 32 characters or
less
Client Certificate PKCS#12 format file
CA Certificate
(Certicateauthority’scerticate)
DERformatle
PEAP-MSCHAPV2 User Name 1 character or more and 32 characters or
less
Password 1 character or more and 32 characters or
less
CA Certificate
(Certicateauthority’scerticate)
DERformatle
① Selecting [EAP-TLS] for [EAP TYPE]:
The operation for selecting [EAP-TLS], refer the step 3 on this page.
The operation for selecting [PEAP-MSCHAPV2] refer the step 3 on page 27.
3. Focus on
[USER NAME] field and press the ENTER button.
The character entry screen (software keyboard) will be displayed. Set a user name.
• Ausernamemustbe1characterormoreand32charactersorless.
4. Focus on
[CLIENT CERTIFICATE] and press the ENTER button.
A list of files ([FILES] screen) will be displayed.
• Toreturntothe[AUTHENTICATION]page,presstheEXITbutton.
NOTE:
Installing a digital certificate
Youcaninstalleachdigitalcerticate(clientcerticateandCAcerticate)for[PROFILE1(or2)]onale-by-lebasis.
• InstallarootCAcerticateforaCAcerticate.
• Ifyouinstalladigitalcerticateoveryourexistingdigitalcerticate,theexistingdigitalcerticatewillbeoverwrittenwiththenew
digitalcerticate.
• Onceadigitalcerticatehasbeeninstalled,itsinformationcannotbedeletedevenifyoustopsettingWPA2-EAP,WPA/WPA2-
EAP.
5.
On the [FILES] screen, focus on a digital certificate (PKCS#12 format file) saved in your USB memory device
and press the ENTER button.
The password screen will be displayed.
6. Focus on
[PASSWORD] field and press the ENTER button.
The character entry screen (software keyboard) will be displayed. Set the password of the private key. A password
must be 1 character or more and 32 characters or less.
The selected digital certificate file will be installed on the projector.
• WhentherootCAcerticateisnotincludedinthelethatwasselectedinStep5,proceedtoStep7.Whenthe
root certification authority certificate is included, proceed to Step 9.
7. Focus on [CA CERTIFICATE] and press the ENTER button.
The drive list screen will be displayed.
8.
On the [FILES] screen, focus on a digital certificate (DER format file) saved in your USB memory device
and press the ENTER button.
• SelectyourrootCAcerticatehere.
The selected digital certificate will be installed on the projector.

27
7. NETWORK SETTINGS
9.
After completing required settings, focus on [OK] and press the ENTER button.
Back to the [SECURITY] page.
10.
Select [OK] and press the ENTER button.
Back to the [ADVANCED] setting screen.
Thiswillcompletesetting[EAP-TLS]for[EAPTYPE]in[WPA-EAP]or[WPA2-EAP].
TIP:
Clearing the digital certificate that is installed on the projector
To clear the digital certificate installed on the projector, follow the steps below.
By doing the following procedure, all the digital certificates for the currently displayed profile will be cleared.
1. Focus on [CLEAR CERTIFICATES] at the bottom of the [ADVANCED] setting screen and press the ENTER
button.
A message for confirmation will be displayed.
2. Focus on [YES] and press the ENTER button.
The digital certificates will be cleared.
② Selecting [PEAP-MSCHAPV2] for [EAP TYPE]:
3.
From the [AUTHENTICATION] page, focus on [EAP TYPE] field and press the ENTER button.
The pull-down list will be displayed.
4. Focus on
[PEAP-MSCHAPV2] and press the ENTER button.
5. Focus on
[USER NAME] field and press the ENTER button.
The character entry screen (software keyboard) will be displayed. Set a user name.
• Ausernamemustbe32charactersorless.
6.
After completing setting a user name, focus on the [PASSWORD] field and press the ENTER button.
The character entry screen (software keyboard) will be displayed. Set a password.
• Apasswordmustbe32charactersorless.
• Youcanselecteither "Usethecerticate"or"Notusethecerticate"forPEAP-MSCHAPV2.Forusingthe
certicate,setat"Usethecerticate",ontheotherhand,ifyoudonotusethecerticate,setat"Notusethe
certicate".
7.
After completing setting the password, focus on [CA CERTIFICATE] field and press the ENTER button.
The drive list screen will be displayed.
• Toreturntothe[AUTHENTICATION]page,presstheEXITbutton.
NOTE:
Installing a digital certificate
You caninstall eachdigital certicate(client certicateand CAcerticate) for[PROFILE1 (or2)] ona le-by-le
basis.
• InstallarootCAcerticateforaCAcerticate.
• Ifyouinstalladigitalcerticateoveryourexistingdigitalcerticate,theexistingdigitalcerticatewillbeoverwrittenwiththenew
digitalcerticate.
• Onceadigitalcerticatehasbeeninstalled,itsinformationcannotbedeletedevenifyoustopsettingWPA2-EAP,WPA/WPA2-
EAP.
8.
On the [FILES] screen, focus on a digital certificate (DER format file) saved in your USB memory device
and press the ENTER button.
The selected digital certificate will be installed on the projector.

28
7. NETWORK SETTINGS
9.
After completing required settings, focus on [OK] and press the ENTER button.
Back to the [SECURITY] page.
10. Focus on
[OK] and press the ENTER button.
Thiswillcompletesetting[PEAP-MSCHAPV2]for[EAPTYPE]in[WPA2-EAP].
TIP:
Clearing the digital certificate that is installed on the projector
To clear the digital certificate installed on the projector, follow the steps below.
By doing the following procedure, all the digital certificates for the currently displayed profile will be cleared.
1. Focus on [CLEAR CERTIFICATES] in the bottom left of the [ADVANCED] setting screen and press the
ENTER button.
A message for confirmation will be displayed.
2. Focus on [YES] and press the ENTER button.
The digital certificates will be cleared.

29
7. NETWORK SETTINGS
7-5. IMAGE EXPRESS UTILITY
CongurethesettingswhenusingImageExpressUtilityLite.
Item Description Remarks
Mode Select the operating mode.
Free: Set the free mode.
Control: Set the managed mode.
The default factory setting when
shippedis“Free”.
HTTP Password AbletosetupapasswordtologintheMANAGEDMODE
for the IMAGE EXPRESS UTILITYintheWEB SERVER
functions
Max 32 alphanumeric charac-
ters. If it leaves in blank, the
passwordbecomes"Null".De-
fault setting: Blank
NOTE:
• Ifyouchangethesettingoftheoperatingmode,connectingtotheIMAGEEXPRESSUTILITY,itwillnotbereectedimmediately.
WhentheIMAGEEXPRESSUTILITYbecomesunusedcondition,thechangeintheoperatingmodewillbereected.
7-6. NETWORK SERVICE
AMX setting
IfyouconnectthisdevicetoanetworkcompatiblewiththeNetLinxcontrolsystemofAMXCorporation,youcanen-
able/disablethedetectionsettingfromAMXDeviceDiscovery.Acheckmarkisnotwhenthedeviceisrstshipped
from the factory.
SeethewebsiteofAMXCorporationformoreinformationonAMXDeviceDiscovery.
HTTP server configuration
SetthepasswordforloggingintothePROJECTORCONTROLscreen.Amaximumofupto10
alphanumeric characters can be set for the password.
PJLink setting
SettheloginpasswordforusingPJLink.Amaximumofupto32alphanumericcharacterscanbesetforthepass-
word.
Alert e-mail setting
When using this device connected to a network, computers and other devices will be notified of the status of this
device via e-mail if the lamp of this device is due for replacement, or if an error occurs.
ALERTMAIL This option will notify your computer of lamp replace time or error messages via e-mail
whenusingwiredLAN.
Placing a checkmark will turn on the Alert Mail feature.
Clearing a checkmark will turn off the Alert Mail feature.
Sample of a message to be sent from the projector:
THECOOLINGFANHASSTOPPED.
[INFORMATION]
PROJECTORNAME:PJ-XXXXXXXX
LIGHTHOURSUSED:XXXX[H]
SENDER’SADDRESS Entersender’saddress.
SMTP SERVER NAME Enter the SMTP server name to be connected to the projector.
RECIPIENT’S ADDRESS
1, 2, 3
Enteryourrecipient’saddress.Uptothreeaddressescanbeentered.

30
7. NETWORK SETTINGS
TESTMAIL Send a test mail to check whether your settings are correct or not.
NOTE:
• Ifyouexecuteatest,youmaynotreceiveanAlertmail.Shouldthishappen,checkifnetwork
settingsarecorrect.
• Ifyouenteredanincorrectaddressinatest,youmaynotreceiveanAlertmail.Shouldthis
happen,checkiftheRecipient’sAddressiscorrect.
CRESTRON SETTINGS
Configure the settings for connecting this device to a CRESTRON product.
Item Description
ROOMVIEW Check this when controlling the unit with a computer.
CRESTRONCONTROL
Check this when controlling the unit with a controller.
IP address Set the IP address of the controller.
IPID
SettheIPIDofthecontroller.
31
8. TOOLS
8-1. MOUSE
When this device is connected to a USB mouse sold commercially, the menu can be operated using the mouse.
The configuration of the mouse is as follows:
Item Description Remarks
Mouse If a check mark is marked, it enables to use the mouse con-
nected with the projector from the next booting up.
Button setting Switch the functions of the left and right buttons on the
mouse.
Speed setting Select the pointer speed reflecting mouse motion among
three levels.
8-2. PROGRAM TIMER
By setting day and time onto the projector, it enables the projector to automatically switch the power, the condition of
standby, the video signal and the condition of ECO mode. As an example based on the above, every Sunday projector
ispoweredonat9AM,isswitchedtothecomputerdisplayat9:03andisgoneintotheStandbyconditionat17:30.
NOTE:
• Beforeusing[PROGRAMTIMER],makesurethatthe[DATEANDTIME]featureisset.(→page34)
MakesurethattheprojectorisinthestandbyconditionwiththePOWERcordconnected.
Iftheprojectorleavesforovertwoweekswithoutthepowersupply,thesetdateandtimewillberesettothefactorydefault
settingandtheprogramtimerfunctionwillbecomeineffective.Whentheprogramtimerfunctionbecomesineffective,set"Date
andtime"again.
* Forutilizingtheprogramtimer,set[NETWORKSTANDBY]for[STANDBYMODE].
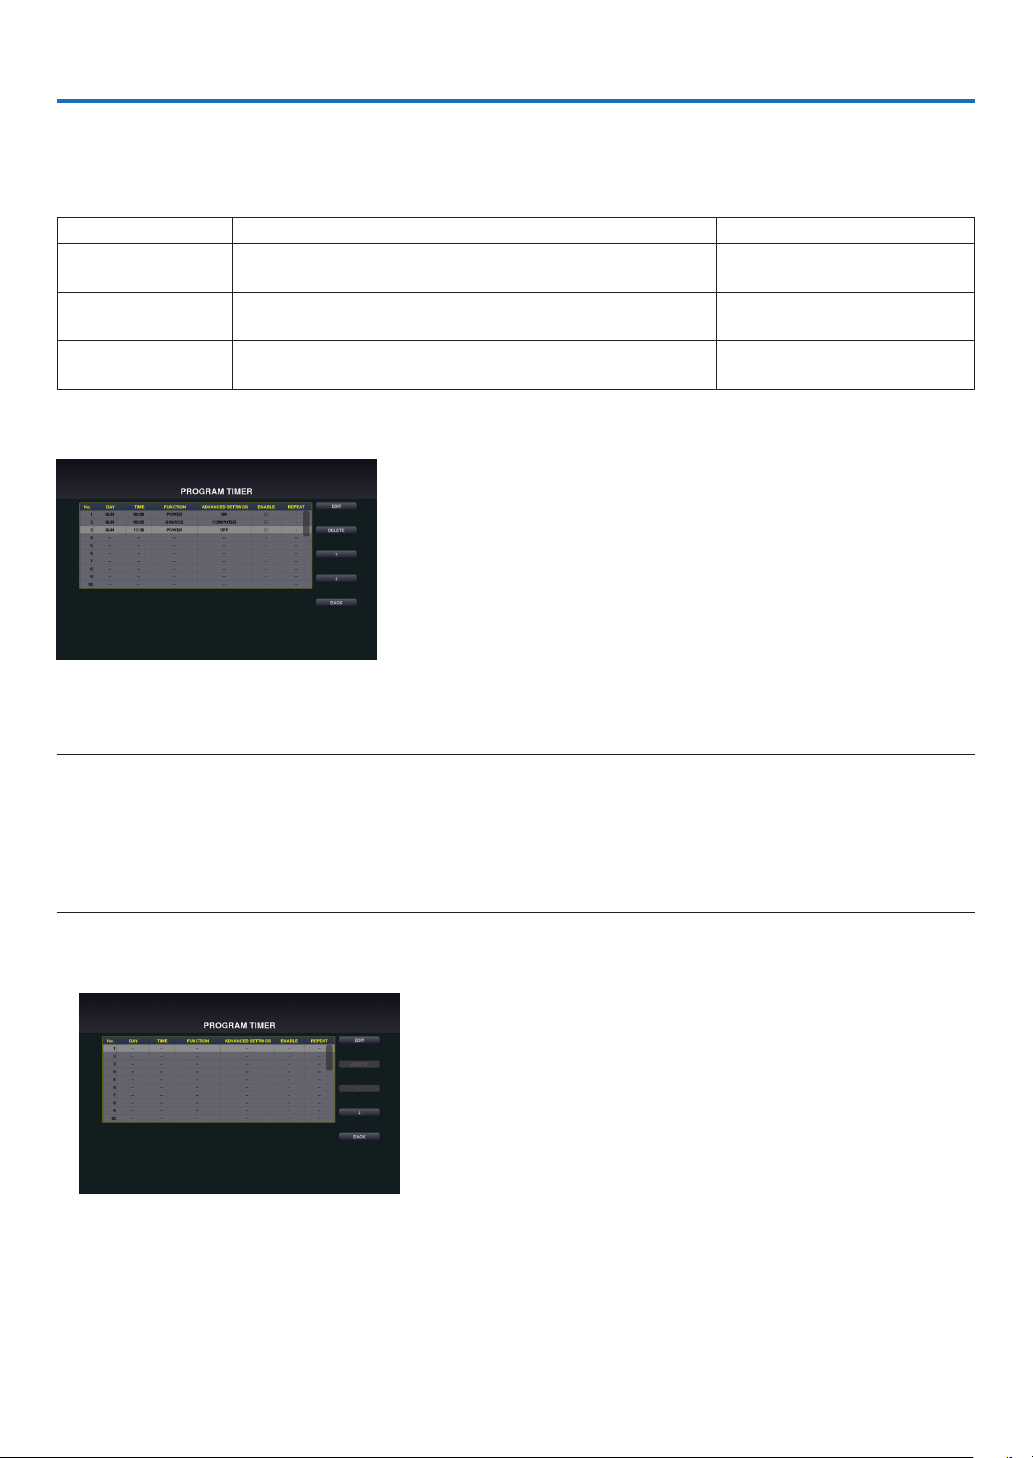
Setting a new program timer
1. On the PROGRAM TIMER screen, use the ▲ or ▼ button to select [EDIT] and press the ENTER button.
The [PROGRAM LIST] screen will be displayed.
2. Focus on a blank program number and press the ENTER button.
The [EDIT] screen will be displayed.
32
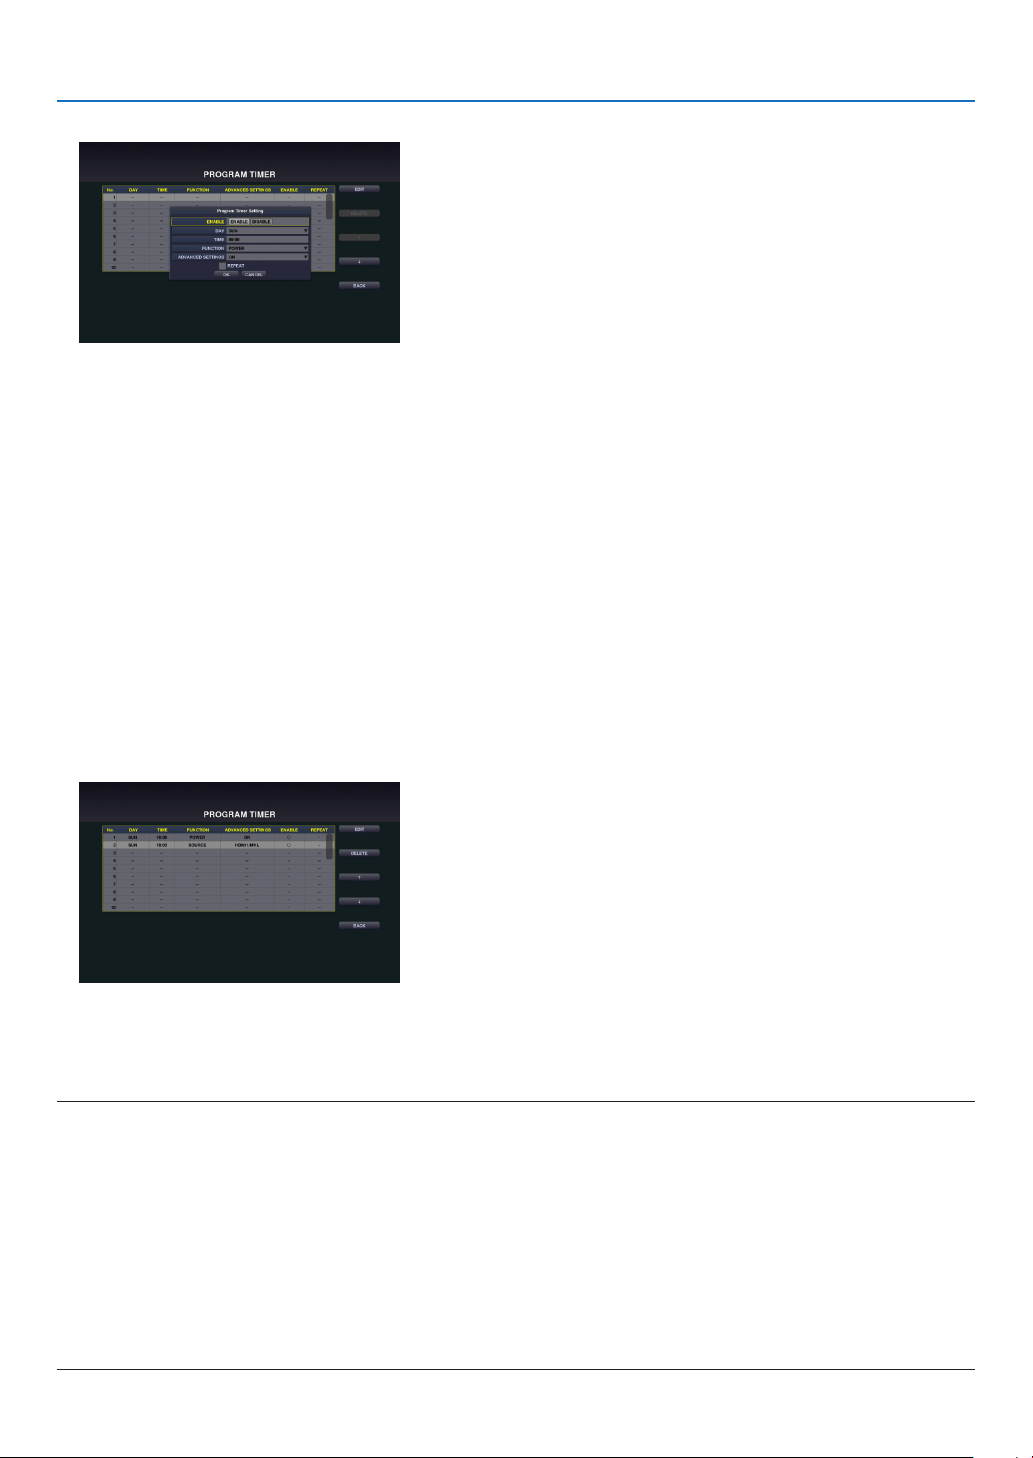
8. TOOLS
3. Make settings for each item as required.
ENABLE ����������������� Select to enable or disable the event�
DAY ������������������������ Select days of the week for the program timer� To execute the program from Monday to Friday, select [MON-
FRI]�
To execute the program in everyday basis, select [EVERY DAY]�
TIME ���������������������� Set the time to execute the program� Enter time in 24-hour notation�
FUNCTION ������������� Select a function to be executed� When [POWER] is selected, you can set powering ON/OFF at [ADVANCED
SETTINGS], when [SOURCE] is selected, you can set video signal at [ADVANCED SETTINGS] and when
[ECO] is selected, you can set [OFF]/[ECO1]/[ECO2] for ECO mode at [ADVANCED SETTINGS]�
ADVANCED SETTINGS
�� Based on the selected item in [FUNCTION], select to power ON/OFF, a type of video source, and setting ECO
MODE to OFF/ECO1/ECO2�
REPEAT ������������������ Place a check mark to repeat the program continuing basis� To use the program this week only, clear the
check mark�
4. Focus on [OK] and press the ENTER button.
This will complete the settings.
You will be returned to the [PROGRAM LIST] screen.
5. Focus on [BACK] and press the ENTER button.
You will be returned to the [PROGRAM TIMER] screen.
6. Focus on [OK] and press the ENTER button.
You will be returned to the [TOOLS] screen.
NOTE:
• Upto30differenttimersettingscanbeprogrammed.
• Oncetheprogramnotmarkedwithacheckin[REPEAT]hasbeenexecuted,thecheckmarkinthe[ENABLE]checkboxwillbe
clearedautomaticallyandtheprogramwillbedisabled.
• Ifseveralprogramsaresetatthesametime,theseprogramsareexecutedinorderoftheprogramlistnumber.
• Theon-timesettingwillnotbeexecutedwhilethecoolingfansarerunningoranerrorisoccurring.
• Iftheoff-timesettingisexpiredundertheconditioninwhichthepoweroffisnotpossible,theoff-timersettingwillnotbeexecuted
untilthepoweroffbecomespossible.
• Programsnotmarkedwithacheckmarkin[ENABLE]ofthe[EDIT]screenwillnotbeexecutedevenifENABLEfortheProgram
Timerisnotactivated.
• Whentheprojectoristurnedonbyusingtheprogramtimerandifyouwanttoturnofftheprojector,settheoff-timeordoit
manuallysoasnottoleavetheprojectoronforalongperiodoftime.

33
8. TOOLS
Activating the program timer
1. Focus on [ENABLE] at the top of the [PROGRAM TIMER] screen and press the ENTER button.
The check mark is added to the program list.
NOTE:
• Theprogramwillnotbeexecutedwithoutaddingacheckmark“√”toENABLEfortheprogramtimerevenwhenacheckmarkis
addedfortheprogramlist.
• Evenacheckmarkisaddedfortheeffectivesettingof[PROGRAMTIMER],the[PROGRAMTIMER]willnotworkuntilthe[PRO-
GRAMTIMER]screenisnotclosed.
Changing the programmed settings
1. On the [PROGRAM LIST] screen, focus on a program you want to edit and press the ENTER button.
2. Change the settings on the [EDIT] screen.
3. Focus on [OK] and press the ENTER button.
The programmed settings will be changed.
You will be returned to the [PROGRAM LIST] screen.
Changing the order of programs
When set time is come, the program will be executed in order of program list number (smaller first)
1. On the [PROGRAM LIST] screen, focus on a program you want to change and press the ▶ button.
2. Press the ▼ button to select ↑ or ↓.
3. Press the ENTER button a few times to select a row to which you wish to move the program.
The order of the programs will be changed.
Deleting the programs
1. On the [PROGRAM LIST] screen, focus on a program number you want to delete and press the ▶ button.
2. Press the ▼ button to focus on [DELETE].
The confirmation screen will be displayed.
3. Focus on [DELETE] and press the ENTER button.
The program will be deleted.
This will complete deleting the program.

34
8. TOOLS
8-3. DATE AND TIME
Set the current date and time in this device.
Item Description Remarks
Time zone settings Set the time difference with UTC (Universal Time, Coordi-
nated) and the region where this device is used.
Thedefaultvalueis“+00:00”.
Example: When using the
deviceinJapan,setitto
“+09:00”.
Dateandtimeset-
tings
Set the current date and time. Synchronize with the NTP
serveronthenetworkandputacheckmarkin“Internet
TimeServer”toobtainthecorrecttime.ThenentertheIP
address or host name of the NTP server to perform updat-
ing.
The default date is
“01/01/2015”(Thu).Thede-
faulttimeis“00:00”.
Summer time set-
ting
Set summer time. When Enable is checked, summer time
is enabled. Set the various time differences and the start
and end of summer time.
Important:
• Whenusingtheclockfunctionofthisdevice,leavethedeviceinthestandbymodeifitisnotgoingtobeused.
Iftheprojectorleavesforovertwoweekswithoutthepowersupply,thesetdateandtimewillberesettothefactorydefaultsetting
andtheclockfunctionwillbecomeineffective.Whentheclockfunctionbecomesineffective,set"Dateandtime"again.
NOTE:
• IfdateandtimeisresetaroundthetimingofstartingornishingSummertime,Summertimesettingmaynotbecomeeffective
properly.
Incasedateandtimeisrequiredtoreset,performthesettingsinorderofTIMEZONE→DATEANDTIMESETTING→SUMMER
TIME.
8-4. ADMINISTRATOR MODE
Select the menu mode of this device, enable/disable the saving of settings of the entire projector, and configure thep-
assword setting in the administrator mode.
Item Description Remarks
Menu mode Select the basic menu or advanced menu. See the user's
manual of the projector for the items that can be used in the
respective menus.
Donotsavetheset-
tings
Put a check mark if you are not saving the value of the con-
figured item in the on-screen menu.
No check mark as the factory
default setting.
New password / Con-
firm new password
Set the password in the administrator mode.
Amaximumof10alphanumeric
characters.
8-5. DEFAULT APP
Omit to display the application menu and select the start-up function either when the APPS button on the remote
control is pressed, or [APPS] is selected as the input terminal on the onscreen menu.
Item Description Remarks
Defaultapplication When the projector is turned on under the condition of being
selectedthe"APPS"terminal,selectfunctioneithertheAPPS
MENU or the viewer.
The default factory setting is
“APPSMENU”.

Trademarks
• OSXandSafariaretrademarksofAppleInc.registeredintheU.S.andothercountries.
• iOSisatrademarkorregisteredtrademarkofCiscointheU.S.andothercountriesandisusedunderlicense.
• AppStoreisaservicemarkofAppleInc.
• InternetExploreriseitheraregisteredtrademarkortrademarkofMicrosoftCorporationintheUnitedStates
and/or other countries.
• TrademarkPJLinkisatrademarkappliedfortrademarkrightsinJapan,theUnitedStatesofAmericaandother
countries and areas.
• Wi-Fi
®
, Wi-Fi Alliance
®
, Wi-Fi Protected Access
®
,Wi-FiDirect
®
are registered trademarks of the Wi-Fi Alliance
®
.
WPA™, WPA2™, Wi-Fi
Protected Setup™, Miracast™ are trademarks of the Wi-Fi Alliance
®
.
• CRESTRONandROOMVIEWareregisteredtrademarksofCrestronElectronics,Inc.intheUnitedStatesand
other countries.
• Android,GooglePlay,andChromearetrademarksofGoogleInc.
• Otherproductnamesandcompanylogosmentionedinthisuser’smanualmaybethetrademarksorregistered
trademarks of their respective holders.
©NECDisplaySolutions,Ltd.2015 Ver.18/15