website lmp:/i_ ww.1
Q • •
Air Conditioner
Prior to. ins_llation, this air*
conditioning unit must be
submitted for approval by the
s_vice which provid_
efl_ricity (EN 51_2_
EN 61_-3 Norm}.
and thoroughly
.airconditioner.
future reference after

FOR YOUR RECORDS
Wr_e the m_li and _rial nu_rs hers:
Mode| #
Serial #
You can find them oin amabel!on the side of each uniL
Dealer's Name
Date Purct-_ased
II Staple your receipt to this pa_ in th_ event you need
it to prove d_te of purcha_ or for warranty issues.
READ TH!S MANUAL
Inside _ou wil_ fi_ many helpful hints on how to use
and maintain your air co_iti.o_r p/r_riy Just a little
preventive care on your part can save you a great dea_
ot time ar,d money over the lille of Wi_ _r oio_,ditiot')lell.
You'B find man_ answers to common prob_e,r[m in 'the
chart of troubleshooting tips. tf you review our cha_ of
Troub_eshootJngi Tips first, you may not need to call
for _rv_e at all
*Contact the authorized service technician for
repair or maiintenance _ this unit
. Contact the installer for installation ol _|s unit,,
*The air conditioner is not intended for use by
you_ children or tnw|ids without su_wIsl_
*Young ehi|,dren should [be su_rvised to ensure
that they do not p|ay with the air oondiUonerr,.
*When the power cord is to be teplsced,
repiac;ement work shal| be performed by
authorized personnel only using only genuine
replacement _rts,
,|nsta||ation work must be performed in
8ccordance with the National E|ecttic 'Code by
q_|ified and suthonzed _rsonnel only.
2 Room Air Conditioner
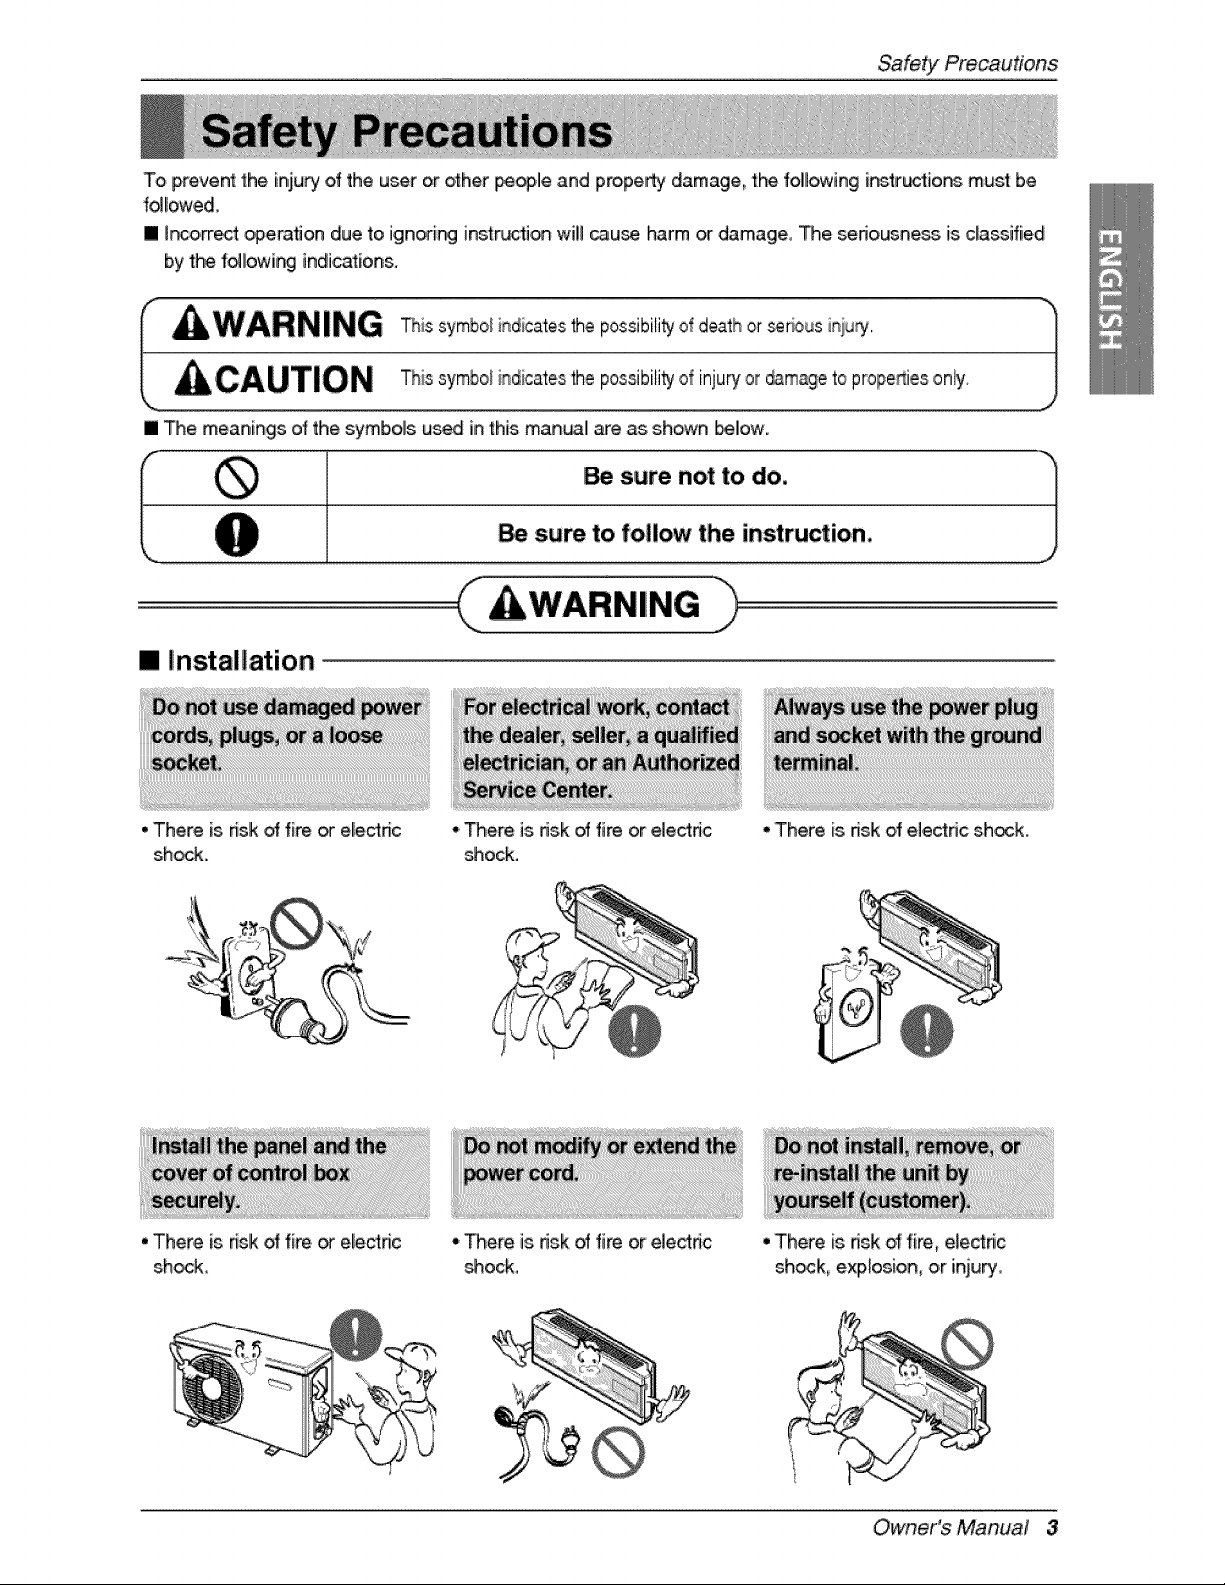
To prevent the iniury of the u_r or other pe_,le and property damage, the follllowing i_4ructions must be
followed
[] _r_orrect _eration due to ignori_ instr_tio_ wiB _u_, harm or damage, The seriousness is classified
by the following indications.
[] The meanings of the symbols used in thiis man_ are as shown I_ow.
iso,.notto°o. iJ
su_ to follow the instruction_
[] Installation
• There is nslk oHfi_. or electnc
shock,
oThere is risk of fi_ or el,ectdc
_ock.
• There is,risk oHfire or elec4tdc
_ock,
•There is risk of electric sh_k.
• There is nsk _ fire, e[ectric
shock, explosion, oir iniury,
Owner's Manual 3

SafetY Precautions
• Sharp edges could cause inju_..
Be especially careful of t_
case ewes and tl*_ fins on the
con_nser and evaporator.
• There is _sk of fire, elec_ic
shock, explosion,, or injury.
-Ifthe base collapses,the air
condi_tionercould i_allwith it _uslng
propertydamage pr_u,_ %lure,
and _rsonal it_juPj,
IOperation
• There is fnsk of fire or electrical
shock.
,,Moisture may condense and
wet or dama_ furnishing&
•There is _sk of fire _ electric
shock.
• iltmay _use inju_, accident, or
dama_ t,ot_ product,
-There, is dsk of fire or electrical
shock.
,k
4 Room Air Conditioner
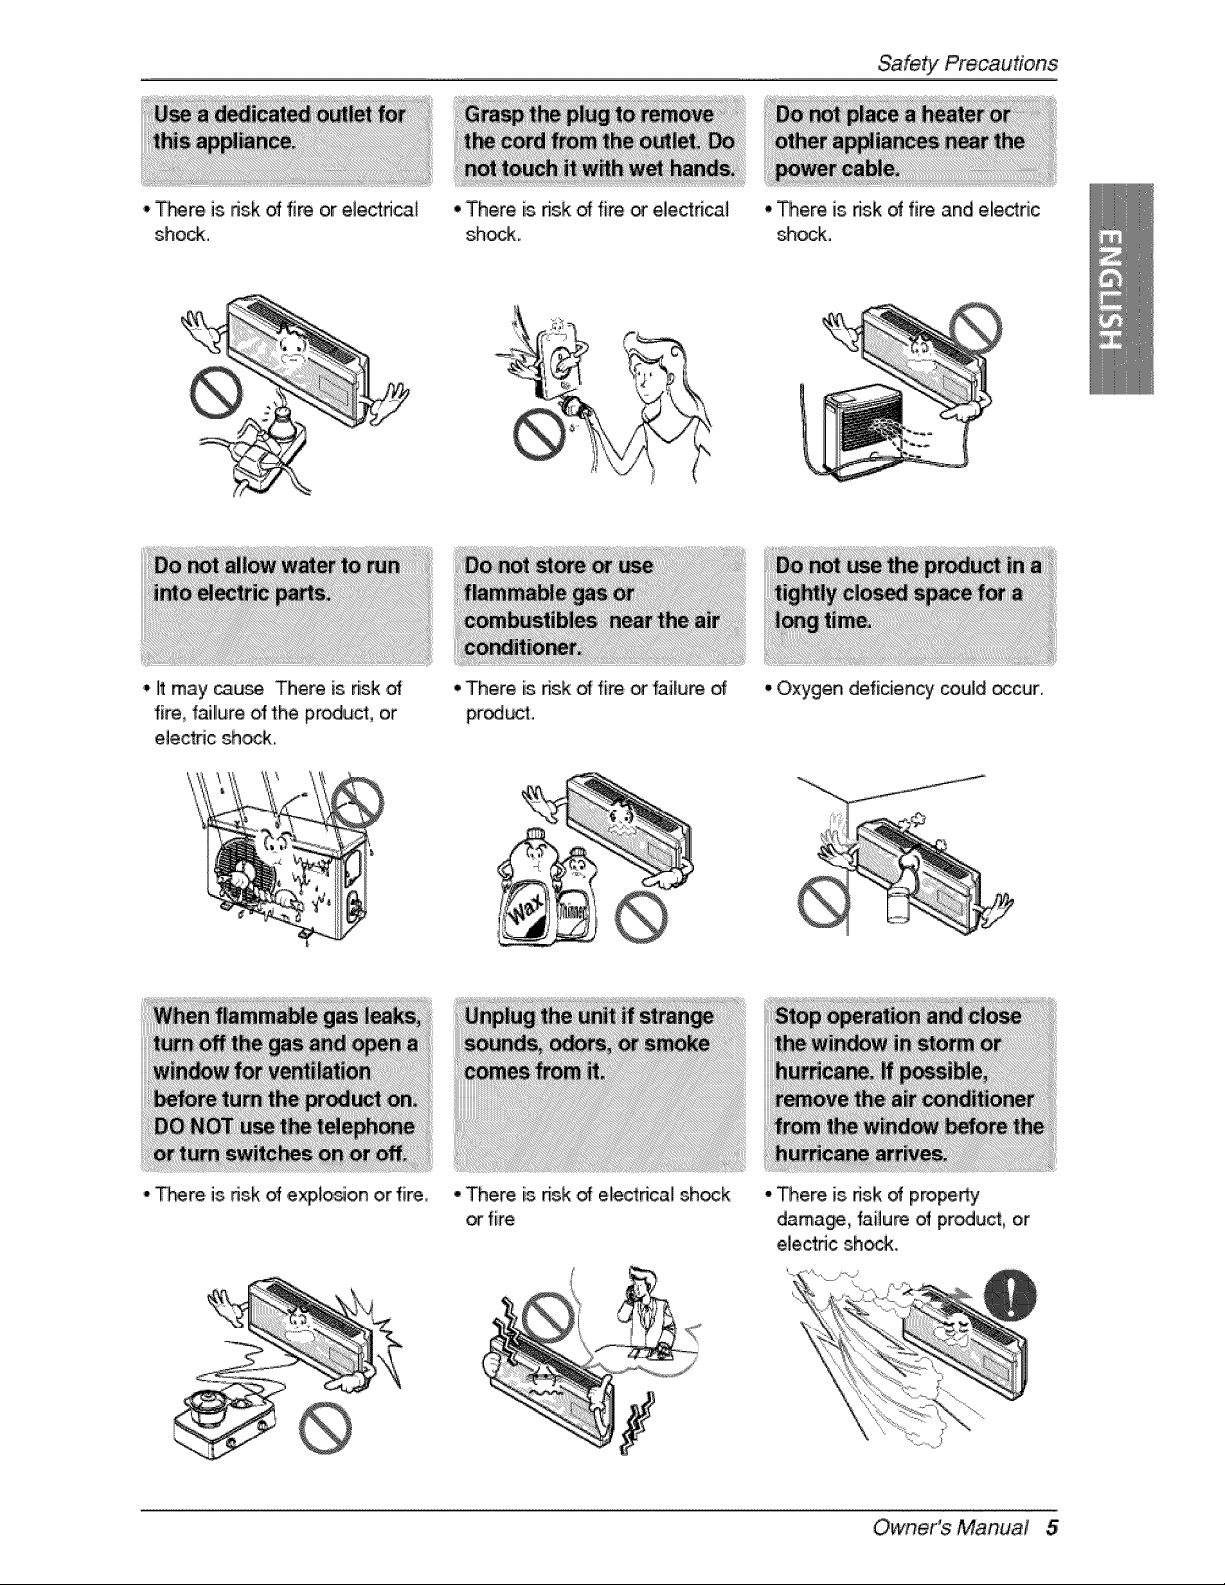
• _m is risk of fire or electrical
shock.
', It may cause There is _sk
fire, f_llure olfthe product, or
el,ectdc shock,
-T_re is dsk of expto_on or fire,
° There is ffsk dfire or eliectrical
shock.
° There is nsk dfire,or failure d
product.
• There is nsk of ele_rica! shock
orfire
• There is dsk dfire and electric
_ock.
• Oxygen deficiency could occur.
- There is ds.kof property
damage, failure of produ_, or
ele,ctdc shock.
Owner's Manual 5
SafetYPrecautions
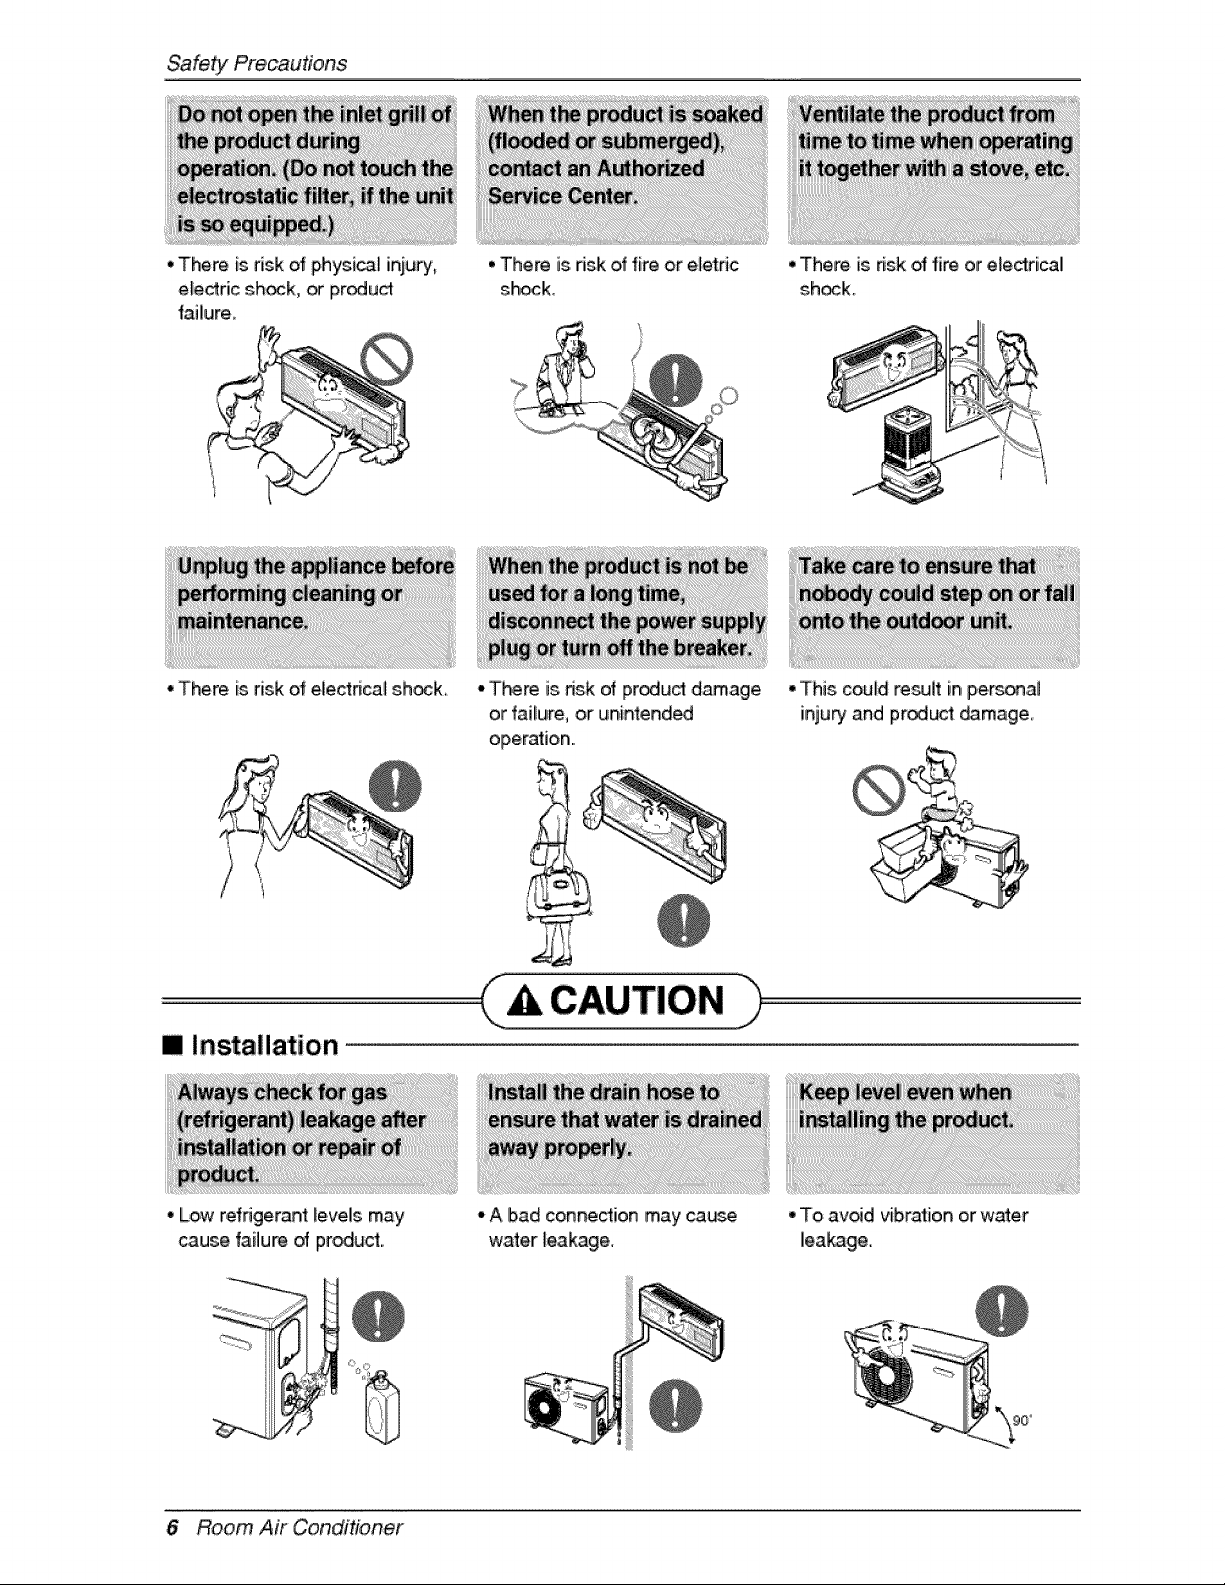
• There is risk ot physi_l iniu_',
eledric sh_k, _ proud
failure_
•There is risk of electncal shock
•There is nsk of fire or e_etdc
shock,
> --..i ¸ [
•There is nsk ol fire or e_edrical
sh_k_
° There is risk of product damage
or failure, or unintend_
operation..
I Installation
° Low r,efdgeran4_evels may
_use failure of product.
-A bad connection may ca_Je
water _eakage.
° This could re_lt in person.al
inju_ and pr_uct _m.age_
° To avid vibration or water
leakage.
6Room Air Conditioner
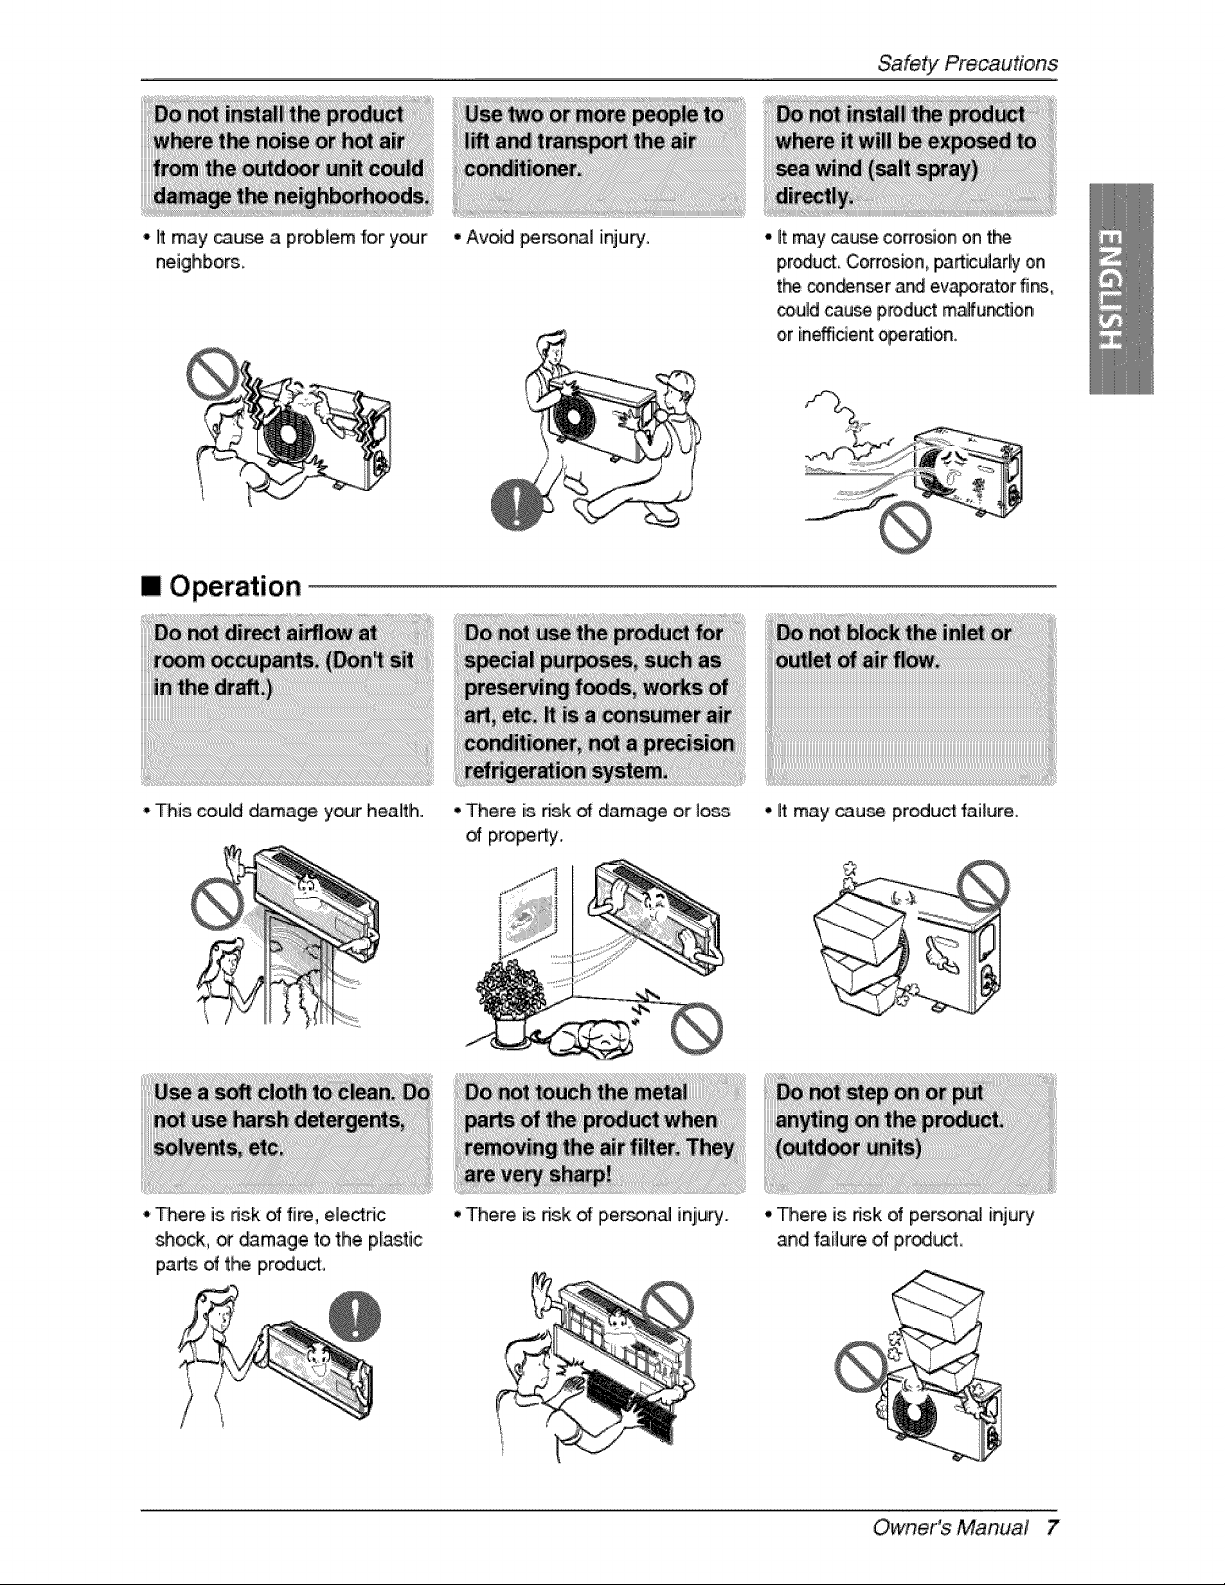
- it may _u_ a problem for your
neighbom.
• Avdd _F'_.OiRa] injulry, -it may_u_ corro_on on t_
pr_u_ Cor_osbn, padicularl'y on
t_ con_n_r and evaporator fi_,
_uld cau_ product malfunction
[mOperation
-his could damage your health. -There is dsk _ damage or Ioe_
of property.
-it may cau_ product failure.
•There is risk of fire, eleddc
shock, _ _mage to the p_asti,c
parts of t_ iproducff,
• There is dsk of p,er_,nal inju_. • here is risk of perso_a[ injury
Owner's Manual 7
SafetYPrecautions
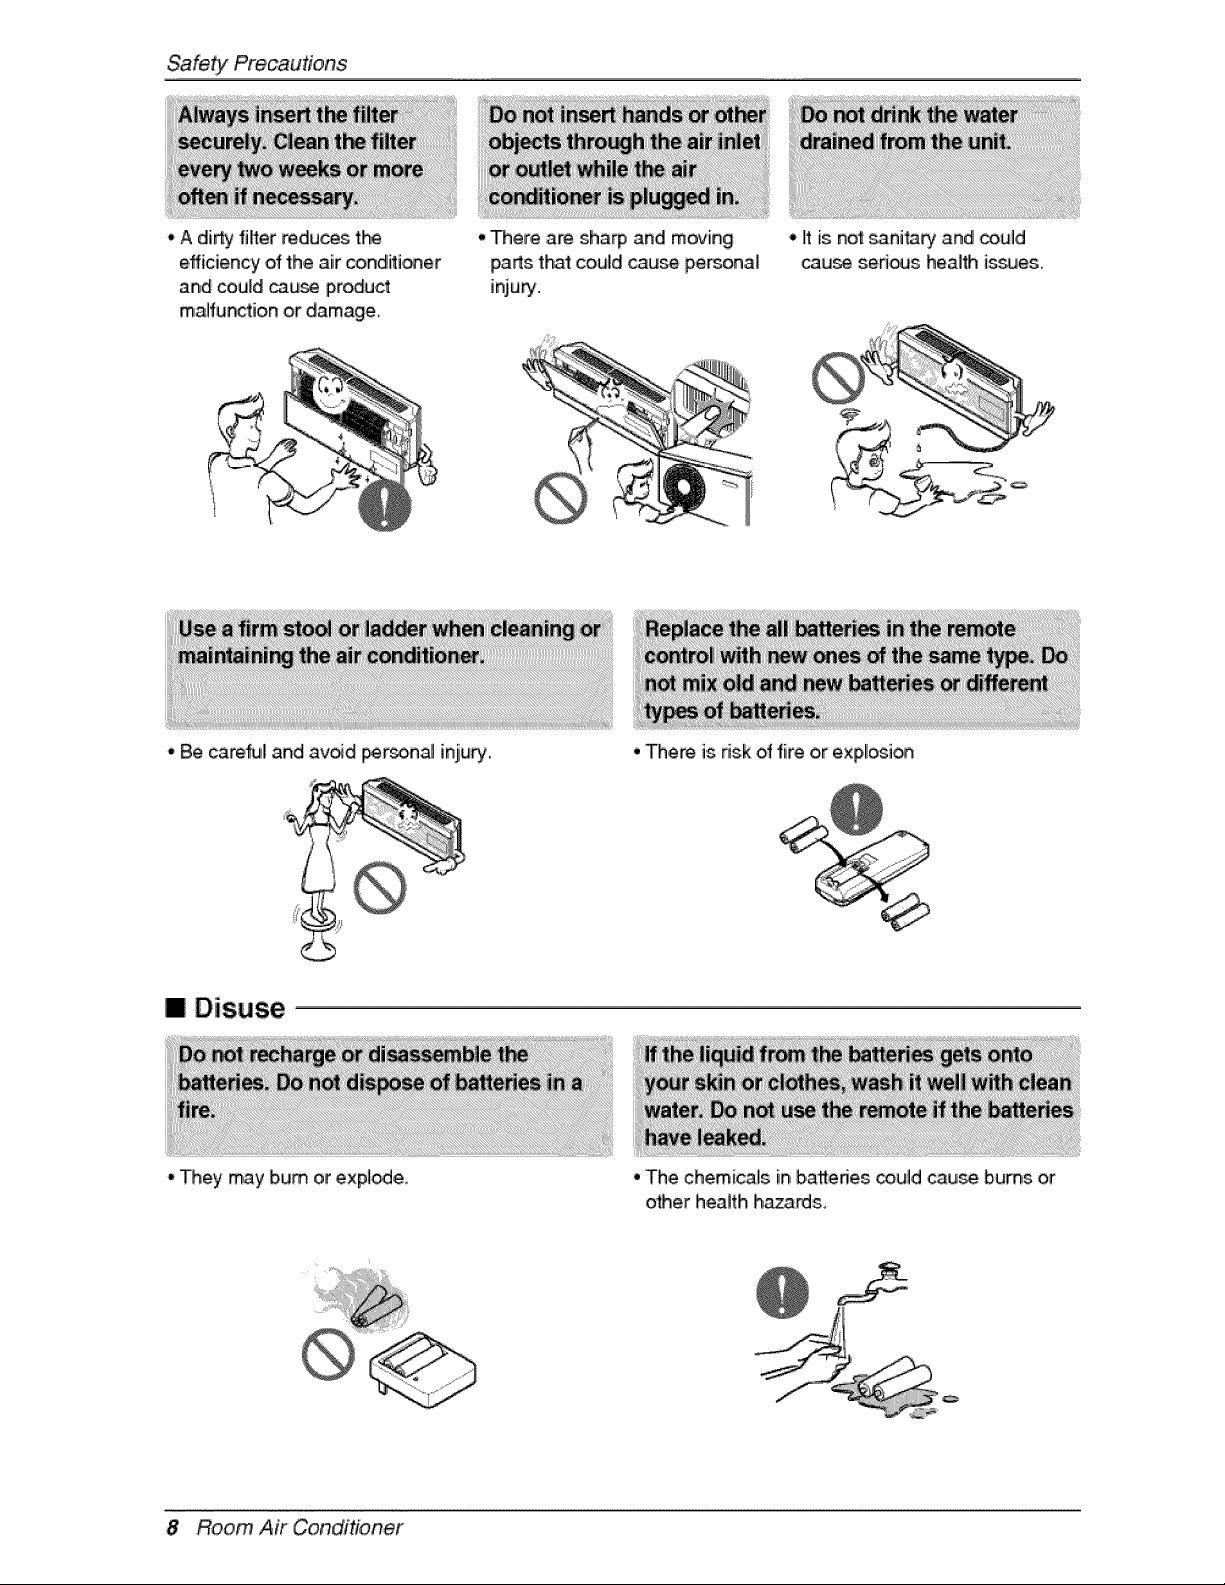
, A di_ filler reduces th_
efficien W of the air conditioner
and couldcau_ product
maHunctionor damage
• There are sha_ and moving
_arts t_t could cause personal
injury.
° Be careful and avoid i_rson_ inju_..
•Itis no'_sanita_ and _uld
cau_ sed_s health is_es.
IDisuse
"They may bum or expire.
• There is risk of fire or explosi_
• 'The chemicals in batteries could cause bums or
other health ha_rds,
8 Room Air Conditioner

Pno,rto Operation
1, Contact an installati_ speciaJist f_ installation,
2, Plug in[the power ptug pro£edy,
3,,.Use a dedicated circuit.
4. Do not use an extensi_ cold.
5. Do not s_rt/stop operation by pluggin_unplugging the power _rd°
6,,ff the co,rd/plug is,damaged, _p, lace it with only an authorized replacement pad,
1.8eir@ exp_ed to,direct airfl_ fo_ a long time may be hazard,s to your heath. Do not ex_e
occup_s, pets, or plants to dirred airflow for a I_g time.
2. Due to the possibili_ o_ oxygen deficiency, ventilate the room when using t}-_ appli_ce toge'_er with
stoves or ot_r heating ,devices.
3..Do not use this air cond_ioner fo_ non-specified special purpose (e.g. pre_i_ precision devices,
food, pe_, plants, _ a_ objects).. Such u_ may damage 'your properties.
ii'i_il
1. Do not touch the metal parts of 'the unit when removing the filter. Iniury can occur.
2..Do not use water to dean in,de the air condffioner. Exp_ure to water can destroy the insulation,
leading to e_ectdc sh_k.
3. When cleaning the unit, fi_t make sure that the power and breaker are turned off_The, fan rotates at a
very high speed dunng operation, There is a po_ibi[ity of injury, if the un_'s, p_er is triggered whi_e
cleaning inner parts of the un&
For repaiir and main_enan_, contact your authorized se_[ce dea_er,
Owner's Manual 9
Introduction
This symbol alerts you to the, risk of electric shock,
This symbol alerts you to hazards that may cause harm to the
air cond_ioner.
This symbol indic_es sp_ial notes.
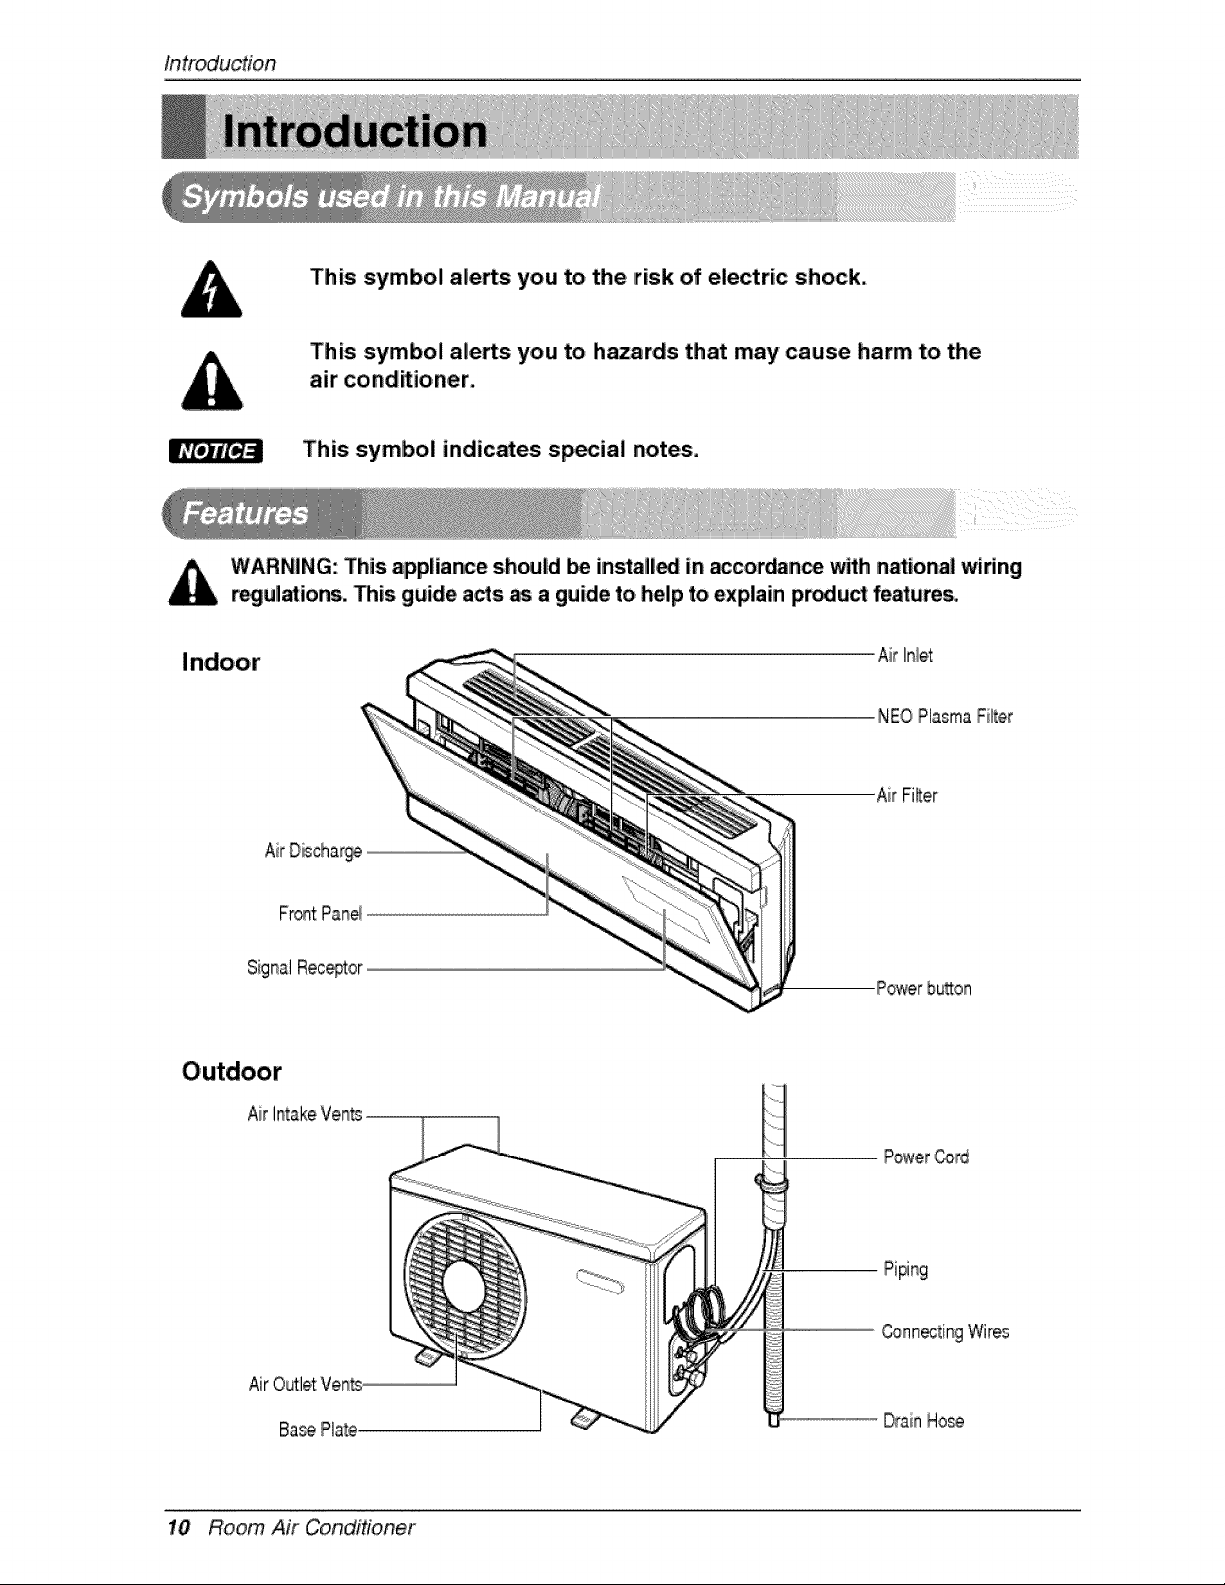
WARNING: This appliance sh_ld Ibe insta_l_ in _cordance with n_:ional wiling
r_ulations. This guide a_s as a guide to help to explain pmdu_ fe_ures.
Air Inlet
NEOPlasmaFi_er
AirFilter
SignalRec@tor
Powerhuron
Air
Power Cord
Piping
AirOutletVents
BasePlate
Connoting Wires
DrainHose
10 Room Air Conditioner
Electrica!Safety"
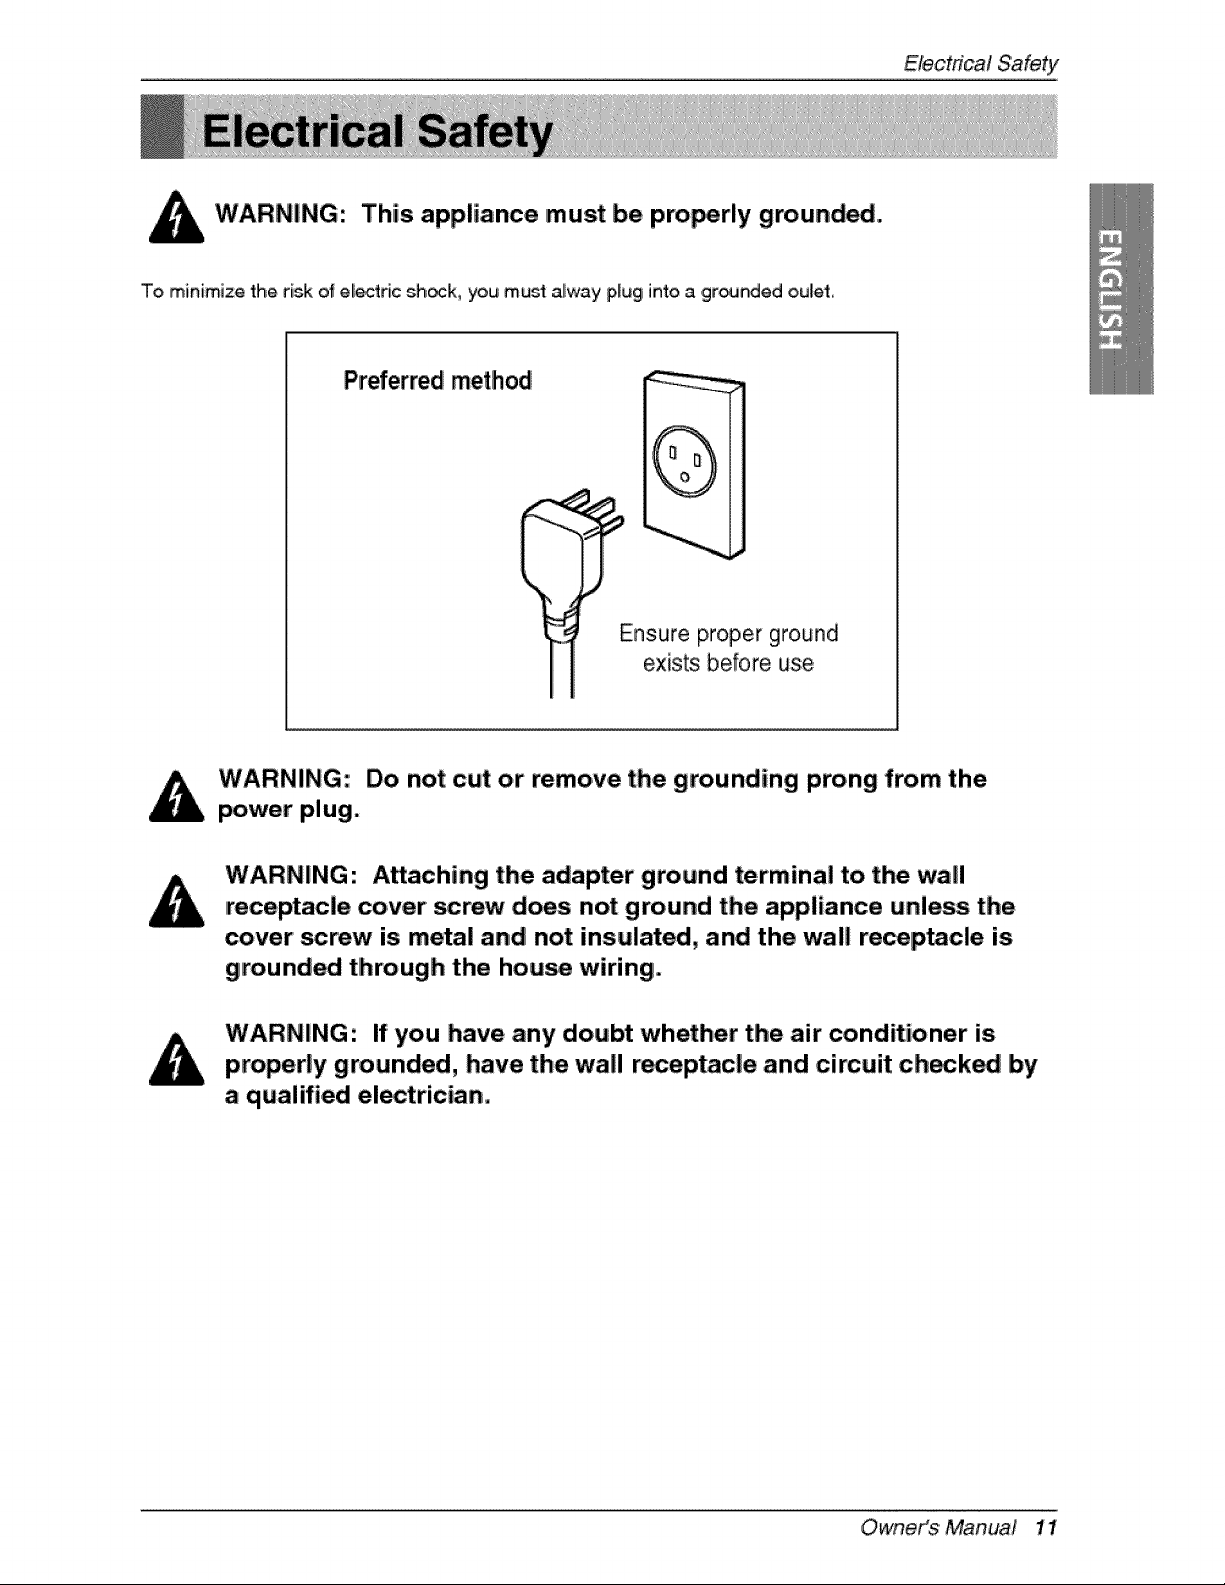
This appliance must be pro_rly grounded.
To minimize the risk of el_ric sh_k, you must alway plug into a ,grounded oulet,
Preferred method
(
Ensure proper ground
exists before use,
Do not cut or remove the grounding prong from the
power plug.
Attaching the adapter ground terminal to. the wall
receptacle cover screw does not ground the appliance unless the
cover' _rew is metal and not insulated, and the wall receptacle is
grounded through the hou_ wiring.
If you have any doubt whether the air' conditioner is
properly grounded, have the wall receptacle and cimuit check_ by
a qualified electrician.
OwneiKs Manua! 11
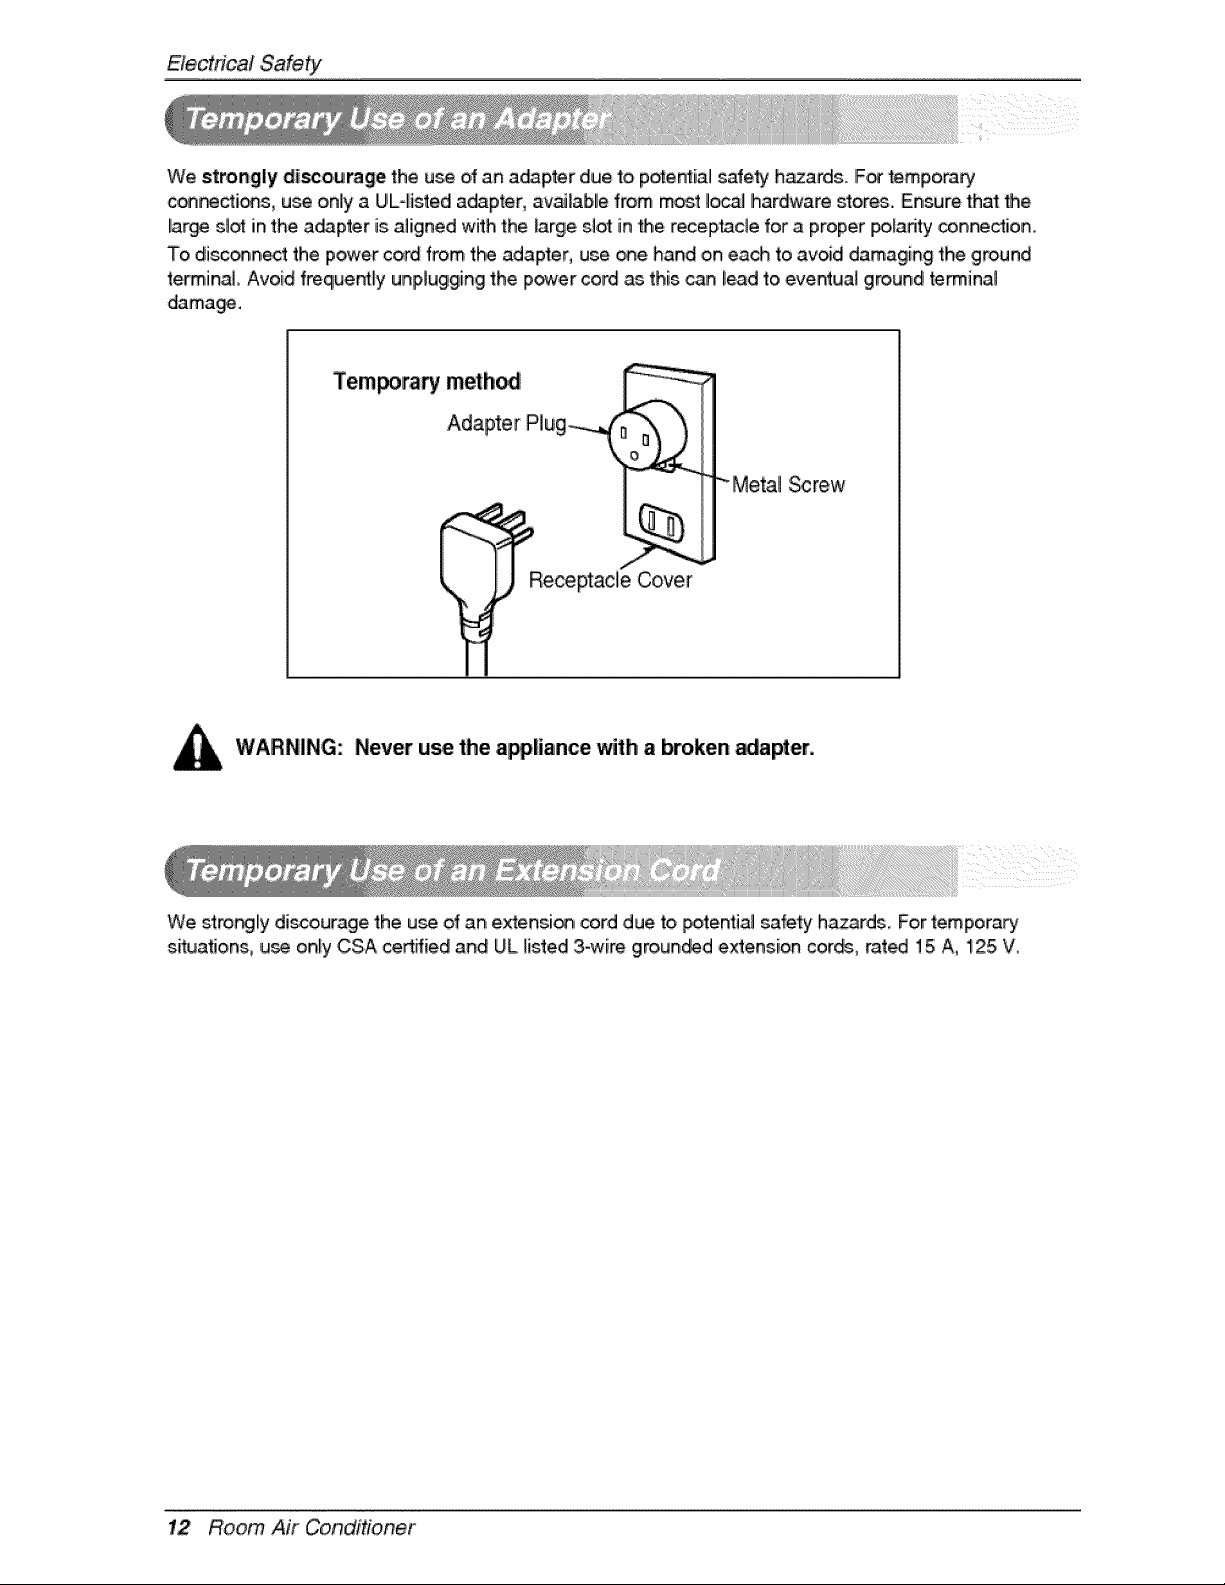
We strongly disco,urage the u_ ,ofan a_pter due to pote_ial safe_ hazards. IF_ temp,orary
_ctions, use only aUL4istedi a_pter, available from most Ioc_ Ihardware stores.. Ensure that _e
lar_ st_ in the a_pter is aligned with the large slot in the rece[ptacle for a proper po_adty connection,
To disc_nect the power cord from t_ adapter, use one hand on each to avoid damaging the ground
terminal Avoid freque_ly unplugging the power cord as this can lead to eventua_ ground retinal
damage.
"_M,e_l _rew
WARNING: Never use the appliance with abroken _apter.
We stro_ly discourage the u_ of an extensi_ cord due to _tentia! safety h.azards, For tempora_
situations, use only CSA certified and UL listed 3-wire grounded extension cor_, rat_ 15 A, 125 W
12 Room Air Conditioner
Operatic Instructions
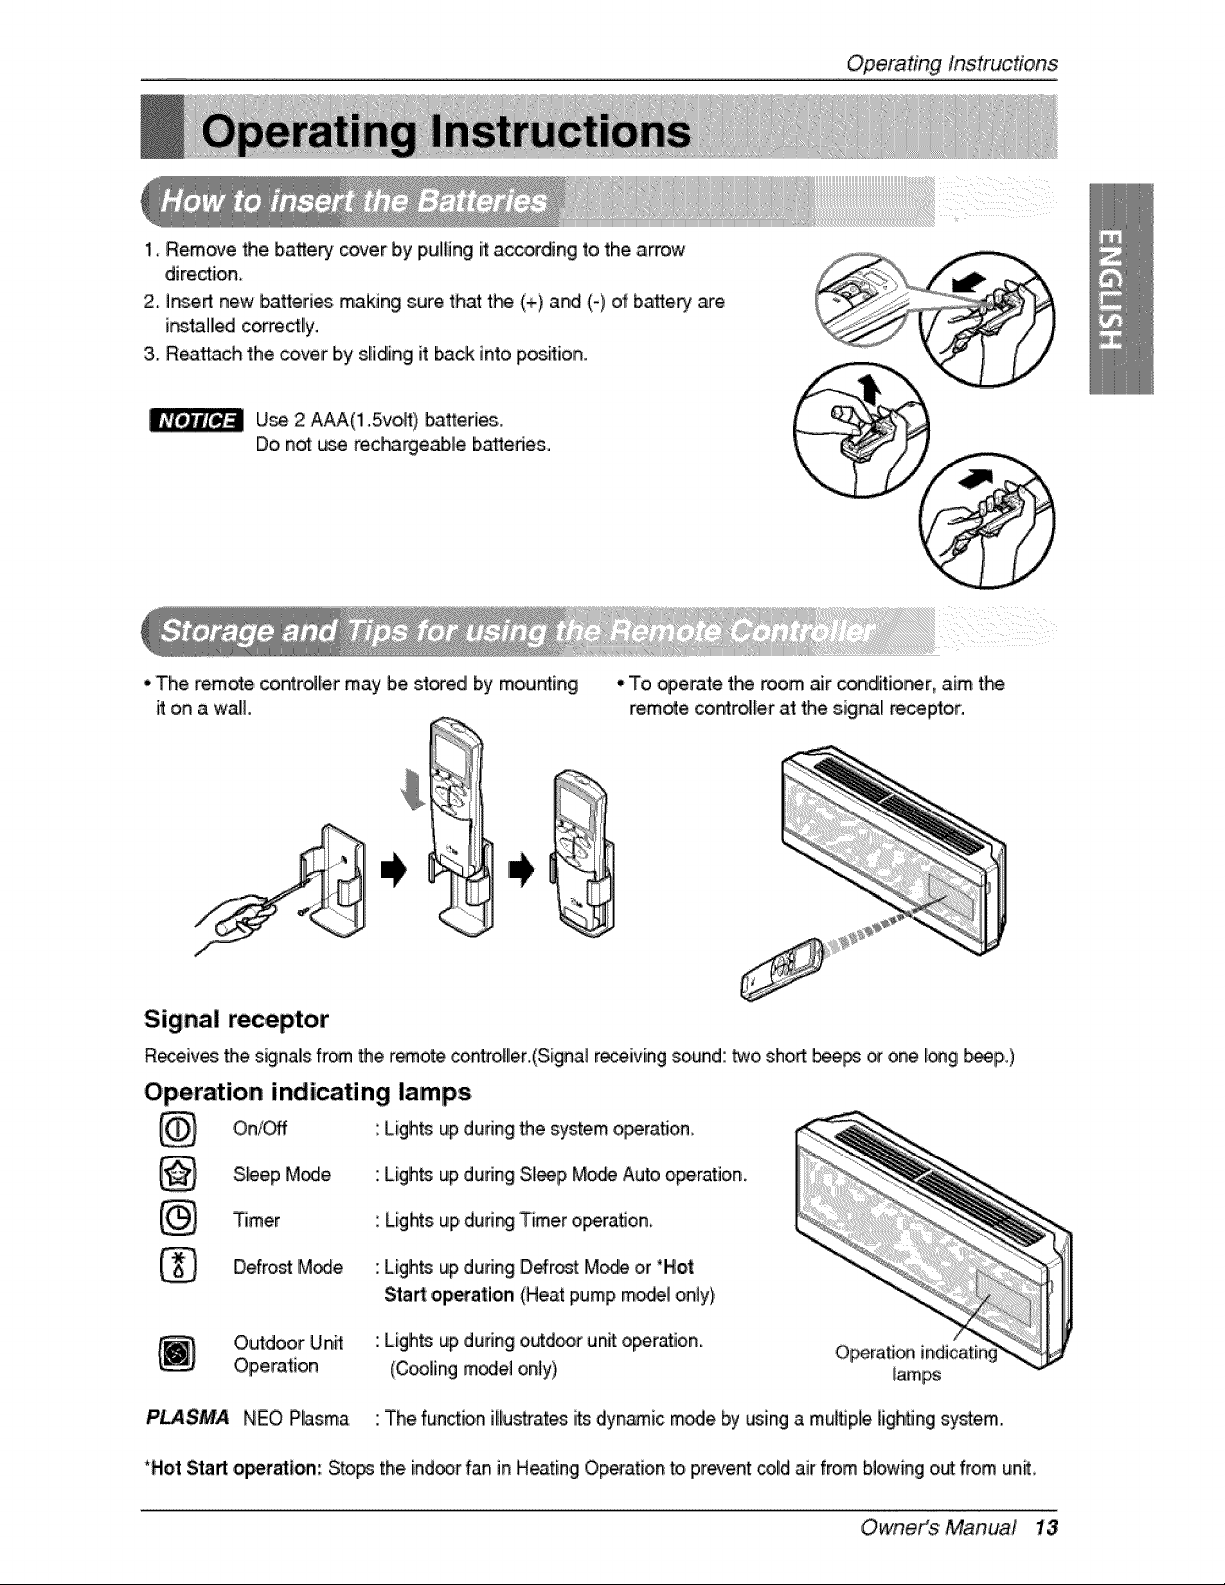
1, Remove the batte_ cover by Ipulling it acceding to the arrow
diredion
2, insert new batteries making sure that t_ (+) and (-} of batte_ are
ir_tal_ corre_lly.
3. Reattach the cover by s_idinglit back into pos_ion.
U_ 2 A_('l1.5vo,P,) batteries..
Do not _.._ereci_rgeab, le b_edes.
• The remote coin_tr_lermay b.e_o_edl by mousing
it on a waE
•.To _,e._te the room, air condiffior_er,aim t_
remote, co_ro_ler at the signal _ceptor.
Signal receptor
Receives the s_nals from the r_.ote cont_oller.(Signal r_eiving sound: _o. sho_ bee_ _ one I_gl _p,.)
Operation indicating lamps
Lights up during system o_ra_on
On/C#f the
S.#ep M_e. Ligh_ up dunng Sl_p Mo,_ Auto operation.
Timer
Defro_ M_e
Lights up dudng Timer operation
Ligh_ up dudng Defr_t M_e or 'Hot
Sta_: o,p_ation (Heat pump mode_on_y),
Orutdoor Unff
Operation
Ligh_ up during o._door unit operation.
(Cooling m_el only}
Operation indicatir
lamps
i
PL4SMA NEO Plasma The function illus't[ates i_ dyn_ic m_e by using a mu_ple lighSng sy_em.
*Hot Start o_r_lon: Sto_ the indoor fan in H_ting! Op_ation to,pr_ent col!dair from blowing out from un_,
Owneit_$ 'Manual 13
Op'eratJngInstructions
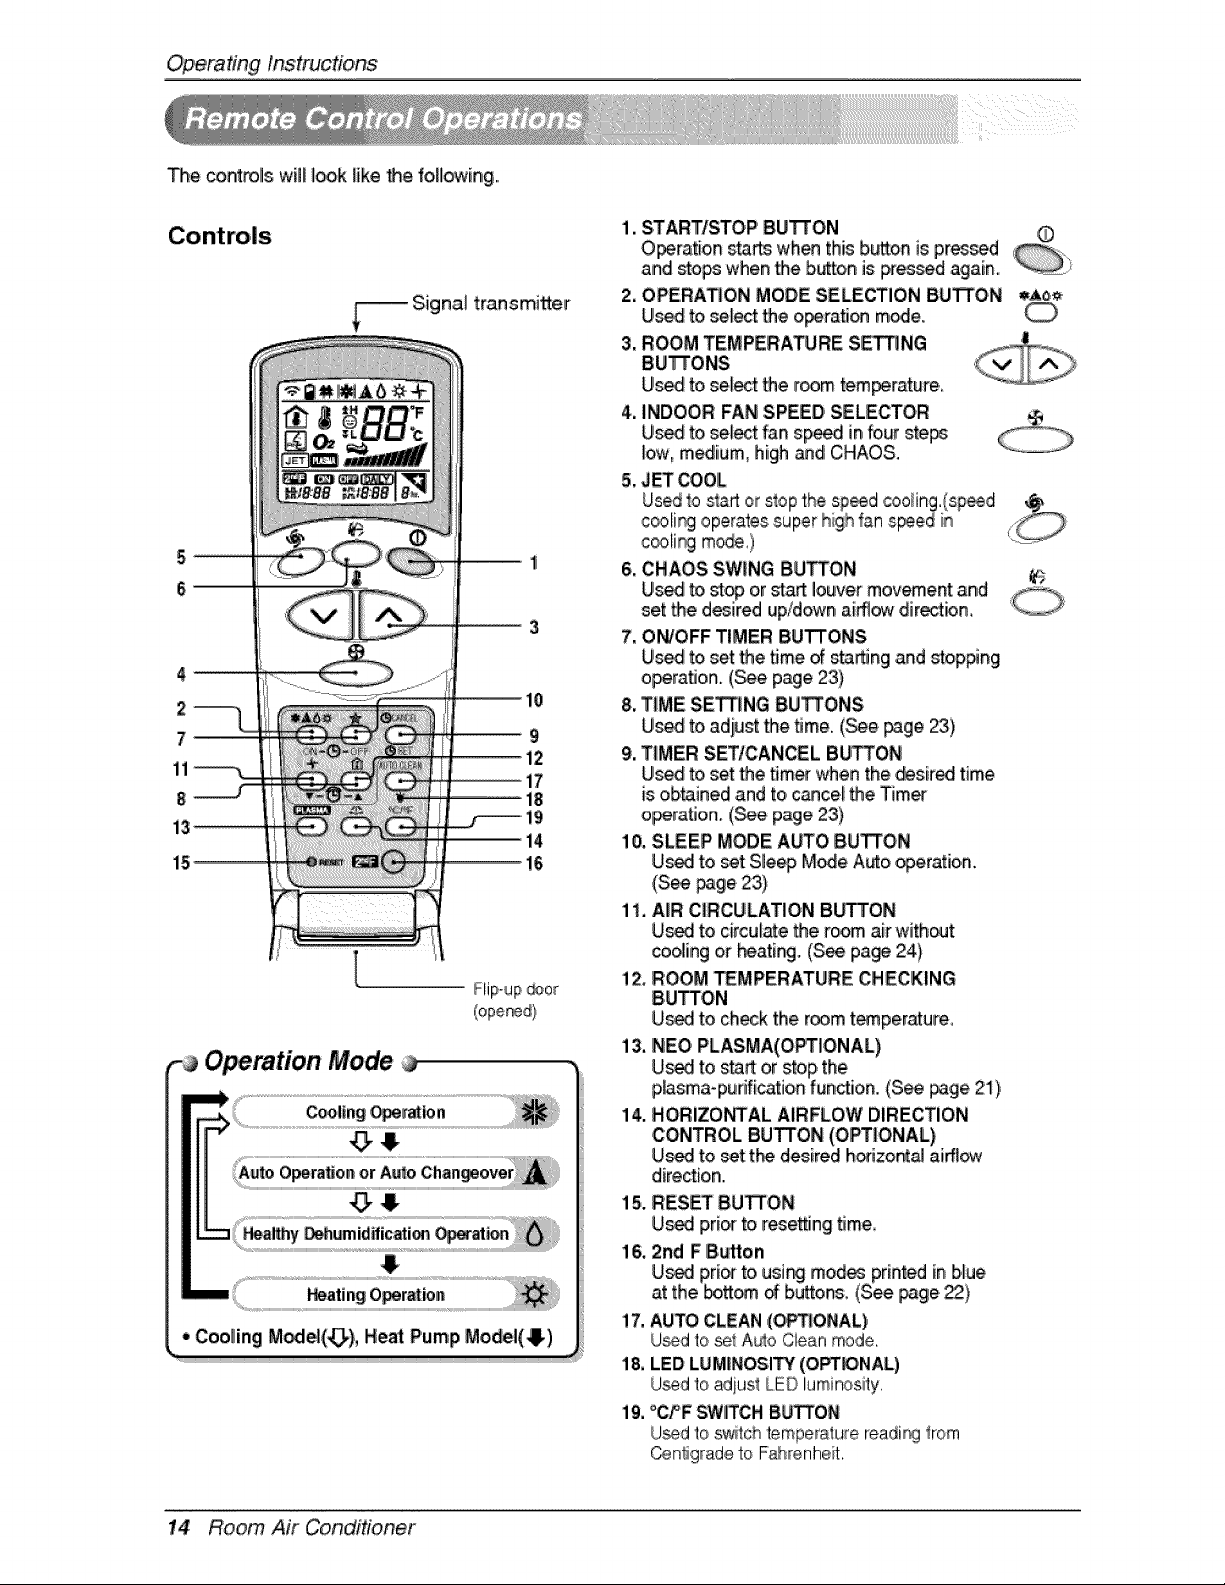
The controls will I_k Jike the, fo,[lowing.
Signal transmi_er
2
7_
11
8
Operation Mode
!
1. STARTISTOP' BU'I-rON
Operation sta_ wh_ this b_on is p,r_d
and _op,s when the b_on is _essed again.
2. OPERATION MODE SELECTION BUTTON q,A6_
Us_ to,select the o_ration m_e.
3, ROOM TEMPERATURE SETTING
BU_ONS
Us_ to select the r_m tem_rature,,
4. INDOOR FAN SPEED SELECTOR
Us_ to|select fan sp_ in four ste_
low, m,_ium, high _d CHAOS.
5. J_ COOL
Usedto start or stopthe sp_d _o_ing,(sp_d
c_31i_ ,operates,super highfan speied in _:
c_!i_l mode,)
6. CHAOS SWUNGBUTTON 6
7, ON/OFF TIMER BUTTONS
Used to set the time _ starting and sto,p#ng
operation. (_e page 23)
8. TIME SE_NG BU_O'NS
Uis_ to,adiu_ the time,, (_e _ge 23)
9, TIMER SETtCANCEL BU_ON
Us_ to set the timer when the desired time
is obtained and to,cancel the Timer
o_ration. (See page 23)
10, SLEEP MODE AUTO BUTTON
U_I to set Sle_ M_e Auto operation.
(See page 23)
1i. AIIR CIRCULATION Bb_ON
U_ to circul_e the room air without
cooling or _ating. (See page 24)
!2. ROOM _MPERATURE CHECKING
BUTTON
U_ to checktheroomtemperature_
13.NEO PLASMA(OPTIIONAL)
U_ to start or stop the
p_sma-punfication function. (S_ page 21),
14. HORIZO_AL AIRFLOW DIRECTION
CONTROL BUTTON (OPTIONAL)
U_ to set tP_ desired hodzo_al aiff_
direction.
15. RESET BUTTON
U_[ pri_ fo resetting time,
16, 2nd F B_tton
U_ pri_ to usi_ mod_ printed in blue
at the _ttom of buttons, (See page,_}
!7, AUTO''CLEAN,(O_!ONAL)
U_d to se_A_o Clean mode,
18, LED LUM|NOSiI_f (O_NAL)
U_d to adjust LED luminosity,
19, °CPF SWIITCHBUTTON
U_d to sw_tchtemperaturereadirg from
_n_gr_de to F_i'enhe?t.
14 Room Air Conditioner
OperatingInstrucfons
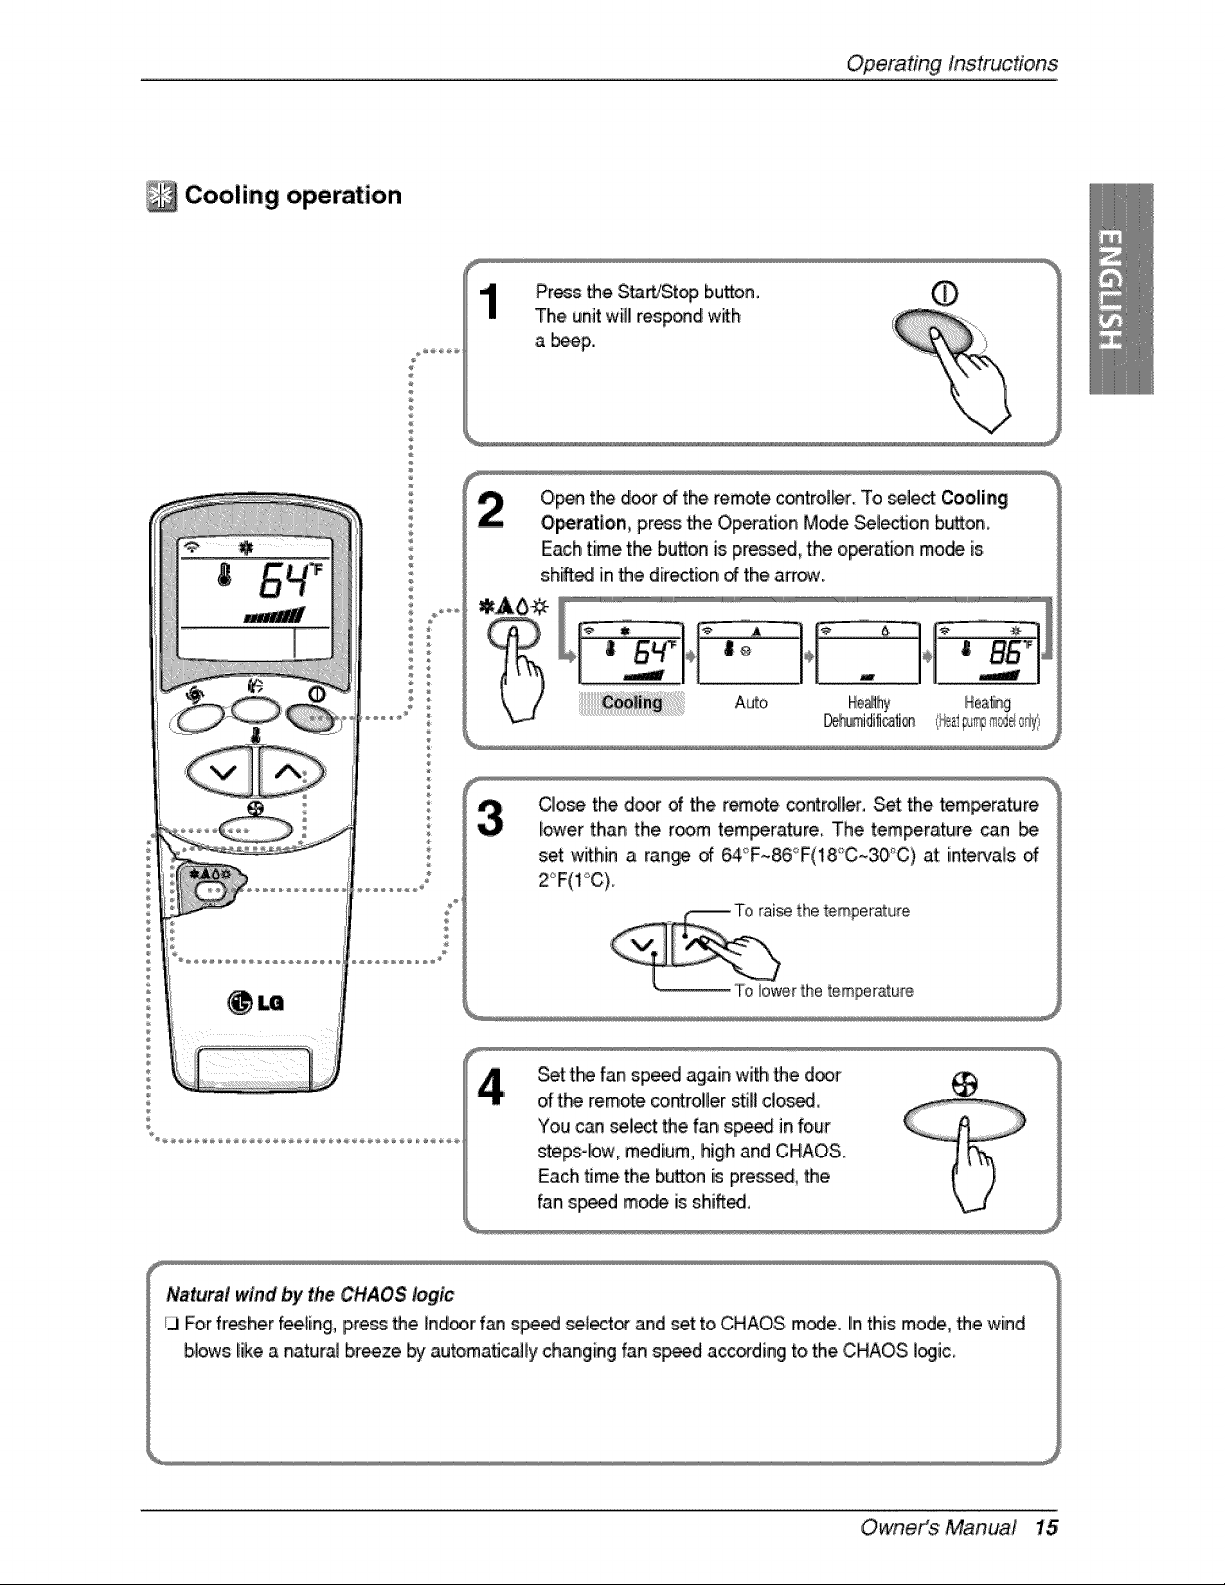
Cooling operation
Pros _e Sta_!Stopi button. ._
The unitwill respond with
a _p.,
Op_ the d_r _ the remote,control_r. To _lect Cooling
Op,etatlon, pros _e Ope{-ationMode _lectJon b_on,
Each time the button is pr_ed, the operation mode is
shift_ in _e dire_ion _ the afr_o
C]o_ the d_r of the r_ote _roHer. Set the tem_rature
i_er than the room tem_rature The temperature _n [be
set within a ran_ of 6,4_F~86°F(18_C~30°C)at imintervalsof
Z_F(I"_C).
e the temperature
,- i! To :_er _hetemper.,,e
Set t_ fan sp_d again with _e d_r
of t_ remote contro!ler still dosed,
You can seliectthe far_sp_ in four
steps-bw, medium, high and ,CHAOS.
Each t_methe button is press_, _e
fan s_d m_ is shiff_,
Owneit_$'Manua! 15
Op,eradngInstructions
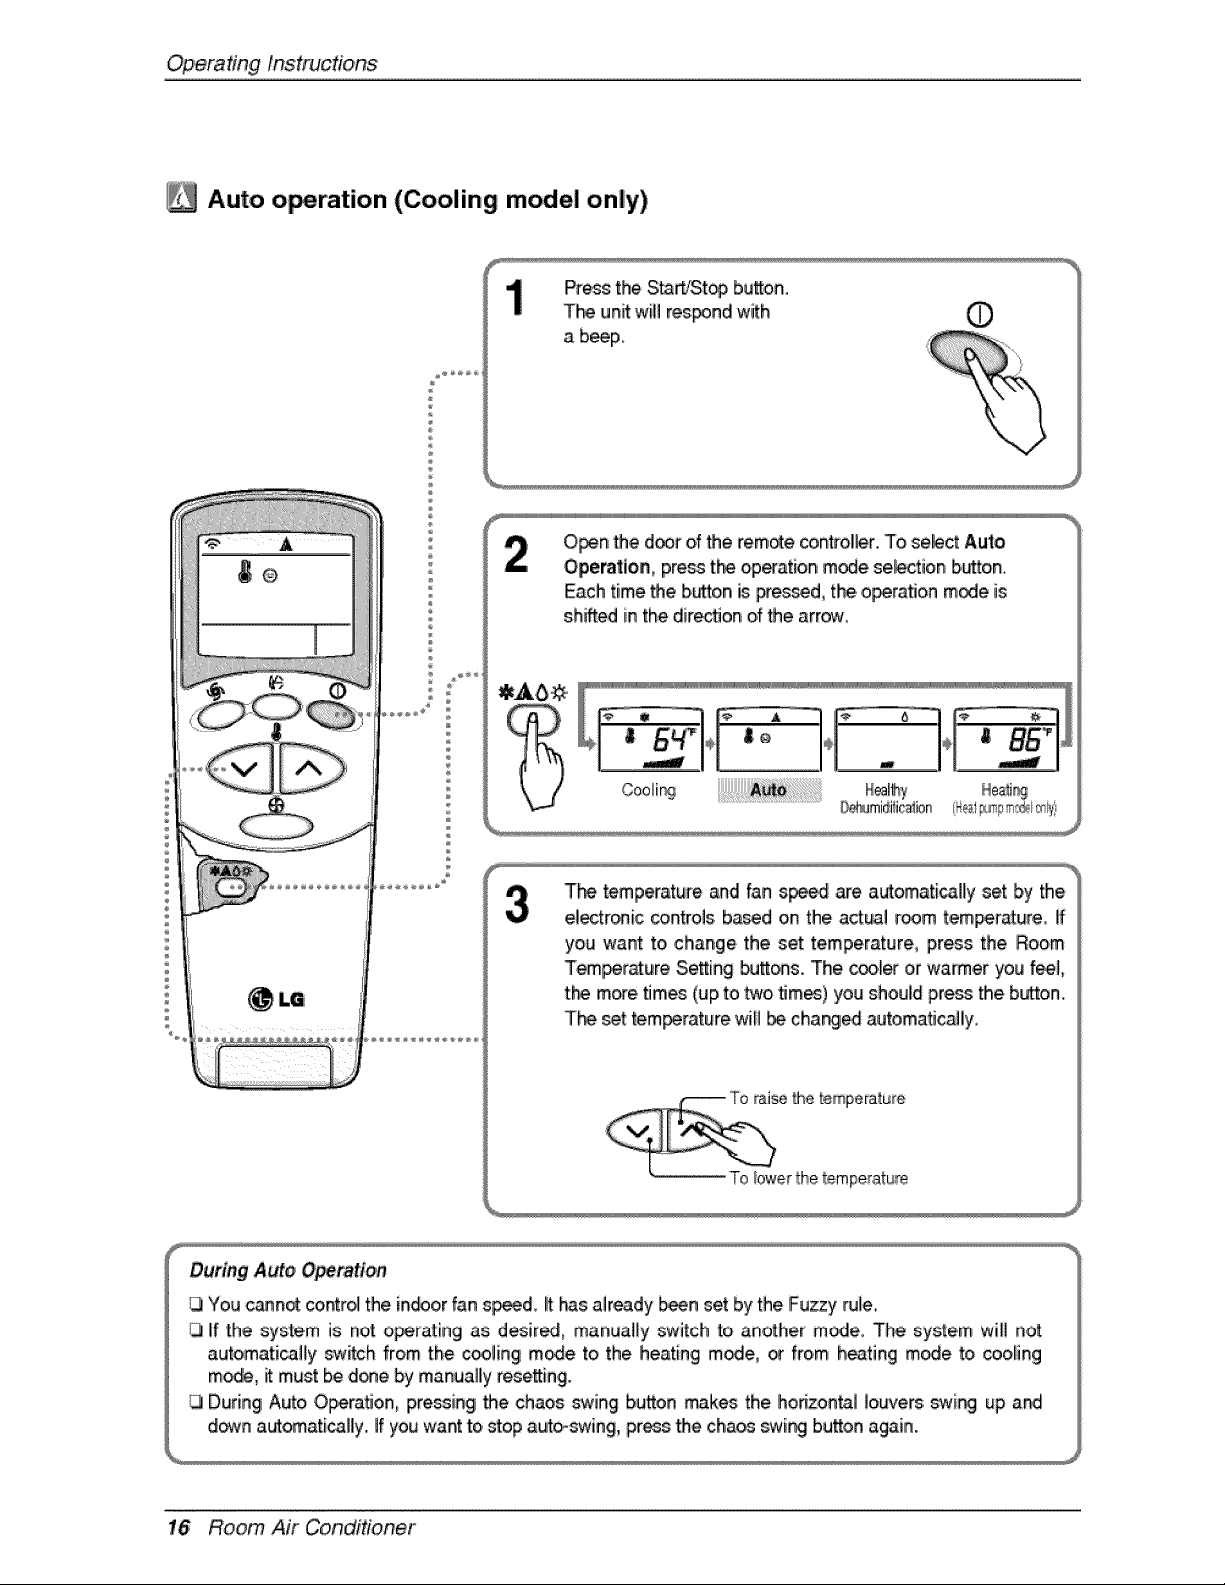
/_ Auto o_ration (Cooling model only)
p
P_s: the St_rt_top button.
T_ unit wilil res_nd with
a beeF
O_n '_e d_r of _e remote controller. To select Aut_o
Opem_ion, pre_ t_ operation mode se_ction button,
Each time the b_on is pressed, the.o_ration mode is
shifted in the dir_on of _e arrow,
T_ temperature and fan s_ are automatically set by the
electr®ic controls b_d on the act_i room _emp,er_ure_[f
you want to change the set temperature, press the Room
Tem_r_ure SeSing butt_s. The cool_ or warmer you 'feel,
t:_ more.times (up to two _mes) you should pre_ the button,
T_ _t tem_rature will be char@_ automat_c_ly,
16 Room Air Conditioner
OperatingInstrucdons
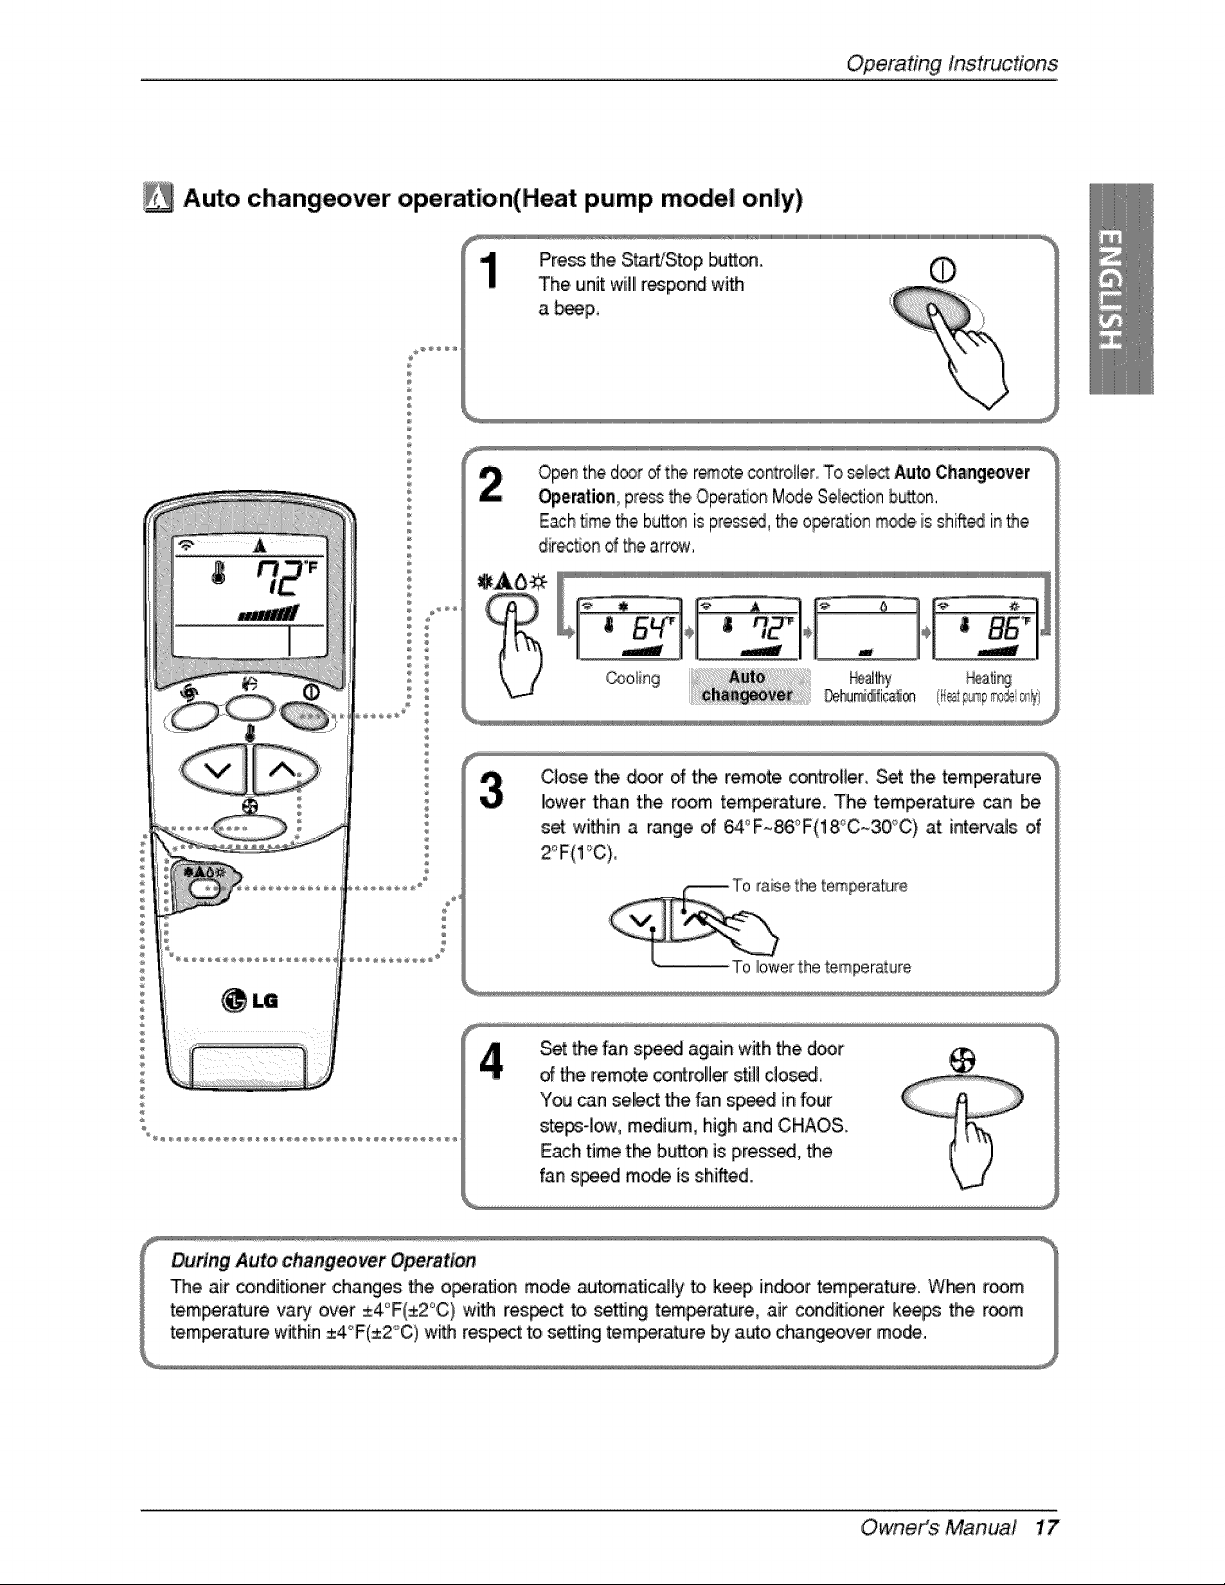
Auto changeover operation(Heat pump model only)
1
÷
Openthe d®r dthe r_ote controller,,'To_l_ Auto,Changeover
Operationpressthe.Opera,on ModeSe_'tion bu_on,
Eachtime_e bu_® is pre_, _e ,operationm_e. is shi_ inthe
dir_t_ond_e afro.
C_o_ tl"_ d_r of the remote con#oUer, Set the tem_rature
lower than the room tem_rature. The temperature can be
s_ wii_in a range of _°F~_°F(18°C~30_'C) at [nte#_also,f
Set _e fan sp_ ag_n wffh 'the door
dthe remote co_rolbr sti]! ,c!o_,
You can select the fan speed in four
ste_-Iow, medium, high and CHAOS.
Each time t_ b,_o_ is p,re_ed, _e
fan speed m_ is shifted.
Owneit_$ 'Manua! 17

Op,eradnginstructions
Healthy ,d,ehumidification operation
Press the S_'Stop _tt_
The unit will[r_po_ with
a _p.
Selection b._on0
Each time the button is pr_d, the opera, on m_e Js
shift_ in the .direc'don_ the arrow.
_t the fan s_ again with the d_r
of the remote controller still close..
Natural wind by _he CHAOS logic
CI For fresher f_ing, press t_ I_r Fan S_d _[ector and set
to CHAOS mode, _nthis mode, the wind biows like a naturat
breeze by automaticaliy changing fan speed according to the
CHAOS _ic,,
During Healthy _humidification O_ra, tion
1.3If you s_ect the dehumidification trade on the op,eralbn seb_ion _on, the #JC st_s to,run the
dehumidff_ation fu_bn, it autom_icaBy sets the ro_ temp and aiff_ volume to the best _ndiflon
for dehumidific_bn, based on the served current room temp.
Iinthis _, however, tl"_ _etting temp, is not display_ _ the remote controller and you a_e not able to
control tl-_ room temp either.
During the healthy _humidif_ation function, the airflow volume is automatically set according to the
optJm,iz;atbnalgorithm res_nding to the cu_ent room temp.,status, _ that:the room c_ditbn _ kept
h,eaRhy_d comfortable even in the very humid season.
18 Room Air Conditioner
OperatingInstrucfons
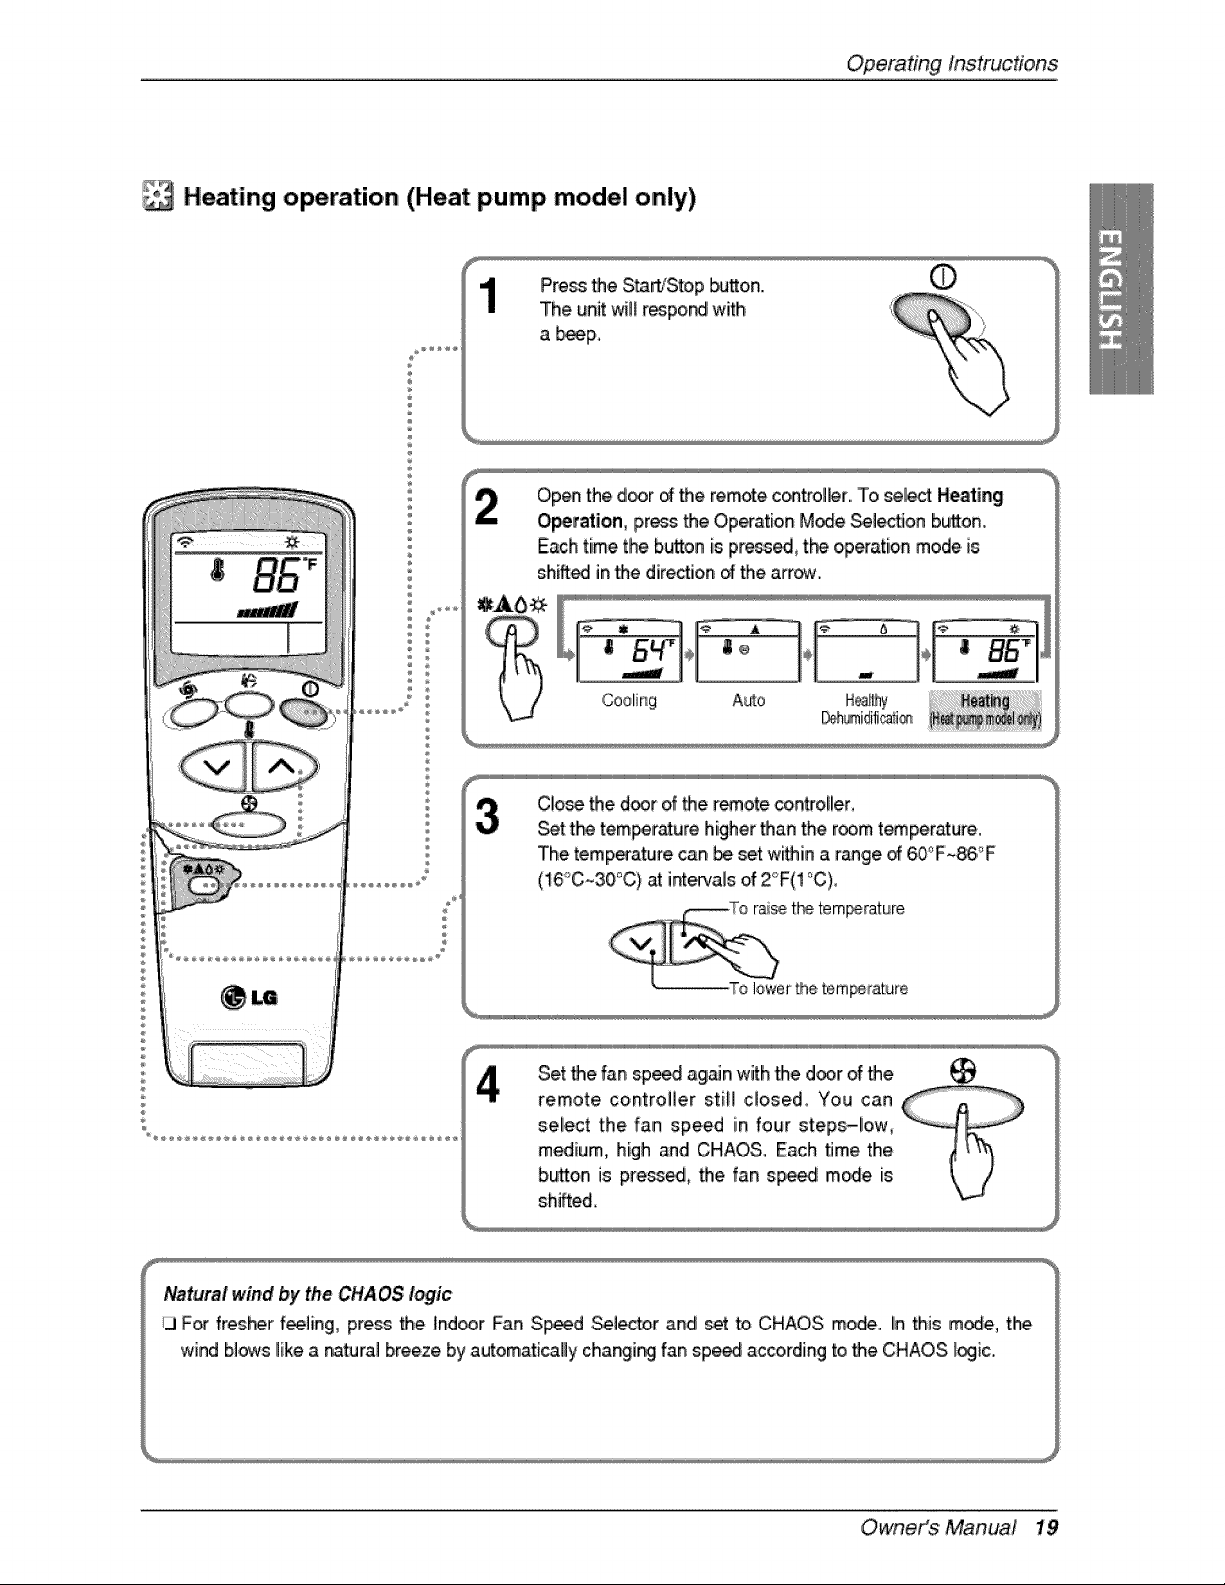
Heating operation (Heat pump model only)
Pre_ the Sta_'Sto,p _a_o,n.
The unit wit_r_po_ with
a b_p,
Open the door o_the remote c_trol_r.. To _lect, Heati_
O_ration, press the Op_ation M_e _lec_on button.
Each time the button is press_ tP_ op_ation mode is
sh_edl inthe direction _ the arrow.
C!o_ the d_r of _e r_,ote controller,
Set t_ tem_rr_ure higher than the room t_perature.
The temperature can be set wi_in a range _ 60_'F_86,_F
(16°C~30°C) at inte_,als of Z_F(! °C),
Set the fan sp_d a#_n with the door of the _
remote controller still closed, You can
sel!ect the fan speed in four steps-!ow,
medium, high and CHAOS. Each time the
button is pre_ed, the fan spe_ m_e is
sh_fted,
N_tura,I wind by the CHAOS I_ic
i_ F_ fres_r f_]ing, press the Ind_r Fan S_d Sei_er .and set to CHAOS mode, Iinthi_ m_e, the
wind b]_s like a natural breeze by automatically cha_i_ fan sp_ according to the CHAOS.I_ic.
Owneit_$'Manua! 19
Op,eradngInstructions
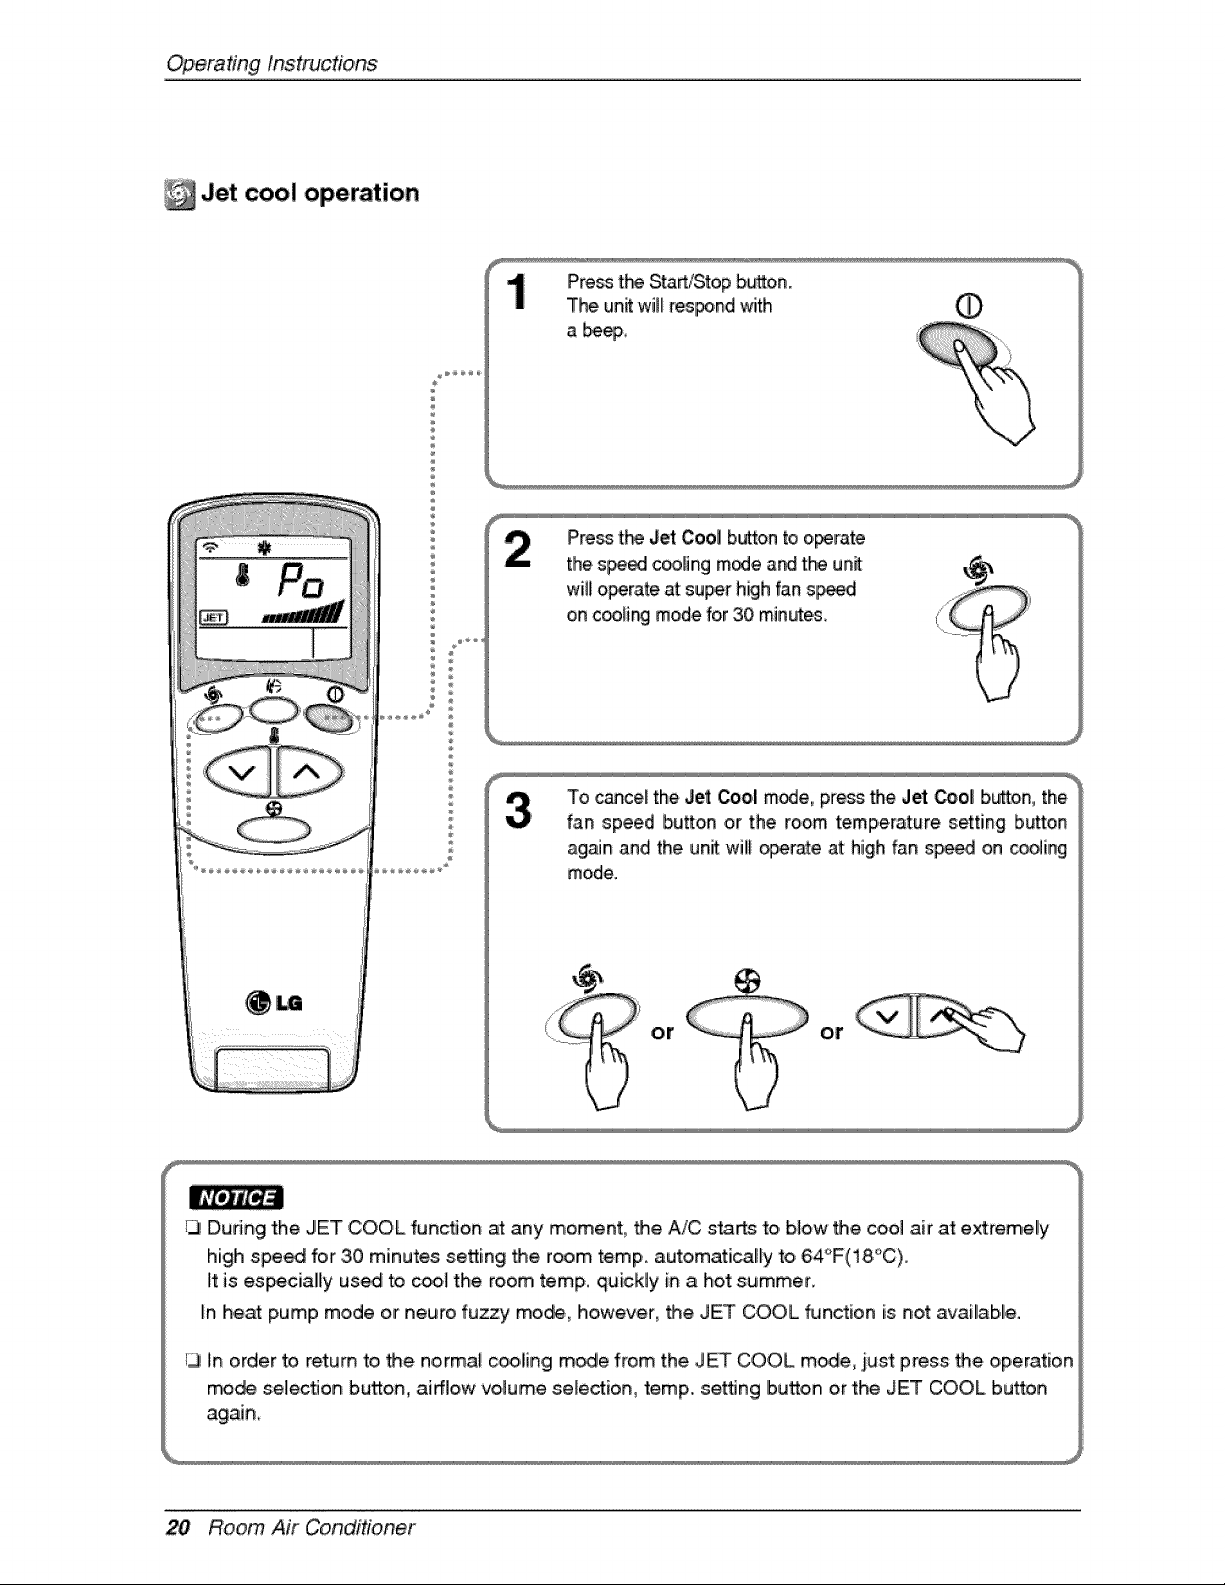
Jet coo! operation
Press t_ StaWStop b_on.
The un_ wi_ respond _ith
Pim_ t_ Jet Cool button to oi_rate
the speed cooling mode a_ t_ unit
wi!l o_rate, at super high fan s_d
on c_[ing mode for 30 minutes.
13Du_ng the JET COOL functJon at any moment, _e A/C starts 'to,blow the cool air at extremely
high spe_ for .30 minutes setting the room temp. auto,mati_Hy to, 64°F(18°C).
it is es_ciallly us_ to c_l the room temp., quickly in a hot s_mmer.
In heat pump mode or negro fuzzy mode, ho,wever, the JET COOL _nction is not availab,le.
13in order to return to the normal co,o,lingl m,_e from the JET COOL m_e .i_st press the operation
mode selection button, airflow volume se[e_ion, temp. setfJng Ib_tto,n or the JET COOL button
20 Room Air Conditioner
OperatingInstrucfons
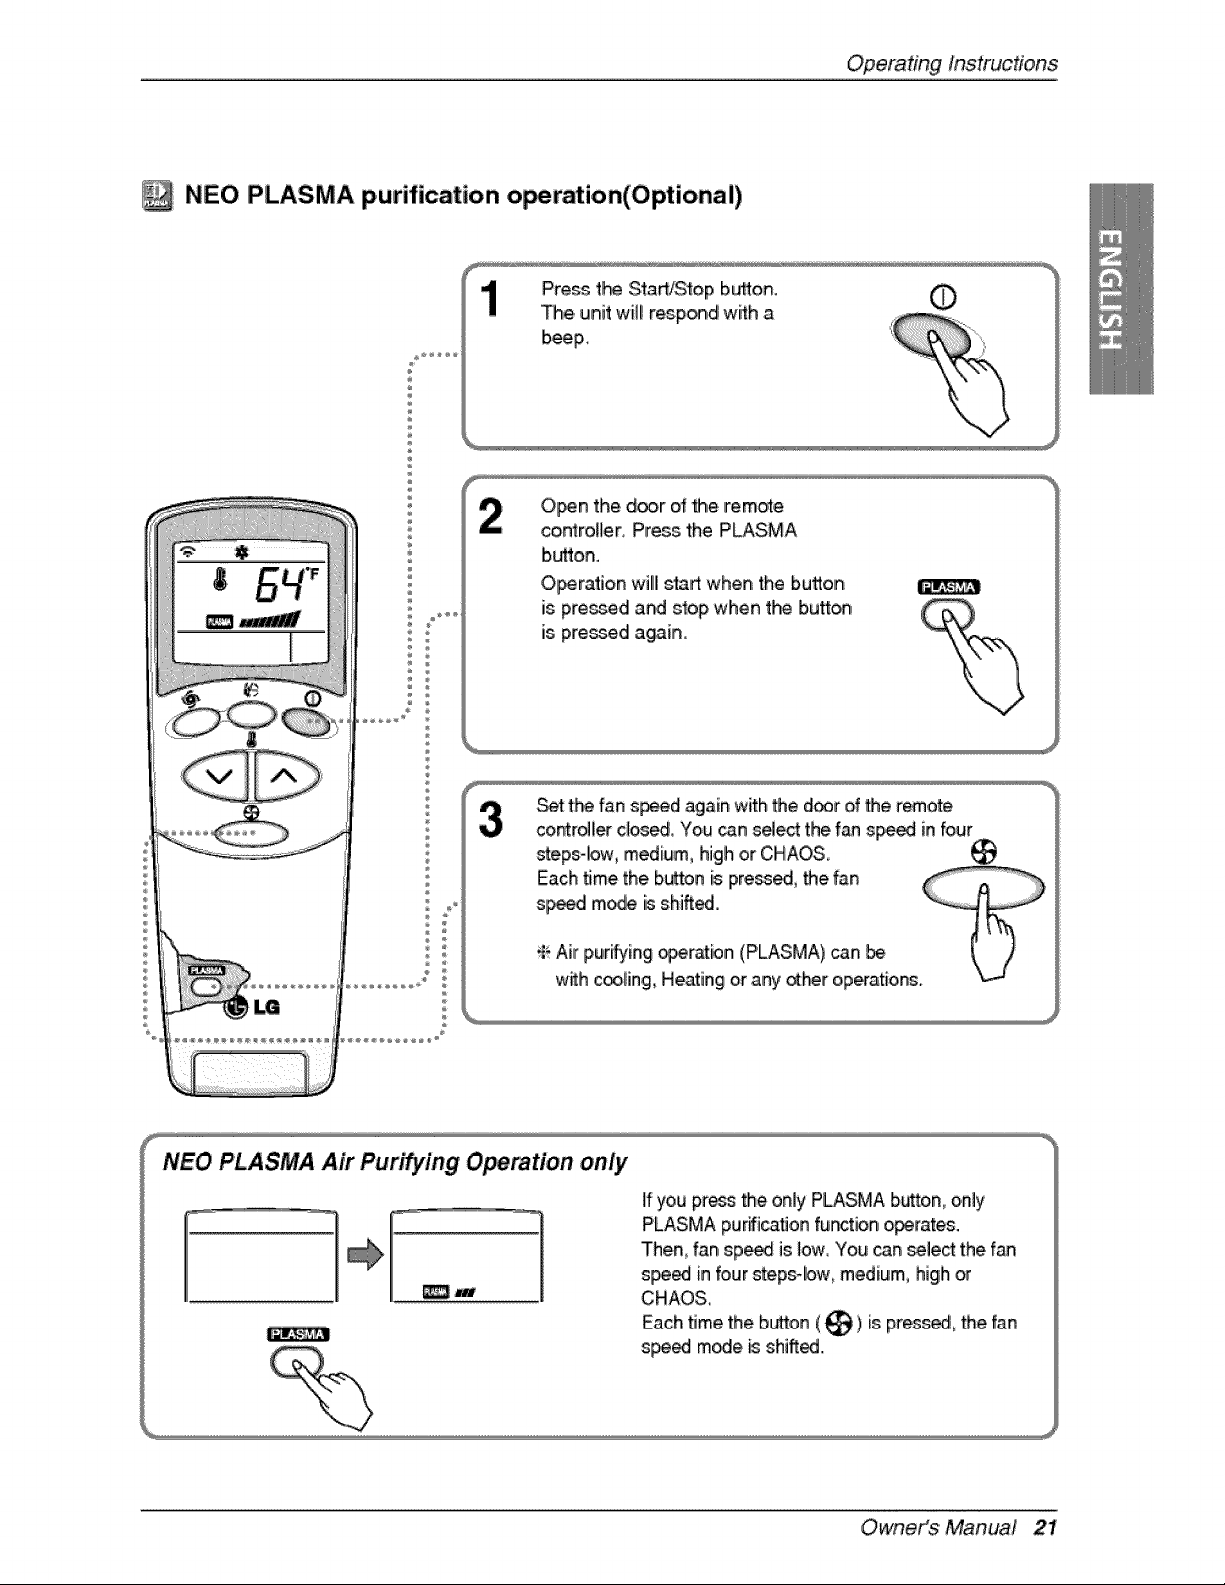
NEO PLASMA purification o_ration(Optionai)
®
Press t_ Start/Stop buflon. 0
The unit will respon,_ with a
beep_
O_n the d_r of _e remote
controller, Press the PLASMA
button.
O_ration willl s_rt when the button
is pre:_ed and stop when t_ button
is pressed again.
Set the fan s_d again with _e d_r of _e remote
co_ro41erc_os_, You can select the fan s_ed in four
steps4ow, medium, high or CH.AOS,
Each time the.button _ pre_, the fan
s_d mode is shined.
_ Air purifying _er_bn (PLASMA) can
w_h c_oling, Heating or any _h_r oip_atio_o
NEO PLASMA Air Puri_ing O_mtion on/y
_J
if you press the only PLASMA b_ton, only
PLASMA pur_icat_onfun_ion o_rates.
Then, fan sp_ is low, You can _lect the fan
s_ in four steps-low, medium, high or
CHAO&
Each time the bud,on(_) is: pr_s_l, the fan
s_ m_e _ shi_..
Owneit_$ 'Manua! 21
Op,eradngInstructions
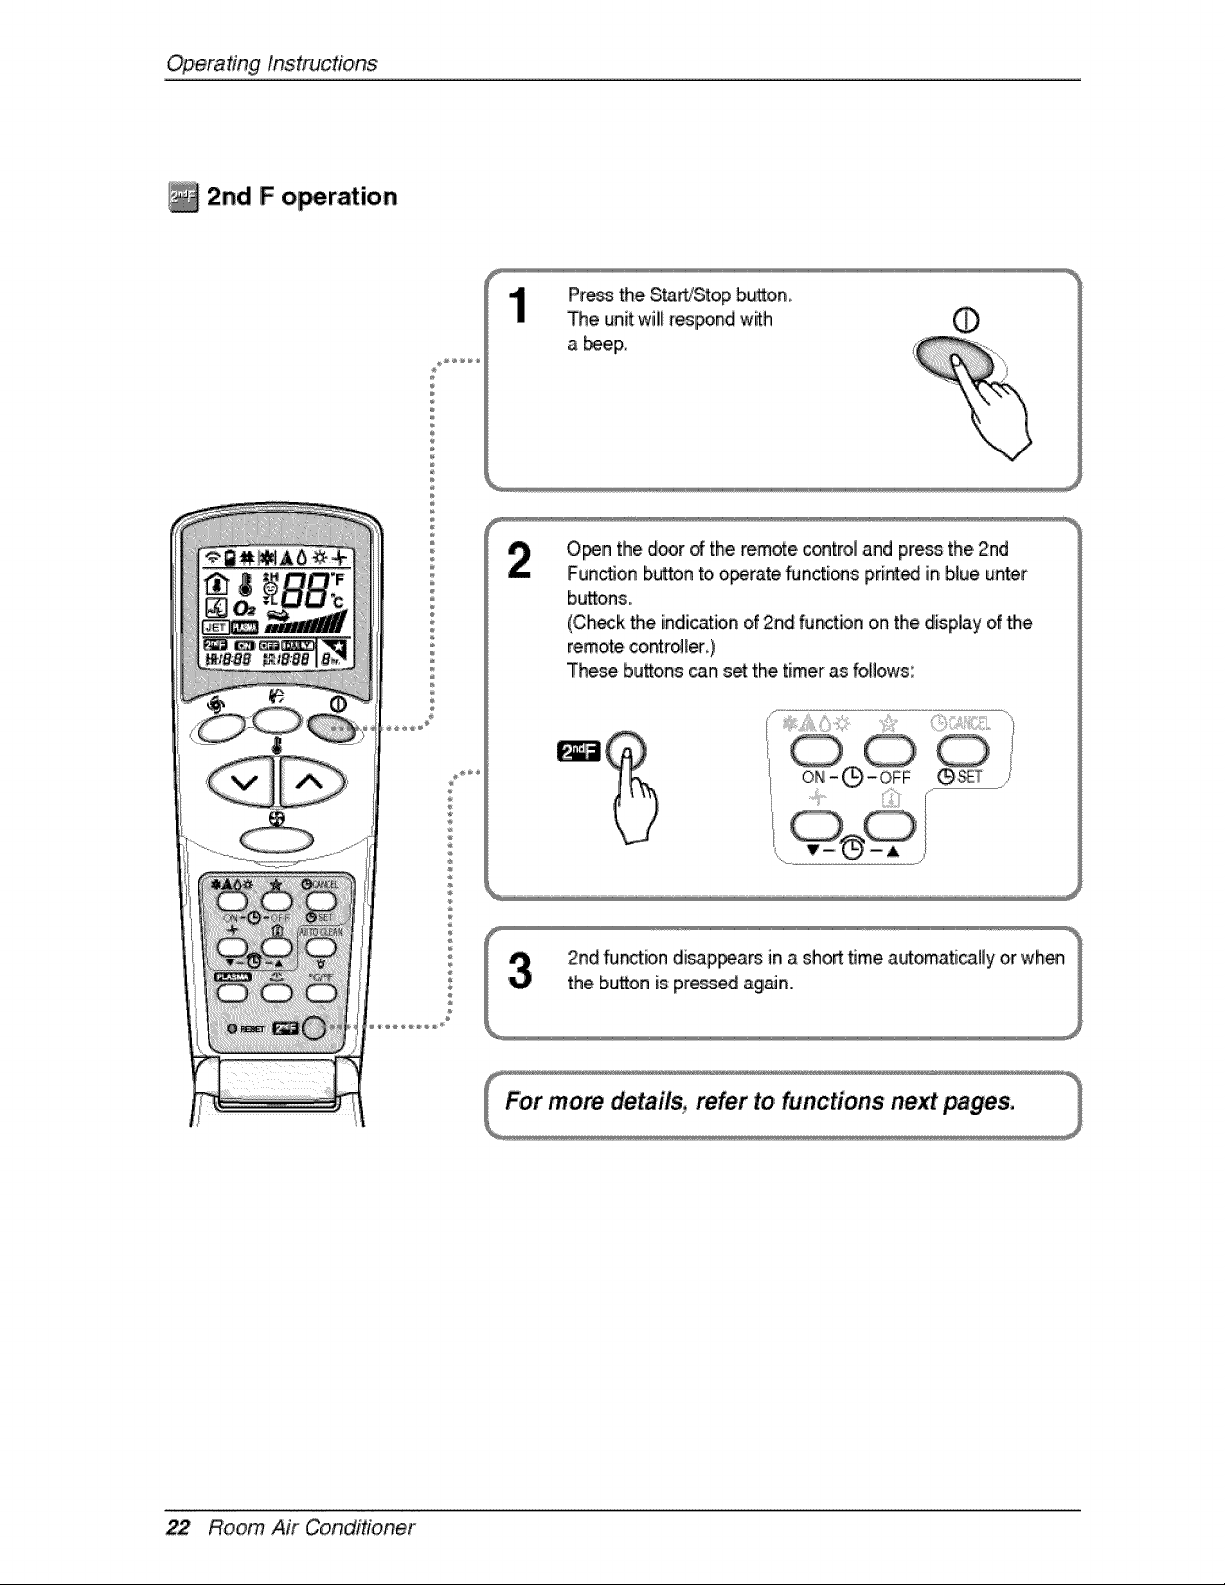
2nd F o_ration
P %
Pr_ the S_rL_Stopb_o,n,
The un_wi!l r_lpond with
a _eF
O_ln the d_r _ the rem_e, ,c®tro_and press the,2nd
Function b_on to o_rate _nctions print_ in b,_ueunter
buttons,
(Ch_k the indication of 2nd function ornthe display of the
remote,co,ntro_[_)
Thee buttons can s_ the timer as follows:
....._ii...... !Z_ili¸
22 Room Air Conditioner
Operating Instructions
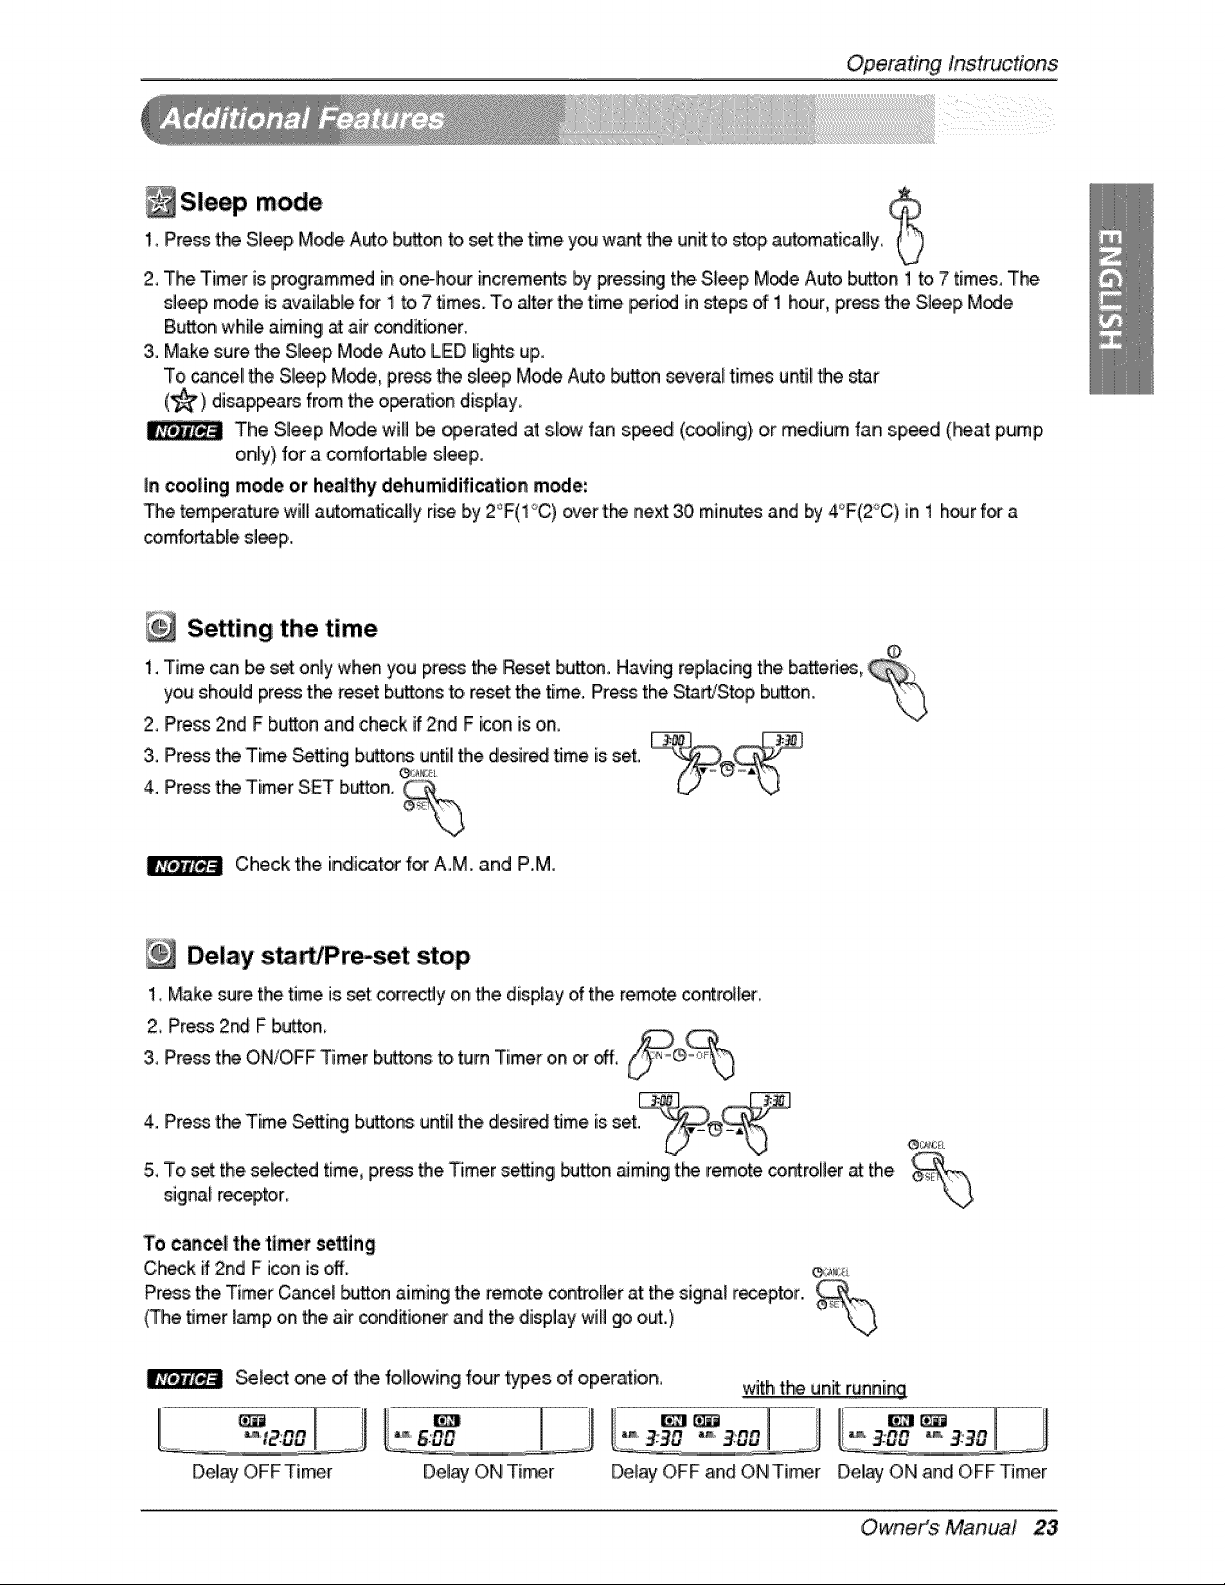
Sleep mode1_Press t_ Sle_, Mode Auto b_on to _t t_ time,you want the unit to stop automati_fly_
2, The Timer is programmed in onehour incremen_ by Fessing the,SJeep Mode Auto b_on 1 to 7 times,,The
sle_, mode _ available f_ 1 to,7 _mes. To _ter t!'e time [periodin steps of 1 hour, press the Sl_p Mode
Button wlhi_eaiming _ air c_dffioner.
3. Make sure the Sleep Mode Auto LIEDIlightsup.
To cancellthe Sleep Mode, p,re_ the sleep Mode Auto _on severn| times unti_the star
(_) disappears from the,o_ratJon disp[ay_
The Sleep Mode wifl _ opemt_ at s,l_ fan s_ed (_ing) or medium fan speed (Peat pump
only) for a co,mfortable sleep.
in cooling mode or hea|thy dehumidification mode:
The _mpera_Jre will| aut_a_cali[y ri_ by 2°F(1C) over 't_ next 30,minL_esand by 4'_F(2°C),Jn1 h_r f_ a
Setting the time
1. Time can be s_ only when you press the Reset bu_. Having rep,_cing the ba_,edes,
you sh_ld press t_ reset bu_ons to,re_t the time. Press the S,_rfJStop button. "_
2, P're_ 2nd F bu_on and ,checkif2nd F icon is on,
4.3"PressP're_tffet_TimerTimeSettingSETb_ton.bUtt°ns_z_°_,untilthe desir_ _me is set,
Check the indicat_ f_ AM. and P,,M
Delay s, WPrmset stop
1, Make sure the time is set con'_y on the display of the remote co_rol_er_
2, P_ess2nd F b_ton_
3,,Press t_ ON/OFF _mer buttons:to,turn Timer on _ _,
4. Pre_ 'tie Time _tting buttons until the desired _me is set
5, To s_ the, se_cted time, pre_ the Timer setting button _mi_ tl-_ remote co.roller _ the
si,gina_rec_tor,
To canal the timer setting
Check _ 2nd F i_n is off. _:_
Press the Timer Cancel _-_Jtto,naiming the rem_e controfler at the signal r_ptor.,
(The timer _p on the air _nd_tioner and the display will go o_.,)
Se!_t one of the followi#g four types of operation, with t_ unit:running
DellayOFF Timer Del_ O,NTier Deliay OFF and ON Tier Del_f ON _nd OFF Timer
Owneit_$ 'Manua! 23
Op,erafingInstructions
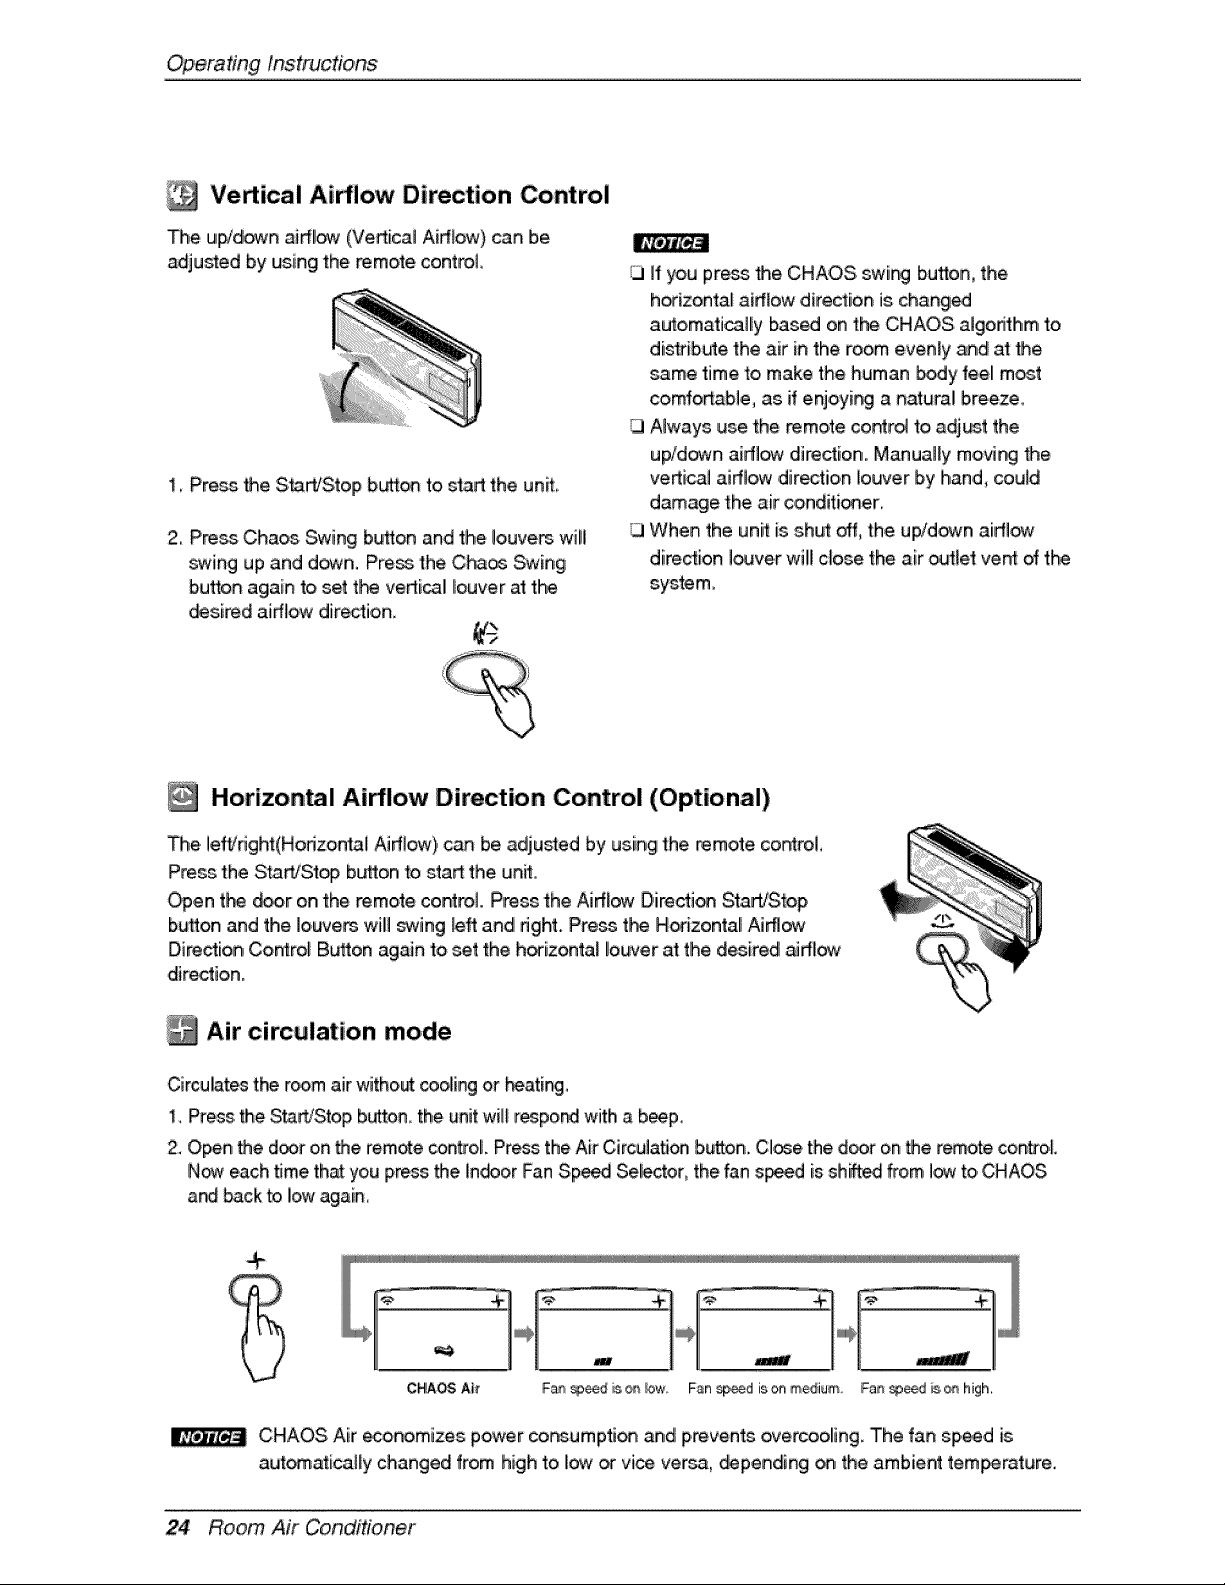
Vertical Ai#!ow Direction Control
Iii
The ui_d_n aidi_ (Vertical Airttow) can b,e
adjusted by using the remote control
II';_#Z'_,i
1, Press Me S_lWStop bL,_o_ to start the unit
2, Pre_ Cha_ Swing bu_on and the iouve_ will
swing up and ,d_n. Press the,C}*_os Swing
button again to set t_ vertical Iiouver at the
_sired airflow direction.
ill I'f you press the CHAOS. swir_ button, the
h_izontaf airflow direction is changed
au_omaticalliy based on the CHAOS aJgorithm to
distribute the air in the room evenly _d at Me
same time to make the human body feel mat
comfortable, as if enjoyir_ a natural bireeze
Always use the remo_e co_rol to adjust the
up!down aidlow dire_ion. Manually movi_ _e
vertical airftow direction io_,-Jerby hand, could
damage the air conditioner.
When the unit is shut _, the up/down airflow
dire_ion I_ver will close the air oc_let vent of the
syste m,
[_ Horizontal Ai_loiw Direction Control (Optional)
The lefVdght(Hodzontal Airflow), can be adjusted by using the remote, co_rol,
Press the StaWSt_ button to start the unit,
Open tf'_ _r on the remo_e control Press the Airf:low D,irecti_ StaWStop
button and the Iouve_ will _wing left and dght. Press t_ Hodzontali Ai_ow
Direction Control B_on again to set the h_izontal louver at the d_iredl _#low
dire_io,n.
Air circulation mode
Circulates the r_m air witho_ _ing or heating,
1. Press the Start/S-topbutton, the unit will respo_ with a b_p,
2. Open the door o,n_,e remote control. Pros tlheAir Circulation button.,Cl_e the door on _e remote control
N_ each time,th_ you press the in.or Fan S,p_ Selector, the fan s_d is shifted from I_ to,CHAOS
and back to Iiowagain,
CHAOS Air economizes power co_umpti_ and prevents overcoolling. The fan speed is
aut_atica_ly changed from high to low _ vice versa, _pending _ the ambien_ tem_rature.
24 Room Air Conditioner
OperatingInstruct!one
Auto clean (Optional)
AUTOCLEA[4 1. Wherever you pre_ the Auto Clean button, Auto Clean Furor!on will b,e
re.fred and can,ce[I,ed,
2, Auto Clean fu#ction works before and after coo_inglor dehumidfficatio, n mode
For ,detai_s,refer to t_ _!ow p_r_s_
& When the unit is start_ afl÷r the reserv_ion of Auto Clean _the_[ Start
_unction operates a_ indoor Fan is started after 20 sec_,_.
4. When you press Star#Stop button to turn off t_ un_ after the you have rese_ed
Auto Clean function, the air-conditioner drculates t_ indoor_r in the Auto
Clean mode with no, moire C_ling or Dehumidification operation For C_lliing
only m_eL it lasts br 30 min,utes for Heat pump m_el, for 16 minute&
& if y_ press t_ auto clean bt_ton again during the product opemti_, Auto
Qean fundion will be,car_elled.
[3 During Auto Clean function, moi_ures left in indoorunits after Cooli_ OperaSon or Heathy
D,ehumidificatJonO_ration c_ be remov_
During Auto Clean function, only Start/Stop button, Plasma butt_ and Auto Qean b,_on are article
Display Luminosity (Optional)
• The Display Luminos_y can be adiusted by using t_ remote c_troi_
Pre_ the, S_a_j_oip but!_onto start _e unit O_n the door on,the remote control pre_ the 2r4F button
and, press displa:y lumino_,i_ button, Display wil! b,e daA_ Press the butto_ again to se_ bnght display_
Owneit_$ 'Manua! 25
Operating Instructions
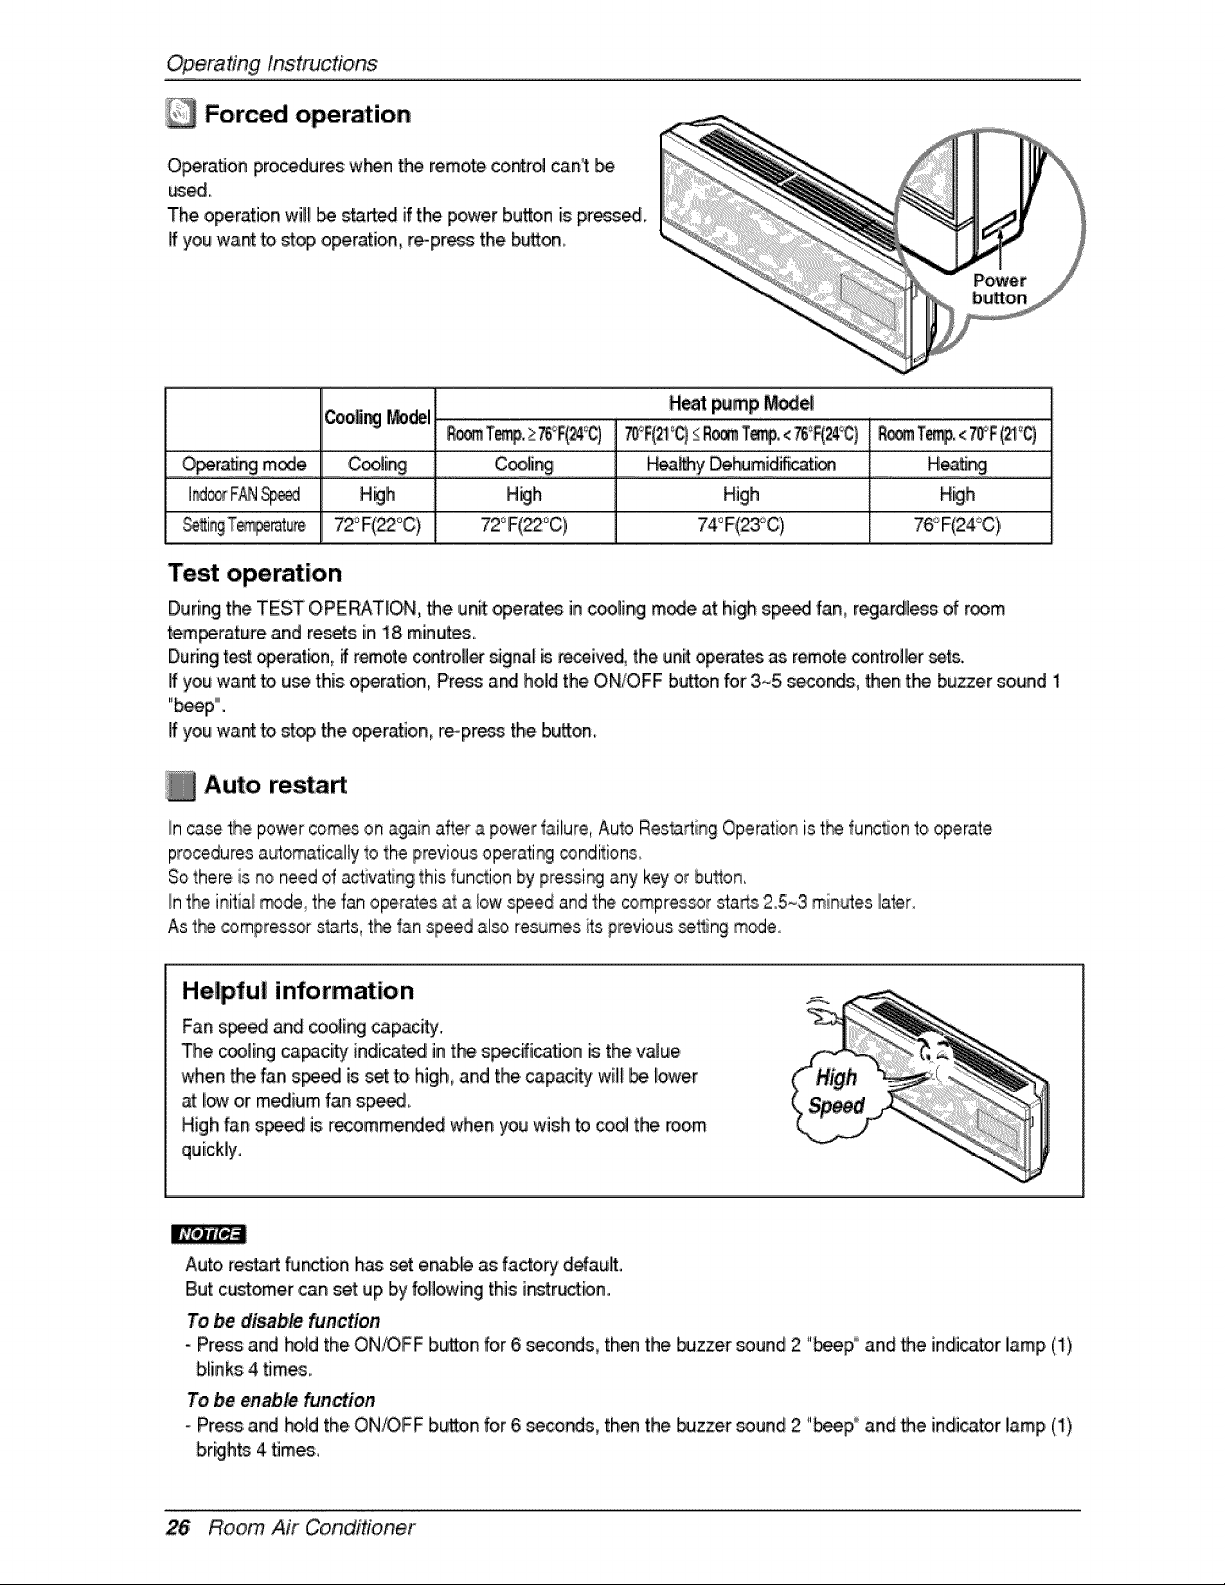
Forced operation
Opera, on pro_dures w_n the remote contr_ can't
wed.
The operation wi!__ started if t!hepower button is premed
Jfyou want to stop operation, re-pressthe button_
Heat _mp _e
Coo_i__del ......
o Jn mod ,...........Coo!!ng........................ ........... ..............................................................
I_ F_ _ Heh H_h High H_h
72°F(_°C)
Test operation
During the TEST OPERAT_O,N,the un_ operates inc_ling mode at highsp_ fan, regardless of room
_em_rature and resets in 18 minutes.
Duringtest _rat_,n, _ remote controll_ signa__ received, the unit operatesas remote_.nt_l_er sets.
If you wa_ to u_ this o_ratJon, Press ar_ hold the ON/OFF button for 3.-5 s_onds, then the buzzer sound 1
"beep"".
If you want to stop the operation, reopress the button_
Auto restaA
In casethe po_r comeson again after a power _ailure,Auto ResOrting Operationist[_ _unc_onto operate
proceduresa_omaIically to the previousoperati_ ,_nditions.
Sothere is _o need of activatingthis function by 9ressi_ any keyor bu_on,
Inthe initiai_de_ the 'fanoperatesat a iow speed and the compressorstarts25_3 minutes later.
As t_ compressors_rts, t_ tan speed al_ resumesits previous _t'_ng m_eo
Helpful information
Fan s_ed and coo_[ngcapacity.
The cooling capacity' indicated in the s_c_icaflon _ the v_ue
when the fan s_ed is _ _ high,and the.capac_y w[_ _. lower
at.I_ or medium fan sp_.
High fan speed is recomme_ed when you wish to _o_ the room
quickly.
Auto restart '_tbn h_ _ erab,_ as factory default.
But customer can set up Ibyfollowing this ir_str_bn.
To _disable hunction
- Press and ho_dthe ON/OFF button for 6 _nds, then the _zzer sound 2 "_p° and the indicatorlamp (1)
blinks 4 tJmes_
To be enable fun,_ion
- Pros and hold the.ON/OFF button for 6 _conds, then the buzzer sound 2 "_p i_ and _e indicatorlamp (I)
26 Room Air Conditioner
Maintenan_ and Se_ice
WARNING: Turn the system off _fore cleani_.
To clean, wi_ wffh asoft, dry cloth. Do not use bleach or abrasives.
S,upp,ly _wer must be disconnected before cleaning the ind_,r unff.
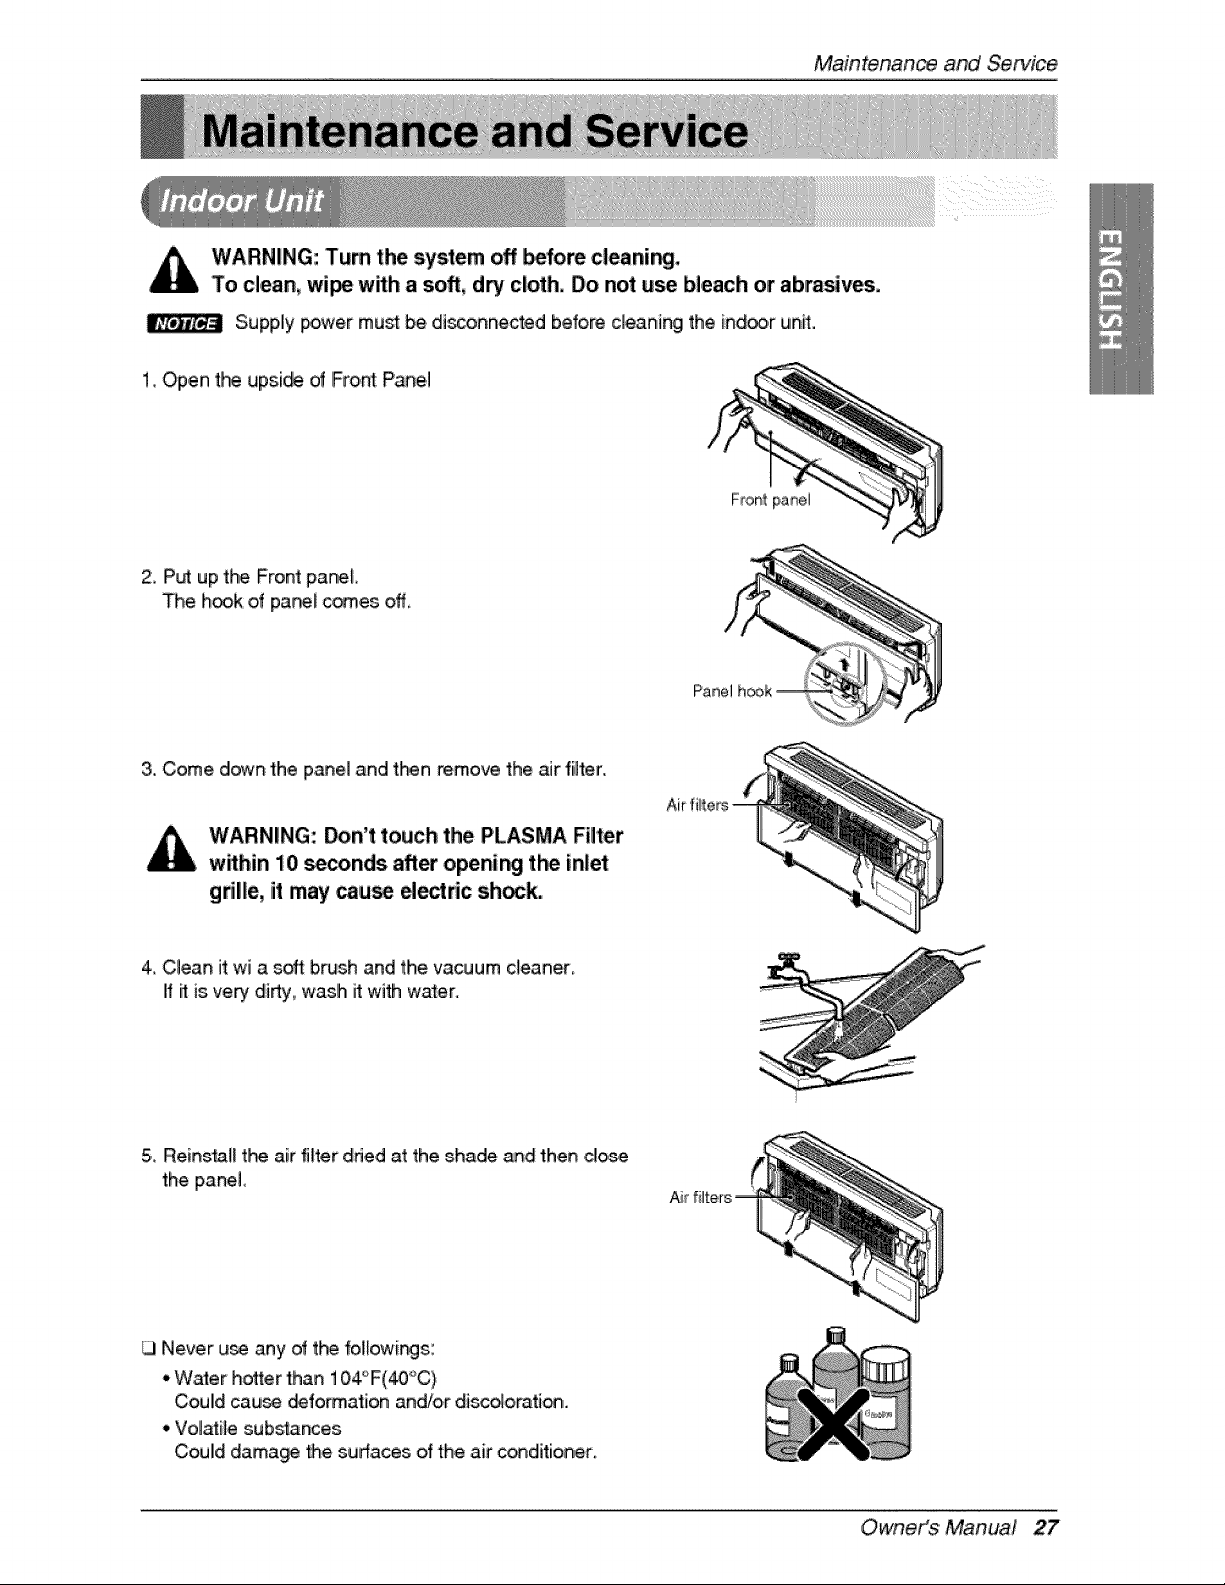
1. Open t_ up:si_ of Front Pane,I
2, Put up the Front panel
The h_k o,f panel c_es off,
Panel
3. Come down the panel and ti-_n remove the air filter.
WARNING: Don't touch the PLASMA Filter
w_hin 10 seconds after openi_ t_ inla
gdlle, it imay _u:_ d_ric sh_k.
4_Clean it wi a soft b_sh and the vacuum cleaner,
if il is 'very di_y, wash it with water.
5,,Re,ins_l_ t}-_ air filter tided at the shade and then dos,e
the panel
Never u_ any of t_ 1ol[owi_s:
• Waler ho_er than 104°F(_C)
,Could cau_ _fo_ation and/or disc_orati_.
• Volatile sub_nces
Could dama_ _e sudaces dthe air conditioner.
_: i!
Air filters
Owneit_$ 'Manua! 27
Maintenanceand Sewic_
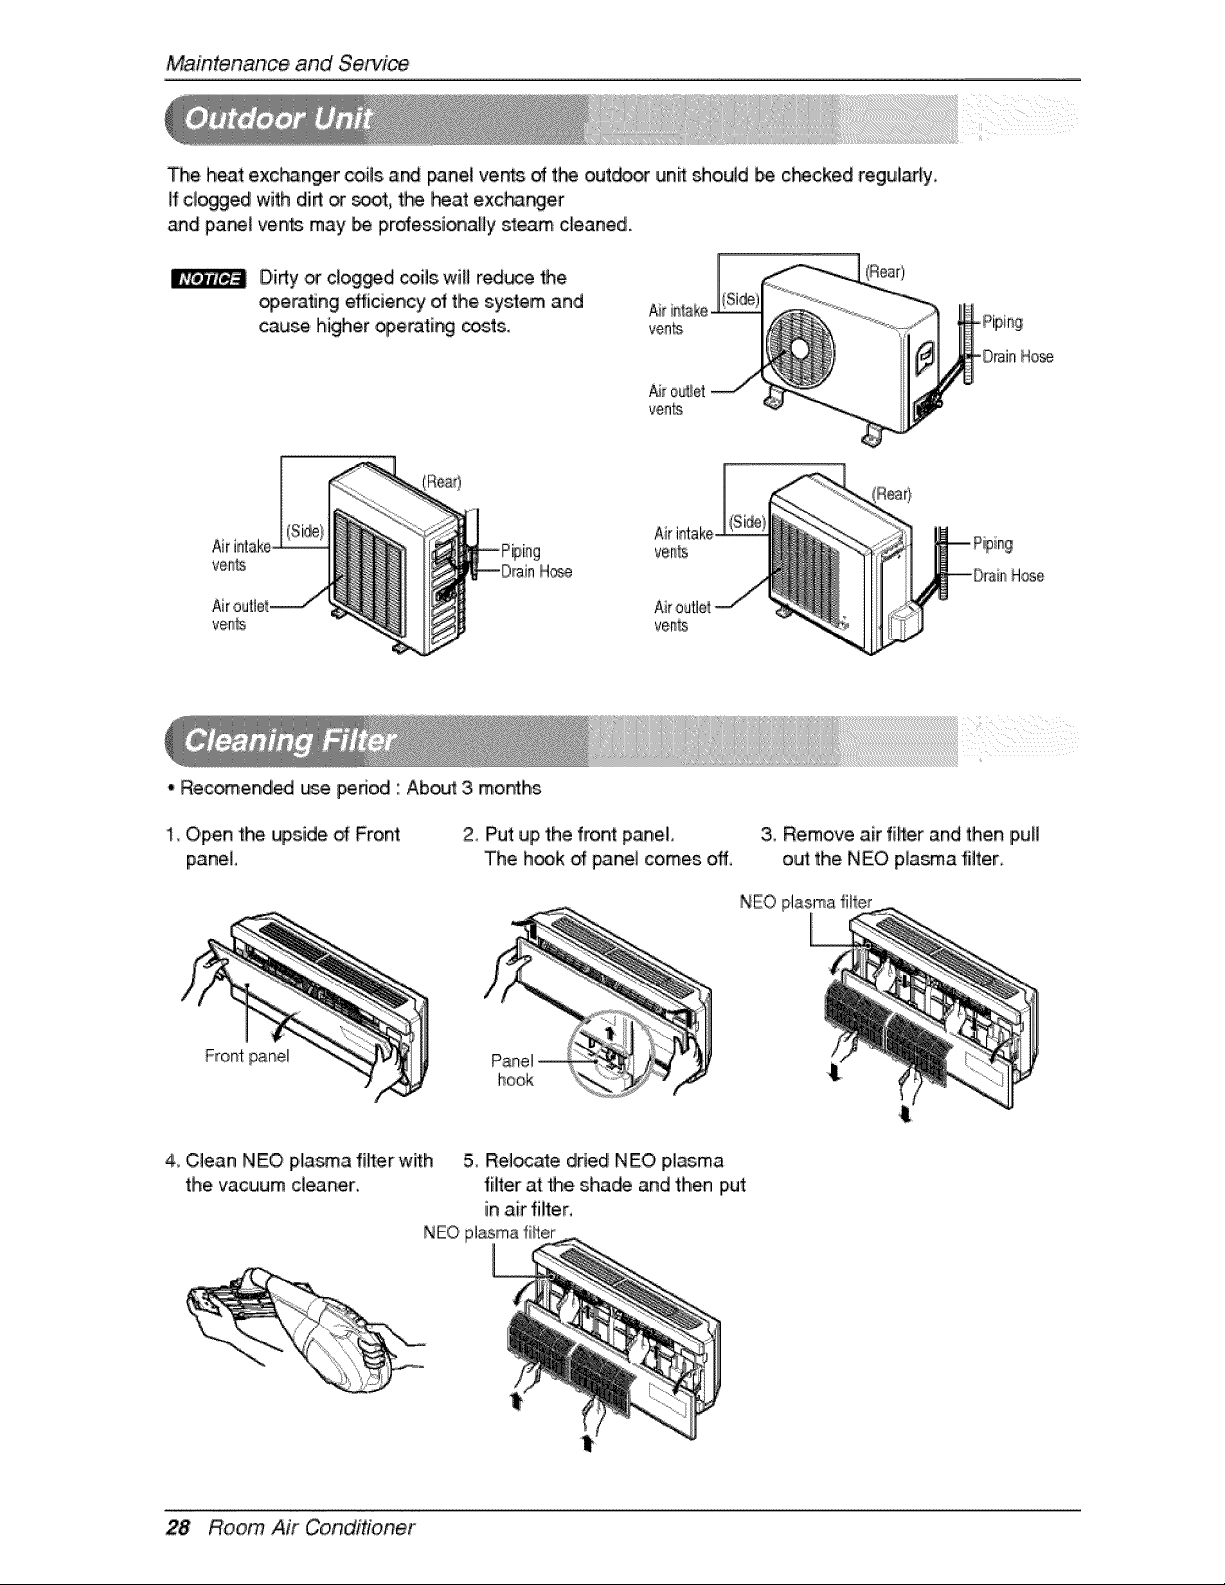
The heat exc_nger coi_sand pane_ vents of the outd_ unit should _ c_cked regularly.
if clogged with dirt _ _t, t_ Rat exchanger
and panel ven_ may _ professi_a,y steam cleaned.
Didy or clog_d coils wi, redt_e Me
_eraflng efficiency of the system and
cause higher _eratir_ trots.
Air
ve_s H_
• Rec_endi_ _.e period ' Aboutt3. months
Air
vem[s
veR%
Hose
1. Open the upside of Front
panel.
2_Put up the front panel
The h_k of _nel comes off.
3, Remove air rifler and then pufl
out the NEO plasma filter_
NEO plasma filler
Front panel
hook
4_Clean NEO Nasma filter with 5 Rel_ate dried NEO plasma
the vacuum deaner, filter at Me shade and then Iput
in air filter,
NEO plasmafi_ter
28 Room Air Conditioner
MaintenanceandService
Before c:alling for se_ice
If you have problems witlh your air conditioner, read the following information and try to solve
the problem, if you cannot find a solution, turn oN the air conditioner and contact your dealer.
Air c_diitioner does not ,o_e
1, Ensure that the air conditioner is p,lugged into a proper o,utlet°
2. Check the fuse or circuit brewer.
& Check whether the vol_ge is unusually high or iow,
Air does not feel cold enough on the cooling setting
1_ Ensure that the tempe_ture se:_ings are _,rr,ect.
2, Check to see if the air filter is c!ogged with dust, If so, replace the filter
3. Ensure that the _r flow from the outside is not obstructed and that there is a clearance of
over 20" between the back of the air conditioner and the wall or fence behind it
4 Close al! _ors _d windows and check for any source dheat in the room,
Before ca!ling for service_ please review the following list dcommon pro,blems and
The air conditior_r is o_rati_ no_all'y when:
• You hear a pinging noise This is caus_ by water being picked up by the fan on rainy days
or in highly humid conditions. This feature is designed to help remove moisture in the air
and improve coo!ing efficiency
• You hear the, thermostat click. This is caused by the, _mpressor cycle sta_ing and
stopping.
• You see water dripping from the rear of the unit Water may be collected in the base pan in
highly humid _nditions or on rainy days. This ,water overflows and drips from the rear of
the unit.
° You hear the fan running while the compressor is silent. This is a normal operational
feature.
Owneit_$ 'Manual 29
Maintenanceand Se_ic_
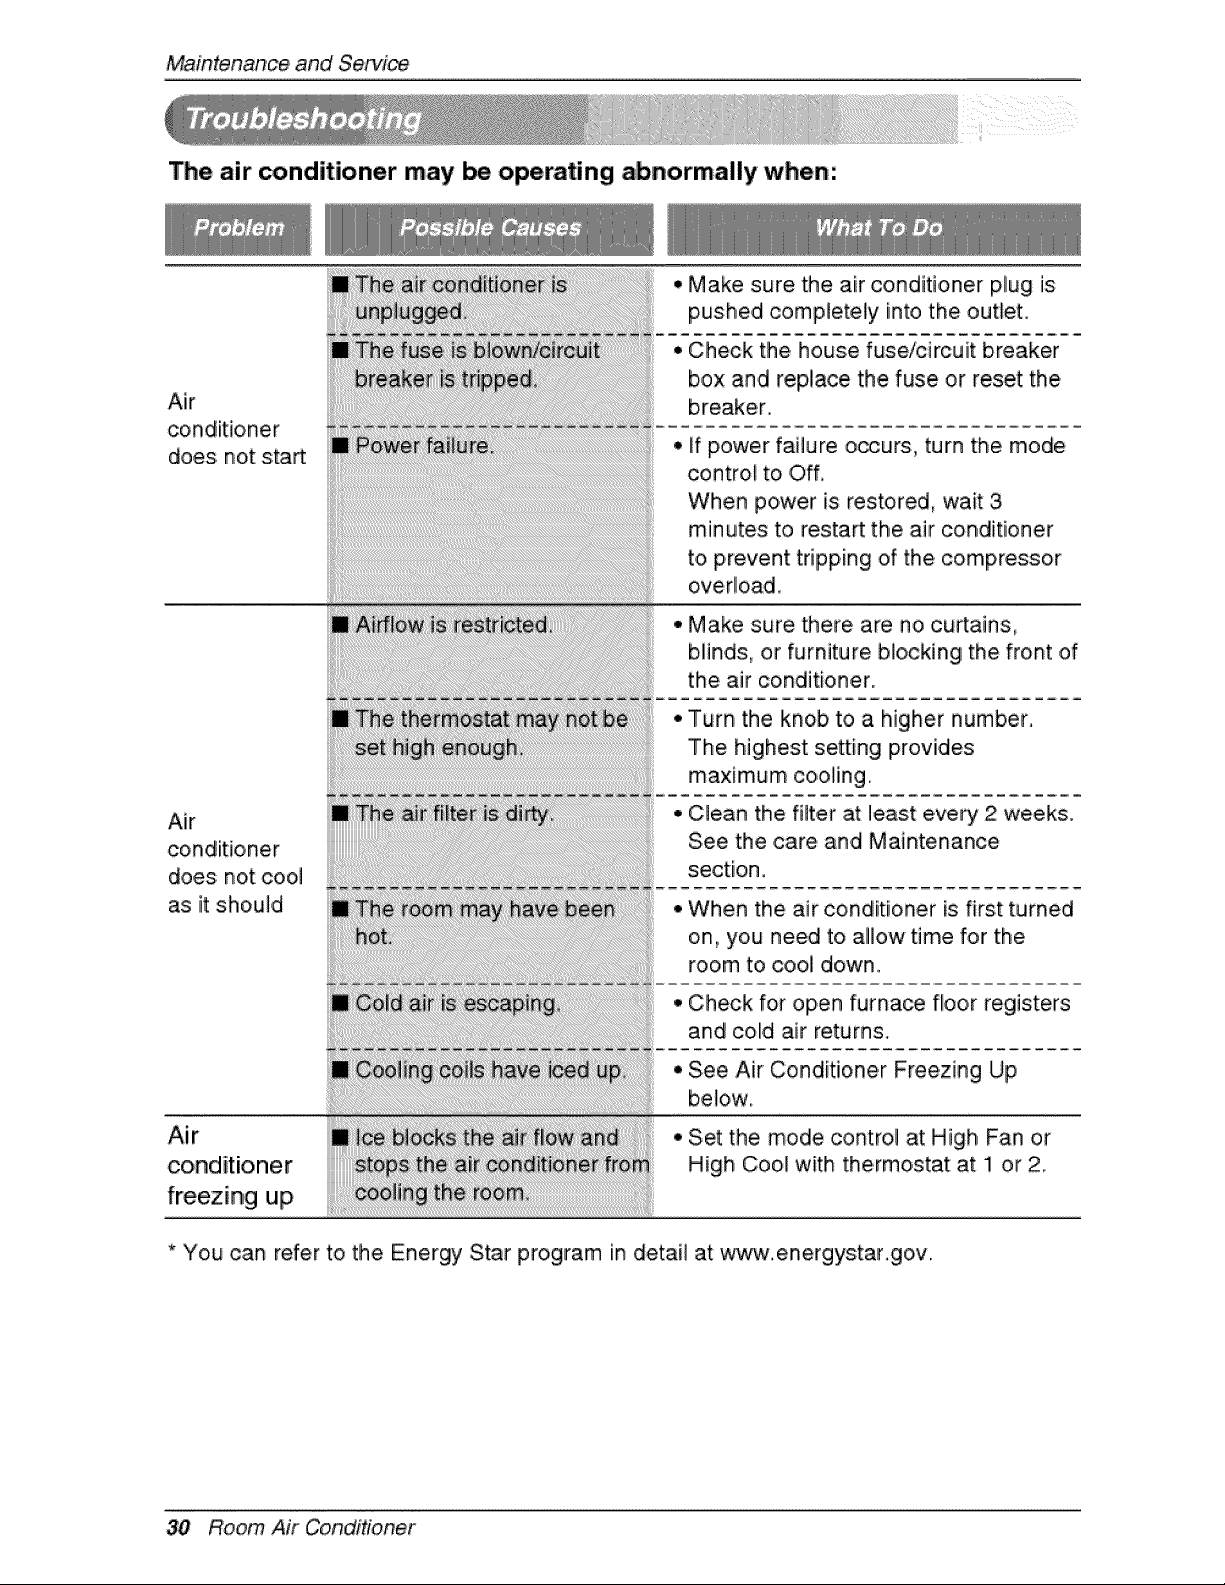
The air conditioner may be operating abnormally when:
Air
does not start
Air
conditioner
does: not cool
as it should
Air
conditioner
freezing up
• Make sure the air conditioner plug is
pushed completely into the outlet.
• Check the, house fuse/circuit breaker
box and replace the fuse or reset the
breaker
• if power failure o_urs, turn the mode
cont:rol to i Off,
When power is restored, wait 3
minutes to restart the air conditioner
to prevent tripping of the compressor
overlload_
° Make sure there are no ,curtains,
blinds:, or furniture blocking the front of
the air conditioner.
Turn the knob to a higher number,
The highest setting provides
maximum co,oling.
Clean the filter at least every 2 weeks.
See the care and Maintenance
section.
When the air conditioner is first turned
on, you need to allow time for the
room t,o cool down.
Check for open furna_ floor registers
and colld air returns,
See Air Conditioner Freezing Up
be!ow,
Set the mode control at High Fan or
High Cool with thermostat at !1 or 2
* You can refer to the Energy Star program in detail at www.energys:tar.gov.
30 Room Air Conditioner

