website htlp://ww_,lg_r_ ice,
eomai] h[ltp:/iww w°lge se_ice.
.html
Please read the ,operating instructions ,ands,afe_ precautions carefully
and thorougNy before [ns,ta!tin,g and op,erating your room air conditioner,
AIR_EDEVENTANA
e
order to, prevent
for any damages
_oner.
FOR YOUR RECORDS
Write the mode_ and serial numbers here:
Model #
_rial #
You can find them on a _abelon the side of each un_
Dea_er's, Name
Da_e Purchased
I 8[ap_e yeu_ re_ip[ to [his page i_th,e eve_t yc_ ne_ ill
to price _te of purchase or for warranty issue,
READ THIS MANUAL
Inside you wil! find many _lp_ul hints oi_ how to use and
maintain your air conditio,_r pro_dy, Just a little pre_Jentive
care on your _t can _ y_ a great deal oi time and
me,hey _er the life of your air cond_ioner
Youll find many ans_s _o,common problems in the chart
of t_¢_b_ho_ing tips.if you review our chart el
Troubleshooting Tips first you may not _edl to call for
se_me at all,
• Coa4act the author_ service t_h_ician for repair
or maintenance of this _ni_.
• Coa4ac_ the install_ for installation of _his u_it.
•The air conditioner is _o_ lin_ended for use by young
children or invalies withou_ supervisio_
• Young children shou|_ be s_rvis_ to e_s.ure that
tlhey _o not piny with the air conditioner:
•Whe_ the power cord is _o be replaced, rep|acement
work shah be _rformed by authorized personnel only
usi#g o_ly g_uine r_lacement parts.
• |nstallatlon work mus_ be performed in _corda#ce
with the National Eie_ri.e Code [by qu_ilfi_ and
authorized pe_so_ne| o_y.
2 Room Air Conditioner
Sa_ Precautions
To prevent iniury to the user or other people and property damage, the bHiowing instructions
must be followed,
[] incorrect operation due to ignoring instruction will _us.e harm or damage. The seriousness.
is cliassifi_ by the following indications.
This sym_l indicates the possibiU_y of death or serious iniury.
This _mbo_ indic_es the po_ibili_ of injury or _ma_ to properties,only.
i Meanings of symbols us_ in this manual are as, shown below:
B,e sure not to do,
Be sure to follow the instruction,
[] Installation
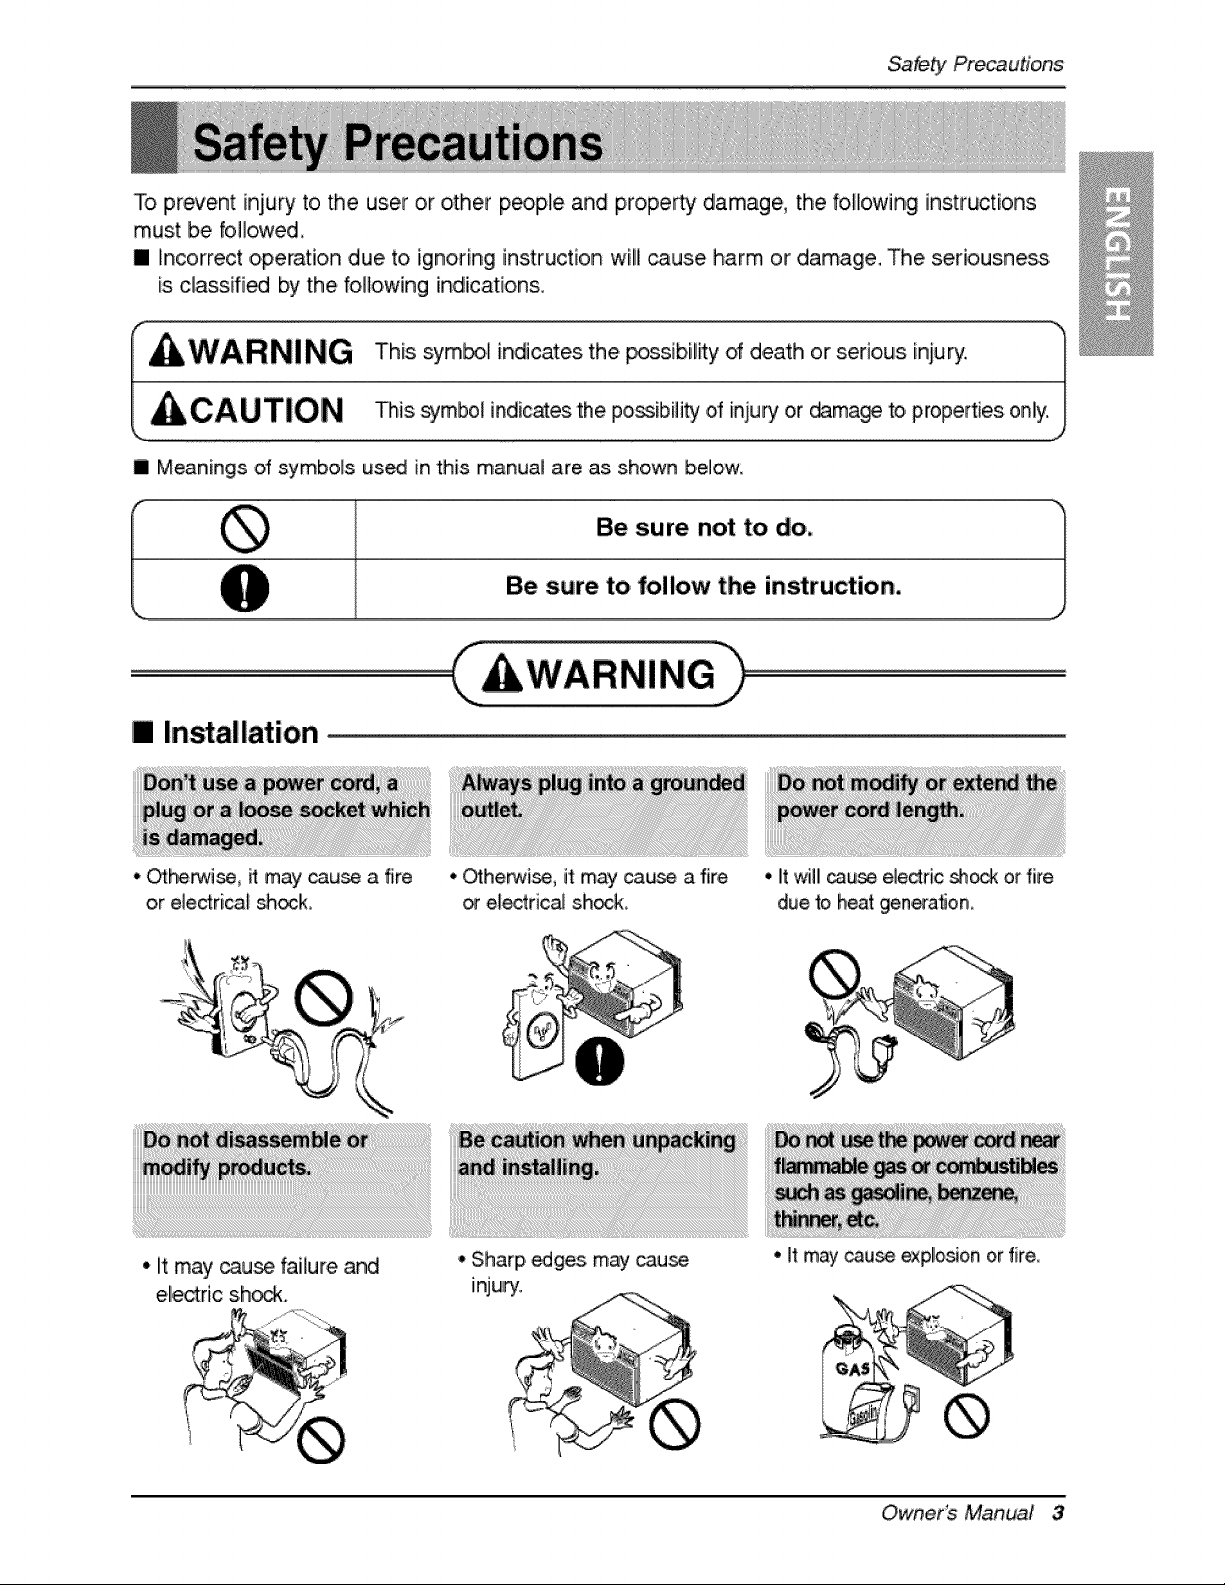
,, _herwi_, _ may _u_ a fire
or eledricat sh_k.
* It may _u_ failure and
ele_ric s.ho_.
* 01therein, it may ca_ a fire
electric_ sh_k.
* Sharp edges may cau_
injury,
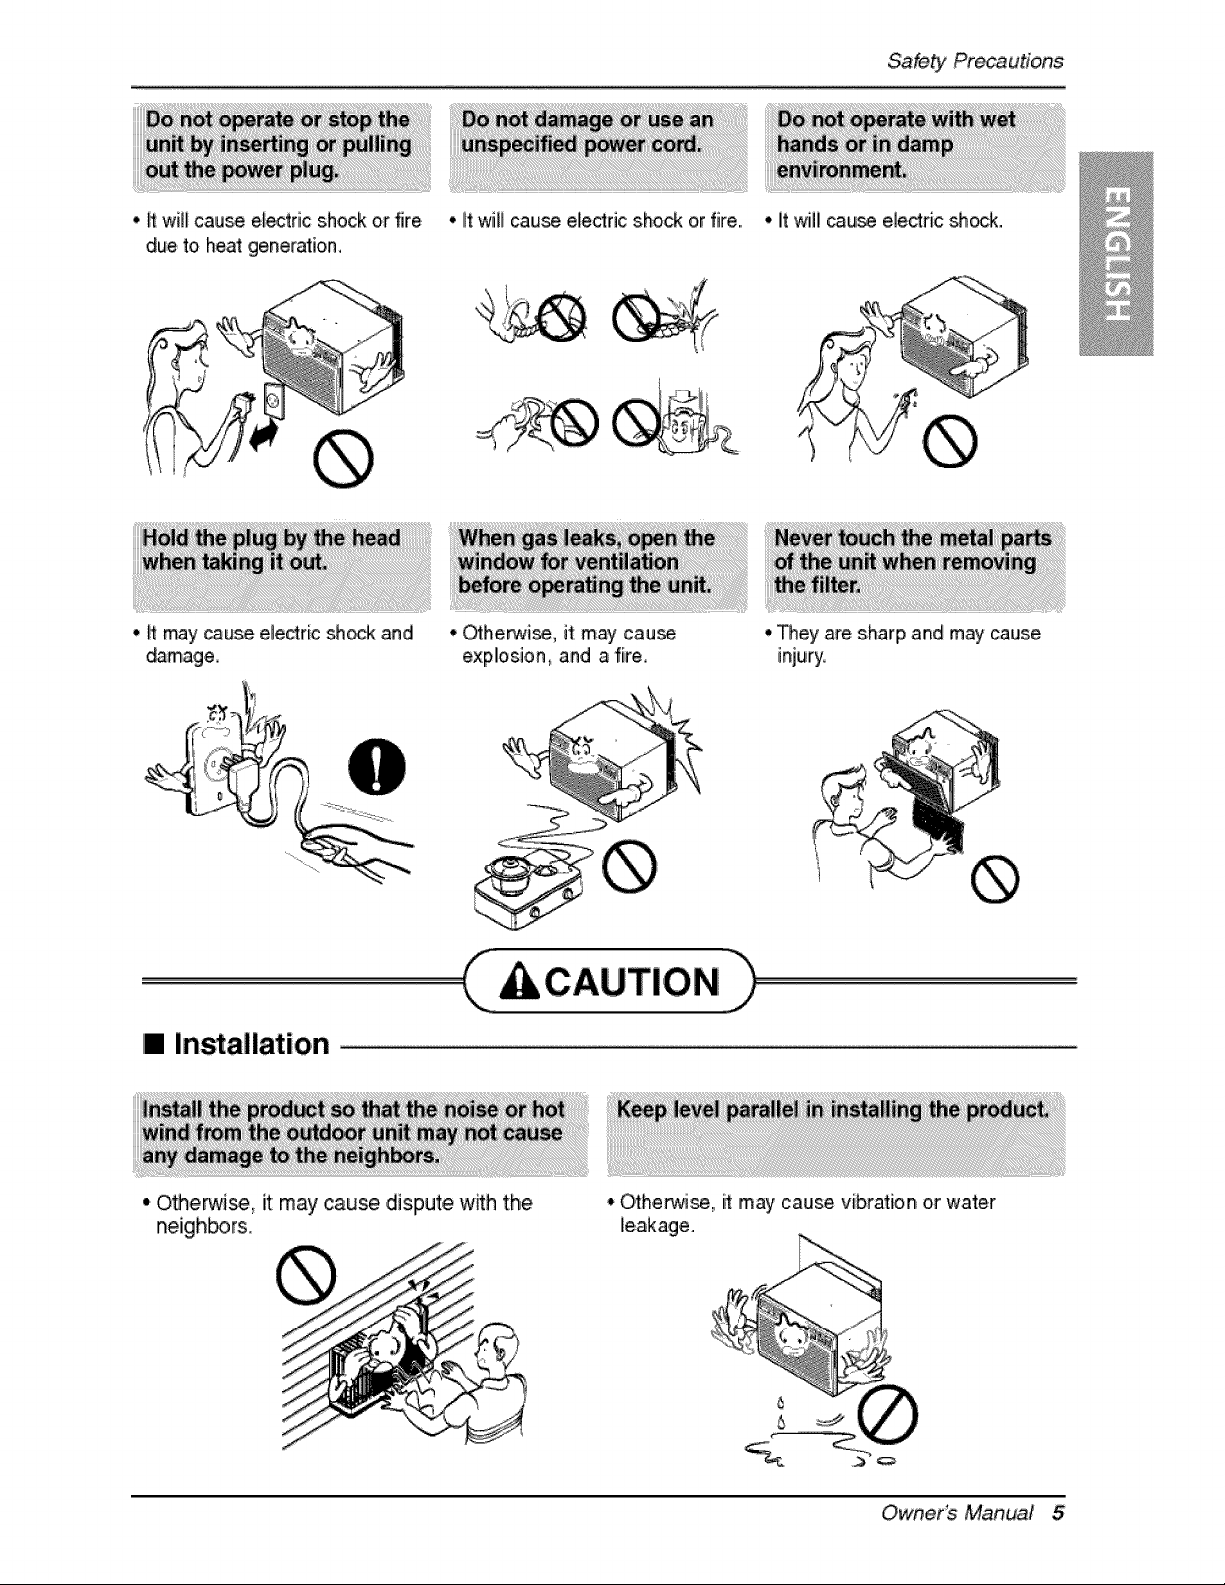
* It will _u_ eledric _ or fire
due to heat generation.
• It may _u_ _p!osion or fire
Own,er_ Manual 3
!I Operation
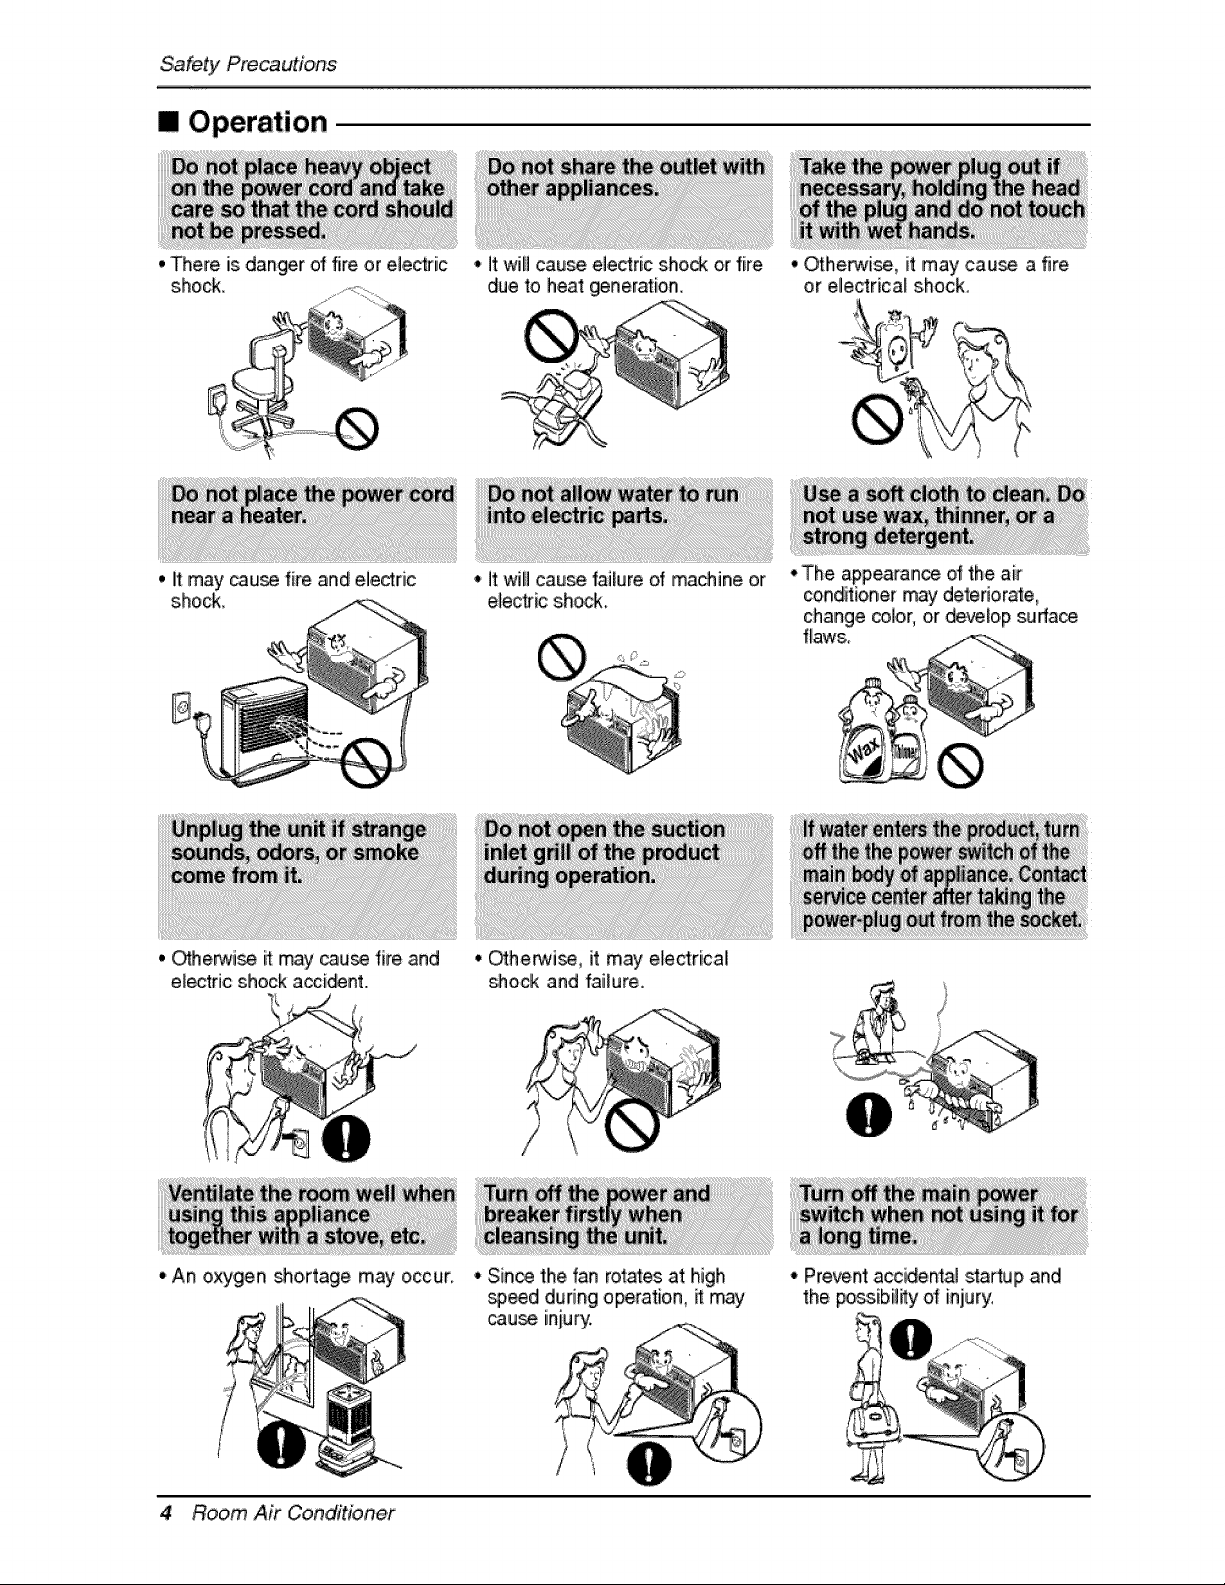
• There ='sdanger offire or elect_ric
shock_
• itwill cause eJectric sho_ or fire
due to heat generation,
• Otherwise, itmay cau_ a fire
or electrica_ shock.
• it may cau_ fire and electric
shock_
* It will cause _ailure of ma_ine or
ele#_ic sh_k_
• The appearance of the air
cond_ioner may deteriorate,
change color, or deve_o.psurfa_
flaws._
°An oxygen _o.rt.age may occur,
4 Room Air Conditioner
° Cffherwi_, it may electrical
shock and failure.
° Since the fan rotates at high
_,_d! during operation,itmay
cause injury. _:_
'i
* Prevent accidenta! st:aHup and
thepoi_,ibil_y 0'{ iniury:
Sa_ Precautions
• H willcause etectric shock or fire • litwill cau_ elledfic shock or fire.. • It will _ui_ e]ectric shock.
due to heat generation_
°ff may _use eledric sh_ and
_mage explosion, and a fire,
I In allation
• O_erwi_, it may cause dispute w_h the
neigh_rs.
*_ey are sharp and may cause
injury,
• O_herwi_, itmay cause vibration or water
[leakage.
Own,er_ Manual 5
[] Operation
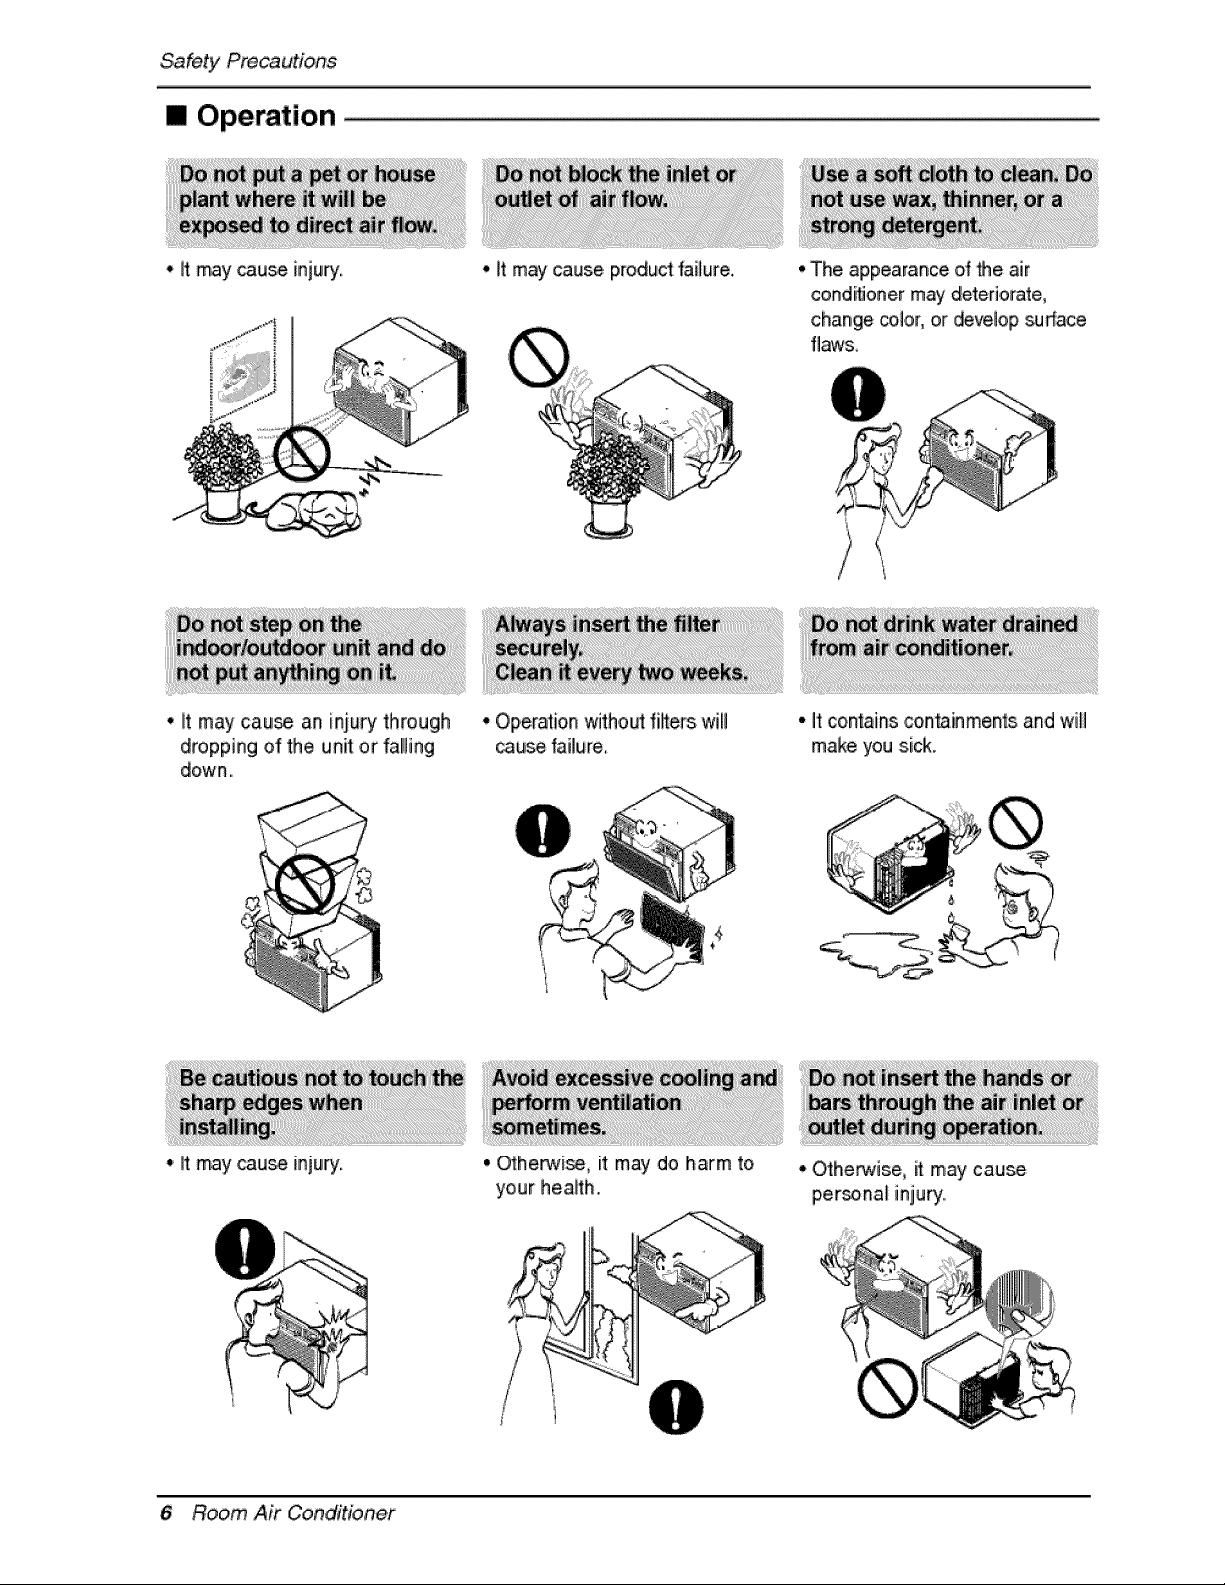
• ff my cause inju_.
• litmay cau_ an injury through
dropping of the unit or fa!lling
down.,
•' _tmay cause injury.
6 Room Air Conditioner
,, it my cause produ_ iai_ure.
• Operai_ionwithou_ riflerswiB
_use failure
• Othep_¢i_ it may do harm to
your heaffh.
• The appearance ofMe air
condi_oner may,deteriorate,
change co.l.or,.ordevelop _rface
fl._s.
• It con'lains con_inmenls and will
make you sick.
• O_herwise, ff may cause
personal injury.
Before Operation
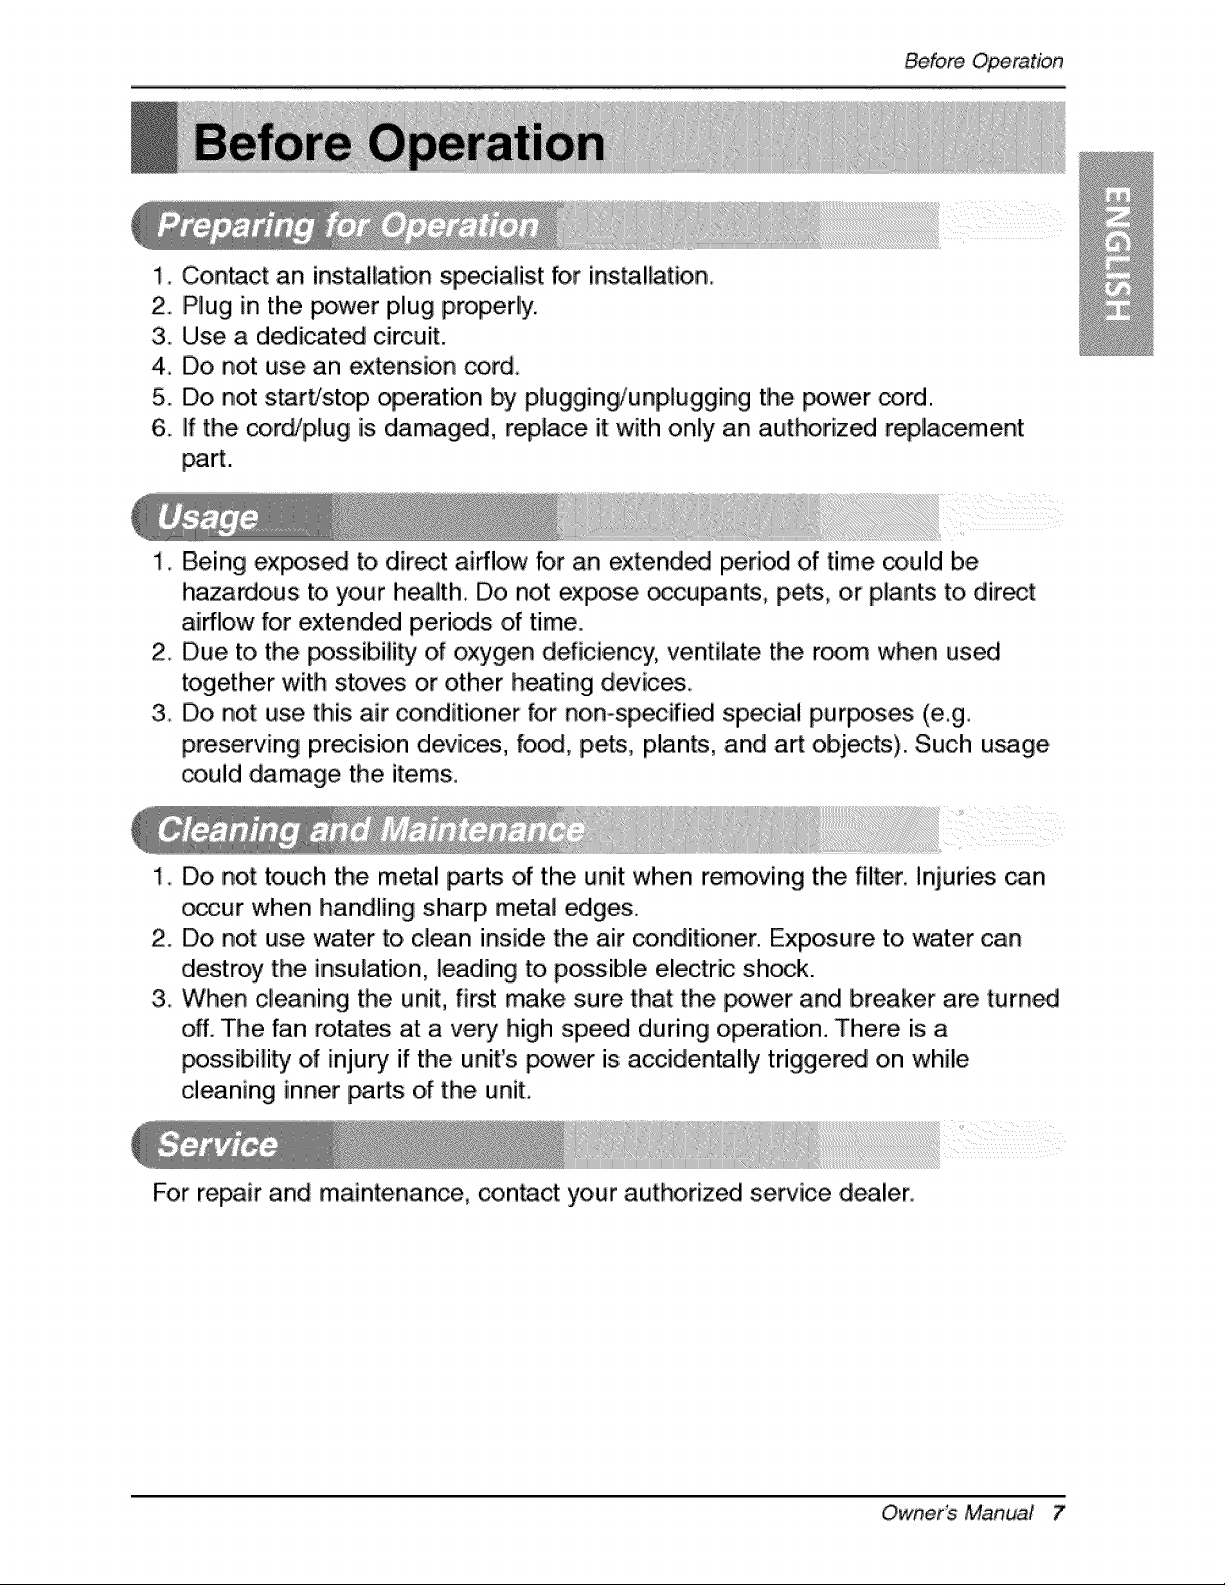
1. Contact an installation specialist for installation.
2. Plug in the power plug properly:
3. Use a dedicated circuit.
4. Do not use an extension cord.
5. Do not s_rb'stop operation by pluggin_unplugging the _wer cord.
6. if the _rd!plug is damaged, replace it with only an authorized replacement
part.
1i_ Being exposed to dir_t airflow for an extended period of time could be
hazardous to your health. Do not expose _cupants, pets, or plants to direct
airflow for extended periods of time.
2. Due to the _ssibilibj d oxygen deficiency, ventilate the r_m when used
together with stoves or other heating d,evice&
3 Do not use this air conditioner for nonospecified special purples (e.g.
preserving precision devices, foed, pets, plants, and art objects). Such u_ge
could damage the items.
1_ Do,not touch the metal _rts of the unit when removing the fiiter. Injuries can
occur when handling sharp metal edges.
2. Do,not use water to clean inside the air conditioner. Exposure to water can
destroy the insulation, leading to possible electric shock.
3. When ,cleaning the unit, first make sure that the _wer and breaker are turned
off. The fan rotates at a very high speed during operation. There is a
_ssibility of injury if the unit's power is a_identally triggered on while
cleaning inner parts o_ the unit:.
For repair and maintenance, contact your authorized service dealer.
Own,er_ Manual 7'
introduction
This symbol alerts you to the risk of electric shock:,.
This, symbol alerts you to hazards that could cause harm to,
the air cond_ione, r.
This symbol indicates sp_ial notes.
This,appliance _ouJd _ instal_ in accordance with the National Ele_ic C_e,
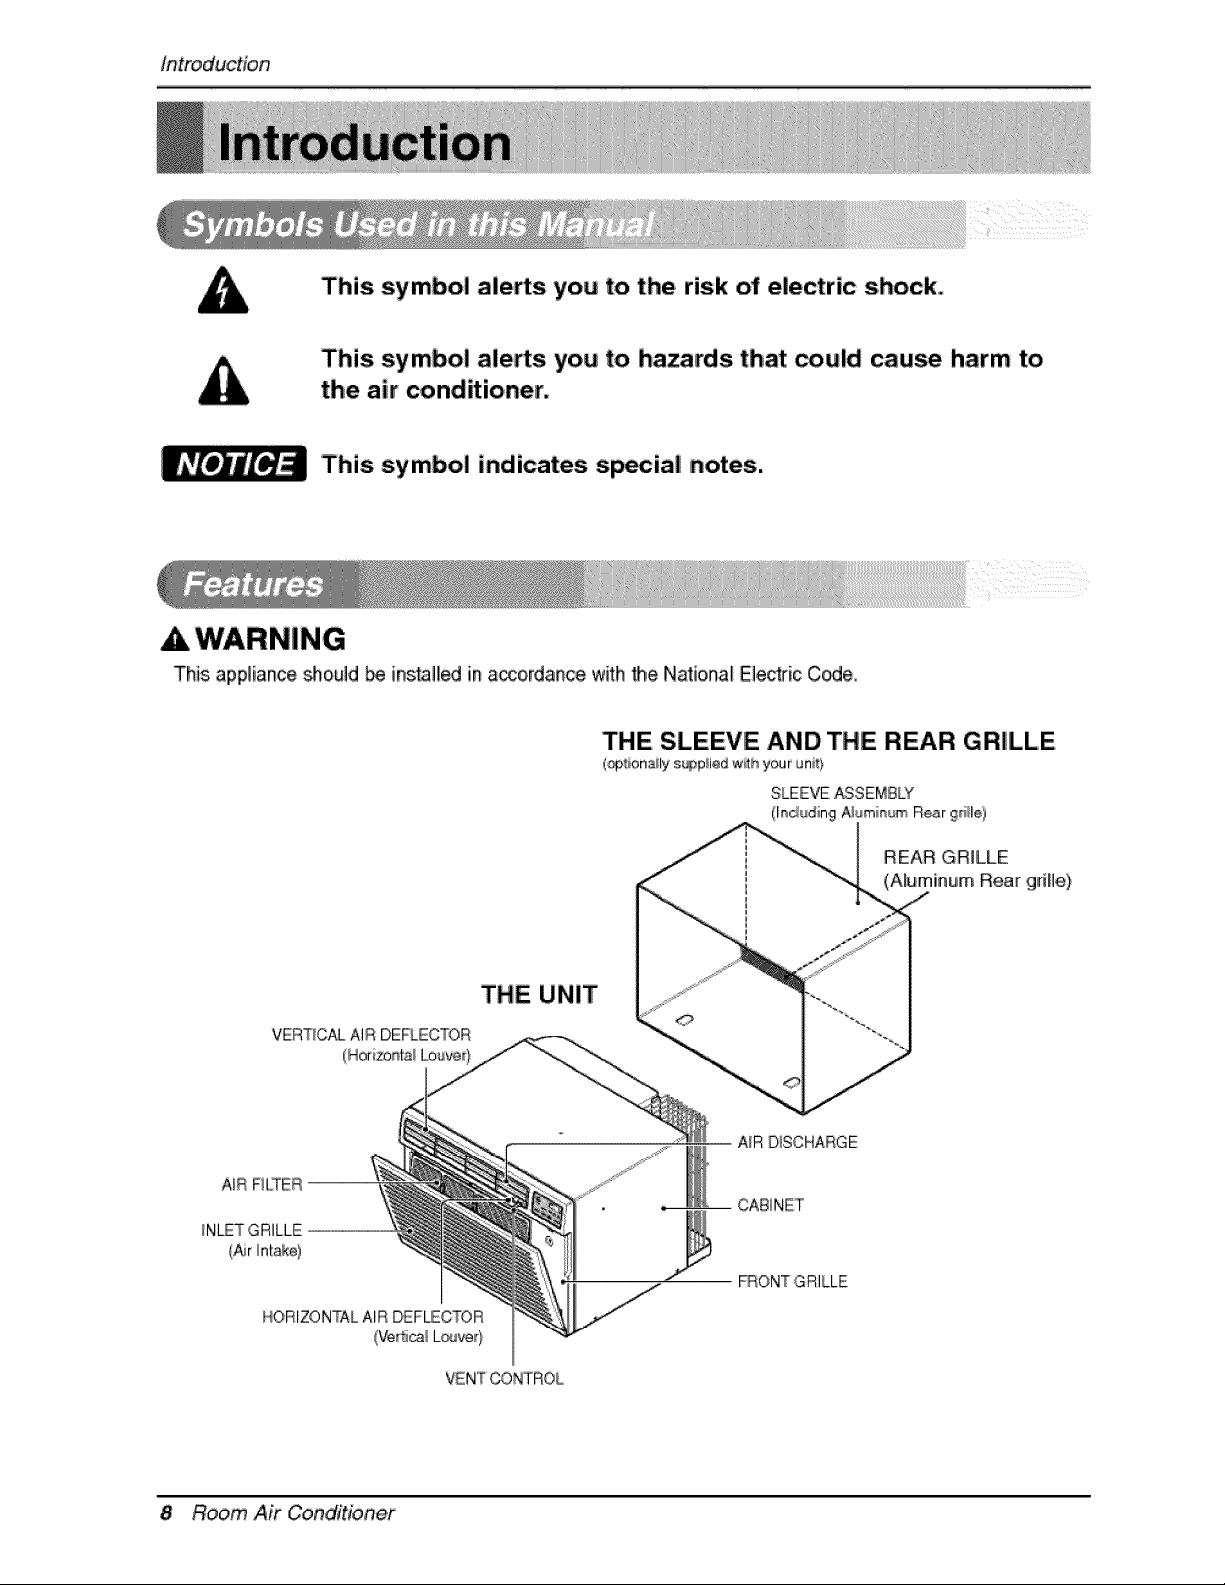
THE SLEEVE AND THE REAR GRILLiE
(_ona_ly s_p_i_d wi_tli_your un_}
SLEEVE ASSEMBLY
(l_sc_udingA_,,_mi_umReal 9[_le)
REAR GRILLE
(Aluminum Rear grille)
THE UNIT
VERTICAL AIR DEFLECTOR
AIR; FILTER
I_N_T GRILLE
(,Air intake)
HORIZONTAL AIR DEFECTOR
(Ve[Sca_ Louver}
V_ N'rT OONTR'O_.....
AIR D_SCHARGE
C,AB_NET
_ONT GRILLE
8 Room Air Conditioner
E!_hficaISafety
115V~
[
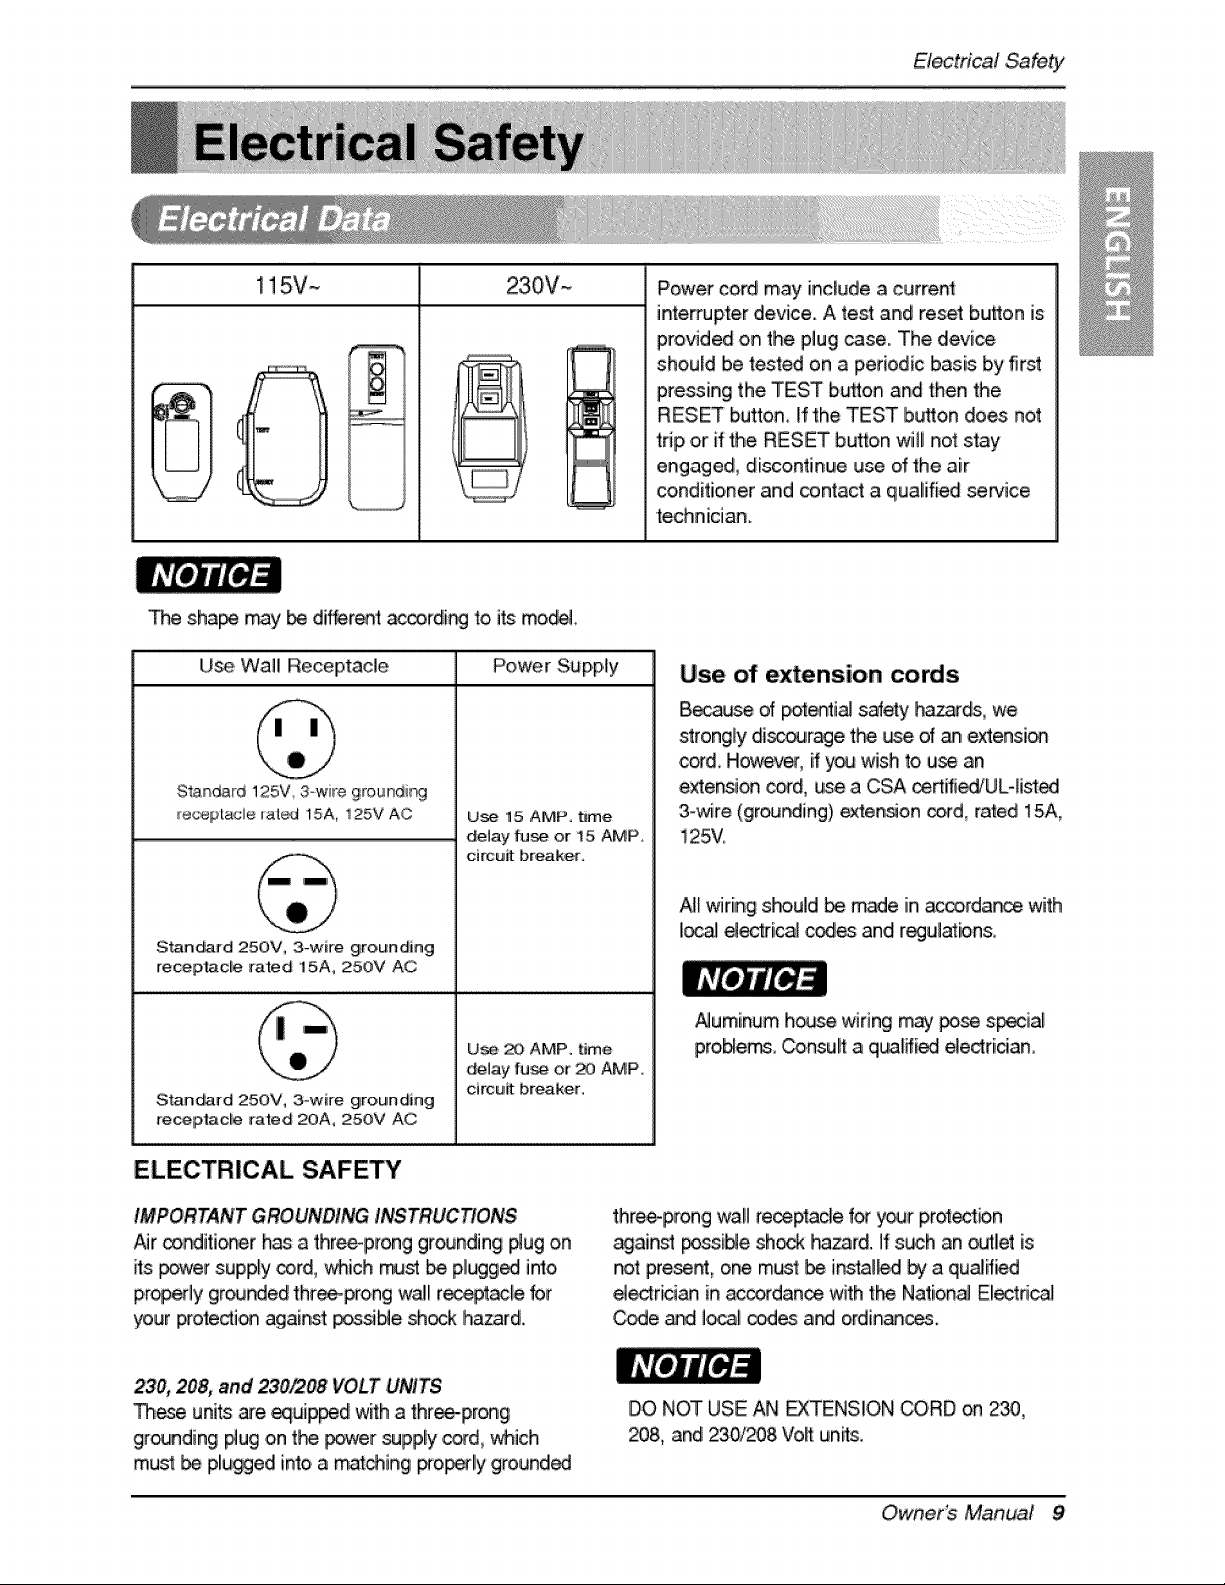
Power cord may include a current
interrupter device. A test and reset bu_on is
provided on the piug case. The dievi_
should Ibe tested on a periodic basis by first
pressing the, TEST b_on and then the
RESET button, If the TEST button does not
tnp or if the RESET button will not stay
engage& disco,ntinue use ofthe ,air
conditioner and contact a qualified service
technician.
The sha_ My _ dif_reet a_rdir_ to. i_ mo_,
U_ Wall Receptacle Power Supply
SIandard 125V 3-wire grounding
_eca#_tacle rated 15A, 125V AC
Standard 250V, 3-wire girourl,d[ng
recep_de rated 15,A, 250V AC
Standard 250V, 3-wire giroundiing
recelP,ta,clie rated 20A, 250V AC
use 15 AMP. time
de_ay fuse or 15, AMP,
circuit breaker.
U_, _ AMP. _Jmi8
de_ay fu_ or _J AMP_
circuiit breaker,
ELECTRICAL SAFETY
IMPORTANT GROUNDING INSTRUCTIONS
Air _iti._r h_ a threepron,g ,grounding #ug on
its power supply _rd, _ich must _ plugg_ into.
p,r_efly grour_ed threeprong waJllr_t_e for
your p_otedi_ against pos_b_esh_k hazard.
Use of extension cords
Because of _enti_ sa_[_ }'_ards, we
strongly discourse t_ _e of_, extensi_
_d,. However, ify_ wish to u_ an
extensi_ cord, u_ .a CSA _#i_UL4isted
3-wire (grour_ing} ex_en_on _d, r_ted 15A,
125V.
A_Iwiring should _ m_e in,acoorda_ with
I_ _ical cod_ and r_ul_ions,
AJuminumho_ wiring may po_ s_ia_
proMems, Consult a qualified eUectrician,
three-prong wal_m_ptacle foryour prolectbn
against possiNe shock hazard. If such an o_1_ is
not present, one must _ insta]_ _ a qualitied
_ec_rici_ in ac_dan_ with the Nation_ Electri_
Code and ]_ _es and ordin_.
230, 2O& and 230f208 VOLTiUN!_TS
These units _e _uip_d with a thr_prong
gr_Jnding p_ugon t_ prier supply c_d, v_ich
must _ plumed into, a _t_ing _o_ly ground_
DO NOT USE AN EXTENSION CORD on 2_,
_8, and 230/_8 Voff un_,
Own,er_ Manual 9
(PLEASE READ CAREFULLY)
FOR' THE USER'S PERSONAL SAFETY,. THIS
APPLIANCE MUST BE PROPERLY GROUNDED
The _or curd of this appliance is equip_ w_h a
three-prong (,grinding) I_ug. U_ this with a standard,
thr_,_s_ot (grinding) wa_ _wer o,ut]et to minimize tl_
hazard of electric shock, 'The c_tomer should have
the wall r_eptade ar_;lcircu_ ch_;k_ by a qualified
ele_ician to make sure, the ir_eptacle isplropedy
DO NOT CUT' OR REMOVE THE THIRD (GROUND)
PRONG FROM THE POWER PLUG.
A. SITUATIONS WHEN THE APPL|ANCE WILL BE,
DISCONNECTED OCCASIONALLY;
Becau_ of potenti_ _ety hazards, we strongly
discs_urage the use, of an a_pter ptug. H_wev_r_ if you
wish to use an adapter, a TEMPO_RY
CONN ECTIiONi may be made Use UL4isted adapter,
available from most ioc_[ har_are steres°
The large sl_: intl"_ adapter must _ align_ with the
large silo| in the roceptade _oi assure a proper polarity
connection
A CAUTION
: At_chinejtheadaptergiroundtermlna| tothe wa_l
r_p_e cov_ screwdo_ not groundthe
app|_nce unless the coverscrew is _al, and not
insu_t_ and _e wa_lte_ptacle is ground_
through_e ho,u_ witing,_e custom_ shou_
havethecircuitchoked _ a qua|ifi_ cleric|an to
_ke sets _e recep_|e _ pmper_gmund_
Di_:_nec_ the _wer cord fr_n the ada,_er, using
one hand on each. Otherwise the adapter ground
t_mi_l might b[eako DO NOT USE the app{ia_e with
a braun adapter plug,
B. SITUATIONS WHEN THE APPL|_CE WILL BE.
DISCONNECTED OFTEN,
Do not use an adapter p_ugiin thee s_uations.
Uin#ugging th_ p_ter cord freq_nt[y _n lead to an
eventua_ bre_age of the ground terminal The wall
pow_ outlet sh_ald _ replac_ by a '|hr_*sff_t
(grinding} _t_e| instead.
USE OF EXTENSION CORD'S
Be_u_ of potenti_ safety Ihazardls,we strongly
discourage the use ,of an extension cord. However, if
y_ wish to u_ an extension colrd, use a _A
certJfi_iULolisted 3,.wire (grounding) exte_ion cord,
rated at 15A, t25M
10 Room Air Co_,ditioner
ins_llation
Remove packir_ materials from the wal 51eevo&qd tape
from t_ air _3ndi'tio_r
INiSTALLATION REQUIIREMENiTS
If you use an existing walt sl_ve, you _ould
measure its dimensions,
install the new air conditioner according to the_
instalation instruc4:ionsto achieve Me best
performan_, AJl wal! slee-_s u_d to mount the new
air condiloner must _ in _od structural condition
and have a rear grille 'to _curely alach the new air
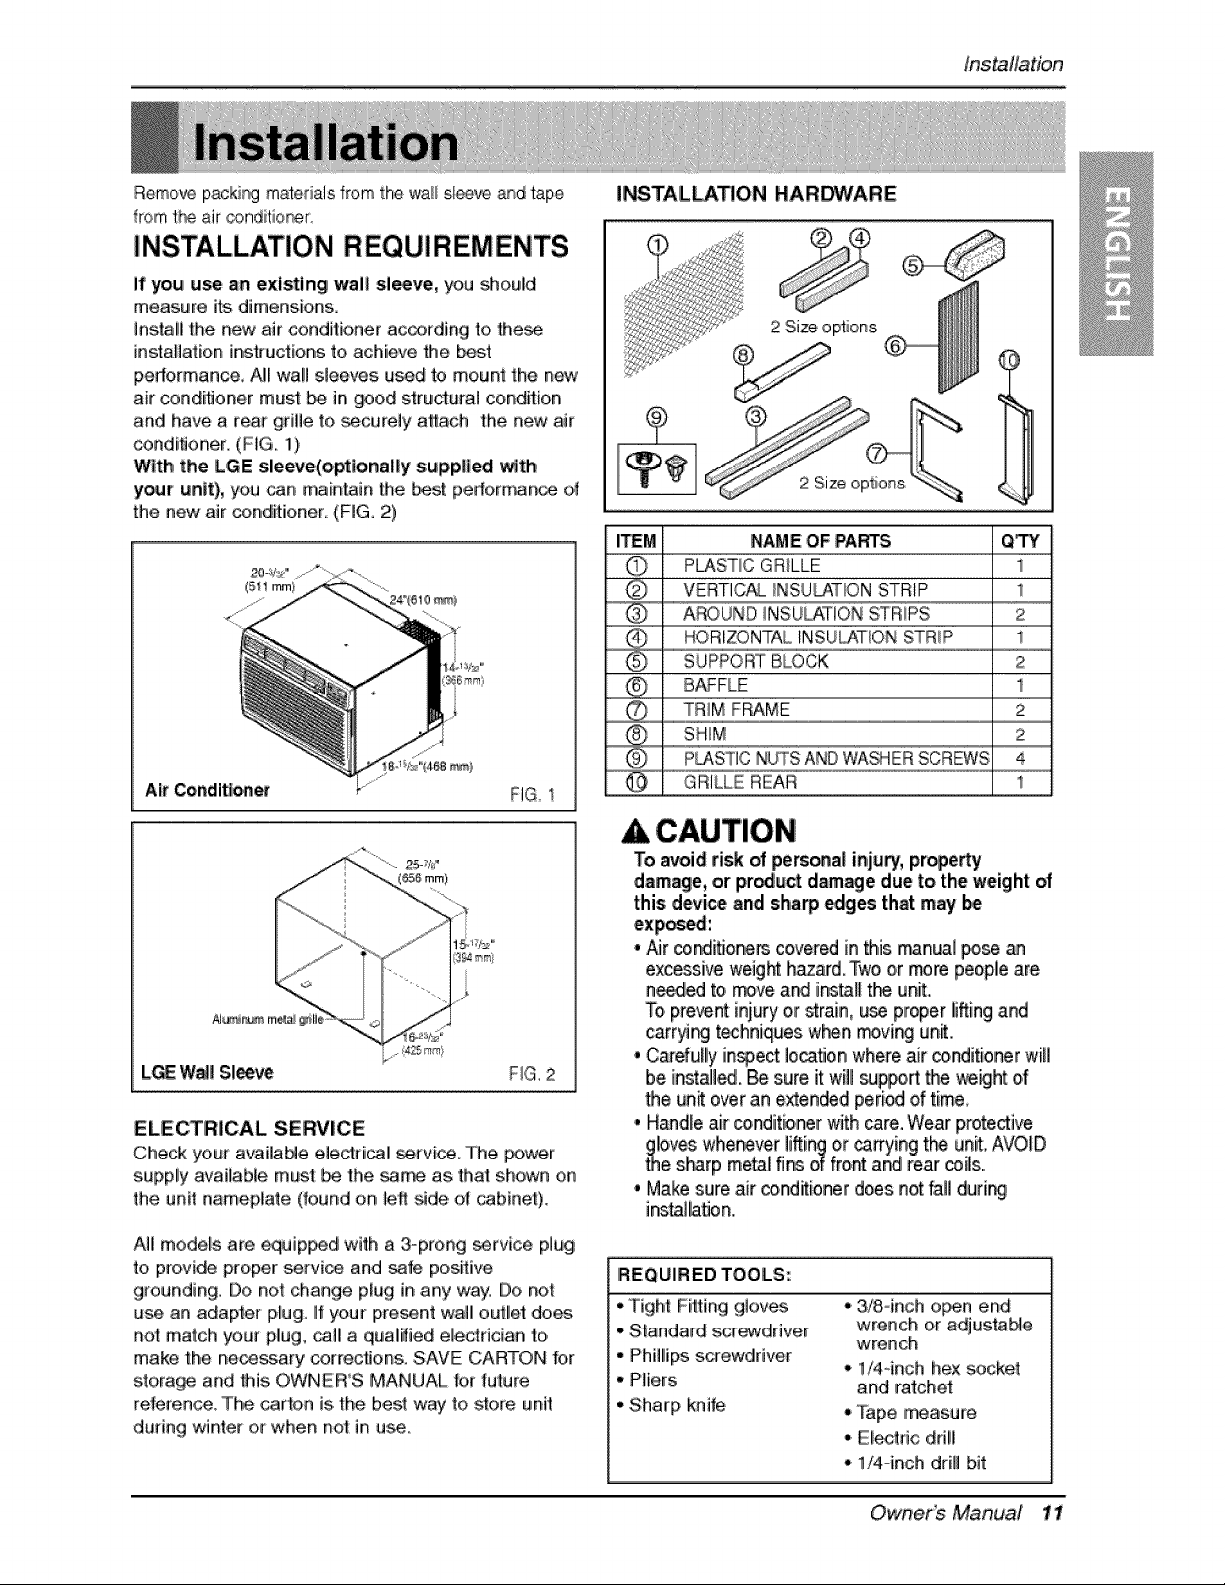
conditioner. (FIG. 1!)
With the LGE sleeve(optio, nally supplied wlth
y_r unit), you can maintain the best pedorrr_n_ of
the new air ®ndiitioner. (FIG. 2)
(511 ram)
AirCondit_o,n_ FIG 1
INS,TALLATION HARDWARE
2 Size options,
©
t
NAME OF PARTS Q'TY
PLASTIC GRILLE 1
VERTIC_/NSU_TION STRIP 1
AROUND INSULATION STRIPS 2
@ B_FLE i
TRIM FRAME 2
SHIM 2
PIJ'_STICNUTSANDWA_ER SCREWS 4
NG, 2
ELECTRICAL SE_ICE
Check your availa_e e,leclri_l _rvi_. "|he _wer
supply available must _ the same as 'that shown on
the unit nameplate, #ound on lel: _de, ot cabinet).
All models are equipped with a 3-prong _rvice plug
to provi_ proiper servi_ and _fe positive
grounding. Do not change plug in any w_/. Do not
use inn adapter p,lug° if your preen| wall outlet do,_
not: match your plug, calli a qualtied electrician to,
make the necessary corrections..SAVE CARTON for
stora£_ and this OWlN!ER'S MANUAL tot future
reference. The carton is the best way to slore unit
during winter o,r when not: in u:_.
To avoi_ risk of persia! inj_, pr_e_y
damage,or pr_ct dam_e due to the weight of
this d_iee and slha_ _ges that may
°_r co_iflo_,_ covered in this manualpose
excessiveweigN h_ard. Two oir Lrlqlorepeople are
n_ed toi _ve and instil tlr_unit.
Topre_ injuryor strain,useproper liiing and
carryi_i techniquesw_n _ir_ un_.
°Carefully in_,ect location whereair conditioner wil
be inst_l_l. _ sure it willsu_art _e wean of
the unitover an extended period oftime
i,Handleair conditbner with care. Wearprotective
gbves whe_ver liling or _rrying t_ unit.AVOID
_e s_rp metal fl_ o_front _r_drear _ils.,
° Make sureair conditioner doesnot All duri_
in_taJbton.
REQUIRED TOOLS:
•"Fight Fitting gl,oves
• Slandard su_,_driver
• Phillips screwdriver
• Pliers
° Sharp knit.
°. 3/8-inch o_n end
wrench or .adju_taMe
wrench
• !/4 inch hex _cket
and ratchet
_i Tape _asure
o.E_tric ddll
• 1/4-inch ,dril bit
Owner_ Manual 1i
installation
CAUTION
We _ron,giy re,commendthe removal of _e
oid wall sleeve and the instalia_on of a new
LGE WaftSleeve,
ilfyou d_i_ to keep Me exiting wall slieeve,
you have to, redired the Iouve_ at Me back of
the waft sleeve illustrati,on,,The u_ of pliers is
re,commendled, ff you DO NOT redirect, you
run Me risk of p,_r performan_ or produ_
failure. This is not covered un_r the terms ot
the LGE ,warranty.
• Pick a io,c,3tion which wiil allow the _nditioned air
to b_ow into the area you wanL G_d installation
with special attention to,the proper position of the
unit will II_n the chance that _r,Ji_ will be
needed.
_EMS IN INSTALLA_ON HARDWARE
You may not need all parts in the k_, Discard unused
)arts
_TEM (inches) ....................................................Ot
Plastic _riffe
Vertical insulation stri_
Around insulation Stri_
Horizontal Insulation Strip
_poM Bbck
Baifl!e
Shim
Trim Frame
Washer Screw
Nlu_(P_astic),
Griffe Rear
23_32 x 1s_,_x i _
11 _3,h6x 1 x _s4
1
2
1
2
2
4
4
1
HOW TO INSTALL
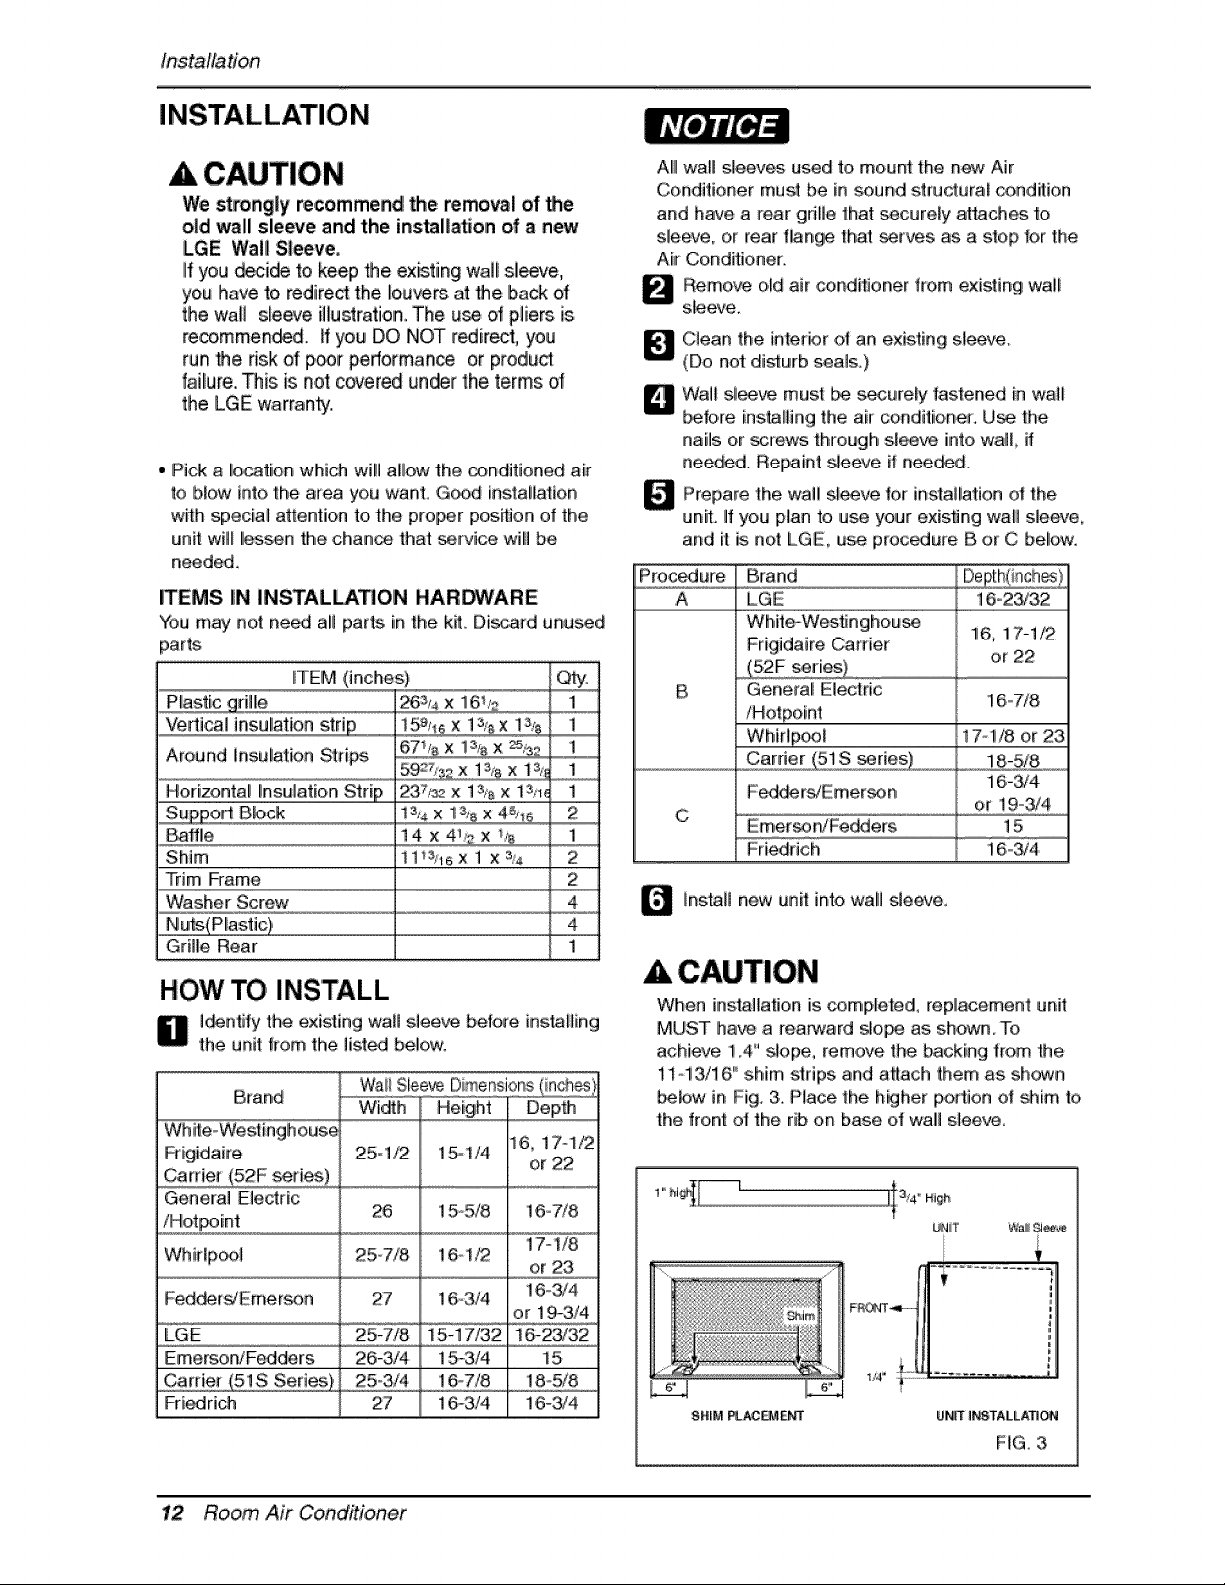
_ _ntJt=y the existing wall sleeve before ins,_lting
the unit item the listed below.
Brand WaliSiee_eDimensions _h_s_
Wi_h Height
25ol/2 15,,,,1/4
Frigidaire
General Electric
26 ! 5o5/8
/Hot_int
Whirlp_l 25-7/8 164
Fed_r_Erner_fl 27 16o3/4
LGE 25-7/8 15-17/32
Emersen/Fe_ders 26-3/4 15-3/4
25o3/4 16....7/8
27 16-3/4Fr[edri,ch
Depth
i6_ 17-1/2
or 22
16o7/8
17-1/8
or 23
! 6.,,_4
or 19-3/4
16-23/32
t5
185/8
16-3/4
A{IIwall _eeve_s used to,mount the new Air
Conditioner must be in _3und structural condition
and have a rear grille that _curely atta_ to
slee_, o,r rear ffangie tha_ _r',_s as a stop lot the
Air Conditioner.
_ emo'_ o,_dair conditioner f_o,m existing wai!
sie_e.
_ lean the interior el an existing sie_.
(Do not d_urb _als.)
Q al! sl_, must be s_urely fastened in wall
_fo, re n,sLatl ng the air conditioner. U_ the
nails or _re_, through sl_ve into waft if
neie_d. Repaint _eeve if' needed.
_ Prepare the wail sl_ve for installation of the
unit. If you plan to use your ,existing wall sleeve,
and it is not LGE0 use procedure B or C below,
Procedure
A 16,.2_32
1i6,,1i7-1/9
or 22
B t 6.....7/8
C ¸
Brand
LGE
Whlite-Westin ghou_
Frigidaire Carrier
_52F _ries_
Generali Electric
iHetpoint
Carder _51S _ries)
Fed®r_Emer_n
Emer,_'a[dFe_ers
Friedrich,
17.,1/8 or 23
18-5/8
16-_4
or !9,,,,,3/4
15
16,,,,,_4
_ installnew unitintowall sleeve
CAUTION
When installation is cempleted_ replacement unit
MUST ha_ a rea_ard slo_ as shown,To
achieve 1.4" _lope, rernove the _cking from the
1i i3716" shim s|fips and a_ach them as sh_m
_bw in Fig. 3. Place the higher portion el shim to
the front ot the rib on base oi wall sleeve
SH_M _AC_ Ui_T I_TALLAT_,ON
FIG. 3
12 Room Air Conditioner
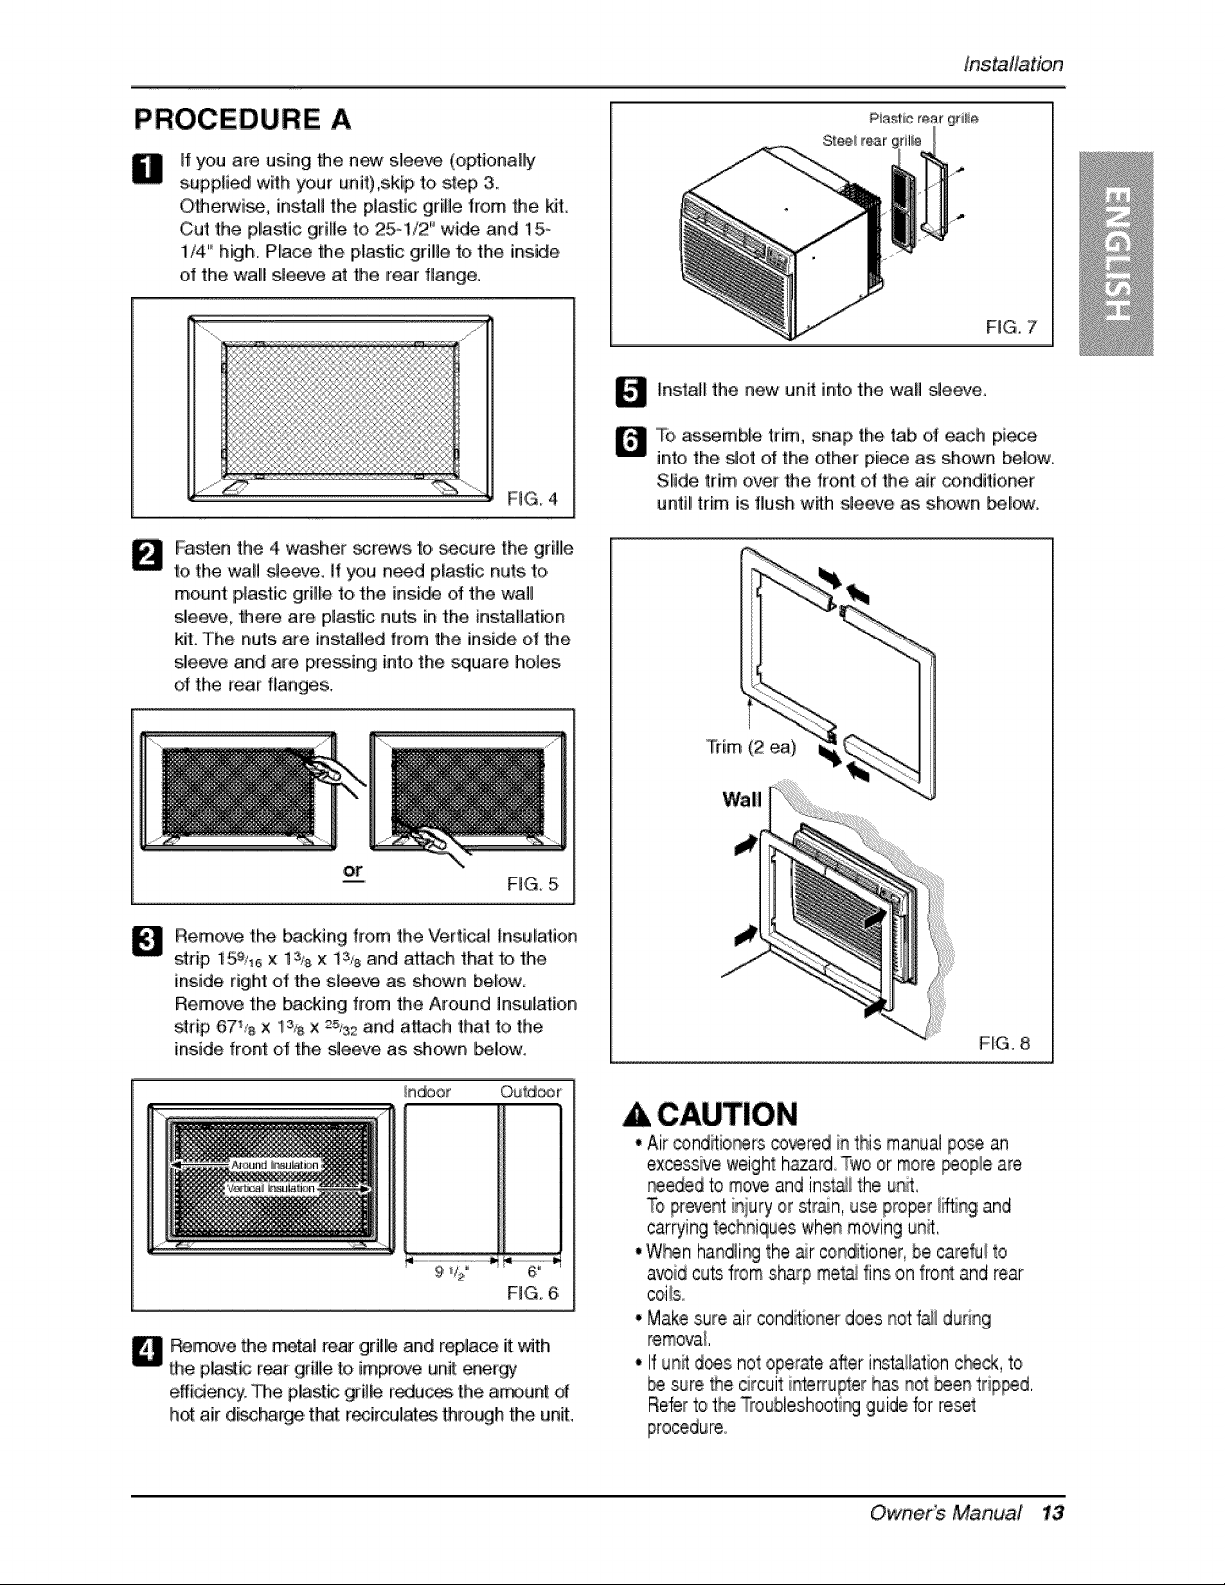
PROCEDURE A
iI
H you are using Me new sleeve (optionally
s,up,p_ied with your unit)_skip to step 3.,
O,lhe_Ti_, install t:he plastic grille lrom #_e kit
Cut the plastic grille to 25o!/2 ``wide and t 5i-
1/4' h_h, Pla_ Me plastic grille to the inside
of the walll sleeve at Me rear flange°
FiG. 4,
B asten the 4 washer _rews to,secure the grille
to the wa!] _ee've. ]'fyou need plastic nuts to,
mount plastic gri_e to,the insi@ d the wal_
sleeve, Mere are plastic nuts in the instal]atbn
kit. The nuts are installed '#o,m the inside of the
slleeve and are pressing into, the _uare holes
of the _ear flanges.
B emove the backing from the Vertical Insu_al:ion
strip, i5%6 x 1ssx is,'s and attach that to the
inside right of the sl_ as shown below.
Remove the backing from the Around Insulation
strip, 67_,,'_x !3_ × 25,,S_and a'Bach 'thai t:othe
inside front ot the _eeve as _own _ow:
indoor Outd_r
9_/_,° @
F]Go6
effidenc_/,The plast_ gri_b [_ui_ 'the a_unt of
hot air diverge, thai r_ircul_ thro[sh the unit,
ins_llation
FIG. 7
_ Install the new unit into the wall _eeve.
To, as_mb_e trim, snap the tab of each piece
into the Hot o:1the other pi_e as shown below.
Slide trim over the #ont o1:the air c#nditioner
until trim is flush w_h _eeve as shown _low_
Wall
NG. 8
A CAUTION
• Air _nditio_rs _vered inthis manualp_ an
excessive weight hazard Two or more _0ple are
reeded to move and inst;_l the unit,
To pre_ent iqury or str_n, use proper l_ing and
carrying tech_iq_,es when moving un_,
•W_n handli% the ar conditioner, be carom to
avoid cuts from sharp met_ fins on fronl and rear
coi_s.
• Make sure air condffioner ,does r_otfuji d_ring
removai,
• If unit d_s not operate after insta!!ation c_, to
sure _he circuit inte_upter ha,snot _en trip_d,
Referto t_ Troubleshooti_ guide for reset
Owtt,er_ Manual 13
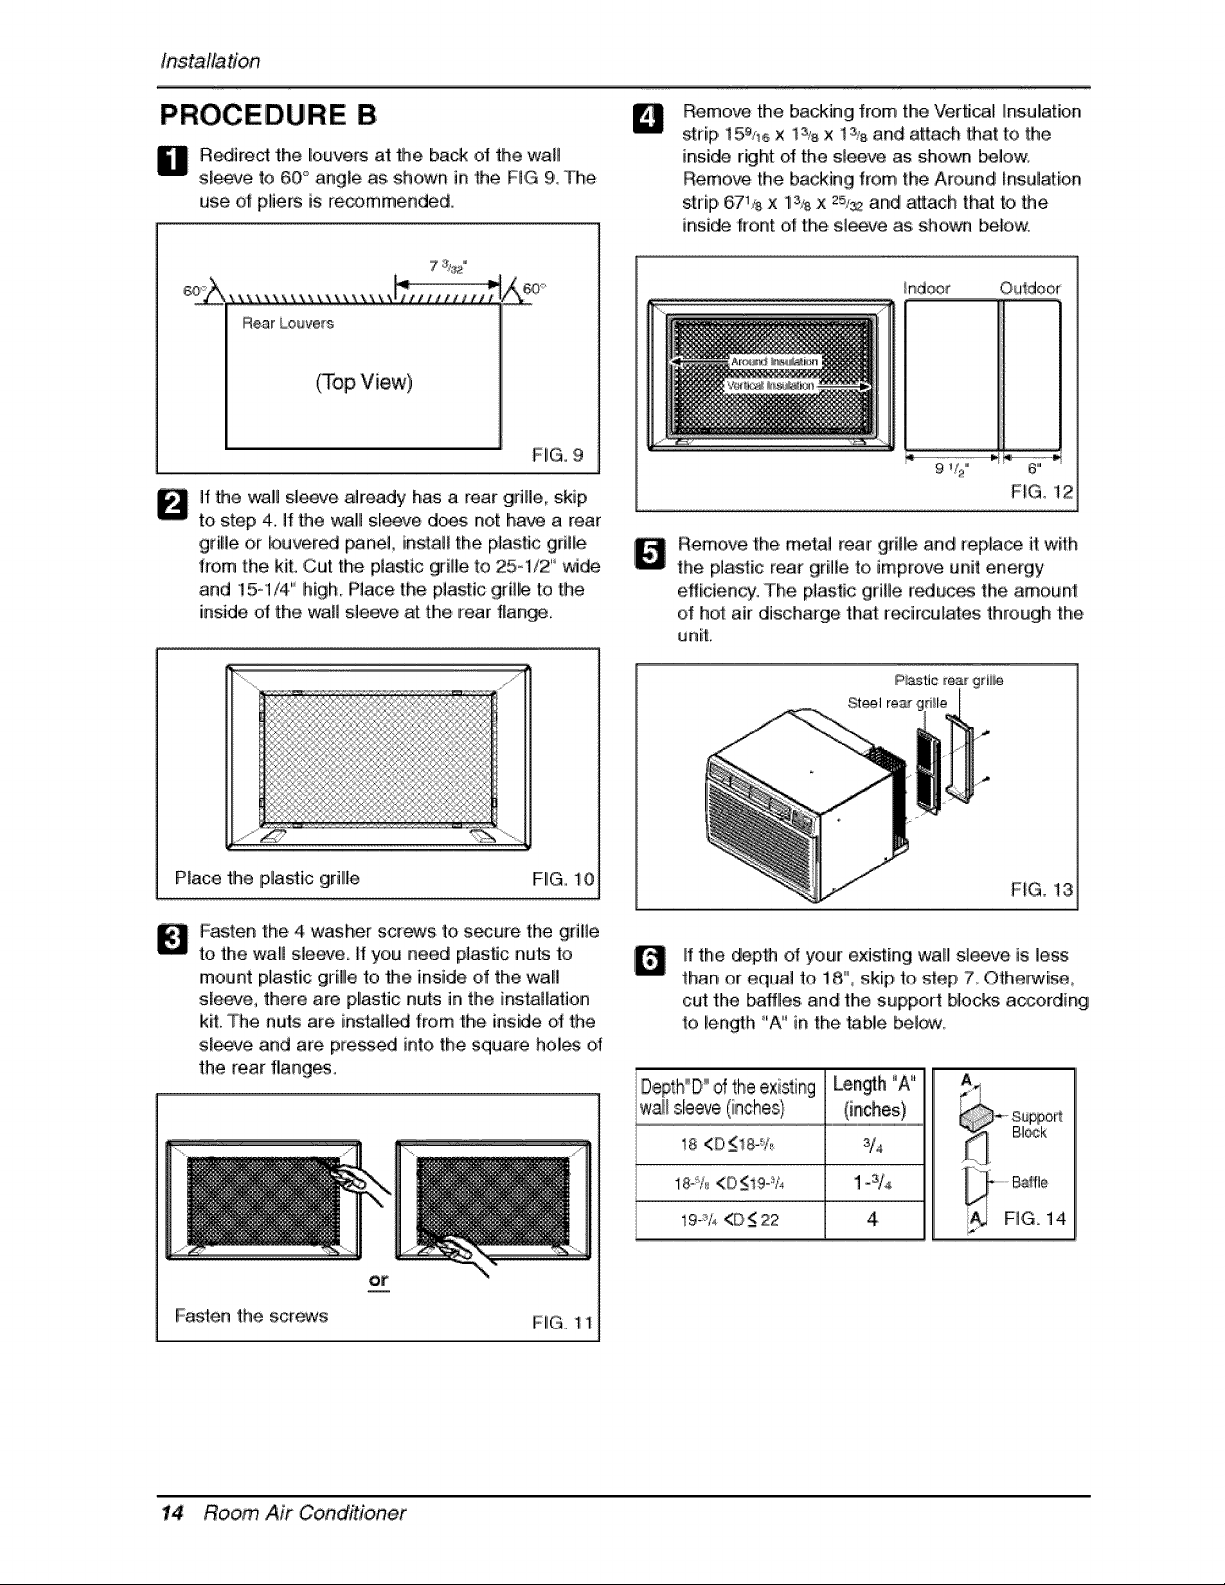
installation
PROCEDURE B
_ edirect the Iieuvers at Me back of the wa_l
sl_ve to 60," angle as, shown in 'the FiG 9,The
use o! ptiers is recommended,
D
Remove the b_cking from tlhe Verticall insulation
strip, t 59_,ex 13,,8x t % and attach #_at te lhe
inside r_ht of the sleeve as shown _lew.
Remove the b_cking from the Around Insulation
strip 67% x 1% x =5_ and al_lach that to the
inside front ,o_the sleeve as; shev_ be!o,w;
RearLo_ve_s
(Top View)
HG.9
it Me walll sleeve already has a rear gdBe, skip
to step 4, It the wal!ll slieeve does not have a rear
gHBe or buvered panel, ins_al_the p_astic grBle
f[o,m the kiL ,Cutthe plastic _ille to 25ol/2 '' wi_
and t 5-1/4 '° high, Place the plastic grille to the
inside of the waB sleeve at the rear flank,
/nd_t Outdoor
F_G, 12
_ emeve the, met:a! rear grite and r,epla_ it with
the plastic rear grille to improve unit energy
efficiency. The plastic gri_te irr_uce's the amount:
of hot air discharge tlhat: reciirculates through the,
unit,
P_ace the plastic grillle
FiG,i0
HG, !3
_ asten the 4 washer scr_s to s_ure the griBe
to the waB sJemte, If you need pJas_c nuts to
meunt plastic gri_lle to Me inside of the walil
sleeve, there are p_astic nuts in the installation
kit. The nuts are inst:a[l_ from the inside ot the
sleeve and are p_e_ed into the square h,ol_ o_
the rear flange.
Fasten the scr_s
FIiG. 11
[f the _p_ of you_rexisting wa[ll sleeve is _ess
llhan or eq_al to 18,'° skip to _ep, 7_ Otherwise
cut tlhe I_fflles and the support blocks according
to length "A' inthe table be]_,
wail sleeve (inches}
18 i(D _! i8-%
19-Y_<D_<22
Length "A "
(in®es)
3/4
1-_/_
4
14 Room Ah Conditioner
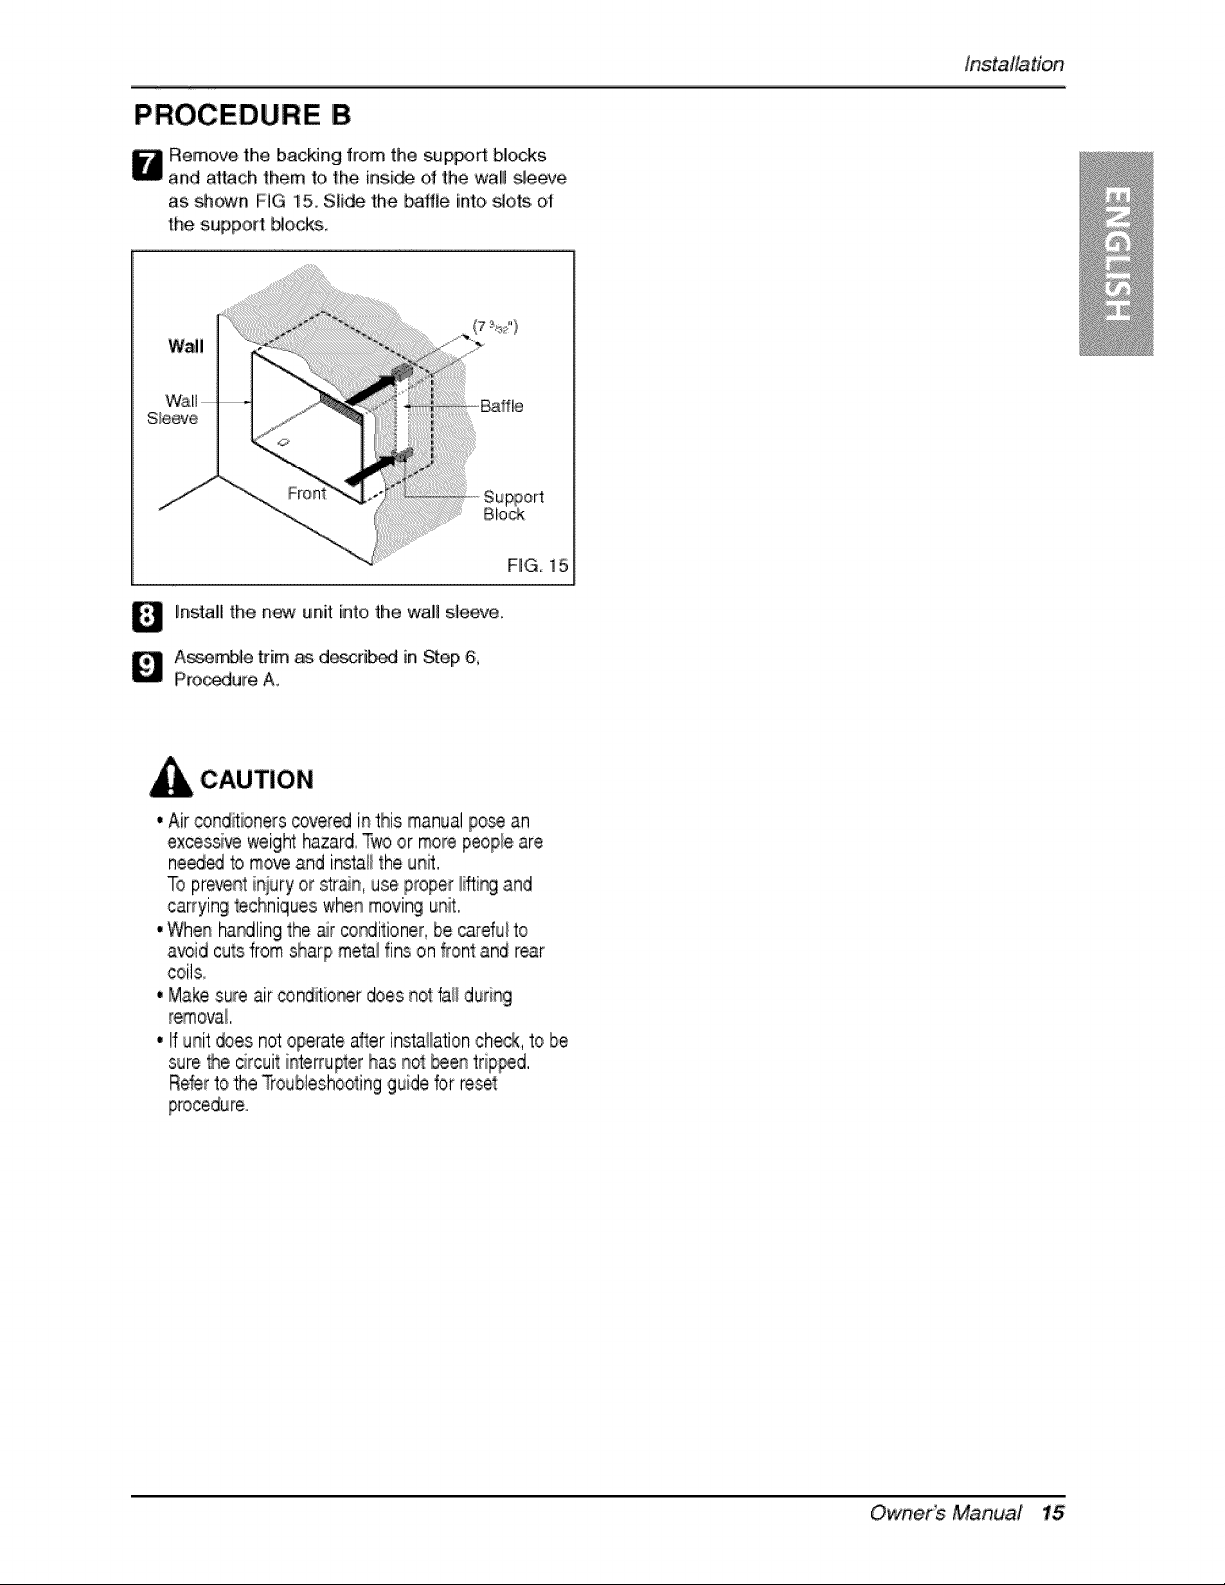
PROCEDURE B
in,staliation
as_n FiG 15,Slide the bafl:te into _ots o!
the support Mocks
Wall
Wall-
Sleeve
UnstalIthe new unit into the wall s_eeve.
_ A_mb_e t_im as d_d_ in _ep 6,
FiG 15
.Air _nd_ioners cover_ in this manual pose an
excessi_ weight hazard,Two or mo_ep,eop_eare
neededto moveand instal_the unit,
To pre,ent iniury or strain, use proper lifti% and
carrying techniqueswhen moving uni,
coils
• Make sure air conditioner does nol fal_during
removal,
• If u_it_es not operate after inaallation che,_,tobe
sure 1hecircuit ilnterrupterhas not_en trip_d,
Refertothe Troubleshootingguideforreset
Own,e,¢_ Manual 1S
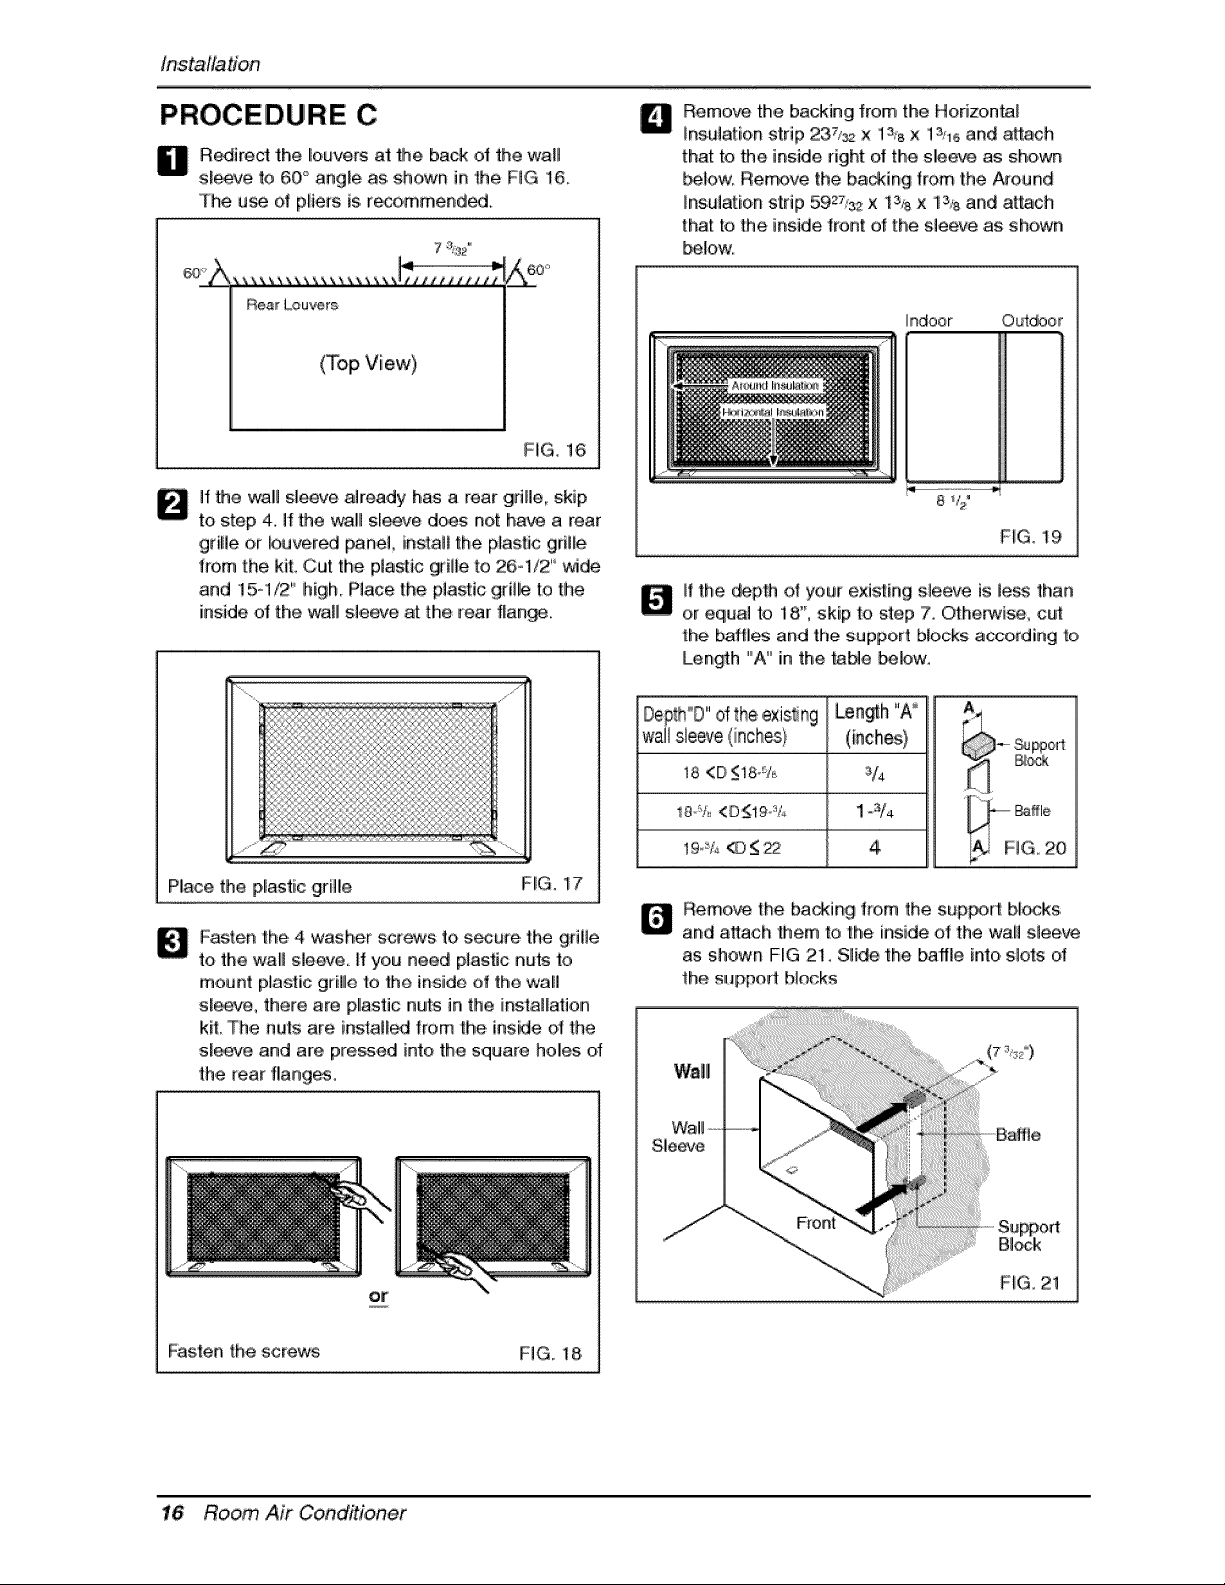
tn,sta:ilation
PROCEDURE C
_ edired the liouvers at the back ot the wa_l
slee've to 60_'angle as.shown in 'the FIG 16
The u_ of pliers is.r_ommend_,
Rea_L,ou'_rs
(Top View)
HG, 16
]f the walll s_e a#eady has a rear gdHe, skip
to step 4. ff the wal!ll slieeve does not have a rear
grille or bu,_red pane], [ns_at_the plastic giri]fe
f_o,mthe kiL Cut the plastic _[]le to 26ol/2 '' wi_
and 15ot!2 ' high, Place the p]asti,c grille 1o the
inside of the wall sleevo at the rear flank,
Place the p_astic grille
FiG. 17
_ aste,n the 4 washer sc_s to s_ure the grille
to the wall sleeve, if you need p]asflc nuts to
mount plast:[c grille to the inside of the wall
sle_we, there are pllastic nuts in the installation
kit. The nuis are insta]l_ from |he inside of the
sleeve and are pressed into the square holes of
'th,e _ear 'flanges,
Fasten the screws, FiG. t 8.
Remove the backing from the Horizontal
_ns,u]atioin strip 237/32 x l_s x !_ and attaoh
that to the inside dght of the s_eeve as shown
_low, Remove the ba_ing from '[he A_ound
insulation strip 59_%_ x 1% x 1% and erich
that to the inside, front of the sle_e as shown
below.
Indoor Outdoor
q
8v_ _
NG. 19
_fthe _pth ol your existing sleece is ]ess than
or equal to 18_', skip to step 7, Otherwise, cut
the baft_ and the support b_ocks according to
Len_h '°A'° in the tame _bw,
18 <D _<18o!:1_,
18o_?<D_19 :%
!9_V4 _22
Len_h "A_
(inches)
1-3/4 _ Baffle
14
_ emove the ba_ing from the s_p_irt bilks
and a_ach them to the inside of the wall slee've
as shown FIG 21. Slide the baffle into. slots of
the Sllj#pQir_ blocks
16 Room Ah Conditioner
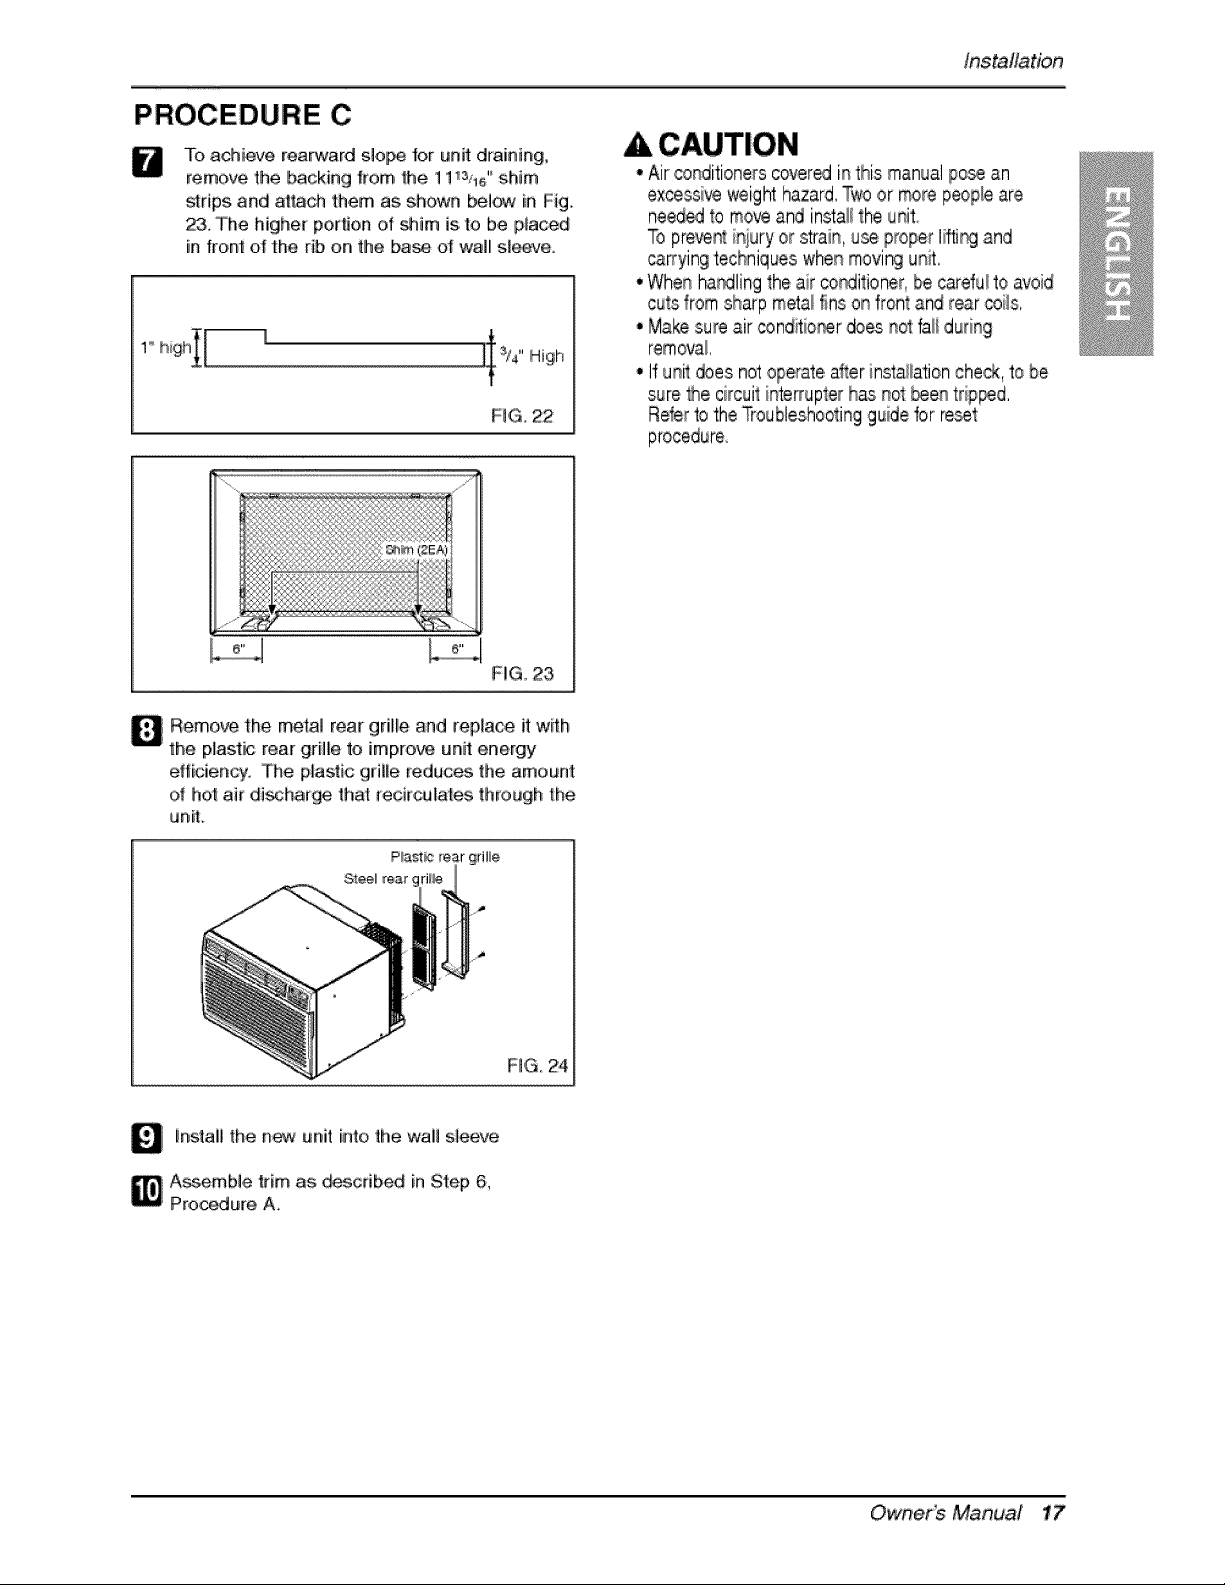
PROCEDURE C
U
To achieve rearward slo_ 1for unit draining,
remeve the backing 'trom the 1! _sa_"shim
strips and at_ch them as shown be!_ in Fig.
23. The highe_ portion of _im is,to be p!aced
in front of the, rib,on the base of wall s_eeveo
Ins_llation
1° high_[I_] ]I s/4" High
FIG, 22
A CAUTION
• Air conditionerscover_ in this manual poseaN
,excessiveweight hazard,Two,ormore peopleare
need_ tomove and instalitheunit
To preventinjury or strain, use proper lifli_ and
canying techniques when movingunit,
• When ha_ling the air conditioner,be carefu!toavoid
,cutsfrom sharpre,eta/finson frontand rear coils,
• Make sure air cond_io_r doesnot fali during
removal,
°If unit doesnot operateafter insta#ationcheck,tobe
FIG, 23
_ ,emo_ the metal rear grille and replace itwith
the plastic rear grille to improve unit energy
ef'l:iciency. The plastic gd_fe reduces the amount
of h,ot air discharge that recircu_ates through the
unit
H,G, 24
_ ins'tall the n_ unit into the wall s_eeve
_ ssembl,e trim as _scdbed in Step 6,
Precc_ure A,
Owt],e,r_ Manual 17
OperatingInstructions
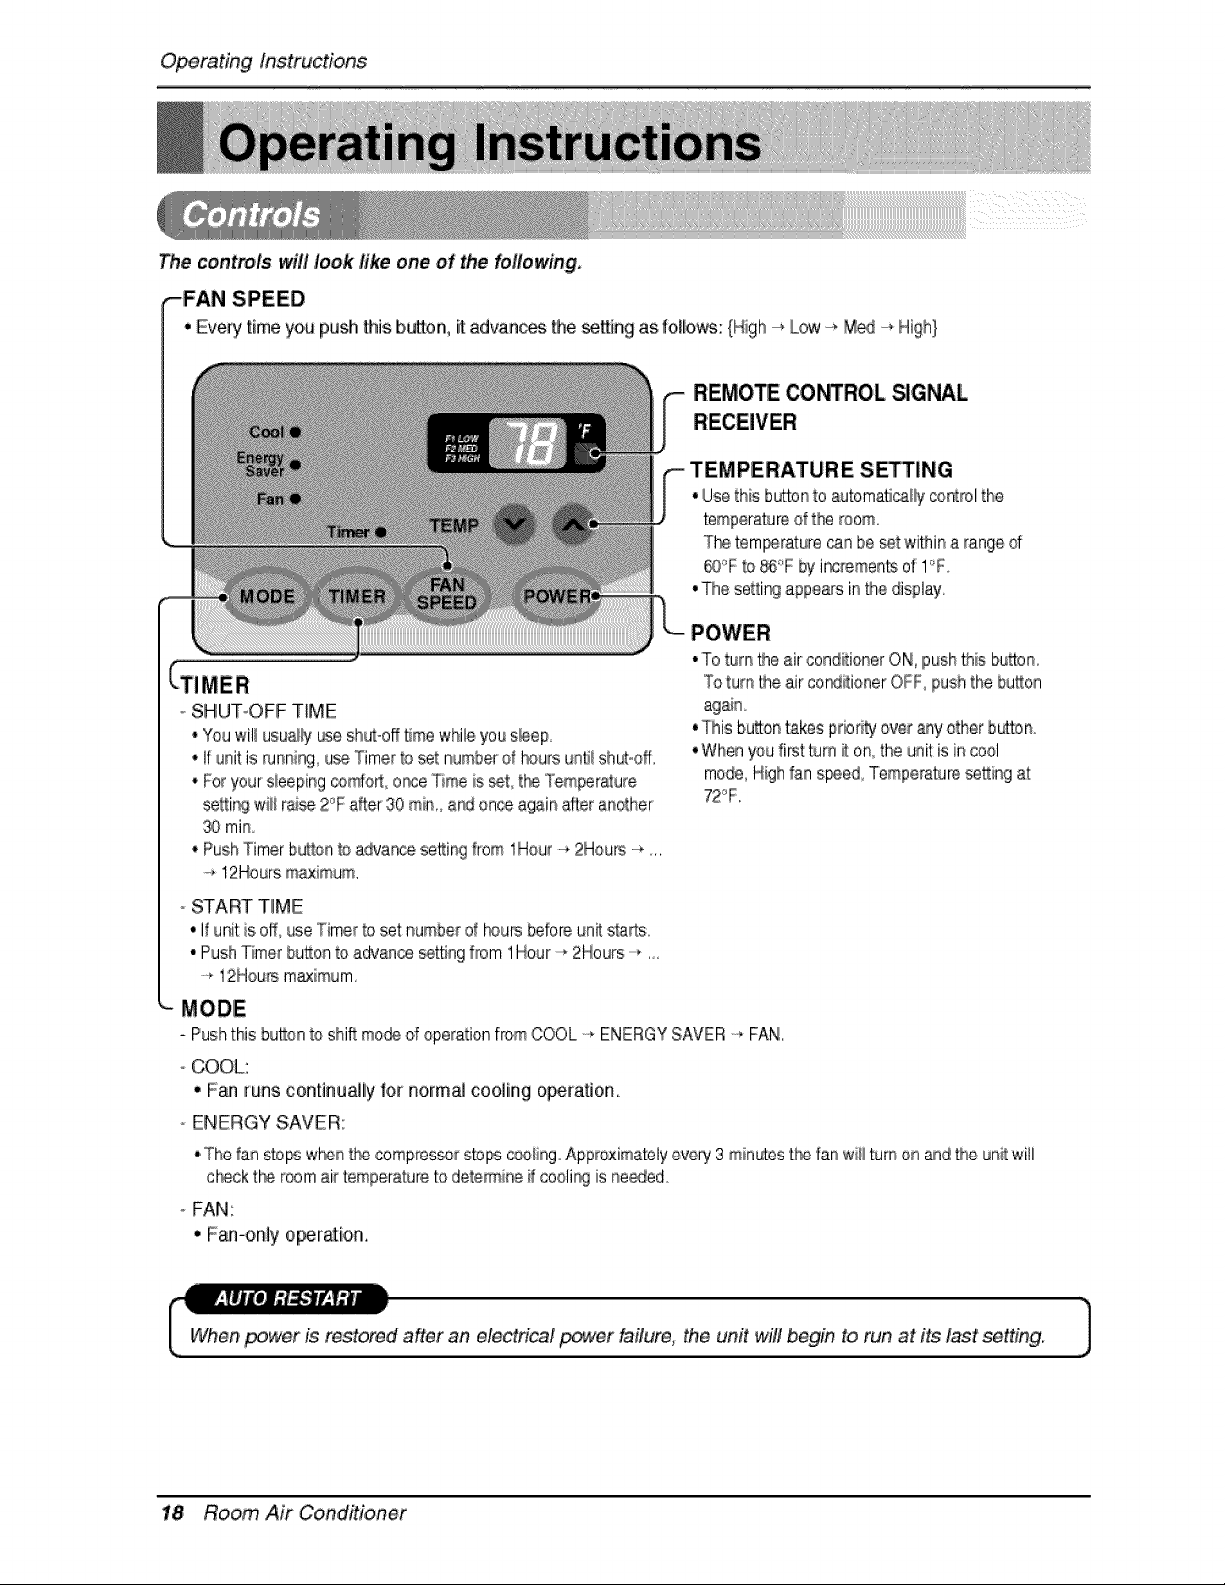
'Thecontrols 'will look like one of the foflowing,
,-FAN SPEED
• Every time youpushthis button, it advanc_ U)e_ng as fo,llows:{High_, Low-_M_ -* High}
REMOTE _ROL SIGNAL
TEMPERATURE SETTING
. Use this buttonto automaticallycontrolthe
temperature d the room,
Thetem_rature _n be_t within a range d
_;F t,o_'_F by i_rements of I°F
•Thesettir¢ appears in Hiedisplay,
POWER
•To turn he aircend_iione[ O_ pueh _ie bu_on,
To turnthe airco_itioner OFF push the bu_on
* This bu_on takes prior_ over _qy other button
.Whenyoufirst:turn _ on the unit:isin cool
mode, High fan s_ed, Temlpe_tu_ se_ing at
72°F,
oSTART TIME:
.If unit:isoff useTimer toset: number d b<_ursbeforeunitsta_s,.
•Push Timer bu£on to advance _ng f_Dm1Hour 2Hours..........,
--_'12Hou_ m_imum
"_MODE
- Push this button toshi_me® o_operation fromCOOL -_ENERGY SAVER -, FAN,
oCOOL:
• F_ runs continuaJily to_ normaJ cooling o_ration
ENERGY SAVER:
,, The fan sto_ wb_n tl'_ compresser,Jto_ c___iingApg_ximatoly ,every3 min_o_ 't[_ fan w#l_m oa _d _e unt will
ctr_ck tt_ rOOmairtemperature to determinei_coeli% isne_ed
o FAN:
• F_-only ope[a_ion,,
after an ete_rical _er failure, the unfl will begin to run at its last setting, 1
18 Room Air Conditioner

OperatingInstructions
The remote control and control panel wifl look like one of the following pictures,
•To turn tte air _nditbner O,N, p_h this button.
To turn t_ air conditioner OFF, p_h t_ button again.
•ThUsbutton takes pdodty over .any ot_r button.
,.When you first turn iton_ the unit is in c_,o_m(_ie_ High fan spe_,
Temperature setting at 72_F.
•Auto Resta_
_nthe event at a power failiure, the unit wilUrun attl"_, p[evio,_ _tting once
power returns.
TEMPERATURE SE_NG
•Uee this bll_on to _u|omaticaHiy con/Imlthe 'l_mper_ture o_the room
The tern#era|are can be set within a range of 60°F to 8_F by
increments of I*_'F.
•The setting @pea_s in the dispmay
FAN SPEED
"Eve_ time you=push this b_on it adwn_e the se_r_ as fo.l[o_:
(High °-*Low-_ Med-_ High)
TIMER
-SHU"T-OFF TiME
•You wiBusu_ly u_ shut-off time while _u s_p.
• If unit is.running_ u_ Timer to, set nu_,er of hours unfil shut_off.
• For your slieepiP_ comfort, o,nc_ "Time is set, '[_ "Temperature setting will
rai_ 2"F after 30 rain, and once again after a_ther 30 rain.
• P_h Timer bu|_on to advan_'_e_tting from 1Hour _, 2Hours ....._.
12Hours maximum.
,oSTART TiME
' ff un_ is off,u_ Timer to set of_urs beforeun_sta_s,
*Push Timer b_on to advice setti_ from IHoulr -_2Hours -_ ,,. -_
!2Hours maximum,
- P_h thb button b shift m_ d c_raflon froimCOOL ......ENERGY SAVER --_FAN
o C_L:
• Fan runs conUn_[iy for normal ,cooling o[_ration.
- ENERGY SAVER:
• T_ fan stops wlhenthe ®rr_res_r stops ceoling_ _4#proximate_yevery 3 minutes the fan wiB turn on
and t_ unit wiT! ch_k the morn air temperature to determine if cooling is need.
FAN:
• Fan-only operation.
Owttie,y_Manual 19
Operatinginstructions
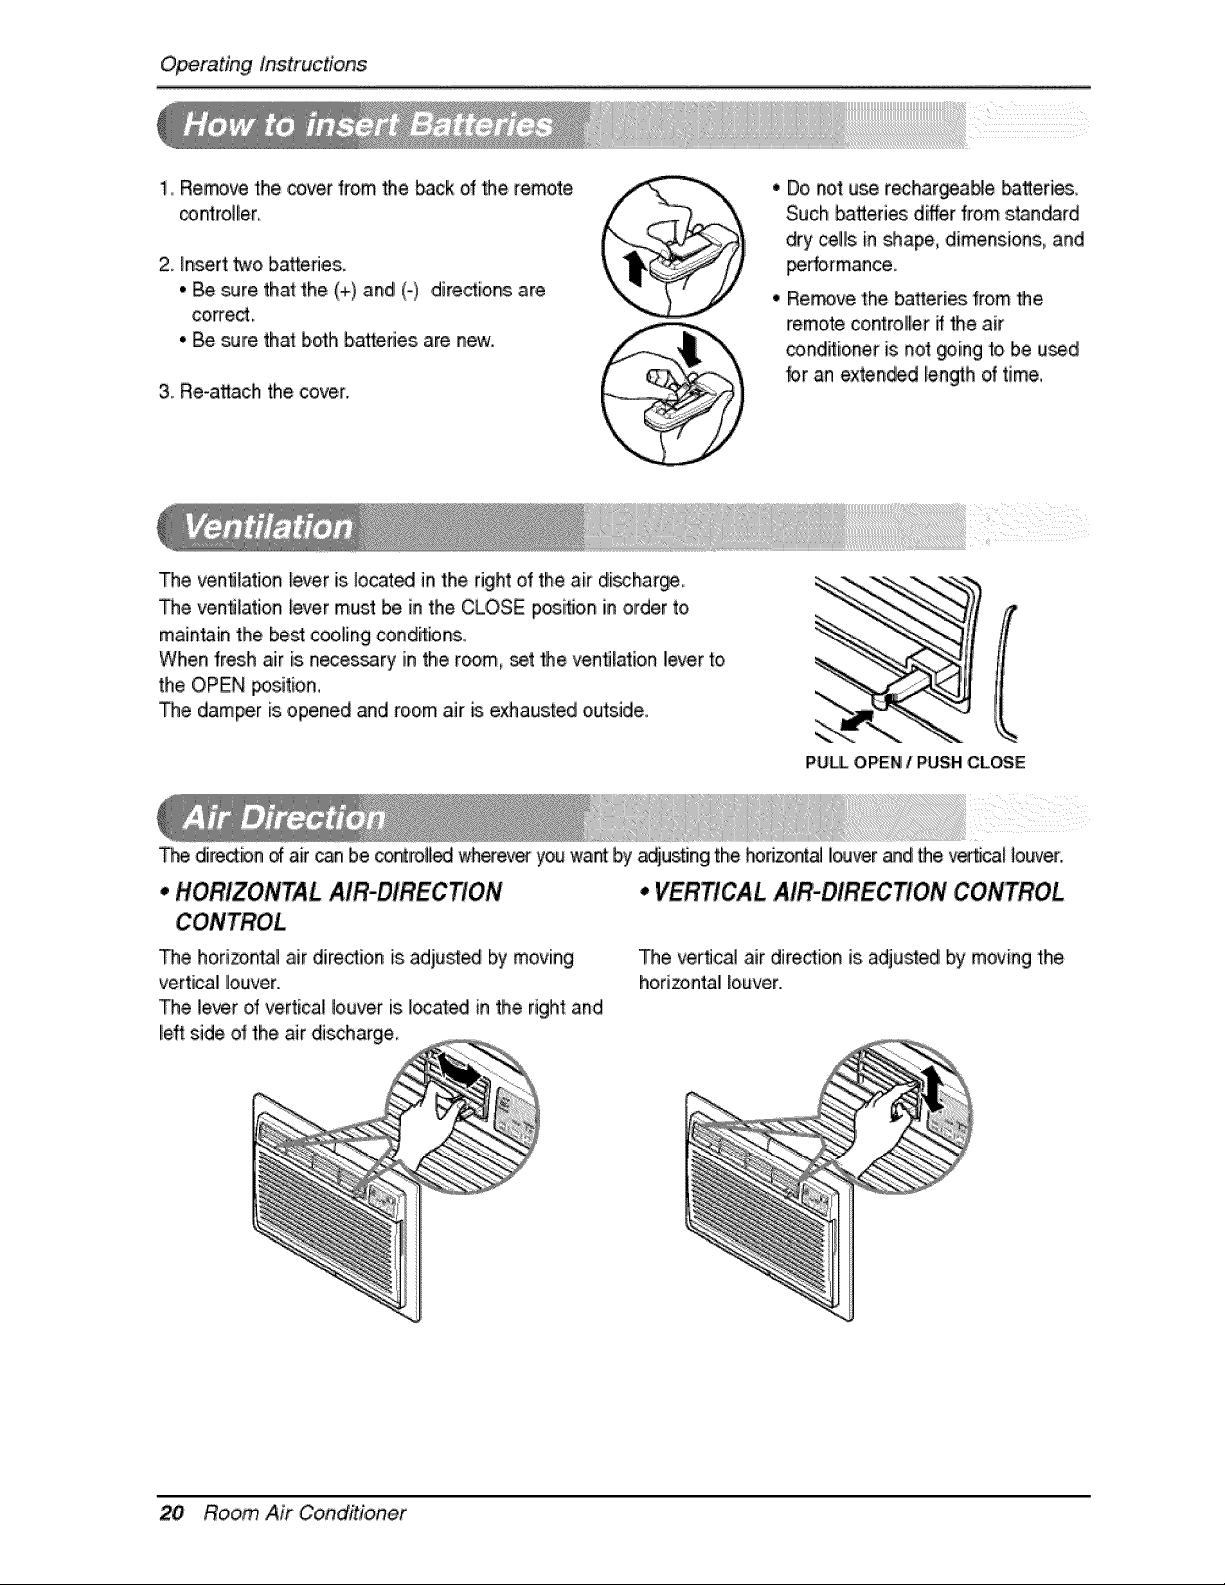
1, Removethe ,coverfrom the back of He remote
controller
2. !nsert two batteries.
° Be _re that the (+) and (o) dire_ions are
c.o_ect.
° Be _re that b.o_hb.a_edes are new.
3. Re-attach the cover,
° Do not use r_har_aNe batteries,
Such batteries differ from stan_rd
dry ,cellsin _ape, dimensions, and
_rformance.
° Ren_ve the ba_eri_ from _e
remote controller ifthe air
_ndi_io,neris n__ing to be used
br an extendedlen_hoftime.
The ventilation _everis_ocat_ in the right of theair di_harge_
The ventilation _evermust be in the CLOSE pos_.on in .order to
maintain the best cooling conditbns.
When fresh .air is necessary in the r_m, set He ventilation !ever to
the OPEN _sition,
The damper isopened and room air _ exhausted outside.,
I
PULL OPEN / PUSH CLUE
T_ direct:iond air _n be oontrolled whe_eve_- youwant by_justing the hedzontaJlouver_d He v_ical Io_¢er.,
,'HORIZONTAL AIR-DIRECTION * VERTICAL AIR-DIRECTION CONTROL
The horizontal air direction is adiusted bymoving
vertical louver,
The le_r of vertica! louver is I_ated in the right and
left side ofthe .airdischa#ge,
The vertical air dim_ion isadju,_ed by m_ing the
horizonta_ louver.
20 Room Air Co_,ditioner
Maintenan¢eandServlce
TURN THEAIR CONDITIONEROFFAND REMOVETHE PLUG FROM THE POWEROUTLET
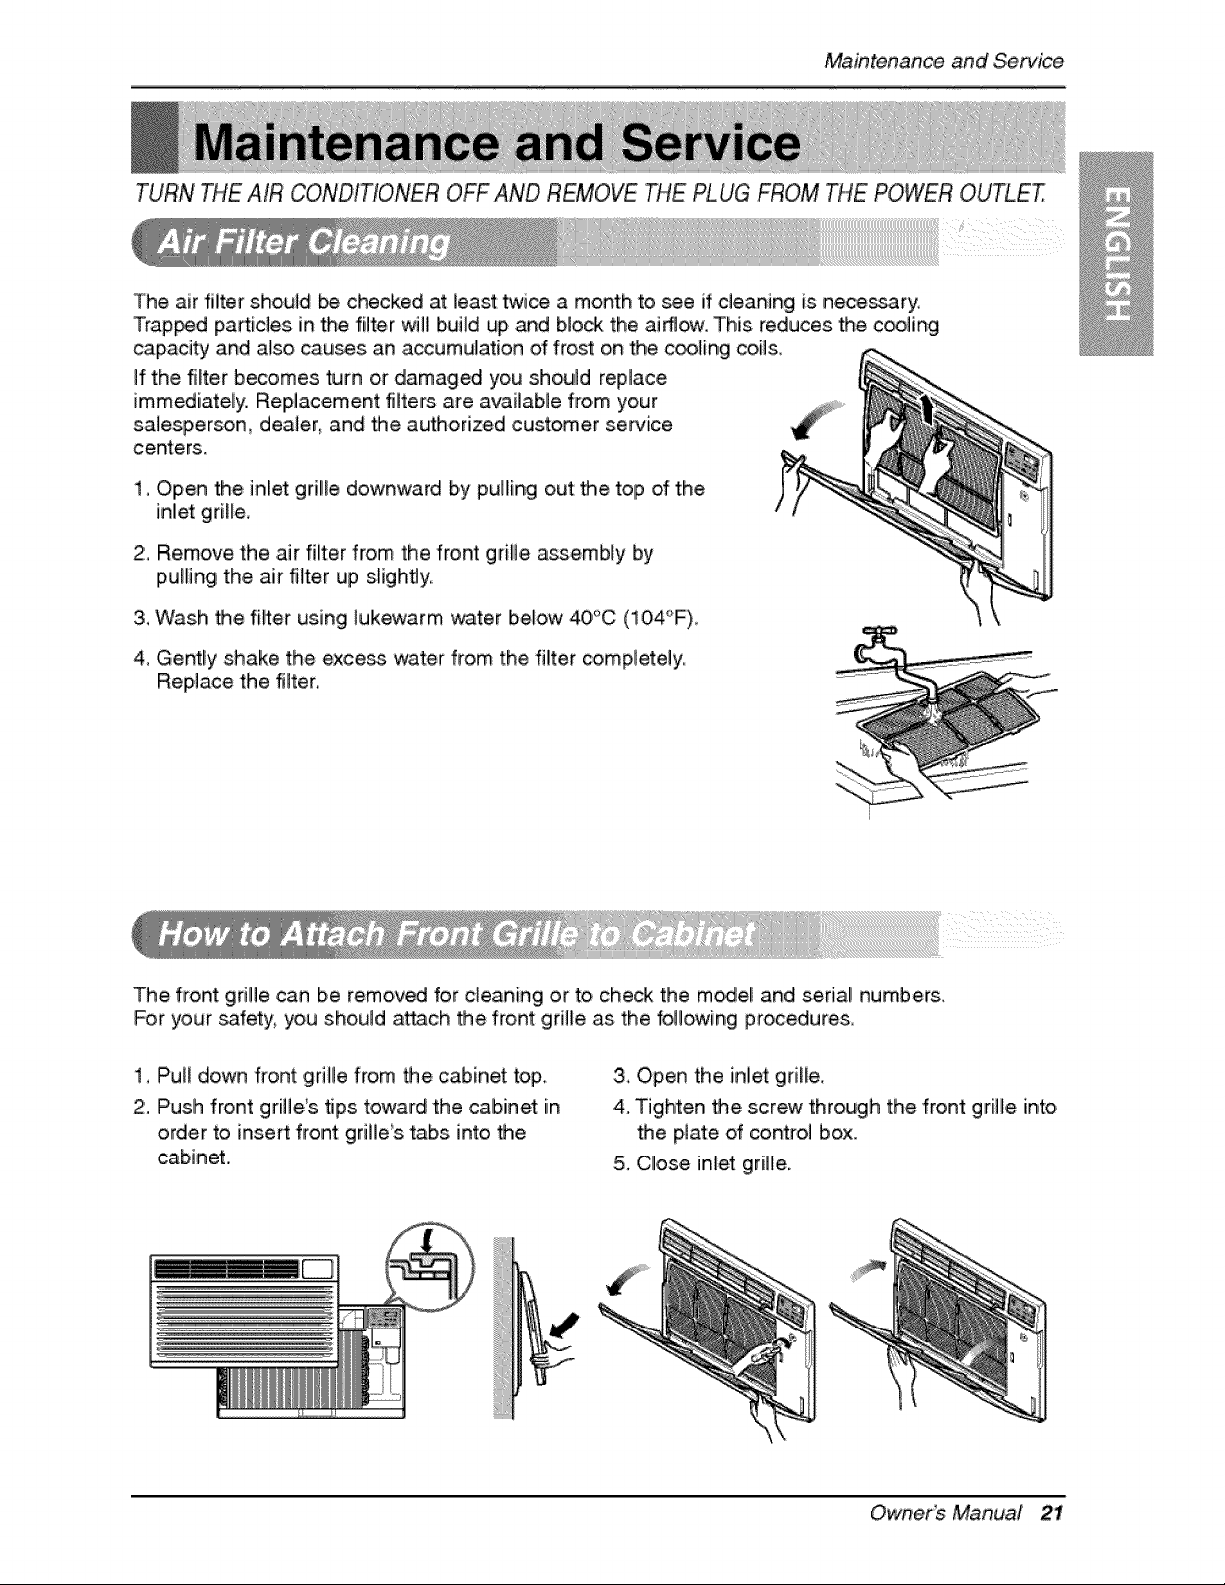
The air filter should _ checked at least twice a month to see if cleaning is neces_ry.
Trap_d particles in the filter wi!l build up and blo_ the ai_v. This reduces the c_ling
capacity and also causes an accumulation of frost on the c_ling coils,
If the fiilter becomes _rn or damaged you should replace
immediately: Replacement filters are available from your
satesper_n, dealer, and the authorized customer service
centers.
1_Open the inlet gril!le downward b,y pulling out the top of the
inlet grille.
2, Remove the ,air filter from the front gri_e assembly by
pulling the air fi_ter up s_ighfly,
3, Wash the fi_ter using _ukewarm v,_ter below 40"C (104_'F)_
4. Gently shake the excess water from the filter completely.
Replace the filter,
The front grille can be removed for c_eaning or to check the model[ and serial numbers.
For your _fetyi you should attach the front girille as the following procedures
!, Pu[[ down front grille from the cabinet top
2, Push front grille_s tips toward the cabinet in
order to inse_ front grille_s tabs into the
cabinet..
3, Open the inliet grille,
4. Tighten the screw through the front grille into,
the p_ate of control box.
5. CIIose inlet griH,e.
Owner_ Manual 21
Maintenance and Service
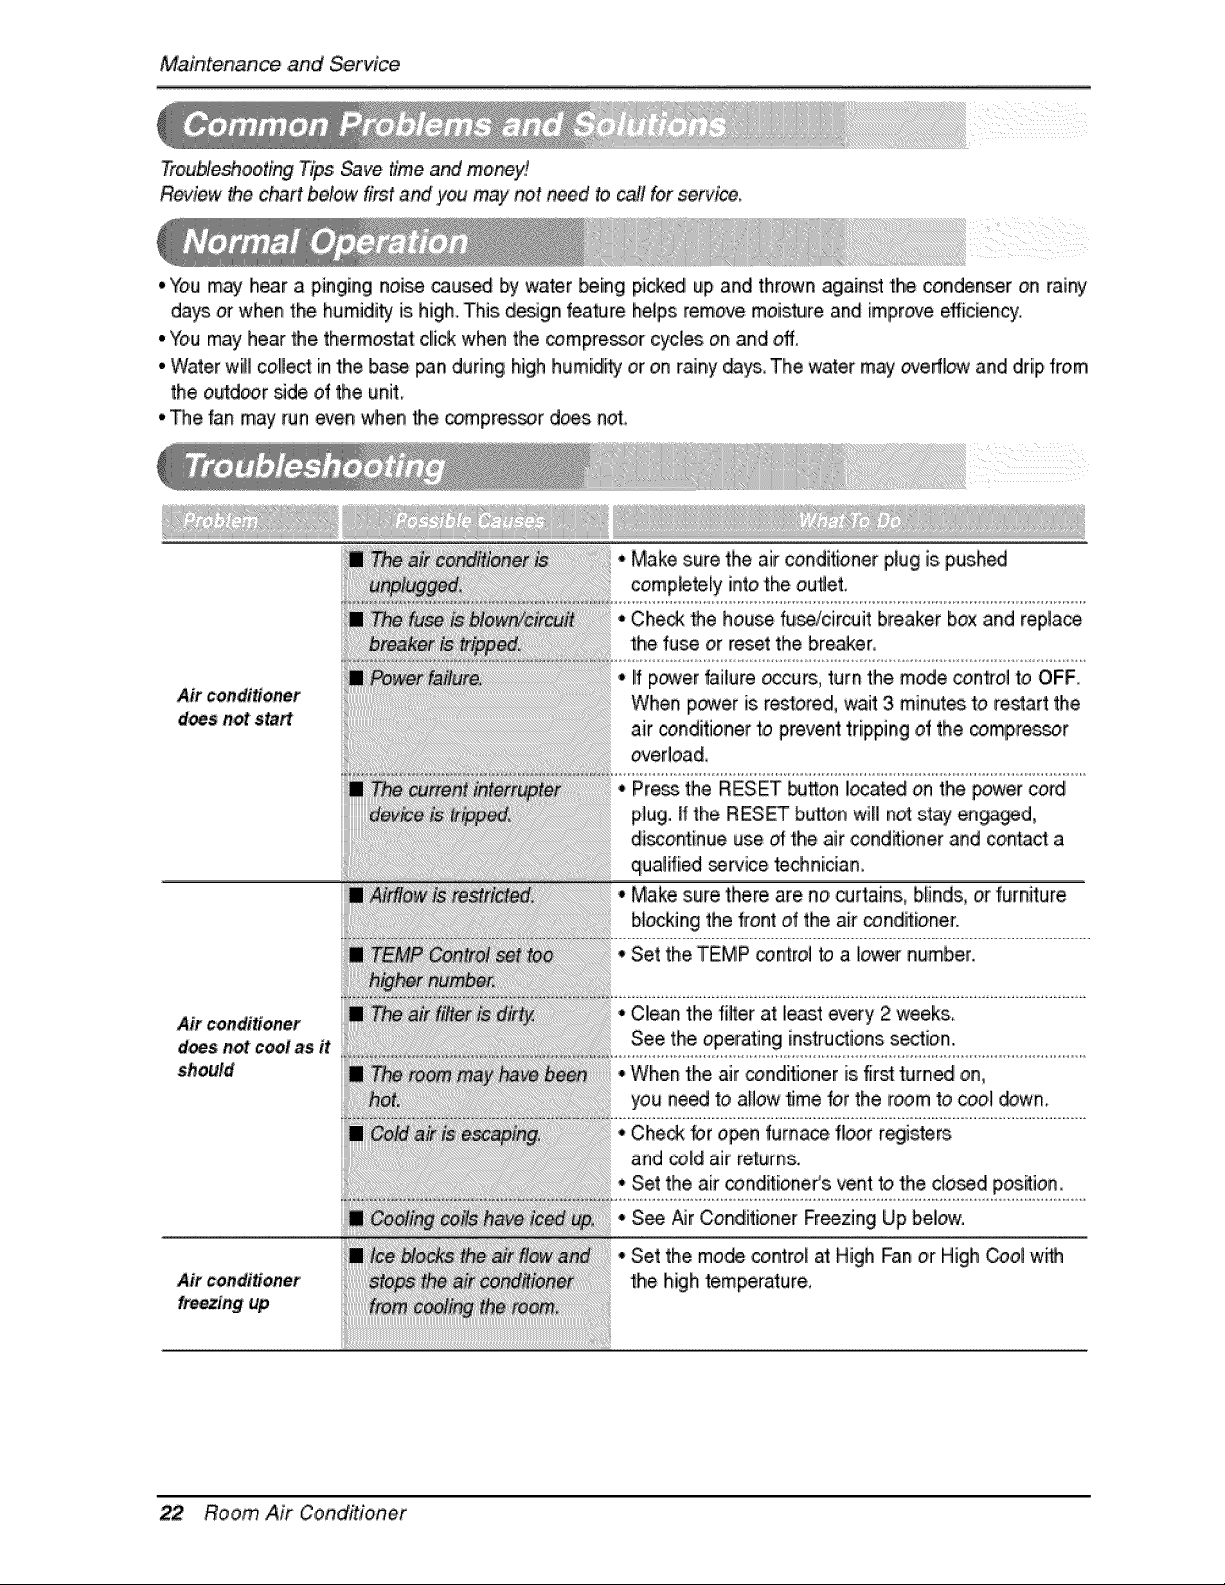
#ouble._eoting Tips _ve time and mioin_ey!
Review _e c_rt below first and y_ m,aynot need to call forservice_
i ii _i i
• You may hear a pinging noi_ caused b.y water _in,g picked up and thr,ownagainst the condenser ,onrainy
days or when the humidi_ iis high.This design fea_re helps remove moisture and improve efficiency..
° You may hear the thermostat dick when the compressor cycles on and off.
°Water will collect in the ba_ [panduring high humidly or on rainy _ys_ The water may _erflc_ and drip from
the outd_r _de of the unit
• _e fan may run _en when the, ,co,mpres_r does n_,
i
Air,con_#oner
d_s notstart
Airc'ondi#oner
d_,s not c_! as ,it
should
Air,condi#oner
* Make sure the air conditioner p_ug is.push_
comp_teiy intothe outlet
* Che_ the house fun!circuit breaker box and replace
the fu_ or reset the breaker_
If p,_er fail[ureoccurs,, turn the mode con#el toOFF_
When p_er isrestored, wait 3 minut_ to restart the
air conditioner to prevent tripping of the _mlpre_r
ocer!oad_
• Pre_ the RESET button I!ocatedon the _wer cord
p_ug. [! the RESET button willn_ stay enga_d,
di_o,ntinue use ofthe air cond_ioner and co,ntacta
qu.alffied _rvice technician.
Make sure there are no, _rtains, b_inds, ,orfurniture
blocking the front of the air conditioner.
• Set theTEMP _tro[ to a lower number.
* Clean the fimterat least every 2 week&
See the operating instructions se_ion.
* When the air conditioner isfir_ turned ,on,
you need to anew_me for the ir_m te _ool down_
* Che_ br open furnace,floor r_iste_
and _ld air returns.
* Set the air _ndlffioneCs vent _ the do_d position,
S_ Air Conditioner Fr_zing Upbelow.
- Set the mode control atHigh Fanor High _ol w_
the high _mperature,
22 Ro,om Air Conditioner
Memo
Owl],e,r_Manual 23

