

Owner's Manual
II::RRFTSMRN'I
1/3 SHEET SANDER
Double Insulated
Model Nos.
315.116310
315.116320
ModelNo.315.116310
Save this manual for
future reference Model No. 315.116320
CAUTION: Read and
follow all Safety Rules and
Operating Instructions before
first use of this product.
Customer Help Line: 1-800-932-3188
Sears Roebuck and Co., Hoffman Estates, IL 60179 USA
Visit the Craftsman web page: www.sears.com/craftsman
972000-506
12-98
• Safety
• Features
• Assembly
• Operation
• Maintenance
• Parts List (_o
NRTL

TABLE O_ CONTENTS
Is' General Safety Rules ................................................................................................................................................. 2-3
• SpecificSafety Rules/Symbols ............................................................................................................................... ..3-4
• Features ...................................................................................................................................................................... 5-6
• Assembly.................................................................................................................................................................... 7-9
• "Operation.................................................................................................................................................... ;.............9:;10
• Maintenance................................................................................................................................................................ 11
• Accessories................................................................................................................................................................. 11
• ExplodedView And Repair Parts List .................................................................................................................... 14-15
• PartsOrdering/ Service.............................................................................................................................................. 16
A WARNING: Read end understand all Instruc-
tions. Failure to follow all instructions listed
below, may result in electric shock, fire and/or
serious personal injury.
SAVE THESE INSTRUCTIONS
Work Area
• Keep your work area clean and well lit. Glut-
tered benches and dark areas invite accidents.
• Do not operate power tools I_n explosive
atmospheres, such as in the presence of
flammable liquids, gases, or dust. Power tools
create sparks which may ignite the dust or fumes.
• Keep bystanders, children, and vleltore away
while operating • power tool. Distractions can
cause you to lose control.
Electrical Safety
i Double Insulated tools are equipped with a
poladsed plug (one blade is wider than the
other.) This plug will fit In a polarized outlet
only one way. If the plug does not fit fully in
the outlet, reverse the plug. If It atlll does not
fit, contact a qualified electrician to Install a
polarized outlet. Do not change the plug In
any way. Double insulation [] eliminates the
need for the three wire grounded power cord and
grounded power supply system.
• Avoid body contact with grounded surfaces
such as pipes, radiators, ranges and refdgera-
tore. There is an increased risk of electric shock
if your body is grounded.
• Don't expose power tools to rain or wet condi-
tions. Water entedng a power tool will increase
the dsk of electdc shock.
Do not abuse the cord. Never use the cord to
carry the tools or pull the plug from an outlet.
Keep cord away from heat, o11,sharp edges or
moving parts. Replace damaged cords Imme-
dlafely. Damaged cords increase the risk of
electdc shock.
• When operating a power tool outside, use an
outdoor extension cord marked "W-A" or "W".
These cords are rated for outdoor use and reduce
the risk of electdc shock.
Personal Safety
• Stay alert, watch what you are doing and use
common sense when operating a power tool
DO not use tool while tired or under the Influ-
once of drugs, alcohol, or medication. A
moment of inattention while operating power tools
may result in serious personal injury.
• Dress properly. Do not wear loose clothing or
jewelry. Contain long hair. Keep your hair,
clothing, and gloves away from moving parts,
Loose clothes, jewelry, or long hair can be caught
in moving parts.
• Avoid accidental starting. Be sure switch Is
off before plugging In. Carrying tools with your
finger on the switch or plugging in tools that have
the switch on invites accidents.
2

• Remove adjusting keys or wrenches before
turning the tool on. A wrench or a key that is left
attached to a rotating part of the tool may result
in personal injury.
• Do not overreach. Keep proper footing end
balance at ell tlmee. Proper footing and balance
enables better control of the tool in unexpected
situations.
• Use safety equipment. Always wear eye
protection. Dust mask, nonskid safety shoes,
hard hat, or hearing protection must be used for
appropriate conditions.
Tool Use and Care
• Use clamps or other practlcel way to secure
end support the workplece to a stable plat-
form. Holding the work by hand or against your
body is unstable and may lead to loss of control.
• Do not force tool. Use the correct tool for
your application. The correct tool will do the job
better and safer at the rate for which it is de-
signed.
• Do not usa tool if switch does not turn It on or
(_)ff.Any tool that cannot be Controlled with the
S_'itch isdangerous and must be repaired.
• Disconnect the plug from the power source
before meldng any edJuatments, changing
accessories, or atorlng the tool. Such preven-
tive safety measures redUce risk of starting the
tool accidentally.
• Store Idle tools out of reach of children end
other untrained persons. Tools are dangerous
in the hands of untrained users.
• Maintain tools with care. Keep cuffing tools
sharp and clean. Pmpedy maintained tools, with :
sharp cutting edges are less likely to bind and are
easier to control.
• Check for mlsallgnment or binding of moving
parts, breakage of parts, and any other oondi-
tion that may affect the tools operstlon. If
damaged, have the tool serviced before using.
Many accidents are caused by poorly maintained
tools.
• Use only accessodes that are recommended
by the manufacturer for your model. Accesso-
des that may be suitable for one tool, may be-
come hazardous when used on another tool.
SERVICE
• Tool service must be performed only by
qualified repair personnel. Service or mainte-
nance performed by unqualified personnel could
result in a risk of injury.
• When servicing • tool, usa only Identical
replacement parts. Follow Inatructlons In
Maintenance section of this manual. Use of
unauthodzed parts or failure to follow Mainte-
nance Instructions may create a risk of electric
shock or injury.
3
SpecificSafetyRulesfor Sanders
• Never use this or any power sander for wet
sanding or liquid polishing. Failure to comply
will increase the risk of electrical shock.
Additional Rules for Safe Operstlon
• Know your power tool. Read operator's
manual carefully. Learn Its applications and
limitations, as well as the specific potential
hazards related to this tool. Following this rule
will reduce the risk of electric shock, fire, or
serious injury.
• Always wear safety glasses. Everyday eye-
glasses have only Impact-resiatant lenses;
they are NOT safety glasses. Following this rule
will reduce the risk of personal injury.
• Protect your lungs. Wear a face or dust mask
if the operation Is dusty. Following this role will
reduce the risk of personal injury.
• Protect your hearing. Wear hearing protection
during extended periods of operation. Fo$$ow-
ing this rule will reduce the risk of personal injury.
• Inspect tool cords periodicelly and, If dam-
aged, have rspelrsd at your nearest Factory
Service Center or other Authorized Service
Organization. Constantly stay aware of cord
location. Following this rule will reduce the risk
of electric shock or fire.
• Check damaged parts. Before further use of
the tool, a guard or other part that Is damaged
should be carefully checked to determine that
It will operate properly and perform Its In-
tended function. Check for alignment of mov-
Ing parts, binding of moving parts, breakage of
parts, mounting, and any other conditions that
may affect Its operation. A guard or other part _
that Is damaged should be progerly repaired or
replaced by an authorized service center.
Following this rule will reduce the risk of electric
shock, fire, or serious injury.
• Don't abuse cord. Never carry the tool by the
cord or yank It to disconnect It from the
receptacle. Keep cord away from heat, oil,
and sharp edges. Following this rule will reduce
the risk of electric shock or fire.
• Make sure your extension cord Is In good
condition. When using an extension cord, be
sure to use one heavy enough to carry the
current your product will draw. A wire gage
size (A.W.G.) of at least 16 Is recommended
for an extension cord 100 feet or less In
length. A cord exceeding 100 feet is not
recommended. If in doubt, use the next
heavier gage. The smaller the gage number,
the heavier the cord. An undersized cord will
cause a drop in line voltage resulting in loss of
power and overheating.
• Inspect for and remove all nails from lumber
before sanding. Following this rule will reduce the
risk of personal injury.
• Drugs, alcohol, medication. Do not operate tool
while under the Influence of drugs, alcohol, or
any medlcetlon. Following this rule wI!l reduce the
risk of electnc shock, fire, or personal injury.
• Savethese Inatructions. Refer tothem frequently
and use them to Instruct others who may use
this tool. If you loan someone this tool, loan
them these Inatructlons also. This willreduce the
risk of fire, shock, and injury.
SYMBOLS •.
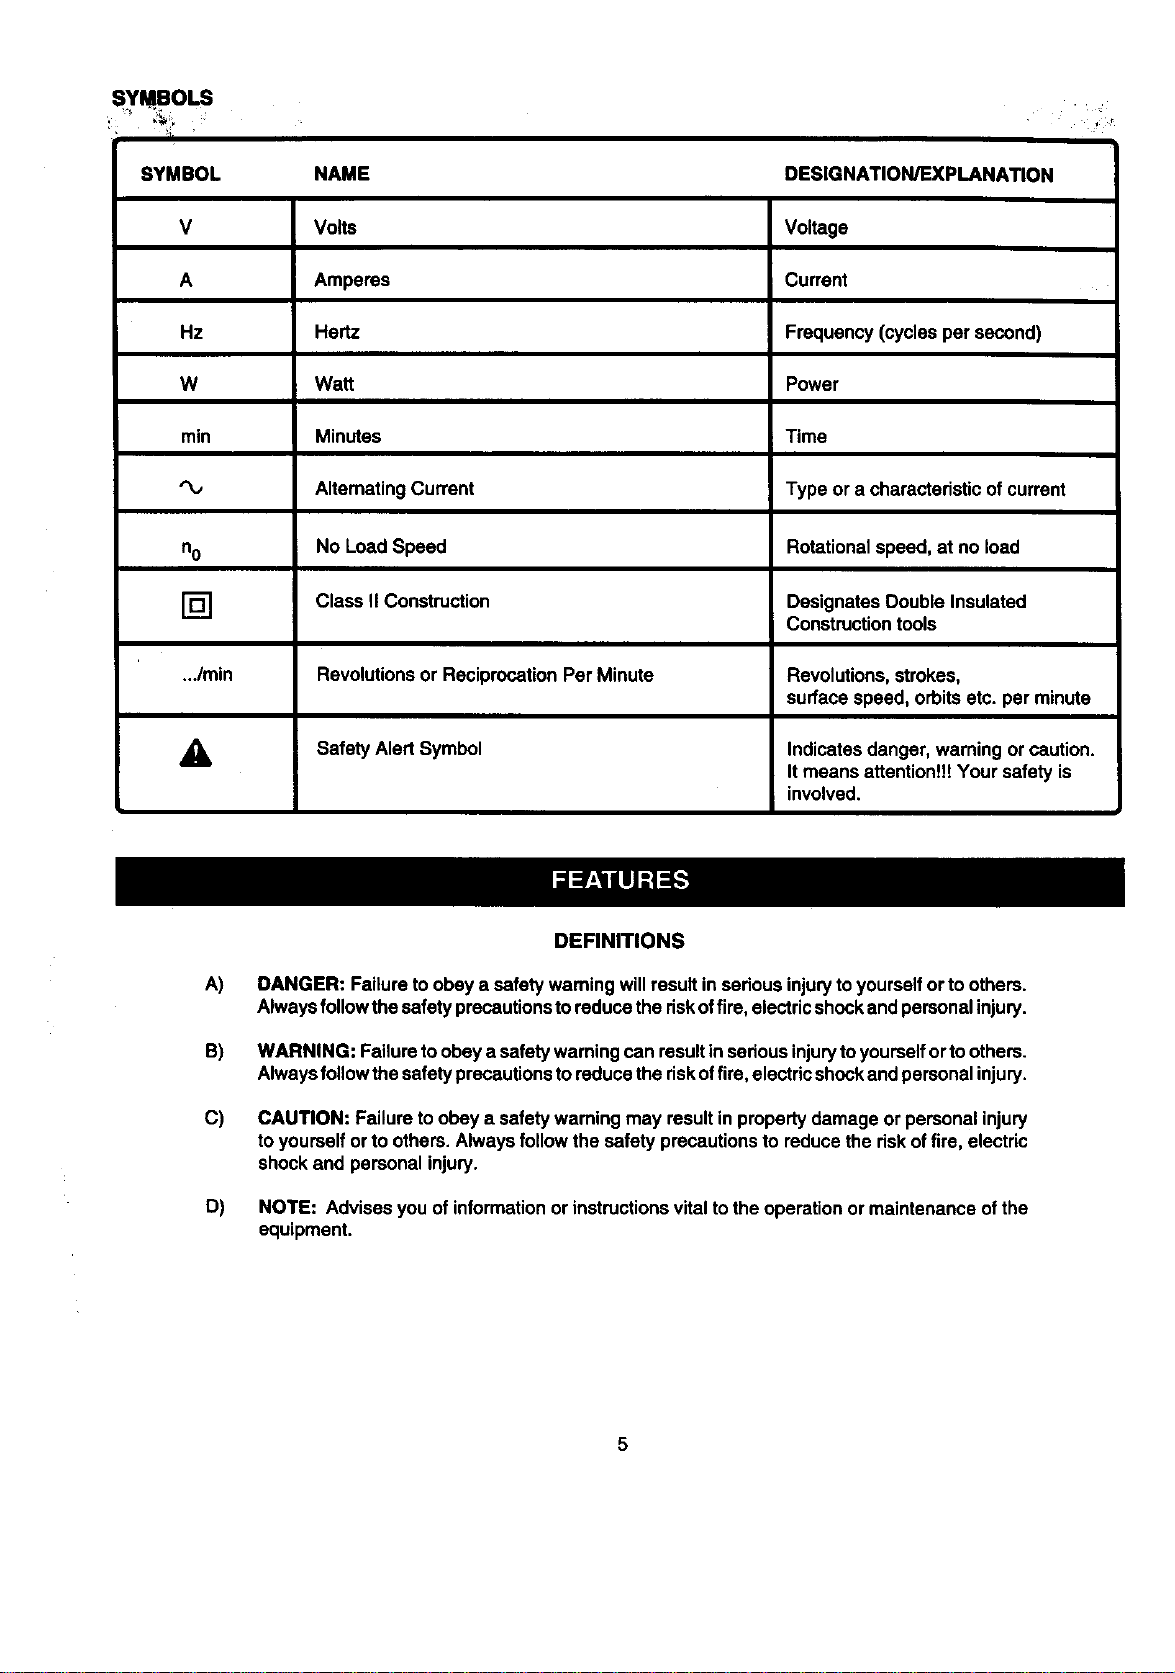
SYMBOL NAME DESIGNATION/EXPLANATION
V Volts Voltage
A Amperes Current
Hz Hertz Frequency(cyclesper second)
W Watt Power
min Minutes Time
AlternatingCurrent Type or a characteristicof current
no No LoadSpeed Rotationalspeed,at no load
[] Class II Construction Designates DoubleInsulated
Constructiontools
.../min Revolutionsor ReciprocationPer Minute Revolutions,strokes,
surfacespeed, orbitsetc. per minute
_k Safety AlertSymbol Indicatesdanger, warningorcaution.
Itmeans attentionU!Your safety is
involved.
A)
B)
C)
D)
DEFINITIONS
DANGER: Failuretoobey a safety wamingwillresultin seriousinjurytoyourselfor toothers.
Alwaysfollowthesafetyprecautionstoreducethe riskoffire,electricshockand personalinjury.
WARNING: Failuretoobey a safety warningcanresult inseriousinjurytoyourselfortoothers.
Alwaysfollowthesafetyprecautionsto reducetheriskoffire, electricshockand personalinjury.
CAUTION: Failureto obey a safety waming may resultin propertydamage orpersonalinjury
to yourselforto others.Alwaysfollow the safety precautionsto reducetherisk offire, electric
shockand personalinjury.
NOTE: Advisesyou ofinformationor instructionsvital tothe operationormaintenance ofthe
equipment.
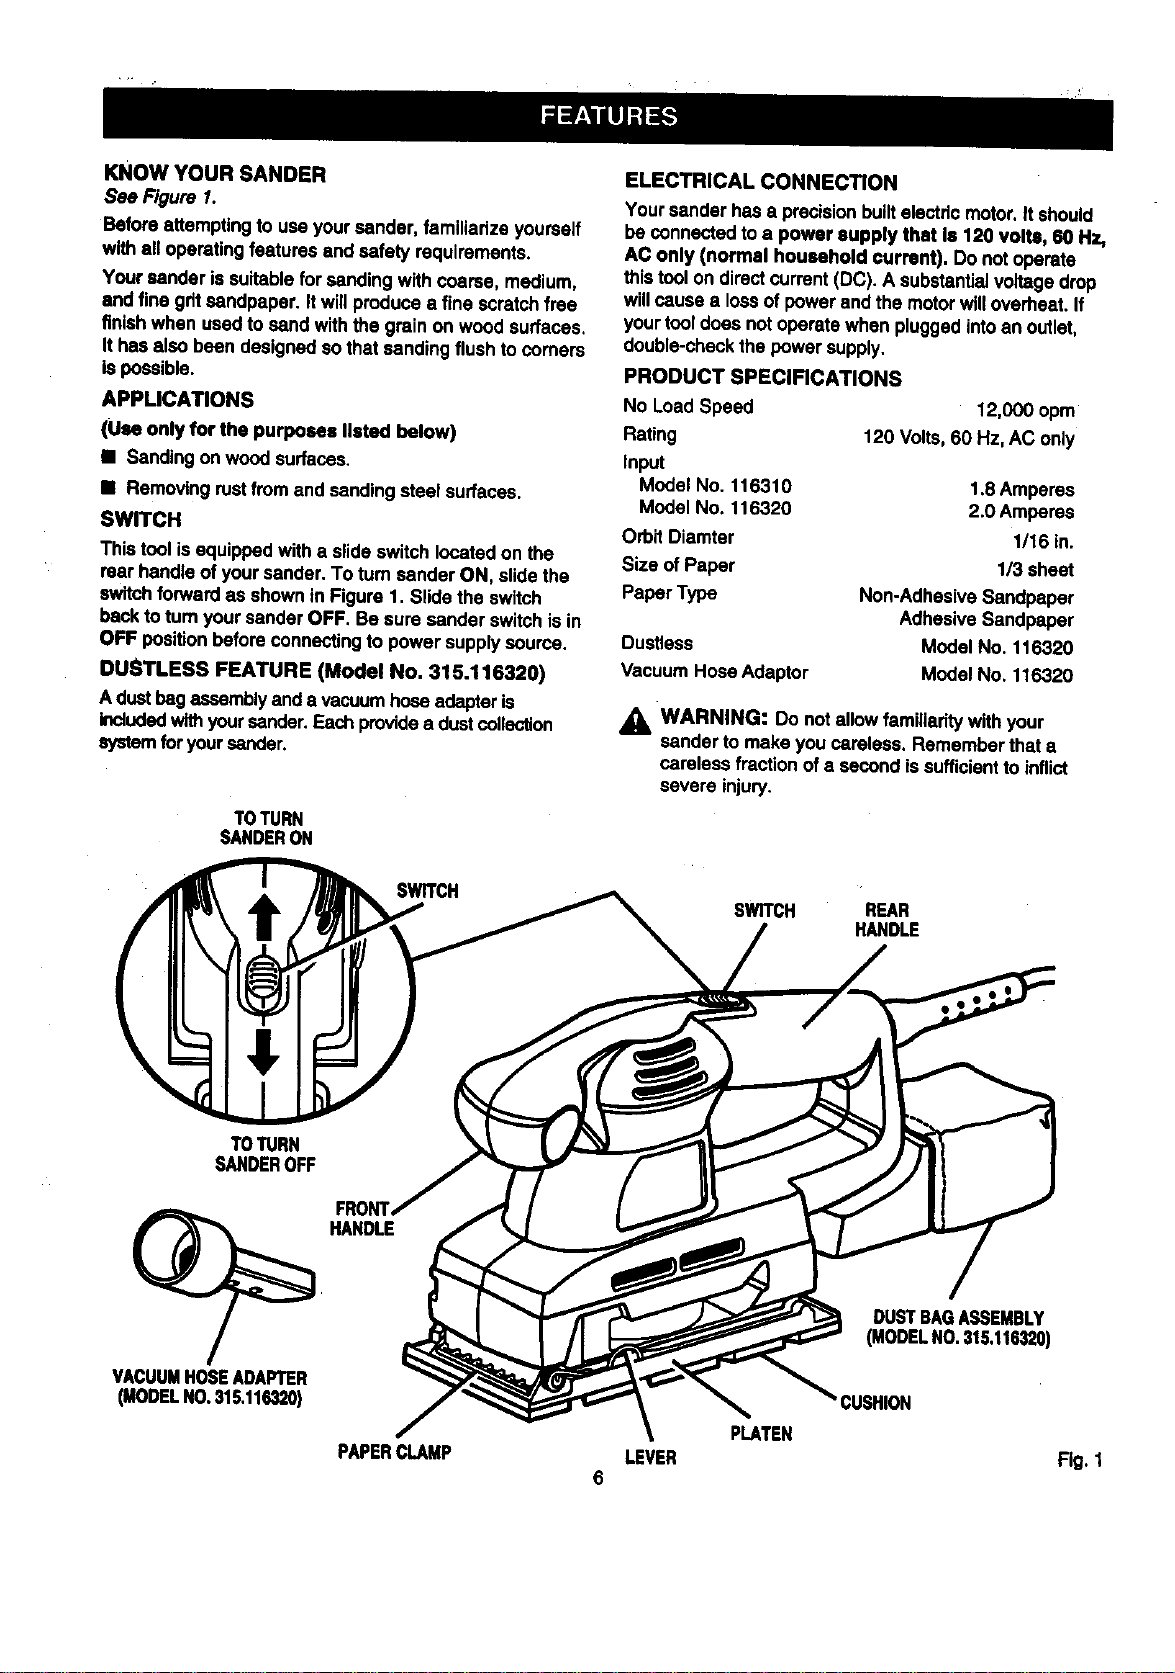
KNOWYOURSANDER
See Figure 1.
Before attempting to useyoursender, familiarize yourself
withall operatingfeatures and safety requirements.
Your sender is suitableforsending withcoarse, medium,
and fine giltsandpaper. It willproducea fine scratchfree
finishwhen used to send withthe grain on woodsurfaces.
Ithas also been designedsothat sandingflushtocomers
is possible.
APPLICATIONS
(Use only for the purposes listed below)
• Sandingon woodsurfaces.
• Removingrustfromand sandingsteel surfaces.
SW_CH
This toolisequippedwith a slideswitchlocatedon the
rearhandle of yoursander. To tum sanderON, slidethe
switchforwardas shownin Figure1. Stidethe sw_tch
back toturnyoursander OFF. Be sure sander switchisin
OFF positionbeforeconnectingto power supplysource.
DUSTLESS FEATURE (Model No. 315.116320)
A dustbagassemblyanda vacuumhose adapteris
Includedwithyoursender. Eachprovidea dustcollection
systemforyoursander.
TOTURN
SANDERON
ELECTRICAL CONNECTION
Yoursander hasa precisionbuiltelectricmotor.It should
be connectedtoa power supply that Is 120 volts, 80 Hz,
AC only (normal household current). Do not operate
this toolon directcurrent(DC). A substantialvoltagedrop
willcausea foss of powerand the motorwiltoverheat,if
yourtooldoes notoperatewhen pluggedintoan outlet,
double-checkthe power supply.
PRODUCT SPECIFICATIONS
No LoadSpeed
Rating
Input
Model No. 116310
Model No. 116320
Orbit Diamter
Size of Paper
Paper Type
Dustless
Vacuum Hose Adaptor
12,000 opm
120 Volts,60 Hz,AC only
1.8Amperes
2.0 Amperes
1/16 in.
113sheet
Non-AdhasiveSandpaper
AdhesiveSandpaper
Model No. 116320
Model No. 116320
_IL WARNING: Do notallowfamiliaritywith your
sender to make you careless. Rememberthat a
carelessfractionof a secondissufficientto inflict
severe injury.
SWITCH
SWITCH REAR
HANDLE
TOTURN
SANDEROFF
HANDLE
VACUUMHOSEADAPTER
(MODELNO,315.116320)
DUSTBAGASSEMBLY
(MODELNO.315,116320)
CUSHION
PAPERCLAMP LEVER Fig. 1
6
_ WARNING: Your sandershouldnever be con-
nectedto powersupplywhen you are assembling
parts,makingadjustments,assemblingor replacing
sandpaper,cleaning, or when not in use. Disconnect-
ingyoursander willpreventaccidentalstartingthat
couldcause seriouspersonalinjury.
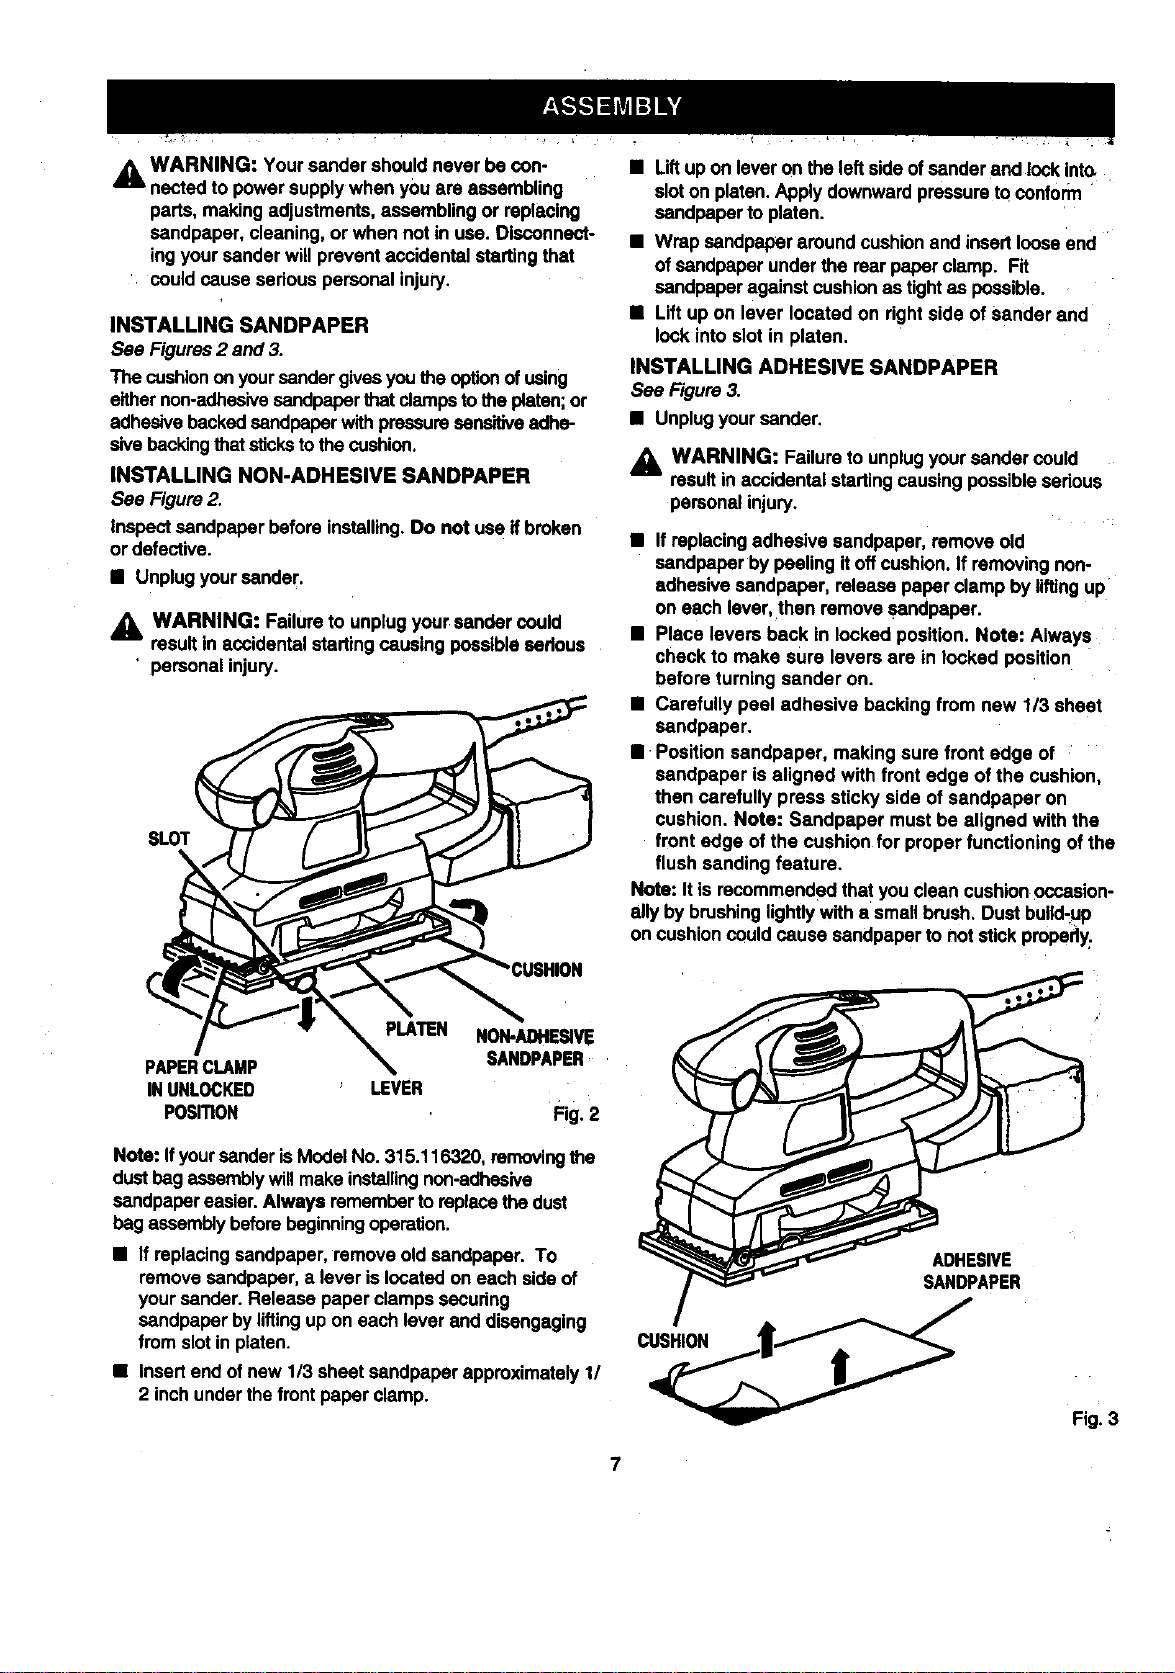
INSTALLING SANDPAPER
See Figures2 and 3.
The cushionon yoursandergivesyou the optionofusing
eithernon-adhesivesandpaperthatdamps totheplaten;or
adhesivebackedsandpaper withpressuresensitiveadhe-
sivebackingthat stickstothe cushion.
INSTALLING NON-ADHESIVE SANDPAPER
See Figure2.
Inspectsandpaper beforeinstalling.Do not usa ifbroken
ordefective.
• Unplugyoursander.
_k WARNING: Failureto unplugyour sandercould
resultin accidentalstarting causing possiblesadous
' personalinjury.
SLOT
NON-/_HE_VIE
PAPERCLAMP SANDPAPER
INUNLOCKED LEVER
PosmoN Fig.2
Note: Ifyoursander iSModel No.315.116320, removingthe
dustbagassemblywillmake installingnon-adhesive
sandpaper easier.Always remember toreplace thedust
bag assemblybeforebeginningoperation.
• If replacingsandpaper,remove oldsandpaper. To
remove sandpaper, a lever islocatedon each sideof
yoursender. Release paper clampssecudng
sandpaper byliftingupon each lever end disengaging
fromslot inplaten.
• Insertend ofnew 1/3 sheetsandpaper approximately11
2 inchunderthefront paperclamp.
• Liftup on leveron the leftside ofsander and lockinto.
sloton platen.Apply downwardpressuretoconform
sandpaper to platen.
• Wrap sandpaper aroundcushionand insertlooseend
of sandpaper underthe rear paperclamp. Fit
sandpaperagainstcushion as tightas possible.
• Lift up on lever located on rightside of sander and
lock into slot in platen.
INSTALLING ADHESIVE SANDPAPER
See Figure3.
• Unplugyoursender.
WARNING: Failureto unplugyoursandercould
resultinaccidentalstartingcausingpossiblesadous
personalinjury.
• Ifreplacingadhesivesandpaper, remove old
sandpaper by peelingitoffcushion.If removingnon-
adhesive sandpaper, release paperclamp by liftingup
on each lever, then remove sandpaper.
• Place levers back in locked position. Note: Always
check to make sure levers are in locked position
before turningsander on.
• Carefully peel adhesive backing from new 1/3 sheet
sandpaper.
• :Positionsandpaper, makingsure front edge of
sandpaper is aligned with front edge of the cushion,
then carefully press sticky side of sandpaper on
cushion. Note: Sandpaper mustbe aligned with the
front edge of the cushionfor proper functioningof the
flush sanding feature.
Note: It isrecommendedthatyou clean cushionoccasion-
ally bybrushinglightlywitha smallbrush. Dust butid-uP
on cushioncouldcause sandpaperto notstick propsdy:
ADHESIVE
SANDPAPER
Fig. 3
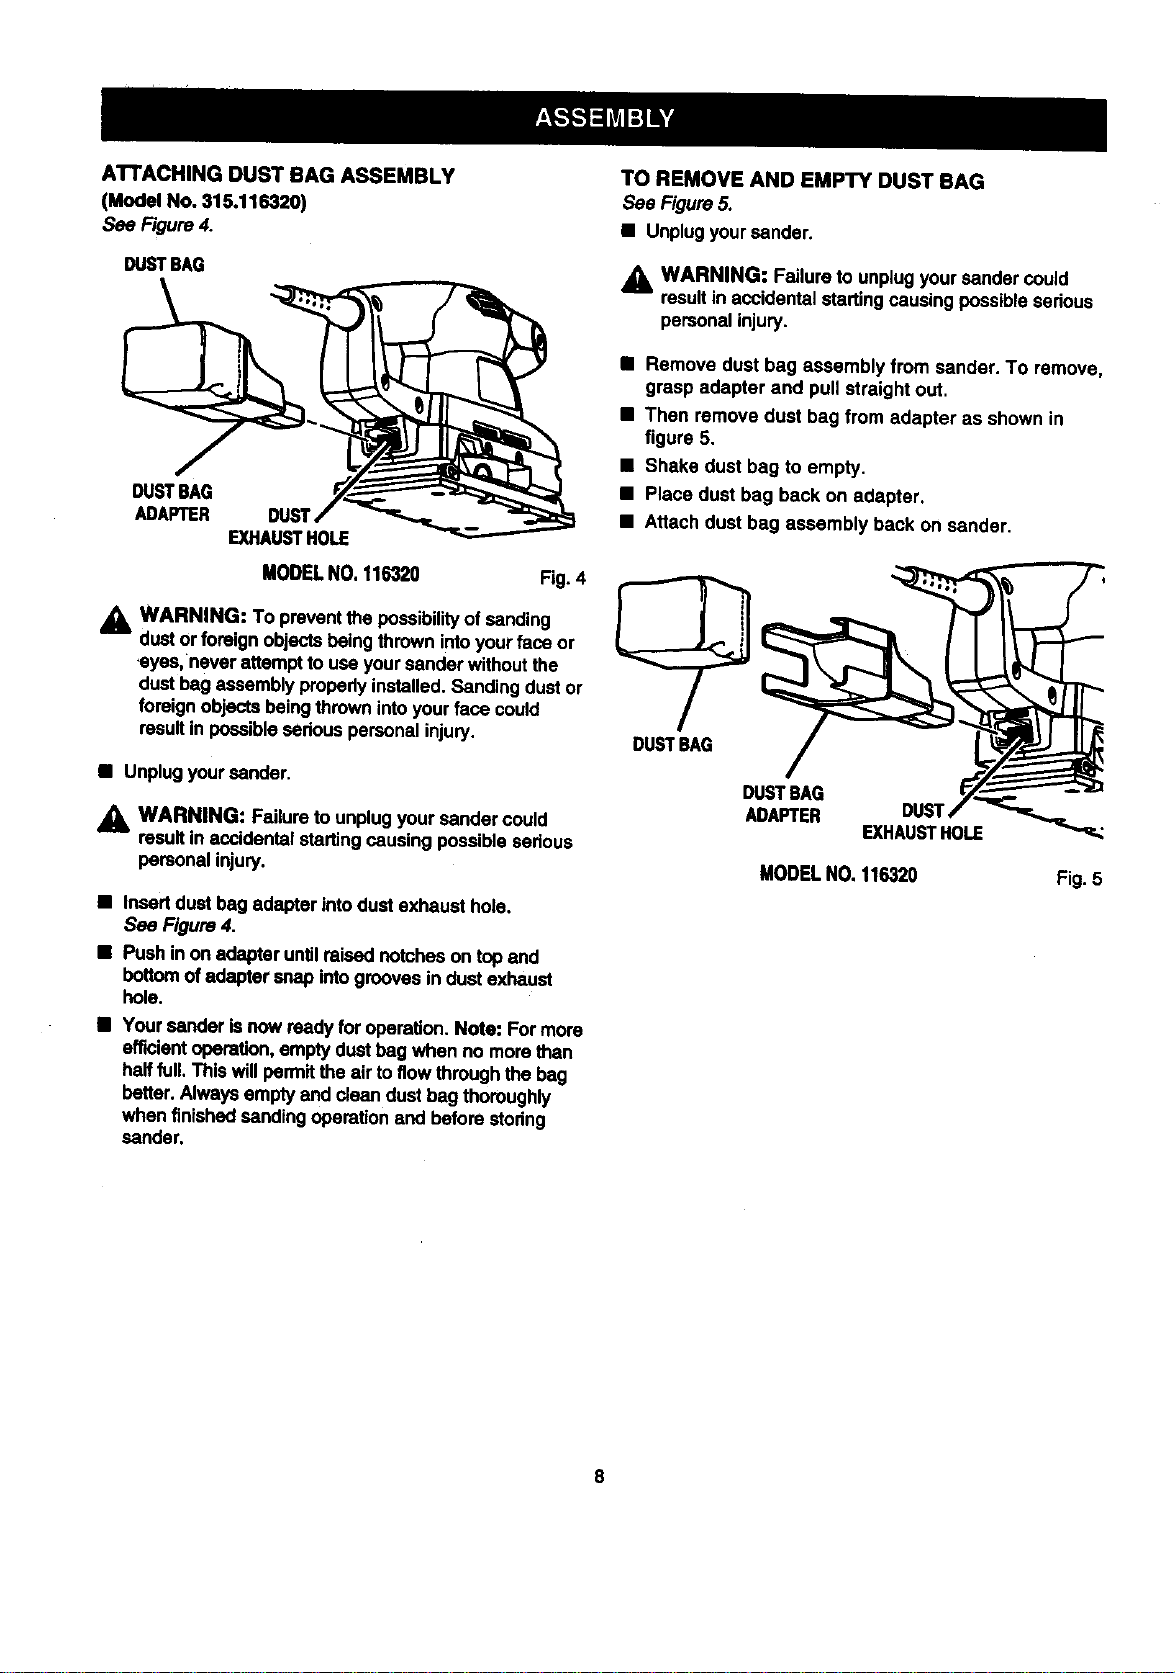
ATTACHINGDUSTBAGASSEMBLY
(ModelNo.315.116320)
See Figure4.
DUSTSAG
DUSTBAG
ADAPTER
EXHAUSTHOLE
MODELNO, 116320 Fig. 4
_1= WARNING: To preventthe possibil_ of sanding
dustor foreignobjectsbeingthrown intoyourface or
,eyes,never attemptto useyoursanderwithoutthe
dustbag assemblyproperlyinstalled.Sandingdustor
foreignobjectsbeing thrownintoyourface could
resultin possibleseriouspersonalinjury.
• Unplugyoursender.
_lb WARNING: Failure to unplug your sender could
result in accidental starting causing possible serious
personal injury.
• Insertdust bag adapter intodust exhaust hole.
See Figure4.
• Push inon adapteruntilraisednotcheson topand
bottomof adaptersnap intogrooves indust exhaust
bole.
• Yoursender isnow ready foroperation.Note: Formore
efficientoperation,emptydustbag when no more than
halffull. Thiswillpermitthe air to flowthroughthe bag
better. Alwaysemptyand clean dustbag thoroughly
when finishedsandingoperationand beforestoring
sander.
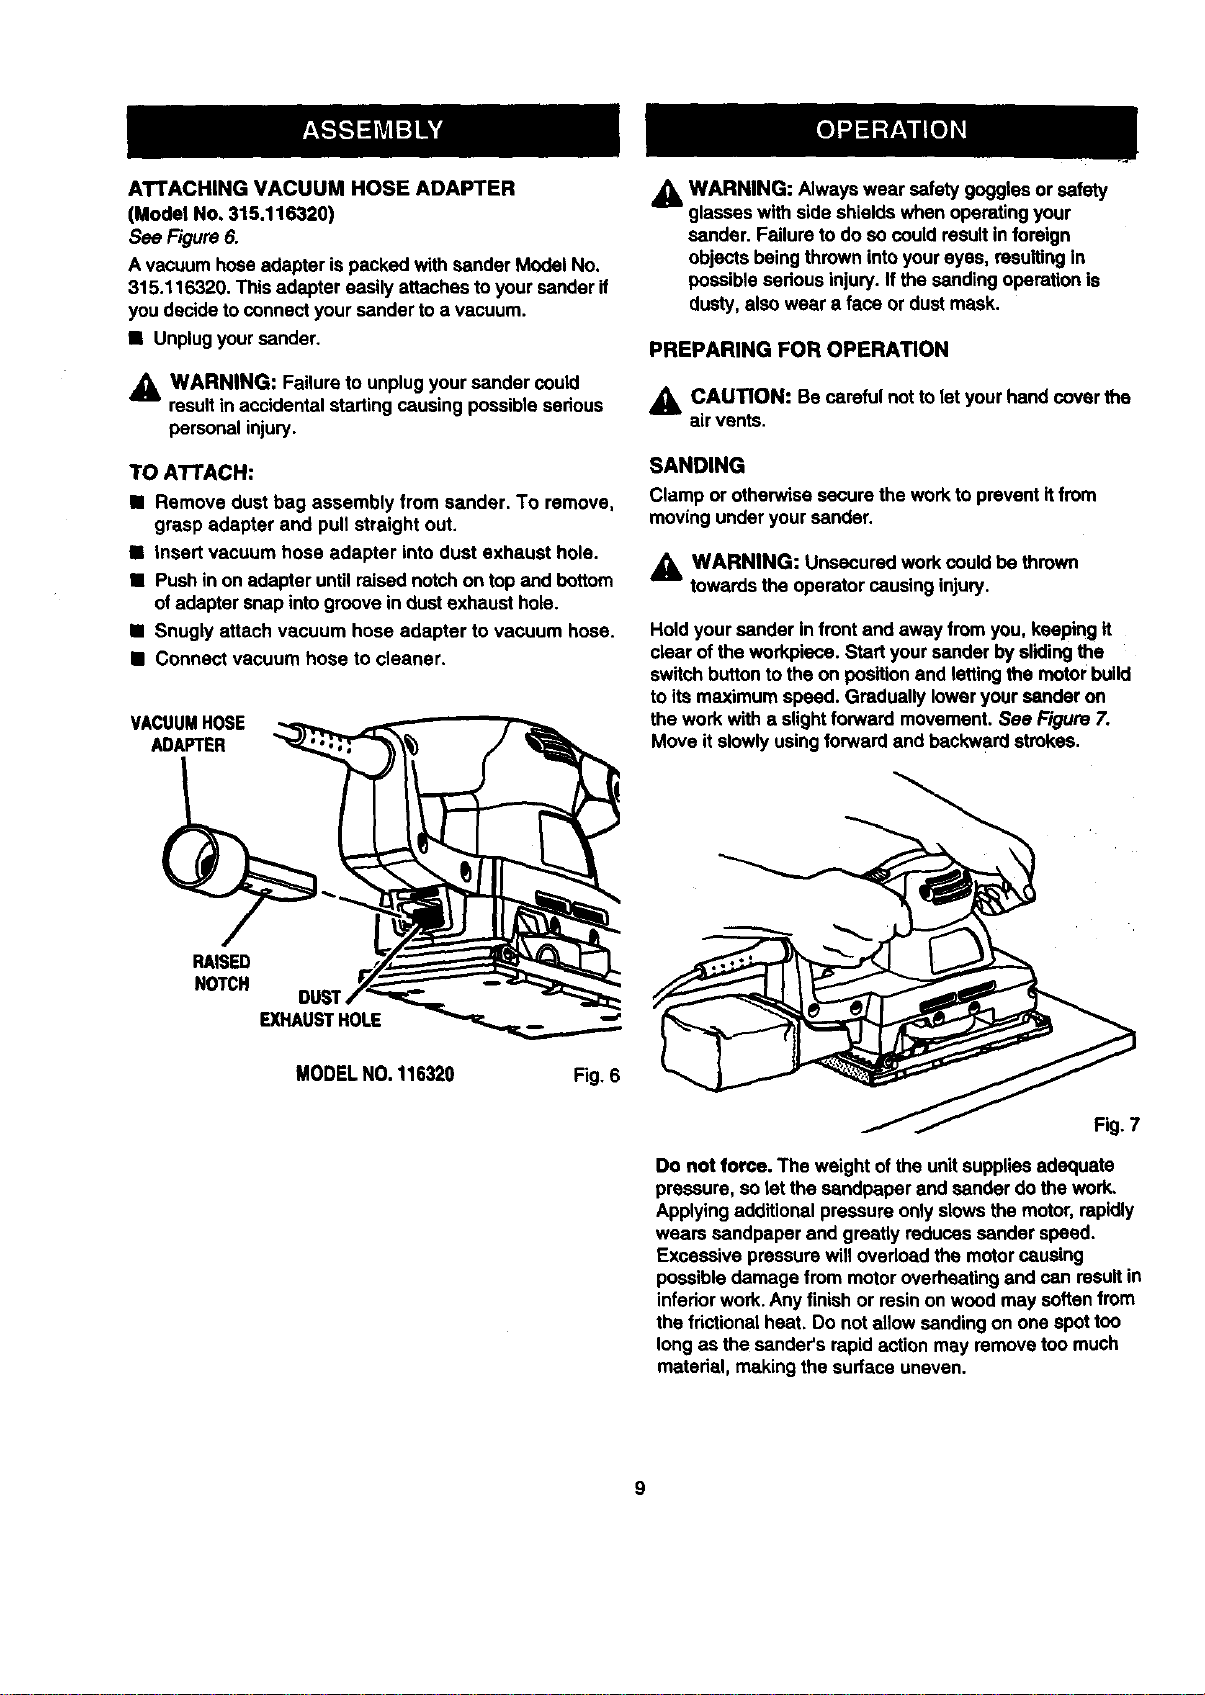
TO REMOVE AND EMPTY DUST BAG
See Figure5.
• Unplugyoursander.
WARNING: Failureto unplugyoursander could
resultin accidentalstartingcausing possiblesedous
personalinjury.
• Remove dust bag assembly from sander. To remove,
grasp adapter and pull straight out.
• Then remove dust bag from adapter as shown in
figure 5.
• Shake dust bag to empty.
• Place dust bag back on adapter,
• Attach dust bag assembly back on sander.
DUSTBAG
/
DUSTBAG
ADAPTER DUST
EXHAUSTHOLE
MODELNO.116320
Fig.5
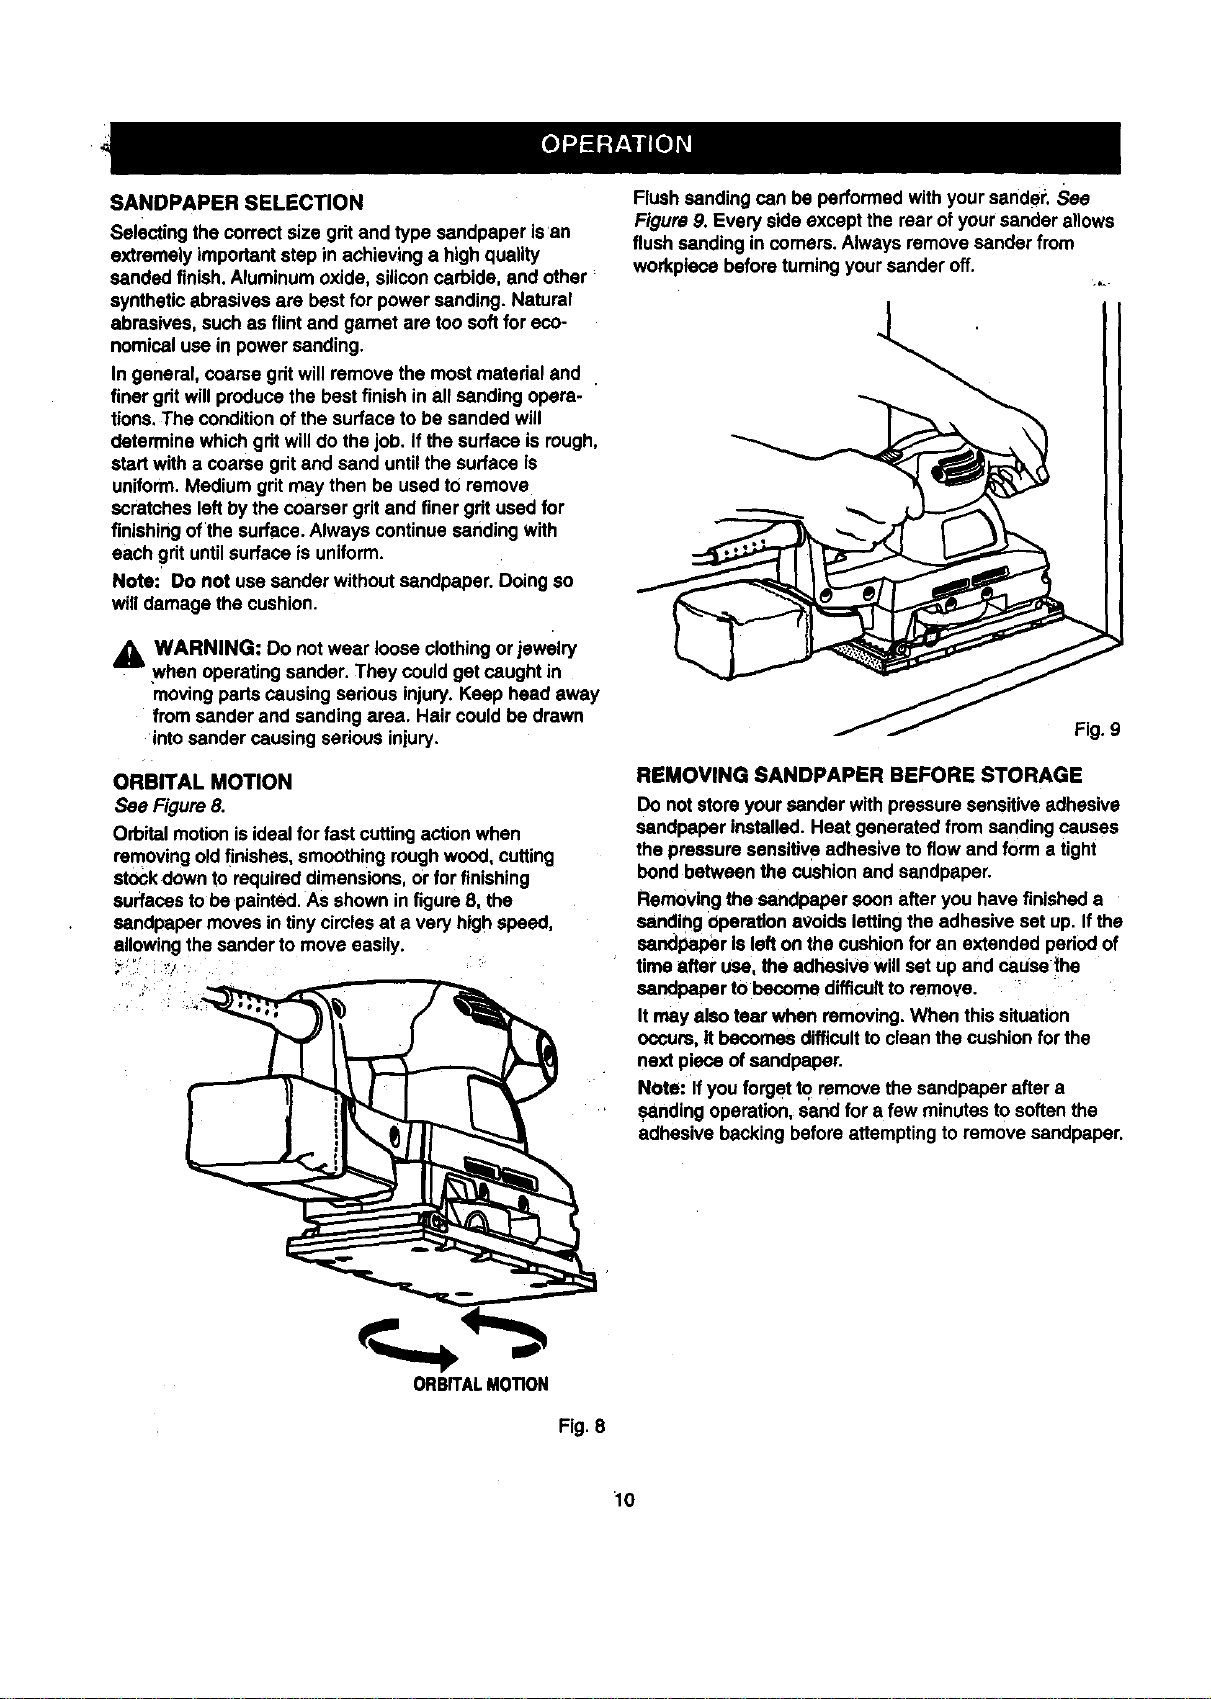
ATTACHINGVACUUMHOSEADAPTER
(ModelNo,315.116320)
See Figure6.
Avacuum hoseadapteris packed withsanderModelNo.
315.116320. Thisadapter easily attachesto yoursanderif
youdecidetoconnectyour sandertoa vacuum.
• Unplugyoursander,
_1= WARNING: Failureto unplugyoursander could
resultin accidentalstartingcausing possiblesedous
personalinjury.
TO ATTACH:
• Remove dust bag assembly from sander. To remove,
grasp adapter and pull straight out.
M insert vacuum hose adapter intodust exhaust hole.
• Push inon adapter untilraisednotchon topand bottom
ofadaptersnap intogroovein dust exhaust hole.
M Snugly attach vacuum hose adapter to vacuum hose.
B Connect vacuum hose to cleaner.
VACUUMHOSE
ADAPTER
WARNING: Always wear safety gogglesor safety
glasseswith sideshields whenoperatingyour
sander. Failureto do socould resultinforeign
objectsbeing thrownintoyoureyes, resultingin
possiblesedousinjury.If the sanding operationis
dusty,also wear a face or dustmask.
PREPARING FOR OPERATION
,_ CAUTION: Be carefulnot tolet yourhandcover the
air vents.
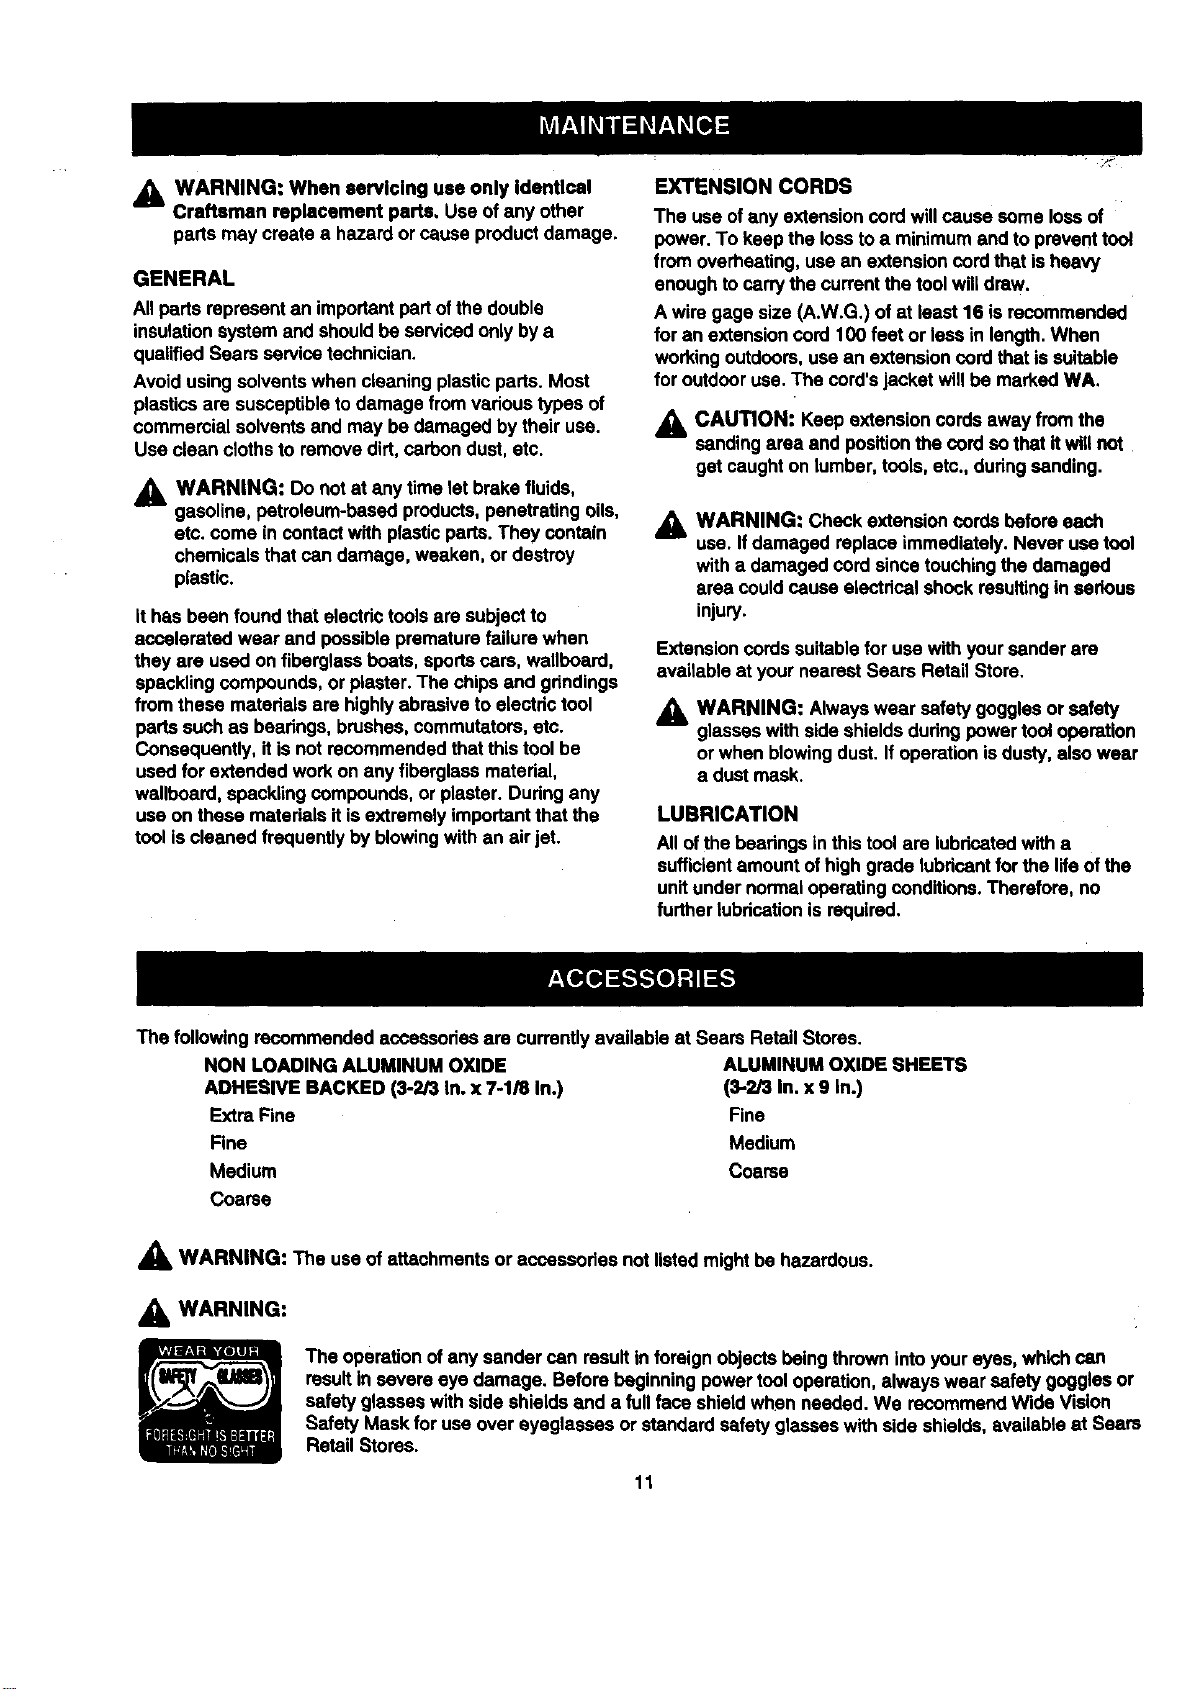
SANDING
Clamp or otherwisesecure the workto preventitfrom
movingunder yoursander.
_1= WARNING: Unsecuredworkcould be thrown
towardsthe operatorcausinginjury.
Holdyoursander infrontand away from you,keepingit
clear ofthe workpiece.Startyoursander byslidingthe
switchbuttonto theon position and lettingthe motorbuild
toits maximum speed. Graduallyloweryour sander on
thework with a slightforward movement.See Figure7.
Move itslowlyusingforward and backwardstrokes.
RAISED
NOTCH
EXHAUSTHOLE --'
MODELNO.116320 Fig. 6
Fig. 7
Do not force. The weightofthe unitsuppliesadequate
pressure,so let the sandpaperand sander do the work.
Applyingadditionalpressureonlyslowsthemotor,rapidly
wears sandpaper and greatlyreducessander speed.
Excessivepressurewill overloadthe motorcausing
possibledamage from motoroverheatingand can resultin
infedorwork.Any finishor resinon woodmay softenfrom
the frictionalheat. Do notallow sanding on one spottoo
longas the sander'srapidactionmay removetoo much
material, makingthe surface uneven.
SANDPAPERSELECTION
selectingthecorrectsizegdtandtypesandpaperisan
extremelyimportantstepin achievinga high quality
sandedfinish.Aluminumoxide, siliconcarbide, and other
syntheticabrasivesare bestfor power sanding.Natural
abrasives, such as flintand garnet are too softfor eco-
nomicaluse in powersanding.
In general, coarse gdt willremove the mostmaterial and .
finergritwillproducethe bestfinishin allsanding opera-
fions. The condition of the surfaceto be sanded will
determinewhichgdt willdo thejob. If thesurface is rough,
startwitha coarse gritand sand untilthe surface is
uniform.Medium gritmay then be used toremove
scratchesleftby thecoarser gritand finergdt used for
finishingofthe surface.Always continuesandingwith
each grit untilsurface is uniform.
Note: Do not use sanderwithoutsandpaper. Doingso
willdamage thecushion.
,_ WARNING: Do notwear looseclothingor jewelry
,whenoperatingsander. They could getcaught in
moving partscausing sedousinjury.Keep head away
fromsander and sandingarea. Haircould be drawn
intosander causingserious injury.
ORBITAL MOTION
See Figure8.
Orbitalmotionisidealfor fastcuttingactionwhen
removingoldfinishes,smoothingroughwood, cutting
stockdownto requireddimensions,or for finishing
surfacestobe painted.Asshownin figureB. the
sandpaper movesintinycirclesat a very highspeed,
allowingthe sander to moveeasily.
_::_" _Jr
Flush sanding can be performedwith yoursander. See
Figure9. Every sideexcept the rear ofyoursander allows
flush sandingin comers.Always removesander from
workplecebeforeturningyoursanderoff.
.ha
Fig.9
REMOVING SANDPAPER BEFORE STORAGE
Do notstore yoursanderwithpressure sensitiveadhesive
sandpaper installed.Heat generated fromsandingcauses
the pressuresensitiveadhesivetoflow and form a tight
bend betweenthe cushionand sandpaper.
Removingthe sandpapersoonafter you have finisheda
sanding operationavoidslettingthe adhesiveset up. Ifthe
sandpaper Is lefton the cushionfor an extended pedodof
time after use, the adhesive willset up and cause the
sandpaperto become difficultto remove.
It may also tear when removing.When this situation
occurs,It becomesdifficulttoclean the cushionfor the
next pieceof sandpaper.
Note: If you forget to remove the sandpaperafter a
sandingoperation,sandfor a few minutesto softenthe
adhesive backingbefore attempting to remove sandpaper.
ORBITALMOTION
Fig. 8
10
_IL WARNING: When servicing use only Identical
Craftsmen replacement parts, Use ofany other
parts may createa hazard orcause productdamage.
GENERAL
Allparts representan importantpart ofthe double
insulationsystemand shouldbe servicedonlybya
qualifiedSears servicetechnician.
Avoid usingsolventswhen cleaningplasticpads. Most
plasticsare susceptibletodamage from varioustypes of
commercial solventsand may be damagedby theiruse.
Use clean clothsto removedirt,carbon dust, etc.
A WARNING: Do not at any timelet brake fluids,
gasoline, patroleum-besed products,penetratingoils,
etc. come in contactwith plasticpads. They contain
chemicalsthatcan damage, weaken, or destroy
plastic.
ithas been found that electrictoolsare subjectto
acceleratedwear and possibleprematurefailure when
they are used on fiberglassboats, sportscars, wallboard,
spacklingcompounds, or piaster. The chipsand gdndings
fromthese matedais are highlyabrasiveto electrictool
pads such as beadngs,brushes,commutators,etc.
Consequently, itisnot recommendedthat thistoolbe
usedfor extended workon any fiberglassmaterial,
wallboard,spacklingcompounds, or plaster. Dudngany
useon these materialsit isextremelyimportantthat the
toolis cleanedfrequentlyby blowingwith an air jet.
EXTENSION CORDS
The use ofany extensioncord willcause some lossof
power.To keepthe losstoa minimumand to preventtool
from overheating,use an extensioncord that isheavy
enoughtocarry the currentthetoolwilldraw.
A wire gage size (A.W.G,) of at least16 isrecommended
for an extensioncord100 feet or lessin length.When
workingoutdoors,usean extensioncord that is suitable
for outdooruse. The cord'sjacket willbe markedWA.
_l CAUTION: Keep extensioncordsaway fromthe
sandingarea and positionthe cordso that itwillnot
get caughton lumber,tools,etc., duringsanding.
_1= WARNING: Check extensioncords before each
use. Ifdamaged replace immediately.Never usetool
with a damagedcordsince touchingthe damaged
area couldcauseelectdcalshock resultinginserious
injury.
Extensioncords suitablefor usewith yoursander are
availableat yournearest Sears Retail Store.
WARNING: Alwayswear safetygogglesor safety
glasseswith sideshieldsdudngpowertooloperation
or when blowingdust. Ifoperationisdusty,also wear
a dustmask.
LUBRICATION
Allofthe beadngs inthis toolare lubricatedwitha
sufficientamountofhighgrade lubricantforthe lifeof the
unitundernormaloperatingconditions.Therefore, no
furtherlubdcationis required,
The followingrecommendedacoessodesare currentlyavailable at Sears RetailStores.
NON LOADING ALUMINUM OXIDE
ADHESIVE BACKED (3-2/3 In. x 7-1/8 In.)
ExtraFine
Fine
Medium
Coarse
ALUMINUM OXIDE SHEETS
(3-2/3 In. x 9 In.)
Fine
Medium
Coarse
_1= WARNING: The useof attachments or accessories not listedmightbe hazardous.
_t WARNING:
The operationofany sander can resultinforeignobjectsbeing thrownintoyoureyes,whichcan
resultin severe eye damage. Before beginning power tooloperation,alwayswear safety gogglesor
safety glasseswith side shieldsand a fullface shieldwhen needed. We recommendWide Vision
Safety Maskfor use over eyeglasses or standard safety glasseswith side shields,availableat Sears
RetailStores.
11
WARRANTY
FULLONEYEARWARRANTYONCRAFTSMANSANDERMODELNO.316.116310
IfthisCRRFTSNANSanderfailstogivecomplete satisfactionwithinone year fromthe date ofpurchase, RETURN IT TO
THE NEAREST SEARS STORE IN THE UNITED STATES, and Seam will replaceit,free of charge.
IfthisCRAFT$MRH Sander isused for commercialor rentalpurposes,thiswarrantyapplies foronly 90 daysfromthe
dateof purchase.
Thiswarrantygivesyou specificlegal rights,and you may also have otherdghtswhichvary fromstate to state.
Sears, Roebuck end Co., Dept. 817WA, Hoffmen Estates, IL 60179
WARRANTY
FULL ONE YEAR WARRANTY ON CRAFTSMAN SANDER MODEL NO, 315.116320
IfthisrRRFrSNRN Sander failsto give completesatisfactionwithinone year from thedate of purchase,RETURN IT TO
THE NEAREST SEARS STORE IN THE UNITED STATES, and Sears will repairit, freeof charge.
IfthisCRAFTSMAN Sander is usedfor commercial or rental purposes,this warrantyappliesfor only90 days fromthe
dateof purchase.
Thiswarrantygives you specificlegal dghts,and you may also have otherrightswhichvaryfrom state tostate.
Sears, Roebuck and Co., Dept. 817WA, Hoffman Estates, IL 60179
12

NOTES:
13
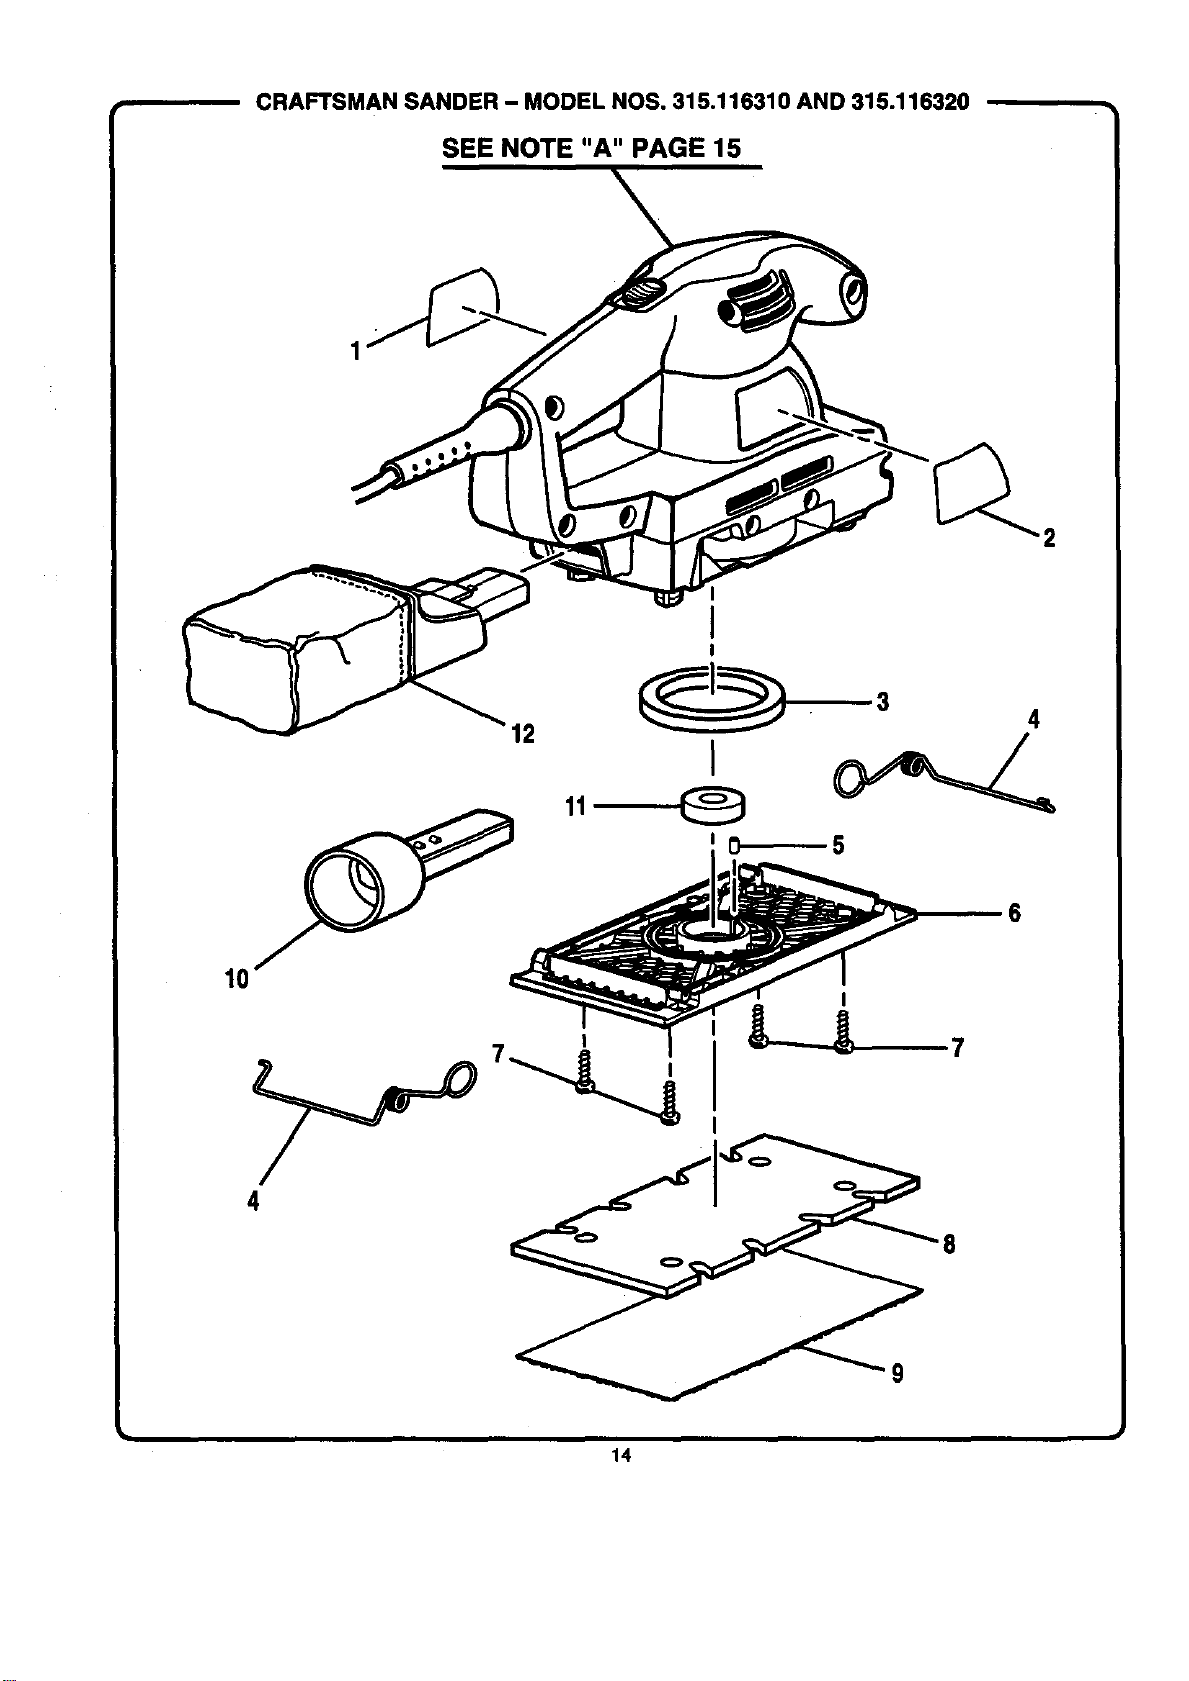
CRAFTSMAN SANDER - MODEL NOS. 315.116310 AND 315.116320
SEE NOTE "A" PAGE 15
1
I
!
I
, L--_7
4
14
[
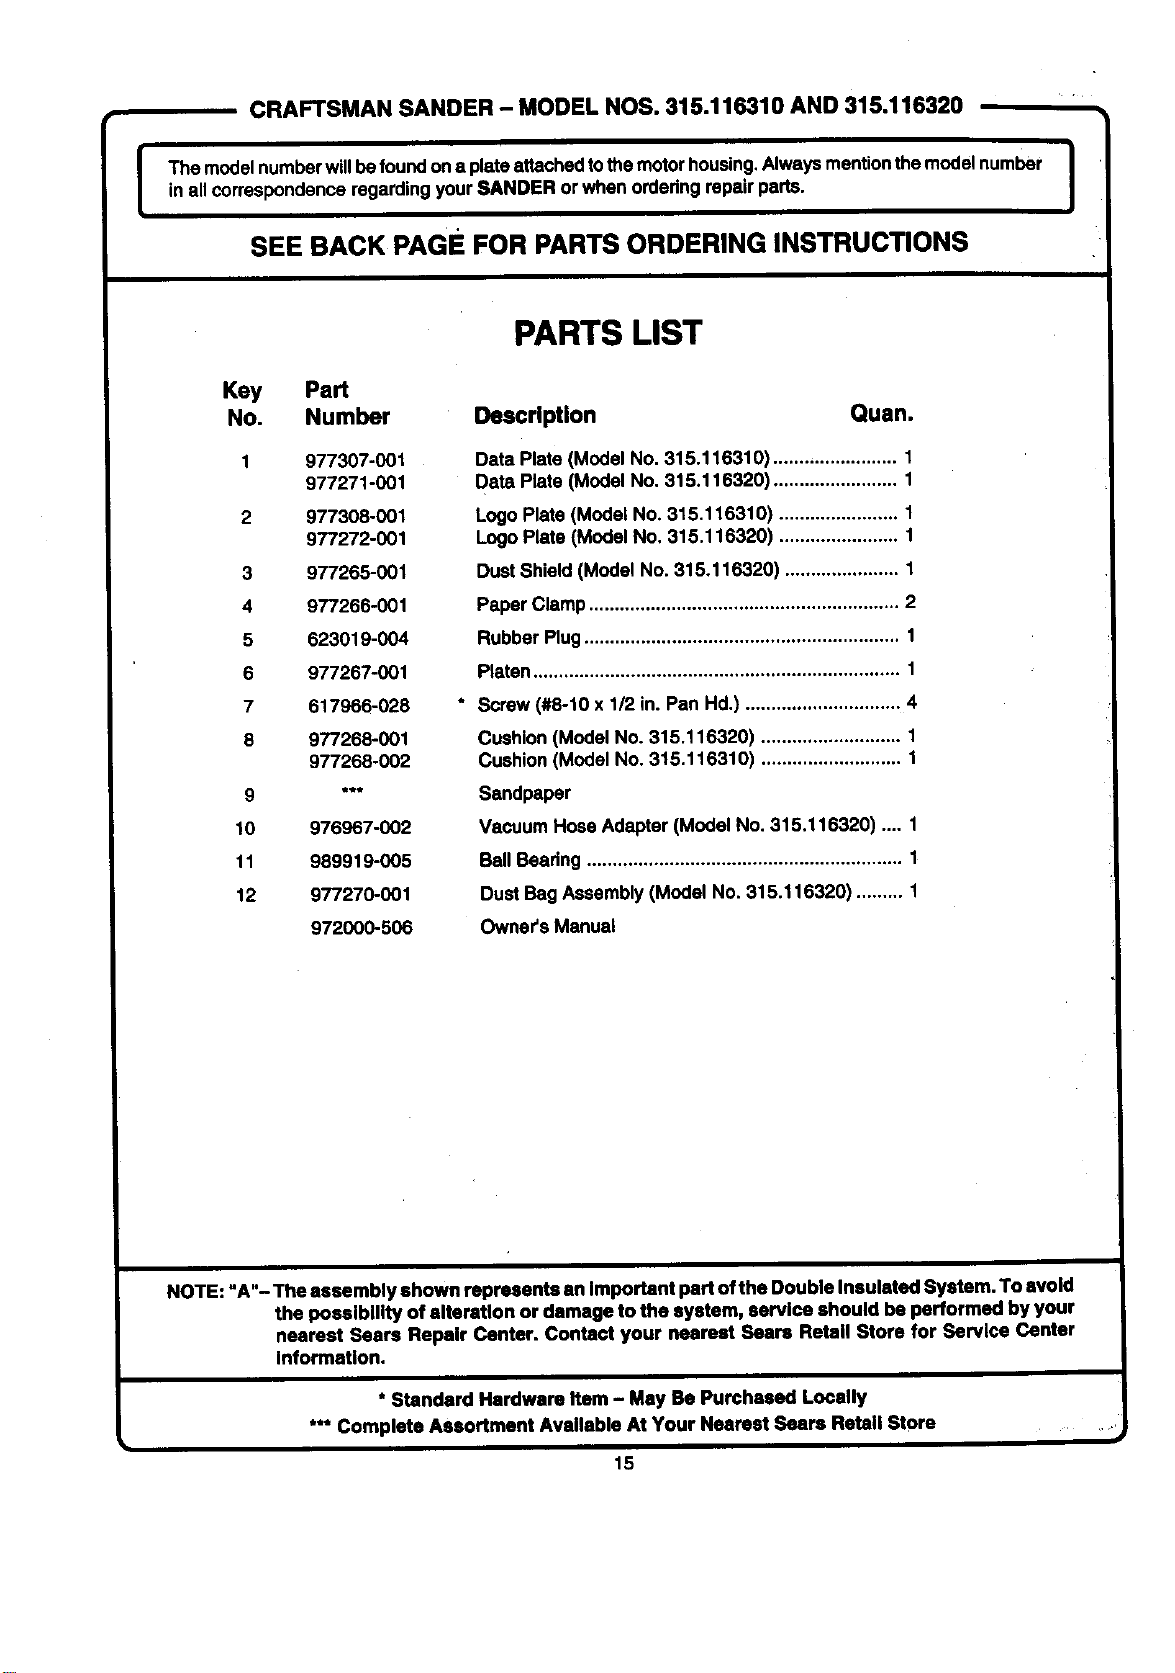
CRAFTSMAN SANDER - MODEL NOS. 315.116310 AND 315.116320
The modelnumberwillbefoundona plateattaohodtothemotor housing,Alwaysmention themodel number Iin allcorrespondenceregardingyourSANDER or when orderingrepairparts.
SEE BACK PAGE FOR PARTS ORDERING INSTRUCTIONS
Key Part
No. Number
1 977307-001
977271-001
2 977308-001
977272-001
3 977265-001
4 977266-001
5 623019-004
6 977267-001
7 617966-028
8 977268-001
977268-002
9 "**
10 976967-002
11 989919-005
12 977270-001
972000-506
PARTS LIST
Description Quan.
Data Plate (Model No, 315.116310) ........................ 1
Date,Plate (Model No. 315,116320) ........................ 1
Logo Plats (Model No. 315.116310) ....................... 1
LogoPlate (Model No, 315.116320) ....................... 1
Dust Shield (Model No. 315.116320) ...................... 1
Paper Clamp............................................................ 2
RubberPlug............................................................. 1
Platen....................................................................... 1
Screw(#8-10 x 1/2 in. Pan Hd.) .............................. 4
Cushion(Model No. 315.116320) ........................... 1
Cushion(Model No. 315.116310) ........................... 1
Sandpaper
Vacuum Hose Adapter (Model No. 315.116320) .... 1
BallBeadng ............................................................. 1
Dust Bag Assembly(Model No, 315.116320) ......... 1
Owner's Manual
NOTE: "A"- The assembly shown represents an Important part of the Double Insulated System. To avoid
the posslblllty of alteration or damage to the system, servlce should be performed by your
nearest Sears Repalr Center. Contact your nearest Sears Retell Store for Barvlce Center
Information.
* Standard Hardware Item - May Be Purchased Locally
*** Complete Assortment Available At Your Nearest Sears Retail Store
i
i
15

For in-home major brand repair service:
Call 24 hours a day, 7 days a week
1-800-4-MY-HOME s" (1-800-469-4663)
Para pedir servicio de reparacibn a domicilio - 1-800-676-5811
In Canada for all your service and parts needs call
- 1-800-665-4455
Au Canada pour tout le service ou les pi_ces
For the repair or replacement parts you need:
Call 6 am - 11 pm CST, 7 days a week
PartsDirects.
1-800-366-PART (1-800-366-7278)
Para ordenar piezas con entrega a domicilio - 1-800-659-7084
For the location of a Sears Parts and Repair Center in your area:
Call 24 hours a day, 7 days a week
1-800-488-1222
For information on purchasing a Sears Maintenance Agreement
or to inquire about an existing Agreement:
Call 9 am - 5 pm, Monday - Saturday
1-800-827-6655
The Service Side of Sears