
Owner's Manual
1/4 SHEET PROFESSIONAL SANDER
Double Insulated
Model No.
315.277011
Save this manual
for future reference
,4_ CAUTION: Read and -
follow all Safety Rulesand
Operating Instructionsbefore
first useof this product.
Customer Help Line: 1-800-932-3188
Sears Roebuck and Co., Hoffman Estates, IL 60179 USA
Visit the Craftsman web page: www.sears.com/craftsman
972O00-555
8-98
• Safety
• Features
• Operation
• Maintenance
• Parts List
®
• Table Of Contents .......................................................................................................................................... 2
• Warranty...._................................................................i...................................................................................2
• Introduction..................................................................................................................................................... 2
• Rules for Safe Operation ............................................................................................................................. 3-4
• Product Specifications .................................................................................................................................... 5
• Unpacking .......................................................................................................................... :............................ 5
• Accessories .................................................................................................................................................... 5
• Features ......................................................................................................................................................... 6
• Operation ..................................................................................................................................................... 6-9
• Maintenance... .............................................................................................................................................. 10
• Expiodad View sod Rabair ParfS List ........................................ _............................................................. 12-13
• PartsOrdadnglService ............................................................................................................................... 14
FULL ONE YEAR WARRANTY ON CRAFTSMAN PROFESSIONAL SANDER
If this CRRFTSMRN Professional Sander fails due to a defect in material or workmanship within one year from
the date of purchase, Sears will repair it, free of charge.
WARRANTY SERVICE IS AVAILABLE By SIMPLY RETURNING THE TOOL TO 11tE NEAREST SEARS
STORE IN THE UNITED STATES.
This warranty gives you specific legal dghts, and you may also have other dghts which vary from state to stata.
Sears, Roebuck end Co., DepL 817WA, Hoffman Estates, IL 60179
Yoursanderhasmanyfeaturesformakingsanding
operationsmorepleasantand enjoyable.Safety,
performanceand dependabilityhavebeengiventop
priorityinthe designofthissander makingiteasyto
maintainandoperate.
÷ _._
_, CAUTION: Carefully read through this entire
owner's manual before using your new sander.
Pay close attention to the Rules for Safe
Operation, Warnings and Cautions. If you use
your sander properly and only for what it is
intended, you will enjoy years of safe, reliable
service.
,_= Look for this symbol to point out important safety precautions. It means attention!l!
Your safety is involved.
,_, WARNING:
The operation of any sander can result in foreign objects being thrown into your eyes, which
can result In severe eye damage. Before beginning power tool operation, always wear safety
goggJeaor safety glasses with side shields and a full face shield when needed. We
recommend Wide Vision Safety Mask for use over eyeglasses or standard safety glasses
with side shields, available at Sears Retail Stores.

ThepurposeofsafetysymbolsIstoattractyourattentiontopossible dangers. The safety symbols, end
the explanations with them, deserve your careful attention and understanding. The safety warnings do
not by themselves eliminate any danger. The Instructions or warnings they give are not substitutes for
proper accident prevention measures.
SYMBOL MEANING
&
a,
a,
SAFETY ALERT SYMBOL:
Indicates danger, wamlag, or caution. May be used inconjunction with other symbols or
pictographs.
DANGER: Failure to obey a safety warning will result in serious injury to yourself or to others.
Always followthe safely precautioea to reduce the risk offire, electric shock and personal injury.
WARNING: Failuretoobeya safetywarningcanresultinseriousinjurytoyourselfortoothers.
Alwaysfollowthe safelypresautior_to reducethe riskoffire,electricshockandpersonal injury.
CAUTION: Failure to obey a cafely warning may result in property damage or personal injury to
yourself or to others. Always follow the safety precautions to reduce the risk of fire. elactdc shock
and personal injury.
NOTE: Advises you of information or instructions vital tothe operation or maintenance of the equipment.
DOUBLEINSULA_ON
Ooubla insulation is a concept in safely, in electric
power tools, which eliminates the need for the usual
three-wire grounded power cord. All exposed metal
parts are isolated from internal metal motor
components with protecting insulation. Double
insulated tools do not need to be grounded.
_, WARNING: Do not attempt to operate this
tool until you have read thoroughly and
understand completely all instructions, safety
rules, etc. contained in this manual. Failure
to comply can result In accidents involving
fire, elactdc shock, or serious personal
Injury, Save owner's manual and review
frequently for continuing safe operation, and
instructing others who may use this tool.
READ ALL INSTRUCTIONS
• KNOW YOUR POWER TOOL. Read owner's
manual carefully. Learn its apptications and
limitations as well as the specific potential hazards
related to this tool.
• GUARD AGAINST ELECTRIGALSHOCK BY
PREVENTINGBODY CONTACTWITH
GROUNDEDSURFACES. Forexsmplo;pipes,
radiators,ranges,refrigeratorencisaurse.
• KEEPGUARDS IN PLACE AND IN WORKING
ORDER.
• KEEPWORK AREA CLEAN. Cluttered-,rossend
benchesInvitea_Idenla.
IMPORTANT
Servicing of a toniwith deub;e insulation requires
extreme cars and knowladge of the system and
should be parformed only by a qua,fled service
technician. For san, ice we suggest you return the tool
to your nearest Sears Store for repair. Always use
original factory replacement parts when servicing,
l AVOID DANGEROUS ENVIRONMENT. Do
not use power tools in damp or wet locations or
expose to rain. Keep work area well lit.
• KEEP CHILDREN AND VISITORS AWAY. All
visitors should wear safety gktsasa and be kept a
safe distance from work area. Do not let visitors
contact tool or extension cord.
• STORE IDLE TOOLS. When not in use, tools
should be stored In a dry and high or locked-up
place - out of the reach of children.
• DO NOT FORCETOOL. Itwilldo thejob better
andsafer at theroteforwhichitwasdesigned,
• USERIGHT TOOL.Don'tforcesmalltoolor
attachmenttodothejob ofa heavydulytool.
DonotusetoolforpurposenotIntondedofor
example-don_uses circularsew for cuttingtree
limbsorlogs.
• WEARPROPERAPPAREL, Do notwear loose
clothing orJewelrythatcan got caught Intool's
movinglmrbnandcause pomonslInjury.Rubber
gloves snd rlocakldfootwearare ra_mmondod
whenworklngoutdoors.Wear proto_)vohslr
3
RULESFORSAFEOPERATION(Continued)
coveting to contain long hair and keep it from being
drawn into nearby air vents.
• ALWAYS WEAR SAFETY GLASSES. Everyday
eyeglasses have only impact-resistant lenses; they
are not safety glasses.
• PROTECT YOUR LUNGS. Wear a face or dust
mask if the operalton isdusty.
• PROTECT YOUR HEARING. Wear hearing
protaction dudng extended periods of operation.
• DO NOT ABUSE CORD. Never carry tool by cord
or yank itto disconnect from receptacle. Keep cord
from heat, oil, and sharp edges.
• SECURE WORK. Use clamps or a vise to hold
work. It is safer than using your hand and itfrees
both hands to operate tool.
• DO NOT OVERREACH. Keep proper footing and
balance at all times. Do not usa ona ladder or
unstable support. Secure tools when woddng st
elevatad positions.
• MAINTAIN TOOLS WITH CARE. Keep tools sharp
and clean for best and safest performance. Follow
instructions for lubricating and changing accesso-
ries.
• DISCONNECT TOOLS. When not in use, before
servicing, or when changing attachments, tools
should be disconnected from power supply.
• REMOVE ADJUSTING KEYS AND WRENCHES,
Form habit of checking to see that keys and
adjusting wrenches are removed from toot before
turning it on.
• AVOID ACCIDENTAL STARTING. Do not carry
plugged-in tool with finger on switch. Be sure
switch isoff when plugging in.
• MAKE SURE YOUR EXTENSION CORD IS IN
GOOD CONDITION. When using an extension
cord, be sure to use one heavy enough to carry the
current your product will draw. An undersized cord
. ._wil_cause a drop in line voltage resulting in loss of
power and overheating. A wire gage size (A.W,G.)
of at least 16 is recommended for an extension
cord 1O0feet or less in length. A cord exceeding
100 feet is not recommended. If in doubt, use the
next heavier gage. The smaller the gage number,
the heavier the cord.
• OUTDOOR USE EXTENSION CORDS. When tool
is used outdoors, use only extension cords suitable
for use outdoors. Outdoor approved cords are
marked with the suffix W-A, for
example - _JTW-A or SJOW-A,
• NEVER USE THIS OR ANY POWER SANDER
FOR WET SANDING OR LIQUID POLISHING.
Failure to comply can result in electrical shock
causing sedous injury or worse.
• KEEP HANDS AWAY FROM SANDING AREA.
• NEVER USE IN AN EXPLOSIVE
ATMOSPHERE. Normal sparking of the motor
could ignite fumes.
• INSPECT TOOL CORDS PERIODICALLY and if
damaged, have repaired by authorized service
facility. Stay constantly aware of cord location.
• INSPECT EXTENSION CORDS
PERIODICALLY and replace if damaged.
• KEEP HANDLES DRY, CLEAN, AND FREE
FROM OIL AND GREASE. Always usa a clean
cloth when cleaning. Never use brake fluids,
gssoline, petroleum-based products, or any strong
solvents to clean your tool.
• STAY ALERT AND EXERCISE CONTROL Watch
what you are doing and use common sense. Do
notoperate tool when you are tired. Do not rush.
• CHECK DAMAGED PARTS. Before further usa of
the tool, a guard or other part that isdamaged
should be sarefu;ly checked to determine that it will
operate propedy and perform its intended function.
Check for alignment of moving parts, binding of
moving pads, breakage of parts, mounting and any
other conditions that may affect its operation. A
guard or other part that is damaged should be
properly repaired or replaced by an authorized
service center.
• DO NOT USE TOOL IF SWITCH DOES NOT
TURN IT ON AND OFF. Have defective switches
replaced by an authorized service canter.
• INSPECT FOR and remove all nails from lumber
before sanding.
• DO NOT operate this tool while under the influence
of drugs, alcohol, or any medication.
• POLARIZED PLUGS. To reduce the risk of electric
shock, this tool has a peladzed plug (one blade is
wider than the other). This plug will fit in a polar*
izad outlet only one way. If the plug does not fit
fully in the outlet, reverse the plug. If it stilldoes
notfit, contact a qualified electrician to install the
proper outlet. Do not change the plug in any way.
• WHEN SERVICING USE ONLY IDENTICAL
CRAFTSMAN REPLACEMENT PARTS,
• SAVE THESE INSTRUCTIONS. Refer to them
frequently and use them to instruct others who may
use this tool, If you loan someone this tao), loan
them these instructions also.
SAVE THESEINSTRUCTIONS
4
SizeofPaper t/4sheet
NoLoadSpeed 14,000 opm
Orbital Motion
Rating 120 Volts, 60 Hz, AC only
Input 2.0 Amperes
Paper Type Non-Adhesive Sandpaper
Adhesive Sandpaper
Your sander has been shipped completely assembled
except for the dust bag. Inspect it carefully to make
sure no breakage or damage has occurred during
shipping. If any parts are damaged or missing, contact
your nearest Sears Retail Store to obtain replacement
parts before attempting to operate sander. The dust
bag, sandpaper, paper punch, and this owner's
manual are also included in the box,
_. WARNING: If any parts are missing, do not
operate this tool until the missing parts are
replaced. Failure to do so could result in possible
sarious personal injury.
The foitowing recommended accessories are currently available at Sears Retail Stores.
ALUMINUM OXIDE SHEETS WITH PAPER BACKING (1/4 SHEET)
Item No. 2-28275-- X-Pine
Item No. _-28276 -- Fine
Item No. _-28277-- Medium
Item No. _-28278 -- Coarse
PRESSURE-SENSmVE ADHESIVE, PAPER BACKED SHEETS (1/4 SHEET)
Item No. _-28280 -- X-Fine
Item No. J_-28281 -- Fine
Item NO. _-28282 -- Medium
Item No. _-28283 -- Coarse
THE FOLLOWING STANDARD 4-1/2 X 11 In. SANDING SHEETS CAN BE CUT TO FIT YOUR SANDER.
NON-LOADING ALUMINUM OXIDE SANDING SHEETS
Item No. p28250-- X-Fine
Item No. _1-28251 -- Fine
- ,:_ Item No. _28252 -- Medium
Item NO. _p28253-- Coarse
_IL WARNING: The use of attachments or accessories not listed might be hazardous.
5
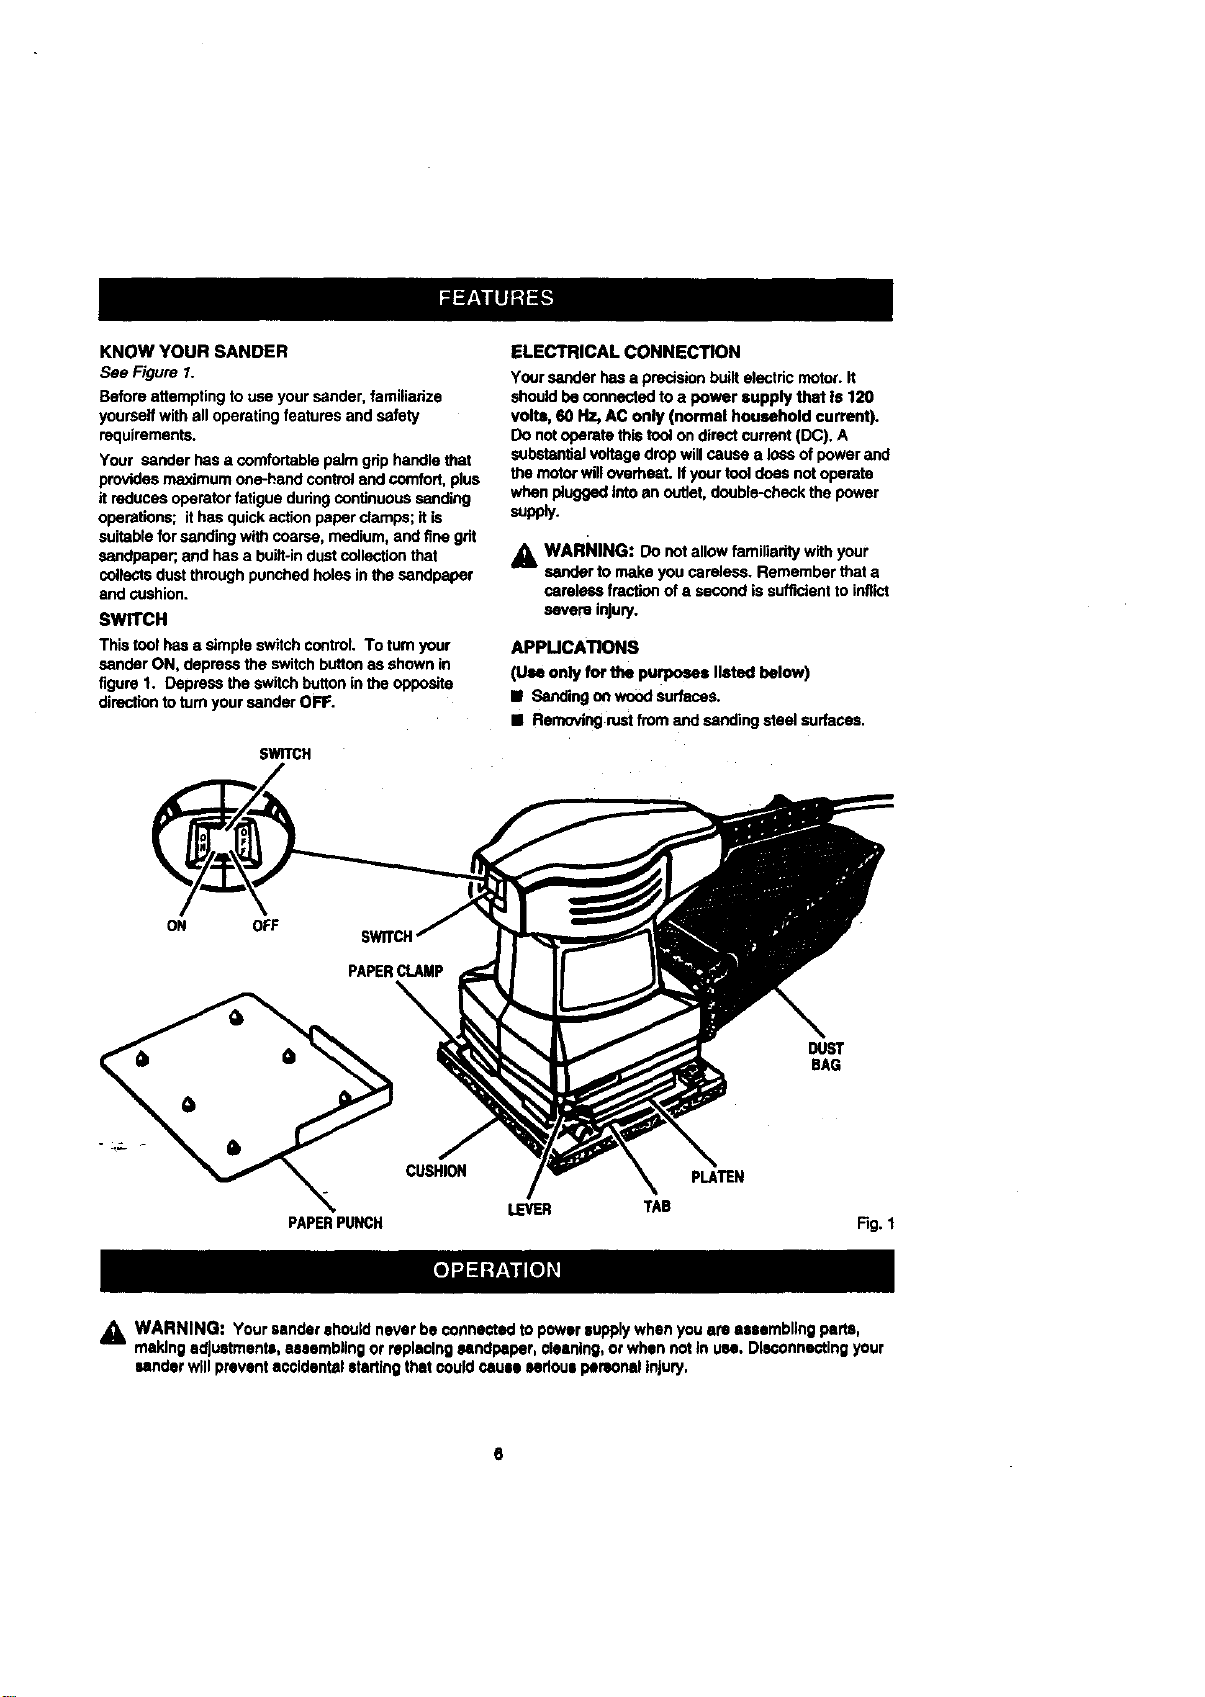
KNOWYOURSANDER
See Figure 1.
Before attempting to use your sander, familiarize
yourseit with all operating features and safely
requirements.
Your sander has a comfortable paJmgdp handle that
provides maximum one-hand control and comfort, plus
it reduces operator fatigue during continuous sanding
operations; it has quick action paper damps; it is
suitable for sanding with coarse, medium, and fine grit
sandpaper;,and has a built-in dust collection that
collects dust through punched holes in the sandpaper
and oushion.
SWITCH
This tool has a simple switch control. To tum your
sander ON, depress the switch button as shown in
figure 1. Depress the switch button in the opposite
direction to turn your sander OFF.
SWITCH
ELECTRICAL CONNECTION
Your sander has a precision built electric motor. It
should be connected to a power supply that ts 120
volts, 60 Hz, AC only (normal household current).
De not operate this tool on direct current (DC). A
substantial voltage drop will cause a Ioes of power and
the motor will overheat. If your tool does not operate
when plugged intoan outlet, double-check the power
supply.
A WARNING: Do not allow familiarity with
your
sander to make you careless. Remember that a
careless fraction of a second is sufficient to inflict
severe injury.
APPUCATIONS
(Use only forthe purposes listedbelow)
El Sandingonwoodsurfaces.
• Removingrestfromandsanding steelsurfaces.
ON OFF
SWITCH
PAPERCLAMP
CUSHION
LEVER
TAB
DUST
BAG
PAPERPUNCH Fig. 1
_k WARNING: Yoursandershouldneverbe connectedtopowersupply whenyou am assembling peha,
makingadjustments,assemblingor raplanlng_ndpeper, cleaning,orwhennot Inusa. Disconnectingyour
sanderwillpreventaccidentalstarting thatcouldcausesedous personalinjury,
8
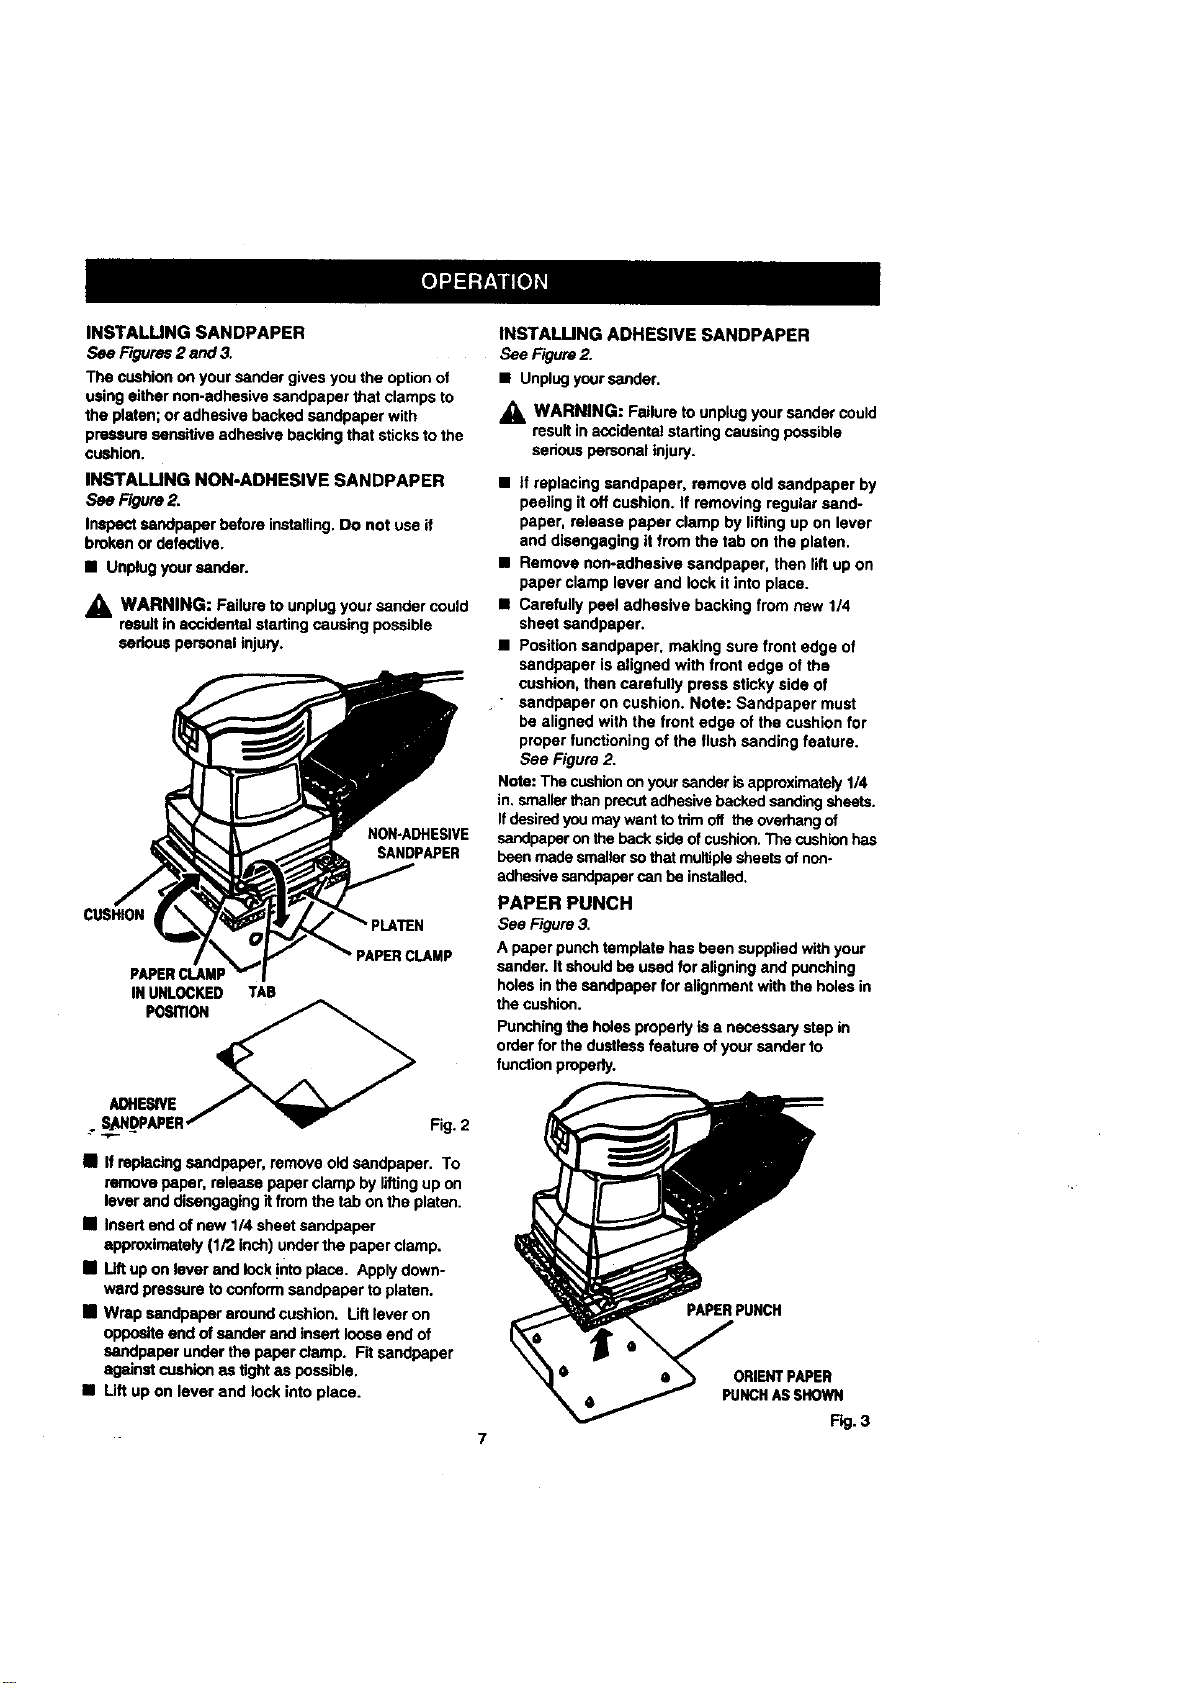
INSTALUNG SANDPAPER
See F_Jres E end 3,
The cushion on your sander gives you the option of
using either non-adhesive sandpaper that clamps to
the platen; Oradhesive backed sandpaper with
pressure sensitive adhesive backing that sticks to the
cushion,
INSTALUNG NON-ADHESIVE SANDPAPER
See Figure2.
Inspectsandpaperbeforeinstalling.Do not useif
brokenor defective.
• Unplug yoursender.
WARNING: Failure to unplug your sander could
resuR in accidental starting causing possible
serious personal injury.
NON-ADHESIVE
SANDPAPER
CUSHION
PAPERCLAMP
PAPERCLAMP
IN UNLOCKED TAB
POSITION _
.. SL.AN_DPAPER"" _ Fig. 2
• If replacing sandpaper, remove old sandpaper. To
remove paper, release paper clamp by liftingup on
lever and disengaging it from the tab on the platen.
• Insert end of new 114 sheet sandpaper
approximately (1/2 inch) under the paper clamp.
• Lift up on lever and lock !nto place. Apply down-
ward pressure to conform sandpaper to platen.
• Wrap sandpaper around cushion, Uft lever on
opposite and of sander and insert loose end of
sandpaper under the paper clamp. Fit sandpaper
against cushion as tight as possible,
• Lift up on lever and lock into place.
7
INSTALUNG ADHESIVE SANDPAPER
See Figure 2.
• Unplug your sender.
_, WARNING: Failure to unplug your sender could
result in accidental starting causing possible
serious personal injury.
• if replacing sandpaper, remove old sandpaper by
peeling it off cushion. If removing regular send-
paper, release paper clamp by lifting up on lever
and disengaging it from the tab on the platen.
• Remove non-adhesive sandpaper, then lift up on
paper clamp lever and lock it into place.
• Carefully peel adhesive backing from new 1/4
sheet sandpaper.
• Position sandpaper, making sure front edge of
sandpaper is aligned with front edge of the
cushion, then carefully press sticky side of
" sandpaper on cushion. Note: Sandpaper must
be aligned with the front edge of the cushion for
proper functioning of the flush sanding feature.
See Figure 2.
Note: The cushionon your sander isapproximately 1/4
in, smaller than precut adhesive backed sanding sheets.
Ifdesired you may want to trim off the overhang of
sandpaper on the back side of cushion. The cushionhas
been made smaller so that multiple sheets of non.
adhesive sandpeper san he installed,
PAPER PUNCH
See Figure 3.
A paper punch template has been supplied with your
sander. It should be used for aligning and punching
holes in the sandpaper for alignment with the hales in
the cushion.
Punching the holes properly is a necessary step in
order for the dustless feature of your sender to
function properly.
PAPERPUNCH
ORIENTPAPER
PUNCHASSHOWN
Fig.3
_1_ WARNING: Always wear safety goggles or
safety glasses with side shields when operating
your sander. Failure to do so could result in
foreign objects being thrown intoyour eyes,
resulting in possible serious injury. If the sanding
operation is dusty, also wear a face or dust
mask.
SANDPAPER SELECTION
Selecting the correct size grit and type sandpaper is
an extremely important step in achieving a high
quality sanded finish.Aluminum oxide, silicon carbide,
and other synthetic abrasives are best for power
sanding. Natural abrasives, such as flint and gamet
are too softfor economical use in power sanding.
In general, coarse grit will remove the most material
and finer grit will produce the best finish in all sanding
operations. The condition of the surface to be sanded
will determine which grit will do the job. If the surface
is rough, start with a coarse grit and sand untilthe
surface is uniform. Medium grit may then be used to
remove scratches left by the coarser grit and finer grit
used for finishing of the surface. Always continue
sanding with each grit until surface is uniform.
Note: Do not use sander without sandpaper, Doing
so will damage the cushion.
PREPARING FOR OPERATION
_k CAUTION: Be careful not to let your hand cover
the air vents.
SANDING
Clampor otherwisesecurethe worktopreventitfrom
movingunderyoursender.
_1= WARNING: Unsecuredworkcouldbethrown
towardstheoperatorcausing injury.
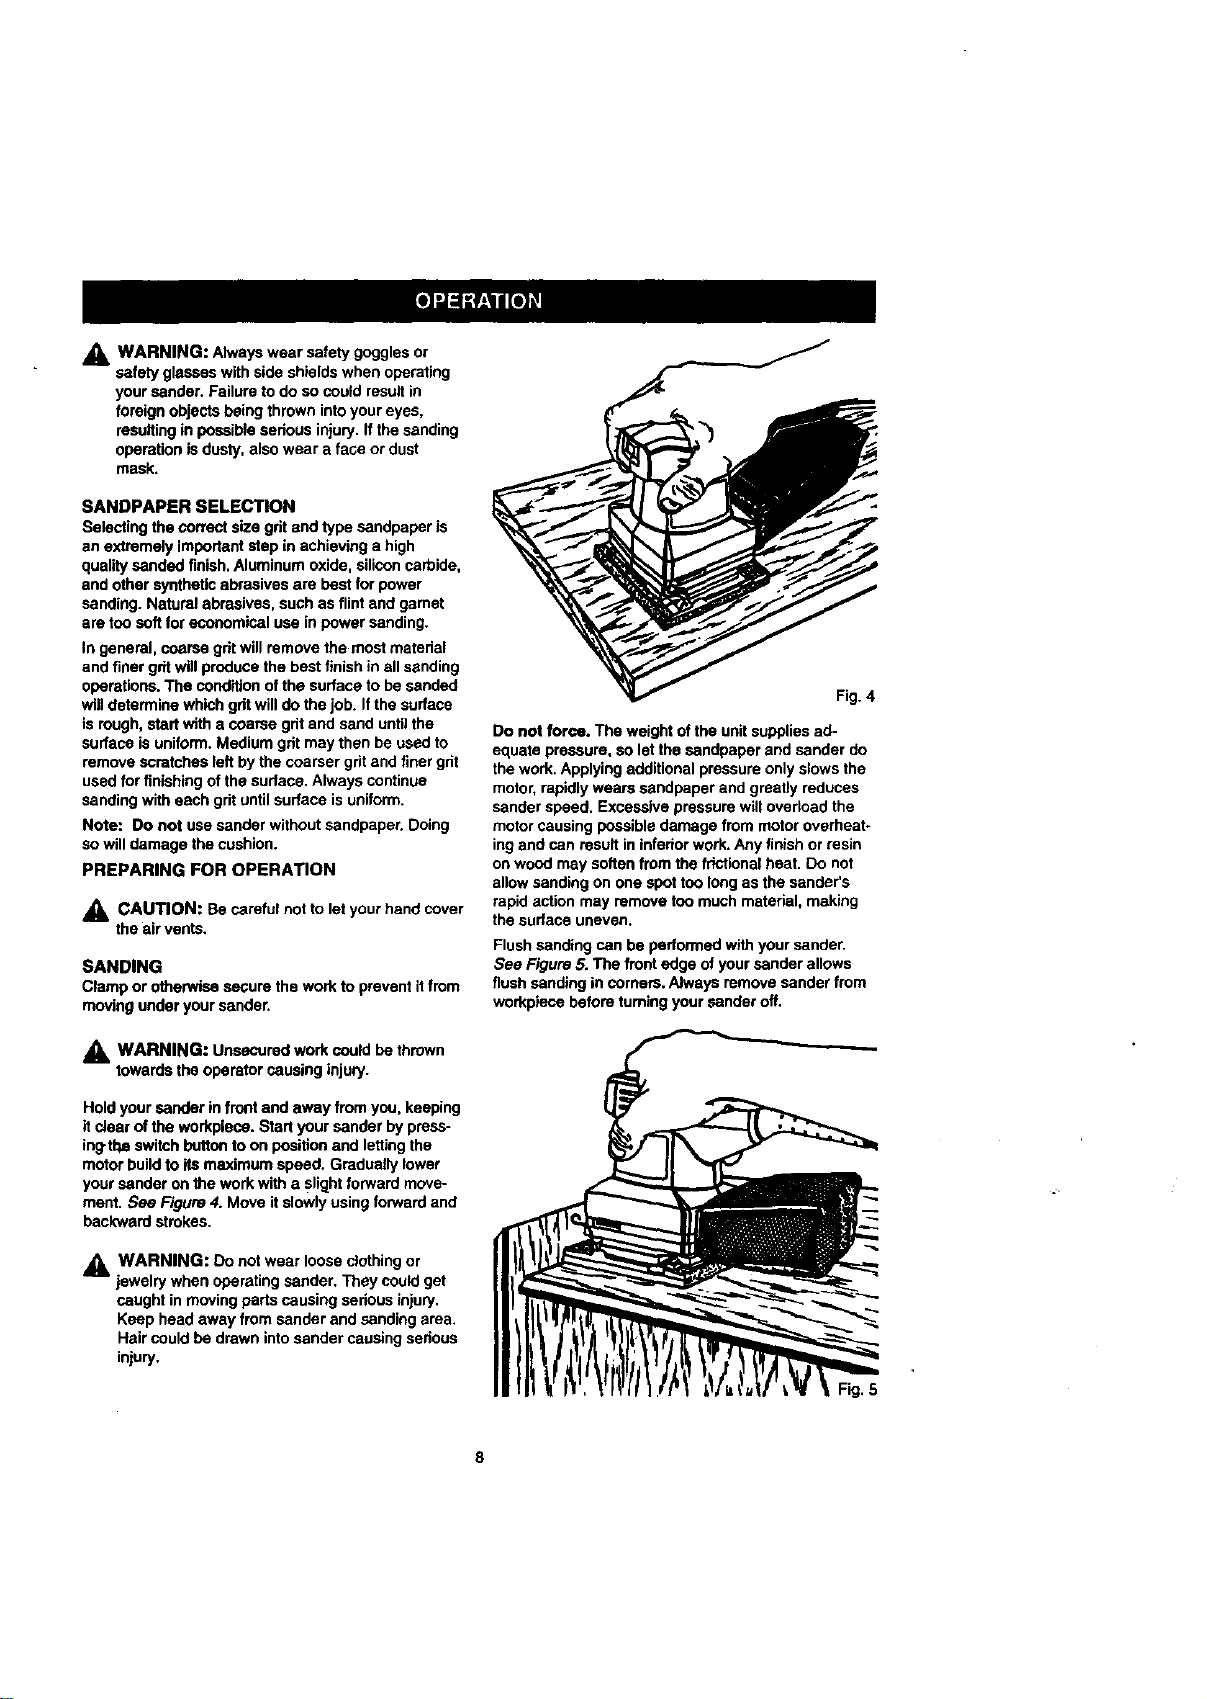
Hold your sander in front and away from you, keeping
it clear of the workpieco. Start your sander by press-
ing-the switch button to on position and letting the
motor build to its maximum speed. Gradually lower
your sander on the work with a slight forward move-
ment. See Figure 4. Move it slowly using forward and
backward strokes.
_. WARNING: Do not wear loose clothing or
jewelry when operating sander. They could get
caught in moving parts causing serious injury.
Keep head away from sander and sanding area.
Hair could be drawn intosander causing serious
injury,
Fig. 4
Do not force. The weight of the unit supplies ad-
equate pressure, so let the sandpaper and sander do
the work, Applying additional pressure only slows the
motor, rapidly wears sandpaper and greatly reduces
sander speed. Excessive pressure will overload the
motor causing possible damage from motor overheat-
ing and can result in infedor work. Any finish or resin
on wood may soften from the frictional heat. Do not
allow sanding on one spot too long as the sander's
rapid action may remove too much material, making
the surface uneven.
Flush sanding can be performed with your sanden
See Figure 5. The front edge of your sander allows
flush sanding in corners. Always remove sander from
workpleca before turning your sander oft.
Fig, 5
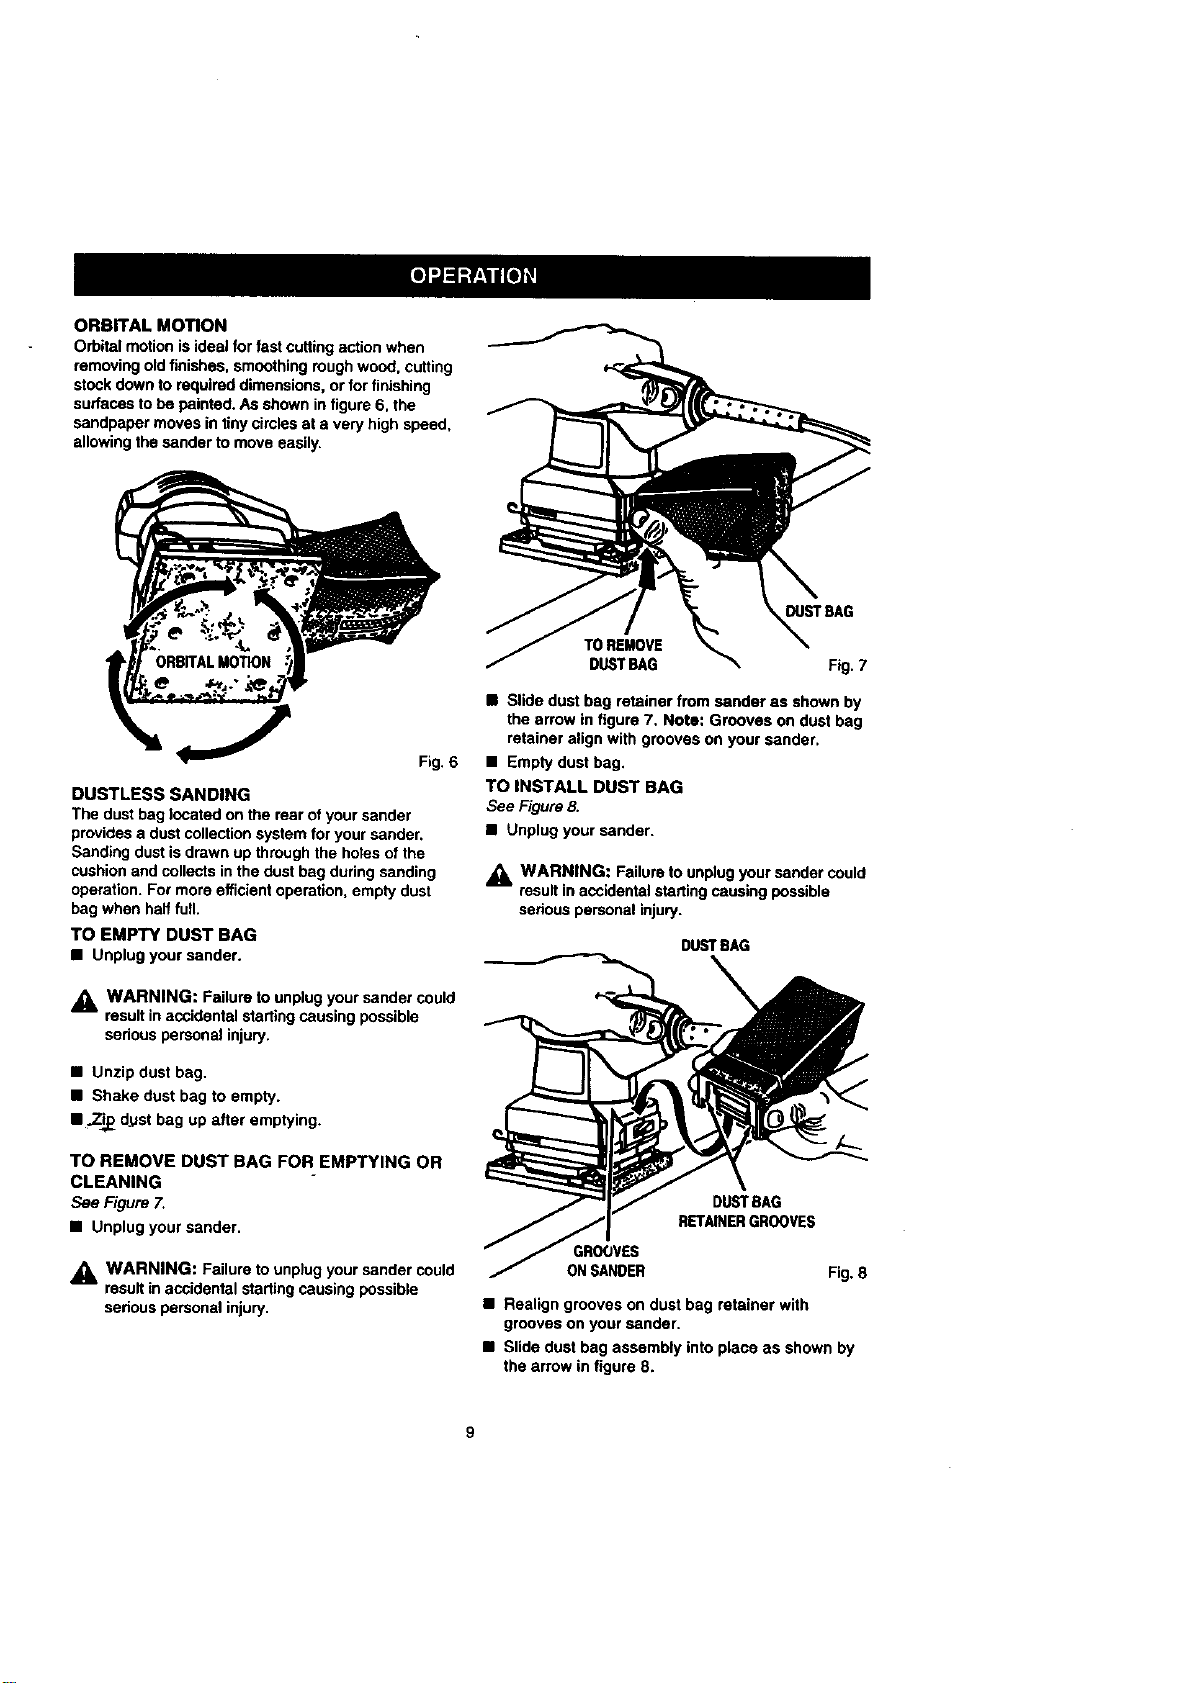
ORBITALMOTION
Orbitalmotionisideal for fast cutting action when
removing old finishes, smoothing rough wood, cutting
stock down to required dimensions, or for finishing
surfaces to be painted. As shown in figure 6. the
sandpaper moves in tiny circles at a very high speed,
a_iowi_ the sander to move easily.
Fig. 6
DUSTLESS SANDING
The dust bag $ocatad on the rear ot your sandeT
provides a dust collection system for your sander.
Sanding dust is drawn up through the holes of the
cushion and collects in the dust bag during sanding
operafion. For more efficient operation, empty dust
bag when half full.
TO EMPTY DUST BAG
• Unplug your sander.
_k WARNING: Failure to unplug your sander could
result in accidental starting causing passible
serious persouat in)uPj.
• Unzip dust bag.
• Shake dust bag to empty.
• _Zi_ dust bag up after emptying.
TO REMOVE DUST BAG FOR EMPTYING OR
CLEANING
See Figure7.
• Unplugyour sander.
_, WARNING: Failure to unplug your sander could
result in accidental starting causing possible
sedous personal injury.
DUSTBAG
TOREMOVE
DUSTBAG Fig. 7
• Slide dust bag retainer from sander as shown by
the arrow in figure 7. Note: Grooves on dust bag
retainer align with grooves on your sander,
• Empty dust bag.
TO INSTALL DUST BAG
See Figure 8.
• Unplug your sander.
_k WARNING: Failure to unplug your sender could
rssuStin accidenta$ stadin 9 ss,usk_j possible
sedous personal injury.
DUSTBAG
DUSTBAG
RETAINERGROOVES
GROOVES
ON SANDER Fig. 8
• Realign grooves on dust bag retainer with
grooves on your sander,
• Slide dust bag assembly into place as shown by
the arrow in figure 8.
9

_1, WARNING: When servicing use only identical
Craftsman replacement parts. Use of any other
parts maycreato a hazard or cause product
damage.
GENERAL
Only the parts shown on parts list, page thirteen, are
intended to be repaired or replaced by the customer.
All other parts represent an Important part of the
double insulation system and should be serviced only
by a qualified Sears service technician.
Avoid using solvents when cleaning plastic parts.
Most plastics are susceptible to damage from various
types of commercial solvents and may be damaged
by their use, Use clean cloths to remove dirt, carbon
dust, etc,
_ WARNING: Do not at any time let brake fluids,
gasoline, petrolaum-basod products, penetrating
oils, etc. come in contact with plastic pads. They
contain chemicals that can damage, weaken, or
destroy plastic.
It has been found that elactdc tools are subject to
accelerated wear and possible premature failure when
they are used on fiberglass boats, sports cars,
wallboard, spackling compounds, or plaster. The
chips and gdndings from these materials are highly
abrasive to electric too! paris such as bearings,
brushes, commutators, etc. Consequently, it is not
recommended that this tool be used for extended
work on any fiberglass material, wallboard, spackling
compounds, or piaster. During any use on these
matedals it isextremely important that the too! is
cleaned frequently by blowing with an air jet.
EXTENSION CORDS
The use of any extension cord will cause some loss of
power. To keep the loss to a minimum and to prevent
tool from overheating, use an extension cord that is
heavy enough to carry the current the tool will draw,
A wire gage size (A.W,G.) of at least 16 Is recom.
mended for an extension cord 100 feat or less in
length. When working outdoors, use an extension
cord that is suitable for outdoor use. The cent's jacket
will be marked WA.
_, CAUTION: Keep extensioncurdsawayfromthe
sending areaendpositionthecordsothat itwill
not get caught on lumber, tools, etc. during
sanding.
WARNING: Check extension cords before each
use. If damaged replace immediately. Never use
tool with a damaged cord since touching the
damaged area could cause electrical shock
resutiing in sedous injury.
Extension cords suitable for use with your sander aie
available at your nearest Sears Retail Store,
_k WARNING: Always wear safety goggles or
safety glasses with side shields dudng power tool
operation or when blowing dust. If operation is
dusty, also wear a dust mask.
LUBRICATION
All of the beadngs in this tool are lubricated with a
sufficient amount of high grade lubricant for the life of
the unit under normal operating conditions. Therefore,
no further lubrication is required.
I0

r-
11
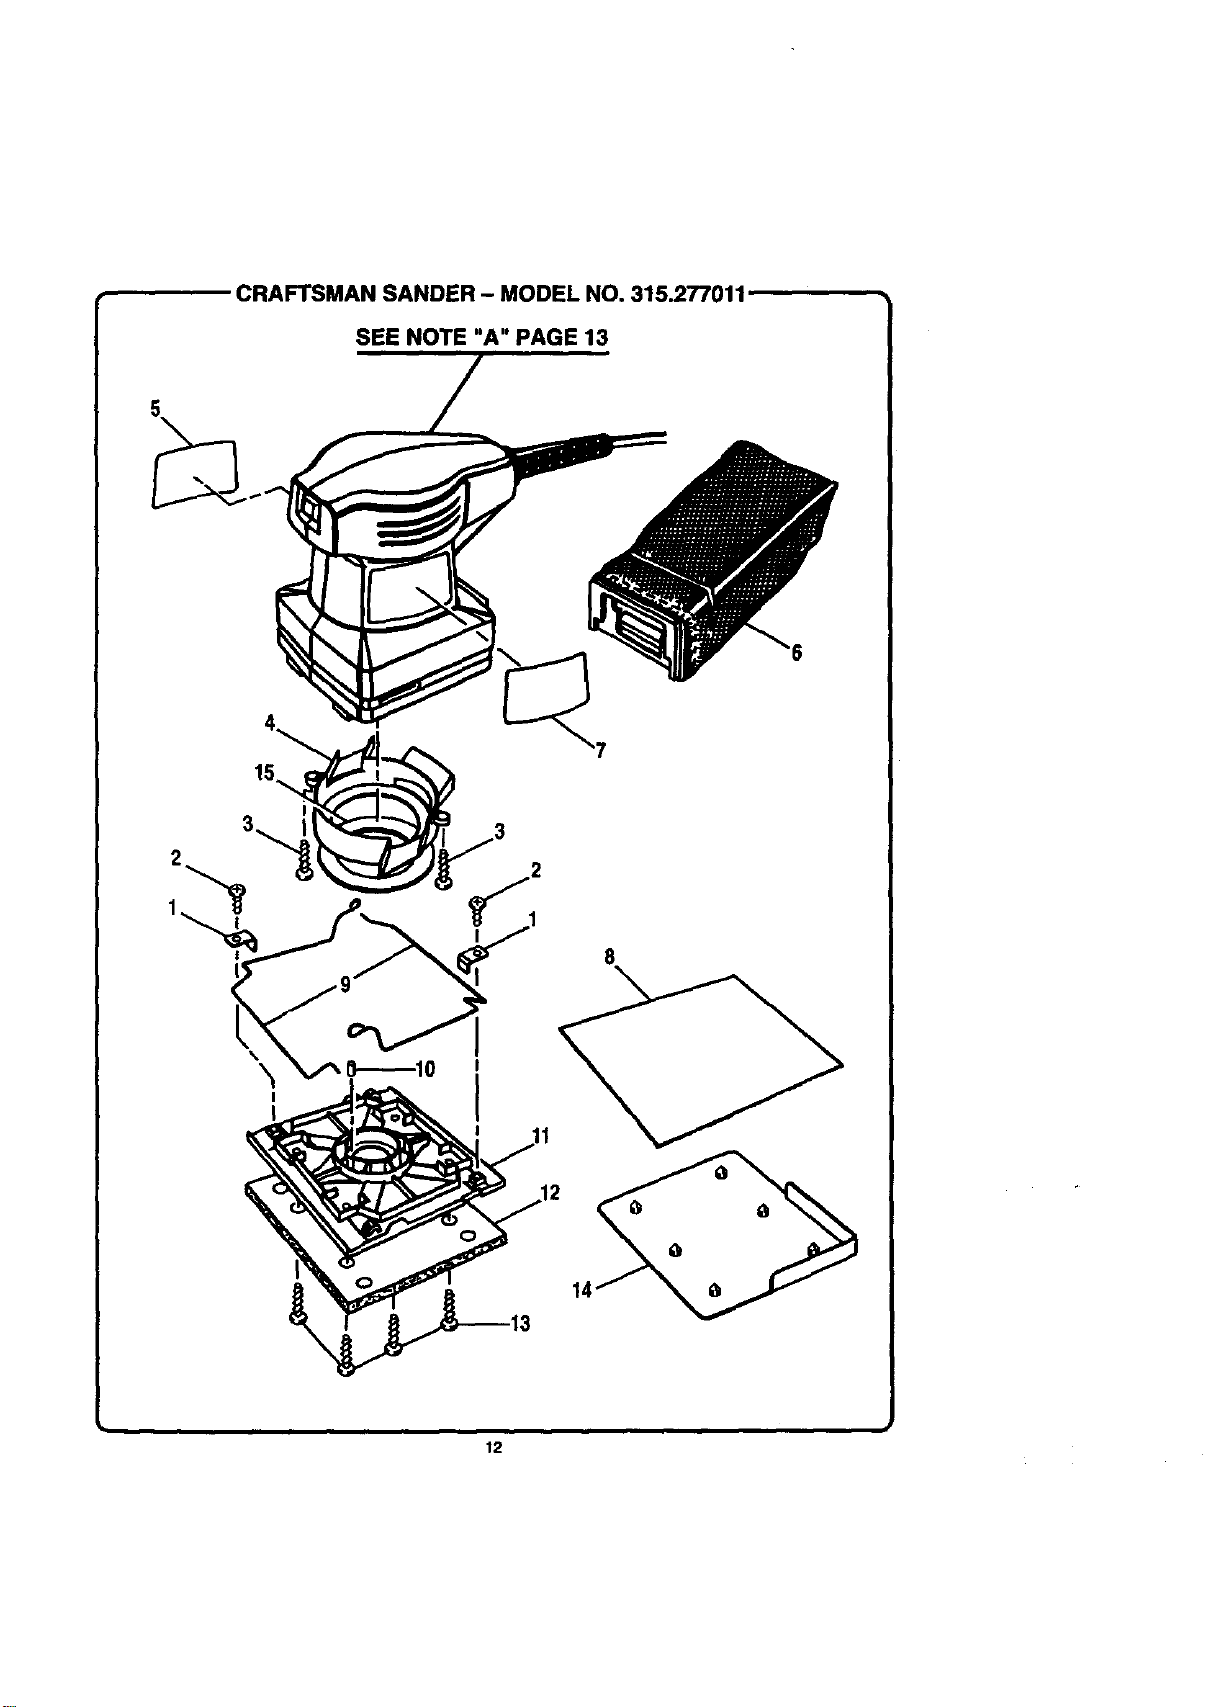
CRAFTSMAN SANDER - MODEL NO. 315.277011
SEE NOTE "A" PAGE 13
6
!
\
\
14
12
I
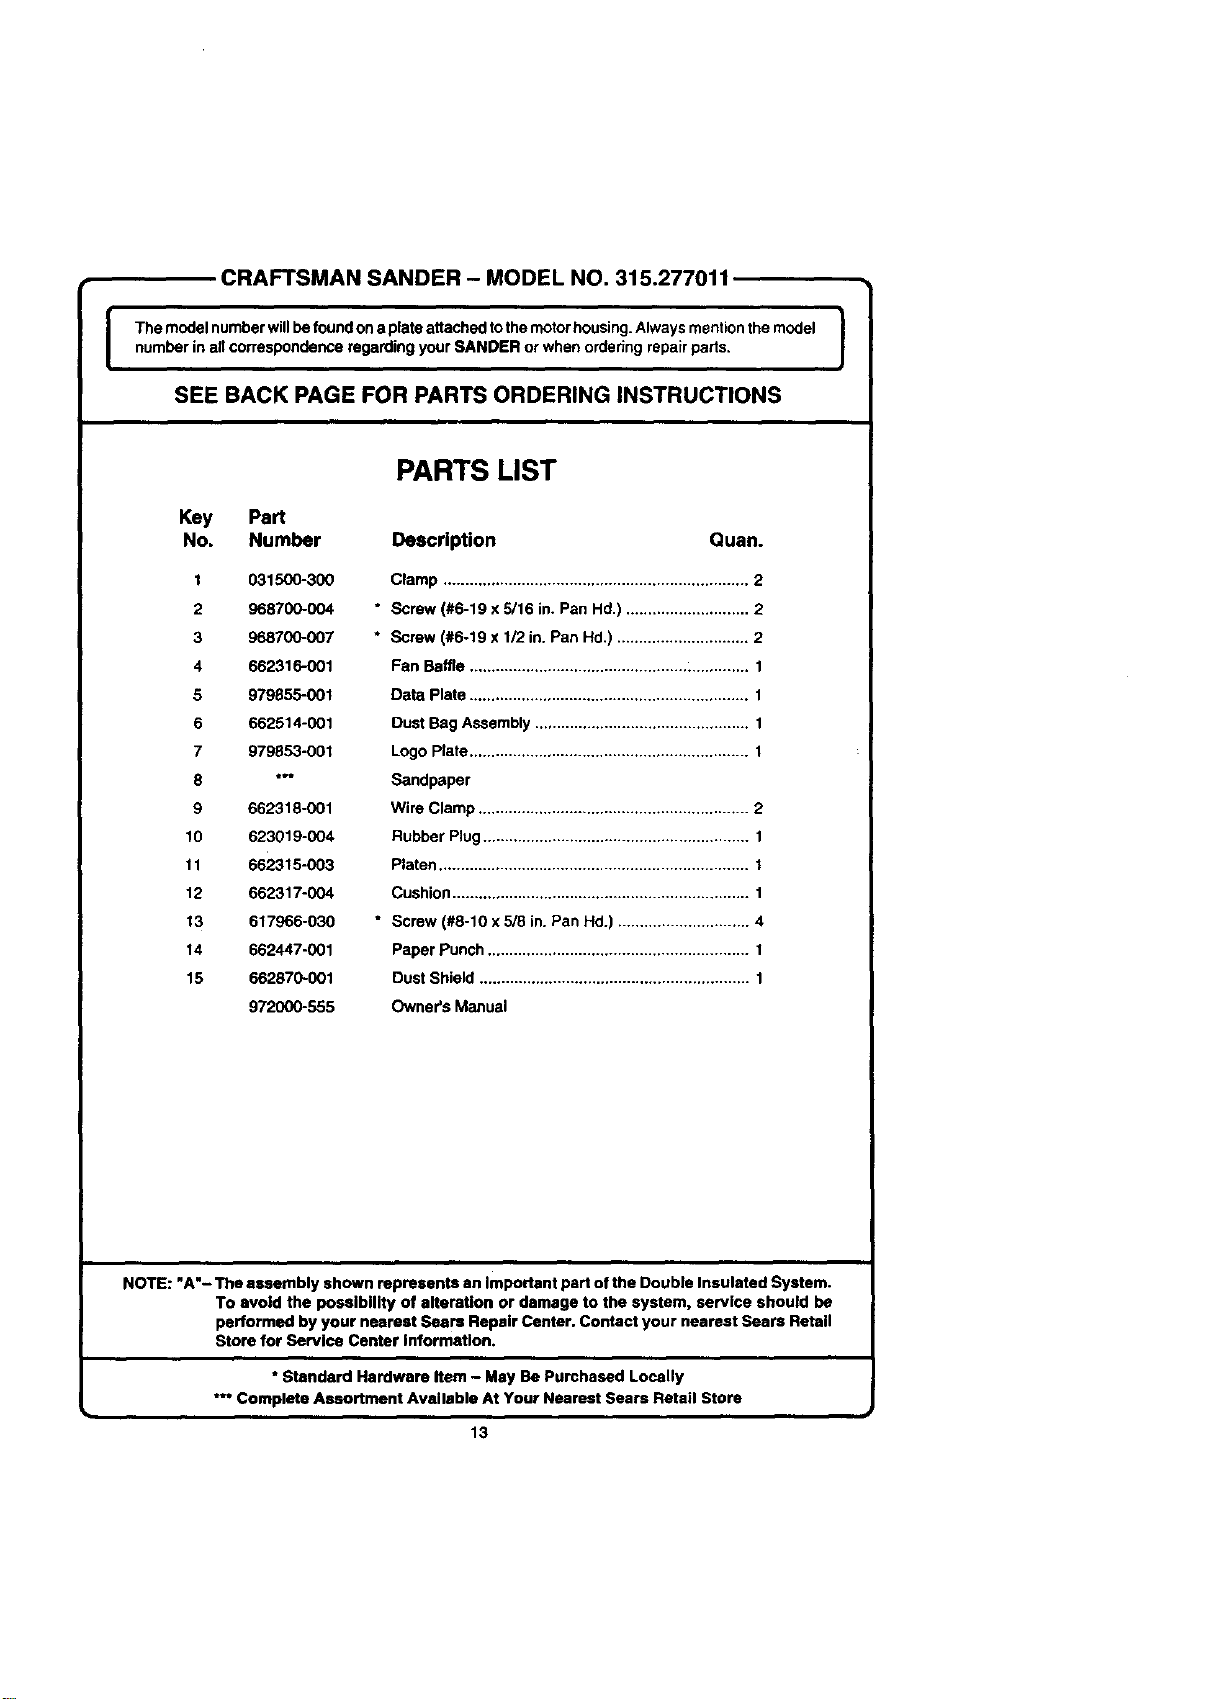
CRAFTSMAN SANDER - MODEL NO. 315.277011
The model number will be found on a plate attached tothe motorhousing. Always mention the model
number in all correspondence regarding your SANDER or when order;ng repair pads,
SEE BACK PAGE FOR PARTS ORDERING INSTRUCTIONS
I
Key Part
No. Number
1 031500-300
2 968700-004
3 968700-007
4 662316-001
5 979655-001
6 662514-001
7 979653-001
6 *t*
9 662318-001
10 623019-004
11 662315-003
12 662317-004
13 617966-030
14 662447-001
15 662870-001
972000-555
PARTS LIST
Description Ouan.
Clamp ...................................................................... 2
• Screw (#6-19 x 5/16 in. Pan Hd.) ............................ 2
* Screw (#6-19 x 1/2 in. Pan Hd,) .............................. 2
Fan Baffle .................................................. .............. 1
Data Plate ................................................................ 1
Dust Bag Assembly ................................................. 1
Logo Plate ................................................................ 1
Sandpaper
Wire Clamp .............................................................. 2
Rubber Plug ............................................................. 1
Platen ....................................................................... 1
Cushion .................................................................... 1
• Screw (#8-10 x 5/8 in. Pan Hd.) .............................. 4
Paper Punch ............................................................ 1
Dust Shield .............................................................. 1
Owner's Manual
NOTE: "A"- The assembly shown represents an Important part of the Double Insulated System.
To avoid the posslblllty of alteration or damage to the system, service should be
performed by your nearest Sears Repair Center. Contact your nearest Sears Retail
Store for Service Center information.
* Standard Hardware Item - May Be Purchased Locally
*** Complete Assortment Available At Your Nearest Sears Retail Store
13

For in-home major brand repair service:
Call 24 hours a day, 7 days a week
1-800-4-MY-Home _" (1-800-469-4663)
Pars pedir servicio de reparaci6n a domlcilio - 1-800-676-5811
In Canada for all your service and pads needs call
- 1-800-665-4455
Au Canada pour tout le service ou les pi_ces
For the repair or replacement parts you need:
Call 7 am - 7 pm, 7 days a week
1-800-366-PART (1-800-366-7278)
Para ordenar piezas con entrega a domicilio - 1-800-659-7084
For the location of a Sears Parts and Repair Center in your area:
Call 24 hours a day, 7 days a week
1-800-488-1222
For information on purchasing a Sears Maintenance Agreement
or to inquire about an existing Agreement:
Call 9 am - 5 pm, Monday - Saturday
1-800-827-6655
HomeCentrals"
I I
The Service Side of Sears"

