
OPERATOR'S MANUAL
II:RRFTSMRN'I
1/3 SHEET SANDER
DOUBLE INSULATED
Model No.
315.116920
_k WARNING: To reducetherLskot injury,
the usermust read and undemtandthe
operator'smanual beforeusingthis product.
Customer Help Lfne: 1-800-932-3188
Soars, Roebuck and Co., 3333 Beverly Rd., Hoffman Estates, IL 60179 USA
Visitthe Craftsmanweb page:www.seam.com/craftsmsn
983000-494
7-04
Save this manual for future reference

• Warranty .......................................................................................................................................................................... 2
• Introduction ..................................................................................................................................................................... 2
• General Safety Rules .................................................................................................................................................... 3-4
• Speclflc Safety Rules ....................................................................................................................................................... 4
• Symbols ........................................................................................................................................................................ 5-6
• Electrical .......................................................................................................................................................................... 7
• Features ........................................................................................................................................................................... 8
• Assembly ......................................................................................................................................................................... 9
• Operation .................................................................................................................................................................... 9-12
• Malntanance .................................................................................................................................................................. 13
• Accessories ................................................................................................................................................................... 13
• Exploded View and Par_s List................................................................................................................................... 14-15
• Par_s Ordering/Service ..................................................................................................................................... Sack Page
ONE YEAR FULLWARRANTY ON CRAFTSMAN TOOL
Ifthis Craftsmantool fallsto givecompletesatisfactionwithinone yearfrom date of pumhase,RETURN IT TO THE
NEAREST SEARS STORE IN THE UNITED STATES,and Seam will replaceit, free of charge,
Ifthis Craftsmantool is used for commercialor rentalpurposes,thiswarrantyapplies for only90 daysfromthe date of
purchase.
Thiswarrantygivesyou specificlegalrights,and you may also haveother rightswhichvaryfrom state to state.
Sears, Roebuck and Co., Dept. 817 WA, Hoffman Estates, IL 60179
Thistool hasmany featuresfor makingits usemore pleasantand enjoyable.Safety,performance,and dependability
have been giventop priorityinthe designof thisproductmakingiteasy to maintainandoperate.

A WARNING: Read and understand all Inetruc-
Uons, Failureto follow all instructionslistedbelow,
may resultin electricshock,fire and/orserious
personalIniury.
SAVE THESE INSTRUCTIONS
WORK AREA
• Keep your work area clean and well lit. Cluttered
benchesand darkareas inviteaccidents.
• Do not operate power tools in explosive abno-
spheres, such as in the presence of flammable liq-
uids, gases, or dust. Power tcols create sparkswhich
may ignitethe dust or fumes.
• Keep bystanders, children, and visitors away while
operating a power tool:DlslTactlons cancauseyouto
losecontrol.
ELECTRICAL SAFETY
• Double Insulated tools are equipped with a polar-
ized plug (one blade Is wider than the other). This
plug will fit in a polarized outlet only one way. If the
plug does not fit fully in the outlet, reverse the plug.
If it still does not fit, contact a qualified electrician
to install a polarized outlet. DO not change the plug
In any way. Double insulation [] eliminates the need
for the three-wire grounded power cord and grounded
power supply system.
• Avoid body €ontaot with grounded surfaces such
as pipes, radiators, ranges, and refrigerators. There
is an increased dsk of elactdc shock if your body Is
grounded.
• Don't expose power tools to rain or wet condiffone.
Water entering a power tool will increase the risk of
elac_c shock.
• Do not abuse the cord. Never use the cord to carry
the tools or pull the pfug from an outlet. Keep cord
away from heat, og, sharp edges, or moving parts.
Replace damaged cords Immediately. Damaged
cords increase the risk of elect/ic shock.
• When operating a power tool outside, use an outdoor
extension cord marked "W-A" or"W". These cords
are rated for outdoor use and reduce the risk of clectrio
shock.
PERSONAL SAFETY
• Stay alert, watch what you are dlolng and use com-
mon sense when operating a power toot. Do not
use toot while tired or under the influence of drugs,
alcohol, or medication. A moment of inattan_don while
operating power tools may result in serious personal
Injury.
• Dress properly. Do not wear loose clothing or
Jewelry. Contain long hair. Keep your hair, clothing,
and gloves away from moving parts. Loose clothes,
jewelry, or long hair can be caught In moving parts.
• Avoid accidental starting. Besure switch Isoff
before pluggingin.Carryingtoolswithyourfingeron
the switchor plugg/ngInroofsthathavetheswitch on
invitesaccidents.
• Remove adjusting keys or wrenches before toming
the tool on.A wrench ora key that is leftattached to a
rotatingpart of thetoolmay resultIn personalin,!ury.
• Do not overreach. Keep proper footing and balance
at all times. Properfootingand balanceenablesbetter
centre]of the toolJnunexpectedsituations.
• Use safety equipment. Always wear eye protection.
Dust mask,nonskidsafetyshoes,hard hat, or hearing
protectionmustbe usedfor appropriateconditions.
• Do not wear loose clothing or Jewelry. Contain long
hair. Looseclothes,jewelry,or fang haircanbe drawn
Intoair vents.
• Do not use on s ladder or unstable support. Stable
footing on a solidsurfaceenablesbetter central ofthe
tool in unexpectedsituations.
TOOL USE AND CARE
• Use clamps or other practical way to secure and
support the workplace to a stable platform. Holding
the work by hand or against your body is unstable and
may lead to loss of control.
• Do not force tool. Use the correot tool for your ap-
plication. The correct tool will do the job better and
safer at the rate for which It is deslgned.
• Do not use tool If switch does not torn It on or off.
An/tool that cannot be controlled with the switch is
dangerous and must be repaired.
• Disconnect the plug from power source before
making any adjustments, changing aGceesodes,
or stodng the tool. Such preventive safety measures
reduce the risk of starting the tool accidentally.
• Store idle tools out of the reach of children and
other untrained persons. Tools are dangerous in the
hands of untrained users.
• Maintain tools with care. Keep cutting tools sharp
end clean. Properly maintained tools with sharp cot-
t_ngedges are less likely to bind and are easier to
control.
• Check for mieaSgnment or binding of moving parts,
breakage of parts, end any other condil_on that
may affect the tool's operation. If damaged, have
the tool serviced before using. Many accidents are
caused by poorly maintained tools.
• Use only accessories that are recommended by the
manufacturer for your model. Accessories that may
be suitable for one tool, may become hazardous when
used on another tool.
• Keep the tool and its handle dry, clean and free
from oH and grease. Always use a clean cloth when
cleaning. Never use brake fluids, gasoline, petroleum-
based products, or any strong solvents to clean your
tool. FolJowing this rule will reduce the dsk of loss of
control and deterioration of the enctoeure pJestic.

SERVICE
• Tool service must be performed only by qualified
repair personnel. Sen/Iceor maintenanceperformed
by unqualifiedpersonnelmay resultina riskof injury.
• When servicing a tool, use only identical replace-
merit parts. Follow instructions in the Maintenance
section ot this manual Use of unauthorized par_s or
failure to follow Maintenance Instructions may create a
risk of shock or injury.
• Hold tool by Insulated gripping surfaces when
performing an operation where the cutting tool may
contact hiddenwiring or Its own cord. Contactwith
a "live" wira wil!make exposed metal parts ofthe cut-
tingtool "live"and shock theoperator.
• Never use this or any power sander for wet sending
or liquid polishing. Failureto complywillincreasethe
riskof electricalshock.
• _JIOWyour power tool. Read operator's manual
cereful_. Learn its applications and IlmitaUons, as
well as the specific potential hazards related to this
tool. Followingthis rulewillreducethe risk of electric
shock,fire,or sedousinjury.
• Always wear safety glasses. Everyday eyeglasses
have onlyimpact-resistant lenses; they are NOT
safety glasses. Followingthis rulewillreduce the risk
ofseriouspersonalinjury.
• Protect your lungs, Wear a face or dust mask if the
operation Is dusty. Followingthis rulewill reducethe
riskof sedouspersonalinjury.
• Protect your headng.Wsar hsadng protection dur-
Ing extended periods of operation. Followingthis rule
will reducethe dsk of seriouspersonalInjury.
• Inspect tool cords pedodicetly and, if damaged,
have repelred at your n_areat Authorlzad Service
Center. Constantly stay aware of cord location. Fol-
lowingthis rulewill reducethe riskofelectdc shock or
fire.
• Cheek damaged parts. Before further use of the
tool, a guard or other part that is damaged should
he carefully checked to determine that It will ep-
orate properly and perform Its Intended function.
Check for alignment of moving parts, binding of
moving parts, breakage of parts, mounting, and
any other conditions that may affect its operaP
Uon, A guard or other part that is damaged should
be properly repaired or replaced by an euthodzad
service _mter. Following this ruta will reduce the risk
of shock, fire, or serious injt_ry.
• Make sure your extension cord Is In good condt-
tion, When using an extension cord, be sure to usa
one heavy enough to carry the currant your product
wilt draw. A wire gauge size (A.W.G.) of at least 16
is recommended for an extension oord 100 feet
or lass in length. A cord exceeding 100 feet Is not
recommended. If In doubt_ usa the next heavier
gouge. The miler the gauge number, the heavier
the cord. An undersized cord will cause a drop In line
voltage resulting in ices of power and overheating.
• Inspect fen and remove ell nells from lumber before
using this tool. Following this rule will reduce the dsk
of sedous personal injury.
• Save these Instructions. Refer to them frequently and
use them to Instruct others who mW usa this too{. if
you loan someone this tool, Icen them these instruc-
tions also.
A WARNING: Some dustcreated by sanding, sawing, grinding, and otherconstructionactiv_t_sa
power drilling,
contains chemicalsknownto causecancer,birthdefectsor otherrsproductfveharm.Some examplesof these
chemicalsare:
• toadTTomlead-based paints,
• crystallinesllioafrom bricksand cementand othermasonryproducts,and
• arsenicand chromium/Tomchemicetty-treeledlumber.
Yourriskfl'omtheseexposures redes, dependingon how oftenyou do this typeof work.Toreduceyourexposure
to these chemicals:work Ina well ventilatedarea, and workwith approvedsafety equipment,such as those dust
masksthat arespecialtydesignedto fitterout rnlcmscoplcparticles.

Someofthe followingsymbolsmay be used on this tool. Pleasestudy them and learntheir meaning. Proper
interpretationof these symbolswillallowyou to operatethe tool better and safer.
SYMBOL NAME DESIGNATION/EXPLANATION
V Vol_ Voltage
A Amperes Current
Hz Hertz Frequency(cyclespar second)
W Watt Power
min Minutes Time
'%, AlternatingCurrent Typeof current
= DirectCurrent Typeor a characteristicof current
no No LoadSpeed Rotationalspeed, at no load
Class II Construction Double-Insulatedconstruction
.../mln PerMinute Revolutions,strokes,surfacespeed, orbitsetc., per minute
(_ Wet ConditionsAlert Do not to rain in
expose or use damp
locations.
I
ReadThe Operator'sManual To reducethe dskof Injury, usermustread and understand
operator_ manualbefore usingthis product.
O A_'ays wear safety gogglesor safetyglasseswith side
Eye
Protection
shieldsand a fullface shieldwhen operatingthisproduct.
_k Safety Precautionsthat Involveyoursafety.
Alert
(_ Failureto keep yourhandsaway fl'omthe bladewillresultin
No HandsSymbol serious personalinjury.
(_ No Hands Failureto keep yourhandsaway from the bladewillresultIn
Symbol
eadous personalinjury.
No HandsSymbol Failureto keep yourhandsaway from the bladewillresultin
sedouspersonalInjury.
/_ No HandsSymbol Failureto keep yourhandsaway from the bladewillresultin
seriouspersonalInjury.
(_) Hot Surface To reducethedsk ofInjuryor damage, avoidcontact with
any hot surface.
=
5
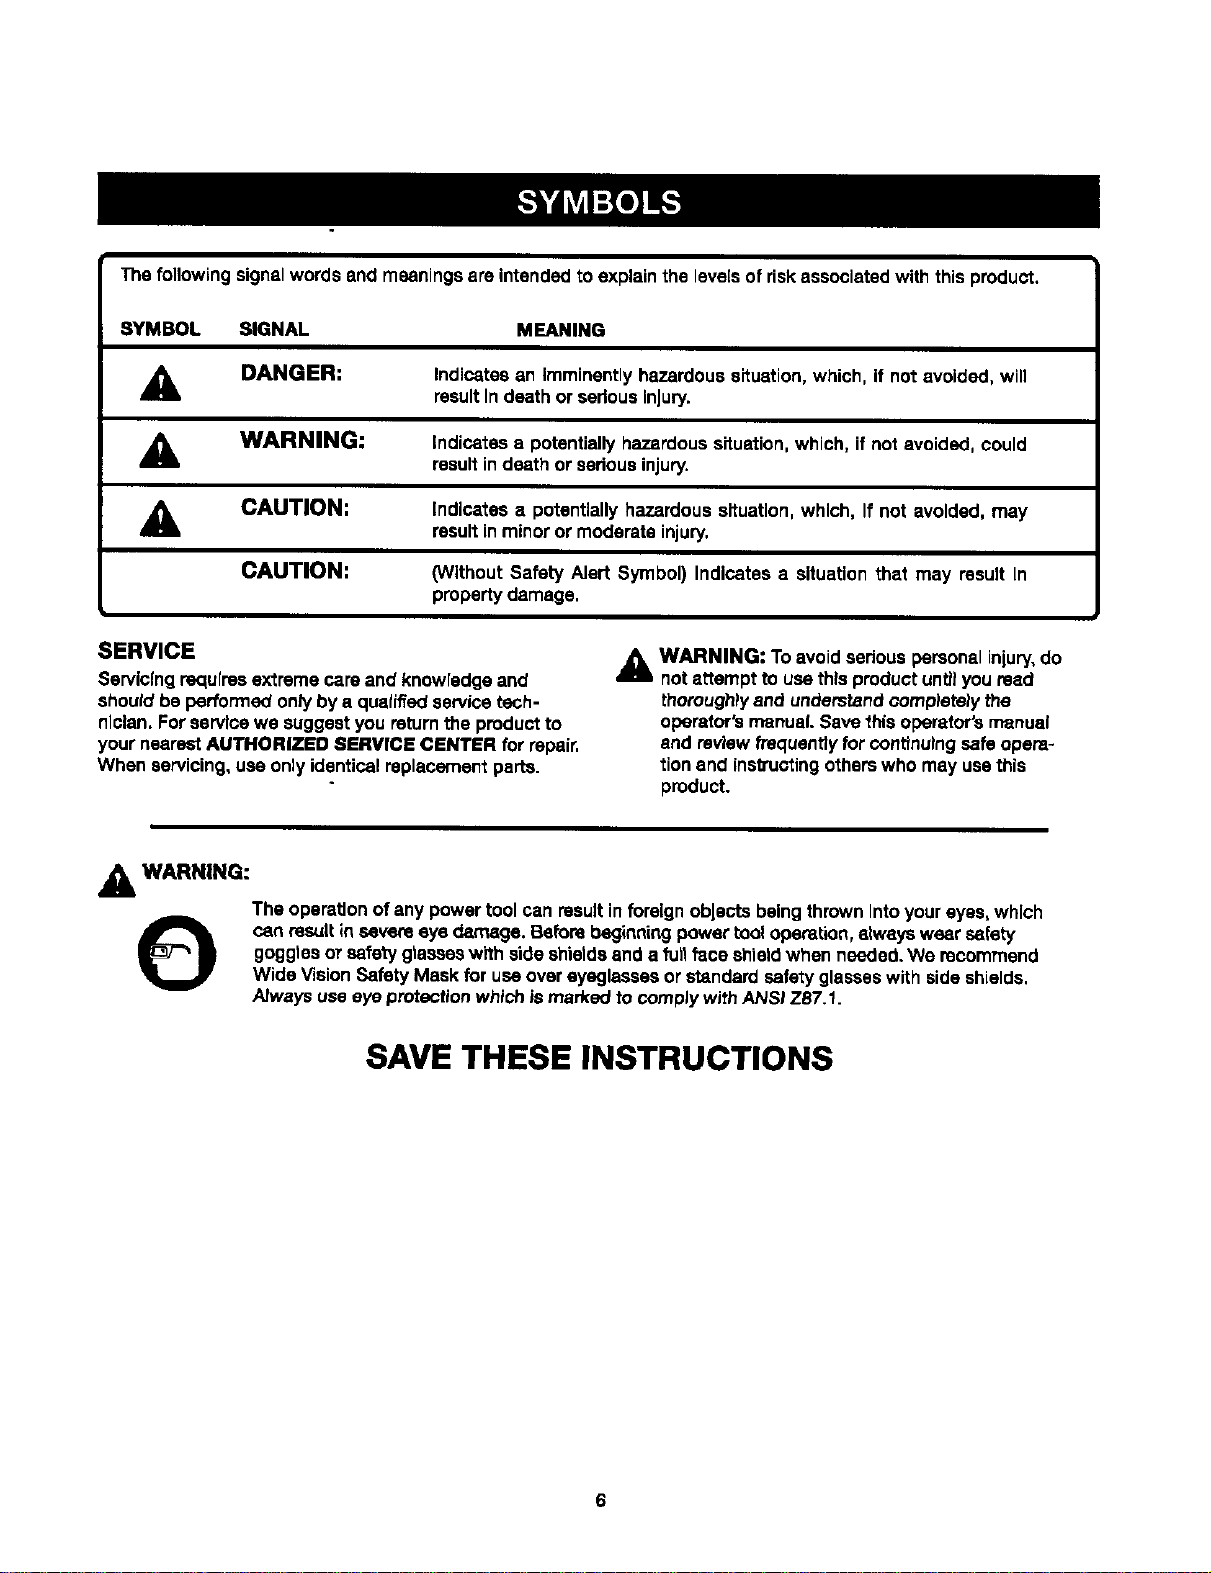
Thefollowingsignalwordsandmeanings are intendedtoexplainthe levelsof riskassociatedwith thisproduct.
SYMBOL SIGNAL MEANING
,_k DANGER:
Indicatesan imminentlyhazardoussituation, which, if not avoided,will
resultIndeath or sedousInjury.
A WARNING:
Indicates a potentially hazardous situation, which, if not avoided, could
result in death or serious injury.
A CAUTION:
CAUTION:
Indicates a potentiallyhazardoussRuatlon,which, If not avoided, may
resultinminor or moderateinjury.
(WithoutSafety Alert Symbol) Indicates a situationthat may result In
propertydamage.
SERVICE
Servic(ngrequiresextreme careand knowredgeand
shouldbe performedonly by a qualifiedservicetech-
nician.Forservicewe suggestyou mtum the productto
your nearestAUTHORIZED SERVICE CENTER for repair,
When servicing, use onlyidenticalreplacementparts.
A WARNING: Toavoidsadous personal injury,do
notattempt to usethIs productuntilyou read
thoroughly and understandcomp_etalythe
operator'smanual.Save this operator'smanual
and reviewfrequentlyfor continuingsafe opera-
tionand instructingotherswho may usethis
product.
A WARNING:
The operationofany powertool can resultin foreignobjects beingthrownIntoyoureyes,which
O can result in severe eye dan_ge. Beforebeginningpowertool operation,alwayswear ssL=ety
gogglesor safetygtasseawith aide shieldsand a fullface shieldwhen needed. We recommend
Wide VisionSafety Maskfor usaover eyeglasses or standardsafety glasseswith side shields.
Alwaysuse eyeprotectionwhichismarked to complywithANSI Z87.1.
SAVE THESE INSTRUCTIONS

DOUBLE INSULATION
Double insulation Is a concept in safety in electric power
tools, which eliminates the need for the usual three-wire
grounded power cord. A/I exposed metal parts are
isolated from the internal metal motor components with
protecting insulation. Oouble insulated tools do not need
to be grounded.
A WARNING: The doubleinsulated is
system
intendedto protectthe userhom shock resulting
from a break in thetool's In_ernalInsulation.Observe
all normal safety precautkmsto avo_ elactr(csl
shock.
NOTE: Servicingofa toolwith doubleinsulationrequires
extreme careand knowledgeofthe system and should
be performedonlyby a qualifiedservicetechnician.For
service,we suggestyou returnthe toolto yournearest
authodzed servicecenter for repair.A/waysuse odglnal
factory replacementparts when servicing.
ELECTRICAL CONNECTION
Thistool has a precision-builtelectricmotor, It shouldbe
connected to a power supply that is 120 volta, 60 Hz,
AC only (normal household current). Do not operate
this toolon direct current(DC).A substantialvoltagedrop
wilt causea loss ofpower and the motorwill overheat.If
yourtool does not operatewhen plugged into an outlet,
doubts-check thepower supply.
EXTENSION CORDS
When using a power tool at a considerable distance from
a power source, be sure to use an extension cord that has
the capacity to handle the current the tool will draw. An
undersized cord will cause a drop in line voltage, resulting
in overheating and toss of power. Usa the chart to deter-
mine the minimum wire size required in an extension cord.
Only round jacketed cords listed by Underwriters Labora-
tories (UL) should be used,
When working outdoors with a tool, use an extension
cord that Is designeq for outside use. This type of cord is
designated with "WA" on the cord's jacket,
Before using any extension cord, inspect it for loose or
exposed wires and cut or worn insulation.
-_pem r_g _on_ool_e_a_
0-2.0 2.1-3.4 3.5-5.0 5.t -7.0 7.1-12.0 12.%16.0
Cord length Wire Size (A.WoGJ
25' 16 16 16 "t6 14 14
50' 16 16 16 14 14 12
100' 16 16 _4 12 10 --
"*Usedon 12gauge. 20ampcircuit
NOTE:AWG=AmedcanWireGauge
WARNING: Keep the extension cord clear of the
working area, Position the cord so that it will not get
caught on lumber, tools or other obstructions while
you are working with a power tool. Failure to do so
can result in serious personal injury,
,_IL WARNING: Check extensioncordsbefore each
use. If damagedreprecaimmediately.Neverusetool
with a damaged cordsincetouchingthe damaged
area could causeelectricalshock resuittngin sertous
injury.

PRODUCTSPECIFICATIONS
OrbitDiameter......................................................... I116 in.
Size of Paper....................................................... 113Sheet
Paper"Pipe................................ Non-AdhesiveSandpaper
Adh_ve Sandpaper
No Load Speed ................................................ 12,000/mIn.
Input................................ 120V, 60 Hz, AC only,2.0 Ampe
Net Weight.................................................................. 4 Ibs.
_cuum hoseadapter ........................................... 1-1/4 in.
FRONT
HANDLE
REARHANDLE
DUSTBAG
SWITCH
PAPERCLAMP
VACUUMHOSEADAPTER
PLATEN
CUSHION OFF ON
Fig. 1
KNOW YOUR SANDER
See Figure 1.
Beforeattemptingto usethis product,familiarize yourself
with all operatingfeatures and safety rules.
The sander is suitable for sanding with coarse, medium,
and fine grit sandpaper. It will produce a fine, scratch-frae
finish when used to sand with the grain on wood surfaces.
It has also been designed so that sanding flush to corners
is possible.
SWITCH
The sander hasa oonvenienfiylocatedsealedelideswitch
to keep out dustfor longerlife.
PAPER CLAMP
The sander hastwo paper clampsdeigned to secure
standardsandpaper to the platen.
CUSHION
The cushionofthe sander accepts bothstandardand
pressuresensitiveadhesive sandpaper.
DUST COLLECTION
The sander hasa built-Indust collectionfor maximum
comfortand control,longer life,and tohelpkeep the work
area clean.A 1-1/4 in.vacuum hoseadapter isalso pro-
vLdedfor attachingto a vacuum cleaner.
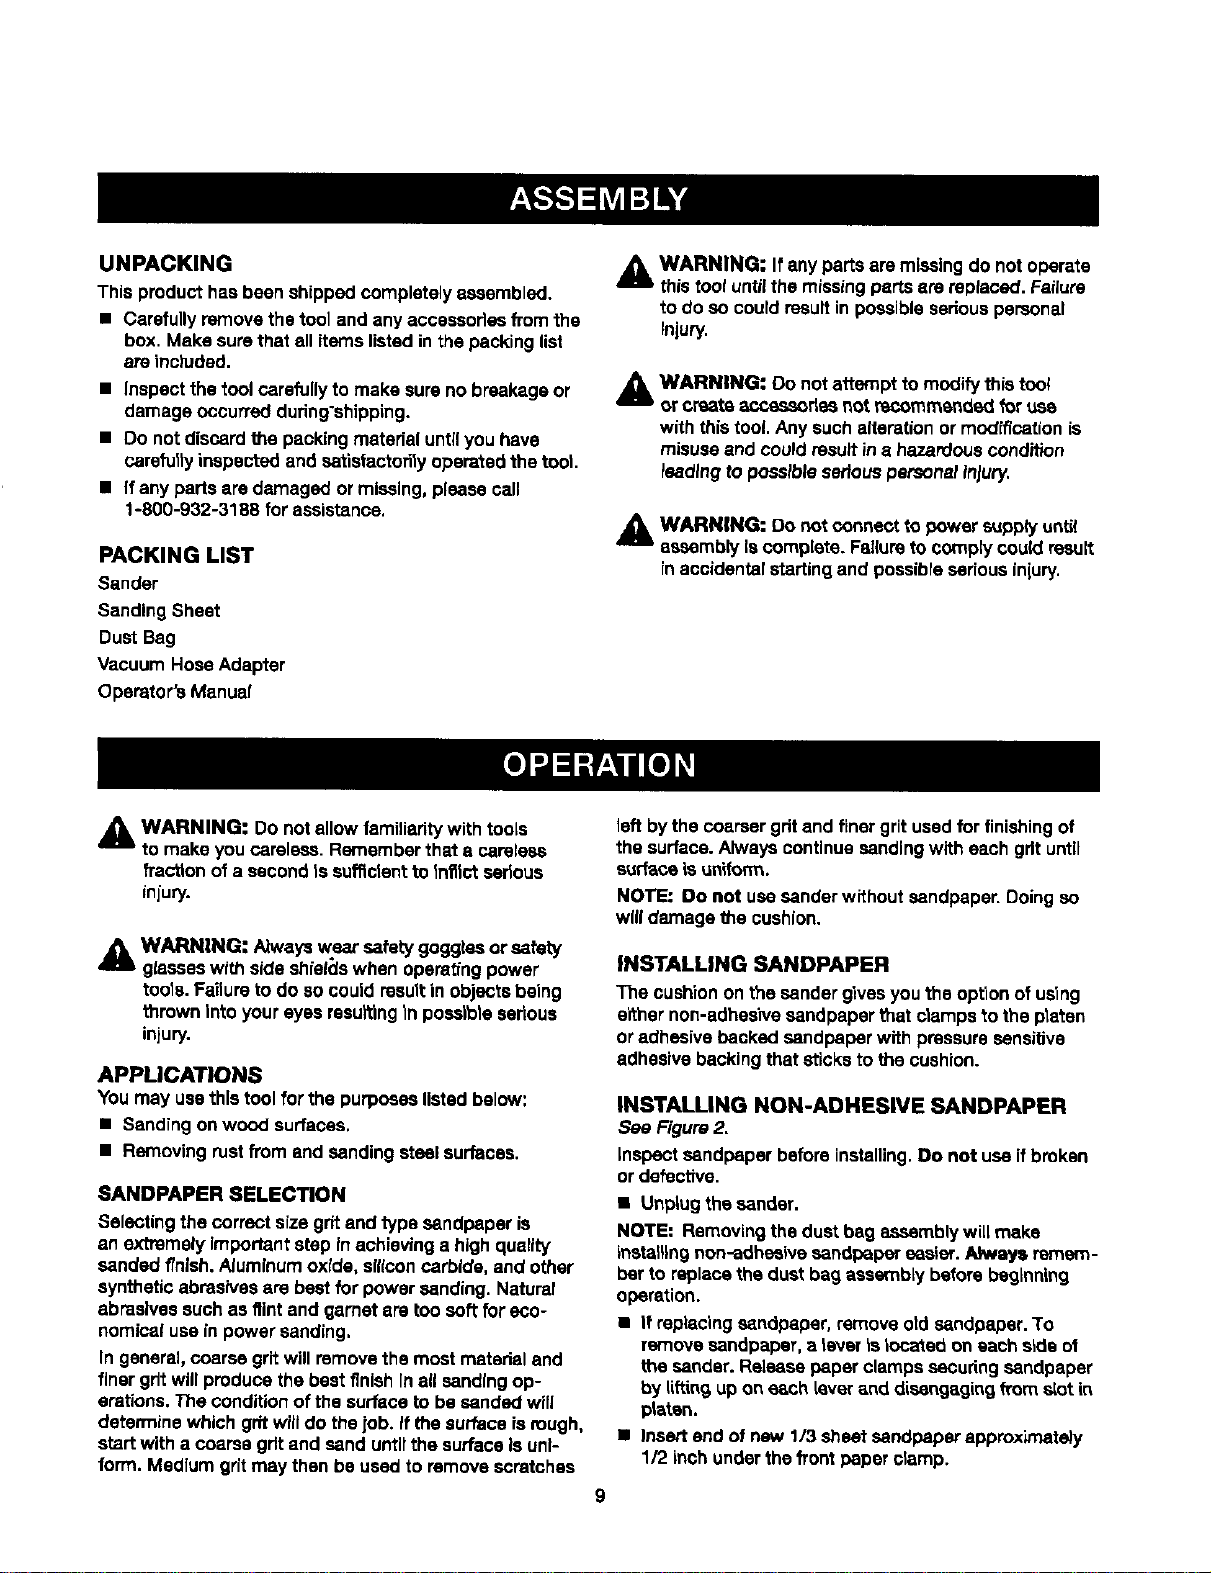
UNPACKING
This producthasbeen shippedcompletelyassembled.
• Carefullyremovethe tool and anyaccessoriesfromthe
box. Make surethat all itemslistedinthe packinglist
are inc)uded.
• Inspectthe toolcarefullyto make sureno breakageor
damage occurredduring'shipping.
• Do not discardthe packingmaterial untilyou have
carefully inspectedand satisfactorilyoperatedthe tool.
• If any partsare damaged ormissing,pleasecall
1-800-932-3188 for assistance,
PACKING LIST
Sander
Sanding Sheet
Dust Bag
Vacuum Hose Adapter
Operator's Manual
A WARNING; Ifanyparts are missingdo not operate
thistooluntilthe missingpartsare replaced.Failure
to do so could resultin possibleseriouspersonal
Injury.
A WARNING: Do notattempt to modifythis tool
orcreate accassodes not recommendedfor use
with thistool. Any suchalterationor modfflcation is
misuseand couldresultin a hazardouscondition
leading to possibleseriouspersonalInjury,
WARNING: Do not connectto power supplyunt_
assemblyIscomplete. Failureto complycould result
in accidentalstartingand possibre seriousiniury,
WARNING: Do not allow with tools
familiarity
to make youcareless. Rememberthat a careless
fraction of a secondis sufficientto Inflict serious
injury.
WARNING: Alwayswear safetygogglesor safety
glasseswith side shields when opamtingpower
tools.Failureto do so could resultin objectsbeing
thrownintoyoureyes resuRingIn possibleserious
injury.
APPLICATIONS
You may usethis toolforthe purposeslisted below:
• Sandingonwood surfaces,
• Removingrustfrom and sanding stealsurfaces.
SANDPAPER SELECTION
Selecting thecorrectsize gritand fypa sandpaper is
an extremely importantstep inachievinga highquality
sanded finish.AJumlnumoxide, sr_lconcarbide, and other
syntheticabrasivesare bestfor powersanding. Natural
abrasivessuchas flintand garnet are toosoft for eco-
nomicalusein power sanding,
In general,coarse gritwill removethe most material and
finer gritwillproducethe bestfinishInall sandingop-
ereUons.The conditionof the surfaceto be sandedwill
determine whichgritwilldo thejob. if thesurface is rough,
startwith a coarse gritand sand untilthe surfaceisuni-
form. Medium gritmay then be usedto removescratches
leftbythe coarsergritand finer gritused for finishingof
the surface.Always continuesandingwith eachgrit until
surfaceisuniform.
NOTE: Do not use sander without sandpaper. Doing so
will damage the cushion.
INSTALLING SANDPAPER
The cushion on the sender gives you the option of using
either non-adhesive sandpaper that clamps to the platen
or adhesive backed sandpaper with pressure sensitive
adhesive backing that sticks to the cushion.
INSTALLING NON-ADHESIVE SANDPAPER
See Figure2,
Inspectsandpaper beforeinstalling,Do not useif broken
or defective.
• Unplugthesander.
NOTE: Removingthe dust bag assemblywit[make
installingnon-adhesive sandpaper easier.Always remem-
ber to replacethe dust bag assembly beforebeginning
operation.
• It replacingsandpaper, removeoldsandpaper. To
removesandpaper, a lever islocatedon each s_deof
the sander. Release paper clampssecuringsandpaper
by liftingupon e&chleverand disengagingfToms_otin
platen.
• Insert end of newI/3 sheetsandpaperapprox_'nateiy
1/2 inchunder thefront paper clamp.
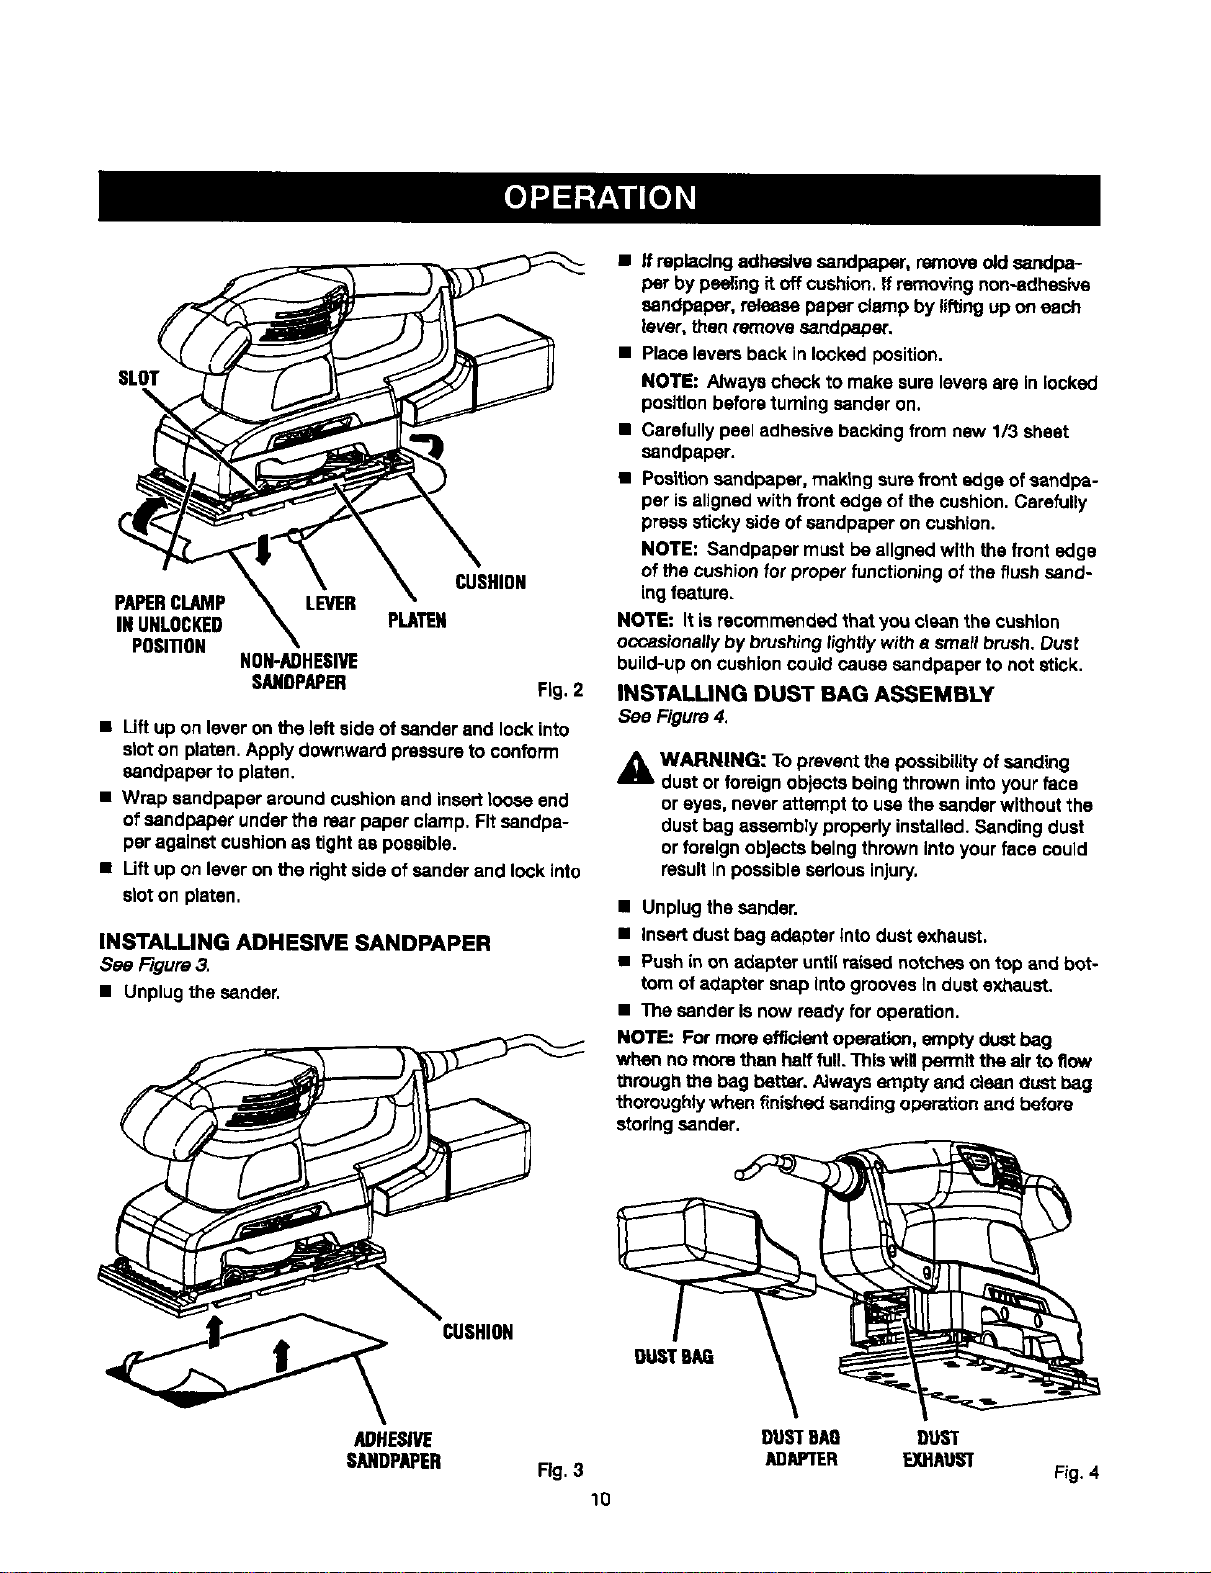
SLOT
PAPERCLAMP LEVER
IN UNLOCKED
POSITION
NON-ADHESIVE
SANDPAPER
PLATEN
CUSHION
Fig. 2
• Lift up on lever onthe leftside of senderand lock into
sloton platen.Apply downwardpressureto conform
sandpaperto platen.
• Wrap sandpaperaroundcushionand insertlooseend
of sandpaperunderthe rear paper clamp.Fit sandpa-
per againstcushionas tightas possible.
• Lift up on lever onthe rightside of sander and lock into
sloton platen.
INSTALLING ADHESIVE SANDPAPER
See Figure3.
• Unplugthe sander.
CUSHION
• If replacingadhesivesandpaper,remove oldsandpa-
per by peelingit offcushion,ff removingnon-adhesive
sandpaper, raisasapaparclamp by liffing up oneach
lever,then removesandpaper,
• Placeleversback inlocked position.
NOTE: Alwayschockto make sure leversareIn Iockap
positionbeforeturningsanderon.
• Carefullypeel adhesivebackingfrom new 1/3 sheet
sandpaper.
• Positionsandpaper,makingsurefrontedge ofsandpa-
perisalignedwithfront edge ofthe cushion.Carefully
pressstickyside ofsandpaperon cushion.
NOTE: Sandpapermust bealignedwith the frontedge
of the cushionfor properfunctioning of the flush sand-
ing fse.fure_
NOTE: It isrecommended that you cleanthe cushion
occasionallybybrushinglightly with a smarlbrush.Dust
build-upon cushioncouldcause sandpaper to not stick.
INSTALUNG DUST BAG ASSEMBLY
See Figure4.
_ WARNING: To prevent the possibilityofsanding
dust or foreignobjectsbeing thrownintoyourface
or eyes. neverattempt to usethe sander withoutthe
dust bag assembly propadyinstalled.Sandingdust
or foreign objectsbeingthrownIntoyourface could
resultInpossiblessrlous injury.
• Unplugthesender.
• Insert dust bag adapterinto dust exhaust.
• Push inon adapter untilraisednotcheson top and bot-
tom ofadapter snap Into grooves{n dust exhaust.
• The sander Isnow reedy for operation.
NOTE: Formore efficientoperation,empty dustbag
when nomore than halffull. This willpermittheair to flow
through the bag better. Alwaysemptyand clean dust bag
thoroughlywhen finishedsending open,ion and before
storingsander.
ADHE=VE
SANDPAPER
DUSTOAO t)OST
AD/ffq'ER EXHKIJST
Fig, 3 Fig.4
10
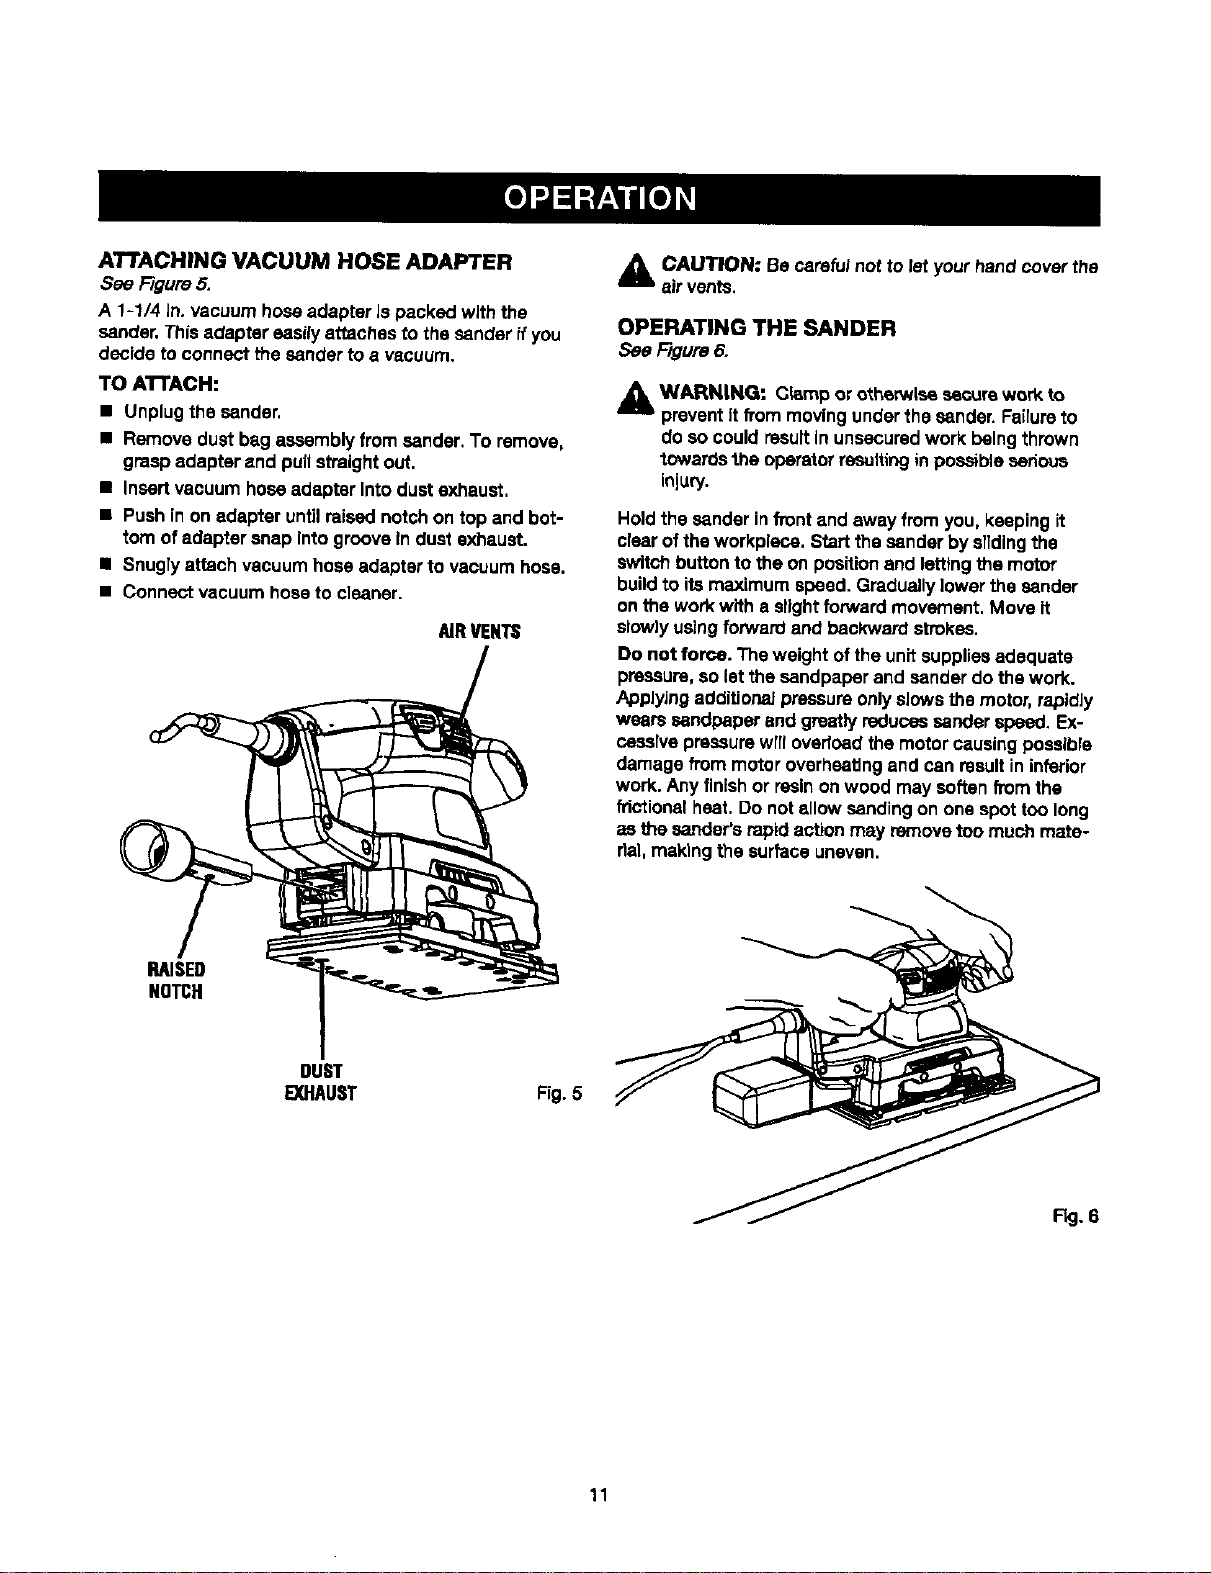
ATTACHINGVACUUMHOSEADAPTER
See Figure5.
A 1-1/4 in. vacuum hoseadapter ispacked with the
sender. Thisadapter easilyattachesto the sanderifyou
decide toconnect thesender to a vacuum.
TO A'I'rACH:
• Unplugthe sender,
• Remove dust bag assemblyfrom sander. To remove,
graspadapter and pull straightout.
• Insertvacuum hoseadapter intodustexhaust.
• Push in on adapter untilraisednotchon top and bot-
tom of adaptersnap Intogroove Indust exhaust.
• Snuglyattachvacuum hose adapterto vacuumhose.
• Connect vacuum hoseto cleaner.
AIRVENTS
RAISED
NOTCH
DUST
EXHAUST Fig.5
_. CAUTION: Be carefulnot tolet handcoverths
your
air vents.
OPERATING THE SANDER
Sea Figure 6.
A WARNING: Cl_mp or o_herwlse secure work to
prevent it Prom moving under the sender. Failure to
do so could result in unsecured work being thrown
towards the operator resultingin possible sadous
injury.
Hold thesander infrontand away fromyou, keepingit
clearof theworkplace. Startthe sander by slidingthe
switchbuttonto the on positionand lettingthe motor
buildto itsmaximum speed. Graduallylowerthe sander
on the work with a slightforwardmovement. Move it
slowlyusingforwardand backwardstrokes,
Do not force. Theweight ofthe unitsuppliesadequate
pressure,solet thesandpaperand sanderdo the work.
Applyingadditionalpressureonlyslows themotor,rapidly
wears sandpaperendgreatlyreducessander speed. Ex-
cessrvepressure wrrloverloadthe motorcausingpossible
damage frommotoroverhsetlngand can resultin inferior
work. Anyfinish or resinonwood may soften fromthe
frictional heat. Do not allow sanding on one spot too long
as the sander'srapidactionmay removetoo much mate-
dal,makingthe surfaceuneven.
Rg. 6
11
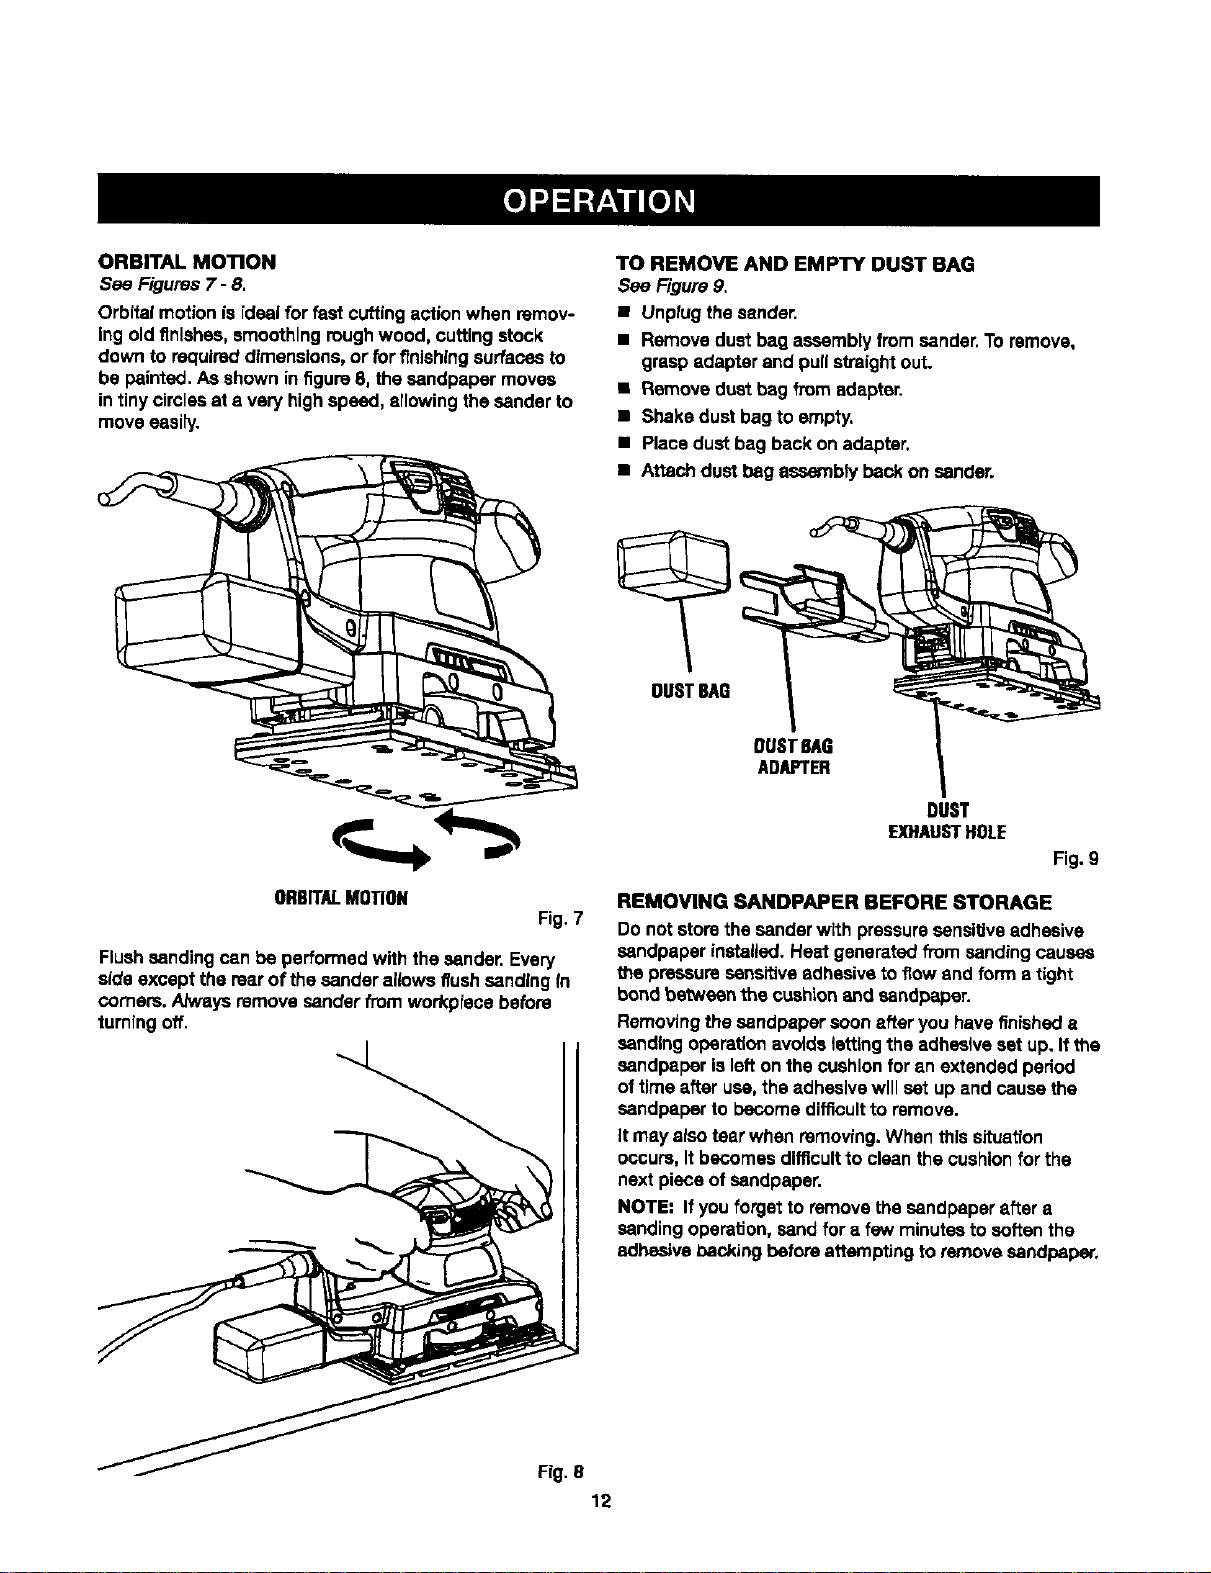
ORBITALMOTION
See Figures7- 8,
Orbital motionis rdeal for fast cuffingactionwhen remov-
Ingoldfinishes,smoothingroughwood, cutting stock
down to requireddimensions,or forfinishingsurfacesto
be painted.Asshown infigure8, the sandpapermoves
intiny circlesat a very highspeed, allowing thesander to
moveeasily.
ORBITALMOTION
Fig. 7
Flushsanding can be performedwith thesander. Every
side except the rearof the sander allowsflushsanding(n
comers. A/ways removesanderfrom workp(scabefore
turning off.
TO REMOVE AND EMPTY DUST BAG
See Figure9.
• Unplug thesender.
• Remove dust bag assemblyfromsander, To remove,
graspadapterand pullstraightout.
• Remove dust bag fromadapter.
• Shake dust bag to empty.
• Placedust bag back on adapter,
• Attachdust bag assemblybeckon sander.
DUSTBAG
DUSTBAG
ADAPTER
DUST
EXHAUSTHOLE
Fig. 9
REMOVING SANDPAPER BEFORE STORAGE
DOnot storethe sander with pressuresansiUveadhesive
sandpaperinstalled.Heat generated from sanding causes
the pressuresensitiveadhesiveto flow end form a tight
bond betweenthe cushionand sandpaper.
Removingthesandpaper soonafter you havefinisheda
sandingoperationavoidslettingthe adhesiveset up. Itthe
sandpaperis leftonthe cushionfor en extended period
of timeafter use,the adhesivewillset up end cause the
sandpaper to become difficultto remove.
It may alsotear when removing.When this situatfon
occurs, Itbecomes difficultto cleanthe cushionfor the
next piece of sandpaper.
NOTE: If youforget to removethe sandpaper after e
sanding operation,sand for e few minutesto soften the
adhesivebackingbeforeattempting to removesandpaper.
Fig. 8
12
WARNING:Whenservicing,useonlyidentical
Craftsmanreplacementparts.Useofanyotherparts
maycreateahazardorcauseproductdamage.
A WARNING: Always wear safety goggles or safety
glasses with side shields during power tool operation
or when blowing dust. If operation is dusty, also wear
a dust mask.
GENERAL MAINTENANCE
Avoid usingsolventswhen elseningplasticparts.Most
pteaticaare susceptibleto damage from vadoca typesof
commercialsolvents and may be damaged by theiruse.
Useclean clothsto removedirt,dust, oil, grease,etc.
A WARNING: Do notat anytime let b_akefluids,
gasoline,petroleum-basedproducts,penetrating
oils,etc., come incontact with plesttcparts,Chemi-
cals can damage, weaken or dea_reyplasticwhich
may resuttinserious personalinjury.
Electdctoolsused onfiberglassmaterial,wallboard,
spacklingcompounds,orplasteraresubjectto accel-
eretedwear and poseibte prematurefaikJrsbecausethe
fiberglass chipsand grlndlngsare highlyabrasiveto bear-
ings,brushes,commutators,etc. Consequently,we do not
recommendedusingthis toolforextended workon these
types of materials.However,ifyoudo work with anyof
thesematerials, it isextrerne)yimportant to c]eanthetool
usingcompressedair.
LUBRICATION
Allofthe bearingsInthis toolare lubricatedwith a suffi-
cientamount ofhighgrade lubricant for thelife ofthe unit
undernormaloperatingconditions.Therefore,nofurther
lubricationisrequired,
Onlythe peJ'tsshownon the parts listareintendedto be
repairedor replaced bythe customer,All otherparts
shouldbe repfacadat a SearsService Center,
The followingrecommendedaccessories are currentlyavailableat Sears retailstores:
• Non-Lcadlng Aluminum OxideAdhesiveBacked Sandpaper........................................................... 3-2/3 in.x 7-1/8 In.
Fine, Fine, Medium,Coarse
• AluminumOxide Sheet Sandpaper........................................................................................................... 3-2/3 in. x 9 in.
Fine, Medium,Coarse
_ WARNING: Currentattachmentsand accessoriesava_bte for usewith thistoolam listed above. Do notuseany
attachments or accessories not recommendedbythe manufacturerof thistool. The use ofattachmentsor acces-
soriesnot recommendedcan resuttIn serious personalinjury.
13
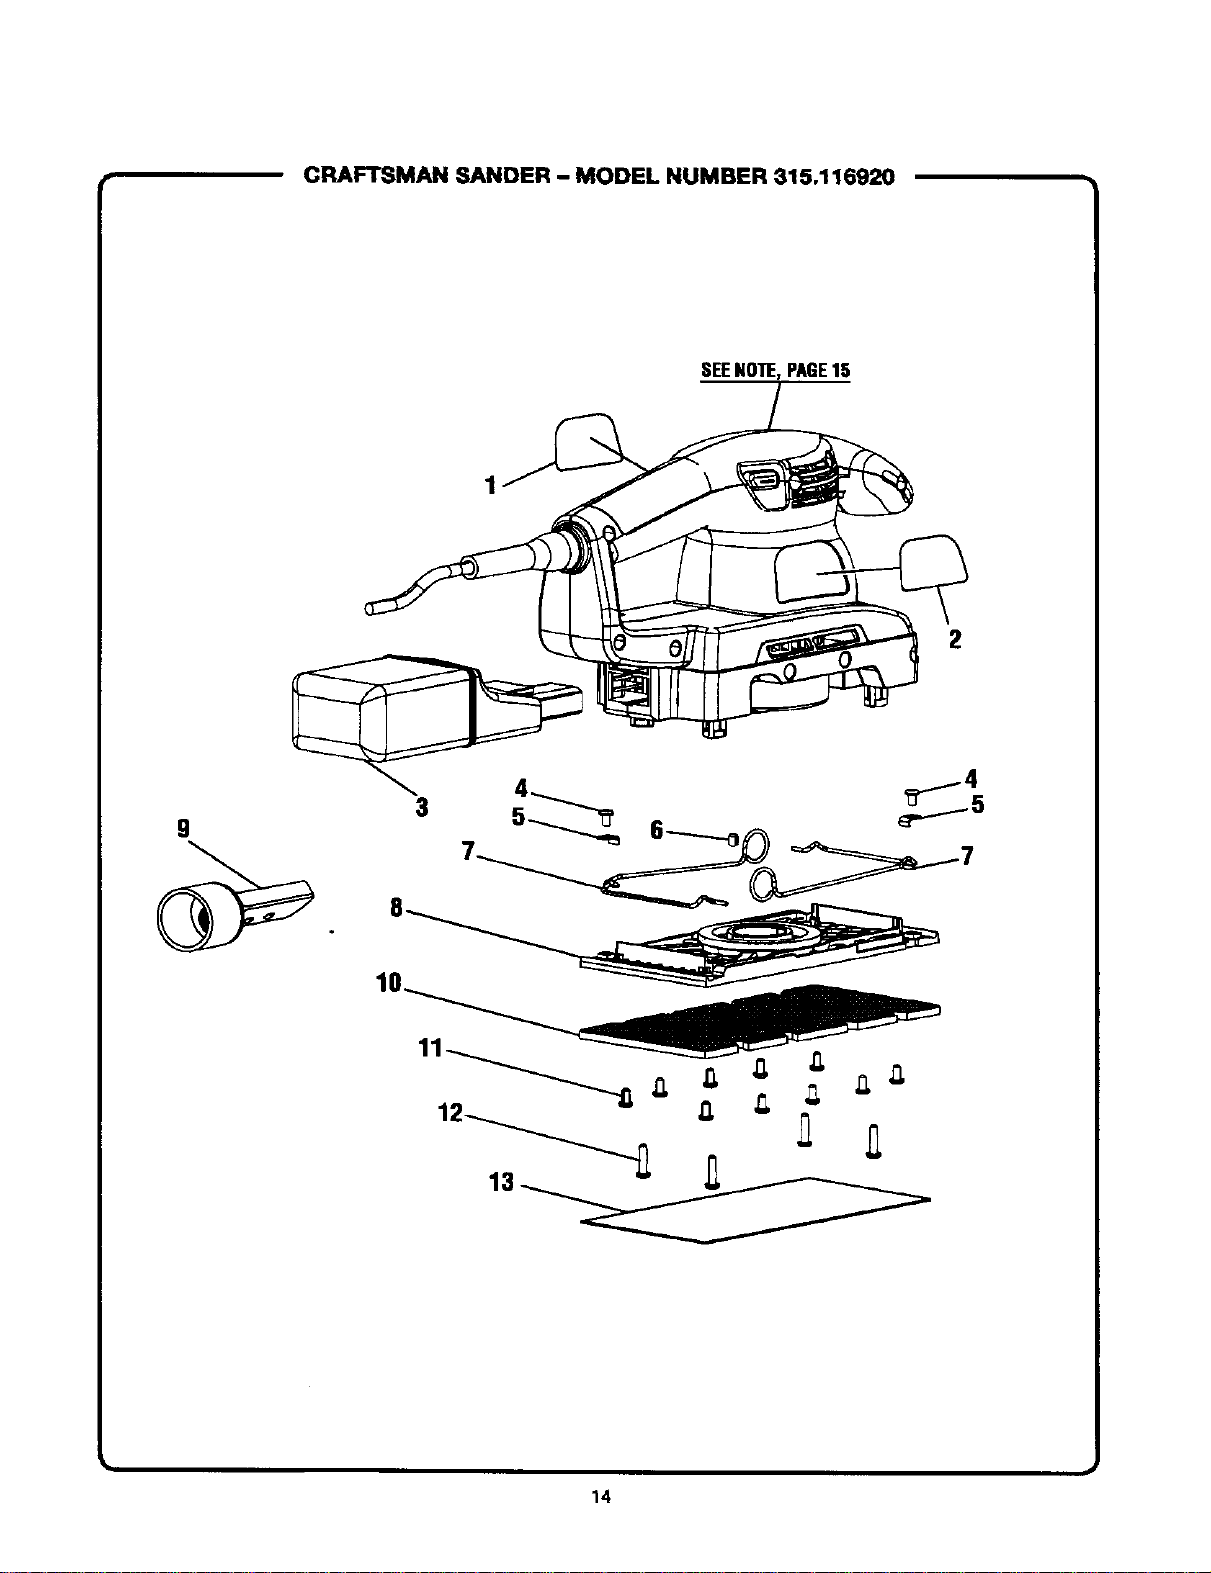
CRAFTSMAN SANDER - MODEL NUMBER 315.116920
PAGE15
2
9
14
[
CRAFTSMAN SANDER - MODEL NUMBER 315.116920
The model number will be found on a plate attached to the motor housing.Always mention the model
number In all correspondence regarding the SANDER or when orderingrepairparts.
SEE BACK PAGE FOR PARTS ORDERING INSTRUCTIONS
I
Key Part
No. Number
1 030156001017
2 030156001011
3 030156001018
030156001022
4 030155001003
5 030156001006
6 030155001007
7 030156001005
030156001001
8 030156001004
9 030156001020
10 030156001002
11 030155001003.
12 030155001002
13 _*
983000-494
PARTS LIST
Description Qty.
Logo Label ...................................................................................................... 1
Data Label ....................................................................................................... 1
Dust Bag Assembly ......................................................................................... 1
Dust Bag ......................................................................................................... 1
Screw (M4.2 x 8 rnm) ...................................................................................... 2
Ratalnlng Plate ................................................................................................ 2
Rubber Plug .................................................................................................... 1
Spring Clamp .................................................................................................. 2
Platen Assembly (Includes Key Nos. 4-8 and 10-11) ...................................... 1
Platen .............................................................................................................. 1
Vacuum Hose Adapter .................................................................................... 1
Pad Assembly ................................................................................................. 1
Screw (M4,2 x 8 ram) .................................................................................... 10
Screw 0VI4,2 x 16 mm) .................................................................................... 4
Sandpaper
Operator's Manual
NOTE: -- The assembly shown represents an Important part of 1he Double Insulated System. To avoid the
poseiblllty of aReratlon or damage to the system, service should be performed by your nearest
Sears Repair Center. Contact your nearest Sears Retail Store for Service Center information.
*** Complete assortment available at your Nearest 8eare Retail Store
15

Your Home
For repair-in your home-of all major brand appliances,
lawn and garden equipment, or healing and cooling systems,
no matter who made it, no matter who sold it!
For the replacement parts, accessories and
owner's manuals that you need to do-it-yourself.
For Sears professional installaUonof home appliances
and items like garage door openers and water heaters.
1-800.4-MY-HOME ® (1400-469-4663)
Callanytime,dayornight(U.S.A, and Canada)
www.sears.com www.sears.ca
Our Home
For repair of carry-in items like vacuums, lawn equipment,
and electronics, call or go on-line for the IocaUon of your nearest
Sears Parts & Repair Center.
1-800-488-1222
Call anytime,dayornight(U.S.A. only)
www.sears.com
To purchase a protecUon agreement (U.S.A.)
or maintenance agreement (Canada) on a productserviced by Sears:
1-800-827-6655 (U.S.A.)
1-800-361-6665 (Canada)
Para pedir servicio de reparacibn
a domicilio, y para ordenar piezas:
1-888-SU-HOGAR =
(1-888-784-6427)
Au Canada pour service an fran_ais:
1-800-LE-FOYER _c
(1-800"533-6937)
www.slgars,ca
GW G
® Registered Tmdemad_ / TMTrademark I aMSar41ce Mark of Sear6. Roebuck and Co.
® Marea Reglab'ada / na Marca de F&bdca / aMMarca de 8tmlldo de _a, Rodauck m_l Co.
uc MIrque de oomrnerce/MD Marque d_p_ de Sears, Roebuck and Co. O Sears, Roebuck and Co.

