Loading ...
Loading ...
Loading ...

ENGLISH
10
Repairs
The charger and battery pack are notserviceable. There are
no serviceable parts inside the charger or batterypack.
WARNING: To assure product SAFETY and RELIABILITY,
repairs, maintenance and adjustment (including brush
inspection and replacement, when applicable) should
be performed by a
DeWALT factory service center or a
DeWALT authorized service center. Always use identical
replacementparts.
Refer to DeWALT press tool accessory compatibilitychart.
Accessories
WARNING: Since accessories, other than those offered
by
DeWALT, have not been tested with this product, use
of such accessories with this tool could be hazardous.
To reduce the risk of injury, only DeWALT recommended
accessories should be used with thisproduct.
Recommended accessories for use with your tool are
available at extra cost from your local dealer or authorized
service center. If you need assistance in locating any
accessory, please contact
DeWALT call 1‑800‑4‑DeWALT
(1-800-433-9258) or visit our website: www.dewalt.com.
Press Jaw and Rings Maintenance (Fig.I–K)
WARNING: To reduce the risk of serious personal
injury, inspect the jaw assembly for cleanliness, cracks
or other damage before beginning a press. Using a dirty
or damaged jaw assembly could result in improper
press connections that could lead to extensive property
damage. Return damaged jaw assembly to a
DeWALT
servicefacility.
1. Remove any dirt and metal deposits inside the
pressprofile
24
and
26
of the press jaw
1
or press
ring
18
and similar locations onjaws.
2. After using the press jaw or press ring check the
pressingprofile
24 of press jaws and rings for
damages27 as shown in Fig.K.
3. After every 400pressings, lubricate joints
25
and
between moving surfaces on the jaws and rings with a
graphite
based lubricant
at thejoints.
Lubrication (Fig.A)
1. Inspect the jaw retention pin
3
and lubricate as needed
with a silicone basedlubricant.
2. Inspect the press jaw
1
, actuator jaw
17
or
press ring
18
.
Lubricate the joints and between
the moving surfaces as needed with any common
graphite basedlubricant.
3. Check springs in attachments before, during and after each
use. Attachments should open and close freely with light to
moderateeffort.
WARNING: Never use solvents or other harsh
chemicals for cleaning the non‑metallic parts of the
tool. These chemicals may weaken the plastic materials
used in these parts. Use a cloth dampened only with
water and mild soap. Never let any liquid get inside the
tool; never immerse any part of the tool into aliquid.
Cleaning
WARNING: Blow dirt and dust out of all air vents with
clean, dry air at least once a week. To minimize the risk
of eye injury, always wear ANSI Z87.1 approved eye
protection when performing thisprocedure.
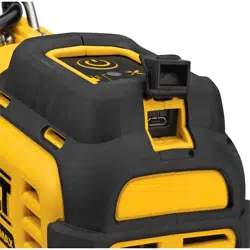
Required Maintenance (Fig.A)
Maintenance is required when the pipe pressing tool reaches
45,000 cycles. Warning indicators will illuminate on the
diagnostic panel
7
asfollows.
1. Maintenance warning at 44,500 cycles (Maintenance LED
lights yellow continuously)
2. Final maintenance warning at 44,900 cycles
(Maintenance LED flashes yellow continuously)
3. Needs service at 45,000 cycles (Maintenance LED lights
red for 10seconds then turns tool off automatically).
At 45,000 cycles, the tool will no longer run. Take your
tool to a
DeWALT factory service center for maintenance
andrecalibration.
WARNING: Before each use, inspect the tool
(including LED indicators) and correct any
problems before attempting touse.
WARNING: Skin injection hazard. The oil in the
mechanism is under extreme pressure. Do not use
hands to check for oilleaks.
WARNING: Explosion hazard. The internal
hydraulic system creates extreme pressures.
Only
DeWALT‑qualified personnel should service
thistool.
MAINTENANCE
WARNING: To reduce the risk of serious personal
injury, turn unit off and remove the battery pack
before making any adjustments or removing/
installing attachments or accessories. An
accidental start‑up can causeinjury.
Your
DeWALT power tool has been designed to operate
over a long period of time with a minimum of maintenance.
Continuous satisfactory operation depends upon proper tool
care and regularcleaning.
NOTE: When pressing overhead, always confirm
workpiece and tool are secure beforepressing.
NOTE: In the event of an incomplete press, press the
reverse trigger switch
6
to open the press jaws and
remove thematerial.
Inspecting the Pressed Connection
1. Clear the pressed fitting of any control rings or control
labels. These are used by fitting manufacturers to indicate
an unpressedfitting.
2. Check for excessive misalignment, tubing not fully inserted
into the fitting, and incorrect jaw or attachment alignment.
Make sure no other issues are present on the pressed
connection per the fitting manufacturer’s instructions. If
any issues are present, remove the fitting and replace with
a newone.
3. Test the fitting according to manufacturer’s instructions
or localcodes.
Loading ...
Loading ...
Loading ...