Projector
P501X /P451X
P451W/P401W
PE501X
User’s Manual
The PE501X is not distributed in North America.
Model No.
NP-P501X, NP-P451X, NP-P451W, NP-P401W, NP-PE501X

Ver. 1/02/13
•Apple,Mac,MacOS,iMac,andMacBookaretrademarksofAppleInc.registeredintheU.S.andothercountries.
•Microsoft,Windows,WindowsVista,InternetExplorer,.NETFramework,Excel,andPowerPointareeitheraregis-
teredtrademarkortrademarkofMicrosoftCorporationintheUnitedStatesand/orothercountries.
•IntelandIntelCorearetrademarksofIntelCorporationintheU.S.and/orothercountries.
•PowerPCisaregisteredtrademarkoftheInternationalBusinessMachinesCorporation.
•MicroSaverisaregisteredtrademarkofKensingtonComputerProductsGroup,adivisionofACCOBrands.
•VirtualRemoteToolusesWinI2C/DDClibrary,©NicomsoftLtd.
•HDMI,theHDMILogoandHigh-DenitionMultimediaInterfacearetrademarksorregisteredtrademarksofHDMI
LicensingLLC.
•TrademarkPJLinkisatrademarkappliedfortrademarkrightsinJapan,theUnitedStatesofAmericaandother
countries and areas.
•Wi-Fi
®
,Wi-FiAlliance
®
,andWi-FiProtectedAccess(WPA,WPA2)
®
areregisteredtrademarksoftheWi-FiAlli-
ance.
•Blu-rayisatrademarkofBlu-rayDiscAssociation
•CRESTRONandROOMVIEWareregisteredtrademarksofCrestronElectronics,Inc.intheUnitedStatesandother
countries.
•Otherproductandcompanynamesmentionedinthisuser’smanualmaybethetrademarksorregisteredtrademarks
oftheirrespectiveholders.
•GPL/LGPLSoftwareLicenses
TheproductincludessoftwarelicensedunderGNUGeneralPublicLicense(GPL),GNULesserGeneralPublic
License(LGPL),andothers.
Formoreinformationoneachsoftware,see“readme.pdf”insidethe“aboutGPL&LGPL”folderonthesuppliedCD-
ROM.
NOTES
(1)Thecontentsofthisuser’smanualmaynotbereprintedinpartorwholewithoutpermission.
(2)Thecontentsofthisuser’smanualaresubjecttochangewithoutnotice.
(3)Greatcarehasbeentakeninthepreparationofthisuser’smanual;however,shouldyounoticeanyquestionable
points,errorsoromissions,pleasecontactus.
(4)Notwithstandingarticle(3),NECwillnotberesponsibleforanyclaimsonlossofprotorothermattersdeemed
toresultfromusingtheProjector.
i
Important Information
Safety Cautions
Precautions
PleasereadthismanualcarefullybeforeusingyourNECprojectorandkeepthemanualhandyforfuturereference.
CAUTION
Toturnoffmainpower,besuretoremovetheplugfrompoweroutlet.
Thepoweroutletsocketshouldbeinstalledasneartotheequipmentaspossible,andshouldbeeasily
accessible.
CAUTION
TOPREVENTSHOCK,DONOTOPENTHECABINET.
THEREAREHIGH-VOLTAGECOMPONENTSINSIDE.
REFERSERVICINGTOQUALIFIEDSERVICEPERSONNEL.
Thissymbolwarnstheuserthatuninsulatedvoltagewithintheunitmaybesufcienttocauseelectrical
shock.Therefore,itisdangeroustomakeanykindofcontactwithanypartinsideoftheunit.
Thissymbolalertstheuserthatimportantinformationconcerningtheoperationandmaintenanceofthis
unithasbeenprovided.
Theinformationshouldbereadcarefullytoavoidproblems.
WARNING:TOPREVENTFIREORSHOCK,DONOTEXPOSETHISUNITTORAINORMOISTURE.
DONOTUSETHISUNIT’SPLUGWITHANEXTENSIONCORDORINANOUTLETUNLESSALLTHEPRONGS
CANBEFULLYINSERTED.
DOC Compliance Notice (for Canada only)
ThisClassBdigitalapparatuscomplieswithCanadianICES-003.
Machine Noise Information Regulation - 3. GPSGV,
Thehighestsoundpressurelevelislessthan70dB(A)inaccordancewithENISO7779.
CAUTION
Avoiddisplayingstationaryimagesforaprolongedperiodoftime.
DoingsocanresultintheseimagesbeingtemporarilysustainedonthesurfaceoftheLCDpanel.
Ifthisshouldhappen,continuetouseyourprojector.Thestaticbackgroundfrompreviousimageswill
disappear.
Disposing of your used product
EU-widelegislationasimplementedineachMemberStaterequiresthatusedelectricalandelectronicprod-
uctscarryingthemark(left)mustbedisposedofseparatelyfromnormalhouseholdwaste.Thisincludes
projectorsandtheirelectricalaccessoriesorlamps.Whenyoudisposeofsuchproducts,pleasefollowthe
guidanceofyourlocalauthorityand/orasktheshopwhereyoupurchasedtheproduct.
Aftercollectingtheusedproducts,theyarereusedandrecycledinaproperway.Thiseffortwillhelpus
reducethewastesaswellasthenegativeimpactsuchasmercurycontainedinalamptothehumanhealth
andtheenvironmentattheminimumlevel.
ThemarkontheelectricalandelectronicproductsonlyappliestothecurrentEuropeanUnionMember
States.

ii
Important Information
WARNING TO CALIFORNIA RESIDENTS:
Handlingthecablessuppliedwiththisproductwillexposeyoutolead,achemicalknowntotheStateofCalifornia
tocausebirthdefectsorotherreproductiveharm.WASHHANDSAFTERHANDLING.
RF Interference (for USA only)
WARNING
TheFederalCommunicationsCommissiondoesnotallowanymodicationsorchangestotheunitEXCEPTthose
speciedbyNECDisplaySolutionsofAmerica,Inc.inthismanual.Failuretocomplywiththisgovernmentregu-
lationcouldvoidyourrighttooperatethisequipment.Thisequipmenthasbeentestedandfoundtocomplywith
thelimitsforaClassBdigitaldevice,pursuanttoPart15oftheFCCRules.Theselimitsaredesignedtoprovide
reasonableprotectionagainstharmfulinterferenceinaresidentialinstallation.Thisequipmentgenerates,uses,and
canradiateradiofrequencyenergyand,ifnotinstalledandusedinaccordancewiththeinstructions,maycause
harmfulinterferencetoradiocommunications.However,thereisnoguaranteethatinterferencewillnotoccurina
particularinstallation.
Ifthisequipmentdoescauseharmfulinterferencetoradioortelevisionreception,whichcanbedeterminedby
turningtheequipmentoffandon,theuserisencouragedtotrytocorrecttheinterferencebyoneormoreofthe
followingmeasures:
•Reorientorrelocatethereceivingantenna.
•Increasetheseparationbetweentheequipmentandreceiver.
•Connecttheequipmentintoanoutletonacircuitdifferentfromthattowhichthereceiverisconnected.
•Consultthedealeroranexperiencedradio/TVtechnicianforhelp.
ForUKonly:InUK,aBSapprovedpowercordwithmouldedplughasaBlack(veAmps)fuseinstalledforusewith
thisequipment.Ifapowercordisnotsuppliedwiththisequipmentpleasecontactyoursupplier.
Important Safeguards
Thesesafetyinstructionsaretoensurethelonglifeofyourprojectorandtopreventreandshock.Pleasereadthem
carefullyandheedallwarnings.
Installation
•Donotplacetheprojectorinthefollowingconditions:
- on an unstable cart, stand, or table.
-nearwater,baths,ordamprooms.
-indirectsunlight,nearheaters,orheatradiatingappliances.
-inadusty,smokyorsteamyenvironment.
-onasheetofpaperorcloth,rugsorcarpets.
•Ifyouwishtohavetheprojectorinstalledontheceiling:
-Donotattempttoinstalltheprojectoryourself.
-Theprojectormustbeinstalledbyqualiedtechniciansinordertoensureproperoperationandreducetherisk
ofbodilyinjury.
-Inaddition,theceilingmustbestrongenoughtosupporttheprojectorandtheinstallationmustbeinaccordance
withanylocalbuildingcodes.
-Pleaseconsultyourdealerformoreinformation.
iii
Important Information
WARNING
•Donotuseanyotherobjectthantheprojector’sslidinglenscovertocoverthelenswhiletheprojectorison.
Doingsocancausetheobjecttogetextremelyhot,andpossiblyresultinginareordamageduetotheheat
emittedfromthelightoutput.
•Donotplaceanyobjects,whichareeasilyaffectedbyheat,infrontoftheprojectorlens.Doingsocouldlead
totheobjectmeltingfromtheheatthatisemittedfromthelightoutput.
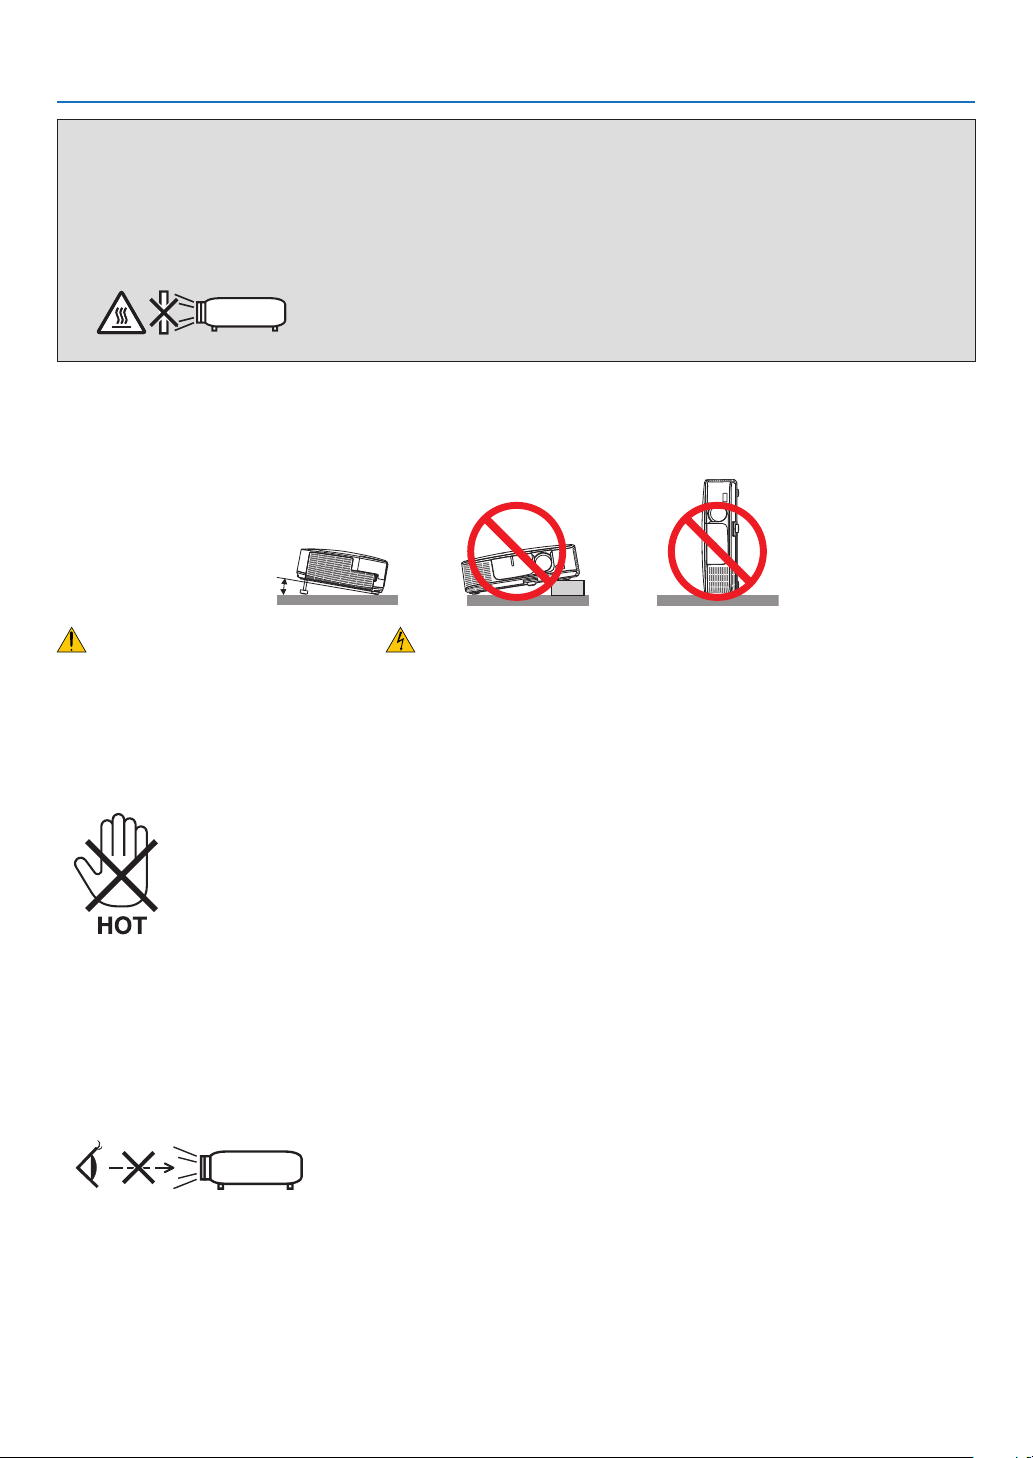
Place the projector in a horizontal position
Thetiltangleoftheprojectorshouldnotexceed10degrees,norshouldtheprojectorbeinstalledinanywayother
thanthedesktopandceilingmount,otherwiselamplifecoulddecreasedramatically.
10°
Fire and Shock Precautions
•Ensurethatthereissufcientventilationandthatventsareunobstructedtopreventthebuild-upofheatinsideyour
projector.Allowatleast4inches(10cm)ofspacebetweenyourprojectorandawall.
•Donottrytotouchtheexhaustventontheleftfront(whenseenfromthefront)asitcanbecomeheatedwhilethe
projectoristurnedonandimmediatelyaftertheprojectoristurnedoff.Partsoftheprojectormaybecometemporarily
heatediftheprojectoristurnedoffwiththePOWERbuttonoriftheACpowersupplyisdisconnectedduringnormal
projectoroperation.
Usecautionwhenpickinguptheprojector.
•Preventforeignobjectssuchaspaperclipsandbitsofpaperfromfallingintoyourprojector.Donotattempttoretrieve
anyobjectsthatmightfallintoyourprojector.Donotinsertanymetalobjectssuchasawireorscrewdriverintoyour
projector.Ifsomethingshouldfallintoyourprojector,disconnectitimmediatelyandhavetheobjectremovedbya
qualiedservicepersonnel.
•Donotplaceanyobjectsontopoftheprojector.
•Donottouchthepowerplugduringathunderstorm.Doingsocancauseelectricalshockorre.
•Theprojectorisdesignedtooperateonapowersupplyof100-240VAC50/60Hz.Ensurethatyourpowersupply
tsthisrequirementbeforeattemptingtouseyourprojector.
•Donotlookintothelenswhiletheprojectorison.Seriousdamagetoyoureyescouldresult.
•Keepanyitemssuchasmagnifyingglassoutofthelightpathoftheprojector.Thelightbeingprojectedfromthe
lensisextensive,thereforeanykindofabnormalobjectsthatcanredirectlightcomingoutofthelens,cancause
unpredictableoutcomesuchasreorinjurytotheeyes.
•Donotplaceanyobjects,whichareeasilyaffectedbyheat,infrontofaprojectorexhaustvent.
Doingsocouldleadtotheobjectmeltingorgettingyourhandsburnedfromtheheatthatisemittedfromtheex-
haust.
•Donotsplashwaterovertheprojector.Doingsocancauseelectricalshockorre.Iftheprojectorgetswet,turnoff
theprojector,unplugthepowercordandhavetheprojectorservicedbyaqualiedservicepersonnel.

iv
Important Information
•Handlethepowercordcarefully.Adamagedorfrayedpowercordcancauseelectricshockorre.
-Donotuseanypowercordotherthantheonesuppliedwiththeprojector.
-Donotbendortugthepowercordexcessively.
-Donotplacethepowercordundertheprojector,oranyheavyobject.
-Donotcoverthepowercordwithothersoftmaterialssuchasrugs.
-Donotheatthepowercord.
-Donothandlethepowerplugwithwethands.
•Turnofftheprojector,unplugthepowercordandhavetheprojectorservicedbyaqualiedservicepersonnelunder
thefollowingconditions:
-Whenthepowercordorplugisdamagedorfrayed.
-Ifliquidhasbeenspilledintotheprojector,orifithasbeenexposedtorainorwater.
-Iftheprojectordoesnotoperatenormallywhenyoufollowtheinstructionsdescribedinthisuser’smanual.
-Iftheprojectorhasbeendroppedorthecabinethasbeendamaged.
-Iftheprojectorexhibitsadistinctchangeinperformance,indicatinganeedforservice.
•Disconnectthepowercordandanyothercablesbeforecarryingtheprojector.
•Turnofftheprojectorandunplugthepowercordbeforecleaningthecabinetorreplacingthelamp.
•Turnofftheprojectorandunplugthepowercordiftheprojectorisnottobeusedforanextendedperiodoftime.
•WhenusingaLANcable(onlymodelswiththeRJ-45LANport):
Forsafety,donotconnecttotheconnectorforperipheraldevicewiringthatmighthaveexcessivevoltage.
CAUTION
•Donotusethetilt-footforpurposesotherthanoriginallyintended.Misusessuchasgrippingthetilt-footorhang-
ingonthewallcancausedamagetotheprojector.
•Donotsendtheprojectorinthesoftcasebyparceldeliveryserviceorcargoshipment.Theprojectorinsidethe
softcasecouldbedamaged.
•Select[HIGH]inFanmodeifyoucontinuetousetheprojectorforconsecutivedays.(Fromthemenu,select
[SETUP][OPTIONS(1)][FANMODE][HIGH].)
•DonotturnofftheACpowerfor60secondsafterthelampisturnedonandwhilethePOWERindicatorisblink-
ingblue.Doingsocouldcauseprematurelampfailure.
Remote Control Precautions
•Handletheremotecontrolcarefully.
•Iftheremotecontrolgetswet,wipeitdryimmediately.
•Avoidexcessiveheatandhumidity.
•Donotshort,heat,ortakeapartbatteries.
•Donotthrowbatteriesintore.
•Ifyouwillnotbeusingtheremotecontrolforalongtime,removethebatteries.
•Ensurethatyouhavethebatteries’polarity(+/−)alignedcorrectly.
•Donotusenewandoldbatteriestogether,orusedifferenttypesofbatteriestogether.
•Disposeofusedbatteriesaccordingtoyourlocalregulations.

v
Important Information
Note for US Residents
Thelampinthisproductcontainsmercury.PleasedisposeaccordingtoLocal,StateorFederalLaws.
Lamp Replacement
•Usethespeciedlampforsafetyandperformance.
•Toreplacethelamp,followallinstructionsprovidedonpage
160.
•Besuretoreplacethelampandlterwhenthemessage[THE LAMP HAS REACHED THE END OF ITS USABLE
LIFE. PLEASE REPLACE THE LAMP AND FILTER.]appears.Ifyoucontinuetousethelampafterthelamphas
reachedtheendofitsusablelife,thelampbulbmayshatter,andpiecesofglassmaybescatteredinthelampcase.
Donottouchthemasthepiecesofglassmaycauseinjury.
Ifthishappens,contactyourdealerforlampreplacement.
A Lamp Characteristic
Theprojectorhasahigh-pressuremercurylampasalightsource.
Alamphasacharacteristicthatitsbrightnessgraduallydecreaseswithage.Alsorepeatedlyturningthelampon
andoffwillincreasethepossibilityofitslowerbrightness.
Theactuallamplifemayvarydependingupontheindividuallamp,theenvironmentalconditionsandusage.
CAUTION:
•DONOTTOUCHTHELAMPimmediatelyafterithasbeenused.Itwillbeextremelyhot.Turntheprojectoroff
andthendisconnectthepowercord.Allowatleastonehourforthelamptocoolbeforehandling.
•Whenremovingthelampfromaceiling-mountedprojector,makesurethatnooneisundertheprojector.Glass
fragmentscouldfallifthelamphasbeenburnedout.
About High Altitude mode
•Set[FANMODE]to[HIGHALTITUDE]whenusingtheprojectorataltitudesapproximately5500feet/1700meters
orhigher.
Usingtheprojectorataltitudesapproximately5500feet/1700metersorhigherwithoutsettingto[HIGHALTITUDE]
cancausetheprojectortooverheatandtheprojectorcouldshutdown.Ifthishappens,waitacoupleminutesand
turnontheprojector.
•Usingtheprojectorataltitudeslessthanapproximately5500feet/1700metersandsettingto[HIGHALTITUDE]
cancausethelamptoovercool,causingtheimagetoicker.Switch[FANMODE]to[AUTO].
•Usingtheprojectorataltitudesapproximately5500feet/1700metersorhighercanshortenthelifeofopticalcom-
ponentssuchasthelamp.
About Copyright of original projected pictures:
Pleasenotethatusingthisprojectorforthepurposeofcommercialgainortheattractionofpublicattentioninavenue
suchasacoffeeshoporhotelandemployingcompressionorexpansionofthescreenimagewiththefollowingfunc-
tionsmayraiseconcernabouttheinfringementofcopyrightswhichareprotectedbycopyrightlaw.
[ASPECTRATIO],[KEYSTONE],Magnifyingfeatureandothersimilarfeatures.
Turkish RoHS information relevant for Turkish market
EEE Yonetmeliğine Uygundur.
Thisdeviceisnotintendedforuseinthedirecteldofviewatvisualdisplayworkplaces.Toavoidincommodingreec-
tionsatvisualdisplayworkplacesthisdevicemustnotbeplacedinthedirecteldofview.

vi
Important Information
Power management function
Theprojectorhaspowermanagementfunctions.Toreducepowerconsumption,thepowermanagementfunctions(1
and2)arefactorypresetasshownbelow.TocontroltheprojectorfromanexternaldeviceviaaLANorserialcable
connection,usetheon-screenmenutochangethesettingsfor1and2.
1. STANDBY MODE (Factory preset: POWER-SAVING)
To control the projector from an external device, select [NORMAL] for [STANDBY MODE].
NOTE:
•When[POWER-SAVING]isselectedfor[STANDBYMODE],thefollowingconnectorsandfunctionswillnotwork:
PCCONTROLport,MONITOROUTconnector,AUDIOOUTconnector,USB(PC)port,LANfunctions*,MailAlertfunction*,DDC/
CI(VirtualRemoteTool)
*PE501Xdoesnothavethisfunction.
2. AUTO POWER OFF (Factory preset: 30 minutes)
To control the projector from an external device, select [OFF] for [AUTO POWER OFF].
NOTE:
•When[0:30]isselectedfor[AUTOPOWEROFF],youcanenabletheprojectortoautomaticallyturnoffin30minutesifthereis
nosignalreceivedbyanyinputorifnooperationisperformed.

vii
Table of Contents
Important Information ............................................................................................i
1. Introduction ...........................................................................................................1
❶What’sintheBox? ..........................................................................................................1
❷IntroductiontotheProjector ...........................................................................................2
CongratulationsonYourPurchaseoftheProjector ..................................................2
Featuresyou’llenjoy: ................................................................................................2
Aboutthisuser’s manual ...........................................................................................3
❸ Part NamesoftheProjector ...........................................................................................4
Front/Top ...................................................................................................................4
Rear ..........................................................................................................................5
TopFeatures .............................................................................................................6
TerminalPanelFeatures ...........................................................................................7
❹PartNamesoftheRemoteControl ................................................................................8
BatteryInstallation ....................................................................................................9
RemoteControlPrecautions .....................................................................................9
OperatingRangeforWirelessRemoteControl .........................................................9
❺OperatingEnvironmentforSoftwareIncludedonCD-ROM .........................................10
OperatingEnvironment ...........................................................................................11
2. Projecting an Image (Basic Operation) ...............................................13
❶FlowofProjectinganImage .........................................................................................13
❷ConnectingYourComputer/ConnectingthePowerCord ..............................................14
❸TurningontheProjector ...............................................................................................15
NoteonStartupscreen(MenuLanguageSelectscreen) .......................................16
❹SelectingaSource .......................................................................................................17
Selectingthecomputerorvideosource..................................................................17
❺AdjustingthePictureSizeandPosition ........................................................................19
Adjustingtheverticalpositionofaprojectedimage(Lensshift) .............................20
Focus ......................................................................................................................21
Zoom .......................................................................................................................22
AdjusttheTiltFoot ..................................................................................................23
❻CorrectingKeystoneDistortion[KEYSTONE] ..............................................................24
❼OptimizingComputerSignalAutomatically ..................................................................26
AdjustingtheImageUsingAutoAdjust ...................................................................26
❽ TurningUporDownVolume .........................................................................................26
❾TurningofftheProjector ...............................................................................................27
❿AfterUse.......................................................................................................................28
3. Convenient Features ......................................................................................29
❶ TurningofftheImageandSound .................................................................................29
❷Freezing a Picture ........................................................................................................29
❸ EnlargingaPicture .......................................................................................................29
❹ChangingEcoMode/CheckingEnergy-SavingEffect .................................................30
UsingEcoMode[ECOMODE] ...............................................................................30
CheckingEnergy-SavingEffect[CARBONMETER] ..............................................31
❺ PreventingtheUnauthorizedUseoftheProjector[SECURITY] ..................................33

viii
Table of Contents
❻Using4-PointCornertoCorrectKeystoneDistortion[CORNERSTONE] ....................36
Cornerstone ............................................................................................................36
❼OperatingYourComputer’sMouseFunctionsfromtheProjector’sRemoteControl
viatheUSBCable(RemoteMouseFunction) ........................................................39
❽ProjectingYourComputer’sScreenImagefromtheProjectorviatheUSBCable
(USBDisplay) .........................................................................................................40
❾ControllingtheProjectorbyUsinganHTTPBrowser(notsupportedbyPE501X) ......42
❿ProjectingYourComputer’sScreenImagefromtheProjectorviaaNetwork
[NETWORKPROJECTOR](notsupportedbyPE501X) ........................................49
⓫UsingtheProjectortoOperateYourComputerviaaNetwork[REMOTE
DESKTOP](notsupportedbyPE501X) .................................................................53
⓬ConnectingYourMicrophone ........................................................................................58
4. Using the Viewer (not supported by PE501X) ...................................................59
❶WhatyoucandowiththeViewer ..................................................................................59
❷Preparingpresentation materials .................................................................................62
❸ProjectingimagesstoredinaUSBmemorydevice .....................................................63
StartingtheViewer ..................................................................................................63
ExitingtheViewer ...................................................................................................68
NamesandfunctionsofViewerscreen ...................................................................69
Vieweroptionsettings .............................................................................................74
❹Projectingdatafromsharedfolder ...............................................................................77
Connectingtheprojectortothesharedfolder ........................................................77
Disconnectingthesharedfolderfromtheprojector ................................................80
❺Projectingdatafrommediaserver................................................................................81
Settingup“MediaSharing”inWindowsMediaPlayer11 .......................................81
Settingup“MediaSharing”inWindowsMediaPlayer12 .......................................83
Connectingtheprojectortothemediaserver .........................................................84
Disconnectingtheprojectorfromthemediaserver ................................................85
❻Restrictionsondisplayingles .....................................................................................86
SomerestrictionsonPowerPointles .....................................................................86
SomerestrictionsonExcelles ..............................................................................86
SomerestrictionsonPDFles ...............................................................................86
5. Using On-Screen Menu .................................................................................87
❶UsingtheMenus ...........................................................................................................87
❷ Menu Elements .............................................................................................................88
❸ListofMenuItems ........................................................................................................89
❹MenuDescriptions&Functions[SOURCE] .................................................................92
COMPUTER ...........................................................................................................92
HDMI1and2 ...........................................................................................................92
VIDEO .....................................................................................................................92
S-VIDEO .................................................................................................................92
VIEWER(notsupportedbyPE501X) .....................................................................92
NETWORK(notsupportedbyPE501X) .................................................................92
USBDISPLAY .........................................................................................................92
❺MenuDescriptions&Functions[ADJUST] ...................................................................93
[PICTURE] ..............................................................................................................93

ix
Table of Contents
[IMAGEOPTIONS] .................................................................................................96
[AUDIO] .................................................................................................................100
❻MenuDescriptions&Functions[SETUP] ...................................................................101
[GENERAL] ...........................................................................................................101
[MENU] .................................................................................................................103
[INSTALLATION] ...................................................................................................105
[OPTIONS(1)] .......................................................................................................107
[OPTIONS(2)] .......................................................................................................110
❼MenuDescriptions&Functions[INFO.] .....................................................................113
[USAGETIME] ......................................................................................................113
[SOURCE(1)] ........................................................................................................114
[SOURCE(2)] ........................................................................................................114
[WIREDLAN](notsupportedbyPE501X) ...........................................................114
[WIRELESSLAN](notsupportedbyPE501X) .....................................................115
[VERSION(1)] .......................................................................................................115
[VERSION(2)](notsupportedbyPE501X) ...........................................................115
[OTHERS] .............................................................................................................116
❽MenuDescriptions&Functions[RESET] ...................................................................117
ReturningtoFactoryDefault[RESET] ..................................................................117
❾ApplicationMenu(notsupportedbyPE501X) ...........................................................118
IMAGEEXPRESSUTILITY ..................................................................................118
DESKTOPCONTROLUTILITY ............................................................................118
NETWORKPROJECTOR .....................................................................................119
REMOTEDESKTOPCONNECTION ...................................................................119
NETWORKSETTINGS .........................................................................................120
TOOLS ..................................................................................................................136
6. Installation and Connections ..................................................................141
❶SettingUptheScreenandtheProjector ....................................................................141
SelectingaLocation..............................................................................................141
ThrowDistanceandScreenSize ..........................................................................143
❷MakingConnections ...................................................................................................145
ConnectingYourComputer ...................................................................................145
ConnectinganExternal Monitor ...........................................................................147
ConnectingYourDVDPlayerorOtherAVEquipment ...........................................148
ConnectingComponentInput ...............................................................................149
ConnectingHDMIInput.........................................................................................150
ConnectingtoaWiredLAN(notsupportedbyPE501X) ......................................151
ConnectingtoaWirelessLAN(Optional:NP02LMseries)(notsupportedby
PE501X)................................................................................................................152
AttachingtheOptionalCableCover(NP03CV) ....................................................155
7. Maintenance .....................................................................................................156
❶CleaningtheFilters.....................................................................................................156
❷CleaningtheLens.......................................................................................................159
❸CleaningtheCabinet ..................................................................................................159
❹ReplacingtheLampandtheFilters ............................................................................160

x
Table of Contents
8. User Supportware ..........................................................................................165
❶InstallingSoftwareProgram .......................................................................................165
InstallationforWindowssoftware ..........................................................................165
❷UsingtheComputerCable(VGA)toOperatetheProjector(VirtualRemoteTool) ....168
❸ProjectingYourComputer’sScreenImageorVideofromtheProjectoroveraLAN
(ImageExpressUtilityLite)(notsupportedbyPE501X) ......................................173
StartingImageExpressUtilityLitefromaUSBMemoryorSDCard ...................178
❹ProjectinganImagefromanAngle(GeometricCorrectionToolinImageExpress
UtilityLite)(notsupportedbyPE501X) .................................................................180
WhatyoucandowithGCT ...................................................................................180
ProjectinganImagefromanAngle(GCT) ............................................................180
❺ ProjectingImagesfromtheProjectoroveraLAN(ImageExpressUtility2.0)(not
supportedbyPE501X) ..........................................................................................182
WhatyoucandowithImageExpressUtility2.0 ...................................................182
ConnectingtheprojectortoaLAN ........................................................................183
BasicOperationofImageExpressUtility2.0 ........................................................184
❻UsingtheProjectortoOperateYourComputeroveraLAN(DesktopControlUtility
1.0)(notsupportedbyPE501X) ...........................................................................193
WhatyoucandowithDesktopControlUtility1.0 .................................................193
ConnectingtheprojectortoaLAN ........................................................................193
Usingtheprojectortooperateyourcomputer’sdesktopscreen ...........................194
❼ControllingtheProjectoroveraLAN(PCControlUtilityPro4/Pro5) ........................202
9. Appendix ..............................................................................................................206
❶Troubleshooting ..........................................................................................................206
IndicatorMessages ...............................................................................................206
CommonProblems&Solutions ............................................................................207
Ifthereisnopicture,orthepictureisnotdisplayedcorrectly. ...............................208
❷Specications .............................................................................................................209
❸CabinetDimensions ...................................................................................................211
❹PinAssignmentsofD-SubCOMPUTERInputConnector .........................................213
❺CompatibleInputSignalList .......................................................................................214
❻PCControlCodesandCableConnection ..................................................................215
❼ TroubleshootingCheckList .........................................................................................216
❽REGISTERYOURPROJECTOR!(for residents in the UnitedStates,Canada, and
Mexico) .................................................................................................................218
1
Projector
1. Introduction
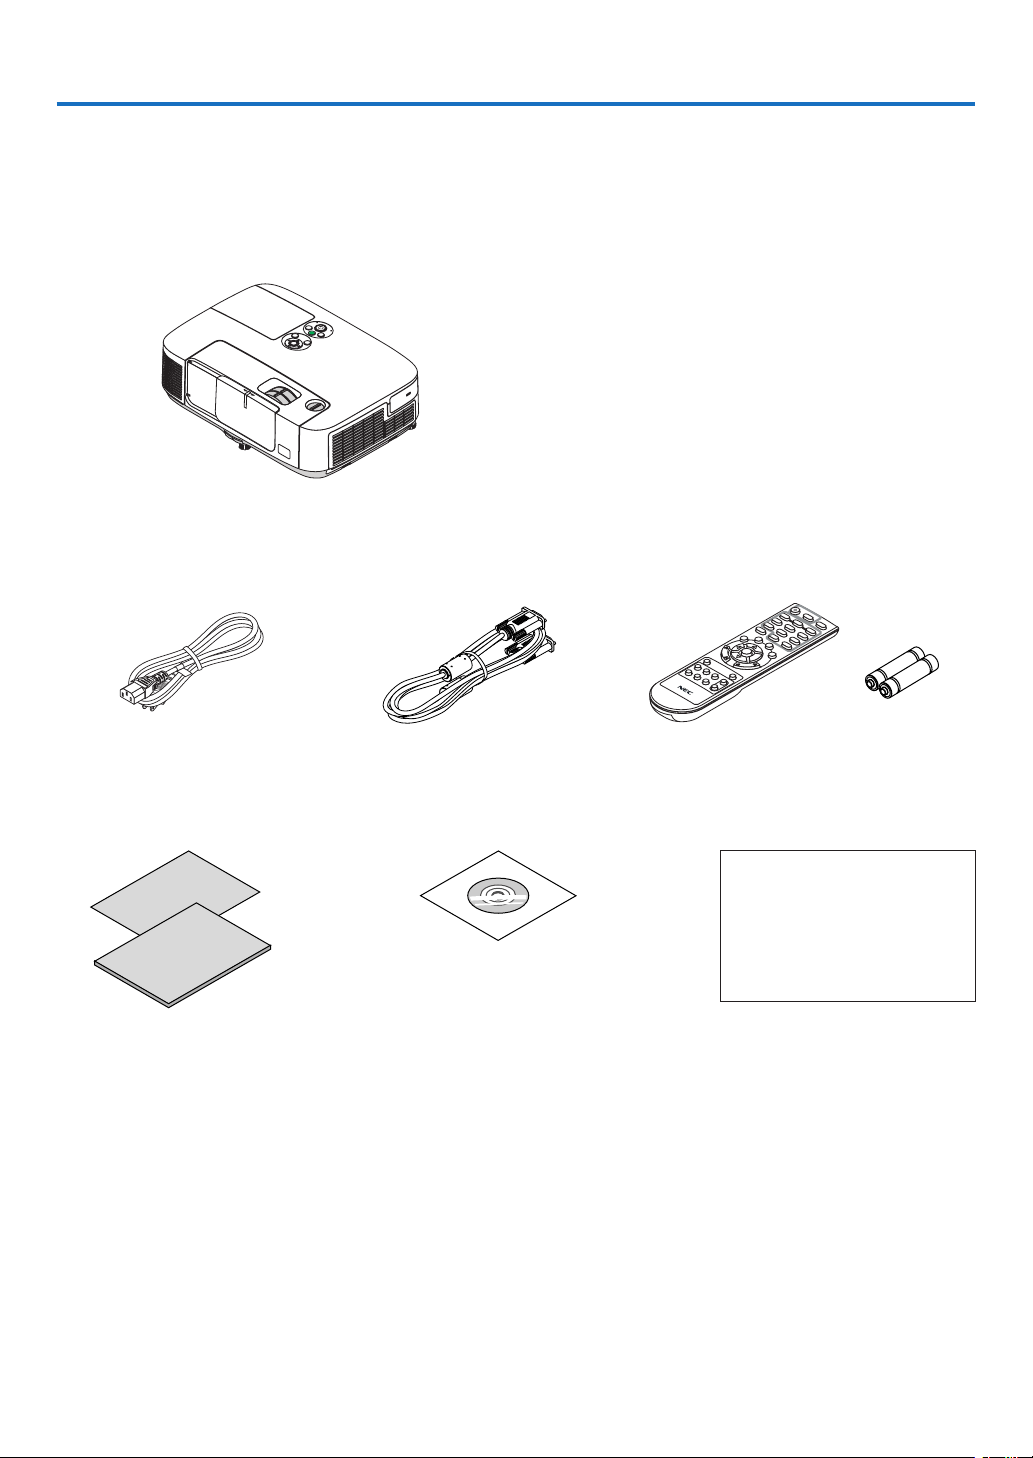
❶ What’s in the Box?
Makesureyourboxcontainseverythinglisted.Ifanypiecesaremissing,contactyourdealer.
Pleasesavetheoriginalboxandpackingmaterialsifyoueverneedtoshipyourprojector.
Power cord
(US: 7N080236)
(EU: 7N080022)
Computer cable (VGA)
(7N520087)
NEC Projector CD-ROM
User’s manual (PDF) and the utility
software
(7N951901)
•ImportantInfomation(ForNorth
America: 7N8N3471) (For Other
countries than North America:
7N8N3471 and 7N8N3481)
•QuickSetupGuide(ForNorthAmer-
ica: 7N8N3491) (For Other countries
than North America: 7N8N3491 and
7N8N3501)
Remote control
(7N900926)
Batteries (AAA × 2)
Unlessotherwisedescribedintheuser’smanual,thedrawingsfortheprojectorcabinetshowexamplesoftheP501X.
For North America only
Limited warranty
For customers in Europe:
You will find our current valid
Guarantee Policy on our Web
Site:
www.nec-display-solutions.com

2
1. Introduction
❷ Introduction to the Projector
Thissectionintroducesyoutoyournewprojectoranddescribesthefeaturesandcontrols.
Congratulations on Your Purchase of the Projector
Thisprojectorisoneoftheverybestprojectorsavailabletoday.Theprojectorenablesyoutoprojectpreciseimages
upto300inchesacross(measureddiagonally)fromyourPCorMaccomputer(desktopornotebook),VCR,DVD
player,ordocumentcamera.
Youcanusetheprojectoronatabletoporcart,youcanusetheprojectortoprojectimagesfrombehindthescreen,
andtheprojectorcanbepermanentlymountedonaceiling*
1
.Theremotecontrolcanbeusedwirelessly.
*
1
Donotattempttomounttheprojectoronaceilingyourself.
Theprojectormustbeinstalledbyqualiedtechniciansinordertoensureproperoperationandreducetherisk
ofbodilyinjury.
Inaddition,theceilingmustbestrongenoughtosupporttheprojectorandtheinstallationmustbeinaccordance
withanylocalbuildingcodes.Pleaseconsultyourdealerformoreinformation.
Features you’ll enjoy:
•Quickstart(3seconds*
2
),QuickPowerOff,DirectPowerOff
3seconds*
2
afterturningonthepower,theprojectorisreadytodisplayPCorvideoimages.
Theprojectorcanbeputawayimmediatelyaftertheprojectorispowereddown.Nocooldownperiodisrequired
aftertheprojectoristurnedofffromtheremotecontrolorcabinetcontrolpanel.
Theprojectorhasafeaturecalled“DirectPowerOff”.Thisfeatureallowstheprojectortobeturnedoff(evenwhen
projectinganimage)byusingtheMainPowerSwitchordisconnectingtheACpowersupply.
ToturnofftheACpowersupplywhentheprojectorispoweredon,useapowerstripequippedwithaswitchand
abreaker.
*
2
Thequickstarttimeisonlywhen[STANDBYMODE]issetto[NORMAL]intheon-screenmessage.
•0.21W(100-130VAC)/0.43W(200-240VAC)instandbyconditionwithenergysavingtechnology
Selecting[POWER-SAVING]for[STANDBYMODE]fromthemenucanputtheprojectorinpower-savingmode
thatconsumesonly0.21W(100-130VAC)/0.43W(200-240VAC).Thewattageisatypicalvalue.
•CarbonMeter
Thisfeaturewillshowenergy-savingeffectintermsofCO
2
emissionreduction(kg)andelectricitycostwhenthe
projector’s[ECOMODE]issetto[AUTOECO],[NORMAL],or[ECO].
TheamountofCO
2
emissionreductionwillbedisplayedintheconrmationmessageatthetimeofpower-offand
intheINFOoftheon-screenmenu.
•Lamplifeupto6000hours*
3
UsinginEcoMode(ECO)allowsyoutoprolongtheprojector’slamplifeupto6000hours(upto4000hoursin
ECOMODEOFF).
*
3
P501X/PE501X/P451W:6000hours(upto3500hoursinECOMODEOFF).
•TwoHDMIinputssupportsdigitalsignals
ThetwoHDMIinputsprovideHDCPcompatibledigitalsignals.TheHDMIinputalsosupportsaudiosignal.
•16Wbuilt-inspeakerforanintegratedaudiosolution
Powerful16wattmonauralspeakerprovidesvolumeneedforlargerooms.
•MICInputprovided
AMICinputjackforacommerciallyavailabledynamicmicrophoneisusefulforyourpresentationinaconference
room or lecture in a classroom.
•ThesuppliedremotecontrolallowsyoutoassignaCONTROLIDtotheprojector
Multipleprojectorscanbeoperatedseparatelyandindependentlywiththesamesingleremotecontrolbyassigning
anIDnumbertoeachprojector.

3
1. Introduction
•Keystonecorrection
Keystonevertical/horizontal/pincushionandcornerstonefeaturesallowsyoutocorrectalmostalldistortionsinthe
image.
•IntegratedRJ-45connectorforwirednetworkingcapabilityalongwithwirelessnetworkingcapabilities
AnRJ-45connectorisstandard.AnoptionalUSBWirelessLANUnit(NP02LMseries)isrequiredforwirelessLAN
connection.(wirelessandwirednetworkcapabilityisnotsupportedbyPE501X)
•Softwareprograms(UserSupportware)containedinthesuppliedCD-ROM
ThesuppliedNECProjectorincludesprograms:VirtualRemoteTool,ImageExpressUtilityLite(forWindows/Mac
OS),ImageExpressUtility2.0(forWindowsonly),DesktopControlUtility1.0(forWindowsonly),andPCControl
UtilityPro4(forWindows)/5(forMacOS).
•LAN-compatibleViewer(notsupportedbyPE501X)
Theprojector’sbuilt-inViewerallowsyoutoviewimagesormovielesinthesharedfolderofyourPCconnected
toawiredorwirelessLAN.
*TheViewersupportstheMediaSharingfunctionofWindowsMediaPlayer11.(TheViewerfunctionisnot
supportedbyPE501X.)
•Audiotransfercapability(forWindowsonly)
ImageExpressUtilityLiteallowsyoutosendthecomputer’sscreenimageandaudiototheprojector.
*Audiotransfercapabilityisavailableonlywhenthecomputerconnectswiththeprojectorinpeer-to-peernet-
work.
*AudiotransfercapabilityisavailablewithUSBDisplayconnection.
•Streamingvideotransfercapability(forWindowsonly)
ImageExpressUtilityLiteallowsyoutosendstreamingvideofromthecomputertoasingleprojectoroverwired
orwirelessLANwithouttheneedofconnectingacomputercable.
•USBDisplay
UsingacommerciallyavailableUSBcable(compatiblewithUSB2.0specications)toconnectthecomputerwith
theprojectorallowsyoutosendyourcomputerscreenimageandaudiototheprojectorwithouttheneedofa
traditionalcomputercable(VGA).
•AUTOPOWERONandAUTOPOWEROFFfeatures
TheDIRECTPOWERON,AUTOPOWERON(COMP.),AUTOPOWEROFF,andOFFTIMERfeatureseliminate
theneedtoalwaysusethePOWERbuttonontheremotecontrolorprojectorcabinet.
•Preventingunauthorizeduseoftheprojector
Enhancedsmartsecuritysettingsforkeywordprotection,cabinetcontrolpanellock,securityslot,andsecurity
chainopeningtohelppreventunauthorizedaccess,adjustmentsandtheftdeterrence.
•HighresolutionuptoWUXGA
Highresolutiondisplay-uptoWUXGAcompatible,XGA(P501X/P451X/PE501X)/WXGA(P451W/P401W)native
resolution.
•CRESTRONROOMVIEWcompatibility(notsupportedbyPE501X)
TheprojectorsupportsCRESTRONROOMVIEW,allowingmultipledevicesconnectedinthenetworktobeman-
agedandcontrolledfromacomputerorcontroller.
About this user’s manual
Thefastestwaytogetstartedistotakeyourtimeanddoeverythingrightthersttime.Takeafewminutesnowto
reviewtheuser’smanual.Thismaysaveyoutimelateron.Atthebeginningofeachsectionofthemanualyou’llnd
anoverview.Ifthesectiondoesn’tapply,youcanskipit.
4
1. Introduction
❸ Part Names of the Projector
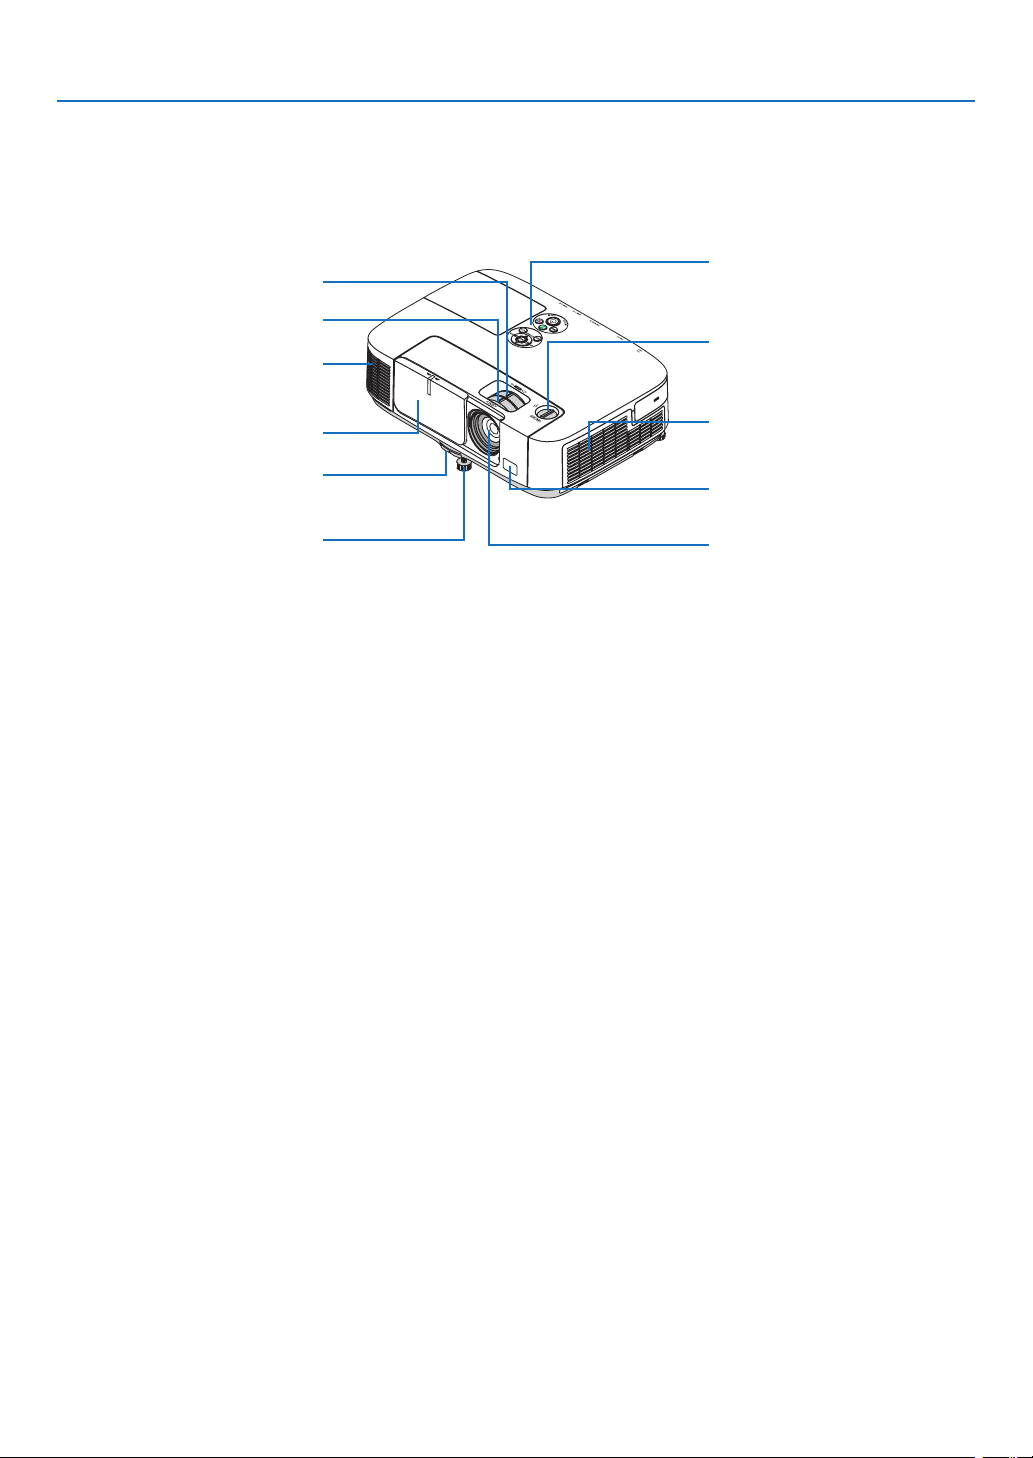
Front/Top
Controls
( page 6)
Lens
Remote Sensor
( page 9)
IntakeVent/FilterCover
( page 158, 163)
Zoom Lever
( page 22)
Lens Cover
Focus Lever
(
page 21)
Adjustable Tilt Foot
(
page 23)
Adjustable Tilt Foot Lever
(
page 23)
Exhaust Vent
Heated air is exhausted from here.
Lens Shift Dial (Vertical)
(
page 20)
5
1. Introduction
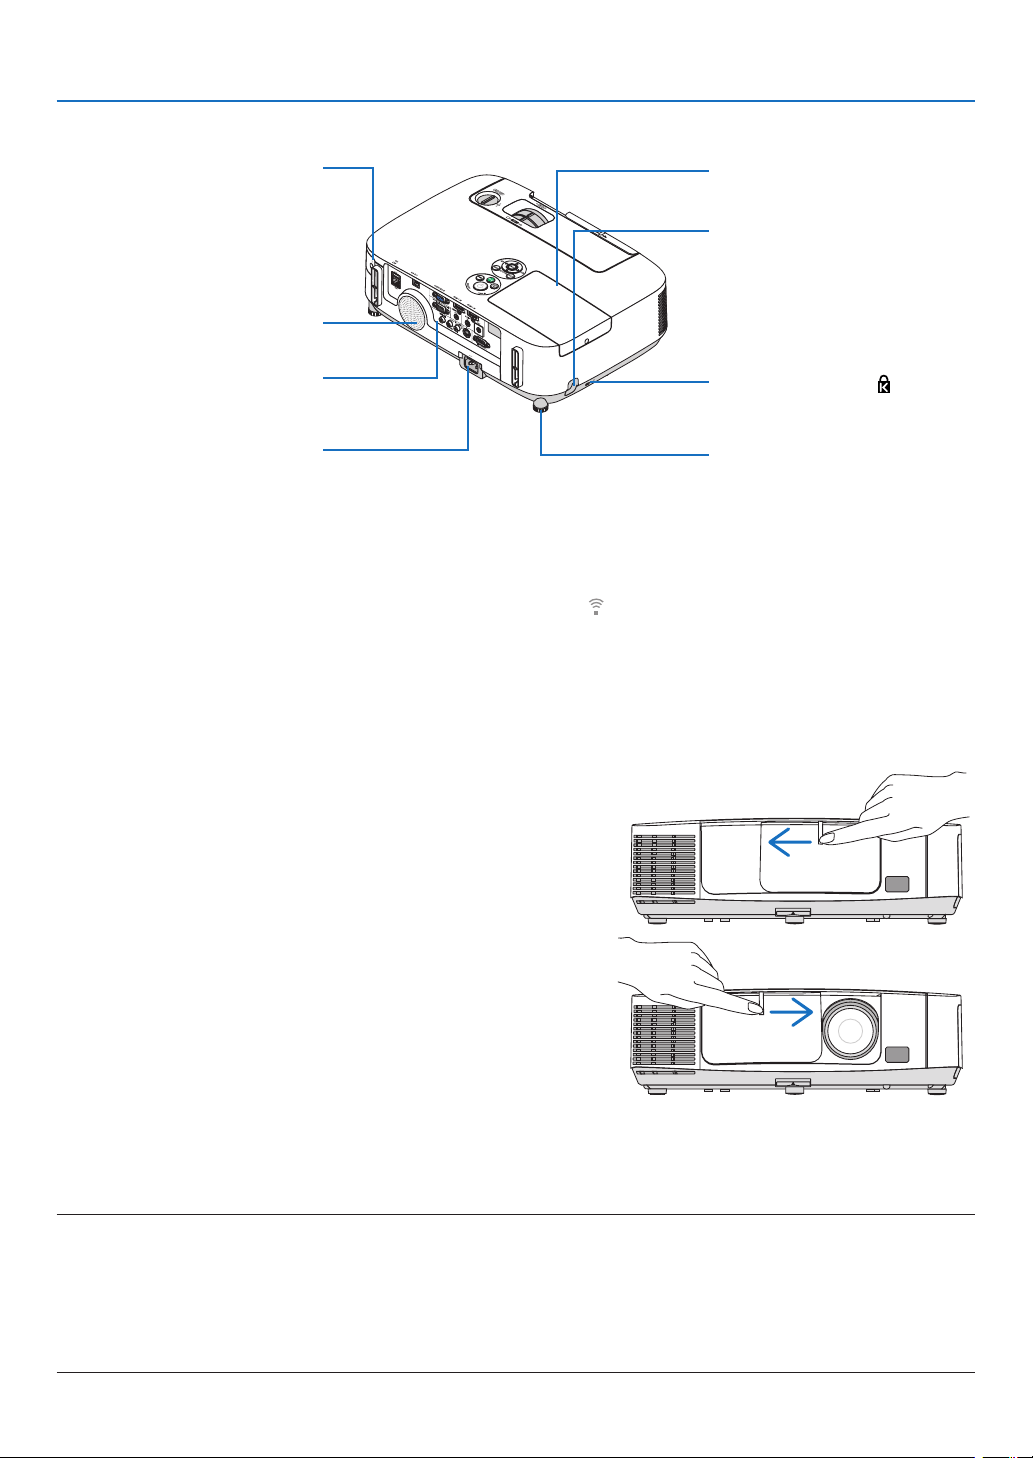
Opening and closing the lens cover
Slidethelenscovertothelefttouncoverthelens.
Tocoverthelens,slidethelenscovertotheright.
NOTE:
•ThelenscoverworksinconjunctionwiththeAV-MUTEfunction.Closingthelenscoverwillturnofftheimageandsoundduring
normalprojectoroperation;openingitwillrestoretheimageandsound.
Withthelenscoverclosedtheimageandsoundisturnedoff,howeverthelampisstilllit.Iftheprojectorstaysthiswayforabout
2hours,itwillturnoffautomatically.
•Donotpullthelenscoverwithexcessiveforceorapplystrongpressureineithertheupordowndirection.Doingsocancause
damagetothelenscoverslidingmechanism!
ACInput
Connect the supplied power cord’s
three-pin plug here, and plug the
other end into an active wall outlet.
(
page 14)
Port Cover for Optional USB
Wireless LAN Unit*
1
(not supported by PE501X)
When using the optional USB
Wireless LAN Unit, first remove
the cover. (
page 152)
Terminal Panel (
page 7)
MonauralSpeaker(16W)
Lamp Cover ( page 161)
Rear Foot ( page 23)
Rear
Built-in Security Slot ( )*
2
Security chain opening
Attach an anti-theft device.
The security chain opening accepts
security wires or chains up to 0.18
inch/4.6mmindiameter.
*
1
AlthoughthePE501XdoesnotsupportwirelessLAN,awirelessmark()isshownonthecabinet.
*
2
ThissecurityslotsupportstheMicroSaver
®
SecuritySystem.

6
1. Introduction
Top Features
1/2
5
6
4
7
811
9
3
10
1. (POWER)Button
(page15, 27)
2. POWER Indicator
(page
14, 15, 27, 206)
3.STATUSIndicator
(page
206)
4.LAMPIndicator
(page
160, 206)
5.ECOButton
(page
30)
6.SOURCEButton
(page
17)
7.AUTOADJ.Button
(page
26)
8.MENUButton
(page
87)
9. ▲▼◀▶/VolumeButtons◀▶/KeystoneButton▼
(
page
24, 26)
10.ENTERButton
(page
87)
11.EXITButton
(page
87)

7
1. Introduction
Terminal Panel Features
1237465
119
810 14
12*
13*
1.COMPUTERIN/ComponentInputConnector(MiniD-Sub15Pin)
(page145, 149)
2.AUDIOINMiniJack(StereoMini)
(page
145, 149)
3.HDMI1INConnector(TypeA)
(page
145, 150)
4.HDMI2INConnector(TypeA)
(page
145, 150)
5.USB(PC)Port(TypeB)
(page
39, 40, 145)
6.MONITOROUT(COMP.)Connector(MiniD-Sub15Pin)
(page
147)
7.AUDIOOUTMiniJack(StereoMini)
(page
147)
8.S-VIDEOINConnector(MiniDIN4Pin)
(page
148)
9.VIDEOINConnector(RCA)
(page
148)
10.VIDEO/S-VIDEOAUDIOINL/MONO,R(RCA)
(page
148)
11.MICInputJack(MonauralMini)
(page
58)
12.USBPort(TypeA)*
(page
63)
13.LANPort(RJ-45)*
(page
151)
14.PCCONTROL[PCCONTROL]Port(D-Sub9Pin)
(page
215)
UsethisporttoconnectaPCorcontrolsystem.Thisenablesyoutocontroltheprojectorusingserialcommunica-
tionprotocol.Ifyouarewritingyourownprogram,typicalPCcontrolcodesareonpage215.
*TheLANPort(RJ-45)andUSBPort(TypeA)arenotprovidedonPE501X.
8
1. Introduction
❹ Part Names of the Remote Control
3
7
5
6
1
2
10
15
16
14
17
9
4
8
13
29
30
31
19
20
25
27
28
24
18
23
22
21
26
32
12
11
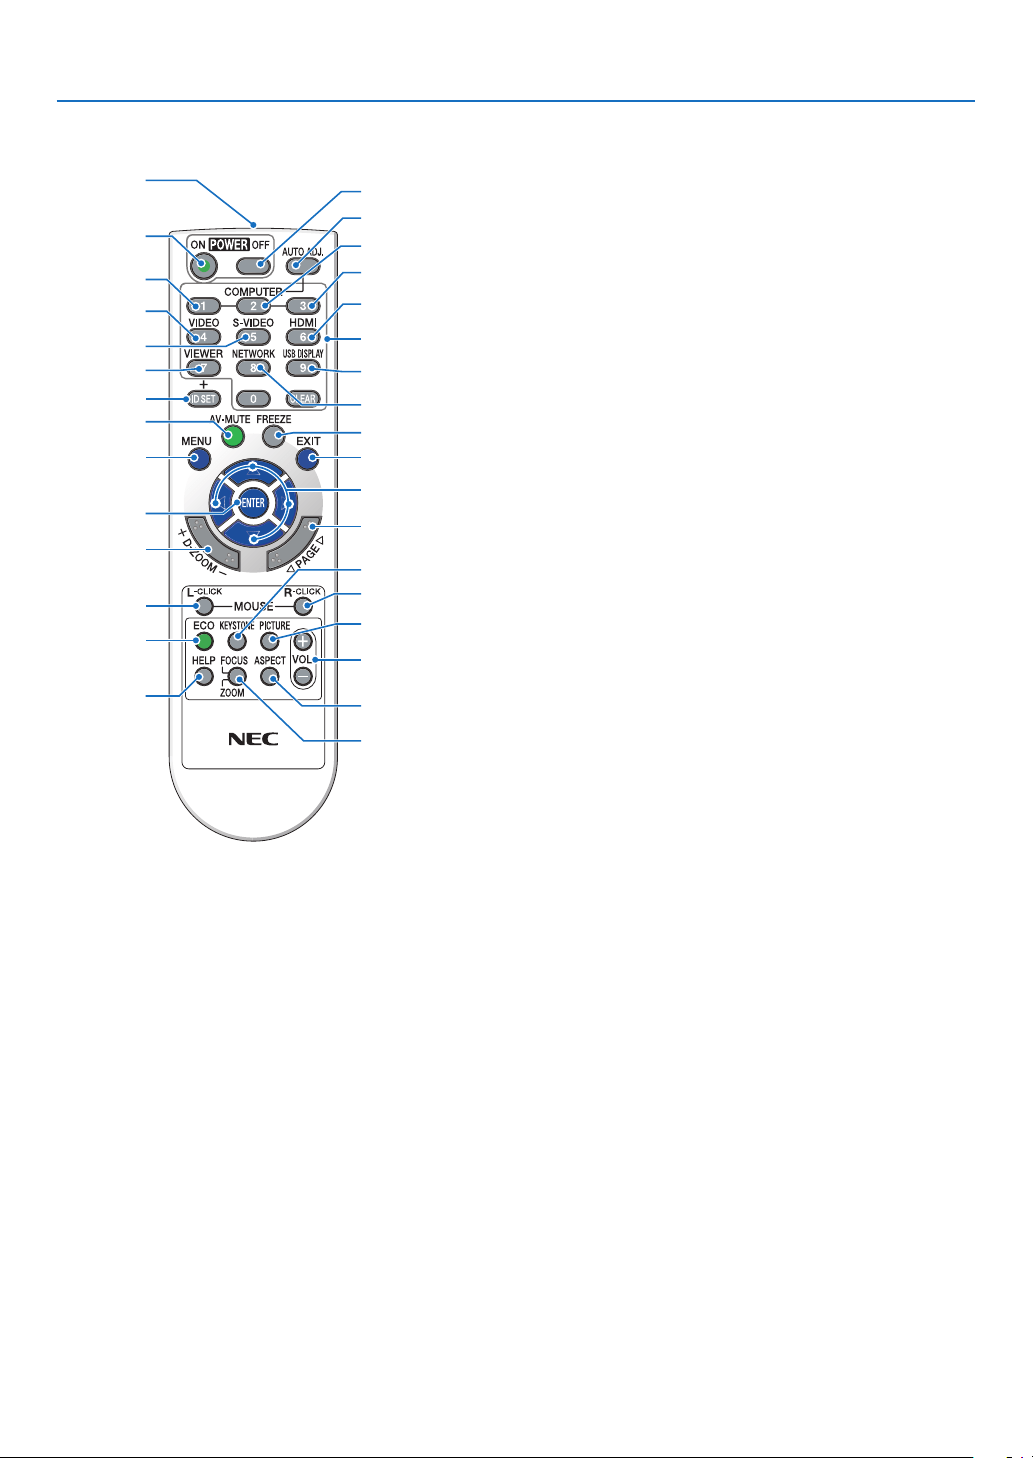
1. Infrared Transmitter
(page9)
2.POWERONButton
(page
15)
3.POWEROFFButton
(page
27)
4,5,6.COMPUTER1/2/3Button
(page
17)
(COMPUTER2/3buttonisnotavailable.)
7.AUTOADJ.Button
(page
26)
8.VIDEOButton
(page
17)
9.S-VIDEOButton
(page17)
10.HDMIButton(page
17)
11.VIEWERButton(page
17, 63)
12.NETWORKButton(page
17)
13.USBDISPLAYButton(page
17)
14.IDSETButton
(page
106)
15.NumericKeypadButton/CLEARButton
(page
106)
16.FREEZEButton
(page
29)
17.AV-MUTEButton
(page
29)
18.MENUButton
(page
87)
19.EXITButton(page
87)
20.▲▼◀▶
Button(page
87)
21.ENTERButton(page
87)
22.D-ZOOM(+)(–)Button
(page
29)
23.MOUSEL-CLICKButton*
(page
39)
24.MOUSER-CLICKButton*
(page
39)
25.PAGE▽/△Button
(page
39)
26.ECOButton(page
30)
27.KEYSTONEButton
(page
24)
28.PICTUREButton
(page
93, 95)
29.VOL.(+)(–)Button
(page
26)
30.ASPECTButton
(page
98)
31.FOCUS/ZOOMButton
(notavailableonthisseriesofprojectors)
32.HELPButton
(page
113)
*TheMOUSEL-CLICKandMOUSER-CLICKbuttonsworkonlywhenaUSBcableisconnectedwithyourcom-
puter.
9
1. Introduction
Remote Control Precautions
•Handletheremotecontrolcarefully.
•Iftheremotecontrolgetswet,wipeitdryimmediately.
•Avoidexcessiveheatandhumidity.
•Donotshort,heat,ortakeapartbatteries.
•Donotthrowbatteriesintore.
•Ifyouwillnotbeusingtheremotecontrolforalongtime,removethebatteries.
•Ensurethatyouhavethebatteries’polarity(+/−)alignedcorrectly.
•Donotusenewandoldbatteriestogether,orusedifferenttypesofbatteriestogether.
•Disposeofusedbatteriesaccordingtoyourlocalregulations.
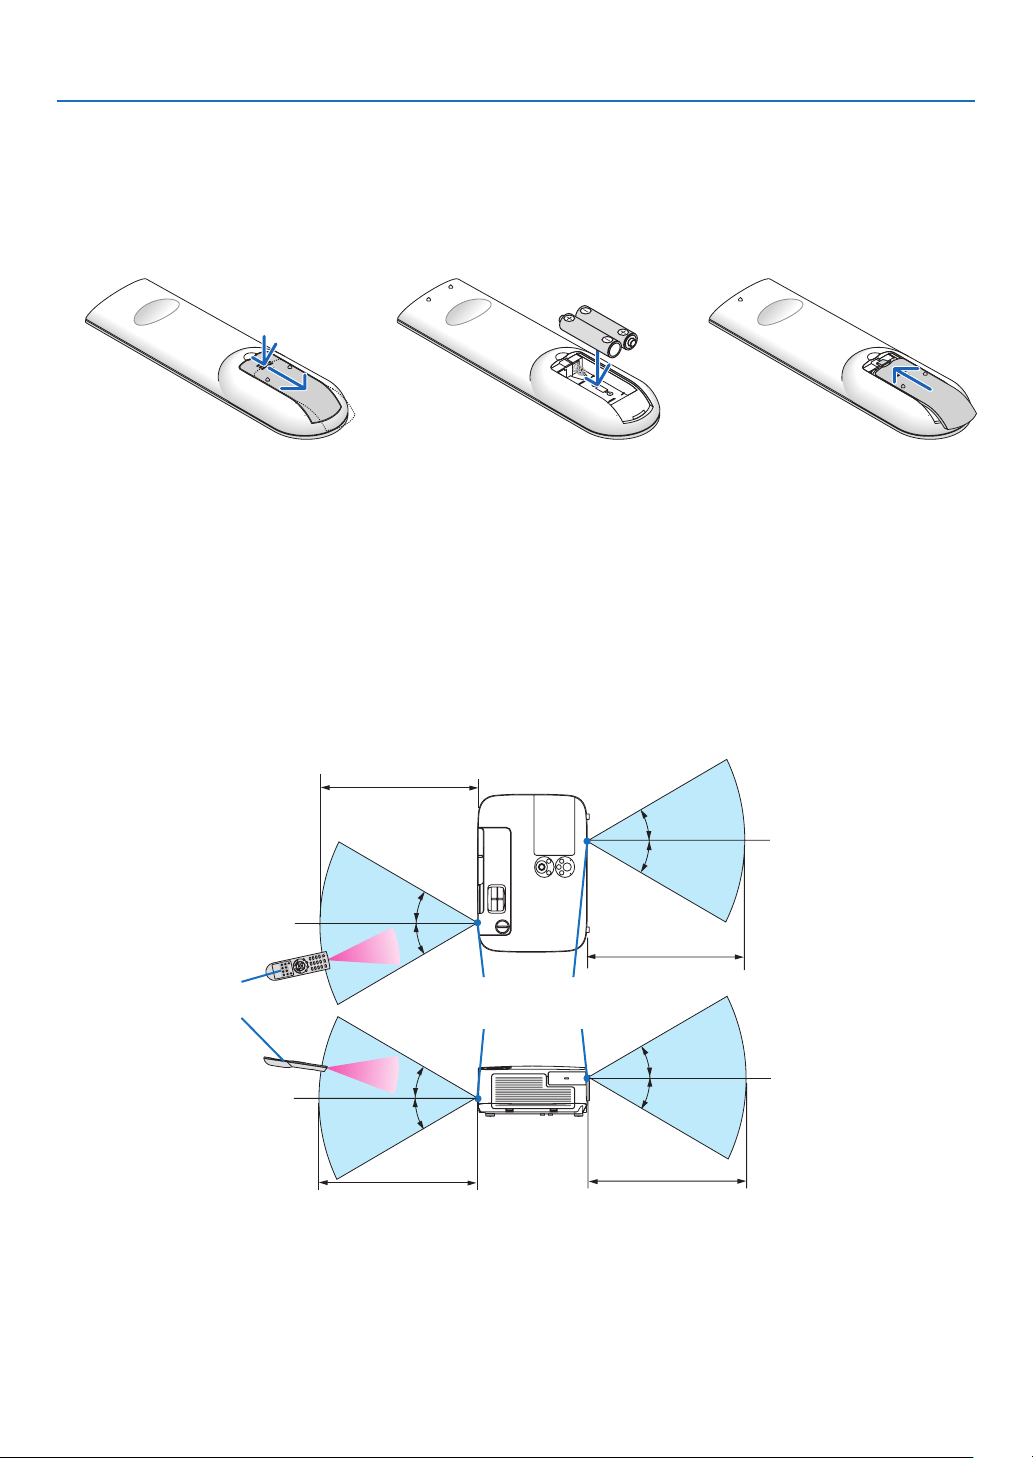
Operating Range for Wireless Remote Control
30°
30°
30°
30°
30°
30°
30°
30°
22feet/7m
22feet/7m
Remote sensor on projector cabinet
Remote control
22feet/7m
22feet/7m
•Theinfraredsignaloperatesbyline-of-sightuptoadistanceofabout22feet/7mandwithina60-degreeangleof
theremotesensorontheprojectorcabinet.
•Theprojectorwillnotrespondifthereareobjectsbetweentheremotecontrolandthesensor,orifstronglightfalls
onthesensor.Weakbatterieswillalsopreventtheremotecontrolfromproperlyoperatingtheprojector.
1
Pressrmlyandslidethebattery
coveroff.
2
Installnewbatteries(AAA).Ensure
thatyouhavethebatteries’polarity
(+/−)alignedcorrectly.
Battery Installation
3
Slipthecoverbackoverthebat-
teriesuntilitsnapsintoplace.Do
notmixdifferenttypesofbatteries
ornewandoldbatteries.
OPEN
OPEN

10
1. Introduction
❺ Operating Environment for Software Included on CD-ROM
NamesandFeaturesofBundledSoftwarePrograms
NameofsoftwareprogramFeatures
VirtualRemoteTool
(Windowsonly)
ThisisasoftwareprogramusedtocontrolthepowerON/OFFandsourceselec-
tionoftheprojectorfromyourcomputerbyusingthesuppliedcomputercable
(VGA)andothers.(page
168)
ImageExpressUtilityLite•Thisisasoftwareprogramusedtoprojectyourcomputer’sscreen,streaming
movie,orsoundfromthecomputerovertheUSBcable*orthewired/wireless
network.Thecomputercable(VGA)isnotrequired.(page
40, 173)
*StreamingmoviescannotbeplayedwithUSBDisplayconnection.Only
USBDisplayfunctionissupportedbyPE501X.
•ThissoftwareprogramcanbeusedtocontrolthepowerON/OFFandsource
selectionoftheprojectorfromyourcomputer.
•TheGeometricCorrectionTool(GCT)andaudiofunctionallowsyoutocor-
rectdistortionofimagesprojectedonacurvedwall.(page180)TheGCT
functionisnotavailableforstreamingvideo.
ImageExpressUtilityLitefor
MacOS
•Thisisasoftwareprogramusedtoprojectyourcomputer'sscreenoverthe
wired/wirelessnetwork.Thecomputercable(VGA)isnotrequired.(page
40, 179)
•ThissoftwareprogramcanbeusedtocontrolthepowerON/OFFandsource
selectionoftheprojectorfromyourcomputer.
*“Audiotransmission”,“USBDisplay”,and“GCT”functionsarenotsupported
byMac.
*ImageExpressUtilityLiteforMacOSisnotsupportedbyPE501X.
ImageExpressUtility2.0
(Windowsonly)
•Thisisasoftwareprogramusedtosendthescreensofyourpersonalcomput-
erstotheprojectorviawired/wirelessLAN(Meetingmode).
Projectedimagescanbetransferredandsavedtopersonalcomputers.
When“MeetingMode”isused,projectedimagescanbesentandsavedto
thepersonalcomputers.Imagescanbesentfromapersonalcomputerto
notonlyoneprojectorbutalsototwoormoreprojectorsatthesametime.
(page
182)
DesktopControlUtility1.0
(Windowsonly)
•Thisisasoftwareprogramusedtooperatethedesktopscreenofapersonal
computerataremotelocationbyusingaprojectorviawired/wirelessLAN.
(page
193)
•DesktopControlUtility1.0isnotsupportedbyPE501X.
PCControlUtilityPro4
PCControlUtilityPro5(forMac
OS)
Thisisasoftwareprogramusedtooperatetheprojectorfromthecomputer
whenthecomputerandtheprojectorareconnectedwithLAN(wiredorwire-
less).(page
202)
•PCControlUtilityPro4canbeusedwithaserialconnection.
•PCControlUtilityPro5(forMacOS)isnotsupportedbyPE501X.
NOTE:
•ImageExpressUtilityLitedoesnotsupport"MeetingMode"inImageExpressUtility2.0includedwithourothermodels.
Downloadservice
Fortheupdateinformationaboutthesesoftwareprograms,visitourwebsite:
URL:
http://www.nec-display.com/dl/en/index.html

11
1. Introduction
Operating Environment
ThefollowingistheoperatingenvironmentforImageExpressUtilityLite.Fortheoperatingenvironmentofothersoft-
wareprogram,refertothehelpfunctionofeachsoftwareprogram.
[Windows]
SupportedOSWindows8(CoreEdition)
Windows8Pro
Windows8Enterprise
Windows7HomeBasic
Windows7HomePremium
Windows7Professional
Windows7Ultimate
Windows7Enterprise
WindowsVistaHomeBasic
WindowsVistaHomePremium
WindowsVistaBusiness
WindowsVistaUltimate
WindowsVistaEnterprise
WindowsXPHomeEdition(32-bitversion)ServicePack3orlater
WindowsXPProfessional(32-bitversion)ServicePack3orlater
•Windowspower-savingfunctionisnotsupported.
•Tousetheaudiotransfercapability,Windows8/Windows7/WindowsVista
ServicePack1orlaterisrequired.
Processor •Windows8/Windows7/WindowsVista
PentiumM1.2GHzequivalentorhigherrequired
Dualcore1.5GHzorhigherrecommended
•WindowsXP
PentiumM1.0GHzequivalentorhigherrequired
Dualcore1.0GHzorhigherrecommended
Memory•Windows8/Windows7/WindowsVista
512MBormorerequired
1GBormorerecommended
•WindowsXP
256MBormorerequired
512MBormorerecommended
*Morememorymayberequiredtorunadditionalapplicationssimultane-
ously.
Graphicprocessor•Windows8/Windows7/WindowsVista
The“Graphics”score3.0ormoreof“WindowsExperienceIndex”recom-
mended.
NetworkenvironmentTCP/IP-compatiblewiredLANorwirelessLAN
*UseawirelessLANunitcomplyingwiththeWi-Fistandard.
*Audiotransfercapabilityrequires3Mbpsormorethroughput.
Resolution•Windows8/Windows7/WindowsVista
SVGA(800×600)orhigherrequired
XGA(1024×768)recommended
•WindowsXP
VGA(640×480)orhigherrequired
XGA(1024×768)recommended
1024dots×768lines-1280dots×800linesrecommended(P451W/
P401W)
ScreenColorsHighColor(15bits,16bits)
TrueColor(24bits,32bits)(recommended)
•256orfewercolorsarenotsupported.

12
1. Introduction
[Mac]
SupportedOSMacOSXv10.6,v10.7,v10.8
Processor(CPU)Intel
®
Core™Duoprocessor1.5GHzorhigherrequired
Intel
®
Core™2Duoprocessor1.6GHzorhigherrecommended
*PowerPC
®
isnotsupported
Memory512MBorhigherrequired
NetworkenvironmentWiredorwirelessLANrequiredthatsupportsTCP/IP
*ThefollowingLANadaptersareveriedtoworkwithImageExpressUtility
Lite:
•WiredLANadapterbuiltintoMac
•WirelessLANadapterbuiltintoMac
•AppleUSBEthernetadapter
“EasyConnection”supportsonlywirelessLAN.
SupportedResolutionSVGA(800×600)orhigherrequired
XGA(1024×768)recommended
(1024×768–1280×800recommendedforP451W/P401W)
SupportedScreenColors16.70millioncolorsrequired

13
Thissectiondescribeshowtoturnontheprojectorandtoprojectapictureontothescreen.
❶ Flow of Projecting an Image
Step 1
•Connectingyourcomputer/Connectingthepowercord(page14)
Step 2
•Turningontheprojector(page15)
Step 3
•Selectingasource(page17)
Step 4
•Adjustingthepicturesizeandposition(page19)
•Correctingkeystonedistortion[KEYSTONE](page24)
Step 5
•Adjustingapictureandsound
- Optimizing a computer signal automatically ( page 26)
- Turning up or down volume (
page 26)
Step 6
•Makingapresentation
Step 7
•Turningofftheprojector(page27)
Step 8
•Afteruse(page28)
2. Projecting an Image (Basic Operation)
14
2. Projecting an Image (Basic Operation)
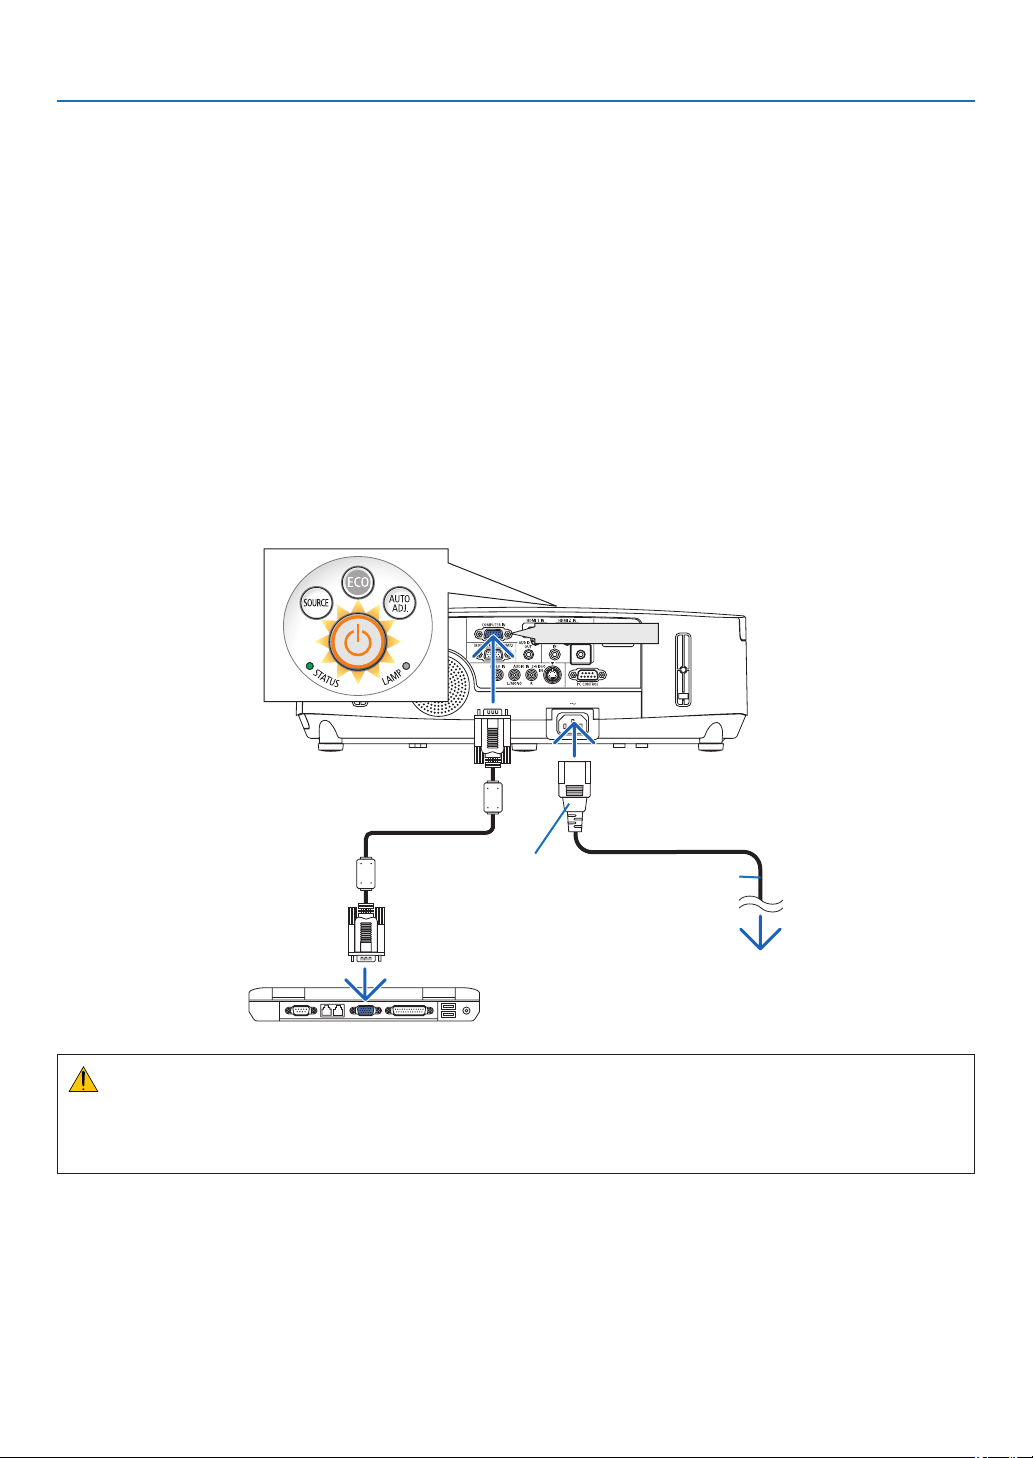
❷ Connecting Your Computer/Connecting the Power Cord
1.Connectyourcomputertotheprojector.
This section will show you a basic connection to a computer. For information about other connections, see “6.
InstallationandConnections”onpage145.
Connectthecomputercable(VGA)betweentheprojector’sCOMPUTERINconnectorandthecomputer’sport
(mini D-Sub 15 Pin). Turn two thumb screws of both connectors to fix the computer cable (VGA).
2.Connectthesuppliedpowercordtotheprojector.
Firstconnectthesuppliedpowercord’sthree-pinplugtotheACINoftheprojector,andthenconnecttheother
plug of the supplied power cord in the wall outlet.
The projector’s power indicator will flash for a few seconds and then will light orange* (standby mode).
The STATUS indicator will also light green*.
*Thiswillapplyforbothindicatorswhen[NORMAL]isselectedfor[STANDBYMODE].SeethePowerIndicator
section.( page 206)
COMPUTER IN
Makesurethattheprongsarefullyinsertedinto
boththeACINandthewalloutlet.
To wall outlet
CAUTION:
PartsoftheprojectormaybecometemporarilyheatediftheprojectoristurnedoffwiththePOWERbuttonorifthe
ACpowersupplyisdisconnectedduringnormalprojectoroperation.
Usecautionwhenpickinguptheprojector.
15
2. Projecting an Image (Basic Operation)
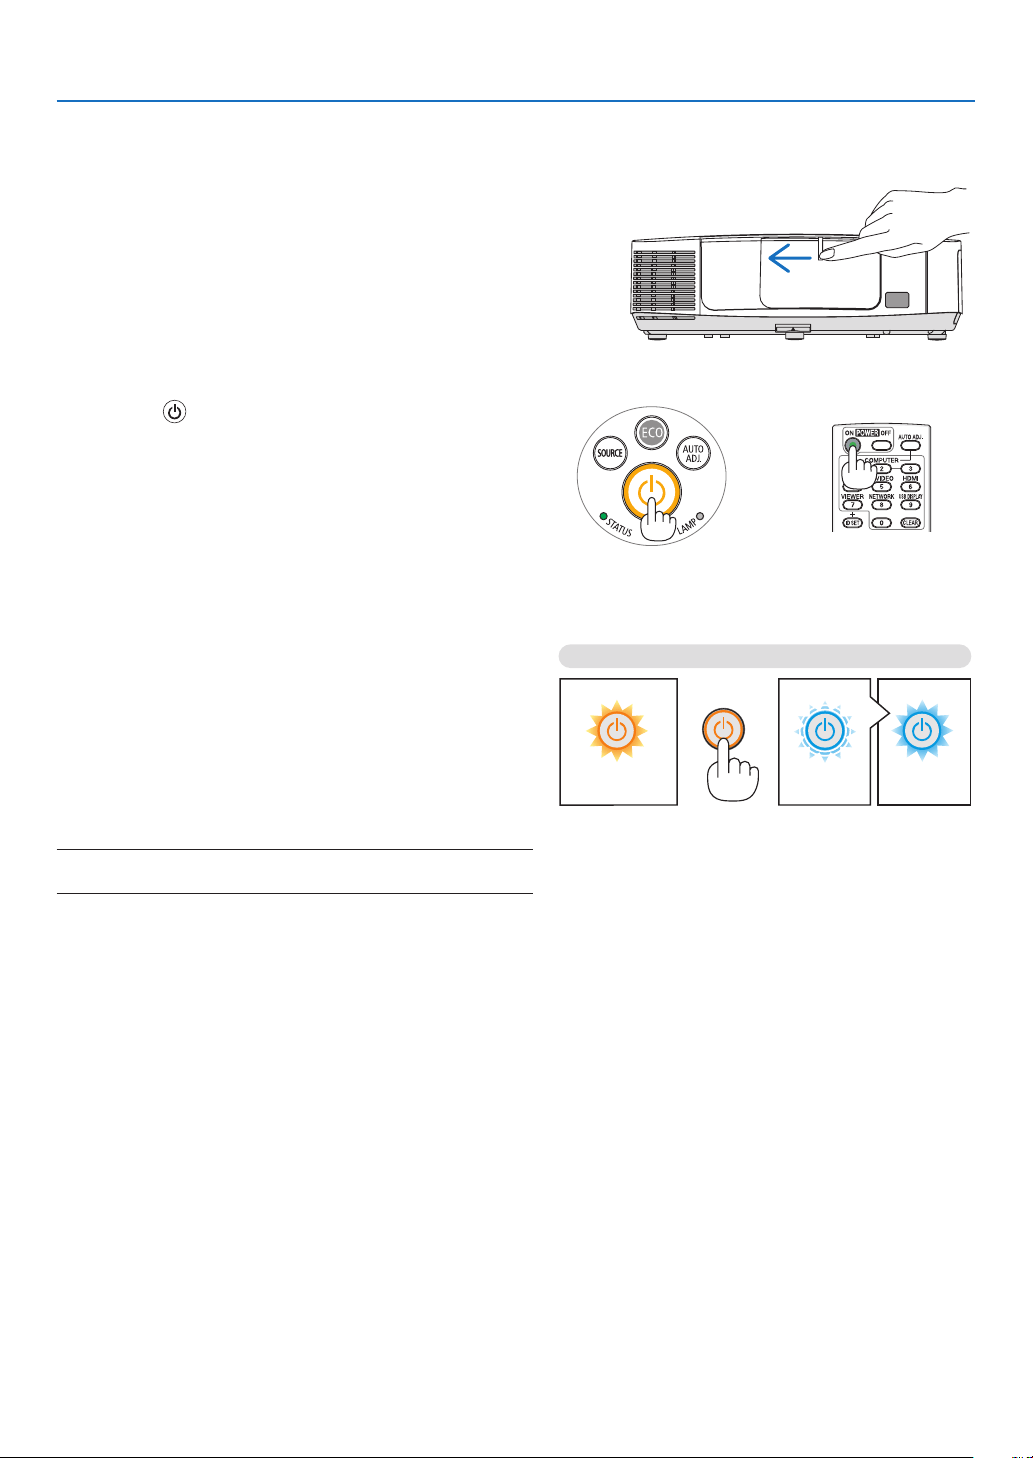
StandbyBlinkingPowerOn
Steady orange light Blinking blue light Steady blue light
❸ Turning on the Projector
1.Slidethelenscovertothelefttouncoverthelens.
2. Press the (POWER) button on the projector cabinet
or the POWER ON button on the remote control.
The POWER indicator will turn to blue and the projector
will become ready to use.
TIP:
•Whenthemessage“Projectorislocked!Enteryourpassword.”
isdisplayed,itmeansthatthe[SECURITY]featureisturnedon.
(page33)
•WhentheECOmessageisdisplayed,itmeansthat[ON]is
selectedfor[ECOMESSAGE].(page104)
•PressingbuttonssuchaspowerbuttonandMENUbuttonwill
makesound.Toturnoffthebeepsound,select[OFF]for[BEEP]
fromthemenu.(page109)
After you turn on your projector, ensure that the computer
or video source is turned on and that the lens cover is
open.
NOTE:Whennoinputsignalispresent,theno-signalguidanceis
displayed(factorymenusetting).
(page206)
16
2. Projecting an Image (Basic Operation)
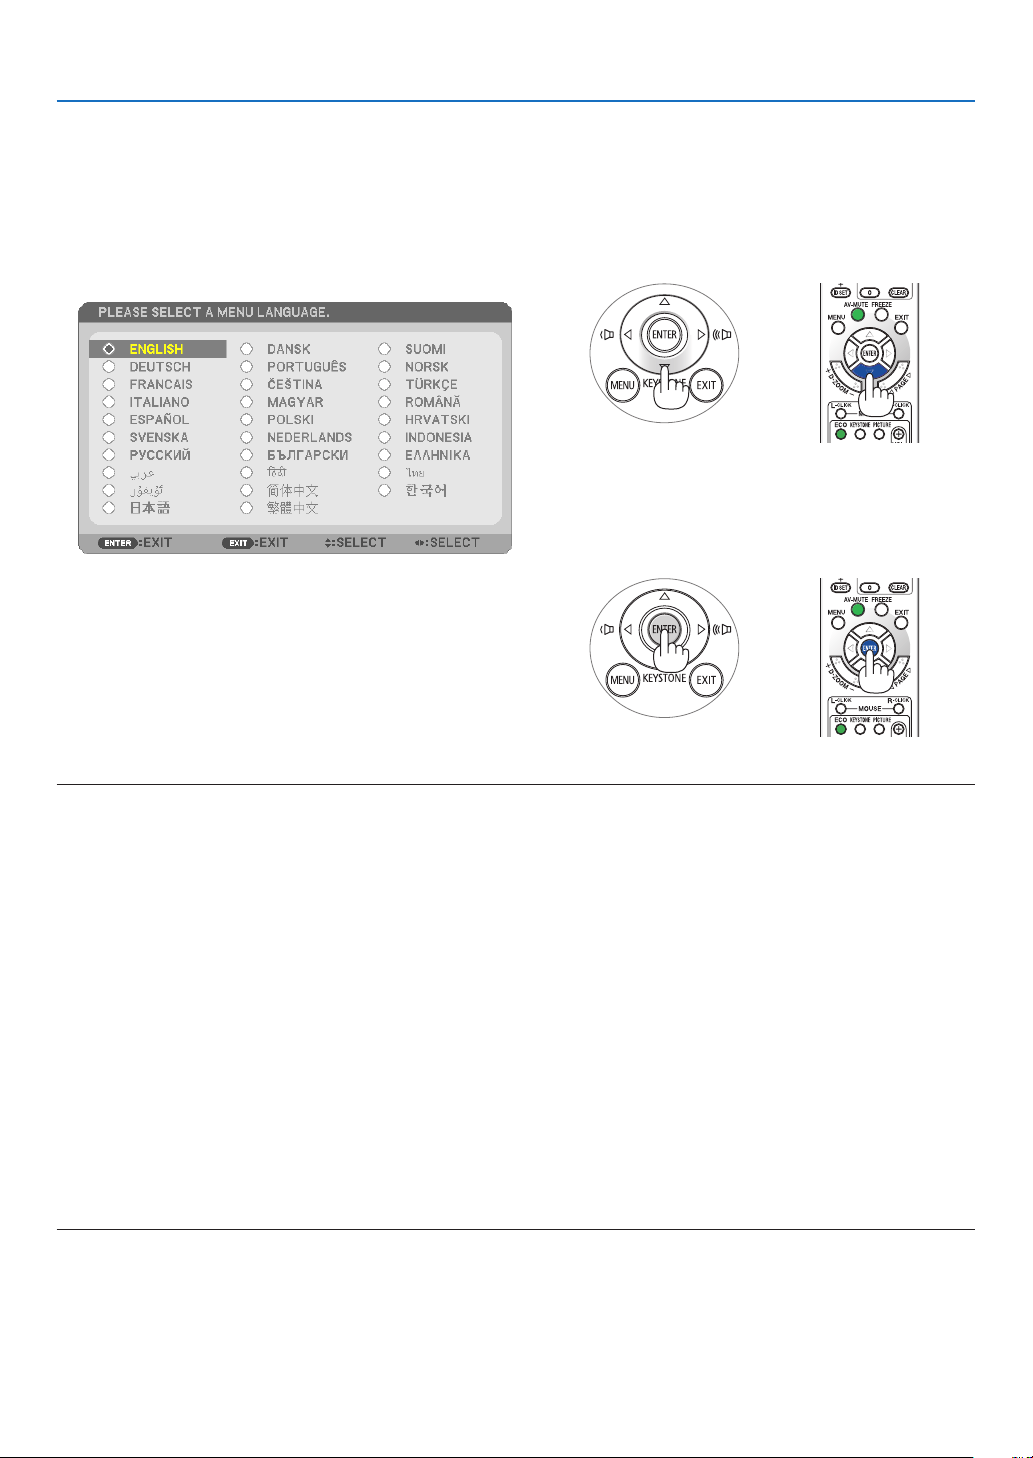
Note on Startup screen (Menu Language Select screen)
Whenyourstturnontheprojector,youwillgettheStartupmenu.Thismenugivesyoutheopportunitytoselectone
ofthe29menulanguages.
Toselectamenulanguage,followthesesteps:
1. Use the ▲, ▼, ◀ or ▶buttontoselectoneofthe29
languagesfromthemenu.
2. Press the ENTER button to execute the selection.
Afterthishasbeendone,youcanproceedtothemenu
operation.
Ifyouwant,youcanselectthemenulanguagelater.
([LANGUAGE]onpage89 and 103)
NOTE:
•Whenturningoffthepowersupplyandthenbackonbyusingapowerstriporbreaker.
Allowaminimumof1secondbetweenturningoffthemainpowersupplyandturningitbackonagain.
Failingtodosocouldresultinnopowertotheprojector.(Therewillbenostand-byLED)
Shouldthishappen,unplugthepowercordandplugitinagain.Turnonthemainpower.
•Ifoneofthefollowingthingshappens,theprojectorwillnotturnon.
-Iftheinternaltemperatureoftheprojectoristoohigh,theprojectordetectsabnormalhightemperature.Inthisconditionthe
projectorwillnotturnontoprotecttheinternalsystem.Ifthishappens,waitfortheprojector’sinternalcomponentstocool
down.
-Whenthelampreachesitsendofusablelife,theprojectorwillnotturnon.Ifthishappens,replacethelamp.
-IftheSTATUSindicatorlightsorangewiththepowerbuttonpressed,itmeansthatthe[CONTROLPANELLOCK]isturnedon.
Cancelthelockbyturningitoff.(page105)
-Ifthelampfailstolight,andiftheSTATUSindicatorashesonandoffinacycleofsixtimes,waitafullminuteandthenturn
onthepower.
•WhilethePOWERindicatorisblinkingblueinshortcycles,thepowercannotbeturnedoffbyusingthepowerbutton.
•Immediatelyafterturningontheprojector,screenickermayoccur.Thisisnormal.Wait3to5minutesuntilthelamplightingis
stabilized.
•Whentheprojectoristurnedon,itmaytakesometimebeforethelamplightbecomesbright.
•Ifyouturnontheprojectorimmediatelyafterthelampisturnedofforwhenthetemperatureishigh,thefansrunwithoutdisplay-
inganimageforsometimeandthentheprojectorwilldisplaytheimage.
17
2. Projecting an Image (Basic Operation)
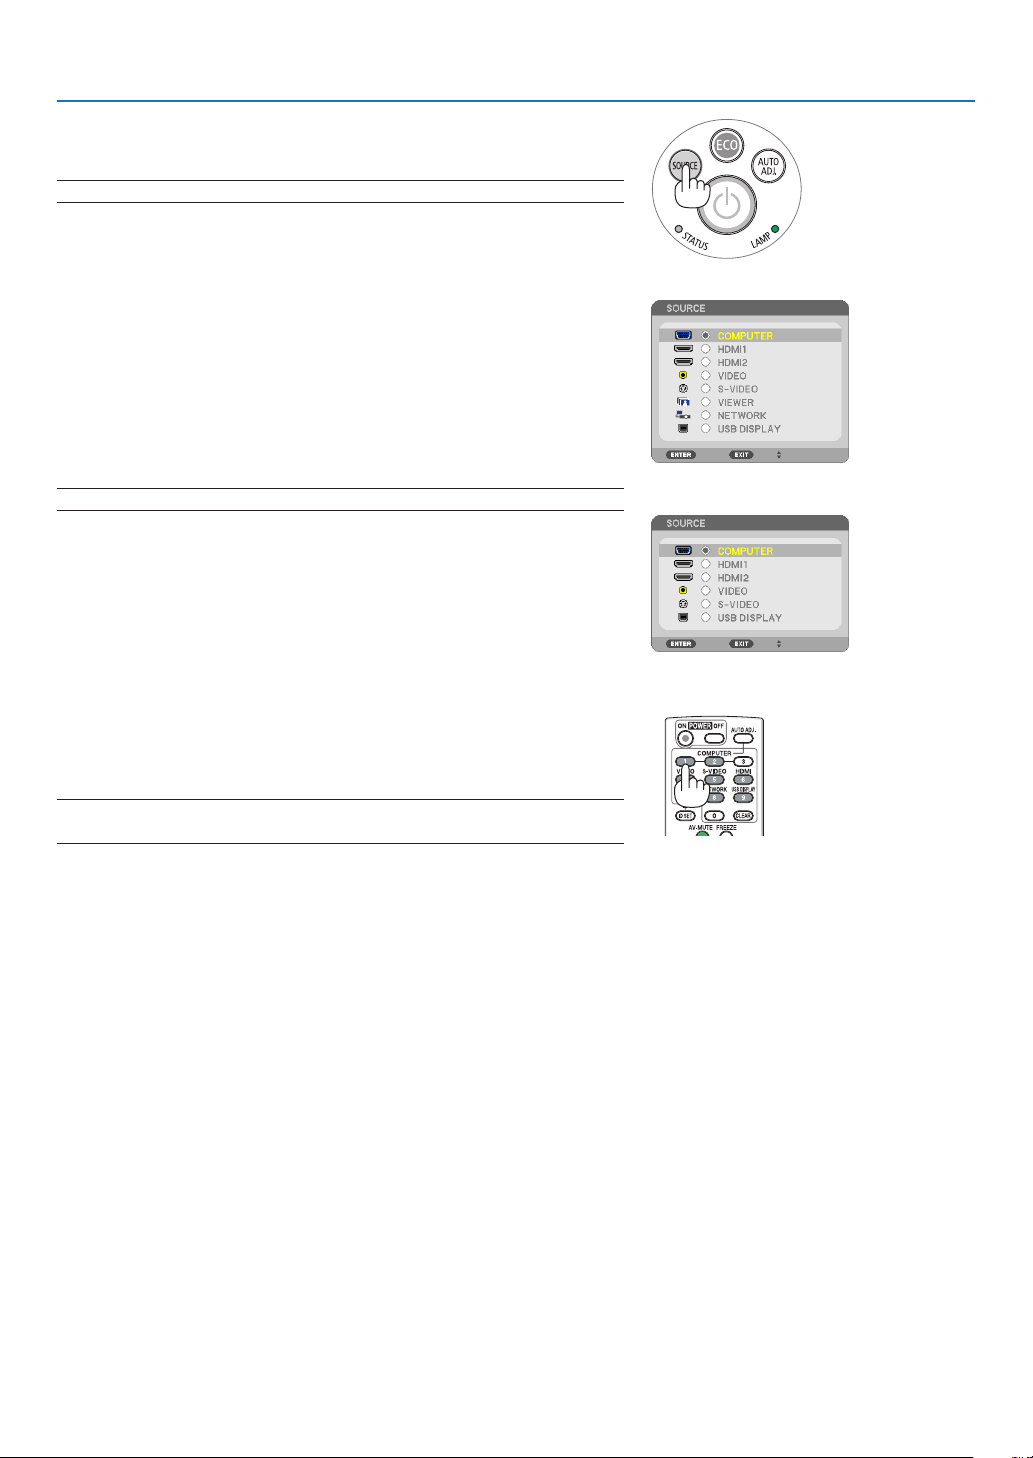
❹ Selecting a Source
Selecting the computer or video source
NOTE:Turnonthecomputerorvideosourceequipmentconnectedtotheprojector.
DetectingtheSignalAutomatically
PresstheSOURCEbuttononce.Theprojectorwillsearchfortheavailable
inputsourceanddisplayit.Theinputsourcewillchangeasfollows:
COMPUTERHDMI1HDMI2VIDEOS-VIDEOVIEWER
USBDISPLAYCOMPUTER ...
•WiththeSOURCEscreendisplayed,youcanpresstheSOURCE
buttonafewtimestoselecttheinputsource.
•TheViewerandNetworksourcesarenotsupportedbyPE501X.
TIP:Ifnoinputsignalispresent,theinputwillbeskipped.
UsingtheRemoteControl
PressanyoneoftheCOMPUTER1,HDMI,VIDEO,S-VIDEO,VIEWER,
NETWORK,orUSBDISPLAYbuttons.
NOTE:TheHDMIbuttonontheremotecontrolwilltogglebetween“HDMI1”and
“HDMI2”.
[P501X/P451X/P451W/P401W]
[PE501X]
18
2. Projecting an Image (Basic Operation)
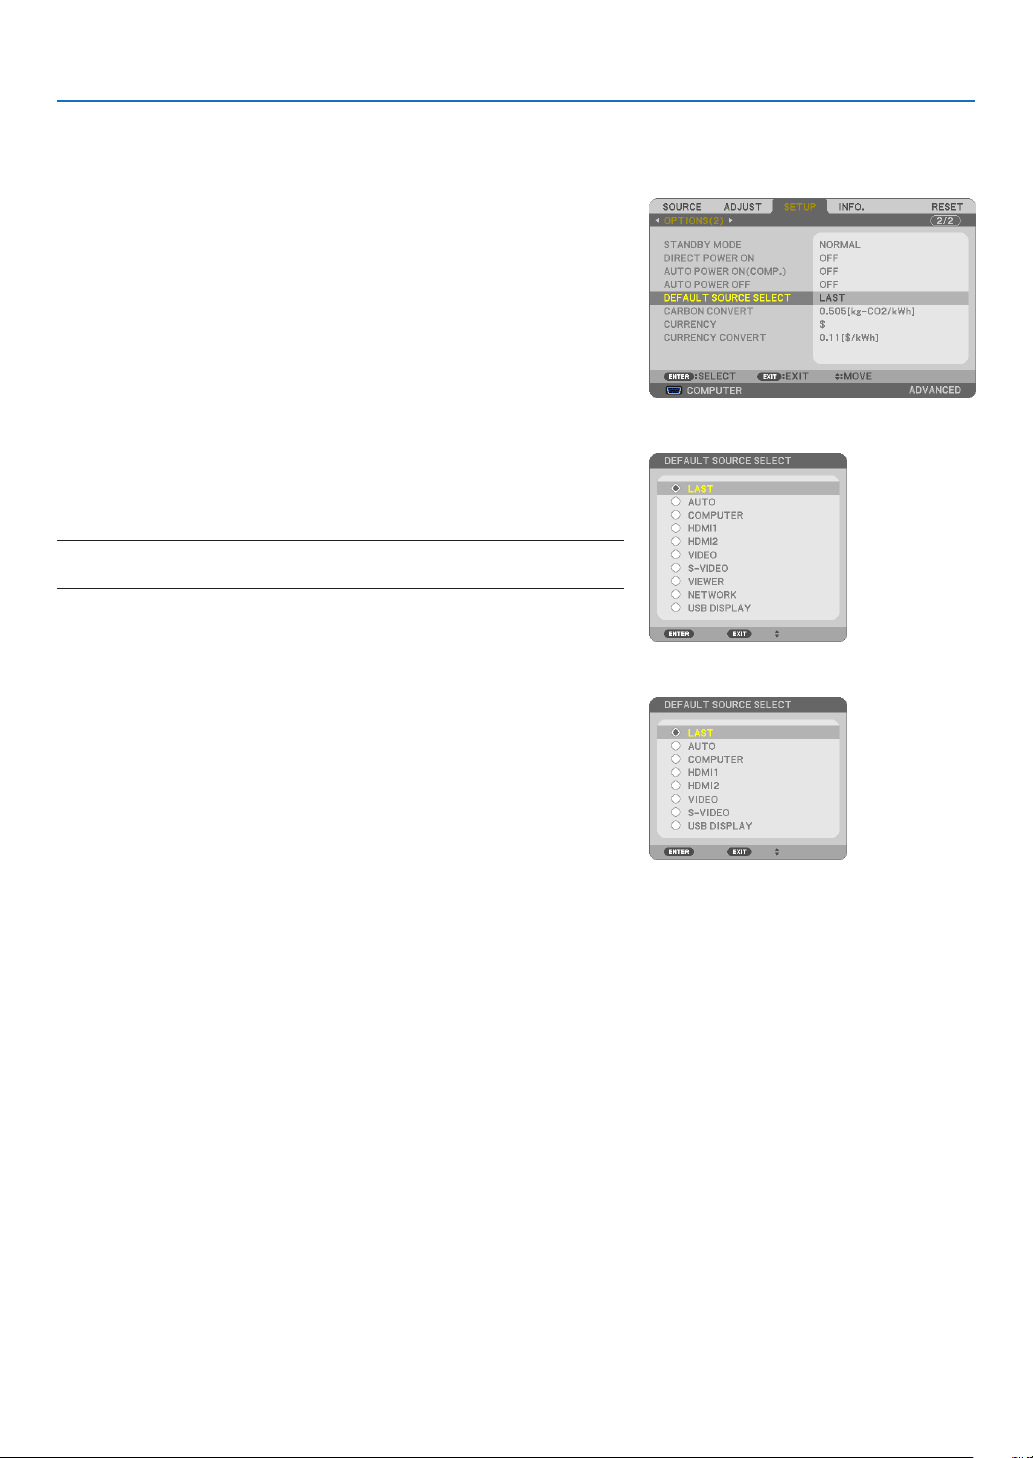
SelectingDefaultSource
Youcansetasourceasthedefaultsourcesothatitwillbedisplayed
eachtimetheprojectoristurnedon.
1. Press the MENU button.
The menu will be displayed.
2. Press the
▶buttontwicetoselect[SETUP]andpressthe▼ but-
tonortheENTERbuttontoselect[GENERAL].
3.
Press the
▶
buttonfourtimestoselect[OPTIONS(2)].
4. Press the ▼buttonvetimestoselect[DEFAULTSOURCESE-
LECT]andpresstheENTERbutton.
The [DEFAULT SOURCE SELECT] screen will be displayed.
(
page 111)
5.
Selectasourceasthedefaultsource,andpresstheENTERbutton.
6.PresstheEXITbuttonafewtimestoclosethemenu.
7. Restart the projector.
The source you selected in step 5 will be projected.
NOTE:Evenwhen[AUTO]isturnedon,the[NETWORK]willnotbeautomatically
selected.Tosetyournetworkasthedefaultsource,select[NETWORK].
TIP:
•WhentheprojectorisinStandbymode,applyingacomputersignalfroma
computerconnectedtotheCOMPUTERINinputwillpowerontheprojector
andsimultaneouslyprojectthecomputer’simage.
([AUTOPOWERON(COMP.)]page111)
•OnWindows7,acombinationoftheWindowsandPkeysallowsyoutosetup
externaldisplayeasilyandquickly.
[P501X/P451X/P451W/P401W]
[PE501X]
19
2. Projecting an Image (Basic Operation)
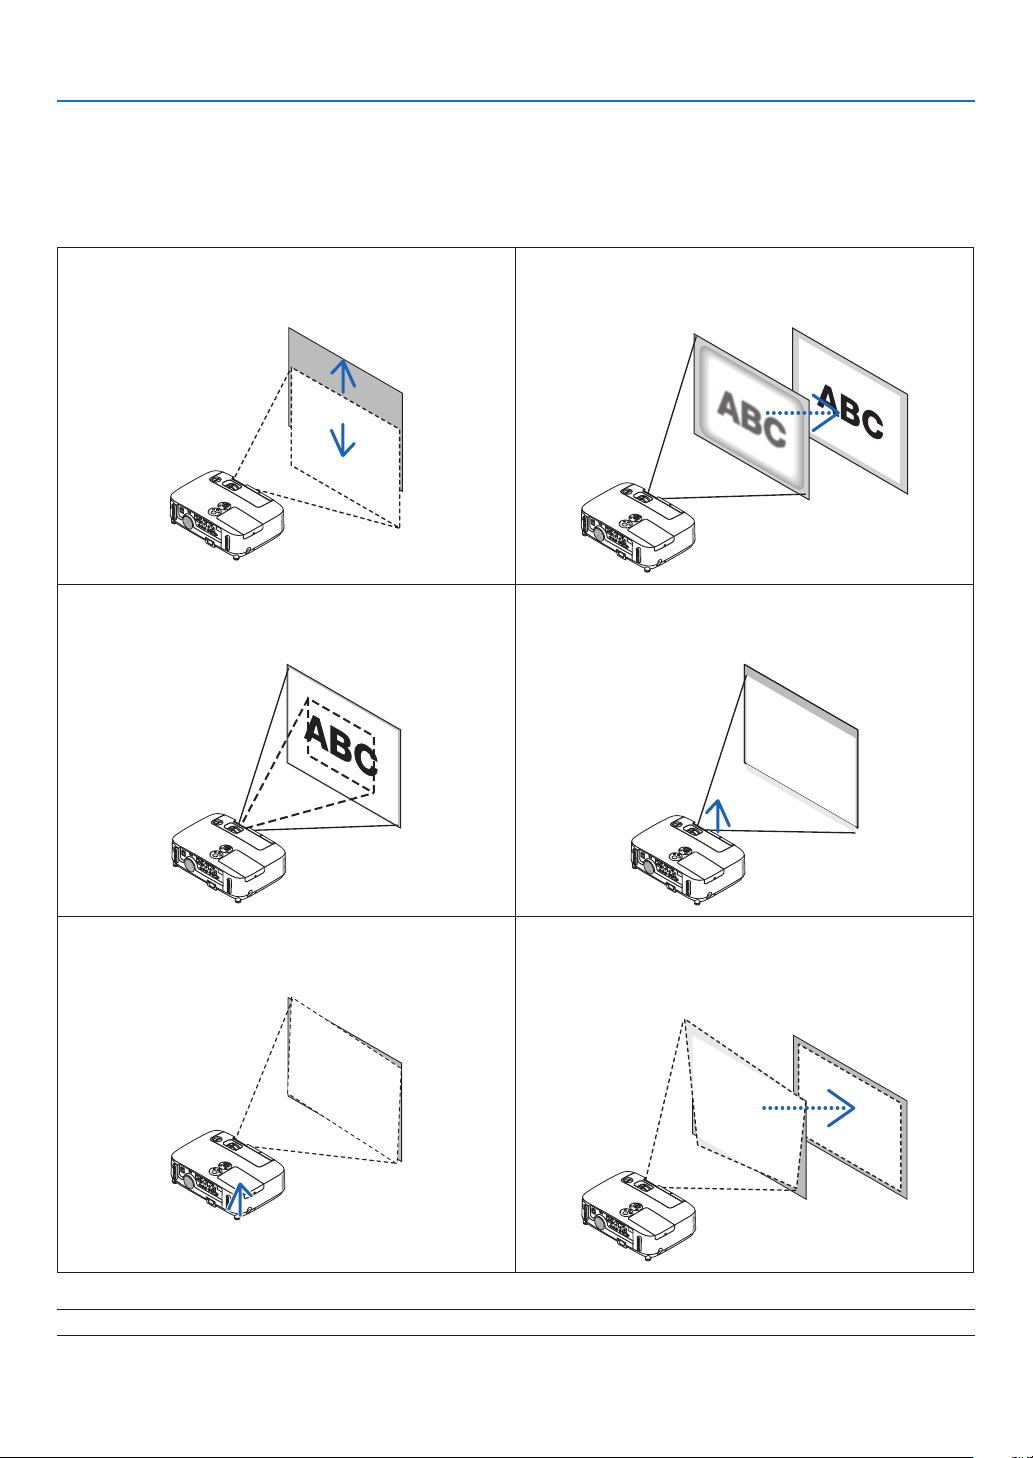
❺ Adjusting the Picture Size and Position
Usethelensshiftdial,theadjustabletiltfootlever,thezoomleverandthefocuslevertoadjustthepicturesizeand
position.
Inthischapterdrawingsandcablesareomittedforclarity.
Adjustingtheverticalpositionofaprojectedimage
[Lensshift]
(page20)
Adjustingthefocus
[Focuslever]
(page21)
Finelyadjustingthesizeofanimage
[Zoomlever]
(page22)
Adjustingthethrowangle(theheightofanimage)
[Tiltfoot]*¹
(page23)
Adjustingtheleftandrighttiltofanimage
[Rearfoot]
(page23)
Adjustingtheverticalandhorizontalkeystonecorrec-
tion
[Keystone]
(page24)
NOTE*1:Adjustthethrowangle(theheightofanimage)whentheimagepositionishigherthanthelensshiftadjustablerange.
20
2. Projecting an Image (Basic Operation)
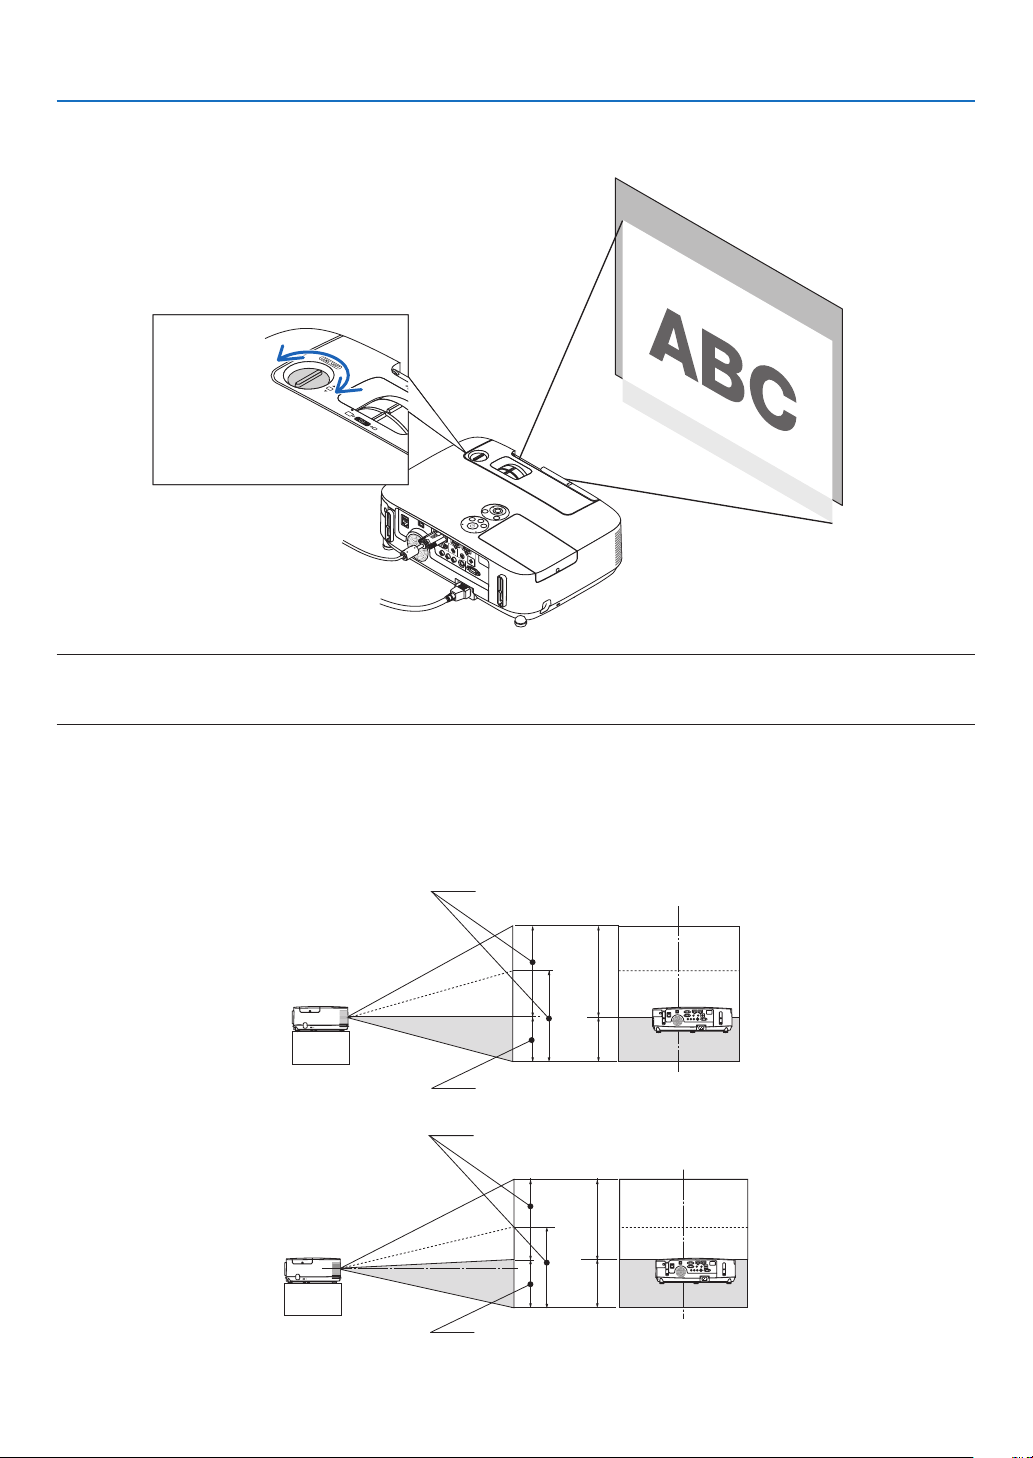
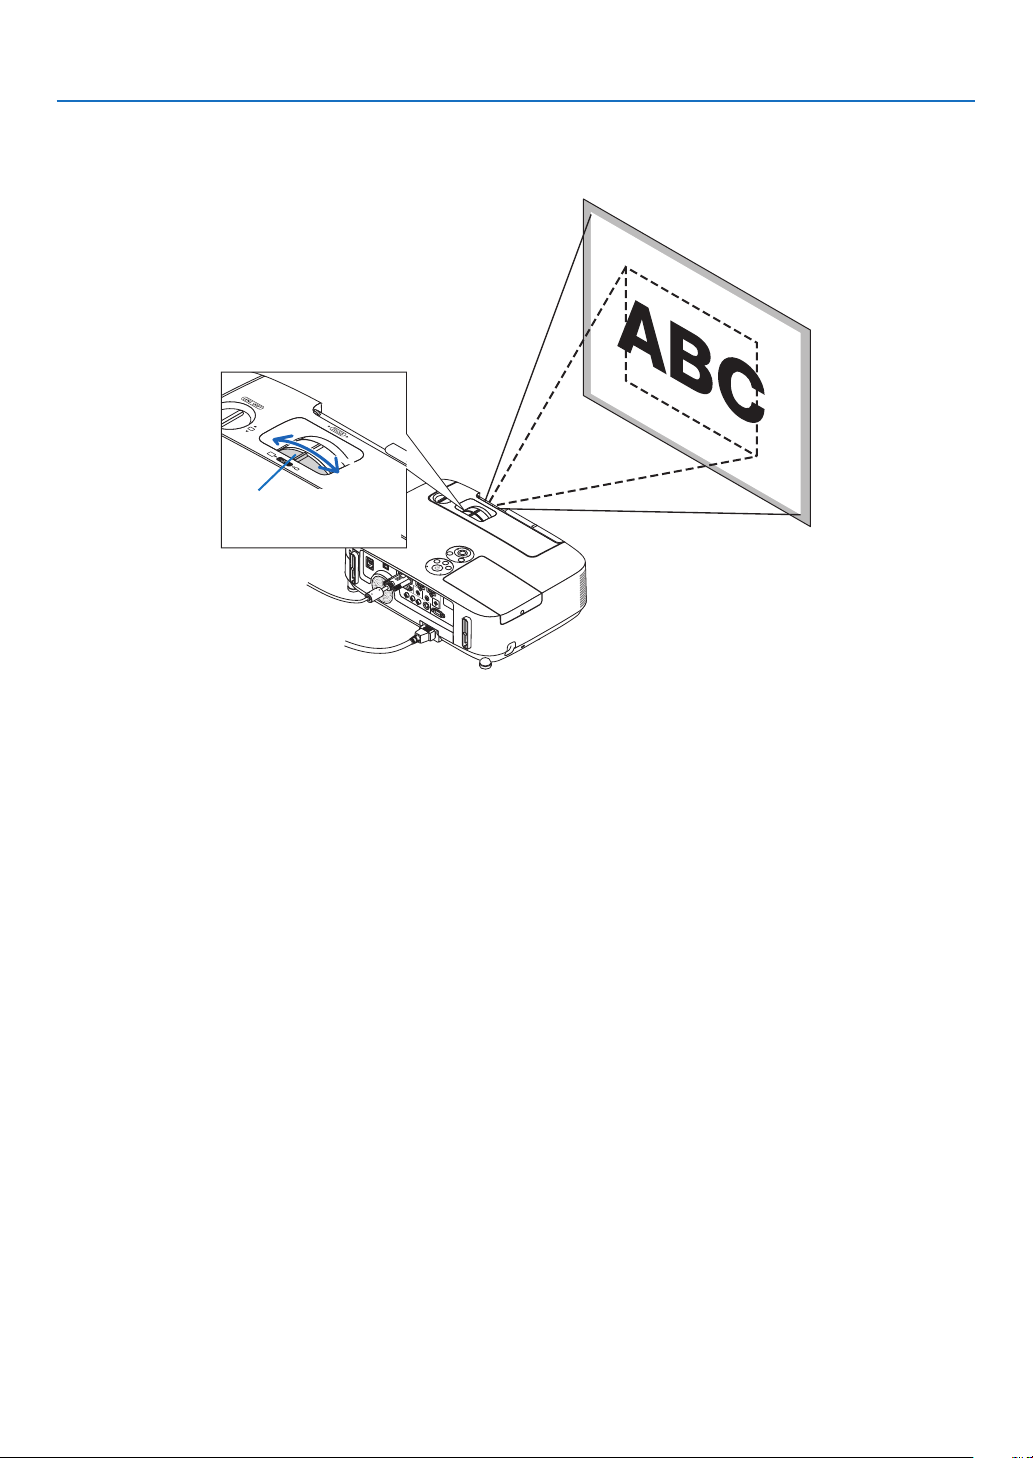
Adjusting the vertical position of a projected image (Lens shift)
Rotatethelensshiftdial.
Downward
Upward
Lens shift dial
NOTE:
Thelensshiftdialcannotberotatedbeyondthemaximumupwardordownwardshift.Forciblyrotatingmaycausedamagetothe
projector.
TIP:
Lensshiftcanbeadjustedwiththerangebelow.Ifyouwishtomoveuptheimagehigherthanthislimit,usethetiltfootofthe
projector.
Desktopfrontprojection
[P501X/P451X/PE501X]
[P451W/P401W]
Height of projected image
Height of projected image
Vertical shift range (0 to 0.5V)
Vertical shift range (0 to 0.6V)
21
2. Projecting an Image (Basic Operation)
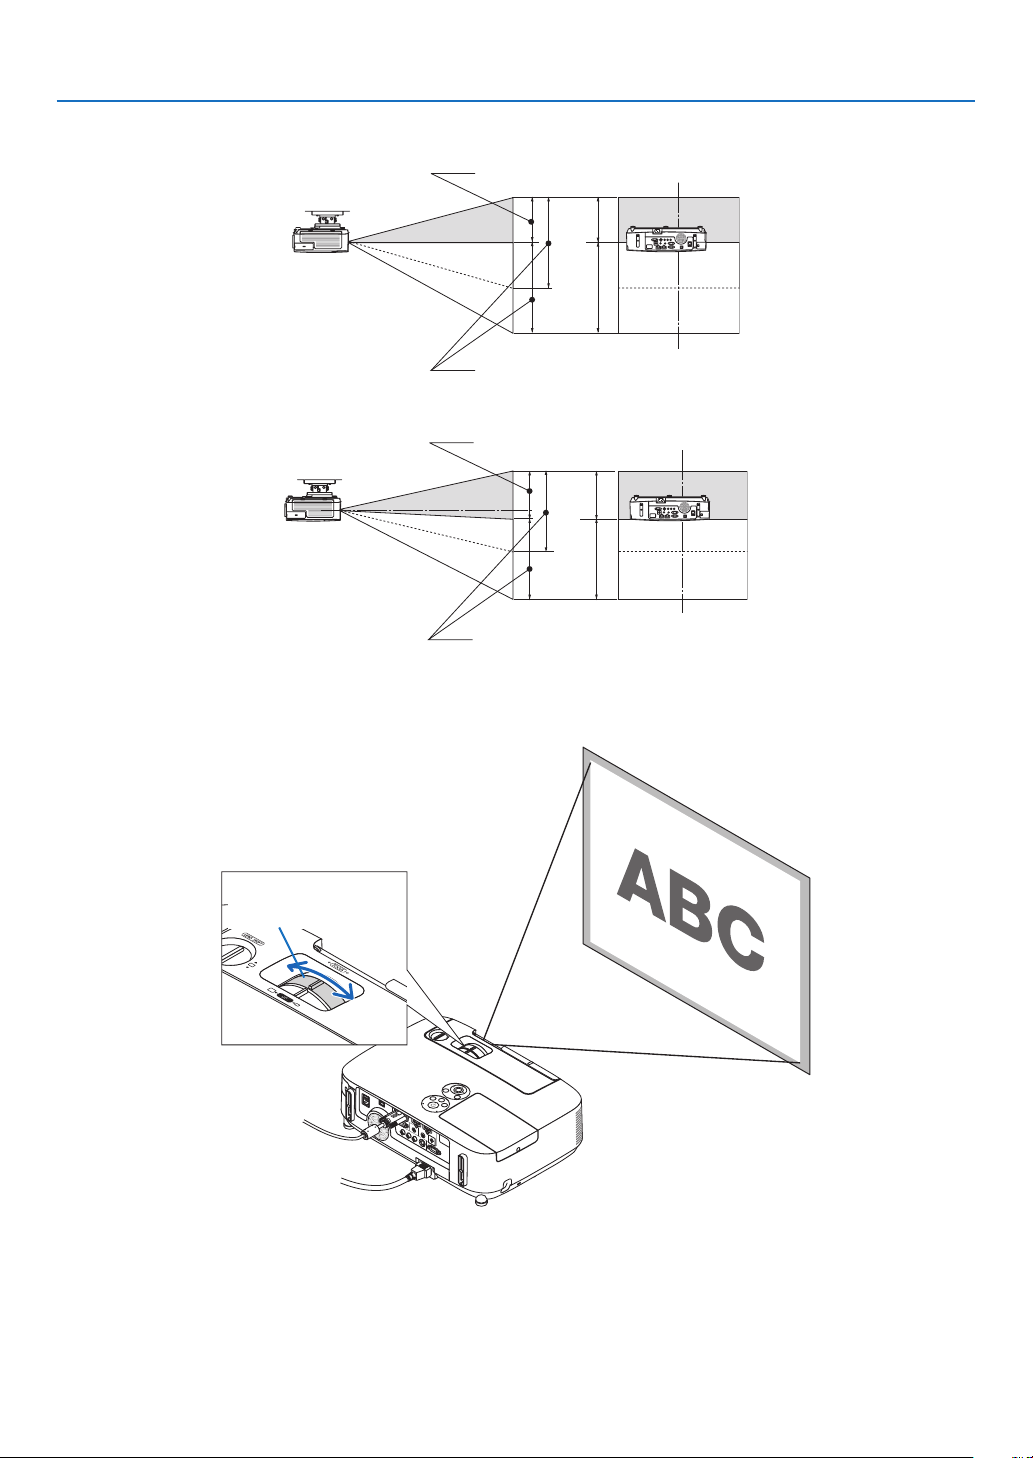
Ceilingfrontprojection
[P501X/P451X/PE501X]
[P451W/P401W]
Focus
UsetheFOCUSlevertoobtainthebestfocus.
Focus Lever
Height of projected
image
Height of projected
image
Vertical shift range (0 to 0.5V)
Vertical shift range (0 to 0.6V)
22
2. Projecting an Image (Basic Operation)
Zoom
UsetheZOOMlevertoadjusttheimagesizeonthescreen.
Zoom Lever
23
2. Projecting an Image (Basic Operation)
2
1
3
Adjustable Tilt Foot
Adjustable Tilt
Foot Lever
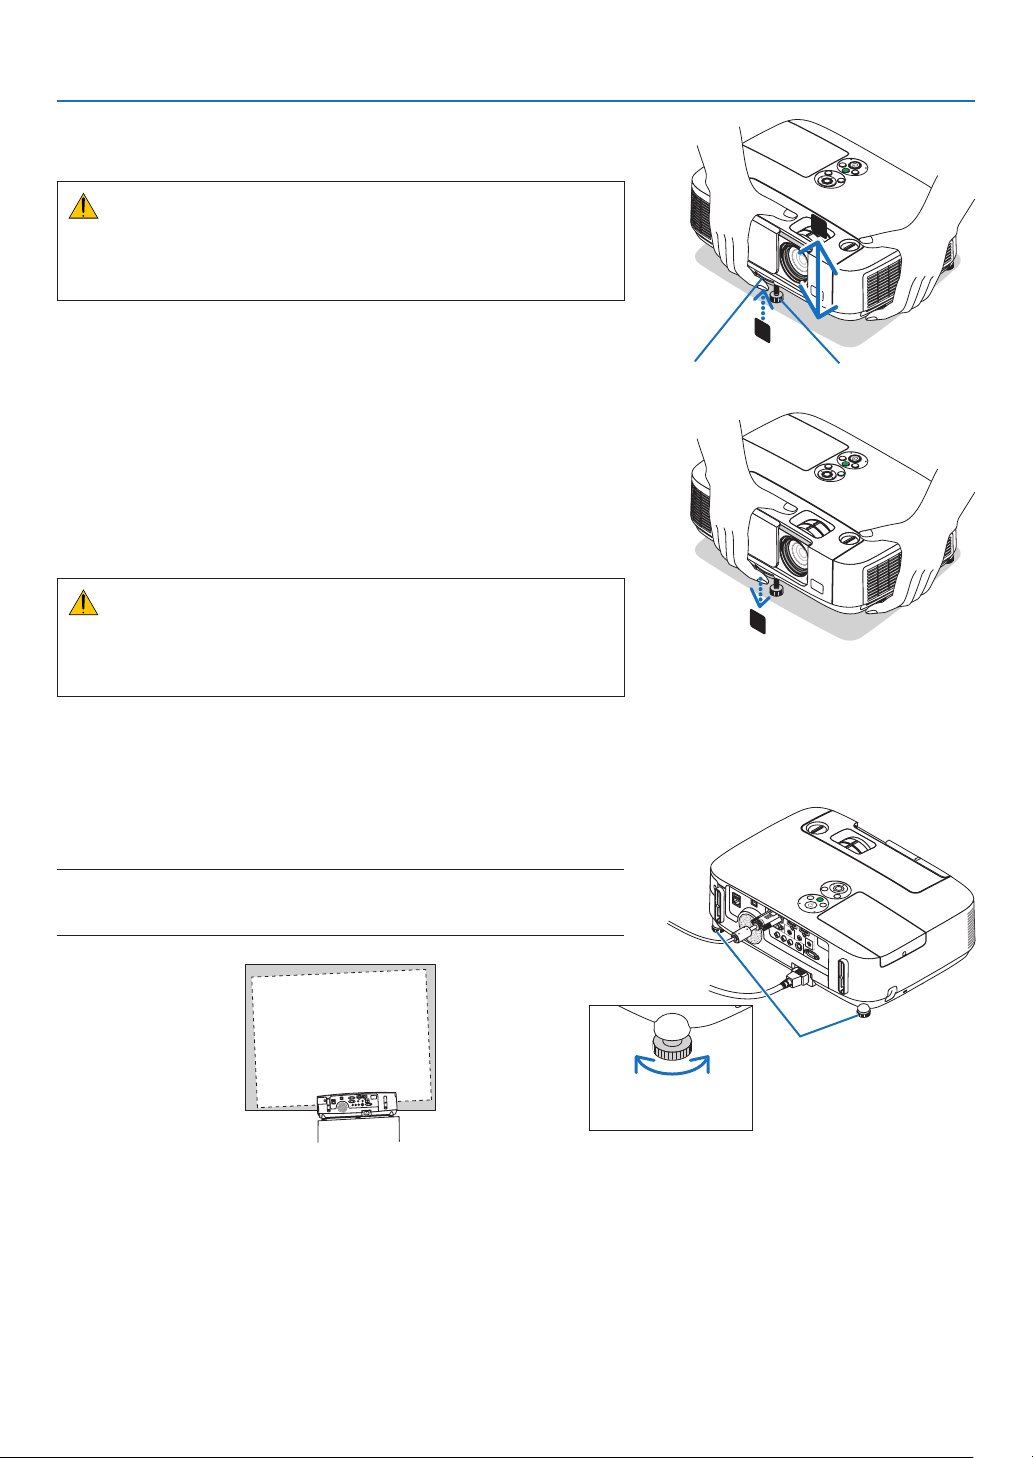
Adjust the Tilt Foot
1.Liftthefrontedgeoftheprojector.
CAUTION:
DonottrytotouchtheventilationoutletduringTiltFootadjustment
asitcanbecomeheatedwhiletheprojectoristurnedonandafterit
isturnedoff.
2.PushupandholdtheAdjustableTiltFootLeveronthefrontof
theprojectortoextendtheadjustabletiltfoot.
3.Lowerthefrontoftheprojectortothedesiredheight.
4.ReleasetheAdjustableTiltFootLevertolocktheAdjustabletilt
foot.
Thetiltfootcanbeextendedupto1.6inch/40mm.
There is approximately 10 degrees (up) of adjustment for the front of
the projector.
Rotate the rear foot to the desired height in order to square the image
on the projection surface.
CAUTION:
•Donotusethetilt-footforpurposesotherthanoriginallyintended.
Misusessuchasusingthetiltfoottocarryorhang(fromthewallor
ceiling)theprojectorcancausedamagetotheprojector.
Adjustingtheleftandrighttiltofanimage[Rearfoot]
•Rotatetherearfoot.
Therearfootcanbeextendedupto0.5inch/12mm.Rotatingtherear
foot allows the projector to be placed horizontally.
NOTE:
•Donotextendtherearfootbeyonditsheightlimit(0.5inch/12mm).Doingso
maycausetherearfoottocomeoutoftheprojector.
Rear foot
Up Down
24
2. Projecting an Image (Basic Operation)
❻ Correcting Keystone Distortion [KEYSTONE]
Whentheprojectorisnotexactlyperpendiculartothescreen,keystonedistortionoccurs.Toovercomeit,youcanuse
the“Keystone”function,adigitaltechnologythatcanadjustforkeystone-typedistortion,resultinginacrisp,square
image.
Thefollowingprocedureexplainshowtousethe[KEYSTONE]screenfromthemenutocorrecttrapezoidaldistor-
tions.
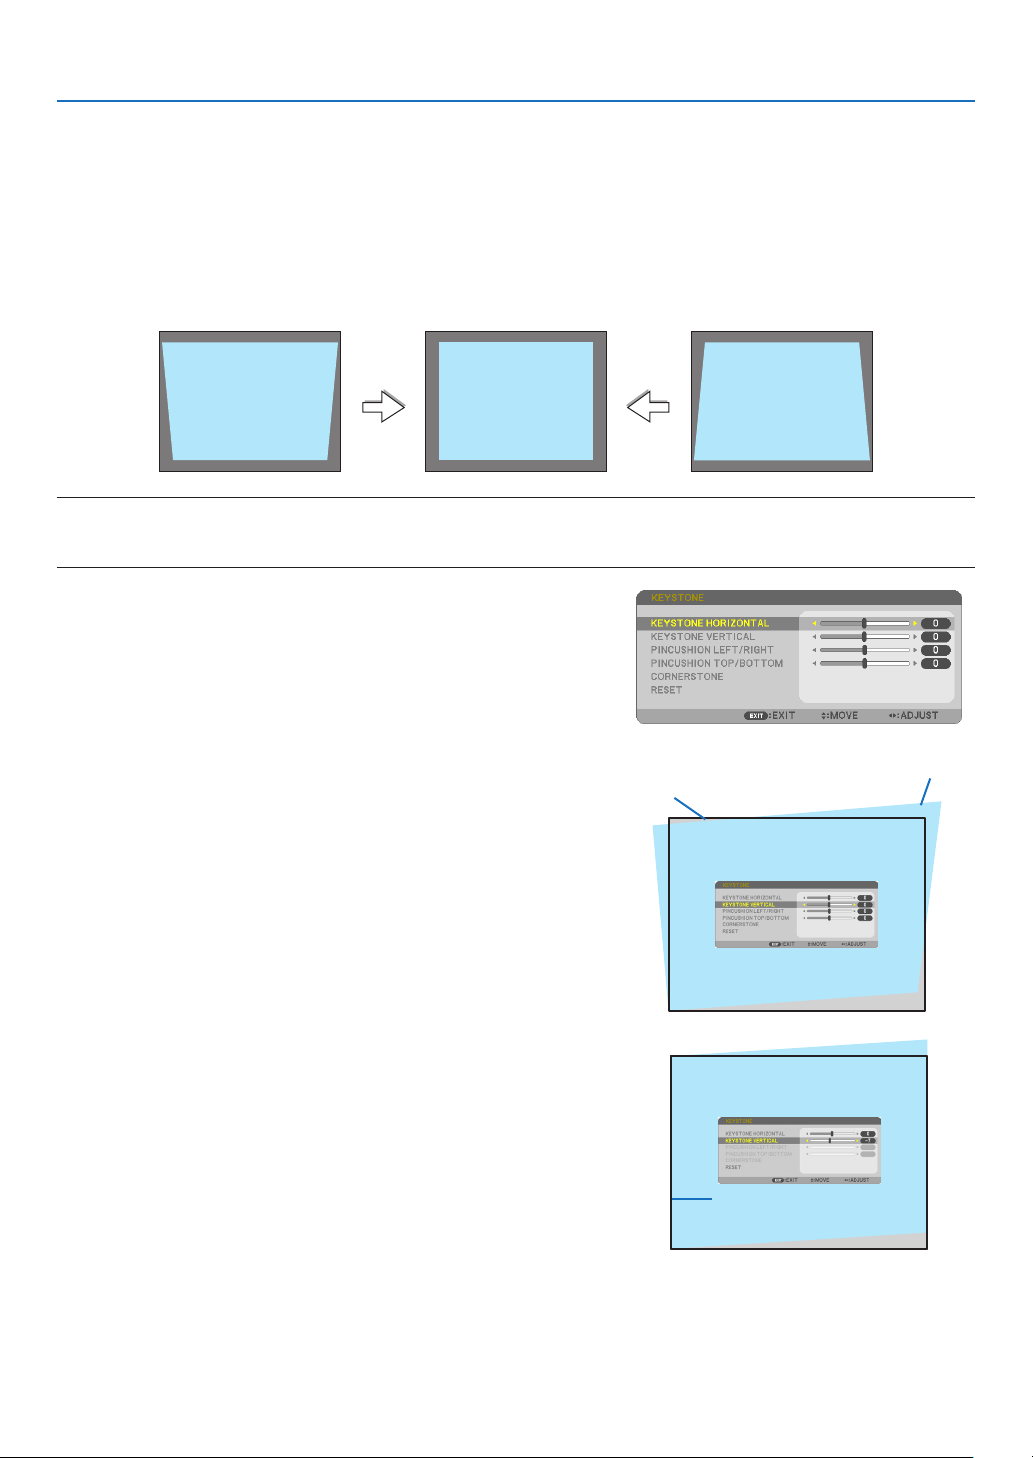
Whentheprojectorisplaceddiagonallytothescreen,
Whentheprojectorissetupatanangleinrelationtothescreen,adjusttheHorizontaloptionoftheKeystonemenu
sothatthetopandbottomofsidesoftheprojectedimageareparallel.
NOTE:
•Beforeperformingthehorizontalkeystonecorrection,setthelensshifttothepositionof0.5V(P501X/P451X/PE501X)/0.6V
(P451W/P401W).
1. Press the ▼ button on the projector cabinet.
The Keystone screen will be displayed on the screen.
•PresstheKEYSTONEbuttonwhenusingtheremotecontrol.
•SeepageforPINCUSHION.
•SeepageforCORNERSTONE.
•SeepageforRESET.
2. Press the ▼buttontoselect[VERTICAL]andthenusethe◀ or ▶
sothattheleftandrightsidesoftheprojectedimageareparal-
lel.
*Adjusttheverticalkeystonedistortion.
Projected area
Screen frame
3.Aligntheleft(orright)sideofthescreenwiththeleft(orright)
sideoftheprojectedimage.
•Usetheshortersideoftheprojectedimageasthebase.
•Intherightexample,usetheleftsideasthebase.
Align left side
25
2. Projecting an Image (Basic Operation)
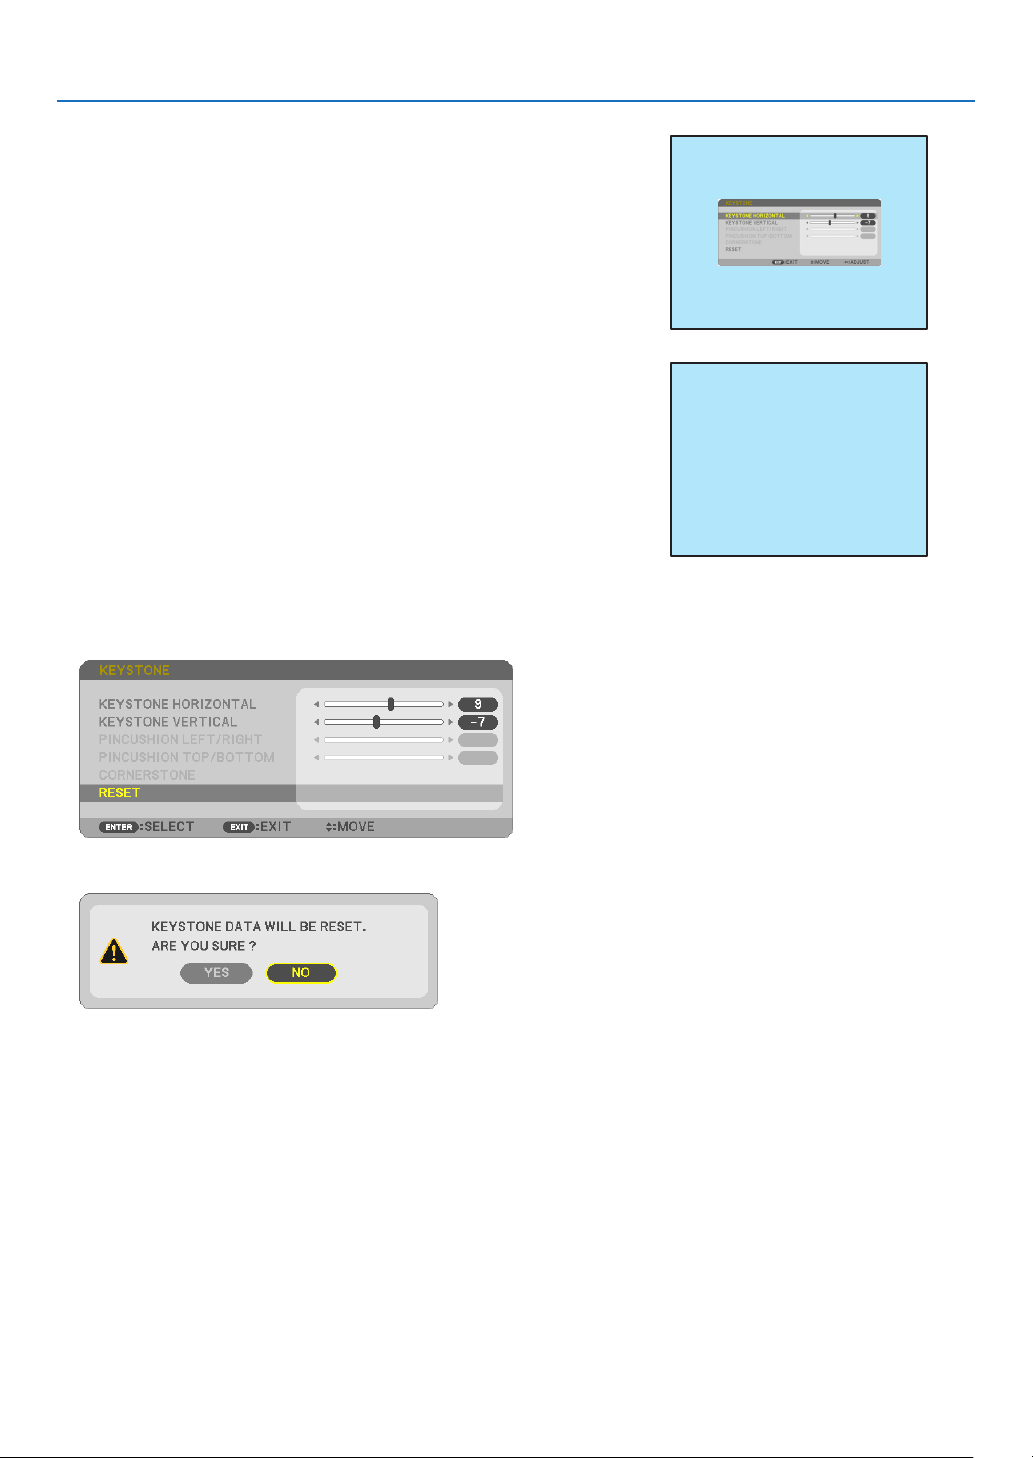
4. Press the ▲buttontoselect[HORIZONTAL]andthenusethe◀
or
▶
sothatthetopandbottomsidesoftheprojectedimageare
parallel.
•Adjustthehorizontalkeystonedistortion.
5.Repeatsteps2and4tocorrectkeystonedistortion.
6.AftercompletingKeystonecorrection,presstheEXITbutton.
The Keystone screen will disappear.
•ToperformKeystonecorrectionagain,pressthe▼ button to display
the Keystone screen and repeat above steps 1 to 6.
Toreturnthekeystoneadjustmentstodefault:
1. Press the ▼buttontoselect[RESET]andpresstheENTERbutton.
2. Press the ◀ or ▶buttontoselect[YES]andpresstheENTERbutton.
The adjustments will be reset.
All the adjustments for all the five items will be reset at the same time.
•TheKEYSTONEfeaturecancauseanimagetobeslightlyblurredbecausethecorrectionismadeelectroni-
cally.

26
2. Projecting an Image (Basic Operation)
❼ Optimizing Computer Signal Automatically
Adjusting the Image Using Auto Adjust
Optimizingacomputerimageautomatically.(COMPUTER)
PresstheAUTOADJ.buttontooptimizeacomputerimageautomatically.
Thisadjustmentmaybenecessarywhenyouconnectyourcomputerforthersttime.
[Poor picture]
[Normal picture]
NOTE:
Somesignalsmaytaketimetodisplayormaynotbedisplayedcorrectly.
•IftheAutoAdjustoperationcannotoptimizethecomputersignal,trytoadjust[HORIZONTAL],[VERTICAL],[CLOCK],and[PHASE]
manually.(page96,97)
❽ Turning Up or Down Volume
Soundlevelfromthespeakercanbeadjusted.
TIP:Whennomenusappear,the◀and▶buttonsontheprojectorcabinetwork
asavolumecontrol.
NOTE:
•Volumecontrolisnotavailablewiththe◀or▶buttonwhenanimageisenlarged
byusingtheD-ZOOM(+)buttonorwhenthemenuisdisplayed.
•Volumecontrolisnotavailablewiththe◀or▶buttonwhenVIEWERis
used.
TIP:
•The[BEEP]soundvolumecannotbeadjusted.Toturnoffthe[BEEP]sound,
fromthemenu,select[SETUP][OPTIONS(1)][BEEP][OFF].
•Volumecanbecontrolledfromthemenu([ADJUST][AUDIO])
Increasevolume
Decrease volume
27
2. Projecting an Image (Basic Operation)
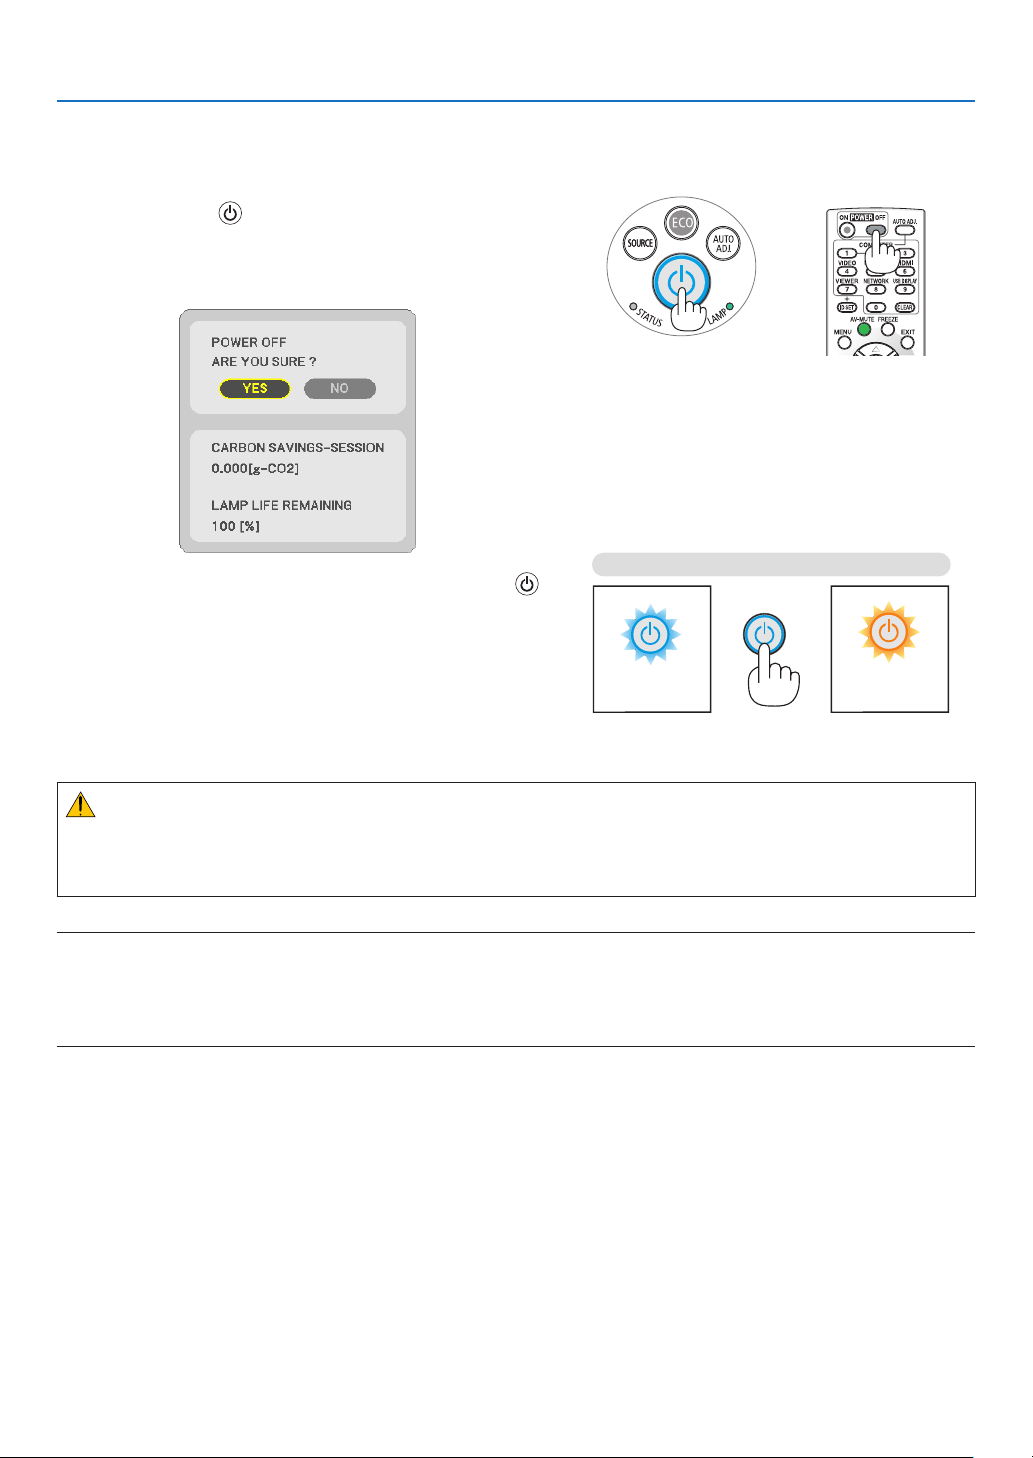
❾ Turning off the Projector
Toturnofftheprojector:
1. First, press the (POWER) button on the projector
cabinet or the POWER OFF button on the remote con-
trol.
The confirmation message will be displayed.
2.Secondly,presstheENTERbuttonorpressthe
(POWER)orthePOWEROFFbuttonagain.
The lamp will turn off and the projector will go into standby
mode. When in standby mode, the POWER indicator will
light orange and the STATUS indicator will light green when
[NORMAL] is selected for [STANDBY MODE].
PowerOn
Steady blue light
Standby
Steady
orange light
CAUTION:
PartsoftheprojectormaybecometemporarilyheatediftheprojectoristurnedoffwiththePOWERbuttonorifthe
ACpowersupplyisdisconnectedduringnormalprojectoroperation.
Usecautionwhenpickinguptheprojector.
NOTE:
•Whilethepowerindicatorisblinkingblueinshortcycles,thepowercannotbeturnedoff.
•Youcannotturnoffthepowerfor60secondsimmediatelyafterturningitonanddisplayinganimage.
•DonotdisconnecttheACpowersupplytotheprojectorwithin10secondsofmakingadjustmentorsettingchangesandclosing
themenu.Doingsocancauselossofadjustmentsandsettings.

28
2. Projecting an Image (Basic Operation)
❿ After Use
Preparation:Makesurethattheprojectoristurnedoff.
1.Unplugthepowercord.
2. Disconnect any other cables.
•RemovetheUSBmemoryifitisinsertedintotheprojector.
3.Retractadjustabletiltfootifextended.
4.Slidethelenscovertotherighttocoverthelens.
29
❶ Turning off the Image and Sound
PresstheAV-MUTEbuttontoturnofftheimageandsoundforashortperiodoftime.
Pressagaintorestoretheimageandsound.
Theprojector’spower-savingfunctionwillwork10secondsaftertheimageisturned
off.
Asaresult,thelamppowerwillbereduced.
NOTE:
•Eventhoughtheimageisturnedoff,themenustillremainsonthescreen.
•SoundfromtheAUDIOOUTjack(Stereomini)canbeturnedoff.
•Evenwhenthepower-savingfunctionworks,thelamppowermayberestoredtoitsoriginal
leveltemporarily.
•Torestoretheimage,evenifyoupresstheAV-MUTEbuttonimmediatelyafterthestartofthe
power-savingfunction,thelampbrightnessmaynotberestoredtoitsoriginallevel.
❷ Freezing a Picture
PresstheFREEZEbuttontofreezeapicture.Pressagaintoresumemotion.
NOTE:
•Theimageisfrozenbuttheoriginalvideoisstillplayingback.
•WithImageExpressUtilityincludingUSBDisplay,pressingtheFREEZEbuttonwilleliminate
soundtemporarilyduringdisplayoffreezedimage.
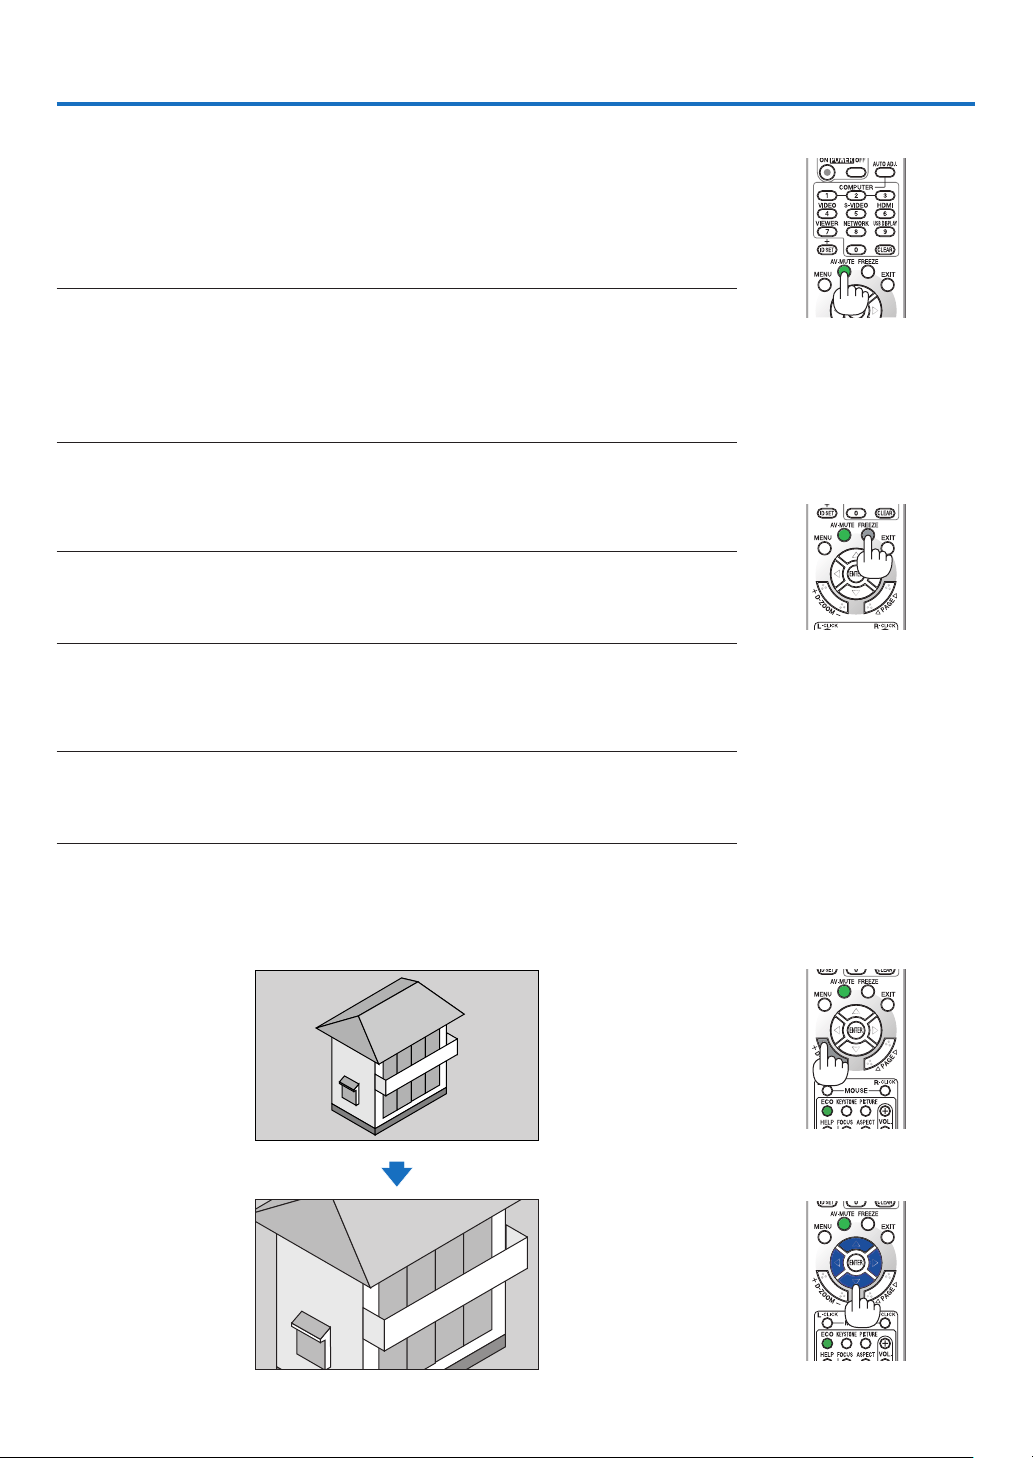
❸ Enlarging a Picture
Youcanenlargethepictureuptofourtimes.
NOTE:
•Dependingontheinputsignal,themaximummagnicationmaybelessthanfourtimes,orthis
featureisnotavailable.
•ThisfeatureisnotavailablewithUSBDisplay.
Todoso:
1.PresstheD-ZOOM(+)buttontomagnifythepicture.
To move the magnified image, use the ▲,▼,◀ or ▶ button.
3. Convenient Features
30
3. Convenient Features
❹ Changing Eco Mode/Checking Energy-Saving Effect
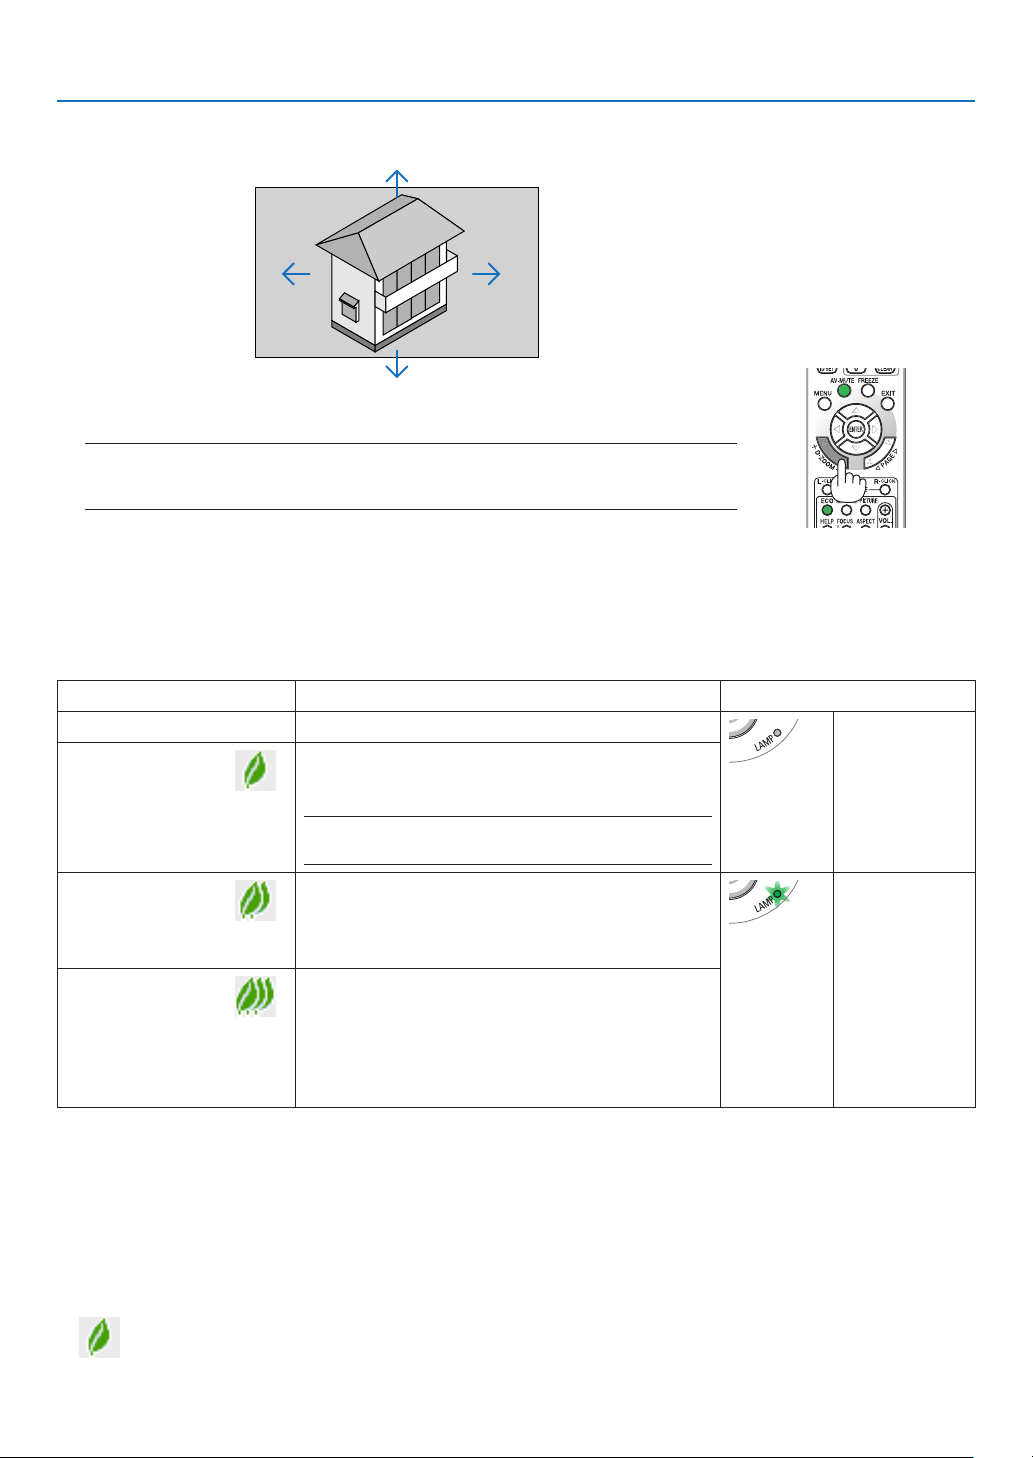
Using Eco Mode [ECO MODE]
TheECOMODE(NORMALandECO)increaseslamplife,whileloweringpowerconsumptionandcuttingdownon
CO
2
emissions.
Fourbrightnessmodesofthelampcanbeselected:[OFF],[AUTOECO],[NORMAL]and[ECO]modes.
[ECOMODE]DescriptionStatusofLAMPindicator
[OFF]Thelampbrightnessis100%.
Off
[AUTOECO]
Lamppowerconsumptionwillbechangedbetween
[OFF]and[NORMAL]automaticallyaccordingto
picturelevel
NOTE:Abrightgradationmaybelessvisibledepending
ontheimage.
[NORMAL]
Lamppowerconsumption.(approx.80%brightness
onP501X/P451W/PE501Xandapprox.83%on
P451X/P401W)Thelamplifewillextendbylowering
thelamppower.
SteadyGreen
light
[ECO]
Lamppowerconsumption.(approx.60%brightness
onP501X/P451W/PE501Xandapprox.67%on
P451X/P401W)Thelamplifewillextendlongerthan
theoneonNORMALmodebycontrollingpowerap-
propriateforthelamp.Themaximumpowerbecomes
equivalenttothepowerinNORMAL.
Toturnonthe[ECOMODE],dothefollowing:
1.PresstheECOButtonontheremotecontroltodisplay[ECOMODE]screen.
2.PresstheECObuttonagaintoselectamodeyouwish.
•EachtimetheECObuttonispressed,thechoiceswillbechanged:
OFF AUTO ECO NORMAL ECO OFF
TIP:
•TheleafsymbolatthebottomofthemenushowsthecurrentselectionofECOmode.
2. Press the ▲▼◀▶ button.
The area of the magnified image will be moved
3.PresstheD-ZOOM(−)button.
Each time the D-ZOOM (−) button is pressed, the image is reduced.
NOTE:
•Theimagewillbeenlargedorreducedatthecenterofthescreen.
•Displayingthemenuwillcancelthecurrentmagnication.
31
3. Convenient Features
NOTE:
•The[ECOMODE]canbechangedbyusingthemenu.
Select[SETUP][GENERAL][ECOMODE].
•Thelampliferemainingandlamphoursusedcanbecheckedin[USAGETIME].Select[INFO.][USAGETIME].
•Theprojectorisalwaysin[NORMAL]for90secondsafterthelampisturnedonandwhilethePOWERindicatorisblinkinggreen.
Thelampconditionwillnotbeaffectedevenwhen[ECOMODE]ischanged.
•Afteralapseof1minutefromwhentheprojectordisplaysno-signalguidance,ablue,blackorlogoscreen,[ECOMODE]will
automaticallyswitchto[ECO].
•Iftheprojectorisoverheatedin[OFF]mode,theremaybeacasewherethe[ECOMODE]automaticallychangesto[NORMAL]
modetoprotecttheprojector.Whentheprojectorisin[NORMAL]mode,thepicturebrightnessdecreases.Whentheprojector
comesbacktonormaltemperature,the[ECOMODE]returnsto[OFF]mode.
Thermometersymbol[]indicatesthe[ECOMODE]isautomaticallysetto[NORMAL]modebecausetheinternaltemperature
istoohigh.
•Immediatelyafter[ECOMODE]ischangedfrom[ECO]tooneof[OFF],[AUTOECO],or[NORMAL],thelampbrightnessmay
decreasetemporarily.Thisisnotamalfunction.
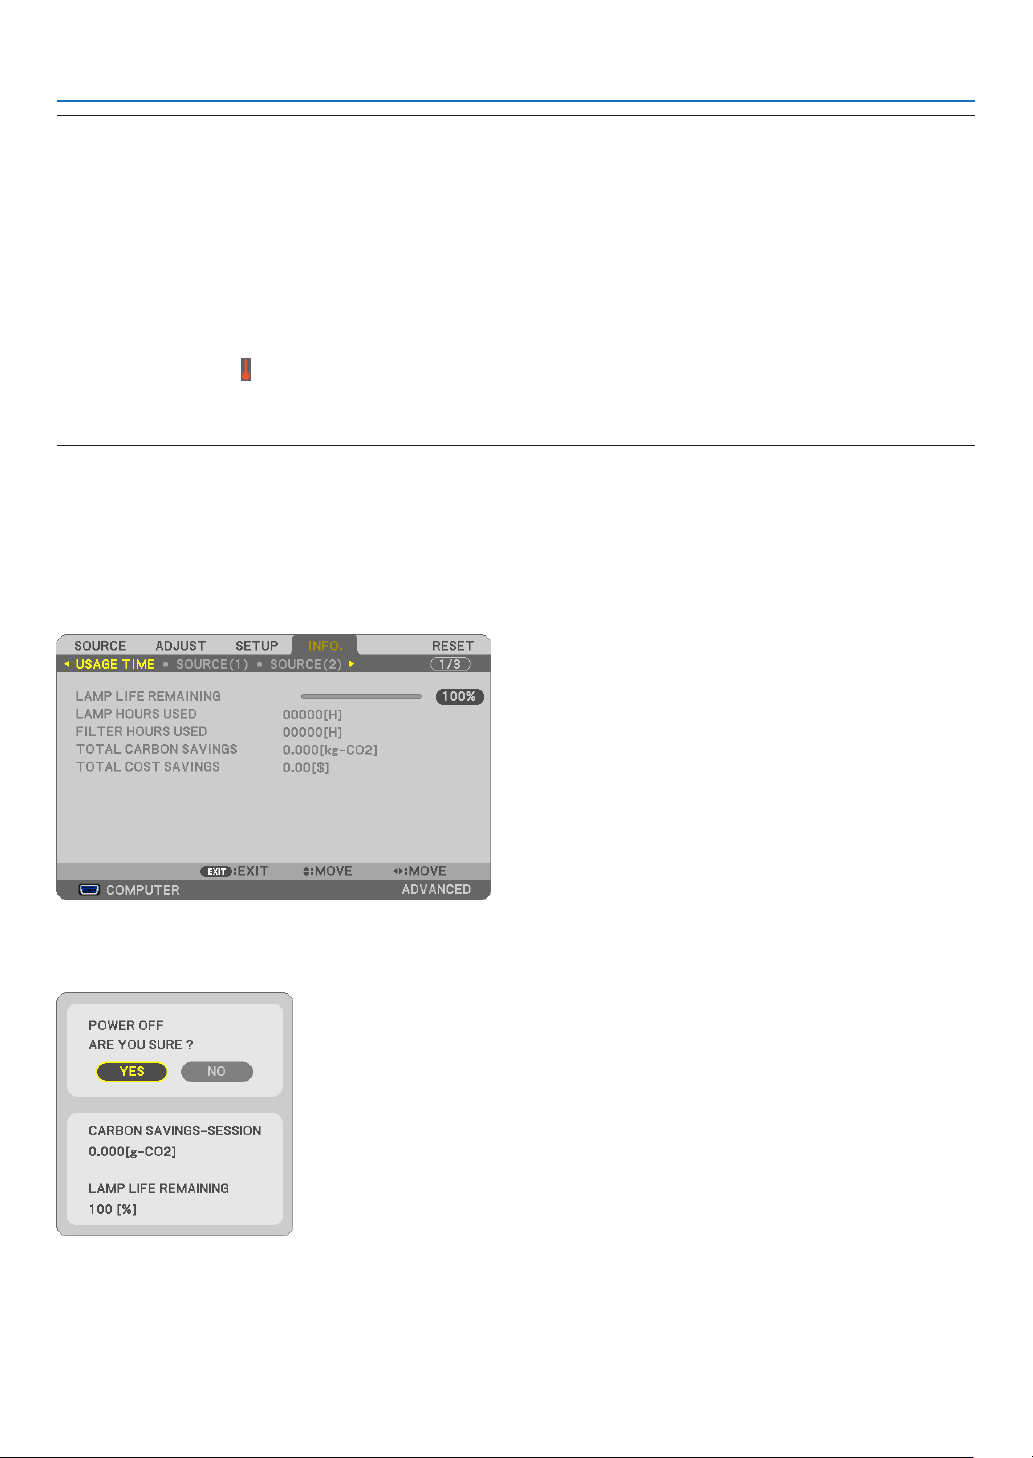
Checking Energy-Saving Effect [CARBON METER]
Thisfeaturewillshowenergy-savingeffectintermsofCO
2
emissionreduction(kg)whentheprojector’s[ECOMODE]
issetto[AUTOECO],[NORMAL],or[ECO].Thisfeatureiscalledas[CARBONMETER].
Therearetwomessages:[TOTALCARBONSAVINGS]and[CARBONSAVINGS-SESSION].The[TOTALCARBON
SAVINGS]messageshowsthetotalamountofCO
2
emissionreductionfromthetimeofshipmentuptonow.Youcan
checktheinformationon[USAGETIME]from[INFO.]ofthemenu.(page
113)
The[CARBONSAVINGS-SESSION]messageshowstheamountofCO
2
emissionreductionbetweenthetimeof
changingtoECOMODEimmediatelyafterthetimeofpower-onandthetimeofpower-off.The[CARBONSAVINGS-
SESSION]messagewillbedisplayedinthe[POWEROFF/AREYOUSURE?]messageatthetimeofpower-off.

32
3. Convenient Features
TIP:
•TheformulaasshownbelowisusedtocalculatetheamountofCO
2
emissionreduction.
AmountofCO
2
emissionreduction=(PowerconsumptioninOFFforECOMODE−PowerconsumptioninAUTOECO/NORMAL/
ECOforECOMODE)×CO
2
conversionfactor.*WhentheimageisturnedoffwiththeAV-MUTEbuttonorwiththelenscover
closed,theamountofCO
2
emmissionreductionwillalsoincrease.
*CalculationforamountofCO
2
emissionreductionisbasedonanOECDpublication“CO
2
EmissionsfromFuelCombustion,2008
Edition”.
•The[TOTALCARBONSAVINGS]iscalculatedbasedonsavingsrecordedin15minutesintervals.
•Thisformulawillnotapplytothepowerconsumptionwhichisnotaffectedbywhether[ECOMODE]isturnedonoroff.
•Thefactorsfor[TOTALCOSTSAVINGS]canbechangedfromthemenu([CARBONCONVERT]and[CURRENCYCONVERT]).(
page112)
•Thecurrencyunitfor[TOTALCOSTSAVINGS]canbechangedfromthemenu([CURRENCY]).(page112)
33
3. Convenient Features
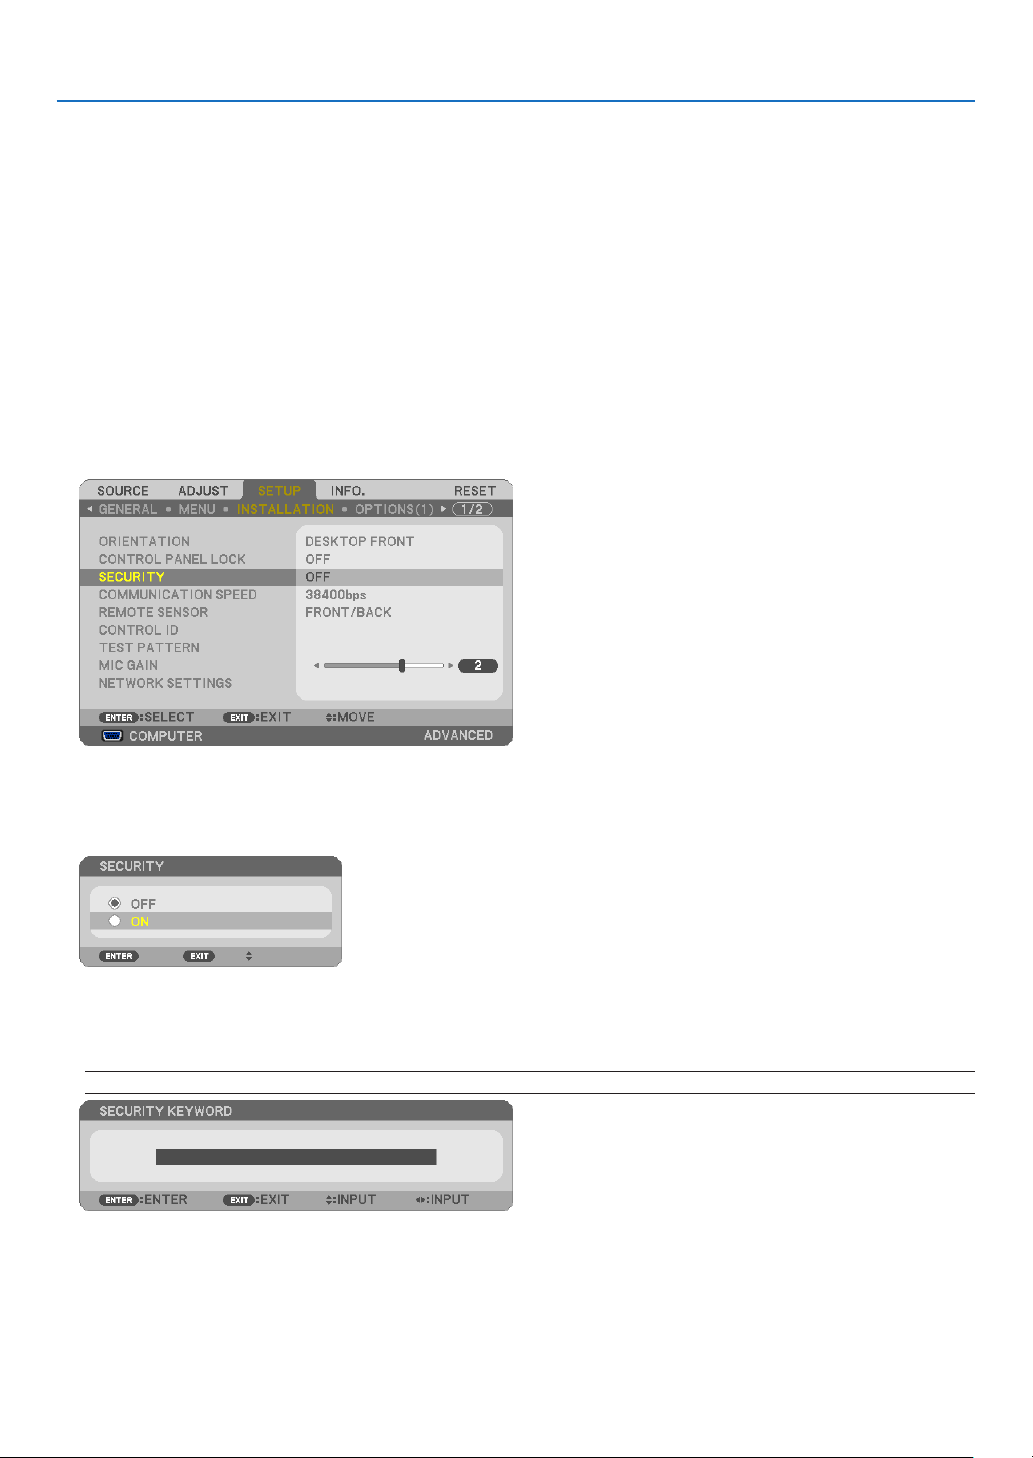
❺
Preventing the Unauthorized Use of the Projector [SECURITY]
AkeywordcanbesetforyourprojectorusingtheMenutoavoidoperationbyanunauthorizeduser.Whenakeyword
isset,turningontheprojectorwilldisplaytheKeywordinputscreen.Unlessthecorrectkeywordisentered,thepro-
jectorcannotprojectanimage.
•The[SECURITY]settingcannotbecancelledbyusingthe[RESET]ofthemenu.
ToenabletheSecurityfunction:
1. Press the MENU button.
The menu will be displayed.
2. Press the
▶buttontwicetoselect[SETUP]andpressthe▼buttonortheENTERbuttontoselect[GEN-
ERAL].
3. Press the ▶buttontoselect[INSTALLATION].
4. Press the ▼buttonthreetimestoselect[SECURITY]andpresstheENTERbutton.
TheOFF/ONmenuwillbedisplayed.
5. Press the ▼buttontoselect[ON]andpresstheENTERbutton.
The[SECURITYKEYWORD]screenwillbedisplayed.
6.Typeinacombinationofthefour▲▼◀▶buttonsandpresstheENTERbutton.
NOTE:Akeywordmustbe4to10digitsinlength.
The[CONFIRMKEYWORD]screenwillbedisplayed.
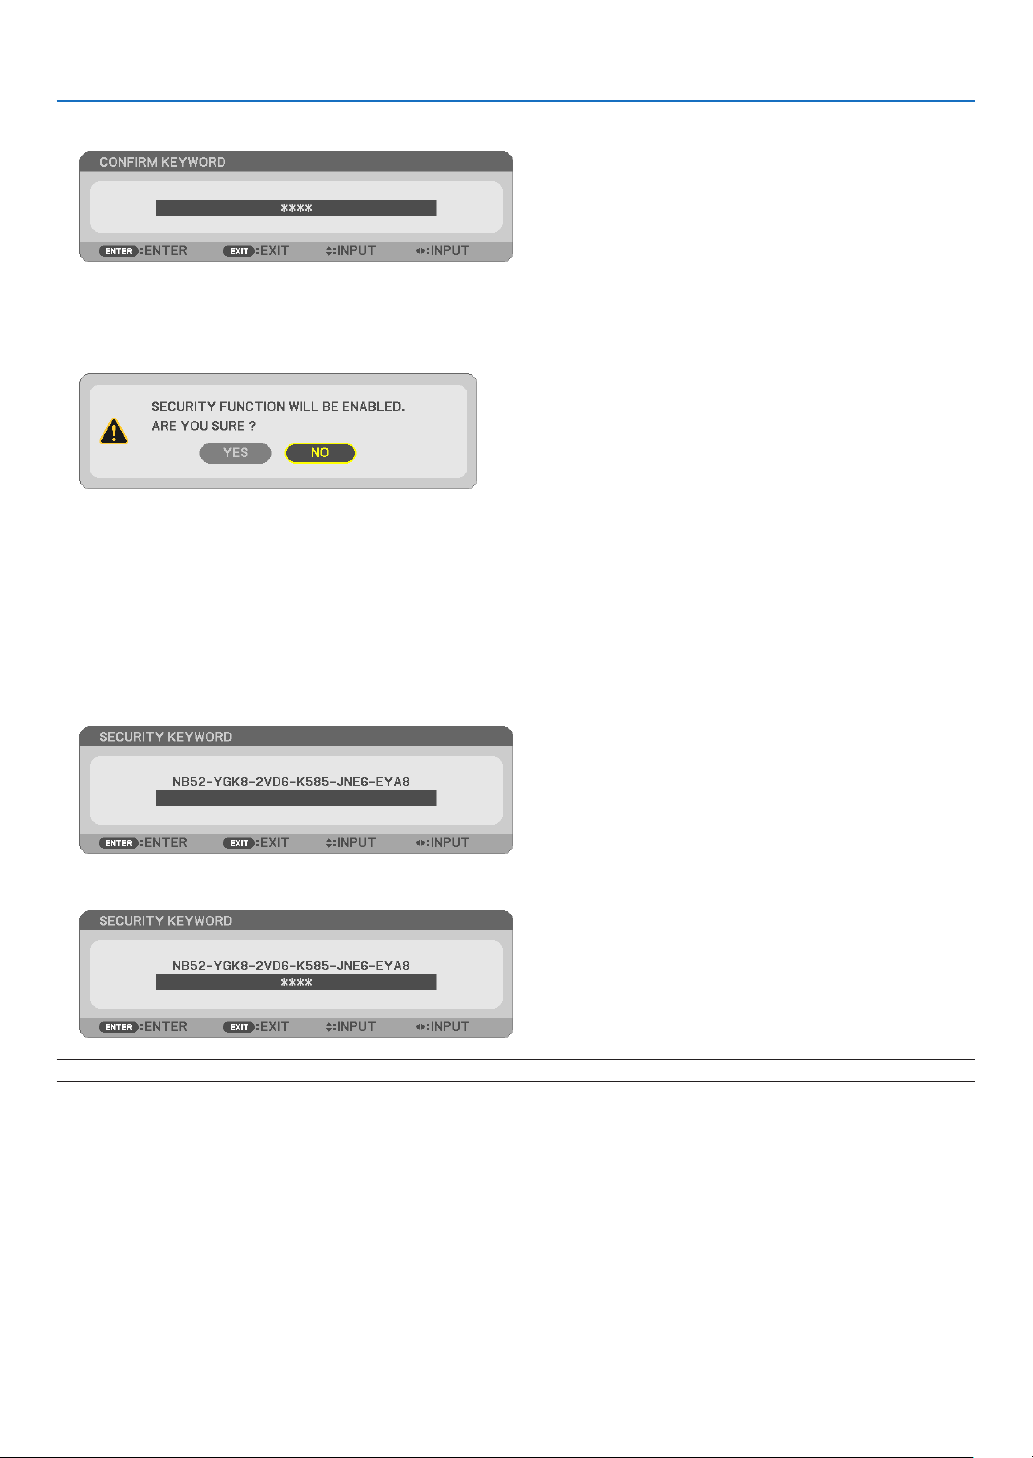
34
3. Convenient Features
7.Typeinthesamecombinationof▲▼◀▶buttonsandpresstheENTERbutton.
The confirmation screen will be displayed.
8.Select[YES]andpresstheENTERbutton.
TheSECURITYfunctionhasbeenenabled.
Toturnontheprojectorwhen[SECURITY]isenabled:
1. Press the POWER button.
Theprojectorwillbeturnedonanddisplayamessagetotheeffectthattheprojectorislocked.
2. Press the MENU button.
3.TypeinthecorrectkeywordandpresstheENTERbutton.Theprojectorwilldisplayanimage.
NOTE:Thesecuritydisablemodeismaintaineduntilthemainpoweristurnedofforunpluggingthepowercord.
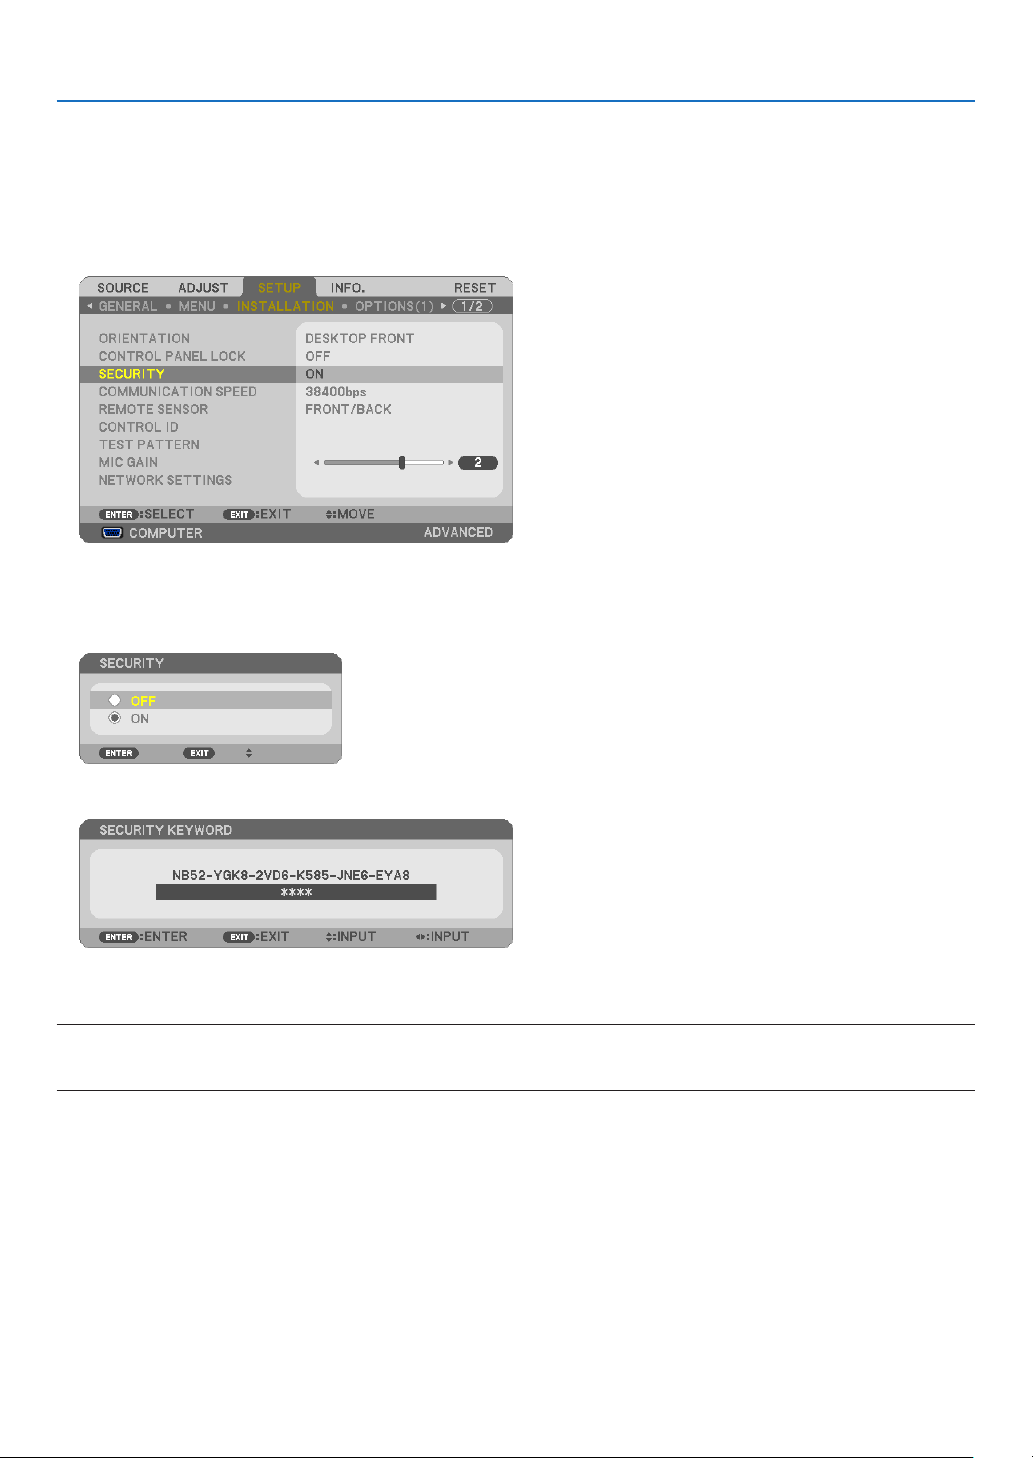
35
3. Convenient Features
TodisabletheSECURITYfunction:
1. Press the MENU button.
The menu will be displayed.
2.Select[SETUP][INSTALLATION][SECURITY]andpresstheENTERbutton.
TheOFF/ONmenuwillbedisplayed.
3.Select[OFF]andpresstheENTERbutton.
TheSECURITYKEYWORDscreenwillbedisplayed.
4.TypeinyourkeywordandpresstheENTERbutton.
Whenthecorrectkeywordisentered,theSECURITYfunctionwillbedisabled.
NOTE:Ifyouforgetyourkeyword,contactyourdealer.Yourdealerwillprovideyouwithyourkeywordinexchangeforyourrequest
code.YourrequestcodeisdisplayedintheKeywordConrmationscreen.Inthisexample[NB52-YGK8-2VD6-K585-JNE6-EYA8]
isarequestcode.
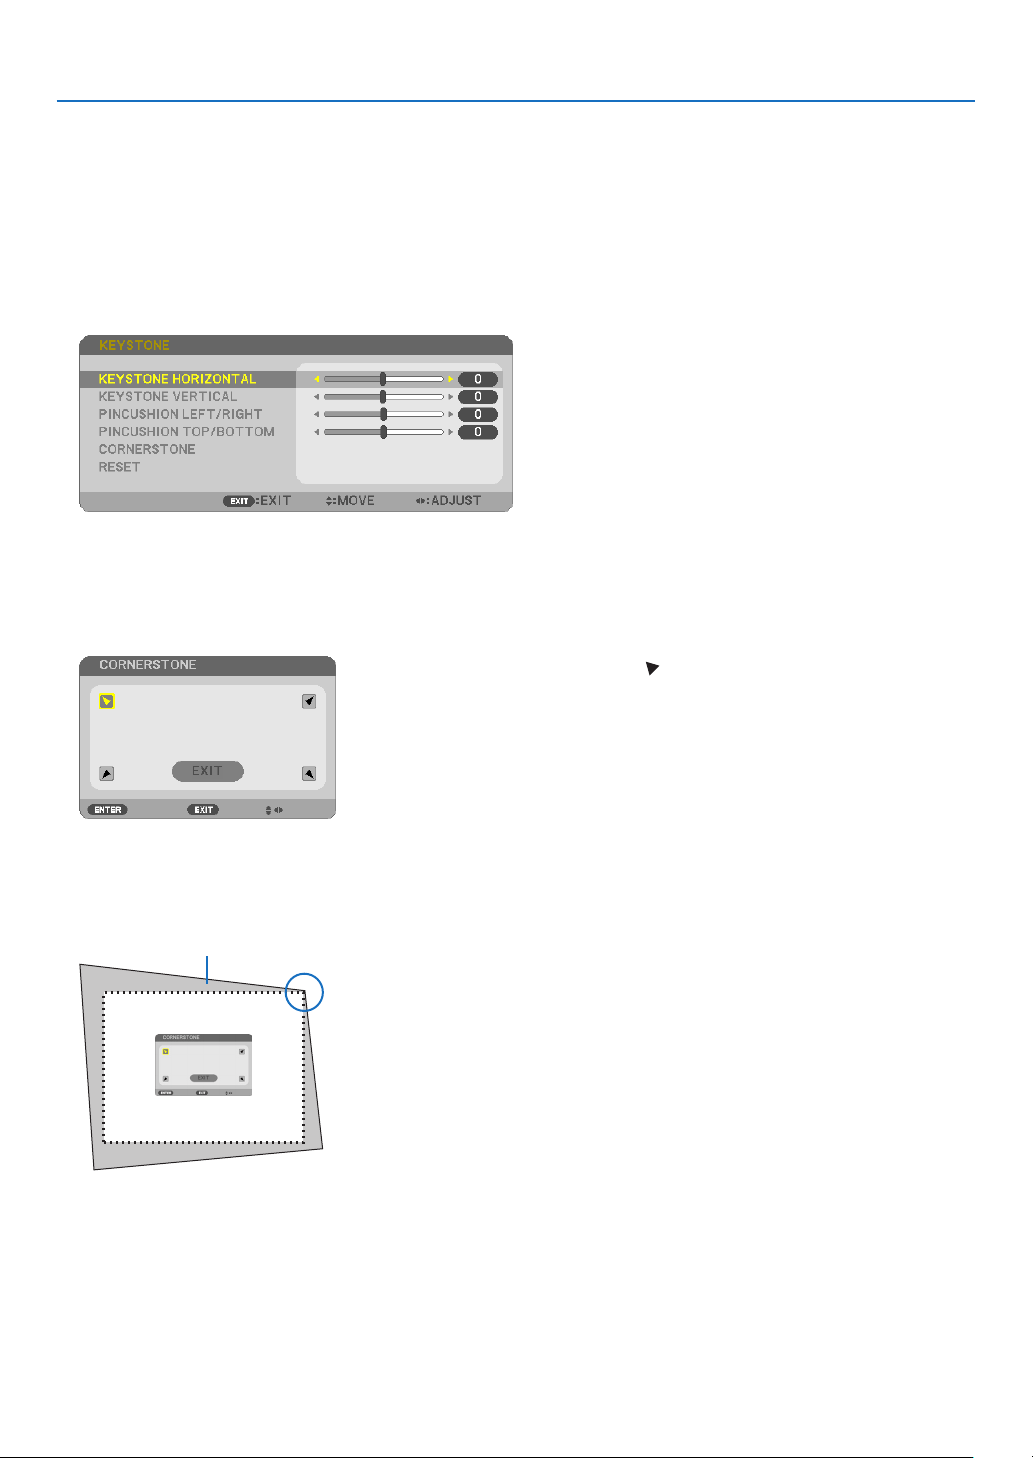
36
3. Convenient Features
❻ Using 4-Point Corner to Correct Keystone Distortion
[CORNERSTONE]
Usethe[CORNERSTONE]featuretocorrectkeystone(trapezoidal)distortiontomakethetoporbottomandtheleft
orrightsideofthescreenlongerorshortersothattheprojectedimageisrectangular.
Cornerstone
1.PresstheKEYSTONEbuttonwithnomenudisplayed.
The KEYSTONE screen will be displayed.
•PresstheKESTONEbuttonwhenusingtheremotecontrol.
•SeepageforPINCUSHION.
2. Press the ▼buttontoselect[CORNERSTONE]andpresstheENTERbutton.
The drawing shows the upper left icon ( ) is selected.
The CORNERSTONE screen will be displayed.
3.Projectanimagesothatthescreenissmallerthantheareaoftheraster.
4.Pickupanyoneofthecornersandalignthecorneroftheimagewithacornerofthescreen.
Projected image
The drawing shows the upper right corner.
TIP:Ifyouareadjusting[KEYSTONEHORIZONTAL],[KEYSTONEVERTICAL],[PINCUSHIONLEFT/RIGHT],or[PINCUSHION
TOP/BOTTOM],the[CORNERSTONE]itemwillnotbeavailable.Ifthishappens,resetthe[KEYSTONE]adjustments.
5. Use the ▲▼◀▶ button to select one icon (▲)whichpointsinthedirectionyouwishtomovetheprojected
imageframe.
6. Press the ENTER button.
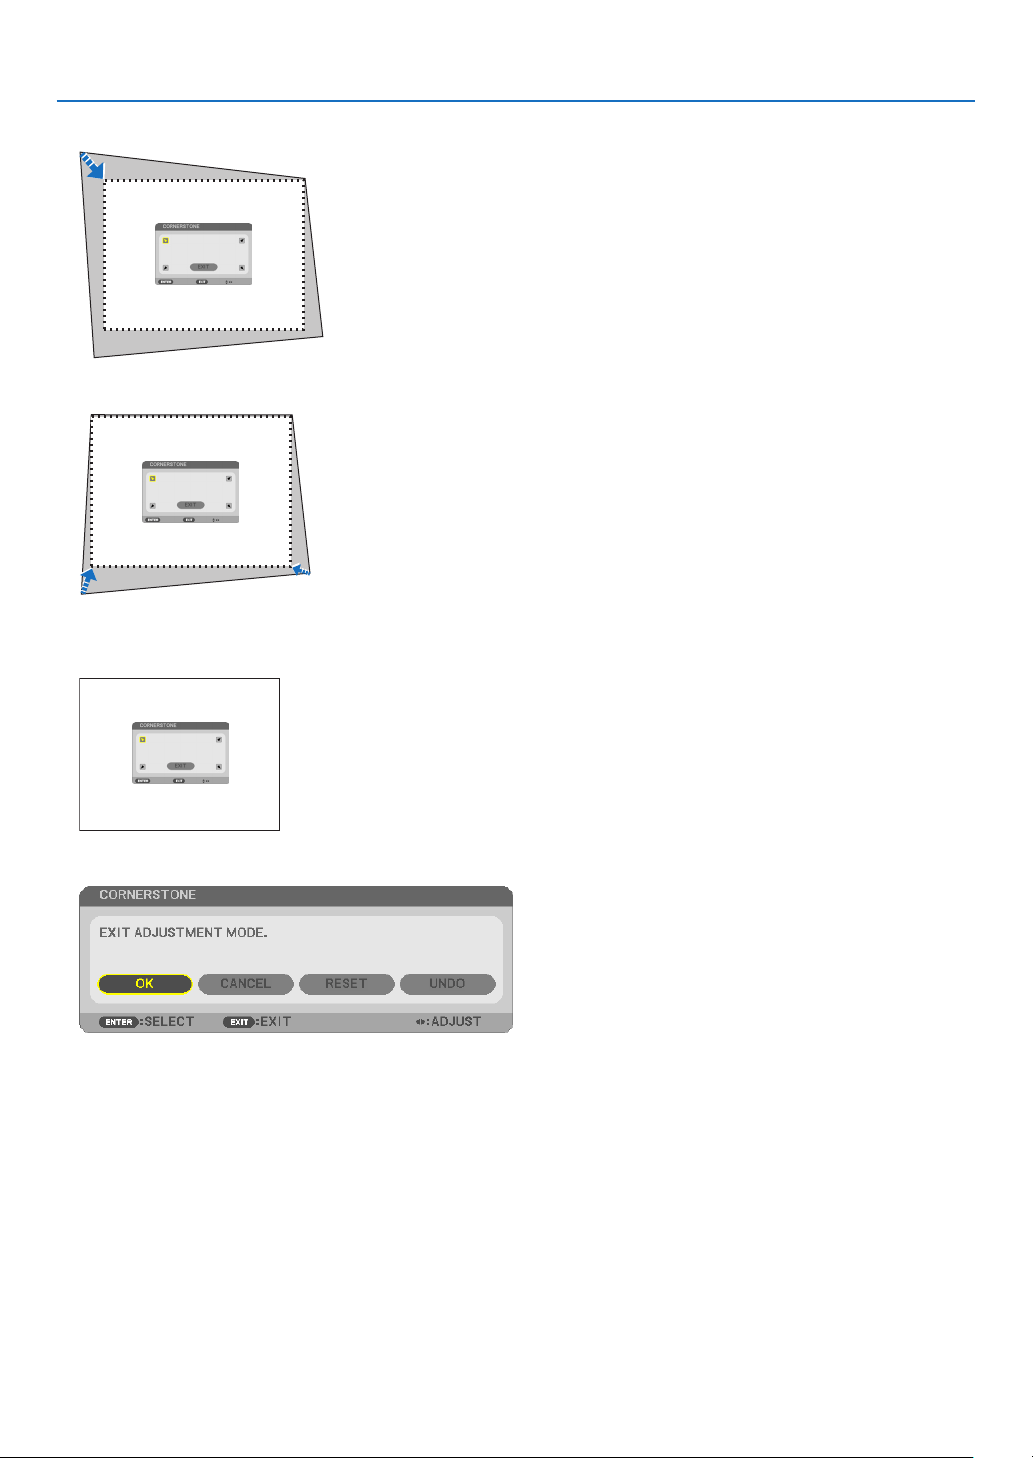
37
3. Convenient Features
7. Use the ▲▼◀▶buttontomovetheprojectedimageframeasshownontheexample.
8. Press the ENTER button.
9. Use the ▲▼◀▶buttontoselectanothericonwhichpointsinthedirection.
OntheCornerstoneadjustmentscreen,select[EXIT]orpresstheEXITbuttonontheremotecontrol.
The confirmation screen is displayed.
10
. Press the ◀ or ▶buttontohighlightthe[OK]andpresstheENTERbutton.
ThiscompletestheCornerstonecorrection.
Selecting[CANCEL]willreturntotheadjustmentscreenwithoutsavingchanges(Step3).
Selecting[RESET]willreturntothefactorydefault.
Selecting[UNDO]willexitwithoutsavingchanges.

38
3. Convenient Features
Theadjustablerangesfor3DReformareasfollows:
HORIZONTALVERTICAL
CORNERSTONE
Max.+/−30°approx.Max.+/−30°approx.
KEYSTONE
*Thefollowingareconditionsunderwhichthemaximumangleisachieved:
•Whenthelensshiftissettothecenter
Whenthelensshiftisusedandyettheimageisnotdisplayedinthecenterofthescreen,theadjustablerange
willbeincreasedordecreased.
•Imageisprojectedinmaximumwidewiththezoom
NOTE:
•Evenwhentheprojectoristurnedon,thelastusedcorrectionvaluesareapplied.
•IftheCornerstonescreenisunavailable(grayed),resetthecurrentcorrectiondata.TheCornerstonefunctionbecomesavail-
able.
•Therangeofkeystonecorrectionisnotthemaximumtiltangleofprojector.
NOTE:Using[KEYSTONE]correctioncancausetheimagetobeslightlyblurredbecausethecorrectionismadeelectronically.
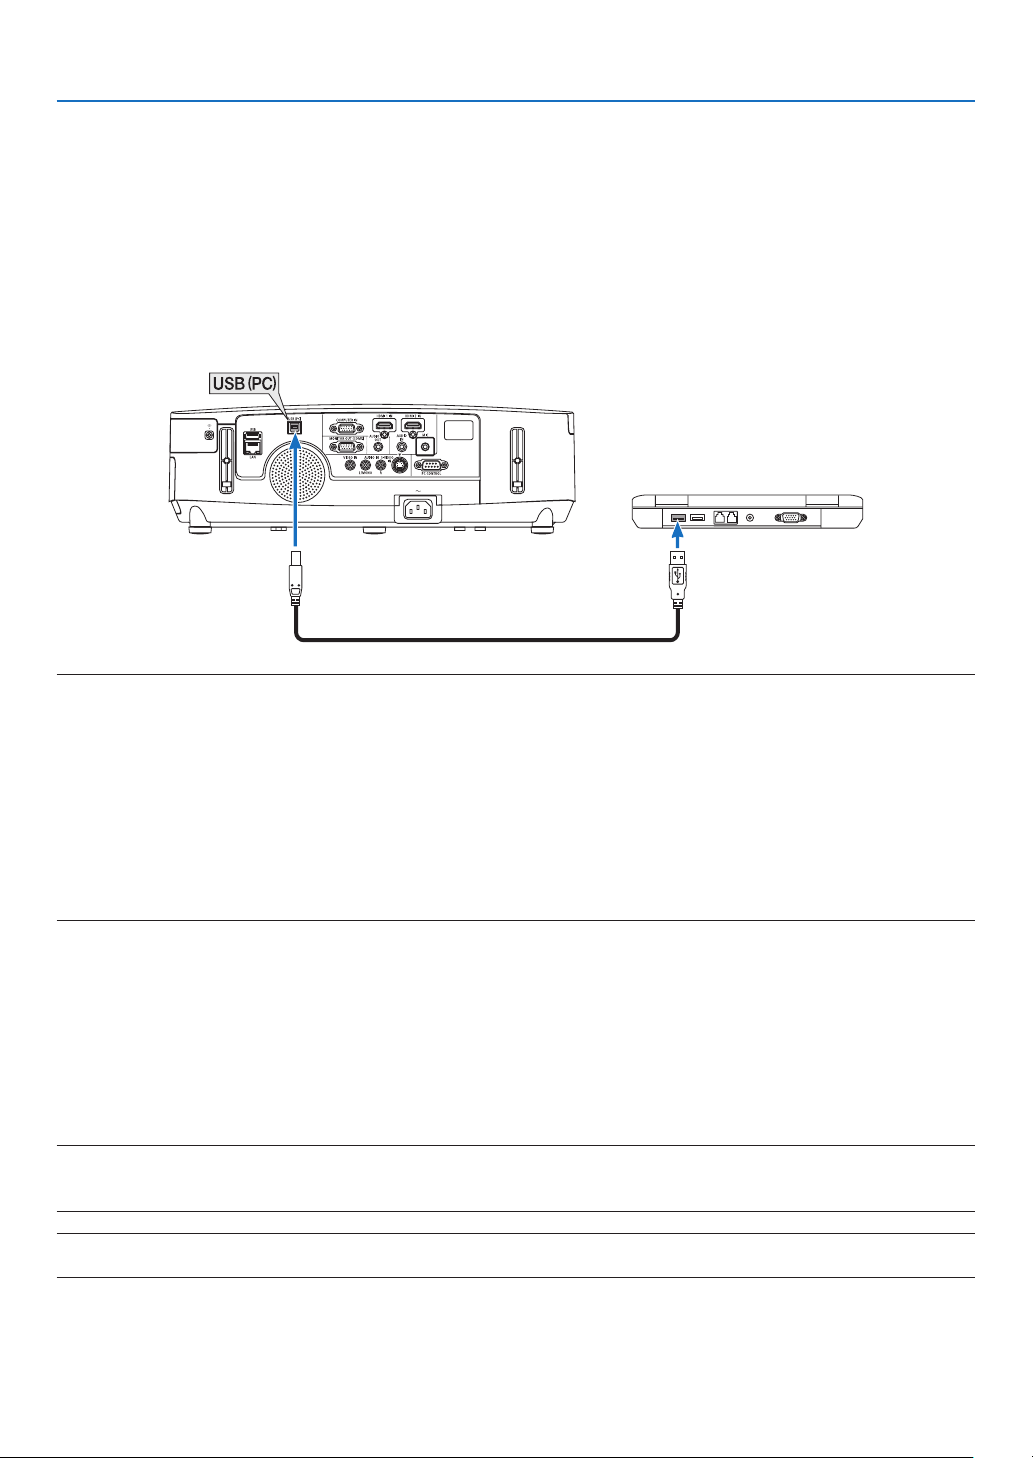
39
3. Convenient Features
❼
Operating Your Computer’s Mouse Functions from the
Projector’s Remote Control via the USB Cable (Remote Mouse
Function)
Thebuilt-inremotemousefunctionenablesyoutooperateyourcomputer’smousefunctionsfromthesuppliedremote
controlwhentheprojectorisconnectedtoacomputerviaacommerciallyavailableUSBcable(compatiblewithUSB
2.0specications).
TheRemoteMousefunctionworksfortheCOMPUTERinputwhilethecomputerscreenisdisplayed.
TheRemoteMousefunctionwillnotworkwhileyoufreezeormagnifyanimage.
-UsingtheUSBcabletoconnecttheprojectorandthecomputerwillalsostartUSBDisplayfunction.
USB cable (not supplied)
NOTE:
•AUSBcablemustsupporttheUSB2.0Specications.
•Themousefunctioncanbeusedwiththefollowingoperatingsystems:
Windows8,Windows7,WindowsXP,orWindowsVista
•InSP2orolderversionofWindowsXP,ifthemousecursorwillnotmovecorrectly,dothefollowing:
CleartheEnhancepointerprecisioncheckboxunderneaththemousespeedsliderintheMousePropertiesdialogbox[Pointer
Optionstab].
•Waitatleast5secondsafterdisconnectingtheUSBcablebeforereconnectingitandviceversa.Thecomputermaynotidentify
theUSBcableifitisrepeatedlyconnectedanddisconnectedinrapidintervals.
•ConnecttheprojectortothecomputerwithaUSBcableafterstartingthecomputer.Failuretodosomayfailtostartthecom-
puter.
Operatingyourcomputer’smousefromtheremotecontrol
Youcanoperateyourcomputer’smousefromtheremotecontrol.
PAGE ▽/△ Button ...........................scrolls the viewing area of the window or to move to the previous or next slide in PowerPoint
on your computer.
▲▼◀▶ Buttons ..............................moves the mouse cursor on your computer.
MOUSE L-CLICK/ENTER Button ......works as the mouse left button.
MOUSE R-CLICK Button ..................works as the mouse right button.
NOTE:
•Whenyouoperatethecomputerusingthe▲▼◀or▶buttonwiththemenudisplayed,boththemenuandthemousepointer
willbeaffected.Closethemenuandperformthemouseoperation.
TIP:YoucanchangethePointerspeedontheMousePropertiesdialogboxontheWindows.Formoreinformation,seetheuser
documentationoronlinehelpsuppliedwithyourcomputer.
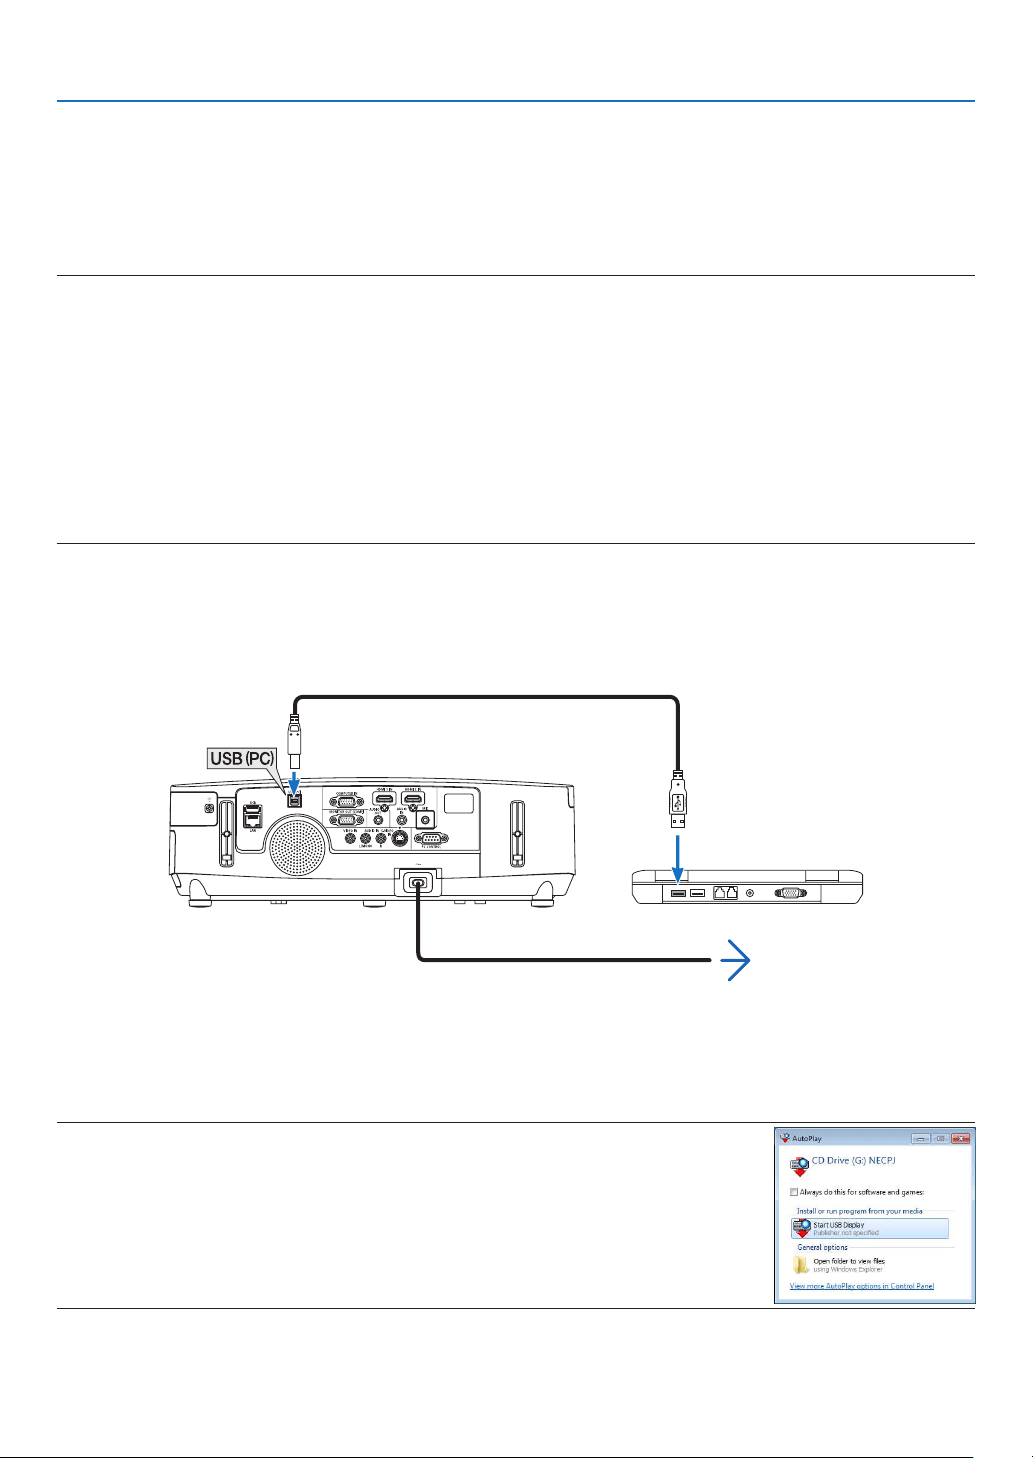
40
3. Convenient Features
❽ Projecting Your Computer’s Screen Image from the
Projector via the USB Cable (USB Display)
UsingacommerciallyavailableUSBcable(compatiblewithUSB2.0specications)toconnectthecomputerwiththe
projectorallowsyoutosendyourcomputerscreenimageandaudiototheprojectorfordisplaying.PowerOn/Offand
sourceselectionoftheprojectorcanbedonefromyourcomputerwithoutconnectingacomputercable(VGA).
NOTE:
•TomakeUSBDISPLAYavailableonWindowsXP,theWindowsuseraccountmusthave“Administrator”privilege.
•USBDisplayusesfunctionsofImageExpressUtilityLitecontainedonNECProjectorCD-ROM(page173).
StartingUSBDisplay,however,willnotinstallImageExpressUtilityLiteonyourcomputer.ThisisbecauseUSBDisplayexecutes
theprojector’sprogramonly.
•WhenImageExpressUtilityLiteisinstalledtobothyourcomputerandtheprojector,theoneinstalledtoyourcomputeralways
startevenifitisolderversionthantheoneinstalledtotheprojector.
Ifaudiotransfercapabilityandotherfeatureswillnotwork,tryuninstallingImageExpressUtilityLitefromyourcomputer.This
willallowyoutouseallthefeatures.
•USBDisplaywillnotworkin[POWER-SAVING]or[NETWORKSTANDBY]of[STANDBYMODE].(page110)
•When[USBDISPLAY]isselectedfor[AUDIOSELECT]from[SETUP][OPTIONS(1)],thesoundfortheUSBDISPLAYsource
isoutputtotheprojectorspeaker.
1. Start the computer.
2.Connecttheprojector’spowercordtothewalloutletandputtheprojectorintostandbycondition.
•Opentheprojector’slenscover.
3.UsetheUSBcabletoconnectthecomputerwiththeprojector.
USB cable (not supplied)
To wall outlet
Power cord (supplied)
Themessage“Theprojectorisinstandbymode.Connectit?”willbedisplayedonthecomputerscreen.
•ThecontrolwindowofImageExpressUtilityLitewillbedisplayedonthetopofthescreen.
NOTE:Dependingonthecomputersetting,the“AutoPlay”windowmaybedisplayedwhenthe
computerdetectstheconnectiontotheprojector.Ifthishappens,clickthe“StartUSBDisplay”
window.
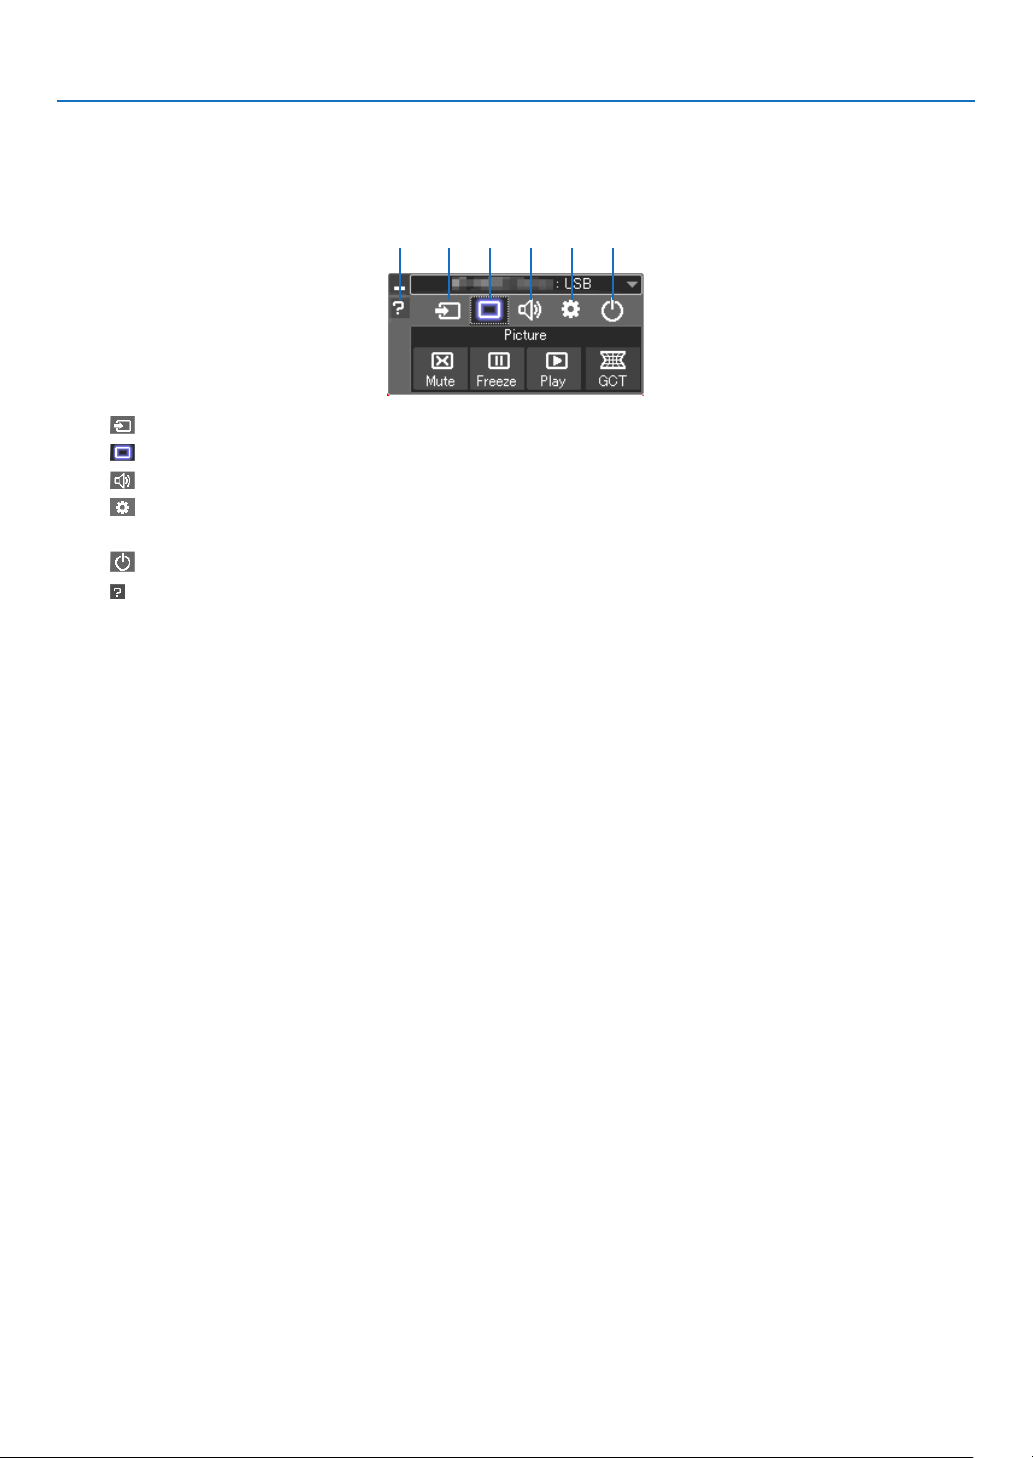
41
3. Convenient Features
4.Click“Yes”.
Theprojectorwillturnonandthemessage“Theprojectorisgettingready.Pleasewait.”willbedisplayedonthe
computer screen. This message will disappear in a few seconds.
5.Operatethecontrolwindow.
(1) (2) (3) (4) (5)(6)
(1) (Source) ..... Selects an input source of the projector.
(2)
(Picture) .... Turns on or off AV-MUTE (Picture mute), and turns on or off FREEZE (Freeze a picture).
(3)
(Sound) ..... Turns on or off AV-MUTE (Sound mute), play the sound and turns up or down the volume.
(4)
(Others) ..... Uses “Update”, “HTTP Server”*, “Settings” and “Information”. (not supported by PE501X)
* The HTTP Server cannot be selected when a USB cable is connected.
(5)
(Exit) .......... Exit Image Express Utility Lite. You can also turn off the projector at the same time.
(6)
(Help) ........... Displays the help of Image Express Utility Lite.

42
3. Convenient Features
❾ Controlling the Projector by Using an HTTP Browser (not
supported by PE501X)
Overview
TheHTTPServerfunctionprovidessettingsandoperationsfor:
1.Settingforwired/wirelessnetwork(NETWORKSETTINGS)
To use wireless LAN connection, the optional USB Wireless LAN Unit is required. ( page 152)
Tousewired/wirelessLANconnection,connecttheprojectortothecomputerwithacommerciallyavailableLAN
cable. ( page 151)
2.SettingAlertMail(ALERTMAIL)
Whentheprojectorisconnectedtoawired/wirelessnetwork,lampreplacetimeorerrormessageswillbesentvia
e-mail.
3.Operatingtheprojector
Poweron/off,selectinginput,volumecontrolandpictureadjustmentsarepossible.
4.SettingPJLinkPASSWORDandAMXBEACON
Thisdeviceuses“JavaScript”and“Cookies”andthebrowsershouldbesettoacceptthesefunctions.Thesetting
methodwillvarydependingontheversionofbrowser.Pleaserefertothehelplesandtheotherinformationprovided
inyoursoftware.
TwowaysofaccesstotheHTTPserverfunctionareavailable:
•StarttheWebbrowseronthecomputerviathenetworkconnectedtotheprojectorandenterthefollowing
URL:
http://<theprojector’sIPaddress>/index.html
•UseImageExpressUtilityLitecontainedonthesuppliedNECProjectorCD-ROM.
TIP:ThefactorysettingIPaddressis[DHCPON].
NOTE:
•Tousetheprojectorinanetwork,consultwithyournetworkadministratoraboutnetworksettings.
•Thedisplay’sorbutton’sresponsecanbesloweddownoroperationmaynotbeaccepteddependingthesettingsofyournet-
work.
Shouldthishappen,consultyournetworkadministrator.Theprojectormaynotrespondifitsbuttonsarerepeatedlypressedin
rapidintervals.Shouldthishappen,waitamomentandrepeat.Ifyoustillcan’tgetanyresponse,turnoffandbackontheprojec-
tor.
•IfthePROJECTORNETWORKSETTINGSscreendoesnotappearinthewebbrowser,presstheCtrl+F5keystorefreshyourweb
browser(orclearthecache).
•Thisdeviceuses“JavaScript”and“Cookies”andthebrowsershouldbesettoacceptthesefunctions.Thesettingmethodwill
varydependingontheversionofbrowser.Pleaserefertothehelplesandtheotherinformationprovidedinyoursoftware.
Preparation before Use
ConnecttheprojectortoacommerciallyavailableLANcablebeforeengaginginbrowseroperations.(page
151)
Operationwithabrowserthatusesaproxyservermaynotbepossibledependingonthetypeofproxyserverandthe
settingmethod.Althoughthetypeofproxyserverwillbeafactor,itispossiblethatitemsthathaveactuallybeenset
willnotbedisplayeddependingontheeffectivenessofthecache,andthecontentssetfromthebrowsermaynotbe
reectedinoperation.Itisrecommendedthataproxyservernotbeusedunlessitisunavoidable.
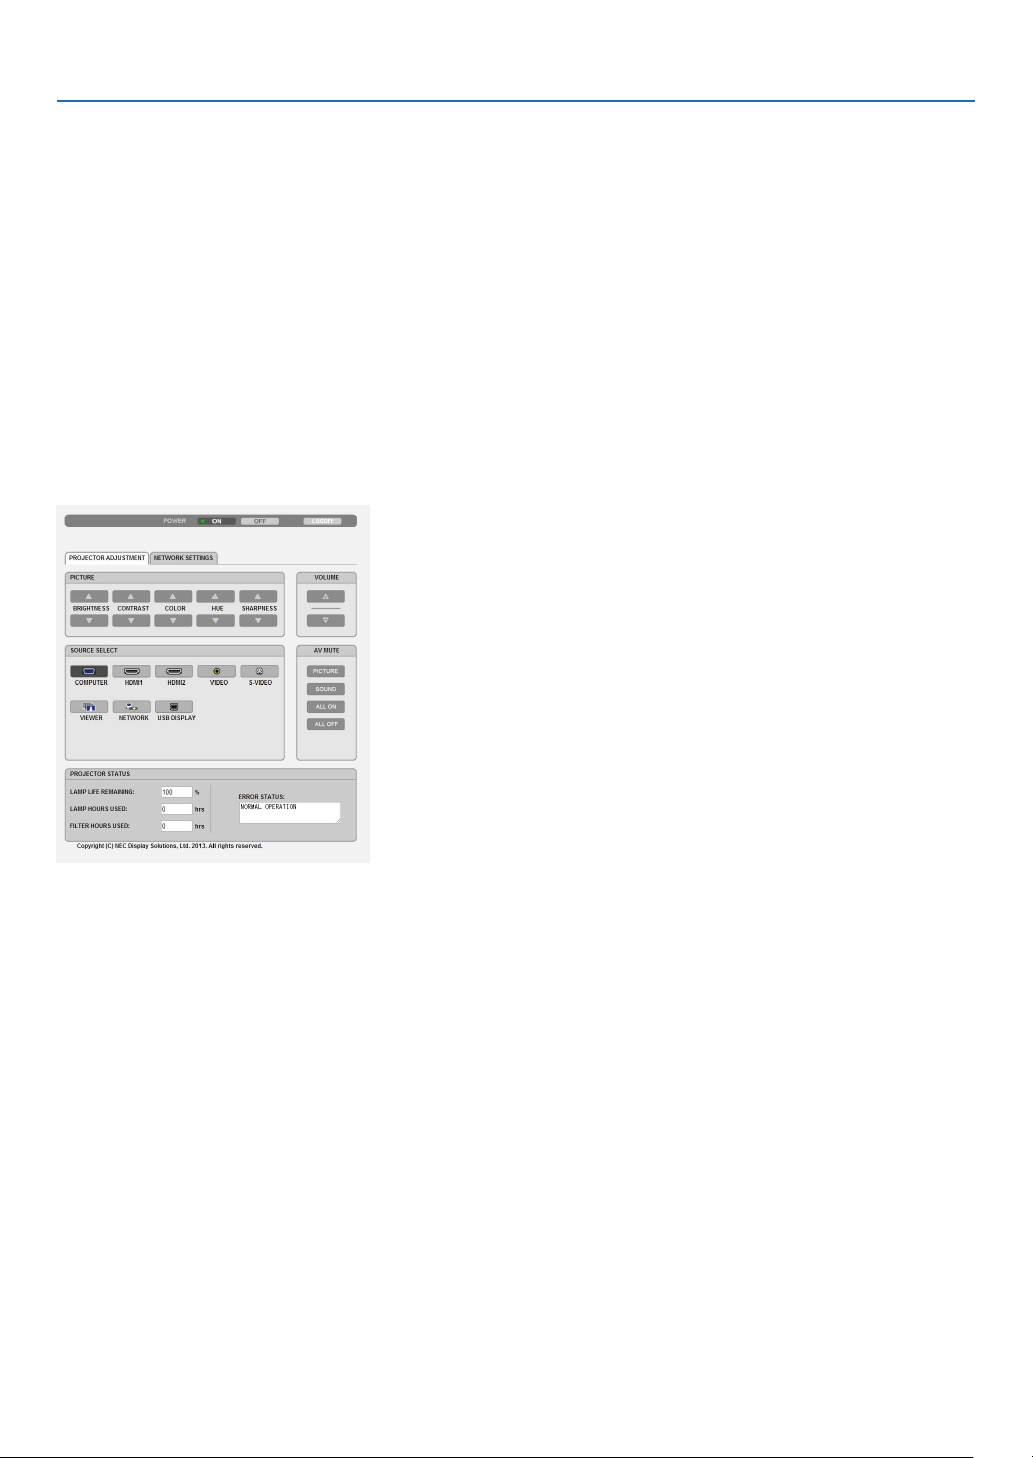
43
3. Convenient Features
Handling of the Address for Operation via a Browser
RegardingtheactualaddressthatisenteredfortheaddressorenteredtotheURLcolumnwhenoperationofthepro-
jectorisviaabrowser,thehostnamecanbeusedasitiswhenthehostnamecorrespondingtotheIPaddressofthe
projectorhasbeenregisteredtothedomainnameserverbyanetworkadministrator,orthehostnamecorresponding
totheIPaddressoftheprojectorhasbeensetinthe“HOSTS”leofthecomputerbeingused.
Example1:Whenthehostnameoftheprojectorhasbeensetto“pj.nec.co.jp”,accessisgainedtothenetwork
settingbyspecifying
http://pj.nec.co.jp/index.html
fortheaddressortheentrycolumnoftheURL.
Example2:WhentheIPaddressoftheprojectoris“192.168.73.1”,accessisgainedtothenetworksettingby
specifying
http://192.168.73.1/index.html
fortheaddressortheentrycolumnoftheURL.
PROJECTOR ADJUSTMENT
POWER:Thiscontrolsthepoweroftheprojector.
ON ......................... Power is switched on.
OFF ........................ Power is switched off.
VOLUME:Thiscontrolsthevolumeoftheprojector.
▲ ........................... Increases the volume adjustment value.
▼ ........................... Decreases the volume adjustment value.
AV-MUTE:Thiscontrolsthemutefunctionoftheprojector.
PICTURE ON .......... Mutes the video.
PICTURE OFF ......... Cancels the video muting.
SOUND ON ............ Mutes the audio.
SOUND OFF ........... Cancels the audio muting.
ALL ON .................. Mutes each of the video, and audio functions.
ALL OFF ................. Cancels the muting of each of the video, and audio functions.

44
3. Convenient Features
PICTURE:Controlsthevideoadjustmentoftheprojector.
BRIGHTNESS ▲ .... Increases the brightness adjustment value.
BRIGHTNESS ▼ .... Decreases the brightness adjustment value.
CONTRAST ▲ ........ Increases the contrast adjustment value.
CONTRAST ▼ ........ Decreases the contrast adjustment value.
COLOR ▲ .............. Increases the color adjustment value.
COLOR ▼ .............. Decreases the color adjustment value.
HUE ▲ ................... Increases the hue adjustment value.
HUE ▼ ................... Decreases the hue adjustment value.
SHARPNESS ▲ ..... Increases the sharpness adjustment value.
SHARPNESS ▼ ..... Decreases the sharpness adjustment value.
•Thefunctionsthatcanbecontrolledwillvarydependingonthesignalbeinginputtotheprojector.(page
95)
SOURCESELECT:Thisswitchestheinputconnectoroftheprojector.
COMPUTER ........... Switches to the COMPUTER IN connector.
HDMI1 ................... Switches to the HDMI 1 IN connector.
HDMI2 ................... Switches to the HDMI 2 IN connector.
VIDEO .................... Switches to the VIDEO IN connector.
S-VIDEO ................ Switches to the S-VIDEO IN connector.
VIEWER ................. Switches to the data on the USB memory device.
NETWORK ............. Switches to a LAN signal.
USB DISPLAY ........ Switches to the USB Port (PC).
PROJECTORSTATUS:Thisdisplaystheconditionoftheprojector.
LAMP LIFE REMAINING .....Displays the remaining life of the lamp as a percentage.
LAMP HOURS USED ...........Displays how many hours the lamp has been used.
FILTER HOURS USED .........Displays how many hours the filter has been used.
ERROR STATUS ..................Displays the status of errors occurring within the projector.
LOGOFF:Loggingoffyourprojectorandreturningtotheauthenticationscreen(LOGONscreen).

45
3. Convenient Features
NETWORK SETTINGS
•SETTINGS
WIRED or WIRELESS
SETTINGSetforwiredLANorforwirelessLAN.
APPLYApplyyoursettingstowiredLANorwirelessLAN.
DHCPONAutomaticallyassignIPaddress,subnetmask,andgatewaytotheprojectorfromyour
DHCPserver.
DHCPOFFSetIPaddress,subnetmask,andgatewaytotheprojectorassignedbyyournetwork
administrator.
IPADDRESSSetyourIPaddressofthenetworkconnectedtotheprojector.
SUBNETMASKSetyoursubnetmasknumberofthenetworkconnectedtotheprojector.
GATEWAYSetthedefaultgatewayofthenetworkconnectedtotheprojector.
WINSSettheIPaddressofyourWINSserverofthenetworkconnectedtotheprojectorwhen
[DHCP]isturnedon,thisoptionisnotavailable.
AUTODNSONDHCPserverwillautomaticallyassignIPaddressofDNSserverconnectedtothe
projector.
AUTODNSOFFSetyourIPaddressofDNSserverconnectedtotheprojector.
SettingforWIREDLAN
PROFILE1/PROFILE2TwosettingscanbesetforwiredLANconnection.SelectPROFILE1orPROFILE2.
DISABLETurnoffwiredLANconnection
SettingforWIRELESSLAN(theoptionalWirelessLANUnitrequired)
EASYCONNECTIONExecuteawirelessLANusingEASYCONNECTION.
SIMPLEACCESPOINTSettheprojectorforsimpleaccesspoint.
WPSUseWPS(Wi-FiProtectedSetup™)tosetupthewirelessLANfortheprojector.
NOTE:Usetheprojector’smenustomakeWPSconnectionsandchangetheWPS
prolesettings.
CHANNELSelectachannel.Availablechannelsvarydependingonthecountryandregion.When
youselect[INFRASTRUCTURE],makesurethattheprojectorandyouraccesspoint
areonthesamechannel;whenyouselect[ADHOC],makesurethattheprojectorand
yourcomputerareonthesamechannel.

46
3. Convenient Features
PROFILE1/PROFILE2TwosettingscanbesetforwirelessLANconnection.SelectPROFILE1orPROFILE
2.
SSID
Enteranidentier(SSID)forwirelessLAN.Communicationcanbedoneonlywith
equipmentwhoseSSIDmatchesSSIDforyourwirelessLAN.
SITESURVEYDisplaysalistofavailableSSIDsforwirelessLANonsite.SelectanSSIDwhichyou
can access.
NETWORKTYPESelectcommunicationmethodwhenusingwirelessLAN.
INFRASTRUCTURE:Selectthisoptionwhencommunicatingwithoneormoreequip-
mentconnectedtothewirelessLANnetworkviaawirelessaccesspoint.
ADHOC:SelectthisoptionwhenusingthewirelessLANtodirectlycommunicatewith
acomputerinpeer-to-peermode.
SECURITYTYPE
Turnonorofftheencryptionmodeforsecuretransmission.Whenturnontheencryp-
tionmode,setWEPkeyorencryptedkey.
DISABLEWillnotturnontheencryptionfeature.Yourcommunicationsmay
bemonitoredbysomeone.
WEP64bitUses64-bitdatalengthforsecuretransmission.
WEP 128 bit Uses128-bitdatalengthforsecuretransmission.Thisoptionwill
increaseprivacyandsecuritywhencomparedtouseof64-bit
datalengthencryption.
WPA-PSKTKIP/WPA-PSKAES/
WPA2-PSKTKIP/WPA2-PSKAES/
WPA-EAPTKIPEAP-TLS/
WPA-EAPAESEAP-TLS/
WPA-EAPTKIPPEAP-MSCHAPv2/
WPA-EAPAESPEAP-MSCHAPv2/
WPA2-EAPTKIPEAP-TLS/
WPA2-EAPAESEAP-TLS/
WPA2-EAPTKIPPEAP-MSCHAPv2/
WPA2-EAPAESPEAP-MSCHAPv2
Theseoptionsparovidestrongersecurity
than WEP.
NOTE:
•TheWEPsettingsmustbethesameascommunicationdevicessuchasPCoraccesspointin
yourwirelessnetwork.
•WhenyouuseWEP,yourimagetransmissionspeedwillslowdown.
•OtherencryptionkeysthanWEP64bitandWEP128bitarenotavailablewhen[ADHOC]is
selectedfrom[NETWORKTYPE].
•Toinstalladigitalcerticate,usetheprojector’smenu.(page125)
INDEX
Selectencryptionkeywhenselecting[WEP64bit]or[WEP128bit]in[SECURITY
TYPE].
KEY
Whenselecting[WEP64bit]or[WEP128bit]in[SECURITYTYPE]:
EnterWEPkey.
SelectCharacters(ASCII)Hexadecimaldigit(HEX)
WEP64bitUpto5charactersUpto10characters
WEP 128 bit Upto13charactersUpto26characters
Whenselecting[WPAPSK-TKIP],[WPAPSK-AES],[WPA2PSK-TKIP]or[WPA2
PSK-AES]:
Enterencryptionkey.Keylengthmustbe8orgreaterand63orless.
USERNAMESetausernameforWPA-EAP/WPA2-EAP.
PASSWORDSetapasswordforWPA-EAPTKIPPEAP-MSCHAPv2/WPA-EAPAESPEAP-MSCHAP
v2/WPA2-EAPTKIPPEAP-MSCHAPv2/WPA2-EAPAESPEAP-MSCHAPv2.

47
3. Convenient Features
USEDIGITALCERTIFI-
CATE
SelectthisifyouuseadigitalcerticateforWPA-EAPTKIPPEAP-MSCHAPv2/WPA-
EAPAESPEAP-MSCHAPv2/WPA2-EAPTKIPPEAP-MSCHAPv2/WPA2-EAPAES
PEAP-MSCHAPv2.
•NAME
PROJECTORNAMEEnteranameforyourprojectorsothatyourcomputercanidentifytheprojector.A
projectornamemustbe16charactersorless.
TIP:Projectornamewillnotbeaffectedevenwhen[RESET]isdonefromthemenu.
HOSTNAMEEnterthehostnameofthenetworkconnectedtotheprojector.Ahostnamemustbe
15 or less.
DOMAINNAMEEnterthedomainnameofthenetworkconnectedtotheprojector.Adomainname
mustbe60charactersorless.
•ALERTMAIL
ALERTMAIL(English
only)
Thisoptionwillnotifyyourcomputeroflampreplacetimeorerrormessagesviae-mail
whenusingwirelessorwiredLAN.
PlacingacheckmarkwillturnontheAlertMailfeature.
ClearingacheckmarkwillturnofftheAlertMailfeature.
Sampleofamessagetobesentfromtheprojector:
Thelampandltersareattheendofitsusablelife.Pleasereplacethelampand
lters.
ProjectorName:NECProjector
LampHoursUsed:100[H]
SENDER’SADDRESSEntersender’saddress.
SMTPSERVERNAMEEntertheSMTPservernametobeconnectedtotheprojector.
RECIPIENT’SADDRESS
1,2,3
Enteryourrecipient’saddress.Uptothreeaddressescanbeentered.
TESTMAIL
Sendatestmailtocheckwhetheryoursettingsarecorrectornot
NOTE:
•Ifyouexecuteatest,youmaynotreceiveanAlertmail.Shouldthishappen,checkifnetwork
settingsarecorrect.
•Ifyouenteredanincorrectaddressinatest,youmaynotreceiveanAlertmail.Shouldthis
happen,checkiftheRecipient’sAddressiscorrect.
SAVEClickthisbuttontoreecttheabovesettings.

48
3. Convenient Features
•NETWORKSERVICE
PJLinkPASSWORDSetapasswordforPJLink*.Apasswordmustbe32charactersorless.Donotforget
yourpassword.However,ifyouforgetyourpassword,consultwithyourdealer.
HTTPPASSWORDSetapasswordforHTTPserver.Apasswordmustbe10charactersorless.
AMXBEACONTurnonorofffordetectionfromAMXDeviceDiscoverywhenconnectingtothenetwork
supportedbyAMX’sNetLinxcontrolsystem.
TIP:
WhenusingadevicethatsupportsAMXDeviceDiscovery,allAMXNetLinxcontrolsystemwillrec-
ognizethedeviceanddownloadtheappropriateDeviceDiscoveryModulefromanAMXserver.
PlacingacheckmarkwillenabledetectingtheprojectorfromAMXDeviceDiscovery.
ClearingacheckmarkwilldisabledetectingtheprojectorfromAMXDeviceDiscovery.
*WhatisPJLink?
PJLinkisastandardizationofprotocolusedforcontrollingprojectorsofdifferentmanufacturers.Thisstandardproto-
colisestablishedbyJapanBusinessMachineandInformationSystemIndustriesAssociation(JBMIA)in2005.
TheprojectorsupportsallthecommandsofPJLinkClass1.
SettingofPJLinkwillnotbeaffectedevenwhen[RESET]isdonefromthemenu.
CRESTRONROOMVIEWcompatibility
TheprojectorsupportsCRESTRONROOMVIEW,allowingmultipledevicesconnectedinthenetworktobemanaged
andcontrolledfromacomputeroracontroller.
Formoreinformation,visithttp://www.crestron.com
<SettingProcedure>
AccesstotheHTTPserverfunction,andmakenecessarysettingsfor[CRESTRON]in[NETWORKSETTINGS].
•ROOMVIEWformanagingfromthecomputer.
DISABLEDisablesROOMVIEW.
ENABLEEnablesROOMVIEW.
•CRESTRONCONTROLformanagingfromthecontroller.
DISABLEDisablesCRESTRONCONTROL.
ENABLEEnablesCRESTRONCONTROL.
IPADDRESSSetyourIPaddressofCRESTRONSERVER.
IPIDSetyourIPIDofCRESTRONSERVER.
TIP:TheCRESTRONsettingsarerequiredonlyforusewithCRESTRONROOMVIEW.
Formoreinformation,visit
http://www.crestron.com
•INFORMATION
WIREDLANDisplayalistofsettingsofwiredLANconnection.
WIRELESSLANDisplayalistofsettingsofwirelessLANconnection.
UPDATEReectsettingswhentheyarechanged.
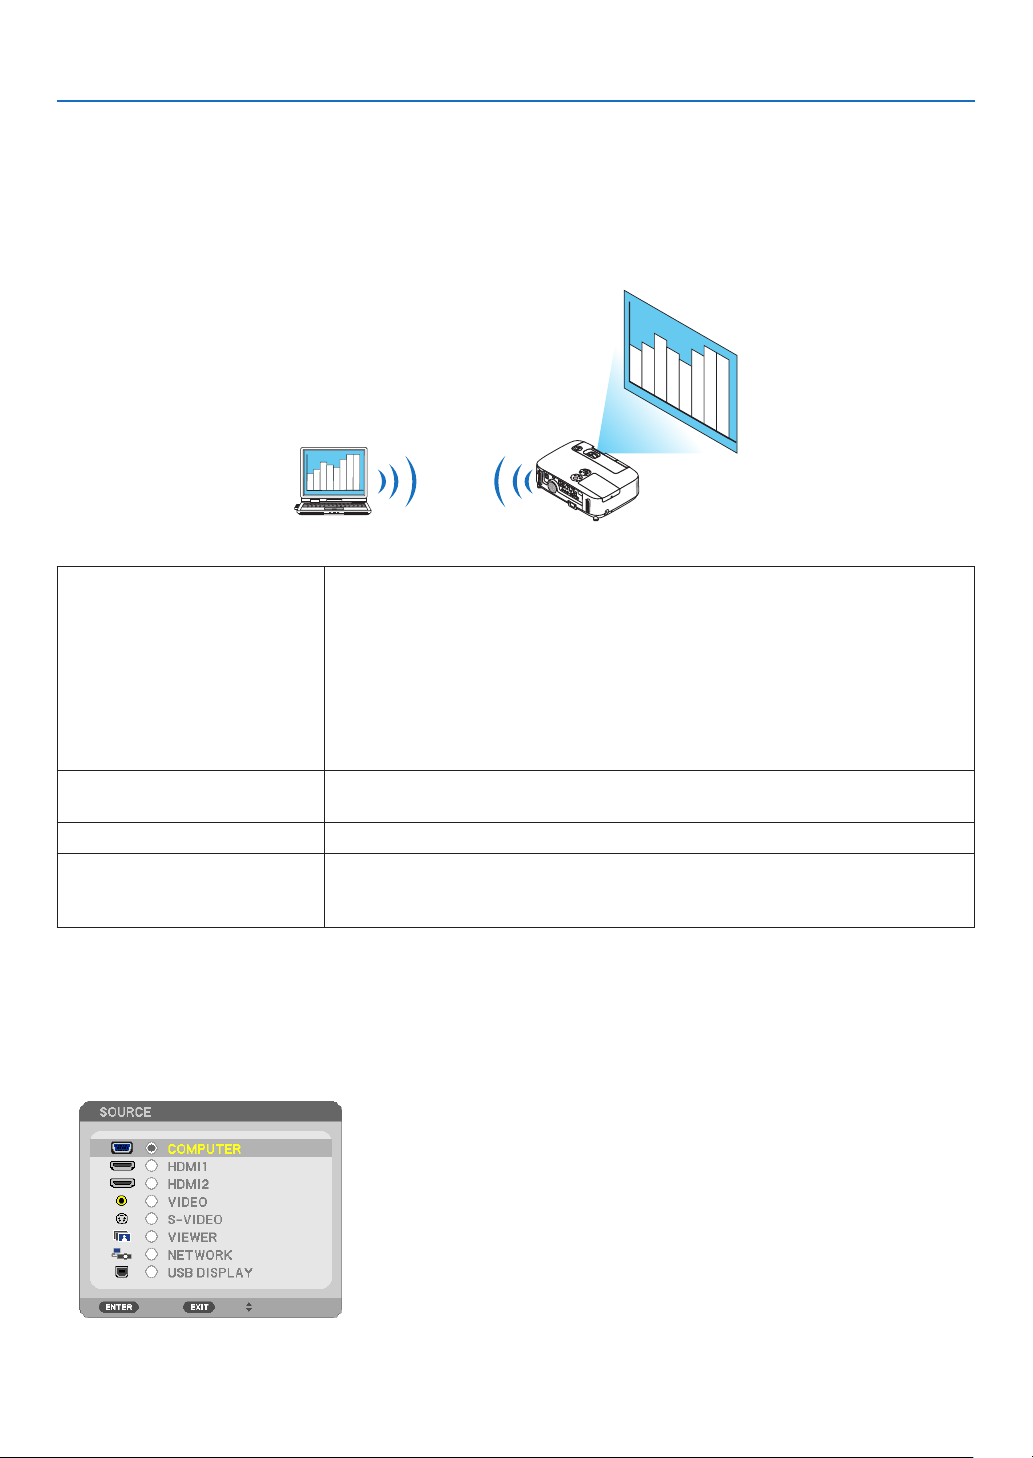
49
3. Convenient Features
❿ Projecting Your Computer’s Screen Image from the
Projector via a Network [NETWORK PROJECTOR] (not
supported by PE501X)
ByselectingtheprojectorconnectedtothesamenetworkasthatofyourPC,thePCscreenimagecanbeprojected
tothescreenvianetwork.Thereisnoneedofconnectionusingthecomputercable(VGA).
Operation Environment
ApplicableOSWindows8Pro
Windows8Enterprise
Windows7Professional
Windows7Ultimate
Windows7Enterprise
WindowsVistaHomePremium
WindowsVistaBusiness
WindowsVistaUltimate
WindowsVistaEnterprise
HardwarespecicationsThespecicationsrecommendedbyMicrosoftastheoperationenvironmentfor
Windows8/Windows7/WindowsVistashouldbesatised.
NetworkEnvironmentWiredLANorwirelessLANenvironmentthatsupportsTCP/IPisrequired.
ScreencolorHighColor(16bits)
TrueColor(24bitsand32bits)
*Settingwith256colorsorlessisnotavailable.
SettingtheProjectortoNetworkProjectorInputMode
1.Withtheprojectorturnedon,presstheSOURCEbutton.
The input selection window appears.
Another way to display the input selection window is to press the NETWORK button on the remote control. The
APPLICATIONMENUscreenwillbedisplayed.Gotostep3.
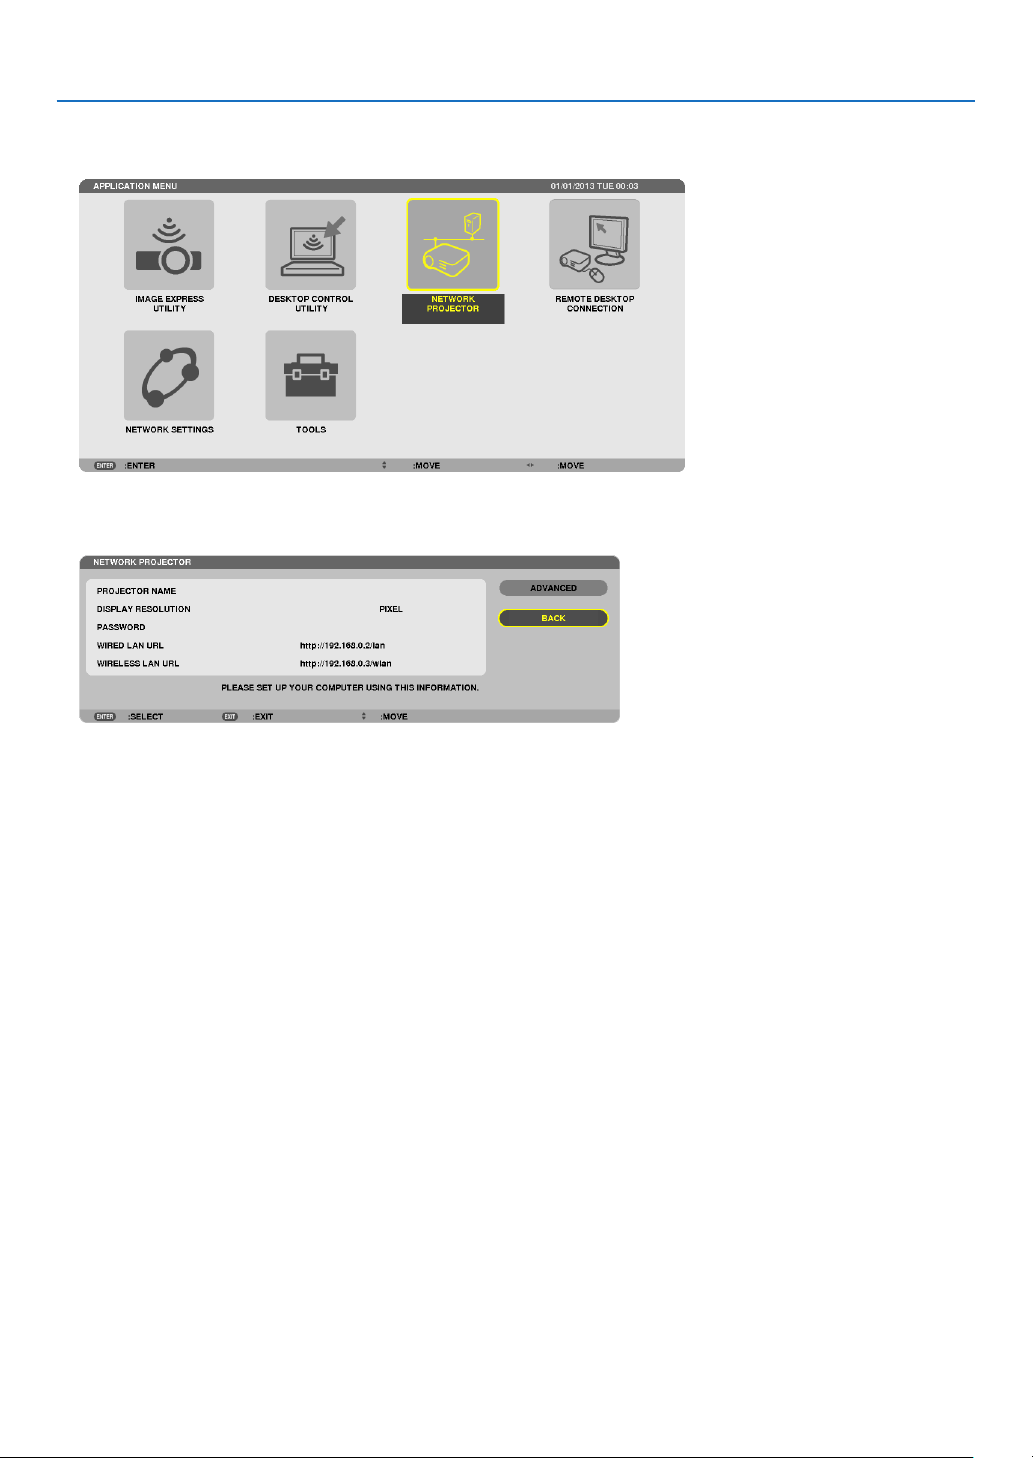
50
3. Convenient Features
2.PresstheSELECT▼
or ▲buttontoselect[NETWORK]andpresstheENTERbutton.
Inthescreen,the[APPLICATIONMENU]menuisdisplayed.
3.Fromthe[APPLICATIONMENU]menu,select[NETWORKPROJECTOR].
The[PROJECTORNAME/DISPLAYRESOLUTION/PASSWORD/URL]willbedisplayed.

51
3. Convenient Features
ProjectingtheImagewithNetworkProjector
1.Click[Start]fromthedesktopofWindows7.
2.Click[AllPrograms].
3.Click[Accessories].
4.Click[ConnecttoaNetworkProjector].
Whenthe[PermissionConnecttoaNetworkProjector]windowappears,click[Yes.].
The“ConnecttoaNetworkProjector”windowappears.
5.Click[Searchforaprojector(recommended)].
Inthe“Availableprojectors”box,“P501Series”isdisplayed.
6.Click[P501Series].
Themessage“Enterthepasswordfortheprojectorthatyouselected.”isdisplayedatthebottomofthewindow.
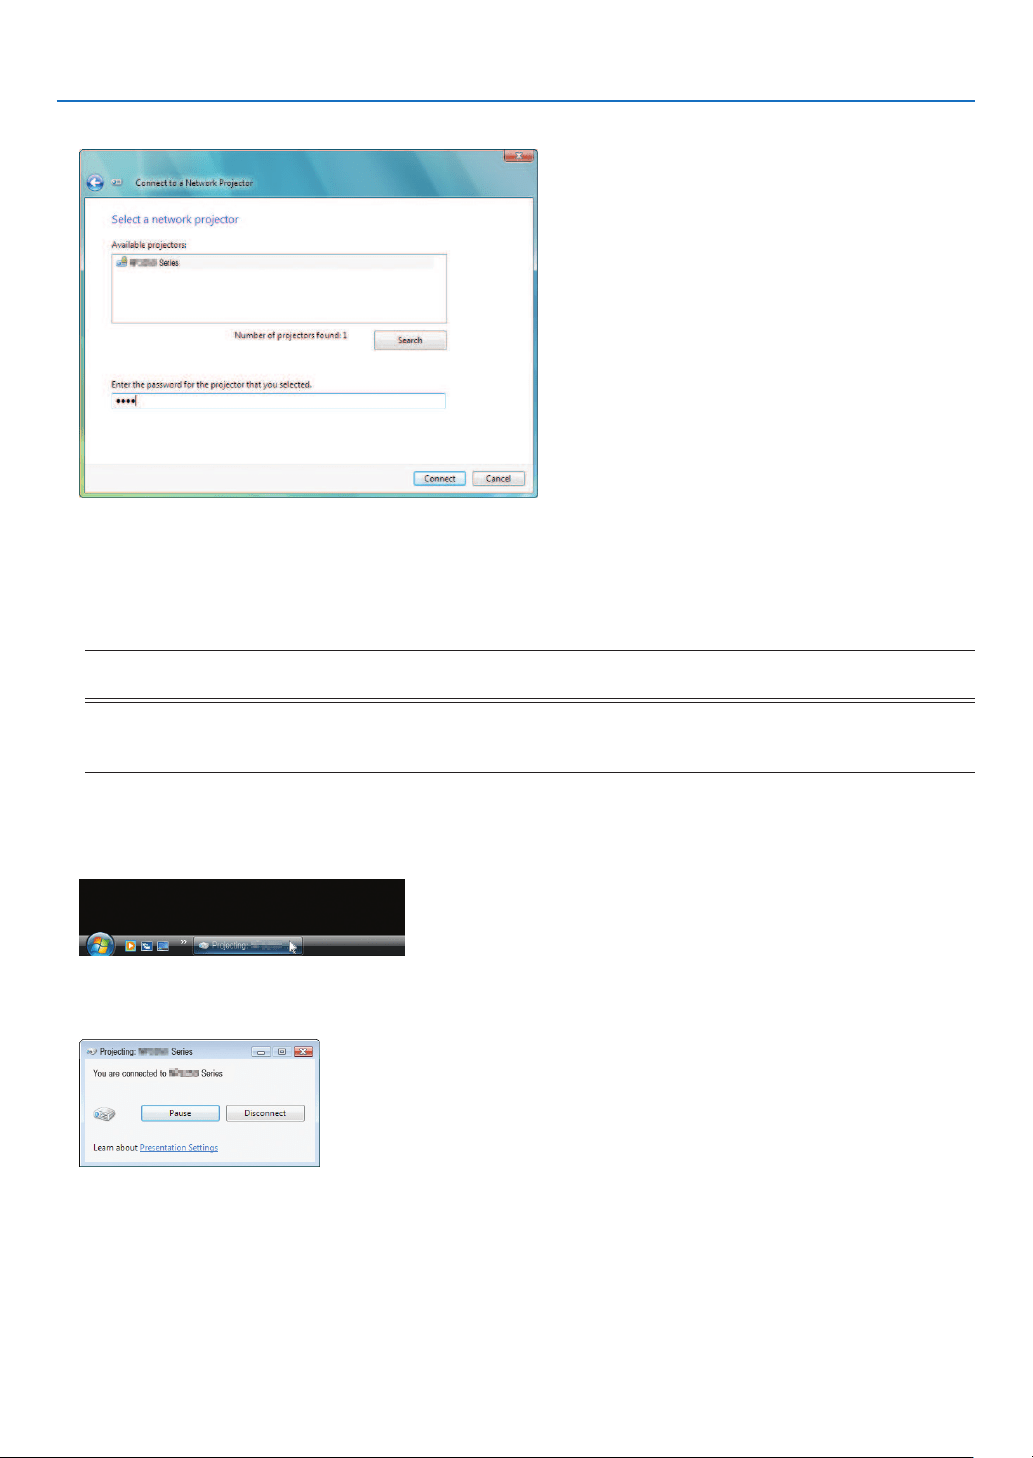
52
3. Convenient Features
7.Inputthepasswordtothepasswordinputboxdisplayedbytheoperationatstep3onpage50.
8.Click[Connect].
ThenetworkprojectorfunctionworksandthescreenofWindows7isprojectedfromtheprojector.
•Iftheresolutionofyourcomputer’sscreenisdifferentfromtheprojector’sscreenresolution,theNETWORK
PROJECTORfunctionmaynotwork.Ifthishappens,changetheresolutionofthecomputer’sscreentolower
resolution than the one displayed at Step 3 on page 50.
NOTE:Whenthenetworkprojectorfunctionworks,thebackgroundcolorofthedesktopchangestosolidcolor.Whenthenetwork
projectorfunctionisstopped,theoriginalbackgroundcolorisrestored.
Reference:IftheprojectorcannotbefoundatStep5,click[Entertheprojectoraddress].Then,inputthe“Networkaddress”
(Inputexample:http://10.32.97.61/lan)and“Projectorpassword”(Inputexample:82291627)displayedinthescreenprojected
fromtheprojector.
ExitingtheNetworkProjectorOperation
1.Click[Projecting:P501Series]intheWindowsVistataskbar.
2.Click[Disconnect].
TheNetworkProjectorfunctionisstopped.
3.PresstheSOURCEbuttonoftheprojectortoselectaninputterminalotherthan[NETWORK].
When using the remote control, press a button other than the NETWORK button.
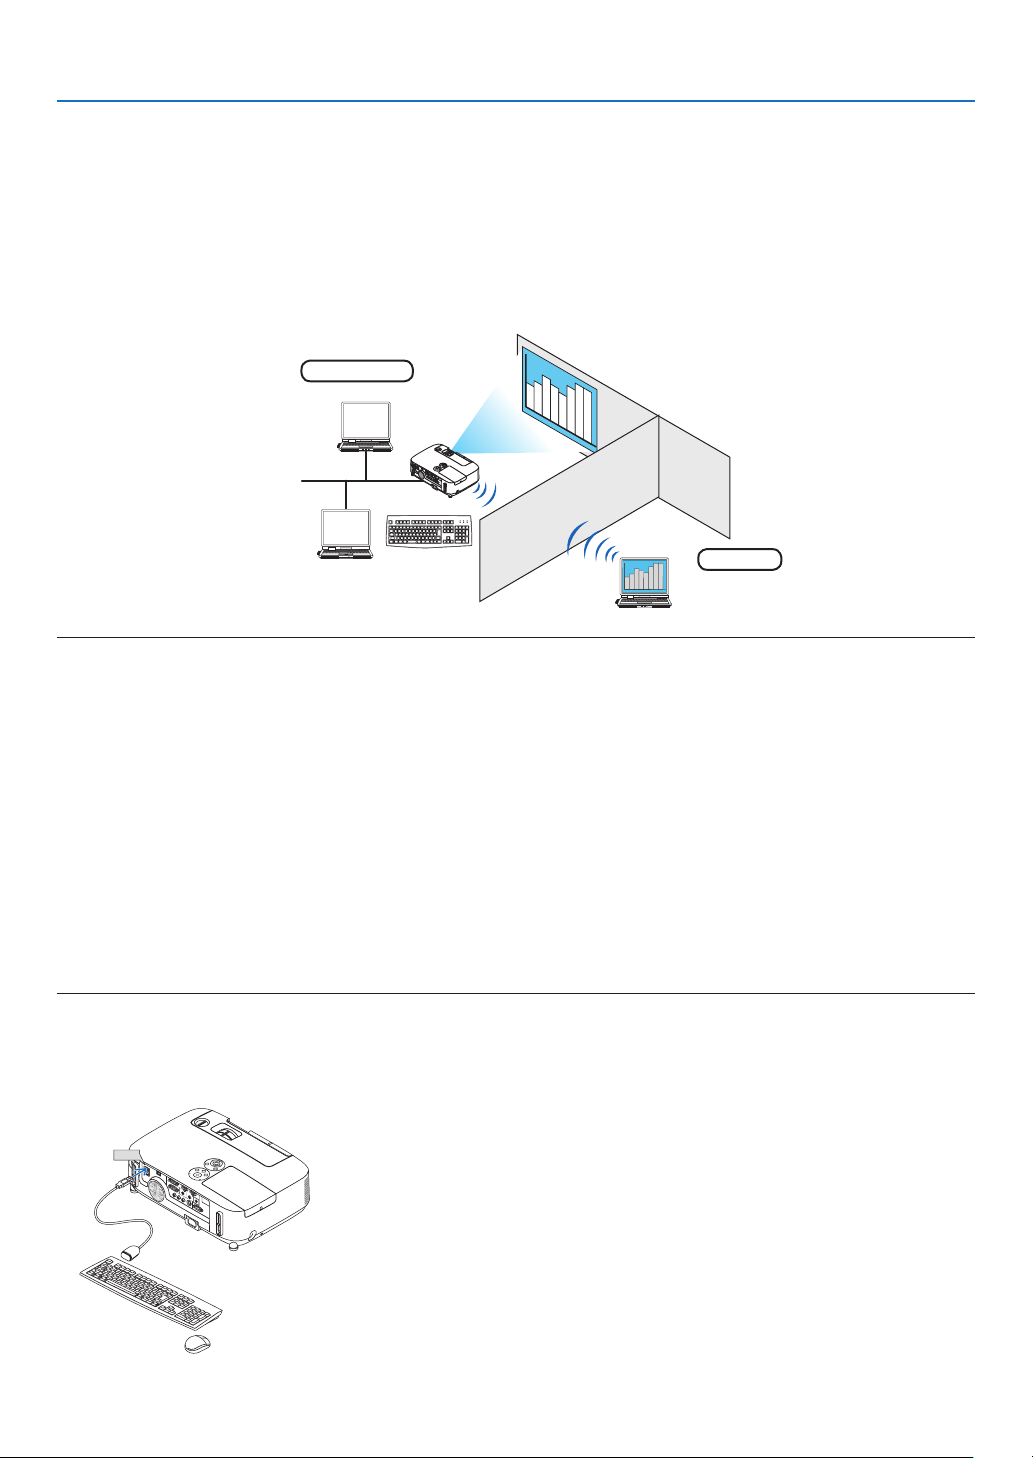
53
3. Convenient Features
⓫ Using the Projector to Operate Your Computer via a Network
[REMOTE DESKTOP] (not supported by PE501X)
•ByselectingthePCconnectedtothesamenetworkasthatoftheprojector,thePCscreenimagecanbeprojected
tothescreenvianetwork.
Then,byoperatingthekeyboard,youcanoperateWindows8,Windows7,WindowsVistaorWindowsXPonthe
PCconnectedwiththenetwork.
•WiththeRemoteDesktopfunction,youcanremotelyoperatethePCplacedatadistancefromtheprojector.
Meetingroom
Ofce
NOTE:
•The[REMOTEDESKTOP]functionwillworkonthefollowingWindowseditions.
Windows8Pro,Windows8Enterprise,
Windows7Professional,Windows7Ultimate,Windows7Enterprise,
WindowsVistaHomePremium,WindowsVistaBusiness,WindowsVistaUltimate,WindowsVistaEnterprise,
WindowsXPProfessionalwithServicePack3
(Note)
•Inthisuser’smanualthisfeatureisdescribedusingWindows7asanexample.
•AkeyboardisrequiredtousetheRemoteDesktopfunction.
•TheRemoteDesktopfunctioncanbeoperatedwithakeyboard.Usingawirelessmousewithawirelesskeyboardismoreuseful
foroperating.
Useacommerciallyavailablewirelesskeyboard,awirelessmouse,andaUSBwirelessreceiver.
UseacommerciallyavailableUSBkeyboardandUSBmouse.
•AUSBkeyboardwithabuilt-inUSBhubcannotbeusedwiththeprojector.
•AwirelesskeyboardormousethatsupportsBluetoothcannotbeusedwiththeprojector.
•WedonotwarrantthattheUSBportoftheprojectorwillsupportallUSBdevicesinthemarket.
Prepareacommerciallyavailablewirelesskeyboard(USlayoutversion).
ConnecttheUSBwirelessreceivertotheUSBport(TypeA)oftheprojector.Makeallnecessarysettingsforyour
wirelesskeyboardandmouse.
USB
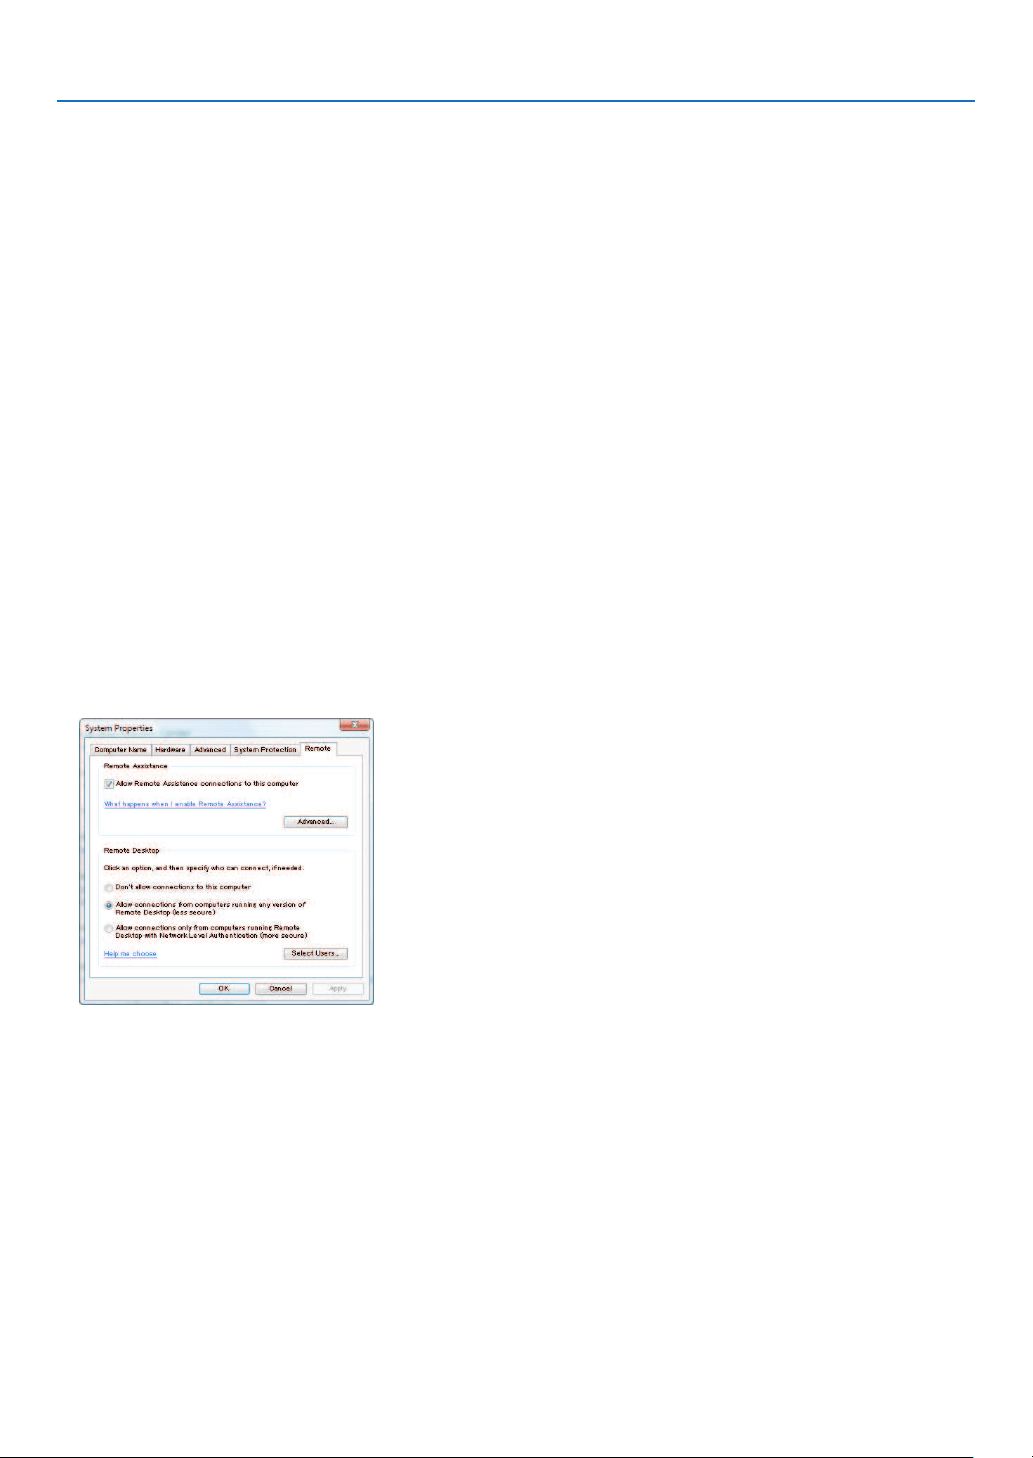
54
3. Convenient Features
SettingthepasswordtotheuseraccountofWindows7
TIP:Ifapasswordhasbeensetforanaccount,thesteps1to9canbeskipped.
1.Click[Start]fromthedesktopofWindows7.
2.Click[ControlPanel].
3.Click[Addorremoveuseraccounts]displayedunder[UserAccounts].
4.Whenthe[UserAccountControl]conrmationwindowappears,click[Continue].
5.Click[Administrator].
6.Click[Createapassword].
7.Inputthepasswordtothe[Newpassword]box.
8.InputthesamepasswordasthatatStep7tothe[Conrmnewpassword]box.
9.Click[Createapassword].
The Administrator is changed to [Password Protection].
SettingtheRemoteAccess
1.Click[Start]fromthedesktopofWindows7.
2.Click[ControlPanel].
3.Click[SystemandSecurity].
4.Click[Allowremoteaccess]displayedunder[System].
5.Whenthe[UserAccountControl]conrmationwindowappears,click[Continue].
The [System Properties] window appears.
6.Click[AllowconnectionsfromcomputersrunninganyversionofRemoteDesktop(lesssecure)]inthe
RemoteDesktopboxandclick[OK].
CheckingtheIPaddressonWindows7
1.Click[Start]fromthedesktopofWindows7.
2.Click[ControlPanel].
3.Click[Viewnetworkstatusandtasks]displayedunder[NetworkandInternet].
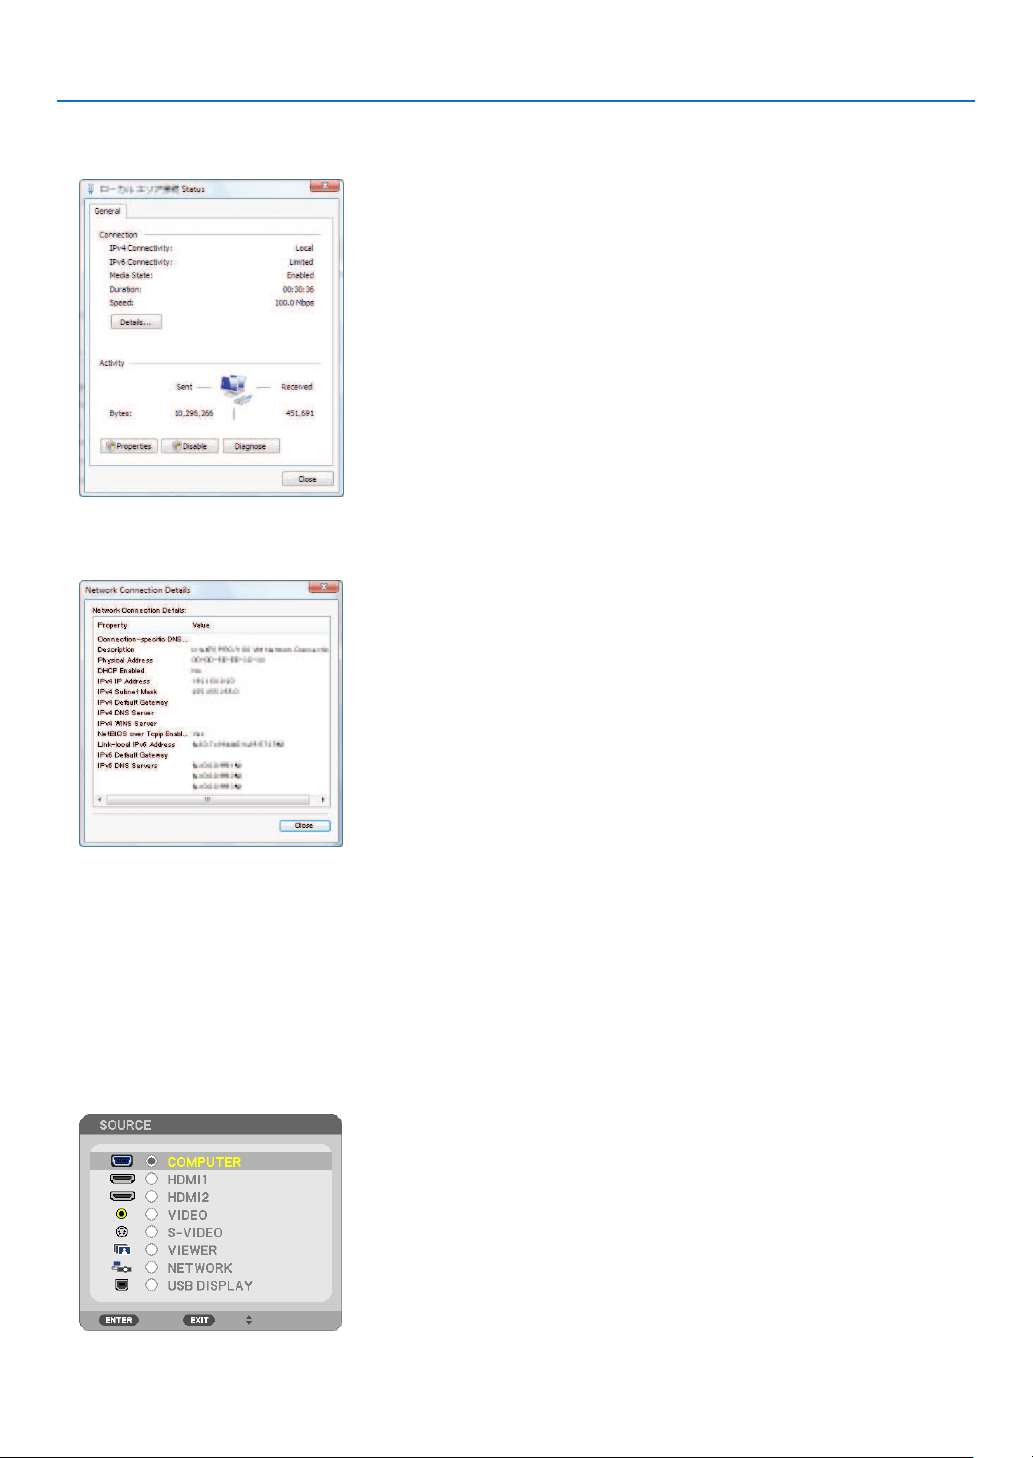
55
3. Convenient Features
4.Click[Viewstatus]displayedinblueontherightof[LocalAreaConnection]inthewindow.
The [Local Area Connection Status] window appears.
5.Click[Details...].
Writedownthevaluefor“IPv4IPAddress”(xxx.xxx.xxx.xxx)displayed.
6.Click[Close].
7.Click[X]attheupperrightofthewindow.
Thesystemgoesbacktothedesktop.
StartingtheRemoteDesktop
1.Withtheprojectorturnedon,presstheSOURCEbutton.
The input selection window appears.
Another way to display the input selection window is to press the NETWORK button on the remote control. The
APPLICATIONMENUscreenwillbedisplayed.Gotostep3.
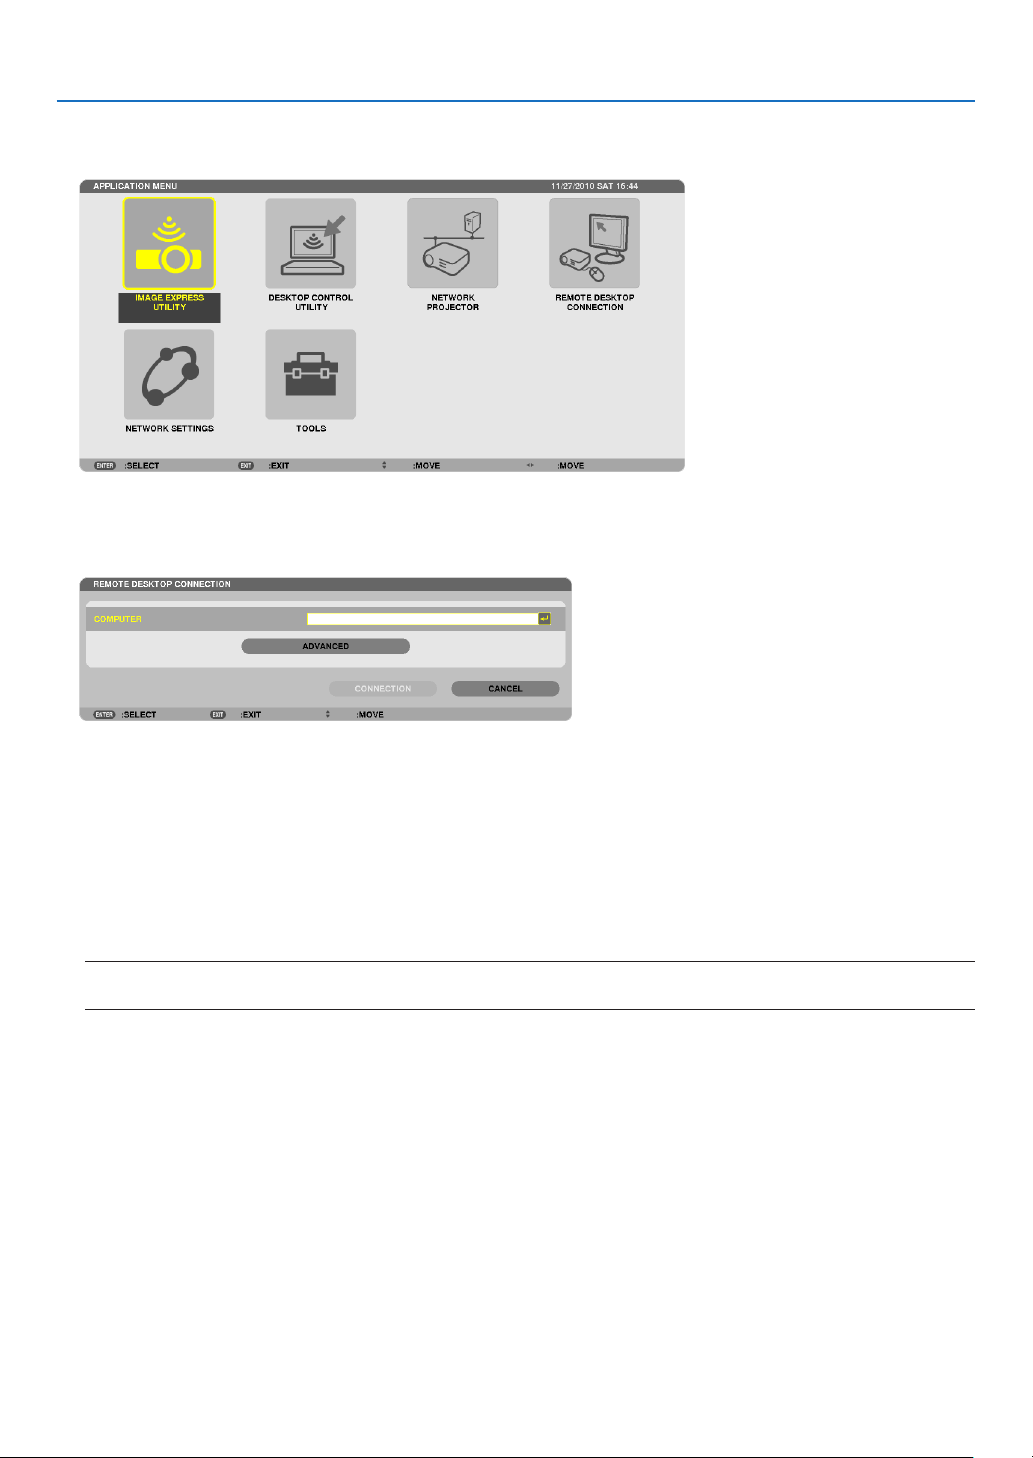
56
3. Convenient Features
2.PresstheSELECT▼ or ▲buttontoselect[NETWORK]andpresstheENTERbutton.
The[APPLICATIONMENU]menuwillbedisplayed.
3.Fromthe[APPLICATIONMENU]menu,usethewirelesskeyboardtoselect[REMOTEDESKTOPCONNEC-
TION].
The[REMOTEDESKTOPCONNECTION]windowappears.
4.OperatethewirelesskeyboardtoinputtheIPaddressofWindows7andclick[CONNECTION].
The log-on screen of Windows 7 is displayed in the screen projected by the projector.
5.Operatethewirelesskeyboardtoinputtheuser’spasswordandpress“Enter”.
Theremotedesktopfunctionisstarted.
Windows7desktopisdisplayedinthescreenprojectedbytheprojector.
Log out the computer.
UsethewirelesskeyboardconnectedtotheprojectortooperateWindows7.
NOTE:Whentheprojectionismadewiththeremotedesktopfunction,thebackgroundcolorofthedesktopischangedtosolid
color.

57
3. Convenient Features
ExitingtheRemoteDesktop
1.Operatethewirelesskeyboardtoclick[Start]fromthedesktopscreenprojectedbytheprojector.
2.Click[X]ontherightofthestartmenu.
Theremotedesktopfunctionisstopped.
3.PresstheSOURCEbuttonoftheprojectortoselectaninputterminalotherthan[NETWORK].
When using the remote control, press a button other than the NETWORK button.
TIP:
Setting[OPTIONS]inREMOTEDESKTOP
Clicking[OPTIONS]displaysthe[PERFORMANCE]screen.
Makingsettingsto[OPTIONS]willallowyoutodisplaythedesktopbackground,ortoenablethewindowanimationfunctionduring
theRemoteDesktopoperation.However,doingthiswillcausethedisplay’sormouse’sresponsetoslowdown.
Ifthedisplay’sormouse’sresponseissloweddown,tryoneormoreofthefollowing:
DESKTOPBACKGROUND:Clearthecheckmarktodisplaythedesktopbackgroundinsolidcolor.
MENUANDWINDOWANIMATION:Clearthecheckmarktodisablemenuandwindowanimation.
THEMES:ClearthecheckmarknottouseThemes.
SHOWCONTENTSOFWINDOWWHILEDRAGGING:Clearthecheckmarktoshowonlythewindowpanewhile
dragging.
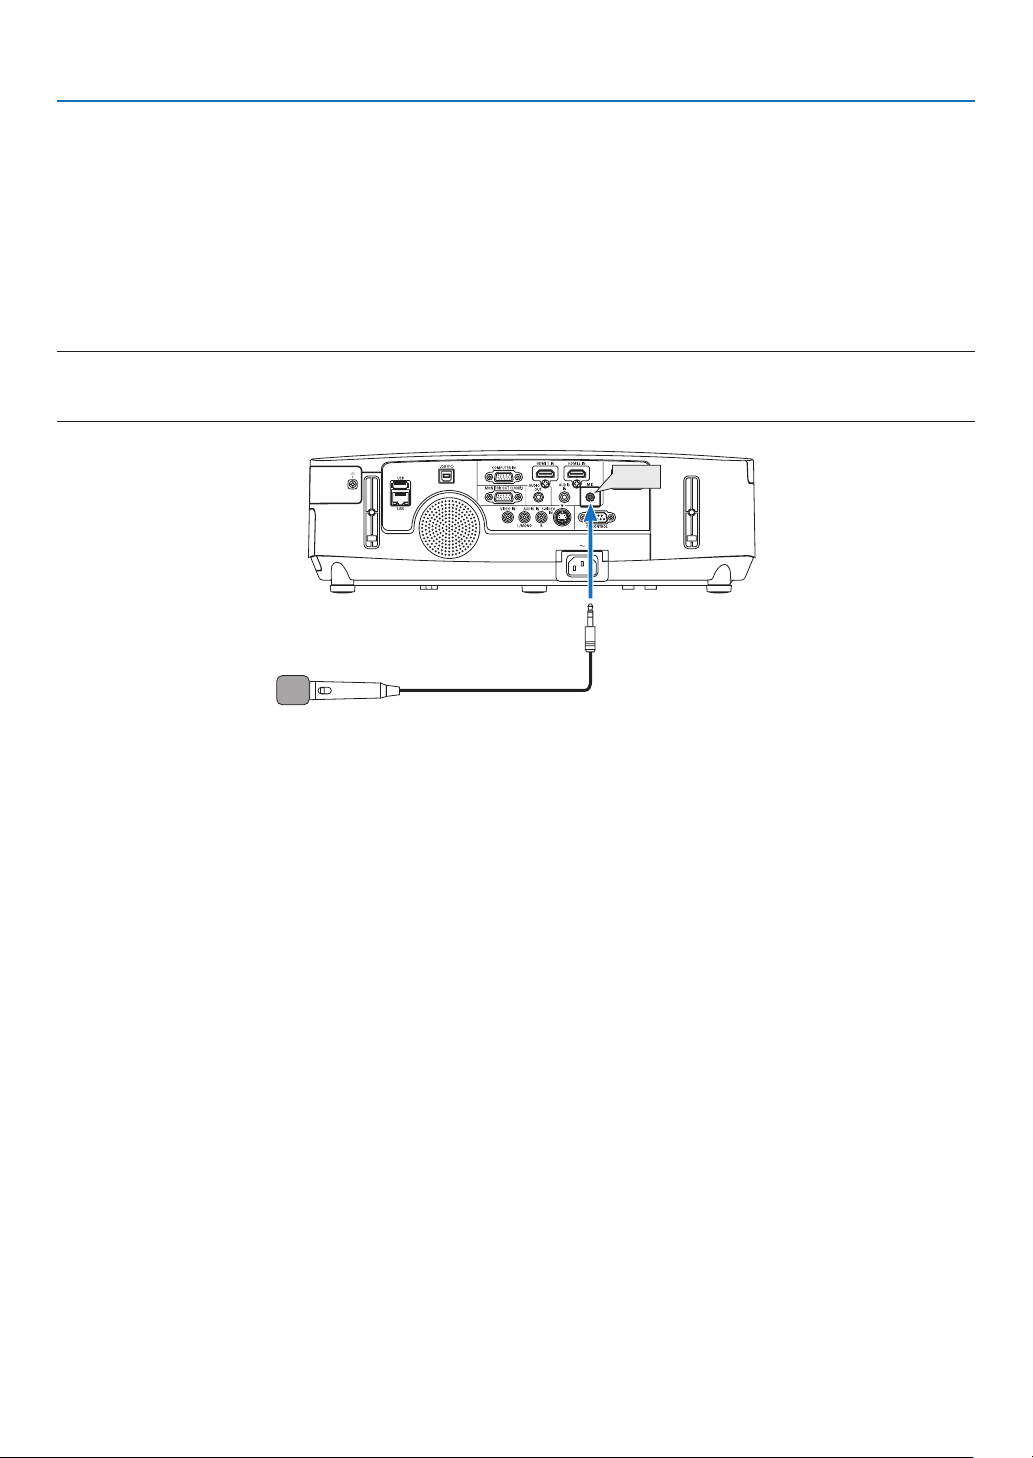
58
3. Convenient Features
⓬ Connecting Your Microphone
ConnectingacommerciallyavailabledynamicmicrophonetotheMICinputjackallowsyoutooutputyourmicsound
fromthebuilt-inspeaker.
SoundfromCOMPUTER,VIDEO,S-VIDEO,andHDMIaudioinputsorsoundofVIEWER/NETWORKinputwillbe
heardfromthespeakerwithyourmicrophonevoice.
Microphonesensitivitycanbeadjusted.Fromthemenu,select[SETUP][INSTALLATION][MICGAIN].(page
107)
NOTE:
•TheMICinputjackdoesnotsupportpluginpowermicrophones.
•IfthereisnosignalwheneitherHDMIinputisselected,soundoutputmaynotwork.
MIC

59
4. Using the Viewer (not supported by PE501X)
❶ What you can do with the Viewer
TheViewerfeatureallowsyoutoviewslidesormovielesstoredonaUSBmemoryontheprojector,orashared
folderinacomputerconnectedtothenetwork.
TheViewerhasthefollowingfeatures.
•WhenacommerciallyavailableUSBmemorythatstoresimagelesisinsertedintotheUSBport(TypeA)ofthe
projector,theViewerallowsyoutoviewtheimagelesontheUSBmemory.
Evenifnocomputerisavailable,presentationscanbeconductedsimplywiththeprojector.
•Movielewithaudiocanbeplayedback.
•AMicrosoftPowerPoint/ExcelleorAdobePDFlecanbesimplyprojectedonthescreenwithoutconnectinga
computer.
•Imageandmovielesstoredinasharedfolderinacomputerconnectedtoanetworkcanbeprojected.
Thecomputerwith“MediaSharing”ofWindowsMediaPlayer11turnedoncanbeusedasamediaserver.
Supportedgraphicformats
FormatFilenameextension
JPEG.jpg,.jpe,.jpeg(CMYKisnotsupported.)
BMP.bmp(biteldnotsupported)
PNG.png(InterlacedPNGandchannelPNGarenotsupported.)
GIF.gif(InterlacedGIF,transparationGIF,andanimationGIFarenotsupported.)
*Ifanunsupportedimageisselected,theicon
willbedisplayed.
NOTE:
Maximumnumberofpixelsofimagewhichcanbedisplayedare:
•BaselineJPEG:10000×10000
•ProgressiveJPEG:1280×1280
•GIF:1280×1280
•Others:4000×4000
•Somelessupportedbytheaboverequirementsmaynotbedisplayed.
Supportedmovieles
FilenameextensionVideocompression/expansionmethodAudiocompression/expansionmethod
.mpg,.mpeg.MPEG2MPEGAudioLayer2
MPEGAudioLayer3
.wmvVC-1/WMV9WMA9Standard
.mp4H.264/AVCAAC-LC
Playbackrequirements:
Resolution:320×240to1280×720
Videoframerate:upto30fps
Bitrate:upto15Mbps
Audiosamplingrate:upto48kHz
Channel:upto2chstereo
Audiobitrate:upto256Kbps
Max.lesize:upto2GB

60
4. Using the Viewer
NOTE:
•Movielesconvertedbyusingthevideo/audioformatwhichisnotsupportedbythisprojectorcannotbeplayedback.
Inthiscase,therewillbenoicontoshowthatplaybackisnotpossible.
•FileswithDigitalRightsManagement(DRM)protectioncannotbeplayedback.
•Someofthemovielesthatmeettheaboverequirementsmaynotbeplayedback.Movielesmaynotbeplayedbackcorrectly
dependingonyournetworkenvironmentorthebitrateofyourle.
•WMVformatvideolewillbedisplayedinanaspectratioof1to1independentlyofitsoriginalaspectratio.
•Filesthatcanbeplayedbackonthemediaserveraregraphicsandmovieles.InWindowsMediaPlayer11(WindowsXP/
WindowsVista)mp4lescannotbeplayedback.
SupportedPDFles
FilenameextensionSupportedleformat
.pdfAdobeAcrobatPDF
NOTE:
•FontsnotembeddedinPDFmaynotbedisplayed
•FunctionsaddedtoPDFleaftercreatedwillnotworkordisplay.Functionsaddedarebookmarks,boxesinformtool,andnotes
willnotbedisplayed.
AutoiporAutotransitionwillnotwork.
•SomePDFlesmaynotbedisplayed.
SupportedPowerPointles
FilenameextensionSupportedleformat
.ppt,.pptxMicrosoftPowerPoint97–2007
NOTE:
•Playablefonts,colors,fontornament,placement,objectinsertionoranimationarerestricted.
•SomeMicrosoftPowerPoint97–2007lesmaynotbedisplayed.
SupportedExcelles
FilenameextensionSupportedleformat
.xls,.xlsxMicrosoftExcel97-2007
NOTE:
•Playablefonts,colors,fontornament,graphs,orgraphicsarerestricted.
•SomeMicrosoftExcel97-2007lesmaynotbedisplayed.
SupportedUSBmemorydevices
-BesuretouseaUSBmemorydeviceformattedwiththeFAT,exFAT,FAT32orFAT16lesystem.
TheprojectordoesnotsupportNTFSformattedUSBmemory.
IftheprojectordoesnotrecognizeyourUSBmemory,checkiftheformatissupported.
ToformatyourUSBmemoryinyourcomputer,refertothedocumentorhelplethatcomeswithyourWin-
dows.
-WedonotwarrantthattheUSBportoftheprojectorwillsupportallUSBmemoriesinthemarket.

61
4. Using the Viewer
Noticesonsharedfolderandmediaserver
•Filesfromasharedfolderormediaservermaynotbeprojectedifsecurityorantivirussoftwareisinstalledonyour
computer.
•Openthefollowingrewallports:
-Mediaserver
Port number Protocol
1900UDP
2869TCP
10243 TCP
10280-10284 UDP
-Sharedfolder
Port number Protocol
137UDP/TCP
138 UDP/TCP
139UDP/TCP
445 UDP/TCP
•Setyourcomputerforsharingandsecuritytograntaccesstolesinthesharedfolderandsetyoursecurityor
antivirussoftwaretograntaccesstolesinthesharedfolder.Consultyournetworkadministratorformoreinforma-
tion.
•Movielesinthesharedfolderorthemediaservermaynotbeplayedbackcorrectlydependingonyournetwork
environmentorthebitrateofyourle.
NOTE:
DonotdisconnectbetweentheprojectorandyourcomputerbyremovingtheLANcableorturningofftheprojectorwhenaPow-
erPointleorPDFleisdisplayedfromasharedfolder.
DoingsowillmakeViewerinoperable.
NOTE
•ThefollowingoperationsbyusingthebuttonsontheprojectorarenotpossiblewhentheVIEWERscreensuchastheslidescreen
andthethumbnailscreenisdisplayed.
-Keystonecorrectionbyusingthe▲or▼button
-AutoAdjustmentbyusingtheAUTOADJ.button
-Volumecontrolwiththe◀or▶button
•FreezingpicturebyusingtheFREEZE,ASPECT,orAUTOADJ.buttonontheremotecontrolisnotpossiblewhentheVIEWER
screensuchastheslidescreenandthethumbnailscreenisdisplayed.
•Executing[RESET][ALLDATA]fromthemenuwillreturnthesettingsfortheViewertoolbartothefactorydefault.
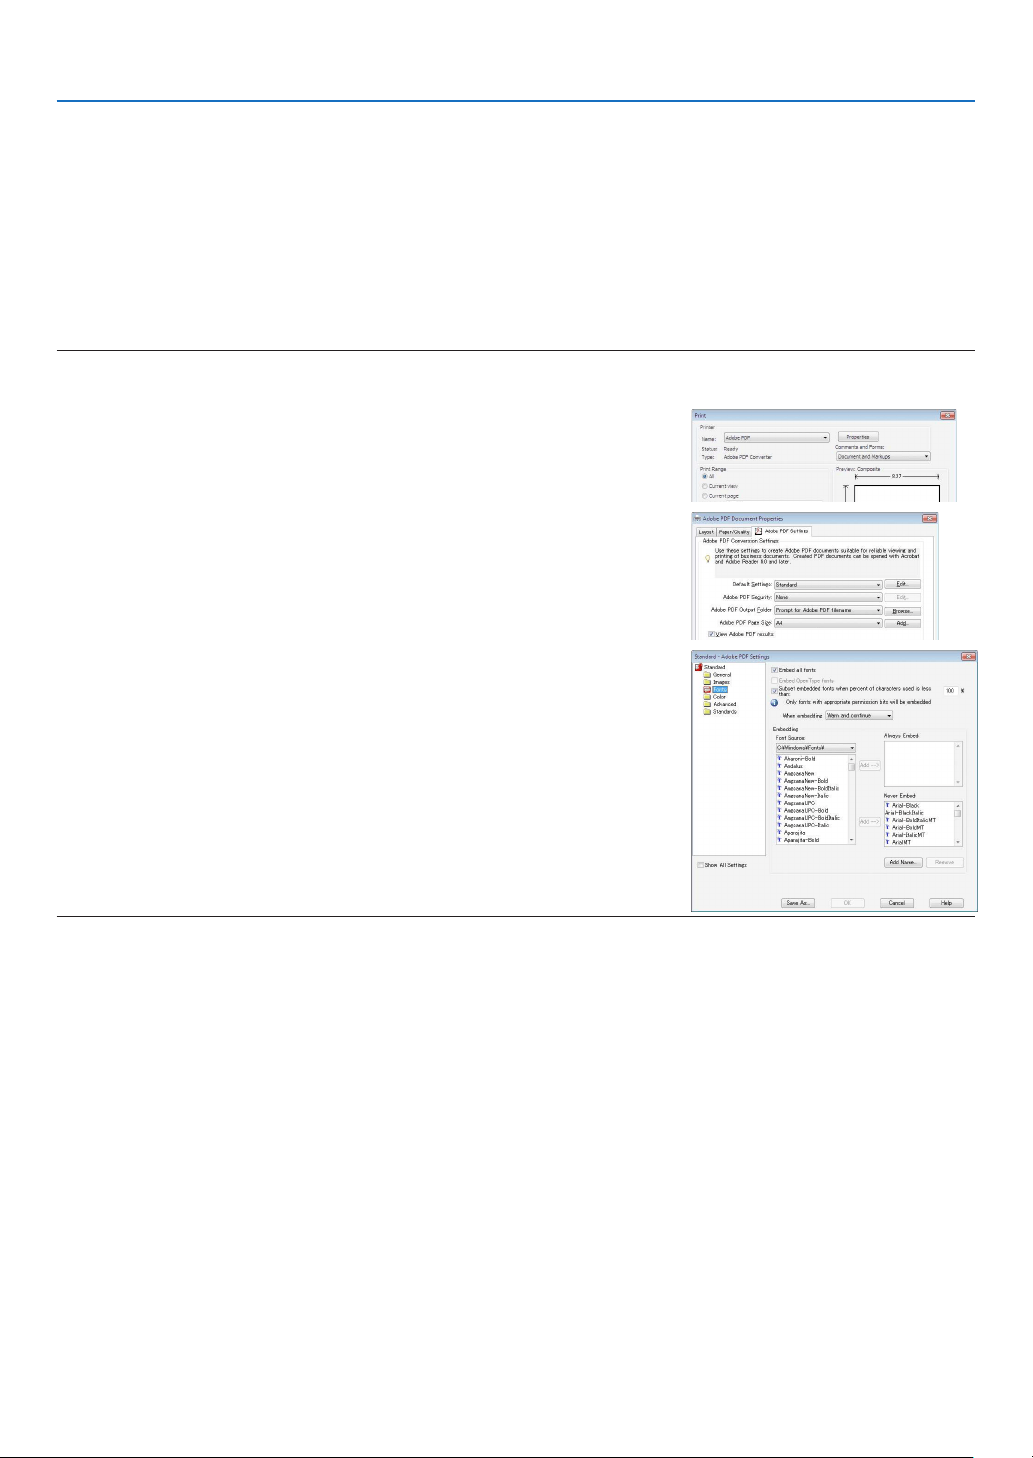
62
4. Using the Viewer
❷ Preparing presentation materials
1.Createyourpresentationmaterialsandsavetheminasupportedleformattoyourcomputer.
•Seepage
86 for supported file formats.
•MakesurethatPowerPointleisdisplayedontheViewerbeforegivingyourrealpresentation.
•WhencreatingaPDFle,embedyourfontsinyourPDFle.EmbeddingfontsrequiresAdobeAcrobat.This
cannot be done in Adobe Reader.
TIP:
•UsingPrintCommand
ExampleforfontembeddingusingPrintCommand.SeethehelpofAdobeAcrobatformoreinformation.
1.Select“Print”fromthe“File”menu.
2.Select“AdobePDF”from“Printername”andclickthe“Properties”but
-
ton.
3.Clickthe“Edit”buttoninthe“AdobePDFSettings”tab.
4.ClickthefonttabintheEditwindowtoselectthefontembedwindow.
5.Placeacheckmarkfor“Embedallfonts”.
Click“OK”toreturntothePrintwindow,andclick“OK”tostartcreatinga
PDF file.
2.Savealetoyourdrive.
To save a file to your USB memory:
Use the Windows Explore to copy the file to your USB memory.
To place a file in a shared folder you create in your computer, see page
77.
Touse“MediaSharing”inWindowsMediaPlayer11,seepage81.
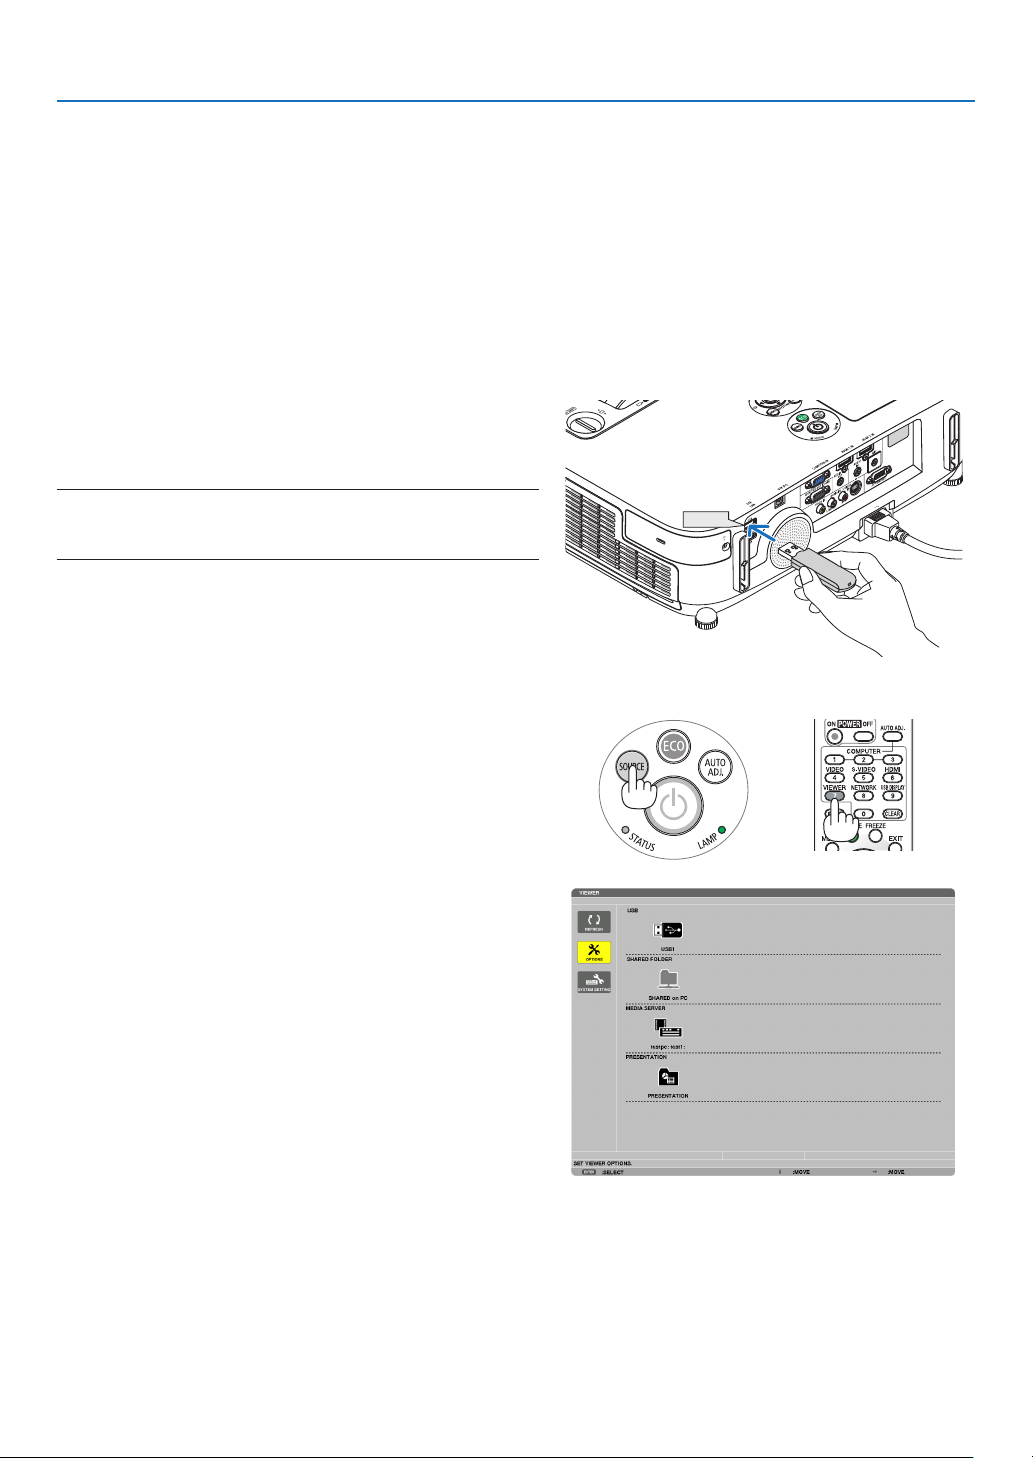
63
4. Using the Viewer
❸ Projecting images stored in a USB memory device
ThissectionexplainsthebasicoperationoftheViewer.
TheexplanationprovidestheoperationalprocedurewhentheViewertoolbarissettothefactorydefault.
Preparation:BeforestartingtheViewer,storeimagestotheUSBmemoryusingyourcomputer.
Starting the Viewer
1. Turn on the projector. (page15)
2.InserttheUSBmemoryintotheUSBportoftheprojec-
tor.
NOTE:
•DonotremovetheUSBmemoryfromtheprojectorwhileit’sLED
ashes.Doingsomaycorruptthedata.
TIP:
YoucanaUSBmemoryinserttheprojectorwhenthedrivelistscreen
isdisplayed.
3.PresstheSOURCEbuttontoselect[VIEWER].
A press of the SOURCE button will display the source select
screen.
A few more presses of the SOURCE button will display the
drive list screen.
Anotherwaytoselect[VIEWER]istopresstheVIEWER
button on the remote control.
TIP:
•Formoreinformationaboutthedrivelistscreen,seepage
69.
•Todisplaygraphicsinasharedfolder,seepage77;todisplaystill
imagesormovielesinamediaserver,seepage81.
USB
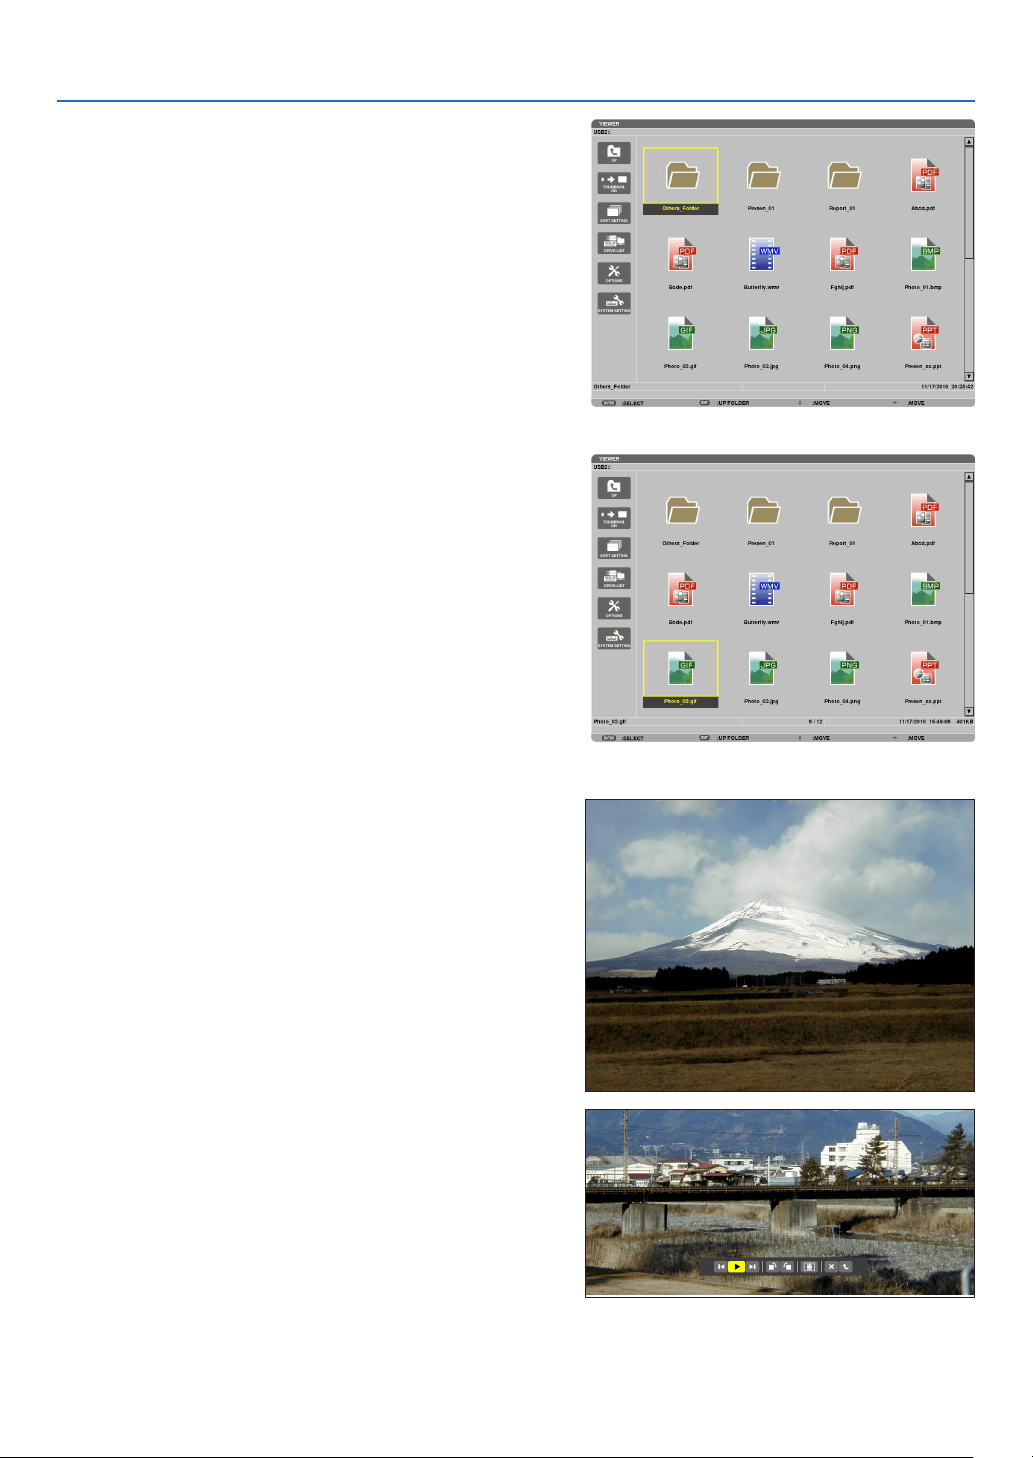
64
4. Using the Viewer
4. Press the ▶buttontoselect“USB1”andpressthe
ENTER button.
The“USB1”thumbnailscreenwillbedisplayed.
TIP:
•Formoreinformationaboutthumbnailscreen,seepage
71.
5. Use the ▲▼◀ or ▶ button to select an icon.
•The (arrow) symbol on the right indicates there are
more pages. pressing the PAGE
▽ (page down) button
will show the next page: pressing the PAGE
△ (page up)
will show the previous page.
6. Press the ENTER button.
Operation varies depending on the selected file.
•Stillimage
The selected slide will be displayed.
The
◀ or ▶ button can be used to select the next (right)
slide or the previous (left) slide in the thumbnail screen.
•PressingtheENTERbuttonwilldisplaythecontrolbar
with which is used to select or rotate an slide.( page
72)
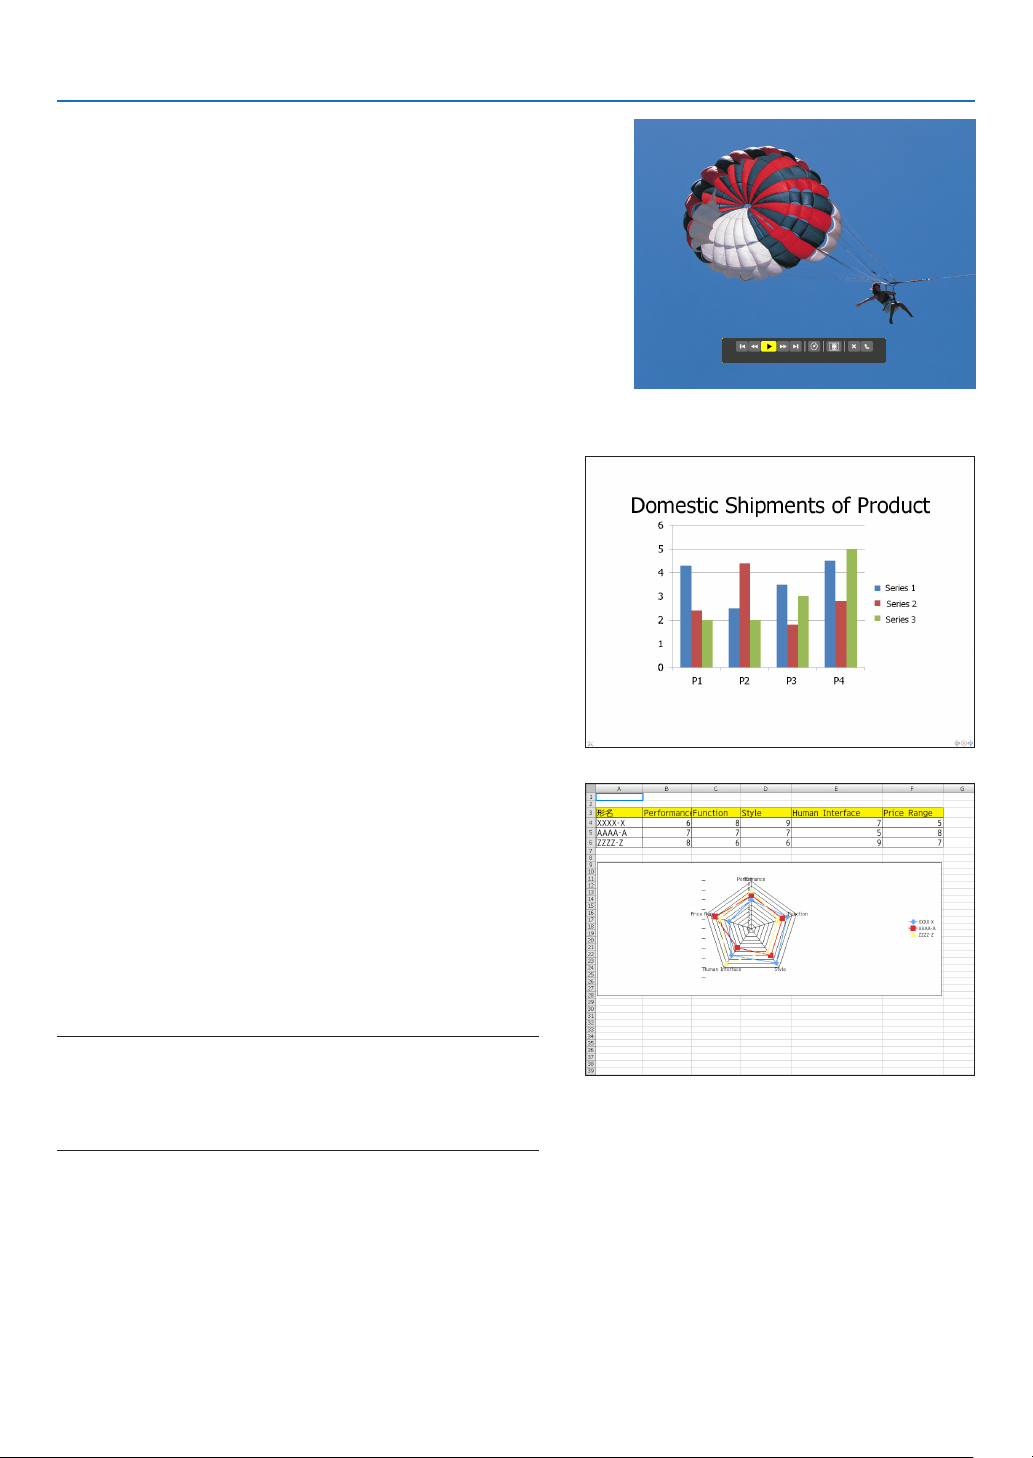
65
4. Using the Viewer
•Moviele
The movie file will start playing.
Afternishingtheplayback,thescreenwillturntoblack.
PresstheEXITbuttontoreturntothethumbnailscreen.
•PressingtheENTERbuttonwilldisplaythemovie’s
control bar with which you can pause or fastforward and
some other operations.
•MicrosoftPowerPoint/Excelle
[PowerPoint]
The slide on the first page will be displayed.
Press
▶ to select the next slide; press ◀ to select the previ-
ous slide.
•Youcanalsousethe▼ or ▲ button to select a page. To
returntothethumbnailscreen,presstheEXITbutton.
[Excel]
The first sheet will be displayed.
Pressing the
▲, ▼, ◀, or ▶ button to scroll the sheet up,
down, left and right.
The PAGE
▼ or PAGE ▲ button will move to the next sheet
or the previous sheet.
Pressing the ENTER button will change the display ratio in
the sheet.
Toreturntothethumbnailscreen,presstheEXITbutton.
NOTE:
•Fileswithslideshoworanimationeffectsmaynotbecorrectly
displayedontheViewer.
See“SupportedPowerPointles”/“SupportedExcelles”onpage
60,86.
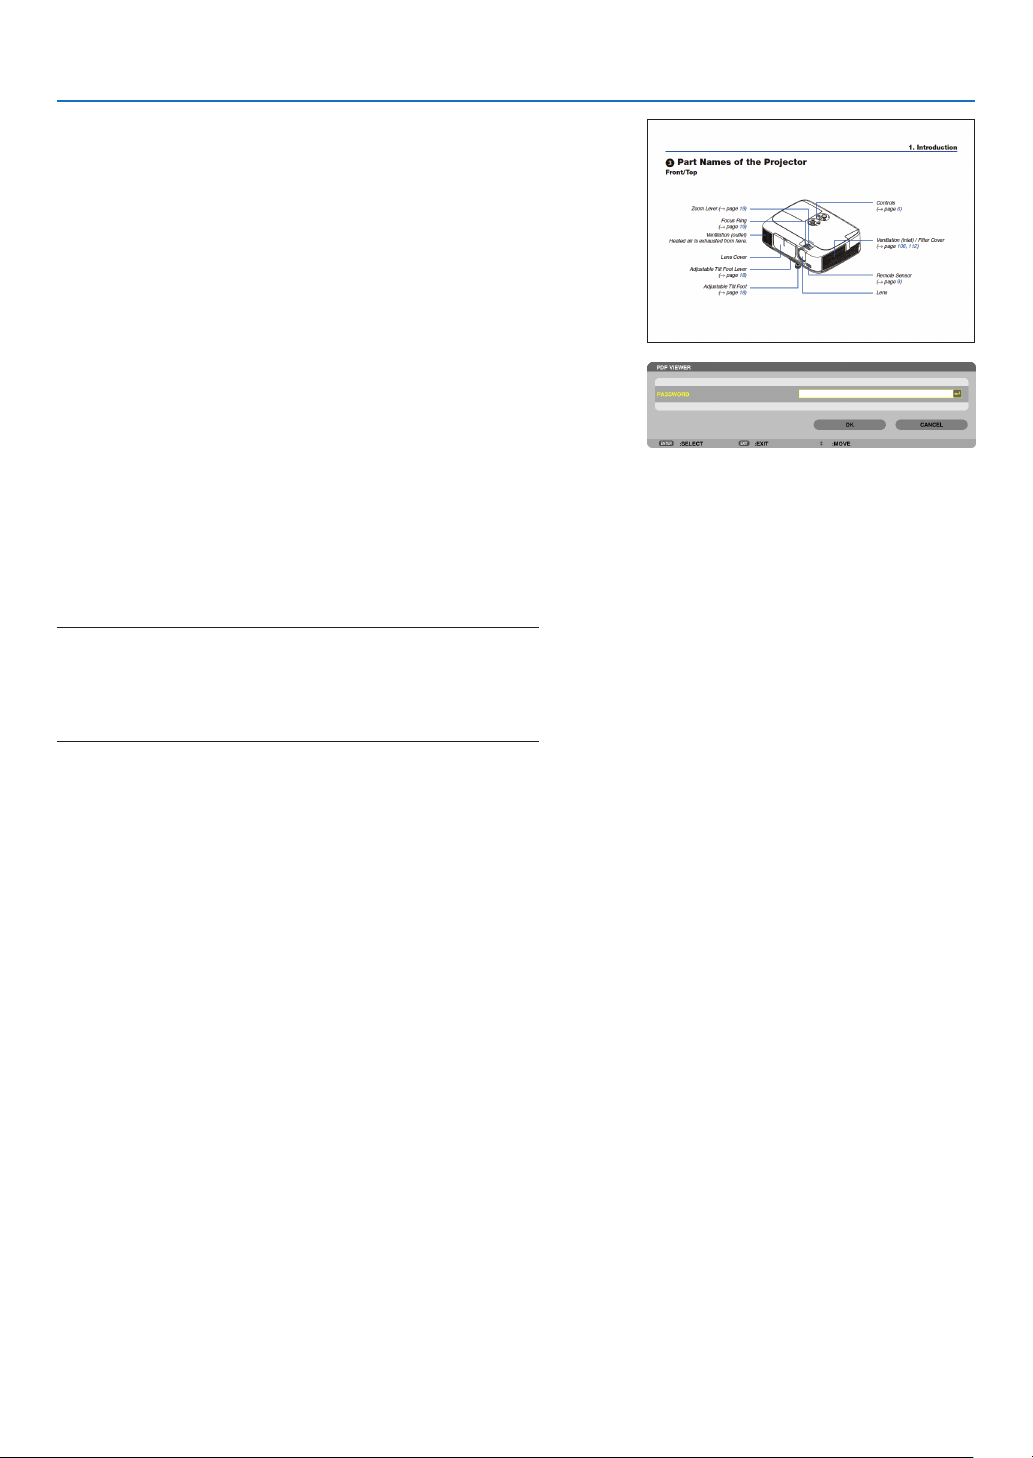
66
4. Using the Viewer
•AdobePDFle
The first page will be displayed.
•ThePDFlewillllthewidthofthescreen.
Pressing the ▼ or ▲ button will scroll the screen down or
up.
The PAGE
▼ or PAGE ▲ button will move the screen one
page down or up.
Toreturntothethumbnailscreen,presstheEXITbutton.
Pressing the ENTER button will change the display mode
between whole screen and part screen.
•Whenapassowordinputwindowisdisplayed,itmeans
that the PDF file is password-protected.
Pressing the ENTER button will show the software
keyboard.Usethesoftwarekeyboardtoenteryour
password.
Select [OK] and press the ENTER button. The PDF file
will be displayed.
•Formoreinformationonthesoftwarekeyboard,seepage
131.
NOTE:
BookmarksandnotesthatwereaddedafterPDFconversionwillnot
bedisplayed.
IffontswerenotembeddedatthetimeofPDFconversion,thosefonts
willnotbedisplayed.
TIP:
Ittakessometime(about30secondstotwominutes)todisplaya
largesizeleortoturnpagesofaPDFlethathasmanypages.
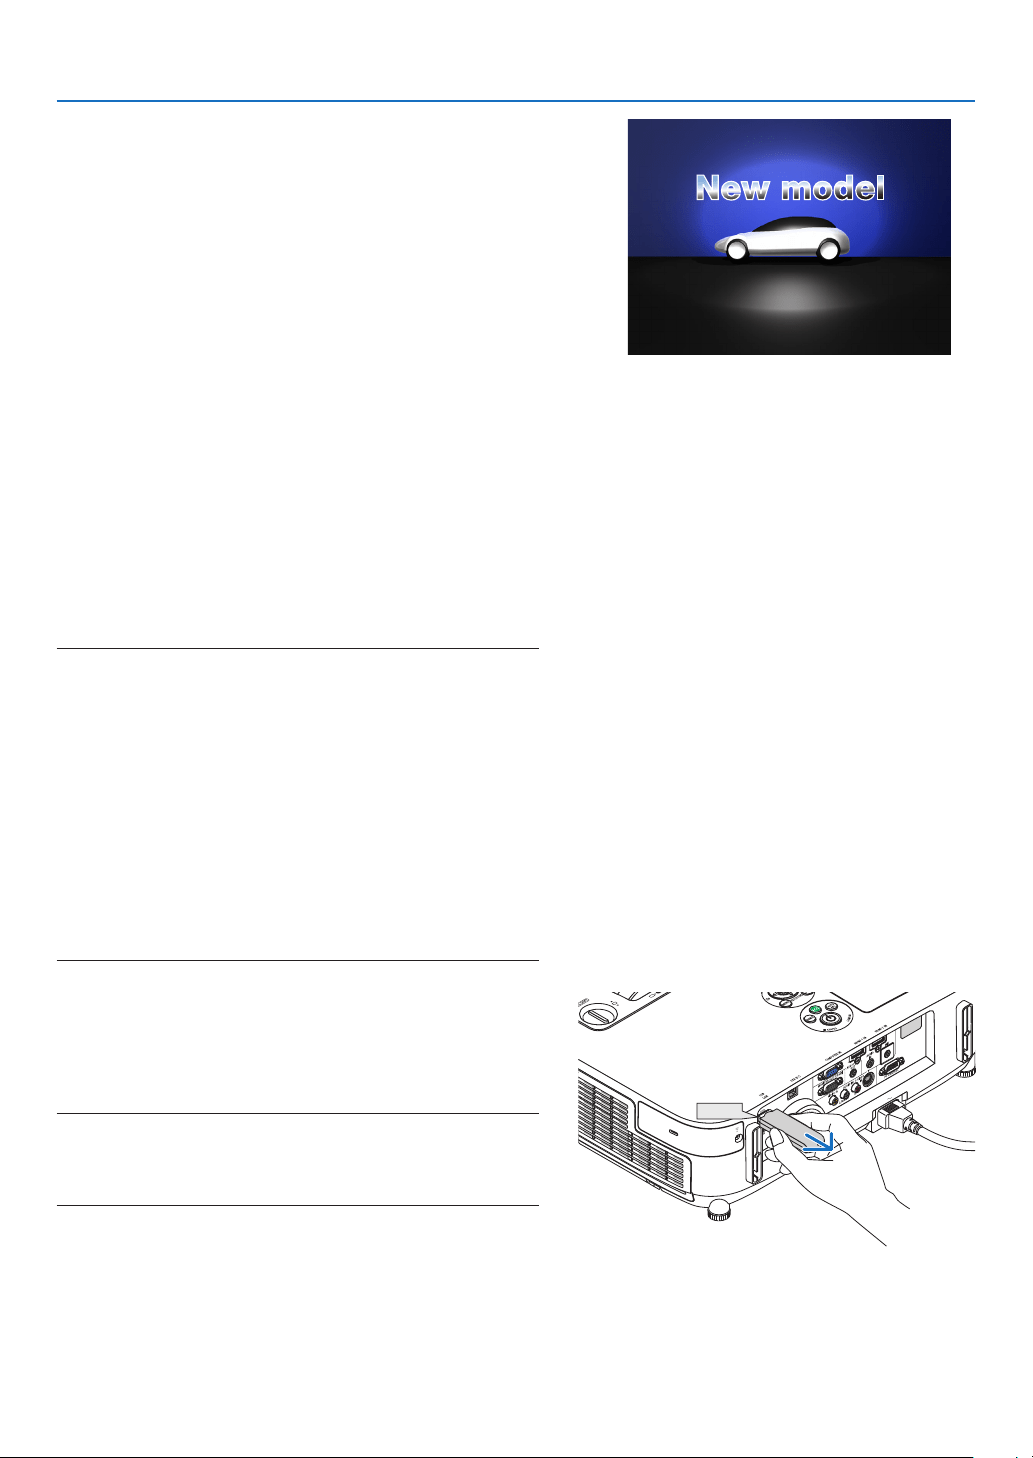
67
4. Using the Viewer
•Indexle(extension:.idx)
•Indexles,whichisconvertedbyusingViewerPPT
Converter 3.0, will appear in the Thumbnail screen.
Only folders and JPEG files converted by using
Viewer PPT Converter 3.0 will appear in the Thumbnail
screen.
TIP:
•ViewerPPTConverter3.0canbedownloadedfromour
website.
URL:
http://www.nec-display.com/dl/en/index.html
•Toselectslideshowofindexles,openthe[PRESENTA-
TION]folderintheDRIVELISTscreen.
However, index files will not appear. Only folders and
JPEG files will appear.
•UptofourindexfoldersinyourUSBandsharedfolder
are displayed. The four folders will be displayed in reverse
chronological order
•WhenyouinserttheUSBmemorydevicestoringindex
with the Viewer in operation, the content of the index files
will be displayed.
NOTE:
•Theplaymode(MANUAL/AUTO)forslidesofindexleworksin
thefollowingway:
Incaseof[MANUAL]for[PLAYMODE]
Whenyouselect[OPTIONS][SLIDESETTING][PLAYMODE]
[MANUAL],indexleswillbesetformanualplaybackinregard-
lessofwhether[INTERVAL]isset.
Incaseof[AUTO]selectedfor[PLAYMODE]
Whenyouselect[OPTIONS][SLIDESETTING][PLAYMODE]
[AUTO],indexleswillbesetforautoplaybackatintervals
speciedbyusing[INTERVAL].
When,however,[-1]isselectedfor[INTERVAL],theplaymodewill
besetforautoplaybackaccordingtothesettingfor[OPTIONS]
[SLIDESETTING][INTERVAL].
7.RemovetheUSBmemoryfromtheprojector.
Returntothedrivelistscreen.MakesurethattheLEDon
the USB memory is not flashing before removing the USB
memory.
NOTE:IfyouremovetheUSBmemoryfromtheprojectorwithaslide
displayed,theprojectormaynotoperatecorrectly.Ifthishappens,
turnofftheprojectorandunplugthepowercord.Wait3minutes,then
connectthepowercord,andturnontheprojector.
USB
XXXX Motors
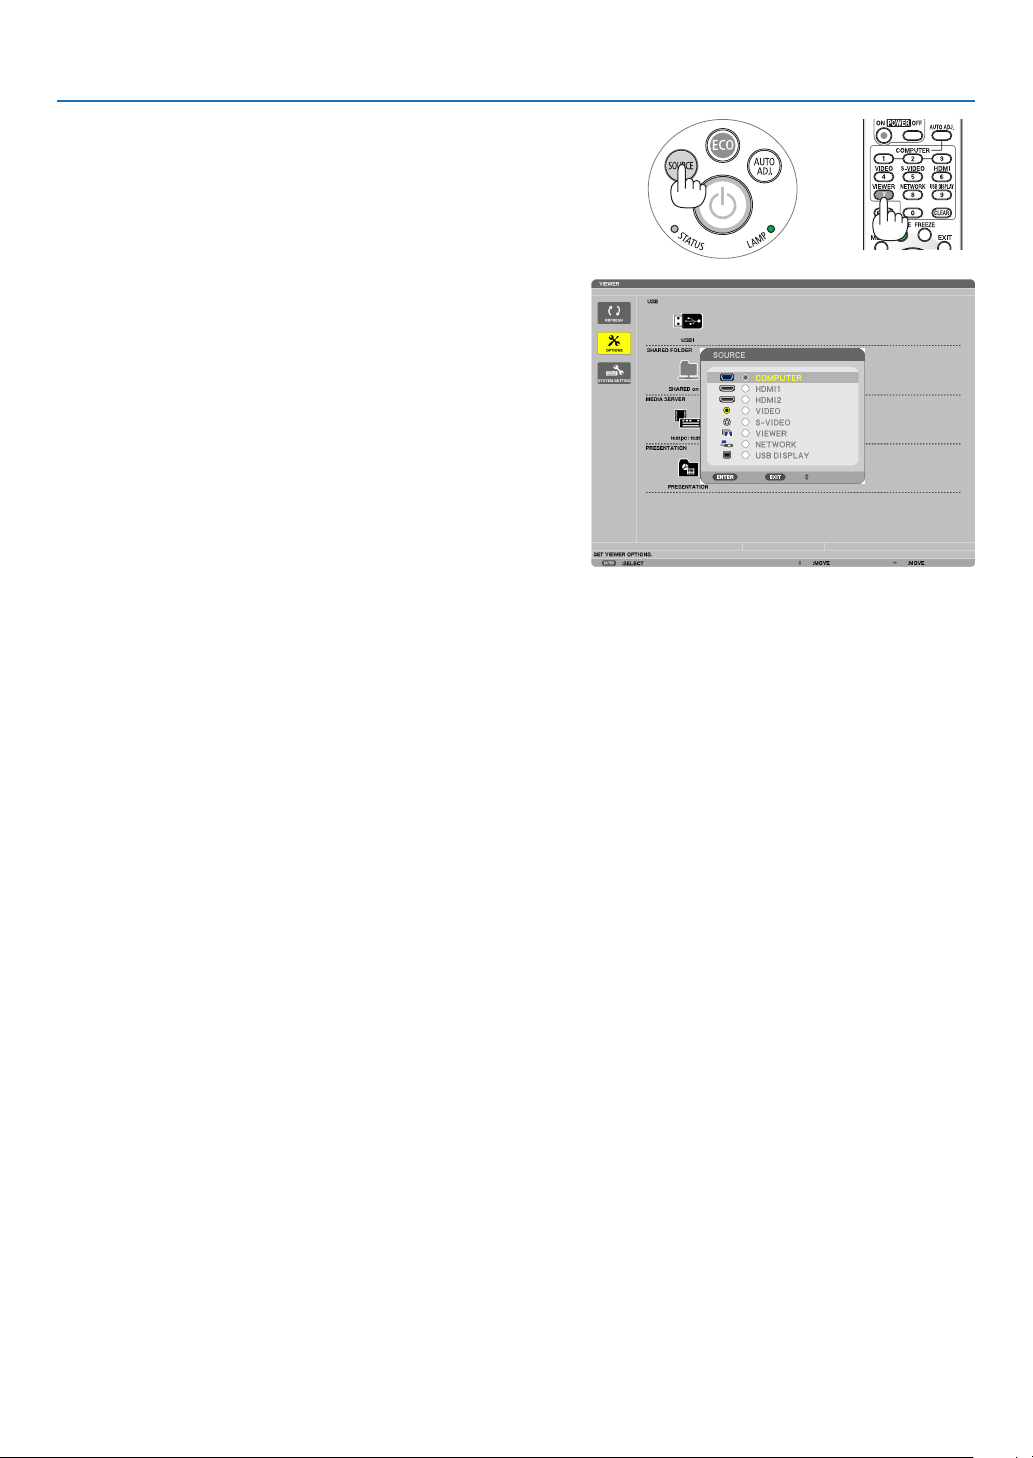
68
4. Using the Viewer
Exiting the Viewer
1.PresstheSOURCEbuttontoselectasourceotherthan
[VIEWER].
A press of the SOURCE button will display the source select
screen.
A few more presses of the SOURCE button will display
another source.
•ToexittheViewerusingtheremotecontrol,selecta
sourceotherthan[VIEWER].
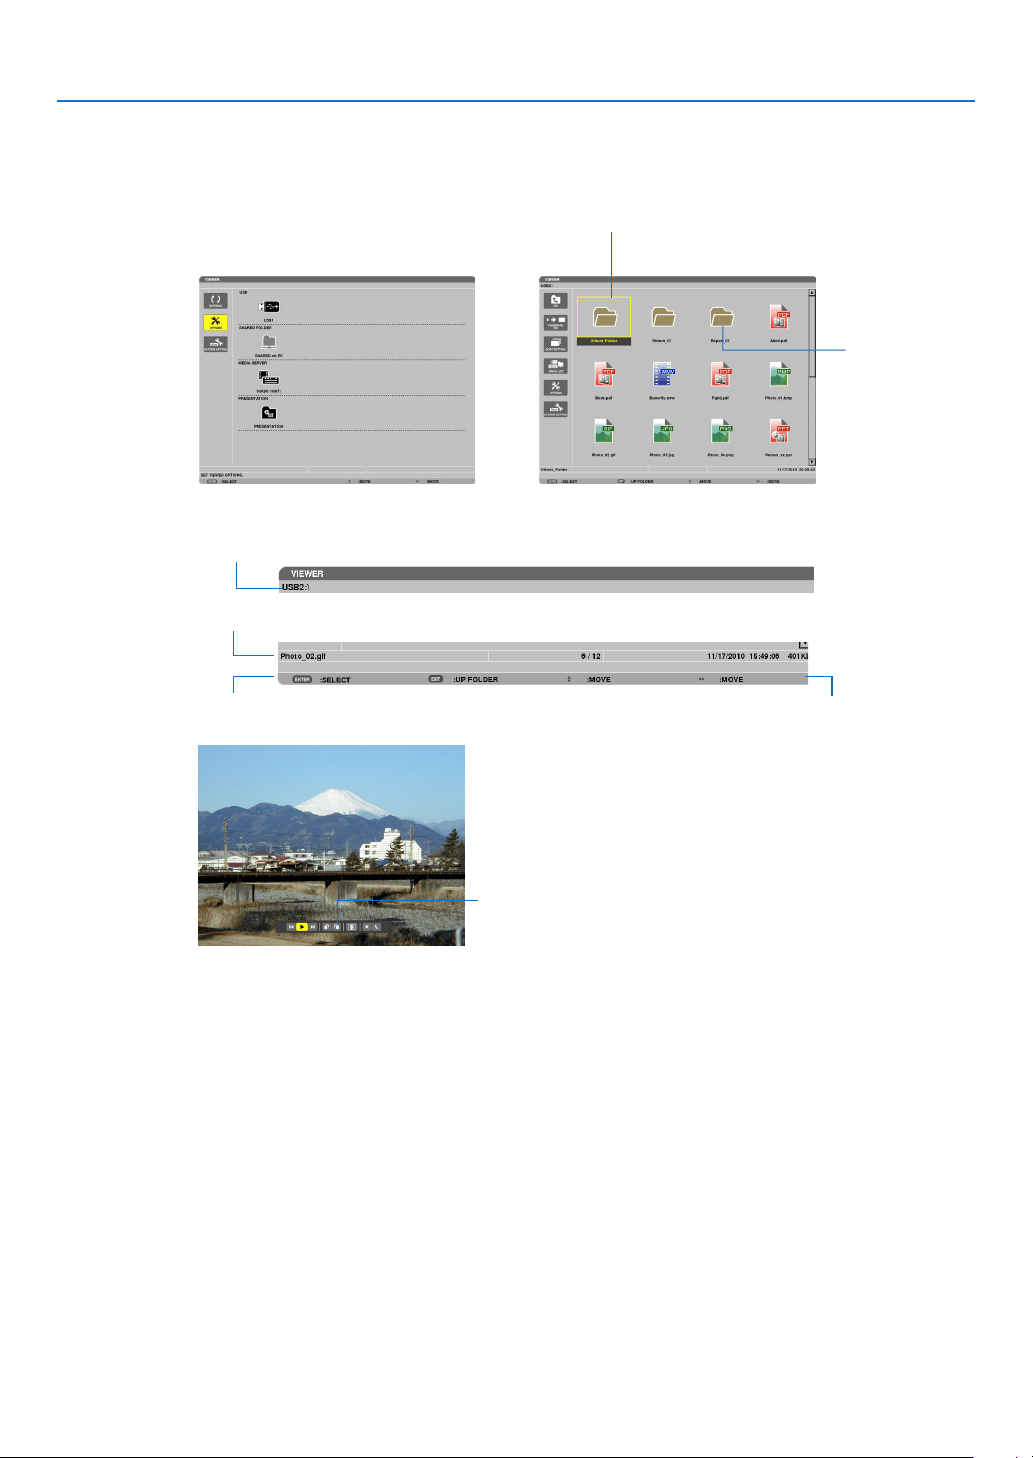
69
4. Using the Viewer
Names and functions of Viewer screen
TheViewerhasthreescreens:Drivelistscreen,Thumbnailscreen,andSlidescreen.
•Drivelistscreen
Displaysalistofdrivesconnectedtotheprojector.
Menuoperation
•Usethe▼
or ▲buttontomovethecursorupordown.SelectthemenuitemandpresstheENTERbutton
todisplaythesubmenu.
OperationforDrivelistscreen
1. Press the ▶buttontomovethecursortothedrivelist.
(Use the ◀ or ▶ button to switch between the menu and the drive list.)
Press the
▼ or ▲ button to select a type of drive; press the ◀ or ▶ button to select the drive connected to the
projector.
2.SelectthedriveandpresstheENTERbuttontoswitchtothethumbnailscreenoftheselecteddrive.
Cursor (yellow) Cursor (yellow)
Menu Menu
Scroll bar
[Drive list screen] [Thumbnail screen]
Folder icon
Path information
Driveinformation/Fileinformation
Menu guide
Operation button guide
Control bar
* The operation for still image differs from that for movie.
[Slide screen]
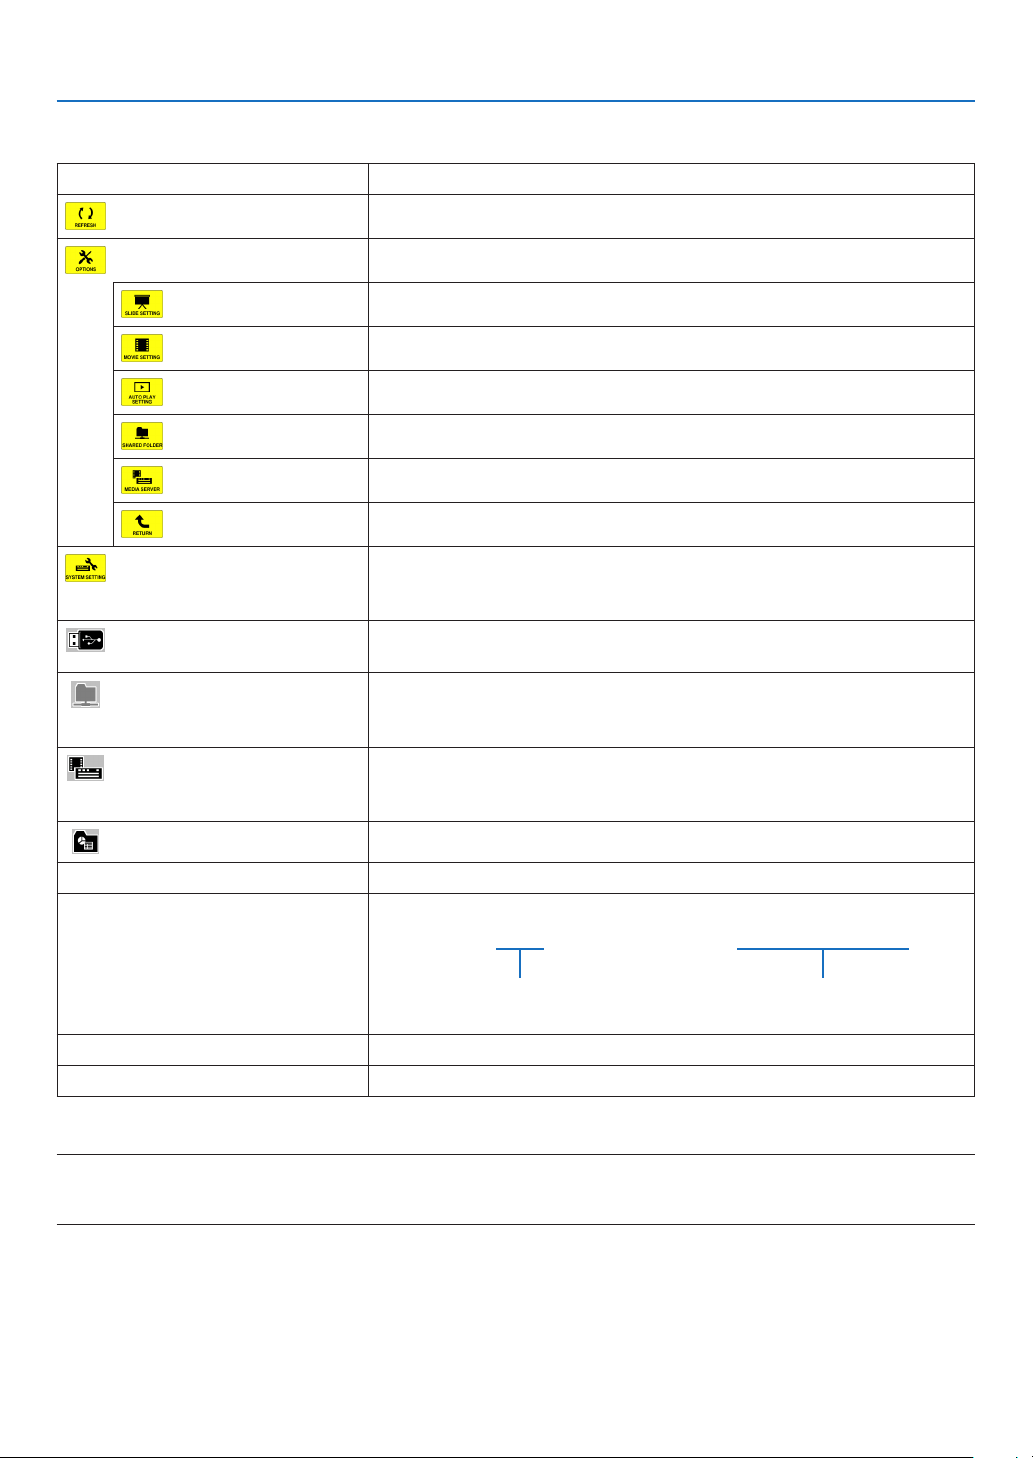
70
4. Using the Viewer
Functions
Name Description
REFRESHDisplaysadditionalmediaserversinthedrivelistscreen.
OPTIONSOpenstheOPTIONSmenu.
SLIDESETTINGSetsupslides.(page74)
MOVIESETTINGSetsupmovieles.(page75)
AUTOPLAYSETTINGSetsupautoplay.(page75)
SHAREEDFOLDERSetsupasharedfolder.(page77)
MEDIASERVERSetsupamediaserver.(page81)
RETURNClosestheOPTIONSmenu.
SYSTEMSETTINGSwitchestothesystemsettingmenu.SeewiredLAN,wirelessLAN,WPS,
networkinformation,mouse,andkeyboardin“9.ApplicationMenu”.(
page118)
USBDisplaystheiconforaUSBmemoryinsertedintotheUSBportofthe
projector.
SHAREDFOLDERDisplaysuptofourdrivesofacomputerconnectedtoaLAN(setforcon-
nectingasharedfolder).
*Seepage77forsettingupforconnectingasharedfoleroftheprojector.
MEDIASERVERDisplaysuptofourdrivesofacomputerconnectedtoaLAN(setforcon-
nectingamediaserver).
*Seepage81forsettingupforconnectingamediaserveroftheprojector
PRESENTATIONDisplaystheiconwhenaUSBmemoryorsharedfolerstoresindexles.
PathinformationDisplaysthelocationofafolderorle.
Driveinformation[Example]
USB1314MBFREE/492MB
Displaysthedrive.Displaysfreespaceandcapcityof
adrive.(USBonly)
MenuguideDisplaysthedescriptionofaselectedmenu.
OperationbuttonguideDisplaysinformationaboutoperationbuttons.
*Itisdisplayedinthree-digitnumber(roundingup)
NOTE:
WhentheOPTIONSmenuisdisplayed,thedrivelistscreenorthumbnailscreenisnotdisplayed.Todisplayit,selectthe[RETURN]
iconandpresstheENTERbutton.
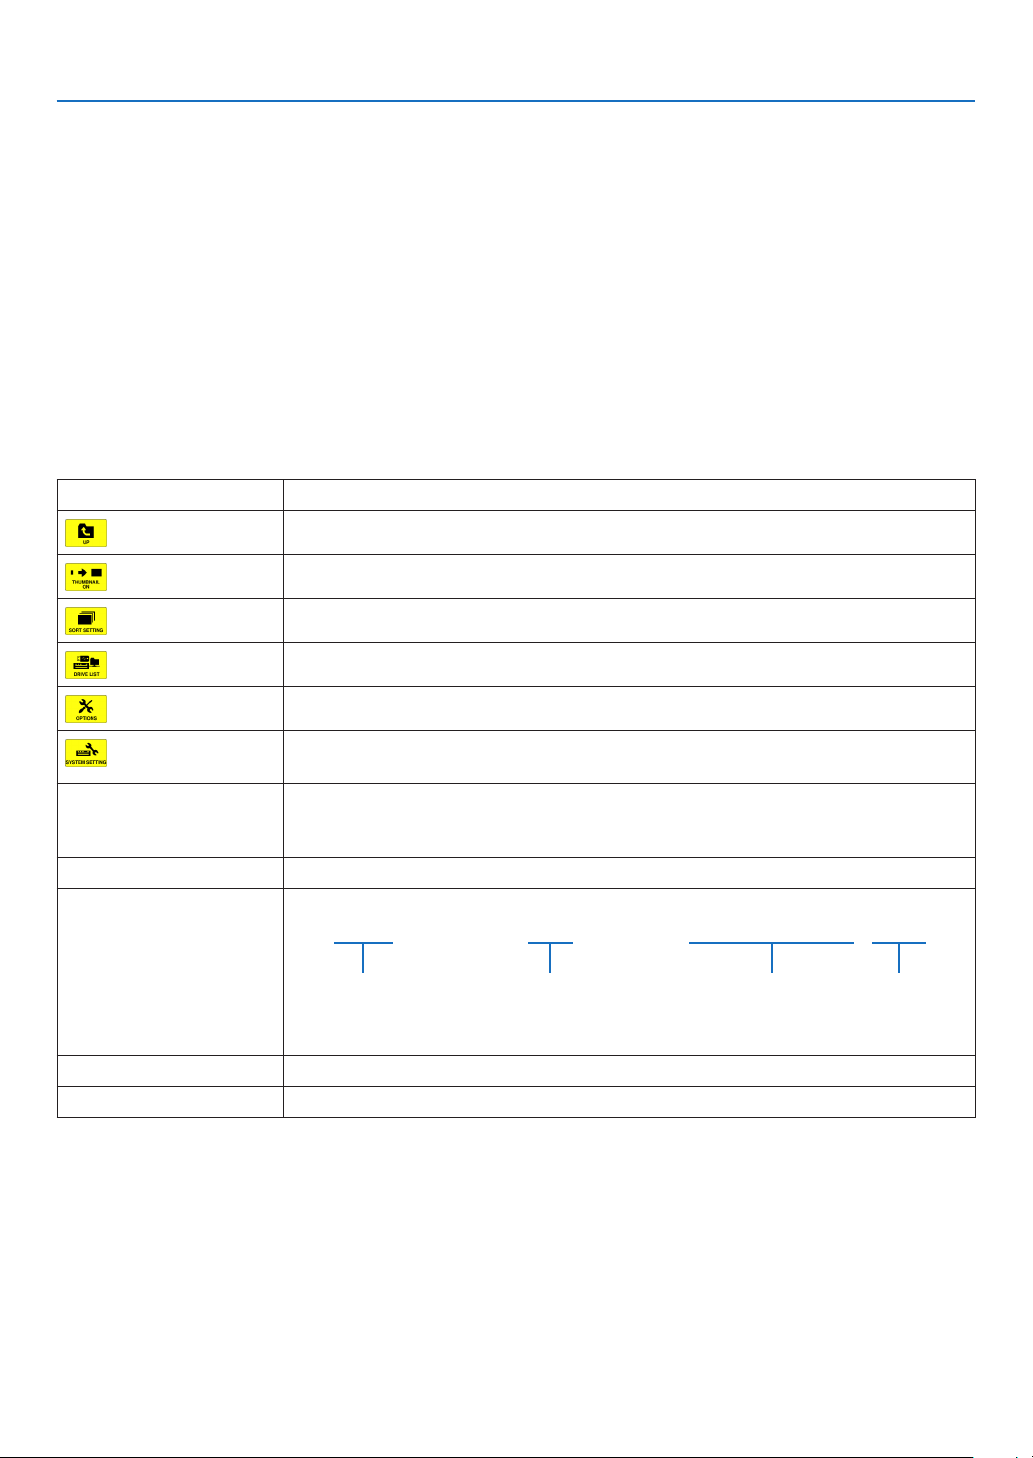
71
4. Using the Viewer
•Thumbnailscreen
Displaysalistoffolders,thumbnails,andiconsinthedriveselectedonthedrivelistscreen.
Menuoperation
•Usethe▼
or ▲buttontomovethecursorupordown.SelectthemenuitemandpresstheENTERbutton
todisplaythemenuorsettingscreen.
OperationforThumbnailscreen
1. Press the ▶buttontomovethecursortothethumbnailscreenwhentheOPTIONSmenuisnotdis-
played.
2. Press the ▼, ▲, ◀, or ▶buttontoselectaleorfolder.
3.PresstheENTERbuttontostartslideshoworplaybackoftheselectedle.Selectingafolderwilldisplay
its thumbnail screen.
Functions
Name Description
UPGoestooneupperlevelmenu.
THUMBNAILSwitchestwodisplaysbetweenthumbnailandicon.
SORTSETTINGRearrangesfoldersorles.
DRIVELISTReturnstothedrivelistscreen.
OPTIONSChangestotheOPTIONSmenu.
SYSTEMSET-
TING
Opensthesystemsettingmenu.
ScrollbarThumbnailscreenwilldisplay12leswith4by3.Ifthethumbnailscreenhastwelveor
morelesorfolders,thescrollbarwillbedisplayedattherightside.UsingthePAGE
▼orPAGE▲buttonwillscrollthewholescreendownorup.
PathinformationDisplaysthelocationofafolderorle.
Thumbnailinformation[Example]
005.jpg5/200 11/03/201013:25:12502KB
Selectedfolder
nameorle
name
Numbersandorderof
lesinafolder(only
whenfolderselected)
Create/Changedate:
M/D/Y/H/M/B
Displaysle
capacity
MenuguideDisplaysthedescriptionofaselectedmenu.
OperationbuttonguideDisplaysinformationaboutoperationbuttons.
TIP:
•Ifanunsupportedimageisselected,theicon[?]willbedisplayed,
•Themaximumdisplayablenumberofimagesis300inthethumbnailscreenincludingthenumberoffolders.
•Ifalenameorpathofafolderislongerthanspecied,itwillbedisplayedwithcentercharactersorpathskipped.
Example:“123456789.jpg”willbedisplayedin“123..789.jpg”.
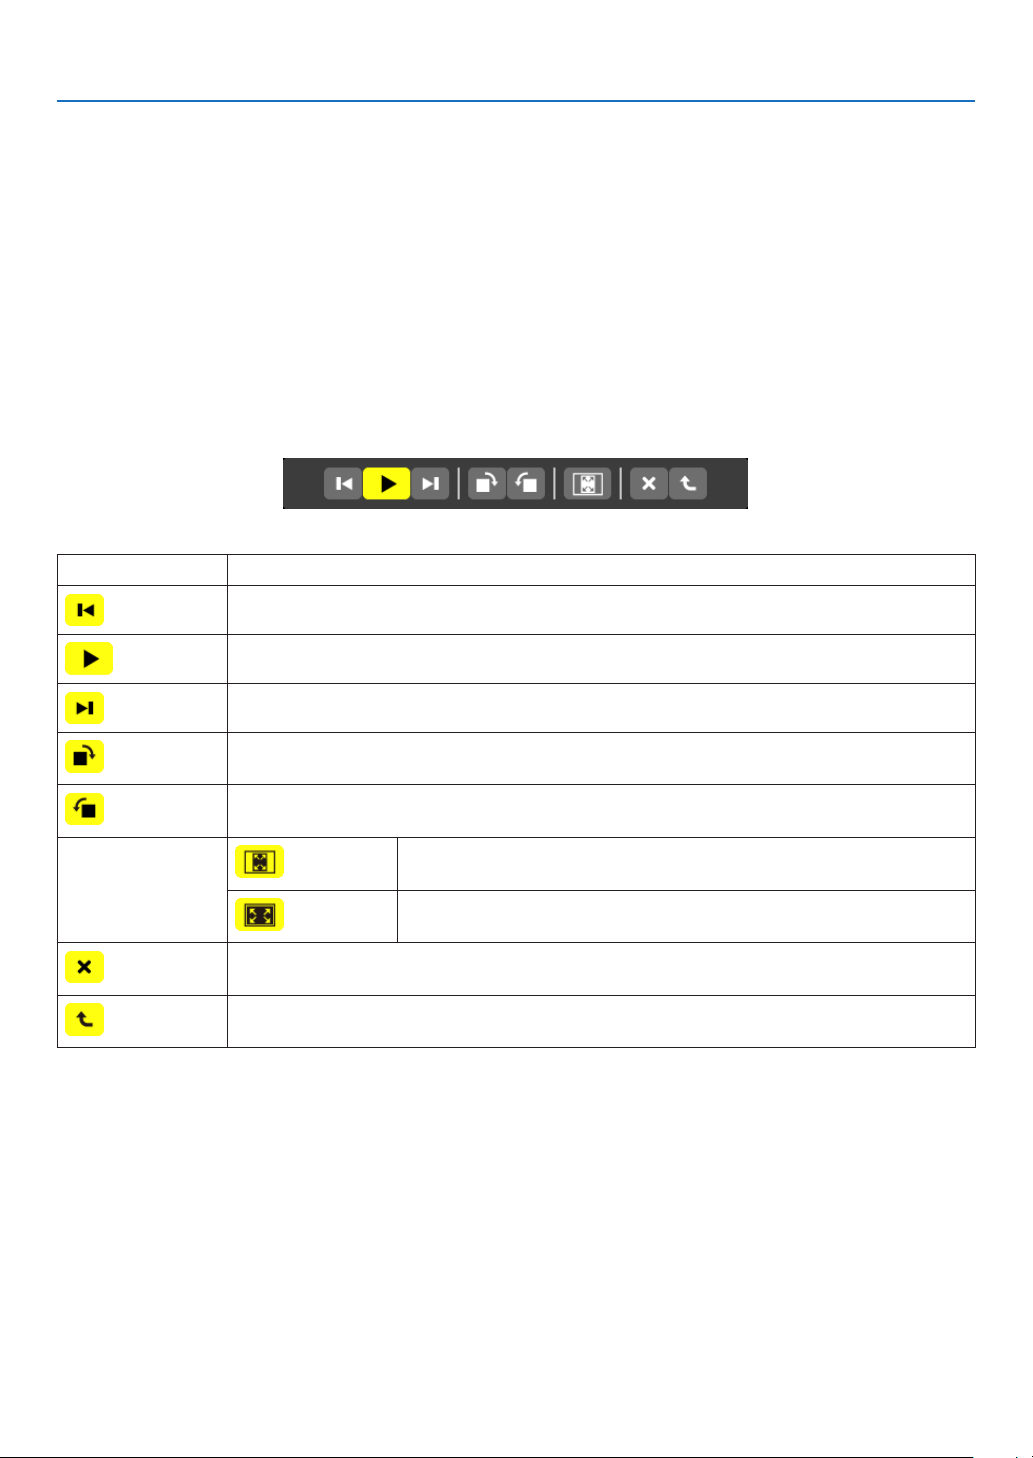
72
4. Using the Viewer
•Slidescreen(stillimage/movie)
Playsaleselectedfromalistofthumbnailsoricons.
•ForoperatingaMicrosoftPowerPointleandAdobePDFle,seepage
65, 66.
Controlbaroperation
•Thecontrolbarwillbedisplayedonlywhenastillimage(orindexle)andamovieleisselected.
•Thecontrolbarforstillimagesdiffersfromthatformovieles.
1.PressingtheENTERbuttoninSlidescreenwilldisplaythecontrolbaratthebottomofthescreen.
2. Use the ◀ or ▶buttontoselectaleandpresstheENTERbutton.
•Theselectedfunctionwillbeexecuted.
Functionsofstillimagecontrolbar
Name Description
PREVGoesbacktothepreviousimage
PLAYPlaystheimage.Thisbuttonalsoisusedtostoporstartplayinganimage.
NEXT Goestothenextimage.
RIGHTRotatestheimage90°clockwise.
•Tocancel,selectanotherfolder.
LEFTRotatestheimage90°counterclockwise.
•Tocancel,selectanotherfolder.
SIZE
BESTFITDisplaystheimagewithitsaspectratiointheprojector’sdisplayable
maximumresolution.
ACTUAL
SIZE
Displaystheimageinitsactualsize.
CLOSEClosesthecontrolbar.
•YoucanalsopresstheEXITbuttontoclosethecontrolbar.
ENDStopsplayingslidesorslideshow,andclosesthecontrolbartoreturntothethumbnail
screen.
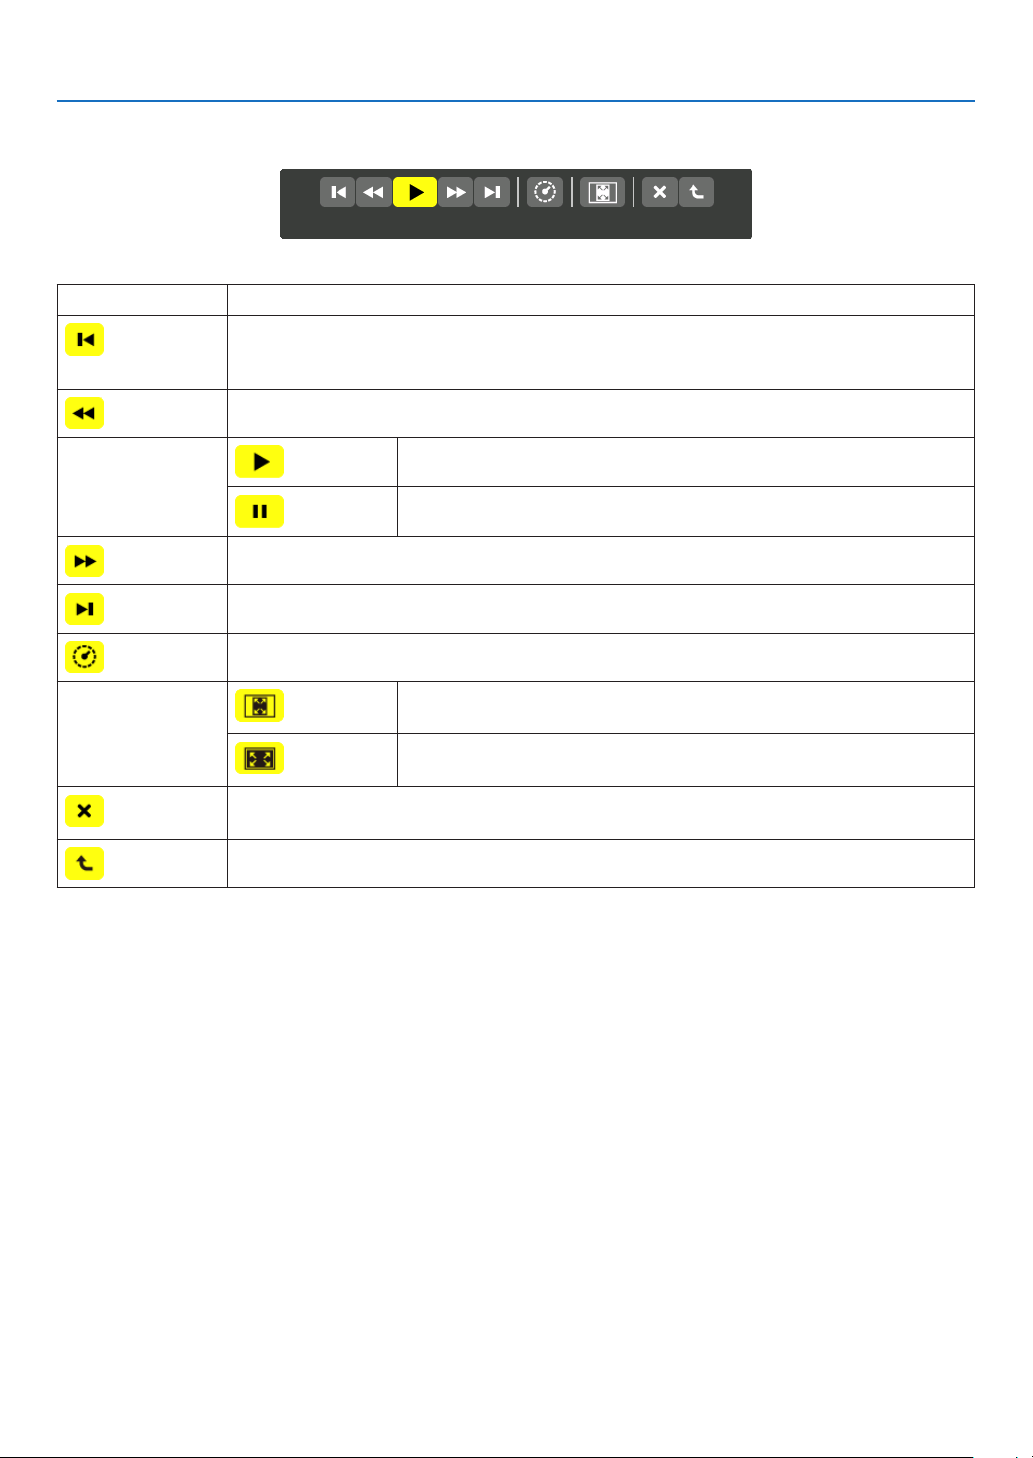
73
4. Using the Viewer
Functionsofmoviecontrolbar
Name Description
PREVGoesbacktothebeginningofamoviele.
•Goesbacktothebeginningofthepreviousmovieleifexecutedimmediatelyafterbeing
startedplaying.
FRFast-rewindsamovieleforabout7seconds.
PLAY/PAUSE
PLAYPlaysamoviele.
PAUSEStopsplayingamoviele.
FFFast-forwardsamovieleforabout7seconds.
NEXT Goestothebeginningofanextmoviele.
TIMEDisplaysanelapsedtimeforplaybackorpause.
SIZE
BESTFITDisplaystheimagewithitsaspectratiointheprojector’sdisplayable
maximumresolution.
ACTUAL
SIZE
Displaystheimageinitsactualsize.
CLOSEClosesthecontrolbar.
•YoucanalsopresstheEXITbuttontoclosethecontrolbar.
ENDStopsplayingamovie,andclosesthecontrolbartoreturntothethumbnailscreen.

74
4. Using the Viewer
Viewer option settings
•SLIDESETTING
Setsstillimagesorslides.
Name OptionsDescription
SCREENSIZEBESTFITDisplaystheimagewithitsaspectratiointheprojector’sdisplay-
ablemaximumresolution.
ACTUALSIZEDisplaystheimageinitsactualsize.
PLAYMODEMANUALSelectsmanualplay.
AUTOSelectsautoplay.
INTERVAL5 - 300 seconds Specifiesintervaltimewhen[AUTO]isselectedforPLAY
MODE.
REPEAT
CheckmarkTurnsonorofftherepeatfunction.
TIP
•Toplayoneormoreslides,placethoselesintoafolder.
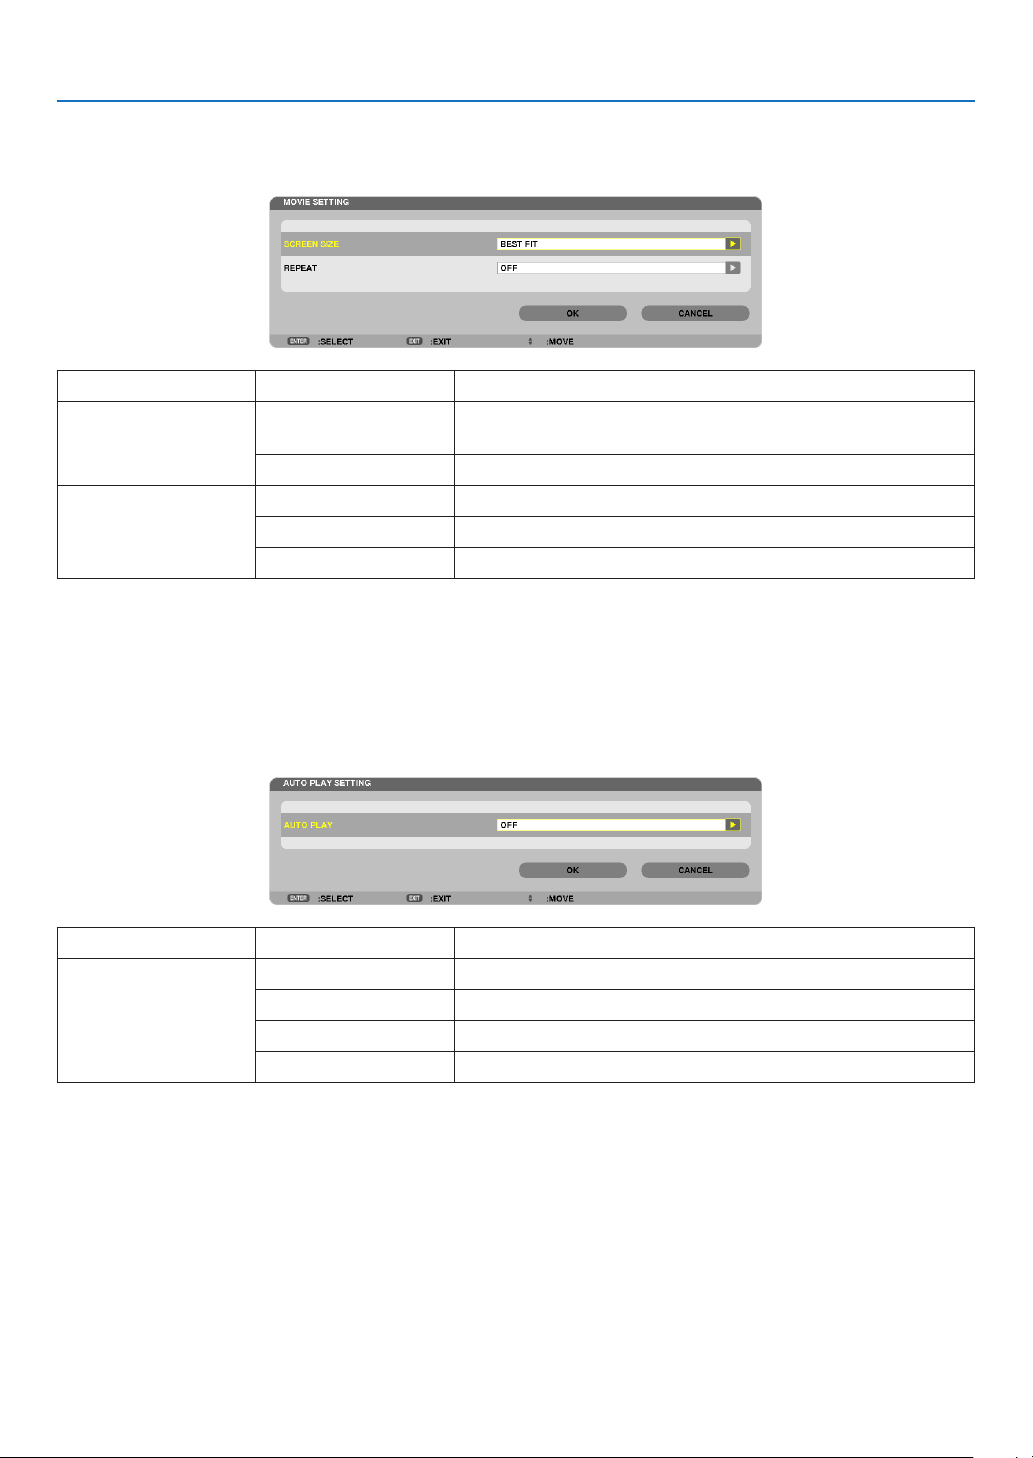
75
4. Using the Viewer
•MOVIESETTING
Setsthefunctionsforamoviele.
Name OptionsDescription
SCREENSIZEBESTFITDisplaystheimagewithitsaspectratiointheprojector’sdisplay-
ablemaximumresolution.
ACTUALSIZEDisplaystheimageinitsactualsize.
REPEATOFFTurnsonorofftherepeatfunction.
ONEREPEATRepeatsoneleonly.
ALLREPEATRepeatsalllesinthecurrentfolder.
TIP
•Turningon[REPEAT]willdisplayblackscreenduringintermissionbetweenmovies.
•AUTOPLAYSETTING
SetsautoplayforslideshowwhenaUSBmemorydeviceisinsertedintotheUSBportoftheprojector,orwhen
[VIEWER]isselectedfor[SOURCE].
Name OptionsDescription
AUTOPLAYOFF—
PICTURE
Playsarstfoundstillimageinadrive.
MOVIEPlaysarstfoundmovieleinadrive.
PowerPointPlaysarstfoundPowerPointleinadrive.
TIP
•AutoplaybehaviorisdifferentbetweenwhenaUSBmemorydeviceisinsertedintotheUSBportoftheprojectorandwhen
[VIEWER]isselectedfor[SOURCE].
•AutoplaystartsfortherstfoundlesupportingtheletypesetupforAutoPlay.Thelewillbesearchedinthedriverootor
lowerlevel.
•When[VIEWER]isselectedfor[SOURCE],thelastselectedlewillbeautomaticallyplayedifitisfound,orthelastselectedfolder
willbesearchedandtherstfoundlewillbeautomaticallyplayed.
ToautomaticallyplayamovieleinaUSBmemory,storeonemovieleorchangeitslenamesothatitcanbesearchedrst.

76
4. Using the Viewer
•SORTSETTING
Setstheorderofdisplayingthumbnailsorslides.
Name OptionsDescription
SORT
NAME(ABC..)Displaysthelesalphabeticallybynameinascendingorder.
NAME(ZYX..)Displaysthelesalphabeticallybynameindescendingorder.
EXT.(ABC..)Displaysthelesalphabeticallybyextensioninascendingor-
der.
EXT.(ZYX..)Displaysthelesalphabeticallybyextensionindescending
order.
DATE(NEW)Displaysthelesinreversechronologicalorder.
DATE(OLD)Displaysthelesinchronologicalorder.
SIZE(BIG)Displaysthelesindescendingorderofitslesize.
SIZE(SMALL)Displaysthelesinascendingorderofitslesize.
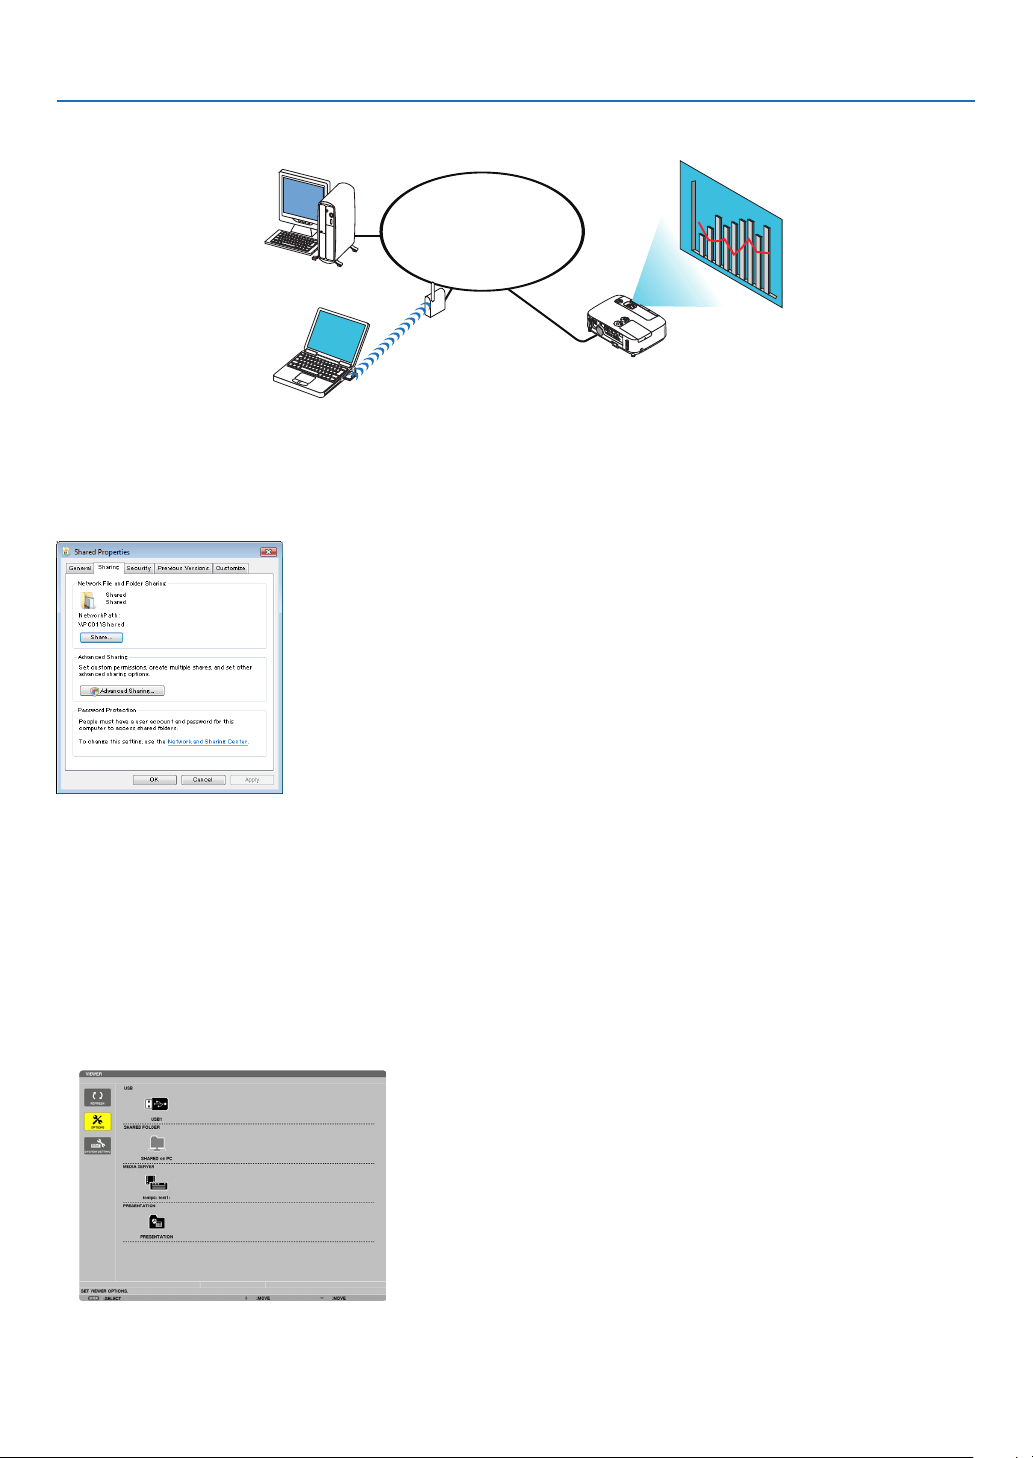
77
4. Using the Viewer
❹ Projecting data from shared folder
LAN
Shared folder
Wireless LAN
Projector
Shared folder
Preparation
Forprojector:Connecttheprojectortothenetwork.
Forcomputer:Placelestobeprojectedinasharedfolderandnotethefolder’spath.Memorizeorwritedownthe
pathforlateruse.
•Forsharingafolder,refertoyouruserguideorhelpleaccompaniedwithyourWindowscomputer.
•Useakeyboardtogiveanametothesharedfolderinalphanumericcharacters.
•Toconnectthesharedfolderbeyondthesubnet,set[WINSCONFIGURATION]in[NETWORKSETTINGS]from
the menu.
•Digitalsignature(SMBsignature)isnotsupported.
Connecting the projector to the shared folder
1. Press the VIEWER button on the remote control.
The drive list window will be displayed.
•AnotherwaytostarttheVIEWERistopresstheSOURCEbuttonafewtimesontheprojectorcabinet.( page
17)
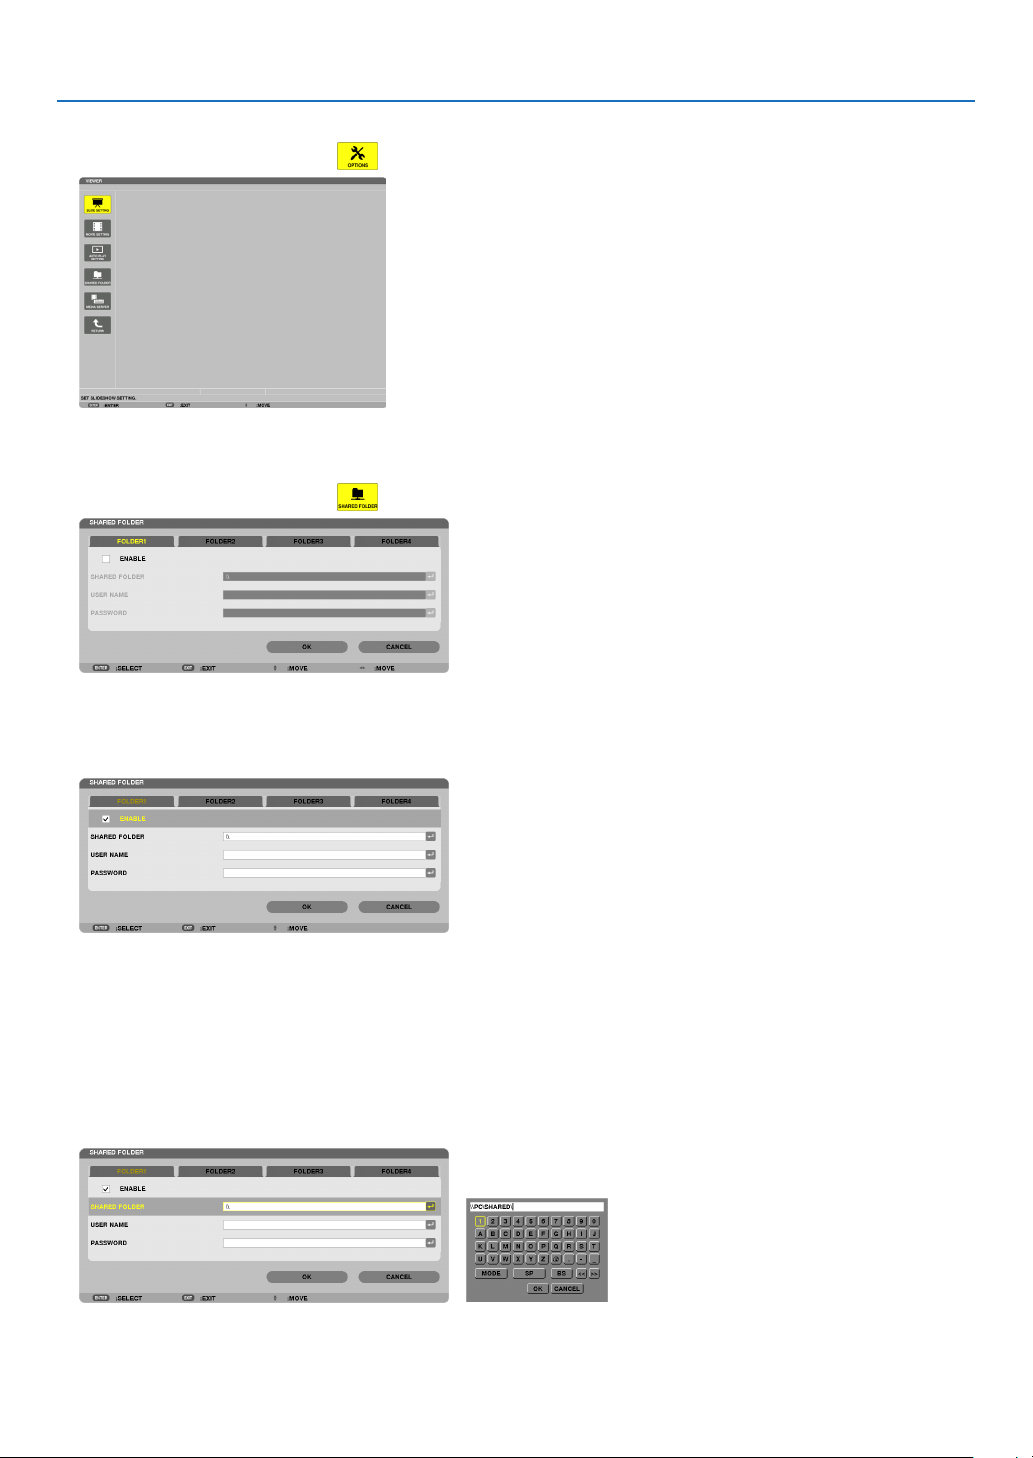
78
4. Using the Viewer
2.Displaysthe[OPTIONS]menu.
Press the ▼ button to select the (OPTIONS)iconandpresstheENTERbutton.
•WhentheOPTIONSmenuisdisplayed,thedrivelistwillnotbedisplayed.
3.Displaythe[SHAREDFOLDER]screen.
Press the ▼ button to select the (SHARED FOLDER) icon and press the ENETR button.
4.Selectafoldernumberandplacetoenableit.
Press the ◀ or ▶ button to a shared folder number and press the ▼ button to select [ENABLE] , and then press
the ENTER button.
5.Enterthepath,username,andpasswordforthesharedfolder.
Press the ▼buttontoselectthe[SHAREDFOLDER]eld.Thesoftwarekeyboardwillbedisplayed.
Forusingthesoftwarekeyboard,seepage
131.
•Ifyourcomputerisnotpasswordprotected,enteringapasswordisnotrequired.
•Uptofoursharedfolderscanbeadded.
•Themaximumlengthofapathofthesharedfoldermustbe15alphanumericcharactersforcomputernameand
23 alphanumeric characters for folder name.

79
4. Using the Viewer
6.Exitthesetting.
Press the ▼ button to select [OK] and press the ENTER button.
This will close the [SHARED FOLDER] screen.
•Ifanerrormessageappear,yoursettingsarenotcorrect.Tryagain.

80
4. Using the Viewer
Disconnecting the shared folder from the projector
•Disablethenumberofasharedfolderyouwishtodisconnect
Press the ▼ button to select [ENABLE] and press the ENTER button to clear it.
NOTE:
•WhenaPowerPointleorPDFleisdisplayed,donotdisconnectyourLANcable.Ifdoingso,theViewerwillnotwork.
TIP:
•ConnectingsettingsforSharedfolder
Settingsofuptofourfolderscanbesaved.
Restartingtheprojectorwilldisplaysetting-savedsharedfoldersingreyfoldericononthedrivelistscreen.
Selectingthegreyiconfolderwillskipentryforafolderpath.
•Failingtoconnectwithasharedfolderwilldisplaythefoldericonwith“x”mark.Ifthishappen,checkyourfoldersetting.
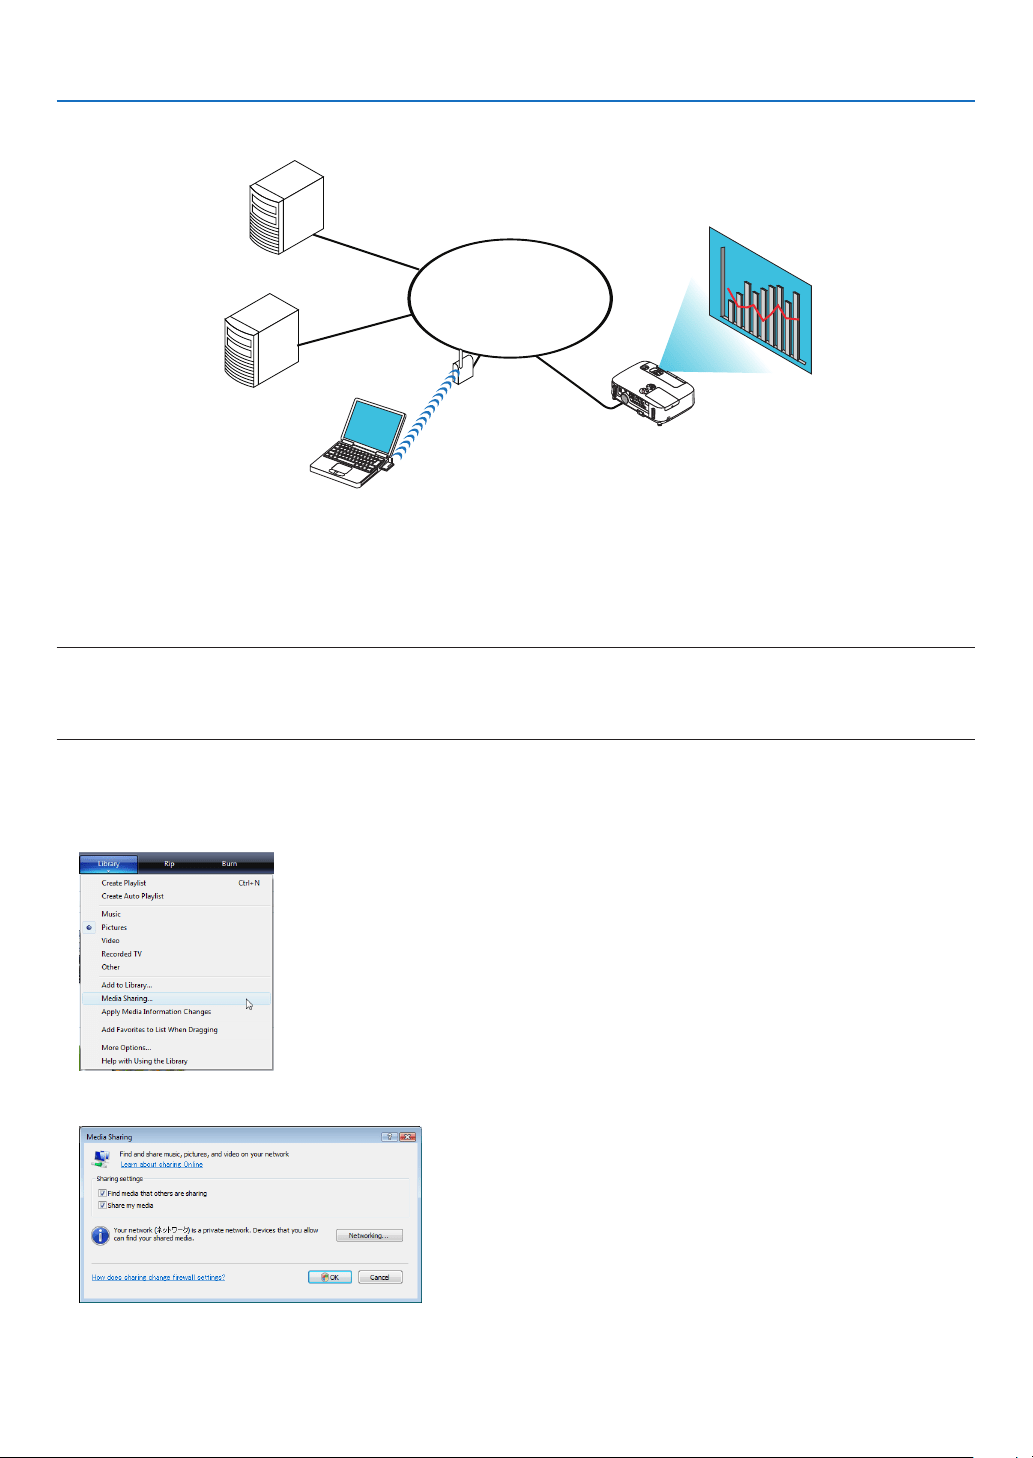
81
4. Using the Viewer
❺ Projecting data from media server
LAN
Media server
Media server
Wireless LAN
Media server
Projector
Preparation
Forprojector:Connecttheprojectortothenetwork.
Forcomputer:Prepareimagelesormovielestobeprojected,andsetup“MediaSharing”inWindowsMediaPlayer
11orWindowsMediaPlayer12.
NOTE:
•Boththeprojectorandthemediaservermustbeonthesamesubnet.Connectingtothemediaserverbeyondthesubnetisnot
possible.
•TypesofimagesandmovieswhichcanbesharedmayvarydependingonWindowsversion.
Setting up “Media Sharing” in Windows Media Player 11
1.StartWindowsMediaPlayer11.
2.Select“MediaSharing”from“Library”.
The“MediaSharing”dialogboxwillbedisplayed.
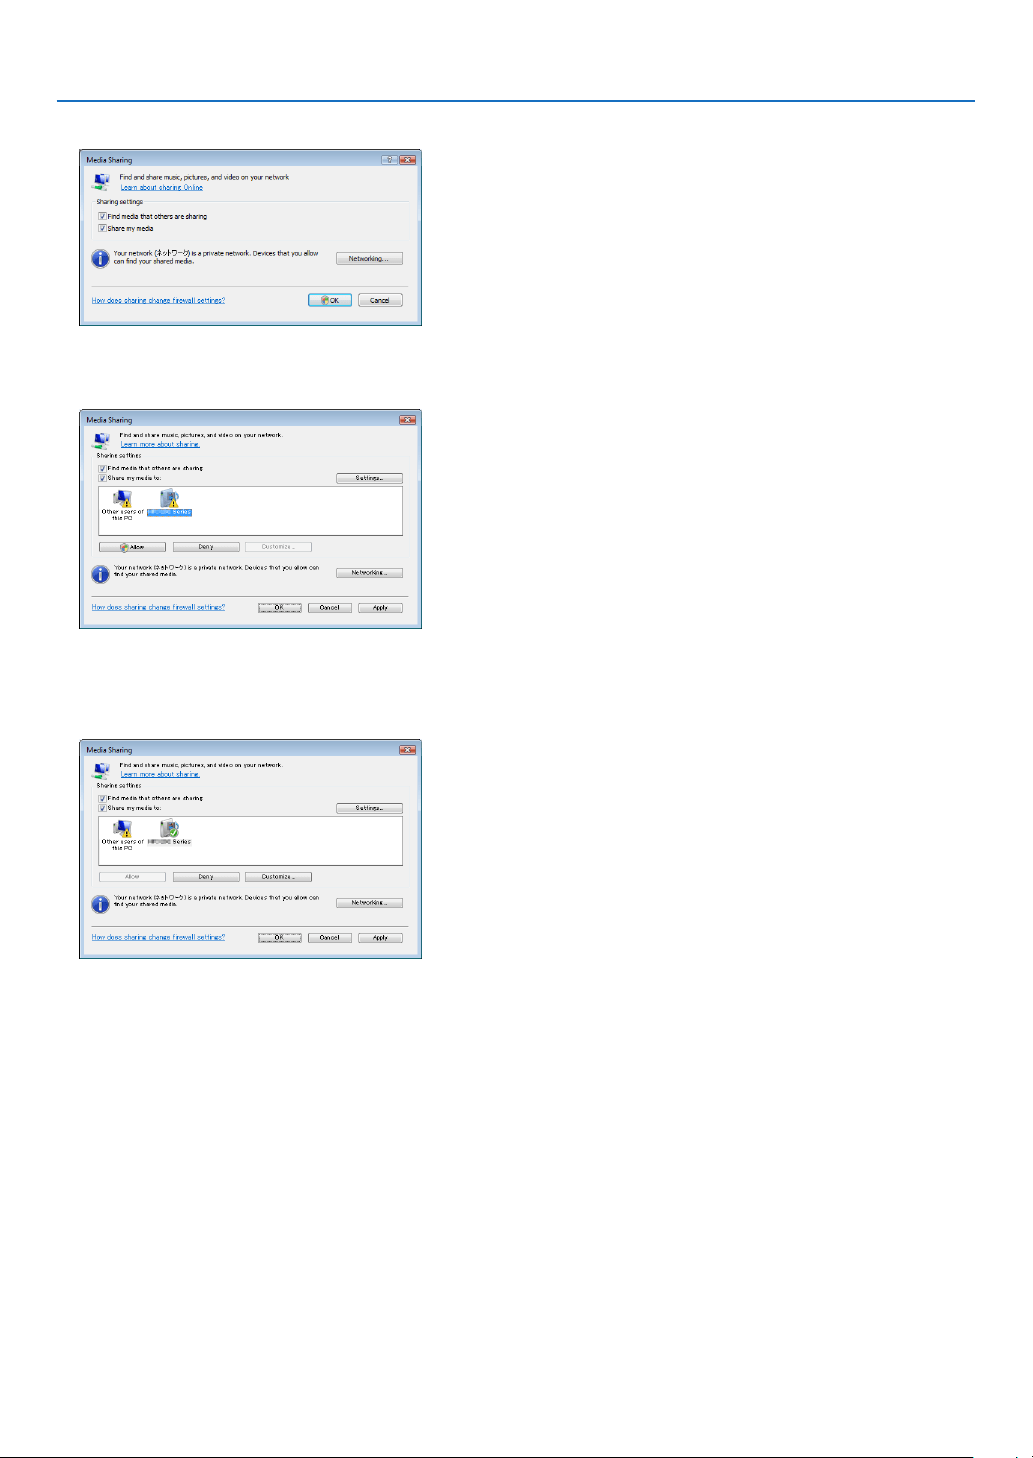
82
4. Using the Viewer
3.Select“Sharemymedia”checkbox,andthenselectOK.
A list of accessible devices will be displayed.
4.Select“P501Series”andthen“Allow”.
Acheckmarkwillbeaddedtothe“P501Series”icon.
•The“P501Series”isaprojectornamespeciedin[NETWORKSETTINGS].
5.Select“OK”.
Thiswillmakepicturesandvideoin“Library”availablefromtheprojector.
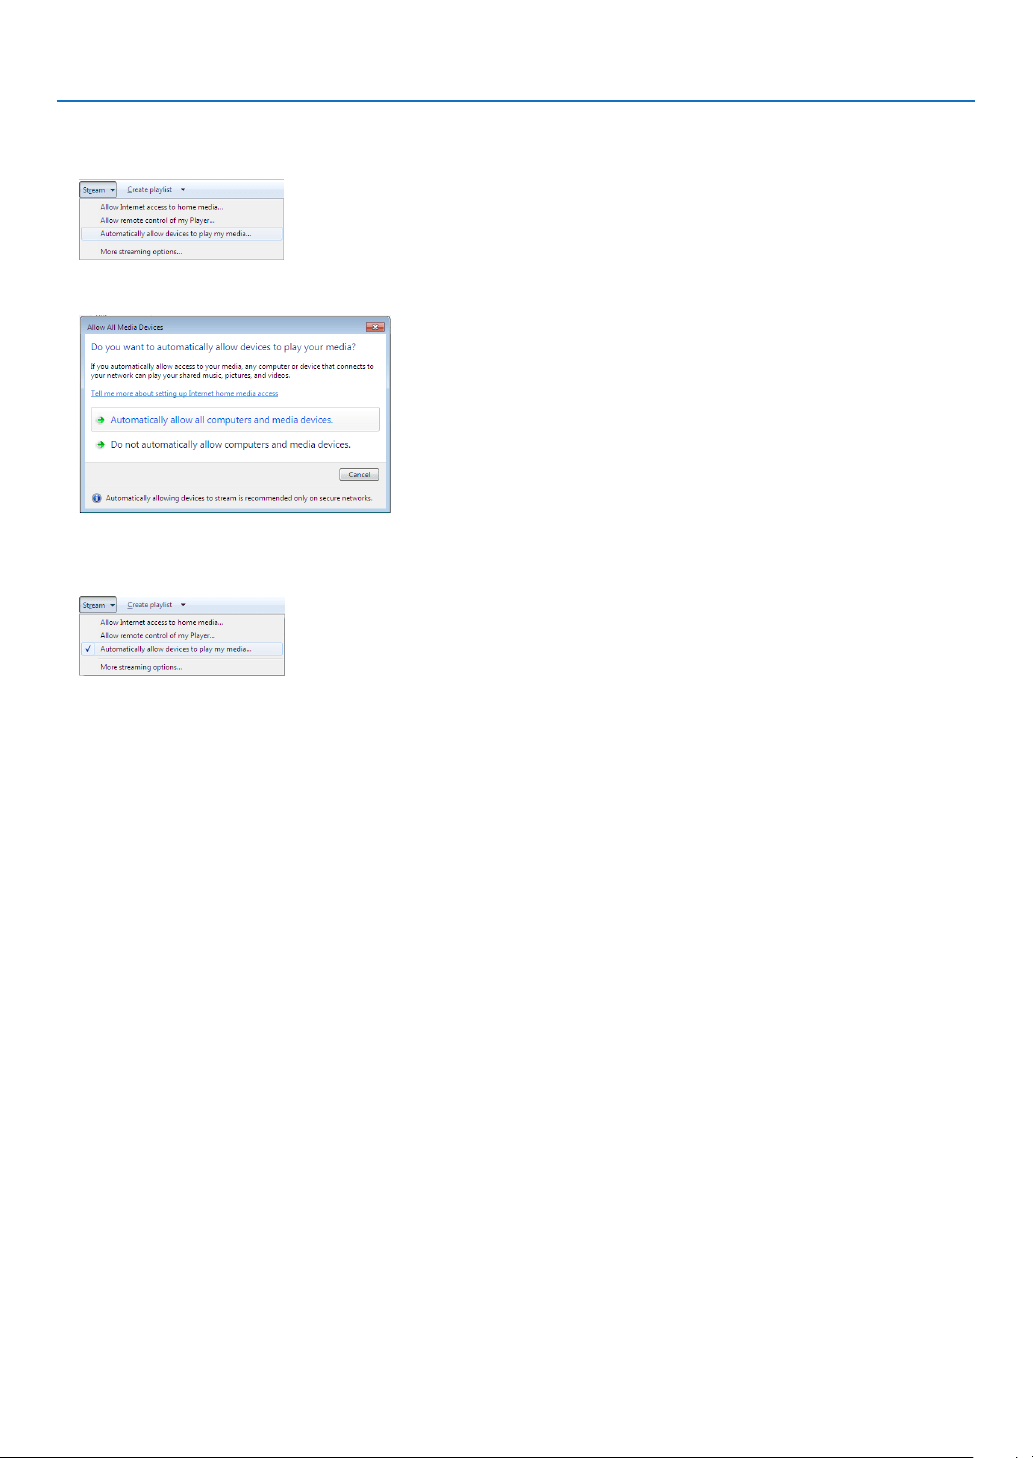
83
4. Using the Viewer
Setting up “Media Sharing” in Windows Media Player 12
1.StartWindowsMediaPlayer12.
2.Select“Stream”,andthenselect“Automaticallyallowdevicestoplaymymedia”.
The“AllowAllMediaDevices”windowswillbedisplayed.
3.Select“Automaticallyallowallcomputersandmediadevices”.
Graphicsandmovielesin“Library”canbeusedfromtheprojector.
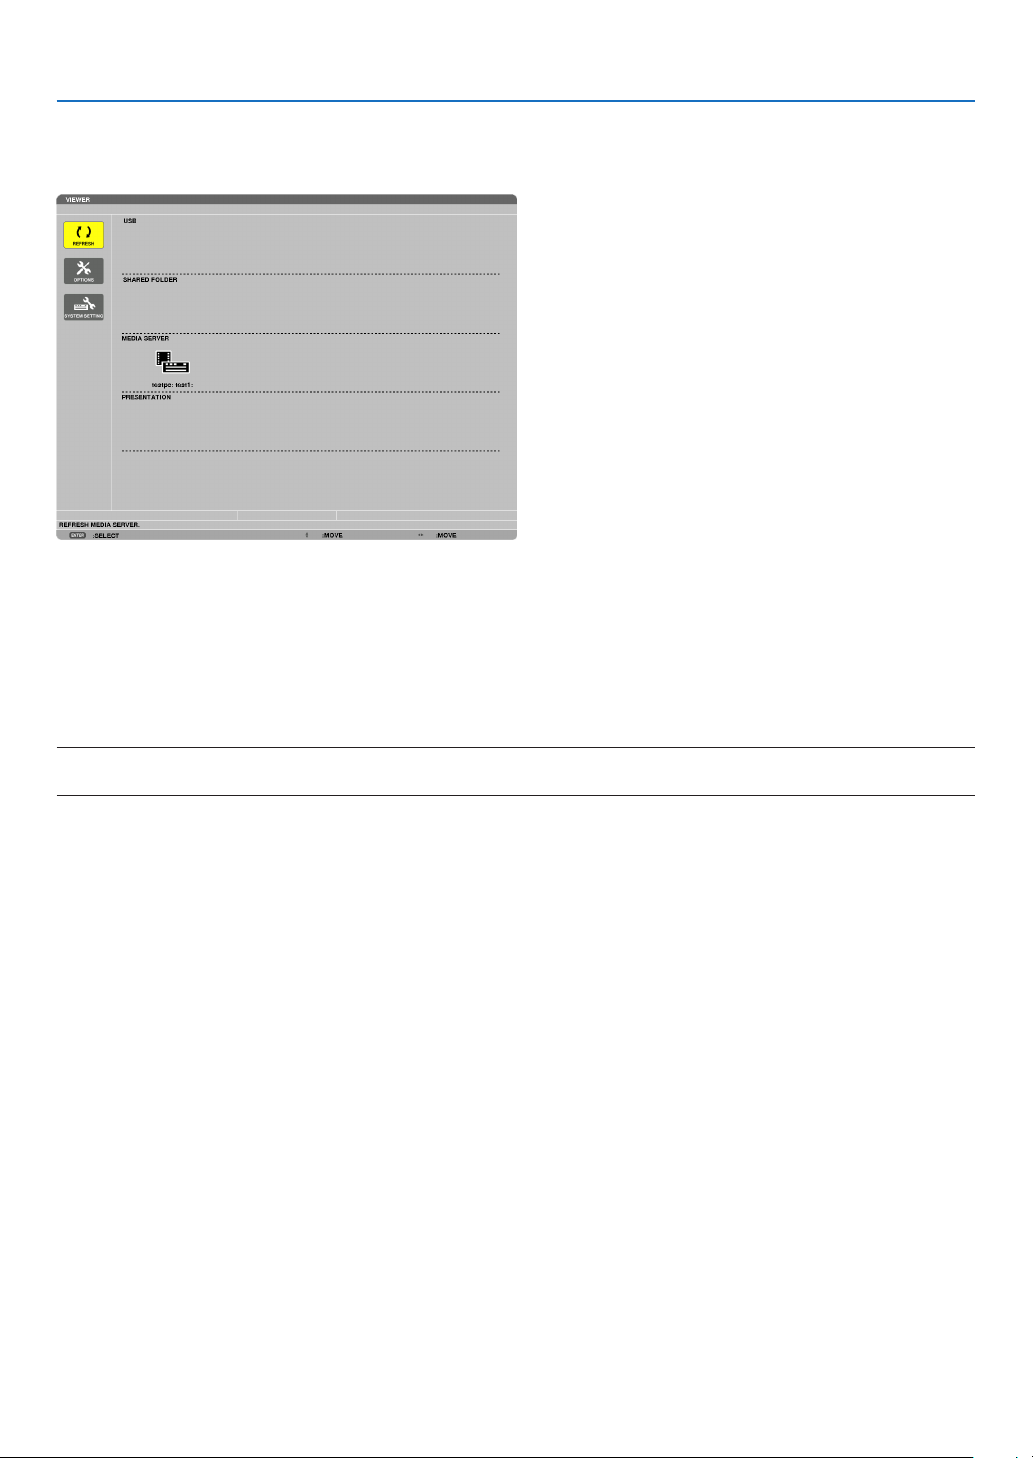
84
4. Using the Viewer
Connecting the projector to the media server
PresstheVIEWERbuttonontheremotecontrol.
TheVIEWERwillstart.
•AnotherwaytostarttheVIEWERistopresstheSOURCEbuttonafewtimesontheprojectorcabinet.(page
17)
•Thiswillstartsearchingforacomputerwith“mediasharing”enabledinthenetworkandaddittothe“Mediaserver”
ofthethumbnailscreen.
Anotherwaytodothisistopointthecursorto“Mediaserver”andselect[REFRESH]fromthethumbnailmenu
andpresstheENTERbutton.
NOTE:
•Uptofouraccessiblemediaserverscanbeautomaticallysearchedanddisplayed.Thefthdeviceorlatercannotbedisplayed.
(page63)
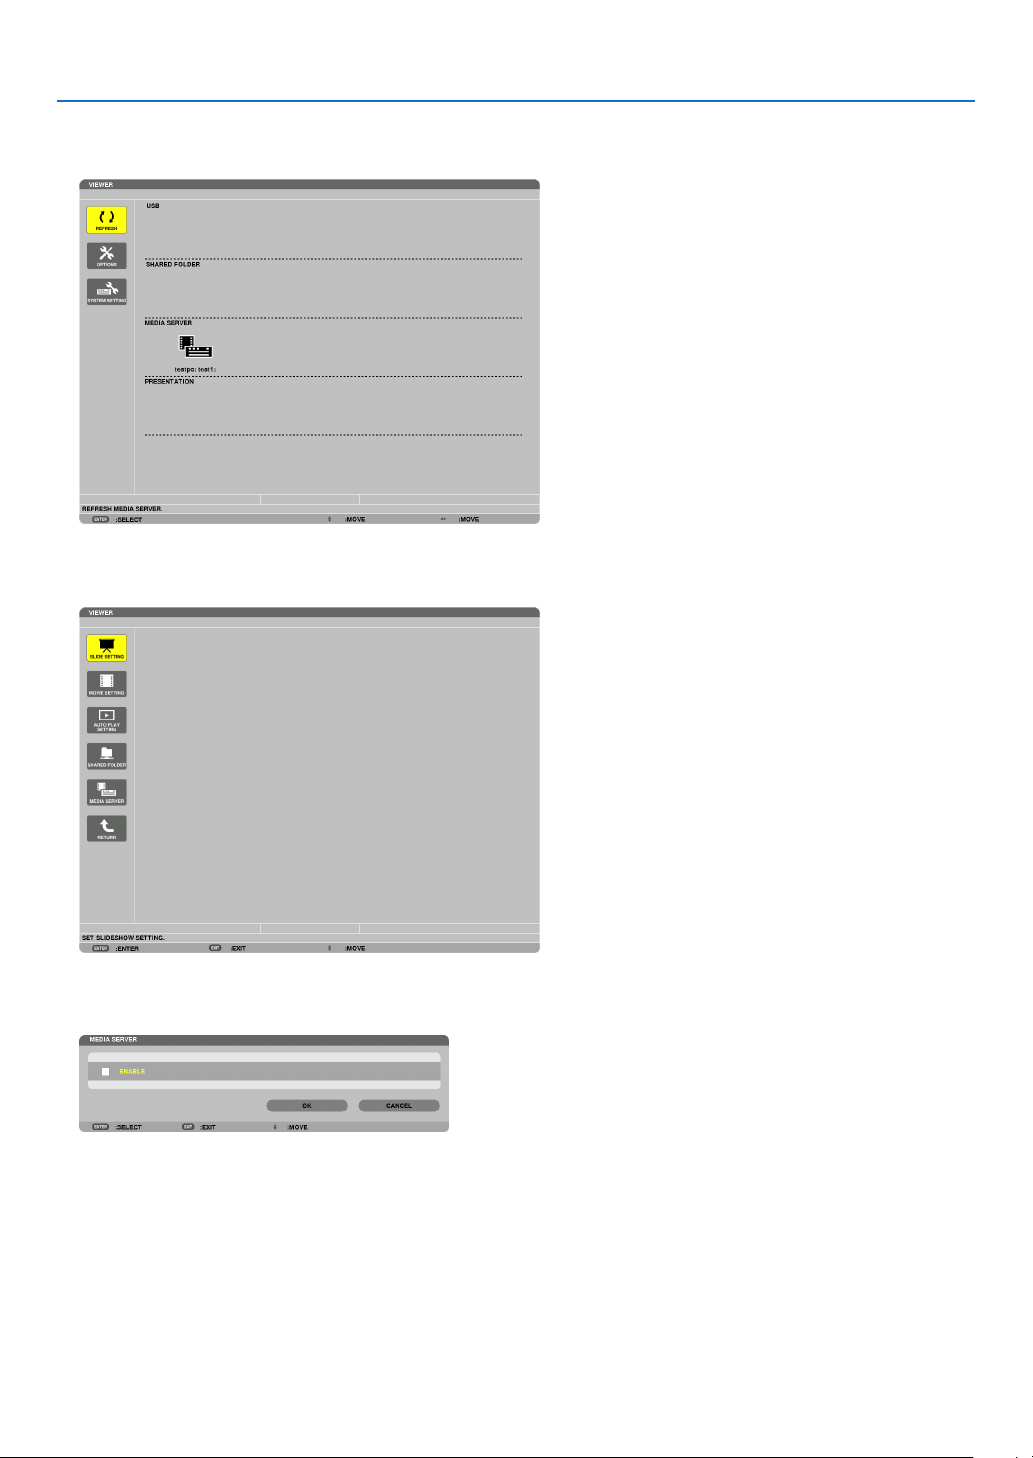
85
4. Using the Viewer
Disconnecting the projector from the media server
1. Display the OPTIONS menu.
Press the ▼buttontoselectthe[OPTIONS]iconandselecttheENTERbutton.
2.DisplaytheMEDIASERVERsettingscreen.
Press the ▼buttontoselecttheMEDIASERVERiconandpresstheENTERbutton.
3. Disable the connection.
PresstheENTERbuttontoclearthecheckmarktodisabletheconnection.
Press the ▼buttontoselect[OK]andpresstheENTERbuttontoclosetheMEDIASERVERsettingscreen.

86
4. Using the Viewer
❻ Restrictions on displaying files
TheViewerallowsyoutogiveasimplieddisplayofaPowerPointleorPDFle.
Duetosimplieddisplay,however,actualdisplaymaybedifferentfromtheoneonyourcomputerapplicationpro-
gram.
Some restrictions on PowerPoint files
•Fontswillbeautomaticallyconvertedtothefontsinstalledintheprojector.Fontscanvaryinsizeorwidth,causing
layoutcorruption
Somecharactersorfontsmaynotbedisplayed.
•Somefunctionsincludedinfontarenotsupported.
Example:Therearesomerestrictionsonanimation,selection,orhyperlink.
•Itmaytakelongertimetofeedpagescomparedwithacomputer
•InsomecasesMicrosoftPowerPoint97-2007formatlesmaynotbedisplayed.
Some restrictions on Excel files
•Fontswillbeautomaticallyconvertedtothefontsinstalledintheprojector.Fontscanvaryinsizeorwidth,causing
layoutcorruption
Somecharactersorfontsmaynotbedisplayed.
•Somefunctionsincludedinfontarenotsupported.
•Therearesomerestrictionsongraphs,graphics,orimages.
•AfocuscursorincellA1cannotbemoved.
•Itmaytakelongertimetofeedpagescomparedwithacomputer
•InsomecasesMicrosoftExcel97-2007formatlesmaynotbedisplayed.
Some restrictions on PDF files
•FontsnotembeddedatthetimeofPDFcreationmaynotbedisplayed.
•Somefunctionsincludedinfontarenotsupported.
Example:Therearesomerestrictionsonannotations,selection,form,orcolorspace.
•Itmaytakelongertimetofeedpagescomparedwithacomputer
•InsomecasesAdobeAcrobatformatlesmaynotbedisplayed.
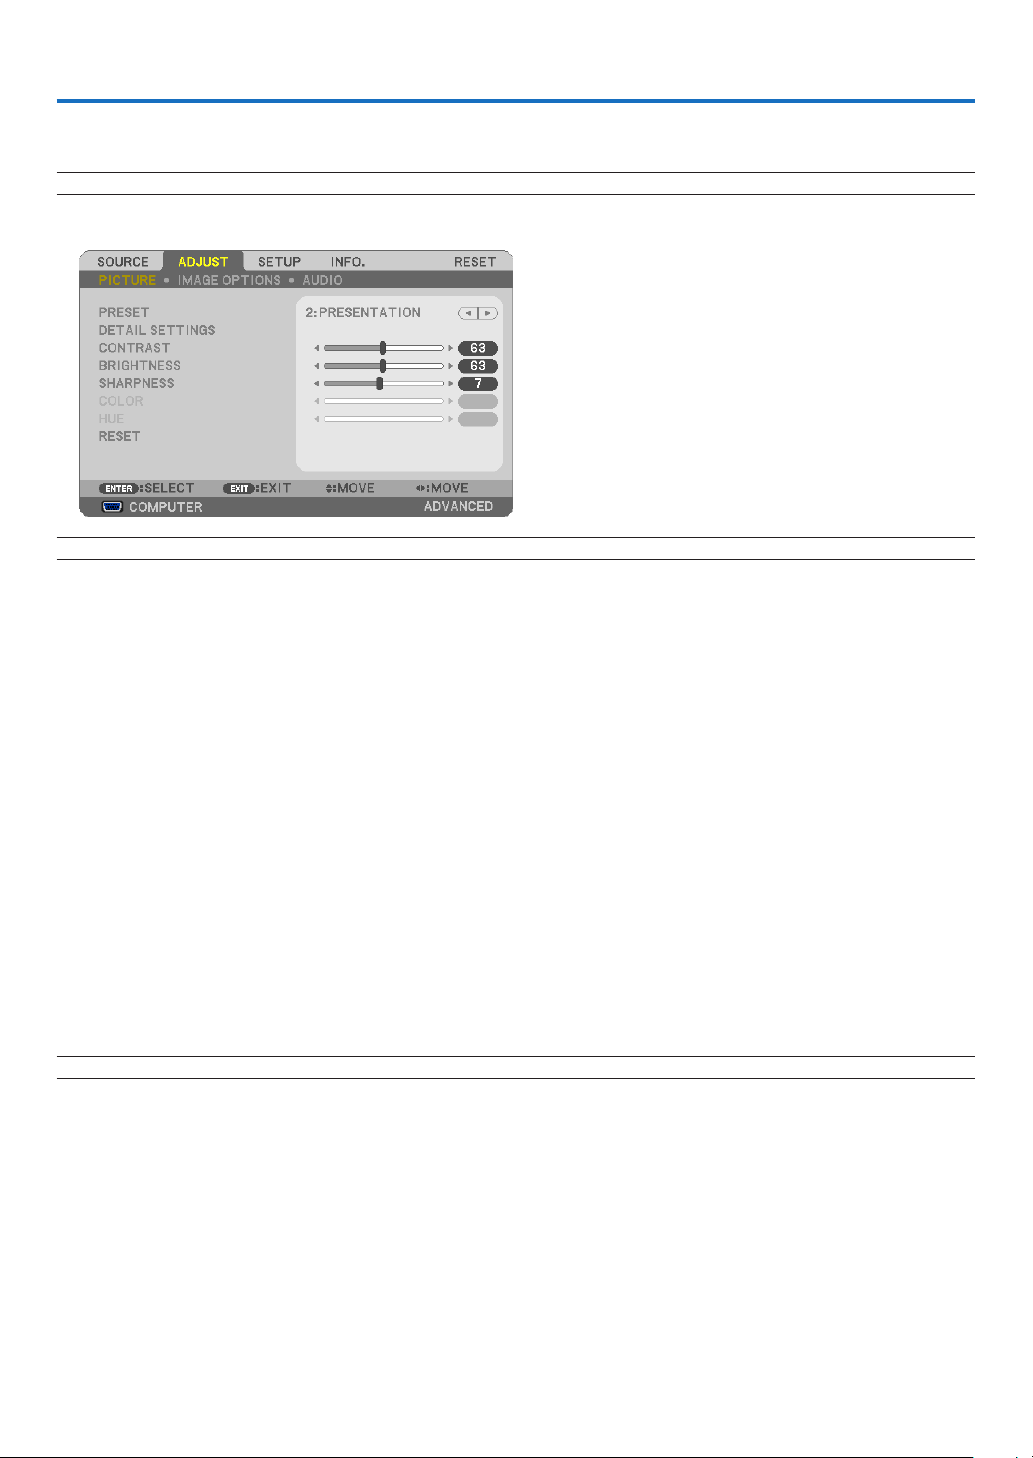
87
5. Using On-Screen Menu
❶ Using the Menus
NOTE:Theon-screenmenumaynotbedisplayedcorrectlywhileinterlacedmotionvideoimageisprojected.
1.PresstheMENUbuttonontheremotecontrolortheprojectorcabinettodisplaythemenu.
NOTE:ThecommandssuchasENTER,EXIT,▲▼,◀▶inthebottomshowavailablebuttonsforyouroperation.
2. Press the ◀▶buttonsontheremotecontrolortheprojectorcabinettodisplaythesubmenu.
3.PresstheENTERbuttonontheremotecontrolortheprojectorcabinettohighlightthetopitemortherst
tab.
4. Use the
▲▼buttonsontheremotecontrolortheprojectorcabinettoselecttheitemyouwanttoadjustor
set.
You can use the
◀▶buttonsontheremotecontrolortheprojectorcabinettoselectthetabyouwant.
5.PresstheENTERbuttonontheremotecontrolortheprojectorcabinettodisplaythesubmenuwindow.
6.Adjustthelevelorturntheselecteditemonoroffbyusingthe▲▼◀▶
buttons on the remote control or
the projector cabinet.
Changesarestoreduntiladjustedagain.
7.Repeatsteps2-6toadjustanadditionalitem,orpresstheEXITbuttonontheremotecontrolortheprojec
-
torcabinettoquitthemenudisplay.
NOTE:Whenamenuormessageisdisplayed,severallinesofinformationmaybelost,dependingonthesignalorsettings.
8. Press the MENU button to close the menu.
Toreturntothepreviousmenu,presstheEXITbutton.
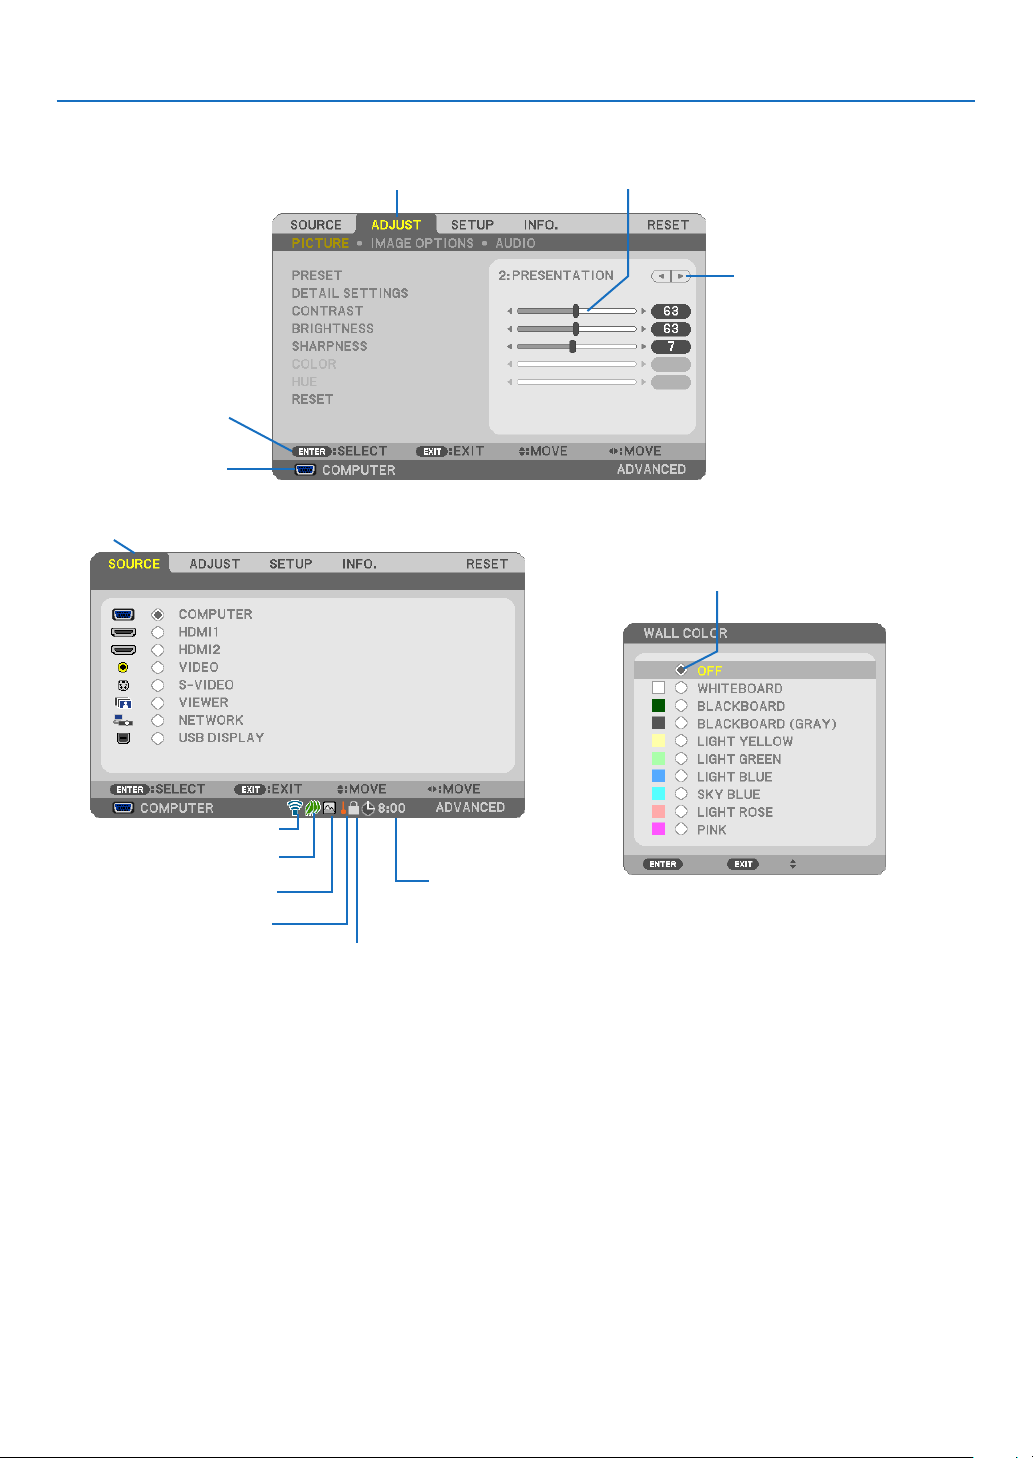
88
5. Using On-Screen Menu
❷
Menu Elements
Slide bar
Solid triangle
Tab
Radio button
High Altitude symbol
ECO mode symbol
Wireless symbol
Menuwindowsordialogboxestypicallyhavethefollowingelements:
Highlight .............................Indicates the selected menu or item.
Solid triangle ......................Indicates further choices are available. A highlighted triangle indicates the item is active.
Tab ......................................Indicates a group of features in a dialog box. Selecting on any tab brings its page to the front.
Radio button .......................Use this round button to select an option in a dialog box.
Source ................................Indicates the currently selected source.
Off Timer remaining time ....Indicates the remaining countdown time when the [OFF TIMER] is preset.
Slide bar .............................Indicates settings or the direction of adjustment.
ECO mode symbol ..............Indicates ECO MODE is set.
Key Lock symbol ................Indicates the [CONTROL PANEL LOCK] is enabled.
Thermometer symbol .........Indicates the [ECO MODE] is forcibly set to [NORMAL] mode because the internal temperature is
too high.
High Altitude symbol ..........Indicates the [FAN MODE] is set to [HIGH ALTITUDE] mode.
Wireless symbol .................Indicate the wireless LAN connection is enabled. (not supported by PE501X)
Source
Available buttons
Thermometer symbol
KeyLocksymbol
Off Timer remaining
time
Highlight
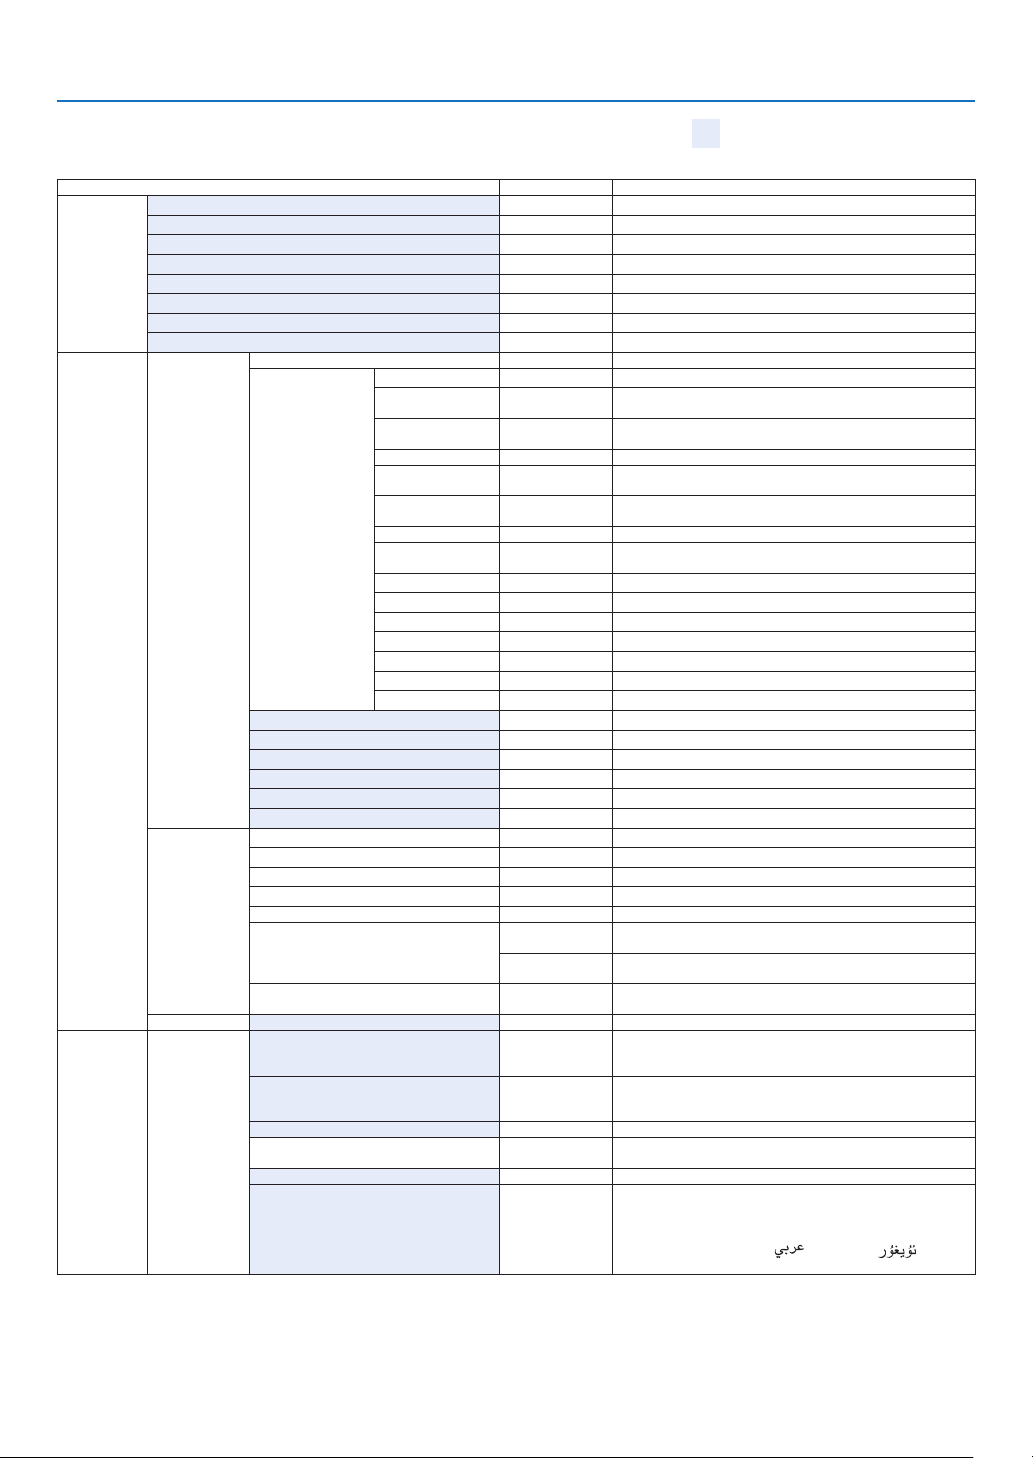
89
5. Using On-Screen Menu
❸ List of Menu Items
Somemenuitemsarenotavailabledependingontheinputsource.
MenuItemDefaultOptions
SOURCE
COMPUTER*
HDMI1*
HDMI2*
VIDEO*
S-VIDEO*
VIEWER(notsupportedbyPE501X)*
NETWORK(notsupportedbyPE501X)*
USBDISPLAY*
ADJUST
PICTURE
PRESET*1–7
DETAILSETTINGS
GENERAL
REFERENCE*
HIGH-BRIGHT,PRESENTATION,VIDEO,MOVIE,GRAPHIC,
sRGB,DICOMSIM.
GAMMA
CORRECTION*
1
DYNAMIC,NATURAL,BLACKDETAIL
SCREENSIZE*
2
*LARGE,MEDIUM,SMALL
COLOR
TEMPERATURE
*5000,6500,7800,8500,9300,10500
DYNAMIC
CONTRAST
*OFF,ON
IMAGEMODE*STILL,MOVIE
COLOR
ENHANCEMENT
*OFF,ON
WHITEBALANCE
CONTRASTR0
CONTRASTG0
CONTRASTB0
BRIGHTNESSR*
3
BRIGHTNESSG*
3
BRIGHTNESSB*
3
CONTRAST63
BRIGHTNESS63
SHARPNESS7
COLOR31
HUE31
RESET
IMAGE
OPTIONS
CLOCK*
PHASE*
HORIZONTAL*
VERTICAL*
OVERSCAN*
AUTO,0[%],5[%],10[%]
ASPECTRATIO
*
P501X/P451X/PE501X:AUTO,4:3,16:9,15:9,16:10,WIDE
ZOOM,NATIVE
*
P451W/P401W:AUTO,4:3,16:9,15:9,16:10,LETTERBOX,
NATIVE
POSITION(NotavailableonP451W/
P401W)
0
AUDIOVOLUME11
SETUPGENERAL
KEYSTONE0
KEYSTONEHORIZONTAL,KEYSTONEVERTICAL,
PINCUSHIONLEFT/RIGHT,PINCUSHIONTOP/BOTTOM,
CORNERSTONE,RESET
WALLCOLOROFF
OFF,WHITEBOARD,BLACKBOARD,BLACKBOARD
(GRAY),LIGHTYELLOW,LIGHTGREEN,LIGHTBLUE,
SKYBLUE,LIGHTROSE,PINK
ECOMODEAUTOECOOFF,AUTOECO,NORMAL,ECO
CLOSEDCAPTIONOFF
OFF,CAPTION1,CAPTION2,CAPTION3,CAPTION4,
TEXT1, TEXT2, TEXT3, TEXT4
OFFTIMEROFFOFF,0:30,1:00,2:00,4:00,8:00,12:00,16:00
LANGUAGEENGLISH
ENGLISH,DEUTSCH,FRANÇAIS,ITALIANO,ESPAÑOL,
SVENSKA,DANSK,PORTUGUÊS,ČEŠTINA,MAGYAR,
POLSKI,NEDERLANDS,SUOMI,NORSK,TÜRKÇE,
ROMÂNĂ, HRVATSKI, INDONESIA, РУССКИЙ,
БЪЛГАРСКИ, ΕΛΛΗΝΙΚΆ,
, , ไทย, , 简体中
文, 한국어, 日本語, 繁體中文
*Theasterisk(*)indicatesthatthedefaultsettingvariesdependingonthesignal.
*1The[GAMMACORRECTION]itemisavailablewhenanitemotherthan[DICOMSIM.]isselectedfor[REFERENCE].
*2The[SCREENSIZE]itemisavailablewhen[DICOMSIM.]isselectedfor[REFERENCE].
*3Thedefaultsettingvariesdependingonthesettingof[REFERENCE].
Basic menu items are indicated by shaded
area.

90
5. Using On-Screen Menu
MenuItemDefaultOptions
SETUP
MENU
COLORSELECTCOLORCOLOR,MONOCHROME
SOURCEDISPLAYONOFF,ON
IDDISPLAYONOFF,ON
ECOMESSAGEOFFOFF,ON
DISPLAYTIMEAUTO45SECMANUAL,AUTO5SEC,AUTO15SEC,AUTO45SEC
BACKGROUNDBLUEBLUE,BLACK,LOGO
FILTERMESSAGEOFFOFF,100[H],500[H],1000[H],2000[H]
INSTALLATION
ORIENTATION
DESKTOP
FRONT
DESKTOPFRONT,CEILINGREAR,DESKTOPREAR,
CEILINGFRONT
CONTROLPANELLOCKOFFOFF,ON
SECURITYOFFOFF,ON
COMMUNICATIONSPEED38400bps4800bps,9600bps,19200bps,38400bps
REMOTESENSORFRONT/BACKFRONT/BACK,FRONT,BACK
CONTROLID
CONTROLID
NUMBER
1 1–254
CONTROLIDOFFOFF,ON
TESTPATTERN
MICGAIN2 0, 1, 2, 3
NETWORKSETTINGS
(notsupportedbyPE501X)
OPTIONS(1)
AUTOADJUSTNORMALOFF,NORMAL,FINE
FANMODEAUTOAUTO,HIGH,HIGHALTITUDE
SIGNALSELECT
COMPUTER
RGB/
COMPONENT
RGB/COMPONENT,RGB,COMPONENT
VIDEOAUTO
AUTO,NTSC3.58,NTSC4.43,PAL,PAL-M,PAL-N,PAL60,
SECAM
S-VIDEOAUTO
AUTO,NTSC3.58,NTSC4.43,PAL,PAL-M,PAL-N,PAL60,
SECAM
WXGAMODE
P501X/P451X/
PE501X:OFF
P451W/P401W:
ON
OFF,ON
DEINTERLACEONOFF,ON
HDMI
SETTINGS
HDMI1
VIDEOLEVELAUTOAUTO,NORMAL,ENHANCED
HDMI2VIDEOLEVELAUTOAUTO,NORMAL,ENHANCED
AUDIO
SELECT
HDMI1HDMI1
HDMI1,COMPUTER
HDMI2HDMI2HDMI2,COMPUTER
NETWORK(notsupported
byPE501X)
NETWORKNETWORK,COMPUTER
USBDISPLAYUSBDISPLAYUSBDISPLAY,COMPUTER
BEEPONOFF,ON
TOOLS(notsupportedbyPE501X)
OPTIONS(2)
STANDBYMODEPOWER-SAVING
NORMAL,POWER-SAVING,NETWORKSTANDBY(not
supportedbyPE501X)
DIRECTPOWERONOFFOFF,ON
AUTOPOWERON(COMP.)OFFOFF,ON
AUTOPOWEROFF0:30OFF,0:05,0:10,0:20,0:30,1:00
DEFAULTSOURCESELECTLAST
LAST,AUTO,COMPUTER,HDMI1,HDMI2,VIDEO,
S-VIDEO,VIEWER,NETWORK,USBDISPLAY(VIEWER
andNETWORKarenotsupportedbyPE501X)
CARBONCONVERT
CURRENCY$, ,JP¥,RMB¥
CURRENCYCONVERT
*Theasterisk(*)indicatesthatthedefaultsettingvariesdependingonthesignal.

91
5. Using On-Screen Menu
MenuItemDefaultOptions
INFO.
USAGETIME
LAMPLIFEREMAINING
LAMPHOURSUSED
FILTERHOURSUSED
TOTALCARBONSAVINGS
TOTALCOSTSAVINGS
SOURCE(1)
SOURCENAME
SOURCEINDEX
HORIZONTALFREQUENCY
VERTICALFREQUENCY
SYNCTYPE
SYNCPOLARITY
SCANTYPE
SOURCE(2)
SIGNALTYPE
VIDEOTYPE
BITDEPTH
VIDEOLEVEL
WIREDLAN
(notsupported
byPE501X)
IPADDRESS
SUBNETMASK
GATEWAY
MACADDRESS
WIRELESSLAN
(notsupported
byPE501X)
IPADDRESS
SUBNETMASK
GATEWAY
MACADDRESS
SSID
NETWORKTYPE
WEP/WPA
CHANNEL
SIGNALLEVEL
VERSION(1)
FIRMWARE
DATA
VERSION(2)FIRMWARE2
OTHERS
PROJECTORNAME
MODELNO.
SERIALNUMBER
LANUNITTYPE(notsupportedby
PE501X)
CONTROLID(when[CONTROLID]is
set)
RESET
CURRENTSIGNAL
ALLDATA
CLEARLAMPHOURS
CLEARFILTERHOURS
*Theasterisk(*)indicatesthatthedefaultsettingvariesdependingonthesignal.

92
5. Using On-Screen Menu
❹ Menu Descriptions & Functions [SOURCE]
COMPUTER
SelectsthecomputerconnectedtoyourCOMPUTERinputconnectorsignal.
NOTE:WhenthecomponentinputsignalisconnectedtotheCOMPUTERINconnector,select[COMPUTER].
HDMI1 and 2
SelectstheHDMIcompatibleequipmentconnectedtoyourHDMI1or2INconnector.
VIDEO
SelectswhatisconnectedtoyourVIDEOinput-VCR,DVDplayerordocumentcamera.
S-VIDEO
SelectswhatisconnectedtoyourS-VIDEOinput-VCRorDVDplayer.
NOTE:Aframemayfreezeforabriefperiodoftimewhenavideoisplayedbackinfast-forwardorfast-rewindwithaVideoorS-
Videosource.
VIEWER (not supported by PE501X)
ThisfeatureenablesyoutomakepresentationsusingaUSBmemorythatcontainsslides.
(page
59“4.UsingtheViewer”)
NETWORK (not supported by PE501X)
SelectsasignalfromtheLANport(RJ-45)ortheinstalledUSBwirelessLANunit(optional).
USB DISPLAY
SelectsthecomputerconnectedtotheUSB(PC)port(typeB)byusingacommerciallyavailableUSBcable.
(page
40)
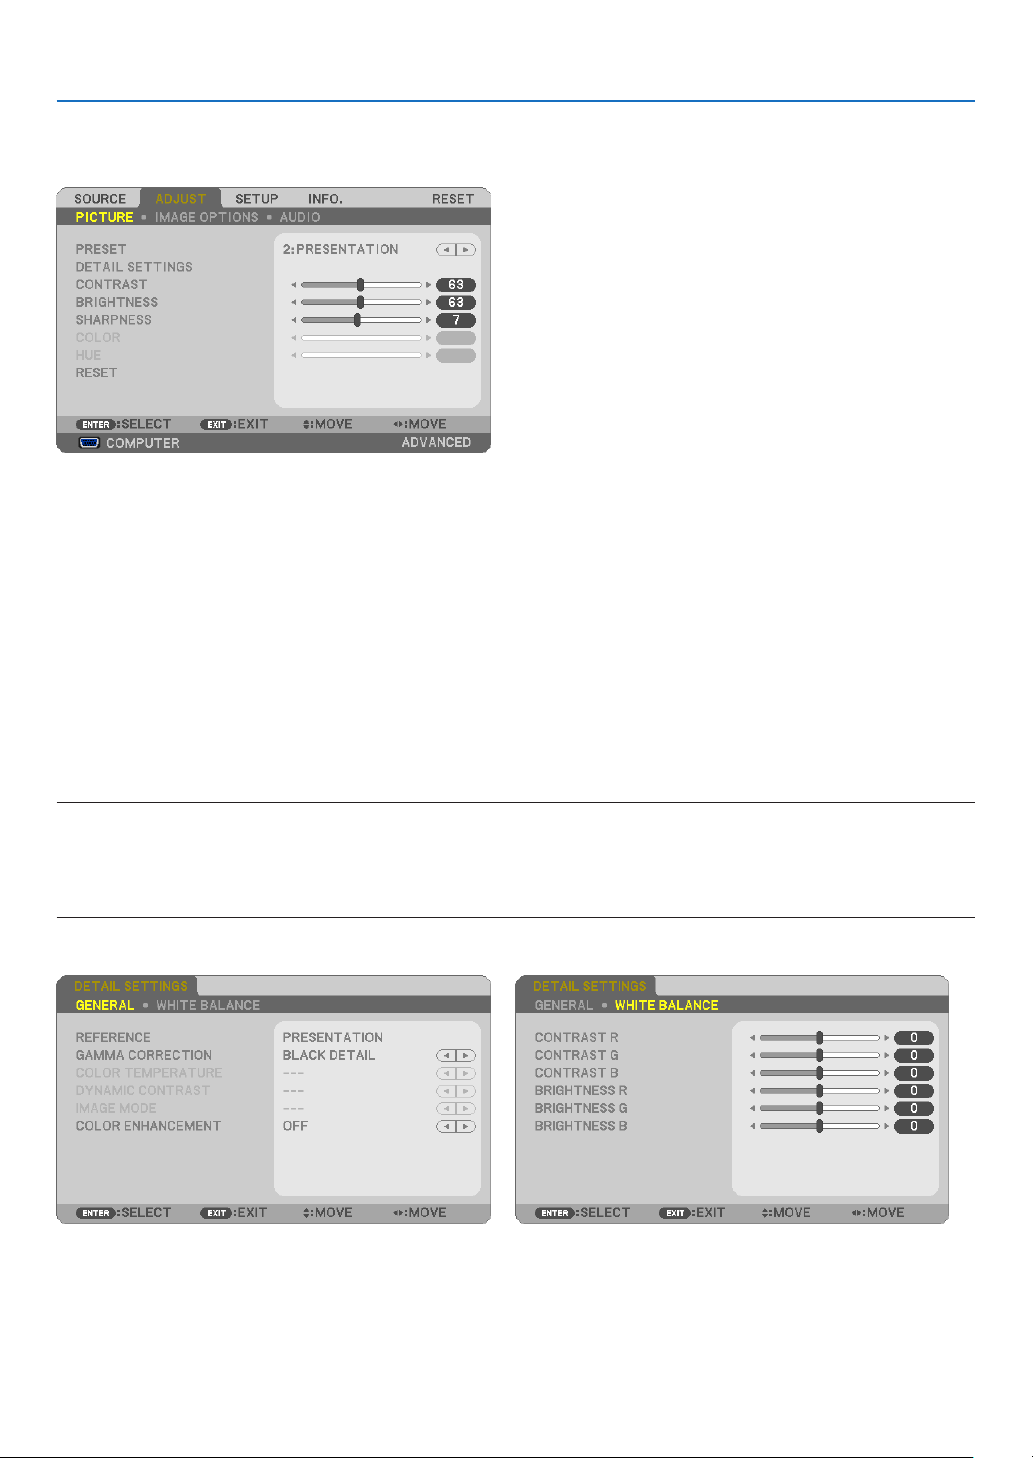
93
5. Using On-Screen Menu
❺ Menu Descriptions & Functions [ADJUST]
[PICTURE]
[PRESET]
Thisfunctionallowsyoutoselectoptimizedsettingsforyourprojectedimage.
Youcanadjustneutraltintforyellow,cyanormagenta.
Therearesevenfactorypresetsoptimizedforvarioustypesofimages.Youcanalsouse[DETAILSETTINGS]toset
useradjustablesettingstocustomizeeachgammaorcolor.
Yoursettingscanbestoredin[PRESET1]to[PRESET7].
HIGH-BRIGHT ........ Recommended for use in a brightly lit room.
PRESENTATION ..... Recommended for making a presentation using a PowerPoint file.
VIDEO .................... Recommended for typical TV program viewing.
MOVIE ................... Recommended for movies.
GRAPHIC ............... Recommended for graphics.
sRGB ..................... Standard color values
DICOM SIM. .......... Recommended for DICOM simulation format.
NOTE:
•The[DICOMSIM.]optionisfortraining/referenceonlyandshouldnotbeusedforactualdiagnosis.
•DICOMstandsforDigitalImagingandCommunicationsinMedicine.ItisastandarddevelopedbytheAmericanCollegeofRadiol-
ogy(ACR)andtheNationalElectricalManufacturersAssociation(NEMA).
Thestandardspecieshowdigitalimagedatacanbemovedfromsystemtosystem.
[DETAIL SETTINGS]

94
5. Using On-Screen Menu
[GENERAL]
StoringYourCustomizedSettings[REFERENCE]
Thisfunctionallowsyoutostoreyourcustomizedsettingsin[PRESET1]to[PRESET7].
First,selectabasepresetmodefrom[REFERENCE],thenset[GAMMACORRECTION]and[COLORTEMPERA-
TURE].
HIGH-BRIGHT ........ Recommended for use in a brightly lit room.
PRESENTATION ..... Recommended for making a presentation using a PowerPoint file.
VIDEO .................... Recommended for typical TV program viewing.
MOVIE ................... Recommended for movies.
GRAPHIC ............... Recommended for graphics.
sRGB ..................... Standard color values.
DICOM SIM. .......... Recommended for DICOM simulation format.
SelectingGammaCorrectionMode[GAMMACORRECTION]
Eachmodeisrecommendedfor:
DYNAMIC .............. Creates a high-contrast picture.
NATURAL ............... Natural reproduction of the picture.
BLACK DETAIL ....... Emphasizes detail in dark areas of the picture.
NOTE:Thisfunctionisnotavailablewhen[DICOMSIM.]isselectedfor[DETAILSETTINGS].
SelectingScreenSizeforDICOMSIM[SCREENSIZE]
Thisfunctionwillperformgammacorrectionappropriateforthescreensize.
LARGE ................... For screen size of 110"
MEDIUM ................ For screen size of 90"
SMALL ................... For screen size of 70"
NOTE:Thisfunctionisavailableonlywhen[DICOMSIM.]isselectedfor[DETAILSETTINGS].
AdjustingColorTemperature[COLORTEMPERATURE]
Thisoptionallowsyoutoselectthecolortemperatureofyourchoice.
NOTE:When[PRESENTATION]or[HIGH-BRIGHT]isselectedin[REFERENCE],thisfunctionisnotavailable.
AdjustingBrightnessandContrast[DYNAMICCONTRAST]
Thisfunctionallowsyoutoadjustthecontrastratioopticallyusingthebuilt-iniris.
Toincreasethecontrastratio,select[ON].
SelectingStillImageModeorMovieMode[IMAGEMODE]
Thisfunctionallowsyoutoselectthestillimagemodeorthemoviemode.
STILL ..................... This mode is for a still image.
MOVIE ................... This mode is for a movie.
NOTE:Thisfunctionisavailableonlywhen[HIGH-BRIGHT]isselectedfor[REFERENCE].

95
5. Using On-Screen Menu
EnhancingtheColor[COLORENHANCEMENT]
Thisfunctionallowsyoutoenhancethecolorofimage.
OFF ........................ Does not enhance the color
ON ......................... Enhances the color.
NOTE:Thisfunctionisavailableonlywhen[PRESENTATION]isselected[REFERENCE].
AdjustingWhiteBalance[WHITEBALANCE]
Thisallowsyoutoadjustthewhitebalance.Contrastforeachcolor(RGB)toadjustthewhitelevelofthescreen;
Brightnessforeachcolor(RGB)isusedtoadjusttheblacklevelofthescreen.
[CONTRAST]
Adjuststheintensityoftheimageaccordingtotheincomingsignal.
[BRIGHTNESS]
Adjuststhebrightnesslevelorthebackrasterintensity.
[SHARPNESS]
Controlsthedetailoftheimage.
[COLOR]
Increasesordecreasesthecolorsaturationlevel.
[HUE]
Variesthecolorlevelfrom+/−greento+/−blue.Theredlevelisusedasreference.
InputsignalCONTRASTBRIGHTNESSSHARPNESSCOLORHUE
COMPUTER/HDMI(RGB)YesYesYesNo No
COMPUTER/HDMI(COMPONENT)YesYesYesYesYes
VIDEO/S-VIDEOYesYesYesYesYes
VIEWER/NETWORK/USBDISPLAYYesYesYesNo No
Yes=Adjustable,No=Notadjustable
[RESET]
Thesettingsandadjustmentsfor[PICTURE]willbereturnedtothefactorysettingswiththeexceptionofthefollowing;
Presetnumbersand[REFERENCE]withinthe[PRESET]screen.
Thesettingsandadjustmentsunder[DETAILSETTINGS]withinthe[PRESET]screenthatarenotcurrentlyselected
willnotbereset.
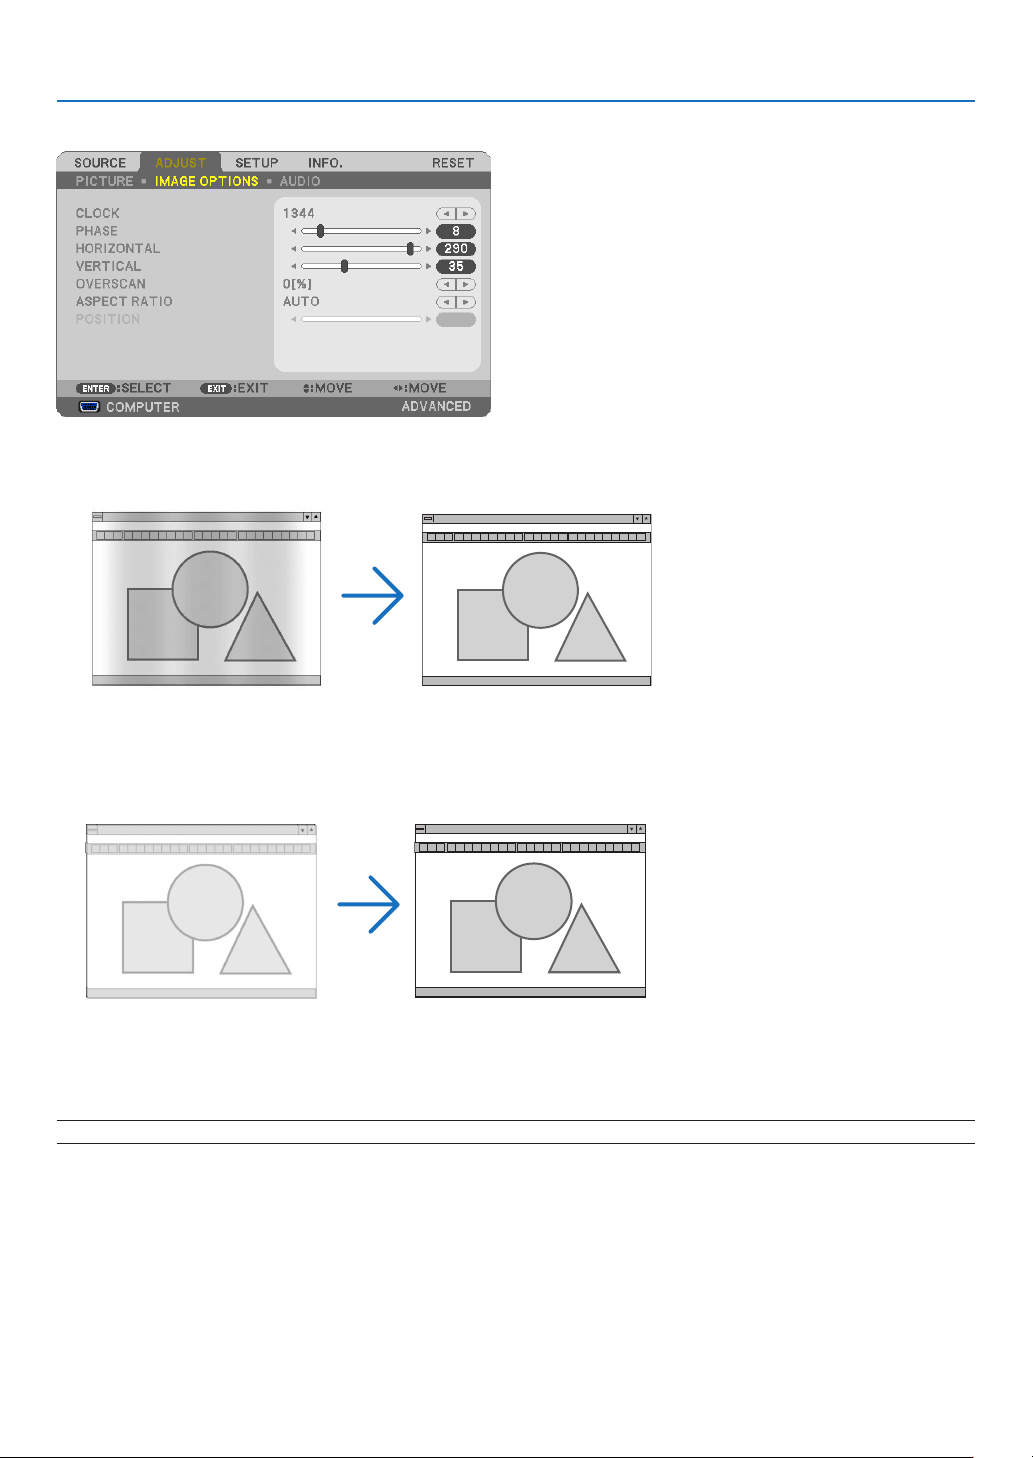
96
5. Using On-Screen Menu
[IMAGE OPTIONS]
AdjustingClockandPhase[CLOCK/PHASE]
ThisallowsyoutomanuallyadjustCLOCKandPHASE.
CLOCK ................... Use this item to fine tune the computer image or to remove any vertical banding that might appear. This
function adjusts the clock frequencies that eliminate the horizontal banding in the image.
This adjustment may be necessary when you connect your computer for the first time.
PHASE ................... Use this item to adjust the clock phase or to reduce video noise, dot interference or cross talk. (This is
evident when part of your image appears to be shimmering.)
Use [PHASE] only after the [CLOCK] is complete.
NOTE:The[CLOCK]and[PHASE]itemsareavailableforRGBsignalsonly.

97
5. Using On-Screen Menu
AdjustingHorizontal/VerticalPosition[HORIZONTAL/VERTICAL]
Adjuststheimagelocationhorizontallyandvertically.
NOTE:
•The[HORIZONTAL]and[VERTICAL]itemsarenotavailableforVIDEO,S-VIDEO,HDMI,VIEWER,NETWORK,andUSBDIS-
PLAY.
•TheHORIZONTALandVERTICALcannotbeadjusteddependingonthesignal.
-Animagecanbedistortedduringtheadjustmentof[CLOCK]and[PHASE].Thisisnotmalfunction.
-Theadjustmentsfor[CLOCK],[PHASE],[HORIZONTAL],and[VERTICAL]willbestoredinmemoryforthe
currentsignal.Thenexttimeyouprojectthesignalwiththesameresolution,horizontalandverticalfrequency,
itsadjustmentswillbecalledupandapplied.
Todeleteadjustmentsstoredinmemory,fromthemenu,youselect[RESET][CURRENTSIGNAL]or[ALL
DATA]andresettheadjustments.
SelectingOverscanPercentage[OVERSCAN]
Selectoverscanpercentage(AUTO,0%,5%and10%)forsignal.
Projected image
Overscaned by 10%
NOTE:
•The[0[%]]cannotbeselectedwhenVIDEOandS-VIDEOsignalsareused.
•The[OVERSCAN]itemisnotavailable:
•when[NATIVE]isselectedfor[ASPECTRATIO].
•when[VIEWER],[NETWORK],or[USBDISPLAY]isselectedfor[SOURCE]
•dependingonthesignal
•IftheprojectordoesnotreectthesettingsforyourHDMIequipmentsuchasaDVDplayerconnectedtotheHDMI1INorHDMI
2INconnector,selecttheHDMI1orHDMI2inputsourceagainontheprojector.
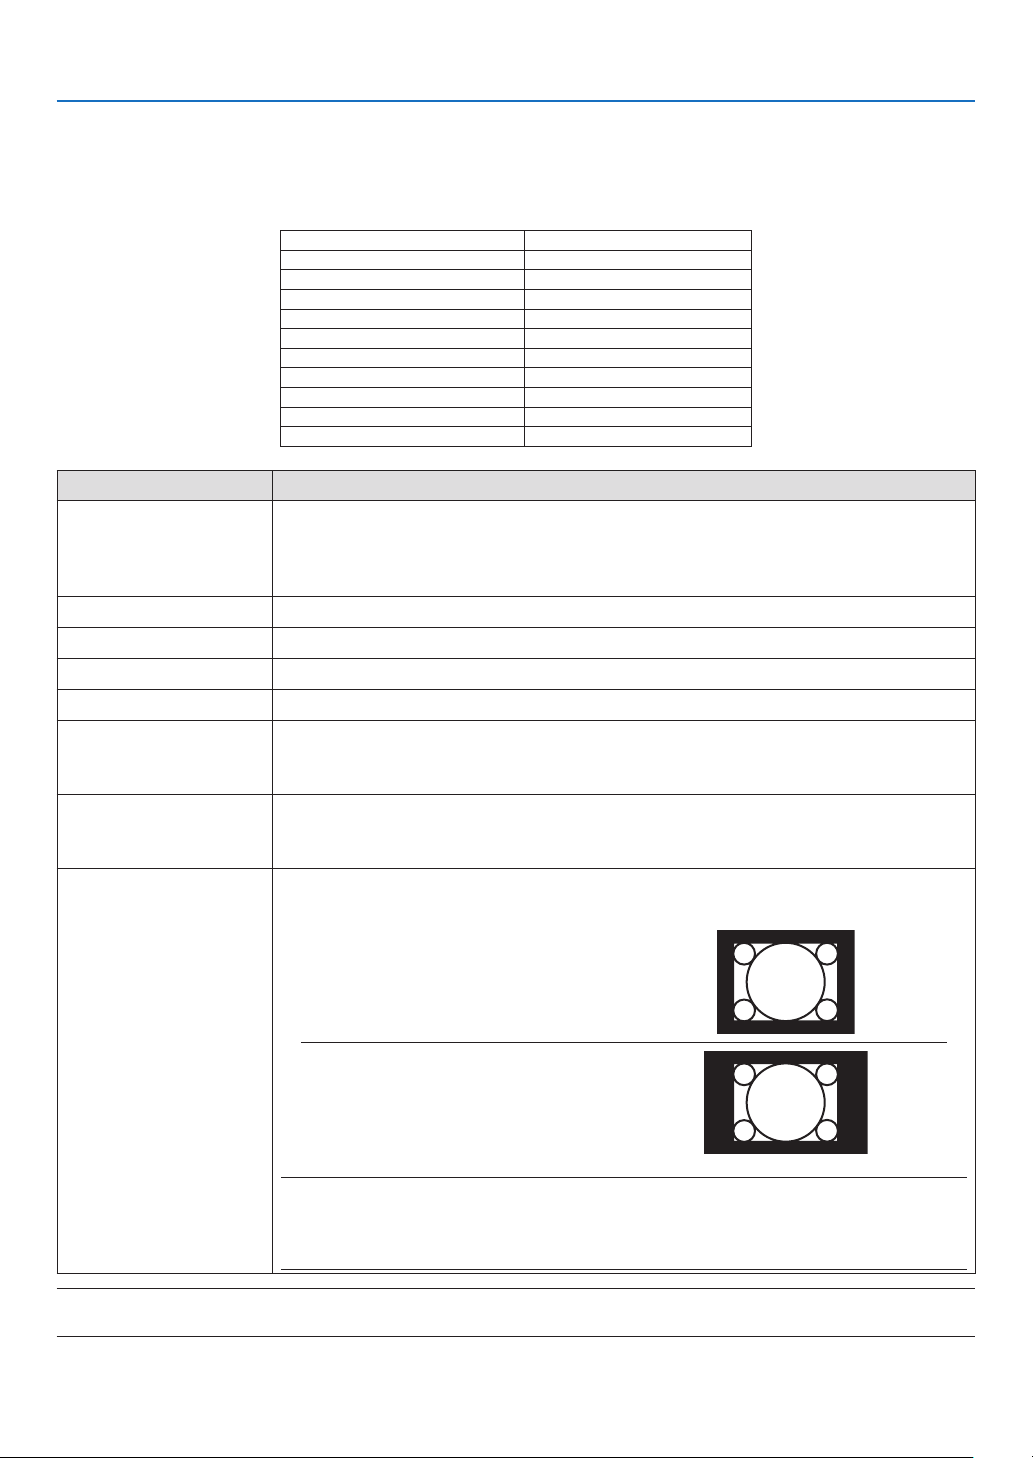
98
5. Using On-Screen Menu
SelectingAspectRatio[ASPECTRATIO]
Theterm“aspectratio”referstotheratioofwidthtoheightofaprojectedimage.
Theprojectorautomaticallydeterminestheincomingsignalanddisplaysitinitsappropriateaspectratio.
•Thistableshowstypicalresolutionsandaspectratiosthatmostcomputerssupport.
ResolutionAspectRatio
VGA640×4804:3
SVGA
800×6004:3
XGA1024×7684:3
WXGA1280×76815:9
WXGA1280×80016:10
WXGA+1440×90016:10
SXGA1280×10245:4
SXGA+
1400×10504:3
UXGA1600×12004:3
WUXGA1920×120016:10
OptionsFunction
AUTO
Theprojectorwillautomaticallydeterminetheincomingsignalanddisplayitinitsaspect
ratio.(
nextpage)
Theprojectormayerroneouslydeterminetheaspectratiodependingonitssignal.Ifthis
occurs,selecttheappropriateaspectratiofromthefollowing.
4:3Theimageisdisplayedin4:3aspectratio.
16:9Theimageisdisplayedin16:9aspectratio.
15:9Theimageisdisplayedin15:9aspectratio.
16:10Theimageisdisplayedin16:10aspectratio.
WIDEZOOM
(P501X/P451X/PE501X)
Theimageisstretchedleftandright.
Partsofthedisplayedimagearecroppedattheleftandrightedgesandthereforenot
visible.
LETTERBOX
(P451W/P401W)
Theimageofaletterboxsignalisstretchedequallyinthehorizontalandverticaldirec-
tionstotthescreen.Partsofthedisplayedimagearecroppedatthetopandbottom
edgesandthereforenotvisible.
NATIVETheprojectordisplaysthecurrentimageinitstrueresolutionwhentheincomingcomputer
signalhasalowerresolutionthantheprojector’snativeresolution.
[Example1]Whentheincoming
signalwiththeresolutionof800
×600isdisplayedontheP501X/
P451X/PE501X:
[Example2]Whentheincoming
signalwiththeresolutionof800×
600isdisplayedontheP451W/
P401W:
NOTE:
•Whenanon-computersignalisdisplayed,the[NATIVE]isnotavailable.
•Whenasignalwithahigherresolutionthantheprojector’snativeresolutionisdisplayed,[NA-
TIVE]isnotavailable.
NOTE:
•TheASPECTfeaturemaynotbeavailabledependingonthesignal.
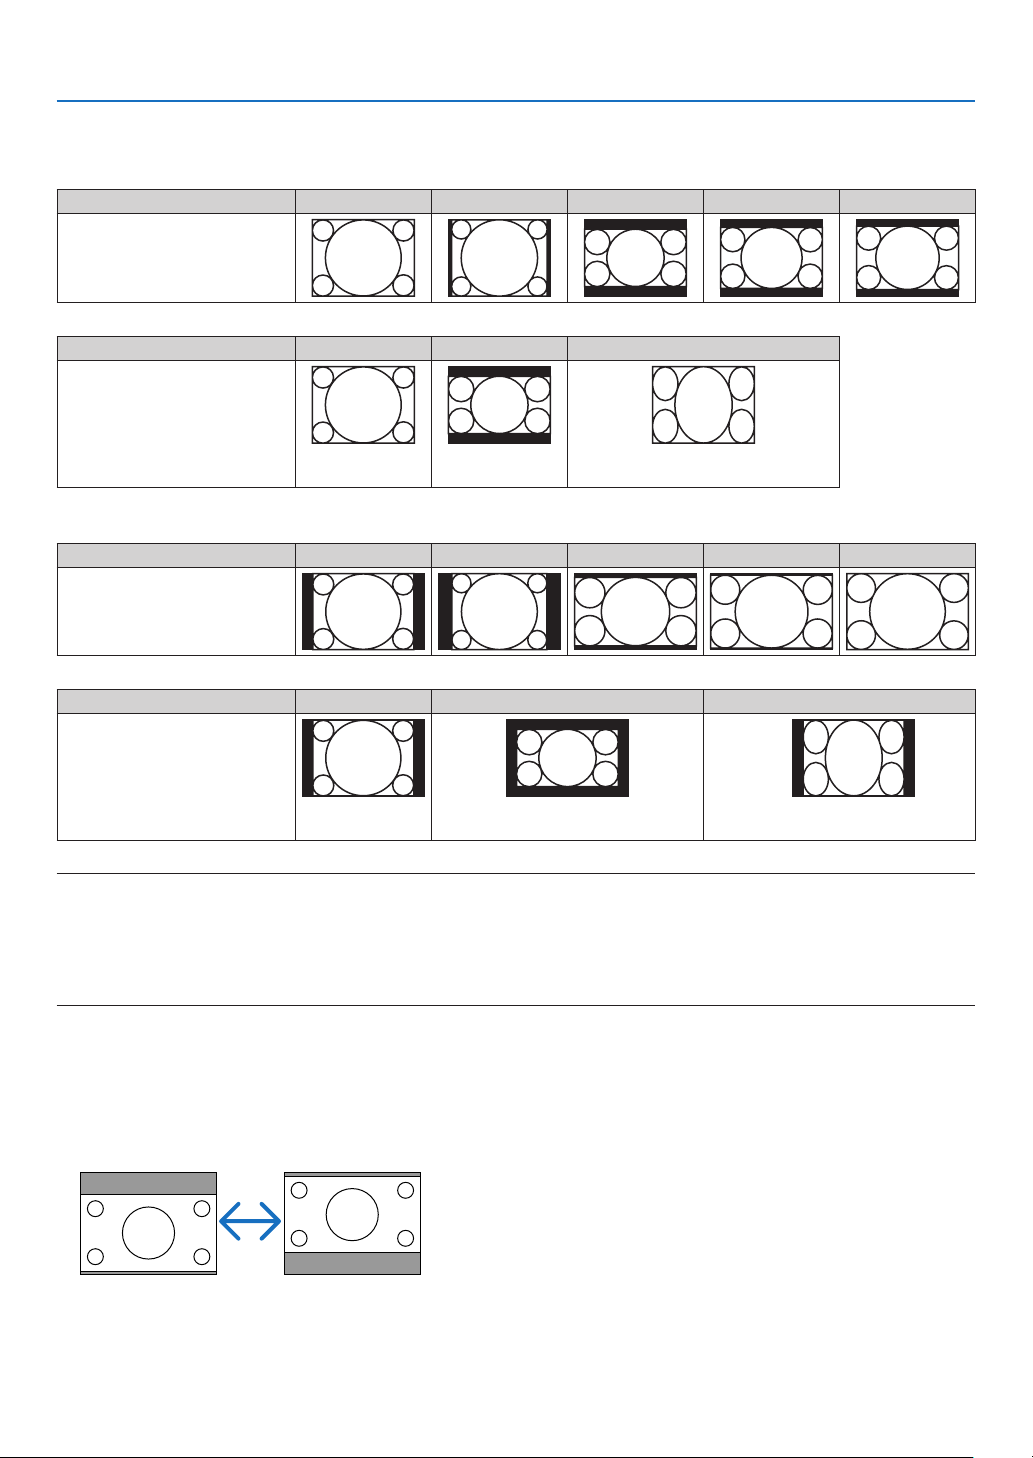
99
5. Using On-Screen Menu
Sampleimagewhentheappropriateaspectratioisautomaticallydetermined
P501X/P451X/PE501X
[Computersignal]
Aspectratioofincomingsignal4:35:416:915:916:10
Sampleimagewhentheappro-
priateaspectratioisautomati-
callydetermined
[Videosignal]
Aspectratioofincomingsignal4:3LetterboxSqueeze
Sampleimagewhentheas-
pectratioisautomaticallyde-
termined
NOTE:Todisplayasqueezedsignalprop-
erly,select[16:9]or[WIDEZOOM].
P451W/P401W
[Computersignal]
Aspectratioofincomingsignal4:35:416:915:916:10
Sampleimagewhentheappro-
priateaspectratioisautomati-
callydetermined
[Videosignal]
Aspectratioofincomingsignal4:3LetterboxSqueeze
Sampleimagewhentheas-
pectratioisautomaticallyde-
termined
NOTE:Todisplayaletterboxsignalprop-
erly,select[LETTERBOX].
NOTE:Todisplayasqueezedsignalprop-
erly,select[16:9].
TIP:
•Imagepositioncanbeadjustedverticallyusing[POSITION]whenthe[16:9],[15:9],or[16:10]aspectratiosareselected.
•Theterm“letterbox”referstoamorelandscape-orientedimagewhencomparedtoa4:3image,whichisthestandardaspect
ratioforavideosource.
Theletterboxsignalhasaspectratioswiththevistasize“1.85:1”orcinemascopesize“2.35:1”formovielm.
•Theterm“squeeze”referstothecompressedimageofwhichaspectratioisconvertedfrom16:9to4:3.
AdjustingtheVerticalPositionofImage[POSITION](notsupportedbyP451W/P401W)
(onlywhen[16:9],[15:9],or[16:10]isselectedfor[ASPECTRATIO])
When[16:9],[15:9],or[16:10]isselectedin[ASPECTRATIO],theimageisdisplayedwithblackbordersonthetop
and bottom.
Youcanadjusttheverticalpositionfromthetoptothebottomoftheblackarea.

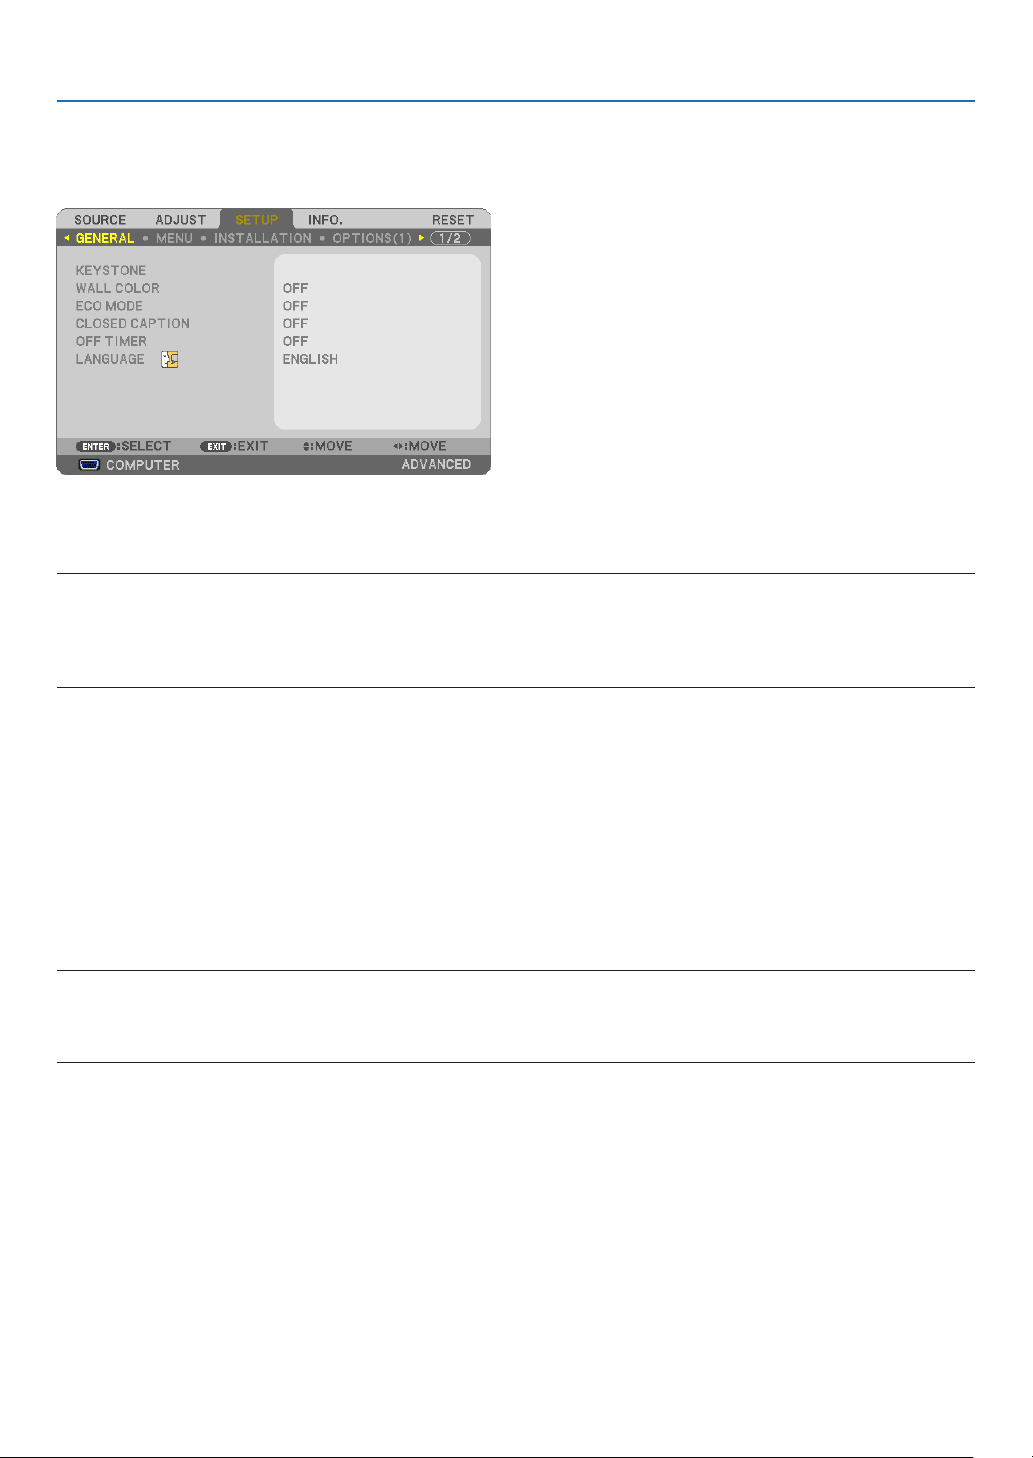
101
5. Using On-Screen Menu
❻ Menu Descriptions & Functions [SETUP]
[GENERAL]
CorrectingKeystoneDistortionManually[KEYSTONE]
Youcancorrecthorizontalorverticalkeystone,pincushion,orcornerstonedistortionmanually.
NOTE:
•Someitemsarenotavailablewhenoneitemisactivated.Unavailableitemsareshowningrey.
•Tochangefromoneitemtoanotheritem,resettherstitem.
•Adjustmentvalueswillbeoverwritten.Theywillnotbedeletedevenwhentheprojectoristurnedoff.
•Using[KEYSTONE]correctioncancausetheimagetobeslightlyblurredbecausethecorrectionismadeelectronically.
KEYSTONE HORIZONTAL ......... Corrects horizontal keystone distortion. ( page 24)
KEYSTONE VERTICAL............... Corrects vertical keystone distortion. ( page
24)
PINCUSHION LEFT/RIGHT ........ Corrects pincushion distortion at the left or right side.
PINCUSHION TOP/BOTTOM ..... Corrects pincushion distortion at the top or bottom side.
CORNERSTONE ........................ Fits a projected image within the border of the screen easily by align the four corner of an image
to the ones of the screen. ( page 36)
RESET ....................................... Returns all the above items to the factory preset values.
Correctingpincushiondistortion
NOTE:
•The[PINCUSHIONLEFT/RIGHT]or[PINCUSHIONTOP/BOTTOM]itemisnotavailablewhen[KEYSTONEHORIZONTAL],[KEY-
STONEVERTICAL]or[CORNERSTONE]isactivated.
•Beforeperformingcorrection,setthelensshifttothecenterposition.
1. Press the ▼ or ▲buttontoselect[PINCUSHIONLEFT/RIGHT]or[PINCUSHIONTOP/BOTTOM].
2. Press the ◀ or ▶buttontocorrectdistortion.
3. Press ENTER button.

102
5. Using On-Screen Menu
UsingtheWallColorCorrection[WALLCOLOR]
Thisfunctionallowsforquickadaptivecolorcorrectioninapplicationswherethescreenmaterialisnotwhite.
NOTE:Selecting[WHITEBOARD]reduceslampbrightness.
SettingEcoMode[ECOMODE]
TheECOMODEincreaseslamplife,whileloweringpowerconsumptionandcuttingdownonCO
2
emissions.
Fourbrightnessmodesofthelampcanbeselected:[OFF],[AUTOECO],[NORMAL]and[ECO]modes.
(page
30)
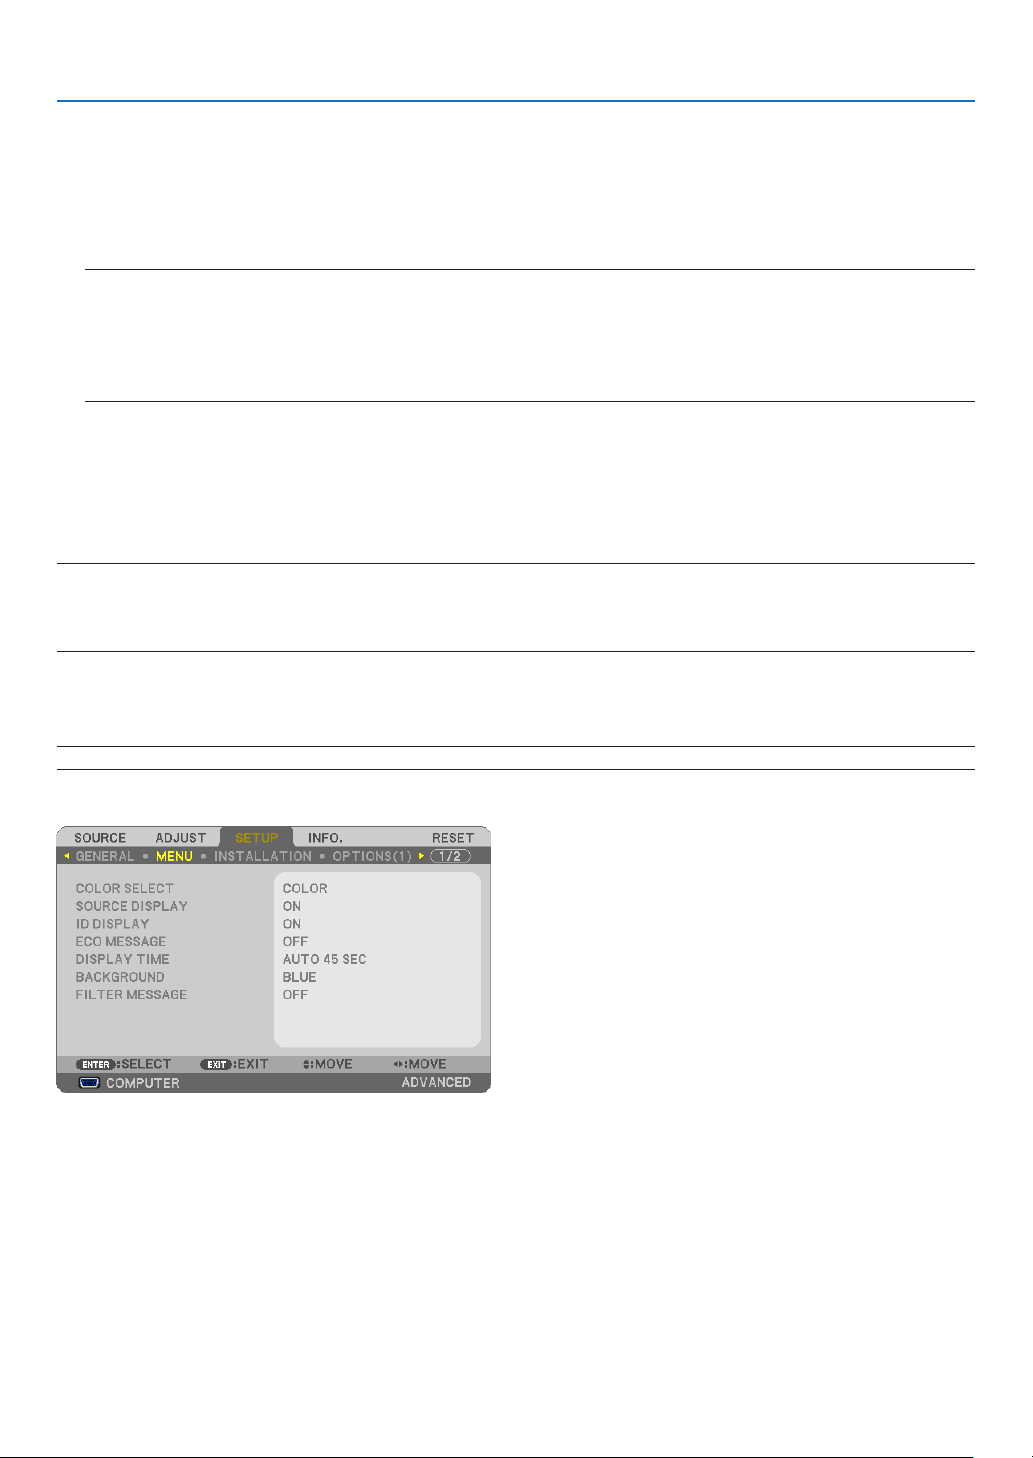
103
5. Using On-Screen Menu
SettingClosedCaption[CLOSEDCAPTION]
ThisoptionsetsseveralclosedcaptionmodesthatallowtexttobesuperimposedontheprojectedimageofVideo
orS-Video.
OFF ........................ This exits the closed caption mode.
CAPTION 1-4 ......... Text is superimposed.
TEXT 1-4 ................ Text is displayed.
NOTE:
•Theclosedcaptionisnotavailableunderthefollowingconditions:
-whenmessagesormenusaredisplayed.
-whenanimageismagnied,frozen,ormuted.
•Portionsofsuperimposedtextorclosedcaptionmaybetruncated.Ifthathappens,trytoplacethesuperimposedtextor
closedcaptionwithinthescreen.
UsingOffTimer[OFFTIMER]
1.Selectyourdesiredtimebetween30minutesand16hours:OFF,0:30,1:00,2:00,4:00,8:00,12:00,16:00.
2. Press the ENTER button on the remote control.
3.Theremainingtimestartscountingdown.
4.Theprojectorwillturnoffafterthecountdowniscomplete.
NOTE:
•Tocancelthepresettime,set[OFF]forthepresettimeorturnoffthepower.
•Whentheremainingtimereaches3minutesbeforetheprojectoristurnedoff,the[THEPROJECTORWILLTURNOFFWITHIN3
MINUTES]messagewillbedisplayedonthebottomofthescreen.
SelectingMenuLanguage[LANGUAGE]
Youcanchooseoneof29languagesforon-screeninstructions.
NOTE:Yoursettingwillnotbeaffectedevenwhen[RESET]isdonefromthemenu.
[MENU]
SelectingMenuColor[COLORSELECT]
Youcanchoosebetweentwooptionsformenucolor:COLORandMONOCHROME.
TurningOn/OffSourceDisplay[SOURCEDISPLAY]
ThisoptionturnsonoroffinputnamedisplaysuchasCOMPUTER,HDMI1,HDMI2,VIDEO,S-VIDEO,VIEWER,
NETWORK,USBDISPLAY,tobedisplayedonthetoprightofthescreen.
Whennoinputsignalispresent,theno-signalguidancepromptingyoutocheckforanavailableinputwillbedisplayed
atthecenterofthescreen.Whenthe[VIEWER]or[NETWORK]itemisselectedfor[SOURCE],theno-signalguid-
ancewillnotbedisplayed.

104
5. Using On-Screen Menu
TurningON/OFFControlID[IDDISPLAY]
ID DISPLAY ........... This option turns on or off the ID number which is displayed when the ID SET button on the remote control
is pressed.
TurningOn/OffEcoMessage[ECOMESSAGE]
Thisoptionturnsonoroffthefollowingmessageswhentheprojectoristurnedon.
TheEcoMessagepromptstheusertosaveenergy.When[OFF]isselectedfor[ECOMODE],youwillgetamessage
topromptyoutoselect[AUTOECO],[NORMAL],or[ECO]for[ECOMODE].
When[AUTOECO],[NORMAL],or[ECO]isselectedfor[ECOMODE]
Toclosethemessage,pressanyoneofthebuttons.Themessagewilldisappearifnobuttonoperationisdonefor
30 seconds.
When[OFF]isselectedfor[ECOMODE]
PressingtheENTERbuttonwilldisplaythe[ECOMODE]screen.(page30)
Toclosethemessage,presstheEXITbutton.
SelectingMenuDisplayTime[DISPLAYTIME]
Thisoptionallowsyoutoselecthowlongtheprojectorwaitsafterthelasttouchofabuttontoturnoffthemenu.The
presetchoicesare[MANUAL],[AUTO5SEC],[AUTO15SEC],and[AUTO45SEC].The[AUTO45SEC]isthefac-
torypreset.
SelectingaColororLogoforBackground[BACKGROUND]
Usethisfeaturetodisplayablue/blackscreenorlogowhennosignalisavailable.Thedefaultbackgroundis
[BLUE].
NOTE:
•Ifthe[LOGO]itemisselectedfor[BACKGROUND]withthe[NETWORK]or[USBDISPLAY]sourceselected,the[BLUE]itemwill
beselectedregardlessofitsselection.
•When[SOURCEDISPLAY]isturnedon,theno-signalguidancepromptingyoutocheckforanavailableinputwillbedisplayed
atthecenterofthescreenregardlessofitsselection.
•Yoursettingwillnotbeaffectedevenwhen[RESET]isdonefromthemenu.
SelectingIntervalTimeforFilterMessage[FILTERMESSAGE]
Thisoptionallowsyoutoselectthetimepreferencebetweendisplayingthemessageforcleaningthelters.Clean
thelterwhenyougetthemessage“PLEASECLEANTHEFILTER.”(page156)
Optionsareavailable:
OFF,100[H],500[H],1000[H],2000[H]
NOTE:Yoursettingwillnotbeaffectedevenwhen[RESET]isdonefromthemenu.

105
5. Using On-Screen Menu
[INSTALLATION]
SelectingProjectorOrientation[ORIENTATION]
Thisreorientsyourimageforyourtypeofprojection.Theoptionsare:desktopfrontprojection,ceilingrearprojection,
desktoprearprojection,andceilingfrontprojection.
DESKTOPFRONTCEILINGREAR
DESKTOPREARCEILINGFRONT
DisablingtheCabinetButtons[CONTROLPANELLOCK]
ThisoptionturnsonorofftheCONTROLPANELLOCKfunction.
NOTE:
•ThisCONTROLPANELLOCKdoesnotaffecttheremotecontrolfunctions.
•Whenthecontrolpanelislocked,pressingandholdingtheEXITbuttonontheprojectorcabinetforabout10secondswillchange
thesettingto[OFF].
TIP:Whenthe[CONTROLPANELLOCK]isturnedon,akeylockicon[]willbedisplayedatthebottomrightofthemenu.
EnablingSecurity[SECURITY]
ThisfeatureturnsonorofftheSECURITYfunction.
Unlessthecorrectkeywordisentered,theprojectorcannotprojectanimage.(page
33)
NOTE:Yoursettingwillnotbeaffectedevenwhen[RESET]isdonefromthemenu.

106
5. Using On-Screen Menu
SelectingCommunicationSpeed[COMMUNICATIONSPEED]
ThisfeaturesetsthebaudrateofthePCControlport(D-Sub9P).Itsupportsdataratesfrom4800to38400bps.The
defaultis38400bps.Selecttheappropriatebaudrateforyourequipmenttobeconnected(dependingontheequip-
ment,alowerbaudratemayberecommendedforlongcableruns).
NOTE:Yourselectedcommunicationspeedwillnotbeaffectedevenwhen[RESET]isdonefromthemenu.
TurningOnorOffRemoteSensor[REMOTESENSOR]
Thisoptiondetermineswhichremotesensorontheprojectorisenabledinwirelessmode.
Theoptionsare:FRONT/BACK,FRONT,andBACK.
Iftheremotecontrolsystemdoesnotfunctionwhendirectsunlightorstrongilluminationstrikestheremotecontrol
sensoroftheprojector,changeanotheroption.
SettingIDtotheProjector[CONTROLID]
YoucanoperatemultipleprojectorsseparatelyandindependentlywiththesingleremotecontrolthathastheCONTROL
IDfunction.IfyouassignthesameIDtoalltheprojectors,youcanconvenientlyoperatealltheprojectorstogether
usingthesingleremotecontrol.Todoso,youhavetoassignanIDnumbertoeachprojector.
CONTROL ID NUMBER .......Select a number from 1 to 254 you wish to assign to your projector.
CONTROL ID .......................Select [OFF] to turn off the CONTROL ID setting and select [ON] to turn on the CONTROL ID set-
ting.
NOTE:
•When[ON]isselectedfor[CONTROLID],theprojectorcannotbeoperatedbyusingtheremotecontrolthatdoesnotsupport
theCONTROLIDfunction.(Inthiscasethebuttonsontheprojectorcabinetcanbeused.)
•Yoursettingwillnotbeaffectedevenwhen[RESET]isdonefromthemenu.
•PressingandholdingtheENTERbuttonontheprojectorcabinetfor10secondswilldisplaythemenuforcancelingtheControl
ID.
AssigningorChangingtheControlID
1. Turn on the projector.
2. Press the ID SET button on the remote control.
TheCONTROLIDscreenwillbedisplayed.
IftheprojectorcanbeoperatedwiththecurrentremotecontrolID,the[ACTIVE]will
bedisplayed.IftheprojectorcannotbeoperatedwiththecurrentremotecontrolID,
the[INACTIVE]willbedisplayed.Tooperatetheinactiveprojector,assignthecontrol
IDusedfortheprojectorbyusingthefollowingprocedure(Step3).
3.PressoneofnumerickeypadbuttonswhilepressingandholdingtheIDSET
button on the remote control.
Example:
Toassign“3”,pressthe“3”buttonontheremotecontrol.
NoIDmeansthatalltheprojectorscanbeoperatedtogetherwithasingleremote
control.Toset“NoID”,enter“000”orpresstheCLEARbutton.
TIP:TherangeofIDsisfrom1to254.
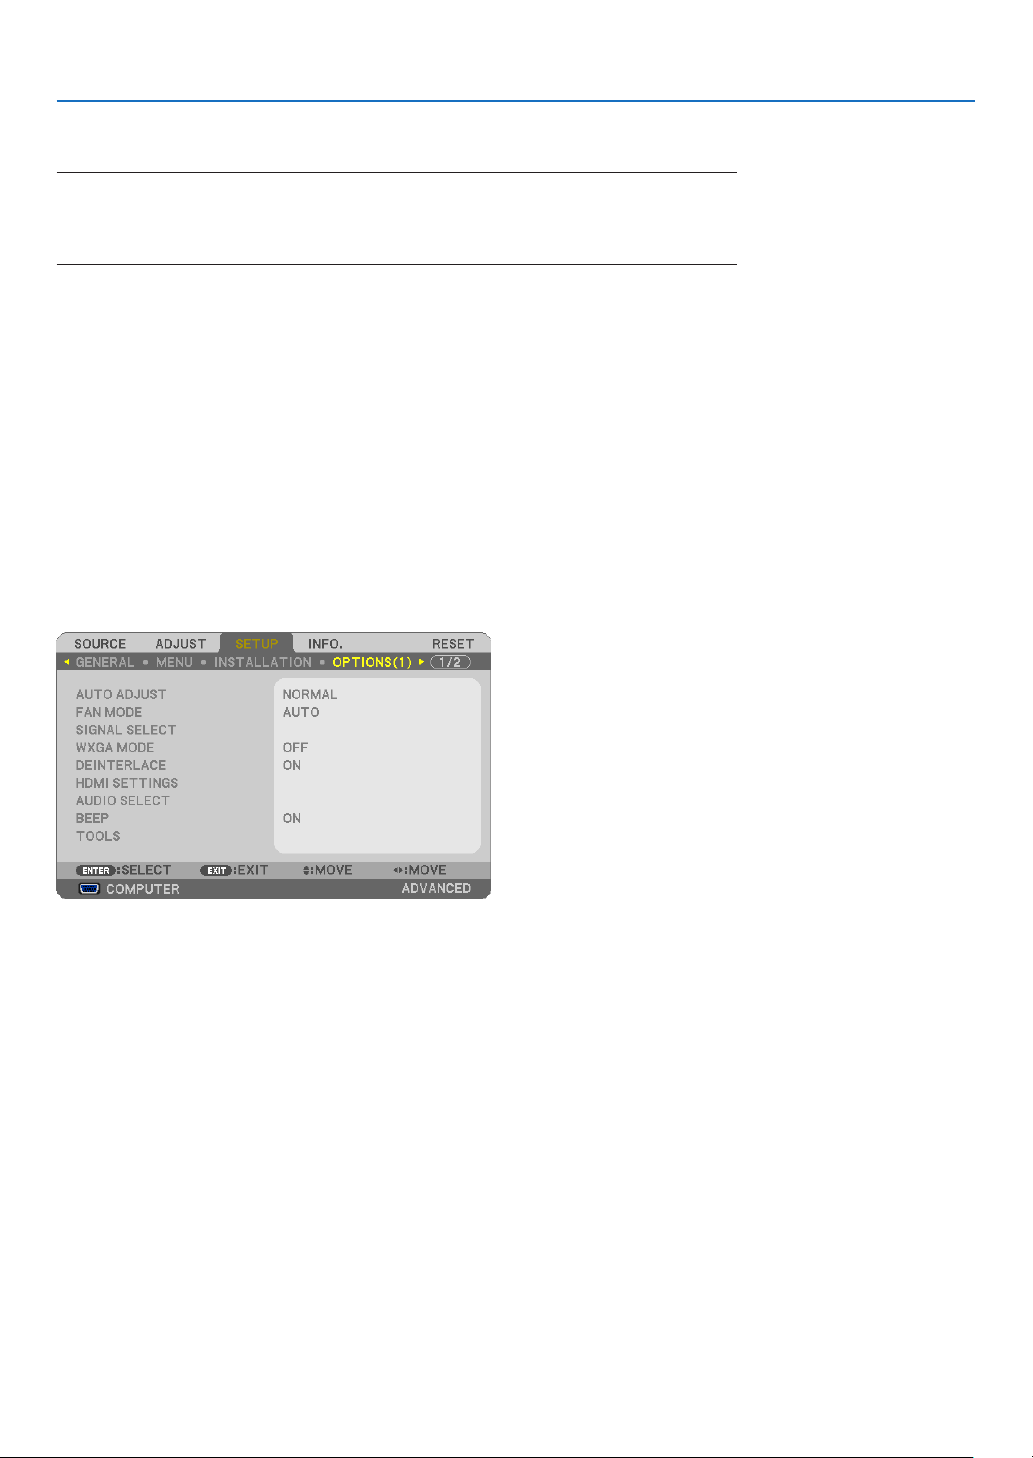
107
5. Using On-Screen Menu
4. Release the ID SET button.
TheupdatedCONTROLIDscreenwillbedisplayed.
NOTE:
•TheIDscanbeclearedinafewdaysafterthebatteriesarerundownorremoved.
•Accidentallypressinganyoneofthebuttonsoftheremotecontrolwillclearcurrentlyspecied
IDwithbatteriesremoved.
UsingTestPattern[TESTPATTERN]
Displaysthetestpatterntocheckforimagedistortionatthetimeoftheprojectorsetup.PresstheENTERbuttonto
displaythetestpattern;presstheEXITbuttontoclosethetestpatternandreturntothemenu.Menuoperationand
keystonecorrectionarenotpossiblewhenthetestpatternisdisplayed.
SettingMICGain[MICGAIN]
ThisfeatureallowsyoutoadjustyourmicrophonesensitivitywhenitisconnectedtotheMICinputjackoftheprojec-
tor.MicrophonevolumecanbeadjustedwiththeVOL.(+)or(−)buttonontheremotecontrolorthe◀ or ▶ on the
projectorcabinet.
[NETWORKINGSETTINGS](notsupportedbyPE501X)
See“APPLICATIONMENU”onpage
120.
[OPTIONS(1)]
SettingAutoAdjust[AUTOADJUST]
ThisfeaturesetstheAutoAdjustmodesothatthecomputersignalcanbeautomaticallyormanuallyadjustedfor
noiseandstability.Youcanautomaticallymakeadjustmentintwoways:[NORMAL]and[FINE].
OFF ........................ The computer signal will not be automatically adjusted. You can manually optimize the computer signal.
NORMAL ................ Default setting. The computer signal will be automatically adjusted. Normally select this option.
FINE ....................... Select this option if fine adjustment is needed. It takes more time to switch to the source than when [NOR-
MAL]is selected.
SelectingFanMode[FANMODE]
Thisoptionallowsyoutoselectthreemodesforfanspeed:Automode,Highspeedmode,andHighAltitudemode.
AUTO ..................... The built-in fans automatically run at a variable speed according to the internal temperature.
HIGH ...................... The built-in fans run at high speed.
HIGH ALTITUDE ..... The built-in fans run at a proper speed for low air pressure areas. Select this option when using the projector
in low air pressure areas or at an altitude of approximately 5500 feet/1700 meters or higher.
Whenyouwishtocooldownthetemperatureinsidetheprojectorquickly,select[HIGH].

108
5. Using On-Screen Menu
NOTE:
•ItisrecommendedthatyouselectHighspeedmodeifyouusetheprojectornon-stopforconsecutivedays.
•Set[FANMODE]to[HIGHALTITUDE]whenusingtheprojectorataltitudesapproximately5500feet/1700metersorhigher.
•Usingtheprojectorataltitudesapproximately5500feet/1700metersorhigherwithoutsettingto[HIGHALTITUDE]cancause
theprojectortooverheatandtheprotectorcouldshutdown.Ifthishappens,waitacoupleminutesandturnontheprojector.
•Usingtheprojectorataltitudeslessthanapproximately5500feet/1700metersandsettingto[HIGHALTITUDE]cancausethe
lamptoovercool,causingtheimagetoicker.Switch[FANMODE]to[AUTO].
•Usingtheprojectorataltitudesapproximately5500feet/1700metersorhighercanshortenthelifeofopticalcomponentssuch
asthelamp.
•Yoursettingwillnotbeaffectedevenwhen[RESET]isdonefromthemenu.
TIP:
•When[HIGHALTITUDE]isselected,anicon[]isdisplayedatthebottomoftheon-screenmenu.
SelectingSignalFormat[SIGNALSELECT]
[COMPUTER]
Allowsyoutochoose[COMPUTER]foranRGBsourcesuchasacomputer,or[COMPONENT]foracomponent
videosourcesuchasaDVDplayer.Normallyselect[RGB/COMPONENT]andtheprojectorautomaticallydetectsa
componentsignal.Howevertheremaybesomecomponentsignalsthattheprojectorisunabletodetect.Ifthisisthe
case,select[COMPONENT].
[VIDEO&S-VIDEOSystemSelect]
Thisfeatureenablesyoutoselectcompositevideostandardsautomaticallyormanually.
Normallyselect[AUTO]andtheprojectorwillautomaticallydetectthevideostandard.
Inthecasewheretheprojectorhasdifcultydetectingthevideostandard,selecttheappropriatevideostandardfrom
the menu.
ThismustbedoneforVIDEOandS-VIDEOrespectively.Notethatifyouhavemanuallyselectedavideostandard
otherthanthevideoformatofthecurrentinput,theimagewillnotappear.
EnablingorDisablingWXGAMode[WXGAMODE]
Selecting[ON]willgiveprioritytoWXGA(1280×768)/WUXGA(1920×1200)signalsinrecognizinganinputsig-
nal.
When[WXGAMODE]issetto[ON],XGA(1024×768)/UXGA(1600×1200)signalsmaynotberecognizedon
P501X/P451X/PE501X.Inthiscase,select[OFF].
NOTE:
•The[OFF]isselectedatthetimeofshipmentofP501X/P451X/PE501X.
•The[ON]isselectedatthetimeofshipmentofP451W/P401W.
EnablingtheDeinterlace[DEINTERLACE]
Turnsonoroffthedeinterlacefunctionforatelecinesignal.
OFF ........................ Select this option if there is any jitter or artifacts in video.
ON ......................... Default standard setting.
NOTE:ThisfeatureisnotavailableforHDTV(progressive)andcomputersignals.

109
5. Using On-Screen Menu
SettingHDMI1/2[HDMISETTINGS]
MakethesettingsforeachvideolevelwhenconnectingHDMIequipmentsuchasaDVDplayer.
VIDEO LEVEL ......... Select [AUTO] to automatically detect video level. If automatic detection may not work well, select [NOR-
MAL] to disable the [ENHANCED] feature of your HDMI equipment or select [ENHANCED] to improve image
contrast and increase detail in the dark areas.
NOTE:
•IftheprojectordoesnotreectthesettingsforyourHDMIequipmentsuchasaDVDplayerconnectedtotheHDMI1INorHDMI
2INconnector,selecttheHDMI1orHDMI2inputsourceagainontheprojector.
SettingAudio[AUDIOSELECT]
MakethesettingsforeachaudiolevelwhenconnectingHDMIequipment,yournetwork,andUSB(PC)port.Select
betweeneachequipmentandcomputer.
HDMI ..................... Select [HDMI1] or [HDMI2] to switch the HDMI 1 or HDMI 2 IN digital audio signal and select [COMPUTER]
to switch the COMPUTER input audio signal.
NETWORK ............. Select [NETWORK] or [COMPUTER] to switch the source connected to the network. (not supported by
PE501X)
USB DISPLAY ........ Select [USB DISPLAY] or [COMPUTER] to switch the source connected over the USB cable (USB DIS-
PLAY).
EnablingKeySoundandErrorSound[BEEP]
Thisfeatureturnsonoroffthebuttonsoundoralarmwhenanerroroccursorthefollowingoperationsareper-
formed.
-Displayingthemainmenu
-Switchingsources
-Resettingdatabyusing[RESET]
-PressingPOWERONorPOWEROFFbutton
[TOOLS](notsupportedbyPE501X)
See“APPLICATIONMENU”onpage
136.

110
5. Using On-Screen Menu
[OPTIONS(2)]
SelectingPower-savingin[STANDBYMODE]
Theprojectorhasthreestandbymodes:[NORMAL],[POWER-SAVING],and[NETWORKSTANDBY].
ThePOWER-SAVINGmodeisthemodethatallowsyoutoputtheprojectorinthepower-savingconditionwhich
consumeslesspowerthantheNORMALmode.
NORMAL ................ Power indicator: Orange light/STATUS indicator: Green light
- MIC sound will not be output from speaker during this mode.
POWER-SAVING .... Power indicator: Red light/STATUS indicator: Off
The following connectors, buttons or functions will not work during this mode.
- MONITOR OUT (COMP.) connector, AUDIO OUT connector, and MIC input jack
- LAN and Mail Alert functions
- Buttons other than POWER button on the cabinet
- Buttons other than POWER ON button on the remote control
- Virtual Remote Tool, USB Display fucntion
NETWORK STANDBY (not supported by PE501X)
.............................. When in the standby mode, the POWER indicator will light orange and the STATUS indicator will not light.
This shows that the projector’s power can be turned on by wired LAN.
When in the standby mode, the following connectors, buttons or functions will not work:
- MONITOR OUT (COMP.) connector, AUDIO OUT connector, and MIC input jack
- Wireless LAN Unit
- [AUTO POWER ON(COMP.)]
- Buttons other than POWER button on the cabinet
- Buttons other than POWER ON button on the remote control
- PC control commands for other than power-on, USB Display function
NOTE:
•When[CONTROLPANELLOCK],[CONTROLID],or[AUTOPOWERON(COMP.)]isturnedon,the[STANDBYMODE]settingis
notavailable.
•Evenwhen[POWER-SAVING]isselectedfor[STANDBYMODE],poweronoroffcanbedonebyusingthePCCONTROLport.
•ThepowerconsumptioninthestandbymodewillnotbeincludedincalculatingCO
2
emissionreduction.
•Yoursettingwillnotbeaffectedevenwhen[RESET]isdonefromthemenu.
EnablingDirectPowerOn[DIRECTPOWERON]
Turnstheprojectoronautomaticallywhenthepowercordisinsertedintoanactivepoweroutlet.Thiseliminatesthe
needtoalwaysusethePOWERbuttonontheremotecontrolorprojectorcabinet.

111
5. Using On-Screen Menu
TurningOntheProjectorByApplyingComputerSignal[AUTOPOWERON(COMP.)]
WhentheprojectorisinStandbymode,applyingacomputersignalfromacomputerconnectedtotheCOMPUTER
INinputwillpowerontheprojectorandsimultaneouslyprojectthecomputer’simage.
ThisfunctionalityeliminatestheneedtoalwaysusethePOWERbuttonontheremotecontrolortheprojectorcabinet
topowerontheprojector.
Tousethisfunction,rstconnectacomputertotheprojectorandtheprojectortoanactiveACinput.
NOTE:
•Disconnectingacomputersignalfromthecomputerwillnotpowerofftheprojector.Werecommendusingthisfunctionincom-
binationoftheAUTOPOWEROFFfunction.
•Thisfunctionwillnotbeavailableunderthefollowingconditions:
-whenacomponentsignalisappliedtotheCOMPUTERINconnector
-whenaSynconGreenRGBsignalorcompositesyncsignalisapplied
•ToenabletheAUTOPOWERON(COMP.)afterturningofftheprojector,wait3secondsandinputacomputersignal.
Ifacomputersignalisstillpresentwhentheprojectoristurnedoff,theAUTOPOWERON(COMP.)willnotworkandtheprojector
remainsinstandbymode.
EnablingPowerManagement[AUTOPOWEROFF]
Whenthisoptionisselectedyoucanenabletheprojectortoautomaticallyturnoff(attheselectedtime:5min.,10min.,
20min.,30min.,60min.)ifthereisnosignalreceivedbyanyinputorifnooperationisperformed.
SelectingDefaultSource[DEFAULTSOURCESELECT]
Youcansettheprojectortodefaulttoanyoneofitsinputseachtimetheprojectoristurnedon.
LAST ...................... Sets the projector to default to the previous or last active input each time the projector is turned on.
AUTO ..................... Searches for an active source in order of COMPUTER HDMI1 HDMI2 VIDEO S-VIDEO VIEWER
NETWORK USB DISPLAY COMPUTER and displays the first found source.
COMPUTER ........... Displays the computer signal from the COMPUTER IN connector every time the projector is turned on.
HDMI1 ................... Displays the digital source from the HDMI 1 IN connector every time the projector is turned on.
HDMI2 ................... Displays the digital source from the HDMI 2 IN connector every time the projector is turned on.
VIDEO .................... Displays the Video source from the VIDEO IN connector every time the projector is turned on.
S-VIDEO ................ Displays the Video source from the S-VIDEO IN connector every time the projector is turned on.
VIEWER ................. Displays slides or plays back movie files from the USB memory device every time the projector is turned
on. (not supported by PE501X)
NETWORK ............. Displays a signal from LAN port (RJ-45) or the USB Wireless LAN Unit. (not supported by PE501X)
USB DISPLAY ........ Displays the computer signal from the USB (PC) port every time the projector is turned on.

112
5. Using On-Screen Menu
Settingcarbonfootprintfactor[CARBONCONVERT]
Adjuststhecarbonfootprintfactorinthecarbonsavingcalculation.Theinitialsettingis0.505[kg-CO2/kWh]basedon
theCO
2
EmissionsfromFuelCombustion(2008Edition)publishedbyOECD.
Selectingyourcurrency[CURRENCY]
Displayselectricitypricing(availablein4currencyunits).
$ ............................ US Dollar
........................... EU Euro
JP¥ ........................ Japanese Yen
RMB¥ .................... Chinese Yuan
Changingcurrencysettingandcurrencyconvertsetting[CURRENCYCONVERT]
ChangescurrencysettingandcurrencyconvertsettingforCARBONMETER.
Theinitialsettingareasfollows:
US Dollar ............... 0.11 [$/kWh]
EU Euro ................. 0.19 [/kWh]
Japanese Yen ......... 20 [¥/kWh]
Chinese Yuan
......... 0.48 [¥/kWh]
TheinitialsettingsforUSdollar,EUEuro,andJapaneseYenarebasedon“EnergyPricesandTaxes(secondquarter
2010”publishedbyOECD.
TheinitialsettingforChineseYuanisbasedon“ChineseDataFile(2010)”publishedbyJETRO.
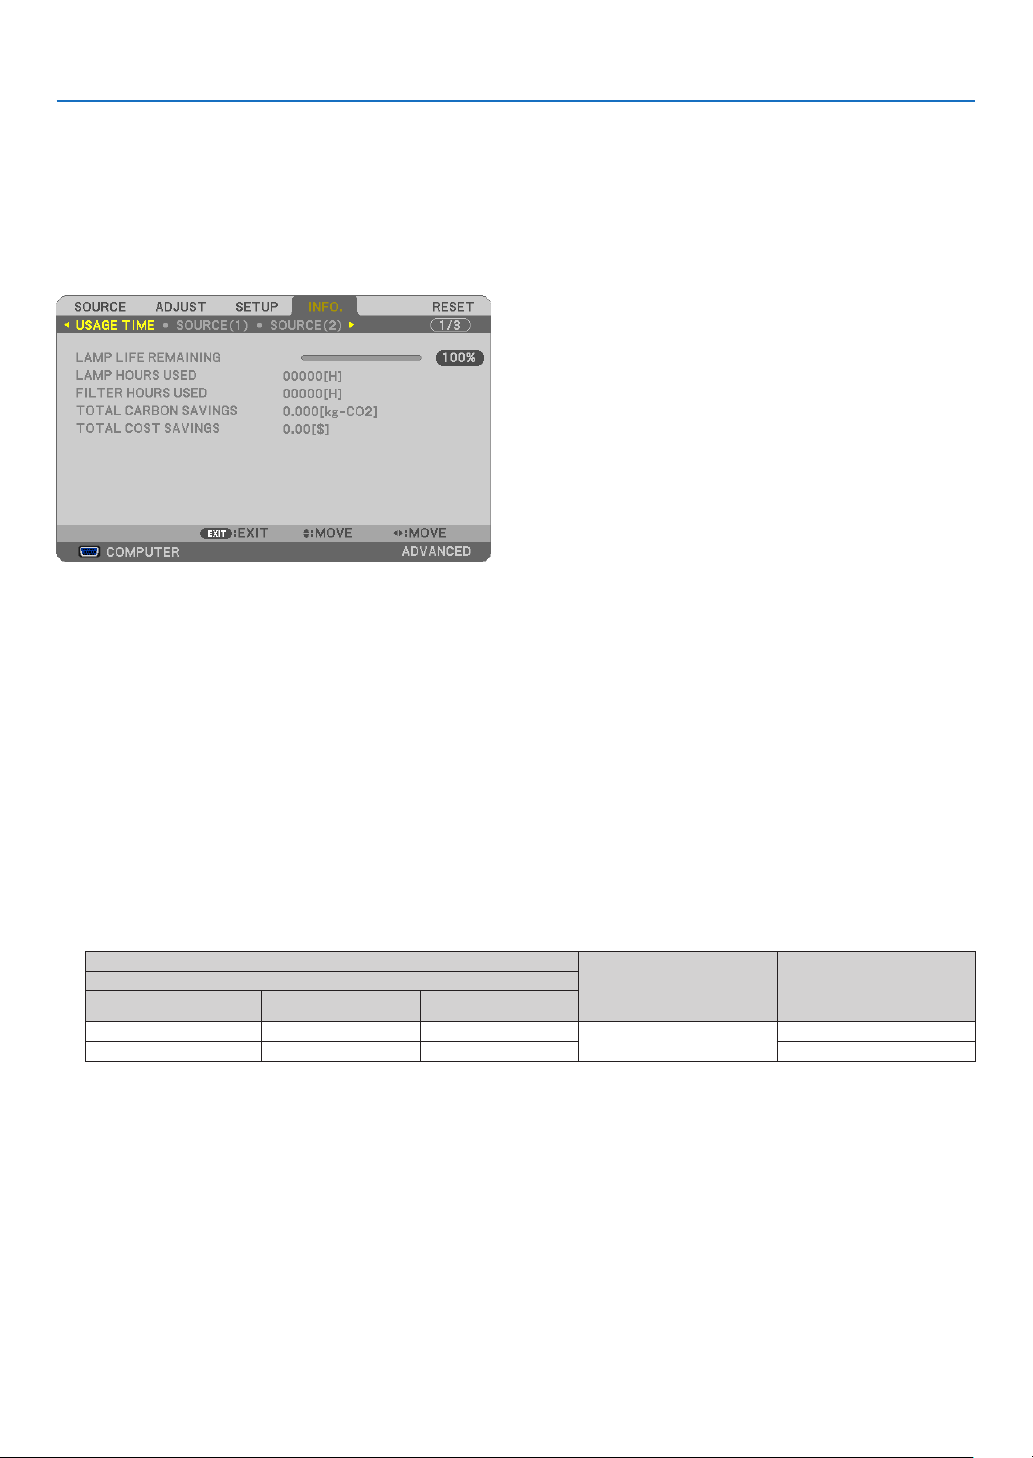
113
5. Using On-Screen Menu
❼ Menu Descriptions & Functions [INFO.]
Displaysthestatusofthecurrentsignalandlampusage.Thisitemhaseightpages.Theinformationincludedisas
follows:
TIP:PressingtheHELPbuttonontheremotecontrolwillshowthe[INFO.]menuitems.
[USAGE TIME]
[LAMPLIFEREMAINING](%)*
[LAMPHOURSUSED](H)
[FILTERHOURSUSED](H)
[TOTALCARBONSAVINGS](kg-CO2)
[TOTALCOSTSAVINGS]($)
*Theprogressindicatorshowsthepercentageofremainingbulblife.
Thevalueinformsyouoftheamountoflampusage.Whentheremaininglamptimereaches0,theLAMPLIFE
REMAININGbarindicatorchangesfrom0%to100Hoursandstartscountingdown.
Iftheremaininglamptimereaches0hours,theprojectorwillnotturnon.
•Themessagetotheeffectthatthelamportheltersshouldbereplacedwillbedisplayedforoneminutewhen
theprojectoristurnedonandwhenthePOWERbuttonontheprojectorortheremotecontrolispressed.
Todismissthismessage,pressanybuttonontheprojectorortheremotecontrol.
Lamplife(H)
ReplacementlampModel
ECO MODE
OFF/AUTOECONORMAL ECO
3500 4000 6000
NP23LP
P501X/P451W/PE501X
4000 5000 6000P451X/P401W
•
[TOTALCARBONSAVINGS]
Thisdisplaystheestimatedcarbonsavinginformationinkg.Thecarbonfootprintfactorinthecarbonsavingcal-
culationisbasedontheOECD(2008Edition).(page
31)
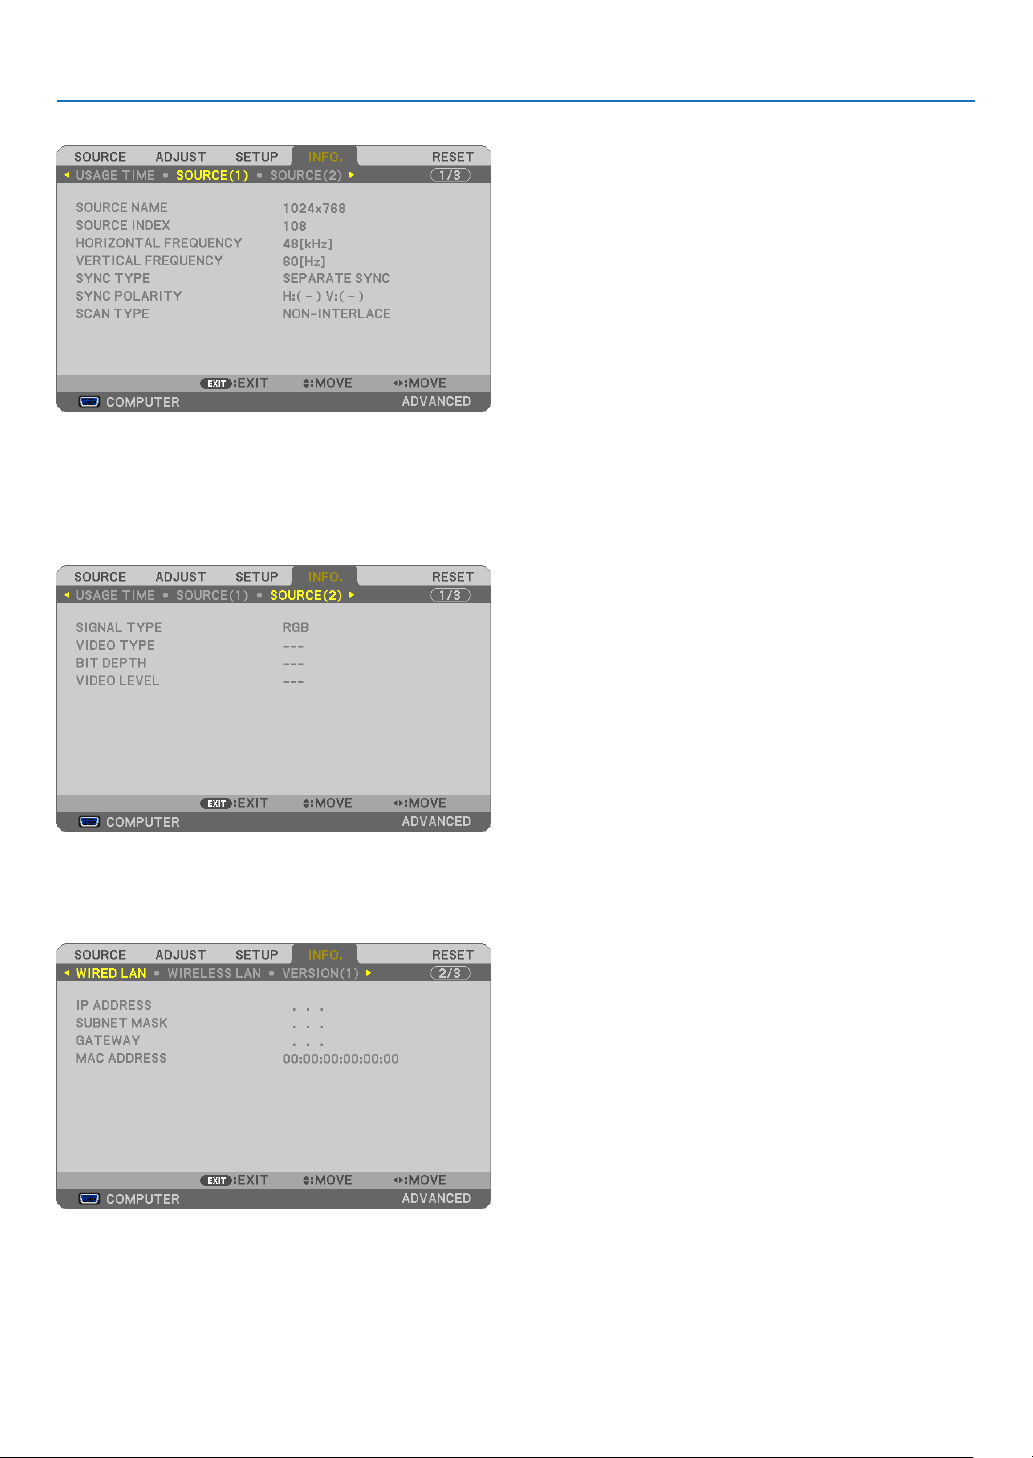
114
5. Using On-Screen Menu
[SOURCE(1)]
[SOURCENAME][SOURCEINDEX]
[HORIZONTALFREQUENCY][VERTICALFREQUENCY]
[SYNCTYPE][SYNCPOLARITY]
[SCANTYPE]
[SOURCE(2)]
[SIGNALTYPE][VIDEOTYPE]
[BITDEPTH][VIDEOLEVEL]
[WIRED LAN] (not supported by PE501X)
[IPADDRESS][SUBNETMASK]
[GATEWAY][MACADDRESS]
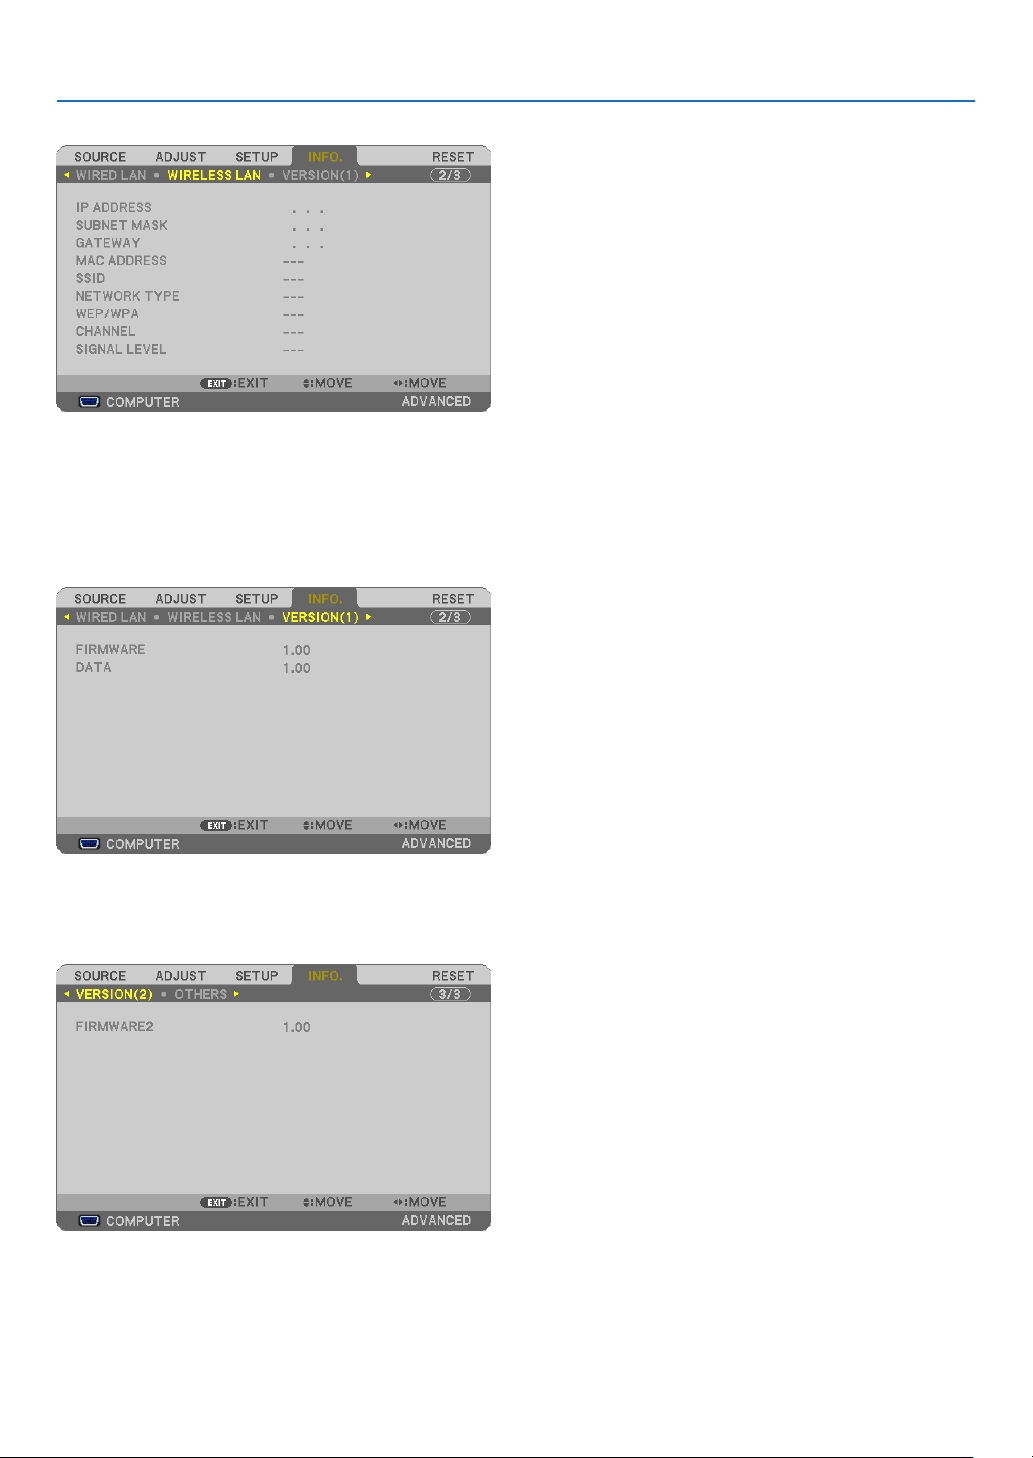
115
5. Using On-Screen Menu
[WIRELESS LAN] (not supported by PE501X)
[IPADDRESS][SUBNETMASK]
[GATEWAY][MACADDRESS]
[SSID][NETWORKTYPE]
[WEP/WPA][CHANNEL]
[SIGNALLEVEL]
[VERSION(1)]
[FIRMWARE]Version
[DATA]Version
[VERSION(2)] (not supported by PE501X)
[FIRMWARE2]Version

116
5. Using On-Screen Menu
[OTHERS]
[PROJECTORNAME]
[MODELNO.]
[SERIALNUMBER]
[LANUNITTYPE]
[CONTROLID](when[CONTROLID]isset)

117
5. Using On-Screen Menu
❽ Menu Descriptions & Functions [RESET]
Returning to Factory Default [RESET]
TheRESETfeatureallowsyoutochangeadjustmentsandsettingstothefactorypresetfora(all)source(s)except
thefollowing:
[CURRENTSIGNAL]
Resetstheadjustmentsforthecurrentsignaltothefactorypresetlevels.
Theitemsthatcanberesetare:[PRESET],[CONTRAST],[BRIGHTNESS],[COLOR],[HUE],[SHARPNESS],
[ASPECTRATIO],[HORIZONTAL],[VERTICAL],[CLOCK],[PHASE],and[OVERSCAN].
[ALLDATA]
Resetalltheadjustmentsandsettingsforallthesignalstothefactorypreset.
All items can be reset EXCEPT[LANGUAGE],[BACKGROUND],[FILTERMESSAGE],[SECURITY],[COMMU-
NICATIONSPEED],[CONTROLID],[STANDBYMODE],[FANMODE],[CARBONCONVERT],[CURRENCY],
[CURRENCYCONVERT],[LAMPLIFEREMAINING],[LAMPHOURSUSED],[FILTERHOURSUSED],[TOTAL
CARBONSAVINGS],[WIREDLAN],and[WIRELESSLAN].
Toresetthelampusagetime,see“ClearingLampHourMeter[CLEARLAMPHOURS]”below.
ClearingLampHourMeter[CLEARLAMPHOURS]
Resetsthelampclockbacktozero.Selectingthisoptiondisplayssubmenuforaconrmation.Select[YES]andpress
theENTERbutton.
NOTE:Elapsedtimeofthelampusewillnotbeaffectedevenwhen[RESET]isdonefromthemenu.
NOTE:Theprojectorwillturnoffandgointostandbymodewhenyoucontinuetousetheprojectorforanother100hoursafterthe
lamphasreachedtheendofitslife.Inthisconditionyoucannotclearthelamphourmeteronthemenu.Ifthishappens,pressthe
HELPbuttonontheremotecontrolfor10secondstoresetthelampclockbacktozero.Dothisonlyafterreplacingthelamp.
ClearingtheFilterUsageHours[CLEARFILTERHOURS]
Resetsthelterusagebacktozero.Selectingthisoptiondisplayssubmenuforaconrmation.Select[YES]andpress
theENTERbutton.
NOTE:Elapsedtimeofthelterusewillnotbeaffectedevenwhen[RESET]isdonefromthemenu.
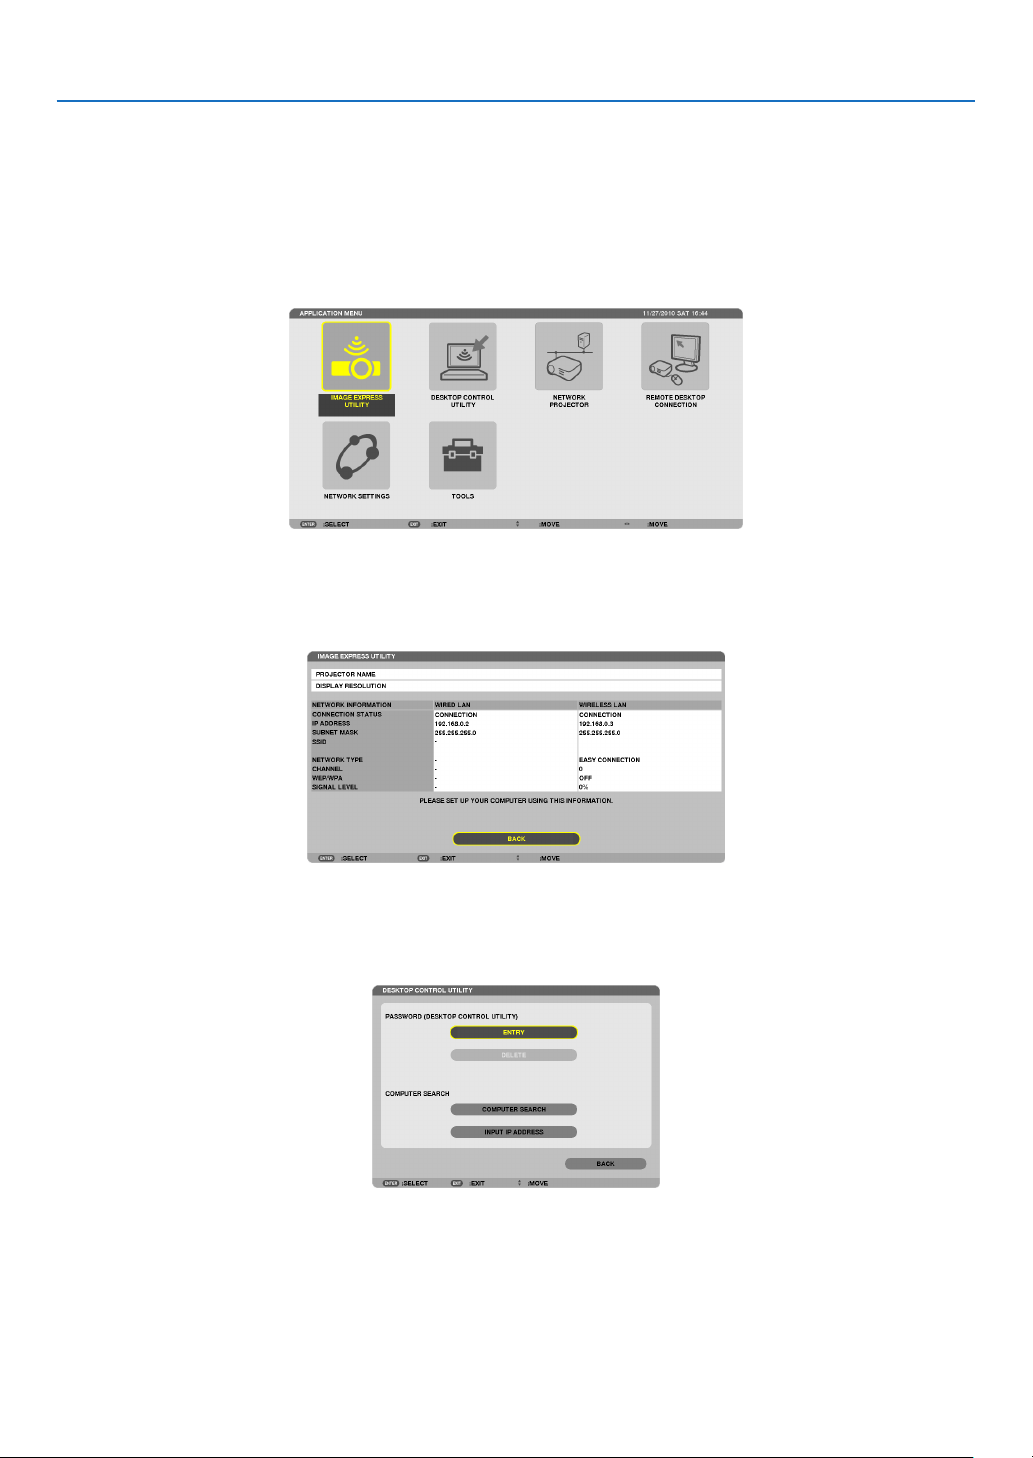
118
5. Using On-Screen Menu
❾ Application Menu (not supported by PE501X)
When[NETWORK]isselectedfromthe[SOURCE]menu,theapplicationmenu[APPLICATIONMENU]willbedis-
played.
TheapplicationmenuallowsyoutosetuptheUserSupportware,NetworkSettings(NETWORKSETTINGS)and
Tools(TOOLS).
TheUserSupportwareiscontainedonthesuppliedNECProjectorCD-ROM.
In[ADMINISTRATORMODE],either[ADVANCED]menuor[BASIC]menucanbeselected.(page
136)
The[BASIC]menucontainsminimumessentialsofmenusandcommands.
IMAGE EXPRESS UTILITY
Thisshowsinformationforprojectorname,resolution,andnetwork(wired/wireless)whicharerequiredtouseImage
ExpressUtility.
Usethisinformationtosetupforyourcomputer.
DESKTOP CONTROL UTILITY
Thisallowsyoutosetupforpasswordentry/deletion,computersearchingandIPaddressonnetwork(wired/wireless)
whicharerequiredtouseDesktopControlUtility.

119
5. Using On-Screen Menu
NETWORK PROJECTOR
Thisshowsinformationforprojectorname,resolution,andnetwork(wired/wireless)whicharerequiredtouseNetwork
Projector.
Usethisinformationtosetupforyourcomputer.
REMOTE DESKTOP CONNECTION
ThisallowsyoutosetupforcomputernameentryandeffectsforRemoteDesktop.
NOTE:
•AUSBkeyboardisrequiredtosetuptheRemoteDesktopConnection.
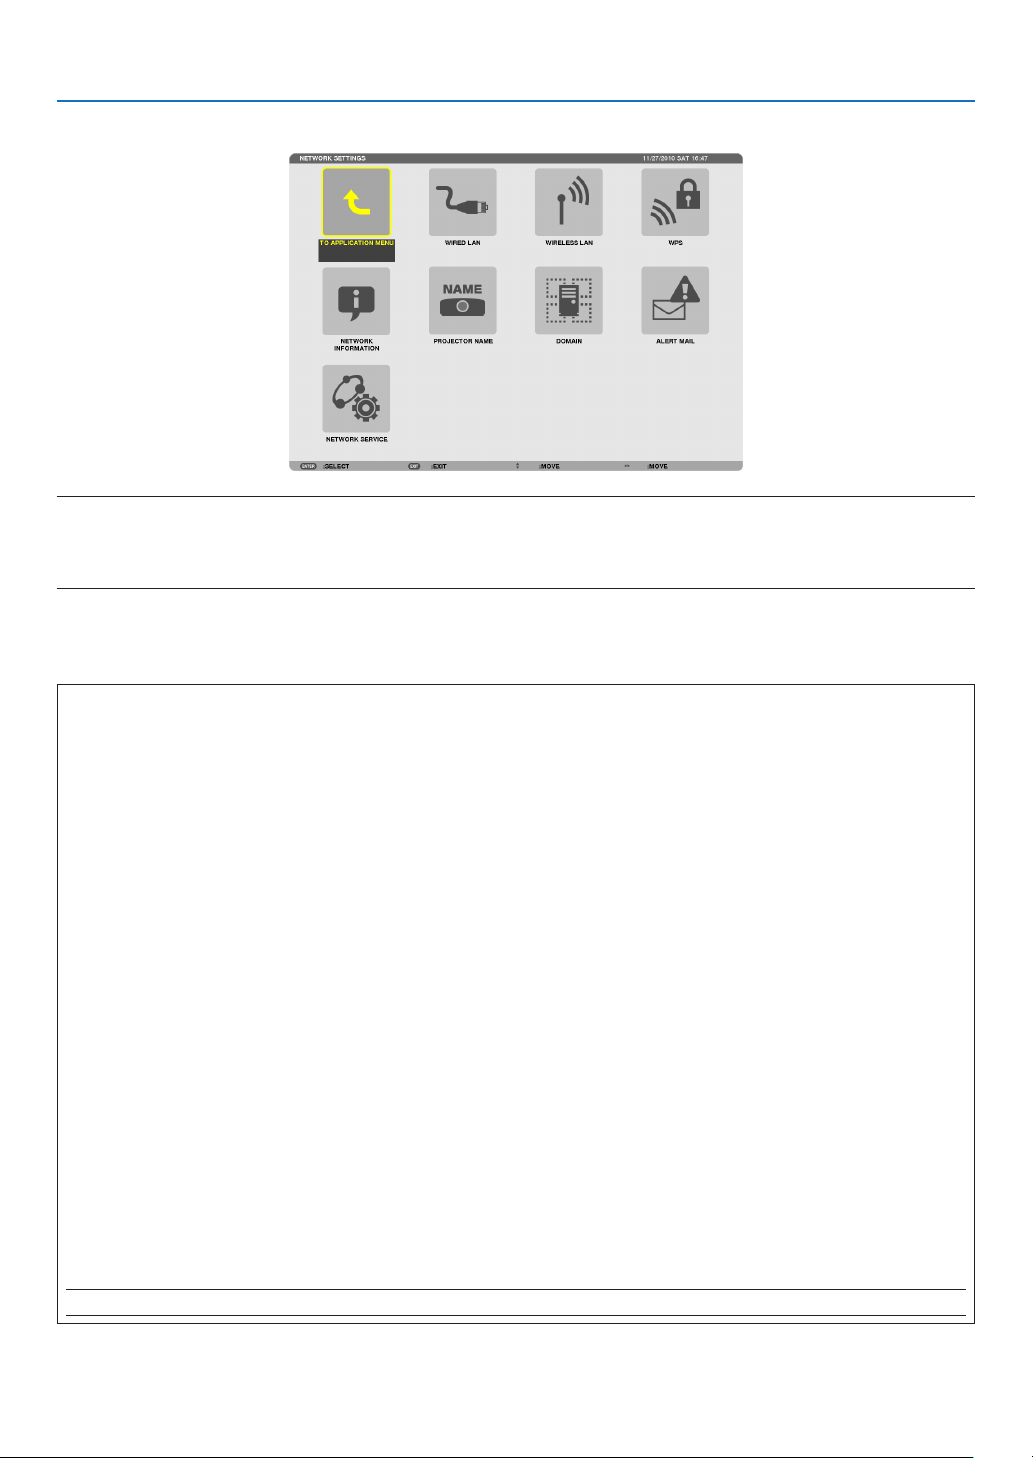
120
5. Using On-Screen Menu
NETWORK SETTINGS
Important:
•Consultwithyournetworkadministratoraboutthesesettings.
•WhenusingawiredLANconnection,connectaLANcable(Ethernetcable)totheLANport(RJ-45)oftheprojector.(page
151)
TIP:Thenetworksettingsyoumakewillnotbeaffectedevenwhen[RESET]isdonefromthemenu.
HintsonHowtoSetUpLANConnection
TosetuptheprojectorforaLANconnection:
Select[WIREDLAN]or[WIRELESSLAN][PROFILES][PROFILE1]or[PROFILE2].
TwosettingscanbesetforwiredorwirelessLAN.
Nextturnonorofffor[DHCP],[IPADDRESS],[SUBNETMASK],and[GATEWAY]andselect[OK]andpressthe
ENTERbutton.(page121)
TorecallLANsettingsstoredintheprolenumber:
Select[PROFILE1]or[PROFILE2]forwiredorwirelessLAN,andthenselect[OK]andpresstheENTERbutton.
(page121)
To connect a DHCP server:
Turnon[DHCP]forwiredorwirelessLAN.Select[ON]andpresstheENTERbutton.TospecifyIPaddresswithout
usingtheDHCPserver,turnoff[DHCP].(page122)
TosetonlyforwirelessLAN(NETWORKTYPEandWEP/WPA):
Select[PROFILE1]or[PROFILE2]forwirelessLAN,andthenselect[ADVANCED]and[OK]andpresstheENTER
button.TheAdvancedmenuwillbedisplayed.(page123)
ToselectanSSID:
Select[ADVANCED][SITESURVEY]andpresstheENTERbutton.
SelectanSSIDandpressthe>buttontoselect[OK]andpresstheENTERbutton.
Ifyoudonotuse[SITESURVEY],typetheSSIDandselect[INFRASTRUCTURE]or[ADHOC].(page123)
Toreceivelampreplacementtimeorerrormessagesviae-mail:
Select[ALERTMAIL],andset[SENDER'SADDRESS],[SMTPSERVERNAME],and[RECIPIENT'SADDRESS].
Last,select[OK]andpresstheENTERbutton.(page134)
Toexecute[EASYCONNECTION]usingImageExpressUtility2.0:
The[EASYCONNECTION]isamodethatcanabbreviatethetroublesomeLANsettingswhenusingtheImage
ExpressUtilityandconnectingthePCandprojectorviaawirelessLAN.
TheImageExpressUtilityLiteandImageExpressUtility2.0arecontainedonthesuppliedNECProjectorCD-
ROM.
Touse[EASYCONNECTION],select[WIRELESSLAN][PROFILES][EASYCONNECTION].
NOTE:The[EASYCONNECTION]functionisavailableonWindows7,WindowsVistaorWindowsXPSP3.

121
5. Using On-Screen Menu
WIREDLANorWIRELESSLAN(ADVANCEDmenuonly)
PROFILES•UptotwosettingsfortheLANportorUSBwirelessLANunit
canbestoredinmemoryoftheprojector.Totaloffoursettings
can be stored.
Fivesettingscanbestored:twoforthebuilt-inLANport,two
forwirelessLANandoneforWPS.
•Select[PROFILE1]or[PROFILE2]andthendosettingsfor
[DHCP]andtheotheroptions.
Afterdoingthis,select[OK]andpresstheENTERbutton.This
willstoreyoursettingsinmemory.
•Torecallthesettingsfrommemory:
Afterselecting[PROFILE1]or[PROFILE2]fromthe[PRO-
FILES]list.
Select[OK]andpresstheENTERbutton.
•Toexecute[EASYCONNECTION]usingImageExpressUtility
LiteorImageExpressUtility2.0,select[WIRELESSLAN]
[PROFILES][EASYCONNECTION].
•TostopemittingradiowavesfromtheUSBWirelessLANUnit,
select[DISABLE]fromthe[PROFILES]list.
•Selecting[SIMPLEACCESSPOINT]willallowtheprojectorto
createaninfrastructurenetwork.
TheIPaddressoftheprojectorwillbesetautomatically.
Select“ObtainanIPAddressAutomatically”tosettheIPad-
dressofaconnectedcomputer.
Ittakesafewsecondsforachangeofyourcomputer’sIPad-
dresstocomeintoeffectinWindows7/WindowsVistawhileit
takesoneortwominutesinWindowXP.
Whenyouconnectwithyourcomputertosaveyourprole
andselect“Automaticallyconnectwhenwithinrange”fromthe
PropertiestabofWirelessNetworkinWindowsforyourselected
prole,yourwirelessLANwillbeaccessedunderthefollowing
conditions:
•atthetimeofturningonthecomputerortheprojector
•whenthenotebooktypeiswithintherangeoftheprojector’s
wirelessLANcanbeachieved.
DatatransmissionbetweenwirelessLANandwiredLANisnot
possible.
Whenthe[SIMPLEACCESSPOINT]modeisusedtosend
images,itisrecommendedtoconnecttoonlyonecomputer.
—

122
5. Using On-Screen Menu
•Whenselecting[WPS],thenetworkwillbeconnectedbyusing
settingsstoredautomaticallywiththeWPSfunction.
Selecting[WPS]willallowtheprojectortoaccessthenetwork
byusingthesettingstheWPSfunctionautomaticallystored.
DHCPPlaceacheckmarktoautomaticallyassignanIPaddresstothe
projectorfromyourDHCPserver.
ClearthischeckboxtoregistertheIPaddressorsubnetmask
numberobtainedfromyournetworkadministrator.
—
IPADDRESSSetyourIPaddressofthenetworkconnectedtotheprojector
when[DHCP]isturnedoff.
Upto12numeric
characters
SUBNETMASKSetyoursubnetmasknumberofthenetworkconnectedtothe
projectorwhen[DHCP]isturnedoff.
Upto12numeric
characters
GATEWAY
Setthedefaultgatewayofthenetworkconnectedtotheprojector
when[DHCP]isturnedoff.
Upto12numeric
characters
WNSCONFIGURA-
TION
SettheIPaddressofyourWINSserverofthenetworkconnected
totheprojectorwhen[DHCP]isturnedoff.
Upto12numeric
characters
AUTODNSPlaceacheckmarktoautomaticallyassigntheIPaddressofyour
DNSserverconnectedtotheprojectorfromyourDHCPserver.
ClearthischeckboxtosettheIPaddressofyourDNSserver
connectedtotheprojector.
—
DNSCONFIGURA-
TION
SettheIPaddressofyourDNSserveronthenetworkconnected
totheprojectorwhen[AUTODNS]iscleared.
Upto12numeric
characters
ADVANCED*
ThismenuallowsyoutosetvariousitemsforyourwirelessLAN
connection(networktype,security).
—
RECONNECT
Retrytoconnecttheprojectortoanetwork.Trythisifyouhave
changed[PROFILES].
—
*The[ADVANCED]settingscreenisavailablefor[WIRELESSLAN]only.
NOTE:
•Ifyouselect[EASYCONNECTION]from[PROFILES],youcannotmakesettingstoDHCPanditsfollowingitemsexcept[CHAN-
NEL]in[ADVANCED].
ADVANCEDSetting(requiredforwirelessLANonly)(ADVANCEDmenuonly)

123
5. Using On-Screen Menu
SITESURVEYDisplaysalistofavailableSSIDsforwirelessLANonsite.Select
anSSIDwhichyoucanaccess.
ToselectanSSID,highlight[SSID]andusetheSELECT to
select[OK]andpresstheENTERbutton.
....................... Wireless access point
....................... Ad Hoc PC
....................... WEP or WPA enabled
—
SECURITY
Thiswillturnonorofftheencryptionmodeforsecuretransmis-
sion.
Touseencryption,specifyaWEPkeyorencryptionkey.Select
yoursecuritytypeappropriateforyourcomputerandthewire-
lessLANunit.
DISABLE ................ Will not turn on the encryption feature. Your com-
munications may be monitored by someone.
WEP(64bit) ............ Uses 64-bit datalength for secure transmis-
sion.
WEP(128bit) .......... Uses 128-bit datalength for secure transmission.
This option will increase privacy and security
when compared to use of 64-bit datalength en-
cryption.
WPA-PSK/WPA2-PSK/WPA-EAP/WPA2-EAP
.............................. These options provide stronger security than
WEP.
NOTE:
•Thesecuritytype,WEPkey,andencryptionkeysettingsmustbethe
sameascommunicationdevicessuchasPCoraccesspointinyour
wirelessnetwork.
•Whenyouuse[SECURITY],yourimagetransmissionspeedwillslow
down.
•[WPA-PSK],[WPA-EAP],[WPA2-PSK]and[WPA2-EAP]arenotavail-
ablewhen[ADHOC]isselectedfrom[NETWORKTYPE].
—
SSID
Enteranidentier(SSID)forwirelessLAN.Communicationcan
bedoneonlywithequipmentwhoseSSIDmatchesSSIDforyour
wirelessLAN.
Upto32alphanumeric
characters(case
sensitive).
NETWORKTYPESelectcommunicationmethodwhenusingwirelessLAN.
INFRASTRUCTURE ...Select this option when communicating with
one or more equipment connected to the wire-
less or wired LAN network via a wireless access
point.
AD HOC ....................Select this option when using the wireless LAN
to directly communicate with a computer in
peer-to-peer mode.
—
CHANNEL
Selectachannel.Availablechannelsvarydependingonthe
countryandregion.Whenyouselect[INFRASTRUCTURE],make
surethattheprojectorandyouraccesspointareonthesame
channel;whenyouselect[ADHOC],makesurethattheprojector
andyourcomputerareonthesamechannel.
—

124
5. Using On-Screen Menu
When[WEP(64bit)]or[WEP(128bit)]isselectedfor[SECURITYTYPE]
KEYSELECTSelectsoneWEPkeyfromthefourkeysbelow.
KEY1,KEY2,KEY3,
KEY4
EnteraWEPkey.
•Maximumnumberofcharacters
OptionAlphanumeric(ASCII)Hexadecimal(HEX)
WEP64bit5 10
WEP 128bit 13 26
When[WPA-PSK],[WPA-EAP],[WPA2-PSK],or[WPA2-EAP]isselectedfor[SECURITYTYPE]
ENCRYPTIONTYPESelect[TKIP]or[AES].
KEYEnterencryptionkey.Keylengthmustbe8orgreaterand63orless.
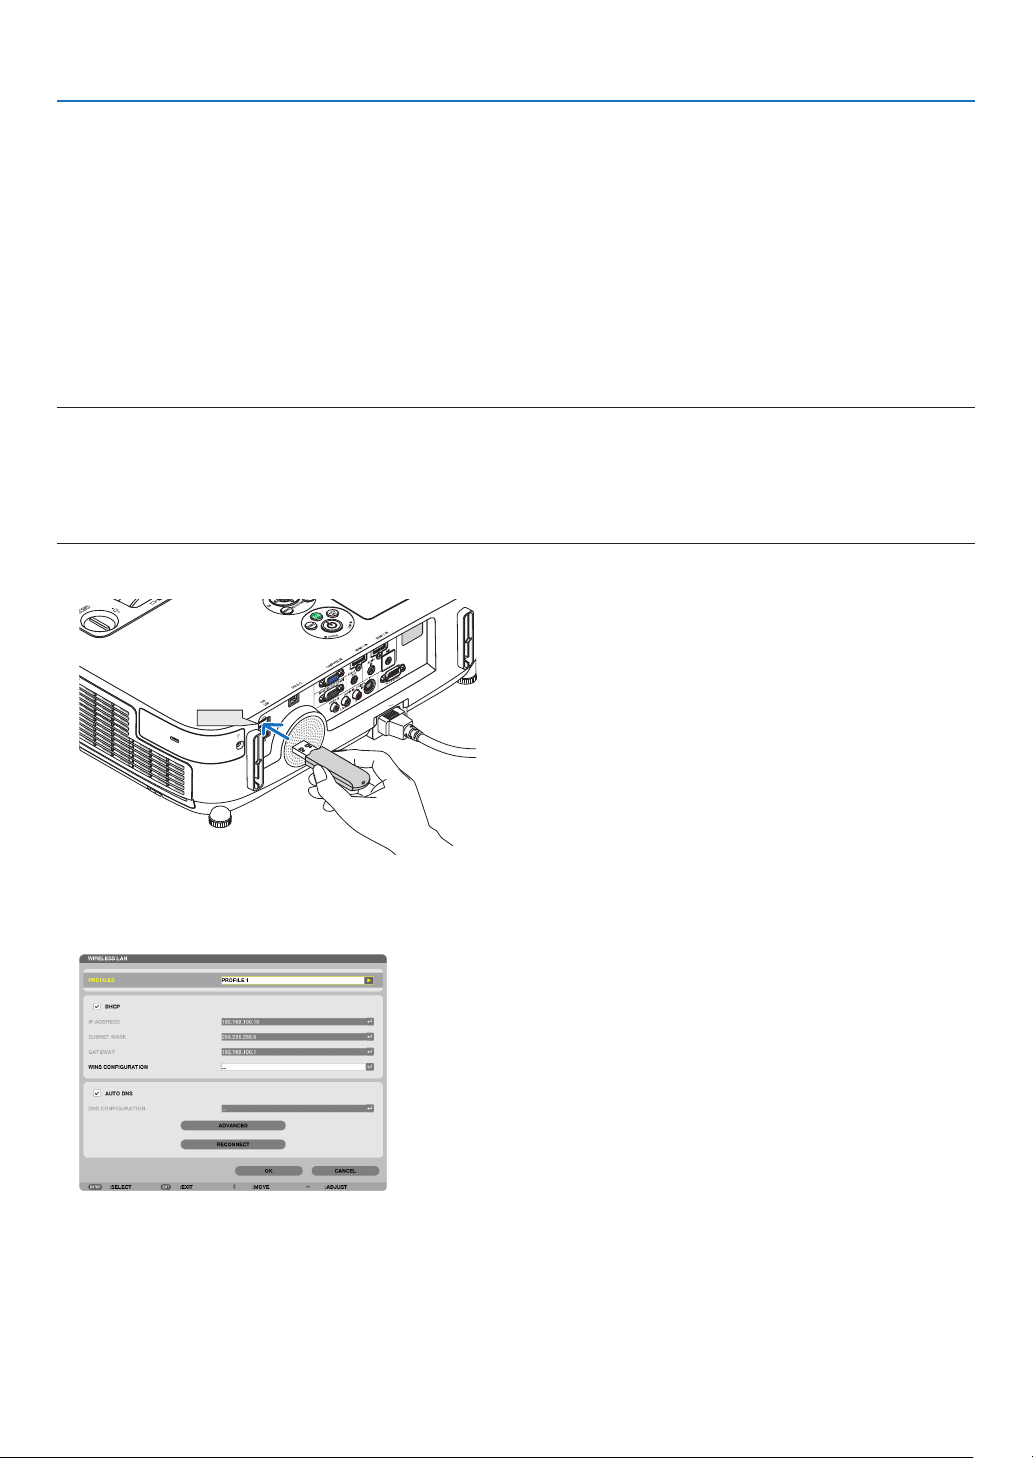
125
5. Using On-Screen Menu
[AUTHENTICATION](requiredforwirelessonly)
SettingisrequiredforusingWPA-EAPorWPA2-EAP.
Preparationbeforesetting
SelectawirelessLANcompliantWPA-EAPorWPA2-EAPauthenticationandinstalladigitalcerticateontheprojec-
tor.
1.Set[DATEANDTIME]ontheprojector.(page
140)
2.Useacomputertosavedigitalcerticates(les)forWPA-EAPorWPA2-EAPsettingtoyourUSBmemory
device.
After completing saving the file, remove the USB memory device from the computer.
Important:
•Saveadigitalcerticate(le)totherootfolderoftheUSBmemory.
•TheleformatsofdigitalcerticatethataresupportedbytheprojectorareDERandPKCS#12only.
•Theprojectorcannothandleanydigitalcerticatewhoselesizeexceeds8KB.
•CRL(CerticateRelocationList)isnotsupported.
•Clientcerticatechainisnotsupported.
3.PlugtheUSBmemorydeviceintotheUSBportoftheprojector.
USB
SettingProcedures
1.Select[NETWORKSETTINGS][WIRELESSSLAN].
2.SetitemssuchasPROFILES,DHCP,IPADDRESS,SUBNETMASKandothersasrequired.
•Select[PROFILE1]or[PROFILE2]for[PROFILES].If[EASYCONNECTION]isselected,WPA-PSK,WPA2-
PSK, WPA-EAP, or WPA2-EAP is not available.
3.Select[ADVANCED]andpresstheENTERbutton.
The [ADVANCED] setting screen will be displayed.
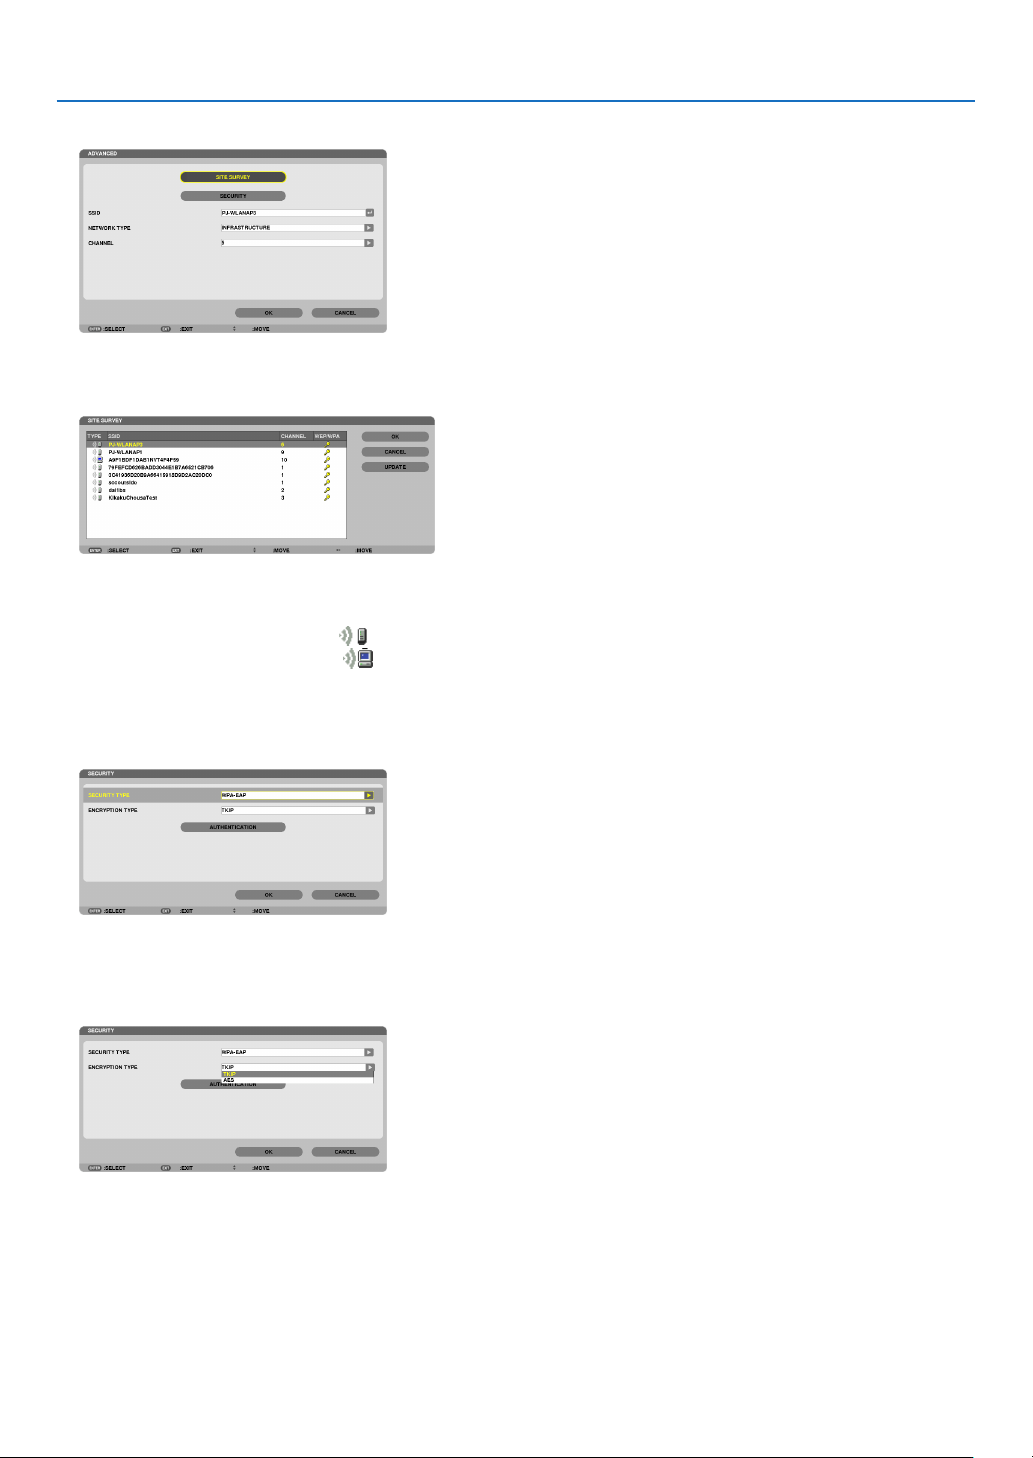
126
5. Using On-Screen Menu
4.Select[SITESURVEY]andpresstheENTERbutton.
The“SSID”listwillbedisplayed.
5.SelectaconnectingSSID,andthenselect[OK].
Finally press the ENTER button.
•SelecttheSSIDforwhichWPA-PSKorWPA2-PSKisset.
•Select[INFRASTRUCTURE(
)] for [NETWORK TYPE]. WPA-PSK, WPA2-PSK, WPA-EAP, or WPA2-EAP is
not available when [AD HOC ( )] is selected.
6.Selectthe[SECURITY]tab.
The[SECURITY]pagewillbedisplayed.
7.Selectthe[SECURITYTYPE]eldandpresstheENTERbutton.
The pull-down list will be displayed.
8.Select[WPA-EAP]or[WPA2-EAP]andpresstheENTERbutton.
9.Selectthe[TKIP/AES]eldandpresstheENTERbutton.
The pull-down list will be displayed.
10
.Select[TKIP]or[AES]andpresstheENTERbutton.
Select[TKIP]or[AES]accordingtothesettingforyouraccesspoint.
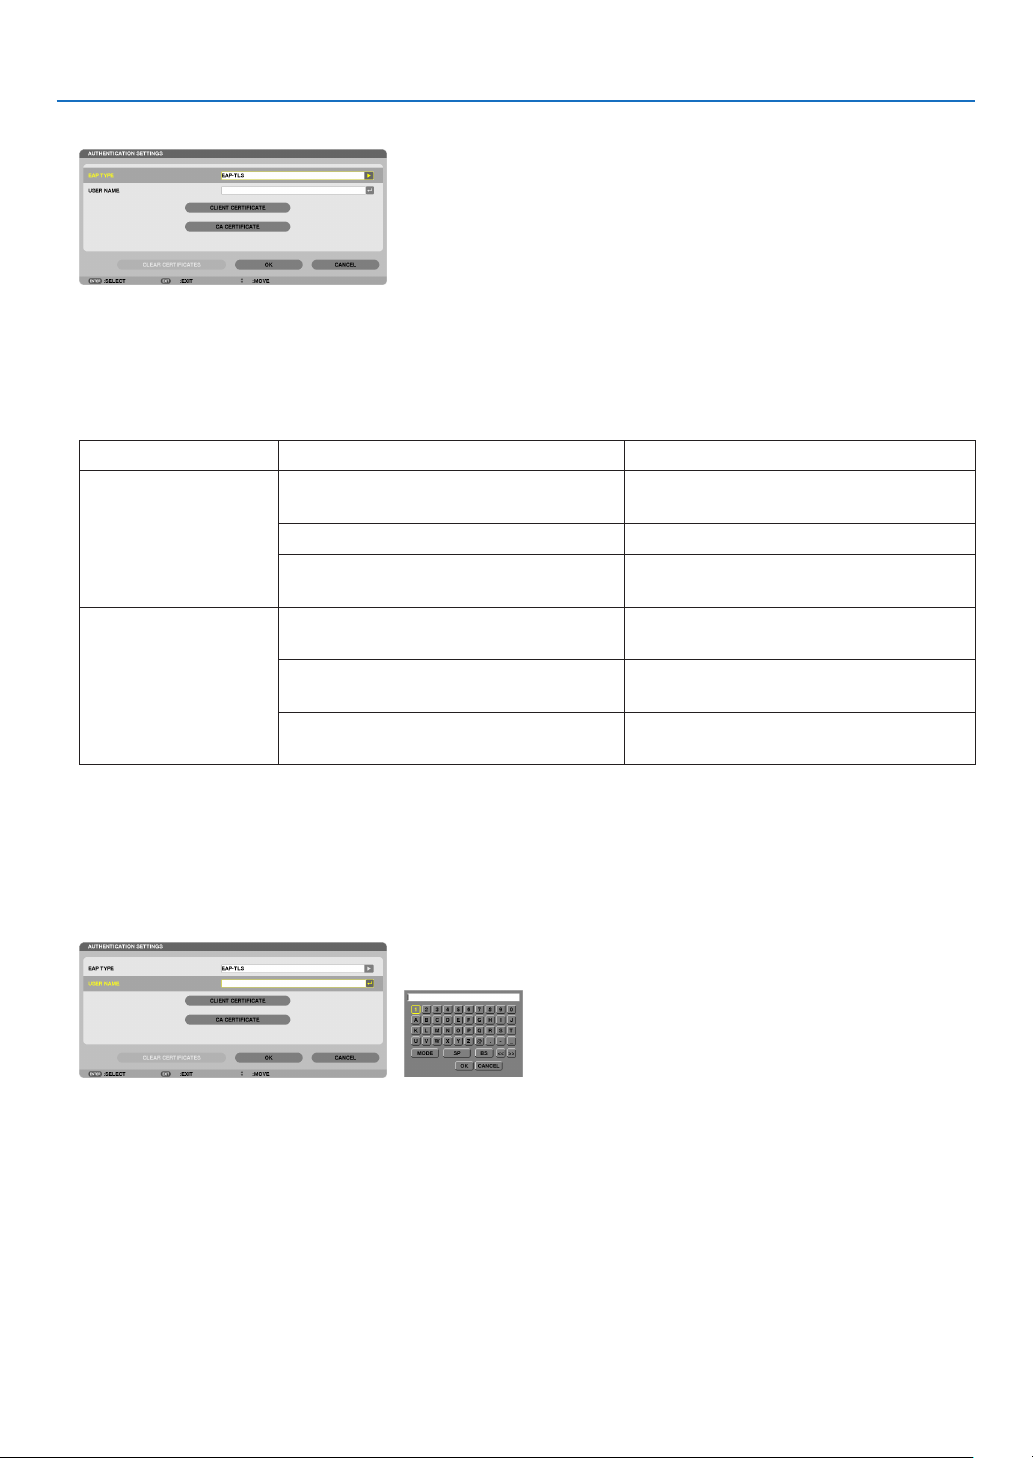
127
5. Using On-Screen Menu
11
.Selectthe[AUTHENTICATION]tab.
The[AUTHENTICATION]pagewillbedisplayed.
Select either [EAP-TLS] or [PEAP-MSCHAPv2] for [EAP TYPE]. The setting items vary depending on the EAP
type.
See the table below.
EAPTypeSettingItemNote
EAP-TLS
UserName1 character or more and 32 characters or
less
ClientCerticatePKCS#12formatle
CACerticate
(Certicateauthority’scerticate)
DERformatle
PEAP-MSCHAPv2UserName1 character or more and 32 characters or
less
Password1 character or more and 32 characters or
less
CACerticate
(Certicateauthority’scerticate)
DERformatle
①Selecting[EAP-TLS]for[EAPTYPE]:
The following section explains the operation for selecting [EAP-TLS].
For selecting [PEAP-MSCHAPv2], go on to Step 12 on page
129.
12.
Selectthe[USERNAME]eldandpresstheENTERbutton.
Thecharacterentryscreen(softwarekeyboard)willbedisplayed.Setausername.
•Ausernamemustbe1characterormoreand32charactersorless.
•Seepage
131forusingthesoftwarekeyboardtoentercharacters.
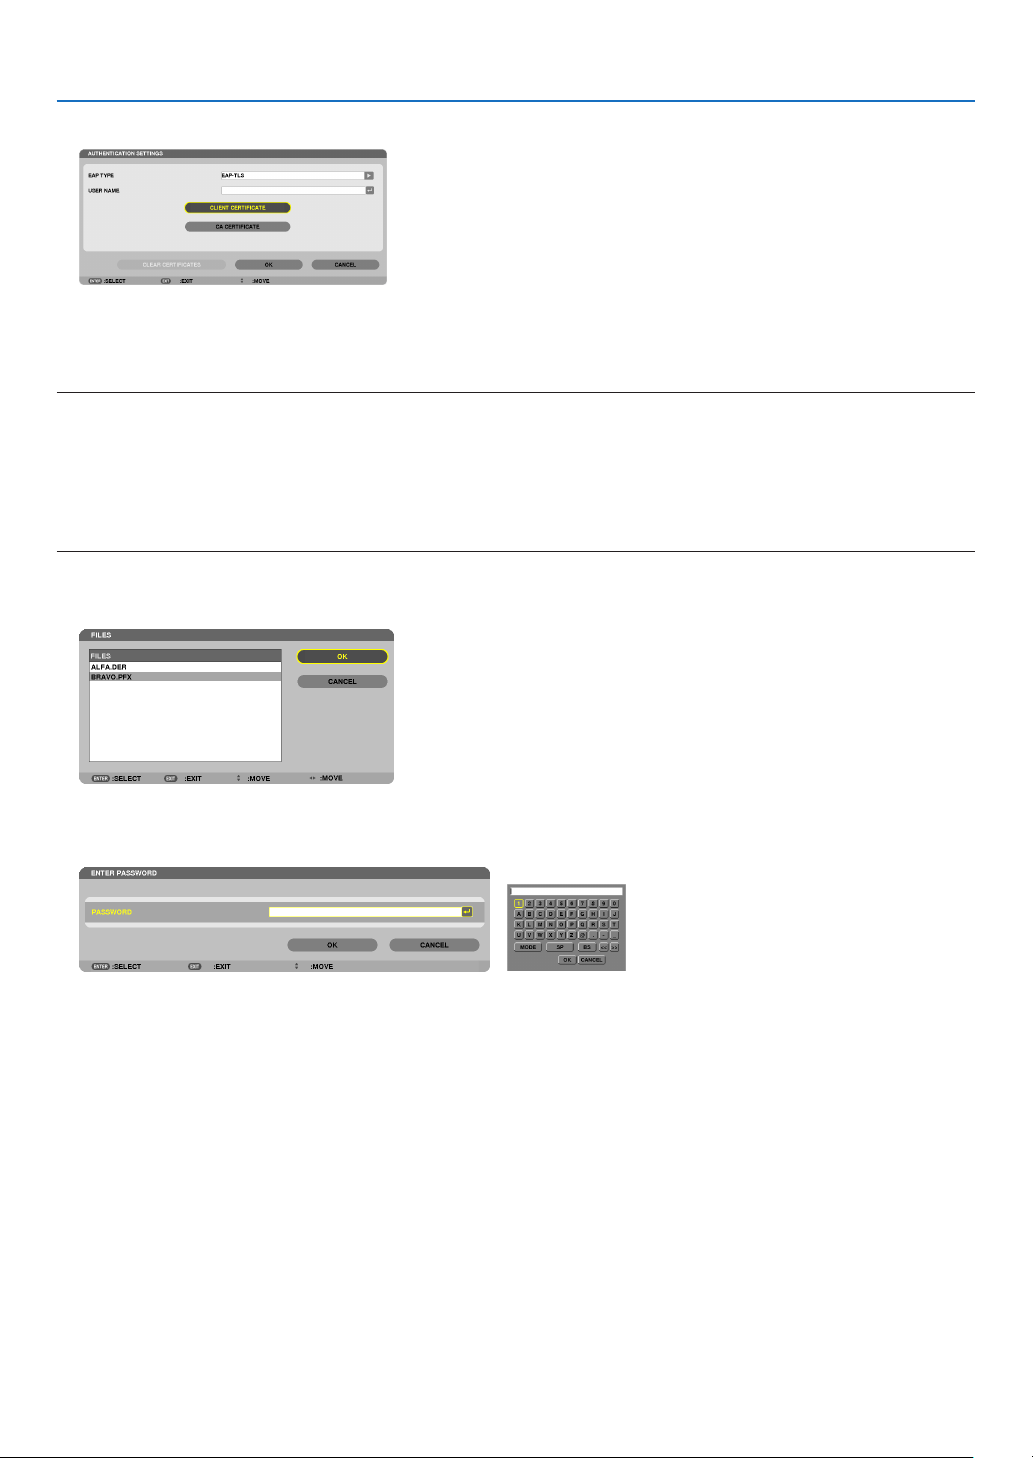
128
5. Using On-Screen Menu
13.
Select[CLIENTCERTIFICATE]andpresstheENTERbutton.
Alistofles([FILES]screen)willbedisplayed.
•Foroperatingthe[FILES]screen,see“4.UsingtheViewer”inthe“User’sManual”(PDF).
•Toreturntothe[AUTHENTICATION]page,presstheEXITbutton.
NOTE:
Installingadigitalcerticate
Youcaninstalleachdigitalcerticate(clientcerticateandCAcerticate)for[PROFILE1(or2)]onale-by-lebasis.
•InstallarootCAcerticateforaCAcerticate.
•Ifyouinstalladigitalcerticateoveryourexistingdigitalcerticate,theexistingdigitalcerticatewillbeoverwrittenwiththenew
digitalcerticate.
•Onceadigitalcerticatehasbeeninstalled,itsinformationcannotbedeletedevenifyoustopsettingWPA-EAPorWPA2-EAP.
14.
Onthe[FILES]screen,selectadigitalcerticate(PKCS#12formatle)savedinyourUSBmemorydevice
andpresstheENTERbutton.
The password screen will be displayed.
15.
Select[PASSWORD]eldandpresstheENTERbutton.
Thecharacterentryscreen(softwarekeyboard)willbedisplayed.Setthepasswordoftheprivatekey.Apassword
must be 1 character or more and 32 characters or less.
The selected digital certificate file will be installed on the projector.
•WhentherootCAcerticateisnotincludedinthelethatwasselectedinStep14,proceedtoStep16.When
the root certification authority certificate is included, proceed to Step 18.
16.Select[CACERTIFICATE]andpresstheENTERbutton.
The drive list screen will be displayed.
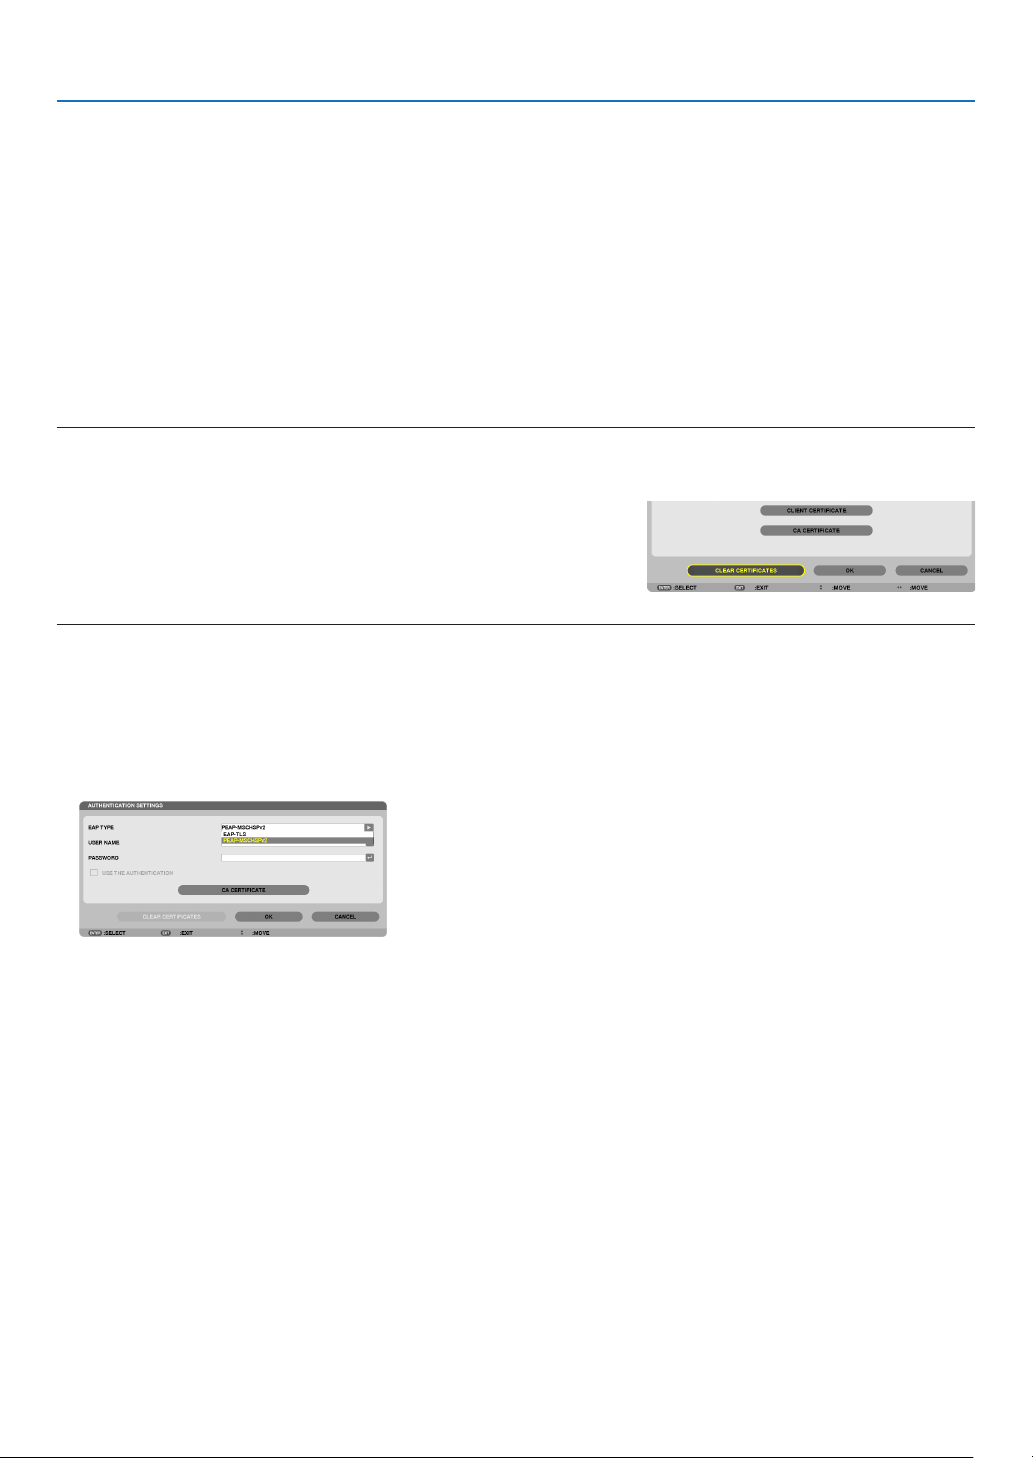
129
5. Using On-Screen Menu
17.
Onthe[FILES]screen,selectadigitalcerticate(DERformatle)savedinyourUSBmemorydeviceand
press the ENTER button.
•SelectyourrootCAcerticatehere.
The selected digital certificate will be installed on the projector.
18.
Aftercompletingrequiredsettings,select[OK]andpresstheENTERbutton.
The[WIRELESS]pagewillbereturned.
19.
Select[RECONNECT]andpresstheENTERbutton.
20.
Select[OK]andpresstheENTERbutton.
Thiswillcompletesetting[EAP-TLS]for[EAPTYPE]in[WPA-EAP]or[WPA2-EAP].
TIP:
Clearingthedigitalcerticatethatisinstalledontheprojector
Toclearthedigitalcerticateinstalledontheprojector,followthestepsbelow.
Bydoingthefollowingprocedure,allthedigitalcerticatesforthecurrentlydisplayedprolewillbecleared.
1.Select[CLEARCERTIFICATES]inthebottomleftofthe[AD
-
VANCED]settingscreenandpresstheENTERbutton.
A message for confirmation will be displayed.
2.Select[YES]andpresstheENTERbutton.
The digital certificates will be cleared.
TIP:
•ThePKCS#12formatdigitalcerticateincludingaCAcerticatewillbeinstalledasarootCAcerticate.
②Selecting[PEAP-MSCHAPv2]for[EAPTYPE]:
12.
Fromthe[AUTHENTICATION]page,select[EAPTYPE]eldandpresstheENTERbutton.
The pull-down list will be displayed.
13.
Select[PEAP-MSCHAPv2]andpresstheENTERbutton.
14.
Select[USERNAME]eldandpresstheENTERbutton.
Thecharacterentryscreen(softwarekeyboard)willbedisplayed.Setausername.
•Ausernamemustbe32charactersorless.
( page 131)
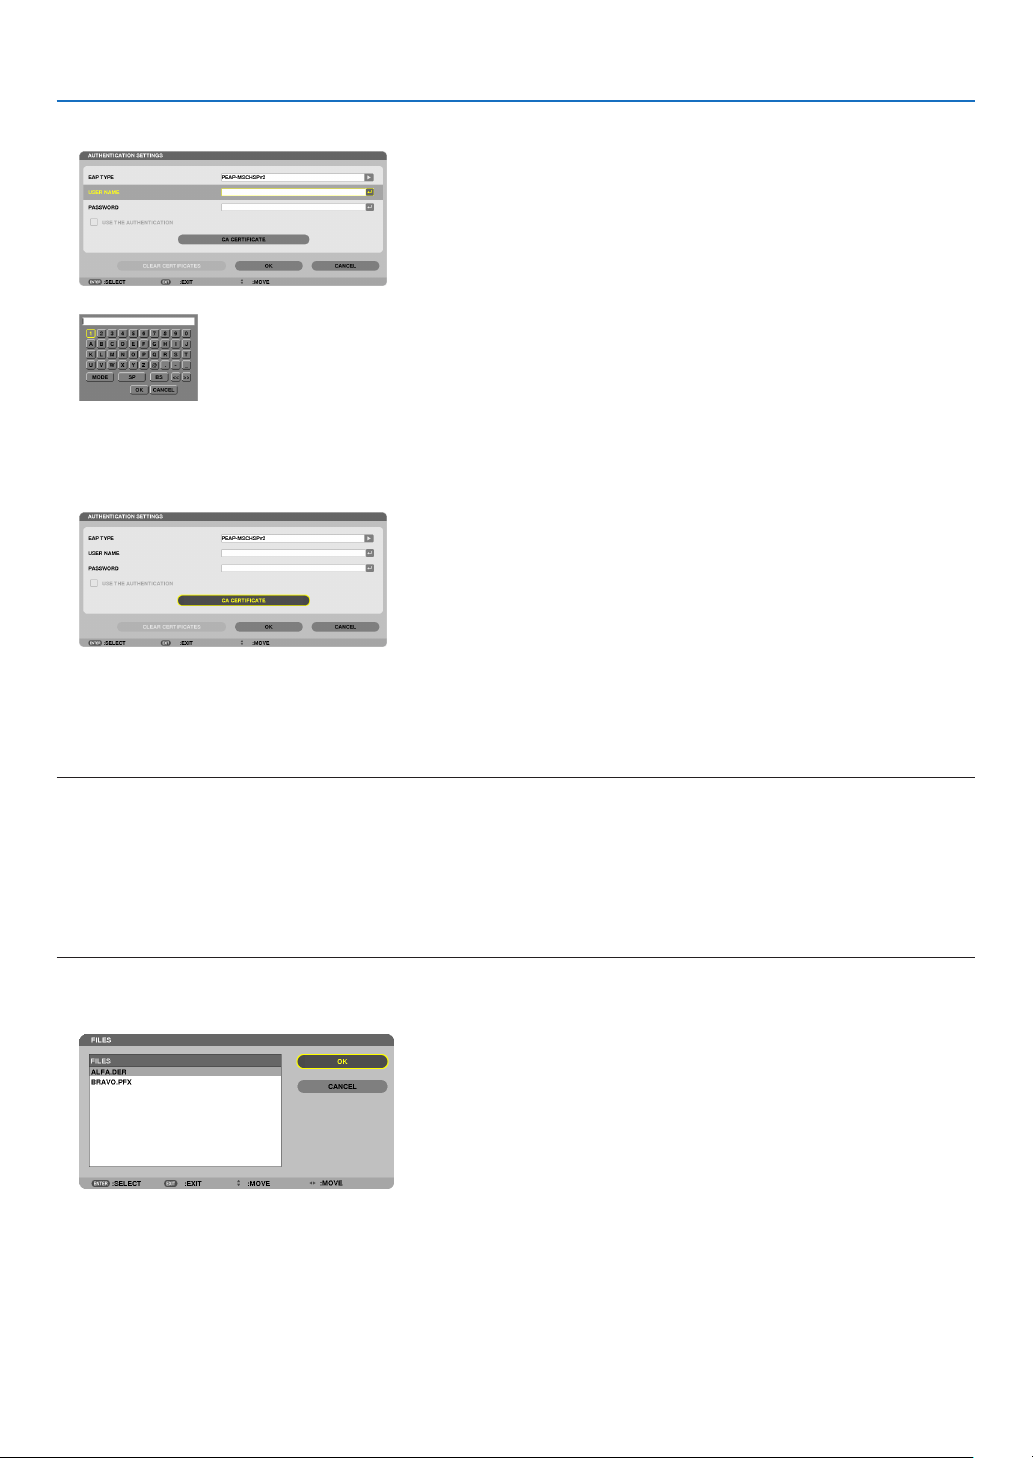
130
5. Using On-Screen Menu
15.
Aftercompletingsettingausername,selectthe[PASSWORD]eldandpresstheENTERbutton.
Thecharacterentryscreen(softwarekeyboard)willbedisplayed.Setapassword.
•Apasswordmustbe32charactersorless.
16.
Aftercompletingsettingthepassword,select[CACERTIFICATE]eldandpresstheENTERbutton.
The drive list screen will be displayed.
•Foroperatingthe[FILES]screen,see“4.UsingtheViewer”inthe“User’sManual”(PDF).
•Toreturntothe[AUTHENTICATION]page,presstheEXITbutton.
NOTE:
Installingadigitalcerticate
Youcaninstalleachdigitalcerticate(clientcerticateandCAcerticate)for[PROFILE1(or2)]onale-by-le
basis.
•InstallarootCAcerticateforaCAcerticate.
•Ifyouinstalladigitalcerticateoveryourexistingdigitalcerticate,theexistingdigitalcerticatewillbeoverwrittenwiththenew
digitalcerticate.
•Onceadigitalcerticatehasbeeninstalled,itsinformationcannotbedeletedevenifyoustopsettingWPA-EAPorWPA2-EAP.
17.
Onthe[FILES]screen,selectadigitalcerticate(DERformatle)savedinyourUSBmemorydeviceand
press the ENTER button.
•SelectyourrootCAcerticatehere.
The selected digital certificate will be installed on the projector.
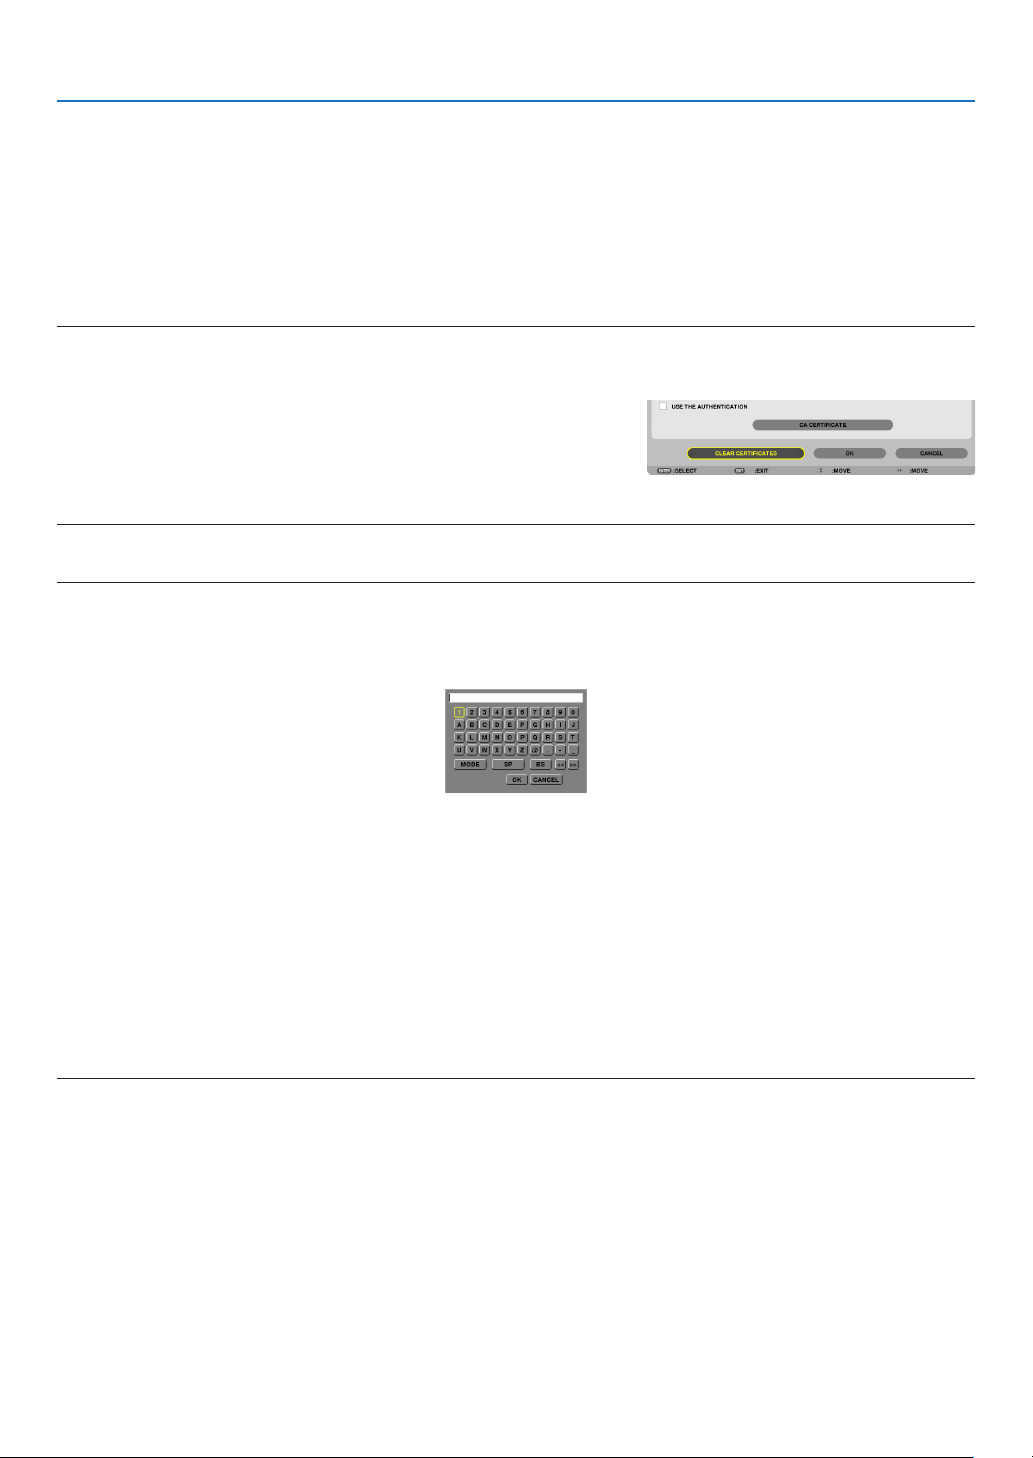
131
5. Using On-Screen Menu
18.
Aftercompletingrequiredsettings,select[OK]andpresstheENTERbutton.
The[WIRELESS]pagewillbereturned.
19.
Select[RECONNECT]andpresstheENTERbutton.
20.
Select[OK]andpresstheENTERbutton.
Thiswillcompletesetting[PEAP-MSCHAPv2]for[EAPTYPE]in[WPA-EAP]or[WPA2-EAP].
TIP:
Clearingthedigitalcerticatethatisinstalledontheprojector
Toclearthedigitalcerticateinstalledontheprojector,followthestepsbelow.
Bydoingthefollowingprocedure,allthedigitalcerticatesforthecurrentlydisplayedprolewillbecleared.
1.Select[CLEARCERTIFICATES]inthebottomleftofthe[AD
-
VANCED]settingscreenandpresstheENTERbutton.
A message for confirmation will be displayed.
2.Select[YES]andpresstheENTERbutton.
The digital certificates will be cleared.
TIP:
EnteringWEPkeys(SwitchingbetweenAlphanumericcharactersandhexadecimal)
Toenterfrom[KEY1]to[KEY4],dothefollowing:
1.Selectoneof[KEY1],[KEY2],[KEY3]and[KEY4]andpresstheENTERbutton.
Thecharacterentryscreen(softwarekeyboard)willbedisplayed.
2. Use the ▼, ▲, ◀, or ▶buttontoselectacharacterandpresstheENTERbutton.
•ToenteraWEPkeyorpassphrase,usealphanumericcharacters(ASCII)orhexadecimal(HEX).ToenteraPSK
key,usealphanumericcharacters(ASCII).
•Pressthe[HEX]buttontochangeto[ASCII]tosetthekeyinASCIIdigit.Youcantogglethisbuttonbetween
[ASCII]and[HEX].
•Enter0x(numeralandalphabetrespectively)rightinfrontofyourkeycode.
•Hexadecimaluses0to9andAtoF.
3.AfterenteringyourWEPkeyorpassphrase,usethe▼
, ▲, ◀, or ▶buttontoselect[OK]andpresstheENTER
button.
Thecharacterentryscreen(softwarekeyboard)willbeclosed.
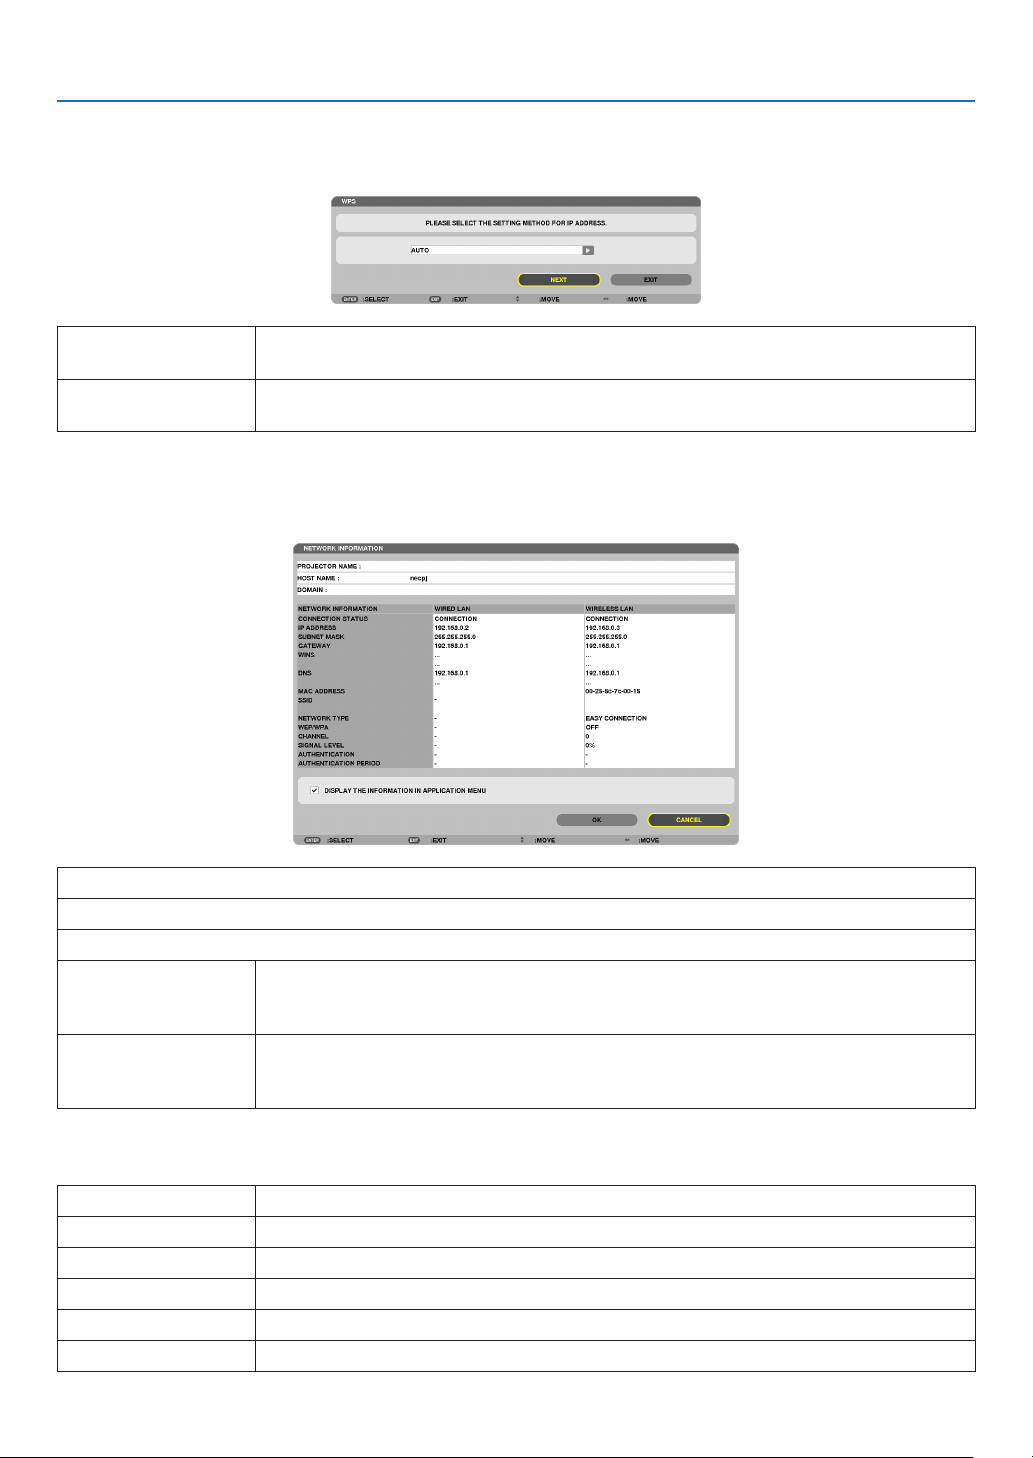
132
5. Using On-Screen Menu
WPS
WhenthewirelessLANaccesspointconnectedtotheprojectorsupportsWPS(Wi-FiProtectedSetup™),youcan
usePINmethodorpushbuttonmethodtosetupthewirelessLANfortheprojector.
PINTYPESeta4-digitor8digit-PINcodeofWPSforyouraccesspointtocompletesettingforthe
SSIDsecurity.
PUSHBUTTONTYPEPressthededicatedbuttonoftheaccesspointandtheprojector’swirelessLANunitto
completesettingfortheSSIDsecurity.
NETWORKINFORMATION
Thefollowinginformationwillbedisplayedwhentheprojectorisconnectedtoanetwork(wiredLANorwireless
LAN).
PROJECTORNAME
HOSTNAME
DOMAIN
NETWORKINFOR-
MATION(WIRED
LAN/WIRELESSLAN)
CONNECTIONSTATUS,IPADDRESS,SUBNETMASK,GATEWAY,WINS,DNS,MAC
ADDRESS,SSID,NETWORKTYPE,WEP/WPA,CHANNEL,SIGNALLEVEL,AU-
THENTICATION,AUTHENTICATIONPERIOD
DISPLAYTHEINFOR-
MATIONINAPPLICA-
TIONMENU
Turnonoroffthedisplayofthenetworkinformation.
Themeaningsofthesestatusstatementsaredescribedbelow.
StatementAuthentication status
Authenticated
Authenticationisdonecorrectly.
FailureAuthenticationfailed.
Authenticating…Authenticationisinprocess.
ExpiredThedigitalcerticateisexpired.Or[DATE,TIMEPRESET]isnotsetcorrectly.
Time Error The[DATE,TIMEPRESET]hasbeencleared.Setthecorrectdateandtime.
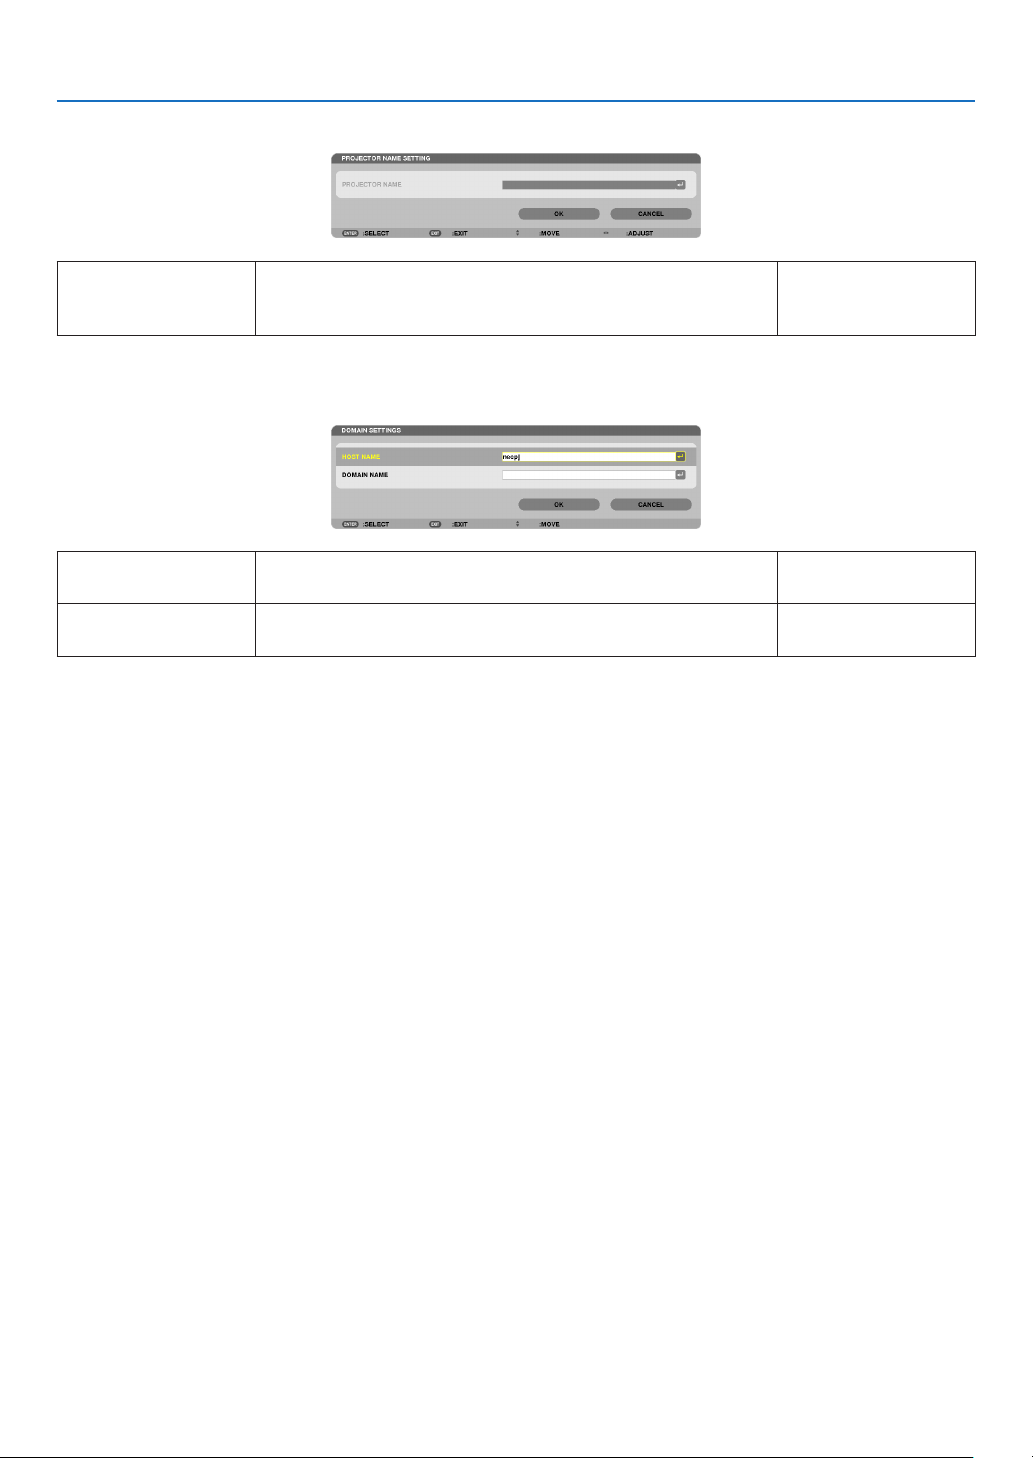
133
5. Using On-Screen Menu
PROJECTORNAME(ADVANCEDmenuonly)
PROJECTORNAMESetauniqueprojectorname.Upto16alphanu-
meric characters and
symbols
DOMAIN(ADVANCEDmenuonly)
Setahostnameanddomainnameoftheprojector.
HOSTNAMESetahostnameoftheprojector.Upto15alphanumeric
characters
DOMAINNAMESetadomainnameoftheprojector.Upto60alphanumeric
characters

134
5. Using On-Screen Menu
ALERTMAIL(ADVANCEDmenuonly)
ALERTMAILThisoptionwillnotifyyourcomputeroflampreplacetimeorerror
messagesviae-mailwhenusingwirelessorwiredLAN.
Placing a checkmark will turn on the Alert Mail feature.
Clearing a checkmark will turn off the Alert Mail feature.
Sampleofamessagetobesentfromtheprojector:
Thelampandltersareattheendofitsusablelife.Please
replacethelampandlters.
ProjectorName:NECProjector
LampHoursUsed:100[H]
—
HOSTNAMETypeinahostname.Upto15alphanumeric
characters
DOMAINNAMETypeinadomainnameofthenetworkconnectedtotheprojec-
tor.
Upto60alphanumeric
characters
SENDER'SAD-
DRESS
Specifythesender’saddress.Upto60alphanu-
meric characters and
symbols
SMTPSERVER
NAME
TypeintheSMTPservernametobeconnectedtotheprojec-
tor.
Upto60alphanumeric
characters
RECIPIENT'SAD-
DRESS1,2,3
Typeinyourrecipient’saddress.Upto60alphanu-
meric characters and
symbols
TESTMAIL
Sendatestmailtocheckifyoursettingsarecorrect.
NOTE:
•Ifyouenteredanincorrectaddressinatest,youmaynotreceivean
Alertmail.Shouldthishappen,checkiftheRecipient’sAddressis
correctlyset.
•Unlessanyoneofthe[SENDER'SADDRESS],[SMTPSERVER'S
NAME]or[RECIPIENT'SADDRESS1-3]isselected,[TESTMAIL]is
notavailable.
•Besuretohighlight[OK]andpresstheENTERbuttonbeforeexecuting
[TESTMAIL].
—

135
5. Using On-Screen Menu
NETWORKSERVICE(ADVANCEDmenuonly)
HTTPSERVERSetapasswordforyourHTTPserver.Upto10alphanumeric
characters
PJLink
Thisoptionallowsyoutosetapasswordwhenyouusethe
PJLinkfeature.
NOTE:
•Donotforgetyourpassword.However,ifyouforgetyourpassword,
consultwithyourdealer.
•WhatisPJLink?
PJLinkisastandardizationofprotocolusedforcontrollingprojectors
ofdifferentmanufacturers.Thisstandardprotocolisestablishedby
JapanBusinessMachineandInformationSystemIndustriesAssocia-
tion(JBMIA)in2005.
TheprojectorsupportsallthecommandsofPJLinkClass1.
•SettingofPJLinkwillnotbeaffectedevenwhen[RESET]isdonefrom
themenu.
Upto32alphanumeric
characters
AMX
TurnonorofffordetectionfromAMXDeviceDiscoverywhen
connectingtothenetworksupportedbyAMX’sNetLinxcontrol
system.
TIP:
WhenusingadevicethatsupportsAMXDeviceDiscovery,allAMXNetLinx
controlsystemwillrecognizethedeviceanddownloadtheappropriate
DeviceDiscoveryModulefromanAMXserver.
Placing a checkmark will enable detecting the projector from AMX Device
Discovery.
Clearing a checkmark will disable detecting the projector from AMX
Device Discovery.
—
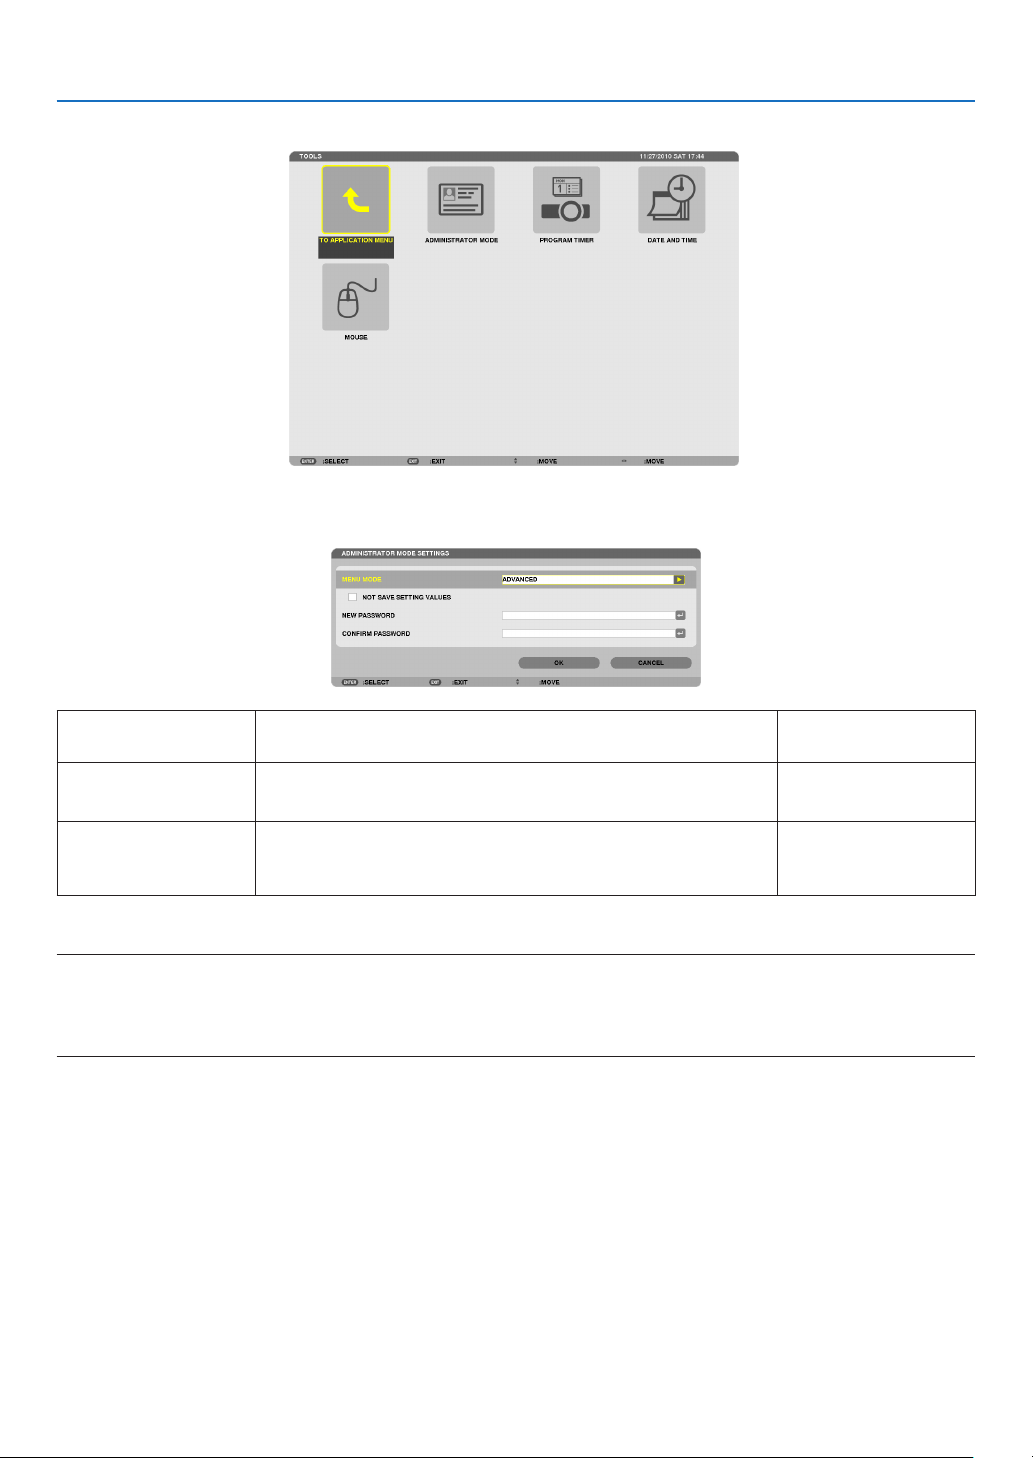
136
5. Using On-Screen Menu
TOOLS
ADMINISTRATOR MODE
ThisallowsyoutoselectMENUMODE,savesettings,andsetapasswordfortheadministratormode.
MENUMODESelecteither[BASIC]or[ADVANCED]menu.
(page89)
—
NOTSAVESETTING
VALUES
Placing a check mark will not save your projector settings.
Clear this check box to save your projector settings.
—
NEWPASSWORD/
CONFIRMPASS-
WORD
Assignapasswordfortheadministratormode.Upto10alphanumeric
characters
TIP:
ToreturntotheADVANCEDmenufromtheBASICmenu,dothefollowing:
1.UsetheSOURCEbuttononthecabinetorpresstheNETWORKbuttonontheremotecontroltoselect
[NETWORK]todisplaytheAPPLICATIONMENU.
2.Select[TOOLS][ADMINISTRATORMODE][MENUMODE][ADVANCEDMODE].
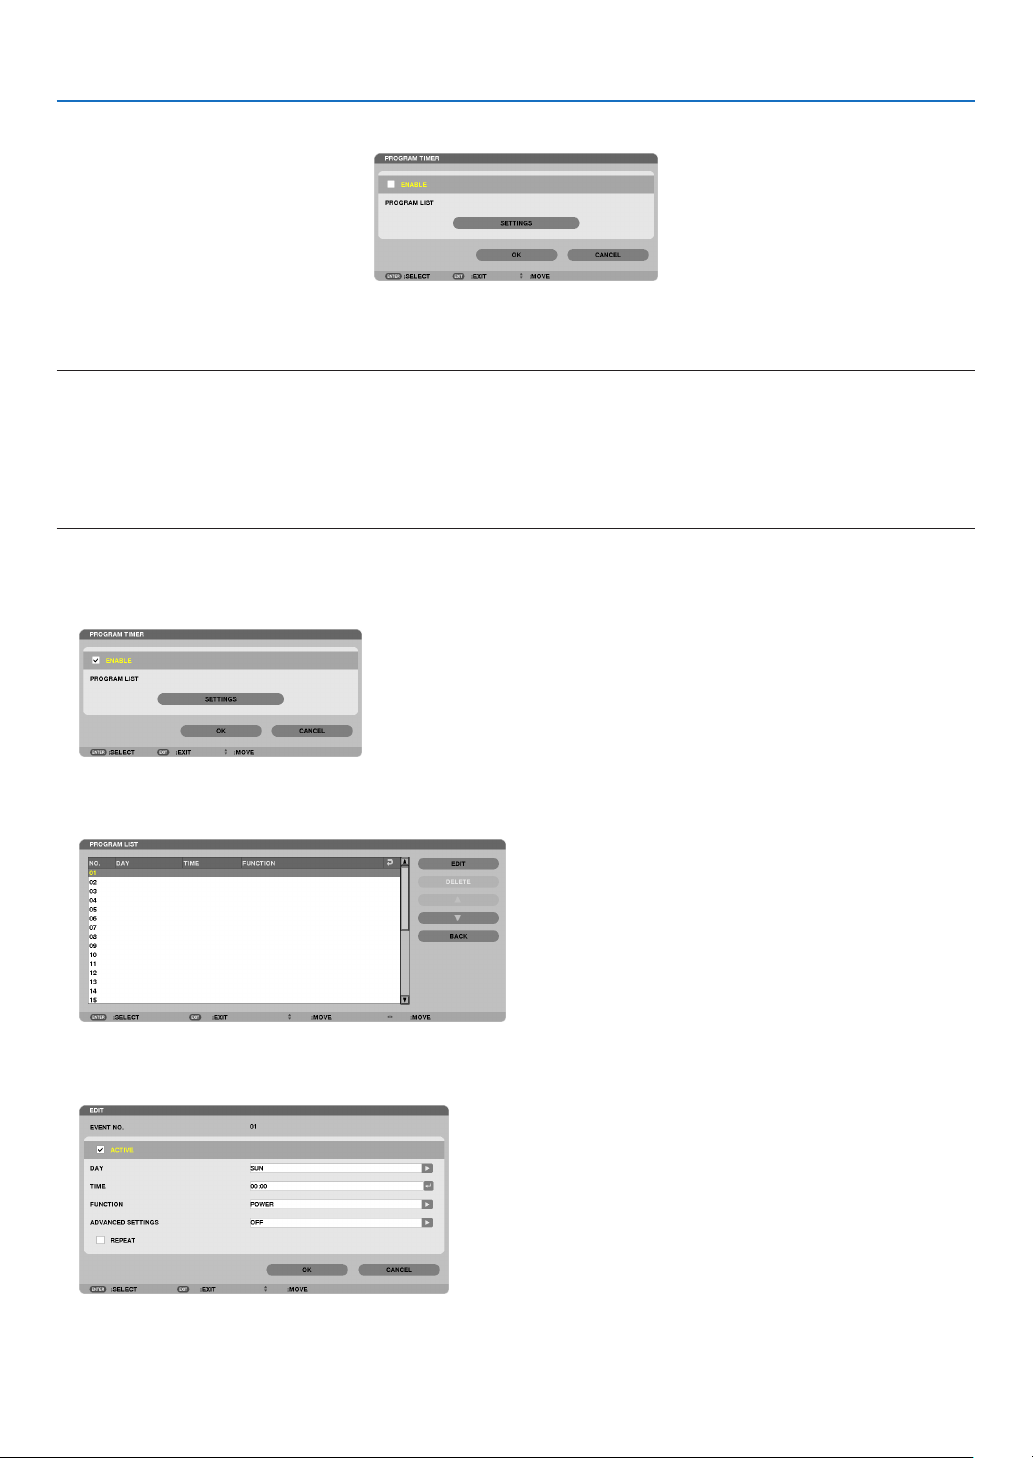
137
5. Using On-Screen Menu
PROGRAM TIMER
Thisoptionturnson/offtheprojectorandchangesvideosignals,andselectsECOmodeautomaticallyataspecied
time.
NOTE:
•Beforeusing[PROGRAMTIMER],makesurethatthe[DATEANDTIME]featureisset.(page140)
•MakesurethattheprojectorisinthestandbyconditionwiththePOWERcordconnected.
•Theprojectorhasabuilt-inclock.Theclockwillkeepworkingforabouttwoweeksafterthemainpoweristurnedoff.Ifthemain
powerisnotsuppliedtotheprojectorfortwoweeksormore,thebuilt-inclockstopsworking.
•The[POWER-SAVING]or[NETWORKSTANDBY]of[STANDBYMODE]willbeinvalidatedwhen[PROGRAMTIMER]isen-
abled.
Settinganewprogramtimer
1.OnthePROGRAMTIMERscreen,usetheSELECT▲ or ▼buttontoselect[SETTINGS]andpresstheENTER
button.
The[PROGRAMLIST]screenwillbedisplayed.
2.SelectablankprogramnumberandpresstheENTERbutton.
The[EDIT]screenwillbedisplayed.
3.Makesettingsforeachitemasrequired.
ACTIVE .................. Place a check mark to enable the program.
DAY ........................ Select days of the week for the program timer. To execute the program from Monday to Friday, select [MON-

138
5. Using On-Screen Menu
FRI].To execute the program in everyday basis, select [EVERYDAY].
TIME ...................... Set the time to execute the program. Enter time in 24-hour format.
FUNCTION ............. Select a function to be executed. Selecting [POWER] will allow you to turn on or off the projector by setting
[ADVANCED SETTINGS]. Selecting [SOURCE] will allow you to select a video source by setting [ADVANCED
SETTINGS]. Selecting [ECO MODE] will allow you to select [ECO MODE] by setting [ADVANCED SET-
TINGS].
ADVANCED SETTINGS
.............................. Select power on/off, a type of video source, or ECO MODE for the selected item in [FUNCTION].
REPEAT .................. Place a check mark to repeat the program continuing basis. To use the program this week only, clear the
check mark.
4.Select[OK]andpresstheENTERbutton.
This will complete the settings.
Youwillbereturnedtothe[PROGRAMLIST]screen.
5.Select[BACK]andpresstheENTERbutton.
Youwillbereturnedtothe[PROGRAMTIMER]screen.
6.Select[OK]andpresstheENTERbutton.
You will be returned to the [TOOLS] screen.
NOTE:
•Upto30differenttimersettingscanbeprogrammed.
•Oncetheprogramnotmarkedwithacheckin[REPEAT]hasbeenexecuted,thecheckmarkinthe[ACTIVE]checkboxwillbe
clearedautomaticallyandtheprogramwillbedisabled.
•Whentheon-timeandtheoff-timesetforthesametime,theoff-timesettingwilltakepreference.
•Twodifferentsourcesaresetforthesametime,thelargerprogramnumberwilltakepreference.
•Theon-timesettingwillnotbeexecutedwhilethecoolingfansarerunningoranerrorisoccurring.
•Iftheoff-timesettingisexpiredundertheconditioninwhichthepoweroffisnotpossible,theoff-timersettingwillnotbeexecuted
untilthepoweroffbecomespossible.
•Programsnotmarkedwithacheckmarkin[ACTIVE]ofthe[EDIT]screenwillnotbeexecutedeveniftheProgramTimeris
enabled.
•Whentheprojectoristurnedonbyusingtheprogramtimerandifyouwanttoturnofftheprojector,settheoff-timeordoit
manuallysoasnottoleavetheprojectoronforalongperiodoftime.

139
5. Using On-Screen Menu
Activatingtheprogramtimer
1.Select[ENABLE]onthe[PROGRAMTIMER]screenandpresstheENTERbutton.
The [ENABLE] will be activated.
2.Select[OK]andpresstheENTERbutton.
The[PROGRAMTIMER]screenwillbechangedtothe[TOOL]screen.
NOTE:
•Clearing[ENABLE]willdisabletheProgramTimerevenwhenaprogramismarkedwithacheckmarkon[PROGRAMLIST]
screen.
•When[ENABLE]isselected,the[PROGRAMLIST]cannotbeedited.Toedittheprograms,select[ENABLE]toturnofftheProgram
Timer.
Changingtheprogrammedsettings
1.Onthe[PROGRAMLIST]screen,selectaprogramyouwanttoeditandpresstheENTERbutton.
2.Changethesettingsonthe[EDIT]screen.
3.Select[OK]andpresstheENTERbutton.
The programmed settings will be changed.
Youwillbereturnedtothe[PROGRAMLIST]screen.
Changingtheorderofprograms
1.Onthe[PROGRAMLIST]screen,selectaprogramwhoseorderyouwanttochangeandpresstheSELECT
▶
button.
2.PresstheSELECT▼ button to select ▲ or ▼.
3.PresstheENTERbuttonafewtimestoselectarowtowhichyouwishtomovetheprogram.
The order of the programs will be changed.
Deletingtheprograms
1.Onthe[PROGRAMLIST]screen,selectaprogramnumberyouwanttodeleteandpresstheSELECT▶
button.
2.PresstheSELECT▼buttontoselect[DELETE].
3. Press the ENTER button.
The confirmation screen will be displayed.
4.Select[YES]andpresstheENTERbutton.
The program will be deleted.
This will complete deleting the program.

140
5. Using On-Screen Menu
DATE AND TIME
Youcansetthecurrenttime,month,date,andyear.
NOTE:Theprojectorhasabuilt-inclock.Theclockwillkeepworkingforabout2weeksafterthemainpoweristurnedoff.Ifthe
mainpowerisofffor2weeksormore,thebuilt-inclockwillcease.Ifthebuilt-inclockceases,setthedateandtimeagain.The
built-inclockwillnotceasewhileinthestandbymode.
TIME ZONE SETTINGS .............. Select your time zone.
DATE AND TIME SETTINGS ...... Set your current date (MM/DD/YYYY) and time (HH:MM).
INTERNET TIME SERVER ......... If you place a check mark, the projector’s built-in clock will be synchronized with an Internet
time server in every 24 hours and at the time of projector’s startup.
UPDATE .................................... Synchronizes the projector’s built-in clock immediately. The UPDATE button is not available
unless the INTERNET TIME SERVER check box is turned on.
SUMMER TIME SETTINGS ....... If you place a check mark, the clock for daylight saving will be enabled.
MOUSE
ThisoptionletsyoutochangeyourUSBmousesettings.ThemousesettingsfeatureisavailableforUSBmouseonly.
Choosethesettingsyouwant:
MOUSE BUTTON ...................... [RIGHT HAND] or [LEFT HAND]
MOUSE SENSITIVITY ............... [FAST], [MEDIUM] or [SLOW]
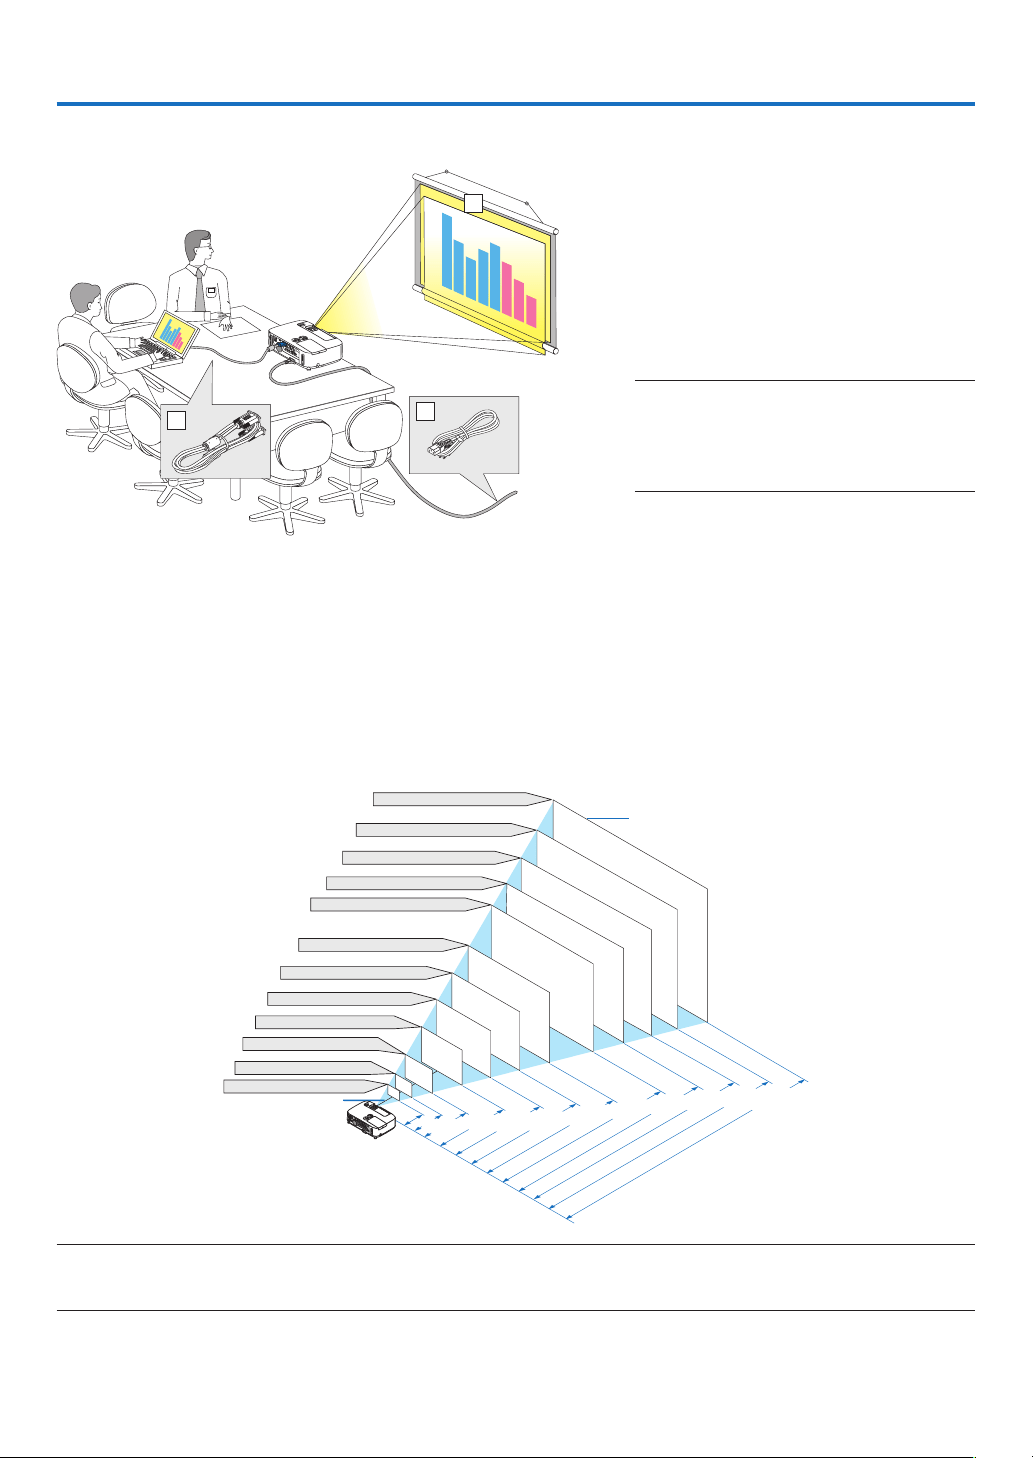
141
6. Installation and Connections
3
2
1
Thissectiondescribeshowtosetupyourprojectorandhowtoconnectvideoandaudiosources.
Yourprojectorissimpletosetupanduse.Butbeforeyougetstarted,youmustrst:
①Setupascreenandtheprojector.
②Connectyourcomputerorvideoequip-
menttotheprojector.
(page145, 147, 148, 149, 150, 151,
152)
③
Connectthesuppliedpowercord.
(page
14)
NOTE:Ensurethatthepowercordandanyother
cablesaredisconnectedbeforemovingthepro-
jector.Whenmovingtheprojectororwhenitis
notinuse,coverthelenswiththeslidinglens
cover.
❶ Setting Up the Screen and the Projector
Selecting a Location
[P501X/P451X/PE501X]
Thefurtheryourprojectorisfromthescreenorwall,thelargertheimage.Theminimumsizetheimagecanbeis
approximately25"(0.64m)measureddiagonallywhentheprojectorisroughly35inches(0.9m)fromthewallor
screen.Thelargesttheimagecanbeis300"(7.6m)whentheprojectorisabout435inches(11.0m)fromthewall
or screen.
300"
240"
Distance
(Unit: m/inch)
Lens center
Screen Size
Screen Size (Unit: cm/inch)
200"
180"
150"
120"
100"
80"
11.0/435
"
8.8/348
"
6.6/260
"
5.5/216
"
4.4/173
"
3.6/144
"
2.9/115
"
2.2/86
"
1.4/57
"
40"
7.3/289
"
60"
30"
25"
1.1/
42
"
0.9/
35
"
609.6(W)�457.2(H) / 240(W)�180(H)
487.7(W)�365.8(H) / 192(W)�144(H)
406.4(W)�304.8(H) / 160(W)�120(H)
304.8(W)�228.6(H) / 120(W)�90(H)
365.8(W)�274.3(H) / 144(W)�108(H)
243.8(W)�182.9(H) / 96(W)�72(H)
203.2(W)�152.4(H) / 80(W)�60(H)
162.6(W)�121.9(H) / 64(W)�48(H)
121.9(W)�91.4(H) / 48(W)�36(H)
81.3(W)�61.0(H) / 32(W)�24(H)
61.0(W)�45.7(H) / 24(W)�18(H)
50.8(W)�38.1(H) / 20(W)�15(H)
TIP:
•Thedistancesareindicatedbyintermediatevaluesbetweenteleandwide.Useasaruleofthumb.
•Formoredetailsonthrowdistance,seepage143.
To the wall outlet.
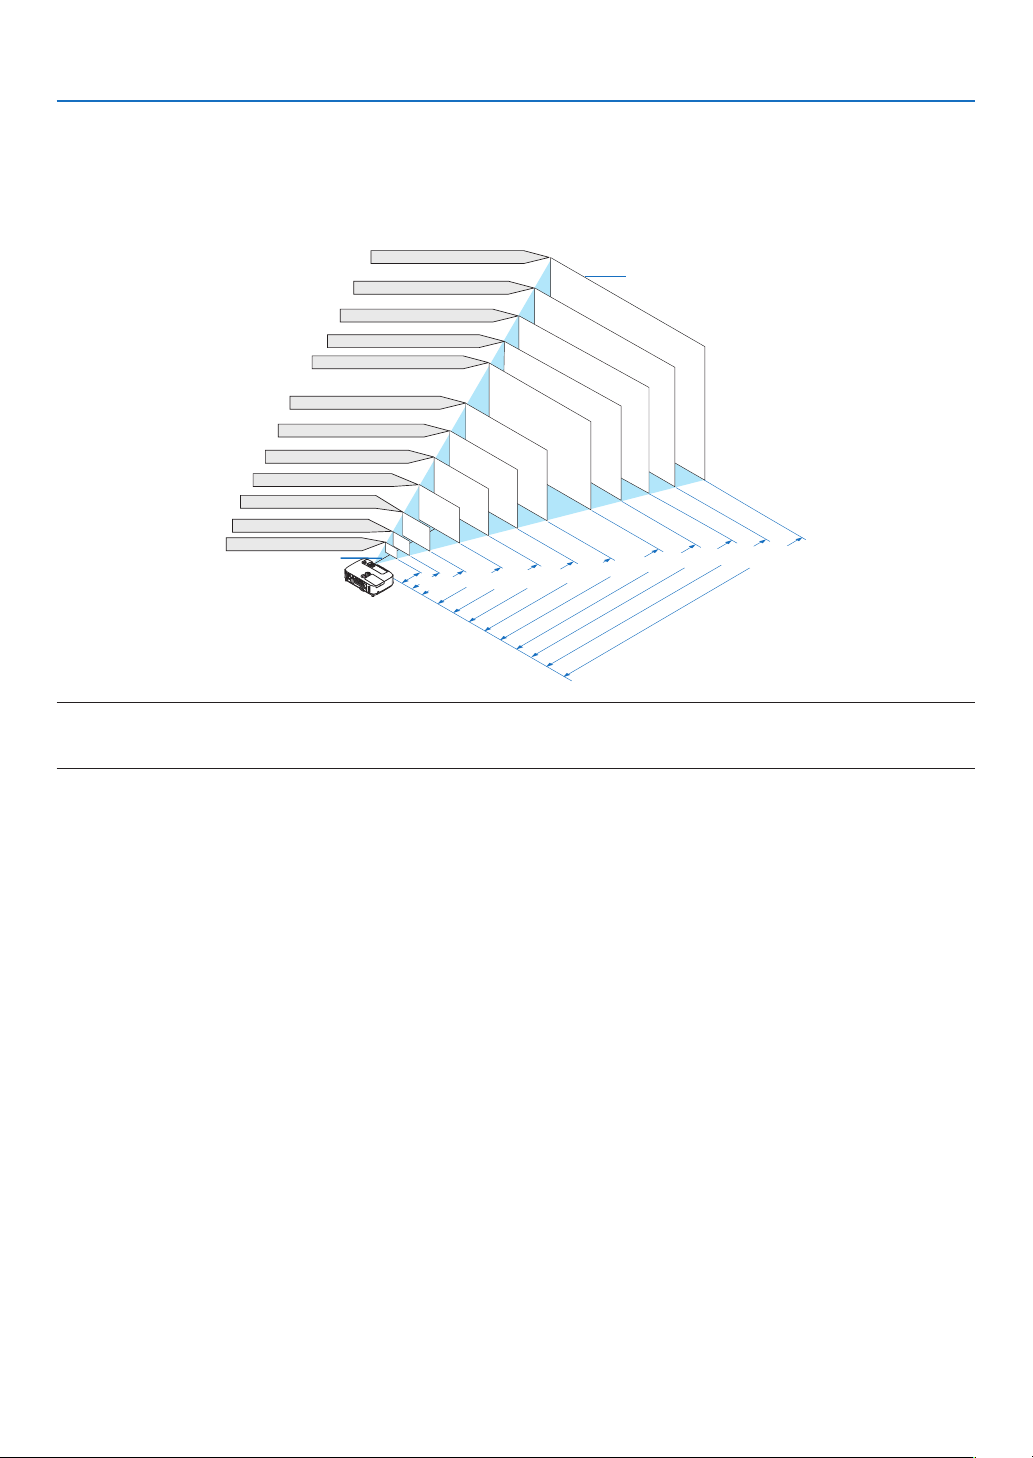
142
6. Installation and Connections
[P451W/P401W]
Thefurtheryourprojectorisfromthescreenorwall,thelargertheimage.Theminimumsizetheimagecanbeis
approximately25"(0.64m)measureddiagonallywhentheprojectorisroughly37inches(0.9m)fromthewallor
screen.Thelargesttheimagecanbeis300"(7.6m)whentheprojectorisabout459inches(11.7m)fromthewall
or screen.
300"
240"
Distance
(Unit: m/inch)
Lens center
Screen Size
Screen Size (Unit: cm/inch)
200"
180"
150"
120"
100"
80"
11.7/459
"
9.3/367
"
7.0/275
"
5.8/229
"
4.6/183
"
3.9/152
"
3.1/121
"
2.3/90
"
1.5/60
"
40"
7.8/306
"
60"
30"
25"
1.1/
45
"
0.9/
37
"
646.2(W)�403.9(H) / 254(W)�159(H)
516.9(W)�323.1(H) / 204(W)�127(H)
430.8(W)�269.2(H) / 170(W)�106(H)
323.1(W)�201.9(H) / 127(W)�79(H)
387.7(W)�242.3(H) / 153(W)�95(H)
258.5(W)�161.5(H) / 102(W)�64(H)
215.4(W)�134.6(H) / 85(W)�53(H)
172.3(W)�107.7(H) / 68(W)�42(H)
129.2(W)�80.8(H) / 51(W)�32(H)
86.2(W)�53.8(H) / 34(W)�21(H)
64.6(W)�40.4(H) / 25(W)�16(H)
53.8(W)�33.7(H) / 21(W)�13(H)
TIP:
•Thedistancesareindicatedbyintermediatevaluesbetweenteleandwide.Useasaruleofthumb.
•Formoredetailsonthrowdistance,seepage143.
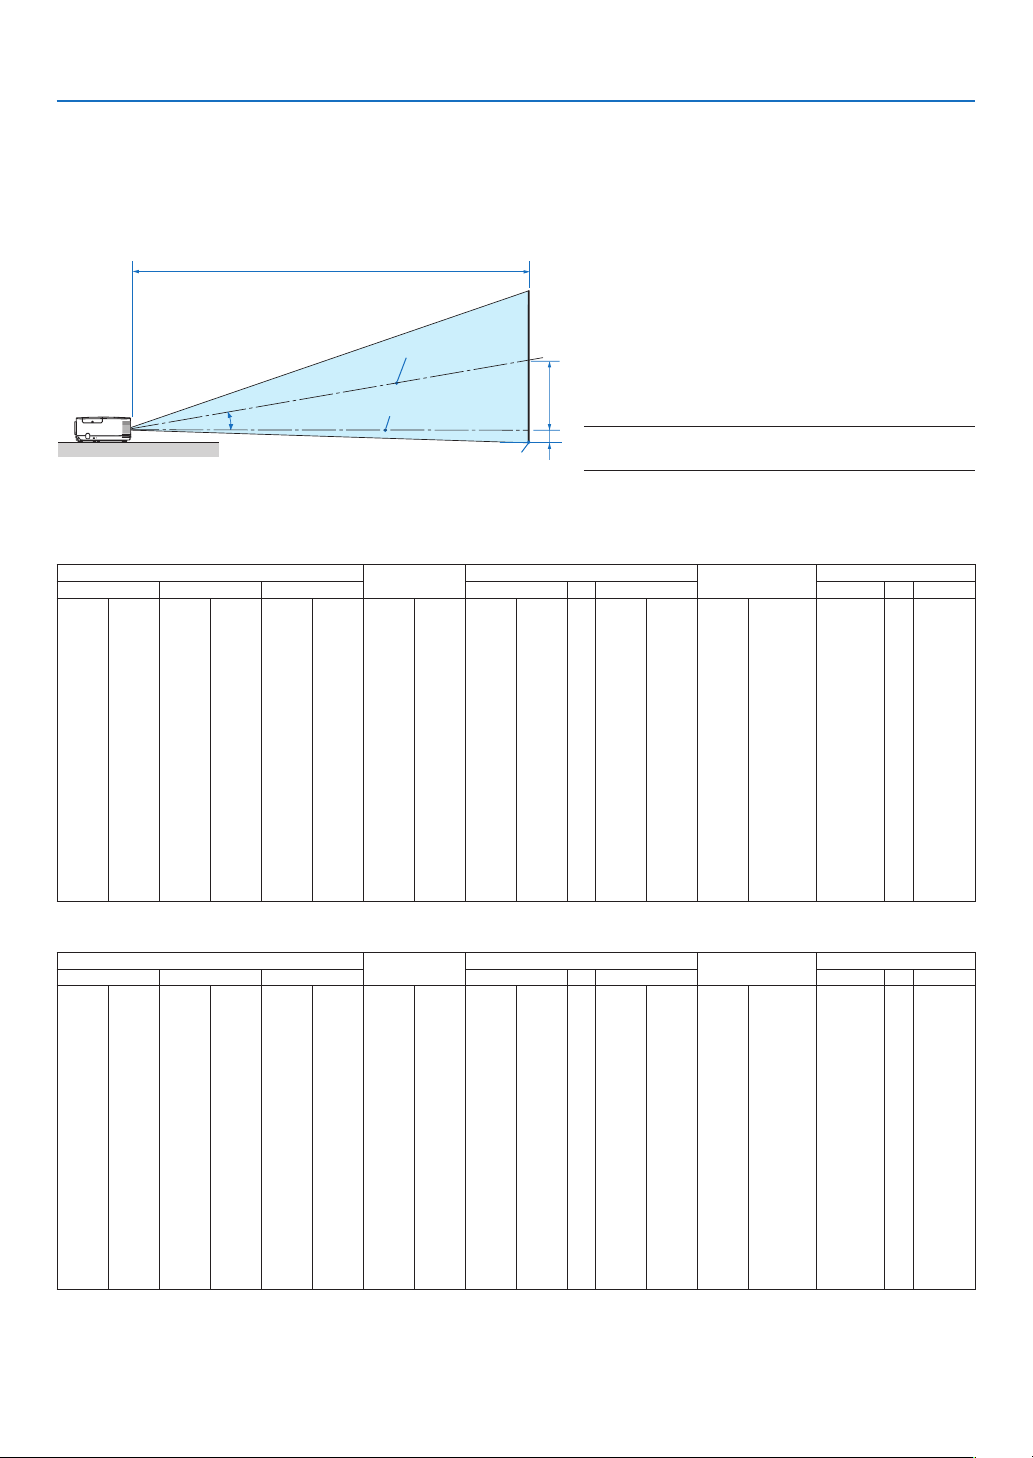
143
6. Installation and Connections
C
B
D
Throw Distance and Screen Size
Thefollowingshowstheproperrelativepositionsoftheprojectorandscreen.Refertothetabletodeterminethe
positionofinstallation.
Distance Chart
B=Verticaldistancebetweenlenscenterand
screen center
C=Throwdistance
D=Verticaldistancebetweenlenscenterand
screenbottom(topofscreenforceilingap-
plication)
=Throwangle
NOTE:Thevaluesinthetablesaredesignvaluesand
mayvary.
[P501X/P451X/PE501X]
Screen Size
B
C
D
Diagonal Width Height wide tele wide tele
inch mm inch mm inch mm inch mm inch mm - inch mm inch mm degree - degree
25 635 20 508 15 381 0–8 0–191 25 643 - 43 1102 -8–0 -191–0
0.0–16.5 - 0.0–9.8
30 762 24 610 18 457 0–9 0–229 31 782 - 52 1333 -9–0 -229–0 0.0–16.3 - 0.0–9.7
40 1016 32 813 24 610 0–12 0–305 42 1060 - 71 1794 -12–0 -305–0 0.0–16.0 - 0.0–9.6
60 1524 48 1219 36 914 0–18 0–457 64 1616 - 107 2717 -18–0 -457–0 0.0–15.8 - 0.0–9.6
72 1829 58 1463 43 1097 0–22 0–549 77 1950 - 129 3271 -22–0 -549–0 0.0–15.7 - 0.0–9.5
80 2032 64 1626 48 1219 0–24 0–610 86 2172 - 143 3641 -24–0 -610–0 0.0–15.7 - 0.0–9.5
84 2134 67 1707 50 1280 0–25 0–640 90 2284 - 151 3825 -25–0 -640–0 0.0–15.7 - 0.0–9.5
90 2286 72 1829 54 1372 0–27 0–686 96 2450 - 161 4102 -27–0 -686–0 0.0–15.6 - 0.0–9.5
100 2540 80 2032 60 1524 0–30 0–762 107 2728 - 180 4564 -30–0 -762–0 0.0–15.6 - 0.0–9.5
120 3048 96 2438 72 1829 0–36 0–914 129 3285 - 216 5487 -36–0 -914–0 0.0–15.6 - 0.0–9.5
150 3810 120 3048 90 2286 0–45 0–1143 162 4119 - 271 6872 -45–0 -1143–0 0.0–15.5 - 0.0–9.4
180 4572 144 3658 108 2743 0–54 0–1372 195 4953 - 325 8256 -54–0 -1372–0 0.0–15.5 - 0.0–9.4
200 5080 160 4064 120 3048 0–60 0–1524 217 5509 - 361 9180 -60–0 -1524–0 0.0–15.5 - 0.0–9.4
210 5334 168 4267 126 3200 0–63 0–1600 228 5787 - 380 9641 -63–0 -1600–0 0.0–15.5 - 0.0–9.4
240 6096 192 4877 144 3658 0–72 0–1829 261 6621 - 434 11026 -72–0 -1829–0 0.0–15.4 - 0.0–9.4
270 6858 216 5486 162 4115 0–81 0–2057 294 7456 - 489 12411 -81–0 -2057–0 0.0–15.4 - 0.0–9.4
300 7620 240 6096 180 4572 0–90 0–2286 326 8290 - 543 13795 -90–0 -2286–0 0.0–15.4 - 0.0–9.4
[P451W/P401W]
Screen Size
B
C
D
Diagonal Width Height wide tele wide tele
inch mm inch mm inch mm inch mm inch mm - inch mm inch mm degree - degree
25 635 21 538 13 337 0–8 0–202 27 682 - 46 1167 -7–1 -168–34
0.0–16.5 - 0.0–9.8
30 762 25 646 16 404 0–10 0–242 33 829 - 56 1411 -8–2 -202–40 0.0–16.3 - 0.0–9.7
40 1016 34 862 21 538 0–13 0–323 44 1123 - 75 1898 -11–2 -269–54 0.0–16.1 - 0.0–9.7
60 1524 51 1292 32 808 0–19 0–485 67 1710 - 113 2873 -16–3 -404–81 0.0–15.8 - 0.0–9.6
72 1829 61 1551 38 969 0–23 0–582 81 2063 - 136 3458 -19–4 -485–97 0.0–15.7 - 0.0–9.5
80 2032 68 1723 42 1077 0–25 0–646 90 2298 - 151 3848 -21–4 -538–108 0.0–15.7 - 0.0–9.5
84 2134 71 1809 45 1131 0–27 0–678 95 2415 - 159 4043 -22–4 -565–113 0.0–15.7 - 0.0–9.5
90 2286 76 1939 48 1212 0–29 0–727 102 2591 - 171 4336 -24–5 -606–121 0.0–15.7 - 0.0–9.5
100 2540 85 2154 53 1346 0–32 0–808 114 2885 - 190 4823 -26–5 -673–135 0.0–15.6 - 0.0–9.5
120 3048 102 2585 64 1615 0–38 0–969 137 3472 - 228 5799 -32–6 -808–162 0.0–15.6 - 0.0–9.5
150 3810 127 3231 79 2019 0–48 0–1212 171 4354 - 286 7261 -40–8 -1010–202 0.0–15.6 - 0.0–9.5
180 4572 153 3877 95 2423 0–57 0–1454 206 5235 - 343 8724 -48–10 -1212–242 0.0–15.5 - 0.0–9.5
200 5080 170 4308 106 2692 0–64 0–1615 229 5822 - 382 9699 -53–11 -1346–269 0.0–15.5 - 0.0–9.5
210 5334 178 4523 111 2827 0–67 0–1696 241 6116 - 401 10187 -56–11 -1414–283 0.0–15.5 - 0.0–9.5
240 6096 204 5169 127 3231 0–76 0–1939 275 6997 - 459 11649 -64–13 -1615–323 0.0–15.5 - 0.0–9.4
270 6858 229 5816 143 3635 0–86 0–2181 310 7878 - 516 13112 -72–14 -1817–363 0.0–15.5 - 0.0–9.4
300 7620 254 6462 159 4039 0–95 0–2423 345 8759 - 574 14575 -79–16 -2019–404 0.0–15.5 - 0.0–9.4
Screencenter
Lenscenter
Screenbottom

144
6. Installation and Connections
WARNING
*Installingyourprojectorontheceilingmustbedone
byaqualiedtechnician.ContactyourNECdealerfor
moreinformation.
*Donotattempttoinstalltheprojectoryourself.
•Onlyuseyourprojectoronasolid,levelsurface.Ifthe
projectorfallstotheground,youcanbeinjuredand
theprojectorseverelydamaged.
•Donotusetheprojectorwheretemperaturesvary
greatly.Theprojectormustbeusedattemperatures
between41°F(5°C)and104°F(40°C)(Ecomode
selectedautomaticallyat95°Fto104°F/35°Cto
40°C).
•Donotexposetheprojectortomoisture,dust,or
smoke.Thiswillharmthescreenimage.
•Ensurethatyouhaveadequateventilationaround
yourprojectorsoheatcandissipate.Donotcoverthe
ventsonthesideorthefrontoftheprojector.
ReectingtheImage
Usingamirrortoreectyourprojector’simageenables
youtoenjoyamuchlargerimagewhenasmallerspace
isrequired.ContactyourNECdealerifyouneedamirror
system.Ifyou’reusingamirrorsystemandyourimage
isinverted,usetheMENUand▲▼◀▶buttonsonyour
projectorcabinetoryourremotecontroltocorrectthe
orientation.(page
105)
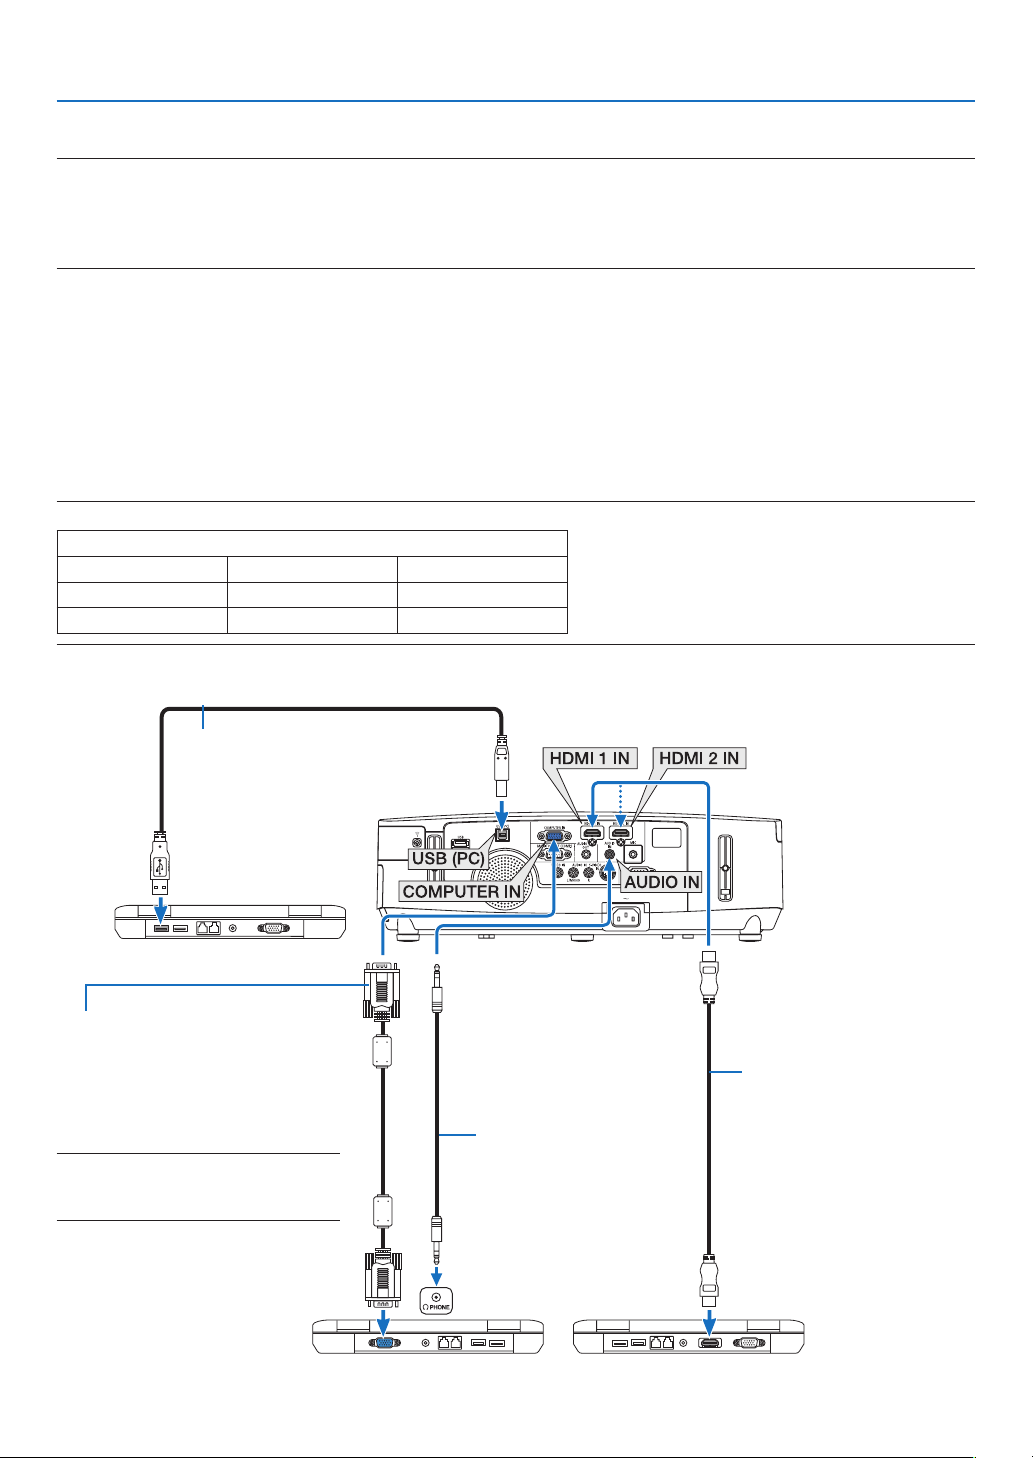
145
6. Installation and Connections
Computer cable (VGA) (supplied)
To mini D-Sub 15-pin connector on the
projector.Itisrecommendedthatyou
use a commercially available distribu-
tion amplifier if connecting a signal
cable longer than the cable supplied.
NOTE:ForMac,useacommerciallyavail-
ablepinadapter(notsupplied)toconnect
toyourMac’svideoport.
A commercially available USB cable
(compatible with USB 2.0 specifications)
Stereo mini-plug audio
cable (not supplied)
❷ Making Connections
NOTE:WhenusingwithanotebookPC,besuretoconnecttheprojectorandnotebookPCwhiletheprojectorisinstandbymode
andbeforeturningonthepowertothenotebookPC.
InmostcasestheoutputsignalfromthenotebookPCisnotturnedonunlessconnectedtotheprojectorbeforebeingpoweredup.
*Ifthescreengoesblankwhileusingyourremotecontrol,itmaybetheresultofthecomputer’sscreen-saverorpowermanage-
mentsoftware.
Enabling the computer’s external display
DisplayinganimageonthenotebookPC’sscreendoesnotnecessarilymeanitoutputsasignaltotheprojector.
WhenusingaPCcompatiblelaptop,acombinationoffunctionkeyswillenable/disabletheexternaldisplay.
Usually,thecombinationofthe“Fn”keyalongwithoneofthe12functionkeysgetstheexternaldisplaytocomeon
oroff.Forexample,NEClaptopsuseFn+F3,whileDelllaptopsuseFn+F8keycombinationstotogglethrough
externaldisplayselections.
Connecting Your Computer
NOTE:SignalssupportedbyPlug&Play(DDC2B)
INPUT
COMPUTER IN HDMI 1 IN HDMI 2 IN
analog digital digital
Yes Yes Yes
HDMIcable(notsupplied)
UseHighSpeedHDMI
®
Cable.

146
6. Installation and Connections
•Selectthesourcenameforitsappropriateinputconnectorafterturningontheprojector.
Inputconnector
SOURCEbuttonontheprojector
cabinet
Buttonontheremotecontrol
COMPUTERIN
COMPUTER(COMPUTER1)
HDMI1IN
HDMI1HDMI
HDMI2IN
HDMI2HDMI
USB(PC)
USBDISPLAY(USBDISPLAY)
NOTE:TheprojectorisnotcompatiblewithvideodecodedoutputsoftheNECISS-6020switcher.
NOTE:AnimagemaynotbedisplayedcorrectlywhenaVideoorS-Videosourceisplayedbackviaacommerciallyavailablescan
converter.
Thisisbecausetheprojectorwillprocessavideosignalasacomputersignalatthedefaultsetting.Inthatcase,dothefollowing.
*Whenanimageisdisplayedwiththelowerandupperblackportionofthescreenoradarkimageisnotdisplayedcorrectly:
ProjectanimagetollthescreenandthenpresstheAUTOADJ.buttonontheremotecontrolortheprojectorcabinet.
NOTE:WhenViewingaDVIDigitalSignal
•UseaDVI-to-HDMIcablecompliantwithDDWG(DigitalDisplayWorkingGroup)DVI(DigitalVisualInterface)revision1.0stan-
dard.Thecableshouldbewithin197"/5mlong.
•TurnofftheprojectorandthePCbeforeconnectingtheDVI-to-HDMIcable.
•ToprojectaDVIdigitalsignal:Connectthecables,turntheprojectoron,thenselecttheHDMIinput.Finally,turnonyourPC.
Failuretodosomaynotactivatethedigitaloutputofthegraphicscardresultinginnopicturebeingdisplayed.Shouldthishappen,
restartyourPC.
•SomegraphicscardshavebothanalogRGB(15-pinD-Sub)andDVI(orDFP)outputs.Useofthe15-pinD-Subconnectormay
resultinnopicturebeingdisplayedfromthedigitaloutputofthegraphicscard.
•DonotdisconnecttheDVI-to-HDMIcablewhiletheprojectorisrunning.Ifthesignalcablehasbeendisconnectedandthen
reconnected,animagemaynotbecorrectlydisplayed.Shouldthishappen,restartyourPC.
NOTE:When[VIEWER],[NETWORK],or[USBDISPLAY]isselectedfor[SOURCE],soundfromtheCOMPUTERAUDIOINminijack
willbeoutputthroughthespeaker.The[VIEWER]and[NETWORK]arenotsupportedbyPE501X.
NOTE:HDMIinputsignal
DisconnectingandconnectingtheHDMIcablemayresultinnopicturebeingdisplayedfromtheHDMIequipmentwhiletheprojec-
torisrunning.
Shouldthishappen,selecttheHDMIinputagain.
<TwowaystoselecttheHDMIinput>
•PresstheHDMIbuttonontheremotecontrol.
•PresstheMENUbuttonontheprojectorcabinet,thenselect[HDMI]from[SOURCE].

147
6. Installation and Connections
Connecting an External Monitor
Youcanconnectaseparate,externalmonitortoyourprojectortosimultaneouslyviewonamonitorthecomputer
analogimageyou’reprojecting.
NOTE:
•Daisychainconnectionisnotpossible.
•Whenaudioequipmentisconnected,theprojectorspeakerisdisabled.
Computer
cable (VGA)
(supplied)
Stereo mini-plug audio cable
(not supplied)
Computer cable (VGA)
(not supplied)
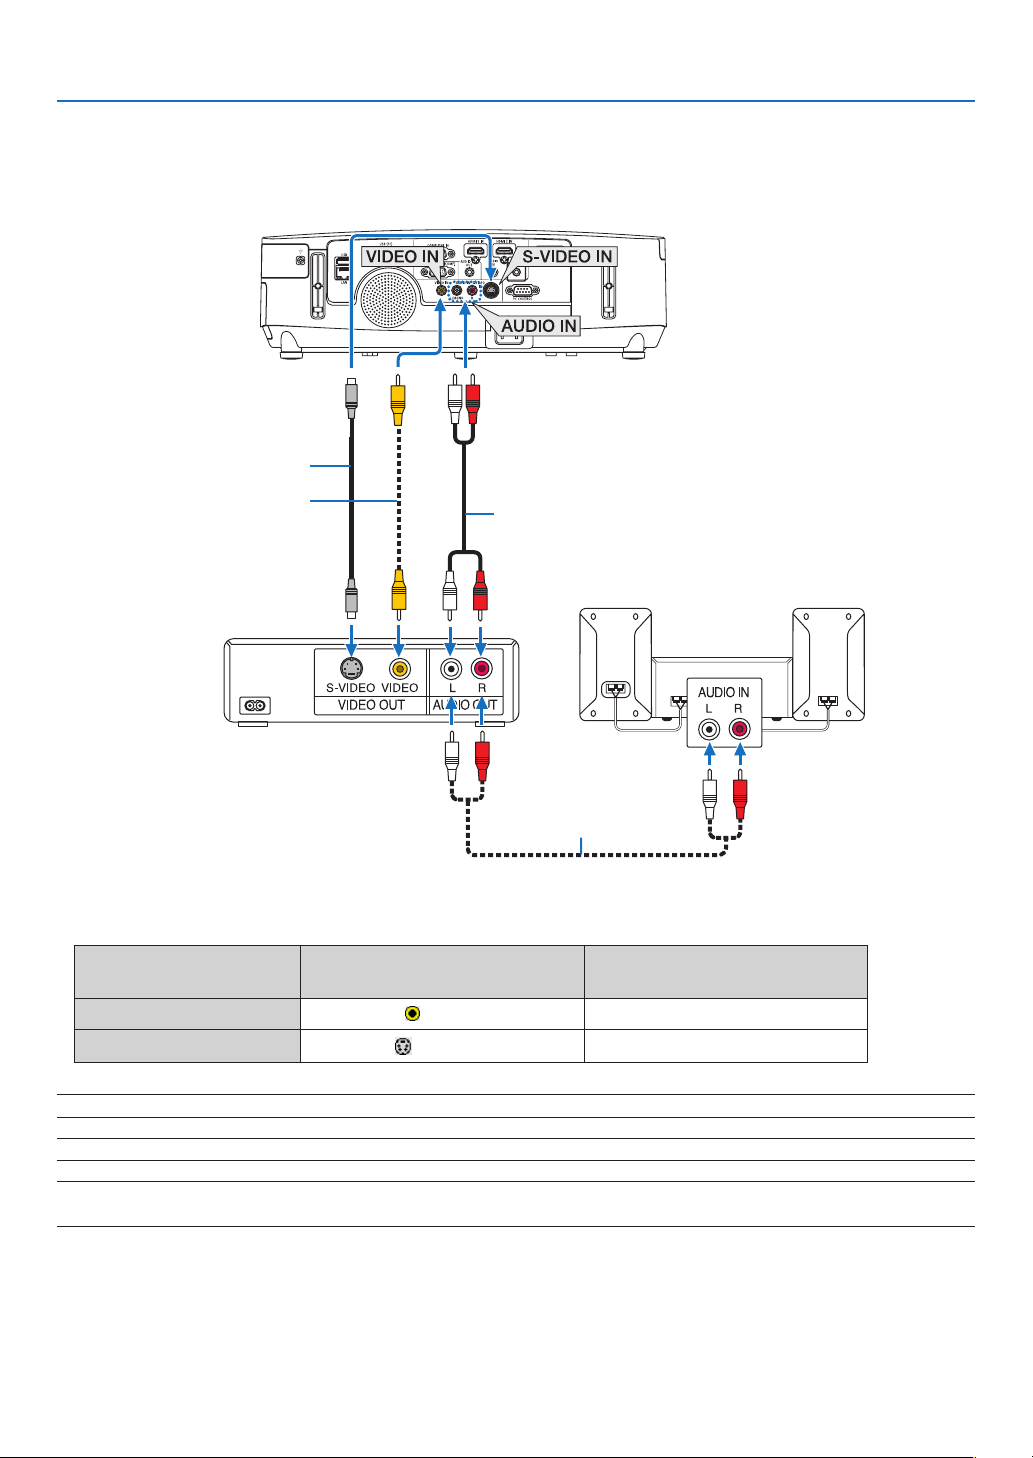
148
6. Installation and Connections
Connecting Your DVD Player or Other AV Equipment
ConnectingVideo/S-VideoInput
•Selectthesourcenameforitsappropriateinputconnectorafterturningontheprojector.
Inputconnector
SOURCEbuttonontheprojector
cabinet
Buttonontheremotecontrol
VIDEOIN
VIDEO
(VIDEO)
S-VIDEOIN
S-VIDEO
(S-VIDEO)
NOTE:TheAUDIOINLandRjacks(RCA)aresharedbetweentheVideoandS-Videoinputs.
NOTE:RefertoyourVCRowner’smanualformoreinformationaboutyourequipment’svideooutputrequirements.
NOTE:AnimagemaynotbedisplayedcorrectlywhenaVideoorS-Videosourceisplayedbackinfast-forwardorfast-rewindvia
ascanconverter.
Audio cable (not supplied)
S-Video cable (not supplied)
Video cable (not supplied)
Audio equipment
Audio cable (not supplied)
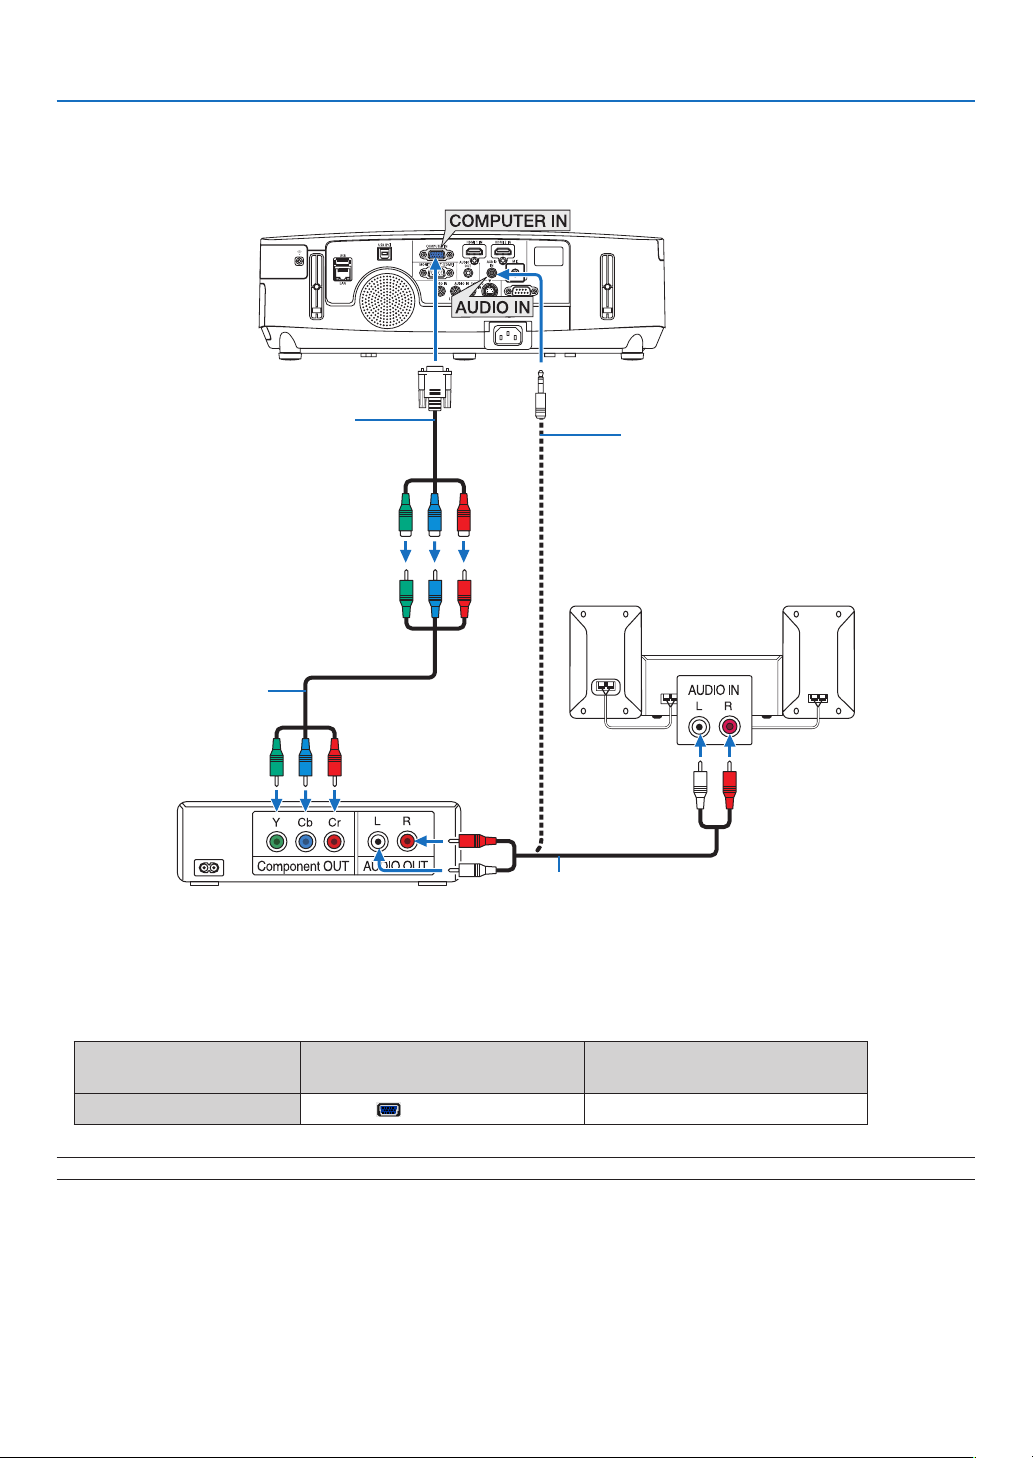
149
6. Installation and Connections
Connecting Component Input
Acomponentsignalwillbeautomaticallydisplayed.Ifnot,fromthemenu,select[SETUP][OPTIONS(1)]
[SIGNALSELECT][COMPUTER],andthenplaceacheckmarkintheComponentradiobutton.
•Selectthesourcenameforitsappropriateinputconnectorafterturningontheprojector.
Inputconnector
SOURCEbuttonontheprojector
cabinet
Buttonontheremotecontrol
COMPUTERIN
COMPUTER(COMPUTER1)
NOTE:RefertoyourDVDplayer’sowner’smanualformoreinformationaboutyourDVDplayer’svideooutputrequirements.
Audio cable (not supplied)
15-pin - to - RCA (female)
× 3 cable adapter (ADP-
CV1E)
Stereo mini plug - to - RCA audio
cable (not supplied)
Component video RCA × 3
cable (not supplied)
DVD player
Audio Equipment
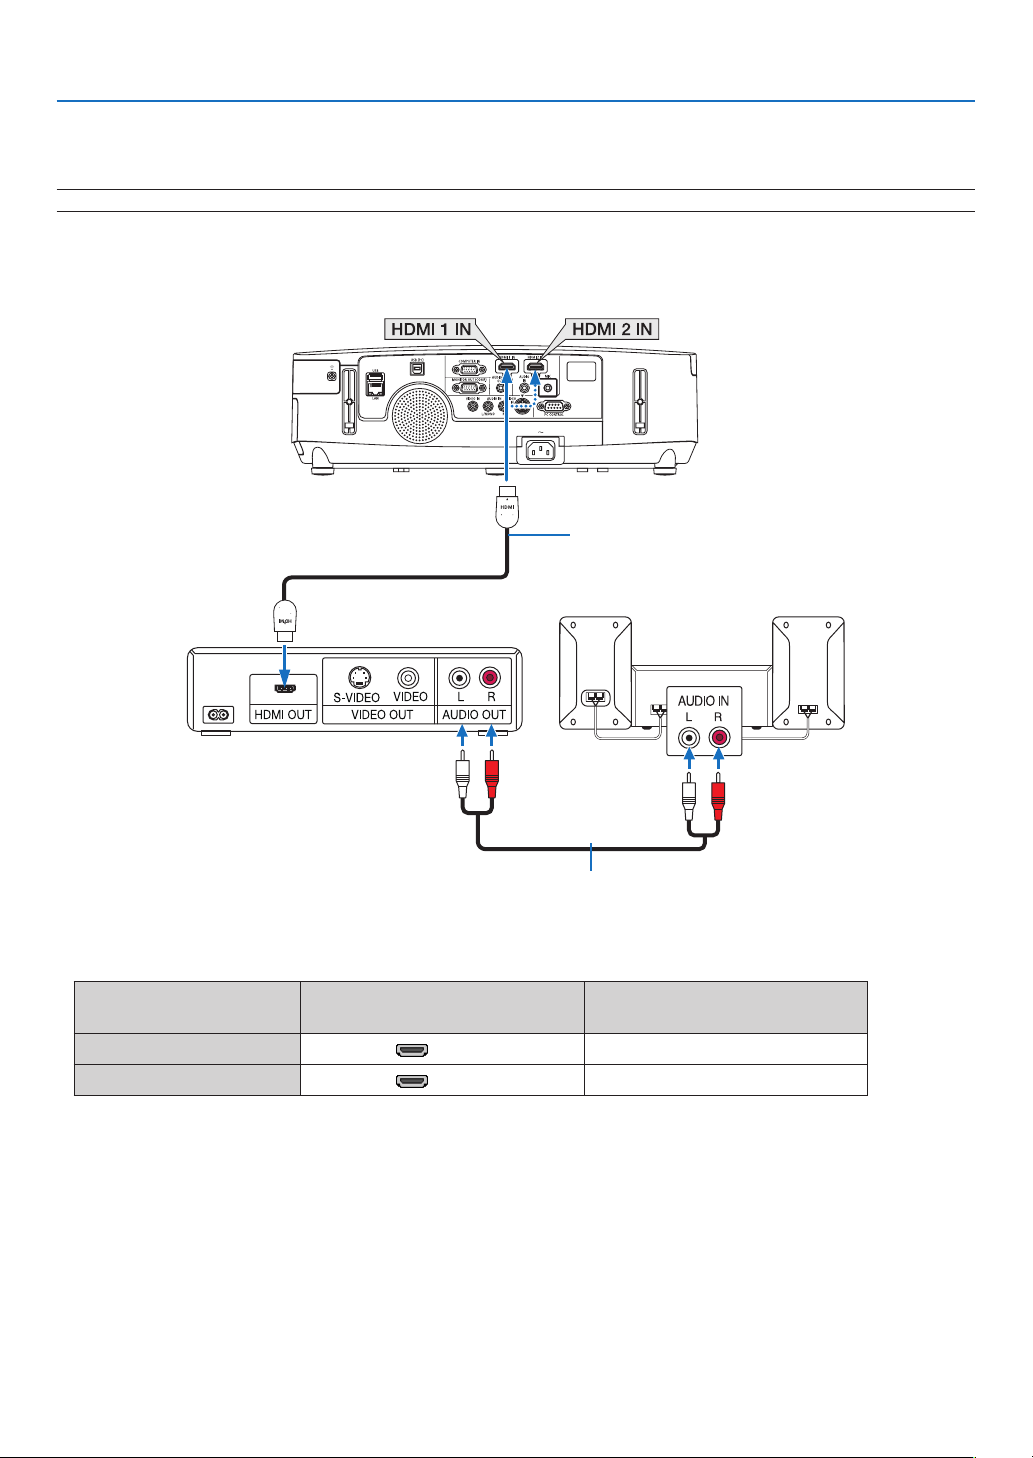
150
6. Installation and Connections
Connecting HDMI Input
YoucanconnecttheHDMIoutputofyourDVDplayer,harddiskplayer,Blu-rayplayer,ornotebooktypePCtothe
HDMIINconnectorofyourprojector.
NOTE:TheHDMI1IN/HDMI2INconnectorsupportsPlug&Play(DDC2B).
Audio cable (not supplied)
HDMIcable(notsupplied)
UseHighSpeedHDMI
®
Cable.
Inputconnector
SOURCEbuttonontheprojector
cabinet
Buttonontheremotecontrol
HDMI1IN
HDMI1HDMI
HDMI2IN
HDMI2HDMI
TIP:ForusersofaudiovideoequipmentwithanHDMIconnector:
Select“Enhanced”ratherthan“Normal”ifHDMIoutputisswitchablebetween“Enhanced”and“Normal”.
Thiswillprovideimprovedimagecontrastandmoredetaileddarkareas.
Formoreinformationonsettings,refertotheinstructionmanualoftheaudiovideoequipmenttobeconnected.
•WhenconnectingtheHDMI1IN(orHDMI2IN)connectoroftheprojectortotheDVDplayer,theprojector’svideo
levelcanbemadesettingsinaccordancewiththeDVDplayer’svideolevel.Inthemenuselect[HDMISETTINGS]
[HDMI1](or[HDMI2])[VIDEOLEVEL]andmakenecessarysettings.
•IftheHDMIinputsoundcannotbeheard,inthemenuselect[AUDIOSELECT][HDMI1](or[HDMI2]).
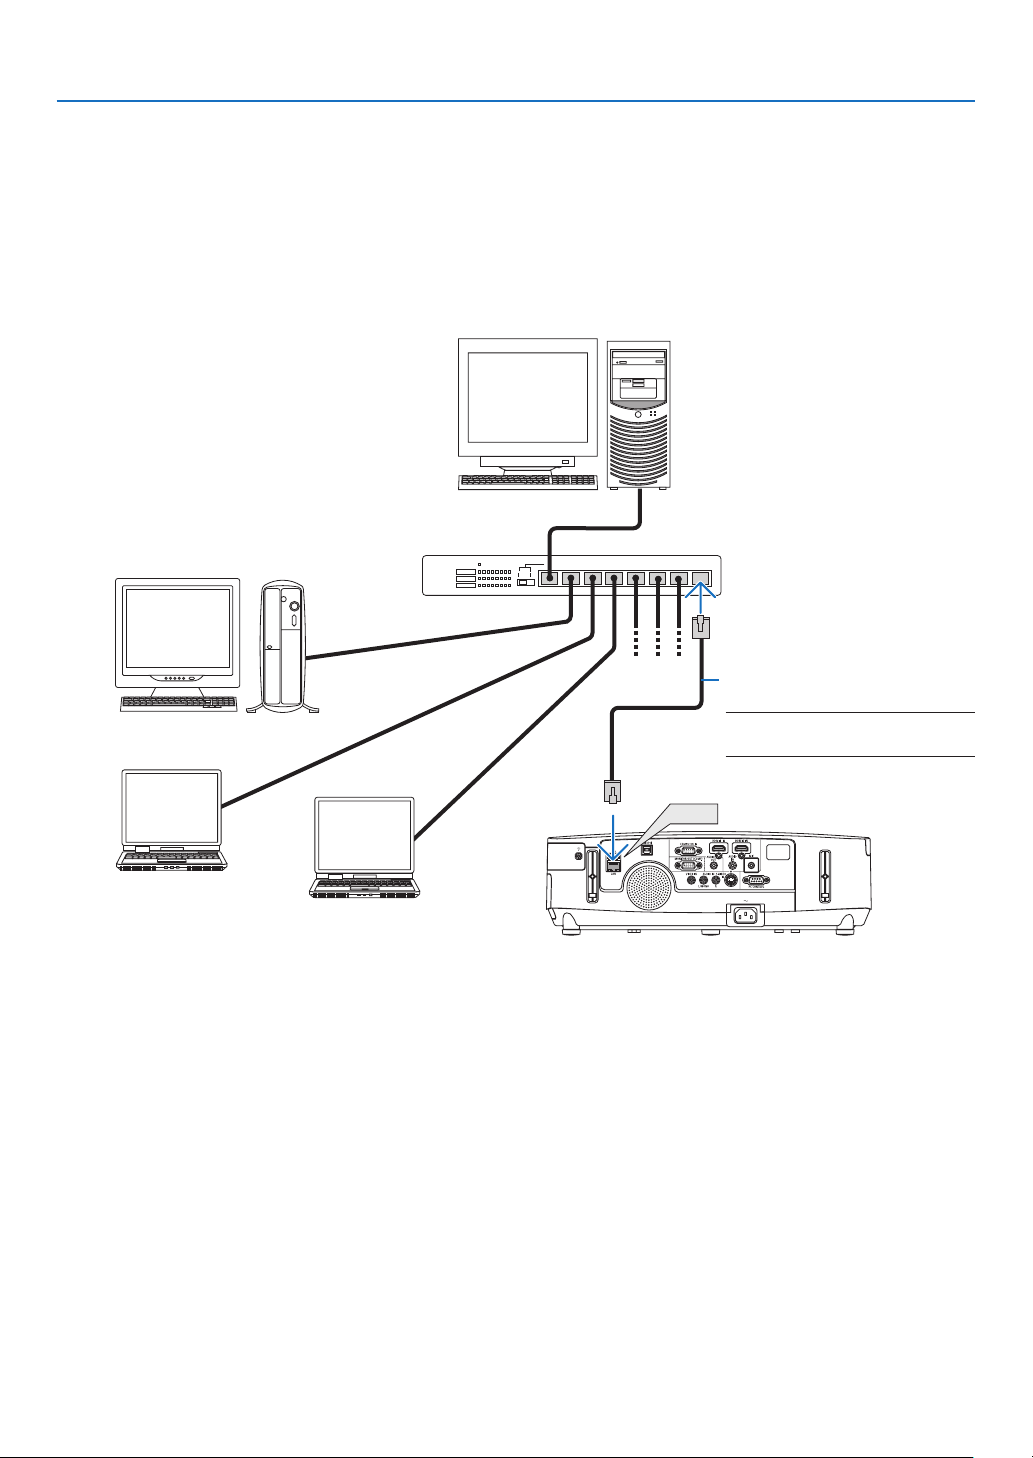
151
6. Installation and Connections
Connecting to a Wired LAN (not supported by PE501X)
TheprojectorcomesstandardwithaLANport(RJ-45)whichprovidesaLANconnectionusingaLANcable.
TouseaLANconnection,youarerequiredtosettheLANontheprojectormenu.Select[SETUP][WIREDLAN].
(page
120).
ExampleofLANconnection
ExampleofwiredLANconnection
LAN
Server
Hub
LAN cable (not supplied)
NOTE:UseaCategory5orhigherLAN
cable.

152
6. Installation and Connections
Connecting to a Wireless LAN (Optional: NP02LM series) (not supported by PE501X)
TheUSBWirelessLANUnitalsoprovidesawirelessLANconnection.TouseawirelessLANconnection,youare
requiredtoassignanIPaddresstotheprojector.
Important:
•IfyouusetheprojectorwiththeUSBWirelessLANUnitintheareawheretheuseofwirelessLANequipmentis
prohibited,removetheUSBWirelessLANUnitfromtheprojector.
•BuytheappropriateUSBWirelessLANUnitforyourcountryorarea.
NOTE:
•ThegreenLEDontheUSBWirelessLANUnitashestoshowthattheUSBWirelessLANUnitisworking.
•Yourcomputer’swirelessLANadapter(orunit)mustbecompliedwithWi-Fi(IEEE802.11b/g/n)standard.
FlowofSettingWirelessLAN
Step 1:AttachtheUSBWirelessLANUnittotheprojector.
Step 2:ConnectthecomputertotheprojectorviawiredLAN.(page151)
Usethecomputer’sbrowsertodisplaytheprojector’sHTTPserver.(page42)
Step 3:
UseanHTTPservertosetthewirelessLAN.(page45)
AccesstheHTTPserverfunctiontoset[NETWORKSETTINGS][SETTINGS][WIRELESS]
[EASYCONNECTION],[SIMPLEACCESSPOINT],[PROFILE1]or[PROFILE2].
NOTE:
•TousetheHTTPserverfunction,theprojectormustbeconnectedtoanetwork.
FirstusethewiredLANtoconnecttheprojectortoanetworkandthenusetheHTTPservertosetthewirelessLAN.
•AftersettingthewirelessLANbyusingtheHTTPserver,set[NETWORKSETTINGS][SETTINGS][WIRED][DISABLE]
WhenswitchingtosetontheprojectorafterconnectingtothewirelessLAN:
UsethemenutosetthewirelessLANconnectionfortheprojector.
(page
120)
Select[DISABLE],[EASYCONNECTION],[SIMPLEACCESSPOINT],[PROFILE1]or[PROFILE2]yousetfromthe
HTTPserver.
AttachingtheUSBWirelessLANUnit
NOTE:
•TheUSBWirelessLANUnitmustbeinsertedintotheUSBWirelessLANUnitportinthecorrectdirection.Itcannotbeinserted
inthereversedirection.IftheUSBWirelessLANUnitisinsertedinthereversedirectionwithexcessiveforceapplied,theUSB
portmaybreak.
•BeforetouchingtheUSBWirelessLANUnit,touchametallicobject(suchasadoorknoboraluminumwindowframe)todischarge
thestaticelectricityfromyourbody.
•AlwaysinsertorremovetheUSBWirelessLANunitwhenthemainpoweristurnedoff.Failuretodosomaycauseprojector
malfunctionordamagetotheUSBwirelessLANunit.Iftheprojectorwillnotworkcorrectly,turnofftheprojector,disconnect
thepowercord,andthenconnectitagain.
•DonotinsertotherUSBdevicesintotheUSBWirelessLANunitport.DonotinserttheUSBWirelessLANunitintotheUSB(PC)
port(TypeB).
•AlthoughthePE501XdoesnotsupportwirelessLAN,awirelessmark()isshownonthecabinet.
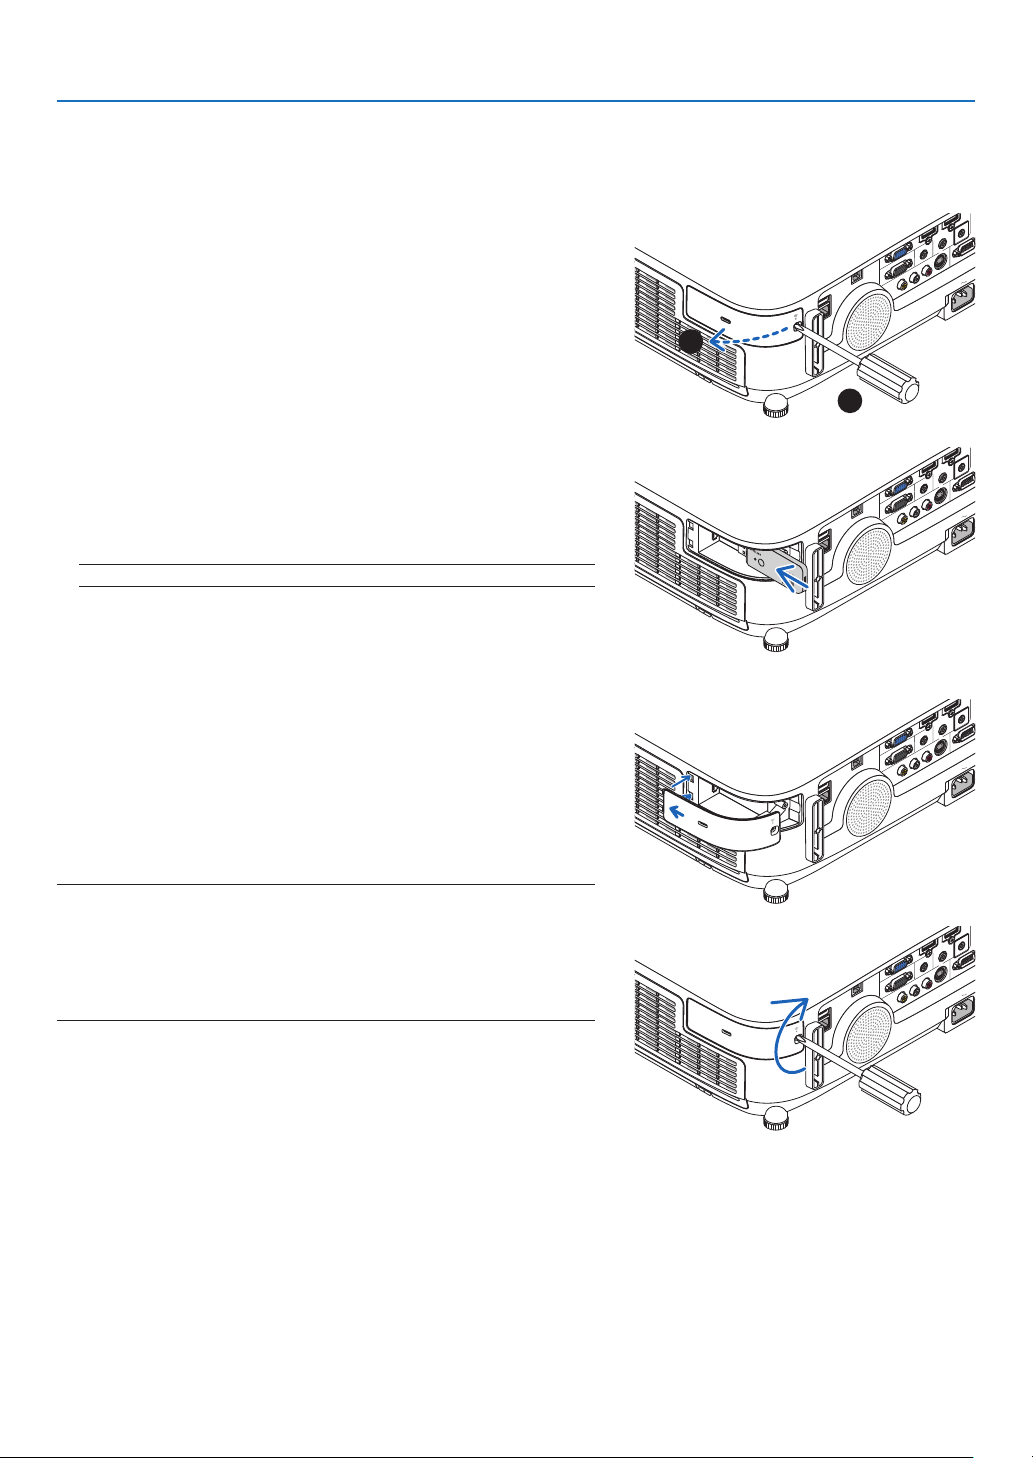
153
6. Installation and Connections
PrepareaPhillipsscrewdriverbeforehand.
1.PressthePOWERbuttontoturnofftheprojectorandsetit
intostandbycondition,anddisconnectthepowercord.
2.RemovetheUSB(LAN)portcover.
Loosen the screw securing the port cover.
•Thescrewisnotremovable.
3.SlowlyinserttheUSBWirelessLANUnitintotheUSB(LAN)
port.
Remove the cap from the USB Wireless LAN Unit, and then insert
it with the surface (side of indicator) facing outward. Keep the cap
for later use.
NOTE:DonotforcetoinserttheUSBWirelessLANUnit.
4.PuttheUSB(LAN)portcoverbackintoplace.
InsertthecatchoftheUSB(LAN)portcoverintothegrooveofthe
projector cabinet, and then tighten the screw to secure the port
cover.
ToremovetheUSBWirelessLANUnit,disconnectthepowercord
andusetheaboveprocedure.
NOTE:
•ThegreenLEDontheUSBWirelessLANUnitashestoshowthatWireless
LANUnitisworking.IftheUSBWirelessLANUnitisincorrectlyattached,
theblueLEDwillnotash.
•DonotpressthebuttonontheUSBWirelessLANUnit.Thebuttonwillnot
workwiththismodel.
1
2
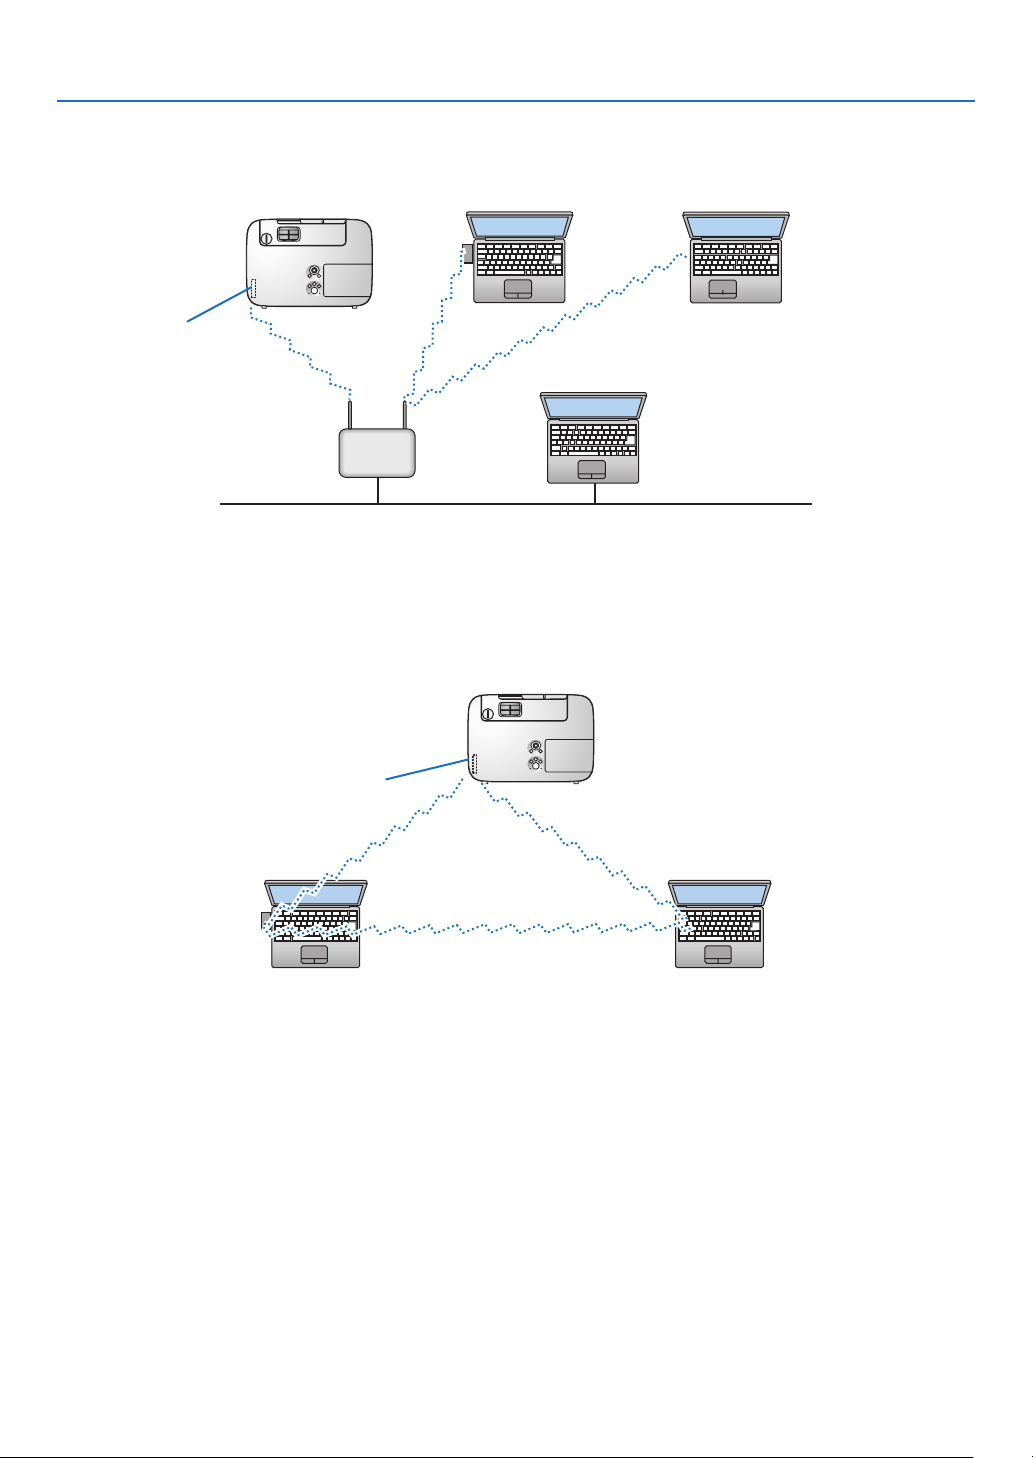
154
6. Installation and Connections
ExampleofwirelessLANconnection
(NetworkTypeInfrastructure)
PC with wireless
LAN card inserted
PC with built-in wireless
LAN function
Wired LAN
Wireless access point
USB Wireless LAN Unit
Toenabledirectcommunication(i.e.,peer-to-peer)betweenpersonalcomputersandprojectors,youneedto
selecttheAdHocmode.
UsetheHTTPserverfunctiontomakethesettings.(page42)
PC with wireless
LAN card inserted
PC with built-in wireless
LAN function
UsetheHTTPserverfunctiontomakethesettings.(page42)
ExampleofwirelessLANconnection(NetworkTypeAdHoc)
USB Wireless LAN Unit
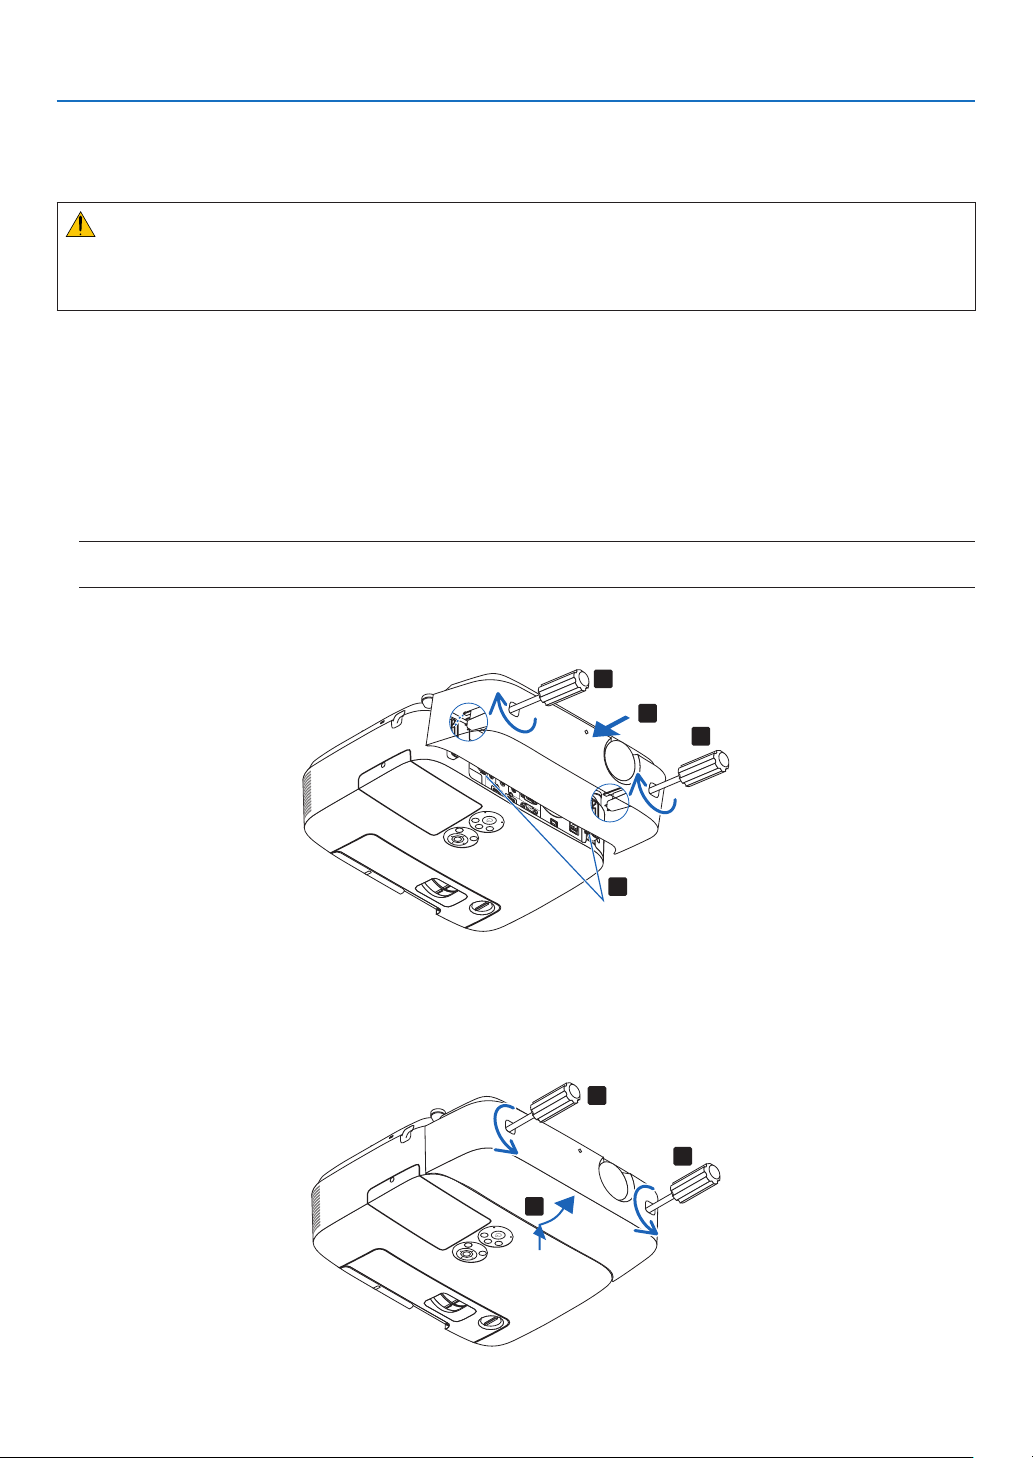
155
6. Installation and Connections
Attaching the Optional Cable Cover (NP03CV)
Anoptionalcablecover(NP03CV)isavailableforhidingcables.
TheNP03CVcablecoverisdesignedforusewiththePseriesprojectors.
CAUTION:
•Besuretotightenthescrewsafterattachingthecablecover.Failuretodosomaycausethecablecovertocome
offandfall,resultingininjuryordamagetothecablecover.
•Donotputbundledcablesinthecablecover.Failuretodosomaydamagethepowercord,resultingare.
Attachingthecablecover
Attachthecablecoverafterinstallingtheprojectorontheceilingandconnectingcables.
Toolneededforattaching:
•Phillipsscrewdriver(plus-head)
1.Aligntwotabsontheoutsideofthecablecoverwithgroovesoftheprojectorandpushthetopend.
•Atthesametimetwotabsontheinsideofthecablecoverwillbeengagedintherespondinggroovesofthe
projector.
NOTE:
•Becarefulnottogetcablescaughtinbetweenthecablecoverandtheprojector.
2.Tightenthecablecoverscrews.
•Besuretotightenthescrews.
1
2
2
1
Tabs
Removingthecablecover
1.LoosenthecablecoverscrewsuntilthePhillipsscrewdrivergoesintoafreewheelingcondition.
2.Removethecablecover.
Push up the cable cover slightly and rotate it to release.
1
1
2
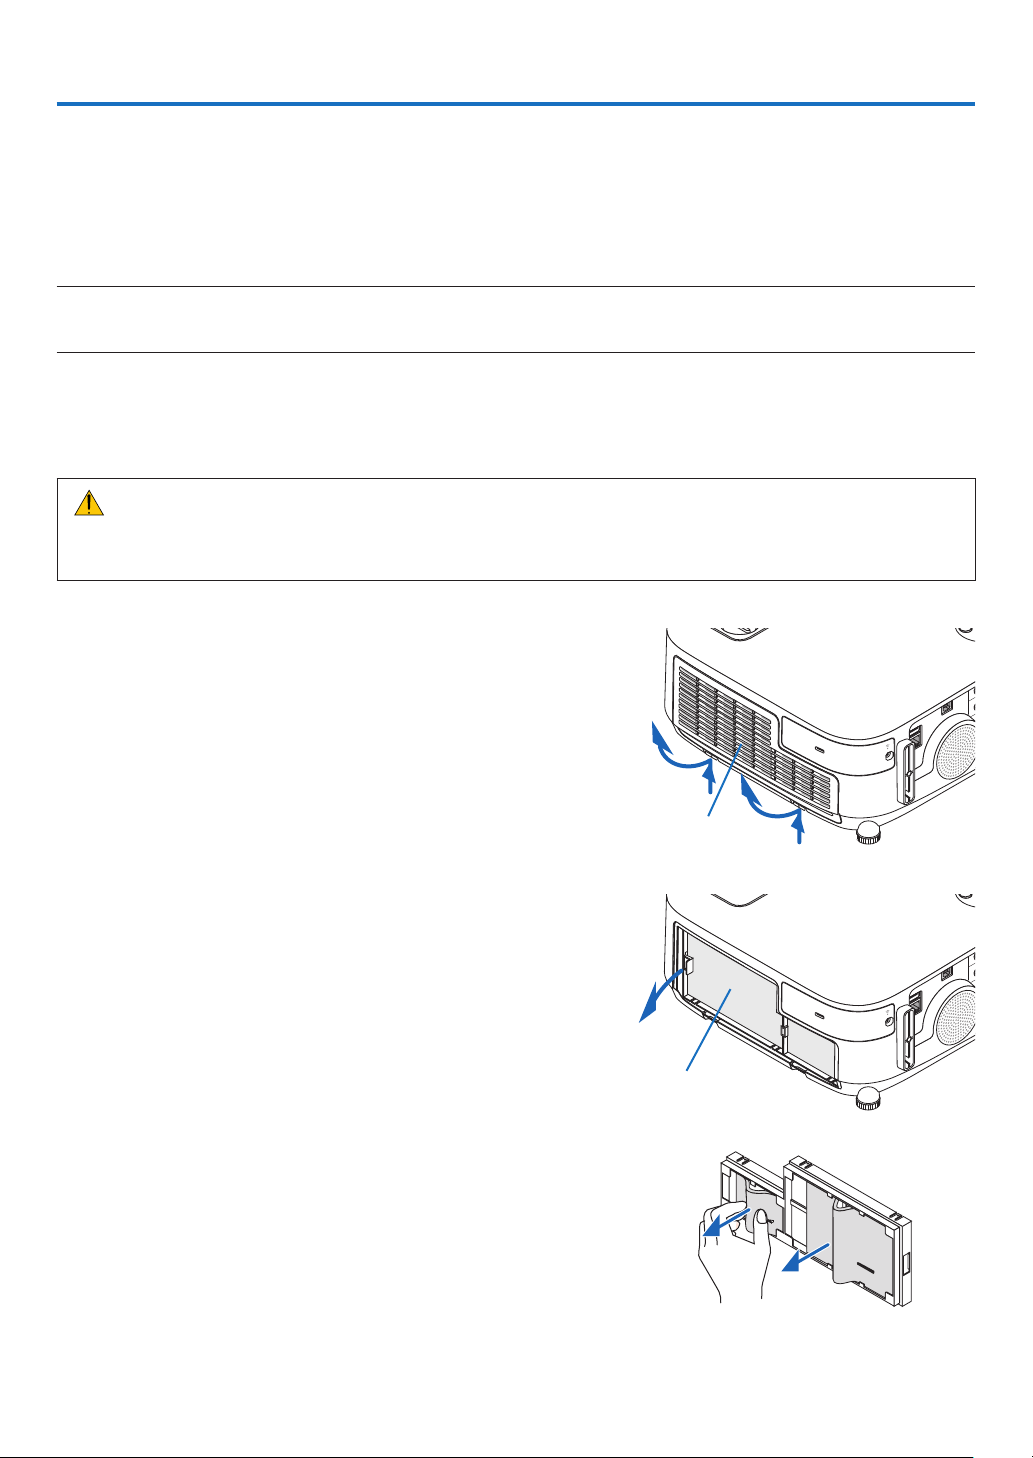
156
1.Pushupthebuttonsontheleftandrighttoreleasethe
lterunitandpullitout.
2.Removethelterunitbypullingoutthetab.
3.Removethefourlters.
(1) Turn the filter unit over and pull out the two soft accordion
filters (large and small).
Filter cover
Filter unit
7. Maintenance
Thissectiondescribesthesimplemaintenanceproceduresyoushouldfollowtocleanthelters,thelens,thecabinet,
andtoreplacethelampandthelters.
❶ Cleaning the Filters
Theair-lterspongekeepsdustanddirtfromgettinginsidetheprojectorandshouldbefrequentlycleaned.Ifthelter
isdirtyorclogged,yourprojectormayoverheat.
NOTE:Themessageforltercleaningwillbedisplayedforoneminuteaftertheprojectoristurnedonoroff.Whenthemessageis
displayed,cleanthelters.Thetimetocleantheltersissetto[OFF]attimeofshipment.
Tocancelthemessage,pressanybuttonontheprojectorcabinetortheremotecontrol.
Thetwo-layerlterontheprojectorimprovescoolinganddust-proofcapabilitiescomparedwiththeconventional
models.
Theoutsides(intakeside)oftherstandsecondlayerltersremovedust.
Tocleanthelter,detachthelterunitandtheltercover.
CAUTION
•Beforecleaningthelters,turnofftheprojector,disconnectthepowercordandthenallowthecabinettocool.
Failuretodosocanresultinelectricshockorburninjuries.
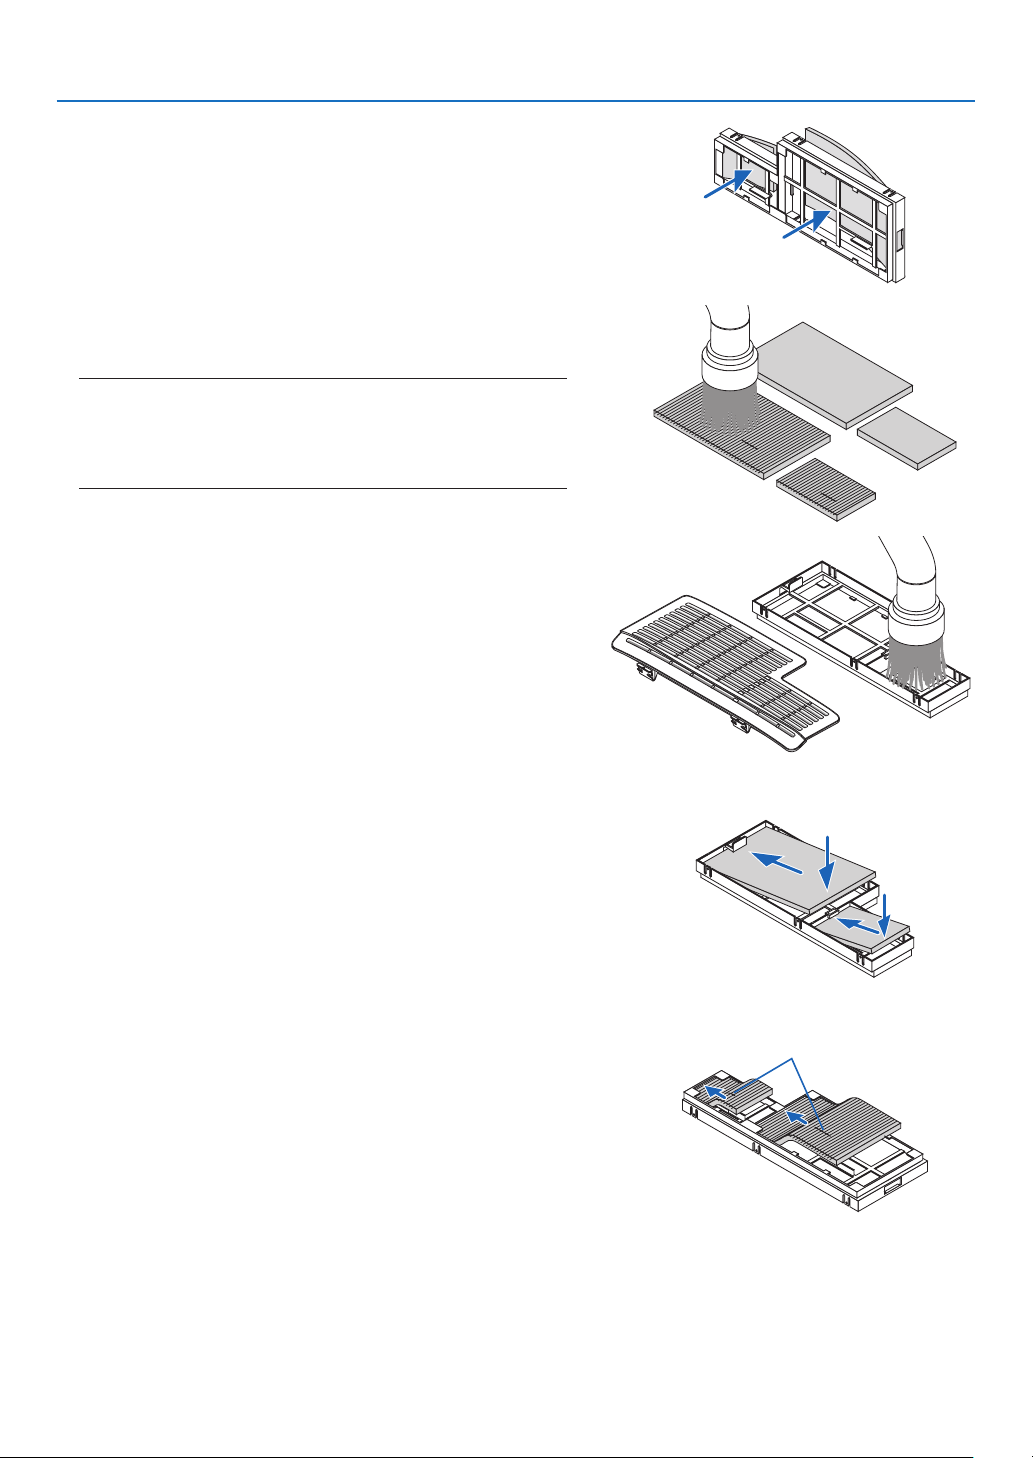
157
7. Maintenance
(2) Push the left end of each filter and remove the hard two
honeycomb filters (large and small).
•Thelargeltercannotberemovedbypushingonitsright
end.
4.Useavacuumcleanertovacuumallthedustinside.
Get rid of dust in the accordion filter
NOTE:
•Wheneveryouvacuumthelter,usethesoftbrushattachmentto
vacuum.Thisistoavoiddamagetothelter.
•Donotwashthelterwithwater.Doingsocanresultinlterclog-
ging.
5.Removedustfromthelterunitandtheltercover.
Clean both outside and inside.
6.Attachthefourlterstothelterunit.
(1)Inserttheleftendofeachhardhoneycomblter(largeand
small) first and then the right end of each hard honeycomb
filter to the filter unit.
•Thelargeltercannotbettedifitsrightendisinserted.
(2) Turn the filter unit over.
•Attachthetwosoftaccordionlters(largeandsmall).Each
accordion filter has a slit on it. Align the slit with each pro-
trusion of the filter unit.
Slit
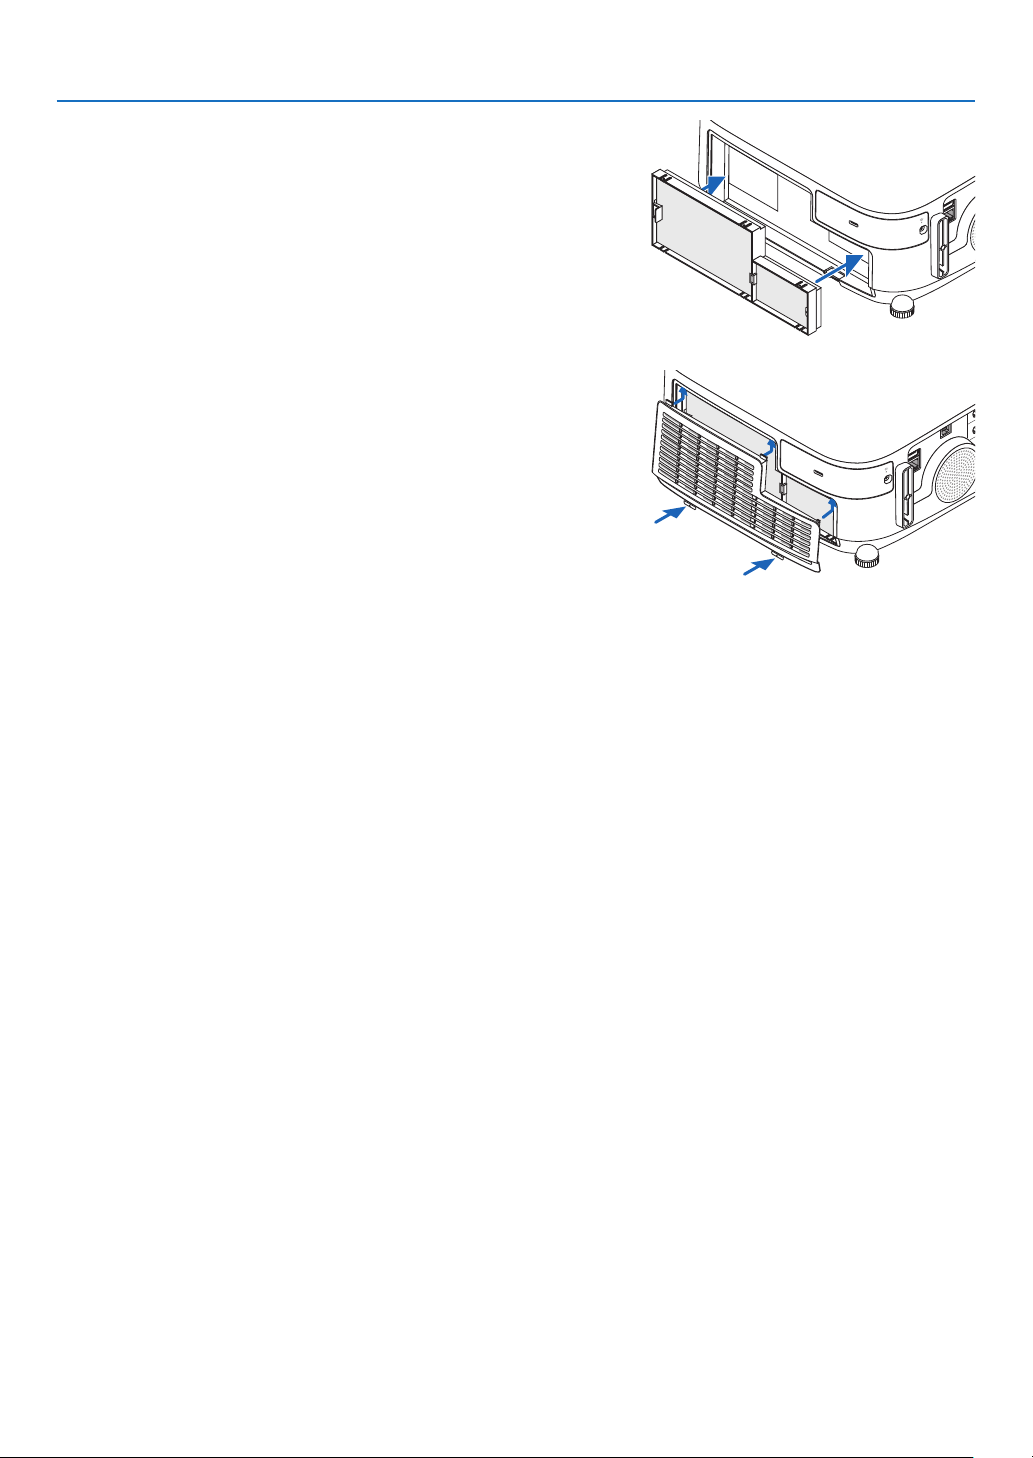
158
7. Maintenance
7.Putthelterunitbacktotheprojectorcabinet.
Makesurethatthelterunitisplacedinthecorrectorienta-
tion.
8.Puttheltercoverbacktotheprojectorcabinet.
Inserttwocatchesofthetopsideoftheltercoverintothe
groove of the cabinet, and push the buttons on the left and right
to close the filter cover.
•Pushtheltercoveruntilitclicksintoplace.
9.Clearthelterusagehours.
Plug the power cord into the wall outlet, and then turn on the
projector.
From the menu, select [RESET]
[CLEARFILTERHOURS].
( page 117)
The interval time to clean the filters is set to [OFF] at time of
shipment. When using the projector as it is, you do not clear
the filter usage
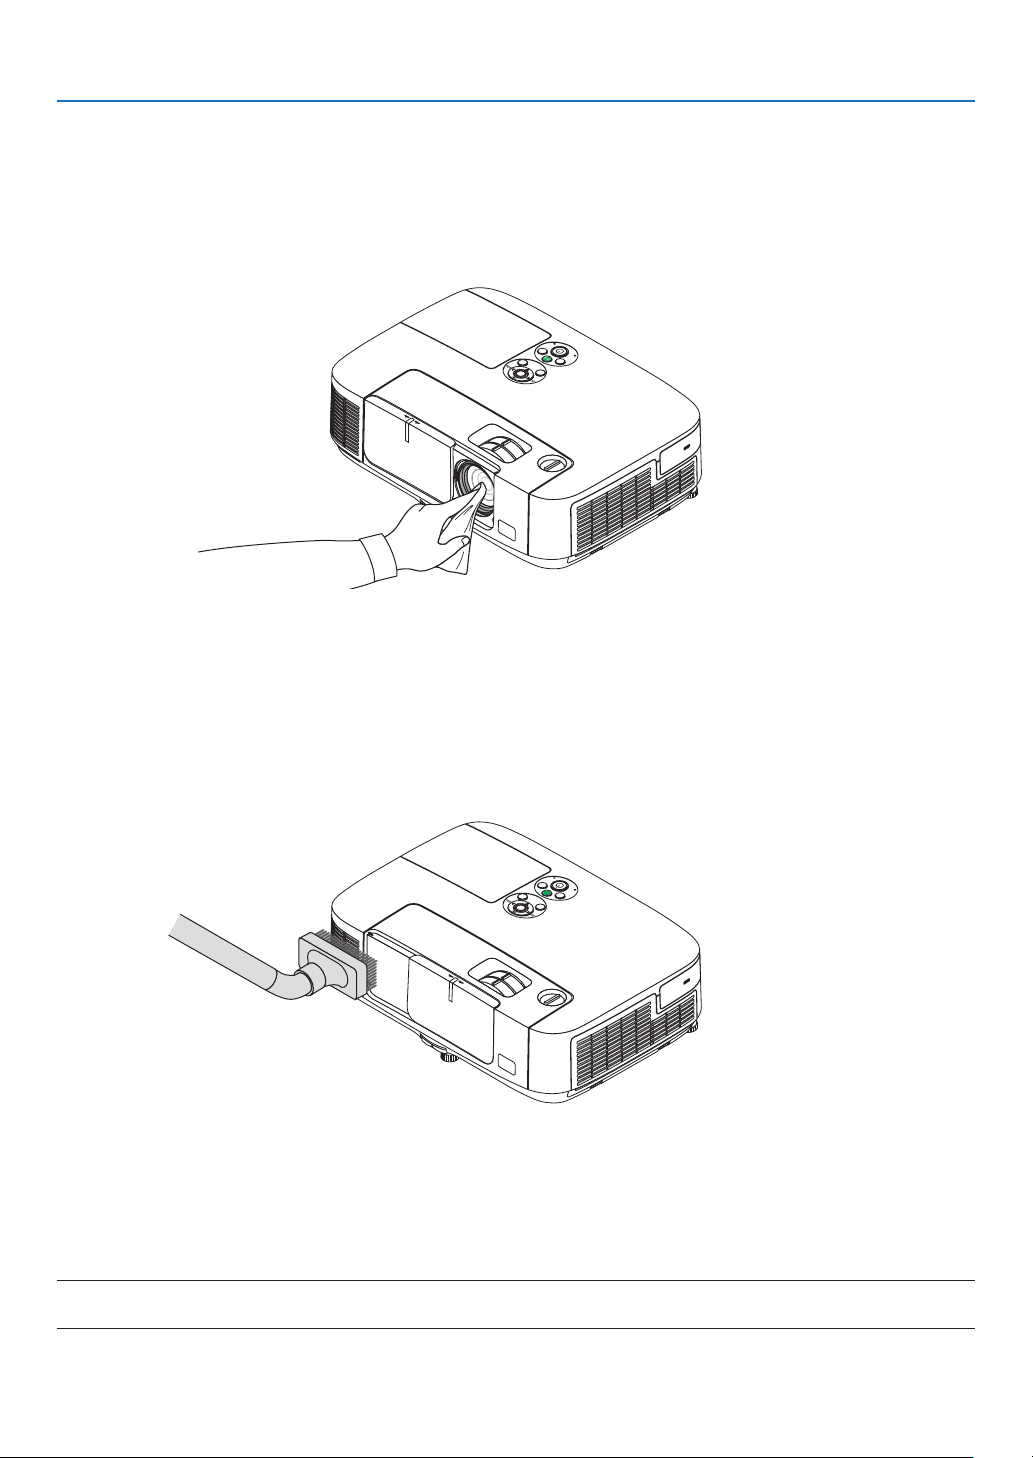
159
7. Maintenance
❷ Cleaning the Lens
•Turnofftheprojectorbeforecleaning.
•Theprojectorhasaplasticlens.Useacommerciallyavailableplasticlenscleaner.
•Donotscratchormarthelenssurfaceasaplasticlensiseasilyscratched.
•Neverusealcoholorglasslenscleanerasdoingsowillcausedamagetotheplasticlenssurface.
❸ Cleaning the Cabinet
Turnofftheprojector,andunplugtheprojectorbeforecleaning.
•Useadrysoftclothtowipedustoffthecabinet.
Ifheavilysoiled,useamilddetergent.
•Neverusestrongdetergentsorsolventssuchasalcoholorthinner.
•Whencleaningtheventilationslitsorthespeakerusingavacuumcleaner,donotforcethebrushofthevacuum
cleanerintotheslitsofthecabinet.
Vacuum the dust off the ventilation slits.
•Cloggedventilationslitsmaycauseariseintheinternaltemperatureoftheprojector,resultinginmalfunction.
•Donotscratchorhitthecabinetwithyourngersoranyhardobjects
•Contactyourdealerforcleaningtheinsideoftheprojector.
NOTE:Donotapplyvolatileagentsuchasinsecticideonthecabinet,thelens,orthescreen.Donotleavearubberorvinylproduct
inprolongedcontactwithit.Otherwisethesurfacenishwillbedeterioratedorthecoatingmaybestrippedoff.

160
7. Maintenance
❹ Replacing the Lamp and the Filters
Whenthelampreachestheendofitslife,theLAMPindicatorinthecabinetwillblinkredandthemessage“THE
LAMPHASREACHEDTHEENDOFITSUSABLELIFE.PLEASEREPLACETHELAMPANDFILTER.”willappear
(*).Eventhoughthelampmaystillbeworking,replacethelamptomaintaintheoptimalprojectorperformance.After
replacingthelamp,besuretoclearthelamphourmeter.(page
117)
CAUTION
•DONOTTOUCHTHELAMPimmediatelyafterithasbeenused.Itwillbeextremelyhot.Turntheprojector
offandthendisconnectthepowercord.Allowatleastonehourforthelamptocoolbeforehandling.
•Usethespeciedlampforsafetyandperformance.
Toorderthereplacementlamp,specifyyourlamptype.
Replacementlamp:
NP23LP
Thereplacementlampcomeswithlters.
•DONOTREMOVEANYSCREWSexceptonelampcoverscrewandtwolamphousingscrews.Youcouldreceive
anelectricshock.
•Donotbreaktheglassonthelamphousing.
Keepngerprintsofftheglasssurfaceonthelamphousing.Leavingngerprintsontheglasssurfacemightcause
anunwantedshadowandpoorpicturequality.
•Theprojectorwillturnoffandgointostandbymodewhenyoucontinuetousetheprojectorforanother100hours
afterthelamphasreachedtheendofitslife.Ifthishappens,besuretoreplacethelamp.Ifyoucontinuetouse
thelampafterthelampreachestheendofitslife,thelampbulbmayshatter,andpiecesofglassmaybescattered
inthelampcase.Donottouchthemasthepiecesofglassmaycauseinjury.Ifthishappens,contactyourNEC
dealerforlampreplacement.
*NOTE:Thismessagewillbedisplayedunderthefollowingconditions:
•foroneminuteaftertheprojectorhasbeenpoweredon
•whenthe
(POWER)buttonontheprojectorcabinetorthePOWEROFFbuttonontheremotecontrolispressed
Toturnoffthemessage,pressanybuttonontheprojectorcabinetortheremotecontrol.
Optionallampandtoolsneededforreplacement:
•Phillipsscrewdriver(plus-head)
•Replacementlamp
Flow of Replacing the Lamp and the Filters
Step 1. Replace the lamp
Step 2. Replace the filters (
page163)
Step 3.
Clearthelampusagehoursandthelterusagehours(page117)
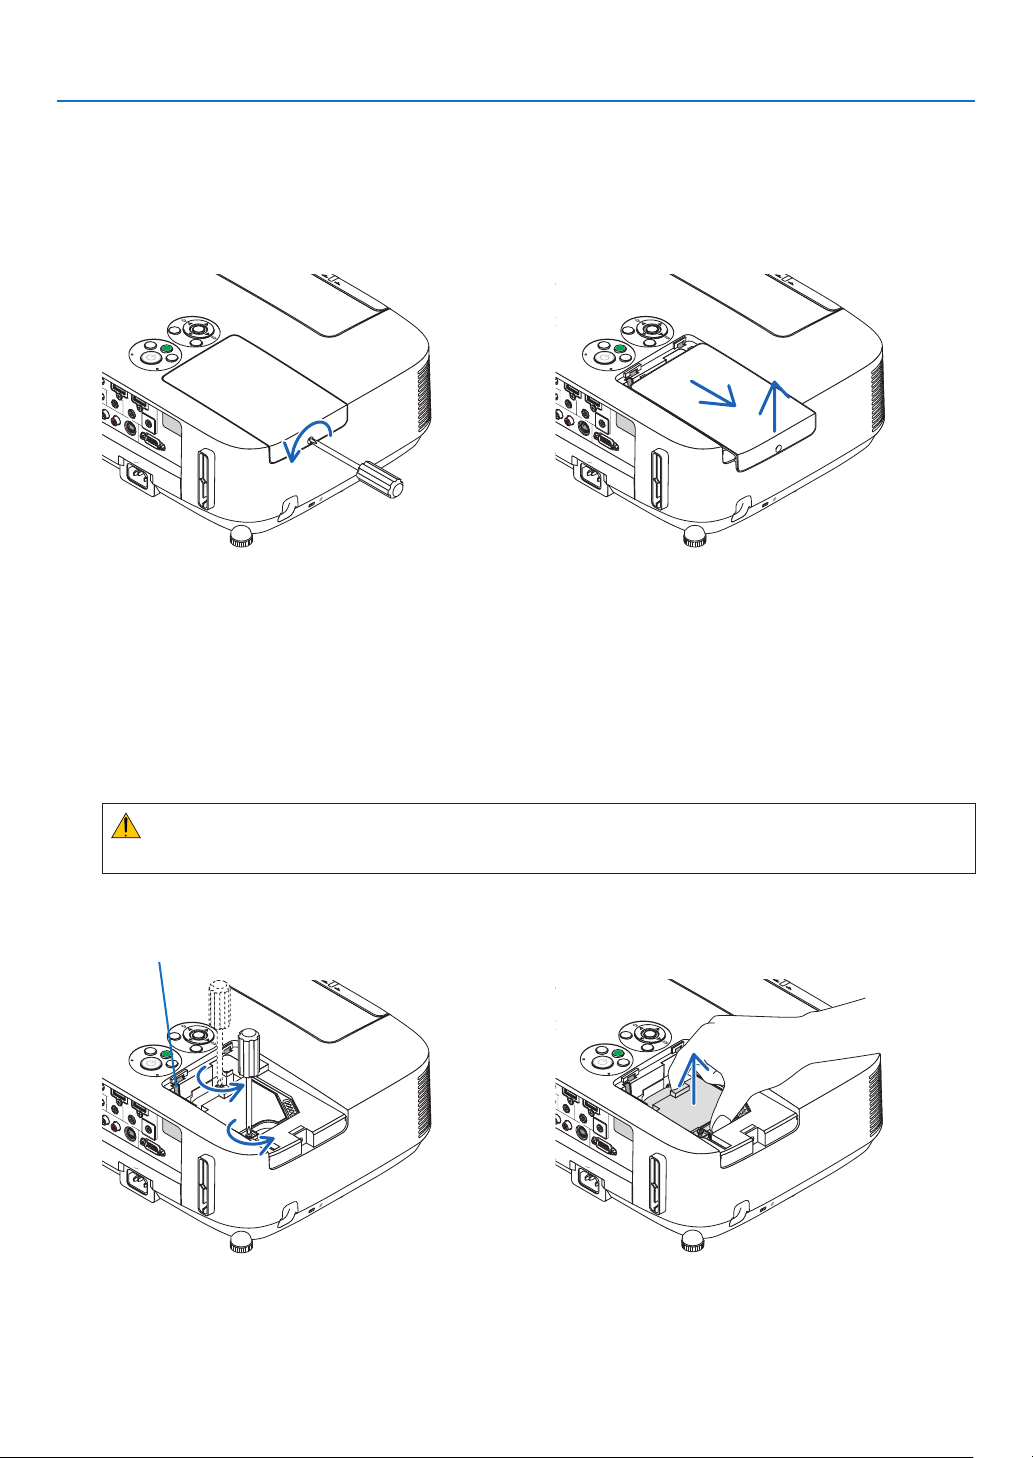
161
7. Maintenance
2.Removethelamphousing.
(1)Loosenthetwoscrewssecuringthelamphousinguntilthephillipsscrewdrivergoesintoafreewheelingcondi-
tion.
•Thetwoscrewsarenotremovable.
•Thereisaninterlockonthiscasetopreventtheriskofelectricalshock.Donotattempttocircumventthis
interlock.
(2)Removethelamphousingbyholdingit.
CAUTION:
Makesurethatthelamphousingiscoolenoughtobeforeremovingit.
Interlock
Toreplacethelamp:
1.Removethelampcover.
(1)Loosenthelampcoverscrew
•Thelampcoverscrewisnotremovable.
(2)Pushandslidethelampcoveroff.
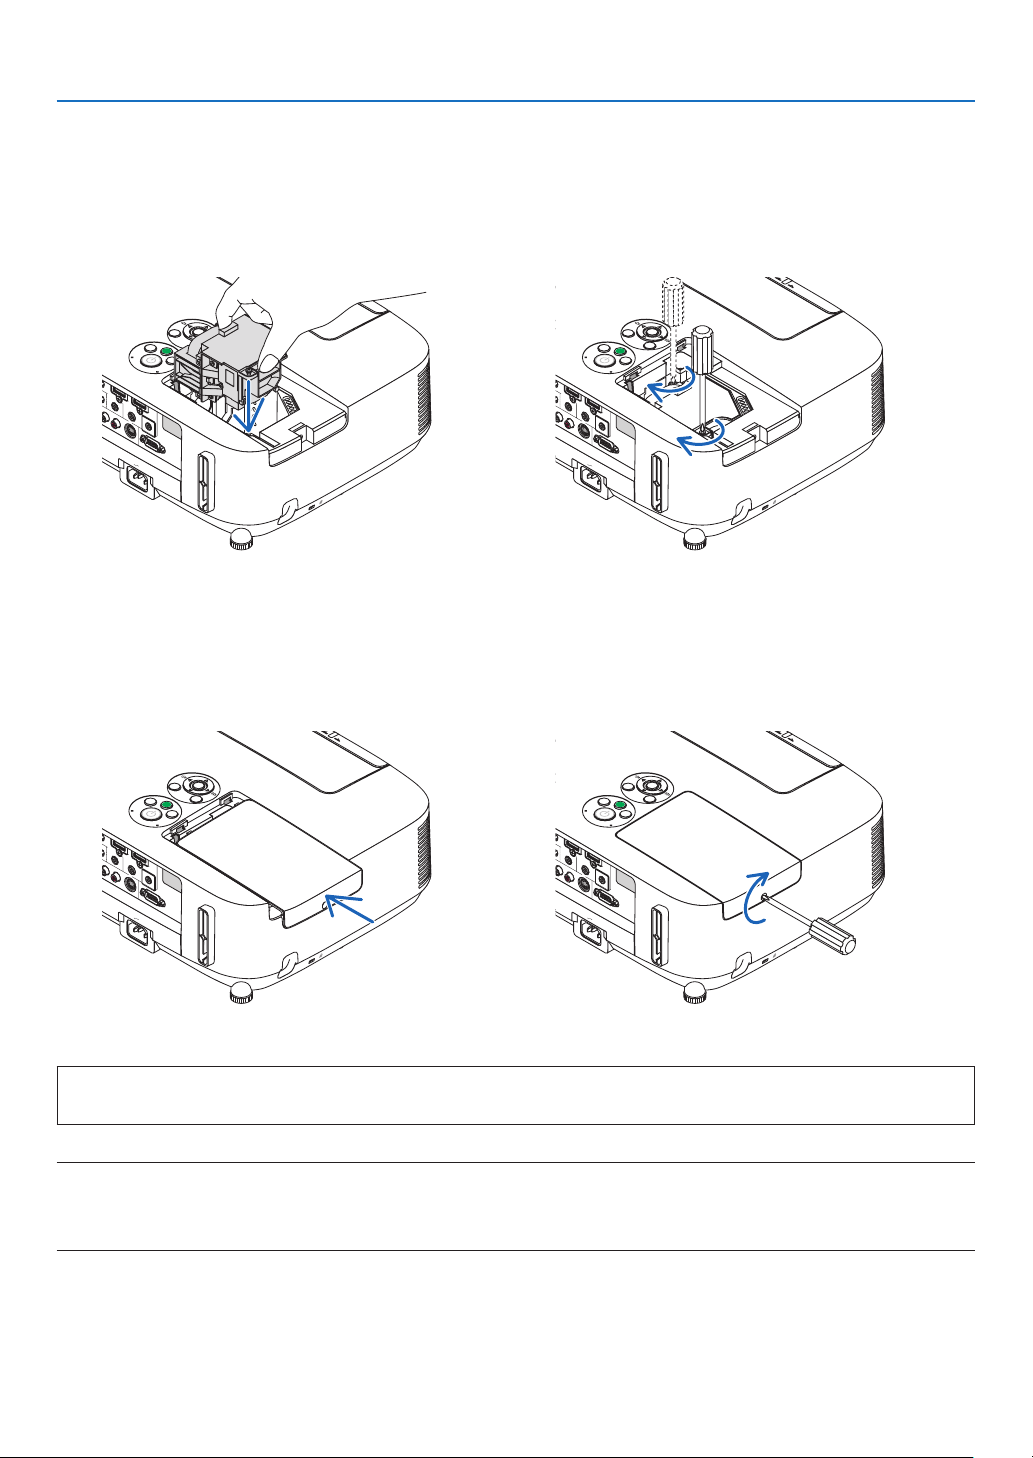
162
7. Maintenance
Thiscompletesthelampreplacement.
Goontothelterreplacement.
NOTE:Whenyoucontinuetousetheprojectorforanother100hoursafterthelamphasreachedtheendofitslife,theprojector
cannotturnonandthemenuisnotdisplayed.
Ifthishappens,presstheHELPbuttonontheremotecontrolfor10secondstoresetthelampclockbacktozero.
Whenthelamptimeclockisresettozero,theLAMPindicatorgoesout.
4.Reattachthelampcover.
(1)Slidethelampcoverbackuntilitsnapsintoplace.
(2)Tightenthescrewtosecurethelampcover.
•Besuretotightenthescrew.
3.Installanewlamphousing.
(1)Insertanewlamphousinguntilthelamphousingispluggedintothesocket.
(2)Pushthetopcenterofthelamphousingtosecureit.
(3)Secureitinplacewiththetwoscrews.
•Besuretotightenthescrews.

163
7. Maintenance
Toreplacethelters:
Fourltersarepackagedwiththereplacementlamp.
Honeycomblter(coarsemesh):Largeandsmallsizes(attachedtotheoutsideofthelterunit)
Accordionlter(nemesh):Largeandsmallsizes(attachedtotheinsideofthelterunit)
NOTE:
•Replaceallfourltersatthesametime.
•Beforereplacingthelters,wipeoffdustanddirtfromtheprojectorcabinet.
•Theprojectorisprecisionequipment.Keepoutdustanddirtduringlterreplacement.
•Donotwashthelterswithsoapandwater.Soapandwaterwilldamagetheltermembrane.
•Putltersintoplace.Incorrectattachmentofaltermaycausedustanddirttogetintotheinsideoftheprojector.
Beforereplacingthelters,replacethelamp.(page
160)
1.Pushupthebuttonsontheleftandrighttoreleasethelterunitandpullitout.
Filter cover
2.Removethelterunitbypullingoutthetab.
Filter unit
3.Removethefourlters.
(1) Turn the filter unit over and pull out the two soft accordion filters (large and small).

164
7. Maintenance
(2) Push the left end of each filter and remove the hard two honeycomb filters (large and small).
•Thelargeltercannotberemovedbypushingonitsrightend.
4.Removedustfromthelterunitandtheltercover.
Clean both outside and inside.
5.Attachfournewlterstothelterunit.
(1)Inserttheleftendofeachhardhoneycomblter(largeandsmall)rstandthentherightendofeachhard
honeycomb filter to the filter unit.
•Thelargeltercannotbettedifitsrightendisinserted.
(2) Turn the filter unit over.
•Attachthetwosoftaccordionlters(largeandsmall).Eachaccordionlterhasaslitonit.Aligntheslitwith
each protrusion of the filter unit.
6.Putthelterunitbacktotheprojectorcabinet.
Makesurethatthelterunitisplacedinthecorrectorientation.
7.Puttheltercoverbacktotheprojectorcabinet.
Inserttwocatchesofthetopsideoftheltercoverintothegrooveofthecabinet,andpushthebuttonsontheleft
and right to close the filter cover.
Pushtheltercoveruntilitclicksintoplace.
Thiscompletesthelterreplacement.
Goontotheclearinglampandlterhourmeters.
Toclearthelampusagehoursandthelterusagehours:
1.Placetheprojectorwhereyouuseit.
2.Plugthepowercordintothewalloutlet,andthenturnontheprojector.
3.Clearthelampusagehoursandthelterusagehours.
1. From the menu, select [RESET] [CLEAR LAMP HOURS] and reset the lamp usage hours.
2.Select[CLEARFILTERHOURS].andresetthelterusagehours.( page 117)
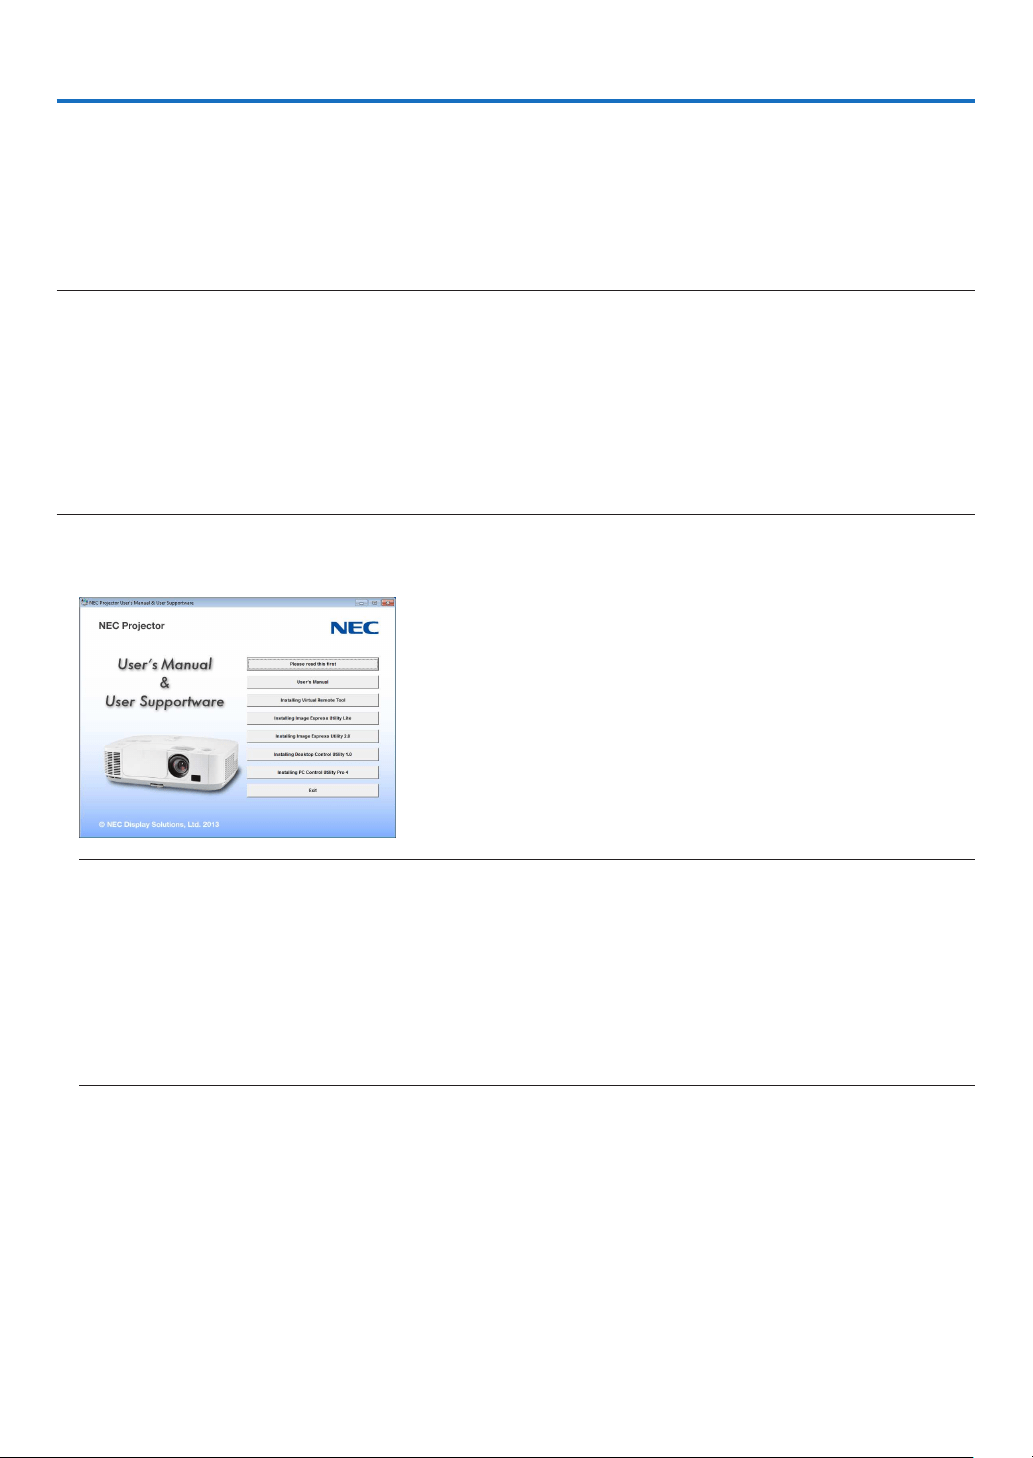
165
8. User Supportware
❶ Installing Software Program
Installation for Windows software
ThesoftwareprogramsexceptImageExpressUtilityLiteforMacOSandPCControlUtilityPro5supportWindows
8,Windows7,WindowsVista,andWindowsXP.
NOTE:
•Toinstalloruninstalleachsoftwareprogram,theWindowsuseraccountmusthave“Administrator”privilege(Windows8,Win-
dows7,WindowsVista)or“ComputerAdministrator”privilege(WindowsXP).
•Exitallrunningprogramsbeforeinstallation.Ifanotherprogramisrunning,theinstallationmaynotbecompleted.
•TorunVirtualRemoteToolorPCControlUtilityPro4onWindows8,WindowsXPHomeEdition,andWindowsXPProfessional,
“Microsoft.NETFrameworkVersion2.0”isrequired.TheMicrosoft.NETFrameworkVersion2.0,3.0or3.5isavailablefrom
Microsoft’swebpage.Downloadandinstallitonyourcomputer.
•ImageExpressUtilityLitewillbeinstalledtothesystemdriveofyourcomputer.
Ifthemessage“Thereisnotenoughfreespaceondestination”isdisplayed,freeupenoughspace(about100MB)toinstallthe
program.
1InserttheaccompanyingNECProjectorCD-ROMintoyourCD-ROMdrive.
The menu window will be displayed.
TIP:
Ifthemenuwindowwillnotbedisplayed,trythefollowingprocedure.
ForWindows7
1.Click“start”onWindows.
2.Click“AllPrograms”“Accessories”“Run”.
3.TypeyourCD-ROMdrivename(example:“Q:\”)and“LAUNCHER.EXE”in“Name”.(example:Q:\
LAUNCHER.EXE)
4.Click“OK”.
the menu window will be displayed.

166
8. User Supportware
2Clickasoftwareprogramyouwishtoinstallonthemenuwindow.
The installation will start.
•Followtheinstructionsontheinstallerscreenstocompletetheinstallation.
TIP:
UninstallingaSoftwareProgram
Preparation:
Exitthesoftwareprogrambeforeuninstalling.Touninstallthesoftwareprogram,theWindowsuseraccountmust
have“Administrator”privilege(Windows8,Windows7,andWindowsVista)or“ComputerAdministrator”privilege
(WindowsXP).
•ForWindows7/WindowsVista
1Click“Start”andthen“ControlPanel”.
The Control Panel window will be displayed.
2Click“Uninstallaprogram”under“Programs”
The“ProgramsandFeatures”windowwillbedisplayed.
3Selectthesoftwareprogramandclickit.
4Click“Uninstall/Change”or“Uninstall”.
•Whenthe“UserAccountControl”windowsisdisplayed,click“Continue”.
Follow the instructions on the screens to complete the uninstallation.
•ForWindowsXP
1Click“Start”andthen“ControlPanel”.
The Control Panel window will be displayed.
2Double-click“Add/RemovePrograms”.
TheAdd/RemoveProgramswindowwillbedisplayed.
3Clickthesoftwareprogramfromthelistandthenclick“Remove”.
Follow the instructions on the screens to complete the uninstallation.

167
8. User Supportware
Using on Mac OS
Step 1: Install Image Express Utility Lite for Mac OS or PC Control Utility Pro 5 on the
computer.
1.InserttheaccompanyingNECProjectorCD-ROMinyourMacCD-ROMdrive.
TheCD-ROMiconwillbedisplayedonthedesktop.
2.Double-clicktheCD-ROMicon.
The CD-ROM window will be displayed.
3.Double-clickthe“MacOSX”folder.
4.Double-click“ImageExpressUtilityLite.dmg”or“PCControlUtility.mpkg”.
The installer will start.
5.Click“Next”.
“ENDUSERLICENSEAGREEMENT”screenwillbedisplayed.
6.Read“ENDUSERLICENSEAGREEMENT”andclick“Next”.
The confirmation window will be displayed
7.Click“Iacceptthetermsinthelicenseagreement”.
Follow the instructions on the installer screens to complete the installation.
TIP:
•Uninstallingasoftwareprogram
1.Putthe“ImageExpressUtilityLite”or“PCControlUtilityPro5”foldertotheTrashicon.
2.PutthecongurationleofImageExpressUtilityLiteorPCControlUtilityPro5totheTrashicon.
•ThecongurationleofImageExpressUtilityLiteislocatedin“/Users/<yourusername>/Library/Preferences/
jp.necds.Image-Express-Utility-Lite.plist”.
•ThecongurationleofPCControlUtilityPro5islocatedin“/Users/<yourusername>/ApplicationData/NEC
ProjectorUserSupportware/PCControlUtilityPro5”.
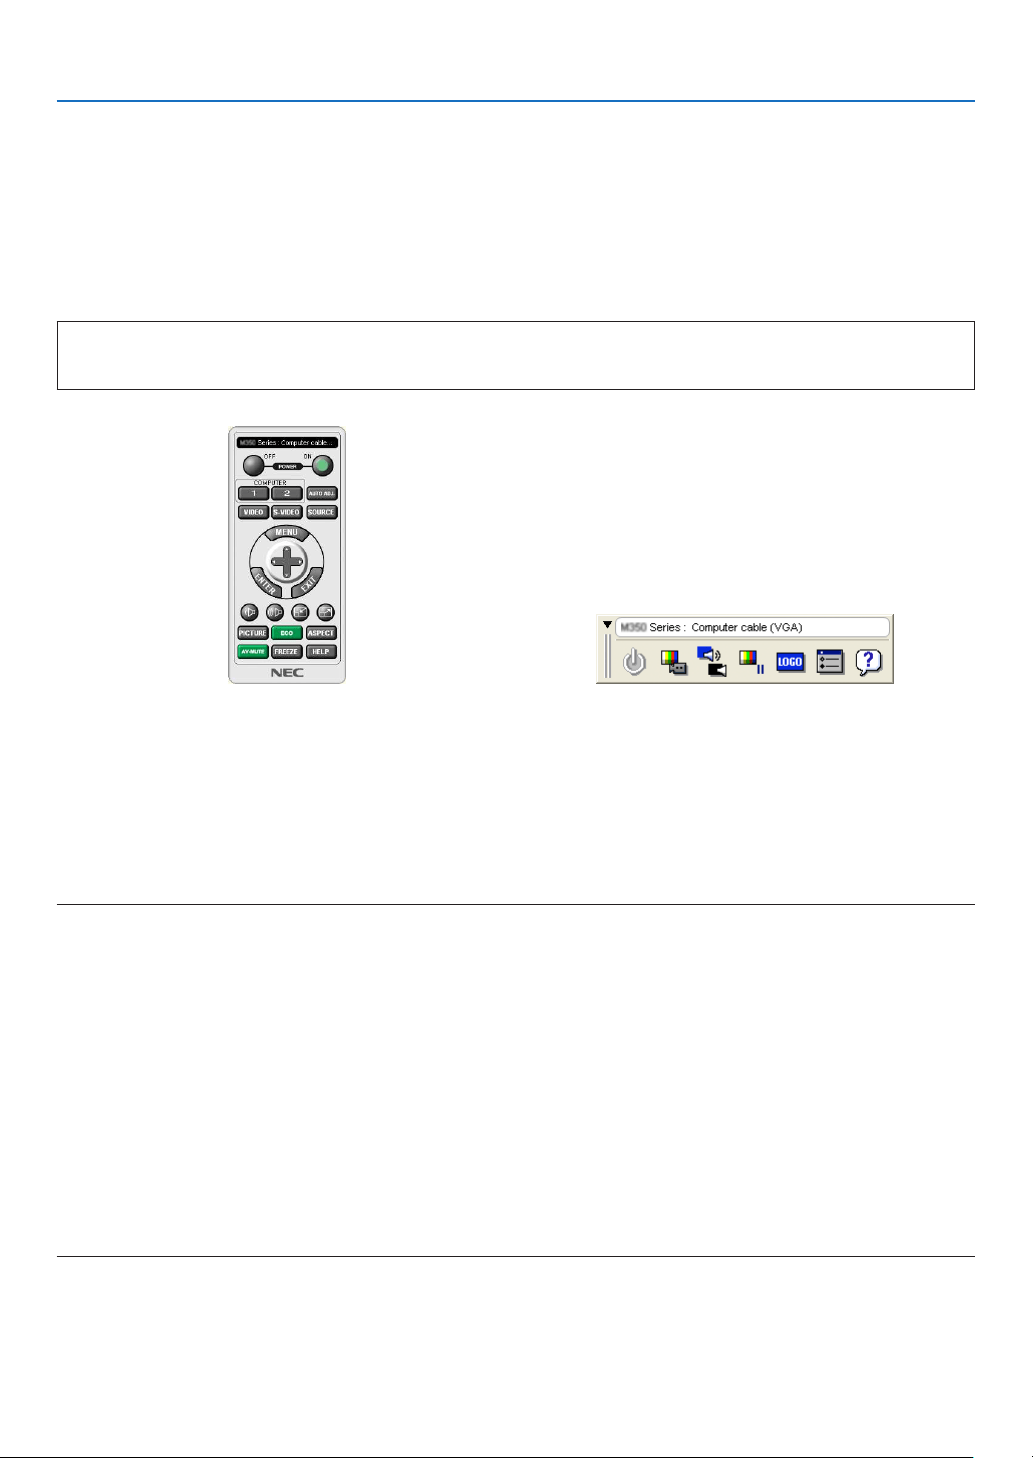
168
8. User Supportware
❷ Using the Computer Cable (VGA) to Operate the Projector
(Virtual Remote Tool)
Usingtheutilitysoftware“VirtualRemoteTool”,VirtualRemotescreen(ortoolbar)canbedisplayedonyourcomputer
screen.
Thiswillhelpyouperformoperationssuchasprojector’spoweronoroffandsignalselectionviathecomputercable
(VGA),serialcable,orLANconnection.OnlyviaserialorLANconnectionitisalsousedtosendanimagetothe
projectorandregisteritasthelogodataoftheprojector.Afterregisteringit,youcanlockthelogotopreventitfrom
changing.
ControlFunctions
PowerOn/Off,signalselection,picturefreeze,picturemute,audiomute,Logotransfertotheprojector,andremote
controloperationonyourPC.
VirtualRemotescreen
RemoteControlWindowToolbar
ThissectionprovidesanoutlineofpreparationforuseofVirtualRemoteTool.
ForinformationonhowtouseVirtualRemoteTool,seeHelpofVirtualRemoteTool.(page
172)
TIP:
•VirtualRemoteToolcanbeusedwithaLANandaserialconnection.
•ForupdateinformationonVirtualRemoteTool,visitourwebsite:
http://www.nec-display.com/dl/en/index.html
NOTE:
•When[COMPUTER]isselectedfromyoursourceselection,theVirtualRemotescreenorthetoolbarwillbedisplayedaswellas
yourcomputerscreen.
•Usethesuppliedcomputercable(VGA)toconnecttheCOMPUTERINconnectordirectlywiththemonitoroutputconnectorof
thecomputertouseVirtualRemoteTool.
Usingaswitcherorothercablesthanthesuppliedcomputercable(VGA)maycausefailureinsignalcommunication.
VGAcableconnector:
PinNos.12and15arerequiredforDDC/CI.
•VirtualRemoteToolmaynotworkdependingonyourcomputer’sspecicationsandversionofgraphicadaptersordrivers.
•Logodata(graphics)thatcanbesenttotheprojectorwithVirtualRemoteToolhasthefollowingrestrictions:
(OnlyviaserialorLANconnection)
-Filesize:Lessthan1MB
-Imagesize(resolution):
P501X/P451X/PE501X:Horizontal1024dots×vertical768dotsorless
P451W/P401W:Horizontal1280dots×vertical800dotsorless
-Numberofcolors:256colorsorless
TIP:
•Theprojector’sCOMPUTERINconnectorsupportsDDC/CI(DisplayDataChannelCommandInterface).DDC/CIisastandard
interfaceforbidirectionalcommunicationbetweendisplay/projectorandcomputer.
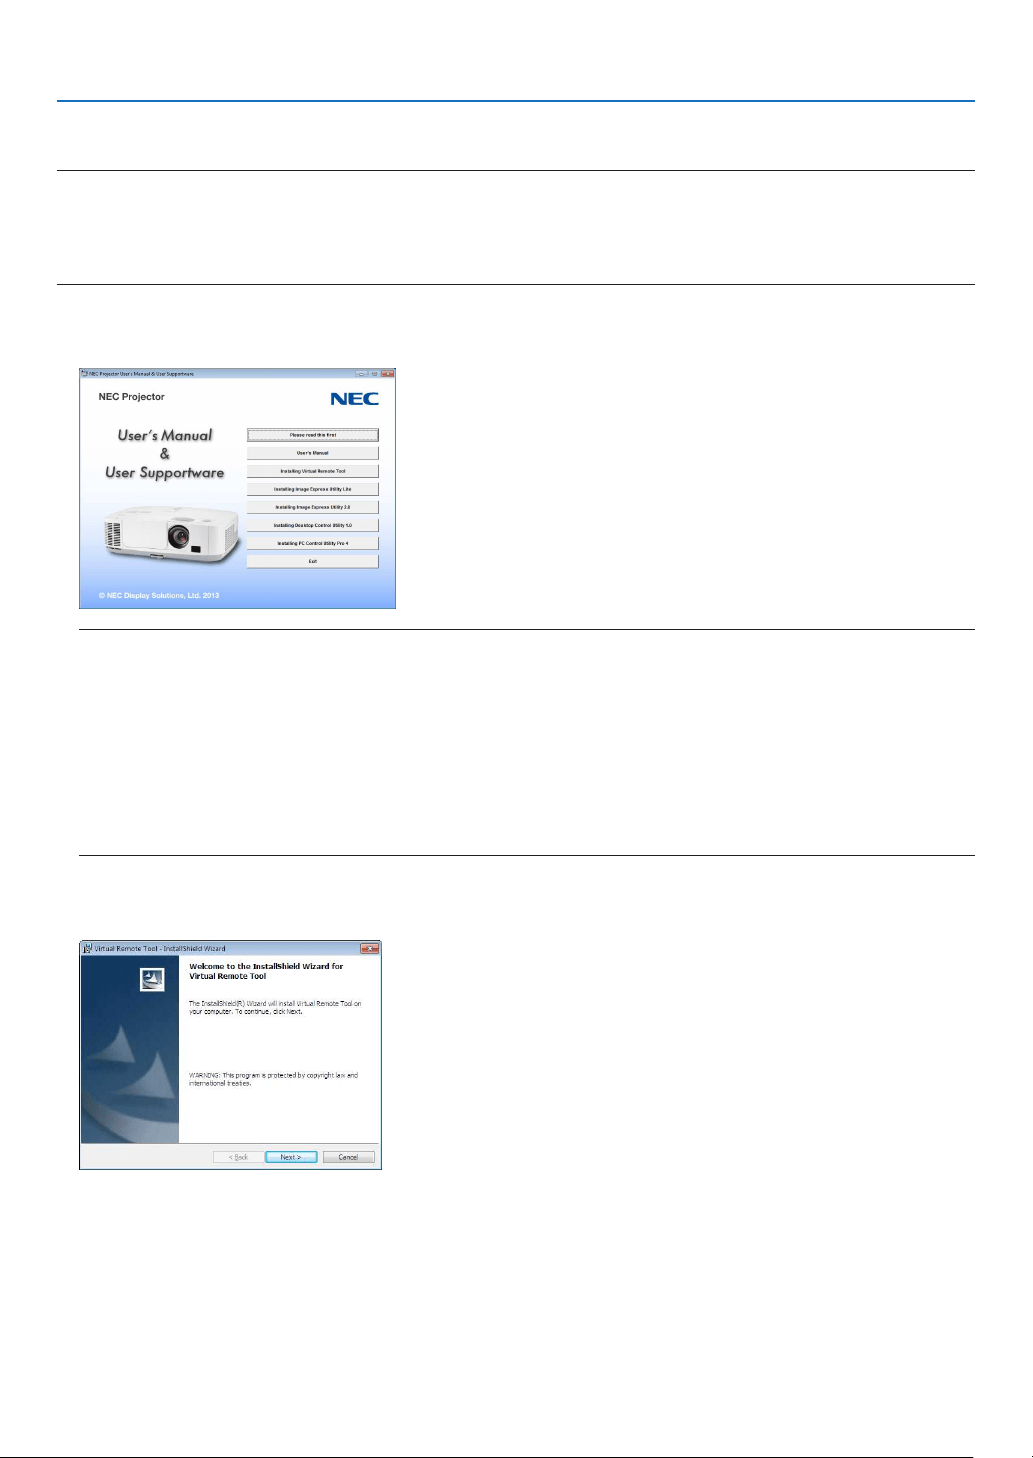
169
8. User Supportware
Step 1: Install Virtual Remote Tool on the computer
NOTE:
•ToinstallVirtualRemoteTool,theWindowsuseraccountmusthave“Administrator”privilege(Windows8,Windows7,Windows
VistaandWindowsXP).
•ExitallrunningprogramsbeforeinstallingVirtualRemoteTool.Ifanotherprogramisrunning,theinstallationmaynotbecom-
pleted.
1InserttheaccompanyingNECProjectorCD-ROMintoyourCD-ROMdrive.
The menu window will be displayed.
TIP:
Ifthemenuwindowwillnotbedisplayed,trythefollowingprocedure.
ForWindows7
1.Click“start”onWindows.
2.Click“AllPrograms”“Accessories”“Run”.
3.TypeyourCD-ROMdrivename(example:“Q:\”)and“LAUNCHER.EXE”in“Name”.(example:Q:\
LAUNCHER.EXE)
4.Click“OK”.
the menu window will be displayed.
2Clickasoftwareprogramyouwishtoinstallonthemenuwindow.
The installation will start.
•Followtheinstructionsontheinstallerscreenstocompletetheinstallation.
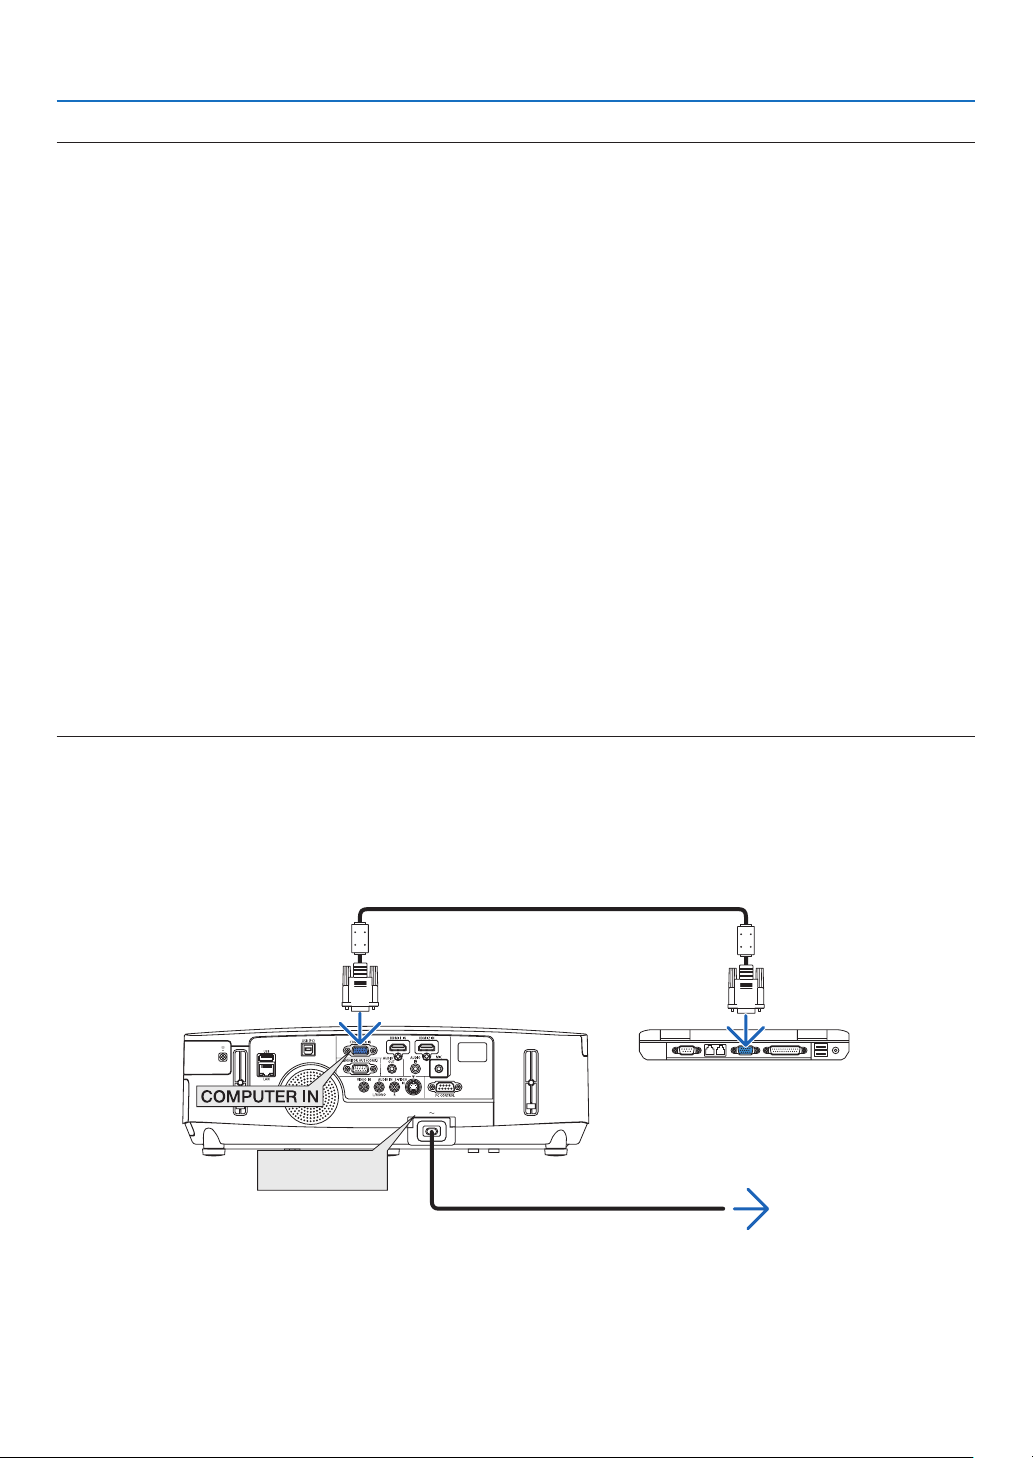
170
8. User Supportware
TIP:
UninstallingSoftwareProgram
Preparation:
Exitthesoftwareprogrambeforeuninstalling.Touninstallthesoftwareprogram,theWindowsuseraccountmusthave
“Administrator”privilege(Windows8,Windows7andWindowsVista)or“ComputerAdministrator”privilege(Windows
XP).
•ForWindows7/WindowsVista
1Click“Start”andthen“ControlPanel”.
The Control Panel window will be displayed.
2Click“Uninstallaprogram”under“Programs”
The“ProgramsandFeatures”windowwillbedisplayed.
3Selectthesoftwareprogramandclickit.
4Click“Uninstall/Change”or“Uninstall”.
•Whenthe“UserAccountControl”windowsisdisplayed,click“Continue”.
Follow the instructions on the screens to complete the uninstallation.
•ForWindowsXP
1Click“Start”andthen“ControlPanel”.
The Control Panel window will be displayed.
2Double-click“Add/RemovePrograms”.
TheAdd/RemoveProgramswindowwillbedisplayed.
3Clickthesoftwareprogramfromthelistandthenclick“Remove”.
Follow the instructions on the screens to complete the uninstallation.
Connect the projector to the computer
1Usethesuppliedcomputercable(VGA)toconnecttheCOMPUTERINconnectoroftheprojectordirectly
withthemonitoroutputconnectorofthecomputer.
2ConnectthesuppliedpowercordtotheACINoftheprojectorandthewalloutlet.
The projector is in the standby condition.
ACInput
Supplied computer cable (VGA)
To wall outlet
Power cord (supplied)
TIP:
•WhenVirtualRemoteToolstartsforthersttime,“EasySetup”windowwillbedisplayedtonavigateyourconnections.
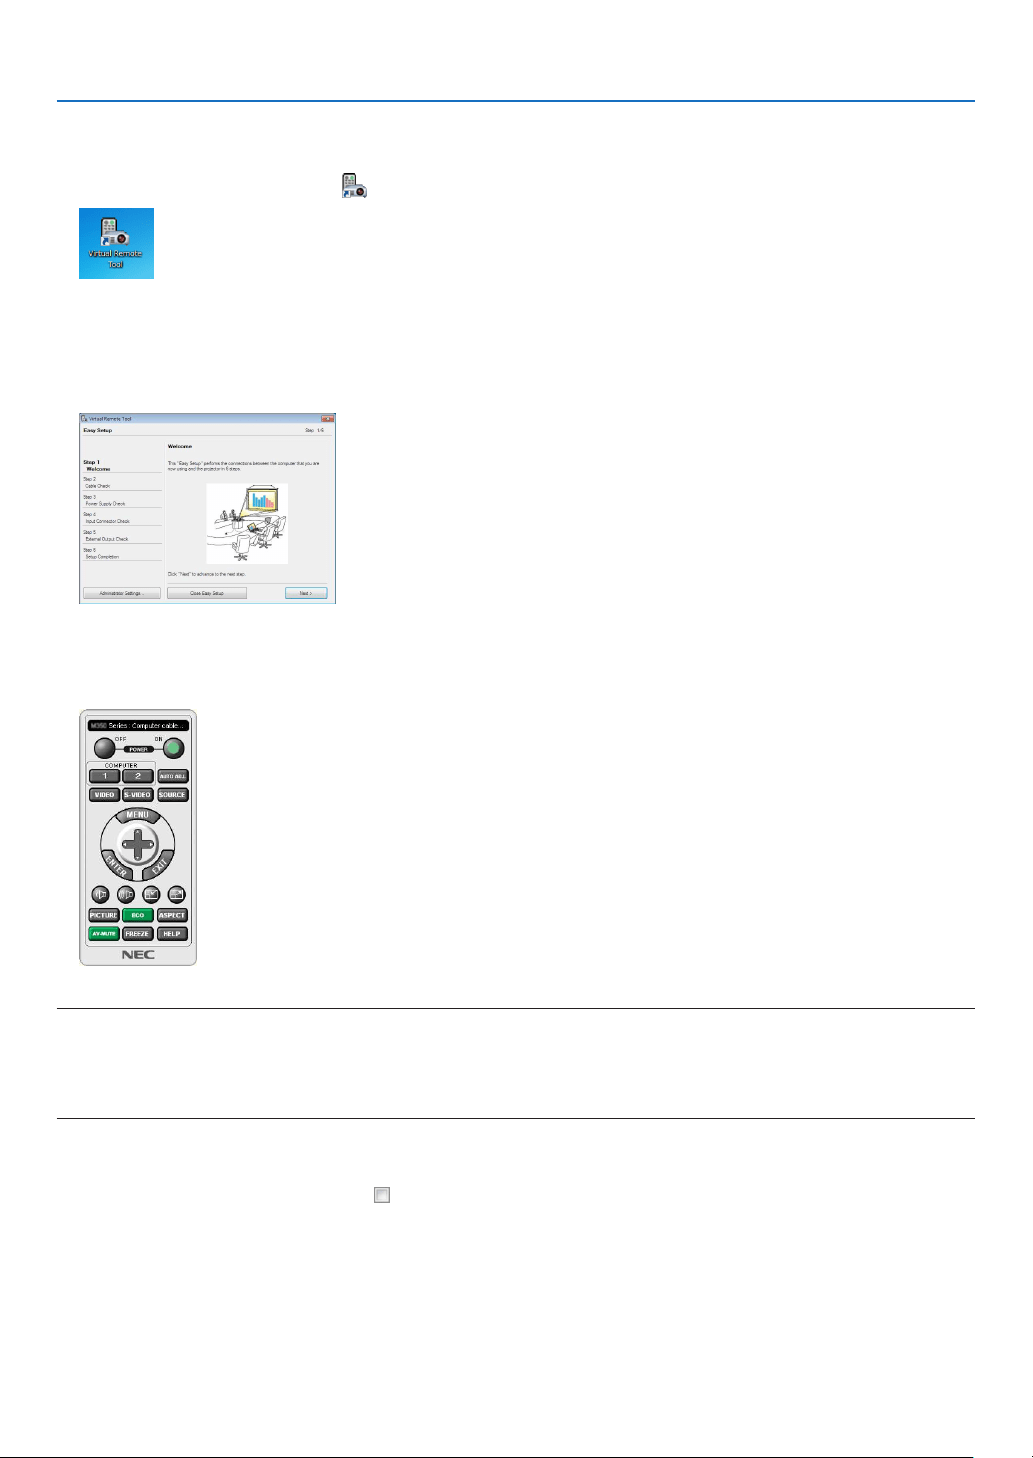
171
8. User Supportware
Start Virtual Remote Tool
Startusingtheshortcuticon
•Double-clicktheshortcuticon
ontheWindowsDesktop.
StartfromtheStartmenu
•Click[Start][AllPrograms]or[Programs][NECProjectorUserSupportware][VirtualRemoteTool]
[VirtualRemoteTool].
WhenVirtualRemoteToolstartsforthersttime,“EasySetup”windowwillbedisplayed.
Follow the instructions on the screens
When“EasySetup”iscompleted,theVirtualRemoteToolscreenwillbedisplayed.
NOTE:
•When[POWER-SAVING]isselectedfor[STANDBYMODE]fromthemenu,theprojectorcannotbeturnedonviathecomputer
cable(VGA)ornetwork(wiredLAN/wirelessLAN)connection.
•When[NETWORKSTANDBY]isselectedfor[STANDBYMODE]fromthemenu,theprojectorcannotbeturnedonviawireless
LANconnection.
TIP:
•TheVirtualRemoteToolscreen(orToolbar)canbedisplayedwithoutdisplaying“EasySetup”window.
Todoso,clicktoplaceacheckmarkfor“DonotuseEasySetupnexttime”onthescreenatStep6in“EasySetup”.
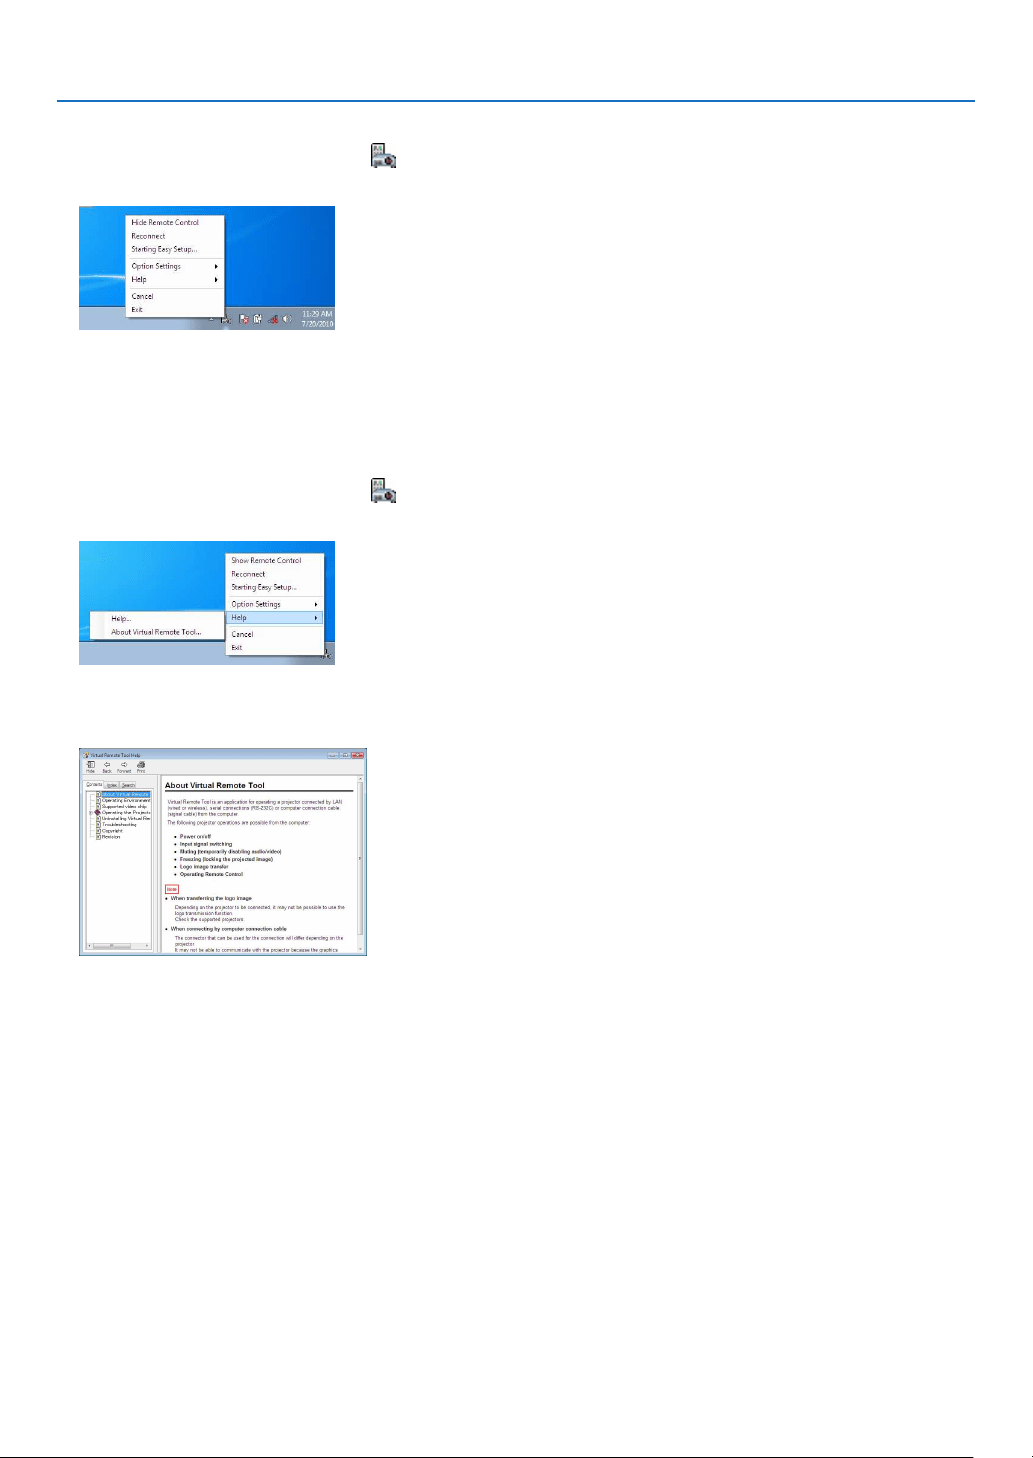
172
8. User Supportware
ExitingVirtualRemoteTool
1ClicktheVirtualRemoteToolicon
ontheTaskbar.
The pop-up menu will be displayed.
2Click“Exit”.
The Virtual Remote Tool will be closed.
ViewingthehelpleofVirtualRemoteTool
•Displayingthehelpleusingthetaskbar
1ClicktheVirtualRemoteToolicon
onthetaskbarwhenVirtualRemoteToolisrunning.
The pop-up menu will be displayed.
2.Click“Help”.
The Help screen will be displayed.
•DisplayingthehelpleusingtheStartMenu.
1.Click“Start”.“Allprograms”or“Programs”.“NECProjectorUserSupportware”.“VirtualRemoteTool”.and
then“VirtualRemoteToolHelp”inthisorder.
The Help screen will be displayed.

173
8. User Supportware
❸ Projecting Your Computer’s Screen Image or Video from
the Projector over a LAN (Image Express Utility Lite) (not
supported by PE501X)
UsingImageExpressUtilityLitecontainedonthesuppliedNECProjectorCD-ROMallowsyoutosendthecomputer’s
screenimagetotheprojectoroveraUSBcableorawiredorwirelessLAN.
ImageExpressUtilityLiteisaprogramcompatiblewithWindows.
ImageExpressUtilityLiteforMacOSisaprogramcompatiblewithMacOS.(page
179)
ThissectionwillshowyouanoutlineabouthowtoconnecttheprojectortoaLANandtouseImageExpressUtility
Lite.FortheoperationofImageExpressUtilityLite,seethehelpofImageExpressUtilityLite.
Step1:installImageExpressUtilityLiteonthecomputer.
Step2:ConnecttheprojectortoaLAN.
Step3:StartImageExpressUtilityLite.
TIP:
•ImageExpressUtilityLite(forWindows)canbestartedfrommostcommerciallyavailableremovablemediasuchasUSBmemory
devicesorSDcardswithouttheneedtoinstallonyourcomputer.(page178)
What You can Do with Image Express Utility Lite
•Imagetransmission(forWindowsandMacOS)
•Thescreenofyourcomputercanbesenttotheprojectorviaawiredorwirelessnetworkwithoutacomputercable
(VGA).
•Byusing“EASYCONNECTION”function,thecomplicatednetworksettingscanbesimpliedandthecomputer
willautomaticallyconnecttotheprojector.
•Thescreenofyourcomputercanbesenttouptofourprojectorsatthesametime.
•Audiotransfercapability(forWindowsonly)
•ImageExpressUtilityLiteallowsyoutosendthecomputer’sscreenimageandaudiototheprojectoroverwired/
wirelessLANorUSBconnection.
•Audiotransfercapabilityisavailableonlywhenthecomputerconnectswiththeprojectorinpeer-to-peernet-
work.
•Playingstreamingvideo(forWindowsonly)
•ImageExpressUtilityLiteallowsyoutosendstreamingvideofromthecomputertoasingleprojectoroverwired
orwirelessLANwithouttheneedofconnectingacomputercable.Forlistofsupportedmovielesandplayback
requirements,seepage
59of“4.UsingtheViewer”.
•USBDisplay(forWindowsonly)
•Computer’sscreenimageandaudiocanbeprojectedviaaUSBcable,withoutconnectingacomputercable
(VGA).
•JustconnectingthecomputerandtheprojectoroveraUSBcablewillmaketheUSBDisplayfunctionavailable
(Plug&Play)evenwithoutinstallingImageExpressUtilityLiteonthecomputer.(page40)
•GeometricCorrectionTool[GCT](forWindowsonly)
See“❹ProjectinganImagefromanAngle(GeometricCorrectionToolinImageExpressUtilityLite)”.(page
180)
NOTE:
•WhenImageExpressUtilityLiteisused,theaudiofromtheCOMPUTERAUDIOINMiniJack(StereoMini)maynotbesynchro-
nizedwiththevideo.

174
8. User Supportware
Using on Windows
Step 1: install Image Express Utility Lite on the computer.
NOTE:
•Toinstalloruninstalltheprogram,theWindowsuseraccountmusthave“Administrator”privilege(Windows7,WindowsVista
andWindowsXP).
•Exitallrunningprogramsbeforeinstallation.Ifanotherprogramisrunning,theinstallationmaynotbecompleted.
•ImageExpressUtilityLitewillbeinstalledtothesystemdriveofyourcomputer.
Ifthemessage“Thereisnotenoughfreespaceondestination”isdisplayed,freeupenoughspace(about100MB)toinstallthe
program.
1.InserttheaccompanyingNECProjectorCD-ROMintoyourCD-ROMdrive.
The menu window will be displayed.
TIP:
Ifthemenuwindowwillnotbedisplayed,trythefollowingprocedure.
ForWindows7:
1.Click“start”onWindows.
2.Click“AllPrograms”“Accessories”“Run”.
3.TypeyourCD-ROMdrivename(example:“Q:\”)and“LAUNCHER.EXE”in“Name”.(example:Q:\LAUNCH
-
ER.EXE)
4.Click“OK”.
The menu window will be displayed.
2.Click“InstallingImageExpressUtilityLite”onthemenuwindow.
The installation will start.
“ENDUSERLICENSEAGREEMENT”screenwillbedisplayed.
Read“ENDUSERLICENSEAGREEMENT”carefully
3.Ifyouagree,click“Iagree.”andthenclick“Next”.
•Followtheinstructionsontheinstallerscreenstocompletetheinstallation.
•Whentheinstallationiscomplete,youwillreturntothemenuwindow.
When the installation is complete, a completion message will be displayed.
4.Click“OK”.
This completes the installation.
TIP:
•UninstallingImageExpressUtilityLite
TouninstallImageExpressUtilityLite,dothesameproceduresstatedasin“UninstallingVirtualRemoteTool”.Read“VirtualRemote
Tool”as“ImageExpressUtilityLite”(page170)
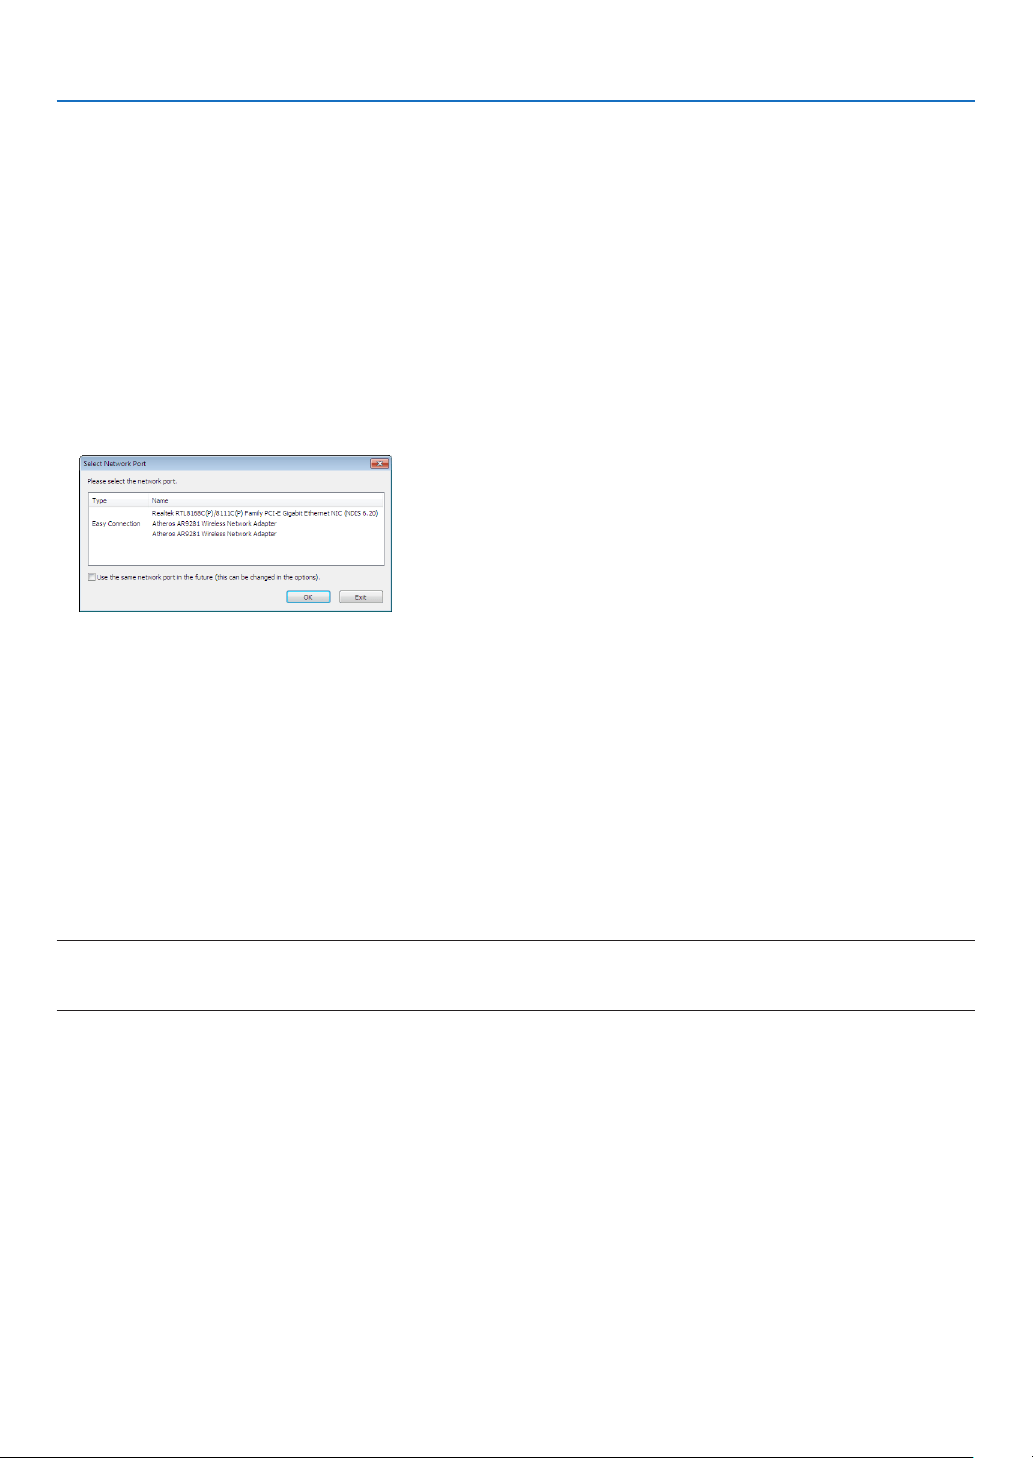
175
8. User Supportware
Step 2: Connect the projector to a LAN.
ConnecttheprojectortotheLANbyfollowingtheinstructionsin“ConnectingtoaWiredLAN”(page
151),“Con-
nectingtoaWirelessLAN(Optional:NP02LMseries)”(page152)and“9.ControllingtheProjectorbyUsingan
HTTPBrowser”(page42)
Step 3: Start Image Express Utility Lite.
1.OnWindows,click“Start”“Allprograms”“NECProjectorUserSupportware”“ImageExpressUtility
Lite”“ImageExpressUtilityLite”.
ImageExpressUtilityLitewillstart.
Theselectwindowfornetworkconnectionwillbedisplayed
2.SelectNetworkandclick“OK”.
The select window for destination will show a list of connectable projectors.
•Whenconnectingthecomputerdirectlytotheprojectorbyone-to-one,“EasyConnection”isrecommended.
•Whenoneormorenetworksfor“EASYCONNECTION”arefound,the“EasyConnectionSelectionScreen”
windowwillbedisplayed.
•Tocheckforthenetworkavailableforconnectedprojectors,fromthemenu,select[INFO.][WIRELESS
LAN][SSID].
3.Selectthenetworkyouwishtoconnect,andclick“Select”.
The target selection window will be displayed.
4.Placeacheckmarkforprojectorstobeconnected,andthenclick“Connect”.
•Whenoneormoreprojectorsaredisplayed,fromthemenuontheprojector,select[INFO.][WIRELESSLAN]
[IPADDRESS].
When connecting with the projector is established, you can operate the control window to control the projector. (
page 41, 176)
NOTE:
•When[POWER-SAVING]or[NETWORKSTANDBY]isselectedfor[STANDBYMODE]fromthemenu,theprojectorthatisturned
offwillnotbedisplayedintheselectwindowfordestination.
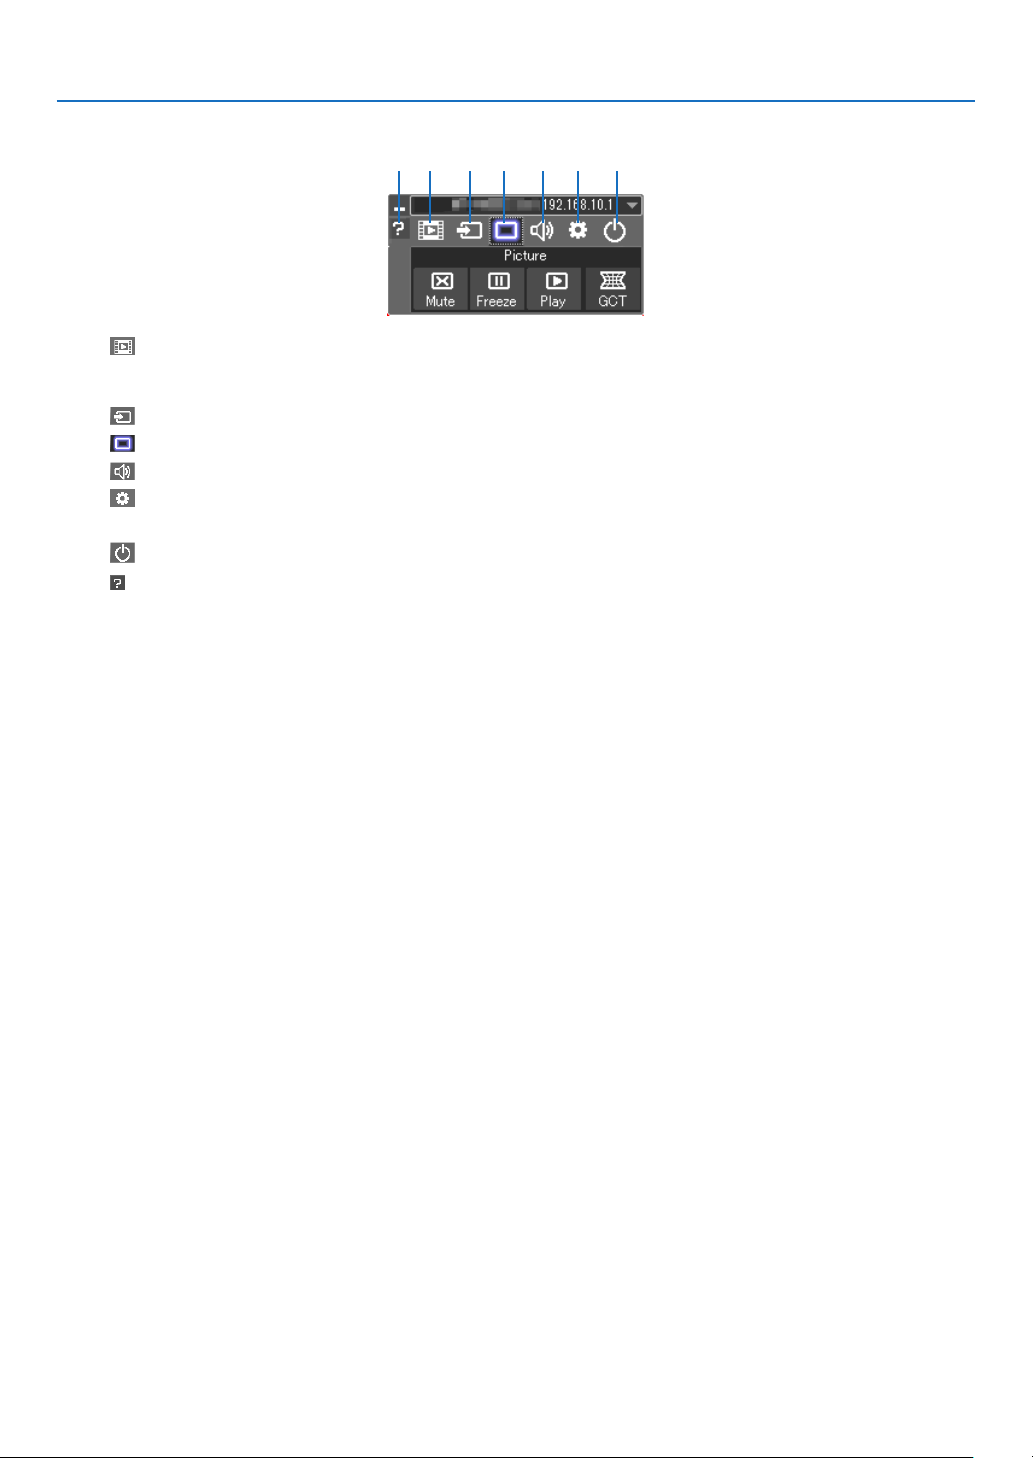
176
8. User Supportware
5.Operatethecontrolwindow.
(1) (Streaming) Displays the streaming window. Movie files on the PC can be transferred to the projector via the network
and played on the projector. Refer to “Movie streaming function” in the help file of Image Express Utility
Lite.
(2)
(Source) ..... Selects an input source of the projector.
(3)
(Picture) .... Turns on or off AV-MUTE (Picture mute), and turns on or off FREEZE (Freeze a picture).
(4)
(Sound) ..... Turns on or off AV-MUTE (Sound mute), play the sound and turns up or down the volume.
(5)
(Others) ..... Uses “Update”, “HTTP Server”*, “Settings” and “Information”. (not supported by PE501X)
* The HTTP Server cannot be selected when a USB cable is connected.
(6)
(Exit) .......... Exit Image Express Utility Lite. You can also turn off the projector at the same time.
(7)
(Help) ........... Displays the help of Image Express Utility Lite.
(1) (2) (3) (4) (5)(7) (6)

177
8. User Supportware
TIP:
Viewingthe“Help”leofImageExpressUtilityLite
•DisplayingtheHelpleofImageExpressUtilityLitewhileitisrunning.
Clickthe[?](help)icononthecontrolwindow.
The Help screen will be displayed.
•DisplayingtheHelpleofGCTwhileitisrunning.
Click“Help”“Help”ontheeditwindow.
The Help screen will be displayed.
•DisplayingthehelpleusingtheStartMenu.
Click“Start”“Allprograms”or“Programs”“NECProjectorUserSupportware”“ImageExpressUtilityLite”
“ImageExpressUtilityLiteHelp”.
The Help screen will be displayed.

178
8. User Supportware
Starting Image Express Utility Lite from a USB Memory or SD Card
ImageExpressUtilityLitecanbestartedfromcommerciallyavailableremovablemediasuchUSBmemoryorSDcards
ifitiscopiedbeforehand.ThiswilleliminatethetroubleofinstallingImageExpressUtilityLitetoyourcomputer.
1.CopyImageExpressUtilityLitetoremovablemedia.
Copyallthefoldersandles(totalsizeapprox.6MB)fromthe“IEU_Lite(removable-media)”folderinthesupplied
NEC Projector CD-ROM to the root directory of your removable media.
2.Insertyourremovablemediaintoyourcomputer.
The“AutoPlay”screenwillbedisplayedonyourcomputer.
TIP:
•Ifthe“AutoPlay”screenisnotdisplayed,openthefolderfrom“Computer”(“MyComputer”forWindowsXP).
3.Click“Openfoldertoviewles”
TheIEU_Lite.exe,otherfolder,andleswillbedisplayed.
4.Double-clickthe“IEU_Lite.exe”(
) icon.
ImageExpressUtilityLitewillstart.
NOTE:
•The“EASYCONNECTION”functionisnotsupportedwhenImageExpressUtilityLiteisstartedfromremovablemedia.
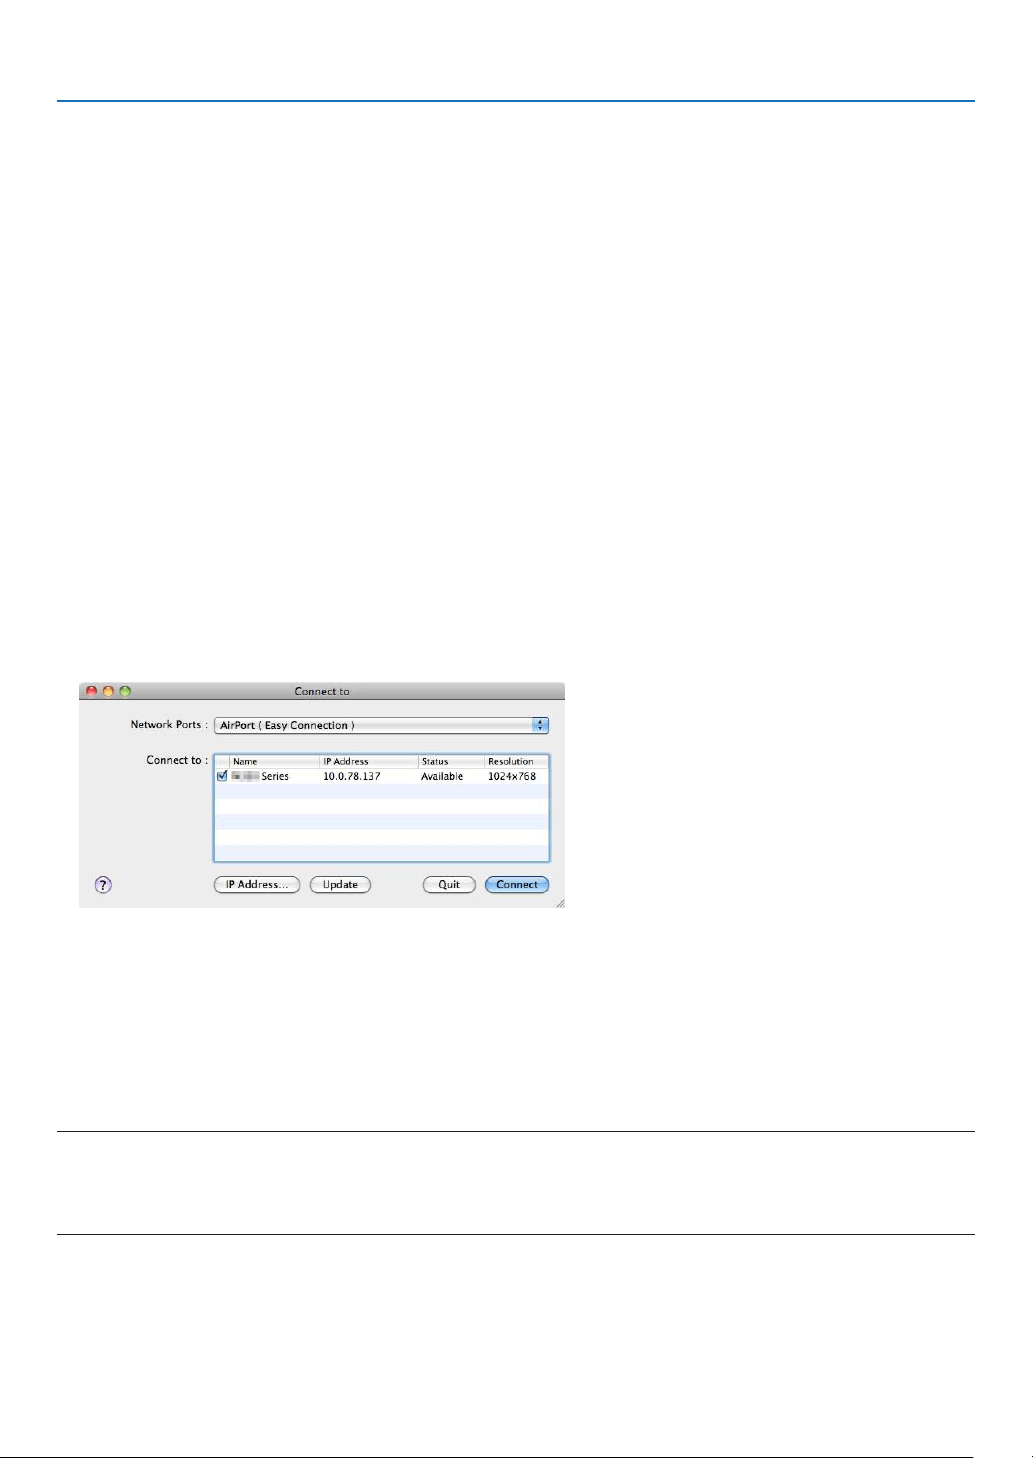
179
8. User Supportware
Using on Mac OS
Step 1: Install Image Express Utility Lite for Mac OS on the computer
1.InserttheaccompanyingNECProjectorCD-ROMinyourMacCD-ROMdrive.
TheCD-ROMiconwillbedisplayedonthedesktop.
2.Double-clicktheCD-ROMicon.
The CD-ROM window will be displayed.
3.Double-clickthe“MacOSX”folder.
4.Double-click“ImageExpressUtilityLite.dmg”.
The“ImageExpressUtilityLite”windowwillbedisplayed.
5.Draganddropthe“ImageExpressUtilityLite”foldertoyourApplicationsfolderinMacOS.
Step 2: Connect the projector to a LAN
ConnecttheprojectortotheLANbyfollowingtheinstructionsin“ConnectingtoaWiredLAN”(page
151),“Con-
nectingtoaWirelessLAN(Optional:NP02LMseries)”(page152)and“❾ControllingtheProjectorbyUsingan
HTTPBrowser”(page42)
Step 3: Start Image Express Utility Lite for Mac OS
1.OpenyourApplicationsfolderinMacOS.
2.Double-clickthe“ImageExpressUtilityLite”folder.
3.Double-clickthe“ImageExpressUtilityLite”icon.
WhenImageExpressUtilityLiteforMacOSstarts,theselectwindowfordestinationwillbedisplayed.
•Atthersttimeofstartup,“ENDUSERLICENSEAGREEMENT”screenwillbedisplayedbeforetheselect
window for destination is displayed.
Read“ENDUSERLICENSEAGREEMENT”andselect“Iacceptthetermsinthelicenseagreement”,andclick
“OK”.
4.Selectaprojectortobeconnected,andthenclick“Connect”.
Yourdesktopscreenwillbedisplayedontheprojector.
TIP:
ViewingtheHelpofImageExpressUtilityLiteforMacOS
•Fromthemenubar,click“Help”“ImageExpressUtilityLiteHelp”whileImageExpressUtilityisrun-
ning.
The Help screen will be displayed
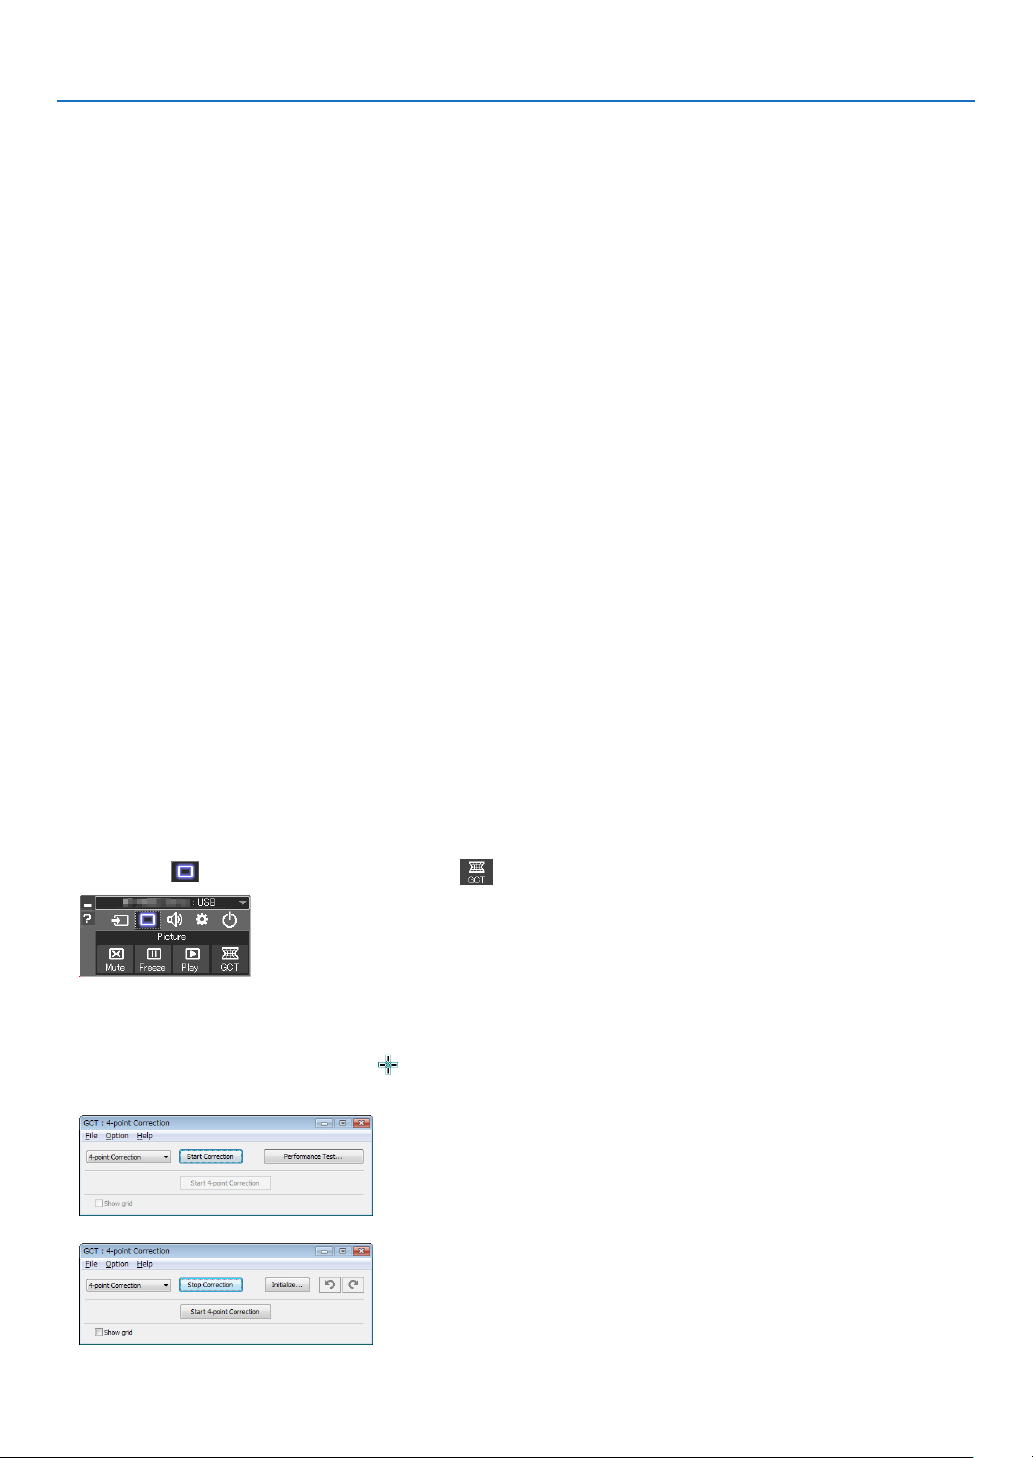
180
8. User Supportware
❹ Projecting an Image from an Angle (Geometric Correction
Tool in Image Express Utility Lite) (not supported by PE501X)
TheGeometricCorrectionTool(GCT)functionallowsyoutocorrectdistortionofimagesprojectedevenfroman
angle.
What you can do with GCT
•TheGCTfeatureincludesthefollowingthreefunctions
•4-pointCorrection:Youcantaprojectedimagewithintheborderofthescreeneasilybyalignthefourcorners
ofanimagetotheonesofthescreen.
•Multi-pointCorrection:Youcancorrectadistortedimageonthecornerofawallorirregularshapedscreen
byusingmanyseparatedscreenstocorrecttheimageaswellas4-pointCorrection.
•Parameters Correction:Youcancorrectadistortedimagebyusingacombinationoftransformationalrules
preparedinadvance.
Thissectionwillshowanexampleforusewith4-pointCorrection.
Forinformationabout“Multi-pointCorrection”and“ParametersCorrection”,seethehelpleofImageExpress
UtilityLite.(page
177, 179)
•Yourcorrectiondatacanbestoredintheprojectororyourcomputerwhichcanberestoredwhennecessary.
•TheGCTfunctionisavailablewithaUSBcable,wiredorwirelessLANconnection,andvideocable.
Projecting an Image from an Angle (GCT)
ThissectionwillshowanexampleforusewithUSBDisplay(usingaUSBcabletoconnectacomputerandthepro-
jector).
•TheUSBDisplayfunctionwillautomaticallydisplaythecontrolwindow
•ForavideocableorLANconnection,installandstartImageExpressUtilityLiteinyourcomputerbeforehand.(
page
173)
Preparation:Adjusttheprojectorpositionorthezoomsothattheprojectedimagecancoverthewholescreenarea.
1.Clickthe“
”(Picture)iconandthenthe“”button.
The“4-pointCorrection”windowwillbedisplayed.
2.Clickthe“StartCorrection”buttonandthen“Start4-pointCorrection”button.
A green frame and a mouse pointer ( ) will be displayed.
•Four[•]markswillbeappearedatfourcornersofthegreenframe
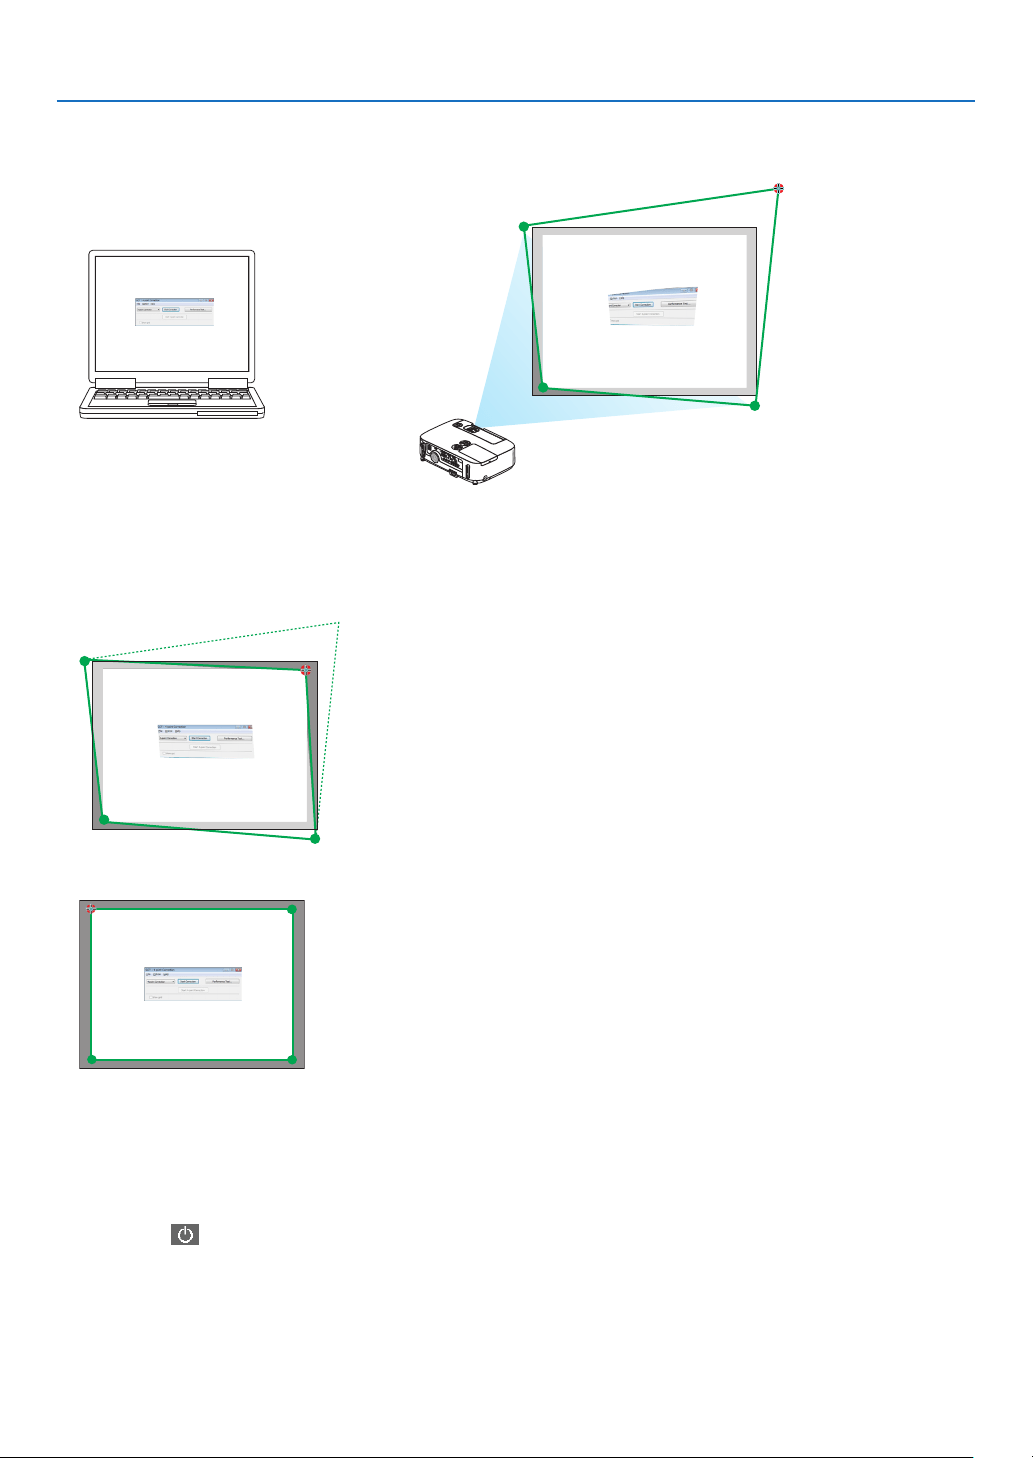
181
8. User Supportware
3.Usethemousetoclickthe[•]markofwhichcorneryouwishtomove.
The currently selected [ •]markwillturnred.
(Intheaboveexample,Windowsscreensareomittedforclarication.)
4.Dragtheselected[•]marktothepointyouwishtocorrectanddropit.
•Whenyouclicksomewherewithintheprojectimagearea,thenearest[•]markwillgotothepositionwhere
the mouse cursor is.
5.RepeatStep3and4tocorrectthedistortionoftheprojectedimage.
6.Aftercompleting,right-clickthemouse.
The green frame and the mouse pointer will disappear from the projected image area. This will complete the cor-
rection.
7.Clickthe“X”(close)buttononthe“4-pointCorrection”window.
The“4-pointCorrection”windowwilldisappearandthe4-pointcorrectionwilltakeeffect.
8.Clickthe“
”buttononthecontrolwindowtoexittheGCT.
TIP:
•Afterperformingthe4-pointcorrection,youcansavethe4-pointcorrectiondatatotheprojectorbyclicking“File”“Exportto
theprojector…”onthe“4-pointCorrection”window.
•SeetheHelpofImageExpressUtilityLiteforoperating“4-pointCorrection”windowandotherfunctionsthanGCT.(page
177,
179)
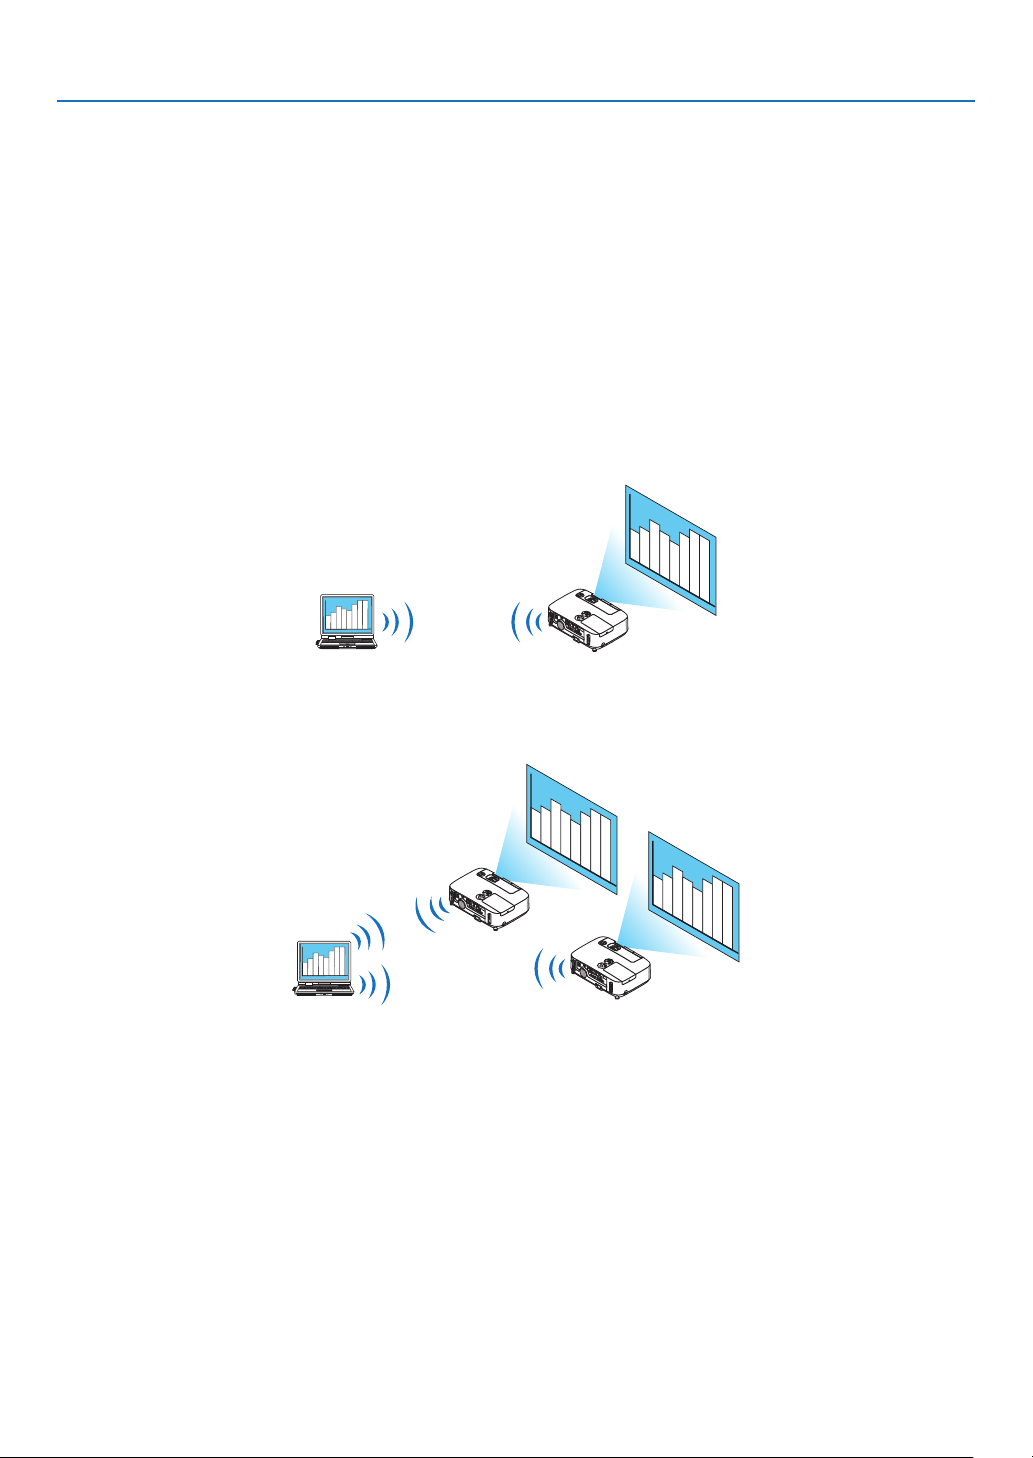
182
8. User Supportware
❺ Projecting Images from the Projector over a LAN (Image
Express Utility 2.0) (not supported by PE501X)
What you can do with Image Express Utility 2.0
•UsingImageExpressUtility2.0allowsyoutosendthescreensofyourcomputerstotheprojectorviawired/wire-
lessLAN.
ThedifferencefromImageExpressUtilityLiteisthatprojectedimagescanbesentfromacomputertonotonly
oneprojectorbutalsototwoormoreprojectorsatthesametime.
When“MeetingMode”isused,projectedimagescanbesentandreceivedbetweentwoormorecomputers.
•High-speed,high-qualityimagetransmissionsbasedonNEC’soriginalcompressionalgorithm
NEC’soriginalcompressionalgorithmallowshigh-qualityimagestobesentoverthenetworkathighspeed,from
yourcomputertotheprojector.
•Simultaneousprojectionbymultipleprojectors
Imagescanbesentfromacomputertonotonlyoneprojectorbutalsototwoormoreprojectorsatthesame
time.
•“EasyConnection”functionforconnectingwirelessLAN
Byusing“EasyConnection”function*
1
,thecomplicatedsettingofwirelessLANcanbesimplied.
*
1
ThisfunctioncanbeusedwhenWindowsXPisusedastheOSandwhenyouhavea“ComputerAdminis-
trator”privilege.IftheOSisWindows7/WindowsVista,inputoflogonpasswordas“Administrator”maybe
prompted.
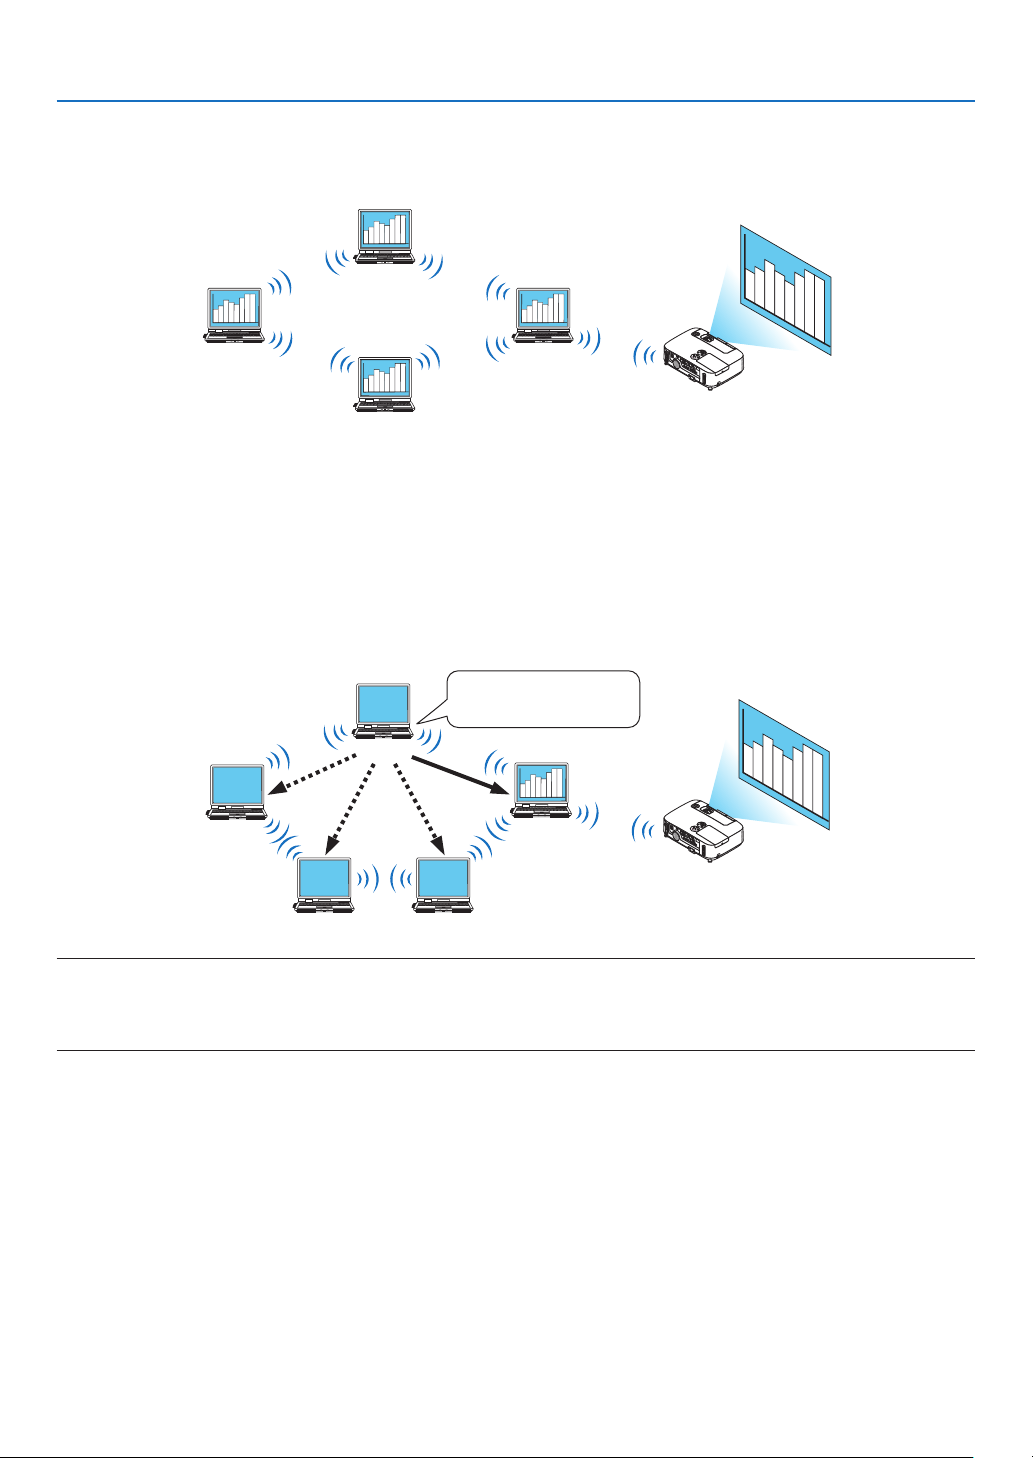
183
8. User Supportware
•Projectedimagescanbetransferredandsavedtocomputers.
When“MeetingMode”isused,projectedimagescanbesenttothecomputersofalltheparticipants(attendants)
ofa“Meeting”.Thereceivedimagescanbesavedtoyourcomputerwithamemo(textdata)attached.
Presenter
Attendant
Attendant
Attendant
•1-clickswitchingofpresenter
Whenswitchingtoanotherpresenterduringtheconference,theparticipants(attendants)cansimplyclickabutton
toswitchovertothenewpresenter.
•Centralmanagementoftheprojectingcomputer
UsingtheTrainingModeallowsyoutouseasinglecomputer(Manager)tomanagewhichcomputer(Attendant)
projects.Possibleoperationincludesswitchingprojectingcomputerstoprojectfrom,aswellastemporarilytermi-
natingcommunicationwiththeprojector.
Attendant D (presenter)
Manager
Attendant B Attendant C
Mr. D, please start
your presentation.
Attendant A
NOTE::
TheTrainingModeisnotinstalledviathe“Typical”installationoptionwhenImageExpressUtility2.0isinstalled.
TouseTrainingMode,select“Extension”installationoptionontheinstallselectionscreenthatisdisplayedwhileImageExpress
Utility2.0installationisinprogress,andselect“TrainingMode(Attendant)”or“TrainingMode(Manager)”.
Connecting the projector to a LAN
ConnecttheprojectortotheLANbyfollowingtheinstructionsin“ConnectingtoaWiredLAN”(page
151),“Con-
nectingtoaWirelessLAN”(page152)and“9ApplicationMenus”(page118)
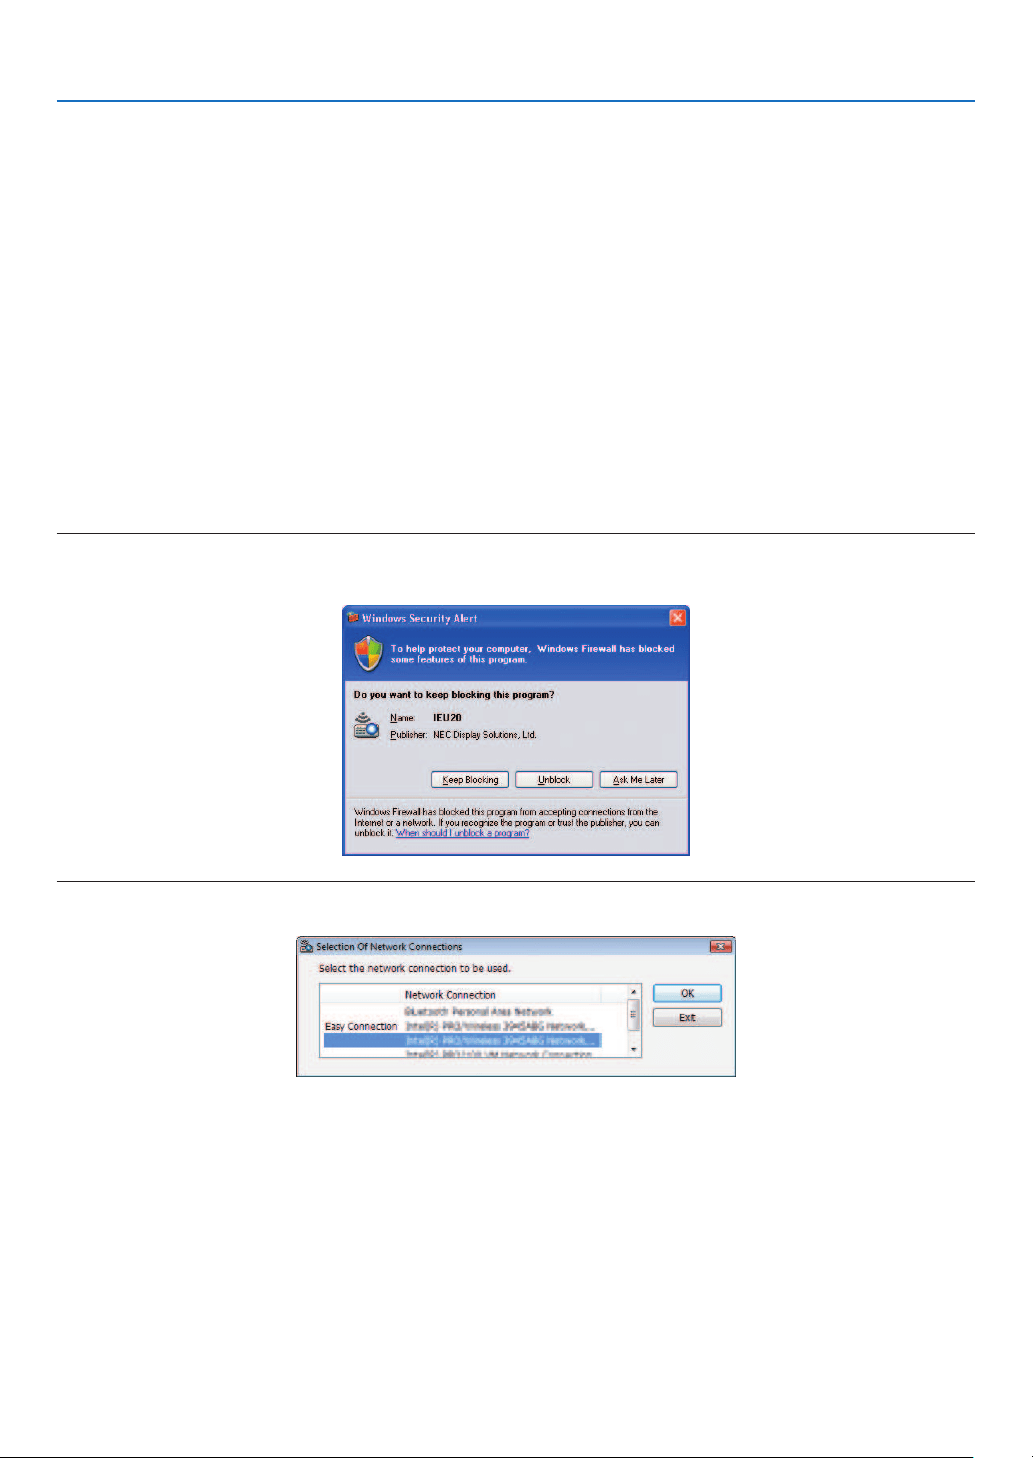
184
8. User Supportware
Basic Operation of Image Express Utility 2.0
ThissectionexplainsthefollowingthreecasesasexamplesofoperatingImageExpressUtility2.0.
(1)Transferringimagestotheprojector
(2)Holdingaconference
(3)Participatinginaconference
SendingImagestoProjector
•Connectingprojector
1TurnonthepowertotheprojectorforwhichLANhasbeenset.
2ClickWindows[Start][AllPrograms][NECProjectorUserSupportware][ImageExpressUtility2.0]
[ImageExpressUtility2.0],inthatorder.
The“SelectionOfNetworkConnections”windowwillbedisplayed.
Alistofthenetworkequipmentconnectedtoyourcomputerwillbedisplayed.
IMPORTANT:
AscreenliketheonebelowisdisplayedwhenthesoftwareisstartedonaPCinstalledwithWindowsXPServicePack2(SP2)(or
later).
Click“Unblock”ifthisisdisplayed.
3Selectthenetworkequipmentthatistobeusedandclick[OK].
Selectthenetworkdevicedisplaying“EasyConnection”iftheproductLANsettingisfor“EasyConnection.”This
willcallupthe“ProjectorList”window.
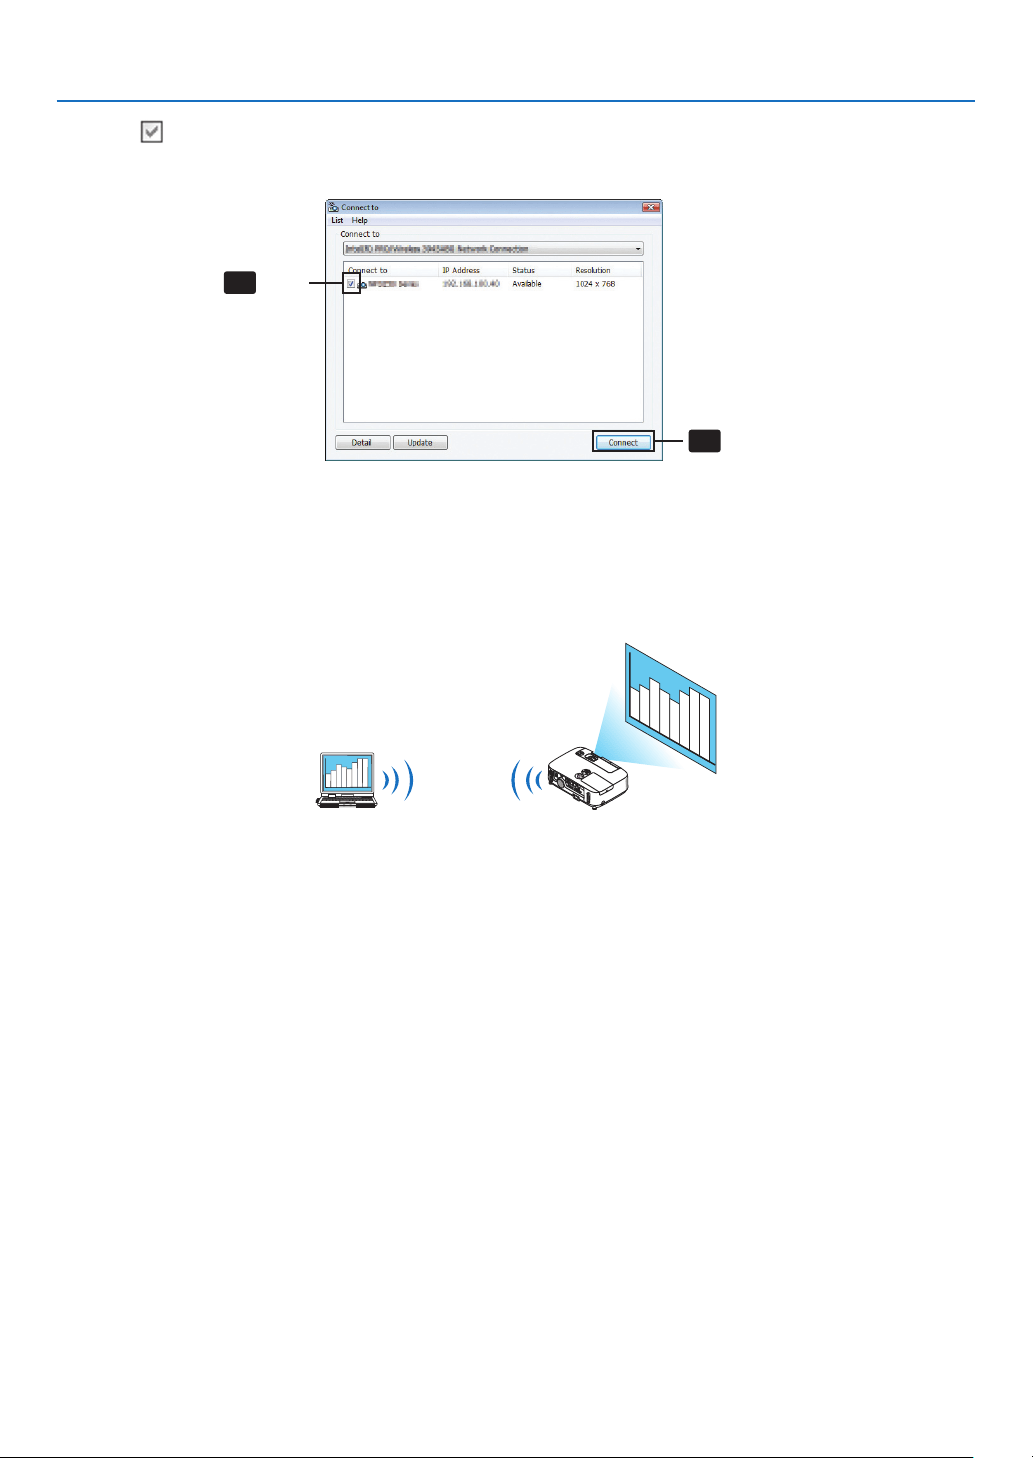
185
8. User Supportware
4Check(
)theprojectortoconnectandclick[Connect].
Ifthenameoftheprojectortoconnectisnotonthelistorifitishidden,click[Update].
4-1
4-2
Click
Click
The screen of your computer will be projected from the projector.
Atthistime,theinputsignaloftheprojectorwillautomaticallychangeto“NETWORK”.
•Transferringimages
Whenyourcomputerisconnectedtotheprojector,thescreenofthecomputerisprojectedfromtheprojectorasis.To
makeyourpresentationbyusingaPowerPointle,openthePowerPointleandstartyourpresentation.
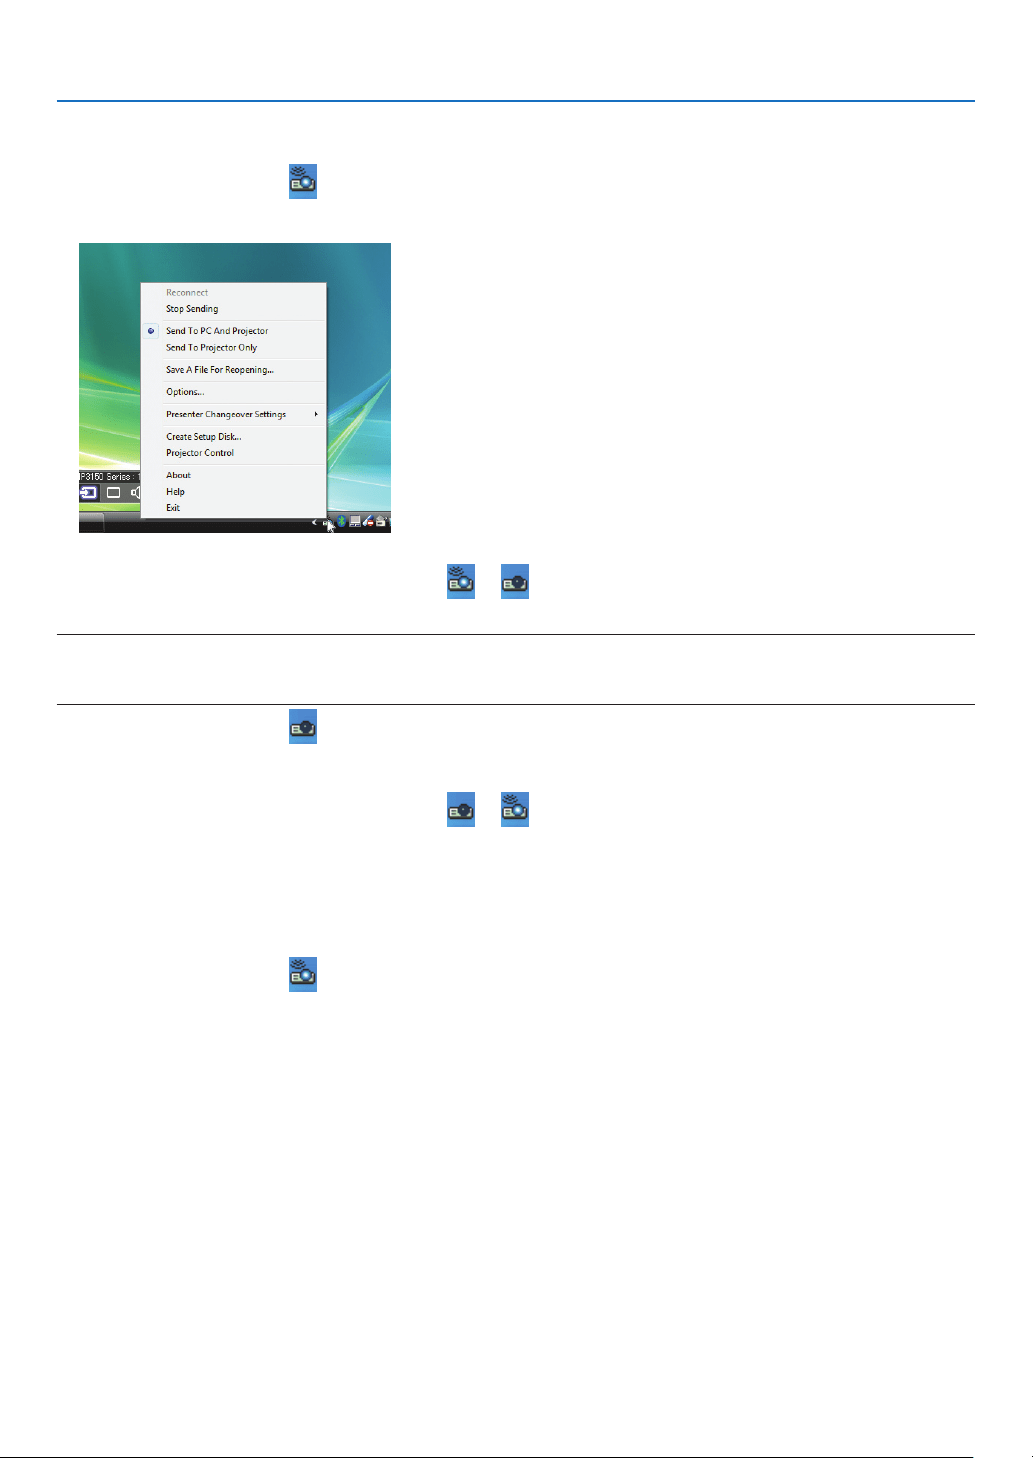
186
8. User Supportware
•Stoppingorresumingthetransmissionofimages
Thetransmissionofthescreenofthecomputertotheprojectorcanbetemporarilystoppedandthenresumed.
1Clicktheprojectoricon(
)ontheWindowstaskbar.
A pop-up menu will be displayed.
2Click[StopSending].
Theprojectoricononthetaskbarwillchange(
).
NOTE:
Evenifthescreenofthecomputerischangedinthisstatus,theimageprojectedfromtheprojectordoesnotchange.
Tomanipulatethescreenthatshouldnotbedisclosed(projectedfromtheprojector),stoptransmission.
3Clicktheprojectoricon()ontheWindowstaskbar.
A pop-up menu will be displayed.
4Click[StartSending].
Theprojectoricononthetaskbarwillchange(
).
The transmission of the screen for the computer will be resumed, and the current screen of the computer will be
projected from the projector.
•Endthetransmissionofimages
ExitImageExpressUtility2.0.
1Clicktheprojectoricon()ontheWindowstaskbar.
A pop-up menu will be displayed.
2Click[Exit].
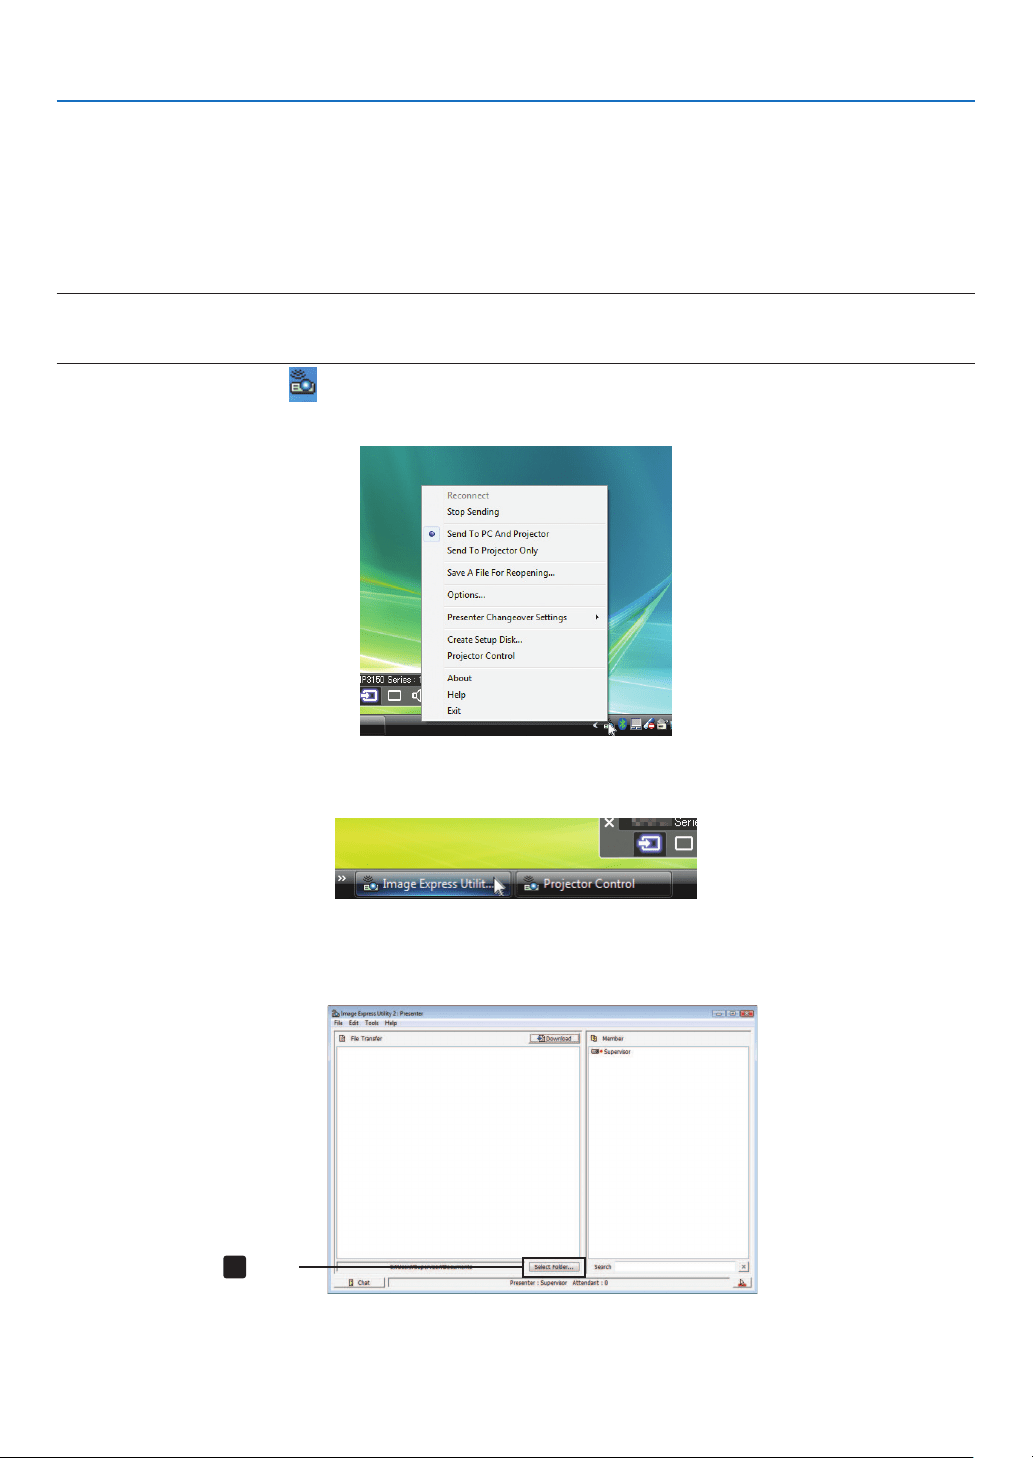
187
8. User Supportware
HoldingConferences
•Holdingconferences
1Followsteps1through4in“Connectingprojector”of“SendingImagestoProjector”(page
184).
The screen of your computer will be projected from the projector.
•Disclosealetotheparticipantsoftheconference.
NOTE:
Todisclosealetotheparticipants,selectioncanbemadeonlyinfolderunits.
Therefore,afolderonlyhavinglesthatcanbedisclosedtotheparticipantsmustbecreatedinadvance.
1Clicktheprojectoricon()ontheWindowstaskbar.
A pop-up menu will be displayed.
2Beforeclicking[SendtoPCandProjector],checkthatthereisa“•”markapplied.
3Clickthe[ImageExpressUtility2.0]buttononthetaskbar.
The presenter window will be opened.
4Click[SelectFolder].
4
Click
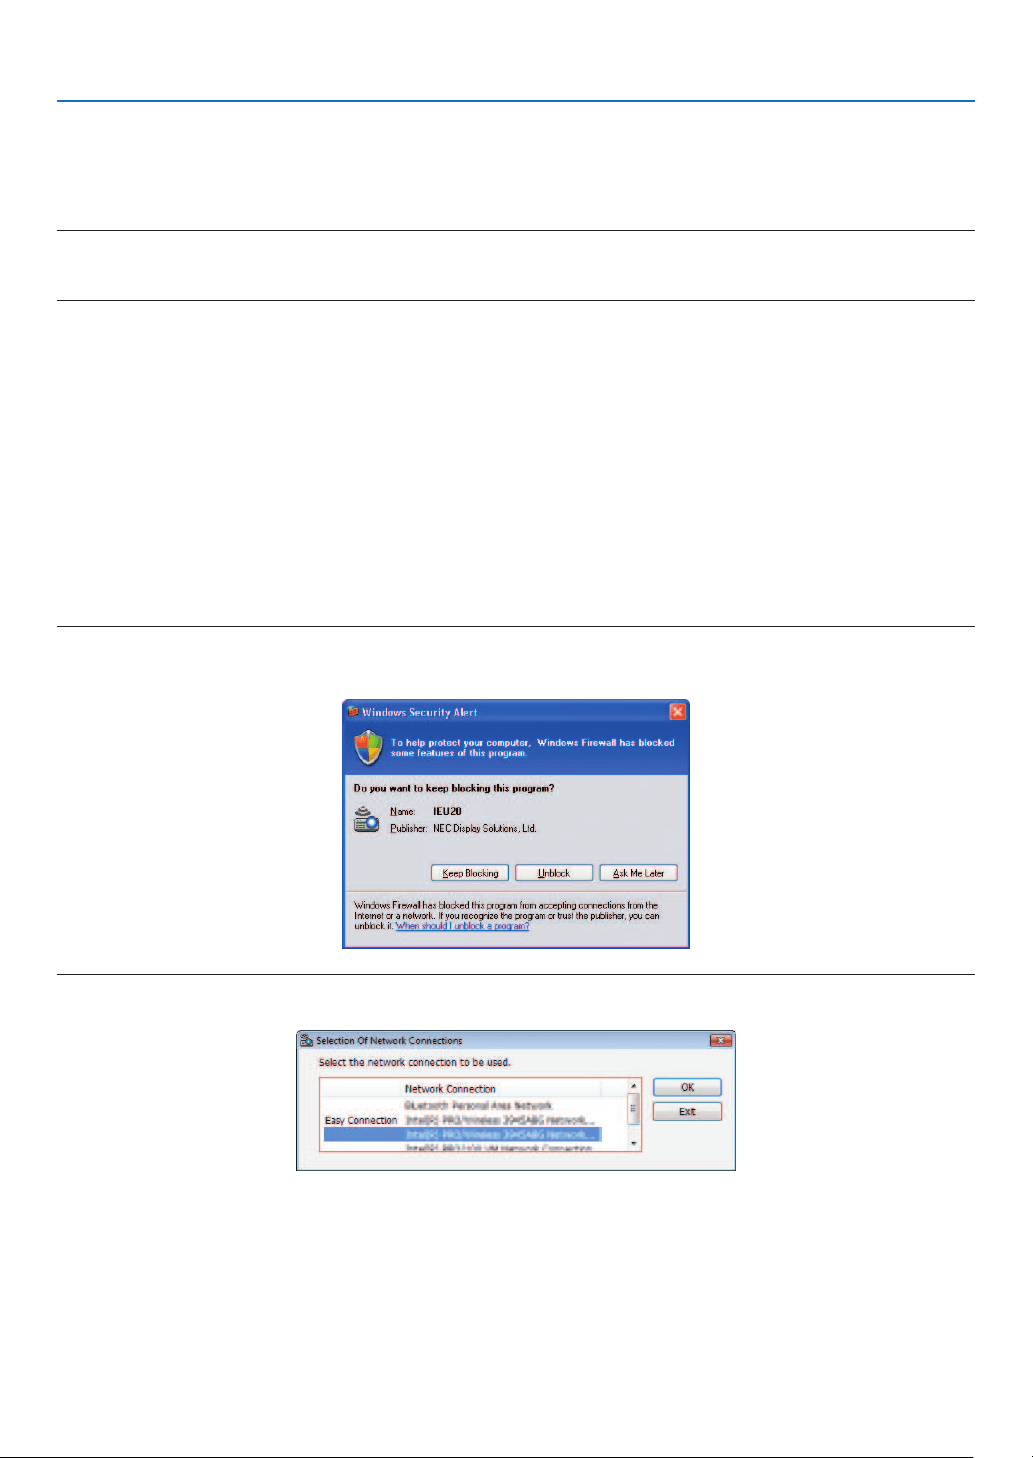
188
8. User Supportware
5Selectafoldersavingtheletobedisclosedtotheparticipants,andclick[OK].
The file in the selected folder will be displayed in the list of files to transfer.
6Click[Download].
The file will be shown to the participants.
NOTE:
Whenthecomputerisconnectedtotheprojector,thecomputerscreenthatisinofbeingprogressisalsoprojectedfromtheprojec-
tor.Tomanipulateascreenthatshouldnotbeshown(notprojected),temporarilystopthetransmission(page186).
•Endingconference
1Click[File]inthepresenterwindow,andclick[Exit].
Youcanalsoendtheconferencebyclicking[×]attheupperrightofthepresenterwindow.
ParticipatinginConference
•Participatinginconferences
1ClickWindows[Start][AllPrograms][NECProjectorUserSupportware][ImageExpressUtility2.0]
[ImageExpressUtility2.0],inthatorder.
The“SelectionOfNetworkConnections”windowwillbedisplayed.
Alistofthenetworkequipmentconnectedtoyourcomputerwillbedisplayed.
IMPORTANT:
AscreenliketheonebelowisdisplayedwhenthesoftwareisstartedonaPCinstalledwithWindowsXPServicePack2(SP2)(or
later).
Click“Unblock”ifthisisdisplayed.
2Selectthenetworkequipmentthatistobeusedandclick[OK].
Selectthenetworkdevicedisplaying“EasyConnection”iftheproductLANsettingisfor“EasyConnection.”This
willcallupthe“MeetingList”window.
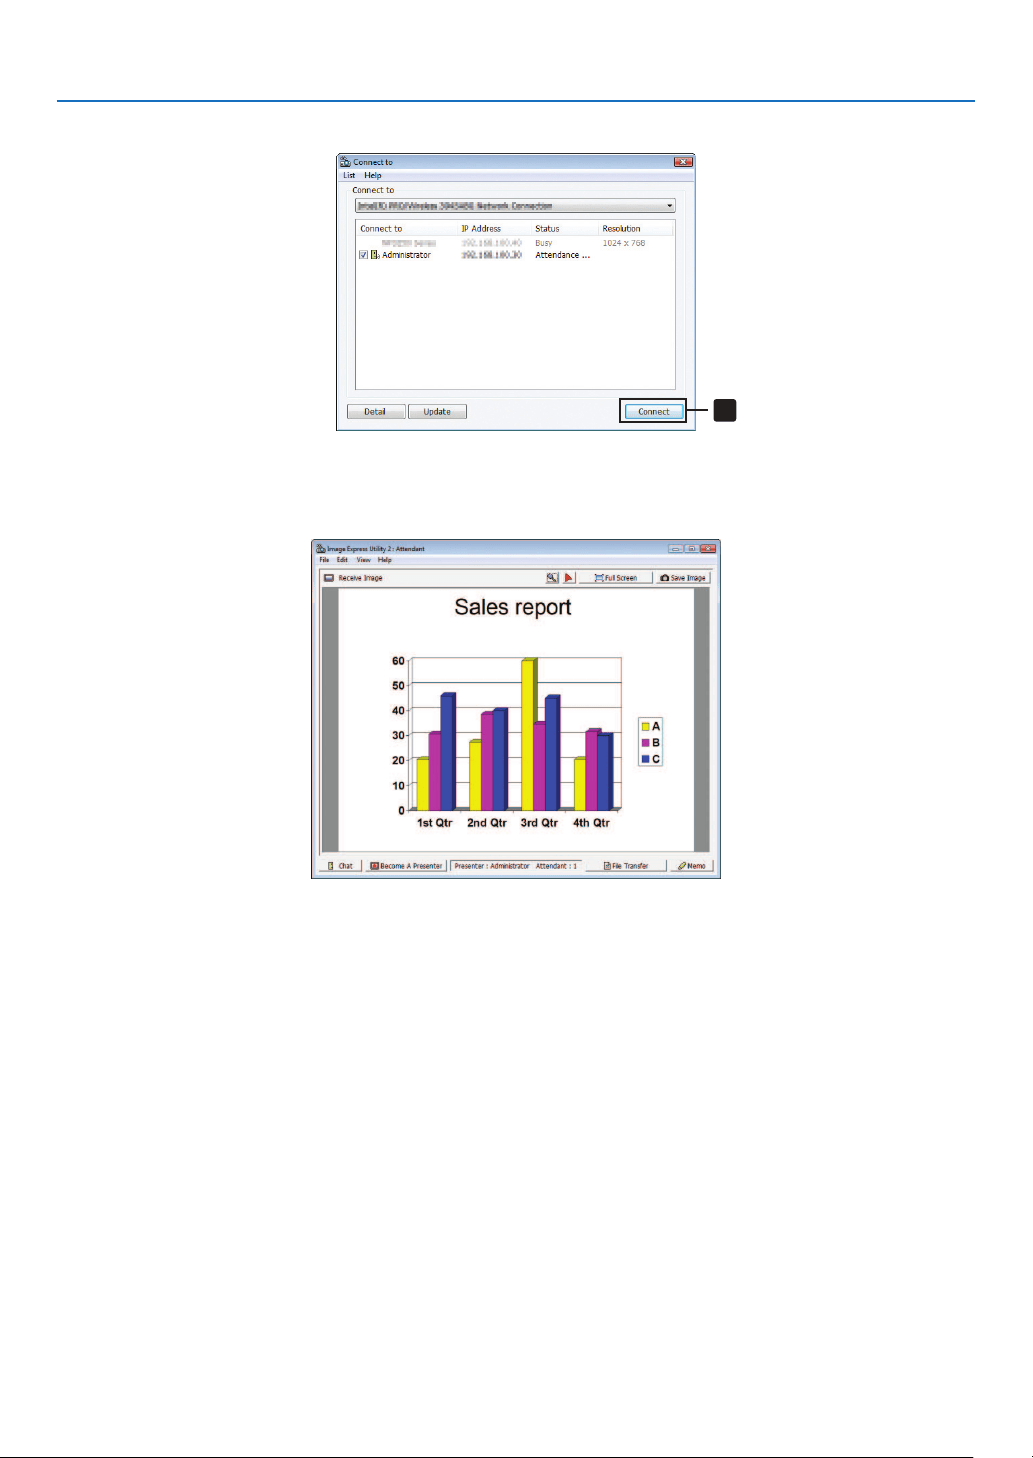
189
8. User Supportware
3ClicktheMeetingNametoparticipate,andclick[Connect].
3
Click
The computer will be connected to the selected conference and the attendant window will be displayed.
Ifthepresenterselects“SendtoPCAndProjector”,theimageprojectedfromtheprojectorisdisplayedintheat-
tendant window.
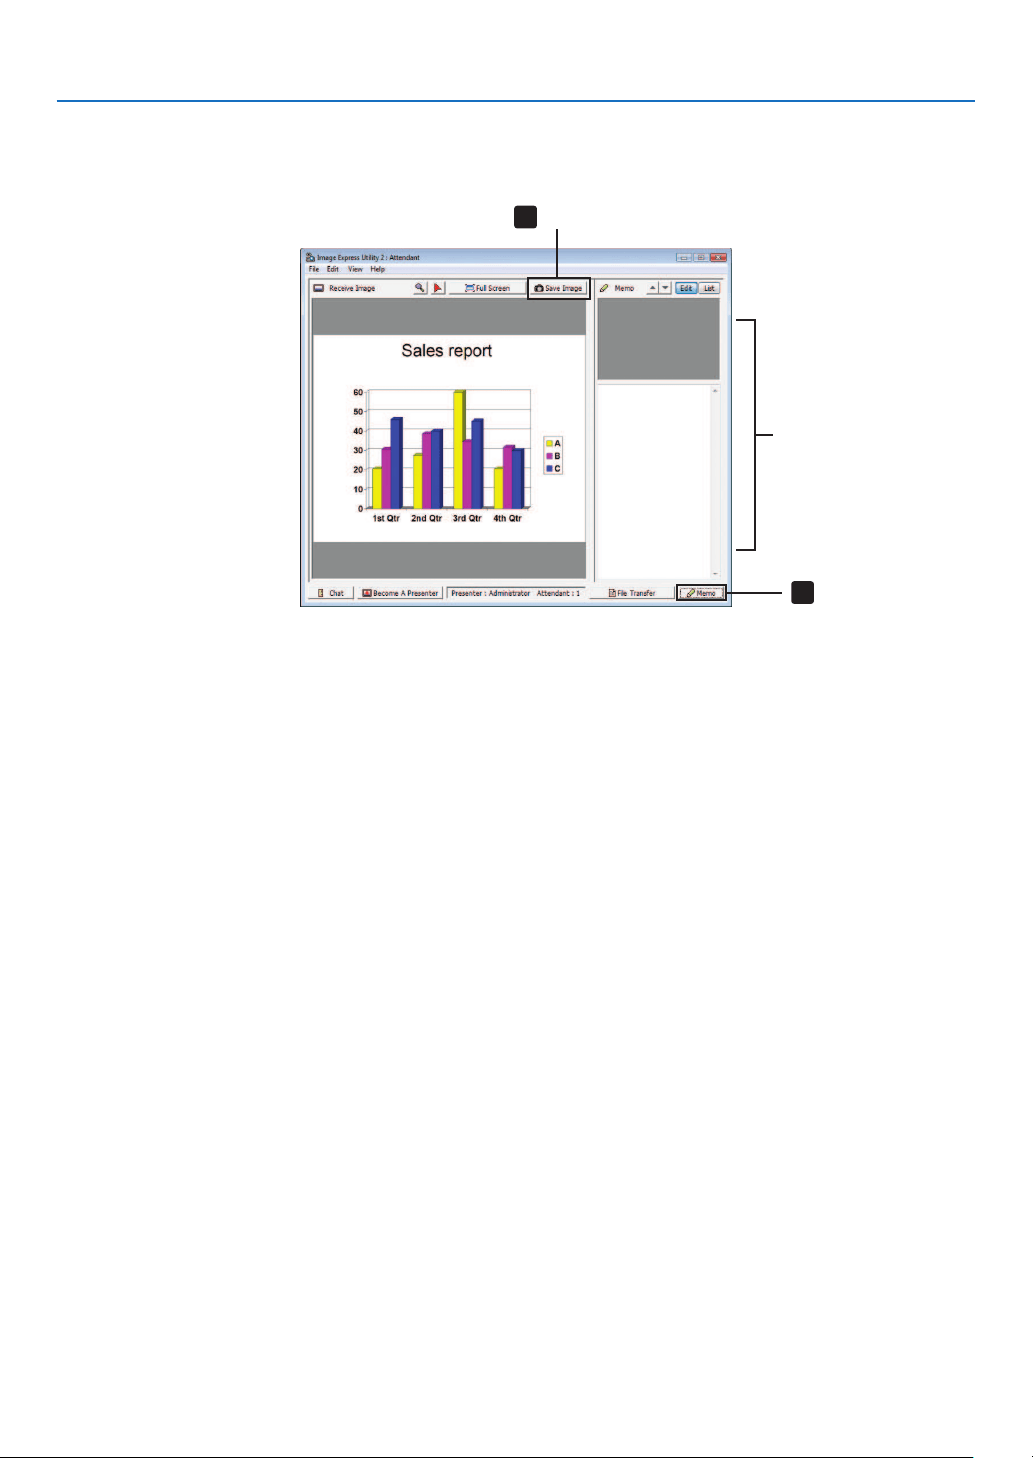
190
8. User Supportware
•Savingreceivedimages
1Click[Memo]intheattendantwindow.
A memo pane will be displayed.
2
1
Click
Memo pane
Click
2Click[SaveImage]intheattendantwindow.
The image displayed in the attendant window will be saved.
•Thesavedimageisaddedtothememolistandathumbnailisdisplayed.
•Amemocanbeattachedtothesavedimage.
REFERENCE:
•IncaseofWindowsXP,acreatedleissavedto“MyDocuments\ImageExpress\”underthedefaultsettings.IncaseofWindows
7/WindowsVista,“Document\ImageExpress\”isthedefaultfoldertosaveacreatedle.
•Afolderiscreatedbelowthedefaultfolderbasedonthetimeanddateoftheconference,andtheimageissavedtoaleinthe
createdfolder.
Forexample,ifaconferenceisheldat11:20onMay14,2009,thedefaultfoldernameonWindowsXPwillbe“MyDocuments\
ImageExpress\2009-05-14_11-20_MeetingRecords”.
Inthisfolder,anHTMLlenamed“MeetingRecords”iscreated.
Thesavedimageissavedin“Images”folder.
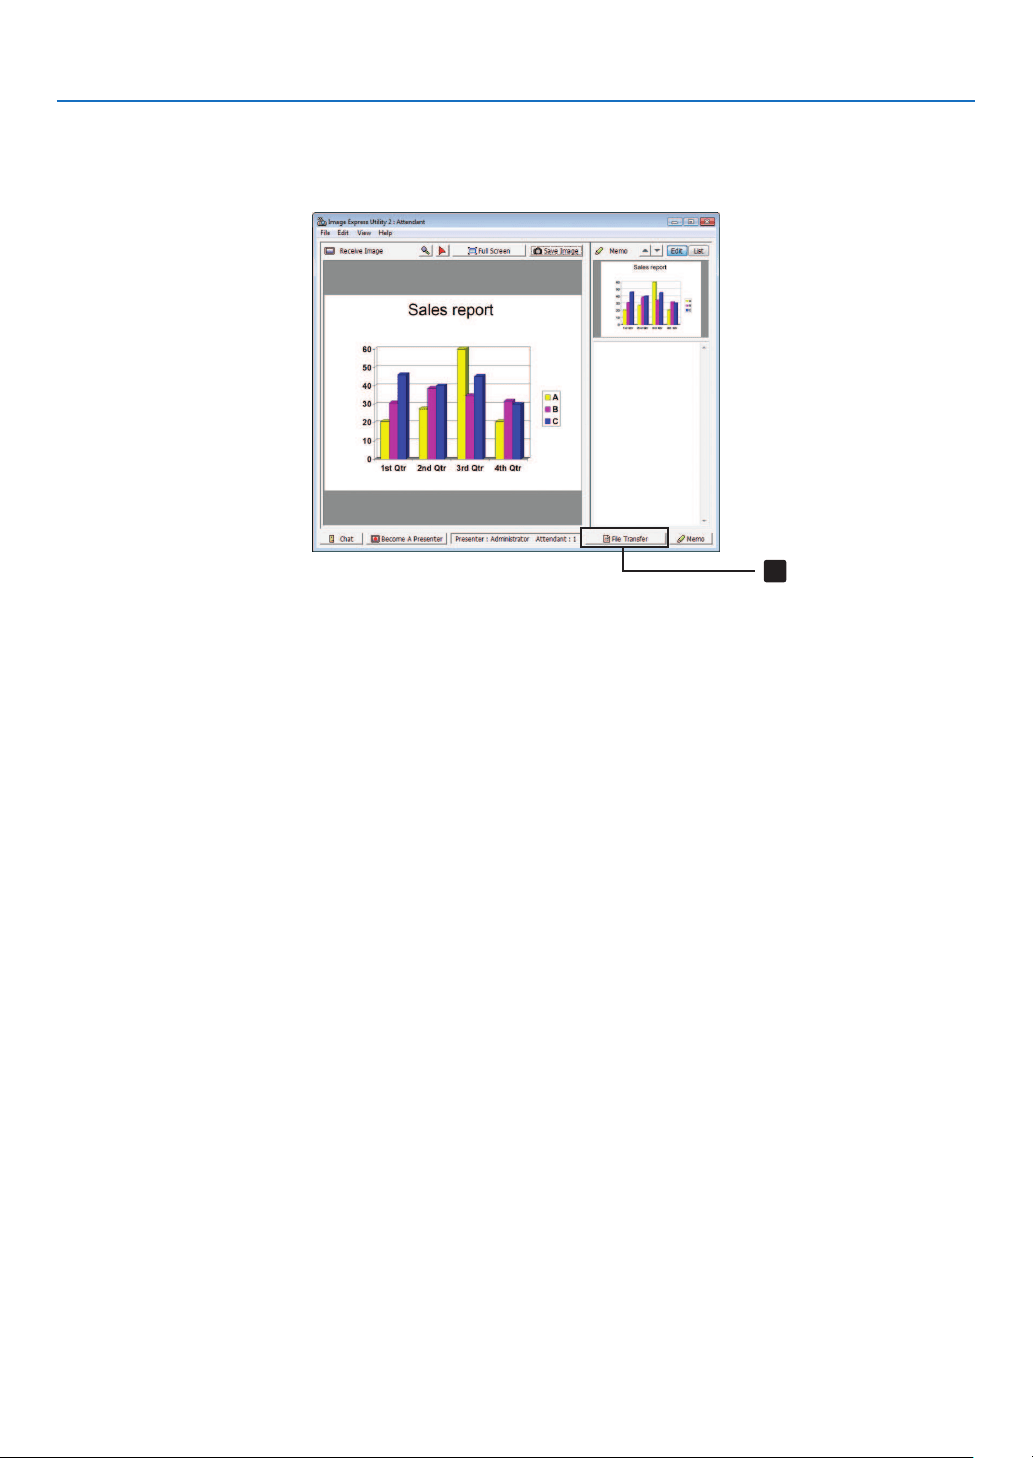
191
8. User Supportware
•Downloadingdisclosedle
1Click[FileTransfer]intheattendantwindow.
The“FileTransfer”windowwillbeopened.
1
Click
2Selectaletodownload,andclick[Download].
Downloading will begin.
The progress of the downloading is displayed at the lower left of the window.
3Whendownloadingiscomplete,click[File]inthe“FileTransfer”window,andclick[Exit].
The“FileTransfer”windowwillbeclosed.
REFERENCE:
•If“OpenAfterDownloading”ischecked,theleisopenedbyspeciedWindowsapplicationsoftwareafterdownloadingiscom-
plete.
•IncaseofWindowsXP,acreatedleissavedto“MyDocuments\ImageExpress\”underthedefaultsettings.IncaseofWindows
7/WindowsVista,“Document\ImageExpress\”isthedefaultfoldertosaveacreatedle.
•Afolderiscreatedbelowthedefaultfolderbasedonthetimeanddateoftheconference,andtheimageissavedtoaleinthe
createdfolder.
Forexample,ifaconferenceisheldat11:20onMay14,2009,thedefaultfoldernameonWindowsXPwillbe“MyDocuments\
ImageExpress\2009-05-14_11-20_MeetingRecords”.
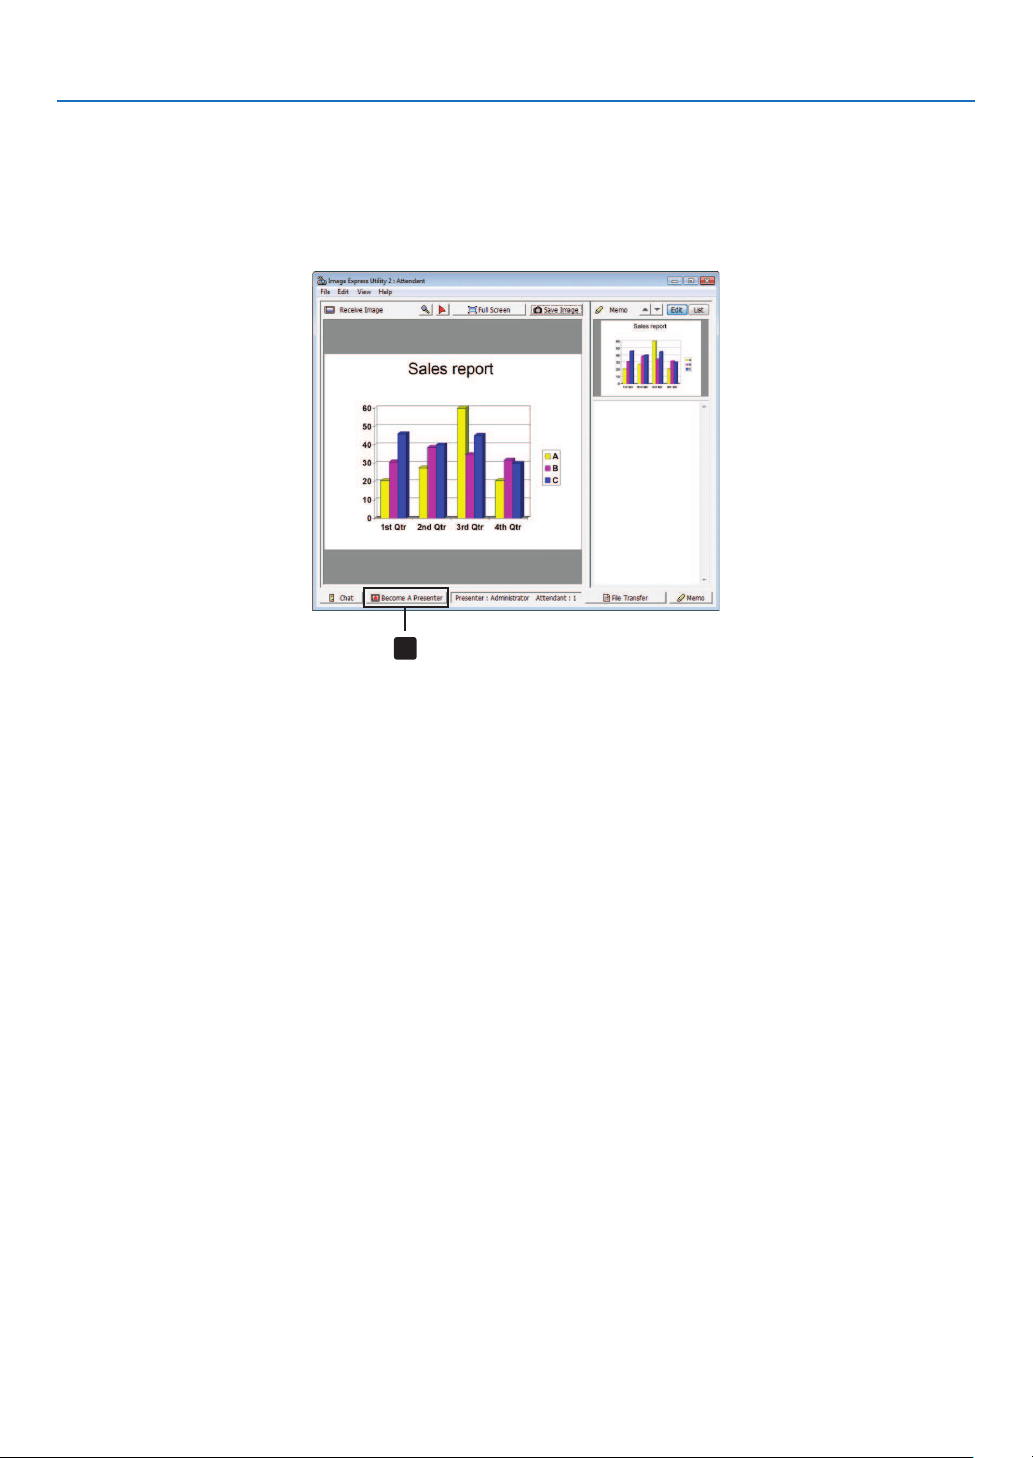
192
8. User Supportware
•Changingpresenter
Threetypesofsettingsmaybemadetochangethepresenter:“NotApproved”,“Approved”,and“ChangingProhibited”
(thesecanbeselectedonlybythepresenter).
Inthefollowingexample,“NotApproved”isselected.
•Click[BecomeAPresenter]intheattendantwindow.
You will change from a participant to a presenter.
1
Click
•Leavingconference
LeavetheconferenceandexitImageExpressUtility2.0.
•Click[File]intheattendantwindow,andclick[Exit].
Youcanalsoleavetheconferencebyclicking[×]attheupperrightoftheattendantwindow.
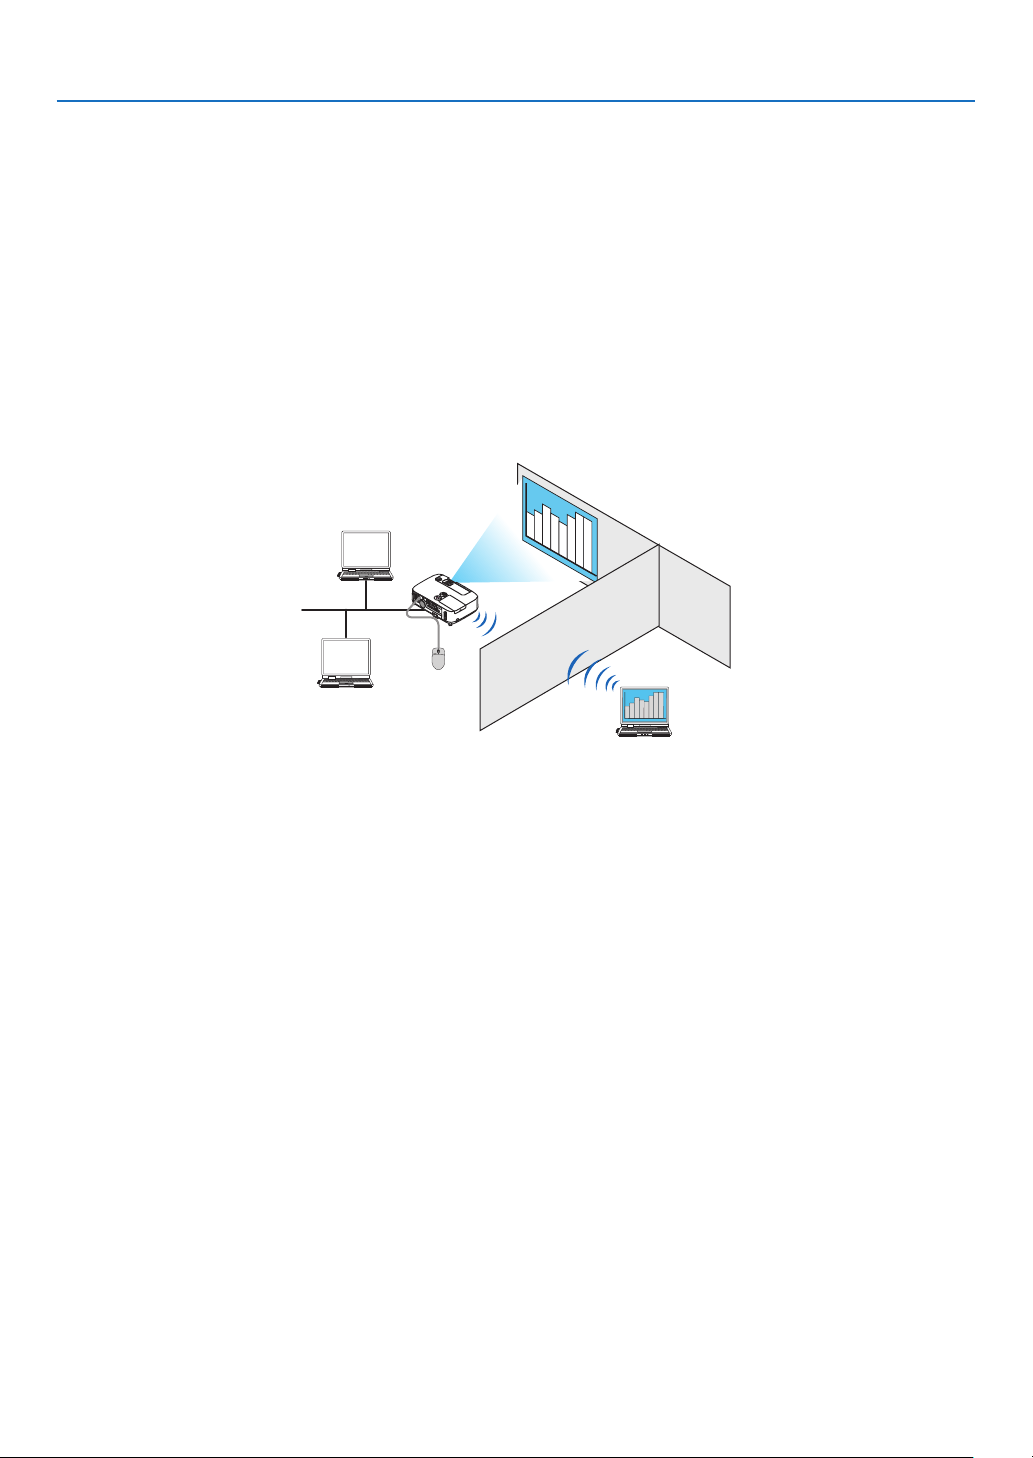
193
8. User Supportware
❻ Using the Projector to Operate Your Computer over a LAN
(Desktop Control Utility 1.0) (not supported by PE501X)
UsingDesktopControlUtility1.0allowsyoutoremotelyoperateyourcomputerplacedatadistancefromtheprojector
overanetwork(wiredLANorwirelessLAN).
What you can do with Desktop Control Utility 1.0
•AcommerciallyavailableUSBmouseisconnectedtotheprojectortooperatethecomputer.
•Suppose,forexample,aPowerPointletobepresentedinaconferenceissavedtoacomputerinyourofce.Ifthis
computerisconnectedtotheprojectorintheconferenceroomwithLANwhentheconferenceisheld,thedesktop
screenofthecomputerinyourofce(Windows8/Windows7/WindowsVista/WindowsXP)canbeprojectedand
thePower-Pointlecanbepresentedbyoperatingtheprojector.Inotherwordsthecomputerdoesnotneedtobe
broughtintotheconferenceroom.
IMPORTANT:
•YoucanusetheDesktopControlUtility1.0tooperateacomputerlocatedinaseparateroomfromtheprojectoroveranetwork.
Therefore,caremustbeexercisedtopreventanythirdpartyfromviewingthescreenofyourcomputer(importantdocuments),
copyingles,orturningoffthepower.
NECassumesnoliabilityforanylossordamagesarisingfrominformationleakorsystemfailurewhileyouareusingDesktop
ControlUtility1.0.
•ThiswilldisconnectLANconnectionwhenthecomputergoesinthestandbymodewhiletheDesktopControlUtility1.0isbeing
used.
IntheWindows8/Windows7/WindowsVista,select[ControlPanel][HardwareandSound][PowerOptions].Set[Change
whenthecomputersleeps]to[Never].
IntheWindowsXP,click[ControlPanel][PerformanceandMaintenance][PowerOptions][SystemStandby]
[Never].
•ThescreensaverfunctionisoffwhileDesktopControlUtility1.0isrunning.
Connecting the projector to a LAN
ConnecttheprojectortotheLANbyfollowingtheinstructionsin“ConnectingtoaWiredLAN”(page
151),“Con-
nectingtoaWirelessLAN”(page152)and“9ApplicationMenus”(page118)

194
8. User Supportware
Using the projector to operate your computer’s desktop screen
IMPORTANT:
•IncaseofWindows8/Windows7/WindowsVista,disabletheuseraccountcontrolbeforeusingDesktopControlUtility1.0.
WindowsVistahas“UserAccountControl”functiontoprotectthecomputer.Theuseraccountconrmationwindowmaybe
displayed.
SinceDesktopControlUtility1.0cannottransfertheuseraccountconrmationwindow,thiswindowmakestheoperationun-
available.BeforeusingDesktopControlUtility1.0,itisnecessarytodisabletheuseraccountcontrolofWindows8/Windows7/
WindowsVista.Afterloggingonwiththeadministratoraccount,followtheprocedurebelowtochangethesetting:
[ChangeProcedure]
<ForWindows8/Windows7>
1Click[ControlPanel].
2Click[UserAccountsandFamilySafety](Windows8only).
3Click[UserAccounts].
4Click[ChangeUserAccountControlsettings].
5Change[Choosewhentobenotiedaboutchangestoyourcomputer]to[Nevernotify]andclick[OK].
•Ifrestartingisrequested,click[Restartnow].
<ForWindowsVista>
1Click[ControlPanel]fromtheStartMenu.
2Click[UserAccountsandFamilySafety].
3Click[UserAccount].
4Click[Enable/DisableUserAccountControl].
5Removethecheckmarkfor[UseUserAccountControl(UAC)toHelpComputerProtection]andclick
[OK].
•Ifrebootingisrequested,click[RebootNow].
UponcompletionofDesktopControlUtility,itisrecommendedtoenabletheuseraccountcontrol.
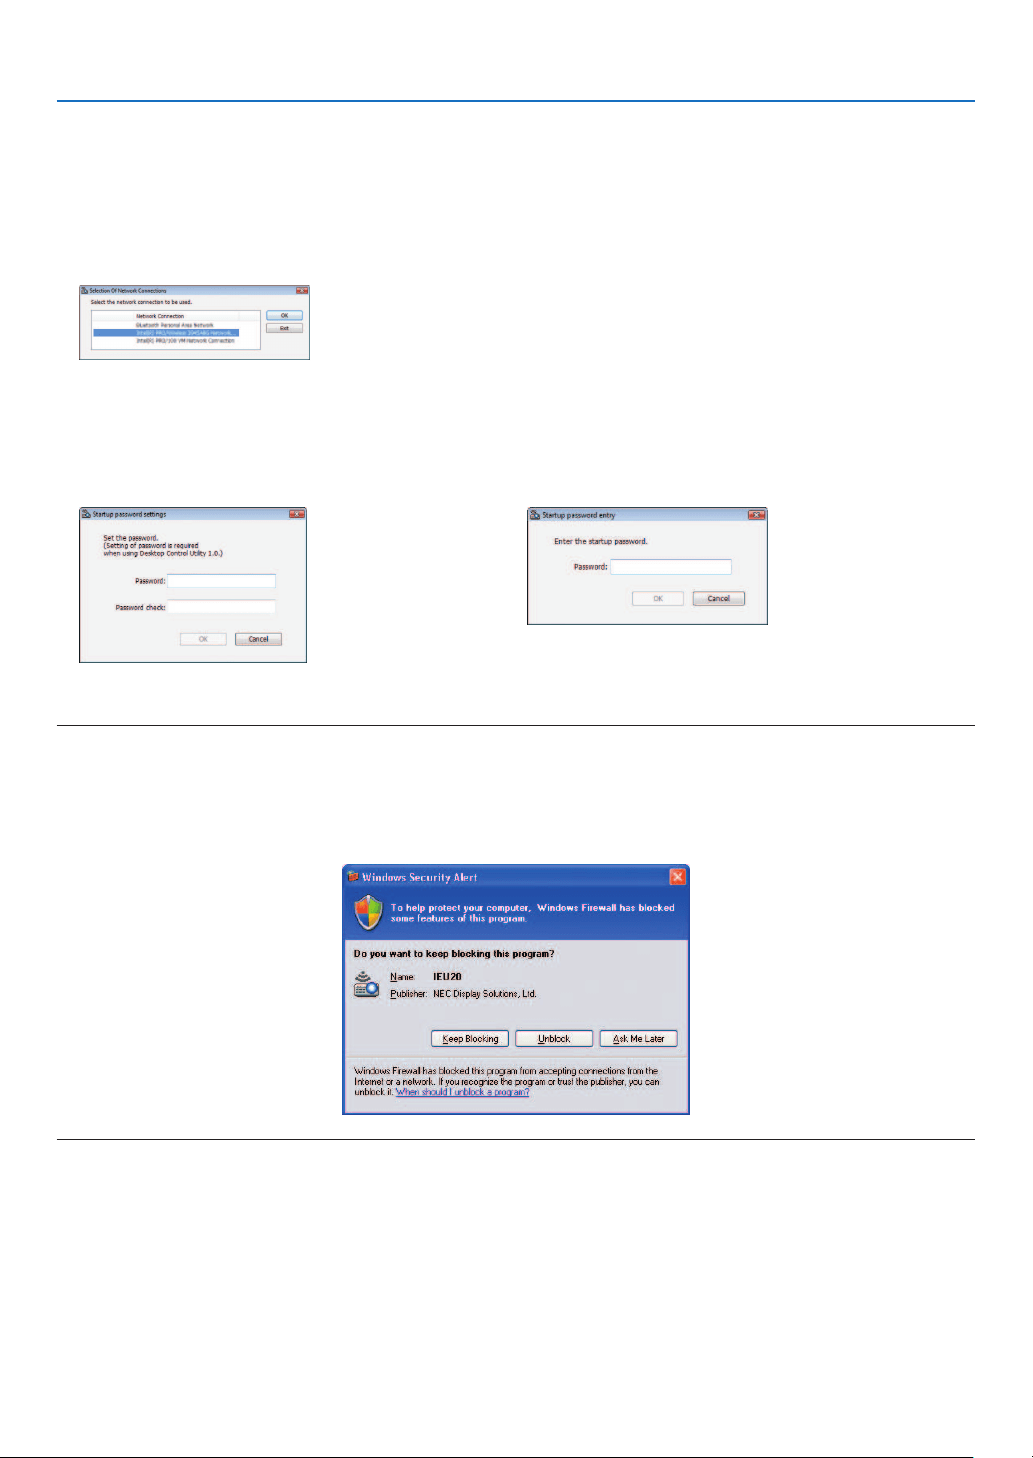
195
8. User Supportware
•Operationoncomputer
1ClickWindows[Start][AllPrograms][NECProjectorUserSupportware][DesktopControlUtility
1.0][DesktopControl],inthatorder.
The“SelectionOfNetworkConnections”windowisdisplayed.
Thisdisplaysalistofthenetworkdevicesconnectedtothecomputeryouareusing.
2Selectthenetworkdevicetouseandclick[OK].
The“Startuppasswordsettings”windowwillbedisplayed.
•IncaseofWindows7/WindowsVista,theUserAccountControlWindowisdisplayed.Click[OK]orinputthe
administrator password.
ScreenwhenDesktopControlUtility1.0isstartedrsttime
already
Screen if starting password has been set
IMPORTANT:
•Besuretowritedownthestartingpasswordincaseyouforgetit.
•ThestartingpasswordmustbeinputeachtimeDesktopControlUtility1.0isstarted.
•Shouldyouforgetthestartingpassword,reinstalltheDesktopControlUtility1.0.
AscreenliketheonebelowisdisplayedwhenthesoftwareisstartedonaPCinstalledwithWindowsXPServicePack2(SP2)(or
later).
Click“Unblock”ifthisisdisplayed.

196
8. User Supportware
3InputthestartingpasswordofDesktopControlUtility1.0,andclick[OK].
The“Currentpassword”windowwillbedisplayed.
NOTE:
ThecharacterstringdisplayedinthepasswordeldvarieseachtimeDesktopControlUtility1.0isstarted.
4Writedownthecharacterstringdisplayedinthepasswordeld.
Writedown“PMHN”inthescreenexampleofstep3.
5Click[OK].
DesktopControlUtility1.0willbestarted.
Move to the room where the projector is installed, with the paper on which you have written down the password in
step 4.
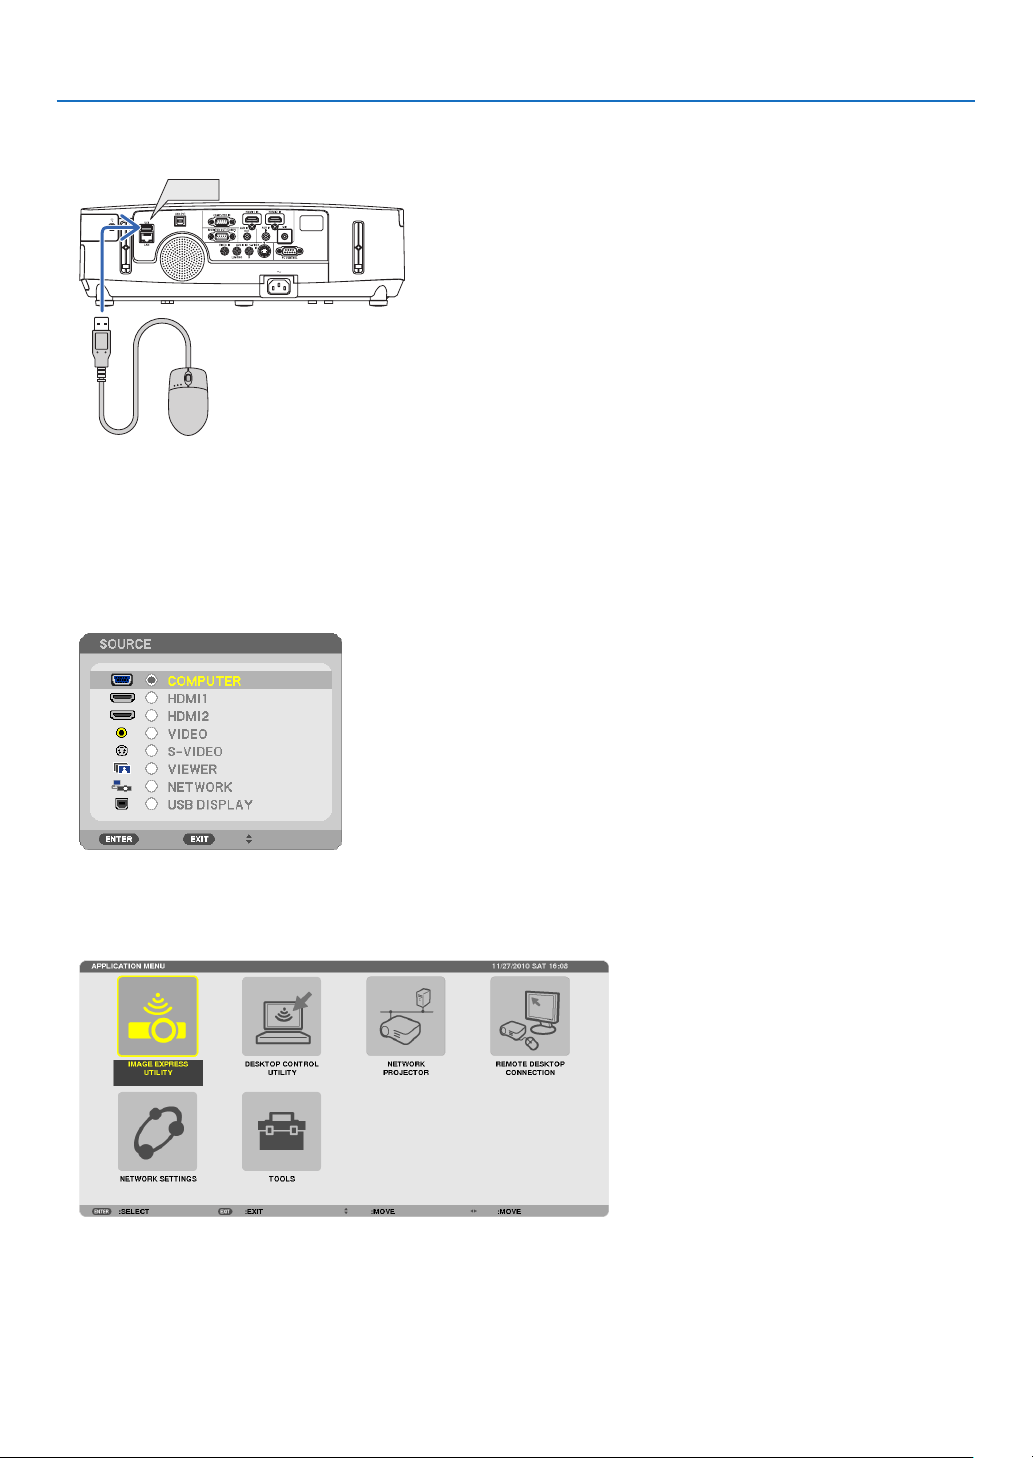
197
8. User Supportware
•Operatingtheprojector(connectingcomputer)
1ConnectaUSBmousethatiscommerciallyavailabletotheprojector.
USB
2Turnonthepowertotheprojector.
Set the LAN setting of the projector in advance.
3PresstheSOURCEbuttonontheprojectorunit.
The Source list will be displayed.
Incaseoftheremotecontrol,presstheNETWORKbutton.
The“networkmenu”screenwillbedisplayed,proceedtostep5.
4PresstheSELECT▼/▲buttonstoselect[NETWORK],andthenpresstheENTERbutton.
The“networkmenu”screenwillbedisplayed.
•TheremainingoperationscanbeperformedusingaUSBmouseconnectedtotheprojector.
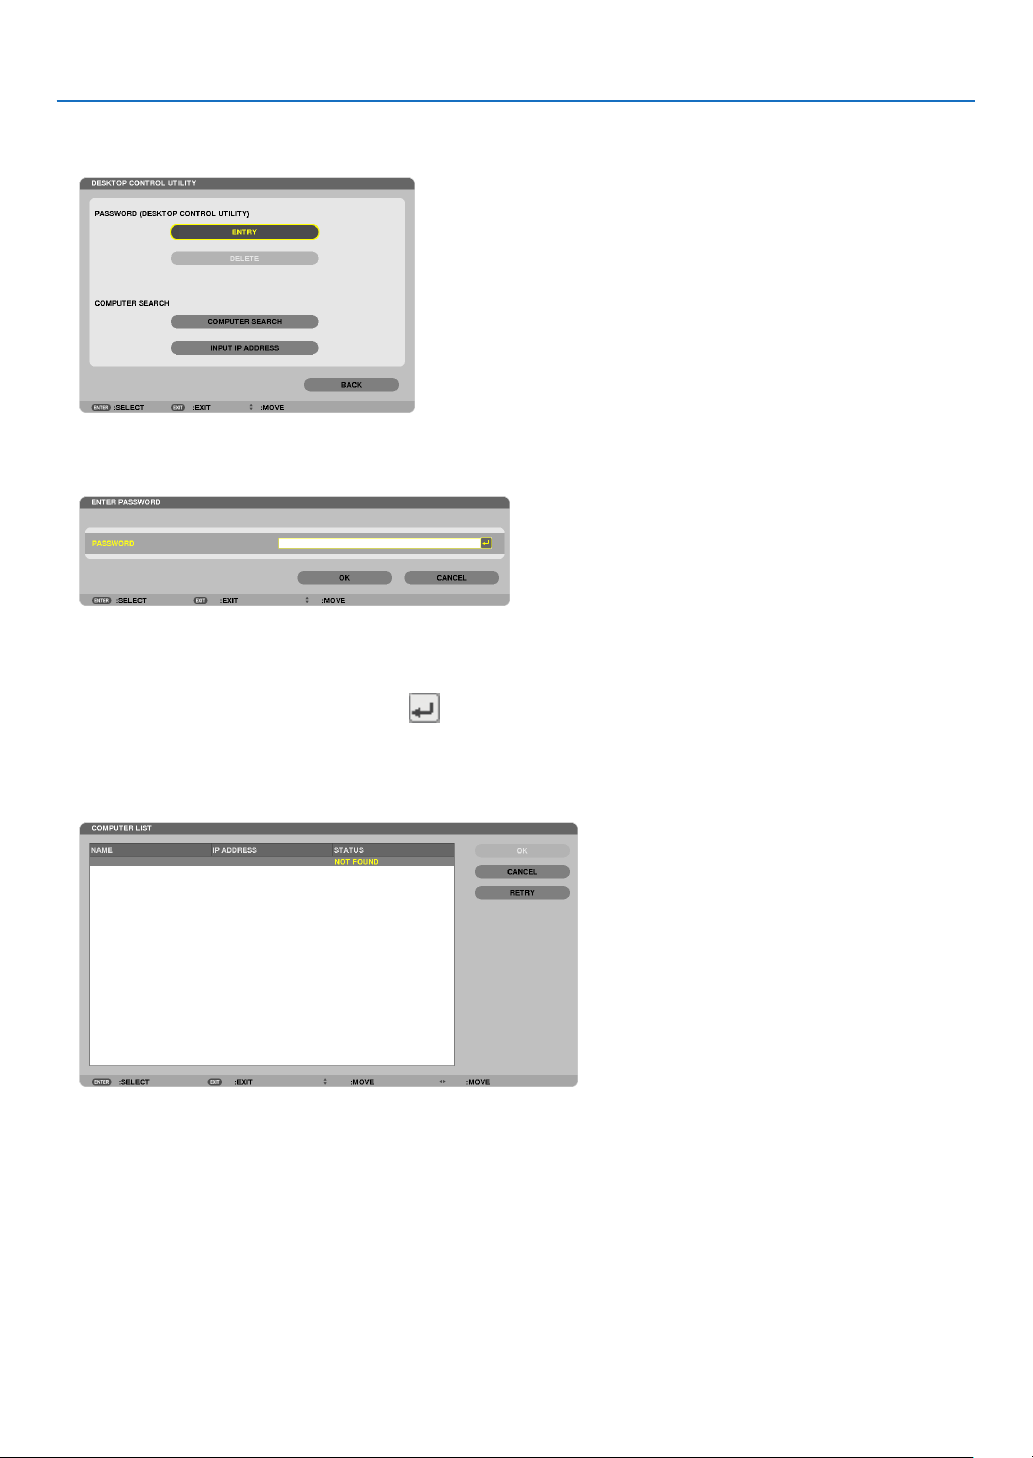
198
8. User Supportware
5Click[DESKTOPCONTROLUTILITY].
The“DESKTOPCONTROLUTILITYmenu”screenwillbedisplayed.
6Click“ENTRY”.
A password input screen will be displayed.
7Inputthepasswordyouhavewrittendowninstep4of“Operationoncomputer”.
•Clickthe[BS]buttonontherightsideofthe[PASSWORD]eldtodeletethecharactertotheleftofthecharacter
insertion point.
8Afterinputtingthepassword,clickthebuttonontherightsideofthe[PASSWORD]eld.
Youarereturnedtothe“DESKTOPCONTROLUTILITY”menuscreen.
9Click[COMPUTERSEARCH].
The“COMPUTERLIST”screenwillbedisplayed.
IftheconnectiondestinationhasnotbeenfoundasaresultofaCOMPUTERSEARCH,searchfortheconnection
destinationbyinputtingtheIPaddressofthecomputerattheconnectiondestination,click“InputIPAddress”.

199
8. User Supportware
10Clickthecomputerattheconnectiondestinationandthen[OK].
Thedesktopscreenofthecomputerattheconnectiondestinationwillbedisplayed.
•Operatingtheprojector(manipulatingdesktopscreen)
ThedisplayeddesktopscreencanbemanipulatedbyusingtheUSBmouseconnectedtotheprojector.IftheEXIT
buttonoftheprojectororremotecontrolispressedwhilethedesktopscreenisdisplayed,anauxiliaryoperationbar
isdisplayedatthelowerleftofthescreen.
Manipulatetheauxiliaryoperationbarbyusingthebuttonsoftheprojectororremotecontrol.
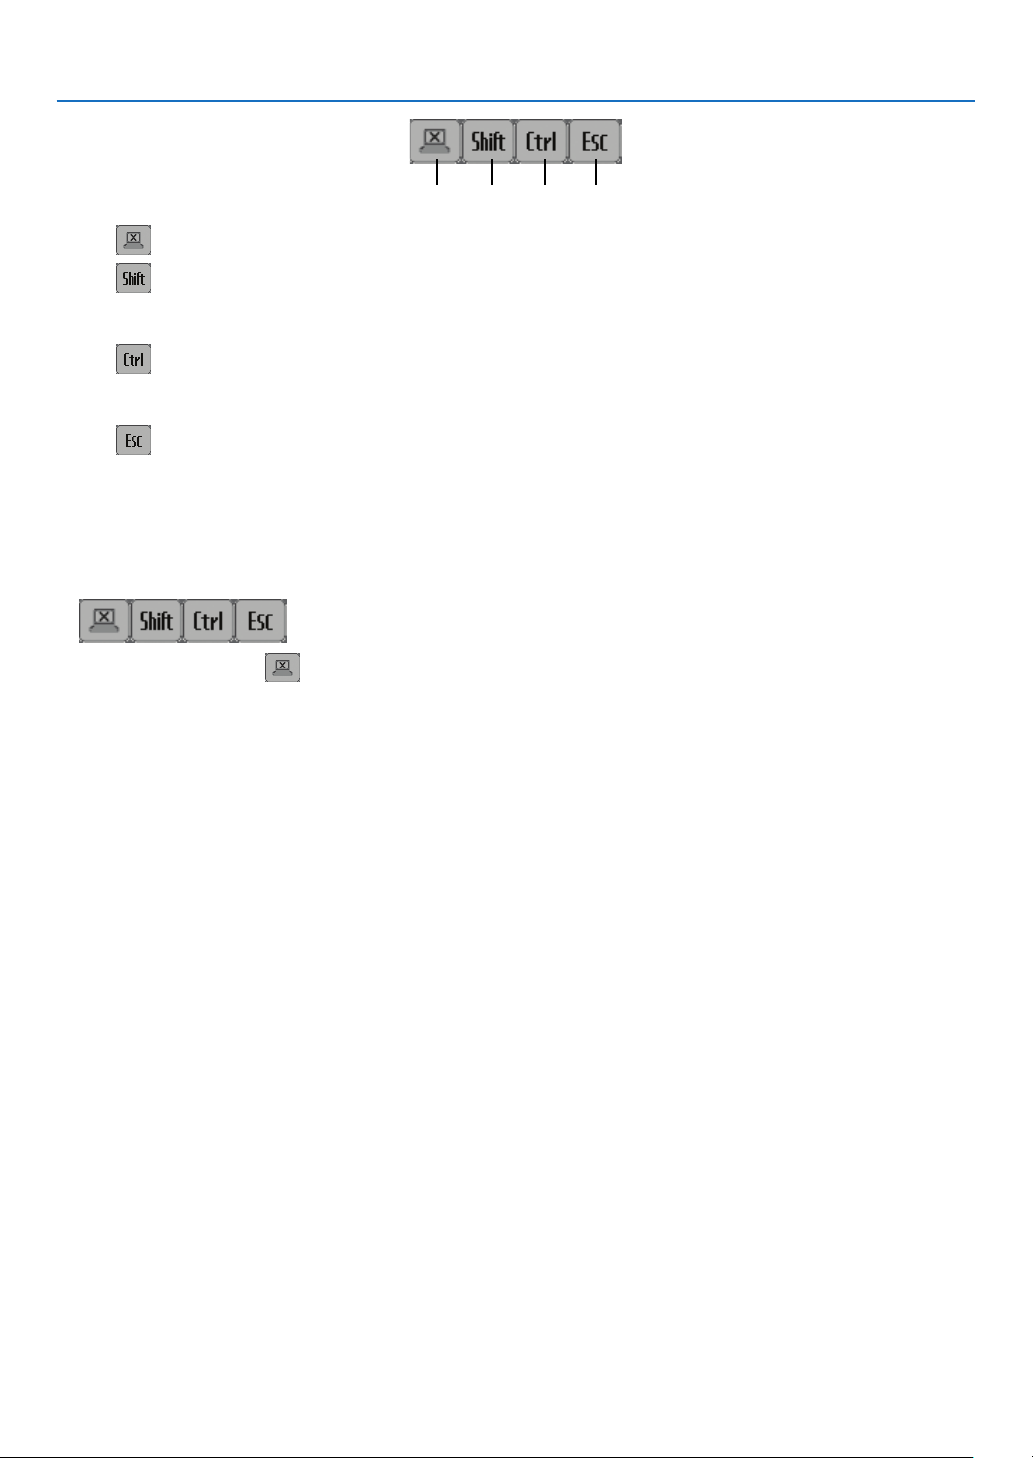
200
8. User Supportware
<1><2><3><4>
<1> (cut-off icon) .......Disconnects communication with the computer.
<2>
(Shift icon) ..........When the highlight is moved to this icon and the ENTER button is pressed, shift lock status is set.
The shift lock is canceled if the highlight is moved to this icon and the ENTER button is pressed
again.
<3>
(Ctrl icon) ............When the highlight is moved to this icon and the ENTER button is pressed, control lock status is set.
The control lock is canceled if the highlight is moved to this icon and the ENTER button is pressed
again.
<4>
(ESC icon) ...........The same operation as when the [ESC] key of the computer is pressed is performed. This icon is
used, for example, to stop a slideshow of PowerPoint.
•Operatingtheprojector(disconnectingcommunications)
1PresstheEXITbuttonwhilethedesktopscreenisdisplayed.
An auxiliary operation bar will be displayed at the lower left of the screen.
2Movethehighlightto(cut-officon)andpresstheENTERbutton.
Communicationwillbedisconnectedandyouarereturnedtothe“DESKTOPCONTROLUTILITY”menuscreen.
Toresumecommunication,click[COMPUTERSEARCH].
After that, follow step 10 on the preceding page.
REFERENCE:
Communicationcanalsobedisconnectedbyclickingtheprojectoricononthetaskbarandthenclicking“Disconnect”whilethe
desktopscreenisdisplayed.

201
8. User Supportware
•Operatingtheprojector(exitingDesktopControlUtility1.0)
1Clicktheprojectoricon[
]onthetaskbarwhilethedesktopscreenisdisplayed.
2Click[Exit].
DesktopControlUtility1.0willbeterminated.
3 Press the EXIT button on the projector unit or on the remote control.
The“networkmenu”screenwillbedisplayed.
4 Press the MENU button on the projector unit or on the remote control.
The on-screen menu will be displayed.
5Selectaninputsourceotherthan[NETWORK].

202
8. User Supportware
❼
Controlling the Projector over a LAN (PC Control Utility Pro 4/
Pro 5)
Usingtheutilitysoftware“PCControlUtilityPro4”or“PCControlUtilityPro5”includedonthecompanionNECPro-
jectorCD-ROM,theprojectorcanbecontrolledfromacomputeroveraLAN.
PCControlUtilityPro4isaprogramcompatiblewithWindows.(thispage)
PCControlUtilityPro5isaprogramcompatiblewithMacOS.(page205)
ControlFunctions
PowerOn/Off,signalselection,picturefreeze,picturemute,audiomute,adjusting,errormessagenotication,event
schedule.
ScreenofPCControlUtilityPro4
ThissectionprovidesanoutlineofpreparationforuseofPCControlUtilityPro4/Pro5.Forinformationonhowtouse
PCControlUtilityPro4/Pro5,seeHelpofPCControlUtilityPro4/Pro5.(page
204, 205)
Step1:InstallPCControlUtilityPro4/Pro5onthecomputer.
Step2:ConnecttheprojectortoaLAN.
Step3:StartPCControlUtilityPro4/Pro5.
•TorunPCControlUtilityPro4onWindows8,WindowsXPHomeEditionandWindowsXPProfessional,“Microsoft
.NETFramework”isrequired.TheMicrosoft.NETFrameworkVersion2.0,3.0or3.5isavailablefromMicrosoft’s
webpage.Downloadandinstalltheitonyourcomputer.
TIP:
•PCControlUtilityPro4canbeusedwithaserialconnection.
•PE501XsupportsPCControlUtilityPro4onlywhentheprojectorisusedwithaserialconnection.
Using on Windows
Step 1: Install PC Control Utility Pro 4 on the computer
NOTE:
•Toinstalloruninstalltheprogram,theWindowsuseraccountmusthave[Administrator]privilege(Windows8,Windows7,
WindowsVistaandWindowsXP)
•Exitallrunningprogramsbeforeinstallation.Ifanotherprogramisrunning,theinstallationmaynotbecompleted.
1InserttheaccompanyingNECProjectorCD-ROMintoyourCD-ROMdrive.
The menu window will be displayed.
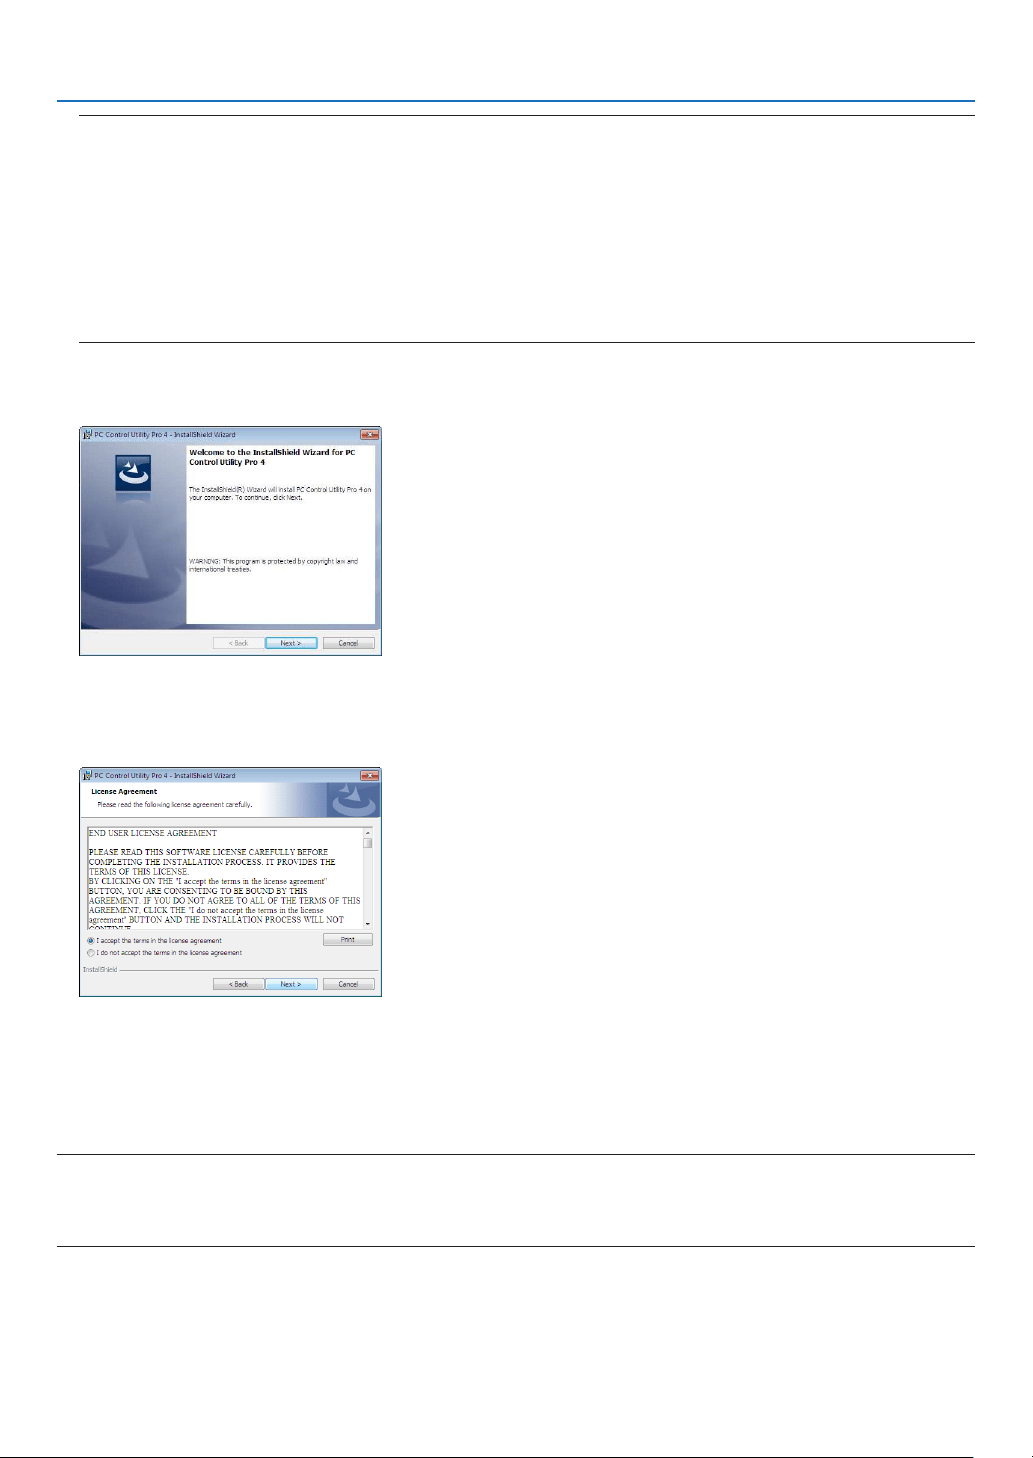
203
8. User Supportware
TIP:
Ifthemenuwindowwillnotbedisplayed,trythefollowingprocedure.
ForWindows7:
1.Click“start”onWindows.
2.Click“AllPrograms”“Accessories”“Run”.
3.TypeyourCD-ROMdrivename(example:“Q:\”)and“LAUNCHER.EXE”in“Name”.(example:Q:\
LAUNCHER.EXE)
4.Click“OK”.
the menu window will be displayed.
2Click“PCControlUtilityPro4”onthemenuwindow.
The installation will start.
When the installation is complete, the Welcome window will be displayed.
3Click“Next”.
“ENDUSERLICENSEAGREEMENT”screenwillbedisplayed.
Read“ENDUSERLICENSEAGREEMENT”carefully.
4Ifyouagree,click“Iacceptthetermsinthelicenseagreement”andthenclick“Next”.
•Followtheinstructionsontheinstallerscreenstocompletetheinstallation.
•Whentheinstallationiscomplete,youwillreturntothemenuwindow.
TIP:
•UninstallingPCControlUtilityPro4
TouninstallPCControlUtilityPro4,dothesameproceduresstatedasin“UninstallingVirtualRemoteTool”.Read“VirtualRemote
Tool”as“PCControlUtilityPro4”(page
170)

204
8. User Supportware
Step 2: Connect the projector to a LAN.
ConnecttheprojectortotheLANbyfollowingtheinstructionsin“ConnectingtoaWiredLAN”(page
151),“Con-
nectingtoaWirelessLAN(Optional:NP02LMseries)”(page152)and“9.ControllingtheProjectorbyUsingan
HTTPBrowser”(page42)
Step 3: Start PC Control Utility Pro 4
Click“Start”“Allprograms”or“Programs”“NECProjectorUserSupportware”“PCControlUtilityPro4”
“PCControlUtilityPro4”.
NOTE:
•FortheSchedulefunctionofthePCControlutilityPro4towork,youmusthaveyourcomputerrunningandnotinstandby/
sleepmode.Select“PowerOptions”fromthe“ControlPanel”inWindowsanddisableitsstandby/sleepmodebeforerunningthe
scheduler.
[Example]ForWindows7:
Select“ControlPanel”“SystemandSecurity”“PowerOptions”“Changewhenthecomputersleeps”“Putthecomputer
tosleep”“Never”.
NOTE:
•When[POWER-SAVING]isselectedfor[STANDBYMODE]fromthemenu,theprojectorcannotbeturnedonviathenetwork
(wiredLAN/wirelessLAN)connection.
•When[NETWORKSTANDBY]isselectedfor[STANDBYMODE]fromthemenu,theprojectorcannotbeturnedonviawireless
LANconnection.
TIP:
ViewingtheHelpofPCControlUtilityPro4
•DisplayingtheHelpleofPCControlUtilityPro4whileitisrunning.
Click“Help(H)”“Help(H)…”ofwindowofPCControlUtilityPro4inthisorder.
The pop-up menu will be displayed.
•DisplayingthehelpleusingtheStartMenu.
Click“Start”“Allprograms”or“Programs”“NECProjectorUserSupportware”“PCControlUtilityPro4”
“PCControlUtilityPro4Help”.
The Help screen will be displayed.

205
8. User Supportware
Using on Mac OS
Step 1: Install PC Control Utility Pro 5 on the computer
1.InserttheaccompanyingNECProjectorCD-ROMinyourMacCD-ROMdrive.
TheCD-ROMiconwillbedisplayedonthedesktop.
2.Double-clicktheCD-ROMicon.
The CD-ROM window will be displayed.
3.Double-clickthe“MacOSX”folder.
4.Double-click“PCControlUtility.mpkg”.
The installer will start.
5.Click“Next”.
“ENDUSERLICENSEAGREEMENT”screenwillbedisplayed.
6.Read“ENDUSERLICENSEAGREEMENT”andclick“Next”.
The confirmation window will be displayed
7.Click“Iacceptthetermsinthelicenseagreement”.
Follow the instructions on the installer screens to complete the installation.
Step 2: Connect the projector to a LAN
ConnecttheprojectortotheLANbyfollowingtheinstructionsin“ConnectingtoaWiredLAN”(page
151),“Con-
nectingtoaWirelessLAN(Optional:NP02LMseries)”(page152)and“❾ControllingtheProjectorbyUsingan
HTTPBrowser”(page42)
Step 3: Start PC Control Utility Pro 5
1.OpenyourApplicationsfolderinMacOS.
2.Clickthe“PCControlUtilityPro5”folder.
3.Clickthe“PCControlUtilityPro5”icon.
PC Control Utility Pro 5 will start.
NOTE:
•FortheSchedulefunctionofthePCControlutilityPro5towork,youmusthaveyourcomputerrunningandnotinsleepmode.
Select“EnergySaver”fromthe“SystemPreferences”inMacanddisableitssleepmodebeforerunningthescheduler.
•When[POWER-SAVING]isselectedfor[STANDBYMODE]fromthemenu,theprojectorcannotbeturnedonviathenetwork
(wiredLAN/wirelessLAN)connection.
•When[NETWORKSTANDBY]isselectedfor[STANDBYMODE]fromthemenu,theprojectorcannotbeturnedonviawireless
LANconnection.
TIP:
ViewingtheHelpofPCControlUtilityPro5
•DisplayingtheHelpleofPCControlUtilityPro5whileitisrunning.
•Fromthemenubar,click“Help”“Help”inthisorder.
The Help screen will be displayed.
•DisplayingtheHelpusingtheDock
1.Open“ApplicationFolder”inMacOS.
2.Clickthe“PCControlUtilityPro5”folder.
3.Clickthe“PCControlUtilityPro5Help”icon.
The Help screen will be displayed.

206
9. Appendix
❶ Troubleshooting
Thissectionhelpsyouresolveproblemsyoumayencounterwhilesettinguporusingtheprojector.
Indicator Messages
PowerIndicator
Indicator Condition ProjectorConditionNote
Off The main power is off –
Blinking light Blue
0.5 sec On,
0.5 sec Off
The projector is getting ready to turn on. Wait for a moment.
2.5 sec On,
0.5 sec Off
Off Timer is enabled. –
Orange
2.5 sec On,
0.5 sec Off
On Timer is working. –
0.5 sec On,
0.5 sec Off
After cooling. –
Steady light Blue
The projector is turned on. –
Orange [NORMAL] is selected for [STANDBY MODE] –
Red [POWER-SAVING] is selected for [STANDBY
MODE]
–
StatusIndicator
Indicator Condition ProjectorConditionNote
Off Normal or Standby ([POWER-SAVING] for
[STANDBY MODE])
–
Blinking light Red
1 cycle (0.5 sec
On, 2.5 sec Off)
Lamp cover error or lamp housing error Replace the lamp cover or lamp housing correctly.
2 cycle (0.5 sec
On, 0.5 sec Off)
Temperature error The projector is overheated. Move the projector to
a cooler location.
3 cycle (0.5 sec
On, 0.5 sec Off)
Power error Power unit is not working properly. Contact your
dealer.
4 cycle (0.5 sec
On, 0.5 sec Off)
Fan error Fans will not work correctly.
6 cycle (0.5 sec
On, 0.5 sec Off)
Lamp error Lamp fails to light. Wait a full minute and then turn
on again.
Orange 1 cycle (0.5 sec
On, 2.5 sec Off)
Network conflict
Both the built-in wired LAN and the wireless LAN cannot
be connected to the same network at the same time.
To use both built-in wired LAN and wireless LAN at the
same time, connect them to different networks.
Green Re-firing the lamp (The projector is cooling
down.)
The projector is re-firing.
Wait for a moment.
Steadylight
Green
Standby ([NORMAL] for [STANDBY MODE])
–
Orange
CONTROL PANEL LOCK is on. You have pressed cabinet button when Control
Panel Lock is on.
CONTROL ID error Remote control ID and projector ID are not
matched.
Lamp Indicator
Indicator Condition ProjectorConditionNote
Off Normal –
Blinking light Red
Lamp has reached its end of life. Lamp replace-
ment message will be displayed.
Replace the lamp.
Steady light Red Lamp has been used beyond its limit. The projector
will not turn on until the lamp is replaced.
Replace the lamp.
Green [ECO MODE] is set to [NORMAL] or [ECO] –
Over-TemperatureProtection
Ifthetemperatureinsidetheprojectorrisestoohigh,theover-temperatureprotectorwillautomaticallyturnoffthelamp
withtheSTATUSindicatorblinking(2-cycleOnandOff.)
Shouldthishappen,dothefollowing:
•Unplugthepowercordafterthecoolingfansstop.
•Movetheprojectortoacoolerlocationiftheroomwhereyouarepresentingisparticularlytoowarm.
•Cleantheventsiftheyarecloggedwithdust.
•Waitabout60minutesuntiltheinsideoftheprojectorbecomescoolenough.

207
9. Appendix
Common Problems & Solutions
(“Power/Status/LampIndicator”onpage
206.)
ProblemCheckTheseItems
Does not turn on or
shut down
• Checkthatthepowercordispluggedinandthatthepowerbuttonontheprojectorcabinetortheremotecontrol
is on. ( pages
14, 15)
• Ensurethatthelampcoverisinstalledcorrectly.( page 162)
• Checktoseeiftheprojectorhasoverheated.Ifthereisinsufcientventilationaroundtheprojectororiftheroom
where you are presenting is particularly warm, move the projector to a cooler location.
• Checktoseeifyoucontinuetousetheprojectorforanother100hoursafterthelamphasreachedtheendofits
life. If so, replace the lamp. After replacing the lamp, reset the lamp hours used. ( page 160)
• Thelampmayfailtolight.Waitafullminuteandthenturnonthepoweragain.
• Set[FANMODE]to[HIGHALTITUDE]whenusingtheprojectorataltitudesapproximately5500feet/1700meters
or higher. Using the projector at altitudes approximately 5500 feet/1700 meters or higher without setting to [HIGH
ALTITUDE] can cause the projector to overheat and the projector could shut down. If this happens, wait a couple
minutes and turn on the projector. ( page
108)
If you turn on the projector immediately after the lamp is turned off, the fans run without displaying an image for
some time and then the projector will display the image. Wait for a moment.
Will turn off • Ensurethatthe[OFFTIMER]or[AUTOPOWEROFF]isoff.( page 103, 111)
No picture
• UsetheCOMPUTER1,theCOMPUTER2,theVIDEOortheS-VIDEObuttonontheremotecontroltoselectyour
source (Computer, Video or S-Video). ( page
17) If there is still no picture, press the button again.
• Ensureyourcablesareconnectedproperly.
• Usemenustoadjustthebrightnessandcontrast.( page 95)
• Ensurethatthelenscoverisopen.( page 5)
• Resetthesettingsoradjustmentstofactorypresetlevelsusingthe[RESET]intheMenu.( page 117)
• EnteryourregisteredkeywordiftheSecurityfunctionisenabled.( page
33)
• BesuretoconnecttheprojectorandnotebookPCwhiletheprojectorisinstandbymodeandbeforeturningon
the power to the notebook PC.
In most cases the output signal from the notebook PC is not turned on unless connected to the projector before
being powered up.
* If the screen goes blank while using your remote control, it may be the result of the computer’s screen-saver
or power management software.
• Seealsothe
next page.
Picture suddenly
becomes dark
• CheckiftheprojectorisintheForcedECOmodebecauseoftoohighambienttemperature.Ifthisisthecase,
lower the room temperature by turning down your air conditioner.
Color tone or hue is
unusual
• Checkifanappropriatecolorisselectedin[WALLCOLOR].Ifso,selectanappropriateoption.( page 102)
• Adjust[HUE]in[PICTURE].( page 95)
Image isn’t square to
the screen
• Repositiontheprojectortoimproveitsangletothescreen.( page
19)
• UsetheKeystonecorrectionfunctiontocorrectthetrapezoiddistortion.( page 24)
Picture is blurred
• Adjustthefocus.( page
21)
• Repositiontheprojectortoimproveitsangletothescreen.( page 19)
• Ensurethatthedistancebetweentheprojectorandscreeniswithintheadjustmentrangeofthelens.
( page 143)
• Condensationmayformonthelensiftheprojectoriscold,broughtintoawarmplaceandisthenturnedon.
Should this happen, let the projector stand until there is no condensation on the lens.
Flicker appears on
screen
• Set[FANMODE]tootherthan[HIGHALTITUDE]modewhenusingtheprojectorataltitudesapproximately5500
feet/1700 meters or lower. Using the projector at altitudes less than approximately 5500 feet/1700 meters and
setting to [HIGH ALTITUDE] can cause the lamp to overcool, causing the image to flicker. Switch [FAN MODE] to
[AUTO]. ( page 108)
Image is scrolling
vertically, horizontally
or both
• Checkthecomputer’sresolutionandfrequency.Makesurethattheresolutionyouaretryingtodisplayissupported
by the projector. ( page 214)
• AdjustthecomputerimagemanuallywiththeHorizontal/Verticalinthe[IMAGEOPTIONS].( page 97)
Remote control does
not work
• Installnewbatteries.( page
9)
• Makesuretherearenoobstaclesbetweenyouandtheprojector.
• Standwithin22feet(7m)oftheprojector.( page
9)
Indicator is lit or blinking
• SeethePOWER/STATUS/LAMPIndicator.( page 206)
Cross color in RGB
mode
• PresstheAUTOADJ.buttonontheprojectorcabinetortheremotecontrol.( page
26)
• Adjustthecomputerimagemanuallywith[CLOCK]/[PHASE]in[IMAGEOPTIONS]inthemenu.( page 96)
Formoreinformationcontactyourdealer.

208
9. Appendix
If there is no picture, or the picture is not displayed correctly.
•PoweronprocessfortheprojectorandthePC.
BesuretoconnecttheprojectorandnotebookPCwhiletheprojectorisinstandbymodeandbeforeturningon
thepowertothenotebookPC.
InmostcasestheoutputsignalfromthenotebookPCisnotturnedonunlessconnectedtotheprojectorbefore
beingpoweredup.
NOTE:Youcancheckthehorizontalfrequencyofthecurrentsignalintheprojector’smenuunderInformation.Ifitreads“0kHz”,
thismeansthereisnosignalbeingoutputfromthecomputer.(page
114orgotonextstep)
•Enablingthecomputer’sexternaldisplay.
DisplayinganimageonthenotebookPC’sscreendoesnotnecessarilymeanitoutputsasignaltotheprojector.
WhenusingaPCcompatiblelaptop,acombinationoffunctionkeyswillenable/disabletheexternaldisplay.Usu-
ally,thecombinationofthe“Fn”keyalongwithoneofthe12functionkeysgetstheexternaldisplaytocomeon
oroff.Forexample,NEClaptopsuseFn+F3,whileDelllaptopsuseFn+F8keycombinationstotogglethrough
externaldisplayselections.
•Non-standardsignaloutputfromthecomputer
IftheoutputsignalfromanotebookPCisnotanindustrystandard,theprojectedimagemaynotbedisplayed
correctly.Shouldthishappen,deactivatethenotebookPC’sLCDscreenwhentheprojectordisplayisinuse.Each
notebookPChasadifferentwayofdeactivate/reactivatethelocalLCDscreensasdescribedinthepreviousstep.
Refertoyourcomputer’sdocumentationfordetailedinformation.
•ImagedisplayedisincorrectwhenusingaMac
WhenusingaMacwiththeprojector,settheDIPswitchoftheMacadapter(notsuppliedwiththeprojector)ac-
cordingtoyourresolution.Aftersetting,restartyourMacforthechangestotakeaffect.
ForsettingdisplaymodesotherthanthosesupportedbyyourMacandtheprojector,changingtheDIPswitchon
aMacadaptermaybounceanimageslightlyormaydisplaynothing.Shouldthishappen,settheDIPswitchto
the13"xedmodeandthenrestartyourMac.Afterthat,restoretheDIPswitchestoadisplayablemodeandthen
restarttheMacagain.
NOTE:AVideoAdaptercablemanufacturedbyAppleInc.isneededforaMacBookwhichdoesnothaveaminiD-Sub15-pin
connector.
•MirroringonaMacBook
*WhenusingtheprojectorwithaMacBook,outputmaynotbesetto1024×768unless“mirroring”isoffonyour
MacBook.Refertoowner’smanualsuppliedwithyourMaccomputerformirroring.
•FoldersoriconsarehiddenontheMacscreen
Foldersoriconsmaynotbeseenonthescreen.Shouldthishappen,select[View][Arrange]fromtheApple
menuandarrangeicons.

209
9. Appendix
❷ Specifications
Thissectionprovidestechnicalinformationaboutprojector’sperformance.
Optical
ModelNumberNP-P501XNP-PE501XNP-P451XNP-P451WNP-P401W
LCDPanel0.63inchLCDwithMicroLensArray(AspectRatio4:3)0.59inchLCDwithMicroLensArray
(AspectRatio16:10)
Resolution*
1
1024×768pixels(XGA)1280×800pixels(WXGA)
LensManualzoomandfocus
ZoomRatio=1.7
F1.7–2.2f=17.4–29.0mm
LensShift(Vertical)0–0.5V0–0.6V
Lamp270WAC
(214WinNORMAL)
(163WinECO)
240WAC
(200WinNOR-
MAL)
(163WinECO)
270WAC
(214WinNOR-
MAL)
(163WinECO)
240WAC
(200WinNOR-
MAL)
(163WinECO)
LightOutput*
2
*
3
5000 lumens 4500 lumens 4500 lumens 4000 lumens
NORMAL:80%NORMAL:83%NORMAL:80%NORMAL:83%
ECO:60%*
4
ECO:67%*
4
ECO:60%*
4
ECO:67%*
4
ContrastRatio*
3
(fullwhite:fullblack)
4000:1withDYNMICCONTRASTON
ImageSize(Diagonal)25–300inches/0.64m–7.6m
ProjectionDistance
(Min.–Max.)
26–543inches/0.65–13.8m27–573inches/0.69–14.6m
ProjectionAngle0°–16.5°(wide)/0°–9.8°(tele)
*1Effectivepixelsaremorethan99.99%.
*2Thisisthelightoutputvalue(lumens)whenthe[PRESET]modeissetto[HIGH-BRIGHT].Ifanyothermodeisselectedasthe
[PRESET]mode,thelightoutputvaluemaydropslightly.
*3CompliancewithISO21118-2005
*4ThemaximumpowerbecomesequivalenttopowerinNORMAL(ECOMODE).
Electrical
ModelNumberNP-P501XNP-PE501XNP-P451XNP-P451WNP-P401W
Inputs
1×RGB/Component(D-Sub15P),2×HDMITypeA(19P,HDMI
®
Connector)HDCPsupported*
5
,
1×S-Video(DIN4P),1×Video(RCA),1×(L/R)RCAAudio,1×StereoMiniAudio
Outputs1×RGB(D-Sub15P),1×StereoMiniAudio
PCControl1×PCControlPort(D-Sub9P)
WiredLANPort1×RJ-45(10BASE-T/100BASE-TX)(notsupportedbyPE501X)
WirelessLANPort
(Optional)
IEE802.11b/g/n(optionalUSBWirelessLANUnitrequired)(notsupportedbyPE501X)
USBPort1×TypeA,1×TypeB
MICInput1×MonauralMiniAudio(Dynamicmichrophoneonly;notsupportedbyplug-inmic)
ColorReproduction10-bitsignalprocessing(1.07billioncolors)(VIEWER,NETWORK:Colors,16.7millioncolors)
CompatibleSignals*
6
Analog:VGA/SVGA/XGA/WXGA/Quad-VGA/SXGA/SXGA+/WXGA+/WXGA++/UXGA/WSXGA+/HD/Full
HD/WUXGA/Mac13",16",21",23"
Component:480i/480p/576i/576p/720p/1080i/1080p
HDMI:VGA/SVGA/XGA/WXGA/Quad-VGA/SXGA/SXGA+/WXGA+/WXGA++/WSXGA+/480p/576p/720p
/1080i/1080p
HorizontalResolution540TVlines:NTSC/NTSC4.43/PAL/PAL-M/PAL-N/PAL60
300TVlines:SECAM
*5HDMI
®
(DeepColor,LipSync)withHDCP
WhatisHDCP/HDCPtechnology?
HDCPisanacronymforHigh-bandwidthDigitalContentProtection.HighbandwidthDigitalContentProtection(HDCP)isasystem
forpreventingillegalcopyingofvideodatasentoveraHigh-DenitionMultimediaInterface(HDMI).
IfyouareunabletoviewmaterialviatheHDMIinput,thisdoesnotnecessarilymeantheprojectorisnotfunctioningproperly.With
theimplementationofHDCP,theremaybecasesinwhichcertaincontentisprotectedwithHDCPandmightnotbedisplayed
duetothedecision/intentionoftheHDCPcommunity(DigitalContentProtection,LLC).
Video:DeepColor;8/10/12-bit,LipSync
Audio:LPCM;upto2ch,samplerate32/44.1/48KHz,samplebit;16/20/24-bit
*6Animagewithhigherorlowerresolutionthantheprojector’snativeresolution(P501X/P451X/PE501X:1024×768/P451W/
P401W:1280×800)willbedisplayedwithAdvancedAccuBlend.

210
9. Appendix
ModelNumberNP-P501XNP-PE501XNP-P451XNP-P451WNP-P401W
ScanRate*
1
Horizontal:15kHzto100kHz(RGB:24kHzorover)
Vertical:50Hzto120Hz(HDMI:50Hzto85Hz)
SyncCompatibilitySeparateSync
Built-inSpeaker16W(monaural)
PowerRequirement100–240VAC,50/60Hz
InputCurrent4.2A/1.7A4.2A/1.7A3.9A/1.6A4.2A/1.7A3.9A/1.6A
Power
Consump-
tion
(Typical
value)
ECO
MODE
OFF
374W(100-130V)/
357W(200-240V)
367W(100-130V)/
350W(200-240V)
341W(100-130V)/
325W(200-240V)
374W(100-130V)/
357W(200-240V)
341W(100-130V)/
325W(200-240V)
NORMAL304W(100-130V)/
292W(200-240V)
296W(100-130V)/
283W(200-240V)
289W(100-130V)/
274W(200-240V)
304W(100-130V)/
292W(200-240V)
289W(100-130V)/
274W(200-240V)
ECO260W(100-130V)/
248W(200-240V)
253W(100-130V)/
241W(200-240V)
260W(100-130V)/
248W(200-240V)
STANDBY
(NORMAL)
10W(100-130V/
200-240V)
7W(100-130V/
200-240V)
10W(100-130V/200-240V)
STANDBY
(NET-
WORK)
2.4W(100-130V)/2.8W(200-240V)
(TheNETWORKfunctionisnotsupportedbyPE501X.)
STANDBY
(POWER-
SAVING)
0.21W(100-130V)/0.43W(200-240V)
*1Somescanratesarenotsupporteddependingontheresolutionofitsinputsignal.
Mechanical
ModelNumberNP-P501XNP-PE501XNP-P451XNP-P451WNP-P401W
Installation
Orientation
Desktop/Front,Desktop/Rear,Ceiling/Front,Ceiling/Rear
Dimensions15.7"(W)×4.5"(H)×11.1"(D)/398mm(W)×115mm(H)×282mm(D)
(notincludingprotrusions)
Weight9.1lbs/4.1kg8.8lbs/4.0kg9.1lbs/4.1kg
Environmental
Considerations
OperationalTemperatures:41°to104°F(5°to40°C),
(ECOmodeselectedautomaticallyat95°Fto104°F/35°Cto40°C)
20%to80%humidity(non-condensing)
StorageTemperatures:14°to122°F(-10°to50°C),
20%to80%humidity(non-condensing)
Operatingaltitude:0to2700m/8800feet(1700to2700m/5500to8800feet:Set[FANMODE]to[HIGH
ALTITUDE])
RegulationsUL/C-ULApproved(UL60950-1,CSA60950-1)
MeetsDOCCanadaClassBrequirements
MeetsFCCClassBrequirements
MeetsAS/NZSCISPR.22ClassB
MeetsEMCDirective(EN55022,EN55024,EN61000-3-2,EN61000-3-3)
MeetsLowVoltageDirective(EN60950-1,TÜVGSApproved)
Foradditionalinformationvisit:
US:http://www.necdisplay.com/
Europe:http://www.nec-display-solutions.com/
Global:http://www.nec-display.com/global/index.html
Forinformationonouroptionalaccessories,visitourwebsiteorseeourbrochure.
Thespecicationsaresubjecttochangewithoutnotice.
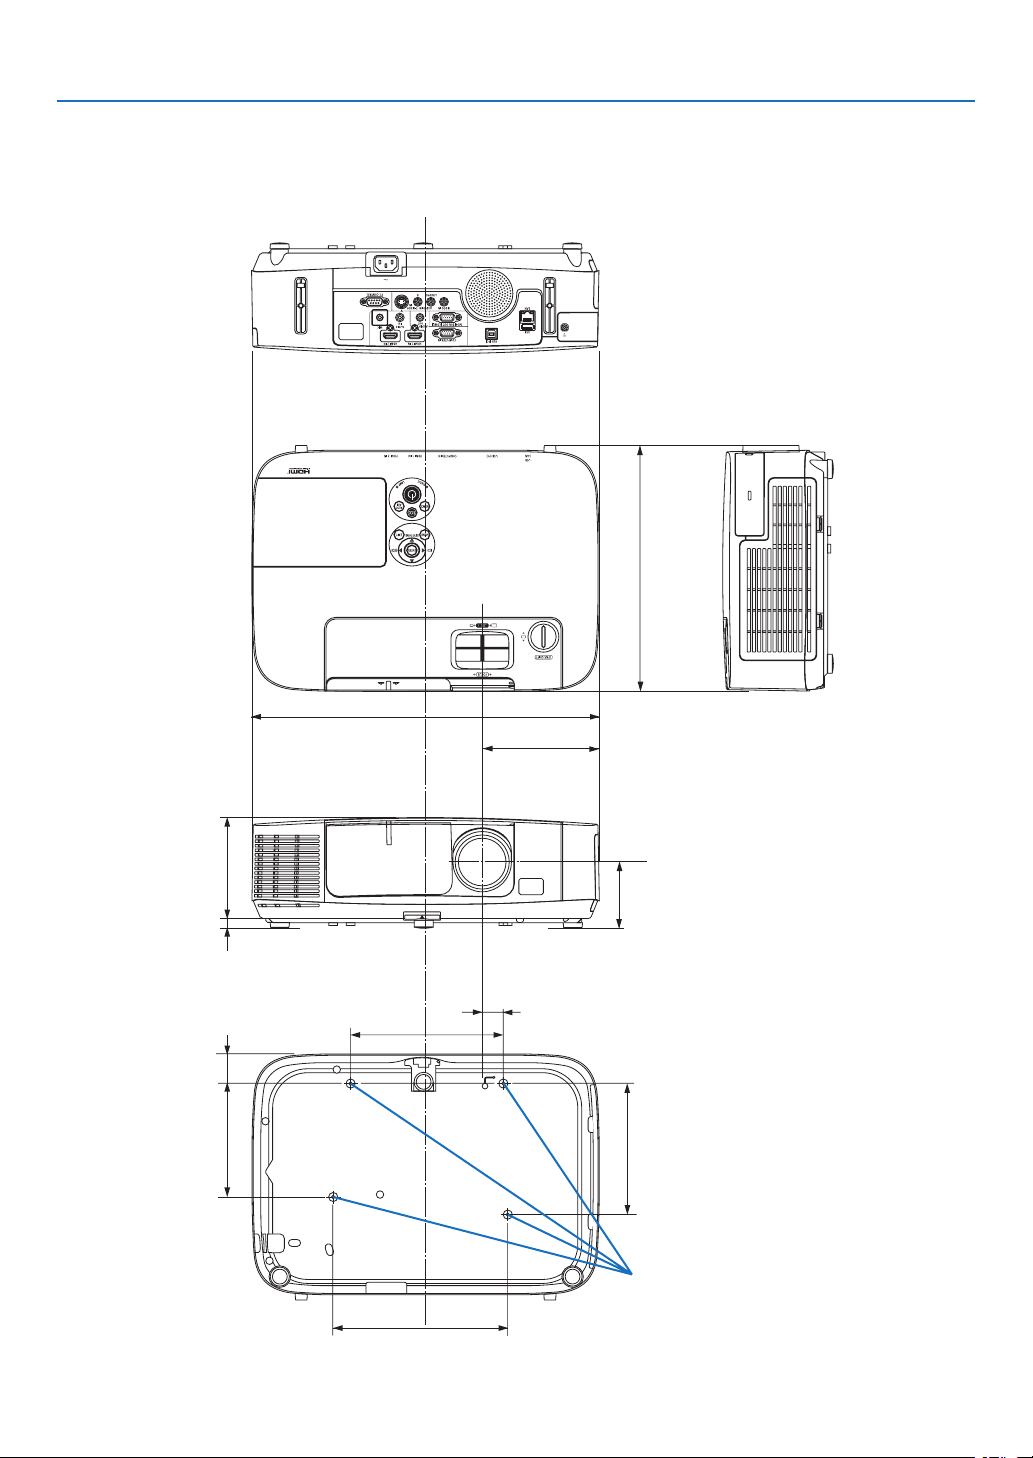
211
9. Appendix
71.8 (2.8)–76.5 (3)
398 (15.7)
115 (4.5)
282 (11.1)
11.5 (0.5)
175 (6.9)
24 (0.9)
33.8 (1.3)
130 (5.1)
150 (5.9)
200 (7.9)
134 (5.3)
❸ Cabinet Dimensions
NP-P501X/NP-P451X/NP-P451W/NP-P401W
Unit:mm(inch)
Lens center
Lens center
Holes for ceiling mount
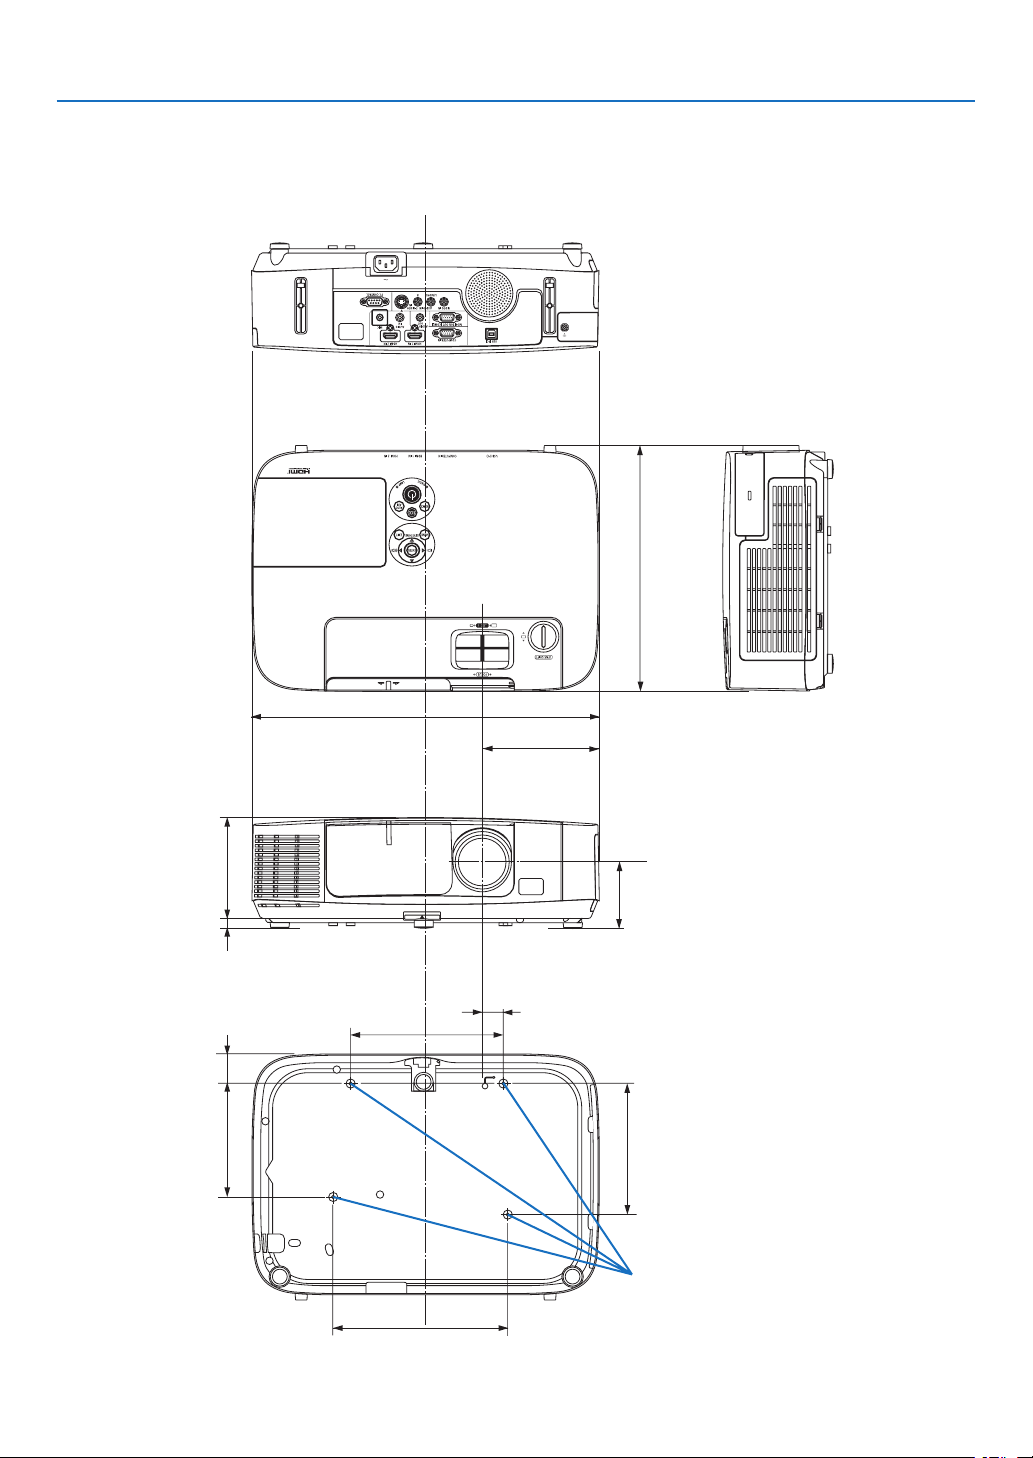
212
9. Appendix
NP-PE501X
71.8 (2.8)–76.5 (3)
398 (15.7)
115 (4.5)
282 (11.1)
11.5 (0.5)
175 (6.9)
24 (0.9)
33.8 (1.3)
130 (5.1)
150 (5.9)
200 (7.9)
134 (5.3)
Lens center
Lens center
Holes for ceiling mount
Unit:mm(inch)

213
9. Appendix
❹ Pin Assignments of D-Sub COMPUTER Input Connector
Mini D-Sub 15 Pin Connector
SignalLevel
Videosignal:0.7Vp-p(Analog)
Syncsignal:TTLlevel
51423
10
11 12 13 14 15
6978
Pin No. RGBSignal(Analog)YCbCrSignal
1 RedCr
2 GreenorSynconGreenY
3 BlueCb
4 Ground
5 Ground
6
RedGroundCrGround
7GreenGroundYGround
8 BlueGroundCbGround
9NoConnection
10 SyncSignalGround
11 NoConnection
12 Bi-directionalDATA(SDA)
13 HorizontalSyncorComposite
Sync
14 VerticalSync
15 DataClock
COMPUTER IN
NOTE:PinNos.12and15arerequiredforDDC/CI.

214
9. Appendix
❺ Compatible Input Signal List
AnalogRGB
Signal
Resolution
(dots)
AspectRatio
RefreshRate
(Hz)
VGA640 ×480 4:360/72/75/85/
iMac
SVGA800 ×6004:356/60/72/75/85/
iMac
XGA1024 ×768*
1
4:360/70/75/85/
iMac
XGA+1152 ×8644:360/70/75/85
WXGA1280 ×768*
2
15:960
1280 ×800 *
2
16:1060
1360×768*
3
16:960
1366×768*
3
16:960
Quad-VGA1280 ×9604:360/75
SXGA1280 × 1024 5:460/75
SXGA+1400 × 1050 4:360
WXGA+1440 ×90016:1060
WXGA++1600×900*
3
16:960
UXGA1600× 1200 *
4
4:360/65/70/75
WSXGA+1680 ×1050 16:1060
HD1280 ×72016:960
FullHD1920 ×1080 16:960
WUXGA1920×1200 *
5
16:1060*
6
MAC13"640 ×480 4:367
MAC16"832 ×6244:375
MAC19"1024 ×7684:375
MAC21"1152 ×8704:3*
3
75
MAC23"1280 × 1024 5:465
Component
SignalFormatAspectRatio
RefreshRate
(Hz)
HDTV(1080p)1920×1080 16:950/60
HDTV(1080i)1920×1080 16:950/60
HDTV(720p)1280 ×72016:950/60
SDTV(480p)720×480 4:3/16:960
SDTV(576p)720×5764:3/16:950
SDTV(480i)720×480 4:3/16:960
SDTV(576i)720×5764:3/16:950
CompositeVideo/S-Video
SignalAspectRatio
RefreshRate
(Hz)
NTSC4:360
PAL4:350
PAL604:360
SECAM4:350
*1NativeresolutiononXGAmodel(P501X/P451X/PE501X)
*2NativeresolutiononWXGAmodel(P451W/P401W)
*3Theprojectormayfailtodisplaythesesignalscorrectlywhen[AUTO]
isselectedfor[ASPECTRATIO]intheon-screenmenu.
Thefactorydefaultis[AUTO]for[ASPECTRATIO].Todisplaythese
signals,select[16:9]for[ASPECTRATIO].
*4WXGAMODE:OFF
*5WXGAMODE:ON
*6RB(ReducedBlanking):upto154MHz
NOTE:
•Animagewithhigherorlowerresolutionthantheprojector’snativeresolution(P501X/P451X/PE501X:1024×768/P451W/
P401W:1280×800)willbedisplayedwithAdvancedAccuBlend.
•SynconGreenandCompositesyncsignalsarenotsupported.
•Signalsotherthanthosespeciedinthetableabovemaynotbedisplayedcorrectly.Ifthisshouldhappen,changetherefresh
rateorresolutiononyourPC.RefertoDisplayPropertieshelpsectionofyourPCforprocedures.
HDMI
Signal
Resolution
(dots)
AspectRatio
RefreshRate
(Hz)
VGA640 ×480 4:360
SVGA800 ×6004:360
XGA1024 ×768*
1
4:360
WXGA1280 ×768*
2
15:960
1280 ×800 *
2
16:1060
1366×76816:960
Quad-VGA1280 ×9604:360
SXGA1280 × 1024 5:460
SXGA+1400 × 1050 4:360
WXGA+1440 ×90016:1060
WXGA++1600×90016:960
WSXGA+1680 ×1050 16:1060
WUXGA1920×1200 16:1060*
6
HDTV(1080p)1920 ×1080 16:950/60
HDTV(1080i)1920 ×1080 16:950/60
HDTV(720p)1280 ×72016:950/60
SDTV(480p)720 ×480 4:3/16:960
SDTV(576p)720 ×5764:3/16:950
SDTV(480i)720 ×480 4:3/16:960
SDTV(576i)720 ×5764:3/16:950

215
9. Appendix
❻ PC Control Codes and Cable Connection
PC Control Codes
Function Code Data
POWER ON 02H 00H 00H 00H 00H 02H
POWER OFF 02H 01H 00H 00H 00H 03H
INPUT SELECT COMPUTER 02H 03H 00H 00H 02H 01H 01H 09H
INPUT SELECT HDMI1 02H 03H 00H 00H 02H 01H 1AH 22H
INPUT SELECT HDMI2 02H 03H 00H 00H 02H 01H 1BH 23H
INPUT SELECT VIDEO 02H 03H 00H 00H 02H 01H 06H 0EH
INPUT SELECT S-VIDEO 02H 03H 00H 00H 02H 01H 0BH 13H
INPUT SELECT VIEWER 02H 03H 00H 00H 02H 01H 1FH 27H
INPUT SELECT NETWORK 02H 03H 00H 00H 02H 01H 20H 28H
INPUT SELECT USB DISPLAY 02H 03H 00H 00H 02H 01H 22H 2AH
PICTURE MUTE ON 02H 10H 00H 00H 00H 12H
PICTURE MUTE OFF 02H 11H 00H 00H 00H 13H
SOUND MUTE ON 02H 12H 00H 00H 00H 14H
SOUND MUTE OFF 02H 13H 00H 00H 00H 15H
NOTE:ContactyourlocaldealerforafulllistofthePCControlCodesifneeded.
Cable Connection
CommunicationProtocol
Baud rate .........................................38400 bps
Data length ......................................8 bits
Parity ...............................................No parity
Stop bit ............................................One bit
X on/off ............................................None
Communications procedure .............Full duplex
NOTE:Dependingontheequipment,alowerbaudratemayberecommendedforlongcableruns.
PC Control Connector (D-SUB 9P)
NOTE1:Pins1,4,6and9arenoused.
NOTE2:Jumper“RequesttoSend”and“CleartoSend”togetheronbothendsofthecabletosimplifycableconnection.
NOTE3:Forlongcablerunsitisrecommendedtosetcommunicationspeedwithinprojectormenusto9600bps.
15243
67 98
To GND of PC
To RxD of PC
To TxD of PC
To RTS of PC
To CTS of PC

216
9. Appendix
No image is displayed from your PC or video equipment to the
projector.
Still no image even though you connect the projector to the PC
first, then start the PC.
Enabling your notebook PC’s signal output to the projector.
• Acombinationoffunctionkeyswillenable/disabletheexter-
naldisplay.Usually,thecombinationofthe“Fn”keyalong
withoneofthe12functionkeysturnstheexternaldisplay
onoroff.
No image (blue or black background, no display).
Still no image even though you press the AUTO ADJUST
button.
Still no image even though you carry out [RESET] in the
projector’s menu.
Signal cable’s plug is fully inserted into the input connector
A message appears on the screen.
( _____________________________________________ )
The source connected to the projector is active and available.
Still no image even though you adjust the brightness and/or
the contrast.
Input source’s resolution and frequency are supported by the
projector.
❼ Troubleshooting Check List
Beforecontactingyourdealerorservicepersonnel,checkthefollowinglisttobesurerepairsareneededalsoby
referringtothe“Troubleshooting”sectioninyouruser’smanual.Thischecklistbelowwillhelpussolveyourproblem
moreefciently.
*Printthispageandthenextpageforyourcheck.
Frequency of occurrence always sometimes (How often?_____________________) other (__________________)
Power
No power (POWER indicator does not light blue) See also “Status
Indicator (STATUS)”.
Power cord’s plug is fully inserted into the wall outlet.
Lamp cover is installed correctly .
Lamp Hours Used (lamp operation hours) was cleared after
lamp replacement.
No power even though you press and hold the POWER but-
ton.
Shut down during operation.
Power cord’s plug is fully inserted into the wall outlet.
Lamp cover is installed correctly .
[AUTO POWER OFF] is turned off (only models with the [AUTO
POWER OFF] function).
[OFF TIMER] is turned off (only models with the [OFF TIMER]
function).
Video and Audio
Image is too dark.
Remains unchanged even though you adjust the brightness
and/or the contrast.
Image is distorted.
Image appears to be trapezoidal (unchanged even though you
carry out the [KEYSTONE] adjustment).
Parts of the image are lost.
Still unchanged even though you press the AUTO ADJUST
button.
Still unchanged even though you carry out [RESET] in the
projector’s menu.
Image is shifted in the vertical or horizontal direction.
Horizontal and vertical positions are correctly adjusted on a
computer signal.
Input source’s resolution and frequency are supported by the
projector.
Some pixels are lost.
Image is flickering.
Still unchanged even though you press the AUTO ADJUST
button.
Still unchanged even though you carry out [RESET] in the
projector’s menu.
Image shows flickering or color drift on a computer signal.
Still unchanged even though you change [FAN MODE] from
[HIGH ALTITUDE] to [AUTO].
Image appears blurry or out of focus.
Still unchanged even though you checked the signal’s resolution
on PC and changed it to projector’s native resolution.
Still unchanged even though you adjusted the focus.
No sound.
Audio cable is correctly connected to the audio input of the
projector.
Still unchanged even though you adjusted the volume level.
AUDIO OUT is connected to your audio equipment (only models
with the AUDIO OUT connector).
Other
Remote control does not work.
No obstacles between the sensor of the projector and the
remote control.
Projector is placed near a fluorescent light that can disturb the
infrared remote controls.
Batteries are new and are not reversed in installation.
Buttons on the projector cabinet do not work (only models with the
[CONTROL PANEL LOCK] function)
[CONTROL PANEL LOCK] is not turned on or is disabled in
the menu.
Still unchanged even though you press and hold the EXIT button
for a minimum of 10 seconds.
217
9. Appendix
In the space below please describe your problem in detail.
Information on application and environment where your projector is used
Projector
Model number:
Serial No.:
Date of purchase:
Lamp operating time (hours):
Eco Mode: OFF AUTO ECO
NORMAL ECO
Information on input signal:
Horizontal synch frequency [ ] kHz
Vertical synch frequency [ ] Hz
Synch polarity H (+) (−)
V (+) (−)
Synch type Separate Composite
Sync on Green
STATUS Indicator:
Steady light Orange Green
Flashing light [ ]] cycles
Remote control model number:
Signalcable
NEC standard or other manufacturer’s cable?
Model number: Length: inch/m
Distribution amplifier
Model number:
Switcher
Model number:
Adapter
Model number:
Installationenvironment
Screen size: inch
Screen type: White matte Beads Polarization
Wide angle High contrast
Throw distance: feet/inch/m
Orientation: Ceiling mount Desktop
Power outlet connection:
Connected directly to wall outlet
Connected to power cord extender or other (the
number of connected equipment______________)
Connected to a power cord reel or other (the number
of connected equipment______________)
Computer
Manufacturer:
Model number:
Notebook PC / Desktop
Native resolution:
Refresh rate:
Video adapter:
Other:
Videoequipment
VCR, DVD player, Video camera, Video game or other
Manufacturer:
Model number:
Projector
PC
DVD player

218
9. Appendix
❽ REGISTER YOUR PROJECTOR! (for residents in the United
States, Canada, and Mexico)
Pleasetaketimetoregisteryournewprojector.ThiswillactivateyourlimitedpartsandlaborwarrantyandInstaCare
serviceprogram.
Visitourwebsiteatwww.necdisplay.com,clickonsupportcenter/registerproductandsubmityourcompletedform
online.
Uponreceipt,wewillsendaconrmationletterwithallthedetailsyouwillneedtotakeadvantageoffast,reliable
warrantyandserviceprogramsfromtheindustryleader,NECDisplaySolutionsofAmerica,Inc.

©NECDisplaySolutions,Ltd.20137N951901